META Admin User Guide
|
|
|
- Dwayne Andrews
- 5 years ago
- Views:
Transcription

1 META Admin User Guide Version 2.2 August, 2017
2 Contents Welcome to META... 6 Accessing META... 6 Logging In 7 Profile Management 9 Changing Your Password 10 Resetting Your Password 10 Troubleshooting Searching Curriculum Keyword Search 12 Filtering Search Results 13 Scope Filter 13 Hierarchy Filter 14 Status Filter 15 Sort Options 16 Apply/Cancel Search 16 Using Search Results 17 Creating and Viewing Curriculum Course 19 New Courses 19 Modify or Deactivate Courses 22 Program or Degree 25 New Programs 27 Modify or Deactivate Programs 27 Cloning 29 What is Cloning? 29 Cloning a Proposal 29 Packages 33 New Package
3 Assessments 36 New Proposal 36 Program Review 37 Accessing Reports 39 Course Reports Course Outline 40 Impact Reports 41 All Fields 42 Comparison Report 43 Program Reports 44 Program Summary 44 Package Reports 45 Assessment/Program Review Reports 45 Program Reports 47 All Fields 47 Program Summary 48 Comparison Report 49 Launching Curriculum into the Approval Workflow Proposal Functions and Features Navigating Proposals 50 Saving 51 Proposal Resource Page Example 51 Dropdown Menus 52 Text box/text Area 52 Date Fields 52 Attach Files 53 Checkbox 54 Checklist
4 Repeater Checklist 54 Multi-Select Lists 55 Grids aka Textbooks/Course Materials 56 Student Learning Outcomes 58 Condition 61 Course Blocks 61 Content Review 62 Read Only Fields 65 Auto Calculations 65 Show/Hide Pages 66 Rich Text Editor 70 Creating an Outline within the Rich Text Editor 70 Creating an Outline Using HTML 72 Approvals Implementing or Publishing Curriculum Public Search Administer Site Navigating the Administrative Area Navigating and Sorting Tables 77 Using Filter Conditions 77 Lookup Data User Management Add a New User 78 Edit Existing Users 79 Assigning Roles and Permissions 80 System Roles 81 Approval Permissions 82 Origination Permissions 84 Positions
5 Actions Holidays Proposal Types Approval Workflows Create New Workflow 105 Proposal Forms Catalog Views Admin Reports Agenda Report 112 All Proposals 116 Approval Participants 117 Pending User Actions 118 Proposal Users Report 119 Saved Queries 121 Ad Hoc Reports Common Ad Hoc Query Parts 128 Saved Queries 128 Approvals Administrative Action in Approval Workflows 132 Optional META Functionalities Comment Moderation 137 Curriculum Subtypes and Course Level Validation 138 Course Reactivation 139 Public Search
6 Welcome to META curriqūnet META is a curriculum development, review, and approval system that addresses campus, statewide, and international collaborative issues in curriculum management and accreditation. META provides non-technical users the ability to configure and modify web entry screens and workflow templates. Every institution develops unique curriculum management processes. This is true even where an institution is part of a regional or statewide system. META enhances and streamlines the user experience with customizable tools that are highly intuitive. The core curriqūnet META System is designed to be configurable to reflect local requirements, while still properly interfacing components with upstream and downstream systems. This functionality includes local student systems, multi-campus curriculum searches, state reporting standards, and similar requirements. META is a web-based application. Browser display variances may cause your screens to look slightly different from the screenshots in this guide. Supported browsers include Microsoft Edge, Google Chrome, Mozilla Firefox, and Safari. META is not currently optimized for mobile devices such as tablets and smart phones. Your institution has one or more META administrators, usually located in the curriculum office. If you need additional assistance in using META, or have questions about the information required, please contact your administrators. Your META administrators are your best resource. curriqūnet META allows each client to have customized workflows, and a secure, private database while maintaining a single codebase. This enables our implementation and support teams to focus on our clients while our development team constantly improves the product. The flexible nature of curriqūnet META means there is a nearly infinite combination of field types and functionalities to collect data in the format required. This guide will highlight specific field types and provide instruction on META specific features. Your institution may provide instructional materials that dive deeper into the specific proposal types you will encounter or include more specific instructions about the types of information they expect. Welcome to META Accessing META Accessing META Your institution will provide you with the URL to access your META system. The URL generally follows the formula (institution name).curriqunet.com. If your institution s META system is using a single sign on system, your log in screen will not look like the screenshot below, but will appear the same as the log in screens across your college s resources. 6


7 Accessing META NOTE: From this point forward in this guide, screenshots will be focused on the particular areas and will no longer include the entire browser window. Logging In You will be provided with your log in credentials by the META administrators at your institution. You will log in with your address (usually the address assigned by your institution), and will be given a temporary password. Upon logging in for the first time, you must change your password from this temporary password to protect your institution s data and security. If your college uses a single sign on system, you will receive instruction from your META administrators on how to log in. Enter your and password as shown below and click Login to begin working in META. 7

8 Accessing META The landing page will always be the Course Search screen. There are several features available on the Course Search screen, described below. 1. Gear icon. The Gear icon allows you access to the following functions: a. Edit your profile. b. Administer Site: (Site administration is detailed in the Administer Site section, page 76) This option will not be available for non-administrative users. c. Log Off 2. User ID. Your User ID is the address you supplied when you set up your META account. 3. Create Proposal. This button will open the Create Proposal page. 8
9 Accessing META 4. Approvals. Allows you to view and search items awaiting your review in an approval process. 5. Curriculum. Allows you to view and search Course, Program, Package, Assessment, or Program Review proposals. Curriculum types may vary depending on institution configuration. 6. META logo. This is a link. Click on it at any time during your session to return to the Course Search page. 7. Institution ID. The name of the college or institution you are logged into. 8. Keyword Search. 9. Search Button. 10. Search Filters. 11. Export Button. This feature allows you to export your search results in Excel, Word, or PDF formats. 12. Search Results Window. Results of your searches will appear here. For instructions on how to use the search screens, see the Searching Curriculum section of this guide. Profile Management The first time you log in, you will need to check your user information to verify it is correct. To access Profile Management, click the Gear icon at the top right of your screen, and then select Profile. Verify that your information is correct, add or correct any necessary information, and click Save. Clicking Save or Cancel will close this screen and return you to the course search screen. If your address needs to be updated, please contact your institution s META administrators. 9
10 Accessing META Changing Your Password Unless your college uses a single sign on, you must change your password the first time you log in. You should also periodically change your password for security purposes. Navigate to the Profile area, as described in the previous section, and click the blue link, Click here to change your password. Enter your Current Password, then enter and confirm your New Password. Passwords must be at least 6 characters long, are case sensitive, and may include letters numbers, and symbols. Make sure your password is something you can remember. Passwords cannot be retrieved, but you may reset your password should you forget it. Resetting Your Password To reset your password, on the Log In screen, click Forgot your Password? Enter your as instructed, and click Reset Password. You will receive an with instructions on how to reset your password. NOTE: The password reset s are included with general notification s, and may not be sent immediately, depending on the notification configuration for your institution. If you do not receive a password reset within 24 hours of your request, please contact your META administrator. 10
, Ctrl+Shift+Del (in Firefox) or Ctrl+R (Microsoft Edge).")
11 Troubleshooting Troubleshooting Many problems encountered with META can be resolved by simply clearing the cache on your internet browser. This is usually found under in the Settings menu in your browser. You can also use the keyboard commands, Ctrl+Shift+Enter (in Chrome), Ctrl+Shift+Del (in Firefox) or Ctrl+R (Microsoft Edge). If you use a different browser and are unsure of how to proceed, search your browser's Help menu for clear cache. After clearing the cache, refresh the window. You may be logged out of META and need to log back in. If clearing the cache does not resolve your issue, you may not be using the most recent version of the internet browser. In the Settings menu of your browser, check for updates. If you have the permission to do so on your computer, update your browser to the most recent version. You may need to log in again after updating. Your META administrators are your best resource. Should you receive an error message of any kind, or the suggestions above do not resolve your issue, please inform your administrators immediately. They may be able to help you, or they may need to contact the curriqūnet support team to resolve the issue. To help resolve any issues, the following information can help expedite your issue: A screenshot of the error encountered, including the URL (this is very important!). The browser you were using, and if possible, the version of that browser (usually available in the settings menu for your browser). What you were attempting to do, including, (if possible), the exact steps you took that resulted in the error. Being able to reproduce the error is vital for the curriqūnet support team to be able to fix the problem. 11

12 Searching Curriculum Searching Curriculum All screenshots in this guide will be from the course search feature, but the appearance and functionality is the same across all curriculum types. Depending on your institution s configuration, you may see more or less columns than appear in the screenshots of the search results, but your search filters and the functionality are as described. Upon logging in, the default view will be courses in all statuses originated by the user. Proposals for which you are a co-contributor will appear highlighted green. After opening a proposal, the last proposal selected will appear highlighted blue. Keyword Search Enter search terms in the Keyword Search text box, (marked 1 in the screenshot below). Click the Magnifying Glass icon ( ) to the right of the box to apply this term, or the X icon ( ) to the left to remove the term. Only items that meet the criteria of both keywords and any filters applied will appear in the results. The keyword option searches the hierarchy, proposal title, and proposal description. The search engine will search for the exact phrase entered, including any spaces or numbers. Adding a 12
13 Searching Curriculum comma between keywords will add an implicit or to the search. For example, cell biology will search for the exact phrase, cell biology. On the other hand, cell, biology will search for all proposals that include the word cell or the word biology in their hierarchy, proposal title, and proposal description. Filtering Search Results Add filters to your search results by clicking the Search Options, ( screenshot below. ), marked 1 in the After clicking the icon, a window will open for you to select any applicable filters. Multiple filters may be applied from this window, as highlighted by the numbers in the screenshot below. Scope Filter Use the dropdown menu (1), to select the scope of the search. Only one filter from this menu can be applied to a search at a time. Filter options include: 13
14 Searching Curriculum Show only my proposals: Only proposals meeting the other search criteria originated by the user will be returned. Show all proposals for my institution: All proposals at the institution meeting the other search criteria will be returned. Show proposals for all institutions: For clients with district configuration and when the user has roles at more than one institution in the district, all proposals at all institutions where the user has roles will be returned. Hierarchy Filter The Hierarchy Filters (2) vary by curriculum type. Filter courses and packages by Subject. For all other curriculum types, such as programs, you will filter by Department or Division. Hierarchy options are collapsed under the institution title. To expand the hierarchy options, click the Arrow icon to the left of the institution, or click the checkbox by your institution title to include the whole institution in your search. 14
15 Searching Curriculum Select any categories to include in the search. To include all hierarchy groups in your search, select either all or none of the checkboxes. Status Filter Select any proposal statuses to include in your search from the Status Filters checklist (3). Your institution may have different statuses than shown here. To include all statuses in your search, select either all or none of these checkboxes. 15


16 Sort Options To sort the search results, select from the Sort Options (4) checklist. Items in the search results will sort in descending order based on the columns selected. Click the checkbox labeled what to sort in ascending order. Sort options can be drag and dropped to prioritize the sort order. Searching Curriculum Apply/Cancel Search To apply the search criteria selected in the Search Options window and view results, click the Apply button (5). To close this window without making changes to the search criteria, click Cancel. 16

17 Using Search Results Search results can be exported to several formats for review offline. Select the Export icon ( ) to download the document. Select the file format from the dropdown menu. Searching Curriculum A file in the specified format will download to your computer with the search results in a table format, as seen in the example below. You may need to authorize the download. Get additional information about the proposal in the search results screen by clicking the arrow to the left of the proposal title (1). 17


18 This will open a summary of the proposal with additional identifying details. Click the arrow again to close the summary. You can view multiple summaries simultaneously. Search results are paginated to more easily access results. Navigate between pages using the navigator at the bottom of the screen, marked 1 on the screenshot below. The result range, marked 2 in the screenshot below, indicates the visible proposals and the total number of proposals that meet the search results. Searching Curriculum 18

19 Creating and Viewing Curriculum Click the Curriculum button on the META home screen. A dropdown menu will appear with the following options: Course, Program and Assessment. Click the desired option to proceed. Curriculum options are explained below, although the process is similar with all three options. Creating/Viewing Curriculum Course New Courses To create a new course proposal for a course that has not previously been offered, click Create Proposal. Select new course Proposal Type from the dropdown menu and click Next. 19

20 Creating/Viewing Curriculum Complete all fields to create the proposal and click Next. If you need to select a different proposal type, click Previous. Do not use your browser s back button. Confirm that the information entered is correct, and then click Create Proposal. 20
 section of this guide.")
21 Creating/Viewing Curriculum A new proposal will be created. Complete the proposal, selecting each dark gray tab on the left to navigate between sections of the proposal. For additional details on proposal function, see the Proposal Functions and Features (page 50) section of this guide. When the proposal is complete, click Launch to move the proposal into the approval process. 21


22 Creating/Viewing Curriculum Modify or Deactivate Courses To create a modification or deactivation proposal for an existing course, click Create Proposal. Select the modification or deactivation Proposal Type from the dropdown menu and click Next. 22

23 Creating/Viewing Curriculum Use the dropdown menu to choose the Subject and/or enter any search terms related to the Course Title you are searching. If you do not know the title, click the Search button after making the Subject selection. When you select the Search button, you will see a list in the Course Search Results textbox for that subject. It may be necessary to use the scroll bar to view all options. Mandatory fields are marked with an asterix (*). Click the course to be modified. The title will be highlighted blue. Click Next. 23


24 Confirm that course selected is correct, and then click Create Proposal. Creating/Viewing Curriculum A proposal of the new course version will be created. Complete the proposal, selecting each dark gray tab on the left. For additional details on proposal function, see the Proposal Functions and Features section of this guide. When the proposal is complete, click Launch to move the proposal into the approval process. 24


25 Creating/Viewing Curriculum Program or Degree To create a proposal for a new degree, click the Create Proposal button on the home screen. From the dropdown menu (1) select the Proposal Type, for Courses, Programs, Assessments, or Program Reviews. You may also type keywords in the textbox (2) to narrow your search options. 25
 are required. As you complete each step, click the Next button.")

26 Click the Next button when complete. Work your way through the dialogs. Items marked with an asterisk (*) are required. As you complete each step, click the Next button. At any time, if you wish to make changes to a previous step, you may go backstep using the Previous button. Creating/Viewing Curriculum Once the proposal has been created, you will be taken to the Draft Proposal Form, shown below. 26
 indicate how many items in each section exist, and how many need to be completed in that particular section. When all items are completed, the badge will change from yellow to green.")


27 Creating/Viewing Curriculum The parts of the Cover Page include the Draft Status (1), the remaining Launch Requirements (2) and the individual Sections of the proposal (3). Badges (also 3) indicate how many items in each section exist, and how many need to be completed in that particular section. When all items are completed, the badge will change from yellow to green. The number of remaining launch requirements will also change accordingly. When completed, you will be able to launch or delete the proposal. New Programs Creating a new program proposal requires the same steps as creating a new course proposal. To create a proposal for a new program, click the Create Proposal button on the home screen. 1. Select the type of Program you desire. Click the Next button. 2. Complete the Minimum Requirements page. Click Next. Review the Proposal Summary, and if it is correct, click Create Proposal. 3. From there, complete the Draft Proposal Form as you would for a degree proposal. 4. When finished, you may Launch or Delete the proposal draft. Modify or Deactivate Programs To modify or deactivate a program, begin by clicking Create Proposal. From the Proposal Type dropdown menu, select the option you desire (Deactivation, for example). Depending on your institution, there may be a variety of modifications or deactivation types. 27


28 Click Next. From the Minimum Requirements window, choose the Subject, and Course Title. META will display a list of courses that meet your search criteria. Creating/Viewing Curriculum 28
29 Select a specific course and click Next. META will display the Proposal Summary. Creating/Viewing Curriculum If you are satisfied with the proposal, click Create Proposal. META will display the Draft Proposal Form. If not, use the Previous button to back up and make changes. Review the Draft Proposal Form. You are able to modify items in the text entries if necessary. When you are satisfied with the proposal, click the Launch button. Otherwise, click Delete Draft. Cloning What is Cloning? Cloning is an optional META feature that must be requested by Admin users. The process of cloning is actually the extraction of the data in an existing proposal (either a course or a program proposal) into a new proposal. Cloning is different than simply copying an entity. Copying an entity simply creates another instance of that entity. Cloning creates an entirely new entity. Cloning a Proposal Log in to META as you normally would. On the META homepage, click the Create Proposal button. 29
30 Creating/Viewing Curriculum On the Create Proposal Page, select the Proposal Type you wish to create. Click Next. This will take you to the Minimum Requirements Page. Click the Find Proposal button. Note, you can only clone proposals which are set up for cloning. If the Find Proposal button does not appear, the proposal you have selected is not set up for cloning. 30


31 Creating/Viewing Curriculum In the Search Proposals Window, choose the desired subject from the Subject Filter dropdown menu. 31

32 META will display a list of course proposals. Choose the proposal you wish to clone from this list, and click Select Proposal. Make sure you are selecting an active proposal, not a draft. META will then populate the data into the minimum Requirements fields. Click Next. From here you will be taken to the Proposal Summary. Note that the proposal information has been filled in with data from the proposal you have cloned. If your chosen course is active, you may need to choose a different course number to differentiate it from the original course. In this case, you will see the following warning in the bottom of the Minimum Requirements window: Creating/Viewing Curriculum In this case, change the Course Number appropriately, and click Next. You will be taken to the Proposal Summary page. If the information on the summary page is correct, click Create Proposal. If not, use the Previous button to return to the appropriate step and make corrections. Do NOT use your browser s Back button. 32

.")
33 Creating/Viewing Curriculum Click Next. You will be taken to the Proposal Draft Form. Complete the newly-cloned proposal as normal, and launch or delete the draft. Packages A package bundles draft Course and Program proposals into a single proposal so that all items work through the approval process together and activate at the same time. You may have multiple package proposal types that follow different workflows, such as one for new curriculum, one for modifying curriculum, and one for deactivating curriculum, or proposal types for different combinations of curriculum, like all courses, all programs, or courses & programs). New Package Before creating a Package you will need to make sure that all of the courses/programs that you will be adding to the package are in draft status. If you are creating a new course/program, then create those proposals first, before creating the package, and then leave the courses/programs in draft without launching them. To create a Package, you will use the same process as for courses and programs. Select Create Proposal from the top of the META screen. Scroll down to the Package proposal types and select the package proposal type. 33


34 The Subject you select in Step 2 of the Creation screens determines which people this package will go to in the Approval Process. The Package Title is the name you are giving this particular package, and Catalog Description is a summary of what changes or new items the package contains. Creating/Viewing Curriculum 34


35 Creating/Viewing Curriculum Once inside the Package screen you will see the information you entered on the Cover page. You will have links two other pages: one for adding Courses and one for adding Programs. Both the Course and Program pages function similarly. These are multi-select lists that allow you to check the items you need. You can either scroll up and down the list with the scroll bar, or just start typing the item you are looking for in the search box. Users are able to make multiple selections on both the Course and Program pages if necessary. After you have made selections and saved the pages select Launch from the upper right corner, just as you would for any other proposal, to launch this Package into the Approval Process. Generally a package has only three tabs: a Cover, which usually includes space for the rationale behind bundling the proposals; a Courses tab, which will have a multi-select list for adding draft course proposals; and a Programs tab, which includes a multi-select list for adding draft program proposals. After clicking launch make sure to select OK on the confirmation pop up. 35


36 Assessments The Assessment page displays a list of Assessments and their status. Click an item in the list to be taken to its page. New Proposal To create a New Proposal, select the Create Proposal button. Creating/Viewing Curriculum Choose your Proposal Type from the drop down menu, and then click Next. 36


37 For a New Course Proposal use the dropdown menu to choose the Subject, and then provide the Course Number, Course Title and Catalog Description of the new proposed course. Click Next. Creating/Viewing Curriculum Program Review From the META home screen, click the Curriculum button. From the dropdown menu, choose Program Review. If the resulting page is blank, with the No data to display notification, click the filter button ( ) to the right of the dropdown menu. This will take you to the Search Options window. 37


 to export a report")
38 From the Search Options Window, choose the options you desire, and how you wish them to be sorted. Click the Apply button to return to the Program Review page. Creating/Viewing Curriculum Click on the arrow next to each proposal to view its details. You may also use the Export button ( ) to export a report to Word, Excel, or PDF. 38


39 Clicking the Program Title will open the Proposal in a new tab. From here the draft may be edited, launched, or deleted. Creating/Viewing Curriculum Accessing Reports You can export your search results as a report that may be saved, printed, and shared. Click the Expand Arrow on the Search button to display your export options. Select the output format you desire from the dropdown that will appear. A report can take up to a few minutes to generate and download, depending on the format chosen and the number of courses in the report. In the Search screen, click the Page icon ( ) in the Reports column. Click on the icon again to close it. A menu will appear with the report options. Select the report you wish to view. 39


40 When in the proposal itself, click the Page icon under the proposal name. If a proposal has been launched or approved, clicking the proposal name in the search results will present this screen. Select the report you wish to view from the buttons at the top of the screen. Course Reports Standard course reports include the Course Outline, Impact, All Fields, and Comparison reports. Your institution may have additional or different reports, or may have customized these reports. Reports Course Outline The Course Outline report is a summary of the course. A completed outline should include the course name and number, credit hours, requisites and prerequisites, a description, and student outcomes. 40


41 Reports Impact Reports The Impact report is only for modification and deactivation proposals. This report lists the courses for which this course is a requisite, and the programs to which the program belongs. 41

42 Reports All Fields The All Fields report includes every field on the proposal. This is useful for gaining a quick overview of the proposal, as well as being able to check specific details at a glance. 42

43 Reports Comparison Report The Comparison report is only for modification and deactivation proposals. Like the All Fields report, this report includes every field on the proposal, with changes made to this version of the proposal highlighted. Deleted information will be highlighted pink, with a strikethrough the words, while new information will be highlighted green and italicized. 43

44 Reports Program Reports Standard program reports include the Program Summary, All Fields, and Comparison reports. Your institution may have additional or different reports, or may have customized these reports. Program Summary The Program Summary shows a summary of the program. 44
45 Reports Package Reports There are no package-specific reports. However, by clicking the course or program title that has been selected, in the proposal, you can view the reports from the curriculum item itself. Assessment/Program Review Reports Assessment and Program Review proposals reports include only the All Fields report. The All Fields report includes every field on the proposal. This is useful for gaining a quick overview of the proposal, as well as being able to check specific details at a glance. 45

46 46 Reports
47 Reports Program Reports All Fields An All Fields report shows all the fields and information in the proposal. 47


48 Reports Program Summary The Program Summary shows a summary of the program. 48


49 Reports Comparison Report For Program Amendment or Program Deactivation proposals, a Comparison Report will show all fields and information in the proposal, with changes between this proposal and the most recent previous version of the program highlighted. Information removed will be highlighted pink with a strike-through, and information added will be highlighted green and italicized. 49


50 Launching Curriculum Functions and Features Launching Curriculum into the Approval Workflow Once you have entered all necessary data and completed all required fields, click the Launch button at the upper right of the proposal screen. This submits the proposal to the approval process. META will send an notifying the person or people assigned to the first level of the workflow that there is a proposal waiting for their review. Proposal Functions and Features If you are familiar with web-based applications, you will find curriqūnet META easy to use. The flexible nature of META means that there numerous combinations of field types and functionalities to collect data in the format required. This guide will highlight specific field types and provide instruction on META-specific features, but does not instruct you on the step-bystep process of creating curriculum. Your institution may provide instructional materials that dive deeper into the specific proposal types you will encounter or include more specific instructions about the types of information they require. Navigating Proposals Move between the sections of the proposal by using the dark gray tabs on the left of the page. Any required fields throughout the course proposal will be marked with an asterisk (*) and highlighted light orange or blue. Sections with required fields also have an orange or blue box showing your progress ( ), which will turn green ( ) when you have completed all required fields. You will only be prompted to save when changes are made. 50


51 Functions and Features NOTE: Some clients will have an informational landing page that includes links to resources and contact information for the local admins. Some have extensive instructional text on that page. Your cover page may or may not, depending on your institution. Saving When changes are made, it is important to click the Save button to commit your changes. In case information previously entered needs to be updated or corrected, DO NOT use your browser s back button. Instead use the Back button in the META window. Select the Cancel button to undo your changes. Proposal Resource Page Example The Proposal Resources page provides links to this manual and the admin manual as well as contact information for curriqūnet support at your institution. For questions concerning the curriqūnet system, refer to these resources. 51

52 Dropdown Menus Use the down arrow on the right side of the textbox to display the dropdown menu to view your options. Click on the option to select it. Text box/text Area Put your curser into the textbox and enter information directly into the text area. Once you have finished entering in the applicable information, click Save. Date Fields To select a date, either use the Calendar icon ( M/D/Year. ) or type in the date using the format Functions and Features 52


53 Functions and Features When you click on the icon a popup of a calendar will appear, use the left and right arrows next to the month s name, to browse for another month. Attach Files In the Attach Files section, you may attach files for additional documentation or support of your proposal. Use the Select button to find files. Navigate to where your files are stored, select them, and then click Upload Files to attach them. 53


54 Checkbox Checkboxes are used when selecting a single option for an item. Checklist A checklist is a list of items where you may select multiple items. Methods of Instruction is an example of a checklist you will commonly encounter. Repeater Checklist A Repeater is a special kind of checklist. When items in the checklist are selected, additional fields appear requesting information about that selection. A common use for this function is course general education, where the user indicates which general education areas this new course will meet. Each selection will trigger a hidden field to appear, requesting a justification for this classification. Functions and Features 54

 to filter and shorten the")

55 Functions and Features Multi-Select Lists A multi-select list presents a very long checklist in a condensed, searchable format. You may scroll down to find the item you are looking for, or type the first few letters of the item you are looking for in the search box (indicated by the red arrow) to filter and shorten the available list. Click the checkbox next to each applicable item (outlined in red below). Select as many items as required. If you check the Show Selected box, you will see only the items you have selected. Click Clear All to start over with your selections. 55


56 Grids aka Textbooks/Course Materials Click Add New Record under the appropriate category to add materials to the course proposal. Add each item separately. Select the Insert button. This will open an area to describe each material. Functions and Features 56


57 Functions and Features To create a list of requisites, click the Add New Item button. Next, choose the Requisite Type by clicking the dropdown arrow on the right side of the textbox to view your options. If the requisite is a course, select Subject and Requisite Course from the subsequent dropdown menus. If the Requisite is not a course, describe that information in the Non Course Requirements field. The Condition dropdown selector is only used if an or situation or a nesting situation applies, otherwise it is implied that an and statement exists between entries. The Condition dropdown menu allows you to specify if this course must be taken as well as (using and ), or instead of (using or ) the next requirement. Click Save to add the requisite to the program. Requisite Condition and Type are illustrated below. 57


58 As you enter and save each entry, you will see a screen similar to the one below. Edit, re-order, and delete items as you did on the SLO page. Student Learning Outcomes Student Learning Outcomes often uses an Ordered List feature. To use this tool, first click Add New Item. Each outcome needs to be added individually. Functions and Features 58


.")
59 Enter the information for each item and click Save after each entry. NOTE: When you see text boxes highlighted in pink they are save requirements. These differ from launch requirement, because these are not necessarily required to launch the proposal, but these are required to save an item to the proposal. As shown in the example below, if you enter a Student Learning Outcome (SLO) you must also enter the Proposed Method of Assessment for that specific SLO. Functions and Features Some Institutions will have the option to map course SLOs directly to Individual Learning Outcomes (ILOs). This is normally only done for stand-alone courses or for institutions that do not map their SLOs to their Program Learning Outcomes (PLOs) directly. If this is an option, users can indicate by checking the appropriate checkboxes as to which ILOs an SLO maps to. You can select multiple checkboxes. 59


60 Functions and Features When you have entered and saved the SLOs, you will see a screen similar to the one below. To edit a Student Learning Outcome, click the blue bar containing the outcome. You will be taken back to the detail page where you are able to make the changes. To re-order outcomes, use the up and down arrows to the right of the blue bar. Click the red Delete icon ( ) to delete individual outcomes. 60

 the next requirement.")

61 Functions and Features Condition The Condition dropdown selector need only be used if an or situation or a nesting situation applies, otherwise it is already implied that an and statement exists between entries. The Condition dropdown menu allows you to specify if this course must be taken as well as (using and ) or instead of (using or ) the next requirement. Course Blocks Course blocks are nested ordered lists that hold the requirements for a program. The first level indicates categories of courses for the program, which may include Program Prerequisites, Core Courses, or Electives. Within each of those categories, the user will assemble the courses that will meet that requirement. 61


62 Functions and Features Content Review To review the content, click Add New Item. 62


63 Functions and Features Use the dropdown menu to choose the Requisite Course and Content Review Type. Objective and Content Mapping To map this courses objectives to a requisite course s objectives, select the Content Review Type, Objective To Objective from the Content Review Type menu. Select the current course objectives and the corresponding requisite course objectives from the check lists that will appear. NOTE: Both courses must have objectives saved for items to appear in checklist. 63


64 Functions and Features Objective to Content To map this course s objectives to items in a requisite course s content, select Content Review Type menu, and then Objective to Content. Select the current course objectives from the check list that will appear, and enter the information from the requisite course s content in the text area. NOTE: The current course must have objectives saved for items to appear in checklist. 64


65 Functions and Features Read Only Fields If at any point you are unable to click into or make changes to a field s information, you do not have edit privileges for that field. If you need to make changes to such a field, contact your institution s curriqūnet administrators. Auto Calculations Some institutions have automatically calculated fields on their Units/Hours pages. When users enter the base measurement into the white numerical fields the grayed out fields will automatically calculate. 65


66 Functions and Features Show/Hide Pages Show/Hide pages are used in areas where additional information is required because the proposal meets certain criteria. Responses on a field of any type may cause additional fields to appear. Most frequently, the trigger field and the unlocked fields will be on the same proposal page. For example, on this proposal page, the user is to indicate that a list of materials to support the course has been provided to library staff. 66

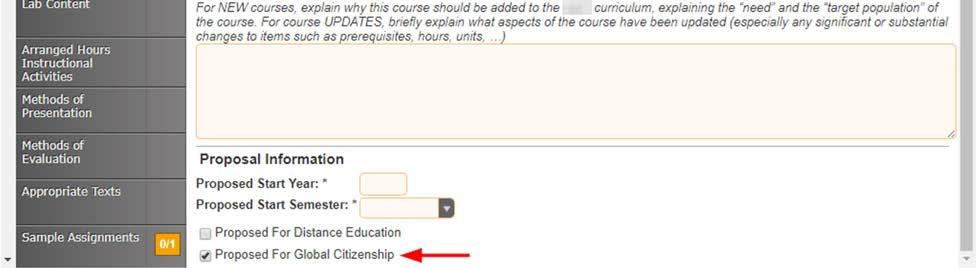
67 Functions and Features When a user selects this checkbox, an attachment tool appears to add a copy of this list to the proposal. Show/Hide triggers may also unlock a different proposal path. In the following example, when a user selects the Global Citizenship page, there is a message stating This course is either not proposed for or already approved for Global Citizenship. Edit the global status of this course on the cover page. 67

68 Functions and Features If the user returns to the Cover page and selects the checkbox indicating this course is proposed for Global Citizenship status, upon returning to the Global Citizenship page, they will be able to edit this page. 68

69 Functions and Features 69

70 Rich Text Editor This feature is used in numerous places throughout META. The Rich Text Editor within the META system provides several tools to help you format text entries. It also allows you to add hyperlinks and insert images like word-processing programs. Copying and pasting an outline straight from Microsoft Word or a similar word-processing program will NOT provide a properly formatted outline. The embedded formatting information word-processing programs include will cause issues within the editor. If pasting a paragraph of text (as you might for a Course Description) into the Rich Text Editor, you must paste it as plain text. Type Ctrl+Shift+V (in Windows), or right click on your mouse, and select Paste as Plain Text. If you do not do this, hidden formatting tags will interfere with the internal tools of the editor and cause problems with reports. Creating an Outline within the Rich Text Editor The simplest and best way to produce a properly formatted outline is directly in the Rich Text Editor. You may enter your line headings as you see fit, or use the built-in list tools. The left List Tools button creates a bulleted list, and the right button creates a numbered list. Use the indent tools to create levels within the list. The button on the left (in the indent tools) will create an indent and the right side button will remove the indentation. Below is an example of a bulleted list with several levels of indentation: Functions and Features 70
71 Functions and Features Below is an example of a numbered list with several levels of indentation: If you would prefer to specify your own level designations, you may do so as well, using the indentation tools as necessary. To create indented levels, select the end of the last line before the indentation, and click Enter. Select the end of the last line of the indentation, and click Enter again. This will create a new block of text. You MUST add these additional hard returns to indent text. 71


72 Functions and Features Click within the block to be indented, and click the Indent button. To indent a second level, click the button twice. For a third level, click three times, etc. Do this for each level. Creating an Outline Using HTML The third way to create a properly formatted outline requires knowledge coding HTML. If you know how to format your outline in this method, click the HTML button. 72


73 Functions and Features Approvals This will change the view of the Rich Text Editor. Enter or copy and paste your content and HTML code as desired. When finished, click OK to save your changes. If done correctly, this will produce an outline in the Rich Text Editor. Approvals To view pending approvals, click the Approvals button at the top of any page. If you have any approvals waiting for you, there will be an orange box with a number in it attached to the Approvals button. The process is similar for all proposal types. The standard user without administrative privileges will not be able to see the All Approvals option. They will only be able to see approvals for which they are the originator or the next member of the approval process. 73
74 Approvals If you are the next user in the approval process, you will see this screen. If you wish to view the course, you can select View Proposal. You may also view any available reports by clicking the name of the report. Use the Action drop down menu to select the action you wish to take on the proposal, add any Comments, and then click Commit. When you make a comment it will become a permanent part of the comments once you click commit. Committing your actions will move the proposal to the next part of the approval process. If you reject the proposal, it will remove the proposal from the system. If you request changes, it will send the proposal back to the originator. Once these changes have been made, the proposal will return to the person who requested the changes. The History report shows what has happened in the approvals process for this proposal and who is next in line, the time and date each action was taken on the proposal. It also shows the actions that have been taken on this proposal and a permanent history of comments. Make sure you see a confirmation message to confirm that when you clicked Commit, the action was received. The confirmation will appear in a popup window. You must click Close to 74
75 continue to ensure your actions are committed. This is vital. If you do not see this popup, your action has not been saved, and you must perform your action again. Public Search Implementing or Publishing Curriculum To implement a curriculum proposal and add it to the college s offerings, the last user in the approval process must select Implement (1) from the action menu. Select the Publish date (the date the course will become active) by clicking on the Calendar icon (2). Add any comments necessary and click Commit (3). You must confirm the final action by clicking Activate. This is a vital action. If you do not see this popup, your action has not been saved, and you must perform it again. Public Search Public Search allows your institution to embed a curriqūnet search window in your institution s website. Generally, students and the general public don't have access to any part of META, unless the institution has public search enabled. In this case, they can search curricula and have access to certain reports, generally course and program outlines. 75


76 Administer Site Navigating the Administrative Area Administer Site Click the Gear icon ( ) at the top right of the screen to administer the curriqūnet META site. Select Administer Site from the dropdown menu. All administrative functions can be accessed through the Configuration Summary page. Return to this page from within the Administrative area by clicking Admin Home. Navigating the Administrative Area The main administrative functions of META are accessed through the tabs at the top of the window. Clicking on each tab will bring up related items in the dropdown menu. 76
, clicking twice will sort in reverse alphabetical order (Z-A).")
 to the right of the column heading to search for a specific user (2). Items may be deleted throughout META by clicking the clicking (3) the Delete icon ( ).")
77 Navigating and Sorting Tables Throughout META, tables and columns may be sorted and filtered for a variety of purposes. To sort columns, click the Column Heading you wish to sort. Clicking the column head once will sort in alphabetical order (A-Z), clicking twice will sort in reverse alphabetical order (Z-A). To navigate between pages of users, select the left and right arrows at the bottom of the list, or select the page number (1). Click the Filter icon ( ) to the right of the column heading to search for a specific user (2). Items may be deleted throughout META by clicking the clicking (3) the Delete icon ( ). Navigating the Administrative Area Using Filter Conditions Enter any filter conditions and click Filter. A filter can be applied to all columns and will combine to find only items that meet all conditions. To remove filters, click Clear Filters. Filters will need to be removed separately from each column. 77


78 Lookup Data The Lookup Data section or lookup manager is not currently editable by users who are not part of the curriqūnet team. Please contact curriqūnet Support for assistance with lookup values. User Management To manage users and their permissions, select System Configuration, then choose User Management from the dropdown menu. Add a New User To add a new user, select the Add New User button on the lower left of the screen. Enter the basic user information into the user profile and select Create. You will need to assign the user a temporary password which the user must change when they log in the first time. After creating a new user, you will need to edit their profile to assign System Roles. Lookup Data User Management 78
79 NOTE: If you receive a message stating already exists in the database when you click Create, please contact the curriqūnet support team to have the user reactivated through the database. Users are never deleted from the system, so if they are deactivated, their account still exists, but is not visible in the interface, and the deactivated user cannot log in. Edit Existing Users The User table shows all existing active users. To sort existing users, click the column heading you wish to sort. Clicking once will sort in alphabetic order (A-Z), clicking twice will sort in reverse alphabetic order (Z-A). To navigate between pages of users, select the left and right arrows at the bottom of the list (1), or select the page number. To search for a specific user, click the Funnel icon (2) on the right of the column heading. User Management Enter any filter conditions and click Filter. A filter can be applied to all columns and will combine to find only users who meet all conditions. To remove filters, click Clear Filters. Filters need to be removed separately from each column. 79
80 User Management To edit an existing user, click the Pencil icon ( ) to the left of their name. Assigning Roles and Permissions Assign System Roles to the user. All users in the system are automatically assigned the User role and must have this role to be able to log in, even if they will also have another role. See System Roles below for an explanation of roles. NOTE: If your institution is configured as a District, assign the Primary College for this user. Non-District configurations will not include this field. District users must be assigned Roles for all colleges in the district for which they will contribute proposals or participate in approval workflows. Save any changes. 80
81 System Roles Users may be assigned any combination of System Roles. Roles can be added or removed at any time. In a district system, users may be assigned roles at any college, in any combination. They do not need to have the same roles at each college. Admin An Admin user acts as an administrator of the META system at their institution. They may add and remove users, assign permissions, view proposal forms, etc. Admin users have universal origination and approval rights. They can create proposals in any area of the institutional hierarchy. They can also take action on behalf of other users in any approval workflow, and move the proposals back in an in-process workflow to be revisited. Admin users can edit any proposal in the system, including those with Active and Historical status, unless the forms are specifically restricted during the implementation process before going live. Admin users must be given Approval Permissions to be specifically included in workflows, but can take action on behalf of other users in any workflow. There can be as many admin users as an institution requires, but there must be at least one. Generally, the only people who communicate directly with curriqūnet and the curriqūnet support team are Admin users, and all other users should contact the Admin users to have their questions and concerns addressed. User Management Catalog Coordinator At this point, the Catalog Coordinator role does not convey any special rights or privileges. However, as curriqūnet s new Catalog Module is developed, this role will be used as part of the module. Live Edit The Live Edit role gives a user the ability to edit any proposal at any time, in any status or department, as an admin user does. This does not grant them the other responsibilities and privileges of an admin user. If you want a user with a certain position in the institution to be able to edit proposals only while they are on their step in the workflow, the Live Edit flag can be added to the position instead of the user. This means that a user can only make changes to the 81

82 User Management proposal when acting in that specific role on proposals on that step in the workflow. For example, when the proposal is on the Department Chair step of the workflow, the Department Chair might have Live Edit permissions so they can answer questions about the departmental budget. User All users in the META system must be assigned the User role (including administrators and users with other roles). It is assigned by default, and if it is removed, the user will not be able to log in or create any proposals. Users must be assigned Origination Permissions to create proposals, and Approval Permissions to participate in Approval processes. In a district system, users must be assigned the User role at any college they will participate in creating or approving proposals. Contributor A Contributor is a user who will be assigned to contribute to proposals, but will not be able to create proposals on their own. This role is for informational purposes. If a user with the Contributor role is assigned Origination permissions, they will be able to create proposals. Approval Permissions Click the A icon ( ) to the left of their name to edit a user s existing Approval Permissions. To add an approval position to the user, click Add Permission. Positions must be added individually. 82
83 Select the Position from the dropdown menu. To add positions to the system so they will appear in this list, see the Positions section of this manual. Enter the Begin Date and End Date that this user will hold the position, if desired. By default, the position will be assigned immediately and will continue until manually removed from the user, unless dates are selected in these fields. Select Add to give the user this assignment if the position is an unfiltered position or applicable to the entire college. User Management If the position can be filtered or restricted to certain areas of the hierarchy, select the level to Filter On from the dropdown menu, which contains the levels of your hierarchy by which the position can be filtered. Click to select the organizations that the user is associated with. For example, select Biology for a member of the Department Member committee for the Biology Department. Departments will turn a darker gray when they have been selected. To remove the department restriction, click the darker gray department again. If no organizations are selected, the user will be assigned to the approval process of all proposals that contain that position. You can mix and match permissions from the different levels of the hierarchy by changing the value selected in the Filter On dropdown menu. Select Add to give the user this assignment. 83

 to the right")


84 Click the Pencil icon ( ) to the left of the permission in order to Edit an existing position. Click the Delete icon ( ) to the right of the permission to remove a position. Origination Permissions Click the O icon ( ) to the left of their name to edit Approval Permissions for a user. To add or change origination permissions, click Modify Permissions. User Management 84


85 Select the Origination Level from the dropdown menu. Origination permissions will cascade through the hierarchy tiers, so that users with a Department level permission will be able to originate programs in that department as well as courses in any subject belonging to that department. Click the organizations to assign origination permissions, and then click Update. User Management Permissions will appear grouped by organization tier. To edit existing permissions, click Modify Permissions. To remove positions for the tier altogether, click the Delete icon ( ) to the right of the tier. 85
 in each column heading. NOTE: The Institution column is specific to district configured institutions.")
 to the right of the position to remove an existing position.")
86 Positions Positions Positions are assigned to users to include them in proposal approval processes. To manage positions, select System Configuration, then choose Positions from the dropdown menu. Positions may be sorted and filtered by selecting their column headings, and the Filter icon ( ) in each column heading. NOTE: The Institution column is specific to district configured institutions. Non-district configurations will not include this column. To edit an existing position, select Edit to the left of the position. To add a new position to the system, click Add New Record. Click the Delete icon ( ) to the right of the position to remove an existing position. NOTE: Positions that are currently part of a workflow cannot be removed, and a red no symbol ( ) will replace the Delete icon. 86


87 Positions Enter the position Title, and select the Lowest Tier in the organization by which this position can be assigned. If this position will have a meeting to review groups of proposals at the same time and needs to have an agenda report to summarize the proposals, select Has Agenda Report. If the user holding this position should be able to edit the proposal while it is at their position in the workflow, select Can Edit in Review. NOTE: The Institution field is specific to district configured institutions. Non-district configurations will not include this field. The Institution field assigns a primary college to own this position. The Global Position field is also specific to district configured institutions, but all institutions will see this field. Global Position allows all colleges in the district to use this position in their workflows, regardless of the primary institution. 87
 in www.curriqunet.")
88 Actions Actions Actions are used in combination with Positions to create Approval Workflows. Select System Configuration, and then choose Actions from the dropdown menu to manage actions. Actions may be sorted and filtered by selecting their column headings, and the Filter icon ( each column heading. To create a new action, click the Add new record button. ) in 88

 to save the new action, or Cancel ( ) to discard. Click the Refresh button ( ) to update the table.")
89 Actions Complete the fields that appear: Title and Description. Select to Vote or Request Changes from the Action Behavior dropdown menu. A Vote action either moves the proposal forward in the workflow or finishes the workflow. A Request Changes action returns the proposal to the originator for corrections. Check whether the box can be used as a Default Action, which allows the proposal to move through the workflow without direct action by a user. Click the Checkmark ( ) to save the new action, or Cancel ( ) to discard. Click the Refresh button ( ) to update the table. Navigate through the Actions by using the First, Previous, Page Numbers, Forward, and Last buttons at the bottom of the page. Actions may be edited by clicking the Pencil icon ( Delete icon ( ). ). Actions can be deleted by clicking the 89
 are automatically included in the determination.")

90 NOTE: Actions included in an active approval process cannot be deleted and are indicated by the no icon ( ). Actions that may be deleted are indicated by the Delete icon. Holidays Holidays are used by META to determine when to send reminders and when to take default actions. Weekends (Saturday and Sunday) are automatically included in the determination. Holidays can also be used to designate days that the campus is closed and staff and faculty are not expected to work, such as spring break, scheduled system or campus facility maintenance, or any other closures. To manage holidays, select System Configuration, then choose Holidays from the dropdown menu. Holidays Holidays may be sorted and filtered like any other table. META has several system level holidays that cannot be removed or edited in the interface. If your institution does not observe one or more of these holidays, and would like them removed, please contact the curriqūnet Support team to have them removed via the database. To add a new holiday, click Add new holiday. Click the Pencil icon ( ) to the left of the holiday to Edit the existing holiday. Click the Delete icon ( ) to the right of the holiday to delete it. 90


91 Proposal Types Enter the Holiday Name, and then select the date type for this holiday from the Holiday Type column. Each selection will show a different combination of fields in the Holiday Details column. Click Save to add the holiday to the system. NOTE: Holidays can only be added one day at a time. If you need to add a series of days, in the case of Spring Break, for example, you must add them one day at a time. 91
92 Proposal Types To manage your institution s proposal types, click the Builders link and select the necessary area from the dropdown menu. Proposal Types combine Approval Workflows and Proposal Forms to get the right information to the required people for new curriculum. To manage proposal types, select Builders, then choose Proposal Types from the dropdown menu. Proposal Types Sort the column heads as desired, then enter any filter conditions and click Filter. A filter can be applied to all columns and will combine to find only users who meet all conditions. To remove filters, click Clear Filters. Filters will need to be removed separately from each column. 92

93 Click the Delete icon ( ) to the right of the proposal type to delete an existing proposal type. When proposal types are deleted, existing proposals are not affected, and currently In Review proposals can still have actions taken to complete the workflow, but no additional proposals using that proposal type can be created. Please contact curriqūnet Support if you need existing proposal types renamed or otherwise updated. To add a new proposal type, select Create Proposal Type. Proposal Types Enter the Title for the new proposal type, then select the Curriculum Type from the dropdown menu. NOTE: The dropdown menus on this page must be completed in the order presented, because each selection filters the options for the next menu. A new menu may appear titled Module Type. This field allows you to specify a sub-type for this proposal. For example, your institution may have Undergraduate Courses and Graduate Courses, or Credit, Non-Credit, and Community Education courses. Please contact CurrIQūnet Support to set up the types. Next, select the Action for this proposal type, the Proposal Form, and the Approval Workflow. 93

94 Some workflows have custom organization binding on certain positions. If the workflow used in this proposal type has this distinction, additional fields will appear to designate the field in the proposal form to which the step is bound. Click Save to create the proposal type, or Cancel to discard the proposal type. Approval Workflows Approval Workflows define the process of approving new curriculum. They are sometimes also referred to as Approval Processes. To manage workflows, select Builders, then choose Approval Workflows from the dropdown menu. Approval Workflows To sort the existing workflows, click the column heading by which you wish to sort. Clicking once will sort in alphabetic order (A-Z), clicking twice will sort in reverse alphabetic order (Z-A). To navigate between pages of workflows, select the left and right arrows at the bottom of the list, or select the page number. Click the Funnel icon ( ) on the right of the column heading to search for a workflow. 94
 to the right of the workflow to delete an existing proposal type.")
95 Enter any filter conditions and click Filter. A filter can be applied to all columns and will combine to find only users who meet all conditions. To remove filters, click Clear Filters. Filters need to be removed separately from each column. Approval Workflows Click the Delete icon ( ) to the right of the workflow to delete an existing proposal type. Click the Pencil icon ( ) to the left of the workflow to edit a workflow. To add a new workflow, select Create Workflow. Enter the Title of the new workflow, and select the Workflow Action. If your institution is a district, select the Institution that owns this workflow, and which institutions will also be able to use this workflow. NOTE: If your institution is not configured as a district, you will not see these fields. Click Create to add the new workflow. 95


96 Individual workflows contain Draft and Historical versions. The History section includes the current active version of the workflow, being used now. The active version will not have an end date. Active and Historical workflows cannot be edited. Click the View ( ) icon to the left of the workflow to view the existing version. Approval Workflows The View icon opens a graphic summary of the workflow version. Click the green Properties icon ( ) on the level or the individual position to view the actions for each position and level. 96


97 Approval Workflows Click Properties to view the level details all the actions for all positions on the level, and the result of each action. Click the gray Properties icon ( ) to view the individual position. This shows whether the position is required or optional, the actions the user can take at that position, and other details about the position at that level. 97
98 Approval Workflows Click the Copy icon ( ) to copy any version to create a starting point for a new draft. You may also choose to create a draft from scratch by selecting Create Draft. Existing, non-active drafts may be edited by clicking the Pencil icon ( ). Enter a title for the draft and click Create. 98

99 Approval Workflows Click the Add icon ( the workflow. ) on the level preceding where the new level should be to add a level to You may name any level, if desired by clicking the Level Name textbox. If no name is specified, the level will be referred to as the first required position on the level. To add a position to any level, choose the position from the Select a position dropdown menu, then click the Add icon next to the dropdown. 99


100 Click the Properties icon provide details about the position. Indicate whether this position is Required or Optional, keeping in mind that all required positions must take action before the proposal moves to the next level, and once all required positions have taken action, the proposal will move on whether or not the optional positions have taken action. All levels must have at least one required position. Indicate if the position has Custom Organization Binding different from what was indicated when the position was created. If this is selected, you will specify the binding in the Proposal Type creation using this workflow. See Proposal Types section. curriqūnet META will send a notification when the proposal first enters the level and is added to the users approval queue. Enter the number of days before the system should send a Reminder notification to the user(s) assigned this position, if desired. For instance, if you enter 5, the user will be reminded every 5 business days, (not including weekends and holidays), until they take action on the proposal. Approval Workflows 100
.")

101 Approval Workflows Finally, select the Action users holding this position can take at this level from the dropdown menu. Actions are sorted as Request Changes and Voting actions, based on what was specified when the action was created (see the Actions section of this manual). Click the gray Add icon to add the action. Each position must have at least one action. If the position is Required on this step, actions have the option of being marked as a Default action, based on what was specified when the action was created (see the Actions section of this manual). Only one action may be marked as the default action for each position, and a user must be assigned to the position for the default action to occur

 until all configuration requirements for the level have been met.")
102 Approval Workflows If an action is selected as Default, additional fields will appear. Specify the number of business days after which the action will occur, not including weekends and holidays. Specify the number of business days prior to the default occurrence that a reminder should be sent to the assigned users. Once all positions on the level have been configured, click the Properties icon on the level. This icon will be red ( ) until all configuration requirements for the level have been met. For Vote Actions, indicate if the action Completes the Proposal or select the Target Level if it does not complete the proposal workflow. If the action completes the proposal, select the Target Status for the proposal
103 Request Change Actions return the proposal to the originator, and then typically returns it to the user who requested the change. If the proposal should return to another user, select the Restart the workflow checkbox, then select the level to start the workflow on in the Restart to level dropdown menu. Approval Workflows You may save the workflow draft at any point when the level property icons are all green by clicking Save Draft. When the workflow is complete, select Activate Workflow to begin using the workflow. If there are existing proposals in review using a previous version of this workflow, they will continue using the old version. Any existing draft or future draft proposal launched using this workflow will use this version of the workflow. You may also remove the workflow draft and start over by clicking Delete Draft at any time


104 Approval Workflows While the proposal is in the draft state, you may edit the Process Title or the Version Title by clicking the Pencil icon ( ) next to the titles. Edit the title, and click Update


105 Create New Workflow To add a new workflow, select Create Workflow. Approval Workflows Enter the Title of the new workflow, and select the Workflow Action. If your institution is a district, select the Institution that owns this workflow, and which institutions will also be able to use this workflow. NOTE: If your institution is not configured as a district, you will not see these fields. Click Create to add the new workflow
106 Individual workflows contain Draft and Historical versions. The History section includes the current, active version of the workflow being used. The active version will not have an end date. Active and Historical workflows cannot be edited. Click the View icon ( ) to the left of the workflow to view the existing version. The View icon opens a graphic summary of the workflow version. To view the actions for each position and level, click the green Properties icon (1) on the level or the individual position. Click the green Properties icon to view the level details all the actions for all positions on the level, and the result of each action. Click the gray Properties icon (2) to view the individual position. This will show whether the position is required or optional, the actions the user can take at that position, and other details about the position at that level. Approval Workflows 106
.")
.")
107 Approval Workflows You may choose to create a draft from scratch by selecting the Create Draft option (1). To copy an existing version to create a starting point for a new draft, click the Copy icon (2). Enter a title for the draft and click Create

108 To add a level to the workflow, click the Add icon on the level preceding where the new level should be. You may name any level, if desired by clicking the Level Name textbox. If no name is specified, the level will be referred to as the first required position on the level. To add a position to any level, choose the position from the Select a position dropdown menu, then click the Add icon ( ) next to the dropdown. META will send a notification when the proposal first enters the level and is added to the users approval queue. Enter the number of days before the system should send a Reminder notification (1) to the user(s) assigned this position, if desired. For instance, if you enter 5, the user will be reminded every 5 business days, not including weekends and holidays, until they take action on the proposal. Click the Properties or gray i icon (2) to provide details about the position. Indicate whether this position is Required or Optional, keeping in mind that all required positions must take action before the proposal moves to the next level, and once all required positions have taken action, the proposal will move on whether or not the optional positions have taken action. All levels must have at least one required position. Indicate if the position has Custom Organization Binding different from what was indicated when the position was created. If this is selected, you will specify the binding in the Proposal Type creation using this workflow. See the Proposal Types section for more information. Approval Workflows 108
.")
.")
109 Approval Workflows Select the Action users holding this position can take at this level from the dropdown menu. Actions are sorted as Request Changes and Voting actions, based on what was specified when the action was created (see Actions, to view the existing version, page 6). Click the gray Add icon (3) to add the action. Each position must have at least one action. If the position is Required on this step, actions have the option of being marked as a Default action, based on what was specified when the action was created (see Actions, page 6). Only one action may be marked as the default action for each position, and a user must be assigned to the position for the default action to occur. If an action is selected as Default, additional fields will appear. Specify the number of business days after which the action will occur, not including weekends and holidays. Specify the number of business days prior to the default occurrence that a reminder should be sent to the assigned users

 returns the proposal to the originator, and then typically returns it to the user who requested the change.")
110 Once all positions on the level have been configured, click the red Properties icon (1) on the level. This icon will be red until all configuration requirements for the level have been met. For Vote Actions, indicate if the action Completes the Proposal or select the Target Level if it does not complete the proposal workflow. If the action completes the proposal, select the Target Status for the proposal. Request Change Actions (2) returns the proposal to the originator, and then typically returns it to the user who requested the change. If the proposal should return to another user, select the Restart the workflow checkbox, then select the level to start the workflow on in the Restart to level dropdown menu. Approval Workflows 110


111 You may save the workflow draft at any point when the level property icons are all green by clicking Save Draft. Select Activate Workflow to begin using this workflow when the workflow is complete. If there are existing proposals in review using a previous version of this workflow, they will continue using the old version. Any existing draft or future draft proposal launched using this workflow will use this version of the workflow. You may also remove the workflow draft and start over by clicking Delete Draft at any time. While in the draft state, you may edit the Process Title or the Version Title by clicking the Pencil icon next to the titles. Edit the title and click Update. Proposal Forms Proposal Forms The Proposal Forms section is not currently editable by users who are not part of the curriqūnet team. Please contact the Support team for assistance

.")
112 Catalog Views The Catalog Views section is not currently editable by users who are not part of the curriqūnet team. Please contact the Support team for assistance. Admin Reports Admin Reports Admin users are those who have META administrative permissions. Technically, all reports are admin reports, but admin reports are available only to admin users. These are found in the Administer Site section of META (see Administer Site, page 76). Proposal-specific reports are available to non-admin users. Non-admin users, or the majority of the faculty at the institution, only have access to the reports attached to proposals (the course/program/assessment reports). There may be a few exceptions to this at your institution, depending on how your institution allows access to reports in META. To access Admin Reports, click the Gear icon ( ) and then click Reports from the Admin page. Report types include Agenda Report, All Proposals, Approval Participants, Pending User Actions, Proposal Users Report, and Saved Queries. Agenda Report Positions can be given the ability to have an agenda report created for them in the Positions screen under System Configuration. This ability is often given to committees or other positions where the proposals will be discussed in a meeting. The agenda report is designed to summarize all proposals waiting for approval by users with a certain position in the approval process. To create an agenda report, select the position for which the agenda is for from the dropdown menu. Catalog Views 112
113 Admin Reports Select the course and/or program proposals to be included in the agenda using the checkboxes to the left of the proposal title. Results may be paginated if there are many proposals at that position in the workflow. Click Run Report to create the report
114 Admin Reports The agenda report will open in another tab in the browser, and can be printed or saved from there, or copied to a word document for editing. The agenda report includes basic information about the proposals


115 Admin Reports 115


116 All Proposals The All Proposals report shows all proposals that have been created in Meta with their status. Proposals imported on the initial Meta data import are not included. Admin Reports 116


117 Admin Reports Approval Participants The Approval Participants report will show the names and contact information of each individual involved in each step of the approval process, including all users with origination permissions on the subject. Select the desired proposal type from the Process dropdown menu, and subject type from the Subject dropdown menu. Click View to generate the report. The report will show the names and contact information of each individual involved in each step of the approval process, including all users with origination permissions on the subject. (Note the illustration below was shortened. Your report may contain more or less information that shown here.) 117


118 Admin Reports Pending User Actions The Pending User Actions report allows an admin user to easily determine where proposals are sitting in the approval process, and which faculty members may need a reminder that the proposal is waiting for their review. Select the proposal from the dropdown menu, and click View. All users at the current level of the workflow for that proposal will be listed with their addresses
119 Admin Reports Proposal Users Report The Proposal Users Report allows the admin to view all users involved in a proposal s approval process. To generate this report, select Proposal User s Report from the Reports dropdown menu. Choose the desired course, and click View. The report will display all users involved with the particular proposal

120 120 Admin Reports
121 Saved Queries Saved Queries are Ad Hoc reports which have been saved for later use. See Ad Hoc Reports below for further information. Ad Hoc Reports Ad Hoc Reports The Ad Hoc reporting feature allows you to create customized, purpose-specific reports. To use the Ad Hoc reporting feature, click Ad Hoc Reports. NOTE: The Ad Hoc feature is still in Beta mode, which means there are ongoing developments and improvements. Not all fields that may be on your forms will be available in the query tool, and many will not be named the same as on your forms. The field labels in this ad hoc tool are derived from the database column names, but because of the dynamic nature of the META system, many fields can be used for wildly different data points for different clients. It may take several attempts of selecting fields and previewing results until you find the fields you need. As the capabilities of this feature are improved, the tool will become easier and more intuitive to use. If you are unable to put together the report you need, please contact curriqūnet Support for assistance. To create an Ad Hoc report, click Add new column to select each data point. Select one of the top level curriculum categories from the list that will appear. NOTE: You cannot mix and match data points from this top level list, as the ad hoc system cannot cross curriculum boundaries at this time. You may report on Course data or Program data or Process data, for example, but not a combination of Course and Process data

122 Ad Hoc Reports Use your mouse to hover over a data area, which will open an additional list of the fields that you may select from. Add each field individually. You may scroll through the list, or type in the bar at the top of the list to find the needed fields. In the example below, the word subject is searched, reducing the options available. If your search term returns no results, try using a synonym or related word. Remember that the field list is not customized to your form, and may be incomplete. NOTE: The type to search function does not work in certain internet browsers, particularly Internet Explorer. If you are unable to type to search, switch to a different browser, such as Chrome or Firefox, or simply scroll through the list


123 Ad Hoc Reports Select all data points required for this report. They will be listed in the Data Fields area. Under the Title heading, you may click each item to change the label of the column in the report. This is especially useful if the field label in the ad hoc tool is not related to what your institution uses them for. Use the Up and Down Arrow icon ( ) to the left of the field to reorder the data fields. You may also drag and drop the fields to reorder them. Click the gray X icon ( ) to the right of the field to remove it from the report


124 You may add filters to reduce the results if needed, or if practical. NOTE: At this time, the Ad Hoc tool is limited in the number of results allowed, so you may need to filter by status or subject code, or by some other logical restriction, to receive any results. Click Add new condition in the Filters section to add a filter to the report. Select one of the top level categories from the list that will appear. Ad Hoc Reports You may scroll through the list, or type keywords in the search bar at the top of the list to find the needed fields. NOTE: The type to search function may not work in certain internet browsers, including Internet Explorer. If you are unable to type to search, switch to a different browser, or simply scroll through the list

125 Ad Hoc Reports Select all conditions required for this report. They will be listed in the Filters area. Click each underlined phrase to change the search conditions

126 Ad Hoc Reports When all Data Fields and Filters are in place, click Preview. The query result will appear in the Results section. Click Export to Excel or Export to CSV to download the report results. This document will save to the Downloads folder on your computer, and can be opened with Microsoft Excel or similar programs. To sort, perform calculations, or print your reports, you must first export the results. To save this query to run this report again, click Save. If you are updating a previously saved query and want to save this version, but maintain the old version, click Save As
, and indicate if this query is Open to Public, meaning other Admin users can access this saved")
127 Ad Hoc Reports Enter the Name for this saved query and a brief Description. Select the Output Format (Excel or CSV), and indicate if this query is Open to Public, meaning other Admin users can access this saved query. Click Save to save the query

128 Ad Hoc Reports To view the saved queries, select Reports, then choose Saved Queries from the dropdown menu. Common Ad Hoc Query Parts Need Course Data Field Program Data Field Notes Proposal Originator Proposal Status Distance Education Saved Queries Course User First Name Course User Last Name Course Status Alias Title Course Is Distance Ed Program User First Name Program User Last Name Program Status Alias Title Saved Queries are Ad Hoc Reports that have been saved for later use. To view the saved queries, select Reports, then choose Saved Queries from the dropdown menu. If there are no Saved Queries available, you will see the following screen
 to download the report in the format it was")
 to make changes to the query, or click the Delete icon (")

129 Ad Hoc Reports If Saved Queries are available, a list will be displayed. Click the Magnifying Glass icon ( ) to download the report in the format it was saved as. Click the Pencil icon ( ) to make changes to the query, or click the Delete icon ( ) to delete the query. If queries are deleted accidentally, you will need to rebuild them in the ad hoc tool. They cannot be retrieved. See the Ad Hoc Reports section of this manual for instructions on editing or building queries
130 Ad Hoc Reports Approvals Approvals To view pending approvals, click the Approvals button at the top of any page. If you have any approvals waiting for you, there will be an orange box with a number in it attached to the Approvals button. The process is similar for all proposal types. The standard user without administrative privileges will not be able to see the All Approvals option. They will only be able to see approvals for which they are the originator or the next member of the approval process


131 Approvals If you are the next user in the approval process, you will see this screen. If you wish to view the course, you can select View Proposal. You may also view any available reports by clicking the name of the report. Use the Action drop down menu to select the action you wish to take on the proposal, add any Comments, and then click Commit. When you make a comment it will become a permanent part of the comments once you click commit Committing your actions will move the proposal to the next part of the approval process. If you reject the proposal, it will remove the proposal from the system. If you request changes, it will send the proposal back to the originator. Once these changes have been made, the proposal will return to the person who requested the changes. The History report shows what has happened in the approvals process for this proposal and who is next in line, the time and date each action was taken on the proposal. It also shows the actions that have been taken on this proposal and a permanent history of comments. Make sure you see a confirmation message to confirm that when you clicked Commit, the action was received. The confirmation will appear in a popup window. You must click Close to 131
 must select Implement (1) from the action menu.")
132 Approvals continue to ensure your actions are committed. This is vital. If you do not see this popup, your action has not been saved, and you must perform your action again. To implement the course and add it to the college s offerings, the last user in the approval process (or an administrator) must select Implement (1) from the action menu. Select the Publish date (the date the course will become active) by clicking on the Calendar icon (2). Add any comments necessary and click Commit (3). You must confirm the final action by clicking Activate. This is a vital action. If you do not see this popup, your action has not been saved, and you must perform it again. Administrative Action in Approval Workflows Administrative users have the ability to take action in the proposal workflows on behalf of other users. To take administrative action on a proposal, select the Approvals button


133 The Approvals screen will first show My Approvals, the items assigned to you for review. To view all proposals in review at your institution, select All Approvals. Approvals The All Approvals screen lists all proposals currently in an approval process. On both the My Approvals and All Approvals screens, items have been returned to the originator for changes will be highlighted in pink. You may filter the proposals by using any of the dropdown menus or by entering search terms in the textbox, then click Search. Select the proposal you need to take action on by clicking the row containing the proposal


134 Administrative users can take action on proposals in two ways. To take action on the current level, select an option from the Take Action as an Administrator dropdown menu. Select the position for which you wish to take action. Click OK after making your selection. Using this menu, you can also Delete this proposal, which will remove it from the META system entirely, or Unlaunch the proposal, which removed the proposal from the workflow and reverts it to draft status. From there the originator can later launch it again to restart the workflow. You will be asked to confirm either of these choices. Approvals After choosing a position, select the Action from the dropdown menu. Add any Comments to the textbox, and click Commit


135 Approvals A red confirmation notification will appear on the approval history screen. Your action will be added to the workflow history and any users assigned to that position will be skipped. Alternatively, you may manually move the proposal to a new level by selecting the link Click here to administratively move proposal to new


136 Select the level you want to move the proposal to, scrolling to view all levels, and click OK. The current level is highlighted purple. Proposals can be moved either forward or back as many levels as necessary in the workflow. The proposal will follow the workflow as usual from that point. Optional META Functionalities Optional META Functionalities Contact curriqūnet Support to configure the following functionalities: Comment Moderation, Course Level Validation or Curriculum Subtypes, Course Reactivation, or Public Search


137 Comment Moderation Administrative users have the ability to moderate comments in the approval histories of in review or completed proposals. Moderated comments are not deleted, only hidden from the view of non-admin users. If this function is configured, click Hide for each comment. The green Eye icon ( ) indicates the comment is visible. The red Sight Disabled icon ( ) indicates the comment is hidden. Optional META Functionalities To show previously hidden comments, click Show to unhide the comment. A non-admin user will see that the action has been taken, but will not see the moderated comment


138 Curriculum Subtypes and Course Level Validation Curriculum Subtypes allow a curriculum type, such as a course, to be further divided. This feature is frequently used to divide credit and non-credit courses, or different levels of programs. Course Level Validation allows for validation of the course number based on defined parameters for various course types. For instance, undergraduate course proposals could require a course number between 0 and 400, graduate course proposals between 401 and 600, etc., depending on the requirements of your institution. These criteria are assigned to the Proposal Types. If a user attempts to create a proposal that does not meet the criteria of the proposal type, they will receive a validation message, as seen below, and be prevented from creating the proposal. Optional META Functionalities 138


139 Course Reactivation The Course Reactivation feature allows admin users to use a modification proposal to reactivate historical courses that have no active version in their course family. To create a Reactivation Proposal, in the first step of the Create Proposal wizard, select a Course Modification proposal type, and click Next. Optional META Functionalities Select the Reactivation Proposal checkbox, then Search for the course to be reactivated, using the Subject dropdown menu and Course Title textbox as needed. Select the course to be reactivated, and click Next. Verify you have selected the correct course and click Create Proposal


140 Optional META Functionalities A proposal will be created and can be edited and launched like any modification proposal. Public Search Public Search allows your institution to embed a curriqūnet search window in your institution s website. Generally, students and the general public don't have access to any part of META, unless the institution has public search enabled. In this case, they can search active curricula and have access to certain reports, generally course and program outlines. Upon activation, you will be provided with a HTML snippet to use as needed. To use public search, select the curriculum type to search. The selected curriculum type will be highlighted red. Enter the search criteria and click Search
META General User Guide
 META General User Guide Version 2.2 November, 2017 Contents Welcome to META 5 Accessing META...5 Logging In 6 Profile Management 8 Changing Your Password 9 Resetting Your Password 9 Troubleshooting...
CurricUNET User Manual
 CurricUNET User Manual Page 1 Contents Log In... 5 Changing Your Password... 6 Viewing Courses... 8 Viewing Programs... 11 Create Proposal... 12 Course Proposals... 15 Cover or Main page... 15 Proposal
Creating and Viewing Curriculum
 Creating and Viewing Click the button on the META home screen. A dropdown menu will appear with the following options: Course, Program and Assessment. Click the desired option to proceed. options are explained
META Admin User Guide
 META Admin User Guide Version 3.0, October 2018 Welcome to the META Admin User Guide... 4 Administer Site... 4 Navigating the Administrative Area... 5 Navigating and Sorting Tables 5 Using Filter Conditions
Peralta Community College District CurricUNET User Manual
 Peralta Community College District CurricUNET User Manual Page 1 Contents Log in... 8 Changing Your Password... 9 Viewing Courses... 11 Viewing programs... 14 Create Proposal... 15 New Course Proposal...
MiraCosta CurricUNET User Manual
 MiraCosta CurricUNET User Manual Building the Worldwide Curriculum Network Page 1 Contents Log In... 5 Courses... 6 Programs... 9 Create Proposal... 10 Deactivate Credit Course... 11 Deactivate Noncredit
Gavilan CurricUNET User Manual
 1000 River Walk Drive, Suite 350 Idaho Falls, ID 83402 Tel: 208.522.1225 Fax: 208.522.2896 Gavilan CurricUNET User Manual Building the Worldwide Curriculum Network Page 1 Table of Contents Log In... 4
Create Proposal. To create a new proposal, select the Create Proposal button.
 Create Proposal To create a new proposal, select the Create Proposal button. Choose your Proposal Type from the drop down menu, and then click the Next button. Page 15 For BCC New Course, COA New Course,
Contra Costa CurricUNET User Manual
 1000 River Walk Drive, Suite 350 Idaho Falls, ID 83402 Tel: 208.522.1225 Fax: 208.522.2896 Contra Costa CurricUNET User Manual Building the Worldwide Curriculum Network Table of Contents Log In... 4 Viewing
ASTRA USER GUIDE. 1. Introducing Astra Schedule. 2. Understanding the Data in Astra Schedule. Notes:
 ASTRA USER GUIDE 1. Introducing Astra Schedule Astra Schedule is the application used by Academic Space Scheduling & Utilization to schedule rooms for classes and by academic colleges, schools, and departments
User Manual: Manager
 Learning Management System ( LMS ) User Manual: Manager V NLFMG-03092017-1 Disclaimer and Warranty Information Limits of Liability / Disclaimer of Warranty The information contained within this manual
Acuity 504. User Guide. Administrators 504 Coordinators Teachers. MSB Customer Care msb-services.
 TM Acuity 504 User Guide Administrators 504 Coordinators Teachers MSB Customer Care 800.810.4220 support@ Copyright 2014 MSB All rights reserved 1 Copyright MSB 2014 Table of Contents MSB Mission Statement...
Wholesale Lockbox User Guide
 Wholesale Lockbox User Guide August 2017 Copyright 2017 City National Bank City National Bank Member FDIC For Client Use Only Table of Contents Introduction... 3 Getting Started... 4 System Requirements...
Learn how to login to Sitefinity and what possible errors you can get if you do not have proper permissions.
 USER GUIDE This guide is intended for users of all levels of expertise. The guide describes in detail Sitefinity user interface - from logging to completing a project. Use it to learn how to create pages
Secure Transfer Site (STS) User Manual
 User Manual") Secure Transfer Site (STS) User Manual (Revised 3/1/12) Table of Contents Basic System Display Information... 3 Command Buttons with Text... 3 Data Entry Boxes Required / Enabled... 3 Connecting to the
Secure Transfer Site (STS) User Manual (Revised 3/1/12) Table of Contents Basic System Display Information... 3 Command Buttons with Text... 3 Data Entry Boxes Required / Enabled... 3 Connecting to the
BBVA Compass Spend Net Payables
 User Guide BBVA Compass Spend Net Payables User Guide Vault Services Table of Contents Introduction 2 Technical Requirements 2 Getting started 3 Sign In 3 General Navigation 4 Upload/Create Payment 5
Administrator Manual
 Administrator Manual CURA Technical Support Email: cura_support@mindscope.com Phone: 1.888.322.2362 x 55 Administrator Manual Page 1 Table of Contents The Setup Module... 3 Skills... 3 Adding or Modifying
Guide for Researchers: Online Human Ethics Application Form
 Guide for Researchers: Online Human Ethics Application Form What is Quest Quest is our comprehensive research management system used to administer and support research activity at Victoria University.
IBC Committee Manager User Guide
 IBC Committee Manager User Guide Key Solutions, Inc. 2803 Lakeview Ct. Fremont, CA 94538 www.keyusa.com Version 1.2 Copyright 2018 Key Solutions 2002-2018 Key Solutions, Inc. 2803 Lakeview Court Fremont,
Compliance Document Manager User Guide
 Compliance Document Manager User Guide Contents OVERVIEW... 3 SYSTEM REQUIREMENTS... 3 VENDORMATE PASSWORD REQUIREMENTS... 3 LOGIN... 4 THE HOME SCREEN... 5 BA Screening... 5 BA Oversight... 5 My Screening
Administrator Quick Guide
 1 Administrator Quick Guide Login Screen The first page employees will see when visiting their training site is the login screen. This is where employees must enter their username and password to access
User Guide Ahmad Bilal [Type the company name] 1/1/2009
![User Guide Ahmad Bilal [Type the company name] 1/1/2009](/thumbs/92/109182878.jpg "User Guide Ahmad Bilal [Type the company name] 1/1/2009") User Guide Ahmad Bilal [Type the company name] 1/1/2009 Contents 1 LOGGING IN... 1 1.1 REMEMBER ME... 1 1.2 FORGOT PASSWORD... 2 2 HOME PAGE... 3 2.1 CABINETS... 4 2.2 SEARCH HISTORY... 5 2.2.1 Recent
User Guide Ahmad Bilal [Type the company name] 1/1/2009 Contents 1 LOGGING IN... 1 1.1 REMEMBER ME... 1 1.2 FORGOT PASSWORD... 2 2 HOME PAGE... 3 2.1 CABINETS... 4 2.2 SEARCH HISTORY... 5 2.2.1 Recent
Production Assistance for Cellular Therapies (PACT) PACT Application System User s Guide
 PACT Application System User s Guide") Production Assistance for Cellular Therapies (PACT) PACT Application System User s Guide Version 1.0 February 9, 2017 Version 1.0 TABLE OF CONTENTS 1.0 Getting Started... 1 1.1 Access to the Internet...
Production Assistance for Cellular Therapies (PACT) PACT Application System User s Guide Version 1.0 February 9, 2017 Version 1.0 TABLE OF CONTENTS 1.0 Getting Started... 1 1.1 Access to the Internet...
Jobtrain Basics Client Guide. January 2019
 Jobtrain Basics Client Guide January 2019 Jobtrain basics - client guide This guide is designed to help users with the most basic processes within Jobtrain including adding jobs, basic candidate management
End of Year LMS Updates Admin Guide
 V 4.7.1.January2019 / Document version 012232019-2 End of Year LMS Updates Admin Guide NOTE: This DRAFT guide should provide a brief overview and screenshots of the End of Year LMS updates. All items in
(APPLIES ONLY TO CLIENTS WHO ENABLE THIS FEATURE)
") V 4.6.1.January2018 Document version 01-10-2018-02 End of Year LMS Updates Admin Guide NOTE: This DRAFT guide should provide a brief overview and screenshots of the End of Year LMS updates. All items in
V 4.6.1.January2018 Document version 01-10-2018-02 End of Year LMS Updates Admin Guide NOTE: This DRAFT guide should provide a brief overview and screenshots of the End of Year LMS updates. All items in
Sourcing - How to Create a Negotiation
 Martin Baker Secure Source-To-Pay Sourcing - How to Create a Negotiation December 07 Contents To Create a Project... To Create a Negotiation... 5 Attachments... 7 Private File Archive... 7 Creating Lines,
Monash University Policy Management. User Guide
 Monash University Policy Management User Guide 1 Table of Contents 1. GENERAL NAVIGATION... 4 1.1. Logging In to Compliance 360 - Single Sign On... 4 1.2. Help... 4 1.2.1. The University Policy Bank...
Test Information and Distribution Engine
 SC-Alt Test Information and Distribution Engine User Guide 2018 2019 Published January 14, 2019 Prepared by the American Institutes for Research Descriptions of the operation of the Test Information Distribution
Administrative Manual
 Administrative Manual Return to Table of Contents Page 1 Contents Managing Positions... 3 Add New Position... 4 Edit a Position... 5 Deactivate a Position... 6 User Management... 7 Add New User... 9 Add/Edit
DocAve Governance Automation Online
 DocAve Governance Automation Online Business User Guide Service Pack 9 Cumulative Update 6 Issued December 2017 Table of Contents What s New in this Guide... 5 About DocAve Governance Automation Online...
SharePoint User Manual
 SharePoint User Manual Developed By The CCAP SharePoint Team Revision: 10/2009 TABLE OF CONTENTS SECTION 1... 5 ABOUT SHAREPOINT... 5 1. WHAT IS MICROSOFT OFFICE SHAREPOINT SERVER (MOSS OR SHAREPOINT)?...
JITs Portal. User Manual
 JITs Portal User Manual November 2017 JITs Portal 1 Table of Contents Chapter 1 Introduction... 2 1.1 What is the JITs Portal?...3 1.2 User Guide structure...4 Chapter 2 Working with the JITs Portal...
Percussion Documentation Table of Contents
 Percussion Documentation Table of Contents Intro to the Percussion Interface... 2 Logging In to Percussion... 2 The Dashboard... 2 Managing Dashboard Gadgets... 3 The Menu... 4 The Finder... 4 Editor view...
HealthStream Connect Administrator User Guide
 HealthStream Connect Administrator User Guide ii Contents About HealthStream Connect... 1 Administrator Overview of HealthStream Connect... 2 Administrator Access and Privileges... 2 Navigating HealthStream
SCHULICH MEDICINE & DENTISTRY Website Updates August 30, Administrative Web Editor Guide v6
 SCHULICH MEDICINE & DENTISTRY Website Updates August 30, 2012 Administrative Web Editor Guide v6 Table of Contents Chapter 1 Web Anatomy... 1 1.1 What You Need To Know First... 1 1.2 Anatomy of a Home
User Reference Guide
 LEARNING CENTRE http://lms.toyota.com.au User Reference Guide Page 1 Learning Centre User Overview Reference Guide Last Modified 23/07/10 2010 Toyota Institute Australia. All rights reserved. All brand
Electronic Grants Administration & Management System - EGrAMS
 Electronic Grants Administration & Management System - EGrAMS Introduction EGrAMS is an enterprise-wide web-based scalable, configurable, business rule driven and workflow based end-to-end electronic grants
A Guide to Quark Author Web Edition 2015
 A Guide to Quark Author Web Edition 2015 CONTENTS Contents Getting Started...4 About Quark Author - Web Edition...4 Smart documents...4 Introduction to the Quark Author - Web Edition User Guide...4 Quark
Administrative Training Mura CMS Version 5.6
 Administrative Training Mura CMS Version 5.6 Published: March 9, 2012 Table of Contents Mura CMS Overview! 6 Dashboard!... 6 Site Manager!... 6 Drafts!... 6 Components!... 6 Categories!... 6 Content Collections:
SPECIFICATIONS Insert Client Name
 ESSENTIAL LMS BRANDING SPECIFICATIONS Insert Client Name Creation Date: June 23, 2011 Last Updated: July 11, 2017 Version: 16.5 Page 1 Contents Branding Elements... 3 Theme Management... 3 Header Images...
Frequently Asked Questions
 Frequently Asked Questions WHAT IS PD IN FOCUS? PD In Focus is an award-winning online platform that features hundreds of hours of videos showing research-based teaching practices in action. Designed as
Training Manual for Researchers. How to Create an Online Human Ethics Application
 Training Manual for Researchers How to Create an Online Human Ethics Application What is in this document This manual is intended to provide general tips on using functionality specific to QUEST online
PowerTeacher Administrator User Guide. PowerTeacher Gradebook
 PowerTeacher Gradebook Released June 2011 Document Owner: Documentation Services This edition applies to Release 2.3 of the PowerTeacher Gradebook software and to all subsequent releases and modifications
ADMINISTRATIVE USER GUIDE FOR THE APTI-LEARN LEARNING MANAGEMENT SYSTEM (LMS)
") ADMINISTRATIVE USER GUIDE FOR THE APTI-LEARN LEARNING MANAGEMENT SYSTEM (LMS) Software Version 2.6 September 2012 Prepared by EM-Assist This page left intentionally blank. Software Version 2.6; Document
ADMINISTRATIVE USER GUIDE FOR THE APTI-LEARN LEARNING MANAGEMENT SYSTEM (LMS) Software Version 2.6 September 2012 Prepared by EM-Assist This page left intentionally blank. Software Version 2.6; Document
PRISM - FHF The Fred Hollows Foundation
 PRISM - FHF The Fred Hollows Foundation MY WORKSPACE USER MANUAL Version 1.2 TABLE OF CONTENTS INTRODUCTION... 4 OVERVIEW... 4 THE FHF-PRISM LOGIN SCREEN... 6 LOGGING INTO THE FHF-PRISM... 6 RECOVERING
SALTO E&T website User manual
 SALTO E&T website User manual salto-et.net Second edition Last updated (01/02/2019) 1 / 34 Table of contents 1. Aims and objectives of the TCA Resource Centre... 4 2. Before use... 5 3. Structure of SALTO
User Guide Product Design Version 1.7
 User Guide Product Design Version 1.7 1 INTRODUCTION 3 Guide 3 USING THE SYSTEM 4 Accessing the System 5 Logging In Using an Access Email 5 Normal Login 6 Resetting a Password 6 Logging Off 6 Home Page
CLIQ Web Manager. User Manual. The global leader in door opening solutions V 6.1
 CLIQ Web Manager User Manual V 6.1 The global leader in door opening solutions Program version: 6.1 Document number: ST-003478 Date published: 2016-03-31 Language: en-gb Table of contents 1 Overview...9
Finding Your Way Around Aspen IMS
 Finding Your Way Around Aspen IMS 12181A 60 minutes - - - - - - - - - - - - - - - - - - - - - - - - - - - - - - - - - - - - - - - - - - - - - - - - - Description Knowing your way around Aspen IMS makes
Version 5. Recruiting Manager / Administrator
 Version 5 Recruiting Manager / Administrator 1 Contents 1.0 Introduction... 4 2.0 Recruitment at a Glance... 6 3.0 Viewing Applicant Numbers... 8 4.0 Activities After Closing Date... 10 5.0 Shortlisting...
Overview & General Navigation
 User Guide Contents Overview & General Navigation... 3 Application Terminology... 3 Groups... 3 Text Formatting Menu Bar... 3 Logging into the Application... 3 Dashboard... 4 My Profile... 5 Administrator
Fulfillment User Guide FULFILLMENT
 Fulfillment User Guide FULFILLMENT TABLE OF CONTENTS I. System Requirements II. Logging In III. Launchpad a. Home b. Profile c. Settings IV. Dashboard Tab a. Actionable Insights b. Open Orders V. Transactions
User Guide. Chapter 6. Teacher Pages
 User Guide Chapter 6 s Table of Contents Introduction... 5 Tips for s... 6 Pitfalls... 7 Key Information... 8 I. How to add a... 8 II. How to Edit... 10 SharpSchool s WYSIWYG Editor... 11 Publish a...
NZX Participant Compliance
 NZX Participant Compliance Participant Portal User Guide Version 1.0 November 2018 CONTENTS 1. Introduction... 3 1.1 Procedure Summary... 3 1.2 Browser Support... 3 2. Portal Navigation... 4 2.1 The Portal
User Manual: Instructor
 Learning Management System ( LMS ) User Manual: Instructor V NLFIG-03102017-1 Disclaimer and Warranty Information Limits of Liability / Disclaimer of Warranty The information contained within this manual
Lionbridge Connector for Sitecore. User Guide
 Lionbridge Connector for Sitecore User Guide Version 4.0.5 November 2, 2018 Copyright Copyright 2018 Lionbridge Technologies, Inc. All rights reserved. Lionbridge and the Lionbridge logotype are registered
Employee self-service guide
 Employee self-service guide August 2016 (V.2) Contents Important note... 4 Login... 5 How do I know I am on the correct site and my connection is secure?... 5 How do I login?... 6 Username and password...
EMS MASTER CALENDAR User Guide
 EMS MASTER CALENDAR User Guide V44.1 Last Updated: May 2018 EMS Software emssoftware.com/help 800.440.3994 2018 EMS Software, LLC. All Rights Reserved. Table of Contents CHAPTER 1: Introduction to the
The following pages will detail these changes and allow you to get familiar with the new interface quickly.
 Overview As part of our continued effort to enhance XCM, we are excited for you to experience the New Release! These changes reflect XCM s commitment to continue to expand the software capabilities, embrace
User Manual. perfectionlearning.com/technical-support
 User Manual perfectionlearning.com/technical-support 1 User Manual Accessing Math X... 3 Login... 3 Forgotten Password... 3 Navigation Menu... 4 Logout... 4 Admin... 5 Creating Classes and Students...
Rabo Supplier Finance User Manual - Suppliers -
 Rabo Supplier Finance User Manual - Suppliers - Page 2 of 33 Table of Contents 1 About This Document... 3 1.1 Objectives of This Document... 3 1.2 Inside This Document... 3 2 Rabo Supplier Finance platform...
Shopper Guide v.3: 3/23/16
 Shopper Guide v.3: 3/23/16 SMARTOCI: ADMINISTRATOR Table of Contents 1) Getting Started...4 What is smartoci?...4 Shopper Browser Versions...5 Logging in...6 Issues Logging In (smartoci Access Issues)...6
SOU Banner 9 Navigation Guide
 SOU Banner 9 Navigation Guide Draft 11.29.2018 Contents Introduction.... 2 Application Navigator.... 2 Basic Navigation.... 3 Page Header.... 4 Key Block... 4 Sections... 5 Bottom Section Navigation...
Guide for Candidates: Online Progress Reports
 Guide for Candidates: Online Progress Reports What is Quest Quest is our comprehensive research management system used to administer and support research activity at Victoria University. All Progress Reports
VERSION 7 JUNE Union Benefits. Employer User Guide Data Collection Tool
 VERSION 7 JUNE 2018 Union Benefits Employer User Guide Data Collection Tool About this guide This document is intended to provide an overview of the main sections of the Data Collection Tool ( DCT ) for
HOTDOCS DOCUMENT SERVICES
 HotDocs Document Services ~ February 2012 Page 1 HOTDOCS DOCUMENT SERVICES Getting Started in the Cloud AT A GLANCE Sign up for HotDocs Document Services Receive contract order confirmation email Install
Lionbridge Connector for Sitecore. User Guide
 Lionbridge Connector for Sitecore User Guide Version 4.0.2 March 28, 2018 Copyright Copyright 2018 Lionbridge Technologies, Inc. All rights reserved. Lionbridge and the Lionbridge logotype are registered
Working with Pages... 9 Edit a Page... 9 Add a Page... 9 Delete a Page Approve a Page... 10
 Land Information Access Association Community Center Software Community Center Editor Manual May 10, 2007 - DRAFT This document describes a series of procedures that you will typically use as an Editor
OU EDUCATE TRAINING MANUAL
 OU EDUCATE TRAINING MANUAL OmniUpdate Web Content Management System El Camino College Staff Development 310-660-3868 Course Topics: Section 1: OU Educate Overview and Login Section 2: The OmniUpdate Interface
Global Support Software. User Guide
 Global Support Software User Guide Table of Contents Contacting Global Support Software Corp... 3 Log into the Site... 5 Changing your password...5 Self Registration...6 About Issues...6 The Home Page...
NYLearns Curriculum Administration:
 NYLearns Curriculum Administration: Creating a Curriculum Map May 2014 2 This page left intentionally blank 3 Contents Signing in to NYLearns... 4 Curriculum Mapping... 6 Creating Curriculum Maps... 7
Web Site Documentation Eugene School District 4J
 Eugene School District 4J Using this Documentation Revision 1.3 1. Instruction step-by-step. The left column contains the simple how-to steps. Over here on the right is the color commentary offered to
VIEWER LICENSE GUIDE FOR SERVICEPOINT 5X
 ADVANCED REPORTING TOOL (ART 3X) VIEWER LICENSE GUIDE FOR SERVICEPOINT 5X 2012 Bowman Systems L.L.C. All Rights Reserved. This document and the information contained herein are the property of Bowman Systems
User Guide. Avery Dennison Web Ordering Solution for Steinmart
 User Guide Avery Dennison Web Ordering Solution for Steinmart March 2012 Copyright 2012 A very Dennison The information in this document is subject to change without notice and should not be construed
Test Delivery System. Test Administrator User Guide LOUISIANA ELPS and ELPT. Published July 6, Updated October 12, 2018
 LOUISIANA ELPS and ELPT Test Delivery System Test Administrator User Guide 2018-2019 Published July 6, 2018 Updated October 12, 2018 Prepared by the American Institutes for Research Descriptions of the
BANNER 9 QUICK NAVIGATION GUIDE
 Application Navigator Application Navigator provides a single interface to navigate the Banner 9 JAVA pages. It is a tool that allows you to go back and forth between the current Banner forms and the new
Guide to User Interface 4.3
 Datatel Colleague Guide to User Interface 4.3 Release 18 June 24, 2011 For corrections and clarifications to this manual, see AnswerNet page 1926.37. Guide to User Interface 4.3 All Rights Reserved The
Managing Your Website with Convert Community. My MU Health and My MU Health Nursing
 Managing Your Website with Convert Community My MU Health and My MU Health Nursing Managing Your Website with Convert Community LOGGING IN... 4 LOG IN TO CONVERT COMMUNITY... 4 LOG OFF CORRECTLY... 4 GETTING
Governet 1000 River Walk Drive, Suite 350 Idaho Falls, ID Tel: Fax: CurricUNET User Manual
 Governet 1000 River Walk Drive, Suite 350 Idaho Falls, ID 83402 Tel: 208.522.1225 Fax: 208.522.2896 CurricUNET User Manual 1 Table of Contents Log In... 4 Viewing Courses and Programs:... 5 Viewing Courses:...
THE LOGIN PAGE... 3 THE HOME PAGE... 4 REPORTS... 15
 CheckTrack Web Reporting User guide 1 Contents THE LOGIN PAGE... 3 THE HOME PAGE... 4 REPORTS... 5 REPORT SCREEN FUNCTIONALITY... 5 CHECK DETAILS & CHECK IMAGE... 8 NEW CHECKS... 10 ALL ACTIVE CHECKS...
October CYP-IMS Admin User Guide
 October 2018 CYP-IMS Admin User Guide CYP-IMS ADMIN USER GUIDE CYP-IMS Admin User Guide... 1 Table of Figures... 5 Introduction... 9 Getting Help 9 Prerequisites 10 Login and Logout... 11 Logging in to
CONTENTS 1) GENERAL. 1.1 About this guide About the CPD Scheme System Compatibility. 3 2) SYSTEM SET-UP
 GENERAL. 1.1 About this guide About the CPD Scheme System Compatibility. 3 2) SYSTEM SET-UP") CONTENTS 1) GENERAL 1.1 About this guide. 1 1.2 About the CPD Scheme 2 1.3 System Compatibility. 3 2) SYSTEM SET-UP 2.1 Setting up your CPD year. 5 2.2 Requesting a date change for your CPD year. 9 2.3
CONTENTS 1) GENERAL 1.1 About this guide. 1 1.2 About the CPD Scheme 2 1.3 System Compatibility. 3 2) SYSTEM SET-UP 2.1 Setting up your CPD year. 5 2.2 Requesting a date change for your CPD year. 9 2.3
Astra Schedule User Guide Scheduler
 Astra Schedule User Guide 7.5.12 Scheduler 1 P a g e ASTRA SCHEDULE USER GUIDE 7.5.12... 1 LOGGING INTO ASTRA SCHEDULE... 3 LOGIN CREDENTIALS... 3 WORKING WITH CALENDARS... 4 CHOOSING A CALENDAR AND FILTER...
Present and Pay. User Manual Payer Analyst
 Present and Pay User Manual Payer Analyst Table of Contents 1.0 Glossary of Terms... 1 2.0 How to Use this Manual... 3 3.0 Common User Features and Functions... 3 3.1 Present and Pay User Interface...
HarePoint HelpDesk for SharePoint. User Guide
 HarePoint HelpDesk for SharePoint For SharePoint Server 2016, SharePoint Server 2013, SharePoint Foundation 2013, SharePoint Server 2010, SharePoint Foundation 2010 User Guide Product version: 16.2.0.0
AiM Overview and Basic Navigation User Guide
 AiM Overview and Basic Navigation User Guide East Carolina University Department of Facilities Services Version 2.0 May 2017 1 AIM OVERVIEW AND BASIC NAVIGATION USER GUIDE Welcome to AiM! AiM, "Intelligence
TEACHER PAGES USER MANUAL CHAPTER 6 SHARPSCHOOL. For more information, please visit: Chapter 6 Teacher Pages
 SHARPSCHOOL USER MANUAL CHAPTER 6 TEACHER PAGES For more information, please visit: www.customernet.sharpschool.com 0 TABLE OF CONTENTS 1. 2. 3. 4. 5. 6. 7. 8. 9. 10. 11. INTRODUCTION... 1 I. TEACHER PAGE
Service Minder Plus Features/Helpful Hints
 Service Minder Plus Features/Helpful Hints This manual covers helpful hints and use of features. Note: These items will be addressed during the training sessions. This document is meant to be used as an
User Guide. BoardDocs Pro. For Administrative Readers. Your Paperless Governance Solution
 User Guide BoardDocs Pro For Administrative Readers Your Paperless Governance Solution BoardDocs Pro For Administrative Readers 800-407-0141 http://www.boarddocs.com This user guide is intended for the
EQUELLA. Moodle User Guide. Version 6.2
 EQUELLA Moodle User Guide Version 6.2 Document History Document No. Reviewed Finalised Published 1 12/12/2013 13/12/2013 13/12/2013 December 2013 edition. Information in this document may change without
July CYP-IMS Admin User Guide
 July 2018 CYP-IMS Admin User Guide CYP-IMS ADMIN USER GUIDE CYP-IMS Admin User Guide... 1 Table of Figures... 4 Introduction... 8 Getting Help 8 Prerequisites 9 Login and Logout... 10 Logging in to CYP-IMS
TransUnion Healthcare Solutions Portal User Guide
 TransUnion Healthcare Solutions Portal User Guide HSP.transunion.com February 16, 2018 Version 2.30 2017 TransUnion LLC All Rights Reserved No part of this publication may be reproduced or distributed
Terex Management System (TMS)
") Terex Management System (TMS) Instructor Manual Instructor Manual TMS is the technology foundation that enables and supports the business capabilities we need to serve our customers, leverage our supply
Terex Management System (TMS) Instructor Manual Instructor Manual TMS is the technology foundation that enables and supports the business capabilities we need to serve our customers, leverage our supply
CourseWorks Quick Start
 Introduction CourseWorks Quick Start CourseWorks (aka Sakai ) is the university's new course management system, which allows instructors to develop and maintain course Web sites. With CourseWorks, instructors
USER GUIDE CLIENT PORTAL RELEASE V5.42
 USER GUIDE CLIENT PORTAL RELEASE V. 0 Table of Contents Introduction... Document Purpose... Document Scope... Prerequisites... Client Portal Login Credentials... Browser Requirements... Login... Client
SSG MAXCAPTURE User Guide
 SSG MAXCAPTURE User Guide Revision 7/27/09 These materials may not be reproduced in whole or part in any form without permission from Sivic Solutions Group, LLC Table of Contents 1 Overview of Service
Table of Contents ADMIN PAGES QUICK REFERENCE GUIDE
 Admin Pages brings an all new look and feel to Banner. It delivers a fresh user experience, all new tools, and significantly improved capabilities. Admin Pages replaces underlying Banner 8 INB technology
ZENworks Reporting System Reference. January 2017
 ZENworks Reporting System Reference January 2017 Legal Notices For information about legal notices, trademarks, disclaimers, warranties, export and other use restrictions, U.S. Government rights, patent
Ektron Advanced. Learning Objectives. Getting Started
 Ektron Advanced 1 Learning Objectives This workshop introduces you beyond the basics of Ektron, the USF web content management system that is being used to modify department web pages. This workshop focuses