Crenova Trail Hunting Camera
|
|
|
- Domenic Long
- 5 years ago
- Views:
Transcription

1 Crenova Trail Hunting Camera Quick User s Manual Congratulations on your purchase of this high quality Crenova Trail Hunting Camera! It has been designed to provide you with the best capturing technology method to provide your perfect experience and satisfaction. For the best results, please read this user s manual carefully as your accurate guide through all the control menus and operation. Table of Contents Page 1: Welcome Introduction Page : Package Content Cautions Page 3: Product Illustration Page 4-6: Parts Definitions Page 6-7: Preparing the trail camera Page 5: Strap Setup Page 6-7: Stand Mount Setup Page 7-8: Connecting to PC Page 8: Connecting to AV/ TV Page 9: Full Product Specification Page 30: Simple Trouble Shooting Page 7-16: Switching the device in Test Mode Page 17-1: Testing the PIR Sensor Testing the capturing functions Page 1-3: Deleting File Page 3-4: Active Slide Show Start the actual Operation

 ) Check all")
 Don t expose this device on heavy")

 Don t wash the device, please clean it with soft and clean")
 Avoid dismantle the device by your self, if you suspect any malfunction and")
 Always make sure that the Optical lens is clean and no any dirt covering on it.")

2 Included in the Package: Please check all the accessories shown on the picture below, if it was included in the package: Trail Camera AV Cable USB Cable Strap Stand Mount Stand Support Bolts & stoppers User s Manual Caution 1) Don t connect this device on external power source over 6 Volts (Should connect it only with 6 Volts power source) ) Check all the camera parts before start the operation if it s well conditioned 3) Follow all the settings and suggested modes to obtain perfect results 4) Don t expose this device on heavy rains and direct sunlight 5) Install on safe and stable locations, if install on the trees make sure no leaves and branches covering and blacking the camera lens. 6) Always make sure your mounting position can easily detect the subject and can t be easily notice by the stranger 7) Don t wash the device, please clean it with soft and clean cloth 8) Use longer lasting AAA Alkaline battery to last and support more recording and pictures 9) Avoid dismantle the device by your self, if you suspect any malfunction and defects bring it to the authorize electronic repair shop or contact the seller directly. 10) Always make sure that the Optical lens is clean and no any dirt covering on it. 11) Installed it very carefully and secure with the strap, if possible additional strap needed in windy location. 1) To maintain much more longer lifespan for this trail hunting camera you can customize the mounting options to protect your device.
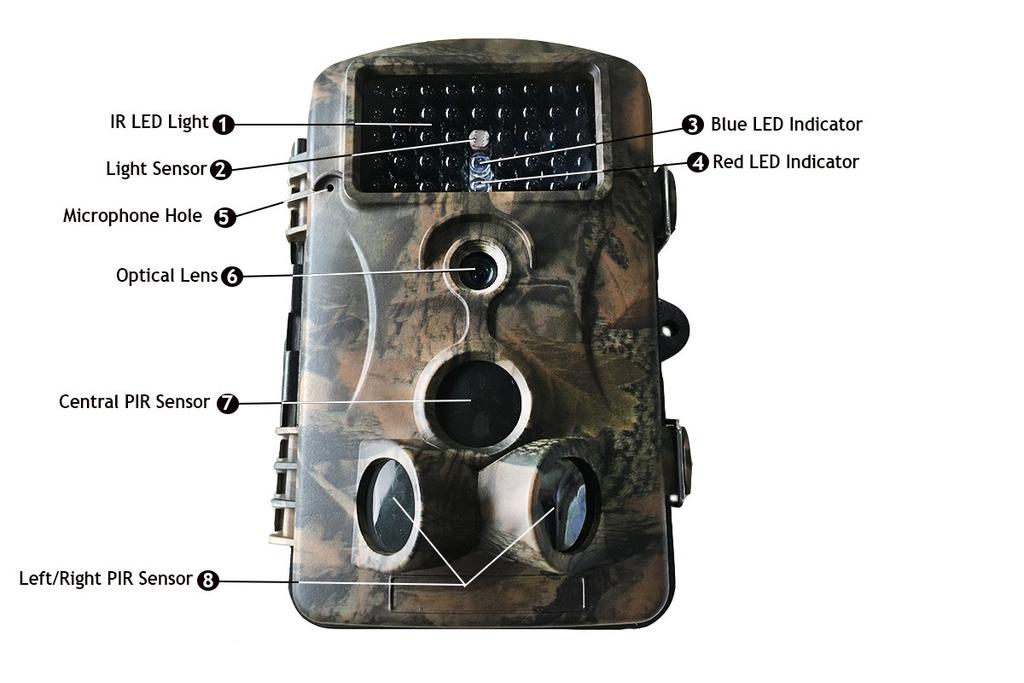
3 Product Illustration Front Parts


 Microphone Hole: This area")
4 Parts Definitions 1) IR LED Light: This will provide the infrared light during night time to give the brightness of images being capture. (in Black and white mode) ) Light Sensor: This will detect the daytime, darkness and light, during night time this part becomes switch of the IR LED light to activate and glow. 3) Blue LED Indicator: This LED light will flash once you are detected by the left and right PIR sensor zone 4) Red LED Indicator: This LED light will flash once you are detected by the Central PIR sensor zone 5) Microphone Hole: This area where the noise and sounds will be capture and recorded. 6) Optical Lens: This is the most important parts of the device, to capture and see the nearby subjects
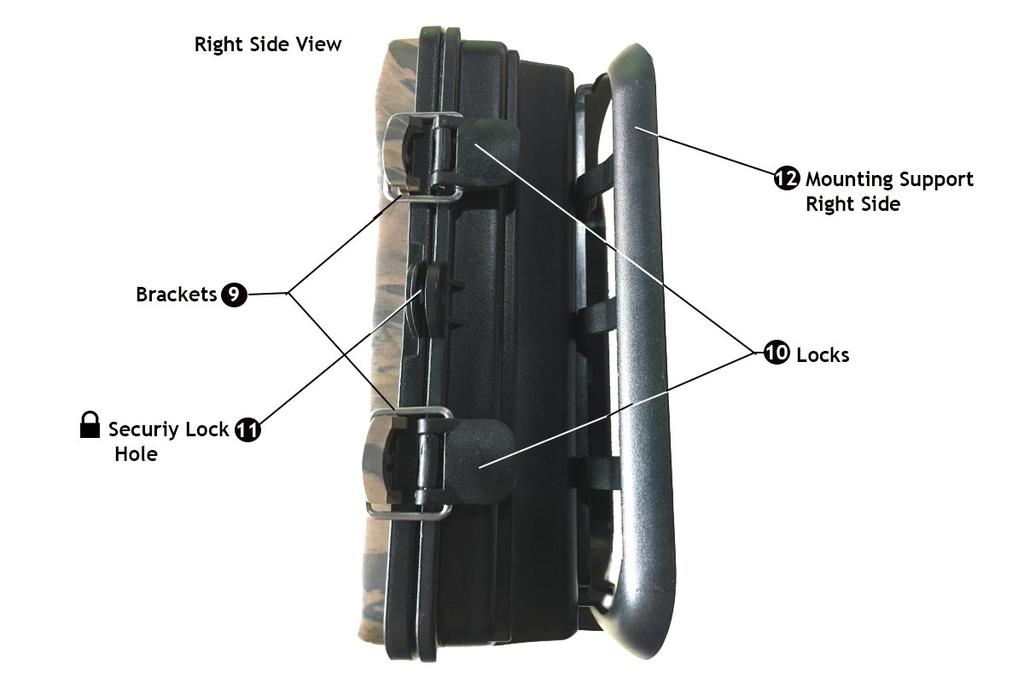
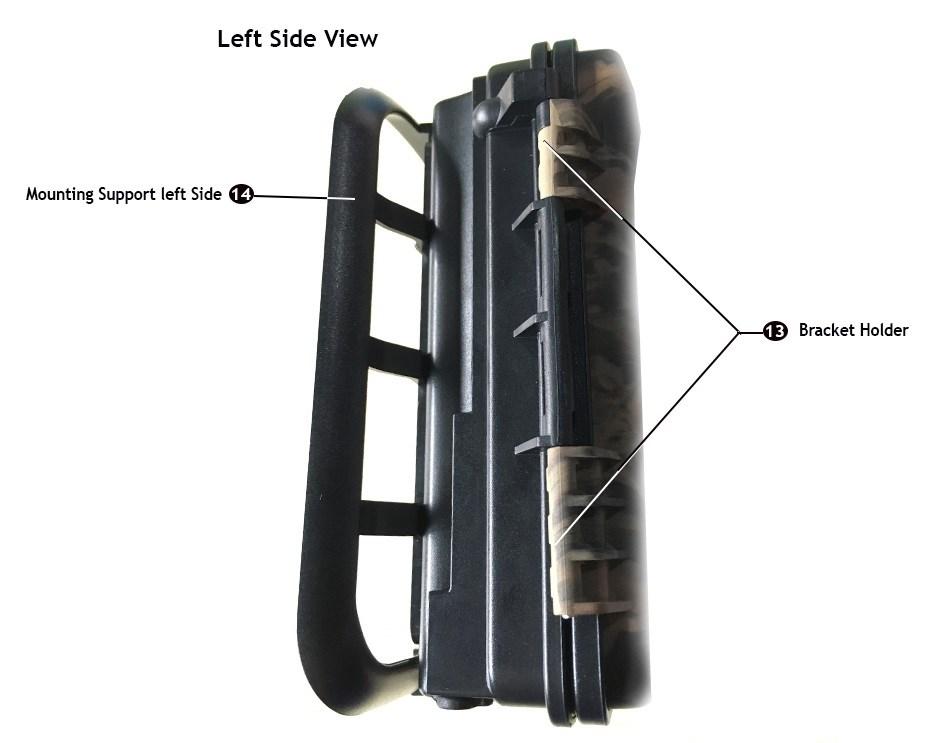
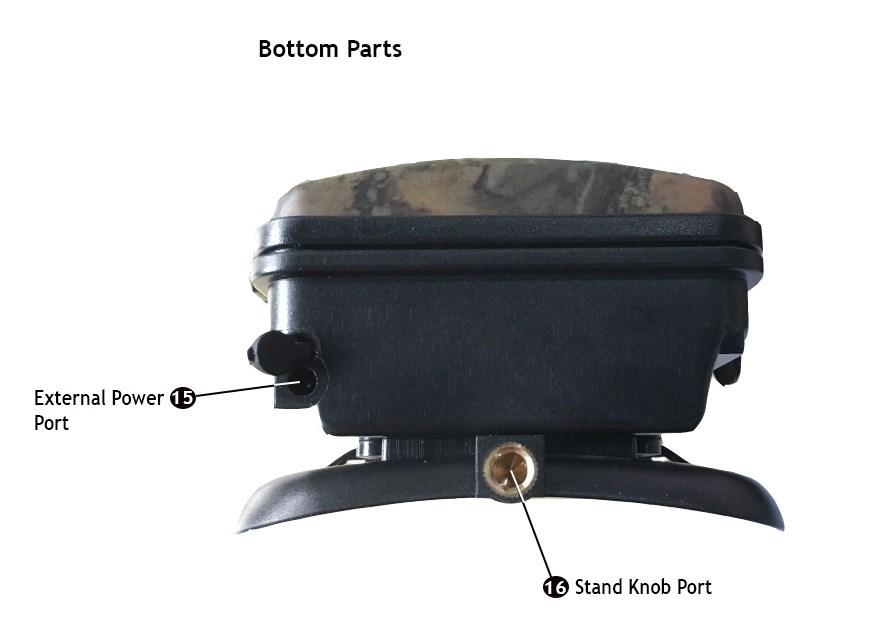
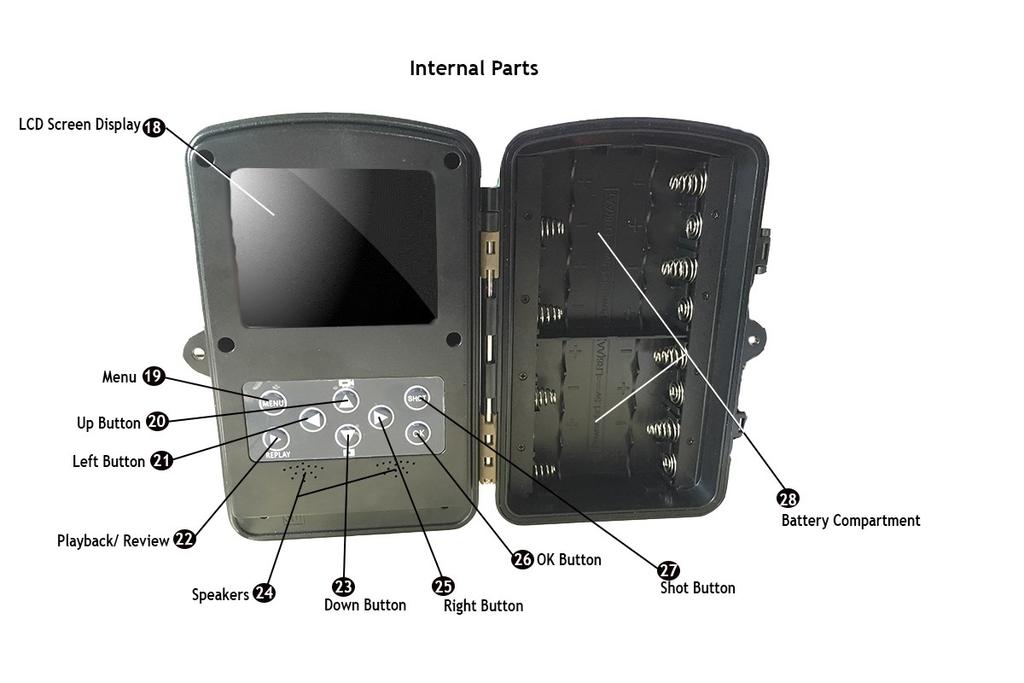
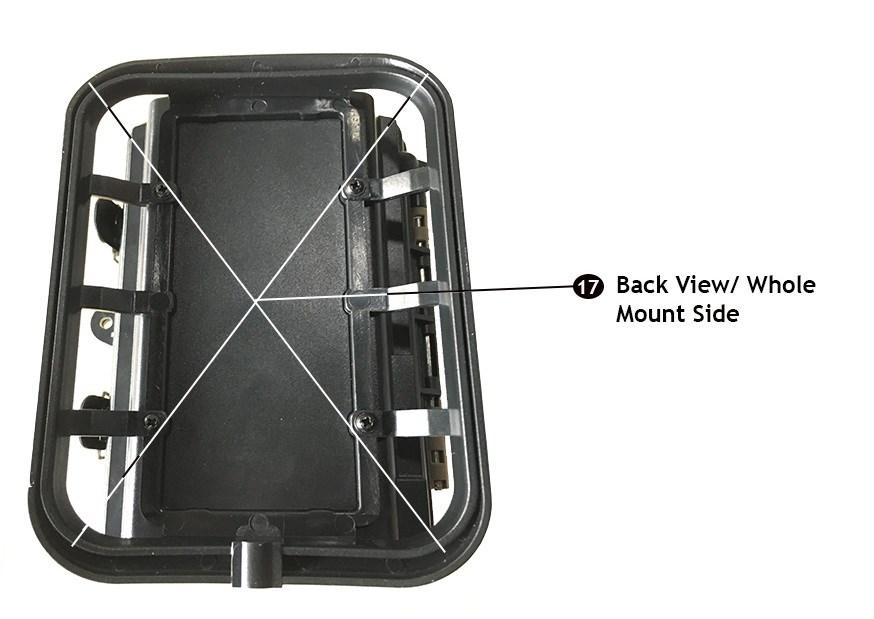
5 7) Central PIR Sensor: This parts of the device can detect the movement of a subject on the center, nearby 8) Left/Right PIR Sensor: This Parts of the device can detect any movement in advance from left and right then the central PIR will get ready to confirm the coming subjects to activate the camera and capture the scene. 9) Brackets: This will holds the hook to support the lock stable and steady 10) Locks: This parts will insure the tightness of the bracket to holds strongly closed the inner compartment. 11) Security Lock Hole: This parts use too hook up the lock, making the inner compartment safety and secured. 1) Mounting Support Right Side: This is the right side parts of the back mounting support bracket. 13) Bracket Holder: This parts holds both side of the device for closing and opening purposes. 14) Mounting Support Right Side: This is the Left side parts of the back mounting support bracket. 15) External Power Source: This parts use to attach external power support for the device. 16) Stand Knob port: This area use to hookup the movable stand mount for the device 17) Back View Whole mount sides: This is the whole back parts of mounting area at the back of the device. 18) LCD Screen Display: This parts will display and use as the monitor display of the settings, options, preview and playback data's save in SD card. 19) Menu: This button use to activate the minus options, modes and settings 0) Up Button: Key to select up direction 1) Left Button: Key to select left direction ) Playback/ Review: Use this button to preview and playback the recorded files 3) Down Button: Key to select down direction 4) Speaker: This parts provide audio and sound for the device 5) Right Button: Key to select right direction
 Battery Cover Lock: This parts is to support and make the cover securely closed 30) Battery Compartment Cover: The whole parts of battery compartment cover 31) SD Card Slot:")


6 6) Ok Button: Used to confirm any selection you choose 7) Shot Button: During testing operation press this button to captured test video and images 8) Battery Compartment: This area where you need to install the batteries 9) Battery Cover Lock: This parts is to support and make the cover securely closed 30) Battery Compartment Cover: The whole parts of battery compartment cover 31) SD Card Slot: This area where you need to install the SD card 3) Micro USB Port: This port used to attach the USB cable port to the computer USB slot 33) Power Switch/ Test Mode: This parts use for switching on as well as for testing setup. 34) Inside Pins Lock: This parts makes the battery cover stable and fit in position 35) Pins Stopper: This area where you place the Pins lock to holds the battery cover securely closed. Preparing The Trail Camera Step 1 - Check all the lens and sensors area of the device and remove the protective plastic film, this way you can make sure the full sensitivity of this parts to function very well. (Picture Shown) Note: Make sure that there is no any dirt on the lens Step - Open the inner parts of the device by pulling up the lock shown on the picture. Step 3 - Release the Brackets from the hook (Picture shown), then open The inner parts of the device.


 same way like you open the cover.")

7 Step 4 - Then open the battery compartment by unlocking the lock (picture shown), Just simply pull down the lock buckle and remove the cover. Step 5 - Install the batteries carefully and follow the (-)/(+) symbol, (picture shown) Place all the required batteries, you can add an additional batteries up to 8 pcs x 1.5 Volts to insure longer lasting operation. Tips: You can connect the device to external power source if your device is closer to the power outlet. Step 6 - Now return the battery cover by placing it correctly to secure and close it tightly. Make sure the Pins inside will shot in the pins stopper below, and push down the lock. (Picture Shown) same way like you open the cover. Switching the Device in Test Mode: Step 1 - Make sure you installed the battery correctly, then slide the switch to the center TEST for real-time preview and testing as well as setting up the modes and functions. Step - After you switch the device in test mode the screen will activate and display the welcome Image, then the screen will activated the real time monitoring and ask for the memory card Memory Card Missing (Picture Shown)

 1 Step 4 - Now we required to format the new SD card with the device on the very first time, this way the SD card will adopt")
 Scroll down to Format Memory Card and press OK Select Yes (Pic ) and")

 will display, 1. Under settings, select mode and press OK button.")
8 1 Step 3 - Insert the new SD Card Max. up to 3 GB push it in until you will hear the click, means it was installed fit inside the SD card slot. (Pic 1) Note: Please Make sure to unlocked the SD Card, by sliding the lock to unlock. (Pic ) 1 Step 4 - Now we required to format the new SD card with the device on the very first time, this way the SD card will adopt the standard coding of the device. Press the Menu button, the setting window will display (Pic 1) Scroll down to Format Memory Card and press OK Select Yes (Pic ) and Press OK The memory card will be formatted and it will be ready to use. Press the Menu Button to go Back and exit the setting window. (it will return to real time monitoring display. 1 Step 5 - Now Press the Menu Button Again, you are required to do the accurate settings in order to obtain the best device performance quality and results, (Pic 1) will display, 1. Under settings, select mode and press OK button. The window, (Pic ) will display, this time you can choose what capturing method you may wanted to use. You can choose the ff: Photo: If you wanted to capture the images only Video: If you wanted to record video for the images only Photo & Video: If you wanted to record videos and pictures at the same time alternately. Press ok Button to confirm and return to the settings window.

 to Photo resolution, then press OK (Pic 1) The Window (Pic")

 to Photo Series, then press OK (Pic 1) The Window (Pic )")

 to Video Resolution, then press OK (Pic 1) The")
9 1 Step 6 - Next Will be the Photo Resolution, now you can choose the Megapixel size for the picture, the more larger of MP is the more clearer of pictures will be, but it will consume much memory too. Press the Button (Arrow down) to Photo resolution, then press OK (Pic 1) The Window (Pic ) will display, now you can choose the best MP size you want, then Press ok button to confirm 1 Step 7 - Next Will be the Photo Series, this setting allowing you to select how many pictures will shot in one scene. Press the Button (Arrow down) to Photo Series, then press OK (Pic 1) The Window (Pic ) will display, now you can choose how many series you want, then Press ok button to confirm 1 Step 8 - Next Will be the Video Resolution, now you can choose the Pixel size for the Videos, the more larger of Pixel is the more clearer of Videos will be, but it will consume much memory too. Press the Button (Arrow down) to Video Resolution, then press OK (Pic 1) The Window (Pic ) will display, now you can choose the best P size you want, then Press ok button to confirm


 to Audio Recording, then press OK (Pic 1) The Window (Pic ) will")

10 1 Step 9 - Next Will be the Video Length, now you can choose how much time the device will capture each video, Max. up to 10 minutes. Press the Button (Arrow down) to Video Length, then press OK (Pic 1) The Window (Pic ) will display, now you can change the video length you needed, press keys arrow up and down, then Press ok button to confirm. 1 Step 10 - Next Will be the Audio Recording, now you can choose to turn on and off the microphone to control the audio recording. Press the Button (Arrow down) to Audio Recording, then press OK (Pic 1) The Window (Pic ) will display, now you can Switch it to ON/ Off, then Press ok button to confirm. 1 Step 11 - Next Will be the Shot Lag, you can adjust the amount of time to record a shot that has already been pre-focused. Press the Button (Arrow down) to Shot Lag, then press OK (Pic 1) The Window (Pic ) will display, Press the UP and Arrow DOWN to change the time Max. up to 60 minutes, then Press ok button to confirm.


 1 Note: You may adjust it based on how strong the wind is, as the wind may cause to move other objects")
 to Sensitivity Motion Sensor, then press OK (Pic 1) The Window (Pic ) will")

 to Target recording time, then press OK (Pic 1) The Window (Pic ) will")
11 1 Step 1 - Next Will be the Side Motion Sensor, now you can control the side sensors, by turning it Off and ON, (But we recommend to turning it ON.) Press the Button (Arrow down) to Side Motion Sensor, then press OK (Pic 1) The Window (Pic ) will display, Please choose the option you wanted, press keys arrow up and down, then Press ok button to confirm. Step 13 - Next Will be the Sensitivity Motion Sensor, now you can control the sensors Sensitivity Between Low, Middle, High, (But we recommend the Middle.) 1 Note: You may adjust it based on how strong the wind is, as the wind may cause to move other objects in front of the camera even without your subject, and will consume your memory storage faster. Press the Button (Arrow down) to Sensitivity Motion Sensor, then press OK (Pic 1) The Window (Pic ) will display, Please choose the option you wanted, press keys arrow up and down, then Press ok button to confirm. 1 3 Step 14 - Next Will be the Target recording time, If you want to have a specific time when will be the device start the recording you need to activate this options, if not just turn it off. (Ex if you wanted the device to record every 6PM to 10 PM Only. Press the Button (Arrow down) to Target recording time, then press OK (Pic 1) The Window (Pic ) will display, If you chose the ON the (Pic ) the window (Pic 3) will display Pres the Arrow UP/ Down To change the Hr & arrow Left/ Right to move on the next Min or Hr, Press OK to Confirm (Pic 3)

 will shown.")


12 1 3 Step 15 - Next Will be Time Lapse, now you can adjust this modes, by turning it Off and ON, and set the accurate time. It mean; A method of filming very slow actions by taking a series ofsingle pictures over a period of time and then putting them together to show theaction happening very quickly Press the Button (Arrow down) to Time Lapse, then press OK (Pic 1) The Window (Pic ) will display, Please choose the option you wanted, press keys arrow up and down, if you chose ON and press the OK button the Window (Pic 3) will shown. Set the Hr by pressing the Arrow up/ Down button, press the Left/ right to jump between Min & Sec then arrow up/ Down again to change the input time. Press OK to confirm. (Pic 3) Note: As you can see, there is a notification Motion sensor deactivated because it better if you used time lapse you need to always activate the Motion sensor. 1 Step 16 - Next Will be the Language, this option will change the system device language for the comfortable of your operations if you don t like to use the English language. Press the Button (Arrow down) to Language, then press OK (Pic 1) The Window (Pic ) will display, now you can Select your own language, then Press ok button to confirm.

 will shown. The default for mat is, dd/mm/yyyy.")


13 1 Step 16 - Next Will be the Time & Date, You need to set the correct time and date as this will appear on screen during the recording. Press the Button (Arrow down) to Time and Date, then press OK (Pic 1) The Window (Pic ) will display, now you can set the correct time & date, then Press ok button to confirm. The window (pic 3) will shown. The default for mat is, dd/mm/yyyy. 3 To change the input press the up/ Down button then left and right to jump with the month and year as well as with the time then press OK to confirm. Time Format on (Pic ) when you select this mode and press the OK button the selection window has a two options 1 Hrs and 4 Hrs you may choose what do you like to use. Date Format on (Pic ) when you select this mode and press the OK button the selection window has a three options dd/mm/yyyy & yyyy/mm/dd & mm/ dd/ yyyy you may choose what best for you. 1 Step 17 - Next Will be the Photo stamp, You can decide either you want to put time stamp on your pictures and videos. Press the Button (Arrow down) to Photo Stamp, then press OK (Pic 1) The window (Pic ) will appear, you can select which type of stamp you want to put. Press Up/Down button to select and press OK button to confirm.

 window will appear, you need to setup now")


14 1 Step 17 - Next Will be the Password protection, You can activate this mode if you want some additional security to avoid that someone will change your settings. Press the Button (Arrow down) to Password protection, then press OK (Pic 1) 3 The window (Pic ) will appear, you can choose to turn it ON or Off if you select ON the (Pic 3) window will appear, you need to setup now your password; numbers from 0 to 9. Press the Up/ Down button to change the input and Left/ Right Button to jump on the next input. Confirm by pressing the OK button Important: Always make sure to remember your password, incase you lost it you need to reset the device to factory settings for you to able the operation again. 1 Step 17 - Next Will be the Beep Sound, here you can turn it Off or On, But this beep let you be notify that every time you press the button the command was acknowledge successfully by the system. Press the Button (Arrow down) to Beep Sound, then press OK (Pic 1) The Window (Pic ) will shown. Select between ON or OFF by pressing the Up and down Button, press the OK button to confirm.
 to Format memory card, then press OK (Pic 1) The Window (Pic ) will shown. Select between Yes or No by pressing the Up and down Button, press the OK button to confirm.")

15 1 Step 17 - Next Will be the Format memory card, this option was mentioned earlier, as you need to do this action at the very first stage of operation. Press the Button (Arrow down) to Format memory card, then press OK (Pic 1) The Window (Pic ) will shown. Select between Yes or No by pressing the Up and down Button, press the OK button to confirm. Warning: If you do this in second time and there's a lot of files in the sd card, please copy it all in the computer as this action will clear all the files stored in memory card and you can t recover it again. Step 18 - Next Will be the Serial NO, in this settings will allow you to 1 input your serial number which makes you easily identify which location the file was created. Press the Button (Arrow down) to Serial NO, then press OK (Pic 1) 3 The window (Pic ) will shown and providing the two choices the ON/OFF, if you choose the On the window (Pic 3) will shown. As the serial settings appear you need to input your desired serial number, please record your serial number inputted and assign which location this was belong. To enter the input, press the Key Up/Down and to move with the next input character just press the left/ right key. Character you can input is A-Z and numbers 0-9. ( Example: if you place your hunting camera at Yellowstone park on November 3, assuming you can set a format like this: Y N 0 3 (means: Yellowstone/ November/ 0 / 3) To confirm just press OK button and Press Menu to return in the main settings mode. Note: This function can only be use for the pictures and can t be applied for videos.


16 1 Step 19 - Next Will be the Reset settings, This option allow you to perform Reset the system to default of factory settings, in case there is some error occurred or malfunctions. Press the Button (Arrow down) to Reset settings, then press OK (Pic 1) Window (Pic ) will shown and it will provide two choices YES/ NO. Remember that all of you're customs settings will be deleted and it will reset to the default settings. Press OK button to confirm. Then perform again your own desired settings, by following all the steps and instructions again. 1 Step 19 - Next Will be the Version, this option is not considered to be change as of now, as this option used to update the firmware of the device if the firmware is available, you can contact the seller directly to ask about the update of the firmware. The Seller will explain how to update and install the firmware in your device.


17 Testing The PIR Sensors 1 This PIR sensor is one of the most important parts of the device, as this parts detect movements, distance of the subjects nearby the device. To make sure that this PIR sensors works well, you need to test it by Following simple steps how to test this parts. (Pic 1) Step 1 - Place your device on the surface where you need to install the camera using the measurement of 1 to meters high from the ground. Step - Switch the camera to Test mode, make sure that the real time screen display is working. Step 3 - Walk in front of the camera, the detection range of the PIR sensor is 100 to 10 and the Optical lens can detect up to 40. Step 4 - As you walk and move Left to right you will notice that the BLUE and RED Led lights are quickly flashing, means it can detect your movements within the detecting zone of the sensors. When the Blue Led will flash means you were detected by the side PIR sensor and when the Red Led will flash means you were detected by the Central PIR sensor (Pic ) Step 5 - When you notice that the flash works as described, means the PIR Sensors works very good. Testing The Capturing Function of the Camera Testing the pictures: Real time screen Display Photo mode When you set the device in Test mode, real time display screen will activated. And to test the picture quality and capture, follow the ff steps. Step 1 - On Real time display the default mode for testing is the Video mode now to test the picture first you need to change the mode to photo mode. Step - Press the Arrow down button, now you will notice this real time Screen display (Photo on page 18)


18 Photo mode Screen Test Mode Display Step 3 - Now you're ready to test the photo capturing. Press the SHOT Button and the image will freeze quickly and return to real time display. Means you captured the image successfully. Step 4 - Press the Replay Button the image below will display.
19 Step 5 - If you want to Zoom In and out the previewed picture, just press the Shot Button to zoom-in and OK Button to Zoom-out. Press left, right, up, down button to move on any area of the image that is being zoomed. Press OK to zoom it out Press Replay to return on real time screen display. Testing the Video Capturing Function of the Camera Step 1 - On Real time display the default mode, Press the Up Arrow for Video recording testing. Note: To stop the recording you can press the Shot again to stop manually. The following picture below shows the real time screen display on video mode: Step Now Press the Shot Button to start the test recording function. Picture shown on the Page 19.

20 Video Real time screen mode display test. Step 3 - Now press the Shot button and it will start the video recording. While you are in recording test operation, the following image will shown on the screen. Video Test Recording display screen Step 4 - As mentioned earlier if you want to stop the recording just press the Shot button again then you will return to normal real time view. Step 5 Replaying the recorded video, Press the Replay Button Replaying all the pictures and videos are the same steps as mentioned earlier.


 During the File replay and on the picture or video you")
 and you want to delete it.")
21 Every time you preview or playback the video recorded when you press the Replay button, all data you can see saved in the memory card. Always remember this icon so you will know if it is a video file or photos; This Icon you will see at top of the screen left side during the replay if the file is photo. This Icon you will see at top of the screen left side during the replay if the file is Video. Deleting the file During the Replay you can also delete the unwanted file for videos and images. (Please note that you can only Replay and review all the data in Test Mode) During the File replay and on the picture or video you are viewing and if you want to delete it just follow the steps: Step 1 - Picture shown assuming you are previewing this image (pic 1) and you want to delete it. Please make sure to check the Write Protect first this way you will able to delete the file (Pic ) Step - While viewing the file press the MENU Button Press the Down arrow button to Write protect Press OK and the Protect window choices will display (Picture 3 shown on page )


22 Step 3 Write-protect has 4 options of choices Write-protect current files - If you need to protect the current files, Select it and Just press OK Write-protect all files If you want to protect all files, select it and press OK Unlock current file - If you want to Unlock the current file that you are viewing so that you can delete it, choose it and press OK Unlock all files - If you want to Unlock all files, this option is good because you can select directly the file you want to delete without unlocking each one of the files. Just choose it and press OK to confirm. Note if in case you Unlock all files after you delete some files please set it again to Write-protect all files Step 4 - In this Example We need to delete the file, Just choose the Unlocked Current File then press OK. Delete Current File Step 5 - Now you will return to Delete settings window, make sure it was selected the Delete current file press OK. The delete confirmation will display (Pic 4) Just press the arrow down to choose Delete press OK to confirm, then you will see that the image is being wipe out, the next image will display and the delete setting window will remain, Repeat the steps if you still need to delete the next file, if not just press the Menu Button and you will return to file replay mode, Press Replay Button to return on the Real time monitoring display. Note: If you connect the device to the computer, you cant delete the files even it has ben unlocked form the write protect, you can only delete it using the device.
 Step - The confirmation window will shown (pic ) Step 3 - On selection window ( pic )")


23 Delete All Files This option is if you need to delete all files to free storage in your sd card but make sure you transfer all files to your computer. Step 1 - On Preview Menu select the Delete all files then press OK (pic 1) Step - The confirmation window will shown (pic ) Step 3 - On selection window ( pic ) Just select the delete. Press OK to confirm. Activate slide show If you want to preview all the pictures, just choose this option and press OK button, the picture will start to change every 5 seconds. Press the ok button to stop the slides show. Press, replay to return to the Real time display. Start the Actual Operation Let say you ve done all the settings and testing, now you are ready to start your operation. Step 1 - Push to slide the Switch from Test mode to ON, means your device is activated and ready to captured the subjects. Pictures shown (Pic 1) Close the Trail hunting camera inner compartment and return the lock. Picture Shown How to Close. (Page 4)


24 Step - Push the front Cover closed as shown on the picture. Step 3 - Let the bracket back to hook as picture shown Step 4 - Push down the Lock to completely closed the inner compartment of the device. As picture shown The secured and completely closed lock, will be like with the picture shown.


25 Strap Setup Now you are ready to hook up the trail hunting camera to the trees or any stand that you need to use this strap. Step 1 - Please prepare the strap and Insert it in the center hole of both sides of the back mount. As shown on the picture. Step - The Strap has a belt style lock. Please Check the picture shown, it has A/ B/ and C Holes. Step 3 - From the back side of hole B insert the strap as picture shown. Step 4 - Fold it up and insert back again to the front side of the hole A as picture shown. Step 5 - Pull the strap to make it holds tighten and stable.


 Step - Release untighten the bolts as picture")
26 Stand Mount Setup This parts use to mount the trail camera on the wall, ceiling and any surface which you can t use the strap to hook up the device. How to connect this mount. Follow the steps below. Step 1 - Connect the B portion into the A socket hole and twist it clockwise as shown on the picture (if you need to use tool to make it tighten you can use) Step - Release untighten the bolts as picture shown.


27 Step 3 - Insert the Stand mount, shoot the center hole to the bolts plug, like on the picture. Step 4 - Now return the Bolts, to Lock the Stand mount, Make it tighten and adjust it carefully. Picture shown. Step 4 - You can adjust the Tightness of the clipper to support firmly the adjustment metal adjustable bearing inside. Just twist the Part C both sides, until you can obtain the right firm and stable of tightness you need. Like on the picture. Connecting To PC Step 1 - Attach the USB cord to USB port on the computer. The device will detect it as Portable USB mass storage device. Make sure that your trail camera is switched on to test mode. The screen when you hookup the device to the computer will be like this. Picture shown. Displaying MSDC


28 Step - On your computer Open the My computer and find the Removable Disk like shown on the picture. Then Click It. Step 3 - The Removable window Disk will open and show the DCIM folder, just click it to open. Picture shown. Step 4 - After you open the DCIM folder, the MEDIA folder form the SD card of the device will displaying. Click it to open the files. Connecting To AV/ TV Please Connect the Yellow plug in the yellow port, and the white in the Audio port, Picture shown. Then set your TV to AV mode. Make sure your Trail camera is on the test mode. Operate the camera, what you are viewing and playing will be display on tv s screen as well. (the Camera monitor will turned Off)
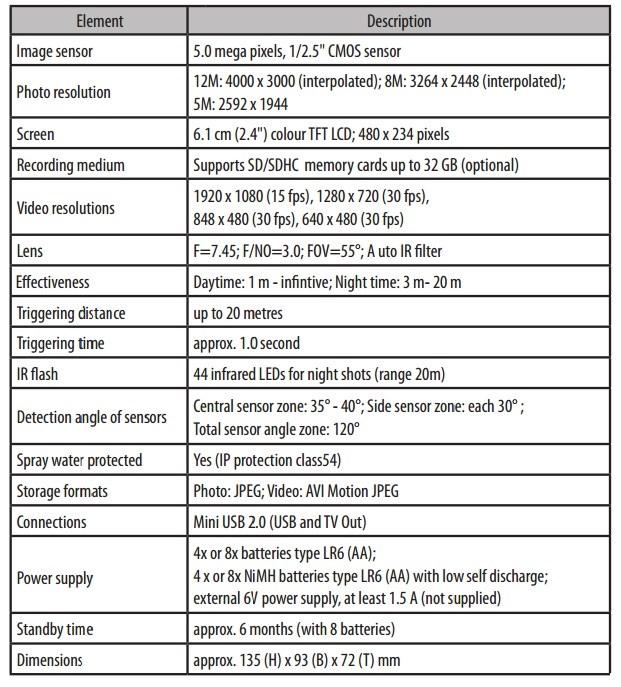
29 Full Product Specifications
.")
30 Simple Trouble Shooting The Camera Won t Turn on. Please check the battery if it was installed properly in a correct way, if you want to test the camera make sure the switch is on the test mode (Center). Also check the battery if it is in a power conditioned. The Buttons is not Working It said SD card is Error Please try to switch off again the camera and turn it on again. If the problem stays, try to Reset the Camera to default factory settings. Unload the SD card. Please format the SD card at the first time of use, and check if it was unlocked. Also make sure that the SD card Is new and have enough storage is available. The Image is not Clear Please make sure that you remove the screen film protector from the factory to obtain clear imaging. I did not get any good capturing results./to many useless images. I Can t close the Inner compartment. Can t recognize by the computer Clean the lens with soft and dry fabrics. Please check the sensitivity of your PIR sensors, as this function may responsible about capturing methods. Please make sure that the closing parts has no dirt and some small things blocking on it or it was not broken. Make sure that the Cable connector is working fine, no cuts and opening to avoid malfunctions. I tried all the suggestion but it doesn't help at all. Please contact the seller at: icrenova@gmail.com or call us at:
USER MANUAL MINI WILDLIFE CAMERA
 USER MANUAL MINI WILDLIFE CAMERA INTRODUCTION Thank you for purchasing our mini wildlife camera. This device is a special camera designed specifically for recording and observing wildlife. These easy to
DV5-2. SC-DV5_Main.jpg. SC-DV5_Main.jpg. SC-DV5_Main.jpg
 DV5-2 SC-DV5_Main.jpg SC-DV5_Main.jpg SC-DV5_Main.jpg Overview Camera: Overview -screen Display: The DV5-2 body camera is an advanced recording system with many options and features available. Please review
D11VR. USER MANUAL DVR Camera
 D11VR USER MANUAL DVR Camera WHAT S INCLUDED D11VR WINDSHIELD BRACKET DC POWER CORD USB CABLE OWNER S MANUAL Welcome Thank you for choosing a Whistler product. We are dedicated to providing products that
Infrared Digital Scouting Camera. User s Manual Covert Deuce
 Infrared Digital Scouting Camera User s Manual Covert Deuce Content 1 Instruction... 1 1.1 General Description... 1 1.2 Application... 1 1.3 Camera Interface... 1 1.4 Saving Images or Videos... 3 2 Cautions...
In-Car DVR KPT-700 User Manual
 Full HD In-Car DVR KPT-700 User Manual Product Picture & Function 2 a) Device Introduction... 2 b) Button Function... 3 c) LED Light Status List... 5 d) Product Accessories... 5 Basic Operation 5 a) Micro
Applicable models:hunting B
 Highly Recommended by Outdoor Explorers - Hunting Wildlife Scouting Cam Cams Instruction Book This Hunting cam is the best-selling scouting camera which is designed for activity and is resistant against
DVR101 HD DASH CAM & 12MP CAMERA
 DVR101 HD DASH CAM & 12MP CAMERA GENERAL - Display: 3 HD LCD - Chipset: Novatek 96223 - Image Sensor: SC1143, 1.0M CMOS - Outputs: USB - PC Interface: USB - Power Supply: 12/24V Cig. Lead Charger - Input
Car DVR User Manual. 1, Key features. Preface. Notes
 Car DVR User Manual Preface Thank you for purchasing this DVR, this device has a unique ultra-portable design; it can be used in various fields, to bring you convenient, safe, colorful daily life. Please
DVR 514 Digital Video Recorder
 DVR 514 Digital Video Recorder User Manual 2010 Sakar International, Inc. All rights reserved. Windows and the Windows logo are registered trademarks of Microsoft Corporation. All other trademarks are
Digital Trail Camera
 Digital Trail Camera Thank you for purchasing our product. You can now enjoy the true benefits of a second generation all digital trail This 12.0 MP camera was developed by our team of highly qualified
Infrared Digital Scouting Camera. User s Manual Scouting Camera SG560P-8M
 Infrared Digital Scouting Camera User s Manual Scouting Camera SG560P-8M Content 1 Instruction...1 1.1 General Description...1 1.2 Application...1 1.3 Camera Interface... 2 1.4 Saving Images or Videos...
Polaris G50 Dash cam incident recorder.
 Polaris G50 Dash cam incident recorder. Operation manual Quick Guide Thank you for purchasing the Polaris G50 DVR. The Polaris G50 DVR is a great product for capturing adventures and incidents both on
Superb Full HD Trail Camera Uovision UV785 12MP Instruction Manual
 Superb Full HD Trail Camera Uovision UV785 12MP Instruction Manual UV785 Model Content Page 1 General Description 1 2 Camera button info diagram 1 3 Installing the batteries 2 4 Inserting SD card 2 5 Customizing
User s Guide for PRIMOS Mug Shot Trail Camera
 User s Guide for PRIMOS Mug Shot Trail Camera Model# 65063 Thanks for purchasing this Primos Mug Shot Trail Camera. Please read this user s guide carefully before your first use. Product overview Fig.1
MIUFLY Body Camera User Guide
 MIUFLY Body Camera User Guide 1 1. Introduction Product Overview Box contents 2. Technical Specifications 3. Features TABLE OF CONTENTS 4. Main Manu Optional Detail 5. Operation 6. Troubleshooting 2 1.
Instructions for D-55IRXT GameSpy Digital Camera
 Instructions for D-55IRXT GameSpy Digital Camera THANK YOU for your purchase of the D-55IRXT GameSpy Digital Camera. Please read this booklet before using the unit. If you should have any questions about
Infrared Digital Scouting Camera User s Manual Scouting Camera SG560K-8M
 Infrared Digital Scouting Camera User s Manual Scouting Camera SG560K-8M For model: SG560K-8M Content 1 Instruction...1 1.1 General Description...1 1.2 Application...1 1.3 Camera Interface...1 1.4 Saving
Complete User Guide. X1 Action Camera
 1 Complete User Guide X1 Action Camera x1 DISCOVER: ADVENTURE Contents Share your footage with us on social media #KBdiscover To view the entire Kaiser Baas product range visit: www.kaiserbaas.com Join
DR-115 Portable DVR System
 DR-115 Portable DVR System User Manual The DR-115 is a compact high definition DVR system and is part of our RecordCam series of Mobile DVR systems. It is designed to be mounted to the windshield of the
1, Key features. Preface. Notes
 Car DVR User Manual Preface Thank you for purchasing this DVR, this device has a unique ultra-portable design; it can be used in various fields, to bring you convenient, safe, colorful daily life. Please
Digital Game & Trail Hunting Camera
 Digital Game & Trail Hunting Camera User Manual ATC-801 Version 1.1.3 Table of Contents 1. Instructions... 1 1.1 General Description... 1 1.2 Camera Body Interface... 1 1.3 Camera components and features...
Rapid deployment surveillance system
 Rapid deployment surveillance system Table of contents Camera Kit Contents... 2 System Requirements and Compatibility... 3 General Information... 3 Battery Life... 3 Quick Start Guide... 4 Camera Overview...
Full Color Digital Scouting Camera. User s Manual HCO ScoutGuard SG560C
 Full Color Digital Scouting Camera User s Manual HCO ScoutGuard SG560C Content 1 Instruction... 1 1.1 General Description... 1 1.2 Application... 1 1.3 Camera Interface... 2 1.4 Saving Images or Videos...
Full Color Digital Scouting Camera. User s Manual Scouting Camera SG860C-HD
 Full Color Digital Scouting Camera User s Manual Scouting Camera SG860C-HD Content 1 Instruction...1 1.1 General Description...1 1.2 Application... 2 1.3 Camera Interface... 2 1.4 Saving Images or Videos...
MIUFLY Body Camera User Guide
 MIUFLY Body Camera User Guide 1 1. Introduction Product Overview Box contents 2. Technical Specifications 3. Features TABLE OF CONTENTS 4. Main Manu Optional Detail 5. Operation 6. Troubleshooting 2 1.
Operation Manual Defender Car Vision 2020 HD Car DVR
 Operation Manual Defender Car Vision 2020 HD Car DVR 1 Thank you for buying Defender Car Vision 2020 HD car DVR. Before using the device read carefully this manual. mini-usb connector HDMI connector Function
Infrared Digital Scouting Camera User s Manual Scouting Camera SG560K-8mHD
 Infrared Digital Scouting Camera User s Manual Scouting Camera SG560K-8mHD Content 1 Instruction... 1 1.1 General Description... 1 1.2 Application... 1 1.3 Camera Interface... 2 1.4 Saving Images or Videos...
INSTRUCTION MANUAL. OutbackCam
 INSTRUCTION MANUAL EN OutbackCam 1 Overview Please take a moment to familiarize yourself with your new Swann OutbackCam. Front Light sensor for night detection Status light 19 Infrared LEDs Lens Passive
Instructions for I40XT GameSpy Digital Camera
 Instructions for I40XT GameSpy Digital Camera THANK YOU for your purchase of the Model. Please read this booklet before using the unit. If you should have any questions about this product or any other
Copyright 2014 DOD Tech All Rights Reserved
 Copyright 2014 DOD Tech All Rights Reserved CONTENTS IMPORTANT SAFETY INSTRUCTION 2 PACKAGE CONTENTS 3 CONTROLS AND FUNCTIONS 4 INSTALLATION AND CONNECTION 6 GETTING START 7 INTRODUCTION OF OTHER FUNCTIONS
User Manual. 5MP Outdoor Camera. with PIR
 User Manual 5MP Outdoor Camera with PIR TABLE OF CONTENTS Camera Kit Contents 3 Camera Overview 4 General Information 8 Definitions 9 Quick Start Guide 13 Battery and Memory Installation 14 Camera Setup
ProStalk PC2000. Nature Camera User Manual
 ProStalk PC2000 Nature Camera User Manual Index 1. Introduction... 3 2. Camera Specifications... 4 3. Parts Identification... 5 4. Packing Contents... 6 5. Battery and SD Card Installation... 6 6. Setup
Trail Camera TC2201NA User Manual
 Trail Camera TC2201NA User Manual Index 1. Introduction... 3 2. Digital Trail Scout Specifications... 4 3. Parts Identification... 5 4. Packing Contents... 6 5. Battery and SD Card Installation... 6 6.
User Manual HC-500A ENG-1
 User Manual HC-500A ENG-1 Contents 1. Instructions... 3 1.1 General Description... 3 1.2 Camera Body Interface... 3 1.3 Camera components and features... 3 1.4 Remote Control... 4 5.1 Shooting Information
D12VRS User Guide AUTOMOTIVE DIGITAL VIDEO RECORDER
 D12VRS User Guide AUTOMOTIVE DIGITAL VIDEO RECORDER WHAT'S INCLUDED D12VR MICRO SD CARD WINDSHIELD BRACKET Car Charger DC POWER CORD USB CABLE USER GUIDE Welcome Thank you for choosing a Whistler product.
USER S MANUAL Scouting Trail Camera
 USER S MANUAL Scouting Trail Camera Contents 1. Whole View and Details of Camera...- 1 - Figure 1: Front View of Camera...- 1 - Camera Screen Display (Test Mode Main Interface)...- 2-2. Camera Menu List
Insert the Micro SD Card to the slot. the setting; Menu Clock Settings. and press "OK" 00 : 00 : 00. to setup date: "YYYY/MM/DD", OK
 Hit Record Dash Cam & User s Manual Thank you for purchasing Hit&Record Dash Cam A60, please read the user s manual and make sure the package content is complete without missing before using the
SG520 Series. Infrared Digital Scouting Camera User Manual. Page 1
 1 Instruction Infrared Digital Scouting Camera User Manual SG520 Series Page 1 1 Instruction Content 1 Instruction... 3 1.1 Camera Body Interface... 3 1.2 General Description...4 1.3 Shooting Information
Infrared Scouting Camera UV595 HD Instruction Manual
 Infrared Scouting Camera UV595 HD Instruction Manual (For UV595 HD Model) Content 1 General Description... 1 2 Camera button info diagram... 2 3 Installing the batteries... 3 4 Customizing the camera settings...
CONTENTS I Getting to know your camera..1 II Software & Download 15 III Maintenance. 23 IV Specification and system requirement...
 CONTENTS I Getting to know your camera..1 1. Configuration & installation...1 2. Monitor screen display...2 3. Preparation before capture..2 4. Shooting 3 5. Video& Audio recording. 7 6. Audio input /output..8
DVR 710HDv2 Digital Video Recorder
 DVR 710HDv2 Digital Video Recorder User Manual 2009-2011 Sakar International, Inc. All rights reserved. Windows and the Windows logo are registered trademarks of Microsoft Corporation. All other trademarks
Instructions for M100 GameSpy Digital Camera
 Instructions for M100 GameSpy Digital Camera THANK YOU for your purchase of the. Please read this booklet before using the unit. If you should have any questions about this product or any other Moultrie
Car Video Recorder RoadRunner 560 / RoadRunner 560GPS User Manual Version 1.0
 Car Video Recorder Version 1.0 www.prestigio.com About this user manual This user manual is specially designed to detail the device s functions and features. -- Please read this manual before using the
Content Prooduct Specification... 4 Getting to Know your camera... 5 Device overview... 5 battery... 7 memory card... 7 Turning your camera on...
 User Manual Content Prooduct Specification... 4 Getting to Know your camera... 5 Device overview... 5 battery... 7 memory card... 7 Turning your camera on... 9 modes... 9 Capture Mode... 10 photo... 10
Table of Contents Welcome 1 Safety Notice 1 Table of Contents 2 Camera Parts 5 Getting Started 6 Loading the batteries 6 Inserting the SD/MMC card (op
 Welcome Dear user, thanks for purchasing this product. Much investment in time and effort has gone into its development, and it is our hope that it will give you many years of trouble-free service. Safety
Copyright C 2014 DOD Tech All Rights Reserved
 USER MANUAL Copyright C 2014 DOD Tech All Rights Reserved CONTENTS IMPORTANT SAFETY INSTRUCTION 2 PACKAGE CONTENTS CONTROLS AND FUNCTIONS 3 4 INSTALLATION AND CONNECTION 6 GETTING STARTED 7 INTRODUCTION
615HD Digital Video Camera
 615HD Digital Video Camera User Manual 2009-2011 Sakar International, Inc. All rights reserved. Windows and the Windows logo are registered trademarks of Microsoft Corporation. All other trademarks are
DVR 528 Digital Video Camera
 DVR 528 Digital Video Camera User Manual 2010 Sakar International, Inc. All rights reserved. Windows and the Windows logo are registered trademarks of Microsoft Corporation. All other trademarks are the
ACTION CAMERA INSTRUCTION MANUAL MODEL: DV6000AF. Li-ion
 ACTION CAMERA Li-ion INSTRUCTION MANUAL MODEL: DV6000AF INTRODUCTION Congratulations on the purchase of this product. This device is perfect for capturing all those important moments in stunning 4k using
Copyright 2013 DOD Tech All Rights Reserved
 LS430W USER MANUAL Copyright 2013 DOD Tech All Rights Reserved Content IMPORTANT SAFETY INSTRUCTION...2 PACKAGE CONTENTS...3 CONTROLS AND FUNCTIONS...4 INSTALLATION AND CONNECTION...6 GETTING START...7
Xenon Flash Digital Scouting Camera. User Manual SG565F-14mHD
 Xenon Flash Digital Scouting Camera User Manual SG565F-14mHD Content 1 Instruction... 1 1.1 Camera Body Interfaces... 1 1.2 General Description... 2 1.3 Application... 2 1.4 Shooting Information Display...
Table of contents Introduction Getting Started Taking still images or videos
 User Manual Table of contents Introduction Features............................................1 Package contents.....................................2 Camera overview.....................................2
igo CAM 600 Accident CAM Vehicle Recorder For more exciting new products please visit our website: Australia:
 igo CAM 600 Accident CAM For more exciting new products please visit our website: Australia: www.uniden.com.au Important Safety Instructions Uniden does not represent this product to be waterproof. Do
DV 5470 User Manual Package Contents:
 DV 5470 User Manual Package Contents: Manual Camera Pouch Installation CD Earbuds AV Cable CONTENTS 1. NOTICE...2 2. SETUP...3 2.1 BATTERY INSTALLATION...3 2.2 MEMORY CARD...4 2.3 CONFIGURATION & INSTALLATION...4
Contents. Important Safety Notice. Your dash cam Introduction What's in the box
 Contents Important Safety Notice Your dash cam Introduction What's in the box Get started Install the dash cam Insert Micro SD card Turn on the dash cam Mode switch Video recording Video settings 6 6 Photo
VIV-CV-1225V v2 Digital Camera Binoculars. Instruction Manual
 VIV-CV-1225V v2 Digital Camera Binoculars Instruction Manual 2009-2019 Sakar International, Inc. All rights reserved Windows and the Windows logo are registered trademarks of Microsoft Corporation. All
Thank you for purchasing the WheelWitness HD PRO Dash Cam!
 Owner s Manual Thank you for purchasing the WheelWitness HD PRO Dash Cam! We are always here to help so please do not hesitate to let us know any questions or concerns you may have! Your 100% satisfaction
RANGER. Digital Trail Camera Instructions for use: Model BN057
 RANGER Digital Trail Camera Instructions for use: Model BN057 In d e x 1. Introduction... 3 2. Specifications... 3 3. Parts identification... 5 4. Package contents... 6 5. Battery and SD card installation...
2.4GHz Digital Wireless 7 LCD Surveillance Kit
 2.4GHz Digital Wireless 7 LCD Surveillance Kit User Manual QC-3762 Box Contents: 1 x 7 LCD Monitor 1 x Wireless Camera 2 x Mains Power Adaptors 1 x Camera Antenna 1 x Mounting Hardware Product Diagram:
Motion Activated Camera
 Motion Activated Camera User Manual MAC 200 www.brinno.com Register@online http://www.brinno.com/support/register.html contact us: customerservice@brinno.com more information: www.brinno.com WEL COME TO
Instructions for PREMISE PRO Digital Surveillance Camera
 Important Battery lnformation - Only use Alkaline or Lithium batteries. We recommend the use of Energizer batteries. - Do not mix old and new batteries. Always replace ALL the batteries at the same time.
T10 Photo Frame Camera-Black User Manual
 T10 Photo Frame Camera-Black User Manual Model No.: T10 Table of Contents Part 1 Before First Use...1-2 Part 2 Quick Guide...3 Part 3 Detailed User Manual... 4-20 Part 3 Detailed User Manual Safety Precautions...4
DIGITAL GAME CAMERA. Model DC-6SS
 DIGITAL GAME CAMERA Model DC-6SS CONTENTS: WELCOME... 2 GETTING STARTED... 3 MOTION DETECTOR... 4-8 CAMERA MENUS... 9-10 CONNECTING TO A COMPUTER... 11 TROUBLESHOOTING... 12 WARRANTY... 13 Leaf River Outdoor
WITH REVERSING MIRROR. Instruction Manual
 WITH REVERSING MIRROR Instruction Manual Thank you for purchasing Powertrain Portable DVR. In order to help you operate the unit correctly, please read this instruction carefully before using. Part No:
FCC Compliance Statement This device complies with Part 15 of the FCC Rules. Operation is subjected to the following two conditions: (1) this device
 this device") 1 FCC Compliance Statement This device complies with Part 15 of the FCC Rules. Operation is subjected to the following two conditions: (1) this device may not cause harmful interference, and (2) this device
1 FCC Compliance Statement This device complies with Part 15 of the FCC Rules. Operation is subjected to the following two conditions: (1) this device may not cause harmful interference, and (2) this device
Motion Activated Camera
 Motion Activated Camera User Manual MAC200 DN www.brinno.com 1 Register@online http://www.brinno.com/support/register.html contact us: customerservice@brinno.com more information: www.brinno.com WEL COME
INSTRUCTION MANUAL Kingfisher Micro DVR w/ Button Cam SB-MSDVR660
 INSTRUCTION MANUAL Kingfisher Micro DVR w/ Button Cam SB-MSDVR660 Revised: March 15, 2013 Thank you for purchasing from SafetyBasement.com! We appreciate your business. We made this simple manual to help
HD 720P DASH CAM MANUAL
 DVR720 E HD 720P DASH CAM MANUAL 720P 90 2.4 VIEW ANGLE LCD SCREEN LOOP RECORDING SOS FILE PROTECTION ! Introduction Thank you for purchasing the EOSS DVR720E Dash Cam. Please ensure that you have read
Sniper Night Vision Binocular XANB30. Owner s Manual
 Sniper Night Vision Binocular XANB30 Owner s Manual 0 Table of Contents 1. Package Contents 2. About the Binocular 3. Quick Start Install batteries Insert an SD card (for photo and video taking) Turn on
Wifi Action Camera T86. User Manual
 Wifi Action Camera T86 User Manual Table of contents Contents Table of Contents...1 Safety Precautions...2 What s in the Box...3 Product Diagram...4 Remote Diagram...5 Setup Your T86...6 Video Mode...7
Operation Manual Defender Car vision 5018FullHD Car DVR
 Operation Manual Defender Car vision 5018FullHD Car DVR 1 Thank you for buying Defender Car Vision 5018FullHD car DVR. Before using the device, read attentively this manual and keep it for the whole period
Features: (no need for QR Code)
") The Capp-Sure series brings a revolution in surveillance. Utilising a range of high-quality IP Wireless cameras, Capp-Sure provides stunning video clarity and optional Talk-Back audio over internet via
The Capp-Sure series brings a revolution in surveillance. Utilising a range of high-quality IP Wireless cameras, Capp-Sure provides stunning video clarity and optional Talk-Back audio over internet via
Trail Camera User s Manual
 Trail Camera User s Manual (for S100/S108/S120/S128/S158) V1.1 PLEASE READ CAREFULLY BEFORE USING CAMERA Package Contents Mounting Strap 1 Trail Camera 1 Antenna(wireless camera only) 1 USB Cable 1 User
Please read this manual carefully before using this product. Please keep this manual for future reference.
 Please read this manual carefully before using this product. Please keep this manual for future reference. DASHcam manual.indd 1 Precautions 1. Do not expose the camera to moisture, dusty, dirty or sandy
IN-CAR HD Digital Video Recorder
 IN-CAR HD Digital Video Recorder USER MANUAL KPT-200 In order to ensure better use of each function of your Kapture In-Car HD DVR, it is recommended that you read these product instructions carefully before
DVR 426HDv3. Digital Camcorder
 DVR 426HDv3 Digital Camcorder User Manual 2009-2012 Sakar International, Inc. All rights reserved. Windows and the Windows logo are registered trademarks of Microsoft Corporation. All other trademarks
Introduction Congratulations on your purchase of this digital video camera. Before using the camera, please read this user manual carefully.
 EVC1700 User Guide 2 Introduction Congratulations on your purchase of this digital video camera. Before using the camera, please read this user manual carefully. The main purpose is to shoot videos. It
SmartView Versa+ User Manual. Table of contents
 Table of contents Overview... 1 What s in the box?... 2 Getting to know your SmartView Versa+.. 3 Getting started... 5 Inserting the battery... 5 Charging the battery... 6 Install SD card... 7 Install
TE-DVR-MM User Manual
 TE-DVR-MM User Manual 1. Components Front Back Remote Control Wiring Connections: Yellow - Battery + Red - Accessory + Black - Ground 2. ibeam Brackets (Sold Separetly) 3. Operation AV1 = Video 1 input
HD Car DVR Camcorder. Instruction Manual AD 282
 HD Car DVR Camcorder Instruction Manual AD 282 CONTENTS INTRODUCTION 2 PACKAGE CONTENTS 2 FEATURES 2 SAFETY PRECAUTIONS 3 APPEARANCE 4 FUNCTION BUTTONS 4 MOUNTING THE UNIT 4 INSERTING THE MEMORY CARD 5
DVR 505 Digital Camcorder
 DVR 505 Digital Camcorder User Manual 2016 Sakar International, Inc. All rights reserved. Windows and the Windows logo are registered trademarks of Microsoft Corporation. All other trademarks are the property
Product Manual. Intova Duo
 Product Manual Intova Duo 1 Introduction Thank you for purchasing an Intova Duo. Your Duo is a tough and robust Sports Camera with a wide range of features. Please read this manual carefully for usage
Infrared Digital Scouting Camera. User s Manual Scouting Camera SG560K-12mHD
 Infrared Digital Scouting Camera User s Manual Scouting Camera Content 1 Instruction...1 1.1 Camera Body Interfaces...1 1.2 General Description... 2 1.3 Application... 2 1.4 Shooting Information Display...
QPC80H2 Portable Visualizer. Quick Guide. This document is subject to change without notice.
 QPC80H2 Portable Visualizer Quick Guide This document is subject to change without notice. Contents Warnings... 1 Parts Identification... 2 Control Panel... 3 Remote Control... 4 Portable Visualizer...
Wildlife Digital Infrared Trail Camera User s Manual HT A
 Wildlife Digital Infrared Trail Camera User s Manual HT-200 002A Table of Contents 1 Instructions...1 1.1 General Description...1 1.2 Camera Body Interfaces...1 1.3 Camera Components and Features...1 1.4
OUTDOOR SECURITY CAMERA WITH LED FLOODLIGHT
 OUTDOOR SECURITY CAMERA WITH LED FLOODLIGHT Wifi Security Camera With LED Floodlight Features 20W with 1600 Lumens Indoor and Outdoor Wifi IP Camera with LED flood light Passive IR and Motion sensor Support
Introduction. Precautions
 User Manual Introduction Thank you for choosing this camera. The product adopts high-performance chip which can achieve HD video, motion graphics with strong continuity, support AVI video format, and take
Function Description 3. Notice for Use...3. System Requirements.5. Start to use..6. ArcSoft PhotoImpression, VideoImpression and MediaImpression.
 0 1 Contents Function Description 3 Notice for Use...3 System Requirements.5 Start to use..6 ArcSoft PhotoImpression, VideoImpression and MediaImpression.13 Product Specifications..28 Supplied Accessories
Wildlife Digital Infrared Trail Camera User s Manual HC-300
 Wildlife Digital Infrared Trail Camera User s Manual HC-300 Table of Contents 1 Instructions...1 1.1 General Description...1 1.2 Camera Body Interfaces...1 1.3 Camera Components and Features...1 1.4 Remote
RANGER. 8MP Digital Trail Camera Instructions for use Model BN061 / BN062
 RANGER 8MP Digital Trail Camera Instructions for use Model BN061 / BN062 1 Introduction... 3 2 Specifications... 3 3 Parts identification... 5 4 Package contents... 6 5 Battery and SD card installation...
Preface. Product Overview
 Instruction Manual Preface Thank you for purchasing the HD Sports Digital Video Camera. This product is stylish, small and exquisite in appearance. It s the digital product that you must have for outdoor
User Manual HC-800M 1
 User Manual HC-800M 1 1. Introduction...3 1.1 Application...3 1.2 Power Supply...3 1.3 Caution...3 1.4 Key Features...4 2. Whole View and Details of Camera...5 2.1 Front View of Camera...5 2.2 Back View
Wild Camera DENVER WCT-8010 Instruction Manual
 Wild Camera DENVER WCT-8010 Instruction Manual WWW.DENVER-ELECTRONICS.COM ENG-1 Table of Contents 1. Instructions...3 1.1 General Description...3 1.2 Camera Body Interface...3 1.3 Camera components and
ViviCam T026 Digital Camera
 ViviCam T026 Digital Camera User Manual 2010 Sakar International, Inc. All rights reserved. Windows and the Windows logo are registered trademarks of Microsoft Corporation. All other trademarks are the
Safety Instructions. Product information
 Safety Instructions Do not disassemble, or drop the camera from high altitude. Do not expose the camera to high temperatures and avoid contact with water and other liquid substances. After long time using,
FULL HD 1080P DASH CAM
 Value you can trust FULL HD 1080P DASH CAM Owners/Instruction Manual PLU 557209 Product overview Thank you for purchasing the SCADVR18 FULL HD 1080P Dash Cam. This Dash Cam is specifically designed for
WITNESS X-01 USER GUIDE ENGLISH
 WITNESS X-01 USER GUIDE ENGLISH TABLE OF CONTENTS Introduction... 3 Box Contents... 3 Support... 3 Features... 4 Operation... 8 Charging... 8 Display... 10 Video... 12 CarDV Mode... 14 Pre-Record... 15
CAMERA-DC2 Digital Camera Instruction Manual
 CAMERA-DC2 Digital Camera Instruction Manual 80 Little Falls Road, Fairfield, NJ 07004 800.631.0868 www.hamiltonbuhl.com Read manual carefully before using the product and keep for future reference. 80
DVR510-KESA Digital Video Camcorder User s Manual
 DVR510-KESA Digital Video Camcorder User s Manual 2009 Sakar International, Inc. All rights reserved. Windows and the Windows logo are registered trademarks of Microsoft Corporation. All other trademarks
INSTRUCTION MANUAL DVR1 FLIP DOWN HD DVR SPECIFICATIONS
 DVR1 FLIP DOWN HD DVR SPECIFICATIONS GENERAL - Display: 2 LCD TFT - Rotates 180 - Image Sensor: 5MP, 1/3 Colour CMOS - Resolutions: HD 720p with 1080p Upscaling - Viewing Angle: 120 - Camera Adjustment: