User instructions Stereo zoom microscope
|
|
|
- Francis Brown
- 5 years ago
- Views:
Transcription


1 KERN & Sohn GmbH Ziegelei 1 D Balingen info@kern-sohn.com User instructions Stereo zoom microscope Tel: +49-[0] Fax: +49-[0] Internet: KERN OZL-44 OZL 441, OZL 445 Version /2015 OZL-44-BA-e-1510
2
3 GB KERN OZL-44 Version /2015 User instructions Stereo zoom microscope Table of contents 1 Before use General notes Notes on the electrical system Storage Maintenance and cleaning Nomenclature Basic data Assembly Operation and functionality Getting started Adjusting the interpupillary distance Adjusting the magnification Dioptre adjustment and focussing Adjusting the stand Using eye cups / High Eye Point eyepieces Lighting control Using external illumination units Fitting and adjusting a camera Changing the bulb Optical data Features Trouble shooting Service Disposal Further information OZL-44-BA-e
4 1 Before use 1.1 General notes You must open the packaging carefully, to make sure that none of the accessories in the packaging fall on the floor and get broken. In general, microscopes should always be handled carefully because they are sensitive precision instruments. When using or transporting the microscope it is particularly important to avoid abrupt movements, as this may damage the optical components. You should also avoid getting dirt or finger prints on the lens surface, because in most cases this will reduce image clarity. To maintain the performance of the microscope, it must never be disassembled. So components such as lenses and other optical elements should be left as they were before use. Also the electrical parts in the base of the device must not be tampered with, as in this area there is an additional risk of triggering an electric shock. 1.2 Notes on the electrical system Before connecting to a mains power supply, you must make sure that you are using the correct input voltage. The information to select the correct power supply is located on the device, on the rear of the stand base. You must comply with this information. If you do not comply with these specifications, then fires or other damage to the device could occur. The lighting unit must also be switched off before the mains cable is connected. In this way you will avoid triggering an electric shock. If you are using an extension cable, then the mains cable you use must be earthed. When carrying out any procedures whereby you come into contact with the electrical system of the device, such as, for example, changing the bulb or fuse, only carry out these procedures when the power is disconnected. 3 OZL-44-BA-e-1510
5 1.3 Storage You should ensure that the device is not exposed to direct sunlight, temperatures which are too high or too low, vibrations, dust or a high level of humidity. The ideal temperature range is between 0 and 40 C and a relative humidity of 85% should not be exceeded. The device should always be located on a rigid, smooth, horizontal surface. For devices with pillar stands, the microscope holder must not be rotated back too far. If you do this, there is a risk that the microscope could tip over. When the microscope is not being used, you should fit the objective cap and cover the microscope with the enclosed dust protective cover. If the eyepieces are being stored separately, the protective caps must be fitted to the tube connectors. In most cases, if dust and dirt gets inside the optical unit of a microscope this can cause irreversible errors or damage. The best way to store accessories which consist of optical elements, such as, for example, eyepieces and objectives, is in a dry box with desiccant. OZL-44-BA-e
6 1.4 Maintenance and cleaning In any event, the device must be kept clean and dusted regularly. If any moisture should be occur, before you wipe down the device you must ensure that the mains power is switched off. When glass components become dirty, the best way to clean them is to wipe them gently with a lint-free cloth. To wipe oil stains or finger prints off the lens surface, moisten the lint free cloth with a mixture of ether and alcohol (70 / 30 ratio) and use this to clean the lens. You must be careful when handling ether and alcohol, as these are highly flammable substances. You must therefore keep it away from naked flames and electrical devices which can be switched on and off, and only use it in well-ventilated rooms. However organic solutions of this type should not be used to clean other components of the device. This could lead to damage to the paint finish. To do this, it is sufficient to use a neutral cleaning product. You could also use the following cleaning products to clean the optical components: Special cleaner for optical lenses Special optical cleaning cloths Bellows Brush When handled correctly and checked regularly, the microscope should give many years of efficient service. Should repairs still be necessary, please contact your KERN dealer or our Technical Department. 5 OZL-44-BA-e-1510

7 2 Nomenclature OZL-44-BA-e
8 3 Basic data OZL 441 / OZL 445 Optical system Greenough Dimmable lighting Yes Tube angled at 45 Interpupillary distance mm Dioptre adjustment On both sides Gross weight 5,5 kg Net weight 4 kg OZL 441 Magnification ratio 4:1 Packing dimensions WxDxH 370x300x475 mm Product dimensions WxDxH 330x235x380 mm OZL 445 Magnification ratio 4,8:1 Packing dimensions WxDxH 345x325x475 mm Product dimensions WxDxH 300x235x360 mm Standard configuration Model Tube Eyepiece Field of view Objective Stand Illumination KERN mm Zoom OZL 441 Trinocular WF 10x Ø 22 mm Ø 23 5,5 1x 4x Pillar OZL 445 Binocular HSWF 10x Ø 21.5 mm Ø x 3.6x Pillar 1W LED (reflected light) 0.35W LED (transmitted light) 1W LED (reflected light) 0.35W LED (transmitted light) 7 OZL-44-BA-e-1510
9 4 Assembly The first step is to position the microscope stand on a firm, level surface. The holder is already on pillar of the stand, but you must always check whether it is fixed securely and that it is in the correct position (preferably centrally and facing to the front). Please see section 5.5 for more details on adjusting the stand. The next step is to place the microscope head on the holder, by passing the objective through the holder ring until the rest of the head is above the ring. You must use the small silver adjusting screw on the front of the holder ring to fix the head in place. The alignment of the microscope head is left to the user to do and can be adjusted to suit the individual application situations. To make it easier to operate the focus wheels or lighting control for example, we recommend that you position the head with the tube connectors centrally to the front. Ideally, the holder and head are then parallel on the central axis of the stand base (see figure on page 9). Both eyepieces are already fitted in the tube. You just need to remove the protective film which covers them. When doing this, please be particularly careful that you do not touch the optical lenses with your fingers and that no dust enters the apertures. In general you should avoid using two eyepieces with different magnifications. When changing the eyepieces, you must also loosen the small silver screw under the eyepiece on the tube connectors and once the new eyepiece is fitted, then it must be re-tightened. With regard to the use of transmitted light illumination you must make sure that the frosted glass stand insert is fitted in the centre of the stand base, so that the transmitted light can be used correctly. It is always best to fix the different stand inserts using the adjusting screw on the front side of the stand base. Additional optional attachments: The eye cups supplied with the microscopes can be fitted to the eyepieces. (see section 5.6) You can fit a C-mount adapter to the appropriate connection point on the top of the microscope head for trinocular devices (OZL 441). This enables you to fit and use digital cameras (see section 5.9). OZL-44-BA-e

10 Assembled stereo zoom microscope 9 OZL-44-BA-e-1510
11 5 Operation and functionality 5.1 Getting started After assembly, if the microscope is ready for use, then you must first establish a power connection using the cable which is connected to the device. Please see section 5.7 for more details on adjusting the lighting. If the device has a camera connection (OZL 441), then for binocular use, you must let the trinocular toggle rod on the left side of the microscope head stay slid-in. For trinocular use (camera connection) see section 5.9. Do not forget to remove the cap from the bottom of the objective, so that you will then be able to see a reflection of the object being observed in the eyepiece. All important functions which relate to the use of the devices in this document are described in the following sections. 5.2 Adjusting the interpupillary distance Different users have different interpupillary distances. So each time a different person uses the microscope, the gap between the two eyepieces must be re-adjusted. While you are looking through the eyepieces, use one hand to hold the righthand or lefthand prism housing firmly. By rotating outwards or inwards, you can either increase or reduce the interpupillary distance. As soon as the lefthand and righthand visual fields exactly overlap each other, this is the correct interpupillary distance. 5.3 Adjusting the magnification As the KERN OZL-44 series are stereo zoom microscopes, then you adjust the magnification using the two zoom adjustment wheels on the lefthand and righthand side of the microscope head. Chapter 6 Optical data gives information on the possible overall magnification which the microscope can produce. It will also include the optional use of different eyepieces and auxiliary objectives. OZL-44-BA-e
12 5.4 Dioptre adjustment and focussing A special feature of stereo microscopes is that they are fitted with an optical unit which has a relatively high depth of field. In order to be able get the most benefit from this feature, each user must synchronise the focussing mechanisms for themselves. The steps to do this are described in the following section. 1. Place the object to be observed on the working surface under the objetive. 2. Put both dioptre adjustment rings into the starting position of Use the zoom control dials to set the smallest possible magnification. 4. Look through the right eyepiece with the right eye and bring the object into focus by using the focus control dials. 5. Now set the largest possible zoom factor. 6. Once again, still only looking through the right eyepiece, bring the object into focus 7. Then set the smallest possible zoom factor again. 8. If the object then does not appear to be in focus, adjust the focus on the dioptre adjustment ring of the right eyepiece. 9. In order to get the highest level of accuracy when adjusting the focus, you should repeat steps Afterwards set back to the smallest possible zoom factor. 11. Then look through the left eyepiece with the left eye and use the lefthand dioptre adjustment ring to also adjust the optimum focus of the object. 12. In this way, the object being observed will be in focus at any zoom setting. 11 OZL-44-BA-e-1510

13 5.5 Adjusting the stand Torque of the focus wheels You can adjust the torque of the focus wheels by turning the ring which is fitted along the axis of the lefthand focus wheel. To do this you need a special wrench which is included with delivery. The ring has holes which the wrench can hook into, so that you can then turn it in the desired direction. Depending on the direction of the turn, the torque will be increased or decreased. On one hand, this function can help to make it easier to adjust the focus and on the other hand it can prevent the microscope head from slipping down unintentionally. In this way you can avoid possible damage which could occur if the objective lens and the object being observed should collide. Height adjustment Fixing the microscope holder With a stereo microscope on a pillar stand, the microscope head can be height adjusted using the focus wheels and in addition, the microscope holder can be fixed at any point on the pillar, depending on the application requirements. To primary way to fix the position is to use an adjusting screw (1) on the holder. There is a metal ring which also ensures sufficient grip and which is fixed with a second screw (2) under the holder on the pillar. This metal ring proves to be particularly useful when the screw (1) on the holder is loosened, to swing the microscope head to the side. OZL-44-BA-e


14 5.6 Using eye cups / High Eye Point eyepieces The eye cups supplied with the microscope can basically be used at all times, as they screen out intrusive light, which is reflected from light sources from the environment onto the eyepiece, and the result is better image quality. But primarily, if eyepieces with a high eye point (particularly suitable for those who wear glasses) are used, then it may also be useful for users who don t wear glasses, to fit the eye cups to the eyepieces. These special eyepieces are also called High Eye Point eyepieces. They can be identified by the glasses symbol on the side. They are also marked in the item description by an additional H (example: HSWF 10x Ø 23 mm). When fitting the eye cups, make sure that the dioptre setting is not moved. We would therefore advise that you hold the dioptre adjustment ring on an eyepiece with one hand while you fit the eye cup with the other. Before using the microscope, users who wear glasses must remove the eye cups, which you may find on High Eye Point eyepieces. As the eye cups are made of rubber, you must be aware that when you are using them, they can become slightly dirty through grease residues. In order to maintain hygiene, we would therefore recommend that you clean the eye cups regularly (e.g. with a damp cloth). Eye cups High Eye Point eyepiece (identified by the glasses symbol) 13 OZL-44-BA-e-1510

15 5.7 Lighting control The microscopes in the OZL-44 series have an adjustable reflected and transmitted light illumination. The power supply is guaranteed by connecting the mains cable and pressing the main switch on the right, rear corner. The control wheel on the righthand side surface of the stand base is responsible both for on-/off-switching and the adjustment of the light intensity of the transmitted illumination. The same functions belong to the control wheel on the lefthand side surface of the stand base according to the reflected illumination. 5.8 Using external illumination units If, when using a microscope in its standard version, the lighting is not suitable for the application, then it often makes sense to fit an external lighting unit to overcome this problem. The lighting units which are suitable for devices of the OZL-44 series, are goose neck lighting units (see figure). These are available as LED as well as halogen versions and also have an on/off switch or different controller. Typical goose neck lighting unit Using goose neck lighting units Depending on the requirements, a goose neck lighting unit is placed next to, in front of or behind the microscope. For halogen lighting units, the light source is in the housing of the unit and is emitted through one or several optical fibre cables. For LED units, on the other hand, it us usually at the end of the cable. These cables are flexible and therefore offer a large number of positioning options, so that the object being observed is perfectly illuminated. OZL-44-BA-e


16 5.9 Fitting and adjusting a camera (OZL 441) You can connect special microscope cameras to trinocular devices in the OZL-44 series, so that you can digitally record images or sequences of objects being observed. The connection for this is on the top side of the microscope head. When the trinocular toggle rod is pulled out, the beam path, which normally emits on the righthand eyepiece, is diverted in the tube, so that it can be used for the camera adapter connection. This means that when the device is used in trinocular mode, you will see one image in the left eyepiece and one on the monitor of the microscope camera. This means that the 3D effect is lost. To fit a microscope camera properly, you must use an adapter with a C-mount thread. There is already an adapter fixed to the camera adapter connection (white varnishing), which is not suitable for C-Mount cameras. You firstly have to remove this adapter in order to attach an appropriate one. In total there are three focusable adapters to choose from (see figure below). The difference between these adapters is that they have different integrated magnification (0.3x, 0.5x, 1.0x). The camera and adapter are then united using the C-mount thread. C-mount adapter The image which is shown on the camera connected to the device can often have a different level of focus compared with the image on the eyepiece. In order to be able to bring both images into focus, the focus can be adjusted by those adapters when turning the attached black plastic ring. 15 OZL-44-BA-e-1510
17 5.10 Changing the bulb LED The devices in the OZL-44 range with lighting are all fitted with LED bulbs. Due to the long service life of an LED lighting system, for these microscopes it will not be necessary to simply change a bulb. Problems with the lighting unit would therefore, in most cases, be caused by defects in the electrical system. If this is the case, then our Technical Service will be able to help. OZL-44-BA-e

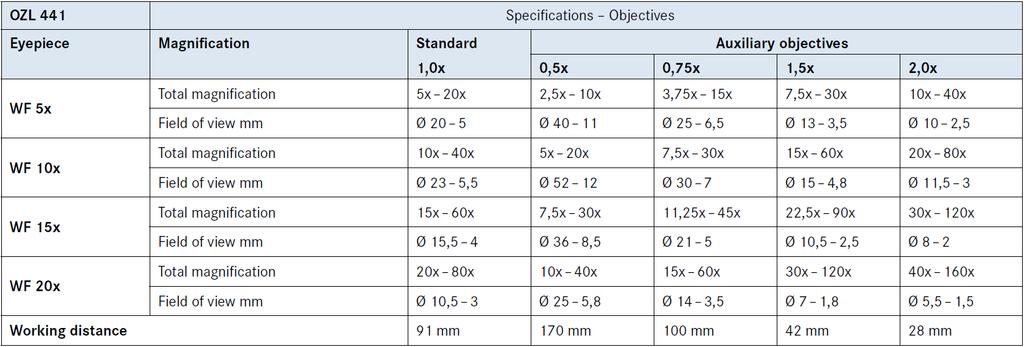
18 6 Optical data OZL 441 OZL OZL-44-BA-e-1510
19 7 Features Model outfit Kern model Order number Eyepieces Auxiliary objectives C-Mount Stand Stand inlay External illumination OZL 441 OZL 445 WF 5x / Ø 16,2 mm OZB-A4101 WF 10x / Ø 22 mm OZB-A4105 WF 10x / Ø 21,5 mm OZB-A4106 WF 15x / Ø 15 mm OZB-A4103 WF 20x / Ø 10 mm OZB-A4104 0,5x OZB-A4201 0,75x OZB-A4202 1,5x OZB-A4204 2,0x OZB-A4205 1x OZB-A4809 0,3x OZB-A4810 0,5x OZB-A4811 Pillar, with LED illumination (0,35W transmitted + 1W reflected light) Frosted glass / Ø95 mm OZB-A4805 black-white / Ø95 mm OZB-A4806 For information on external lighting units, please see the Kern Optics main catalogue, from page 68 and visit our website = Standard-Konfiguration = Option OZL-44-BA-e
20 8 Trouble shooting Electrical system Problem The lighting unit (if fitted) cannot be switched on The bulb has blown The bulb flickers The bulb brightness is not sufficient Possible causes The power cable is either not connected or not connected correctly The bulb is not fitted The bulb has blown The fuse has blown The brightness control is set to the lowest level The wrong bulb has been used The input voltage was too high The bulb is not correctly fitted The lamp is worn out The wrong bulb has been used The input voltage is too low Optical unit Problem You can see two images There is dirt in the visual field Possible causes The gap between the eyes is not set correctly The magnifications of the eyepieces do not match There is dirt on the object being observed There is dirt on the eyepiece surface The image is unclear The focus wheels are jammed The microscope head slips down while you are viewing the object Eyes get tired easily There is dirt on the objective surface The torque of the focus wheels is set too high The torque of the focus wheels is set too low The dioptre adjustment is not correct The brightness adjustment is not correct 19 OZL-44-BA-e-1510

21 9 Service If, after studying the user manual, you still have questions about commissioning or using the microscope, or if unforeseen problems should arise, please get in touch with your dealer. The device may only be opened by trained service engineers who have been authorised by KERN. 10 Disposal The packaging is made of environmentally-friendly materials, which you can dispose of at your local recycling centre. Disposal of the storage box and device must be carried out by the operator in accordance with all national or regional laws in force in the location of use. 11 Further information The illustrations may differ slightly from the product. The descriptions and illustrations in this user manual are subject to change without notice. Further developments on the device may lead to these changes. All language versions contain a non-binding translation. The original German document is the binding version. OZL-44-BA-e
User instructions Stereo microscope
 User instructions Stereo microscope KERN & Sohn GmbH Ziegelei 1 D-72336 Balingen E-mail: info@kern-sohn.com Tel: +49-[0]7433-9933-0 Fax: +49-[0]7433-9933-149 Internet: www.kern-sohn.com KERN OSE-4 OSE
User instructions Stereo microscope
 User instructions Stereo microscope KERN & Sohn GmbH Ziegelei 1 D-72336 Balingen E-mail: info@kern-sohn.com Tel: +49-[0]7433-9933-0 Fax: +49-[0]7433-9933-149 Internet: www.kern-sohn.com KERN OSF-4 OSF
User instructions Stereo microscope
 User instructions Stereo microscope KERN & Sohn GmbH Ziegelei 1 D-72336 Balingen E-mail: info@kern-sohn.com Tel: +49-[0]7433-9933-0 Fax: +49-[0]7433-9933-149 Internet: www.kern-sohn.com KERN OSF-5 OSF
User instructions Stereo microscope set
 KERN & Sohn GmbH Ziegelei 1 D-72336 Balingen E-mail: info@kern-sohn.com User instructions Stereo microscope set Tel: +49-[0]7433-9933-0 Fax: +49-[0]7433-9933-149 Internet: www.kern-sohn.com KERN OZM-98
User instructions Stereo zoom microscope
 KERN & Sohn GmbH Ziegelei 1 D-72336 Balingen E-mail: info@kern-sohn.com User instructions Stereo zoom microscope Tel: +49-[0]7433-9933-0 Fax: +49-[0]7433-9933-149 Internet: www.kern-sohn.com KERN OZC-5
User instructions Stereo zoom microscope
 KERN & Sohn GmbH Ziegelei 1 D-72336 Balingen E-mail: info@kern-sohn.com User instructions Stereo zoom microscope Tel: +49-[0]7433-9933-0 Fax: +49-[0]7433-9933-149 Internet: www.kern-sohn.com KERN OZM-5
User instructions Stereo zoom microscope
 KERN & Sohn GmbH Ziegelei 1 D-72336 Balingen E-mail: info@kern-sohn.com User instructions Stereo zoom microscope Tel: +49-[0]7433-9933-0 Fax: +49-[0]7433-9933-149 Internet: www.kern-sohn.com KERN OZO-5,
Eco D-ELS-4 Stereo Microscope. Instruction Manual
 Eco D-ELS-4 Stereo Microscope Instruction Manual Contents 1. Application 2 2. Nomenclature 2 3. Specifications 3 4. Operation 4 4.1 Working Environment 4 4.2 Light Intensity Control 4 4.3 Select a Work
User Manual. Trinocular Stereo Microscope
 User Manual Trinocular Stereo Microscope Model V434 XV434 Series MicroscopeNet.com Table of Contents i. Caution.. 1 ii. Care and Maintenance... 2 1. Component Illustration... 3 2. Installation 4 3. Operation....6
M40 Microscope User s Manual
 M40 Microscope User s Manual for M40 and M40RT Microscope Components: Trinocular Port Eyepieces Beam Splitter Field Diaphragm Adjustment Aperture Diaphragm Adjustment Filter Slots Analyzer Polarizer Hex
User Manual. Binocular Zoom Stereo Microscope with Boom Stand. MicroscopeNet.com
 User Manual Binocular Stereo Microscope with Boom Stand Model W42C1 Series MicroscopeNet.com Table of Contents i. Caution.. 1 ii. Care and Maintenance... 1 1. Component Illustration... 2 2. Installation...3
Richter Optica. Instructions for Model: MDS2 Middle School Microscope
 Richter Optica info@richter-optica.com Instructions for Model: MDS2 Middle School Microscope Eyepiece 360 Rotatable Head Revolving Nosepiece Carrying Handle Objectives Rack Stop Stage Stage Clips Disc
User Manual. Trinocular Stereo Microscope
 User Manual Trinocular Stereo Microscope Model V436 XV436 Series MicroscopeNet.com Table of Contents i. Caution.. 1 ii. Care and Maintenance... 1 1. Component Illustration... 2 2. Installation 3 3. Operation....4
User Manual. Binocular Stereo Microscope. MicroscopeNet.com
 User Manual Binocular Stereo Microscope Model K2213 Series MicroscopeNet.com Table of Contents i. Caution... 1 ii. Care and Maintenance... 1 1. Components Illustration... 2 2. Installation... 3 3. Operation...
Instruction Manual. B1 Series. Copyright 02/02 Motic Microscopes, European Division
 Instruction Manual B1 Series Copyright 02/02 Motic Microscopes, European Division 1. Eyepieces 13. Sliding interpupilliary adjustment. 2. Interpupillary Scale 3. Revolving Nosepiece 4.Objectives 5. Moveable
Mi50 Inverted Microscope User s Manual. Fein.
 Mi50 Inverted Microscope User s Manual Fein info@feinoptic.com Mi50 Microscope Components Siedentopf Trinocular Head Stage Plate Mechanical Stage Locking Screw Hex Wrench Storage Beam Splitter Dust Protector
Instruction Manual. B3 Series. Copyright 02/02 Motic Microscopes, European Division
 Instruction Manual B3 Series Copyright 02/02 Motic Microscopes, European Division 1. Eyepiece 2. Interpupillary Scale 12. Head 13. Eyepiece holder 3. Revolving nosepiece 14. Knurled head locking screw
Richter Optica. Instructions for: S6-BL, S6-TS, S6-SPS, S6-ILST Models
 Richter Optica info@richter-optica.com Instructions for: S6-BL, S6-TS, S6-SPS, S6-ILST Models Trinocular port for c-mount adapter Zoom Knob Focusing Holder Clamp Diopter adjustable eyepieces Magnification
OMM200 and OMM200T. Metallurgical Microscope
 OMM200 and OMM200T Metallurgical Microscope Instruction Manual (Please read the manual carefully before using the microscope) Contents Safety ----------------------------------------------------------------------------
G500 SERIES MICROSCOPE OPERATION MANUAL For use with MFR# G502, G502T, G504, G504T, G505, G505T.
 G500 SERIES MICROSCOPE OPERATION MANUAL For use with MFR# G502, G502T, G504, G504T, G505, G505T. United Products & Instruments, Inc. 182 Ridge Road, Suite E Dayton, NJ 08810 USA T. 732 274 1155; F. 732
Richter Optica. Instructions for Model: S-2 Dual Power Stereo Microscope
 Richter Optica 6122 Innovation Way Carlsbad, California 92009 (800) 942-0528 US TOLL FREE (760) 438-0528 INTERNATIONAL Instructions for Model: S-2 Dual Power Stereo Microscope Eyepieces Post Diopter Adjustment
Richter Optica. Instructions for Models: UX1B Binocular and UX1T Trinocular Laboratory and University Biological Microscope
 Richter Optica info@richter-optica.com Instructions for Models: UX1B Binocular and UX1T Trinocular Laboratory and University Biological Microscope Interpupillary Adjustment Scale Eyepieces Diopter Adjustment
Polarization Microscope. Omano OM349P Series. User Guide
 Polarization Microscope Omano OM349P Series User Guide Table of Contents Getting Started... 3 Components... 3 Technical Specifications... 5 Setup Instructions... 6 Basic Operation... 7 Changing the Light
National Optical & Scientific Instruments Inc Tri-County Parkway Schertz, Texas Phone (210) Fax (210)
 Fax (210)") National Optical & Scientific Instruments Inc. 6508 Tri-County Parkway Schertz, Texas 78154 Phone (210) 590-9010 Fax (210) 590-1104 INSTRUCTIONS FOR STEREOSCOPIC ZOOM MICROSCOPE MODELS 420-430PHF-10 (Binocular
National Optical & Scientific Instruments Inc. 6508 Tri-County Parkway Schertz, Texas 78154 Phone (210) 590-9010 Fax (210) 590-1104 INSTRUCTIONS FOR STEREOSCOPIC ZOOM MICROSCOPE MODELS 420-430PHF-10 (Binocular
For documentation, both instruments are available with a trinocular head which permits mounting of a video or digital camera system.
 PriorLux 1 1. Introduction The PriorLab and PriorLux upright compound microscopes are high quality instruments equipped with high resolution, chromatically corrected optics for excellent image quality.
Richter Optica. Instructions for Model: HSX1 High School Microscope
 Richter Optica info@richter-optica.com Instructions for Model: HSX1 High School Microscope Eyepiece 360 Rotatable Head Objectives Carrying Handle Revolving Nosepiece Rack Stop Slide Holder Focus Tension
3025 MICROSCOPE SERIES INSTRUCTIONS
 3025 MICROSCOPE SERIES INSTRUCTIONS Polysciences, Inc. 400 Valley Road Warrington, PA 18976 (800) 523-2575 / (215) 343-6484 (800) 343-3291 / (215) 343-0214 fax info@polysciences.com www.polysciences.com
M20 Metallurgical Microscope User s Manual. Fein.
 M20 Metallurgical Microscope User s Manual info@feinoptic.com M20 Microscope Components Lamp Housing C-Mount Adapter Eyepieces Analyzer Objective Lens Coarse Focus Mechanical Stage Stage X-Y Control Fine
Swift SM100 Series Stereo Microscope
 Swift SM100 Series Stereo Microscope Use and Care Manual SWIFT OPTICAL Enduring Quality and Technical Excellence 2 SWIFT SM100 SERIES STEREO MICROSCOPE The Swift SM100 Series stereo microscope is a full
Richter Optica. Instructions for Model F-1 Compound Microscope
 Richter Optica 6122 Innovation Way Carlsbad, California 92009 (800) 942-0528 US TOLL FREE (760) 438-0528 INTERNATIONAL Instructions for Model F-1 Compound Microscope Ocular Lens (eyepiece) Eyepiece Tube
650/1000 Fresnel 650/1000 PC 300/500 Antihalo 300/500 Fresnel theatre spotlight. user manual
 650/1000 Fresnel 650/1000 PC 300/500 Antihalo 300/500 Fresnel theatre spotlight user manual Musikhaus Thomann Thomann GmbH Hans-Thomann-Straße 1 96138 Burgebrach Germany Telephone: +49 (0) 9546 9223-0
R40POL Microscope User s Manual
 R40POL Microscope User s Manual for R40POL and R40POL-RT Polarizing Microscopes Microscope Components: Trinocular Port Eyepieces Beam Splitter Analyzer Daylight Balancing Filter 12v 50w Halogen Reflected
For documentation the instrument is available with a trinocular head which permits mounting of a video or digital camera system.
 1. Introduction The PriorLux MET upright compound metallurgical microscope is a high quality instrument equipped with high resolution, chromatically corrected optics for excellent image quality in reflected
MANUAL 3072 STEREO MICROSCOPE SERIES
 MANUAL 3072 STEREO MICROSCOPE SERIES 73 Mall Drive, Commack, NY 11725 631-864-1000 (P) 631-543-8900 (F) www.accu-scope.com info@accu-scope.com CONTENTS SAFETY NOTES... 3 CARE AND MAINTENANCE... 3 INTRODUCTION...
MANUAL Series ZOOM STEREO MICROSCOPE MANUAL
 MANUAL 3078 Series ZOOM STEREO MICROSCOPE MANUAL Distributed By: CONTENTS SAFETY NOTES... 3 CARE AND MAINTENANCE... 3 INTRODUCTION... 4 UNPACKING AND COMPONENTS... 4 COMPONENT DIAGRAMS... 5 ASSEMBLY...
Operation Manual. VWR Inverted Microscope. (Version 1.0.0) VWR Inverted Microscope VWR Inverted Microscope.
 VWR Inverted Microscope VWR Inverted Microscope.") www.vwr.com VWR Inverted Microscope Operation Manual (Version 1.0.0) VWR Inverted Microscope 89404-462 89404-462 VWR Inverted Microscope Man.V100 (28 Sept. 2012) TABLE OF CONTENTS SECTION I. Safety Instructions
www.vwr.com VWR Inverted Microscope Operation Manual (Version 1.0.0) VWR Inverted Microscope 89404-462 89404-462 VWR Inverted Microscope Man.V100 (28 Sept. 2012) TABLE OF CONTENTS SECTION I. Safety Instructions
National Optical & Scientific Instruments Inc Tri-County Parkway Schertz, Texas Phone (210) Fax (210)
 Fax (210)") National Optical & Scientific Instruments Inc. 6508 Tri-County Parkway Schertz, Texas 78154 Phone (210) 590-9010 Fax (210) 590-1104 INSTRUCTIONS FOR MODELS 156, 156-S, 157 COMPOUND BIOLOGICAL MICROSCOPES
National Optical & Scientific Instruments Inc. 6508 Tri-County Parkway Schertz, Texas 78154 Phone (210) 590-9010 Fax (210) 590-1104 INSTRUCTIONS FOR MODELS 156, 156-S, 157 COMPOUND BIOLOGICAL MICROSCOPES
INSTRUCTIONS FOR STEREOSCOPIC MICROSCOPES CATALOG NUMBERS (120V) (220V) (120V) (220V)
 (220V) (120V) (220V)") Cole-Parmer Instrument Company 625 East Bunker Court Vernon Hills, Illinois 60061 1-847-549-7600 or Toll-Free 1-800-323-4340 Telex: 28-9405 Fax: 1-847-549-7676 INSTRUCTIONS FOR STEREOSCOPIC MICROSCOPES
Cole-Parmer Instrument Company 625 East Bunker Court Vernon Hills, Illinois 60061 1-847-549-7600 or Toll-Free 1-800-323-4340 Telex: 28-9405 Fax: 1-847-549-7676 INSTRUCTIONS FOR STEREOSCOPIC MICROSCOPES
SM-6 Series. User s Manual
 User s Manual 1 Table of Contents Before Use... 3 Introduction...3 Safety Precautions...4 Parts... 5 SM-6B/T... 5 Definition of Parts... 6 Operation... 8 Assembly...8 Setting Up... 11 Focusing... 11 Using
Swift SM100 Series Stereo Microscope
 Swift SM100 Series Stereo Microscope Use and Care Manual SWIFT OPTICAL Enduring Quality and Technical Excellence SWIFT SM100 SERIES STEREO MICROSCOPE The Swift SM100 Series stereo microscope is a full
OLYMPUS STEREO MICROSCOPES I INSTRUCTION MANUAL I MODELS VMF,VMT&VMZ OLYMPUS
 OLYMPUS STEREO MICROSCOPES I INSTRUCTION MANUAL I MODELS VMF,VMT&VMZ OLYMPUS This instruction manual has been written for the use of the Olympus Stereo Microscopes Models VMF, VMT and VMZ. lt is recommended
STEREO MICROSCOPE MODEL K400 / K500 / K700 INSTRUCTION MANUAL
 STEREO MICROSCOPE MODEL K400 / K500 / K700 INSTRUCTION MANUAL Contents 1. Introduction...2 2. Nomenclature and Function....3 3. Assembly.....5 4. Operating the Microscope... 6 4.1 Interpupillary Distance
National Optical & Scientific Instruments Inc Tri-County Parkway Schertz, Texas Phone (210) Fax (210) INSTRUCTIONS FOR
 Fax (210) INSTRUCTIONS FOR") National Optical & Scientific Instruments Inc. 6508 Tri-County Parkway Schertz, Texas 78154 Phone (210) 590-9010 Fax (210) 590-1104 INSTRUCTIONS FOR MODELS #446TBL, #447TBL AND #448TBL STEREOSCOPIC MICROSCOPES
National Optical & Scientific Instruments Inc. 6508 Tri-County Parkway Schertz, Texas 78154 Phone (210) 590-9010 Fax (210) 590-1104 INSTRUCTIONS FOR MODELS #446TBL, #447TBL AND #448TBL STEREOSCOPIC MICROSCOPES
National Optical & Scientific Instruments Inc Tri-County Parkway Schertz, Texas Phone (210) Fax (210) INSTRUCTIONS FOR
 Fax (210) INSTRUCTIONS FOR") National Optical & Scientific Instruments Inc. 6508 Tri-County Parkway Schertz, Texas 78154 Phone (210) 590-9010 Fax (210) 590-1104 INSTRUCTIONS FOR MODEL DC5-163 COMPOUND BIOLOGICAL MICROSCOPE WITH DIGITAL
National Optical & Scientific Instruments Inc. 6508 Tri-County Parkway Schertz, Texas 78154 Phone (210) 590-9010 Fax (210) 590-1104 INSTRUCTIONS FOR MODEL DC5-163 COMPOUND BIOLOGICAL MICROSCOPE WITH DIGITAL
Operation Instruction
 Di-Li DIGITAL-Microscopes Ernst Christmann Str.8, 67659 Kaiserslautern Telefon: +49-631-78319, Fax: +49-631-78399, E-Mail:info@di-li.eu www.di-li.eu Operation Instruction Digital Zoom Microscope Di-Li
National Optical & Scientific Instrument Inc Tri-County Parkway Schertz, Texas Phone (210) Fax (210) INSTRUCTIONS FOR
 Fax (210) INSTRUCTIONS FOR") National Optical & Scientific Instrument Inc. 6508 Tri-County Parkway Schertz, Texas 78154 Phone (210) 590-9010 Fax (210) 590-1104 INSTRUCTIONS FOR MODEL DC4-156-S COMPOUND BIOLOGICAL MICROSCOPE WITH DIGITAL
National Optical & Scientific Instrument Inc. 6508 Tri-County Parkway Schertz, Texas 78154 Phone (210) 590-9010 Fax (210) 590-1104 INSTRUCTIONS FOR MODEL DC4-156-S COMPOUND BIOLOGICAL MICROSCOPE WITH DIGITAL
Checklist for your microscope - your requirements
 Checklist for your microscope - your requirements 1) Which kind of microscope do you need? Compound microscope: (primarily used for transparent/translucent preparation) (Page: 1-3) Stereo microscope (surface
SM-4 Series. User s Manual
 User s Manual 1 Table of Contents Before Use... 3 Introduction...3 Safety Precautions...4 Parts... 5 SM-4B/T... 5 Definition of Parts... 6 Operation... 8 Assembly...8 Setting Up... 11 Focusing... 11 Using
Blue Weapon Laser. User manual UK. Version 1.0
 Blue Weapon Laser User manual 152.754UK Version 1.0 CAUTION 15. Disposal : Please disposal of the unserviceable device according to the current statutory requirements. Please read this manual fully before
Microscopes. Star - 24 LED. Stereo Microscope Range
 Star - 24 LED The Star is a Stereo Microscope which is designed for both educational and professional use. It is particularly well suited to viewing specimens at low magnifications and introduces the benefits
Operation Manual. for Micromas ter I Micros copes. T his manual covers catalog numbers : S 11031, S 11033, and S 11035
 Operation Manual for Micromas ter I Micros copes T his manual covers catalog numbers : S 11031, S 11033, and S 11035 General Operation Thank you for purchasing a Micromaster I microscope. This instrument
GTA PREVENTIVE MAINTENANCE CHECKS AND SERVICES ON THE ZOOM STEREOSCOPE 95R
 PREVENTIVE MAINTENANCE CHECKS AND SERVICES ON THE ZOOM STEREOSCOPE 95R DISTRIBUTION RESTRICTION: Approved for public release; distribution is unlimited. DISTRIBUTION:... US Army Training and Audiovisual
National Optical & Scientific Instruments Inc Tri-County Parkway Schertz, Texas Phone (210) Fax (210) INSTRUCTIONS FOR
 Fax (210) INSTRUCTIONS FOR") National Optical & Scientific Instruments Inc. 6508 Tri-County Parkway Schertz, Texas 78154 Phone (210) 590-9010 Fax (210) 590-1104 INSTRUCTIONS FOR MODEL DC6-163 COMPOUND BIOLOGICAL MICROSCOPE WITH DIGITAL
National Optical & Scientific Instruments Inc. 6508 Tri-County Parkway Schertz, Texas 78154 Phone (210) 590-9010 Fax (210) 590-1104 INSTRUCTIONS FOR MODEL DC6-163 COMPOUND BIOLOGICAL MICROSCOPE WITH DIGITAL
Ostar Eye K6. Beam and Kaleido Effects. User manual. Please read the instructions carefully before use
 Ostar Eye K6 Beam and Kaleido Effects User manual Please read the instructions carefully before use TABLE OF CONTENTS 1. Safety Instructions... 2 2. Technical Specifications... 4 3. How To Control The
LED SPIDER MOVING HEAD LIGHT
 LED SPIDER MOVING HEAD LIGHT MJ-1031C (4IN1) INSTRUCTION MANUAL Thank you for choosing our LED spider moving head light. For the sake of your safety, Please read and follow these instructions carefully
Microscope. Dual Magnification Microscope 20X / 40X. Base: 115 x 180mm Net weight: 4.0kg. Stereo Zoom Microscope 7X to 45X
 Dual Magnification Microscope XTJ6000-B1 Magnification: 10X/20X, 10X/30X, 20X/40X Objective: 1X/2X, 1X/3X, 2X/4X Working distance: XTJ6012: 110mm, XTJ6013: 102mm, XTJ6024: 90mm Illuminator: 8W fluorescent
EXAMET-4 MANUAL MICROSCOPE SERIES. 73 Mall Drive, Commack, NY (P) (F)
 (F)") EXAMET-4 MICROSCOPE SERIES MANUAL 73 Mall Drive, Commack, NY 11725 631-543-2000 (P) 631-589-6975 (F) www.unitronusa.com info@unitronusa.com CONTENTS SAFETY NOTES... 3 CARE AND MAINTENANCE... 3 INTRODUCTION...
EXAMET-4 MICROSCOPE SERIES MANUAL 73 Mall Drive, Commack, NY 11725 631-543-2000 (P) 631-589-6975 (F) www.unitronusa.com info@unitronusa.com CONTENTS SAFETY NOTES... 3 CARE AND MAINTENANCE... 3 INTRODUCTION...
Transmission Polarizing Microscope OM239
 Transmission Polarizing Microscope OM239 Instruction Manual Please read the instructions carefully before operating CONTENTS Safety 2 Parts List 2 Features 3 Assembly 4 Operation 6 Maintenance 7 Specifications
Therefore, all descriptions and illustrations in this instruction manual, including all specifications are subject to change without notice.
 We are constantly endeavoring to improve our instruments and to adapt them to the requirements of modern research techniques and testing methods. This involves modification to the mechanical structure
MICROSCOPE USER MANUAL
 WARRANTY BARSKA warrants your micrscope to be free from defects in materials and workmanship for one () year. BARSKA will repair or replace such product or part thereof which, upon inspection by BARSKA,
National Optical & Scientific Instruments Inc Landmark 35 Drive San Antonio, Texas Phone (210) Fax (210)
 Fax (210)") National Optical & Scientific Instruments Inc. 11113 Landmark 35 Drive San Antonio, Texas 78233 Phone (210) 590-9010 Fax (210) 590-1104 INSTRUCTIONS FOR 160 SERIES COMPOUND BIOLOGICAL MICROSCOPES Copyright
National Optical & Scientific Instruments Inc. 11113 Landmark 35 Drive San Antonio, Texas 78233 Phone (210) 590-9010 Fax (210) 590-1104 INSTRUCTIONS FOR 160 SERIES COMPOUND BIOLOGICAL MICROSCOPES Copyright
National Optical & Scientific Instruments Inc Tri-County Parkway Schertz, Texas Phone (210) Fax (210)
 Fax (210)") National Optical & Scientific Instruments Inc. 6508 Tri-County Parkway Schertz, Texas 78154 Phone (210) 590-9010 Fax (210) 590-1104 INSTRUCTIONS FOR STEREOSCOPIC MICROSCOPES 410TBL Binocular Stereo 411TBL
National Optical & Scientific Instruments Inc. 6508 Tri-County Parkway Schertz, Texas 78154 Phone (210) 590-9010 Fax (210) 590-1104 INSTRUCTIONS FOR STEREOSCOPIC MICROSCOPES 410TBL Binocular Stereo 411TBL
Stereoscopic Zoom Microscope SMZ1500
 M249 E 06.2.NF.2 Stereoscopic Zoom Microscope SMZ1500 Instructions Thank you for purchasing the Nikon product. This instruction manual is written for the users of Nikon Stereoscopic Zoom Microscope SMZ1500.
Spectrum Laser. User manual UK. Version 1.0
 Spectrum Laser User manual 152.753UK Version 1.0 CAUTION 15. Disposal : Please disposal of the unserviceable device according to the current statutory requirements. Please read this manual fully before
Operation Manual (Version 1.0.0)
") VWR Standard Biological Microscope Operation Manual (Version 1.0.0) VWR Standard Biological Microscope 89404-882, 89404-884 VWR Stand Monocular Microscope Man.V100 (15 Nov. 2012) 1. SAFETY INSTRUCTIONS
VWR Standard Biological Microscope Operation Manual (Version 1.0.0) VWR Standard Biological Microscope 89404-882, 89404-884 VWR Stand Monocular Microscope Man.V100 (15 Nov. 2012) 1. SAFETY INSTRUCTIONS
SP mm F/2.8 Di VC USD (Model A009)
") SP 70-200mm F/2.8 Di VC USD (Model A009) Thank you for purchasing the Tamron lens as the latest addition to your photographic equipment. Before using your new lens, please read the contents of this Owner
SP 70-200mm F/2.8 Di VC USD (Model A009) Thank you for purchasing the Tamron lens as the latest addition to your photographic equipment. Before using your new lens, please read the contents of this Owner
Operating Instructions
 Operating Instructions INTERCHANGEABLE LENS FOR DIGITAL CAMERA Model No. H-F007014 Before use, please read these instructions completely. E -1 Contents Information for Your Safety... 2 Precautions... 4
National Optical & Scientific Instruments Inc Tri-County Parkway Schertz, Texas Phone (210) Fax (210) INSTRUCTIONS FOR
 Fax (210) INSTRUCTIONS FOR") National Optical & Scientific Instruments Inc. 6508 Tri-County Parkway Schertz, Texas 78154 Phone (210) 590-9010 Fax (210) 590-1104 INSTRUCTIONS FOR 160 SERIES COMPOUND BIOLOGICAL MICROSCOPES Copyright
National Optical & Scientific Instruments Inc. 6508 Tri-County Parkway Schertz, Texas 78154 Phone (210) 590-9010 Fax (210) 590-1104 INSTRUCTIONS FOR 160 SERIES COMPOUND BIOLOGICAL MICROSCOPES Copyright
National Optical & Scientific Instruments Inc Tri-County Parkway Schertz, Texas Phone (210) Fax (210) INSTRUCTIONS FOR
 Fax (210) INSTRUCTIONS FOR") National Optical & Scientific Instruments Inc. 6508 Tri-County Parkway Schertz, Texas 78154 Phone (210) 590-9010 Fax (210) 590-1104 INSTRUCTIONS FOR 450 SERIES STEREOSCOPIC MICROSCOPES Copyright 4/6/2010
National Optical & Scientific Instruments Inc. 6508 Tri-County Parkway Schertz, Texas 78154 Phone (210) 590-9010 Fax (210) 590-1104 INSTRUCTIONS FOR 450 SERIES STEREOSCOPIC MICROSCOPES Copyright 4/6/2010
INSTRUCTION MANUAL for STEREO MICROSCOPE FUTURO EDU CAM
 INSTRUCTION MANUAL for STEREO MICROSCOPE FUTURO EDU CAM 152375.0200 Brütsch Rüegger Werkzeuge AG Heinrich Stutz-Strasse 20 CH-8902 Urdorf www.brw.ch 1.0 Introduction With your purchase of a FUTURO EDU
Ostar Eye K18. Beam and Kaleido Effects. User manual. 6. Fixture Cleaning. Please read the instructions carefully before use
 6. Fixture Cleaning The cleaning of internal and external optical lenses and/or mirrors must be carried out periodically to optimize light output. Cleaning frequency depends on the Ostar Eye K18 Beam and
Operation Manual (Version 1.0.0)
") VWR Professional Microscope Operation Manual (Version 1.0.0) VWR Professional Microscope 89404-886, 89404-888 89404-890, 89404-892 89404-894, 89404-896 VWR Professional Trinocular Microscope Man.V100 (14
VWR Professional Microscope Operation Manual (Version 1.0.0) VWR Professional Microscope 89404-886, 89404-888 89404-890, 89404-892 89404-894, 89404-896 VWR Professional Trinocular Microscope Man.V100 (14
For your safety! General information
 We are very pleased that you decided to purchase this product from Swarovski Optik. If you have any questions, please consult your specialist dealer or contact us directly at www.swarovskioptik.com. For
National Optical & Scientific Instruments Inc Tri-County Parkway Schertz, Texas Phone (210) Fax (210) INSTRUCTIONS FOR
 Fax (210) INSTRUCTIONS FOR") National Optical & Scientific Instruments Inc. 6508 Tri-County Parkway Schertz, Texas 78154 Phone (210) 590-9010 Fax (210) 590-1104 INSTRUCTIONS FOR MODEL DC4-456H STEREOSCOPIC MICROSCOPE WITH DIGITAL
National Optical & Scientific Instruments Inc. 6508 Tri-County Parkway Schertz, Texas 78154 Phone (210) 590-9010 Fax (210) 590-1104 INSTRUCTIONS FOR MODEL DC4-456H STEREOSCOPIC MICROSCOPE WITH DIGITAL
Z10 SERIES Z10 Z8 Z6 MANUAL ZOOM STEREO MICROSCOPES
 Z10 SERIES Z10 Z8 Z6 ZOOM STEREO MICROSCOPES MANUAL 250 Gibbs Road, Islandia, NY 11749 631-582-8440 (P) 631-582-8487 (F) www.flexbar.com sales@flexbar.com CONTENTS SAFETY NOTES... 3 CARE AND MAINTENANCE...
Compound microscope KERN OBE-1
 Trinocular head OBE 104, OBE 110, OBE 114 Mononcular head OBE 101, OBE 107, OBE 111 Objectives OBE EDUCATIONAL LINE The robust model for use in school, vocational training and laboratory Simple polarising
ACCU-SCOPE INC. 73 Mall Drive Commack, NY Phone: (631) Fax: (631)
 Fax: (631)") 3065 ZOOM STEREO MICROSCOPE SERIES INSTRUCTIONS ACCU-SCOPE INC. 73 Mall Drive Commack, NY 11725 Phone: (631) 864-1000 Fax: (631) 543-8900 E-mail: info@accu-scope.com www.accu-scope.com Head Locking Screw
3065 ZOOM STEREO MICROSCOPE SERIES INSTRUCTIONS ACCU-SCOPE INC. 73 Mall Drive Commack, NY 11725 Phone: (631) 864-1000 Fax: (631) 543-8900 E-mail: info@accu-scope.com www.accu-scope.com Head Locking Screw
Leica XL Universal Base User Manual
 Leica XL Universal Base User Manual Important Safety Notes Safety concept Before using your microscope for the first time, please read the Safety concept brochure included with your instrument. It contains
National Optical & Scientific Instruments Inc Tri-County Parkway Schertz, Texas Phone (210) Fax (210) INSTRUCTIONS FOR
 Fax (210) INSTRUCTIONS FOR") National Optical & Scientific Instruments Inc. 6508 Tri-County Parkway Schertz, Texas 78154 Phone (210) 590-9010 Fax (210) 590-1104 INSTRUCTIONS FOR MODELS 131-SPMS, 132-SPMS, 134-CLED & 135-CLED COMPOUND
National Optical & Scientific Instruments Inc. 6508 Tri-County Parkway Schertz, Texas 78154 Phone (210) 590-9010 Fax (210) 590-1104 INSTRUCTIONS FOR MODELS 131-SPMS, 132-SPMS, 134-CLED & 135-CLED COMPOUND
User Manual. Binocular Compound LED Microscope. MicroscopeNet.com
 User Manual Binocular Compound LED Microscope Model M8211 Series MicroscopeNet.com Table of Contents I. Caution...1 II. Care and Maintenance...2 1. Components Illustration...3 2. Installation...4 3. Operation...6
7x15W 4IN1 Infinity Rotation LED Pixel Bar. This product manual contains important information about the safe
 Pixel Beam K7 7x15W 4IN1 Infinity Rotation LED Pixel Bar This product manual contains important information about the safe installation and use of this projector. Please read and follow these instructions
STEREO MICROSCOPE MODULAR SYSTEM
 GB STEREO MICROSCOPE MODULAR SYSTEM KERN Pictograms 360 rotatable microscope head Monocular Microscope For the inspection with one eye Parallel optical system For stereomicroscopes, enables fatigue-proof
148 Series. User s Manual
 148 Series User s Manual 1 148 Series Table of Contents Before Use... 3 Introduction...3 Safety Precautions...4 Parts... 5 M148...5 Definition of Parts...6 Getting Started... 7 Assembly...7 Operation...
INSTRUCTION MANUAL POLARIZING & ORE MICROSCOPES. Polarizing Microscopes. Ore Microscopes. Model: NYMC62B00
 POLARISING & ORE MICROSCOPES INSTRUCTION MANUAL Monocular Microscope Binocular Microscope Trinocular Microscope Polarizing Microscopes POLARIZING & ORE MICROSCOPES Model: NYMC62B00 Monocular Microscope
SP AF 17-50mm F/2.8 XR Di-II VC LD Aspherical [IF] (Model B005)
![SP AF 17-50mm F/2.8 XR Di-II VC LD Aspherical [IF] (Model B005)](/thumbs/72/66333745.jpg "SP AF 17-50mm F/2.8 XR Di-II VC LD Aspherical [IF] (Model B005)") SP AF 17-50mm F/2.8 XR Di-II VC LD Aspherical [IF] (Model B005) Thank you for purchasing the Tamron lens as the latest addition to your photographic equipment. Before using your new lens, please read the
SP AF 17-50mm F/2.8 XR Di-II VC LD Aspherical [IF] (Model B005) Thank you for purchasing the Tamron lens as the latest addition to your photographic equipment. Before using your new lens, please read the
Teaching Microscope Instruction Manual OMTM85 and OMTM85L
 Teaching Microscope Instruction Manual OMTM85 and OMTM85L Please read the instruction carefully before using the microscope CONTENTS Safety 3 Parts list 3 Features 3 Assembly 4 Operation 4 Maintenance
Symbio Microscope. L1500 Series. Biological Upright Compound Microscopes. Operating Manual
 Symbio Microscope L1500 Series Biological Upright Compound Microscopes Operating Manual 1 The GXM L1500 Series of biological microscopes are high quality instruments equipped with high grade, glass objectives
Compound Microscope Instruction Manual
 Compound Microscope Instruction Manual OM-118-M3 OM-118-M4 Please read the instructions carefully before using the microscope CONTENTS Safety 2 Parts list 3 Features 3 Assembly 4 Operation 4 Maintenance
SP mm F/4-5.6 Di VC USD for Canon and Nikon (Model A005) SP mm F/4-5.6 Di USD for Sony (Model A005)
 SP mm F/4-5.6 Di USD for Sony (Model A005)") R SP 70-300mm F/4-5.6 Di VC USD for Canon and Nikon (Model A005) SP 70-300mm F/4-5.6 Di USD for Sony (Model A005) Thank you for purchasing the Tamron lens as the latest addition to your photographic equipment.
R SP 70-300mm F/4-5.6 Di VC USD for Canon and Nikon (Model A005) SP 70-300mm F/4-5.6 Di USD for Sony (Model A005) Thank you for purchasing the Tamron lens as the latest addition to your photographic equipment.
Comprehensive Scope 2. Instruction Manual T-19011C - Monocular T-19021C - Dual Viewing T-19031C - Binocular T-19041C - Trinocular
 Comprehensive Scope 2 Instruction Manual T-19011C - Monocular T-19021C - Dual Viewing T-19031C - Binocular T-19041C - Trinocular Application Thank you for purchasing the new Ken-A-Vision Comprehensive
28-300mm F/ XR Di VC LD Aspherical [IF] Macro (Model A020)
![28-300mm F/ XR Di VC LD Aspherical [IF] Macro (Model A020)](/thumbs/82/86828397.jpg "28-300mm F/ XR Di VC LD Aspherical [IF] Macro (Model A020)") R 28-300mm F/3.5-6.3 XR Di VC LD Aspherical [IF] Macro (Model A020) Thank you for purchasing the Tamron lens as the latest addition to your photographic equipment. Before using your new lens, please read
R 28-300mm F/3.5-6.3 XR Di VC LD Aspherical [IF] Macro (Model A020) Thank you for purchasing the Tamron lens as the latest addition to your photographic equipment. Before using your new lens, please read
Full HD IP Vandal Dome Camera
 Quick Start Guide Full HD IP Vandal Dome Camera O3VLD1 Version 1.0 Welcome Thank you for purchasing this network camera! This owner s manual is designed to be a reference tool for your system. Please read
Infrared Dome CCD Camera User Manual
 Infrared Dome CCD Camera User Manual Products: CDC3115IR, CDC3114VF, CDC3114VF2, CDC3114IR2 Please read this manual before installing and using this camera and always follow instructions for proper use.
Richter Optica. Instructions for Model: MDS1 Compound Microscope
 Richter Optica info@richter-optica.com Instructions for Model: MDS1 Compound Microscope 10x Eyepiece Carrying Handle Rotatable Viewing Head Objective Lens Coarse Focus Stage Clip Stage Built-in Condenser
Large Police Light 100W ORDERCODE 80361
 Large Police Light 100W ORDERCODE 80361 Congratulations! You have bought a great, innovative product from Showtec. The Showtec Large Police Light brings excitement to any venue. You can rely on Showtec,
National Optical & Scientific Instruments Inc Tri-County Parkway Schertz, TX Phone (210) Fax (210) INSTRUCTIONS FOR
 Fax (210) INSTRUCTIONS FOR") National Optical & Scientific Instruments Inc. 6508 Tri-County Parkway Schertz, TX 78154 Phone (210) 590-9010 Fax (210) 590-1104 INSTRUCTIONS FOR MODELS 131, 132, 131-CLED & 132-CLED COMPOUND MICROSCOPES
National Optical & Scientific Instruments Inc. 6508 Tri-County Parkway Schertz, TX 78154 Phone (210) 590-9010 Fax (210) 590-1104 INSTRUCTIONS FOR MODELS 131, 132, 131-CLED & 132-CLED COMPOUND MICROSCOPES
Professional Entertainment Technology. imove 50SR. Innovation, Quality, Performance 21-
 Innovation, Quality, Performance 21- imove 50SR User Guide Professional Entertainment Technology EC Declaration of Conformity We declare that our products (lighting equipments) comply with the following
LED Colour Flood 10W / 30W RGB LED floodlight. user manual
 LED Colour Flood 10W / 30W RGB LED floodlight user manual Musikhaus Thomann e.k. Treppendorf 30 96138 Burgebrach Germany Telephone: +49 (0) 9546 9223-0 E-mail: info@thomann.de Internet: www.thomann.de
Stereo Turntable System
 3-866-873-15(1) Stereo Turntable System Operating Instructions OWNER S RECORD The model and serial numbers are located at the rear. Record the serial number in the space provided below. Refer to them whenever
INSTRUCTIONS FOR MODEL C-1028 COMPOUND MICROSCOPE
 INSTRUCTIONS FOR MODEL C-1028 COMPOUND MICROSCOPE Eyepiece (ocular lens) Eyepiece tube Head of microscope Objective turret (nosepiece) Arm Objective lens Stage Clips Condenser lens Stage Safety rack stop