Operation Instruction Manual VRCP-65
|
|
|
- Megan Parsons
- 6 years ago
- Views:
Transcription


1 Operation Instruction Manual Page 1 of 37
2 Content 1. Appearance Wiring Connection Front panel description Main Menu Settings Apple CarPlay Radio SiriusXM Operation DISC USB BT Audio BT Phone Aux IN Rear Camera E-Link Remote Control Specification Sirius, XM and all marks and logos are trademarks of Sirius XM Radio Inc. All rights reserved. Page 2 of 37


3 1. Appearance Main Menu CarPlay Menu Page 3 of 37
 Page 4 of")
4 2. WIRING CONNECTION SiriusXM Tuner Input (SiriusXM Connect tuner and subscription required) Page 4 of 37

5 3. FRONT PANEL Description 1 IR SENSOR IR Remote control signal receiving windows. Max distance is 6-8 meters, in 45 degree. 2 POWER Turn Power on or off. During power OFF, press Power button to turn ON the Head unit. During the unit is ON, long press power button to turn OFF the Head unit 3 Home In any mode, touch the Home button to enter to the Main Menu. 4 SIRI In CarPlay mode, touch the SIRI button to start the Apple SIRI function. 5 MUTE To toggle Mute and unmute 6 VOL+ Increment the Volume level (0~50). 7 VOL- Decrement the Volume level (50~0). 8 EJECT Insert or eject the disc. 9 RESET To reset the Head unit for any reason, use a ball pen or pin to press the RESET button. After reset the head unit, the head unit will be restart, all parameter and setting will be kept as pervious status Page 5 of 37
 and Phone The MODE icon in grey mean the corresponding function is not ready or proper device have not been connected. Touch the corresponding MODE icon to enter playing mode.")
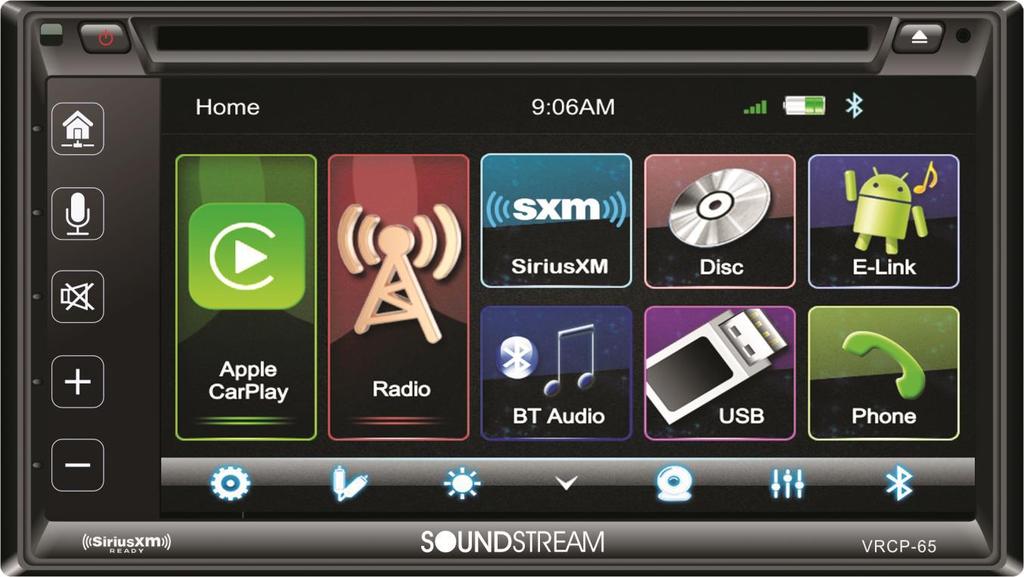
6 4. MAIN MENU is a Two Din Car Audio with the following functions: Apple CarPlay, Radio, SiriusXM, Bluetooth Audio, Disc (DVD), USB, E-link (Android 5.0 or above smartphone) and Phone The MODE icon in grey mean the corresponding function is not ready or proper device have not been connected. Touch the corresponding MODE icon to enter playing mode. Hidden soft button bar A hidden pop up soft button bar is located at the bottom. Touch the icon to shown the soft button bar. Touch the to hidden. Pop up the soft button bar Hidden the pop up soft button bar Setup, to enter the Settings Menu AUX IN, to enter the AUX and A/V IN interface Dimming, to change Daylight or Night (If lighting detect is OFF in Display Setting) Rear Camera, to enter the camera setting mode EQ Setting, to enter the Audio EQ setting menu Bluetooth pairing Page 6 of 37


7 5. Settings Touch the icon to enter the Setup menu. The Setup menu is included System Settings, Display Settings, Audio & EQ Settings, Disc & DVD Settings, Bluetooth Settings and Rear Camera Settings System Settings The System Settings allow the user to set up the Language, Display Time, Date & Time, Beep Tone, Factory Reset and About Language Display Time: ON/ OFF - To select display full format date time Page 7 of 37
, setting the date and time Beep")


8 Date & Time: - To setting Time display format (12H or 24H), setting the date and time Beep Tone: On/Off - To set the touch button beep tune On or Off Factory Reset - To reset the default factory setting. About - To display the Unit Hardware and Firmware version Page 8 of 37


9 Display Settings Below is the Display setting menu, user can select Lighting Detect, Daylight Dimming Level, Night Dimming Level, Illumination and Wallpaper. Lighting Detect: On/Off Daylight Dimming Level: 0 8 Night Dimming Level: -8 0 Illumination: Red/Yellow/Blue/Green/White Wallpaper User can select the preset wallpaper or select the picture in USB driver as the wallpaper. Touch the corresponding picture to select the prefer background. Touch +, the head unit will search the USB photo file for wallpaper. Select a picture and touch OK to add the wallpaper Page 9 of 37


10 Audio & EQ Settings Below shown is the Audio Setting Menu Balance/Fader: Touch the + or of Balance/Fade to tune for the driver and passenger preference. The value of Balance (Left 15 Right 15) and Fade (Front 15 Rear 15) Touch Reset to set both Balance and Fade to zero Subwoofer Output On/Off Subwoofer Filter OFF/ 50Hz/ 80Hz/ 120Hz/ 160Hz Subwoofer Time Align 0 18ms 10-Band Equalizer 10 band of EQ tuning, slide the EQ bar to tune each band frequency level according to user preference. Touch Reset to set all Band to 0. Or user can touch < or > at the bottom to select the following preset EQ: OFF/Custom/ Jazz/ Hip-Hop /Pop/Rock/R&B Page 10 of 37

 Pairing > (To start the pairing) Device Name: shown the connected phone or device Clear Records (To clear the device")
11 Disc & DVD Settings Touch the Disc/DVD Settings from the menu to enter the Disc/DVD setting interface. TV Aspect Select between 16:9 and 4:3 aspect ratio DVD Menu Language: DVD Audio Language: DVD Subtitle Language: Bluetooth Settings Touch the Bluetooth Settings from the setting menu will be shown below Connection: On/Off (Select Bluetooth connection on or off) Pairing > (To start the pairing) Device Name: shown the connected phone or device Clear Records (To clear the device list records) Page 11 of 37


12 Rear Camera Setting Touch Rear View Camera in the Setting Menu to enter rear camera setting interface as follow: Rear Camera Input: On/Off Rear Camera View: Normal/Reverse Parking Assist Guide: On/Off Parking Assist Guide Adjustment Touch > to enter Parking Assist Guide Adjustment interface to show the below screen Select the adjust position and Touch / / / to adjust. Touch Reset to resume the default Parking Assist Line Page 12 of 37

13 6. Apple CarPlay Plug the iphone (iphone 5 or latter models, and ios 7.1 or above) through the lightening cable to the USB port of the Head unit. The iphone will be shown the CarPlay. The Head unit will enter the CarPlay interface, the APP that support the CarPlay feature will be displayed on the Head Unit as shown below. Touch the corresponding APP can operation the operation, touch the go back to the CarPlay interface. button to SIRI In CarPlay mode, user can talk to SIRI to control the CarPlay function. Press button to start the SIRI function, or touch the button for 2 second or the HOME button of iphone in the CarPlay Home screen to talk to SIRI for playing music, GPS Notice: For the SIRI function in the Head unit, the Microphone has to been connected. In CarPlay model, touch button or Main menu icon to enter the Head unit main menu Page 13 of 37

14 7. Radio Mode Touch the Radio mode icon to enter Radio mode Touch FM can change between FM1=>FM2=>FM3 Touch AM can change between AM1=>AM2 Touch SiriusXM to enter SiriusXM Mode, if a SiriusXM tuner is connected with the unit. *Note - A SiriusXM Connect Vehicle Tuner and Subscription are required and sold separatly. Touch for Prescan search, each scanned station will be play for 3 sec, touch again to stop. Touch it for the Auto Scan searching. Touch it to enter EQ setting Short touch for Tune-, long touch for Seek-. Short touch for Tune+, long touch for Seek+. Preset channel, Six preset buttons store and recall stations for each band. Touch and slide the preset channel can switch to next band FM1 / FM2 / FM3 or AM1 / AM2 Slide the frequency to Seek +/- to next station Store a Station 1. Tune radio to desired station. 2. Touch and hold the one of the preset channel button for more than 3 seconds, then the preset buttons will be highlighted on the screen, and the preset station will be store. Page 14 of 37

15 8. SiriusXM Operation Only SiriusXM brings you more of what you love to listen to, all in one place. Get over 140 channels, including commercial-free music plus the best sports, news, talk, comedy and entertainment. Welcome to the world of satellite radio. A SiriusXM Vehicle Tuner and Subscription are required. For more information, visit After installing your SiriusXM Connect Vehicle Tuner and antenna, power on your and select SiriusXM mode. You should be able to hear the SiriusXM preview channel on Channel 1. If you cannot hear the preview channel, please check the installation instructions to make sure your SiriusXM Connect tuner is properly installed. After you can hear the preview channel, tune to Channel 0 to find the Radio ID of your tuner. In addition, the Radio ID is located on the bottom of the SiriusXM Connect Vehicle Tuner and its packaging. You will need this number to activate your subscription. Write the number down for reference. Note: the SiriusXM Radio ID does not include the letters I, O, S or F. In the USA, you can activate online or by calling SiriusXM Listener care: Visit Call SiriusXM Listener Care at For Canadian Subscriptions, please contact: Visit Call XM Customer Care at As part of the activation process, the SiriusXM satellites will send an activation message to your tuner. When your radio detects that the tuner has received the activation message, your radio will display "Subscription Updated". Once subscribed, you can tune to channels in your subscription plan. Note, the activation process usually takes 10 to 15 minutes, but may take up to an hour. Your radio will need to be powered on and receiving the SiriusXM signal to receive the activation message. To enter SiriusXM Mode, touch the SXM icon on the Main Menu. Page 15 of 37


16 If the screen is shown Check Tuner as below, check the SiriusXM tuner connection. Signal Strength The Top Left corner of the screen is showing the Signal Strength of the SiriusXM satellite SiriusXM Signal is Excellent SiriusXM Signal is Good SiriusXM Signal is Weak No SiriusXM Signal In SiriusXM mode, SiriusXM icon is highlighted. Touch FM1 to go to FM radio Touch AM1 to go to AM radio Press to go to the next channel Press to go to the pervious channel Preset Stations is shown at the bottom, six preset buttons store and recall stations for each band. Channel Name Channel Number Artist Name / Content Info Song Title Category The following functions are also supported Browse function Artist & Song Alerts Direct Tune function EQ Setting function SiriusXM Setting Menu Page 16 of 37

17 Artist and Song Alert While listening to SiriusXM Satellite Radio, user can mark Artists and/or Songs for which you wish to be alerted. The radio will display an Alert message when a matching artist or song is found on another channel. Then user can choose if you want to tune to that favorite or user can ignore the alert and stay on your current channel. To store an artist or song title, touch on the "artist" or "Song" metadata on the display. User will then be prompted to set the alert for the Artist or the Song Title. User will be alerted when one of your stored artists or songs is playing on another channel. If multile alerts happen at the same time, or the alert gets dismissed, user can touch the ALRT button to list the channels that are currently playing your artist or song. Channel Browse Touch List. to browse the channel listing. User can browse by select the Channel List and Category Channel List Touch Channel button at Left side to show the channel listing Slide the bar at right to browse the channel Touch Channel button at top right corner to change the display different Metadata as Channel Name, Song Title, Artist/Category Name, Content Info and Category Name Page 17 of 37


18 Category List Touch the Category for the Category list The channel will be shown according to different Category. Touch < or > to select different Category. Touch Channel button at top right corner to change the display different Metadata as Channel Name, Song Title, Artist/Category Name and Content Info. Direct Tune Press to shown the direct tune interface, user can direct enter the channel number and touch to go to the desire channel. Press backspace to clear the pervious digit SiriusXM Setting Menu Touch to enter the SiriusXM setting menu. It allows user to Change Passcode, Lock Channel and check the Version. Page 18 of 37


19 Change Passcode Touch > of the Change Passcode to show the below screen. Input the passcode by using the keypad. Press to clear the pervious digit if input wrong. Touch to confirm input. If the passcode is correct, the below screen will be shown to allow user to Enter NEW Passcode. Input a new 4 digits passcode and select to confirm the new passcode Input the passcode again and press to confirm, then the passcode can be successfully changed. Lock Channel Press > of the Lock Channel in SiriusXM setting menu to enter the Lock channel interface as below. Input the passcode and touch to confirm, press to backspace to remove the pervious digit if input wrongly If the passcode is correct, the unit will enter the lock channel list, select the channel for any channel that has been locked. Tap the locked channel again to remove from the locked channel list. The lock icon will be shown that that you would like to lock. Page 19 of 37

; 5.")
20 Version Press Version in the menu, the below screen will be shown the Software version information Reset SiriusXM passcode The default SiriusXM passcode is 0000, If you forget the passcode, follow the steps below to restore the unit to the default. 1. Enter Settings; 2. Set the time format is 24H and the date/time to :01; 3. Enter SiriusXM mode and select direct tune; 4. Input the channel number 9992(the display only can show 999); 5. Press confirm to reset the SiriusXM passcode to default Radio ID Tune to channel 0 to display the Radio ID. you can use channel up/down or direct tune. Page 20 of 37
21 Troubleshooting On-Screen Display Advisory Message Cause Explanation/Solution Check Antenna Check Antenna The radio has detected a fault with the SiriusXM antenna. The antenna cable may be either disconnected or damaged. Verify that the antenna cable is connected to the SiriusXM Connect Vehicle Tuner. Inspect the antenna cable for damage and kinks. Replace the antenna if the cable is damaged. Check Tuner Check Tuner The radio has difficulty communicating with the SiriusXM Connect Vehicle Tuner. The tuner may be disconnected or damaged Verify that the SiriusXM Connect Vehicle Tuner cable is securely connected to the radio SiriusXM connector/ cable. If the problem persists, disconnect and reconnect the tuner and then contact your dealer. No Signal No Signal The SiriusXM Connect Vehicle Tuner has difficulty receiving the SiriusXM satellite signal. Verify that your vehicle is outdoors with a clear view of the southern sky. Verify that the SiriusXM magnetic mount antenna is mounted on a metal surface on the outside the vehicle. Move the SiriusXM antenna away from any obstructions. Inspect the antenna cable for damage and kinks. Replace the antenna if the cable is damaged. If the problem persists, disconnect and reconnect the tuner and then contact your dealer. Channel Not Available Channel Not Subscribed Channel Locked Please Enter the Lock Code Incorrect Passcode Entered Channel Not Available Channel Not Subscribed Channel Locked Please Enter the Lock Code Incorrect Passcode Entered The channel that you have requested is not a valid SiriusXM channel or the channel that you were listening to is no longer available. You may also see this message briefly when first connecting a new SiriusXM Connect Vehicle tuner. Visit for more information about the SiriusXM channel lineup. The channel that you have requested is not included in your SiriusXM subscription package or the channel that you were listening to is no longer included in your SiriusXM subscription package The channel that you have requested is Locked by the radio User prompted to enter the lock/unlock code. The unlock code entered by the user is incorrect The channel that you have requested is not a valid SiriusXM channel or the channel that you were listening to is no longer available. You may also see this message briefly when first connecting a new SiriusXM Connect Vehicle tuner. Visit or for more information about the SiriusXM channel lineup. Questions about your subscription in the United States please visit or call SiriusXM Listener Care at Questions about your subscription in Canada please visit or call XM Listener Care at See the section on Lock Channel, page 18 for more information on the Lock Channel feature and how to access locked channels Enter the four digit code to unlock the channel Input the correct four digit code to unlock the channel. Reset lock code to default following instructions on page 19 Page 21 of 37

22 9. Disc Inserting a Disc Insert a Disc to the slot of the head unit, pull the disc or press the Eject button to make the disc into the deck. Touch the Disc to perform Disc playing function. Ejecting a Disc During disc playing or inside the deck, press the Eject button to stop playing the disc and eject the disc. After the disc is ejected and press the Eject button, the disc will go inside to the unit. Playing CD/MP3 Disc If playing the CD/MP3 Disc, the following will be shown. Press it to skip to the next folder (for MP3) Press it to search song files or folder list. Press it to skip to the previous folder (for MP3). Short press it to skip to the previous track,long press it to fast reverse. Pause/Play button. Short press it to skip to the next track, long press it to fast forward. Repeat: For CD: Press for switch between Repeat All and Repeat One For MP3: Press for select Repeat All, Repeat One or Repeat Directory Press it to turn on/off random play. Press it to turn on/off the Audio Settings menu to adjust the EQ. Press it to select songs. Return button. Page 22 of 37
 is parking Short press it to skip to the previous track, long press it to fast reverse.")


23 DVD/VCD Playback The Video display can be watched only during the Car is Parked Parking wiring: High level (+12v or NC) is driving; low level (ground) is parking Short press it to skip to the previous track, long press it to fast reverse. / Pause/Play button. Short press it to skip to the next track, long press it to fast forward. Touch it to select subtitle language Touch to open/close the navigation button Touch it to show the tools bar Touch it to select Chapter Touch it to select Title Press it to select repeat All, Repeat One and Repeat Off Touch it to select subtitle language or sub off. Touch it to change the viewing angle. Touch it to adjust the Brightness/Contract/Color Touch it to hidden the tools bar Direct search 1. Touch the button, 2. Touch the button or to select a chapter or title directly using the on-screen display direct entry menu display. Enter the Direct Search menu, 3. Enter the chapter or Title Digital, touch that starts the function. Page 23 of 37
, MP3, WMA, Flac, Dolby Digital, DTS, 3. Supported Picture Format: JPEG, BMP, PNG. - Max file size is 10Mbytes or Max. Resolution 1200 1200. 4.")
24 Playing Multimedia Files in Disc is supporting the below disc types and Multimedia file format. 1. Supported DISC Format: CD-DA /CD-TEXT/Video CD/DVD/Multi session 2. Supported Audio Format: PCM(.wav ), MP3, WMA, Flac, Dolby Digital, DTS, 3. Supported Picture Format: JPEG, BMP, PNG. - Max file size is 10Mbytes or Max. Resolution Supported Video Format: MPEG1/MPEG2/MPEG4 Simple Profile (.mp4 (MPEG-4 Simple Profile + AAC), JPEG, DVD-Video, DVD-VR When the disc is included different type of Multimedia, Touch to shown the list. Select Audio or Music files Select Movie or Video files. Select Picture files Return to playing pervious file Touch the corresponding icon to list the files, touch the filename to playback the file. Touch it to return to the file list Repeat Play, touch to select repeat play once, directory or all Touch to rotate the picture anti-clockwise for 90 degree (for picture playback) Touch to rotate the picture clockwise for 90 degree (for picture playback) Touch to set the video Brightness, Contrast and Color (for video playback) Page 24 of 37


25 10. USB Plug the USB to the connector, the USB icon will have color. Touch the USB icon to enter the USB playback mode. The Head unit default to play the Audio in the USB driver. Press to go to the next folder. Press to search Audio, Video or Picture files. Press to go to the previous folder. Short press it to skip to the previous track, long press it to fast reverse. Pause/Play button. Short press it to skip to the next track, long press it to fast forward. Repeat Play Press it to select Repeat All, Repeat One or Repeat Directory. Press it to turn on/off random play. Press it to select the Audio setting or set the prefer EQ of each band in Custom mode Audio, Video, Picture play back is default audio play back, it also support to play picture and video. If there is other multimedia files in the USB, touch to browse the folder and file list of the USB driver. Select the multimedia type Select Audio or Music files Select Movie or Video files. Select Picture files Return to playing pervious file Touch the corresponding icon to select different type of multimedia file list will be shown. Select the file to play. Page 25 of 37
 Touch to rotate the picture clockwise for 90 degree (for picture playback) Touch to set the video Brightness, Contrast and Color (for video playback)")

26 Picture and Video Playback Touch it to return to the file list Repeat Play, touch to select repeat play once, directory or all Touch to rotate the picture anti-clockwise for 90 degree (for picture playback) Touch to rotate the picture clockwise for 90 degree (for picture playback) Touch to set the video Brightness, Contrast and Color (for video playback) 11. Bluetooth Audio Touch the BT Audio icon to enter Bluetooth Audio playing mode. If the Bluetooth is connected, the music will be playing as following shown. If the Bluetooth is not connected, press Reconnect to connect the paired phone or Pairing to pair the new device. Bluetooth Pairing Press Pairing the Pairing Mode screen will be shown as below Page 26 of 37
27 Turn On the Bluetooth of the Mobile phone/bluetooth device, you can see the. Select the for pairing and connection Bluetooth Audio Playback Press it to skip to the next folder. Press it to open the music file list or folder (support iphone). Press it to skip to the previous folder. Short press it to skip to the previous track. Pause/Play button. Short press it to skip to the next track. Repeat, press for select between Repeat All, Repeat One or Repeat Directory Press it to turn on/off random play. Press it to turn on/off the Audio Settings menu to adjust the EQ. Press it to select songs. Return button. Setting the Bluetooth output level Page 27 of 37
, user can through the Head unit to make a phone call.")


28 12. Phone Touch the Phone icon in main menu to go to Phone mode. After the phone connected with the Head Unit via Bluetooth (HFP), user can through the Head unit to make a phone call. Please note it needs to connect the microphone for phone call. Dial Pad, tap Dial pad button to enter call mode Call logs, to show the call record, missed, received and dialed calls Contact, to show the phonebook connected phone BT Setup, to set auto answer and microphone gain Make a Call or Accept the Incoming Call Backspace, to clear the pervious dial digit Dial a Call 1. Touch the icon to the above screen will appear. 2. Using the keypad, touch 0-9,*, #, to enter the phone number you wish to dial. If you enter an incorrect number, touch the icon on the keypad to delete the incorrect number. 3. Once the correct number appears on the screen, touch the icon. To go back dialing interface, touch the return icon at the upper right corner of the screen. 4. To end the call, touch the on the screen Page 28 of 37


29 Receive an incoming Call If the Phone is connect with the unit via Bluetooth, when an incoming call, the below screen will be shown Press to receive the Call or to hang the call Interchange between phone and head unit ON/OFF the Microphone function Display the Dial Pad Call Logs Touch the icon to display the Call Combined list. Slide the bar at right side up and down to display a Call logs up to 20 records. Page 29 of 37


30 Contacts Touch the icon to access the phone book of the connected phone. To make a call from the phone book, simply touch the contact name. BT Setup Auto Answer Mic Gain On/Off Low/ Middle/High Page 30 of 37

31 13. AUX IN The Audio/Video source with RCA cable can through the Head unit to play the Audio/Video. Plug the RCA to the corresponding A/V socket. Touch the to pop up the function bars and touch to view the playing Audio/Video. The Audio and Video will via the RCA cable to the Head unit If there is no Video signal the below screen will be shown Page 31 of 37
 is reverse; low level (ground or NC) is normal User also can touch the to pop up the")

32 14. Rear Camera There is a RCA socket for the Rear camera video signal to display on the Head unit. The Reverse wire in High level (+12V) is reverse; low level (ground or NC) is normal User also can touch the to pop up the function bars and touch to view the Rear camera. Rear Camera Settings menu Rear Camera Input: On/Off Rear Camera view: Normal/ Reverse Parking Assist Guide: On/Off Parking Assist Guide Adjust Touch the / / / buton to adjust the assist line to guide the car position Page 32 of 37
33 15. E-Link The have the E-Link function to allow the Android 5.0 or above smartphone display on the Head unit screen. Install Auto Link User need to install the Autolink App to the Android phone. When the Android phone first time connected to the via USB, the phone will show a website link to download the Autolink application pack. Download and install the apk file on the Android phone. After installed the Autolink App, the Android phone can use the E-Link function. Connection Connect the Android phone and head unit via USB cable, the Android phone display will be shown on the Head unit screen. User also allows using the touch panel of the head unit to control the Android phone. Page 33 of 37
34 16. Remote Control 1 Power 4 Answer 2 Disc 5 Hang up 3 SiriusXM 6 Radio 10 Up 7 Carplay 11 VOL+ 8 USB 12 ENTER/MENU 9 Phone 13 VOL- 15 Right 14 Left 16 SEEK+/ 19 EJECT 17 SEEK-/ 20 Number Key 18 Down 21 OPEN/TILT 22 Play/Pause 1. Power Long press it to power off 2. Disc Press it to select the disc play mode if there is a disc in the unit. 3. SiriusXM Press it to select the SiriusXM mode if the unit is connected with a SiriusXM tuner. 4. Answer BT phone is connected, press it to accept call. 5. Hang up BT phone is connected, press it to end call. 6. Radio Press it to select the Radio mode. 7. Carplay Press it to select the CarPlay mode if the unit is connected with iphone. 8. USB Press it to select the USB mode if there is a USB device in the unit. 9. Phone Press it to select the BT Phone mode. 10. UP In the radio mode, press it to select a preset station up. In the USB mode, press it to select a folder up. In the disc mode, press it to select the DVD menu item up. Page 34 of 37
35 11. VOL+ Press it to increment volume step, long press to volume rapid up. 12. ENTER/MENU In disc mode, press it to confirm selection or enter setting for DVD menu. 13. VOL- Press for decrement the volume step, long press for volume rapid down. 14. LEFT In the radio mode, short press for seek-, long press for tune-. In the disc mode, press to select the DVD menu item left. 15. RIGHT In the radio mode, short press for seek+, long press for tune+. In the disc mode, press it to select the DVD menu item right. 16. SEEK+/ In Radio mode, short press for next preset channel, long press for SEEK+ In SiriusXM mode, short press for next preset channel, long press to browse the channel up. In USB/BT/Disc mode, short press for next track, long press for fast forward 17. SEEK-/ In Radio mode, short press for pervious preset channel, long press for SEEK- In SiriusXM mode, short press for pervious preset channel, long press to browse the channel down In USB/BT/Disc mode, short press for previous track, long press for fast reverse 18. DOWN In the radio mode, press it to select a preset station down. In the USB mode, press it to select a folder down. In the disc mode, press it to select the DVD menu item down. 19. EJECT Press it to eject the disc, Press it to again to insert the disc. 20. Numeric Key In Radio and SiriusXM mode, 1 to 6 can use to select the preset channel. In BT Phone mode, the numeric key can act for number dialing 21. OPEN/TILT No function for 22. PLAY/PAUSE Play/Pause button Page 35 of 37
36 17. Specification General Power Supply..... DC10~16Volts Grounding System Negative Ground Current Drain A(Max.) Power Output W/channel(Max.) Speaker Impedance ~8ohms per channel Frequency Response Hz~20KHz Operating Temperature ~+60 Dimensions mm(W) 175mm(D) 100mm(H) TFT Display TFT Screen size inch Resolution pixels FM Radio Frequency Range (USA) ~107.9MHz Frequency Range (Europe) ~108MHz Usable Sensitivity (S/N=30dB) dB S/N Ratio dB Stereo Separation dB AM/MW Frequency Range (USA) ~1710KHz Frequency Range (Europe) ~1620KHz Usable Sensitivity(S/N=20dB) dB S/N Ratio... 45dB DVD/CD S/N Ratio... 60dB Channel Separation..... >50dB Line-Out/Subwoofer Output Maximum Output Level (10K ohms load) Vrms Subwoofer Time Align. 0~18ms Page 36 of 37
37 FCC Notes WARNING! Changes or modifications to this unit not expressly approved by the party responsible for compliance could void the user s authority to operate the equipment. NOTE: This equipment has been tested and found to comply with the limits for a Class B digital device, pursuant to Part 15 of the FCC Rules. These limits are designed to provide reasonable protection against harmful interference in a residential installation. This equipment generates, uses and can radiate radio frequency energy and, if not installed and used in accordance with the instructions, may cause harmful interference to radio communications. However, there is no guarantee that interference will not occur in a particular installation. If this equipment does cause harmful interference to radio or television reception, which can be determined by turning the equipment off and on, the user is encouraged to try to correct the interference by one or more of the following measures: - Reorient or relocate the receiving antenna. - Increase the separation between the equipment and receiver. - Connect the equipment into an outlet on a circuit different from that to which the receiver is connected. - Consult the dealer or an experienced radio/ TV technician for help. Page 37 of 37
MR100 INSTALLATION/OWNER'S MANUAL Digital Media Marine Receiver
 MR100 INSTALLATION/OWNER'S MANUAL Digital Media Marine Receiver Preparation MR100 INSTALLATION Please read entire manual before installation. Before You Start Disconnect negative battery terminal. Consult
INSTRUCTION MANUAL RFX9900
 INSTRUCTION MANUAL RFX9900 l Capacitive Touch Control Panel l 7-line Dot Matrix Display l SiriusXM-Ready TM l FM/AM Stereo Radio l HDMI Output l CD-DVD Changer l USB SD Audio/Video Play l DMD Digital Music
NA1610 AV Media Receiver User Manual
 NA1610 AV Media Receiver User Manual Enjoy the Lifestyle of In-Car Entertainment FCC ID :2AB7S-NA1610 FCC Compliance Statement: This device complies with Part 15 of the FCC rules. Operation is subjected
WALLMOUNT Entertainment System
 Wiring Diagram AV IN AV OUT SUBWOOFER OUT HDMI JACK R R R L L L IR REMOTE JACK AUDIO IN ANTENNA WIRING CONNECTING SOCKET Specification GENERAL Supply Voltage Current Consumption Power Output Number of
FUSION MS-RA70NSX O W N E R S M A N U A L ENGLISH
 FUSION MS-RA70NSX O W N E R S M A N U A L ENGLISH FUSIONENTERTAINMENT.COM 2018 Garmin Ltd. or its subsidiaries All rights reserved. Under the copyright laws, this manual may not be copied, in whole or
FUSION Apollo RA770 O W N E R S M A N U A L ENGLISH
 FUSION Apollo RA770 O W N E R S M A N U A L ENGLISH FUSIONENTERTAINMENT.COM 2018 Garmin Ltd. or its subsidiaries All rights reserved. Under the copyright laws, this manual may not be copied, in whole or
AM/FM/USB CD/MP3 PLAYER WITH BLUETOOTH
 INSTALLATION NOTES AM/FM/USB CD/MP3 PLAYER WITH BLUETOOTH 1. Please read these installation and operation instructions before installation. 2. Make sure to connect all other wires before power connection.
MXD378SXM INSTALLATION/OWNER'S MANUAL. AM/FM/SiriusXM - Ready Receiver with Bluetooth / Detachable Face (Includes SiriusXM Connect Tuner and Antenna)
") MXD378SXM INSTALLATION/OWNER'S MANUAL TM AM/FM/SiriusXM - Ready Receiver with Bluetooth / Detachable Face (Includes SiriusXM Connect Tuner and Antenna) MXD378SXM INSTALLATION Preparation Please read entire
MXD378SXM INSTALLATION/OWNER'S MANUAL TM AM/FM/SiriusXM - Ready Receiver with Bluetooth / Detachable Face (Includes SiriusXM Connect Tuner and Antenna) MXD378SXM INSTALLATION Preparation Please read entire
JRV4100 Owner s Manual
 JRV4100 Owner s Manual Content Button Description.02 Remote Control..03 Main Menu...04 Radio Operation.04 USB /SD Operation..06 Settings Operation..06 Bluetooth Operation..08 Aux-In Operation 09 Troubleshooting..11
INSTRUCTIONS Please read all instructions carefully before using
 INSTRUCTIONS Please read all instructions carefully before using CONTENTS 1.Basic Operation Panel Introduction 02 Remote control function 04 Turn the Unit On/Off 06 Access main interface 06 U Disc/SD Card
Content. 1 Welcome Your phone Phone overview Functions of Keys Getting started... 6
 User Manual -1- Content 1 Welcome... 3 2 Your phone... 4 2.1 Phone overview... 4 2.2 Functions of Keys... 5 3 Getting started... 6 3.1 Installing the SIM Cards and the Battery... 6 3.2 Linking to the Network...
Stratus 6 Zone Kit Installation and Operation Guide
 Stratus 6 Zone Kit Installation and Operation Guide Kit contents: Stratus 6 radio Docking cradle Self-adhesive wall mount for docking cradle (with alcohol wipe) Screws to attach wall mount to docking cradle
Installation Table of Contents
 1 Installation Table of Contents Pages 1. Introduction 4 2. Precautions 4 3. Compatibility 5 4. Dipswitch Settings 5 5. Installation 6-7 6. Operation 8-16 2 Neo Gateway 2.0 & Optional Add-ons Neo Gateway
FCC NOTICE: FCC STATEMENT:
 FCC NOTICE: This equipment has been tested and found to comply with the limits for a Class B digital device, pursuant to Part 15 of the FCC Rules. These limits are designed to provide reasonable protection
MARINE HEADUNIT MS-RA50
 MARINE HEADUNIT MS-RA50 USER INTERFACE AND CONTROLS LICENSING CONTROL PANEL LAYOUT Apple, the Apple logo, ipod and itunes are trademarks of Apple Computer, Inc., registered in the US and other countries.
Models with touchscreen Touchscreen Operation*
 Touchscreen Operation* Use simple gestures including touching, swiping, and scrolling to operate certain audio functions. Some items may be grayed out during driving to reduce the potential for distraction.
AUDIO AND CONNECTIVITY
 AUDIO AND CONNECTIVITY Learn how to operate the vehicle s audio system. Basic Audio Operation Connect audio devices and operate buttons and displays for the audio system. USB Connection Connect a USB flash
Introduction. See page #6 for device requirements.
 W-FI CAMERA USER MANUAL Contents Introduction 4 Camera LED Indicators 5 Wi-Fi Requirements 6 Mobile Device Requirements 6 Download the Momentum App 7 Create an Account 8 Setup 10 Pairing 10 Connecting
MOBILE AUDIO SYSTEM PATVR14 USER MANUAL
 MOBILE AUDIO SYSTEM PATVR14 USER MANUAL CONTENTS Installation... 3 Mounting... 4 Wiring Connection... 5 Operation... 6 Location of the keys... 6 Power on/off the unit... 7 Main menu... 7 Setup... 7 Reset
MP Music & Video Player VOL. User Guide
 MP414-4 Music & Video Player 4 VOL User Guide In the box VOL slick MENU VOL Player Headphones USB Cable MP414-4 Music & Video Player 4 User Guide User Guide CD Location of controls 1 OFF ON 2 slick MENU
WMC Remote Control and Receiver RRC-127 User Manual
 Welcome Congratulations on your purchase of the Remote Control and Receiver for Windows Media Center. The infrared (IR) remote control and receiver let you access and manage your Media Center PC and other
AUDIO AND CONNECTIVITY
 AUDIO AND CONNECTIVITY Learn how to operate the vehicle s audio system. Basic Audio Operation Connect audio devices and operate buttons and displays for the audio system. USB Port Connect a USB flash drive
AUDIO AND CONNECTIVITY
 AUDIO AND CONNECTIVITY Learn how to operate the vehicle s audio system. Basic Audio Operation Connect audio devices and operate buttons and displays for the audio system. USB Port Connect a USB device,
MDM300 INSTALLATION/OWNER'S MANUAL. CD Marine Receiver
 MDM300 INSTALLATION/OWNER'S MANUAL CD Marine Receiver Preparation MDM300 INSTALLATION Please read entire manual before installation. Before You Start Disconnect negative battery terminal. Consult a qualified
AX1300BT SPECIFICATIONS: MECHLESS AM/FM MULTIMEDIA PLAYER RECEIVER BLUETOOTH w BUILT-IN SPEAKERS DESIGNED FOR AUSTRALASIAN CONDITIONS
 MECHLESS AM/FM MULTIMEDIA PLAYER RECEIVER BLUETOOTH w BUILT-IN SPEAKERS SPECIFICATIONS: GENERAL: Mechless Fixed Face Panel Ultra Memory Power Backup Built-In Speakers ISO DIN Mounting ISO Wiring harness
FCC NOTICE: FCC STATEMENT: FCC Radiation Ex posure Statement:
 FCC NOTICE: This equipment has been tested and found to comply with the limits for a Class B digital device, pursuant to Part 15 of the FCC Rules. These limits are designed to provide reasonable protection
OVERHEAD AUDIO UNIT Model A10049
 R R R OVERHEAD AUDIO UNIT Model 2879459 21A10049 R NOTES APPENDICES TROUBLESHOOTING Resetting the unit Should the overhead unit become unresponsive: Remove power for 5minutes and then reconnect. CONTENTS
OWNER S MANUAL G4-RM55OO
 OWNER S MANUAL G4-RM55OO INSTALLATION... 3-4 WIRING CONNECTION... 5 OPERATION... 6 LOCATION OF THE KEYS... 6 POWER ON/OFF THE UNIT... 7 MAIN MENU... 7 SETUP... 7 RESET FUNCTION... 9 SLIGHTFOG AFTER OPERATION...9
FUSION MS-BB100 B L A C K B O X E N T E R T A I N M E N T S Y S T E M O W N E R S M A N U A L ENGLISH
 FUSION MS-BB100 B L A C K B O X E N T E R T A I N M E N T S Y S T E M O W N E R S M A N U A L ENGLISH FUSIONENTERTAINMENT.COM 2015 2016 Garmin Ltd. or its subsidiaries All rights reserved. Under the copyright
Smart Interact Navigation Entertainment System user manual
 Smart Interact Navigation Entertainment System user manual Contents 1. Attentions.2 2. Features...2 3. Installation...3 4. Panel and Key...... 3 5. Power on operation. 4 6. Radio operation...6 7. CD/DVD/USB/SD
Owner s Manual AWM910 JENSEN AWM910 COMPACT DISC PLAYER RADIO CD COMPACT MUSIC SYSTEM MUTE AUX BAND AUX IN PUSH PUSH PWR VOL ALARM T/F AUD SPK A SPK B
 AWM910 Owner s Manual COMPACT DISC PLAYER PUSH 1 2 3 4 5 6 RPT SCAN RDM H M PUSH PWR VOL ALARM SET ON/OFF EQ T/F AUD RADIO CD COMPACT MUSIC SYSTEM MUTE AUX BAND CD AUX IN A B A+B JENSEN AWM910 Thank You!
Bluetooth Hands-free Car Kit S-61. Quick Start Guide
 Bluetooth Hands-free Car Kit S-61 Quick Start Guide CONTENTS WELCOME...................................... 2 S-61 OVERVIEW POSITIONING.....................................................................
DXRM57BT INSTALLATION/OWNER'S MANUAL. AM/FM Receiver with Bluetooth
 DXRM57BT INSTALLATION/OWNER'S MANUAL AM/FM Receiver with Bluetooth DXRM57BT INSTALLATION Preparation Please read entire manual before installation. Before You Start Disconnect negative battery terminal.
VX " Double DIN Multimedia Receiver. AM-FM / Pandora / Bluetooth / iphone - ipod / USB / AV In / Rear Camera In / Sirius XM Ready
 VX3228 6.2" Double DIN Multimedia Receiver AM-FM / Pandora / Bluetooth / iphone - ipod / USB / AV In / Rear Camera In / Sirius XM Ready INSTALLATION & OWNER'S MANUAL VX3228 INSTALLATION Preparation Please
MXD337BT INSTALLATION/OWNER'S MANUAL. AM/FM Marine Receiver with Bluetooth and Fixed Face
 MXD337BT INSTALLATION/OWNER'S MANUAL AM/FM Marine Receiver with Bluetooth and Fixed Face MXD337BT INSTALLATION Preparation Please read entire manual before installation. Before You Start Disconnect negative
ipod Digital Media Center AM / FM Radio
 INSTRUCTION MANUAL MULTI- ENVIRONMENT PLAYER AQ-IP-3B- AQ-IP-3B-X ipod Digital Media Center AM / FM Radio INFO TOP 1. MOUNTING PRECAUTIONS The AQ-IP-3B-X is designed for a multi environment application.
Tank II User s Manual
 Tank II User s Manual -1- Table of Contents Key Functions... 4 Getting Started... 5 Installing the SIM Card, SD Card and Battery... 5 Menu Guide... 7 Messaging... 7 Contact... 7 Audio player... 8 Call
AUDIO AND CONNECTIVITY
 Learn how to operate the vehicle s audio system. Basic Audio Operation Connect audio devices and operate buttons and displays for the audio system. USB Port Connect a USB flash drive or other audio device,
Breeze III FB201N User Manual
 Breeze III FB201N User Manual Table of Contents Getting Started... 3 Insert the SIM Card and Battery... 3 Insert the Media Card... 4 Keys and Parts... 5 Basics... 6 Display Indicators... 6 Home Screen...
INSTRUCTIONS INSTRUCTIONS PANEL INTRODUCTION
 INSTRUCTIONS INSTRUCTIONS Warning: To ensure safety while driving and to comply with laws, drivers should not watch video or operate the video device while driving. PANEL INTRODUCTION 1. PWR/VOL button
INSTRUCTION MANUAL CAR RADIO RECEIVER / MP3 PLAYER WITH BULETOOTH HAND FREE SYSTEM TUNING / SEEK UP / DOWN NEXT/ BACK BUTTON LCD DISPLAY RANDOM
 INSTRUCTION MANUAL CAR RADIO RECEIVER / MP3 PLAYER WITH BULETOOTH HAND FREE SYSTEM TUNING / SEEK UP / DOWN NEXT/ BACK LCD DISPLAY AUX TALK CANCEL/ SRC ENCODER VOLUME KNOB MENU PLAY/ PAUSE INTRO REPEAT
CONTENTS ... S-62 OVERVIEW POSITIONING GETTING STARTED... 6 HOW TO USE YOUR S OTHER FUNCTIONS TECHNICAL SPECIFICATIONS...
 Quick Start Guide CONTENTS WELCOME...................................... 2 S-62 OVERVIEW POSITIONING..................................................................... 3 4 CHARGING.......................................
A-01. Instruction Manual. Bluetooth Active Noise Cancelling Headphone
 A-01 Instruction Manual Bluetooth Active Noise Cancelling Headphone The user manual explains the features and functions of your A-01 to help ensure an optimal user experience. Product Specifications: Bluetooth
AUDIO AND CONNECTIVITY
 Learn how to operate the vehicle s audio system. Basic Audio Operation Connect audio devices and operate buttons and displays for the audio system. USB Port Connect a USB flash drive or other audio device,
Models with Display Audio Display Audio Operation
 AUDIO AND CONNECTIVITY Models with Display Audio Display Audio Operation Use simple gestures including touching, swiping, and scrolling to operate certain audio functions. Some items may be grayed out
OWNER'S GUIDE BT 390
 OWNER'S GUIDE BT 390 WIRELESS HEADPHONES Thank you for purchasing PHIATON BT 390. - Please follow the directions, and read the guidelines carefully before use. Please keep the owner s guide for future
INSTRUCTIONS PANEL INTRODUCTION. 1. / SRC button 2. IR 3. EQ button 4. MENU button 5. VOL / MUTE button 6. SD slot 7. USB slot 8.
 INSTRUCTIONS PANEL INTRODUCTION 1. / SRC button 2. IR 3. EQ button 4. MENU button 5. VOL / MUTE button 6. SD slot 7. USB slot 8. AUX slot 9. RESET 10. 11. 12. 13. 14. 15. Disk load slot BASIC FUNCTION
AVM211NAV INSTALLATION/OWNER S MANUAL
 AVM211NAV INSTALLATION/OWNER S MANUAL Multimedia Receiver with Bluetooth and Navigation featuring a 10.1" Touch Screen Display Table of Contents Page Safety Information/Precautions...................................
Models with Touchscreen Touchscreen Operation
 Models with Touchscreen Touchscreen Operation Use simple gestures including touching, swiping, and scrolling to operate certain audio functions. Some items may be grayed out during driving to reduce the
SB Channel Soundbar with Built-in Subwoofer
 SB-100 2.1-Channel Soundbar with Built-in Subwoofer P/N 34710 User's Manual SAFETY WARNINGS AND GUIDELINES Please read this entire manual before using this device, paying extra attention to these safety
FCC NOTICE: FCC WARNING:
 FCC NOTICE: This equipment has been tested and found to comply with the limits for a Class B digital device, pursuant to Part 15 of the FCC Rules. These limits are designed to provide reasonable protection
FUSION MS-RA70/MS-RA70N
 FUSION MS-RA70/MS-RA70N M A R I N E E N T E R T A I N M E N T S Y S T E M O W N E R S M A N U A L ENGLISH FUSIONENTERTAINMENT.COM 2015 2016 Garmin Ltd. or its subsidiaries All rights reserved. Under the
Models with Display Audio Touchscreen Operation*
 Touchscreen Operation* Use simple gestures including touching, swiping, and scrolling to operate certain audio functions. Some items may be grayed out during driving to reduce the potential for distraction.
SPH-DA120. English. Operation Manual. Smartphone Receiver
 Operation Manual Smartphone Receiver SPH-DA120 Be sure to read Important Information for the User first! Important Information for the User includes the important information that you must understand before
LH1. Home Kit LH1 QUICK START GUIDE. Listen to your Lynx Radio through your home stereo or powered speakers
 Home Kit LH1 Listen to your Lynx Radio through your home stereo or powered speakers QUICK START GUIDE LH1 What s in the Box? ch - ch + Lynx Home Dock Remote Control Indoor/Outdoor Home Antenna Home Power
Duo Cinema Professional Automotive Rear Seat Entertainment System
 Instruction Manual Duo Cinema Professional Automotive Rear Seat Entertainment System Regulatory Statements FCC Statement This device has been tested and found to comply with the limits for a Class B digital
AUDIO AND CONNECTIVITY
 Learn how to operate the vehicle s audio system. Basic Audio Operation Connect audio devices and operate buttons and displays for the audio system. USB Port 1. Open one of the USB covers under the front
PLMR7BTW OWNER S MANUAL. Mobile Audio System
 PLMR7BTW OWNER S MANUAL Mobile Audio System PLL Synthesizer Stereo Radio Automatic Memory Storing USB Interface SD Interface 3.5mm Input Jack Bluetooth Function 1 CONTENTS Installation... 3 Take out screw
Stereo Bluetooth Headset Manual (AVANCA D1) FCC ID: 2AGLYAVANCAD1
 FCC ID: 2AGLYAVANCAD1") Stereo Bluetooth Headset Manual (AVANCA D1) FCC ID: 2AGLYAVANCAD1 Basic Specifications Size: 31 28 9mm Weight: 17.2g(Net Weight) Charging port: Micro USB Keys: 5 (MFB button, volume+ button, volume- button,
Stereo Bluetooth Headset Manual (AVANCA D1) FCC ID: 2AGLYAVANCAD1 Basic Specifications Size: 31 28 9mm Weight: 17.2g(Net Weight) Charging port: Micro USB Keys: 5 (MFB button, volume+ button, volume- button,
2.Download the Fundo Wear from Google play store and APP store; Android phone Google play store Fundo Wear
 User manual for Bluetooth smart watch Thank you for choosing our watch devices. You can completely understand the method of using it and realize its perfect function and concise operating methods by reading
Quickstart Guide (English)
") Quickstart Guide (English) Introduction 1. Make sure all items listed in the Box Contents are included in the box. Look in the box under the foam sheet for the speaker stand rubber feet, speaker stand
Quickstart Guide (English) Introduction 1. Make sure all items listed in the Box Contents are included in the box. Look in the box under the foam sheet for the speaker stand rubber feet, speaker stand
Uconnect. 4.3/4.3S Owner s Manual Supplement
 Uconnect 4.3/4.3S Owner s Manual Supplement SECTION TABLE OF CONTENTS PAGE 1 SAFETY GUIDELINES...3 2 INTRODUCTION...5 3 RADIO MODE...9 4 DISC MODE...19 5 USBMODE...23 6 AUXMODE...27 7 BLUETOOTH MODE...29
KS-PD100. INTERFACE ADAPTER for ipod R
 INTERFACE ADAPTER for ipod R KS-PD100 Thank you for purchasing a JVC product. Please read this manual carefully before operation, to ensure your complete understanding and to obtain the best possible performance
CONTENT FUNCTION MENU... 6
 CONTENT BASIC INFORMATION... 3 Phone Instruction... 3 Interface Icons... 4 Insert SIM card... 5 Charging the battery... 5 Power on/off your phone... 5 FUNCTION MENU... 6 PHONEBOOK... 6 MESSAGING... 6 Write
Contents. Precaution. Before installing this product. Precaution... Main Menu... Radio... Play DVD... USB/SD Important safety information
 USER MANUAL Thank you for buying this XTRONS product. Please read through these instructions so you will know how to operate this unit properly. After you have finished reading the instructions, keep this
Accessories Unit Installation..03. Wire Connection 03. Parking Brake Connection 04. Speaker connection.05. Button Description.
 Content Accessories...02 Unit Installation..03 Wire Connection 03 Parking Brake Connection 04 Speaker connection.05 Button Description.06 Remote Control..07 Main Menu...09 Radio Operation.09 USB /SD Operation..10
Portable DVD Boombox with 7 LCD Display Owner s Manual
 Portable DVD Boombox with 7 LCD Display Owner s Manual 1607001 Before attempting to connect, operate or adjust this player, please read these instructions completely. Keep this manual in a safe place for
NV2200 NAVIGATION SYSTEM OWNER S MANUAL
 NV2200 NAVIGATION SYSTEM OWNER S MANUAL Contents 1. PRECAUTIONS... 3 2. FEATURES... 4 Disc (DVD/CD/VCD)... 4 Radio (AM/FM)... 4 Bluetooth... 4 USB... 5 CHASSIS... 5 GENERAL... 5 NAVIGATION... 5 CAMERA...
DVD-209 DVD-419 PRECAUTIONS
 PRECAUTIONS The lightning flash with arrowhead symbol within an equilateral triangle is intended to alert the user to the presence of uninsulated dangerous voltage within the product s enclosure that may
MATRIX model: AF62 part of the series
 MATRIX model: AF62 part of the series MATRIX Thank you for your purchase of the MEElectronics Air-Fi Matrix AF62 Stereo Bluetooth Wireless Headphones with Microphone Package Contents Bluetooth and NFC
Contents. Precaution Main Menu Radio Play DVD... 8 USB/SD AUX Input Bluetooth Navigation VMCD...
 USER MANUAL Thank you for buying this XTRONS product. Please read through these instructions so you will know how to operate this unit properly. After you have finished reading the instructions, keep this
CWA BT320 Product Information Guide
 TM Printed in China Part No. 480-900-P Version A CWA BT320 Product Information Guide IMPORTANT To get the full capability of your new Cobra Airwave 360, please read this manual. It's more than just a Bluetooth
Over the Air System Updates April 28, 2018
 Over the Air System Updates April 28, 2018 2018 Odyssey: Software Update Available INTRODUCTION The latest software contains system enhancements and bug fixes for a number of rarely found problems. INSTALLATION
THE FUTURE OF HOME ENTERTAINMENT
 CVBS 16:9 HD OSD P+M OK VOL+ VOL MUTE MOVIE MUSIC PHOTO MENU INT. MEMORY SETUP PRO. SEARCH FILE ZOOM ROTATE USER S MANUAL DAB/DAB+ Receiver DGDAB888R THE FUTURE OF HOME ENTERTAINMENT A clever. product
OVERHEAD AUDIO UNIT Model A10117
 R R R OVERHEAD AUDIO UNIT Model 2879703 21A10117 R NOTES APPENDICES TROUBLESHOOTING Resetting the unit Should the overhead unit become unresponsive: Remove power for 5minutes and then reconnect. CONTENTS
GSMR30 OWNER S MANUAL
 GSMR30 OWNER S MANUAL Version 1.0 MP4/MP3/Photo Playback Gauge Series Marine Radio FEATURES 4 Channel Full Range, Class A/B 45W x 4 @ 4Ω IPX5 Water proof INPUTS AND OUTPUTS Bluetooth Audio Streaming Easy
Models with Display Audio Display Audio Operation
 Display Audio Operation Use simple gestures including touching, swiping, and scrolling to operate certain audio functions. Some items may be grayed out during driving to reduce the potential for distraction.
VENTURE. model: AF52
 VENTURE model: AF52 part of the series VENTURE Thank you for your purchase of the MEElectronics Air-Fi Venture AF52 Stereo Bluetooth Wireless Headphones with Microphone Package Contents Bluetooth Information
1. INSTALLATION. Trim Plate. Bend the appropriate tabs to hold the sleeve firmly in place.
 0 R - 0 0896 . INSTALLATION The following illustration shows a typical installation. If you have any questions or require information regarding installation kits, consult your customer car audio dealer
Table of contents. Precautions. Media and Data Type. Menu operation. 1. Radio. 2.Multimedia player. Play disc. Play SD/USB. 4.Bluetooth (optional)
") DD-6442B T Table of contents Precautions Media and Data Type Menu operation 1. Radio 2.Multimedia player Play disc Play SD/USB 3.GPS navigation system (optional) 4.Bluetooth (optional) 5.TV function (optional)
DD-6442B T Table of contents Precautions Media and Data Type Menu operation 1. Radio 2.Multimedia player Play disc Play SD/USB 3.GPS navigation system (optional) 4.Bluetooth (optional) 5.TV function (optional)
SAMSUNG POWERED WIFI SURROUND SPEAKER
 SAMSUNG POWERED WIFI SURROUND SPEAKER MODEL:CAW-02013 PLEASE READ THIS INSTRUCTION MANUAL CAREFULLY BEFORE OPERATION AND KEEP IT FOR FUTURE REFERENCE FCC Warnings WARNING:Changes or modifications to this
Touchscreen Operation
 Touchscreen Operation Use simple gestures including touching, swiping, and scrolling to operate certain audio functions. Some items may be grayed out during driving to reduce the potential for distraction.
XRM47BT INSTALLATION/OWNER'S MANUAL. AM/FM Receiver with Bluetooth / Fixed Face
 XRM47BT INSTALLATION/OWNER'S MANUAL AM/FM Receiver with Bluetooth / Fixed Face XRM47BT INSTALLATION Preparation Please read entire manual before installation. Before You Start Disconnect negative battery
MP BT-200 Lightweight Bluetooth Over-the-Ear Headphones
 MP BT-200 Lightweight Bluetooth Over-the-Ear Headphones P/N 33397 User's Manual CONTENTS SAFETY WARNINGS AND GUIDELINES... 3 FEATURES... 4 CUSTOMER SERVICE... 5 PACKAGE CONTENTS... 5 PRODUCT OVERVIEW...6
Anker Portable Bluetooth Speaker. Instruction Manual. Specifications. Model No: A7908
 Anker Portable Bluetooth Speaker Model No: A7908 Instruction Manual Package Contents Anker Portable Bluetooth Speaker Micro USB cable 3.5mm audio cable Travel pouch Instruction manual Product Features
TOCMR-OE100. Quick Start Guide
 TOCMR-OE100 Quick Start Guide Introduction Congratulations on your purchase of the TOCMR-OE100 Mobile Multimedia Receiver. Please read the instruction manual for this product before using. The documentation
Enjoy TV Box User Manual
 Enjoy TV Box User Manual V1.7 Introduction Enjoy TV box is a product connected to your TV via HDMI that turn your TV to a multifunction smart TV. It is a revolutionary entertainment on your TV. It is also
Contents. Precaution. Before installing this product. Precaution... Main Menu... Radio... Play DVD... USB/SD Important safety information
 USER MANUAL Thank you for buying this XTRONS product. Please read through these instructions so you will know how to operate this unit properly. After you have finished reading the instructions, keep this
TV WIRELESS HEADPHONES
 TV WIRELESS HEADPHONES Item No. 206077 Owner s Manual Thank you for purchasing the Sharper Image TV Wireless Headphones. This updated version has a new design with new features, including a digital audio
PLMR18 OWNER S MANUAL. Mobile Audio System.
 PLMR18 OWNER S MANUAL Mobile Audio System PLL Synthesizer Stereo Radio Automatic Memory Storing Preset Equalization USB/ SD Interface 3.5mm Jack input www.pyleaudio.com 1 CONTENTS Installation... 3 Take
Expand Your Factory Radio. add. ipod PXAMG. Owner s Manual. Neo Gateway ENJOY THE MUSIC
 Expand Your Factory Radio add ipod PXAMG GM Owner s Manual Neo Gateway ENJOY THE MUSIC Table of Contents Pages 1. Introduction 2 2. Precautions 2 3. Compatibility 3 4. Dipswitch Settings 3 5. Installation
Please read this manual carefully before you use the unit and save it for future reference.
 ANDROID STEREO RECEIVER Please read this manual carefully before you use the unit and save it for future reference. Installation Precaution: 1. This unit is designed for using a 12V negative ground system
Monoprice Harmony Bluetooth Wireless Speaker. User Guide P/N 33827
 Monoprice Harmony Bluetooth Wireless Speaker User Guide P/N 33827 PACKAGE CONTENTS 1. Bluetooth Speaker x 1 pc 2. Micro USB cable x 1 pc 3. 3.5mm Audio cable x 1 pc 4. User manual x 1 pc FUNCTIONS PANEL
Directions for use. Using the application icon. keyboard
 Beat 3.0 Directions for use Notification will show a new message, calendar and ongoing activities, such as call transfer or in the state. You can also open the notifications panel to view your network
7 inch HD IPS LCD, Resolution: 800*480 OS Android 4.2. Front:0.3MP Rear: 2.0MP(AF)
") Q PAD USER MANUAL Specification Display 7 inch HD IPS LCD, Resolution: 800*480 OS Android 4.2 CPU ARM Cortex A9,Dual core,mtk8312, 1GHz Camera G-sensor Network Audio Format Video Format Image Format Extended
Q PAD USER MANUAL Specification Display 7 inch HD IPS LCD, Resolution: 800*480 OS Android 4.2 CPU ARM Cortex A9,Dual core,mtk8312, 1GHz Camera G-sensor Network Audio Format Video Format Image Format Extended
ADVUV630. Owner s Manual DEST NAV A/V INPUT PWR-VOL
 ADVUV630 Owner s Manual DEST NAV PWR-VOL A/V INPUT Introduction Congratulations on your purchase of the ADVUV630 Mobile Multimedia Receiver. Please read the instruction manual for this product before using.
INSTRUCTION MANUAL K101R
 INSTRUCTION MANUAL K101R MP3/USB/AUX/BLUETOOTH/iPod CD PLAYER WITH AM/FM RADIO BEFORE USE Before operating the unit, please read this manual thoroughly and retain it for future reference 1. OPERATING INSTRUCTIONS
ADVUNI400CP. 6.2" Double DIN Multimedia Receiver
 6.2" Double DIN Multimedia Receiver AM-FM / DVD / NAV / SiriusXM Ready / Pandora / Bluetooth / iphone - ipod / Screen Mirroring / USB / AV In / Rear Camera In / CarPlay Operation Manual 6VRMS RCA Output
UVO SYSTEM USER'S MANUAL
 UVO SYSTEM USER'S MANUAL Congratulations on the Purchase of your new UVO system! Your new UVO system allows you to enjoy various audio and multimedia features through the main audio system. For the latest
WIRELESS BLUETOOTH AUDIO TO ANY CAR RADIO MAKE THE CONNECTION
 ISFM23 WIRELESS BLUETOOTH AUDIO TO ANY CAR RADIO MAKE THE CONNECTION Smartphones and Bluetooth media devices TranzItTM BLU 98.2 98.3 98.4 Perfect for ANDROID 1. Introduction Thank you for choosing the