Teach Yourself Microsoft Office Excel Topic 17: Revision, Importing and Grouping Data
|
|
|
- Amberlynn Snow
- 5 years ago
- Views:
Transcription
1 Teach Yourself Microsoft Office Excel Topic 17: Revision, Importing and Grouping Data In this topic we will revise several basics mainly through discussion and a few example tasks and then go on to use the Data ribbon to import data into a worksheet from one or more webpages. Finally, you will work with grouped ranges and create subtotals for grouped ranges. This may seem like a disjointed lesson, however I have had a few learners ask me about importing data from external sources and so I have added this to the lesson. 1/ Excel file = Workbook, not Document. 2/ Columns (Represented by Letters). 3/ Rows (Represented by Numbers). 4/ Cells = Intersection of Column and Row = Name or Address such as B5 or A1. 5/ Worksheet = Sheet = All the Cells. 6/ Sheet Tab = Name of worksheet. Double-click a Sheet Tab to highlight the sheet name, then type a new sheet name to rename, then hit Enter. You can add new sheets using the to the right of the sheets: 7/ Workbook = All the worksheets = File = File Name. 8/ The Selection Cursor looks like:. 9/ Move Cursor: White diagonal arrow with four-way pointing black arrow underneath as shown right: Click and drag to move things (like cells) in Excel. 10/ Fill Handle = After you select a cell the fill handle is the little green square in the lower right corner as shown right: 11/ Cross-Hair Cursor: This small black cross cursor allows you to click on the Fill Handle and drag the cell to copy numbers, text or formulas: a. If you have text and numbers, the numbers will increment. E.g. Quiz 1, Quiz 2, Quiz 3 b. If you have words like Monday or January, click and drag the Fill Handle will increment those also. c. If you have formulas, it will copy the formulas. D:\TAFE\microsoft\ms-office\Excel\learning-tasks\level-5\task17\TYMSExcel17.docx Page 1
2 d. If you have a number, it will copy it; it will not increment it. e. If you want to increment numbers (e.g. 1, 2, 3) then choose one of the following methods: o Type 1 and 2 in two adjacent cells, highlight both cells, then use the Fill Handle. o Type number and, instead of clicking and dragging the Fill Handle with only Mouse, hold Ctrl and use Mouse. o Type number then highlight the cell with the number and an empty cell next to the number and then use the Fill Handle to click and drag. When you double-click a Fill Handle then the formula is automatically copied down (provided there is data/formulae/functions in column to left or right or below). 12/ Entering data or formulas in a cell and then pressing: Tab puts data in the cell and moves selected cell to the right. Ctrl + Enter puts data in the cell and keeps the current cell selected. Enter puts data in the cell and moves the selected cell down. 13/ Default alignment in Excel: Text aligned left. Numbers aligned right. Note: If you see numbers aligned to the left, then this indicates potential errors. 14/ Entering data into a large range of cells: Highlight Cell Range first, then use Enter. At bottom of column, cursor jumps to top of next column. 15/ To select an entire table: Click in any cell in the table and then use one of: o Ctrl + * (Number pad) o Ctrl + A o Ctrl + Shift / Stylistic Formatting options: Borders Fill Font Color 17/ Formulas: Equal sign as the first character in a cell starts all formulas. When you type an equal sign as the first character in a cell, you are telling Excel that you want a formula in the cell. Cell is a single cell in a Sheet. E.g. cell B2. When we want several cells in a formula, we often use a Range of Cells, such as B2:G2. Range of Cells can also be referred to as a Range. When we have a Cell or a Range is a formula, we say Cell References because we are referring to the cells in our formula. D:\TAFE\microsoft\ms-office\Excel\learning-tasks\level-5\task17\TYMSExcel17.docx Page 2


3 Cell References in formulas allow the numbers (or other cell content) to be used by a formula. Then if you change the number in the cell, the formula will automatically update. Built-in functions like SUM or AVERAGE can make calculations for us: a. SUM functions keyboard shortcut is Alt + =. b. You can type formulas into cells by typing an equal sign as the first character in a cell. c. When you type the first few letters of a function name, a drop-down list will let you select a function as shown on the right: d. When you select a function, you can read the screen tip that tells you what the function does as shown on the right: e. When you see a function that you want from the drop-down list, you can use the Tab key to insert the function as shown on the right: f. You can insert Cells or Ranges of Cells into your formula using your Selection Cursor as shown on the right where I have selected the range B3 to B10: g. When you use your Selection Cursor to select cells and insert then into the formula, you call that range of cells Marching Ants because the outer edge looks like Marching Ants. If the Marching Ants are still moving, and you do not let go of the Mouse left-button, you can keep dragging and moving in any direction. When you let go of the mouse left-button, the Range is inserted into the formula. D:\TAFE\microsoft\ms-office\Excel\learning-tasks\level-5\task17\TYMSExcel17.docx Page 3

4 h. For the selection shown above, the Formula Bar looks like that shown on the right: i. Formula Inputs: The numbers in the cells are called Formula Inputs because if you change them, then the formula result will change. j. A cell shows a Formula Result. The Formula Bar shows a Formula: For example: When Cell B11 is selected, the Formula Bar shows the actual Formula Cell B11 shows formula result. The formula result for the average calculation is k. To put Formula in Edit Mode keyboard shortcut = F2 l. If you make a mistake with your formula and you want to revert to whatever was in the cell before you put the cell in Edit Mode, use the Esc key. m. The tiny green triangles on the top-left of some cells containing a formula indicates that there may be (but not necessarily) an error in a formula. If you see one or more of these small green triangles, then make sure you thoroughly check your formulae. Clicking the tiny you to resolve any issues. n. Maths operator for division = / o. Maths operator for multiplication = * p. Relative Cell Reference: Cell references that will move throughout the copy formula action. warning sign may help Relative means that from the formulas point of view, where is the formula going to look? E.g. The Relative Cell Reference Range in the formula used above: =AVERAGE(B3:B9) will always look at the cells that are 7 cells above the cell that houses the formula. D:\TAFE\microsoft\ms-office\Excel\learning-tasks\level-5\task17\TYMSExcel17.docx Page 4
5 q. Absolute Cell References are Cell References that Do Not Change throughout the copy formula action. Cell references that are always locked throughout the copy action. Absolute means that as you copy the formula, the Cell Reference is locked and will always look at the original cell as the formula is copied. E.g. In this formula: =H3/$H$2, no matter where you copy the formula, the formula will always look at Cell H2. When your cursor is touching a cell reference, if you hit the F4 key, this will put one dollar sign in from of the letter (column reference) and one dollar sign in front of the number (row reference). The dollar signs lock the column and row references so that they cannot move during the copy action. r. Using the keyboard Arrow Keys to put Cell References into Formulas can be faster than the Mouse if the cells are close to the formula. s. The Beauty of Excel: When formula inputs are changed, everything updates in the workbook! 18/ Number Formatting Excel uses a façade that sits on top of the numbers The number that is actually in the cell can be different to what you see in the cell Format Cells dialog box keyboard shortcut = Ctrl + 1 Formulas do not see Number Formatting they act on the underlying number! 19/ Page Setup Page Setup dialog box keyboard shortcut = Alt + P S P Page Setup dialog box a. Page tab i. Orientation ii. Scaling b. Margins tab i. Horizontal centring ii. Vertical centring iii. Header, Footer size c. Header/Footer tab i. Header 3 sections: o Built-in o Custom Header o Preview ii. Footer 3 sections: o Preview o Built-in o Custom Footer D:\TAFE\microsoft\ms-office\Excel\learning-tasks\level-5\task17\TYMSExcel17.docx Page 5

6 d. Sheet tab 20/ Move Sheet i. Set print area ii. Print gridlines iii. Print row and column headings Right-click on Sheet Tab Move/Copy Mouse Click on the Sheet Tab and drag 21/ Copy Sheet Right-click Move/Copy Tick Copy tick box Use Ctrl + Mouse Click on the Sheet Tab, then drag, to copy work sheet. + symbol means copying sheet. Skills Check 17a Using skills that you have revised in this lesson create a worksheet that is laid out and formatted as shown below: For each of the four quizzes, add your own grades. For each of the four tests, add your own grades. Include a formula to calculate the average for each quiz and test formatted to one decimal place. Include a formula to calculate the total for each row. Include a formula to calculate the percentage grade formatted to the nearest whole number. Save your changes as Task 17a.xlsx Name the worksheet tab as Term 1 grades and give the tab a colour. Repeat the above steps for Term 2, 3 and 4. Save your changes. Show your work to Mr Kruyer. D:\TAFE\microsoft\ms-office\Excel\learning-tasks\level-5\task17\TYMSExcel17.docx Page 6
7 Importing Data from a Webpage The steps for importing data into a Table from a webpage are: Step 1/ Step 2/ Step 3/ Step 4/ Step 5/ Step 6/ Click the Data tab. Click From Web in the Get & Transform Data group. Enter the web address in the URL box and click OK. You may have to wait a bit here. You will be shown a list of tables in the webpage. There will be at least two to choose from. Click through the list and select the table that you want to import. Click the Load button and wait a bit more. If you are trying to import a large table, the import process may take a minute or two. Save your spreadsheet Table. Let s try these six steps with an example Click on the following website address to open it in a browser: Scroll down to The Largest States population table. Note: You may very well see different figures to when I took a snip of this table. I do not know how often this data is updated. Highlight the web address in the browser s address bar. Copy the webpage address. Open a new workbook using MS Excel. Click the Data tab. Click From Web in the Get & Transform Data group. Paste the webpage address into the URL box as shown on the right: Click OK. Wait for data to populate the Navigator dialog box. D:\TAFE\microsoft\ms-office\Excel\learning-tasks\level-5\task17\TYMSExcel17.docx Page 7

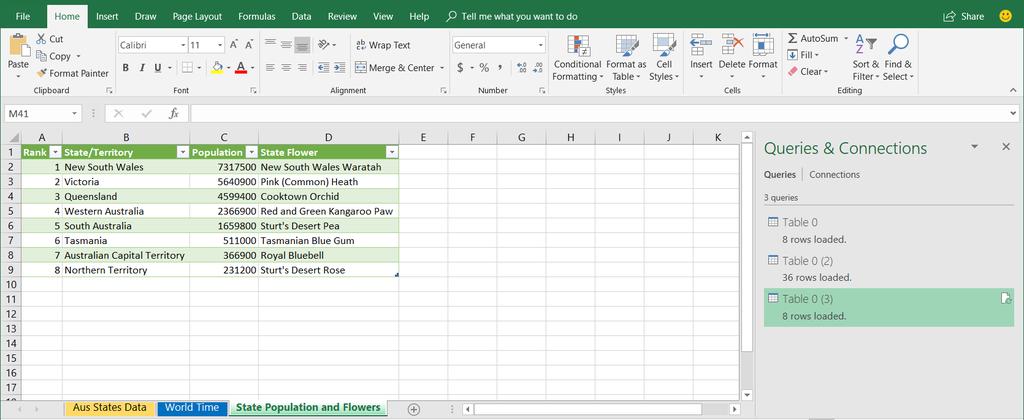
8 You will see a list of tables contained in the webpage. Click through the tables list until you see displayed the table that you want to copy. This is shown on the right: Click the Load button and wait. You should eventually see the MS Excel Table shown below with the data copied from the webpage: Notice that this process opens a Queries & Connections panel. Also notice that the Table has a Table Name and, at the moment, the table is named Table_0. This table name can be changed but the name must follow the four standard programming and scripting language naming rules that I have spoken and written about in the past (MS Excel is partially coded in Visual Basic). The rules are: i. No spaces in a name. ii. Must start with a letter or underscore (_). iii. Must not include certain keyboard characters such and #. iv. You cannot use a name that you have already used for something else. D:\TAFE\microsoft\ms-office\Excel\learning-tasks\level-5\task17\TYMSExcel17.docx Page 8


9 Excel will give you a warning dialog box message if you try to break these four rules: Click anywhere within your Table. Make sure you are using the Table Tools - Design ribbon. Change the Table Name to: Aus_State_Data This will be useful later in this lesson. Rename the Sheet 1 tab as: Aus State Data If you like, colour the worksheet tab. Save your Table as: Task 17b.xlsx Connection Between Website and Spreadsheet In the above example the data that you imported does not get updated daily. You can create a link between a website s data to your spreadsheet so that changes are updated regularly in your Excel file. Let s try this with an example still using Task 17b.xlsx Click the Data tab. Click From Web in the Get & Transform Data group. Next, open a browser such as Google Chrome. Using Google, search for Time and Date (i.e. Search for a quick changing website. Time changes quickly!) Look for in the results and click on it. In the website s menu, click: World Clock Main World Clock as shown on the right: Add Melbourne and move it to the left using the blue Edit locations button: Go back to the Main World Clock webpage. Highlight the website address in the address bar and copy it. Paste the address into the From Web dialog box in the URL section as shown on the right: D:\TAFE\microsoft\ms-office\Excel\learning-tasks\level-5\task17\TYMSExcel17.docx Page 9
 called Power Query Editor which is included with MS Excel 2013 and later versions.")

10 Excel will ask you a question as shown on the right: Use Anonymous and click Connect. Look for the data table that you want to use (Table 0) You do not want the first column so click the Edit button. This will open a separate Microsoft application (or App) called Power Query Editor which is included with MS Excel 2013 and later versions. Remove the first column using the Power Query Editor s Remove Columns button. Click on the Close & Load button. Save the addition. The data will be opened in a Table in a new sheet tab. In the Table Tools Design ribbon, in the Properties group which is on the left of the ribbon name the Table as: World_Time Name this new worksheet tab: World Time If you like, colour the worksheet tab. Save your additions and changes. After one minute or longer click the Refresh All button in the External Table Data group of the Table Tools Design ribbon. You could also use the Refresh All button in the Data ribbon. Your Table will be updated. This process can be done automatically Click on any single cell in the Table containing a day and time. You will be presented with two extra ribbons: Table Tools Design and Query Tools Query. The Design ribbon is shown below: D:\TAFE\microsoft\ms-office\Excel\learning-tasks\level-5\task17\TYMSExcel17.docx Page 10


11 Click on the Table Tools Design ribbon. You want to create a link to the dateandtime website. In the External Table Data group click on the Properties button. This opens the External Data Properties dialog box shown on the right: Click the Query Properties button:. This opens the Query Properties dialog box shown below-right. Making sure the Usage tab is selected, look at the tick box options available in the Refresh Control section. Assuming you want to refresh your Table every 1 minute, tick the Refresh every tick box and change the timing to 1 minute. Also tick Refresh data when opening the file. Click OK. Click OK. Save your changes. Wait for over a minute and see if your Table data changes. (Deep breathing and stretching exercises while you wait!) Original Table Table one minute later As you can see from the results, the Table changes every one-minute reflecting what is going on in the original website where the data was sourced from. The problem with this Table is that it is not all that useful because of the way it is set out. The cities and times should all be in columns A and B and then you could sort by City or Time. D:\TAFE\microsoft\ms-office\Excel\learning-tasks\level-5\task17\TYMSExcel17.docx Page 11


12 Question 1. Question 2. Question 3. Can the Refresh every timing be set to less than 1 minute? List any possible problems if the Refresh every timing was left at 1 minute. You may have noticed that the names of your two Tables in the Queries & Connections panel has not changed to the names that you set using the Table Tools Design ribbon s Table Name box. Why? Give any possible reasons. Merge Multiple Tables You can merge two separate MS Excel Tables together on the proviso that there is at least one field of common data in both Tables. You will merge your Aus State Data Table with data from a Wikipedia page on Australian State flowers emblems. This will not be a problem because there is a common field in both Tables the Australian states names. Open the following webpage: Scroll down until you see a table of Australia s state flowers as shown on the right: Notice that it has a field containing the Australian states but also includes Australia. You will deal with this in a moment. Next you need to import this table into your workbook but before you do, two columns and the top row needs to be deleted. In the Data tab in the Get & Transform Data group click on From Web. Enter the webpage URL into the From Web dialog box. Click OK. In the Navigator dialog box, click on the relevant Table in the list of Tables. You will need to edit this Table to remove unwanted data, so click the Edit button. This will open the Power Query Editor app. Remove the top row using the button. (Hint: 1, the top row.) Select both the Image field column and the Binomial nomenclature field column using the Ctrl key. D:\TAFE\microsoft\ms-office\Excel\learning-tasks\level-5\task17\TYMSExcel17.docx Page 12
13 Click the top half of the button. Next you want to merge this query with your Aus State Data Table. Note: It is called a query because you are questioning the data that you grabbed from the webpage. Still within the Power Query Editor app, in the Combine group, click the button. This will open the dialog box shown on the right: Click on the drop-down arrow to display a list of Tables in your workbook: Choose Table 0 which is the Aus State Data. Now select the matching fields from both Tables: Leave the Join Kind set to Left Outer. Click OK. D:\TAFE\microsoft\ms-office\Excel\learning-tasks\level-5\task17\TYMSExcel17.docx Page 13


14 You should now see the screen shot shown on the right: Notice that the Table 0 field needs to be expanded. Click the button and then click OK to expand Table 0. The result of doing this is shown below. Remove the Area represented field column as this appears twice in the Power Query Editor. Drag the Common name field to the right side of the Table. Rename the field heading names as shown below. Sort the Table on Rank in ascending order. Click on the Close & Load button. D:\TAFE\microsoft\ms-office\Excel\learning-tasks\level-5\task17\TYMSExcel17.docx Page 14

15 Give the worksheet tab a sensible name. If you like, colour the tab. Save the additions and changes to your workbook. D:\TAFE\microsoft\ms-office\Excel\learning-tasks\level-5\task17\TYMSExcel17.docx Page 15

16 Skills Check 17b Merge your Task 17b.xlsx State Population and Flowers worksheet with Australian State mammal emblems which you can find at: Give the tab a sensible name and colour. Save the additions and changes to your worksheet. Show your worksheet to Mr. Kruyer. Groups Worksheets with a lot of content can sometimes feel overwhelming and even become difficult to read. When you completed Excel Topic 12: Viewing Options you learnt to use a few methods to make it easier for you to view a large range of data. In this lesson you will extend on this by grouping a data range and including subtotals to the data in that range. When you organise data into groups, you can easily show and hide different sections of your worksheet. I have prepared an Excel worksheet that you can download and work with to show you how to group a selected range: From my website download the Excel file titled The Bridge course payments. Save the file to your USB drive as: Task 17c.xlsx Open Task 17c.xlsx Select columns B, C and D. Click on the Data tab in the ribbon. In the Outline group, click on the Group button. You will see the following: Your three columns are now grouped. When you click the (or the Hide Detail button) your grouped columns or rows will collapse. Click the Hide Details button. D:\TAFE\microsoft\ms-office\Excel\learning-tasks\level-5\task17\TYMSExcel17.docx Page 16


17 Notice that columns B, C and D have now disappeared as shown on the right and the minus sign has changed to a plus sign: Click on the collapsed columns. button to open the You can also do this to any number of adjoining rows. Sort the courses in column A into ascending order making sure that all related row data is also moved. Group the Advanced Plus Word/Excel rows (rows 10 to 16). Note: You can only group contiguous rows or columns. You can remove a grouping by following these steps: Open the collapsed group by clicking on the button. Highlight the rows or columns contained in the group. Click the Ungroup button. Remove both groupings that you have created. Save your changes. D:\TAFE\microsoft\ms-office\Excel\learning-tasks\level-5\task17\TYMSExcel17.docx Page 17


18 Subtotals The Subtotal command allows you to automatically create groups and use common functions such as SUM, COUNT, MIN, MAX and AVERAGE on a range of data. For example, the Subtotal command could help to calculate the total amount of money that people have paid for each course as well as their payment method creating a hierarchy of groups, known as an outline, to help organise the worksheet. Your data must be correctly sorted before using the Subtotal command. You will still be using the data from your Task 17b.xlsx to create your subtotals to determine how much money has been paid to The Bridge for each of the courses that they are considering running. Then you will find out how many people are interested in each course using a similar procedure. Add an extra column to the left of the First Name column: Select column C Click on the Home ribbon Click on the upper half of the Cells group Insert Cells button. Add the heading Paid into cell C3. Add the data shown below. This added data is based on the data supplied in the Comment column. First, make sure your data is sorted by Course in your worksheet. (It should already be sorted!) To organise this data so that there are subtotals of the amount paid for each course follow these steps: Click into cell A4 (or any other data cell in this column). D:\TAFE\microsoft\ms-office\Excel\learning-tasks\level-5\task17\TYMSExcel17.docx Page 18

19 Select the Data ribbon, then in the Outline group click the Subtotal button:. This opens the Subtotals dialog box shown on the right: Click the drop-down arrow for the At each change in: field to select the column you want to subtotal. In our exercise, this should already be set to Course since we clicked into this column a few steps back. Click the drop-down arrow for the Use function: field to select the function that you want to use. Select SUM to sum the money paid for each course so far. In the Add subtotal to: field, select the column where you want the paid sum to appear. Select Paid. Click OK. Your worksheet is now outlined into groups. Looking at the result of the steps above you see that the worksheet is now grouped by Course and the money paid so far for each course is shown below each group in the Paid column. There is also a grand total at the very bottom in the Paid column. Now that you have created subtotals, your worksheet it is divided into different levels. You can switch between these levels to quickly control how much information is displayed in the worksheet by clicking the three Level buttons to the left of the worksheet. While this example contains only three levels:, MS Excel can accommodate up to eight levels. D:\TAFE\microsoft\ms-office\Excel\learning-tasks\level-5\task17\TYMSExcel17.docx Page 19


20 To see how these level buttons work, follow these steps: Click the Level 1 button to display the least amount of detail. You should only see the Grand Total, or the total paid for all courses. This is shown below: Click the Level 2 button other data from the worksheet. to expand the detail which will now contain each subtotal row but hides all Click the Level 3 button to view and expand all your worksheet data. You can also use the Show Details and Hide Detail buttons to show and hide the groups within the outline. An example is shown below: Note: You can also show or hide groups using the Outline group. buttons which are on the right in the Data ribbon s Imagine that you would now like to know how many people are interested in each course. Follow these steps: Click the Subtotal button again to open the Subtotal dialog box. D:\TAFE\microsoft\ms-office\Excel\learning-tasks\level-5\task17\TYMSExcel17.docx Page 20


21 You would like to place this information underneath the Last Name below each group so set the parameter options to that shown on the right: Click OK with the result shown below: Save your changes. Question 4. How can I get the above result but have the information presented as shown below? Give all the steps necessary to produce this output. Sometimes you may not want to keep subtotals in your worksheet, or you want to reorganise your data in different ways. If you no longer want to use subtotalling, then you can remove it from your worksheet. Follow these steps: Select the Data ribbon, then click the Subtotal button. D:\TAFE\microsoft\ms-office\Excel\learning-tasks\level-5\task17\TYMSExcel17.docx Page 21


22 The Subtotal dialog box will appear. Click the Remove All button at the bottom of the dialog box. Save your changes. You can remove all groups without deleting the subtotals. To do this click the Ungroup button s drop-down arrow, then choose Clear Outline: Open the grouped worksheet above again. Clear the outline. The result should look like this: Save your changes. D:\TAFE\microsoft\ms-office\Excel\learning-tasks\level-5\task17\TYMSExcel17.docx Page 22
23 A. Entering data or formulas: i. Tab puts data in cell and moves selected cell to right ii. Ctrl + Enter puts data in cell and keeps cell selected iii. Enter puts data in cell and moves selected cell down B. Select whole table: Click in one cell in table: i. Ctrl + * (Use number pad) ii. Ctrl + A iii. Ctrl + Shift + 8 C. SUM Function keyboard shortcut is Alt + = D. Put Formula in Edit Mode keyboard shortcut = F2 E. If you make a mistake with your formula and you want to revert to whatever was in the cell before you put the cell in Edit Mode, you use the Esc Key F. When you see a function that you want from our drop-down list, you use the Tab key to insert the function G. If the formula is in Edit Mode and Cursor is touching the Cell Reference, then to put dollar signs in Cell Reference use the keyboard shortcut = F4 H. Open Page Setup dialog box keyboard shortcut = Alt + P S P D:\TAFE\microsoft\ms-office\Excel\learning-tasks\level-5\task17\TYMSExcel17.docx Page 23
Office 2016 Excel Basics 01 Video/Class Project #13 Excel Basics 1: Excel Grid, Formatting, Formulas, Cell References, Page Setup (O16-13)
") Office 2016 Excel Basics 01 Video/Class Project #13 Excel Basics 1: Excel Grid, Formatting, Formulas, Cell References, Page Setup (O16-13) Topics Covered in Video: 1) Excel file = Workbook, not Document
Office 2016 Excel Basics 01 Video/Class Project #13 Excel Basics 1: Excel Grid, Formatting, Formulas, Cell References, Page Setup (O16-13) Topics Covered in Video: 1) Excel file = Workbook, not Document
Teach Yourself Microsoft Excel Topic 5: Revision, Headers & Footers, Metadata
 Teach Yourself Microsoft Excel Topic 5: Revision, Headers & Footers, Metadata http://www.gerrykruyer.com In this first lesson of this level 2 course you will cover basic Microsoft Excel concepts as well
Application of Skills: Microsoft Excel 2013 Tutorial
 Application of Skills: Microsoft Excel 2013 Tutorial Throughout this module, you will progress through a series of steps to create a spreadsheet for sales of a club or organization. You will continue to
Excel Level 1
 Excel 2016 - Level 1 Tell Me Assistant The Tell Me Assistant, which is new to all Office 2016 applications, allows users to search words, or phrases, about what they want to do in Excel. The Tell Me Assistant
Excel & Business Math Video/Class Project #01 Introduction to Excel. Why We Use Excel for Math. First Formula.
 Excel & Business Math Video/Class Project #01 Introduction to Excel. Why We Use Excel for Math. First Formula. Topics Covered in Video: 1) USB Drive to store files from class... 2 2) Save As to Download
MS Excel Henrico County Public Library. I. Tour of the Excel Window
 MS Excel 2013 I. Tour of the Excel Window Start Excel by double-clicking on the Excel icon on the desktop. Excel may also be opened by clicking on the Start button>all Programs>Microsoft Office>Excel.
Excel Tables and Pivot Tables
 A) Why use a table in the first place a. Easy to filter and sort if you only sort or filter by one item b. Automatically fills formulas down c. Can easily add a totals row d. Easy formatting with preformatted
Using Microsoft Excel
 Using Microsoft Excel Formatting a spreadsheet means changing the way it looks to make it neater and more attractive. Formatting changes can include modifying number styles, text size and colours. Many
MS Excel Henrico County Public Library. I. Tour of the Excel Window
 MS Excel 2013 I. Tour of the Excel Window Start Excel by double-clicking on the Excel icon on the desktop. Excel may also be opened by clicking on the Start button>all Programs>Microsoft Office>Excel.
Teach Yourself Microsoft Word Topic 10 - Margins, Indents and Tabs
 http://www.gerrykruyer.com Teach Yourself Microsoft Word Topic 10 - Margins, Indents and Tabs In the previous Level 2 MS Word course: Topic 8 you covered columns, text boxes and tables as well as look
INSERT SUBTOTALS Database Exercise Sort the Data Department Department Data Tab Sort and Filter Group
 INSERT SUBTOTALS Subtotals are used to summarize data in a range of data. This command offers many kinds of summary information, including counts, sums, averages, minimums, and maximums. When this feature
Microsoft How to Series
 Microsoft How to Series Getting Started with EXCEL 2007 A B C D E F Tabs Introduction to the Excel 2007 Interface The Excel 2007 Interface is comprised of several elements, with four main parts: Office
EXCEL 2007 TIP SHEET. Dialog Box Launcher these allow you to access additional features associated with a specific Group of buttons within a Ribbon.
 EXCEL 2007 TIP SHEET GLOSSARY AutoSum a function in Excel that adds the contents of a specified range of Cells; the AutoSum button appears on the Home ribbon as a. Dialog Box Launcher these allow you to
Microsoft Excel 2010 Handout
 Microsoft Excel 2010 Handout Excel is an electronic spreadsheet program you can use to enter and organize data, and perform a wide variety of number crunching tasks. Excel helps you organize and track
Excel Tables & PivotTables
 Excel Tables & PivotTables A PivotTable is a tool that is used to summarize and reorganize data from an Excel spreadsheet. PivotTables are very useful where there is a lot of data that to analyze. PivotTables
Table of Contents Data Validation... 2 Data Validation Dialog Box... 3 INDIRECT function... 3 Cumulative List of Keyboards Throughout Class:...
 Highline Excel 2016 Class 10: Data Validation Table of Contents Data Validation... 2 Data Validation Dialog Box... 3 INDIRECT function... 3 Cumulative List of Keyboards Throughout Class:... 4 Page 1 of
MICROSOFT OFFICE. Courseware: Exam: Sample Only EXCEL 2016 CORE. Certification Guide
 MICROSOFT OFFICE Courseware: 3263 2 Exam: 77 727 EXCEL 2016 CORE Certification Guide Microsoft Office Specialist 2016 Series Microsoft Excel 2016 Core Certification Guide Lesson 1: Introducing Excel Lesson
WEEK NO. 12 MICROSOFT EXCEL 2007
 WEEK NO. 12 MICROSOFT EXCEL 2007 LESSONS OVERVIEW: GOODBYE CALCULATORS, HELLO SPREADSHEET! 1. The Excel Environment 2. Starting A Workbook 3. Modifying Columns, Rows, & Cells 4. Working with Worksheets
Excel 2007 New Features Table of Contents
 Table of Contents Excel 2007 New Interface... 1 Quick Access Toolbar... 1 Minimizing the Ribbon... 1 The Office Button... 2 Format as Table Filters and Sorting... 2 Table Tools... 4 Filtering Data... 4
Teach Yourself Microsoft Word Topic 7 Lists and Columns
 http://www.gerrykruyer.com Teach Yourself Microsoft Word Topic 7 Lists and Columns In this lesson, you will spend some time revising and testing your knowledge of the material covered in the previous lesson,
Excel 2016 Basics for Windows
 Excel 2016 Basics for Windows Excel 2016 Basics for Windows Training Objective To learn the tools and features to get started using Excel 2016 more efficiently and effectively. What you can expect to learn
Microsoft Excel 2013: Part 3 More on Formatting Cells And Worksheet Basics. To apply number formatting:
 Microsoft Excel 2013: Part 3 More on Formatting Cells And Worksheet Basics Formatting text and numbers In Excel, you can apply specific formatting for text and numbers instead of displaying all cell content
Microsoft Excel Basics Ben Johnson
 Microsoft Excel Basics Ben Johnson Topic...page # Basics...1 Workbook and worksheets...1 Sizing columns and rows...2 Auto Fill...2 Sort...2 Formatting Cells...3 Formulas...3 Percentage Button...4 Sum function...4
MICROSOFT EXCEL BIS 202. Lesson 1. Prepared By: Amna Alshurooqi Hajar Alshurooqi
 MICROSOFT EXCEL Prepared By: Amna Alshurooqi Hajar Alshurooqi Lesson 1 BIS 202 1. INTRODUCTION Microsoft Excel is a spreadsheet application used to perform financial calculations, statistical analysis,
Intro to Excel. To start a new workbook, click on the Blank workbook icon in the middle of the screen.
 Excel is a spreadsheet application that allows for the storing, organizing and manipulation of data that is entered into it. Excel has variety of built in tools that allow users to perform both simple
EXCEL TUTORIAL.
 EXCEL TUTORIAL Excel is software that lets you create tables, and calculate and analyze data. This type of software is called spreadsheet software. Excel lets you create tables that automatically calculate
Kenora Public Library. Computer Training. Introduction to Excel
 Kenora Public Library Computer Training Introduction to Excel Page 2 Introduction: Spreadsheet programs allow users to develop a number of documents that can be used to store data, perform calculations,
Teach Yourself Microsoft Word Topic 12 - Multipage Document Features Part 1
 http://www.gerrykruyer.com Teach Yourself Microsoft Word Topic 12 - Multipage Document Features Part 1 In this class and the next few you will find out how to use MS Word features that make it easier to
Day : Date : Objects : Open MS Excel program * Open Excel application. Select : start. Choose: programs. Choose : Microsoft Office.
 Day : Date : Objects : Open MS Excel program * Open Excel application. Select : start Choose: programs Choose : Microsoft Office Select: Excel *The interface of Excel program - Menu bar. - Standard bar.
SUM - This says to add together cells F28 through F35. Notice that it will show your result is
 COUNTA - The COUNTA function will examine a set of cells and tell you how many cells are not empty. In this example, Excel analyzed 19 cells and found that only 18 were not empty. COUNTBLANK - The COUNTBLANK
Excel 2016: Part 1. Updated January 2017 Copy cost: $1.50
 Excel 2016: Part 1 Updated January 2017 Copy cost: $1.50 Getting Started Please note that you are required to have some basic computer skills for this class. Also, any experience with Microsoft Word is
The HOME Tab: Cut Copy Vertical Alignments
 The HOME Tab: Cut Copy Vertical Alignments Text Direction Wrap Text Paste Format Painter Borders Cell Color Text Color Horizontal Alignments Merge and Center Highlighting a cell, a column, a row, or the
Excel 2010 Essentials
 Excel 2010 Essentials Training Manual Narre Community Learning Centre Inc. TABLE OF CONTENTS Module One: Getting Started... 4 Workshop Objectives... 5 Module Two: Opening and Closing Excel... 7 Opening
Microsoft Excel XP. Intermediate
 Microsoft Excel XP Intermediate Jonathan Thomas March 2006 Contents Lesson 1: Headers and Footers...1 Lesson 2: Inserting, Viewing and Deleting Cell Comments...2 Options...2 Lesson 3: Printing Comments...3
Microsoft Excel 2007
 Learning computers is Show ezy Microsoft Excel 2007 301 Excel screen, toolbars, views, sheets, and uses for Excel 2005-8 Steve Slisar 2005-8 COPYRIGHT: The copyright for this publication is owned by Steve
Excel Basics. TJ McKeon
 Excel Basics TJ McKeon What is Excel? Electronic Spreadsheet in a rows and columns layout Can contain alphabetical and numerical data (text, dates, times, numbers) Allows for easy calculations and mathematical
1. Right-click the worksheet tab you want to rename. The worksheet menu appears. 2. Select Rename.
 Excel 2010 Worksheet Basics Introduction Page 1 Every Excel workbook contains at least one or more worksheets. If you are working with a large amount of related data, you can use worksheets to help organize
Excel 2010: Getting Started with Excel
 Excel 2010: Getting Started with Excel Excel 2010 Getting Started with Excel Introduction Page 1 Excel is a spreadsheet program that allows you to store, organize, and analyze information. In this lesson,
Launch old style dialogue boxes from the dialogue box launchers at the bottom of the ribbon.
 Ribbon Overview Ribbon Overview Launch old style dialogue boxes from the dialogue box launchers at the bottom of the ribbon. Add buttons to Quick Access Toolbar either by right clicking or via the Customise
CHAPTER 4: MICROSOFT OFFICE: EXCEL 2010
 CHAPTER 4: MICROSOFT OFFICE: EXCEL 2010 Quick Summary A workbook an Excel document that stores data contains one or more pages called a worksheet. A worksheet or spreadsheet is stored in a workbook, and
INTRODUCTION... 1 UNDERSTANDING CELLS... 2 CELL CONTENT... 4
 Introduction to Microsoft Excel 2016 INTRODUCTION... 1 The Excel 2016 Environment... 1 Worksheet Views... 2 UNDERSTANDING CELLS... 2 Select a Cell Range... 3 CELL CONTENT... 4 Enter and Edit Data... 4
WAAT-PivotTables Accounting Seminar
 WAAT-PivotTables-08-26-2016-Accounting Seminar Table of Contents What does a PivotTable do?... 2 How to create PivotTable:... 2 Add conditions to the PivotTable:... 2 Grouping Daily Dates into Years, Quarters,
Microsoft Excel 2010
 Microsoft Excel 2010 omar 2013-2014 First Semester 1. Exploring and Setting Up Your Excel Environment Microsoft Excel 2010 2013-2014 The Ribbon contains multiple tabs, each with several groups of commands.
Status Bar: Right click on the Status Bar to add or remove features.
 Excel 2013 Quick Start Guide The Excel Window File Tab: Click to access actions like Print, Save As, etc. Also to set Excel options. Ribbon: Logically organizes actions onto Tabs, Groups, and Buttons to
Introduction to Excel
 Office Button, Tabs and Ribbons Office Button The File menu selection located in the upper left corner in previous versions of Excel has been replaced with the Office Button in Excel 2007. Clicking on
EXCEL 2010 TIPS & TRICKS
 EXCEL 2010 TIPS & TRICKS Training and Reference Guide Starlight Education Table of Contents Move to the End of a Row or Column of Data... 1 Select Cells Without Scrolling... 1 Select Non-Adjacent Ranges...
EXCEL BASICS: MICROSOFT OFFICE 2007
 EXCEL BASICS: MICROSOFT OFFICE 2007 GETTING STARTED PAGE 02 Prerequisites What You Will Learn USING MICROSOFT EXCEL PAGE 03 Opening Microsoft Excel Microsoft Excel Features Keyboard Review Pointer Shapes
Introduction to Microsoft Excel 2016
 Screen Elements: Introduction to Microsoft Excel 2016 The Ribbon The Ribbon is designed to help you quickly find the commands that you need to complete a task. Commands are organized in logical groups,
Changing Worksheet Views
 PROCEDURES LESSON 1: TOURING EXCEL Starting Excel 1 Click the Start button 2 Click All Programs 3 Click the Microsoft Office folder icon 4 Click Microsoft Excel 2010 Naming and Saving (Ctrl+S) a Workbook
Excel 2007 Fundamentals
 Excel 2007 Fundamentals Introduction The aim of this document is to introduce some basic techniques for using Excel to enter data, perform calculations and produce simple charts based on that information.
Excel 2016 Basics for Mac
 Excel 2016 Basics for Mac Excel 2016 Basics for Mac Training Objective To learn the tools and features to get started using Excel 2016 more efficiently and effectively. What you can expect to learn from
Workbook Also called a spreadsheet, the Workbook is a unique file created by Excel. Title bar
 Microsoft Excel 2007 is a spreadsheet application in the Microsoft Office Suite. A spreadsheet is an accounting program for the computer. Spreadsheets are primarily used to work with numbers and text.
Changing Worksheet Views
 PROCEDURES LESSON 1: TOURING EXCEL Starting Excel From the Windows Start screen, click the Excel 2013 program tile 1 Right-click a blank area of the Windows Start screen 2 Click the All Apps button 3 Click
Section 8 Formatting
 Section 8 Formatting By the end of this Section you should be able to: Format Numbers, Dates & Percentages Change Cell Alignment and Rotate Text Add Borders and Colour Change Row Height and Column Width
Using Microsoft Excel
 About Excel Using Microsoft Excel What is a Spreadsheet? Microsoft Excel is a program that s used for creating spreadsheets. So what is a spreadsheet? Before personal computers were common, spreadsheet
M i c r o s o f t E x c e l A d v a n c e d P a r t 3-4. Microsoft Excel Advanced 3-4
 Microsoft Excel 2010 Advanced 3-4 0 Absolute references There may be times when you do not want a cell reference to change when copying or filling cells. You can use an absolute reference to keep a row
Printing spreadsheets is easy. Microsoft Excel has lots of options available so you can print exactly what you want.
 Page Setup and Print Chapter 4 Printing spreadsheets is easy. Microsoft Excel has lots of options available so you can print exactly what you want. Print Preview is available so that you can check how
Highline Excel 2016 Class 09: Date Functions
 Highline Excel 2016 Class 09: Date Functions Table of Contents Date Functions... 2 Examples of EOMONTH, EDATE and DATE functions:... 2 Fiscal Year... 3 Example of Data Set with Date Helper Columns, including
Teach Yourself Microsoft Office Access Topic 2: Getting Started with Microsoft Access
 http://www.gerrykruyer.com Teach Yourself Microsoft Office Access Topic 2: Getting Started with Microsoft Access Microsoft Access 2016 uses the Ribbon to organise commands, just like the versions of MS
Using Microsoft Excel
 Using Microsoft Excel Table of Contents The Excel Window... 2 The Formula Bar... 3 Workbook View Buttons... 3 Moving in a Spreadsheet... 3 Entering Data... 3 Creating and Renaming Worksheets... 4 Opening
Cell to Cell mouse arrow Type Tab Enter Scroll Bars Page Up Page Down Crtl + Home Crtl + End Value Label Formula Note:
 1 of 1 NOTE: IT IS RECOMMENDED THAT YOU READ THE ACCOMPANYING DOCUMENT CALLED INTRO TO EXCEL LAYOUT 2007 TO FULLY GRASP THE BASICS OF EXCEL Introduction A spreadsheet application allows you to enter data
4) Study the section of a worksheet in the image below. What is the cell address of the cell containing the word "Qtr3"?
 Study the section of a worksheet in the image below. What is the cell address of the cell containing the word Qtr3?") Choose The Correct Answer: 1) Study the highlighted cells in the image below and identify which of the following represents the correct cell address for these cells: a) The cell reference for the selected
Choose The Correct Answer: 1) Study the highlighted cells in the image below and identify which of the following represents the correct cell address for these cells: a) The cell reference for the selected
Microsoft Office Excel 2007: Basic. Course Overview. Course Length: 1 Day. Course Overview
 Microsoft Office Excel 2007: Basic Course Length: 1 Day Course Overview This course teaches the basic functions and features of Excel 2007. After an introduction to spreadsheet terminology and Excel's
Introduction to Excel 2007
 Introduction to Excel 2007 These documents are based on and developed from information published in the LTS Online Help Collection (www.uwec.edu/help) developed by the University of Wisconsin Eau Claire
Gloucester County Library System EXCEL 2007
 Gloucester County Library System EXCEL 2007 Introduction What is Excel? Microsoft E x c e l is an electronic s preadsheet program. I t is capable o f performing many diff e r e n t t y p e s o f c a l
Microsoft Excel 2010 Part 2: Intermediate Excel
 CALIFORNIA STATE UNIVERSITY, LOS ANGELES INFORMATION TECHNOLOGY SERVICES Microsoft Excel 2010 Part 2: Intermediate Excel Spring 2014, Version 1.0 Table of Contents Introduction...3 Working with Rows and
SPREADSHEETS. (Data for this tutorial at
 SPREADSHEETS (Data for this tutorial at www.peteraldhous.com/data) Spreadsheets are great tools for sorting, filtering and running calculations on tables of data. Journalists who know the basics can interview
What we will learn in Introduction to Excel. How to Open Excel. Introduction to Excel 2010 Lodi Memorial Library NJ Developed by Barb Hauck-Mah
 Introduction to Excel 2010 Lodi Memorial Library NJ Developed by Barb Hauck-Mah What is Excel? It is a Microsoft Office computer software program to organize and analyze numbers, data and labels in spreadsheet
Creating and Using an Excel Table
 Creating and Using an Excel Table Overview of Excel 2007 tables In earlier Excel versions, the organization of data in tables was referred to as an Excel database or list. An Excel table is not to be confused
Excel Shortcuts Increasing YOUR Productivity
 Excel Shortcuts Increasing YOUR Productivity CompuHELP Division of Tommy Harrington Enterprises, Inc. tommy@tommyharrington.com https://www.facebook.com/tommyharringtonextremeexcel Excel Shortcuts Increasing
Teach Yourself Microsoft PowerPoint Topic 3: Photo Albums, Slide Sections & Action Buttons
 Teach Yourself Microsoft PowerPoint Topic 3: Photo Albums, Slide Sections & Action Buttons http://www.gerrykruyer.com Last week you were introduced to Microsoft PowerPoint slide animation and printing
EXCEL BASICS: MICROSOFT OFFICE 2010
 EXCEL BASICS: MICROSOFT OFFICE 2010 GETTING STARTED PAGE 02 Prerequisites What You Will Learn USING MICROSOFT EXCEL PAGE 03 Opening Microsoft Excel Microsoft Excel Features Keyboard Review Pointer Shapes
1 THE PNP BASIC COMPUTER ESSENTIALS e-learning (MS Excel 2007)
") 1 THE PNP BASIC COMPUTER ESSENTIALS e-learning (MS Excel 2007) 2 THE PNP BASIC COMPUTER ESSENTIALS e-learning (MS Excel 2007) TABLE OF CONTENTS CHAPTER 1: GETTING STARTED... 5 THE EXCEL ENVIRONMENT...
1 THE PNP BASIC COMPUTER ESSENTIALS e-learning (MS Excel 2007) 2 THE PNP BASIC COMPUTER ESSENTIALS e-learning (MS Excel 2007) TABLE OF CONTENTS CHAPTER 1: GETTING STARTED... 5 THE EXCEL ENVIRONMENT...
EXCEL 2013 FDLRS SUNRISE
 EXCEL 2013 FDLRS SUNRISE Goal: Participants will create a spreadsheet and graph to document student progress. Objectives: Participants will create a spreadsheet which includes basic formulas. Participants
Open Learning Guide. Microsoft Excel Introductory. Release OL356v1
 Guide Microsoft Excel 2013 Introductory Note: Microsoft, Excel and Windows are registered trademarks of the Microsoft Corporation. Release OL356v1 Contents SECTION 1 FUNDAMENTALS... 9 1 - SPREADSHEET PRINCIPLES...
Teach Yourself Microsoft Excel Topic 7: AutoFill, Multiple Worksheets, Addressing & VLOOKUP
 http://www.gerrykruyer.com Teach Yourself Microsoft Excel Topic 7: AutoFill, Multiple Worksheets, Addressing & VLOOKUP This week we will cover Excel features which can enhance the simplest of spreadsheets.
Excel FDLRS Sunrise
 Excel 2010 FDLRS Sunrise Within 2 weeks participants will submit a project: Create an Excel spreadsheet with a chart include the completed and signed ARROW form Send to: Lourdes Day FDLRS (Bartow Airport)
Introduction to Excel 2007 Table of Contents
 Table of Contents Excel Microsoft s Spreadsheet... 1 Starting Excel... 1 Excel 2007 New Interface... 1 Exploring the Excel Screen... 2 Viewing Dialog Boxes... 2 Quick Access Toolbar... 3 Minimizing the
A cell is highlighted when a thick black border appears around it. Use TAB to move to the next cell to the LEFT. Use SHIFT-TAB to move to the RIGHT.
 Instructional Center for Educational Technologies EXCEL 2010 BASICS Things to Know Before You Start The cursor in Excel looks like a plus sign. When you click in a cell, the column and row headings will
Unit 12. Electronic Spreadsheets - Microsoft Excel. Desired Outcomes
 Unit 12 Electronic Spreadsheets - Microsoft Excel Desired Outcomes Student understands Excel workbooks and worksheets Student can navigate in an Excel workbook and worksheet Student can use toolbars and
DOING MORE WITH EXCEL: MICROSOFT OFFICE 2013
 DOING MORE WITH EXCEL: MICROSOFT OFFICE 2013 GETTING STARTED PAGE 02 Prerequisites What You Will Learn MORE TASKS IN MICROSOFT EXCEL PAGE 03 Cutting, Copying, and Pasting Data Basic Formulas Filling Data
Excel. Spreadsheet functions
 Excel Spreadsheet functions Objectives Week 1 By the end of this session you will be able to :- Move around workbooks and worksheets Insert and delete rows and columns Calculate with the Auto Sum function
Intermediate Microsoft Excel 2008
 Intermediate Microsoft Excel 2008 Table of Contents ADVANCED FORMATTING... 2 FORMATTING NUMBERS... 2 WRAPPING TEXT... 3 THE MERGE AND CENTER FUNCTIONS... 4 INSERTING COMMENTS... 5 FREEZE PANES... 6 INSERTING
1 Ctrl + X Cut the selected item. 2 Ctrl + C (or Ctrl + Insert) Copy the selected item. 3 Ctrl + V (or Shift + Insert) Paste the selected item
 Copy the selected item. 3 Ctrl + V (or Shift + Insert) Paste the selected item") Tips and Tricks Recorder Actions Library XPath Syntax Hotkeys Windows Hotkeys General Keyboard Shortcuts Windows Explorer Shortcuts Command Prompt Shortcuts Dialog Box Keyboard Shortcuts Excel Hotkeys
Tips and Tricks Recorder Actions Library XPath Syntax Hotkeys Windows Hotkeys General Keyboard Shortcuts Windows Explorer Shortcuts Command Prompt Shortcuts Dialog Box Keyboard Shortcuts Excel Hotkeys
Highline Excel 2016 Class 13: One Lookup Value to Return Multiple Items: Array Formula
 Highline Excel 2016 Class 13: One Lookup Value to Return Multiple Items: Array Formula Table of Contents One Lookup Value to Return Multiple Items: Array Formula with INDEX, AGGREGATE, ROW, ROWS and IF
Beginning Excel. Revised 4/19/16
 Beginning Excel Objectives: The Learner will: Become familiar with terminology used in Microsoft Excel Create a simple workbook Write a simple formula Formatting Cells Adding Columns Borders Table of Contents:
Section 3. Formulas. By the end of this Section you should be able to:
 Excel 2003 CLAIT Plus Section 3 Formulas By the end of this Section you should be able to: Create Simple Formulas Understand Mathematical Operators Use Brackets Calculate Percentages Select Cells with
HO-1: BASIC SPREADSHEET SKILLS - CREATING A WORKBOOK
 HO-1: BASIC SPREADSHEET SKILLS - CREATING A WORKBOOK After completing this exercise you will be able to: Create a new workbook and add and rename worksheets. Enter data (text labels, numerical values and
Excel Select a template category in the Office.com Templates section. 5. Click the Download button.
 Microsoft QUICK Excel 2010 Source Getting Started The Excel Window u v w z Creating a New Blank Workbook 2. Select New in the left pane. 3. Select the Blank workbook template in the Available Templates
Excel Introduction to Excel Databases & Data Tables
 Creating an Excel Database Key field: Each record should have some field(s) that helps to uniquely identify them, put these fields at the start of your database. In an Excel database each column is a field
Table of Contents. 1. Creating a Microsoft Excel Workbook...1 EVALUATION COPY
 Table of Contents Table of Contents 1. Creating a Microsoft Excel Workbook...1 Starting Microsoft Excel...1 Creating a Workbook...2 Saving a Workbook...3 The Status Bar...5 Adding and Deleting Worksheets...6
Part III Fundamentals of Microsoft Excel
 Part III Fundamentals of Microsoft Excel Table of Contents 1. INTRODUCTION... 83 2. STARTING MICROSOFT EXCEL... 84 2.1 Steps for starting word...84 2.2 The Excel Window...84 3. MICROSOFT EXCEL BASICS...
Contents Microsoft Excel Lesson 1: Entering Text and Numbers...4 The Microsoft Excel Window...4 The Microsoft Office Button...
 Contents Microsoft Excel 2007...4 Lesson 1: Entering Text and Numbers...4 The Microsoft Excel Window...4 The Microsoft Office Button...5 The Quick Access Toolbar...5 The Title Bar...5 The Ribbon...5 Worksheets...6
I OFFICE TAB... 1 RIBBONS & GROUPS... 2 OTHER SCREEN PARTS... 4 APPLICATION SPECIFICATIONS... 5 THE BASICS...
 EXCEL 2010 BASICS Microsoft Excel I OFFICE TAB... 1 RIBBONS & GROUPS... 2 OTHER SCREEN PARTS... 4 APPLICATION SPECIFICATIONS... 5 THE BASICS... 6 The Mouse... 6 What Are Worksheets?... 6 What is a Workbook?...
Links to Activities ACTIVITY 1.1. Links to Activities Links to Activities
 EXCEL Analyzing Data Using Excel Section 1 Skills Start Excel and identify features in the Excel window Enter labels and values Use the fill handle to enter a series Enter formulas Create a formula using
Contents. Spreadsheet Software ITQ Level 1
 Contents SKILL SET 1 FUNDAMENTALS... 11 1 - SPREADSHEET PRINCIPLES... 12 2 - STARTING EXCEL... 13 3 - THE LAYOUT OF THE EXCEL SCREEN... 14 4 - THE RIBBON... 16 5 - THE WORKSHEET WINDOW... 18 6 - CLOSING
Quick Reference Guide 8 Excel 2013 for Windows Keyboard Shortcut Keys
 Quick Reference Guide 8 Excel 2013 for Windows Keyboard Shortcut Keys Control Shortcut s Ctrl + PgDn Ctrl + PgUp Ctrl + Shift + & Ctrl + Shift_ Ctrl + Shift + ~ Ctrl + Shift + $ Ctrl + Shift + % Ctrl +
MAKING TABLES WITH WORD BASIC INSTRUCTIONS. Setting the Page Orientation. Inserting the Basic Table. Daily Schedule
 MAKING TABLES WITH WORD BASIC INSTRUCTIONS Setting the Page Orientation Once in word, decide if you want your paper to print vertically (the normal way, called portrait) or horizontally (called landscape)
Excel 2013 Workshop. Prepared by
 Excel 2013 Workshop Prepared by Joan Weeks Computer Labs Manager & Madeline Davis Computer Labs Assistant Department of Library and Information Science June 2014 Excel 2013: Fundamentals Course Description
Data. Selecting Data. Sorting Data
 1 of 1 Data Selecting Data To select a large range of cells: Click on the first cell in the area you want to select Scroll down to the last cell and hold down the Shift key while you click on it. This