Peralta Community College District CurricUNET User Manual
|
|
|
- Jane Hopkins
- 6 years ago
- Views:
Transcription

1 Peralta Community College District CurricUNET User Manual Page 1
2 Contents Log in... 8 Changing Your Password... 9 Viewing Courses Viewing programs Create Proposal New Course Proposal Cover Co-contributor Cross-Listed Courses List of Changes Units/Hours Degree/Transfer General Education Lecture/Lab Content Student Performance Objectives Student learning outcomes Methods of instruction Distance education Instructor-Student Contact Assignments Student assessment Requisites Content validation Texts, readings, and materials Page 2
3 Library Attached files Codes/Dates Launch BCC New Fee Based Course COA New Fee Based Course Laney New Fee Based Course MC New Fee Based Course Cover Co-Contributor Units/hours Lecture/lab content Student learning outcomes Codes/Dates Launch BCC Course Reactivation BCC Course Changes In Catalog Info BCC Course Changes Only In Non-Catalog Info COA Course Changes In Catalog Info COA Course Changes Only In Non-Catalog Info Laney Course Reactivation Laney Course Updating Laney: N/A Non-Catalog Course Changes MC Add De Addendum Only MC Add De Addendum W/Catalog Changes Page 3
4 MC Add De Addendum W/Non-Catalog Changes MC Course Changes In Catalog Info MC Course Changes Only In Non-Catalog Info MC Course Reactivation Cover Co-Contributor Cross-listed courses List Of Changes Units/hours General Education Degree/Transfer Lecture/Lab Content Student Performance Objectives Student Learning Outcomes Methods Of Instruction Distance Education Instructor-student contact Assignments Student Assessment Requisites Content validation Texts, Readings, And Materials Library Attached files Codes/Dates Page 4
5 Launch BCC Deactivate Course COA Deactivate Course Laney Deactivate Course MC Deactivate Course Cover Co-Contributor Cross-Listed Courses List Of Changes Units/Hours General Education Student Performance Objectives Degree/Transfer Lecture/Lab Content Student Learning Outcomes Instructor-Student Contact Methods of instruction Assignments Distance education Student assessment Requisites Content validation Texts, Readings, And Materials Library Attached files Page 5
6 Codes/Dates Launch BCC New Program COA New Program Laney New Program Laney: N/A New Voc Program MC New Program Cover Co-Contributor Description Course block definitions Program learning outcomes Attached Files Codes Launch BCC Modified Program COA Modified Program Laney Program Modification MC Program Modification Cover Description Co-Contributor Course Block Definitions Program learning outcomes Attached files Page 6
7 Codes Launch BCC Deactivate Program COA Deactivate Program Laney Program Deletion MC Program Deactivation Cover Co-Contributor Description Course Block Definitions Program Learning Outcomes Attached Files Codes Launch Reports Course Reports Program Reports Approvals Rich text editor detailed instructions Creating an outline within the rich text editor Creating An Outline In Microsoft Word, Notepad, Or A Pdf Reader Create your outline Copy To Notepad Save As A PDF Creating An Outline Using Html Page 7

8 Log in Testing website: peralta.sandbox.curricunet.com Live website: peralta.curricunet.com Password: your password Enter your and password credentials as shown below, and then click the green Login button. Page 8
9 Changing Your Password To change your password, click the Gear Icon at the top of any page, and select Profile. On the Edit Profile screen, you may make changes to or add any information except your . To change your password, select Click here to change your password. Enter your current password (ChangeMe1), then your new password. Please note that passwords must be a minimum of 6 characters in length, and are case-sensitive. Confirm your new password, and click Change Password. Click Back to Edit Profile to confirm the password change. Page 9


10 Click Save to verify any profile changes. You will be returned to the Courses screen. Page 10


11 Viewing Courses When you have logged in, you will arrive at this screen. The default is Draft and In Review courses. The default viewing selection will be My Courses. These are anything that you are currently working on, courses that you created, and courses for which you are a co-contributor. To expand your course search, select My Institution, and you will be able to view all courses at your institution. To search within courses there are options. The user can search without selecting any designated filters; the user can enter information into every search filter box, or select any combination of search features. Search in either My Courses or the My Institution pages. Use the dropdown menus to select the course Subject(s) and Status (es). You may also enter the Course Number or Title keywords in the Search text box. After you make your selections, click Search. Page 11
, click the heading a second time. Scroll through the list until you find the course you want, and then click on the course to select.")

12 If you wish to reorder your search results, for example, by Title, click on the category heading you want to reorder. Results will sort alphabetically (a-z, ). To sort them reverse alphabetically (z-a, ), click the heading a second time. Scroll through the list until you find the course you want, and then click on the course to select. You can also export your search results as a report that can be saved, printed, and shared outside the CurricUNET system. Click the dropdown menu on the Search button to export. Select the format you wish to have the report in, from the dropdown that will appear. This report can take up to a few minutes to generate and download depending on the format and the number of results. Page 12

13 A report Exported to Excel will look similar to the below example. A report Exported to Word will look similar to the below example. A report Exported to PDF will look like the below example. Page 13


14 Viewing programs To view programs, click the Curriculum button at the top of your screen, and select Program from the dropdown menu. To return to courses, click Curriculum and select Course. These actions can be done from any screen on the site. The default viewing selection is My Program. These are anything that you are currently working on, programs that you created, and programs for which you are a co-contributor. The default status is Draft and In Review programs. To expand your options, select My Institutions. There are various search options. The user can search without selecting any designated filters, the user can enter information into every search filter box, or the user can select any combination of search features. To search within your programs, use the drop down menus or the search bar to enter your search information, and then click Search. You may need to scroll within the drop down menus to see all options, or type the word you are looking for in the drop down specific search box (next to the magnifying glass symbol). Page 14


15 Create Proposal To create a new proposal, select the Create Proposal button. Choose your Proposal Type from the drop down menu, and then click the Next button. Page 15
16 For BCC New Course, COA New Course, Laney New Course, MC New Course w/de Adddendum, BCC New Fee Based Course, COA New Fee Based Course, Laney New BCC New Fee Based Course and MC New Fee Based Course proposals, use the dropdown menu to choose the Subject, and then fill in the Course Number, Course Title and Catalog Description. Click the Next button. For the BCC Course Reactivation, BCC Course Changes In Catalog Info, BCC Course Changes Only In Non-Catalog Info, COA Course Changes In Catalog Info, COA Course Changes Only In Non-Catalog Info, Laney Course Reactivation, Laney Course Updating, Laney: N/A Non-Catalog Course Changes, MC Add DE Addendum Only, MC Add DE Addendum W/Catalog Changes, MC Add DE Addendum W/Non- Catalog Changes, MC Course Changes In Catalog Info, MC Course Changes Only In Non-Catalog Info, MC Course Reactivation, BCC Deactivate Course, COA Deactivate Course, Laney Deactivate Course and MC Deactivate Course proposals use the dropdown menu or type in the first few letters of the search criteria. Enter any search terms related to the Course Title. When you select the Search Courses button you will to see a list of the courses matching the Course Title that you have entered. It may be necessary to use the scroll bar to view all of your options. Mandatory fields are marked with an *. Click Next button. Page 16
17 For the BCC New Program, COA New Program, Laney New Program, Laney: N/A New Voc Program, and MC New Program use the dropdown menu or key in the first few letters of your search to choose the College, Division, Department, Program Title and the Award Type. Enter the Program Title. Mandatory fields are marked with an *. Click Next. For the BCC Modified Program, COA Modified Program, Laney Program Modification, MC Program Modification, BCC Deactivate Program, COA Deactivate Program, Laney Program Deletion, MC Program Deactivation use the dropdown menu or key in the first few letters of your search to choose the College, Division, and Department. Enter any search terms related to the Program Title. When you select the Search button you will to see a list of the Programs matching the Program Title that you have entered. It may be necessary to use the scroll bar to view all of your options. Mandatory fields are marked with an *. Click Next. Page 17

18 Review the information on this screen. If this information is not correct, return to the previous steps to make corrections. Click the Create Proposal button. Page 18

19 New Course Proposal Refer to the Create Proposal section on page 15 to create a BCC New Course, COA New Course, Laney New Course, MC New Course w/de Adddendum, BCC New Fee Based Course, COA New Fee Based Course, Laney New BCC New Fee Based Course and MC New Fee Based Course Proposal. Cover The Cover section is the first section of the New Course proposal. If you realize at any point that the information you provided to create the proposal was incorrect, DO NOT use your browser s back button to correct this. Make the changes on the Cover screen, OR click Delete Draft and start over. Any required fields throughout the proposal will be marked with an * and highlighted light orange. Move between the sections of the proposal by using the dark gray tabs on the left of the page. Sections with required fields also have an orange box showing your progress, which will turn green when you have completed all required fields. You will only be prompted to save when changes are made. If, at any point you are unable to click into or make changes to a field s information, you do not have edit privileges for that field. If you need to make changes to such a field, contact your college s CurricUNET administrators. Select the College to confirm which campus this course is for. This selection needs to match the campus selected in the create proposal process to ensure that the proposal goes to the correct people during the approval process. The Subject, Course Number, Title, and Description will pull from the Create Proposal process. You may make changes to these fields if needed. Provide a Justification for this course, and indicate if This is a modular course. Page 19

20 If this course is a modular course, an additional field will appear to indicate the Number of Modules. Select the Additional Information that applies to this course. Several of these categories may apply. Select the CB Funding Agency Category from the dropdown menu. Explain why Assignments and Readings are not at a college level, or indicate that they are. Save this information and continue to the Co-Contributor tab. Throughout the proposal, you will only be prompted to save as changes are made. Page 20
21 Co-contributor To select a Contributor, scroll down to find the name of the faculty member(s) who have contributed on this proposal. You may also type their name in the search box to filter names and shorten the available list. Click the checkbox next to each applicable name. You may select as many names as necessary. Click Show Selected to view only the names you have selected. Click Clear All to start over with your selections. Click Save and continue to the Cross-Listed Courses tab. Page 21

22 Cross-Listed Courses To add Cross Listed Courses, select any Related courses from the list. You may need to scroll within this section to find your choice. You may also narrow your options by entering search terms related to the desired course in the search bar. Only options containing the letter and/or number sequence you type will show. To view all options again, simply delete your search. Click the checkbox to the left of the cross-listed courses. If you click the box next to the right of Show Selected, only the selected courses will show. Click once more to show all courses again. If you click the Clear All button, any selections within this section will be removed and you will have to find and select a new related course. Click Save when you are finished and continue to the List of Changes tab. Page 22

23 List of Changes Check the boxes that apply in the Reasons for Update section. Use the rich text editor to List the Changes. This textbox contains formatting tools that allow you to, among other things, italicize text or format information into an outline. If you are making lists, it is important to use the outline tools in order for the lists to appear correctly on reports. You can NOT copy information directly from Microsoft Word or similar programs, as embedded formatting information will cause problems with the editor. For assistance using the Rich Text Editor Detailed Instructions see page 182 of this manual. Save this page, and continue to the Units/Hours tab. Page 23
 section that will need to be completed.")
24 Units/Hours In the Units /Hours section of the proposal, select the check box if the hours are variable. If they are, you will see additional textboxes in the Units (Max) section that will need to be completed. Indicate the Units (Min), Lecture Hours (Min), Lab/Studio/Activity Hours (Min), TBA Hours (Min), and any corresponding maximums. Use the dropdown menu to select the Grading Policy and Minimum Duration. Add justification if selection is not full semester in the textbox. Enter the Enrollment Maximum and Add justification if selection is not 40. Indicate if this course is repeatable and if the course was Previously offered as a selected topic. Page 24

25 If this course is repeatable and/or was previously offered as a selected topic, additional fields will appear. If the course is repeatable, complete the Justification of repeatability and Number of times repeatable. If the course was previously offered as a selected topic course, indicate the Enrollment (Average) and Number of Times Offered for the previous course. Save this page and continue to the Degree/Transfer tab. Page 25
 this course applies to in the Required for degree/certificate field.")

26 Degree/Transfer Indicate if this course is Program Applicable. Use the dropdown menus to select the CB Levels for this course. If this course is Program Applicable, an additional section will appear asking you to specify which program(s) this course applies to in the Required for degree/certificate field. Use the scroll bar to view all programs. You may also narrow your options by entering search terms related to the desired course in the search bar. Only options containing the letter and/or number sequence you type will show. To view all options again, delete your search. Click the checkbox to the left of the cross-listed courses. If you click Show Selected, only the selected courses will show. Click once more to show all courses again. If you click the Clear All button, any selections within this section will be removed and you will have to find and select a new related course. Click Save and continue to the General Education tab. Page 26

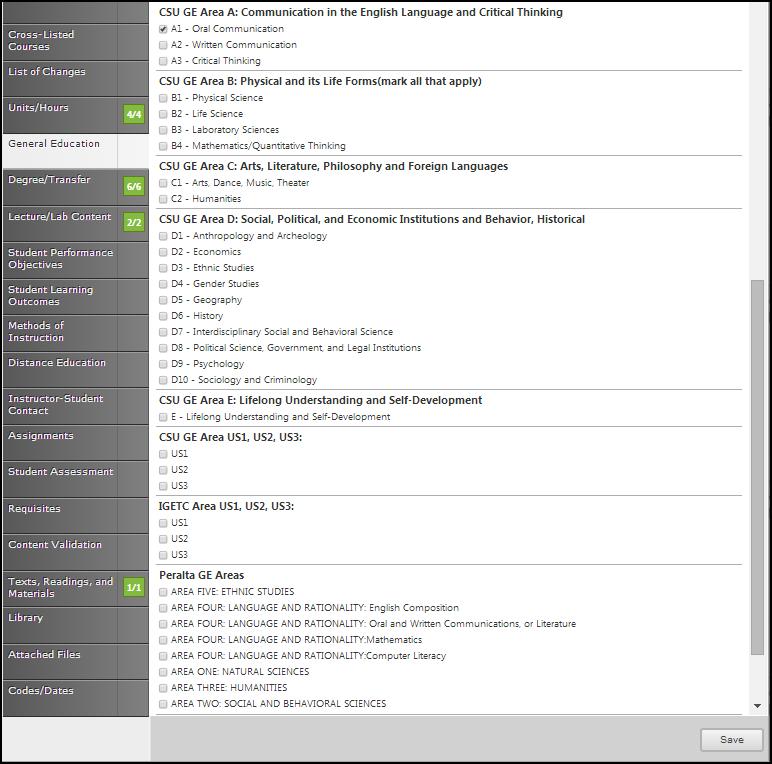
27 General Education Enter the C-ID Information in the textboxes, using the calendar icon to choose the Expiration Date. Use the checkboxes to indicate the transferability of this course to CSU/UC. Indicate which, if any, of the General Education Patterns this course applies to and which specific area you propose this course to be incorporated into. You will need to scroll down to access all general education areas. Save this information and continue to the Lecture/Lab Content tab. Page 27
28 Lecture/Lab Content Create the outline for Lectures and Labs in these textboxes. Use the Rich Text Editor to make the list of changes. This textbox contain formatting tools that allow you to, among other things, italicize text or format information into an outline. If you are making lists, it is important to use the outline tools in order for the lists to appear correctly on reports. You can NOT copy information directly from Microsoft Word or similar programs, as embedded formatting information will cause problems with the editor. For assistance using the Rich Text Editor Detailed Instructions see page 182 of this manual. Save this page, and continue to the Student Performance Objectives tab. Page 28


29 Student Performance Objectives Click the Add New Item button to add each Objective individually. In this section, you will create a list of Student Performance Objectives. List them in the Objective textbox. Save. Page 29

30 To edit an objective, click the blue bar. To reorder them, use the up and down arrows to the right of the bar, or to delete, click the red X. When all objectives are entered in the correct order, continue to the student learning outcomes tab. Page 30

31 Student learning outcomes Click the Add New Item button to add outcomes. Enter information in the Outcome Text and the Assessment textboxes. Click Save and continue this process until all outcomes are entered. Page 31
32 To edit an outcome, click the blue bar. To reorder them, use the up and down arrows to the right of the bar, or to delete, click the red X. When all objectives have been entered in the correct order, continue to the Methods of Instruction tab. Page 32
33 Methods of instruction Select the Instruction Types from the checkboxes provided. If there are additional methods that are not listed, enter those into the textbox for Other Methods. Click Save when done. Page 33

34 Distance education When you select the checkbox that is asking Will this course be available for distance education, (shown below) it will trigger additional forms fields to appear. The textboxes and checkboxes below will appear. Fill in the textboxes completely and use the dropdown menus when provided. Page 34

35 If you select Yes from the dropdown asking if there are additional resources or clerical support needed or anticipated, you will see an additional textbox asking you to explain. Click Save and continue to the Instructor-Student Contact tab. Page 35

36 Instructor-Student Contact Select the Add New Item button to add a type of contact. Use the dropdown menu to choose your options for Contact Type and then fill in the textbox provided for the Frequency of this type of contact. Click Save and continue this process until all types of been entered. Page 36

37 To edit a contact type, click the blue bar. To reorder them, use the up and down arrows to the right of the bar, or to delete, click the red X. When all types of contact are entered, continue to the Assignments tab. Page 37
38 Assignments If you check the box to Override Outside Class Hours, the Outside Class Hours will become a required textbox. List all out of class assignments, including library assignments, in the Out Of Class Assignment textbox provided. Click Save and continue to the Student Assessment tab. Page 38

39 Student assessment In this section, check as many boxes as are applicable. Note: for degree credit, at least one of the first three boxes must be checked. If Essay is not checked, please explain why in the textbox. If you select the Other checkbox, describe what that other is in the textbox following the checkboxes. Click Save when finished and continue to the Requisites tab. Page 39


40 Requisites Select the checkbox if this course has requisites. The following screen will appear. If the course has requisites, select the Add New Item button. Enter each requisite individually. This will allow you to specify the type of requisite and the course or non-course requirement. Choose the Requisite Type from the dropdown menu. If the requisite is a course, select the Subject and Requisite Course from the subsequent dropdown menus. If it is a non-course requirement, enter that information in the Requisite Comment field along with any other additional information such as grade requirements of the requisite, reasoning for the requisite, etc. Use the Condition menu to indicate this requisite s relationship to the next. When you do not select a specific condition the and is already implied. When you select or, you are indicating that a student may use this course or the next course, to qualify for the course. Following this or selection with an and is only used when nesting needs to be present. For example; art 101 or art 102 and 101 A. Page 40

41 Click Save to add the requisite. To edit a requisite, click on the blue bar. Use the up and down arrows on the right of the blue bars to reorder. To delete, press the red X. Page 41
. Use the dropdown menu to choose the course requisite to review.")
42 Content validation To review the content, click the Add New Item button. If you have added requisites in the Requisites page this checkbox will be selected (refer to the requisites page to change this value). Use the dropdown menu to choose the course requisite to review. The contents of the page will be determined by what option you choose. Follow the prompts attached to each field. Click Save when all fields are finished. Page 42
43 Content to Content Enter the Current Content and the Requisite Content in the textboxes. Fill in the textboxes labeled Current Content and Requisite Content. Page 43
44 Objective to Objective Check the boxes that apply in the Course Objective and Requisite Course Objective(s) sections. Content to Objective Enter the Current Content and select the Requisite Course Objectives by checking the box.click Save and continue to the Texts, Readings, And Materials tab. Page 44

45 To edit a requisite, click on the blue bar. Use the up and down arrows on the right of the blue bars to reorder. To delete, press the red X. Once you have completed all sections, Save and continue to the Texts, Readings, And Materials tab. Page 45

46 Texts, readings, and materials In the Texts, Readings And Materials section use the dropdown menu to select the Citation Style. Enter materials individually with books under Textbooks and any other materials under the appropriate heading. Click Add New Record to add items to the lists. Page 46

47 Add all books in the Textbook section. Add the Author, Title, Edition, ISBN, City, Publisher and the Year Published in the textboxes, and then click Insert. Click Add New Record to enter additional textbooks. You will need to add each entry separately. Add Manuals in this section. Add the Author, Title, Pub Date and Publisher in the textboxes provided. Click the calendar icon to find the date the manual was published. In the calendar icon pop up, use the left and right arrows next to the month s name to browse for another month and then click Insert. Click Add New Record to enter additional textbooks. You will need to add each entry separately. Page 47
48 Add Periodicals in this section. Add the Title, Author, Publication Name, Publication Date and Publisher in the textboxes, and then click Insert or Cancel. Click Add New Record to enter additional textbooks. You will need to add each entry separately. Add software in the Software area. Add the Title, Edition, Publisher and Description in the appropriate textboxes, and then click Insert or Cancel. Click Add New Record to enter additional textbooks. You will need to add each entry separately. Page 48


49 You can sort materials within their categories by clicking on the heading by which you wish to sort them. Please note that this sorting is only for your current view. Items will appear on reports in the order they are added to the proposal. They will also revert to the order added if you leave this page and return later. To edit a material, click the Edit button to the left of the item. To remove an item from your list, click the Delete button to the right of the item. You may need to use the side scroll bar in each category to access the Delete button. If you have a lot of materials, you can move between pages with the arrows at the bottom of each category. When your materials list is complete, click Save and continue to the Library tab. Page 49
50 Library In the Library section, indicate how the library will be impacted by this course by clicking the appropriate checkbox. If you have comments put them in the Comment textbox provided. Click Save and continue to the Attached Files tab. Page 50
51 Attached files In the Attach Files section, you may attach files for additional documentation or support of your proposal. Use the Select button to find files, and then press Upload Files to attach them. Page 51

52 Codes/Dates In the Codes/Dates section of the proposal, select the date by clicking the calendar icons. In the calendar icon pop up, use the left and right arrows next to the month s name to browse for another month. Use the dropdown menu options or key in the first few letters of your search criteria in the textbox. Follow prompts for completing the information needed in the textboxes. Click Save when finished. This is the last section of this proposal. Page 52
53 This is a screen shot when the calendar icon is clicked. Click Save. This is the last section of the proposal. Reviewing this proposal can be done by moving through the dark gray tabs or by viewing the reports on page 168. Page 53
54 Launch When you are satisfied with the information in the proposal you have created, select the Launch button. This can be done from any page within the proposal. This will move the proposal into the approval process. You may also choose Delete Draft, and the draft will be deleted. You will be prompted to confirm your decision in a popup box. Page 54

55 BCC New Fee Based Course COA New Fee Based Course Laney New Fee Based Course MC New Fee Based Course Refer to the Create Proposal section on page 15 to begin creating a proposal. Cover The Cover section is the first section of the New Course proposal. If you realize at any point that the information you provided to create the proposal was incorrect, DO NOT use your browser s back button to correct this. Make the changes on the Cover screen, OR click Delete Draft and start over. Any required fields throughout the proposal will be marked with an * and highlighted light orange. Move between the sections of the proposal by using the dark gray tabs on the left of the page. Sections with required fields also have an orange box showing your progress, which will turn green when you have completed all required fields. You will only be prompted to save when changes are made. If, at any point you are unable to click into or make changes to a field s information, you do not have edit privileges for that field. If you need to make changes to such a field, contact your college s CurricUNET administrators. The Subject, Course Number, Title, and Description boxes have been pre-populated from the course creation screen. Enter information by following the prompts attached to the textboxes. Use the dropdowns menus if provided. Click Save once you have entered all necessary information in the forms. Page 55
56 Co-Contributor To select a Contributor, scroll down to find the name of the faculty member(s) who have contributed on this proposal. You may also type their name in the search box to filter names and shorten the available list. Click the checkbox next to each applicable name. You may select as many names as necessary. Click Show Selected to view only the names you have selected. Click Clear All if you need to start over with your selections. Click Save and continue to the Units/Hours tab. Page 56
.")

57 Units/hours Fill in the Units (Min), Lecture Hours (Min), Lab/Studio/Activity Hours (Min) and TBA Hours (Min). In the Hours/Units section of the proposal, select the check box if the hours are variable. If you select the checkbox you will see additional textboxes that will need to be filled in. Click Save and continue to the Lecture/Lab Content tab. Page 57
58 Lecture/lab content Create the outline for Lectures and Labs in these textboxes. Use the Rich Text Editor to make the list of changes. This textbox contain formatting tools that allow you to, among other things, italicize text or format information into an outline. If you are making lists, it is important to use the outline tools in order for the lists to appear correctly on reports. You should NOT copy information directly from Microsoft Word or similar programs, as embedded formatting information will cause problems with the editor. For assistance using the Rich Text Editor Detailed Instructions see page 182 of this manual. Save this page, and continue to the Student Learning Outcomes tab. Page 58


59 Student learning outcomes Click the Add New Item button to add outcomes. Enter information in the Outcome Text and the Assessment textboxes. Click Save and continue this process until all outcomes are entered. Page 59

60 Select the checkboxes to choose the Institutional Learning Outcomes. Click Save and continue to the Codes/Dates tab. Page 60

61 Codes/Dates In the Codes/Dates section of the proposal select the date by clicking the calendar icons. In the calendar icon pop up, use the left and right arrows next to the month s name to browse for another month. Use the dropdown menu options or key in the first few letters of your search criteria in the textbox. Follow prompts for completing the information needed in the textboxes. Click Save when finished. This is the last section of this proposal. Reviewing this proposal can be done by moving through the dark gray tabs or by viewing the reports. Page 61
62 Launch When you are satisfied with the information in the proposal you have created, select the Launch button. This can be done from any page within the proposal. This will move the proposal into the approval process. You may also choose Delete Draft, and the draft will be deleted. You will be prompted to confirm your decision in a popup box. Page 62
63 BCC Course Reactivation BCC Course Changes In Catalog Info BCC Course Changes Only In Non-Catalog Info COA Course Changes In Catalog Info COA Course Changes Only In Non-Catalog Info Laney Course Reactivation Laney Course Updating Laney: N/A Non-Catalog Course Changes MC Add De Addendum Only MC Add De Addendum W/Catalog Changes MC Add De Addendum W/Non-Catalog Changes MC Course Changes In Catalog Info MC Course Changes Only In Non-Catalog Info MC Course Reactivation Refer to the Create Proposal section on page 15 to begin creating a proposal. Cover The Cover section is the first section of the New Course proposal. If you realize at any point that the information you provided to create the proposal was incorrect, DO NOT use your browser s back button to correct this. Make the changes on the Cover screen, OR click Delete Draft and start over. Any required fields throughout the proposal will be marked with an * and highlighted light orange. Move between the sections of the proposal by using the dark gray tabs on the left of the page. Sections with required fields also have an orange box showing your progress, which will turn green when you have completed all required fields. You will only be prompted to save when changes are made. If, at any point you are unable to click into or make changes to a field s information, you do not have edit privileges for that field. If you need to make changes to such a field, contact your college s CurricUNET administrators. Page 63

64 Four boxes have been pre-populated from the course creation screen. Enter information into the field textboxes. Use the dropdowns menus if they are an option. Click Save and continue to the Co-Contributor tab. Page 64
65 Co-Contributor To select a Contributor scroll down if necessary, to find the name of the faculty member(s) who have contributed on this proposal. You may also type their name in the search box to filter names and shorten the available list. Click the checkbox next to each applicable name. You may select as many names as necessary. Click Show Selected to view only the names you have selected. Click Clear All to start over with your selections. Click Save and continue to the Cross-Listed Course tab. Page 65
66 Cross-listed courses To add Cross Listed Courses, select any Related courses from the list. You may need to scroll within this section to find your choice. You may also narrow your options by entering search terms related to the desired course in the search bar. Only options containing the letter and/or number sequence you type will show. To view all options again, simply delete your search. Click the checkbox to the left of the cross-listed courses. If you click the box to the left of Show Selected, only the selected courses will show. Click once more to show all courses again. If you click the Clear All button, any selections within this section will be removed and you will have to find and select a new related course. Click Save when you are finished and continue to the List Of Changes tab. Page 66

67 List Of Changes Check the boxes that apply in the Reason For Update section. Use the Rich Text Editor to make the list of changes. This textbox contain formatting tools that allow you to, among other things, italicize text or format information into an outline. If you are making lists, it is important to use the outline tools in order for the lists to appear correctly on reports. You cannot copy information directly from Microsoft Word or similar programs, as embedded formatting information will cause problems with the editor. For assistance using the Rich Text Editor Detailed Instructions see page 182 of this manual. Save this page, and continue to the Units/Hours tab. Page 67

68 Units/hours Fill in the Units (Min), Lecture Hours (Min), Lab/Studio/Activity Hours (Min) and TBA Hours (Min). Use the dropdown menu in the Grading Policy And Duration section to select the Grading Policy and Minimum Duration. If the duration of the course is less than a full semester add the justification in the textbox. In the enrollment section, Put In the Enrollment Maximum and Add Justification If Selection Is Not 40. Under the Selected Topic heading, check the box if it was Previously Offered As A Selected Topic. Page 68

69 In the Hours/Units section of the proposal, select the check box if the hours are variable. If they are, you will see additional textboxes that will need to be filled in. Page 69
70 These are the additional textboxes that appear when you check the VARIABLE box. Click Save and continue to the General Education tab. Page 70

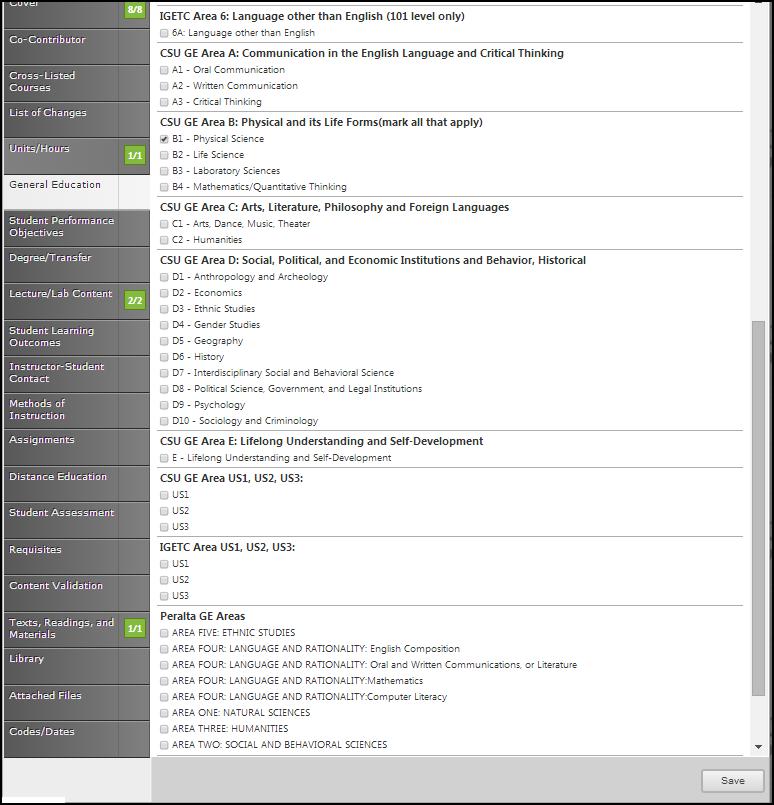
71 General Education Enter the C-ID Information in the textboxes, using the calendar icon to choose the Expiration Date. Use the checkboxes to indicate the transferability of this course to CSU/UC. Indicate which if any of the general education patterns this course applies to and which specific area you propose this course to be incorporated into. Click Save and continue to the Degree/Transfer tab. Page 71
72 Page 72


73 Degree/Transfer Use the dropdown menus to view your options for each item. If you check the Program Applicable box, an additional section will appear asking you to specify if this course is Required for Degree/Certificate. Use the scroll bar to view all programs. You may also narrow your options by entering search terms related to the desired course in the search bar. Only options containing the letter and/or number sequence you type will show. To view all options again, delete your search. Click the checkbox to the left of the cross-listed courses. If you click the box next to Show Selected, only the selected courses will show. Click once more to show all courses again. If you click the Clear All button, any selections within this section will be removed and you will have to find and select a new related course. Click Save. Page 73
74 Lecture/Lab Content Create the outline for Lectures and Labs in these textboxes. Use the Rich Text Editor to make the list of changes. This textbox contain formatting tools that allow you to, among other things, italicize text or format information into an outline. If you are making lists, it is important to use the outline tools in order for the lists to appear correctly on reports. You should Not copy information directly from Microsoft Word or similar programs, as embedded formatting information will cause problems with the editor. For assistance using the Rich Text Editor Detailed Instructions see page 182 of this manual. Save this page, and continue to the Student Learning Outcomes tab. Page 74


75 Student Performance Objectives In this section, you will enter the Student Performance Objectives. Click the Add New Item button to add each objective individually. When you click the Create Grouping (Optional) button you will see an additional box to insert the Grouping Label. Type the Objective into the textbox provided. Click Save and continue this process until all objectives have been entered. Required fields are marked with an *. Page 75

76 To edit an objective, click the blue bar. To reorder them, use the up and down arrows to the right of the bar, or to delete, click the red X. When all objectives have been entered in the correct order, continue to the Student Learning Outcomes tab. Page 76
77 Student Learning Outcomes Click the Add New Item button to add outcomes. Enter information in the Outcome Text and the Assessment Text textboxes. Click Save and continue this process until all outcomes are entered. Page 77

78 To edit an outcome, click the blue bar. To reorder them, use the up and down arrows to the right of the bar, or to delete, click the red X. When all outcomes have been entered in the correct order, continue to the Methods of Instruction tab. Page 78
79 Methods Of Instruction Select the Instruction Types from the checkboxes provided. If there are additional methods that are not listed, enter those into the textbox for Other Methods. Click Save and continue to the Distance Education tab. Page 79


80 Distance Education The first page will give you the option to check the box asking you if this course will be available for Distance Education. When you select the box, you will see the following screen. Page 80


81 If you select No in the dropdown menu, an additional textbox will be shown asking you to explain. If you select Yes in the dropdown menu in the Additional Recourses section, you will be shown an additional textbox asking you to explain. Click Save when completed. Page 81
82 Instructor-student contact Select the Add New Item button to add a type of contact. Use the dropdown menu to choose your options for Contact Type and then fill in the textbox provided for the Frequency of this type of contact. Click Save and continue this process until all types of been entered. To edit a contact type, click the blue bar. To reorder them, use the up and down arrows to the right of the bar, or to delete, click the red. When all types of contact are entered, continue to the Assignments tab. Page 82
83 Assignments If you check the box to Override Outside Class Hours, the Outside Class Hours will become a required textbox. List all out of class assignments, including library assignments, in the Out Of Class Assignment textbox provided. Click Save and continue to the Student Assessment tab. Page 83

84 Student Assessment In this section, check as many boxes as are applicable. Note: for degree credit, At Least One of the first three boxes must be checked. If Essay is not checked, please explain why in the textbox. If you select the Other checkbox, describe what that other is in the textbox following the checkboxes. Click Save when finished and continue to the Requisites tab. Page 84

85 Requisites Select the checkbox if This Course Has Requisites. The following screen will appear. If the course has requisites, select the Add New Item button. Enter each requisite individually. This will allow you to specify the type of requisite and the course or non-course requirement. Choose the Requisite Type from the dropdown menu. If the requisite is a course, select the Subject and Requisite Course from the subsequent dropdown menus. If it is a non-course requirement, enter that information in the Requisite Comment field along with any other additional information such as grade requirements of the requisite, reasoning for the requisite, etc. Use the Condition menu to indicate this requisite s relationship to the next. When you do not select a specific condition the and is already implied. When you select or you are indicating that a student may use this course or the next course, to qualify for the course. Following this or selection with an and is only used when nesting needs to be present. For example; art 101 or art 102 and 101 A. Page 85

86 To edit a requisite, click on the blue bar. Use the up and down arrows on the right of the blue bars to reorder. To delete, press the red X. Page 86


87 Content validation To add content review select add new item button. To review the content, use the dropdown menu to make your selection. If you have added requisites in the requisites page, this checkbox will be selected (refer to the requisites page to change this value). If you choose Content Review from the dropdown menu, you will see the following screen. Page 87
88 You will then select the Content Review Type from the dropdown menu. Page 88

89 If you choose one of the other options from the dropdown menu you will see the screen below asking you to Explain Why Content Review Is Not Selected. Once you have finished filling in the explanation click Save. Click Save when all fields are finished. Page 89

90 Texts, Readings, And Materials In the Texts, Readings And Materials section use the dropdown menu to select the Citation Style. Enter materials individually with books under Textbooks and any other materials under the appropriate heading. Click Add New Record to add items to the lists. Page 90

91 Add all books in the Textbook section. Add the Author, Title, Edition, ISBN, City, Publisher, and the Year of Publication in the textboxes, and then click Insert. Click Add New Record to enter additional textbooks. You will need to add each entry separately. Page 91
92 Add Manuals in this section. Add the Author, Title, Pub. Date and Publisher in the textboxes provided. Click the calendar icon to find the date the manual was published. In the calendar icon pop up, use the left and right arrows next to the month s name to browse for another month and then click Insert. Click Add New Record to enter additional textbooks. You will need to add each entry separately. Add Periodicals in this section. Add the Title, Author, Publication Name, Publication Date and Publisher in the textboxes, and then click Insert or Cancel. Click Add New Record to enter additional textbooks. You will need to add each entry separately. Page 92


93 Add software in the Software area. Add the Title, Edition, Publisher, and Description in the appropriate textboxes, and then click Insert or Cancel. Click Add New Record to enter additional textbooks. You will need to add each entry separately. You can sort materials within their categories by clicking on the heading by which you wish to sort them. Please note that this sorting is only for your current view. Items will appear on reports in the order they are added to the proposal. They will also revert to the order added if you leave this page and return later. To edit a material, click the Edit button to the left of the item. To remove an item from your list, click the Delete button to the right of the item. You may need to use the side scroll bar in each category to access the Delete button. If you have a lot of materials, you can move between pages with the arrows at the bottom of each category. When your materials list is complete, click Save and continue to the Library tab. Page 93

94 Library In the Library section, indicate how the library will be impacted by this course by clicking the appropriate checkbox. If you have comments put them in the Comment textbox provided. Click Save and continue to the Attached Files tab. Page 94
95 Attached files In the Attach Files section, you may attach files for additional documentation or support of your proposal. Use the Select button to find files, and then press Upload Files to attach them. Continue to the Codes/Date tab. Page 95

96 Codes/Dates In the Codes/Dates section of the proposal, select the date by clicking the calendar icons. In the calendar icon pop up, use the left and right arrows next to the month s name to browse for another month. Use the dropdown menu options or key in the first few letters of your search criteria in the textbox. Follow prompts for completing the information needed in the textboxes. Click Save when finished. This is the last section of this proposal. Reviewing this proposal can be done by moving through the dark gray tabs or by viewing the reports on page 168. Page 96
97 Launch When you are satisfied with the information in the proposal you have created, select the Launch button. This can be done from any page within the proposal. This will move the proposal into the approval process. You may also choose Delete Draft, and the draft will be deleted. You will be prompted to confirm your decision in a popup box. Page 97

98 BCC Deactivate Course COA Deactivate Course Laney Deactivate Course MC Deactivate Course Refer to the Create Proposal section on page 15 to begin creating a proposal. Cover The Cover section is the first section of the New Course proposal. If you realize at any point that the information you provided to create the proposal was incorrect, DO NOT use your browser s back button to correct this. Make the changes on the Cover screen, OR click Delete Draft and start over. Any required fields throughout the proposal will be marked with an * and highlighted light orange. Move between the sections of the proposal by using the dark gray tabs on the left of the page. Sections with required fields also have an orange box showing your progress, which will turn green when you have completed all required fields. You will only be prompted to save when changes are made. If, at any point you are unable to click into or make changes to a field s information, you do not have edit privileges for that field. If you need to make changes to such a field, contact your college s CurricUNET administrators. The first 3 boxes have been pre-populated from the course creation screen. Enter information into the field textboxes. Use the dropdowns menus if they are an option. Page 98
99 Co-Contributor To select a Contributor, scroll down to find the name of the faculty member(s) who have contributed on this proposal. You may also type their name in the search box to filter names and shorten the available list. Click the checkbox next to each applicable name. You may select as many names as necessary. Click Show Selected to view only the names you have selected. Click Clear All to start over with your selections. Click Save and continue to the Cross-Listed Courses tab. Page 99

100 Cross-Listed Courses To add Cross Listed Courses, select any Related courses from the list. You may need to scroll within this section to find your choice. You may also narrow your options by entering search terms related to the desired course in the search bar. Only options containing the letter and/or number sequence you type will show. To view all options again, simply delete your search. Click the checkbox to the left of the cross-listed courses. If you click the box next to Show Selected, only the selected courses will show. Click once more to show all courses again. If you click the Clear All button, any selections within this section will be removed and you will have to find and select a new related course. Click Save when you are finished and continue to the List Of Changes tab. Page 100
101 List Of Changes Check the boxes that apply in the Reasons For Update section. Use the Rich Text Editor to make the list of changes. This textbox contain formatting tools that allow you to, among other things, italicize text or format information into an outline. If you are making lists, it is important to use the outline tools in order for the lists to appear correctly on reports. It is recommended that you do NOT copy information directly from Microsoft Word or similar programs, as embedded formatting information will cause problems with the editor. For assistance using the Rich Text Editor Detailed Instructions see page 182 of this manual. Save this page, and continue to the Units/Hours tab. Page 101

102 Units/Hours Fill in the Units (Min), Lecture Hours (Min), Lab/Studio/Activity Hours (Min) and TBA Hours (Min). Use the dropdown menu to select the Grading Policy, Minimum Duration and if this course is repeatable. Fill in the textboxes to add justification if selection is not full semester, enrollment maximum and Add Justification If Selection Is Not 40. Under the selected topic heading check the box if was previously offered as a selected topic. Page 102

103 In the Units/Hours section of the proposal, if you select the check box indicating that the hours are variable, you will see additional textboxes that will need to be filled in. Click Save and continue to the General Education tab. Page 103

104 General Education Enter the C-ID Information in the textboxes, using the calendar icon to choose the Expiration Date. Use the checkboxes to indicate the transferability of this course to CSU/UC. Indicate which if any of the general education patterns this course applies to and which specific area you propose this course to be incorporated into. Click Save and continue to the Student Performance Objectives tab. Page 104
105 Page 105
106 Student Performance Objectives In this section, you will enter the Student Performance Objectives. Click the Add New Item button to add each objective individually. When you click the Create Grouping (Optional) button you will see an additional box to insert the Grouping Label. Type the Objective into the textbox provided. Click Save and continue this process until all objectives have been entered. Required fields are marked with an *. Page 106

107 To edit an objective, click the blue bar. To reorder them, use the up and down arrows to the right of the bar, or to delete, click the red x. When all objectives have been entered in the correct order, continue to the Degree/Transfer tab. Page 107


108 Degree/Transfer Use the dropdown menu to select the Codes and Status (Es). If you check the Program Applicable box, an additional section will appear asking you to specify if this course is Required for Degree/Certificate. Use the scroll bar to view all programs. You may also narrow your options by entering search terms related to the desired course in the search bar. Only options containing the letter and/or number sequence you type will show. To view all options again, delete your search. Click the checkbox to the left of the cross-listed courses. If you click the box next to Show Selected, only the selected courses will show. Click once more to show all courses again. If you click the Clear All button, any selections within this section will be removed and you will have to find and select a new related course. Click Save and continue to the Lecture/Lab Content tab. Page 108

109 Lecture/Lab Content Create the outline for Lectures and Labs in these textboxes. Use the Rich Text Editor to make the list of changes. This textbox contain formatting tools that allow you to, among other things, italicize text or format information into an outline. If you are making lists, it is important to use the outline tools in order for the lists to appear correctly on reports. It is recommended that you do Not copy information directly from Microsoft Word or similar programs, as embedded formatting information will cause problems with the editor. For assistance using the Rich Text Editor Detailed Instructions see page 182 of this manual. Save this page, and continue to the Student Learning Outcomes tab. Page 109
110 Student Learning Outcomes Click the Add New Item button to add outcomes. Enter information in the Outcome Text and the Assessment Text textboxes. Click Save and continue this process until all outcomes are entered. Page 110

111 To edit an outcome, click the blue bar. To reorder them, use the up and down arrows to the right of the bar, or to delete, click the red X. When all outcomes have been entered in the correct order, continue to the Instructor-Student Contact tab. Page 111
112 Instructor-Student Contact Select the Add New Item button to add a type of contact. Use the dropdown menu to choose your options for Contact Type and then fill in the textbox provided for the Frequency of this type of contact. Click Save and continue this process until all types of been entered. To edit a Contact Type, click the blue bar. To reorder them, use the up and down arrows to the right of the bar, or to delete, click the red x. When all types of contact are entered, continue to the Assignments tab. Page 112

113 To edit a contact type, click the blue bar. To reorder them, use the up and down arrows to the right of the bar, or to delete, click the red X. When all types of contact are entered, continue to the Assignments tab. Page 113
114 Methods of instruction Select the Instruction Types from the checkboxes provided. If there are additional methods that are not listed, enter those into the textbox for Other Methods. Click Save and continue to the Assignments tab. Page 114

115 Assignments If you check the box to override Outside Class Hours, the Outside Class Hours will become a required textbox. List all Out Of Class Assignments, including library assignments, in the Out Of Class Assignment textbox provided. Click Save and continue to the Distance Education tab. Page 115
116 Distance education Indicate if this course will be available for Distance Education by checking the box. When you select the checkbox you will see the following screen. Page 116


117 Indicate if this course will be designed to accommodate students with disabilities using the dropdown menus. If you select NO an additional text box will appear asking you to explain. If you select YES an additional textbox will appear asking you to explain. Click Save and continue to the Student Assessment tab. Page 117
118 Student assessment In this section, check as many boxes as are applicable. Note: for degree credit, At Least One of the first three boxes must be checked. If Essay is not checked, please explain why in the textbox. If you select the Other checkbox, describe what that other is in the textbox following the checkboxes. Click Save when finished and continue to the Requisites tab. Page 118
119 Requisites Check the box if this course has requisites. You will then be able to click the Add New Item button to add each requisite individually. This will allow you to specify the type of requisite and the course or non-course requirement. Choose the Requisite Type from the dropdown menu. If the requisite is a course, select the Subject and Requisite Course from the subsequent dropdown menus. If it is a non-course requirement, enter that information in the Requisite Comment field along with any other additional information such as grade requirements of the requisite, reasoning for the requisite, etc. Use the Condition menu to indicate this requisite s relationship to the next. When you do not select a specific condition the and is already implied. When you select or, you are indicating that a student may use this course or the next course, to qualify for the course. Following this or selection with an and is only used when nesting needs to be present. For example; art 101 or art 102 and 101 A. Page 119

120 To edit a requisite, click on the blue bar. Use the up and down arrows on the right of the blue bars to reorder. To delete, press the red X. Page 120

121 Content validation To add Content Review select Add New Item button. Use the dropdown menu to choose the Course Requisite and Content Validation. All of the dropdown options in the Content Validation menu show this view except Content Review. If you choose Content View you will see the following views. Page 121

122 Objective to Objective Check the box to choose the Requisite Course Objective(s). Objective to Content Enter the Requisite Content in the textbox. Fill in the Requisite Content in the textbox. Page 122
123 Content to Content Enter the Current Content and the Requisite Content in the textboxes. Fill in the textboxes labeled Current Content and Requisite Content. Content to Objective Enter the Current Content and select the Requisite Course Objectives by checking the box.click Save and continue to the Math & English skills Advisories tab. Page 123

124 Texts, Readings, And Materials In the Texts, Readings and Materials section use the dropdown menu to select the Citation Style. Enter materials individually with books under Textbooks and any other materials under the appropriate heading. Click Add New Record to add items to the lists. Page 124


125 Add all books in the Textbook section. Add the Author, Title, Edition, ISBN, City, Publisher, and Year of Publication in the textboxes, and then click Insert. Click Add New Record to enter additional textbooks. You will need to add each entry separately. Add Periodicals in this section. Add the Title, Author, Publication Name, Publication Date and Publisher in the textboxes, and then click Insert or Cancel. Click Add New Record to enter additional textbooks. Then click Insert. You will need to add each entry separately. Page 125


126 Add software in the Software area. Add the Title, Edition, Publisher, and Description in the appropriate textboxes, and then click Insert or Cancel. Click Add New Record to enter additional textbooks. You will need to add each entry separately. Add Manuals in this section. Add Author, Title, Pub Date, and Publisher in the textboxes provided. Click the calendar icon to find the date the manual was published. In the calendar icon pop up, use the left and right arrows next to the month s name to browse for another month and then click Insert. Click Add New Record to enter additional textbooks. You will need to add each entry separately. You can sort materials within their categories by clicking on the heading by which you wish to sort them. To edit a material, click the Edit button to the left of the item. To remove an item from your list, click the Delete button to the right of the item. If you have a lot of materials, you can move between pages with the arrows at the bottom of each category. When your materials list is complete, continue to the Library tab. Page 126
127 Library In the Library section, indicate how the library will be impacted by this course by clicking the appropriate checkbox. If you have comments put them in the Comment textbox provided. Click Save and continue to the Attached Files tab. Page 127
128 Attached files In the Attach Files section, you may attach files for additional documentation or support of your proposal. Use the Select button to find files, and then press Upload Files to attach them. Page 128

129 Codes/Dates In the Codes/Dates section of the proposal, select the date by clicking the calendar icons. In the calendar icon pop up, use the left and right arrows next to the month s name to browse for another month. Use the dropdown menu options or key in the first few letters of your search criteria in the textbox. Follow prompts for completing the information needed in the textboxes. Click Save when finished. This is the last section of this proposal. Click Save when finished. This is the last section of this proposal. Reviewing this proposal can be done by moving through the dark gray tabs or by viewing the reports on page 168. Page 129

130 Launch When you are satisfied with the information in the proposal you have created, select the Launch button. This can be done from any page within the proposal. This will move the proposal into the approval process. You may also choose Delete Draft, and the draft will be deleted. You will be prompted to confirm your decision in a popup box. Page 130
131 BCC New Program COA New Program Laney New Program Laney: N/A New Voc Program MC New Program Refer to the Create Proposal section on page 15 to begin creating a proposal. Cover The Cover section is the first section of the New Course proposal. If you realize at any point that the information you provided to create the proposal was incorrect, DO NOT use your browser s back button to correct this. Make the changes on the Cover screen, OR click Delete Draft and start over. Any required fields throughout the proposal will be marked with an * and highlighted light orange. Move between the sections of the proposal by using the dark gray tabs on the left of the page. Sections with required fields also have an orange box showing your progress, which will turn green when you have completed all required fields. You will only be prompted to save when changes are made. If, at any point you are unable to click into or make changes to a field s information, you do not have edit privileges for that field. If you need to make changes to such a field, contact your college s CurricUNET administrators. Click Save and continue to the Co-Contributor tab. Page 131

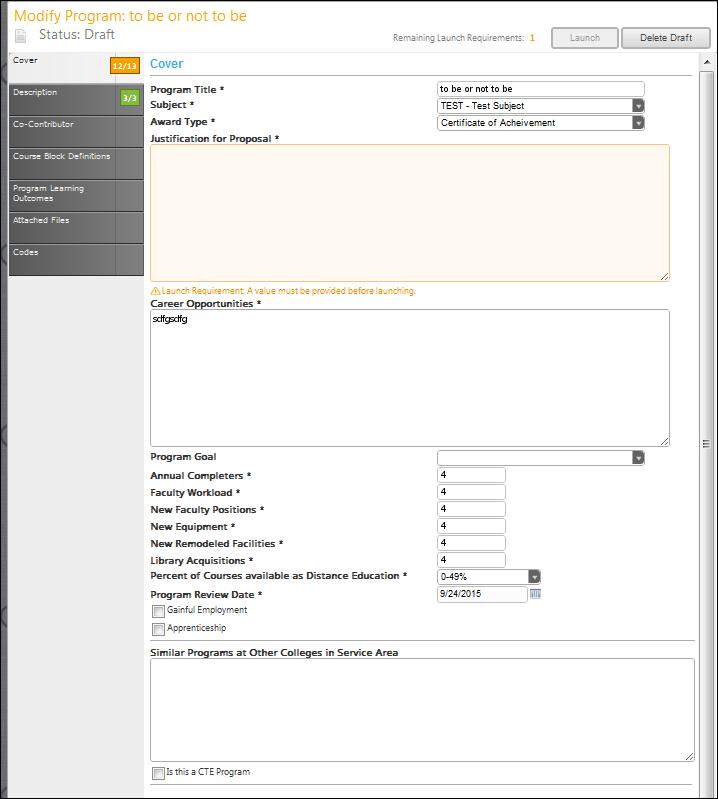
132 Use the dropdown menu or type in the first few letters of your search criteria for the Division, Department, Program Goal and the Percent of Courses available as Distance Education. Fill in the remaining textboxes with the information they are asking for. A calendar icon is provided to find the Program Review Date. Check the box if this is a CTE Program. Page 132
133 Co-Contributor To select a Contributor, scroll down to find the name of the faculty member(s) who have contributed on this proposal. You may also type their name in the search box to filter names and shorten the available list. Click the checkbox next to each applicable name. You may select as many names as necessary. Click Show Selected to view only the names you have selected. Click Clear All to start over with your selections. Click Save and continue to the Description tab. Page 133

134 Description Use the dropdown menu to select the Top Code. Then enter the Cip Code. Click on the link to visit Cip user site. Enter the program description that will appear in the college catalog, in the textbox. Use the Rich Text Editor to enter the description. This textbox contain formatting tools that allow you to, among other things, italicize text or format information into an outline. If you are making lists, it is important to use the outline tools in order for the lists to appear correctly on reports. It is recommended that you do NOT copy information directly from Microsoft Word or similar programs, as embedded formatting information will cause problems with the editor. For assistance using the Rich Text Editor Detailed Instructions see page 182 of this manual. Required fields are marked with an *. Click Save and continue to the Course Block Definitions tab. Page 134

, Block Headers and Block Footers.")
135 Course block definitions Courses and other requirements are added to the program in Course Blocks that define the requirements of the program. You may add as many course blocks as needed, according to your institution or department s requirements for program planning. Examples of Course Blocks might include "Semester 1" and "Semester 2," or "Required Courses" and "Elective Courses." To add a Course Block to the program, click Add New Item. Enter the Course Block Definitions (for example, required courses, electives, community involvement prerequisites, etc.), Block Headers and Block Footers. Block Headers and Block Footers allow you to provide additional information (grade requirements, number of units required, etc.) and only appear on reports. If you wish to specify that, the block has fewer units or a range of units, select the Override Default Unit Calculations box, and enter the Unit Min and Unit Max in the following fields. The Unit Max must always be equal to or greater than the Unit Min. Click Save to add the block to the program. Page 135

136 To edit Program Courses in the course block, select Edit Program Courses. To add a program course, select Add New Item. Use the dropdown menus to select the Subject and Course.if the requirement is not a course, enter that information in the Non-Course Requirements textbox. It is IMPORTANT to check the box if this course is to be included in outcome mapping. The Condition drop down menu allows you to specify if the course must be taken as well as (using and ) or instead of (using or ) the next requirement. The Condition drop down selector need only be used if an or situation or a nesting situation applies, otherwise it is already implied that an and statement exists between entries. Page 136

137 If a course is offered at variable units, you can also specify the range that will meet this requirement in the Units Low and Units High. If this requisite has any special circumstances (such as a grade requirement, approval of an advisor, etc.), add a number or symbol in the Exception Identifier, and describe the circumstances in the Exception text box. Click Save to add the requisite. When all information for the requirement is entered, click Save to add the requirement to the course block. To reorder blocks, use the up and down arrows on the right of the blue bar. To delete, click the red X. When all Course Block Definitions are entered, click on the Program Learning Outcomes tab. Page 137
138 Program learning outcomes To add outcomes click the Add New Outcome button. Fill in the Outcome and Assessment textboxes. Select the checkboxes that apply. Page 138

139 Click Save and continue to the Attached Files tab. Page 139

140 Attached Files In the Attach Files section, you may attach files for additional documentation or support of your proposal. Use the Select button to find files, and then press Upload Files to attach them. After any files are attached, move to the Codes section. Page 140

141 Codes In the Codes section of the proposal use the dropdown menu to select the Program Goal. Select the dates by clicking the calendar icons. In the calendar icon pop up, use the left and right arrows next to the month s name to browse for another month. Use the dropdown menu options or key in the first few letters of your search criteria in the textbox. Follow prompts for completing the information needed in the textboxes. Click Save when finished. This is the last section of this proposal. Reviewing this proposal can be done by moving through the dark gray tabs or by viewing the reports on page 168. Page 141
142 Launch When you are satisfied with the information in the proposal you have created, select the Launch button. This can be done from any page within the proposal. This will move the proposal into the approval process. You may also choose Delete Draft, and the draft will be deleted. You will be prompted to confirm your decision in a popup box. Page 142
143 BCC Modified Program COA Modified Program Laney Program Modification MC Program Modification Refer to the Create Proposal section on page 15 to begin creating a proposal. Cover The Cover section is the first section of the New Course proposal. If you realize at any point that the information you provided to create the proposal was incorrect, DO NOT use your browser s back button to correct this. Make the changes on the Cover screen, OR click Delete Draft and start over. Any required fields throughout the proposal will be marked with an * and highlighted light orange. Move between the sections of the proposal by using the dark gray tabs on the left of the page. Sections with required fields also have an orange box showing your progress, which will turn green when you have completed all required fields. You will only be prompted to save when changes are made. If, at any point you are unable to click into or make changes to a field s information, you do not have edit privileges for that field. If you need to make changes to such a field, contact your college s CurricUNET administrators. Page 143
144 Page 144

145 If you select the checkbox to indicate this is a CTE program. You will see additional textboxes to add information. Complete the textboxes following the prompts attached. Click Save and continue to the Description tab. Page 145
146 Description Use the dropdown menu to select the Top Code. Then enter the CIP Code. Enter the program description that will appear in the college catalog, in the textbox. Use the Rich Text Editor to enter the description. This textbox contain formatting tools that allow you to, among other things, italicize text or format information into an outline. If you are making lists, it is important to use the outline tools in order for the lists to appear correctly on reports. It is recommended that you do NOT copy information directly from Microsoft Word or similar programs, as embedded formatting information will cause problems with the editor. For assistance using the Rich Text Editor Detailed Instructions see page 182 of this manual. Required fields are marked with an *. Click Save and continue to the Co-Contributor tab. Page 146
147 Co-Contributor To select a Contributor, scroll down to find the name of the faculty member(s) who have contributed on this proposal. You may also type their name in the search box to filter names and shorten the available list. Click the checkbox next to each applicable name. You may select as many names as necessary. Click Show Selected to view only the names you have selected. Click Clear All to start over with your selections. Click Save and continue to the Course Block Definitions tab. Page 147
148 Course Block Definitions Courses and other requirements are added to the program in Course Blocks that define the requirements of the program. You may add as many course blocks as needed, according to your institution or department s requirements for program planning. Examples of Course Blocks might include "Semester 1" and "Semester 2," or "Required Courses" and "Elective Courses." To add a Course Block to the program, click Add New Item. Enter the Course Block Definitions (for example, required courses, electives, community involvement prerequisites, etc.), Block Headers and Block Footers. Block Headers and Block Footers allow you to provide additional information (grade requirements, number of units required, etc.) and only appear on reports. If you wish to specify that, the block has fewer units or a range of units, select the Override Default Unit Calculations box, and enter the unit min and unit max in the following fields. The Unit Max must always be equal to or greater than the Unit Min. Save once you have entered the information needed. Enter each definition separately. Page 148

 or instead of (using or ) the next requirement.")

149 To edit a program course, click on the Edit Program Course button. To add an item to the course block, select add new item. Use the dropdown menus to select the Subject and Course.if the requirement is not a course, enter that information in the Non-Course Requirements textbox. It is IMPORTANT to check the box if this course is to be included in outcome mapping the Condition drop down menu allows you to specify if the course must be taken as well as (using and ) or instead of (using or ) the next requirement. The Condition drop down selector need only be used if an or situation or a nesting situation applies, otherwise it is already implied that an and statement exists between entries. If a course is offered at variable units, you can also specify the range that will meet this requirement in the Units Low and Units High. If this requisite has any special circumstances (such as a grade requirement, approval of an advisor, etc.), add a number or symbol in the Exception Identifier, and describe the circumstances in the Exception text box. Click Save to add the requisite to the program. Page 149

150 When all information for the requirement is entered, click Save to add the requirement to the course block. To reorder blocks, use the up and down arrows on the right of the blue bar. To delete, click the red X. When all Course Block Definitions are entered, click on the Program Learning Outcomes tab. Page 150
151 Program learning outcomes Click the Add New Item button to add outcomes. Enter information in the Outcome Text and the Assessment Text textboxes. Select the checkboxes that apply. Page 151


152 Click save and continue this process until all outcomes are entered. To reorder outcomes, use the up and down arrows on the right of the blue bar. To delete, click the red X. When all Program Learning Outcomes are entered, click on the Attached Files tab. Page 152

153 Attached files In the Attach Files section, you may attach files for additional documentation or support of your proposal. Use the Select button to find files, and then Press Upload Files to attach them. After any files are attached, move to the Codes section. Page 153

154 Codes In the Codes section of the proposal, use the dropdown menu to select the Program Goal. Select the dates by clicking the calendar icons. In the calendar icon pop up, use the left and right arrows next to the month s name to browse for another month. Use the dropdown menu options or key in the first few letters of your search criteria in the textbox. Follow prompts for completing the information needed in the textboxes. Click Save when finished. This is the last section of this proposal. Reviewing this proposal can be done by moving through the dark gray tabs or by viewing the Reports on page 168. Page 154

155 Launch When you are satisfied with the information in the proposal you have created, select the Launch button. This can be done from any page within the proposal. This will move the proposal into the approval process. You may also choose Delete Draft, and the draft will be deleted. You will be prompted to confirm your decision in a popup box. Page 155

156 BCC Deactivate Program COA Deactivate Program Laney Program Deletion MC Program Deactivation Refer to the create proposal section on page 15 to begin creating a proposal. Cover The Cover section is the first section of the New Program proposal. If you realize at any point that the information you provided to create the proposal was incorrect, DO NOT use your browser s back button to correct this. Make the changes on the Cover screen, OR click Delete Draft and start over. Any required fields throughout the proposal will be marked with an * and highlighted light orange. Move between the sections of the proposal by using the dark gray tabs on the left of the page. Sections with required fields also have an orange box showing your progress, which will turn green when you have completed all required fields. You will only be prompted to save when changes are made. If, at any point you are unable to click into or make changes to a field s information, you do not have edit privileges for that field. If you need to make changes to such a field, contact your college s CurricUNET administrators. Enter information following the prompts attached to the textboxes. Use the dropdowns menus and calendar icons if provided. Page 156

157 When you select the checkbox indicating that this is a CTE Program you will be see additional textboxes asking you for more information. Save once completed and continue to the Co-Contributor tab. Page 157

158 Co-Contributor To select a Contributor, scroll down to find the name of the faculty member(s) who have contributed on this proposal. You may also type their name in the search box to filter names and shorten the available list. Click the checkbox next to each applicable name. You may select as many names as necessary. Click Show Selected to view only the names you have selected. Click Clear All to start over with your selections. Click Save and continue to the Description tab. Page 158

159 Description Use the dropdown menu to select the Top Code and enter the CIP Code. Click the link to visit the CIP user site. Enter the program description that will appear in the college catalog, in the textbox using the Rich Text Editor to enter the description. This textbox contain formatting tools that allow you to, among other things, italicize text or format information into an outline. If you are making lists, it is important to use the outline tools in order for the lists to appear correctly on reports. It is recommended that you do NOT copy information directly from Microsoft Word or similar programs, as embedded formatting information will cause problems with the editor. For assistance using the Rich Text Editor Detailed Instructions see page 182 of this manual. Required fields are marked with an *. Continue to the Course Block Definitions tab. Page 159
160 Course Block Definitions Courses and other requirements are added to the program in Course Blocks that define the requirements of the program. You may add as many course blocks as needed, according to your institution or department s requirements for program planning. Examples of Course Blocks might include "Semester 1" and "Semester 2," or "Required Courses" and "Elective Courses." To add a Course Block to the program, click Add New Item. Enter the Course Block Definitions (for example, required courses, electives, community involvement prerequisites, etc.), Block Headers and Block Footers. Block Headers and Block Footers allow you to provide additional information (grade requirements, number of units required, etc.) and only appear on reports. If you wish to specify that, the block has fewer units or a range of units, select the Override Default Unit Calculations box, and enter the unit min and unit max in the following fields. The Unit Max must always be equal to or greater than the Unit Min. Save once you have entered the information needed. Enter each definition separately. Click Save to add the block to the program. Page 160

161 To edit program courses in the course block, select edit program courses. To add an item to the course block, select add new item. Use the dropdown menus to select the Subject and Course.if the requirement is not a course, enter that information in the Non-Course Requirements textbox. It is IMPORTANT to check the box if this course is to be included in outcome mapping. The Condition drop down menu allows you to specify if the course must be taken as well as (using and ) or instead of (using or ) the next requirement. The Condition drop down selector need only be used if an or situation or a nesting situation applies, otherwise it is already implied that an and statement exists between entries. If a course is offered at variable units, you can also specify the range that will meet this requirement in the Units Low and Units High. If this requisite has any special circumstances (such as a grade requirement, approval of an advisor, etc.), add a number or symbol in the Exception Identifier, and describe the circumstances in the Exception text box. Click Save to add the requisite to the program. Page 161

162 To reorder blocks, use the up and down arrows on the right of the blue bar. To delete, click the red X. When all Course Block Definitions are entered, click on the Program Learning Outcomes tab. Page 162

163 Program Learning Outcomes To add outcomes click the Add New Outcome button. Fill in the Outcome and Assessment textboxes. Select the checkboxes that apply and click Save. Page 163


164 To reorder outcomes, use the up and down arrows on the right of the blue bar. To delete, click the red X. When all outcomes are entered, click on the Attached Files tab. Continue to the Attached Files tab. Page 164
165 Attached Files In the Attach Files section, you may attach files for additional documentation or support of your proposal. Use the Select button to find files, and then press Upload Files to attach them. After any files are attached, move to the Codes section. Page 165

166 Codes In the Codes section of the proposal, use the dropdown menu to select the Program Goal. Select the dates by clicking the calendar icons. In the calendar icon pop up, use the left and right arrows next to the month s name to browse for another month. Use the dropdown menu options or key in the first few letters of your search criteria in the textbox. Follow prompts for completing the information needed in the textboxes. Click Save when finished. This is the last section of this proposal. Reviewing this proposal can be done by moving through the dark gray tabs or by viewing the Reports on page 168. Page 166

167 Launch When you are satisfied with the information in the proposal you have created, select the Launch button. This can be done from any page within the proposal. This will move the proposal into the approval process. You may also choose Delete Draft, and the draft will be deleted. You will be prompted to confirm your decision in a popup box. Page 167


168 Reports Reports show a summary of any proposal, in any status. Each type of proposal has slightly different report options, but the process of accessing them is the same. Each report will open in a new tab within your internet browser. In the Search screen, click the page icon in the Reports column. A menu will appear with the report options. Select the report you wish to view. When in the proposal itself, click the page icon under the orange proposal name. A menu will appear with the report options. Select the report you wish to view. If a proposal has been launched or approved, clicking the proposal name in the search results will present this screen. Select the report you wish to view from the buttons at the top of the screen. Page 168
169 Page 169
170 Course Reports All Fields An All Fields report shows all the fields and information in the proposal. Page 170
171 Comparison A Comparison report shows all the fields in the proposal, with changes between this proposal and the most recent active version of the proposal are highlighted. Information removed will be highlighted pink, with a strikethrough the words, while new information will be highlighted green and italicized. Page 171

172 Course Outline A Course Outline report is a summary report. Page 172

173 Impact An Impact report shows the courses for which this course is a requisite, and programs that include this course. Page 173

174 Program Reports The Program Summary summarizes the program s Degree Requirements. Page 174
175 All Fields Report The All Fields Report shows all the fields and information in the proposal. Page 175
176 Comparison Report For Program Amendment or Program Deactivation proposals, a Comparison Report will show all fields and information in the proposal, with changes between this proposal and the most recent previous version of the program highlighted. Information removed will be highlighted pink with a strike-through, and information added will be highlighted green and italicized. Page 176


177 Approvals To view pending approvals, click the Approvals button at the top of any page. If you have any approvals waiting for you, there will be an orange box with a number in it attached to the Approvals button. The process is similar for all proposal types. To view a pending approval, click on the proposal. The process is similar for all proposal types. The standard user without administrative privileges will not be able to see the All Approvals option. They will only be able to see approvals for which they are the originator or the next member of the approval process. Page 177


178 If you are the next user in the approval process, you will see this screen. If you wish to view the proposal, you can select View Course Proposal. You may also view any available reports by clicking the name of the report. Use the Action drop down menu to select the action you wish to take on the proposal, add any Comments if necessary, and then click Commit. This will move it to the next level of the approval process. If you reject the proposal, it will move the proposal into Rejected status. If you request changes, it will send the proposal back to the originator. Once these changes have been made, the default action is that the proposal will return to the person who requested the changes. Page 178

179 Make sure you see a confirmation message that will pop up on the screen to confirm that when you pressed Commit the action was received. Press Close To Continue to ensure this. Page 179
 must")
 must")
180 The admin screen will now show a red confirmation that the proposal has been moved. To implement the course and add it to the college s offerings, the last user in the approval process (or an administrator) must select Implement from the action menu. To implement the course and add it to the institution s offerings, the last user in the approval process (or an administrator) must select Implement from the action menu. Select the Publish date (the date the course will become active). Add any comments, and click Commit. Page 180


181 Select Implement in the Action menu and select the Publish Date (the date the course will become active). Add any Comments, and click Commit. You must confirm the final action by clicking Activate. Page 181
182 Rich text editor detailed instructions The rich text editors within the CurricUNET system provide several tools to help you format your information. Unfortunately, copying and pasting an outline straight from Microsoft Word or a similar program will not provide a properly formatted outline. There are a few ways to create an outline that will be formatted properly. Please note that the Rich Text Editors do not currently support tables or charts. If pasting a paragraph of text (as you might for a course description) into the Rich Text Editor, you must paste it as plain text. On a windows based computer, type Ctrl+Shift+V, or right click on your mouse, and select Paste As Plain Text. If you do not do this, hidden formatting tags will interfere with the internal tools of the editor and cause problems with reports. An outline or list requires additional changes. Page 182

183 Creating an outline within the rich text editor The best way to produce a properly formatted outline is directly in the rich text editor. You may enter your line headings as you see fit, or use the built-in list tools. The left button creates a bulleted list, and the right button creates a numbered list. Use the indent tools to create levels within the list. Click the far right button to indent, or the left indent button to remove an indentation. Indent Tools List Tools Below is an example of a bulleted list with several levels of indentation: Page 183
184 In addition, an example of a numbered list with several levels of indentation: If you choose to not use the list tools because you would prefer to specify your own level beginning designations, you may do so, using the indentation tools as needed. Page 184

185 Creating An Outline In Microsoft Word, Notepad, Or A Pdf Reader If you wish to use Microsoft Word or a similar program to create the initial outline, you must follow several steps to produce a properly formatted outline or text. If you use Microsoft Word, or a similar program, you must first copy the outline into a program such as Notepad, which will strip out the internal formatting within the text, or as a PDF file. Create your outline As an example, here is a course outline created in Microsoft Word. After you create the outline, you copy the file to Notepad or save it as a PDF. Page 185

186 Copy To Notepad Copy the outline into Notepad (or a similar plain text writing program), which will strip out formatting. (you could also begin in Notepad and compose your outline within that program.) Page 186


187 Save As A PDF Please note that with this method, using a Sans Serif Font (such as Helvetica or Arial) tends to provide the best results. Using a Serif Font such as Times New Roman or Georgia is possible, but may require some additional proofreading to make sure that all spaces and letters copied correctly. You can save your Word files as a Pdf. On Microsoft 2010 and newer, do this by clicking File and Save As. Enter/edit the File name, then use the Save As type dropdown menu to select PDF, and click Save. Page 187


188 You will now be able to open this file in your PDF reader (such as Adobe Acrobat or Adobe Reader). You can also scan a hard copy of a document to get to this point, but be sure to save it as a text PDF file, not an image. Copy the text from Notepad or a PDF reader and past it into the Rich Text Editor. Proofread carefully to make sure that no unnecessary line breaks copied over, and that all spaces and characters copied correctly. To create indented levels, select the end of the last line before the indentation, and press Enter on your keyboard. Select the end of the last line of the indentation, and press Enter again. This will create a new block of text. You Must add these additional hard returns to indent text. Page 188

189 Click within the block to be indented, and click the Right Indent formatting influence on the Rich Text Editor. To indent a second level, click the button once. For a third level, click twice, etc. Do this for each level. Page 189


190 Creating An Outline Using Html The third way to create a properly formatted outline requires HTML skills. If you have the HTML skills to write your outline in this method, click the HTML button. This will change the view of the Rich Text Editor. Enter the HTML in this field, then click Ok. If done correctly, this will produce an outline in the Rich Text Editor. Page 190
Create Proposal. To create a new proposal, select the Create Proposal button.
 Create Proposal To create a new proposal, select the Create Proposal button. Choose your Proposal Type from the drop down menu, and then click the Next button. Page 15 For BCC New Course, COA New Course,
Gavilan CurricUNET User Manual
 1000 River Walk Drive, Suite 350 Idaho Falls, ID 83402 Tel: 208.522.1225 Fax: 208.522.2896 Gavilan CurricUNET User Manual Building the Worldwide Curriculum Network Page 1 Table of Contents Log In... 4
Contra Costa CurricUNET User Manual
 1000 River Walk Drive, Suite 350 Idaho Falls, ID 83402 Tel: 208.522.1225 Fax: 208.522.2896 Contra Costa CurricUNET User Manual Building the Worldwide Curriculum Network Table of Contents Log In... 4 Viewing
MiraCosta CurricUNET User Manual
 MiraCosta CurricUNET User Manual Building the Worldwide Curriculum Network Page 1 Contents Log In... 5 Courses... 6 Programs... 9 Create Proposal... 10 Deactivate Credit Course... 11 Deactivate Noncredit
CurricUNET User Manual
 CurricUNET User Manual Page 1 Contents Log In... 5 Changing Your Password... 6 Viewing Courses... 8 Viewing Programs... 11 Create Proposal... 12 Course Proposals... 15 Cover or Main page... 15 Proposal
META Admin User Guide
 META Admin User Guide Version 2.2 August, 2017 Contents Welcome to META... 6 Accessing META... 6 Logging In 7 Profile Management 9 Changing Your Password 10 Resetting Your Password 10 Troubleshooting...
Governet 1000 River Walk Drive, Suite 350 Idaho Falls, ID Tel: Fax: CurricUNET User Manual
 Governet 1000 River Walk Drive, Suite 350 Idaho Falls, ID 83402 Tel: 208.522.1225 Fax: 208.522.2896 CurricUNET User Manual 1 Table of Contents Log In... 4 Viewing Courses and Programs:... 5 Viewing Courses:...
META Admin User Guide
 META Admin User Guide Version 3.0, October 2018 Welcome to the META Admin User Guide... 4 Administer Site... 4 Navigating the Administrative Area... 5 Navigating and Sorting Tables 5 Using Filter Conditions
META General User Guide
 META General User Guide Version 2.2 November, 2017 Contents Welcome to META 5 Accessing META...5 Logging In 6 Profile Management 8 Changing Your Password 9 Resetting Your Password 9 Troubleshooting...
User Manual: Manager
 Learning Management System ( LMS ) User Manual: Manager V NLFMG-03092017-1 Disclaimer and Warranty Information Limits of Liability / Disclaimer of Warranty The information contained within this manual
Washington State Educator Electronic Certificate System (E-Certification) College/University Administrator User Guide
 College/University Administrator User Guide") Washington State Educator Electronic Certificate System (E-Certification) College/University Administrator User Guide October 8, 2015 Table of Contents 2.0 College/University Personnel Administrators...
Washington State Educator Electronic Certificate System (E-Certification) College/University Administrator User Guide October 8, 2015 Table of Contents 2.0 College/University Personnel Administrators...
Creating and Viewing Curriculum
 Creating and Viewing Click the button on the META home screen. A dropdown menu will appear with the following options: Course, Program and Assessment. Click the desired option to proceed. options are explained
End of Year LMS Updates Admin Guide
 V 4.7.1.January2019 / Document version 012232019-2 End of Year LMS Updates Admin Guide NOTE: This DRAFT guide should provide a brief overview and screenshots of the End of Year LMS updates. All items in
SIS Modernization Faculty (Instructor) Portal Training Guide
 Portal Training Guide") Faculty (Instructor) Portal Training Guide Created on August 2017 Table of Contents Introduction to the New Faculty Portal... 1 Logging into the Faculty Portal... 1 Navigating the Faculty Portal... 5 Using
Faculty (Instructor) Portal Training Guide Created on August 2017 Table of Contents Introduction to the New Faculty Portal... 1 Logging into the Faculty Portal... 1 Navigating the Faculty Portal... 5 Using
2018 Annual Report Instructions
 2018 Annual Report Instructions How to Complete the 2018 Annual Report There s plenty of assistance right at your fingertips when you follow the 2018 ANNUAL REPORT INSTRUCTIONS for Surgical Technology
Annual Report Instruc ons Surgical Technology (for programs that previously filed an Annual Report)
") Annual Report Instruc ons Surgical Technology (for programs that previously filed an Annual Report) 2015 It is suggested that each program have all data ready to input prior to logging into the E-Report.
Annual Report Instruc ons Surgical Technology (for programs that previously filed an Annual Report) 2015 It is suggested that each program have all data ready to input prior to logging into the E-Report.
CourseWorks Quick Start
 Introduction CourseWorks Quick Start CourseWorks (aka Sakai ) is the university's new course management system, which allows instructors to develop and maintain course Web sites. With CourseWorks, instructors
Introduction. Paradigm Publishing. SNAP for Microsoft Office SNAP for Our Digital World. System Requirements
 Introduction Paradigm Publishing Paradigm understands the needs of today s educators and exceeds the demand by offering the latest technological advancements for coursework settings. With the success of
Blackboard 5 Level One Student Manual
 Blackboard 5 Level One Student Manual Blackboard, Inc. 1899 L Street NW 5 th Floor Washington DC 20036 Copyright 2000 by Blackboard Inc. All rights reserved. No part of the contents of this manual may
Blackboard 5. Instructor Manual Level One Release 5.5
 Bringing Education Online Blackboard 5 Instructor Manual Level One Release 5.5 Copyright 2001 by Blackboard Inc. All rights reserved. No part of the contents of this manual may be reproduced or transmitted
Faculty Guide to e-campus Uploading and Submitting Grades University of Rhode Island Office of Enrollment Services
 FOR DUE DATES PLEASE CHECK: FACULTY SENATE APPROVED UNIVERSITY CALENDAR These instructions are in 3 parts, please read through all before starting. Step 1 Getting into your Grade Roster Step 2 Entering
ADMINISTRATIVE USER GUIDE FOR THE APTI-LEARN LEARNING MANAGEMENT SYSTEM (LMS)
") ADMINISTRATIVE USER GUIDE FOR THE APTI-LEARN LEARNING MANAGEMENT SYSTEM (LMS) Software Version 2.6 September 2012 Prepared by EM-Assist This page left intentionally blank. Software Version 2.6; Document
ADMINISTRATIVE USER GUIDE FOR THE APTI-LEARN LEARNING MANAGEMENT SYSTEM (LMS) Software Version 2.6 September 2012 Prepared by EM-Assist This page left intentionally blank. Software Version 2.6; Document
Guide for K-6 Teachers
 Guide for K-6 Teachers 2009 Houghton Mifflin Harcourt Publishing Company. All rights reserved. Houghton Mifflin Harcourt and its logo are trademarks of Houghton Mifflin Harcourt Publishing Company. Microsoft
hondadreamfactory User Guide
 hondadreamfactory User Guide Contents 1. Preparatory Steps 3 System Requirements 3 Accessing hondadreamfactory 4 Navigating the Portal 5 2. Training Courses 6 Accessing an online training course 8 Exiting
INSTRUCTOR SELF SERVICE USER GUIDE
 INSTRUCTOR SELF SERVICE USER GUIDE Page 1 of 38 Instructor Self Service Table of Contents Introduction... 3 Overview... 3 Access... 3 Sign in to Bear Tracks... 4 General Navigation... 6 Menu Navigation...
Guide for Candidates: Online Progress Reports
 Guide for Candidates: Online Progress Reports What is Quest Quest is our comprehensive research management system used to administer and support research activity at Victoria University. All Progress Reports
HealthStream Connect Administrator User Guide
 HealthStream Connect Administrator User Guide ii Contents About HealthStream Connect... 1 Administrator Overview of HealthStream Connect... 2 Administrator Access and Privileges... 2 Navigating HealthStream
Administrator Quick Guide
 1 Administrator Quick Guide Login Screen The first page employees will see when visiting their training site is the login screen. This is where employees must enter their username and password to access
PeopleSoft Departmental Student Records Training. Bloomsburg University
 PeopleSoft Departmental Student Records Training Bloomsburg University 1 Table of Contents Bloomsburg University Training Notes... 3 Terminology Crosswalk... 3 Term Code Logic... 3 Viewing a Student s
EAB Admin Training. John Indiatsi Academic Advising Director
 EAB Admin Training John Indiatsi Academic Advising Director Indiatsi_j@utpb.edu 432-552-2661 Contents Logging into EAB... 2 Advisor Home Page... 3 Advisor Home View... 3 Syncing Calendars... 4 Syncing
Student Sonia Guide. A quick-start reference to SoniaOnline for students
 Student Sonia Guide A quick-start reference to SoniaOnline for students Copyright 2012, Planet Software Pty Ltd. Licensed users of Sonia are permitted to copy and reprint all or part of this document for
User Manual: Instructor
 Learning Management System ( LMS ) User Manual: Instructor V NLFIG-03102017-1 Disclaimer and Warranty Information Limits of Liability / Disclaimer of Warranty The information contained within this manual
Kodiak Quick Guide: Content
 Kodiak Quick Guide: Content Overview The Content tool is the core of a Kodiak classroom. Use the Content tool to post and organize course content so that information about course expectations, course syllabus,
Frequently Asked Questions
 Frequently Asked Questions WHAT IS PD IN FOCUS? PD In Focus is an award-winning online platform that features hundreds of hours of videos showing research-based teaching practices in action. Designed as
STUDY ASSISTANT. Adding a New Study & Submitting to the Review Board. Version 10.03
 STUDY ASSISTANT Adding a New Study & Submitting to the Review Board Version 10.03 Contents Introduction... 3 Add a Study... 3 Selecting an Application... 3 1.0 General Information... 3 2.0 Add Department(s)...
QUESTION ITEM BANK MAINTENANCE PROGRAM QUICK GUIDE & ILLUSTRATED HELP
 PROJECT PHOENIX EduTrax Instructional Management Solution Phoenix/EIM ItemPlus QUESTION ITEM BANK MAINTENANCE PROGRAM QUICK GUIDE & ILLUSTRATED HELP Version 1.3.3.2 The ItemPlus Windows PC program is used
Version 5. Recruiting Manager / Administrator
 Version 5 Recruiting Manager / Administrator 1 Contents 1.0 Introduction... 4 2.0 Recruitment at a Glance... 6 3.0 Viewing Applicant Numbers... 8 4.0 Activities After Closing Date... 10 5.0 Shortlisting...
Supervisor/Hiring Manager User Essentials. PageUp People Recruit Essentials
 PageUp People Recruit Essentials Table of contents Quick Reference Guide Accessing MyUA Quick Reference Guide Creating and viewing Position Descriptions (PDs) Quick Reference Guide Creating a recruitment/requisition
User Guide. Customer Self Service (CSS) Web Application Progress Software Corporation. All rights reserved.
 Web Application Progress Software Corporation. All rights reserved.") User Guide Customer Self Service (CSS) Web Application 1993-2017 Progress Software Corporation. Version 2.1 March 2017 Table of Contents Welcome... 3 Accessing the Customer Self Service (CSS) Web Application...
User Guide Customer Self Service (CSS) Web Application 1993-2017 Progress Software Corporation. Version 2.1 March 2017 Table of Contents Welcome... 3 Accessing the Customer Self Service (CSS) Web Application...
Turnitin assignments are added from the course s home page. To open the course home page, click on the course from the Moodle start page.
 Guides.turnitin.com Creating a Turnitin Assignment Creating a PeerMark Assignment Submitting Papers The Turnitin Assignment Inbox GradeMark Viewing the PeerMark Assignment Inbox Assignment Inbox Navigation
D2L Fundamentals Faculty Support Guide
 D2L Fundamentals Faculty Support Guide D2L Services West Chester University of Pennsylvania www.wcupa.edu/d2l 610-436-3350, option 2 Anderson Hall, room 2 d2l@wcupa.edu v10.5 July 2015 Contents NAVIGATING
ASTRA USER GUIDE. 1. Introducing Astra Schedule. 2. Understanding the Data in Astra Schedule. Notes:
 ASTRA USER GUIDE 1. Introducing Astra Schedule Astra Schedule is the application used by Academic Space Scheduling & Utilization to schedule rooms for classes and by academic colleges, schools, and departments
FACULTY CENTER. 1. CUNYfirst: https://home.cunyfirst.cuny.edu 2. Select: HR/Campus Solutions. 3. Navigate to: Self Service > Faculty Center
 FACULTY CENTER 1. CUNYfirst: https://home.cunyfirst.cuny.edu 2. Select: HR/Campus Solutions 3. Navigate to: Self Service > Faculty Center 4. Click on My Schedule or any of the other Advisor Center information
(APPLIES ONLY TO CLIENTS WHO ENABLE THIS FEATURE)
") V 4.6.1.January2018 Document version 01-10-2018-02 End of Year LMS Updates Admin Guide NOTE: This DRAFT guide should provide a brief overview and screenshots of the End of Year LMS updates. All items in
V 4.6.1.January2018 Document version 01-10-2018-02 End of Year LMS Updates Admin Guide NOTE: This DRAFT guide should provide a brief overview and screenshots of the End of Year LMS updates. All items in
TXSMARTBUY ONLINE ORDERING SYSTEM
 TEXAS COMPTROLLER OF PUBLIC ACCOUNTS TXSMARTBUY ONLINE ORDERING SYSTEM USER GUIDE May 2015 1 Page TxSmartBuy.com User Guide Table of Contents WHO CAN USE THIS SYSTEM?... 4 SYSTEM REQUIREMENTS AND BROWSER
Guide for Researchers: Online Human Ethics Application Form
 Guide for Researchers: Online Human Ethics Application Form What is Quest Quest is our comprehensive research management system used to administer and support research activity at Victoria University.
Academic Student Learning Outcomes Assessment Management System TracDat v5
 Academic Student Learning Outcomes Assessment Management System TracDat v5 Director of Assessment - Diane Beaudoin beaudoin@purdue.edu TracDat Coordinators Ada Uche: auche@purdue.edu Dan Whiteley: dan@purdue.edu
connected New User Guide
 connected New User Guide This guide will walk you through how to accomplish the following for programs launched through the McGraw-Hill connected website: Create a Teacher Account Redeem Content Create
DOME - Instructor Dynamic Online Mark Entry
 DOME - Instructor Dynamic Online Mark Entry 2015, University of Regina. All rights reserved. Page 2 DOME Table of Contents SECTION 1 NAVIGATION... 3 A. The Dynamic Online Mark Entry (DOME) Functions...
Simplifi 797. CriticalPoint Manual 8/30/2013 1:12 PM
 Simplifi 797 CriticalPoint Manual 8/30/2013 1:12 PM Simplifi 797 IP CriticalPoint Manual Copyright 2013 by Pharmacy OneSource, Inc. Printed in the United States of America All rights reserved. No part
My Courses: Displays courses the user has self-enrolled in as well as courses that have been assigned to the user when available.
 LOGGING IN To log in go to https://gbateam.redvector.com and enter your Login /Username and Password. If you have forgotten your password, click on the Forgot your password link. 1. Enter the primary email
Linking Program Review Data to Reports
 Linking Program Review Data to Reports 1. Accessing & Using the Program Review Data Warehouse 2. Creating Hyperlinks in your Report 3. Exporting Colleague Data as Excel Spreadsheets Open your internet
2013 EDITION. V-Camp Student. Guide. INTERACTIVE GUIDE Use the buttons shown below to navigate throughout this interactive PDF BACK
 V-Camp Student Guide INTERACTIVE GUIDE Use the buttons shown below to navigate throughout this interactive PDF BACK 03 EDITION V-Camp Student Guide Table of Contents Unit : Table of Contents...iii How
1. After turning Edit Mode On at the top right of the Contents page, select Turnitin Assignment using the Create Assessment pull down menu
 Guides.turnitin.com Creating a Turnitin Assignment Revision Assignments Creating a PeerMark Assignment Submitting Papers The Turnitin Assignment Inbox Viewing the PeerMark Assignment Inbox Glossary 1 Creating
JITs Portal. User Manual
 JITs Portal User Manual November 2017 JITs Portal 1 Table of Contents Chapter 1 Introduction... 2 1.1 What is the JITs Portal?...3 1.2 User Guide structure...4 Chapter 2 Working with the JITs Portal...
Logging into and using MyBC
 Logging into and using MyBC MyBC is Bellin College s Student Information System. This is where you go to register for classes, view your student documents, check your billing, and view your financial aid.
SIS STUDENT INFORMATION CENTER
 Using the Self Service Student Center As a student you can: 1. Log Into the System 2. Navigate 3. Add Favorites 4. Add, Drop, or Swap Classes 5. View Your Class Schedule 6. View Grades 7. View Degree Progress
Department Course Scheduling PSv9
 Department Course Scheduling PSv9 classroomsched@uakron.edu Table of Contents Chapter 1: Using the Maintain Schedule of Classes and Schedule New Course Components... 1 Chapter 2: Associated Class... 2
Introduction to Cognos
 Introduction to Cognos User Handbook 7800 E Orchard Road, Suite 280 Greenwood Village, CO 80111 Table of Contents... 3 Logging In To the Portal... 3 Understanding IBM Cognos Connection... 4 The IBM Cognos
Introduction. Paradigm Publishing. SNAP for Microsoft Office SNAP for Our Digital World
 Introduction Paradigm Publishing Paradigm understands the needs of today s educators and exceeds the demand by offering the latest technological advancements for coursework settings. With the success of
KnowlegeTrack User Guide Standard User
 Standard User Standard User Page 1 Standard User Introduction: The Learning portal is designed to manage the subscription and enrollment in the courses, and to provide community features to all of the
CitiManager Job Aids. Cardholder
 CitiManager Job Aids Cardholder Contents Account Info... 2 Reactivating a User s Profile... 2 View Unbilled Transactions... 2 Setup E-mail Alerts... 3 Apply for New Card Invitation Passcode... 4 Apply
Acuity 504. User Guide. Administrators 504 Coordinators Teachers. MSB Customer Care msb-services.
 TM Acuity 504 User Guide Administrators 504 Coordinators Teachers MSB Customer Care 800.810.4220 support@ Copyright 2014 MSB All rights reserved 1 Copyright MSB 2014 Table of Contents MSB Mission Statement...
CourseWorks Syllabus Guide for Instructors
 CourseWorks Syllabus Guide for Instructors Note: In order to setup your CourseWorks syllabus, the Syllabus section has to be enabled in your course site. See the CourseWorks Settings Guide to learn how
Faculty Training. Blackboard I Workshop Bobbi Dubins
 Faculty Training Blackboard I Workshop Bobbi Dubins Table of Contents Introduction... 2 blackboard.allegany.edu... 2 Overview of Features:... 2 Using Blackboard... 3 Changing Your Password... 3 How to
Hyundai Training and Certification System [TACS] Learner User Guide
![Hyundai Training and Certification System [TACS] Learner User Guide](/thumbs/72/66435477.jpg "Hyundai Training and Certification System [TACS] Learner User Guide") Hyundai Training and Certification System [TACS] Learner User Guide REV. 2010-01-29 TACS USER GUIDE - TABLE OF CONTENTS 1. OVERVIEW 4 2. ACCESSING HYUNDAI TACS / LOGIN 4 3. LOG OUT 7 4. LEARNER REGISTRATION
Hyundai Training and Certification System [TACS] Learner User Guide REV. 2010-01-29 TACS USER GUIDE - TABLE OF CONTENTS 1. OVERVIEW 4 2. ACCESSING HYUNDAI TACS / LOGIN 4 3. LOG OUT 7 4. LEARNER REGISTRATION
INSTRUCTIONS FOR FACULTY USER MANUAL CENTRE FOR PROFESSIONAL STUDIES. 1 P age
 INSTRUCTIONS FOR FACULTY USER MANUAL CENTRE FOR PROFESSIONAL STUDIES 1 P age Table of Contents Getting Started... 3 Logging In to Portal... 4 Choosing Faculty... 5 Course Website... 7 Grade Points Entry...
The Army Distributed Learning Program Registration Site Proponent Admin Role
 The Army Distributed Learning Program Registration Site Proponent Admin Role Page 1 Nominations User Guide: Proponent Admin Contents What is Nominations?... 3 User Roles... 3 Role: User... 3 Role: Proponent
Course Alteration and Deletion
 Course Alteration and Deletion The proposal forms within Curriculog are based on the previous paper versions of the forms. The following general directions are for: Deletion of an Existing Course LEVEL
Campus Solutions Advisement Quick Reference Guide
 Campus Solutions Advisement Table of Contents Introduction to Step Sheets... 1 About Your Advisee... 2 View List of Advisees... 3 Send Notifications to Advisees... 4 View Advisee Student Center... 7 View
Tyler SIS Student 360 Parent Portal
 To begin using the Parent Portal, follow these steps: 1.) Your password will be emailed to the address KSD has on record for you. 2.) Go to the Tyler SIS Student 360 web page https://sis.kunaschools.org/idkn360
Security: Account Maintenance User Guide v
 Security: Account Maintenance User Guide v. 5.7.0 Copyright 2002-2018 eschooldata, LLC All rights reserved. TABLE OF CONTENTS Overview... 3 Staff Type... 3 New Staff Type...3 New Certification Type...4
User Manual. perfectionlearning.com/technical-support
 User Manual perfectionlearning.com/technical-support 1 User Manual Accessing Math X... 3 Login... 3 Forgotten Password... 3 Navigation Menu... 4 Logout... 4 Admin... 5 Creating Classes and Students...
Up-To-Date Class Rosters can be accessed through the My UW Madison portal in the Faculty Center
 INSTRUCTOR ACCESS TO CLASS ROSTERS Up-To-Date Class Rosters can be accessed through the My UW Madison portal http://my.wisc.edu in the Faculty Center You will use your NetID and Password to access My UW
Test Information and Distribution Engine
 SC-Alt Test Information and Distribution Engine User Guide 2018 2019 Published January 14, 2019 Prepared by the American Institutes for Research Descriptions of the operation of the Test Information Distribution
User Guide Product Design Version 1.7
 User Guide Product Design Version 1.7 1 INTRODUCTION 3 Guide 3 USING THE SYSTEM 4 Accessing the System 5 Logging In Using an Access Email 5 Normal Login 6 Resetting a Password 6 Logging Off 6 Home Page
SALTO E&T website User manual
 SALTO E&T website User manual salto-et.net Second edition Last updated (01/02/2019) 1 / 34 Table of contents 1. Aims and objectives of the TCA Resource Centre... 4 2. Before use... 5 3. Structure of SALTO
S2 NetBox v4.8 Basic End-User Admin Training
 S2 NetBox v4.8 Basic End-User Admin Training 4/8/16 S2 Security 1 Table of Contents Introduction... 3 Log into your NetBox System... 3 Person Records... 5 Accessing Person Records... 5 Content of a Person
Parent Student Portal User Guide. Version 3.1,
 Parent Student Portal User Guide Version 3.1, 3.21.14 Version 3.1, 3.21.14 Table of Contents 4 The Login Page Students Authorized Users Password Reset 5 The PSP Display Icons Header Side Navigation Panel
Note: Parts of images may be obscured for security reasons.
 Student Enrollment Quick Enroll When an advisee needs an advisor s assistance, enrollment actions may be processed using the Quick Enroll a Student component. Step Note: Parts of images may be obscured
Logging into your online campus:
 2018 TABLE OF CONTENTS Logging into your Online Campus... 3 Home, Training & Administration Tabs... 4 Training Tab... 4 Taking a course... 5 Administration Tab.... 5 Managing User Accounts... 6 Adding
ACADEMIC TECHNOLOGY SUPPORT
 ACADEMIC TECHNOLOGY SUPPORT D2L : Introduction A Guide for Instructors ats@etsu.edu 439-8611 www.etsu.edu/ats Table of Contents Introduction...1 Objectives... 1 Logging In to D2L...1 My Home... 2 The Minibar...
Contents. Announcer Pro Version 4.6 Page 2 of 35 Version V4.6
 User Guide Contents 1. Introduction... 3 1.1. Getting Started... 3 1.2. Navigation... 4 2. Create a Newsletter... 6 2.1. Confirm Company Details... 6 2.2. Choose Template... 8 2.3. Edit Newsletter... 8
Preface...6. Introduction to InspectTech Software...6. What to Look For in Version Glossary...9. InspectTech Basic Features...
 0 1 Table of Contents Preface...6 Introduction to InspectTech Software...6 What to Look For in Version 7.0...6 Glossary...9 InspectTech Basic Features...10 How to Log Into the InspectTech Website...10
MY CCP Customization
 MY CCP Customization Includes information on how-to customize timeout minutes, channels, tabs and columns Updated: 3/21/05-1 - ACKNOWLEDGEMENT Community College of Philadelphia gratefully acknowledges
COLLEGE OF THE DESERT
 COLLEGE OF THE DESERT Course Code CIS-017 Course Outline of Record 1. Course Code: CIS-017 2. a. Long Course Title: Business Data Management with Microsoft Access b. Short Course Title: Business Data Mgmt
Table of Contents Tutorials for Faculty... 3 Creating a News Item... 3 Syllabus... 3 Uploading Your Syllabus... 3 Update Your Syllabus
 Table of Contents Tutorials for Faculty... 3 Creating a News Item... 3 Syllabus... 3 Uploading Your Syllabus... 3 Update Your Syllabus... 3 Email... 4 Send an Email to the Entire Class... 4 Send Email
CAMPUS PORTAL QUICK REFERENCE GUIDE: STUDENT PORTAL
 CAMPUS PORTAL QUICK REFERENCE GUIDE: STUDENT PORTAL 1 CONTENTS How to Set Up Your Portal Web Account... 3 How to Personalize Your Homepage... 4 How to View Holds Applied to Your Portal Account... 4 How
Instructor Manual Contents
 Instructor Manual Contents Welcome to egrade Plus...1 The Roles Within egrade Plus...1 Master Course Instructor...1 Class Section Instructor...2 Navigating egrade Plus...2 Using the Universal Navigation
Enhanced Registration Overview
 Enhanced Registration Overview ID AND PASSWORD 1) In order to register, you must know your NetID and password to login. If you have already used the Financial Aid or Student Accounts system, you have already
CONTENTS... 1 OVERVIEW OF SIMNET...
 CONTENTS CONTENTS... 1 OVERVIEW OF SIMNET... 3 COMPUTER REQUIREMENTS... 3 OPTIMIZING YOUR COMPUTER TO RUN SIMNET ONLINE... 3 Changing Pop-Up Blocker Setting... 3 Changing Screen Resolution Settings...
AVID Reports. User Manager
 AVID Reports User Manager Table of Contents Overview... 3 User Manager Features... 4 Application Toolbar...4 Add New User...4 Export to Excel...4 Help...4 User Account List...4 Sorting...4 Editing...4
myngconnect.com Teacher User Manual
 myngconnect.com Teacher User Manual Table of Contents Teacher & Student eeditions... 2 Resources... 6 Accessing Resources... 6 Digital Library... 6 Teacher Resource Directory... 7 Assessment Resource Directory...
CUBuyplusR. Browser s Guide
 CUBuyplusR Browser s Guide This guide will review how to search for products and add them to your cart. In addition, the procedure for generating a purchase request will be outlined as well as tracking
Campus Solutions Self Service: Faculty Quick Reference Guide
 Campus Solutions Self Service: Faculty Table of Contents Introduction to Step Sheets... 1 The Faculty Center... 2 View Teaching Schedule... 3 Enter My Textbooks... 9 View Textbook Summary... 19 View Exam
Code X Digital User s Guide
 Code X Digital User s Guide PDF0531 (PDF) Houghton Mifflin Harcourt Publishing Company Table of Contents Introduction... 4 Code X Digital and Scholastic Achievement Manager... 5 Enrolling Students and
SIS Modernization Faculty Portal Training Guide
 SIS Modernization Faculty Portal Training Guide Created May 2017 Table of Contents Introduction to the New Faculty Portal... 1 Logging into the Faculty Portal... 1 Navigating the Faculty Portal... 6 Using
SEP Template Management Procedure Document
 SEP Template Management Procedure Document Getting Started First login to Cyberbear and from the ribbon on the top of the screen click on Cyberbear For Faculty and Advisors. Next click DegreeWorks and
Chapter 10: Dynamic Learning Maps (DLM ) Appendix
 Appendix") 10.1 Chapter 10: Dynamic Learning Maps (DLM ) Appendix This Appendix contains information specific to the Dynamic Learning Maps (DLM) program. This information may not apply to you if you are a member
10.1 Chapter 10: Dynamic Learning Maps (DLM ) Appendix This Appendix contains information specific to the Dynamic Learning Maps (DLM) program. This information may not apply to you if you are a member
Qwik Start Guide. For Destiny 9.5 MEDT Dr. Phyllis Snipes. Whitney Fletcher. Natalie Hamlin. Tiffany Johnson
 Qwik Start Guide For Destiny 9.5 MEDT 6468 Dr. Phyllis Snipes Whitney Fletcher Natalie Hamlin Tiffany Johnson 1 Table of Contents Section I: In the Beginning Page # 4 Setting up Patrons types 4 Adding