Breeding Guide. Customer Services PHENOME-NETWORKS 4Ben Gurion Street, 74032, Nes-Ziona, Israel
|
|
|
- Daniel Henderson
- 5 years ago
- Views:
Transcription

1 Breeding Guide Customer Services PHENOME-NETWORKS 4Ben Gurion Street, 74032, Nes-Ziona, Israel
2 Contents PHENOME ONE - INTRODUCTION... 3 THE PHENOME ONE LAYOUT... 4 THE JOBS ICON... 6 GERMPLASM... 8 What is a germplasm?...8 Germplasm Set...8 Phenotypic Study...13 Where can I see all my germplasms?...14 The Germplasm Tab...15 The Variables Tab...16 The Observations Tab:...21 GERMPLASM INFORMATION Pedigree Chart...25 BREEDING FIELD What is a Breeding Field?...28 Creating a New Field...28 Field Types...30 Define Germplasm Columns...31 Toolbar Icons...33 Create a Template Field...35 Clone Field...35 THE LIST TAB How to import lines into the List tab?...37 Entry Code...39 Add Columns to the List Tab...40 Plants Tab...41 THE MAP TAB Design the Field Map...43 Add Germplasm to the Field Map...44 Randomization
3 THE PLOT TAB Manage Columns in the Plot Tab...45 Reports...45 Create Observations...51 Create Selections...52 THE OBSERVATIONS TAB System Columns in the Observation Tab...53 Add Columns to the Observations Tab...53 Add Phenotypic Data to the Observations Tab...55 Transfer germplasm data to the observation row...55 THE SELECTIONS TAB Naming Convention Selections...56 Phenotypic Data on Selections...57 Create a Selection List Report...58 Create a Seed Label Report...59 CROSSES TAB Crosses Planning...60 Crosses List...65 Create a Seed Label Report...68 NAMING CONVENTION

4 Phenome One - Introduction The Phenome One platform is a web-based data management software for plant breeding and genetic research. It implements and supports multiple processes throughout the breeding cycle, including data hosting and management, analytics, mobile app for collecting data and genomics. The system includes four modules: Breeding management - Hosting and managing of germplasm (seeds or plant material) and their pedigree relations, creating and designing fields, observations, selections, crosses, reports, etc. PhenomApp - An Android application for collecting plant phenotypes using tablets and smartphones. It provides offline capabilities for viewing existing information on plots and recording new observations traits and images, in the field, which are then synchronized back into the main system. Data Analysis - Implementation of various statistical methods and graphic representation tools on the data, to translate it into smart decisions. Genomics - Phenome One s Genomics module (a.k.a. Unity) uses advanced technology to enable management of SNPs markers and correlating them into phenotypes. It supports various methods for QTL and genome-wide association studies to find genes and markers that affect important traits. Each module has its user manual that describes its functionalities. This user manual will focus on the breeding management module, demonstrating how the system can implement and support multiple processes throughout the breeding cycle. This manual will explain how to view and manage your genetic material and its pedigree relation, how to design field trials, to produce reports and create new observations/selections 3
5 and crosses. Also, we will demonstrate how to define naming convention of a germplasm and customize the traits settings and inheritance. A separate manual will focus on how to upload data into Phenome One. The Phenome One Layout Phenome One is a user-friendly interface based on a single page application, which allows users to easily browse through their breeding data, organize it into folders, and manage their germplasm, pedigrees, experiments, observations, traits (morphological or genetic ones) and The Navigation Panel more. The content that is managed in the system includes: genetic material (germplasm; seeds or plant material) and observations made of them in various experiments and on diverse variables. The main layout is divided into two areas: The left side area is called the Navigation Panel and contains a library of research groups, folders and their content. Mine: is the very top tab in the navigation tree. Under Mine the user sees all the information he has created or that has been shared with him. Research group: is the main workspace for a research conducted on a specific topic. It may represent a crop, but can be organization, department, laboratory, etc. 4
6 Folder and subfolder: create a hierarchy of folders and subfolders that contain items of various types. This is done using the Left Actions button. You can change their locations in the research group using the drag and drop. Germplasm set: is a list of germplasms (seed or plant material) with their "passport data" (attributes). Phenotypic study: is an experiment loaded from a CSV file with germplasm and their phenotypic observations. Field: represents a breeding trial, where a set of germplasm are sowed / planted in a specific location. The field folder provides functions to design the trial and create new observations, selections and crosses within it. The right-side area represents the viewer or editor for the item that was selected from the navigation panel. On top of the left and right-side areas, there are two Action Buttons. In the user manual I will use the terms left Action Button and right Action Button to describe their functions. These buttons control most of the functions in the system. The left Action Button provides a menu of actions which you can perform on the navigation panel, while the Right Action Button provides a menu of actions which you can perform on the editor panel. left Action Button right Action Button 5

7 The Jobs icon On top of the page, next to the username, the cogwheel icon provides access to the list of tasks. When clicked on, a pop-up window is opened showing the list of processes generated by the user. These processes are created when using specific functions. Here are the functions that create new processes: Upload from PhenomApp Create plants, observations, selections, crosses Create reports Create pedigree chart Inherit/append to material This pop-up window allows users to see the status of the job. Initially it starts with a processing icon. When the status is changed to it means that the job is complete. The user can then see the results either by opening a file (i.e. report or a pedigree chart) or by going back to the relevant tables in the system (i.e. selections loaded from PhenomApp, observations created, etc.). In the process window, it is possible to filter the jobs by different types: 6

8 You can remove jobs that were completed by selecting them, and clicking on the Actions Button -> Delete. 7

9 Germplasm What is a germplasm? A germplasm refers to samples of seeds or plant material which exist or existed at some time, produced by a germplasm method. Germplasms may refer to breeding lines, parental lines, hybrids, introductions, varieties, accessions, etc. Each germplasm created by the system or uploaded from a spreadsheet file has a unique name as well as a unique ID number (GID = germplasm ID). If the user uploads germplasm from a file, he must provide it with a unique name, and the system will add the unique GID. However, if the germplasm was created in the system (as a result of selection or cross), the line name will be generated automatically by the system according to a predefined naming template. The default name template is customizable and may be set with the assistance of Phenome s support. However, every user can override the template using the Set Value button (see explanation in the Selection tab page). The unique line name may be composed of different elements such as field location, year, generation, plot number, selection method etc., so the breeder can recognize the germplasm and its origin just by the name. Example: AS14-F (AS= field location, 14= year, F3= generation, 284=plot number, 1= plant number) Germplasm Set 8
, such as names, codes, traits on a list of germplasms (rows). After creating a germplasm set, there are three ways to add entries into it.")
10 The Germplasm set represents a list of germplasm, such as breeding lines, parental lines, hybrids, varieties, introductions, accessions and so on. This is a table showing various variables (columns), such as names, codes, traits on a list of germplasms (rows). After creating a germplasm set, there are three ways to add entries into it. The first is by loading a CSV file, the second is by manually creating a new germplasm in the system, and the third is by dragging and dropping entries from other sets. More details about the upload process are given in the Upload User Manual. Add germplasm: In order to add a germplasm manually into the germplasm set the user has to: 1. Click on the right Action Button and choose Add germplasm. 9
11 2. Name the germplasm and click OK. 3. Add any information about the germplasm by double clicking on the empty cells and typing in the values manually. Remove germplasms: click on the right Action Button and choose Remove germplasm in order to remove the germplasm from the germplasm set. 10
.")
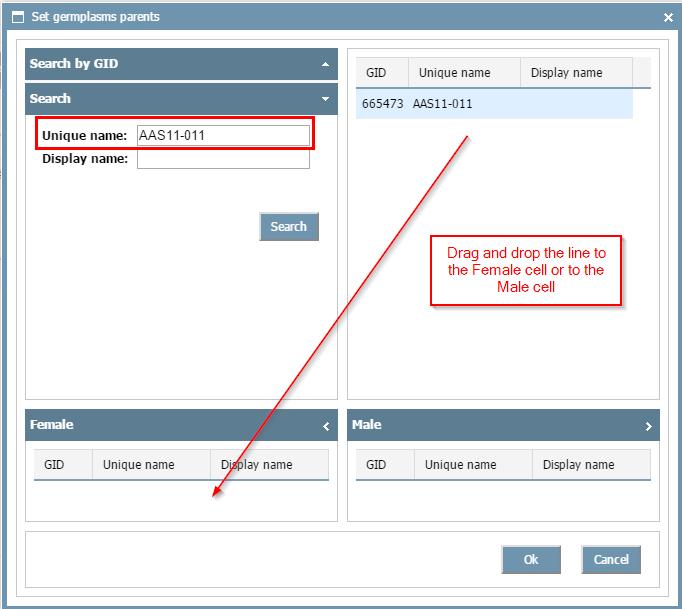
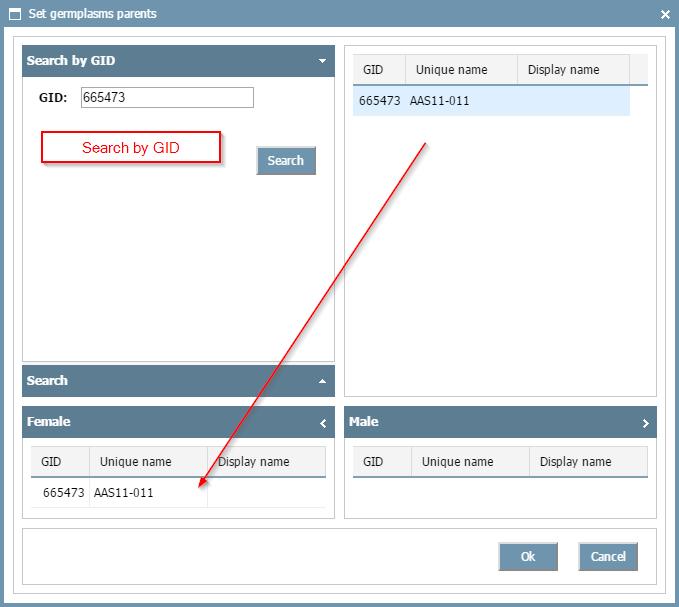
12 Set parents: choose a germplasm and define or change its parent(s) by clicking on Action -> Set parents. This functionality is useful in case the user has to set the parents of only a few germplasms. If the user has to update a long list of germplasm, it is better to use the upload functionality called update germplasm data (see more details in the upload manual). Search for the parent's unique name or search by GID, then select the germplasm and assign it the role of Female or Male using the drag and drop option. 11
13 12

14 Pedigree: Click on one or more germplasms from the germplasm set -> Action -> Pedigree in order to generate a pedigree chart. For more details go to the Pedigree chart paragraph. Phenotypic Study Phenotypic study represents an experiment, or a list of observations made on a set of germplasm. It is comprised of four tabs. The Germplasm tab shows the unique set of lines measured. The Variables tab shows the unique set of variables measured. The Observations tab shows the observations (rows), and variables (columns). Note that for replicated trials (i.e. when each germplasm was measured more than once), the number of observations is higher than the number of germplasm. For non-replicated trials, the numbers are the same. 13

15 Phenotypic study is used mostly to store observations data on past experiments. These can be used for analysis purposes and to output data as part of the reports and PhenomApp (see further on). Each column in a study file should correspond to a trait in the system. If the trait does not exist in the system yet, it will be automatically created and added to the variables list. The user can upload a list of variables using the Phenotypic Study Wizard. More details about the upload process are provided in the Upload User Manual. Where can I see all my germplasms? When clicking on the Research Group title (i.e. the crop), four tabs are available at the top of the window: Overview, Germplasm, Variables, and Observations. 14

16 The Germplasm Tab In the Germplasm tab, you can find the entire list of germplasms (uploaded or created) of this crop (the total number of germplasm is displayed on the bottom of the screen). Moreover, these tabs also appear when placing the pointer on a folder. In this case the germplasm list will represent only the germplasms that exist under that folder. Germplasm list under Program A Number of records From the germplasm list you can perform the following actions: Set parents: choose a germplasm and define or change its parent(s). Add image: upload an image from your computer and attach it to the germplasm. 15
17 Inherit: after setting inheritance rules, choose lines and click on inherit to apply the rules to the offspring of these germplasms (see Inheritance paragraph). Pedigree: create a pedigree chart (see pedigree chart paragraph). The Variables Tab The Variables tab displays the list of all variables added by the user. In the variables list you can add more details to the variables such as description, abbreviation, set their scales and define inheritance rules. It is also possible to assign groups of traits (using the group column). There are three types of variables: Attributes, Factors, and Variates. Attributes: represents a variable that describes the germplasm. Typically these are "passport data" or genetic traits of the germplasm such as: pedigree name, generation, source, nick name, resistant traits or anything else that is constant for the germplasm regardless of where or when it grows. Factors: refers to variables that are part of the field s design, and were not necessarily measured, e.g.: Replication number, entry code, treatment, date, field code, etc. Variates: refers to variables that are being measured, e.g. Yield, color, weight and height. The type of variable can be changed anytime in the Variables tab by clicking on the Variables -> right Action Button -> Edit. Variables are uploaded to the system as part of a phenotypic study or germplasm set. When you import a phenotypic study or germplasm set, the variables are created automatically in the Variables tab. It is also possible to add a new variable using the add column button in the fields entity see detailed explanation in the Add columns to observation tab paragraph. 16


18 Set scale: adding scale to the variable. Click on one or more variables, then on the right Action Button-> Set scale. 17
.")
19 Scale name: write a title for the scale (e.g.: Code (1-4), Kg, cm, etc.) - not mandatory. Scale type: there are three scale types: None is the default and refers to free text (i.e. no restriction on the scale of that variable). The Continuous type represents a range with a start and an end value (for example, between 1 and 10). The Nominal type refers to a list of categories that will appear as drop down menu in the PhenomApp application. For nominal scales, click on Add to add categories and fill out the values and their description: In case that all values of a particular scale are numeric, after clicking OK, you will get a message asking if you want this variable to be nominal or ordinal. Ordinal represents trait categories that can be compared numerically. For example, fruit size can be 1 (small), 2, 3 and 4 (large). 2 is higher than 1, 3 is higher than 2 and so on. It is meaningful to compare these categories. Nominal represents trait categories that cannot be compared numerically. For example "fruit color", can be 1 (red), 2 (orange) or 3 (green). Here 2 is not higher than 1 as the red value is not higher or lower than orange or green (just different). Add image: you can attach an image to describe the trait. Click on the Trait-> Action -> Add image. 18

 will automatically get values from its parents based on these inheritance rules.")
20 Set Inheritance: Inheritance is a set of rules that define trait values of a given germplasm based on its parents. This is useful for genetic traits, where you can set what will be inherited based on a parents data. These rules will be applied by the system when creating new selections or crosses. The new germplasm (selection or crosses) will automatically get values from its parents based on these inheritance rules. The inheritance rules are defined in the Variables tab. Click on one or more variables, then click the right Action Button -> Set inheritance. There are inheritance rules for two types of germplasm: selections and crosses. 19
21 Selection Settings: If the inheritance rule is to copy the parent s value, click on the Same as Parent button. If there are more complex rules, click on Add to add a rule. Set the rules for every scenario. Choose one or more of the parent s values and give a result that will be inherited from the parent. Add as many rules as needed. 20
22 Crosses Setting: click on Add to set inheritance in case of hybrids. Set the rules according to the parents values. Click on Reciprocal if you also want to apply the rules reciprocally (meaning with no distinction between female and male). The Observations Tab: The Observations tab is used to gather all the phenotypic observations that were created or uploaded under the research group. This tab also appears when choosing a folder. In this case the observation list will represent only the observations that exist under that folder. 21


23 In this view, the user can compare lines between several fields or phenotypic studies. The filter icon allows selecting only observations from a specific field entity. Click on the filter icon next to the column type and chose the observation types: Germplasm Information Next to each germplasm, you can click on the little square icon with all the germplasm s details. that will open a new tab 22


24 The germplasm information window helps the user to see the germplasm s attributes, observations, locations, pedigree tree and its images -all in one place. The germplasm information window is composed of three tabs: Summary Tab: Displays attributes as well as where the germplasm exist in fields/studies/lists. Also, images are displayed. Attributes are columns which define the germplasm properties. They can be: General info: unique name, additional name types, codes, etc. "Passport data": generation, method, source. Genetic traits: disease resistance. Any other trait that is constant and describes the germplasm. 23


25 Lists are all germplasm sets, phenotypic studies, genotypic studies and fields in which the germplasm exists. Images displays all the images taken for this germplasm. Pedigree Tab: The next tab is the pedigree tree of the germplasm in a tabular view. On the upper part of the window it displays the germplasm and its previous generations (i.e. parents), while on the lower part of the window it displays the germplasm and its next generations (offspring selection/crosses made from it). In this pedigree tree display, the user can follow the germplasm s traits throughout the generations. Click on the + sign to see previous 24

26 generations (upper table). Each entry contains an icon according to the germplasm method. The orange icon refers to selections (inbred) and the green icon refers to hybrids. Parents grid Offspring grid Observation Tab: The last tab of the germplasm information window is the observation tab, which displays a list of all observations made for this germplasm in all studies/fields. This tab gathers phenotypic data from various fields and the user can filter and compare various observations for this germplasm. Pedigree Chart Phenome One can also generate a pedigree chart that will display the tree in a graphic manner. Select one or more germplasms from any germplasm s table in the system, then click the right Action Button -> select Pedigree option. A pop up window will open to set the parameters of the pedigree: 25

27 View: Normal, Derivatives (hide all crosses), Derivatives+. related hybrids (hide all crosses except for the related hybrids). Max backwards: number of generations to display backwards. Max forwards: number of generations to display forwards. Max siblings: show other offspring of my parents and all parents of my offspring. Text: add values to the germplasm in addition to the name. Click on the job icon to open the process window. Then click on the link to open the pedigree chart. After clicking on the link, you will get a pop-up window showing the pedigree chart. 26

28 You can use the option Derivatives + related hybrids for displaying crosses, if you need to check previous versions of that cross. Meaning, if hybrids were created from previous generation of the same parents (example below). 27

29 Breeding Field What is a Breeding Field? A Field in Phenome-Networks represents an experiment or breeding trial, in which plants are planted in a particular field location (or greenhouse, nursery, etc.), and that is where the main breeding work of selections, observations and crosses is being conducted. A field is a building block within the breeding cycle, as is described in the chart below. The input from each field is germplasm (seeds or plant material) that exists in the system (typically taken from previous fields) and the output is new germplasm (selections or crosses), that represent the next generation, and their characterization (observations). Creating a New Field Fields are created under a folder; therefore you have to click on the folder name -> left Action Button-> Add field. The Create Field window contains the following components: Name: the name of the field. It is mandatory to enter free text. Typical convention is to name your field according to location/year/season, etc. Description (optional): add any description you may have of this field. 28
30 Code (optional): The field code can be an abbreviation of the field s name in a few letters. This code can then be used as part of selections or crosses name made from the plants of this field. For example: if the code is AK15, the selection name may be AK15- F7-314-B3. This depends on the naming convention set (will be explained later). Field type: choose the field type (explanation about each field type is described below). ID: After you click OK and create this field, an ID number will be automatically created by the system. Click on the field name again -> left Action Button -> Edit to view it. The ID number of the field will later on be used to load the plots list to the PhenomApp. 29
 and two for variety testing (with or without a field s map and plots) and each of them corresponds to a different task and workflow.")
31 Field Types There are four types of fields. Two for breeding (with or without a field s map and plots) and two for variety testing (with or without a field s map and plots) and each of them corresponds to a different task and workflow. The first and main type is called Breeding (entries -> plots). It contains the following sections: List, Map, Plots, Observations, Selections and Crosses. The List section is used to collect the list of germplasm that will be used in this experiment. The Map section is used to assign these lines into the plots within the field s map. The Plots section displays the list of plots as were defined in the Map section. In this section you can create observations and selections that will be displayed in the corresponding sections. Finally, the Crosses section is used to plan and manage bi-parental crosses. A detailed explanation about each tab will be discussed further on. The second type is called Breeding (entries only). This field type does not contain the Map and Plot tabs since in some cases (for example, simple strip plots) designing a field map and plots is not required or relevant. The third type is called Variety tests (entries only). This is the simplest field type, which contains only the List and the Observations tabs, and is designed for simple variety tests trials (such as strip plots). The fourth type is called Variety tests (entries -> plots). This field types is for variety tests trials and contains the List, Map Plots, and Observations tabs. There are no selection and crosses. 30

32 Define Germplasm Columns All entities in the navigation tree can display different columns in a different order. In order to set the germplasm columns for a specific field, click on the field name -> click on the left Action Button -> select Define germplasm columns. The define germplasm columns window opens -> show or hide the germplasm columns using the drag and drop function. Drag & drop Display parent data: In order to add parents data in the selected columns, drag any attribute to the right side and double click on the Type cell -> change it from Self to female or male. 31


33 In your table, the parent s name will automatically appear, in addition to the attributes you have selected. The parents column will have an icon next to the column name: i.e.: 32

34 Toolbar Icons The icon toolbar is displayed on the top of every table of the field entities. Sort: the Sort button allows the user to sort the columns according to his choice. The sort window displays all the columns that exist in the grid table, and the user can drag one or more columns to the right side. Then he can double click on the sort column in order to choose if the sort is Numeric/Char case sensitive or automatic. For columns with numeric values (i.e. plot number) choose the numeric sort, while columns with letters and numbers values (i.e. generation) choose the automatic or case sensitive sort. Also, the user can determine whether the sort should be ascending or descending. Filter: the filter is used when the user is looking for specific values in the tables. Enter the value in the filter area and click on the filter icon. To clean the filter, remove the value and click filter again. The filter area: 33
. For results that contain a range of values, use the dash character (1-20). For results that contain only specific numbers, use the comma (i.e.: 1, 4,6).")
35 There are different filter options: Greater than (>), lower than (<), greater or equal than (>=), lower or equal to (<=), equal to (=), different from (!=). For results that contain the letter X or the number Y, enter the value in the filter area (i.e. 3, means all the results that contain the number 3). For results that contain a range of values, use the dash character (1-20). For results that contain only specific numbers, use the comma (i.e.: 1, 4,6). Refresh: Click on refresh whenever you need to refresh the current table. Filter columns: In each table the user can define and arrange the order of the columns. As a default, all the columns that have been defined in the define germplasm column filter (see explanation about the germplasm column management in the Define Germplasm Columns section) will appear in the field tables. In order to filter columns for a specific table in the field, click on the icon and drag the selected columns to the right: Before loading a field to PhenomApp, click on the column filter icon in the Plots tab, and choose which columns should be seen in the app s plots list. Split: click on split if you want to freeze columns in the beginning of the table for an easier scroll down the columns. Choose after how many columns the table should freeze: 34
 to customize your template field.")

36 Save in Excel: click on this icon to download the table to an Excel sheet. Create a Template Field Create a new field and set which columns should be displayed in each tab. Use the Define germplasm columns and Filter columns buttons (which were described above) to customize your template field. Then click on the field name-> left Action button -> Set default variables Clone Field In case the user wants to have the same experiment tested in different location, it is possible to duplicate the existing field using the Clone field button. This will duplicate the field settings and the content of the genetic material to a new field called the same with the end of (1) in the field name 35

37 1. Create a field 2. You may add the germplasm list, design the field map, add factors and plot numbers. 3. Click on the field name-> left Action -> Clone field 4. A new field will be automatically created with a serial number at the end of the field name (i.e. Field(1)) 36

38 The List Tab The List tab can represent the sowing list. This is the list of germplasm that were chosen to be planted in this experiment. In the List tab, users can manage the germplasm information, add parents data and insert new column such as seeds number, sowing date, plant number or comment in order to manage the sowing phase. How to import lines into the List tab? Initially empty, the List tab will be filled by the user with a list of lines according to his/her choice. There are four ways to add germplasms to the list: 1. Drag and drop from other fields, germplasm sets or phenotypic study: choose lines from the Selections tab or Crosses tab from the previous season, or from breeding lines that have been uploaded as germplasm set or phenotypic study, and drag them to the List tab. Example: select lines in a germplasm set -> drag and drop them in the List tab of the current field -> click on the List tab. Drag & drop 2. Drag and drop from the germplasm list: on the top of each folder you can find the Germplasm tab that contains all the breeding lines that exist under this folder. You can filter and find the list of germplasms that you need in order to drag them to the List tab. 37


39 Drag & drop 3. Import germplasm: click on the right Action Button -> choose Import germplasm. From the import window you can select germplasm from all the germplasm lists in the crop. Select the germplasm and drag them to the lower part of the window -> click OK. Drag & drop 38

40 4. Upload from file: It is possible to upload a sowing list from a CSV file. Prepare a CSV file with the line name and the entry code. Click on the Field name -> left Action Button -> Upload. More details can be found in the Upload User Guide. Entry Code The entry code column is a system column in the List tab that allows the user to enter a code for the sowing list. The entry code may be composed of numbers or letters or both. In order to add values to the entry code column, click on the right Action Button -> Set value -> choose the entry code column -> set the value to start with. The program will assign a sequential number to this column. 39
41 Add Columns to the List Tab In order to add information to the list, click on right Action Button -> Add column. The add column window opens with the available variables in the program. Existing Variables: Select one or more variables and drag them to the selected variables area in the lower part of the screen. The filter option is available in order to search for a specific category or group of variables. New Variable: In case the desired variable does not yet exist in the list of variables, click on the New Variable option to create a new one. You may choose whether the variable is a Factor or a Variate (this can be changed at any time later on). 40


42 Plants Tab The user can use the Create Plants function to manage the plant level. In order to drill down to plant resolution, select one or several germplasms in the sowing list -> Click right Action Button - > Create plants. In the Create Plants window, enter the number of plants you wish to create. 41

43 The number of plants created for each line is mentioned under the icon Go to the Plants tab in order to view the detailed plant list: in the sowing list. Add columns to the Plant tab if you want to enter values for each plant: Right Action Button -> add columns. 42
. The right side area represents the field map, which is basically a list of plots.")

44 The Map Tab In the Map tab the user assigns lines into plots according to the physical dimensions of the field and the experiment type. This tab contains two areas: The left side area is the sowing list as was created in the previous tab (List). The right side area represents the field map, which is basically a list of plots. The assignment of germplasms to one or more plots in the field is done by a drag and drop action from the sowing list to the field. Note that the word field here may represent the target environment in which the plants will grow. It may be greenhouse, nursery, open field and so on. Design the Field Map Initially the field map table is empty. The first thing to do is to add plots according to how many rows and columns are available in the field. Click the right Action Button -> Add plots. Row: represents the number of rows in the field or greenhouse. Column: represents the number of plots that you can place in a row. For example, adding 8 rows and 12 columns will create total of 96 (8 x 12) plots. After clicking OK, the system will create a two dimensional field map on the right part of the screen. Each row in this table represents a plot, and its location in the field is represented by the field s row number and column. 43
45 Add Germplasm to the Field Map The next step is to assign germplasms to the field. Select one or more lines from the left-side table and drag them to the right side-table. Germplasm names will be indicated on the right side table. You can assign each germplasm to one or more plots in the right side table. Number of replications for each germplasm will be indicated on the left side table below the icon. Drag and drop If changing the line location in the field map is required, the line can be dragged to the new location. Alternatively, you can drag the line back to the sowing list and then drag it to the new location in the field. Randomization In case of a replicated trial, the Randomize button allows you to place lines randomly in the field. The user may choose which lines he wishes to randomize (by selecting them in the Leftside table), how many replications are desired and in which area in the field he wishes to plant them (by selecting a range in the right-side table). To activate the randomization: 1. Select the lines in the left-side table. 2. If required, select the rows in the field map where you wish to place your line. 3. Click left Action Button -> Randomize. 4. Set number of repetitions. 44

46 The next step after creating the field s map is to generate reports that will assist the planting. This is explained in next section. The Plot Tab The Plots tab displays the full planting list. This table can then be downloaded to PhenomApp and provided with the plot list in the field. From the Plots tab you can generate reports, create observations and selections, manage the columns, create plants and more. Manage Columns in the Plot Tab Before downloading the field information to the PhenomApp (Phenome s Android application) or generating reports, choose the columns that you wish to display in the plot list by using the column icon: It may include parents' data as well as parents' name, breeder name, resistance, etc. If you don t set those column settings before downloading the field to the app, the only columns in the app will be: line name, plot name and its location in the map (row, columns) Reports From the Plots tabs, the user can create several reports by clicking the right Action Button -> Create report. 1. Plots data report: Shows plot data including parents and previous observations. Also, previous hybrids are displayed. It is useful as a field book report. Also available as a CSV report. Plots tab-> right Action Button-> Create report -> Plots data. 45
47 Numeric sort: sort by numeric order of the plot number. Show parents: display parent s data (female and male for hybrids, female only for inbred). Show previous: display existing observations. Fill missing from germplasm: if there is no observation data in the traits column, it retrieves the value from the germplasm attribute. Click on the jobs icon to open the report. Plots data report: 46

48 2. Field map report: print the field map in order to use it for the actual planting. Click on the jobs icon to open the report. Field map: planting reports (example 1) Field map: planting reports (example 2) 47


49 Field map: planting reports (example 3 - labels) 3. Observations: This report display each plot in a different page. It will display previous observations of the line, parents data and a place to fill out the current observation manually. it is also possible to display images that belong to the germplasm. 48
50 Click on the jobs icon to open and download the report. 49
51 4. Selections list: From the Plots tab, you can output a selection report with the plot lists and its selections. Click on the right Action Button -> Create report. Choose the Selection list report: Set the report parameters and click Ok. 50

52 5. Create CSV report: the Plots data report can also be printed in a CSV format: click on the right Action Button -> Create CSV report. Click on the jobs icon to open the report. Create Observations From the Plot tab, the user can select lines and create new observations from the selected plots by clicking on right Action Button -> Create observation. This is typically done in cases where the PhenomApp is not in use (otherwise this will be done automatically from PhenomApp). Observations refer to characterization of the entire plot or of one or more plants within a plot. 51


53 The create observations window displays: 1. Observation date - choose the date from the calendar. You may choose a past date. 2. Number of observations - set how many new observations you wish to create for the selected plots. Create Selections Selections represent new materials (germplasm) that are created, in the form of seeds or clones. From the Plot tab, the user can select lines and create new selections from the chosen plots by clicking on right Action Button -> Create selection. The create selections window displays the following: 1. Method - Choose the selection method. Adding methods is possible with the assistance of Phenome s support. 2. Selection names pattern give the selection a name, typically referring to a specific plant within a plot. You may write the plant number. For example: if the selection name is 4, the selection is from plant number 4. You may create more than one choice for the selected plots by writing several numbers with a comma between them, for example: 2,6,7,9 (this will create 4 selections named 2, 6, 7, 9). It is also possible to create a range of selections by writing 1-5 (it will create 5 selections, named 1-5). Selections, which represent new germplasm, receive a unique name from the system. The name and the breeder name of the new selection are set according to a pre-defined naming convention. See discussion of naming convention later on. 52

54 The Observations Tab The Observations tab displays the list of observations collected in the field. Each plot may have more than one observation or no observations at all. System Columns in the Observation Tab The observation table contains system columns, generated automatically by the program: Observation name: as you may have more than one observation per plot, they all need to have different names. The system will provide numbers by default (example: observation name=1, observation name=2 etc.). However, this can be modified by the user who can change this name. Origin type: An observation may be created from three types of sources: List, Plant, Plot. The most common value will be Plot, as the observation is often created from the plot list, but sometimes users may create observation from the List tab or the Plant tab as well. Origin: If Plot is the origin type, then the plot number will be displayed as origin. If List is the origin type, the entry code is the origin. If Plant is the origin type, then the Plant number is the origin. User: the username that creates the observation. Date: the date when the observation was made. The system allows creating observations retroactively. Add Columns to the Observations Tab In order to add traits to the observation table, click on the right Action Button -> Add column. 53

55 The add column window opens with the available traits in the program. Existing variables: Select one or more variables and drag them to the selected variables area in the lower part of the screen. The filter option is available in order to search for a specific category or group of traits. Then click OK to add them. New variable: In case the necessary variable does not yet exist in the list of variables, click on the New Variable option to create a new one. You may choose whether the variable is a Factor or a Variate. 54
56 If the user works with PhenomApp to collect observations in the field, he first needs to add the traits to the Observations tab, using the Add column button. Only after he defines which traits he would like to see, then he may download it to the tablet. Add Phenotypic Data to the Observations Tab There are few ways to fill out the observation table with data: 1. Enter the data manually; double click on a cell and type in the value. 2. PhenomApp: synchronize data and images from the PhenomApp (more details in the PhenomApp user guide). 3. Upload observations from Excel: upload and update observations using an Excel file (more details in the Uploads user guide). Transfer germplasm data to the observation row When creating a new observation in the main system, the phenotypic data on the germplasm level are copied to the phenotypic data on the observation level. This function saves time to the user as he doesn t need to fill out all the traits but only the values that changed in the current field. This function will work only if the variables are set to be Same as Parent. For more information about the inheritance rules, go to the Inheritance section. 55
57 The Selections Tab The Selections tab displays the selections list taken from the field. The Selections are new seeds and therefore automatically get a new GID (germplasm ID) and a new Line name from the system. Naming Convention Selections The default name of a selection is customizable and may be composed of several components that help the user recognize the source of the line. Also, additional names such as breeder name or pedigree name can be set automatically when creating a new selection. The default naming convention is defined with the assistance of Phenome s support. However, if the user chooses to override the default naming convention in a specific field, he can use the Set value function. In most cases, the new selection name is composed of other column s value, such as plot number, generation, plant name, parents names and more. In the Selection tab -> choose the entries -> right Action Button -> Set value. 1. Choose the Name option. 2. Choose the Text option. 56
58 3. Start composing the naming convention of your choice. You can add any free text or separators to the text cell. You can also choose any column value from the drop down menu. 4. Example: In order to set the name AK15-F you have to add the following: o Free text: AK15- (to refer to the field code) o Column Generation from the drop down menu -> click on (the green arrow) to add the column value to the syntax. o Free text - (separator) o Column Origin from the drop down menu which represent the plot number-> click on (the green arrow) to add the column value to the syntax. o Free text - (separator) o Column Selection name from the drop down menu which in most cases represent the plant number -> click on (the green arrow) to add the column value to the syntax. Phenotypic Data on Selections In the Selection tab, the phenotypic data will be displayed as germplasm columns (attributes) as this data describes the new selection. There are a few ways to create selections: Create a new selection from the plot tab, the observation tab or the plant tab, and enter data manually; click on the attribute cells and type in the value. PhenomApp: synchronize data and images from the PhenomApp (more details in the PhenomApp user guide). Upload data from Excel: upload and update observations using an Excel file (more details in the Uploads user guide). 57
59 Create a Selection List Report From the Plots tab, you can output a selection report with the plot lists and its selections. Click on the right Action Button -> Create report. Choose the Selection list report: Set the report parameters and click Ok. 58
60 Create a Seed Label Report Seed labels: Print labels for the list of selections (for seed packets). Customized templates can be defined upon user request. Selections tab -> right Action Button -> Create report -> Seed label. Click on the job icon to open the report. 59
61 Seed label report: Crosses Tab In the Crosses tab, the breeder can plan the crossing list. The crosses tab is composed of two inner tabs: the Crosses planning and the Crosses list tabs. Crosses Planning The Crosses planning tab is divided into two areas. On the left side there is the female list and on the right there is the male list. The purpose in this tab is to plan crosses between parental lines (female and male). The breeder can plan his crosses at the very beginning of the season (in the sowing phase) or plan the crosses after the planting. Therefore in the Crosses planning tab there is an option to display three different germplasm lists: 1. List: displays parental lines that you added to the List tab (before the planting). 2. Plants: display the plant list if you wish to cross specific plants instead of lines. 3. Plots: display parental lines that are already planted in the field and have plot numbers. 60
.")

62 The basic way to plan crosses is to select one or more records (germplasm) in the females list, and one or more records in the male list, and then click on the Create crosses button (blue button on the top right side of the screen). Set parent role: The user can define which germplasm will act as female, as male, or be indicated as both. The parents lists will be updated accordingly, i.e. lines that were set as female will be displayed under the female table, lines that were set as males will be displayed under the male table and lines that were set to be both will be displayed in both tables (which is the default). Select lines -> Click Action Button -> Set parent role. 61


63 Parent description: After selecting females and males candidates for crosses, click on the Parents description button on the top right side of the screen. This will open a pop-up window with pairs of rows; each row corresponds to a single cross candidate, showing one female and one male. This allows you to fine-tune the crosses selections based on all parents data and get rid of candidates that do not meet your requirements. Create cross: the create cross button will generate new hybrids in the crossing list tab. However, before creating them, the system will open a pop-up window to ask the user for the following parameters: 62

64 Cross type: using the Cartesian product option will cross all selected females with all selected males (so the number of crosses is the number of females multiplied by the number of males selected), while the Sequence approach will cross only first female with first male, second female in the list with the second male in the list, and so on (so the number of crosses is the number of females selected - In this option the number of selected females must be the same as the number of selected males). Skip existing if this is checked, crosses that are already existing will be ignored, i.e. they will not be created again. Skip self if this is checked, it will prevent crosses where the female and male parents are the same. Skip reciprocal if this is checked, crosses that have the reciprocal equivalent will be ignored, i.e. they will not be created again. Skip previous if this is checked, crosses that their parents have been crossed in previous generations, will be ignored, i.e. they will not be created again. After setting these parameters, a second pop-up window will open with the crossing information: 63

65 Current field settings: provides the current settings as were set by the user in the settings window. Cross information: provides details about the crosses that are going to be generated: Cross count: total number of crosses to be created in this current action. Existing count: number of crosses that already exist in the system out of the crosses to be created in this action. Self-count: number of crosses that have the same male and female parents out of the crosses to be created in this action. Previous count: number of crosses that have a previous version (i.e. there are crosses between earlier generations of their current parents), out of the crosses to be create in this action. The "Skip" function indicates whether this category of crosses will be skipped according to the current setting. When planning crosses, you may want to check if there are any previous hybrid versions. Meaning, if hybrids were created from previous generation of the selected parents, and this will aid you in deciding whether to produce them again next season. 64

66 Crosses List After clicking OK on the crosses calculation pop-up window, the system will generate the new hybrids and they will be displayed in the Crosses list tab. 65


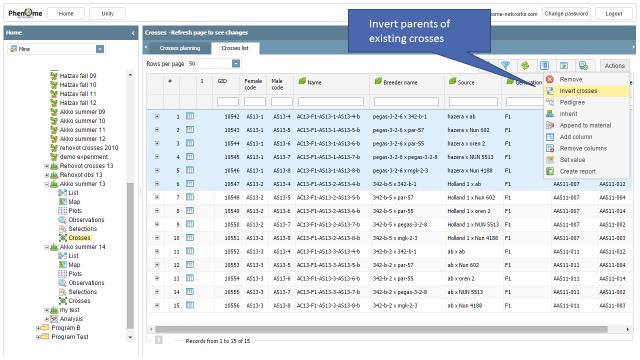
67 The cross list table displays the hybrids and the parent s information. If the parents column does not appear, click on the field s name -> left Action Button -> Define germplasm column, and drag the columns from the left side to the right. The + button on the very left is clickable and allows you to display the parents and the cross information one under the other, in order to compare their values. The cross data refers to what was inherited from the parents based on the inheritance rules. Invert crosses: If the user wants to invert the parents of the cross (so the female turns to male and male to female), he can select the cross, click on the right Action Button -> Invert crosses. 66
68 67
69 Selections and crosses represent new genetic material (germplasm), usually in the form of seeds or clones. This is an output of a given breeding field and the input of the next season s field. Observations represent characterization made on existing germplasm over one or more traits (variables). Create a Seed Label Report Seed labels: Print labels for the crosses list (for seed packets). Customized templates can be defined upon user request. Selections tab -> right Action-> Create report -> Seed label. Click on the job icon to open the report. 68
70 Seed label report: Crosses, which represent new germplasm, receive a unique name from the system. There hybrid name will be defined according to a pre-configured template. See discussion of naming convention below. 69

71 Naming convention Each cross and selection, which represent new germplasm, receive a unique name from the system based on the naming template that is defined by Phenome s support team. Values for other variables can be set using naming convention as well. Also, inheritance rules, if defined by the user for specific variables, are applied and the variables values are calculated. name: This is a common method of naming convention for the unique name and a pedigree Unique name: Field s code + generation + plot name + plant / germplasm method. For example, AS15-F3-208-B1 Pedigree name: same as the pedigree name of the female parent + plant / germplasm method. This figure shows a typical example of naming for selections through several generations. The unique name is determined by a field s code (2 letters and 2 digits for the year) + generation + plot + plant. The pedigree name is the same as the parent, concatenated with the plant number. 70
Chronodat Issue Tracker Add-in. User Manual CHRONODAT, LLC. February 15, 2017 Version P age
 Chronodat Issue Tracker Add-in User Manual CHRONODAT, LLC February 15, 2017 Version 2.0 1 P age Introduction The introduction section of the document describes the scope and objective of Office 365 Chronodat
Chronodat Help Desk. (User Manual) By CHRONODAT, LLC
 By CHRONODAT, LLC") Chronodat Help Desk (User Manual) By CHRONODAT, LLC For further information, visit us at www.chronodat.com For support, contact us at support@chronodat.com Version 2.0.0.0 Created: 09-24-2018 1 P a g e
Chronodat Help Desk (User Manual) By CHRONODAT, LLC For further information, visit us at www.chronodat.com For support, contact us at support@chronodat.com Version 2.0.0.0 Created: 09-24-2018 1 P a g e
Query Studio Training Guide Cognos 8 February 2010 DRAFT. Arkansas Public School Computer Network 101 East Capitol, Suite 101 Little Rock, AR 72201
 Query Studio Training Guide Cognos 8 February 2010 DRAFT Arkansas Public School Computer Network 101 East Capitol, Suite 101 Little Rock, AR 72201 2 Table of Contents Accessing Cognos Query Studio... 5
Numbers Basics Website:
 Website: http://etc.usf.edu/te/ Numbers is Apple's new spreadsheet application. It is installed as part of the iwork suite, which also includes the word processing program Pages and the presentation program
Chronodat Help Desk (Lite)
") Chronodat Help Desk (Lite) (User Manual) By CHRONODAT, LLC For further information, visit us at www.chronodat.com For support, contact us at support@chronodat.com Version 2.0.0.0 Created: 10-03-2018 1
Chronodat Help Desk (Lite) (User Manual) By CHRONODAT, LLC For further information, visit us at www.chronodat.com For support, contact us at support@chronodat.com Version 2.0.0.0 Created: 10-03-2018 1
Creating an Excel resource
 Excel Mobile Excel Mobile is a Microsoft application similar to Excel, but designed to run on handhelds. This mobile version of Excel is a spreadsheet application that allows you to manipulate numbers,
Microsoft Excel 2010 Part 2: Intermediate Excel
 CALIFORNIA STATE UNIVERSITY, LOS ANGELES INFORMATION TECHNOLOGY SERVICES Microsoft Excel 2010 Part 2: Intermediate Excel Spring 2014, Version 1.0 Table of Contents Introduction...3 Working with Rows and
ES CONTENT MANAGEMENT - EVER TEAM
 ES CONTENT MANAGEMENT - EVER TEAM USER GUIDE Document Title Author ES Content Management - User Guide EVER TEAM Date 20/09/2010 Validated by EVER TEAM Date 20/09/2010 Version 9.4.0.0 Status Final TABLE
Microsoft How to Series
 Microsoft How to Series Getting Started with EXCEL 2007 A B C D E F Tabs Introduction to the Excel 2007 Interface The Excel 2007 Interface is comprised of several elements, with four main parts: Office
eschoolplus+ Cognos Query Studio Training Guide Version 2.4
 + Training Guide Version 2.4 May 2015 Arkansas Public School Computer Network This page was intentionally left blank Page 2 of 68 Table of Contents... 5 Accessing... 5 Working in Query Studio... 8 Query
Business Insight Authoring
 Business Insight Authoring Getting Started Guide ImageNow Version: 6.7.x Written by: Product Documentation, R&D Date: August 2016 2014 Perceptive Software. All rights reserved CaptureNow, ImageNow, Interact,
Introduction to Microsoft Access 2016
 Introduction to Microsoft Access 2016 A database is a collection of information that is related. Access allows you to manage your information in one database file. Within Access there are four major objects:
A Guide to Quark Author Web Edition 2015
 A Guide to Quark Author Web Edition 2015 CONTENTS Contents Getting Started...4 About Quark Author - Web Edition...4 Smart documents...4 Introduction to the Quark Author - Web Edition User Guide...4 Quark
GOOGLE SHEETS TUTORIAL
 GOOGLE SHEETS TUTORIAL STM TRAINING PROGRAM BY BREANA NARINE (Instructional Design Assistant) Google Sheets Tutorial Google Sheet is an online service provided by Google where you are able to create new
Introduction to the workbook and spreadsheet
 Excel Tutorial To make the most of this tutorial I suggest you follow through it while sitting in front of a computer with Microsoft Excel running. This will allow you to try things out as you follow along.
WebStudio User Guide. OpenL Tablets BRMS Release 5.18
 WebStudio User Guide OpenL Tablets BRMS Release 5.18 Document number: TP_OpenL_WS_UG_3.2_LSh Revised: 07-12-2017 OpenL Tablets Documentation is licensed under a Creative Commons Attribution 3.0 United
VisitBasis Tutorial for Admins
 VisitBasis Tutorial for Admins Introduction By the end of this tutorial you will be able to:. Have a working account. Create and use divisions. Add new users manually with their respective security roles
MicroStrategy Academic Program
 MicroStrategy Academic Program Creating a center of excellence for enterprise analytics and mobility. HOW TO DEPLOY ENTERPRISE ANALYTICS AND MOBILITY ON AWS APPROXIMATE TIME NEEDED: 1 HOUR In this workshop,
TABLE OF CONTENTS CHAPTER
 TABLE OF CONTENTS CHAPTER 1...1 A QUICK OVERVIEW OF THE MICROSOFT EXCHANGE CLIENT...1 BASIC CONCEPTS AND FEATURES...1 STARTING THE MICROSOFT EXCHANGE CLIENT...1 SETTING OPTIONS FOR YOUR MESSAGES...3 LOOKING
NiceForm User Guide. English Edition. Rev Euro Plus d.o.o. & Niceware International LLC All rights reserved.
 www.nicelabel.com, info@nicelabel.com English Edition Rev-0910 2009 Euro Plus d.o.o. & Niceware International LLC All rights reserved. www.nicelabel.com Head Office Euro Plus d.o.o. Ulica Lojzeta Hrovata
Rev. C 11/09/2010 Downers Grove Public Library Page 1 of 41
 Table of Contents Objectives... 3 Introduction... 3 Excel Ribbon Components... 3 Office Button... 4 Quick Access Toolbar... 5 Excel Worksheet Components... 8 Navigating Through a Worksheet... 8 Making
Microsoft Excel 2010 Tutorial
 1 Microsoft Excel 2010 Tutorial Excel is a spreadsheet program in the Microsoft Office system. You can use Excel to create and format workbooks (a collection of spreadsheets) in order to analyze data and
Excel Select a template category in the Office.com Templates section. 5. Click the Download button.
 Microsoft QUICK Excel 2010 Source Getting Started The Excel Window u v w z Creating a New Blank Workbook 2. Select New in the left pane. 3. Select the Blank workbook template in the Available Templates
MicroStrategy Desktop
 MicroStrategy Desktop Quick Start Guide MicroStrategy Desktop is designed to enable business professionals like you to explore data, simply and without needing direct support from IT. 1 Import data from
Microsoft Excel Level 2
 Microsoft Excel Level 2 Table of Contents Chapter 1 Working with Excel Templates... 5 What is a Template?... 5 I. Opening a Template... 5 II. Using a Template... 5 III. Creating a Template... 6 Chapter
Learn how to login to Sitefinity and what possible errors you can get if you do not have proper permissions.
 USER GUIDE This guide is intended for users of all levels of expertise. The guide describes in detail Sitefinity user interface - from logging to completing a project. Use it to learn how to create pages
INFORMATION TECHNOLOGY 402 UNIT IV SPREADSHEET
 INFORMATION TECHNOLOGY 402 UNIT IV SPREADSHEET AUTOSUM AutoSum is a function in Microsoft Excel and other spreadsheet programs that automatically enters the appropriate formula or function into your spreadsheet.
Roxen Content Provider
 Roxen Content Provider Generation 3 Templates Purpose This workbook is designed to provide a training and reference tool for placing University of Alaska information on the World Wide Web (WWW) using the
LIMS QUICK START GUIDE. A Multi Step Guide to Assist in the Construction of a LIMS Database. Rev 1.22
 LIMS QUICK START GUIDE A Multi Step Guide to Assist in the Construction of a LIMS Database Rev 1.22 Contents Contents...1 Overview - Creating a LIMS Database...2 1.0 Folders...3 2.0 Data Fields...3 2.1
Microsoft Access 2010
 Microsoft Access 2010 Chapter 2 Querying a Database Objectives Create queries using Design view Include fields in the design grid Use text and numeric data in criteria Save a query and use the saved query
SAS Universal Viewer 1.3
 SAS Universal Viewer 1.3 User's Guide SAS Documentation The correct bibliographic citation for this manual is as follows: SAS Institute Inc. 2012. SAS Universal Viewer 1.3: User's Guide. Cary, NC: SAS
Introduction to Microsoft Excel 2010
 Introduction to Microsoft Excel 2010 This class is designed to cover the following basics: What you can do with Excel Excel Ribbon Moving and selecting cells Formatting cells Adding Worksheets, Rows and
Blackboard for Faculty: Grade Center (631) In this document:
 In this document:") 1 Blackboard for Faculty: Grade Center (631) 632-2777 Teaching, Learning + Technology Stony Brook University In this document: blackboard@stonybrook.edu http://it.stonybrook.edu 1. What is the Grade Center?..
1 Blackboard for Faculty: Grade Center (631) 632-2777 Teaching, Learning + Technology Stony Brook University In this document: blackboard@stonybrook.edu http://it.stonybrook.edu 1. What is the Grade Center?..
Getting started with Ms Access Getting Started. Primary Key Composite Key Foreign Key
 Getting started with Ms Access 2007 Getting Started Customize Microsoft Office Toolbar The Ribbon Quick Access Toolbar Navigation Tabbed Document Window Viewing Primary Key Composite Key Foreign Key Table
Microsoft Access 2013
 Microsoft Access 2013 Chapter 2 Querying a Database Objectives Create queries using Design view Include fields in the design grid Use text and numeric data in criteria Save a query and use the saved query
Microsoft Access 2013
 Microsoft Access 2013 Chapter 2 Querying a Database Objectives Create queries using Design view Include fields in the design grid Use text and numeric data in criteria Save a query and use the saved query
Integrating Sintelix and ANB. Learn how to access and explore Sintelix networks in IBM i2 Analyst s Notebook
 Integrating Sintelix and ANB Learn how to access and explore Sintelix networks in IBM i2 Analyst s Notebook 2 Integrating Sintelix and ANB By the end of this tutorial you will know how to: 1 2 3 Install
Expense Management Asset Management
 Expense Management Asset Management User Guide NEC NEC Corporation November 2010 NDA-31136, Revision 1 Liability Disclaimer NEC Corporation reserves the right to change the specifications, functions, or
VisitEye Tutorial for Admins
 VisitEye Tutorial for Admins Introduction By the end of this tutorial you will be able to: 1. Have a working account 2. Add new users manually with their respective security roles. Load locations in bulk
Learn more about Pages, Keynote & Numbers
 Learn more about Pages, Keynote & Numbers HCPS Instructional Technology May 2012 Adapted from Apple Help Guides CHAPTER ONE: PAGES Part 1: Get to Know Pages Opening and Creating Documents Opening a Pages
Introduction to Microsoft Excel 2010
 Introduction to Microsoft Excel 2010 This class is designed to cover the following basics: What you can do with Excel Excel Ribbon Moving and selecting cells Formatting cells Adding Worksheets, Rows and
About SharePoint Server 2007 My Sites
 SharePoint How To s / My Sites of 6 About SharePoint Server 007 My Sites Use your My Site to store files and collaborate with your co-workers online. My Sites have public and private pages. Use your public
Quick Start Guide. Version R94. English
 Custom Reports Quick Start Guide Version R94 English December 12, 2016 Copyright Agreement The purchase and use of all Software and Services is subject to the Agreement as defined in Kaseya s Click-Accept
The Center for Teaching, Learning, & Technology
 The Center for Teaching, Learning, & Technology Instructional Technology Workshops Blackboard 9.1 SP 13 Grade Center Albert Robinson / Delwar Sayeed Faculty and Staff Development Programs Colston Hall
Tabs, Tables & Columns
 Tabs, Tables & Columns What we will cover Creating tables Formatting tables Sorting information in tables Using columns Using tabs Tables You can insert a table several: Insert Table button This will open
Layout and display. STILOG IST, all rights reserved
 2 Table of Contents I. Main Window... 1 1. DEFINITION... 1 2. LIST OF WINDOW ELEMENTS... 1 Quick Access Bar... 1 Menu Bar... 1 Windows... 2 Status bar... 2 Pop-up menu... 4 II. Menu Bar... 5 1. DEFINITION...
Paragon Essentials: Getting Started with Paragon 4 This manual sets the foundation for all future work in Paragon 4. It covers the basic activities
 Paragon Essentials: Getting Started with Paragon 4 This manual sets the foundation for all future work in Paragon 4. It covers the basic activities necessary to navigate the MLS. Table of Contents 1. Accessing
Day : Date : Objects : Open MS Excel program. Subject : * Open Excel application. Select : start. Choose: programs. Choose : Microsoft Office
 1 2 Day : Date : Objects : Open MS Excel program. Subject : * Open Excel application. Select : start Choose: programs Choose : Microsoft Office Select: Excel * Close the Excel program Click on the Close
Working with Charts Stratum.Viewer 6
 Working with Charts Stratum.Viewer 6 Getting Started Tasks Additional Information Access to Charts Introduction to Charts Overview of Chart Types Quick Start - Adding a Chart to a View Create a Chart with
IT Training Services. SharePoint 2013 Getting Started. Version: 2015/2016 V1
 IT Training Services SharePoint 2013 Getting Started Version: 2015/2016 V1 Table of Contents ACCESSING SHAREPOINT SITE 1 IT Intranet SharePoint Site... 1 Create a SubSite... 1 DOCUMENT LIBRARIES 2 Create
ZENworks Reporting System Reference. January 2017
 ZENworks Reporting System Reference January 2017 Legal Notices For information about legal notices, trademarks, disclaimers, warranties, export and other use restrictions, U.S. Government rights, patent
Griffin Training Manual Grif-WebI Introduction (For Analysts)
") Griffin Training Manual Grif-WebI Introduction (For Analysts) Alumni Relations and Development The University of Chicago Table of Contents Chapter 1: Defining WebIntelligence... 1 Chapter 2: Working with
Griffin Training Manual Grif-WebI Introduction (For Analysts) Alumni Relations and Development The University of Chicago Table of Contents Chapter 1: Defining WebIntelligence... 1 Chapter 2: Working with
Tutorial: Input Grades in Blackboard
 Tutorial: Input Grades in Blackboard Get into the Grade Center The following steps will lead you to the Full Grade Center page (❶ - ❽). ❶ Enter the URL: blackboard.indstate.edu ❷ Enter username and password
Chapter 7 Inserting Spreadsheets, Charts, and Other Objects
 Impress Guide Chapter 7 Inserting Spreadsheets, Charts, and Other Objects OpenOffice.org Copyright This document is Copyright 2007 by its contributors as listed in the section titled Authors. You can distribute
In Depth: Writer. The word processor is arguably the most popular element within any office suite. That. Formatting Text CHAPTER 23
 CHAPTER 23 In Depth: Writer The word processor is arguably the most popular element within any office suite. That said, you ll be happy to know that OpenOffice.org s Writer component doesn t skimp on features.
EQuIS Data Processor (EDP) User Manual
 User Manual") EQuIS Data Processor (EDP) User Manual Introduction EQuIS Data Processor (EDP) Introduction The EQuIS Data Processor, or EDP, is today s answer to the many data quality issues that plague data managers.
EQuIS Data Processor (EDP) User Manual Introduction EQuIS Data Processor (EDP) Introduction The EQuIS Data Processor, or EDP, is today s answer to the many data quality issues that plague data managers.
Section 1 Creating Mail Merge Files
 Course Topics: I. Creating Mail Merge Files II. Creating Mailing Labels III. Printing Selective Records IV. Using Mail Merge Toolbar V. Envelopes and labels on the fly Section 1 Creating Mail Merge Files
Lesson Skill Matrix Skill Exam Objective Objective Number
 Lesson 6 Page 1 Creating Tables Lesson Skill Matrix Skill Exam Objective Objective Number Creating a Table Create a table by specifying rows and columns. 3.1.3 Formatting a Table Apply table styles. 3.1.4
Skill Exam Objective Objective Number
 Creating Tables 6 LESSON SKILL MATRIX Skill Exam Objective Objective Number Creating a Table Create a table by specifying rows and columns. 3.1.3 Formatting a Table Apply table styles. 3.1.4 Managing Tables
How to create and send a new . NOTE: See different guide for repurposing an existing
 How to create and send a new email NOTE: See different guide for repurposing an existing email 1 Log into marketo at https://rufsso.rutgers.edu/ 2 Remember You will need a NetID and password to log in
WINCROSS EXECUTIVE Getting Started
 WINCROSS EXECUTIVE Getting Started The Analytical Group, Inc. WinCross Executive 1 Getting Started 2 Version 1 Copyright 2018, The Analytical Group, Inc. Editor: Pete Hilmers All rights reserved. No part
MAS 90/200 Intelligence Tips and Tricks Booklet Vol. 1
 MAS 90/200 Intelligence Tips and Tricks Booklet Vol. 1 1 Contents Accessing the Sage MAS Intelligence Reports... 3 Copying, Pasting and Renaming Reports... 4 To create a new report from an existing report...
SIX Trade Repository AG
 January 2018 Table of contents 1. General information 4 1.1 Purpose and scope of the manual 4 1.2 References 4 2. General information and navigation 5 2.1 Using with Internet Explorer 5 2.2 User login
Excel 2013 for Beginners
 Excel 2013 for Beginners Class Objective: This class will familiarize you with the basics of using Microsoft Excel. Class Outline: Introduction to Microsoft Excel 2013... 1 Microsoft Excel...2-3 Getting
Product Documentation SAP Business ByDesign August Analytics
 Product Documentation PUBLIC Analytics Table Of Contents 1 Analytics.... 5 2 Business Background... 6 2.1 Overview of Analytics... 6 2.2 Overview of Reports in SAP Business ByDesign... 12 2.3 Reports
Microsoft Windows SharePoint Services
 Microsoft Windows SharePoint Services SITE ADMIN USER TRAINING 1 Introduction What is Microsoft Windows SharePoint Services? Windows SharePoint Services (referred to generically as SharePoint) is a tool
How to Transfer Your Contact Information Into Microsoft Outlook 2010
 How to Transfer Your Contact Information Into Microsoft Outlook 2010 Your Contacts Exported To an Excel Spreadsheet (CSV Format ) Now Located on a Device or Computer Then To Outlook 2010 on an L&F Computer
Creating Reports using Report Designer Part 1. Training Guide
 Creating Reports using Report Designer Part 1 Training Guide 2 Dayforce HCM Creating Reports using Report Designer Part 1 Contributors We would like to thank the following individual who contributed to
Skills Exam Objective Objective Number
 Overview 1 LESSON SKILL MATRIX Skills Exam Objective Objective Number Starting Excel Create a workbook. 1.1.1 Working in the Excel Window Customize the Quick Access Toolbar. 1.4.3 Changing Workbook and
IP4 - Running reports
 To assist with tracking and monitoring HRIS recruitment and personnel, reports can be run from Discoverer Plus. This guide covers the following process steps: Logging in... 2 What s changed? Changed reference
OneStop Reporting OSR Budgeting 4.5 User Guide
 OneStop Reporting OSR Budgeting 4.5 User Guide Doc. Version 1.3 Updated: 19-Dec-14 Copyright OneStop Reporting AS Contents Introduction... 1 Two Different Setup Strategies and Use of OSR Budgeting...
User Guide. Web Intelligence Rich Client. Business Objects 4.1
 User Guide Web Intelligence Rich Client Business Objects 4.1 2 P a g e Web Intelligence 4.1 User Guide Web Intelligence 4.1 User Guide Contents Getting Started in Web Intelligence 4.1... 5 Log into EDDIE...
SAS Web Report Studio 3.1
 SAS Web Report Studio 3.1 User s Guide SAS Documentation The correct bibliographic citation for this manual is as follows: SAS Institute Inc. 2006. SAS Web Report Studio 3.1: User s Guide. Cary, NC: SAS
 Page 1 of 6 Procedures > Pages > Procedures Use -the-system > MI-generate-report MI - Generate Report I Like It Tags & Notes MI - Generate Report This is an explanation of how to access, view and filter
Microsoft Access 2010
 2013\2014 Microsoft Access 2010 Tamer Farkouh M i c r o s o f t A c c e s s 2 0 1 0 P a g e 1 Definitions Microsoft Access 2010 What is a database? A database is defined as an organized collection of data
TRAINING GUIDE. Web App End User Training
 TRAINING GUIDE Web App End User Training Web Application End-User Training In this booklet, we will introduce you to the Lucity Web application. The Web system allows you to utilize customized views, forms,
Campaign Manager 2.0 for Sitecore CMS 6.6
 E-Mail Campaign Manager 2.0 Marketer's Guide Rev: 2014-06-11 E-Mail Campaign Manager 2.0 for Sitecore CMS 6.6 Marketer's Guide User guide for marketing analysts and business users Table of Contents Chapter
Using Word 2003 for Mail Merge
 Using Word 2003 for Mail Merge Doc 5.125 Ver 2 August 2004 John Matthews Central Computing Services Prerequisites This document assumes that you are familiar with the use of a computer keyboard and mouse
Electrical 3D Design & Documentation
 Electrical 3D Design & Documentation Page 1 Overview Conventions User Tasks Using Electrical 3D Design & Documentation Entering the Electrical Assembly Design Workbench Entering the Electrical Part Design
Breeding Management System
 Breeding Management System Version 3.0 Complete User Manual September 2014 ibp@cgiar.org Funding & Acknowledgements The Integrated Breeding Platform (IBP) is jointly funded by: the Bill and Melinda Gates
LUMINATE ONLINE : REPORTS 1
 In Luminate Online, the reporting options are endless and can be used for email, TeamRaiser, Events, Constituent360, Donations and more. Understanding the features of reporting allows you to make sure
Create a new form. To create a form from a new or existing spreadsheet: 1. Click the Tools drop down menu and select Create a form.
 Create a new form You can choose Google Forms when creating a new doc from Google Drive. You can also create a new form from a Google Sheet or from a template. To create a form within Google Drive: Click
version 7.6 user manual
 version 7.6 user manual 2 Copyright JAVS 1981-2014 Table of Contents Introduction... 4 Getting Started... 5 Login... 5 JAVS Publisher 7 Overview... 6 Search Tool Overview... 7 Search Tool-Detailed Operation...
Contents. Xweb User Manual
 USER MANUAL Contents 1. Website/Pages/Sections/Items/Elements...2 2. Click & Edit, Mix & Match (Drag & Drop)...3 3. Adding a Section...4 4. Managing Sections...5 5. Adding a Page...8 6. Managing Pages
MultiSite Suite: Accounts Payable
 MultiSite Suite: Accounts Payable User s Manual version 6 Copyright & Trademarks Copyright Notice and Trademarks 2010 MultiSite Systems, All rights reserved. Microsoft, Windows, Excel, and Outlook are
Getting Started Guide
 Getting Started Guide Sage MAS Intelligence 90/200 Table of Contents Getting Started Guide... 1 Login Properties... 1 Standard Reports Available... 2 Financial Report... 2 Financial Trend Analysis... 3
SmartView. User Guide - Analysis. Version 2.0
 SmartView User Guide - Analysis Version 2.0 Table of Contents Page i Table of Contents Table Of Contents I Introduction 1 Dashboard Layouts 2 Dashboard Mode 2 Story Mode 3 Dashboard Controls 4 Dashboards
MultiSite Suite: General Ledger
 MultiSite Suite: General Ledger User s Manual version 2.2.97 Copyright & Trademarks Copyright Notice and Trademarks 2003 by Brent Lawrence, LLC. All rights reserved. Reprinted and edited by MultiSite Systems,
Access Intermediate
 Access 2013 - Intermediate 103-134 Advanced Queries Quick Links Overview Pages AC124 AC125 Selecting Fields Pages AC125 AC128 AC129 AC131 AC238 Sorting Results Pages AC131 AC136 Specifying Criteria Pages
SAS Business Rules Manager 1.2
 SAS Business Rules Manager 1.2 User s Guide Second Edition SAS Documentation The correct bibliographic citation for this manual is as follows: SAS Institute Inc. 2012. SAS Business Rules Manager 1.2. Cary,
Quark XML Author September 2016 Update for Platform with Business Documents
 Quark XML Author 05 - September 06 Update for Platform with Business Documents Contents Getting started... About Quark XML Author... Working with the Platform repository... Creating a new document from
Chapter 10 Linking Calc Data
 Calc Guide Chapter 10 Linking Calc Data Sharing data in and out of Calc This PDF is designed to be read onscreen, two pages at a time. If you want to print a copy, your PDF viewer should have an option
Pulse LMS: User Management Guide Version: 1.86
 Pulse LMS: User Management Guide Version: 1.86 This Guide focuses on the tools that support User Managers. Please consult our separate guides for processes for end users, learning management and administration
Getting Started Guide. Sage MAS Intelligence 500
 Getting Started Guide Sage MAS Intelligence 500 Table of Contents Getting Started Guide... 1 Login Properties... 1 Standard Reports Available... 2 Financial Report... 2 Financial Trend Analysis... 3 Dashboard
Marketer's Guide. User guide for marketing analysts and business users
 Marketer's Guide Rev: 2014-06-11 Marketer's Guide User guide for marketing analysts and business users Table of Contents Chapter 1 Introduction... 4 Chapter 2 Quick Start Guide... 5 2.1 Accessing the Email
ABOUT THIS COURSE... 3 ABOUT THIS MANUAL... 4 LESSON 1: MANAGING LISTS... 5
 Table of Contents ABOUT THIS COURSE... 3 ABOUT THIS MANUAL... 4 LESSON 1: MANAGING LISTS... 5 TOPIC 1A: SORT A LIST... 6 Sort a list in A-Z or Z-A Order... 6 TOPIC 1B: RENUMBER A LIST... 7 Renumber a List
Open Excel by following the directions listed below: Click on Start, select Programs, and the click on Microsoft Excel.
 Candy is Dandy Grading Rubric You have been hired to conduct some market research about M&M's. First, you had your team purchase 4 large bags and the results are given for the contents of those bags. You
DataMaster for Windows
 DataMaster for Windows Version 3.0 April 2004 Mid America Computer Corp. 111 Admiral Drive Blair, NE 68008-0700 (402) 426-6222 Copyright 2003-2004 Mid America Computer Corp. All rights reserved. Table
WEST TEXAS A&M UNIVERSITY
 WEST TEXAS A&M UNIVERSITY Instructional Technology Services WTClass Training Manual Grade Center July 2014 WTClass Blackboard 9.1 For technical support call (806) 651-4357 Support website: http://angel.wtamu.edu/online
Ektron Advanced. Learning Objectives. Getting Started
 Ektron Advanced 1 Learning Objectives This workshop introduces you beyond the basics of Ektron, the USF web content management system that is being used to modify department web pages. This workshop focuses