Contents. AM5055 Roadster V.92 USB Quick Start Guide
|
|
|
- Rafe Lester
- 5 years ago
- Views:
Transcription
1
2 Contents Introduction... 3 Features of your Roadster V.92 USB modem... 3 Step 1: Installing your Modem... 4 Speakerphone... 4 Step 2: Installing your Drivers... 5 Windows XP... 5 Windows ME... 8 Windows Windows 98 se Step 3: Installing your Software Facsimile and Voice Mail Utility Step 4: Using your Roadster V.92 Modem with FaxTalk Configuring voice/fax mailboxes Password protecting a mailbox Greeting settings Using the Speakerphone feature Troubleshooting Testing Your Modem Updating Your Modem's Firmware AT Commands Frequently Asked V.92 Questions Step 5: Registering your Modem Contact Information Warranty Information Regulatory Information Telecom New Zealand Warnings Trademarks and Notices Page 2 AM5055 Roadster V.92 USB Quick Start Guide
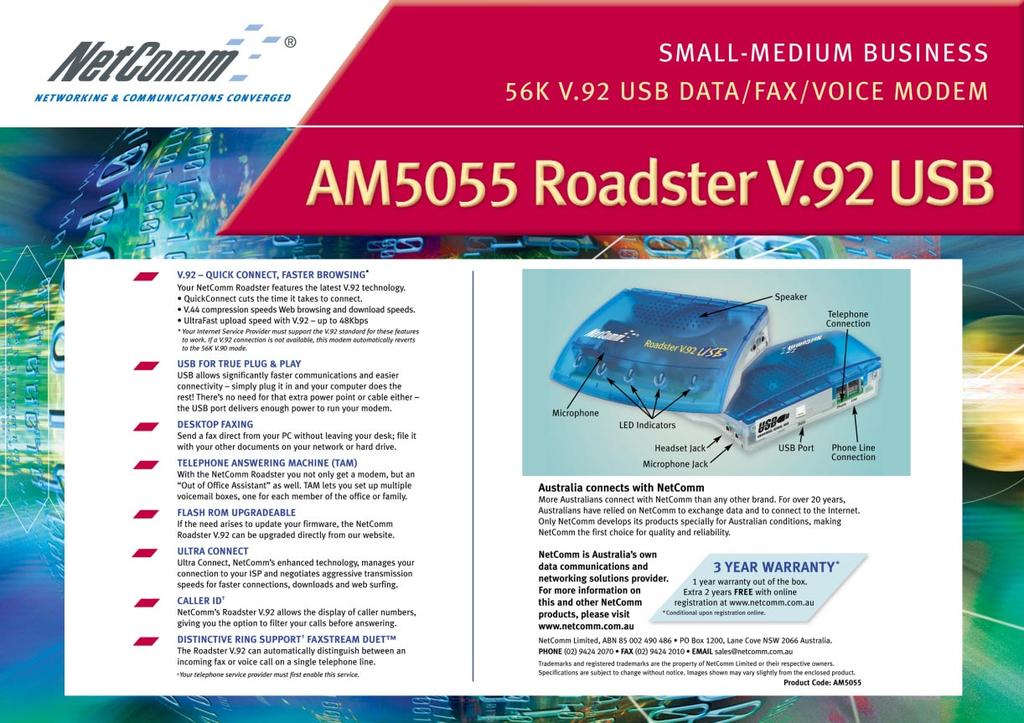
3 Introduction Thank you for purchasing a genuine NetComm product. Follow the steps in this Quick Start Guide to correctly install your Roadster V.92 USB Modem and begin data, fax and voice communications. Features of your Roadster V.92 USB modem Connect to the Internet faster The Roadster V.92 cuts the time it takes to connect by 40% or more. Upload faster The Roadster V.92 can upload at speeds of up to 48,000 bps. Download faster The Roadster V.92 uses new V.44 compression, which allows you greater throughput for viewing HTML pages on the Internet. Supporting the following Standards 56 Kbps (download)48 Kbps (send)with Auto-negotiation of V.92 and V.90 Data -V.92,V.90,V.34,V.32 bis,v.32, V.22 bis,v.22 A/B,V.22,V.23,V.21 Bell 103/212 A Error Correction V.42,MNP 2-4 Data Compression V.44,V.42 bis,mnp 5 Fax Send/Receive 14,400 bps (Class 1 ) Video support V.80 for H.324 (videophone) compatibility Supports Digital Line Protection, Voice Capable (TAM), Speakerphone, Distinctive Ring (duet) and Caller Id. Flash ROM Upgradeable Hayes AT and extended AT command set compatibility Note: To achieve a 56Kbps V.92 connection and utilise the other V.92 features - such as Caller ID, Modem - these features must be enabled on your phone line and your ISP must support and enable the V.92 Standard. If a V.92 connection is not available, this product will revert to a 56K V.90 mode. AM5055 Roadster V.92 USB Quick Start Guide Page 3

4 Step 1: Installing your Modem 1. Connect the USB port on the back of the modem to a USB port on the computer (or USB hub) using the supplied USB cable. SmartBoot Enabler Speakerphone To use the Speakerphone feature of your Roadster V.92 USB modem: Use the inbuilt speakerphone functions, such as microphone and speaker, or Plug in a headset and boom microphone for easy hands-free communication, or Use your computer's external speaker, sound card and sound card cable to enhance video conferencing. Rear of Modem NOTE: Some USB ports such as those on some keyboards are not capable of powering the Roadster V.92 USB. 2. Connect the telephone cord to the line socket on the back of the modem (marked LINE) and the other end to a phone socket. 3. Refer to the appropriate operating system in Step 2: Installing your Drivers to continue. Note: The Headset is available as an optional extra. Note: Windows 2000 users will need to change the jumper on the SmartBoot Enabler to the lower pins in order to operate correctly. Refer to the diagram in the Windows 2000 section of Step 2: Installing your Drivers. Page 4 AM5055 Roadster V.92 USB Quick Start Guide
\" and then click")
5 Step 2: Installing your Drivers Windows XP 1. Please insert the NetComm CD supplied and, when the "Found New Hardware Wizard" recognizes the new "NetComm USB Modem", select "Install from a list or specific location (Advanced)" and then click "Next>". 2. Select "Search for the best driver in these locations" and choose "Include this location in the search:". Type in "D:\DRIVERS\AM5055\WINXP" (where d:\ is the letter of your CD ROM drive) and click on "Next>". 3. The Wizard will search for the correct driver. The drivers that Windows XP uses are not digitally signed by Microsoft and the message to the right will be displayed. Click "Continue Anyway". 4. Windows XP will now copy the required files (for the USB Serial Converter portion of the modem). 5. Once all files have been copied click "Finish", and the "Found New Hardware Wizard" will be displayed again. AM5055 Roadster V.92 USB Quick Start Guide Page 5


. 10.")
6 6. Select "Install from a list or specific location (Advanced)" and then click "Next>". 7. Select "Search for the best driver in these locations" and choose "Include this location in the search:". Type in "D:\DRIVERS\AM5055\WINXP" (where d:\ is the letter of your CD ROM drive) and click on "Next>". 8. The Wizard will search for the correct driver. The drivers that Windows XP uses are not digitally signed by Microsoft and the message to the right will be displayed. Click "Continue Anyway". 9. Windows XP will now copy the required files (for the USB Serial Port portion of the modem). 10. Once all files have been copied click "Finish", and the "Found New Hardware Wizard" will be displayed again. Page 6 AM5055 Roadster V.92 USB Quick Start Guide
 and click on \"Next>\". 13. The Wizard will search for the correct driver.")
7 11. Select "Install from a list or specific location (Advanced)" and then click "Next>". 12. Select "Search for the best driver in these locations" and choose "Include this location in the search:". Type in "D:\DRIVERS\AM5055\WINXP" (where d:\ is the letter of your CD ROM drive) and click on "Next>". 13. The Wizard will search for the correct driver. The drivers that Windows XP uses are not digitally signed by Microsoft and the message to the right will be displayed. Click "Continue Anyway". 14. Windows XP will now copy the required files (for the modem). 15. Once all files have been copied click "Finish". 16. As Windows System Settings have changed you must restart your computer to complete the modem installation. AM5055 Roadster V.92 USB Quick Start Guide Page 7


8 Windows ME 1. Please insert the NetComm CD supplied and, when the "Add New Hardware Wizard" recognizes the new "NetComm USB Modem", select "Specify the location of the driver (Advanced)" and then click "Next>". 2. Select "Search for the best driver in these locations" and choose "Specify a location:". Type in "D:\DRIVERS\AM5055\WINME" (where d:\ is the letter of your CD ROM drive) and click on "Next>". 3. Windows will confirm the driver and location. Click on "Next>" to continue. 4. Click on "Finish" to complete installation of the USB Serial Converter portion of the modem. 5. The driver for the NetComm USB Serial port will then be installed without user intervention. Page 8 AM5055 Roadster V.92 USB Quick Start Guide
9 6. When the "Add New Hardware Wizard" finds the "NetComm Roadster V.92 USB Modem" select "Specify the location of the driver (Advanced)" and then click "Next>". 7. Select "Search for the best driver in these locations" and choose "Specify a location:". Type in "D:\DRIVERS\AM5055\WINME" (where d:\ is the letter of your CD ROM drive) and click on "Next>". 8. Windows will confirm the driver and location. Click on "Next>" to continue and then click on "Finish" to complete installation of the NetComm Roadster V.92 USB. AM5055 Roadster V.92 USB Quick Start Guide Page 9

10 Windows 2000 Note: Windows 2000 users will need to change the jumper on the SmartBoot Enabler to the lower pins in order to operate correctly. Move SmartBoot Enabler jumper from the default of the top pins to bottom pins for Windows 2000 only. 1. Please insert the NetComm CD supplied and, when the "Found New Hardware Wizard" starts. Click on "Next>". 2. Select "Search for a suitable driver for my device (recommended)" and click on "Next>". 3. Select "Specify a location" and click on Next>". Page 10 AM5055 Roadster V.92 USB Quick Start Guide
11 4. Enter the driver location "D:\DRIVERS\AM5055\WIN2K" (where D:\ is the drive letter of your CD ROM drive) and click on "OK". 5. Windows will locate the correct driver. Click on "Next>" to continue. 6. Windows 2000 will now copy the required files (for the USB Serial converter portion of the modem). 7. Once all files have been copied click "Finish", and the "Found New Hardware Wizard" will be displayed again. 8. Click on "Next>". 9. Select "Search for a suitable driver for my device (recommended)" and click on "Next>". AM5055 Roadster V.92 USB Quick Start Guide Page 11
. 14.")
12 10.Select "Specify a location" and click on Next>". 11. Enter the driver location "D:\DRIVERS\AM5055\WIN2K" (where D:\ is the drive letter of your CD ROM drive) and click on "OK". 12. Windows will locate the correct driver. Click on "Next>" to continue. 13. Windows 2000 will now copy the required files (for the USB Serial Port portion of the modem). 14. Once all files have been copied click "Finish", and the "Found New Hardware Wizard" will be displayed again. 15. Click on "Next>". Page 12 AM5055 Roadster V.92 USB Quick Start Guide


13 16. Select "Search for a suitable driver for my device (recommended)" and click on "Next>". 17. Select "Specify a location" and click on Next>". 18. Enter the driver location "D:\DRIVERS\AM5055\WIN2K" (where D:\ is the drive letter of your CD ROM drive) and click on "OK". 19. The Wizard will search for the correct driver. The drivers that Windows 2000 uses are are not digitally signed by Microsoft and the message to the right will be displayed. Click "Yes" to continue. AM5055 Roadster V.92 USB Quick Start Guide Page 13


14 19. Windows will locate the correct driver. Click on "Next>" to continue. 20. Windows 2000 will now copy the required files (for the USB Serial Port portion of the modem). 21. Once all files have been copied click "Finish" to complete the installation. Page 14 AM5055 Roadster V.92 USB Quick Start Guide
\" and click on \"Next>\". 3. Select \"Specify a location:\".")
15 Windows 98 se 1. Please insert the NetComm CD supplied and, when the "Add New Hardware Wizard" recognizes the new "NetComm USB Modem", click on "Next>". 2. Select "Search for the best driver for your device (Recommended)" and click on "Next>". 3. Select "Specify a location:". Type in "D:\DRIVERS\AM5055\WIN98" (where d:\ is the letter of your CD ROM drive) and click on "Next>". 4. Windows will confirm the driver and location. Click on "Next>". 5. The required files will then be copied to your computer. AM5055 Roadster V.92 USB Quick Start Guide Page 15
\" and click on \"Next>\". 10.")
16 6. Click on "Finish" to complete installation of the USB Serial Converter portion of the modem. 7. The driver for the NetComm USB Serial port will then be installed without user intervention. 8. When the "Add New Hardware Wizard" finds the "NetComm Roadster V.92 USB Modem" click on "Next>". 9. Select "Search for the best driver for your device (Recommended)" and click on "Next>". 10. Select "Specify a location:". Type in "D:\DRIVERS\AM5055\WIN98" (where d:\ is the letter of your CD ROM drive) and click on "Next>". Page 16 AM5055 Roadster V.92 USB Quick Start Guide
17 11. Windows will confirm the driver and location. Click on "Next>". 12. The required files will then be copied to your computer. 13. Click on "Finish" to complete the installation. 14. Once the modem installation is complete your modem can be selected from within the communications application you are using, such as Dial Up Networking for Internet connection. AM5055 Roadster V.92 USB Quick Start Guide Page 17


18 Step 3: Installing your Software Facsimile and Voice Mail Utility 1. Insert the NetComm CD into your CD- ROM drive. Go to the Start Menu and click on Run. 2. Browse the CD for the location or type in "D:\Software\Faxtalk\setup.exe" where D: is the letter of your CD-ROM drive. 2. Select a language and click OK to continue. 3. Follow the instructions on screen to install the FaxTalk Communicator software. 4. You will be prompted to select your Modem. 5. Select the "NetComm Roadster V.92 " from the list and click on "Next". 6. Continue with the installation and restart your computer when prompted. Page 18 AM5055 Roadster V.92 USB Quick Start Guide

19 Step 4: Using your Roadster V.92 Modem with FaxTalk Configuring voice/fax mailboxes Voice/fax mailboxes are the basic type of mailbox used by FaxTalk Communicator. These mailboxes can receive both voice messages and faxes. You can also configure a Voice/fax mailbox to act as an announce only or fax only mailbox. To change the settings of a Voice/fax mailbox, select the desired mailbox and click Properties. A Voice/fax mailbox contains three configuration tabs. General settings The General tab contains the mailbox settings such as mailbox name, maximum message length, and remote access password. Voice /Fax Mailbox General Configuration Screen Setting the maximum message length You can control the length of time a caller has to leave a message. Each mailbox can be set to a specific message length of between 1 and 999 seconds. To change the maximum message length: 1. Click the up or down arrows on the Maximum Message Length setting to change the value. You can also type a new value directly into the field. 2. Click OK to save the change. AM5055 Roadster V.92 USB Quick Start Guide Page 19
20 Logging incoming calls You can elect to have all incoming calls logged to a mailbox regardless of whether the caller left a message. If Caller ID information is available, The Caller ID name and number will also be logged with the call. To log all incoming calls: 1. Check the Log all calls where the caller did not leave a message option. 2. Click OK to save the change. Automatically detecting fax calls You can enable a mailbox to automatically detect incoming fax calls while playing the greeting. If a fax call is detected during the greeting and the Auto Detect Fax Calls for this Mailbox option is enabled, the software will automatically begin receiving the fax. To automatically detect fax calls: 1. Check the Auto Detect Fax Calls for this Mailbox option. 2. Click OK to save the change. Discarding messages You can have a mailbox automatically delete received messages that are under certain length. To automatically delete messages under a certain length: 1. Enable the Discard Messages Under X seconds option. 2. Click the up or down arrows on the Discard Messages Under X seconds setting to select the maximum length of messages to delete. A setting of 3 seconds will delete all messages under 3 seconds in length. 3. Click OK to save the change. Password protecting a mailbox You can password protect individual Voice / Fax mailboxes for privacy. You have the option of requiring a password for local access, local and remote access, or just remote access. To set a mailbox password: 1. Enter a numeric password in the password field. If you want password protection only when accessing the mailbox remotely, check the Prompt for password with remote access only option. 2. Click OK to save the change. Page 20 AM5055 Roadster V.92 USB Quick Start Guide

21 Greeting settings The Greeting tab includes options for recording, selecting, saving, and playing greetings. Recording a greeting Greeting Configuration Screen You can record a custom greeting to be played when a caller accesses the mailbox. A Data greeting should inform the caller that this is a data mailbox. Depending on your modem's capabilities, you can record your greeting from the telephone handset, modem microphone, or multimedia microphone. To record a greeting: 1. Click New to create a new greeting 2. In the Greeting Recorder, select the recording device in the From list that you will be using the record the greeting. 3. Click the Record button to begin recording. Click the Stop button when you are finished. 4. Once you have recorded the greeting, click Save and save the greeting to a file. Selecting a greeting To select a greeting for a mailbox, select the desired greeting Greeting list and click OK. AM5055 Roadster V.92 USB Quick Start Guide Page 21
22 Playing a greeting To play and review a greeting: 1. Select the desired greeting from the Greeting list. 2. In the Greeting Recorder, select the playback device from 3. Click the Play button to begin playback. If you are playing multimedia device you can use the playback slider to move backward in the greeting. Deleting a greeting To delete a greeting: 1. Select the desired greeting from the Greeting list and click button. You will be asked to confirm that you wish to delete selected greeting. 2. Click OK to delete the greeting. Page 22 AM5055 Roadster V.92 USB Quick Start Guide

23 Using the Speakerphone feature With the FaxTalk Communicator speakerphone you can place and receive voice calls and use your computer and Roadster V.92 modem as a "smart" telephone. FaxTalk Communicator's speakerphone capabilities offer mute, hold with optional music, last 20 number redial, and support for call waiting services. Speakerphone capabilities are a feature of the Roadster V.92 modem. FaxTalk cannot "add" speakerphone capabilities to a modem that does not have hardware support for speakerphone. Receiving calls FaxTalk Communicator with speakerphone To answer an incoming call on FaxTalk Communicator's speakerphone, click Speaker. The speakerphone answers the call and connects you to the calling party. When you're finished with the call, click Hangup. Placing calls You can place outgoing calls with FaxTalk Communicator using a variety of methods: If the number you wish to call is entered in the phonebook, click the Phonebook tab and either double-click on the entry or highlight the entry and click Dial. If you previously added a number to a Speed Dial button, click the Speed Dial tab and click on the appropriate button. Click Speaker to take the phone off-hook and enter the numbers individually Select a previously dialed number from the Redial list, and click Dial. AM5055 Roadster V.92 USB Quick Start Guide Page 23
24 Using the phonebook The Phonebook tab displays all entries in the FaxTalk Phonebook. You can dial a phonebook entry by either double clicking on the entry or highlighting the entry in the Name column and clicking Dial. When a phonebook entry is highlighted, the number to be dialed is displayed in the Redial field. Using the redial list FaxTalk Communicator includes a recent dialed numbers list that contains the last 20 numbers dialed. To redial a number in the redial list, select the number from the dropdown list and click Dial. Placing callers on hold During a conversation on the speakerphone, you can put callers on hold by clicking Hold. When hold is active, a green light appears on the Hold button. To take a caller off hold, click Hold again. FaxTalk Communicator includes the ability to play.wav, MIDI, or CD-Audio music to the caller while on hold. This feature requires specific modem support and may not be available. To configure music on hold see Configuring Music on Hold later in this chapter. Muting a conversion To mute a call so that the caller cannot hear conversations occurring locally, click Mute. When Mute is active a green light appears on the Mute button. Click on Mute again to resume a normal conversation. Using the speakerphone with call waiting If you subscribe to "call waiting" service through your phone company, you can continue receiving calls while talking on the speakerphone. When a new call comes in and your phone company sends a tone to indicate another call, click Flash to put the current call on "standby" and switch to the new call. When finished with the second call, click Flash again to switch back to the original call. Adjusting the speakerphone volume The Speaker volume control allows you to adjust the volume of the caller while on the speakerphone. If you want to increase the volume of the caller's voice, slide the volume control to the right. To decrease the caller's volume, slide the volume control to the left. Adjusting the microphone sensitivity The Microphone sensitivity control allows you to adjust the sensitivity of the microphone when used with the speakerphone. If you want to increase the sensitivity of the speakerphone microphone, slide the volume control to the right. To decrease the sensitivity of the speakerphone microphone, slide the volume control to the left. Page 24 AM5055 Roadster V.92 USB Quick Start Guide
25 Troubleshooting Testing Your Modem Windows XP 1. To test and verify that the modem is working properly, please go to Start / Settings / Control Panel. 2. If "Category view" is selected (by default) select "Switch to Classic View". 3. Double click on the "Phone and Modem options" icon. 4. Select the "Modem" tab and select your new modem. Click on the "Properties" button. 5. Select the "Diagnostics" tab and click on the "Query Modem" button. 6. If your modem is responding to AT commands and functioning correctly, it means that your modem is working properly. Click "OK" to end this procedure. If any error is reported during this procedure please restart your PC and repeat the test procedure. Windows 98/ME 1. Please go to Start / Settings / Control Panel and double-click on the "Modems" icon. 2. Test the modem by clicking on the "Diagnostics" tab. Then select the COM Port for your new Modem and click on the "More Info " button to start the test. 3. If your modem is responding to AT commands and functioning correctly, it means that your modem is working properly. Click "OK" to end this procedure. If any error is reported during this procedure please restart your PC and repeat the test procedure. Windows Please go to Start / Settings / Control Panel and double-click on the "Phone and Modem Options" icon. 2. Click "Modems" tab, select your new modem and click on the "Properties" button. 3. Click "Diagnostics" tab and then click on the "Query Modem" button. 4. If your modem is responding to AT commands and functioning correctly, it means that your modem is working properly. Click "OK". If any error is reported during this procedure please restart your PC and repeat the test procedure. Updating Your Modem's Firmware Your NetComm Roadster V.92 modem comes with the latest firmware, however, as new releases become available, you may wish to update to update your firmware. To update your Modem s Firmware, go to the NetComm web site at and refer to the support section. Search for your Modem and select the latest firmware version to download. Follow the instructions included with the file to correctly install your modem s firmware. AM5055 Roadster V.92 USB Quick Start Guide Page 25
26 AT Commands Note: Not all of the commands and registers are accessible to the user. The following are listed for quick reference only. A full copy of the AT command set can be found in Adobe Acrobat format at D:\Manuals\ where D:\ is the letter of your CD-ROM drive. Where the following table shows an n, the n represents a numerical value. For example Mn can represent M1, M2 or M3, etc. Command Description T Dial using Tone (DTMF) method., (comma) Pauses before continuing the dial string. A Enter answer mode, go off hook and attempt to answer call. D Enter originate mode, go off hook, and attempt to dial. En Character Echo: 0 = Do not echo, 1 = echo characters. Hn Hook-state: 0 = Hang up, 1 = Go off hook (loop line) Ln Set speaker volume: where n is 0 or 1=low, 2=medium, 3=high On Go to on-line state from command state: 0 = no retrain, 1 = retrain. Vn Display result codes: 0 = as numbers, 1 = as words Wn Negotiation progress messages: 0= None, 1 = Return (display) X3 Provide basic codes, connection speed and BUSY detection. X4 Provides basic codes, connection speeds, DIALTONE, and BUSY. Z Reset. &F Recall factory configuration. &Kn Flow control: 3= RTS/CTS, 4=XON/XOFF \Nn Error correction mode: 0 = normal (off) speed buffered mode. %Cn Data compression: 0 = Disabled. S0=n Set auto answer. Range n = (Rings) Page 26 AM5055 Roadster V.92 USB Quick Start Guide
27 Frequently Asked V.92 Questions What is V.92? V.92 is a new standard for dial-up communications that offers several important improvements over the existing V.90 standard. These improvements are intended to make communications faster, easier and more enjoyable. V.92 and its companion compression standard V.44, have been officially adopted by the ITU, the International Telecommunications Union. What makes a V.92 modem faster than V.90? There are three features that allow the V.92 modem to give you faster speeds.the first is the V.92's improved "automatic negotiation" or "handshake" which is the way modems determine compatibility and decide what standards to use to communicate. With a typical V.90 modem this can take as long as 30 seconds. With QuickConnect, the entire process can take as little as half that time.the V.92 Modem also includes V.44, a new international data compression standard. V.44 was designed specifically for the Internet, and can double the effective speed of your Internet page loading. Finally, the V.92 standard increases the upload speed by as much as 30%., from 33,600 bps (the maximum upload speed using V.90) to 48,000 bps. How does V.44 increase the speed of my web browsing? V.44 is the latest compression standard approved by the ITU. Compression increases the effective speed of your connection by analysing the data and encoding it so that it can be sent more efficiently. The old standard (V.42bis) was created about 10 years ago, so it wasn't designed with the Internet in mind. V.44 was, and it is therefore much more efficient at compressing WEB pages - up to 100% more efficient in some cases. Do I need a special service or new ISP? No. But you may not be able to take advantage of all these features right away. While your current ISP will almost certainly support V.92 and V.44 at some point, it may take a while before the equipment manufacturers that your ISP or online service uses sends them an upgrade, or until they implement the upgrade. However, V.92 and V.44 are true international standards, so over time you can be assured of nearly universal support. In the meantime you can use the V.90 protocol, which is also in your V.92 modem, until your ISP switches over. Does V.92 "QuickConnect" work on all calls? This feature of the V.92 standard allows the modem to "learn" and "remember" the variables associated with calling a specific telephone number and connecting to a specific modem associated with that number. This feature will be most effective when you repetitively call the same number - such as that for your on-line service or internet service provider. The modem will then be able to use its stored profile and deliver the advantage of a quicker connection. AM5055 Roadster V.92 USB Quick Start Guide Page 27
28 Does V.44 work equally well on all file transfers? Which are most improved; least improved? V.44 compression is optimized for the types of files associated with internet use including WEB pages, graphics and documents such as.pdf files. As with all compression the amount of improved performance varies both with the actual format and with the content of individual pages. For reference, WEB searches show the most visible improvement, especially searches on WEB stores or areas that have high amounts of text and numerous small images. The next most improvement is in standard WEB browsing. and downloading of ASCII type text files show noticeable but more modest improvement Will a V.92 modem work automatically with earlier modems? V.90, K56flex, X2? With 33.6k, 14.4k, 9600 and 2400 modems? A V.92 modem will automatically negotiate and connect at the best achievable-shared speed down to 2,400 bps. The negotiation and the related connection time may take longer if the connection does need to be negotiated down to a very low speed as the higher speeds are attempted first. However the connection between a 56K V.92 and a 56K V.90 will take approximately the same time as between two current V.90 modems. How do V.92 modem speeds compare to ISDN, ADSL and Cable speeds? First, remember that V.92 is asymmetric in nature, the same as ADSL. It offers download speeds from the WEB which are higher than it's upload speeds. This means that it is inherently different from ISDN and has been optimized, like ADSL, for Internet access. In fact it is optimized primarily with V.44 compression rather than with purely higher transmission speed as found in ADSL and Cable. Because of this it is not possibly to directly compare the different devices except in terms of the Internet experience itself, including Web browsing. Given optimum V.92/ V.44 performance of approximately 300,000 bps, this still means that that it will operate at less than half the speed of most broadband services (which range from 60,000 bps to 1,500,000 bps). Page 28 AM5055 Roadster V.92 USB Quick Start Guide
29 Step 5: Registering your Modem To ensure that the conditions of your warranty are complied with, please go to the NetComm web site for quick and easy registration of your product at Alternatively, you can fill in the Warranty Registration Form and mail it to NetComm Limited, PO Box 1200, Lane Cove NSW Contact Information If you have any technical difficulties with your product, please do not hesitate to contact NetComm s Customer Support Department. support@netcomm.com.au Fax: (02) Web: AM5055 Roadster V.92 USB Quick Start Guide Page 29
30 Warranty Information The warranty is granted on the following conditions: 1. This warranty extends to the original purchaser (you) and is not transferable; 2. This warranty shall not apply to software programs, batteries power supplies, cables or other accessories supplied in or with the product; 3. The customer complies with all of the terms of any relevant agreement with NetComm and any other reasonable requirements of NetComm including producing such evidence of purchase as NetComm may require; 4. The cost of transporting product to and from NetComm's nominated premises is your responsibility; and, 5. NetComm does not have any liability or responsibility under this warranty where any cost, loss, injury or damage of any kind, whether direct, indirect, consequential, incidental or otherwise arises out of events beyond NetComm's reasonable control. This includes but is not limited to: acts of God, war, riot, embargoes, acts of civil or military authorities, fire, floods, electricity outages, lightning, power surges, or shortages of materials or labour. The warranty is automatically voided if: 1. You, or someone else uses the product, or attempts to use it, other than as specified by NetComm; 2. The fault or defect in your product is the result of a voltage surge subjected to the modem either by power supply or communication line, whether caused by thunderstorm activity or any other cause(s); 3. The fault is the result of accidental damage or damage in transit, including but not limited to liquid spillage; Page Your modem has been used for any other purposes than that for which it is sold, or in any way other than in strict accordance with the user manual supplied; 5. Your modem has been repaired or modified or attempted to be repaired or modified, other than by a qualified person at a service centre authorised by NetComm; and, 6. The serial number has been defaced or altered in any way or if the serial number plate has been removed. Limitations of Warranty The Trade Practices Act 1974 and corresponding State and Territory Fair Trading Acts or legalisation of another Government ("the relevant acts") in certain circumstances imply mandatory conditions and warranties which cannot be excluded. This warranty is in addition to and not in replacement for such conditions and warranties. To the extent permitted by the Relevant Acts, in relation to your product and any other materials provided with the product ("the Goods") the liability of NetComm under the Relevant Acts is limited to, at the option of NetComm to: Replacement of the Goods; or Repair of the Goods; or Payment of the cost of replacing the Goods; or Payment of the cost of having the Goods repaired. All NetComm ACN products have a standard 12 months warranty from date of purchase. However some products have an extended warranty option (refer to packaging). To be eligible for the extended warranty you must supply the requested warranty information to NetComm within 30 days of the original purchase by registering on-line via the NetComm web site at. NetComm reserves the right to request proof of purchase upon any warranty claim. AM5055 Roadster V.92 USB Quick Start Guide
31 Warranty Registration Form Date of Purchase Name Cut along the line Company Address Post Code Tel No ( ) Fax No ( ) The following information is vital for your warranty Please make sure it s correct and complete. Serial No Model Product Type: PC Card Internal External Other!Make sure you fill this section in! I intend to use this modem at: Home Business School/College/University Government Office Dealer s Name Dealer s Address Post Code Tel No ( ) Fax No ( ) How did you find out about our products?
32
33 Regulatory Information Austel Requirements (Australia Only) The software supplied with this modem has default settings compliant with the requirements of Austel Technical Standard TS-ØØ2. Adjustment of these settings outside the required limits will void the Austel permit associated with the modem. Dial Retry Attempts With the service tone detection enabled (eg. Busy Tone) the unit must not be configured to make more than 1Ø dial attempts to the same telephone number. With the service tone detection disabled (eg. Busy Tone - ATXØ) the unit must not be configured to make more than 3 dial attempts to the same telephone number. With dial tone detection disabled (eg. ATXØ) the unit should be configured to dial not less than two seconds after line seizure and not more than 5 seconds after line seizure. In all of the above cases no further attempts shall be made to connect to the telephone number, until a further period of at least 3Ø minutes has elapsed (this does not apply if the redial sequence is manually restarted). Call Answering The modem shall answer an incoming call by seizing the line in not less than 2 seconds from the start of the application of ring signal from the PSTN. (eg. ATSØ=2 or issue ATA after the 2nd ring.) Internal Modems Internal modems are designed to operate only within a PC with a screw down lid. Also, telecommunications network voltages exist on the card inside the PC. Therefore the telecommunications line connection (Telecom cable) must be removed before opening the case of the PC. NOTE Adjustment of these settings outside the required limits will void the Austel permit associated with the modem. Connection of a non-approved modem to the telecommunications network is an offence under Section 253 of the Telecommunications Act 1991 and may attract a maximum fine of $12,ØØØ. Telecom New Zealand Warnings. The grant of a Telepermit for any item of terminal equipment indicates only that Telecom has accepted that the item complies with minimum conditions for connection to its network. It indicates no endorsement of the product by Telecom, nor does it provide any sort of warranty. Above all, it provides no assurance that any item will work correctly in all respects with another item of Telepermitted equipment of a different make or model, nor does it imply that any product is compatible with all of Telecom's network services. This equipment is not capable, under all operating conditions, of correct operation at the higher speeds for which it is designed. Telecom will accept no responsibility should difficulties arise in such circumstances. This equipment shall not be set up to make automatic calls to the Telecom `111` Emergency Service. This equipment may not provide for the effective hand-over of a call to another device connected to the same line. IMPORTANT NOTICE Under power failure conditions, this telephone may not operate. Please ensure that a separate telephone, not dependent on local power, is available for emergency use. Some parameters required for compliance with Telecom's Telepermit requirements are dependent on the equipment (PC) associated with this device. The associated equipment shall be set to operate within the following limits for compliance with Telecom's Specification:- AM5055 Roadster V.92 USB Quick Start Guide Page 33
34 a. There shall be no more that 10 call attempts to the same number within any 30 minute period for any single manual call initiation, and b. The equipment shall go on-hook for a period of not less than 30 seconds between the end of one attempt and the beginning of the next attempt. Some parameters required for compliance with Telecom's Telepermit requirements are dependent on the equipment (PC) associated with this device. In order to operate within the limits for compliance with Telecom's Specifications, the associated equipment shall be set to ensure that automatic calls to different numbers are spaced such that there is no less than 5 seconds between the end of one call attempt and the beginning of another. Some parameters required for compliance with Telecom's Telepermit requirements are dependent on the equipment (PC) associated with this device. In order to operate within the limits for compliance with Telecom's Specifications, the associated equipment shall be set to ensure that calls are answered between 3 and 30 seconds of receipt of ringing. All persons using this device for recording telephone conversations shall comply with New Zealand law. This requires that at least one party to the conversation is to be aware that it is being recorded. In addition, the Principles enumerated in the Privacy Act 1993 shall be complied with in respect to the nature of the personal information collected, the purpose for collection, how it is used and what is disclosed to any other party. Not all telephones will respond to incoming ringing when connected to the extension socket. Mandatory European Statement The equipment has been approved in accordance with Council Decision 98/482/EC for Pan-European single terminal connection to the public switched telephone network (PSTN). However, due to differences between the individual PSTN's provided in different countries, the Approval does not, of itself, give an unconditional assurance of successful operation on every PSTN network termination point. In the event of problems, you should contact your equipment supplier in the first instance. Network Compatibility Statement This product is designed to work with, and is compatible with the following networks. It has been tested to and found to conform with the additional requirements contained in EG Germany - ATAAB AN005, AN006, AN007, AN009, AN010, and DE03, DE04, DE05, DE08, DE09, DE12, DE14, DE17 Greece - ATAAB AN005, AN006 and GR01, GR02, GR03, GR04 Portugal - ATAAB AN001, AN005, AN006, AN007, AN011 and P03, P04, P08, P10 Spain - ATAAB AN005, AN007, AN012, and ES01 Switzerland - ATAAB AN002 All other countries - ATAAB AN003, AN004 Specific switch settings or software setup are required for each network, please refer to the relevant sections of the user guide for more details. The hookflash (time break register recall) function is subject to separate national type approval. It has not been tested for conformity to national type regulations, and no guarantee of successful operation of that specific function on specific national networks can be given. Page 34 AM5055 Roadster V.92 USB Quick Start Guide
35 Trademarks and Notices NetComm is a trademark of NetComm Limited. Windows is a registered trademark of Microsoft Corporation. Other brand and product names are trademarks or registered trademarks of their respective holders. Information is subject to change without notice. All rights reserved. Please note that the images used in this document may vary slightly from those of the actual product. Specifications are accurate at the time of the preparation of this document but are subject to change without notice. AM5055 Roadster V.92 USB Quick Start Guide Page 35
36
Contents. AM5698 Roadster V.92 User Guide
 Contents Features of your Roadster V.92 modem... 4 Installing your Modem... 5 Speakerphone... 6 Installing your Drivers... 7 Windows XP... 7 Windows 2000... 8 Windows Me... 10 Windows 98... 11 Windows
Contents. CD K WebMaster Quick Start Guide
 Contents Thank you for purchasing a genuine NetComm product.... 3 What s in the Box?... 3 Step 1 - Hardware Installation... 4 Step 2 - Software Installation... 5 Windows XP... 5 Windows 2000... 6 Windows
Contents. NB1200 ADSL USB Modem
 Contents Introduction... 3 Contents of your Package... 4 ISP information... 5 What is a Micro filter for?... 6 Installing the Modem Driver... 7 Standard Setup (Recommended)... 7 Windows XP...7 Step 1 -
Contents. BD3068 V.92 MyModem User Guide
 Contents Features of your V.92 MyModem... 3 Front Panel... 4 Rear Panel... 4 Package Contents... 5 Installing your Modem... 5 Installing your Drivers... 6 Windows XP... 6 Windows 2000... 7 Windows Me...
Contents. 56K V.92 Internal Modem
 Contents 56K V.92 Internal Modem What s in the Box?... 3 Step 1 - Hardware Installation... 5 Step 2 - Software Installation... 7 Windows XP... 7 Windows ME... 9 Windows 2000... 11 Driver removal process
Contents. CD2004 Mega-i 56K V.90 Modem User Guide
 Contents Introduction...3 What s in the Box?...3 Step 1 - Hardware Installation...4 Step 2 - Software Installation...5 Windows XP...5 Windows 2000...6 Windows Me...8 Windows 98...10 Windows 95...13 Driver
Contents. Introduction... 3
 Contents Introduction... 3 Step 1 - Connecting your Mini Print Server... 4 Diagnostic Push Button... 5 LED Indicators... 5 Step 2 - Configuring your Mini Print Server... 6 Overview... 6 Configuration Methods...
Contents. NP1500 Fast Ethernet LAN Adaptor
 Contents Introduction... 3 Step 1: Hardware Installation... 3 Step 2: Driver Installation... 4 Windows 95... 4 Windows 98... 4 Windows ME... 5 Windows XP... 7 Windows NT... 9 Windows 2000... 10 Linux...
User Guide. 1.2Gbps Powerline Kit with Gigabit Port
 User Guide 1.2Gbps Powerline Kit with Gigabit Port Copyright Copyright 2017 NetComm Wireless Limited. All rights reserved. The information contained herein is proprietary to NetComm Wireless. No part of
Introduction... 3 Gigabit Ethernet Technology... 4 Switching Technology... 4 Features Package Contents... 6
 Contents Introduction... 3 Gigabit Ethernet Technology... 4 Switching Technology... 4 Features... 5 Package Contents... 6 Front Panel... 7 LED Indicators... 7 Rear Panel... 8 RJ-45 Network ports... 9 Twisted
Contents. NetComm NB2 USB ADSL Modem 2
 Contents Chapter 1: Introduction... 3 About ADSL... 3 Microfilters... 3 Features... 4 Package Contents... 5 Using a Microfilter... 6 Description of the front Panel LEDs... 7 Description of the Rear Panel
Contents. NP G Wireless PC Card User Guide
 Contents Introduction... 3 Package Contents... 4 Features... 5 What is Wireless LAN?... 6 Wireless LAN Modes... 7 Notes on Wireless LAN Configuration... 8 Hardware Installation... 9 System Requirements
User's Guide. Voice Messaging and Fax Software. FaxTalk Communicator SETM
 User's Guide Voice Messaging and Fax Software FaxTalk Communicator SETM FaxTalk Communicator SE for Windows Version 4.7 Telephone Consumer Protection Act of 1991 "It shall be unlawful for any person within
Quick Start Guide. Smartvoice VoIP Gateway
 Quick Start Guide Smartvoice VoIP Gateway Safety and Precaution Installation Use only the type of power source indicated on the marking labels. Use only power adapter supplied with the product. Do not
User Manual. NP Mbps Powerline Adapters with AC Passthrough
 User Manual NP504 Copyright Copyright 2013 NetComm Wireless Limited. All rights reserved. The information contained herein is proprietary to NetComm Wireless. No part of this document may be translated,
Spirit V.90/K56 Flex PCI PnP Modem VoiceFax/Modems
 12 Feature Notes In addition to high speed fax and data transfer functions, your fax/modem supports the following additional voice features: Personal Voice Messaging System Automatically detect and route
User Guide. NP545 54Mbps Wireless USB Adapter
 User Guide NP545 54Mbps Wireless USB Adapter Package Contents The following contents should be found in your box: One NP545 USB Wireless Adapter One USB extension cable Quick Installation Guide One NP545
This manual covers 3Com U.S. Robotics faxmodems.
 This manual covers 3Com U.S. Robotics faxmodems. 3Com, the 3Com logo, U.S. Robotics, and Winmodem are registered trademarks and Connections, RapidComm, and x2 are trademarks of 3Com Corporation. Windows
IC+ 56k External Data Fax Voice Modem IP568x User s Guide
 IC + 56k External Data Fax Voice Modem IP568x FCC Requirements This equipment complies with Part 68 of the FCC Rules. On the bottom of this equipment is a label that contains, among other information,
TRUST 56K V92 USB MODEM
 UK TRUST 56K V92 USB MODEM User manual Version 1.0 Thank you Thank you very much for purchasing this product from the Trust range. We wish you hours of fun with it. Please read this manual carefully before
9417CW Installation and User Guide
 9417CW Installation and User Guide 9417CW Telephone Important Tips Wait for at least two rings to allow the phone to identify a caller and display the caller s name and/or number. You will have to subscribe
NRX EVO 250 USER GUIDE.
 NRX EVO 250 USER GUIDE www.nrx-telecom.com The layout of your NRX EVO 250 Wall Mount Tab Ringer/MWI Indicator Memory Buttons Number Keypad SW4 90V MWI 1 2 ABC 4 GHI PQRS 7 5 JKL TUV 8 DEF 3 MNO 6 WXYZ
RS K Ext Modem. User Manual
 RS-232 56K Ext Modem User Manual Content 1. Introduction... 2 2. Features... 3 3. Installation... 4 3.2.1 Installation Procedures for Windows 64 bits (XP/Win7/Vista)... 6 3.2.2 Installation Procedures
CONTENTS. INTRODUCTION 3 Unpacking the Telephone 4. DESCRIPTION 5 General Description 5. INSTALLATION 10 Setting Up 10 Wall Mounting 11
 CONTENTS CONTENTS 1 INTRODUCTION 3 Unpacking the Telephone 4 DESCRIPTION 5 General Description 5 INSTALLATION 10 Setting Up 10 Wall Mounting 11 SETTINGS 12 Ringer Settings 12 Flash (Recall) Setting 12
User Manual. IPEVO Skype USB Handset with LCD.
 User Manual IPEVO Skype USB Handset with LCD www.ipevo.com Contents 1. Before You Begin 2 2. Installation Guide 3 3. Audio Settings 5 4. User Interface 6 5. Operating Instructions 9 6. FAQ and Troubleshooting
Delta 40. This user guide will ensure you obtain the best use of your answer machine. USER GUIDE
 Delta 40 Thank you for choosing a Delta 40 Answer Machine. You have selected a carefully designed answer machine that incorporates the latest technology giving 40 minutes total recording time, a unique
Contents. 2 NB8/NB8W ADSL2+ Modem Router YML804 Rev1
 Contents Overview... 3 NB8/NB8W Package Contents... 4 Selected terminology used in this manual... 5 Minimum System Requirements:... 5 Do I need a micro filter?... 6 Getting to Know the NB8/NB8W... 7 LED
LINESTEIN DIGITAL ADAPTER
 LINESTEIN DIGITAL ADAPTER USER GUIDE IMPORTANT! FOLLOW THE SETUP PROCEDURE IN THIS USER GUIDE WHENEVER YOU MOVE LINESTEIN TO A DIFFERENT TELEPHONE. About Your New LineStein Congratulations on purchasing
Berkshire 600 AG. User Guide
 Berkshire 600 AG Thank you for choosing a Berkshire 600 AG telephone. You have selected a carefully designed telephone that incorporates the very latest technology, offering a stylish instrument, and providing
Delta 40. This user guide will ensure you obtain the best use of your answer machine. USER GUIDE
 Delta 40 Thank you for choosing a Delta 40 Answer Machine. You have selected a carefully designed answer machine that incorporates the latest technology giving 40 minutes total recording time, a unique
TRUST 56K V92 EXTERNAL MODEM
 UK TRUST 56K V92 EXTERNAL MODEM User manual Version 1.0 Thank you Thank you very much for purchasing this product from the Trust range. We wish you hours of fun with it. Please read this manual carefully
k u.oc.ltenajotr.w DBT 3000 USER GUIDE w w
 DBT 3000 USER GUIDE www. tr ojantel. co.u k The layout of your DBT 3000 Park Hook Delete Cancel Select Ring Indicator/ Message Waiting Indication Wall Mount Tab Shift Button Scroll Keys Memory Buttons
PHONE EASY. User guide. Big Button Telephone. Computer & Telephone Services Ltd NZ
 PHONE EASY Big Button Telephone Computer & Telephone Services Ltd NZ 0800 366363 support@cts.co.nz User guide LOCATION OF CONTROLS 1 2 1 2 3 4 5 6 7 8 9 0 8 9 M1 M2 M3 STORE/MUTE MEMORY RECALL REDIAL +
Avaya 9408 User Guide
 Avaya 9408 User Guide UW-IT Quick Reference Guide Contents 9408 Telephone Buttons and Features... 3 Description of Icons on the Display... 4 Making and Receiving Phone Calls... 5 Answering a Call... 5
Installation Guide and User Manual
 Installation Guide and User Manual For BT Accord 30 Telephone Amplifier & Headset Telephone and multimedia headset and amplifier kit with noise-cancelling microphone for BT Converse, most other corded
Contents (What is included)
") USER MANUAL Contents (What is included) BASE UNIT MICROPHONE HEADSET SPEAKER COVER ALTERNATIVE COLOUR HEADBAND EAR HOOK LEATHERETTE EAR CUSHION POWER ADAPTER TELEPHONE CONNECTION CORD USB CABLE (USB VERSION
USER MANUAL Contents (What is included) BASE UNIT MICROPHONE HEADSET SPEAKER COVER ALTERNATIVE COLOUR HEADBAND EAR HOOK LEATHERETTE EAR CUSHION POWER ADAPTER TELEPHONE CONNECTION CORD USB CABLE (USB VERSION
internet phone USB cordless dual mode phone TWIN (Model GG200) Installation guide Helping you spend less on keeping in touch
 Installation guide Helping you spend less on keeping in touch") internet phone USB cordless dual mode phone TWIN (Model GG200) Installation guide YOUR APPLIANCE IS COVERED BY A WARRANTY FOR 12 MONTHS FROM THE DATE OF PURCHASE. IF A FAULT DEVELOPS ON THIS PRODUCT WITHIN
internet phone USB cordless dual mode phone TWIN (Model GG200) Installation guide YOUR APPLIANCE IS COVERED BY A WARRANTY FOR 12 MONTHS FROM THE DATE OF PURCHASE. IF A FAULT DEVELOPS ON THIS PRODUCT WITHIN
Contents. NP Wireless LAN PC Card
 Contents Introduction... 3 About the NetComm NP7032 - Wireless LAN PC Card... 4 NetComm NP7032 - Wireless LAN PC Card LED Descriptions... 4 Wireless LAN Basics... 5 Ad-Hoc (IBSS) Mode... 5 Infrastructure
AVAYA 9608/9611G SIP DESKPHONE INSTRUCTIONS
 AVAYA 9608/9611G SIP DESKPHONE INSTRUCTIONS MESSAGE WAITING INDICATOR PHONE DISPLAY NAVIGATION ARROWS and the OK BUTTON PHONE BUTTON MESSAGE BUTTON CONTACTS HISTORY HOME HEADSET SPEAKER VOLUME BUTTON MUTE
Now available to purchase from
 CONTENTS CONTENTS 1 INTRODUCTION 3 Unpacking the Telephone 4 DESCRIPTION 5 General Description 5 INSTALLATION 7 Setting Up 7 Wall Mounting 8 SETTINGS 9 Ringer Settings 9 Flash (Recall) Setting 9 Receiving
Telstra T210 Telephone User Guide
 Telstra T210 Telephone User Guide If you have any problems with your phone, firstly refer to the Help section of this User Guide or call the TecHelp line on 1300 369 193. Introduction to your Telstra T210
BT Call Blocking. Pull out and keep
 BT HALO USER GUIDE You need a Caller Display service from your network provider to use Call Blocking and other Caller Display enabled features. Charges may apply. Pull out and keep BT Call Blocking To
Phone Quick Reference Guide. Rev2. M I T E L. EMEA CALA. Global Headquarters U.S. Asia Pacific
 M I T E L 3000 Phone Quick Reference Guide. Rev2. Global Headquarters U.S. EMEA CALA Asia Pacific Tel: +1(613) 592-2122 Fax: +1(613) 592-4784 Tel: +1(480) 961-9000 Fax: +1(480) 961-1370 Tel: +44(0)1291-430000
CommPortal Communicator Desktop End User Guide 19 Feb 2014
 End User Guide 19 Feb 2014 Integra Hosted Voice Service PC Communicator Desktop End User Guide 19 Feb 2014 21 Feb 20134 End User Guide Contents 1 Introduction... 1-1 1.1 Using this End User Guide... 1-2
Digital Home. Information & FAQs
 Digital Phone @ Home Information & FAQs @ For a complete tutorial on the Customer Portal, Digital Phone @ Home Features & Voicemail, and FAQs, please click on the link Digital Phone @ Home Tutorial on
Fig. 1. Figs. 2, 3, 4, & 5. Berkshire MR42. Hotel CLI telephone USER GUIDE. Contents. 1. The Display Panel (see illustration Fig.
 Berkshire MR42 Hotel CLI telephone USER GUIDE Contents 1. The Display Panel (see illustration Fig.1) 2. Received Calls List 3. Receiving calls 4. Making calls 5. Compliance Notes 6. Safety Statement 7.
Wireless Doorphone Intercom
 Security Made Smarter Wireless Doorphone Intercom EN INSTRUCTION MANUAL DOORBELL OVERVIEW MICROPHONE LEDS CAMERA LENS LIGHT SENSOR Detects ambient light and turns on the LEDS to provide clear color night
Alcatel DECT 209 Wireless PBX System
 Alcatel DECT 209 Wireless PBX System USER GUIDE 1 User Guide Index Contents 4 Installation 5 The Base 5 The Handset 6 Charger 6 Battery Cover 7 Handset Keys 7 LCD Icons 8 Standby Mode 8 Receiving a Call
CL210A TELEPHONE & ANSWERING MACHINE
 CL210A TELEPHONE & ANSWERING MACHINE CONTENTS CONTENTS CONTENTS 1 INTRODUCTION 3 Unpacking the Telephone 4 DESCRIPTION 5 General Description 5 INSTALLATION 7 Setting Up 7 Wall Mounting 7 SETTINGS 8 Ringer
Model No. KX-TGP500 B01. Model No. KX-TGP550
 User Guide SIP Cordless Phone Model No. KX-TGP500 B01 Model No. KX-TGP550 T01 Model shown is KX-TGP500. Model shown is KX-TGP550. Thank you for purchasing a Panasonic product. You can configure some of
BT 8568 Digital Phone
 0 BT 8568 Digital Phone 1 2 3 4 1 Handset 2 Menu Keys 3 Display 5 4 Ring/Message Indicator 5 Feature Keys 9 6 6 Dialpad 7 Navigation Keys 8 Programmable Keys 9 External Speaker 8 7 Handset: The handset
VoIPvoice Integration User Guide. VoIPvoice Skype Integration. User Guide. Last Updated 30 November Page 1 of 28
 VoIPvoice Skype Integration User Guide Last Updated 30 November 2005 Page 1 of 28 Contents 1 Getting Started 3 Who are VoIPvoice? 3 What is Skype? 3 Glossary of Terms 3 Minimum System Requirements 4 2
Model No. KX-TGP500 B08. Model No. KX-TGP550
 User Guide SIP Cordless Phone Model No. KX-TGP500 B08 Model No. KX-TGP550 T08 Model shown is KX-TGP500. Model shown is KX-TGP550. Thank you for purchasing a Panasonic product. You can configure some of
HP Travel Phone User s Guide
 HP Travel Phone User s Guide Version 1.0 Copyright 2007 Hewlett-Packard Development Company, L.P. The information contained herein is subject to change without notice. The only warranties for HP products
AVAVA 9608 SIP DESKPHONE INSTRUCTIONS
 AVAVA 9608 SIP DESKPHONE INSTRUCTIONS MESSAGE WAITING INDICATOR YOUR PHONE DISPLAY NAVIGATION ARROWS and the OK BUTTON 9608 PHONE INSTRUCTIONS If there are messages in your Avaya Voice Mailbox, the light
PJP-25UR Conference Microphone Speaker
 PJP-25UR Conference Microphone Speaker User's Manual Contents INTRODUCTION Introduction...2 Controls and Functions...3 PREPARATION Connection...5 Check the following before connecting this unit to the
Contents. 4 Important information 6 What s in the box 7 Your telephone adapter 8 Install 10 Connect 13 Call 15 Troubleshooting 17 Information
 User manual NO ES Contents EN 3 Contents 4 Important information 6 What s in the box 7 Your telephone adapter 8 Install 10 Connect 13 Call 15 Troubleshooting 17 Information 3 EN Important information
PJP-25UR Conference Microphone Speaker
 PJP-25UR Conference Microphone Speaker User's Manual Contents INTRODUCTION Introduction...2 Controls and Functions...3 PREPARATION Connection...5 Check the following before connecting this unit to the
RTU-COM PSTN AT. User Guide
 1 RTU-COM PSTN AT User Guide V. 1.00 / Feb 2006 / Doc 40142 2 1. Introduction This document is a guide for change settings in the PSTN modem integrated in the RTU-COM. You have only access to change the
INTRODUCTION SAFETY INSTRUCTION FEATURES
 INTRODUCTION Thank you for your purchasing our newest Caller ID phone with phonebook function. This manual is designed to familiarize you with this phone. To get the maximum use from your new phone, we
CORTELCO 2700 Single-Line / Multi-Feature Set. Instruction Manual
 CORTELCO 2700 Single-Line / Multi-Feature Set Instruction Manual 1 Table of Contents Why VoiceManager SM with Cortelco Phones?... 2 Cortelco 2700 Set Features... 3 Telephone Set Part Identification...
List of network services. Miscellaneous settings. List of incoming calls and messages
 Guarantee Dear Customer, Thank you for purchasing this Philips product which has been designed and manufactured to the highest quality standards. If, unfortunately, something should go wrong with this
Voic Guide. Access internally Access your mailbox by pressing the Messages/Msgs/MSG key or by dialing Enter your password.
 Voicemail Guide Access internally Access your mailbox by pressing the Messages/Msgs/MSG key or by dialing 1000. Enter your password. Access externally (if configured on your system) i.e. An option on your
For bulk discounts, product demonstrations, free product trials & world-wide Avaya orders, please contact:
 For bulk discounts, product demonstrations, free product trials & world-wide Avaya orders, please contact: Telefonix Voice & Data UK (+44) 01252 333 888 info@telefonix.co.uk http://www.telefonix.co.uk/
CBTH3. Bluetooth Speakerphone User Guide
 Bluetooth Speakerphone User Guide CBTH3 1. Notice Before Using Thank you for purchasing the Cobra Bluetooth Visor Speakerphone CBTH3. Your Cobra CBTH3 is a Bluetooth wireless technology device that enables
LAZER Model 906K USER GUIDE
 Specification This product is designed for use in Great Britain and complies with the European Low Voltage and EMC Directives. For a copy of the Declaration of Conformity for this product, please write
HKBN Unified Communications T61P SIP Phone User Guide
 HKBN Unified Communications T61P SIP Phone User Guide Contents Getting Start of Phone... 2 Phone Package... 2 Assembling the phone... 2 SIP Phone Button... 4 SIP Phone Screen Display... 5 Icon Instruction...
Programming Manual KX-TVA50 KX-TVA200. Voice Processing System. Model
 Voice Processing System Programming Manual Model KX-TVA50 KX-TVA200 Thank you for purchasing a Panasonic Voice Processing System. Please read this manual carefully before using this product and save this
38 Series Telephones User Guide Covers Models
 38 Series Telephones User Guide Covers Models HA9888 (38) TSD-A-S HA9888 (38) TS-A-S BITTEL Page 1 of 7 38 Series User Guide Thank you for purchasing a Bittel product! UNPACKING YOUR PHONE This package
IP Office 1603 Phone User Guide
 1603 Phone User Guide 15-601013 Issue 03a - (03 October 2011) 2011 AVAYA All Rights Reserved. Notice While reasonable efforts were made to ensure that the information in this document was complete and
LAZER Model 905K USER GUIDE
 Specification This product is designed for use in Great Britain and complies with the European Low Voltage and EMC Directives. For a copy of the Declaration of Conformity for this product, please write
A-Module 40. User Guide. Answering Machine. Upgrade for. System Phones. ST 31 and ST 40
 A-Module 40 Answering Machine Upgrade for System Phones ST 31 and ST 40 User Guide Table of Contents Features... 4 Technical Specification... 5 Installation of A-Module 40... 6 Software Update of ST 40
User s Manual. PNG140 Bluetooth Car Kit
 User s Manual PNG140 Bluetooth Car Kit 1 191211R1 Contents: 3 - Overview. 4 - Charging the Battery. 5 - Switching on the car kit. Pairing with phone. 6 - Multipoint. 7 - Call handling. Redialing. Voice
VMS User s Guide: PMM Utility
 NOTICE All rights reserved. No part of this document may be changed, reproduced or transmitted in any form or by any means (electronic, photocopying, recording, or otherwise) without the prior written
AVAYA 9601 SIP DESKPHONE INSTRUCTIONS
 AVAYA 9601 SIP DESKPHONE INSTRUCTIONS The following table provides button/feature descriptions for the 9601 deskphone. Name Description 1 Message Waiting Indicator An illuminated red light in the upper
Register your product and get support at. D450 D455. Short user manual
 Register your product and get support at www.philips.com/support D450 D455 Short user manual Important safety instructions Warning The Electrical network is classified as hazardous. The only way to power
3.5 inch Hard Drive Enclosure. Model #: HDE350U. User s Manual
 3.5 inch Hard Drive Enclosure Model #: HDE350U User s Manual 2 Rev. 060811 User s Record: To provide quality customer service and technical support, it is suggested that you keep the following information
3.5 inch Hard Drive Enclosure. User s Manual
 3.5 inch Hard Drive Enclosure Model #: HDE355U User s Manual Rev. 060811 User s Record: To provide quality customer service and technical support, it is suggested that you keep the following information
Installation and Operation Guide for AT&T Softphone Call Manager for use with TL86103/TL16013/ TL87203/TL16113
 Installation and Operation Guide for AT&T Softphone Call Manager for use with TL86103/TL16013/ TL87203/TL16113 Installation and Operation Guide for AT&T Softphone Call Manager for use with TL86103/TL16013/TL87203/TL16113
User Guide. Slimline 25. Telephone
 MNO Techelp is our commitment to Making Life Easier for it s customers by providing superior service for our Corded and Cordless Telephones, Answering Machines and accessories. We support this by providing
Cordless Internet Telephony Kit
 A Division of Cisco Systems, Inc. Cordless Internet Telephony Kit User Guide Model No. CIT200 Copyright and Trademarks Specifications are subject to change without notice. Linksys is a registered trademark
2N Telecommunications H.I.M. USER GUIDE Helios Interface Module
 2N Telecommunications H.I.M. USER GUIDE Helios Interface Module PRODUCT DESCRIPTION The Helios Interface Module (HIM) is designed to connect the Helios Door Phone device to all telephones connected to
Register your product and get support at. D200 D205. Short user manual
 Register your product and get support at www.philips.com/welcome D200 D205 Short user manual Important safety instructions Warning The Electrical network is classified as hazardous. The only way to power
FAQs ACN Digital Phone Service. General
 FAQs ACN Digital Phone Service General 1. What do I need in order to benefit from ACN Digital Phone Service? Customers will need a broadband Internet connection with a minimum available upload speed of
9516CW Installation and User Guide
 9516CW Installation and User Guide 9516CW Important Tips Wait for at least two rings to allow the phone to identify a caller and display the caller s name and/or number. You will have to subscribe to a
Short user manual. D460 D465. Register your product and get support at
 D460 D465 Short user manual Philips cordless phone Philips cordless phone with answering machine Register your product and get support at www.philips.com/support Important safety instructions Warning The
Newfonic Phone User Guide
 Newfonic Phone 4019 User Guide Welcome Congratulations on the purchase of your Newfonic Phone. The Newfonic is durable and designed to give you years of quality service. Please read this manual carefully
ACN DIGITAL PHONE SERVICE (DPS) USER GUIDE
 USER GUIDE") ACN DIGITAL PHONE SERVICE (DPS) USER GUIDE Using your phone adaptor and calling from home General Guidelines 1. What do I need before I can use the ACN Digital Phone Service (DPS)? Customers will need
ACN DIGITAL PHONE SERVICE (DPS) USER GUIDE Using your phone adaptor and calling from home General Guidelines 1. What do I need before I can use the ACN Digital Phone Service (DPS)? Customers will need
Home Phone Quick Start Guide. Review these helpful instructions to understand your Midco home phone service and its many convenient features.
 Home Phone Quick Start Guide Review these helpful instructions to understand your Midco home phone service and its many convenient features. 1 Staying Connected Has Never Been Easier Thank you for choosing
Instruction Manual. CORTELCO 2720 Two-Line / Caller ID / Type II Set
 1 Instruction Manual CORTELCO 2720 Two-Line / Caller ID / Type II Set Table of Contents Why VoiceManager SM with Cortelco Phones?... 2 Cortelco 2720 Telephone Set Features... 3 Telephone Set Part Identification...
mini USB ISDN TA128 User s Manual
 mini USB ISDN TA128 User s Manual Billion mini USB ISDN TA128 CE Approval All CE approved ISDN devices may be connected to the Euro- ISDN in all countries of the EU. Billion mini USB ISDN TA128 has been
Quick Resource for Crexendo Home Office Suite
 Crexendo Business Solutions Inc. Quick Resource for Crexendo Home Office Suite Crexendo QuickStart Guide 1 Crexendo QuickStart Guide Crexendo Business Solutions Inc. Getting Started Adaptor Installation
Register your product and get support at. D115. Short user manual
 Register your product and get support at www.philips.com/support D115 Short user manual Important safety instructions Warning The Electrical network is classified as hazardous. The only way to power down
Hi-Phone DeskTop USB H/W User Manual
 Hi-Phone DeskTop USB H/W User Manual 1.08.08 Way2call Communication Ltd. reserves the right to make changes to the Hi-Phone devices and to the content of this document without notice 2001 Way2call Communications
BT Duet 210. User Guide
 BT Duet 210 User Guide Welcome. to your BT Duet 210 Corded Telephone 10 number quickdial memory - for ease of dialling your most important telephone numbers Mute mutes your voice so you can talk to someone
VMS User s Guide: PMM Utility
 Release 1.7 December 2008 NOTICE All rights reserved. No part of this document may be changed, reproduced or transmitted in any form or by any means (electronic, photocopying, recording, or otherwise)
User Guide for. Mitel IP Phone
 User Guide for Mitel 3300 5020 IP Phone 1 On-screen menu keys Fixed keys Fixed keys Open/user Programmable keys Do Not Disturb Open/user Programmable keys Pick Up Voicemail Rollover Prime line 2 5020 IP
2757 VoIP Phone Users Guide
 2757 VoIP Phone Users Guide Rev. 1.0 Table of Contents 1 Introduction... 5 1.1 Package Contents... 5 1.2 Features... 5 1.3 Basic Setup... 6 2 Network Setup... 8 2.1 Static IP Address... 8 2-2 PPPoE...11
For customers in Newnan, GA WEB PORTAL GUIDE. NuLink. NuLink_RES_0117
 WEB PORTAL GUIDE NuLink NuLink_RES_0117 Web Portal Guide Table of Contents Getting Started...3 Dashboard...4 Messages and Calls...5 Messages...5 Missed Calls...5 Dialed Calls...5 Received Calls...5 Contacts...6
UK s best selling phone brand. User Guide. BT Duet 210. Corded Phone
 UK s best selling phone brand User Guide BT Duet 210 Corded Phone Welcome. to your BT Duet 210 Corded Telephone 10 number quickdial memory - for ease of dialling your most important telephone numbers Mute