GET YOUR DRAGONBOARD UP TO DATE
|
|
|
- Jonathan Lewis
- 5 years ago
- Views:
Transcription

1 SAFESTOP (Instructable) A step-by-step guide on how to make this project. THINGS YOU WILL NEED DragonBoard-410c Mezzanine Shield 4 LED s 4 push bottons 4 1 Kohm resistances ohm resistances Jumpers MAKE SURE YOU RE CONNECTED TO A NETWORK Click on the wireless network indicator and select the appropriate wireless network. GET YOUR DRAGONBOARD UP TO DATE
2 To install the new libraries and software, you will have to open a terminal window, which is located in Start -> System Tools -> LXTerminal (or UXTerm, or XTerm). Then type this code (without the $ sign): $ sudo apt-get update $ sudo apt-get upgrade $ sudo apt-get dist-upgrade INSTALL EXTRA TOOL PACKAGES In order to use the IDE, we ll install the Debian packages for the standard Linux development tools, including the Arduino toolchain. $ sudo apt-get install arduino-mk arduino git build-essential autoconf libtool swig3.0 python-dev nodejs-dev cmake pkg-config libpcre3-dev CONFIGURE THE SOFTWARE This is to fetch the 96boards-tools package and install the provided configuration files: $ sudo adduser linaro i2c # Allow the normal user to perform i2c operations $ git clone $ sudo cp 96boards-tools/70-96boards-common.rules /etc/udev/rules.d/ Now you need to edit/create a shell script in /etc/profile.d the shell script file name is: 96boards-sensors.sh and it might already exist, or it might not. Then type this code: $vim /etc/profile.d/96boards-sensors.sh export JAVA_TOOL_OPTIONS="-Dgnu.io.rxtx.SerialPorts=/dev/tty96B0" export MONITOR_PORT=/dev/tty96B0 export PYTHONPATH="$PYTHONPATH:/usr/local/lib/python2.7/site-packages" Save and exit the editor Copy this file one other place on the file system $ sudo cp /etc/profile.d/96boards-sensors.sh /etc/x11/xsession.d/96boards-sensors Now reboot the system to pick up all the changes $ sudo reboot
3 Once you are back from the reboot, the Arduino IDE should be installed now. Check on the Start button (lower left corner of the desktop), then Programming tab, and click on the Arduino IDE. And now you have to set everything like this on the Arduino IDE: Check the Tools menu option. Tools->Board should be set to Arduino Uno Tools->Serial Port should be set to /dev/tty96b0 Tools->Programmer should be set to AVRISP mkii or AVR ISP With all these steps you are now ready to program on Arduino, if you want to test it out, you can click on File->Examples->Basics->Blink option You should be able to compile it and upload it without any problems on the Mezzanine Shield. ARDUINO CODE This will be the code used on the project. The codes simulates a situation where if a car arrives first to the stop sign, the other 3 cars coming on the other sides will be warned with a LED light that a car is near to cross the street so they have to take more precautions. If many cars arrive at the same time, the first one that arrived will be the first to cross, then the second one and so on. const int buttonpin1 = 2; // the number of the pushbutton pin const int buttonpin2 = 3; const int buttonpin3 = 4; const int buttonpin4 = 5; const int ledpin1 = 8; const int ledpin2 = 9; // the number of the LED pin const int ledpin3 = 10; const int ledpin4 = 11; // variables will change: int buttonstate1 = 0; // variable for reading the pushbutton status int buttonstate2 = 0;
4 int buttonstate3 = 0; int buttonstate4 = 0; void setup() { // initialize the LED pin as an output: pinmode(ledpin1, OUTPUT); pinmode(ledpin2, OUTPUT); pinmode(ledpin3, OUTPUT); pinmode(ledpin4, OUTPUT); // initialize the pushbutton pin as an input: pinmode(buttonpin1, INPUT); pinmode(buttonpin2, INPUT); pinmode(buttonpin3, INPUT); pinmode(buttonpin4, INPUT); void loop() { // read the state of the pushbutton value: buttonstate1 = digitalread(buttonpin1); buttonstate2 = digitalread(buttonpin2); buttonstate3 = digitalread(buttonpin3); buttonstate4 = digitalread(buttonpin4); // check if the pushbutton is pressed. // if it is, the buttonstate is HIGH: if (buttonstate1 == HIGH && buttonstate2 == LOW && buttonstate3 == LOW && buttonstate4 == LOW) {
5 digitalwrite(ledpin1, LOW); delay(2000); else if (buttonstate1 == LOW && buttonstate2 == HIGH && buttonstate3 == LOW && buttonstate4 == LOW) { digitalwrite(ledpin2, LOW); delay(2000); else if (buttonstate1 == LOW && buttonstate2 == LOW && buttonstate3 == HIGH && buttonstate4 == LOW) { digitalwrite(ledpin3, LOW); delay(2000); else if (buttonstate1 == LOW && buttonstate2 == LOW && buttonstate3 == LOW && buttonstate4 == HIGH) {
6 digitalwrite(ledpin4, LOW); delay(2000); else if (buttonstate1 == HIGH && buttonstate2 == HIGH && buttonstate3 == LOW && buttonstate4 == LOW) { digitalwrite(ledpin1, LOW); else if (buttonstate1 == LOW && buttonstate2 == HIGH && buttonstate3 == HIGH && buttonstate4 == LOW) { digitalwrite(ledpin2, LOW); else if (buttonstate1 == LOW && buttonstate2 == LOW && buttonstate3 == HIGH && buttonstate4 == HIGH) {
7 digitalwrite(ledpin3, LOW); else if (buttonstate1 == HIGH && buttonstate2 == LOW && buttonstate3 == LOW && buttonstate4 == HIGH) { digitalwrite(ledpin4, LOW); else if (buttonstate1 == HIGH && buttonstate2 == HIGH && buttonstate3 == HIGH && buttonstate4 == LOW) { digitalwrite(ledpin1, LOW); else if (buttonstate1 == LOW && buttonstate2 == HIGH && buttonstate3 == HIGH && buttonstate4 == HIGH) {
8 digitalwrite(ledpin2, LOW); else if (buttonstate1 == HIGH && buttonstate2 == LOW && buttonstate3 == HIGH && buttonstate4 == HIGH) { digitalwrite(ledpin3, LOW); else if (buttonstate1 == HIGH && buttonstate2 == HIGH && buttonstate3 == LOW && buttonstate4 == HIGH) { digitalwrite(ledpin4, LOW); else {
9 digitalwrite(ledpin1, LOW); digitalwrite(ledpin2, LOW); digitalwrite(ledpin3, LOW); digitalwrite(ledpin4, LOW); CIRCUIT This is what the circuit will look like Tip: if you have problems to see the connections, you can check the pins used in the code)

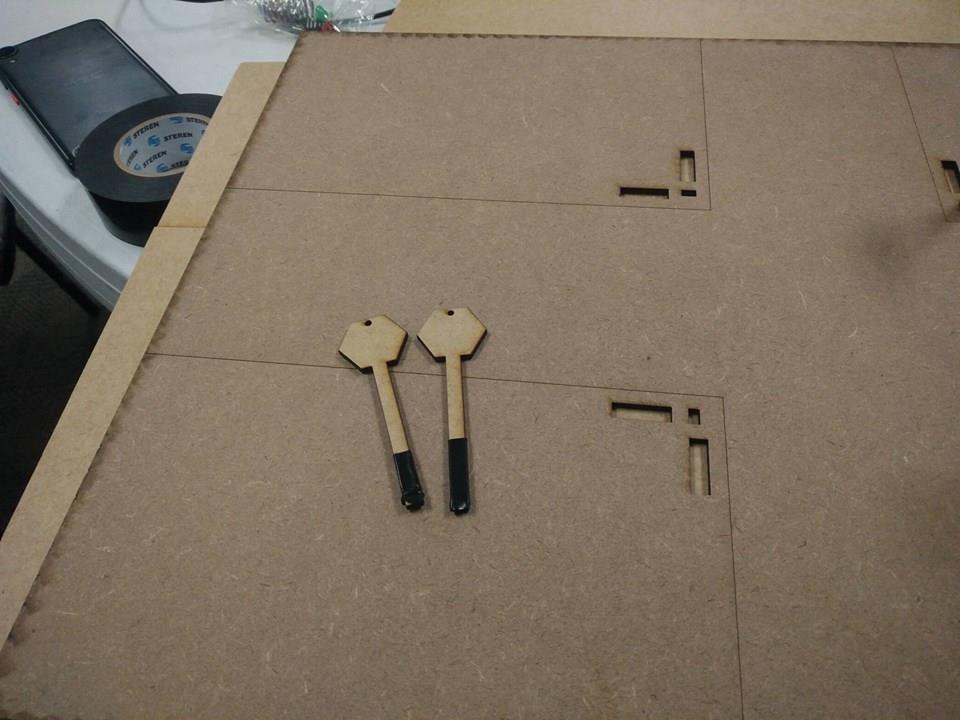
10 MAKING THE MODEL For this project we used SolidWorks to create a template of the model to cut it with a laser machine cutter. You are free to decide how to make the model.

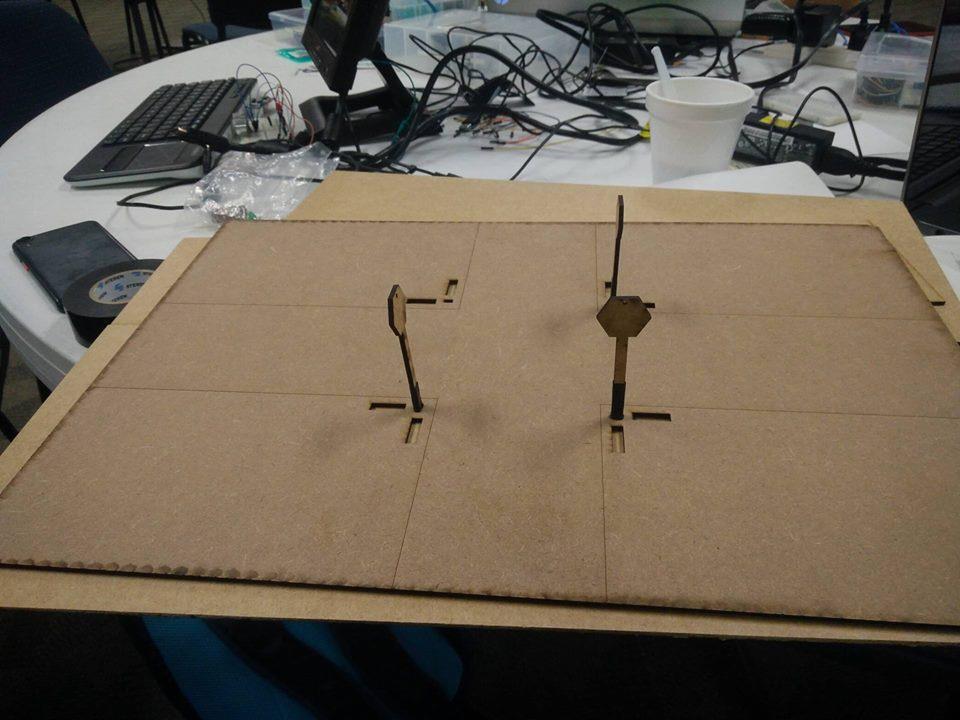
11 After cutting all the templates, the result was ready to just be assembly and painted.
12


13 This was the final result (with the built-in circuit)
<Table of content> <Parts and description> <Circuit board Guide> <Pins> <Basics of Coding> <Intro to Arduino> <Intro> <Downloading Arduino IDO>
 http://www.arduino.cc/
IME-100 Interdisciplinary Design and Manufacturing
 IME-100 Interdisciplinary Design and Manufacturing Introduction Arduino and Programming Topics: 1. Introduction to Microprocessors/Microcontrollers 2. Introduction to Arduino 3. Arduino Programming Basics
Green Grass Demo: Vineyard / Agricultural IIoT
 Green Grass Demo: Vineyard / Agricultural IIoT Setup Guide Page 1 of 54 Table of Contents Table of Contents 2 Revision History: 4 Introduction 5 Scope: 5 Hardware and Software Requirements 6 Hardware components:
IME-100 ECE. Lab 3. Electrical and Computer Engineering Department Kettering University. G. Tewolde, IME100-ECE,
 IME-100 ECE Lab 3 Electrical and Computer Engineering Department Kettering University 3-1 1. Laboratory Computers Getting Started i. Log-in with User Name: Kettering Student (no password required) ii.
Lab 02 Arduino 數位感測訊號處理, SPI I2C 介面實驗. More Arduino Digital Signal Process
 Lab 02 Arduino 數位感測訊號處理, SPI I2C 介面實驗 More Arduino Digital Signal Process Blink Without Delay Sometimes you need to do two things at once. For example you might want to blink an LED (or some other timesensitive
AT42QT1010 Capacitive Touch Breakout Hookup Guide
 Page 1 of 7 AT42QT1010 Capacitive Touch Breakout Hookup Guide Introduction If you need to add user input without using a button, then a capacitive touch interface might be the answer. The AT42QT1010 Capacitive
DUAL PUSh BUTTON PLUG[v1.1]
![DUAL PUSh BUTTON PLUG[v1.1]](/thumbs/86/93817026.jpg "DUAL PUSh BUTTON PLUG[v1.1]") Product Manual DUAL PUSh BUTTON PLUG[v1.1] Updated on: 27th November 2017 Index About Elint Labz 2 Introduction 3 Specification 3 Variants 3 Supported cables: 4 Details 4 How to interface? 6 Example Codes
Product Manual DUAL PUSh BUTTON PLUG[v1.1] Updated on: 27th November 2017 Index About Elint Labz 2 Introduction 3 Specification 3 Variants 3 Supported cables: 4 Details 4 How to interface? 6 Example Codes
AT42QT101X Capacitive Touch Breakout Hookup Guide
 Page 1 of 10 AT42QT101X Capacitive Touch Breakout Hookup Guide Introduction If you need to add user input without using a button, then a capacitive touch interface might be the answer. The AT42QT1010 and
Arduino Workshop. Overview. What is an Arduino? Why Arduino? Setting up your Arduino Environment. Get an Arduino based board and usb cable
 Arduino Workshop Overview Arduino, The open source Microcontroller for easy prototyping and development What is an Arduino? Arduino is a tool for making computers that can sense and control more of the
Arduino Prof. Dr. Magdy M. Abdelhameed
 Course Code: MDP 454, Course Name:, Second Semester 2014 Arduino What is Arduino? Microcontroller Platform Okay but what s a Microcontroller? Tiny, self-contained computers in an IC Often contain peripherals
Project 2: Sensor Light
 Project 2: Sensor Light In this session, we will create a sensor light. The behavior we want to implement is as follows: - When the sensor detects human motion, the LED light will be on - When no human
The speaker connection is circled in yellow, the button connection in red and the temperature sensor in blue
 Connections While the board can be connected to a number of different Arduino versions I chose to use the Pro Mini as I wanted the completed unit to be fairly small. The Mini and the MP3 board run on 5
Tutorial 1: Software Setup
 1 of 5 11/21/2013 11:33 AM Shopping Cart Checkout Shipping Cost Download Website Home MP3 Player 8051 Tools All Projects PJRC Store Site Map You are here: Teensy Teensyduino Tutorial Setup PJRC Store Teensy
CROWDCOIN MASTERNODE SETUP COLD WALLET ON WINDOWS WITH LINUX VPS
 CROWDCOIN MASTERNODE SETUP COLD WALLET ON WINDOWS WITH LINUX VPS This tutorial shows the steps required to setup your Crowdcoin Masternode on a Linux server and run your wallet on a Windows operating system
TANGIBLE MEDIA & PHYSICAL COMPUTING MORE ARDUINO
 TANGIBLE MEDIA & PHYSICAL COMPUTING MORE ARDUINO AGENDA RECAP ALGORITHMIC APPROACHES TIMERS RECAP: LAST WEEK WE DID: ARDUINO IDE INTRO MAKE SURE BOARD AND USB PORT SELECTED UPLOAD PROCESS COVERED DATATYPES
HOW TO INSTALL YAKINDU AND TRICKS ABOUT IT
 HOW TO INSTALL YAKINDU AND TRICKS ABOUT IT 1-Installation First you need to download the YAKINDU Statechart Tools. Unzip the archive to an arbitrary directory and start SCT. Choose "Install New Software..."
Create your own wireless motion sensor with
 Create your own wireless motion sensor with Arduino If you have a friend that has an alarm system in his or her home, I am sure you ve all seen these white motion sensors that are usually fixed above doors
Quickstart Guide: Programming the Arduino ESP 8266
 Quickstart Guide: Programming the Arduino ESP 8266 V1.0 - March 2018 Part 1: Setting up the Arduino 1. Connect to your wireless network 2. Install Arduino software from www.arduino.cc 3. Check if Windows
manifold Documentation
 manifold Documentation Release 0.0.1 Open Source Robotics Foundation Mar 04, 2017 Contents 1 What is Manifold? 3 2 Installation 5 2.1 Ubuntu Linux............................................... 5 2.2
micro:bit Lesson 2. Controlling LEDs on Breadboard
 micro:bit Lesson 2. Controlling LEDs on Breadboard Created by Simon Monk Last updated on 2018-03-09 02:39:14 PM UTC Guide Contents Guide Contents Overview Parts BBC micro:bit Half-size breadboard Small
Monitor your home remotely using the Arduino
 Monitor your home remotely using the Arduino WiFi Shield How to monitor some data in your home using precisely this Arduino WiFi shield. Along with the Arduino Uno board, the final system will form an
MariaDB ColumnStore C++ API Building Documentation
 MariaDB ColumnStore C++ API Building Documentation Release 1.1.3-acf32cc MariaDB Corporation Feb 22, 2018 CONTENTS 1 Licensing 1 1.1 Documentation Content......................................... 1 1.2
SUB1X Masternode Setup Guide: LINUX Version
 SUB1X Masternode Setup Guide: LINUX Version What you will need for this guide: 1) Local computer with Windows, MacOS or Linux. 2) Remote server VPS [Vultr.com or AWS for instance] 3) PuTTY to configure
Masternode Guide #1. Single masternode on Linux VPS (Ubuntu)+ control wallet on local PC (Windows)
+ control wallet on local PC (Windows)") Masternode Guide #1 Single masternode on Linux VPS (Ubuntu)+ control wallet on local PC (Windows) Prerequisites: a - A remote server (Virtual Private Server, VPS) which will be our masternode wallet. b
Masternode Guide #1 Single masternode on Linux VPS (Ubuntu)+ control wallet on local PC (Windows) Prerequisites: a - A remote server (Virtual Private Server, VPS) which will be our masternode wallet. b
BitcoinMonster Masternode Linux VPS Tutorial - Vultr VPS Created By : Samshak Donet Mon: MKX8PFz1uvBkwNDTXtUuj6KinudhsKZh1K
 BitcoinMonster Masternode Linux VPS Tutorial - Vultr VPS Created By : Samshak Donet Mon: MKX8PFz1uvBkwNDTXtUuj6KinudhsKZh1K Step 1 Download, install and sync latest BitcoinMonster Windows s wallet on both
Sensors and Motor Control Lab
 Sensors and Motor Control Lab Individual lab report #1 October 16, 2015 Menghan Zhang TeamA Amit Agarwal Harry Golash Yihao Qian Zihao Zhang Individual progress Challenges Teamwork a) Used potentiometer
SCRIV NETWORK COLD WALLET MASTERNODE SETUP GUIDE DETAILED
 SCRIV NETWORK MASTERNODE SETUP GUIDE COLD WALLET DETAILED March, 2018 Table of Contents Requirements for running SCRIV cold wallet masternode on Linux VPS: 3 Setup Linux-based VPS... 3 1. Install SCRIV
Introduction to Arduino Diagrams & Code Brown County Library
 Introduction to Arduino Diagrams & Code Project 01: Blinking LED Components needed: Arduino Uno board LED Put long lead into pin 13 // Project 01: Blinking LED int LED = 13; // LED connected to digital
Introduction to Arduino Diagrams & Code Brown County Library
 Introduction to Arduino Diagrams & Code Project 01: Blinking LED Components needed: Arduino Uno board LED Put long lead into pin 13 // Project 01: Blinking LED int LED = 13; // LED connected to digital
Project 24 LCD Temperature Display
 Project 24 LCD Temperature Display This project is a simple demonstration of using an LCD to present useful information to the user in this case, the temperature from an analog temperature sensor. You
TrinityCore Documentation
 TrinityCore Documentation Release TrinityCore Developers February 21, 2016 Contents 1 Compiling TrinityCore 3 1.1 Requirements............................................... 3 1.2 Build Environment............................................
IME-100 ECE. Lab 4. Electrical and Computer Engineering Department Kettering University. G. Tewolde, IME100-ECE,
 IME-100 ECE Lab 4 Electrical and Computer Engineering Department Kettering University 4-1 1. Laboratory Computers Getting Started i. Log-in with User Name: Kettering Student (no password required) ii.
Windows cold wallet managing Linux VPS connected Masternode
 Discount Coin Masternodes How to setup a Discount Coin Masternode Single and Multiple masternodes Windows cold wallet managing Linux VPS connected Masternode Version 1.0.2 The DiscountCoin Core Team February
ESP32 WIFI/BLE Board v0.9
 ESP32 WIFI/BLE Board v0.9 From Elecrow Contents 1 Introduction 2 Feactures 3 Specification 4 Interface Function 5 Usage 5.1 Installing the ESP32 Arduino Core 5.1.1 Download the Core 5.1.2 Install the Xtensa
Specification. 1.Power Supply direct from Microcontroller Board. 2.The circuit can be used with Microcontroller Board such as Arduino UNO R3.
 Part Number : Product Name : FK-FA1410 12-LED AND 3-BOTTON SHIELD This is the experimental board for receiving and transmitting data from the port of microcontroller. The function of FK-FA1401 is fundamental
Touch Board User Guide. Introduction
 Touch Board User Guide Introduction The Crazy Circuits Touch Board is a fun way to create interactive projects. The Touch Board has 11 built in Touch Points for use with projects and also features built
IoT with Intel Galileo Gerardo Carmona. makerobots.tk
 IoT with Intel Galileo Gerardo Carmona Outline What is Intel Galileo? Hello world! In Arduino Arduino and Linux Linux via SSH Playing around in Linux Programming flexibility How GPIOs works Challenge 1:
Intel Do-It-Yourself Challenge Compile C/C++ for Galileo Nicolas Vailliet
 Intel Do-It-Yourself Challenge Compile C/C++ for Galileo Nicolas Vailliet www.intel-software-academic-program.com paul.guermonprez@intel.com Intel Software 2014-02-01 Why? C/C++ code? Why C/C++ code? Arduino
Arduino Uno Microcontroller Overview
 Innovation Fellows Program Arduino Uno Microcontroller Overview, http://saliterman.umn.edu/ Department of Biomedical Engineering, University of Minnesota Arduino Uno Power & Interface Reset Button USB
Introduction To Arduino
 Introduction To Arduino What is Arduino? Hardware Boards / microcontrollers Shields Software Arduino IDE Simplified C Community Tutorials Forums Sample projects Arduino Uno Power: 5v (7-12v input) Digital
swiftenv Documentation
 swiftenv Documentation Release 1.3.0 Kyle Fuller Sep 27, 2017 Contents 1 The User Guide 3 1.1 Installation................................................ 3 1.2 Getting Started..............................................
University of Hull Department of Computer Science C4DI Interfacing with Arduinos
 Introduction Welcome to our Arduino hardware sessions. University of Hull Department of Computer Science C4DI Interfacing with Arduinos Vsn. 1.0 Rob Miles 2014 Please follow the instructions carefully.
University of Portland EE 271 Electrical Circuits Laboratory. Experiment: Arduino
 University of Portland EE 271 Electrical Circuits Laboratory Experiment: Arduino I. Objective The objective of this experiment is to learn how to use the Arduino microcontroller to monitor switches and
More Arduino Programming
 Introductory Medical Device Prototyping Arduino Part 2, http://saliterman.umn.edu/ Department of Biomedical Engineering, University of Minnesota More Arduino Programming Digital I/O (Read/Write) Analog
EXPERIMENT2. V3 Robot Navigates Autonomously with Feelers and Infrared Sensors
 EXPERIMENT2 V3 Robot Navigates Autonomously with Feelers and Infrared Sensors Purpose: Install and program the feeler sensors (switches) plus the adjustable range infrared sensors to navigate autonomously
Arduino Part 2. Introductory Medical Device Prototyping
 Introductory Medical Device Prototyping Arduino Part 2, http://saliterman.umn.edu/ Department of Biomedical Engineering, University of Minnesota More Arduino Programming Digital I/O (Read/Write) Analog
Raspberry Pi NTP Clock Setup Guide
 Raspberry Pi NTP Clock Setup Guide Several steps are involved in getting your Raspberry Pi to operate as a NTP Clock. To begin with, you must obtain a LCD Plate (www.adafruit.com) and build it. You must
Connecting Arduino to Processing
 Connecting Arduino to Processing Introduction to Processing So, you ve blinked some LEDs with Arduino, and maybe you ve even drawn some pretty pictures with Processing - what s next? At this point you
Gravity: I2C ADS Bit ADC Module(Arduino & Raspberry Pi Compatible) SKU: DFR0553
 SKU: DFR0553") Gravity: I2C ADS1115 16-Bit ADC Module(Arduino & Raspberry Pi Compatible) SKU: DFR0553 DFRobot I2C ADS1115 16-bit ADC module can accurately collect and convert analog signals. Through this ADC module,
Gravity: I2C ADS1115 16-Bit ADC Module(Arduino & Raspberry Pi Compatible) SKU: DFR0553 DFRobot I2C ADS1115 16-bit ADC module can accurately collect and convert analog signals. Through this ADC module,
This week we will learn about embedded programming. The agenda:
 Week 7: Embedded Programming 11.3. 2015 This week we will learn about embedded programming. The agenda: http://academy.cba.mit.edu/classes/embedded_programming/index.html architectures Harvard, von Neumann
COLD WALLET + MASTERNODE SETUP ON LINUX
 COLD WALLET + MASTERNODE SETUP ON LINUX This tutorial shows the steps required to setup your Magnet masternode on a Linux system while running a local cold wallet (Windows system here). Let s get started!
Serial.begin ( ); Serial.println( ); analogread ( ); map ( );
; Serial.println( ); analogread ( ); map ( );") Control and Serial.begin ( ); Serial.println( ); analogread ( ); map ( ); A system output can be changed through the use of knobs, motion, or environmental conditions. Many electronic systems in our world
Control and Serial.begin ( ); Serial.println( ); analogread ( ); map ( ); A system output can be changed through the use of knobs, motion, or environmental conditions. Many electronic systems in our world
This guide assumes that you are setting up a masternode for the first time. You will need:
 KRT MN Guide Setting up a masternode requires a basic understanding of Linux and blockchain technology, as well as the ability to follow instructions closely. It also requires regular maintenance and careful
Smart Objects. SAPIENZA Università di Roma, M.Sc. in Product Design Fabio Patrizi
 Smart Objects SAPIENZA Università di Roma, M.Sc. in Product Design Fabio Patrizi 1 What is a Smart Object? Essentially, an object that: Senses Thinks Acts 2 Example 1 https://www.youtube.com/watch?v=6bncjd8eke0
BUS=="usb", ACTION=="add", SYSFS{product}=="AVRISP mkii", MODE="0666", SYMLINK+="avrdev"
 Get the arduino code from http://arduino.cc/en/main/software On unbunto get the avr compilers and downloaders apt-get install gdb-avr avrdude avr-libc Using the AVRISP mkii under linux You need to set
Prototyping & Engineering Electronics Kits Basic Kit Guide
 Prototyping & Engineering Electronics Kits Basic Kit Guide odysseyboard.com Please refer to www.odysseyboard.com for a PDF updated version of this guide. Guide version 1.0, February, 2018. Copyright Odyssey
TANGIBLE MEDIA & PHYSICAL COMPUTING INTRODUCTION TO ARDUINO
 TANGIBLE MEDIA & PHYSICAL COMPUTING INTRODUCTION TO ARDUINO AGENDA ARDUINO HARDWARE THE IDE & SETUP BASIC PROGRAMMING CONCEPTS DEBUGGING & HELLO WORLD INPUTS AND OUTPUTS DEMOS ARDUINO HISTORY IN 2003 HERNANDO
TABLE OF CONTENTS INTRODUCTION LESSONS PROJECTS
 TABLE OF CONTENTS INTRODUCTION Introduction to Components - Maker UNO 5 - Maker UNO Board 6 - Setting Up - Download Arduino IDE 7 - Install Maker UNO Drivers - Install Maker UNO Board Package 3 LESSONS.
User s Manual of Board ET-ESP32 WROVER MODULE V1 ET-ESP32 WROVER MODULE V1
 ET-ESP32 WROVER MODULE V1 ET-ESP32 WROVER MODULE V1 is Module MCU ESP32 of Espressif Systems that uses the Module model ESP32 WROVER-I to be MCU on board. Memory o 4MB SPI Flash(32Mbits SPI flash)/ 8MB
Zephyr Kernel Installation & Setup Manual
 Zephyr Kernel Installation & Setup Manual Zephyr kernel is a small footprint Single address space OS, i.e, it combines application specific code with a custom kernel to create a monolithic image that gets
Vaango Installation Guide
 Vaango Installation Guide Version Version 17.10 October 1, 2017 The Utah Vaango team and Biswajit Banerjee Copyright 2015-2017 Parresia Research Limited The contents of this manual can and will change
Introduction to Internet of Things Prof. Sudip Misra Department of Computer Science & Engineering Indian Institute of Technology, Kharagpur
 Introduction to Internet of Things Prof. Sudip Misra Department of Computer Science & Engineering Indian Institute of Technology, Kharagpur Lecture - 23 Introduction to Arduino- II Hi. Now, we will continue
RedBoard Hookup Guide
 Page 1 of 11 RedBoard Hookup Guide CONTRIBUTORS: JIMB0 Introduction The Redboard is an Arduino-compatible development platform that enables quick-and-easy project prototyping. It can interact with real-world
MASTERNODE Setup Guide
 MASTERNODE Setup Guide Version 1.0 February 2018 Page 1 / 13 Table of Contents Table of Contents... 2 Linux Setup... 3 Prerequisites... 3 Updates and dependencies... 3 Building the wallet... 4 Starting
Gooligum Electronics 2015
 The Wombat Prototyping Board for Raspberry Pi Operation and Software Guide This prototyping board is intended to make it easy to experiment and try out ideas for building electronic devices that connect
TangeloHub Documentation
 TangeloHub Documentation Release None Kitware, Inc. September 21, 2015 Contents 1 User s Guide 3 1.1 Managing Data.............................................. 3 1.2 Running an Analysis...........................................
SiFive HiFive1 Getting Started Guide. c SiFive, Inc.
 SiFive HiFive1 Getting Started Guide c SiFive, Inc. January 3, 2017 2 SiFive HiFive1 Getting Started Guide 1.0.2 SiFive HiFive1Getting Started Guide Copyright Notice Copyright c 2017, SiFive Inc. All rights
SAROS MasterNode Guide V1.1
 SAROS MasterNode Guide V1.1 Pre-requisites Local Windows wallet holding at least 1501 SAROS coins Remote VPS Ubuntu 14.04 VPS (in this guide I am using a XS ordered from www.masterhash.us) OVERVIEW This
PS Move API Documentation
 PS Move API Documentation Release 4.0.4 Thomas Perl Dec 16, 2017 Contents 1 Building PS Move API from source 1 1.1 Building on macos 10.12........................................ 1 1.2 Building on Ubuntu
Intel Do-It-Yourself Challenge Rebuild (with) Yocto Nicolas Vailliet
 Yocto Nicolas Vailliet") Intel Do-It-Yourself Challenge Rebuild (with) Yocto Nicolas Vailliet www.intel-software-academic-program.com paul.guermonprez@intel.com Intel Software 2014-02-01 Why? Should I? Yocto? Is Yocto a distribution?
Intel Do-It-Yourself Challenge Rebuild (with) Yocto Nicolas Vailliet www.intel-software-academic-program.com paul.guermonprez@intel.com Intel Software 2014-02-01 Why? Should I? Yocto? Is Yocto a distribution?
Index. Jeff Cicolani 2018 J. Cicolani, Beginning Robotics with Raspberry Pi and Arduino,
 A Accessor methods, 92 Adafruit, 9 Adafruit DC & Stepper Motor HAT assembling board adjustment, 199 circuit board, 199 kit, 197 pins, 197 preparation, 197 Raspberry Pi, 198, 204 removal, 201 rotation,
To lead your students through this activity, you will need your computer, attached to a projector, for projecting your code for students to see.
 To lead your students through this activity, you will need your computer, attached to a projector, for projecting your code for students to see. STEP 1: PREPARE TO PROGRAM 1. Launch the IDE by clicking
Raspberry PI 'How-To' Series
 Raspberry PI 'How-To' Series AOSONG AM2315 Temperature Sensor Implementation Guide Update Written by: Sopwith Revision 3.0 February 1, 2019 sopwith@ismellsmoke.net 1 Introduction Here we are in February
KINGSTON COIN VPS MASTERNODE SETUP GUIDE
 KINGSTON COIN VPS MASTERNODE SETUP GUIDE UBUNTU 16.04 x64 ** THIS GUIDE ASSUMES YOU HAVE PURCHASED A VPS THROUGH A SERVICE LIKE DIGITALOCEAN. COM OR VULTR.COM AND HAVE CONNECTED TO YOUR VPS THROUGH SSH/TERMINAL**
Objectives: Learn how to input and output analogue values Be able to see what the Arduino is thinking by sending numbers to the screen
 Objectives: Learn how to input and output analogue values Be able to see what the Arduino is thinking by sending numbers to the screen By the end of this session: You will know how to write a program to
6 GPIO 84. Date: 29/09/2016 Name: ID: This laboratory session discusses about writing program to interact with GPIO of Reapberry Pi.
 6 GPIO 84 Date: 29/09/2016 Name: ID: Name: ID: 6 GPIO This laboratory session discusses about writing program to interact with GPIO of Reapberry Pi. GPIO programming with Assembly Code:block installation
mangoh Red Getting Started WPx5xx + Linux Dev Machine + CLI
 mangoh Red Getting Started WPx5xx + Linux Dev Machine + CLI 41110481 Rev 3 Contents subject to change mangoh Red Getting Started Important Notice Limitation of Liability Patents Document details Copyright
CN310 Microprocessor Systems Design
 CN310 Microprocessor Systems Design Microcontroller Nawin Somyat Department of Electrical and Computer Engineering Thammasat University Outline Course Contents 1 Introduction 2 Simple Computer 3 Microprocessor
Setting up a Chaincoin Masternode
 Setting up a Chaincoin Masternode Introduction So you want to set up your own Chaincoin Masternode? You ve come to the right place! These instructions are correct as of April, 2017, and relate to version
How to set Caffe up and running SegNet from scratch in OSX El Capitan using CPU mode
 How to set Caffe up and running SegNet from scratch in OSX El Capitan using CPU mode Written by : Sirawat Pitaksarit Probably can be applied to Ubuntu system, but all the brew commands needs to be replaced
SIK Experiment Guide for Arduino - V3.3
 Page 1 of 93 SIK Experiment Guide for Arduino - V3.3 Introduction: Hardware The SparkFun Inventor s Kit is your map for navigating the waters of beginning embedded electronics. This kit contains all the
Sparkfun Lunch & Learn. Jeff Boody
 Sparkfun Lunch & Learn Jeff Boody 2013-01-24 Who Am I? Android fanatic Engineer at Qualcomm developing Android graphics drivers since 2008 Team member for Qualcomm sponsored Roboteers club Simon Says SMD
Arduino Micro Breadboard Laboratory Interface Processor (Micro BLIP) User Manual
 User Manual") Arduino Micro Breadboard Laboratory Interface Processor (Micro BLIP) MicroBLIP circuit board v2.0 Operating System v2.0.0 1/22/2019 User Manual 2 1 Setup and Operation 1.1 Introduction For the past ten
Arduino Micro Breadboard Laboratory Interface Processor (Micro BLIP) MicroBLIP circuit board v2.0 Operating System v2.0.0 1/22/2019 User Manual 2 1 Setup and Operation 1.1 Introduction For the past ten
Advanced Activities - Information and Ideas
 Advanced Activities - Information and Ideas Congratulations! You successfully created and controlled the robotic chameleon using the program developed for the chameleon project. Here you'll learn how you
keyestudio Keyestudio MEGA 2560 R3 Board
 Keyestudio MEGA 2560 R3 Board Introduction: Keyestudio Mega 2560 R3 is a microcontroller board based on the ATMEGA2560-16AU, fully compatible with ARDUINO MEGA 2560 REV3. It has 54 digital input/output
3.The circuit board is composed of 4 sets which are 16x2 LCD Shield, 3 pieces of Switch, 2
 Part Number : Product Name : FK-FA1416 MULTI-FUNCTION 16x2 LCD SHIELD This is the experimental board of Multi-Function 16x2 LCD Shield as the fundamental programming about the digits, alphabets and symbols.
Arduino Compatible Do-it-Yourself Kit
 Arduino Compatible Do-it-Yourself Kit 1 Sr. Num. Topics Page 1 About Arduino and DIY 3 2 Product Contents and Assembly Instructions 4 3 Important information 12 2 1. About Arduino & DIY Arduino is an open-source
FreeSWITCH for Ubuntu 14.04
 FreeSWITCH for Ubuntu 14.04 Freeswitch is an open-source alternative to Asterisk to build a voip telephony server. It was launched by a member of the Asterisk development team who wanted to rewrite the
Adafruit NFC/RFID on Raspberry Pi
 Adafruit NFC/RFID on Raspberry Pi Created by Kevin Townsend Last updated on 2018-08-22 03:31:24 PM UTC Guide Contents Guide Contents Overview Freeing UART on the Pi Step One: Run raspi-conf Step Two: Disable
Yocto Project components
 Lecture 3 3 Yocto Project components 25 octombrie 2016 Exam questions 1. Please write al least four of the described components of a GNU toolchain 2. List the components which define a Linux distribution
Git Command Line Tool Is Not Installed
 Git Command Line Tool Is Not Installed Make Sure It Is Accessible On Y Error: "git" command line tool is not installed: make sure it is accessible on y I have installed git tool. even in git bash its showing
Package Managers. What are they and why we use them
 Package Managers What are they and why we use them Thoughts of an admin Installing software is painful Installing a lot of software is extremely painful Installing a lot of software on a lot of machines
E. Annex. Rules and conventions used for the project. v The µkos package
 v 13.28 E.1. Rules and conventions used for the project E. Annex In order to have and to maintain a coherency along all the µkos project, the following rules for writing software have been used. NULL =
Introduction to Microcontrollers
 Introduction to Microcontrollers June 2017 Scott A. Theis W2LW Rev 5 ( 0 8 / 0 2 / 2 0 1 7 ) What s it all about How to get started What are some of the common controller options General introduction to
GNU-AVR Building the GNU AVR Toolchain for Mac OS X and Linux
 GNU-AVR Building the GNU AVR Toolchain for Mac OS X and Linux BDMICRO http://www.bdmicro.com/ Brian S. Dean bsd@bdmicro.com April 24, 2007 Copyright (c) 2005 BDMICRO All Rights Reserved. GNU-AVR April
Lab 3 XBees and LCDs and Accelerometers, Oh My! Part 1: Wireless Communication Using XBee Modules and the Arduino
 University of Pennsylvania Department of Electrical and Systems Engineering ESE 205 Electrical Circuits and Systems Laboratory I Lab 3 XBees and LCDs and Accelerometers, Oh My! Introduction: In the first
PDF of this portion of workshop notes:
 PDF of this portion of workshop notes: http://goo.gl/jfpeym Teaching Engineering Design with Student-Owned Digital and Analog Lab Equipment John B. Schneider Washington State University June 15, 2015 Overview
To enter AT Command mode using an Arduino Uno wired to a HC-05 Bluetooth Module one must first familiarized with the physical Bluetooth Module.
 Configuring Bluetooth HC-05 in AT mode with Arduino Uno The HC-05 module is an easy to use Bluetooth SPP (Serial Port Protocol) module, designed for transparent wireless serial connection setup [1]. In
IR Breakbeam Sensors. Created by lady ada. Last updated on :32:59 PM UTC
 IR Breakbeam Sensors Created by lady ada Last updated on 2017-12-08 10:32:59 PM UTC Guide Contents Guide Contents Overview Arduino CircuitPython 2 3 5 8 Adafruit Industries https://learn.adafruit.com/ir-breakbeam-sensors
Rover Coin. Hot Cold Wallet Masternode VPS setup Guide
 Rover Coin Hot Cold Wallet Masternode VPS setup Guide 2018.03.07 1 Contents 1. Windows cold wallet guide... 3 1.1 Download the latest Rover windows wallet.... 3 1.2 How to make your own Rover address.....