DVR 840XHD Digital Video Camcorder User s Manual
|
|
|
- Corey Hawkins
- 6 years ago
- Views:
Transcription

1 DVR 840XHD Digital Video Camcorder User s Manual 2009 Sakar International, Inc. All rights reserved. Windows and the Windows logo are registered trademarks of Microsoft Corporation. All other trademarks are the property of their respective companies.
2 Table of Contents Introduction... 2 Key Features... 2 What your digital video camcorder includes... 3 Computer System Requirements for Windows XP... 4 Computer System Requirement for Windows Vista... 4 Computer System Requirements for Macintosh... 5 A Quick Look at your Digital Video Camcorder... 6 Preparing Your Camcorder for Use... 8 Inserting an SD Memory Card... 9 Camcorder Buttons and Functions DVR Functions and Menu Control Camcorder Playback Modes Connecting to a High Definition TV to view images Connecting to a non High Definition TV to view images Install the Vivitar Experience Image Manager Software Connect your camcorder to the computer Get photos and videos from your camcorder to your computer Get started! Transfer media from my camcorder to my computer manually (Using Windows) Transfer media from my camcorder to my computer manually (Using Macintosh) Maintenance of Your Digital Camcoder Sakar Warranty Card
3 Technical Specifications Trouble Shooting Introduction Thank you for purchasing the DVR 840XHD Digital Video Camcorder. With your camcorder you can shoot high resolution H.264 video clips and take individual photos. In addition, 128 MB built-in memory allows you to take pictures and short movies without a memory card. However a SD compatible memory card of up to 32GB should to be inserted in order to expand the memory of your DVR camcorder. You can also connect it to an HDTV via the provided HDMI cable, and easily playback recorded high-definition videos directly on the wide screen HDTV. Key Features 5 Digital Video resolutions 1440x1080 Pixels (HD), 1280x720p (HD), 848x480p (WVGA), 640x480p (VGA) and 320x240 (QVGA). 8 mega-pixels camcorder with choice of 3 digital camera resolutions- High 3200x2400 (8M), Standard 2592x1944 (5M) and Low 2048x1536p (3M) 2
4 3" TFT LCD 5 X Optical Zoom Lens Supports external SD memory card up to 32GB Built-in Microphone Vivitar Experience Image Manager software for uploading and managing photos and videos to or from the most popular photo sharing and social network websites. What your digital video camcorder includes Digital Video Camcorder USB cable AV cable HDMI Cable Power Adapter Lithium-ion Rechargeable Battery Vivitar Experience Image Manager software Installation CD Quick Start Guide Built-in wrist strap 3
5 Computer System Requirements for Windows XP To be able to download photos and videos to your PC, you will need the following minimum configuration: Pentium 4 processor or above with Windows XP service pack MB RAM, with 100MB of free disk space 1024 x 768 Recommended screen resolution 16-bit color or higher display adaptor CD-ROM Drive QuickTime 6 or higher Microsoft Internet Explorer 7 or higher Windows Media Player 10 or higher Internet connection required Computer System Requirement for Windows Vista To be able to download photos and videos to your PC you will need the following minimum configuration: Windows Vista 800MHz processor and 512 MB of system memory 20GB hard drive with at least 15GB of available space Support for Super VGA graphics 4
6 Available USB Interface CD-ROM drive QuickTime 6 or higher Microsoft Internet Explorer 7 or higher Internet connection required Computer System Requirements for Macintosh Macintosh with Intel processor running Mac OS X v or later 256 MB RAM, 100 MB free disk space Display: 1024 x 768 or higher-resolution monitor QuickTime 6 or higher Internet connection required 5
7 A Quick Look at your Digital Video Camcorder 6
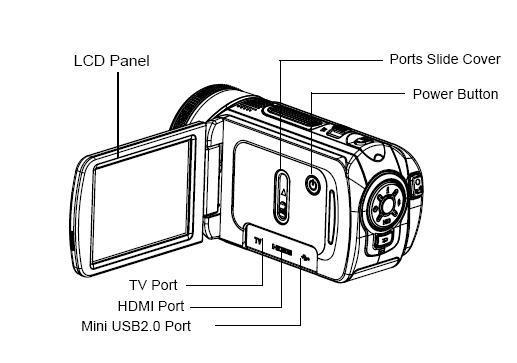
8 7
 as indicated. 2. Close the battery cover.")
9 Preparing Your Camcorder for Use Battery Installation Your DVR camcorder requires a Lithium-ion rechargeable battery (included in packaging). Open the battery compartment on the bottom of the camcorder. 1. Insert the batteries in accordance with the polarity (+ and - ) as indicated. 2. Close the battery cover. Note: You must ONLY use the supplied AC charger to recharge the battery. The camcorder should be Off while charging. Allow the battery to fully charge first. This should take approximately 6 hours. 8
 should be inserted into your DVR camcorder.")
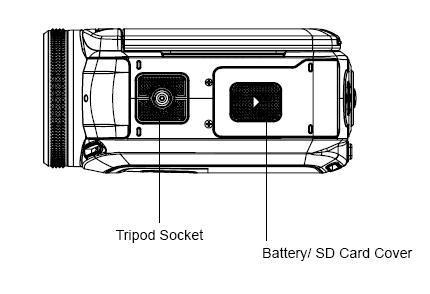
10 The battery cannot be charged by connecting the camcorder via the USB cable to the USB port of your computer. Inserting an SD Memory Card An SD compatible memory card of up to 32GB (not included) should be inserted into your DVR camcorder. SD Memory cards expand the amount of memory thus allowing an increase in the number of movies and photos that can be captured before transferring them to your computer. 1. Locate the SD card slot in the battery compartment on the bottom of the camcorder. 9
11 2. Insert the SD memory card correctly in the direction shown. 3. Press the memory card until you hear a Click sound. Note: After you insert an SD memory card, the icon will appear on the LCD, indicating that your SD memory card has been installed successfully, and the media you capture will now be stored on the card and not in the internal memory. This product supports SD cards of up to 32GB. Formatting will delete all data on the SD Memory Card including protected data. Do not remove the SD memory Card during formatting as this may damage the card and render it unusable. Be sure to format the card with the camcorder. 10
12 Camcorder Buttons and Functions 11
13 DVR Functions and Menu Control To power on the camcorder you need to flip open the LCD Screen. The Power button is situated on the inside of the camcorder. Power on Press the Power button to turn on your DVR. The green LED on the back of the camcorder will light up followed by the LCD monitor, indicating that your DVR is ready for use. Power off Press the Power button to turn your DVR camcorder off. The DVR camcorder will switch off. Alternatively, simply close the LCD panel and the camcorder will automatically turn off. If the DVR camcorder is not in use or in an operational mode for 60 seconds it will switch off automatically. 12
14 When there is insufficient battery power, a flashing red battery icon will appear on the LCD screen. The camcorder will automatically power off a few moments later. Capturing Videos In order to start capturing videos (with audio) with your camcorder: 1. Aim the camcorder at the subject you wish to capture. The image you are capturing will appear on the LCD screen. 2. Press the Movie Shutter button to the right of the dial to start shooting. 3. A red flashing recording icon and the elapsed time of the video being captured will appear on the top right hand side of the LCD. 4. Use the Optical Zoom W/T on the top of the camcorder to zoom in or out. 5. Press the Movie Shutter button again to stop the recording. 6. The recorded file will be saved in AVI format. Note: 1. You can view the AVI files in playback mode. 2. Once they are downloaded to the PC view them using QuickTime and 13
15 Windows Media Player. 3. Please insert an SD memory card of up to 32 GB to expand the memory and capture more videos. 4. When the internal memory is full, a MEMORY FULL message will flash on the LCD screen when you attempt to shoot further videos. 5. Download the photo to your computer using the Vivitar Experience Image Manager software as described below in the section Transfer photos and videos to your computer or insert an SD card to continue taking more photos and videos. In Video mode there are five video resolutions for you to choose from before capturing your video. The higher the resolution selected the better the quality of the video, however higher quality videos use up more memory. 14
16 To enter the setup submenu options for the Video mode press the OK/Menu button. 15

17 1. Press the Right/Left buttons to select the Video mode. 2. Press the Up/Down button to select one of the Video mode options Resolution, Stabilization or Motion Detect. 3. Press the Right/Left button to select the setting that appears on the right hand side of the menu table. 4. Press the OK/Menu button again to confirm and save your choice. 5. Press the Exit button. 16
18 6. Your camcorder is now ready to capture videos with the new settings you selected. Resolution 1. Press the Down button to enter the Resolution submenu. 2. Use the Right/Left button to move between the 5 video resolution settings HD(1080p) / HD(720p) / WVGA 60 / VGA / QVGA. 3. Press the OK/Menu button to confirm and save your choice. 17
19 4. Press the Exit button. 5. Your camcorder is now ready to capture videos with the new settings you selected. 6. The selected resolution icon appears on the top right corner of the LCD. Stabilization 1. Press the Down button to enter the Stabilization submenu 2. Use the Right/Left button to select either On or Off. 18
20 3. Press the OK/Menu button to confirm and save your choice. 4. Press the Exit button. 5. Your camcorder is now ready to capture videos with the new settings you selected. 6. If On is selected the icon will appear on the right hand side of the LCD. Note: Stabilization is not supported in HD(1080p) and WVGA/60fps resolutions. Motion Detect Using this feature the camcorder will start to record videos automatically if it detects movement. The recording will also stop automatically if no movement is detected. 19

21 1. Press the Down button to enter the Motion Detect submenu. 2. Use the Right/Left button to select either On or Off. 3. Press the OK/Menu button to confirm and save your choice. 4. Press the Exit button. 5. Your camcorder is now ready to capture videos with the new settings you selected. Note: If On is selected, the Motion Detect icon will appear on the left 20

22 side of the LCD and the camcorder will start to record videos automatically if it detects a movement. The recording will also stop automatically if no movement is detected. Capturing Pictures You can use your camcorder to capture still pictures. 1. Aim the camcorder at the object you wish to photograph. 2. Use the optical zoom button on the top of the camcorder to Tele/Wide to zoom in or out of the object. 3. The zoom can be set as 1X~10X (5X Optical + 2X Digital) or 1X~20X (5X Optical + 4X Digital) 21
23 4. For close-up pictures of objects located within 80cm use the Macro mode feature as explained in the Effects Submenu mode. 5. Press the Picture Shutter button half way down to focus in on your subject. 6. A white focusing frame appears in the center of the LCD. 7. Once you have the object you wish to photo in this white frame, press the Picture Shutter button fully down for a green focusing frame to appear before the picture is taken. 8. The camcorder will beep and the picture taken is now saved to the memory. 9. The recorded photo file will be saved in JPEG format. 10. The number of photos that can be taken for each resolution and per the memory card inserted appears on the top left of the LCD screen. 11. After the shot is taken the number is reduced by one. 12. To view and/or delete the photo you have taken press the Playback button. Note: When the camcorder's internal memory is full, MEMORY FULL appears on the LCD screen when you attempt to press the Shutter button to take a photo. Either download the photo to your computer using the Vivitar Experience Image Manager software as described below in the section Transfer photos and 22
24 videos to your computer or insert an SD card to continue taking more photos and videos. The number of photos that can be captured not only depends on the SD card s capacity but also on the resolution selected. Better quality photos are taken at higher resolutions but these will also take up more memory on the card. In Picture mode there are three photo resolutions for you to choose from before capturing your pictures. The higher the resolution selected the better the quality of the photo, however higher quality photos use up more memory. To enter the setup submenu options for the Picture mode press the OK/Menu button. 23
25 1. Press the Right/Left buttons to select the Picture mode. 2. Press the Up/Down button to select one of the Picture mode options Resolution, Flash or Selftimer. 3. Press the Right/Left button to select the setting that appears on the right hand side of the menu table. 4. Press the OK/Menu button again to confirm and save your choice. 5. Press the Exit button. 6. Your camcorder is now ready to snap pictures with the new settings you 24
26 selected. Resolution 1. Press the Down button to enter the Resolution submenu. 2. Use the Right/Left button to move between the 3 picture resolution settings High / Std / Low. 3. Press the OK/Menu button to confirm and save your choice. 4. Press the Exit button. 25
27 5. Your camcorder is now ready to capture photos with the new settings you selected. 6. The selected resolution icon appears on the top left corner of the LCD. Flash The camcorder has 3 flash settings. You can change the flash setting by using the Right button on the camcorder dial or from within the Flash submenu. The flash icons appear at the top center of the LCD. Auto The flash is fired on automatically according to the light conditions at the time of taking the picture. Red Eye A pre flash will fire before the regular flash to reduce the red-eye affect. Off The flash will not fire under any circumstances. Use this mode where taking photos in a place where flash photography is prohibited or where the object is distant beyond the range of the flash. 26
28 1. Press the Down button to enter the Flash submenu. 2. Use the Right/Left button to move between the 3 picture resolution settings Auto / Red Eye / Off. 3. Press the OK/Menu button to confirm and save your choice. 4. Press the Exit button. 5. Your camcorder is now ready to capture photos with the new settings you selected. 27
29 Note: The Flash will not activate if the batteries are low being charged. or if the camcorder is Selftimer You can set the Selftimer to up the camcorder and include yourself in the picture. Place the camcorder on a tripod or on a steady and flat surface. After pressing the Picture Shutter button the photo will be taken 10 seconds later. 28
30 1. Press the Down button to enter the Selftimer submenu. 2. Use the Right/Left button to select either On or Off. 3. Press the OK/Menu button to confirm and save your choice. 4. Press the Exit button. 5. Your camcorder is now ready to capture photos with the new settings you selected. 6. If On is selected, the Selftimer icon will appear in the center of the LCD. 7. Press the Picture Shutter button to activate the 10 second countdown. 8. The Selftimer LED at the front of the camcorder will blink until the picture is taken. Effects The Effects submenu contains 4 different options Macro, Scene, Exposure and White Balance. To enter the setup submenu options for the Effects mode press the OK/Menu button. 29
31 1. Press the Right/Left buttons to select the Effects mode. 2. Press the Up/Down button to select one of the Effects mode options Macro, Scene, Exposure and White Balance. 3. Press the Right/Left button to select the setting that appears on the right hand side of the menu table. 4. Press the OK/Menu button again to confirm and save your choice. 30
32 Macro The camcorder has a close-up picture mode to allow you to take pictures at close range within 80cm.. 1. Press the Down button to enter the Macro Mode submenu. 2. Use the Right/Left button to move between Macro or Normal. 3. Press the OK/Menu button to confirm and save your choice. 4. Press the Exit button. 5. Your camcorder is now ready to capture photos with the new settings you 31
33 selected. 6. If Macro is selected, a Macro icon will appear on the bottom left of the LCD. 7. To revert to Normal mode select Normal in step 2. Scene The camcorder has a selection of built-in scenes. Select the scene that you want before taking the photo. 32
34 . 1. Press the Down button to enter the Scene submenu. 2. Use the Right/Left button to move between the 7 options Auto / Skin / Night / Backlight / Black and White / Classic / Negative. 3. Press the OK/Menu button to confirm and save your choice. 4. Press the Exit button. 5. Your camcorder is now ready to capture photos with the new settings you selected. 6. The following options appear as icons on the bottom left corner of the LCD 33
35 when selected Skin, Night and Backlight Exposure The camcorder adjusts image exposure automatically. In certain circumstances you may wish to adjust the exposure compensation manually.. 1. Press the Down button to enter the Exposure submenu. 2. Use the Right/Left button to move between the 7 options -1.0 EV / -0.6 EV / - 34

36 0.3 EV / Auto / 0.3 EV / 0.6 EV / 1.0 EV. 3. Press the OK/Menu button to confirm and save your choice. 4. Press the Exit button. 5. Your camcorder is now ready to capture photos with the new settings you selected. 6. The EV option selected appears next to the icon on the bottom of the LCD. White Balance The camcorder adjusts the color balance of images automatically. 35
37 . 1. Press the Down button to enter the White Balance (WB) submenu. 2. Use the Right/Left button to move between the 4 options Auto / Daylight / Fluorescent / Tungsten. 3. The option selected is immediately previewed on the LCD. 4. Press the OK/Menu button to confirm and save your choice. 5. Press the Exit button. 6. Your camcorder is now ready to capture photos with the new settings you selected. 7. If one of the White Balance option is selected the icon appears on the bottom of the LCD. 36

38 Settings Your camcorder has 7 setting options Sound (operation sound), Information, Time Setting, Format, TV, Language and Default Setting.. To enter the setup submenu options for the Setting mode press the OK/Menu button. 1. Press the Right/Left buttons to select the Setting mode. 2. Press the Up/Down button to select one of the Setting mode options Sound, 37

39 Information, Time Setting, Format, TV, Language and Default Setting. 3. Press the Right/Left button to select the setting that appears on the right hand side of the menu table. 4. Press the OK/Menu button again to confirm and save your choice. 5. Press the Exit button. 6. Your camcorder is now ready with the new settings you selected. Sound 38
40 1. Press the Down button to enter the Sound submenu. 2. Use the Right/Left button to select On or Off. 3. Press the OK/Menu button to confirm and save your choice. 4. Press the Exit button. 5. If you selected On the camcorder will emit a sound whenever a button is selected. Information 39
41 1. Press the Down button to enter the Information submenu. 2. Use the Right/Left button to select On or Off. 3. Press the OK/Menu button to confirm and save your choice. 4. Press the Exit button. 5. If you selected On the screen information will appear on the LCD. Selecting Off hides all the information on the LCD. Note: The Up button is a hot key that enables you to show or hide the information that appears on the LCD screen. Time Setting 40
42 1. Press the Down button to enter the Time Setting submenu. 2. An adjustable Time Setting menu appears. 3. Use the Up/Down button to select Year, Month, Day, Hour and Minute option. 4. Use the Right/Left button to adjust the time setting for each option. 5. Press the OK/Menu button to confirm and save your choice. 6. Press the Exit button. 41
43 Format Please use this feature with caution. Using this feature will format either the internal built-in memory or the SD card if one is inserted in the camcorder. Once formatted all the media in the camcorder`s memory will be erased. This process is irreversible. Important: Before formatting download all images to the computer. 42
44 1. Press the Down button to enter the Format submenu. 2. A Format message will appear on the LCD with a Yes or No. 3. Use the Right/Left button to select the option you wish Yes to continue with the format; No to cancel the format and revert back to the operational mode. 4. Press the OK/Menu button to confirm and save your choice. 5. If you selected to format the camcorder then once formatted the camcorder reverts to the operational mode. 43
45 TV Select the appropriate TV standard for the area in which you are located. The choices are NTSC or PAL. Using the wrong TV system will result in the image flickering on playback. 44
46 1. Press the Down button to enter the TV submenu. 2. Use the Right/Left button to select NTSC (60Hz) or PAL (50Hz). 3. Press the OK/Menu button to confirm and save your choice. 4. Press the Exit button. Language Select the language of your choice. There are 10 languages from which to choose. Once the language is selected all the camcorder`s menus and information will appear in that language. 45
47 1. Press the Down button to enter the Language submenu. 2. Use the Right/Left button to select the language of your choice English, German, French, Italian, Spanish, Portuguese, Chinese Traditional, Chinese Simplified, Japanese and Korean. 3. Press the OK/Menu button to confirm and save your choice. 4. Press the Exit button. Default Setting Use this option to revert to the original factory setting. 46

48 1. Press the Down button to enter the Default Setting submenu. 2. A Default Setting message will appear on the LCD with a Yes or No. 3. Use the Right/Left button to select the option you wish Yes to revert back to the original factory setting; No to cancel the request and revert back to the operational mode. 4. Press the OK/Menu button to confirm and save your choice. 47
49 48
50 Camcorder Playback Modes 49

51 The Playback mode is for viewing and managing the photos and videos on the built-in memory or the SD card inserted in the camcorder. 1. Press the Playback button beneath the dial for the Playback menu screen to appear. 2. Use the Right/Left button to select the desired Playback mode - Movie or Picture. 3. Press the OK/Menu button to enter that modes thumbnail preview folder. 4. If there are no images in the mode a NO FILE message will appear on the LCD. 50

52 5. Use the Right/Left button to select the desired video or photo you want to view. 6. Press the OK/Menu button to view the selected video or photo. Movie Playback 1. In the Movie Playback thumbnail view select the movie you wish to view using the Right/Left button. 2. Press the OK/Menu button for the first frame of the selected video to appear on the LCD. 51
53 3. The sequence number of the video, the duration of the video and the resolution at which the video was recorded appears above the video on the top of the LCD. 4. Press the Movie Shutter button to start playing the video. 5. Press the Up/Down button to adjust the volume. The volume icon will appear on the left side of the LCD. 6. Press the Right/Left button to fast forward or rewind the video while it is playing. 7. Press the Movie Shutter button to pause the video. The Pause/Play icon 52
54 will appear on the LCD. 8. Press the Movie Shutter again to continue playing. Movie Playback Mode Menu 1. In the Movie Playback mode press the OK/Menu button. 2. The Movie Playback options appear. 53
55 3. Press the Up/Down button to select one of the options Delete, Lock, Repeat One or Repeat All. Delete Movies 1. Press the Down button to enter the Delete submenu. 2. Select the Up button to delete all the videos; the Down button to delete the present video or the Exit button to Exit the mode. 54

56 Delete All 1. On selecting the Up button, a Delete All message will appear on the LCD. 55
57 2. Use the Right/Left button to select either Yes or No. 3. Press the OK/Menu button to confirm and save your choice. 4. If you selected Yes all the videos in the Movie mode will be deleted. Delete One 1. On selecting the Down button, a Delete One message will appear on the LCD. 2. Use the Right/Left button to select either Yes or No. 3. Press the OK/Menu button to confirm and save your choice. 4. If you selected Yes the selected video in the Movie mode will be deleted. Note: Only unlocked videos will be deleted. If an SD card is inserted you will be deleting the videos stored on the card. To delete Locked videos you will first need to unlock them. 56

58 Lock Movies In order to prevent movies being deleted by accident you can lock either all or single movies. 1. Press the Down button to enter the Lock submenu. 2. Select the Up button to lock all the videos; the Down button to lock the present video or the Exit button to Exit the mode. 57
59 3. A Lock icon will appear on the top of the LCD to show if the video is locked or not. 4. To unlock the video simply press the same button as before in Step 2 when you locked the video. 5. The Lock icon will disappear. 58

60 Repeat Movies Use this function to repeat playing either single movies or all the movies in the order they appear in the memory. Repeat One 1. Press the Down button to enter the Repeat One submenu. 2. Press the OK/Menu button for the selected movies to start playing. 3. The same movie will repeat itself over and over. 59

61 4. Press the Movie Shutter to Pause/Play 5. Press the Exit button to stop the repeat. Repeat All 1. Press the Down button to enter the Repeat All submenu. 2. Press the OK/Menu button for all the movies to start playing one after the other. 3. Press the Movie Shutter to Pause/Play 4. Press the Exit button to stop the repeat. 60

62 Picture Playback 1. Use the Right/Left button to select the photo to view in the Picture thumbnail preview window 2. Press the OK/Menu button to view the picture in full screen. 3. Use the Right/Left button to go to the next or previous picture. 4. To magnify the picture on the LCD, use the W/T zoom button 5. To navigate around the magnified photo use the Up/Down/Left/Right 61

63 buttons. 6. Press the OK/Menu button to exit the magnify mode. Picture Playback Mode Menu 1. In the Picture Playback mode select a photo. 2. Press the OK/Menu button the Picture Playback menu to appear. 62
64 Delete 1. Press the Down button to select the Delete submenu 2. Press the OK/Menu button to open the Delete Picture menu. 3. Press the Right/Left button to select the Picture you wish to delete. 63

65 4. Press the Up button to delete all the pictures; The Down button to delete the selected picture only; Exit button to exit without deleting. Delete All 1. If you selected Delete All a confirmation message screen will appear on the LCD. 64
66 2. Use the Right/Left button to choose Yes or No 3. If you choose Yes all the unlocked pictures in the camcorder`s memory or the SD card if inserted will be deleted. This process is irreversible. 4. Pressing No will cancel the delete process 5. Press the OK/Menu button to confirm and save your choice. Delete One 1. Press the Down button to delete the presently selected photo. 65
67 2. A Delete One confirmation message screen will appear. 3. Use the Right/Left button to select Yes or No. 4. If you choose Yes the present picture if unlocked will be deleted from the camcorder`s memory or the SD card if inserted. This process is irreversible. 5. Pressing No will cancel the delete process. 6. Press the OK/Menu button to confirm and save your choice. Lock Pictures This function can prevent a single or all pictures from being deleted accidently. 66

68 1. Use the Down button to select the Lock submenu. 2. Press the OK/Menu button to open the Lock menu screen 3. Use the Right/Left button to select the picture. 4. Use the Up button to lock/unlock all the pictures. 5. Use the Down button to lock/unlock the presently selected picture. 6. Press the Playback button to Exit. 67

69 Make Slideshow This function automatically plays all the pictures in consecutive order. 1. Press the Down button to select the Slideshow submenu. 2. Press the OK/Menu button to start the slideshow. 3. Press the OK/Menu button again to stop the slideshow and return to the Picture Playback mode menu. 68
70 Connecting to a High Definition TV to view images Note: The camcorder will not be able to capture movies or snap pictures when it is connected to an HDTV. The LCD will also not display any image when connected to an HDTV. 69
71 Connecting to a non High Definition TV to view images Note: No image will appear on the LCD screen when the camcorder is connected to the TV. 70

72 Install the Vivitar Experience Image Manager Software Warning: Do not plug your camcorder into the computer until the software installation is complete You must be connected to the internet to install and run the Vivitar Experience Image Manager software. 1. Insert the installation CD into your CD-ROM drive. The installation screen should automatically open. 71

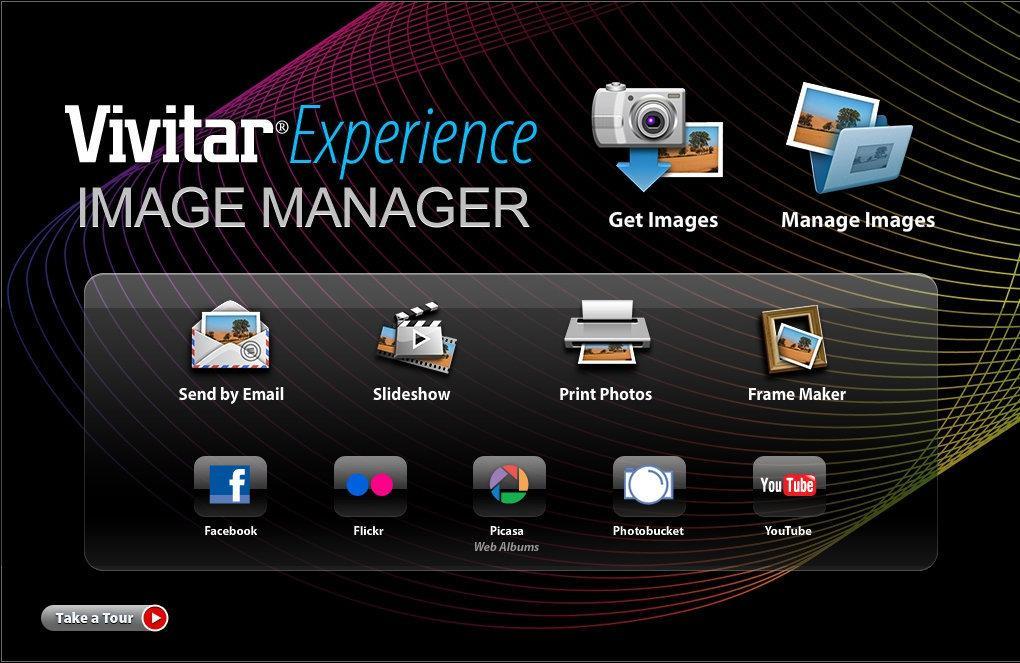
73 2. On PC: The Vivitar Experience Image Manager Installer window appears. If the window does not appear, open the application s CD/DVD drive and click on Setup.bat to launch the installer. 3. On Macintosh: Click the icon to install the Vivitar Experience Image Manager. 4. If you do not have internet access at the time of inserting the CD-ROM, connect to the internet and then click the Install Vivitar Experience Image Manager button to begin the installation Note: If you do not have internet access, you can still download media from the camcorder. Click the How to transfer photos and videos from my camcorder to my computer button for instructions. 72
74 5. If you have internet access, the Choose your language window opens, choose your language and click Next to open the next window. 6. Select your camcorder model from the list and click Next to open the next window. 7. Click Next to confirm your camcorder model selection and to install the application. 8. Please wait while the application is being installed on your computer. 9. Please review the license terms. On PC and Macintosh: Click the I accept the terms of this license agreement and then click Next to continue. 10. On PC only: Let the Vivitar Experience Image Manager installer create the folder to where the program will be installed, and then click Install. 11. Please wait while the application continues the installation process on your computer. 12. On PC: Click the Close button when the installation is complete. On Macintosh: Click the Quit button when the installation is complete. 13. Click the Launch Vivitar Experience Image Manager to open the application or close the window and run the Vivitar Experience Image Manager from your computer. 73
75 Connect your camcorder to the computer 1. Use the USB cable that came with your camcorder to connect your camcorder to your computer. 2. Turn the camcorder on. 3. The first time you connect the device to the computer you will have to wait a few seconds until the computer recognizes the device. Get photos and videos from your camcorder to your computer An SD card needs to be inserted. Do not disconnect the cable during transfer. Doing so will cancel the transfer of any files on their way to your computer. 1. Select the Get images button from the Main menu. 74
76 75
77 2. The Get media from device window opens. 3. You can select to download photos, videos or both. 4. Select your camcorder (removable disk) from the device window. If your camcorder is the only USB device connected then it will be selected automatically. 5. Select a location on the computer where to place the new photo and video files. 6. Add the new photo and video files to albums if desired. 7. Select to remove the media files from the selected device (removable disk) after the import. 8. Click the Get media button to transfer the photos and videos from your camcorder to your computer. A media download progress bar appears on the bottom left showing the number of media files downloading to your computer. A message appears when the download is complete. 9. The photo and video files that you selected are now downloaded to your computer to the selected folder and albums ready for your use. Get started! Using the Vivitar Experience Image Manager, you can upload and manage photos and videos to and from the most popular photo sharing and social networking sites - Facebook, Flickr, MySpace, Picasa, Photobucket and YouTube. Seamlessly transfer photos and videos from one social network to another. Organize your images by 76
78 creating offline and online albums. Edit images using automatic and manual tools. Use automatic Geotagging with built in Google Maps. For more details on how to use the Vivitar Experience Image Manager open the Help file or click the Take the Tour button on the application`s Home page. Transfer media from my camcorder to my computer manually (Using Windows) 1. Use the USB cable that came with your camcorder to connect your camcorder to your computer. 2. A window appears with a list of options, select Open folder to view files and click OK. 3. Open the DCIM folder and the folder inside to view the media files. 4. Select the media and copy the files from this folder into your computer. Optionally, select the files and choose Copy from the Edit menu. Then select a folder and choose Paste from the Edit menu. 5. We recommend that you copy the images into the Pictures/My Pictures folder and the videos into the Videos/My Videos folder. 6. Do not disconnect the cable during transfer. Doing so will cancel the transfer of any files on their way to your computer. 77
79 Transfer media from my camcorder to my computer manually (Using Macintosh) 1. Use the USB cable that came with your camcorder to connect your camcorder to your computer. 2. The camcorder s device icon appears on the desktop. 3. Click on the device icon and open the DCIM folder and the folder inside to view the media files. 4. Select the files and drag them into your computer. Optionally, select the files and choose Copy from the Finder s Edit menu. Then select a folder and choose Paste from the Edit menu. 5. We recommend that you copy the images into the Pictures folder and the videos into the Movies folder. 6. Do not disconnect the cable during transfer. Doing so will cancel the transfer of any files on their way to your computer. Maintenance of Your Digital Camcoder The digital camcorder is a delicate device. Please handle your camcorder with care to avoid damaging it. 78
80 Sakar Warranty Card This warranty covers for the original consumer purchaser only and is not transferable. Products that fail to function properly UNDER NORMAL USAGE, due to defects in material or workmanship. Your product will be repaired at no charge for parts or labor for a period of one year. What Is Not Covered By Warranty: Damages or malfunctions not resulting from defects in material or workmanship and damages or malfunctions from other than normal use, including but limited to, repair by unauthorized parties, tampering, modification or accident. What To Do When Service Is Required: When returning your defective product (postage pre-paid) for service, your package should include: 1. Copy of original bill of sale 2. A detailed written description of the problem. 3. Your return address and telephone number (Daytime) MAIL TO ADDRESS BELOW: Sakar International Attention: Service Department 195 Carter Drive Edison, NJ
81 TECHNICAL SUPPORT For technical support issues please visit our website at You can find manuals, software and FAQ s at the website. Can t find what you are looking for? us at support@vivitar.com and one of our technical support team members will answer your questions. For phone support in the US please call , in the UK call If you would like to call from anywhere else, please visit for your local toll free number. Technical Specifications Image Resolution Video Resolution LCD Display LCD Swivel 90 Internal Memory High 3200x2400 (8M Pixels) Std 2592x1944 (5M Pixels) Low 2048x1536 (3M Pixels) HD(1080p) 1440X1080(30fps) HD(720p) 1280X720(30fps) WVGA 848X480(60fps) VGA 640X480(30fps) QVGA 320X240(30fps) 3 TFT(4:3) Built-in 128MB Memory (partial memory is used for Firmware code) 80
82 External Memory SD card up to 32 GB Lens Lens f=6.8 ~ 34mm; F3.5 ~3.7 Optical Zoom Zoom HD (1080p):1X~10X (5X Optical + 2X Digital). Other video resolution:1x~20x (5X Optical + 4X Digital) Self-timer 10s File Format JPEG ( Still Image) /AVI ( Video) Focus Range Macro 1 ~ 80cm Focus Range Normal 10cm ~ infinite Microphone YES Speaker YES Recorder YES White Balance Auto/Manual (Daylight, Fluorescent, Tungsten) Exposure Auto/Manual Flash Auto/Red-Eye-Reduction/Off Image Play Single Image/Slideshow Interface USB 2.0 System Requirements Windows XP, VISTA, Mac OS X ( or higher) TV out NTSC/PAL Selectable, HDMI Battery Lithium-ion Rechargeable Working Temperature 0-40 C 81
83 Trouble Shooting 1. If the LCD image is not clear when shooting, how can the focus be adjusted? When taking photos and the object is within 80cm, use the Macro Mode which is a Submenu of the Effect Mode. 2. The flash is not working. The camcorder is in Macro Mode / The battery power is low. 3. The files on the memory card do not display smoothly when the LCD shows the! marking. The! means the SD card is low speed or has the wrong content inside. The way to solve this condition is to format the SD card with the camcorder instead of the PC (Please refer to the detail Format instruction section). 4. Why is Camera Flash not active when taking pictures? Make sure that the focus range is NOT set at Macro mode, as flash is disabled in this mode. Scroll through Picture mode and set Flash as Auto; note that Flash OFF is the default pre-set mode for normal picture taking. In Auto mode camera flash fires ONLY when necessary (in dark setting as example). 5. Why do some of my indoor pictures look blurry and dark? Camcorder extends pictures exposure time under low light/ indoor condition. Keep camcorder (and photographed subject) steady for several seconds when taking pictures. Shutter will sound when picture has been taken. 82
84 6. How do I charge the battery? The computer will not charge the battery when connected. You must ONLY use the supplied AC charger. Camcorder must be turned OFF; blinking light confirms charging, but light is constant when charging has been completed. 7. I deleted images using the Vivitar Experience Image Manager. The images were also deleted from the folder where they are found on my computer. How do I recover photos that I accidently deleted? All images deleted using the Vivitar Experience Image Manager are sent to your computer`s Recycle or Trash Bin and can be retrieved from there. RP08DVDV030C7RKSE00 A GES 83
DVR 510HD Digital Video Camcorder Owner s Manual
 DVR 510HD Digital Video Camcorder Owner s Manual 2009 Sakar International, Inc. All rights reserved. Windows and the Windows logo are registered trademarks of Microsoft Corporation. All other trademarks
DVR510-KESA Digital Video Camcorder User s Manual
 DVR510-KESA Digital Video Camcorder User s Manual 2009 Sakar International, Inc. All rights reserved. Windows and the Windows logo are registered trademarks of Microsoft Corporation. All other trademarks
ViviCam 8025 Digital Camera
 ViviCam 8025 Digital Camera User s Manual CD500DOGF 2009 Sakar International, Inc. All rights reserved. Windows and the Windows logo are registered trademarks of Microsoft Corporation. All other trademarks
ViviCam 7020 Digital Camera
 ViviCam 7020 Digital Camera User Manual 2010 Sakar International, Inc. All rights reserved. Windows and the Windows logo are registered trademarks of Microsoft Corporation. All other trademarks are the
ViviCam 8027 Digital Camera
 ViviCam 8027 Digital Camera User s Manual 2009 Sakar International, Inc. All rights reserved. Windows and the Windows logo are registered trademarks of Microsoft Corporation. All other trademarks are the
DVR 865HD Digital Video Camcorder User s Manual
 DVR 865HD Digital Video Camcorder User s Manual 2009 Sakar International, Inc. All rights reserved. Windows and the Windows logo are registered trademarks of Microsoft Corporation. All other trademarks
DVR 880HD Digital Video Camera
 DVR 880HD Digital Video Camera User Manual 2009-2011 Sakar International, Inc. All rights reserved. Windows and the Windows logo are registered trademarks of Microsoft Corporation. All other trademarks
itwist DVR 613HD Digital Camcorder
 itwist DVR 613HD Digital Camcorder with 2ViewScreen User Manual 2009-2011 Sakar International, Inc. All rights reserved. Windows and the Windows logo are registered trademarks of Microsoft Corporation.
DVR 514 Digital Video Recorder
 DVR 514 Digital Video Recorder User Manual 2010 Sakar International, Inc. All rights reserved. Windows and the Windows logo are registered trademarks of Microsoft Corporation. All other trademarks are
DVR 520 / 1.8 Digital Video Recorder
 DVR 520 / 1.8 Digital Video Recorder User Manual 2010 Sakar International, Inc. All rights reserved. Windows and the Windows logo are registered trademarks of Microsoft Corporation. All other trademarks
DVR 560HD Digital Video Recorder
 DVR 560HD Digital Video Recorder User Manual 2010 Sakar International, Inc. All rights reserved. Windows and the Windows logo are registered trademarks of Microsoft Corporation. All other trademarks are
DVR 949HD Digital Video Camera
 DVR 949HD Digital Video Camera User Manual 2009-2012 Sakar International, Inc. All rights reserved. Windows and the Windows logo are registered trademarks of Microsoft Corporation. All other trademarks
35061 Digital Camcorder
 35061 Digital Camcorder User Manual 2010 Sakar International, Inc. All rights reserved. Windows and the Windows logo are registered trademarks of Microsoft Corporation. All other trademarks are the property
ViviCam T026 Digital Camera
 ViviCam T026 Digital Camera User Manual 2010 Sakar International, Inc. All rights reserved. Windows and the Windows logo are registered trademarks of Microsoft Corporation. All other trademarks are the
DVR 548HD Digital Video Recorder
 DVR 548HD Digital Video Recorder User Manual 2009-2011 Sakar International, Inc. All rights reserved. Windows and the Windows logo are registered trademarks of Microsoft Corporation. All other trademarks
26690 Digital Camera with Water Resistant casing
 26690 Digital Camera with Water Resistant casing User s Manual 2009 Sakar International, Inc. All rights reserved. Windows and the Windows logo are registered trademarks of Microsoft Corporation. All other
615HD Digital Video Camera
 615HD Digital Video Camera User Manual 2009-2011 Sakar International, Inc. All rights reserved. Windows and the Windows logo are registered trademarks of Microsoft Corporation. All other trademarks are
Vivicam F526. All Weather Waterproof Digital Camera
 Vivicam F526 All Weather Waterproof Digital Camera with Twin view Preview Screens User Manual 2009-2012 Sakar International, Inc. All rights reserved. Windows and the Windows logo are registered trademarks
DVR 505 Digital Camcorder
 DVR 505 Digital Camcorder User Manual 2016 Sakar International, Inc. All rights reserved. Windows and the Windows logo are registered trademarks of Microsoft Corporation. All other trademarks are the property
DVR 1440HD Digital Camcorder
 DVR 1440HD Digital Camcorder User Manual 2009-2013 Sakar International, Inc. All rights reserved. Windows and the Windows logo are registered trademarks of Microsoft Corporation. All other trademarks are
DVR 960HD Digital Video Recorder
 DVR 960HD Digital Video Recorder User Manual 2010 Sakar International, Inc. All rights reserved. Windows and the Windows logo are registered trademarks of Microsoft Corporation. All other trademarks are
DVR 528 Digital Video Camera
 DVR 528 Digital Video Camera User Manual 2010 Sakar International, Inc. All rights reserved. Windows and the Windows logo are registered trademarks of Microsoft Corporation. All other trademarks are the
DVR 710HDv2 Digital Video Recorder
 DVR 710HDv2 Digital Video Recorder User Manual 2009-2011 Sakar International, Inc. All rights reserved. Windows and the Windows logo are registered trademarks of Microsoft Corporation. All other trademarks
DVR 426HDv3. Digital Camcorder
 DVR 426HDv3 Digital Camcorder User Manual 2009-2012 Sakar International, Inc. All rights reserved. Windows and the Windows logo are registered trademarks of Microsoft Corporation. All other trademarks
DVR 783HD Action Camcorder
 DVR 783HD Action Camcorder User Manual 2009-2014 Sakar International, Inc. All rights reserved. Windows and the Windows logo are registered trademarks of Microsoft Corporation. All other trademarks are
ViviCam X014 Digital Camera
 ViviCam X014 Digital Camera User Manual 2010 Sakar International, Inc. All rights reserved. Windows and the Windows logo are registered trademarks of Microsoft Corporation. All other trademarks are the
DVR 508NHD Digital Camcorder
 DVR 508NHD Digital Camcorder User Manual 2009-2012 Sakar International, Inc. All rights reserved. Windows and the Windows logo are registered trademarks of Microsoft Corporation. All other trademarks are
DVR 808HD Digital Camcorder
 DVR 808HD Digital Camcorder User Manual 2009-2016 Sakar International, Inc. All rights reserved. Windows and the Windows logo are registered trademarks of Microsoft Corporation. All other trademarks are
High Definition Digital Video Camera
 High Definition Digital Video Camera User s Manual Contents Section 1 Getting to Know Your Camera... 3 Section 2 Getting Started... 6 Section 3 Enjoying the Record Mode... 8 Section 4 Enjoying the Playback
88067 Talking Digital Camera User s Manual
 88067 Talking Digital Camera User s Manual 2010 Sakar International, Inc. All rights reserved. Windows and the Windows logo are registered trademarks of Microsoft Corporation. All other trademarks are
78056N HD Action Camcorder
 78056N HD Action Camcorder User Manual 2009-2015 Sakar International, Inc. All rights reserved. Windows and the Windows logo are registered trademarks of Microsoft Corporation. All other trademarks are
ViviCam V8426v2_For 10MP Digital Waterproof. All Weather Digital Camera
 ViviCam V8426v2_For 10MP Digital Waterproof All Weather Digital Camera User Manual 2009-2012 Sakar International, Inc. All rights reserved. Windows and the Windows logo are registered trademarks of Microsoft
ViviCam T027 Digital Camera
 ViviCam T027 Digital Camera User Manual 2010 Sakar International, Inc. All rights reserved. Windows and the Windows logo are registered trademarks of Microsoft Corporation. All other trademarks are the
ViviCam S124 Digital Camera
 ViviCam S124 Digital Camera User Manual 2009-2013 Sakar International, Inc. All rights reserved. Windows and the Windows logo are registered trademarks of Microsoft Corporation. All other trademarks are
ViviCam F529 Digital Camera
 ViviCam F529 Digital Camera User Manual 2010 Sakar International, Inc. All rights reserved. Windows and the Windows logo are registered trademarks of Microsoft Corporation. All other trademarks are the
ViviCam S131 Digital Camera
 ViviCam S131 Digital Camera User Manual 2009-2012 Sakar International, Inc. All rights reserved. Windows and the Windows logo are registered trademarks of Microsoft Corporation. All other trademarks are
USER MANUAL KGNDVCVEA
 USER MANUAL KGNDVCVEA Read This Before Using the Camera SAFETY INSTRUCTIONS Do not drop, puncture or disassemble the camera. Use the camera with care. Rough handling may damage the internal components.
DVR 548NHD Digital Camcorder
 DVR 548NHD Digital Camcorder User Manual 2009-2012 Sakar International, Inc. All rights reserved. Windows and the Windows logo are registered trademarks of Microsoft Corporation. All other trademarks are
DVR 985HD Digital Video Camera
 DVR 985HD Digital Video Camera User Manual 2009-2012 Sakar International, Inc. All rights reserved. Windows and the Windows logo are registered trademarks of Microsoft Corporation. All other trademarks
DVR 584HD Digital Camcorder
 DVR 584HD Digital Camcorder User Manual 2009-2012 Sakar International, Inc. All rights reserved. Windows and the Windows logo are registered trademarks of Microsoft Corporation. All other trademarks are
2014 All Rights Reserved. Windows and the Windows logo are registered trademarks of Microsoft Corporation. All other trademarks are the property of
 2014 All Rights Reserved. Windows and the Windows logo are registered trademarks of Microsoft Corporation. All other trademarks are the property of their respective companies. 1 2 Thank you for purchasing
ViviCam S126 Digital Camera
 ViviCam S126 Digital Camera User Manual 2009-2017 Sakar International, Inc. All rights reserved. Windows and the Windows logo are registered trademarks of Microsoft Corporation. All other trademarks are
Please read this manual carefully before use and keep it for future reference. Please format your SD card first in our camera when you start to use
 1 Please read this manual carefully before use and keep it for future reference. Please format your SD card first in our camera when you start to use our camera, or format it in computer. Table of Content
ViviCam S830 Digital Camera
 ViviCam S830 Digital Camera User Manual 2009-2012 Sakar International, Inc. All rights reserved. Windows and the Windows logo are registered trademarks of Microsoft Corporation. All other trademarks are
DVR 1080HD Digital Camcorder
 DVR 1080HD Digital Camcorder User Manual 2009-2012 Sakar International, Inc. All rights reserved. Windows and the Windows logo are registered trademarks of Microsoft Corporation. All other trademarks are
ViviCam S327 Digital Camera
 ViviCam S327 Digital Camera User Manual 2009-2012 Sakar International, Inc. All rights reserved. Windows and the Windows logo are registered trademarks of Microsoft Corporation. All other trademarks are
INSTRUCTION MANUAL 1
 INSTRUCTION MANUAL 1 Precautions...4 Disclaimer 5 PREPARING FOR USE...6 Parts of the Camera.. 7-8 Inserting the Battery and SD Card..9-10 BASIC OPERATION.. 11 Powering the Camcorder On and Off...11 Setting
98346 Digital Camera. User Manual
 98346 Digital Camera User Manual 2009-2014 Sakar International, Inc. All rights reserved. Windows and the Windows logo are registered trademarks of Microsoft Corporation. All other trademarks are the property
DV 5470 User Manual Package Contents:
 DV 5470 User Manual Package Contents: Manual Camera Pouch Installation CD Earbuds AV Cable CONTENTS 1. NOTICE...2 2. SETUP...3 2.1 BATTERY INSTALLATION...3 2.2 MEMORY CARD...4 2.3 CONFIGURATION & INSTALLATION...4
AquaShot Underwater Digital Camera with Water Resistant Casing. User Manual
 AquaShot 26693 Underwater Digital Camera with Water Resistant Casing User Manual 2009-2013 Sakar International, Inc. All rights reserved. Windows and the Windows logo are registered trademarks of Microsoft
High Definition Digital Video Camera
 High Definition Digital Video Camera User Manual Contents Section 1 Getting to Know Your Camera... 2 Section 2 Getting Started... 5 Section 3 Record Mode... 8 Section 4 Playback Mode... 34 Section 5 Listening
ViviCam X014N Digital Camera
 ViviCam X014N Digital Camera User Manual 2009-2011 Sakar International, Inc. All rights reserved. Windows and the Windows logo are registered trademarks of Microsoft Corporation. All other trademarks are
28056 Digital Camera
 28056 Digital Camera User Manual HASBRO and its logo and NERF are trademarks of Hasbro and are used with permission. 2012 Hasbro. All rights reserved. Windows and the Windows logo are registered trademarks
ViviCam X029-10MP Digital Camera
 ViviCam X029-10MP Digital Camera User Manual 2009-2012 Sakar International, Inc. All rights reserved. Windows and the Windows logo are registered trademarks of Microsoft Corporation. All other trademarks
2014 All Rights Reserved. Windows and the Windows logo are registered trademarks of Microsoft Corporation. All other trademarks are the property of
 2014 All Rights Reserved. Windows and the Windows logo are registered trademarks of Microsoft Corporation. All other trademarks are the property of their respective companies. 1 Thank you for purchasing
Digital Camera / GVA12DC. Instruction Manual
 Digital Camera / GVA12DC Instruction Manual Introduction Thank you for purchasing the 12 Mega-Pixel Digital Camera. Everything you need to take quality digital photos and videos is included with your camera.
DVR 850HD Underwater Digital Video Camcorder
 DVR 850HD Underwater Digital Video Camcorder User Manual 2010 Sakar International, Inc. All rights reserved. Windows and the Windows logo are registered trademarks of Microsoft Corporation. All other trademarks
1. PARTS OF THE CAMCORDER PREPARING FOR USING... 5
 INSTRUCTION MANUAL 1. PARTS OF THE CAMCORDER... 4 2. PREPARING FOR USING... 5 INSTALLING THE BATTERY... 5 CHARGING THE BATTERY... 5 FORMAT THE MEMORY CARD... 6 SETTING THE LANGUAGE... 7 SETTING THE DATE
Table of contents Introduction Getting Started Taking still images or videos
 User Manual Table of contents Introduction Features............................................1 Package contents.....................................2 Camera overview.....................................2
DVR 995WHD Underwater Digital Camcorder
 DVR 995WHD Underwater Digital Camcorder User Manual 2009-2012 Sakar International, Inc. All rights reserved. Windows and the Windows logo are registered trademarks of Microsoft Corporation. All other trademarks
Contents. Section 1 Getting to Know Your Digital Camera Overview...1 Front View...1 Rear View...2 Side View...2 Bottom View...
 1 Contents Section 1 Getting to Know Your Digital Camera... 1 Overview...1 Front View...1 Rear View...2 Side View...2 Bottom View...3 Section 2 Getting Up and Running... 4 Loading the Batteries...4 Inserting
2016 All Rights Reserved. Windows and the Windows logo are registered trademarks of Microsoft Corporation. All other trademarks are the property of
 2016 All Rights Reserved. Windows and the Windows logo are registered trademarks of Microsoft Corporation. All other trademarks are the property of their respective companies. 1 2 Thank you for purchasing
DVR 788HD Digital Camcorder
 DVR 788HD Digital Camcorder User Manual 2009-2016 Sakar International, Inc. All rights reserved. Windows and the Windows logo are registered trademarks of Microsoft Corporation. All other trademarks are
Shenzhen SUNSKY Technology Limited
 Introduction Thank you for purchasing the 15 Mega-Pixel Digital Camera w ith Auto-Focus zoom lens. Everything you need to take quality digital photos and videos is included with your camera. Your digital
CAMERA-DC2 Digital Camera Instruction Manual
 CAMERA-DC2 Digital Camera Instruction Manual 80 Little Falls Road, Fairfield, NJ 07004 800.631.0868 www.hamiltonbuhl.com Read manual carefully before using the product and keep for future reference. 80
User s Manual. Camileo H10 DE DK ES FI FR IT NL NO PT SE
 User s Manual Camileo H10 DE DK ES FI FR IT NL NO PT SE Introduction Welcome and thank you for choosing a TOSHIBA product. For your convenience, your TOSHIBA product is furnished with two guides: a) a
2017 All Rights Reserved. Windows and the Windows logo are registered trademarks of Microsoft Corporation. All other trademarks are the property of
 2017 All Rights Reserved. Windows and the Windows logo are registered trademarks of Microsoft Corporation. All other trademarks are the property of their respective companies. 1 2 Thank you for purchasing
DVR 850HDv3 Underwater Digital Camcorder. User Manual
 DVR 850HDv3 Underwater Digital Camcorder User Manual 2009-2013 Sakar International, Inc. All rights reserved. Windows and the Windows logo are registered trademarks of Microsoft Corporation. All other
I. Getting to know your camera 1. Configuration and installation
 I. Getting to know your camera 1. Configuration and installation 1 Display button 2 LED On / Off button 3 Mode button (DV / DSC) 4 Shutter button 5 Up button 6 OK button 7 AV / USB jack 8 Right button
High Definition Digital Video Camera
 High Definition Digital Video Camera User s Manual Contents Section 1 Getting to Know Your Camera... 2 Section 2 Getting Started... 6 Section 3 Record Mode... 9 Section 4 Playback Mode... 38 Section 5
Car DVR User Manual. 1, Key features. Preface. Notes
 Car DVR User Manual Preface Thank you for purchasing this DVR, this device has a unique ultra-portable design; it can be used in various fields, to bring you convenient, safe, colorful daily life. Please
PRECAUTIONS... 1 DISCLAIMER... 1 FACTORY DEFAULT SETTINGS... 1 PREPARATION...
 CONTENTS PRECAUTIONS... 1 DISCLAIMER... 1 FACTORY DEFAULT SETTINGS... 1 PREPARATION... 2 INTRODUCTION... 2 INSERTING BATTERY... 4 INSERTING MEMORY CARD... 4 BASIC OPERATION... 5 TURN ON / OFF THE DV...
1, Key features. Preface. Notes
 Car DVR User Manual Preface Thank you for purchasing this DVR, this device has a unique ultra-portable design; it can be used in various fields, to bring you convenient, safe, colorful daily life. Please
Digital Video Camera User Manual
 Digital Video Camera User Manual Content Section 1 Getting to Know Your Camera... 2 Section 2 Getting Up and Running... 5 Section 3 Record Mode... 7 Section 4 Playback Mode... 33 Section 5 Listening to
98379 Digital Camera Owner s Manual
 98379 Digital Camera Owner s Manual 2007 Sakar International, Inc. All rights reserved. Windows and the Windows logo are registered trademarks of Microsoft Corporation. All other trademarks are the property
Digital Camera. VF332-GRP-TA (Rev: A00) Please read this manual carefully before using this unit and keep it for future reference
 Please read this manual carefully before using this unit and keep it for future reference") Digital Camera VF332-GRP-TA (Rev: A00) Please read this manual carefully before using this unit and keep it for future reference Table of Contents Introduction...3 Key Features...3 What your camera package
Digital Camera VF332-GRP-TA (Rev: A00) Please read this manual carefully before using this unit and keep it for future reference Table of Contents Introduction...3 Key Features...3 What your camera package
High Definition Digital Video Camera
 High Definition Digital Video Camera User Manual Contents Section 1 Getting to Know Your Camera... 2 Section 2 Getting Started... 5 Section 3 Record Mode... 8 Section 4 Playback Mode... 34 Section 5 Listening
Knox KN-DC20MP Instruction Manual
 Knox KN-DC20MP Instruction Manual Camera Interface, Inputs, and Outputs 1) Shutter - Press this button to take photographs or to start /stop recording a video clip, or to confirm changes in menu mode 2)
VIV-CV-1225V v2 Digital Camera Binoculars. Instruction Manual
 VIV-CV-1225V v2 Digital Camera Binoculars Instruction Manual 2009-2019 Sakar International, Inc. All rights reserved Windows and the Windows logo are registered trademarks of Microsoft Corporation. All
DVR 988HD. Wi-Fi Action Camera
 DVR 988HD Wi-Fi Action Camera Dual Lens 360 View User Manual 2016 Sakar International, Inc. All rights reserved. Windows and the Windows logo are registered trademarks of Microsoft Corporation. All other
DVR 789HD Full HD Action Camcorder
 DVR 789HD Full HD Action Camcorder User Manual 2009-2018 Sakar International, Inc. All rights reserved. Windows and the Windows logo are registered trademarks of Microsoft Corporation. All other trademarks
CONTENTS I Getting to know your camera..1 II Software & Download 15 III Maintenance. 23 IV Specification and system requirement...
 CONTENTS I Getting to know your camera..1 1. Configuration & installation...1 2. Monitor screen display...2 3. Preparation before capture..2 4. Shooting 3 5. Video& Audio recording. 7 6. Audio input /output..8
VIV-CV-1224V Digital Camera Binoculars Instruction Manual
 VIV-CV-1224V Digital Camera Binoculars Instruction Manual 2009-2018 Sakar International, Inc. All rights reserved. Windows and the Windows logo are registered trademarks of Microsoft Corporation. All other
Polaris G50 Dash cam incident recorder.
 Polaris G50 Dash cam incident recorder. Operation manual Quick Guide Thank you for purchasing the Polaris G50 DVR. The Polaris G50 DVR is a great product for capturing adventures and incidents both on
USER S MANUAL. Thank you for purchasing portable DVR from our company. In order to help you operate it correctly. Please read this user s
 USER S MANUAL Thank you for purchasing portable DVR from our company. In order to help you operate it correctly. Please read this user s manual carefully before using. Appearance of DVR 1 Power Button:
Luxmedia. User Manual
 Luxmedia User Manual PRAKTICA International Ltd, 5 Century Point, Halifax Road, High Wycombe, HP12 3SL, United Kingdom www.praktica.com care@praktica.com +44(0)344 822 9940 Copyright This manual contains
INSTRUCTION MANUAL DVR1 FLIP DOWN HD DVR SPECIFICATIONS
 DVR1 FLIP DOWN HD DVR SPECIFICATIONS GENERAL - Display: 2 LCD TFT - Rotates 180 - Image Sensor: 5MP, 1/3 Colour CMOS - Resolutions: HD 720p with 1080p Upscaling - Viewing Angle: 120 - Camera Adjustment:
Welcome 1. Camera Precaution
 0 Table of Contents 1. Camera Precautions 4 2. Preparation... 7 Standard Accessories... 7 Parts Names... 8 Charging the Battery...... 9 Loading the SD card.. 11 Attaching the Strap.... 12 3. Quick Start.
Handbuch CL 83_UK.indd :18
 1. Parts of the digital camera...30 2. Preparing for using...31 Installing the Battery... Charge the battery... Inserting the Memory Card... Format the memory card... Setting the Language... Setting the
User Manual Package Contents:
 User Manual Package Contents: Bean - Carabiner Camera Li-Ion Rechargeable Battery USB Cable/Video Cable AC Adapter User Guide ArcSoft PhotoImpression and Driver Installation CD CONTENTS I Getting to Know
G-SHOT3000CC. (User Guide)
") 82-170-00041 G-SHOT3000CC Digital Video (User Guide) Warning: In the event of return of this product, it will only be accepted by the retailer with the supplied 32Mb memory card. Goodmans Helpline Phone
82-170-00041 G-SHOT3000CC Digital Video (User Guide) Warning: In the event of return of this product, it will only be accepted by the retailer with the supplied 32Mb memory card. Goodmans Helpline Phone
Introduction Congratulations on your purchase of this digital video camera. Before using the camera, please read this user manual carefully.
 EVC1700 User Guide 2 Introduction Congratulations on your purchase of this digital video camera. Before using the camera, please read this user manual carefully. The main purpose is to shoot videos. It
High Definition Digital Video Camera
 High Definition Digital Video Camera User Manual Contents Section 1 Getting to Know Your Camera... 2 Section 2 Getting Started... 5 Section 3 Record Mode... 8 Section 4 Playback Mode... 28 Section 5 Listening
DXG-5F0V HD User s Manual DXG USA
 DXG-5F0V HD User s Manual DXG USA Table of Contents About this manual...iv Copyright...iv Precautions...v Before You Start...vii Copyright information...vii 1 Introduction... 1 1.1 System requirements...1
Hamilton Electronics CAMERA-DC2. User s Manual
 Hamilton Electronics CAMERA-DC2 User s Manual 1 1. PARTS OF THE DIGITAL CAMERA...5 2. PREPARING FOR USING...6 INSTALLING THE BATTERY... 6 CHARGE THE BATTERY... 7 INSERTING THE MEMORY CARD... 9 FORMAT THE
Xtreme Imaging. Table of Contents:
 Xtreme Imaging Table of Contents: Preface 1 Main features...1 Computer operating system requirements.....1 Prestart Guide...3 Basic installation.3 Video mode...6 Settings 13 Photo mode......17 Settings
FHD Digital Video Camera. 24 Max /2.7 TFT. ActionPro FHD Digital Video Camera. Instruction Manual. Model #: HDV17BK. Never-Ending Learning Innovation
 ActionPro FHD Digital Video Camera MP 24 Max /2.7 TFT ActionPro FHD Digital Video Camera Instruction Manual Model #: HDV17BK Never-Ending Learning Innovation 2 1. About...4 1a. System Requirements...4
DXG-5C0V HD and DXG-5C8V HD. User s Manual DXG USA
 DXG-5C0V HD and DXG-5C8V HD User s Manual DXG USA Table of Contents Preface...v About this manual...v Copyright...v Precautions...vi Before You Start...viii 1 Introduction... 1 1.1 System requirements...1
User s Manual. User s Manual. Camileo HD
 User s Manual User s Manual Camileo HD Introduction Welcome and thank you for choosing a TOSHIBA product. For your convenience, your TOSHIBA product is furnished with two guides: a) a Quick Start Guide,
User's Manual. Car DVR Prestigio Roadrunner 520 with display
 (044)361-05-06 (067)469-02-12 (099)048-99-03 (093)672-77-76 ICQ:495-089-192 ICQ:613-211-859 User's Manual Car DVR Roadrunner 520 with display In the online store you also can buy car DVR Roadrunner 520.