Advanced Test Equipment Rentals ATEC (2832) User's Guide
|
|
|
- Sheila Stanley
- 6 years ago
- Views:
Transcription


1 Established 1981 Advanced Test Equipment Rentals ATEC (2832) R R User's Guide
2 Lynx / Cobra Users Guide Foreward Use this manual only after assembling the L Y N X or ALPHA Stereo Zoom Microscope and familiarizing yourself with its various components. This manual is designed to be used in conjunction with the L Y N X or ALPHA Instruction Manual. This Users Guide will help you become familiar with the operation and use of the microscope as well as provide an explanation of the options available to increase the versatility of the system. Also included in this manual is a comprehensive maintenance and troubleshooting guide.
3 Page intentionally left blank
4 Lynx & Alpha Users Guide Table of Contents Contents Page The Basic Systems Lynx Bench Stand Packages 1-1 Lynx Bench Stand System Diagram 1-2 Lynx Boom Mount Packages 1-3 Lynx Boom Mount System Diagram 1-4 Alpha Bench Stand Packages 1-5 Alpha Bench Stand System Diagram 1-6 Alpha Boom Mount Packages 1-7 Alpha Boom Mount System Diagram 1-8 Magnification Specifications 1-9 Getting Started Setting the Dynascope head angle 2-1 Applying power 2-3 Using the Lynx 2-4 Using the Alpha 2-5 Lighting Options 6-point ring light point ring light watt illuminator watt illuminator 3-3 Spot Lamps 3-4 Co-Axial Illuminator 3-5 Substage illumination 3-5 Dual Flex and Stay Fiber Optics 3-6 Continuous Ring Light 3-6 Polarizing kit for Continuous Ring Light 3-7 Polarizing kit for Substage Illumination 3-7 UV Filter 3-8 i
5 Lynx & Alpha Users Guide Table of Contents Contents Page Optical Accessories Objectives 4-1 Switching Multipliers Degree Wedge 4-2 Motorized Oblique Viewers 4-3 Manual Oblique Viewers 4-3 Oblique Viewer Operating Techniques 4-4 Oblique Viewer Optical Specifications 4-4 Measurement Options Reticles 5-1 Reticle calibration x 2 Measuring Stage 5-3 Stands and Stages Extended Horizontal Bar x 24 Table base 6-1 Weighted Base 6-1 Power assist boom stand 6-1 Flex Arm Stand x 4 Floating Stage x 10 VS8 Scanning Table x 18 VS8 Scanning Table 6-2 Photo Attachments Camera Arm 7-1 CCTV Camera 7-2 Nikon Coolpix Digital Camera 7-4 ii
6 Lynx & Alpha Users Guide Table of Contents Contents Page Maintenance Service Watt and 250 Watt Illuminator Bulb replacement 8-1 Ceramic lamp socket replacement 8-1 Fuse replacement 8-2 Fan cooling vents 8-2 Cleaning the Dynascope 8-2 Spare parts list 8-3 Oblique and Direct Viewers Eliminate target orbiting 8-4 Eliminate focus orbiting 8-5 Centering the focus 8-6 Centering the target 8-7 Troubleshooting Guide Dynascope disk not spinning 9-1 Bulb Life 9-2 Warranty 10-1 Information Contact Us 11-1 iii
7 Lynx & Alpha Users Guide Table of Contents Page intentionally left blank iv
8 Lynx & Alpha Users Guide The Basic Systems The Lynx and Alpha stereo zoom Dynascopes are versatile optical inspection systems. The patented Dynascope technology provides a bright, clear image in a fatigue free viewing position. Long working distance offers ample room for rework and part manipulation. These versatile systems are completely modular to allow a wide range of accessories that can be added at any time. The systems are available in either a boom mount or bench stand configuration. L Y N X Bench Stand Packages The Bench Stand systems provide a bench stand with zoom and focus and a subject tray. These systems have the ability to be configured to provide substage illumination for backlighting. L/S/1 150 Watt Bench Stand System Includes: L-001 Lynx stereo head C-003 Bench stereo 7x - 40x zoom multiplier, focus assembly and glare shield C-010 Bench stand with 40 watt illumination transformer C-011/N Subject tray for C-010 bench stand C-023 or C-024 Six point ring light illuminator attachment C-030/N 150 watt illuminator C-031/N 150 watt transformer with dimming control L/S/2 250 Watt Bench Stand System Includes: L-001 Lynx stereo head C-003 Bench stereo 7x 40x zoom multiplier, focus assembly and glare shield C-010 Bench stand with 40 watt illumination transformer C-011/N Subject tray for C-010 bench stand C-023 or C -024 Six point ring light illuminator attachment C watt illuminator C watt transformer with dimming control An objective needs to be added to the package to complete each system. A range of objectives are available to configure the Dynascope to your specific needs for magnification, working distance and field of view. Please refer to page 1-10 for lens data. 1-1
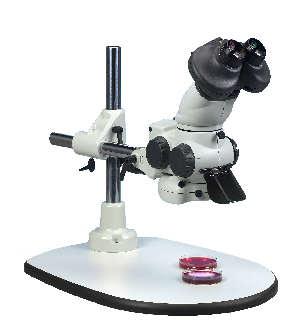
9 Lynx & Alpha Users Guide The Basic Systems Lynx Dynascope Head Viewing screen Power On LED Coarse focus clamp Zoom assembly Glare shield Focus adjustment knob Zoom adjustment knob 6-point ring light Spot lamp intensity control Subject tray Sub-stage illuminator (optional) Base / Column assembly L Y N X BENCH STAND SYSTEM Sub-stage intensity control 1-2
10 Lynx & Alpha Users Guide The Basic Systems L Y N X Boom Mount Packages In boom mount configurations, the zoom and focus are mounted on a boom arm that is mounted to a work surface or a separate mounting platform. These type of systems provide the flexibility required to inspect larger subjects such as PC Boards. L/S/3 150 Watt Boom Mount System Includes: L-001 Lynx stereo head C-146 Boom stereo 7x - 40x zoom multiplier, focus assembly and glare shield C-023 or C-024 Six point ring light illuminator attachment C-030/N 150 watt illuminator C-031/N 150 watt transformer with dimming control C-145 Boom mount featuring 17" adjustable reach C-148 Illuminator mounting plate for boom mount (Quantity 2) L/S/4 250 Watt Boom Mount System Includes: L-001 Lynx stereo head C-146 Boom stereo 7x - 40x zoom multiplier, focus assembly and glare shield C-023 or C-024 Six point ring light illuminator attachment C watt illuminator C watt transformer with dimming control C-145 Boom mount featuring 17" adjustable reach C-148 Illuminator mounting plate for boom mount (Quantity 2) An objective needs to be added to the package to complete each system. A range of objectives is available to configure the Dynascope to your specific needs for magnification, working distance and field of view. Please refer to page 1-9 for lens data. 1-3
11 Lynx & Alpha Users Guide The Basic Systems Viewing screen Lynx Dynascope head Head angle-adjusting screw 90 Degree knuckle casting Stop collar Power ON LED Zoom assembly Glare shield Boom stand assembly Base casting 6-point ring light Zoom adjustment knob Focus adjustment knob L Y N X BOOM MOUNT SYSTEM 1-4
12 The Alpha system is available in two basic versions.. Lynx & Alpha Users Guide The Basic Systems ALPHA Bench Stand Packages The Bench Stand systems provide a bench stand with zoom and focus and a subject tray. These bench stand systems have the ability to be configured to provide substage illumination or backlighting IS-ALPHA1 ALPHA Bench Stand/ Dual Spot Illuminator System Includes: IS-081 Alpha Pod Complete C-003 Bench stereo zoom 7x - 40x, focus assembly C-010X Bench stand with universal illumination transformer IS Watt Dichroic illuminator IS-ALPHA3 ALPHA Bench Stand 150W Fiber Optic Ring Light System Includes: IS-081 Alpha Pod Complete C-003 Bench stereo zoom 7x - 40x, focus assembly C-010X Bench stand with universal illumination transformer HLS W Halogen Light Source, AC Non regulated CRL-036 Continuous ring light with 36 fiber bundle An objective needs to be added to the package to complete the system. A range of objectives is available to configure the Dynascope to your specific needs for magnification, working distance and field of view. Please refer to page 1-9 for lens data. 1-5
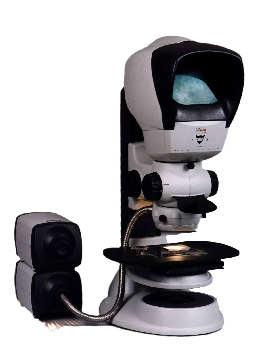
13 Lynx & Alpha Users Guide The Basic Systems Diopter adjustment controls Power ON LEDs (2) ISIS Binocular Head Alpha Pod Coarse focus clamp Zoom assembly Glare shield Focus adjustment knob Spot lamp unit (shown) or ring light Sub-stage illuminator (Optional) Zoom adjustment knob Spot lamp intensity control Base / Column assembly Sub-stage intensity control 1-6 BENCH MOUNT SYSTEM
14 Lynx & Alpha Users Guide The Basic Systems ALPHA Boom Mount Packages In the Boom Mount configuration, the zoom and focus are mounted on a boom arm, which is mounted to a work surface or a separate mounting platform. These types of systems provide the flexibility required to inspect larger subjects such as PC Boards. IS-ALPHA2 ALPHA Boom Mount/ Dual Spot Illuminator System Includes: IS-081 Alpha Pod Complete C-146 Boom stereo 7x - 40x zoom multiplier, focus assembly C-145 Boom mount featuring 17" adjustable reach C-034X Transformer for spot illuminator IS Watt Dicroic spot illuminator C-148 Mounting plate for boom mount transformer IS-ALPHA4 ALPHA Boom Mount/ 150W Fiber Optic Ring Light System Includes: IS-081 Alpha Pod Complete C-146 Boom stereo 7x - 40x zoom multiplier, focus assembly C-145 Boom mount featuring 17" adjustable reach IS-012 Power supply HLS W Halogen Light Source, AC Non regulated CRL-036 Continuous ring light with 36 fiber bundle An objective needs to be added to the package to complete the system. A range of objectives is available to configure the Dynascope to your specific needs for magnification, working distance and field of view. Please refer to page 1-10 for lens data. 1-7
15 Lynx & Alpha Users Guide The Basic Systems Zoom adjustment knob ISIS Binocular Head Power On LED s (2) Focus adjustment knob Diopter adjustments 90 Degree knuckle casting Zoom assembly Glare shield Stop collar Head angle adjusting screw Dual spot lamp (shown) or 6-point ring light Base casting Optional platform base BOOM MOUNT SYSTEM 1-8
16 Lynx & Alpha Users Guide The Basic Systems Magnification Specifications The L Y N X / ALPHA zoom microscope can achieve a variety of magnification levels ranging from a minimum of 2.1X to a maximum of 160X. Change magnification by using options discussed in this manual, such as objectives and multipliers. As magnification changes, field of view and depth of field also change. General Definitions: Working distance: The distance between the objective lens and the subject when instrument is properly focused. As magnification increases, the working distance decreases. Field of View: The area of subject that is visible in the viewing screen at any one time. As magnification increases, the field of view (FOV) decreases. Depth of Field: Also referred to as focal depth. This is the maximum subject height variation that will remain in focus. As magnification increases, depth of field decreases. The charts on the following page describe the optical characteristics that can be achieved with each system. 1-9
17 Lynx & Alpha Users Guide The Basic Systems LYNX Optical Data Part No. Mag. Range W/ 1.5x Multiplier W/ 2.0x Multiplier Working Distance Field of View Max. Zoom Field of View Min. Zoom C-050 X0.3 X2.1 - X12 X X18 X4.2 - X24 312mm 12mm 77mm C-055 X0.5 X3.5 - X20 X X30 X7.0 - X40 175mm 7mm 46mm C-051 X0.7 X4.9 - X28 X X42 X9.8 - X56 127mm 5mm 33mm C-052 X1.0 X7.0 - X40 X X60 X14 - X80 85mm 3.5mm 24mm C-053 X1.5 X X60 X X90 X21 - X120 45mm 2.5mm 16mm C-054 X2.0 X14 - X80 X21 - X120 X28 - X160 25mm 1.75mm 12mm ALPHA Optical Data Part No. Mag. Range W/ 1.5x Multiplier W/ 2.0x Multiplier Working Distance Field of View Max. Zoom Field of View Min. Zoom C-050 X0.3 X2.1 - X12 X X18 X4.2 - X24 312mm 16.5mm 88mm C-055 X0.5 X3.5 - X20 X X30 X7.0 - X40 175mm 10mm 53mm C-051 X0.7 X4.9 - X28 X X42 X9.8 - X56 127mm 7mm 38mm C-052 X1.0 X7.0 - X40 X X60 X14 - X80 85mm 5mm 26.5mm C-053 X1.5 X X60 X X90 X21 - X120 45mm 3mm 18mm C-054 X2.0 X14 - X80 X21 - X120 X28 - X160 25mm 2.2mm 13mm 1-10
18 Getting Started Setting the Dynascope Head Angle The Boom Mount systems incorporate a mechanism to adjust the head angle. The mechanism is a threaded rod and knurled adjusting nut located behind the zoom unit and below the horizontal support arm. For general inspection and rework tasks, the angle of the head does not have an affect on system performance. Simply adjust the knurled adjusting nut until the head is roughly horizontal or in a comfortable viewing position. Other uses of the system may require further adjustment as follows: For use with the 25 Degree Wedge A 25-Degree wedge (C-152) can be used to provide an angled or oblique view of the subject. This can be especially useful for looking under components without having to change the orientation of the subject under test. Turn the knurled adjusting nut so the zoom assembly tilts downward approximately 25 degrees. Now the wedge can be installed between the zoom and head that will re-position the head for comfortable viewing. For use with a measurement reticle To ensure measurement accuracy when a reticle is used, the Dynascope head needs to be parallel with the working surface directly below the ringlight. Procedure: 1. Remove the ring light from the objective lens and set aside. 2. Use a tool with two straight, parallel edges such as a metal rule. 3. Lay the tool (on its edge) on the working surface below the objective lens. 4. Look from the sides of the Dynascope and carefully adjust the vertical position until the bottom of the objective lens is very close to the tool upper edge. Use the focus knob to fine adjust the vertical position of the head / zoom assembly. 5. Adjust the head angle to equalize the light gap visible between the bottom of the objective lens and the tool edge at the front and back of the objective lens. 6. Repeat steps 4 and 5 until parallelism is established. 7. Install ring light back on system. 2-1
19 Getting Started Setting the Dynascope Head Angle For use with Oblique and Direct Viewers To ensure optimal operation of the Manual (C-161) or Motorized (C-162) Oblique Viewing Attachment, the Dynascope head needs to be parallel with the working surface directly below the ringlight. Procedure: 1. Use a tool with two straight, parallel edges such as a metal rule. 2. Lay the tool (on its edge) on the working surface below the ring light on the Oblique and Direct Viewer. 3. Look from the sides of the Dynascope and carefully adjust the vertical position until the bottom of the Oblique and Direct Viewer is very close to the tool upper edge. Use the focus knob to fine adjust the vertical position of the head / zoom assembly. 4. Adjust the head angle to equalize the light gap visible between the bottom of the Oblique and Direct Viewer and the tool edge at the front and back of the unit. 5. Repeat steps 3 and 4 until parallelism is established.. 2-2
20 Applying Power Lynx / Alpha Users Guide Getting Started Bench Stand Systems The main power switch is located directly behind the vertical column near the base of the unit. Putting the switch in the ON position will supply power to the Dynascope head and halogen spot lamps (if equipped). The power switch will illuminate as well as the red LED that is located on the front of the LYNX or on top of the ALPHA module. Boom Mount Systems For boom mount systems, power is supplied to the Dynascope head by either a 60W Power Supply Unit or by the transformer for the illuminator. Fiber Optic Lighting Fiber optic illuminators are available in 21Volt, 150-Watt or 24 Volt, 250-Watt modular Power Supply Unit (PSU) and Illuminator units. These systems provide power to the Dynascope head (boom mount systems only) in addition to providing power to the illuminator. While the operating specifications are unique to each unit, the basic functions are the same for each. On boom stand systems, the illuminator and transformer can be affixed to mounting brackets (P/N C-148) attached to the horizontal boom arm. For Bench stand systems, the illuminator and transformer can be placed on either side of the Bench Stand. Turn the lighting system ON by switching the toggle switch on the back panel of the PSU to the ON position. The toggle switch will become illuminated. The illuminator should be connected to the PSU via a special modular plug. For boom mount systems the Dynascope head power cord also has a special modular plug for connecting to the rear of the zoom assembly.! CAUTION! Always turn the Power Supply Unit/Illuminator off before covering with any dust covers as overheating may result. Allow for adequate ventilation around the Power Supply Unit and Illuminator as overheating may result. Keep air vents clear from blockage. Turning the Illuminator ON and OFF multiple times a day can significantly reduce bulb life. Voltage spikes associated with hard ignitions will degrade the filament as well as the ceramic lamp socket and pins. Re-igniting the bulb while it is still hot can also degrade the filament. It is best to allow the bulb to cool a minimum of 15 minutes before re-igniting. 2-3
21 Getting Started Using the LYNX Center the subject to be examined under the six-point ringlight. Turn the zoom adjustment (refer to page 1-2 of this manual) counter clockwise to the end of its travel. This will set the unit at its lowest magnification (7X with the 1.0X objective lens). Look at the viewing screen (refer to page 2 of this manual). You should be able to see the object although it may be out of focus. By manually moving the subject up or down, determine which direction the focus assembly must be moved in order to provide a clear, focused image. With the 1.0X objective lens the Working Distance should be approximately four inches for proper focus. Focus Focus the image by gently rotating the focus adjustment knob in the proper direction (refer to the system diagram at the front of this manual). Do not force the focusing adjustment. If the focus assembly runs out of travel without obtaining focus then a gross focus (height) adjustment must be made. See Below.! CAUTION! Do not force the focus adjustment as damage may result. Now that the image is in focus at the lowest magnification it is advisable to fine-tune the focus at the highest magnification. Turn the zoom adjustment all the way clockwise. The magnification will then be at its maximum setting (40X with the 1.0X objective lens). Adjust focus as described above. By focusing at the highest magnification the unit is now parfocal. Parfocal means that the image remains in focus throughout the zoom magnification range. This feature makes it quick and convenient to inspect subjects at lower magnifications and then zoom in on specific areas without re-focusing. Gross Focus (Height) Adjustment -- Choose method for your system Boom Mount Adjust the height of the Dynascope head by raising or lowering the assembly on the vertical support shaft. Support the weight of the Lynx / Alpha with one hand and loosen the locking lever on the vertical support with the other hand. Adjust the position and re-tighten the locking lever. After setting the vertical position, locate the stop collar directly below the vertical support and tighten into place. This will act as a secondary support. The boom mount can also be adjusted horizontally. Loosen the horizontal support shaft-locking lever. Reposition the boom as required then re-tighten the locking lever. 2-4
22 Lynx / Alpha Users Guide Getting Started For simplified height adjustments, use the Gas Assist Boom Stand option (P/N MSP/062). This accessory fits the existing base casting of the standard C-145 Boom Stand. It incorporates a gas charged counter balance to offset the weight of the Dynascope head and accessories while providing a stable mount to minimize vibration. Use this unit when the system needs frequent gross-height adjustments due to different subject sizes. Refer to the Stands and Stages section of this manual. Bench Stand The bench stand incorporates a dovetail slide for adjustment of the height of the Dynascope head. Support the weight of the Lynx / Alpha with one hand and loosen the coarse focus clamp handle on the right side of the zoom assembly. Refer to the system diagram on page 1-2 of this manual. Adjust the position, and re-tighten the clamping handle. Using the ALPHA Center the subject to be examined under the spot lamps or the six-point ringlight, depending upon your specific configuration. Turn the zoom adjustment (refer to the system diagram at the front of this manual) counter clockwise to the end of its travel. This will set the unit at its lowest magnification (7X with the 1.0X objective lens). Look through the ISIS Binocular Head (refer to page 11 of this manual). Adjust for your eye spacing by moving the eyepieces closer together or farther as required for a comfortable view. You should now be able to see the object although it may be out of focus. By manually moving the subject up or down, determine which direction the focus assembly must be moved in order to provide a clear, focused image. With the 1.0X objective lens the Working Distance (the distance between the bottom of the ringlight and the subject) should be approximately four inches for proper focus. Focus Focus the image by gently rotating the focus adjustment knob in the proper direction (refer to the system diagram at the front of this manual). Do not force the focusing adjustment. If the focus assembly runs out of travel without obtaining focus then a gross focus (height) adjustment must be made. See Below.! CAUTION! Do not force the focus adjustment as damage may result. Now that the image is in focus at the lowest magnification it is advisable to adjust the focus at the highest magnification. Turn the zoom adjustment all the way clockwise. The magnification will then be at its maximum setting (40X with the 1.0X objective lens). Adjust focus as described above. ALPHA allows you to further finetune the focus by adjusting the Diopter on each eyepiece. Rotate the eyepieces until the image is sharply in focus in each eye. 2-5
23 Getting Started Parfocality Adjustment At this point you should have the zoom knob fully clockwise to maximum zoom and with a clear, sharp image in the ALPHA. Turn the zoom knob for minimum magnification setting. View the image. If it is not perfectly in focus, turn the parfocal adjusting knobs that are located on the backside of the ISIS Binocular Head until the image is sharp. The unit is now parfocal and can be used normally. Parfocal means that the image remains in focus throughout the zoom magnification range. This feature makes it quick and convenient to inspect subjects at lower magnifications and then zoom in on specific areas without re-focusing. Gross Focus (Height) Adjustment -- Choose method for your system Boom Mount Adjust the height of the Dynascope head by raising or lowering the assembly on the vertical support shaft. Support the weight of the Lynx/ Alpha with one hand and loosen the locking lever on the vertical support with the other hand. Adjust the position and re-tighten the locking lever. After setting the vertical position, locate the stop collar directly below the vertical support and tighten into place. This will act as a secondary support. The boom mount can also be adjusted horizontally. Loosen the horizontal support shaft-locking lever. Reposition the boom as required then re-tighten the locking lever. For simplified height adjustments, use the Gas Assist Boom Stand option (P/N MSP/062). This accessory fits the existing base casting of the standard C-145 Boom Stand. It incorporates a gas charged counter balance to offset the weight of the Dynascope head and accessories while providing a stable mount to minimize vibration. Use this unit when the system needs frequent gross-height adjustments due to different subject sizes. Refer to the Stands and Stages section of this manual. Bench Stand The bench stand incorporates a dovetail slide for adjustment of the height of the Dynascope head. Support the weight of the Lynx / Alpha with one hand and loosen the coarse focus clamp handle on the right side of the zoom assembly. Refer to the system diagram on page 1-2 of this manual. Adjust the position, and re-tighten the clamping handle. 2-6
24 Lighting Options 6-Point Ring Light (Low Magnification); P/N C-023 This ring light is designed for use with the 150W or 250W light sources on systems with reducing objectives. Reducing objectives are defined as the objective lenses with a magnification of less than 1.0x. The C-023 ring light is also very effective with the 1.0x objective, making it a good choice for building a versatile system capable of attaining excellent working distances for rework and yet achieving higher magnification for general inspection needs. A Fresnel lens assembly is included with each C-023 ring light for use with the 0.5x and 0.3x Reducing Objectives. The purpose of this attachment is to re-focus the light from the ring light when used with these longer working distance objectives. Use the Fresnel Lens Attachment with the 0.5x and 0.3x objectives only. Light will be too dispersed if used with the 0.7x or 1.0x objective. 6-Point Ring Light (High Magnification); P/N C-024 This ring light is designed for use with the 150W or 250W light sources on systems with the 1.0x or multiplying objectives. Multiplying objectives are defined as the objective lenses with a magnification greater than 1.0x. The C-024 ring light is optimized for the shorter working distances associated with the higher magnification objectives. Use this 6-point ring light for general inspection needs or when the system will be used at magnifications greater than 40x. A Fresnel lens assembly is included with each C-024 ring light for use with the 1.5x and 2x Multiplying Objectives. The purpose of this attachment is to re-focus the light from the ring light when used with these objectives. Use the Fresnel Lens Attachment with the 1.5x and 2x objectives only. Light will be too dispersed when used with the 1.0x objective. 10-Point Ring Light (Low Magnification); P/N C-181 When used with a 250 Watt illuminator, this ring light addresses lighting requirements for those applications that are light intensive such as viewing dark or non reflective subjects. It can also be configured with a 150-Watt illuminator, which will provide a longer lamp life when used for general inspection applications. Similar to the 6 point ring lights described above, this ring light is designed for use with the 150W or 250W light sources on systems with reducing objectives. Reducing objectives are defined as the objective lenses with a magnification of less than 1.0x. A Fresnel lens assembly is included with each C-181 ring light for use with the 0.5x and 0.3x Reducing Objectives. The purpose of this attachment is to re-focus the light from the ring light when used with these longer working distance objectives. Use the Fresnel Lens Attachment with the 0.5x and 0.3x objectives only. Light will be too dispersed if used with the 0.7x or 1.0x objective. 3-1
25 Lighting Options 10-Point Ring Light (High Magnification); P/N C-180 When used with a 250 Watt illuminator, this ring light addresses lighting requirements for those tough applications that are light intensive such as viewing dark or non reflective subjects. It can also be configured with a 150-Watt illuminator that will provide a longer lamp life when used for general inspection applications. Similar to the 6 point ring lights described above, this ring light is designed for use with the 150W or 250W light sources on systems with multiplying objectives. This ring light is designed for use with the 150W or 250W light sources on systems with the 1.0x or multiplying objectives. Multiplying objectives are defined as the objective lenses with a magnification greater than 1.0x. The C-180 ring light is optimized for the shorter working distances associated with the higher magnification objectives. A Fresnel lens assembly is included with each C-024 ring light for use with the 1.5x and 2x Multiplying Objectives. The purpose of this attachment is to re-focus the light from the ring light when used with these objectives. Use the Fresnel Lens Attachment with the 1.5x and 2x objectives only. Light will be too dispersed when used with the 1.0x objective. 150 Watt 21 Volt Power Supply Unit; P/N C-030/N 150 Watt Illuminator; P/N C-031/N This illuminator system is designed for use with the six or ten point ringlight and incorporates an electronic dimming control. It should be used on Lynx where subjects are too reflective for use with higher power lighting systems or on ALPHA when a very bright image is desired. Special soft start circuitry improves bulb life. Use: The Power Supply Unit should be located to your left as you face the Dynascope head. It can be attached to mounting brackets (P/N C-148) when used with boom mount systems or placed on a bench. The power switch is located on the rear panel of the unit. The rotary knob on the front of the unit is the intensity control and adjusts the brightness of the illuminator. Turning this knob clockwise increases lamp brightness. It is recommended to use the lowest setting that will produce a suitable image as this will generate less heat and increase bulb life significantly. Bench Mount For Bench mount systems the Power Supply Unit and Illuminator should be placed on the same work surface as the Dynascope system. The Power Supply Unit main power cord should be plugged into a standard wall outlet or suitable power source. 3-2
26 Lighting Options Boom Mount For Boom Mount systems, brackets (C-148) are available for mounting to the left and/or right side of the horizontal boom shaft. The Power Supply Unit main power cord should be plugged into a standard wall outlet or suitable power source.! CAUTION! Always turn the Power Supply Unit / Illuminator off before covering with any dust covers as overheating may result. Allow for adequate ventilation around the Power Supply Unit and Illuminator as overheating may result. Keep air vents clear from blockage. Turning the illuminator on and off multiple times a day can significantly reduce bulb life. Voltage spikes associated with hard ignitions will degrade the filament as well as the ceramic lamp socket and pins. It is best to allow the bulb to cool a minimum of 15 minutes before re-igniting. The illuminator can be left turned ON for extended periods if the Lamp Intensity control is turned down (counterclockwise) all the way. 250 Watt 24 Volt Power Supply Unit; P/N C Watt Illuminator; P/N C-029 This illuminator system is designed for use with the six or ten point ringlight and incorporates an electronic dimming control. It should be used on Lynx for general inspection/rework tasks and where options such as Oblique and Direct Viewer or the 25-Degree Wedge are used. It can be used with ALPHA when a very bright image is desired. Special soft start circuitry improves bulb life. Use: The Power Supply Unit should be located to your left as you face the Dynascope head. It can be attached to mounting brackets (P/N C-148) when used with boom mount systems or placed on a bench. The power switch is located on the rear panel of the unit. The rotary knob on the front of the unit is the intensity control and adjusts the brightness of the illuminator. Turning this knob clockwise increases lamp brightness. It is recommended to use the lowest setting that will produce a suitable image as this will generate less heat and increase bulb life significantly. Bench Mount For Bench mount systems the Power Supply Unit and Illuminator should be placed on the same work surface as the Dynascope system. The Power Supply Unit main power cord should be plugged into a standard wall outlet or suitable power source. 3-3
27 Lighting Options Boom Mount For Boom Mount systems, brackets (C-148) are available for mounting to the left and/or right side of the horizontal boom shaft. The Power Supply Unit main power cord should be plugged into a standard wall outlet or suitable power source.! CAUTION! Always turn the Power Supply Unit / Illuminator off before covering with any dust covers as overheating may result. Allow for adequate ventilation around the Power Supply Unit and Illuminator as overheating may result. Keep air vents clear from blockage. Turning the illuminator on and off multiple times a day can significantly reduce bulb life. Voltage spikes associated with hard ignitions will degrade the filament as well as the ceramic lamp socket and pins. It is best to allow the bulb to cool a minimum of 15 minutes before re-igniting. The illuminator can be left turned ON for extended periods if the Lamp Intensity control is turned down (counterclockwise) all the way. Spot Lamps; P/N IS-013 The 20-Watt dual spot lamp unit is designed primarily for use with ALPHA. The unit contains two adjustable halogen lamps and can be used on the bench stand or boom mount system. The spot lamp unit fits over the objective lens and is secured in place with a thumbscrew at the front. Use: Bench Stand systems Power is supplied to the IS-013 Spot Lamp Unit by the bench stand and it connects to a phonoplug on the underside of the zoom body. The intensity of the spot lamps can be adjusted with the thumb wheel on the right hand side of the bench stand base. Turn the thumb wheel until the desired lighting effect is achieved. Boom Mount systems A 60-Watt Power Supply Unit (C-034X) is required to energize the spot lamp unit when used with a boom mount system. Connect the special molded cable from the rear panel of the PSU to the connector on the rear of the zoom assembly. The Power Supply Unit main power cord should be plugged into a standard wall outlet or suitable power source. 3-4
28 Lighting Options! CAUTION! Always turn the Power Supply Unit / Illuminator off before covering with any dust covers as overheating may result Once the spot lamp unit is operational, adjust the position of the halogen lamps to optimize the lighting. While looking into the Dynascope, cover one of the spot lamps with your hand. Adjust the position of the remaining lamp for maximum brilliance at the subject using the thumb slide on top of the spot lamp unit. Repeat procedure for the other lamp. Coaxial Illumination; P/N C-139 Applications such as inspection of blind holes or when trying to see into a cavity require the use of co-axial illumination. This illuminator can be used with the 250-Watt Halogen lighting system to provide the required lighting affect. Light is placed into the axis of the optical path, thereby putting light directly through the objective lens, down to the subject. Use: The Coaxial Illuminator body fits between the Lynx head or Alpha head and the zoom assembly. It has a fixed 1.5x multiplier making the basic range of magnification 9 60X. The flexible fiber optic cable is then connected to the illuminator. No further adjustments are required. The full range of multipliers, objectives and photo adapters can be utilized. Sub-Stage Illumination; P/N IS-014 This is a special attachment that can only be used on bench stand configurations. Sub-Stage lighting (also known as bottom or back lighting) provides illumination from the underside of a subject and can be helpful in certain inspection situations. Use: The Substage Illuminator assembly is designed to be installed into the bottom of the bench stand. It is held in place by two socket head screws installed from the top of the bench stand base. The large round plate at the bottom of the stand must to be removed to gain access to install the substage illuminator assembly. On the substage illuminator bracket, install the bulb into the socket and slip the bulb under the retaining clips. Install the assembly bulb first, into the base of the bench stand. Secure with the 2 screws provided. Plug the Sub-Stage Illuminator power jack into the receptacle in the base of the stand. There is a thumb wheel on the right side of the bench stand base that will adjust the brightness of the sub-stage lighting. Using a lower setting improves bulb life significantly. The sub-stage illuminator includes a base plate that has an internal condensing lens to better concentrate the light. The lens is mounted in a slide arrangement so the position of the light can be adjusted by manually moving the condensing lens. A blue diffuser lens is also provided in the kit. It screws onto the OD of the condensing lens. 3-5
29 Lighting Options Dual Flex & Stay Fiber Optics; P/N C-153 Some inspection applications require lighting from the side or lighting that can be focused intensely onto a small area. The Flex and Stay Fiber Optic system includes dual flexible fibers with condensing lenses and an illuminator with a special weighted base. The system is powered by the available C-031/N Power Supply Unit. Use: Assemble the weighted base to the bottom of the special illuminator housing. This illuminator utilizes a special keyed adapter and retaining knob to hold the Flex & Stay Fiber assembly. Position the illuminator on the work surface adjacent to the Dynascope. The flex & stay fiber optic connects to the illuminator and can independently aimed to provide optimal lighting.! CAUTION! Always turn the Power Supply Unit / Illuminator off before covering with any dust covers as overheating may result Each flex & stay cable is fitted with an adjustable focus to intensify the light where it is needed. Loosen the thumbscrew on the condenser lens to move the lens assembly in and out, which will focus the light as required. Continuous Ring Light with 150 Watt Illuminator unit; HLS-001/S This illuminator / ring light combination provides a uniform lighting effect for viewing certain subjects. It is best suited for use on the ALPHA systems. Common applications are for viewing clear, opaque subjects or highly reflective subjects. Use: The Fiber Optic Ring Light guide attaches to the front of the special illuminator/power supply unit. Attach the ring light to the objective lens by tightening the 3 thumbscrews. No further adjustments are required.! CAUTION! Always turn the Power Supply Unit / Illuminator off before covering with any dust covers as overheating may result 3-6
30 Polarizing Kit for continuous ring light; P/N MSP-076 Lynx / Alpha Users Guide Lighting Options A polarizing kit is available for use with the HLS-001/S illuminator to polarize the continuous ring light. Use this illumination in cases where faults, inclusions or impurities are being looked at in plastic, film, glass and liquids. The MSP/076 Polarizing Kit requires the HLS-001/S illumination option. The kit consists of the following parts: One 46mm circular analyzer; for use with the 0.3x, 0.5x, 0.7x and 1.0x objectives One 40.5mm circular analyzer; for use with the 1.5x objective. One Polarizer assembly for the CRL-036 continuous ring light Use: 1. Snap the polarizer on the OD of the continuous ring light. This will polarize the light. 2. Screw the 46mm or the 40.5mm circular analyzer ( depending upon the objective you are using ) to the bottom of the objective 3. Focus the Dynascope and illumination on the subject. 4. Rotate the analyzer on the objective with your fingertips until the subject has the color that shows the faults best. Circular polarization has 2 points where the light spectrum cuts out as the analyzer is rotated. This results in a complete loss of light at these settings. Substage Polarizing Kit; P/N C-096 This polarizing kit is available for use with bench stand systems to polarize the sub-stage illumination in cases where faults, inclusions or impurities are being looked at in plastic, film, glass and liquids. The C-096 Polarizing Kit requires the IS-014 sub-stage illumination option. The kit consists of the following parts: One 46mm circular analyzer; for use with the 0.3x, 0.5x, 0.7x and 1.0x objectives Two 40.5mm circular analyzers; for use with the 1.5x objective and the substage condensing lens. Use: 1. Remove the diffuser 2. Screw the 40.5mm circular analyzer to the condenser on the sub-stage illuminator. This will polarize the light 3. Screw the 46mm or the 40.5mm circular analyzer ( depending upon the objective you are using ) to the bottom of the objective 4. Focus the Dynascope and illumination on the subject. 5. Rotate the analyzer on the objective with your fingertips until the subject has the color which shows the faults best. 3-7
31 Lighting Options Circular polarization has 2 points where the light spectrum cuts out as the analyzer is rotated. This results in a complete loss of light at these settings. UV Filter Assembly for 6-point ring lights; P/N C-167 Some rework and assembly operations include the use of UV curing epoxies and sealant. The UV Filter assembly fits over the end of the ring light to provide a 400nm filter for the light. This will prevent the UV sensitive products from curing prematurely. This filter can only be used with the 0.7x and 1.0X objectives. 3-8
32 Magnification and Optical Accessories Lynx / Alpha Users Guide Optical Accessories Through the use of objective lenses and switching multipliers, the magnification of the system can be configured as required to provide a maximum of 160X. Objective lenses are mounted at the bottom of the zoom body and provide primary magnification. Typically, as magnification increases, field of view, depth of focus, and working distance decrease. For this reason it is advisable to use the lowest magnification settings that allow proper viewing. For applications requiring a combination of high magnification and long working distance, the use of a switching multiplier is advised. Switching Multipliers are an inexpensive way to increase the versatility of the Dynascope. Multipliers are mounted between the zoom body and Dynascope head and provide secondary magnification allowing the use of reducing objectives to provide long working distances. Objectives The standard LYNX / ALPHA system when configured with a 1.0X objective lens will provide 7X to 40X magnification. Other available objective lenses are 0.3X, 0,5X, 0.7X, 1.5X and 2.0X. Optical specifications of the objective lenses are as follows: Part No. Mag. Range W/ 1.5X Multiplier W/ 2.0X Multiplier Working Distance C-050 X0.3 X2.1 - X12 X X18 X4.2 - X24 312mm C-055 X0.5 X3.5 - X20 X X30 X7.0 - X40 175mm C-051 X0.7 X4.9 - X28 X X42 X9.8 - X56 127mm C-052 X1.0 X7.0 - X40 X X60 X14 - X80 85mm C-053 X1.5 X X60 X X90 X21 - X120 45mm C-054 X2.0 X14 - X80 X21 - X120 X28 - X160 25mm Use: Objectives are centrally located at the bottom of Dynascope zoom body on a dovetail mount. Remove the ring light or spot light unit. Hold the objective lens with one hand and loosen the thumbscrew on the lower front of the zoom body. Remove the existing lens, position the new one and tighten the thumbscrew. Replace the ring light or spot light. 4-1
33 Optical Accessories Switching Multipliers The Switching Multiplier can be used to increase the zoom magnification by either 1.5X or 2.0X. This additional magnification can be particularly useful to restore the overall system magnification when a reducing objective is used to increase working distance. Alternatively, use of a high power objective lens and a multiplier can bring total system magnification to 120X or 160X. Part Number Description C x and 1.5x Switching Multiplier C x and 2.0x Switching Multiplier ( not recommended for Lynx ). Use: The Switching Multiplier mounts between the Dynascope head and zoom body. There is a slide lever on the front of the multiplier. With the lever moved to the extreme right position (directly in front) the multiplier lens is by-passed and the zoom range is at normal magnification. Slide the lever towards the rear of the unit to engage the multiplier lens. The zoom range is now multiplied by 1.5x or 2x depending upon model. The 250-Watt Illuminator and Power Supply should be used when a multiplier is used on the Lynx Dynascope. This is to overcome light losses from the lenses in the multiplier. Oblique Viewing Attachments 25 Degree Wedge; P/N C-152 The 25-Degree Wedge enables the Dynascope head and zoom assembly to be tilted to get an angled view of a subject. For use only on boom mount systems, this accessory adds versatility to the unit by allowing for inspection tasks as well as rework applications. It can be used with any of the objective lenses or multipliers to create a flexible system. Use: Loosen the clamping handle that is behind the zoom pod on the right hand side of the boom arm. Turn the knurled adjusting nut that is located under the boom arm so the zoom assembly tilts downward approximately 25 degrees. Now the wedge can be installed between the zoom and head that will re-position the head for comfortable viewing. 4-2
34 Optical Accessories Oblique and Direct Viewers Inspecting at an oblique angle rather than a direct overhead view can be helpful when inspecting certain items. It can be a significant advantage for applications such as assembled printed circuit boards. In situations where some subjects require an overhead view and others require an oblique view the Oblique and Direct Viewing Attachments are the perfect accessories. Oblique viewing attachments allow the LYNX/ALPHA to view subjects at the normal overhead direct view and then quickly switch to a 34 Degree oblique view by engaging the oblique viewer. The oblique view can then be rotated to view 360 degrees around a subject. The Oblique and Direct Viewers are available in manual and motorized versions and are equipped with their own objective lenses and lighting assemblies. In addition, they can be used with the full range of multipliers and photo attachments. Oblique views require additional light and are recommended for use only with the optional 24 volt 250 watt Illuminator (See Options - Lighting). Motorized Oblique and Direct Viewer; P/N C-162 (w/ 6-point ring light) P/N C-183 (w/10-point ring light) The C-162 or C-183 Oblique and Direct Viewer are the most popular viewer because they are fully motorized. An Oblique/Direct View control box is included that must be turned On (via the front panel switch on the control box) to power the drive motors. Also included with this viewer is a wired remote control for switching between the normal and oblique views and for rotating the oblique view. There are three buttons on the remote control, arranged in a triangle with two buttons above and one button below. When viewing in the normal mode, bring the oblique viewer into position by pressing the single, lower remote control button once. This will bring the oblique viewer into position. Pressing the same button again will return to the normal, top down view. In the oblique mode, rotate the view by pressing one of the two upper buttons. The left button will rotate the view clockwise and the right button will rotate counter-clockwise. The view can be endlessly rotated in either direction. A speed control on the Oblique/Direct View control box adjusts the rotational speed of the oblique view. Rotate the control clockwise to increase the rotational speed. Manual Oblique and Direct Viewer; P/N C-161 (w/6-point ring light) P/N C-182 (w/10-point ring light) Manual oblique viewers require the operator, viewing in the direct or overhead view, to manually swivel the viewer into position. The oblique can be manually rotated by turning the knurled ring on the viewer to view around the subject. Set-up and adjustment of the oblique viewing systems is done at Vision Engineering before shipment. Due to the complexity of these adjustments the unit should be returned to Vision Engineering Inc. for repairs when required. 4-3
35 Optical Accessories Oblique Viewer Operating Techniques When properly set up on the Dynascope system and when viewing in the oblique mode, the center of the image will be sharply in focus. The fringes of the field of view will not be as sharp as the center due to the angle of the optical paths. At the lowest magnification settings, it is normal to have a dark area at the edge of the field of view. This is also due to the angle of the optical paths and diminishes as the zoom magnification is brought up from its minimum. Procedure: 1. Swing the Oblique Viewer to the Direct View position. 2. Rotate the zoom knob fully clockwise to adjust for maximum magnification. 3. Adjust the focus knob as required to get a sharp image of the subject. The system is now parfocal. The zoom magnification can be adjusted to any position and the image will stay clearly in focus. 4. Swing the Oblique Viewer to the oblique view position. The center of the image will be in focus on the subject. 5. To view a section of the subject that is not in focus, move the subject into the focused area. Do not adjust the focus knob on the zoom body. 6. The Oblique and Direct Viewer is now set up and ready for use. The use of the 4 x 4 Floating Stage (C-070) greatly increases the efficiency of scanning the subject so that all areas are properly covered and inspected without the need to move the part. Scanning Tables (C-163 and C- 164) are available for inspecting printed circuit boards. Oblique and Direct Viewer Optical Specifications Viewing Angle from Vertical 34 Degrees Magnifications Direct View Oblique View 7-40X X X w/ multiplier 1.5X 14-80X w/ multiplier 2.0X X w/ multiplier 1.5X X w/ multiplier 2.0X Working Distance 28mm 4-4
36 Measurement Options Reticles Reticles are clear glass inserts that can be placed into the optical path of the Lynx or Alpha. The reticle can be simple such as a fine crossline, or it can be more complex such as a graduated scale for measuring subjects. Vision Engineering Inc. offers a variety of standard and custom reticles for any application. Installation in Lynx: (Refer to Lynx Assembly / Instruction manual) 1. Squeeze the securing clip at the base of the front cover and lift the front cover off. 2. The reticle can be located in the right or left optical path. Loosen the appropriate knurled retaining knob and slide the reticle assembly into position and tighten the knob slightly. 3. Focus the reticle image by moving the reticle assembly up or down as required until a sharp image is attained. 4. Tighten the retaining knob. 5. If required, rotate the reticle by inserting a small dowel (supplied) into a hole in the rotation ring on the reticle assembly and turning to desired position. 6. Replace the dowel to its storage position and close the front cover. Installation in Alpha: (Refer to the ISIS Instruction manual) 1. Remove a rear cover from the ISIS head. It is held in place with 3 Philips head screws. 2. Unscrew the extending lens holder and remove it from the head. It is held in place with 3 Philips head screws 3. Remove the blank (field stop) that is under the extending lens holder and install the new reticle assembly in its place, ensuring the serration on the OD of the reticle assembly engage with the small gears in the head assembly. The small gear is installed on an eccentric bushing and its position can be adjusted to ensure smooth rotation of reticle when turning thumbwheel. 4. Replace the extending lens holder. 5. Replace the rear cover. 5-1
User Manual. Binocular Zoom Stereo Microscope with Boom Stand. MicroscopeNet.com
 User Manual Binocular Stereo Microscope with Boom Stand Model W42C1 Series MicroscopeNet.com Table of Contents i. Caution.. 1 ii. Care and Maintenance... 1 1. Component Illustration... 2 2. Installation...3
User Manual. Trinocular Stereo Microscope
 User Manual Trinocular Stereo Microscope Model V434 XV434 Series MicroscopeNet.com Table of Contents i. Caution.. 1 ii. Care and Maintenance... 2 1. Component Illustration... 3 2. Installation 4 3. Operation....6
M40 Microscope User s Manual
 M40 Microscope User s Manual for M40 and M40RT Microscope Components: Trinocular Port Eyepieces Beam Splitter Field Diaphragm Adjustment Aperture Diaphragm Adjustment Filter Slots Analyzer Polarizer Hex
User Manual. Trinocular Stereo Microscope
 User Manual Trinocular Stereo Microscope Model V436 XV436 Series MicroscopeNet.com Table of Contents i. Caution.. 1 ii. Care and Maintenance... 1 1. Component Illustration... 2 2. Installation 3 3. Operation....4
M20 Metallurgical Microscope User s Manual. Fein.
 M20 Metallurgical Microscope User s Manual info@feinoptic.com M20 Microscope Components Lamp Housing C-Mount Adapter Eyepieces Analyzer Objective Lens Coarse Focus Mechanical Stage Stage X-Y Control Fine
OMM200 and OMM200T. Metallurgical Microscope
 OMM200 and OMM200T Metallurgical Microscope Instruction Manual (Please read the manual carefully before using the microscope) Contents Safety ----------------------------------------------------------------------------
Operation Manual. for Micromas ter I Micros copes. T his manual covers catalog numbers : S 11031, S 11033, and S 11035
 Operation Manual for Micromas ter I Micros copes T his manual covers catalog numbers : S 11031, S 11033, and S 11035 General Operation Thank you for purchasing a Micromaster I microscope. This instrument
Polarization Microscope. Omano OM349P Series. User Guide
 Polarization Microscope Omano OM349P Series User Guide Table of Contents Getting Started... 3 Components... 3 Technical Specifications... 5 Setup Instructions... 6 Basic Operation... 7 Changing the Light
User Manual. Binocular Stereo Microscope. MicroscopeNet.com
 User Manual Binocular Stereo Microscope Model K2213 Series MicroscopeNet.com Table of Contents i. Caution... 1 ii. Care and Maintenance... 1 1. Components Illustration... 2 2. Installation... 3 3. Operation...
G500 SERIES MICROSCOPE OPERATION MANUAL For use with MFR# G502, G502T, G504, G504T, G505, G505T.
 G500 SERIES MICROSCOPE OPERATION MANUAL For use with MFR# G502, G502T, G504, G504T, G505, G505T. United Products & Instruments, Inc. 182 Ridge Road, Suite E Dayton, NJ 08810 USA T. 732 274 1155; F. 732
Mi50 Inverted Microscope User s Manual. Fein.
 Mi50 Inverted Microscope User s Manual Fein info@feinoptic.com Mi50 Microscope Components Siedentopf Trinocular Head Stage Plate Mechanical Stage Locking Screw Hex Wrench Storage Beam Splitter Dust Protector
Swift SM100 Series Stereo Microscope
 Swift SM100 Series Stereo Microscope Use and Care Manual SWIFT OPTICAL Enduring Quality and Technical Excellence 2 SWIFT SM100 SERIES STEREO MICROSCOPE The Swift SM100 Series stereo microscope is a full
Mantis Stereo Viewing System. Operating Instructions And Service Manual. Use this manual only after assembling the Mantis Viewing system.
 Established 1981 Advanced Test Equipment Rentals www.atecorp.com 800-404-ATEC (2832) Visi n E N G I N E E R I N G Mantis Stereo Viewing System Operating Instructions And Service Manual Use this manual
Instruction Manual. B1 Series. Copyright 02/02 Motic Microscopes, European Division
 Instruction Manual B1 Series Copyright 02/02 Motic Microscopes, European Division 1. Eyepieces 13. Sliding interpupilliary adjustment. 2. Interpupillary Scale 3. Revolving Nosepiece 4.Objectives 5. Moveable
National Optical & Scientific Instruments Inc Tri-County Parkway Schertz, Texas Phone (210) Fax (210) INSTRUCTIONS FOR
 Fax (210) INSTRUCTIONS FOR") National Optical & Scientific Instruments Inc. 6508 Tri-County Parkway Schertz, Texas 78154 Phone (210) 590-9010 Fax (210) 590-1104 INSTRUCTIONS FOR MODELS #446TBL, #447TBL AND #448TBL STEREOSCOPIC MICROSCOPES
National Optical & Scientific Instruments Inc. 6508 Tri-County Parkway Schertz, Texas 78154 Phone (210) 590-9010 Fax (210) 590-1104 INSTRUCTIONS FOR MODELS #446TBL, #447TBL AND #448TBL STEREOSCOPIC MICROSCOPES
Richter Optica. Instructions for: S6-BL, S6-TS, S6-SPS, S6-ILST Models
 Richter Optica info@richter-optica.com Instructions for: S6-BL, S6-TS, S6-SPS, S6-ILST Models Trinocular port for c-mount adapter Zoom Knob Focusing Holder Clamp Diopter adjustable eyepieces Magnification
National Optical & Scientific Instruments Inc Tri-County Parkway Schertz, Texas Phone (210) Fax (210)
 Fax (210)") National Optical & Scientific Instruments Inc. 6508 Tri-County Parkway Schertz, Texas 78154 Phone (210) 590-9010 Fax (210) 590-1104 INSTRUCTIONS FOR STEREOSCOPIC ZOOM MICROSCOPE MODELS 420-430PHF-10 (Binocular
National Optical & Scientific Instruments Inc. 6508 Tri-County Parkway Schertz, Texas 78154 Phone (210) 590-9010 Fax (210) 590-1104 INSTRUCTIONS FOR STEREOSCOPIC ZOOM MICROSCOPE MODELS 420-430PHF-10 (Binocular
For documentation the instrument is available with a trinocular head which permits mounting of a video or digital camera system.
 1. Introduction The PriorLux MET upright compound metallurgical microscope is a high quality instrument equipped with high resolution, chromatically corrected optics for excellent image quality in reflected
R40POL Microscope User s Manual
 R40POL Microscope User s Manual for R40POL and R40POL-RT Polarizing Microscopes Microscope Components: Trinocular Port Eyepieces Beam Splitter Analyzer Daylight Balancing Filter 12v 50w Halogen Reflected
Cordless Comprehensive Dual Purpose Scope. Instruction Manual T-1931C T-1932C T-1933C
 Cordless Comprehensive Dual Purpose Scope Instruction Manual T-1931C T-1932C T-1933C Thank you for purchasing a Cordless Comprehensive Dual Purpose Scope. Packing List Dust Cover Power Supply / Charger
Use of the Binocular Microscope
 Use of the Binocular Microscope Before you begin this learning module be sure that you have the following materials in front of you: A microscope A packet of lens paper and Kimwipes A glass slide of a
ACCU-SCOPE INC. 73 Mall Drive Commack, NY Phone: (631) Fax: (631)
 Fax: (631)") 3065 ZOOM STEREO MICROSCOPE SERIES INSTRUCTIONS ACCU-SCOPE INC. 73 Mall Drive Commack, NY 11725 Phone: (631) 864-1000 Fax: (631) 543-8900 E-mail: info@accu-scope.com www.accu-scope.com Head Locking Screw
3065 ZOOM STEREO MICROSCOPE SERIES INSTRUCTIONS ACCU-SCOPE INC. 73 Mall Drive Commack, NY 11725 Phone: (631) 864-1000 Fax: (631) 543-8900 E-mail: info@accu-scope.com www.accu-scope.com Head Locking Screw
EDUCATIONAL SPECTROPHOTOMETER ACCESSORY KIT AND EDUCATIONAL SPECTROPHOTOMETER SYSTEM
 GAIN 0 Instruction Manual and Experiment Guide for the PASCO scientific Model OS-8537 and OS-8539 02-06575A 3/98 EDUCATIONAL SPECTROPHOTOMETER ACCESSORY KIT AND EDUCATIONAL SPECTROPHOTOMETER SYSTEM CI-6604A
For documentation, both instruments are available with a trinocular head which permits mounting of a video or digital camera system.
 PriorLux 1 1. Introduction The PriorLab and PriorLux upright compound microscopes are high quality instruments equipped with high resolution, chromatically corrected optics for excellent image quality.
Lab 4 - The Microscope
 Lab 4 - The Microscope Part A: The parts of the compound microscope. Obtain a microscope as indicated by your instructor. Always carry the microscope with one hand under the base and the other hand holding
National Optical & Scientific Instruments Inc Tri-County Parkway Schertz, Texas Phone (210) Fax (210)
 Fax (210)") National Optical & Scientific Instruments Inc. 6508 Tri-County Parkway Schertz, Texas 78154 Phone (210) 590-9010 Fax (210) 590-1104 INSTRUCTIONS FOR STEREOSCOPIC MICROSCOPES 410TBL Binocular Stereo 411TBL
National Optical & Scientific Instruments Inc. 6508 Tri-County Parkway Schertz, Texas 78154 Phone (210) 590-9010 Fax (210) 590-1104 INSTRUCTIONS FOR STEREOSCOPIC MICROSCOPES 410TBL Binocular Stereo 411TBL
BPL SERIES INSTALLATION INSTRUCTIONS THIS SHEET CONTAINS IMPORTANT SAFETY INSTRUCTIONS. SAVE THESE INSTRUCTIONS.
 BPL SERIES INSTALLATION INSTRUCTIONS Important Warning THIS SHEET CONTAINS IMPORTANT SAFETY INSTRUCTIONS. SAVE THESE INSTRUCTIONS. This product must be installed in accordance with National Electrical
National Optical & Scientific Instruments Inc Tri-County Parkway Schertz, Texas Phone (210) Fax (210) INSTRUCTIONS FOR
 Fax (210) INSTRUCTIONS FOR") National Optical & Scientific Instruments Inc. 6508 Tri-County Parkway Schertz, Texas 78154 Phone (210) 590-9010 Fax (210) 590-1104 INSTRUCTIONS FOR MODEL DC5-163 COMPOUND BIOLOGICAL MICROSCOPE WITH DIGITAL
National Optical & Scientific Instruments Inc. 6508 Tri-County Parkway Schertz, Texas 78154 Phone (210) 590-9010 Fax (210) 590-1104 INSTRUCTIONS FOR MODEL DC5-163 COMPOUND BIOLOGICAL MICROSCOPE WITH DIGITAL
Comprehensive Scope 2. Instruction Manual T-19011C - Monocular T-19021C - Dual Viewing T-19031C - Binocular T-19041C - Trinocular
 Comprehensive Scope 2 Instruction Manual T-19011C - Monocular T-19021C - Dual Viewing T-19031C - Binocular T-19041C - Trinocular Application Thank you for purchasing the new Ken-A-Vision Comprehensive
Instruction Manual. B3 Series. Copyright 02/02 Motic Microscopes, European Division
 Instruction Manual B3 Series Copyright 02/02 Motic Microscopes, European Division 1. Eyepiece 2. Interpupillary Scale 12. Head 13. Eyepiece holder 3. Revolving nosepiece 14. Knurled head locking screw
National Optical & Scientific Instruments Inc Tri-County Parkway Schertz, Texas Phone (210) Fax (210) INSTRUCTIONS FOR
 Fax (210) INSTRUCTIONS FOR") National Optical & Scientific Instruments Inc. 6508 Tri-County Parkway Schertz, Texas 78154 Phone (210) 590-9010 Fax (210) 590-1104 INSTRUCTIONS FOR MODEL DC6-163 COMPOUND BIOLOGICAL MICROSCOPE WITH DIGITAL
National Optical & Scientific Instruments Inc. 6508 Tri-County Parkway Schertz, Texas 78154 Phone (210) 590-9010 Fax (210) 590-1104 INSTRUCTIONS FOR MODEL DC6-163 COMPOUND BIOLOGICAL MICROSCOPE WITH DIGITAL
Richter Optica. Instructions for Model: MDS2 Middle School Microscope
 Richter Optica info@richter-optica.com Instructions for Model: MDS2 Middle School Microscope Eyepiece 360 Rotatable Head Revolving Nosepiece Carrying Handle Objectives Rack Stop Stage Stage Clips Disc
3025 MICROSCOPE SERIES INSTRUCTIONS
 3025 MICROSCOPE SERIES INSTRUCTIONS Polysciences, Inc. 400 Valley Road Warrington, PA 18976 (800) 523-2575 / (215) 343-6484 (800) 343-3291 / (215) 343-0214 fax info@polysciences.com www.polysciences.com
TECHNICAL INFORMATION Forensic Optical Comparator Catalog Nos. FX8B, FX8B220
 SIRCHIE Products Vehicles Training Copyright 2011 by SIRCHIE All Rights Reserved. TECHNICAL INFORMATION Forensic Optical Comparator Catalog Nos. FX8B, FX8B220 INTRODUCTION The FX8B is an opaque projector
optech Reflected Metallurgical Microscope Model SM lnstruction Manual OPTICAL TECHNOLOGY
 optech OPTICAL TECHNOLOGY Reflected Metallurgical Microscope Model SM lnstruction Manual Congratulations and Thank You for your purchase of The Microscope model SM This precision instrument has been designed
National Optical & Scientific Instruments Inc Tri-County Parkway Schertz, Texas Phone (210) Fax (210) INSTRUCTIONS FOR
 Fax (210) INSTRUCTIONS FOR") National Optical & Scientific Instruments Inc. 6508 Tri-County Parkway Schertz, Texas 78154 Phone (210) 590-9010 Fax (210) 590-1104 INSTRUCTIONS FOR MODEL DC4-456H STEREOSCOPIC MICROSCOPE WITH DIGITAL
National Optical & Scientific Instruments Inc. 6508 Tri-County Parkway Schertz, Texas 78154 Phone (210) 590-9010 Fax (210) 590-1104 INSTRUCTIONS FOR MODEL DC4-456H STEREOSCOPIC MICROSCOPE WITH DIGITAL
INSTRUCTIONS FOR STEREOSCOPIC MICROSCOPES CATALOG NUMBERS (120V) (220V) (120V) (220V)
 (220V) (120V) (220V)") Cole-Parmer Instrument Company 625 East Bunker Court Vernon Hills, Illinois 60061 1-847-549-7600 or Toll-Free 1-800-323-4340 Telex: 28-9405 Fax: 1-847-549-7676 INSTRUCTIONS FOR STEREOSCOPIC MICROSCOPES
Cole-Parmer Instrument Company 625 East Bunker Court Vernon Hills, Illinois 60061 1-847-549-7600 or Toll-Free 1-800-323-4340 Telex: 28-9405 Fax: 1-847-549-7676 INSTRUCTIONS FOR STEREOSCOPIC MICROSCOPES
National Optical & Scientific Instruments Inc Tri-County Parkway Schertz, Texas Phone (210) Fax (210)
 Fax (210)") National Optical & Scientific Instruments Inc. 6508 Tri-County Parkway Schertz, Texas 78154 Phone (210) 590-9010 Fax (210) 590-1104 INSTRUCTIONS FOR MODELS 106, 106-L, 106-LED 109, 109-L, 109-LED ELEMENTARY
National Optical & Scientific Instruments Inc. 6508 Tri-County Parkway Schertz, Texas 78154 Phone (210) 590-9010 Fax (210) 590-1104 INSTRUCTIONS FOR MODELS 106, 106-L, 106-LED 109, 109-L, 109-LED ELEMENTARY
National Optical & Scientific Instrument Inc Tri-County Parkway Schertz, Texas Phone (210) Fax (210) INSTRUCTIONS FOR
 Fax (210) INSTRUCTIONS FOR") National Optical & Scientific Instrument Inc. 6508 Tri-County Parkway Schertz, Texas 78154 Phone (210) 590-9010 Fax (210) 590-1104 INSTRUCTIONS FOR MODEL DC4-156-S COMPOUND BIOLOGICAL MICROSCOPE WITH DIGITAL
National Optical & Scientific Instrument Inc. 6508 Tri-County Parkway Schertz, Texas 78154 Phone (210) 590-9010 Fax (210) 590-1104 INSTRUCTIONS FOR MODEL DC4-156-S COMPOUND BIOLOGICAL MICROSCOPE WITH DIGITAL
Macro View All in One Scope Description. 2. Features. 3. Package Contents
 Macro View All in One Scope 26700-104-00 1. Description Portable system ideal for inline use This self-contained video inspection system is a compact unit, that simplifies quality checks at any stage of
MANUAL Series ZOOM STEREO MICROSCOPE MANUAL
 MANUAL 3078 Series ZOOM STEREO MICROSCOPE MANUAL Distributed By: CONTENTS SAFETY NOTES... 3 CARE AND MAINTENANCE... 3 INTRODUCTION... 4 UNPACKING AND COMPONENTS... 4 COMPONENT DIAGRAMS... 5 ASSEMBLY...
National Optical & Scientific Instruments Inc Tri-County Parkway Schertz, Texas Phone (210) Fax (210)
 Fax (210)") National Optical & Scientific Instruments Inc. 6508 Tri-County Parkway Schertz, Texas 78154 Phone (210) 590-9010 Fax (210) 590-1104 INSTRUCTIONS FOR MODELS 156, 156-S, 157 COMPOUND BIOLOGICAL MICROSCOPES
National Optical & Scientific Instruments Inc. 6508 Tri-County Parkway Schertz, Texas 78154 Phone (210) 590-9010 Fax (210) 590-1104 INSTRUCTIONS FOR MODELS 156, 156-S, 157 COMPOUND BIOLOGICAL MICROSCOPES
OLYMPUS STEREO MICROSCOPES I INSTRUCTION MANUAL I MODELS VMF,VMT&VMZ OLYMPUS
 OLYMPUS STEREO MICROSCOPES I INSTRUCTION MANUAL I MODELS VMF,VMT&VMZ OLYMPUS This instruction manual has been written for the use of the Olympus Stereo Microscopes Models VMF, VMT and VMZ. lt is recommended
User Manual. Binocular Compound LED Microscope. MicroscopeNet.com
 User Manual Binocular Compound LED Microscope Model M8211 Series MicroscopeNet.com Table of Contents I. Caution...1 II. Care and Maintenance...2 1. Components Illustration...3 2. Installation...4 3. Operation...6
EXAMET-4 MANUAL MICROSCOPE SERIES. 73 Mall Drive, Commack, NY (P) (F)
 (F)") EXAMET-4 MICROSCOPE SERIES MANUAL 73 Mall Drive, Commack, NY 11725 631-543-2000 (P) 631-589-6975 (F) www.unitronusa.com info@unitronusa.com CONTENTS SAFETY NOTES... 3 CARE AND MAINTENANCE... 3 INTRODUCTION...
EXAMET-4 MICROSCOPE SERIES MANUAL 73 Mall Drive, Commack, NY 11725 631-543-2000 (P) 631-589-6975 (F) www.unitronusa.com info@unitronusa.com CONTENTS SAFETY NOTES... 3 CARE AND MAINTENANCE... 3 INTRODUCTION...
Richter Optica. Instructions for Model: HSX1 High School Microscope
 Richter Optica info@richter-optica.com Instructions for Model: HSX1 High School Microscope Eyepiece 360 Rotatable Head Objectives Carrying Handle Revolving Nosepiece Rack Stop Slide Holder Focus Tension
The Eye Com 7000 Dual Page Reader Operating and Maintenance Instructions
 A MEDIA INDEPENDENT DOCUMENT MANAGEMENT COMPANY EYE COMMUNICATION SYSTEMS, INC. 455 E. Industrial Drive P.O. Box 620 Hartland, WI 53029 USA (262) 367-1360 or (800) 558-2153 Fax: (262) 367-1362 www.eyecom.com
HDAF800 HD 1080p Digital Microscope USB drive for Image Capture
 HDAF800 HD 1080p Digital Microscope USB drive for Image Capture HDAF800-US Auto-Focus HD Camera System 1080p including Universal Stand with 15" Vertical Pole and integrated LED lighting and controls panels.
Richter Optica. Instructions for Models: UX1B Binocular and UX1T Trinocular Laboratory and University Biological Microscope
 Richter Optica info@richter-optica.com Instructions for Models: UX1B Binocular and UX1T Trinocular Laboratory and University Biological Microscope Interpupillary Adjustment Scale Eyepieces Diopter Adjustment
INSTRUCTIONS FOR MODEL C-1028 COMPOUND MICROSCOPE
 INSTRUCTIONS FOR MODEL C-1028 COMPOUND MICROSCOPE Eyepiece (ocular lens) Eyepiece tube Head of microscope Objective turret (nosepiece) Arm Objective lens Stage Clips Condenser lens Stage Safety rack stop
Full-HD (1080p) digital microscope. Stunning full-hd 1080p/60fps live video image quality
 digital microscope. Stunning full-hd 1080p/60fps live video image quality") Full-HD (1080p) digital microscope Stunning full-hd 1080p/60fps live video image quality Effortlessly capture full-hd images direct to USB memory stick (without a PC) High quality stand options, built
Full-HD (1080p) digital microscope Stunning full-hd 1080p/60fps live video image quality Effortlessly capture full-hd images direct to USB memory stick (without a PC) High quality stand options, built
National Optical & Scientific Instruments Inc Landmark 35 Drive San Antonio, Texas Phone (210) Fax (210)
 Fax (210)") National Optical & Scientific Instruments Inc. 11113 Landmark 35 Drive San Antonio, Texas 78233 Phone (210) 590-9010 Fax (210) 590-1104 INSTRUCTIONS FOR 160 SERIES COMPOUND BIOLOGICAL MICROSCOPES Copyright
National Optical & Scientific Instruments Inc. 11113 Landmark 35 Drive San Antonio, Texas 78233 Phone (210) 590-9010 Fax (210) 590-1104 INSTRUCTIONS FOR 160 SERIES COMPOUND BIOLOGICAL MICROSCOPES Copyright
National Optical & Scientific Instruments Inc Tri-County Parkway Schertz, Texas Phone (210) Fax (210) INSTRUCTIONS FOR
 Fax (210) INSTRUCTIONS FOR") National Optical & Scientific Instruments Inc. 6508 Tri-County Parkway Schertz, Texas 78154 Phone (210) 590-9010 Fax (210) 590-1104 INSTRUCTIONS FOR MODEL 131-LED COMPOUND MICROSCOPES Copyright 2/6/03
National Optical & Scientific Instruments Inc. 6508 Tri-County Parkway Schertz, Texas 78154 Phone (210) 590-9010 Fax (210) 590-1104 INSTRUCTIONS FOR MODEL 131-LED COMPOUND MICROSCOPES Copyright 2/6/03
Swift SM100 Series Stereo Microscope
 Swift SM100 Series Stereo Microscope Use and Care Manual SWIFT OPTICAL Enduring Quality and Technical Excellence SWIFT SM100 SERIES STEREO MICROSCOPE The Swift SM100 Series stereo microscope is a full
STEREO MICROSCOPE MODEL K400 / K500 / K700 INSTRUCTION MANUAL
 STEREO MICROSCOPE MODEL K400 / K500 / K700 INSTRUCTION MANUAL Contents 1. Introduction...2 2. Nomenclature and Function....3 3. Assembly.....5 4. Operating the Microscope... 6 4.1 Interpupillary Distance
Removal and Installation8
 8 Screw Types 8-4 Top Cover Assembly 8-5 Left Hand Cover 8-6 Right Hand Cover 8-10 Front Panel Assembly 8-14 Left Rear Cover 8-15 Right Rear Cover 8-16 Extension Cover (60" Model only) 8-17 Media Lever
If you are missing any of the following items, please contact Stanton Video immediately (602)
") RIGHT ANGLE FOCUS Jan 03 If you are missing any of the following items, please contact Stanton Video immediately (602) 493-9505 1. Right Angle Focus Servo 2. Servo End Cap 3. Lens Gears (32 pitch, 48 pitch,.6
RIGHT ANGLE FOCUS Jan 03 If you are missing any of the following items, please contact Stanton Video immediately (602) 493-9505 1. Right Angle Focus Servo 2. Servo End Cap 3. Lens Gears (32 pitch, 48 pitch,.6
High definition digital microscope. visioneng.us/lynxevo
 visioneng.us/lynxevo High definition digital microscope Exceptional high resolution 1080p/60fps image quality Intuitive image capture and documentation Stand alone, wireless or PC connectivity High quality
Diagonal FOV 18.5mm - 2.7mm ( inch); Video Magnification 30x-210x on 22" Monitor.
; Video Magnification 30x-210x on 22 Monitor.") HD803-BSM22 HD803 3D HD High Definition 1080p Rotational Microscope with Detent Working Distance. Diagonal FOV 18.5mm - 2.7mm (0.72-0.10 inch); Video Magnification 30x-210x on 22" Monitor. HD 1080P 60
HD803-BSM22 HD803 3D HD High Definition 1080p Rotational Microscope with Detent Working Distance. Diagonal FOV 18.5mm - 2.7mm (0.72-0.10 inch); Video Magnification 30x-210x on 22" Monitor. HD 1080P 60
Eco D-ELS-4 Stereo Microscope. Instruction Manual
 Eco D-ELS-4 Stereo Microscope Instruction Manual Contents 1. Application 2 2. Nomenclature 2 3. Specifications 3 4. Operation 4 4.1 Working Environment 4 4.2 Light Intensity Control 4 4.3 Select a Work
Profile Projectors. Microscopes
 I Optical Measuring Profile Projectors Microscopes MF-UB3017D INDEX Profile Projectors PJ-A3000 Series 302-Vertical I-2,3 PJ-H30 Series 303-High Accuracy I-4,5 PV-5110 Series 304 I-6,7 PH-A14 Series 172
INSTRUCTION MANUAL POLARIZING & ORE MICROSCOPES. Polarizing Microscopes. Ore Microscopes. Model: NYMC62B00
 POLARISING & ORE MICROSCOPES INSTRUCTION MANUAL Monocular Microscope Binocular Microscope Trinocular Microscope Polarizing Microscopes POLARIZING & ORE MICROSCOPES Model: NYMC62B00 Monocular Microscope
ABM's High Resolution Mask Aligner Features:
 ABM's High Resolution Mask Aligner is a very versatile instrument with interchangeable light sources which allow Near-UV (405-365 nm) as well as Mid- and Deep-UV (254 nm, 220 nm) exposures in proximity
National Optical & Scientific Instruments Inc Tri-County Parkway Schertz, Texas Phone (210) Fax (210) INSTRUCTIONS FOR
 Fax (210) INSTRUCTIONS FOR") National Optical & Scientific Instruments Inc. 6508 Tri-County Parkway Schertz, Texas 78154 Phone (210) 590-9010 Fax (210) 590-1104 INSTRUCTIONS FOR 450 SERIES STEREOSCOPIC MICROSCOPES Copyright 4/6/2010
National Optical & Scientific Instruments Inc. 6508 Tri-County Parkway Schertz, Texas 78154 Phone (210) 590-9010 Fax (210) 590-1104 INSTRUCTIONS FOR 450 SERIES STEREOSCOPIC MICROSCOPES Copyright 4/6/2010
SeBa Digital Imaging Systems
 SeBa Series LAXCO, INC. SeBa Digital Imaging Systems SeBa 2 SeBa 3 SeBa Pro 4 SeBa Pro 4B SeBa Pro 5 9.7 full retina touchscreen display 5MP color camera User-friendly touchscreen interface Parfocal, parcentric,
Page 1
 4K102-LBSM28 and 1x. LED ring light, Basic Stand and 28 inch 4K UHD Monitor are included. Optional USB device for image&video capture and measurement software are not included. 4K102-LABM28 4K102-LUSM28
Symbio Microscope. L1500 Series. Biological Upright Compound Microscopes. Operating Manual
 Symbio Microscope L1500 Series Biological Upright Compound Microscopes Operating Manual 1 The GXM L1500 Series of biological microscopes are high quality instruments equipped with high grade, glass objectives
National Optical & Scientific Instruments Inc Tri-County Parkway Schertz, Texas Phone (210) Fax (210) INSTRUCTIONS FOR
 Fax (210) INSTRUCTIONS FOR") National Optical & Scientific Instruments Inc. 6508 Tri-County Parkway Schertz, Texas 78154 Phone (210) 590-9010 Fax (210) 590-1104 INSTRUCTIONS FOR 160 SERIES COMPOUND BIOLOGICAL MICROSCOPES Copyright
National Optical & Scientific Instruments Inc. 6508 Tri-County Parkway Schertz, Texas 78154 Phone (210) 590-9010 Fax (210) 590-1104 INSTRUCTIONS FOR 160 SERIES COMPOUND BIOLOGICAL MICROSCOPES Copyright
LEEDS. Product Catalog. PRECISION INSTRUMENTS. Microscope accessories, bases, stands, lighting, mounts & tables.
 PRECISION INSTRUMENTS Product Catalog Microscope accessories, bases, stands, lighting, mounts & tables December 2018 www.leedsmicro.com T a b l e o f C o n t e n t s Part Number Description Page # STANDS
Microscopic Imaging Research Station (MIRS) Assembly Guide. Version 1.0.0
 Assembly Guide. Version 1.0.0") Microscopic Imaging Research Station (MIRS) Assembly Guide www.adsyscontrols.com Adsys Controls, Inc.2012 Version 1.0.0 I. Assembly of the Adsys Controls MIRS system This document explains the assembly
Microscopic Imaging Research Station (MIRS) Assembly Guide www.adsyscontrols.com Adsys Controls, Inc.2012 Version 1.0.0 I. Assembly of the Adsys Controls MIRS system This document explains the assembly
Richter Optica. Instructions for Model: MDS1 Compound Microscope
 Richter Optica info@richter-optica.com Instructions for Model: MDS1 Compound Microscope 10x Eyepiece Carrying Handle Rotatable Viewing Head Objective Lens Coarse Focus Stage Clip Stage Built-in Condenser
Optic accessories. Zubehör. Accessories
 Zubehör Accessories Optic accessories The wide range of ALPHA LASER s optics accessories enables you to carry out the most specialized laser welding tasks and to adapt the laser welding to your specific
Stereo Viewing Systems
 Stereo Viewing Systems for a wide range of inspection and material rework tasks Patented optical technology for fatigue-free viewing and superb image quality Wide range of magnification options (to x20)
INSTRUCTION MANUAL for STEREO MICROSCOPE FUTURO EDU CAM
 INSTRUCTION MANUAL for STEREO MICROSCOPE FUTURO EDU CAM 152375.0200 Brütsch Rüegger Werkzeuge AG Heinrich Stutz-Strasse 20 CH-8902 Urdorf www.brw.ch 1.0 Introduction With your purchase of a FUTURO EDU
MANUAL 3072 STEREO MICROSCOPE SERIES
 MANUAL 3072 STEREO MICROSCOPE SERIES 73 Mall Drive, Commack, NY 11725 631-864-1000 (P) 631-543-8900 (F) www.accu-scope.com info@accu-scope.com CONTENTS SAFETY NOTES... 3 CARE AND MAINTENANCE... 3 INTRODUCTION...
ASSET LGA1366 Top-side Probe
 ASSET LGA1366 Top-side Probe (Manual version 1.1) For gaining test access to the debug port of Intel processors that are designed for use in LGA1366 Sockets (Socket B). These include the Intel Core i7
Z10 SERIES Z10 Z8 Z6 MANUAL ZOOM STEREO MICROSCOPES
 Z10 SERIES Z10 Z8 Z6 ZOOM STEREO MICROSCOPES MANUAL 250 Gibbs Road, Islandia, NY 11749 631-582-8440 (P) 631-582-8487 (F) www.flexbar.com sales@flexbar.com CONTENTS SAFETY NOTES... 3 CARE AND MAINTENANCE...
National Optical & Scientific Instruments Inc Tri-County Parkway Schertz, Texas Phone (210) Fax (210) INSTRUCTIONS FOR
 Fax (210) INSTRUCTIONS FOR") National Optical & Scientific Instruments Inc. 6508 Tri-County Parkway Schertz, Texas 78154 Phone (210) 590-9010 Fax (210) 590-1104 INSTRUCTIONS FOR MODEL 205-RLED (formerly Model 205) COMPOUND MICROSCOPE
National Optical & Scientific Instruments Inc. 6508 Tri-County Parkway Schertz, Texas 78154 Phone (210) 590-9010 Fax (210) 590-1104 INSTRUCTIONS FOR MODEL 205-RLED (formerly Model 205) COMPOUND MICROSCOPE
MICROSCOPE USER MANUAL
 WARRANTY BARSKA warrants your micrscope to be free from defects in materials and workmanship for one () year. BARSKA will repair or replace such product or part thereof which, upon inspection by BARSKA,
Richter Optica. Instructions for Model: S-2 Dual Power Stereo Microscope
 Richter Optica 6122 Innovation Way Carlsbad, California 92009 (800) 942-0528 US TOLL FREE (760) 438-0528 INTERNATIONAL Instructions for Model: S-2 Dual Power Stereo Microscope Eyepieces Post Diopter Adjustment
Zero Gravity Rig Operating Instructions
 Welcome to our new top-of-the-line shoulder support system for cameras up to 15 lbs - the ZG Rig. In addition to its totally unique vertical balancing mechanism, this system is designed to be configurable
HD802 (17x-914x on 24 inch HD monitor) Full HD 1080p
 Full HD 1080p") ehd802-lbs HD802-LBS Digital USB Microscope. Capture images (5MP 2592 1944) 15fps@USB2.0 15fps@HDMI Lens adapters included are: ring light, Basic Stand are included. ring light, Basic Stand are included.
ehd802-lbs HD802-LBS Digital USB Microscope. Capture images (5MP 2592 1944) 15fps@USB2.0 15fps@HDMI Lens adapters included are: ring light, Basic Stand are included. ring light, Basic Stand are included.
M50 and M50RT Series. Brightfield / Darkfield Metallurgical Microscopes
 M50 and M50RT Series Brightfield / Darkfield Metallurgical Microscopes M50 / M50RT Brightfield / Darkfiefld Metallurgical Microscope Features Semi APO BF MET Infinity Corrected Objectives Part # Objective
EXAMET-5 MANUAL MICROSCOPE SERIES. 73 Mall Drive, Commack, NY (P) (F)
 (F)") EXAMET-5 MICROSCOPE SERIES MANUAL 73 Mall Drive, Commack, NY 75 63-543-000 (P) 63-589-6975 (F) www.unitronusa.com info@unitronusa.com CONTENTS SAFETY NOTES... 3 CARE AND MAINTENANCE... 3 INTRODUCTION...
EXAMET-5 MICROSCOPE SERIES MANUAL 73 Mall Drive, Commack, NY 75 63-543-000 (P) 63-589-6975 (F) www.unitronusa.com info@unitronusa.com CONTENTS SAFETY NOTES... 3 CARE AND MAINTENANCE... 3 INTRODUCTION...
Vision Engineering Ltd.
 Vision Engineering Ltd. Seminar/Workshop October 2015 Amtest d.o.o. The Human Body Facts and Figures 29 Mrd. Euro have been payed per year, for medical treatment for back / dorsal pain, in Germany. 17%
Microscopes. Star - 24 LED. Stereo Microscope Range
 Star - 24 LED The Star is a Stereo Microscope which is designed for both educational and professional use. It is particularly well suited to viewing specimens at low magnifications and introduces the benefits
CONTENDER LED FRESNEL SPOT FOCUSING LIGHT USER MANUAL
 CONTENDER LED FRESNEL SPOT FOCUSING LIGHT USER MANUAL Contender INTRODUCTION THANK YOU FOR CHOOSING GENARAY The Genaray Contender is a compact and versatile light that s ideal for still and tabletop photography,
National Optical & Scientific Instruments Inc Tri-County Parkway Schertz, TX Phone (210) Fax (210) INSTRUCTIONS FOR
 Fax (210) INSTRUCTIONS FOR") National Optical & Scientific Instruments Inc. 6508 Tri-County Parkway Schertz, TX 78154 Phone (210) 590-9010 Fax (210) 590-1104 INSTRUCTIONS FOR MODELS 131, 132, 131-CLED & 132-CLED COMPOUND MICROSCOPES
National Optical & Scientific Instruments Inc. 6508 Tri-County Parkway Schertz, TX 78154 Phone (210) 590-9010 Fax (210) 590-1104 INSTRUCTIONS FOR MODELS 131, 132, 131-CLED & 132-CLED COMPOUND MICROSCOPES
Optilia Instruments. Empowering Your Vision! Soporte y Garantía Local en México
 Optilia Instruments Empowering Your Vision! +52 33 3615 2703 www.mexser.com.mx ventas.soporte@mexser.com.mx Soporte y Garantía Local en México Product Review: High Definition Inspection Cameras New technology
National Optical & Scientific Instrument Inc Tri-County Parkway Schertz, Texas Phone (210) Fax (210) INSTRUCTIONS FOR
 Fax (210) INSTRUCTIONS FOR") National Optical & Scientific Instrument Inc. 6508 Tri-County Parkway Schertz, Texas 78154 Phone (210) 590-9010 Fax (210) 590-1104 INSTRUCTIONS FOR MODEL DC-128 COMPOUND BIOLOGICAL MICROSCOPE WITH DIGITAL
National Optical & Scientific Instrument Inc. 6508 Tri-County Parkway Schertz, Texas 78154 Phone (210) 590-9010 Fax (210) 590-1104 INSTRUCTIONS FOR MODEL DC-128 COMPOUND BIOLOGICAL MICROSCOPE WITH DIGITAL
40x, 400x, 1600x 3MP Digital Microscope with Screen
 40x, 400x, 1600x 3MP Digital Microscope with Screen Introduction Thank you for purchasing the LCD Digital Microscope (LDM) with a 3.5 monitor. Your microscope is a precision optical instrument, made of
Richter Optica. Instructions for Model F-1 Compound Microscope
 Richter Optica 6122 Innovation Way Carlsbad, California 92009 (800) 942-0528 US TOLL FREE (760) 438-0528 INTERNATIONAL Instructions for Model F-1 Compound Microscope Ocular Lens (eyepiece) Eyepiece Tube
Blue Weapon Laser. User manual UK. Version 1.0
 Blue Weapon Laser User manual 152.754UK Version 1.0 CAUTION 15. Disposal : Please disposal of the unserviceable device according to the current statutory requirements. Please read this manual fully before
PROMS PORTABLE RAPID-DEPLOYMENT OBSERVATION AND MONITORING SYSTEM. INSTRUCTIONS FOR USE BS EN BS EN BS EN
 PROMS PORTABLE RAPID-DEPLOYMENT OBSERVATION AND MONITORING SYSTEM. INSTRUCTIONS FOR USE BS EN 55103-1 BS EN 55103-2 BS EN 60555-2 Note: The battery supplied with this equipment is a sealed lead acid cell.
DOM 3000 Series Dental Microscopes For Dentistry, For you
 See more,treat more Version: DOM3000s MS en 2016/A. Semorr Medical Tech 2016. Printed in China. Pics, Specifications and Technical data subject to change without advance notifications. DOM 3000 Series
Operating Microscope OM-18. A i m i n g a t n e w l e v e l s i n q u a l i t y
 Operating Microscope OM-18 A i m i n g a t n e w l e v e l s i n q u a l i t y Operating Microscope OM-18 Compact Microscope Diverse illumination optics Protection against phototoxicity Apochromatic objective
Setup Information Panosaurus May 3, 2011
 Setup Information Panosaurus 2.0 www.gregwired.com May 3, 2011 Please take the time to read all of the setup information to ensure success and ease of use of this tripod head. Much of the setup is a one
TECHNICAL INFORMATION Forensic Video-Based Optical Comparators Catalog Nos. FX10A, FX10AC
 SIRCHIE Products Vehicles Training Copyright 2011 by SIRCHIE All Rights Reserved. TECHNICAL INFORMATION Forensic Video-Based Optical Comparators Catalog Nos. FX10A, FX10AC Upon initial receipt of the instrument,
Stereo Zoom. Microscopes
 17 Our stereo zoom and stereo microscopes are manufactured exclusively for Aven by Carton Optical of Japan. Carton Optical has been manufacturing microscopes for over 40 years. Their microscopes have a
User instructions Stereo microscope
 User instructions Stereo microscope KERN & Sohn GmbH Ziegelei 1 D-72336 Balingen E-mail: info@kern-sohn.com Tel: +49-[0]7433-9933-0 Fax: +49-[0]7433-9933-149 Internet: www.kern-sohn.com KERN OSE-4 OSE