UFED Touch User Manual March 2014
|
|
|
- Erin Melton
- 6 years ago
- Views:
Transcription
1 UFED Touch User Manual March 2014
2
3 Legal Notices Copyright 2014 Cellebrite Mobile Synchronization Ltd. All rights reserved. This manual is delivered subject to the following conditions and restrictions: This manual contains proprietary information belonging to Cellebrite Ltd. Such information is supplied solely for the purpose of assisting explicitly and properly authorized users of the UFED Touch. No part of this content may be used for any other purpose, disclosed to any person or firm, or reproduced by any means, electronic or mechanical, without the express prior written permission of Cellebrite Ltd. The text and graphics are for the purpose of illustration and reference only. The specifications on which they are based are subject to change without notice. Information in this document is subject to change without notice. Corporate and individual names and data used in examples herein are Fictitious unless otherwise noted.
4 WARNING: UFED Touch should be used only with the dedicated AC/DC adapter supplied with this device. WARNING: USB, Ethernet and target and source connectors should be connected only to CE approved devices (according to IEC/EN standard). WARNING: Make sure that all external connections to other devices (except for the power adapter) are only indoor and SELV (safety extra low voltage, not exceed 42.4 V peak or 60 VDC). This device complies with part 15 of the FCC rules. Operation is subject to the following two conditions: 1) This device may not cause harmful interference 2) This device must accept any interference received, including interference that may cause undesired operation
5 Contents Chapter 1: Introduction Overview UFED Touch extraction types and device tools UFED Touch accessories Using cables and tips Supported devices Cellebrite YouTube channel Chapter 2: Orientation to the UFED Touch unit Top view Front panel Back panel Left panel Right panel Bottom Panel Chapter 3: Getting started Turning the UFED Touch Unit On or Off Working with UFED Touch Starting the UFED Touch application manually Home screen Search function Detect automatically Application taskbar Virtual keyboard Waking up from sleep mode Charging the battery Enabling wireless and Bluetooth communication... 54
6 6 Chapter 4: Application License Activation Chapter 5: Extracting Data to PC Chapter 6: Logical extraction Performing logical extraction Connect mobile device Select phone memory Select extraction location Select content types Extraction in progress The extracted data folder Chapter 7: Password extraction Performing password extraction The extracted passwords folder Disabling the password Chapter 8: File system extraction Performing a file system extraction The file system extraction folder Chapter 9: Physical extraction Performing a physical extraction The Physical Extraction folder Chapter 10: SIM card functionality SIM data extraction Performing SIM data extraction The extracted SIM data folder Clone SIM Cloning an existing SIM card ID Entering SIM data manually Creating GSM test SIM Chapter 11: Device tools Bluetooth Scan Switch to CDMA offline mode
7 Contents Test peek/poke functionality Activate TomTom trip log Uninstall Windows Mobile Client Uninstall Android client Exit Odin mode Chapter 12: Settings General settings Managing the custom list Changing the application interface language Mobile extraction client Report settings Managing report fields System settings License settings Version details Updates and versions Users permissions Permission management Network Chapter 13: Special cables Device power-up cable Chapter 14: Technical specifications General specifications Battery Power supply Network I/O interfaces Dimensions and weights Temperature Chapter 15: Extracting Android devices
8 Android extraction methods Android debugging bridge method Bootloader extraction Performing File System extraction for an Android device Locked Motorola devices Locked HTC, Huawei, and ZTE devices Other locked devices Unlocked devices Technical terms Chapter 16: Appendix
9 Contents 9
10
11 Chapter 1: Introduction UFED Touch is a new generation handheld unit that empowers law enforcement, military, intelligence, corporate security, and e-discovery personnel to capture critical forensic evidence from all mobile devices. This includes mobile phones, handheld tablets, portable GPS devices, and devices manufactured with Chinese chipsets. With an intuitive touch-screen interface and an integrated battery, UFED Touch is portable, easy to operate, and can be used in the forensic lab and field Overview UFED Touch enables you to: Perform physical, file system, and logical extraction of device data and passwords. Capabilities may vary, based on the UFED Touch product purchased - UFED Touch Logical or UFED Touch Ultimate. Extract vital data such as call logs, phonebook entries, text messages (SMS), pictures, videos, audio files, ESN IMEI, ICCID and IMSI information and more, from a wide range of mobile devices.
12 12 Extract data from the widest selection of operating systems, such as Apple ios, Blackberry, Android, Symbian, Microsoft Mobile, and Palm OS. Clone the SIM ID, which allows you to extract phone data while preventing the mobile device from connecting to the network. It can also help if the SIM card is missing. Extract the data from a mobile device either by a cable based connection (serial or USB) or a Bluetooth wireless connection. The tips and cable kit consists of four master cables and various tips. The extracted data can be saved to any standard USB mass storage drive, SD card, or PC, and then generated in the form of clear and concise reports.


13 Chapter 1: Introduction 13 Cellebrite s industry expertise provides reliability and ease-of-use, and ensures the broadest support for mobile devices, including updates for newly released models before they are available to the market. Figure 1: UFED Touch unit
14 UFED Touch extraction types and device tools UFED Touch includes a range of data extraction types that can be accessed through the Select Extraction Type screen. NOTE: The available extraction functionalities may vary, based on the type of product purchased; the UFED Touch Logical or the UFED Touch Ultimate product. Table 1-1: Functionalities of the UFED Touch products Functionality UFED Touch Logical UFED Touch Ultimate Logical Extraction Yes Yes SIM Data Extraction Yes Yes Password Extraction Yes Yes Clone SIM Yes Yes File System Extraction Not available Yes Physical Extraction Not available Yes The extraction types are: Logical extraction (page 73)
15 Chapter 1: Introduction 15 Logical Extraction enables the extraction of various data types. This includes call logs, phonebook entries, SMS text messages, MMS, s, calendar events, multimedia files (images, videos, and so on), and more. SIM data extraction (page 89) Sim Data Extraction enables the extraction of information from a SIM or USIM card to a removable storage device or PC. File system extraction (page Error! Bookmark not defined.) File System Extraction enables a full system extraction of a source mobile device's memory. Password extraction (page Error! Bookmark not defined.) Password Extraction enables the extraction of passwords from a source mobile device and displayed directly in the Password Obtained screen, or saved. Clone SIM (page 130) Clone SIM ID copies a SIM ID from one SIM card to another SIM or to a UFED SIM ID Access Card.
16 16 Physical extraction (page 151) Physical Extraction uses advanced methods in order to extract a physical bit-for-bit image of the flash memory of a mobile device, including unallocated space. Unlike conventional logical extraction processes, physical extraction bypasses the mobile device s operating system, and extracts data from the phone's internal flash memory directly. Unallocated space may contain deleted items such as SMS, call logs, phonebook entries, pictures, and videos. All types of extractions can be done to a removable storage device or PC. The Device tools (page 151) menu tab is also located in the Select Extraction Type screen, and includes: Bluetooth scan Switch to CDMA offline mode Odin mode Test Peek/ Poke functionality Activate TomTom trip log Uninstall Windows Mobile Client Uninstall Android Client

17 Chapter 1: Introduction UFED Touch accessories The UFED Touch kit includes connection cables and tips. These are used in order to connect mobile devices to UFED Touch. Figure 2: UFED Touch Cables and tips The UFED Touch Ultimate kit contains tips and cables for logical, file system, and physical extractions. The UFED Logical kit contains tips and cables for Logical Extraction only.
. Each cable has a letter and name for example: A Adapter USB. Figure 3: Single cable")
18 Using cables and tips The cables and tips set includes up to various adapter cables (the number of cables depends on the UFED product and kit purchased). Each cable has a letter and name for example: A Adapter USB. Figure 3: Single cable


19 Chapter 1: Introduction 19 For easy recognition, the tips are color coded and numbered; the color represents the vendor. Figure 4: UFED Touch tip (example) Before each extraction, the required cable and tip number and color is specified in the Source area of the Select Content Types screen.

20 20 Figure 5: Enlargement of notification

21 Chapter 1: Introduction Supported devices To find out which mobile devices are supported in UFED Touch and which data extraction capabilities are available for every mobile device use one of the following: The UFED <version no> Supported Phone List file is delivered with every UFED software version update. The Microsoft Excel file contains two worksheets: The UFED Logical sheet lists the mobile devices supported for logical extraction. The UFED Physical sheet lists the mobile devices supported for physical, file system, and password extractions. Figure 6: Supported devices list Excel file UFED Phone Detective (devices supported for logical extraction only).
22 22 On Cellebrite's website: Logical extraction: l/ufed-logical-supported-phones.html Physical extraction: te/ufed-physical-supported-phones.html 1.5. Cellebrite YouTube channel For your convenience, a selection of useful videos demonstrating typical workflows and common procedures are available at (
23 Chapter 1: Introduction 23
24
25 Chapter 2: Orientation to the UFED Touch unit This section describes the layout and components of the UFED Touch unit Top view Access the UFED Touch application through the UFED Touch screen. Navigate the application using a stylus or your index finger. The screen can be tilted into position as desired.

26 26 The following components can be found in the top panel: Figure 7: UFED Touch top view


27 Chapter 2: Orientation to the UFED Touch unit 27 The LED indicator panel displays the following: Figure 8: Top panel LED indicators


28 Front panel The SIM card slot is located in the front panel of the UFED Touch unit. Figure 9: UFED Touch front panel 2.3. Back panel The back panel of the UFED Touch unit includes multiple ports and a security slot. The ports are protected by a cover. To gain access to the back panel, flip the cover open. The cover is hinged to the unit.
29 Chapter 2: Orientation to the UFED Touch unit 29 The back panel includes the following components: Figure 10: UFED Touch back panel
 panel of the UFED Touch unit includes")
30 Left panel The left (source) panel of the UFED Touch unit includes the following components: Figure 11: UFED Touch left panel
 panel of the UFED Touch unit includes the following")
31 Chapter 2: Orientation to the UFED Touch unit Right panel The right (target) panel of the UFED Touch unit includes the following components: Figure 12: UFED Touch right panel


32 Bottom Panel Access to the unit's battery is through the bottom panel. This panel is covered by a protective cover which includes a carry handle and brackets. The handle, brackets, and protective cover must be removed in order to reach the battery housing. The bottom panel includes the following components: Figure 13: UFED Touch bottom panel

33 Chapter 2: Orientation to the UFED Touch unit 33 The handle strap and brackets must be removed in order to remove the protective cover. The brackets are attached to the UFED Touch unit with four Phillip screws. Remove the protective covering to access the battery storage area of the UFED Touch unit. Figure 14: UFED Touch bottom panel with protective covering removed
34 34

 panel.")
35 Chapter 3: Getting started 3.1. Turning the UFED Touch Unit On or Off The On/off switch of the UFED Touch unit is located on the right (target) panel. Figure 15: Device right panel On/Off switch
 launches automatically. The UFED Touch application launches automatically.")
36 36 To turn the UFED Touch unit on: 1) Push the power switch located on the right panel of the device to the On position. The LED power indicator lights up and the startup sequence begins. Figure 16: Power indicator During the startup sequence: The operating system (Microsoft Windows XP) launches automatically. The UFED Touch application launches automatically. To turn the UFED Touch unit off: NOTE: Turning off the UFED Touch unit is similar to the standard process of turning a Windows based computer off. 1) Close the UFED Touch application. 2) Select Start > Turn Off Computer > Turn Off. To perform an immediate shut down, pull the power switch to the left and hold it until the device powers down.
37 Chapter 3: Getting started Working with UFED Touch Starting the UFED Touch application manually When you turn on the UFED Touch unit, the UFED Touch application is launched automatically. If the application does not launch automatically or if you had to previously quit, use one of the following to launch the application: Tap the UFED Touch application shortcut located in the UFED shortcuts panel at the right of the screen. Double-tap the UFED Touch icon located on the desktop.
38 Home screen All extraction functionality available in UFED Touch is driven by Vendor and Model of the device in question. UFED Touch will first ask that the user select the vendor and model of the device in question. UFED Touch will then determine what functions are available for this specific device and will present the relevant functions. The possible functions are: Logical extraction (page 73) Password extraction (page Error! Bookmark not defined.) File system extraction (page Error! Bookmark not defined.) Physical extraction (page 151) There is also the option to use Device Tools or SIM Card functionality. Device tools (page 151) Clone SIM (page 130) and SIM data extraction (page 89) On the home screen the user is presented with the Select Vendor screen, where the vendor of the device is chosen.

39 Chapter 3: Getting started 39
40 40 After choosing the Vendor, the application presents the Select Model screen where the specific model of the device is chosen:

41 Chapter 3: Getting started 41 Having chosen the Vendor and the Model, UFED Touch will determine what extraction functions are available for this combination and present those functions as follows:
42 Search function To perform a search for the mobile device: 1) In the Select Vendor screen, tap the keyboard icon in the top toolbar to activate the device keyboard. 2) Begin typing the vendor name. As you type each letter, the list of vendors is reduced to meet the criteria.
43 Chapter 3: Getting started 43 These letters appear in the Search field. The various options appear in the screen. In this example "sa" is the search criteria, and the vendors that match the criteria are displayed. 3) Select the vendor.
 In the Select Model screen tap to activate the")
44 44 The Select Model screen appears. 4) In the Select Model screen tap to activate the device keyboard.
45 Chapter 3: Getting started 45 5) Start typing the letters of the model. These letters appear in the search field. The matching options appear in the screen. 6) Select the device model type from the list. Use the down arrow to view additional models. If the vendor type is known, it is recommended the Search function is used Detect automatically To use Autodetect function to locate the mobile device: 1) Connect the mobile device to the UFED Touch unit. In the event that the device has not been connected, a waiting for a device to be connected prompt appears with a red Source arrow flashing on the left side of the screen.

46 46 The following screen appears. If the connected device cannot be recognized by the system, a message prompts you to select the device manually.

47 Chapter 3: Getting started 47

48 48 In the event that multiple matches are found, the Select Autodetected Model screen appears. 2) Select the relevant model.
49 Chapter 3: Getting started Application taskbar The application taskbar is located at the top of the touch screen. Figure 17: Application taskbar
50 50 Table 3-1: Application taskbar icons and descriptions Icon Description Wireless network connection ( = Disconnected, = Connected) Show/Hide the virtual keyboard Return to home screen Display the Settings (page 161) screen from where the device settings can be defined. Quit the application Battery indicator

51 Chapter 3: Getting started Virtual keyboard The virtual keyboard allows you to type text whenever needed. Figure 18: Virtual keyboard To show the virtual keyboard, tap the keyboard icon in the application taskbar. To hide the virtual keyboard, tap the icon in the top right corner of keyboard panel.
52 52 NOTE: The virtual keyboard is not limited for use in the UFED Touch application. It can be accessed by tapping the keyboard icon in the UFED shortcuts panel at the right of the screen. Table 3-2: Virtual keyboard icons and descriptions Icon Key Function Switch to numbers and symbols mode Switch to letters mode (from numbers and symbols mode Create a new line Delete the last character Switch between the keyboard layouts of supported languages
53 Chapter 3: Getting started 53 Icon Key Function Activate CAPS LOCK NOTE: Any external USB keyboard can be connected to a USB port in the back panel, or a Bluetooth keyboard paired with the Bluetooth interface of the device Waking up from sleep mode The UFED Touch unit enters sleep mode after being idle for 20 minutes in order to reduce power consumption. To wake the unit up: Press any of the navigation buttons on the top of the unit Charging the battery To charge the UFED Touch battery, connect the supplied power adapter to the power supply jack on the right (target) panel of the device.
54 54 The battery indicator is located within the LED panel and lights up when the power adapter is connected and display one of the following color indications: Orange - battery is charging Green - battery is fully charged 3.5. Enabling wireless and Bluetooth communication The UFED Touch unit is equipped with integrated wireless and Bluetooth communication interfaces, configurable in the operating system Device Manager list, and can be used to connect UFED TouchUFED Touch to standard WLAN networks and Bluetooth-enabled devices using the standard WLAN and Bluetooth features of the operating system. NOTE: For information regarding the use of Wi-Fi/Wireless Networks and the operating system s wireless features, contact your IT manager or system administrator. When using the wireless interfaces when the device is in battery operation mode increases battery power consumption, resulting in a shorter operation time. When the wireless interfaces are disabled, the WLAN and Bluetooth interfaces are turned off and cannot be turned on or used by the operating system, thus saving battery power. To enable or disable the wireless interfaces: Turn the Wi-Fi switch, located in the back panel of the UFED Touch unit, to ON or OFF.
55 Chapter 4: Application License Activation 55 Chapter 4: Application License Activation Before you can use the UFED Touch application, you need to install the application license provided by Cellebrite in your my.cellebrite.com account. 1) Power on your UFED Touch unit.
 On a computer, log in to your account at my.")
56 56 The UFED License Activation screen appears. 2) On a computer, log in to your account at my.cellebrite.com.
 Register the new UFED Touch unit enter the UFED Touch serial number and UFED Touch ID as they appear in the UFED Touch")
57 Chapter 4: Application License Activation 57 The Register My Device dialog box opens. 3) Register the new UFED Touch unit enter the UFED Touch serial number and UFED Touch ID as they appear in the UFED Touch unit activation window. 4) Click Add Device.
 Select your UFED Touch unit in My Devices and tap Retrieve")
58 58 The My Devices window opens listing your UFED Touch unit. 5) Select your UFED Touch unit in My Devices and tap Retrieve Licenses.
59 Chapter 4: Application License Activation 59 The license is sent via to your account as defined in MyCellebrite. 6) Copy the license.dat file to the root directory of a USB flash drive. 7) At the back of the UFED Touch unit, flip the cover open to gain access to the back panel. Figure 19: UFED Touch back panel 8) Insert the USB drive into the USB EXT 1 or 2 port. 9) On the UFED Touch unit, in the UFED License Activation screen, tap USB and follow the instructions on the unit.
60
 Do one of the following: Connect the UFED unit to your PC using a USB to mini-usb cable, utilizing the port marked PC located on the top of your UFED unit.")
61 Chapter 5: Extracting Data to PC NOTE: Extraction to a PC with Windows Vista Operating System is not supported. 1) Do one of the following: Connect the UFED unit to your PC using a USB to mini-usb cable, utilizing the port marked PC located on the top of your UFED unit. Your PC may prompt you to install drivers (refer to the UFED Touch User Manual). Connect your UFED unit to your PC using the UFED to PC cable (U-441) provided in the UFED Standard and ruggedized kits. Your PC may prompt you to install drivers (refer to the UFED Touch User Manual). Figure 20: UFED to PC cable
62 62 2) Connect the source device, using the appropriate cable, to the left USB port of the UFED device. 3) On the UFED unit: a) From the Main Menu, do one of the following: For a physical extraction, select Physical Extraction. For a file system extraction, select File System Extraction. b) Select the manufacturer of the device from the Select Model menu. c) Select the model of the device. 4) On the PC, click Start > UFED Physical Analyzer to open the UFED Physical Analyzer. The UFED Physical Analyzer application opens. 5) Click the Read Data from UFED icon in the application toolbar.
 On the UFED Touch unit, in the Select Extract Location screen, select PC.")
63 Chapter 5: Extracting Data to PC 63 The UFED Downloader window appears. 6) In the Download path area, click and browse to the desired location for the extraction. Tip: Click Open Target Folder to display the content of the selected target folder. 7) On the UFED Touch unit, in the Select Extract Location screen, select PC.
64 64 8) Follow the prompts in the UFED Touch unit until prompted to start the download procedure. 9) On the PC, in UFED Physical Analyzer, click Start in the UFED Downloader window.

65 Chapter 5: Extracting Data to PC 65 The data transfer from the device to the PC starts.

66 66 During the extraction process, the Extraction in Progress screen appears on the UFED unit:

67 Chapter 5: Extracting Data to PC 67 On the UFED unit, you are prompted to select the types of multimedia to include in the extraction:
68 68 10) Make sure that the media types that you want to include in the extraction are marked with. To cancel the extraction of a particular multimedia type, click on the multimedia name. 11) Click OK.

69 Chapter 5: Extracting Data to PC 69 The extraction process continues. When complete, the Phone Extraction Summary window appears on the UFED Touch unit.
 Click")
70 70 On the PC in UFED Physical Analyzer, the following message appears: 12) Click Yes.

71 Chapter 5: Extracting Data to PC 71 The extraction opens in UFED Physical Analyzer and the Extraction Summary screen is displayed.
72 72
73 Chapter 6: Logical extraction The Logical Extraction function enables you to extract various types of data, such as call logs, phonebook records, SMS text messages, calendar events, and multimedia files (images, videos, etc.) from a source device and saved to your PC or to a removable storage device, as desired. In addition, data can be extracted from the following Android apps: Facebook, Facebook Messenger, Google+, PingChat!, Skype, Twitter, Viber, Yahoo messenger, Whatsapp, TigerText, Dropbox, QIP, Kik Messenger, Evernote, Kakao Talk, ICQ, and Vkontakte. Data extracted from Android apps can be analyzed using UFED Logical Analyzer (although the data is not included in UFED HTML and XML reports). NOTE: The available types of extracted data may vary depending on the source device manufacturer and model. The supported data types are listed in the UFED Phone Detective or within the UFED Supported Phone List Microsoft Excel file.

74 Performing logical extraction To perform a logical extraction from a mobile device: In the home screen after choosing Vendor and Model, click Logical Extraction.
75 Chapter 6: Logical extraction Connect mobile device NOTE: The following screen appears only when more than one connection option is available. NOTE: For Apple devices use the generic option that is available in the Model selection screen. Select the connection type from the options shown.
76 Select phone memory Data can be extracted from the device memory, memory cards and SIM memory of the device. All memories can be selected or only one. The types of memories can vary between devices. Where only a single memory is available, this screen is not displayed.
77 Chapter 6: Logical extraction 77 To select a phone memory: 1) The Phone memory selection box is selected by default. It can be deselected if desired. 2) Select any other memories, as desired. 3) Tap Next to continue. The Select extraction location screen appears.
78 Select extraction location NOTE: The UFED Physical Analyzer Application must be installed on the PC before the PC option can be selected. See Extracting Data to PC (page 61).
79 Chapter 6: Logical extraction 79 To select a target location: 1) In the Select Extract Location screen, select the desired target location. Select Removable Drive to extract the device data to a USB Flash drive connected to the UFED Touch TARGET USB port (on the right panel) or SD card inserted to the SD card reader (on the back panel). Select PC to extract information directly to the PC. The Select Content Types screen appears Select content types Multiple content types are listed. The types are displayed in three different ways: Types selected by default shown with a check mark. Types available for selection shown without check marks. Types not available shown with a cross.

80 80 To select content types: 1) Select the additional content types required to be included in the information extracted from this device. 2) Tap Select All to select all the available types.
81 Chapter 6: Logical extraction 81 NOTE: Only content types that are supported by the selected device are enabled for selection. Unsupported content types appear with a cross. 3) Tap Next to continue. The Waiting for Device screen appears.
82 Extraction in progress During the extraction process, the progress bar for the Source and then the Target is active.
83 Chapter 6: Logical extraction 83 4) Tap the Keyboard button to enter a case number and then tap OK.

84 84 When extraction is complete and if required, the Source Instructions screen appears (this depends on the device model).
 Tap Continue. The Phone Extraction Summary screen appears.")
85 Chapter 6: Logical extraction 85 5) Follow the instructions to return the mobile device settings to the correct settings. 6) Tap Continue. The Phone Extraction Summary screen appears. 7) To end the process and return to the home screen, tap Finish.
86 The extracted data folder At the end of the data extraction process, the extracted data is saved in the location you selected. NOTE: The extracted data folder is named "UFED" with the selected device name, the IMEI/MEID info. and the extraction date. For example, "UFED Nokia GSM 3710 fold _06_11 (001)" The extracted data folder contains: Multimedia files folders named Audio, Images, Ringtones, and Video folders, containing each of the respective type of media files. Phone extraction report files in HTML and XML formats. (One HTML report per content type) UFED Manager files of the extracted calls log (*.clog), phonebook (*.pbb), SMS messages (*.sms), and calendar (*.cal) (*. ), MMS(*.MMS) and IM(*.IM) data. UFD file. NOTE: UFED Manager files are generated only for data types that contain items. The XML file can be viewed by both the UFED Logical Analyzer and the UFED Physical Analyzer.
87 Chapter 6: Logical extraction 87
88
89 Chapter 7: Password extraction The Extract Password function can extract the password from a device Performing password extraction To extract passwords from a mobile device: 1) In the home screen after choosing Vendor and Model, tap Password Extraction.
90 90 2) The Select Extraction Location screen appears. 3) In Select Extract Location, select the desired location. Select Display Only to display the extracted passwords on the UFED Touch display without saving them to any media.
91 Chapter 7: Password extraction 91 Select Removable Drive to save the extracted passwords to a USB drive connected to the UFED Touch TARGET USB port (on the right panel) or SD card inserted to the SD card reader (on the back panel). Select PC to save the extracted passwords to the PC. The Waiting for Device screens appears. 4) Connect the source device.
92 92 5) Tap Continue. The Extraction in Progress screen appears. At the end of the extraction process, the extracted passwords are displayed in the Passwords screen.
93 Chapter 7: Password extraction 93 6) Tap Continue to display a summary of the passwords extraction process.
94 94 7) To end the process and return to the home screen, tap Finish The extracted passwords folder At the end of the passwords extraction process, the extracted passwords are saved to a text file named Passwords.txt at the location you selected during the data extraction process.
95 Chapter 7: Password extraction 95 NOTE: The text file is located inside a folder named "Password" with the name of the selected device name and the extraction date. For example, "Passwords Iden i9 2011_06_11 (001)" 7.3. Disabling the password You can disable the password for the following Samsung models: SamsungCDMA SamsungGSM SamsungGSM SamsungGSM SamsungGSM SamsungGSM SamsungGSM SamsungGSM SamsungGSM SamsungGSM SPH-M820 Galaxy Prevail (Android) SGH-T499 Dart (Android) SGH-T589 Gravity Smart (Android) SGH-i857 Doubletime (Android) GT-i5500 Europa Galaxy 5 (Android) GT-i5510 Galaxy (Android) GT-S5570 Galaxy Mini (Android) GT-S5660 Galaxy Gio (Android) GT-S5670L (Android) GT-S5830 Ace (Android)
96 96 When you disable the password for these models using UFED Touch, UFED Touch disables the code that enables the password. Each device model has a slightly different process, depending on the phone lock combination and how the model connects to UFED Touch. 1) In the home screen, choose Vendor and Model and then tap Password Extraction.
97 Chapter 7: Password extraction 97 2) The Select Extraction Location screen appears. 3) Tap Display Only. NOTE: Do not select Removable Drive or PC.
 Follow the on-screen instructions to successfully connect to the device to UFED Touch.")
98 98 The Waiting for Device screens appears. 4) Follow the on-screen instructions to successfully connect to the device to UFED Touch. NOTE: For the greatest chance at success, press Continue immediately.
99 Chapter 7: Password extraction 99 The Executing screen appears. 5) When the Executing screen is display, click Continue.
 Do one of the following: If the device does not unlock, tap Abort, and repeat steps 5-6.")
100 100 6) Attempt to unlock the device using any password. 7) Do one of the following: If the device does not unlock, tap Abort, and repeat steps 5-6. If the device unlocks, tap Continue.

101 Chapter 7: Password extraction 101 The device is disabled until another lock is set on the device.
 Tap Continue to")
102 102 8) Tap Continue. 9) Tap Continue to finish.
103 Chapter 8: File system extraction The File System Extraction function enables you to perform a full system extraction from a device to a removable storage device or PC Performing a file system extraction 1) In the home screen after choosing Vendor and Model, tap File System Extraction. The Select Extraction Location screen appears.
104 104 2) Tap Next.
105 Chapter 8: File system extraction 105 The Waiting for Device screen appears. 3) Select the correct cable and tip for the mobile device based on the information written in the screen. 4) Change the device settings according to the instructions 5) Connect the device.
106 106 6) Connect the device to the UFED Touch SOURCE port. A red source arrow continues to flash on the left of the screen until the device is connected. 7) Tap Continue. The Extraction in Progress screen appears.
107 Chapter 8: File system extraction 107 During the extraction process, the progress bar for the Source and then the Target is active. NOTE: For QCP and Samsung MTK devices, an estimation of the time the extraction will take is displayed. When extraction is complete the File System Extraction Summary screen appears.
108 108 8) To end the process and return to the home screen, tap Finish The file system extraction folder At the end of the file system extraction process, the extracted data is saved in the location you selected previously (see Performing a File System Extraction (page 103). NOTE: The extracted data folder is named "FileSystemDump" with the selected device model and name and the extraction operation date. For example, "FileSystemDump Nokia GSM Nokia _03_12 (001)" The extracted data folder contains: Zipped archive of the device file system containing files and folders in the same structure they were extracted. UFD file containing the system extraction information, used by the UFED Physical Analyzer application. PM file. The File System extraction can be viewed using the UFED Physical Analyzer.
109 Chapter 9: Physical extraction 109 Chapter 9: Physical extraction The Physical Extraction function enables you to perform a physical bit-for-bit image of the source device memory to a removable storage device or PC Performing a physical extraction 1) In the home screen after choosing Vendor and Model, tap Physical Extraction. The Select Extraction Location screen appears.
110 110 2) Tap ADB or Boot Loader (recommended). The following screen appears.
111 Chapter 9: Physical extraction 111 3) Tap Next.
 Do one of the following: Select the correct cable and tip for the mobile device based on the instruction on the screen.")
112 112 Depending on whether or not the device requires the UFED Device Adapter, the Waiting for Device or Waiting for Device Adapter screen appears. 4) Do one of the following: Select the correct cable and tip for the mobile device based on the instruction on the screen. Change the device settings according to the instructions.
 Tap Continue.")
113 Chapter 9: Physical extraction 113 Connect the device to the UFED Touch SOURCE port. A red source arrow continues to flash on the left of the screen until the device is connected. 5) Tap Continue. The Extraction in Progress screen appears.
114 114 During the extraction process, the progress bar for the Source and then the Target is active. NOTE: For the following devices, an estimation of the time the extraction will take is displayed: Blackberry, Nokia BB5, QCP (SamM550, LgEmergency, LgP0), Android, (generic and SPF), SpreadTrum, Samsung GSM (MTK, LGInfinion, and BCM2133), and Palm.
115 Chapter 9: Physical extraction 115 When extraction is complete the Physical Extraction Summary screen appears. 6) To end the process and return to the home screen, tap Finish.
 Follow the instructions on the screen.")
116 116 In the event that the system cannot connect to the device the Extraction Summary screen appears with an error message. 7) Follow the instructions on the screen. 8) Tap Retry.
117 Chapter 9: Physical extraction The Physical Extraction folder At the end of the physical extraction process, the extracted data is saved in the location you selected during the physical extraction process. See step 5 of Performing a Physical Extraction. NOTE: The extracted data folder is named "Physical" with the selected device name and the extraction operation date. For example, "Physical Samsung GSM SGH-A _06_12 (001)" The extracted data folder contains: Binary file of the device memory. UFD file containing the system extraction information, used by the UFED Physical Analyzer application. The extraction information can be viewed using the UFED Physical Analyzer. You can double tap on the UDF file or open it via the GUI.
118
119 Chapter 10: SIM card functionality The SIM Card functions enable you to perform various SIM card related functions: - Sim data extraction - Clone SIM - File system extraction SIM data extraction The SIM Data Extraction function enables you to perform logical extraction from a SIM or USIM card to a removable storage device or PC Performing SIM data extraction The following example is performed using a SIM Card. To perform the SIM Data Extraction: 1) In the home screen, tap.

120 120 The Select Model (SIM reader) screen appears. Here you pick the type of SIM card. Information can be extracted from either Iden SIM or SIM card. 2) Tap either Iden SIM or SIM Card.

121 Chapter 10: SIM card functionality 121 3) The Select Extraction Type screen appears.
122 122 4) Select an option. The Select Extraction Location screen appears. NOTE: The UFED Physical Analyzer Application must be installed on the PC before the PC option can be selected. See Extracting Data to PC (page 61).
 or SD card inserted to the SD card reader (on the back panel). Select PC to extract information directly to the PC. The Select Content Types screen appears.")
123 Chapter 10: SIM card functionality 123 5) Select the desired location: Select Removable Drive to extract the device data to a USB Flash drive connected to the UFED Touch TARGET USB port (on the right panel) or SD card inserted to the SD card reader (on the back panel). Select PC to extract information directly to the PC. The Select Content Types screen appears.
124 124 In the Select Content Types screen, select the content types that you want to extract from the list of options on the center of the screen. To select all the available data types, tap Select All under the data types list (Select All appears after you tap one or more of the options on the screen). 6) Tap Next. The Waiting for Device screen appears.
125 Chapter 10: SIM card functionality 125 7) Insert SIM card into the SIM card reader slot located in the middle of the front panel. NOTE: The SIM red arrow prompt at the bottom of the screen continues to flash even after the SIM card has been inserted into the SIM reader slot. 8) Tap Continue. The Extraction in Progress screen appears.
126 126 9) If prompted, select which of the SIM card partitions to read. The following screen appears. 10) Tap the Keyboard button to enter a case number and then tap OK.
127 Chapter 10: SIM card functionality 127 When the extraction process is complete, the SIM Extraction Summary screen appears, displaying a summary of the extraction process.
 To end the process and return to the home screen, tap OK.")
128 128 In the event that the Phone Extraction option was selected, the Phone Extraction Summary screen appears. 11) To end the process and return to the home screen, tap OK.
129 Chapter 10: SIM card functionality The extracted SIM data folder At the end of the SIM data extraction process, the extracted SIM data is saved in the location you selected previously. NOTE: The extracted SIM data folder is named "UFED SIM card" with the extraction date and counter: "UFED SIM card SIM card <DATE> (001)" If you selected to extract to the local drive, the extracted SIM data folder is located inside the application s Backup folder. The extracted SIM data folder contains a detailed report of extracted data in both HTML and XML formats and call log file (*.clog).
130 Clone SIM The Clone SIM ID function enables you to copy the SIM ID from one SIM card to a UFED SIM ID Access Card. Cloning the SIM ID provides a suitable solution to several problems facing forensic examiners, by allowing extraction of the device data: While preventing the cellular device from connecting to the network, rendering the device invisible to the network without the ability to send or receive calls or SMS messages, and thereby preserving the device's current information. (No Faraday Bag is required to block RF signals). When the original SIM is not available, by manually programming the ICCID or IMSI into the Cloned SIM ID Card to mimic the original missing card. When the SIM card is PIN locked, by cloning the identification of the original SIM, which allows extraction of the device data without losing critical data including call history and SMS messages. There are three different ways that a SIM card can be cloned: Clone an existing SIM card - to create a cloned SIM to use to extract device data without a network connection. See Cloning an existing SIM card ID.
131 Chapter 10: SIM card functionality 131 Manually enter SIM data - to manually program the ICCID and IMSI to the cloned SIM card. See Entering SIM data manually. Create GSM Test SIM - The GSM test SIM card is used to extract device data when the original SIM is not available a default ICCID and IMSI are programmed into the Cloned SIM ID Card to mimic the original missing card. See Creating GSM test SIM Cloning an existing SIM card ID 1) In the home screen, tap Clone SIM. The Waiting for Device screen appears.
132 132 NOTE: The SIM red arrow prompt at the bottom of the screen flashes even after you insert the SIM card into the SIM reader slot. 2) Insert the SIM card into the UFED Device Adapter. 3) Tap Continue. The Select Source screen appears.
 Tap Clone an existing SIM")
133 Chapter 10: SIM card functionality 133 4) Tap Clone an existing SIM card
134 134 The Clone SIM ID prompt appears. 5) Check that the right SIM was inserted into the SIM card reader slot. 6) Tap Continue.
 Select which of the SIM card partitions to read.")
135 Chapter 10: SIM card functionality 135 If the SIM card is partitioned, a prompt appears. 7) Select which of the SIM card partitions to read. The Extraction in Progress Source screen appears.
136 136 When the information has been extracted from the SIM the Insert Target Card prompt appears. 8) Remove the original SIM card from the UFED Device Adapter SIM card reader. 9) Insert a UFED SIM ID Access Card into the UFED Device Adapter SIM card reader. 10) Tap Continue.

137 Chapter 10: SIM card functionality 137 At the end of the data process, a summary of the SIM cloning process is displayed, detailing the ICCID and IMSI information of the cloned SIM card. 11) To end the process and return to the home screen, tap OK.
138 Entering SIM data manually 1) In the home screen, click Clone SIM. The Waiting for Device screen appears. 2) Insert the UFED SIM ID Access card. 3) Tap Continue.
139 Chapter 10: SIM card functionality 139 4) The Select Source screen appears. 5) Tap click Manually enter SIM data.
140 140 6) Enter the SIM ICCID number (up to 20 digits). 7) Tap OK.
141 Chapter 10: SIM card functionality 141 The following screen appears: 8) Enter the SIM IMSI number (up to 15 digits), then click OK.
142 142 The Select Language screen appears. 9) If required, select either a language or click None.
143 Chapter 10: SIM card functionality 143 The Enter advanced settings screen appears. 10) Tap Yes or No to continue. Tap Yes to display the advanced settings. Extraction in Progress > Enter SPN screen appears. Proceed to the following step. Tap No to continue. Proceed to step 15.
, then tap OK.")
144 144 11) Enter the SIM SPN number (up to 16 digits), then tap OK. The following screen appears:
145 Chapter 10: SIM card functionality ) Enter the SIM GID 1 number (up to 8 characters) and tap OK. The Extraction in Progress > Enter GID 2 screen appears. 13) Enter the SIM GID 2 number (up to 8 characters). 14) Tap OK. The Insert Target Card prompt appears. 15) Insert the UFED SIM ID access card into the SIM reader slot. 16) Tap Continue. NOTE: Reminder: The Extraction in Progress screen is displayed throughout the data writing process.
146 146 At the end of the data writing process, a summary of the SIM cloning process is displayed, detailing the ICCID and IMSI information programmed to the SIM card. 17) To end the process and return to home screen tap OK (Finish).
147 Chapter 10: SIM card functionality Creating GSM test SIM 1) In the home screen, click Clone SIM. The Waiting for Device screen appears. NOTE: The SIM red arrow prompt at the bottom of the screen flashes even after you insert the SIM card into the SIM reader slot.
148 148 2) Insert the SIM card into the SIM card reader slot located in the left of the front panel. 3) Tap Continue. The Select Source screen appears. 4) Tap Create GSM Test SIM. The following screen appears. 5) Make sure that the target SIM card is inserted correctly into the SIM card reader slot, then tap Continue. The Extraction in Progress screen is displayed throughout the data reading process.
149 Chapter 10: SIM card functionality 149 At the end of the data writing process, a summary of the SIM cloning process is displayed, detailing the ICCID and IMSI information programmed to the SIM card. 6) To end the process and return to the home screen, tap OK.
150
151 Chapter 11: Device tools 1) In the home screen, click Device Tools. The Select Tool screen appears.
152 152 The device tools include: Bluetooth Scan (page 152) Switch to CDMA Offline Mode (page 155) Test Peek/Poke functionality (page 157) Activate TomTom Trip log (page 159) Uninstall Windows Mobile Client (page 159) Uninstall Android client (page 160) Exit Odin mode (page 160) Bluetooth Scan NOTE: This feature is available for Bluetooth-enabled PCs only. This tool scans for available Bluetooth devices in your proximity and enables you to pair with them. Make sure that the Bluetooth feature of the device is enabled. Make sure that the Bluetooth switch is on.
 Tap Continue. 3) A list of Bluetooth devices in the vicinity appears.")
153 Chapter 11: Device tools 153 To perform a Bluetooth scan: 1) In the Device Tools > Select Tool screen, tap Bluetooth scan. The Connecting Bluetooth prompt appears. 2) Tap Continue. 3) A list of Bluetooth devices in the vicinity appears. Select one or the following options:
154 154 Tap one of the devices Device summary screen appears Tap Continue Device summary screen appears Tap Refresh list - Device tool in progress screen appears and UFED Touch tries to find additional devices.
155 Chapter 11: Device tools Switch to CDMA offline mode This tool enables you to switch radio on CDMA devices to offline mode. To switch to CDMA offline mode: 1) In the Device Tools > Select Tool screen, tap Switch to CDMA offline mode. The Select Link prompt appears. 2) Select the link type (USB cable or Serial cable). The Device Tool in Progress screen appears.
156 156 The Device Tool Summary appears.
157 Chapter 11: Device tools Test peek/poke functionality This tool enables you to perform a Peek/Poke test in order to check if the device is supported by the UFED Touch. To Test Peek/Poke functionality: 1) In the Device Tools > Select Tool screen, tap Test Peek/Poke functionality. The Select Link prompt appears. 2) Select the link type (USB cable or serial cable).
158 158 The Device Tool in Progress screen appears. The Peek check reply prompt appears. 3) Tap Continue. The Device Tool in Progress screen appears. The Reporting prompt appears.
159 Chapter 11: Device tools Activate TomTom trip log This tool enables you to activate or deactivate the trip log sharing feature of a connected TomTom device, which is often disabled by the user To Activate TomTom trip log: 1) In the Device Tools > Select Tool screen, tap Activate TomTom trip log. The Select Mode prompt appears. 2) Select the desired mode. A prompt labeled Attention appears requesting to connect the device to the PC. 3) Connect the device to the PC. 4) Tap Continue Uninstall Windows Mobile Client In order to perform Logical Extraction, the client is installed on the device. In some cases, due to device failure, or if the mobile device was improperly disconnected from the UFED Touch, the client remains installed on the mobile device. This option enables the client to be manually uninstalled.
160 Uninstall Android client In order to perform Logical Extraction, the client is installed on the device. In some cases, due to device failure, or if the mobile device was improperly disconnected from the UFED Touch, the client remains installed on the mobile device. This option enables the client to be manually uninstalled Exit Odin mode In order to perform Logical Extraction, the device is placed in Odin mode. In some cases, due to device failure, or if the mobile device was improperly disconnected from the UFED Touch, the mobile device remains in Odin mode. This option enables the device to be taken out of Odin mode.
161 Chapter 12: Settings 161 Chapter 12: Settings The settings screen provides access to a set of functional and behavioral setup options used to control the functionality and usability of UFED Touch. To access the settings screen, click in the application taskbar. The settings are grouped in the settings screen in the following tabs: General (page 162) Report settings (page 174) System settings(page 180) License settings (page 182) Version details (page 184) Users permissions (page 186) Network (page 197) The settings screen opens on the General tab.

162 General settings The settings screen opens on the General tab.
163 Chapter 12: Settings 163 The General tab provides access to the following functions and settings: Managing the Custom List (page 163) Changing the application interface language (page 169) Mobile Extraction Client (page 173) Changing the extraction location (page 173) To swap the first and last name in the phone book: Select Swap first and last name in phonebook Managing the custom list The Custom List is the list of devices available for use during the Logical Extraction process. Device models can be added to or deleted from the list. Multiple device models can be defined. After a Custom List has been defined, a Custom List button is added to the Logical Extraction screen.
164 164 To add devices to the custom list: 1) Tap in the application taskbar. The settings screen opens on the General tab. 2) Tap Edit Custom List.
165 Chapter 12: Settings 165 The Custom List opens. In the event that devices have been previously defined in the custom list, the vendor names are selected. In this example the Apple device was previously defined for the custom list and is indicated with a blue. NOTE: Use and to scroll through the lists of manufacturers and devices.
 Select one or more device models that you would like to associate with this Device Manufacturer.")
166 166 3) In the Custom List, select the required device vendor. For example, Alcatel. The list of device models opens. 4) Select one or more device models that you would like to associate with this Device Manufacturer. A blue appears in each selected device model box.
 Repeat steps 2-4 for each device manufacturer and model/s to be added to the Custom List.")
167 Chapter 12: Settings 167 5) Tap Back. The selected manufacturer is marked with a blue. 6) Repeat steps 2-4 for each device manufacturer and model/s to be added to the Custom List. 7) Tap Finish.
168 168 To remove a device from the Custom List: 1) Tap Edit Custom List. 2) In the displayed Custom List dialog, select a device manufacturer marked with a blue that you would like to remove (all the associated models or only one). 3) Select one or more device models marked with a blue that you would like to remove from the Custom List. The mark is removed. 4) Tap Back. 5) Repeat steps 2-4 for each device that needs to be removes from the Custom List. NOTE: Removing all the marked devices of a manufacturer also removes its blue mark. 6) Tap Finish.
169 Chapter 12: Settings Changing the application interface language 1) Tap the language field.
170 170 The Select Single Value screen appears with the current language selected. (In this case, English). NOTE: Use the arrows to scroll through the list of available interface languages.
 Tap the required")
171 Chapter 12: Settings 171 2) Tap the required language.
172 172 The following message appears: 3) Tap OK. The General tab appears with the language of choice in the Interface language field. 4) Tap Save to close the Settings panel. 5) To restart the application: a) To close the application, Tap in the application taskbar. b) To re-launch the application, do one of the following:
173 Chapter 12: Settings 173 Tap the application shortcut icon located in the UFED shortcuts panel at the right of the screen. Double-tap the UFED Touch icon located on the Desktop. Tap Start > UFED Touch Tap Start > All Programs > Cellebrite Touch > UFED Touch. UFED Touch launches in the selected language Mobile extraction client To operate in covert mode: In the Settings > General tab, select the following: Operate in covert mode - Renames the application client name from "Cellebrite.sis/exe" to "AAA.sis/exe". Uninstall reminder - When enabled, the UFED Touch prompts you to uninstall the client from the examined smartphone.

174 Report settings
175 Chapter 12: Settings 175 To set the report settings: 1) Access the Settings > Reports tab. 2) To set the generated reports language, click next to Generate Reports Language, and select the desired language. 3) To set how the known issues notes about the extracted device are logged in the generated report, click next to Note display modes, and select one of the following: Disable Do not include device specific notes in the report. Separated Notes Add all the device specific notes at the end of the report. Embedded Notes Device-specific notes follow the content type they refer to in the report. 4) To set the generated reports visual formats, click next to Report format, and select one of the following: Normal The standard report structure, suitable to standard display screens. Compact A compact report structure, suitable for devices with a small display area. 5) To set the generated reports folder name formats, select next to Report folder format, and select one of the following: Model Serial YYYY_MM_DD The folder name is constructed from <the model name> <the model serial> <the year in 4 digits>_<the month in 2 digits>_<the day in 2 digits>
176 176 YYYYMMDD Model Serial The folder name is constructed from <the year in 4 digits><the month in 2 digits><the day in 2 digits> <the model name> <the model serial> 6) Select or clear Show MD5 to toggle the display of the MD5 values which are generated for each file in the extracted data. 7) Select Create MD5 list file to generate a Checksums.md5 file that contains all the generated MD5 values of the extracted data. 8) Select or clear Show SHA256 to toggle the display of the SHA 256 values which are generated for each file in the extracted data. 9) Select or clear Partial Extraction to set, in the event of an extraction error, whether or not to include the partially extracted data up to the error point in the generated report. 10) Tap Report custom fields to add, remove and edit report fields. For more information, see Managing report fields (page 177). 11) To set a field as required, click the field in the Required column. 12) Tap Save.
 Tap Report custom fields to customize the report by defining additional fields which will be filled at the")
177 Chapter 12: Settings Managing report fields 1) Access the Settings > Reports tab. 2) Tap Report custom fields to customize the report by defining additional fields which will be filled at the end of the extraction.
178 178 3) To add a new field: a) Tap Add. b) Enter the field name in the Field Name box. NOTE: To display the keyboard, click Keyboard. c) To set the field as mandatory, select Required next to the field name. d) Tap Update, or to exit without saving, tap Cancel. 4) To add additional fields, repeat step 3.
179 Chapter 12: Settings 179 5) To edit an existing field: a) Tap the field in the list, and click Edit. b) Repeat steps 3b-3d. NOTE: You cannot edit the field name of a default custom field. 6) To delete a field: a) Tap the field in the list, and click Delete. b) In the confirmation message, click Yes. 7) Tap Save in the Reports tab.

180 System settings Set the following in the System tab: Additional settings Extraction target
181 Chapter 12: Settings 181 Define the following additional settings in the System tab: 1) To set the unit to make a sound for UFED Touch operations such as failure, select Play notification sounds. 2) To display the screensaver that appears after the unit is idle for a period, select Disable screensaver. 3) To change the ULG log level, click next to ULG logs level, and select one of the following: Disable set to not generate log files. Normal set to generate log files. If the transaction is very fast, not all the information is written to the log. Detailed set to generate detailed log files. The transaction will be slower in order to write to the log. Recommended in case of debugging/error situation. 4) To export system information, click Export system information. 5) To save the application logs, click Export application logs. 6) To monitor device usage, click the Transactions counter. This counts the number of transactions performed on the UFED Touch. Transactions include all extractions per type and device tool actions. The counters are managed locally and can be reset.
182 License settings The license can be updated via the network (Web), or a using an external device (via USB port). To update the license via the web: NOTE: Before updating the license from the network ensure that the device is connected to the network. In the License tab, tap Web.
183 Chapter 12: Settings 183 The following message appears: To update the license from an external device (via USB port): 1) Save the license file on the root directory of the USB flash drive. 2) Connect the external device to the UFED Touch Ext1 or Ext 2 USB ports on the back panel. 3) Tap USB. UFED Touch identifies the license file automatically, and updated information appears on screen.

184 Version details The version details display information about the UFED Touch version and build. The Version tab displays current information regarding the license and the available version for upgrade.
185 Chapter 12: Settings 185 The following information is displayed: Version The application version For more information on downloading a software update or new version, see Updates and versions Updates and versions When UFED Touch is connected to the network, automatic notifications appear in the event of updates and new versions of the application. Tap Refresh in the Settings > Version tab to update the information available on the screen. To install a newer version of the UFED Touch application via the web: NOTE: Before using this option, please ensure that the unit is connected to the network. In the Settings > Version tab, in the Version area, tap Web. The unit upgrades the application to the latest version available on the Cellebrite download server. To install a newer version of the UFED Touch application using an external device (via USB port): 1) Download the latest application version from your account in My Cellebrite, and save it to the root directory of the external device.
186 186 2) Connect the external device to the UFED Touch Ext1 or Ext 2 USB ports on the back panel. 3) In the Settings > Version tab, in the Version area, tap USB. 4) UFED Touch identifies the new software file and starts the upgrade process Users permissions UFED Touch enables user authentication ensuring that only users with the right credentials can access the application. Access rights are further enforced by defining permission levels per profile. For more information, see Permission management page 189).
 Select Enable Users Permissions and click Import.")
187 Chapter 12: Settings 187 To import user permissions: 1) Run the UFED Touch as an administrator. 2) Select Enable Users Permissions and click Import. The following warning appears.
. 4) Tap Open and then tap Save.")
188 188 3) Tap Yes and navigate to the directory where the permission management file (*.cp) is located. For information on creating a permission management file, see Using the UFED Permission Manager page 189). 4) Tap Open and then tap Save. 5) Restart the UFED touch application, which will now prompt for login credentials. 6) Use one of the login credentials configured in the permission management file. For more information, see Permission management.
189 Chapter 12: Settings Permission management The administrator can create multiple profiles using the UFED Permission Manager standalone application. Each profile contains access permissions, including operation rights per extraction type, content types etc. A single profile can be assigned to multiple users. The users and profiles can be exported into an encrypted permission management file, which can be imported into multiple UFED Touch applications Using the UFED Permission Manager To create a new profile: 1) Download the latest UFED Permission Manager application from your account in MyCellebrite, and save it to a directory on a PC or external device. 2) Run the UFED Permission Manager and follow the setup instructions. The UFED Permission Manager screen appears.
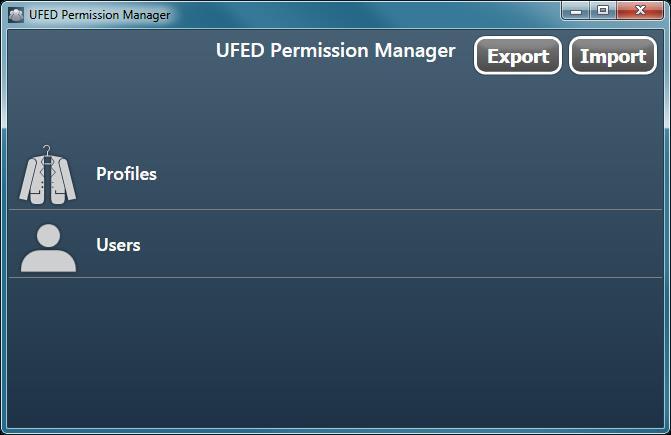
190 190
191 Chapter 12: Settings 191 3) Click Profiles. 4) Click New Profile. The following screen appears.
192 192 5) Enter a name and description for this profile, and then click the Extraction Types tab.
193 Chapter 12: Settings 193 6) Select the options for this profile, such as Admin who can manage users, and the Extraction Type: Logical Extraction, SIM Data extraction, Password extraction etc. NOTE: At least of the enabled users must be an Administrator (Admin). 7) Click Save and proceed to create a new user.
194 194 To create a new user: 1) In the UFED Permission Manager screen, click Users. The following screen appears. 2) Click New User. The following screen appears.
 Select a profile for the user. 5) Click User is disabled to enable the user.")
195 Chapter 12: Settings 195 3) Enter the details for the new user including Username, Display Name, Description, and Password. 4) Select a profile for the user. 5) Click User is disabled to enable the user. 6) Click Save.
 Click OK. NOTE: The next time you run the UFED Permission Manager you will be prompted for your user credentials to access the application.")
196 196 To export an encrypted permission management file: 7) In the UFED Permission Manager screen, click Export, specify a directory for the file and click Save. The following screen appears. 8) Click OK. NOTE: The next time you run the UFED Permission Manager you will be prompted for your user credentials to access the application. NOTE: Click Import to configure an existing permission management file.

197 Chapter 12: Settings Network Local Area Network, Wireless Network and Bluetooth connections.
UFED Touch User Manual January 2015
 UFED Touch User Manual January 2015 Legal Notices Copyright 2015 Cellebrite Mobile Synchronization Ltd. All rights reserved. This manual is delivered subject to the following conditions and restrictions:
Lenovo TAB A User Guide V1.0. Please read the safety precautions and important notes in the supplied manual before use.
 Lenovo TAB A10-70 User Guide V1.0 Please read the safety precautions and important notes in the supplied manual before use. Chapter 01 Lenovo TAB A10-70 Overview 1-1 Appearance 1-2 Buttons 1-3 Turning
UNIVERSAL FORENSIC EXTRACTION DEVICE USER MANUAL
 UNIVERSAL FORENSIC EXTRACTION DEVICE USER MANUAL UFED Standard UFED Ruggedized UFED SYSTEM UNIVERSAL FORENSIC EXTRACTION DEVICE USER MANUAL June 2009 version 4b This manual is delivered subject to the
BEAT 2.0 USER MANUAL
 BEAT 2.0 USER MANUAL FCC ID: 2ADLJBEAT20 The device complies with part 15 of the FCC Rules. Operation is subject to the following two conditions: (1) This device may not cause harmful interference, and
Catalogue. Assembling... 1 Unpack Charge the Battery Install the Memory Card Product Basics Buttons and Connections...
 Catalogue Assembling... 1 Unpack... 1 Charge the Battery... 1 Install the Memory Card... 1 1 Product Basics... 2 1.1 Buttons and Connections... 2 1.2 Start Up and Shut Down... 2 2 Introduction of Google
MPE+ Frequently Asked Questions & Troubleshooting
 MPE+ Frequently Asked Questions & Troubleshooting Version 7 (4.5.0.45078) 2011 AccessData Group, LLC Table of Contents Mobile Forensics Background Knowledge... 4 Q. What is the difference between Computer
HotSpot USER MANUAL. twitter.com/vortexcellular facebook.com/vortexcellular instagram.com/vortexcellular
 HotSpot USER MANUAL www.vortexcellular.com twitter.com/vortexcellular facebook.com/vortexcellular instagram.com/vortexcellular 1 Contents Quick User Guide... 2 1. Power On/Off... 2 2. Turn On /Off Screen...
IdeaTab S6000. User Guide V1.0. Please read the safety precautions and important notes in the supplied manual before use.
 IdeaTab S6000 User Guide V1.0 Please read the safety precautions and important notes in the supplied manual before use. Chapter 01 IdeaTab S6000 Overview *Specific models only 1-1 IdeaTab Appearance 1-2
Optus Blitz ZTE BLADE V7 LITE Quick Start Guide
 Optus Blitz ZTE BLADE V7 LITE Quick Start Guide Search ZTE Australia on Facebook, Google+ and Twitter to keep in touch. ZTE 2016 Ver 1.0 May 2016 Copyright 2016 by ZTE Corporation All rights reserved.
Specifications. What s Inside The box
 Tablet of Contents Specifications.1 What s inside the box 1 Tablet Parts 2 Getting started...2 Connecting to the Internet..6 Task Bar..8 Install and Uninstall 9 Camera.10 HDMI.11 Trouble Shooting 11 Warranty..13
MOBILedit Forensic Express
 MOBILedit Forensic Express All-in-one phone forensic tool from pioneers in the field MOBILedit Forensic Express is a phone and cloud extractor, data analyzer and report generator all in one solution. A
Get Started. Insert SIM card The phone is a Dual SIM mobile phone allowing you to use the facility of two networks.
 Thank You for Purchasing this Smart mobile device. This device will provide you with high quality mobile communication and entertainment based on SMART and high standards. Content in this manual may differ
FAQ for KULT Basic. Connections. Settings. Calls. Apps. Media
 FAQ for KULT Basic 1. What do the Icons mean that can be found in notifications bar at the top of my screen? 2. How can I move an item on the home screen? 3. How can I switch between home screens? 4. How
+ THE UFED ADVANTAGE DEVICE SUPPORT APPLICATION SUPPORT
 + + As the number of mobile devices grows, so does the volume and complexity of mobile device data. Rapid and timely deployment of the right mobile forensic tools to extract data quickly has never been
IdeaTab A1000L-F. User Guide V1.0. Please read the Important safety and handling information in the supplied manuals before use.
 IdeaTab A1000L - UserGuide IdeaTab A1000L-F User Guide V1.0 Please read the Important safety and handling information in the supplied manuals before use. file:///c /Users/xieqy1/Desktop/EN UG/index.html[2013/8/14
Battery Charging The tablet has a built-in rechargeable Li-polymer battery.
 Attention: This handbook contains important security measures and the correct use of the product information, in order to avoid accidents. Pls make sure to reading the manual carefully before use the device.
 1.1 1.2 2.1 2.2 2.3 3.1 3.2 INTRODUCING YOUR MOBILE PHONE Learn about your mobile phone s keys, display and icons. Keys From the front view of your phone you will observe the following elements: (See 1.1
Quick Start Guide U.S. Cellular Customer Service
 Quick Start Guide U.S. Cellular Customer Service 1-888-944-9400 LEGAL INFORMATION Copyright 2017 ZTE CORPORATION. All rights reserved. No part of this publication may be quoted, reproduced, translated
Getting Started Select Wireless Manager. Wireless Manager Window. To enable or disable a wireless connection, tap the specific button.
 Getting Started 1-11 Select Wireless Manager. Figure 1-10 Wireless Manager Window To enable or disable a wireless connection, tap the specific button. To enable or disable all wireless connections, tap
Contents. Get Started Install SIM Card
 Contents Get Started... 2 Install SIM Card... 2 Insert Micro SD card... 2 Charge Mobile Phone... 3 PC-Phone File Transfer... 4 Keys and Parts... 5 Fingerprint... 7 Lock and Unlock the Screen... 9 Notification
A quick guide to your. Xda Stellar
 A quick guide to your Xda Stellar Contents Section 1 Getting started 02 Install the SIM card 02 Install the MicroSD card 03 Installing the battery 04 To turn the device on or off 05 Synchronise your PDA
Lenovo A5500. User Guide V1.0. Please read the safety precautions and important notes in the supplied manual before use.
 Lenovo A5500 User Guide V1.0 Please read the safety precautions and important notes in the supplied manual before use. Chapter 01 Lenovo A5500 Overview 1-1 Appearance 1-2 Buttons 1-3 Activating/Deactivating
User Guide. Welcome to HUAWEI
 User Guide Welcome to HUAWEI Contents Introduction.................................... 1 Installation..................................... 2 Keys and Functions.................................. 2 Installing
Paraben s DS 7.5 Release Notes
 Paraben s DS 7.5 Release Notes Welcome to Paraben s DS Mobile Forensic Solution! DS is designed to allow investigators to acquire the data contained on mobile phones, smartphones, tablets, GPS, and PDA
PHAROS. GPS Phone 600 Series. Hardware Quick Start Guide. Travel with ease and confidence
 R PHAROS GPS Phone 600 Series Hardware Quick Start Guide Travel with ease and confidence Pharos GPS Phone 600 Series Quick Start Guide GPRS / EDGE Settings for AT&T / Cingular 1. Tap Start, Settings >
Contents Welcome Know your Device Greeting started Features Accessing the Internet Taking Care of Your Device
 Thank you for purchasing the tablet PC and it is packaged with the following state of the art features and much more: 1 GHz Processor 7 Inch Full touch screen with Pinch Zoom 3G Dongle support via USB
Table of contents. 2 Samsung Care. 3 Know Your Device. 5 S Pen. 7 Device Setup. 12 Home Screen. 18 Apps. 19 Calls. 20 Voic .
 Table of contents 2 Samsung Care 3 Know Your Device 5 S Pen 7 Device Setup 12 Home Screen 18 Apps 19 Calls 20 Voicemail 21 Contacts 22 Messages 24 Camera 25 Internet 26 Connections 27 Security Samsung
VEGA. Operation Manual T A B L E T P C. advent vega operation manaul_new.indd 1
 VEGA T A B L E T P C Operation Manual advent vega operation manaul_new.indd 1 advent vega operation manaul_new.indd 2 CONTENTS SETTING UP YOUR TABLET FOR THE FIRST TIME... 4 USING THE DEVICE S BUTTONS
Using memory cards (not supplied)
") Chapter 1. Getting to know your computer Using memory cards (not supplied) Your computer supports the following types of memory cards: Secure Digital (SD) card Secure Digital High Capacity (SDHC) card
Chapter 1. Getting to know your computer Using memory cards (not supplied) Your computer supports the following types of memory cards: Secure Digital (SD) card Secure Digital High Capacity (SDHC) card
Dash 4.0. User Manual
 1 Dash 4.0 User Manual Table of Contents Safety Information... 3 Appearance and Key Function... 4 Introduction... 5 Call Functions... 6 Contacts... 7 Messaging... 8 Internet Browser... 9 Bluetooth... 10
STUDIO 7.0 USER MANUAL
 STUDIO 7.0 USER MANUAL 1 Table of Contents Safety Information... 3 Appearance and Key Functions... 4 Introduction... 5 Call Functions... 6 Notifications Bar... 7 Contacts... 8 Messaging... 9 Internet Browser...
Lenovo N22. User Guide. included manuals before using your computer. included manuals before using your computer.
 Lenovo N22 User Guide Read Read the the safety safety notices notices and and important important tips tips in in the the included manuals before using your computer. included manuals before using your
Contents. Introduction. Getting Started. Navigating your Device. Customizing the Panels. Pure Android Audio. E-Books
 Contents Introduction Getting Started Your Device at a Glance Charging Assembling the Power Adapter Turning On/Off, Unlocking Setting to Sleep and Waking Up Inserting and Removing a microsd Card Connecting
Studio 5.5. User Manual
 Studio 5.5 User Manual 1 Table of Contents Safety Information... 3 Appearance and Key Function... 4 Introduction... 5 Call Functions... 6 Contacts... 7 Messaging... 8 Internet Browser... 9 Bluetooth...
LIFE PURE User Manual
 LIFE PURE User Manual 1 Table of Contents Safety Information... 3 Appearance and Key Function... 4 Introduction... 5 Call Functions... 6 Contacts... 7 Messaging... 8 Internet Browser... 9 Bluetooth...
Quick Reference Guide
 Quick Reference Guide Unlocked ¹ Table of Contents 2 Samsung Care 3 Know your device 5 Device setup 9 Home screen 12 Volume and ringtones 13 Hello Bixby 14 Useful apps 15 Calls 16 Voicemail 17 Contacts
LT30 GETTING STARTED GUIDE GPS/GIS HANDHELD CONTROLLER
 LT30 GETTING STARTED GUIDE GPS/GIS HANDHELD CONTROLLER Copyright Copyright 2009-2012 CHC Shanghai HuaCe Navigation Technology Ltd. All rights reserved. The CHC are trademark of Shanghai Huace Navigation
Contents. Introduction. Getting Started. Navigating your Device. Customizing the Panels. Pure Android Audio. E-Books. Browsing the Internet
 Contents Introduction Getting Started Your Device at a Glance Charging Assembling the Power Adapter Turning On/Off, Unlocking Setting to Sleep and Waking Up Connecting to a Computer Navigating your Device
User Guide. BlackBerry 8300 Smartphone
 User Guide BlackBerry 8300 Smartphone SWDT178576-178576-0323102356-001 Contents BlackBerry basics... 11 Switch applications... 11 Assign an application to a Convenience key... 11 Set owner information...
Tablet PA752C. User Manual
 Tablet PA752C User Manual User Manual Notice Before operating the device, please read the safety precautions and user s guide carefully to ensure safe and proper usage. The descriptions in this user s
Contents. Introduction
 Page 1 of 15 Contents Introduction Getting Started Your Device at a Glance Charging Assembling the Power Adapter Turning On/Off, Unlocking Setting to Sleep and Waking Up Inserting and Removing a microsd
CONTENT FUNCTION MENU... 6
 CONTENT BASIC INFORMATION... 3 Phone Instruction... 3 Interface Icons... 4 Insert SIM card... 5 Charging the battery... 5 Power on/off your phone... 5 FUNCTION MENU... 6 PHONEBOOK... 6 MESSAGING... 6 Write
Handbook. CLIÉ handheld basic operations. Exchanging and updating files/data using the HotSync operation. Entering text on your CLIÉ.
 A-BU6-100-11 (1) CLIÉ handheld basic operations Exchanging and updating files/data using the HotSync operation Entering text on your CLIÉ handheld Customizing your CLIÉ handheld (Preferences) Exchanging
User Operating Manual
 User Operating Manual Contents 1 Introduction... 1 1.1 Acknowledgements... 1 1.2 Safety Notice... 1 1.3 Abbreviation/term... 2 2 Brief Product Introduction... 3 2.1 Diagram for TABLET... 3 2.2 Introduction
Table of Contents 2 Device Functions 4 Device Setup 8 Call Features 9 Voic Customize Your Device 12 Contacts 13 Messages 15 Connections
 Table of Contents 2 Device Functions 4 Device Setup 8 Call Features 9 Voicemail 10 Customize Your Device 12 Contacts 13 Messages 15 Connections 16 Apps & More 19 Security Device Functions Front View Front
Basics. screen? CALLS. In call. Missed call. Speakerphone on. Mute your microphone. Make another call. Turn on the speakerphone
 Basics 1. What do the Icons mean that can be found in notifications bar at the top of my screen? CALLS In call Missed call Speakerphone on Mute your microphone Show the dial pad Put a call on hold Make
Point of View SmartTV-500 Center - Android 4.2. General notices for use...2 Disclaimer...2 Box Contents...2
 Point of View SmartTV-500 Center - Android 4.2 English Table of Contents General notices for use...2 Disclaimer...2 Box Contents...2 1.0 Product basics...3 1.1 Buttons and connections... 3 1.2 Connecting
1. Introduction. 1.1 Cosmo Specifications
 1. Introduction 1.1 Cosmo Specifications Details CPU Memory Storage Operating System Connectivity Sensor Camera Display Video Formats Description Quad Core 1.3 GHz ARM Cortex A7 Processor 512MB RAM 8 GB
How to use the HTC Desire C mobile devices
 How to use the HTC Desire C mobile devices Orientation First, a quick overview of your primary buttons and areas of your phone. A B C D E F G H A) Headphone Jack B) Power Hold down to power your phone
Tablet PC. Android 5.1 User Manual
 Tablet PC Android 5.1 User Manual Tablet of Contents Specifications. What s inside the box Tablet Parts Getting started... How to use TF card How to connect to PC Connection to Internet.. Camera. Trouble
NEO 4.5. User Manual
 1 NEO 4.5 User Manual Table of Contents Safety Information... 3 Appearance and Key Function... 4 Introduction... 5 Call Functions... 6 Contacts... 7 Messaging... 8 Internet Browser... 9 Bluetooth & Wi-Fi...
User Guide. BlackBerry Curve 8330 Smartphone
 User Guide BlackBerry Curve 8330 Smartphone SWD-319876-1213120259-001 Contents BlackBerry basics...11 Switch typing input methods...11 Switch applications...11 Assign an application to a Convenience key...11
Maxwell RSC Tablet PC Configuration Manual for use with Windows 8 Operating System
 Maxwell RSC Tablet PC Configuration Manual for use with Windows 8 Operating System TM537 1/18 Table of Contents 1 Maxwell RSC Instrument and Tablet PC...1 2 Glossary...3 3 Adjusting Volume Settings...5
For your safety and protection of the E-bot, please read and abide by the following important safety precautions.
 2 P age Safety Precautions For your safety and protection of the E-bot, please read and abide by the following important safety precautions. 1) Do not plug the AC adapter into a faulty electrical outlet.
User Guide. BlackBerry 8707 Series
 User Guide BlackBerry 8707 Series SWD-129381-0116055452-001 Contents BlackBerry basics... 9 Switch applications... 9 Assign an application to a Convenience key... 9 Set owner information... 9 About links...
UFED Cloud Analyzer. Traces and changes. February Version 6.0
 UFED Cloud Analyzer Traces and changes February 2017 Version 6.0 Legal notices Copyright 2017 Cellebrite Mobile Synchronization Ltd. All rights reserved. This manual is delivered subject to the following
User Manual. Product Model: MiTraveler 7D-8B. OS: Android 4.1
 User Manual Product Model: MiTraveler 7D-8B OS: Android 4.1 Tablet of Contents Specifications.1 What s inside the box 2 Tablet Parts 2 Getting started...2 Connection to Internet..6 Task Bar..8 Install
User Guide. BlackBerry 8820 Smartphone
 User Guide BlackBerry 8820 Smartphone SWD-280419-0221054322-001 Contents BlackBerry basics...9 Switch applications...9 Assign an application to a Convenience key...9 Set owner information...9 Turn on standby
StarryBay. User Guide
 StarryBay User Guide SW-08 Smart Watch 1 / 13 Contents 3 Chapter 1: Overview 3 External part & Internal part 3 Accessories 3 On screen keyboard 4 Basic gestures 5 Status icons 6 Three working modes 7 Chapter
This guide describes features that are common to most models. Some features may not be available on your tablet.
 User Guide Copyright 2014 Hewlett-Packard Development Company, L.P. Bluetooth is a trademark owned by its proprietor and used by Hewlett-Packard Company under license. Google, Google Now, Google Play,
Get. Started. All you need to know to get going.
 Get Started All you need to know to get going. Special note for Sprint As You Go customers With Sprint As You Go you can free yourself from long-term contracts and enjoy more wireless flexibility. Some
User Guide. BlackBerry 8320 Smartphone
 User Guide BlackBerry 8320 Smartphone SWD-280417-0201042058-001 Contents BlackBerry basics...11 Switch applications...11 Assign an application to a Convenience key...11 Set owner information...11 Turn
Content. 1 Welcome Your phone Phone overview Functions of Keys Getting started... 6
 User Manual -1- Content 1 Welcome... 3 2 Your phone... 4 2.1 Phone overview... 4 2.2 Functions of Keys... 5 3 Getting started... 6 3.1 Installing the SIM Cards and the Battery... 6 3.2 Linking to the Network...
Safety and Maintenance You can use your Tablet PC under a wide range of environmental conditions. However, to ensure long use and continued high
 EVG7 DL46 Getting Started Congratulations on your purchase of a Tablet PC. The Tablet PC is a fully functional PC with built-in LAN, and wireless connectivity. With your Tablet PC you will be able to organize
College of Pharmacy Windows 10
 College of Pharmacy Windows 10 Windows 10 is the version of Microsoft s flagship operating system that follows Windows 8; the OS was released in July 2015. Windows 10 is designed to address common criticisms
Wileyfox Pro Instruction User manual
 Wileyfox Pro Instruction User manual Table of Contents Quick Guide... 3 1.1 Install SIM card and battery... 3 1.2 Charging the battery... 3 1.3 On and off the screen... 3 1.4 Phone locking and unlocking...
WorksPad. User Guide
 Version 3.0.6 January 2017 MobilityLab, LLC. 2011-2017 MobilityLab, LLC. All rights reserved. MobilityLab,, the logo are trademarks or registered trademarks of MobilityLab, LLC. in the U.S., Russia and
Aero. Quickstart. Important Icons
 Important Icons Icon Description AGPS is available Missed call Outgoing call Silent mode is enabled Vibrate mode is enabled Battery charge level is 60% Battery is charging Icon Description Wi-Fi is in
Task On Gingerbread On Ice Cream Sandwich Notification bar on lock screen Notification bar is not accessible on the lock screen.
 HTC Rezound to 3.14.605.12 710RD: What s Different and New? Congratulations on updating your HTC Rezound to 3.14.605.12 710RD. You might have some questions about the new update and how you can take advantage
Salesforce Classic User Guide for Android
 Salesforce Classic User Guide for Android Version 36.0, Spring 16 @salesforcedocs Last updated: April 27, 2016 Copyright 2000 2016 salesforce.com, inc. All rights reserved. Salesforce is a registered trademark
Full User Manual and Quick Start Guide
 Full User Manual and Quick Start Guide 2 W hile every precaution has been taken in the preparation of this manual, we assume no responsibility for errors or omissions. Neither, is any liability assumed
Technoversity Tuesdays
 Technoversity Tuesdays Microsoft Windows 10 Overview, New Features, Tips and Tricks Technology training brought to you by Computer Education Support New Features Windows 10 is Microsoft s newest operating
Manual Download. Please visit SUNIX website by searching keyword isafe or KEY-256UN1 for detail.
 Manual Download Please visit SUNIX website http://www.sunix.com by searching keyword isafe or KEY-256UN1 for detail. 1 User s Manual Copyright Copyright 2014 SUNIX Co., Ltd. All Rights Reserved. No part
Salesforce Classic Mobile User Guide for Android
 Salesforce Classic Mobile User Guide for Android Version 41.0, Winter 18 @salesforcedocs Last updated: November 21, 2017 Copyright 2000 2017 salesforce.com, inc. All rights reserved. Salesforce is a registered
User Guide. BlackBerry 8120 Smartphone
 User Guide BlackBerry 8120 Smartphone SWD-278813-0204092321-001 Contents BlackBerry basics...11 About typing input methods...11 Type text using SureType technology...11 Switch typing input methods...11
Electronic data system application end user manual
 The MalariaCare Toolkit Tools for maintaining high-quality malaria case management services Electronic data system application end user manual Download all the MalariaCare tools from: www.malariacare.org/resources/toolkit.
Galaxy Tab S2 NOOK Key Features
 Galaxy Tab S2 NOOK Key Features Front-facing Camera Power/Lock Volume Memory Card Slot Recent Headset Jack Back Home Camera Speaker Speaker USB/Accessory Port Basic Functions Charging the Battery Before
Mobile Devices Villanova University Department of Computing Sciences D. Justin Price Spring 2014
 Mobile Devices Villanova University Department of Computing Sciences D. Justin Price Spring 2014 INTRODUCTION The field of computer forensics has long been centered on traditional media like hard drives.
NETGEAR genie Apps. User Manual. 350 East Plumeria Drive San Jose, CA USA. August v1.0
 User Manual 350 East Plumeria Drive San Jose, CA 95134 USA August 2012 202-10933-03 v1.0 Support Thank you for choosing NETGEAR. To register your product, get the latest product updates, get support online,
User Manual Mobile internet device Model: S
 User Manual Mobile internet device Model: S3 591-00101 Welcome... 3 Important Notices... 3 Keys and Functions... 4 I. Getting Started... 4 1.1 Turn on/off... 4 1.1.1 Turn on... 4 1.1.2 Turn off... 5 1.2
Table of Contents. Manual Overview
 Table of Contents Manual Overview D-Link reserves the right to revise this publication and to make changes in the content hereof without obligation to notify any person or organization of such revisions
Take and Send a Picture. To send the picture, press. Send Send To. Tip: To store or discard the picture, press Options and select Store Only.
 Take and Send a Picture This feature is network/ subscription dependent and may not be available in all areas. Contact your service provider for more details. Press the centre key, then select Camera.
PILOT QUICK START GUIDE
 PILOT QUICK START GUIDE www.hipstreet.com Getting started Device Layout Camera Touch screen App Menu 01 Back Button Home Button Menu Button History Button Volume -/+ Buttons Power Button Volume Buttons
Smart Pen User Manual
 Smart Pen User Manual Model: XN690 Accessories Receiver Mini USB Cable Smart Pen Ink Refill Refill Extractor User Manual Receiver Overview of Receiver 1 5 2 3 4 1. Reset hole- Reset and shut off the device
Thank you for choosing VOYAGER
 Svenska English Thank you for choosing VOYAGER VOYAGER is a 3G Connected Vehicle Smartphone using software based on Android OS. VOYAGER was created specifically for use in a vehicle. The device was designed
Chromebook Basics. Headset /mic
 Chromebook Basics What is a Chromebook? Unlike most computers, Chromebooks do not run Windows. Instead, they use Chrome OS, which is similar to the Google Chrome web browser. This means you can use a Chromebook
Karbonn All rights reserved
 User Manual V97 HD Table of Contents Safety instructions ------------------------------------------------------------------ 3 Device overview --------------------------------------------------------------------
79 Backup and Reset DRAFT FOR INTERNAL USE ONLY. Factory Data Reset
 Backup and Reset Back up your data to Google servers. You can also reset your device to its factory defaults. Backup and Restore Samsung Account Enable backup of your information to Samsung servers. 2.
User Manual. Product Model: MiTraveler 10C2. OS: Android 4.0
 User Manual Product Model: MiTraveler 10C2 OS: Android 4.0 Tablet of Contents Specifications.1 What s inside the box 2 Tablet Parts 2 Getting started...2 Connection to Internet..6 Task Bar..8 Install and
linkzone User ManUal
 LINKZONE User Manual Getting to Know Your Mobile Hotspot Power key WPS key LED indicator USB jack LED Description Part Power key WPS key LED indicators Charging / USB Port Reset Reboot Description Hold
<,W,EϬϱ E USER MANUAL
 USER MANUAL GETTING STARTED To get started with the Agora handset, please take both the phone and the battery out of the box. On the rear of the phone you will find a plastic backing cover with a small
1. Introduction P Package Contents 1.
 1 Contents 1. Introduction ------------------------------------------------------------------------------- P. 3-5 1.1 Package Contents 1.2 Tablet Overview 2. Using the Tablet for the first time ---------------------------------------------------
Lenovo ideapad 110S. User Guide. ideapad 110S-11IBR. Read the safety notices and important tips in the included manuals before using your computer.
 Lenovo ideapad 110S ideapad 110S-11IBR User Guide Read the safety notices and important tips in the included manuals before using your computer. Notes Before using the product, be sure to read Lenovo Safety
User Guide. Model: ELT0702
 User Guide Model: ELT0702 Welcome! Thank you for purchasing your new Epik Learning Tab Jr. This User Guide will provide step-by-step instructions to help you learn to use your new device. After opening
Table of Contents. 2 Know your device. 4 Device setup. 8 Customize. 10 Connections. 11 Apps. 12 Contacts. 13 Messages. 14 Camera.
 Table of Contents 2 Know your device 4 Device setup 8 Customize 10 Connections 11 Apps 12 Contacts 13 Messages 14 Camera 15 Internet Know your device Front view Front Camera SIM Card Slot microsd Card
8 WiFi Digital Photo Frame with Touchscreen LCD Display Instructional Manual
 8 WiFi Digital Photo Frame with Touchscreen LCD Display Instructional Manual aluratek.com mnl M10438 model AWDMPF8BB Copyright 2017 Aluratek, Inc. All Rights Reserved. Table of Contents Frame Features...
M101M4 Tablet PC Quick Start Guide V1.0
 M101M4 Tablet PC Quick Start Guide V1.0 Please read these instructions carefully before using this product, and save this manual for future use. Getting Started Congratulations on purchasing this rugged
CHC HCE320 GNSS Data Controller User Guide
 CHC HCE320 GNSS Data Controller User Guide Revision 1.0 8/05/2018 1 Table of Contents Table of Contents Table of Contents... 2 1 Product Introduction... 3 1.1 Brief Introduction... 3 1.2 Product Accessories...
User Guide. BlackBerry Curve 8330 Smartphone
 User Guide BlackBerry Curve 8330 Smartphone SWD-363038-0311083614-001 Contents BlackBerry basics...9 Switch applications...9 Assign an application to a Convenience key...9 Set owner information...9 Turn
User Manual. Mobile Viewer Mobile Manager Software (MMS) 1 st Edition : 10 Jan nd Edition : 31 Mar rd Edition : 20 May 2010
 1 st Edition : 10 Jan nd Edition : 31 Mar rd Edition : 20 May 2010") Mobile Viewer Mobile Manager Software (MMS) User Manual The picture might differ according to the specification and model. Contents of this manual are protected under copyrights and computer program laws.
Mobile Viewer Mobile Manager Software (MMS) User Manual The picture might differ according to the specification and model. Contents of this manual are protected under copyrights and computer program laws.