TRASK SERIES 2 DIGITAL PANEL METER OWNERS MANUAL
|
|
|
- Suzan Rodgers
- 5 years ago
- Views:
Transcription

 848-9569 mike@traskinst.com See us on the web: www.")
1 TRASK SERIES 2 DIGITAL PANEL METER OWNERS MANUAL Now with Ethernet Trask Instrumentation Inc. 414 West Poinsett Street, Greer, SC Tel: (864) Fax: (864) mike@traskinst.com See us on the web:
2 1. ORDERING GUIDE Configure a model number in this format: T20201DCV1, CBL01 T.Digital panel meter with screw terminal connectors. Display Color 1... DPM with green LED 2...DPM with red LED 3... Extended DPM, green LED 4... Extended DPM, red LED Note: Extended adds rate of change & linearization of nonlinear inputs. Not applicable to thermocouple or RTD inputs. Power Vac or Vdc Vdc or Vac Setpoint Output 0... None 1... Two 8A contact relays 2... Two solid state relays 3... Four 8A contact relays 4... Four solid state relays Analog Output 0... None ma, 0-10V, -10/+10V Digital Interface 0... None 1... RS RS RS485-Modbus 5... USB 6...USB-to-RS485 converter 7... Ethernet 8.. Ethernet-to-RS485 converter Input Type DC Volts DCV mv DCV V DCV V DCV V DCV5* V DCV V * Range not ETL certified. DC Amperes DCA ma DCA ma DCA ma DCA A RTDs P385C... Pt100, -202 to 850 C P385F.. Pt100, -331 to 1562 F P392C... Pt100, -202 to 850 C P392F.. Pt100, -331 to 1562 F N672C.... Ni120, -80 to 260 C N672F... Ni120, -112 to 500 F C427C.... Cu10, -97 to 260 C C427F... Cu10, -143 to 500 F Thermocouples JC to 760 C JF to 1400 F KC to 1372 C KF to 2501 F TC to 400 C TF to 752 F EC to 1000 C EF to 1830 F NC to 1300 C NF to 2370 F SC to 1768 C SF to 3214 F RC to 1768 C RF to 3213 F Resistance / Ohms R to ohms R to ohms R to ohms R to kohms R to kohms R to kohms R to Mohms Process Signals (4-20 ma, 0-10V, etc.) P ma = P1.Custom Scaling Specify min signal & reading, max signal & reading. Strain Gauge, Potentiometer (4-wire ratio) SG mv = SG1... Custom Scaling Specify min signal & reading, max signal & reading. Fullscale ranges 200 mv to 20V. RMS Volts RMV mv RMV V RMV V RMV V RMV5* V RMV V RMS Amperes RMA ma RMA ma RMA ma RMA A Load Cells (6-wire ratio) WM ,999 to +99,999 Specify min input signal & displayed reading, and max input signal & displayed reading. Full-scale inputs mv to mv. 10 Vdc excitation. Options & Accessories BL... Blank lens, no button pads. CBL01... RJ11-to-DB9 RS232 cable. Connects meter to PC com port. CBL02... USB-to-DB9 adapter. For use with CBL01. CBL05... USB-cable. Type A male to Type B male. IPC... NEMA-4 panel cover. BOX1... NEMA4 wall mount enclosure. BOX2... BOX1 plus IPC
3 2. TABLE OF CONTENTS 1. ORDERING GUIDE TABLE OF CONTENTS PRODUCT INTRODUCTION RECEIVING & UNPACKING SAFETY CONSIDERATIONS CONNECTOR WIRING INFORMATION MECHANICAL ASSEMBLY FRONT PANEL SETUP KEYS ENABLING & LOCKING OUT MENU ITEMS METER SCALING THEORY DC VOLTS, AMPS, PROCESS, STRAIN INPUT LOAD CELL & MICROVOLT INPUT AC RMS VOLTS & AMPS INPUT THERMOCOUPLE INPUT RTD & RESISTANCE INPUT DUAL & QUAD RELAY OUTPUT OPTIONS ANALOG OUTPUT OPTION SERIAL COMMUNICATION OPTIONS EXCITATION OUTPUT & POWER SUPPLY INSTRUMENT SETUP VIA PC CUSTOM CURVE LINEARIZATION METER CALIBRATION SPECIFICATIONS GLOSSARY OF TERMS WARRANTY
4 3. PRODUCT INTRODUCTION Our digital panel meters are versatile, cost effective solutions to a wide variety of monitoring and control applications. Depending on the choice of signal conditioner, they are easily set up for an accurate display of temperature, pressure, flow, weight, voltage or current, all in appropriate engineering units and with zero and span adjustment when needed. Setup can be via front panel pushbuttons or the meter s serial interface. Selective security lockout of the front panel keys protects against accidental changes to meter setup. High read rates up to 60 per second (50 for 50 Hz operation) are made possible by Concurrent Slope Conversion (Pat 5,262,780), which integrates the signal over an AC power line cycle for maximum noise rejection. High read rates provide accurate peak and valley capture, and quick response for control applications. An adaptive digital filter supplies a time constant for the encountered signal noise level, yet responds rapidly to changes that exceed a selected threshold. Self-calibration occurs automatically after every 17th reading. The standard power supply is a high-efficiency switching unit that operates from AC or DC, and allows the meters to be powered from worldwide AC without changes. A low-voltage supply is optional for power from 10-48V batteries or from Vac. Both supplies provide an isolated 5, 10 or 24Vdc transducer excitation output. The meter case conforms to the 1/8 DIN size standard. It is made of high impact, 94V-0 ULrated plastic and is watertight to NEMA-4 (IP65) when panel mounted. Mounting is from the front of the panel and requires less than 110 mm behind the panel. Power and signal wiring is via removable plugs conforming to UL61010C safety standards. All output options are isolated from meter and power ground to 250 Vac. Extended meter versions can linearize nonlinear inputs. Up to 180 data points may be linearized by a computer program that stores setup parameters in nonvolatile memory. Extended meters can also display rate of change, for example to display flow rate based on changing tank level. Alarm or setpoint control is provided by an optional relay board with two or four Form C 8A mechanical relays or two or four Form A 120 ma solid state relays. The setpoints may be latching or non-latching, be energized above or below the setpoint, or operate in a fail-safe mode. The relays can operate from the filtered signal to reduce relay chatter or from the unfiltered signal for fastest response. Snubber circuits and a programmable relay switching time delay extend relay contact life. An isolated analog output of 4-20 ma, 0-20 ma, 0-10V or -10 to +10V can be provided by an optional analog output board. The output is linearized to the display and can operate from the filtered or unfiltered signal input. It can be scaled via front panel pushbuttons or the meter s serial interface. Ethernet USB, RS232, or RS485 (2-wire half-duplex or 4-wire full-duplex) serial communications options are available with the Modbus protocol or a simpler custom ASCII protocol. Modbus operation includes RTU or ASCII modes, up to 247 digital addresses, and up to 32 devices per RS485 line without a repeater. Ethernet-to-RS485 and USB-to-RS485 converter boards allow a meter to be interfaced to a PC and to multiple meters on an RS485 network. Meter programming can be via the meter s front panel or a PC running Windows based Instrument Setup Software (serial interface option required). 4

5 4. RECEIVING & UNPACKING Your meter was carefully tested and inspected prior to shipment. Should the meter be damaged in shipment, notify the freight carrier immediately. In the event the meter is not configured as ordered or the unit is inoperable, return it to the place of purchase for repair or replacement. Please include a detailed description of the problem. 5. SAFETY CONSIDERATIONS Warning: Use of this equipment in a manner other than specified may impair the protection of the device and subject the user to a hazard. Visually inspect the unit for signs of damage. If the unit is damaged, do not attempt to operate. Caution: The unit must be connected to a Disconnect switch or a branch-circuit breaker, which must be in a suitable location This unit must be powered by Vac with the high voltage power supply option, or Vdc (12-32 Vac) with the low voltage power supply option. Verify that the proper power option is installed for the power to be used. This meter has no On/Off switch. It will be in operation as soon as power is connected. The Vac power connector (P1 Pins 1-3) is colored Green to differentiate it from other input and output connectors. The Vac (10-48 Vdc) power connector is colored Black. Do not make signal wiring changes or connections when power is applied to the instrument. Make signal connections before power is applied. If reconnection is required, disconnect power before such wiring is attempted. To prevent electrical or fire hazard, do not expose the instrument to excessive moisture. Do not operate the instrument in the presence of flammable gases or fumes; such an environment constitutes a definite safety hazard. This meter is designed to be mounted in a metal panel or a bench or wall mount style case. The spacing around the meter and the ventilation must be sufficient to maintain the ambient temperature at less than 55 C. Verify the panel cutout dimensions, and mount according to instructions. Symbols used Caution (refer to accompanying documents) Caution, risk of electric shock. Equipment protected throughout by double insulation or reinforced insulation. Earth (ground) terminal. Both direct and alternating current. Operating environment: The meter is Class II (double insulated) equipment designed for use in Pollution degree 2. 5

.")
6 6. CONNECTOR WIRING INFORMATION CONNECTORS Connectors for signal and power are UL-rated screw-clamp terminal blocks that plug into mating jacks on the printed circuit board. Communication connectors are a single RJ11 plug for RS232, dual RJ11 plugs for RS485, dual RJ45 plugs for RS485 Modbus, or USB. Note: The functions of control inputs 1 & 2 of P1 are menu selectable. Warning: Hazardous voltages may be present on pins 4, 5 & 6 of P1 since digital ground is tied to pin 3 of P5 (-Signal Input). Keep pin 3 close to earth ground to minimize common mode voltage or shock hazard at pins 4, 5 & 6 of P1. For 4-wire load cell connection, jumper 1 to 2, 5 to 6 at the meter. 6

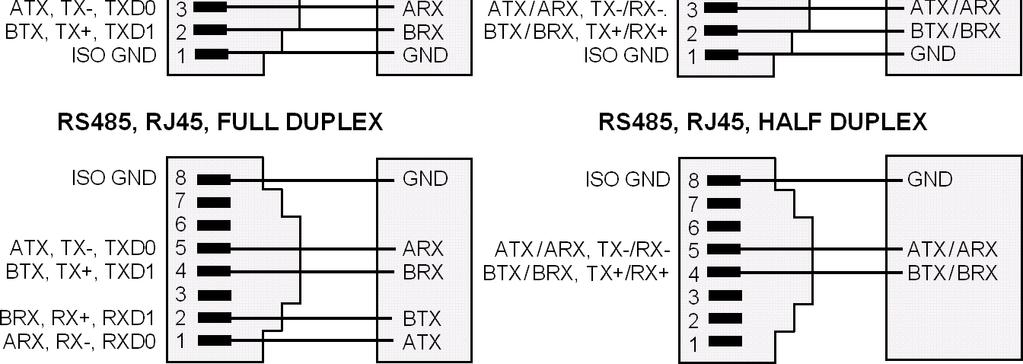
7 P3 - SERIAL COMMUNICATIONS P4 - ANALOG OUTPUT 7
.")
8 7. MECHANICAL ASSEMBLY REMOVING THE REAR PANEL First remove any connectors. Use one hand to press in the two sides of the rear of the case, and the other hand to press down the two protruding tab releases at the top of the rear panel (see figure below). This will unhook the rear panel from the case. Retaining tab with tab release Retaining tab with tab release Retaining tab Retaining tab Rear Panel REMOVING THE ELECTRONICS & INSTALLING OPTION BOARDS With the rear panel removed, the electronic assembly will easily slide out through the rear of the case. Options boards plug into the main board at the front of the meter. These are plug-and-play and may be installed in the field. New boards will be recognized by the meter software for access to the appropriate menu items. You may need to remove rear panel knockouts to fit new boards. Note: When an option board is installed correctly, the top and bottom edges of the main board and option board are aligned. Misaligned boards will burn out the electronics. Option Board Main Board Plug Rear Panel Jack Power supply Relay board Serial interface board Analog output board Signal conditioner board P11 P12 P13 P14 P15 J1 J2 J3 J4 J5 REASSEMBLING YOUR METER Slide the electronics assembly back into the case until the display board is seated flush against the front of the case. Insert the bottom tabs of the rear panel into the case, and then carefully align the board connectors with the openings in the rear panel. Ensure that all option boards are properly aligned with the molded board retaining pins on the inside of the 8


9 rear panel. Once the rear panel is in place, reinstall the input/output screw clamp terminal plugs. PANEL MOUNTING Slide the meter into the 45 x 92 mm 1/8 DIN panel cutout. Ensure that the provided gasket is in place between the front of the panel and the back of the meter bezel. The meter is secured by two pawls, each held by a screw. Turning a screw clockwise extends the pawl outward. Turning the screw clockwise further tightens it against the panel to secure the meter. Turning a screw counterclockwise loosens the pawl and retracts it into its well. This allows the meter to be inserted into the panel cutout for installation, or to be removed from the panel cutout following installation. Note: In no case should a screw be removed from its pawl. Doing so would cause the screw and pawl to fall off and likely get lost. Dimensioned case drawings 9
 for the Run Mode and with symbols ( right arrow, right triangle, up triangle, left arrow) for the Menu Mode.")
10 8. FRONT PANEL SETUP KEYS Meter Front Panel There are four front panel keys, which change function for the Run Mode and Menu Mode, effectively becoming eight keys. The keys are labeled with alphanumeric captions (MENU, PEAK, RESET, ALARMS) for the Run Mode and with symbols ( right arrow, right triangle, up triangle, left arrow) for the Menu Mode. FRONT PANEL LOCKOUT The Menu Mode may not work with meters as received from the factory, because menu items have been disabled in software. Disabling causes menu items not to appear in the menu sequence. To enable menu items, change their lockout status under Loc 1, Loc 2 and Loc 3 from 0 (locked or disabled) to 1 (unlocked or enabled), as explained in Section 9 of this manual. Also ensure that the lockout jumper is not installed, as explained in that same section. The paragraphs below assume that all menu items have been unlocked. MENU MODE KEY ACTION In the Menu Mode, pressing a key momentarily advances to the next menu item. Holding down a key automatically advances through multiple menu items for fast menu navigation. KEYS IN RUN MODE MENU Key. Pressing MENU from the Run Mode enters the Menu Mode. Pressing MENU repeatedly will step the meter through the various menu items (if these have not been locked out) and then back to the Run Mode. PEAK Key. Pressing PEAK normally causes the peak value of the input signal to be displayed. The peak display then blinks to differentiate it from the normal present value display. Pressing PEAK again returns the display to the present value. The PEAK key can also be programmed to display Valley, alternating Peak or Valley, or to Tare the reading to zero. When Peak or Valley is selected, periodic horizontals bars at the top of the display indicate Peak, and periodic horizontals bars at the bottom indicate Valley. RESET Key. Pressing RESET with PEAK resets peak and valley values. Pressing RESET with ALARMS resets latched alarms. Pressing RESET with MENU performs a meter reset (same as power on). Meter reset can also be applied via a rear panel connect or a serial ASCII command. 10
11 ALARMS Key. Pressing ALARMS once displays the setpoint for Alarm 1. Pressing it again displays the setpoint for Alarm 2. Pressing it again returns to the present value. KEYS IN MENU MODE Right Arrow Key (MENU). Pressing steps the meter through all menu items that have been enabled and then back to the Run Mode. With the DC signal conditioner board and no option boards, available menu items are _InPut, SEtuP, ConFG, _FiLtr, dec.pt, SCALE, OFFst, Loc 1, Loc 2, Loc 3. If a change has been made to a menu item, that change is saved to non-volatile memory when the key is pressed next, and StoreE is displayed briefly. To return the meter to the run mode after StoreE has been displayed, you can press the key repeatedly to step through all top-level menu selections until reset is displayed briefly. As a shortcut, to return to the run mode after StoreE has been displayed, you can press then simultaneously. Again, reset will be displayed briefly. Right Triangle Key (Digit Select). Pressing from the InPut menu brings up all meter functions available with the meter's signal conditioner. For example, for the DC signal conditioner board, these are _dc U, _dc A and _ratio. Pressing from the SEtuP, ConfFG, FiLtr, SCALE, OFFSt, Loc 1, Loc 2 or Loc 3 menus items sequentially selects digit positions 1-5, as indicated by a flashing digit:,,,,. Pressing from the dec.pt menu item sequentially selects decimal point positions, which will flash: d.dddd dd.ddd ddd.dd dddd.d ddddd..ddddd. Up Triangle Key (Value Select). Pressing for a flashing item (digit position or decimal point position) will increment that item. Pressing will save any changes, and StoreE is displayed briefly. Left Arrow Key (Reverse Menu). Pressing has the same effect as pressing, except that menu items are brought up in reverse order. Pressing repeatedly will backtrack to the previous menu items all the way to meter reset and return to the run mode. 11

12 9. ENABLING & LOCKING OUT MENU ITEMS For security reasons and ease of meter operation, any or all menu items may be disabled or "locked out" so that they are no longer accessible from the front panel. Each function to be disabled can be set to "1" under menu headers Loc 1-3, while each function to be enabled can be set to "0." Access to the menu headers Loc 1-3 can in turn be locked out by installing a hardware jumper on the power supply board. With the jumper installed, the operator only has access to previously enable menu items, not to the menu headers Loc 1-3 and hence not to the menu items below. With the jumper removed, the operator has access to menu headers Loc 1-3 and hence to the menu items below. SETTING HARDWARE LOCKOUT JUMPER To access the lockout jumper, remove the rear panel per Section 9 and locate jumper a in the lower portion of the power supply board next to the input connectors (see figure at right). Check lockout status. Many Laurel meters are shipped with lockouts in place. This causes menu items described later in this manual not to appear. SETTING SOFTWARE LOCKOUTS To set up a meter, it may be necessary to enable menu items by setting lockout digits to 0. Following setup, reset the digits to "1" if you do not want the menu item to be changed by an operator. Loc 1 Loc 2 Loc 3 Press the MENU key until Loc 1, Loc 2 or Loc 3 is displayed, as desired. Note: hardware lockout jumper a must be removed (see above) Press to display the lockout status, consisting of 1 s and 0 s. The left digit will flash. Press again to step to the next digit, which will flash Press to set the flashing digit to "0" to enable the menu item or to "1" to disable. Press MENU to enter. See the table to the right for list of menu items that can be enabled or disabled. Enabled or Disabled Menu Items Loc Input type selection. 2 - Meter setup, configuration & decimal point 3 - Filter selection. 4 - Scale or Lo, Hi input. 5 - Offset or Lo, Hi reading Loc Alarm setup 3 - Alarm setpoint value programming. 4 - Analog output scaling. 5 - Serial interface setup. Loc View peak or tare value 3 - View alarm setpoints 4 - Reset (peak & latched alarms) 5 - Reset (meter reset) 12
13 10. METER SCALING THEORY User scalability is a standard feature of all of our analog input meters, with the exception of thermocouple and RTD meters. It allows electrical signals to be converted to readings in engineering units. These readings can have up to 5 digits, a user specified decimal point, and a user specified polarity. For example, the same 4-20 ma signal from a pressure transducer can be scaled to display to psi or to kpa. Three scaling methods are user selectable under the meter SEtuP programming item: 1) Scale and Offset Method, which specifies a straight line of the type y = mx + b 2) Coordinates of 2 Points Method, which fits a straight line between two data points (low in, low read, and high in, high read). 3) Reading Coordinates of 2 Points Method, which uses actual signal inputs instead of manually entered low and high input signals. Select the scaling method which is most convenient. If you know that the straight line passes through zero, you will typically use the Zero and Offset Method by entering an offset of zero and the required scale factor. If you are using a calibrated 4-20 ma transducer, you may wish to use the Coordinates of 2 Points Method by entering the desired readings for 4 ma and 20 ma. If you have a load cell meter and a known kg weight, you may wish to use the Reading Coordinates of 2 Points Method by entering for no load and for the reference weight in place. Counts, which are properly rounded integers, are used for scaling regardless of the scaling method. The decimal point is not used in calculations, but is only a decoration. The number of inputs counts is the integer number generated by analog-to-digital conversion. The maximum is 20,000 for full scale (FS) of all signal types and ranges, except for the mv load cell range, where the maximum is 50,000. This means that one count is 1 µa for the ma range (which includes 4-20 ma), and 1 µv for the mv load cell range. With the DC signal conditioner, one count is 0.1V for the 300.0V and 600.0V ranges, which are part of the V range, and one count is 1 ma for the 5.000A range, which is part of the A range. Our meter cannot be rated for the full V and A ranges. The number of output counts is the integer number that is displayed on the meter, is output as serial data, is used to generate the meter s analog output, and is used for relay setpoint comparisons. This is the number generated by the scaling arithmetic. To increase output resolution and add displayed digits after the decimal point, multiply the input counts by a factor of 10 for each additional digit, then move the decimal point one position to the left for each added digit. For example, if you want to display kg instead of 517 kg from a load cell input, increase the scale factor by a factor of 100 to increase the counts to 51713, then move the decimal point to the left by two positions. This change in scaling can also be achieved by entering larger readout numbers using the Coordinates of 2 Points Method or Reading Coordinates of 2 Points Method. To decrease resolution, for example to display 15,547 mv as 15.5V, divide the scale factor by 10 for each digit to be eliminated. For this example, apply a scale factor of 0.01 to change the counts to 155, and move the decimal point one position to the left. 13

14 11. DC VOLTS, AMPS, PROCESS, DC RATIO The DC Volts, Amps, Process and Strain meters utilize the DC signal conditioner board, which needs to be configured via jumpers for the desired voltage or current range. All signal ranges are factory calibrated with calibration factors stored in EEPROM. The meter software recognizes the board and will bring up the appropriate menu items for it; however, it does not recognize the jumper settings. Please see further manual sections for setup of relay outputs, analog output, communications, and excitation output. Board Revisions Q and R Ranges Jumpers FS Voltage E1 E2 E3 ± mv ± V ± V ± V ±300.0V (ETL) ±600.0V (not ETL) A A B B B B f f h h g g b a b a a a FS Current E1 E2 E3 ± ma ± ma ± ma ±5.000 A A A A A e, g d, g c, g a, b, g b b b b Notes: Jumpers are to cover gaps marked by a letter. Store spare jumpers on unused jumper posts. Please contact us for board revisions earlier than Q. For DC voltmeters & ammeters, a scale factor of 1 and an offset of 0 are used for direct readings in (milli)volts or (milli)amperes. Decimal point selection does not affect the displayed digits. A full scale reading is counts. This may be displayed as ma or µa. Use with a current shunt requires a scale factor to be set. For example, for a (500A, 100 mv) shunt, divide 5000 (the desired full scale display with 0.1A resolution) by (displayed value with 100 mv when the scale factor is 1.0) for a scale factor of 0.5. For process & strain meters, scaling is normally set up from the front panel using the and keys, but can also be set up via a serial connection and Windows based Instrument Setup Software (available at no charge). A full scale reading is counts. Three scaling methods are selectable: 1) Scale and offset, 2) Coordinates of 2 points, and 3) Reading coordinates of 2 points. Only menu items applicable to the selected method are presented. For DC ratio (or potentiometer follower) operation, the meter displays the ratio of the signal and applied excitation voltage, so that the reading is unaffected by changes in the excitation voltage. This capability is used for resistive bridge sensors and voltage dividers, such as potentiometers which track wiper position. To implement, set _InPut to _ratio (next page). For bridges and potentiometers, and make P5 Signal Input connections as shown under Connector Wiring Information (page 6). 14
15 KEYSTROKES FOR SETUP If the MENU key does not work, see Section 9 Enabling & Locking Out Menu Items. Press Menu _InPut Selection of signal input type & range SEtuP Meter Setup _dc U DC Volts _dc A DC Amps Press Digit _ratio Strain gauge & ratio 00_00 Display selection with scale factor of _00 Power line frequency 00_ 00 Scaling method 00_00 Control inputs 1 & 2: True = logic 1 (0V or tied to digital ground) False = logic 0 (5V or open) 15 Press Value Select Key 0.2U 2.0U _20.0U 200.0U 600.0U 0.2, 2, 20, 200, 600V FS 2.0a _20.0a _200.0a _5.0a 0.2, 20, 200 ma, 5A FS 0.2U 2.0U _20.0U 0.2, 2, 20V FS /2 digits (±20,000) 1 Remote display (±99,999) 2 4-1/2 digits, counts by 10 (±20,000) 3 3-1/2 digits (±2,000) 0 Noise minimized for 60 Hz 1 Noise minimized for 50 Hz 0 Scale and offset method 1 Coordinates of 2 points method 2 Reading coordinates of 2 points method 0 1 = Reset, 2 = Meter Hold 1 1 = Function Reset, 2 = Peak or Valley 2 1 = Hold, 2 = Peak or Valley Display 3 1 = Hold, 2 = Tare 4 1 = Peak or Valley Display, 2 = Tare 5 1 = Tare, 2 = Reset 6 1 = 1, 2 = 1, decimal point = XXXXX 1 = 0, 2 = 1, decimal point = XXXX.X 1 = 1, 2 = 0, decimal point = XXX.XX 1 = 0, 2 = 0, decimal point = XX.XXX 7 1 = 1, 2 = 1, decimal point = XXXX.X 1 = 0, 2 = 1, decimal point = XXX.XX 1 = 1, 2 = 0, decimal point = XX.XXX 1 = 0, 2 = 0, decimal point = X.XXXX 8 1 = Function Reset, 2 = Display Blank 9 1 = Hold, 2 = Display Blank A 1 = Peak or Valley, 2 = Display Blank B 1 = Tare, 2 = Display Blank C 1 = Valley Display, 2 = Peak Display D 1 = Tare, 2 = Tare Reset Both inputs 1 and 2 set to 1 for selections 2, 4, A, C = Function Reset (fast, 20 msec). Both inputs 1 and 2 set to 1 for selections 0, 1, 3, 5, 8, 9, B, D = Meter Reset (slow, 2 sec, same as removing & reapplying power).
16 Press Menu ConFG Meter Configuration FiLtr Filtering dec.pt Dec. point selection Press Digit 000_0 Operation as a rate of change meter. Extended meter only. 000_0 Operation of front panel PEAK button and rear connector for Peak or Valley Display 000_0 Auto-tare 000_ 0 Nonlinear input scaling Extended meter only. Alarm filtering Peak & Valley filtering Display filtering Adaptive filter threshold for all filters Input signal filter setting Can be applied to display, setpoint, analog output, data output. d.dddd Decimal point flashes. Press Value Select Key 0 Not rate of change 1 Rate x Rate x 1 3 Rate x 10 4 Rate x Rate x Rate x Peak Display. Also selects Peak in Peak or Valley at connector above. 1 Valley Display. Also selects Valley in Peak or Valley at connector above. 2 Peak (1st push), Valley (2nd push) 3 Front panel Tare 0 Meter comes up in normal run mode. 1 Meter comes up in auto-tare mode 0 Linear input 1 Custom curve linearization 0 Unfiltered output 1 Filtered output 0 Unfiltered Peak & Valley 1 Filtered Peak & Valley 0 Display 16-reading batch average every 17 readings. Updates display 3.5 times/ sec at 60 Hz, 3.0 times/sec at 50 Hz. 1 Display per input signal filter setting below 0 Low adaptive filter threshold level 1 High adaptive filter threshold level 0 Autofilter. Time constant set by meter. 1 Batch average of 16 readings 2 Moving average, 0.08 sec time constant. 3 Moving average, 0.15 sec time constant 4 Moving average, 0.3 sec time constant. 5 Moving average, 0.6 sec time constant. 6 Moving average, 1.2 sec time constant. 7 Moving average, 2.4 sec time constant. 8 Moving average, 4.8 sec time constant. 9 Moving average, 9.6 sec time constant. A Unfiltered. Readings updated at 60/sec at 60 Hz, 50/sec at 50 Hz. d.dddd dd.ddd ddd.dd dddd.d ddddd..ddddd Press to shift the decimal point. 16
17 Press Menu Press Digit Press Value Select Key Scaling method Scale and Offset if selected under SEtuP SCALE Scale factor with decimal point OFFst Offset value Select digit then dec pt Select digit to flash. Scaling method Coordinates of 2 points if selected under SEtuP Lo In. Low signal input. Lo rd Desired reading at Lo In. Hi In. High signal input. Hi rd. Desired reading at Hi In Select digit to flash Select digit to flash Select digit to flash Select digit to flash. Select -9 thru 9 for first flashing digit, 0 thru 9 for flashing other digits. Then press key to move flashing decimal point. Select -9 thru 9 for flashing first digit, 0 thru 9 for other flashing digits. Decimal point location is selected by dec.pt. Select -9 thru 9 for flashing first digit, 0 thru 9 for other flashing digits. Decimal point is set by input range chosen. Select -9 thru 9 for flashing first digit, 0 thru 9 for other flashing digits. Decimal point is set by dec.pt. Select -9 thru 9 for flashing first digit, 0 thru 9 for other flashing digits. Decimal point is set by input range chosen. Select -9 thru 9 for flashing first digit, 0 thru 9 for other flashing digits. Decimal point is set by dec.pt. Scaling method Reading coordinates of 2 points if selected under SEtuP. When this method is selected, the four menu items below will appear ahead of all other menu items when the MENU or key is first pressed from the run mode. See next page. Lo In. Low signal input. Press key. Hi In. High signal input. Press key. Lo rd Desired reading at Lo In. Press key. _0.021 Apply low reference signal to meter. _ Apply high reference signal to meter Modify flashing digit. _0.021 Press key to store low signal input in meter, then press Menu key. _0.021 Press to store high signal input meter, then press Menu key Select -9 thru 9 for flashing first digit, 0 thru 9 for other flashing digits (decimal point is set by dec.pt), then press Menu key. 17
18 Hi rd. Desired reading at Hi In. Press key Select digit to flash. Option board dependent menu items Select -9 thru 9 for flashing first digit, 0 thru 9 for other flashing digits (decimal point is set by dec.pt), then press Menu key. ALSEt. ALS34 deu1h deu2h deu1b deu2b deu3h DEU4H DEU3b DEU4b Menu items related to alarm setup These will only appear if a relay board is detected. If so, please see Section16. AnSEt. An Lo. An Hi.. Menu items related to analog output setup. These will only appear if an analog output board is detected. If so, see Section 17. SEr 1. SEr 2. SEr 3. SEr 4. _Addr Menu items related to serial communications. These will only appear if an RS232, RS485 or USB I/O board is detected. If so, see Section 18. Menu lockout items Loc 1. Loc 2. Loc 3. Menu items used to enable or lock out (hide) other menu items. Loc menu items may in turn be locked out by a hardware jumper. Please see Section 9. Reading Coordinates of 2 Points Scaling Method This scaling method applies a straight line fit between two points, which are based on actual transducer signals. A low input signal, such as the signal with zero weight, and a high input signal, such as the signal with a known weight, are applied to the meter. The corresponding desired low and high readings are then entered from the front panel. The meter applies straight line fit between these low and high calibration points. This scaling method has the advantage of calibrating the transducer and meter as a system. The actual voltages or currents at the two endpoints do not need to be known. This method can be used with DC, process and load cell meters when known inputs are available. It is also available for AC meters, but not thermocouple or RTD meters. 18

, analog output (17), communications (18), and transducer excitation output (19).")
19 12. LOAD CELL & MICROVOLT INPUT Load Cell, Strain Gauge and Microvolt meters utilize the load cell signal conditioner board, which offers sensitivity to ±20 mv full scale and 4 or 6-wire load cell connection. This board needs to be configured via jumpers for the desired voltage range. All signal ranges are factory calibrated with calibration factors stored in EEPROM. The meter software recognizes the board and will bring up the appropriate menu items for it; however, it does not recognize the jumper settings. Please see further manual sections for setup of the following features: relay output (16), analog output (17), communications (18), and transducer excitation output (19). RANGE SELECTION VIA JUMPERS Ranges & Display with Scale Factor = 1 Input Jumpers Counts ± mv ± mv ± mv ± mv ± mv e a b c d ±20000 ±50000 ±10000 ±25000 ±50000 Notes 1. See Section 19 to select 10V excitation. 2. Jumpers are 2.5 mm (0.1 in). SCALE & OFFSET SETUP For absolute readings in millivolts or microvolts, select _dc u under _InPut. Also select a scale factor of 1 and an offset of 0. A full scale reading is 20,000 counts. Decimal point selection does not affect the displayed digits. For example, 20 mv can be displayed as mv or µv. For ratiometric readings with bridges, such as load cells, select _Strn under _InPut. Scaling is normally set up from the front panel using the and keys, but can also be set up via RS232/485 using our PC compatible setup software (available at no charge). A full scale reading is 20,000 counts. Three scaling methods are selectable: 1) Manual scale and offset, 2) Coordinates of 2 points, and 3) Reading coordinates of 2 points. Please see the Glossary for an explanation of each method. The reading coordinates of 2 points scaling method applies a straight line fit between two points, which are based on actual transducer signals. A low input signal, such as the signal with zero weight, and a high input signal, such as the signal with a known weight, are applied to the meter. The corresponding desired low and high readings are then entered from the front panel. The meter applies straight line fit between these low and high calibration points. This scaling method has the advantage of calibrating the transducer and meter as a system. The actual voltages or currents at the two endpoints do not need to be known. This method can be used with DC, process and load cell meters when known inputs are available. It is also available for AC meters, but not thermocouple or RTD meters. 19
20 KEYSTROKES FOR SETUP If the MENU key does not work, see Section 9 Enabling & Locking Out Menu Items. Press Menu _InPut Selection of signal input type & range SEtuP Meter Setup Press Digit _Strn Strain or ratiometric _dc u U DC millivolts 00_00 Display type 00 _00 Power line frequency 00_ 00 Scaling method 00_00 Rear connector control inputs 1 & 2. True = logic 1 (0V or tied to digital ground) False = logic 0 (5V or open) Press Value Select Key _ _250.0 _ , 50, 100, 250, 500 mv FS voltage _ _250.0 _ , 50, 100, 250, 500 mv FS voltage 0 4-1/2 digit meter, counts by digit remote display (±99,999) 2 4-1/2 digit meter, counts by /2 digit meter 0 Noise minimized for 60 Hz 1 Noise minimized for 50 Hz 0 Scale and offset method 1 Coordinates of 2 points method 2 Reading coordinates of 2 points method 0 1 = Reset, 2 = Meter Hold 1 1 = Function Reset 2 = Pk or Valley Disp. 2 1 = Meter Hold 2 = Pk or Valley Disp. 3 1 = Meter Hold 2 = Tare 4 1 = Peak or Valley 2 = Tare 5 1 = Tare 2 = Reset 6 1 = 0, 2 = 0, decimal point 1= XXXXX 1 = 1, 2 = 0, decimal point 1 = XXXX.X 1 = 0, 2 = 1, decimal point 1 = XXX.XX 1 = 1, 2 = 1, decimal point 1 = XX.XXX 7 1 = 0, 2 = 0, decimal point 2 = XXXX.X 1 = 1, 2 = 0, decimal point 2 = XXX.XX 1 = 0, 2 = 1, decimal point 2 = XX.XXX 1 = 1, 2 = 1, decimal point 2 = X.XXXX 8 1 = Function Reset 2 = Display Blank 9 1 = Hold 2 = Display Blank A 1 = Peak or Valley 2 = Display Blank B 1 = Tare 2 = Display Blank C 1 = Valley Display 2 = Peak Display D 1 = Tare 2 = Tare Reset Both inputs 1 and 2 set to 1 for selections 2, 4, A, C = Function Reset (fast, 20 msec). Both inputs 1 and 2 set to 1 for selections 0, 1, 3, 5, 8, 9, B, D = Meter Reset (slow, 2 sec, same as removing & reapplying power). 20
21 Press Menu ConFG Meter Configuration FiLtr Filtering dec.pt Dec. point selection Press Digit 000_0 Operation as a rate of change meter. Extended meter only. 000_0 Operation of front panel PEAK button and rear connector for Peak or Valley Display 000_0 Auto-tare 000_ 0 Extended meter only. Alarm filtering Peak & Valley filtering Display filtering Adaptive filter threshold for all filters Input signal filter setting Can be applied to display, setpoint, analog output, data output. d.dddd Decimal point flashes. Press Value Select Key 0 Not rate of change 1 Rate x Rate x 1 3 Rate x 10 4 Rate x Rate x Rate x Peak Display. Also selects Peak in Peak or Valley at connector above. 1 Valley Display. Also selects Valley in Peak or Valley at connector above. 2 Peak (1st push), Valley (2nd push) 3 Front panel Tare 0 Meter comes up in normal run mode. 1 Meter comes up in auto-tare mode 0 Linear input 1 Custom curve linearization 0 Unfiltered output 1 Filtered output 0 Unfiltered Peak & Valley 1 Filtered Peak & Valley 0 Display 16-reading batch average every 17 readings. Updates display 3.5 times/ sec at 60 Hz, 3.0 times/sec at 50 Hz. 1 Display per input signal filter setting below 0 Low adaptive filter threshold level 1 High adaptive filter threshold level 0 Autofilter. Time constant set by meter. 1 Batch average of 16 readings 2 Moving average, 0.08 sec time constant. 3 Moving average, 0.15 sec time constant 4 Moving average, 0.3 sec time constant. 5 Moving average, 0.6 sec time constant. 6 Moving average, 1.2 sec time constant. 7 Moving average, 2.4 sec time constant. 8 Moving average, 4.8 sec time constant. 9 Moving average, 9.6 sec time constant. A Unfiltered. Readings updated at 60/sec at 60 Hz, 50/sec at 50 Hz. d.dddd dd.ddd ddd.dd dddd.d ddddd..ddddd 21
22 Press Menu Press Digit Press Value Select Key Scaling method Scale and Offset if selected under SEtuP SCALE Scale factor OFFst Offset value Select digit then dec pt Select digit to flash. Scaling method Coordinates of 2 points if selected under SEtuP Lo In. Low signal input. Lo rd Desired reading at Lo In. Hi In. High signal input. Hi rd. Desired reading at Hi In Select digit to flash Select digit to flash Select digit to flash Select digit to flash. 22 Select -9 thru 9 for first flashing digit, 0 thru 9 for flashing other digits. Then press key to move flashing decimal point. Select -9 thru 9 for flashing first digit, 0 thru 9 for other flashing digits. Decimal point location is selected by dec.pt. Select -9 thru 9 for flashing first digit, 0 thru 9 for other flashing digits. Decimal point is set by input range chosen. Select -9 thru 9 for flashing first digit, 0 thru 9 for other flashing digits. Decimal point is set by dec.pt. Select -9 thru 9 for flashing first digit, 0 thru 9 for other flashing digits. Decimal point is set by input range chosen. Select -9 thru 9 for flashing first digit, 0 thru 9 for other flashing digits. Decimal point is set by dec.pt. Scaling method Reading coordinates of 2 points if selected under SEtuP. When this method is selected, the four menu items below will appear ahead of all other menu items when the MENU or key is first pressed from the run mode. Lo In. Low signal input. Press key. Hi In. High signal input. Press key. Lo rd Desired reading at Lo In. Press key. Hi rd. Desired reading at Hi In. Press key. _0.021 Apply low reference signal to meter. _ Apply high reference signal to meter Modify flashing digit Select digit to flash. _0.021 Press key to store low signal input in meter, then press Menu key. _0.021 Press to store high signal input meter, then press Menu key Select -9 thru 9 for flashing first digit, 0 thru 9 for other flashing digits (decimal point is set by dec.pt), then press Menu key Select -9 thru 9 for flashing first digit, 0 thru 9 for other flashing digits (decimal point is set by dec.pt), then press Menu key.
23 Option board dependent menu items ALSEt. ALS34 deu1h deu2h deu1b deu2b deu3h DEU4H DEU3b DEU4b Menu items related to alarm setup These will only appear if a relay board is detected. If so, please see Section16. AnSEt. An Lo. An Hi.. Menu items related to analog output setup. These will only appear if an analog output board is detected. If so, see Section 17. SEr 1. SEr 2. SEr 3. SEr 4. _Addr Menu items related to serial communications. These will only appear if an RS232, RS485 or USB I/O board is detected. If so, see Section 18. Menu lockout items Loc 1. Loc 2. Loc 3. Menu items used to enable or lock out (hide) other menu items. Loc menu items may in turn be locked out by a hardware jumper. Please see Section 9. How to Maximize Accuracy of Load Cell Measurements 1. Avoid plated connectors or terminal blocks, since dissimilar metals can set up thermoelectric voltages in the millivolt range. If possible, use copper wiring throughout. If you have to use a junction box, have copper wire touch copper wire. 2. With long cable runs, use six-wire hookup, where the extra two wires are used to sense the excitation voltage at the load cell. This allows ratiometric meter operation to correct for voltage drops in the excitation wires. 3. Use twisted, shielded wire from the meter to the load cell to minimize pickup of electrical noise. Connect the shield to signal input ground at the meter. Do not connect the other end of the shield. 4. Do not run low-level signals in the same cable tray as electrical power to minimize pickup of electrical noise carried by power lines. 5. If pickup electrical noise is unavoidable, use the digital filtering capability of our meter to apply a time constant that averages out random noise over time. 6. Use 5V excitation, not 10V excitation, with miniature or button-type load cells. Even though small 350-ohm bridge load cells may be rated for 10V, the higher voltage will produce four times as much self-heating and will cause thermal errors. 7. Operate load cells within their linear range. Do not exceed specified maximum operating limits so as not to damage the load cell. 8. Operate load cell along their principal axis. Do not apply lateral or twisting forces, as these will cause deformation and produce non-intended electrical signals. 23

24 13. AC TRUE RMS VOLTS & AMPS INPUT AC voltage or current measurement utilizes the True RMS signal conditioner board which uses precision circuitry to compute the root-mean-square of complex waveforms from 10 Hz to 10 khz. Accurate measurements are obtained with spikes up to 3 times the maximum of each range. The input can be AC coupled to read only the AC component, such as ripple on a power supply, or DC coupled to read AC plus DC. The board needs to be configured via jumpers for the desired voltage or current range, and for AC or DC coupling. All signal ranges are factory calibrated with calibration factors stored in EEPROM. The meter software recognizes the board and will bring up the appropriate menu items for it; however, it does not recognize the jumper settings. These need to be set manually. Please see further manual sections for setup of the following features: relay output (16), analog output (17), and communications (18). Voltage Ranges Full Scale Input Counts Jumpers mv V V V V 600V (not ETL) Current Ranges j c, g, h c, i c, k c, m c, m Full Scale Input Counts Jumpers ma ma ma A l, k b, m a, m c, d, e, m AC or DC Coupling Coupling Type DC coupling for AC + DC AC coupling for AC only Jumpers f none RANGE SELECTION VIA JUMPERS 1. Letters indicate jumper position. Jumpers are installed on pins adjacent to letters. 2. Use 2.5 mm (0.1") jumpers. 3. Store spare jumpers on unused jumper post. 24
volts or (milli)amperes. Decimal point selection does not affect the counts. For example, a 20V input may be displayed as 20.000V or 20000 mv.")
25 METER SCALING Refer to the above tables for the full scale counts (or displayed digits) produced by the available full scale input ranges with a scale factor of 1 and an offset of 0. The decimal point can be set for direct readout in (milli)volts or (milli)amperes. Decimal point selection does not affect the counts. For example, a 20V input may be displayed as V or mv. The 5A range, designed for use with a 5A current transformer (CT), is scaled to produce 5000 counts with a scale factor of 1 and an offset of 0. Use with a specific CT will require the scale factor to be set. For example, for an 800A input, 5A output CT, set a scale factor of 1.6. This is the desired 8000 count display at 5A divided by the default 5000 count display at 5A. Then set the decimal point to display to at 5A. All scaling methods applicable to DC, process, strain and load cell meters are available with AC RMS meters. INTERNAL SHIELD To reduce noise pickup inside the meter or transmitter, the RMS board is fitted with a flexible plug-on shield. If necessary, This shield may be removed for jumper setting, but must be reinstalled before closing the instrument. SIGNAL SHIELDING Signal Source Shield around twisted pair Shielding for noise reduction Sig High Sig Low Earth Ground RMS Board AC RMS measurements are susceptible to signal noise. This is especially true when the instrument has a wide bandwidth. To minimize noise pickup, the input signal wiring should utilize a shielded twisted pair, and the shield should be connected to signal low at the meter, as illustrated. If signal low is close to earth ground, such as within 2V, signal low can further be connected to earth ground at the meter, as illustrated. PROVISION FOR SIGNAL LEVELS CLOSE TO ZERO It difficult to obtain meaningful RMS readings of 0 or close to 0 because of electrical noise pickup. To avoid erroneous very low readings, the RMS board has been programmed to return 0 counts for readings less than 15 counts. The maximum number of counts is for the mv, V, V, V, ma, ma, and ma ranges. The maximum number is 6000 for the 600.0V range (which is the V range for counts purposes), so that 1 count is 0.1V. The maximum number is 5000 for the 5.000A range (which is the A for counts purposes), so that 1 count is 1 ma. If needed, the 15-count limit can be changed using the Custom ASCII protocol. 25
26 KEYSTROKES FOR SETUP If the MENU key does not work, see Section 9 Enabling & Locking Out Menu Items. Press Menu _InPut Selection of signal input type & range SEtuP Meter Setup _AC U AC Volts _AC A U AC Amps Press Digit 00_00 Display selection with scale factor of 1 00 _00 Power line frequency 00_ 00 Scaling method 00_00 Rear connector inputs 1 & 2 True = logic 1 (0V or tied to digital ground) False = logic 0 (5V or open) Press Value Select Key 0.2U 2.0U _20.0U 200.0U 600.0U 0.2, 2, 20, 200, 600V FS 2.0a _20.0a _200.0a _5.0A 2, 20, 200 ma, 5A FS 0 4-1/2 digits (±20,000) 1 Remote display (±99,999) 2 4-1/2 digits, counts by 10 (±20,000) 3 3-1/2 digits (±2,000) 0 Noise minimized for 60 Hz 1 Noise minimized for 50 Hz 0 Scale and offset method 1 Coordinates of 2 points method 2 Reading coordinates of 2 points method 0 1 = Reset, 2 = Meter Hold 1 1 = Function Reset 2 = Pk or Valley Disp. 2 1 = Meter Hold 2 = Pk or Valley Disp. 3 1 = Meter Hold 2 = Tare 4 1 = Peak or Valley 2 = Tare 5 1 = Tare 2 = Reset 6 1 = 0, 2 = 0, decimal point 1= XXXXX 1 = 1, 2 = 0, decimal point 1 = XXXX.X 1 = 0, 2 = 1, decimal point 1 = XXX.XX 1 = 1, 2 = 1, decimal point 1 = XX.XXX 7 1 = 0, 2 = 0, decimal point 2 = XXXX.X 1 = 1, 2 = 0, decimal point 2 = XXX.XX 1 = 0, 2 = 1, decimal point 2 = XX.XXX 1 = 1, 2 = 1, decimal point 2 = X.XXXX 8 1 = Function Reset 2 = Display Blank 9 1 = Hold 2 = Display Blank A 1 = Peak or Valley 2 = Display Blank B 1 = Tare 2 = Display Blank C 1 = Valley Display 2 = Peak Display D 1 = Tare 2 = Tare Reset Both inputs 1 and 2 set to 1 for selections 2, 4, A, C = Function Reset (fast, 20 msec). Both inputs 1 and 2 set to 1 for selections 0, 1, 3, 5, 8, 9, B, D = Meter Reset (slow, 2 sec, same as removing & reapplying power). 26
27 Press Menu ConFG Meter Configuration FiLtr Filtering dec.pt Dec. point selection Press Digit 000_0 Operation as a rate of change meter. Extended meter only Operation of front panel PEAK button and rear connector for Peak or Valley Display 000 _0 Auto-tare 000_ 0 Extended meter only. Alarm filtering Peak & Valley filtering Display filtering Adaptive filter threshold Input signal filter setting Can be applied to display, setpoint, analog output, data output. d.dddd Decimal point flashes. Press Value Select Key 0 Not rate of change 1 Rate x Rate x 1 3 Rate x 10 4 Rate x Rate x Rate x Peak Display. Also selects Peak in Peak or Valley at connector above. 1 Valley Display. Also selects Valley in Peak or Valley at connector above. 2 Peak (1st push), Valley (2nd push) 3 Front panel Tare 0 Meter comes up in normal run mode. 1 Meter comes up in auto-tare mode. 0 Linear input 1 Custom curve linearization 0 Unfiltered output 1 Filtered output 0 Unfiltered Peak & Valley 1 Filtered Peak & Valley 0 Display 16-reading batch average every 17 readings. Updates display 3.5 times/ sec at 60 Hz, 3.0 times/sec at 50 Hz. 1 Display per input signal filter setting below 0 Low adaptive filter threshold level 1 High adaptive filter threshold level 0 Autofilter. Time constant set by meter. 1 Batch average of 16 readings 2 Moving average, 0.08 sec time constant. 3 Moving average, 0.15 sec time constant 4 Moving average, 0.3 sec time constant. 5 Moving average, 0.6 sec time constant. 6 Moving average, 1.2 sec time constant. 7 Moving average, 2.4 sec time constant. 8 Moving average, 4.8 sec time constant. 9 Moving average, 9.6 sec time constant. A Unfiltered. Readings updated at 60/sec at 60 Hz, 50/sec at 50 Hz. d.dddd dd.ddd ddd.dd dddd.d ddddd..ddddd 27
28 Press Menu Press Digit Press Value Select Key Scaling method Scale and Offset if selected under SEtuP SCALE Scale factor OFFst Offset value Select digit then dec pt Select digit to flash. Scaling method Coordinates of 2 points if selected under SEtuP Lo In. Low signal input. Lo rd Desired reading at Lo In. Hi In. High signal input. Hi rd. Desired reading at Hi In Select digit to flash Select digit to flash Select digit to flash Select digit to flash. 28 Select -9 thru 9 for first flashing digit, 0 thru 9 for flashing other digits. Then press key to move flashing decimal point. Select -9 thru 9 for flashing first digit, 0 thru 9 for other flashing digits. Decimal point location is selected by dec.pt. Select -9 thru 9 for flashing first digit, 0 thru 9 for other flashing digits. Decimal point is set by input range chosen. Select -9 thru 9 for flashing first digit, 0 thru 9 for other flashing digits. Decimal point is set by dec.pt. Select -9 thru 9 for flashing first digit, 0 thru 9 for other flashing digits. Decimal point is set by input range chosen. Select -9 thru 9 for flashing first digit, 0 thru 9 for other flashing digits. Decimal point is set by dec.pt. Scaling method Reading coordinates of 2 points if selected under SEtuP. When this method is selected, the four menu items below will appear ahead of all other menu items when the MENU or key is first pressed from the run mode. See next page. Lo In. Low signal input. Press key. Hi In. High signal input. Press key. Lo rd Desired reading at Lo In. Press key. Hi rd. Desired reading at Hi In. Press key. _0.021 Apply low reference signal to meter. _ Apply high reference signal to meter Modify flashing digit Select digit to flash. _0.021 Press key to store low signal input in meter, then press Menu key. _0.021 Press to store high signal input meter, then press Menu key Select -9 thru 9 for flashing first digit, 0 thru 9 for other flashing digits (decimal point is set by dec.pt), then press Menu key Select -9 thru 9 for flashing first digit, 0 thru 9 for other flashing digits (decimal point is set by dec.pt), then press Menu key.
29 Option board dependent menu items ALSEt. ALS34 deu1h deu2h deu1b deu2b deu3h DEU4H DEU3b DEU4b Menu items related to alarm setup These will only appear if a relay board is detected. If so, please see Section16. AnSEt. An Lo. An Hi.. Menu items related to analog output setup. These will only appear if an analog output board is detected. If so, see Section 17. SEr 1. SEr 2. SEr 3. SEr 4. _Addr Menu items related to serial communications. These will only appear if an RS232, RS485 or USB I/O board is detected. If so, see Section 18. Menu lockout items Loc 1. Loc 2. Loc 3. Menu items used to enable or lock out (hide) other menu items. Loc menu items may in turn be locked out by a hardware jumper. Please see Section 9. Reading Coordinates of 2 Points Scaling Method This scaling method applies a straight line fit between two points, which are determined from actual transducer signals and the desired corresponding meter readings. A low input signal, such as the output of a pressure transducer at zero pressure, and high input signal, such as the output of the same transducer at a known high pressure, are applied to the meter. The desired corresponding low reading and high reading are then entered from the front panel. The meter then applies straight line fit between the high and low calibration points. This scaling method has the advantage of calibrating the transducer and meter as a system. The actual voltages or currents the two points do not need to be known. This method is used with DC, process and load cell meters when known inputs are available. It is also available for AC meters. It is not available with thermocouple or RTD meters. 29
30 14. THERMOCOUPLE INPUT The thermocouple signal conditioner board used for temperature measurement can be configured via jumpers for either type J, K, E, N thermocouples or type T, R, S thermocouples, and for upscale or downscale open sensor indication. The meter software recognizes the thermocouple board and will bring up the appropriate menu items for it; however, it does not recognize jumper settings. For each jumper selection, the thermocouple type, display in C or F, and resolution of 1, 0.1 or 0.01 are user program selectable. High resolution should only be used for relative readings, not absolute readings. Although available, 0.01 resolution is not recommended for thermocouples. Offset adjustment is available for thermocouples and is normally set to If C is selected, entering an offset of will change the display to Kelvin. If F is selected, entering an offset of will change the display to Rankin. The addition of a relay output board turns the thermocouple meter from a temperature indicator into an on/off temperature controller. Please see further manual sections for setup of the following features: relay output (Section 16), analog output (17), and communications (18). BOARD SETUP VIA JUMPERS PNP transistor Type J, K, E, N T, R, S Open Indication Upscale Downscale E4 Jumper none j E3 Jumper h i E3 h i j J5-X J5-Y E c + b e - Sig + Sig 1. Jumpers are installed on pins bridging letters. 2. Use 2.5 mm (0.1") jumpers. 3. Store spare jumpers on an unused jumper post. THERMOCOUPLE READING ERRORS The following types of thermocouple errors need to be combined: 1. Conformity error. The difference between the meter reading and the temperature stated in NIST Monograph 125 (IPTS-68) for a specified thermocouple type, the thermoelectric voltage in mv, and a cold junction reference temperature of 0 C. For our meters, this error is typically less than 0.2 C across the entire thermocouple range. 2. Voltage measurement error at 25 C. With our meters, this is less than 0.01% of full scale at a meter temperature of 25 C, and hence also less than 0.01% of the temperature reading. This error is negligible. 3. Voltage measurement span tempco error. With our meters, this error is less than ±0.003% of the voltage reading/ C as the temperature of the meter changes, and hence also less than ±0.003% of the temperature reading/ C. This error is negligible. 30
31 4. Reference junction error. Our meters do not use an actual cold junction in ice water as the thermoelectric reference, but they calculate an offset by measuring the voltage drop across the PN junction of a PNP transistor in close proximity to the junction of the thermocouple wires and the meter terminals. The voltage drop changes by -2.2 mv/ C. We specify the reference junction error as 0.5 C for an ambient temperature of 10 C to 40 C. 5. Thermocouple wire errors. This the largest source of thermocouple reading errors, and is caused by variations in the alloys found in commercial thermocouple wires. There are variations from manufacturer to manufacturer, from batch to batch, and within batches. Shown below are the American Limits of Error ASTM E230-ANSI MC These are the error limits imposed on manufacturers of thermocouple wire, not error limits applicable to a meter used with ideal thermocouple wire. The Special Limit of Error applies to more expensive Special Limits of Error (SLE) thermocouple wire. Thermocouple Type Temperature Range C Temperature Range F Standard Limit of Error Special Limit of Error J 0 to 750 C 32 to1382 F 2.2 C or 0.75% 1.1 C or 0.4% K T E N 0 to 1250 C -200 to 0 C 0 to 350 C -200 to 0 C 0 to 900 C -200 to 0 C 0 to 1300 C -270 to 0 C 32 to 2282 F -328 to 32 F 32 to 662 F -328 to 32 F 32 to 1652 F -328 to 32 F 32 to 2372 F -454 to 32 F 2.2 C or 0.75% 2.2 C or 2.0% 1.0 C or 0.75% 1.0 C or 1.5% 1.7 C or 0.5% 1.7 C or 1.0% 2.2 C or 0.75% 2.2 C or 2.0% 1.1 C or 0.4% 0.5 C or 0.4% 1.0 C or 0.4% 1.1 C or 0.4% S or R 0 to 1450 C 32 to 2642 F 1.5 C or 0.25% 0.6 C or 0.1% The Limit or Error tolerance to be used is the listed temperature or percentage, whichever is greater. Tolerances expressed in F are 1.8 times those in C. Percentage based tolerances are to be computed from temperatures expressed in C. Tolerances in the above table apply to new, essentially homogeneous thermocouple wire, normally 0.25 to 33 mm in diameter (30 to 8 AWG) and used at temperatures not exceeding the upper temperature limits listed. If used at higher temperatures, these tolerances do not apply. Thermocouples degrade with time, temperature, and exposure to the environment. 31
32 KEYSTROKES FOR SETUP If the MENU key does not work, see Section 9 Enabling & Locking Out Menu Items. Press Menu _InPut Selection of signal input type & range SEtuP Meter Setup Press Digit tc_ Thermocouple 00_00 Display selection. 00 _00 Power line frequency 00_ 00 Scaling method 00_00 Control inputs 1 & 2: True = logic 1 (0V or tied to digital ground) False = logic 0 (5V or open) 32 Press Value Select Key --.J F.J C_ Type J, F or C...K F K- C_ Type K, F or C...n F -n C_ Type N, F or C _.E F_...Ek C- Type E, F or C t F..t C_ Type T, F or C _.S F.S C_ Type S, F or C _.r F.r C._ Type R, F or C degree resolution 1 Remote display (±99,999) degree resolution 3 1 degree resolution 0 Noise minimized for 60 Hz 1 Noise minimized for 50 Hz 0 Offset only for thermocouple input. 0 1 = Reset, 2 = Meter Hold 1 1 = Function Reset, 2 = Peak or Valley 2 1 = Hold, 2 = Peak or Valley Display 3 1 = Hold, 2 = Tare 4 1 = Peak or Valley Display, 2 = Tare 5 1 = Tare, 2 = Reset 6 1 = 0, 2 = 0, decimal point 1= XXXXX 1 = 1, 2 = 0, decimal point 1 = XXXX.X 1 = 0, 2 = 1, decimal point 1 = XXX.XX 1 = 1, 2 = 1, decimal point 1 = XX.XXX 7 1 = 0, 2 = 0, decimal point 2 = XXXX.X 1 = 1, 2 = 0, decimal point 2 = XXX.XX 1 = 0, 2 = 1, decimal point 2 = XX.XXX 1 = 1, 2 = 1, decimal point 2 = X.XXXX 8 1 = Function Reset 2 = Display Blank 9 1 = Hold 2 = Display Blank A 1 = Peak or Valley 2 = Display Blank B 1 = Tare 2 = Display Blank C 1 = Valley Display 2 = Peak Display D 1 = Tare 2 = Tare Reset Both control inputs 1 & 2 set to 1 for selections 2, 4, A, C = Function Reset. Both control inputs 1 & 2 set to 1 for selections 0, 1, 3, 5, 8, 9, B, D = Meter Reset.
33 Press Menu ConFG Meter Configuration FiLtr Filtering OFFst Offset value Press Digit 000_0 0 No used Operation of front panel PEAK button and rear connector for Peak or Valley Display Alarm filtering Peak & Valley filtering Display filtering Adaptive filter threshold for all filters Input signal filter setting Can be applied to display, setpoint, analog output, data output Select digit to flash. Option board dependent menu items 33 Press Value Select Key 0 Peak Display. Also selects Peak in Peak or Valley at rear connector. 1 Valley Display. Also selects Valley in Peak or Valley at rear connector. 2 Peak (1st push), Valley (2nd push) 3 Front panel Tare 0 Unfiltered output 1 Filtered output 0 Unfiltered Peak & Valley 1 Filtered Peak & Valley 0 Display batch average of every 16 readings. 3.5 updates at 60 Hz, 3.0 at 50 Hz. 1 Display per input signal filter setting below 0 Low adaptive filter threshold level 1 High adaptive filter threshold level 0 Autofilter. Time constant set by meter. 1 Batch average of 16 readings 2 Moving average, 0.08 sec time constant. 3 Moving average, 0.15 sec time constant. 4 Moving average, 0.3 sec time constant. 5 Moving average, 0.6 sec time constant. 6 Moving average, 1.2 sec time constant. 7 Moving average, 2.4 sec time constant. 8 Moving average, 4.8 sec time constant. 9 Moving average, 9.6 sec. A Unfiltered Select -9 thru 9 for flashing first digit, 0 thru 9 for other flashing digits. Use offset for display in Rankine or Kelvin. ALSEt. ALS34 deu1h deu2h deu1b deu2b deu3h DEU4H DEU3b DEU4b Menu items related to alarm setup if a relay board is detected. Please see Section16. AnSEt. An Lo. An Hi.. Menu items related to analog output if detected. Please see Section 17. SEr 1. SEr 2. SEr 3. SEr 4. _Addr Menu items related to serial communications if detected. Please see Section 18. Menu lockout items Loc 1. Loc 2. Loc 3. Menu items used to enable or lock out (hide) menu items. Please see Section 9.
. Fixed 2Ω or 2 MΩ resistance ranges can be provided by a factory modified signal conditioner board.")
34 15. RTD & RESISTANCE INPUT The standard RTD and resistance signal conditioner board can be configured via jumpers for four RTD types (DIN 100Ω platinum, ANSI 100Ω platinum, 120Ω nickel, 10Ω copper) or five resistance ranges (from Ω to kω). Fixed 2Ω or 2 MΩ resistance ranges can be provided by a factory modified signal conditioner board. All ranges are factory calibrated with calibration factors stored in EEPROM on the signal conditioner board. The meter software recognizes the board and will bring up the appropriate menu items for it; however, it does not recognize the jumper settings. With RTDs, display in C or F and resolution of 1, 0.1 or 0.01 are user programmable. SIGNAL CONDITIONER BOARD SETUP VIA JUMPERS Standard Board Pt100, Ni120 Cu10, Ω Ω kω kω kω Connection 2 or 4 wire 3 wire Modified Board E1 Jumper N/A Ω N/A N/A N/A MΩ a b c d e f E2 Jumper none g 1. Program decimal point selection under dec.pt menu item. 2. Letters indicate jumper position. Jumpers are installed on pins adjacent to letters. 3. Store spare jumpers on an unused jumper post. SCALE & OFFSET SETUP Scale is normally set to Scale can be used as an RTD correction when actual resistance is other than nominal, as stated on the RTD calibration sheet. For a Pt100 RTD, divide 100 by the stated resistance at 0 C. For example, for a ohm RTD, scale should be set to 100 / = SIGNAL SHIELDING Shielding for noise reduction 200 kω ranges and above measurements are susceptible to signal noise. To minimize noise pickup, the input signal wiring should utilize a shielded twisted pair and the shield should be connected to signal low and earth ground at the meter, as illustrated. Use 2-wire hookup. 34
35 RTD & RESISTANCE CONNECTION With the appropriate jumper settings, RTD and resistance measurements allow 2, 3 or 4- wire RTD hookup to the J5 connector, as illustrated. The meter applies a fixed excitation current. In 4-wire hookup, lead resistance is not a factor, since different pairs of wires are used for excitation and sensing. In 3-wire hookup, the meter automatically compensates for lead resistance by measuring the voltage drop in one current-carrying lead and assuming that the voltage drop in the other current-carrying lead is the same. In 2-wire hookup, the meter senses the voltage drop across the load and both lead wires. The effect of the lead wires can be measured and subtracted by shorting out the load during meter setup. The short should be as close as possible to the load. Ambient temperature changes will still cause some error in the readings -- the higher the lead resistance, the greater the error. To eliminate lead wire resistance, follow this procedure: 1. Set the InPut menu item and jumpers for the desired range 2. Set COnFG to Short the two leads at the sensor end. 4. When the display has settled, push the key. The meter will then store a value proportional to lead resistance, automatically change COnFG to 00010, and then reset. The same result is obtained by grounding a Control Input that has been selected for Peak or Valley (SEtuP 00_0Y, where Y = 1, 2, 4, A, C ). 5. Remove the short and connect the sensor. The meter now processes the sensor resistance only. If the range and associated jumpers are subsequently changed, the above procedure must be repeated. This procedure is also available through Instrument Setup software, Revision or later. 35
36 KEYSTROKES FOR SETUP If the MENU key does not work, see Section 9 Enabling & Locking Out Menu Items. Press Menu _InPut Selection of signal input type & range SEtuP Meter Setup _-rtd_ RTD OHnnS Ohmmeter Press Digit Set decimal point under dec.pt 00_00 Display selection with scale factor of _00 Power line frequency 00_ 00 Scaling method 00_00 Control inputs 1 & 2: True = logic 1 (0V or tied to digital ground) False = logic 0 (5V or open) Press Value Select Key.. d F- Pt100 RTD, DIN alpha.00385, F.. d C. Pt100 RTD, DIN alpha.00385, C.. A F- Pt100 RTD, ANSI alpha , F.. A C- Pt100 RTD, ANSI alpha , C. ni F - Ni120 RTD, alpha.00672, F..ni C- Ni120 RTD, alpha.00672, C.Cu F- Cu10 RTD, alpha.00427, F.Cu C- Cu10 RTD, alpha.00427, C to ohms to ohms to ohms to ohms to kohm RTD or 4-1/2 digits for ohms 1 5-digit remote display (±99,999) RTD, 4-1/2 digit ohms count by RTD or 3-1/2 digits for ohms 0 Noise minimized for 60 Hz 1 Noise minimized for 50 Hz 0 Scale and offset method (RTD & ohms) 1 Coordinates of 2 points (ohms) 2 Reading coordinates of 2 points (ohms) 0 1 = Reset, 2 = Meter Hold 1 1 = Function Reset, 2 = Peak or Valley 2 1 = Hold, 2 = Peak or Valley Display 3 1 = Hold, 2 = Tare 4 1 = Peak or Valley Display, 2 = Tare 5 1 = Tare, 2 = Reset 6 1 = 0, 2 = 0, decimal point 1= XXXXX 1 = 1, 2 = 0, decimal point 1 = XXXX.X 1 = 0, 2 = 1, decimal point 1 = XXX.XX 1 = 1, 2 = 1, decimal point 1 = XX.XXX 7 1 = 0, 2 = 0, decimal point 2 = XXXX.X 1 = 1, 2 = 0, decimal point 2 = XXX.XX 1 = 0, 2 = 1, decimal point 2 = XX.XXX 1 = 1, 2 = 1, decimal point 2 = X.XXXX 36
37 Press Menu SEtuP Meter Setup (continued) ConFG Meter Configuration FiLtr Filtering Press Digit 00_00 Control inputs 1 & 2 (continued) Operation as a rate of change meter. Extended meter only. Operation of front panel PEAK button and rear connector for Peak or Valley Display Auto-tare selection RTD or Ohms wiring Alarm filtering Peak & Valley filtering Display filtering Adaptive filter threshold for all filters Press Value Select Key 8 1 = Function Reset 2 = Display Blank 9 1 = Hold 2 = Display Blank A 1 = Peak or Valley 2 = Display Blank B 1 = Tare 2 = Display Blank C 1 = Valley Display 2 = Peak Display D 1 = Tare 2 = Tare Reset Both inputs 1 and 2 set to 1 for selections 2, 4, A, C = Function Reset (fast, 20 msec). Both inputs 1 and 2 set to 1 for selections 0, 1, 3, 5, 8, 9, B, D = Meter Reset (slow, 2 sec, same as removing & reapplying power). 0 Not rate of change 3 Rate x 10 1 Rate x Rate x Rate x 1 6 Rate x Peak Display. Also selects Peak in Peak or Valley at connector above. 1 Valley Display. Also selects Valley in Peak or Valley at connector above. 2 Peak (1st push), Valley (2nd push) 3 Front panel Tare 0 No auto-tare 1 Auto-tare RTD Ohms 00 3 or 4 wire 3 or 4 wire 01 Not allowed Custom curve 10 2-wire read 2-wire read 11 2-wire short 2-wire short 0 Unfiltered output 1 Filtered output 0 Unfiltered Peak & Valley 1 Filtered Peak & Valley 0 Display 16-reading batch average every 17 readings. Updates display 3.5 times/ sec at 60 Hz, 3.0 times/sec at 50 Hz. 1 Display per input signal filter setting below 0 Low adaptive filter threshold level 1 High adaptive filter threshold level 37
38 FiLtr Filtering (continued) Press Menu dec.pt Decimal point selection SCALE Scale factor OFFst Offset value Press Digit Input signal filter setting Can be applied to display, setpoint, analog output, data output. d.dddd Decimal point flashes if ohms are selected under _InPut Select digit then dec pt Select digit to flash. Option board dependent menu items Press Value Select Key 0 Autofilter 1 Batch average, 16 readings 2 Moving average, 0.08 sec. 3 Moving average, 0.15 sec. 4 Moving average, 0.3 sec. 5 Moving average, 0.6 sec. 6 Moving average, 1.2 sec. 7 Moving average, 2.4 sec. 8 Moving average, 4.8 sec. 9 Moving average, 9.6 sec. A Unfiltered. Updates at 60/sec at 60 Hz, 50/sec at 50 Hz. d.dddd dd.ddd ddd.dd dddd.d ddddd..ddddd Select -9 thru 9 for first flashing digit, 0 thru 9 for flashing other digits. Then press key to move flashing decimal point. Select -9 thru 9 for flashing first digit, 0 thru 9 for other flashing digits. Use offset for display in Rankine or Kelvin. Decimal point location is selected by dec.pt. ALSEt. ALS34 deu1h deu2h deu1b deu2b deu3h DEU4H DEU3b DEU4b Menu items related to alarm setup These will only appear if a relay board is detected. If so, please see Section16. AnSEt. An Lo. An Hi.. Menu items related to analog output setup. These will only appear if an analog output board is detected. If so, see Section 17. SEr 1. SEr 2. SEr 3. SEr 4. _Addr Menu items related to serial communications. These will only appear if an RS232, RS485, or USB I/O board is detected. If so, see Section 18. Menu lockout items Loc 1. Loc 2. Loc 3. Menu items used to enable or lock out (hide) other menu items. Loc menu items may in turn be locked out by a hardware jumper. Please see Section 9. 38


39 16. DUAL OR QUAD RELAY OUTPUT OPTION An optional relay board may be installed in the meter main board at plug position P2, adjacent to the power supply board. Four board versions are available: 2 or 4 relays, mechanical or solid state. Once installed, the relay board is recognized by the meter software or PC-based Instrument Setup software, which will bring up the appropriate menu items for the type of board. These menu items will not be brought up if no relay board is detected. Menu selections for relays 3 and 4 will not be brought up if the dual relay board is detected. All relay boards offer a choice of operating modes: normally off or on, latched or non-latched, hysteresis band, deviation band, alarm based on the filtered or unfiltered signal, and selectable number of readings in alarm zone to cause an alarm. KEYSTROKES FOR VIEWING & CHANGING SETPOINTS The (Alarms) key can be used to step through and view setpoints while the meter continues to make conversions and performs setpoint control. If the (Peak) key is pressed while a setpoint is displayed, conversion stops and the setpoint can be changed. After pressing, you have 30 seconds, or the meter reverts to the normal display. To view setpoints, menu item Loc3, digit 2, must have been set to 0. To change setpoints, menu item Loc2, digit 2, must have been set to 0. Press Alarms Key Press (Alarms) to display Alarm 1 setpoint Press (Alarms) to display Alarm 2 setpoint Press (Alarms) to display Alarm 3 setpoint Press (Alarms) to display Alarm 4 setpoint. Press Digit _ Current setpoint 1 value blinks, and Alarm 1 LED indicator lights. Press to select a digit, which will blink. _ Current setpoint 2 value blinks, and Alarm 2 LED indicator lights. Press to select a digit, which will blink. _ Current setpoint 3 value blinks, and Alarm 3 LED indicator lights. Press to select a digit, which will blink. _ Current setpoint 4 value blinks, and Alarm 4 LED indicator lights. Press to select a digit, which will blink. Press Value Select Key _ To change setpoint 1 value, press to change selected blinking digits. _ To change setpoint 2 value, press to change selected blinking digits. _ To change setpoint 3 value, press to change selected blinking digits. _ To change setpoint 4 value, press to change selected blinking digits Press (Alarms) again. Meter will reset and display current reading. 39
40 KEYSTROKES FOR SETPOINT SETUP If the MENU key does not work, see Section 9 Enabling & Locking Out Menu Items. Press Menu ALSEt Alarm Setup for relays 1 & 2 if detected. Press until ALSEt is displayed. ALS34 Alarm Setup for relays 3 & 4 if detected. Press Digit Relay alarm state when alarm is active. Alarm latching or nonlatching (auto reset). Alarm operates at and above setpoint (active high) or at and below setpoint (active low). Hysteresis mode or band deviation mode Number of consecutive readings in alarm zone to cause an alarm. Relay alarm state when alarm is active. Alarm latching or nonlatching (auto reset). Press Value Select Key 0 Relay 1 active on Relay 2 active on 1 Relay 1 active off Relay 2 active on 2 Relay 1 active on Relay 2 active off 3 Relay 1 active off Relay 2 active off 0 AL1 non-latching AL2 non-latching 1 AL1 latching AL2 non-latching 2 AL1 non-latching AL2 latching 3 AL1 latching AL2 latching 0 AL1 active high AL2 active high 1 AL1 active low AL2 active high 2 AL1 disabled AL2 active high 3 AL1 active high AL2 active low 4 AL1 active low AL2 active low 5 AL1 disabled AL2 active low 6 AL1 active high AL2 disabled 7 AL1 active low AL2 disabled 8 AL1 disabled AL2 disabled 0 AL1 band deviation AL2 band deviation 1 AL1 split hysteresis AL2 band deviation 2 AL1 band deviation AL2 split hysteresis 3 AL1 split hysteresis AL2 split hysteresis 4 No deviation or hysteresis in menu. 5 AL1 span hysteresis AL2 band deviation 6 AL1 span hysteresis AL2 split hysteresis 7 AL1 span hysteresis AL2 span hysteresis 0 After 1 reading 4 After 16 readings 1 After 2 readings 5 After 32 readings 2 After 4 readings 6 After 64 readings 3 After 8 readings 7 After 128 reading 0 Relay 3 active on Relay 4 active on 1 Relay 3 active off Relay 4 active on 2 Relay 3 active on Relay 4 active off 3 Relay 3 active off Relay 4 active off 0 AL3 non-latching AL4 non-latching 1 AL3 latching AL4 non-latching 2 AL3 non-latching AL4 latching 3 AL3 latching AL4 latching 40
41 Press Menu ALS34 Alarm Setup for relays 3 & 4 (continued) deu1h Alarm 1 hysteresis DEU2H Alarm 2 hysteresis DEU1b Alarm 1 band deviation DEU2b Alarm 2 band deviation deu3h Alarm 3 hysteresis DEU4H Alarm 4 hysteresis DEU3b Alarm 3 band deviation DEU4b Alarm 4 band deviation Press Digit Alarm operates at and above setpoint (active high) or at and below setpoint (active low). Hysteresis mode or band deviation mode (see Glossary) Number of consecutive readings in alarm zone to cause an alarm Select digit to flash Select digit to flash Select digit to flash Select digit to flash. 41 Press Value Select Key 0 AL3 active high AL4 active high 1 AL3 active low AL4 active high 2 AL3 disabled AL4 active high 3 AL3 active high AL4 active low 4 AL3 active low AL4 active low 5 AL3 disabled AL4 active low 6 AL3 active high AL4 disabled 7 AL3 active low AL4 disabled 8 AL3 disabled AL4 disabled 0 AL3 band deviation AL4 band deviation 1 AL3 split hysteresis AL4 band deviation 2 AL3 band deviation AL4 split hysteresis 3 AL3 split hysteresis AL4 split hysteresis 0 After 1 reading 4 After 16 readings 1 After 2 readings 5 After 32 readings 2 After 4 readings 6 After 64 readings 3 After 8 readings 7 After 128 reading Select -9 thru 9 for flashing first digit, 0 thru 9 for other flashing digits. Alarms will activate above the setpoint by the value entered and deactivate below the setpoint by the value entered. Select -9 thru 9 for flashing first digit, 0 thru 9 for other flashing digits. Alarms will activate above and below the setpoint by the value entered and will deactivate in the middle of the band. Select -9 thru 9 for flashing first digit, 0 thru 9 for other flashing digits. Alarms will activate above the setpoint by the value entered and deactivate below the setpoint by the value entered. Select -9 thru 9 for flashing first digit, 0 thru 9 for other flashing digits. Alarms will activate above and below the setpoint by the value entered and will deactivate in the middle of the band.

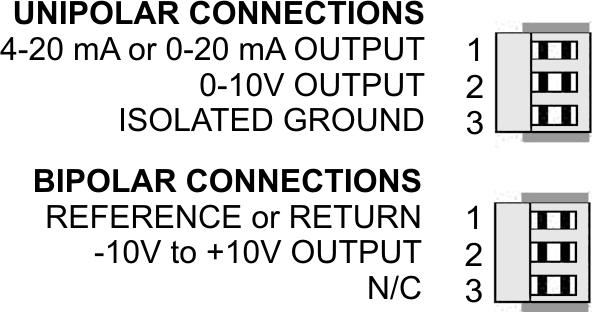
42 17. ANALOG OUTPUT OPTION An optional analog output board may be installed in the meter at rear panel jack position J4, adjacent to the signal conditioner board. Once installed, this board is recognized by the meter, which will bring up the appropriate menu items for it. These will not be brought up if an analog output board is not installed. The analog output can be a 0-20 ma, 4-20 ma or 0-10V unipolar signal with respect to isolated ground, or a bipolar -10V to +10V voltage signal with respect to a reference return line. Unipolar or bipolar operation is selected by a jumper. A unipolar current or voltage output is selected at the connector. Unipolar 4-20 ma or 0-20 ma current is selected in software. Unipolar current of voltage: Jumper a Bipolar -10 to +10 voltage: Jumper b The analog output is sourcing. Do not put an external voltage source in series with it. Applying an external 24 Vdc source will burn out the analog output board. The low analog output (0 ma, 4 ma, 0V, or -10V) may be set to correspond to any low displayed reading An Lo. The high analog output (20 ma, 0V or 10V) may be set to correspond to any high displayed reading An Hi. The meter will then apply a straight line fit between these two end points to provide an analog output scaled to the meter reading. KEYSTROKES FOR SETUP If the MENU key does not work, see Section 9 Enabling & Locking Out Menu Items. Press Menu AnSEt Analog Output Setup. Press until AnSEt is displayed (requires analog output board). An Lo Low displayed value for 0 ma, 4 ma, 0V, or -10V output An Hi. High displayed value for 20 ma or 10V output Press Digit Select Key 00 Analog output signal selection. 00 Analog output filtering Select digit to flash Select digit to flash. 42 Press Value Select Key ma current output V voltage output ma current output 3-10 to +10V voltage output 0 Analog output unfiltered 1 Analog output filtered Select -9 thru 9 for flashing first digit, 0 thru 9 for other flashing digits. Decimal point location is fixed by dec.pt selection. Select -9 thru 9 for flashing first digit, 0 thru 9 for other flashing digits. Decimal point location is fixed by dec.pt selection.
43 18. SERIAL COMMUNICATION OPTIONS A serial communications board may be connected to the meter main board at plug position P13 (middle position). Available boards are RS232, RS485 (with dual RJ11 connectors), RS485 Modbus (with dual RJ45 connectors), USB, USB-to-RS485 converter, Ethernet, and Ethernet-to-RS485 converter. The dual connectors of RS485 boards are wired in parallel to allow daisy chaining of addressable meters without use of a hub. Three serial communication protocols are selectable for all serial boards: Custom ASCII, Modbus RTU, and Modbus ASCII. A USB-to-RS485 converter board or an Ethernet-to-RS485 converter board allows a meter to be interfaced to a computer and be the device server for a network of up to 31 other meters on an RS485 bus, while itself retaining all capabilities of a meter. The remote meters need to be equipped with our RS485 digital interface board with dual 6-pin RJ11 jacks, not our RS485 digital interface with dual 8-pin RJ45 jacks. The dual 6-pin RJ11 jacks on the RS485 board are wired in parallel to allow multiple meters to be daisy-chained using 6-wire data cables with no need for hand-wiring or an RS485 hub. The outer two wires are used for ground. Use 6-wire, straight-through data cables, not 4-wire telephone cables or crossover cables, all the way from the device server to the last device on the RS485 bus. Connect ATX to ATX, BTX to BTX, etc., with no crossover as you go from device to device. To connect a meter with a USB board to a Windows PC, use a USB cable with Type A and Type B connectors. Upon first connection, your computer may display Found new Hardware and automatically download and install the required USB driver from the Internet. If installation is not automatic, download the driver file (with a name like CDM v WHQL Certified.zip) from Unzip it into its own directory, and point to that directory as the location of the driver. You will need to use Device Manager (accessible from Control Panel) to determine the com port. Go down the device list and click on Ports (COM & LPT) and USB serial port (com #). Note the com port # for use with communications to your meter, then exit Control Panel. If you later need to change the Com port, right-click on USB serial port (com #), then on Properties, Port settings, and Advanced. Change port to the desired number, click OK, then exit Control Panel. To connect a meter with an Ethernet board to a computer, see our separate Ethernet Manual, which covers our Node Manager Software. This Windows-based application runs on a host computer and is used to configure our Ethernet Nodes. It automatically discovers all Nodes on a LAN or WAN, plus any devices connected to Server Nodes via an RS485 bus. It is used to configure each Node, such as setting communication parameters, naming the Node and associated devices, entering addresses for alarm notification and data requests, selecting the Node's time zone for time-stamping of s and streaming data, and upgrading firmware. Once configuration data has been stored in flash memory of all Nodes, Node Manager Software can be closed. Node resident web server software is also provided. BOARD SETUP VIA JUMPERS USB Board No jumpers required. 43


44 Basic Ethernet Board No jumpers needed. RS232 Board e - Externally enabled RTS (otherwise always enabled) f - Remote display (or slave) operation. g - Normal operation (other than remote display). Note: Board is shipped with jumper g installed. RS485 Board, Full Duplex Operation b & d - Installed on last meter in long cable run. RS485 Board, Half Duplex Operation a & c - Installed for half duplex operation. d - Installed on last meter in line with long cable runs. Note: Board is shipped with no jumpers installed. RS485-Modbus Board, Full Duplex Operation b & e - Bias jumpers should be installed on 1 board. a & d - Installed on last meter in long cable run. RS485-Modbus Board, Half Duplex Operation a d c b e f RJ45 b & e - bias jumpers installed on 1 board. c & f - installed for half duplex operation. a - installed on last meter in line with long cable runs. Modbus RJ45 Note: Board is shipped with no jumpers installed. Ethernet-to-RS485 Converter Board & USB-to-RS485 Converter Board Full Duplex Operation No jumpers for short cable runs. Add b & d for long cable runs. Half Duplex Operation a & c - Installed for half duplex operation. d - Installed on last meter in line with long cable runs. 44


45 SERIAL CONNECTION EXAMPLES 45


46 KEYSTROKES FOR SETUP If the MENU key does not work, see Section 9 Enabling & Locking Out Menu Items. Press Menu.SEr 1. Fixed Parameters: No parity 8 data bits 1 stop bit Press Digit Select Key 000 Output filtering 000U Baud rate 000U Output update rate 46 Press Value Select Key 0 Send unfiltered signal 1 Send filtered signal baud baud baud baud baud baud baud 60 Hz 50 Hz 0 Line frequency Line frequency sec 0.34 sec sec 0.68 sec sec 1.4 sec sec 2.7 sec sec 5.4 sec sec 10.9 sec sec 21.8 sec sec 43.5 sec sec 97 sec
47 Press Menu.SEr 2. Serial Setup 2.SEr 3. Serial Setup 3.SEr 3. Serial Setup 3 (continued) SEr 4. Serial Setup 4. _Addr Modbus Address. Appears only if the Modbus protocol is selected. _0000U Line feed Press Digit Select Key _0000U Alarm data with readings _0000U Control of data output _0000U Meter address with Custom ASCII protocol U Half or full duplex U Special start & stop char. U RTS mode U Termination characters U Data sent in continuous mode 000U Modbus ASCII gap timeout 000U Serial protocol 000U Parity Select digit to flash. Press Value Select Key 0 No line feed after carriage return 1 Line feed after carriage return 0 No alarm data 1 Alarm data with reading 0 Continuous data output 1 Data output on ASCII command only Select 1 thru F for addresses 1 thru 15. Select 0. thru F. (with decimal point) for addresses 16 thru Full duplex 1 Half duplex 0 Standard continuous mode 1 Special start & stop characters 0 Normal RTS 1 Single transmission 0 Only at end of all items 1 At end of each item 0 Reading 1 Peak 2 Valley 3 Reading + peak 4 Reading + valley 5 Reading + peak + valley 0 1 sec 1 3 sec 2 5 sec 3 10 sec 0 Custom ASCII 1 Modbus RTU 2 Modbus ASCII 0 None, 2 or more stop bits 1 Odd, 1 or more stop bits 2 Even, 1 or more stop bits 247 Select 0 through 9 for flashing digit. Address range is 1 to

48 19. EXCITATION OUTPUTS Jumpers in upper right Jumpers b, c, d, e, f in the upper right of the power supply board allow selection of one of three available transducer excitation outputs. These are isolated to 50 Vdc from signal common, to 250 Vac from power, and to 2 kv from meter output options. The same jumper locations apply to the universal AC power supply ( Vac) and to the low voltage power supply (12-32 Vac or Vdc). When these jumpers are not installed, an external reference voltage up to 20 Vdc can be applied to the meter for ratiometric operation. Excitation output Jumper locations 5 Vdc ±5%, 100 ma max 10 Vdc ±5%, 120 ma max 24 Vdc ±5%, 50 ma max None b, d, e b, d, f c No jumpers Jumpers in lower left Jumpers a, h, g in the lower left of the power supply board provide special features when installed: Jumper a Front panel menus are locked out when installed. See Section 9. Jumper h Connects "Control Input 2" to P1-4 when installed. Jumper g Provides non-isolated +5 Vdc, 30 ma power output at P1-4 when installed. This power is in addition to the isolated excitation output set by jumpers in the upper right of the board. 48

 to Never Notify so that the software can write files. Download IS2*.exe onto your PC from our website.")
 PC with an available RS232 or USB port. 2) Meter to be set up. 3) RS232 or USB board in the meter. This board can be removed following meter setup.")
49 20. INSTRUMENT SETUP VIA PC Instrument Setup software is a PC program which is much easier to learn than front panel programming. It is of benefit whether or not the meter is connected to a PC. With the meter connected to a PC, it allows uploading, editing and downloading of setup data, execution of commands under computer control, listing, plotting and graphing of data, and computer prompted calibration. With the meter unconnected to a PC, it provides quick selection of jumper locations and a printable display of menu selections for front panel setup. SOFTWARE INSTALLATION Under Windows 7 or 8, first set User Account Control (UAC) to Never Notify so that the software can write files. Download IS2*.exe onto your PC from our website. Double-click on the downloaded file to unzip it into a directory, such as c:\temp. Within that directory, double-click on setup.exe, which will install the software on your PC. PREREQUISITES FOR CONNECTED USE 1) PC with an available RS232 or USB port. 2) Meter to be set up. 3) RS232 or USB board in the meter. This board can be removed following meter setup. 4) RJ11-to-DB9 cable from the meter to a PC RS232 com port, or a USB cable to a PC USB port (see Section 1, Ordering Guide). 5) Instrument Setup software. ESTABLISHING COMMUNICATIONS Connect the meter and PC. Apply power to the meter. Be sure that the meter is in Run Mode, not Setup Mode. To start the software from Windows, click on Start => Programs => IS2 => IS2. Click on RS232 => Establish. The program will temporarily set the selected Com port to the required baud rate, parity, data bits and stop bit. Once communications have been established, click on Main Menu. The software will sense the type of meter and installed boards, but it cannot sense jumpers positions nor set jumpers for you. If the computer is not connected to a meter, select DPM and Series 2. 49
, and be downloaded into one or multiple meters (DPM => Put Setup). Downloading of setup files from a PC can be a major time saving when multiple meters have to be set up in the same way.")


50 SETUP OF CONNECTED METER A setup file can be retrieved from the meter (DPM => Get Setup), be edited (View => Setup), be saved to disk (File => Save Setup), be retrieved from disk (File => Open Setup), and be downloaded into one or multiple meters (DPM => Put Setup). Downloading of setup files from a PC can be a major time saving when multiple meters have to be set up in the same way. You will find that Instrument Setup software is very user friendly, with separate tabselectable windows for Input+Display, Scaling, Filter, Relay Alarms, Communications, Analog Out, and Lockouts. If the required hardware, such as the analog output board, is not sensed, the corresponding tab will be grayed out. ADDITIONAL FEATURES The Commands pull-down menu allows you to execute certain meter functions by using your computer mouse. You can reset individual meter functions, display current or peak readings, and enter numbers to be displayed remotely by the DPM. The first position of a transmitted number must be a blank, + sign or - sign. Five digits and a decimal point must be transmitted. Leading 0 s serve as blanks. The Commands pull-down menu will be grayed out unless a Get Setup has been executed. Plot 50 Graph


51 The Readings pull-down menu provides three formats to display DPM data on the PC monitor. Use the Pause and Continue buttons to control the timing of data collection, then press Print for a hardcopy using your PC printer. - List presents the latest readings in a 20-row by 10-column table. Press Pause at any time to freeze the display. Press Print for a hardcopy. List can capture peak readings. - Plot generates a plot of readings vs. time in seconds. It effectively turns the DPM-PC combination into a printing digital oscilloscope. - Graph generates a histogram, where the horizontal axis is the reading and the vertical axis is the number of occurrences of readings. The display continually resizes itself as the number of readings increases. The Jumpers pull-down menu provides jumper positions for the various meter boards, duplicating information in this manual. The Calibration pull-down menu allows easy calibration of voltage and current ranges for the DC, load cell, and AC RMS signal conditioner boards. The PC first recognizes the type of board, then prompts you to apply specific jumpers and calibration signals. Press Ready to take a reading. Press Repeat to take more readings. When you have decided on which reading to accept, press on the number 1 through 10 of that reading. Additional calibration software is available online. METER SETUP WITH AN UNCONNECTED PC Instrument Setup software is also of benefit when the PC is not connected to a meter. Upon launching the software, click on None for Communications, then on DPM and Series 2. Click on File => Default Setup to retrieve a default setup file from disk, or on File => Open Setup to retrieve a previously saved setup file from disk. To enter new setup information, click on View => Setup, then make your screen selections as if you were connected to a meter. Tabs will be grayed out if you have not selected the required hardware under the Input+Display tab. When done, press on Main Menu, then on View => Menu. The selections made under Setup will now be shown in the form of the required front panel programming sequence, where each row corresponds to a menu item selected by the key, and the seven data columns correspond to values entered via the and keys. Click on any step in the sequence to bring up a detailed help window. Click on Print for a hardcopy, which you can then use as an instruction sheet to program your meter via its front panel. Click on Main Menu => File => Save Setup As to save your setup to disk and have an electronic record. 51


52 21. CUSTOM CURVE LINEARIZATION Curve.exe is a DOS-based, executable PC program used to set up an Extended meter so that the readings have a user-defined, non-linear relationship with the input signal. The calculated linearizing parameters are downloaded into non-volatile memory of the meter. For example, it allows a meter to correct for transducer nonlinearity or to display volume of an irregularly shaped tank based on liquid level. The curvefitting algorithm uses quadratic segments of varying length and curvature, and provides diagnostics to estimate curve fitting errors. The program is self-prompting, avoiding the need for a detailed printed manual. This manual section is only intended as an introduction and get-started guide. PREREQUISITES 1) PC-compatible computer with an available RS232 or USB port. 2) Extended meter. 3) An RS232 or USB board in the meter. This board can be removed following meter setup. 4) An RJ11-to-DB9 RS232 cable or a USB cable to connect the meter to the PC (see Section 1, Ordering Guide). 5) Curve.exe software (downloadable from the web at no charge). GETTING STARTED Download curve.exe into the same directory that will contain your data files, such as c:\curves. Set the meter baud rate to To do so, press the key to get to SEr 1, then set the entry to 050. Set the meter address to 1. To do so, press the key to get to SEr 2, then set the entry to _0011. To execute the program from Windows, simply double-click on curve.exe, which is an executable file. Follow the steps on computer screens, which will prompt you and provide extensive information. Pressing R (Enter) returns to the main menu. You will be given the choice to enter your data in one of four modes: 1) Text file entry mode, with an X value in one column and a Y value in another. There can be additional columns, which are ignored. The file must have a DOS name of up to 8 characters and the extension.raw. There can be from 5 to 180 rows. X is the input value and should be in the unit of measure for which the meter was set up, such as mv, V, ma or A. Y is the desired corresponding reading and can range from to with any decimal point. 2) 2-coordinate keyboard entry mode, where an actual X input signal is applied, and the desired Y reading is entered from the keyboard. 3) 2-coordinate file entry mode, where an actual X input signal is applied, and the desired Y reading is provided from a file. 52
SHIMPO INSTRUMENTS DIGITAL PANEL METER OWNERS MANUAL
 SHIMPO INSTRUMENTS DIGITAL PANEL METER OWNERS MANUAL SHIMPO INSTRUMENTS 1701 Glenlake Avenue, Itasca, Illinois 60143, USA Phone: (800) 237-7079 Fax: (630) 924-0342 www.shimpoinst.com 1. ORDERING GUIDE
MICRO-P & MIGHTY-1 SERIES B OWNERS MANUAL
 MICRO-P & MIGHTY-1 SERIES B OWNERS MANUAL ELECTRO-NUMERICS, INC. 1. USER NOTES 2 TABLE OF CONTENTS 1. USER NOTES... 2 2. TABLE OF CONTENTS... 3 3. PRODUCT INTRODUCTION... 4 4. RECEIVING & UNPACKING...
LAUREATE SERIES 2 DIGITAL PANEL METER OWNERS MANUAL
 LAUREATE SERIES 2 DIGITAL PANEL METER OWNERS MANUAL Now with Ethernet LAUREL Electronics Inc. 3183-G Airway Ave, Costa Mesa, CA, 92626, USA Tel: (714) 434-6131 Fax: (714) 434-3766 Website: www.laurels.com
VL SERIES 2 DPM OWNERS MANUAL
 VL SERIES 2 DPM OWNERS MANUAL 199 Fire Tower Drive Tonawanda, NY 14150, USA Tel: (716) 629-3800 Fax: (716) 693-9162 Email: solutions@viatran.com 1. ORDERING GUIDE Configure a model number in this format:
IPM490 & IPM500 DIGITAL PANEL METER OWNERS MANUAL
 IPM90 & IPM00 DIGITAL PANEL METER OWNERS MANUAL 0 Thomas, Irvine, CA 98, USA Tel: (99) -0900 Fax: (99) -090 Website: www.futek.com . TABLE OF CONTENTS. TABLE OF CONTENTS.... TEDS INTRODUCTION.... IPM90
DPM-3. Transducer Techniques DIGITAL PANEL MOUNT METER PLUG AND PLAY IEEE COMPLIANT OPERATOR MANUAL
 DPM-3 DIGITAL PANEL MOUNT METER PLUG AND PLAY IEEE 1451.4 COMPLIANT OPERATOR MANUAL 4006497 Transducer Techniques R TABLE OF CONTENTS 1. TEDS IEEE 1451.4 INTRODUCTION... 3 2. GENERAL INTRODUCTION... 3
LAUREL. Laureate Digital Panel Meter for Process and Ratiometric Signals ELECTRONICS, INC. Features. Description
 LAUREL ELECTRONICS, INC. Laureate Digital Panel Meter for Process and Ratiometric Signals Features Reads process signals from ±200 mv to ±600V or ±2 ma to ±5A full scale Ratiometric mode for bridges and
Model SM9850-Series DIGITAL PANEL METER OWNERS MANUAL
 Model SM9850-Series DIGITAL PANEL METER OWNERS MANUAL TENSION MEASUREMENT Instruments For Test & Industry Tension Sensors available for fibers, optical fibers, wire, rod, cable, yarn, thread, EDM, coil
LAUREL. Laureate Digital Panel Meter for Load Cell & Microvolt Input ELECTRONICS, INC. Features. Description
 Description LAUREL ELECTRONICS, INC. Features Laureate Digital Panel Meter for Load Cell & Microvolt Input 20, 50, 100, 250 & 500 mv ranges Span adjust from 0 to ±99,999, zero adjust from -99,999 to +99,999
LAUREL. Laureate RTD Temperature Panel Meter / Controller ELECTRONICS, INC. Features. Description. Specifications
 LAUREL ELECTRONICS, INC. Laureate RTD Temperature Panel Meter / Controller Features Factory calibrated for 100Ω platinum, 10Ω copper & 120Ω nickel RTDs 2, 3 or 4-wire connection with lead resistance compensation
Laurel Electronics Customer Price List
 Laurel Electronics 2017 Customer Price List Laurel Electronics, Inc. 3183-G Airway Ave., Costa Mesa, CA 92626-4611 USA Phone: (714) 434-6131 Fax: (714) 434-3766 E-mail: sales@laurels.com Website: www.laurels.com
TC Type Range Conformity Error. J -210 C to +760 C (-347 F to F) ±0.09 C (±0.16 F) K -244 C to C (-408 F to F) ±0.1 C (±0.
 ±0.09 C (±0.16 F) K -244 C to C (-408 F to F) ±0.1 C (±0.") LAUREL ELECTRONICS, INC. Laureate Thermocouple Panel Meter / Controller Features Factory calibrated for thermocouple types J, K, T, E, N, R, S Entire range of each thermocouple in one scale Highly accurate
LAUREL ELECTRONICS, INC. Laureate Thermocouple Panel Meter / Controller Features Factory calibrated for thermocouple types J, K, T, E, N, R, S Entire range of each thermocouple in one scale Highly accurate
LAUREL ELECTRONICS, INC.
 LAUREL ELECTRONICS, INC. Laureate RTD Temperature Panel Meter / Controller Features Factory calibrated for 100Ω platinum, 10Ω copper & 120Ω nickel RTDs 2, 3 or 4-wire connection with lead resistance compensation
IPM500 Series QuickStart Manual
 IPM500 Series QuickStart Manual The Force of Innovation 10 Thomas Irvine, CA 92618 USA (949) 465-0900 FAX: (949) 465-0905 E-Mail: HTUfutek@futek.comUTH www.futek.com Manufacturer of Load Cells, Pressure
MICRO SERIES PROCESS DISPLAYS LARGE DIGIT MODELS
 The MICRO SERIES PROCESS DISPLAYS LARGE DIGIT MODELS Mighty-5 DPM MODELS Micro-P & Mighty-1 Mighty-1 Micro-P ELECTRO-NUMERICS, INC. Introduction The Electro-Numerics family of Digital Panel Meters and
Y800 Plus Frequency, Rate & Period Meter With dual, independently field-scalable channels
 Y800 Plus Frequency, Rate & Period Meter With dual, independently field-scalable channels Description Features Frequencies from 0.005 Hz to 1 MHz 6-digit resolution at update rates up to 25/s Selectable
LAUREL. Laureate Dual-Channel Pulse Input Totalizer With Two Independently Scalable Input Channels & Presets ELECTRONICS, INC. Features.
 Description LAUREL ELECTRONICS, INC. Laureate Dual-Channel Pulse Input Totalizer With Two Independently Scalable Input Channels & Presets Features Frequencies up to 1 MHz Totals stored in non-volatile
LAUREL ELECTRONICS, INC.
 Description LAUREL ELECTRONICS, INC. Laureate Pulse or Analog Input Batch Controller Automatic batch control for repetitive liquid fill operations Features Available for turbine flow meter pulse signals
Trident and Trident X2 Digital Process and Temperature Panel Meter
 Sign In New User ISO 9001:2008 Certified Quality System Home Products Online Tools Videos Downloads About Us Store Contact Policies Trident and Trident X2 Digital Process and Temperature Panel Meter Products
12-36 VDC/12-24 VAC Power Option 4-Digit Display, 0.56 (14.2 mm) or 1.20 (30.5 mm)
 or 1.20 (30.5 mm)") 4-20 ma & Relay Output Features 4-20 ma, ± 10 V, TC & RTD Inputs 12-36 VDC/12-24 VAC Power Option 4-Digit Display, 0.56 (14.2 mm) or 1.20 (30.5 mm) 24 VDC @ 200 ma Transmitter Power Supply Options Type
4-20 ma & Relay Output Features 4-20 ma, ± 10 V, TC & RTD Inputs 12-36 VDC/12-24 VAC Power Option 4-Digit Display, 0.56 (14.2 mm) or 1.20 (30.5 mm) 24 VDC @ 200 ma Transmitter Power Supply Options Type
LTE SERIES TRANSMITTERS
 LTE SERIES TRANSMITTERS Analog Input, Ethernet & Isolated 4-20 ma Outputs USER MANUAL LAUREL Electronics Inc. 3183-G Airway Ave, Costa Mesa, CA, 92626, USA Tel: (714) 434-6131 Fax: (714) 434-3766 Website:
LAUREL. Laureate Pulse or Analog Input Batch Controller Automatic batch control for repetitive liquid fill operations ELECTRONICS, INC.
 Description LAUREL ELECTRONICS, INC. Laureate Pulse or Analog Input Batch Controller Automatic batch control for repetitive liquid fill operations Features Available for turbine flow meter pulse signals
DFI 7000 DIGITAL FORCE INDICATOR USER S GUIDE 1.0 INTRODUCTION 2.0 DESCRIPTION. 2.1 Configuration. 2.2 Specifications
 DFI 7000 DIGITAL FORCE INDICATOR USER S GUIDE 1.0 INTRODUCTION The DFI 7000 Signal Conditioner-Indicator is a complete 4-1/2-digit signal conditioner and indicator housed in a 1/8 DIN case. This unit provides
LT SERIES TRANSMITTERS ANALOG INPUT 4-20 MA OUTPUT & RS232 / RS485 I/O USER MANUAL
 LT SERIES TRANSMITTERS ANALOG INPUT 4-20 MA OUTPUT & RS232 / RS485 I/O USER MANUAL LAUREL Electronics Inc. 3183-G Airway Ave, Costa Mesa, CA, 92626, USA Tel: (714) 434-6131 Fax: (714) 434-3766 Website:
TRACKER 220 SERIES. Digital Panel Indicators. A Complete Range of Universal Input Digital Panel Indicators for Temperature and Process Measurement
 TRACKER 220 SERIES Digital Panel Indicators A Complete Range of Universal Input Digital Panel Indicators for Temperature and Process Measurement TRACKER 220 SERIES INDICATORS Universal Input Analogue Output
The Tracker 220 Series A Complete Range of Universal Input Digital Panel Indicators for Temperature and Process Measurement
 Acquisition Measurement Control The Tracker 220 Series A Complete Range of Universal Input Digital Panel Indicators for Temperature and Process Measurement TRACKER 220 SERIES INDICATORS Universal Input
The PM1000 series is a universal 4 digit LED plug-on display for transmitters with 4-20mA 2 wire output and fitted with DIN43650 connector.
 PM1000 SERIES PLUG-ON DISPLAY BRIGHT LED DISPLAY INDICATION RANGE -999 TO +9999 FITS TO DIN 43650 CONNECTOR PLUG-ON TO ANY TRANSMITTER WITH 4-20MA OUTPUT EASY TO SCALE ON SITE ROBUST DESIGN SET POINT OPTION
Tempco Instruction Manual
 Tempco Instruction Manual 1/16 DIN Solid State Temperature Controller Relay Output Solid State Output For Heating Model Numbers: TEC-901, TEC-902, TEC-905 Temperature controls in this series are designed
LAUREL. Laureate Rate Meter & Totalizer with Functions A+B, A-B, AxB, A/B, A/B-1 ELECTRONICS, INC. Features. Description
 Description LAUREL ELECTRONICS, INC. Features Laureate Rate Meter & Totalizer with Functions A+B, A-B, AxB, A/B, A/B-1 Arithmetic functions A+B, A-B, AxB, A/B, A/B-1 applied to rate or total for channels
MODCELL 2050R Single Loop Controllers
 Isolated universal process and remote set-point input Four internal set-points No jumpers required to define instrument parameters Ratio/bias on process and remote set-point Totalizer Ramp/soak profile
1/32-DIN TEMPERATURE CONTROLLER INSTALLATION, WIRING AND OPERATION MANUAL FORM 3882
 1/32-DIN TEMPERATURE CONTROLLER INSTALLATION, WIRING AND OPERATION MANUAL FORM 3882 This manual is intended for use in support of installation, commissioning and configuration of the 1/32-DIN Temperature
GUIDE PROGRAMMABLE PANEL METER M905
 USER S GUIDE PROGRAMMABLE PANEL METER M905 Please read instructions carefully. 30727265 03/2018 Force Torque Pressure Acceleration - Standard Sensors and Custom Specials! MEAS France SAS, a TE Connectivity
SA SERIES Arlingate Lane, Columbus, Ohio (614)
") SA SERIES 2080 Arlingate Lane, Columbus, Ohio 43228 (614) 850-5000 Sensotec, Inc. SA Series Instruction Manual Sensotec Part Number: 008-0131 - 00 Rev. A: January 1996 Copyright Notice: 2080 Arlingate
SA SERIES 2080 Arlingate Lane, Columbus, Ohio 43228 (614) 850-5000 Sensotec, Inc. SA Series Instruction Manual Sensotec Part Number: 008-0131 - 00 Rev. A: January 1996 Copyright Notice: 2080 Arlingate
UDC 1000 and UDC 1500 MICRO-PRO SERIES UNIVERSAL DIGITAL CONTROLLERS
 UDC 1000 and UDC 1500 MICRO-PRO SERIES UNIVERSAL DIGITAL CONTROLLERS EN0I-6041 12/99 PRODUCT SPECIFICATION SHEET OVERVIEW The UDC 1000 and UDC 1500 are microprocessor-based 1/16 DIN and 1/8 DIN controllers
PD765 TRIDENT. Trident Series Process & Temperature Meters.
 PD765 Trident Series Process & Temperature Meters TRIDENT PROCESS & Temp 4-20 ma, ± 10 V, TC & RTD Inputs 4-Digit Display, 0.56 (14.2 mm) or 1.20 (30.5 mm) Type 4X, NEMA 4X, IP65 Front 1/8 DIN Shallow
Temperature Measurement
 Copyright 1999-2002. All rights reserved. Web design by Sullivan Creative -1000 to +3500 and -10000 to +35000 Count Thermocouple, RTD, and Thermistor Temperature Measurement in C or F without Recalibration
INSTALLATION INSTRUCTIONS
 www.altroniccontrols.com INSTALLATION INSTRUCTIONS EXACTA 21 MONITORING AND CONTROL SYSTEM CAUTION: The EXACTA 21 CONTROL SYSTEM is CSA CERTIFIED FOR use in Class I, GROUPS C & D, Division 2 hazardous
MODBUS RTU I/O Expansion Modules - Models C267, C277, and C287. Installation and Operations Manual Section 50
 MODBUS RTU I/O Expansion Modules - Models C267, C277, and C287 Installation and Operations Manual 00-02-0651 09-01-09 Section 50 In order to consistently bring you the highest quality, full featured products,
5450 NW 33rd Ave, Suite 104 Fort Lauderdale, FL Fruitland Ave Los Angeles, CA UM Channel Monitor.
 5450 NW 33rd Ave, Suite 104 Fort Lauderdale, FL 33309 3211 Fruitland Ave Los Angeles, CA 90058 UM-600 6-Channel Monitor Version 2 Installation and Operation Manual Rev. G P/N145F-12990 PCO 00007462 (c)
SINGLE-CHANNEL PROCESS CONTROLLERS & TEMP. DISPLAYS D3820/D3830 Series
 The Digitec Series D3800 Panel Meters offer many features and performance capabilities to suit a wide range of industrial applications. The D3820 and D3830 are available in the ranges of 4-20mA, 0-10 VDC,
High Voltage DC Meter
 High Voltage DC Meter Javelin D PD644 0-300 VDC input NEMA 4X, IP65 front Scale in engineering units Sunlight readable LED display 4-20 ma analog output Two form C 3 A relays option RS-485 serial communications
PD765 TRIDENT. Trident Series Process & Temperature Meters.
 PD765 Trident Series Process & Temperature Meters TRIDENT PROCESS & Temp 4-20 ma, ± 10 V, TC & RTD Inputs 4-Digit Display, 0.56" (14.2 mm) or 1.20" (30.5 mm) Linear or Square Root with Low-Flow Cutoff
MYRIAD QLC 4-CHANNEL MONITOR/CONTROLLER INSTRUCTION MANUAL
 MYRIAD QLC 4-CHANNEL MONITOR/CONTROLLER INSTRUCTION MANUAL VISIT OUR WEBSITE SIGMACONTROLS.COM MYR QLC MANUAL 013114 2 TABLE OF CONTENTS INTRODUCTION 3 Ordering Information Specifications Features WIRING
AUTOMATION. Operator s Manual PG-7. Full Access. Doc Part Rev B, 07/18. Automation Products Group, Inc.
 AUTOMATION P R O D U C T S GROUP, INC. Operator s Manual PG-7 Full Access Doc. 9003312 Part 200180 Rev B, 07/18 Tel: 1/888/525-7300 Fax: 1/435/753-7490 www.apgsensors.com E-mail: sales@apgsensors.com PG7
TPE 1464 Series Pressure Transducer
 TPE 1464 Series Pressure Transducer Description The KMC TPE 1464 series of pressure transducers incorporate a gauge pressure transmitter featuring low hysteresis, excellent repeatability, and longterm
USER INSTRUCTION MANUAL FOR LOADCELL TRANSMITTER MODEL TDC/I/0550 (SOFTWARE: VER2A) INDEX
 INDEX") USER INSTRUCTION MANUAL FOR LOADCELL TRANSMITTER MODEL TDC/I/0550 (SOFTWARE: VER2A) INDEX DOCUMENT NO: TDC 0550 MANUAL - 2 1.0) INTRODUCTION. PAGE 2 1.1) ABOUT THIS MANUAL. PAGE 2 1.2) INTRODUCTION. PAGE
USER INSTRUCTION MANUAL FOR LOADCELL TRANSMITTER MODEL TDC/I/0550 (SOFTWARE: VER2A) INDEX DOCUMENT NO: TDC 0550 MANUAL - 2 1.0) INTRODUCTION. PAGE 2 1.1) ABOUT THIS MANUAL. PAGE 2 1.2) INTRODUCTION. PAGE
Digital Indicator Solutions
 Digital Indicator Solutions Loop-Powered Attachable Compact Attachable Loop-Powered Smart Compact System Loop-Powered Compact Smart System Intelligent Smart System "Intelligent" Options Dual & Display
IPM650 Intelligent Panel-Mount Display
 Quick Start Guide IPM650 Intelligent Panel-Mount Display Sensor Solutions Source Load Torque Pressure Multi Component Calibration Instruments Software www.futek.com Getting Help TECHNICAL SUPPORT For more
L40 UNIVERSAL ANALOG INPUT DIGITAL PANEL METER OWNERS MANUAL
 L40 UNIVERSAL ANALOG INPUT DIGITAL PANEL METER OWNERS MANUAL LAUREL Electronics Inc. 3183-G Airway Ave, Costa Mesa, CA, 92626, USA Tel: (714) 434-6131 Fax: (714) 434-3766 Website: www.laurels.com 1. ORDERING
TRACKER 240 SERIES. Load Cell and Weighing Indicators. A Precision Measurement Instrument with Outstanding Features
 TRACKER 240 SERIES Load Cell and Weighing Indicators A Precision Measurement Instrument with Outstanding Features TRACKER 240 SERIES INDICATORS Ratiometric Measurement Tare and Auto Transducer Excitation
SSI SMART SENSOR INDICATOR PLUG & PLAY IEEE COMPLIANT OPERATOR MANUAL (USB)
") SSI SMART SENSOR INDICATOR PLUG & PLAY IEEE 1451.4 COMPLIANT OPERATOR MANUAL (USB) R 1. TABLE OF CONTENTS 1. TABLE OF CONTENTS... 2 2. TEDS IEEE 1451.4 INTRODUCTION... 3 3. SSI PRODUCT INTRODUCTION...
SSI SMART SENSOR INDICATOR PLUG & PLAY IEEE 1451.4 COMPLIANT OPERATOR MANUAL (USB) R 1. TABLE OF CONTENTS 1. TABLE OF CONTENTS... 2 2. TEDS IEEE 1451.4 INTRODUCTION... 3 3. SSI PRODUCT INTRODUCTION...
DBK48. Multipurpose Isolated Signal-Conditioning Module. Description. Supports up to Sixteen 8B Modules
 DBK48 Multipurpose Isolated Signal-Conditioning Module Description 1 Safety Concerns 2 Hardware Setup 2 Installing 8B Modules 4 Installing Plug-in Resistors to Create 4 to 20 ma Loops 5 Making Terminal
Isolated Wideband Voltage Input 3B40 / 3B41 FEATURES APPLICATIONS PRODUCT OVERVIEW FUNCTIONAL BLOCK DIAGRAM
 Isolated Wideband Voltage Input 3B40 / 3B41 FEATURES Interfaces, amplifies, protects& filters wide-bandwidth (h0 khz) single-channel analog voltage inputs. Module provides simultaneous precision voltage
955 ebrik INSTALLATION MANUAL. Series ebrik ABSOLUTE PROCESS CONTROL KNOW WHERE YOU ARE... REGARDLESS LINEAR DISPLACEMENT TRANSDUCERS
 Series ebrik INSTALLATION MANUAL LINEAR DISPLACEMENT TRANSDUCERS ABSOLUTE PROCESS CONTROL KNOW WHERE YOU ARE... REGARDLESS Introduction The is an accurate programmable, auto-tuning, noncontact, linear
AWP-24-3 Wave Height Gauge User's Guide
 AWP-24-3 Wave Height Gauge User's Guide Issue: 1.5 Status: Released 18-Dec-2014 Prepared by Akamina Technologies Inc. Akamina Technologies Inc. 91 Norice St.,Ottawa,Ontario K2G 2X9, CANADA TEL: +1 613
EPWR Series. RoHS. Product Description. Available Products. Installation Instructions 01
 01 Series RoHS Compliant Product Description The Series remote pressure transducers are designed for differential pressure applications. The sensors are remotely installed on existing plumbing runs. The
DIGITAL METERS Universal Analog Input Process Meter With Rate/Totalizer/Batch Control Features Instruction Manual
 DIGITAL METERS Universal Analog Input Process Meter With Rate/Totalizer/Batch Control Features 4-20 ma, 1-5 V, 0-5 V, or 0-10 V Field Selectable Inputs Full Six Digit Display for Total, 4½ Digit + Extra
dual-line 6-dIGIt process MeteR
 dual-line 6-dIGIt process MeteR ProVu Se r i e S provu Model pd6000 0-20 ma, 4-20 ma, 0-5 V, 1-5 V, and ±10 V Inputs NEMA 4X, IP65 Front Universal 85-265 VAC or 12/24 VDC Input Power Large Dual-Line 6-Digit
JR3 EXTERNAL SENSOR ELECTRONICS WITH SERIAL DATA OUTPUT. JR3, Inc. 22 Harter Ave. Woodland, CA 95776
 JR3 EXTERNAL SENSOR ELECTRONICS WITH SERIAL DATA OUTPUT JR3, Inc. 22 Harter Ave. Woodland, CA 95776 5963B 13 October, 2003 TABLE OF CONTENTS CHAPTER 1 OVERVIEW General...1-1 Sensor...1-1 Electronic System...1-1
6-Channel Monitor. Installation and Operation Manual
 3211 Fruitland Ave Los Angeles, CA 90058 Catalyst Monitor 6-Channel Monitor Version 2 Installation and Operation Manual Rev. H P/N145F-12964 PCO - 00009743 (c) Copyright 2015, Barksdale, Inc. All Rights
Temperature, Process &
 Temperature, Process & 150 For Temp. Units 1/32 DIN meter 195 with 2 control outputs User Friendly, Simple to Configure High Quality i/32 i/16 i/8 Extended 5-Year Warranty Powerful Features Free Software,
HIGH-VOLTAGE DC METER
 HIGH-VOLTAGE DC METER Javelin D PD644 0-300 VDC input NEMA 4X, IP65 front Scale in engineering units Sunlight readable LED display 4-20 ma analog output Two form C 3 A relays option RS-485 serial communications
BIPOLAR OPERATIONAL POWER SUPPLY
 QUICK START GUIDE I INTRODUCTION KEPCO An ISO 9001 Company. BIPOLAR OPERATIONAL POWER SUPPLY 1.1. SCOPE OF MANUAL. This Quick Start Guide covers simple installation and local operation of the Kepco 100W,
PHASETRONICS. SCR Power Control Specialists. EP1 Series Power Control Single Phase SCR Amps OPERATION & SERVICE MANUAL
 PHASETRONICS Specialists EP1 Series Power Control Single Phase SCR 10-50 Amps OPERATION & SERVICE MANUAL Phasetronics, Inc. P.O. Box 5988 1600 Sunshine Drive Clearwater, FL 33765 (727)573-1900 FAX(727)573-1803
Contents. HP E1586A Rack Mount Terminal Panel User s Manual
 Contents HP E1586A Rack Mount Terminal Panel User s Manual Description... 5 Connecting to VXIbus Instruments... 5 Interconnect Cables... 5 Terminal Block Connections... 6 Using the Terminal Panel for Reference
User's Guide. MiniTec TM Series Model MN25 MultiMeter
 User's Guide MiniTec TM Series Model MN25 MultiMeter Warranty EXTECH INSTRUMENTS CORPORATION warrants this instrument to be free of defects in parts and workmanship for one year from date of shipment (a
JR3 EXTERNAL SENSOR ELECTRONICS WITH ANALOG OUTPUT. JR3, Inc. 22 Harter Ave. Woodland, CA 95776
 JR3 EXTERNAL SENSOR ELECTRONICS WITH ANALOG OUTPUT JR3, Inc. 22 Harter Ave. Woodland, CA 95776 5962C 15 December, 2003 TABLE OF CONTENTS CHAPTER 1 OVERVIEW General...1-1 Sensor...1-1 Electronic System...1-1
Operating Manual. Dynisco /8 DIN Indicator Concise Product Manual
 Dynisco 1490 1/8 DIN Indicator Concise Product Manual 59476-9 Operating Manual -1- CAUTION: Installation should be only performed by technically competent personnel. Local Regulations regarding electrical
5450 NW 33rd Ave, Suite 104 Fort Lauderdale, FL Fruitland Ave Los Angeles, CA SST7000 SST7100. Speed Switch / Transmitter
 5450 NW 33rd Ave, Suite 104 Fort Lauderdale, FL 33309 3211 Fruitland Ave Los Angeles, CA 90058 SST7000 SST7100 Speed Switch / Transmitter Installation and Operation Manual Rev. C P/N145F-13112 PCO 00009270
S-14 S-14. Compact Digital Multimeter. Compact Digital Multimeter
 S-14 Compact Digital Multimeter S-14 Compact Digital Multimeter SAFETY INFORMATION The following safety information must be observed to insure maximum personal safety during the operation at this meter
BOP QUICK START GUIDE 100W, 200W, 400W. KEPCO An ISO 9001 Company. BIPOLAR OPERATIONAL POWER SUPPLY I INTRODUCTION
 QUICK START GUIDE I INTRODUCTION KEPCO An ISO 9001 Company. BIPOLAR OPERATIONAL POWER SUPPLY 1.1. SCOPE OF MANUAL. This Quick Start Guide covers simple installation and local operation of the Kepco 100W,
305-RTD Miniature Panel Thermometer
 Made in the USA 305-RTD Miniature Panel Thermometer 11434ML-02A This device is marked with the international caution symbol. It is important to read the Setup Guide before installing or commissioning this
BOP QUICK START GUIDE 100W, 200W, 400W. KEPCO An ISO 9001 Company. BIPOLAR OPERATIONAL POWER SUPPLY WARNINGS I INTRODUCTION II SAFETY.
 QUICK START GUIDE I INTRODUCTION KEPCO An ISO 9001 Company. BIPOLAR OPERATIONAL POWER SUPPLY 1.1. SCOPE OF MANUAL. This Quick Start Guide covers simple installation and local operation of the Kepco 100W,
Vorne Industries. 2000S Series Serial Input Alphanumeric Display User's Manual
 Vorne Industries 2000S Series Serial Input Alphanumeric Display User's Manual 1445 Industrial Drive Itasca, IL 60143-1849 Telephone (630) 875-3600 Telefax (630) 875-3609 2000S Series Serial Input Alphanumeric
Digital Lighting Systems, Inc. PD216. Two Channel Dimmer and Switch Packs PROTOCOL USER'S MANUAL. PD216-UM Rev. E - 02/03
 Digital Lighting Systems, Inc. PD26 Two Channel Dimmer and Switch Packs PROTOCOL PD26 S2 S USER'S MANUAL PD26-UM Rev. E - 02/03 Digital Lighting Systems PD26 User's Manual - Page GENERAL DESCRIPTION The
The IQ240 panel mount load cell indicator is a precision digital indicator for load cell and strain gauge applications.
 IQ240 Panel Mount Load Cell Indicator Data sheet English 1.01 Introduction The IQ240 panel mount load cell indicator is a precision digital indicator for load cell and strain gauge applications. The high
TC-9102 Series Surface Mount Temperature Controllers
 TC-9102 Series Surface Mount Temperature Controllers General Description & Applications The TC-9102 Series Temperature Controller offers a versatile solution for a wide variety of applications that may
INDICATOR FOR PROCESS CONTROL. Love Controls. LCI108J-0x INSTRUCTION MANUAL. EDITION: January Valid for models with software version P-1
 Love Controls INDICATOR FOR PROCESS CONTROL LCI108-0x LCI108J-0x INSTRUCTION MANUAL EDITION: January 2001 Valid for models with software version P-1 INTRODUCTION TO THE LOVE CONTROLS LCI108 SERIES This
Isolated Voltage Input 3B30 / 3B31 FEATURES APPLICATIONS PRODUCT OVERVIEW FUNCTIONAL BLOCK DIAGRAM
 Isolated Voltage Input 3B30 / 3B31 FEATURES Interfaces, amplifies, & filtersanalog input voltages. Narrow-bandwidth (3Hz) single-channel single conditioning. Module provides simultaneous precision voltage
BCM2 Series Branch Circuit Monitors Quick Setup Guide
 BCM2 Series Branch Circuit Monitors Quick Setup Guide Safety Information DANGER! HAZARD OF ELECTRIC SHOCK, EXPLOSION, OR ARC FLASH Follow safe electrical work practices. See NFPA 70E in the USA, or applicable
Quick Start Guide. 240 Series Cryogenic Sensor Input Module. 1 Model 240 Quick Start Guide
 Quick Start Guide 240 Series Cryogenic Sensor Input Module 1 Model 240 Quick Start Guide 2 Model 240 Quick Start Guide Safety Precautions Observe these general safety precautions during all phases of instrument
User's Guide. Model W 3-in-1 Switching DC Power Supply
 User's Guide Model 382260 80W 3-in-1 Switching DC Power Supply Introduction Congratulations on your purchase of the Extech 80W 3-in-1 Switching DC Power Supply. The Model 382260 has three output ranges
Rhino Buffer Module PSM24-BFM600S. Operating Instructions
 Rhino Buffer Module PSM24-BFM600S Operating Instructions RHINO BUFFER MODULE PSM24-BFM600S Description The PSM24-BFM600S Buffer Module will hold the output voltage of a 24 VDC power supply after brownouts
INSTALLATION DKM-409 NETWORK ANALYSER WITH HARMONIC MEASUREMENT AND SCOPEMETER. Before installation:
 DKM-409 NETWORK ANALYSER WITH HARMONIC MEASUREMENT AND SCOPEMETER The DKM-409 is a precision instrument designed for displaying various AC parameters in 3-phase distribution panels. Thanks to its isolated
DIGITAL PANEL THERMOMETER
 Love Controls DIGITAL PANEL THERMOMETER LCI108-2x LCI108J-2x INSTRUCTIONS MANUAL EDITION: February 2001 INTRODUCTION TO THE LOVE CONTROLS LCI108 SERIES This manual does not constitute a formal agreement.
Level instruments. Communications and Displays SITRANS RD200. 5/306 Siemens FI Technical specifications. Overview
 Overview The is a universal input, panel mount remote digital display for process instrumentation. Benefits Easy setup and programming via front panel buttons or remotely using RD software Display readable
QUICK SETUP GUIDE. BCM2 Series Branch Circuit Monitors. Safety Information. Equipment Maintenance and Service. Raritan DANGER!
 QUICK SETUP GUIDE BCM2 Series Branch Circuit Monitors Safety Information DANGER! HAZARD OF ELECTRIC SHOCK, EXPLOSION, OR ARC FLASH Follow safe electrical work practices. See NFPA 70E in the USA, or applicable
E101 - Strain Gauge Transducer Display Module. Contents
 E101 - Strain Gauge Transducer Display Module Contents Torque Transducer Display Interface: TSE3249R Strain Gauge Transducer Display Interface [E101] Operating Guide: TSE2097V (Includes Introduction, Description
Mini Digital Multimeter
 User Manual Mini Digital Multimeter Model MN15A Additional User Manual Translations available at www.extech.com Introduction Congratulations on your purchase of the Extech MN15A MultiMeter. The MN15A offers
OPERATING INSTRUCTION
 OPERATING INSTRUCTION AUTORANGING MULTIMETER MAX Ω F C 10A MAX every 15 min. COM V SAFETY INFORMATION The following safety information must be observed to insure maximum personal safety during the operation
Models beginning with 2M, 2L or 2X. Product Description. Technical Specifications. Installation Instructions. Series 2000 Multiple Meter Units (MMUs)
") Models beginning with 2M, 2L or 2X Series 2000 Multiple Meter Units (MMUs) Product Description Technical Specifications Installation Instructions February 28 th, 2013 List of Figures...2 List of Tables...2
Models beginning with 2M, 2L or 2X Series 2000 Multiple Meter Units (MMUs) Product Description Technical Specifications Installation Instructions February 28 th, 2013 List of Figures...2 List of Tables...2
OBSOLETE. Isolated, Linearized, Thermocouple Input 3B47 FEATURES APPLICATIONS PRODUCT OVERVIEW FUNCTIONAL BLOCK DIAGRAM
 FEATURES Interfaces, amplifies, filters, isolates, & linearizes analog input voltages from a J, K, T, E, R, S or B-type thermocouple Thermocouple input signal is internally linearized High accuracy internal
ATE QUICK START GUIDE. KEPCO An ISO 9001 Company. VOLTAGE/CURRENT STABILIZED POWER SUPPLY I INTRODUCTION
 QUICK START GUIDE KEPCO An ISO 9001 Company. ATE VOLTAGE/CURRENT STABILIZED POWER SUPPLY I INTRODUCTION 1.1. SCOPE OF MANUAL. This Quick Start Guide covers simple installation and local operation of the
SP6R Level Controller Operation Manual
 SP6R Level Controller Operation Manual www.sjerhombus.com SP6R LEVEL CONTROLLER INTRODUCTION SJE-Rhombus, an industry leader in water and wastewater pump controls, introduces the SP6R Level Controller.
The IQ300 wall mount load cell indicator is a precision digital indicator for load cell and strain gauge applications.
 IQ300 Wall Mount Load Cell Indicator Data sheet English 1.01 Introduction The IQ300 wall mount load cell indicator is a precision digital indicator for load cell and strain gauge applications. The high
Measurement Systems Datascan Installation and User Guide
 Measurement Systems Datascan Installation and User Guide Supplied By Contents Contents 1. INTRODUCTION... 1 1.1 GENERAL... 1 1.2 DATASCAN MODULE RANGE... 1 1.2.1 Measurement Processors... 1 1.2.2 Analog
General Specifications. P2-08THM Analog Input
 General Specifications Operating Temperature Storage Temperature Humidity Environmental Air Vibration Shock Field to Logic Side Isolation Heat Dissipation Enclosure Type Agency Approvals Module Keying
DM-918 OPERATIONS MANUAL AUTORANGING MULTIMETER
 DM-918 OPERATIONS MANUAL AUTORANGING MULTIMETER SAFETY INFORMATION The following safety information must be observed to ensure maximum personal safety during the operation of this meter: This meter is
TOXALERT MODEL AIR 2000
 TOXALERT MODEL AIR 2000 NOTE: Toxalert s Model GVU-CO 2 Sensor is the same as the Air2000R. Microprocessor-based, Infrared Environmental CO 2 Sensor OPERATOR S MANUAL TOXALERT TM INTERNATIONAL INC. P.O.
INSTRUCTION MANUAL. Digivac 760 Series. Models 100Led P / P / 29.9" 100Led 760 / SixVac 801 / 760 / 2c 801 Micro
 INSTRUCTION MANUAL Digivac 760 Series Models 100Led 760 100P / 760 100P / 29.9" 100Led 760 / SixVac 801 / 760 / 2c 801 Micro Ranges 0 to 760 Torr 0 to 19.99 Torr 0 to 29.9 inches of mercury The Digivac