Query. Training and Participation Guide Financials 9.2
|
|
|
- Abner Arnold
- 6 years ago
- Views:
Transcription


1 Query Training and Participation Guide Financials 9.2
2 Contents Overview... 4 Objectives... 5 Types of Queries... 6 Query Terminology... 6 Roles and Security... 7 Choosing a Reporting Tool... 8 Working With Existing Queries... 9 Searching for and Running an Existing Query in Viewer... 9 Running a Query Via Schedule Saving an Existing Query as Private Creating Queries Creating a New Query Review Tabs Selecting Records Changing Column and Sort Order for Multiple Fields Editing Field Properties Changing Field Labels Previewing Query Results Defining Selection Criteria Criteria View Selecting Condition Types Entering Comparison Values Understanding Effective Dates Specifying Effective Date Criteria Adding Run-Time Prompts Organizing Queries Adding Queries to the My Favorite Queries List Copying a Query to Another User s List of Queries Moving a Query to an Organization Folder Renaming a Query Working with Multiple Tables Adding and Joining Multiple Records to a Query
3 Record Hierarchy Join Related Record Join Any Record Join Left Outer Join Additional Query Options Aggregate Functions in Query Applying Aggregate Functions to Fields Relating Multiple Criteria Using AND OR Logical Operators Advanced Query Having Criteria Unions Sub Queries APPENDIX Frequently Used Records Useful Queries by Module
4 Overview This class will introduce you to the PeopleSoft Query tool. You will learn the basic functions of Query and how to create a simple query including selecting a record, selecting specific fields, modifying column headings and how to retrieve the short or long description for a translate value, rather than the code. Once you know the basics, you will learn how to modify and retrieve information based on criteria requirements such as equal to, greater than, in list, between and like. You will also be introduced to runtime prompts. Runtime prompts give you the ability to enter specific values for a designated field. These values are then used as criteria for retrieving the information for your report. The main reason you store your business data in a database is so you can manipulate it to answer questions and solve business problems. However, getting just the information you're looking for can often be a difficult and time-consuming process. With PeopleSoft Query, you can extract the precise data you want using visual representations of your PeopleSoft database, without having to write SQL statements. The queries can be as simple or as complex as necessary, and they can be one-time ad-hoc queries or queries you'll use repeatedly. This manual explains the basic concepts of selecting data, designing simple and complex queries, and sending query results to other reporting tools. To take full advantage of the information covered in this book, users should have a basic understanding of how to use PeopleSoft applications. We recommend that you complete at least one PeopleSoft introductory training course. You should be familiar with navigating the system and adding, updating, and deleting information by using PeopleSoft windows, menus, and pages.
5 Objectives The objectives of this manual are for you to be able to: Recall the Navigation steps to Query Use Query Viewer to search, save, and/or schedule queries Create a query from scratch Save as Private Use Query Manager to Edit an existing query o Reorder, rename, and sort o Add Records, Prompts, and Criteria o Select fields Understand the functionality of Hierarchy Joins (outer) 5
6 Types of Queries PeopleSoft Query provides the following different types of queries: User queries. Create and run queries to retrieve data from the database directly from Windows-based Query Designer, or the web-based Query Manager/Query Viewer applications. These are the queries that will be discussed in this class. Reporting queries. Reporting queries are essentially the same as user queries, except that they are designed to be used by another reporting tool. Reporting queries can be used as data sources for reports, PS/nVision, or Cube Manager. Process queries. Write queries that are intended to run periodically by batch processes, most likely using PeopleSoft Application Engine and the Query API (application programming interface). Query Terminology Record Definitions: The record definitions are the design specifications that determine the structure of your PeopleSoft application data tables and online processing. In the PeopleSoft database, tables are represented as record definitions. In PeopleSoft Query, tables are also called records. Tables: The table is made up of columns (Fields) and rows (Data). Columns determine how the data will be stored. Rows represent the actual data stored in the database. SetID: Code that is used to group and share configuration data across the application. For example at FIU, we create most of our control records (i.e. Accounts, Department ID, Activity #) under SetID FIU01 and it allows the entire university to use those values. Control vs. Transactional Data Control data represents the configuration values which are agreed on and shared across the enterprise. Information that is key to the operation of a business that does not change very often. Transaction data are data describing an event (the change as a result of a transaction) and is usually described with verbs. Transaction data always has a time dimension, a numerical value and refers to one or more objects. Changes frequently. Run Control: When running a report, you must enter the parameters from which the report will be run, and eventually display data for you to view. To aid in running reports, PeopleSoft created a means to allow the user to save search parameters so he/she does not have to perform the same steps each time the report is requested. Run Control ID's are how PeopleSoft identifies saved search parameters for reports or processes. 6
7 Roles and Security There are several types of users that will use query functionality. There are Query Super Users who are a specific set of users that develop queries within PeopleSoft for the user community. They have the ability to save Public queries that can be accessed by any user. Then there are Query Viewers who only have the ability to run public queries but cannot develop or modify queries. Users have access to data based on security settings within Panthersoft. Any user with Query Manager Access may save a Public query as Private under a different name. 7
8 Choosing a Reporting Tool Here are some guidelines to consider when determining which interface to display your results. Reporting Tool HTML Description & Guidelines Online ad hoc reporting tool. Create and run queries to retrieve data from the database directly from the web-based Query Manager/Query Viewer applications. This option is useful as you refine your queries. Results display on the screen within PS. Excel Query-to-Excel Interface provides the ability to send queries from Query to a Microsoft Excel spreadsheet. Your data is sent directly from your query into a predefined spreadsheet layout. This way you can spend your time analyzing results, not typing data into your spreadsheet Use a spreadsheet to: Generate output for further analysis. Create charts or graphs of the data. Work with data in a spreadsheet format. Quickly display an ad hoc query answer with default formats. XML Schedule Not used at FIU You can choose to schedule queries so that they run in the background as opposed to your desktop. This is helpful if your query is taking too long to run or returns too many rows of data. The results of scheduled queries are routed to PeopleSoft Report Manager 8

9 Working With Existing Queries In Query Viewer and Query Manager, the user can run a query to different interfaces, schedule a query for future use, and save that query to favorites for faster retrieval. Searching for and Running an Existing Query in Viewer 1. If you know the Query Name, enter it in the Search Box. If not, click on Advanced Search to filter your results. Leave the Search By box at Query Name. If you do not type anything in the begins with box and simply hit Search ; the system will bring back all available public queries or click Advanced Search to filter your results. 9

10 Note: When using, the IN or BETWEEN operators, enter comma separated values without quotes. I.e. JOB, EMPLOYEE Field Query Name Description Users Record Name* Uses Field Name* Access Group Name Folder Name Query Type Owner Description Enter the name of the query. Enter a description or partial description of the query. Enter the record with which the query is associated. Enter a field that the query uses. Enter the access group with which the query is associated. Enter the name of the folder that stores the query. Enter the query types: Role, User, Process, or Archive Enter whether the query is public or private. Below is a screen shot when entering just EX_ER in the Query Name search box. Run To options: a. Run to HTML displays the query results on your screen. b. Run to Excel displays the result in an excel spreadsheet. c. Run to XML, we do not use at FIU. 10
11 11


12 Please search for the Query entitled FIU_FSSS_TA_QUEUE and click HTML. Formatted: List Paragraph, Bulleted + Level: 1 + Aligned at: 0.25" + Indent at: 0.5" When you click, HTML you might have to enter a prompt. Prompts are other information needed to narrow down the search. For instance, when performing a search to see whose approval queue a Travel Authorization may be in, that query prompts you to enter the TA#, to narrow the results down to that specific authorization. In the below example, the FIU_FSSS_TA_QUEUE requires a TA# as a prompt. Formatted: Centered, Indent: Left: 0" Clicking HTML displays the results on your screen. RESULTS Selecting HTML displays the results on your screen. 12

13 Running Aa Query Vvia Schedule Running a Query via schedule allows you to capitalize on having the query process in the background, while you perform other tasks. 1. From the Query Viewer screen, Click on Schedule. 2. Name the Run Control ID The Run-Control ID is the save name for the search parameters you have selected; something that briefly explains what the query does.. Once you name your query, when choosing schedule in the future, you will not have to enter the Run-Control ID again. 13

14 3. Write a Description of what the query does. For this example, name it Vendors List.For example Dr. Harris Monthly Travel 4. Click Apply 14
 9.")

15 5. Choose PSUNX server 6. Enter the dates you would like the query to run. 7. Choose Run Date 8. Choose Type, Format, and Distribution (WEB, TXT are your standards) 9. Click OK The query will then run in the background at its scheduled date and time. Do not set recurrences for queries until you have successfully completed Query Manager Advanced Query. Navigate to Process Monitor to view the results of your query. 15


16 NAVIGATION People Tools Process Scheduler Process Monitor You can click the Refresh button to update the status when the query is running. The query has finished running when the Run Status is Successful and the Distribution Status is Posted. 1. Click on Details. 16


17 2. Click View Log/Trace 3. Click the.csv file and open it in Excel to view the results of the query. 17
18 Saving an Existing Query as Private In Query Viewer or Manager, you can take an existing Public query and save it for yourself and to make edits/adjustments. To save a query via Query Viewer: 1. After retrieving the Query, click edit to view the Save options at the bottom of the screen. 2. Click Save As to save a copy of the query. 3. In the Query box, enter a short name for the query (NOTE: query names should begin with FIU_; cannot have spaces. Use underscores _) 4. In the Description field, enter information that will help you to later identify the query. 5. Create or Select a Folder to file saved queries. 6. Select a Query Type. Standard queries are designated as User queries. The Archive, Process, or Role options apply to Workflow queries. NOTE: Workflow (which essentially allows you to route information to another user) is not currently implemented by FIU, so select the default option User. 7. In the Owner field, select Private. a. Private means that only the user ID that created the query can open, run, modify or delete the query. b. Public means that any user with access to the records used by the query can run, modify, or delete the query. NOTE: The ability to save a query as public will vary depending on your level of security. 8. Enter the Query Definition which can be a long description. Note: Using Save As creates another instance of the query that you can modify and save under a different name. When you select Save As, the Properties page appears, enabling you to change the name, description, and owner of the new query. You cannot save a public and a private query with the same name. Going forward, all queries must begin with a prefix of FIU_ followed by any other descriptive values (keeping in mind that a maximum of 30 characters is allowed). 18
19 To save a Query via Query Manager: 1. After you make your changes in Query Manager, select Save As. 2. In the Query box, enter a short name for the query (NOTE: query names should begin with FIU_; cannot have spaces. Use underscores _) 3. In the Description field, enter information that will help you to later identify the query. 4. Select a Query Type. Standard queries are designated as User queries. The Archive, Process, or Role options apply to Workflow queries. NOTE: Workflow (which essentially allows you to route information to another user) is not currently implemented by FIU, so select the default option User. 5. In the Owner field, select Private. Private means that only the user ID that created the query can open, run, modify or delete the query. Public means that any user with access to the records used by the query can run, modify, or delete the query. NOTE: The ability to save a query as public will vary depending on your level of security. 6. Enter the Query Definition which can be a long description. Note: Using Save As creates another instance of the query that you can modify and save under a different name. When you select Save As, the Properties page appears, enabling you to change the name, description, and owner of the new query. You cannot save a public and a private query with the same name. Going forward, all queries must begin with a prefix of FIU_ followed by any other descriptive values (keeping in mind that a maximum of 30 characters is allowed). 19

20 Creating Queries The ability to create/modify/ is done using Query Manager, whereas the ability to run/schedule/view pre-defined queries is done through Query Viewer. When creating a query, user must navigate to Query Manager in the Reporting Database. Creating a New Query 1. Navigate to the Reporting Database first. We ask all users to run their queries in the Reporting Database as to not affect Production. Information in the Reporting database is a production day behind. So if you are trying to run a query on, for example, Wednesday morning, you will be using information from Monday. The last completed day of production. Reporting Tools NAVIGATION Reporting Database Look for this to indicate that you are in the Reporting Database. 20


21 2. Another window pops up to navigate to the Query menu. Choose Query Manager Query Query Manager NAVIGATION The Query Manager Search page appears. 3. Click the Create New Query link to open the Find an Existing Record search page. 21
22 Review Tabs Records allows you to add records to the query via query manager Query Manual 9.2 Query Tab Shows you which records are already selected for this particular query. Expressions advanced Prompts allows user to add, edit prompts Fields allows you to select/deselect or edit fields within a record Criteria allows you to edit, view the search criteria Having advanced View SQl advanced Run- runs the query according to set parameters. Selecting Records All queries are built off records/tables, fields and data in those fields. Running a query asks the system to search the database for an answer. The database is comprised of records (tables), fields (columns), key fields, and field data (rows). The results you generate in a query will depend on the records (tables) selected. If you are unsure of a table to use see Appendix in back of this manual, or send an to controller@fiu.edu. Example of a Table - EX_TAUTH_HDR - Travel Authorization Header Table You choose to run the existing public query: DRIVE_INFO and realize that you only received her name and address. However you also need, her: DOB, car make, insurance company name, and date of her last speeding ticket. Melissa s name, address, DOB, , phone number, and driver s license number can be found in one record. Her car insurance information, make, model, and car year are in another record, and her driving history, and license number are in another record. Name, Address, DOB, Make, Model, etc. are called fields within these different records. Within these records are key fields. Key fields are unique to the record. In the example below, Melissa s address, license plate number, and license number are unique to only her. Formatted: Font: Bold Formatted: Font: Bold EX_TAUTH_HDR RECORD FIELDS TRAVEL_AUTH_ID EMPLID TRAVEL_AUTH_STATUS SUBMISSION_DATE 22
 Rows (data in the field) contain all the information for a unique combination of key values on the table. TA#11111 is the data in the field.")
23 Field Data APPROVED 10/1/2014 Field Data PENDING 10/15/2014 Fields (columns) store single pieces of information for each row. (TRAVEL_AUTH_ID is a field.) Rows (data in the field) contain all the information for a unique combination of key values on the table. TA#11111 is the data in the field. For example, in the EX_TAUTH_HDR a row includes the data for these fields: TRAVEL_AUTH_ID, EMPLID, TRAVEL_AUTH_STATUS, and SUBMISSION_DATE. Within these records are key fields. Key fields are unique to the record. Every record has a key field. The Key Fields for the EX_TAUTH_HDR table are Employee ID, and TA#. No employee or Travel Authorization has the same number. This information is what the query is looking at to retrieve your answer If you know the name of the record you want, enter it in the Search By box on the Find Existing Record page, and click the Search button. If you want to search for a record, leave the field blank and click the Search button to display a list of up to 300 records. By default, only the first 20 records appear on the page. To see more of the list, use the navigation buttons and links located on the header bar. To display all of the records, select the View All link, and use the scrollbar to go through the rest of the list. 23

24 Helpful Search Hints Perform a partial search by entering part of a record name or description in the Search For field. Search records either by name or description, then further define your search by choosing either a begins with or a contains search type. Click the Search button to display a list of records that match your search criteria. Enter the name of the required record in the Search For box, and then click the Search button. For example: Enter the word SPEED to search for the Speed Type Table Query Manager will display the record(s) at the bottom of the page. Click Add Record nest to SPEEDTYP_TBL to select the record (i.e. place it in the Query Tab) NOTE: The Show Fields link will display a list of all the fields in the record available for selection. 24

25 Query Name New Unsaved Query appears in this read-only field until you change it on the Properties page. This field appears on all of the Create New Query pages. Click the Sort button once to list fields in alphabetical order. Click the button again to return to original sort. Alias Record The alias name that the system automatically assigns to the chosen records. Click the Folder button to view the fields for the chosen record. Query Manager expands the record so that you can see the fields and make sure that this record has the content that you want. Click the Folder button again to hide the fields for a record. Click this link to join a child table to its parent table. Click the Delete button to delete the associated record from the query. Click this button to check all fields in the record. Once you select a field, the system automatically adds it to the query and you can view it on the Fields page. Click this button to clear all fields in the record. Fields Select the box located to the left of each field that you want to add to your query content. Indicates key fields. Related Record Join Click this link to join two records based on a shared field. For example, in the above screenshot, the SPEEDTYP_TBL record is related to the GL_ACCOUNT_TBL record by the ACCOUNT field. 25
26 Click the Use as Criteria button to open the Criteria page, where you can add criteria for the selected field. 26

27 Changing Column and Sort Order for Multiple Fields Query Manual 9.2 Access the Edit Field Column Order page by clicking the Fields page. button on the Column Order Sort Order Direction Enter new column number to reorder columns. Columns left blank are automatically assigned a number. You cannot use the same number on multiple fields. Enter the desired sort order. Enter zero to remove a sort order. If the field is the first sort field, enter 1, and the system sorts rows based on this field first. To be the second sort field, enter 2, and so on. Select Descending to sort fields in descending order or leave blank for Ascending 27

28 Editing Field Properties Access the Edit Field Properties page by clicking the next to the desired field you would like to edit. button on the Fields page The below screen appears. Heading Unique Field Name Aggregate None Choose a column heading from the following: No Heading: The column does not have a heading. Text: The column heading is the text you ve entered in the text box. RFT Short: The column heading is the short name from the record definition. RFT Long: The column heading is the long name from the record definition. Used for translations. There is no need to change the default value, which is a single-letter alias for the record followed with the record field name (for example A.NAME or B.EMPLID). If you are using aggregate values, select the aggregate function value for this field. An aggregate function is a special type of operator that returns a single value based on multiple rows of data. When your query includes one or more aggregate functions, PeopleSoft Query collects related rows and displays a single row that summarizes their contents. Will not use aggregate functions. 28
29 Sum Count Min (minimum) Max (maximum) Average Adds the values from each row and displays the total. Counts the number of rows. Checks the value from each row and returns the lowest one. Checks the value from each row and returns the highest one. Adds the values from each row and divides the result by the number of rows. Changing Field Labels When you add a field to your query, the default name will be displayed in your results when you run it. To change the name of the field displayed in your query: 1. In Query Manager, click the Fields tab. 2. Click the button associated with the appropriate field. The Edit Field Properties page appears. 3. Over-write the value in the Heading text box and click OK. Once the query is run, the value entered above will be displayed in your query results. 29

30 Previewing Query Results Click on the Run Tab to access the query results. View All Rerun Query Download to Excel Click this link to view all rows and use scroll bar to navigate. Click this link to rerun your query in the preview pane. If you have made changes to your query since the last preview, you must rerun the query to see the effect of your changes. Click this link to download your query to Excel. 30

31 Defining Selection Criteria In this chapter, you will learn how to add criteria clauses to a query to return specific rows of data. Within these criteria clauses, you will learn how to compare fields to find data of equal values, values greater or less than the field, values in a list, values in a range, and much more. You will also learn how to use effective dates when specifying criteria. Criteria View In most cases, you don't want to retrieve every row of data in a table. Your database contains a lot of information, and a complete list of entries is unlikely to answer the question that's motivating you to write a query. To selectively retrieve just the data you want, define selection criteria. Selection criteria refine your query by specifying conditions that the retrieved data must meet. Define selection criteria using the Criteria Tab 31

32 To create criteria based on a field: 1. Click the Add Criteria icon next to the desired field, on the Fields or Query page. Query Manager opens the Edit Criteria Properties page with the selected field entered as Expression Specify the criteria for that field, and then click OK to return to the Fields or Query page. 32
33 Selecting Condition Types The condition type determines how Query Manager compares the values of the first (left-hand) expression to the second (right-hand) expression. The following table describes the available condition types. For each of the condition types, Query Manager offers a not option that reverses its effect. For example, not equal to returns all rows that equal to would not return. Condition Types between equal to exists greater than in list in tree is null less than like When It Returns a Row The value in the selected record field falls between two comparison values. The range is inclusive. The value in the selected record field exactly matches the comparison value. This condition is different from the others, in that it doesn t compare a record field to the comparison value. The comparison value is a subquery. If the subquery returns any data, PeopleSoft Query returns the corresponding row. The value in the record field is greater than the comparison value. The value in the selected record field matches one of the comparison values in a list. The value in the selected record field appears as a node in a tree created with PeopleSoft Tree Manager. The comparison value for this condition is a tree or branch of a tree that you want PeopleSoft Query to search. The selected record field doesn t have a value in it. You don t specify a comparison value for this condition. Key fields, required fields, character fields, and numeric fields do not allow null values. The value in the record field is less than the comparison value. The value in the selected field matches a specified string pattern. The comparison value may be a string that contains wildcard characters. The wildcard characters that PeopleSoft Query recognizes are % and _. % matches any string of zero or more characters. For example, C% matches any string starting with C, including C alone. _ matches any single character. For example, _ones matches any five-character string ending with ones, such as Jones or Cones. 33


34 In List The In List condition finds fields having a value that matches any one of the values in a list of values. With this option, you are prompted to create a list with the Edit List dialog box. 34


35 To build a list of values: 1. For each value you want to add, manually enter a value in the Value text box and click the button. The List Member grid, containing the selected value, appears when a value is selected. 2. To select from a list of values, click the button to display the Select a Constant page. Click the Lookup button to display the Look Up page. Enter part of a value in the text box. The system automatically adds a wildcard to the end of the entry, which enables you to do a partial search. 35

36 3. To delete a value, select the check box to the left of the appropriate List In Tree Members value and click the button. The In Tree condition type enables you to specify a tree, and within the tree, the nodes containing specific values. In Tree is used to return the records that match, or appear underneath the specified tree. Trees are used to create hierarchical structures that visually represent a set of summarization rules for a particular field. For example, a tree specifies how your manufacturing locations are summarized or rolled up for reporting purposes. Similarly, a tree shows the reporting relationships within an organization by specifying, for example, how individual departments are summarized into territories, territories into regions, and regions into countries. The summarization rules depicted in a tree apply to the detail values of a particular field departments, vendors, customers, or other values you define. These detail values are summarized into nodes on the tree. The nodes may also be organized into levels to logically group nodes that represent the same type of information or level of summarization. Some of the most commonly used trees by FIU are: ACCOUNTROLLUP ACTIVITY_HIERARCHY DEPT_ROLLUP STUFINANCIALS Student Financials in Campus Solutions Click the New Node List link in the Criteria Dialog Box to display the Select Tree page. 36

37 Click on Search or type in the Tree name. Only trees to which you have access are listed. Click the name of the desired tree to display the Display and Select TreeNodes page. To select tree nodes: 1. Highlight the desired tree node, and click the Add Node icon. 2. If you know the name of the desired node, enter the name of the desired node in the Manual Selection list box. 3. Remove nodes from the list by clicking the corresponding icon. 4. Display the selected tree branch by clicking the corresponding icon. This is applicable only when the tree has been branched. 5. Click OK. The selected tree SetID, tree name, effective date, and selected nodes appear in the Select Tree dialog box. 37
38 Entering Comparison Values The procedure for entering comparison values differs depending on what kind of value you re entering. If you re comparing one field to another, pick the second record field; if you re comparing the rows to a constant value, enter the constant. The following table describes all the available value types, the dialog boxes that appear based on each comparison type, and the fields you must complete in those dialog boxes. Value Type Field Expression Constant Subquery Prompt Action The value in the selected field is compared to the value in another field, usually a field in another record component. When you ve selected Field as the comparison value, the Select Field dialog box appears. The Record Alias field lists all the records that are part of the current query. Select the record and the field. The selected field name appears in the second Expression column of that field s row. The value in the selected field is compared to an expression you enter, which PeopleSoft Query evaluates once for each row before comparing the result to the value in the selected field. When you ve selected Expression as the comparison value, the Edit Expression dialog box appears. In the text box, enter a valid SQL expression. To add a field or user prompt to the expression, click the Add Prompt link or the Add Field link. These links display the same dialog boxes that you see when adding a field or prompt as a comparison value: the Add Prompt displays the Run-time Prompt dialog box; the Add Field link displays the Select Field dialog box. The only difference is that PeopleSoft Query adds the field or prompt to your expression rather than using it directly as the comparison value. The value in the selected field is compared to a single fixed value. When you select Constant as the comparison value the Edit Constant Value dialog box appears. In the text box, enter the value you want to compare to the first expression. The value in the selected field is compared to the data returned by a subquery. When you select Subquery as the comparison value, the Define Subquery dialog box appears. Click the Define/Edit Subquery link to move to the Records tab to start a new query. The value in the selected field is compared to a value that you enter when running the query. When you select Prompt as the comparison value, the Define Prompt dialog box appears. Click the New Prompt link to move to the Edit Prompt Properties page. 38
39 Understanding Effective Dates When you update existing information, you do not want to lose or overwrite the data already stored in the database. To retain history, you can add a new data row identified by the date when the information goes into effect: an effective date. Effective dates allow you to keep history, current, and future information in tables. The system categorizes effective-dated rows into three basic types: Future Current History Data rows that have effective dates greater than the system date usually today s date. There can be more than one. The data row with the greatest effective date less than or equal to today s (system) date. Only one row is the current row. Data rows that have effective dates less than the effective date of the current data row. There can be more than one. Specifying Effective Date Criteria Effective-dated tables have record definitions that include the Effective Date (EFFDT) field. This field, used throughout the PeopleSoft applications, provides a historical perspective, allowing you to see how the data has changed over time. Whenever a row of data is added to the table, you specify the date on which that data becomes effective; whenever a row of data is changed, you specify a new effective date, and the system retains the previous version of the row as history. When you re using a PeopleSoft application for day-to-day processing, you usually want the system to give you the currently effective rows of data the row where the effective date is less than or equal to today s date. You don t want to see the historic rows, which are no longer accurate, nor do you want to see future-dated rows, which aren t yet in effect. When you re querying an effective-dated table, though, you may well want to see some rows that aren t currently in effect. You might want to see all the rows, regardless of their effective dates. Alternatively, you might want to see the rows that were effective as of some date in the past. 39
40 To specify effective date criteria: 1. When you choose the record that has EFFDT as a key field, Query Manager automatically creates default criteria and adds that criteria to the Criteria page. These criteria are used to specify which row of data PeopleSoft Query retrieves for each item in the table. The default is the currently effective row. Defaults are as follows: Expression 1 Condition Type EffDt <= Expression 2 Effective Sequence Record Alias.EFFDT Current Date 2. If you choose one of the comparison options, choose to compare each row s effective date against today s date or a date other than today. Last Select Current Date to compare each row s effective date against today s date. Select Constant to display the Constant box so that you can enter a date. Select this option when you want to see the rows that were effective as of a past date or that will be effective on some future date. Select Expression to display the Edit Expression box so that you can enter a SQL expression that evaluates the date entered. Select this option if you want to prompt users for an effective date when they run the query. You can add a prompt to the expression you define in the Edit Expression box. Select Field to display the Select Field box so that you can select the record field that holds the date to which you want to compare effective dates. Select this option when you want to see the rows that were effective at the same time as some other record. For example, if you re reviewing the list of products on a customer order, you ll want to see the products that were effective on the date of the order. Select First Effective Date to return the row with the oldest effective date, usually the first row entered for an item. Select Last Effective Date to return the row with the latest effective date, even if that date is still in the future. Select No Effective Date to return all rows, regardless of their effective dates. 40
, select No Effective Date, then enter a selection criterion on the Effective Date field.")
41 Note: All options (except No Effective Date) return a single row for each item on the table. If you want a subset of the rows (say, all future-dated rows or all history rows), select No Effective Date, then enter a selection criterion on the Effective Date field. Use the standard comparison operators rather than the Effective Date comparison operators. Keep in mind that the effective date operators work differently than the standard comparison operators: they always return a single effective-dated row. For example, Eff Date <= returns the one row whose EFFDT value is most recent, whereas not greater than would return the currently active row and all history rows. Adding Run-Time Prompts A run-time prompt allows you to enter values for a specific field at the time the report is executed. The report will display only those rows of information that match the value entered at the prompt. Prompts make reports more flexible. Prompt reports can be used by different departments, or individuals within the same department with different responsibilities. To define prompts: 1. Click the Add Criteria icon associated with the required field, on the Fields or Query page. Query Manager opens the Edit Criteria Properties page with the selected field entered as Expression From the Choose Expression 2 Type box, select Prompt. 3. In the Define Prompt box, click the New Prompt link The Edit Prompt Properties page will appear. 41
42 After you select a prompt field, the name of the field appears. PeopleSoft Query looks to the record definition for information about this field and completes the rest of the dialog box based on its properties. Heading Type RFT Long The long field name from the Record Editor. RFT Short The short field name from the Record Editor. Text Anything you want - you make up the label. Heading Text Unique Prompt Name Edit Type Displays the label for the text box where you enter the comparison value. To change the text, select Text from the Heading Type list box, then enter the new label in the Heading Text box. A default value generated by Query Manager for globalization. Defines the type of field edit for the specified field. Prompt Table If the edit type is Prompt Table, the value in the Field list box specifies the prompt table to use. If the edit type is Translate Table, the value in the list box determines the values used. Adding a prompt allows you to further refine a query when you run it. When you run a query with a prompt, a dialog box appears for you to specify the required value. Enter the value into the text box. 42
43 Organizing Queries Adding Queries to the My Favorite Queries List If you use certain queries often, you can put them in your My Favorite Queries list for easy access. This option is available through Query Manager as well as Query Viewer. To add a query to the My Favorite Queries list: 1. On the Query Manager Search Results page, select the query that you want to add to the My Favorite Queries list (click the box to the left of the query). It will appear as follows: 2. Select Add to Favorites from the Action drop-down list box. 3. Click Go. The query appears in the My Favorite Queries list group box. 43


44 Copying a Query to Another User s List of Queries Query Manual 9.2 The Query Manager allows you to copy a query from your list of queries to another user's list of queries. You can only copy Private queries to another user's list of queries. If the target user does not have permission to access all of the records in a copied query, that query will not appear in the target user's list of queries. Once permission has been granted, the query will then appear in the list. Navigation: Main Menu>Reporting Tools>Query>Query Manager To copy a query to another user's list of queries: 1. On the Query Manager Search Results page, select the query or queries that you want to copy. 2. Select Copy to User from the Action drop-down list box. 3. Click Go. The Enter User ID dialog box appears. 4. Enter the user ID of the user to whom you would like to copy the query. 5. Click OK. You will receive a message indicating the query was successfully copied to the designated user 44

45 Moving a Query to an Organization Folder Folders enable you to organize queries under a common heading. To move a query to an organization folder: 1. On the Query Manager Search Results page, select the query or queries that you want to move to an organization folder. 2. Select Move to Folder from the Action drop-down list box. 3. Click Go. The Move to Folder dialog box appears. 4. Select one of the following: 5. Click OK. Select an existing folder to move to: Select the folder from the drop-down list box to which you would like to move the queries. OR enter a folder name to move to: Enter the name for a new folder to which you would like to move the queries. 45


46 Renaming a Query To rename an existing query, refer to the instructions below: 1. On the Query Manager Search Results page, select the query or queries that you want to rename. 2. Select Rename Selected from the Action drop-down list box. 3. Enter the desired name of the query in the New Name box 4. Click OK You will be taken back to the Query Manager page. 46

47 Working with Multiple Tables In many cases, the desired output data comes from at least two different tables. In these cases, you must link the tables together to retrieve the correct output. Adding and Joining Multiple Records to a Query PeopleSoft Query enables you to create queries that include multiple-table joins. Joins allow you to retrieve data from more than one underlying table, presenting the data as if it came from one. Whenever you perform a join, the records involved are linked based on common fields. The procedure for joining tables differs depending on how the tables being joined are related to each other. PeopleSoft Query recognizes four types of joins: Record Hierarchy Join, which joins a parent table to a child table. (A child table is a table that uses all the same key fields as its parent, plus one or more additional keys). Related Record Join, which joins records from non-hierarchical records that are related by common fields. For example, description tables for common codes are related records. Any Record Join, which joins any two tables in the database. Left Outer Join, which joins any two tables in the database similar to an Any Record Join. However, in a left outer join, all rows of the first (left) record are present in the result set, even if there are no matches in the joining record. In Query, predefined joins can be generated as a Record Hierarchy Join or a Related Record Join. Since these types of joins are predefined, you do not have to add any criteria to manually link the records. If you have the Auto Join Wizard option enabled in Query Preferences, then PeopleSoft Query automatically attempts to join the new record to the existing record by looking for matching columns on the two records when you do Any Record Join or Left Outer Join. 47
 To create a record hierarchy join: 1.")

48 Record Hierarchy Join A record hierarchy joins a parent table to a child table. (A child table is a table that uses all the same key fields as its parent, plus one or more additional keys.) To create a record hierarchy join: 1. Choose the base record for your query and select the appropriate fields and criteria. 2. From the Query page, click the Hierarchy Join link. All of the records that have a parent/child relationship with your selected record appear. 3. Select the second record for the join. In our example, we are selecting JRNL_LN. The join is reflected on the Query page. At this point, you can select any field from either table into one query. 48


49 Related Record Join In a related record join, you join two tables based on a shared field that isn't necessarily a key field. For example, if a field has a prompt table defined for it, then PeopleSoft Query displays a join link to the right of the shared field. To create a related record join: 1. Choose the base record for your query and select the appropriate fields and criteria. 2. From the Query page, click the required Related Record Join link and select Standard Join The join is reflected on the Query page. 49
 by selecting your initial base record, defining its output fields and associated criteria, and then returning to the Record")

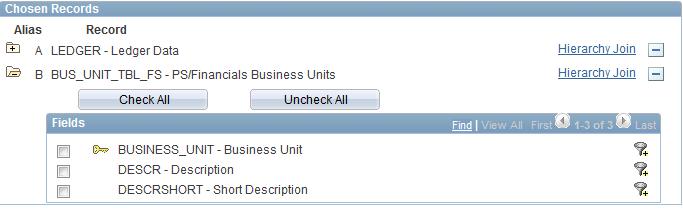
50 Any Record Join The Any Record Join is typically used when you already know the name of the tables you would like to join in your query. Using Query Manager, you can create a join between two records (tables) by selecting your initial base record, defining its output fields and associated criteria, and then returning to the Record page to select the second record. If you have Auto Join Wizard option enabled, then PeopleSoft Query automatically attempts to join the new record to the existing record by looking for matching columns on the two records. For example, the LEDGER table contains no related record for the Field Business Unit. If you wanted to join the Business Unit description table (BUS_UNIT_TBL_FS) to the LEDGER Table, then you would do so by creating an any record join. To create any record join: 1. Choose the base record for your query and select the appropriate fields and criteria. 2. Return to the Record page to select the second record. The Auto Join Wizard will attempt to join the new record to the existing record by finding matching fields between the two tables. The Join is reflected on the Query page 50
51 51
 record are present in the result set, even if there are no matches in the joining record.")
52 Left Outer Join PeopleSoft Query enables you to easily create a left outer join. In a left outer join, all rows of the first (left) record are present in the result set, even if there are no matches in the joining record. This essentially allows you to retain the integrity of the data from the first table though none of those records exist in the secondary tables in your join. Unlike any of the other three joins, a left outer join will not filter any rows when the query is run. To create left outer joins: 1. Choose the base record for your query and select the appropriate fields and criteria. 2. Return to the Record page to select the second record. Also, you can select a Related Record Join Link. The Auto Join Wizard will attempt to join the new record to the existing record by finding matching fields between the two tables. 3. Click the Join Record link on the same row as the joining record. 4. Select Join to get additional fields only (Left outer join). If the Enable Auto Join preference is selected, click the record name to join with. 52

53 The join is reflected on the Query page. 53
54 Additional Query Options You will learn how to use aggregate functions in a query. Instead of returning many rows of data, perhaps you are only interested in a count of rows or a sum of a numeric field. In addition, you ll learn how to specify Having Criteria on aggregate functions. You will learn how to set-up runtime prompts. You will learn how to use logical operators when specifying criteria, and grouping it with parentheses. Aggregate Functions in Query An aggregate function is a special type of operator that returns a single value based on multiple rows of data. When your query includes one or more aggregate functions, Query collects together related rows and displays a single row that summarizes their contents. For example, suppose you have an Order table that includes (among other fields) a Customer ID and an Amount for each item ordered. You'd like to find out how much each customer has ordered, so you create a query that selects the Customer ID and Amount fields. Without any aggregate functions, this query would return the same number of rows as there were in the table: if Stuart Schumacher ordered 10 items, you'd see 10 rows with his ID in the Customer ID column. On the other hand, if you apply the aggregate function Sum to the Amount field, you'll get just one row for each Customer ID. Query takes all the rows with the same value in the non-aggregated column (Customer ID) and collapses them into a single row. The value of the Amount field in Stuart Schumacher's row would be the sum of the values from the 10 rows. The table below lists the aggregate functions you can apply to a field using Query. Aggregate Function Sum Count Min Max Average Action Adds the values from each row and displays the total. Counts the number of rows. Checks the value from each row and returns the lowest one. Checks the value from each row and returns the highest one. Adds the values from each row and divides the result by the number of rows. 54

55 Applying Aggregate Functions to Fields When you apply an aggregate function to a field, you re redefining how PeopleSoft Query uses the field throughout the query. Essentially, PeopleSoft Query replaces the field, wherever it occurs, with the results of the function. If you select the field as a display column, PeopleSoft Query displays the aggregate values; if you use the field as an order by column, PeopleSoft Query orders the results based on the aggregate values. To apply an aggregate function to a field: 1. In Query Manager, click the Fields tab. 2. Click the button associated with the appropriate field. The Edit Field Properties page appears. 3. Pick the aggregate function you want to use for this field, and click OK. The abbreviation for the selected function appears in the Agg column. If a function is not available for the field you ve selected, the Edit Field Properties page does not close. For example, you can t use Sum with a character field. 55

56 Relating Multiple Criteria Using PeopleSoft Query, you can relate multiple criteria in specific ways that you define using the AND, AND NOT, OR, and OR NOT operators. You can also group criteria using parentheses Using AND OR Logical Operators When you specify two or more selection criteria for a query, you must tell PeopleSoft Query how to coordinate the different criteria. For example, suppose you re querying the list of your customers and you ve defined two criteria: one that selects customers from the state of Washington and another that selects customers who have purchased airplanes. You may want PeopleSoft Query to return only those rows that meet both conditions (customers in Washington who ve purchased airplanes), or you may want the rows that meet either one of the conditions (all Washington customers plus all customers who ve purchased airplanes). Rows returned by AND OR When your query includes multiple criteria, link them using either AND, AND NOT, OR, or OR NOT. When you link two criteria with AND, a row must meet the first and second criterion in order for PeopleSoft Query to return it. When you link two criteria with OR, a row must meet the first or second criterion, not necessarily both. The AND NOT operator will return results on those rows that meet the first criteria and exclude the second criteria. The OR NOT operator will return results on rows that meet both criteria along with all rows that meet the second criteria. By default, PeopleSoft Query assumes that you want those rows that meet all the criteria you specify. When you add a new criterion, PeopleSoft Query displays AND in the Logical column on the Criteria tab. To link the criterion using one of the other options instead, select the required option from the dropdown list. 56
PeopleSoft (version 9.1): Introduction to the Query Tool
: Introduction to the Query Tool") PeopleSoft (version 9.1): Introduction to the Query Tool Introduction This training material introduces you to some of the basic functions of the PeopleSoft (PS) Query tool as they are used at the University
PeopleSoft (version 9.1): Introduction to the Query Tool Introduction This training material introduces you to some of the basic functions of the PeopleSoft (PS) Query tool as they are used at the University
Introduction. Prerequisite. Training Objectives
 PeopleSoft (version 8.4): Introduction to the Query Tool Introduction This training material introduces you to some of the basic functions of the PeopleSoft (PS) Query tool as they are used at the University
Introduction to PeopleSoft Query. The University of British Columbia
 Introduction to PeopleSoft Query The University of British Columbia December 6, 1999 PeopleSoft Query Table of Contents Table of Contents TABLE OF CONTENTS... I CHAPTER 1... 1 INTRODUCTION TO PEOPLESOFT
Advanced ARC Reporting
 COPYRIGHT & TRADEMARKS Copyright 1998, 2009, Oracle and/or its affiliates. All rights reserved. Oracle is a registered trademark of Oracle Corporation and/or its affiliates. Other names may be trademarks
Introduction to PeopleSoft Query Part II Query Manager
 Student/Faculty Information System Introduction to PeopleSoft Query Part II Query Manager Student/Faculty Information System Introduction to PeopleSoft Query Part II - Query Manager SFIS TEST DATABASE
Business Insight Authoring
 Business Insight Authoring Getting Started Guide ImageNow Version: 6.7.x Written by: Product Documentation, R&D Date: August 2016 2014 Perceptive Software. All rights reserved CaptureNow, ImageNow, Interact,
University of Wisconsin System SFS Business Process RPT Basic PeopleSoft Query
 Contents PeopleSoft Query Overview... 1 Process Detail... 2 I. Running the Query... 2 II. Query Actions... 5 III. Planning a New Query... 5 IV. How to Find Out Which Record(s) to Use... 5 V. Building a
General Features Agenda
 General Features Agenda Agenda Item Detailed Description Day 1 Query Class Introductions Query Overview Understand SQL Using Query Query Viewer Query Manager Schedule Query Create Query Tabs Table/Records
University of Wisconsin System SFS Business Process RPT Intermediate PeopleSoft Query
 Contents Overview... 1 Process Details - Joins... 2 I. Creating a Query with Multiple Records... 2 II. Creating Record Hierarchy Joins... 3 III. Creating Related Record Joins... 6 IV. Creating Any Record
State of Connecticut. Core-CT. Enterprise Performance Management (EPM) Query Class Presentation
 Query Class Presentation") State of Connecticut Core-CT Enterprise Performance Management (EPM) Query Class Presentation Updated 11/2015 Objectives Use the basic concept of Query in Core-CT. Utilize Core-CT functionality to maximize
State of Connecticut Core-CT Enterprise Performance Management (EPM) Query Class Presentation Updated 11/2015 Objectives Use the basic concept of Query in Core-CT. Utilize Core-CT functionality to maximize
QUERY USER MANUAL Chapter 7
 QUERY USER MANUAL Chapter 7 The Spectrum System PeopleSoft Financials Version 7.5 1. INTRODUCTION... 3 1.1. QUERY TOOL... 3 2. OPENING THE QUERY TOOL... 4 3. THE QUERY TOOL PANEL... 5 3.1. COMPONENT VIEW
BRF_Financials_Query_9_1
 Version Date: January 2014 COPYRIGHT & TRADEMARKS Copyright 1998, 2011, Oracle and/or its affiliates. All rights reserved. Oracle is a registered trademark of Oracle Corporation and/or its affiliates.
EDITING AN EXISTING REPORT
 Report Writing in NMU Cognos Administrative Reporting 1 This guide assumes that you have had basic report writing training for Cognos. It is simple guide for the new upgrade. Basic usage of report running
PowerLink Views and Subsets. What do they do and how can they help me? John Grindley
 PowerLink Views and Subsets What do they do and how can they help me? John Grindley John.Grindley@cistech.net Power Link Views What are they? View considerations Agenda for Today Code files value, alias,
PeopleTools 8.54: Query
 PeopleTools 8.54: Query November 2016 PeopleTools 8.54: Query CDSKU License Restrictions Warranty/Consequential Damages Disclaimer This software and related documentation are provided under a license agreement
OBIEE. Oracle Business Intelligence Enterprise Edition. Rensselaer Business Intelligence Finance Author Training
 OBIEE Oracle Business Intelligence Enterprise Edition Rensselaer Business Intelligence Finance Author Training TABLE OF CONTENTS INTRODUCTION... 1 USER INTERFACE... 1 HOW TO LAUNCH OBIEE... 1 TERMINOLOGY...
Intellicus Enterprise Reporting and BI Platform
 Designing Adhoc Reports Intellicus Enterprise Reporting and BI Platform Intellicus Technologies info@intellicus.com www.intellicus.com Designing Adhoc Reports i Copyright 2012 Intellicus Technologies This
Process Document Creating a Query with Runtime Prompts. Creating a Query with Runtime Prompts. Concept
 Concept Adding a prompt enables you to further refine a query when you run it. For example, suppose you wanted to change a query so that you could prompt the user to enter a value for the duration of a
Notice on Access to Advanced Lists...2 Database Overview...2 Example: Real-life concept of a database... 2
 Table of Contents Notice on Access to Advanced Lists...2 Database Overview...2 Example: Real-life concept of a database... 2 Queries...2 Example: Real-life concept of a query... 2 Database terminology...3
Basic Query for Human Resources
 Basic Query for Human Resources Open browser Log into PeopleSoft Human Resources: Go to: https://cubshr9.clemson.edu/psp/hpprd/?cmd=login Enter your Novell ID and Password Click Sign In Navigation into
WebIntelligence. Creating Documents
 Creating Documents This page is intentionally left blank. 2 WIC110904 Table of Contents Lesson Objective... 5 For Assistance...6 Introduction... 7 Document Editor... 7 Designing a Query Flowchart... 9
Excel Tutorial 5: Working with Excel Tables, PivotTables, and PivotCharts. 6. You can use a table s sizing handle to add columns or rows to a table.
 Excel Tutorial 5: Working with Excel Tables, PivotTables, and PivotCharts TRUE/FALSE 1. The header row must be row 1. ANS: F PTS: 1 REF: EX 234 2. If you freeze the top row in a worksheet and press Ctrl+Home,
Searching and Favorites in Datatel Web UI 4.3
 Searching and Favorites in Datatel Web UI 4.3 Search Field The Search field uses icons and text prompts (see Figure 1) to switch between Person Search and Form Search. You can click the icon to the left
PEOPLESOFT TIPS. TABLE OF CONTENTS Background... Error! Bookmark not defined. Navigate PeopleSoft... 3
 PEOPLESOFT TIPS TABLE OF CONTENTS Background... Error! Bookmark not defined. Navigate PeopleSoft... 3 Main Menu in PeopleSoft... 3 Sort the Main Menu... 3 Change the Default Sort Order... 5 Cascading Menu...
New Perspectives on Microsoft Excel Module 5: Working with Excel Tables, PivotTables, and PivotCharts
 New Perspectives on Microsoft Excel 2016 Module 5: Working with Excel Tables, PivotTables, and PivotCharts Objectives, Part 1 Explore a structured range of data Freeze rows and columns Plan and create
Creating Reports using Report Designer Part 1. Training Guide
 Creating Reports using Report Designer Part 1 Training Guide 2 Dayforce HCM Creating Reports using Report Designer Part 1 Contributors We would like to thank the following individual who contributed to
Access Intermediate
 Access 2013 - Intermediate 103-134 Advanced Queries Quick Links Overview Pages AC124 AC125 Selecting Fields Pages AC125 AC128 AC129 AC131 AC238 Sorting Results Pages AC131 AC136 Specifying Criteria Pages
PEOPLESOFT TIPS. TABLE OF CONTENTS Overview... 3 Navigate PeopleSoft... 3
 PEOPLESOFT TIPS TABLE OF CONTENTS Overview... 3 Navigate PeopleSoft... 3 Main Menu in PeopleSoft... 3 Sort the Main Menu... 3 Cascading Menu... 5 Breadcrumb Trail Menu... 6 Search... 7 Searches: Maximum
Shopping Cart: Queries, Personalizations, Filters, and Settings
 Shopping Cart: Queries, Personalizations, Filters, and Settings on the Shopping Cart Home Page Use this Job Aid to: Learn how to organize the Shopping Cart home page so that it is easier to use. BEFORE
Introduction to Microsoft Access 2016
 Introduction to Microsoft Access 2016 A database is a collection of information that is related. Access allows you to manage your information in one database file. Within Access there are four major objects:
Use mail merge to create and print letters and other documents
 Use mail merge to create and print letters and other documents Contents Use mail merge to create and print letters and other documents... 1 Set up the main document... 1 Connect the document to a data
eschoolplus+ Cognos Query Studio Training Guide Version 2.4
 + Training Guide Version 2.4 May 2015 Arkansas Public School Computer Network This page was intentionally left blank Page 2 of 68 Table of Contents... 5 Accessing... 5 Working in Query Studio... 8 Query
Public-Private Dialogue
 Public-Private Dialogue www.publicprivatedialogue.org The PPD Reform Tracking Tool A tutorial to use a tool designed to manage, track and report on Working Groups issues 1- INTRODUCTION... 3 2 - BROWSING
SAS Web Report Studio 3.1
 SAS Web Report Studio 3.1 User s Guide SAS Documentation The correct bibliographic citation for this manual is as follows: SAS Institute Inc. 2006. SAS Web Report Studio 3.1: User s Guide. Cary, NC: SAS
Query Studio Training Guide Cognos 8 February 2010 DRAFT. Arkansas Public School Computer Network 101 East Capitol, Suite 101 Little Rock, AR 72201
 Query Studio Training Guide Cognos 8 February 2010 DRAFT Arkansas Public School Computer Network 101 East Capitol, Suite 101 Little Rock, AR 72201 2 Table of Contents Accessing Cognos Query Studio... 5
Access Intermediate
 Access 2010 - Intermediate 103-134 Advanced Queries Quick Links Overview Pages AC116 AC117 Selecting Fields Pages AC118 AC119 AC122 Sorting Results Pages AC125 AC126 Specifying Criteria Pages AC132 AC134
The PeopleSoft Financials System
 The PeopleSoft Financials System 2 Introduction...................... 14 Signing In and Out.................... 14 Signing In to the System.............. 14 Signing Out................... 17 Navigation
Designing Adhoc Reports
 Designing Adhoc Reports Intellicus Enterprise Reporting and BI Platform Intellicus Technologies info@intellicus.com www.intellicus.com Copyright 2010 Intellicus Technologies This document and its content
IBM Maximo Asset Management Starting with Version 7116
 IBM Maximo Asset Management Starting with Version 7116 QBR (Ad Hoc) Reporting and Report Object Structures Document Version 9 Pam Denny Maximo Report Designer/Architect CONTENTS Revision History... iv
Doc. Version 1.0 Updated:
 OneStop Reporting Report Designer/Player 3.5 User Guide Doc. Version 1.0 Updated: 2012-01-02 Table of Contents Introduction... 3 Who should read this manual... 3 What s included in this manual... 3 Symbols
Learn about the Display options Complete Review Questions and Activities Complete Training Survey
 Intended Audience: Staff members who will be using the AdHoc reporting tools to query the Campus database. Description: To learn filter and report design capabilities available in Campus. Time: 3 hours
CCRS Quick Start Guide for Program Administrators. September Bank Handlowy w Warszawie S.A.
 CCRS Quick Start Guide for Program Administrators September 2017 www.citihandlowy.pl Bank Handlowy w Warszawie S.A. CitiManager Quick Start Guide for Program Administrators Table of Contents Table of Contents
EXCEL BASICS: MICROSOFT OFFICE 2007
 EXCEL BASICS: MICROSOFT OFFICE 2007 GETTING STARTED PAGE 02 Prerequisites What You Will Learn USING MICROSOFT EXCEL PAGE 03 Opening Microsoft Excel Microsoft Excel Features Keyboard Review Pointer Shapes
Tutorial 5: Working with Excel Tables, PivotTables, and PivotCharts. Microsoft Excel 2013 Enhanced
 Tutorial 5: Working with Excel Tables, PivotTables, and PivotCharts Microsoft Excel 2013 Enhanced Objectives Explore a structured range of data Freeze rows and columns Plan and create an Excel table Rename
Microsoft Dynamics GP is a robust accounting package that can meet
 In This Chapter Chapter 1 What Microsoft Dynamics GP Does Best Familiarizing yourself with the Microsoft Dynamics GP window Understanding Dynamics GP terms Knowing how Dynamics GP keeps your CPA happy
My Sysco Reporting Job Aid for CMU Customers. My Sysco Reporting. For CMU Customers (Serviced by Program Sales)
") My Sysco Reporting For CMU Customers (Serviced by Program Sales) 1 Accessing My Sysco Reporting... 2 Logging In... 2 The Reporting Dashboard... 3 My Sysco Reporting Process... 6 Generating a Report...
My Sysco Reporting For CMU Customers (Serviced by Program Sales) 1 Accessing My Sysco Reporting... 2 Logging In... 2 The Reporting Dashboard... 3 My Sysco Reporting Process... 6 Generating a Report...
User Manual Mail Merge
 User Manual Mail Merge Version: 1.0 Mail Merge Date: 27-08-2013 How to print letters using Mail Merge You can use Mail Merge to create a series of documents, such as a standard letter that you want to
VUEWorks Report Generation Training Packet
 VUEWorks Report Generation Training Packet Thursday, June 21, 2018 Copyright 2017 VUEWorks, LLC. All rights reserved. Page 1 of 53 Table of Contents VUEWorks Reporting Course Description... 3 Generating
Lesson 1: Creating and formatting an Answers analysis
 Lesson 1: Creating and formatting an Answers analysis Answers is the ad-hoc query environment in the OBIEE suite. It is in Answers that you create and format analyses to help analyze business results.
Asset Arena InvestOne
 Asset Arena InvestOne 1 21 AD HOC REPORTING 21.1 OVERVIEW Ad Hoc reporting supports a range of functionality from quick querying of data to more advanced features: publishing reports with complex features
Accounts Payable MODULE USER S GUIDE
 Accounts Payable MODULE USER S GUIDE INTEGRATED SOFTWARE SERIES Accounts Payable MODULE USER S GUIDE Version 3.1 Copyright 2005 2009, Interactive Financial Solutions, Inc. All Rights Reserved. Integrated
1. Managing Information in Table
 1. Managing Information in Table Spreadsheets are great for making lists (such as phone lists, client lists). The researchers discovered that not only was list management the number one spreadsheet activity,
Beyond the Basics with nvision and Query for PeopleSoft 9.2
 Beyond the Basics with nvision and Query for PeopleSoft 9.2 Session ID: 101180 Prepared by: Millie Babicz Managing Director SpearMC Consulting @SpearMC Welcome and Please: Silence Audible Devices Note
Introduction to Microsoft Office 2007
 Introduction to Microsoft Office 2007 What s New follows: TABS Tabs denote general activity area. There are 7 basic tabs that run across the top. They include: Home, Insert, Page Layout, Review, and View
Blackboard for Faculty: Grade Center (631) In this document:
 In this document:") 1 Blackboard for Faculty: Grade Center (631) 632-2777 Teaching, Learning + Technology Stony Brook University In this document: blackboard@stonybrook.edu http://it.stonybrook.edu 1. What is the Grade Center?..
1 Blackboard for Faculty: Grade Center (631) 632-2777 Teaching, Learning + Technology Stony Brook University In this document: blackboard@stonybrook.edu http://it.stonybrook.edu 1. What is the Grade Center?..
ER/Studio Enterprise Portal User Guide
 ER/Studio Enterprise Portal 1.1.1 User Guide Copyright 1994-2009 Embarcadero Technologies, Inc. Embarcadero Technologies, Inc. 100 California Street, 12th Floor San Francisco, CA 94111 U.S.A. All rights
EPM Query Introduction HRMS Focus Course Number: HRP 100
 EPM Query Introduction HRMS Focus Course Number: HRP 100 Description This full-day course is hands-on and is designed for EPM users with a basic understanding of the concepts of Query in Core-CT EPM. The
CSCI 1100L: Topics in Computing Lab Lab 07: Microsoft Access (Databases) Part I: Movie review database.
 Part I: Movie review database.") CSCI 1100L: Topics in Computing Lab Lab 07: Microsoft Access (Databases) Purpose: The purpose of this lab is to introduce you to the basics of creating a database and writing SQL (Structured Query Language)
CSCI 1100L: Topics in Computing Lab Lab 07: Microsoft Access (Databases) Purpose: The purpose of this lab is to introduce you to the basics of creating a database and writing SQL (Structured Query Language)
Colleague UI4.3 Documentation
 Colleague UI4.3 Documentation Table of Contents Getting Started... 2 Add the Shortcuts to your Desktop... 2 Searching for and Using Forms... 3 Begin Your Form Search... 3 Form Search Results... 3 The Navigation
COGNOS (R) ENTERPRISE BI SERIES COGNOS REPORTNET (TM)
 ENTERPRISE BI SERIES COGNOS REPORTNET (TM)") COGNOS (R) ENTERPRISE BI SERIES COGNOS REPORTNET (TM) GETTING STARTED Cognos ReportNet Getting Started 07-05-2004 Cognos ReportNet 1.1MR1 Type the text for the HTML TOC entry Type the text for the HTML
COGNOS (R) ENTERPRISE BI SERIES COGNOS REPORTNET (TM) GETTING STARTED Cognos ReportNet Getting Started 07-05-2004 Cognos ReportNet 1.1MR1 Type the text for the HTML TOC entry Type the text for the HTML
Calendar & Buttons Dashboard Menu Features My Profile My Favorites Watch List Adding a New Request...
 remitview User Guide 1 TABLE OF CONTENTS INTRODUCTION... 3 Calendar & Buttons... 3 GETTING STARTED.... 5 Dashboard.... 7 Menu Features... 8 PROFILE.... 10 My Profile... 10 My Favorites... 12 Watch List...
IHS Enerdeq Desktop International Training Guide
 IHS > Decision Support Tool IHS Enerdeq Desktop International Training Guide May 2009 Version 1.5.2 2009 IHS, All Rights Reserved. All trademarks belong to IHS or its affiliated and subsidiary companies,
Microsoft Excel 2010 Basic
 Microsoft Excel 2010 Basic Introduction to MS Excel 2010 Microsoft Excel 2010 is a spreadsheet software in the new Microsoft 2010 Office Suite. Excel allows you to store, manipulate and analyze data in
Management Reports Centre. User Guide. Emmanuel Amekuedi
 Management Reports Centre User Guide Emmanuel Amekuedi Table of Contents Introduction... 3 Overview... 3 Key features... 4 Authentication methods... 4 System requirements... 5 Deployment options... 5 Getting
To access BuckIQ, you must first be granted access. Send requests for permission to
 BuckIQ User s Guide Job Aid What is BuckIQ? Several years ago, Oracle took a look at the state of the Business Intelligence industry in terms of the different processes and applications that were required
STIDistrict Query (Basic)
") STIDistrict Query (Basic) Creating a Basic Query To create a basic query in the Query Builder, open the STIDistrict workstation and click on Utilities Query Builder. When the program opens, database objects
STIDistrict Query (Basic) Creating a Basic Query To create a basic query in the Query Builder, open the STIDistrict workstation and click on Utilities Query Builder. When the program opens, database objects
EXCEL BASICS: MICROSOFT OFFICE 2010
 EXCEL BASICS: MICROSOFT OFFICE 2010 GETTING STARTED PAGE 02 Prerequisites What You Will Learn USING MICROSOFT EXCEL PAGE 03 Opening Microsoft Excel Microsoft Excel Features Keyboard Review Pointer Shapes
Griffin Training Manual Grif-WebI Intermediate Class
 Griffin Training Manual Grif-WebI Intermediate Class Alumni Relations and Development The University of Chicago Table of Contents Chapter 1: Setting Up My Computer for Successful Use of the Grif-WebI
Expense: Process Reports
 Expense: Process Reports User Guide for Standard Edition Applies to these SAP Concur solutions: Expense Professional/Premium edition Standard edition Travel Professional/Premium edition Standard edition
Creating Dashboard Widgets. Version: 7.3
 Creating Dashboard Widgets Version: 7.3 Copyright 2015 Intellicus Technologies This document and its content is copyrighted material of Intellicus Technologies. The content may not be copied or derived
New Finance Officer & Staff Training
 New Finance Officer & Staff Training Overview MUNIS includes many programs and tools to allow for the management of the District financials. As newer finance officers and staff, you are charged with understanding,
Table of Contents COURSE OVERVIEW... 5
 Table of Contents COURSE OVERVIEW... 5 DISCUSSION... 5 THE NEW DATABASE FORMAT... 5 COURSE TOPICS... 6 CONVENTIONS USED IN THIS MANUAL... 7 Tip Open a File... 7 LESSON 1: THE NEW INTERFACE... 8 LESSON
Navigation Reference Guide
 FISCAL AFFAIRS FINANCIAL MANAGEMENT SYSTEM (FMS) Navigation Reference Guide June 2004 Table of Contents Introduction to Financial Management System... ii Navigation Reference Guide... ii Overview...ii
Excel 2016: Part 2 Functions/Formulas/Charts
 Excel 2016: Part 2 Functions/Formulas/Charts Updated: March 2018 Copy cost: $1.30 Getting Started This class requires a basic understanding of Microsoft Excel skills. Please take our introductory class,
Searching Guide. September 16, Version 9.3
 Searching Guide September 16, 2016 - Version 9.3 - - - - - - - - - - - - - - - - - - - - - - - - - - - - - - - - - - - - - - - - - - - - - - - - - - - - - - - - - - - - - - - - - - - - - - - - - - - -
USING ODBC COMPLIANT SOFTWARE MINTRAC PLUS CONTENTS:
 CONTENTS: Summary... 2 Microsoft Excel... 2 Creating a New Spreadsheet With ODBC Data... 2 Editing a Query in Microsoft Excel... 9 Quattro Pro... 12 Creating a New Spreadsheet with ODBC Data... 13 Editing
Project and Portfolio Management Center
 Project and Portfolio Management Center Software Version: 9.42 Getting Started Go to HELP CENTER ONLINE http://admhelp.microfocus.com/ppm/ Document Release Date: September 2017 Software Release Date: September
Unit 1: Working With Tables
 Unit 1: Working With Tables Unit Overview This unit covers the basics of working with Tables and the Table wizard. It does not include working with fields, which is covered in Units 3 and 4. It is divided
TABLE OF CONTENTS CHAPTER
 TABLE OF CONTENTS CHAPTER 1...1 A QUICK OVERVIEW OF THE MICROSOFT EXCHANGE CLIENT...1 BASIC CONCEPTS AND FEATURES...1 STARTING THE MICROSOFT EXCHANGE CLIENT...1 SETTING OPTIONS FOR YOUR MESSAGES...3 LOOKING
Working with Analytical Objects. Version: 16.0
 Working with Analytical Objects Version: 16.0 Copyright 2017 Intellicus Technologies This document and its content is copyrighted material of Intellicus Technologies. The content may not be copied or derived
Reporter Tutorial: The Basics
 Reporter Tutorial: The Basics Refer to the following sections for guidance on using the Reporter: Lesson 1: Overview and Finding Reports Lesson 2: Create Tutorial Training Report and Report Group Lesson
Getting started with Mint UK
 Getting started with Mint UK Helpline number: 020 7549 5050 Email : help.london@bvdinfo.com Getting started with Mint UK This guide gets you started with Mint UK by explaining how you can search for companies
Site Owners: Cascade Basics. May 2017
 Site Owners: Cascade Basics May 2017 Page 2 Logging In & Your Site Logging In Open a browser and enter the following URL (or click this link): http://mordac.itcs.northwestern.edu/ OR http://www.northwestern.edu/cms/
Basics User Guide. Release
 Basics User Guide Release 14.2.00 This Documentation, which includes embedded help systems and electronically distributed materials (hereinafter referred to as the Documentation ), is for your informational
Advisor Workstation Training Manual: Working in the Research Module
 Advisor Workstation Training Manual: Working in the Research Module Overview of the Research module - - - - - - - - - - - - - - - - 1 What you will learn in this section - - - - - - - - - - - - - - - -
CORPORATE ACCOUNT RECONCILIATION. SAM2CAR: Key Functions Manual for Program Administrators
 CORPORATE ACCOUNT RECONCILIATION SAM CAR SAM2CAR: Key Functions Manual for Program Administrators May 2012 2 How to Use This Manual This manual is designed to serve as a reference guide to help you perform
Veco User Guides. Grids, Views, and Grid Reports
 Veco User Guides Grids, Views, and Grid Reports Introduction A Grid is defined as being a list of data records presented to the user. A grid is shown generally when an option is selected from the Tree
Microsoft Access Illustrated. Unit B: Building and Using Queries
 Microsoft Access 2010- Illustrated Unit B: Building and Using Queries Objectives Use the Query Wizard Work with data in a query Use Query Design View Sort and find data (continued) Microsoft Office 2010-Illustrated
Administration. Training Guide. Infinite Visions Enterprise Edition phone toll free fax
 Administration Training Guide Infinite Visions Enterprise Edition 406.252.4357 phone 1.800.247.1161 toll free 406.252.7705 fax www.csavisions.com Copyright 2005 2011 Windsor Management Group, LLC Revised:
1. Managing Information in Table
 1. Managing Information in Table Spreadsheets are great for making lists (such as phone lists, client lists). The researchers discovered that not only was list management the number one spreadsheet activity,
Formulas, LookUp Tables and PivotTables Prepared for Aero Controlex
 Basic Topics: Formulas, LookUp Tables and PivotTables Prepared for Aero Controlex Review ribbon terminology such as tabs, groups and commands Navigate a worksheet, workbook, and multiple workbooks Prepare
DOING MORE WITH EXCEL: MICROSOFT OFFICE 2013
 DOING MORE WITH EXCEL: MICROSOFT OFFICE 2013 GETTING STARTED PAGE 02 Prerequisites What You Will Learn MORE TASKS IN MICROSOFT EXCEL PAGE 03 Cutting, Copying, and Pasting Data Basic Formulas Filling Data
Pivots and Queries Intro
 Workshop: Pivots and Queries Intro An overview of the Pivot, Query and Alert functions in Multiview as a refresher for the experienced or new user, we will go over how to format an inquiry screen, create
Chapter 4: Single Table Form Lab
 Chapter 4: Single Table Form Lab Learning Objectives This chapter provides practice with creating forms for individual tables in Access 2003. After this chapter, you should have acquired the knowledge
Excel Tables & PivotTables
 Excel Tables & PivotTables A PivotTable is a tool that is used to summarize and reorganize data from an Excel spreadsheet. PivotTables are very useful where there is a lot of data that to analyze. PivotTables
Vector Issue Tracker and License Manager - Administrator s Guide. Configuring and Maintaining Vector Issue Tracker and License Manager
 Vector Issue Tracker and License Manager - Administrator s Guide Configuring and Maintaining Vector Issue Tracker and License Manager Copyright Vector Networks Limited, MetaQuest Software Inc. and NetSupport
MAS 90/200 Intelligence Tips and Tricks Booklet Vol. 1
 MAS 90/200 Intelligence Tips and Tricks Booklet Vol. 1 1 Contents Accessing the Sage MAS Intelligence Reports... 3 Copying, Pasting and Renaming Reports... 4 To create a new report from an existing report...
SyncFirst Standard. Quick Start Guide User Guide Step-By-Step Guide
 SyncFirst Standard Quick Start Guide Step-By-Step Guide How to Use This Manual This manual contains the complete documentation set for the SyncFirst system. The SyncFirst documentation set consists of
Simply Accounting Intelligence Tips and Tricks Booklet Vol. 1
 Simply Accounting Intelligence Tips and Tricks Booklet Vol. 1 1 Contents Accessing the SAI reports... 3 Copying, Pasting and Renaming Reports... 4 Creating and linking a report... 6 Auto e-mailing reports...
IBM Leads Version 9 Release 1 October 25, User Guide
 IBM Leads Version 9 Release 1 October 25, 2013 User Guide Note Before using this information and the product it supports, read the information in Notices on page 35. This edition applies to version 9,