USO RESTRITO. Model No. DMAT-AB SPORTS CONTROLLER. Abekas Mira. For. Digital Video Production Server. User Manual. Version 1.3
|
|
|
- Chester Bridges
- 5 years ago
- Views:
Transcription
1 12843 Foothill Blvd. Suite C Sylmar, California V: F: sales@dnfcontrols.com Model No. DMAT-AB SPORTS CONTROLLER For Abekas Mira Digital Video Production Server User Manual Version 1.3
2
3 TABLE OF CONTENTS REVISION HISTORY SYSTEM DESCRIPTION SYSTEM INSTALLATION SELECT OPERATIONAL MODE START RECORDINGS CAM KEY ASSIGNMENT CLIP KEY ASSIGNMENT LIVE/ RECORDED SOURCE SELECTION SAVE CLIP RECALL CLIP TRIM EXISTING CLIP LABEL OR RE-NAME AN EXISTING CLIP DELETE SAVED CLIP CREATE PLAYLIST ASSIGN SPEED TO PLAYLIST ELEMENT APPEND PLAYLIST CUT / MIX TRANSITIONS GANG PLAYBACK UPLOAD MELT GPI FUNCTIONS DMAT-AB FUNCTION TABLE SETUP MENU SPECIFICATIONS KEY LAYOUT...25 DMAT-AB Sports Controller for Abekas Mira Page 1 of 25
4 24. DNF CONTROLS LIMITED WARRANTY...26 REVISION HISTORY Original document Updated for SSM mode, various enhancements Updated for multiple enhancements Updated for multiple enhancements
5 Getting Started 1. SYSTEM DESCRIPTION Designed for the chaotic and fast-paced environment of sports broadcasting, the DMAT family of Sports Controllers lets you stay in control of slow-motion instant replays, and highlights playout to create exciting visuals. Coupled with the simultaneous record and playback capabilities of Abekas Mira, DMAT gives you the power to quickly access just-recorded or archived events while continuing to record and respond to on-field action. Don t Miss A Thing! Quickly and easily mark an IN and OUT point for instant replay. With minimal key strokes, recall it, play it, then add it to a game highlight list. Seamlessly play out highlights, one after another to tell the story - game action, player profiles, live crowd scenes, graphics, and advertisements. Personalize your control options for smooth, precise replays. A T-Bar provides precise slow motion speed control. The DMAT-AB consists of DNF s robust controller, the ST400, with Sports Control software. Definitions Words surrounded by brackets, for example, [ENTER], refer to keys on the DMAT-AB. [XXX] + [XXX] refers to a combination of more that one key. Press and hold the first key, then press the second key. Keys may be released in any order. The 6 keys located directly below the Graphic LCD display are referred to as Softkeys. The function assigned to each key will change during operation of the device. The bottom line of the display shows the current function assigned to each softkey. Words surrounded by curly brackets in bold/italic type, {UPDATES}, are softkeys on the DMAT-AB. DMAT-AB Sports Controller for Abekas Mira Page 3 of 25
6 2. SYSTEM INSTALLATION Refer to the Connection Diagram. A. DMAT-AB Sports Controller 1. Plug one end of a standard 9-conductor, RS422 serial cable into the VTR connector on the rear of DMAT-AB. Plug the other end of the cable into the 9-pin RS422 connector RS422 IN on the rear of Mira. See the connection diagrams for specific configurations. 2. Connect the DNF supplied power supply, into the POWER connector on the rear of DMAT-AB. Plug the Power Supply into an outlet, 90 VAC VAC. B. Mira Setup Please refer to the Abekas Mira user manual for information on configuring the Mira server. C. Connection Diagram
7 DMAT-AB Sports Controller for Abekas Mira Page 5 of 25
8 3. SELECT OPERATIONAL MODE The DMAT-AB supports multiple modes of operation with the Mira. The mode of operation is selected in the Setup Menu. - 3 IN / 1 OUT: Supports 3 live record channels and 1 softkey for accessing pre-recorded clips. Only supports 1 playback channel. - 1 IN / 1 OUT: Supports 1 live record channels and 3 softkeys for accessing pre-recorded clips. Only supports 1 playback channel. - 2 IN / 2 OUT: Supports 2 live record channels and 2 softkeys for accessing pre-recorded clips. Supports 2 playback channels with the ability to perform cut / mix / wipe transitions between playback channels. - 6 IN / 2 OUT: Supports up to 6 live record channels. Does not support softkeys for pre-recorded clip access. Supports 2 playback channels with the ability to perform cut / mix / wipe transitions between playback channels. 4. START RECORDINGS All recordings must be started from the GUI of the Mira. To begin a new recording: A. On the Mira, open the Mira Explorer application. B. Within Mira Explorer, select the channel you wish to record on. C. Click on the Record button. D. Enter a Clip Name for the new recording. E. Click on OK. The record button will now be flashing red. F. Click on the record button to begin recording. 5. CAM KEY ASSIGNMENT Assign Mira record channels to CAM keys. Press the corresponding {CAM-X} softkey (ranging from {CAM-1} to {CAM-6}) to instantly access the associated live or recorded video on the playback channel. Press [SHIFT] + {CAM-X} The current assignments are shown in the upper left portion of the display. A list of available multiple angle clips in Mira are displayed on the right side of the display. A. Using the wheel, scroll through and find the CLIP ID for the multi-angle clip current in record on Mira.
9 B. Press the {ASSIGN} softkey assign the highlighted multiple angle clip to the CAM keys. The same multi-angle clip gets assigned to all the CAM keys available in the selected mode. The first angle of the clip gets assigned to CAM-1 key, the second angle is assigned to CAM-2 key etc. C. Press [ESC] to exit. NOTE: In 1 IN / 1 OUT mode, only {CAM-1} is available. In 3 IN / 1 OUT mode, {CAM-1}, {CAM-2}, and {CAM-3} are available. In 2 IN / 2 OUT mode, {CAM-1} and {CAM-2} are available. In 6 IN / 2 OUT mode, {CAM-1}, {CAM-2}, {CAM-3}, {CAM-4}, {CAM-5} and {CAM-6} are available. 6. CLIP KEY ASSIGNMENT Assign a pre-recorded clip to the {CLIP-X} softkey (ranging from {CLIP-1} to {CLIP-3}). Press {CLIP-X} to instantly access the recorded video on the playback channel. A. Press [SHIFT] + {CLIP-X} The current assignments are shown in the upper left portion of the display. A list of clips available in Mira is displayed on the right side of the display. B. Using the wheel, scroll through and find desired CLIP ID. C. Press softkey {CLIP-X} to assign the highlighted clip to the {CLIP-X} softkey.. D. Press [ESC] to exit. NOTE: In 1 IN / 1 OUT mode, {CLIP-1}, {CLIP-2} and {CLIP-3} are available. In 3 IN / 1 OUT mode, only {CLIP-1} is available. In 2 IN / 2 OUT mode, only {CLIP-1} and {CLIP-2} are available. This function is not available in 6 IN / 2 OUT mode. 7. LIVE/ RECORDED SOURCE SELECTION Select the desired live source to view in EE mode, or recorded video to view in mode as follows: Press {CAM-X} to view the live source or recorded video on the assigned Mira channel. OR Press {CLIP-X} to view the assigned pre-recorded clip. DMAT-AB Sports Controller for Abekas Mira Page 7 of 25
10 8. SAVE CLIP A. Press [IN] to mark an IN point and overwrite an existing IN point using the current timecode. Or enter a timecode using the numeric keypad and press [IN]. B. Press [OUT] to mark an OUT point and overwrite an existing OUT point. Or enter a timecode using the numeric keypad and press [OUT]. C. Press [SAVE CLIP] to save the IN and OUT points in the next available clip number. NOTE- If a CAM-X is currently selected, one clip for each CAM will be saved automatically. If CLIP-X is currently selected, only one clip for CLIP-X will be saved. NOTE- If no IN / OUT Points are assigned, they will be automatically generated using the AUTO-MARK HEAD and AUTO-MARK TAIL settings in the Setup Menu. The IN Point will be set to the current time minus the time set in AUTO-MARK HEAD. The OUT Point will be set to the current time minus the time set in AUTO-MARK TAIL. If only the IN or OUT Point is missing, it will be automatically generated using the same settings. For determining which cue points apply to which channels, use the table below. MODE SOFTKEY CUE POINT NUMBERS {CAM-1} IN / 1 OUT {CLIP-1} {CLIP-2} {CLIP-3} {CAM-1} IN / 1 OUT {CAM-2} {CAM-3} {CLIP-1} {CAM-1} IN / 2 OUT {CAM-2} {CLIP-1} {CLIP-2} {CAM-1} {CAM-2} IN / 2 OUT {CAM-3} {CAM-4} {CAM-5} {CAM-6} OR Manually enter a clip number (3 digit number) using the numeric keypad, and then press [SAVE CLIP] to save the IN and OUT points into the entered clip number
11 The IN point HH:MM:SS is assigned as the default Clip Label. D. Press [DEL] + [IN] to clear the IN point. E. Press [DEL] + [OUT] to clear the OUT point. 9. RECALL CLIP A. Press [UP ARROW] to highlight the next clip in the clip list portion of the display. B. Press [DOWN ARROW] to highlight the previous clip in the clip list portion of the display. C. In CP mode, Clips are automatically loaded as they are highlighted. In all other modes, RECALL CLIP must be pressed to load the clip. OR Manually enter a clip number using the numeric keypad, and then press [RECALL CLIP] to recall the selected clip. NOTE- If a 1, 2, or 3-digit number is entered, the clip number in the range corresponding to the playback channel s currently selected source (CAM-A, CAM-B, CAM-C, or CLIP) will be recalled. 10. TRIM EXISTING CLIP Mark a new IN point, new OUT point, or new IN & OUT point. A. Recall an existing clip. B. Use transport keys to locate a new IN point. C. Press [IN] to mark the new IN point. D. Use transport keys to locate desired OUT point. E. Press [OUT] to mark the new OUT point. F. Press [SAVE CLIP] to replace the original clip with the trimmed clip. OR Manually enter clip number using the numeric keypad, and then press [SAVE CLIP] to save trimmed clip in the entered clip number. OR DMAT-AB Sports Controller for Abekas Mira Page 9 of 25
12 Or press [SHIFT/ESC] + [SAVE CLIP] to trim all camera angles saved to this clip. 11. LABEL OR RE-NAME AN EXISTING CLIP Label the highlighted clip using a PC keyboard connected to the DMAT. Manually enter an alpha-numeric label on the PC keyboard. Press ENTER on the PC keyboard to save the label. 12. DELETE SAVED CLIP A. Highlight the desired clip in the DMAT-AB. B. Press [DEL] + [SAVE CLIP] to delete the clip. This will delete all 4 or 6 angles saved within that clip. OR Press [DEL] + {CAM} OR {CLIP} softkey to delete only the selected angle from that cue point. 13. CREATE PLAYLIST A. To select Playlist, enter 2-digit number, from 00 to 19, on the numeric keypad, then press [LIST]. B. Press [ADD/INS] to append the current clip to the end of the current Playlist. OR Press [ALT] + [ADD/INS] or [SHIFT] + [ADD/INS] to insert the current clip above the highlight bar. OR Enter clip number using the numeric keypad, then press [ADD/INS] to append the entered clip number to the end of the current Playlist. OR Enter clip number using the numeric keypad, then press [ALT] + [ADD/INS] or [SHIFT] + [ADD/INS] to insert the entered clip above the highlight bar. OR Press [DEL ELEM] to delete the currently highlighted element.
13 14. ASSIGN SPEED TO PLAYLIST ELEMENT A. Press [UP ARROW] or [DOWN ARROW] to highlight the desired element in the current playlist. B. Press the {SPEED} softkey. C. Move the T-bar to set the desired speed. D. Press [ENTER], [UP ARROW], or [DOWN ARROW] to assign the T-bar speed to the current element. OR Press [ESC] to exit without assigning speed to element. 15. APPEND PLAYLIST An existing playlist can be appended to the end of another playlist as an element. Upon reaching this element in the list, the appended playlist will be automatically loaded and seamlessly transitioned to. A. In PL mode, using the numeric keypad, select a playlist to be appended. B. Press [LIST] to pre-load the selected playlist. The display will show the cued playlist number next to the current playlist number. C. Upon completing playout of the current playlist, the pre-loaded playlist will begin playing. D. Press [ALT] + [LIST] to cancel the pre-loaded playlist. NOTE: The pre-loaded list will be cancelled if the operator exits PL mode or if another playlist is appended. Only one playlist may be pre-loaded at a given time. Playlists may not be inserted into the middle of an existing playlist. 16. CUT / MIX TRANSITIONS 2 IN / 2 OUT and 6 IN / 2 OUT modes of operation support the capability to perform cut or mix transitions between the two playback channels. Transition Type and Transition Time are configured in the Setup Menu. To perform a transition, press the [TAKE] key. The currently loaded clip on P2 will automatically be put into play with the configured transition. If in PL mode, the list will automatically be put into play using the assigned speed for that element if applicable. DMAT-AB Sports Controller for Abekas Mira Page 11 of 25
14 17. GANG PLAYBACK In 2 IN / 2 OUT and 6 IN / 2 OUT modes, the playback channels can be ganged together for simultaneous playback. Press the [GANG] key to gang P1 and P2 together. Press [GANG] again to disable the gang. NOTE: In gang, pressing a {CAM} key will affect the currently selected channel. If P1 is selected, all {CAM} keys will load on P1. If P2 is selected, all {CAM} keys will load on P2. NOTE: For frame accurate ganged playback, video reference must be connected to the DMAT-AB, and Video Reference must be turned on in the setup menu. (Default setting for Video Reference is On.)
15 18. UPLOAD MELT The content of the playlists can be uploaded to the Mira server for archiving and future use. In PL mode, press the {MELT} softkey to upload the content to the server. The uploaded information includes: -Clip Name -IN / OUT Points -Camera Angle -Clip Label -Play Speed See the Mira User Manual for more information. 19. GPI FUNCTIONS Current Mode E-E / CP PL GPI Inputs on the rear of the DMAT-AB may be used to execute Play, Stop, or Recue commands. The functionality depends upon the current mode of the unit. See specifications for GPI wiring diagram. Function Description PLAY STOP RECUE PLAY STOP RECUE PLAY STOP RECUE Begin playing the currently recording content Stop the current playback Do Nothing Begin playing the currently loaded pre-recorded clip Stop the current playback Recue to the beginning of the clip Begin playing the currently loaded playlist Stop playing the current playlist Recue to the beginning of the playlist DMAT-AB Sports Controller for Abekas Mira Page 13 of 25
16 DMAT-AB FUNCTIONALITY OVERVIEW Press {CAM-X} to instantly switch between input sources on Mira channels A, B, C, D, E or F. EE MODE: MODE: CP MODE: PL MODE: Press {CLIP-X} to instantly exit EE mode and load assigned, prerecorded clip for playback. Clip will load and pause at first frame of video. Press [RECALL CLIP] to exit EE mode and load selected clip for playback. Press [LIST] to exit EE mode and load selected highlight list for playback. Move T-bar or press any transport key to exit EE mode and go to mode. Press {CAM-X} to instantly switch between playback sources from Mira channels A, B, and C. (The current playback time does not change when switching between CAMs.) If {CLIP-X} was previously selected, CAM-A, CAM-B, or CAM-C will load and pause at first frame of video. Press {CLIP} to load the assigned, pre-recorded clip for playback. Clip will load and pause at first frame of video. Press [RECALL CLIP] to exit mode and load selected clip for playback. Press [LIST] to exit mode and load selected highlight list for playback. Press [REC] to exit mode and view live source of selected CAM Press {CAM-X } to load the associated angle for the current clip number. The clip will load and pause at its IN point. Press {CLIP-X} to exit CP mode and load the assigned, pre-recorded clip for playback. Pre-recorded clip will load and pause at first frame of video. Press [RECALL CLIP] to load selected clip for playback. Press [LIST] to exit CP mode and load selected highlight list for playback. Press [REC] to exit CP mode and view live source of selected CAM Press [RECALL CLIP] to exit PL mode and load selected clip for playback. Press [REC] to exit PL mode and view live source of selected CAM
17 20. DMAT-AB FUNCTION TABLE Current Next Operation Function Mode Mode Description EE T-BAR Slow Motion Slow Motion Playback. [SLOMO] Slow Motion Slow Motion Playback. [SHIFT] + T-BAR Set Slow Motion Speed EE Set Slow Motion speed without affecting current transport mode. [PLAY] Play Playback from current time of day time. [JOG] Jog Jog from current time of day time. [FFWD] FFWD FFWD from current time of day time (press & hold key). [RWD] RWD RWD from current time of day time (press & hold key). [SHUT] SHUTTLE Shuttle from current position. [UP ARROW] Highlight Next Clip EE Highlight Next Clip in CLIP LIST. [DOWN ARROW] Highlight Previous Clip EE Highlight Previous Clip in CLIP LIST. [GOTO] + Entered Timecode + [GOTO] Goto TC Search to entered time code. [GOTO], then [IN] Goto IN Point Search to IN Point [GOTO], then [OUT] Goto OUT Point Search to OUT Point [IN] Mark IN Point EE Mark IN POINT based upon RECORD time. [OUT] Mark OUT Point EE Mark OUT POINT based upon RECORD time. [SAVE CLIP] Save CLIP EE Save a CLIP with IN and OUT point at next available clip number. Enter Number + Save a CLIP with IN and OUT point at entered Save CLIP EE [SAVE CLIP] clip number. [RECALL CLIP] Recall CLIP CP Recall current clip number. Enter Number + [RECALL CLIP] Recall CLIP CP Recall entered clip number. [INS/ADD] Add Element EE Add current CLIP to end of current Playlist. Enter Number + Add entered CLIP number to end of current Add Element EE [INS/ADD] Playlist. [ALT] + [INS/ADD] or Insert current CLIP into current Playlist above Insert Element EE [SHIFT] + highlight bar. [INS/ADD] Enter Number + [ALT] +[INS/ADD] or Insert selected CLIP into current Playlist above Insert Element EE [SHIFT] + highlight bar. [INS/ADD] [DELETE ITEM] Delete Element EE Delete currently highlighted element in Playlist. [ALT] + [DELETE ITEM] Delete Playlist EE Delete current Playlist. [LIST] Load Playlist PL Load current Playlist and cue the currently highlighted element. Enter Number + Load entered Playlist number and cue first Load Playlist PL [LIST] element. [SHIFT] + [UP ARROW] Display next clip page EE Display the next page of clips. [SHIFT] + [DOWN Display previous clip ARROW] page EE Display the previous page of clips. [ALT] + [UP ARROW] Step to next element EE Step to next element in current Playlist. Do not cue. DMAT-AB Sports Controller for Abekas Mira Page 15 of 25
18 Current Mode Operation Function Next Mode Description [ALT] + [DOWN Step to previous Step to next element in current Playlist. Do not EE ARROW] element cue. [PREROLL] Preroll to current time Searches to current time minus preroll value. Transitions from the current element on P1 to Transition from P1 to [TAKE] the current element on P2 and executes the P2 previously set up transition Loads the live recording that is currently {CAM} Load live recording EE assigned to that softkey. Assign live recording Allows operator to assign a live recording to the [SHIFT] + {CAM} EE to softkey softkey for easy recall. Loads the pre-recorded clip that is currently {CLIP} Load pre-recorded clip assigned to that softkey. Assign pre-recorded Allows operator to assign a pre-recorded clip to [SHIFT] + {CLIP} EE clip to softkey the softkey for easy recall. Delete currently Deletes the contents saved within that clip [DEL] + [SAVE CLIP] EE selected clip number across all channels on the DMAT-AB [DEL] + {CAM} OR {CLIP} Delete currently selected clip [GANG] GANG P1 + P2 EE EE Deletes the content saved within that clip number on the currently selected channel Gangs P1 and P2 channels for simultaneous playback Current Next Operation Function Mode Mode Description [REC] E to E EE Go to EE mode. [PLAY] Play Playout video from its current location. T-BAR or [SLOMO] Slomo Slomo video from its current location. [SHIFT] + T-BAR Set Slomo Speed Set slomo speed without affecting current transport mode. [REV] Slomo Reverse Slomo video from its current location in Reverse direction. [JOG] Jog Jog video from its current location [FFWD] FFWD FFWD video from its current location (press and hold key). [RWD] RWD RWD video from its current location (press and hold key). [SHUT] Shuttle Shuttle from current position. [UP ARROW] Highlight Next Clip Highlight Next Clip in CLIP LIST. [DOWN ARROW] Highlight Previous Clip Highlight Previous Clip in CLIP LIST. [GOTO] + Entered Timecode + [GOTO] Goto TC Search to entered Time Code. [GOTO], then [IN] Goto IN Point Search to IN Point [GOTO], then [OUT] Goto OUT Point Search to OUT Point [IN] Mark IN Point Mark IN point based upon playback Timecode. [OUT] Mark OUT Point Mark OUT point based upon playback Timecode. [SAVE CLIP] Save CLIP Save CLIP with IN and OUT point at next available clip number. Entered Number + Save CLIP with IN and OUT point at entered Save CLIP [SAVE CLIP] clip number. [RECALL CLIP] Recall CLIP CP Recall current clip number. Entered Number + [RECALL CLIP] Recall CLIP CP Recall entered clip number. [INS/ADD] Add Element Add current CLIP to end of current Playlist.
19 Enter Number + [INS/ADD] [ALT] + [INS/ADD] or [SHIFT] + [INS/ADD] Enter Number + [ALT] + [INS/ADD] or [SHIFT] + [INS/ADD] Add Element Insert Element Insert Element [DELETE ITEM] Delete Element [ALT] + [DELETE ITEM] [LIST] Load Playlist PL Enter Number + [LIST] [SHIFT] + [UP ARROW] [SHIFT] + [DOWN ARROW] [ALT] + [UP ARROW] [ALT] + [DOWN ARROW] [PREROLL] [TAKE] {CAM} [SHIFT] + {CAM} {CLIP} [SHIFT] + {CLIP} [DEL] + [SAVE CLIP] [DEL] + {CAM} OR {CLIP} Add entered CLIP number to end of current Playlist. Insert current CLIP into current Playlist above highlight bar. Insert selected CLIP into current Playlist above highlight bar. Delete currently highlighted element in Playlist. Delete Playlist Delete current Playlist. Load Playlist Display next clip page Display previous clip page Step to next element Step to previous element Preroll to current time Transition from P1 to P2 Load live recording Assign live recording to softkey Load prerecorded clip Assign prerecorded clip to softkey Delete currently selected clip Delete currently selected clip PL EE [GANG] Gangs P1 + P2 Load current Playlist and cue the currently highlighted element. Load entered Playlist number and cue first element. Display the next page of clips. Display the previous page of clips. Step to next element in current Playlist. Do not cue. Step to next element in current Playlist. Do not cue. Search to current time minus preroll value. Transitions from the current element on P1 to the current element on P2 and executes the previously set up transition Loads the live recording that is currently assigned to that softkey. Allows operator to assign a live recording to the softkey for easy recall. Loads the pre-recorded clip that is currently assigned to that softkey. Allows operator to assign a pre-recorded clip to the softkey for easy recall. Deletes the contents saved within that clip number across all channels on the DMAT-AB Deletes the content saved within that clip number on the currently selected channel Gangs P1 and P2 channels for simultaneous playback Current Next Operation Function Mode Mode Description CP [REC] E to E EE Go to EE mode. [PLAY] Play CP Playout clip from its current location. T-BAR or [SLOMO] Slomo CP Slomo clip from its current location [SHIFT] + T-BAR Set Slomo Speed CP Set slomo speed without affecting current transport mode. [REV] Slomo Reverse CP Slomo clip from its current location in Reverse direction. DMAT-AB Sports Controller for Abekas Mira Page 17 of 25
20 [JOG] Jog CP Jog video from its current location. [FFWD] FFWD CP FFWD clip from its current location (press and hold key). [RWD] RWD CP RWD clip from its current location (press and hold key). [SHUT] Shuttle CP Shuttle from current time. [UP ARROW] Highlight Next Clip CP Highlight Next Clip in CLIP LIST. [DOWN ARROW] Highlight Previous Clip CP Highlight Previous Clip in CLIP LIST. [GOTO] + Entered Timecode + [GOTO] Goto TC Search to entered Time Code. [GOTO], then [IN] Goto IN Point Search to IN Point [GOTO], then [OUT] Goto OUT Point Search to OUT Point [IN] Mark IN Point CP Mark IN point based upon playback Timecode. [OUT] Mark OUT Point CP Mark OUT point based upon playback Timecode. [SAVE CLIP] Save CLIP CP Save trimmed clip at current clip number. Entered Number + Save trimmed clip at entered clip number. Save CLIP CP [SAVE CLIP] [SHIFT/ESC] + Save trimmed clip at current clip number and Save CLIP CP [SAVE CLIP] apply to all camera angles within that clip. [RECALL CLIP] Recall CLIP CP Recall current clip number. Entered Number + Recall entered clip number. Recall CLIP CP [RECALL CLIP] [INS/ADD] Add Element CP Add current CLIP to end of current Playlist. Enter Number + Add entered CLIP number to end of current Add Element CP [INS/ADD] Playlist. [ALT] + [INS/ADD] or Insert selected CLIP into current Playlist Insert Element CP [SHIFT] + above highlight bar. [INS/ADD] Enter Number + [ALT] + [INS/ADD] or [SHIFT] + [INS/ADD] Insert Element CP Insert current CLIP into current Playlist above highlight bar. [DELETE ITEM] Delete Element CP Delete currently highlighted element in Playlist [ALT] + [DELETE ITEM] Delete Playlist CP Delete current Playlist. [LIST] Load Playlist PL Load current Playlist and cue the currently highlighted element. Enter Number + Load entered Playlist number and cue first Load Playlist PL [LIST] element [SHIFT] + [UP Display next clip ARROW] page CP Display the next page of clips. [SHIFT] + [DOWN Display previous ARROW] clip page CP Display the previous page of clips. Step to next Step to next element in current Playlist. Do [ALT] + [UP ARROW] CP element not cue. [ALT] + [DOWN Step to previous Step to next element in current Playlist. Do CP ARROW] element not cue. Change the currently selected camera angle {CAM-A}, {CAM-B}, Change the CP in the clip being played back. Recues to IN {CAM-C} current angle point and begins playing. [PREROLL] Preroll to IN point CP Search to IN point minus preroll value.
21 [TAKE] [SHIFT] + {CAM} {CLIP} [SHIFT] + {CLIP} [DEL] + [SAVE CLIP] [DEL] + {CAM} OR {CLIP} Transition from P1 to P2 Assign live recording to softkey Load pre-recorded clip Assign prerecorded clip to softkey Delete currently selected clip Delete currently selected clip CP CP CP CP CP [GANG] Gangs P1 + P2 CP Current Mode Operation Function PL [REC] E to E EE Next Mode [PLAY] Play PL Transitions from the current element on P1 to the current element on P2 and executes the previously set up transition Allows operator to assign a live recording to the softkey for easy recall. Loads the pre-recorded clip that is currently selected with stored IN/OUT points. Allows operator to assign a pre-recorded clip to the softkey for easy recall. Deletes the contents saved within that clip number across all channels on the DMAT-AB Deletes the content saved within that clip number on the currently selected channel Gangs P1 and P2 channels for simultaneous playback Description Go to EE mode. (NOTE: IN 2 IN / 2 OUT or 6 IN / 2 OUT mode, control is passed to P1.) Play current Playlist from highlighted element. T-BAR Slomo PL Slomo Playlist from its current location. [JOG] Jog PL Jog playlist from its current location. [DOWN ARROW] Cue to Previous (Playlist not playing) Element PL Cue to previous element in Playlist. [UP ARROW] (Playlist Cue to Next not playing) Element PL Cue to next element in Playlist. [UP ARROW] (Playlist Go to next Immediately go to the next element in the PL playing) element Playlist during Playlist playout. {SKIP} Skip next element PL Skip next element during Playlist playout. [IN] Mark IN Point PL Modify IN point of current Playlist element. [OUT] Mark OUT Point PL Modify OUT point of current Playlist element. [RECALL CLIP] Recall CLIP CP Recall current clip number. Entered Number + Recall entered clip number. Recall CLIP CP [RECALL CLIP] [INS/ADD] Add Element PL Add current CLIP to end of current Playlist. Enter Number + Add entered CLIP number to end of Add Element PL [INS/ADD] current Playlist. [ALT] + [INS/ADD] or Insert current CLIP into current Playlist at Insert Element PL [SHIFT] + highlight bar. [INS/ADD] Enter Number + [ALT] + [INS/ADD] or [SHIFT] + [INS/ADD] Insert Element PL Insert current CLIP into current Playlist at highlight bar. Delete currently highlighted element in [DEL ELEM] Delete Element PL Playlist. [ALT] + [DEL ELEM] Delete Playlist PL Delete current Playlist. [LIST] Load Playlist PL Load current Playlist and cue first element. DMAT-AB Sports Controller for Abekas Mira Page 19 of 25
22 Enter Number + [LIST] [SHIFT] + [UP ARROW] [SHIFT] + [DOWN ARROW] {SPEED} [TAKE] Load Playlist Cue to next IN/OUT Cue to previous IN/OUT Assign speed to element Transition from P1 to P2 [GANG] Gangs P1 + P2 PL PL PL PL PL PL Load entered Playlist number and cue first element. Cue to next IN POINT or OUT POINT in current Playlist. Cue to last IN POINT or OUT POINT in current Playlist. Assign speed to highlighted Playlist element. Transitions from the current element on P1 to the current element on P2 and executes the previously set up transition Gangs P1 and P2 channels for simultaneous playback
23 Reference 21. SETUP MENU Press [MENU]. The MENU indicator will turn on. Turn wheel to select menu item. FUNCTION {CLEAR} {DEFAULTS} DMAT MODEL VIDEO STANDARD PREROLL VALUE Press the {CHANGE} softkey to open the choices for that item. Press {BACK} softkey to save change and return to menu. Press the {EXIT} softkey to exit the Setup Menu. DESCRIPTION Select Item to Clear {CLR CLIPS} Delete all clips from 1000 to 1399, 2000 to 2399, 3000 to 3399, and 4000 to {CLR LISTS} Delete all Playlists, (00-19), {CLR MEMORY} Clear all non-volatile memory including clips and Playlists. {SET DEFAULTS} Set Setup Menu parameters to factory programmed defaults. Select 1 IN / 1 OUT, 2 IN / 2 OUT, 3 IN / 1 OUT, or 6 IN / 2 OUT mode to match the configuration of the Mira. See the Mira documentation for details on the modes of operation. Default - 2 IN / 2 OUT Select {PAL} or {NTSC}. Default NTSC. Enter Preroll Value between 0 59 seconds. Default 5 seconds. AUTO JOG SHUTTLE SPEED MAXIMUM JOG SPEED MAXIMUM Select {ENABLE} to enable jog by turning wheel. Select {DISABLE} to disable function. {20x} Limit shuttle speed to 20x play speed. {49x} (Default) Limit shuttle speed to 49x play speed. Select {1X}, {4X}, {8X}, {16X} or {32X} Default 16X DMAT-AB Sports Controller for Abekas Mira Page 21 of 25
24 AUTO-MARK HEAD AUTO-MARK TAIL CAM KEY IN CP TRANSITION TRANSITION DURATION VIDEO REFERENCE MARK AUTO ADVANCE SAVE CLIP STOP AT OUT AUTO-GANG WITH REC Enter a timecode number between 00:00:00:00 and 23:59:59:29 Default 00:00:05:00 Set value to 00:00:00:00 for both AUTO-MARK HEAD and AUTO-MARK TAIL to disable Auto Save. Enter a timecode number between 00:00:00:00 and 23:59:59:29 Default 00:00:05:00 Set value to 00:00:00:00 for both AUTO-MARK HEAD and AUTO-MARK TAIL to disable Auto Save. Select {SWITCH ANGLE ONLY} OR {CUE TO IN AND PLAY} Default SWITCH ANGLE ONLY - defines the description of the controller when the clip is in CP mode and is playing at regular or variplay speed. Select {CUT}, {MIX}, {H-WIPE}, or {V-WIPE}. Default CUT for 1 IN / 1 OUT and 3 IN / 1 OUT. MIX for 2 IN / 2 OUT and 6 IN / 2 OUT. Enter a Transition Duration between 0 98 frames Default 5 frames Select {ON} or {OFF} Default ON Select {ON} or {OFF} ON: Upon pressing [SAVE CLIP] the clip number will automatically advance. OFF: Upon pressing [SAVE CLIP] the clip number does not advance. The operator must manually select a different clip number. Select {ON} or {OFF} ON: The IN and OUT point for the selected clip number are saved only when the operator presses [SAVE CLIP]. OFF: In EE and modes, when the IN key is pressed, the OUT point is automatically calculated using the Auto-Mark Tail setting. When the OUT key is pressed, the IN point is automatically calculated using the Auto-Mark Head setting. In CP mode, press IN to save the current position as the IN point, or press OUT to save the current position as the OUT point for the selected angle. Select {ON} or {OFF} ON: In CP mode, the clip will stop playing when the OUT point is reached. OFF: In CP mode, the clip will continue playing when the OUT point is reached, and the time display will display a negative number when the OUT point is passed. Select {ON} or {OFF} When enabled during any 2-OUT operating mode, playback channels are automatically put into gang when the [REC] button is pressed. Default - OFF
25 22. SPECIFICATIONS Power: Size: 90 VAC to 265 VAC adapter supplied with IEC connector APX Model #AP4108 4A, 1.0A, 0.6A [L x W x H ] 12 3/4 x 8 x 1 3/4 (front) 3 5/8 (rear) [8 5/8 high to top of display] Weight: 10 lbs. Rear Panel Connectors: VTR1, 2, 3, 4, 5, 6 (All DB9F) VTR 1 and VTR 2 only function GPI (DB26HDF) Power (DB9M) SHOTBOX (DB9F) Not functional IO (DB9F) Not functional Keyboard (6-pin mini DIN) For PS/2 style keyboard Ref. Video In (BNC) LTC Input (BNC) Not used Ground Threaded stud Display: Jog/Shuttle Wheel: T-Bar: Easy to read, back-lit LCD display With mechanical detents With mechanical detent at x1 speed. RS422 SERIAL CONNECTOR 9-Pin D-Type, Female (DB9F) Pin # 1 Frame Ground 6 Receive Common 2 Receive A 7 Receive B 3 Transmit B 8 Transmit A 4 Transmit Common 9 Frame Ground 5 Spare POWER CONNECTOR 9-Pin D-Type, Female (DB9M) Pin # 1 +5v DC 6 +5 VDC 2 +5v DC 7 Ground 3 Ground 8 Ground VDC 9 Ground 5 12 VDC DMAT-AB Sports Controller for Abekas Mira Page 23 of 25
26 GPI IN/OUT CONNECTOR 26-Pin D-Type, Female (DB26F) Pin # Function Pin # Function 1 Not Used 14 GPI #5 No Function 2 Not Used 15 GPI #6 No Function 3 Not Used 16 GPI #7 No Function 4 Not Used 17 Not Used 5 Not Used 18 Ground 6 Not Used 19 +5V 7 Not Used 20 +5V 8 Not Used 21 Not Used 9 Ground 22 Not Used 10 GPI #1 PLAY 23 Not Used 11 GPI #2 STOP 24 Not Used 12 GPI #3 RECUE 25 Not Used 13 GPI #4 No Function 26 Ground


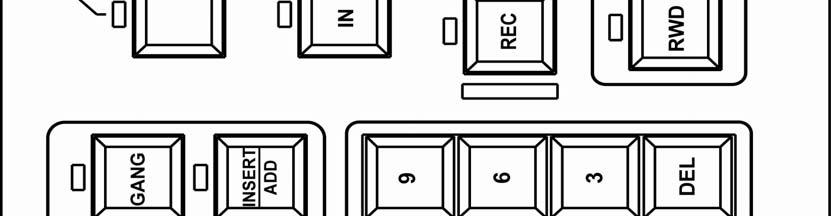
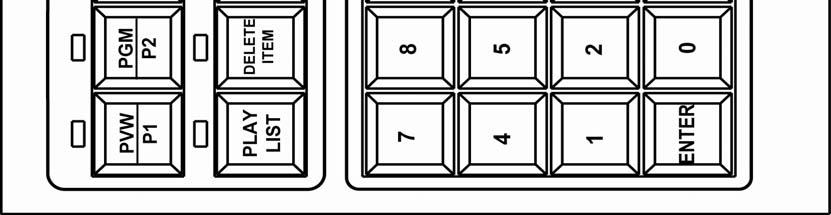
27 23. KEY LAYOUT DMAT-AB Sports Controller for Abekas Mira Page 25 of 25
28 24. DNF CONTROLS LIMITED WARRANTY DNF Controls warrants its product to be free from defects in material and workmanship for a period of one (1) year from the date of sale to the original purchaser from DNF Controls. In order to enforce the rights under this warranty, the customer must first contact DNF s Customer Support Department to afford the opportunity of identifying and fixing the problem without sending the unit in for repair. If DNF s Customer Support Department cannot fix the problem, the customer will be issued a Returned Merchandise Authorization number (RMA). The customer will then ship the defective product prepaid to DNF Controls with the RMA number clearly indicated on the customer s shipping document. The merchandise is to be shipped to: DNF Controls Foothill Blvd., Suite C Sylmar, CA USA Failure to obtain a proper RMA number prior to returning the product may result in the return not being accepted, or in a charge for the required repair. DNF Controls, at its option, will repair or replace the defective unit. DNF Controls will return the unit prepaid to the customer. The method of shipment is at the discretion of DNF Controls, principally UPS Ground for shipments within the United States of America. Shipments to international customers will be sent via air. Should a customer require the product to be returned in a more expeditious manner, the return shipment will be billed to their freight account. This warranty will be considered null and void if accident, misuse, abuse, improper line voltage, fire, water, lightning or other acts of God damaged the product. All repair parts are to be supplied by DNF Controls, either directly or through its authorized dealer network. Similarly, any repair work not performed by either DNF Controls or its authorized dealer may void the warranty. After the warranty period has expired, DNF Controls offers repair services at prices listed in the DNF Controls Price List. DNF Controls reserves the right to refuse repair of any unit outside the warranty period that is deemed non-repairable. DNF Controls shall not be liable for direct, indirect, incidental, consequential or other types of damage resulting from the use of the product. # # #
SPORTS CONTROLLER. For. Odetics Protocol USER MANUAL. For Software Version V and above
 12843 Foothill Blvd., Suite D Sylmar, CA 91342 818 898 3380 voice 818 898 3360 fax www.dnfcontrols.com Model No. DMAT-O-42 SPORTS CONTROLLER For 4 Record / 2 Playback Configuration Odetics Protocol USER
DMAT-O-22 SPORTS CONTROLLER
 12843 Foothill Blvd. Suite C Sylmar, California 91342 V: 818.898.3380 F: 818.898.3360 sales@dnfcontrols.com Model No. DMAT-O-22 SPORTS CONTROLLER For 2 Record / 2 Playback Configuration Odetics Protocol
Model No. 4040CL-EVS (& 4040CL-EVS-T)
") 12843 Foothill Blvd. Suite C Sylmar, California 91342 V: 818.898.3380 F: 818.898.3360 sales@dnfcontrols.com Model No. 4040CL-EVS (& 4040CL-EVS-T) 300 CLIP FAST ACCESS SYSTEM FOR EVS DDRs USER MANUAL 4040CL-EVS,
12843 Foothill Blvd. Suite C Sylmar, California 91342 V: 818.898.3380 F: 818.898.3360 sales@dnfcontrols.com Model No. 4040CL-EVS (& 4040CL-EVS-T) 300 CLIP FAST ACCESS SYSTEM FOR EVS DDRs USER MANUAL 4040CL-EVS,
Model 4000CL-BVW 400 CLIP FAST ACCESS SYSTEM
 12843 Foothill Blvd. Suite C Sylmar, California 91342 V: 818.898.3380 F: 818.898.3360 sales@dnfcontrols.com Model 4000CL-BVW 400 CLIP FAST ACCESS SYSTEM WITH BVW PROTOCOL F PROFILE VIDEO SERVERS ONLY VERSION
Model No. 2034CL-BVW (& 2034CL-BVW-T)
") 12843 Foothill Blvd. Suite C Sylmar, California 91342 V: 818.898.3380 F: 818.898.3360 sales@dnfcontrols.com Model No. 2034CL-BVW (& 2034CL-BVW-T) 300 CLIP INSTANT ACCESS SYSTEM BVW Protocol For PROFILE
12843 Foothill Blvd. Suite C Sylmar, California 91342 V: 818.898.3380 F: 818.898.3360 sales@dnfcontrols.com Model No. 2034CL-BVW (& 2034CL-BVW-T) 300 CLIP INSTANT ACCESS SYSTEM BVW Protocol For PROFILE
Model 3040P-L/ 3040P-L-LT
 12843 Foothill Blvd. Suite C Sylmar, California 91342 V: 818.898.3380 F: 818.898.3360 sales@dnfcontrols.com Model 3040P-L/ 3040P-L-LT Playlist Playout System for Louth Protocol User Manual Rev 3.82 TABLE
SLOW MOTION CONTROLLER
 12843 Foothill Blvd. Suite C Sylmar, California 91342 V: 818.898.3380 F: 818.898.3360 sales@dnfcontrols.com Model No. ST300-EVS and ST300-EVS-T SLOW MOTION CONTROLLER USER MANUAL Table of Contents 1. REVISION
Model No. 2044CL-EVS- PBIO (& 2044CL-EVS-T-PBIO)
") 12843 Foothill Blvd., Suite D Sylmar, CA 91342 818 898 3380 voice 818 898 3360 fax www.dnfcontrols.com Model No. 2044CL-EVS- PBIO (& 2044CL-EVS-T-PBIO) 300 CLIP INSTANT ACCESS SYSTEM For EVS DDRs USER
12843 Foothill Blvd., Suite D Sylmar, CA 91342 818 898 3380 voice 818 898 3360 fax www.dnfcontrols.com Model No. 2044CL-EVS- PBIO (& 2044CL-EVS-T-PBIO) 300 CLIP INSTANT ACCESS SYSTEM For EVS DDRs USER
RS422 PORT SWITCHER REMOTE CONTROL PANEL
 12843 Foothill Blvd. Suite C Sylmar, California 91342 V: 818.898.3380 F: 818.898.3360 sales@dnfcontrols.com Model No. SW32PS-RCP RS422 PORT SWITCHER REMOTE CONTROL PANEL User Manual Rev 1.01 TABLE OF
Model No. ST200-S-RCP
 12843 Foothill Blvd. Suite C Sylmar, California 91342 V: 818.898.3380 F: 818.898.3360 sales@dnfcontrols.com Model No. ST200-S-RCP DUAL FUNCTION RS422 REMOTE CONTROL PORT SWITCHER AND VTR CONTROLLER User
Model No. 2034CL-L-PBIO (&2034CL-L-T)
") 12843 Foothill Blvd. Suite C Sylmar, California 91342 V: 818.898.3380 F: 818.898.3360 sales@dnfcontrols.com Model No. 2034CL-L-PBIO (&2034CL-L-T) 300 CLIP INSTANT ACCESS SYSTEM Louth Protocol VERSION 3.0
12843 Foothill Blvd. Suite C Sylmar, California 91342 V: 818.898.3380 F: 818.898.3360 sales@dnfcontrols.com Model No. 2034CL-L-PBIO (&2034CL-L-T) 300 CLIP INSTANT ACCESS SYSTEM Louth Protocol VERSION 3.0
Model No. 2044CL-L (& 2044CL-L-T)
") 12843 Foothill Blvd. Suite C Sylmar, California 91342 V: 818.898.3380 F: 818.898.3360 sales@dnfcontrols.com Model No. 2044CL-L (& 2044CL-L-T) 300 CLIP FAST ACCESS SYSTEM Louth Protocol USER MANUAL Ver.
12843 Foothill Blvd. Suite C Sylmar, California 91342 V: 818.898.3380 F: 818.898.3360 sales@dnfcontrols.com Model No. 2044CL-L (& 2044CL-L-T) 300 CLIP FAST ACCESS SYSTEM Louth Protocol USER MANUAL Ver.
ST600-KIPRO User Manual
 19770 Bahama St. Northridge, CA. 91324 V: 818.898.3380 F: 818.898.3360 sales@dnfcontrols.com www.dnfcontrols.com ST600-KIPRO User Manual ST600-KIPRO User Manual Page 1 of 16 TABLE OF CONTENTS GETTING STARTED...
MODEL No. SW1X8 RS422 SWITCHER
 12843 Foothill Blvd. Suite C Sylmar, California 91342 V: 818.898.3380 F: 818.898.3360 sales@dnfcontrols.com MODEL No. SW1X8 RS422 SWITCHER User Manual TABLE OF CONTENTS I. REVISION HISTORY... 2 II. INTRODUCTION...
Universal Switch Panel USP-KEYSERVER. User Manual
 12843 Foothill Blvd., Suite D Sylmar, CA 91342 818 898 3380 voice 818 898 3360 fax www.dnfcontrols.com Universal Switch Panel USP-KEYSERVER User Manual Rev 1.0 USP-KEYSERVER User Manual 1 OF 10 TABLE OF
The Analyst. RS422/RS232 Tester. (Standard Model) User Manual
 User Manual") 12843 Foothill Blvd., Suite D Sylmar, CA 91342 818 898 3380 voice 818 898 3360 fax www.dnfcontrolscom The Analyst RS422/RS232 Tester (Standard Model) User Manual Manual Revision 102506 Table of Contents
12843 Foothill Blvd., Suite D Sylmar, CA 91342 818 898 3380 voice 818 898 3360 fax www.dnfcontrolscom The Analyst RS422/RS232 Tester (Standard Model) User Manual Manual Revision 102506 Table of Contents
USP-RDC-8 & USP-RDC-16. Control Primary and Backup at the press of one button. Monitor Primary and Backup status on the same button
 19770 Bahama St. Northridge, CA. 91324 V: 818.898.3380 F: 818.898.3360 sales@dnfcontrols.com www.dnfcontrols.com USP-RDC-8 & USP-RDC-16 Control Primary and Backup at the press of one button Monitor Primary
Flex Control Network. Model No. DC20/ DC21 DEVICE CONTROLLER. Rev 2 Hardware
 19770 Bahama St. Northridge, CA. 91324 V: 818.898.3380 F: 818.898.3360 sales@dnfcontrols.com www.dnfcontrols.com Flex Control Network Model No. DC20/ DC21 DEVICE CONTROLLER Rev 2 Hardware User Manual Rev.
The Analyst RS422/RS232 Tester. With. VTR, Monitor, and Data Logging Option (LOG2) User Manual
 User Manual") 12843 Foothill Blvd. Suite C Sylmar, California 91342 V: 818.898.3380 F: 818.898.3360 sales@dnfcontrols.com The Analyst RS422/RS232 Tester With VTR, Monitor, and Data Logging Option (LOG2) User Manual
12843 Foothill Blvd. Suite C Sylmar, California 91342 V: 818.898.3380 F: 818.898.3360 sales@dnfcontrols.com The Analyst RS422/RS232 Tester With VTR, Monitor, and Data Logging Option (LOG2) User Manual
Universal Switch Panel. User Manual
 12843 Foothill Blvd. Suite C Sylmar, California 91342 V: 818.898.3380 F: 818.898.3360 sales@dnfcontrols.com Universal Switch Panel User Manual Rev 1.3 NOTES: TABLE OF CONTENT REVISION HISTORY... 2 I. UNIVERSAL
Multi Angle Replay Controller
 Multi Angle Replay Controller INSTRUCTION MANUAL VERSION: 110331 BUF Technology, 12335 World Trade Drive, Suite 11, San Diego, CA 92128 Telephone: 858-451-1350 www.buftek.com Fax: 858-451-6589 Version:
USP-S24 & USP-S48. Multi-purpose Web-browser Configurable 24 and 48 Pushbutton Switch Panels. USP-S24 and USP-S48 RELIABILITY
 12843 Foothill Blvd. Suite C Sylmar, California 91342 V: 818.898.3380 F: 818.898.3360 sales@dnfcontrols.com USP-S24 & USP-S48 Multi-purpose Web-browser Configurable 24 and 48 Pushbutton Switch Panels USP-S24
INSTALLATION INSTRUCTIONS 5" SINGLE CHANNEL ULTIMATE TACH
 Instr. No. 2650-887C INSTALLATION INSTRUCTIONS 5" SINGLE CHANNEL ULTIMATE TACH MODEL 6871, 6872, 6873, 6874, 6875, 6877 IMPORTANT WEAR SAFETY GLASSES 5 4 6 COPYRIGHT PATENT PENDING 3 7 8 PLAYBACK 9 2 0
Production Control Software
 4-529-192-14(1) Production Control Software User s Guide Software Version 1.2 PWA-PRC1 2013 Sony Corporation NOTICE TO USERS 2013, 2014 Sony Corporation All rights reserved. This manual or the software
AE21 SERIES DISPLAY CONTROL TERMINAL
 FN:AE21MAN1.DOC AE21 SERIES DISPLAY CONTROL TERMINAL DESCRIPTION The AE21 Series Display Control Terminal is used for implementing various display functions. It consists of a control terminal, the AE21,
Installation & Operation
 LED Readout Installation & Operation WARRANTY Accurate Technology, Inc. warrants the ProScale Systems against defective parts and workmanship for 1 year commencing from the date of original purchase. Upon
CC186 AND CC186/2 STAND-ALONE OR SYSTEM CLOCK
 FN:CC186M2.DOC CC186 AND CC186/2 STAND-ALONE OR SYSTEM CLOCK DESCRIPTION The CC186 is a single sided clock with six, 1.8 inch high digits. The CC186/2 is a double sided clock with six, 1.8 inch high digits
EAR K. Installation and Programming. Manual
 EAR 2000 4K Installation and Programming Manual EAR 2000 4K Installation and Programming Manual Release 1 Version 3 June 2011 NOTICE This publication refers to the EAR 2000, Release 3. Additional copies
Proliphix EPA-60 Installation Guide
 Proliphix EPA-60 Installation Guide Rev 1.2 Page 2 of 5 Installation CAUTION THE EPA-60 SHOULD ONLY BE POWERED WITH THE PROLIPHIX POWER SUPPLY INCLUDED WITH THE EPA-60. DO NOT POWER THE EPA-60 WITH ANY
212iL Rev. 1.1
 212iL 1 International Electronics, Inc. 427 Turnpike Street Canton, Massachusetts 02021 212iL (illuminated Luxury) Keypad Single Unit Keypad- Control Installation Manual Features: 120 User Capability Illuminated
OPERATION MANUAL. MAV and SHOTBOX
 OPERATION MANUAL MAV and SHOTBOX Instant access of up to 300 clips with the press of a button. Recall two or three channels of video simultaneously, And play them back in synchronization. Sony Electronics
INTELLIGENT DOCKING STATION USERS MANUAL
 Kodiak Mobile by Jotto Desk 209 W. Easy St., Rogers, AR USA 72756 Customer Service: 877.455.6886 http://www.kodiakmobile.com PART NUMBER: 450-4011 - Last Update: 06.2009 INTELLIGENT DOCKING STATION USERS
Catalogue. asign the application control panel for Windows TM and MAC TM applications
 asign the application control panel for Windows TM and MAC TM applications Hi Tech Systems has developed a system of highly configurable control panels, called asign, which can be connected to a wide range
VK-3iX WARRANTY REGISTRATION FORM
 VK-3iX WARRANTY REGISTRATION FORM Unit Serial Number: Customer Name: Address: Date of Purchase: Purchased From: Dealer Name: Address: IMPORTANT NOTE: In order to receive the full five year product warranty,
GTP 32 CONTROL PROCESSOR User Manual
 19770 Bahama St. Northridge, CA. 91324 V: 818.898.3380 F: 818.898.3360 sales@dnfcontrols.com www.dnfcontrols.com GTP 32 CONTROL PROCESSOR User Manual - 1 - TABLE OF CONTENTS GETTING STARTED... 4 EQUIPMENT
3.5 TFT LCD CCTV Service Viewer with Wristband LCD35SV
 User Manual 3.5 TFT LCD CCTV Service Viewer with Wristband LCD35SV LCD35SV is a type of product that summarizes views of first-line safety engineers and it is developed specially for technical personnel
K2 Dyno S. Replay Controller. User Manual. Software Version
 K2 Dyno S Replay Controller User Manual Software Version 3.1 071-8909- 00 20130719 K2 Dyno S Replay Controller User Manual Software Version 3.1 071-8909- 00 20130719 Contents Introduction...9 What is
EAR 1000 / ADRA 1000 / Installation and Programming Manual
 EAR 1000 / 2 000 ADRA 1000 / 2000 Installation and Programming Manual EAR 1000/2000 and ADRA 1000/2000 Installation and Programming Manual Release 3 Version 3 February 2004 NOTICE This publication refers
Table of Contents.
 Table of Contents http://www.bioaxxis.com 1. Items Included with the BioAxxis ThumbLock PCMU:...2 2. IMPORTANT NOTE:...2 3. Supported Operating Systems:...2 Section 1 Installing the BioAxxis ThumbLock
SP6R Level Controller Operation Manual
 SP6R Level Controller Operation Manual www.sjerhombus.com SP6R LEVEL CONTROLLER INTRODUCTION SJE-Rhombus, an industry leader in water and wastewater pump controls, introduces the SP6R Level Controller.
PS232. RS-232 to PS/2 Keyboard Port Adapter Part # SA0009 (Version 4.0) Copyright 2003 L3 Systems, Inc. Redmond
 Copyright 2003 L3 Systems, Inc. Redmond") PS232 RS-232 to PS/2 Keyboard Port Adapter Part # SA0009 (Version 4.0) Copyright 2003 L3 Systems, Inc. Redmond Quick Reference Command Description Pg ~H Help Screen Displays short command reference 4 ~V
PS232 RS-232 to PS/2 Keyboard Port Adapter Part # SA0009 (Version 4.0) Copyright 2003 L3 Systems, Inc. Redmond Quick Reference Command Description Pg ~H Help Screen Displays short command reference 4 ~V
AE14-503J SERIES PRODUCTION DISPLAY SYSTEM
 FN:503JMAN2.DOC AE14-503J SERIES PRODUCTION DISPLAY SYSTEM DESCRIPTION The AE14-503J Series Production Display System is a stand-alone production pacing (Goal) and monitoring (Actual) display. It includes
User's Guide. Programmable DC Power Supply 200 Watt (40 Volts / 5 Amps) Model Introduction
 Model Introduction") User's Guide Programmable DC Power Supply 200 Watt (40 Volts / 5 Amps) Model 382280 382280 Introduction Congratulations on your purchase of the Extech 382280 Programmable DC Power Supply. This 200 watt
User's Guide Programmable DC Power Supply 200 Watt (40 Volts / 5 Amps) Model 382280 382280 Introduction Congratulations on your purchase of the Extech 382280 Programmable DC Power Supply. This 200 watt
User's Guide Video Borescope Model BR200
 User's Guide Video Borescope Model BR200 Introduction Congratulations on your purchase of this Extech BR200 Video Borescope. This instrument was designed for use as a remote inspection device. It can be
Secured Series: Hub Plus Kit Single Door Controller Package Installation Manual
 Secured Series: Hub Plus Kit Single Door Controller Package Installation Manual This package is designed to simplify the connections to our Secured Series Hub Plus Controller. This will translate into
HEX. User s Manual.
 HEX User s Manual www.voodoolab.com Copyright 2014-2017 by Digital Music Corporation. This publication is protected by copyright and all rights are reserved. Voodoo Lab, Pedal Power, Ground Control and
Fastrack Release Notes Version 3.5X60
 Fastrack Release Notes Version 3.5X60 10/29/04 This document covers changes made to Fastrack since Version V3.4.R4 * * * * * * * * * * * * * * * * * * * * * * * * * * * * * * * * * * * * * * * * * * *
Eagle PT-MP1 Pan Tilt Communications Multiplexer Installation and Operations Manual Revision 3.0 August 20, 2001
 Eagle PT-MP1 Pan Tilt Communications Multiplexer Installation and Operations Manual Revision 3.0 August 20, 2001 Distributed by Hitachi Denshi America Ltd. 150 Crossways Park Drive Woodbury, NY 11797 (516)
Embeddable Digital Video Recorder with Incremental Encoder Interface. Hardware Manual
 Embeddable Digital Video Recorder with Incremental Encoder Interface Hardware Manual Model 4012 Ver. 1.0.0 May 2016 SENSORAY p. 503.684.8005 email:info@sensoray.com www.sensoray.com 7313 SW Tech Center
TC1880 Series. 4/5/6/8 Channel RS-232 FIBER OPTIC MICRO MUX User's Manual
 Series 4/5/6/8 Channel RS-232 FIBER OPTIC MICRO MUX MODEL: S/N: DATE: Notice! Although every effort has been made to insure that this manual is current and accurate as of date of publication, no guarantee
USB Server User Manual
 1 Copyright Notice Copyright Incorporated 2009. All rights reserved. Disclaimer Incorporated shall not be liable for technical or editorial errors or omissions contained herein; nor for incidental or consequential
AEXX-349 SERIES REMOTE DISPLAYS
 FN:349MAN1.DOC AEXX-349 SERIES REMOTE DISPLAYS DESCRIPTION AEXX-349 Series Remote Displays are available with 1, 2.3, 4, 8, or 12 high digits, visible from 5 feet to 500 feet away. They are available in
User Guide DMX TESTER
 User Guide DMX TESTER Document Release Aug. 2006 Revision A Warranty Leviton Manufacturing Co Inc. warrants this control console to be free of material and workmanship defects for a period of two years
4300 WINDFERN RD #100 - HOUSTON TX VOICE (713) FAX (713) web: IMPORTANT!!!
 FAX (713) web: IMPORTANT!!!") 4300 WINDFERN RD #100 - HOUSTON TX 77041-8943 VOICE (713) 973-6905 - FAX (713) 973-9352 web: www.twrlighting.com IMPORTANT!!! PLEASE TAKE THE TIME TO FILL OUT THIS FORM COMPLETELY. FILE IT IN A SAFE PLACE.
4300 WINDFERN RD #100 - HOUSTON TX 77041-8943 VOICE (713) 973-6905 - FAX (713) 973-9352 web: www.twrlighting.com IMPORTANT!!! PLEASE TAKE THE TIME TO FILL OUT THIS FORM COMPLETELY. FILE IT IN A SAFE PLACE.
cb 1500 quick start guide & user manual Time and Attendance Made Simple...
 cb 1500 quick start guide & user manual Time and Attendance Made Simple... and Smart! ABC Office 1142 West Flint Meadow Drive, Kaysville, UT 84037 (800) 658-8788 www.abcoffice.com Sign-up Thank you for
zpen-1080p Features zpen-1080p Layout
 1 zpen-1080p Features CMOS image sensor with Low Light sensitivity HD 1080P up to 30fps, 720P up to 60fps H.264 compression Built-in micro SD card, supports up to 32GB One button operation Easily download
AUTOMATION. Operator s Manual. PG5 Digital Pressure Gauge
 AUTOMATION P R O D U C T S GROUP, INC. Operator s Manual PG5 Digital Pressure Gauge DOC. 9003264 Rev. A1 3/10 Tel: 1/888/525-7300 Fax: 1/435/753-7490 www.apgsensors.com E-mail: sales@apgsensors.com PG5
Kodiak Mobile INTELLIGENT DOCKING STATION USERS MANUAL PART NUMBER: PANASONIC CF53 TOUGHBOOK COMPATIBLE AN ISO 9001:2008 CERTIFIED COMPANY
 CUSTOMER SERVICE If you have any questions or require additional information please contact Customer Service at 877-455-6886, Monday though Friday, 8:00am - 5:00pm CST. TECHNICAL SUPPORT Kodiak Mobile
INSTRUCTION and OPERATIONS MANUAL. for
 INSTRUCTION and OPERATIONS MANUAL for CAB SIGNAL MASTER MODEL NUMBER 15100-00 CAUTION Be sure to read and become thoroughly familiar with the entire contents of this manual before attempting to operate
Media Control Station 2 MIDI Version User's Manual Third Edition
 Media Control Station 2 MIDI Version User's Manual Third Edition 1997-2002 JLCooper Electronics 142 Arena Street El Segundo, CA 90245 MCS 2 and Media Control Station 2 are trademarks of JLCooper Electronics.
4300 WINDFERN RD #100 HOUSTON TX VOICE (713) FAX (713) web: IMPORTANT!!!
 FAX (713) web: IMPORTANT!!!") 4300 WINDFERN RD #100 HOUSTON TX 77041-8943 VOICE (713) 973-6905 FAX (713) 973-9352 web: www.twrlighting.com IMPORTANT!!! PLEASE TAKE THE TIME TO FILL OUT THIS FORM COMPLETELY. FILE IT IN A SAFE PLACE.
4300 WINDFERN RD #100 HOUSTON TX 77041-8943 VOICE (713) 973-6905 FAX (713) 973-9352 web: www.twrlighting.com IMPORTANT!!! PLEASE TAKE THE TIME TO FILL OUT THIS FORM COMPLETELY. FILE IT IN A SAFE PLACE.
Installation Manual. 12 Volt Power Supplies. 18-Port. 9-Port RET18PT RET9PT
 12 Volt Power Supplies Installation Manual 9-Port RET9PT 18-Port RET18PT INTRODUCTION Congratulations! The RET9PT 9-Port 12V Power Supply is the perfect solution for your larger security installations.
EAR 1000 / ADRA 1000 / Installation and Programming Manual
 EAR 1000 / 2 000 ADRA 1000 / 2000 Installation and Programming Manual EAR 1000/2000 and ADRA 1000/2000 Installation and Programming Manual Release 2 May 2002 NOTICE This publication refers to the EAR
12 Digital Photo Frame Instructional Manual
 12 Digital Photo Frame Instructional Manual aluratek.com mnl M10208 model ADMPF512F Copyright 2017 Aluratek, Inc. All Rights Reserved. Table of Contents Frame Features... Frame Control Close-up... Remote
DataPort 250 USB 2.0 Enclosure User s Guide (800)
") DataPort 250 USB 2.0 Enclosure User s Guide WWW.CRU-DATAPORT.COM (800) 260-9800 TABLE OF CONTENTS PAGE Package Contents 1 Features and Requirements 2 Installation 4 Trouble Shooting 13 Technical Support
DataPort 250 USB 2.0 Enclosure User s Guide WWW.CRU-DATAPORT.COM (800) 260-9800 TABLE OF CONTENTS PAGE Package Contents 1 Features and Requirements 2 Installation 4 Trouble Shooting 13 Technical Support
Instruction Manual. Balanced Audio Upgrade Installation. iport IW-21/IW-22 Upgrade Kits. Balanced Audio Upgrade Kit. (iport IW-21)
") Introduction The iport IW Balanced Audio, Balanced Video, and RS-232 Upgrade Kits add functionality and capability to iport IW-21 and IW-22 models. Balanced Audio Upgrade Kit For use with iport IW-21 models.
Introduction The iport IW Balanced Audio, Balanced Video, and RS-232 Upgrade Kits add functionality and capability to iport IW-21 and IW-22 models. Balanced Audio Upgrade Kit For use with iport IW-21 models.
OPERATION MANUAL. Version June 2015
 OPERATION MANUAL Version 14.00 - June 2015 OPERATION MANUAL Multicam LSM 14.00 Disclaimer This manual and the information contained herein are the sole property of EVS Broadcast Equipment SA and/or its
USER MANUAL. Kramer Electronics, Ltd. Models:
 Kramer Electronics, Ltd. USER MANUAL Models: VM-10FW, 1:10 FireWire Distributor/Hub VM-15FW, 1:15 FireWire Distributor/Hub VM-20FW, 1:20 FireWire Distributor/Hub Contents Contents 1 Introduction 1 2 Getting
Kramer Electronics, Ltd. USER MANUAL. Model: RC-52N. Room Controller
 Kramer Electronics, Ltd. USER MANUAL Model: RC-52N Room Controller Contents Contents 1 Introduction 1 2 Getting Started 1 3 Overview 2 4 Your RC-52N 3 4.1 The RC-52N Front Panel 3 4.2 The RC-52N Rear Panel
User's Guide. diskette drive. Rev. 6/1/97 Copyright 1997 Micro Solutions, Inc.
 diskette drive User's Guide Rev. 6/1/97 Copyright 1997 Micro Solutions, Inc. Micro Solutions, Inc., provides this manual as is, without warranty of any kind, either express or implied. Micro Solutions,
10 Digital Photo Frame Instructional Manual
 10 Digital Photo Frame Instructional Manual aluratek.com mnl M10403 model ADMPF410T Copyright 2016 Aluratek, Inc. All Rights Reserved. Table of Contents Frame Features... Frame Control Close-up... Remote
KE18 PC Keyboard Encoder User Manual
 KE18 PC Keyboard Encoder User Manual Table of Contents Introduction to the KE18 1 Configuring the KE18 Jumpers 2 Interfacing to the KE18 I/O Header 4 Connection to Computer and Keyboard 5 KE18 Keycode
VADDIO /CANON BU-SERIES PTZ CAMERAS
 Camera and Electronic Products for Integrators Installation and User Guide VADDIO /CANON BU-SERIES PTZ CAMERAS Canon BU-45H Outdoor & BU-50H Indoor PTZ Cameras including Vaddio accessories for easy integration
Kramer Electronics, Ltd. USER MANUAL. Models: RC-2C, Wall Plate / RS-232 / IR Controller RC-2, Wall Plate / RS-232 Controller
 Kramer Electronics, Ltd. USER MANUAL Models: RC-2C, Wall Plate / RS-232 / IR Controller RC-2, Wall Plate / RS-232 Controller Contents Contents 1 Introduction 1 2 Getting Started 1 3 Overview 2 4 Your RC-2C/RC-2
14 Digital Photo Frame Instructional Manual
 14 Digital Photo Frame Instructional Manual aluratek.com mnl M10423 model ADMPF214B Copyright 2017 Aluratek, Inc. All Rights Reserved. Table of Contents Frame Features... Frame Control Close-up... Remote
POWER Shiloh Road Alpharetta, Georgia (770) FAX (770) Toll Free
 FAX (770) Toll Free") Instruction Manual Model 1582-10M Protection Switch January 2009 Rev O ALARMS MENU OUTPUT = CH1 AUTO POWER 1 2 MODEL 1582 SWITCH CROSS TECHNOLOGIES INC. CH1 CH2 REMOTE EXECUTE Data, drawings, and other
Instruction Manual Model 1582-10M Protection Switch January 2009 Rev O ALARMS MENU OUTPUT = CH1 AUTO POWER 1 2 MODEL 1582 SWITCH CROSS TECHNOLOGIES INC. CH1 CH2 REMOTE EXECUTE Data, drawings, and other
SNT-E RT 10.4 VGA TFT with Touch Screen Display Module Powered By SegeNT embedded GUI Board Hardware Manual
 HAIDAR TECHNOLOGY, LLC. The Next Generation Of Intelligent Embedded GUI Systems WWW.haidartechnology.com (614) 389-3022 Sales@haidartechnology.com SNT-E640480-104-RT 10.4 VGA TFT with Touch Screen Display
OPERATING INSTRUCTIONS FOR MODEL ST-15 5-DIGIT SPORTS TIMER
 OPERATING INSTRUCTIONS FOR MODEL ST-15 5-DIGIT SPORTS TIMER Table of Contents OPERATING INSTRUCTIONS... 0 MODEL ST-15... 0 2- YEAR WARRANTY... 2 IMPORTANT!... 3 Warranty Activation/Installation & Completion
EASON TECHNOLOGY. IO8 & IO24 Break-Out Module
 EASON TECHNOLOGY IO8 & IO24 Break-Out Module p/n 50-00180-01 Revision1.2 Eason Technology, Inc. 7975 Cameron Dr. Bldg 300 Windsor, CA 95492 Phone (707) 837-0120 FAX (707) 837-2742 http://www.eason.com
Heavy Duty Vibration Meter
 User Guide Heavy Duty Vibration Meter Model 407860 Introduction Congratulations on your purchase of the Extech 407860 Vibration Meter. The Model 407860 measures vibration levels in industrial machinery.
MCS-Spectrum. Tactile Colorist Control Surface. Users Manual
 MCS-Spectrum Tactile Colorist Control Surface Users Manual MCS-Spectrum, MCS-3800, MCS-3400 and MCS-3000 are trademarks of JLCooper Electronics. All other brand names are the property of their respective
Heavy Duty Datalogger Module
 User's Guide Heavy Duty Datalogger Module Model 380340 Introduction Congratulations on your purchase of Extech s 380340 Datalogger Module. The Datalogger connects to and records data from Extech Heavy
Integrated Stepper Drive & Motor
 SMD23 Integrated Stepper Drive & Motor Manual #: 940-0S050 User Manual AMCI Motion Control Products Important User Information The products and application data described in this manual are useful in a
RV LEVELING SYSTEM AUTO LEVEL SYSTEM WARNING! FAILURE TO ACT IN ACCORDANCE WITH THE FOLLOWING MAY RESULT IN SERIOUS PERSONAL INJURY OR DEATH.
 RV LEVELING SYSTEM AUTO LEVEL SYSTEM WARNING! FAILURE TO ACT IN ACCORDANCE WITH THE FOLLOWING MAY RESULT IN SERIOUS PERSONAL INJURY OR DEATH. THE USE OF THE GROUND CONTROL AUTO LEVELING SYSTEM TO SUPPORT
INSTRUCTION MANUAL. Model Dual Input RTD Thermometer. Measures two temperatures simultaneously. Dual RTD probe inputs
 INSTRUCTION MANUAL Model 421504 Dual Input RTD Thermometer Measures two temperatures simultaneously Dual RTD probe inputs Clock and Elapsed Timer functions Special functions include Data Hold, MIN/MAX/AVG,
SVP110 SURGE VOLTAGE PROTECTOR INSTRUCTION MANUAL
 SVP110 SURGE VOLTAGE PROTECTOR INSTRUCTION MANUAL REVISION: 01/03/03 COPYRIGHT (c) 1995-2000 CAMPBELL SCIENTIFIC, INC. This is a blank page. WARRANTY AND ASSISTANCE The SVP110 SURGE VOLTAGE PROTECTOR is
Chapter 3 Operating instructions
 Chapter 3 Operating instructions Summary This chapter describes the how to control and navigate through the TVR 30 s menus and options. Content Control interfaces 10 Controlling the TVR 30 10 Front panel
E-BEAM SWEEP NILES ELECTRONICS
 E-BEAM SWEEP INSTRUCTION MANUAL Version 3.0 NILES ELECTRONICS Niles Electronics Inc. 440610 S. Grimmer Blvd. Fremont, CA 94538-6382 USA Tel.: (510) 252-0100 Fax: (510) 252-0106 Web Site: www.nileselectronics.com
ALESIS M20. RS-422 Implementation
 ALESIS M20 RS-422 Implementation Second Revision August 5, 1999 INTRODUCTION This document contains information outlining the implementation of the Sony 9-Pin Protocol in the Alesis M20. This is not an
PRODUCT CONTENTS... 3 II. REQUIRED MATERIALS... 3 III. OVERVIEW... 3 IV. BENCH LAYOUT...
 IR-510 Bench 2012 Infrared Industries, Inc. 25590 Seaboard Lane Hayward, CA 94545 Toll-free phone 800.344.0321 Phone 510.782.8100 Fax 510.782.8101 www.infraredindustries.com Table of Contents I. PRODUCT
Rackmount Keyboard Installation Instructions. Revision A A-0000
 Rackmount Keyboard Installation Instructions Revision A 22000200A-0000 WARRANTY The following is an abbreviated version of warranty policy for keyboard products. For a complete warranty statement, contact
MediaNXS. Complete I/O Solution
 MediaNXS Complete I/O Solution Table of Contents About MediaNXS... 1 Reference... 2 File Menu... 2 New Project... 2 Open Project... 2 Save Project... 2 Save Project As... 2 Add Media... 2 Import... 2 Export...
Kramer Electronics, Ltd.
 Kramer Electronics, Ltd. Preliminary USER MANUAL Model: SL-12 Master Room Controller Contents Contents 1 Introduction 1 2 Getting Started 1 2.1 Quick Start 2 3 Overview 3 4 Your SL-12 Master Room Controller
SMD Series Integrated Stepper Driver and Motor Revision 1.3
 The AMCI Integrated Stepper Motor and Microstepping Drive Combination represents the future of Stepper Motor Control applications. The SMD is a self-contained stepper motor and driver package, capable
Plus-X 600. Installation and Operation Manual
 Plus-X 600 Installation and Operation Manual Table of Contents Introduction... 1 Compatibility... 1 Unpacking... 1 Front Panel Indicators... 2 Hardware Configuration... 2 Installation... 4 Software Configuration...
MRDT Display Terminal
 www.mercury-security.com 2355 MIRA MAR AVE. LONG BEACH, CA 90815-1755, (562)986-9105 FAX (562) 986-9205 MRDT Display Terminal Installation and Specifications: This device complies with part 15 of the FCC
V-9908 MESSAGE/PAGE PANEL
 Issue 4 V-9908 MESSAGE/PAGE PANEL Introduction These instructions contain the specifications and guidelines necessary to install, operate, and maintain the V-9908, /Page Panel. The V-9908 /Page Panel provides
Heavy Duty Datalogger Module
 User's Guide Heavy Duty Datalogger Module Model 380340 Introduction Congratulations on your purchase of Extech s 380340 Datalogger Module. The Datalogger connects to and records data from Extech Heavy
10 Slim Digital Photo Frame Instructional Manual
 10 Slim Digital Photo Frame Instructional Manual aluratek.com mnl M10447 model ASGK410B Copyright 2017 Aluratek, Inc. All Rights Reserved. Table of Contents Frame Features... Frame Control Close-up...
IS50-CM Corner Mount. For Use with IS50/IS51 Series Camclosure 2 Dome Cameras C2261M (8/11)
") I N S T A L L A T I O N IS50-CM Corner Mount For Use with IS50/IS51 Series Camclosure 2 Dome Cameras C2261M (8/11) 2 C2261M (7/11) Important Safety Instructions 1. Read these instructions. 2. Keep these
I N S T A L L A T I O N IS50-CM Corner Mount For Use with IS50/IS51 Series Camclosure 2 Dome Cameras C2261M (8/11) 2 C2261M (7/11) Important Safety Instructions 1. Read these instructions. 2. Keep these