ServiceWise User Guide. Date:
|
|
|
- Wilfrid Hubbard
- 5 years ago
- Views:
Transcription
1 ServiceWise User Guide Author: TechExcel co.ltd Date:
2 Table of Content ServiceWise User Guide Chapter 1 ServiceWise Concepts 1 Chapter 1 -- ServiceWise Concepts 1.1 Understanding ServiceWise ServiceWise Projects Base Projects Subproject Management 1.2 ServiceWise Administration System-level Administration Project-level Administration Administrative Accounts and Access Controls 1.3 Team Representation and Management Account types Team groups Group folders 1.4 Incident and Event Management Incident Management Event Management 1.5 Employee Management Employee Web Portal Tracking Web Conversations CTI Integration 1.6 Knowledge Management and Communication TechExcel KnowledgeWise Chapter 2 ServiceWise Client Basics 2 Chapter 2 -- ServiceWise Client Basics 2.1 Understanding the ServiceWise Client Workspace Understanding the ServiceWise Web Client Workspace Understanding the ServiceWise Windows Client Workspace 2.2 Accessing Projects and Views Logging Into Projects Switching Projects Switching Views Reconnecting to ServiceWise Server Reloading Data Reloading Project Settings Personalizing Login Settings Exiting Projects 2.3 Managing Incidents, Events, and Employees in the List Panels Understanding Incident, Event, and Employee Filters Refreshing the List Panel Filtering Incidents, Events, and Employees by Employee Filtering Incidents and Events by Owner Filtering Incidents by Submitter Filtering Incidents and Events by Status Personalizing the Owner and Submitter Filters Sorting Incidents in the Windows Client Sorting Incidents in the Web Client Locating Records by ID Number or Keyword 2.4 Managing Incidents, Events, and Employees in the Detail Panel Browsing Incidents, Events, and Employees in the Detail Panel Reloading Incidents, Events, and Employees in the Detail Panel Saving Incidents, Events, and Employees in the Detail Panel Printing Incidents, Events, and Employees in the Detail Panel Personalizing the Detail Panel 2.5 Working in the ServiceWise Windows Client Using Keyboard Shortcuts Chapter 3 Employee Management 3 Chapter 3 -- Employee Management 3.1 Managing Employees in TechExcel ServiceWise 3.2 Managing Employees in the Employee List Panel Defining Custom Employee List Views Filtering Employees by Predefined Query 3.3 Managing Employees Creating New Employees Checking if Employees Exist Understanding the Employee Change Log Understanding Employee Statuses Defining Employee Login Settings 3.4 Managing Employee Support Teams Understanding Employee Team Assignment Rules Assigning Employees to System Team Groups Assigning Employees to Primary Support Engineers 3.5 Managing Incidents, Events, and Assets in the Employee View Managing Incidents in the Employee View Managing Events in the Employee View Managing Assets in the Employee View Page 2 of 78
3 3.6 Managing Employee Quick Reports Chapter 4 Incident Management 4 Chapter 4 -- Incident Management 4.1 Understanding ServiceWise Incidents Understanding Incident Workflow Understanding Incident Management Privileges 4.2 Submitting Incidents in the ServiceWise Clients Understanding the New Incident Page Submitting New Incidents in the ServiceWise Client Searching for Employees (Employee Quick Search)incident Selecting Incident Templates Defining Employee Incident Access on Incident Submission Assigning Incidents to Project Members on Incident Submission Adding Attachments to Incidents on Submission Submitting Incidents by Understanding User Identity Authentication 4.3 Forwarding Incidents Forwarding Incidents 4.4 Closing, Reopening, and Deleting Incidents Closing Incidents Reopening Incidents Deleting Incidents 4.5 Tracking Incident Details in the Incident View Managing Incident Histories 4.6 Managing Inter-project Actions Copying/Transferring Incidents to Other Projects New Section 4.7 Managing Incident Templates Creating Incident Templates Editing Incident Templates Deleting Incident Templates 4.8 Managing Incident Cloning Chapter 5 Incident Linking Management 5 Chapter 5 -- Incident Linking Management 5.1 Understanding Incident Linking Understanding Links and Link Types Viewing LInked Incidents in the Incident List Panel Viewing Linked Incidents in the Links Incident Detail Page Searching for Incidents Based on Link Types Understanding the Links Tab in ServiceWise Windows Client Displaying Linked Incidents in the Incident List Panel 5.2 Managing Incident Linking Linking Incidents in the Same ServiceWise Project Deleting Incident Links 5.3 Editing Linked Incidents 5.4 Managing Broken Links Chapter 6 Event Management 6 Chapter 6 -- Event Management 6.1 Managing Events in TechExcel ServiceWise Understanding Event Workflow Understanding Event Management Privileges and Access Controls 6.2 Tracking Events in the Event List Panel Filtering Events in the Event List Panel Personalizing the Event List Panel 6.3 Managing Events Understanding Event Creation Submitting Events Submitting Autocreation Eventsface Defining Employee Access to Events Chapter 7 Search and Query Management 7 Chapter 7 -- Search and Query Management 7.1 Managing CustomerWise Searches and Queries Understanding the TechExcel Search Engine 7.2 Managing Incident Searches and Queries Managing Incident Quick Searches Managing Incident Queries Keyword Search Conditions Incident Description Search Parameters Incident Current Status Search Conditions Incident Time Search Conditions Incident Other Search Parameters 7.3 Managing Event Searches Managing Event Quick Searches 7.4 Managing Customer Searches and Queries Managing Customer Quick Searches Managing Customer Queries Customer Status and Type Search Conditions Contact Search Conditions Chapter 8 Subproject Management 8 Chapter 8 -- Subproject Management 8.1 Understanding Subprojects Page 3 of 78
4 8.1.1 Understanding Subproject Workflow 8.2 Using the Subproject Tree Panel Filtering Incidents by Subproject Sorting Subprojects in the Subproject Tree Panel 8.3 Creating and Managing Subprojects Managing Subproject Applicable Owners Managing Subproject Workflow Chapter 9 Employee Web Portal Management 9 Chapter 9 -- Employee Web Portal Management 9.1 Understanding the Employee Web Portal 9.2 Managing Web Announcements and Announcements Adding Announcements Editing Announcements Managing Web Announcements Managing Blasts Chapter 10 Communication Management 10 Chapter 10- Communication Management 10.1 Managing Events Understanding Sent Events Understanding Received Events 10.2 Communicating with Employees by Creating in the Page of the Incident View Creating in the Web Conversation Page Creating Messages in the Employee View Page Sending in the Related Incidents Tab of the Event View Tracking Employee Communicating by Web Conversation Understanding Web Conversation Flagging Submitting Web Conversation Responses Printing Web Conversations 10.4 Communicating by Telephone (CTI Integration) Understanding On-screen Caller ID Making Outgoing Calls in ServiceWise Answering Incoming Calls Chapter 11 Knowledge Management 11 Chapter 11- Knowledge Management 11.1 Understanding ServiceWise Knowledge Management Understanding Knowledge Items Understanding Events and Knowledge Management Understanding Note and Attachment Management Understanding Knowledge Management Access Controls 11.2 Managing Knowledge Folders Creating Document Type Subfolders Deleting Document Type Subfolders Renaming Knowledge Folders Moving Knowledge Items Between Subfolders Defining Employee Access to Knowledge Folders Defining Project Team View Access to Knowledge Folders Defining Project Team Build Access to Knowledge Folders Defining Secured Knowledge Folder Type Access Rules 11.3 Searching for Knowledge Items Understanding the TechExcel Search Engine Searching in the ServiceWise Windows Client Defining Advanced Knowledge Base Searches 11.4 Managing Documents Adding Documents to the Project Knowledge Base Defining Document Keywords Deleting Documents Checking Out Documents Checking In Documents Locking Documents Chapter 12 ServiceWise Asset Management 12 Chapter 12- ServiceWise Asset Management 12.1 Understanding Asset Management in the TechExcel ServiceWise Client Understanding the ServiceWise Web Asset Tab Understanding the ServiceWise Windows Asset Tab Understanding Asset Management Privileges and Access Controls Understanding Asset Operation Access Controls 12.2 Creating New Assets 12.3 Assigning Assets to Employees 12.4 Editing Asset Properties Returning Assets 12.5 Deleting Assets 12.6 Linking Assets to Incidents 12.7 Managing Asset Support Plans Viewing Related Incidents 12.8 Managing Asset Locations Defining Primary Locations and Secondary Locations Creating New Asset Locations Editing Asset Location Details Deleting Asset Locations 12.9 Managing Asset Notes Page 4 of 78
5 Adding Asset Notes Chapter 13 Import and Export Management 13 Chapter13 -- Import and Export Management 13.1 Managing Importing, Linking, and Exporting Defining Structured Text Files 13.2 Importing, Linking, and Exporting Employees Identifying ServiceWise Employee Data Fields Linking Employees in the Base Project Linking Employees in the Base Project Importing Users From Base Project Importing Employee Accounts from Structured Text Files 13.3 Importing Service Agreements Importing Service Agreements 13.4 Importing and Exporting Incidents Importing Incidents to Structured Text Files Exporting Incidents to Structured Text Files Chapter 14 Outlook Sync Management 14 Chapter14--Outlook Sync Management 14.1 Outlook Sync Management Page 5 of 78
6 ServiceWise User Guide Chapter 1 ServiceWise Concepts 1 Chapter 1 -- ServiceWise Concepts This chapter provides a brief introduction to ServiceWise concepts and features. In this chapter: Understanding ServiceWise ServiceWise Administration Team Representation and Management Incident and Event Management Employee Management Knowledge Management and Communication Asset Management Professional Services Management ServiceWise Add-On Modules 1.1 Understanding ServiceWise TechExcel ServiceWise offers a complete solution for managing internal IT and service desk processes. Using TechExcel ServiceWise, IT organizations may optimize every aspect of their support processes including: Tracking service requests and employeeincidents Managing IT changes and projects Enabling employee self-service Creating and maintaining a knowledgebase as a support resource Tracking company assets and configuration items Time tracking Service level management Automatic s and escalations TechExcel ServiceWise provides a comprehensive, high-end solution that can be configured to match any internal support process ServiceWise Projects ServiceWise uses projects to represent employee and support management processes. In ServiceWise, each project represents a distinct area of work and is controlled by a set of administrator-defined workflow rules. There are two types of ServiceWise projects: base projects and work projects: Base project:used to store and manage the employee and asset data. This data will be available to all work projects. Base projects may support one or more work projects. Work project:used to configure processes and busines rules for specific activities. For example, an incident management process or change management process. Knowledge can also be shared among work projects. You can create a knowledge base so multiple support projects can all work together to build and share knowledge. Although all support incidents are work project-specific, project members may share incidents (interproject copying) and events (global events) across work projects Base Projects A base project is project for storing employee data, asset data, and knowledge data that is shared by work projects. The base project acts as a centralized datastore for the work projects and enables them to freely share employee, asset, and knowledge data while maintaining their own incident and event data, team structures, and workflow rules Subproject Management Each work project may include sub-projects. Subprojects allow teams to organize work items into subfolders. This provides teams a clear view of the work managed in each project. Generally, subprojects represent incidents that are grouped together based on incident types, incident ownership, serviced employees, or schedules. But subprojects may be used to organize support incidents by any criteria that is useful or meaningful to the support organization. Every subproject is defined by its schedule start and end dates, access controls, and parent-child relationships with the other subprojects. Every subproject may be the parent of multiple subprojects, which in turn could be the parent of child subprojects. 1.2 ServiceWise Administration TechExcel ServiceWise system administration and customization requires no programming. All administrative tasks may be managed in the ServiceWise Admin client using a point-and-click interface. Projects, incidents, events, and employees are fully customizable so that support organization may track the data that is important to them. In addition, all access controls are defined on a project-by-project basis. ServiceWise users may log into and work in many different projects, be assigned a unique account type, privileges, and responsibilities in each project using a single ServiceWise license. ServiceWise administration is managed at three levels: the system level, the base project level and the work project level System-level Administration System-level administrative tasks include System level configuration settings and management of ServiceWise user accounts and licenses. System-level administrative tasks fall into three general groups: System-level project administrative tasks include the creation and maintenance of base projects and work projects as well as all ServiceWise site configurations. System-level user administrative tasks include the creation and management of user accounts and licensing, the defintion of system team groups, and the creation and management of administrator account types. System-level tool administrative tasks include the installation of ServiceWise applications and modules, the configuration of the ServiceWise Server, ServiceWise Document Server, and TechExcel Search Engine, and all integration configurations. All system level administrative tasks are managed by a system administrator a licensed ServiceWise user that has been assigned a system administrator account type. A system administrator account type defines the privileges that are granted to that user in the ServiceWise site Project-level Administration Project administration tasks may be broken into four inter-related areas: Page 6 of 78
7 Process definition and business rules GUI customization Project member administration Workflow administration Administrative Accounts and Access Controls Access controls that enable administrators to perform system-level and project-level configuration and customization tasks may be defined independently of one another enabling support organizations to create many different administrative accounts with different levels of access and power. 1.3 Team Representation and Management ServiceWise enables project administrators to define and represent their support organizations based on their job responsibilities and team membership and to implement project workflow and security. All incident, employee, and knowledge management tasks in ServiceWise are controlled using a set of account type-based access controls. The ability of project members to perform specific tasks may be controlled. The following may be used to represent your team: Account types Team groups Group folders Account types An account type defines the role of a user account the privileges and responsibilities granted to that user in a ServiceWise work project. Every licensed ServiceWise user is assigned an account type in each work project. The account type defines the role that the user plays in that project. Project members that have different responsibilities in different projects may be assigned account types that reflect their role in each project. In ServiceWise, all project-level access controls are assigned to account types and not to individual user accounts. Project members inherit privileges from the account type they are assigned in a project. A user may belong to many different projects and be assigned different account types in different work projects. Project administrators may define any number of account types in a project and assign a unique set of privileges to each account type providing them with the flexibility to define many different levels of project security Team groups A team group represents a group of project members that share a common set of responsibilities in a ServiceWise work project, but who do not necessarily share the same role or responsibilities. Whereas an account type represents a specific role, team groups represent a team of project members that belong to the same work group, but have different responsibilities. Using team groups, project administrators may organize project team members into smaller, more useful entities for the assignment of incidents, events, and employees. If the project administrator defines a team group as an applicable owner in an event template, every member of that team group is deemed to be an applicable owner of every event that is based on that event template Group folders The group folder concept reflects the fact that a support incident may belong to a group instead of an individual team member at a particular phase in its life cycle. ServiceWise group folders store common support incidents and enable flexible and definable workflow control. Group folders represent a kind of buffer between a team group and the incidents assigned to that group. Each group folder is owned by a particular team and protected by access controls: View, Put, and Get privilege. Only those project members with the appropriate account type may view incidents assigned to a group folder (Get), add incidents to a group folder (Put), or forward those incidents to another project member or group. Group folders are particularly useful to administrators when they define project workflow and determine how tasks are distributed to project members in the project. Anything that may be assigned to a project member in the project may also be assigned to a group folder. 1.4 Incident and Event Management TechExcel ServiceWise delivers a flexible workflow model that enables project administrators to replicate and enforce their processes in ServiceWise projects. By combining administrator-defined incident workflow, incident routing, and incident escalation rules, TechExcel ServiceWise enables administrators to define flexible and powerful process management tools. Incident Management Event Management Incident Management The primary vehicle for managing and tracking issues in ServiceWise is the collection of data called incidents. Each incident represents a particular task or set of tasks that must be managed by a support team. ServiceWise incidents are usually associated with an employee and one or more subtasks called events. Every incident is represented by a unique incident ID, a description of the incident, an incident workflow state, a work description, and other dynamic properties. Most incident properties are fully customizable. Project administrators may define which properties comprise an incident on a project-by-project basis. ServiceWise projects are fundamentally tools for creating, managing, and tracking incidents and related employees, events, and assets. Incident management tasks include: Creating incidents Working and editing incidents Forwarding incidents Closing and reopening incidents The ServiceWise client GUI provides support teams with a central repository for viewing and updating all information about the incident. Project members can update incident details, add notes and note attachments, view incident history, or create links between related incidents. Meanwhile, at any time during its life cycle, project members may communicate with employees by web conversations, automated notifications, or personalized incident summaries by . Incident Workflow Workflow rules enable project managers to define and track the flow of work between individuals and teams. The Workflow is a business process used to manage the tasks that compose a project. A well-defined set of workflow rules enable an organization to perform tasks in an efficient and repeatable manner. Incident workflow rules enable project administrators to define rules for managing the incidents and events that are managed in each subproject and for determining which project members and employees are applicable to a subproject and its incidents and events. Project workflowdetermines the life cycle of ServiceWise incidents. Project administrators may define workflow settings once in the TechExcel ServiceWise Admin. All project members will manage incidents according to existing processes. Incident routingenables administrators to define rules for automatically assigning incidents to appropriate project members based on the incident attributes and project member skills and workload. Incident escalationenables administrators to define rules for automatically escalating incident statuses if the due date has passed or if no progress has been made in several days. Project administrators may also enable notifications for all escalations. Incident Notification ServiceWise incident notification enables support teams to ensure that all appropriate stake holders are notified (by , pager, or mobile phone) whenever incidents are created, updated, or closed in a ServiceWise project. ServiceWise incident notification is based on administrator-defined incident notification rules. Incident notification rules consist of triggers, conditions, actions, and subscribers. ServiceWise enables administrators to manage both push and pull for each incident notification rule using subscription rules. Project administrators may mandate that certain project members receive incident notifications for certain incidents while others may opt in or opt out of individual subscriptions. Project administrators may also mandate that certain project members never receive incident notifications based on incident notification rules. Incident Routing Page 7 of 78
8 Incident routing is an optional feature that enables administrators to define rules for automatically routing ServiceWise incidents to project members based on administrator-defined routing rules. Incidents may be automatically routed and assigned to project members based on: Based on project member workloads Based on project member skill levels Based on a formula that is based on the workload and the skill level of potential targets Based on availability administrators may optionally mandate that a user must be logged into a project to be subject to routing rules. Based on field(s) selected on the incident form Incident Escalation ServiceWise incident escalation enables project teams to ensure that support incidents do not fall through the cracks by ensuring that project teams are automatically notified if insufficient progress is made on ServiceWise incidents during a defined time period. Escalation actions include reassigning the incident to a new owner, changing the progress state of the incident, or even automatically generating notifications. Project teams may be notified by , pager, mobile phone, or personal folder based on an administrator-defined escalation schedule. If an action is still not taken, incidents may be automatically reassigned to another project member, group, or group folder Event Management Events represent the to do items that project members must perform in the course of processing incidents.every event is either an incident-specific event or a general event. As incidents progress through the incident life cycle, changing workflow states and owners, events may be attached to those incidents to support multi-tasking, track day-to-day activities, and enhance incident workflow. Typical events include calling or receiving a call from an employee, employee requests for equipment, an online meeting or visit to a site, receiving or sending , or approval from management. Events in Views Project members may manage and track events in the Event view of the ServiceWise client. Events may also be managed in the Incident view, Employee view, and Calendar view. Most events are the child of a parent incident, are associated with a single employee, are owned by a single ServiceWise project member, and may be managed based on these relationships. The Event view displays events and information about incidents and employees that are related to specific events. Project members may also manage sibling events in the Event view. The Incident view displays incidents and information about all of the child events of each incident. The Employee view displays employees and information about all of the incidents and events associated with that employee. 1.5 Employee Management Employee accounts represent the company employees for whom ServiceWise support engineers create, manage, and track incidents and events in a ServiceWise project. Employee accounts may be identified by their employee type, job function, site, division, department, group, etc. All employees may be tracked and managed by project members in the Employee view of the ServiceWise clients. TechExcel ServiceWise enables project administrators to define businesses objects, processes, and workflow rules that enable ServiceWise work project members to manage employees effectively. TechExcel enables businesses to manage employees through every step of the employee life cycle. Complete history of employee interactions. Ensure employee incidents seamlessly transition between ServiceWise project members. Effectively communicate and collaborate with employees by phone, , and web conversations. Project members may use the following to keep employees up-to-date on the status of their incidents and on individual events: Employee Web Portal Online Web Conversations Phone (Optional CTI Integration available as Add-on module) Employee Web Portal The TechExcel Employee Web Portal is a secure self-service site providing controlled access to support processes. Using the Employee Web Portal, employees may: Submit and edit incidents through the Internet View their incidents and events Access FAQs, upgrades and patch info, and product documentation Search the knowledge base, download documents or software, and read whatever news or announcements administrators have determined they should see based on their role Engage in web conversations with ServiceWise project members The Employee Web Portal is composed of six views. Each Employee Web Portal view displays tools that enable employees to manage incidents, view reports, interact with ServiceWise personnel, or customize their personal information or preferences. The Employee Web Portal may be fully integrated with TechExcel DownloadPlus, enabling your users to download software or documents based on their profile Tracking Communication by between support engineers and employees is represented in ServiceWise project by events. One of the most common events in ServiceWise projects to send or receive from an employee. All events are instances of an administrator-defined event template belonging to one of three event types: The Sentevent type represents a set of business rules for managing sent to an employee from a ServiceWise project member. The Receivedevent type represents a set of business rules for managing sent to a project member from an employee. The Announcementevent type represents a set of business rules for managing announcement events Web Conversations The web conversation is a useful tool for communicating with employees. The Web Conversation page provides support project members a powerful tool for communicating with employees about their incidents. The Web Conversation page features a rich text chat-like interface, with time stamped and logged data input. Employees may communicate through the Employee Web Portal. Web conversations enable the support team to see when employees add new web conversation to an incident. Incidents can be flagged in the incident list so that the team members can easily spot them. Flagged incidents may also be displayed in the home page of each team member. Team members may manually clear the web conversation flags by checking the Clear the New Employee Request check box on web conversation page and clicking the Submit button CTI Integration Computer telephony integration, or CTI, is a technology that enables telephone and computer interactions to be integrated or coordinated. TechExcel ServiceWise features CTI tools that enable support teams to improve employee support over the telephone by using a plug-and-play solution based on the CTI Data Connector (CDC) from Mirage Computer Systems. ServiceWise CTI integration introduces the following features: On-screen dialing of outgoing phone numbers from the TechExcel ServiceWise client improves support efficiency. Project members may dial employees by selecting phone numbers in the ServiceWise client. Automatic on-screen display of caller data for all inbound calls. Project members can immediately see who is calling and do not need to look up employee names and service history. On-screen caller ID of incoming and outgoing phone calls. ServiceWise CTI automatically matches incoming and outgoing calls with phone numbers stored in the base project. Page 8 of 78
9 1.6 Knowledge Management and Communication In ServiceWise, all company knowledge items documents, web pages, FAQs, company announcements, blast messages, and attachments may be stored and managed in an integrated KnowledgeWise knowledge base. As with employee and asset data, the company knowledge base may be shared by multiple ServiceWise work projects. Every ServiceWise work project in a site has access to a common knowledge base through which they may share business intelligence. ServiceWise facilitates self-service by providing company employees access to the knowledge base through the Employee Web Portal. ServiceWise knowledge management tasks are carried out at two levels: the project level and the incident level TechExcel KnowledgeWise TechExcel KnowledgeWise is a key component in the TechExcel ServiceWise Suite of service management tools. KnowledgeWise provides businesses with a single knowledge base through which they can manage and share information across ServiceWise projects. The TechExcel KnowledgeWise distribution engine enables support organizations to enforce change management, security, and transparency to business knowledge and facilitates collaboration for distributed support organizations. Chapter 2 ServiceWise Client Basics 2 Chapter 2 -- ServiceWise Client Basics This chapter introduces the client workspace and tools and provides an overview of basic ServiceWise tasks such as logging into a project, switching projects and views, and filtering and sorting incidents in the list panel. In this chapter: Accessing Projects and Views Managing Incidents, Events, and Employees in the List Panels Using Keyboard Shortcuts Printing ServiceWise Incidents 2.1 Understanding the ServiceWise Client Workspace Businesses may deploy ServiceWise using any combination of Windows and web clients. ServiceWise Web may be used as a stand-alone product or in tandem with the ServiceWise Windows client uniting internal and external development teams. All data is completely synchronized in real time to the central ServiceWise database. The procedures required to manage incidents in the web client are essentially the same as the procedures required to perform similar tasks in the ServiceWise Windows client Understanding the ServiceWise Web Client Workspace The ServiceWise web client is a thin client that enables project team members to view, manage, and track incidents, events, and employees through the Internet using a web browser. The client workspace organizes project data in multiple web pages calledviews. A view is an interface that displays and organizes data in the client workspace. Each web page is designed to track a specific type of data incidents, events, employees, and reports and features tools that enable the user to process the work items in view. The primary views for most project team members are the incident, event, and employee views. These views share a common layout and set of tools for managing and tracking project work items. Figure 2-1: Employee List Panel in ServiceWise Web Workspace The workspace of the incident, event, and employee views is organized into panels and control bars. In ServiceWise, a control bar is a graphic element that organizes a set of commands and controls that enable the user to navigate between views and projects, perform incident, event or employee management tasks, or filter or search for records based on its properties. List Panel The list panel displays high-level information about work items (incidents, events, or employees) in a tabular list of columns and rows. The list panel is a tool for identifying records that share properties in common. Three controls bars are displayed in every ServiceWise view. View Bar:The view bar displays navigation buttons that enable project members to switch between all ServiceWise web pages. The Menu bar appears in all ServiceWise web pages. Tool Bar: The tool bar displays command buttons that enable project members to perform tasks within a specific page. The controls displayed in the Tool bar are specific to each page. Search Bar:The Search bar contains controls that enable project members to filter the data displayed in the page. The Search bar is displayed in the Incident List page, the Detail page, the New page, and the Report page. List: The list panel displays high-level information about work items (incidents, events, or employees) in a tabular list of columns and rows. The user may view detailed information about a single work item (incident, event, or employee) by selecting that record in the list panel Understanding the ServiceWise Windows Client Workspace The ServiceWise Windows smart client is a web service-enabled client that enables project managers to view, manage, and track incidents, events, and employees. The client workspace organizes project data in multiple views. Each view is designed to track a specific type of data incidents, events, employees, and reports and features tools that enable the user to perform tasks in that view. The three primary views in ServiceWise are the incident view, event view, and employee view. These views are all organized into panels (list panel and detail Page 9 of 78
10 panel) and bars (the menu bar, tool bar, and action bar). Figure 2-2: ServiceWise Windows Client Workspace Each view displays tools and controls that enable the user to process the work items managed in that view. The ServiceWise Windows client workspace is organized into two distinct panels: List Panel :The list panel displays high-level information about work items (incidents, events, or employees) in a tabular list of columns and rows. Detail Panel: The detail panel displays detailed information about a single work items (incident, event, or employee) in a series of tabbed pages. In addition to the information presented within each page, each page displays controls for navigating between pages. Menu Bar :The view bar displays navigation buttons that enable project members to switch between all ServiceWise web pages. The Menu bar appears in all ServiceWise web pages. Tool Bar:The tool bar displays command buttons that enable project members to perform tasks within a specific page. The controls displayed in the Tool bar are specific to each page. Action Bar: The action bar displays command buttons that enable the user to forward a work item to another workflow state or owner. The controls displayed in the action bar depend on the workflow model employed in the project transition-based or state-based. 2.2 Accessing Projects and Views In ServiceWise, a work project is a tool for organizing, managing, and tracking a dis-tinct area of work. Every project is defined by its project type and administrator-defined team structures, business rules, and workflow rules. Every work project is represented in the ServiceWise, client by a customized graphical user interface (GUI) that provides project members with the tools that they need to manage and track incidents, events, and employees. The client workspace organizes project data in multiple views. A view is an interface that displays and organizes data in the client workspace. Each view displays tools and controls that enable the user to process the work items managed in that view. The ServiceWise client displays five views: the incident view, the event view, the employee view, the report view, and the knowledge view. Incident View: The incident view is the primary view for creating, managing, and tracking incidents in the ServiceWise client. Event View: The event view is the primary view for creating, managing, and tracking events in the ServiceWise client. Employee View: The employee view is the primary view for creating, managing, and tracking employees in the ServiceWise client. Report View: The report view is the primary view for creating, managing, and tracking incident, event, employee, and asset reports. Knowledge View: The knowledge view is the primary view for creating, managing, and tracking knowledge in the work project. In addition to the five primary views, project members may also access the Home, Utilities, and Calendar views in the ServiceWise Web client Logging Into Projects ServiceWise implements project-level security by assigning a unique username, password, and account type to every project team member. The username and password enable the ServiceWise system to identify, control, and track the changes users make to the project data. To access ServiceWise projects, the user must enter a valid login name and password in the ServiceWise Login page The password is that user s personal key to the DevSpec system and its projects. Passwords provide accountability for all transactions and other changes to project data and enable the organization to ensure that only authorized individuals may access and change project data. Every user is assigned an account type that defines the role and responsibilities of that user in the project. To log into projects in the Windows client: 1Select the ServiceWise icon in the Windows Start menu By default the ServiceWise icon is displayed in the ServiceWise Client folder. The ServiceWise Login dialog box appears. 2 Enter the user name in the User Name edit box. 3 Enter the password in the Password edit box. Every project member is assigned a unique user name and password by the project administrator. Project members may change their password in the User Preferences page. 4Select a web service in the Web Service dropdown list. 5Select the OK button. The Select Project to Login dialog box appears. 6Select a project and click the OK button. The project is displayed in the client. To log into projects in the web client: 1 Select the ServiceWise Web for Support Team icon in the Windows Start menu. By default the ServiceWise Web icon is displayed in the ServiceWise Web folder. The ServiceWise Login page is opened the web browser. ServiceWise projects may be managed using the Microsoft Internet Explorer, Firefox, and Netscape Navigator browsers. 2 Enter the user name in the User Name edit box. 3 Enter the password in the Password edit box. Every project member is assigned a unique user name and password by the project administrator. Project members may change their password in the User Preferences page. 4 Optional: To open the web client in a new window or tab, select the Pop Up New Browser Window check box. The option is handled differently in each supported web browser. In Microsoft Internet Explorer a new window is opened. In Firefox a new tab is opened. 5 Select the OK button. Page 10 of 78
11 The browser displays the Home page Switching Projects The Switch Project command enables project members to exit one project and open another project without logging out of ServiceWise. Using controls in the Home page, project team members may quickly switch between projects and view open incidents in each projectthe ServiceWise web client Home Figure 2-3: Home Page in ServiceWise Web Client page may be personalized to display information that is important to you. In addition to active projects, the Home page may display: Project List Incident List To Do List Team Member Menu Calendar To switch projects in the web client: 1Click the Home button in the menu bar. The Home page appears. 2Select a project in the Project List. To switch projects in the Windows client: To switch projects in the Windows client, Select File > Active Projects > [PROJECT NAME] Switching Views In ServiceWise, a view is an interface that displays and organizes data in the client workspace. The ServiceWise web client is organized into eight views (web pages): the home, incident, event, employee, report, knowledge, utilities, and calendar views. A view is an interface that displays and organizes project data in the workspace. Each view is designed to manage different types of data and displays a unique set of tools that enable the user to manage data in that view. Only one view is displayed in workspace at a time. Web Client In the web client, the view bar displays eight buttons that enable project members to navigate between pages in the ServiceWise web client. The view bar is displayed in all ServiceWise web pages. The Home button enables project members to display the Home page. The Incident View button enables project members to display the incident view. The Event View button enables project members to display the event view. The Employee View button enables project members to display the employee view. The Report View button enables project members to display the report view. The Knowledge View button enables project members to display the knowledge view. The Utilities button enables project members to display the utilities view. The Calendar View button enables project members to display the calendar view. To switch views in the web client: To switch views in the web client, select a view button in the menu bar. Windows Smart Client In the Windows smart client, the view bar displays five buttons that enable project members to navigate between views. Page 11 of 78
12 The Incident View button enables project members to display the incident view. The Event View button enables project members to display the event view. The Employee View button enables project members to display the employee view. The Report View button enables project members to display the report view. The Knowledge View button enables project members to display the knowledge view. To switch views in the Windows client: In the Windows client, project members may use view buttons, keyboard shortcut commands, or View menu commands to switch between ServiceWise views. Use view buttons in the tool bar: Click the Employee View button for the employee view. Click the Incident View button for the incident view. Click the Event View button for the event view. Click the Report View button for the report view. Click the Knowledge View button for the knowledge view. Use a keyboard shortcut: Press ALT + C for the employee view. Press ALT + I for the incident view. Press ALT + N for the event view. Press ALT + R for the report view. Press ALT + K for the knowledge view. Use the View menu commands: Select View > Employee View for the employee view. Select View > Incident View for the incident view. Select View > Event View for the event view. Select View > Report View for the report view. Select View > Knowledge View for the knowledge view Reconnecting to ServiceWise Server Occasionally, project members may lose their connection to the ServiceWise database; for example, when the network goes down.servicewise Windows users may reconnect to the ServiceWise database using the Reconnect command. The Reconnect command may be invoked by two methods: Press CTRL + B. Select the Reconnect command in the File menu Reloading Data The Reload command enables project members to reload incident data in the incident list panel. The Reload command ensures that the most recent data is displayed in the Windows client. ServiceWise Windows client users may reload incident information by two methods: Press F6. Select the Reload command in the File menu Reloading Project Settings The Reload Project Settings command enables project members to reload project definition settings. ServiceWise Windows client users may reload project settings by two methods: Press F7. Select the Reload Project Settings command in the File menu Personalizing Login Settings Using controls in the Login Control page of the Utilities view, project team members may personalize their login settings. Figure 2-4: Login Control Page To personalize login settings: 1Select the Utilities tab in the view bar. 2Click the Login Control command in the tree panel. The Login Control page appears. 3Define login personal preferences Exiting Projects The Exit command enables project members to exit a project and close the client. Web client: To exit a project click the Log Off button in the menu bar. Windows client: To exit a project select the Exit command in the File menu. 2.3 Managing Incidents, Events, and Employees in the List Panels In ServiceWise, list panels enable project members to access high-level information about the work items (incidents, events, or employees) tracked in each view. Page 12 of 78
13 In each view, high-level information about multiple incidents, events, and employees are displayed in tabular list of rows and intersecting columns. Each column represents an incident, event, or employee property (field). Each row represents a single incident, event, or employee record. Figure 2-5: ServiceWise Web List Panel The list panel is a tool for identifying records that share properties in common. The ability to effectively identify, prioritize, and manage work is key to support management processes.too much information can be overwhelming and make it difficult for developers to focus on the task at hand or stay on top of important issues. Filtering and querying is therefore crucial. In ServiceWise, a filter is a simple query that returns records matching a defined set of criteria. Records matching the criteria are displayed in the list panel or report all other work items are filtered out and not shown. To effectively manage incidents, events, and employees, project members must be able to quickly identify relevant records based on key indicators, minimize the time needed to review large numbers of records, and to maximize effectiveness. The records filtered in the list panel are specific to each view. Incident List Panel:The incident list panel in the incident view displays high-level information about incidents in a tabular list of columns and rows. Event List Panel:The event list panel in the event view displays high-level information about events in a tabular list of columns and rows. Employee List Panel:The employee list panel in the employee view displays high-level information about employees in a tabular list of columns and rows Understanding Incident, Event, and Employee Filters In ServiceWise, a filter is a simple query that returns all records that match search criteria and displays those records in the list panel or report all other issues are filtered out and not displayed. Each view features a set of predefined filters that enable project team member to quickly search for an identify records (incidents, events, or employees) based on shared property definitions. Filtering enables project team members to quickly identify relevant records based on key indicators, minimize the time needed to review large numbers of records, and to maximize effectiveness. Incident Filters Using controls in the incident search bar, project members may choose which events are displayed in the incident list panel. Figure 2-6: Incident Search Bar Incidents may be filtered by employee, event owner, event template, event status, or dates. Employee:The Employee text box enables the user to filter events by employee name. The Employee text box supports the asterisk (*) wildcard character. Criteria entered in the Employee text box filters the options displayed in the Employee dropdown list. Employee List:The Employee dropdown list enables the user to filter events by employee. The list displays all every employee in the base project as well as the*all Employees and *Unknown Employees system variables. Owner:The Owner dropdown list enables the user to filter events by current owner. Status:The Status dropdown list enables the user to filter events by status. Every event workflow state is defined by its status: open or closed. The list displays the {All Open}, {All Closed} and {All Open & Closed} search parameters. Query:The Query dropdown list enables project members to choose a predefined query to filter incidents. Queries may be public or private. Search:The Search button enables project members to define custom search parameters based on incident properties. The Define Query and Quick Search controls enable the user to define and save custom-defined search queries. Event Filters Using controls in the event search bar, project members may choose which events are displayed in the event list panel. Figure 2-7: Event Search Bar Events may be filtered by employee, event owner, event template, event status, or dates. Employee:The Employee text box enables the user to filter events by employee name. The Employee text box supports the asterisk (*) wildcard character. Criteria entered in the Employee text box filters the options displayed in the Employee dropdown list. Employee List:The Employee dropdown list enables the user to filter events by employee. The list displays all every employee in the base project as well as the*all Employees and *Unknown Employees system variables. Owner:The Owner dropdown list enables the user to filter events by current owner. Status:The Status dropdown list enables the user to filter events by status. Every event workflow state is defined by its status: open or closed. The list displays the {All Open}, {All Closed} and {All Open & Closed} search parameters. Page 13 of 78
14 Template:The Template dropdown list enables the user to filter events by event template. The list displays the all event template types as well as the *All Events, *All Global Events, and *All Web Activity Events event template search parameters. Date Type:The Date Type dropdown list enables the user to define the date fields used to filter events in the event list. The list displays the Due Date, Start Date, Start or Due Date, Start and Due Date, and the Last Modified Date search parameters. From:The From calendar enables the user to define the starting date of the date search filter. To:The From calendar enables the user to define the starting date of the date search filter. Employee Filters Using controls in the employee search bar, project members may choose which employees are displayed in the employee list panel. Figure 2-8: Employee Search Bar In the employee view, employees may be filtered using the employee filters or the employee search. Employee:The Employee text box enables the user to filter events by employee name. The Employee text box supports the asterisk (*) wildcard character. Criteria entered in the Employee text box filters the options displayed in the Employee dropdown list. Employee List:The Employee dropdown list enables the user to filter events by employee. The list displays all every employee in the base project as well as the*all Employees and *Unknown Employees system variables Refreshing the List Panel The Refresh command enables project members to refresh the data in the list panel. The Refresh command ensures that the most recent data is displayed in the client. Web client: To refresh incident data in the web client, click the Refresh button in the search bar. Windows client: Project members can refresh the incident list panel by two methods: Press F5. Select View > Refresh Incident Filtering Incidents, Events, and Employees by Employee Incidents, events, and employees may all filtered using the Employee and Employee List controls in the search bar. Employee:The Employee text box enables the user to filter events by employee name. The Employee text box supports the asterisk (*) wildcard character. Criteria entered in the Employee text box filters the options displayed in the Employee dropdown list. Employee List:The Employee dropdown list enables the user to filter events by employee. The list displays all every employee in the base project as well as the*all Employees and *Unknown Employees system variables Filtering Incidents and Events by Owner In ServiceWise, every incident and event is at all times owned by one-and-only-one project team member or team folder. Filtering by owner enables the user to quickly view every incident or event owned by a specific project team member or team folder. Using a team list filter, the user may filter the work items displayed in the list panel by current owner. The Owner filter may be displayed in the search bar of the incident view and event view. The Owner list displays the name of all project team members, group folders, and two system parameters: the*all Members and *Unassigned parameters. *All Members:The *All Members parameter returns all incidents or events owned by project team members. *Unassigned:The *Unassigned parameter returns all incidents or events that are yet to be assigned to a project team member or group folder. In the incident view, the user may choose to display the Owner filter or the Submitter filter in the search bar. The Submitter filter enables the user to view the incidents submitted by specific project team members or employees Filtering Incidents by Submitter In ServiceWise, most incidents are submitted to the project by a project team member. Filtering by submitter enables the user to quickly view every incident or event submitted a specific project team member. The Submitter filter may be displayed in the search bar of the incident view. The Submitter list displays the name of all project team members and two system parameters: the*all Members and *Employees parameters. *All Members:The *All Members parameter returns all incidents submitted to the project by project team members. *Employees:The *Employees parameter returns all incidents submitted to the project by employees Filtering Incidents and Events by Status In ServiceWise, all incidents and events are at all times defined by theirworkflow state. A workflow state represents a particular stage in the lifecycle of that incident or event. Status filtering enables the user to view incidents or events that share the same workflow state or status and filters out all other records. Figure 2-9: Status List Filter in Incident View Page 14 of 78
15 The Status list filter may also be used to filter records by groups of workflow states according to theirworkflow status. Every workflow state is defined as an open state (a state with an open status) or closed state (a state with a closed status). The Status list filter may also be used to filter records by groups of workflow states according to theirworkflow status. Every workflow state is defined as an open state (a state with an open status) or closed state (a state with a closed status). The Status List dropdown list in the search bar displays every workflow state and status that is applicable to the work items managed in that view. In addition to workflow states, the dropdown list may display one or more parameter filters which identify groups of incidents or events based on their property definitions. {All Open}: The {All Open} parameter returns all work items that are in an open workflow state a workflow state defined by an open status. {All Closed}:The {All Closed} parameter returns all work items that are in an closed workflow state a workflow state defined by an closed status. {All Open & Closed}:The {All Open & Closed} parameter returns all work items. In projects that have enabled the ServiceWise Web Portal, two add it on al parameters may be displayed in the incident search bar. The {Mark as Resolved} and {Requested to Reopen} parameters identify incidents that have been tagged by employees in the Employee Web Portal. {Mark as Resolved}: The {Mark as Resolved} parameter returns all incidents that employees have tagged as resolved. {Requested to Reopen}:The {Requested to Reopen} parameter returns all incidents that employees have requested to be reopened Personalizing the Owner and Submitter Filters Using controls in the User List page of the Utilities view, project team members may define which project team members are displayed in the Owner filter displayed in the incident and event view. Figure 2-10: Login Control Page To define user list filter preferences: 1Select the Utilities tab in the view bar. 2Click the User List command in the tree panel. The User List page appears. 3Define user list preference: To display the Owner filter, select the Owner option in the Team Member Filter dropdown list. To display the Submitter filter, select the Submitter option in the Team Member Filter dropdown list. 4 Optional: To display inactive users in the user list filter, select the Show Inactive Users in the List check box. 5 Optional: To filter the user names displayed in the user list filter, select the Apply User List Filter check box and select one or more project team members in the Team Member list Sorting Incidents in the Windows Client In ServiceWise, sorting is the process of arranging development incidents in an ordered sequence based on one or more incident property values. Using the Incident Sorting dialog box, ServiceWise Windows client users may identify the columns by which incidents are sorted, define the relative priority of each sort column, and define the sort order of each column. To sort incidents in the Windows client: 1Right-click in the incident list panel and select the Sort command in the shortcut menu. The Incident Sorting dialog box appears. 2Select incident list columns displayed in the Incident List Columns panel. 3Click the Right arrow to add the incident list columns selected to the Sorting Columns panel. 4Select incident list columns displayed in the Sorting Columns panel. 5Click the Left arrow to add the incident list columns selected to the Incident List Columns panel. 6Click the Up and Down buttons to change the order of the list columns displayed in the Sorting Columns panel. The Up button moves the list columns higher up the list. The Down button move the list columns lower in the list. 7Click the Sort Order button to determine the sort order for each list column displayed in the Sorting list. Ascending order Descending order 8Click the OK button Sorting Incidents in the Web Client In ServiceWise, sorting is the process of arranging development incidents in an ordered sequence based on one or more incident property values. ServiceWise web supports two methods of sorting development incidents in the incident list panel: A basic sort orders incidents in ascending or descending order based on the incident property values of a single column. An advanced sort orders incidents sorts incidents in order based on the incident property values tracked in multiple columns. Users may identify and define the relative priority of multiple columns. To sort incidents using basic sorting: Web client users may sort incidents in the incident list by a single parameter incident property. Incidents may be sorted in ascending order (A-Z or 0-9) or descending order (Z-A and 9-0). To sort incidents in ascending order, click a column header in the incident list panel. The incidents sorted by that column. To sort incidents in descending order, click a column in the incident list panel where Page 15 of 78
16 A sort icon indicates whether the incidents are sorted in ascending or descending order in the incident list. The Ascending Sort icon indicates that the incidents are sorted in ascending order (A-Z or 0-9). The Descending Sort icon indicates that the incidents are sorted in descending order (Z-A and 9-0) Locating Records by ID Number or Keyword In ServiceWise, the Go To command is simple search tool that enables project members to quickly find development incidents based on ranges of incident ID numbers or keywords in incident titles. Incident ID numbers: Every development incident is identified by a sequential ID number that is assigned to that record when it is submitted to the project. Title keywords: Every development incident is identified by a user-defined title. Using basic punctuation marks (commas, hyphens, and asterisks) as logical operators, project members may define complex queries to locate multiple incidents based on ranges of incident ID numbers. Use commas to search for multiple records (for example, 3, 7, 21). Use hyphens to search for ranges of records (for example, 20-50) Use asterisks (*) as wildcard characters to search for multiple records (for example, *9). Use the greater than >, less than <, and equal to = characters to define dynamic ranges of incidents. Combine commas, hyphens, and asterisks in a single Go To search (for example, 3, 20-30, *9). The wildcard expression may be used to distinguish different ranges of incidents: 4*: All incidents beginning with the number 4 *4: All incidents ending with the number 4 *4*: All incidents containing the number 4 Greater than and less then characters may be used to search for dynamic ranges of incidents. >50: All incidents greater than 50. <50: All incidents less than 50. >=50: All incidents greater than or equal to 50. To use the Go command in the Windows client: 1Select the Go To command. In the Windows client, press CTRL + G or select the Go To command in the Edit menu. In the web client, click the Go To button in the menu bar. The Go To dialog box appears. 2Enter an incident ID number, range of ID numbers, or a keyword in the Go To edit box. Integers and numerical ranges are checked against incident ID numbers. Keywords are checked against incident titles. 3Click the OK button. Incidents matching the criteria are displayed in the incident list panel. 2.4 Managing Incidents, Events, and Employees in the Detail Panel The detail panel displays detailed information about a single work item in a group of tabbed pages. Using controls in the detail panel, the user may manage detailed information about a single incident, event, or employee. Figure 2-11: Incident List Panel in ServiceWise Web Workspace In the ServiceWise web client, the detail panel is organized into six areas. The view bar and tool bar are also displayed in the list panel. View Bar:The view bar displays navigation buttons that enable project members to switch between all ServiceWise web pages. The Menu bar appears in all ServiceWise web pages. Tool Bar:The tool bar displays command buttons that enable project members to perform tasks within a specific page. The controls displayed in the Tool bar are specific to each page. Detail Bar:The detail bar displays command buttons that enable the user to browse work items without leaving the detail panel. Action Bar:The action bar displays command buttons that enable the user to forward a work item to another workflow state or owner. The controls displayed in the action bar depend on the workflow model employed in the project transition-based or state-based. Detail Tab Bar:The detail tab bar displays tabs that represent individual detail pages. Selecting a tab in the detail tab bar displays the corresponding detail page in workspace. Page 16 of 78
17 Detail Page:A detail page displays detailed information about a single work item. Common pages include the Description, Current Status, History, and Notes pages Browsing Incidents, Events, and Employees in the Detail Panel In the ServiceWise web client, the detail bar in the detail panel enables the user to browse detailed information about the work items (incidents, events, or employees) returned by a filter or query The detail panel displays detailed information about a single work item in multiple tabbed pages. Detail bar tools enable the user to browse through related records work items that meet the same search conditions. Figure 2-12: Detail Bar in ServiceWise Web Detail Panel The Current Record dropdown list displays the ID Number and Title of the work item on display in the detail panel. To view another record in the detail panel, select a work item (incident, event, or employee) in the Current Record dropdown list. The Record Browser displays the number of records returned by a query and enables the user to browse records by clicking the Next Record and Last Record buttons. To view the previous work item in the detail panel, click the Last Record button. To view the next work item in the detail panel, click the Next Record button Reloading Incidents, Events, and Employees in the Detail Panel To reload a record, click the Reload button in the detail bar of the detail panel Saving Incidents, Events, and Employees in the Detail Panel To save a record, click the Save button in the detail bar of the detail panel Printing Incidents, Events, and Employees in the Detail Panel To print a record, click the Print button in the detail bar of the detail panel Personalizing the Detail Panel In the detail panel of the incident, event, and employee views, detailed information about a single work item may be displayed in multiple tabbed pages. Using controls in the Preferences page, project team members may personalize the appearance of detail pages in the client. The ServiceWise Web client supports two options for organizing and displaying detail pages in the detail panel: the Primary Tab and Secondary Text option and the Text Only option. Tabs and Text Option If the Primary Tab and Secondary Text option is selected, links to the detail pages displayed in detail panel are graphically represented as tabs in the web client. Figure 2-13: Tabs in Incident Detail Panel Using controls in the User Preferences page, the user may define the order in which the tabs are displayed in the client. Detail pages may be designated as primary or secondary. Text Only Option If the Text Only option is selected, links to the detail pages displayed in detail panel are displayed as text in the web client. Figure 2-14: Text Links in Incident Detail Panel To personalize the detail panel: 1Click the Preferences button in the detail bar of the detail panel. The User Preferences page appears. 2Designate detail pages as primary and secondary. The links to detail pages are displayed in two rows within the detail tab bar. Primary detail pages are displayed in the first row. Secondary detail pages are displayed in the second row. To define a detail page as primary, select the detail page in the Secondary list and click the Right Arrow button. To define a detail page as secondary, select the detail page in the Primary list and click the Left Arrow button. 3 Optional: Define the display order of primary and secondary detail pages: To move a detail page to the left of a row, select the detail page in the list and click the Up Arrow button. To move a detail page to the right of a row, select the detail page in the list and click the Down Arrow button. 4Choose an option for representing the links to detail pages in the detail tab bar. To graphically represent primary detail pages as tabs and secondary detail pages as text links, select the Primary Tab and Secondary Text option button. To represent both primary and secondary detail pages as text links, select the Text Only option button. 5Click the Submit button. 2.5 Working in the ServiceWise Windows Client Please input description Using Keyboard Shortcuts Keyboard shortcuts are combinations of keystrokes that enable users to perform a predefined function quickly. Keyboard shortcuts generally consist of a modifier key and a hot key or function keys. In the ServiceWise Windows client, two types of keyboard shortcuts are supported: system keyboard shortcuts and incident management keyboard shortcuts. Page 17 of 78
18 System keyboard shortcuts provide project members with quick access to commands that are otherwise available in the menu bar or tool bar. Incident management keyboard shortcuts enable project members to quickly browse and edit incidents in the Update Incident manager. System keyboard shortcuts Many of the system-level ServiceWise commands that are available in the menu bar and the tool bar are also accessible through keyboard shortcuts: CTRL + A:The Select All command enables project members to undo changes made to a ServiceWise incident. CTRL + B:The Reconnect Chapter 3 Employee Management 3 Chapter 3 -- Employee Management This chapter describes employee management tasks. In this chapter: Managing Employees in TechExcel ServiceWise Managing Employees in the Employee List Panel Managing Employees Managing Employee Support Teams Managing Incidents, Events, and Assets in the Employee View Managing Employee Quick Reports Linking employees in the base project to the current project 3.1 Managing Employees in TechExcel ServiceWise TechExcel ServiceWise brings people, data, and process management together so that internal employee support organizations may track employee interests and needs, improve communication between the business and its employees, and deliver higher quality services. All ServiceWise work projects share a common employee base project. An employee base project enables project teams to manage a common database of employees. Not every employee may be managed in every work project employee accounts stored in the base project must be linked to each work project. 3.2 Managing Employees in the Employee List Panel The employee list panel displays high-level information about multiple employee accounts in a tabular format. Each row in the employee list panel represents an individual employee account. Each column displays a key employee property. Figure 3-1: Employee List in the ServiceWise Web Client Project members may personalize the employee list panel to display many different employee properties and as many or as few columns as are needed. Common employee properties displayed in the employee list panel include the employee ID, employee name, and the employee phone numbers. The Employee list is a tool for identifying employees that share properties in common. Project members may use tools in the Search bar to determine which employees are displayed in the employee list based on employee properties. Employee Filtering:Employee filtering controls enable project members to display employees based on their name or employee type values. Employee Sorting:Employee sorting enables project members to sort the employees displayed in the Employee list based on a single employee property. Employee Searching:Employee searching displays employees based on one or more custom search parameters. Project members may define queries based on any employee property. Once an employee or set of employees has been located in the employee list panel, the project member may click on an employee record to view and manage employee details in the employee detail panel Defining Custom Employee List Views Project members may use the employee list filters displayed in the View dropdown list of the Search bar in the employee view, to determine which employee property values are displayed in the employee list panel and to filter the employees displayed in the list by user-defined search criteria. All employee list filters are user-defined. Project members may create multiple public and private employee filters in the Utilities view. Page 18 of 78
19 Figure 3-2: Employee List View Page in the Utilities View Every employee list filter is either a public filter or a private filter. Public filters are available to all project members Private filters are only available to a limited number of project members based on their account type. To define employee list filters: 1Select the Employee List View page in the Utilities view. 2Click the Add New button. 3Define a unique and descriptive title for the employee list filter in the Name control. 4Add or remove columns to the employee list panel. To add columns, select an employee property in the Data Fields list and click the Right arrow. To delete columns, select an employee property in the View Columns list and click the Left arrow. 5Select a predefined query in the Query dropdown list. The Query dropdown list displays the public queries defined in the project, the{current Query} system variable option, and the {No Query} option. Project members may create public and private queries using the Advanced Search controls. 6Define the display order of the filter in the Display Order edit box control. 7To enable project members to make changes to the employee list filter, select the Enable Personalization check box. 8Select an employee list filter option from the Type dropdown list. 9Project members may create two types of employee list filters: Public and available to all account types Public and available to selected account types 10 Optional: If the Public and Available to Selected Account Types option is selected, define the account types that may access the employee list filter in the Available for Account Types check box controls. The Available for Account Types areas displays the account types created in the current project. 11Click the Submit button Filtering Employees by Predefined Query Project members may filter the employees displayed in the employee list panel using predefined public or private queries. To filter the employees displayed in the employee list panel by a predefined query, select an option from the Query dropdown list in the Search bar of the employee view. The Query dropdown list displays all of the public and private queries that are available to the project members. Queries are predefined sets of search criteria that are saved in the ServiceWise system. 3.3 Managing Employees Every employee is represented in TechExcel ServiceWise by an employee account that represents a collection of administrator-defined properties. All employee properties are defined, managed, and tracked by project members in the employee view of the ServiceWise client applications. Figure 3-3: Employee View in the ServiceWise Web Client Employee account properties include the employees name and address, employee information, and other data that enable project members to communicate with that employee and track the progress of incidents associated with that employee. Employee data defined in the New Employee page is subsequently tracked in the Address page, Employee page, and Team page of the employee detail panel. Address:Employee properties including the company employee information is tracked and updated in the Address page of the employee detail panel. Team:Team properties including employee information for project members assigned to the employee is tracked and updated in the Team page of the employee detail panel. Employee:Employee properties including the primary employee information is tracked and updated in the Employee page of the employee detail panel Creating New Employees Project members may define key employee account properties, designate support members as the primary support engineers for the employees, and assign support team members to employee accounts whenever they create new employee accounts. Figure 3-4: New Employee Page The New Employee page is divided into four basic areas: the Address, Location, Team, and Login Info areas: Address:The Address area enables project members to define the employee name and employee information. Location:The Location area is used to assign Location and Company Hierarchy information. Team:The Team area enables project members to define which system team groups and project members are responsible for managing the employee. If the administrator has defined auto-assignment rules, project members may opt to automatically assign employees to teams and project members based on those rules. Login:The Login area enables project members to create and define employee and password. ServiceWise pages and data-entry controls may be renamed and customized by project administrators in the ServiceWise Admin client. The names used in this chapter are the default names given to the pages and controls. To create a new employee: 1 Select the New Employee link in the Action bar. The New Employee Page is displayed. 2 Define the name of the employee in the First Name and Last Name edit box controls. 3 Optional: To check to see if the employee already exists in the employee base project, click the Check if Employee Exists button at the bottom of the page. Confirming that employees by the same name do not exist in the project helps to ensure that duplicate employee accounts are not erroneously created. For Page 19 of 78
20 more information on employee addresses see Checking if Employees Exist. 4 Define the employee information for the employee. Employee data may include phone numbers and cell phone numbers. 5 Select an option from the Employee Type dropdown list. In ServiceWise, an employee type defines the privileges and access rights assigned to an employee in multiple work projects. The Employee Type dropdown list displays all of the administrator-defined employee types created in the current project. 6 Define employee location information in the Location area of the New Employee page. Employee location data defines the place of the employee in the company hierarchy. Site :The Site dropdown list displays a list of administrator-defined sites. Division: The Division dropdown list displays a list of administrator-defined divisions that are applicable to the selected site. Department: The Department dropdown list displays a list of administrator-defined departments that are applicable to the selected division. Group: The Group dropdown list displays a list of administrator-defined company hierarchy groups that are applicable to the selected system team group. 7 Identify the project members responsible for managing the employee account in the Team area of the New Employee page. Group Assigned To: The Group Assigned To dropdown list displays all of the system team groups available to the project. Primary Support Engineer: The Primary Support Engineer dropdown list displays support project team members that are applicable to the employee. Secondary Support Engineer: The Secondary Support Engineer displays dropdown list displays support project team members that are applicable to the employee. If the project administrator has defined auto-assignment rules, project members may opt to select the{auto-assign} option in each dropdown list control. ServiceWise auto-assignment rules assign employees to system team groups and project members based on administrator-defined rules. For more information see Understanding Employee Team Assignment Rules. 8 Define the employee and password in the Login Info area of the New Employee page. 9 Click the Submit button. The employee is added to the base project Checking if Employees Exist To limit the chances that a project member may create a duplicate account for a employee, project members may check to see if a employee already exists in the employee base whenever they create a new employee account. Figure 3-5: New Employee Page (Detail) To check if a employee exists: 1Define employee properties in the New Employee page. Project members may search by company name or phone number. 2Click the Check if Employee Exist button. 3Employee account that match the data values defined for the controls in the New Employee page are displayed at the bottom of the page. 4To select a pre-existing employee, select the check box next to the suggested employee account Understanding the Employee Change Log The Change Log displays high-level information about the employee type of a employee in a tabular format. Every row represents a change in the employee type. Three values are displayed in the change log: the date and time of the change in employee type, the project member who made the change, and the change made to the employee. Project members may view the history of changes made to the employee type of a employee in the Change Log area of the Employee Info page in the employee view. Figure 3-6: Change Log in the Address Page Understanding Employee Statuses The Active Employee control designates this employee as an active employee within the company. Inactive employees cannot own or submit incidents, and cannot log into the Employee Web Portal Defining Employee Login Settings Project members may define individual login aliases for each employee in the Employee Info page of the ServiceWise clients. Login aliases enable employees to log into the Employee Web Portal using an alias that has been specifically created for them by a ServiceWise project member. Employees may log into the Employee Web Portal using either an address or a login alias. If the Support Login Alias check box in the General Setting page isnotselected, employee employees may only log into the Employee Web Portal using their address. The employee address serves two purposes: The employee address enables project members to communicate with the employee using ServiceWise features. The employee address controls the login information that the employee uses to access the Employee Web Portal. The employee address and password enables the employee to log into the Employee Web Portal. 3.4 Managing Employee Support Teams Project members may assign a system team group, a primary support engineer, and a secondary support engineer to an employee whenever they create a new employee or update an existing employee in the Employee Info page of the employee detail panel. Each employee may be assigned to project members that are responsible for that account in the ServiceWise site. Group Primary support engineer Secondary support engineer Understanding Employee Team Assignment Rules TechExcel ServiceWise team assignment rules enable businesses to ensure that employees are always assigned to an appropriate system team group, primary support engineer, and secondary support engineer. Project members may assign a system team group, a primary support engineer, and a secondary support engineer to a employee whenever they create a new employee or update an existing employee in the Team page of the employee detail panel. Each employee is assigned a system team group, a primary support engineer, and a secondary support engineer by one of two methods: manual assignment or auto-assignment. Project members may manually assign a system team group, primary support engineer, and secondary support engineer to a employee by selecting an option from the dropdown lists displayed in the Team dropdown list controls. Administrator-defined assignment rules ensure that only appropriate options may be selected. Project members may select the{auto-assign} option for each of the Team dropdown lists to automatically assign employees to appropriate support engineers based on the company hierarchy. Only one system team group, one primary support engineer, and one secondary support engineer is assigned to each employee. Page 20 of 78
21 3.4.2 Assigning Employees to System Team Groups A system team group is an administrator-defined grouping of users that enables the administrator to represent internal structure of the company for example, product divisions or geographic divisions and to define and manage company addresses Assigning Employees to Primary Support Engineers The Primary Support Engineer control enables project members to assign a employee to a support engineer whenever they create a new employee or update an existing employee in the Team page of the employee detail panel. Project administrators may ensure that only support engineers that belong to the selected system team group are displayed in the Primary Support dropdown list From Assigned Group Only check box. Administrators may choose to make this control visible or invisible in the Employee Info page. 3.5 Managing Incidents, Events, and Assets in the Employee View In ServiceWise, incidents, events, and assets are linked to employees enabling support engineers to manage those work items in the employee view. The employee view displays the Incident and Events tab and the Asset tab in the employee detail panel. Project members may use these tools to manage and track the incidents, events, and assets that are associated to a particular incident. Project members define, update, and manage incidents, events, and assets in the employee detail panel of the employee view Managing Incidents in the Employee View Project members may create, manage, and track the incidents associated with a particular employee in the Incident and Events tab of the employee view. Figure 3-7: Incidents and Events Tab in Employee View The Incidents and Events page enables for an overview style summary of all the incidents and events submitted by the employee. Users may also create new incidents, new events, add files, take screen captures, and send s from this view Managing Events in the Employee View Project members may create, manage, and track the events associated with a particular employee in the Incident and Events tab of the employee view. The Incidents and Events page enables for an overview style summary of all the incidents and events submitted by the employee. This page also offers a quick way to manage these incidents and events, through the edit button. You can also create a new incident or event for the employee by clicking the respective buttons Managing Assets in the Employee View Project members may create, manage, and track the assets associated with a particular employee in the Incident and Events tab of the employee view. Figure 3-8: Incidents and Events Tab in Employee View The Assets tab displays all of the assets that are related to the current employee and enables project members to view and manage assets associated with that employee. The Assets page is divided into three main areas: Asset list:the asset list area displays the assets assigned to the Employee and any asset relationships. Asset summary:the asset summary area enables project members to manage assets associated with the current incident. Project members may create edit, assign, and manage assets Asset detail:the asset detail area displays detailed information about the asset selected in the Asset list. 3.6 Managing Employee Quick Reports The Employee Quick Reports page enables project members to view administrator-defined quick reports for employee accounts. Page 21 of 78
22 Figure 3-9: Quick Reports Page The Project dropdown list displays each project in the current ServiceWise implementation. The Report dropdown list displays the administrator-defined quick reports that are available for the selected project. Chapter 4 Incident Management 4 Chapter 4 -- Incident Management This chapter describes incident management tasks. An incident represents a particular task or set of tasks that must be managed by a support team. In this chapter: Understanding ServiceWise Incident Management Submitting Incidents in the ServiceWise Clients Forwarding Incidents Closing, Reopening, and Deleting Incidents Tracking Incident Details in the Incident View Managing Interproject Actions Managing Incident Templates Managing Incident Cloning 4.1 Understanding ServiceWise Incidents Anincidentin ServiceWise may represent any kind of record or work item that must be managed by the support or IT team. ServiceWiseincidentsmay be used to track service requests, incidents, problems, change requests and other records. A ServiceWiseincidentis usually associated with an employee, an assets, and one or more events. Every incident is represented by a unique incident ID, a description of the incident, an incident workflow state, a work description, and other user-defined fields. Most incident properties are fully customizable. Project administrators may define which properties comprise an incident on a project-by-project basis. Incident management tasks include: Creating and working on incidents Forwarding incidents Closing and reopening incidents ServiceWise incidents are generally managed in the Incident view of the ServiceWise client, but project members may create, edit, and track incidents in other views as well including the Events view and the Employee view. Project members may define, update, and manage incident data in the ServiceWise client. The ServiceWise client GUI provides support teams with a central repository for viewing and updating all information about the incident. Project members can update incident details, add notes and note attachments, view incident history, or create links between related incidents. Meanwhile, at any time during its life cycle, project members may communicate with employees by web conversations, automated notifications, or personalized incident summaries by Understanding Incident Workflow TechExcel ServiceWise delivers a flexible workflow model that enables project administrators to replicate and enforce their support workflow in ServiceWise projects. The graphical workflow interface enables project administrators to define workflow rules to manage incidents in the project. Figure 4-1: ServiceWise Workflow Flowchart Workflow rules enable project managers to define and track the flow of work between individuals and teams. A well-defined set of workflow rules enable an organization to perform tasks in an efficient and repeatable manner. Workflow in the sample ServiceWise project is managed in eight workflow states: a opening workflow state, a closing workflow state, and six intermediary workflow states: The New workflow state The New Incident workflow state The Level 1 Support workflow state The Level 2 Support workflow state The In Development workflow state The Resolved: Closed workflow state The Resolved: Notify Employee workflow state The Closed workflow state Administrator-defined workflow states determine the incident properties that may be edited, the project members who may own, and the actions that may be taken for incidents in each incident workflow state Understanding Incident Management Privileges Page 22 of 78
23 Incident privileges enable project members to create, edit, and manage incidents in TechExcel ServiceWise projects. All privileges are granted by project administrators to account types in ServiceWise projects. Project members inherit privileges when they are assigned an account type in a project. In ServiceWise, a privilege is a right to perform a task that is granted to project members based on their account type. Every project member is assigned an account type when they join a project. Their account type defines project member roles, responsibilities, access rights and privileges. Project members assigned a light account type cannot own incidents and may be granted a limited set of incident management privileges. Can Submit Incidents:The privilege enables project members to submit new incidents in ServiceWise projects. Can Forward Own Incidents within Own Group:The privilege enables project members to forward their own incidents to any member in their team group, to their team group itself, or to a group folder owned by their team group. This privilege also allows the user to assign incidents to members of their team group at submission time. For more information regarding team groups and group folders, see their respective sections later in this chapter. Can Assign Incidents within Own Group:The privilege enables project members to forward incidents that belong to any member in their team group to any member in their team group, to their team group itself, or to a group folder owned by their team group. Can Forward Own Incidents to Members of all Groups:The privilege enables project members to forward their own incidents to any member in any team group, any team group itself, or to any group folder. This privilege also allows the user to assign incidents at submission time. Can Assign Incidents to Members of all Groups:The privilege enables project members to assign or forward any incident in the current project to any member in any team group, any team group itself, or to any group folder. Can View Incidents within Own Group:The privilege enables project members to view incidents that belong to any member in their team group, to their team group itself, or to a group folder owned by their team group. Can View Incidents of all Groups:The privilege enables project members to view all incidents in the project. Can Close Incidents:The privilege enables project members to close their own incidents. Can Reopen Incidents:The privilege enables project members to reopen their own incidents. Can Update Incidents Description:The privilege enables project members to update incident descriptions. Can Import and Delete:The privilege enables project members to import incidents into the project as well as delete incidents from the project. Can Define Public Query:The privilege enables project members to define queries for public use in the Incident view. Without this privilege, users can only create private queries. Can Perform Inter-project Copy:The privilege enables project members to copy/transfer incidents from one project to another Can Edit Linked incidents from other Projects:The privilege enables project members to make changes to linked incidents from other projects. 4.2 Submitting Incidents in the ServiceWise Clients Project members and employees may submit new incidents to ServiceWise projects through the ServiceWise clients, , and the Employee Web Portal. The majority of incidents are submitted by ServiceWise project members through the ServiceWise Windows or Web client applications. An administrator-defined set of data represents an incident that a support engineer must manage for an employee. Every incident is represented by a set of dataentry controls in the ServiceWise clients. The data tracked in a project is based on administrator-defined customizations to the project GUI. The New Incident page in the ServiceWise client is a data-entry form that enables project members to define incident properties. Each data-entry control displayed in the New Incident page represents a single incident property. Although project administrators may define incidents and customize the ServiceWise GUI to support and track those processes, project members must define certain controls whenever they create a new incident in a ServiceWise project. Key incident properties that must be defined whenever a project members creates a new incident include: Employee:Every ServiceWise incident is associated with an employee. In ServiceWise employee is the general term for any user who is served by the support engineers. Employees may submit incidents, requests, and events, be associated with multiple incidents, and assigned assets. Project members may select, search for, or define employees whenever they create an incident in the ServiceWise client. Subprojects:Every incident may be assigned to a subproject, if subprojects are enabled in the project. Subprojects represent a collection of incidents that are managed together in the project. Subprojects enable work project teams to group and manage incidents by organization, product line, or by any other criteria they choose. Incident Templates:Project members may select a userdefined incident template whenever they create a new incident in a ServiceWise project. An incident template is a predefined pattern for creating incidents of a particular type in a ServiceWise project. Each incident template represents an incident of multiple predefined incident properties. Incident Attachments:Incident attachments: Project members may add documents as attachments to new incidents submitted in ServiceWise projects Understanding the New Incident Page The New Incident page displays the two windows: the New Incident window and the New incident detail panel. The New Incident page enables project members to select an incident template for creating the incident, assign the new incident to a subproject, or associate the incident with an employee. The New incident detail panel enables project members to define the incident fields that should be displayed to the employees. The data-entry controls displayed in the New Incident page and New Incident Detail page is based on administrator-defined customizations, and the access type of the project member submitting the incident. Project administrators may rename the data-entry controls displayed in the Create Page function page. Project administrators may define data-entry controls as mandatory, read only, or invisible to project members based on their account type or the incident status of an incident. Project administrators may define multiple data-entry fields asmandatory on submission. Mandatory fields must be completed for the incident to be submitted to the project. The field labels of mandatory incidents are set in boldface type in the client Submitting New Incidents in the ServiceWise Client Project members may submit new incidents using controls in the ServiceWise Web and Windows client applications. To submit incidents to a ServiceWise project, project members must belong to an account type that has been granted the Can Submit incidents privilege by a project administrator. Project members that have been granted the appropriate privileges may defineincident templatesthat automatically pre-populate the dataentry controls in the Description page, Current Status page, or custom pages on incident submission. Alternatively, administrators may enable project members to define and use their own incident templates. The data-entry controls displayed in the New Incident page and New Incident Detail page are based on administrator-defined customizations, and the access type of the project member submitting the incident. Page 23 of 78
24 To submit a new incident: 1Click the New Incident command in the Action bar of the ServiceWise Web client. The New Incident page appears. The New Incident page may enable project members to select an incident template for creating the incident, assign the new incident to a subproject, or associate the incident with a particular employee. 2 Optional: To assign the incident to a subproject, select an appropriate root subproject and child subproject in the subproject controls. The root subproject dropdown list enables project members to select the root subproject for the incident. A subfolder beneath the project root folder in the incident tree panel represents the root subproject. The Subproject dropdown list enables project members to select any subproject beneath the root subproject. The Subproject dropdown list displays all of the child subprojects of the root subproject as well all grandchild subprojects and so on. Subprojects are an optional feature in ServiceWise projects that must be enabled and configured by a project administrator. Subprojects enable work project teams to group and manage incidents by organization, product line, or by any other criteria they choose. 3 Optional: To select an incident template, select an option from the Incident Template dropdown list. The Incident Template dropdown list enables project members to select an appropriate template for the new incident. 4Associate the new incident with an existing or new employee. The New Incident page displays tools that enable project members to select, search for, or create an appropriate employee account for the incident. The Employee dropdown list displays a list of every employee account managed in the parent base project. Project members may associate an incident with an employee by selecting an option in the Employee dropdown list. The Employee Quick Search control enables project members to search for existing employee accounts and associate the incident with one of those accounts. The Employee Search button enables project members to define detailed search parameters for identifying and associating existing employees with the new incident. The New Employee button enables project members to create new employee accounts and to associate the new incident with that new employee. 5Click the Continue button. The New Incident Detail tab appears. The New Incident Detail tab displays tools that enable project members to define basic incident properties including the title and work status of the incident. 6Define incident properties. The data-entry controls displayed in the Create Page is based on administrator-defined customizations, and the access type of the project member submitting the incident. The following controls are commonly displayed in the Create Page of ServiceWise projects. The Employee Access control enables project members to define the level of access to the incident that is granted to the employee for the new incident. The Title control enables project members to define the title of an incident. The Title control is generally mandatory on submission. The Progress Status control defines the current workflow status of the incident in project workflow. This control is generally read-only on incident submission. The Assigned To control enables project members to assign the incident to an applicable project member. Administrator-defined workflow rules determine which project members may own incidents based on their work status and other factors. The Attachment control enables project members to attach knowledge items (documents, HTML links, topics) to an incident. Boldface controls indicate that the data-entry control is mandatory. The incident cannot be submitted unless the project member defines a value for all mandatory controls. 7Click the Submit button Searching for Employees (Employee Quick Search)incident Project member may search for existing employee using the Employee Quick Search and Detail Search whenever they submit a new incident in the ServiceWise client applications. Searching for employees enables businesses to avoid duplicate employee accounts Selecting Incident Templates An incident template is a predefinedpatternfor creating incidents of a particular type in a ServiceWise project. Each incident template represents an incident of multiple predefined incident properties. Incidents commonly share multiple properties based on the employee, product line, or other factors and an incident template may be used to represent a particular type of incident that share many common values. Project teams may use incident template to expedite the creation of new incidents by importing incident properties from an incident template into the New Incident form. Importing incident properties from an incident template saves project members the effort of completing multiple data-entry controls in the New Incident page. To select incident templates: 1Click the New incident button. Project members may select an incident template whenever they create a new incident. The New Page appears. 2Select a template from the Incident Template dropdown list. The incident templates displayed in the Incident dropdown list depend on the project. All incident templates are defined on a project-by-project basis. 3Define employee incident properties in the New Page and click the Continue button. The New Page appears. The New Page displays the incident properties inherited from the selected incident template. 4Update incident template properties where needed Defining Employee Incident Access on Incident Submission Employees may view and edit the incidents associated to them in the Employee Web Portal based on administrator-defined employee access rules. Employee access rules determine which pages or data-entry controls employees may view or edit based on their access type. Project members may grant employees access to incidents on an incident-by-incident basis in the ServiceWise client. Whenever a project member creates or updates a ServiceWise incident, the project member may change employee access to that incident. User-defined employee access rules override the administrator-defined employee access rules granted to each employee based on their access type. For example, an administrator may define employee access rules that make incidents invisible to employees with the Temporary Employee access type. A project member may grant a specific employee to edit a specific incident by granting an employee full access to that incident. To define employee access to the incident, select an option from the Employee Access dropdown list. The Employee Access dropdown list displays six options: Currently Full Access:The Currently Full Access rule grants employees full access to incidents in the current incident workflow state. Currently Read-only Access:The Currently Read-only Access rule grants employees read-only access to an incident in the current incident workflow states. Currently No Access:The Currently No Access forbids employees from accessing an incident in all incident workflow states. Always Full Access:The Always Full Access rule grants employees full access to incidents in all incident workflow states. Always Read-only Access:The Always Read-only Access rule grants employees read-only access to an incident in all incident workflow states. Always No Access:The Always No Access rule forbids employees from accessing an incident in all incident workflow states. Project members may update employee access to an incident at any time in the Current Status page of the incident detail panel. Note:The Employee Access dropdown list displays employee access to an incident at all times. If the Currently Read Only option is selected when an incident is in the Level 1 Support workflow state, the value displayed in the Employee Access dropdown list of the ServiceWise client displays a value that represents the administrator-defined employee access rule for the employee as soon as the incident is changed to another incident workflow state. Page 24 of 78


![Properties] and [Description] tags. The [Incident Properties] tag identifies the beginning of the incident property definitions.](/docs-images/84/91023783/images/25-32.jpg "Employees may define appropriate values for each incident property.")


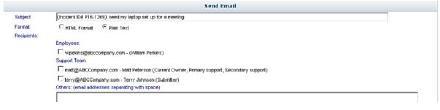

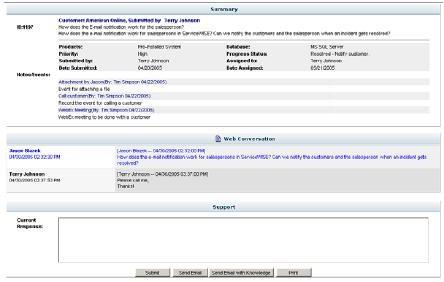
25 Always No Access:The Always No Access rule forbids employees from accessing an incident in all incident workflow states. Project members may update employee access to an incident at any time in the Current Status page of the incident detail panel. Note:The Employee Access dropdown list displays employee access to an incident at all times. If the Currently Read Only option is selected when an incident is in the Level 1 Support workflow state, the value displayed in the Employee Access dropdown list of the ServiceWise client displays a value that represents the /W3C//DTD HTML 4.01 Transitional//EN" " administrator-defined employee access rule for the employee as soon as the incident is changed to another incident workflow state Assigning Incidents to Project Members on Incident Submission The Assigned To control enables project members to assign new incidents to an applicable project member. Administrator-defined workflow rules determine which project members may own incidents based on incident workflow states and other factors. ServiceWise Admin Guide Adding Attachments to Incidents on Submission Project members may attach files to new incidents whenever they submit an incident in the ServiceWise client application. The New Incident Detail page enables project members to define basic incident properties, define employee access to incidents, and attach files to incidents. Note:Project administrators may restrict the type of files that may be uploaded to the ServiceWise knowledge base in the ServiceWise Admin client. If a project member attempts to upload a forbidden file type (for example, an EXE file), a warning message is displayed. To attach files to incidents on submission: 1Click the Browse button in the New Incident Detail page. A file browser appears. 2Locate the file and click the Open button. The file browser closes. The path to the attached document is displayed in the Attachment control Submitting Incidents by Project members and employees may submit new incidents to ServiceWise projects and define incident property values by sending conforming to a specific format to an administrator-defined address. The subject line of the automatically defines the title of the new incident. The body of the may be used to provide a brief description of the incident and to define multiple incident property fields. file attachments are converted to incident attachments. Employees may create messages that create new incidents and define multiple incident property fields by using markup tags to identify incident fields in the body of the . To define multiple fields by incident submission, the body of the must be divided into two sections using the[incident Properties] and [Description] tags. The [Incident Properties] tag identifies the beginning of the incident property definitions. Employees may define appropriate values for each incident property. The employee-defined field names and values must match the incident property aliases and applicable field values for the mapped field represented by the field alias. The [Description] tag identifies the beginning of the incident description. Text in this section of the populates the Incident Description field. Both the [Incident Properties] tag and the[description] tag must be included in the body of the for ServiceWise to properly parse the and populate the new incident fields. If tags are not in the body of the , ServiceWise populates the incident title with the subject and the incident description with the body. An incident auto-submission must follow the following format: In the [Incident Properties] section, the ServiceWise field name is on the left, followed by an equals sign and the value to assign to that field. Administrators can only associate values that already exist for each field, even if the field type is an auto-grow combo box. [Incident Properties] < Understanding User Identity Authentication User authentication enables development teams to ensure that key transition and state changes to incidents and events are approved in ServiceWise projects. Development teams may wish to restrict certain incident or event changes to certain project members. ServiceWise account types and workflow rules are designed to ensure that only project members with the appropriate privileges may make changes in projects. User identity authentication enables development teams to add an addition level of security to their projects by requiring that project members verify their identity before they may update incidents or events in specific workflow states. Identity authentication on incident state or transition changes: incident authentication rules may require that project members enter their password before an incident can be updated based on transitions or state changes identified by the administrator. Identity authentication on event state or transition changes: Event authentications rules may require that project members enter their password before an event can be updated based on event templates and event states identified by the administrator. Once enabled and defined, user authentication rules ensure that no changes may be made unless the user confirms their identity by entering their password. Project members are prompted to enter their password whenever they attempt to update an incident or event covered by an authentication rule. Table 4-1: Authentication Dialog Box All identity authentications are recorded and tracked in the History page in the ServiceWise incident detail panel. All identity authentications are tracked in the ServiceWise projects, enabling administrators to identity unauthorized or fraudulent changes. 4.3 Forwarding Incidents Forwarding incidents enables project members to change incident workflow states, to assign incidents to other project members, and to forward the child events of an incident to the new incident owner. Incident workflow state changes Project workflow rules are based on changes made to the incident workflow states of ServiceWise incidents. The steps required to change incident workflow states depends on the workflow model used in a ServiceWise project. State-Based Workflow:In projects using the state-to-state workflow model project members may directly change the workflow state of an incident by selecting an applicable option from the Progress dropdown list in the Current Status page of the incident detail panel. Transition-Based Workflow:In projects using the transition workflow model project members may not directly change the workflow state of an incident. The Progress dropdown list in the Current Status page of the incident detail panel is a read-only field. Change incident owner The options displayed in the Forward To control are based on two factors: the project member s forwarding privileges and state-dependent Applicable Owner rules. The Forward To dropdown list displays four system-defined variables as well as all administrator-defined group folders and project members. Auto-assignment:The Auto-assignment system variable represents the administrator-defined auto-routing rules. Primary Support:The Primary Support Applicable system variable represents primary support engineers that are deemed applicable to be assigned an incident based on administrator-defined rules. Secondary Support:The Secondary Support Applicable system variable represents secondary support engineers that are deemed applicable to be assigned an incident based on administrator-defined rules. Group Folder:Group folders represent a kind of buffer between a group and the incidents assigned to that group. A particular group owns each group folder Page 25 of 78 and access to the incidents assigned to that group folder are protected by a set of privileges. User Account:Project members are individual users that have been assigned a license and an account type in the ServiceWise project.
26 Group Folder:Group folders represent a kind of buffer between a group and the incidents assigned to that group. A particular group owns each group folder and access to the incidents assigned to that group folder are protected by a set of privileges. User Account:Project members are individual users that have been assigned a license and an account type in the ServiceWise project Forwarding Incidents Project members may forward ServiceWise incidents to other project members and incident workflow states by selecting the Forward button in the Incident bar of the ServiceWise client. Figure 4-2: Incident Bar The Forward page is a data-entry form that enables project members to define the new owner of the forwarded incident, define a brief note, and to choose whether to forward child events of the incident to the new incident owner. Note:Project members may only forward incidents to other project members within their group if they belong to an account type that has not been assigned privilege to forward incidents outside their group. To forward incidents 1Select the Forward command in the Incident bar of the incident detail panel. The Forward page appears. 2Select an applicable owner from the Forward To dropdown list control in the Forward page. The options displayed in the Forward To control are based on two factors: the project member s forwarding privileges and state-dependent Applicable Owner rules. The Forward To dropdown list displays Auto-assignment Primary Support Primary Support Applicable Secondary Support Secondary Support Applicable Group folders Project members 3Click the Submit button. The incident is forwarded. If the project administrator has enabled the incident-level Time Tracking feature, the Incident Time Track page may appear. 4.4 Closing, Reopening, and Deleting Incidents In the course of a ServiceWise project, project members may close, reopen, or delete incidents. Closed incidents are incidents that have been forwarded to aclosedincident status. Every work state in a ServiceWise project is either an open or a closed status. Administrators may define multiple closed work states in a project. Closed incidents arenotdeleted from the project. Closed incidents may be viewed, reopened, or deleted. View:Project members may view closed incidents in the incident list panel. Closed incidents are only displayed in the incident list panel when a Closed or Open & Closed option is selected in the Status dropdown list. Closed incidents are not displayed in the incident list panel when the Open option is selected in the Status dropdown list. Reopen:Project members may reopen closed incidents by changing the work status of the incident to an open work state. Project members should have an account type that has the Can Reopen Incidents privilege and the project Admin should define which state the reopened incident moves to in the workflow. Delete:Project members with appropriate privileges may delete incidents. Deleting an incident permanently removes that incident from the ServiceWise database. Deleted incidents cannot be reopened. Both open and closed incidents can be deleted Closing Incidents Project members can use the Close Reopen command to close ServiceWise incidents. Closing a ServiceWise incident does not remove the incident from the ServiceWise database. The Closed status enables project members to filter incidents in the incident list panel: Closed incidents are not displayed when the Open status option is selected in the incident Status dropdown list. To close ServiceWise incidents a project team member must belong to an account type that has been granted the Can Close incidents privilege. To close incidents: 1Select the incident in the incident list panel. 2Select the Close command. Project members may invoke the Close command by four different methods: Click the Close icon in the tool bar. Select File > Close Reopen in the menu bar. Right-click in the incident list panel and select the Close Reopen command in the shortcut menu. Click the Close button (blue) in the History page. The Close page appears. 3 Optional: To forward the incident to a subproject click the Subproject Ellipsis button and select a subproject from the dialog box. Project members may select a subproject if the project administrator has enabled support of subprojects in the project. If this option is not enabled the Subproject dropdown list is not displayed. 4Change the incident status in the Close Status dropdown list. Only closing statuses are displayed in the Close Status dropdown list. 5Optional: Update incident properties in the close page. 6Click the OK button. The incident is closed. If the project administrator has enabled the incident-level Time Tracking feature, the incident Time Track page may appear Reopening Incidents Project members may use the Close Reopen command to reopen closed ServiceWise incidents. Closed incidents are incidents that have been forwarded to a closed work state. Every work state in project workflow is either an open or closed state. The reopen command enables project member to move an incident from a closed incident state to an open incident state. Project members should have an account type that has the Can Reopen Incidents privilege and the project Admin should define which state the reopened incident moves to in the workflow. To reopen incidents: 1Select a closed incident in the incident list panel. To view closed incidents select the Open & Closed option or the Closed option in the Status dropdown list of the tool bar. 2Select the Reopen command. Project members may invoke the Reopen command by six different methods: Click the Reopen icon in the tool bar. Select File > Close Reopen in the menu bar. Page 26 of 78
27 Right-click in the incident list panel and select the Close Reopen command in the shortcut menu. Click the Reopen button (blue) in the History page. The Reopen incident manager appears. 3 Optional: To forward the incident to a subproject click the Subproject Ellipsis button and select a subproject from the dialog box. Project members may select a subproject if the project administrator has enabled support of subprojects in the project. If this option is not enabled the Subproject dropdown list is not displayed. 4Change the incident status in the Progress Status dropdown list. Only open states are displayed in the Progress Status dropdown list. 5 Optional: Update incident properties defined in the Reopen page. 6Click the Submit button Deleting Incidents Project members can use the Delete command to permanently remove incidents from the ServiceWise database. Project members can delete incidents by two methods: Right-click the incident and select the Delete command from the shortcut menu. Select File > Delete in menu bar. Users may generally delete incidents that they created if ownership of the record has never changed. But project administrator may disable this privilege in ServiceWise Admin. If the ownership of a record is changed, project members may only delete ServiceWise incidents if that project member belongs to an account type that has been granted the Can Delete incidents privilege. 4.5 Tracking Incident Details in the Incident View The Incident view enables project members to manage and track all activities related to ServiceWise incidents. Project members define, update, and manage the events, employees, and assets that are related to specific incidents in the incident detail panel of the Incident view. Figure 4-3: Incident View The Incident view displays the Employee tab and the Asset tab in the incident detail panel. Project members may use these tools to manage and track the employees and assets that are associated to a particular incident. Project members should update incident properties frequently to keep other project members informed of their work. By frequently updating incident properties, project members can keep other project members up to date on the progress they have made on an incident Managing Incident Histories The History page displays a read-only audit trail of all changes made to an incident and provides project members with tools for changing the status of ServiceWise incidents. The History page is divided in multiple sections. Each section displays detailed information about the history of that incident. Project members may use controls in the Utilities view to display or hide any of the available History page sections. History page sections include: Summary Work History Summary Work History Graph Employee Events section Change Log section Knowledge section 4.6 Managing Inter-project Actions ServiceWise inter-project actions enable project members to transfer or copy ServiceWise incidents to linked TechExcel ServiceWise projects or TechExcel DevTrack projects. Inter-project Copy/transfer enables project members to copy a ServiceWise incident to another project. Project members may optionallycreate a link between the original incident and the copy and update the properties of the copied incident. Before project members can use the inter-project copy or the transfer feature, project administrators must enable inter-project actions in ServiceWise Admin, map record fields, and define one or more inter-project link types. When an incident is submitted or copied to another project, only fields that have mapped in ServiceWise Admin are copied to the new project. All field and field value mapping is specified in ServiceWise Admin Copying/Transferring Incidents to Other Projects Project members may use the Inter-project Copy/Transfer command to copy/transfer ServiceWise incidents to other TechExcel ServiceWise or TechExcel DevTrack projects. The Incident Copy manager enables project members to define the target project, select an appropriate link type, define a title prefix, and add a brief comment. Project members may select the target project, select an appropriate inter-project link type, define a title prefix and add a brief comment. Administrators must enable each target project for inter-project actions and, if the copied incidents is to be linked with the original incident, define appropriate link types. To copy/transfer an incident to another project the project member must belong to an account type that has been granted the Can Perform Inter-project Copy privilege. To copy incidents between projects: 1In the Windows client, select File -> Inter-Project Copy... or Right-click in the incident list panel and select the Inter-project Copy command in the shortcut menu. In the Web client, click on the Links tab and then click on Inter-Project Copy. The Inter-project Copy page appears 2Select the project in the Target Project dropdown list. Project members may copy ServiceWise incidents to other TechExcel ServiceWise projects, or TechExcel DevTrack projects. Administrators must enable each target project in ServiceWise Admin. 3 Optional: Select a subproject from the Subproject dropdown list. Page 27 of 78
28 If the copied incidents is to be submitted to a ServiceWise project that has enabled subproject management, the project member may select an option in the Subproject dropdown list. 4Select the Inter-project copy of inter-project transfer(incidents, events) radio button. 5Select the Include a prefix for copied incidents checkbox to include a prefix for the incident created in the target project. Define the prefix in the Prefix edit box. 6Define the status of the new incident. In the Select a new action drop-down list, select the appropriate action to determin which state the incident is in. 7Define the owner of the new incident. In the Member to be assigned drop-down list, select the project member/group/group folder. 8 Optional: Select the Link Customer & Contacts to target project automatically checkbox to copy the customer and contact information over to the target project and incident. Select the Copy all open events along with the incidents checkbox to copy the open events of the original incident to the target incident and project. Select the Do not create duplicated inter-project copy to not create a duplicate incident in the target project if the incident already exists. 9 Optional: To define the link type, select an option from the Link Type dropdown list. Administrators may define multiple link types belonging to each link type category: parent-child link types or referential link types. The Link Type dropdown list displays all administrator-define link types belonging to either the Referential link type category or the Parent-Child link type category. 10 Optional: To select a link type category select the appropriate radio button. Select the As Parent option to define the cloned incident as the parent of the original incident. Select the As Child option to define the cloned incident as the child of the original incident. Select the As Reference option to define a referential link between the original incident and the clone. The radio button selected determines the options available in the Link Type dropdown list 11 Optional: To add a note to the link, enter a brief note in the Link Note field. The link note is displayed in the Link Comment tab of the Links page of the incident Detail panel. 12Click the OK button New Section 4.7 Managing Incident Templates An incident template is a user-defined pattern for creating incidents of a particular type quickly and easily. All incident template tasks are performed using the Setup Incident Template manager which is accessed using the Incident Template command in the Tool menu. Incident templates enable project members to save time and effort by pre-populating incident properties with values specified in the incident template. Incident templates may be managed in the ServiceWise Windows client only. The Setup Incident manager is not accessible through the ServiceWise Web client. Figure 4-4: Setup Incident Template Manager In the ServiceWise Windows client project members can use the incident Template command to create, edit, copy, and delete the incident templates available to them in ServiceWise client applications. The ability of each project member to manage incident templates in their Windows client is dependent on their account type privileges. Project members may only create and use incident templates if they belong to an account that has been granted the appropriate privileges by the project administrator Creating Incident Templates Project members may create incident templates in the Setup Incident manager of the ServiceWise Windows client. Project members may create two different types of incident templates in ServiceWise projects. Team member incident templates may be used by project members to create new ServiceWise project incidents in the ServiceWise clients. Employee incident templates may be used by employees to create new ServiceWise project incidents in the Employee Web Portal. Employees that have the appropriate privileges may submit new incidents in ServiceWise projects. Administrator-defined access types may restrict the ability of employees to submit new incidents by requiring employees to use an incident template whenever they submit new incidents. To create incident templates: 1Select the Incident Template command in the Tool menu of the ServiceWise Windows client. The Setup Incident Template manager appears. 2Select the New button The Incident Template dialog box appears. 3Define a unique name for the incident template. 4Select an option from the Template Type dropdown list. To create incident templates for project members, select the Incident Template to be used by selecting Team Members radio button. To create incident templates for project members, Incident Template to be used by selecting Employees/End Users radio button. 5Click the OK button. The Incident Template dialog box closes and the name of the incident template is displayed in the Incident Template list of the Setup Incident Template manager. 6Define incident template properties in the Description page. The Description page enables project members to define default values for administrator-defined employee properties. 7Define incident template properties in the Current State page. The Description page enables project members to define default values for administrator-defined employee properties. 8Define incident template properties in the Applicable Events page. The Description page enables project members to define default values for administrator-defined employee properties. 9Define incident template properties in the Applicable Team Members page. 10Click the OK button Editing Incident Templates Project members may edit existing incident templates in the Setup Incident manager of the ServiceWise Windows client. To edit incident templates: 1Select the Incident Template command in the Tool menu of the ServiceWise Windows client. The Setup Incident Template manager appears. 2Select an incident template in the Incident Template list. 3Select the Edit button The Incident Template dialog box appears. 4Define the name of the incident template. Page 28 of 78
29 5Select an option from the Template Type dropdown list. 6Select an option from the Template Type dropdown list. To edit incident templates for project members, select the Incident Template to be used by selecting Team Members radio button. To edit incident templates for project members, Incident Template to be used by selecting Employees/End Users radio button. 7Click the OK button. The Incident Template dialog box closes and the name of the incident template is displayed in the Incident Template list of the Setup Incident Template manager. 8Define incident template properties in the Description page. 9Define incident template properties in the Current State page. 10Define incident template properties in the Applicable Events page. 11Define incident template properties in the Applicable Team Members page 12Click the OK button Deleting Incident Templates Project members may delete existing incident templates in the Setup Incident manager of the ServiceWise Windows client. To delete incident templates: 1Select the Incident Template command in the Tool menu of the ServiceWise Windows client. The Setup Incident Template manager appears. 2Select an incident template in the Incident Template list. 3Select the Delete button The Delete Incident Template manager appears. 4Click the Ok button. 4.8 Managing Incident Cloning Project members may use the Clone command to create new ServiceWise incidents based on the values and histories of another incident. A clone is a copy of another ServiceWise incident. ServiceWise project teams may want to clone existing incidents when the same topic must be addressed by numerous team groups or project members. A single incident may be created, cloned, and addressed to the appropriate project or subproject. Chapter 5 Incident Linking Management 5 Chapter 5 -- Incident Linking Management This chapter describes incident linking management tasks. Incident linking enables project teams to avoid incident duplication, identify common problems across multiple incidents, and to share information across multiple incidents and projects. In this chapter: Understanding Incident Linking Managing Incident Linking Editing Linked Incidents Managing Broken Links 5.1 Understanding Incident Linking Incident linking enables project teams to avoid incident duplication, identify common problems across multiple incidents, and to share information across multiple incidents and projects. Project members may create links between incidents whenever they create, edit, clone, inter-project copy, or inter-project transfer incidents in ServiceWise projects. Project members may create links between incidents using controls in the Add Link page, the Edit Link page, the Clone incident page, the Inter-project Copy/Transfer page. The Link Type dropdown list in each of these pages displays the administrator-defined link types available to them. Project members may create links between incidents in a single ServiceWise project, between incidents in separate ServiceWise projects and between ServiceWise incidents and TechExcel DevTrack issues Understanding Links and Link Types Every link that a project member creates in a ServiceWise project is identified by an administrator-defined link type. All link types belongs to one of twolink type categories: referential links or parent-child links. Referential links identify basic links between incidents. Parent-Child links identify parent-child links between incidents. Both referential link types and parent-child link types may be used for inter-project linking. Both referential link types and parent-child link types may be used to create a link between incidents within a single ServiceWise project, between incidents in separate ServiceWise projects, or between a ServiceWise incident and an issue in a TechExcel DevTrack project. Referential link types The Referential link type is the primary link type in ServiceWise. Referential links enable project teams to create one-to-one relationships between incidents. Referential links simply indicate that two incidents are related to one another in a significant way. Changes to the workflow state of one incident does not affect the work state of the other incident. Through the two-way link, project members may view the History of the copied incident by checking the Linked issue Info tab on the Links page. All changes to an incident made in a project are reflected in the Linked issue Info tab on the Links tab in the other project. For project members to create referential links in a project, the administrator must have defined at least one referential link type in the ServiceWise Admin client. If the administrator has not created a referential link type, no link option is displayed in the Link Type dropdown list of the Add Link page, Edit Link page, or Clone incident page. Parent-Child link types Parent-Child links enable project members to create relationships between incidents in which the first incident is designated as the parent incident and the second incident is designated as the child incident. Project administrators may define rules for changing the status of a parent incident based on changes made to linked child incidents, or rules for changing the workflow state of a child incident based on changes made to a linked parent incident. Project administrators may also define rules which make the incident Status field in either the parent or child incident read-only. In such cases, the workflow state of the incident in the parent-child relationship is based entirely on the administrator-defined workflow state change rules. Project administrators may define two different types of workflow state change rules: A change to the workflow state of a child incident triggers a change to the work state of the parent incident. A change to the workflow state of a parent incident triggers a change to the work state of the child incident. If the project administrator has not defined at least one parent-child link type, no link option appears in the Link Type dropdown list in the Add Link page, Edit Link page, or Clone incident page Viewing LInked Incidents in the Incident List Panel Project members may customize the incident list panel in their ServiceWise client to display linked incidents. Page 29 of 78
30 Figure 5-1: Linked Incident in the Incident List Panel Every linked incident displayed in the incident list panel is identified by its title and by a link icon. Link icons indicate whether the incident is linked to another incident in the current ServiceWise project or to an incident or issue in a TechExcel ServiceWise or TechExcel DevTrack project. Events may be tagged by four different icons: the Link icon, the Linked Sales icon, and the Linked Support icon, and the Linked DevTrack icon. The Link icon indicates that the ServiceWise incident is linked to another ServiceWise incident. The Linked Sales icon indicates that the ServiceWise incident is linked to a sales incident in a TechExcel CustomerWise sales project. The Linked Support icon indicates that the ServiceWise incident is linked to a support incident in a TechExcel CustomerWise support project. The Linked DevTrack icon indicates that the ServiceWise incident is linked to a TechExcel DevTrack issue Viewing Linked Incidents in the Links Incident Detail Page The Links tab in the Incident detail panel enables project teams to create, edit, and delete links to other incidents and to view detailed information about linked incidents including their history, comments, and notes. Figure 5-2: Link Tab in the Incident Detail Window The Links tab consists of two primary areas: The Link tree control The links between a ServiceWise incidents and other incidents are displayed in the Links tab of the Incident detail panel in the ServiceWise Windows and ServiceWise Web client applications. Incident link icons may also be displayed in the incident list panel. Project members may quickly identify links by their link type categories. Project members may filter, sort, and search for linked incidents based on their administrator-defined link types Searching for Incidents Based on Link Types Project administrators may define queries to find incidents that are linked to incidents or issues in other TechExcel ServiceWise or TechExcel DevTrack projects. To search for incidents based on link type: 1Select the Search icon in the Search bar of the Incident view. 2Select the Define Query radio button in the Search bar. 3Select the Other tab in the Define Query window. 4Select one or more link type check boxes in the Link Type area of the Other tab. 5Select the Get Results radio button in the Search bar Understanding the Links Tab in ServiceWise Windows Client The Links tab in the Incident detail panel enables project teams to create, edit, and delete links to other incidents and to view detailed information about linked incidents including their history, comments, and notes. Figure 5-3: Link Tab in the Incident Detail Window of the ServiceWise Windows Client The Links tab consists of two primary areas: The Incident tree control tab enables project member to add, edit, and delete links to other incidents and view high-level information about every incident linked to an incident. The Linked Issue Info tab The Linked Issue Notes The Linked Issue Comment Displaying Linked Incidents in the Incident List Panel Project members may optionally display linked incidents and issues in the incident list panel in the ServiceWise Windows client. 5.2 Managing Incident Linking Project members may link ServiceWise incidents to other ServiceWise incidents in the same project, incidents in other ServiceWise projects and issues in TechExcel DevTrack projects in the Links page in the Incident detail panel of the ServiceWise client. Page 30 of 78
31 Link incidents whenever they create or edit ServiceWise incidents. Link incidents whenever they clone ServiceWise incidents. Link incidents whenever they copy/transfer incidents to another project Linking Incidents in the Same ServiceWise Project Project members may link incidents in the same ServiceWise project to another using controls in the Links page in the Incident detail panel. The Add Link page enables project members to define search parameters for finding related incidents. Project members may use either the Keyword filter or the incident ID filter to identify relevant incidents in the current or an external project. Figure 5-4: Add Link Manager Incidents may be linked by either referential links or parent-child links. The keyword filter enables project members to search for linked incidents based on user-defined keywords. Enter the desired keywords in the Keywords edit box. Separate words with a space or comma. If a project member enters multiple keywords for searching the following keywords searching logic is used: The OR operator returns incidents that have any of the specified keywords. The AND operator only returns incidents that have all of the specified keywords. The incident ID filter enables project members to easily select an incident by incident ID number or by using the wildcard character *. Project members may create links based on administrator-defined link types. The Link Type dropdown list displays every link type belonging to either the Referential link type category or the Parent-Child link type category. To link incidents in the ServiceWise Web client: 1Select the Links tab in the Incident detail panel. 2Click the New Link command. The Incident Search page appears. 3Select a project from the Project dropdown list. The Project dropdown list displays the current ServiceWise project and possibly other ServiceWise and TechExcel DevTrack projects. 4Define the search parameters for the search. Enter a keyword in the Keyword field. Enter incident ID numbers in the ID Filter field. Select the AND or the OR operator. 5Click the Search button. 6The Incident Results page appears. The Incident Results page displays three windows: the Incident Results list panel, the Incident Results detail panel, and the Incident Results Link Notes window. 7Select a target incident in the incident list. 8Enter a brief note in the Notes control of the Incident Results Link Notes window. 9Select a link type from the Link Type dropdown list. The Link Type dropdown list displays the administrator-defined link types that may be used to link incidents in the ServiceWise project. The link type selected in the Link Type dropdown list determines the 10Define the relationship between the linked incidents. To define a parent-child relationship between the two incidents with the current incident as the child, select the As Child radio button. To define a parent-child relationship between the two incidents with the current incident as the parent, select the As Parent radio button To define a referential relationship between the two incidents, select the As Reference radio button. 11Click the Save button. To link incidents in the ServiceWise Windows client: 1Select the Links tab in the incident Detail window. 2Click the Add button. The Add Link manager appears. 3Select an option from the Project dropdown list. The projects displayed in the Project dropdown list are determined by the project administrator in ServiceWise Admin. 4Define the search parameters for the search. Enter a keyword in the Keyword field. Enter incident ID numbers in the ID Filter field. Select the AND or the OR operator. 5Click the Search button. All incidents that match the search parameters appear in the incident list. All incidents found from the search are displayed in the incident list and contain a brief overview: incident ID, incident title and current owner. The details of the highlighted incident are displayed in the incident Details section. 6Select a target incident in the incident list. 7Select the As Reference radio button. 8Select an referential link type option from the Link Type dropdown list. The Link Type dropdown list displays all of the referential link types created by the administrator in ServiceWise Admin. 9 Optional: To add a note to the link, enter a note in the Comments field. 10Click the OK button Deleting Incident Links Project members may delete links between incidents using the Delete button in the Linked incident area of the Link tab. To delete links between incidents: 1Select the Links tab in the incident Detail window. 2Select an incident in the incident list. 3Click the Delete button. The Delete Selected Links dialog box appears. 4Click Yes. The Links disappears from the Link list. 5.3 Editing Linked Incidents Project members may use controls in the Links page of the incident Detail window to edit linked ServiceWise incidents and TechExcel DevTrack issues. Click the Edit button in the Links page opens the Update incident manager. The Update incident manager displays editable properties belonging to the linked incident or incident. Project members may update or define incident properties displayed in the Description page, Current Status page, and Notes page. Project members may or may not be able to edit linked incidents in other ServiceWise or TechExcel DevTrack projects. Project administrators must enable the project team to edit linked incidents in each linked project. Administrators may enable project members to edit the work status, the incident or incident owner, and the work description of linked incidents in other projects. To edit links between incidents: 1Select the Links tab in the Incident detail panel. 2Select an incident in the incident list. 3Click the Edit button. The Update incident manager appears. 4Update incident properties in the data-entry controls. Page 31 of 78
32 5Click the OK button. 5.4 Managing Broken Links If either an incident or a project is deleted from the database, and the incident or project has corresponding linked incidents, then the link between the incidents is broken. Project members may recognize broken links by the following signs: The existing incident displays an **Invalid Link** message in the incident Title column of the Linked incident list in the Links page. The history of the deleted incident is no longer displayed in the Linked incident Info tab The description in the Links Comments tab remains, providing an explanation for the invalid link. Therefore, it is helpful to compose a detailed and descriptive reason when copying incidents from one project to another. If either incident or project is deleted from the database, the history of the deleted incident is no longer displayed in the Linked incident Info tab. Chapter 6 Event Management 6 Chapter 6 -- Event Management ServiceWise project administrators and support teams may use events to create flexible and realistic workflow rules for managing incidents and incident subtasks. In this chapter: Managing Events in TechExcel ServiceWise Tracking Events in the Event List Panel Managing Events Managing Co-Owner Events Managing Power User Events Managing Knowledge Management Events Managing Events in the Event All Activities Page Managing Parent Incidents 6.1 Managing Events in TechExcel ServiceWise TechExcel ServiceWise tracks day-to-day business activity as events. Events represent the to do items that project members must perform in the course of processing incidents. As incidents progress through the incident lifecycle, changing workflow states and owners, events may be attached to those incidents to support multi-tasking, track day-to-day activities, and enhance incident workflow. Typical events include calling or receiving a call from an employee, employee requests for equipment, an online meeting or visit to a site, receiving or sending , or approval from management. Incidents and events Events enable support teams to schedule, assign, and track each of the subtasks that make up an incident. Each event has its own owner, a separate set of start and due dates, and may be managed by a different set of workflow rules than that of its sibling events. An incident may be open days, weeks, or even months, and events provide project teams a way of tracking the daily tasks and actions taken to help resolve those incidents. Every incident may have multiple child events. Events enable project teams to define a workflow rules for managing tasks within a particular incident workflow state, to assign those subtasks to different account types, group teams, or group folders, and to track the progress of those tasks Understanding Event Workflow Event workflow rules enable project teams to manage and track to do and incident subtasks independently of one another, assign those tasks to different owners, and define separate schedules (start and due dates) for each event. The lifecycle of an event is determined by the event type used to create that event. All event workflow rules are defined on an event type-by-event type basis. Like incidents, events are managed within a set of administrator-defined workflow rules. The lifecycle of an event is composed of open and closed workflow states. Figure 6-1: Event Workflow within Development Issue Workflow Event workflow is typically quite simple. The event may consist of nothing more than anopen event workflow stateand aclosed event workflow state. The event has two workflow states: To be done (open) Done (closed) An open workflow state is a workflow state that has an open status. A closed workflow state has a closed status. In this scenario, the event merely tracks whether a specific subtask has been completed Alternatively, event workflow may consist of an opening state and multiple closed states to indicate the result of the subtask. The event has three workflow states: To be tested (open) Test passed (closed) Test failed (closed) The lifecycle of an event may consist of multiple open and closed events. But no transition rules may be defined for event workflow. Transitions exists between everyopenevent workflow state in event workflow and consequently an event may be forwarded to any event state within event workflow. The event has four workflow states: (open) (open) (open) (closed) All event management tasks (creating, updating, and closing events) are controlled by administrator-defined workflow rules. Page 32 of 78
33 6.1.2 Understanding Event Management Privileges and Access Controls In ServiceWise, a privilege is a right to perform a task that is granted to project members based on their account type. Every project member is assigned an account type when they join a project. Project member roles, responsibilities, access rights, and privileges are defined by their account type. ServiceWise events are controlled by account type-based privileges and access controls. Event management privileges are defined on anevent type-by-event typebasis and are granted to project team members based on their account type. Event management access controls are defined on anevent template-by-event templatebasis and are granted to project team members based on their account type or relationship with a employee or previously submitted event. Event management privileges In ServiceWise, event management privileges are defined by event type. Project team members are granted the ability to edit or delete events of a particular event type based on their account type. An event type is a set of business rules that represents a kind of subtask that needs to be tracked in a work project. Every event template is based on an event type. ServiceWise supports four event types: the regular, system, asset operation, and power user event types. For each event type, a project team member may be granted the ability to edit or delete events of that event type. Edit Regular EventsThe Edit Regular Events privilege enables project team members belonging to the selected account type to edit regular events. Edit System EventsThe Edit System Events privilege enables project team members belonging to the selected account type to edit system events. Edit Asset Operation EventsThe Edit Asset Operation Events privilege enables project team members belonging to the selected account type to edit asset operation events. Edit Power User EventsThe Edit Power User Events privilege enables project team members belonging to the selected account type to edit power user events. Delete Regular EventsThe Delete Regular Events privilege enables project team members belonging to the selected account type to delete regular events. Delete System EventsThe Delete System Events privilege enables project team members belonging to the selected account type to delete system events. Delete Asset Operation EventsThe Delete Asset Operation Events privilege enables project team members belonging to the selected account type to delete asset operation events. Delete Power User EventsThe Delete Power User Events privilege enables project team members belonging to the selected account type to delete power user events. Access Controls The ability to submit, edit, or delete events in a project is controlled by account type-based access controls that are defined on a template-bytemplate basis. An event template is a set of default event properties, workflow rules, project member and employee access controls, and other business rules that define how events are to be managed in a project. Every event template is defined by three account type-based access controls: SubmitThe Submit access control enables the user to submit events based on the event template. EditThe Edit access control enables the user to edit events based on the event template. DeleteThe Delete access control enables the user to delete events based on the event template. 6.2 Tracking Events in the Event List Panel The event list panel displays high-level information about the events managed in a ServiceWise project. The event list displays events in a tabular format. Each row represents a single event. Each column displays an event property. Figure 6-2: Event List Panel in the Event View Project members may personalize the event list panel to display many different event properties and as many or as few columns as are needed. Common event properties displayed in the event view include the event ID number, event title, the event owner, event start date and event due date. Every event displayed in the event list panel is identified by an icon which indicates the current status of that event in the project. Open Event icon is displayed next to events that have an open event status. Closed Event icon is displayed next to events that have a closed event status. Overdue Event icon is displayed next to events that have an open event status past their due date. The event list panel displays high-level information the events managed in ServiceWise work projects. The event list is a tool for identifying events that share properties in common. Project members may use controls displayed in the event search bar to filter or sort the events displayed in the event list. Assigned To City Company Name Contact Contact Phone Country Created by Employee access Date Closed Date Created Date Last Modified Days Open Due Date Elapsed Time Event ID Event Name Incident ID No. Primary Contact Start Date State Zip Once an event or set of events has been located in the event list panel, the project member may click an event to view and manage event details in the event detail panel Filtering Events in the Event List Panel Filtering enables project team members to quickly identify relevant records based on key indicators, minimize the time needed to review large numbers of records, and to maximize effectiveness. The ServiceWise search engine returns all events that match the search criteria and displays those events in the list panel all other events are filtered out and not displayed. Using controls in the event search bar, project members may choose which events are displayed in the event list panel. Page 33 of 78
34 Figure 6-3: Event Search Bar Events may be filtered by employee, event owner, event template, event status, or dates. Employee: The Employee text box enables the user to filter events by employee name. The Employee text box supports the asterisk (*) wildcard character. Criteria entered in the Employee text box filters the options displayed in the Employee dropdown list. Employee List:The Employee dropdown list enables the user to filter events by employee. The list displays all every employee in the base project as well as the*all Employees and *Unknown Employees system variables. Owner:The Owner dropdown list enables the user to filter events by current owner. Status:The Status dropdown list enables the user to filter events by status. Every event workflow state is defined by its status: open or closed. The list displays the {All Open}, {All Closed} and {All Open & Closed} search parameters. Template:The Template dropdown list enables the user to filter events by event template. The list displays the all event template types as well as the *All Events, *All Global Events, and *All Web Activity Events event template search parameters. Date Type:The Date Type dropdown list enables the user to define the date fields used to filter events in the event list. The list displays the Due Date, Start Date, Start or Due Date, Start and Due Date, and the Last Modified Date search parameters. From:The From calendar enables the user to define the starting date of the date search filter. To:The From calendar enables the user to define the starting date of the date search filter Personalizing the Event List Panel Project members may add, remove, or order the columns displayed in the event list panel of the ServiceWise client. All event list panel personalizations are client-specific and do not affect the display of events in other clients. To personalize the event list panel: 1Click the Settings button in the search bar. The Event View Customization tab is displayed. 2Add or remove fields (columns) to the list of displayed columns. To add an event field to the list panel, select a field in the Available fields list and click the Right Arrow button. To remove an event field to the list panel, select a field in the Displayed fields list and click the Left Arrow button. 3Define the display order of columns in the list panel. To move an event column to the left, select the Up Arrow button. To move an event column to the right, select the Down Arrow button. 4 Optional: To display hours and minutes in event date fields, select the Date Fields Include Time check box. Event date fields include: the Date Closed, Date Created, Date Last Modified, Due Date, and Start Date fields. 6.3 Managing Events An event represents to to do item or subtask of an incident. Events enable support organizations to serve employees more effectively by assigning and tracking the subtasks associated with employees and incidents in workflow. Every event is defined by aemployee, anevent type, anevent owner, itsevent workflow state, and other dynamic properties. Events may also be defined as the child of aparent incident. Using controls in the New Event page, project administrates may define and submit new events Figure 6-4: Create New Event Page Definable event types Project administrators may create multiple event templates for each of the nine definable event types. Definable event types represent a set of business rules designed to manage a particular type of event (for example, management tasks, knowledge management tasks, or asset management tasks) that may be used as the basis for one or more administrator-defined event templates. Project administrators may create customized event templates based on nine different event types. Asset Operation: The Asset Operation event type represents a set of business rules for managing asset operation events. Every event template based on the Asset Operation event type is applicable to one of ten types of assets {Assign Asset}, {Exchange}, {New Asset}, {{Parts}, {Reconcile}, {Return, Asset}, {RMA Return with Exchange}, {RMA Return}, {Update Status}, and {Upgrade} Co-Owner:The co-owner event type represents a set of business rules for managing co-owner events. Announcement:The announcement event type represents a set of business rules for managing announcement events. Received:The Received event type represents a set of business rules for managing received events. Sent:The Sent event type represents a set of business rules for managing sent events. Knowledge Management:The knowledge management event type represents a set of business rules for managing knowledge management events. Power User:The power user event type represents a set of business rules for managing power user events. A power user event is an event that may be submitted and owned by a power user employee. Quick Letter:The quick letter event type represents a set of business rules for managing Quick Letter events. Regular:The regular event type represents a set of business rules for managing regular events Understanding Event Creation Every event is based on an administrator-defined event template and is managed in the client using administrator-defined workflow rules. Project administrators may define workflow rules that automatically generate new events based on changes to the workflow state of an incident or event. Administrator-defined applicable events and autocreation events determine in which incident state events may be created based on an event template. Each project member may be responsible for submitting new events, editing existing events, viewing event information, or deleting events. Events are created in the ServiceWise client in three ways: Project members may manually create new events based on event templates in the ServiceWise client. The event templates available to project members in a given incident state depend on administrator-defined applicable event rules. Employees may create new events based on event templates in the Employee Web Portal. The event templates available to employees in a given incident state depend on administrator-defined applicable event rules. Events may be created automatically based on event workflow rules. Administrators may define workflow rules that create new events based on changes to the workflow state of a parent incident. However, the completion of many tasks may be required before an incident can progress from one workflow state to another. And these subtasks may be performed by many different project members and have different due dates. Page 34 of 78
35 6.3.2 Submitting Events To submit events to a ServiceWise project, project members must belong to an account type that has been granted the Can Submit incidents privilege by a project administrator. To submit an event: 1Click the New Event command in the Action bar of the ServiceWise Web client. The Create New Event page appears. 2Associate the new event with an existing or new employee. The Create New Event page displays tool that enable project members to select, search for, or create an appropriate employee account for the incident. The Employee dropdown list displays a list of every employee account managed in the parent base project. Project members may associate an incident with a employee by selecting an option in the employee dropdown list. The Employee Quick Search control enables project members to search for existing employee accounts and associate the incident with one of those accounts. The Employee Search button enables project members to define detailed search parameters for identifying and associating existing employees with the new incident. The New employee button enables project members to create new employee accounts and to associate the new incident with that new employee. 3Select an event template from Event Type dropdown list. The Event Type dropdown list displays a list of system events and administrator-defined event templates. Note:The Event Type dropdown list displays only those event templates that are applicable to incidents in the current workflow state and those that are accessible to project members based on administrator-defined access rules. 4Select an incident option from the Parent Incident dropdown list. The Parent Incident dropdown list displays open incidents belonging to the selected employee and the General Events system variable. Incident-specific events are the children of a parent incident and are always associated with a specific employee. General events are not associated with any incident or employee. 5Click the Continue button. The Event Summary page appears. The Event Summary page displays tools that enable project members to define basic event properties including the title and workflow status of the event. 6Define event properties The data-entry controls displayed in the Create Page is based administrator-defined customizations, and the access type of the project member submitting the event. Note:Event properties are frequently prepopulated by values defined in the selected event template. Note:Boldface field labels indicate that the data-entry control is mandatory. The incident cannot be submitted unless the project member defines a value for all mandatory controls. 7Click the Submit button Submitting Autocreation Eventsface Project members may be prompted to submit new events whenever they make change to the workflow state of an incident or an event. In ServiceWise administrators may define autocreation rules that automatically create new events based on predefined triggers.event autocreation rules are based on administrator-defined triggers. Event autocreation rules may be mandatory or optional.servicewise supports optional or mandatory events: MandatoryIf the autocreation event is mandatory, the event is created in the project without any input from the project member. OptionalIf the autocreation event is option, the project member is prompted to create the event and, possibly, to choose the event template. Most event autocreation events require no input from project members and cannot be altered in the ServiceWise client. However, administrators may choose to make even autocreation optional and prompt the project member to submit the new event in the Event Workflow dialog box. Figure 6-5: Event Workflow Dialog Box The Event Workflow dialog box appears in the client whenever an autocreation event is triggered. Administrators may define workflow rules to automatically create events whenever a change is made to the state of an incident or the state of an event. The Event Workflow dialog box lists all the events that to be created based on the parent incident workflow state change. A red check next to the event indicates the event creation is mandatory. A blue check next to the event indicates the event creation is optional. Project members may disable optional event creations by doubleclicking the blue check mark. To manage autocreation events: 1Edit the state of an incident. The Event Workflow dialog box appears. 2Double-click blue check marks to deselect the autocreation event Defining Employee Access to Events employees may view and edit the events associated to them in the employee Web Portal based on administrator-defined employee access rules. employee access rules determine which pages or data-entry controls employees may view or edit based on their access type. Project members may grant employees access to events on an event-by-event basis in the ServiceWise client. Whenever a project member creates or updates a ServiceWise event, he or she may change employee access to that event. User-defined employee access rules override the administrator-defined employee access rules granted to each employee based on their access type. For example, an administrator may define employee access rules that make events invisible to employees with the Temporary employee access type. A project member may grant a specific employee to edit a specific event by granting an employee full access to that event. To define employee access to the event, select an option from the employee Access dropdown list. The employee Access dropdown list displays six options: Currently Full Access:The Currently Full Access rule grants employees full access to events in the current event workflow state. Currently Read-Only Access:The Currently Read-only Access rule grants employees read-only access to an event in the current event workflow states. Currently No Access:The Currently No Access forbids employees from accessing an event in all event workflow states. Always Full Access:The Always Full Access rule grants employees full access to event in all event workflow states. Chapter 7 Search and Query Management 7 Chapter 7 -- Search and Query Management This chapter describes the search management tasks. Using query management tools in the CustomerWise client, project members may locate the incidents, customers, assets, and knowledge items that are managed in the project. Page 35 of 78
36 In this chapter: Managing CustomerWise Searches and Queries Managing Incident Searches and Queries Managing Event Searches Managing Customer Searches and Queries 7.1 Managing CustomerWise Searches and Queries The ability to effectively identify, prioritize, and manage key development incidents is key to development processes. To work effectively, project members must be able to quickly identify and executed important tasks. Too much information can be overwhelming and make it difficult for developers to focus on the task at hand or stay on top of important incidents. Incident filtering and querying is crucial. Filtering enables users to quickly identify relevant incidents based on key indicators, minimize the time needed to review large numbers of records, and to maximize effectiveness. The CustomerWise search engine returns all work items that match the search criteria and displays those work items in the list panel all other work items are filtered out and not displayed. In the CustomerWise Web client, project members may filter the incidents displayed in the list panel and reports by three methods: filters, searches, or queries. Filter:A filter is a predefined control that enables the user to filter work items (incidents, events, or customers) by a single parameter. Multiple filters may be used together to filter the records displayed in the list panel or reports. Search:A search is a user-definedsearch conditionsfor multiple parameters that may be used to filter the records displayed in the list panel or reports. Query:A query is a set of search conditions that have been saved in the project and which may be reused in the project. A CustomerWise query is a set of instructions for retrieving and displaying development incident data in the incident list panel or CustomerWise report. Every query consists of one or more search conditions, which identify the data fields searched and the field value criteria for each field. Multiple search conditions may be organized into search terms and filtered by using the AND, NOT, and OR logical operators Understanding the TechExcel Search Engine The TechExcel search engine enables project members and customers to quickly search the notes, memo fields, and descriptions of CustomerWise incidents and events. Unlike the standard search engine built into each CustomerWise project, the TechExcel Search Engine enables project members to search multiple notes fields (the Description field, incident history, link comments, and so on). Project administrators may also periodically index these fields to enhance project searches. Project administrators may install multiple TechExcel Search Engines in their CustomerWise site. Each CustomerWise project may have its own Search Engine or multiple projects may share the same TechExcel Search Engine. Once the TechExcel Search Engine is installed and configured, project members and customers may use search seven different types of CustomerWise fields based on keywords: Description Close Note History Incident Notes Link Comments Event Description All custom-defined memo fields 7.2 Managing Incident Searches and Queries In CustomerWise the most common type of query is based on incident property definitions. An incident is a collection of data that represents a particular task or set of tasks that must be processed. Every incident is defined by a unique incident ID, description, workflow state, owner, work description, and other dynamic properties. Using tools in the search bar of incident view, project members may define search conditions based on keywords, incident property values, user and incident variable values, and other parameters to display subsets of incidents in the incident list panel Managing Incident Quick Searches CustomerWise features an enhanced search bar that eliminate unnecessary clicks and makes it easier than ever for project team members to create, apply, save, and store searches and queries. Using controls in the search bar, the user may define search conditions for multiple parameters. Figure 7-1: Incident Search Bar CustomerWise Quick Search enables project members to search for incidents based on user-defined search conditions for multiple parameters. Project members may create, define, update, rename, and save searches in the search bar of the CustomerWise Web client. The search bar displays multiple controls that enable the user to search for incidents based on many different parameters. Customer:The Customer text box enables the user to filter incidents by customer name. The Customer text box supports the asterisk (*) wildcard character. Criteria entered in the Customer text box filters the options displayed in the Customer dropdown list. Customer List:The Customer dropdown list enables the user to filter incidents by customer. The list displays all every customer in the base project as well as the*all Customers and *Unknown Customers system variables. Owner:The Owner dropdown list enables the user to filter incidents by current owner. Status:The Status dropdown list enables the user to filter incidents by status. Every event workflow state is defined by its status: open or closed. The list displays the {All Open}, {All Closed} and {All Open & Closed} search parameters. Keyword:In CustomerWise, a keyword is a term (word, phrase, or alphanumeric string) that is used as a search condition in a query. The CustomerWise search engine searches for instances of the keyword in a record set and returns those records in which the keyword is found. Product: Database: Priority: Submitted Date From:The Submitted Date From calendar enables the user to define the starting date of the date search filter. Submitted Date To:The Submitted Date From calendar enables the user to define the starting date of the date search filter Managing Incident Queries CustomerWise Quick Search enables project members to search for incidents based on user-defined search conditions for multiple parameters. Project members may create, define, update, rename, and save searches in the search bar of the CustomerWise Web client. Using controls in the search bar, the user may define search conditions for multiple parameters. Page 36 of 78
37 Figure 7-2: Search Manager The Search Manager page displays multiple tabbed pages that enable project members to define search parameters based on customer properties. Incident Description:The Incident Description tab displays controls that enable the user to define search conditions based on keywords and core incident properties including product, priority, and problem area. Incident Status:The Current Status tab displays controls that enable the user to define search conditions based on properties that track the status of the incident including its workflow state, substatus, and the expected effort. Incident Time:The Time tab displays controls that enable the user to define search conditions based on project schedules and timelines. CustomerWise supports both static and dynamic date ranges Incident Other:The Other tab displays controls that enable the user to define search conditions based on link types, incident ID numbers, and other parameters Keyword Search Conditions In CustomerWise, a keyword is a term (word, phrase, or alphanumeric string) that is used as a search condition in a query. The CustomerWise search engine searches for instances of the keyword in a record set and returns those records in which the keyword is found. Figure 7-3: Status Tab in the Search Manager The keyword condition scope defines that fields searched. Keyword conditions may be defined for one or all of the following fields: the Title, Description, Events/Notes, Work Description, and Work History fields. Using controls in the Description tab of the Search Manager, the user may define rules for handling search conditions that include multiple keywords Incident Description Search Parameters The Incident Description tab displays controls that enable the user to define search conditions based on core incident properties including product, priority, and problem area. Using controls in the Current Status tab of the Search Manager, project team members may define search conditions based on incident workflow states, substatuses, SLA exceptions, and the effort expected. Figure 7-4: Status Tab in the Search Manager Incident description search parameters include: Product Problem Area Platform Priority Database Component Incident Current Status Search Conditions The Current Status tab displays controls that enable the user to define search conditions based on properties that track the status of the incident including its workflow state, substatus, and the expected effort. Using controls in the Current Status tab of the Search Manager, project team members may define search conditions based on incident workflow states, substatuses, SLA exceptions, and the effort expected. Page 37 of 78
38 Figure 7-5: Status Tab in the Search Manager Incident current status search parameters include: Progress Status:A Progress Status search condition returns incidents based on their workflow state. Substatus:A Substatus search condition returns incidents based on substatus property definitions. Expected Effort:An Expected Effort search condition returns incidents based on the effort expected. SLA Exception:A SLA Exception search condition returns incidents based on SLA exceptions Incident Time Search Conditions Date and time search condition define a range of days enabling project team members to filter incidents based on project schedules and timelines. Using controls in the Time tab of the Search Manager, project team members may define the beginning and ending of a date-based query. Figure 7-6: TIme Tab in the Search Manager CustomerWise supports two methods of defining the date range of a time search condition: static (fixed dates) conditions and dynamic (number of days) search conditions Static date searches enable project members to search for records that fall within a fixed time period. Using the From and To controls, project administrators can define the earliest and latest date for the records returned. Dynamic date searches enable project members to search for records that fall within a defined number of days from the current date. Using the Dynamic Time controls, project administrators can define search parameters based number of days before and the number of days after the relative date. Only those records that fall within this relative date range are returned. Incident time search parameters include: Date Submitted Date Closed Date Forwarded Planned Start Date Finish Date Created Date Event Closed Date Incident Other Search Parameters Date and time search condition define a range of days enabling project team members to filter incidents based on project schedules and timelines. Using controls in the Other tab of the Search Manager, project team members may define search conditions based on incident ID numbers, link types, the close state, or new requests for web conversations. Figure 7-7: Other Tab in the Search Manager Incident other search parameters include Close Reason:A Close Reason search condition returns closed incidents based on their workflow state. Link Type:A Link Type search condition returns incidents that are linked to other work items using a user-specified link type. A link type is an administrator-defined category of links, which distinguishes those links from other kinds of links. Incident ID:An Incident ID search condition returns incidents that are assigned ID numbers within a specific range of numbers. Web Conversation:A Web Conversation search condition returns incidents in which a customer has recently requested a web conversation. 7.3 Managing Event Searches Managing Event Quick Searches An event quick search enables project team members to quickly search for events based on search conditions defined in the search bar of the event view. Using tools in the search bar of event view, project members may define search conditions based on multiple core event properties including. Page 38 of 78
39 Figure 7-8: Search Bar in the Event View Events may be filtered by customer, event owner, event template, event status, or dates. Customer:The Customer text box enables the user to filter events by customer name. The Customer text box supports the asterisk (*) wildcard character. Criteria entered in the Customer text box filters the options displayed in the Customer dropdown list. Customer List:The Customer dropdown list enables the user to filter events by customer. The list displays all every customer in the base project as well as the*all Customers and *Unknown Customers system variables. Owner:The Owner dropdown list enables the user to filter events by current owner. Status:The Status dropdown list enables the user to filter events by status. Every event workflow state is defined by its status: open or closed. The list displays the {All Open}, {All Closed} and {All Open & Closed} search parameters. Template:The Template dropdown list enables the user to filter events by event template. The list displays the all event template types as well as the *All Events, *All Global Events, and *All Web Activity Events event template search parameters. Keyword: Date Type:The Date Type dropdown list enables the user to define the date fields used to filter events in the event list. The list displays the Due Date, Start Date, Start or Due Date, Start and Due Date, and the Last Modified Date search parameters. From:The From calendar enables the user to define the starting date of the date search filter. To:The From calendar enables the user to define the starting date of the date search filter. 7.4 Managing Customer Searches and Queries A customer-based search condition defines search criteria for customer property definitions. Queries based on customer-based search conditions return only those issues that are owned by a customer that meets the criteria of that condition. In the CustomerWise Web client, project members may filter the customers displayed in the customer list panel using searches or queries. Search:A search (or quick search ) is a set of search conditions that may be defined in the search bar of the customer view. Query:A query is a set of user-definedsearch conditionsfor multiple parameters that are defined in the Search Manager of the customer view. Queries are distinguished from quick searches by two features: (1) a larger number of parameters (customer fields) may be queried to returned customers; (2) Queries may be saved and reused to retrieve customers at any time. All quick searches are ad-hoc queries that are used once and then lost Managing Customer Quick Searches A customer quick search enables project team members to quickly search for customers based on search conditions defined in the search bar of the customer view. Using tools in the search bar of customer view, project members may define search conditions based on multiple core customer properties including the company name and phone number to display subsets of incidents in the incident list panel. Figure 7-9: Customer Search Bar in the Customer View Customers may be filtered by core customer properties or by the work items (incidents or assets) associated with that customer. View: Customer:The Customer text box enables the user to filter incidents by customer name. The Customer text box supports the asterisk (*) wildcard character. Criteria entered in the Customer text box filters the options displayed in the Customer dropdown list. Customer List:The Customer dropdown list enables the user to filter incidents by customer. The list displays all every customer in the base project as well as the*all Customers and *Unknown Customers system variables. Company Name:The Owner dropdown list enables the user to filter incidents by current owner. Main Phone:The Status dropdown list enables the user to filter incidents by status. Every event workflow state is defined by its status: open or closed. The list displays the {All Open}, {All Closed} and {All Open & Closed} search parameters. Keyword:The Keyword control enables the user to filter incidents by based on keywords. Incident ID: Asset ID: Customer Of: Managing Customer Queries A query is a set of user-definedsearch conditionsfor multiple parameters that are defined in the Search Manager of the customer view. Queries are distinguished from quick searches by two features: (1) a larger number of parameters (customer fields) may be queried to returned customers; (2) Queries may be saved and reused to retrieve customers at any time. All quick searches are ad-hoc queries that are used once and then lost. Using tools in the Query Manager, may define, update, and save queries based on multiple user-defined search conditions. The Query Manager displays multiple tabbed pages that enable project members to define search conditions for many different customer-related parameters. General Properties:The General Properties tab displays controls that enable the user to define search conditions based on customer properties. Status and Type:The Status and Type tab displays controls that enable the user to define search conditions based on the customer type, business, type, or current status of the customer. Contact:The Contact tab displays controls that enable the user to define search conditions based on contact properties. Asset and Support:The Asset and Support tab displays controls that enable the user to define search conditions based on the customer service level agreements and assets. Customer General Property Search Conditions The General Properties tab displays controls that enable the user to define search conditions based on customer properties. Figure 7-10: General Properties Tab in Customer Detailed Search Page General customer search parameters include: Company Name: Customer ID Date Type Date From: Date To Support Plan No Asset No: Serial No Group Assigned Sales person: To Primary support Engineer Inside Sales Rep Main Phone Source Source Detail Customers of Page 39 of 78
40 7.4.3 Customer Status and Type Search Conditions The Status and Type tab displays controls that enable the user to define search conditions based on the customer type, business, type, or current status of the customer. Figure 7-11: Status & Type Tab in Customer Detailed Search Page Customer status and customer type search parameters include: Business Type Customer Status Customer Type Customers Of Contact Search Conditions The Contact tab displays controls that enable the user to define search conditions based on contact properties. Figure 7-12: Contact Tab in Customer Detailed Search Page Contact search parameters include: First Name Last Name Phone Login Alias Access Type Contact Type Title Customers Of Customer Asset and Support Plan Search Conditions The Asset and Support tab displays controls that enable the user to define search conditions based on the customer service level agreements and assets. Figure 7-13: Asset & Support Tab in Customer Detailed Search Page Customer asset and service plan search parameters include: Asset Category Asset Template SLA search type Support Plan Plan Status Plan Start Date From Plan Start Date To Plan End Date From Plan End Date To Chapter 8 Subproject Management 8 Chapter 8 -- Subproject Management This chapter describes subprojects and subproject management tasks. Using subprojects, support organizations may organize support incidents by many different criteria to better represent and manage support incidents. In this chapter: Understanding Subprojects Using the Subproject Tree Panel Creating and Managing Subprojects 8.1 Understanding Subprojects Subprojects enable work project teams to group and manage incidents by organization, product line, or by any other criteria they choose. A subproject represents a collection of incidents that are managed together. TechExcel ServiceWise enables project members with the applicable privileges to create subproject folders in the Incident tree panel and to store incidents within those subproject folders. Access to subprojects may be restricted based on user-defined access rules. Each subproject has its own description, priority, status, and beginning and ending dates. Status Percentage complete Project delivery dates Priority Every incident in a project may be assigned to a subproject, providing project teams with a much clearer and more realistic view of their workload. Project members may link knowledge items directly to subprojects. Frequently knowledge items are relevant not only to a single incident, but to many different incidents. Rather than repeatedly attaching the same document to multiple incidents, project members may store those incidents in a subproject folder and link relevant knowledge items to that subproject folder. In Work projects, subprojects are frequently organized to manage the different types of documents generated by a ServiceWise team: Advertising Brochures Business Development Case Studies Competition Press Coverage Press Opportunities Press Releases Reseller Channel Support Services East-testing Trade Shows Training Program Web Site White Papers Understanding Subproject Workflow Subprojects organize incidents into discreet groups of related tasks providing project teams with a clearer understanding of their progress. Work project teams may use subprojects to prioritize their work based on two factors: subproject status and the subproject priority properties. Like incidents, subprojects may be managed based on their workflow status. In TechExcel ServiceWise the workflow status of a subproject may be independently defined or derived from the workflow status of the incidents assigned to that subproject. Project members may also prioritize subprojects using the Priority control. In the TechExcel ServiceWise clients, the Status control and the Priority control are both displayed in General tab of the Subproject Manager. Project administrators define how subprojects are managed in their projects in the ServiceWise Admin client. The status of subprojects may be determined by one of four different methods: Independent:The Independent of its Incidents option enables administrators to define a set of subproject workflow states. Derived from Highest:The Derived from the Highest-ranked Incident Status method links subproject status to the status of the highest ranked incident within the subproject. If this option is selected the available states for subproject status are the same as the available states for incidents. Derived from Lowest:The Derived from the Lowest-ranked Incident Status method links the subproject status to the lowest ranked incident within the subproject. If this option is selected the available states for subproject status are the same as the available states for incidents. Click the Edit button to assign a rank to each incident status. Page 40 of 78
41 Linked to Incident Status:The Linked to Incident Status Definition method links the applicable subproject progress states to the incident workflow status fields. 8.2 Using the Subproject Tree Panel The subproject tree panel displays all of the subprojects defined in a current project and tools that enable project members to create, edit, manage, and delete subprojects. Figure 8-1: Subproject Tree Panel in the Incident View Project members may choose to display or hide the Subproject tree panel in the ServiceWise client applications. To display the subproject tree panel in the ServiceWise Web client, click the Tree button in the Search bar. To hide the subproject tree panel in the ServiceWise Web client, click the List button in the Search bar Filtering Incidents by Subproject Subprojects enable businesses to organize incidents into hierarchical structures based on incident properties, group ownership, document type, or any other criteria that is useful to a business. Grouping together similar incidents provides project teams with a much clearer and more realistic view of a work project. The incident list panel displays high-level information about all of the incidents in a project. Project members may use subproject folders to determine which incidents are displayed in the incident list panel. In addition to the Employee, Owner, Status, and other dropdown list filters displayed in the Search bar, project members may filter the incidents based on their subproject. The steps required to filter incidents by subproject depend on whether the Subproject tree panel is displayed in the Incident view. To filter by subproject with the Subproject tree panel hidden, select an option from the Subproject dropdown list in the Search bar. To filter by subproject with the Subproject tree panel displayed, select a subproject in the Subproject tree panel Sorting Subprojects in the Subproject Tree Panel Project members may define how subprojects are displayed in the Subproject tree panel using controls in the Subproject Settings page. Subprojects may be displayed in ascending or descending order based on a subproject property. Figure 8-2: Subproject Settings Page The Sorted By dropdown list displays a list subproject properties. Common subproject properties include: Status Priority Percentage Complete Start Date Finish Date Due Date To sort subprojects in the Subproject tree panel: 1Display the Subproject tree panel in the Incident view of the ServiceWise client. 2Click the Sort Subproject button. The Create a New Subproject page is displayed in the client. 3Select a subproject property from the Sort By dropdown list. 4Select a sort option: To display subproject folders in ascending order (A-Z or 1-9), select the Ascending radio button control. To display subproject folders in descending order (Z-A or 9-1), select the Descending radio button control. 5Click the Submit button. 8.3 Creating and Managing Subprojects The Create a New Subproject page enables project members create a new subproject and to define fundamental subproject properties including its parent, status, priority, and project delivery dates. Figure 8-3: Create New Subproject Page Each subproject has its own description, priority, status, and start and end dates. Status Percentage complete Project delivery dates Priority Page 41 of 78
42 Project members with the appropriate privileges may create, edit, manage, and delete subprojects using controls in the Subproject tree panel. To add a subproject: 1Display the Subproject tree panel in the Incident view of the ServiceWise client. 2Click the New Subproject button. The Create a New Subproject page is displayed in the client. 3Select an option from the Parent Subproject dropdown list. The Parent Subproject dropdown list displays all of the subprojects created in the project. Project members may create subprojects of the parent project or create subprojects of subprojects. To create a subproject of the parent project, select the {None} option. To create a subproject of another subproject, select the name of the subproject. 4Define the subproject status. The Status dropdown list displays administrator-defined subproject status options. The options displayed in the Status dropdown list depend on the method that is used to defined subproject status in the project. Administrators may choose between four different methods: Independent of its incidents method Derived from the highest-ranked incident status method Derived from the lowest-ranked incident status method Link to incident status definition method 5Define the subproject priority. The Priority dropdown list displays administrator-defined subproject priority options. Typical subproject priority values include: Urgent, High, Medium, and Low. 6Define the subproject delivery schedule. Project members may define a delivery schedule for a subproject using controls in the Project Delivery Info section of the Create Subproject page. The Same As Parent Sub Project enables project members to link the delivery schedule of the subproject to its parent subproject. The Planned Start Date The Planned End Date The Due Date The Release Date The Expected Effort All subproject delivery schedules may be updated in the Edit Subproject page. 7Define a descriptive note of the subproject. 8Click the Submit button Managing Subproject Applicable Owners Project members with the appropriate privileges may define project members asapplicable ownersin a subproject.applicable ownersare project members who may own the incidents contained and managed in a subproject folder. Using controls in the Applicable Owners tab of the Edit Subproject page, project members may add or remove project members from the subproject applicable owner list. Figure 8-4: The Applicable Owners Tab in the Edit Subproject Page The Subproject Applicable Owner list displays list displays high-level information about all of the project members defined as applicable to the current subproject. Project members may view the name, account type, phone number, and addresses of all applicable subproject incident owners. Project members may manage subproject applicable owners using controls in the Subproject Applicable Owner page: The All Applicable and Define Applicable radio button controls enable the project members to choose to define all project members as applicable owners in the subproject or to select individual project members as applicable owners in the subproject. The Add button control enables project members to define one or more project members as applicable owners in the current subproject. The Delete button control enables project members to remove select project members from the list of applicable project members in a project. To add subproject applicable owners: 1Display the Subproject tree panel in the Incident view of the ServiceWise client. 2Click the Edit Subproject button. The Edit Subproject page is displayed in the client. 3Select an applicable owner option in the Applicable Owner tab of the Edit Subproject page. Project members may choose between two options for defining applicable owners. To define all project members as applicable to the subproject, select the All Applicable radio button. To select which workflow states are applicable to the subproject, select the Define Applicable radio button. 4 Optional: To define one or more project members as applicable in a subproject, click the Add button. The Select Applicable Team Members page appears. 5Select the check box next to the name of a project member to define that project member as applicable to the current subproject. 6Click the Submit button. To remove subproject applicable owners: 1Display the Subproject tree panel in the Incident view of the ServiceWise client. 2Click the Edit Subproject button. The Edit Subproject page is displayed in the client. 3Select an applicable owner in the Applicable Owners list in the Applicable Owners tab. 4Click the Remove button. The project member is removed from the list of applicable owners Managing Subproject Workflow In TechExcel ServiceWise, administrator-defined workflow rules determine how incidents may be managed in a project. The same workflow states that identify the life cycle of an incident may identify the progress of a subproject. Project members may define which workflow states are applicable to a subproject in the Workflow tab of the Edit Subproject page. Page 42 of 78
43 Figure 8-5: Workflow Tab in the Edit Subproject Page To define subproject applicable incident workflow states: 1Display the subproject tree panel in the Incident view of the ServiceWise client. 2Click the Edit Subproject button. The Edit Subproject page is displayed in the client. 3Select a workflow definition option in the Workflow tab of the Edit Subproject page. Project members may choose between two options for defining subproject workflow. To define all workflow states as applicable to a subproject, select the All Applicable radio button. To select which workflow states are applicable to the subproject, select the Define Applicable radio button. 4 Optional: To add one or more applicable subproject statuses, select the check boxes next to the names of the subproject workflow states. 5Click the Submit button. Chapter 9 Employee Web Portal Management 9 Chapter 9 -- Employee Web Portal Management This chapter describes Employee Web Portal management tasks. The Employee Web Portal is a secure interactive web site that provides employees with controlled access to their support incidents and to the project knowledge base. In this chapter: Understanding the Employee Web Portal Managing Web and Announcements 9.1 Understanding the Employee Web Portal The TechExcel Employee Web Portal is a secure self-service website that may be used to centralize communication with the employee for all IT and support processes. Employees use the Employee Web Portal to: Submit all incidents and requests View and edit incidents and events Access the public knowledgebase and FAQs Stay informed of IT and company news by reading announcements administrators have determined they should see based on their role Engage in online web conversations with ServiceWise project members Download files and documents (requires DownloadPlus module) Figure 9-1: Incident List Report in the Employee Web Portal The Employee Web Portal is composed of the following Views: Home view Incident List view Submit New view Employee Info view Knowledge view Report view Download view (Requires DownloadPlus) 9.2 Managing Web Announcements and Announcements Announcements may be used to broadcast information to users about company news, outages, or other useful information. Announcements are sent to users in two ways: Web announcementsmay be posted in the Employee Web Portal. The announcement displayed in the Home page may be specifically tailored for employees based on employee properties. announcementsare predefined s that are created in the TechExcel ServiceWise client, and are then delivered to one or more employees also through blasts Adding Announcements Project members may create new announcements in the Announcement window of the Knowledge view in the ServiceWise client applications. To add a new announcement: 1Select the Announcement folder in the Knowledge tree panel of the Knowledge view. 2Click the Add New button in the Announcements list panel. 3Define announcement properties in the Properties tab of the knowledge detail panel. 4Enter a descriptive name in the Title control. 5 (Optional): To define keywords, click the Keyword button. The Keyword list controls enable project members to create, edit, and delete keywords, assign an expert weight to each keyword, and enable the keyword to Page 43 of 78
44 be used to auto-suggest the announcement to employees. 6Select a product from the Product dropdown list. 7Select a problem area from the Problem area dropdown list. 8Enter the body of the announcement in the Description field. 9Click the Submit button Editing Announcements Project members may add events and attach knowledge items whenever they edit an announcement in the knowledge detail panel. To edit announcements: 1Select the Announcement folder in the Knowledge tree panel of the Knowledge view. 2Select an announcement in the Announcements list panel. The announcement list panel displays high-level information about every announcement defined in the project. 3Define announcement properties in the Properties tab of the knowledge detail panel. 4Enter a descriptive name in the Title control. 5 (Optional): To define keywords, click the Keyword button. The Keyword list controls enable project members to create, edit, and delete keywords, assign an expert weight to each keyword, and enable the keyword to be used to auto-suggest the announcement to employees. 6Select a product from the Product dropdown list. 7Select a problem area from the Problem area dropdown list. 8Enter the body of the announcement in the Description field. 9 (Optional): To attach a knowledge item to the announcement, click the Link File button, in the Properties tab. The File Info controls enable project members to attach knowledge items to announcements. 10 (Optional): To add an event to the announcement, click the New Event button, in the Properties tab. The Task controls enable project members to create an event relevant to announcements. 11Click the Submit button Managing Web Announcements Announcements may be posted to the home page of the Employee Web Portal and specifically targeted towards visitors meeting a user-defined set of criteria. Using controls in the Web Announcement for Employee tab, project members may determine which web announcement is displayed based on the employee properties of the visitor. Project members may create, edit, and manage announcements in the Knowledge view of the ServiceWise client applications. Figure 9-2: Build Tab in the Knowledge Detail Window Web announcements may be a determining factor in identifying hot prospects in ServiceWise projects. A hot prospect is a employee that has been identified as a likely employee based on administrator-defined criteria. To define web announcement settings: 1Select the Announcement folder in the Knowledge tree panel of the Knowledge view. 2Select an announcement in the Announcements list panel. The announcements list panel displays high-level information about every announcement defined in the project. 3 Optional: To display the web announcement on the Employee Web Portal home page, select the Post to Employee Page check box. 4Select an option from the Post Section dropdown list. 5Define the display order of the Web announcement in the Display Order control. 6Define the period during which the web announcement is displayed in the Post Start Date and Post End Date controls. 7To display the web announcement to all employee regardless of their employee status, select the Post to All Employee status/privilege check box. Or, you can define which employees may see the web announcement based on their employee. 8To display the web announcement to all projects, select the Post to All Projects check box. Or, you candefine which individual projects to post the announcements to. 9Click the Submit button Managing Blasts announcements are predefined s that are created in the TechExcel ServiceWise client, and are then delivered to one or multiple employees also through the client. Project members may create, edit, and manage announcements in the Knowledge view of the ServiceWise client applications In TechExcel ServiceWise, project members that have been granted the Can Blast Knowledge Announcement privilege, may create a knowledge announcement in the Knowledge view and blast the customized to all employees with a single click. announcements are an optional feature of TechExcel ServiceWise and must be enabled by a project administrator in the ServiceWise Admin client. announcements are enabled on a project-by-project basis. Chapter 10 Communication Management 10 Chapter 10- Communication Management TechExcel ServiceWise enables project members to keep in constant contact with other project members and with employees by , web conversation, and the telephone through CTI. Project members may use tools to keep employees up-to-date on the status of their incidents and on individual events. In this chapter: Managing Events Communicating with Employees by Managing Announcements Communicating by Web Conversation Communicating by Telephone (CTI Integration) 10.1 Managing Events One of the most common events in ServiceWise projects to send or receive from an employee. Communication by between support engineers and employees is tracked in ServiceWise project by events.events represent the communication thread. Events( s) are generally the children of a parent incident and represent a task that must be performed within an incident workflow state. All events are instances of an administrator-defined event template belonging to one of three event types: Page 44 of 78
45 The sent event type represents a set of business rules for managing sent to an employee from a ServiceWise project member. The received event type represents a set of business rules for managing sent to a project member from an employee. The announcement event type represents a set of business rules for managing announcement events Understanding Sent Events sent events represent messages sent from ServiceWise project members and may be used to manage and track all outgoing in ServiceWise projects. Every sent through ServiceWise is tracked as an event and includes the content, recipient(s),and date/time. CC information and BCC information is also tracked in ServiceWise 8.1 and above Understanding Received Events received events represent messages sent from employees to ServiceWise project members and may be used to manage and track all incoming in ServiceWise projects. received events are automatically created for all incoming sent to applicable addresses. Every received event is based on an event template. Although only one received event template is generally needed in a ServiceWise project, project administrators may choose to define multiple received event templates if multiple team accounts have been defined. Each team account may have a unique received template Communicating with Employees by The page enables project members to create and send messages to one or more employees. Figure 10-1: Page Project members may send to employees from various places in ServiceWise: In the Incident view, project members may use controls in the tab, Web Conversation tab, and Knowledge/Events tab of the Incident detail panel. In the Event view, project members may use controls in the Event Summary tab and Related Incident tab of the event detail panel. In the Employee view, project members may use controls in the tab and Incidents and Events tab of the event detail panel Creating in the Page of the Incident View Project members may create and send messages regarding specific ServiceWise incidents in the Page in the Incident detail panel of the Incident view. Figure 10-2: Tab in the Incident Detail Window The Send page in the tab enables project members to define the subject and body of the message, define multiple employees or project members as recipients, and to add documents as attachments to the . ServiceWise automatically includes key incident details in the body of messages created in the Incident view including incident properties, incident description, and incident work history. Incident details may be drawn from eight incident properties: Project Name Incident ID Title Submitted By Current Owner Description Work Description The list may display all related to an incident or an employee. To send an from the incident detail /Events page: 1Select the /Events tab in the detail panel. 2 Optional: To display general in the list, select the Display General check box. 3Click the Send button. 4The page displays the Send form. The Send form displays data-entry controls that enables the project member to define the title, subject, recipients, and body of the . 5Define the subject of the in the Subject text box control. 6Define the format of the . may be formatted as plain text or using HTML markup tags. 7Select the employee or employees to receive the . 8Select the project member or project members to receive the . 9 Optional: To define other recipients of the message, enter their addresses in the Others text box. All addresses must be separated by a comma. 10Click the Send button. 11The Send page appears. The Send page enables project members to edit the title, subject, recipient and CC list of the message, as well as define the body of the and to add attachments. 12 Optional: To edit the subject line, the primary addressee, and the CC list, enter values in the appropriate controls. 13Define the body of the in the Body text field. The Body text field includes incident properties, the incident description, and the incident work history. 14 Optional: To add an attachment to the message, click the Browse button and navigate to the location of the document to be attached to the . 15Click the Send button Creating in the Web Conversation Page Project members may create and send messages regarding specific ServiceWise incidents in the Web Conversation page in the Incident detail panel of the Incident view. To send an from the Incident Web Conversation tab: 1Select the Web Conversation tab in the detail panel. Page 45 of 78
46 2Click the Send button at the bottom of the page. 3The page displays the Send form. The Send form displays data-entry controls that enables the project member to define the title, subject, recipients, and body of the . 4Define the subject of the in the Subject text box control. 5Define the format of the . may be formatted as plain text or using HTML markup tags. 6Select the employee or employees to receive the . 7Select the project member or project members to receive the . 8 Optional: To define other recipients of the message, enter their addresses in the Others text box. All addresses must be separated by a comma. 9Click the Next button. 10The Send page appears. The Send page enables project members to edit the title, subject, recipient and CC list of the message, as well as define the body of the and to add attachments. 11 Optional: To edit the subject line, the primary addressee, and the CC list, enter values in the appropriate controls. 12Define the body of the in the Body text field. The Body text field includes incident properties, the incident description, and the incident work history. 13 Optional: To add an attachment to the message, click the Browse button and navigate to the location of the document to be attached to the . 14Click the Send button. To send an in the Web Conservation page (with Knowledge): 1Select the Web Conversation tab in the detail panel of the Incident view. 2Click the New with Knowledge button. 3Select one or more knowledge items. 4Click the Close button. The page displays the Send form. The Send form displays data-entry controls that enables the project member to define the title, subject, recipients, and body of the . The body of the includes links to the selected knowledge items. 5Define the subject of the in the Subject text box control. 6 Optional: To define other recipients of the message, enter their addresses in the Others text box. All addresses must be separated by a comma. 7Define the body of the message in the Content text control. 8Click the Send button Creating Messages in the Employee View Page Project members may create and send messages to employees in the Page in the Employee detail panel of the Employee view. Figure 10-3: Send Page in the Employee Tab The Send page in the tab enables project members to define the subject and body of the message, define multiple employees or project members as recipients, and to add documents as attachments to the . To send an in the Employee view (without knowledge): 1Select the tab in the detail panel of the Employee view. 2Click the Send button. The page displays the Send form. The Send form displays data-entry controls that enables the project member to define the title, subject, recipients, and body of the . 3Define the subject of the in the Subject text box control. 4 Optional: To define other recipients of the message, enter their addresses in the Others text box. All addresses must be separated by a comma. 5Define the body of the message in the Content text control. 6Click the Send button. To send an in the Employee view (with knowledge): 1Select the tab in the detail panel of the Employee view. 2Click the New with Knowledge button. 3Select one or more knowledge items. 4Click the Close button. The page displays the Send form. The Send form displays data-entry controls that enables the project member to define the title, subject, recipients, and body of the . The body of the includes links to the selected knowledge items. 5Define the subject of the in the Subject text box control. 6 Optional: To define other recipients of the message, enter their addresses in the Others text box. All addresses must be separated by a comma. 7Define the body of the message in the Content text control. 8Click the Send button Sending in the Related Incidents Tab of the Event View Project members may create and send messages regarding specific ServiceWise incidents in the Related Incident Page in the event detail panel of the Event view. To send an from the Related Incidents Tab of the Event: 1Select the Related Incidents tab in the Event view. 2Click the Send button at the bottom of the page. 4The page displays the Send form. The Send form displays data-entry controls that enables the project member to define the title, subject, recipients, and body of the . 5Define the subject of the in the Subject text box control. 6Define the format of the . may be formatted as plain text or using HTML markup tags. 7Select the employee or employees to receive the . 8Select the project member or project members to receive the . 9 Optional: To define other recipients of the message, enter their addresses in the Others text box. All addresses must be separated by a comma. Page 46 of 78
47 The Send form displays data-entry controls that enables the project member to define the title, subject, recipients, and body of the . 5Define the subject of the in the Subject text box control. 6Define the format of the . may be formatted as plain text or using HTML markup tags. 7Select the employee or employees to receive the . 8Select the project member or project members to receive the . /W3C//DTD HTML Transitional//EN" " 9 Optional: To 4.01 define other recipients of the message, enter their addresses in the Others text box. All addresses must be separated by a comma. 10Click the Next button. 11The Send page appears. The Send page enables project members to edit the title, subject, recipient and CC list of the message, as well as define the body of the and to add attachments. 12 Optional: To edit the subject line, the primary addressee, and the CC list, enter values in the appropriate controls. 13Define the body of the in the Body text field. The Body text field includes incident properties, the incident description, and the incident work history. 14 Optional: To add an attachment to the message, click the Browse button and navigate to the location of the document to be attached to the . 15Click the Send button. To send an from the Event Summary tab of the Event view: 1Select the Event Summary tab in the detail panel of the Event view. 2Click the Send button. 3The Event Summary page displays the Send form. The Send form displays data-entry controls that enables the project member to define the parent event, recipients, and body of the . 4Select the parent event from the Parent Event dropdown list. 5Define the event owner. 6Define the contacts of the event owner. 7 Optional: To define other recipients of the message, enter their addresses in the Others text box. All addresses must be separated by a comma. 8 Optional: To attach knowledge items to the , select the Select Knowledge Items for this check box. 9Click the Continue button. 10The Send page appears. The Send page enables project members to edit the title, subject, recipient and CC list of the message, as well as define the body of the and to add attachments. 11 Optional: To edit the subject line, the primary addressee, and the CC list, enter values in the appropriate controls. 12Define the body of the in the Body text field. The Body text field includes the event summary text. 13 Optional: To add an attachment to the message, click the Browse button and navigate to the location of the document to be attached to the . 14Click the Send button. ServiceWise Admin Guide Tracking Employee that is sent from an address of a registered contact are automatically associated with the correct employee and tracked in the page of the Employee detail panel. By selecting an , the message summary is displayed in the message tab and a list of recipients is displayed in the Recipients tab. sent events represent messages sent from ServiceWise project members and may be used to manage and track all outgoing in ServiceWise projects. Every sent event is based on an event template Communicating by Web Conversation The Web Conversation page gives your support personnel a powerful tool to interface with the submitters of a support incident. The Web Conversation tab provides a rich text chat-like interface, with time stamped and logged data input. Figure 10-4: Web Conversation Tab The contact that is listed as the contact for the incident can reply to the incident using the employee web portal. The web conversation is a useful tool for communicating with employees. Remember, you can set your display options to display when new web conversations exist that you have not replied to Understanding Web Conversation Flagging Incidents are flagged (red flag icon) in the incident list so that the team members can easily identify incidents with new web conversation entries. Team members may manually clear the web conversation flags by checking the Clear the New Employee Request check box on web conversation page and clicking the Submit button Submitting Web Conversation Responses Project members may communicate with employees about incidents using controls in the Web Conversation page of the Incident detail panel in the Incident view. Figure 10-5: Web Conversation Page in the Incident Detail Window The Web Conversation page is divided into four areas: The Incident Summary area displays a detailed information about an incident including its title, ID, workflow status, priority, submitter, and owner. The Notes/Events area displays the history of incident events and of notes added to the incident. The Web Conversation area displays a chronology of responses from the employee and project members regarding an incident. The Support area enables project members to reply to employees, send replies by , add attachments to replies, and print the web conversation page. To submit web conversation responses: Page 47 of 78 1Select the Web Conversation tab in the detail panel of the Incident view. All web conversations are regarding a specific incident. 2Enter text in the Current Response text box control. 3Click the Submit button.
48 To submit web conversation responses: 1Select the Web Conversation tab in the detail panel of the Incident view. All web conversations are regarding a specific incident. 2Enter text in the Current Response text box control. 3Click the Submit button Printing Web Conversations To print web conversation responses: 1Select the Web Conversation tab in the detail panel of the Incident view. All web conversations are regarding a specific incident. 2Click the Print button Communicating by Telephone (CTI Integration) Computer telephony integration, or CTI, is a technology that enables telephone and computer interactions to be integrated or coordinated. TechExcel ServiceWise features CTI tools that enable support teams to improve employee support over the telephone by using a plug-and-play solution based on the CTI Data Connector (CDC) from Mirage Computer Systems. ServiceWise CTI integration introduces the following features: On-screen dialing of outgoing phone numbers from the TechExcel ServiceWise client improves support efficiency. Project members may dial employees by selecting phone numbers in the ServiceWise client. Automatic on-screen display of caller data for all inbound calls. Project members can immediately see who is calling and do not need to look up employee names and service history. On-screen caller ID of incoming and outgoing phone calls. ServiceWise CTI automatically matches incoming and outgoing calls with phone numbers stored in the base project. ServiceWise CTI tasks include: Making Outgoing Calls in ServiceWise Answering Incoming Calls Understanding On-screen Caller ID ServiceWise CTI integration features on-screen caller ID for all incoming and outgoing phone calls. All phone calls are compared to the phone numbers stored in the base project. If the incoming or outgoing telephone number matches that of an existing phone number, ServiceWise automatically identifies the employee in a fade-in window displayed in the lower-right hand corner of the client The fade-in window displays the name and address of the employee. Figure 10-6: Outgoing Fade-in Window For ServiceWise on-screen caller ID to work properly, two criteria must be met: Every phone number must be unique to an employee. If a phone number is assigned to multiple employees, ServiceWise cannot tie the phone number to an employee record. The formatting of phone numbers in the base project must follow ITU-T recommendations. Telephone numbers may include special characters such as+, -, (), or /, but must comply with international standards. The following formats are all valid: 0925/ / (0) (0) If the number zero (0) follows the country code, it must be enclosed in paretheses or it to be dialed Making Outgoing Calls in ServiceWise ServiceWise support engineers may use ServiceWise CTI tools to make calls to employees from within the ServiceWise Web client. Employee phone numbers displayed in the Employee view, Incident view, Event view, or Report view of the ServiceWise Web client may be used to initiate an outgoing calls. Project administrators must enable outgoing CTI calls for each employee phone number (Phone1, Phone2, Fax, CellPhone). Calling employee using the CTI Data Connector automatically displays the Outgoing Phone Call page in the caller s web browser. The Outgoing Phone Call page displays detailed information about the employee dialed and enables the project member to quickly create new issues and define the outgoing call event. Figure 10-7: Outgoing Phone Call page Outgoing calls may be initiated by two methods: Highlight the phone number and press an administrator-defined keyboard shortcut. Highlight the phone number, right-click, and select the Dial with CTI Data Connector command in a shortcut menu. This method only works in the Employee view. All outgoing calls may be managed and tracked as events in the ServiceWise project. Administrator-defined workflow rules may automatically create an outgoing call event whenever a project member makes a caller from within the ServiceWise Web client. To dial employees from within the ServiceWise client: 1Highlight an employee phone number in the employee list panel. 2Select the Dial with CTI Data Connector command. Project members may execute the CTI Data Connector commands by two methods: Right-click and select the Dial with CTI Data Connector command in the shortcut menu. Press the administrator-defined keyboard shortcut for outgoing phone calls. Note:Project members must use the keyboard shortcut option to dial the primary number of an employee. The shortcut menu is not displayed in the client if the number tracked in the Phone1 column is highlighted. The number is automatically dialed on an integrated telephone and the Outgoing call fade in window displays the name and address of the employee called. 3Answer the telephone. 4The Outgoing Phone Call page is displayed in the web browser Answering Incoming Calls Page 48 of 78
49 ServiceWise enables support engineers may use ServiceWise CTI tools to view employee data whenever they call the help desk and to record and track all calls as events. ServiceWise matches the incoming call to the telephone numbers stored in the base project, and automatically displays the Incoming Phone Call page in the support engineer s web browser. The Incoming Phone Call page displays detailed information about the employee dialed and enables the project member to quickly create new issues and define the incoming call event. Figure 10-8: Incoming Phone Call page ServiceWise checks all incoming calls to confirm that the call is from an existing telephone number. TechExcel ServiceWise maintains a list of employee telephone numbers and checks incoming calls against this list. If the call is not from a recognized employee, the No Address Found fade in window is displayed in the client application. If the call is from a recognized number, the CTI Event Page is displayed with the employee details completed in the form. The Employee Information page displays detailed information about the employee and automatically creates an event for the telephone call. Chapter 11 Knowledge Management 11 Chapter 11- Knowledge Management This chapter describes the ServiceWise knowledge base. Using controls in the knowledge view, support organizations may manage all project-related knowledge items in a central repository including documents, knowledge topics, HTML links, web and announcements, FAQs, and attachments. In this chapter: Understanding ServiceWise Knowledge Management Managing Knowledge Folders Searching for Knowledge Items Managing Documents Managing Knowledge Topics Managing Announcements Managing Notes and Note Attachments Managing Knowledge Item Linking Managing Knowledge Events in the Knowledge View Managing Project Knowledge Portals 11.1 Understanding ServiceWise Knowledge Management The ServiceWise Knowledge view enables support teams to manage all project-related knowledge items in a central repository: documents, knowledge topics, HTML links, web and announcements, FAQs, and attachments. ServiceWise knowledge management consists of four related processes: Building knowledge and knowledge structures (document type subfolders) in the project knowledge base and defining project member and employee access to knowledge folders. Publishing knowledge items (documents, knowledge topics, HTML links, and attachments) to the project knowledge base. Managing web and announcements. Managing frequently asked questions (FAQs). Managing incident, event, and employee-related notes and attachments in the Incident, Event, and Employee views of the ServiceWise clients. Managing document versions using the ServiceWise version control system or an integrated third-party version control system. Linking knowledge items to ServiceWise incidents. Managing project knowledge portals for project members and employees. The Knowledge view is an integrated document-control module that supports the enforcement of disciplined knowledge management process. Using tools in the Knowledge view project teams may establish and enforce the management of all project-related documents. The ServiceWise Knowledge view offers several management capabilities: The Knowledge view supports HTML and Web page tracking. Incidents and events may be linked with a dynamically changing Web site or page-based HTML document for easy reference and access. The Knowledge view helps achieve better team communication. Once team members develop a habit of checking their daily work assignments through ServiceWise, the document management feature enables them to better manage project-related documents Understanding Knowledge Items ServiceWise enables project members to manage six different types of knowledge items in the Knowledge view of ServiceWise projects: documents, knowledge topics, HTML links, announcements, and attachments in the Knowledge view. The Knowledge tree panel organizes knowledge items into a hierarchy of folders. Each knowledge type is represented by a knowledge folder in the Knowledge tree panel of the ServiceWise client. Project teams may create and manage knowledge items in the folder that is appropriate to their knowledge type. Documents are managed in the Document folder, knowledge topics in the Knowledge Topic folder, and so on. Documents include all external files that saved in the ServiceWise database through the Knowledge view. Documents may either be created internally from user-defined document templates or externally using a word processing, spreadsheet program, or any other application. Project members may add any type of file that is not forbidden by administrator-defined rules. HTML links enable project teams to create a library of project-related URLs. Incidents may be linked with a dynamically changing web pages for easy reference and access. Knowledge topics are knowledge items specifically designed to enable project teams to build a knowledge base of problems and resolutions. Each topic knowledge item consists of a description page, a resolution page, and a links page. Announcements are user-defined messages that are expressively targeted at employees. Project members may create two types of announcements: web announcements and blasts. Web announcements may be scheduled for display in the Employee Web Portal based on user-defined rules. announcements may be scheduled and sent to employees based on user-defined rules. Attachments are files that have been attached to incident, event, or employee notes in ServiceWise client. Although these knowledge items are visible through the Knowledge view, they are managed using tools in the Note/File page of the Incident, Event, or Employee view. Page 49 of 78
50 Understanding Events and Knowledge Management An event type represents the different types of subtasks that project members may perform during project workflow and determine how the events that represent those subtasks are managed in ServiceWise projects. Two event types are especially designed to manage ServiceWise knowledge items: The Announcement event type represents a set of business rules for managing announcement events. The Knowledge Management event type represents a set of business rules for managing knowledge management events. Event attachment rules Administrator-defined event attachment rules determine which project members or employees may attach documents to events. Document attachments may be defined as mandatory on a template-by-template basis. Project administrators may also define applicable attachment types and document templates Understanding Note and Attachment Management The Note/File page in the detail panel of the Incident, Event, and Employee views enable project members to manage notes and note attachments that are related to ServiceWise incidents, events, and employees. An attachment is any file that is appended to a note in the ServiceWise client. Project members may attach documents based on predefined document templates or any other type of file that they can access using a custom file browser. Every file that is attached to a ServiceWise note is assigned to adocument type. In ServiceWise adocument typerepresents a user-defined folder that has been added as a subfolder beneath a knowledge type folder in the project Knowledge view. Each attachment subfolder may be defined as a secured, private, or public folder and have distinct access privileges for employees and project members. Project members may add, edit, or delete notes to each ServiceWise incident, event, or employee in the ServiceWise client. Unlike other knowledge items (documents, knowledge topics, HTML links, and FAQs), all attachments are managed in the Note/ File page of the Incident, Event, and Employee detail panels and not in the Knowledge view Understanding Knowledge Management Access Controls Knowledge privileges enable project members to build, publish, and manage knowledge items in TechExcel ServiceWise projects based on their account type. Project members assigned a light account type cannot perform any of the knowledge-related operations. Project administrators may assign 13 different knowledge management privileges to each regular account type. Can Build Public Knowledge: The privilege enables project members to create knowledge documents in a knowledge folder that enables public access (public folders). Can Publish Public Knowledge:The privilege enables project members to publish knowledge items from public folders, such as knowledge topics, documents, HTML links, and announcements. Can Build Protected Knowledge:The privilege enables project members to create knowledge documents in a protected knowledge folder. Can Publish Protected Knowledge:The privilege enables project members to publish knowledge items from protected knowledge folders, such as knowledge topics, documents, HTML links, and announcements. Can Read Protected Knowledge:The privilege enables project members to obtain a knowledge document from a protected knowledge folder. Can Delete Knowledge Items:The privilege enables project members to delete a knowledge file. Can Set Up Knowledge Tree and its Access Controls:The privilege enables project members to create knowledge folders and documents within the folders, as well as assign privileges. Can Build Knowledge Documents through a Web Browser:The privilege enables project members to create knowledge folders and documents through a Web browser. The user can also assign privileges. Can Blast Knowledge Announcement:The privilege enables project members to create an in the knowledge view and it (blast it) to a group of recipients. Can Check In/Out Documents:The privilege enables project members to check out a knowledge document and check it back in with modifications. Can Lock/unlock Documents:The privilege enables project members to place a temporary restriction on other users accessibility to checking out a document (other users may still obtain a read-only copy). The user can also release the restriction on a locked document. Can Close Documents:The privilege enables project members to close any file. When a file is closed it can only be accessed with the proper privileges. Can Reopen Documents:The privilege enables project members to reopen a closed file Managing Knowledge Folders Project members may manage how knowledge items (documents, knowledge topics, HTML links, announcements, and attachments) are organized in the Knowledge view of ServiceWise clients by creating and structuring document type subfolders. Project members with the appropriate privileges may add, rename, move, or delete the knowledge subfolders displayed in the Knowledge tree panel. The Knowledge tree panel is a hierarchical structure that enables project teams to organize knowledge items by knowledge types and document types. Knowledge types represent the six types of knowledge items that may be managed in a ServiceWise project: documents, knowledge topics, HTML links, announcements, and attachments. Each knowledge type is represented by a system-defined folder in the Knowledge tree panel. Knowledge type folders cannot be deleted. Document types are user-defined subcategories of knowledge types. Each document type is represented by a subfolder beneath a knowledge type folder in the project Knowledge view Creating Document Type Subfolders Document type folders are user-defined subfolders that enable project members to identify and organize the different types of documents managed in a project. A document type is a user-defined subclass of a system-defined knowledge type. Each knowledge type is represented by a folder in the Knowledge tree panel. Each document type is represented by a subfolder beneath a parent knowledge type folder. Project members and employees may search for knowledge items based on theirknowledge typeand theirdocument type. To add custom folders in the Knowledge tree panel, project members must belong to an account that has been granted the Can Modify Knowledge Structure privilege by a project administrator. To add subfolders in the ServiceWise Windows client: 1Right-click a knowledge type folder in the Knowledge tree panel. The Knowledge tree panel displays six knowledge type folders: the Documents folder, the Knowledge Topics folder, the HTML Links folder, the Announcements folder, and the Attachments folder. The shortcut menu appears. 2Select Add a New Folder command. The folder appears in the Knowledge Tree window. 3Define a unique and descriptive title for the document type subfolder. Project members and employees may search for knowledge items based document type subfolders. To add subfolders in the ServiceWise Web client: 1Select the Setup tab in the Knowledge view of the ServiceWise Web client. 2Select a knowledge type folder in the Knowledge tree panel of the Setup tab. The Knowledge tree panel displays six knowledge type folders: the Documents folder, the Knowledge Topics folder, the HTML Links folder, the Announcements folder, and the Attachments folder. 3Click the New button. 4Define a unique and descriptive title for the document type subfolder in the Name text control. Project members and employees may search for knowledge items based document type subfolders. 5Define the folder type and read and write access rules for the subfolder Deleting Document Type Subfolders Project members may use the Delete command to delete the document type subfolders and all of the contents of that folder in the Knowledge tree panel of the ServiceWise clients. System-defined knowledge type folders (the Documents folder, Knowledge Topics folder, HTML Links folder, Announcements folder, and Attachments folder) cannot be deleted but only renamed. To delete custom folders in the Knowledge Tree window, project members must belong to an account that has been granted the Can Modify Knowledge Structure Page 50 of 78
51 privilege by a project administrator. To delete subfolders in the ServiceWise Windows client: 1Right-click a knowledge type folder in the Knowledge tree panel. The Knowledge tree panel displays six knowledge type folders: the Documents folder, the Knowledge Topics folder, the HTML Links folder, the Announcements folder, and the Attachments folder. The shortcut menu appears. 2Select Delete the Folder command. A warning message appears. 3Click the Yes button. The document type subfolder and all of the knowledge items contained in that subfolder are deleted Renaming Knowledge Folders Project members may use the Rename command to change the title of folders in the Knowledge tree panel. To edit the folders in the knowledge tree panel, project members must belong to an account that has been granted the Can Modify Knowledge Structure privilege by a project administrator. To rename a folder in the ServiceWise Windows client: The four default folders may not be deleted, only renamed. 1Right-click the folder to want to rename. The shortcut menu appears. 2Select Rename command. The folder is renamed in Knowledge tree menu Moving Knowledge Items Between Subfolders Project members may drag and drop knowledge items between knowledge subfolders displayed in the Knowledge tree panel of the ServiceWise Windows client. Each type of knowledge item (documents, knowledge topics, HTML links, and attachments) may only be moved to a subfolder within in the same parent knowledge type folder. Each knowledge item type is stored within a parent knowledge folder designed to manage that type of knowledge item. Documents are always stored in the Document knowledge folder. Topics are always store in the Topics knowledge folder. HTML links are always store in the HTML links knowledge folder. Attachments are always store in the Attachments knowledge folder. Project members may move knowledge items between any subfolder contained in the parent folder, but cannot move the knowledge items to another parent folder in the Knowledge Tree window. To move knowledge items to another subfolder: 1Select a knowledge folder in the Knowledge tree panel of the ServiceWise Windows client. The knowledge items contained in that folder are displayed in the knowledge list panel. 2Select a knowledge item in the knowledge list panel. 3 Drag the knowledge item to the destination folder. A confirmation dialog box appears. 4 Click the Yes button Defining Employee Access to Knowledge Folders Project members may grant employees the ability to search and view knowledge items contained in the knowledge type folders and document type subfolders. All knowledge base access privileges granted to employees are granted on a folder-by-folder basis. Project members may choose to grant view privileges to project members of all ServiceWise projects or selected ServiceWise projects. To grant view privileges to employees in the Windows client: 1 Right-click a knowledge folder or knowledge subfolder in the Knowledge tree panel of the ServiceWise Windows client. The Knowledge tree shortcut menu appears. 2 Select the Attribute command in the shortcut menu. The Attribute manager appears. 3 Select an option from the Employee View Access dropdown list. The Employee View Access dropdown list displays three options: Can Search All Web Portal From Limited Web Portal No Employee Can Search 4 Optional: To enable selected employees to view knowledge items in the knowledge folder, double-click one or more employees in the Team View Access list. A red check mark is displayed next to the enabled employees. 5 Optional: To apply knowledge folder settings to all subfolders, select the Apply All the Settings to Subfolders check box. 6 Click the OK button Defining Project Team View Access to Knowledge Folders ServiceWise projects may grant the ability to view and build knowledge items in their knowledge base to the members of other ServiceWise projects that share a common ServiceWise base project. All knowledge base access privileges granted to other ServiceWise project teams are granted on a folder-by-folder basis. Project members may choose to grant build privileges to project members of all ServiceWise projects or selected ServiceWise projects. To grant view privileges to other project teams: 1 Right-click a knowledge folder or knowledge subfolder in the Knowledge tree panel of the ServiceWise Windows client. The Knowledge tree shortcut menu appears. 2 Select the Attribute command in the shortcut menu. The Attribute manager appears. 3 Select an option from the Team View Access dropdown list. The Team View Access dropdown list displays three options: Available to Limited Projects Available to All Projects 4 Optional: To enable selected projects to view knowledge items in the knowledge folder, double-click one or more projects in the Team View Access list. A red check mark is displayed next to the enabled projects. 5 Optional: To apply knowledge folder settings to all subfolders, select the Apply All the Settings to Subfolders check box. 6 Click the OK button Defining Project Team Build Access to Knowledge Folders ServiceWise projects may grant the ability to view and build knowledge items in their knowledge base to the members of other ServiceWise projects that share a common ServiceWise base project. All knowledge base access privileges granted to other ServiceWise project teams are granted on a folder-by-folder basis. Project members may choose to grant build privileges to project members of all ServiceWise projects or selected ServiceWise projects. To grant build privileges to other project teams: 1 Right-click a knowledge folder or knowledge subfolder in the Knowledge tree panel of the ServiceWise Windows client. The Knowledge tree shortcut menu appears. 2 Select the Attribute command in the shortcut menu. The Attribute manager appears. 3 Select an option from the Team Build Access dropdown list. Page 51 of 78
52 The Team Build Access dropdown list displays three options: Available to Limited Projects Available to All Projects 4 Optional: To enable selected projects to build knowledge items in the knowledge folder, double-click one or more projects in the Team Build Access list. A red check mark is displayed next to the enabled projects. 5 Optional: To apply knowledge folder settings to all subfolders, select the Apply All the Settings to Subfolders check box. 6 Click the OK button Defining Secured Knowledge Folder Type Access Rules Every system-defined knowledge folder and user-defined knowledge subfolder displayed in the Knowledge tree panel of the Knowledge view belongs to one of three folder types: public folders, private folders, and secured folder. The folder type assigned to a knowledge folder determines which project members may read and write the knowledge items stored in that folder based on their account type. The public folder type is designed to manage knowledge items that are available to the general public: project members and employees. Read and write privileges to public folders is based on the knowledge privileges granted to users based on their account type. The private folder type is designed to manage knowledge items that protected from public view. Read and write privileges to private folders is based on the knowledge privileges granted to users based on their account type. The secured folder type represents knowledge folders that are protected by a set of user-defined privilege settings. Project members may grant secured folder read and write access to project members based on their account type in the Attributes manager. Project members may define knowledge folder type access rules in the Attributes manager of the ServiceWise Windows client. Figure 11-1: Attribute Manager To define read and write access to knowledge folders types: 1Right-click a knowledge folder or knowledge subfolder in the Knowledge tree panel of the ServiceWise Windows client. The Knowledge tree shortcut menu appears. 2Select the Attribute command in the shortcut menu. The Attribute manager appears. 3Select the Secured folder type in the Folder Type area of the Attribute manager. 4Double-click an account type in the Current Project Access list. The Secured Folder Account Permissions dialog box appears. 5Define knowledge folder privileges for the account type. To grant write privileges, select the Can Write on this Folder check box. To grant read privileges, Can Read Folder check box. 6 Optional: To apply knowledge folder settings to all subfolders, select the Apply All the Settings to Subfolders check box. 7Click the OK button Searching for Knowledge Items Project members may search the ServiceWise knowledge base for documents, HTML links, and knowledge topics based on knowledge item types, linked products, document subtypes, and keywords. Figure 11-2: Search View in ServiceWise Web Client Understanding the TechExcel Search Engine The TechExcel search engine enables project members and employees to quickly search the notes, memo fields, and descriptions of ServiceWise incidents, events, employees, and knowledge items. Unlike the standard search engine built into each ServiceWise project, the TechExcel Search Engine enables project members to search multiple notes fields (the Description field, issue history, link comments, and so on). Project administrators may also periodically index these fields to enhance project searches. Once the TechExcel Search Engine is installed and configured, project members and employees may use search seven different types of ServiceWise fields based on keywords: Description Close Note History Issue Notes Link Comments Event Description All custom-defined memo fields Project administrators may install multiple TechExcel Search Engines in their ServiceWise site. Each ServiceWise project may have its own Search Engine or multiple projects may share the same TechExcel Search Engine Searching in the ServiceWise Windows Client Project members may search for knowledge items in the ServiceWise Windows client using the Search Knowledge manager in the Knowledge view of the ServiceWise Windows client. Page 52 of 78
53 Figure 11-3: Search Knowledge Manager The Search Knowledge manage enables project member to search for keywords in knowledge items based on four options: Contains one of these words Contains all of these words Contains the exact phrase Does not contain these words Defining Advanced Knowledge Base Searches Project members may define advanced knowledge base queries to identify relevant knowledge items based on user-defined keywords in the Search tab of the Search tab of the Knowledge view in the ServiceWise Web client. Keywords are words that describe a concept found in a document or that appear with special frequency in that document or field. Project members may define multiple keywords for every document they save in the project knowledge base providing the metadata that enables project members and employees to locate that information. Project members may use controls in the Search tab of the Knowledge view to define advanced search parameters for knowledge items based on keywords. The TechExcel Search Engine searches fields for the keywords defined in the query. Figure 11-4: Search Tab in the Knowledge View of the ServiceWise Web Client Noise words are ignored in TechExcel Search Engine queries. Noise words include all articles (a,an,the), propositions (at,for,until,with), and most conjunctions (but,whether,because). To define advanced search parameters: 1Select the Search tab in the Knowledge view of the ServiceWise Web client. 2Enter one or more keywords in the Keyword edit box control. Project members to define search requests that consist of words or phrases that are connected by one or more of five different boolean operators:and, OR, NOT, w/ 5, and w/25. 3Select an option in the Category dropdown list. The Category dropdown list displays the Knowledge in Current Project option as well as theknowledge typesanddocument typesthat are accessible to the project member based on his or her account type. The Knowledge in Current Project option enables project members to search all knowledge type, document type, and document subtype folders in the knowledge base. Knowledge types represent the system-defined knowledge folders displayed in the Knowledge tree panel: the Documents, Knowledge Topics, and HTML Links folders. Document types represent the user-defined subfolders that are used to organize knowledge items in each knowledge folder. 4Select an option from the Subcategory dropdown list. The Subcategory dropdown list displays the user-defined subfolders that have been created beneath the document type subfolder selected in the Category dropdown list. 5Select an option for displaying the results returned by the query in the More Options area. To display only title and the description of the knowledge item, select the Title and Brief Description radio button. To display only the title of the knowledge item, select the Title Only radio button. 6 Optional: To determine the number of results displayed in a single page, enter a number in the Results in Each Page edit box. 7Click the Search button Managing Documents In ServiceWise adocumentis any file (word processing file, spreadsheet, or image file) that is saved in the ServiceWise database and managed using tools in the Knowledge view of the ServiceWise Web and Windows clients. Project members may manage documents in the Build tab of the Knowledge view of the ServiceWise Web client. Figure 11-5: Build Tab in the Knowledge View A key part of document management is ensuring that other project members and employees can find documents in the knowledge base. Generally, project Page 53 of 78
54 members and employees locate knowledge items by one of two methods: browsing the knowledge base and searching the knowledge base. Browsing the knowledge base involves looking into knowledge folders and document type subfolders in the Knowledge tree panel. Searching the knowledge base involves defining search criteria for relevant knowledge items. Project teams can increase the availability of documents by creating them in the proper user-defined subfolder and by properly identifying the document so that it is returned by relevant search criteria. Making documents available to browsers Documents are one of the six types of knowledge items managed in ServiceWise projects, and each type of knowledge item is managed in a system-defined knowledge type folder in the Knowledge tree panel. All documents are stored and managed in the system-defined Documents knowledge type folder. Each knowledge type folder may contain one or more userdefined document type subfolders. Project teams may create any number of subfolders to contain and organize the different types of documents managed in a project, but they cannot delete the Documents folder. The Knowledge tree panel displays all system-defined knowledge type folders and user-defined document type subfolders in a hierarchical tree structure. Every user-defined subfolder organizes knowledge items beneath a knowledge type folder. Making documents available to searches Project members may make documents available to project members and employees by properly identifying the document in four different document property fields: The document title is especially important for keyword searches. Include keywords in the document title. The description is especially important for keyword searches. Include keywords in the document description. The words used in the document description are indexed by the TechExcel Search Engine and are an important factors in all knowledge item searches. Document descriptions are compared to user-defined search keywords. Document keywords identify the subject of the document. The product identifies the administrator-defined product that the document is associated with in the project. Project members and employees may search for knowledge items by product. Keywords are words that describe a concept found in a document or that appear with special frequency in that document or field. Keywords help to define the knowledge item metadata that enables project members and employees to locate the file using the TechExcel Search Engine Adding Documents to the Project Knowledge Base In ServiceWise a document is any file that is upload to the knowledge base and managed in the Documents folder. Documents may include word processing documents, spreadsheets, diagrams, images or any other type of file. To add new documents to the project knowledge base, a project member must belong to an account type that has been granted the Can Build Public Knowledge privilege by a project administrator. To add documents to the project knowledge base: 1Select the Build tab in the Knowledge view of the ServiceWise Web client. Project members may also add documents to the knowledge base in the Browse tab. 2Select the Document folder or a user-defined document subfolder in the Knowledge tree panel. The documents contained in the selected folder or subfolder are displayed in the Document list panel. 3Click the Add New button in the Document Folder list panel. The Create New page is displayed in the Document detail panel. 4Define a unique title for the document in the Title edit box control. 5Define identifying keywords using the Keyword control. Keywords are words that describe a concept found in a document or that appear with special frequency in that document or field. Keywords help to define the knowledge item metadata that enables project members and employees to locate the file using the TechExcel Search Engine. For step-by-step instructions see Defining Document Keywords. 6Select an option from the Product dropdown list control. Every document in the knowledge base may be associated with an administrator-defined product. Project members and employees may search for knowledge items by product. 7Enter a brief description of the file in the Description control. The document description is displayed whenever the document is returned based on project member or employee-defined search criteria. The document description is a concise description of the topics covered in the file and should enable project members and employee to decide if the document is relevant to their search. The words used in the document description are indexed by the TechExcel Search Engine and are an important factors in all knowledge item searches. Document descriptions are compared to user-defined search keywords. 8Click the Browse button and navigate to the location of the file to be added. A custom file browser enables project members to navigate all accessible directories. 9Click the Open button. The field directory is displayed in the File control. 10Click the Submit button Defining Document Keywords Keywords are words that describe a concept found in a document or that appear with special frequency in that document or field. Keywords help to define the knowledge item metadata that enables project members and employees to locate the file using the TechExcel Search Engine. Project members may define multiple keywords for every document they add or update in the project knowledge base in the Keyword panel of the Build tab in the Knowledge view. Figure 11-6: Keyword Panel Project members (experts), may assign keywords to the knowledge items stored in the project knowledge base, assign a relative weight to each keyword (expert points), and enable the keyword to be taken into account by the TechExcel Search Engine when automatically recommending knowledge items. Every expert keyword is assigned a value between 0 and 100, which determines how heavily the keyword is weighed by the TechExcel Search Engine. A high score indicates that the keyword is relevant to the information contained in the document. A expert point weight of 0 indicates that the keyword is completely irrelevant to the information in the knowledge item. An expert point weight of 100 indicates that the keyword is extremely relevant to the information in the knowledge item. The TechExcel Search Engine may or may not weigh keyword expert point values heavily when recommending documents to employees. Project administrators may determine how heavily the expert points assigned to keywords are weighed in the ServiceWise Admin client. To define document keywords: 1Select the Build tab in the Knowledge view of the ServiceWise Web client. 2Select the Document folder or a user-defined document subfolder in the Knowledge tree panel. 3Select a document in the Document list panel or click the Add New button. Project members may define keywords whenever they add knowledge items to the knowledge base or update keywords and keyword weights for existing documents. 4Click the Display Keyword Panel control button in the Document detail panel. The Keyword Panel appears. 5Click the Add New button. Page 54 of 78
55 6Enter the keyword in the Keyword dialog box and click the OK button. 7Define a weight for the keyword in the Weight edit box control. Keywords may be weighted any number between 0 and 100. The higher the number the greater the relevancy of the document to the keyword. To enable the document to be recommended to employees when they submit new incidents, select the Auto Suggest check box. 8 Optional: To enable the document to be automatically recommended to employees based on a keyword, select the Autosuggest check box. 9Click the Close button Deleting Documents Project members may delete documents from project knowledge base using the Delete command in the Build tab of the Knowledge view. To delete documents project members must belong to an account that has been granted the Can Delete Knowledge Items privilege by a project administrator. To delete documents: 1Select the Build tab in the Knowledge view of the ServiceWise Web client. Documents may be deleted in the Build tab only. 2Select the Document folder or a user-defined document subfolder in the Knowledge tree panel. The documents contained in the selected folder or subfolder are displayed in the Document list panel. 3Select the document title in the Document list panel. 4Click the Delete button in the Document detail panel. A warning dialog box appears. 5Click the OK button Checking Out Documents Project members may check out documents stored in the knowledge base using controls in the Build tab of the Knowledge view of the ServiceWise Web client. The File Info page in the Document detail panel enables project members to check out, check in, lock, and unlock documents stored in the project knowledge base. Figure 11-7: File Info Page in the Document Detail Window To check out documents a project member must belong to an account that has been granted the Can Check In/Check Out privilege by a project administrator. To check out documents: 1Select the Build tab in the Knowledge view of the ServiceWise Web client. 2Select the Document folder or a user-defined document subfolder in the Knowledge tree panel. The documents contained in the selected folder or subfolder are displayed in the Document list panel. 3Select the file name in the Document list panel. The File Info page is displayed in the Document detail panel. 4Select the Check Out this File radio button in the Document detail panel. 5Click the file in the Document detail panel. The file opens Checking In Documents Project members may check in the documents that they have previously checked out of the project knowledge base using controls in the Build tab of the Knowledge view of the ServiceWise Web client. The File Info page in the Document detail panel enables project members to check out, check in, lock, and unlock documents stored in the project knowledge base. Figure 11-8: File Info Page in the Document Detail Window Every time a file is checked into the project knowledge base the action is recorded in the File History list of the File Info page. The File History list displays the version number, the date and time, and the action for each version of a document. To check in documents a project member must belong to an account that has been granted the Can Check In/Check Out privilege by a project administrator. To check in documents (Web client): 1Select the Build tab in the Knowledge view of the ServiceWise Web client. 2Select the Document folder or a user-defined document subfolder in the Knowledge tree panel. The documents contained in the selected folder or subfolder are displayed in the Document list panel. 3Select the file name in the Document list panel. The File Info page is displayed in the Document detail panel. 4Select the Check In this File radio button in the Document detail panel. 5Click the Browse button and navigate to the location of the file using the custom file browser. 6Click the Open button. The location of the file is displayed in the Select a File control. 7Click the Continue button Locking Documents Chapter 12 ServiceWise Asset Management 12 Chapter 12- ServiceWise Asset Management This chapter describes the asset management tasks that may be performed in the TechExcel ServiceWise client including standard asset operations, managing subassets, asset locations, and asset-level knowledge, and tracking asset histories. In this chapter: Understanding Asset Management in the TechExcel ServiceWise Client Creating New Assets Assigning Assets to Employees Editing Asset Properties Page 55 of 78
56 Returning Assets Linking Assets to Incidents Managing Asset Support Plans Managing Asset Locations Managing Asset Notes 12.1 Understanding Asset Management in the TechExcel ServiceWise Client AssetWise is designed to be tightly integrated with TechExcel ServiceWise and TechExcel CRM and to enable members of those projects to perform basic operations from within the ServiceWise Windows or Web client applications. AssetWise enables project members to track assets from their entrance into project members organization to the end of their life cycle. AssetWise optimizes all aspects of project members asset-related processes, from detailed asset tracking by serial number, to purchasing, inventory tracking, service and repair, and product return management. It enables the employee support plan auto renewal to be possible by tracking and analyzing each support plan with a support status for every product project members employee has purchased. An asset is represents any article or equipment that requires tracking. It could be a tangible asset, such as a mobile phone or a spare part for the mobile phone, or an intangible asset, such as licenses for software. TechExcel ServiceWise provides several levels of integration with AssetWise: enabling project members team to track assets that are distributed to employees assigning new ones Understanding the ServiceWise Web Asset Tab Project members may manage and track assets using the Assets tabs displayed in the Employee view, the Incident view, and the Event view. The data displayed in the Asset tab is identical in each ServiceWise view. Figure 12-1: Asset Tab in the ServiceWise Web Client The Asset tab in the ServiceWise Web client is divided into two main areas: The Asset tree list panel The Asset Summary window Asset tree list panel The Asset list panel displays high-level information about all of the assets assigned to an employee in a tabular format. Every row represents an asset. Every column represents an asset property and displays the asset property values for each asset. Every asset incident is represented by an asset icon. The Primary Location icon indicates that the asset is assigned to a primary location. The Linked Location icon indicates that the asset is linked to a secondary location. The Link icon indicates that an asset is linked to a ServiceWise incident Understanding the ServiceWise Windows Asset Tab Project members may manage and track assets using the Assets tabs displayed in the Employee view, and the Incident view. The data displayed in the Asset tab is identical in each ServiceWise view. Figure 12-2: Asset Tab in the ServiceWise Windows Client The ServiceWise Windows client Asset tab is divided into two areas: The Asset tree control displays the assets associated with or linked to an employee. The Asset detail panel displays three tabbed pages: Detail Info, Related Incidents, and the Asset Notes pages Understanding Asset Management Privileges and Access Controls Asset management privileges enable project members to r perform asset-related operations in the ServiceWise client application. Project administrators may grant asset management privileges to project members based on their account type. Can Edit Asset Properties: The privilege enables project members to edit asset properties. Can Edit Asset Support Plan Properties: The privilege enables project members to edit asset support plan properties. Can Edit Asset Operations Owned By Other Team Members: The privilege enables project members to edit asset operations owned by other project members. Can Edit Asset Operations Owned By Himself/Herself: The privilege enables project members to edit their own asset operations. Can Perform AssetWise LinkPlus Operations: The privilege enables project members to perform LinkPlus operations. Can Access Asset Page in the Employee View: The privilege enables project members to view the Asset tab in the detail panel of the Employee view. Can Access Asset Page in the Incident View:The privilege enables project members to view the Asset tab in the detail panel of the Incident view. Can Update Asset Item Status: The privilege enables project members to update the status of assets. Can Update Asset Item Purchase Information:The privilege enables project members to update asset purchase information Understanding Asset Operation Access Controls Standard asset operations enable project members to perform standard asset operations (Assign, Delete, New, Return and Upgrade) in ServiceWise projects. Project administrators may assign asset operation privileges to ServiceWise project members based on their account types. {Upgrade}:The operation enables project members to upgrade assets. {Update Status}:The operation enables project members to update the status of assets. {Return Asset}:The operation enables project members to return assets. {New Employee Assets}:The operation enables project members to create new assets for employees. {New Asset}:The operation enables project members to create new assets. {Delete Asset}:The operation enables project members to delete assets. {Associate Asset}:The operation enables project members to associate assets with employees. {Deassociate Asset}:The operation enables project members to deassociate assets with employees. {Assign Asset}:The operation enables project members to assign assets to employees. Page 56 of 78
57 12.2 Creating New Assets Project members create new assets, define asset locations, asset categories, and asset templates in the Asset tab displayed in the Employee view, the Incident view, and the Event view. Figure 12-3: Create New Asset Page in the Asset Tab The data displayed in the Asset tab is identical in each ServiceWise view To edit asset properties, the project member must be granted the Can Edit Asset Properties privilege by the project administrator. All ServiceWise privileges are assigned to project members based on their account type. To add new employee assets: 1Select the Asset tab in the Incident view, Employee view, or Event view. 2Click the New button. The Create New Asset page appears. 3Define asset ownership: Project members may define two types of assets: assets assigned to employees and assets assigned to the company. To create an asset that is assigned to an employee, select the Assigned to Employee radio button. To create an asset that is assigned to an employee, select the Assigned Company Asset radio button. 4Select an asset location from the Asset Location dropdown list. The Asset Location dropdown list displays administrator-defined asset locations that are associated with the employee based on the company hierarchy. 5Select an asset category from the Asset Category dropdown list. The Asset Category dropdown list displays administrator-defined asset categories. 6Select an asset template: from the Asset Template dropdown list. The Asset Template dropdown list displays administrator-defined asset templates. 7Define the asset numbers in the Asset Numbers field. Depending on the asset template selected, project members may also assign asset numbers. If a quantity text box appears, project members must define the quantity of assets to be created. 8Click the OK button Assigning Assets to Employees Project members may assign assets to employees in the ServiceWise Web and Windows clients. Figure 12-4: Assign Asset Window in the Asset Tab of the ServiceWise Web Client In the ServiceWise Windows client project members may search for employees prior to assigning assets. In the ServiceWise Web client project members may assign assets to employees based on the incident or employee selected. In the Asset tab of the Employee view, the asset is associated with the selected employee. In the Asset tab of the Incident view, the asset is associated with employee associated with the selected incident. To assign assets to employees, the project member must be granted the {Asset Asset} operation privilege by the project administrator. All ServiceWise asset operation privileges are assigned to project members based on their account type. To assign assets to employees in the ServiceWise Windows client: 1Select the Assign button in the Asset Summary area of the Asset tab in the Incident and Employee detail panels. The Assign Asset window appears. 2Define asset ownership: Project members may define two types of assets: assets assigned to employees and assets assigned to the company. To create an asset that is assigned to an employee, select the Assigned to Employee radio button. To create an asset that is assigned to an employee, select the Assigned Company Asset radio button. 3Select an asset location from the Asset Location dropdown list. 4Select an asset category from the Asset Category dropdown list. The Asset Category dropdown list displays administrator-defined asset categories. 5Select an asset template from the Asset Template dropdown list. The Asset Template dropdown list displays administrator-defined asset templates. 6Click the Submit button Editing Asset Properties Project members may use the Edit Asset Properties manager to edit asset properties in three administrator-defined tabs: the Description tab, the Values tab, and the Support Plan tab. Figure 12-5: Edit Asset Properties Manager in the ServiceWise Windows Client The Edit Asset Properties manager displays three tabs. The information tracked in each of these tabs may be customized by a project administrator in ServiceWise Admin. The Description tab enables project members to enter data about the general properties of the asset. The Values tab enables project members to populate data that relates to the value of the asset. These values include a purchase price, date purchased, and an invoice number. The Support Plan tab enables project members to enter information relating to valid support plans and options for the current asset. These plans are defined in the ServiceWise admin, as well as through the Edit plan button in the client. The append button enables project members to enter notes about a plan. To edit asset properties, the project member must be granted the Can Edit Asset Properties privilege by the project administrator. All ServiceWise privileges are assigned to project members based on their account type. To edit assets in the ServiceWise Windows client: 1Select an asset in the Asset tree panel. 2Click the Edit button. The Edit Asset Properties manager appears. 3Define asset properties in the Description tab. The Description tab enables project members to enter data about the general properties of the asset. Page 57 of 78
58 4Define asset properties in the Values tab. The Values tab enables project members to populate data that relates to the value of the asset. These values include a purchase price, date purchased, and an invoice number. 5Define asset properties in the Support Plan tab. The Support Plan tab enables project members to enter information relating to valid support plans and options for the current asset. Support plans are created and managed in the ServiceWise Admin client. Project members may edit support plans in the ServiceWise Windows client. For more information see Managing Asset Support Plans. 6Click the OK button. To edit assets in the ServiceWise Web Client: 1 Select the Asset tab in the Incident view, Employee view, or Event view. 2 Select an asset in the Asset list tree panel. 3 Click the Edit button. The Description window appears. 4 Define asset properties. 5 Click the Submit button Returning Assets To return assets: 1 Select an asset in the Asset tree panel. 2 Click the Return button. A warning dialog box appears. 3 Select an option from the Future Inventory dropdown list. 4 Enter a number in the Quantity field. 5 Click the Yes button Deleting Assets The delete button removes the asset from the asset catalog. This permanently erases all record of the item in AssetWise, and project member is unable to assign the same asset to another employee. Project members are prompted to confirm that they want to delete the selected asset. To edit asset properties, the project member must be granted the Can Edit Asset Properties privilege by the project administrator. All ServiceWise privileges are assigned to project members based on their account type. To delete assets: 1Select an asset in the Asset tree panel. 2Click the Return button. A warning dialog box appears. 3Enter a number in the Quantity field. 4Click the Yes button Linking Assets to Incidents Project members may link assets to incidents in the Asset tab of the Incident view in the ServiceWise Windows and ServiceWise Web clients. This linked asset appears in the incident view. This is a very powerful feature for project members support staff to track malfunctioning or improperly used assets. project members may also add a note with the link To edit asset properties, the project member must be granted the Can Edit Asset Properties privilege by the project administrator. All ServiceWise privileges are assigned to project members based on their account type. To link assets in the ServiceWise Windows client: 1Select an asset in the Asset tree panel of the Asset tab in the Incident view. 2Click the Link button. The Link Manager appears. 3 Optional: To link the asset to the current incident, select the Link Asset with Current Incident check box. 4Add comments in the Notes field. 5Click the OK button. A link icon is displayed next to the asset in the Asset tree panel of the Asset tab in the Employee view. To link assets in the ServiceWise Web client: 1Select an asset in the Asset tree list panel of the Asset tab in the Incident view of the ServiceWise Web client. 2Select the Link Asset with Current Incident check box. 3Click the Save button. A link icon is displayed next to the asset in the Asset tree list panel of the Asset tab in the Employee view Managing Asset Support Plans Project members may edit asset support plans whenever they edit an asset in the ServiceWise Windows client. Figure 12-6: Coverage Details Manager Asset support plans cannot be managed in the ServiceWise Web client. To edit asset support plans, the project member must be granted the Can Edit Asset Support Plan Properties privilege by the project administrator. All ServiceWise privileges are assigned to project members based on their account type Viewing Related Incidents The Related Incidents tab shows all incidents that have been linked to the selected asset by using the link button Managing Asset Locations Project members may create, edit, and delete asset locations in the Asset tab of the ServiceWise Web client. Asset locations cannot be managed in the ServiceWise Windows client Defining Primary Locations and Secondary Locations Project members may define primary locations and linked locations in the in the Location Info page of the Asset page in the Incident and Employee detail panels. Page 58 of 78
59 Figure 12-7: Location Info Page To define primary and linked locations: 1Select the Location button in the Location Info page of the Asset tab in the Incident and Employee detail panels. 2The Location Info page appears in the Asset tab. The Location Info page is divided two main areas: the Location Info area, and the Select a Location area. 3Define the Name, Address, Site, Department, Group, Division in the Location Info area. 4Select a primary location. 5Select a linked location. 6Click the Submit button Creating New Asset Locations Project members may create new asset locations and define asset location properties in the Location Details detail panel in the Location Info page of the Asset page in the Incident and Employee detail panels. Figure 12-8: Setup Info Mode in the Asset Tab To create new asset locations: 1Select the Location button in the Location Info page of the Asset tab in the Incident and Employee detail panels. 2The Location Info page appears in the Asset tab. The Location Info page is divided two main areas: the Location Info area, and the Select a Location area. 3Enter asset setup mode. Project administrators may enter asset setup mode by two means: Click the Asset Setup button in the Location Info area. Click the Asset Setup button in the Select a Location area. 4The Asset Setup page is displayed. The Asset Setup page is divided two main areas: the Location Info list panel and the Location Details detail panel. 5Click the Add New button in the Location Details detail panel. 6The New Location Details window is displayed. 7Define the Name, Address, Site, Department, Group, Division. 8Click the Submit button Editing Asset Location Details Project members may define primary locations and linked locations in the in the Location Info page of the Asset page in the Incident and Employee detail panels of the ServiceWise Web client. Figure 12-9: Asset Location Page in the Asset Tab of the ServiceWise Web Client Asset locations cannot be managed in the ServiceWise Windows client Deleting Asset Locations Project members may create new asset locations and define asset location properties in the Location Details detail panel in the Location Info page of the Asset page in the Incident and Employee detail panels Managing Asset Notes Page 59 of 78
60 ServiceWise enables project members to enter notes that relate to each asset, and attach files to those notes, such as purchase orders or packing slips. Figure 12-10: Asset Tab in the ServiceWise Web Client Asset note management tasks include: Adding Asset Notes Editing Asset Notes Deleting Asset Notes Attaching Knowledge Items to Asset Notes Adding Asset Notes Project members may define primary locations and linked locations in the in the Location Info page of the Asset page in the Incident and Employee detail panels. To add asset notes in the ServiceWise Web client: 1Select the Asset Note button in the Asset Summary area of the Asset tab in the Incident and Employee detail panels. The Asset Note window appears. 2Click the Add New button. 3The Add a New Asset Note form appears. 4Define the title. 5Define the note. 6Select a contact from the Contact dropdown list. 7Click the Submit button. To add asset notes in the ServiceWise Windows client: 1Select an asset in the Asset tree control in the Asset tab of the ServiceWise Windows client. 2Click the New button. 3The Asset Notes dialog box appears. 4Define the title and the note. 5 Optional: To add an attachment, click the Attachment button. 6 Optional: To define the Contact, select an employee from the Contact dropdown list. 7Click the Submit button To edit asset notes in the ServiceWise Web client: 1Select the Asset Note button in the Asset Summary area of the Asset tab in the Incident and Employee detail panels. The Asset Note window appears. 2Select a asset note in the Asset Note list. 3Edit the title. 4Edit the note. 5Select a contact from the Contact dropdown list. 6Click the Submit button. To edit asset notes in the ServiceWise Windows client: 1Select an asset in the Asset tree control in the Asset tab of the ServiceWise Windows client. 2Select an asset note in the Asset Note list of the Asset Notes tab. 3Click the Edit button. 4The Asset Notes dialog box appears. 5Define the title and the note. 6 Optional: To add an attachment, click the Attachment button. 7 Optional: To define the Contact, select an employee from the Contact dropdown list. 8Click the Submit button Project members may create, edit, and delete asset notes in the Asset tab of the ServiceWise Windows client. Figure 12-11: Asset Tab in the ServiceWise Windows Client Project members may not delete asset notes in the ServiceWise Web client. To delete asset notes: 1Select an asset in the Asset tree control in the Asset tab of the ServiceWise Windows client. 2Select an asset note in the Asset Note list of the Asset Notes tab. 3Click the Delete button. 4Awarning dialog box appears. 5Click the OK button Project members may attach knowledge items to asset notes whenever they create or edit asset notes in the Asset Tab of the ServiceWise Windows client. Project members may not attach knowledge items to asset notes in the ServiceWise Web client. Chapter 13 Import and Export Management 13 Chapter13 -- Import and Export Management Page 60 of 78
61 In this chapter: Managing Importing, Linking, and Exporting Importing, Linking, and Exporting Employees Importing Service Agreements Importing and Exporting Incidents Importing Events Importing s Importing Employee Attachments 13.1 Managing Importing, Linking, and Exporting In ServiceWise, project team members may import or export employees, incidents, events, and other business objects in the ServiceWise Windows smart client. ServiceWise importing and exporting enables project team members (salespeople, marketers, and support engineers) to quickly import new employees to the base project and share access to those accounts with other projects. Moreover, project members with the appropriate privileges may import other key business objects including employee accounts, service agreements, incidents, events, , and file attachments. ServiceWise supports four import or export management tasks: import from base, import from file, link to work project, and export. Import from Base:The import from base task enables the user to import and link employees managed in a base project to one or more work projects. Import from File:The import from file task enables the user to import a business object (employee, service agreement, incident, or event) from a structured text file into the project. Link to Project:The link to project task enable the user to make imported employees available to other work projects. Export:The export task enables the user to export a business object (employee or incident) to a structured text file. Not every import or export task may be performed for every business object. ServiceWise features intuitive wizard-driven tools that are specifically designed to enable the user properly manage each business object: Figure 13-1: Importing, Linking, and Exporting In ServiceWise, all employee data (including assets) is stored in a base project that is shared by multiple work projects. employee data are always imported into a base project and linked to individual work projects. All incidents, events, and service agreements are imported directly into the work project itself and are not accessible in other work projects. ServiceWise also enables project team members to import files that are associated with or owned by specific employees, incidents, or events Defining Structured Text Files A structure text file is a file that uses reserved characters (delimiters and qualifiers) to organize data into columns (fields) and newlines (end-of-line characters) to define rows (records) so that the data may be saved as a flat file. New records must be defined in a structured text file before that data may be imported in the ServiceWise database. The first step towards importing employee record data into ServiceWise is create a structured file using field delimiters and text qualifiers that are recognized by the ServiceWise import wizard. If the data is improperly structured, the import wizard cannot parse the data. The ServiceWise Import wizards used field delimiters and text, date, and hour qualifiers to parse the data contained in the structured text file. Field Delimiters A field delimiter is a reserved character that defines the beginning end of each field (column) imported. ServiceWise recognizes five field delimiters: Hash # Comma, Semi-colon ; Tab {tab} Pipe character The pipe character ( ) usually gets the best results. The major problem with tab-delimited text files is that tabs are invisible, and difficult to distinguish from spaces; therefore, there are sometimes problems with the files being corrupted when people try to edit them by hand. The major problem with comma-delimited text files is that commas are common in field data for many applications, which means that some form of quoting and/or escaping mechanism must be used. A common alternative is to choose another punctuation character as a delimiter, one which is less likely to occur in field data than comma -- common choices include pipe ( ) and hash (#), but the best choice depends on the kind of data the application deals with. Text, Date, and Time Qualifiers Text qualifiers define the beginning and end of text within fields and indicate that the Import Wizard should interpret the text exactly as it appears in the structured text file. Qualifiers define imported data is to be interpreted if the column contains spaces or characters that might be read as field delimiters. The ServiceWise import wizards recognize text, date, and time qualifiers. Text Qualifier: Any character may be used as a text qualifier, but the default text qualifier is the double quotation mark ( ). Date Qualifier: Any character may be used as a date qualifier, but the default date qualifier is the forward slash(\). Hour Qualifier: Any character may be used as an hour qualifier, but the default h our qualifier is the colon (:) Importing, Linking, and Exporting Employees employee importing, linking, and exporting are the processes by which a project manager may make employee accounts stored in a base project accessible in a child project. Employees may be linked to child work projects automatically or manually based on their employee type. In ServiceWise, a base project is the parent of one or more child work project, which stores and manages employee data for those work projects. To view and manage an employee record in a work project, the employee account must be imported or linked to one or more child work projects. A base project may store thousands of employee accounts and it may be impractical to manage and track all of those employees in a single work project. A support organization may wish to manage access to employee data by using multiple work projects to certain projects while extending visibility to another project. The employees displayed in each work project are a subset of the employees stored and managed in the base project. Page 61 of 78
62 Figure 13-2: Employees Linked to Work Projects by Employee Type In ServiceWise, every employee is assigned to an employee type a set of access rights and privileges that enable the support organization to control the access that support engineers have to employee data and the access that employees have to project data through the Employee Web Portal. Project members may manage and track employees in work projects only if those employees belong to an employee type that has been linked to that work project Employee data including employee-related documents and service agreements may also be imported into ServiceWise base projects from structured text files. The business objects are linked to employees based on their internal employee ID. Using controls in the Link Employees from Base Project window, work project managers may import employees from the base project. The employees are not actually imported into the project so much as they are made visible in the child work project all employees are defined and managed exclusively in base projects Identifying ServiceWise Employee Data Fields ServiceWise import wizards enable users to import employee, employee attachment, and service agreement records from structured text files and to map that data to ServiceWise fields in the base project database. In ServiceWise, all employee data is imported from the base project. Even if employee records are imported using tools in a work project, the records themselves are stored in a base project and automatically linked to the child work project. Before creating the structured text file that organizes the employee records, the user should audit the employee fields that are actually tracked in their system. Not every employee property need be imported, nor need every field be mapped to a ServiceWise field. Note: In ServiceWise, all field names may be customized to suit the needs of a business. Consequently, the title given in this guide for ServiceWise employee, employee attachment, and service agreement fields may not match the terms used all implementations. Employee Info field mapping ServiceWise supports the mapping of 23 employee properties that are tracked in the Employee Info page of the employee view. The user may map structured text file columns to employee fields in the Import Employee wizard. Address Business type* Cell Phone City Country Date Created Employee ID (Internal ID) Employee Status/ Privilege Fax First Name Job Role* Last Name Middle Name Phone Phone2 State Title User def 1 User def 2 User def 3 User def 4 User ID (External ID)* Zip The Business Type, Job Role, and User ID (External ID) fields are key to ServiceWise employee management processes and business logic. Although these fields are not required, project managers should ensure that structured text file employee columns are mapped to these fields Linking Employees in the Base Project Using controls in the Link Employees from Base Project window, work project managers may import employees from the base project. The employees are not actually imported into the project so much as they are made visible in the child work project all employees are defined and managed exclusively in base projects. Imported employee records are imported into the base project and automatically linked to the current work project based on field mappings. Using controls in the Link Employees from Base Project window, employee managers may link employees in the base project to the current project. Figure 13-3: Link Employees from the Base Project Window To link an employee in a base project: 1Select File > Import > Link User from Base command in the employee view of a work project. The Link Employees from the Base Project window appears. 2Optional: To filter employees based on their name, location, employee type or any other employee property define employee data in the Company Information area of the window. Employees may be filtered by eight different properties: First Name Last Name Country State City Zip Phone Employee Type If no filtering criteria is defined, all applicable employees are returned. Employees are defined as applicable to a work project based on their employee type. Note: The Employee Type control filters employees by their employee type and provides the businesses with the best method of identifying appropriate employees to link to each work project. 3Click the Search button. Page 62 of 78
63 All applicable employees that meet the filtering criteria are displayed in the Employee List. 4Select one or more employees in the Employee List. To select a consecutive range of employees, press and hold the SHIFT key while selecting two employees. Every employee within that range is selected. To select multiple employees, press and hold the CTRL key while selecting employees. 5Click the Link button. The employees are linked to the current work project. Their records may be accessed and updated in the employee view Linking Employees in the Base Project Using controls in the Link Customers from Base Project window, work project managers may import employees from the base project. The employees are not actually imported into the project so much as they are made visible in the child work project all employees are defined and managed exclusively in base projects. Imported employee records are imported into the base project and automatically linked to the current work project based on field mappings. Using controls in the Link Customers from Base Project window, employee managers may link employees in the base project to the current project. Figure 13-4: Link Customers from the Base Project Window To link an employee in a base project: 1 Select File > Import > Link User from Base command in the employee view of a work project. The Link Customers from the Base Project window appears. 2 Optional: To filter employees based on their name, location, employee type or any other employee property define employee data in the Company Information area of the window. Employees may be filtered by eight different properties: First Name Last Name Country State City Zip Phone Employee Type If no filtering criteria is defined, all applicable employees are returned. Employees are defined as applicable to a work project based on their employee type. Note: The Employee Type control filters employees by their employee type and provides the businesses with the best method of identifying appropriate employees to link to each work project. 3 Click the Search button. All applicable employees that meet the filtering criteria are displayed in the Employee List. 4 Select one or more employees in the Employee List. To select a consecutive range of employees, press and hold the SHIFT key while selecting two employees. Every employee within that range is selected. To select multiple employees, press and hold the CTRL key while selecting employees. 5 Click the Link button. The employees are linked to the current work project. Their records may be accessed and updated in the employee view Importing Users From Base Project To import an employee from a base project is to make employee data stored in a base project accessible to project team members in a work project. Using controls in the Link Customers from Base Project window, employee managers may link employees in the base project to the current project. Page 63 of 78
64 Figure 13-5: Import Customers From Base Project To import employees from the base project: 1Select File > Import > Import User from Base command in the employee view of a work project. The Import Customers from the Base Project window appears. 2Select one or more employee types in the Select Customer Type for Importing list. The list displays every employee type defined in the project. The Auto Link column shows whether employees belonging to that employee type are automatically linked to the current work project. Note: TechExcel recommends that only employee types that are automatically linked to the project are imported into the project. 3Click the Import button. All applicable employees that meet the filtering criteria are displayed in the Employee List. 4Select one or more employees in the Employee List. 5Click the Import button. A confirmation dialog box appears. 6Click the Yes button. The employees are imported into the project Importing Employee Accounts from Structured Text Files The Import Employee wizard facilitates the importation of new employees and the updating of existing employees in the ServiceWise Windows client. A wizard is a GUI element that progressively discloses the operations that are required to complete a complex process. The Import Employee wizard consists of seven pages. Each page presents tools that enable the user to define settings. Import Employee: File and Format Import Employee: Employee Table Import Employee: Field Mapping Import Employee: Employee Info Import Employee: Custom Fields Import Employee: Company and Login Info Import Employee: Matching Method and Error Log Import Employee: File and Format: The Import Employee: File and Format wizard page enables the user to identify the structured text file that contains the employee records to be imported. Import Employee: Employee Table:The Import Employee: Employee Table wizard page enables the user to define default properties for imported employees including their employee type, job role, group, and primary and secondary support engineers. Import Employee: Field Mapping: The Import Employee: Field Mapping wizard page enables the user to map structured text file columns to employee properties tracked in the Employee Info page. Import Employee: Contact Info: The Import Employee: Contact Info wizard page is not used in ServiceWise. The page may be skipped. Import Employee: Custom Fields: The Import Employee: Custom Fields wizard page enables the user to map structured text file columns to employee properties tracked in custom pages. Import Employee: Company and Login Info: The Import Employee: Company and Login Info wizard page enables the user to map structured text file columns to customdefined employee fields tracked in custom pages. If no custom pages are defined, the page may be skipped. Import Employee: Matching Method and Error Log:The Import Employee: Matching Method and Error Log wizard page enables the user to define the methods that the Import wizard uses to match structured text records to existing employees and to define an import error log. To import employees from a structured text file: 1Select File > Import > Import User from Base command in the employee view of a work project. The Import File and Format window appears. Import Employee: File and Format wizard page (1 of 7) The Import Employee: File and Format wizard page enables the user to identify the structured text file that contains the employee records to be imported. 2Locate the structured text file that contains the list of employees. 3Select the character that is used as a field delimiter in the structured text file from the Field Delimiter dropdown list. The fields delimiter defines the beginning and end of each field imported. The Field Delimiter dropdown list displays five options. #, ; {tab} The field delimiter defines the beginning and end of each field imported. 4Define the character that is used as a text qualifier in the structured text file in the Text Delimiter field. Text qualifiers define the beginning and end of text within fields and indicate that the Import Wizard is to interpret the text in the structured text file. Any character may be used as a text qualifier, but the default text qualifier is the double quotation mark ( ). 5Select a date format in the Date dropdown list. The date format identifies the order of dates in the structured test file. The Date dropdown list displays three options: MMDDYY DDMMYY YYMMDD 6Define a date delimiter in the Date Delimiter field. Page 64 of 78
65 The Date Delimiter identifies the delimiter used to structure dates (years, months, and days) in the structured test file. Any character may be used as a date delimiter, but the default date delimiter is the forward slash(\). 7Define a time delimiter in the Time Delimiter field. The Time Delimiter identifies the delimiter used to structure time (hours, minutes, and seconds) in the structured test file. Any character may be used as a time delimiter, but the default time delimiter is the colon (:). 8Optional: To exclude Field names from the first row, select the Field names on the first row check box. Using the first line of the structured text file to identify the name of the fields imported makes it easier to map structured text columns to employee fields. 9Select an option for importing employee data in the Employee option area. To import new and update existing employees, select the Import New and Update Existing Customers option button. To import data for existing employees only, select the For Existing Customers Only option button. 10Click the Next button. The Import Employee: Employee Table wizard page appears. Import Employee: Employee Table wizard page (2 of 7) The Import Employee: Employee Table wizard page enables the user to define default properties for imported employees including their employee type, job role, group, and primary and secondary support engineers. 11Select the external employee ID in the External Customer ID dropdown list. The External Employee ID dropdown list displays every employee property defined in the structured text file. In ServiceWise, the External Employee ID property may be mapped to any field that uniquely identifies the employee in another system. By default, the external employee ID is set to {None} and no text field data is mapped to the employee External Employee ID property. 12Define default employee properties (employee type, job role, business type) for the imported employee records. The Default Employee, Default Job Role, and Default Business Type dropdown lists display administrator-defined employee property values. The option selected from each list defines the default setting for all imported employees. To define the default employee type, select an option from the Default Employee Type dropdown list. To define the default job role, select an option from the Default Job Role dropdown list. To define the default business type, select an option from the Default Business Type dropdown list. 13Define the default support team (group, secondary support, and primary support) for the imported employee records. The Group Assigned To, Secondary Support, and Primary Support dropdown lists display every employee property defined in the structured text file. The option selected from each list defines the default support settings for all imported employees. If no appropriate employee properties are defined in the structured text file, select the appropriate Auto Assign check box and an appropriate property definition will be automatically assigned to each employee account. To define the default group, select an option from the Group Assigned To dropdown list or select the Auto Assign check box. To define the default secondary support, select an option from the Secondary Support dropdown list or select the Auto Assign check box. To define the default primary support, select an option from the Primary Support dropdown list or select the Auto Assign check box. 14 Optional: To define default users settings in the Default User area of the window. 15Select the Next button. If no external Employee ID property, Job Role, or default Business Type has been defined, a confirmation dialog box appears. Click Yes to continue or No to define an external employee ID. The Mapping Description Page Fields wizard page appears. Import Employee: Field Mapping wizard page (3 of 7) The Import Employee: Field Mapping wizard page enables the user to map structured text file columns to employee properties tracked in the Employee Info page. 16 Optional: To map structured text file data to ServiceWise employee property values, select the Import This Page check box and then select an option from the appropriate Column in File dropdown list for each employee property. The Column in File dropdown lists display every employee property defined in the structured text file. The following employee properties may be mapped in the Mapping Description Page Fields wizard page. Address Business type Cell Phone City Country Date Created Employee ID (Internal ID) Employee Status/ Privilege Fax First Name Job Role Last Name Middle Name Phone Phone2 State Title User def 1 User def 2 User def 3 User def 4 User ID (External ID) Zip 17Click the Next button. The Import Employee: Employee Info wizard page appears. Import Employee: Employee Info wizard page (4 of 7) The Import Employee: Employee Info wizard page is not used in ServiceWise. 18Click the Next button. The Import Employee: Custom Fields wizard page appears. Import Employee: Custom Field wizard page (5 of 7) The Import Employee: Custom Fields wizard page enables the user to map structured text file columns to employee properties tracked in custom pages. 19Optional: To map structured text file data to ServiceWise employee property values, select the Import This Page check box and then select an option from the appropriate Column in File dropdown list for each employee property. The Column in File dropdown lists display every employee property defined in the structured text file. 20Click the Next button. The Import Employee: Company and Login Info wizard page appears. Import Employee: Company and Login Info wizard page (6 of 7) The Import Employee: Company and Login Info wizard page enables the user to map structured text file columns to custom-defined employee fields tracked in custom pages. If no custom pages are defined, the page may be skipped 21Define employee login data in the Login Alias, , and Password dropdown list controls. The following employee properties may be mapped in the Login Data area of the Company Structure and Login Info wizard page. Login Alias Password 22Define company structure data in the Site, Division, Department, and Group dropdown list controls. The following employee properties may be mapped in the Company Structure area of the Company Structure and Login Info wizard page. Site Division Department Group 23Click the Next button. The Import Wizard page appears. Import Employee: Matching Method and Error Log wizard page (7 of 7) The Import Employee: Matching Method and Error Log wizard page enables the user to define the methods that the import wizard uses to match structured text records to existing employees and to define an import error log. 24Select a matching method option in the Matching Method dropdown list. The Matching Method dropdown list displays two options: To identify existing employees by external ID numbers, select the By External ID option. To identify existing employees by multiple employee properties, select the By Analyzing Employee Info with Name, Phone, , and Page 65 of 78
66 Address option. 25Optional: To treat employees with matching addresses as the same employee, select the If Address Matches Exactly, Treat as Same Customer check box. The If Address Matches Exactly, Treat as Same Customer check box is read-only if the external ID matching method is selected. 26 Optional: To generate a log file that tracks all of structured text file records that are not loaded into the database, select the Start Trace File in the Following Log File check box and locate the file using the Browse (ellipsis) button. 27Click the Finish button Importing Service Agreements Service agreement importing is the process by which service agreements associated with a particular employee are imported into a base project and made accessible to one or more work projects. Service agreements are tied to employees by the internal employee ID. In ServiceWise, eight fields are used to track employee service agreement data. The user may map structured text file columns to each service agreement field in the Import Employee Service Agreement wizard. External Employee ID Service Agreement Identifier Default Agreement Template Service Agreement Name Service Agreement Status Default Status From Date End Date Importing Service Agreements To import service agreements: 1 Select File > Import > Service Agreements command in the employee view of a work project. The Import File and Format window appears. 2 Locate the structured text file that contains the list of service agreements. 3 Select a field delimiter in the Field Delimiter dropdown list. The fields delimiter defines the beginning and end of each field you import. The Field Delimiter dropdown list displays five options. #, ; {tab} The field delimiter defines the beginning and end of each field imported. Administrators may between five different delimiters: The pipe character ( ) usually gets the best results. 4 Define a text delimiter in the Text Delimiter field. Text qualifiers define the beginning and end of text within fields and indicate that the Import Wizard should interpret the text exactly as it appears in the structured text file. Text qualifiers should be used if the text contains spaces or characters that might be read as field delimiters. Any character may be used as a text qualifier, but the default text qualifier is the double quotation mark ( ). 5 Select a date format in the Date dropdown list. The date format identifies the order of dates in the structured test file. The Date dropdown list displays three options: MMDDYY DDMMYY YYMMDD 6 Define a date delimiter in the Date Delimiter field. The Date Delimiter identifies the delimiter used to structure dates (years, months, and days) in the structured test file. Any character may be used as a date delimiter, but the default date delimiter is the forward slash(\). 7 Define a time delimiter in the Time Delimiter field. The Time Delimiter identifies the delimiter used to structure time (hours, minutes, and seconds) in the structured test file. Any character may be used as a time delimiter, but the default time delimiter is the colon (:). 8 Optional: To exclude Field names from the first row, select the Field names on the first row check box. 9 Select an import employee option. To import new and update existing employees, select the Auto Match Existing Employees option button. To import data for existing employees only, select the For Existing Employees Only option button. 10 Click the Next button. The Service Agreement File Field Mapping wizard page appears. 11 To map structured text file data to ServiceWise knowledge property values, select an option from the appropriate Column in File dropdown list for each document property. The Column in File dropdown lists display every service agreement property defined in the structured text file. The following document properties may be mapped in the Employee File Field Mapping wizard page. External Employee ID Service Agreement Identifier Service Agreement Name Service Agreement Status From Date End Date 12 Select a default service agreement in the Default Agreement Template dropdown list. The Default Agreement Template dropdown list displays every service agreement template defined in the project. 13 Select a default status in the Default Status dropdown list. The Default Status dropdown list displays every service agreement status defined in the project. 14 Click the Next button. The Import wizard page is displayed. 15 Select a matching method option in the Matching Method dropdown list. The Matching Method dropdown list displays two options: To identify existing employees by external ID numbers, select the By External ID option. To identify existing employees by multiple employee properties, select the By Analyzing Employee Info with Name, Phone, , and Address option. 16 Optional: To overwrite existing settings, select the Overwrite If Same External Service Agreement ID Is Already Existing check box. 17 Click the Finish button Importing and Exporting Incidents Incident importing is the process by which incidents are imported into a work project from a structured text file Importing Incidents to Structured Text Files The Import Incident wizard facilitates the importation of new employees and the updating of existing employees in the ServiceWise Windows client. A wizard is a GUI element that progressively discloses the operations that are required to complete a complex process. To import incidents from a structured text file: 1Select File > Import > Incident command in the employee view of a work project. The Import File and Format window appears. Import Incident: File and Format wizard page (1 of 8) The Import Incident: File and Format wizard page enables the user to identify the structured text file that contains the incident records to be imported. 2Locate the structured text file that contains the list of incidents. 3Select the character that is used as a field delimiter in the structured text file from the Field Delimiter dropdown list. The fields delimiter defines the beginning and end of each field imported. The Field Delimiter dropdown list displays five options. #, ; {tab} The field delimiter defines the beginning and end of each field imported. Page 66 of 78
67 4Define the character that is used as a text qualifier in the structured text file in the Text Delimiter field. Text qualifiers define the beginning and end of text within fields and indicate that the Import Wizard is to interpret the text in the structured text file. Any character may be used as a text qualifier, but the default text qualifier is the double quotation mark ( ). 5Select a date format in the Date dropdown list. The date format identifies the order of dates in the structured test file. The Date dropdown list displays three options: MMDDYY DDMMYY YYMMDD 6Define a date delimiter in the Date Delimiter field. The Date Delimiter identifies the delimiter used to structure dates (years, months, and days) in the structured test file. Any character may be used as a date delimiter, but the default date delimiter is the forward slash(\). 7Define a time delimiter in the Time Delimiter field. The Time Delimiter identifies the delimiter used to structure time (hours, minutes, and seconds) in the structured test file. Any character may be used as a time delimiter, but the default time delimiter is the colon (:). 8 Optional: To exclude Field names from the first row, select the Field names on the first row check box. Using the first line of the structured text file to identify the name of the fields imported makes it easier to map structured text columns to employee fields. 9Select an option for importing employee data in the Employee option area. To import new and update existing employees, select the Import New and Auto Match Existing Employees option button. To import data for existing employees only, select the For Existing Employees Only option button. 10Click the Next button. The Import Incident: System Mapping Field wizard page appears. Import Incident: System Field Mapping wizard page (2 of 8) The Import Incident: System Field Mapping wizard page enables the user to map structured text file columns to incident properties tracked in system fields. 11To map structured text file data to ServiceWise incident property values, select an option from the appropriate Import Column dropdown list for each incident property. The following incident properties may be mapped in the System Field Mapping wizard page. External Employee ID External Incident ID Assigned To Submitted By Date Submitted IfClosed Title Description Product Priority Database Problem Area Platform Progress Status Expected Effort Assigned By Date Assigned Work Description Planned Start Date Planned Finish Date 12Click the Next button. Import Incident: Page 1 Field Mapping wizard page (3 of 8) The Import Incident: Page 1 Field Mapping wizard page enables the user to map structured text file columns to incident properties tracked in custom pages. 13To map structured text file data to ServiceWise incident property values, select an option from the appropriate Import Column dropdown list for each incident property. 14Click the Next button. Import Incident: Page 2 Field Mapping wizard page (4 of 8) The Import Incident: Page 2 Field Mapping wizard page enables the user to map structured text file columns to incident properties tracked in custom pages. 15To map structured text file data to ServiceWise incident property values, select an option from the appropriate Import Column dropdown list for each incident property. 16Click the Next button. Import Incident: Page 3 Field Mapping wizard page (5 of 8) The Import Incident: Page 3 Field Mapping wizard page enables the user to map structured text file columns to incident properties tracked in custom pages. 17To map structured text file data to ServiceWise incident property values, select an option from the appropriate Import Column dropdown list for each incident property. 18Click the Next button. Import Incident: Page 4 Field Mapping wizard page (6 of 8) The Import Incident: Page 4 Field Mapping wizard page enables the user to map structured text file columns to incident properties tracked in custom pages. 19To map structured text file data to ServiceWise incident property values, select an option from the appropriate Import Column dropdown list for each incident property. 20Click the Next button. Import Incident: Page 5 Field Mapping wizard page (7 of 8) The Import Incident: Page 5 Field Mapping wizard page enables the user to map structured text file columns to incident properties tracked in custom pages. 21To map structured text file data to ServiceWise incident property values, select an option from the appropriate Import Column dropdown list for each incident property. 22Click the Next button. Import Incident: Matching Method wizard page (8 of 8) The Import Incident: Matching Method wizard page enables the user to define the methods that the import wizard uses to match structured text records to existing employees and to define an import error log. 23Select a matching method option in the Matching Method dropdown list. The Matching Method dropdown list displays two options: To identify existing employees by external ID numbers, select the By External ID option. To identify existing employees by multiple employee properties, select the By Analyzing Employee Info with Name, Phone, , and Address option. 24Click the Finish button Exporting Incidents to Structured Text Files Using controls in the Export Incidents window, employee managers may link employees in the base project to the current project. To export project incidents: 1Select File > Export > Incident command in the incident view of a work project. The Export File and Format window appears. Export Incident: File and Format wizard page (1 of 8) The Export Incident: File and Format wizard page enables the user to identify the structured text file that contains the incident records to be imported. 2Locate the file to which incident data is to be exported. 3Select the character that is used as a field delimiter in the structured text file from the Field Delimiter dropdown list. Page 67 of 78
68 The fields delimiter defines the beginning and end of each field imported. The Field Delimiter dropdown list displays five options. #, ; {tab} The field delimiter defines the beginning and end of each field imported. 4Define the character that is used as a text qualifier in the structured text file in the Text Delimiter field. Text qualifiers define the beginning and end of text within fields and indicate that the Import Wizard is to interpret the text in the structured text file. Any character may be used as a text qualifier, but the default text qualifier is the double quotation mark ( ). 5Select a date format in the Date dropdown list. The date format identifies the order of dates in the structured test file. The Date dropdown list displays three options: MMDDYY DDMMYY YYMMDD 6Define a date delimiter in the Date Delimiter field. The Date Delimiter identifies the delimiter used to structure dates (years, months, and days) in the structured test file. Any character may be used as a date delimiter, but the default date delimiter is the forward slash(\). 7Define a time delimiter in the Time Delimiter field. The Time Delimiter identifies the delimiter used to structure time (hours, minutes, and seconds) in the structured test file. Any character may be used as a time delimiter, but the default time delimiter is the colon (:). 8Select an option for exporting incident data in the Export Records area. To export all records, select the Export All option button. To export only those incident records currently displayed in the list panel, select the Current List option button. To export a selected group of incident records, select the Selected option button. 9 Optional: To exclude Field names from the first row, select the Field names on the first row check box. Using the first line of the structured text file to identify the name of the fields imported makes it easier to map structured text columns to incident fields. 10Click the Next button. The Export Incident wizard page appears. Export Incident: File and Format wizard page (2 of 8) 11To define an identifying title displayed in the first line of the structured text file, select the edit check box next to each incident field and enter text in the Output Name text box. The following incident properties may be exported. External Employee ID External Incident ID Assigned To Submitted By Date Submitted IfClosed Title Description Product Priority Database Problem Area Platform Progress Status Expected Effort Assigned By DateAssigned Work Description Planned Start Date Planned Finish Date 12Click the Next button. The Export Incident: File and Format Continued wizard page appears. Export Incident: Page 1 File and Format wizard page (3 of 8) The Export Incident: Page 1 wizard page enables the user to define an identifying title displayed in the first line of the structured text file for incident properties tracked in custom pages. 13Click the Next button. The Export Incident Page 2 File and Format wizard page appears. Export Incident: Page 2 File and Format wizard page (4 of 8) The Export Incident: Page 2 wizard page enables the user to define an identifying title displayed in the first line of the structured text file for incident properties tracked in custom pages. 14Click the Next button. The Export Incident Page 3 File and Format wizard page appears. Export Incident: Page 3 File and Format wizard page (5 of 8) The Export Incident: Page 3 wizard page enables the user to define an identifying title displayed in the first line of the structured text file for incident properties tracked in custom pages. 15Click the Next button. The Export Incident Page 4 File and Format wizard page appears. Export Incident: Page 4 File and Format wizard page (6 of 8) The Export Incident: Page 4 wizard page enables the user to define an identifying title displayed in the first line of the structured text file for incident properties tracked in custom pages. 16Click the Next button. The Export Incident Page 5 File and Format wizard page appears. Export Incident: Page 5 File and Format wizard page (7 of 8) The Chapter 14 Outlook Sync Management 14 Chapter14--Outlook Sync Management 14.1 Outlook Sync Management TechExcel Outlook Sync provides Microsoft Outlook users the ability to interact with TechExcel ServiceWise data from directly within Outlook. The TechExcel Outlook Synd adds additional buttons to the Microsoft Outlook interface making it easy for salespeople and customer support technicians to synchronize activities performed within Outlook to ServiceWise. Synchronizing communications, activities, and tasks from Outlook to ServiceWise improves both user efficiency and visibility. Capture Outlook s Incoming and outgoing Outlook s may be selected and linked with the appropriate customer in ServiceWise with a single click. Or, more detailed Employee search may also be used to find and match the with the appropriate customer record. Automatic Record Matching s sent and received are automatically matched with existing ServiceWise information based on matching addresses. Support teams link new and existing s with employees, requests, or support incidents while adding Outlook s to ServiceWise. If no match is found, users may also choose to perform a search of ServiceWise employee data from within Outlook. Page 68 of 78
69 Online/Offline Customer Contact Support Search the ServiceWise employee database from within Outlook even when offline. TechExcel Outlook Sync maintains a local database of customer, contact, opportunity, and event information so sales and support users may access and update information while offline. All updates made locally will be synchronized with the ServiceWise server when online. Employee Manager Add or update ServiceWise employee information directly from Outlook at the same time you add an , task, or appointment. Create Outlook Tasks and Activities from ServiceWise Events ServiceWise Events may be configured to automatically create calendar appointments or tasks in Microsoft Outlook. ServiceWise Events are also workflow driven so you may configure a process which automatically updates users task lists and calendars as a part of the IT management or support workflow to ensure incidents, requests, or changes are worked on consistently and in a timely manner. ]]> Server Requirements TechExcel ServiceWise 8.0 or above Outlook Integration must be enabled and configured by Administrator End User Requirements Microsoft Windows 2000, XP, XP Professional, or Vista Microsoft Outlook XP, 2003, and 2007 Permission to perform Outlook Sync Actions TechExcel System Administrators must configure Outlook Sync within the Admin Client before use. There are two areas within the Admin Client that must be configured: 1. Support Member Manager System administrators must grant team members permission to use Outlook Sync. This privilege is granted using a new checkbox in the Team Member Manager. The image below shows a new privilege Can perform Outlook Integration that must be checked for team members allowed to perform actions. 2. Outlook Integration Settings The second step is to configure the Outlook Integration settings found under the Advanced Project Settings folder in the Admin Client. The image below shows the new Outlook Integration page and is followed by a brief description of each control on the page. 1.Enable Outlook integration This checkbox must be checked to enable syncing Outlook items with events and saving s as events in the work project. Event Sync Options Tab Control how events sync from TechExcel ServiceWise to Microsoft Outlook with these settings. Only the events that meet the criteria defined here will be synced to Outlook appointments or tasks. 2.Sync options For each event template there are three sync options available: 1. Don t sync 2. Sync to appointment 3. Sync to task 3.Sync Statuses For each event template, the administrator may choose the event statuses in which the event will be synced. 4.Date Range The administrator may define date ranges to further limit event syncing so not all events are synced at once. The Administrator may create Date Range rules based on the event Create Date, Start Date, and End Date. The date range rules are global and will apply to all event templates configured to synchronize with Outlook. Save s as Events Tab End users may save s from Microsoft Outlook to TechExcel ServiceWise as an event. When users choose to save an as an event, they will be able to choose from the events the administrator has selected as applicable event templates. Only event templates with an event type of received or sent (defined in the event template settings) are available to administrators when defining applicable events. A default event template may also be defined by the administrator for the most commonly Page 69 of 78
70 used event. ]]> If you have not installed the TechExcel Outlook Sync plug-in, please see the AppendixInstalling TechExcel Outlook Syncfor detailed installation instructions. Configuring Outlook Sync for Use 1. Press Configuration Before using TechExcel Outlook Sync, you need to run the Configuration wizard. The wizard will run automatically the first time you open Outlook after installing. You may also run the configuration wizard by pressing the Configuration button in the Outlook toolbar, or selecting the new ServiceWise menu option, and selecting Configuration. 2. Press User Login Enter your TechExcel ServiceWise login credentials, select the correct web service connection, select the project to synchronize s, and press the OK button. Having Trouble Logging In? Do you have permission to use the Outlook Sync? Contact your ServiceWise Administrator to request permission to use Outlook Sync. Does the project you belong to allow for Outlook Sync? Contact your ServiceWise Administrator to inquire if the project allows Outlook integration. Not Seeing Synchronization? Make sure you have selected the correct project in the Select Project dropdown. You may only synchronize with one project at a time. However, you may always return to this configuration screen and switch projects. 3. Press Setup Local DB After you have configured user profile information, the wizard will ask you to set up a local database. Or, you may select thesetup Local DBitem in the Configuration menu. The local database will be used to preferences and also actions performed while offline. When a connection becomes available, the actions performed will synchronize with the live ServiceWise system. To configure your local database Select the Database Type. Choose between: Microsoft Access Microsoft SQL server Page 70 of 78


. 4.")
. 5.")


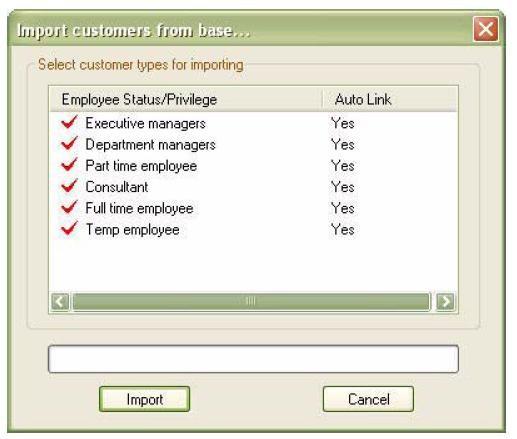

71 Select the Database Type. Choose between: Microsoft Access Microsoft SQL server /W3C//DTD HTML 4.01 Transitional//EN" " ServiceWise Admin Guide Once you have completed the database connection information, press the OK button. The configuration wizard will populate the local database with the correct tables and synchronize data from live ServiceWise database. 4. Finishing Configuration After the local database is updated, the configuration wizard will display a list of event synchronizations and settings defined by your ServiceWise Administrator. This summary shows the ServiceWise event templates used for synchronizing Outlook events and appointments and also the ServiceWise events created when saving Outlook s to ServiceWise. You may always utilize the Configuration menu to reconfigure local settings. For example, Set up local DB: Create a new or change the local database. Sync time: Re-synchronize the time difference between the local and master database. Restore local DB: Overwrite the local database with data from the live ServiceWise database. ]]> ]]> When sending an , you may now choose to save the to TechExcel ServiceWise and associate the with a customer and a specific support incident if connected to a support project or sales opportunity if connected to a sales project. 1. Create a new message within Outlook. 2. Press the Add-Ins toolbar or menu item. 3. Press thesend and Save to ServiceWisebutton (Shown in image below). 4. Confirm the Send information is correct or make adjustments using the Save Event dialog (shown below). 5. The correct employee will be selected automatically based on the matching information from TechExcel ServiceWise. You may add Employees using thenew buttons next to Employee fields. You may search Employees using the icon next to the Employee field. You may edit the existing information using any of theeditbuttons for the Employee. Please Note:Creating/editing employee information is only available when there is an interment connection. Functions performed offline will be done on the local database and synchronized to main TechExcel ServiceWise database when a connection becomes available. 6. Choose the related incident to associate the event. 7. Choose theevent templateandevent statusused to track this activity in TechExcel ServiceWise. 8. You will now see this event and message from within TechExcel ServiceWise. Please Note: An can only be saved to one event. Once saved, the Save to ServiceWise button will be disabled for that . ]]> Page 71 of 78 s already in your Microsoft OutlookInboxorSent Itemsfolders may also be saved to TechExcel ServiceWise retroactively. The steps are similar to those above and the Save Event dialog is the same.
72 ]]> s already in your Microsoft OutlookInboxorSent Itemsfolders may also be saved to TechExcel ServiceWise retroactively. The steps are similar to those above and the Save Event dialog is the same. 1. Select any you have received or sent within Microsoft Outlook. 2. Press thesave to ServiceWisebutton from the ServiceWise toolbar. 3. Complete the Save Event dialog. Again, you may use this dialog to associate the with the correct customer, contact, incident, and ServiceWise event. You may also create new customer and contact information from this dialog. Please Note: An can only be saved to one event. Once saved, the Save to ]]> ServiceWise button will be disabled for that . You may choose to sync an appointment/task to a ServiceWise event. To do so, you will be required to specify the customer and event information using the ServiceWise toolbar visible whenever an Outlook task or appointment is opened. ]]> The toolbar shown below becomes visible whenever an Microsoft Outlook task or appointment is opened: By default, the toolbar is grayed out for a new appointment/task, indicating it will not be synced to a ServiceWise event. The tool bar includes three fields that display the current Project, Employee/Customer and Event information. The toolbar includes two ellipses ( ) buttons you may use to change the associated Employee and Event Info. Clicking either ellipses ( ) button will bring up the dialog below: ]]> 1. If Sync to ServiceWise is not checked, all other fields on the dialog will be disabled. This appointment/task will not sync to a ServiceWise event. 2. To specify the customer/event information, check the Sync to ServiceWise checkbox: Page 72 of 78
73 3. When an Employee is selected their information will be displayed. 4. Clicking the New or Edit buttons will begin the create/edit a Employee dialog shown in the image below. Please Note:Creating/editing employee information is only available when there is an interment connection. Functions performed offline will be done on the local database and synchronized to main TechExcel ServiceWise database when a connection becomes available. 5. A quick search dialog is provided for searching Employees. 6. You may choose to associate the event to the incident or opportunity. Only incidents related to the selected customer are displayed. 7. Select the event template and status in the Event Info frame. The events available are based on the status of the related incident selected. If you are using event workflow you will only see events that are applicable to the state of the incident. If no incident is selected, all the event templates will be listed. 8. The default event owner will be set to the user using Outlook Sync. You may change it to another team member. Please Note: If you create or change the ownership of an appointment/task to another project member it will no longer be available for you to once it is synced to ServiceWise. 9. You must specify a customerandan event template if you want to sync the appointment/task to a ServiceWise event. ]]> 10. When an appointment is synced to a ServiceWise event the subject and content will become Event Title and Event Description. The start time and end time of the Outlook appointment/task will become the ServiceWise Event start date and end date. This operation happens automatically and there is no user interface involved in this function. When Microsoft Outlook is opened, the TechExcel Outlook Sync begins to compare the live ServiceWise database with your local database. If there are synchronizations required they occur automatically. If there are any changes in the Administration settings or incidents/customers/contacts, the sync service will also sync them to local DB. Therefore the settings for the Outlook integration will be up-to-date as long as there is an interment connection. ]]> 1. Download TechExcel Outlook Sync setup (OutlookSynz.zip) from website or a location provided by your TechExcel Administrator. 2. Backup Microsoft Outlook files using Microsoft Outlook backup function. 3. Close Microsoft Outlook 4. Uncompress installation files to a local folder. You will have the following folders and files: 5. Run the setup.exe to install prerequisite program files. 6. Run CWOutlookAddinSetup.msi and follow on-screen prompts ]]> 7. Start Microsoft Outlook and continue with the sectionuser Configuration Configuring TechExcel Outlook Syncabove. Page 73 of 78
74 Page 74 of 78
75 Page 75 of 78
76 Page 76 of 78
77 Page 77 of 78

78 Page 78 of 78
CustomerWise User Guide. Date:
 CustomerWise User Guide Author: TechExcel co.ltd Date: Table of Content CustomerWise User Guide Chapter 1 CustomerWise Concepts 1 Chapter 1 CustomerWise Concepts 1.1 Understanding CustomerWise 1.1.1 CustomerWise
ServiceWise Admin Guide. Date:
 ServiceWise Admin Guide Author: TechExcel co.ltd Date: Table of Content ServiceWise Admin Guide Chapter 1 ServiceWise Concepts 1 Chapter 1-- ServiceWise Concepts 1.1 Understanding ServiceWise 1.1.1 ServiceWise
DevSuite Admin Guide. Date:
 DevSuite Admin Guide Author: TechExcel co.ltd Date: Table of Content DevSuite Admin Guide DevSuite Overview and Common System Settings Chapter 1 Chapter 1- Understanding TechExcel DevSuite 1.1 Understanding
DevPlan User Guide. Table of Content. DevPlan User Guide. Author: TechExcel co.ltd
 DevPlan User Guide Author: TechExcel co.ltd Table of Content DevPlan User Guide Chapter 1- Project Mangement with DevPlan 1 Understanding TechExcel DevPlan 2 Product Design and Knowledge Management 3 Planning
Vector Issue Tracker and License Manager - Administrator s Guide. Configuring and Maintaining Vector Issue Tracker and License Manager
 Vector Issue Tracker and License Manager - Administrator s Guide Configuring and Maintaining Vector Issue Tracker and License Manager Copyright Vector Networks Limited, MetaQuest Software Inc. and NetSupport
DevPlan User Guide. Table of Content. Author: TechExcel co.ltd. Date: DevPlan User Guide
 DevPlan User Guide Author: TechExcel co.ltd Date: Table of Content DevPlan User Guide Chapter 1 Project Mangement with DevPlan 1 Project Mangement with DevPlan 1.1 Understanding TechExcel DevPlan 1.2 Product
CustomerWise 8.5 New Features Guide
 CustomerWise 8.5 New Features Guide Author: TechExcel co.ltd Date: Table of Content Chapter 1 1 1.1 CustomerWise 8.5 New Feature Chapter 1 1 1.1 CustomerWise 8.5 New Feature TechExcel CustomerWise is a
DocAve Governance Automation Online
 DocAve Governance Automation Online Business User Guide Service Pack 9 Cumulative Update 6 Issued December 2017 Table of Contents What s New in this Guide... 5 About DocAve Governance Automation Online...
ES CONTENT MANAGEMENT - EVER TEAM
 ES CONTENT MANAGEMENT - EVER TEAM USER GUIDE Document Title Author ES Content Management - User Guide EVER TEAM Date 20/09/2010 Validated by EVER TEAM Date 20/09/2010 Version 9.4.0.0 Status Final TABLE
Banner 9. Navigation Guide Revised for Ithaca College Fall The URL for Banner 9 is
 Banner 9 Navigation Guide Revised for Ithaca College Fall 2018 The URL for Banner 9 is http://banner.ithaca.edu/ Login with Netpass Credentials Recommended Browsers Firefox Safari Edge Chrome (no Java
12/05/2017. Customer Service Management
 12/05/2017 Contents...3 Get started with... 3 Activate Customer Service... 5 Set up associated entities... 6 Set up communication channels... 16 Track and analyze Customer Service case data... 40 Create
RightNow eservice Center 5.5 New Administrator s Survival Guide
 RightNow eservice Center 5.5 New Administrator s Survival Guide Table of Contents You may click on each line below to go to that section of this document. OVERVIEW...3 HELPFUL RESOURCES...4 GAINING FAMILIARITY
DOCUMENTUM D2. User Guide
 DOCUMENTUM D2 User Guide Contents 1. Groups... 6 2. Introduction to D2... 7 Access D2... 7 Recommended browsers... 7 Login... 7 First-time login... 7 Installing the Content Transfer Extension... 8 Logout...
MyOffice Employee. User Guide Release 4.1
 MyOffice Employee User Guide Release 4.1 Copyright 1996-2014 Sigma Systems Canada Inc. Last Revision: 2015-06-05 Sigma Systems Canada Inc., Toronto, ON, Canada The Programs (which include both the software
DevPlan User Guide. Author: TechExcel co.ltd. Date:
 Author: TechExcel co.ltd Date: Table of Content DevPlan User Guide Chapter 1 Project Mangement with DevPlan 1 Project Mangement with DevPlan 1.1 Understanding TechExcel DevPlan 1.2 Product Design and Knowledge
ServiceWise/CustomerWise 10.1
 Page 1 of 35 ServiceWise/CustomerWise 10.1 Highlights Widescreen and multi monitor support Unified incident level attachments New HTML5 ProjectPlan with resource management Doubled number of available
User Guide. Kronodoc Kronodoc Oy. Intelligent methods for process improvement and project execution
 User Guide Kronodoc 3.0 Intelligent methods for process improvement and project execution 2003 Kronodoc Oy 2 Table of Contents 1 User Guide 5 2 Information Structure in Kronodoc 6 3 Entering and Exiting
Icon Directory. Action Icons. Icon Name Description
 Icon Directory The icons found on the various MasterControl pages are listed according to their general location on a given page. For instance, Action Icons usually are found in columns headed "Action".
SOU Banner 9 Navigation Guide
 SOU Banner 9 Navigation Guide Draft 11.29.2018 Contents Introduction.... 2 Application Navigator.... 2 Basic Navigation.... 3 Page Header.... 4 Key Block... 4 Sections... 5 Bottom Section Navigation...
HarePoint HelpDesk for SharePoint. User Guide
 HarePoint HelpDesk for SharePoint For SharePoint Server 2016, SharePoint Server 2013, SharePoint Foundation 2013, SharePoint Server 2010, SharePoint Foundation 2010 User Guide Product version: 16.2.0.0
Contents Using the Primavera Cloud Service Administrator's Guide... 9 Web Browser Setup Tasks... 10
 Cloud Service Administrator's Guide 15 R2 March 2016 Contents Using the Primavera Cloud Service Administrator's Guide... 9 Web Browser Setup Tasks... 10 Configuring Settings for Microsoft Internet Explorer...
Microsoft Office SharePoint. Reference Guide for Contributors
 Microsoft Office SharePoint Reference Guide for Contributors SharePoint: Reference Guide for Contributors Table of Contents INTRODUCTION... 3 FOLLOWING A SITE... 3 NAVIGATION... 4 LISTS AND LIBRARIES...
NetSupport ServiceDesk Product Manual Version 3.10
 NetSupport ServiceDesk Product Manual Version 3.10 Manual COPYRIGHT (C) 2013 NetSupport Ltd. All rights reserved. The Information in this document is subject to change without notice. NetSupport Ltd. reserves
HPE Intelligent Management Center v7.3
 HPE Intelligent Management Center v7.3 Service Operation Manager Administrator Guide Abstract This guide contains comprehensive conceptual information for network administrators and other personnel who
FindUs.Rail User Guide
 FindUs.Rail User Guide 7001 Weston Parkway, Suite 200 Cary, North Carolina 27513 Copyright 2016 Railinc. All Rights Reserved. Last Updated: December 2016 FindUs.Rail User Guide Table of Contents Learning
Microsoft Office SharePoint Reference Guide for Site Owners
 Microsoft Office SharePoint Reference Guide for Site Owners Table of Contents INTRODUCTION...3 REQUESTING A NEW SITE...3 FOLLOWING A SITE...4 NAVIGATION...5 LISTS AND LIBRARIES...6 ADDING PEOPLE TO A SITE...6
kalmstrom.com Business Solutions
 Contents 1 INTRODUCTION... 2 1.1 LANGUAGES... 2 1.2 REQUIREMENTS... 2 2 THE SHAREPOINT SITE... 3 2.1 PERMISSIONS... 3 3 CONVERTED E-MAILS AND SHAREPOINT TICKETS... 4 3.1 THE CONVERTED E-MAIL... 4 3.2 THE
Maximo Self Service Center
 Maximo Self Service Center Once you have received an email regarding your registration approval, go to the following web address: https://maximo.mysodexo.com Log in to the Self Service Center: Your User
Introduction...2. Application Navigator...3
 Banner 9 Training Contents Introduction...2 Application Navigator...3 Basic Navigation...5 Page Header...5 Key Block...6 Sections...6 Bottom Section Navigation...7 Notification Center Messages...7 Data
Product Documentation. ER/Studio Portal. User Guide. Version Published February 21, 2012
 Product Documentation ER/Studio Portal User Guide Version 1.6.3 Published February 21, 2012 2012 Embarcadero Technologies, Inc. Embarcadero, the Embarcadero Technologies logos, and all other Embarcadero
Zimbra Connector for Microsoft Outlook User Guide. Zimbra Collaboration
 Zimbra Connector for Microsoft Outlook User Guide Zimbra Collaboration 8.8.11 Table of Contents Legal Notices............................................................................... 1 1. Introduction..............................................................................
USER MANUAL. TapCRM TABLE OF CONTENTS. Version: 1.4
 USER MANUAL TABLE OF CONTENTS Introduction... 1 Benefits of TapCRM... 1 Prerequisites... 1 Installation & Configuration... 2 TapCRM Plug-in Installation... 2 Front Side Instructions... 9 Contact Us...
Salesforce Enterprise Edition Upgrade Guide
 Salesforce Enterprise Edition Upgrade Guide Salesforce, Spring 16 @salesforcedocs Last updated: February 11, 2016 Copyright 2000 2016 salesforce.com, inc. All rights reserved. Salesforce is a registered
Salesforce Classic Guide for iphone
 Salesforce Classic Guide for iphone Version 35.0, Winter 16 @salesforcedocs Last updated: October 27, 2015 Copyright 2000 2015 salesforce.com, inc. All rights reserved. Salesforce is a registered trademark
CLIQ Web Manager. User Manual. The global leader in door opening solutions V 6.1
 CLIQ Web Manager User Manual V 6.1 The global leader in door opening solutions Program version: 6.1 Document number: ST-003478 Date published: 2016-03-31 Language: en-gb Table of contents 1 Overview...9
Documentum Client for Siebel User Guide
 Documentum Client for Siebel User Guide Version 5.3 SP4 April 2007 Copyright 1994-2007 EMC Corporation. All rights reserved. Table of Contents Preface... 7 Chapter 1 Introduction... 9 About DCS... 9 Getting
SharePoint General Instructions
 SharePoint General Instructions Table of Content What is GC Drive?... 2 Access GC Drive... 2 Navigate GC Drive... 2 View and Edit My Profile... 3 OneDrive for Business... 3 What is OneDrive for Business...
Group Administrators
 Hosted VoIP Phone System Blue Platform Admin Portal Guide for Group Administrators Table of Contents 1 About this Guide... 6 2 Accessing the Hosted VoIP Phone System Admin Portal... 7 3 Hosted VoIP Admin
Salesforce Classic Mobile Guide for iphone
 Salesforce Classic Mobile Guide for iphone Version 41.0, Winter 18 @salesforcedocs Last updated: November 30, 2017 Copyright 2000 2017 salesforce.com, inc. All rights reserved. Salesforce is a registered
Nortel Quality Monitoring Search and Replay Guide
 Nortel Quality Monitoring Search and Replay Guide NN44480-106 Product release 7.0 Standard 02.02 November 2009 Nortel Quality Monitoring Search and Replay Guide Publication number: NN44480-106 Product
Symantec ServiceDesk 7.1 SP2 Portal User Guide
 Symantec ServiceDesk 7.1 SP2 Portal User Guide Symantec ServiceDesk 7.1 SP2 Portal User Guide The software described in this book is furnished under a license agreement and may be used only in accordance
Microsoft Windows SharePoint Services
 Microsoft Windows SharePoint Services SITE ADMIN USER TRAINING 1 Introduction What is Microsoft Windows SharePoint Services? Windows SharePoint Services (referred to generically as SharePoint) is a tool
Active Servicedesk Release Notes
 8.00.00 Integration Added new history information related to external notifications Notifications Added config.xml to templates folder so specific email settings can be controlled using template scripts
samwin 5.1 R3 User Manual
 samwin 5.1 R3 User Manual Version 1.0 Last Modified September 17, 2012 Contents 1 Introduction... 3 2 Using the samwin contact center suite Operator Console... 4 2.1 Basic Information about Control...
Perceptive Nolij Web. Administrator Guide. Version: 6.8.x
 Perceptive Nolij Web Administrator Guide Version: 6.8.x Written by: Product Knowledge, R&D Date: June 2018 Copyright 2014-2018 Hyland Software, Inc. and its affiliates.. Table of Contents Introduction...
Working with Groups, Roles, and Users. Selectica, Inc. Selectica Contract Performance Management System
 Selectica, Inc. Selectica Contract Performance Management System Copyright 2008 Selectica, Inc. 1740 Technology Drive, Suite 450 San Jose, CA 95110 http://www.selectica.com World rights reserved. You cannot
Lionbridge Connector for Sitecore. User Guide
 Lionbridge Connector for Sitecore User Guide Version 4.0.2 March 28, 2018 Copyright Copyright 2018 Lionbridge Technologies, Inc. All rights reserved. Lionbridge and the Lionbridge logotype are registered
Episerver CMS. Editor User Guide
 Episerver CMS Editor User Guide Episerver CMS Editor User Guide 17-2 Release date 2017-03-13 Table of Contents 3 Table of contents Table of contents 3 Introduction 11 Features, licenses and releases 11
ZENworks Service Desk 8.0 Using ZENworks with ZENworks Service Desk. November 2018
 ZENworks Service Desk 8.0 Using ZENworks with ZENworks Service Desk November 2018 Legal Notices For information about legal notices, trademarks, disclaimers, warranties, export and other use restrictions,
HP Intelligent Management Center SOM Administrator Guide
 HP Intelligent Management Center SOM Administrator Guide Abstract This guide contains comprehensive conceptual information for network administrators and other personnel who administrate and operate the
Manage Administrators and Admin Access Policies
 Manage Administrators and Admin Access Policies Role-Based Access Control, on page 1 Cisco ISE Administrators, on page 1 Cisco ISE Administrator Groups, on page 3 Administrative Access to Cisco ISE, on
Residential Voice SUBSCRIBER GUIDE
 Residential Voice SUBSCRIBER GUIDE RESIDENTIAL VOICE SUBSCRIBER GUIDE TABLE OF CONTENTS Table of Contents Getting Started... 6 Requirements... 6 First Login... 6 Features Management... 0 Basic Features...
Learning Series. Volume 8: Service Design and Business Processes
 Learning Series Volume 8: Service Design and Business Processes NOTICES ServicePRO Learning Series Edition November 2014 HelpSTAR and ServicePRO are registered trademarks of Help Desk Technology International
Log into your portal and then select the Banner 9 badge. Application Navigator: How to access Banner forms (now called pages.)
") Navigation Banner 9 Log into your portal and then select the Banner 9 badge. This will bring you to the Application Navigator. Application Navigator: How to access Banner forms (now called pages.) Menu
Navigation Banner 9 Log into your portal and then select the Banner 9 badge. This will bring you to the Application Navigator. Application Navigator: How to access Banner forms (now called pages.) Menu
Global Support Software. User Guide
 Global Support Software User Guide Table of Contents Contacting Global Support Software Corp... 3 Log into the Site... 5 Changing your password...5 Self Registration...6 About Issues...6 The Home Page...
IBM Security Identity Manager Version Administration Topics
 IBM Security Identity Manager Version 6.0.0.5 Administration Topics IBM Security Identity Manager Version 6.0.0.5 Administration Topics ii IBM Security Identity Manager Version 6.0.0.5: Administration
One of the fundamental kinds of websites that SharePoint 2010 allows
 Chapter 1 Getting to Know Your Team Site In This Chapter Requesting a new team site and opening it in the browser Participating in a team site Changing your team site s home page One of the fundamental
CA Output Management Web Viewer
 CA Output Management Web Viewer User Guide Release 12.1.00 This Documentation, which includes embedded help systems and electronically distributed materials, (hereinafter referred to as the Documentation
START GUIDE CDMNEXT CEIC Data. All rights reserved.
 1 START GUIDE CDMNEXT 2017 CEIC Data. All rights reserved. 2 TABLE OF CONTENTS 1. Product Overview... 3 2. Starting CDMNext... 3 2.1 Login... 3 2.2 Prerequisites... 4 2.3 Landing Page... 5 3. Creating
USER AND ADMINISTRATOR MANUAL FOR PROJECTWEB
 Intended for Administrators and users of ProjectWEB Date 22-07-2016 Version 03 USER AND ADMINISTRATOR MANUAL FOR PROJECTWEB Table of contents GUIDELINES FOR USERS 6 1. LOGIN 6 1.1. How do I get access
Lionbridge Connector for Sitecore. User Guide
 Lionbridge Connector for Sitecore User Guide Version 4.0.5 November 2, 2018 Copyright Copyright 2018 Lionbridge Technologies, Inc. All rights reserved. Lionbridge and the Lionbridge logotype are registered
DreamTeam Document Manager User Guide
 DreamTeam Document Manager User Guide Product Usage and Best Practices Guide By Adam Buxbaum September 10, 2009 Table of Contents Introduction... 3 Document Manager Views... 4 Working with Folders... 5
Salesforce Classic Mobile User Guide for Android
 Salesforce Classic Mobile User Guide for Android Version 41.0, Winter 18 @salesforcedocs Last updated: November 21, 2017 Copyright 2000 2017 salesforce.com, inc. All rights reserved. Salesforce is a registered
Building Standards Department Markham eplan Applicant Handbook For Building Permits, Sign Permits and Zoning Preliminary Review
 Markham eplan Applicant Handbook For Building Permits, Sign Permits and Zoning Preliminary Review In addition to this user manual, please refer to the instructions provided in the electronic forms (eforms)
Managing Your Website with Convert Community. My MU Health and My MU Health Nursing
 Managing Your Website with Convert Community My MU Health and My MU Health Nursing Managing Your Website with Convert Community LOGGING IN... 4 LOG IN TO CONVERT COMMUNITY... 4 LOG OFF CORRECTLY... 4 GETTING
Salesforce Classic User Guide for Android
 Salesforce Classic User Guide for Android Version 36.0, Spring 16 @salesforcedocs Last updated: April 27, 2016 Copyright 2000 2016 salesforce.com, inc. All rights reserved. Salesforce is a registered trademark
Oracle General Navigation Overview
 Oracle 11.5.9 General Navigation Overview 1 Logging On to Oracle Applications You may access Oracle, by logging onto the ATC Applications Login System Status page located at www.atc.caltech.edu/support/index.php
Cisco Unity Express Windows and Menus
 Last updated: June 21, 2007 This chapter describes the windows, menus, and icons available in the Cisco Unity Express voice-mail system and contains the following sections: Navigating Through the Cisco
PaperClip32. Revision 2.0
 PaperClip32 Quick Start Guide Revision 2.0 Copyright Information Copyright 2003, PaperClip Software, Inc. The PaperClip32 product name and PaperClip Logo are registered trademarks of PaperClip Software,
Using ZENworks with Novell Service Desk
 www.novell.com/documentation Using ZENworks with Novell Service Desk Novell Service Desk 7.1 April 2015 Legal Notices Novell, Inc. makes no representations or warranties with respect to the contents or
START GUIDE CDMNext V.3.0
 1 START GUIDE CDMNext V.3.0 2018 CEIC Data. All rights reserved. 2 TABLE OF CONTENTS 1. PRODUCT OVERVIEW... 3 2. Starting CDMNEXT... 3 2.1 Login... 3 2.2 Prerequisites... 4 2.3 Landing Page... 4 3. creating
Contents. Common Site Operations. Home actions. Using SharePoint
 This is a companion document to About Share-Point. That document describes the features of a SharePoint website in as much detail as possible with an emphasis on the relationships between features. This
TDS managedip Hosted Unified Communication (UC) User Guide
 User Guide") Installation and Setup To Install the Application: The application is available for both PC and MAC. To download, visit the TDS Support Site at: http://support.tdsmanagedip.com/hosted To log into the Application:
Installation and Setup To Install the Application: The application is available for both PC and MAC. To download, visit the TDS Support Site at: http://support.tdsmanagedip.com/hosted To log into the Application:
Administrator Guide. Position Manager 11 Effective 4/9/2018
 Administrator Guide Position Manager 11 Effective 4/9/2018 Contents System Administration 4 Career Site 6 Acknowledgement Text 6 Career Site Settings: Acknowledgement Text Detail 6 Adding an Acknowledgement
START GUIDE CDMNEXT CEIC Data. All rights reserved.
 1 START GUIDE CDMNEXT 2016 CEIC Data. All rights reserved. 2 TABLE OF CONTENTS 1. Product Overview... 3 2. Starting CDMNext... 3 2.1 Login... 3 2.2 Prerequisites... 4 2.3 Landing Page... 5 3. Creating
Xton Access Manager GETTING STARTED GUIDE
 Xton Access Manager GETTING STARTED GUIDE XTON TECHNOLOGIES, LLC PHILADELPHIA Copyright 2017. Xton Technologies LLC. Contents Introduction... 2 Technical Support... 2 What is Xton Access Manager?... 3
Overview NOTE: Listing Overview. User Profile. Language Selection. Asset(s) View. Asset(s) Details. Editing Mode
 View. Asset(s) Details. Editing Mode") Overview Listing Overview User Profile Language Selection Asset(s) View Asset(s) Details Editing Mode NOTE: Some functions may not be available to all users depending on permissions granted. Some of the
Overview Listing Overview User Profile Language Selection Asset(s) View Asset(s) Details Editing Mode NOTE: Some functions may not be available to all users depending on permissions granted. Some of the
DAMION DISCOVERY APPLICATION ADMINISTRATION REFERENCE GUIDE
 DAMION DISCOVERY APPLICATION ADMINISTRATION REFERENCE GUIDE TABLE OF CONTENTS Chapter 1: Code Tables...1-1 Understanding Code Tables...1-2 Deactivating Codes...1-7 Code Table Descriptions...1-9 Chapter
How to Configure And Text Notifications
 Purpose This document describes how to configure and manage notifications within. Notifications can be Emails or Text Messages (SMS) sent to users when Hosts and Services change states, this keeps users
SCOUT SUSPENSE TRACKER Version 10.0
 SCOUT SUSPENSE TRACKER Version 10.0 USER S MANUAL For Civilian Personnel Management Service (CPMS) HPC-COM LLC Help Desk 800-795-1902 Updated: February 2011 Table of Contents SCOUT Suspense Tracker V10.0
Interaction Center Business Manager Supervisor Functions
 Interaction Center Business Manager Supervisor Functions CIC 2016 RX 1 Contents Interaction Supervisor... 10 Introduction... 10 Views... 10 Access to Views is controlled by License Assignment... 11 Alerts...
The PeopleSoft Financials System
 The PeopleSoft Financials System 2 Introduction...................... 14 Signing In and Out.................... 14 Signing In to the System.............. 14 Signing Out................... 17 Navigation
Partners. Brief Description:
 Partners Partners Important: This part of the HelpDesk User s Guide is the Partner section, and contains information about the Partners role in the HelpDesk system. For other information, please refer
Integrated Conference Bridge Professional
 Title page Communication Server 1000 Integrated Conference Bridge Professional iii Nortel Communication Server 1000 Nortel Integrated Conference Bridge Professional Revision history June 2007 Standard
CollabNet TeamForge 6.2 User Guide
 CollabNet TeamForge 6.2 User Guide 2 TeamForge 6.2 TOC Contents How to use TeamForge 6.2...6 Get started with CollabNet TeamForge 6.2...6 Quick start: Working on a TeamForge project...6 Quick start: Managing
Talend Open Studio for MDM Web User Interface. User Guide 5.6.2
 Talend Open Studio for MDM Web User Interface User Guide 5.6.2 Talend Open Studio for MDM Web User Interface Adapted for v5.6.2. Supersedes previous releases. Publication date: May 12, 2015 Copyleft This
22 August 2018 NETOP REMOTE CONTROL PORTAL USER S GUIDE
 22 August 2018 NETOP REMOTE CONTROL PORTAL USER S GUIDE CONTENTS 1 Overview... 3 1.1 Netop Remote Control Portal... 3 1.2 Technical Requirements... 3 2 General... 4 2.1 Authentication... 4 2.1.1 Forgot
CORRESPONDENCE TRACKING SYSTEM - EVER ME
 CORRESPONDENCE TRACKING SYSTEM - EVER ME CORRESPONDENCE TRACKING SYSTEM USER GUIDE Document Title Author ES-CTS - User Guide Grace Boutros - EVER ME Date 29/08/2008 Validated by Date Version 1.1 Status
Oncor Installer Portal Training Guide
 Oncor Installer Portal Training Guide 1 Index 1 Introduction to Portal 2 3 Project Workflow 4 5 Introduction to Tabs in Portals 6 All Web Pages Navigation, Buttons, Features & Functionalities New Installer
CollabNet Desktop - Microsoft Windows Edition
 CollabNet Desktop - Microsoft Windows Edition User Guide 2009 CollabNet Inc. CollabNet Desktop - Microsoft Windows Edition TOC 3 Contents Legal fine print...7 CollabNet, Inc. Trademark and Logos...7 Chapter
SCP Embraer Supplier Guide
 SCP Embraer Supplier Guide Revised 1 Contents Introduction... 5 Getting Started... 5 How to Log In to SCP... 5 Steps to Complete First Time Login... 6 Steps to Log-in to SCP... 7 General Navigation and
ipcr Web Training Manual
 ipcr Web Training Manual Technical support: (800) 464-1740 Technical support email address: support@ipcrems.com [1] Table of Contents Accessing ipcr Web... 4 ipcr Web Sign In... 5 Persistent ipcr Web Features...
Banner 9 Navigation Quick Guide
 Banner 9 Navigation Quick Guide CONTENTS Contents... Error! Bookmark not defined. Application Navigator... 2 Navigating Banner Main Menu... 3 Banner Terminology/Short Cuts... 3 Basic Navigation... 4 Page
CMS 504: D2 for Space Contributors and Coordinators Updated: January 29, 2018
 CMS 504: D2 for Space Contributors and s Agenda Part One What is Documentum D2? Groups: Support,, Contributor, Consumer D2 Overview: Login/Logout Main Menu User settings Workspaces Widgets Spaces Folders
Manage Administrators and Admin Access Policies
 Manage Administrators and Admin Access Policies Role-Based Access Control, page 1 Cisco ISE Administrators, page 1 Cisco ISE Administrator Groups, page 3 Administrative Access to Cisco ISE, page 11 Role-Based
Service Manager. Ops Console On-Premise User Guide
 Service Manager powered by HEAT Ops Console On-Premise User Guide 2017.2.1 Copyright Notice This document contains the confidential information and/or proprietary property of Ivanti, Inc. and its affiliates
DevSuite V9/ DevTest V5 Installation Guide
 DevSuite V9/ DevTest V5 Installation Guide Author: TechExcel co.ltd Date: Table of Content Installation Guide Chapter1DevSuiteInstallationGuide 1.1TechExcel DevSuite Installation Guide 1.2DownloadingtheInstallationFiles
Solutions Reference Guide. IP TalkSM. Voic & Navigator Web Portal
 IP Talk SM Solutions Reference Guide IP TalkSM Voicemail & Navigator Web Portal Table of Contents Voicemail Accessing Your Voicemail................... 1 Voicemail Main Menu........................ 2
FRONT USER GUIDE Getting Started with Front
 USER GUIDE USER GUIDE Getting Started with Front ESSENTIALS Teams That Use Front How To Roll Out Front Quick Start Productivity Tips Downloading Front Adding Your Team Inbox Add Your Own Work Email Update
PRISM-FHF The Fred Hollows Foundation
 PRISM-FHF The Fred Hollows Foundation SECURITY ADMINISTRATOR S GUIDE Version 1.2 TABLE OF CONTENTS INTRODUCTION... 4 OVERVIEW... 4 SECURITY CONSOLE... 6 ACCESSING THE SECURITY CONSOLE... 6 VIEWING THE