DevSuite V9/ DevTest V5 Installation Guide
|
|
|
- Tabitha Bradford
- 5 years ago
- Views:
Transcription


 2.")


1 DevSuite V9/ DevTest V5 Installation Guide Author: TechExcel co.ltd Date: Table of Content Installation Guide Chapter1DevSuiteInstallationGuide 1.1TechExcel DevSuite Installation Guide 1.2DownloadingtheInstallationFiles 1.3StartingtheDevSuiteInstallation 1.4InstallingtheDevSuiteDatabaseServer 1.5InstallingtheDevSuiteApplicationServer 1.6InstallingtheDevSuiteDocumentServer 1.7InstallingtheDevSuiteWebService 1.8InstallingtheDevSuiteWebServer 1.9InstallingtheDevSuiteAdminClient 1.9.1InstallingDevSuiteAdminClientfromDevSuiteWeb 1.10AdditionalSupport Online Phone Chapter2DevTestInstallationGuide(WithDevSuite) 2.1IntroductionandStartofInstallation 2.2DevTestDatabaseServerinstallation 2.3DevTestApplicationServerInstallation 2.4æaÉîqÉëí=açÅìãÉåí=pÉêîÉê=fåëí~ää~íáçå 2.5DevTestWebServiceInstallation 2.6DevTestWebServerInstallation 2.7DevTestClientInstallation 2.7.1AccessDevTestProjectsusingDevSuiteAdminClient 2.8DevTestMailServiceInstallation Chapter3DevTestOnlyInstallationGuide 3.1IntroductionandStartofInstallation 3.2DevTestDatabaseServerinstallation 3.3DevTestApplicationServerInstallation 3.4DevTestDocumentServerInstallation 3.5DevTestWebServiceInstallation 3.6DevTestWebServerInstallation 3.7DevTestClient&AdminInstallation
2 Author: TechExcel co.ltd Date: Table of Content Installation Guide Chapter1DevSuiteInstallationGuide 1.1TechExcel DevSuite Installation Guide 1.2DownloadingtheInstallationFiles 1.3StartingtheDevSuiteInstallation 1.4InstallingtheDevSuiteDatabaseServer 1.5InstallingtheDevSuiteApplicationServer 1.6InstallingtheDevSuiteDocumentServer 1.7InstallingtheDevSuiteWebService 1.8InstallingtheDevSuiteWebServer 1.9InstallingtheDevSuiteAdminClient 1.9.1InstallingDevSuiteAdminClientfromDevSuiteWeb 1.10AdditionalSupport Online Phone Chapter2DevTestInstallationGuide(WithDevSuite) 2.1IntroductionandStartofInstallation 2.2DevTestDatabaseServerinstallation 2.3DevTestApplicationServerInstallation 2.4æaÉîqÉëí=açÅìãÉåí=pÉêîÉê=fåëí~ää~íáçå 2.5DevTestWebServiceInstallation 2.6DevTestWebServerInstallation 2.7DevTestClientInstallation 2.7.1AccessDevTestProjectsusingDevSuiteAdminClient 2.8DevTestMailServiceInstallation Chapter3DevTestOnlyInstallationGuide 3.1IntroductionandStartofInstallation 3.2DevTestDatabaseServerinstallation 3.3DevTestApplicationServerInstallation 3.4DevTestDocumentServerInstallation 3.5DevTestWebServiceInstallation 3.6DevTestWebServerInstallation 3.7DevTestClient&AdminInstallation 3.8DevTestMailServiceInstallation Chapter4DevSuite-DevTest Integration Guide 4.1UnderstandingDevSuite-DevTest Integration 4.2GuidetoAdministeringDevSuite--DevTest Integration 4.3GuidetoenablingDevSpec/KnowledgeWiseintegrationinDevTest Chapter5MicrosoftSQLServerExpressInstallationGuide 5.1SystemRequirements Page 2 of 62
3 Chapter4DevSuite-DevTest Integration Guide 4.1UnderstandingDevSuite-DevTest Integration DevSuite4.2GuidetoAdministeringDevSuite--DevTest V9/ DevTest V5 Installation Guide Integration 4.3GuidetoenablingDevSpec/KnowledgeWiseintegrationinDevTest Chapter5MicrosoftSQLServerExpressInstallationGuide 5.1SystemRequirements 5.2DownloadfromMicrosoftWebsite 5.3.NETFramework2.0DownloadandInstall 5.4SQLServerExpressDownloadandInstall 5.4.1Setup 5.4.2Installation 5.5PostInstallationConfiguration 5.5.1TCP/IP 5.5.2SQLServerBrowserService Chapter6IISConfigurationGuide 6.1Introduction 6.2IISInstallation 6.3InstallorRepair.Net2.0(orhigher) 6.4IISfolderpermissions 6.5ApplicationPoolConfiguration 6.6Howtoassociateanapplicationpooltoavirtualdirectoryorwebservice Chapter7IIS7InstallationandConfigurationGuide 7.1Installation 7.2Configuration 7.2.1Enabling32-bit Applications 7.3FolderPermissions 7.4ApplicationPoolConfiguration 7.4.1AssociatinganApplicationPool Installation Guide Chapter1DevSuiteInstallationGuide Page 3 of TechExcel DevSuite Installation Guide
4 7.2.1Enabling32-bit Applications 7.3FolderPermissions 7.4ApplicationPoolConfiguration 7.4.1AssociatinganApplicationPool Installation Guide Chapter1DevSuiteInstallationGuide 1.1TechExcel DevSuite Installation Guide This guide applies to DevSuite Version and above. The screen shots in this guide demonstrate an installation of DevSuite Thank you for your interest in TechExcel's DevSuite! DevSuite provides an integrated set of tools to manage every aspect of application development. DevSuite allows teams to define and enforce a process (or workflow) for development and testing activities DevSuite s modules allow different users to track their work efficiently DevSuite is designed to be easy to understand for end-users DevSuite s features are highly configurable: teams can choose to use whichever functions they choose This guide covers the installation of DevSuite. 1.2DownloadingtheInstallationFiles To download the installation files for DevSuite, log into the TechExcel Customer Care Portal. If you are a new customer, you will need to create a new account. From the customer portal home page, click ondownloads. Page 4 of 62 On the download site, filter the items bydevsuite, and click ondevsuite Customized InstallationandDevSuite Optional Installationto download these two zip files." The screen shots below demonstrate downloading the install files for DevSuite
5 Chapter1DevSuiteInstallationGuide 1.1TechExcel DevSuite Installation Guide This guide applies to DevSuite Version and above. The screen shots in this guide demonstrate an installation of DevSuite Thank you for your interest in TechExcel's DevSuite! DevSuite provides an integrated set of tools to manage every aspect of application development. DevSuite allows teams to define and enforce a process (or workflow) for development and testing activities DevSuite s modules allow different users to track their work efficiently DevSuite is designed to be easy to understand for end-users DevSuite s features are highly configurable: teams can choose to use whichever functions they choose This guide covers the installation of DevSuite. 1.2DownloadingtheInstallationFiles To download the installation files for DevSuite, log into the TechExcel Customer Care Portal. If you are a new customer, you will need to create a new account. From the customer portal home page, click ondownloads. On the download site, filter the items bydevsuite, and click ondevsuite Customized InstallationandDevSuite Optional Installationto download these two zip files." The screen shots below demonstrate downloading the install files for DevSuite There should now bedevsuiteinstall.zipand OtherComponents.zip downloaded on your local machine. Extract these two zip files and you can start with the installation." 1.3StartingtheDevSuiteInstallation Page 5 of 62 Open thedevsuiteinstallfolder, and double-click ondevsuiteinstall.exeto start the DevSuite installation. This will run a platform, with
6 1.3StartingtheDevSuiteInstallation Open thedevsuiteinstallfolder, and double-click ondevsuiteinstall.exeto start the DevSuite installation. This will run a platform, with which all DevSuite components will be installed one by one. Click thenextbutton. Please read the software license and warranty, and then accept the terms of the license agreement." Click thenextbutton. Installation prerequisites are listed in the next page." This is the minimum requirement for a DevSuite system. ClickNextto continue. Next you will be asked to define the path where the installation files for the individual components are located." By default, the path points to the directory in whichdevsuiteinstall.exeis located. As long as no files have been moved, this does not need to be changed. Click thenextbutton. Specify which DevSuite components are to be installed." Since all are necessary, make sure all are selected to be installed. Click thestart Installbutton. 1.4InstallingtheDevSuiteDatabaseServer The first step towards deploying a DevSuite site is to install the DevSuite Database Server and to configure the database settings. The DevSuite Database Server installation program must be installed before you can install the DevSuite Application Server, DevSuite Windows clients, and DevSuite Web Services, and all other DevSuite modules. The DevSuite Database Server accepts connections and stores data. TechExcel solutions run on the Microsoft Windows server platform, but the DevSuite database can run on SQL Server, Oracle, or MySQL. The DevSuite Database Server Setup installation wizard appears. Click thenextbutton. Page 6 of 62 Select a destination directory." The Database Server installation program creates a subdirectory under the DB folder in the installation directory. These subdirectories contain the documents and scripts needed to step up the database manually if using MySQL or Oracle.
7 DevSuite Windows clients, and DevSuite Web Services, and all other DevSuite modules. The DevSuite Database Server accepts connections and stores data. TechExcel solutions run on the Microsoft Windows server platform, but the DevSuite database can run on SQL Server, Oracle, or MySQL. The DevSuite Database Server Setup installation wizard appears. Click thenextbutton. DevSuite V9/ DevTest V5 Installation Guide Select a destination directory." The Database Server installation program creates a subdirectory under the DB folder in the installation directory. These subdirectories contain the documents and scripts needed to step up the database manually if using MySQL or Oracle. To accept the default destination directory, click the Next button. To change the destination directory, click the Change button and navigate to a directory. Click the Next button. If TechExcel CustomerWise or TechExcel ServiceWise is installed as well, DevSuite can share a database with either one of these two." If neither of these products have been installed, or you simply wish to create a separate database for DevSuite, selectcreate a newdevsuite Database. Click theokbutton. Select a database option and click the OK button. To install on SQL Server, select the MS SQL option. The DevSuite Database Server installer automatically installs Microsoft SQL Server (6.5, 7.0, 2000 and later) databases. If you are using SQL Server 6.5 you must create a new database device and a new log device. ToinstallonSQLServerExpress,selecttheMSSQLServerExpressoption.TheDevSuiteDatabaseServerinstallerautomatically installs Microsoft SQL Server Express databases. For more information on installing Microsoft SQL Server Express, please seemicrosoft SQL Server Express Installation Guide To install a MySQL database, select the MySQL option. DevSuite MySQL databases must be installed manually. You must define the system ODBC data source names (DevSuiteDB) manually for DevSuite applications (Client, Application Server, Server, etc.) to connect to the MySQL database. Please look into C:\Program Files\Techexcel\DTServer\DB\MySQL directory for MySQL database installationdocumentationsaftertheinstallation. To install an Oracle database, select the Oracle option. DevSuite Oracle databases must be set up manually. System ODBC data source names (DevSuiteDB) need to be defined manually for DevSuite applications (Client, Application Server, Server, and so on) to connect to the Oracle database. Please look into C:\Program Files\Techexcel\DTServer\DB\Oracle directory for Oracle database installation documentations after the installation. TechExcel recommends the Microsoft SQL Server 2008, Service Pack 3 database platform. The remainder of the document describes a DevSuite implementation using a SQL Server database. Close all open SQL Server applications and click theokbutton. Select a SQL Server database from the dropdown list and enter the administrator name and password." Click theokbutton. Define the configuration parameters for your SQL Server system." Click theokbutton. The DevSuite Database Server Installation dialog box appears." The wizard may take several minutes to install the DevSuite Database Server. When the operation is complete, a DevSuite Database Installation dialog box appears." Click thefinishbutton. Page 7 of 62
8 The DevSuite Database Server Installation dialog box appears." The wizard may take several minutes to install the DevSuite Database Server. When the operation is complete, a DevSuite Database Installation dialog box appears." Click thefinishbutton. DevSuite V9/ DevTest V5 Installation Guide The DevSuite Database Server has been installed, and the DevSuite Application Server installation will begin automatically. 1.5InstallingtheDevSuiteApplicationServer The DevSuite Application Server wizard starts. Click thenextbutton. Select a destination directory." The Application Server installation program creates a TechExcel\DTServer\ subdirectory in the Program Files directory. To accept the default destination directory click thenextbutton. To change the destination directory, click thechangebutton and navigate to a directory. Click thenextbutton. Define the DevSuite Application Server configuration settings." Make sure the database server, database name, SQL Server username, and SQL Server password are correct. Click thetest Connectionbutton to confirm that the Application Server can connect to the database, and then click theokbutton to continue. Note:ThedefaultpasswordthatcomeswithPTAdminisPT2Excel. Towards to the end of the application server installation, the "Select applicable application for team installation" would appear." Select the modules you would like to enable. Some of them might be disabled due to the license file you have. ClickOkto continue. Page 8 of 62
9 Towards to the end of the application server installation, the "Select applicable application for team installation" would appear." Select the modules you would like to enable. Some of them might be disabled due to the license file you have. ClickOkto continue. DevSuite V9/ DevTest V5 Installation Guide TheApplicationServerinstallationisnowcomplete."ClicktheFinishbutton. The DevSuite Application Server has been installed, and the DevSuite Document Server installation will begin automatically. 1.6InstallingtheDevSuiteDocumentServer The DevSuite Document Server enables development teams to attach files to DevSuite issues and to upload and download files in DevSuite Web. Both the DevSuite client and DevSuite Web Server use the DevSuite Document Server to access the related files including file attachments, attachments, and knowledge items. DevSuite Database Server and Application Server must be installed before the DevSuite Document Server service can execute Page 9 of 62 properly. The DevSuite Document Server talks to the Application Server and Web Server through a TCP/IP connection. The DevSuite Document Server can be installed on the database server machine or on a separate computer. If your issue tracking involves a large number of attachment files, TechExcel recommends that you use a separate machine to host the DevSuite Document Server.
10 1.6InstallingtheDevSuiteDocumentServer The DevSuite Document Server enables development teams to attach files to DevSuite issues and to upload and download files in DevSuite Web. Both the DevSuite client and DevSuite Web Server use the DevSuite Document Server to access the related files including file attachments, attachments, and knowledge items. DevSuite V9/ DevTest V5 Installation Guide DevSuite Database Server and Application Server must be installed before the DevSuite Document Server service can execute properly. The DevSuite Document Server talks to the Application Server and Web Server through a TCP/IP connection. The DevSuite Document Server can be installed on the database server machine or on a separate computer. If your issue tracking involves a large number of attachment files, TechExcel recommends that you use a separate machine to host the DevSuite Document Server. The DevSuite Document Server installation program installs a new DevSuite Document Server service. Please ensure that it is running by checking the system Service Manager after the installation. To use the DevSuite Document Server, the system administrator must define the document server name and port number in DevSuite Admin. The DevSuite Document Server installation wizard starts. Click thenextbutton. Select a destination directory." The Document Server installation program creates a TechExcel\DTServer\DocServer\ subdirectory in the Program Files directory. To accept the default destination directory click thenextbutton. To change the destination directory, click thechangebutton and navigate to a directory. Click thenextbutton. Inspect and update the DevSuite Document Server configuration settings. To check the connection to the DevSuite Application Server, click the Connect button." To change the document root directory, click the Browse button and locate an appropriate directory for managing documents. To change the document revision directory, click the Browse button and locate an appropriate directory for managing document revisions. Click theokbutton. The Document Server installation will soon be completed." Click thefinishbutton. Open the Services panel from Administrative Tools, locate DevSuite Document Server and make sure it is running." If not, right click ontheserviceandselect"restart". TheDevSuiteDocumentServerhasbeeninstalledandyou'veconfirmedthatit'srunning. The DevSuite Web Service installation will begin automatically. 1.7InstallingtheDevSuiteWebService The DevSuite Admin client and DevSuite Web require that the DevSuite Web Service is installed, and that IIS web service runs the.net Framework 2.0 for some application pools and.net Framework 4.0 for others.. Prerequisites for installing the DevSuite Web Service: Microsoft IIS (version 5+) must be installed Microsoft.NETFramework2.0and4.0mustbeinstalled FormoreinformationoninstallingIIS5.0or6.0,pleaseseeIIS Installation and Configuration Guide For more information on installing IIS 7.0, please seeiis 7 Installation and Configuration Guide The DevSuite Web Service installation wizard starts. Click thenextbutton. Page 10 of 62
11 Prerequisites for installing the DevSuite Web Service: Microsoft IIS (version 5+) must be installed Microsoft.NETFramework2.0and4.0mustbeinstalled FormoreinformationoninstallingIIS5.0or6.0,pleaseseeIIS Installation and Configuration Guide DevSuite V9/ DevTest V5 Installation Guide For more information on installing IIS 7.0, please seeiis 7 Installation and Configuration Guide The DevSuite Web Service installation wizard starts. Click thenextbutton. Review the installation checklist, and click theokbutton. The Destination Folder dialog box appears." By default, the DevSuite Web Service is installed to C:\Inetpub\. Click thenextbutton. Define the application server name and port, and the server name, on which the web service is being installed. Also specify the name of DevSuite Web Service as well as DevSuite Web Service URL." Note:SystemadministratorscangiveanynametotheDevSuiteWebServicethatisbeingestablished.Makesuretousetheserver domainnameorserverip.itisnotrecommendedtouselocalhost. Test the connection of the Web Services, and click theokbutton to continue. The Web Service installation will soon be completed." Click thefinishbutton. The DevSuite Web Service has been installed, and the DevSuite Web Server installation will begin automatically. 1.8InstallingtheDevSuiteWebServer TheDevSuiteWebServerneedstobeinstalledtoprovideusersaccesstoDevSuitethroughtheWeb. Installation of the DevSuite Web Server requires the DevSuite Application Server name (or IP) and its port number (the default is 8228). The DevSuite Web Server installation program distributes the DevSuite Web Server (in ISAPI DLLs) to your IIS directory. Page 11 of 62 The DevSuite Web Server installation program creates a directory PTWeb (which contains some web pages and images) under your web root directory (by default, it is under your wwwroot directory. If your web root is not default to wwwroot, you will need to move it to your web home directory manually after installing the DevSuite Web Server.)
12 1.8InstallingtheDevSuiteWebServer TheDevSuiteWebServerneedstobeinstalledtoprovideusersaccesstoDevSuitethroughtheWeb. Installation of the DevSuite Web Server requires the DevSuite Application Server name (or IP) and its port number (the default is 8228). DevSuite V9/ DevTest V5 Installation Guide The DevSuite Web Server installation program distributes the DevSuite Web Server (in ISAPI DLLs) to your IIS directory. The DevSuite Web Server installation program creates a directory PTWeb (which contains some web pages and images) under your web root directory (by default, it is under your wwwroot directory. If your web root is not default to wwwroot, you will need to move it to your web home directory manually after installing the DevSuite Web Server.) While you are installing the DevSuite Web Server, the installation connects to the DevSuite Application Server and retrieves your database type, database server, and database name automatically. You can also manually specify the database information as needed. The installation program creates a system DSN for DevWeb for the DevSuite Web Server to connect to your database. A system administrator can create a virtual directory, providing easy access to the DevSuite Web Server. Once installed and finalized, the DevSuite login URL may be sent to all DevSuite users. The DevSuite Web Server installation wizard starts. Click thenextbutton. DevSuite Web Server V8.6 and above requires.net Framework 4.0." If it is not detected on the server, a warning message like below will be displayed. Use the link in the dialog box to download the program. The Destination Folder window appears." By default, the DevSuite Web Server is installed to C:\Inetpub\. Click thenextbutton. In order to install the Web Server on your machine, the installation wizard must stop your IIS web server." Click theokbutton to continue, orcancelto abort. Define your application server settings and test the connection. Server name: (ex: devsuite) Port number: (ex: 8228) Define your Web Service URLs: KnowledgeWiseWebServiceURL:(ex: DevTimeWebServiceURL:(ex: Define your database connection and test the connection. Database type: Microsoft SQL Server Database server: (ex: devsuite) Database name: (ex: DevSuite) Database authentication: SQL authentication or Window NT authentication (SQL authentication is recommended) The Web Server installation will soon be completed." Click thefinishbutton. TheDevSuiteWebServerhasbeeninstalled." Click thefinishbutton. The complete installation of DevSuite has been installed. Page 12 of 62
13 The Web Server installation will soon be completed." Click thefinishbutton. TheDevSuiteWebServerhasbeeninstalled." DevSuite V9/ DevTest V5 Installation Guide Click thefinishbutton. The complete installation of DevSuite has been installed. 1.9InstallingtheDevSuiteAdminClient InstallationoftheDevSuiteAdminclientscanbedoneonanycomputerthathastheDevSuiteWebServiceinformation. The Web Service name is the URL of the computer on which the web services are installed. For DevSuite Admin Client, the default web service path is: Note:DevSuite Windows Client for all the modules are not supported in version Thus only the installation file of Admin Client msi is delivered along with this release. DevSuiteAdminClientSetupmsicanbefoundunderC:\Inetpub\wwwroot\DevSuiteWeb\Applicationson the machinewheredevsuitewebserverisinstalled. ExecuteDXAdminSetup.msi.TheDevSuiteAdminClientinstallationwizardstarts.ClicktheNextbutton. Select a destination directory." By default, the clients are installed to C:\Program Files\TechExcel\DTClient\ To accept the default destination directory click thenextbutton. To change the destination directory, click thechangebutton and navigate to a directory. Click thenextbutton. The msi starts to deliver files to the specified folder in the last step." Then the DevSuite Web Service for DevSuite Admin dialog box appears. Enter the Web Service URL for DevSuite Admin. The default URL should behttp:// {servername}/devsuiteadminservice/dataservice.asmx) Click thetest Connectionbutton to test that DevSuite can connect to the DevSuite Web Service. If the connection is made successfully, click theokbutton. The Clients installation will soon be completed." Click thefinishbutton. Page 13 of 62
14 The Clients installation will soon be completed." Click thefinishbutton. DevSuite V9/ DevTest V5 Installation Guide TheDevSuiteClientshavebeeninstalled InstallingDevSuiteAdminClientfromDevSuite Web 1.10AdditionalSupport An alternative way to download and install DevSuite Admin Client is from DevSuite Web. This gives end users an easier way to get the Admin client installed without accessing the server folder directly. To run DevSuite Web Go to Start menu and run DevSuite Web from the web server. Or simply access DevSuite Web using this URL: {servername}/devsuite To download and install DevSuite Admin and other add-on installations In DevSuite Web, click on the Tool icon located in the upper right corner, next to the Exit button." In the drop down menu, select Add-on download. The add-on download webpage will come up. In the add-on download page, select DevSuite Admin (or other add-on modules) to download the setup file and follow the prompts to finish the installation." Online Phone Page 14 of 62
15 1.10.1Online Phone Chapter2DevTestInstallationGuide(WithDevSuite) 2.1IntroductionandStartofInstallation The following are the installation files you may download from our web portal.youwillnotneedtorundttwebservicesetup.exe anddttclientsetup.exe(unlessyouneedaccesstodevtestwindowsclient). It is preferred that you run the DevTestInstall.exe which is an installation wizard.the individual components are also available for stand-alone installation if it is ever needed. Run the DevTestInstall.exe The DevTest Installation Wizard begins ClickNext Accept the license agreement and clicknext 1." Confirm or change the location of the set-up files. 2. ClickNext Youareshownthelistofcomponentstobeinstalled." If there are any components that you wish to skip, you may de-select them.example: in a DevSuite-DevTest joined system, you may skip the installation of Web Service and DevTest Client. ClickStart Install Page 15 of 62
16 1.10.2Phone Chapter2DevTestInstallationGuide(WithDevSuite) 2.1IntroductionandStartofInstallation The following are the installation files you may download from our web portal.youwillnotneedtorundttwebservicesetup.exe anddttclientsetup.exe(unlessyouneedaccesstodevtestwindowsclient). It is preferred that you run the DevTestInstall.exe which is an installation wizard.the individual components are also available for stand-alone installation if it is ever needed. Run the DevTestInstall.exe The DevTest Installation Wizard begins ClickNext Accept the license agreement and clicknext 1." Confirm or change the location of the set-up files. 2. ClickNext Youareshownthelistofcomponentstobeinstalled." If there are any components that you wish to skip, you may de-select them.example: in a DevSuite-DevTest joined system, you may skip the installation of Web Service and DevTest Client. ClickStart Install Page 16 of 62
17 Youareshownthelistofcomponentstobeinstalled." If there are any components that you wish to skip, you may de-select them.example: in a DevSuite-DevTest joined system, you may skip the installation of Web Service and DevTest Client. ClickStart Install 2.2DevTestDatabaseServerinstallation The Database Server installation begins. ClickNext 1." Confirm Destination Folder for Database Server Files.Note: This is not the physical database.the physical DB will be installed to database server. 2. ClickNext You will be prompted and reminded that you must be a local system administrator to continue the database installation. ClickOK 1." Select a database option and click the OK button. To install on SQL Server, select the MS SQL option. The DevSuite Database Server installer automatically installs Microsoft SQL Server (6.5, 7.0, 2000 and later) databases. If you are using SQL Server 6.5 you must create a new database device and a new log device. To install an Oracle database, select the Oracle 9i and up option. DevSuite Oracle databases must be set up manually. System ODBC data source names (DevTestDB) need to be defined manually for DevTest applications (Client, Application Server, Server, and so on) to connect to the Oracle database. Please look intoc:\program Files\Techexcel\DevTestServer\DB\Oracledirectory for Oracle database installation documentations after the installation. In this example, we are selecting MS SQL Server. 2. ClickOK Youwillbepromptedtoclosealldatabaseapplications. ClickOK Page 17 of 62
18 2. ClickOK Youwillbepromptedtoclosealldatabaseapplications. ClickOK 1." Confirm Server name, database user name and password 2. ClickOK SQL server configuration appears. 1." Confirm SQL server version, and Database name. Default values for database name and size.we suggest using the default database name, but you may change it if needed. 2. ClickOK Database installation will be done and once completed, will display the following confirmation. ClickOK Database installation completes with this confirmation screen: 2.3DevTestApplicationServerInstallation The Application Server installation begins. Page 18 of 62
19 Installation Guide DevSuite V9/ DevTest V5 2.3DevTestApplicationServerInstallation The Application Server installation begins. ClickNext 1." Confirm installation folder. Use thechangebutton if you wish to install the files in a different directory. 2. ClickNext Application Server Configuration appears 1." Confirm the following information: SystemName:Thenameofthesystem,suchasTechExcelDevTest ServerName:Thenameoftheserver.Itcanbeahostname,anIPorafully-qualified domain name PortNumber:ThedefaultportnumberforDevTestapplicationserveris8338. DatabaseType:Thetypeofthedatabaseinuse,suchasMicrosoftSQLServer,Oracleandetc. DatabaseServer:ThenameoftheDatabaseserver.ItcanbeamachinenameoranIP. DatabaseName:ThenameoftheDevTestdatabase,suchasDevTestDB. UserName:UseraccountusedtoaccesstheDB.Thebuilt-in account that comes with the sample DB is PTAdmin. Password:ThedefaultpasswordforPTAdminisPT2Excel. 2. Use thetest Connectionbutton to verify the connection. Then clickok. Application Server installation is complete. ClickOK 2.4DevTestDocumentServerInstallation DevTest Document Server installation begins ClickOK Page 19 of 62 1." Confirm installation directory 2. ClickNext
20 2.4DevTestDocumentServerInstallation DevTest Document Server installation begins ClickOK 1." Confirm installation directory 2. ClickNext Document Server configuration appears 1." Confirm Application Server and Document Server settings, including Root directories 2. ClickOK Document Server installation is now complete ClickFinish 2.5DevTestWebServiceInstallation DevTest Web Service installation may be skipped in a DevSuite-DevTestjoinedsystem. 2.6DevTestWebServerInstallation WebServer installation begins ClickNext Page 1." Confirm installation folder. Use the Change button if you wish to install the program under a different directory. 2. ClickNext 20 of 62
21 2.6DevTestWebServerInstallation WebServer installation begins ClickNext 1." Confirm installation folder. Use the Change button if you wish to install the program under a different directory. 2. ClickNext A message indicating that the installation would stop the IIS would be prompted." ClickOKto continue. 1."ConfirmApplicationServerandDatabaseServerdetails.Theyshouldbethesameinfoastheoneintheapplicationserver configuration window. 2. Use thetest Connectionbuttons to verify the connection to the web server as well as to the database server. 3. ClickOK Installation is now complete ClickFinish 2.7DevTestClientInstallation In a DevSuite-DevTest joined system, DevTest projects can be accessed directly using DevSuite Admin Client. Thus you may skip DevTest Client Installation. However, if you need to gain access to DevTest Windows Client, the setup file still has to be installed. DevTest Client installation begins ClickNext Confirm installation directory." Use thechangebutton if you wish to install the program under a different directory. ClickNext Select the Setup Type." In this case, we'll only be installing the Client. ClickNext Web Service connection window will appear 1."ConfirmURLisaccurate.WhensharingwebservicewithDevSuite,theURLshouldbehttp:// {servername}/devsuiteadminservice/dttdataservice.asmx 2. Test Connection 3. ClickOK Page 21 of 62
22 ClickNext Web Service connection DevSuite V9/ DevTest V5 Installation Guide window will appear 1."ConfirmURLisaccurate.WhensharingwebservicewithDevSuite,theURLshouldbehttp:// {servername}/devsuiteadminservice/dttdataservice.asmx 2. Test Connection 3. ClickOK Client installation is now complete ClickFinish 2.7.1AccessDevTestProjectsusingDevSuiteAdmin Client 2.8DevTestMailServiceInstallation To access DevTest projects using DevSuite Admin Clent, launch DevSuite Admin Client from the Start Menu. IntheLoginwindow,clickontheellpsisbuttonnexttotheWebServicedropdown. In the Define Web Service For DevSuite Admin window, use thenewbutton to create a new web service connection." The Web Service URL to access DevTest ishttp://{servername}/devsuiteadminservice/dttdataservice.asmx Use the Test Connection button to verify the connection and then clickok. Page 22 of 62
23 Go back to the login window." Enter user name and password. Select the newly created Web Service for DevTest. You should now have access to DevTest projects in DevSuite Admin Client." Note:Please refer to Chapter 4 DevSuite-DevTest Integration Guide to set up DevTest as a component site to thedevsuitesystem."oncetheintegrationisenabled,youwillbeabletoaccessbothdevsuiteanddevtest projectsatthesametimeusingdevsuiteadminclientusingthiswebservicehttp:// {servername}/devsuiteadminservice/dataservice.asmx Chapter3DevTestOnlyInstallationGuide 3.1IntroductionandStartofInstallation The following are the installation files.it is preferred that you run the DevTestInstall.exe which is an installation wizard.the individual components are also available for stand-alone installation if it is ever needed. Run the DevTestInstall.exe The DevTest Installation Wizard begins ClickNext Accept the license agreement and clicknext Page 23 of 62
24 {servername}/devsuiteadminservice/dataservice.asmx DevSuite V9/ DevTest V5 Installation Guide Chapter3DevTestOnlyInstallationGuide 3.1IntroductionandStartofInstallation The following are the installation files.it is preferred that you run the DevTestInstall.exe which is an installation wizard.the individual components are also available for stand-alone installation if it is ever needed. Run the DevTestInstall.exe The DevTest Installation Wizard begins ClickNext Accept the license agreement and clicknext 1." Confirm or change the location of the set-up files. 2. ClickNext Youareshownthelistofcomponentstobeinstalled." If there are any components that you wish to skip, you may de-select them.example: If you happen to be upgrading, you would skip the database installation. ClickStart Install Page 24 of 62
25 Youareshownthelistofcomponentstobeinstalled." If there are any components that you wish to skip, you may de-select them.example: If you happen to be upgrading, you would skip the database installation. DevSuite V9/ DevTest V5 Installation Guide ClickStart Install 3.2DevTestDatabaseServerinstallation The Database Server installation begins. ClickNext 1." Confirm Destination Folder for Database Server Files.Note: This is not the physical database.the physical DB will be installed to database server. 2. ClickNext You will be prompted and reminded that you must be a local system administrator to continue the database installation. ClickOK 1." Select a database option and click the OK button. To install on SQL Server, select the MS SQL option. The DevSuite Database Server installer automatically installs Microsoft SQL Server (6.5, 7.0, 2000 and later) databases. If you are using SQL Server 6.5 you must create a new database device and a new log device. To install an Oracle database, select the Oracle 9i and up option. DevSuite Oracle databases must be set up manually. System ODBC data source names (DevTestDB) need to be defined manually for DevTest applications (Client, Application Server, Server, and so on) to connect to the Oracle database. Please look intoc:\program Files\Techexcel\DevTestServer\DB\Oracledirectory for Oracle database installation documentations after the installation. In this example, we are selecting MS SQL Server. 2. ClickOK Youwillbepromptedtoclosealldatabaseapplications. ClickOK Page 25 of 62
26 documentations after the installation. In this example, we are selecting MS SQL Server. 2. ClickOK Youwillbepromptedtoclosealldatabaseapplications. ClickOK 1." Confirm Server name, database user name and password 2. ClickOK SQL server configuration appears. 1." Confirm SQL server version, and Database name. Default values for database name and size.we suggest using the default database name, but you may change it if needed. 2. ClickOK Database installation will be done and once completed, will display the following confirmation. ClickOK Database installation completes with this confirmation screen: Page 26 of 62


27 Database installation completes with this confirmation screen: 3.3DevTestApplicationServerInstallation The Application Server installation begins. ClickNext 1." Confirm installation folder. Use thechangebutton if you wish to install the files in a different directory. 2. ClickNext Application Server Configuration appears 1." Confirm the following information: SystemName:Thenameofthesystem,suchasTechExcelDevTest ServerName:Thenameoftheserver.Itcanbeahostname,anIPorafully-qualified domain name PortNumber:ThedefaultportnumberforDevTestapplicationserveris8338. DatabaseType:Thetypeofthedatabaseinuse,suchasMicrosoftSQLServer,Oracleandetc. DatabaseServer:ThenameoftheDatabaseserver.ItcanbeamachinenameoranIP. DatabaseName:ThenameoftheDevTestdatabase,suchasDevTestDB. UserName:UseraccountusedtoaccesstheDB.Thebuilt-in account that comes with the sample DB is PTAdmin. Password:ThedefaultpasswordforPTAdminisPT2Excel. 2. Use thetest Connectionbutton to verify the connection. Then clickok. Application Server installation is complete. ClickOK Page 27 of 62
28 Application Server installation is complete. ClickOK 3.4DevTestDocumentServerInstallation DevTest Document Server installation begins ClickOK 1." Confirm installation directory 2. ClickNext Document Server configuration appears 1." Confirm Application Server and Document Server settings, including Root directories 2. ClickOK Document Server installation is now complete ClickFinish Page 28 of 62
29 Document Server installation is now complete ClickFinish 3.5DevTestWebServiceInstallation The DevTest Web Service installation begins. ClickNext Web Service Installation checklist appears. You will be shown the IIS and.net requirements.prerequisites for installing the DevTest Web Service are: Microsoft IIS (version 5+) must be installed Microsoft dot net framework 2.0 must be installed FormoreinformationoninstallingIIS5.0or6.0,pleaseseeIIS Installation and Configuration Guide For more information on installing IIS 7.0, please seeiis 7 Installation and Configuration Guide Ensure that this has been done properly and then clickok 1." Confirm installation folder. Use the Change button if you wish to have the application installed in a different directory. 2. ClickNext Page 29 of 62
30 1." Confirm installation folder. Use the Change button if you wish to have the application installed in a different directory. 2. ClickNext Confirm Server name and details. The DevTest Admin Web Service URL should be: Test connections to application server and WebService itself ClickOKto continue WebService installation is now complete 3.6DevTestWebServerInstallation WebServer installation begins ClickNext 1." Confirm installation folder. Use the Change button if you wish to install the program under a different directory. 2. ClickNext Page 30 A message indicating that the installation would stop the IIS would be prompted." ClickOKto continue. of 62
31 1." Confirm installation folder. Use the Change button if you wish to install the program under a different directory. DevSuite V9/ DevTest V5 2. Installation ClickNext Guide A message indicating that the installation would stop the IIS would be prompted." ClickOKto continue. 1."ConfirmApplicationServerandDatabaseServerdetails.Theyshouldbethesameinfoastheoneinthe application server configuration window. 2. Use thetest Connectionbuttons to verify the connection to the web server as well as to the database server. 3. ClickOK Installation is now complete ClickFinish 3.7DevTestClient&AdminInstallation DevTest Client installation begins ClickNext Confirm installation directory ClickNext Page 31 of 62
32 Confirm installation directory ClickNext DevSuite V9/ DevTest V5 Installation Guide Select if install will be for Client & Admin or Client only (In this guide we are installing both the client and the Admin as an example) ClickNext Web Service connection window will appear 1." Confirm URL is accurate. It should behttp://{servername}/devtestadminservice/dttdataservice.asmx 2. Test Connection 3. ClickOK Client installation is now complete ClickFinish 3.8DevTestMailServiceInstallation Page 32 of 62
33 3.8DevTestMailServiceInstallation DevTest Mail Service installation begins ClickNext Confirm installation directory ClickNext Server Configuration appears 1." Confirm Application Server and Database details are accurate 2. Test connections 3. ClickOK Mail service installation is now complete ClickFinish Installation wizard screen appears, confirming that all selected components have now been installed. ClickNext Page 33 of 62
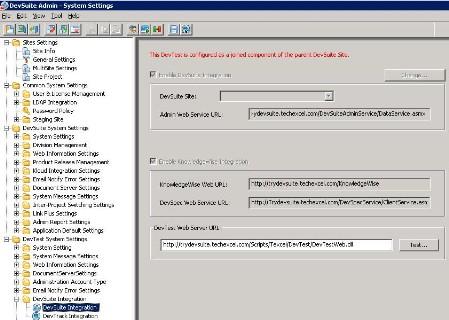
34 Installation wizard screen appears, confirming that all selected components have now been installed. DevSuite V9/ DevTest V5 Installation Guide ClickNext Installation is now complete and confirmation screen appears ClickNext ClickFinishto exit Chapter4DevSuite-DevTest Integration Guide 4.1UnderstandingDevSuite-DevTest Integration Although DevSuite officially consists of KnowledgeWise, DevSpec, DevPlan, DevTrack and DevTest, currently DevTest is always installed using a separate database to the other applications. For this reason it is necessary to do a small amount of configuration after installation to enable DevSuite and DevTest to share the same admin console as well as information such as license and user data. The integration also provides the ability to link requirements, specifications or knowledge items created in DevSpec to test templates in DevTest. We do this by joining DevTest as a component site to the Master site DevSuite. 4.2GuidetoAdministeringDevSuite--DevTest Integration TojoinDevTestasacomponentsitetotheDevSuitefamily,weneedtofirstconfigurethesettingsinDevtest Application Server Configuration window and then perform site join in DevSuite Admin Client. 1.SetDevTestasacomponentsitetoDevSuite During the DevTest application server installation (or you can later bring this window up from the Start menu), intheparentdevsuitesysteminfosection,select"configureasacomponentofadevsuitesite"optionand specify the DevSuite application name. This could be the server host name, server IP or even the fully qualified domain name. Keep the port number to the default (8228) unless your DevSuite system is running under a different port. Use the Test button to confirm the connection. Once the connection is successfully make, the System Name would be automatically populated (by pulling the information from your DevSuite sytem) with the join status listed as "To be joined". Page 34 of 62 At this point if you bring up the DevSuite application configuration window, similar information regarding DevTest component system is also pre-populated:
35 ClickFinishto exit DevSuite V9/ DevTest V5 Installation Guide Chapter4DevSuite-DevTest Integration Guide 4.1UnderstandingDevSuite-DevTest Integration Although DevSuite officially consists of KnowledgeWise, DevSpec, DevPlan, DevTrack and DevTest, currently DevTest is always installed using a separate database to the other applications. For this reason it is necessary to do a small amount of configuration after installation to enable DevSuite and DevTest to share the same admin console as well as information such as license and user data. The integration also provides the ability to link requirements, specifications or knowledge items created in DevSpec to test templates in DevTest. We do this by joining DevTest as a component site to the Master site DevSuite. 4.2GuidetoAdministeringDevSuite--DevTest Integration TojoinDevTestasacomponentsitetotheDevSuitefamily,weneedtofirstconfigurethesettingsinDevtest Application Server Configuration window and then perform site join in DevSuite Admin Client. 1.SetDevTestasacomponentsitetoDevSuite During the DevTest application server installation (or you can later bring this window up from the Start menu), intheparentdevsuitesysteminfosection,select"configureasacomponentofadevsuitesite"optionand specify the DevSuite application name. This could be the server host name, server IP or even the fully qualified domain name. Keep the port number to the default (8228) unless your DevSuite system is running under a different port. Use the Test button to confirm the connection. Once the connection is successfully make, the System Name would be automatically populated (by pulling the information from your DevSuite sytem) with the join status listed as "To be joined". At this point if you bring up the DevSuite application configuration window, similar information regarding DevTest component system is also pre-populated: 2."JoinDevTestasacomponentsiteinDevSuiteAdminClient Launch DevSuite Admin Client and log in with your Administrator account. You should see DevSuite and DevTest listed as available sites in the background upon login. Use the "Open Project" icon or File--> Open Project menu to launch the project selection window. Note that twosystemswouldbelistedrespectivelyonthetop.whenselectingtechexceldevsuitesystem,all theknowledgewise,devspec,devtrackprojectsaredisplayedbelow,whileselectingtechexceldevtest system gives you accesss to all available DevTest template and work projects. Note that after the site join, you willnolongerseethesystemselectionsection.instead,alldevsuiteanddevtestprojectswillbelisted alltogether in the project selection pane. Select TechExcel DevTest system and once the project selection pane refreshes to display the DevTest projects,thengotosystemsettings. Page 35 of 62
36 system gives you accesss to all available DevTest template and work projects. Note that after the site join, you willnolongerseethesystemselectionsection.instead,alldevsuiteanddevtestprojectswillbelisted alltogether in the project selection pane. Select TechExcel DevTest system and once the project selection pane refreshes to display the DevTest projects,thengotosystemsettings. IntheDevTestSystemSettingsproject,gotoSiteSettings--> Site Info. Click on the Join button underneath the Current System section, as shown below. A warning message stating that the component join might require some time, thus you need to make sure the connection timeout defined in IIS is sufficient. HowdoIcofigureIISconnectiontimout? To change the connection timeout setting in IIS 6, right click on Default Web Site and select Properties. Extend your connection timout seconds in the Web Site tab. TochangetheconnectiontimeoutsettinginIIS7,selecttheDefaultWebSiteandintheActionspane,select Advanced Settings. Extend your connection timout seconds in the Connection Limits section: Page 36 of 62
37 TochangetheconnectiontimeoutsettinginIIS7,selecttheDefaultWebSiteandintheActionspane,select Advanced Settings. Extend your connection timout seconds in the Connection Limits section: DevSuite V9/ DevTest V5 Installation Guide What if I don't see the Join button? MakesurethesystemAdminaccounttypeyoubelongtodoescarrytheprivilegeformultisitemanagement. Tocheckwhatsystemaccounttypeyoubelongto,launchDevSuiteUserManagerandlocateyouraccount. You can locate the system admin account type info in the User Information tab. ThenopenDevTestSystemSettingsprojectandgotoAdministrationAccountType--> System Account Type page. Select the system account type you belong to and make sure "multisite management" privilege is checked. Go back to the Site Info page and you should see the Join button now. 3.SiteJoinProcess The component join process would start to take place after the "OK" confirmation button is pressed in step 2. The first half part of the join mainly involves resolving the user ID as well as the project ID conflict between the two sites, as the user IDs and the project IDs now have to be unique across two systems. Therefore, when the systemdetectsanidoverlap,anewidwillbeassignedtotheitem(itcouldbeauseroraproject)inthe componentsite. Page 37 of 62 Follow the site join wizard to complete the join process. Note that it's possible that you won't see all the windows listed below.
38 3.SiteJoinProcess The component join process would start to take place after the "OK" confirmation button is pressed in step 2. The first half part of the join mainly involves resolving the user ID as well as the project ID conflict between the two sites, as the user IDs and the project IDs now have to be unique across two systems. Therefore, when the DevSuite V9/ DevTest V5 Installation Guide systemdetectsanidoverlap,anewidwillbeassignedtotheitem(itcouldbeauseroraproject)inthe componentsite. Follow the site join wizard to complete the join process. Note that it's possible that you won't see all the windows listed below. --Check if any of the existing users in DevTest are new users in DevSuite. --ResolvingprojectIDconflict --Resolving user ID conflict by updating user IDs in the component site --Joining DevTest to the DevSuite system Page 38 of 62
39 --Joining DevTest to the DevSuite system DevSuite V9/ DevTest V5 Installation Guide Once you click the Finish button, you will be prompted with the message informing you that the join has been done successfully. 4.3GuidetoenablingDevSpec/KnowledgeWise integration in DevTest Once DevTest site has been set up as a component site to the DevSuite system, the following can be performed to enable DevSpec/KnowledgeWise integration. 1. Enable DevSuite Integration in DevTest System Settings InDevSuiteAdmin,openSystemSettingsproject.UnderDevTestSystemSettings>DevSuiteIntegration> DevSuiteIntegrationpage,youshouldnowseethemessageindicatingthatDevTestisconfiguredasajoined componentoftheparentdevsuitesite. Select the "Enable KnowledgeWise Integration" check box. Make sure the KnowledgeWise Web URL and the DevSpec Web Service URL are specified correctly. 2. DevTest--AssociateDevTesttemplateprojectswithDevSpecandKnowledgeWiseprojects Goto'File','Openproject',andopenthe'templatebase'projectyouwanttointegratewithDevSpec. The 'work projects' linked to this 'template base' project will be associated automatically. Go to the 'Overview' page. Click the lower 'Change' button. Select a KnowledgeWise project. Tick the 'Enable DevSpec Integration' box. Select a DevSpec project. Click 'OK'. Page 39 of 62
40 Go to the 'Overview' page. Click the lower 'Change' button. Select a KnowledgeWise project. Tick the 'Enable DevSpec Integration' box. Select a DevSpec project. Click 'OK'. 3. DevTest--Addthe'AllLinks'pagetotheTemplateView In the template base project, go to 'Template GUI Settings', 'Function Pages', 'Detail Pages'. Add 'All links' page to the working page section. Repeat these steps for the 'Editing Pages'. 4. DevTest--Addthe'AllLinks'pagetotheTaskView Intheworkproject,goto'TestTaskGUISettings','FunctionPages','DetailPages'. Add 'All links' page to the working page section. Reload the Web Settings. Note: You may need to restart the server in order to get the 'All Links' pages to show. Chapter5MicrosoftSQLServerExpressInstallation Guide 5.1SystemRequirements Installing Microsoft SQL Server Express on a computer is an easy process that combines the download and installation into one simple step. Before proceeding, please be aware of the following system requirements: Supported Operating Systems Physical Limitations Windows Server 2003 Service Pack 2 Windows Server 2008 Windows Vista Windows Vista Service Pack 1 Windows XP Service Pack 2 Windows XP Service Pack 3 32-Bit Systems: Computer with Intel or compatible 1GHz or faster processor (2 GHz or faster is recommended. Only a single processor is supported.) 64-Bit systems: Computer with Intel or compatible 1.4 GHz or higher processor (2 GHz or faster is recommended. Only a single processor is supported.) Minimum of 512 MB of RAM (1 GB or more is recommended) Page 40 of 62
41 Note: You may need to restart the server in order to get the 'All Links' pages to show. Chapter5MicrosoftSQLServerExpressInstallation Guide 5.1SystemRequirements Installing Microsoft SQL Server Express on a computer is an easy process that combines the download and installation into one simple step. Before proceeding, please be aware of the following system requirements: Supported Operating Systems Physical Limitations Windows Server 2003 Service Pack 2 Windows Server 2008 Windows Vista Windows Vista Service Pack 1 Windows XP Service Pack 2 Windows XP Service Pack 3 32-Bit Systems: Computer with Intel or compatible 1GHz or faster processor (2 GHz or faster is recommended. Only a single processor is supported.) 64-Bit systems: Computer with Intel or compatible 1.4 GHz or higher processor (2 GHz or faster is recommended. Only a single processor is supported.) Minimum of 512 MB of RAM (1 GB or more is recommended) 1.9GB of free hard disk space SQL Server Express requires Microsoft.NET Framework 2.0. However, if this is not installed on your computer, this will be detected during the download and installation process and.net Framework 2.0 will be installed, as well. 5.2DownloadfromMicrosoftWebsite Begin the download of SQL Server Express by going to the following URL, and clicking on theinstall It Nowbutton. In the newly opened window, click the button to download and install the Microsoft Web Platform installer." This tool will combine the download and installation of SQL Server Express into one simple step. When prompted to run or save the file, click therunbutton. 5.3.NETFramework2.0DownloadandInstall If Microsoft.NET Framework 2.0 is not yet installed on your computer, the installer will detect this, and prompt you to download and install this along with SQL Server Express. If you see this dialog, click theokbutton.if Microsoft.NET Framework 2.0 is already installed on your computer, simply clickcanceland proceed with installing SQL Server Express. A new dialog will appear to begin the installation of.net Framework 2.0." Click thenextbutton to continue. Page 41 of 62 Accept the terms of the license agreement, and click theinstallbutton.
42 installing SQL Server Express. A new dialog will appear to begin the installation of.net Framework 2.0." Click thenextbutton to continue. DevSuite V9/ DevTest V5 Installation Guide Accept the terms of the license agreement, and click theinstallbutton..net Framework 2.0 will now be installed on your computer."installation should last only a few minutes to complete. When done, click thefinishbutton to continue with the installation of SQL Server Express. 5.4SQLServerExpressDownloadandInstall The Web Platform Installer will automatically open to prepare the download and installation of SQL Server Express. Page 42 of 62
43 5.4SQLServerExpressDownloadandInstall The Web Platform Installer will automatically open to prepare the download and installation of SQL Server Express. DevSuite V9/ DevTest V5 Installation Guide 5.4.1Setup 5.4.2Installation 5.5PostInstallationConfiguration It is recommended to install SQL Server Management Studio Express on your computer as well. It is a tool for configuring, managing, and administering all components within Microsoft SQL Server Express. The tool includes both script editors and graphical tools which work with objects and features of the server. By default, SQL Server Management Studio Express is not selected to be included in the installation. To add this tool, simply click on thewhat s Newtab, and then check the box next to SQL Server Management Studio Express. Click theinstallbutton to continue. You will be quickly asked to confirm the components that are to be installed." Click thei Acceptbutton to continue. You will now be required to create a username and password for the SQL server." SelectMixed Mode Authentication, and define a password for thesa(system administrator) account. The password must contain at least one lowercase letter, one capital letter, one number, and one non-alphanumeric character #, $, etc.). Click thecontinuebutton to begin the download and installation of SQL Server Express TCP/IP 5.5.2SQLServerBrowserService Chapter6IISConfigurationGuide Page 43 of 62
44 5.5.1TCP/IP 5.5.2SQLServerBrowserService Chapter6IISConfigurationGuide 6.1Introduction TechExcel products require IIS and.net 2.0 or higher to be installed in order to function properly.these should be installed before any of the TechExcel components are installed. This guide will walk you through the installation and configuration steps. Note: IIS must be installed first, and then.net.if it is the other way around, you will need to run a repair or reinstallof.net 6.2IISInstallation Go to Control Panels / Add-Remove Programs and select Application Server (this will contain the IIS install components). Click Details. Select Internet Information Services (IIS).Note: This may also prompt you to include Application Server Console if it was not previously installed. Once installed, click Next Page 44 of 62
45 5.5.1TCP/IP 5.5.2SQLServerBrowserService Chapter6IISConfigurationGuide 6.1Introduction TechExcel products require IIS and.net 2.0 or higher to be installed in order to function properly.these should be installed before any of the TechExcel components are installed. This guide will walk you through the installation and configuration steps. Note: IIS must be installed first, and then.net.if it is the other way around, you will need to run a repair or reinstallof.net 6.2IISInstallation Go to Control Panels / Add-Remove Programs and select Application Server (this will contain the IIS install components). Click Details. Select Internet Information Services (IIS).Note: This may also prompt you to include Application Server Console if it was not previously installed. Once installed, click Next Page 45 of 62
46 Once installed, click Next You may be prompted for to provide an Installation CD. Most systems will have a directory named C:\i386.You may need to actually browse for it, so that it is recognized properly.if that is not located on your server, you may need the actual Microsoft Installation CD. The IIS installation is now complete. You can navigate to the IIS Manager through the start menu or through the Control Panels / Administrative Tools. Page 46 of 62
47 You can navigate to the IIS Manager through the start menu or through the Control Panels / Administrative DevSuite V9/ DevTest V5 Installation Guide Tools. 6.3InstallorRepair.Net2.0(orhigher) If you previously had.net 2.0 or higher installed, you will need to run a Repair on the installation to get it to the proper state required for use with TechExcel products.this can be done by going to the Control Panels / Add-Remove Programs and clicking Remove. The Repair process begins: The Repair process continues: Page 47 of 62
48 The Repair process continues: DevSuite V9/ DevTest V5 Installation Guide.Net Repair or installation is complete. If you did not previously have.net installed, or a version prior to 2.0, you will need to install.net 2.0 or higher.this can be downloaded from Microsoft.The package is calledmicrosoft.net Framework Version 2.0 Redistributable Package Once the.net installation is complete, you will need to confirm thatasp.netis shown in the list of Web Service Extensions as well as having a Status ofallowed.by default it will likely have a status ofprohibitedand will therefore need to be updated. Note: It is also important that the other two following items are also changed to anallowedstatus: 1. All Unknown ISAPI Extensions 2. Active Server Pages Once these items have been properly updated, they will appear as follows: Page 48 of 62
49 Once these items have been properly updated, they will appear as follows: Lastly, confirm that the web site is utilizing the correct.net version. 6.4IISfolderpermissions There are a few IIS related folders that require special permissions for various functions of TechExcel products. 1..Net Framework directory 2. Temp directory Ensure that the.net Framework folder hasreadpermissions for thenetwork Serviceaccount that the TechExcel web services require: The C:\Windows\Temp folder requires certain accounts to have full access to the folder.bring up the folder properties of the Temp folder and view the Security tab: Page 49 of 62
50 The C:\Windows\Temp folder requires certain accounts to have full access to the folder.bring up the folder properties of the Temp folder and view the Security tab: SelectAddand theselect User or Groupswindow appears: If the location is not the local server, click Locations and specify it. ClickOK. Click Advanced ClickFind Nowto bring us all users: Page 50 of 62
51 ClickFind Nowto bring us all users: DevSuite V9/ DevTest V5 Installation Guide Select the following users: Authenticated Users, IIS_WPG, IUSR_MACHINENAME, IWAM_MACHINENAME, Network Service Click OK. Selected users will be displayed. Confirm and click OK. Ensure that the selected users havefull Control Once this is completed, perform and IISRESET from the command line or restart the IIS Admin service from the Services Control Panel. Page 51toof If you are not running more than one TechExcel product on a single web server, you may now proceed the62 TechExcel Installation. If you are running multiple TechExcel products that require the same web server, we recommend using
52 Once this is completed, perform and IISRESET from the command line or restart the IIS Admin service from the Services Control Panel. If you are not running more than one TechExcel product on a single web server, you may now proceed to the TechExcel Installation. If you are running multiple TechExcel products that require the same web server, we recommend using Application Pools to optimize performance.however, before we proceed to this step, please proceed to the TechExcel installation and then return to this guide to complete the configuration of Application Pools. 6.5ApplicationPoolConfiguration Application Pools are created to define and separate processing for a set of web applications.configuration is as follows: From the IIS Manager, create a new application pool for your secondary TechExcel application by right-clicking on the Application Pools folder and selectingnew& then selectingapplication Pool. Choose a name for the new application pool with an appropriate name that corresponds to your TechExcel application. Note:FortheDevTrackproduct,werecommendtousetheDefaultapplicationpool.Theotherproducts shouldbesplitintoanewapplicationpool.fordevtest,avirtualpathcalledtxtdownloadshouldbecreated and pointing to c:\inetpub\wwwroot. Once the new application pool is created, it will show up in the list of application pools: Page 52 of 62
53 The TechExcel web components (other than DevTrack) will now need to be configured to use the newly created application pool. Below is a list of virtual directories & web services for TechExcel applications, that should use application pools. Application DevTrack DevTrack/DevSuite DevSpec DevPlan DevTest ServiceWise SW Staging Site ServiceWiseProjectPlan CustomerWise CW Staging Site CustomerWise ProjectPlan All Applications Application Pool Name Default Application Pool Default Application Pool Default Application Pool Default Application Pool DevTest Application Pool ServiceWise Application Pool CustomerWise Application Pool Default Application Pool Application or Service Scripts/texcel/DevTrack DevTrackWeb PTWeb DevSuiteAdminService DTFileUploadService DevSpecService DevPlanService Scripts/texcel/DevTest DevTestAdminService TxTDownload (must be manually created and pointed to c:\inetpub\wwwroot) Scripts/texcel/ServiceWise TxSWWebService Scripts/texcel/ServiceWiseStage TxSWStageWebService TxSWProjectPlan Scripts/texcel/CustomerWise TxCWWebService Scripts/texcel/CustomerWiseStage TxCWStageWebService TxCWProjectPlan KnowledgeWiseWeb 6.6 How to associate an application pool to a virtual directory or web service Under the Web Sites / Default WebSite (or other defined site), you will see the components that need to be associated with application pools. These are marked with the Gear icon. Page 53 of 62
54 : Right-click on each component and change the application pool to the newly defined pool that was created: Also, ensure that the folders underneath scripts (i.e. Devtrack, Customerwise, etc) need to use their own pool. To associate the new pool to the application, go to the properties of the Application folder, click Create in Application Settings. Then select the application pool to be used: Page 54 of 62
55 Once all application pool configuration and associations are done, restart the IIS Admin service, through the services manager. Configuration is now complete. Page 55 of 62
56 Chapter 7 IIS 7 Installation and Configuration Guide 7.1 Installation To install IIS 7.0 on windows Vista and Windows 2008, please refer to: You can navigate to the IIS Manager through the start menu or through the Control Panels / Administrative Tools. 7.2 Configuration In IIS 7.0, there is no IIS 6.0 item calledweb Service Extensions.Instead, to enable such extensions you will have to navigate to several places to make the adjustments. Click onisapi and CGI Restrictionsat the serverlevel. SelectASP.NET v2.0and click onedit Feature Settings. Page 56 of 62
57 CheckAllow unspecified ISAPI modules. Navigate to thedefault Web Siteand double click onhandler Mappings. Click onedit Feature Permissions. Page 57 of 62
58 CheckRead,ScriptandExecute Enabling 32-bit Applications 7.3 Folder Permissions If your IIS 7 is running on a 64-bit machine, please make sure that the application pools allows 32-bit applications to run on it. In the Advanced Settings window, change 'Enable 32-Bit Applications' to True so that the worker process(es) serving the application pool will be in WOW64 mode. Page 58 of 62
59 7.4 Application Pool Configuration There are a few IIS related folders that require special permissions for various functions of TechExcel products. 1).Net Frameworkdirectory 2) Tempdirectory Ensure that the.net Framework folder hasreadpermissions for thenetwork Serviceaccount that the TechExcel web services require. TheC:\Windows\Tempfolder requires certain accounts to have full access to the folder.bring up the folder properties of thetempfolder and view thesecuritytab. Page 59 of 62
60 SelectAddand theselect User or Groupswindow appears. If the location is not the local server, clicklocationsand specify it. ClickOK. ClickAdvanced. ClickFind Nowto show all users. Page 60 of 62
61 Select the following users: Authenticated Users, IIS_IUSRS, IUSR, NETWORK SERVICE ClickOK. Selected users will be displayed. Confirm and clickok. Ensure that the selected users havefull Controlchecked underallow. Once this is completed, perform an IIS reset from the command line or restart the IIS Admin Page 61 of 62


62 service from the services control panel. If you are not running more than one TechExcel product on a single web server, you may now proceed to the TechExcel Installation. If you are running multiple TechExcel products that require the same web server, we recommend using Application Pools to optimize performance. However, before we proceed to this step, please proceed to the TechExcel installation and then return to this guide to complete the configuration of Application Pools Associating an Application Pool Page 62 of 62
Installation Guide. Table of Content. Installation Guide. Author: TechExcel co.ltd. Date: Installation Guide
 Installation Guide Author: TechExcel co.ltd Date: Table of Content Installation Guide Chapter 1 DevSuite Installation Guide 1 DevSuite Installation Guide 1.1 TechExcel DevSuite Installation Guide 1.2 Downloading
Important notice regarding accounts used for installation and configuration
 System Requirements Operating System Nintex Reporting 2008 can be installed on Microsoft Windows Server 2003 or 2008 (32 and 64 bit supported for both OS versions). Browser Client Microsoft Internet Explorer
DevSuite Admin Guide. Date:
 DevSuite Admin Guide Author: TechExcel co.ltd Date: Table of Content DevSuite Admin Guide DevSuite Overview and Common System Settings Chapter 1 Chapter 1- Understanding TechExcel DevSuite 1.1 Understanding
NBC-IG Installation Guide. Version 7.2
 Installation Guide Version 7.2 2017 Nuance Business Connect 7.2 Installation Guide Document Revision History Revision Date August 8, 2017 Revision List Updated supported SQL Server versions June 14, 2017
Status Web Evaluator s Guide Software Pursuits, Inc.
 Status Web Evaluator s Guide 2018 Table of Contents Introduction... 2 System Requirements... 2 Contact Information... 2 Installing Microsoft IIS... 2 Verifying Microsoft IIS Features... 9 Installing the
Installation Guide Worksoft Analyze
 Installation Guide Worksoft Analyze Worksoft, Inc. 15851 Dallas Parkway, Suite 855 Addison, TX 75001 www.worksoft.com 866-836-1773 Worksoft Analyze Installation Guide Version 1.0.0 Copyright 2018 by Worksoft,
Partner Integration Portal (PIP) Installation Guide
 Installation Guide") Partner Integration Portal (PIP) Installation Guide Last Update: 12/3/13 Digital Gateway, Inc. All rights reserved Page 1 TABLE OF CONTENTS INSTALLING PARTNER INTEGRATION PORTAL (PIP)... 3 DOWNLOADING
Partner Integration Portal (PIP) Installation Guide Last Update: 12/3/13 Digital Gateway, Inc. All rights reserved Page 1 TABLE OF CONTENTS INSTALLING PARTNER INTEGRATION PORTAL (PIP)... 3 DOWNLOADING
Reconfiguring VMware vsphere Update Manager. 17 APR 2018 VMware vsphere 6.7 vsphere Update Manager 6.7
 Reconfiguring VMware vsphere Update Manager 17 APR 2018 VMware vsphere 6.7 vsphere Update Manager 6.7 You can find the most up-to-date technical documentation on the VMware website at: https://docs.vmware.com/
High Availability Failover. Version 1.0
 High Availability Failover Version 1.0 CONTENTS High Availability Failover High Availability Failover (Active/Active) 2 Prerequisites 2 STEP 1: DB Replication Server Setup 2 STEP 2: Configure the MySQL
29 March 2017 SECURITY SERVER INSTALLATION GUIDE
 29 March 2017 SECURITY SERVER INSTALLATION GUIDE Contents 1. Introduction... 2 1.1 Assumptions... 2 1.2 Prerequisites... 2 2. Required setups prior the Security Server Installation... 3 1.1 Create domain
Migrating to MIL-Comply SQL Server Edition
 Migrating to MIL-Comply SQL Server Edition Step by step instructions for migrating MIL-Comply s local database to Microsoft SQL Server or SQL Server Express. Pre-start Checklist: The following items must
Installation of Microsoft SQL Server 2012 Setup MwPharm++ database
 Installation of Microsoft SQL Server 2012 Setup MwPharm++ database Datum: 12/15/2015 Strana: 1 Title Installation of Microsoft SQL Server 2012 & Setup MwPharm++ DB Author George Dousa Document No. 1.02
AppWizard Installation/Upgrade Guide (v.4.00)
") AppWizard Installation/Upgrade Guide (v.4.00) Last Updated: 15 September 2010 1 Introduction This manual is intended for the installation or upgrade of AppWizard 5.00. Please ensure that all steps are
AppWizard Installation/Upgrade Guide (v.4.00) Last Updated: 15 September 2010 1 Introduction This manual is intended for the installation or upgrade of AppWizard 5.00. Please ensure that all steps are
Reconfiguring VMware vsphere Update Manager. Update 1 VMware vsphere 6.5 vsphere Update Manager 6.5
 Reconfiguring VMware vsphere Update Manager Update 1 VMware vsphere 6.5 vsphere Update Manager 6.5 You can find the most up-to-date technical documentation on the VMware website at: https://docs.vmware.com/
ControlPoint. Installation Guide for SharePoint August 23,
 ControlPoint Installation Guide for SharePoint 2007 August 23, 2017 www.metalogix.com info@metalogix.com 202.609.9100 Copyright International GmbH., 2008-2017 All rights reserved. No part or section of
DOCUMENT REVISION HISTORY
 DOCUMENT REVISION HISTORY Rev. No. Changes Date 000 New Document 10 Jan. 2011 001 Document Revision: 06 Jun. 2011 - Addition of section on MYSQL backup and restore. 002 Document Revision: 22 Jul. 2011
ControlPoint. Advanced Installation Guide. September 07,
 ControlPoint Advanced Installation Guide September 07, 2017 www.metalogix.com info@metalogix.com 202.609.9100 Copyright International GmbH., 2008-2017 All rights reserved. No part or section of the contents
Password Reset Server Installation
 Password Reset Server Installation Vista/Server 08 and Windows 7/Server 2008 R2 Table of Contents I. Requirements... 4 A. System Requirements... 4 B. Domain Account Requirements... 5 C. Recommendations...
Prophet 21 Middleware Installation Guide. version 12.16
 version 12.16 Disclaimer This document is for informational purposes only and is subject to change without notice. This document and its contents, including the viewpoints, dates and functional content
Working with SQL SERVER EXPRESS
 Table of Contents How to Install SQL Server 2012 Express Edition... 1 Step 1.... 1 Step 2.... 2 Step 3.... 3 Step 4.... 3 Step 5.... 4 Step 6.... 5 Step 7.... 5 Step 8.... 6 Fixing Database Start-up Connection
BPM Installation & Configuration Guide
 BPM Installation & Configuration Guide Product Documentation 19 October 2012 Issue 1.0 This edition applies to Version 8.0.5 of the Lagan ECM product suite. Make sure you are using the correct edition
dotdefender for IIS Installation Guide
 dotdefender for IIS Installation Guide Installation Process The installation guide contains the following sections: System Requirements Installing dotdefender System Requirements dotdefender operation
LiveNX Upgrade Guide from v5.2.0 to v5.2.1
 LIVEACTION, INC. LiveNX Upgrade Guide from v5.2.0 to v5.2.1 UPGRADE LiveAction, Inc. 3500 Copyright WEST BAYSHORE 2016 LiveAction, ROAD Inc. All rights reserved. LiveAction, LiveNX, LiveUX, the LiveAction
VMware AirWatch Database Migration Guide A sample procedure for migrating your AirWatch database
 VMware AirWatch Database Migration Guide A sample procedure for migrating your AirWatch database For multiple versions Have documentation feedback? Submit a Documentation Feedback support ticket using
Installation Guide. Last Revision: Oct 03, Page 1-
 Installation Guide Last Revision: Oct 03, 2005 -Page 1- Contents Before You Begin... 2 Installation Overview... 2 Installation for Microsoft Windows 2000, Windows 2003, and Windows XP Professional... 3
External Data Connector for SharePoint
 External Data Connector for SharePoint Last Updated: July 2017 Copyright 2014-2017 Vyapin Software Systems Private Limited. All rights reserved. This document is being furnished by Vyapin Software Systems
Jonas Activity Management Technical Deployment Guide
 Jonas Activity Management Technical Deployment Guide [] Software for Life Jonas Activity Management Technical Deployment Guide, Jonas, Jonas Software, Software for Life, and Gary Jonas Computing are registered
Workspace Administrator Help File
 Workspace Administrator Help File Table of Contents HotDocs Workspace Help File... 1 Getting Started with Workspace... 3 What is HotDocs Workspace?... 3 Getting Started with Workspace... 3 To access Workspace...
Perceptive Matching Engine
 Perceptive Matching Engine Installation and Setup Guide Version: 1.0.x Written by: Product Development, R&D Date: March 2018 2018 Hyland Software, Inc. and its affiliates. Table of Contents Overview...
TGWeb. Step 1: Installer Files Step 2: Installing JAVA Runtime Step 3: Installing Apache/Tomcat Step 4: MSSQL Setup Step 5: DBSelect Utility
 Web Step 1: Installer Files Step 2: Installing JAVA Runtime Step 3: Installing Apache/Tomcat Step 4: MSSQL Setup Step 5: DBSelect Utility Web Assumptions You have received an email with ftp links to the
Setting up and Connecting to a MSSQL database
 Setting up and Connecting to a MSSQL database Setting Up MSSQL... 1 SQL Server Instance... 1 Why do we need socdbconnect and socadminuser?... 1 On the Client... 1 Creating an ODBC Data Source... 1 Setting
Silk Performance Manager Installation and Setup Help
 Silk Performance Manager 18.5 Installation and Setup Help Micro Focus The Lawn 22-30 Old Bath Road Newbury, Berkshire RG14 1QN UK http://www.microfocus.com Copyright 2004-2017 Micro Focus. All rights reserved.
KYOCERA Net Admin Installation Guide
 KYOCERA Net Admin Guide Legal Notes Unauthorized reproduction of all or part of this guide is prohibited. The information in this guide is subject to change without notice. We cannot be held liable for
Scribe Insight Installation Guide. Version August 10, 2011
 Scribe Insight Installation Guide Version 7.0.2 August 10, 2011 www.scribesoft.com Important Notice No part of this publication may be reproduced, stored in a retrieval system, or transmitted in any form
Managing the CaseMap Admin Console User Guide
 Managing the CaseMap Admin Console User Guide CaseMap Server, Version 2.3 Accessing the CaseMap Admin Console Registering CaseMap Servers Registering SQL Servers Setting Up Roles and Users Managing SQL
Symantec Ghost Solution Suite Web Console - Getting Started Guide
 Symantec Ghost Solution Suite Web Console - Getting Started Guide Symantec Ghost Solution Suite Web Console- Getting Started Guide Documentation version: 3.3 RU1 Legal Notice Copyright 2019 Symantec Corporation.
Microsoft SQL Server 2014
 PersonalEffect Microsoft SQL Server 2014 Installation Guide Notices 2015 XMPie Inc. All rights reserved. U.S. Patents 6948115, 7406194, 7548338, 7757169 and pending patents. JP Patent 4406364B and pending
SMEC ASSET MANAGEMENT SYSTEM PMS Version 5.5. System Administrator s Guide
 SMEC ASSET MANAGEMENT SYSTEM PMS Version 5.5 System Administrator s Guide January 2015 PREPARATION, REVIEW AND AUTHORISATION Revision # Date Prepared by Reviewed by Approved for Issue by 1 21-Jan-2015
DefendX Software Control-Audit for Hitachi Installation Guide
 DefendX Software Control-Audit for Hitachi Installation Guide Version 4.1 This guide details the method for the installation and initial configuration of DefendX Software Control-Audit for NAS, Hitachi
Millennium Expert/Enterprise Installation Guide Version Table of Contents
 Millennium Expert/Enterprise Installation Guide Version 5.0.3599 Table of Contents Section Page Installing Microsoft SQL Server 2 Installing Millennium Server software 9 Installing Millennium Databases
COINS Ti Call Management System Standard Installation Instructions for Citrix Users
 COINS Ti Call Management System Standard Installation Instructions for Citrix Users COINS recommends that the System Administrator or staff trained in both UNIX and Citrix installation processes perform
NTP Software File Auditor for Windows Edition
 NTP Software File Auditor for Windows Edition An NTP Software Installation Guide Abstract This guide provides a short introduction to installation and initial configuration of NTP Software File Auditor
ControlPoint. Quick Start Guide. November 09,
 ControlPoint Quick Start Guide November 09, 2017 www.metalogix.com info@metalogix.com 202.609.9100 Copyright International GmbH., 2008-2017 All rights reserved. No part or section of the contents of this
This Quick Start describes how to use Bocconi Cloud Service, called Filr in the rest of the document, from your Windows desktop.
 Quick Start Bocconi Cloud Service, based on Novell Filr, allows you to easily access all your files and folders from your desktop, browser, or a mobile device. In addition, you can promote collaboration
BACKUP APP V7 QUICK START GUIDE FOR SYNOLOGY NAS
 BACKUP APP V7 QUICK START GUIDE FOR SYNOLOGY NAS Revision History Date Descriptions Type of modification 29 Jun 2016 First Draft New 25 Nov 2016 Modified Ch 3 Download Backup App, Ch 3 Install Backup App
New World ERP-eSuite
 New World ERP-eSuite 2018.1 INSTALLATION GUIDE April 9, 2018 Review important information for installing this release: SSL is required for esuite Services and Website servers. 2018 Tyler Technologies.
Building Block Installation - Admins
 Building Block Installation - Admins Overview To use your Blackboard Server with Panopto, you first need to install the Panopto Building Block on your Blackboard server. You then need to add Blackboard
Application Notes for Installing and Configuring Avaya Control Manager Enterprise Edition in a High Availability mode.
 Application Notes for Installing and Configuring Avaya Control Manager Enterprise Edition in a High Availability mode. Abstract This Application Note describes the steps required for installing and configuring
Using vrealize Operations Tenant App as a Service Provider
 Using vrealize Operations Tenant App as a Service Provider Using vrealize Operations Tenant App as a Service Provider You can find the most up-to-date technical documentation on the VMware Web site at:
APPENDIX B: INSTALLATION AND SETUP
 APPENDIX B: INSTALLATION AND SETUP Page A. Overview... B:1 How do I install and setup ICMS?... B:1 Do I need special security rights to install ICMS?... B:1 Installation Basics... B:1 How do I get a quick
Sharpdesk V3.3. Push Installation Guide for system administrator Version
 Sharpdesk V3.3 Push Installation Guide for system administrator Version 3.3.04 Copyright 2000-2010 by SHARP CORPORATION. All rights reserved. Reproduction, adaptation or translation without prior written
Installing and Configuring vcloud Connector
 Installing and Configuring vcloud Connector vcloud Connector 2.6.0 This document supports the version of each product listed and supports all subsequent versions until the document is replaced by a new
Desktop Deployment Guide
 ARGUS Enterprise 11.7.0 12/13/2017 ARGUS Enterprise 11.7.0 12/13/2017 Published by: ARGUS Software, Inc. 750 Town and Country Blvd Suite 800 Houston, TX 77024 Telephone (713) 621-4343 Facsimile (713) 621-2787
1 Installing the integration server
 1 Installing the integration server This document contains information about how to install the Rational DOORS for HP Quality Center Interface integration server. Installing the integration server also
ECM-VNA Convergence Connector
 ECM-VNA Convergence Connector Installation and Setup Guide Version: 1.0.x Written by: Product Knowledge, R&D Date: September 2016 2016 Lexmark. All rights reserved. Lexmark is a trademark of Lexmark International
ITCorporation HOW DO I INSTALL A FRESH INSTANCE OF ANALYZER? DESCRIPTION RESOLUTION. Knowledge Database KNOWLEDGE DATABASE
 KNOWLEDGE DATABASE HOW DO I INSTALL A FRESH INSTANCE OF ANALYZER? 3. Click on GMS/Analyzer - Virtual Appliance or GMS/Analyzer - Virtual Appliance 950GB under GMS - Virtual Appliance. Note: It is not recommended
SC-T35/SC-T45/SC-T46/SC-T47 ViewSonic Device Manager User Guide
 SC-T35/SC-T45/SC-T46/SC-T47 ViewSonic Device Manager User Guide Copyright and Trademark Statements 2014 ViewSonic Computer Corp. All rights reserved. This document contains proprietary information that
Enabling Smart Card Logon for Linux Using Centrify Suite
 DoD Public Key Enablement (PKE) Reference Guide Enabling Smart Card Logon for Linux Using Centrify Suite 2012.4 Contact: dodpke@mail.mil URL: http://iase.disa.mil/pki-pke/ URL: http://iase.disa.smil.mil/pki-pke/
ImageNow Interact for ESRI ArcGIS Server Installation and Setup Guide
 ImageNow Interact for ESRI ArcGIS Server Installation and Setup Guide Microsoft Windows.NET Framework Version: 6.6.x Written by: Product Documentation, R&D Date: November 2011 ImageNow and CaptureNow are
XIA Configuration Server
 XIA Configuration Server XIA Configuration Server v6 Cloud Services Quick Start Guide Tuesday, 20 May 2014 1 P a g e X I A C o n f i g u r a t i o n C l o u d S e r v i c e s Contents Overview... 3 Creating
Locate your Advanced Tools and Applications
 . phpmyadmin is a web-based application used to manage a MySQL database. It is free and open-source software. We have modified phpmyadmin so that it functions without errors on a shared hosting platform.
Deploying a System Center 2012 R2 Configuration Manager Hierarchy
 Deploying a System Center 2012 R2 Configuration Manager Hierarchy This document is for informational purposes only. MICROSOFT MAKES NO WARRANTIES, EXPRESS, IMPLIED, OR STATUTORY, AS TO THE INFORMATION
Sage X3 Intelligence Financial Reporting. Installation and Upgrade Guide
 Financial Reporting Installation and Upgrade Guide The software described in this document is protected by copyright, and may not be copied on any medium except as specifically authorized in the license
Sticky Notes for Cognos Analytics by Tech Data BSP Software
 Sticky Notes for Cognos Analytics by Tech Data BSP Software Installation Guide Sticky Notes for Cognos Analytics is an easy to install extension that allows report authors to record notes directly from
ROCK-POND REPORTING 2.1
 ROCK-POND REPORTING 2.1 Installation and Setup Guide Revised on 09/25/2014 TABLE OF CONTENTS ROCK-POND REPORTING 2.1... 1 SUPPORT FROM ROCK-POND SOLUTIONS... 2 ROCK-POND REPORTING OVERVIEW... 2 INFRASTRUCTURE
Integrating IBM Security Privileged Identity Manager with ObserveIT Enterprise Session Recording
 Integrating IBM Security Privileged Identity Manager with ObserveIT Enterprise Session Recording Contents 1 About This Document... 2 2 Overview... 2 3 Before You Begin... 2 4 Deploying ObserveIT with IBM
Installation and Upgrade Guide
 ControlPoint for Office 365 Installation and Upgrade Guide Publication Date:November 09, 2017 All Rights Reserved. This software is protected by copyright law and international treaties. Unauthorized reproduction
Proficy Plant Applications 7.0 Quick Install Guide (And Best Practices)
") Proficy Plant Applications 7.0 Quick Install Guide (And Best Practices) Installation Instructions Based on: Windows Server 2016 x64 Operating System SQL Server 2016 Standard (where applicable) Microsoft
Proficy Plant Applications 7.0 Quick Install Guide (And Best Practices) Installation Instructions Based on: Windows Server 2016 x64 Operating System SQL Server 2016 Standard (where applicable) Microsoft
Migrating vrealize Automation 6.2 to 7.1
 Migrating vrealize Automation 6.2 to 7.1 vrealize Automation 7.1 This document supports the version of each product listed and supports all subsequent versions until the document is replaced by a new edition.
Accops HyWorks v3.0. Installation Guide
 Accops HyWorks v3.0 Installation Guide Last Update: 4/25/2017 2017 Accops Technologies Pvt. Ltd. All rights reserved. The information contained in this document represents the current view of Propalms
IQSweb Installation Instructions Version 5.0
 IQSweb Installation Instructions Version 5.0 Contents Additional References... 3 IQSweb ROSS Connection... 3 IQSweb V5.0 Install/Upgrade Scenarios... 4 IQSweb Configuration Options... 5 A. Single Computer/Server
VMware Skyline Collector Installation and Configuration Guide. VMware Skyline 1.4
 VMware Skyline Collector Installation and Configuration Guide VMware Skyline 1.4 You can find the most up-to-date technical documentation on the VMware website at: https://docs.vmware.com/ If you have
ServiceWise User Guide. Date:
 ServiceWise User Guide Author: TechExcel co.ltd Date: Table of Content ServiceWise User Guide Chapter 1 ServiceWise Concepts 1 Chapter 1 -- ServiceWise Concepts 1.1 Understanding ServiceWise 1.1.1 ServiceWise
Application Server The following programs must be preinstalled on the application server before installing BizView:
 BizView INSTALLATION DESCRIPTION BizView INSTALLATION DESCRIPTION... 1 BizView installation... 1 Prerequisites... 1 Preparations to fulfill prerequisites... 2 Install IIS... 3 Install.Net Framework...
Installation Guide. for 6.5 and all add-on modules
 Kaseya Server Setup Installation Guide for 6.5 and all add-on modules February 11, 2014 Agreement The purchase and use of all Software and Services is subject to the Agreement as defined in Kaseya s Click-Accept
Perceptive TransForm E-Forms Manager
 Perceptive TransForm E-Forms Manager Installation and Setup Guide Version: 8.x Date: February 2017 2016-2017 Lexmark. All rights reserved. Lexmark is a trademark of Lexmark International Inc., registered
ZENworks Service Desk 8.0 Using ZENworks with ZENworks Service Desk. November 2018
 ZENworks Service Desk 8.0 Using ZENworks with ZENworks Service Desk November 2018 Legal Notices For information about legal notices, trademarks, disclaimers, warranties, export and other use restrictions,
AT&T Core Mobility Integrated Dispatch Console User Guide. Installation Guide. AT&T Integrated Dispatch Console 3.0
 Installation Guide AT&T Integrated Dispatch Console 3.0 October 2016 Table of Content 1. Introduction... 3 1.1. Purpose and Scope... 3 1.2. Terms and Definitions... 3 1.3. About this Manual... 5 1.4. What
AUTODESK DATA MANAGEMENT SERVER. Advanced Configuration Guide for Autodesk data management server
 AUTODESK DATA MANAGEMENT SERVER Advanced Configuration Guide for Autodesk data management server Contents Introduction... 1 Installing Autodesk data management server 2011... 1 Customizing your Autodesk
SYNTHESYS.NET INTERACTION STUDIO Database Output Actions
 SYNTHESYS.NET INTERACTION STUDIO Database Output Actions Synthesys.Net Database Output Action 1 DATABASE OUTPUT ACTION DATABASE OUTPUT ACTION WIZARD...3 Database Output Name... 3 Settings... 3 Output Type...
Deploying HP SIM 6.x on MSCS clusters on Windows 2008 with SQL Server 2008 SP1 White Paper
 Deploying HP SIM 6.x on MSCS clusters on Windows 2008 with SQL Server 2008 SP1 White Paper Table of Contents Abstract... 2 Introduction... 2 System infrastructure... 3 Storage configuration... 3 IP addresses...
Accops HyWorks v2.5. HyWorks Controller Installation Guide. Last Update: 4/18/2016
 Accops HyWorks v2.5 Last Update: 4/18/2016 2016 Propalms Technologies Pvt. Ltd. All rights reserved. The information contained in this document represents the current view of Propalms Technologies Pvt.
Installation Guide Worksoft Certify Execution Suite
 Installation Guide Worksoft Certify Execution Suite Worksoft, Inc. 15851 Dallas Parkway, Suite 855 Addison, TX 75001 www.worksoft.com 866-836-1773 Worksoft Certify Execution Suite Installation Guide Version
OneLogin Integration User Guide
 OneLogin Integration User Guide Table of Contents OneLogin Account Setup... 2 Create Account with OneLogin... 2 Setup Application with OneLogin... 2 Setup Required in OneLogin: SSO and AD Connector...
Tanium IaaS Cloud Solution Deployment Guide for Microsoft Azure
 Tanium IaaS Cloud Solution Deployment Guide for Microsoft Azure Version: All December 21, 2018 The information in this document is subject to change without notice. Further, the information provided in
NetExtender for SSL-VPN
 NetExtender for SSL-VPN Document Scope This document describes how to plan, design, implement, and manage the NetExtender feature in a SonicWALL SSL-VPN Environment. This document contains the following
Installation and Upgrade Guide. Front Office v9.0
 c Installation and Upgrade Guide Front Office v9.0 Contents 1.0 Introduction... 4 2.0 Prerequisites... 5 2.1 Database... 5 2.2 Portal and Web Service... 5 2.3 Windows Service... 5 3.0 New Installation...
December P Xerox FreeFlow Core Installation Guide
 5.1.0.0 December 2017 702P06246 2017 Xerox Corporation. All rights reserved. Xerox, Xerox and Design, and FreeFlow are trademarks of Xerox Corporation in the United States and/or other countries. This
DataFlux Web Studio 2.5. Installation and Configuration Guide
 DataFlux Web Studio 2.5 Installation and Configuration Guide The correct bibliographic citation for this manual is as follows: SAS Institute Inc. 2014. DataFlux Web Studio 2.5: Installation and Configuration
WhatsUp Gold 2016 Installation and Configuration Guide
 WhatsUp Gold 2016 Installation and Configuration Guide Contents Installing and Configuring WhatsUp Gold using WhatsUp Setup 1 Installation Overview 1 Overview 1 Security considerations 2 Standard WhatsUp
NTP Software File Auditor for Hitachi
 NTP Software File Auditor for Hitachi Installation Guide Version 3.3 This guide details the method for the installation and initial configuration of NTP Software File Auditor for NAS, Hitachi Edition,
PST for Outlook Admin Guide
 PST for Outlook 2013 Admin Guide Document Revision Date: Sept. 25, 2015 PST Admin for Outlook 2013 1 Populating Your Exchange Mailbox/Importing and Exporting.PST Files Use this guide to import data (Emails,
Storage Manager 2018 R1. Installation Guide
 Storage Manager 2018 R1 Installation Guide Notes, Cautions, and Warnings NOTE: A NOTE indicates important information that helps you make better use of your product. CAUTION: A CAUTION indicates either
Web Suite Time Billing and Business Management Software
 Web Suite Time Billing and Business Management Software Built With Your Industry Knowledge Web Suite 2012 Getting Started Guide BQE Software, Inc. 2601 Airport Drive Suite 380 Torrance CA 90505 Support:
Connect to Wireless, certificate install and setup Citrix Receiver
 Connect to Wireless, certificate install and setup Citrix Receiver This document explains how to connect to the Wireless Network and access applications using Citrix Receiver on a Bring Your Own Device
Bomgar Vault Server Installation Guide
 Bomgar Vault 17.2.1 Server Installation Guide 2017 Bomgar Corporation. All rights reserved worldwide. BOMGAR and the BOMGAR logo are trademarks of Bomgar Corporation; other trademarks shown are the property
Perceptive Process Mining
 Perceptive Process Mining Installation and Setup Guide Version: 2.8.x Written by: Product Knowledge, R&D Date: September 2016 2014-2016 Lexmark. All rights reserved. Lexmark is a trademark of Lexmark International,
HR-Lite Database & Web Service Setup Guide
 HR-Lite Database & Web Service Setup Guide Version: 1.00 HR21 Limited All rights reserved. No part of this document may be reproduced or transmitted in any form or by any means, electronic or mechanical,
Workstation Configuration
 Workstation Configuration December 15, 2017 - Version 9.3 - - - - - - - - - - - - - - - - - - - - - - - - - - - - - - - - - - - - - - - - - - - - - - - - - - - - - - - - - - - - - - - - - - - - - - - -
Platinum~Pro (v21.0): Deployment Guide (v1.2)
: Deployment Guide (v1.2)") (v1.2) INTRODUCTION... 2 SYSTEM REQUIREMENTS... 4 CHAPTER 1 DEPLOYMENT... 6 CHAPTER 2 UPGRADING... 12 CHAPTER 3 MIGRATION... 15 CHAPTER 4 UNINSTALLATION... 16 APPENDIX 1 DEPLOYMENT ISSUES... 18 APPENDIX
(v1.2) INTRODUCTION... 2 SYSTEM REQUIREMENTS... 4 CHAPTER 1 DEPLOYMENT... 6 CHAPTER 2 UPGRADING... 12 CHAPTER 3 MIGRATION... 15 CHAPTER 4 UNINSTALLATION... 16 APPENDIX 1 DEPLOYMENT ISSUES... 18 APPENDIX