|
|
|
- Noreen Leonard
- 6 years ago
- Views:
Transcription
1 (Approved by AICTE, Affiliated to Anna University, Chennai) Dindigul Periyakulam National Highway, Devathanapatti (P.O), Periyakulam Taluk, Theni District DEPARTMENT OF COMPUTER SCIENCE AND ENGINEERING Lab Manual for Mobile Application Development Laboratory (CS6611) Under the Anna University Regulations-2013 Prepared By B.Sankarapndian M.E., Assistant Professor, Dept.of CSE, VPVCE. 1
2 S.NO EXPERIMENTS 1 Develop an application that uses GUI components, Font and Colours 2 Develop an application that uses Layout Managers and event listeners. 3 Develop a native calculator application. 4 Write an application that draws basic graphical primitives on the screen. 5 Develop an application that makes use of database. 6 Develop an application that makes use of RSS Feed. 7 Implement an application that implements Multi threading 8 Develop a native application that uses GPS location information. 9 Implement an application that writes data to the SD card. 10 Implement an application that creates an alert upon receiving a message. 11 Write a mobile application that creates alarm clock 2
Give project name and select next 3) Choose the android version.")
Go to package explorer in the left hand side.select our project.")
3 1. Develop an application that uses GUI components, Font and Colours Simple application to change font size and color of textview 1)Open eclipse or android studio and select new android project 2)Give project name and select next 3) Choose the android version.choose the lowest android version(android 2.2) and select next 4) Enter the package name.package name must be two word seprated by comma and click finish 5)Go to package explorer in the left hand side.select our project. 6)Go to res folder and select layout.double click the main.xml file 7)Now you can see the Graphics layout window. 3
4 8)Click the main.xml file and type the code below <?xml version="1.0" encoding="utf-8"?> <LinearLayout xmlns:android=" android:layout_width="fill_parent" android:layout_height="fill_parent" android:orientation="vertical" > <TextView android:layout_margin="20sp" android:gravity="center" android:text="hello WORLD" android:textsize="20sp" android:textstyle="bold" /> <Button android:gravity="center" android:text="change font size" android:textsize="20sp" /> <Button android:gravity="center" android:text="change color" android:textsize="20sp" /> <Button android:gravity="center" android:text="change font" android:textsize="20sp" /> </LinearLayout> 9)Again click the graphics layout tab and screen layout is look like below 4
5 10)Go to project explorer and select src folder.now select mainactivity.java file and type the following code PROGRAM //import android.r; import android.app.activity; import android.graphics.color; import android.graphics.typeface; import android.os.bundle; import android.view.view; import android.widget.button; import android.widget.textview; public class AndroidActivity extends Activity float font =24; int public void oncreate(bundle savedinstancestate) super.oncreate(savedinstancestate); setcontentview(r.layout.main); final TextView t1=(textview) findviewbyid(r.id.textview1); Button b1 = (Button) findviewbyid(r.id.button1); b1.setonclicklistener(new View.OnClickListener() public void onclick(view view) t1.settextsize(font); font=font+4; 5
6 if(font==40) font=20; ); Button b2 = (Button) findviewbyid(r.id.button2); b2.setonclicklistener(new View.OnClickListener() public void onclick(view view) switch(i) case 1: t1.settextcolor(color.parsecolor("#0000ff")); break; case 2: t1.settextcolor(color.parsecolor("#00ff00")); break; case 3: t1.settextcolor(color.parsecolor("#ff0000")); break; case 4: t1.settextcolor(color.parsecolor("#800000")); break; i++; if(i==5) i=1; ); 11)Now go to main.xml and right click.select run as option and select run configuration 6

7 12) Android output is present in the android emulator as shown in below. 7
8 2. Develop an application that uses Layout Managers and event listeners. 1)Open eclipse or android studio and select new android project 2)Give project name and select next 3) Choose the android version.choose the lowest android version(android 2.2) and select next 4) Enter the package name.package name must be two word seprated by comma and click finish 5)Go to package explorer in the left hand side.select our project. 6)Go to res folder and select layout.double click the main.xml file.add the code below <RelativeLayout xmlns:android=" android:layout_width="fill_parent" android:layout_height="fill_parent" > <LinearLayout android:layout_width="wrap_content" android:layout_alignparentleft="true" android:layout_alignparentright="true" android:layout_alignparenttop="true" > <TextView android:layout_width="wrap_content" android:layout_gravity="center" android:text="addition" android:textsize="20dp" > </TextView> </LinearLayout> <LinearLayout android:layout_width="wrap_content" android:layout_alignparentleft="true" android:layout_alignparentright="true" > <TextView android:layout_width="wrap_content" android:text="enter NO 1" > </TextView> <EditText android:layout_width="wrap_content" 8
9 android:layout_weight="0.20" android:inputtype="number"> </EditText> </LinearLayout> <LinearLayout android:layout_width="wrap_content" android:layout_alignparentleft="true" android:layout_alignparentright="true" > <TextView android:layout_width="wrap_content" android:text="enter NO 2" > </TextView> <EditText android:layout_width="wrap_content" android:layout_weight="0.20" android:inputtype="number"> </EditText> </LinearLayout> <LinearLayout android:layout_width="wrap_content" android:layout_alignparentleft="true" android:layout_alignparentright="true" > <Button android:layout_width="wrap_content" android:text="addition" android:layout_weight="0.50" /> <Button android:layout_width="wrap_content" android:text="subtraction" android:layout_weight="0.50" /> <Button 9
10 android:layout_width="wrap_content" android:text="clear" android:layout_weight="0.50" /> </LinearLayout> <View android:layout_height="2px" android:layout_width="fill_parent" android:background="#ddffdd"/> </RelativeLayout> 7) Now select mainactivity.java file and type the following code. package layout.ne; import android.app.activity; import android.os.bundle; import android.view.view; import android.view.view.onclicklistener; import android.widget.button; import android.widget.edittext; import android.widget.toast; public class LAYOUTActivity extends Activity /** Called when the activity is first created. */ EditText txtdata1,txtdata2; float public void oncreate(bundle savedinstancestate) super.oncreate(savedinstancestate); setcontentview(r.layout.main); Button add = (Button) findviewbyid(r.id.button1); add.setonclicklistener(new OnClickListener() public void onclick(view v) try txtdata1 = (EditText) findviewbyid(r.id.edittext1); txtdata2 = (EditText) findviewbyid(r.id.edittext2); num1 = Float.parseFloat(txtData1.getText().toString()); num2 = Float.parseFloat(txtData2.getText().toString()); result1=num1+num2; Toast.makeText(getBaseContext(),"ANSWER:"+result1,Toast.LENGTH_SHORT).show(); 10
11 catch(exception e) Toast.makeText(getBaseContext(), e.getmessage(), Toast.LENGTH_SHORT).show(); ); Button sub = (Button) findviewbyid(r.id.button3); sub.setonclicklistener(new OnClickListener() public void onclick(view v) try txtdata1 = (EditText) findviewbyid(r.id.edittext1); txtdata2 = (EditText) findviewbyid(r.id.edittext2); num1 = Float.parseFloat(txtData1.getText().toString()); num2 = Float.parseFloat(txtData2.getText().toString()); result2=num1-num2; Toast.makeText(getBaseContext(),"ANSWER:"+result2,Toast.LENGTH_SHORT).show(); catch(exception e) Toast.makeText(getBaseContext(), e.getmessage(), Toast.LENGTH_SHORT).show(); ); Button clear = (Button) findviewbyid(r.id.button2); clear.setonclicklistener(new OnClickListener() public void onclick(view v) try txtdata1.settext(""); txtdata2.settext(""); catch(exception e) Toast.makeText(getBaseContext(), e.getmessage(), Toast.LENGTH_SHORT).show(); 11
12 ); 8)Now go to main.xml and right click.select run as option and select run configuration 9) Android output is present in the android emulator as shown in below. 12
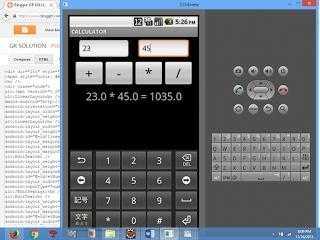
13 3. Develop a native calculator application Main.xml coding <?xml version="1.0" encoding="utf-8"?> <LinearLayout xmlns:android=" android:orientation="vertical" android:layout_width="fill_parent" android:layout_height="fill_parent"> <LinearLayout android:id="@+id/linearlayout1" android:layout_marginleft="10pt" android:layout_marginright="10pt" android:layout_margintop="3pt"> <EditText android:layout_weight="1" android:layout_marginright="5pt" android:id="@+id/etnum1" android:inputtype="numberdecimal"> </EditText> <EditText android:layout_weight="1" android:layout_marginleft="5pt" android:id="@+id/etnum2" android:inputtype="numberdecimal"> </EditText> </LinearLayout> <LinearLayout android:id="@+id/linearlayout2" android:layout_margintop="3pt" android:layout_marginleft="5pt" android:layout_marginright="5pt"> <Button 13
14 android:layout_weight="1" android:text="+" android:textsize="15pt" </Button> <Button android:layout_weight="1" android:text="-" android:textsize="15pt" </Button> <Button android:layout_weight="1" android:text="*" android:textsize="15pt" </Button> <Button android:layout_weight="1" android:text="/" android:textsize="15pt" </Button> </LinearLayout> <TextView android:layout_marginleft="5pt" android:layout_marginright="5pt" android:textsize="12pt" android:layout_margintop="3pt" android:gravity="center_horizontal"> </TextView> </LinearLayout> MainActivity.java coding package CALCU.CALU; import android.app.activity; 14
15 import android.os.bundle; import android.text.textutils; import android.view.view; import android.view.view.onclicklistener; import android.widget.button; import android.widget.edittext; import android.widget.textview; public class CALCULATORActivity extends Activity implements OnClickListener EditText input1; EditText input2; Button addition; Button subtraction; Button multiplication; Button division; TextView tvresult; String oper = public void oncreate(bundle savedinstancestate) super.oncreate(savedinstancestate); setcontentview(r.layout.main); input1 = (EditText) findviewbyid(r.id.etnum1); input2 = (EditText) findviewbyid(r.id.etnum2); addition = (Button) findviewbyid(r.id.btnadd); subtraction = (Button) findviewbyid(r.id.btnsub); multiplication = (Button) findviewbyid(r.id.btnmult); division = (Button) findviewbyid(r.id.btndiv); tvresult = (TextView) findviewbyid(r.id.tvresult); // set a listener addition.setonclicklistener(this); subtraction.setonclicklistener(this); multiplication.setonclicklistener(this); public void onclick(view v) // TODO Auto-generated method stub 15
16 float num1 = 0; float num2 = 0; float result = 0; // check if the fields are empty if (TextUtils.isEmpty(input1.getText().toString()) TextUtils.isEmpty(input2.getText().toString())) return; // read EditText and fill variables with numbers num1 = Float.parseFloat(input1.getText().toString()); num2 = Float.parseFloat(input2.getText().toString()); // defines the button that has been clicked and performs the corresponding operation // write operation into oper, we will use it later for output switch (v.getid()) case R.id.btnAdd: oper = "+"; result = num1 + num2; break; case R.id.btnSub: oper = "-"; result = num1 - num2; break; case R.id.btnMult: oper = "*"; result = num1 * num2; break; case R.id.btnDiv: oper = "/"; result = num1 / num2; break; default: break; // form the output line tvresult.settext(num1 + " " + oper + " " + num2 + " = " + result); Output 16
17 17
18 4. Write an application that draws basic graphical primitives on the screen in android 1. Open eclipse or android studio and select new android project 2. Give project name and select next 3. Choose the android version.choose the lowest android version(android 2.2) and select next 4. Enter the package name.package name must be two word seprated by comma and click finish 5. Go to package explorer in the left hand side.select our project. 6. Go to res folder and select layout.double click the main.xml file.don't change anything in layout.leave as default. 7. Now select mainactivity.java file and type the following code. package Basic.primitive; import android.app.activity; import android.content.context; import android.graphics.canvas; import android.graphics.color; import android.graphics.paint; import android.os.bundle; import android.view.view; public class BasicprimitiveActivity extends Activity /** Called when the activity is first created. public void oncreate(bundle savedinstancestate) super.oncreate(savedinstancestate); setcontentview(new myview(this)); private class myview extends View public myview(context context) protected void ondraw(canvas canvas) super.ondraw(canvas); Paint paint=new Paint(); paint.settextsize(40); paint.setcolor(color.green); canvas.drawtext("circle", 55, 30, paint); 18
19 paint.setcolor(color.red); canvas.drawcircle(100, 150,100, paint); paint.setcolor(color.green); canvas.drawtext("rectangle", 255, 30, paint); paint.setcolor(color.yellow); canvas.drawrect(250, 50,400,350, paint); paint.setcolor(color.green); canvas.drawtext("square", 55, 430, paint); paint.setcolor(color.blue); canvas.drawrect(50, 450,150,550, paint); paint.setcolor(color.green); canvas.drawtext("line", 255, 430, paint); paint.setcolor(color.cyan); canvas.drawline(250, 500, 350, 500, paint); 8)Now go to main.xml and right click.select run as option and select run configuration 9) Android output is present in the android emulator as shown in below. 19
20 5. Develop an application that makes use of database 1)Open eclipse or android studio and select new android project 2)Give project name and select next 3) Choose the android version.choose the lowest android version(android 2.2) and select next 4) Enter the package name.package name must be two word seprated by comma and click finish 5)Go to package explorer in the left hand side.select our project. 6)Go to res folder and select layout.double click the main.xml file.add the code below <?xml version="1.0" encoding="utf-8"?> <AbsoluteLayout xmlns:android=" android:stretchcolumns="0" android:layout_width="fill_parent" android:layout_height="fill_parent"> <TextView android:layout_x="110dp" android:layout_y="10dp" android:layout_width="wrap_content" /> <TextView android:layout_x="30dp" android:layout_y="50dp" android:layout_width="wrap_content" /> <EditText android:inputtype="number" android:layout_x="150dp" android:layout_y="50dp" android:layout_width="150dp" android:layout_height="40dp"/> <TextView android:layout_x="30dp" android:layout_y="100dp" android:layout_width="wrap_content" /> <EditText android:inputtype="text" android:layout_x="150dp" android:layout_y="100dp" android:layout_width="150dp" android:layout_height="40dp"/> <TextView android:layout_x="30dp" android:layout_y="150dp" android:layout_width="wrap_content" 20
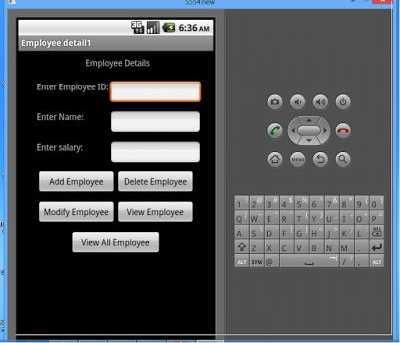
21 /> <EditText android:inputtype="number" android:layout_x="150dp" android:layout_y="150dp" android:layout_width="150dp" android:layout_height="40dp"/> <Button android:layout_x="30dp" android:layout_y="200dp" android:layout_width="130dp" android:layout_height="40dp"/> <Button android:layout_x="160dp" android:layout_y="200dp" android:layout_width="130dp" android:layout_height="40dp"/>n <Button android:layout_x="30dp" android:layout_y="250dp" android:layout_width="130dp" android:layout_height="40dp"/> <Button android:layout_x="160dp" android:layout_y="250dp" android:layout_width="130dp" android:layout_height="40dp"/> <Button android:layout_x="85dp" android:layout_y="300dp" android:layout_width="150dp" android:layout_height="40dp"/> </AbsoluteLayout> 7)Go to values folder and select string.xml file.replace the code below <?xml version="1.0" encoding="utf-8"?> <resources> <string name="app_name">employee detail1</string> <string name="hello">hello World, Employee detail Activity!</string> 21
22 <string name="title">employee Details</string> <string name="empid">enter Employee ID: </string> <string name="name">enter Name: </string> <string name="salary">enter salary: </string> <string name="add">add Employee</string> <string name="delete">delete Employee</string> <string name="modify">modify Employee</string> <string name="view">view Employee</string> <string name="view_all">view All Employee</string> </resources> 8) Now select mainactivity.java file and type the following code.in my coding maniactivity name is EmployeedetailActivity. package employee.detail; //import android.r; import android.app.activity; import android.app.alertdialog.builder; import android.content.context; import android.database.cursor; import android.database.sqlite.sqlitedatabase; import android.os.bundle; import android.view.view; import android.view.view.onclicklistener; import android.widget.button; import android.widget.edittext; public class EmployeedetailActivity extends Activity implements OnClickListener EditText editempid,editname,editsalary; Button btnadd,btndelete,btnmodify,btnview,btnviewall; SQLiteDatabase db; /** Called when the activity is first created. public void oncreate(bundle savedinstancestate) super.oncreate(savedinstancestate); setcontentview(r.layout.main); editempid=(edittext)findviewbyid(r.id.editempid); editname=(edittext)findviewbyid(r.id.editname); editsalary=(edittext)findviewbyid(r.id.editsalary); btnadd=(button)findviewbyid(r.id.btnadd); btndelete=(button)findviewbyid(r.id.btndelete); btnmodify=(button)findviewbyid(r.id.btnmodify); btnview=(button)findviewbyid(r.id.btnview); btnviewall=(button)findviewbyid(r.id.btnviewall); btnadd.setonclicklistener(this); btndelete.setonclicklistener(this); 22
23 btnmodify.setonclicklistener(this); btnview.setonclicklistener(this); btnviewall.setonclicklistener(this); db=openorcreatedatabase("employeedb", Context.MODE_PRIVATE, null); db.execsql("create TABLE IF NOT EXISTS employee(empid VARCHAR,name VARCHAR,salary VARCHAR);"); public void onclick(view view) if(view==btnadd) if(editempid.gettext().tostring().trim().length()==0 editname.gettext().tostring().trim().length()==0 editsalary.gettext().tostring().trim().length()==0) showmessage("error", "Please enter all values"); return; db.execsql("insert INTO employee VALUES('"+editEmpid.getText()+"','"+editName.getText()+ "','"+editsalary.gettext()+"');"); showmessage("success", "Record added"); cleartext(); if(view==btndelete) if(editempid.gettext().tostring().trim().length()==0) showmessage("error", "Please enter Employee id"); return; Cursor c=db.rawquery("select * FROM employee WHERE empid='"+editempid.gettext()+"'", null); if(c.movetofirst()) db.execsql("delete FROM employee WHERE empid='"+editempid.gettext()+"'"); showmessage("success", "Record Deleted"); else showmessage("error", "Invalid Employee id"); cleartext(); if(view==btnmodify) 23
24 if(editempid.gettext().tostring().trim().length()==0) showmessage("error", "Please enter Employee id"); return; Cursor c=db.rawquery("select * FROM employee WHERE empid='"+editempid.gettext()+"'", null); if(c.movetofirst()) db.execsql("update employee SET name='"+editname.gettext()+"',salary='"+editsalary.gettext()+ "' WHERE empid='"+editempid.gettext()+"'"); showmessage("success", "Record Modified"); else showmessage("error", "Invalid Rollno"); cleartext(); if(view==btnview) if(editempid.gettext().tostring().trim().length()==0) showmessage("error", "Please enter Employee id"); return; Cursor c=db.rawquery("select * FROM employee WHERE empid='"+editempid.gettext()+"'", null); if(c.movetofirst()) editname.settext(c.getstring(1)); editsalary.settext(c.getstring(2)); else showmessage("error", "Invalid Employee id"); cleartext(); if(view==btnviewall) Cursor c=db.rawquery("select * FROM employee", null); if(c.getcount()==0) 24
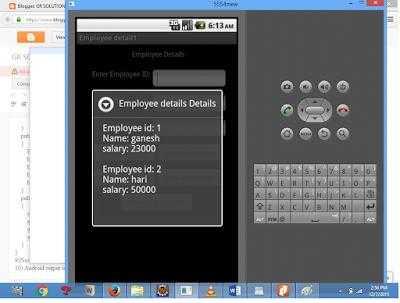
25 showmessage("error", "No records found"); return; StringBuffer buffer=new StringBuffer(); while(c.movetonext()) buffer.append("employee id: "+c.getstring(0)+"\n"); buffer.append("name: "+c.getstring(1)+"\n"); buffer.append("salary: "+c.getstring(2)+"\n\n"); showmessage("employee details Details", buffer.tostring()); public void showmessage(string title,string message) Builder builder=new Builder(this); builder.setcancelable(true); builder.settitle(title); builder.setmessage(message); builder.show(); public void cleartext() editempid.settext(""); editname.settext(""); editsalary.settext(""); editempid.requestfocus(); 9)Now go to main.xml and right click.select run as option and select run configuration 10) Android output is present in the android emulator as shown in below. 25
26 26
27 7. Implement an application that implements Multi threading 1)Open eclipse or android studio and select new android project 2)Give project name and select next 3) Choose the android version.choose the lowest android version(android 2.2) and select next 4) Enter the package name.package name must be two word seprated by comma and click finish 5)Go to package explorer in the left hand side.select our project. 6)Go to res folder and select layout.double click the main.xml file.add the code below <?xml version="1.0" encoding="utf-8"?> <LinearLayout xmlns:android=" android:layout_height="match_parent" android:orientation="vertical" > <Button android:onclick="fetchdata" android:text="start MULTITHREAD" /> <TextView android:layout_width="wrap_content" android:text="main thread" /> </LinearLayout> 7) Now select mainactivity.java file and type the following code. package multi.threading; //import your.first.r; import android.app.activity; import android.os.bundle; import android.os.handler; import android.view.view; import android.widget.textview; public class MultiThreadingActivity extends Activity private TextView tvoutput; private static final int t1 = 1; private static final int t2 = 2; private static final int t3 = public void oncreate(bundle savedinstancestate) super.oncreate(savedinstancestate); setcontentview(r.layout.main); 27
28 tvoutput = (TextView) findviewbyid(r.id.textview1); public void fetchdata(view v) tvoutput.settext("main thread"); thread1.start(); thread2.start(); thread3.start(); Thread thread1 = new Thread(new public void run() for (int i = 0; i < 5; i++) try Thread.sleep(1000); catch (InterruptedException e) e.printstacktrace(); handler.sendemptymessage(t1); ); Thread thread2 = new Thread(new public void run() for (int i = 0; i < 5; i++) try Thread.sleep(1000); catch (InterruptedException e) e.printstacktrace(); handler.sendemptymessage(t2); ); Thread thread3 = new Thread(new public void run() for (int i = 0; i < 5; i++) try 28
29 Thread.sleep(1000); catch (InterruptedException e) e.printstacktrace(); handler.sendemptymessage(t3); ); Handler handler = new Handler() public void handlemessage(android.os.message msg) if(msg.what == t1) tvoutput.append("\nin thread 1"); if(msg.what == t2) tvoutput.append("\nin thread 2"); if(msg.what == t3) tvoutput.append("\nin thread 3"); ; 8)Now go to main.xml and right click.select run as option and select run configuration 9) Android output is present in the android emulator as shown in below. 29
30 30
31 8. Develop a native application that uses GPS location information. 1)Open eclipse or android studio and select new android project 2)Give project name and select next 3) Choose the android version.choose the lowest android version(android 2.2) and select next 4) Enter the package name.package name must be two word seprated by comma and click finish 5)Go to package explorer in the left hand side.select our project. 6)Go to res folder and select layout.double click the main.xml file.add the code below <?xml version="1.0" encoding="utf-8"?> <RelativeLayout xmlns:android=" android:id="@+id/relativelayout1" android:layout_height="match_parent" > <Button android:id="@+id/show_location" android:layout_width="wrap_content" android:layout_height="wrap_content android:text="show_location" android:layout_centervertical="true" android:layout_centerhorizontal="true" /> </RelativeLayout> 7) Now select mainactivity.java file and type the following code.in my coding maniactivity name is GPSlocationActivity. package gps.location; //import android.r; import android.app.activity; import android.os.bundle; import android.view.view; import android.widget.button; import android.widget.toast; public class GPSlocationActivity extends Activity /** Called when the activity is first created. */ Button btnshowlocation; GPStrace public void oncreate(bundle savedinstancestate) super.oncreate(savedinstancestate); setcontentview(r.layout.main); btnshowlocation=(button)findviewbyid(r.id.show_location); 31
) double latitude=gps.getlatitude(); double longitude=gps.getlongtiude(); Toast.makeText(getApplicationContext(),\"Your Location is \nlat:\"+latitude+\"\nlong:\"+longitude, Toast.")
32 btnshowlocation.setonclicklistener(new public void onclick(view v) // TODO Auto-generated method stub gps=new GPStrace(GPSlocationActivity.this); if(gps.cangetlocation()) double latitude=gps.getlatitude(); double longitude=gps.getlongtiude(); Toast.makeText(getApplicationContext(),"Your Location is \nlat:"+latitude+"\nlong:"+longitude, Toast.LENGTH_LONG).show(); else gps.showsettingalert(); ); 8)Go to src folder and Right Click on your package folder and choose new class and give the class nams as GPStrace 9)Select the GPStrace.java file and paste the following code. package gps.location; import android.app.alertdialog; import android.app.service; 32
33 import android.content.context; import android.content.dialoginterface; import android.content.intent; import android.location.location; import android.location.locationlistener; import android.location.locationmanager; import android.os.bundle; import android.os.ibinder; import android.provider.settings; public class GPStrace extends Service implements LocationListener private final Context context; boolean isgpsenabled=false; boolean cangetlocation=false; boolean isnetworkenabled=false; Location location; double latitude; double longtitude; private static final long MIN_DISTANCE_CHANGE_FOR_UPDATES=10; private static final long MIN_TIME_BW_UPDATES=1000*60*1; protected LocationManager locationmanager; public GPStrace(Context context) this.context=context; getlocation(); public Location getlocation() try locationmanager=(locationmanager) context.getsystemservice(location_service); isgpsenabled=locationmanager.isproviderenabled(locationmanager.gps_provider); isnetworkenabled=locationmanager.isproviderenabled(locationmanager.network_provi DER); if(!isgpsenabled &&!isnetworkenabled) else this.cangetlocation=true; if(isnetworkenabled) locationmanager.requestlocationupdates( LocationManager.NETWORK_PROVIDER, MIN_TIME_BW_UPDATES, MIN_DISTANCE_CHANGE_FOR_UPDATES,this); 33
34 if(locationmanager!=null) location=locationmanager.getlastknownlocation(locationmanager.network_provider) ; if(location!=null) latitude=location.getlatitude(); longtitude=location.getlongitude(); if(isgpsenabled) if(location==null) locationmanager.requestlocationupdates(locationmanager.gps_provider,min_time_b W_UPDATES, MIN_DISTANCE_CHANGE_FOR_UPDATES, this); if(locationmanager!=null) location=locationmanager.getlastknownlocation(locationmanager.gps_provider); if(location!=null) latitude=location.getlatitude(); longtitude=location.getlongitude(); catch(exception e) e.printstacktrace(); return location; public void stopusinggps() if(locationmanager!=null) locationmanager.removeupdates(gpstrace.this); public double getlatitude() if(location!=null) latitude=location.getlatitude(); return latitude; public double getlongtiude() 34
35 if(location!=null) longtitude=location.getlatitude(); return longtitude; public boolean cangetlocation() return this.cangetlocation; public void showsettingalert() AlertDialog.Builder alertdialog=new AlertDialog.Builder(context); alertdialog.settitle("gps is settings"); alertdialog.setmessage("gps is not enabled.do you want to go to setting menu?"); alertdialog.setpositivebutton("settings", new public void onclick(dialoginterface dialog,int which) Intent intent=new Intent(Settings.ACTION_LOCATION_SOURCE_SETTINGS); context.startactivity(intent); ); alertdialog.setnegativebutton("cancel", new public void onclick(dialoginterface dialog, int which) // TODO Auto-generated method stub dialog.cancel(); ); public void onlocationchanged(location location) // TODO Auto-generated method public void onproviderdisabled(string provider) // TODO Auto-generated method public void onproviderenabled(string provider) // TODO Auto-generated method 35
Go to manifest.xml file and add the code below <uses-permission android:name=\"android.permission.access_fine_location\"/> <uses-permission android:name=\"android.permission.internet\"/> 11)Now go to main.")
36 public void onstatuschanged(string provider, int status, Bundle extras) // TODO Auto-generated method public IBinder onbind(intent intent) // TODO Auto-generated method stub return null; 10)Go to manifest.xml file and add the code below <uses-permission android:name="android.permission.access_fine_location"/> <uses-permission android:name="android.permission.internet"/> 11)Now go to main.xml and right click.select run as option and select run configuration 12) Android output is present in the android emulator as shown in below. 36
37 9. Implement an application that writes data to the SD card. 1)Open eclipse or android studio and select new android project 2)Give project name and select next 3) Choose the android version.choose the lowest android version(android 2.2) and select next 4) Enter the package name.package name must be two word seprated by comma and click finish 5)Go to package explorer in the left hand side.select our project. 6)Go to res folder and select layout.double click the main.xml file.add the code below <?xml version="1.0" encoding="utf-8"?> <LinearLayout xmlns:android=" android:layout_width="fill_parent" android:layout_height="fill_parent" android:background="#ff0000ff" android:orientation="vertical" > <EditText > <requestfocus /> </EditText> <Button android:text="save DATA" /> <Button android:text="show DATA" /> <TextView android:layout_width="wrap_content" /> </LinearLayout> 7) Now select mainactivity.java file and type the following code. 37
38 package save.sd; import java.io.file; import java.io.fileinputstream; import java.io.filenotfoundexception; import java.io.fileoutputstream; import java.io.ioexception; import java.io.inputstreamreader; import java.io.outputstreamwriter; import android.app.activity; import android.os.bundle; import android.os.environment; import android.view.view; import android.widget.button; import android.widget.edittext; import android.widget.textview; import android.widget.toast; public class SavedatasdcardActivity extends Activity /** Called when the activity is first created. */ Button save,load; EditText message; TextView t1; String public void oncreate(bundle savedinstancestate) super.oncreate(savedinstancestate); setcontentview(r.layout.main); save=(button) findviewbyid(r.id.button1); load=(button) findviewbyid(r.id.button2); message=(edittext) findviewbyid(r.id.edittext1); t1=(textview) findviewbyid(r.id.textview1); save.setonclicklistener(new View.OnClickListener() public void onclick(view v) //Get message from user store in message1 variable Message1 =message.gettext().tostring(); try //Create a new folder called MyDirectory in SDCard File sdcard=environment.getexternalstoragedirectory(); File directory=new File(sdcard.getAbsolutePath()+"/MyDirectory"); directory.mkdirs(); //Create a new file name textfile.txt inside MyDirectory File file=new File(directory,"textfile.txt"); //Create File Outputstream to read the file FileOutputStream fou=new FileOutputStream(file); OutputStreamWriter osw=new OutputStreamWriter(fou); 38
39 try //write a user data to file osw.append(message1); osw.flush(); osw.close(); Toast.makeText(getBaseContext(),"Data Saved",Toast.LENGTH_LONG).show(); catch(ioexception e) e.printstacktrace(); catch (FileNotFoundException e) e.printstacktrace(); ); load.setonclicklistener(new View.OnClickListener() public void onclick(view v) try File sdcard=environment.getexternalstoragedirectory(); File directory=new File(sdcard.getAbsolutePath()+"/MyDirectory"); File file=new File(directory,"textfile.txt"); FileInputStream fis=new FileInputStream(file); InputStreamReader isr=new InputStreamReader(fis); char[] data=new char[100]; String final_data=""; int size; try while((size=isr.read(data))>0) //read a data from file String read_data=string.copyvalueof(data,0,size); final_data+=read_data; data=new char[100]; //display the data in output Toast.makeText(getBaseContext(),"Message:"+final_data,Toast.LENGTH_LONG).show(); catch(ioexception e) e.printstacktrace(); catch (FileNotFoundException e) e.printstacktrace(); ); 39
40 8)Next step is to set permission to write data in sd card.so go to AndroidManifest.xml file. Copy and paste the following coding.the code should come before <application> tab. <uses-permission android:name="android.permission.write_external_storage"></uses-permission> 9)Now go to main.xml and right click.select run as option and select run configuration 10) Android output is present in the android emulator as shown in below. 40
41 41
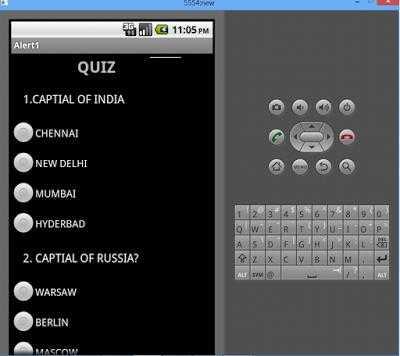
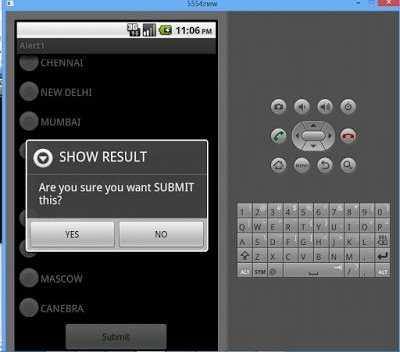
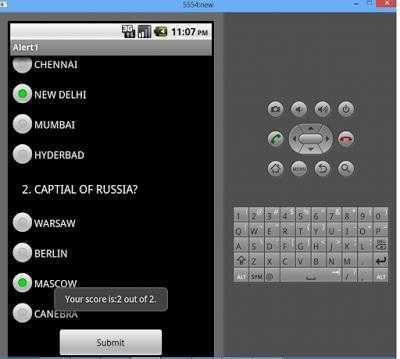
42 10. Implement an application that creates an alert upon receiving a message in android 1)Open eclipse or android studio and select new android project 2)Give project name and select next 3) Choose the android version.choose the lowest android version(android 2.2) and select next 4) Enter the package name.package name must be two word seprated by comma and click finish 5)Go to package explorer in the left hand side.select our project. 6)Go to res folder and select layout.double click the main.xml file.add the code below <ScrollView xmlns:android=" android:layout_width="fill_parent" android:scrollbars="vertical" > <TableLayout android:shrinkcolumns="*" android:stretchcolumns="*" android:background="#000000"> <TableRow android:gravity="center_horizontal"> <TextView android:id="@+id/title" android:layout_width="fill_parent" android:layout_margin="5px" android:focusable="false" android:focusableintouchmode="false" android:gravity="center_vertical center_horizontal" android:text="quiz" android:textsize="25sp" android:textstyle="bold" /> <View android:layout_height="2px" android:layout_margintop="5dip" android:layout_marginbottom="5dip" android:background="#ddffdd"/> </TableRow> 42
43 <TableRow android:gravity="center_horizontal"> <TextView android:textsize="18sp" android:text="1.captial OF INDIA" android:layout_span="4" android:padding="18dip" android:textcolor="#ffffff"/> </TableRow> <TableRow > <RadioGroup android:layout_weight="0.4" > <RadioButton android:textcolor="#ffffff" android:text="chennai" /> <RadioButton android:textcolor="#ffffff" android:text="new DELHI" /> <RadioButton android:textcolor="#ffffff" android:text="mumbai" /> <RadioButton 43
44 android:textcolor="#ffffff" android:text="hyderbad" /> </RadioGroup> </TableRow> <TableRow android:gravity="center_horizontal"> <TextView android:textsize="18sp" android:text="2. CAPTIAL OF RUSSIA?" android:layout_span="4" android:padding="18dip" android:textcolor="#ffffff"/> </TableRow> <TableRow > <RadioGroup android:layout_weight="0.4" > <RadioButton android:textcolor="#ffffff" android:text="warsaw " /> <RadioButton android:textcolor="#ffffff" android:text="berlin" /> <RadioButton 44
45 android:textcolor="#ffffff" android:text="mascow " /> <RadioButton android:textcolor="#ffffff" android:text="canebra " /> </RadioGroup> </TableRow> <TableRow android:gravity="center_horizontal"> <Button android:layout_width="wrap_content" android:gravity="center" android:text="submit" /> </TableRow> </TableLayout> </ScrollView> 7) Now select mainactivity.java file and type the following code.in my coding maniactivity name is Alert1Activity. 8)Now go to main.xml and right click.select run as option and select run configuration 9) Android output is present in the android emulator as shown in below. 45
46 46
47 47
48 11. Write a mobile application that creates alarm clock 1. Android Manifest AndroidManifest.xml We need to give uses-permission for WAKE_LOCK, other than that the AndroidManifest.xml is pretty standard one. Just need to include the service and receiver. <?xml version="1.0" encoding="utf-8"?> <manifest xmlns:android=" package="com.javapapers.androidalarmclock"> <uses-permission android:name="android.permission.wake_lock" /> <application android:allowbackup="true" android:icon="@drawable/ic_launcher" android:label="@string/app_name" android:theme="@style/apptheme"> <activity android:name=".alarmactivity" android:label="@string/app_name"> <intent-filter> <action android:name="android.intent.action.main" /> <category android:name="android.intent.category.launcher" /> </intent-filter> </activity> <service android:name=".alarmservice" android:enabled="true" /> <receiver android:name=".alarmreceiver" /> </application> </manifest> 2. Android Activity activity_my.xml The Android Activity is designed to be simple. We have a TimePicker component followed by a ToggleButton. That s it. Choose the time to set the alarm and toggle the switch to on. The alarm will work. <RelativeLayout xmlns:android=" xmlns:tools=" 48
49 android:layout_height="match_parent" tools:context=".myactivity"> <TimePicker android:layout_width="wrap_content" android:layout_alignparenttop="true" android:layout_centerhorizontal="true" /> <ToggleButton android:layout_width="wrap_content" android:text="alarm On/Off" android:layout_centerhorizontal="true" android:onclick="ontoggleclicked" /> <TextView android:layout_width="wrap_content" android:textappearance="?android:attr/textappearancelarge" android:text="" android:layout_alignparentbottom="true" android:layout_centerhorizontal="true" android:layout_margintop="20dp" /> </RelativeLayout> AlarmActivity.java AlarmActivity uses the AlarmManager to set the alarm and send notification on alarm trigger. package com.javapapers.androidalarmclock; import android.app.activity; import android.app.alarmmanager; import android.app.pendingintent; import android.content.intent; import android.os.bundle; import android.util.log; import android.view.view; import android.widget.textview; import android.widget.timepicker; import android.widget.togglebutton; 49
50 import java.util.calendar; public class AlarmActivity extends Activity AlarmManager alarmmanager; private PendingIntent pendingintent; private TimePicker alarmtimepicker; private static AlarmActivity inst; private TextView alarmtextview; public static AlarmActivity instance() return public void onstart() super.onstart(); inst = protected void oncreate(bundle savedinstancestate) super.oncreate(savedinstancestate); setcontentview(r.layout.activity_my); alarmtimepicker = (TimePicker) findviewbyid(r.id.alarmtimepicker); alarmtextview = (TextView) findviewbyid(r.id.alarmtext); ToggleButton alarmtoggle = (ToggleButton) findviewbyid(r.id.alarmtoggle); alarmmanager = (AlarmManager) getsystemservice(alarm_service); public void ontoggleclicked(view view) if (((ToggleButton) view).ischecked()) Log.d("MyActivity", "Alarm On"); Calendar calendar = Calendar.getInstance(); calendar.set(calendar.hour_of_day, alarmtimepicker.getcurrenthour()); calendar.set(calendar.minute, alarmtimepicker.getcurrentminute()); Intent myintent = new Intent(AlarmActivity.this, AlarmReceiver.class); pendingintent = PendingIntent.getBroadcast(AlarmActivity.this, 0, myintent, 0); alarmmanager.set(alarmmanager.rtc, calendar.gettimeinmillis(), pendingintent); else alarmmanager.cancel(pendingintent); setalarmtext(""); Log.d("MyActivity", "Alarm Off"); public void setalarmtext(string alarmtext) alarmtextview.settext(alarmtext); 50
51 3. Alarm Receiver AlarmReceiver.java AlarmReceiver is a WakefulBroadcasReceiver, this is the one that receives the alarm trigger on set time. From here we initiate different actions to notify the user as per our choice. I have given three type of notifications, first show a message to user in the activity UI, second play the alarm ringtone and third send an Android notification message. So this is the place to add enhancement for different types of user notifications. package com.javapapers.androidalarmclock; import android.app.activity; import android.content.componentname; import android.content.context; import android.content.intent; import android.media.ringtone; import android.media.ringtonemanager; import android.net.uri; import android.support.v4.content.wakefulbroadcastreceiver; public class AlarmReceiver extends public void onreceive(final Context context, Intent intent) //this will update the UI with message AlarmActivity inst = AlarmActivity.instance(); inst.setalarmtext("alarm! Wake up! Wake up!"); //this will sound the alarm tone //this will sound the alarm once, if you wish to //raise alarm in loop continuously then use MediaPlayer and setlooping(true) Uri alarmuri = RingtoneManager.getDefaultUri(RingtoneManager.TYPE_ALARM); if (alarmuri == null) alarmuri = RingtoneManager.getDefaultUri(RingtoneManager.TYPE_NOTIFICATION); Ringtone ringtone = RingtoneManager.getRingtone(context, alarmuri); ringtone.play(); //this will send a notification message ComponentName comp = new ComponentName(context.getPackageName(), AlarmService.class.getName()); startwakefulservice(context, (intent.setcomponent(comp))); setresultcode(activity.result_ok); 51
52 4. Alarm Notification Message AlarmService.java The receiver will start the following IntentService to send a standard notification to the user. package com.javapapers.androidalarmclock; import android.app.intentservice; import android.app.notificationmanager; import android.app.pendingintent; import android.content.context; import android.content.intent; import android.support.v4.app.notificationcompat; import android.util.log; public class AlarmService extends IntentService private NotificationManager alarmnotificationmanager; public AlarmService() public void onhandleintent(intent intent) sendnotification("wake Up! Wake Up!"); private void sendnotification(string msg) Log.d("AlarmService", "Preparing to send notification...: " + msg); alarmnotificationmanager = (NotificationManager) this.getsystemservice(context.notification_service); PendingIntent contentintent = PendingIntent.getActivity(this, 0, new Intent(this, AlarmActivity.class), 0); NotificationCompat.Builder alamnotificationbuilder = new NotificationCompat.Builder( this).setcontenttitle("alarm").setsmallicon(r.drawable.ic_launcher).setstyle(new NotificationCompat.BigTextStyle().bigText(msg)).setContentText(msg); alamnotificationbuilder.setcontentintent(contentintent); alarmnotificationmanager.notify(1, alamnotificationbuilder.build()); Log.d("AlarmService", "Notification sent."); 52

53
Mobile Application Development Lab [] Simple Android Application for Native Calculator. To develop a Simple Android Application for Native Calculator.
![Mobile Application Development Lab [] Simple Android Application for Native Calculator. To develop a Simple Android Application for Native Calculator.](/thumbs/96/129287620.jpg "Mobile Application Development Lab [] Simple Android Application for Native Calculator. To develop a Simple Android Application for Native Calculator.") Simple Android Application for Native Calculator Aim: To develop a Simple Android Application for Native Calculator. Procedure: Creating a New project: Open Android Stdio and then click on File -> New
Simple Android Application for Native Calculator Aim: To develop a Simple Android Application for Native Calculator. Procedure: Creating a New project: Open Android Stdio and then click on File -> New
CSE 660 Lab 7. Submitted by: Arumugam Thendramil Pavai. 1)Simple Remote Calculator. Server is created using ServerSocket class of java. Server.
Simple Remote Calculator. Server is created using ServerSocket class of java. Server.") CSE 660 Lab 7 Submitted by: Arumugam Thendramil Pavai 1)Simple Remote Calculator Server is created using ServerSocket class of java Server.java import java.io.ioexception; import java.net.serversocket;
CSE 660 Lab 7 Submitted by: Arumugam Thendramil Pavai 1)Simple Remote Calculator Server is created using ServerSocket class of java Server.java import java.io.ioexception; import java.net.serversocket;
EMBEDDED SYSTEMS PROGRAMMING Application Tip: Switching UIs
 EMBEDDED SYSTEMS PROGRAMMING 2015-16 Application Tip: Switching UIs THE PROBLEM How to switch from one UI to another Each UI is associated with a distinct class that controls it Solution shown: two UIs,
Press project on the left toolbar if it doesn t show an overview of the app yet.
 #3 Setting up the permissions needed to allow the app to use GPS. Okay! Press project on the left toolbar if it doesn t show an overview of the app yet. In this project plane, we will navigate to the manifests
MAD ASSIGNMENT NO 3. Submitted by: Rehan Asghar BSSE AUGUST 25, SUBMITTED TO: SIR WAQAS ASGHAR Superior CS&IT Dept.
 MAD ASSIGNMENT NO 3 Submitted by: Rehan Asghar BSSE 7 15126 AUGUST 25, 2017 SUBMITTED TO: SIR WAQAS ASGHAR Superior CS&IT Dept. MainActivity.java File package com.example.tutorialspoint; import android.manifest;
Tip Calculator. xmlns:tools="http://schemas.android.com/tools" android:layout_width="match_parent"
 Tip Calculator activity_main.xml
Android Apps Development for Mobile and Tablet Device (Level I) Lesson 2
 Lesson 2") Workshop 1. Compare different layout by using Change Layout button (Page 1 5) Relative Layout Linear Layout (Horizontal) Linear Layout (Vertical) Frame Layout 2. Revision on basic programming skill - control
Workshop 1. Compare different layout by using Change Layout button (Page 1 5) Relative Layout Linear Layout (Horizontal) Linear Layout (Vertical) Frame Layout 2. Revision on basic programming skill - control
MAD ASSIGNMENT NO 2. Submitted by: Rehan Asghar BSSE AUGUST 25, SUBMITTED TO: SIR WAQAS ASGHAR Superior CS&IT Dept.
 MAD ASSIGNMENT NO 2 Submitted by: Rehan Asghar BSSE 7 15126 AUGUST 25, 2017 SUBMITTED TO: SIR WAQAS ASGHAR Superior CS&IT Dept. Android Widgets There are given a lot of android widgets with simplified
Basic GUI elements - exercises
 Basic GUI elements - exercises https://developer.android.com/studio/index.html LIVE DEMO Please create a simple application, which will be used to calculate the area of basic geometric figures. To add
<uses-permission android:name="android.permission.internet"/>
 Chapter 11 Playing Video 11.1 Introduction We have discussed how to play audio in Chapter 9 using the class MediaPlayer. This class can also play video clips. In fact, the Android multimedia framework
CSE 660 Lab 3 Khoi Pham Thanh Ho April 19 th, 2015
 CSE 660 Lab 3 Khoi Pham Thanh Ho April 19 th, 2015 Comment and Evaluation: This lab introduces us about Android SDK and how to write a program for Android platform. The calculator is pretty easy, everything
Fragment Example Create the following files and test the application on emulator or device.
 Fragment Example Create the following files and test the application on emulator or device. File: AndroidManifest.xml
Manifest.xml. Activity.java
 Dr.K.Somasundaram Ph.D Professor Department of Computer Science and Applications Gandhigram Rural Institute, Gandhigram, Tamil Nadu-624302, India ka.somasundaram@gmail.com Manifest.xml
else if(rb2.ischecked()) {
) {") Problem :Toy Calculator Description:Please design an Android application that contains 2 activities: cal_main and cal_result. The following figure is a suggested layout for the cal_main activity. For the
Problem :Toy Calculator Description:Please design an Android application that contains 2 activities: cal_main and cal_result. The following figure is a suggested layout for the cal_main activity. For the
TextView Control. EditText Control. TextView Attributes. android:id - This is the ID which uniquely identifies the control.
 A TextView displays text to the user. TextView Attributes TextView Control android:id - This is the ID which uniquely identifies the control. android:capitalize - If set, specifies that this TextView has
EMBEDDED SYSTEMS PROGRAMMING Application Tip: Managing Screen Orientation
 EMBEDDED SYSTEMS PROGRAMMING 2016-17 Application Tip: Managing Screen Orientation ORIENTATIONS Portrait Landscape Reverse portrait Reverse landscape ON REVERSE PORTRAIT Android: all four orientations are
ITU- FAO- DOA- TRCSL. Training on. Innovation & Application Development for E- Agriculture. Shared Preferences
 ITU- FAO- DOA- TRCSL Training on Innovation & Application Development for E- Agriculture Shared Preferences 11 th - 15 th December 2017 Peradeniya, Sri Lanka Shahryar Khan & Imran Tanveer, ITU Experts
1. Location Services. 1.1 GPS Location. 1. Create the Android application with the following attributes. Application Name: MyLocation
 1. Location Services 1.1 GPS Location 1. Create the Android application with the following attributes. Application Name: MyLocation Project Name: Package Name: MyLocation com.example.mylocation 2. Put
Android Workshop: Model View Controller ( MVC):
:") Android Workshop: Android Details: Android is framework that provides java programmers the ability to control different aspects of smart devices. This interaction happens through the Android SDK (Software
Android Workshop: Android Details: Android is framework that provides java programmers the ability to control different aspects of smart devices. This interaction happens through the Android SDK (Software
IPN-ESCOM Application Development for Mobile Devices. Extraordinary. A Web service, invoking the SOAP protocol, in an Android application.
 Learning Unit Exam Project IPN-ESCOM Application Development for Mobile Devices. Extraordinary. A Web service, invoking the SOAP protocol, in an Android application. The delivery of this project is essential
 Lampiran Program : Res - Layout Activity_main.xml
 Android Services. Victor Matos Cleveland State University. Services
 22 Android Victor Matos Cleveland State University Notes are based on: Android Developers http://developer.android.com/index.html 22. Android Android A Service is an application component that runs in
Android UI Development
 Android UI Development Android UI Studio Widget Layout Android UI 1 Building Applications A typical application will include: Activities - MainActivity as your entry point - Possibly other activities (corresponding
Thread. A Thread is a concurrent unit of execution. The thread has its own call stack for methods being invoked, their arguments and local variables.
 1 Thread A Thread is a concurrent unit of execution. The thread has its own call stack for methods being invoked, their arguments and local variables. Each virtual machine instance has at least one main
Android - JSON Parser Tutorial
 Android - JSON Parser Tutorial JSON stands for JavaScript Object Notation.It is an independent data exchange format and is the best alternative for XML. This chapter explains how to parse the JSON file
Simple Currency Converter
 Simple Currency Converter Implementing a simple currency converter: USD Euro Colon (CR) Note. Naive implementation using the rates 1 Costa Rican Colon = 0.001736 U.S. dollars 1 Euro = 1.39900 U.S. dollars
Notification mechanism
 Notification mechanism Adaptation of materials: dr Tomasz Xięski. Based on presentations made available by Victor Matos, Cleveland State University. Portions of this page are reproduced from work created
Produced by. Mobile Application Development. Higher Diploma in Science in Computer Science. Eamonn de Leastar
 Mobile Application Development Higher Diploma in Science in Computer Science Produced by Eamonn de Leastar (edeleastar@wit.ie) Department of Computing, Maths & Physics Waterford Institute of Technology
Android Apps Development for Mobile Game Lesson 5
 Workshop 1. Create a simple Environment Sensors (Page 1 6) Pressure Sensor Ambient Temperature Sensor Light Sensor Relative Humidity Sensor 2. Create a simple Position Sensors (Page 7 8) Proximity Sensor
EMBEDDED SYSTEMS PROGRAMMING Application Tip: Saving State
 EMBEDDED SYSTEMS PROGRAMMING 2016-17 Application Tip: Saving State THE PROBLEM How to save the state (of a UI, for instance) so that it survives even when the application is closed/killed The state should
StoppUhr. <Button android:layout_width="wrap_content" android:layout_height="wrap_content" android:text="start1"
 StoppUhr
Vienos veiklos būsena. Theory
 Vienos veiklos būsena Theory While application is running, we create new Activities and close old ones, hide the application and open it again and so on, and Activity can process all these events. It is
Create Parent Activity and pass its information to Child Activity using Intents.
 Create Parent Activity and pass its information to Child Activity using Intents. /* MainActivity.java */ package com.example.first; import android.os.bundle; import android.app.activity; import android.view.menu;
ANDROID PROGRAMS DAY 3
 ANDROID PROGRAMS DAY 3 //Android project to navigate from first page to second page using Intent Step 1: Create a new project Step 2: Enter necessary details while creating project. Step 3: Drag and drop
Produced by. Mobile Application Development. Higher Diploma in Science in Computer Science. Eamonn de Leastar
 Mobile Application Development Higher Diploma in Science in Computer Science Produced by Eamonn de Leastar (edeleastar@wit.ie) Department of Computing, Maths & Physics Waterford Institute of Technology
EMBEDDED SYSTEMS PROGRAMMING Android Services
 EMBEDDED SYSTEMS PROGRAMMING 2016-17 Android Services APP COMPONENTS Activity: a single screen with a user interface Broadcast receiver: responds to system-wide broadcast events. No user interface Service:
PENGEMBANGAN APLIKASI PERANGKAT BERGERAK (MOBILE)
") PENGEMBANGAN APLIKASI PERANGKAT BERGERAK (MOBILE) Network Connection Web Service K Candra Brata andra.course@gmail.com Mobille App Lab 2015-2016 Network Connection http://developer.android.com/training/basics/network-ops/connecting.html
PENGEMBANGAN APLIKASI PERANGKAT BERGERAK (MOBILE) Network Connection Web Service K Candra Brata andra.course@gmail.com Mobille App Lab 2015-2016 Network Connection http://developer.android.com/training/basics/network-ops/connecting.html
 Statistics http://www.statista.com/topics/840/smartphones/ http://www.statista.com/topics/876/android/ http://www.statista.com/statistics/271774/share-of-android-platforms-on-mobile-devices-with-android-os/
Nadar Saraswathi College of Engineering and Technology, Nadar Saraswathi College of Engineering and Technology,
 Nadar Saraswathi College of Engineering and Technology, DEPARTMENT OF COMPUTER SCIENCE AND ENGINEERING CS6611 MOBILE APPLICATION DEVELOPMENT LAB MANUAL (R-2017) Lab Manual Prepared By : Mr. R. Udhaya Kumar,
M.A.D Assignment # 1
 Submitted by: Rehan Asghar Roll no: BSSE (7) 15126 M.A.D Assignment # 1 Submitted to: Sir Waqas Asghar Submitted by: M. Rehan Asghar 4/25/17 Roll no: BSSE 7 15126 XML Code: Calculator Android App
Learn about Android Content Providers and SQLite
 Tampa Bay Android Developers Group Learn about Android Content Providers and SQLite Scott A. Thisse March 20, 2012 Learn about Android Content Providers and SQLite What are they? How are they defined?
package import import import import import import import public class extends public void super new this class extends public super public void new
 Android 2-D Drawing Android uses a Canvas object to host its 2-D drawing methods. The program below draws a blue circle on a white canvas. It does not make use of the main.xml layout but draws directly
Android App Development. Mr. Michaud ICE Programs Georgia Institute of Technology
 Android App Development Mr. Michaud ICE Programs Georgia Institute of Technology Android Operating System Created by Android, Inc. Bought by Google in 2005. First Android Device released in 2008 Based
Android Beginners Workshop
 Android Beginners Workshop at the M O B IL E M O N D AY m 2 d 2 D E V E L O P E R D A Y February, 23 th 2010 Sven Woltmann, AndroidPIT Sven Woltmann Studied Computer Science at the TU Ilmenau, 1994-1999
Data Persistence. Chapter 10
 Chapter 10 Data Persistence When applications create or capture data from user inputs, those data will only be available during the lifetime of the application. You only have access to that data as long
INTRODUCTION TO ANDROID
 INTRODUCTION TO ANDROID 1 Niv Voskoboynik Ben-Gurion University Electrical and Computer Engineering Advanced computer lab 2015 2 Contents Introduction Prior learning Download and install Thread Android
android:layout_margintop="5dp" > <EditText android:layout_width="210dp"
 activity_main.xml
Diving into Android. By Jeroen Tietema. Jeroen Tietema,
 Diving into Android By Jeroen Tietema Jeroen Tietema, 2015 1 Requirements 4 Android SDK 1 4 Android Studio (or your IDE / editor of choice) 4 Emulator (Genymotion) or a real device. 1 See https://developer.android.com
Embedded Systems Programming - PA8001
 Embedded Systems Programming - PA8001 http://goo.gl/ydeczu Lecture 9 Mohammad Mousavi m.r.mousavi@hh.se Center for Research on Embedded Systems School of Information Science, Computer and Electrical Engineering
Software Practice 3 Before we start Today s lecture Today s Task Team organization
 1 Software Practice 3 Before we start Today s lecture Today s Task Team organization Prof. Hwansoo Han T.A. Jeonghwan Park 43 2 Lecture Schedule Spring 2017 (Monday) This schedule can be changed M A R
Laying Out Controls in Containers
 CHAPTER 3 Laying Out Controls in Containers A container is a view used to contain other views. Android offers a collection of view classes that act as containers for views. These container classes are
Create a local SQL database hosting a CUSTOMER table. Each customer includes [id, name, phone]. Do the work inside Threads and Asynctasks.
![Create a local SQL database hosting a CUSTOMER table. Each customer includes [id, name, phone]. Do the work inside Threads and Asynctasks.](/thumbs/87/97410589.jpg "Create a local SQL database hosting a CUSTOMER table. Each customer includes [id, name, phone]. Do the work inside Threads and Asynctasks.") CIS 470 Lesson 13 Databases - Quick Notes Create a local SQL database hosting a CUSTOMER table. Each customer includes [id, name, phone]. Do the work inside Threads and Asynctasks. package csu.matos; import
CIS 470 Lesson 13 Databases - Quick Notes Create a local SQL database hosting a CUSTOMER table. Each customer includes [id, name, phone]. Do the work inside Threads and Asynctasks. package csu.matos; import
<uses-permission android:name="android.permission.internet" />
 Listing Program : 1. Android Manifest.xml
Database Development In Android Applications
 ITU- FAO- DOA- TRCSL Training on Innovation & Application Development for E- Agriculture Database Development In Android Applications 11 th - 15 th December 2017 Peradeniya, Sri Lanka Shahryar Khan & Imran
EMBEDDED SYSTEMS PROGRAMMING UI Specification: Approaches
 EMBEDDED SYSTEMS PROGRAMMING 2016-17 UI Specification: Approaches UIS: APPROACHES Programmatic approach: UI elements are created inside the application code Declarative approach: UI elements are listed
Advanced Android Development
 Advanced Android Development review of greporter open-source project: GPS, Audio / Photo Capture, SQLite, HTTP File Upload and more! Nathan Freitas, Oliver+Coady nathan@olivercoady.com Android Platform
Programming with Android: Introduction. Layouts. Dipartimento di Informatica: Scienza e Ingegneria Università di Bologna
 Programming with Android: Introduction Layouts Luca Bedogni Marco Di Felice Dipartimento di Informatica: Scienza e Ingegneria Università di Bologna Views: outline Main difference between a Drawable and
CS 234/334 Lab 1: Android Jump Start
 CS 234/334 Lab 1: Android Jump Start Distributed: January 7, 2014 Due: Friday, January 10 or Monday, January 13 (in-person check off in Mobile Lab, Ry 167). No late assignments. Introduction The goal of
// MainActivity.java ; Noah Spenser; Senior Design; Diabetic Breathalyzer
 // MainActivity.java ; Noah Spenser; Senior Design; Diabetic Breathalyzer package com.noahspenser.seniordesign; import android.os.parcel; import android.os.parcelable; import android.support.v7.app.appcompatactivity;
Android Layout Types
 Android Layout Types Android Linear Layout Android LinearLayout is a view group that aligns all children in either vertically or horizontally. android:divider - This is drawable to use as a vertical divider
COMP61242: Task /04/18
 COMP61242: Task 2 1 16/04/18 1. Introduction University of Manchester School of Computer Science COMP61242: Mobile Communications Semester 2: 2017-18 Laboratory Task 2 Messaging with Android Smartphones
Android - Widgets Tutorial
 Android - Widgets Tutorial A widget is a small gadget or control of your android application placed on the home screen. Widgets can be very handy as they allow you to put your favourite applications on
8/30/15 MOBILE COMPUTING. CSE 40814/60814 Fall How many of you. have implemented a command-line user interface?
 MOBILE COMPUTING CSE 40814/60814 Fall 2015 How many of you have implemented a command-line user interface? 1 How many of you have implemented a graphical user interface? HTML/CSS Java Swing.NET Framework
M.A.D ASSIGNMENT # 2 REHAN ASGHAR BSSE 15126
 M.A.D ASSIGNMENT # 2 REHAN ASGHAR BSSE 15126 Submitted to: Sir Waqas Asghar MAY 23, 2017 SUBMITTED BY: REHAN ASGHAR Intent in Android What are Intent? An Intent is a messaging object you can use to request
Adaptation of materials: dr Tomasz Xięski. Based on presentations made available by Victor Matos, Cleveland State University.
 Creating dialogs Adaptation of materials: dr Tomasz Xięski. Based on presentations made available by Victor Matos, Cleveland State University. Portions of this page are reproduced from work created and
User Interface Development. CSE 5236: Mobile Application Development Instructor: Adam C. Champion Course Coordinator: Dr.
 User Interface Development CSE 5236: Mobile Application Development Instructor: Adam C. Champion Course Coordinator: Dr. Rajiv Ramnath 1 Outline UI Support in Android Fragments 2 UI Support in the Android
ANDROID USER INTERFACE
 1 ANDROID USER INTERFACE Views FUNDAMENTAL UI DESIGN Visual interface element (controls or widgets) ViewGroup Contains multiple widgets. Layouts inherit the ViewGroup class Activities Screen being displayed
UI (User Interface) overview Supporting Multiple Screens Touch events and listeners
 overview Supporting Multiple Screens Touch events and listeners") http://www.android.com/ UI (User Interface) overview Supporting Multiple Screens Touch events and listeners User Interface Layout The Android user interface (UI) consists of screen views (one or more viewgroups
http://www.android.com/ UI (User Interface) overview Supporting Multiple Screens Touch events and listeners User Interface Layout The Android user interface (UI) consists of screen views (one or more viewgroups
Topics of Discussion
 Reference CPET 565 Mobile Computing Systems CPET/ITC 499 Mobile Computing Fragments, ActionBar and Menus Part 3 of 5 Android Programming Concepts, by Trish Cornez and Richard Cornez, pubslihed by Jones
Understanding Intents and Intent Filters
 255 Chapter 11 Understanding Intents and Intent Filters This chapter will delve into intents, which are messaging objects that carry communications between the major components of your application your
Applied Cognitive Computing Fall 2016 Android Application + IBM Bluemix (Cloudant NoSQL DB)
") Applied Cognitive Computing Fall 2016 Android Application + IBM Bluemix (Cloudant NoSQL DB) In this exercise, we will create a simple Android application that uses IBM Bluemix Cloudant NoSQL DB. The application
Applied Cognitive Computing Fall 2016 Android Application + IBM Bluemix (Cloudant NoSQL DB) In this exercise, we will create a simple Android application that uses IBM Bluemix Cloudant NoSQL DB. The application
Graphical User Interfaces
 Graphical User Interfaces Some suggestions Avoid displaying too many things Well-known anti-patterns Display useful content on your start screen Use action bars to provide consistent navigation Keep your
Produced by. Mobile Application Development. Higher Diploma in Science in Computer Science. Eamonn de Leastar
 Mobile Application Development Higher Diploma in Science in Computer Science Produced by Eamonn de Leastar (edeleastar@wit.ie) Department of Computing, Maths & Physics Waterford Institute of Technology
Android Application Development. By : Shibaji Debnath
 Android Application Development By : Shibaji Debnath About Me I have over 10 years experience in IT Industry. I have started my career as Java Software Developer. I worked in various multinational company.
Tutorial: Setup for Android Development
 Tutorial: Setup for Android Development Adam C. Champion CSE 5236: Mobile Application Development Autumn 2017 Based on material from C. Horstmann [1], J. Bloch [2], C. Collins et al. [4], M.L. Sichitiu
TPCT s College of Engineering, Osmanabad. Laboratory Manual SDL-II. Mobile Application Development (Android) For. Third Year Students (CSE)
 For. Third Year Students (CSE)") TPCT s College of Engineering, Osmanabad Laboratory Manual SDL-II Mobile Application Development (Android) For Third Year Students (CSE) Manual Prepared by Prof. Sujata A. Gaikwad Author COE, Osmanabad
TPCT s College of Engineering, Osmanabad Laboratory Manual SDL-II Mobile Application Development (Android) For Third Year Students (CSE) Manual Prepared by Prof. Sujata A. Gaikwad Author COE, Osmanabad
Introduction to Android Development
 Introduction to Android Development What is Android? Android is the customizable, easy to use operating system that powers more than a billion devices across the globe - from phones and tablets to watches,
An Overview of the Android Programming
 ID2212 Network Programming with Java Lecture 14 An Overview of the Android Programming Hooman Peiro Sajjad KTH/ICT/SCS HT 2016 References http://developer.android.com/training/index.html Developing Android
Android. Broadcasts Services Notifications
 Android Broadcasts Services Notifications Broadcast receivers Application components that can receive intents from other applications Broadcast receivers must be declared in the manifest They have an associated
Mobile Software Development for Android - I397
 1 Mobile Software Development for Android - I397 IT COLLEGE, ANDRES KÄVER, 2015-2016 EMAIL: AKAVER@ITCOLLEGE.EE WEB: HTTP://ENOS.ITCOLLEGE.EE/~AKAVER/2015-2016/DISTANCE/ANDROID SKYPE: AKAVER Layout fundamentals
A Crash Course to Android Mobile Platform
 Enterprise Application Development using J2EE Shmulik London Lecture #2 A Crash Course to Android Mobile Platform Enterprise Application Development Using J2EE / Shmulik London 2004 Interdisciplinary Center
Designing Apps Using The WebView Control
 28 Designing Apps Using The Control Victor Matos Cleveland State University Notes are based on: Android Developers http://developer.android.com/index.html The Busy Coder's Guide to Advanced Android Development
Hangman Requirements
 Samuel Martin Software-Hardware Codesign COT 5930 Design Project 2 Hangman Requirements 1. Overview A game of hangman works as follows: 1. The program selects a word from a pool of words and displays a
Android Basics. - Bhaumik Shukla Android Application STEALTH FLASH
 Android Basics - Bhaumik Shukla Android Application Developer @ STEALTH FLASH Introduction to Android Android is a software stack for mobile devices that includes an operating system, middleware and key
Programming with Android: Layouts, Widgets and Events. Dipartimento di Scienze dell Informazione Università di Bologna
 Programming with Android: Layouts, Widgets and Events Luca Bedogni Marco Di Felice Dipartimento di Scienze dell Informazione Università di Bologna Outline Components of an Activity ViewGroup: definition
Arrays of Buttons. Inside Android
 Arrays of Buttons Inside Android The Complete Code Listing. Be careful about cutting and pasting.
Intents. Your first app assignment
 Intents Your first app assignment We will make this. Decidedly lackluster. Java Code Java Code XML XML Preview XML Java Code Java Code XML Buttons that work
Android Programs Day 5
 Android Programs Day 5 //Android Program to demonstrate the working of Options Menu. 1. Create a New Project. 2. Write the necessary codes in the MainActivity.java to create OptionMenu. 3. Add the oncreateoptionsmenu()
Mobile Software Development for Android - I397
 1 Mobile Software Development for Android - I397 IT COLLEGE, ANDRES KÄVER, 2015-2016 EMAIL: AKAVER@ITCOLLEGE.EE WEB: HTTP://ENOS.ITCOLLEGE.EE/~AKAVER/2015-2016/DISTANCE/ANDROID SKYPE: AKAVER Timetable
Basic UI elements: Android Buttons (Basics) Marco Ronchetti Università degli Studi di Trento
 Marco Ronchetti Università degli Studi di Trento") Basic UI elements: Android Buttons (Basics) Marco Ronchetti Università degli Studi di Trento Let s work with the listener Button button = ; button.setonclicklistener(new.onclicklistener() { public void
Basic UI elements: Android Buttons (Basics) Marco Ronchetti Università degli Studi di Trento Let s work with the listener Button button = ; button.setonclicklistener(new.onclicklistener() { public void
App Development for Smart Devices. Lec #7: Audio, Video & Telephony Try It Out
 App Development for Smart Devices CS 495/595 - Fall 2013 Lec #7: Audio, Video & Telephony Try It Out Tamer Nadeem Dept. of Computer Science Trt It Out Example - SoundPool Example - VideoView Page 2 Fall
1 카메라 1.1 제어절차 1.2 관련주요메서드 1.3 제작철차 서피스뷰를생성하고이를제어하는서피스홀더객체를참조해야함. 매니페스트에퍼미션을지정해야한다.
 1 카메라 1.1 제어절차 서피스뷰를생성하고이를제어하는서피스홀더객체를참조해야함. 매니페스트에퍼미션을지정해야한다. 1.2 관련주요메서드 setpreviewdisplay() : startpreview() : stoppreview(); onpicturetaken() : 사진을찍을때자동으로호출되며캡처한이미지가전달됨 1.3 제작철차 Step 1 프로젝트를생성한후매니페스트에퍼미션들을설정한다.
Mobile Programming Lecture 2. Layouts, Widgets, Toasts, and Event Handling
 Mobile Programming Lecture 2 Layouts, Widgets, Toasts, and Event Handling Lecture 1 Review How to edit XML files in Android Studio? What holds all elements (Views) that appear to the user in an Activity?
Mobile Computing Practice # 2c Android Applications - Interface
 Mobile Computing Practice # 2c Android Applications - Interface One more step in the restaurants application. 1. Design an alternative layout for showing up in landscape mode. Our current layout is not
API Guide for Gesture Recognition Engine. Version 2.0
 API Guide for Gesture Recognition Engine Version 2.0 Table of Contents Gesture Recognition API... 3 API URI... 3 Communication Protocol... 3 Getting Started... 4 Protobuf... 4 WebSocket Library... 4 Project
Android Apps Development for Mobile Game Lesson Create a simple paint brush that allows user to draw something (Page 11 13)
") Workshop 1. Create a simple Canvas view with simple drawing (Page 1 5) Hide Action Bar and Status Bar Create Canvas View Create Simple Drawing 2. Create a simple animation (Page 6 10) Load a simple image
Workshop 1. Create a simple Canvas view with simple drawing (Page 1 5) Hide Action Bar and Status Bar Create Canvas View Create Simple Drawing 2. Create a simple animation (Page 6 10) Load a simple image
Solving an Android Threading Problem
 Home Java News Brief Archive OCI Educational Services Solving an Android Threading Problem Introduction by Eric M. Burke, Principal Software Engineer Object Computing, Inc. (OCI) By now, you probably know
Created By: Keith Acosta Instructor: Wei Zhong Courses: Senior Seminar Cryptography
 Created By: Keith Acosta Instructor: Wei Zhong Courses: Senior Seminar Cryptography 1. Thread Summery 2. Thread creation 3. App Diagram and information flow 4. General flow of Diffie-Hellman 5. Steps of
Android UI: Overview
 1 Android UI: Overview An Activity is the front end component and it can contain screens. Android screens are composed of components or screen containers and components within the containers Screen containers
Tabel mysql. Kode di PHP. Config.php. Service.php
 Tabel mysql Kode di PHP Config.php Service.php Layout Kode di Main Activity package com.example.mini.webandroid; import android.app.progressdialog; import android.os.asynctask; import android.support.v7.app.appcompatactivity;