Contents. Warranty... Pg. 4. Assembly Option 1 : Upright... Pg Ladder Installation... Pg. 11. Assembly Option 2 : Upside down... Pg.
|
|
|
- Bernard Bradford
- 5 years ago
- Views:
Transcription
 695 316 Toll free: (888) 39 913 Fax: (519) 695 59 www.lambtonconveyor.")
1 HOPPER BOTTOM Assembly Manual LAMBTON CONVEYOR LIMITED Florence Rd. Florence, ON N0P 1R0 Canada Telephone: (519) Toll free: (888) Fax: (519) ONE SOURCE ONE SOLUTION Revised: October 1, 009
2
3 Contents Warranty... Pg. Assembly Option 1 : Upright... Pg Ladder Installation... Pg. 11 Assembly Option : Upside down... Pg Complete Hopper Bottom Models... Pg. -16 Parts List... Pg. 1- ASSEMBLY OF HOPPER BOTTOMS: There are two ways to install all sizes and types of hopper bottom. They can be assembled upright ( under the bin ) or upside down and flipped upright after assembly. SEE PAGE 16 FOR COMPLETE MODEL SHOWING MOST COMPONENTS LABELLED 3
4 WARRANTY LAMBTON CONVEYOR LIMITED WARRANTS ALL PRODUCTS MANUFACTURED BY LAMBTON CONVEYOR TO BE FREE OF DEFECTS IN MATERIAL AND WORKMANSHIP UNDER NORMAL USAGE AND CONDITIONS FOR A PERIOD OF YEARS AFTER RETAIL SALE TO THE ORIGINAL END USER OF SUCH PRODUCTS. LAMBTON CONVEYOR S ONLY OBLIGATION IS, AND PURCHASER S SOLE REMEDY SHALL BE FOR LAMBTON CONVEYOR, TO REPAIR OR REPLACE, AT LAMBTON CONVEYOR S OPTION AND EXPENSE, PRODUCTS THAT, IN LAMBTON CONVEYOR S SOLE JUDGMENT, CONTAIN A MATERIAL DEFECT DUE TO MATERIALS OR WORKMANSHIP. ALL DELIVERY AND SHIPMENT CHARGES TO AND FROM LAMBTON CONVEYOR FACTORY WILL BE PURCHASER S RESPONSIBILITY. EXPENSES INCURRED BY OR ON BEHALF OF THE PURCHASER WITHOUT PRIOR WRITTEN AUTHORIZATION FROM AN EMPLOYEE OF LAMBTON CONVEYOR LIMITED SHALL BE THE SOLE RESPONSIBILITY OF THE PURCHASER. EXCEPT FOR THE ABOVE STATED EXPRESS LIMITED WARRANTIES, LAMBTON CONVEYOR LIMITED MAKES NO WARRANTY OF ANY KIND, EXPRESSED OR IMPLIED, INCLUDING, WITHOUT LIMITATION, WARRANTIES OF MERCHANTABILITY OF FITNESS FOR A PARTICULAR PURPOSE OR USE IN CONNECTION WITH (I) PRODUCT MANUFACTURED OR SOLD BY LAMBTON CONVEYOR LIMITED OR (ii) ANY ADVICE, INSTRUCTION, RECOMMENDATION OR SUGGESTION PROVIDED BY AN AGENT, REPRESENTATIVE OR EMPLOYEE OF LAMBTON CONVEYOR LIMITED REGARDING OR RELATED TO THE CONFIGURATION, INSTALLATION, LAYOUT, SUITABILITY FOR A PARTICULAR PURPOSE, OR DESIGN OF SUCH PRODUCT OR PRODUCTS. IN NO EVENT SHALL LAMBTON CONVEYOR LIMITED BE LIABLE FOR ANY DIRECT, INDIRECT, INCIDENTAL OR CONSEQUENTIAL DAMAGES, INCLUDING, WITHOUT LIMITATION, LOSS OF ANTICIPATED PROFITS OR BENEFITS. PURCHASER S SOLE AND EXCLUSIVE REMEDY SHALL BE LIMITED TO THAT STATED ABOVE, WHICH SHALL NOT EXCEED THE AMOUNT PAID FOR THE PRODUCT PURCHASED. THIS WARRANTY IS NOT TRANSFERABLE AND APPLIES ONLY TO THE ORIGINAL PURCHASER. LAMBTON CONVEYOR LIMITED SHALL HAVE NO OBLIGATION OR RESPONSIBILITY FOR ANY REPRESENTATIVE OR WARRANTIES MADE BY OR ON BEHALF OF ANY DEALER, AGENT OR DISTRIBUTION OF LAMBTON CONVEYOR LIMITED. LAMBTON CONVEYOR ASSUMES NO RESPONSIBILITY FOR FIELD MODIFICATIONS OR ERECTION DEFECTS, WHICH CREATE STRUCTURAL OR STORAGE QUALITY PROBLEMS. MODIFICATIONS TO THE PRODUCT NOT SPECIFICALLY COVERED BY THE CONTENTS OF THIS MANUAL WILL NULLIFY ANY PRODUCT WARRANTY THAT MIGHT HAVE BEEN OTHERWISE AVAILABLE. THE FOREGOING WARRANTY SHALL NOT COVER PRODUCTS OR PARTS, WHICH HAVE BEEN DAMAGED BY NEGLIGENT USE, MISUSE, ALTERNATION OR ACCIDENT. THIS WARRANTY COVERS ONLY PRODUCTS MANUFACTURED BY LAMBTON CONVEYOR LIMITED. THIS WARRANTY IS EXCLUSIVE AND IN LIEU OF ALL OTHER WARRANTIES EXPRESS OR IMPLIED. LAMBTON CONVEYOR LIMITED RESERVES THE RIGHT TO MAKE DESIGN OR SPECIFICATION CHANGES AT ANY TIME. PRIOR TO INSTALLATION, PURCHASER HAS THE RESPONSIBILITY TO RESEARCH AND COMPLY WITH ALL FEDERAL, PROVINCIAL/STATE AND LOCAL CODES WHICH MAY APPLY TO THE LOCATION AND INSTALLATION.
 (this picture shows un-stiffened hopper leg, as an example) Install the stiffener connection brackets to leg V shaped face as indicated below.")
 ( This is for - stiffened hopper tanks only) Install the 3/8 x1.5 bolts to upper flat leg gusset.")
5 Assembly Option 1 : Upright To be built under the bin (stiffened or un-stiffened). Step 1 Preparation: Install the leg base plates to the lower legs ( - ) or legs ( - ). Make them ready to install. Also install the leg gussets (-- unstiffened) (this picture shows un-stiffened hopper leg, as an example) Install the stiffener connection brackets to leg V shaped face as indicated below. Make them ready to install.( all stiffened hoppers ) (this picture shows stiffened hopper leg V face plate assembly, as an example) Install the 3/8 x1.5 bolts to upper flat leg faces.( bolts and nuts) ( This is for - stiffened hopper tanks only) Install the 3/8 x1.5 bolts to upper flat leg gusset.( bolts and nuts) ( This is for - stiffened hopper tanks only) Step Raise the tank with jacks and install the outer ring to the tank. ASSEMBLY OPTION 1 : UPRIGHT 5


 Step Install the")
![hopper sheets ( & ) [or upper hopper sheets ( & ] Apply the](/docs-images/95/125778724/images/6-4.jpg "caulking to the vertical seam from the outside of edge of")

6 3/8 X 1.5 If assembling a stiffened hopper, install the 3 bolts (3/8 x1.5 ) heading outward to the outer ring at the locations of leg connection 3/8 X 1.5 Step 3 Install the legs. STIFFENED HOPPER STIFFENED HOPPER Step Install the ring spacers. Step 5 Install the inner ring. Step 6 Install the hopper gussets to the legs. ( & stiffened hoppers and all & hoppers ) Step Install the hopper sheets ( & ) [or upper hopper sheets ( & ] Apply the caulking to the vertical seam from the outside of edge of hopper sheet. Note: In hopper, every hopper sheet covers 1.5 leg spacing. Insert the bolts through the hopper gusset in those locations. Keep torched edge of hopper sheets inside of the hopper tank..! 6 ASSEMBLY OPTION 1 : UPRIGHT


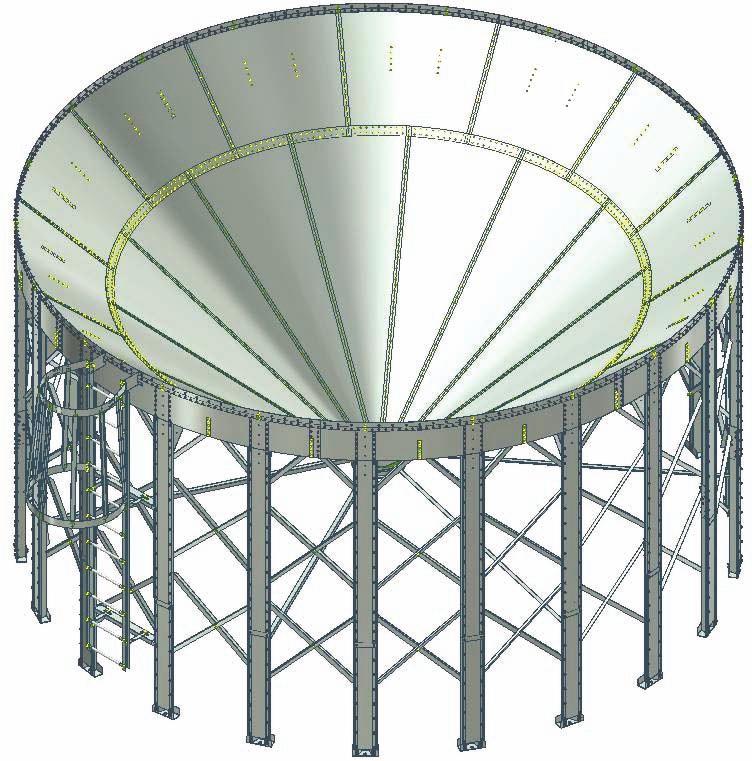
7 Step 8 The three bolts at the top of the upper hopper sheet vertical seam are the hardest to install. Thus we have included the hopper upper seam weldment to make assembly easier the weldments come assembled with 3 weldnuts that eliminate the need to struggle with trying to thread a bolt and nut in this tight space. The three weldnuts will be the nuts for first three bolts of vertical seam. Install upper seam weldments as shown below. Use 5/16 x 3/ flanged bolts for these 3 holes. Application of caulking: CAULKING HOPPER SEAM WELDMENT shown but same principle applies to all! Step 9 Install the inner ring and X braces Install all X brace and ring brace angles face down as in the drawing. X braces have one long and one short notched end. Longer notched end will be in the lower position. SHORTER NOTCHED END LONGER NOTCHED END This picture shows hopper bottom. Install yours accordingly. ASSEMBLY OPTION 1 : UPRIGHT


 Apply caulking to the vertical seams at outer edge of overlap.")

8 Step 10 After installation of upper hopper sheets, ring and X braces it is necessary to raise the tank for rest of the installation. ( This is just for & hoppers. If your hopper is one piece leg ( & ), you can go to Step 11. Raise the tank and install the lower section of legs. This picture shows hopper bottom at Step 10 of installation. Step 11 Now you can continue with installation of lower hopper sheets. Overlap the lower hopper sheet equally to the upper two hopper sheet sections. ( See the previous image ) Apply caulking to the vertical seams at outer edge of overlap. ( Same application done for upper hopper sheet ) Keep the torched edge of the hopper sheet on the inside of the hopper. Overlapping the hopper sheets prevents water, rain leak. The upper edge of the lower hopper sheet and the upper edge of the hopper collar will be on the inside of the hopper. After installing half of the hopper sheets install the hopper collar and then continue installing hopper sheets. This picture shows hopper at Step 11 of the installation. 8 ASSEMBLY OPTION 1 : UPRIGHT


9 Step Now you can install all remaining X braces. Apply the same rules as indicated above. Step 13 Now you can install the hopper braces. Step 1 Now you can start to install all leg face plates and stiffener connections - stiffened hoppers: 1-Install the upper flat leg face plate first. ASSEMBLY OPTION 1 : UPRIGHT 9


10 -Install all stiffener extensions. 3-Than install the lower flat leg face plate and V shaped face plate together. - stiffened hoppers: 1-Install the upper flat leg gusset. Now all bolts of the face plates can be inserted and tightened.\ -Install stiffener extensions. 3-Now install the all V shaped face plate assemblies to all legs. 10 ASSEMBLY OPTION 1 : UPRIGHT


11 Step Ladder installation Shows - Hopper ladder, lower connection. Shows stiffened hopper ladder lower connection. Shows stiffened hopper ladder middle and upper connection. stiffened hopper ladder lower connection. stiffened hopper middle and upper connection. ASSEMBLY OPTION 1 : UPRIGHT 11
12


13 Assembly Option : Upside down In this type of installation a crane will be necessary to flip the hopper bottom upright after assembly. Please refer to Assembly Option 1 in the previous section for supplemental assembly information. Step 1 : Assemble the outer ring. Step : Install the hopper sheets. Apply the caulking on the hopper sheet vertical seams as explained in the previous section ( see page ). After half of the hopper sheets are installed, install the hopper collar. Step 3 : Install the legs. See pages 5, 9-10 for more details. NOTE: During the installation of the hopper sheets it is not necessary to use the hopper upper seam weldment parts because the inner ring is not yet installed; there is adequate space to use regular nuts. It is your decision whether you use the weldment or not. 5/16 x 3/ flanged bolts are still required for the top 3 holes of the vertical seam. ASSEMBLY OPTION : UPSIDE DOWN 13


14 Step : Install the ring spacers and inner rings Step 5 : Install the ring and X braces Step 6: Install the hopper braces. Now that installation is mostly complete, flip the hopper right side up by the use of a crane. All ladder assembly can be done similarly to what was explained in the previous section see page ASSEMBLY OPTION : UPSIDE DOWN


15 Complete Hopper Bottom Models UNSTIFFENED HOPPER UNSTIFFENED HOPPER UNSTIFFENED HOPPER UNSTIFFENED HOPPER COMPLETE HOPPER BOTTOM MODELS


16 STIFFENED HOPPER STIFFENED HOPPER STIFFENED HOPPER STIFFENED HOPPER 16 COMPLETE HOPPER BOTTOM MODELS

17 PARTS LIST FOR ALL SIZES AND TYPE OF HOPPERS UNSTIFFENED STIFFENED H H H H PART # : GP-001 DESCRIPTION : LOWER BASE PLATE PART # : GP-00 DESCRIPTION : UPPER BASE PLATE PART # : GP-00 DESCRIPTION : LEG GUSSET FOR, & UNSTIFFENED HOPPERS PART # : GP-050-A-HOP DESCRIPTION : X-BRACE FOR ALL SIZE HOPPERS PART # : GP-03-A-HOP DESCRIPTION : RING BRACE FOR ALL SIZE HOPPERS PART # : GP-09-A-HOP DESCRIPTION : OUTER RINGS FOR ALL SIZE HOPPERS PART # : GP-06-A DESCRIPTION : ALL HOPPERS INNER RINGS PART # : GP-05-A DESCRIPTION : ALL HOPPERS INNER RINGS 5 5 PART # : GP-030-A DESCRIPTION : ALL HOPPERS INNER RINGS 6 6 PART # : GP-0-A DESCRIPTION : ALL HOPPERS INNER RINGS PART # : GP-003 DESCRIPTION : SPACER FOR ALL SIZE HOPPERS PART # : GP-051-ST-HOP DESCRIPTION : & STIFFENED HOPPERS UPPER FLAT LEG GUSSET PARTS LIST 1
18 UNSTIFFENED STIFFENED H H H H PART # : BHOPH-01 DESCRIPTION : STIFFENED HOPPER LEG PART # : BHOP-01 DESCRIPTION : UNSTIFFENED HOPPER LEG PART # : BHOPH-0 DESCRIPTION : STIFFENED HOPPER LEG V SHAPED FACE PLATE PART # : BHOP-01 DESCRIPTION : UNSTIFFENED HOPPER LEG PART # : BHOPH-01 DESCRIPTION : STIFFENED HOPPER LEG PART # : BHOPH-0 DESCRIPTION : STIFFENED HOPPER V SHAPED LEG FACE PLATE PART # : GP-0-H-A DESCRIPTION : ALL & ALL UPPER LEGS PART # : GP-08-H-A DESCRIPTION : ALL & ALL LOWER LEGS PART # : GP-0-H-A DESCRIPTION : UPPER FLAT LEG FACE PLATE FOR STIFFENED AND ALL HOPPERS PART # : GP-03-H-A DESCRIPTION : LOWER FLAT LEG FACE PLATE FOR STIFFENED AND ALL HOPPERS PART # : GP-033-H-H DESCRIPTION : LEG V SHAPED FACE PLATE FOR ALL & STEFFENED HOPPERS PARTS LIST


19 UNSTIFFENED STIFFENED H H H H PART # : GP-060-A DESCRIPTION : HOPPER SHEET FOR ALL HOPPERS PART # : GP-053-A DESCRIPTION : HOPPER SHEET FOR ALL HOPPERS PART # : GP-065-A DESCRIPTION : HOPPER SKIRT FOR ALL HOPPERS 3 3 PART # : GP-00-A DESCRIPTION : UPPER HOPPER SHEET FOR ALL HOPPERS PART # : GP-01-A DESCRIPTION : LOWER HOPPER SHEET FOR ALL HOPPERS PARTS LIST 19

20 UNSTIFFENED STIFFENED H H H H PART # : GP-0-A DESCRIPTION : UPPER HOPPER SHEET FOR ALL HOPPERS 1 1 PART # : GP-05-A DESCRIPTION : LOWER HOPPER SHEET FOR ALL HOPPERS 1 1 PART # : GP-031-A DESCRIPTION : ALL HOPPER BRACES 6 6 PART # : GP-0-A DESCRIPTION : ALL HOPPER BRACES PART # : GP-063-A-A DESCRIPTION : ALL & HOPPER LADDER RAILS PART # : GP-039-A-A DESCRIPTION : ALL & HOPPER LADDER RAILS PART # : GP-03 DESCRIPTION : LADDER RUNG PART # : GP-019 DESCRIPTION : LADDER CAGE STARTER HOOP HALF PART # : GP-0 DESCRIPTION : CAGE VERTICAL CHANNELS PART # : GP-00 DESCRIPTION : CAGE INTERMEDIATE HOOP HALF 0 PARTS LIST


21 UNSTIFFENED STIFFENED H H H H PART # : GP-0 DESCRIPTION : LADDER UPPER CONNECTION BRACKETS PART # : GP-036 DESCRIPTION : LADDER CONNECTION BEAMS PART # : GP-03 DESCRIPTION : LADDER CONNECTION BRACKETS (RIGHT AND LEFT TOTAL) PART # : GP-038-A DESCRIPTION : HOPPER GUSSET FOR ALL HOPPERS PART # : GP-08-A5DSH DESCRIPTION : HOPPER GUSSET FOR STIFFENED, HOPPERS AND ALL HOPPERS PART # : GP-035-ST-HOP DESCRIPTION : STIFFENER EXTENSION FOR ALL SIZE STIFFENED HOPPERS PART # : GP-06-A-HOP DESCRIPTION : HOPPER UPPER SEAM WELDMENT FOR ALL HOPPERS 1 1 PART # :GP-03-ST-HOP DESCRIPTION : STIFFENER CONNECTION BRACKET FOR ALL STIFFENED HOPPERS PARTS LIST
Instruction Sheet. PCS Series. Fiber\Cable Management Spool
 Instruction Sheet PCS Series Fiber\Cable Management Spool THANK YOU! Thank you for purchasing the PCS Series Fiber\Cabling Management Spool. Please read these instructions thoroughly before installing
OWNER S MANUAL Calc-U-Dri PRINTER
 OWNER S MANUAL Calc-U-Dri PRINTER PNEG-1141 Date: 9-21-06 PNEG-1141 Calc-U-Dri Printer TABLE OF CONTENTS Limited Warranty... ii Safety Information - Please Read...iii CAUTION! Be a Safe Operator...iv Decal
SAVE THESE INSTRUCTIONS
 and Height Mounts Assembly, Installation and Operating Instructions Model Nos. QL, QLA, ARM250, QLM6 and QLAM6 NOTE: Check all parts for shipping damage. In case of shipping damage, DO NOT use. Contact
90130, 90131, POP DISPLAY ASSEMBLY INSTRUCTIONS
 90130, 90131, 90132 POP DISPLAY ASSEMBLY INSTRUCTIONS WARNING! Ensure ALL hardware is securely fastened using appropriate tools to prevent damage to the display unit, the products or any injury due to
Pit Transition with 24" Fan Installation and Operators Instruction Manual
 Pit Transition with 4" Fan Installation and Operators Instruction Manual z Fan and Fan Framing Dimensions Shutter Fan " [8. cm] 6" [9.4 cm] 6-/4" [9. cm] Cone Fan " [5. cm] 4-/6" [88.4 cm] 75-/" [9.8 cm]
Connecting Sockets, Mounting Brackets, DIN Rails
 Connecting Sockets, Mounting Brackets, DIN Rails CSM_ConnectionSocket_DS_E_3_1 Durable, Easy-to-handle Connecting Sockets and Mounting Brackets Highly reliable Track-mounted and Back-connecting Sockets
Macon Plastics, Inc. Solvent Weld SCH 40/80 DWV
 Catalog #210SDWV MP Macon Plastics, Inc. & DWV Fittings P R I C E L I S T Solvent Weld /80 DWV Effective Date: 02/02/15 Catalog : 210SDWV Revision: D Supercedes: 209SDWV Not sure if you have a current
PRODUCT CONTENTS... 3 II. REQUIRED MATERIALS... 3 III. OVERVIEW... 3 IV. BENCH LAYOUT...
 IR-510 Bench 2012 Infrared Industries, Inc. 25590 Seaboard Lane Hayward, CA 94545 Toll-free phone 800.344.0321 Phone 510.782.8100 Fax 510.782.8101 www.infraredindustries.com Table of Contents I. PRODUCT
Model 7035 Clamp-On Half Rails OPERATOR S MANUAL
 Model 7035 Clamp-On Half Rails OPERATOR S MANUAL NOTE: Check ALL parts for shipping damage. If shipping damage is noted, DO NOT use. Contact medical equipment provider for further instruction. Index 1.
Instruction Sheet ICLS-COOL TM. Quiet-Cool Series Closet Cooler ICLS-COOL1 ICLS-COOL2
 Instruction Sheet ICLS-COOL TM Quiet-Cool Series Closet Cooler (REAR) (REAR) THANK YOU TM Thank you for purchasing the Quiet Cool Series ICLS-COOL Closet Cooler. Please read these instructions thoroughly
ClearCube Enclosure Installation Instructions
 ClearCube Enclosure Installation Instructions Hint: watching the video is much easier than reading this. Thank you for purchasing the PowerLogix ClearCube Enclosure for your Apple Power Mac G4 Cube computer.
Flex-Flo Control Unit
 Flex-Flo Control Unit For 208-230 Volt, 1 PH and 3 PH Applications Operation Manual PNEG-1955 Date: 03-05-15 PNEG-1955 2 PNEG-1955 Flex-Flo Control Unit Table of Contents Contents Chapter 1 Safety...4
OCEANIC SYSTEMS MULTIPLE ENGINE DISPLAY Part Numbers: 4161 USER MANUAL
 OCEANIC SYSTEMS MULTIPLE ENGINE DISPLAY Part Numbers: 4161 USER MANUAL Document revision 1.0.0 2 of 10 1 Introduction... 2 1.1 Product features... 2 2 Unit dimentions... 4 3 Installation... 4 3.1 Unpacking
SVP110 SURGE VOLTAGE PROTECTOR INSTRUCTION MANUAL
 SVP110 SURGE VOLTAGE PROTECTOR INSTRUCTION MANUAL REVISION: 01/03/03 COPYRIGHT (c) 1995-2000 CAMPBELL SCIENTIFIC, INC. This is a blank page. WARRANTY AND ASSISTANCE The SVP110 SURGE VOLTAGE PROTECTOR is
Source Audio External Tap Tempo Footswitch User s Guide
 Source Audio External Tap Tempo Footswitch User s Guide Welcome Thank you for purchasing the Source Audio External Tap Tempo Footswitch. This accessory allows you to set the LFO speed or delay time for
Everything in its place. OWNER S MANUAL. TRINITY 56 ROLLING WORKBENCH STAINLESS STEEL Model # TLS-4804 (Stainless Body) TLS-4805 (Black Body)
 TLS-4805 (Black Body)") Everything in its place. OWNER S MANUAL TRINITY 56 ROLLING WORKBENCH STAINLESS STEEL Model # TLS-4804 (Stainless Body) TLS-4805 (Black Body) PARTS LIST Your TRINITY 56in Stainless Steel Workbench should
Everything in its place. OWNER S MANUAL TRINITY 56 ROLLING WORKBENCH STAINLESS STEEL Model # TLS-4804 (Stainless Body) TLS-4805 (Black Body) PARTS LIST Your TRINITY 56in Stainless Steel Workbench should
Rackmount Keyboard Installation Instructions. Revision A A-0000
 Rackmount Keyboard Installation Instructions Revision A 22000200A-0000 WARRANTY The following is an abbreviated version of warranty policy for keyboard products. For a complete warranty statement, contact
PREFACE. Thank you for choosing Zen Space Desks. We hope your desk helps you find your zen when being used. Zen Space Desks Team
 INSTRUCTION MANUAL PREFACE We are thrilled that you have chosen Zen Space. Congratulations, you have selected one of the most advanced and sophisticated Power Adjustable Workstations available today. Our
SVP48 SURGE VOLTAGE PROTECTOR INSTRUCTION MANUAL
 SVP48 SURGE VOLTAGE PROTECTOR INSTRUCTION MANUAL REVISION: 3/03 COPYRIGHT (c) 1995-2003 CAMPBELL SCIENTIFIC, INC. This is a blank page. Warranty and Assistance The SVP48 SURGE VOLTAGE PROTECTOR is warranted
OWNER & OPERATOR INSTRUCTION MANUAL
 For service contact: German Knife Inc. -00-00- www.turboairinc.com OWNER & OPERATOR INSTRUCTION MANUAL Model No. GBS-0S IMPORTANT SAFETY NOTICE To ensure safe and trouble free performance of you new German
FNet Repeater Installation & Operator s Instruction Manual
 FNet Repeater Installation & Operator s Instruction Manual October 2004 CTB Inc. Warranty FNet Repeater CTB Inc. Warranty CTB Inc. warrants each new Chore-Tronics product manufactured by it to be free
RATIO CONTROLLER HD FIRE PROTECT PVT. LTD. TECHNICAL DATA INSTALLATION NOTE DESCRIPTION SPECIFICATION
 RATIO CONTROLLER TECHNICAL DATA MODEL SIZE MAX. SERVICE PRESSURE FACTORY HYDRO TEST PRESSURE MOUNTING APPROVAL FINISH ORDERING INFORMATION DESCRIPTION Bronze Construction:- RCW-B, RCW-BM RCF-B, RCF-BM
Trimble S6 and SPS700 Total Station Firmware
 Trimble S6 and SPS700 Total Station Firmware Release Notes Introduction Upgrading from a previous version Using Trimble S6/SPS700 firmware with other Trimble products New features/enha ncements Changes
HeadMouse Extreme. Bracket Installation Instructions for DynaVox Maestro. Additional Resources. Bracket Installation Instructions for Maestro
 Additional Resources HeadMouse Extreme User Guide o Included in the HeadMouse Extreme package o And, available online at www.orin.com Extra and/or replacement targets can be purchased online at: http://shop.orin.com
Instructions. RM3000 Rackmount Kit for TDS3000 Series Oscilloscopes
 Instructions RM3000 Rackmount Kit for TDS3000 Series Oscilloscopes 071-0326-00 Copyright Tektronix, Inc. All rights reserved. Tektronix products are covered by U.S. and foreign patents, issued and pending.
EconoComp Product. 6th Edition S I G N E X T R U S I O N S A N D K I T S EFFECTIVE APRIL 1, 2018
 S I G N E X T R U S I O N S A N D K I T S TM EconoComp Product EFFECTIVE APRIL 1, 8 th Edition E C O N O C O M P E X T R U S I O N S Sign Cabinet Kits General Information Included in Kit Pricing The filler
E2EY. A Proximity Sensor for Aluminum, Brass and Other Non-ferrous Metals. Iron Is Not Detected. Aluminum-detecting Proximity Sensor
 Aluminum-detecting Proximity Sensor EEY CSM_EEY_DS_E_5_1 A Proximity Sensor for Aluminum, Brass and Other Non-ferrous Metals. Iron Is Not Detected. Non-ferrous metals, such as aluminum and brass, are detected.
SREDKey PCI 3.0 Encrypted Key Pad with MagStripe Card Reader USB Interface QuickStart Manual
 SREDKey PCI 3.0 Encrypted Key Pad with MagStripe Card Reader USB Interface QuickStart Manual AGENCY APPROVED Specifications for subpart B of part 15 of FCC rule for a Class A computing device. LIMITED
AMERICA S PREMIER EXERCISE EQUIPMENT RCD-347. Chin-Dip / Ab-Back / Push-Up Stand. TuffStuff Fitness Equipment, Inc. 83 3/4" 43 1/4" 44 3/4"
 ASSEMBLY INSTRUCTIONS 83 3/4" RCD-347 44 3/4" 43 1/4" Chin-Dip / Ab-Back / Push-Up Stand TuffStuff Fitness Equipment, Inc. 1325 E. Franklin Avenue Pomona, CA 91766, USA Ph: 909-629-1600 Fax: 909-629-4967
Model A7BS
 Thumbwheel Switch ABS/ABL CSM_ABS/ABL_DS_E Wide Range of Locking-type s Available Character height of.8 or. mm makes for easy-toview display. Installation is easy with snap-in mounting. The series includes
VIP-812A DUAL NETWORKED STATION PORT
 ISSUE 1 VIP-812A DUAL NETWORKED STATION PORT INTRODUCTION The VIP-812A Dual Networked Station Port allows most loop start terminal devices to be connected to a managed IP-based LAN/WAN. SPECIFICATIONS
QUICK START GUIDE. 1. How to register your Camera to Hubble account A. Setting Up the Camera - can be connected via WiFi or LAN
 MODEL: FOCUS72 FOCUS72-2 FOCUS72-3 FOCUS72-4 FOCUS72-W FOCUS72-W2 FOCUS72-W3 FOCUS72-W4 QUICK START GUIDE For a full explanation of all features and instructions, please refer to the User s Guide. (available
CSM_PYF S/P2RF- -S_DS_E_2_5
 Screwless Clamp Terminal Sockets PYF@@S/P2RF-@@-S CSM_PYF S/P2RF- -S_DS_E_2_5 New Screwless Terminal Sockets Added for MY and G2R Relays. Simplified wiring without tightening screws. Two wires can be independently
OL-KT. Online Connection Kit Installation Manual
 OL-KT Online Connection Kit Installation Manual V.4 NOVEMBER 3, 2015 Whitelisting the Server THE SERVER REQUIRES A LIVE ETHERNET PORT FOR MAC ADDRESS PRINTED ON THE SERVER WITH DHCP AND THE ABILITY TO
PV Series. Owner s Manual. Photo Tripod
 PV Series Owner s Manual Photo Tripod Thank you for choosing Magnus. Congratulations on the purchase of your new Magnus tripod. This tripod features an adjustable center column for smooth and precise camera
EPSON PreferredSM Limited Warranty Program for the Epson Stylus
 Limited Warranty Program for the Epson Stylus Pro 17-inch Wide Format Printers Priority Technical Support Toll-Free Phone Number Security and Peace of Mind CPD-28163R1 Limited Warranty Program for the
PageBot for Kindle 3. User Guide. Adaptive Switch Interface.
 PageBot for Kindle 3 Adaptive Switch Interface User Guide www.orin.com Legal Notices Copyright 2011 Origin Instruments Corporation. All rights reserved. Information in this User Guide is provided as is
Instruction Manual. CT-4 High-Current Transformer
 Instruction Manual CT-4 High-Current Transformer 070-6478-02 Copyright Tektronix, Inc. 1987. All rights reserved. Tektronix products are covered by U.S. and foreign patents, issued and pending. Information
VE8014A/VE8014AR QUAD NETWORKED STATION PORT
 ISSUE 2 VE8014A/VE8014AR QUAD NETWORKED STATION PORT INTRODUCTION The VE8014A/VE8014AR Quad Networked Station Port allows most loop start terminal devices to be connected to a managed IP-based LAN/WAN.
STAINLESS STEEL CAST FITTINGS 150lb 304 & 316 Stainless Steel Cast Fittings Specifications
 STAINLESS STEEL CAST FITTINGS 150lb 304 & 316 Stainless Steel Cast Fittings Specifications Manufactured in ISO9000:2000 Facility Items Conform to AISI 304 / 316 Investment Cast SP114 Stainless Fittings
PCMCIA Flash Card User Guide
 R R PCMCIA Flash Card User Guide For the CoreBuilder 3500 System Introduction The CoreBuilder 3500 PCMCIA Flash Card is a 20 MB flash card that you can use to save your system software. When you have saved
Release Information. Revision History. Version: build 018 Release Date: 23 rd November 2011
 Version: 02.00.2 build 018 Release Date: 23 rd November 2011 Release Date Version 02.00.2 Build 018 23 rd November 2011 Release Information Release Type: General Availability Supported Cyberoam Versions:
Instruction Manual. Balanced Audio Upgrade Installation. iport IW-21/IW-22 Upgrade Kits. Balanced Audio Upgrade Kit. (iport IW-21)
") Introduction The iport IW Balanced Audio, Balanced Video, and RS-232 Upgrade Kits add functionality and capability to iport IW-21 and IW-22 models. Balanced Audio Upgrade Kit For use with iport IW-21 models.
Introduction The iport IW Balanced Audio, Balanced Video, and RS-232 Upgrade Kits add functionality and capability to iport IW-21 and IW-22 models. Balanced Audio Upgrade Kit For use with iport IW-21 models.
AUREOL RECESSED BEAMSHAPER OPERATION MANUAL
 AUREOL RECESSED BEAMSHAPER OPERATION MANUAL Thank you for purchasing an Aureol Recessed BeamShaper. We have designed this luminaire to provide superior performance in design and engineering and we are
AIRLIFT S3 Electric Height-Adjustable Standing Desk USER MANUAL
 AIRLIFT S3 Electric Height-Adjustable Standing Desk USER MANUAL Initialization & Use Instructions DESK MUST BE INITIALIZED BEFORE YOUR FIRST USE SAVE MEMORY MEMORY 1 / 2 / 3 / 4 DISPLAY UP ARROW DOWN ARROW
OPERATING INSTRUCTIONS FOR MODEL ST-15 5-DIGIT SPORTS TIMER
 OPERATING INSTRUCTIONS FOR MODEL ST-15 5-DIGIT SPORTS TIMER Table of Contents OPERATING INSTRUCTIONS... 0 MODEL ST-15... 0 2- YEAR WARRANTY... 2 IMPORTANT!... 3 Warranty Activation/Installation & Completion
Quick Installation Guide TK-407K
 Quick Installation Guide TK-407K PC 3 PC 1 PC 2 PC 4 LCD Monitor 4-Port USB KVM Switch (TK-407K) USB Keyboard USB Mouse Troubleshooting Q1: Where is the power supply? I did not find one in the box.
Fantasea Blue Ray Tray (Cat. No. 2040, 2045, 2050) Instruction Manual
 Instruction Manual") Fantasea Blue Ray Tray (Cat. No. 2040, 2045, 2050) Instruction Manual For Illustration- Blue Ray Double Tray with Housing 1 The Fantasea Blue Ray Tray allows integrating different components in an underwater
Fantasea Blue Ray Tray (Cat. No. 2040, 2045, 2050) Instruction Manual For Illustration- Blue Ray Double Tray with Housing 1 The Fantasea Blue Ray Tray allows integrating different components in an underwater
Wall. No opening (Example: LA-030-W)
") Thank you very much for choosing an EIZO product. Please read this User s Manual carefully to familiarize yourself with safe and effective usage procedures. Please retain this manual for future reference.
Thank you very much for choosing an EIZO product. Please read this User s Manual carefully to familiarize yourself with safe and effective usage procedures. Please retain this manual for future reference.
VIP-480AL IP One-Way Horn
 Issue 1 VIP-480AL IP One-Way Horn Issue 1 INTRODUCTION The VIP-480AL IP One-way Horn provides for one-way communication when used in a Valcom VoIP based intercom/paging system. SPECIFICATIONS Access Methods
Front Axle Beams. Catalog PB-8951B
 Front Axle Beams Catalog PB-8951B 2 HOW TO USE THIS CATALOG The front axle beams are arranged by axle model, then by the dimension from center to center of the King Pin holes, they are further grouped
FastForward TM User Guide
 Let s play follow the leader! FastForward TM User Guide LG G4010 and G4050 Series Phones Welcome Thank you for purchasing Cingular s FastForward. Now you can easily forward incoming calls made to your
Vocia. Page Active Relay Module (PARM-1) Operation Manual
 Operation Manual") Vocia Page Active Relay Module (PARM-1) Operation Manual Biamp System 9300 SW Gemini Drive, Beaverton, OR 97008 U.S.A. (503) 641-7287 www.biamp.com table of contents Vocia Page Active Relay Module (PARM-1)
Vocia Page Active Relay Module (PARM-1) Operation Manual Biamp System 9300 SW Gemini Drive, Beaverton, OR 97008 U.S.A. (503) 641-7287 www.biamp.com table of contents Vocia Page Active Relay Module (PARM-1)
URC Light Sensor SEN-LITE for use with MRX units containing sensor ports
 URC Light Sensor SEN-LITE for use with MRX units containing sensor ports URC Light Sensor SEN-LITE 2014 Universal Remote Control, Inc. The information in this Owner s Manual is copyright protected. No
INSTRUCTION MANUAL. SGB20(D) Transient Protection System. June Copyright 2008 Campbell Scientific (Canada)Corp.
 Transient Protection System. June Copyright 2008 Campbell Scientific (Canada)Corp.") INSTRUCTION MANUAL SGB20(D) Transient Protection System June 2008 Copyright 2008 Campbell Scientific (Canada)Corp. WARRANTY AND ASSISTANCE This equipment is warranted by CAMPBELL SCIENTIFIC (CANADA) CORP.
INSTRUCTION MANUAL SGB20(D) Transient Protection System June 2008 Copyright 2008 Campbell Scientific (Canada)Corp. WARRANTY AND ASSISTANCE This equipment is warranted by CAMPBELL SCIENTIFIC (CANADA) CORP.
FastForward User Guide
 Let s play follow the leader! FastForward User Guide Nokia 3100, 3200, 6100, 6200 & 6800 Series Phones Welcome Thank you for purchasing Cingular s FastForward. Now you can easily forward incoming calls
Piccola Smart Box Member of Modul MAS family
 Piccola Smart Box Member of Modul MAS family Pag. 1 of 6 Piccola Smart Box Rev.1.1 All Rights Reserved. No part of this document may be photocopied, reproduced, stored in a retrieval system, or transmitted,
AVer FD1020. Quick User Guide
 AVer FD1020 Quick User Guide Table of Contents I. Camera Introduction... 1 1. Package Contents... 1 2. Hardware Installation... 2 2.1 Factory Default... 7 3. SD card Compatibility List... 8 II. Monitor
Installation Instructions. Barcode Dock Mount
 Installation Instructions Barcode Dock Mount w w w. a m i c o. c o m Preface IMPORTANT, PLEASE READ CAREFULLY Thank you for your purchase with Amico Accessories Inc. This unit is designed for long lasting
Data Reporter. Installation-Operation E rev.f
 Installation-Operation Data Reporter 309867E rev.f Important Safety Instructions Read all warnings and instructions in this manual. Save these instructions. Part No. 246085 Records actual temperature,
SECURE/NONSECURE LED SIGN USER MANUAL
 SECURE/NONSECURE LED SIGN USER MANUAL December 2012 Wall Mount Part Number: 51-01198 1U Rack Mount Part Number: 51-01196 500 Business Center Drive, Pittsburgh, PA 15205 Phone: (412) 494-2800, Fax: (412)
Probe Pin XP3A. Electroplated Probe Pin for High Reliability. Feature. List. New Product News
 New Product News Probe Pin Electroplated Probe Pin for High Reliability The Probe Pin that is made of only one part. The flat structure helps you reduce the pin pitch in comparison with standard probe
zpen-1080p Features zpen-1080p Layout
 1 zpen-1080p Features CMOS image sensor with Low Light sensitivity HD 1080P up to 30fps, 720P up to 60fps H.264 compression Built-in micro SD card, supports up to 32GB One button operation Easily download
E2K-F. Flat Capacitive Sensor with a Thickness of Only 10 mm. Flat Proximity Sensor. Ordering Information. Sensors [Refer to Dimensions on page 4.
 Flat Proximity Sensor EK-F CSM_EK-F_DS_E Flat Capacitive Sensor with a Thickness of Only mm Flat Sensor with excellent space efficiency. (Model with built-in Amplifier is only mm thick.) Direct mounting
Vertical Cable Organizer with D-Ring Hooks - 40U
 Vertical Cable Organizer with D-Ring Hooks - 40U CMVER40UD *actual product may vary from photos FR: Guide de l utilisateur - fr.startech.com DE: Bedienungsanleitung - de.startech.com ES: Guía del usuario
Installing the NEMA 4X Hatch
 Installing the NEMA 4X Hatch ET 350 Monitor (Models ET 350R and ET 350L3) and ET 3170 Terminal Intended Use When properly installed using the materials provided, and according to these instructions, the
Benchmark Plus Microplate Reader User Manual. This Instrument for Laboratory Use Only Rev C
 Benchmark Plus Microplate Reader User Manual This Instrument for Laboratory Use Only 4100172 Rev C 4100172 Rev C Benchmark Plus System with Incubator Catalog Number 170-6930 Benchmark Plus Reader with
OWNER S MANUAL RLE-382 AMERICA S PREMIER EXERCISE EQUIPMENT. Seated leg ext / curl bench RLE-382 L 61 W 44 H 38
 OWNER S MANUAL RLE-382 Seated leg ext / curl bench AMERICA S PREMIER EXERCISE EQUIPMENT RLE-382 L 61 W 44 H 38 RLE-382 Rev1 Revision Date 9-11-2008 Introduction About the RLE-382 Seated leg ext/curl bench
ATV Single Gang Disc Harrow OWNER S MANUAL
 ATV Single Gang Disc Harrow OWNER S MANUAL WARNING: Read carefully and understand all ASSEMBLY AND OPERATION INSTRUCTIONS before operating. Failure to follow the safety rules and other basic safety precautions
OWNER S MANUAL AMERICA S PREMIER EXERCISE EQUIPMENT RHE-340. Adjustable Hyper Extension Bench 31 1/4" 49 3/4" 33 3/4"
 OWNER S MANUAL 1/4" 49 3/4" 3/4" RHE-0 Adjustable Hyper Extension Bench AMERICA S PREMIER EXERCISE EQUIPMENT RHE-0 Rev0 Revision Date 3-26-2007 About the Adjustable Hyper Extension Bench RHE-0 Congratulations
Flex Pro Series Assembly Guide
 ELECTRIC HEIGHT-ADJUSTED SIT TO STAND DESK Table of Contents CAUTION, USE & LIABILITY... 2 PARTS & HARDWARE LIST... 3 PARTS / COMPONENT DIAGRAMS... 3 ASSEMBLY INSTRUCTIONS... 5 BLUETOOTH... 10 TROUBLESHOOTING...
Operating Bulletin MODBUS-RTU. The Fastest Flow Controller Company in the World!
 Operating Bulletin MODBUS-RTU The Fastest Flow Controller Company in the World! 1 Notice: Alicat Scientific, Inc. reserves the right to make any changes and improvements to the products described in this
MK-212 SERIES OWNERS MANUAL & OPERATING INSTRUCTIONS
 www.mkdiamond.com MK-212 SERIES OWNERS MANUAL & OPERATING INSTRUCTIONS MK-212-4 MK-212-6 Revision 303 03.2012 Manual Part No. 159862 Caution: Read all safety and operating instructions before using this
OWNER & OPERATOR INSTRUCTION MANUAL
 For service contact: German Knife Inc. -00-00- www.turboairinc.com OWNER & OPERATOR INSTRUCTION MANUAL Model No. GBS-0S IMPORTANT SAFETY NOTICE To ensure safe and trouble free performance of you new German
Setup guide Automatic tool measurement on AKKON CNC system
 TN020 AKKON CNC SYSTEM Setup guide Automatic tool measurement on AKKON CNC system Authors: Gerhard Burger Version: 1.0 Last update: 13.07.2009 File: TN020_Setup_Automatic_Tool_Measurement Attachments:
AMERICA S PREMIER EXERCISE EQUIPMENT RAB-336. Abdominal / Back Bench. TuffStuff Fitness Equipment, Inc. 46" 61 3/4" 44 1/4"
 A S S E M B L Y I N S T R U C T I O N S 46" 44 1/4" 61 3/4" RAB-336 Abdominal / Back Bench TuffStuff Fitness Equipment, Inc. 25 E. Franklin Avenue Pomona, CA 91766, USA Ph: 909-629-1600 Fax: 909-629-4967
3M DSLAM Mounting Bracket Kit J0746
 3M DSLAM Mounting Bracket Kit J0746 Instructions July 2009 3 Contents 1.0 3M DSLAM Mounting Bracket J0746 - Installation...3 2.0 DSLAM Installation, Nokia...5 3.0 Accessory Kit, Cable Addition Shroud J0747
PMDX-170 Slotted Optical Sensor
 PMDX-170 Slotted Optical Sensor User s Manual Date: 20 May 2009 PMDX Web: http://www.pmdx.com 9704-D Gunston Cove Rd Phone: +1 (703) 372-2975 Lorton, VA 22079-2366 USA FAX: +1 (703) 372-2977 PMDX-170_Manual_10.doc
SD1306. Speed Dome IP Camera. Quick User Guide
 SD1306 Speed Dome IP Camera Quick User Guide Table of Contents I. Camera Introduction... 1 1. Package Contents... 1 2. Hardware Installation... 2 2.1 Factory Default... 6 3. SD card Compatibility List...
M22. Round Indicator Series with 22 dia. and 25 dia. (when using a ring) Indicator (Cylindrical 22/25-dia.) List of Models. Model Number Structure
 Indicator (Cylindrical 22/25-dia.) List of Models. Model Number Structure") Indicator (Cylindrical 22/25-dia.) CSM DS_E_3_4 Round Indicator Series with 22 dia. and 25 dia. (when using a ring) Same type as the A22-series Pushbutton Switches. Use 25-dia. ring to install in 25-dia.
Indicator (Cylindrical 22/25-dia.) CSM DS_E_3_4 Round Indicator Series with 22 dia. and 25 dia. (when using a ring) Same type as the A22-series Pushbutton Switches. Use 25-dia. ring to install in 25-dia.
Remote Control for Inverter RC-200. Manual. Please read this manual before operating your RC-200 Remote Control
 Remote Control for Inverter RC-200 Owner's Manual Please read this manual before operating your RC-200 Remote Control Owner's Manual Index SECTION 1 Safety...3 SECTION 2 Description...3 SECTION 3 Layout
Drum Set Owner s Manual D2518
 5-PIECE SoundPercussionLabs.com Thank you for purchasing this Sound Percussion Labs drum set. Please take a few moments to familiarize yourself with this set-up guide so you can assemble your new drums
BACNet Gateway Option
 INSTRUCTION MANUAL MultiGard 5000 System Integration BACNet Gateway Option 1-800-MSA-INST or FAX (724) 776-8783 MSA International (412) 967-3354 or FAX (412) 967-3451 In Canada 1-800-267-0672 or FAX (416)
COBALT C INSTALLATION GUIDE RFID CONTROLLER ESCORT MEMORY SYSTEMS. High Frequency Passive Radio Frequency Identification Controller
 ESCORT MEMORY SYSTEMS COBALT C0405-232-01 RFID CONTROLLER High Frequency Passive Radio Frequency Identification Controller INSTALLATION GUIDE How to Install and Configure Escort Memory Systems Cobalt C0405-232-01
Desk Mount Articulating Dual Monitor Arm with Cable Management & Height Adjust
 Desk Mount Articulating Dual Monitor Arm with Cable Management & Height Adjust ARMDUAL *actual product may vary from photos DE: Bedienungsanleitung - de.startech.com FR: Guide de l'utilisateur - fr.startech.com
Desk Mount Articulating Monitor Arm with Cable Management and Gas Spring Height Adjust
 Desk Mount Articulating Monitor Arm with Cable Management and Gas Spring Height Adjust ARMPIVOTE DE: Bedienungsanleitung - de.startech.com FR: Guide de l'utilisateur - fr.startech.com ES: Guía del usuario
CubePro. Main PCB Replacement Guide. Prosumer 3D Printer. Original Instructions
 CubePro Prosumer 3D Printer Main PCB Replacement Guide Original Instructions 1 INTRODUCTION COPYRIGHT 2014 by All rights reserved. This document is subject to change without notice. This document is copyrighted
SC-9
 OPERATING INSTRUCTIONS FOR SC-9 www.sportablescoreboards.com 1 Table of Contents INSTRUCTIONS FOR REPORTING SHIPPING DAMAGE... 3 GETTING STARTED... 6 CABLE SYSTEMS... 6 WIRELESS SYSTEMS... 6 SUPPLYING
Quick Installation Guide TU2-700
 Quick Installation Guide TU2-700 Table of of Contents Contents English... 1. Before You Start... 2. Hardware Installation... 1 1 2 Troubleshooting... 3 Version 01.16.2006 1. Before You Start Package Content
NMEA2000 DC MONITOR Part Numbers: 3410 USER MANUAL
 NMEA2000 DC MONITOR Part Numbers: 3410 USER MANUAL Document revision 2.00 1. Introduction... 2 1.1 Product Features... 2 2. Installation... 3 2.1 Unpacking the box... 3 2.2 Mounting the unit... 3 2.3
MWR30. INSTALLATION/OWNER S MANUAL Wired Remote Control MARINE
 MWR30 INSTALLATION/OWNER S MANUAL Wired Remote Control MARINE MWR30 INSTALLATION Preparation Tools and supplies needed You will need the following tools and supplies to complete the installation process.
PV3500. Fuel Site Controller. Service Manual OPW Fuel Management Systems Manual M Rev. 1
 PV3500 Fuel Site Controller Service Manual 2002 OPW Fuel Management Systems Manual M11-00.03 Rev. 1 OPW Fuel Management Systems - System and Replacement Parts Warranty Statement Effective September 1,
INSTRUCTIONS FOR LED INDUSTRIAL LIGHTING LIGHT STRIPS AND WORK LIGHTS
 INSTRUCTIONS FOR LED INDUSTRIAL LIGHTING LIGHT STRIPS AND WORK LIGHTS These lights use extremely bright, cool white, energy-efficient LEDs and are effective in directing the light to the work area. Light
Type Terminal Block Connector No. of poles Appearance Model 40 XW2B-40G4 50 XW2B-50G4. 40 XW2B-40G5 Flat Cable Connectors
 Standard-type Connector- Conversion Units XWB CSM_XWB_DS_E Simplifies Connector and terminal block replacement, and requires less in-panel wiring. Mount to DIN Track or via screws. MIL Flat Cable Connectors
Extended Range IR Illuminator Operator Manual
 Extended Range IR Illuminator Operator Manual NIGHT OPTICS USA, INC www.nightoptics.com TABLE OF CONTENTS Product Description 1 Technical Specifications 1 Product Overview 2 Package Contents 2 Device Operation
Monitor Mount with Articulating Arm and Laptop Riser
 Monitor Mount with Articulating Arm and Laptop Riser ARMUNONB *actual product may vary from photos FR: Guide de l utilisateur - fr.startech.com DE: Bedienungsanleitung - de.startech.com ES: Guía del usuario
500 Business Center Drive Pittsburgh, PA USA CAGE 1BGJ7. SwitchMaster R5000 Series Ultra-Compact Ganged A/B Switching System
 Market Central www.secureswitch.com 500 Business Center Drive Pittsburgh, PA 15205 USA 412.494.2800 CAGE 1BGJ7 SwitchMaster R5000 Series Ultra-Compact Ganged A/B Switching System July, 2014 COMPLETE 2
Rack Power Distribution Unit AP7530, AP7540
 Rack Power Distribution Unit AP7530, AP7540 Description This booklet provides information on installing and operating the singlephase Rack Power Distribution Units (PDUs) AP7530 and AP7540. AP7530 AP7540
EPSON Preferred Limited Warranty Program for the Epson
 EPSON Preferred Limited Warranty Program for the Epson Stylus SM Pro 4800 Priority Technical Support Toll-Free Phone Number Security and Peace of Mind CPD-19588 Please open this booklet and record your
MPP200 User s Manual
 2011 Visionary Solutions, Inc. All rights reserved. Please visit the support section of our website at www.vsicam.com for manuals, other documentation, and software downloads. Visionary Solutions, Inc.