USER MANUAL. KDS-MP2 Digital Media Player MODEL: P/N: Rev 5.
|
|
|
- Nelson Quinn
- 5 years ago
- Views:
Transcription
1 USER MANUAL MODEL: KDS-MP2 Digital Media Player P/N: Rev 5
2

3
4 Contents 1 Introduction 1 2 Getting Started Achieving the Best Performance Safety Instructions Recycling Kramer Products 3 3 Overview Defining the KDS-MP2 Digital Media Player About KDS-MP2 Setup 7 4 Connecting the KDS-MP2 8 5 Configuring the Player System Connections Basic Settings Connect the Player to the Network Time Zone Settings Content Settings Player Information Content Configuration AppStart Content Configuration FailSafe Content Configuration EasyPlay Display Settings Sound Settings System Configuration Player Name System Configuration Security System Configuration Time Server System Configuration Scheduled Reboot System Configuration - Firmware Update System Configuration - Factory Reset System Configuration Power Save Content Management Authoring in HTML Working with SMIL Frequently Asked Questions 41 6 Kramer Media Manager Installation 44 7 Technical Specifications 45 Figures Figure 1: KDS-MP2 Digital Media Player - Front 6 Figure 2: KDS-MP2 Digital Media Player Rear 6 Figure 3: Connecting the KDS-MP2 Digital Media Player 9 KDS-MP2 Contents i
5 1 Introduction Welcome to Kramer Electronics! Since 1981, Kramer Electronics has been providing a world of unique, creative, and affordable solutions to the vast range of problems that confront video, audio, presentation, and broadcasting professionals on a daily basis. In recent years, we have redesigned and upgraded most of our line, making the best even better! Our 1,000-plus different models now appear in 14 groups that are clearly defined by function: GROUP 1: Distribution Amplifiers; GROUP 2: Switchers and Routers; GROUP 3: Control Systems; GROUP 4: Format/Standards Converters; GROUP 5: Range Extenders and Repeaters; GROUP 6: Specialty AV Products; GROUP 7: Scan Converters and Scalers; GROUP 8: Cables and Connectors; GROUP 9: Room Connectivity; GROUP 10: Accessories and Rack Adapters; GROUP 11: Sierra Video Products; GROUP 12: Digital Signage; GROUP 13: Audio; and GROUP 14: Collaboration. Congratulations on purchasing your Kramer KDS-MP2 Digital Media Player. This product, which incorporates HDMI technology, is ideal for: Digital signage KDS-MP2 - Introduction 1
. 2.")
6 2 Getting Started We recommend that you: Unpack the equipment carefully and save the original box and packaging materials for possible future shipment Review the contents of this user manual Go to to check for up-to-date user manuals, application programs, and to check if firmware upgrades are available (where appropriate). 2.1 Achieving the Best Performance To achieve the best performance: Use only good quality connection cables (we recommend Kramer highperformance, high-resolution cables) to avoid interference, deterioration in signal quality due to poor matching, and elevated noise levels (often associated with low quality cables) Do not secure the cables in tight bundles or roll the slack into tight coils Avoid interference from neighbouring electrical appliances that may adversely influence signal quality Position your KDS-MP2 away from moisture, excessive sunlight and dust This equipment is to be used only inside a building. It may only be connected to other equipment that is installed inside a building. 2.2 Safety Instructions Caution: Warning: Warning: There are no operator serviceable parts inside the unit Use only the Kramer Electronics power supply that is provided with the unit Disconnect the power and unplug the unit from the wall before installing 2 KDS-MP2 - Getting Started
7 2.3 Recycling Kramer Products The Waste Electrical and Electronic Equipment (WEEE) Directive 2002/96/EC aims to reduce the amount of WEEE sent for disposal to landfill or incineration by requiring it to be collected and recycled. To comply with the WEEE Directive, Kramer Electronics has made arrangements with the European Advanced Recycling Network (EARN) and covers any costs of treatment, recycling and recovery of waste Kramer Electronics branded equipment on arrival at the EARN facility. For details of Kramer s recycling arrangements in your particular country go to our recycling pages at KDS-MP2 - Getting Started 3
8 3 Overview The KDS-MP2 is a high quality LAN-based digital signage media player. The KDS-MP2 receives content streamed from the Network, saved in its internal memory or from an external USB memory stick and shows it with up to 1080p HD image quality on an HDMI display. The KDS-MP2 Digital Media Player features: 1080p full HD support High quality video and audio output via the HDMI output connector MPEG-1, MPEG-2, MPEG L2, MP3, H.264/MPEG-4, and VC-1 codec format support 8GB internal built-in memory, sufficient for 360 minutes of typical 720p Micro SD card expansion slot for additional storage up to 32GB NTP client for time synchronization CMS device management in LAN environments using the integrated SMIL control SMIL 3.0 instructions (sub-set) support, HTML5, Android A perforated side panel for efficient heat dissipation The Kramer DigiTOOLS KDS-MP2 is enclosed in a VESA standard mounting bracket and can be mounted on-wall, inside a cabinet or to the VESA standard screw holes on the rear panel of a display. The KDS-MP2 comes with Kramer Media Manager software which is an easy and simple way to manage digital signage content via a PC (See Section 5). 4 KDS-MP2 - Overview
9 KDS-MP2 Manager: Enables creating or modifying content playback schedules Introduces seven Smart Widgets that allow players that support HTML5 to schedule dynamic contents Enables publishing multiple PowerPoint slides directly to the Player (2003/2007/2010, static only) Supports Video Input sequence in playlist scheduling Supports full screen portrait mode (auto rotates content) Supports Looping or Weekly schedule Schedules energy saving video display on/off Auto detects IP, MAC address, and models Supports easy setup for multi-zone layout Features multi-zone (split-screen) scheduling Features minute-accurate time slot scheduling Features firmware upgrade Features image fit, crop, and stretch options KDS-MP2 - Overview 5

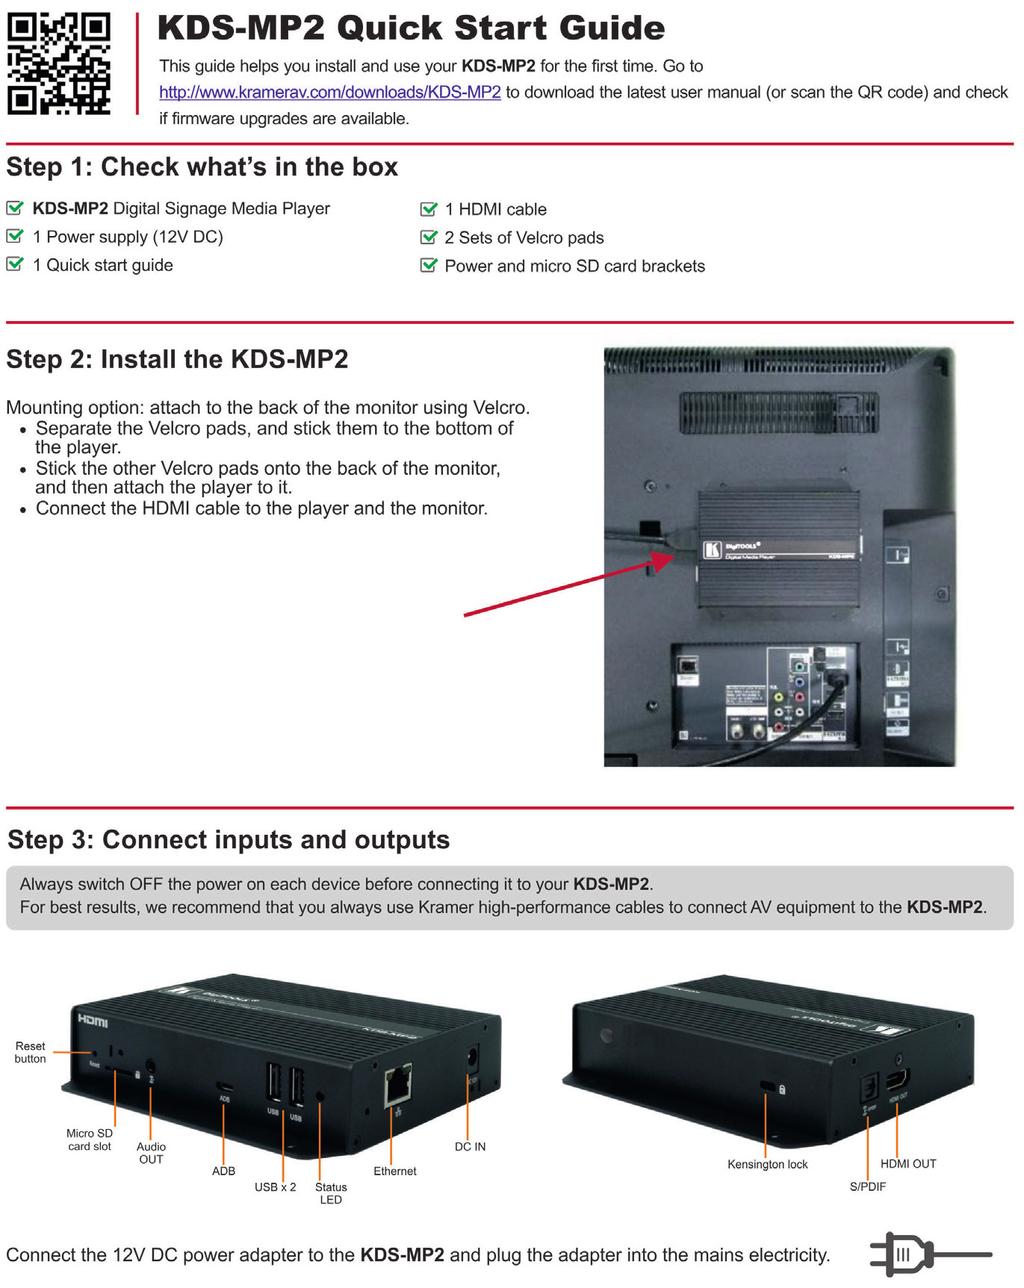
10 3.1 Defining the KDS-MP2 Digital Media Player This section defines the KDS-MP2. Figure 1: KDS-MP2 Digital Media Player - Front # Feature Function 1 Reset Button Returns to factory configuration 2 Micro SD Card Slot Connects to a micro SD card for additional 32GB storage 3 Audio Out 3.5mm Mini Jack Connects to an unbalanced stereo acceptor 4 ADB Connector N/A 5 USB Connectors (2) Connect to a mouse and a keyboard 6 Status LED Lights green when powered on, red when error detected 7 Ethernet RJ-45 Connector Connects to a network 8 DC IN Connector Connects to a 12V DC power supply Figure 2: KDS-MP2 Digital Media Player Rear 6 KDS-MP2 - Overview
11 # Feature Function 9 Kensington Lock Connects to a Kensington-style locking cable 10 S/PDIF Connector Connects to digital audio acceptor 11 HDMI OUT Connector Connects to an HDMI display 3.2 About KDS-MP2 Setup To prepare the KDS-MP2 for operation, you need to: Connect the machine, see Section 4 Connect the KDS-MP2 to play media; connect a USB keyboard to configure the KDS-MP2 Configure the machine, see Section 5 Before using the KDS-MP2 you have to configure it. When powering the unit, the machine boots up to the configuration mode if it does not recognize content for playback. At any point, configuration is possible when connecting a USB keyboard Prepare the content and export Use the KDS-MP2 Manager to prepare the content to playback KDS-MP2 - Overview 7
12 4 Connecting the KDS-MP2! Always switch off the power to each device before connecting it to your KDS-MP2. After connecting your KDS-MP2, connect its power and then switch on the power to each device. To connect the KDS-MP2, as illustrated in the example in Figure 3, do the following: 1. Connect the HDMI connector to an HDMI acceptor (for example, an LCD display). 2. Connect an amplifier to the 3.5mm mini-jack connector. 3. Connect a USB mouse to a USB connector. 4. If needed, connect a memory stick to a USB connector. 5. Connect the Ethernet RJ-45 connector to the network via a LAN cable. 6. Connect the power adapter to the 12V DC socket on the KDS-MP2 and to the mains electricity (not shown in Figure 3). 8 KDS-MP2 - Connecting the KDS-MP2
. The KDS-MP2 identifies only a true USB keyboard. A keyboard that is connected via a PS/2 to USB adapter is not identified.")
13 Figure 3: Connecting the KDS-MP2 Digital Media Player i If you need to configure the system (see Section 5), connect a USB keyboard to one of the USB connectors (see Figure 3). The KDS-MP2 identifies only a true USB keyboard. A keyboard that is connected via a PS/2 to USB adapter is not identified. KDS-MP2 - Connecting the KDS-MP2 9
, no monitor is required. However, a signboard player can still be connected to a monitor via HDMI for larger display area.")

14 5 Configuring the Player This section describes how to configure the player. 5.1 System Connections If KDS-MP2 is a media player, connect it to a monitor via an HDMI cable. If it is a signboard (with built-in screen), no monitor is required. However, a signboard player can still be connected to a monitor via HDMI for larger display area. When using an HDMI connection, audio is sent along with video over the HDMI cable, so no additional cables are required. 1. Attach the AC power adapter to power on the unit. After approximately 15 seconds, the booting animation is displayed on screen as shown below: 2. The boot-up process takes approximately 40 seconds to complete. 10 KDS-MP2 - Configuring the Player
15 After boot-up completes, the player stays in Basic settings menu if no content service has been configured (i.e. first boot-up for brand new unit or after a factory reset). If you have already set content into the player, contents play back automatically 15 seconds after boot-up. 5.2 Basic Settings You must attach a USB mouse to the player to configure settings. If the player has a touch screen, the USB mouse is not required, and all click actions can be replaced by tap actions. KDS-MP2 - Configuring the Player 11

16 Basic settings: Network, Time zone and Content. Each time the Basic setting menu is entered, playback automatically begins after 15 seconds if content services have been previously set. Auto playback can be canceled by clicking on the button before the countdown ends. Enter Advanced Settings by clicking the Advanced button. To enter the menu system at any time during playback, plug in a USB mouse and hold the left mouse key in the corner area as shown below for 10 seconds. If the player has a touch screen, tapping and holding the corner areas for 10 seconds brings you to the menu. The player asks for a password if a password has been configured. 12 KDS-MP2 - Configuring the Player

17 5.3 Connect the Player to the Network Static IP Manually assign network IP address 1. Check the box that says "Show advanced options". 2. Click the down arrow to hide the keyboard if needed. You can also scroll down/ swipe to see the rest of the menu. 3. Under IP settings, change DHCP to Static. 4. Fill the form and click Connect to complete the setting. (Scroll down/swipe to see the rest of the menu if needed). KDS-MP2 - Configuring the Player 13


18 Wired Connection To use the wired Ethernet connection, connect an Ethernet cable. Ethernet connection takes higher priority. DHCP Automatically assign network IP address Turn on Ethernet. If using DHCP, no further action is required. Static IP Manually assign network IP address Click Static IP Settings to configure static IP address. 14 KDS-MP2 - Configuring the Player

19 Proxy Settings 1. In Basic settings, click the Advanced button. The advanced configuration menu is launched. 2. Click Network, and then click Advanced. 3. The proxy setting menu is launched. Input proxy hostname and port, then click Done to finish the configuration. KDS-MP2 - Configuring the Player 15

20 Show IP Settings 1. In Basic settings, click the Advanced button. The advanced configuration menu is launched. 2. Click Network, then click Show IP. 3. This feature controls whether the IP address is displayed in the Basic settings menu. This is enabled by default. When disabled, Basic settings displays connected instead of IP address. 16 KDS-MP2 - Configuring the Player


21 5.4 Time Zone Settings 1. Click Time zone. 2. Choose the correct time zone from the available options. KDS-MP2 - Configuring the Player 17

22 5.5 Content Settings 1. Click the Set content button. 2. Input the SMIL/HTML5 content URL and click Set. It returns to Basic Settings automatically. 18 KDS-MP2 - Configuring the Player

23 3. The player checks the availability of SMIL/HTML5 content URL, with the Play button showing Checking To cancel the checking action, click the Checking button. It returns to Play. NOTE: It is highly recommended to let the player check the availability of the content URL. Clicking the Play button with a bad/invalid URL set causes the player to reboot if the FailSafe function is not configured. KDS-MP2 - Configuring the Player 19

24 4. If the SMIL/HTML5 content URL is available, the Play button changes to a 15-second countdown and the playback starts after the countdown. The countdown can be canceled by clicking the button. If Checking shows for a long time, go back to Set content to check the correctness of the URL. 5.6 Player Information The user can check the player s basic information including its Health status, Firmware version, and Player ID. 1. Click the Advanced button. The advanced configuration menu is launched. 20 KDS-MP2 - Configuring the Player


25 2. Click on Information. The definitions of the Health Status are: Green Normal. The device is connected to the URL server. Blue Local. The device is playing content from the USB drive. Gray Disconnected. The device is disconnected. KDS-MP2 - Configuring the Player 21

26 5.7 Content Configuration AppStart The user can assign the URL and APP for execution right after the system starts up. 1. Click the Advanced button. 2. Click on Content, and then click on AppStart. 3. Enter the valid URL of HTML/SMIL in AppStart. If you already configured SMIL/HTML5 content URL via Set content, the URL is shown here. 4. The Advanced option is used for 3rd-party App configuration only. 5.8 Content Configuration FailSafe The user can assign the URL and APP for execution while the system has failed to play the assigned content. 1. Click the Advanced button, the advanced configuration menu is launched. 2. Click on Content, then click on FailSafe. 3. Enter the URL of HTML/SMIL in FailSafe. 4. The Advanced option is used for 3rd-party App configuration only. 22 KDS-MP2 - Configuring the Player
27 5.9 Content Configuration EasyPlay The feature EasyPlay allows the player to play media content from the USB flash drive directly. Note, media files are not copied to the player s internal storage, so the USB flash drive must not be removed. When EasyPlay is enabled, the player plays content only from the USB drive. If user wants to play content from the URL server configured via Set content, EasyPlay must be disabled. 1. Insert a USB drive containing media content that you want to play. 2. Click the Advanced button. 3. Click on Content, then click on EasyPlay. 4. Click Disabled/Enabled button to enable EasyPlay, and choose from two available operation modes, Photo Mode and Movie Mode. KDS-MP2 - Configuring the Player 23
28 Configure Photo Mode 1. Click on Photo for choosing photos and music. Click on the buttons marked in red below, and select the directories for photos and music from the USB drive. 2. Click Set button after selecting the directories. 24 KDS-MP2 - Configuring the Player
29 Configure Movie Mode 1. Click on Movie. Click on the buttons marked in red below and select the directory for movies from the USB drive. 2. Click Set button after the folder is selected. 3. The files in the selected folders are played after clicking the Play button in the Basic or Advanced settings menu. EasyPlay Schedule Configuration 1. Click the Advanced button. 2. Click on Content, then click on Schedule. 3. Click on the buttons marked in red below to enable/disable the EasyPlay schedule for each time slot. 4. Type the scheduled time in the dialogue boxes marked in blue below by using the pop-up keyboard or the USB keyboard. KDS-MP2 - Configuring the Player 25
30 5. The "On" times assigned in the time slots A-E are inclusive. See a schedule assigned in the following example: The exact playback time is shown in the time slots marked. The dark blue parts are the overlap time of C/D and D/E. 26 KDS-MP2 - Configuring the Player

31 5.10 Display Settings Resolution Settings (for media players) For best quality and to avoid image scaling and blur, set the output resolution to match your display s native resolution. If you are connecting an LCD computer monitor, projector, or plasma display, refer to the device specifications for optimal settings. 1. Click the Advanced button, advanced configuration menu is launched. 2. Click the Display/sound button, and then click on Display. The Display Settings page is launched. KDS-MP2 - Configuring the Player 27

32 3. Click on Resolution and select suitable resolution from the popup menu. The default configuration is Auto Detect where a player automatically detects and uses the best optimized resolution that your display supports. 28 KDS-MP2 - Configuring the Player


33 Panel Brightness (for signboards) The default panel brightness is set to maximum. It can be adjusted in the Display settings. 1. Click the Advanced button, advanced configuration menu is launched. 2. Click the Display/sound button, and then click on Display. The Display Settings page is launched. 3. Click on Brightness. KDS-MP2 - Configuring the Player 29


34 4. Drag the blue dot marked in red below to adjust the brightness. Click on OK to save the configuration. Screen Orientation Screen orientation is to set the display to rotate 90/180/270 degrees. 1. Click the Advanced button. The advanced configuration menu is launched. 30 KDS-MP2 - Configuring the Player

35 2. Click the Display/sound button, and then click on Display. The Display Settings page is launched. 3. Click on the Screen orientation marked in red below. 4. Click on the preferred angle from the menu Sound Settings To control the output sound volumes and touch sounds: 1. Click the Advanced button, the advanced configuration menu is launched. KDS-MP2 - Configuring the Player 31

36 2. Click the Display/sound button, and then click on Sound. The Sound Settings page is launched. 3. Click on Volumes, the Volumes settings page is launched. Drag the blue sliders to adjust the volumes for the selected options, then click on OK to save the new settings. 32 KDS-MP2 - Configuring the Player

37 5.12 System Configuration Player Name The player s name can be specified so the player can be easily recognized in the management software. (Management software support is required). 1. Click the Advanced button, advanced configuration menu is launched. 2. Click on System, and click on Player name. 3. Input a name for the field and click Set. KDS-MP2 - Configuring the Player 33


38 5.13 System Configuration Security A password can be set to provide authentication for player access. If the password is set, a password prompt appears if a user is trying to enter the Basic settings menu from playback. 1. Click the Advanced button, the advanced configuration menu is launched. 2. Click on System, and click on Security. 3. Input a password in the field and click Set. 34 KDS-MP2 - Configuring the Player
39 5.14 System Configuration Time Server This feature allows the user to synchronize the player s time with the Web server where the appstart URL is hosted. It is disabled by default. When disabled, the player synchronizes its time with the Android default time server (ntp.pool.org). This requires an Internet connection. When enabled, the player synchronizes its time with the Web server where the appstart URL is hosted (based on http response header s time). 1. Click the Advanced button, the advanced configuration menu is launched. 2. Click on System, and click on Time server. 3. Click the Use AppStart URL as the time server button as marked in red below to enable/disable the time server function. 4. Click on Set to save the setting. KDS-MP2 - Configuring the Player 35
40 5.15 System Configuration Scheduled Reboot The Scheduled Reboot feature allows the player to reboot at the assigned time automatically every day. 1. Click the Advanced button, the advanced configuration menu is launched. 2. Click on System, and click on Scheduled Reboot. 3. Click the Enable daily reboot button as marked in red below to enable/disable the daily reboot function. Click on the dialog box to set the time. The value can be inputted with the pop-up keyboard or the USB keyboard. 4. Click on Set to save the setting. 36 KDS-MP2 - Configuring the Player
41 5.16 System Configuration - Firmware Update Firmware updates can be performed using a USB flash drive. Read the release notes regarding the changes made to your player before applying the upgrade. IMPORTANT: DO NOT unplug the USB drive or power down the player while the system is performing the firmware update. 1. Download the latest firmware from and copy it to the root directory of a USB drive. 2. Plug the power cord into the device and connect to the electricity. 3. After the boot-up completes, click the Advanced button on the Basic settings menu. 4. Click on System, then click Firmware update. 5. Click on OK to begin the firmware update. 6. Plug in the USB drive while the screen shows Scanning USB drives for firmware package. KDS-MP2 - Configuring the Player 37

42 5.17 System Configuration - Factory Reset If the system password is forgotten, you must reset the system to regain access to the player. Using the Reset Button 1. PRESS and HOLD the reset button with a pen or small blunt screwdriver. 2. RE-CONNECT the power cord. 3. WAIT until the status LED flashes. 4. RELEASE the reset button and wait for the system to initialize. Using a USB Mouse System reset re-initializes the system, clears passwords and returns the settings to their default values. Perform the following: 1. CONNECT a USB mouse or use a touch screen for input. 2. Click the Advanced button, the advanced configuration menu is launched. 3. Click on System configuration and choose Factory default. 38 KDS-MP2 - Configuring the Player

43 4. Click the OK button to perform the system reset System Configuration Power Save The Power save feature allows the player to power off automatically while staying at the Basic settings menu without any action taken for 10 minutes. 1. Click the Advanced button, the advanced configuration menu is launched. 2. Click on System, and click on Power save. 3. Click the Enable Power Save mode button as marked in red below to enable/disable the power save function. 4. Click on Set to save the setting. KDS-MP2 - Configuring the Player 39
44 5.19 Content Management The player is designed to work with 3rd party management solutions. Refer to the printed guide for related set up instructions Authoring in HTML5 A major advancement in the player is the ability to playback HTML5 content, which can contain dynamic information. To find out more about using HTML5 for digital signage, visit Working with SMIL The player uses open communications protocols for content presentation and playback control. SMIL-compliance means predictable results across multiple devices, and SMIL s non-proprietary nature means that your investments are never obsolete Introduction check font Using SMIL (pronounced smile ), the language created by W3C for multimedia communications, the media player understands the language spoken by professional tools from companies such as Adobe, Apple, Microsoft, and Real Networks. What this means is quicker, easier, and better integration of your players 40 KDS-MP2 - Configuring the Player
45 into your digital signage networks, opening up avenues of software controls and realizing the full potential of your player hardware down the road for developers The media player operating system utilizes W3C SMIL as the underlying scripting language, which lends well to customization to your project management needs. For resources, downloads, and community support, visit Frequently Asked Questions What video format can I play? Video files encoded in MPEG-4 AVC up to 1920x1080 resolutions and bitrates should play perfectly. If a certain video is not played as scheduled, or if it plays poorly, search the support site for transcode instructions. What should I do if I forgot my password? Perform a factory reset. Use the S/W RESET button located at the back of the media player to restore factory settings. This also clears the player s password. How do I manage the playback of contents? The media appliance is designed to be interoperable with leading 3rd party management software solutions or via SMIL open standard commands. Can the player display Flash or Microsoft PowerPoint presentations? The player features limited PowerPoint support, but not Flash support. While PCs can play many formats with varying degrees of success, RISC-based media players are designed to reliably play specific video formats (see spec for details). While Microsoft PowerPoint native files cannot play directly on a RISCbased player, the file can be converted (i.e. Manager Express) into an image format to be played as an image slideshow. KDS-MP2 - Configuring the Player 41
46 Why won t some media files play properly? The video data bit-rate used may have exceeded the recommended bit rate. The video data bit-rate is the amount of video or audio data used per second to store or play the contents, usually expressed in Mbps (mega-bits per second). Video encoded with excessive bit-rates does not playback smoothly in the media player, likely due to storage I/O bottleneck. Visit for compatible media format presets. The media playback looks different on a PC compared to the media player s screen. (Wrong aspect ratio) There are two major aspect ratios (width-to-height ratios) for video content, but many kinds of displays. If you play 4:3 video on a 16:9 display (or vice versa), a circle becomes oval, and the picture takes on a squeezed or stretched look. To avoid this distorted look, adding black bars is a common technique. The Network Media Player can be configured to automatically add black bars for certain types of displays. You can set the output resolution in the player s configuration menu to match the native resolution of your display. Some JPEG images cannot be played in the media player. Progressive JPEG files are not supported. Convert to baseline JPEG for maximum compatibility. JPEG images can be either of 2 types: baseline or progressive compression. Baseline JPEG offers greatest compatibility, while progressive JPEGs are suitable for Web site images. Progressive images are downloaded and displayed progressively, being rendered more clearly as more data is received over the internet. Progressive images are primarily supported on PCs. For media appliances, make sure to save images as baseline JPEG in your photo editor, or resave them as baseline JPEGs using free tools such as IrfanView ( ). Does the media player support video streaming? 42 KDS-MP2 - Configuring the Player
47 No. Media players play files from local storage and do not support real-time video streaming over the network. This delivers an optimum viewing experience free of playback quality issues such as stuttering, blocking, or blue-screens. The player is not playing. What should I do? Play list errors and scheduling issues are two major causes of playback problems. To determine if the problem is caused by a bad playlist, just delete the playlist and restart the player. The player should loop through all media files, indicating a fault with the play list. If the playback is scheduled to play at specific time, check to see if the device is set to the right time zone on the world clock. If nothing seems wrong, the time zone setting is often the reason the program is not played. The video is playing but I can t hear any sound, what should I do? Check volume (mute) settings on monitor. KDS-MP2 - Configuring the Player 43
48 6 Kramer Media Manager Installation Download the Kramer Media Manager from the Kramer Web site. For further information, see the Kramer Media Manager User Guide. 44 KDS-MP2 - Kramer Media Manager Installation
49 7 Technical Specifications I/O CONNECTORS: 1 HDMI, 2 USB 2.0, 1 Ethernet on a RJ-45 connector, 1 unbalanced stereo audio on a 3.5mm mini jack, 1 S/PDIF digital audio connector, 1 micro SD card slot VIDEO FORMAT SUPPORT: IMAGE FORMAT SUPPORT: AUDIO CODEC SUPPORT: DYNAMIC CONTENT: LOCAL STORAGE: INDICATOR LEDS: ACCESSORIES: SAFETY: CERTIFICATIONS: OPERATING TEMPERATURE: STORAGE TEMPERATURE: HUMIDITY: POWER CONSUMPTION: DIMENSIONS: WEIGHT: INCLUDED ACCESSORIES: POPAI Screen Media Standards S6 (MPEG-1 SIF, 3Mbps CBR) S7 (MPEG-1 480p, 10Mbps CBR) S8 (MPEG-1 720p, 15Mbps CBR) S9 (MPEG-2 480p, 6Mbps CBR) S10 (MPEG-2 720p, 12Mbps CBR) S11 (MPEG-4 AVC, 480p, 6Mbps CBR) S12 (MPEG-4 AVC, 720p, 10Mbps CBR) E4 (VC-1/WMV9, MP@ML, 720p) E7 (MPEG-4 ASP, 480p, 10Mbps CBR) E8 (MPEG-4 AVC, 1080p, 10Mbps CBR) POPAI Screen Media Standards S1 (JPEG 480p baseline) S2 (JPEG 720p baseline) S3 (JPEG 1080p baseline) E1 (PNG 24bpp+alpha, 480p) E2 (PNG 24bpp+alpha, 720p) E3 (PNG 24bpp+alpha, 1080p) POPAI Screen Media Standards S4 (MPEG L2 audio) S5 (MP3 audio, 320Kbps) W3C HTML5 (HTML, CSS, JavaScript) W3C SMIL 3.0 instructions (sub-set) 8 GB on-board flash memory (up to 360 minutes of typical 720p micro SD card expansion slot (up to 32GB additional storage replaces internal storage when in use) Power (green), status (orange) AC adapter, HDMI cable UL/FCC/CE/CCC/C-Tick/VCCI certified power supplies CE/FCC/VCCI/TELEC/CCC/IC 0 to +40 C (32 to 104 F) -40 to +70 C (-40 to 158 F) 10% to 90%, RHL non-condensing 12V, 1.5A, 18W 167mm x 118.8mm x 24.5mm (6.57 x 4.67 x 0.96 ) W, D, H 0.275kg (0.61lbs) AC adapter, HDMI cable KDS-MP2 - Technical Specifications 45

50

51 P/N: Rev: 5 SAFETY WARNING Disconnect the unit from the power supply before opening and servicing For the latest information on our products and a list of Kramer distributors, visit our Web site to find updates to this user manual. We welcome your questions, comments, and feedback. info@kramerav.com
IAdea Player Firmware User Manual
 IAdea Player Firmware User Manual Firmware version 4.6 Media players : XMP-2200 XMP-2300 XMP-2400 Signboards : XDS-1060 XDS-1062 XDS-1068 Contents IAdea Player Firmware User Manual 0 1. Introduction 1
USER MANUAL. KDS-MP4 4K Digital Media Player MODEL: P/N: Rev 3.
 USER MANUAL MODEL: KDS-MP4 4K Digital Media Player P/N: 2900-300546 Rev 3 www.solidsignal.com Contents 1 Introduction 1 2 Getting Started 2 2.1 Achieving the Best Performance 2 2.2 Safety Instructions
Firmware User Manual
 Firmware User Manual Contents Firmware User Manual 1 1. Introduction 1 1.1. Features 1 2. Configuring the Player 1 2.1. System connections 1 2.2. Basic settings 2 2.3. Connect the player to your network
Planar ContentSmart Media Player MP60 User Manual
 Planar ContentSmart Media Player MP60 User Manual Contents 1 Overview... 3 1.1 Feature Highlights... 3 1.2 Package Contents... 4 1.3 Installation... 4 1.3.1 Attach wireless antenna... 4 1.3.2 Mounting
USER MANUAL. KDS-EN3 HD Video Encoder/Streamer. KDS-DEC3 HD Video Decoder MODELS: P/N: Rev 3
 KRAMER ELECTRONICS LTD. USER MANUAL MODELS: KDS-EN3 HD Video Encoder/Streamer KDS-DEC3 HD Video Decoder P/N: 2900-300375 Rev 3 Contents 1 Introduction 1 2 Getting Started 2 2.1 Achieving the Best Performance
USER MANUAL. PT-101UHD HDMI Repeater MODEL: P/N: Rev 3.
 USER MANUAL MODEL: PT-101UHD HDMI Repeater P/N: 2900-300492 Rev 3 www.kramerav.com Contents 1 Introduction 1 2 Getting Started 2 2.1 Achieving the Best Performance 2 2.2 Safety Instructions 2 2.3 Recycling
USER MANUAL. VM-2Hxl 1:2 HDMI Distributor MODEL: P/N: Rev 3
 KRAMER ELECTRONICS LTD. USER MANUAL MODEL: VM-2Hxl 1:2 HDMI Distributor P/N: 2900-000672 Rev 3 Contents 1 Introduction 1 2 Getting Started 2 2.1 Achieving the Best Performance 2 2.2 Safety Instructions
KRAMER ELECTRONICS LTD. USER MANUAL MODEL: VS-211HA Automatic HDMI Standby Switcher. P/N: Rev 3
 KRAMER ELECTRONICS LTD. USER MANUAL MODEL: VS-211HA Automatic HDMI Standby Switcher P/N: 2900-300378 Rev 3 Contents 1 Introduction 1 2 Getting Started 2 2.1 Achieving the Best Performance 2 2.2 Safety
USER MANUAL. RC-43SL 6-Button Room Controller MODEL: P/N: Rev 1.
 USER MANUAL MODEL: RC-43SL 6-Button Room Controller P/N: 2900-300450 Rev 1 www.kramerav.com Contents 1 Introduction 1 2 Getting Started 2 2.1 Achieving the Best Performance 2 2.2 Safety Instructions
USER MANUAL. RC-43SL 6-Button Room Controller MODEL: P/N: Rev 3.
 USER MANUAL MODEL: RC-43SL 6-Button Room Controller P/N: 2900-300450 Rev 3 www.kramerav.com Contents 1 Introduction 1 2 Getting Started 2 2.1 Achieving the Best Performance 2 2.2 Safety Instructions
XDS-2450 User s Manual
 XDS-2450 User s Manual Contents 1. Introduction 1 Features 1 Box Contents 1 Physical ports and features 1 2. Configuring the XDS-2450 2 Mounting Options and Hardware Installation 2 Menu setup 2 USB keyboard
XMP-3450 User s Manual
 XMP-3450 User s Manual Contents XMP-3450 User s Manual 0 1. Introduction 1 1.1. Features 1 1.2. Package contents 1 1.3. Mounting options 1 1.4. Physical view 2 2. Configuring the XMP-3450 Media Player
USER MANUAL. VM-2HDCPxl 1:2 DVI Distributor MODEL: P/N: Rev 3
 KRAMER ELECTRONICS LTD. USER MANUAL MODEL: VM-2HDCPxl 1:2 DVI Distributor P/N: 2900-000510 Rev 3 Contents 1 Introduction 1 2 Getting Started 2 2.1 Achieving the Best Performance 2 2.2 Safety Instructions
USER MANUAL. SL-1N Master Room Controller MODEL: P/N: Rev 1
 KRAMER ELECTRONICS LTD. USER MANUAL MODEL: SL-1N Master Room Controller P/N: 2900-300399 Rev 1 Contents 1 Introduction 1 2 Getting Started 2 2.1 Achieving the Best Performance 2 2.2 Safety Instructions
USER MANUAL. PT-5T/R IR Extender/Repeater MODEL: P/N: Rev 3
 KRAMER ELECTRONICS LTD. USER MANUAL MODEL: PT-5T/R IR Extender/Repeater P/N: 2900-300010 Rev 3 Contents 1 Introduction 1 2 Getting Started 2 2.1 Achieving the Best Performance 2 2.2 Safety Instructions
KRAMER ELECTRONICS LTD. USER MANUAL MODEL: VS-41HC 4x1 HDMI Switcher. P/N: Rev 4
 KRAMER ELECTRONICS LTD. USER MANUAL MODEL: VS-41HC 4x1 HDMI Switcher P/N: 2900-000423 Rev 4 Contents 1 Introduction 1 2 Getting Started 2 2.1 Achieving the Best Performance 2 2.2 Safety Instructions 3
USER MANUAL. VP-311DVI Automatic DVI/Audio Switcher MODEL: P/N: Rev 3
 KRAMER ELECTRONICS LTD. USER MANUAL MODEL: VP-311DVI Automatic DVI/Audio Switcher P/N: 2900-000120 Rev 3 Contents 1 Introduction 1 2 Getting Started 2 2.1 Achieving the Best Performance 2 2.2 Safety Instructions
USER MANUAL. VP-211K Automatic UXGA / Audio Switcher MODEL: P/N: Rev 3
 KRAMER ELECTRONICS LTD. USER MANUAL MODEL: VP-211K Automatic UXGA / Audio Switcher P/N: 2900-000414 Rev 3 Contents 1 Introduction 1 2 Getting Started 2 2.1 Achieving the Best Performance 2 2.2 Safety
USER MANUAL. RC-43T Remote Controller MODEL: P/N: Rev 3
 KRAMER ELECTRONICS LTD. USER MANUAL MODEL: RC-43T Remote Controller P/N: 2900-300301 Rev 3 Contents 1 Introduction 1 2 Getting Started 2 2.1 Achieving the Best Performance 2 2.2 Safety Instructions 3
KRAMER ELECTRONICS LTD. USER MANUAL MODEL: VA-1VGAN EDID Capture. P/N: Rev 2
 KRAMER ELECTRONICS LTD. USER MANUAL MODEL: VA-1VGAN EDID Capture P/N: 2900-000513 Rev 2 Contents 1 Introduction 1 2 Getting Started 2 2.1 Achieving the Best Performance 2 2.2 Recycling Kramer Products
USER MANUAL. 671T DVI Optical Transmitter. 671R DVI Optical Receiver MODEL: P/N: Rev 4
 KRAMER ELECTRONICS LTD. USER MANUAL MODEL: 671T DVI Optical Transmitter 671R DVI Optical Receiver P/N: 2900-000484 Rev 4 Contents 1 Introduction 1 2 Getting Started 2 2.1 Achieving the Best Performance
USER MANUAL. PT-1C EDID Processor MODEL: P/N: Rev 3
 KRAMER ELECTRONICS LTD. USER MANUAL MODEL: PT-1C EDID Processor P/N: 2900-300276 Rev 3 Contents 1 Introduction 1 2 Getting Started 2 2.1 Achieving the Best Performance 2 2.2 Recycling Kramer Products
USER MANUAL. KT-10 Touch Panel MODEL: P/N: Rev 1.
 USER MANUAL MODEL: KT-10 Touch Panel P/N: 2900-300607 Rev 1 www.kramerav.com Contents 1 Introduction 1 2 Getting Started 2 2.1 Achieving the Best Performance 2 2.2 Safety Instructions 2 2.3 Recycling
USER MANUAL. RS-232 Extender MODEL: P/N: Rev 1
 USER MANUAL MODEL: RS-232 Extender P/N: 2900-300284 Rev 1 Contents 1 Introduction 1 2 Getting Started 2 2.1 Achieving the Best Performance 2 2.2 Safety Instructions 3 2.3 Recycling Kramer Products 3 3
USER MANUAL. SL-10 Master Room Controller MODEL: P/N: Rev 4
 KRAMER ELECTRONICS LTD. USER MANUAL MODEL: SL-10 Master Room Controller P/N: 2900-000581 Rev 4 Contents 1 Introduction 1 2 Getting Started 2 2.1 Achieving the Best Performance 2 2.2 Safety Instructions
USER MANUAL. VS-311H Automatic HDMI/Audio Switcher MODEL: P/N: Rev 3
 KRAMER ELECTRONICS LTD. USER MANUAL MODEL: VS-311H Automatic HDMI/Audio Switcher P/N: 2900-000666 Rev 3 Contents 1 Introduction 1 2 Getting Started 2 2.1 Achieving the Best Performance 2 2.2 Safety Instructions
USER MANUAL. VA-1USB-T USB Transmitter. VA-1USB-R USB Receiver MODELS: P/N: Rev 3
 KRAMER ELECTRONICS LTD. USER MANUAL MODELS: VA-1USB-T USB Transmitter VA-1USB-R USB Receiver P/N: 2900-300209 Rev 3 Contents 1 Introduction 1 2 Getting Started 2 2.1 Achieving the Best Performance 2 2.2
USER MANUAL. 614T One-Fiber Detachable Optical DVI Transmitter. 614R One-Fiber Detachable Optical DVI Receiver MODELS: P/N: Rev 5
 KRAMER ELECTRONICS LTD. USER MANUAL MODELS: 614T One-Fiber Detachable Optical DVI Transmitter 614R One-Fiber Detachable Optical DVI Receiver P/N: 2900-300249 Rev 5 Contents 1 Introduction 1 2 Getting
XDS-104 User s Manual
 XDS-104 User s Manual Contents 1. Introduction 1 Features 1 Package contents 1 Physical ports and features 1 2. Configuring the XDS-104 2 System connections 2 USB keyboard configuration menus 2 Navigating
KRAMER ELECTRONICS LTD. USER MANUAL MODELS: TP-125xl UXGA/Audio/Data Line Transmitter. TP-126xl UXGA/Audio/Data Line Receiver. P/N: Rev 4
 KRAMER ELECTRONICS LTD. USER MANUAL MODELS: TP-125xl UXGA/Audio/Data Line Transmitter TP-126xl UXGA/Audio/Data Line Receiver P/N: 2900-300206 Rev 4 Contents 1 Introduction 1 2 Getting Started 2 2.1 Achieving
KRAMER ELECTRONICS LTD. USER MANUAL MODEL: RC-76R/RC-78R Room Controllers. P/N: Rev 5
 KRAMER ELECTRONICS LTD. USER MANUAL MODEL: RC-76R/RC-78R Room Controllers P/N: 2900-300253 Rev 5 Contents 1 Introduction 1 2 Getting Started 2 2.1 Achieving the Best Performance 2 2.2 Safety Instructions
USER MANUAL. 602T Two-fiber Detachable Optical DVI Transmitter 602R. DVI Receiver MODELS: P/N: Rev 3
 KRAMER ELECTRONICS LTD. USER MANUAL MODELS: 602T Two-fiber Detachable Optical DVI Transmitter 602R Two-fiber Detachable Optical DVI Receiver P/N: 2900-000646 Rev 3 Contents 1 Introduction 1 2 Getting
USER MANUAL. PT-580T HDMI Line Transmitter. TP-580T HDMI Line Transmitter. TP-580R HDMI Line Receiver MODELS: P/N: Rev 3
 KRAMER ELECTRONICS LTD. USER MANUAL MODELS: PT-580T HDMI Line Transmitter TP-580T HDMI Line Transmitter TP-580R HDMI Line Receiver P/N: 2900-300340 Rev 3 Contents 1 Introduction 1 2 Getting Started 2
USER MANUAL V/100V Power Amplifier MODEL: P/N: Rev 4
 KRAMER ELECTRONICS LTD. USER MANUAL MODEL: 920 70V/100V Power Amplifier P/N: 2900-300308 Rev 4 Contents 1 Introduction 1 2 Getting Started 2 2.1 Achieving the Best Performance 2 2.2 Safety Instructions
Kramer Electronics, Ltd. USER MANUAL. Models: VM-8H, 1:8 HDMI Distributor VM-16H, 1:16 HDMI Distributor
 Kramer Electronics, Ltd. USER MANUAL Models: VM-8H, 1:8 HDMI Distributor VM-16H, 1:16 HDMI Distributor Contents Contents 1 Introduction 1 2 Getting Started 1 2.1 Quick Start 2 3 Overview 3 3.1 Recommendations
USER MANUAL. RC-76R/RC-78R Room Controllers MODEL: P/N: Rev 2
 KRAMER ELECTRONICS LTD. USER MANUAL MODEL: RC-76R/RC-78R Room Controllers P/N: 2900-300253 Rev 2 Contents 1 Introduction 1 2 Getting Started 2 2.1 Achieving the Best Performance 2 2.2 Safety Instructions
XDS-151 User s Manual
 XDS-151 User s Manual Contents 1. Introduction 1 Features 1 Box Contents 1 Physical ports and features 1 2. Configuring the XDS-151 2 Mounting Options and Hardware Installation 2 Menu setup 2 USB keyboard
KRAMER ELECTRONICS LTD. USER MANUAL MODEL: RC-74DL Master Room Controller. P/N: Rev 5
 KRAMER ELECTRONICS LTD. USER MANUAL MODEL: RC-74DL Master Room Controller P/N: 2900-000691 Rev 5 Contents 1 Introduction 1 2 Getting Started 2 2.1 Achieving the Best Performance 2 2.2 Safety Instructions
USER MANUAL. RC-74DL Master Room Controller MODEL: P/N: Rev 4
 KRAMER ELECTRONICS LTD. USER MANUAL MODEL: RC-74DL Master Room Controller P/N: 2900-000691 Rev 4 Contents 1 Introduction 1 2 Getting Started 2 2.1 Achieving the Best Performance 2 2.2 Safety Instructions
XMP-120/130 User s Manual
 XMP-120/130 User s Manual Notes about model variants The XMP-120 and XMP-130 models are based on XMP-320 with the following additional features: XMP-120 Ethernet only XMP-130 Ethernet + Wi-Fi All other
USER MANUAL RC-76M/RC-712M MODEL: P/N: Rev 3
 KRAMER ELECTRONICS LTD. USER MANUAL MODEL: RC-76M/RC-712M P/N: 2900-300329 Rev 3 Contents 1 Introduction 1 2 Getting Started 2 2.1 Achieving the Best Performance 2 2.2 Safety Instructions 3 2.3 Recycling
USER MANUAL. VM-28H 2 Input 1:8 HDMI Distributor. VM-216H 2 Input 1:16 HDMI Distributor MODEL: P/N: Rev 5
 KRAMER ELECTRONICS LTD. USER MANUAL MODEL: VM-28H 2 Input 1:8 HDMI Distributor VM-216H 2 Input 1:16 HDMI Distributor P/N: 2900-000662 Rev 5 Contents 1 Introduction 1 2 Getting Started 2 2.1 Achieving
KRAMER ELECTRONICS LTD. USER MANUAL MODEL: VM-73 Multiformat 1:3 Distribution Amplifier. P/N: Rev 3
 KRAMER ELECTRONICS LTD. USER MANUAL MODEL: VM-73 Multiformat 1:3 Distribution Amplifier P/N: 2900-000544 Rev 3 Contents 1 Introduction 1 2 Getting Started 2 2.1 Achieving the Best Performance 2 2.2 Recycling
KRAMER ELECTRONICS LTD. USER MANUAL MODEL: VM-24H 2 Input 1:4 HDMI Distributor. P/N: Rev 4
 KRAMER ELECTRONICS LTD. USER MANUAL MODEL: VM-24H 2 Input 1:4 HDMI Distributor P/N: 2900-000664 Rev 4 Contents 1 Introduction 1 2 Getting Started 2 2.1 Achieving the Best Performance 2 2.2 Safety Instructions
USER MANUAL. TP-580Txr HDMI Line Transmitter. TP-580Rxr HDMI Line Receiver MODELS: P/N: Rev 5
 KRAMER ELECTRONICS LTD. USER MANUAL MODELS: TP-580Txr HDMI Line Transmitter TP-580Rxr HDMI Line Receiver P/N: 2900-300088 Rev 5 Contents 1 Introduction 1 2 Getting Started 2 2.1 Achieving the Best Performance
USER MANUAL. TP-780T HDMI Line Transmitter + POE TP-780R HDMI Line Receiver + POE MODELS: P/N: Rev 2.
 USER MANUAL MODELS: TP-780T HDMI Line Transmitter + POE TP-780R HDMI Line Receiver + POE P/N: 2900-300575 Rev 2 www.kramerav.com Contents 1 Introduction 1 2 Getting Started 2 2.1 Achieving the Best Performance
USER MANUAL. TP-145 XGA/Audio/Data Line Transmitter. TP-146 UXGA/Audio/Data Line Receiver MODELS: P/N: Rev 3
 KRAMER ELECTRONICS LTD. USER MANUAL MODELS: TP-145 XGA/Audio/Data Line Transmitter TP-146 UXGA/Audio/Data Line Receiver P/N: 2900-000607 Rev 3 Contents 1 Introduction 1 2 Getting Started 2 2.1 Achieving
USER MANUAL. KT-10 Touch Panel MODEL: P/N: Rev 5.
 USER MANUAL MODEL: KT-10 Touch Panel P/N: 2900-300607 Rev 5 www.kramerav.com Contents 1 Introduction 1 2 Getting Started 2 2.1 Achieving the Best Performance 2 2.2 Safety Instructions 2 2.3 Recycling
KRAMER ELECTRONICS LTD. USER MANUAL MODEL: VS-41H 4x1 HDMI Switcher. P/N: Rev 7
 KRAMER ELECTRONICS LTD. USER MANUAL MODEL: VS-41H 4x1 HDMI Switcher P/N: 2900-000667 Rev 7 Contents 1 Introduction 1 2 Getting Started 2 2.1 Achieving the Best Performance 2 2.2 Safety Instructions 3
KRAMER ELECTRONICS LTD. USER MANUAL MODELS: TP-580T HDMI Line Transmitter. TP-580R HDMI Line Receiver. P/N: Rev 2
 KRAMER ELECTRONICS LTD. USER MANUAL MODELS: TP-580T HDMI Line Transmitter TP-580R HDMI Line Receiver P/N: 2900-300034 Rev 2 Contents 1 Introduction 1 2 Getting Started 2 2.1 Achieving the Best Performance
XMP-300/305 User s Manual October 2009
 XMP-300/305 User s Manual October 2009 About the XMP-300/305 Models This user s manual covers both model variants each with different local storage technologies: XMP-300 HD network media player XMP-305
KRAMER ELECTRONICS LTD. USER MANUAL MODEL: 905xl Power Amplifier. P/N: Rev 3
 KRAMER ELECTRONICS LTD. USER MANUAL MODEL: 905xl Power Amplifier P/N: 2900-300196 Rev 3 Contents 1 Introduction 1 2 Getting Started 2 2.1 Achieving the Best Performance 2 2.2 Safety Instructions 2 2.3
KRAMER ELECTRONICS LTD. USER MANUAL MODEL: 622T Dual Link DVI Optical Transmitter. 622R Dual Link DVI Optical Receiver. P/N: Rev 4
 KRAMER ELECTRONICS LTD. USER MANUAL MODEL: 622T Dual Link DVI Optical Transmitter 622R Dual Link DVI Optical Receiver P/N: 2900-000104 Rev 4 Contents 1 Introduction 1 2 Getting Started 2 2.1 Achieving
USER MANUAL MODEL: KWC-1 Wireless Charging Spot
 USER MANUAL MODEL: KWC-1 Wireless Charging Spot P/N: 2900-300504 Rev 6 www.kramerav.com Contents 1 Introduction 1 2 Getting Started 2 2.1 Achieving the Best Performance 2 2.2 Recycling Kramer Products
USER MANUAL. VS Port RS-422 Matrix Switcher MODEL: P/N: Rev 5
 KRAMER ELECTRONICS LTD. USER MANUAL MODEL: VS-4228 8-Port RS-422 Matrix Switcher P/N: 2900-0033 Rev 5 Contents 1 Introduction 1 2 Getting Started 2 2.1 Achieving the Best Performance 2 2.2 Safety Instructions
USER MANUAL. 621T DVI Optical Transmitter. 621R DVI Optical Receiver MODEL: P/N: Rev 8
 KRAMER ELECTRONICS LTD. USER MANUAL MODEL: 621T DVI Optical Transmitter 621R DVI Optical Receiver P/N: 2900-000103 Rev 8 Contents 1 Introduction 1 2 Getting Started 2 2.1 Achieving the Best Performance
USER MANUAL. TP-780TXR Extended Range HDMI Line Transmitter + POE TP-780RXR Extended Range HDMI Line Receiver + POE MODELS: P/N: Rev 2
 USER MANUAL MODELS: TP-780TXR Extended Range HDMI Line Transmitter + POE TP-780RXR Extended Range HDMI Line Receiver + POE P/N: 2900-300576 Rev 2 www.kramerav.com Contents 1 Introduction 1 2 Getting
XMP-3250/3350 User s Manual
 XMP-3250/3350 User s Manual Notes about model variants The XMP-3250 and XMP-3350 models are based on XMP-3250 with the following differences: XMP-3250 Ethernet only XMP-3350 Ethernet + Wi-Fi Wireless operations
USER MANUAL. VS-88H 8x8 HDMI Matrix Switcher MODEL: P/N: Rev 5
 KRAMER ELECTRONICS LTD. USER MANUAL MODEL: VS-88H 8x8 HDMI Matrix Switcher P/N: 2900-000654 Rev 5 Contents 1 Introduction 1 2 Getting Started 2 2.1 Achieving the Best Performance 2 2.2 Safety Instructions
WAV-5 WAV-5C WAV-3 WA-1H WAV-1R WAV-1RP
 KRAMER ELECTRONICS LTD. USER MANUAL MODELS: WAV-5 WAV-5C WAV-3 WA-1H WAV-1R WAV-1RP Wall Plate Series P/N: 2900-300124 Rev 2 Contents 1 Introduction 1 2 Getting Started 2 2.1 Achieving the Best Performance
USER MANUAL. FC-49 DVI / Audio to HDMI Converter MODEL: P/N: Rev 6
 KRAMER ELECTRONICS LTD. USER MANUAL MODEL: FC-49 DVI / Audio to HDMI Converter P/N: 2900-000286 Rev 6 Contents 1 Introduction 1 2 Getting Started 2 2.1 Achieving the Best Performance 2 2.2 Safety Instructions
XDS-101 User s Manual December 2009
 XDS-101 User s Manual December 2009 Contents 1. Introduction 1 1.1. Hardware features 1 1.2. Software Features 1 1.3. Package Contents 2 1.4. Physical ports and features 2 1.5. VESA mounting kit (Optional
USER MANUAL. RC-54DL KNET Auxiliary Control Panel MODEL: P/N: Rev 2
 KRAMER ELECTRONICS LTD. USER MANUAL MODEL: RC-54DL KNET Auxiliary Control Panel P/N: 2900-300130 Rev 2 Contents 1 Introduction 1 2 Getting Started 2 2.1 Achieving the Best Performance 2 3 Overview 3 3.1
USER MANUAL VM-4HN 1:4 HDMI DA MODEL: P/N: Rev 4
 KRAMER ELECTRONICS LTD. USER MANUAL MODEL: VM-4HN 1:4 HDMI DA P/N: 2900-300106 Rev 4 Contents 1 Introduction 1 2 Getting Started 2 2.1 Achieving the Best Performance 2 2.2 Safety Instructions 3 2.3 Recycling
KRAMER ELECTRONICS LTD. USER MANUAL MODELS: TP-121EDID, XGA /Audio Line Transmitter TP-125EDID, XGA. PT-110EDID, XGA Line Transmitter
 KRAMER ELECTRONICS LTD. USER MANUAL MODELS: TP-121EDID, XGA /Audio Line Transmitter TP-123EDID, XGA /Audio/Data Line Transmitter TP-125EDID, XGA /Audio/Data Line Transmitter PT-110EDID, XGA Line Transmitter
USER MANUAL VM-2HN 1:2 HDMI DA MODEL: P/N: Rev 3
 KRAMER ELECTRONICS LTD. USER MANUAL MODEL: VM-2HN 1:2 HDMI DA P/N: 2900-300381 Rev 3 Contents 1 Introduction 1 2 Getting Started 2 2.1 Achieving the Best Performance 2 2.2 Safety Instructions 3 2.3 Recycling
USER MANUAL. VS-21HDCP-IR 2x1 DVI Switcher MODEL: P/N: Rev 5
 KRAMER ELECTRONICS LTD. USER MANUAL MODEL: VS-21HDCP-IR 2x1 DVI Switcher P/N: 2900-000556 Rev 5 Contents 1 Introduction 1 2 Getting Started 2 2.1 Achieving the Best Performance 2 2.2 Safety Instructions
USER MANUAL. VM-400HDCP 1:4 DVI Distributor MODEL: P/N: Rev 2
 KRAMER ELECTRONICS LTD. USER MANUAL MODEL: VM-400HDCP 1:4 DVI Distributor P/N: 2900-300054 Rev 2 Contents 1 Introduction 1 2 Getting Started 2 2.1 Achieving the Best Performance 2 2.2 Safety Instructions
KRAMER ELECTRONICS LTD. USER MANUAL MODEL: VA-2H EDID Reader-Emulator. P/N: Rev 3
 KRAMER ELECTRONICS LTD. USER MANUAL MODEL: VA-2H EDID Reader-Emulator P/N: 2900-000677 Rev 3 Contents 1 Introduction 1 2 Getting Started 2 2.1 Achieving the Best Performance 2 3 Overview 3 3.1 Defining
Kramer Electronics, Ltd. USER MANUAL. Model: TP Channel UXGA/Audio/RS-232 to CAT 5 Transmitter
 Kramer Electronics, Ltd. USER MANUAL Model: TP-185 8 Channel UXGA/Audio/RS-232 to CAT 5 Transmitter Contents Contents 1 Introduction 1 2 Getting Started 1 2.1 Quick Start 2 3 Overview 3 3.1 Shielded Twisted
KRAMER ELECTRONICS LTD. USER MANUAL MODEL: VA-1VGAxl EDID Capture/Emulator. P/N: Rev 2
 KRAMER ELECTRONICS LTD. USER MANUAL MODEL: VA-1VGAxl EDID Capture/Emulator P/N: 2900-300011 Rev 2 Contents 1 Introduction 1 2 Getting Started 2 2.1 Achieving the Best Performance 2 3 Overview 3 3.1 Defining
USER MANUAL. TP-780TXR Extended Range HDMI Line Transmitter + POE TP-780RXR Extended Range HDMI Line Receiver + POE MODELS: P/N: Rev 3
 USER MANUAL MODELS: TP-780TXR Extended Range HDMI Line Transmitter + POE TP-780RXR Extended Range HDMI Line Receiver + POE P/N: 2900-300576 Rev 3 www.kramerav.com Contents 1 Introduction 1 2 Getting
Contents 1. Introduction Hardware Operation Software Operation Technical Data 5. IAdea Limited Warranty 6
 VS16021 User Manual Contents 1. Introduction 1 1.1. Package contents 1 1.2. Physical view 2 2. Hardware Operation 2 2.1. How to connect the player 2 3. Software Operation 3 3.1. System boot-up 3 3.2. Settings
KRAMER ELECTRONICS LTD. USER MANUAL MODEL: VS-401USB 4x1 USB Switcher. P/N: Rev 1
 KRAMER ELECTRONICS LTD. USER MANUAL MODEL: VS-401USB 4x1 USB Switcher P/N: 2900-300029 Rev 1 Contents 1 Introduction 1 2 Getting Started 2 2.1 Achieving the Best Performance 2 2.2 Recycling Kramer Products
XMP-2200/2300/2400 Hardware User Manual
 XMP-2200/2300/2400 Hardware User Manual Notes about model variants The XMP-2300 and XMP-2400 models are based on XMP-2200 with the following differences: XMP-2200 Ethernet only 1 AV-out XMP-2300 Ethernet
KRAMER ELECTRONICS LTD. USER MANUAL MODELS: KDS-EN2T HDMI to IP Transmitter. KDS-EN2R HDMI to IP Receiver. P/N: Rev 2
 KRAMER ELECTRONICS LTD. USER MANUAL MODELS: KDS-EN2T HDMI to IP Transmitter KDS-EN2R HDMI to IP Receiver P/N: 2900-300158 Rev 2 21 Contents 1 Introduction 1 2 Getting Started 2 2.1 Achieving the Best
Kramer Electronics, Ltd.
 Kramer Electronics, Ltd. Preliminary USER MANUAL Model: VA-1VGAN EDID Capture Introduction Contents 1 Introduction 1 2 Getting Started 1 2.1 Quick Start 2 3 Overview 3 3.1 Defining EDID 4 4 Your VA-1VGAN
Kramer Electronics, Ltd. USER MANUAL VM-24HD. 2 x 1:4 HD/SD SDI DA
 Kramer Electronics, Ltd. USER MANUAL VM-24HD 2 x 1:4 HD/SD SDI DA Contents Contents 1 Introduction 1 2 Getting Started 1 2.1 Quick Start 2 3 Overview 3 4 Your VM-24HD 2 x 1:4 HD/SD SDI DA 4 5 Connecting
USER MANUAL VM-4HC 1:4 HDMI DA MODEL: P/N: Rev 4
 KRAMER ELECTRONICS LTD. USER MANUAL MODEL: VM-4HC 1:4 HDMI DA P/N: 2900-000716 Rev 4 Contents 1 Introduction 1 2 Getting Started 2 2.1 Achieving the Best Performance 2 2.2 Safety Instructions 3 2.3 Recycling
KRAMER ELECTRONICS LTD. USER MANUAL MODELS: WP-110, XGA Line Transmitter. PT-120, XGA Line Receiver. TP-120, XGA Line Receiver. P/N: Rev 1
 KRAMER ELECTRONICS LTD. USER MANUAL MODELS: WP-110, XGA Line Transmitter PT-120, XGA Line Receiver TP-120, XGA Line Receiver P/N: 2900-300180 Rev 1 Contents 1 Introduction 1 2 Getting Started 2 2.1 Achieving
IAD18000/18001 Hardware User Manual
 IAD18000/18001 Hardware User Manual 10.1 HD Smart Signboard IAdea Corporation 綠創科技 Warning: Changes or modifications to this unit not expressly approved by the party responsible for compliance could void
Firmware User Manual. Firmware version v1.0. Suitable for Product Series: Touch Panel PC Panel PC Box PC. QD-FW_Manual_v1.0
 1 Firmware User Manual Firmware version v1.0 Suitable for Product Series: Touch Panel PC Panel PC Box PC 2 Contents Features 3 System setup 3 System start up 3 System Settings 4 System Information 9 System
USER MANUAL MODEL: TDPB-2V1AD Dual square table box with HDMI, VGA, 3.5mm audio, and RJ45 inputs
 USER MANUAL MODEL: TDPB-2V1AD Dual square table box with HDMI, VGA, 3.5mm audio, and RJ45 inputs Contents 1 Introduction 1 2 Getting Started 2 2.1 Achieving the Best Performance 2 2.2 Recycling Products
USER MANUAL. VS-808TP 8x8 Twisted Pair Matrix Switcher MODEL: P/N: Rev 2
 KRAMER ELECTRONICS LTD. USER MANUAL MODEL: VS-808TP 8x8 Twisted Pair Matrix Switcher P/N: 2900-300147 Rev 2 Contents 1 Introduction 1 2 Getting Started 2 2.1 Achieving the Best Performance 2 2.2 Safety
Kramer Electronics, Ltd.
 Kramer Electronics, Ltd. Preliminary USER MANUAL Model: FC-50 RS-232 Range Extender Contents Contents 1 Introduction 1 2 Getting Started 1 2.1 Quick Start 2 3 Overview 3 3.1 About the Power Connect Feature
Kramer Electronics, Ltd. USER MANUAL. Model: VA-1VGA. EDID Capture
 Kramer Electronics, Ltd. USER MANUAL Model: VA-1VGA EDID Capture Contents Contents 1 Introduction 1 2 Getting Started 1 2.1 Quick Start 2 3 Overview 3 3.1 Defining EDID 3 4 Your VA-1VGA EDID Capture 4
PCS88-90 (Black) PCS88-94 (Silver)
 PCS88-94 (Silver)") USER MANUAL MODELS: PCS88-90 (Black) PCS88-94 (Silver) Pop-up Table Connection Bus Contents 1 Introduction 1 2 Getting Started 2 2.1 Achieving the Best Performance 2 2.2 Recycling Products 2 3 Overview
USER MANUAL MODELS: PCS88-90 (Black) PCS88-94 (Silver) Pop-up Table Connection Bus Contents 1 Introduction 1 2 Getting Started 2 2.1 Achieving the Best Performance 2 2.2 Recycling Products 2 3 Overview
Kramer Electronics, Ltd. USER MANUAL. Models: TP-125, UXGA / Audio / Data Line Transmitter TP-126, UXGA / Audio / Data Line Receiver
 Kramer Electronics, Ltd. USER MANUAL Models: TP-125, UXGA / Audio / Data Line Transmitter TP-126, UXGA / Audio / Data Line Receiver Contents Contents 1 Introduction 1 2 Getting Started 1 2.1 Quick Start
USER MANUAL. VS-88HDCPxl 8x8 DVI Matrix Switcher MODEL: P/N: Rev 9
 KRAMER ELECTRONICS LTD. USER MANUAL MODEL: VS-88HDCPxl 8x8 DVI Matrix Switcher P/N: 2900-300016 Rev 9 Contents 1 Introduction 1 2 Getting Started 2 2.1 Achieving the Best Performance 2 2.2 Safety Instructions
KRAMER ELECTRONICS LTD. USER MANUAL MODEL: VS-161H 16x1 HDMI Switcher. P/N: Rev 6
 KRAMER ELECTRONICS LTD. USER MANUAL MODEL: VS-161H 16x1 HDMI Switcher P/N: 2900-000665 Rev 6 Contents 1 Introduction 1 2 Getting Started 2 2.1 Achieving the Best Performance 2 3 Overview 3 3.1 About HDMI
HMP-500S/505S Media Player User s Manual
 HMP-500S/505S Media Player User s Manual About the HMP-500S/505S Models This user s manual applies to both model variants each with different local storage technologies: HMP 500S HD network media player
KRAMER ELECTRONICS LTD. USER MANUAL MODEL: VS Port RS-422 Matrix Switcher. P/N: Rev 4
 KRAMER ELECTRONICS LTD. USER MANUAL MODEL: VS-4228 8-Port RS-422 Matrix Switcher P/N: 2900-002033 Rev 4 6 Contents 1 Introduction 1 2 Getting Started 2 2.1 Achieving the Best Performance 2 3 Overview
KRAMER ELECTRONICS LTD. USER MANUAL MODEL: VS-808TP 8x8 Twisted Pair Matrix Switcher. P/N: Rev 1
 KRAMER ELECTRONICS LTD. USER MANUAL MODEL: VS-808TP 8x8 Twisted Pair Matrix Switcher P/N: 2900-300147 Rev 1 Contents 1 Introduction 1 2 Getting Started 2 2.1 Achieving the Best Performance 2 2.2 Using
Kramer Electronics, Ltd. USER MANUAL. Model: WP-209. Wall Plate
 Kramer Electronics, Ltd. USER MANUAL Model: WP-209 Wall Plate Contents Contents 1 Introduction 1 2 Getting Started 1 2.1 Quick Start 1 3 Overview 3 4 Your WP-209 4.1 Your WP-209 Front Panel 4 4 4.2 Your
USER MANUAL VM-2H2 4K HDMI 2.0 1:2 DA MODEL: P/N: Rev 2.
 USER MANUAL MODEL: VM-2H2 4K HDMI 2.0 1:2 DA P/N: 2900-300602 Rev 2 www.kramerav.com Contents 1 Introduction 1 2 Getting Started 2 2.1 Achieving the Best Performance 2 2.2 Safety Instructions 2 2.3 Recycling
Kramer Electronics, Ltd. USER MANUAL. Model: TBUS-9. Table Connection Bus
 Kramer Electronics, Ltd. USER MANUAL Model: TBUS-9 Table Connection Bus Contents Contents 1 Introduction 1 2 Getting Started 1 2.1 Quick Start 2 3 Overview 3 4 Your TBUS-9 4 5 Installing the TBUS-9 Table
Kramer Electronics, Ltd. USER MANUAL. Models: RC-7RL, Media / Room Controller RC-7RLE, Media / Room Controller
 Kramer Electronics, Ltd. USER MANUAL Models: RC-7RL, Media / Room Controller RC-7RLE, Media / Room Controller Contents Contents 1 Introduction 1 2 Getting Started 1 3 Overview 2 4 Your RC-7RL / RC-7RLE
USER MANUAL. KDS-EN6 Video Encoder. KDS-DEC6 Video Decoder MODELS: P/N: Rev 2.
 USER MANUAL MODELS: KDS-EN6 Video Encoder KDS-DEC6 Video Decoder P/N: 2900-300655 Rev 2 www.kramerav.com Contents 1 Introduction 1 2 Getting Started 2 2.1 Achieving the Best Performance 2 2.2 Safety
USER MANUAL. VM-2DP 1:2 DisplayPort Distributor MODEL: P/N: Rev 2
 KRAMER ELECTRONICS LTD. USER MANUAL MODEL: VM-2DP 1:2 DisplayPort Distributor P/N: 2900-000769 Rev 2 VM-2DP Quick Start Guide This page guides you through a basic installation and first-time use of your
Kramer Electronics, Ltd. USER MANUAL. Models: RC-7LC, Media / Room Controller RC-7LCE, Media / Room Controller
 Kramer Electronics, Ltd. USER MANUAL Models: RC-7LC, Media / Room Controller RC-7LCE, Media / Room Controller Contents Contents 1 Introduction 1 2 Getting Started 1 3 Overview 2 4 Your RC-7LC / RC-7LCE