16-Channel DVR Rear Panel
|
|
|
- Logan Cain
- 5 years ago
- Views:
Transcription


1
2

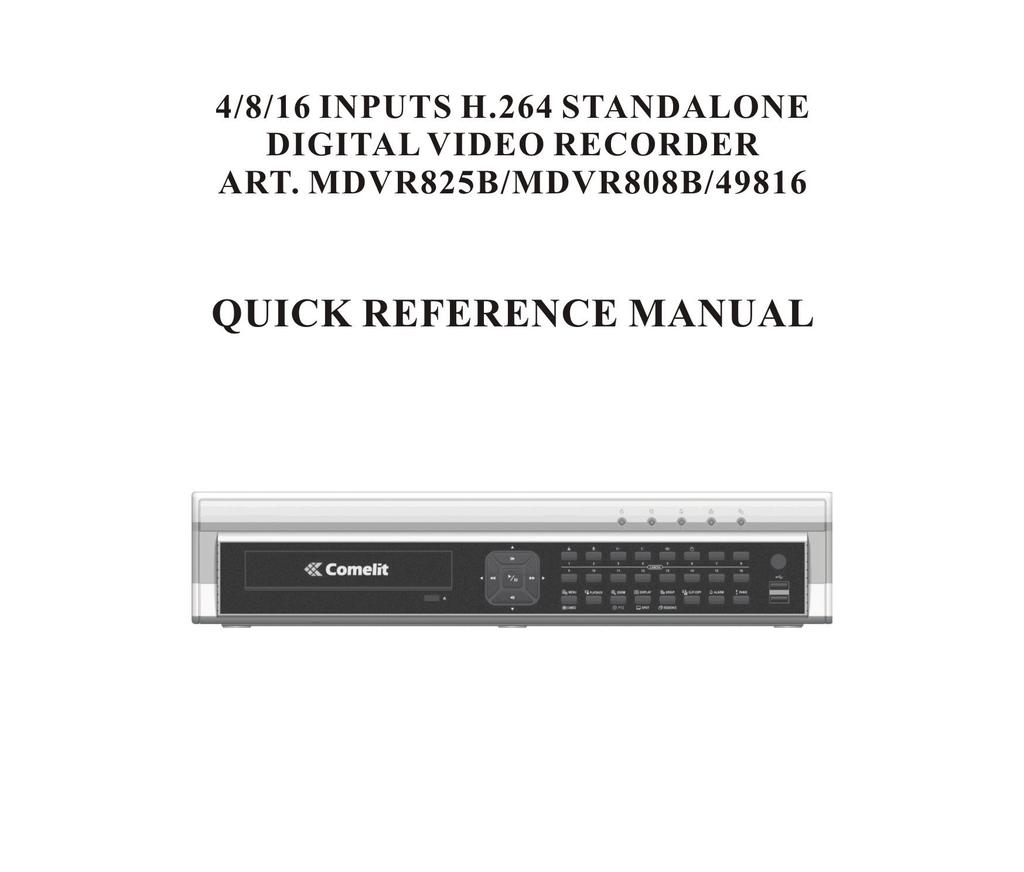
3 Digital Video Recorder art. MDVR825B/MDVR808B/49816 DVR Rear Panel 16-Channel DVR Rear Panel Video Input Video Loop Through RS485 Port Alarm Input/Output Network Port RS232C Port Audio In/Out Video Out Factory Reset Switch Power Cord Connector Video Input: Connect the coaxial cables from the video sources to the BNC Video In connectors. Video Out: A VGA connector is provided so that you can use a standard, multi-sync computer monitor as your main monitor. Use the cable supplied with your monitor to connect it to the DVR. Connect the main monitor to the Video Out connector. Connect the spot monitor to the SPOT connector as needed. Power Cord Connector: Connect the AC power cord to the DVR and then to a wall outlet. No special tools are required to install the DVR. Refer to the installation manuals for the other items that make up part of your system. DVR Front Panel 16-Channel DVR Front Panel Power LED HDD LED Alarm Out LED Network LED Clip Copy LED Camera Buttons Play/Pause Button Arrow Buttons Menu/Cameo Button Playback Mode Button Zoom/PTZ Button Display/SPOT Button Group/Sequence Button Clip Copy Button Alarm Button Panic Button USB Port 1
4 Quick Reference Manual Camera Buttons: Pressing the individual camera buttons will cause the selected camera to display full screen. Buttons 1 to 9 are also used to enter passwords. Play/Pause Button: In the live monitoring mode, pressing the button freezes the current screen. When in the playback mode, pressing the button plays back images at regular speed or pauses playing video. Pressing the button selects a highlighted item or completes an entry that you have made during system setup. Arrow Buttons: These buttons are used to navigate through menus and GUI. You can also use them to change numbers by highlighting a number in the menu and using the Up and Down arrow buttons to increase or decrease the number s value. In the playback mode, pressing the button plays video backward at high speed and pressing the button again toggles the playback speed from, and. Pressing the button plays video forward at high speed and pressing the button again toggles the playback speed from, and. When in the pause mode, pressing the button moves to the next image and pressing the button moves to the previous image. Menu/Cameo Button: In the Live Monitoring mode and Search mode, pressing the button displays the menu icons at the top of the screen. Pressing and holding the button for three seconds or longer enters the cameo mode. Playback Mode Button: Pressing the button enters the playback mode, and pressing the button again exits the playback mode. When in one of the multi-view formats, pressing this button enters the Triplex mode. The DVR supports the Triplex function: monitoring, recording and playing back at the same time. Zoom/PTZ Button: Pressing the button zooms in the current image in double on the screen. Pressing and holding the button for three seconds or longer enters the PTZ (Pan/Tilt/Zoom) mode. Display/Spot Button: Pressing the button toggles between different display formats (PIP, 2x2, 1+5, 1+7, 3x3 and 4x4). Pressing and holding the button for three seconds or longer allows you to select which cameras will display on the Spot monitor. Group/Sequence Button: When in the live mode, pressing the button changes the screen from the current camera group to the next camera group. Pressing and holding the button for three seconds or longer displays live channels sequentially. Clip Copy Button: Pressing the button allows you to copy video clips. Alarm Button: Pressing the button resets the DVR s outputs including the internal buzzer during an alarm, and displays the event log when you are in the live monitoring mode unless there is an active alarm. Panic Button: Pressing the button starts panic recoding of all camera channels, and pressing the button again will stop panic recording. USB Port: The USB port is provided to connect external hard disk or flash drives for video clip copying or system upgrades. A USB mouse or PostScript USB printer can be connected to the USB port. Turning on the Power Connecting the power cord to the DVR turns on the unit. The unit takes approximately 60 seconds to initialize. Setting Up the System Press the MENU button or move the mouse pointer to the top of the screen and then select Live Monitoring menu to enter the setup screen. (Setup) in the 2


5 Digital Video Recorder art. MDVR825B/MDVR808B/49816 Wizard The Wizard setup guides you through configuring the system for basic operation. Go to System Wizard to display the Wizard setup screen. NOTE: This Wizard screen can only be accessed when logged on as the admin user. Select either Quick wizard or Network wizard and select the Next button to start the selected setup wizard. If you selected the Quick wizard, selecting the Next button starts the Quick Setup Wizard. Date/Time Setup Date: Set the system date and select the date format. Time: Set the system time and select the time format. Time Zone: Select your time zone. Use Daylight Saving Time: Selecting the box sets the system to use daylight saving time. 3
 Continuous & Motion Event Record Continuous Record Record Video Quality")


6 Quick Reference Manual Record Method Setup Select the desired recording mode from: Motion Event Record (Recommended) Continuous & Motion Event Record Continuous Record Record Video Quality Setup Select the desired video quality profile from: Higher Video Quality Priority Profile Standard Recording Profile Longer Recording Time Priority Profile Select the Finish button to finish the Quick Setup Wizard and select the Go to Network Setup button to start the Network Setup. If you selected the Go to Network Setup, select the Next button to start the Network Setup Wizard. 4


 device. DVR Name: Enter the DVR name to be registered on the DVRNS server.")
7 Digital Video Recorder art. MDVR825B/MDVR808B/49816 Internet Connection Select whether or not your DVR is connected to the Internet. LAN Setup Select between Auto Configuration and Manual Configuration for network configuration, and then select the Test button to test the network configuration you selected. Use DSL/PPPoE Setup: Selecting the box allows you to set up the DSL network. Entering the ID and password for DSL connection is required. DVRNS Setup Use DVR Name Service: Select the box to use the DVR Name Service. DVRNS Server: Enter the IP address or domain name of the DVRNS server. Port: Set the port number of the DVRNS server. Use NAT: Select the box to use the NAT (Network Address Translation) device. DVR Name: Enter the DVR name to be registered on the DVRNS server. Check: Select the box to check whether or not the name you entered can be used. Select the Finish button to finish the Setup Wizard. 5
8 Quick Reference Manual Map of Setup Screens NOTE: Refer to User s Manual (on CD) for the setup instructions for details. Live Monitoring As soon as the DVR completes its initialization process, it will begin showing live video on the attached monitor and playing live audio through the attached speaker. The default mode is to display all cameras at once. Pressing any camera button will cause that camera to display full screen. It displays live video and plays live audio until the user enters another mode. 6

9 Digital Video Recorder art. MDVR825B/MDVR808B/49816 While in the live monitoring mode, pressing the MENU button displays the following Live Monitoring menu at the top of the screen. Pressing the MENU button again hides the menu. You can navigate through menus and items by pressing the arrow buttons. Freeze Sequence Camera Menu Alarm Panic Setup Search Mode Login/Logout Freeze: Selecting will freeze the current image on the screen until you select again. Sequence: Selecting causes the cameras to display sequentially, and selecting again exits the Sequence mode. Camera Menu: Selecting allows you to control PTZ, Zoom, Audio, Color Control and Spot Monitor. Alarm: Selecting resets the DVR s outputs including the internal buzzer during an alarm. Panic: Selecting starts panic recording of all cameras, and selecting again stops panic recording. Setup: Selecting enters the Main Setup screen. Search Mode: Selecting exits the live monitoring mode and enters the search mode. Login/Logout: Selecting (Login) accesses the Login screen, and you will be asked to select a User and enter the password to log into the system. Selecting (Logout) menu displays the Logout screen asking you to confirm whether or not you want to log out the current user. Searching Video While in the search mode, pressing the MENU button displays the following Search menu at the top of the screen. Pressing the MENU button again hides the menu. You can navigate through menus and items by pressing the arrow buttons. Search Go To Bookmark Export Camera Menu Alarm Panic Data Source Exit 7

10 Quick Reference Manual y Search: Selecting allows you to select the search method from Event Log Search, Record Table Search, Calendar Search, Motion Search and Text-In Search. y Go To: Selecting allows you to search the first/last recorded image or search the image with specific date and time. y Bookmark: Selecting adds the current playback point to the bookmark list. y Export: Selecting allows you to copy video clips and print a selected image. allows you to control Zoom and Audio. y Camera Menu: Selecting resets the DVR s outputs including the internal buzzer during an alarm. y Alarm: Selecting y Panic: Selecting starts panic recording of all cameras, and selecting again stops panic recording. allows you to select the data source to be searched. y Data Source: Selecting exits the search mode and enters the live monitoring mode. y Exit: Selecting Remote Program RASplus RASplus (Remote Administration System Plus) program, which is designed to be used with remote digital video recorders (DVRs, network video transmitters and network cameras included), is an integrated software program that controls system management, video monitoring, video recording and image playback of multiple remote sites. Computer system requirements for using the RASplus program are: y Operating System: Microsoft Windows XP x86 (32 Bit) (Service Pack 3), Microsoft Windows Vista x86 (32 Bit) (Service Pack 1) or Microsoft Windows 7 x86 (32 Bit) y CPU: Intel Pentium IV (Celeron) 2.4GHz or faster y RAM: 512MB or higher y VGA: AGP, Video RAM 8MB or higher (1024x768, 24bpp or higher) After installing the RASplus software, you will find the RASplus shortcut icon RASplus program by double clicking the icon. 8 on the desktop. Run the
11 Digital Video Recorder art. MDVR825B/MDVR808B/49816 Live Monitoring To connect a remote site on the Watch screen, select the site or camera you want to connect to in the Remote Site, Favorite Sites or Map panel and then drag and drop it in the desired position on the screen. The icon will be displayed on each Watch screen. To disconnect the current connection, select the site or camera you want to disconnect to in the Remote Sites, Favorite Sites or Map panel or on the screen and then click the button on the toolbar or select Disconnect from the System drop-down menu. Playback and Search To connect a remote site on the Search screen, select the site or camera you want to connect to in the Remote Site or Favorite Sites panel and then drag and drop it in the desired position on the screen. The icon will be displayed on each Search screen. The remote site connection on the Search screen will automatically be disconnected if there is no activity for a specified amount of time. Click the button on the toolbar or select Disconnect from the System drop-down menu to disconnect the current connection manually. Panic Recording Clicking the button on the toolbar starts panic recording of cameras currently displayed on the Watch screen. Clicking the button again stops panic recording. Clicking the button on the toolbar initiates the Record Player program and plays video saved in the recording folder designated during the System setup. WebGuard WebGuard allows you to access a remote DVR, monitor live video images and search recorded video using Internet Explorer web browser anytime from virtually anywhere. Computer system requirements for using the WebGuard program are: Operating System: Microsoft Windows XP x86 (32 Bit) (Service Pack 3), Microsoft Windows Vista x86 (32 Bit) (Service Pack 1), Microsoft Windows 7 x86 (32 Bit) CPU: Intel Pentium III (Celeron) 600MHz or faster RAM: 128MB or higher VGA: 8MB or higher (1024x768, 24bpp or higher) Internet Explorer: Version 6.0 or later Start Internet Explorer on your local PC. You can run the WebGuard program by entering the following information in the address field. address:port number (The DVR IP address and the WebGuard port number (default: 12088) set in the Network setup screen (WebGuard tab)) Or, server address/dvr name (The DVRNS server address and the DVR name registered on the DVRNS server) Or, (Entering the DVR IP address or the DVR name will be required when logging in) 9

12 Quick Reference Manual Web Monitoring WebWatch is a remote web monitoring program that allows you to monitor live video transmitted in real-time from the remote DVR. ཛ ཛྷ ཝ ཞ ཟ འ ཡ ར ལ ཤ ཥ ས ཧ 10 Click the to log out the WebGuard program. Click the to access to the web search mode. Position the mouse pointer on the WebWatch logo to see the version of the WebGuard program. The DVR information window displays the login information of WebGuard. Click the screen format to select the desired display mode. When changing the screen format, the selected camera on the current screen will be located in the first cell of the new layout. Click the camera button to select the camera to be viewed. Click the to adjust the brightness, contrast, saturation and hue of monitoring image. Click the to control pan, tilt and zoom of the camera from a remote site. Click the to control alarm out devices at the remote site. to save the current image as a bitmap or JPEG file format. Click the to set up the image drawing mode and OSD display. You can adjust the display speed by Click the changing the image drawing mode, and select OSD information to be displayed on the screen. The event status window at the bottom displays a list of events that were detected from the remote site. Selecting a camera on the screen and clicking the right mouse button displays the text menu screen. You can change the camera title, enable audio communication with the remote site, change the image aspect ratio, turn on the interlacing filter and eliminate aliasing effects.

13 Digital Video Recorder art. MDVR825B/MDVR808B/49816 Web Search WebSearch is a remote web search program that allows you to search recorded video on the remote DVR. ཛ ཛྷ ཝ ཞ ཟ འ ཡ ར ལ ཤ ཥ ས ཧ Click the to log out the WebGuard program. Click the to access to the web monitoring mode. Position the mouse pointer on the WebSearch logo to see the version of the WebGuard program. The DVR information window displays the time information of recorded data on the remote DVR and login information of WebGuard. to blur, sharpen, equalize and interpolate playback images. Click the to zoom out Click the or zoom in the recorded image. Click the to adjust the brightness of the recorded images. The playback function buttons include fast backward, pause, play, fast forward, go to the first image, go to the previous image, go to the next image, and got to the last image. Click the screen format to select the desired display mode. Click the to enter the time-lapse search mode which allows you to search for recorded data by time and then play back images found within the time parameters. The Timetable window located at the bottom displays the time information for the image of the date selected on the calendar. If more than one video stream in the same time range, you can select the video stream you want to search. Clicking a specific time displays the image recorded at that time on the screen. Selecting the allows you to display an image from a specific time. Click the to enter the event search mode which allows you to search for event log entries using specific conditions and play back the images associated with those event entries. Click the to save any video clip of recorded data as an executable file, or click the to save the current image in a bitmap or JPEG file format. Click the to print the current image on a printer connected to your computer. Click the to set up the image drawing mode and OSD display. You can adjust the display speed by changing the image drawing mode, and select OSD information to be displayed on the screen. Click the to reload the recording data. The Timetable displays recorded data of the selected camera by time (in hour segments). 11

14 Quick Reference Manual Selecting a camera on the screen and clicking the right mouse button displays the text menu screen. You can change the camera title, play audio, change the image aspect ratio, turn on the interlacing filter and eliminate aliasing effects. Via Don Arrigoni, Rovetta S. Lorenzo (Bergamo) E mail: export.department@comelit.it 12
Table of Contents. Chapter 1 Overview In This Manual RASplus Features Product Information Chapter 2 Installation...
 Remote Administration System Plus (RASplus) Table of Contents Chapter 1 Overview... 1 1.1 In This Manual... 1 1.2 RASplus Features... 1 1.3 Product Information... 1 Chapter 2 Installation... 3 Chapter
RAS (Remote Administration System)
") RAS (Remote Administration System) Digital Video Recorder Software User Guide Document 900.0314 Rev 2.00 RAS User Guide Revisions Issue Date Revisions 1.00 08/04 New document. 1.01 04/05 Update template,
RAS (Remote Administration System) Digital Video Recorder Software User Guide Document 900.0314 Rev 2.00 RAS User Guide Revisions Issue Date Revisions 1.00 08/04 New document. 1.01 04/05 Update template,
Table of Contents. Chapter 1 Overview In This Manual ATVision Pro Features Product Information... 1
 Remote Management Software (ATVision Pro) Table of Contents Chapter 1 Overview... 1 1.1 In This Manual... 1 1.2 ATVision Pro Features... 1 1.3 Product Information... 1 Chapter 2 Installation... 3 Chapter
WARNING RISK OF ELECTRIC SHOCK DO NOT OPEN
 About This Document This document contains instructions for DVR configuration and operation. Package Contents The package contains the following: Digital Video Recorder Power Adaptor and Power Cord Quick
Table of Contents. Chapter 1 Overview. Chapter 2 Installation & Operation. Chapter 3 RAS Watch. Chapter 4 RAS Search
 Table of Contents Chapter 1 Overview 1.1 In This Manual 1.2 Overview 1.3 RAS Features 1.4 Product Information Chapter 2 Installation & Operation 2.1 Installation Procedures 2.2 Operation Procedures Chapter
Table of Contents. Chapter 1 Introduction Features System Diagram... 2 Multi-Server... 2 Single-Server... 3
 inex Standard Table of Contents Chapter 1 Introduction... 1 1.1 Features... 1 1.2 System Diagram... 2 Multi-Server... 2 Single-Server... 3 Chapter 2 Installation... 5 2.1 Product Information... 5 Package
ART. IPSWI000A USER S MANUAL
 ART. IPSWI000A USER S MANUAL Via Don Arrigoni, 5 24020 Rovetta S. Lorenzo (Bergamo) http://www.comelitgroup.com e-mail: export.department@comelit.it inex Basic Table of Contents Chapter 1 Introduction...1
Table of Contents. Chapter 1 Introduction Features System Diagram... 2
 inex Standard Table of Contents Chapter 1 Introduction... 1 1.1 Features... 1 1.2 System Diagram... 2 Chapter 2 Installation... 5 2.1 Product Information... 5 Package Contents... 5 System Requirements...
LOREX CLIENT 3.0 SOFTWARE MANUAL IRMS Integrated Remote Management Software
 LOREX CLIENT 3.0 SOFTWARE MANUAL IRMS Integrated Remote Management Software Instruction Manual English Version 2.0 Copyright 2007 Lorex Technology Inc. www.lorexcctv.com Table of Contents Overview... -
WARNING RISK OF ELECTRIC SHOCK DO NOT OPEN
 About This Document This document contains instructions for DVR configuration and operation. Package Contents The package contains the following: Digital Video Recorder Power Cord Quick User Guide (This
PIVOT CMS CLIENT SOFTWARE USER MANUAL
 PIVOT CMS CLIENT SOFTWARE USER MANUAL 1 CMS USER GUIDE 1.1 PC REQUIREMENT Recommended PC Requirement OS CPU VGA RAM HDD Graphics Card OS CPU VGA RAM HDD Windows Vista, 7 or higher Intel Core2Quad Q9400
WARNING RISK OF ELECTRIC SHOCK DO NOT OPEN
 About This Document This document contains instructions for DVR configuration and operation. Package Contents The package contains the following: Digital Video Recorder Power Adaptors and Power Cords (DVR,
Lorex Client 7.0 & Lorex Message Master
 Lorex Client 7.0 & Lorex Message Master Software Manual English Version 1.0 MODELS: L19WD Series www.lorexcctv.com Includes L19WD800 & L19WD1600 Copyright 2008 Lorex Technology Inc. Table of Contents Table
Operating Instructions. Digital Video Recorder H.264, DVD-RW, Ethernet. DLR4-08/xxx(T)DV (8-Channel) DLR4-16/ xxx(t)dv (16-Channel)
DV (8-Channel) DLR4-16/ xxx(t)dv (16-Channel)") Operating Instructions Digital Video Recorder H.264, DVD-RW, Ethernet DLR4-08/xxx(T)DV (8-Channel) DLR4-16/ xxx(t)dv (16-Channel) Digital Video Recorder Safety instructions EMC class This video recorder
Operating Instructions Digital Video Recorder H.264, DVD-RW, Ethernet DLR4-08/xxx(T)DV (8-Channel) DLR4-16/ xxx(t)dv (16-Channel) Digital Video Recorder Safety instructions EMC class This video recorder
Leader DVR WJ-HL204/208 Product Outline
 Leader DVR WJ-HL204/208 Product Outline Concept Appearance Specifications 2 Concept Entry Class Recorder with H.264 Real-time Recording @ CIF Real-time Recording @ CIF - 4ch 100ips (PAL) - 8ch 200ips (PAL)
WARNING RISK OF ELECTRIC SHOCK DO NOT OPEN
 Digital Video Recorder WARNING RISK OF ELECTRIC SHOCK DO NOT OPEN WARNING: TO REDUCE THE RISK OF ELECTRIC SHOCK, DO NOT REMOVE COVER (OR BACK). NO USER-SERVICEABLE PARTS INSIDE. REFER SERVICING TO QUALIFIED
WARNING RISK OF ELECTRIC SHOCK DO NOT OPEN
 Digital Video Recorder WARNING RISK OF ELECTRIC SHOCK DO NOT OPEN WARNING: TO REDUCE THE RISK OF ELECTRIC SHOCK, DO NOT REMOVE COVER (OR BACK). NO USER-SERVICEABLE PARTS INSIDE. REFER SERVICING TO QUALIFIED
The SW can manage 16CH devices and support 16Ch live view simultaneously. Supported functions are
 RMS User Manual 1. Introduction 1.1 Introduce This SW can manage and control several DVRs from Remote site through network at the same time. This SW provides live image monitoring, Playback and DVR configuration.
WARNINGS AND CAUTIONS
 Digital Video Recorder art. 49826 WARNINGS AND CAUTIONS WARNING TO REDUCE THE RISK OF FIRE OR ELECTRIC SHOCK, DO NOT EXPOSE THIS PRODUCT TO RAIN OR MOISTURE. DO NOT INSERT ANY METALLIC OBJECT THROUGH THE
H.264 Network DVR. Quick Start
 H.264 Network DVR Quick Start GUI Display with USB Mouse Control Please read instructions thoroughly before operation and retain it for future reference. For the actual display & operation, please refer
Video Management Software
 Video Management Software User Manual Web: europesecurity.eu Mail: info@europesecurity.eu Tel.: 0541 352 952 User s Manual 2 Contents CHAPTER : XMS CENTRAL USER MANUAL 1 PC REQUIREMENT 3 2 INSTALL 3 3
Table of Contents. Chapter 1 Introduction Features... 1
 iras (Remote Administration System) Table of Contents Chapter 1 Introduction... 1 1.1 Features... 1 Chapter 2 Installation... 3 2.1 Product Information... 3 Package Contents... 3 System Requirements...
WARNING RISK OF ELECTRIC SHOCK DO NOT OPEN
 Digital Video Recorder WARNING RISK OF ELECTRIC SHOCK DO NOT OPEN WARNING: TO REDUCE THE RISK OF ELECTRIC SHOCK, DO NOT REMOVE COVER (OR BACK). NO USER-SERVICEABLE PARTS INSIDE. REFER SERVICING TO QUALIFIED
User Manual. Central Monitoring Software for TER-series recorders. CenPro
 EN User Manual Central Monitoring Software for TER-series recorders CenPro Contents CENPRO USER MANUAL 1 PC REQUIREMENT 3 2 INSTALL 3 3 UNINSTALL 5 4 BASIC OPERATION 7 4.1 Log In 7 4.2 Screen Layout 8
Operating Instructions. Digital Video Recorder, H.264 Models: DLR-2104/1.0TBV (4-Channel) Models: DLR-2108/1.0TBV (8-Channel)
 Models: DLR-2108/1.0TBV (8-Channel)") Operating Instructions Digital Video Recorder, H.264 Models: DLR-2104/1.0TBV (4-Channel) Models: DLR-2108/1.0TBV (8-Channel) Digital Video Recorder WARNING RISK OF ELECTRIC SHOCK DO NOT OPEN WARNING:
Operating Instructions Digital Video Recorder, H.264 Models: DLR-2104/1.0TBV (4-Channel) Models: DLR-2108/1.0TBV (8-Channel) Digital Video Recorder WARNING RISK OF ELECTRIC SHOCK DO NOT OPEN WARNING:
H.264 Network DVR. Quick Start
 341Z H.264 Network DVR Quick Start GUI Display with USB Mouse Control Please read instructions thoroughly before operation and retain it for future reference. For the actual display & operation, please
WARNING RISK OF ELECTRIC SHOCK DO NOT OPEN
 Digital Video Recorder WARNING RISK OF ELECTRIC SHOCK DO NOT OPEN WARNING: TO REDUCE THE RISK OF ELECTRIC SHOCK, DO NOT REMOVE COVER (OR BACK). NO USER-SERVICEABLE PARTS INSIDE. REFER SERVICING TO QUALIFIED
Table of Contents. Chapter 1 Introduction Features System Diagram... 2
 inex Basic Table of Contents Chapter 1 Introduction... 1 1.1 Features... 1 1.2 System Diagram... 2 Chapter 2 Installation... 3 2.1 Product Information... 3 2.2 Installation... 4 2.3 Uninstall... 6 Chapter
WARNING RISK OF ELECTRIC SHOCK DO NOT OPEN
 Digital Video Recorder WARNING RISK OF ELECTRIC SHOCK DO NOT OPEN WARNING: TO REDUCE THE RISK OF ELECTRIC SHOCK, DO NOT REMOVE COVER (OR BACK). NO USER-SERVICEABLE PARTS INSIDE. REFER SERVICING TO QUALIFIED
H.264 Network DVR. Quick Start. GUI Display with USB Mouse Control 336Z
 336Z H.264 Network DVR Quick Start GUI Display with USB Mouse Control Please read instructions thoroughly before operation and retain it for future reference. For the actual display & operation, please
Operating Instructions. Digital Video Recorder (4 channels) H.264, Ethernet. DLR1.2-04/xxxV
 H.264, Ethernet. DLR1.2-04/xxxV") Operating Instructions Digital Video Recorder (4 channels) H.264, Ethernet DLR1.2-04/xxxV 4-Channel Digital Video Recorder Safety instructions EMC class This video recorder (DVR) is a class A device in
Operating Instructions Digital Video Recorder (4 channels) H.264, Ethernet DLR1.2-04/xxxV 4-Channel Digital Video Recorder Safety instructions EMC class This video recorder (DVR) is a class A device in
WARNING RISK OF ELECTRIC SHOCK DO NOT OPEN
 Digital Video Recorder WARNING RISK OF ELECTRIC SHOCK DO NOT OPEN WARNING: TO REDUCE THE RISK OF ELECTRIC SHOCK, DO NOT REMOVE COVER (OR BACK). NO USER-SERVICEABLE PARTS INSIDE. REFER SERVICING TO QUALIFIED
NUBIX H.264 DVR Setup Guide
 Package Content NUBIX H.264 DVR Setup Guide Inspect the packaging carton. Make sure the NUBIX H.264 DVR is properly delivered. Remove all items from the box and make sure the box contains the following
960H H.264 DVR Setup Guide
 Package Content 960H H.264 DVR Setup Guide Inspect the packaging carton. Make sure the 960H H.264 DVR is properly delivered. Remove all items from the box and make sure the box contains the following items.
MAC ACS CLIENT SOFTWARE USER MANUAL
 MAC ACS CLIENT SOFTWARE USER MANUAL 1 MAC ACS USER GUIDE 1.1 System Requirement Recommended System Requirement OS CPU VGA RAM HDD OS CPU VGA RAM HDD Mac OS X 10.6(snow leopard) Built-in Intel CPU MAC Recommended
Table of Contents. Chapter 1 Introduction Features... 1
 StarNET (Remote Administration System) Table of Contents Chapter 1 Introduction... 1 1.1 Features... 1 Chapter 2 Installation... 3 2.1 Product Information... 3 Package Contents... 3 System Requirements...
S-Series Multi-Site Client Software OPERATION MANUAL
 S-Series Multi-Site Client Software OPERATION MANUAL Copyright 2005 All rights reserved Reproduction, adaptation, or translation without prior written permission is prohibited, except as allowed under
SmartWatch Eco/Eco Compact
 SmartWatch Eco/Eco Compact Digital Video Recorders SmartWatch Eco SmartWatch Eco Compact Quick User Guide Index Box Contents...3 Front Panel Controls...4-5 SmartWatch Eco Compact...4 SmartWatch Eco...5
WARNING RISK OF ELECTRIC SHOCK DO NOT OPEN
 Digital Video Recorder WARNING RISK OF ELECTRIC SHOCK DO NOT OPEN WARNING: TO REDUCE THE RISK OF ELECTRIC SHOCK, DO NOT REMOVE COVER (OR BACK). NO USER-SERVICEABLE PARTS INSIDE. REFER SERVICING TO QUALIFIED
Lite H.264 DVR Setup Guide
 Package Content Lite H.264 DVR Setup Guide Inspect the packaging carton. Make sure the Lite H.264 DVR is properly delivered. Remove all items from the box and make sure the box contains the following items.
VIPER. Quick User Guide
 VIPER Quick User Guide 1 2 Please read this manual thoroughly before use and keep it handy for future reference. Contents 1. Overview... 1 1.1 DVR Description... 1 1.2 DVR power up... 1 1.2.1 Login...
Chapter 3 Operating instructions
 Chapter 3 Operating instructions Summary This chapter describes the how to control and navigate through the TVR 30 s menus and options. Content Control interfaces 10 Controlling the TVR 30 10 Front panel
WARNING RISK OF ELECTRIC SHOCK DO NOT OPEN
 Digital Video Recorder WARNING RISK OF ELECTRIC SHOCK DO NOT OPEN WARNING: TO REDUCE THE RISK OF ELECTRIC SHOCK, DO NOT REMOVE COVER (OR BACK). NO USER-SERVICEABLE PARTS INSIDE. REFER SERVICING TO QUALIFIED
WARNING RISK OF ELECTRIC SHOCK DO NOT OPEN
 16-Channel Digital Video Recorder WARNING RISK OF ELECTRIC SHOCK DO NOT OPEN WARNING: TO REDUCE THE RISK OF ELECTRIC SHOCK, DO NOT REMOVE COVER (OR BACK). NO USER-SERVICEABLE PARTS INSIDE. REFER SERVICING
1 - Introduction About this this manual Configuration SMS Functions Product Information System Requirements 2
 Contents 1 - Introduction. 2 1.1 About this this manual... 2 1.2 Configuration 2 1.3 SMS Functions 2 1.4 Product Information 2 1.5 System Requirements 2 2 SMS Installation... 3 2.1 How to install 3 3 -
WARNING RISK OF ELECTRIC SHOCK DO NOT OPEN
 Four-Channel Digital Video Recorder WARNING RISK OF ELECTRIC SHOCK DO NOT OPEN WARNING: TO REDUCE THE RISK OF ELECTRIC SHOCK, DO NOT REMOVE COVER (OR BACK). NO USER-SERVICEABLE PARTS INSIDE. REFER SERVICING
NetClient software user manual
 NetClient software user manual 1-1. General information Net Client is an application which provides users not only viewing and controling remote DVRs, but also receiving realtime event data or alarm signals
High Resolution Digital Surveillance System
 High Resolution Digital Surveillance System Product Features The PDR-Platinum-D1 (S72725) is a fully-featured digital video management system with 16 camera inputs. It provides high resolution images with
LOREX CLIENT Remote Agent Software
 LOREX CLIENT Remote Agent Software Instruction Manual English Version 1.0 MODEL: L500 Series www.lorexcctv.com Copyright 2006 LOREX Technology Inc. Table of Contents Table of Contents About the Lorex Client...
Operating Instructions. Digital Video Recorder Models: DTR-6108/xxxD DTR-6116/xxxD
 Operating Instructions Digital Video Recorder Models: DTR-6108/xxxD DTR-6116/xxxD Safety instructions EMC class This video recorder (DVR) is a class A device in accordance with EN 55022. This device may
Standard H.264 DVR Setup Guide
 Package Content Standard H.264 DVR Setup Guide Inspect the packaging carton. Make sure the Standard H.264 DVR is properly delivered. Remove all items from the box and make sure the box contains the following
Central Management Software for NVR-915 / NVR-1615 CV5-M256
 Central Management Software for NVR-915 / NVR-1615 Table of Contents Chapter 1. Main Console... 4 1.1 Tool Bar... 4 1.2 NVR List... 5 1.3 Division List... 7 1.4 Group List... 9 1.5 PTZ Panel...11 1.6 Operation
Intelligent Security and Fire Ltd
 Quantum PLUS (H.264) Quick User guide Quick user guide for the Vista Quantum Plus range of H264 DVRs, including the models QP04-xxxhf QP08-xxxhf QP16-xxxhf Full manual found on the CD supplied with the
LadibugTM Visual Presenter Image Software User Manual
 LadibugTM Visual Presenter Image Software User Manual 1 Contents 1. Introduction... 3 2. System requirement... 3 3. Install Ladibug TM... 4 3.1 In Windows XP/ Vista... 4 3.2 In Windows MAC... 6 4. Connection...
4CH Real Time DVR. User Guide INFORMATION MAY CHANGE WITHOUT NOTICE. Digital Video Recorder
 User Guide INFORMATION MAY CHANGE WITHOUT NOTICE. Table of Contents Caution... 4 Package Contents... 4 Introduction... 5 1. Product Overview...5 2. Front Panel...5 3. Rear Panel...6 4. IR Remote Controller
WARNING RISK OF ELECTRIC SHOCK DO NOT OPEN
 4-Channel Digital Video Recorder WARNING RISK OF ELECTRIC SHOCK DO NOT OPEN WARNING: TO REDUCE THE RISK OF ELECTRIC SHOCK, DO NOT REMOVE COVER (OR BACK). NO USER-SERVICEABLE PARTS INSIDE. REFER SERVICING
Quick user guide for the Vista Quantum TVI range of DVRs, models included:
 Quick user guide for the Vista Quantum TVI range of DVRs, models included: QTVI08-xxx QTVI16-xxx Full manual found on the CD supplied with the DVR Quantum TVI DVR range User guide V1.0 2 Contents SCOPE
AVE DR16X / AVE DR8X Quick Installation Guide
 AVE DR16X / AVE DR8X Quick Installation Guide Package Content Inspect the packaging carton. Make sure your AVE DR16X / AVE DR8X is properly delivered. Remove all items from the box and make sure the box
NVMS User Manual
 NVMS-1000 User Manual Contents 1 Software Introduction...1 1.1 Summary... 1 1.2 Operation Environment... 1 1.3 Install and Uninstall... 2 1.3.1 Install the Software... 2 1.3.2 Uninstall the Software...
RemoteManager USER S MANUAL
 Remote Monitoring Software RemoteManager USER S MANUAL Thank you for purchasing our products. Before operating the system, please read this User s Manual thoroughly and retain it for future reference.
RemoteManager Software
 RMS RemoteManager Software User Manual Contents of this user manual are protected under copyrights and computer program laws. Functions or configurations are subject to be changed or modified without prior
NVMS User Manual. Version 2.1.0
 NVMS-1000 User Manual Version 2.1.0 Contents 1 Software Introduction... 1 1.1 Summary... 1 1.2 Operation Environment... 1 1.3 Install and Uninstall... 2 1.3.1 Install the Software... 2 1.3.2 Uninstall
Contents Contents. Chapter 1. Program Installation. Chapter 2. For the start of CMS. Chapter 3. Monitoring. Chapter 4. E-Map Mode
 CMS User's Manual Contents 0 Contents Chapter 1. Program Installation 1.1 PC specifications 1.2 Program Installation Chapter 2. For the start of CMS 2.1 Site Registration Setup (Network Camera Registration)
Mirasys NVR. User s Guide
 Mirasys NVR User s Guide CONTENTS Contents... 2 Before you start... 3 Introduction... 6 Logging in... 9 User interface... 13 Navigator... 16 Cameras... 25 Video outputs... 41 Digital outputs... 46 Digital
NVMS User Manual
 NVMS-1000 User Manual Contents 1 Software Introduction...1 1.1 Summary... 1 1.2 Operation Environment... 1 1.3 Install and Uninstall... 2 1.3.1 Install the Software... 2 1.3.2 Uninstall the Software...
Quick Start Guide (V1.03) UD.6L0201B1064A01
 UD.6L0201B1064A01") ivms-4200 PCNVR Quick Start Guide (V1.03) UD.6L0201B1064A01 Thank you for purchasing our product. If there is any question or request, please do not hesitate to contact the dealer. This manual applies
ivms-4200 PCNVR Quick Start Guide (V1.03) UD.6L0201B1064A01 Thank you for purchasing our product. If there is any question or request, please do not hesitate to contact the dealer. This manual applies
NVMS1000. User Manual
 NVMS1000 User Manual Contents 1 Software Introduction... 1 1.1 Summary... 1 1.2 Operation Environment... 1 1.3 Install and Uninstall... 2 1.3.1 Install the Software... 2 1.3.2 Uninstall the Software...
TruVision DVR 60 Quick Start Guide
 Content Package contents 1 Installation environment 1 Setting up the TVR 60 1 Connecting the devices 2 Turning on and off the TVR 60 2 Operating the TVR 60 3 DDNS settings 5 Live mode 5 Quick Archive 5
Table of Contents. Chapter 1 Introduction Features System Diagram... 3 Multi-Server... 3 Single-Server... 3
 inex Standard Table of Contents Chapter 1 Introduction... 1 1.1 Features... 1 1.2 System Diagram... 3 Multi-Server... 3 Single-Server... 3 Chapter 2 Installation... 5 2.1 Product Information... 5 Package
USER GUIDE STAND-ALONE. 4 channel MPEG-4 Triplex DVR V Stand-Alone DVR User Guide
 USER GUIDE STAND-ALONE 4 channel MPEG-4 Triplex DVR V. 1.4 This document contains preliminary information and subject to change without notice. SAFETY PRECAUTIONS EXPLANATION OF SYMBOLS This symbol is
Digital Recorder End User Guide. Official UK distribution partner
 Digital Recorder End User Guide Official UK distribution partner 2 Installer Information Contents General Operation Mouse Operation Logging into the System Quick Menu PTZ Control 4 5 5 6 Playback Operation
icms Pro USER s MANUAL Ver 1.0
 icms Pro USER s MANUAL Ver 1.0 Contents Target Audience for this Document... 5 Copyright, Trademarks and Important Information... 5 Copyright... 5 Disclaimer... 5 Introduction... 6 Tabs... 6 Panes... 7
W Box VMS BOX T E C H N O L O G I E S.
 W Box VMS BOX T E C H N O L O G I E S www.wboxtech.eu Contents Contents... 1 Overview... 3 1.1 Description... 3 1.2 Running Environment... 3 1.3 Function Modules... 3 Live view... 6 2.1 User Registration
Grandstream Networks, Inc. GSurf User Manual
 Grandstream Networks, Inc. GSurf User Manual GSurf Contents Contents Introduction 3 Installation 4 Minimum Recommended Requirements 4 Login 4 Main Window 5 Menu Items 5 Toolbar Items 6 Play Bar Items 7
IDIS Solution Suite. Video Wall Service. Software Manual. Powered by
 Solution Suite Software Manual Video Wall Service Powered by Before reading this manual This Operation Manual provides instructions for using Solution Suite, a network integration solution enabling remote
Bosch Video Client. Operator s manual
 Bosch Video Client en Operator s manual Bosch Video Client Table of Contents en 3 Table of Contents 1 Introduction 6 1.1 System requirements 6 1.2 Software installation 6 1.3 Conventions used in the application
WARNING RISK OF ELECTRIC SHOCK DO NOT OPEN
 Network Video Recorder WARNING RISK OF ELECTRIC SHOCK DO NOT OPEN WARNING: TO REDUCE THE RISK OF ELECTRIC SHOCK, DO NOT REMOVE COVER (OR BACK). NO USER-SERVICEABLE PARTS INSIDE. REFER SERVICING TO QUALIFIED
Network Video Recorder
 Network Video Recorder Quick Operation Guide No. Name Function Description POWER Turns green when NVR is powered up. READY The LED is green when the device is running normally. The light is green when
Digital Recorder End User Guide
 Digital Recorder End User Guide metcalfeallen www.metcalfeallen.co.uk - 01884 38222 - admin@metcalfeallen.co.uk Installer Information Metcalfe Allen Ltd Unit 7 Saunders Way Kingsmill Industrial Estate
TVR 12 Quick Start Guide
 TVR 12 Quick Start Guide Figure 1: Back panel connections 1. Loop through for up to 16 analog cameras (depends on DVR model). 2. Connect to a RS-232 device. 3. Connect up to four alarm inputs. 4. Connect
INIT USER S MANUAL (1)
") INIT USER S MANUAL (1) The INIT (Integrated Network Installation Tool) program is provided with the product for remote operation. You can connect to the product remotely via Ethernet to change its settings
INIT USER S MANUAL (1) The INIT (Integrated Network Installation Tool) program is provided with the product for remote operation. You can connect to the product remotely via Ethernet to change its settings
Figure 2: Front panel controls For detailed information on all the button functions, please refer to the user manual.
 TruVision NVR 22 (S/P) Quick Start Guide Figure 1: Back panel connections (TVN 22S shown) 1. Connect one audio input to RCA connectors. 2. Connect to an HDTV. The HDMI connection supports both digital
C/O/N/T/E/N/T/S RUGGED VISION CMS C/O/N/T/E/N/T/S Chapter Remote Management Software... 3
 RUGGED VISION CMS C/O/N/T/E/N/T/S C/O/N/T/E/N/T/S... 2 Chapter Remote Management Software... 3 - Introduction... 3 -- Overview... 3 -- Feature... 4 -- System recommendation... 4 - Installing Software...
icms Pro USER S Manual Ver 1.4
 icms Pro USER S Manual Ver 1.4 Contents Panes... 7 How Can User Rights Affect Your Use of icms Pro SW?... 10 Minimum System Requirements... 11 Installing the icms Pro SW... 12 Download icms Pro from icatchinc
INSTRUCTION MANUAL. NC-Titanium. Please read this manual thoroughly before use, and keep it handy for future reference.
 INSTRUCTION MANUAL NC-Titanium Please read this manual thoroughly before use, and keep it handy for future reference. Table of Contents Chapter 1 Introduction... 1 1.1 Features... 1 1.2 System Requirements...
Live Viewing Using Remote Applications
 CHAPTER 8 Live Viewing Using Remote Applications The system is supplied with three remote applications. Remote View System IP Multicast System Remote View Remote View is used to remotely monitor live videos
USER GUIDE VCT-STDDVR9-1 = /16 channel MPEG-4 Triplex DVR V. 1.0
 USER GUIDE VCT-STDDVR9-1 = 16-1 9/16 channel MPEG-4 Triplex DVR V. 1.0 This document contains preliminary information and subject to change without notice. 2 SAFETY PRECAUTIONS EXPLANATION OF SYMBOLS This
Figure 2: Front panel controls For detailed information on all the button functions, please refer to the user manual.
 TruVision NVR 22 (S/P) Quick Start Guide Figure 1: Back panel connections (TVN 22S shown) 1. Connect one audio input to RCA connectors. 2. Connect to an HDTV. The HDMI connection supports both digital
HVR LINE INSTALL GUIDE
 HVR LINE INSTALL GUIDE 4.9.07 HVR v2.4.1 455 E. Industrial Drive P.O. Box 94 Hartland, WI 53029 Technical Support: 262.369.8798 Sales & Service: 262.369.8797 efax: 312.602.1356 www.visioncontrols.net Basic
WARNING RISK OF ELECTRIC SHOCK DO NOT OPEN
 4, 8 &16 Channel Digital Video Recorder WARNING RISK OF ELECTRIC SHOCK DO NOT OPEN WARNING: TO REDUCE THE RISK OF ELECTRIC SHOCK, DO NOT REMOVE COVER (OR BACK). NO USER-SERVICEABLE PARTS INSIDE. REFER
ipims USER s MANUAL (ORION IP Device Total Management SW) Ver 1.2 by sj
 Ver 1.2 by sj") ipims USER s MANUAL (ORION IP Device Total Management SW) Ver 1.2 by sj Contents Contents... 2 Target Audience for this Document... 5 Minimum System Requirements... 5 Introduction... 6 Tabs... 6 Panes...
ipims USER s MANUAL (ORION IP Device Total Management SW) Ver 1.2 by sj Contents Contents... 2 Target Audience for this Document... 5 Minimum System Requirements... 5 Introduction... 6 Tabs... 6 Panes...
4-Channel DVR. Product Features
 4-Channel DVR Product Features The PDR-410 (S72729) is one of the latest additions to the family of Digital Video Recorders from Pacific Communications. It offers high performance features at a cost effective
IP Solution Intelligent Surveillance Solution
 IP Solution Intelligent Surveillance Solution user s manual Table of Contents TABLE OF CONTENTS TABLE OF CONTENTS...1 SYSTEM REQUIREMENT...5 INSTALLATION...6 QUICK START...10 1. MAIN CONSOLE...14 1.1 Start...16
32 CHANNEL SURVEILLANCE SYSTEM MANUAL
 32 CHANNEL SURVEILLANCE SYSTEM MANUAL English version 1.0 SOFTWARE GUIDE Software Guide for Digimerge Networkable Cameras Copyright 2007 Digimerge Technologies Inc. 32-CH Surveillance System Note This
NVMS1000. User Manual
 NVMS1000 User Manual Contents 1 Software Introduction... 1 1.1 Summary... 1 1.2 Operation Environment... 1 1.3 Install and Uninstall... 2 1.3.1 Install the Software... 2 1.3.2 Uninstall the Software...
Digital Video Recorder SISTORE AX8 1000/200 V4.0 SISTORE AX /400 V4.0. Installation Manual
 Digital Video Recorder SISTORE AX8 1000/200 V4.0 SISTORE AX16 1000/400 V4.0 Installation Manual Liefermöglichkeiten und technische Änderungen vorbehalten. Data and design subject to change without notice.
WARNING RISK OF ELECTRIC SHOCK DO NOT OPEN
 Digital Video Recorder WARNING RISK OF ELECTRIC SHOCK DO NOT OPEN WARNING: TO REDUCE THE RISK OF ELECTRIC SHOCK, DO NOT REMOVE COVER (OR BACK). NO USER-SERVICEABLE PARTS INSIDE. REFER SERVICING TO QUALIFIED
TruVision NVR 50 Quick Start Guide
 TruVision NVR 50 Quick Start Guide Content Contact information 1 Package contents 1 Installation environment 1 Quick install 1 First-time use 1 TVN 50 front and back panels 2 Operating the NVR 50 4 Web
B-Works 2 User s Guide
 B-Works 2 User s Guide UMBWORKS 011413V1 Table of Contents 1. Introduction... 2 2. System Requirements... 2 3. Install B-Works 2... 3 4. Connection to the Hardware... 7 5. Start to Use B-Works 2... 7 6.