C/O/N/T/E/N/T/S RUGGED VISION CMS C/O/N/T/E/N/T/S Chapter Remote Management Software... 3
|
|
|
- Jerome Stevenson
- 6 years ago
- Views:
Transcription
1
2 RUGGED VISION CMS C/O/N/T/E/N/T/S C/O/N/T/E/N/T/S... 2 Chapter Remote Management Software Introduction Overview Feature System recommendation Installing Software Starting the remote management program Starting Graphic User Interface(GUI) Connecting/Disconnecting Connecting Viewing the added DVR status Releasing single connection Releasing multiple connections Real-time monitoring Viewing real-time images Viewing segmentation screen Controlling the PTZ Listening to the audio Viewing the product information Picture Setting Network Account Viewing the log file Application Setting Address Book Display Capture Image Printing Live Recording Adjust Color Viewing the full screen mode Search and Playback Search Playback Local Player Starting Local File Search and Playback Remote setup Starting
3 -- DVR Main/App Setup DVR setup edit Chapter RUGGED VISION PDA ( PDA Viewer ) Overview Installation Running and using Chapter Transcoder Overview Running and using Chapter Calculator Overview Running and using How to run it Description on detail functions Chapter Flash Down Overview Running and using Running A/P/P/E/N/D/I/X Table of compatibility between codes for the mass production DVR and RUGGED VISION CMS versions Chapter Remote Management Software -Introduction --Overview The RUGGED VISION CMS is designed to manage the DVR through the network at a distance. The RUGGED VISION CMS supports the remote management for the DVR of the following models. Premier 240 / 480 / Plus and Workhorse 410 / 810 & 1610 You can use the following functions using the remote management software. Remote real-time image monitoring Remote search and playback of recorded images Search and playback of images stored in the user computer System setting for the remote DVR Calculation of time available to record depending on the hard disk space System upgrade Other functions 3
4 --Feature With one computer you can connect to up to 256 remote DVRs Up to 8 users can connect to one DVR at the same time With 16 channel connections, image data transmission at up to 120 fps Monitoring using Drag & Drop by channel Backup of recorded images using the download portion of the software Search and playback of backed up local files Modifies, edits, saves and applies settings such as record/schedule/ntp/network of the DVR, etc. User-friendly Graphic User Interface(GUI) --System recommendation Premier 480 Min. Spec. Rec. Spec. Min. spec. Hardware Software Hardware Software Hardware Software CPU : Intel Pentium-III 800 MHz RAM : 256 MB (SDRAM) or more Video : - NVIDIA FX chipset based, 32 MB VRAM - ATI Radeon 7000 / 9000 Series, 32 MB - With 32MB or higher video memory, Other products support the YUV and overlay - Direct X 9.0 or higher - Windows Service Pack - Internet Explorer 6.0 or higher CPU : Intel Pentium-IV 3.0 GHz RAM : 512 MB(SDRAM, DDR) or more Video : - NVIDIA FX chipset based, 64 MB VRAM - ATI Radeon 9000 Series (AGP) - ATI Radeon X300 Series (PCI Express) - Matrox Dual Head, 32/64 MB - With 64MB or higher video memory, Other products support the YUV and overlay - Direct X 9.0 or higher - Window Service Pack - Internet Explorer 6.0 or higher Premier 240 CPU : Intel Pentium-III 800 MHz RAM : 128 MB (SDRAM) or more Video : - NVIDIA FX chipset based, 32 MB VRAM - ATI Radeon 7000 / 9000 Series, 32 MB - With 32MB or higher video memory, Other products support the YUV and overlay - Direct X 9.0 or higher - Window Service Pack - Internet Explorer 6.0 or higher 4
 or more Video : - NVIDIA FX chipset based, 64 MB VRAM - ATI Radeon 9000 Series (AGP) - ATI Radeon X300 Series (PCI Express) - Matrox Dual Head, 32/64 MB -")

5 Rec. Spec. Hardware Software CPU : Intel Pentium-IV 1.5 GHz RAM : 256 MB (DDR) or more Video : - NVIDIA FX chipset based, 64 MB VRAM - ATI Radeon 9000 Series (AGP) - ATI Radeon X300 Series (PCI Express) - Matrox Dual Head, 32/64 MB - With 64MB or higher video memory, Other products support the YUV and overlay - Direct X 9.0 or higher - Window Service Pack - Internet Explorer 6.0 or higher -Installing Software Insert the remote management software CD provided with the product into the CD drive. Click the Setup.exe file. If the installation language selection window is displayed, select an installation language and click the [Ok]. If the installation wizard is displayed, continue to install it by following the screen guide. 5

6 6


7 RUGGED VISION CMS This remote management program allows the user to utilize real time monitoring, search, playback, altering DVR settings and system software upgrade by accessing several DVRs using the network. TransCoder This program transforms the MPEG-4 format download and recorded files to MPEG-1 format files, allowing the user to see them using Windows Media Player. FlashDown This update program is used to update the DVR by utilizing the RS232C Cable directly or through the network. Calculator The calculator program estimates the record duration depending on the HDD space and record settings. 7
8 8

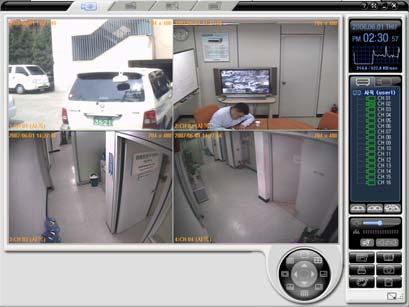
9 -Starting the remote management program --Starting Click the Start > All Programs > RUGGED > RUGGED VISION CMS> RUGGED VISION CMS. When the program is run, the following startup screen is displayed. 9
10 --Graphic User Interface(GUI) Function mode selection tabs Remote real-time monitoring Remote search and playback of recorded images Search and playback of images stored in the remote computer System setting for the remote DVR Window control and program exit buttons Version information Window minimization Window maximization Program exit 10
11 Function buttons Log in and connection Disconnection Multi-disconnections Captures images, downloads recorded images and specifies the path that DVR setup file is saved to. Sets the PSTN modem and specifies scripts Specifies the OSD font, color and size, and sets the information display Sets the border line size, color and On/Off Sets the DVR Alarm-Out function Address Book Captures the display screen Prints the captured images Controls the display screen color Display Mode Button If you click the center circle of the circular button, it switches to Display / Playback / PTZ mode as in the following figure. 1, 4, 6, 8, 9, 10, 13 and 16 segmentation modes To see full screen view, double-click any position of the channel screen of each segmentation mode. Playback Control Button These buttons are used for the playback. Forward Play / Reverse Play Forward Single Frame Play / Reverse Single Frame Play Fast Forward / Fast Rewind The speed control for the normal play ranges from 1/16X to 16X in 1-ch mode. (Units 1/16X, 1/8X, 1/4X, 1/2X, 1X, 2X, 4X, 8X, 16X) The speed control for the fast play ranges from 30X to 300X in 1-ch mode. (Units 30X, 60X, 90X, 120X 270X, 300X) 11

12 Both real-time record search and local file use PTZ Control Button This function button provides PAN / TILT / Zoom / Focus Control. Use buttons for each control mode PAN/TILT Up/Down/Left/Right ZOOM Up/Down FOCUS Left/Right PTZ Preset Control Button Controls the PTZ camera using the preset values in the PTZ mode. Preset Saves values by controlling Pan/Tilt/Zoom/Focus of the PTZ camera. You can save up to 8 presets using these buttons. DATE & network transmission information Shows the current network traffic of the PC. 12

13 -Connecting/Disconnecting --Connecting If you click the displayed. button on the right side of the screen, the following login window is 13

14 If you click the Address Book Mode, all connection names registered in the address book are listed. To enter the connection information manually, select the Manual Mode in the address list. Either enter the IP-Address, User Name and Password or select one from the address book and press the [Connect] button. 14


15 System default values of the user accounts for the network access are as follows; Network default Account Default Password user user user user Viewing the added DVR status If the connection is successfully established, DVR IP or ID and channel list are added to the DVR connection tab and displayed on the right side of the program screen as in the right figure. [Normal connection] [Group connection] To monitor all channels, drag the IP/ID of the added DVR in the DVR connection tab and drop it to the monitoring window on the left side of the program screen. To monitor a specific channel, drag the channel in the added DVR channel list and drop it to the monitoring window on the left side of the program screen where you want to view it. IP Drag & Drop Channel Drag & Drop 15


16 --Releasing single connection Releases the connection with the remote DVR accessed currently. Select the accessed DVR IP/ID in the DVR tab on the right side of the program screen, and click the button. The connection with the remote DVR for the selected IP/ID is released, and the selected IP/ID and channel list disappears. Connected Disconnected --Releasing multiple connections Releases the connection with all remote DVRs accessed currently. 16

17 Click the button in the DVR tab on the right side of the program screen. Connection with all DVRs connected currently are released, and the selected IP and channel lists disappear. Connection Disconnection 17


18 -Real-time monitoring --Viewing real-time images Drag the ID or IP of the DVR that was added remotely, and drop it to the monitoring window on the left side of the screen. Each channel image of the dragged remote DVR is displayed. 18


19 Live channel move function You can move a channel to another channels location by selecting the channel you want to move and dragging it to the square you want to see it in, and letting it go. The two channels will switch locations. --Viewing segmentation screen After images of channels are displayed on the monitoring window of the program screen, you can see the segmentation screen view by clicking each segmentation mode button. To see the full screen view for one channel in each division mode, double-click the channel screen. To return to the previous division screen view, doubleclick the full screen. Examples of Selecting 1/4/6/8/9/10/13/16 segmentation mode 1-segmentation mode 19


20 4-segmentation mode 6-segmentation mode 8-segmentation mode 9-segmentation mode 20


21 10-segmentation mode 13-segmentation mode 16-segmentation mode 21


22 --Controlling the PTZ (1)Switching to the PTZ mode Click the center part of the segmentation screen view button from the real-time screen, as shown in the following figure. Then, PTZ control buttons appear, and the camera is set to. mark is indicated on the channels that each PTZ Details of each buttons are as follows; Controls the pan/tilt Zoom In / Zoom Out Controls the focus Switches form/to the preset mode 22
23 (2)Controlling the pan/tilt Click the button, and control the pan/tilt using direction buttons. (3)Zoom In / Zoom Out Click the button, zoom in/out using Up/Down direction buttons. 23


24 (4)Controlling the focus Click the button, control the focus using the Left/Right direction buttons. (5)Controlling the focus Click the button, control the preset screen by pushing the preset number. 24

25 --Listening to the audio If audio recording is turned on, you can listen to the audio set to each channel in real-time as in the following figure. Go to the status by clicking the button Click the button or click the channel that comes with the mark to display the mark. Drag the button to control the audio volume. 25

 2. Hardware version 3. Video type 4.")
26 --Viewing the product information Move your cursor to the ID or IP of the DVR, on the right side of the screen, under the DVR tab, and right-click it. Click on the {Product Information} from the popup window. Then, a window that shows the product information is displayed, as shown in the following figure. 1. Software version: 00 (Build Number) 2. Hardware version 3. Video type 4. HDD use information Total space Used space Free space Record start date Recording end date 5. Network setup information 6. HDD overwriting On/Off 26


27 --Picture Setting Move the cursor to ID or IP of the DVR, on the right side of the program screen, under the DVR tab, and right-click it. Click on the {Picture Setting} from the popup window. As shown in the following figure, a window that allows you to control the resolution/quality/frame rate is displayed. Picture Resolution Controls the resolution of a picture. The lower resolution, the network transmission speed is faster. (CIF > Field > Full) Picture Quality Controls the quality of a picture. The larger number, the quality is lower and the network transmission speed is faster due to higher compression rate. Enable Temporal Filter If there is a lot of static on images, it will decrease unnecessary static and increase the network transmission speed by removing them. Picture Frame Rate Controls the number of transmission fames of an image. Based on 30 frames. Approximately it is set as follows. High:30, Medium:15, Low:7.5 27


28 --Network Account (1)Starting Move the cursor to the ID or IP of the DVR, on the right side of the program screen, under the DVR tab, and right-click it. Click on the {Network Account} from the popup window. As shown in the following figure, a window that shows the user information is displayed. 28
29 To use the user information setup, the user must have the DVR setup correctlyt. Otherwise, the following message is displayed. (2)Adding the user information Click the [Add] button form the user information setup window. 29
30 Enter a user account and password you want to add, check the needed functions and click the [OK] button. Then, the success message is displayed and the user account is added. (3)Modifying the user information Click the [Modify] button from the user information setup window. 30
![Enter the user information you want to modify, modify the information and click the [OK] button.](/docs-images/75/72755601/images/31-0.jpg "Then, the success message is displayed and the user account is modified.")
31 Enter the user information you want to modify, modify the information and click the [OK] button. Then, the success message is displayed and the user account is modified. (4)Deleting the user information Select a user you want to delete form the user information setup window, and click the [Delete] button. 31
32 Then, the success message is displayed and the user account is deleted. 32


33 --Viewing the log file (1)Starting Move the cursor to the ID or IP of the DVR, on the right side of the program screen, under the DVR tab and right-click it. If you click the {Log file Viewer} from the popup window, the log information window is displayed. 33
Viewing total logs If you select the [All] tab from the log information on the right side of the screen, all log information is listed.")
34 Form the calendar on the left side of the screen, click the date when you want to see logs. (2)Viewing total logs If you select the [All] tab from the log information on the right side of the screen, all log information is listed. To see detailed log information, click an event for a specific time. 34

Viewing network logs If you select the [Network] tab from the log information on the right side of the")
35 (3)Viewing failure logs. If you select the [Fail] tab from the log information on the right side of the screen, logs for failure events are listed. To see detailed log information, click an event for a specific time. (4)Viewing network logs If you select the [Network] tab from the log information on the right side of the screen, logs for network events are listed. To see detailed log information, click an event for a specific time. 35
![(5)Viewing recording logs If you select the [Record] tab from the log information on the right side of the](/docs-images/75/72755601/images/36-1.jpg "screen, logs for recording events are listed.")
Viewing normal logs If you select the [Normal] tab from the log information on the right side of the")
36 (5)Viewing recording logs If you select the [Record] tab from the log information on the right side of the screen, logs for recording events are listed. To see detailed log information, click an event for a specific time. (6)Viewing normal logs If you select the [Normal] tab from the log information on the right side of the screen, logs for normal events are listed. To see detailed log information, click an event for a specific time. 36


37 --Application Setting With the application setup, you can Capture images, download recorded images and specify the path that DVR setup file is saved to. Set the PSTN modem and specify scripts Specify the OSD font, color and size, and set the information display Set the border line size, color and On/Off Set the DVR Alarm-Out function Save application settings and load them. If you click the button on the right side of the program screen, the following application setting window is displayed. Storage Setting sets the saving path by clicking the path assignment button at each saving path item. Default Path Image file C:\Temp\Image Download file C:\Temp\Video DVR setup file C:\Temp\Setup 37

![If you click the [Color] button from the application setting window, the color assignment window is displayed as in the](/docs-images/75/72755601/images/38-1.jpg "right figure.")
38 Modem Setting selects a modem and modifies script files. OSD Setting sets OSD use On/Off and specifies OSD text color. Select whether you will use the OSD by clicking the OSD Enable check box from the application setting window. If you click the [Color] button from the application setting window, the color assignment window is displayed as in the right figure. Specify an OSD text color that indicates the channel name and date information for each channel and click the [OK] button. 38
![-To create a color you want directly, click the [Create custom color] button.](/docs-images/75/72755601/images/39-0.jpg "- If the Create color window is displayed as in the following figure, create a color using the cursor and click the [Add to custom")
39 -To create a color you want directly, click the [Create custom color] button. - If the Create color window is displayed as in the following figure, create a color using the cursor and click the [Add to custom color] button. < All OSDs are changed to the black color. > 39


40 Border Line Setting selects an option for the frame boundary between image channels. The width is the thickness of the line, the method to set the color is the same as that of the color information of Alarm Out Setting Power Off power off Hard disk fail when hard disk is failed Sound Effect supports the system beep sounds and wave files. Sound Duration when an alarm occurs, selects the duration(seconds) of the warning sound. 40

41 Backup Setting Backup setup for emergency situations, Load applies the information saved in the existing file to the current RUGGED VISION CMS. Save saves the current information to a file. 41
Starting the address book If you click the is displayed.")
42 --Address Book When you access the remote DVR through the Ethernet or PSTN, this address book function allows the user to access it with the registered address and login information conveniently, instead of having to retype all of the log in information each time. (1)Starting the address book If you click the is displayed. button on the right side of the screen, the following Address Book window Depending on the access type, select one of [Ethernet], [Domain Name], [PSTN/ISDN] and [Group Registration] tabs. 42
![(2)Ethernet A)Registering Click the [Add] button from the Address Book window, as shown in the following figure.](/docs-images/75/72755601/images/43-1.jpg "Fill out all information on the Edit Ethernet Address Book window as in the following figure and click the [OK]")
43 (2)Ethernet A)Registering Click the [Add] button from the Address Book window, as shown in the following figure. Fill out all information on the Edit Ethernet Address Book window as in the following figure and click the [OK] button. 43
44 B)Modifying Select the DVR access information you want to modify from the Address Book window, and click the [Modify] button. Modify all information on the Edit Ethernet Address Book window as in the following figure and click the [OK] button. 44
45 C)Deleting Select the DVR access information you want to delete from the Address Book window, and click the [Delete] button. 45
46 (3)Domain Name A)Registering Click the [Add] button from the Address Book window, as shown in the following figure. Fill out all information on the Edit Ethernet Address Book window as in the following figure and click the [OK] button. 46
47 (4)Modifying Select the DVR information you want to modify from the Address Book window, and click the [Modify] button. Modify all information on the Edit Ethernet Address Book window as in the following figure and click the [OK] button. 47
48 B)Deleting Select the DVR you want to delete from the Address Book window, and click the [Delete] button. 48
![(5) PSTN / ISDN A) Registering Clock the [Add] button from](/docs-images/75/72755601/images/49-1.jpg "the Address Book window, as shown in the following figure.")
49 (5) PSTN / ISDN A) Registering Clock the [Add] button from the Address Book window, as shown in the following figure. 49
50 B) Modifying Select the DVR you want to modify from the Address Book window, and click the [Modify] button. 50
51 C) Deleting Select the DVR you want to delete from the Address Book window, and click the [Delete] button. (6) Group Registration A) Registering To manage several DVRs with one RUGGED VISION CMS program, use the group access. The configuration of the group access screen is as follows. 51
![To add the group access, click the [Add] button on the left-lower side of the screen. Then, this window is displayed.](/docs-images/75/72755601/images/52-0.jpg "To register DVR and channel, add a name you want, click the [OK] button and click the Alias Name.")
52 To add the group access, click the [Add] button on the left-lower side of the screen. Then, this window is displayed. To register DVR and channel, add a name you want, click the [OK] button and click the Alias Name. After you add a group name, select an alias name for the screen number and select the channel of the alias DVR. After you finished setting the alias name and DVR channel for the screen number, press the Apply 52
53 button. Once the group registration is successfully completed, the following massage box is displayed. 53
54 B) Modifying If you select the DVR you want to modify from the Address Book window, the registration screen comes with the list as in the following figure. Modify the Alias Name and Channel, and click the Apply button. 54
![C) Deleting Select the DVR you want to delete from the Address Book window, and click the [Delete] button.](/docs-images/75/72755601/images/55-1.jpg "--Display Capture This function is used to capture the current monitoring screen and save it as a picture image. The captured image is saved to the path that is specified through the App Setting.")
55 C) Deleting Select the DVR you want to delete from the Address Book window, and click the [Delete] button. --Display Capture This function is used to capture the current monitoring screen and save it as a picture image. The captured image is saved to the path that is specified through the App Setting. (1)Capturing the current screen If you click the button on the right side of the program screen, the picture view window for the current monitoring screen is displayed. 55

56 (2)Adjusting the brightness/contrast/saturation/tint/gamma Drag the control bar on the right panel to adjust the brightness/contrast/saturation/tint/gamma. 56

Applying a filter Adjust the")

57 (3)Adjusting the tint Drag Amount and Hue control bars on the right panel to adjust the tint. (4)Applying a filter Adjust the filter application setting of the right panel to compensate the picture. 57

Rotating To rotate a picture by a certain degree,")
58 (5)Restoring the original picture To restore the original picture, click the [Reset] button on the right panel. (6)Rotating To rotate a picture by a certain degree, click the degree on the upper icon. Rotation by 90 degrees 58


59 Rotation by 180 degrees Rotation by 270 degrees 59


60 (7)Horizontal flipping Click the icon in the upper menu, or select the [Edit] [Flip] {Horizontal} menu. (8)Vertical flipping Click the icon in the upper menu, or select the [Edit] [Flip] {Vertical} menu. 60

![To save it as a different file name, select the [File] {Save As} in the upper menu, enter a](/docs-images/75/72755601/images/61-1.jpg "file name and save it as filename.bmp for the bitmap file or filename,jpg for the jpeg file.")
![(10)Printing Click the icon in the upper menu, or select the [File] {Print} menu.](/docs-images/75/72755601/images/61-3.jpg "If the Print window is displayed, select the printer you want to use and click the [OK]")
61 (9)Saving To save the picture in the default folder as the default file name, click the icon or select the [File] {Save} menu. To save it as a different file name, select the [File] {Save As} in the upper menu, enter a file name and save it as filename.bmp for the bitmap file or filename,jpg for the jpeg file. (10)Printing Click the icon in the upper menu, or select the [File] {Print} menu. If the Print window is displayed, select the printer you want to use and click the [OK] button. --Image Printing This function is used to print a captured image. 61

62 If you click the capturing the monitoring screen are listed. button on the right side of the program screen, the image files created from If you click an image file in the file list and click the [Preview] button, the preview window is displayed. With the preview window, enter a description for the image into the MEMO text box and click the [Print] button. 62
![If the Print window is displayed, select the printer you want to use and click the [OK] button.](/docs-images/75/72755601/images/63-1.jpg "--Live Recording This function is used to record images in real time.")

63 If the Print window is displayed, select the printer you want to use and click the [OK] button. --Live Recording This function is used to record images in real time. If you click the button on the right side of the program screen, the mark is indicated on the screen and the recording is started. The recorded file is saved in the folder described in section For example, the file saved as 17, May 15, 2006 is saved in the 2006\05\15\170000_Live folder. To stop the recording, press the button. Then, the mark disappears from the screen and the recoding is stopped. 63


64 --Adjust Color This function is used to adjust the brightness, gamma, contrast, saturation, tint and post processing filter for the channel image. If you click the window is displayed. button on the right side of the screen, the Adjust Color & Post Processing From the Adjust Color & Post Processing window, select a channel by clicking the Channel checkbox and adjust the brightness, gamma, contrast, saturation and tint by dragging their adjustment bars. While adjusting the brightness, gamma, contrast, saturation and tint, you can see the monitoring screen that changes in real time. When you finished adjusting them, click the [Close] button. 64
65 --Viewing the full screen mode Switches the real-time monitoring screen to the full screen mode. To switch to the full screen mode, click the screen. button on the lower right side of the program 65

66 To return to the default mode, click the screen. button on the lower right side of the program 66


67 -Search and Playback --Search This function is used to search and play an image recorded in real time in the DVR. Although the real time monitoring mode is switched to the search mode, the network connection is not disconnected. (1) Start - Click the tab on the top of the program screen. Drag IP or ID of the DVR you want to search from the added DVR list on the right side of the screen, and drop it onto the monitoring window on the left side of the program screen. A preview is displayed on the lower left side of the [Hour/Min unit Preview] page. 67

68 Click the desired image from the lower left side of the screen, only the image corresponding to the channel is enlarged. 68

69 (2)Selecting a search method Displays the recorded images in the Hour/Min histogram format. Displays the recorded images in the file list format. Select a search method by clicking the [Status Bar] or [File List] button on the Search window. Status Bar File List 69


70 If the time of the DVR system is changed, the existing file is indicated with the sky blue color. Status Bar (3)Selecting date and time From the Calendar window of the Search window, click the date you want to search. 70

71 Select a recording type by clicking the recording type tab on the Search window. Specify the time when you want to search by dragging the yellow time assignment line on the Search window. 71

72 -- Playback (1) If you specify the time and click the button, the following Normal Playback screen is displayed. Control the playback speed using the Playback Control button.. Press the Play button. The buttons related to the playback control are as follows; Switches modes using the center button Forward Play Forward Single Frame Play Fast Forward Reverse Play Reverse Single Frame Play Fast Rewind Forward Play Reverse Play Fast Forward Fast Rewind Using the left Starting from x-1, adjustable up to x-1/16 ~ x-1/2, x-1 ~ x-16. Starting from x-30, adjustable up to x30 ~ x300. button of the Playback Control button, you can increase/decrease the playback speed. 72

73 To stop the playback. Click the button on the lower side of the Playback screen. When the playback is stopped, it returns to the previous search screen. To continue to play images for another time zone, repeat the above steps. Restrictions 1ch mode (Full screen) Normal mode (4ch~16ch segmentation screen) Possible Impossible Possible Possible Possible Possible Possible Impossible Possible Impossible Possible Impossible Possible Impossible The audio file playback works only with 1CH mode. You can also use functions such as Capture and Print in the playback mode. 73


74 - 16CH mode: only and buttons are enabled. 1CH mode: All buttons associated with the controller are enabled. 74
75 (2)Download(Recording File Download) Specify the time when you want to download by dragging the time assignment line on the search window in the search mode, and click the button. Specify an hour, set a start minute/end minute and select a channel that you want to download. 75

76 If you press the button after the selection is finished, the Filedownload Information window is displayed and the download is started as in the following figure. The downloaded file is saved to the subfolder named to current year/month/day date of the folder that the application assigned. Example - if the file is created at 20, 5/19/2006, then it is saved in C:\Temp\Video\2006\05\19\ The file download is finished, Click the [Complete] button. 76

77 -Local Player This function is used to play downloaded files or backup files in the user computer. --Starting Click the tab on the top of the program screen. The startup screen that includes the folder search window under the screen is displayed. 77


78 --Local File Search and Playback In the local playback mode, search the folder that includes downloaded video files or backup files from the folder list on the lower side of the program screen. If you select the subfolder containing year/month/day information from the upper folder that includes video files, the number-type folder list, available for the playback, is displayed on the Playback list window on the right side of the screen. If you select the time you want to play and click the Play(1x) Playback screen is displayed. button, the following Normal 78

79 -Remote setup Provides the Main Setup and App. Setup functions for the remote DVR. --Starting Click the tab on the top of the program screen. Drag IP or ID of the DVR you want to setup from the added DVR list on the right side of the screen, and drop it into the monitoring window on the left side of the program screen. -- DVR Main/App Setup (1) Main/App Setup The configuration of the remote DVRs setup screen is the same as that of the DVRs OSD setup menu screen. Change the system settings using the mouse on the DVR setup screen. For more information on the system setup, please refer to Chapter 5. System Setup in the DVRs regular manual. 79

 LOAD If the drop.")

80 If you right-click the area of settings you want to change, values in the settable range are displayed. Select a value to change the setting. If you need to enter directly, for example, channel name, double click it to change the setting. (2) LOAD If the drop. (3) SAVE button is disabled when the DVR system is connected, load settings through drag & If you modify the settings on the screen using the mouse and click the settings are saved as a file. (extension is *.bin) button, the current 80
 SEND If there are DVRs connected remotely, current connected DVRs are listed in the [Save Setup DVR].")

81 Click the Save button to save them as a file. (4) SEND If there are DVRs connected remotely, current connected DVRs are listed in the [Save Setup DVR]. Select the DVR you want to change the settings for, and click the button. The changed DVR settings are applied to the remote DVR, the following message window appears and the network connection is released (5) ALL RESET Initializes the settings to the factory default values. Click the on the screen. 81

82 DVR system sounds a beep and all settings are initialized. You can see that all settings have been initialized by accessing the DVR. -- DVR setup edit (1) Load Click the FILE in the DVR remote setup mode. 82

83 Load Setup File: shows the path of the latest file where settings are saved. If you have not saved them as a file before, it is indicated with the empty space. Save Setup File: shows the path where current DVR setting values are located.edited values will be saved. Click the button. Click the Open button to see settings saved in the file. 83
 SEND Loads the file where the settings are saved, or sends the current settings to the accessed")
 ALL RESET Initializes settings to the factory default values. If you push on the?")
84 B) SAVE Saves the changed settings. C) SEND Loads the file where the settings are saved, or sends the current settings to the accessed DVR if you click the button after editing the settings of another DVR. D) ALL RESET Initializes settings to the factory default values. If you push on the? button in the upper right hand corner of the CMS Software you will get the version and copyright information. 84
 In order to install the PDA Viewer, you must have the Microsoft Active Sync (Version 4.0 or higher) installed in your computer.")
85 Chapter RUGGED VISION PDA ( PDA Viewer ) - Overview (1) This program is designed to allow the user to see images through a PDA. - Installation (1) In order to install the PDA Viewer, you must have the Microsoft Active Sync (Version 4.0 or higher) installed in your computer. (2) After your computer and PDA are synchronized, run the RUGGED VISION CMS Setup.exe to install the RUGGED VISION PDA. (3) Click the [Next] button. 85
![(4) Read through the End User License Agreement (EULA) carefully. If you select the item related to acceptance, the [Finish] button is enabled.](/docs-images/75/72755601/images/86-0.jpg "To continue to install the program, click the [Finish] button.")
86 (4) Read through the End User License Agreement (EULA) carefully. If you select the item related to acceptance, the [Finish] button is enabled. To continue to install the program, click the [Finish] button. (5) If you click the Yes button on the next screen, the system checks the connection with the PDA and starts the installation from the PDA. 86


87 (6) This is the screen during the installation at the user s computer side. You can complete the additional installation tasks from the PDA. (7) This is the screen when the PDA installation is in process. 87
88 88
 Fill out IP Address / Port / User ID / Password items and click the Connect button.")
89 - Running and using (1) If you click the button on the upper left side of the screen, the access dialog box is displayed. (2) Fill out IP Address / Port / User ID / Password items and click the Connect button. 89

90 (3) While trying to connect, the IP address and Connecting are displayed. (4) When the connection is failed, the following screen is displayed. Then, please check the connection information again. (5) When the connection is successfully established, the following screen is displayed and the number of connected channels are activated. 90

![(7) The [PRESET] is used to save the values by controlling Pan/Tilt/Zoom/Focus](/docs-images/75/72755601/images/91-1.jpg "of the PTZ camera. You can save up to 8 control presets.")
91 (6) For the cameras that have PTZ control, you can control them through the following buttons. (7) The [PRESET] is used to save the values by controlling Pan/Tilt/Zoom/Focus of the PTZ camera. You can save up to 8 control presets.. (8) If you click the screen of the corresponding channel, the full screen mode comes up. 91
 To release the connection, click the button.")
92 (9) If you click the on the right side of the screen, the audio for the channel where audio is set, is played (10) To release the connection, click the button. 92

 Click the Start > All Programs > Rugged CCTV > RUGGED VISION")
93 Chapter Transcoder - Overview (1) This program transforms the MPEG-4 format download and recorded files to MPEG-1 format files, allowing the user to see them using Windows Media Player. - Running and using (1) Click the Start > All Programs > Rugged CCTV > RUGGED VISION CMS> Trans Coder menu. (2) Then, the following screen is displayed. 93
94 (3) Click the [Add] button to search the file you want to transfer. (4) Select the directory for the desired time zone from the directory list, and click the [Select] button on the right-side of the screen. 94

 If you select a channel from the list, the")
 To preview images of the")
95 (5) Once the selection is completed, the corresponding recordings of the image are displayed as a graph. (6) If you select a channel from the list, the front side of the channel is indicated with the mark. (7) To preview images of the corresponding channel, click the Preview button. 95
 Color changes the color of texts displayed on the screen. E) OK - stops the preview and closes the dialog box. F) Cancel closes the Preview dialog box.")
96 A) Start plays images B) End stops the preview and closes the dialog box. C) Capture saves the corresponding image as a picture file. D) Color changes the color of texts displayed on the screen. E) OK - stops the preview and closes the dialog box. F) Cancel closes the Preview dialog box. (8) To remove an image from the list, select it and click the [Remove] button. 96
97 (9) This shows that an image is removed from the list by using the [Remove] button. (To clear all images from the list, click the [Clear] button.). (10) Only the MPEG1 file format is supported. (11) Specify a file name that you want to display in the Destination. 97
98 (12) The context of the Quality consists of Very High High Medium Low Very Low steps (13) CIF / FULL indicates the resolution. (14) The predefined watermark is inserted into the image. It is not visible to the naked eyes but can be seen from a dedicated detector. (15) The Time View is used to set the screen view format of the date and time. (16) If you select the Partition from the Etc and enter a size, the image is segmented according to the input unit. (Unit: Mega Byte) (17) With the Merge All, you can merge images by channel and by time as one file. (18) If you select the Show Preview, the following warning message is displayed. You can see the transformation process on the screen although its speed decreases a little. (19)This screen shows the transformation process. To stop it, click the Stop button. 98
99 (20) Once the transformation is completed, a completion message is displayed as in the following figure. Then, click the [OK] button. 99
 Click the Start > All Programs > Rugged CCTV > RUGGED VISION CMS> Calculator menu (2) Basic screen")
100 Chapter Calculator - Overview (1) The calculator program estimates the record duration depending on the HDD space and record settings. - Running and using --How to run it (1) Click the Start > All Programs > Rugged CCTV > RUGGED VISION CMS> Calculator menu (2) Basic screen 100
 (5) HDD CAPACITY (GB) : Enter the total space of the HDD. (Unit: Giga Byte) (6) DAY / HOUR : calculated values are displayed.")
101 (3) VIDEO MODE : There are two types; NTSC and PAL. (it depends on the camera specification.) (4) MODEL NO. : Enter the model number of the DVR system. (Premier XX, Workhorse XX) (5) HDD CAPACITY (GB) : Enter the total space of the HDD. (Unit: Giga Byte) (6) DAY / HOUR : calculated values are displayed. ( ** Days ** Hour) -- Description on detail functions (1) Channel A) To enable/disable all channels, click the Channel in the title bar. 101
 B) You can modify the Max Bitrate (Kbyte) of a channel. If you click it, the color is changed to the orange color.")
102 B) To enable/disable a channel, double-click it in the same way. (2) Max Bitrate (Kbyte) A) Click the Max Bitrate (Kbyte) in the title bar to set all channels with the same ratio. (This figure shows that the ratio is changed from 250 to 1000.) B) You can modify the Max Bitrate (Kbyte) of a channel. If you click it, the color is changed to the orange color. To enter a number, double-click it. 102
103 C) This figure shows that it is changed to
 You can modify the resolution of a channel.")
104 (3) Recording Resolution Controls the resolution of the recording images NTSC type : CIF 352*240 / Field 704*240 / Full 704*480 PAL type : CIF 352*288 / Field 704*288 / Full 704*576 A) To change the resolution of all channels with an equal value, click the Recording Resolution in the title bar. B) You can modify the resolution of a channel. If you click it, the color is changed to the orange color. Select an item in the context menu by double-clicking it. 104
 To change all channels with a same frame rate, click the Frame Rate (Frame/Sec) in the")
105 (4) Frame Rate (Frame/Sec) Enter the number of frames per second of a recoding image. A) To change all channels with a same frame rate, click the Frame Rate (Frame/Sec) in the title bar. 105
106 B) You can modify the frame rate of a channel. If you click it, the color is changed to the orange color. Select one in the context menu by double-clicking it. 106
 You can modify the recording hours of a channel. If you click it, the color is changed to the orange color. Select one in the context menu by double-clicking it. 107")
107 (5) Recording Hour a Day (Hours) Specifies recording hours in a day. A) To change all channels with a same value, click the Recording Hour a Day (Hours) in the title bar. B) You can modify the recording hours of a channel. If you click it, the color is changed to the orange color. Select one in the context menu by double-clicking it. 107
108 (6) To set the value back to default, press the Reset button. (7) If you press the Calculate button after all input items are selected, the calculated output value is displayed in the DAY/HOUR. 108

 Prerequisites The RS232C cable connection should be established.")
109 Chapter Flash Down - Overview (1) This is the DVR system update program, and uses the RS232C cable if you are connecting directly to the DVR or crossover cable, or you can access it through the network connection. - Running and using -- Running (1) Click the Start > All Programs > Rugged CCTV > RUGGED VISION CMS> FlashDown menu (2)Local Upgrade In this type, the user performs the upgrade task by connecting the RS232C cable to his/her PC and then directly to the DVR. A) Prerequisites The RS232C cable connection should be established. The network setup should be configured. B) In the Select COM Port, specify the port that the RS232C cable is connected to. C) In the PC IP Address, enter the IP of the user PC. 109
 Click the [Open] button by selecting all of three files that are shown on the screen.")
110 D) To add upgrade files, select the Partupdate. E) Click the [Open] button by selecting all of three files that are shown on the screen. F) Once files that will be upgraded are selected, select the model of the corresponding DVR from the Select DVR Model. 110

111 G) If the Success message is displayed after you click the Upgrade, reboot the DVR system. Then, the upgrade task continues to proceed. (Success, open the COM port Reset DVR, please) (3) Network Upgrade A) DVR and user PC should be connected across the network. 111


112 B) Fill out each item. IP Address : IP of the DVR system Port : 2000 User ID : user ID Password : User password C) For the Upgrade File Path, select the file you want to upgrade. The file name is *.bin. 112
113 D) Once the setup is completed, click the Upgrade button to continue the upgrade task. E) If the upgrade task is completed, a notification message is displayed. Then, press the [OK] button to finish it at the user PC side. F) DVR system continues to upgrade files. And then, it reboots by itself. 113
114 RUGGED VISION CMS A/P/P/E/N/D/I/X Table of compatibility between codes for the mass production DVR and RUGGED VISION CMS versions RUGGED VISION CMS DVR mass production codes DA - V1.6 (2729,2837,2838) DB - V1.6 (3420) DC - V2.0 (466,468) DD - V2.5 (612) Version V V V V V V OK Incompatible Incompatible Incompatible Incompatible OK Incompatible Incompatible Incompatible Incompatible OK Incompatible Incompatible Incompatible Incompatible OK Cautions Although the RUGGED VISION CMS PROGRAM- V (7850), for both DC and DD, provides live and playback functions, the RUGGED VISION CMS PROGRAM- V (533) is not compatible with the DC Version. 114
The SW can manage 16CH devices and support 16Ch live view simultaneously. Supported functions are
 RMS User Manual 1. Introduction 1.1 Introduce This SW can manage and control several DVRs from Remote site through network at the same time. This SW provides live image monitoring, Playback and DVR configuration.
RAS (Remote Administration System)
") RAS (Remote Administration System) Digital Video Recorder Software User Guide Document 900.0314 Rev 2.00 RAS User Guide Revisions Issue Date Revisions 1.00 08/04 New document. 1.01 04/05 Update template,
RAS (Remote Administration System) Digital Video Recorder Software User Guide Document 900.0314 Rev 2.00 RAS User Guide Revisions Issue Date Revisions 1.00 08/04 New document. 1.01 04/05 Update template,
PIVOT CMS CLIENT SOFTWARE USER MANUAL
 PIVOT CMS CLIENT SOFTWARE USER MANUAL 1 CMS USER GUIDE 1.1 PC REQUIREMENT Recommended PC Requirement OS CPU VGA RAM HDD Graphics Card OS CPU VGA RAM HDD Windows Vista, 7 or higher Intel Core2Quad Q9400
Lorex Client 7.0 & Lorex Message Master
 Lorex Client 7.0 & Lorex Message Master Software Manual English Version 1.0 MODELS: L19WD Series www.lorexcctv.com Includes L19WD800 & L19WD1600 Copyright 2008 Lorex Technology Inc. Table of Contents Table
Video Management Software
 Video Management Software User Manual Web: europesecurity.eu Mail: info@europesecurity.eu Tel.: 0541 352 952 User s Manual 2 Contents CHAPTER : XMS CENTRAL USER MANUAL 1 PC REQUIREMENT 3 2 INSTALL 3 3
Table of Contents. Chapter 1 Overview. Chapter 2 Installation & Operation. Chapter 3 RAS Watch. Chapter 4 RAS Search
 Table of Contents Chapter 1 Overview 1.1 In This Manual 1.2 Overview 1.3 RAS Features 1.4 Product Information Chapter 2 Installation & Operation 2.1 Installation Procedures 2.2 Operation Procedures Chapter
Contents Contents. Chapter 1. Program Installation. Chapter 2. For the start of CMS. Chapter 3. Monitoring. Chapter 4. E-Map Mode
 CMS User's Manual Contents 0 Contents Chapter 1. Program Installation 1.1 PC specifications 1.2 Program Installation Chapter 2. For the start of CMS 2.1 Site Registration Setup (Network Camera Registration)
Table of Contents. Chapter 1 Overview In This Manual ATVision Pro Features Product Information... 1
 Remote Management Software (ATVision Pro) Table of Contents Chapter 1 Overview... 1 1.1 In This Manual... 1 1.2 ATVision Pro Features... 1 1.3 Product Information... 1 Chapter 2 Installation... 3 Chapter
Central Management Software. Cam Viewer 3 Lite. User Manual
 Central Management Software Cam Viewer 3 Lite User Manual Version 1.0.0 Table of Contents 1. System Requirement...4 2. Software Installation...5 3. Configuration Wizard...9 3.1 Channel...10 3.1.1 Adding
SAFEGUARD CONTENTS. Digital Video Recorder. Version 1.3. Page. DVR Server S A F E G U A R D
 S A F E G U A R D SAFEGUARD Digital Video Recorder Version 1.3 CONTENTS Chapter 1 Chapter 2 Chapter 3 3.1 3.2 3.3 3.4 3.5 3.6 3.7 3.8 3.9 Chapter 4 4.1 4.2 Remote Client Chapter 5 Chapter 6 Chapter 7 7.1
Table of Contents. Chapter 1 Overview In This Manual RASplus Features Product Information Chapter 2 Installation...
 Remote Administration System Plus (RASplus) Table of Contents Chapter 1 Overview... 1 1.1 In This Manual... 1 1.2 RASplus Features... 1 1.3 Product Information... 1 Chapter 2 Installation... 3 Chapter
LOREX CLIENT Remote Agent Software
 LOREX CLIENT Remote Agent Software Instruction Manual English Version 1.0 MODEL: L500 Series www.lorexcctv.com Copyright 2006 LOREX Technology Inc. Table of Contents Table of Contents About the Lorex Client...
- Image search. - Duplex audio
 2 3 M-Client is a remote monitoring program that enables user to monitor and record image of many DVRs installed in remote sites and to search recorded image in server DVR. 1. Functions - Connection to
User`s Manual. CMS Pro. Professional Central Monitoring Software. Full-featured Enterprise Class Surveillance Solution
 Professional Central Monitoring Software CMS Pro Full-featured Enterprise Class Surveillance Solution User`s Manual This document contains preliminary information and is subject to change without notice.
Table of Contents. Chapter 1 Overview In This Manual RASplus Features Product Information Chapter 2 Installation...
 Remote Administration System Plus (RASplus) Table of Contents Chapter 1 Overview... 1 1.1 In This Manual... 1 1.2 RASplus Features... 1 1.3 Product Information... 1 Chapter 2 Installation... 3 Chapter
CMS User's Manual. Version 1.9
 CMS User's Manual Version 1.9 Introduction 0 Introduction [ Principal function ] This CMS Interlocked with megapixel camera. This CMS supports easy connection and registration of the site(camera) This
1 - Introduction About this this manual Configuration SMS Functions Product Information System Requirements 2
 Contents 1 - Introduction. 2 1.1 About this this manual... 2 1.2 Configuration 2 1.3 SMS Functions 2 1.4 Product Information 2 1.5 System Requirements 2 2 SMS Installation... 3 2.1 How to install 3 3 -
NVMS User Manual. Version 2.1.0
 NVMS-1000 User Manual Version 2.1.0 Contents 1 Software Introduction... 1 1.1 Summary... 1 1.2 Operation Environment... 1 1.3 Install and Uninstall... 2 1.3.1 Install the Software... 2 1.3.2 Uninstall
RemoteManager Software
 RMS RemoteManager Software User Manual Contents of this user manual are protected under copyrights and computer program laws. Functions or configurations are subject to be changed or modified without prior
User Manual. Central Monitoring Software for TER-series recorders. CenPro
 EN User Manual Central Monitoring Software for TER-series recorders CenPro Contents CENPRO USER MANUAL 1 PC REQUIREMENT 3 2 INSTALL 3 3 UNINSTALL 5 4 BASIC OPERATION 7 4.1 Log In 7 4.2 Screen Layout 8
S-Series Multi-Site Client Software OPERATION MANUAL
 S-Series Multi-Site Client Software OPERATION MANUAL Copyright 2005 All rights reserved Reproduction, adaptation, or translation without prior written permission is prohibited, except as allowed under
PDR.net Series USER MANUAL ENGLISH VERSION
 PDR.net Series USER MANUAL ENGLISH VERSION CONTENTS Frequently Asked Questions (FAQ LIST) 1. SYSTEM REQUIREMENT 2. INSTALLATION PROCEDURE 3. PDR.net MAIN SCREEN INSTRUCTION 3.1 Main tool bar operation
USER MANUAL. Mac Version
 USER MANUAL Mac Version Contents 1 Software Introduction... 1 1.1 Summary... 1 1.2 Install and Uninstall... 1 1.2.1 Install the Software... 1 2 Login Software... 3 2.1 Login... 3 2.2 Control Panel Instruction...
NVMS User Manual
 NVMS-1000 User Manual Contents 1 Software Introduction...1 1.1 Summary... 1 1.2 Operation Environment... 1 1.3 Install and Uninstall... 2 1.3.1 Install the Software... 2 1.3.2 Uninstall the Software...
VSPlayer Software User Manual
 VSPlayer Software User Manual UD.6L0202D1505A01 Thank you for purchasing our product. This manual applies to VSPlayer software, please read it carefully for the better use of this software. This manual
W Box VMS BOX T E C H N O L O G I E S.
 W Box VMS BOX T E C H N O L O G I E S www.wboxtech.eu Contents Contents... 1 Overview... 3 1.1 Description... 3 1.2 Running Environment... 3 1.3 Function Modules... 3 Live view... 6 2.1 User Registration
SecuGuard. Basic 5.0. User s manual. Dec Version: 5.0.x
 SecuGuard Basic 5.0 User s manual Dec. 2009 Version: 5.0.x SecuGuard Basic System Requirement...5 Installation...6 Before Installing the Software... 6 Starting the Installation... 6 Quick Start...9 Install
User Manual. CENTRAL MANAGEMENT SYSTEM of H.264 DIGITAL VIDEO RECORDER
 User Manual CENTRAL MANAGEMENT SYSTEM of H.264 DIGITAL VIDEO RECORDER 1 TABLE of CONTENTS I. SYSTEM REQUIREMENTS...3 A. MINIMUM REQUIREMENTS...3 B. SUGGESTED REQUIREMENTS...3 II. CENTRAL MANAGEMENT SYSTEM
LOREX CLIENT 3.0 SOFTWARE MANUAL IRMS Integrated Remote Management Software
 LOREX CLIENT 3.0 SOFTWARE MANUAL IRMS Integrated Remote Management Software Instruction Manual English Version 2.0 Copyright 2007 Lorex Technology Inc. www.lorexcctv.com Table of Contents Overview... -
Table of Contents. Chapter 1 Introduction Features System Diagram... 2 Multi-Server... 2 Single-Server... 3
 inex Standard Table of Contents Chapter 1 Introduction... 1 1.1 Features... 1 1.2 System Diagram... 2 Multi-Server... 2 Single-Server... 3 Chapter 2 Installation... 5 2.1 Product Information... 5 Package
NetClient software user manual
 NetClient software user manual 1-1. General information Net Client is an application which provides users not only viewing and controling remote DVRs, but also receiving realtime event data or alarm signals
Thank you for purchasing the DVTech Digital Video Recorder, a high-tech monitoring and recording solution to cover all your security needs.
 Introduction Thank you for purchasing the DVTech Digital Video Recorder, a high-tech monitoring and recording solution to cover all your security needs. Within the chapter you will be introduced to your
Unisight DVR System. Unisight DVR Manual. Ver rev1.3.4
 Unisight DVR Manual Ver2.7.1027 rev1.3.4 1 Table of Contents System Requirements.8 Unisight DVR Server.. 8 Server Hardware Requirements...8 Server Software Requirements 8 Client Hardware Requirements...
NVMS User Manual
 NVMS-1000 User Manual Contents 1 Software Introduction...1 1.1 Summary... 1 1.2 Operation Environment... 1 1.3 Install and Uninstall... 2 1.3.1 Install the Software... 2 1.3.2 Uninstall the Software...
Remote DVR Manager. User s Guide. v 1.1
 Remote DVR Manager User s Guide v 1.1 DVR Manager TABLE OF CONTENTS OVERVIEW...5 1. PC system requirements...5 2. Installing Program... 6 DVR Manager Monitor...8 3. Screen mode...8 3.1. Screens split...
NVMS1000. User Manual
 NVMS1000 User Manual Contents 1 Software Introduction... 1 1.1 Summary... 1 1.2 Operation Environment... 1 1.3 Install and Uninstall... 2 1.3.1 Install the Software... 2 1.3.2 Uninstall the Software...
RemoteManager USER S MANUAL
 Remote Monitoring Software RemoteManager USER S MANUAL Thank you for purchasing our products. Before operating the system, please read this User s Manual thoroughly and retain it for future reference.
IP Solution Intelligent Surveillance Solution
 IP Solution Intelligent Surveillance Solution user s manual Table of Contents TABLE OF CONTENTS TABLE OF CONTENTS...1 SYSTEM REQUIREMENT...5 INSTALLATION...6 QUICK START...10 1. MAIN CONSOLE...14 1.1 Start...16
User Manual. CENTRAL MANAGEMENT SYSTEM of H.264 NETWORK VIDEO RECORDE H.264 DIGITAL VIDEO RECORDER
 User Manual CENTRAL MANAGEMENT SYSTEM of H.264 NETWORK VIDEO RECORDE H.264 DIGITAL VIDEO RECORDER 1 TABLE of CONTENTS I. SPECIFICATION... 3 II. HARDWARE REQUIREMENTS... 5 A. MINIMUM REQUIREMENTS... 5 B.
SecuGuard. Basic 5.0. Version: xxx
 SecuGuard Basic 5.0 Ł` ˆª Ø Version: 5.0.2.xxx SecuGuard Basic ` Ø ˆ ˆ...6 ˆ Ø...7 Ł ˆ Ø»ˆÆ ˆ`... 7 ˆŁ` ˆ Ø»ˆÆ ˆ`... 7 Ø Æ Ł...10 Ø IP Camera(s)... 10 Ł` IP Camera(s)... 10 ˆ Ø Ł ˆ ˆ :... 14 Playback:...
eview Network Video Recorder User s Manual
 eview Network Video Recorder User s Manual Version 1.02 2010/02/09 Copyright 2010, All rights reserved. Contents 1. Starting / Closing...1 2. Monitoring...4 2.1. Monitoring Windows Layout...4 2.2. Full
Chapter 1 Features FEATURES
 Chapter 1 Features Operation Playback, recording and network transmission simultaneously Real time full screen or quad screen display 2X digital zoom and Picture-in-picture display Easy operations by shuttle
DVR SYSTEM User s Manual
 DVR SYSTEM User s Manual Manual Revision : Version 5.3 above Release Date : July 1. 2004 INDEX Chapter. Main Screen -1. Explanation of Main Screen A ~ N Functions per button -2. Pan/Tilt Control O Pan/Tilt
Table of Contents. Chapter 1 Introduction Features System Diagram... 2
 inex Standard Table of Contents Chapter 1 Introduction... 1 1.1 Features... 1 1.2 System Diagram... 2 Chapter 2 Installation... 5 2.1 Product Information... 5 Package Contents... 5 System Requirements...
Central Management Software for NVR-915 / NVR-1615 CV5-M256
 Central Management Software for NVR-915 / NVR-1615 Table of Contents Chapter 1. Main Console... 4 1.1 Tool Bar... 4 1.2 NVR List... 5 1.3 Division List... 7 1.4 Group List... 9 1.5 PTZ Panel...11 1.6 Operation
Central Management Software. For use with HAI 68A00-1 Network Digital Recorder
 Central Management Software For use with HAI 68A00-1 Network Digital Recorder Document Number 68R00-1 Rev. A January, 2008 Table of Contents 1. Introduction... 3 1.1. CMS (Central Management Software)...
User s Manual of DVR ULTIMAX. Remote Client Software V wersja 2.40
 User s Manual of DVR ULTIMAX Remote Client Software V 4.0.1 ULTIMAX-304 ULTIMAX-308 ULTIMAX-316 ULTIMAX-504 ULTIMAX-508 ULTIMAX-516 ULTIMAX-704 ULTIMAX-708 ULTIMAX-716 wersja 2.40 Index 1 Software Install,
Before Setting. GMS is an integrated security management system that provides a useful solution for central monitoring station operation.
 GMS MANUAL Before Setting What What is is GMS? GMS? GMS is an integrated security management system that provides a useful solution for central monitoring station operation. Minimum Minimum System System
AVerMedia. CM3000 Central Management System. User Manual
 AVerMedia CM3000 Central Management System User Manual DISCLAIMER No warranty or representation, either expressed or implied, is made with respect to the contents of this documentation, its quality, performance,
Video Surveillance Management Software NVClient V5 User Manual
 Video Surveillance Management Software NVClient V5 User Manual Version: V5.0 Update Date: 2013-12-12 Welcome Thanks for using the Company's digital video surveillance management software. Please read this
Appendix A. esync DVR Manual Appendix A. FCC Compliance Statement WARNING. Revision A esync Manual esync
 Appendix A Appendix A FCC Compliance Statement Model Name: esync Series (SSA-1648e, SSA-0824e, SSA-0424e). This device complies with Part 15 of the FCC Rules. Operation is Subject to the following two
DiViS Net (Integration)
") DiViS Net (Integration) Installation and User s Guide Ver 12.00.1 Digital Video Security System Digital Video Recorder www.divisdvr.com Chance-i USA Corp. *All contents of this document may change without
DiViS Net (Integration) Installation and User s Guide Ver 12.00.1 Digital Video Security System Digital Video Recorder www.divisdvr.com Chance-i USA Corp. *All contents of this document may change without
PROFESSIONAL PROTECTION INCORPORATED
 PROFESSIONAL PROTECTION INCORPORATED EAGLE EYE DIGITAL VIDEO RECORDING AND SURVEILLANCE SYSTEMS 1101 Tyvola Road Suite 202 Charlotte North Carolina 28217-3515 Business: (704) 523-1660 Facsimile: (704)
DVR CH Digital Video Recorder SW242-LP4 / SW242-LPN
 DVR4-1100 4CH Digital Video Recorder SW242-LP4 / SW242-LPN User Manual INDEX 1. DVR Features... 1 2. Layout 2.1 Front Panel...1 2.2 Rear Panel...2 2.3 Remote Controller...2 3. Installation 3.1 Installing
DESCRIPTION Enter user name provided by ISP Enter password provided by ISP
 User name Password ICON Enter user name provided by ISP Enter password provided by ISP 4-5-2. HTTP 4-5-3. DDNS ICON Startup HTTP Check to enable HTTP server. Users can remotely access into the DVR over
Downloaded from manuals search engine
 INDEX 1. DVR Features...1 2. Layout 2.1 Front Panel...1 2.2 Rear Panel...2 2.3 Remote Control...2 3. Installation 3.1 Installing the Hard Drive...3 3.2 Connecting Camera and Monitor...3 3.3 Connecting
Table of Contents. Index
 Index Table of Contents Chapter 1 Notice for All Users...1-1 Chapter 2 Installation...2-1 2-1 HD NVR Manager Setup...2-1 2-1-1 Installation Steps...2-2 2-1-2 License Activation...2-9 Chapter 3 SCM Program...3-1
4CH Real Time DVR. User Guide INFORMATION MAY CHANGE WITHOUT NOTICE. Digital Video Recorder
 User Guide INFORMATION MAY CHANGE WITHOUT NOTICE. Table of Contents Caution... 4 Package Contents... 4 Introduction... 5 1. Product Overview...5 2. Front Panel...5 3. Rear Panel...6 4. IR Remote Controller
ART. IPSWI000A USER S MANUAL
 ART. IPSWI000A USER S MANUAL Via Don Arrigoni, 5 24020 Rovetta S. Lorenzo (Bergamo) http://www.comelitgroup.com e-mail: export.department@comelit.it inex Basic Table of Contents Chapter 1 Introduction...1
DVR Server Users Manual
 DVR Server Users Manual System Guide... 4 Precaution in Use... 4 Product Guide... 4 Live View... 5 Server Login... 7 Power Off... 7 On-Screen Display (OSD)... 8 View Screen... 8 Digital Zoom... 9 Video
Linksys Video Monitoring System User Guide
 Linksys Video Monitoring System User Guide BUSINESS SERIES Model: LBAVMS16 Linksys is a registered trademark or trademark of Cisco Systems, Inc. and/or its affiliates in the U.S. and certain other countries.
CyberView Systems, Embedded DVR Basic Operating Instructions =========================================================================
 CyberView Systems, Embedded DVR Basic Operating Instructions ========================================================================= Main Display This Main Display section covers the operation and description
USER GUIDE STAND-ALONE. 4 channel MPEG-4 Triplex DVR V Stand-Alone DVR User Guide
 USER GUIDE STAND-ALONE 4 channel MPEG-4 Triplex DVR V. 1.4 This document contains preliminary information and subject to change without notice. SAFETY PRECAUTIONS EXPLANATION OF SYMBOLS This symbol is
Table of Contents. Chapter 1 Introduction Features... 1
 iras (Remote Administration System) Table of Contents Chapter 1 Introduction... 1 1.1 Features... 1 Chapter 2 Installation... 3 2.1 Product Information... 3 Package Contents... 3 System Requirements...
Network Video Recorder Software 2.2 User Manual. Table of Contents
 Network Video Recorder Software 2.2 User Manual Table of Contents Chapter 1. Using NVR Software 2.2... 6 Chapter 1-1. System Settings... 6 Chapter 1-2. HDD Settings... 7 Chapter 1-3. Device Settings...
Exxi Net (Integration)
") Exxi Net (Integration) Installation and User s Guide Ver 11.06.x Digital Video Security System Digital Video Recorder www.exxicom.com *All contents of this document may change without prior notice. INDEX
Exxi Net (Integration) Installation and User s Guide Ver 11.06.x Digital Video Security System Digital Video Recorder www.exxicom.com *All contents of this document may change without prior notice. INDEX
SunEyes V Series IP Camera P2P CMS user manual
 SunEyes V Series IP Camera P2P CMS user manual Version: 2.0 Date: July. 2015 This document is applicable to all series devices in our company. Page 1 ON page 40 foreword The HiP2P client of IP Camera is
H.264 Network DVR. Quick Start. GUI Display with USB Mouse Control 336Z
 336Z H.264 Network DVR Quick Start GUI Display with USB Mouse Control Please read instructions thoroughly before operation and retain it for future reference. For the actual display & operation, please
SKY l SYS DVR USER S MANUAL TABLE OF CONTENTS. Skydreamers Systems DVR Page 1
 TABLE OF CONTENTS Main System Application (Control) SERVER Startup Screen 6 Login/Logout/Shutdown 7 Control Screen 7 Setup 7 System Power Management 8 Auto Switching Interval 8 E-map 8 TV-Out 8 On-screen
VMS-A1 Client Software. User Manual
 VMS-A1 Client Software User Manual Contents Contents... 2 Chapter1. Overview... 4 1.1 Description... 4 1.2 Features & Functions... 4 Chapter2. Update Info... 6 Chapter3. Starting VMS-A1... 7 3.1 Installing
Contents. When you purchased DN Center program, make sure that the following contents are Included. DN Center Program Installation CD User manual
 What What is is The The Center Center Program? Program? Center Program is a software used for remote access to a Digital Video Recorder (DVR) via TCP/IP network, telephone line or ISDN line. In this manual
16-Channel DVR Rear Panel
 Digital Video Recorder art. MDVR825B/MDVR808B/49816 DVR Rear Panel 16-Channel DVR Rear Panel Video Input Video Loop Through RS485 Port Alarm Input/Output Network Port RS232C Port Audio In/Out Video Out
Ver HDxViewer. Manual
 Ver. 13.09.06 HDxViewer Manual Symbols and Letters used in this Manual Importance mark : Arrangement of items to be considered for completing work Additional information or tip to avoid in order to completing
NVMS1000. User Manual
 NVMS1000 User Manual Contents 1 Software Introduction... 1 1.1 Summary... 1 1.2 Operation Environment... 1 1.3 Install and Uninstall... 2 1.3.1 Install the Software... 2 1.3.2 Uninstall the Software...
USB DVR Starter Guide
 USB DVR Starter Guide You must install the software bundled on the Install CD before connecting the USB DVR to the computer. 1 Install the software Connect the USB DVR to 2 the computer. This guide explains
The Intelligent Surveillance Solution
 The Intelligent Surveillance Solution Hardware & Software NDVR Installation Guide Ver. 99.350.A430.001 Table of Contents TABLE OF CONTENTS TABLE OF CONTENTS... 1 1000 SERIES; 3000 SERIES... 2 Product Specification...
H.264 Network DVR. Quick Start
 341Z H.264 Network DVR Quick Start GUI Display with USB Mouse Control Please read instructions thoroughly before operation and retain it for future reference. For the actual display & operation, please
The Intelligent Surveillance Solution
 The Intelligent Surveillance Solution Hardware & Software Installation user s manual Ver. 99.333.A520.001 Table of Contents TABLE OF CONTENTS TABLE OF CONTENTS...1 1000 SERIES; 2000 SERIES; 3000 SERIES...2
4 Channel Digital Video Recorder / Camera Kit. Model No QV-3024 USER S MANUAL
 4 Channel Digital Video Recorder / Camera Kit Model No QV-3024 USER S MANUAL 1 Important Note: Please keep this manual in a safe location in case you need to refer to it at a later date. 1 INDEX CHAPTER
Remote Monitoring System. User Manual DVR8A+/ 16B+ DVR4/ 8/ 16E+
 Remote Monitoring System User Manual For DVR Model (Version 1.02.004 Onwards): DVR8A+/ 16B+ DVR4/ 8/ 16E+ ifocus Pte Ltd Copyright Statement Copyright 1999-2008. Version 3.1 All rights reserved. No part
Multi-NVR Manager. Quick Start Configuration Usage
 Multi-NVR Manager Quick Start Configuration Usage 2014. All rights are reserved. No portion of this document may be reproduced without permission. All trademarks and brand names mentioned in this publication
Guarding Expert (Android) Mobile Client Software User Manual (V3.2)
 Mobile Client Software User Manual (V3.2)") Guarding Expert (Android) Mobile Client Software User Manual (V3.2) UD.6L0202D1247A01 Thank you for purchasing our product. This manual applies to Guarding Expert (Android) mobile client software; please
Guarding Expert (Android) Mobile Client Software User Manual (V3.2) UD.6L0202D1247A01 Thank you for purchasing our product. This manual applies to Guarding Expert (Android) mobile client software; please
icms Pro USER s MANUAL Ver 1.0
 icms Pro USER s MANUAL Ver 1.0 Contents Target Audience for this Document... 5 Copyright, Trademarks and Important Information... 5 Copyright... 5 Disclaimer... 5 Introduction... 6 Tabs... 6 Panes... 7
MagicInfo VideoWall Author
 MagicInfo VideoWall Author MagicInfo VideoWall Author User Guide MagicInfo VideoWall Author is a program designed to construct a VideoWall layout and create VideoWall content by adding various elements
User Manual of VSPlayer Software. VSPlayer Software. User Manual UD06784B
 VSPlayer Software User Manual UD06784B i User Manual COPYRIGHT 2017 Hangzhou Hikvision Digital Technology Co., Ltd. ALL RIGHTS RESERVED. Any and all information, including, among others, wordings, pictures,
Product and company names appearing in this document are trademarks of each respective company or organization.
 . CMS_beta LEGAL INFORMATION Reproduction, transfer, distribution or storage of part or all of the contents in this document in any form without the prior written permission of the company is prohibited.
Software. IP Video Control Center v User s Manual
 Software IP Video Control Center v1.36.03 User s Manual i Table of Contents 1.Getting Started 1 Recommended System Requirements 1 Start IP Video Control Center 2 Exit IP Video Control Center 3 Check IP
4Ch Real time / Triplex / Mux Stand Alone DVR
 4Ch Real time / Triplex / Mux Stand Alone DVR User s Manual VER 1.2 VSD-31 4 Channel Stand Alone DVR USB Backup available The most stable and reliable real stand alone Digital Video Multiplex Recorder
Local Playback Software User Manual
 Local Playback Software User Manual UD.6L0202D1299A01 Thank you for purchasing our product. This manual applies to Local Playback software, please read it carefully for the better use of this software.
DiViS Net (Integration)
") DiViS Net (Integration) Installation and User s Guide Ver 12.12.0 Digital Video Security System Digital Video Recorder www.divisdvr.com DiViS DVR.com *All contents of this document may change without prior
DiViS Net (Integration) Installation and User s Guide Ver 12.12.0 Digital Video Security System Digital Video Recorder www.divisdvr.com DiViS DVR.com *All contents of this document may change without prior
225 Vendoma-MPG DVR. Installation and User Guide. (Digital Video Recorder) Version
 Version") 225 Vendoma-MPG DVR (Digital Video Recorder) Installation and User Guide Version 1.00.00 2004 Aventura Technologies, Inc. Table of Contents Foreword 3 Features and Specifications 4 1. Driver Installation
225 Vendoma-MPG DVR (Digital Video Recorder) Installation and User Guide Version 1.00.00 2004 Aventura Technologies, Inc. Table of Contents Foreword 3 Features and Specifications 4 1. Driver Installation
Pro-Series DVRT CTMS
 D VR D ig it a l V id e o R e c o r d e r Pro-Series DVRT CTMS CTMS Central Monitoring Software Copyright 2008 Cascadia Video Products, LLC All rights reserved Reproduction, adaptation, or translation
Viewgate. DVR Software
 Viewgate DVR Software Table of Contents 5. DVR Software 1 5-1. DVR Setup 1 5-1-1. Disk Tool 2 5-1-2. System Setup 4 5-1-3. Camera Setup 7 5-1-3-1. General Tab 7 5-1-3-2. Schedule Tab 10 5-1-3-3. Color
Quick Start Guide (V1.03) UD.6L0201B1064A01
 UD.6L0201B1064A01") ivms-4200 PCNVR Quick Start Guide (V1.03) UD.6L0201B1064A01 Thank you for purchasing our product. If there is any question or request, please do not hesitate to contact the dealer. This manual applies
ivms-4200 PCNVR Quick Start Guide (V1.03) UD.6L0201B1064A01 Thank you for purchasing our product. If there is any question or request, please do not hesitate to contact the dealer. This manual applies
icms Pro USER S Manual Ver 1.4
 icms Pro USER S Manual Ver 1.4 Contents Panes... 7 How Can User Rights Affect Your Use of icms Pro SW?... 10 Minimum System Requirements... 11 Installing the icms Pro SW... 12 Download icms Pro from icatchinc
ICMS. Tale of Contents. icms
 ICMS Tale of Contents 0 I. SYSTEM REQUIREMENT... 3 II. INSTALLING... 4 III.EXECUTING ICMS... 6 IV. FEATURES... 7 1. ICMS Overview... 7 1. On/Off button...7 2. Device Manager...7 3. Tree...9 4. Live...9
4CH/ 8CH/ 16CH Digital Video Recorder
 4CH/ 8CH/ 16CH Digital Video Recorder DVR204B/ 208B/ 216B INSTRUCTION MANUAL DIRECTORY CHAPTER 1 Hard Disk Installing (Standard shipping products include neither HDD or R/W)...2 CHAPTER 2 Panel Appearance...4
RMS RemoteManager Software
 RMS RemoteManager Software This is a brief manual for quick and convenient reference. Please refer to the User Manual contained in CD for details. Quick Manual 1 st Edition : 31 Mar 2009 The picture might
Vegas Valley Video Systems. Vegas Valley DVR Manual TZHC Series Server
 Vegas Valley DVR Manual TZHC Series Server 1 Table of Contents Initial Startup...4 Initial Setup...4 Live Preview Mode...5 DVR Information Window...6 Camera Status LEDs...6 Channel Grid...7 Grid Layout
Central Manager System
 Central Manager System User s Manual 3.42 i 2 nd Edition (Aug-17-11) Content CCOONNTTEENNTT...I 1. PREFACE...1 2. INSTALLATION...2 2-1. Install CMS...3 3. PROFILE MANAGER...5 3-1. Create a New User Profile...5