Reimage a Cisco FireSIGHT Management Center and FirePOWER Appliance
|
|
|
- Lauren Cook
- 5 years ago
- Views:
Transcription
1 Reimage a Cisco FireSIGHT Management Center and FirePOWER Appliance Contents Introduction Prerequisites Requirements Components Used Reimage Process Before You Begin Overview of the Reimage Process Cisco Firepower Management Center 1000, 2500, and 4500 Troubleshoot System_Restore LILO Menu Option is Not Listed 7010, 7020, and 7030 Devices 7110 and 7120 Devices 8000 Series Devices or Management Center Models FS750, FS1500 or FS3500 System restore for models FMC1000, FMC2500, FMC4500 (M4-Based FMCs) Boot Option Not Listed Introduction This document describes the processes with examples for reimaging a Cisco FireSIGHT Management Center (FMC) and FirePOWER appliances. Prerequisites Requirements There are no specific requirements for this document. Components Used The information in this document is based on the following hardware models and lists the software versions available for each model. Managed Device Cisco FirePOWER 7000 Series Cisco FirePOWER 7100 Series Cisco FirePOWER 8100 Series Cisco FirePOWER 8200 Series FireSIGHT Management Center FS 750 FS 1500 FS 3500 Software Versions Availab Reimage 5.2 or later Firepower 8300 Series Cisco AMP or later
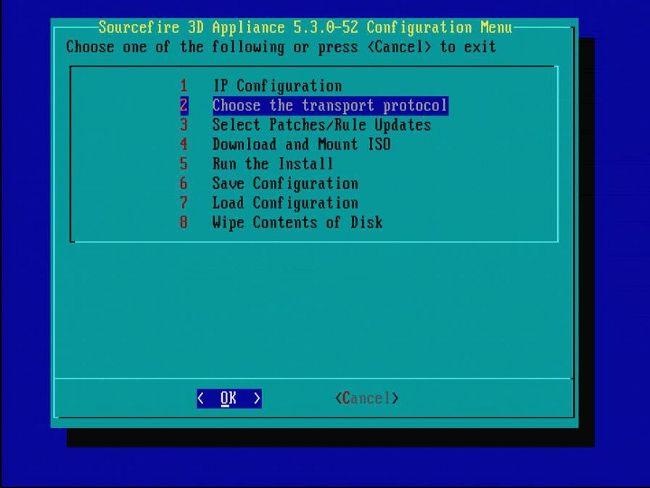
2 Cisco AMP 8150 Reimage Process Caution: Do not insert a USB storage device or plug a Keyboard, Video, and Mouse (KVM) switch when you upgrade or reimage a FireSIGHT Management Center or a FirePOWER appliance. Before You Begin 1. If you plan to reimage a Management Center or stand-alone Firepower device, it is recommended to back up your appliance before you proceed. 2. Identify the model of your sensor and use the list of models in the Components Used section in order to verify that this guide is appropriate. 3. Download the appropriate installation guide and disk image for your desired software version from the Cisco Support site.note: Do not rename an.iso file. Serve the image: The.iso file should be copied to a host that runs an SSH server reachable from the management network of the appliance to be reimaged. Note: If no other SSH server is available, an FMC can be used for this process.verify the integrity of the iso: The md5sum of the files are provided on the right-hand side of the page for verification with an md5sum utility. 4. The installation guides contain step-by-step reimage instructions and also outlines several methods for performing the reimage. Follow the steps in the guide in order to complete the reimage. The screenshots provided in this document can be used for reference. Overview of the Reimage Process Note: The 5.3 version was used to capture the screenshots in this article. The reimage process is identical for other 5.x versions except for the version numbers that appear in the screenshots.

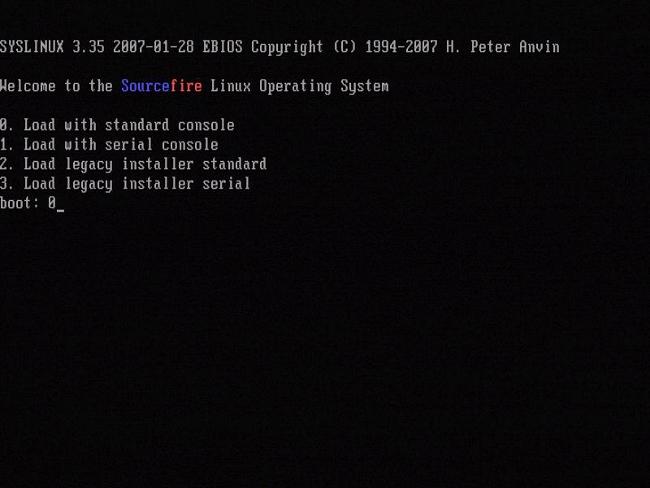
3 Figure 1 Figure 2 - When the system reboots, press an arrow key on the keyboard in order to halt the countdown to choose the System_Restore option for the screen depicted next.
4 Figure 3 Note: If the System_Restore prompt does not display, you must change the boot order to boot directly to the Restore partition (DOM). For more information, see System_Restore LILO menu option is missing.
5 Figure 4 - Choose option 0 if you use a keyboard and monitor. Figure 5
6 Figure 6

7 Figure 7 - In order to select the network device, press the spacebar.
8 Figure 8
9 Figure 9
10 Figure 10
11 Figure 11
12 Figure 12
13 Figure 13
14 Figure 14
")
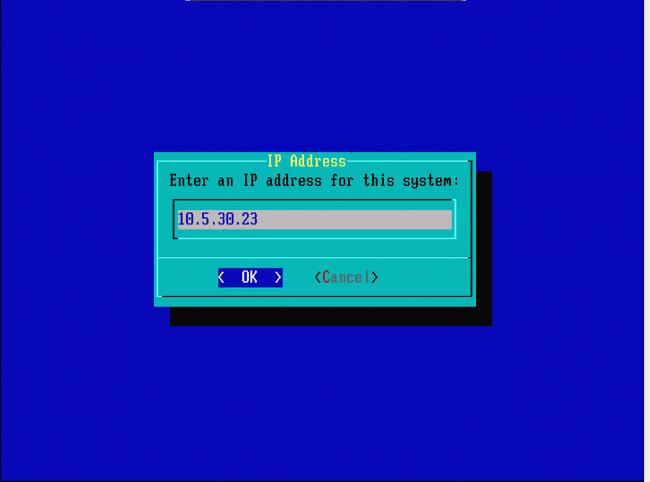
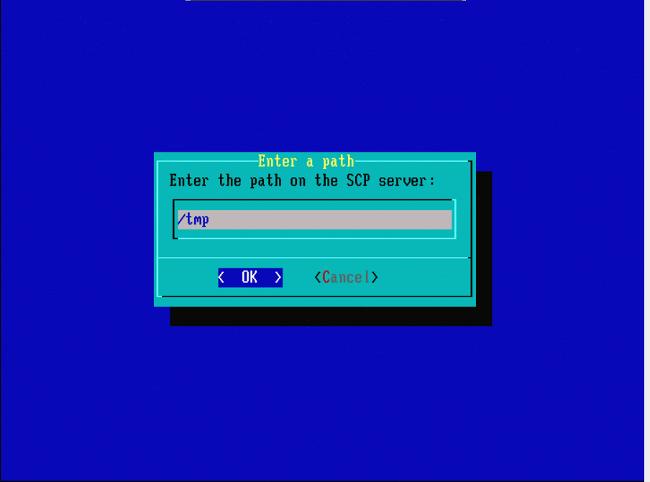
15 Figure 15 - Cisco Support recommends that you use the Secure Copy (SCP) protocol.
16 Figure 16 - It is possible to use a FireSIGHT Management Center as the SCP server for this step. Follow the steps in, and use the IP address and credentials for the Management Center in order to populate the fields in the System Restore menu.
17 Figure 17
18 Figure 18
19 Figure 19 Note: If you receive a connectivity error at this point instead of the expected message, verify your connection to the SSH server.

20 Figure 20 - In order to select the.iso image, press the spacebar. Note: It is required to use the default filenames for the.iso files or the files might not be detected at this step.
21 Figure 21
22 Figure 22 - Cisco Support recommends to skip step 3 in this process. Patches and Snort Rule Updates (SRUs) can be installed after the reimage is complete.
23 Figure 23
24 Figure 24
25 Figure 25
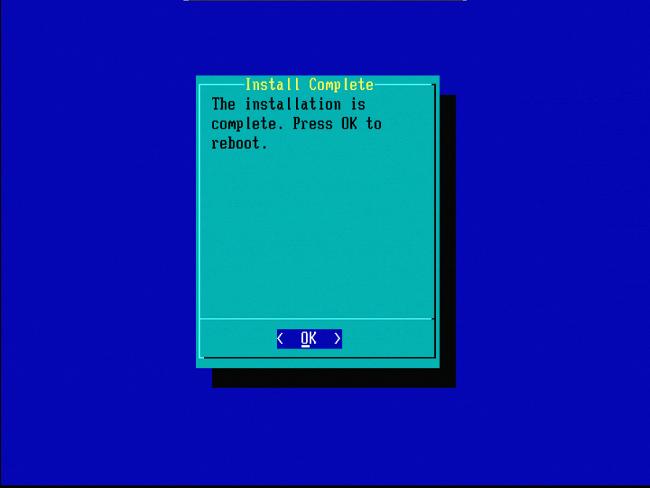
26 Figure 26 Important note in regards to a reimage from a different major software version: If you attempt to reimage a device that previously ran a different major software version, such as if you reimage 5.1 > 5.2, 5.2 > 5.3, 5.3 > 5.2, and so on, you must complete the steps depicted in Figures 1-26 twice. 1. After you choose OK on the prompt shown in Figure 26, the System Restore partition is flashed to the new version and the appliance reboots. 2. After the reboot, you must begin the reimage process again from the start and continue through the process depicted in Figures 27b through 31. If this is the first reimage from a different major software version, you will see the screen depicted in Figure 27a, followed by Figures 31 and 32. Caution: If you see this screen, there might be a delay with no visible output after "Checking Hardware" and before "The USB device...". Do not press any keys at this time, or the device will reboot into an unusable state and will need to be reimaged once more. If this is not the case, you will see the screens in Figure 27b through Figure 32.

27 Figure 27a
28 Figure 27b
29 Figure 28

30 Figure 29
31 Figure 30
32 Figure 31

33 Figure 32 Cisco Firepower Management Center 1000, 2500, and 4500 On FMC 1000, 2500, and 4500 the options are different. Use a KVM switch or the CIMC and while the device is booting you will be presented with the following options: 1 - Cisco Firepower Management Console VGA Mode 2 - Cisco Firepower Management Console Serial 3 - Cisco Firepower Management Console System Restore Mode 4 - Cisco Firepower Management Console Password Restore Mode If you want to enter the Restore Mode using UI select the option 'Cisco Firepower Management Console System Restor Mode' (option 3) and then 'Cisco Firepower Management Console System Restore VGA Mode' (option 1):

34 Figure 33 The rest of the process is the same as on other FMC appliances. Troubleshoot System_Restore LILO Menu Option is Not Listed The FireSIGHT Management Center and the FirePOWER 7000 and 8000 series appliances have an integrated flash drive which contains the reimage system. If the "System_Restore" option is not listed in the LILO (Linux Loader) boot menu, it is still possible to access this drive in order to complete the reimage. 7010, 7020, and 7030 Devices If you use a 70XX Series device, complete these steps in order to select the boot device: 1. Power off the appliance gracefully. 2. Power on the appliance and press the Delete key repeatedly while the appliance boots up in order to access the boot device selection screen. See the screenshots shown here:
35 Figure A1

36 Figure A2 3. Use the right arrow key in order to select the Save & Exit tab. On this tab use the down arrow key in order to select SATA SM: InnoDisk. - InnoLite and press the Enter key.
37 Figure A3 4. Choose option 0 if you use a keyboard and monitor.
38 Figure A4

39 Figure A and 7120 Devices If you use a 71XX Series device, complete these steps in order to select the boot device: 1. Power off the appliance gracefully. 2. Power on the appliance and press the F11 key repeatedly while the appliance boots up in order to access the boot device selection screen. See the screenshot shown here:

40 Figure B1 3. Select option HDD:P1-SATADOM and press Enter in order to boot to the System_Restore partition.

41 Figure B2
42 Figure B Series Devices or Management Center Models FS750, FS1500 or FS3500 If you use a 8000 Series device or Management Center model FS750, FS1500, or FS3500, complete these steps in order to select the boot device: 1. Power off the appliance gracefully. 2. Power on the appliance and press the F6 key repeatedly while the appliance boots up in order to access the boot device selection screen. See the screenshot shown here:
43 Figure C1 3. Select the USB option.

44 Figure C2 4. The appliance boots from the System_Restore partition and displays the System_Restore menu.

45 Figure C3 System restore for models FMC1000, FMC2500, FMC4500 (M4-Based FMCs) The prompt to select system restore will appear differently for these models: FMC1000, FMC2500, FMC During boot, you will see this screen for 5 seconds: Figure D1 2. Select the System Restore option (#3 in this case).


46 Figure D2 3. Select the display method for the system restore (#1 for VGA in this case) Figure D3 4. You will then arrive at the prompt seen in figure 5, and the process will continue as normal. Boot Option Not Listed It is possible that the option to boot to the reimage partition is not listed in the BIOS or the boot menu. If this is the case, the drive that contains the reimage system might be missing or damaged. An RMA is probably necessary.
Reimage a Sourcefire Defense Center and FirePOWER Appliance
 Reimage a Sourcefire Defense Center and FirePOWER Appliance Contents Introduction Prerequisites Requirements Components Used Reimage Process Before You Begin Overview of the Reimage Process Troubleshoot
Installing CMX 10.5 on Cisco MSE 3375
 Installing CMX 10.5 on Cisco MSE 3375 Contents Introduction Prerequisites Requirements Components Used Installation CIMC configuration and KVM launch CMX image installation CMX initial setup CMX node installation
The instruction in this document is applicable on Cisco FireSIGHT Management Center FS2000 and FS4000 models.
 Contents Introduction Prerequisite Hardware Requirements Procedures Step 1: Backup the Current Configuration and Data Step 2. Remove and Replace the Existing Storage Media Step 3. Reconfigure the RAID
Installing Cisco StadiumVision Director Software from a DVD
 Installing Cisco StadiumVision Director Software from a DVD First Published: May 29, 2012 Revised: August 2, 2012 This module describes how to install the Cisco StadiumVision Director Release 3.0 software
Instrument Software Update Instructions. X-Series Multi-touch instruments
 Purpose Instrument Software Update Instructions X-Series Multi-touch instruments The purpose of this document is to outline the instrument software update procedure for the touchscreen or B model instrument
Post-Installation and Maintenance Tasks
 Log In to the Cisco ISE Web-Based Interface, on page 1 Cisco ISE Configuration Verification, on page 2 VMware Tools Installation Verification, on page 4 Return Material Authorization, on page 6 Reset a
Understanding UCS Server Configuration Utility User Interface
 CHAPTER 3 Understanding UCS Server Configuration Utility User Interface The UCS-SCU GUI is a web-based management interface that allows you to perform tasks such as operating system installation, RAID
Cisco UCS Diagnostics User Guide for B-Series Servers, Release 2.0
 First Published: 2018-03-13 Americas Headquarters Cisco Systems, Inc. 170 West Tasman Drive San Jose, CA 95134-1706 USA http://www.cisco.com Tel: 408 526-4000 800 553-NETS (6387) Fax: 408 527-0883 2018
Reset the Admin Password with the ExtraHop Rescue CD
 Reset the Admin Password with the ExtraHop Rescue CD Published: 2018-01-19 This guide explains how to reset the administration password on physical and virtual ExtraHop appliances with the ExtraHop Rescue
Cisco Stealthwatch. Update Guide 7.0
 Cisco Stealthwatch Update Guide 7.0 Table of Contents Introduction 5 Overview 5 Audience 5 Terminology 5 New Update Process 6 Before You Begin 7 Software Version 7 Java 7 TLS 7 Default Credentials 8 Third
Deployment of FireSIGHT Management Center on VMware ESXi
 Deployment of FireSIGHT Management Center on VMware ESXi Contents Introduction Prerequisites Components Used Configuration Deploy an OVF Template Power On and Complete Initialization Configure the Network
Lab - Install Windows 7 or Vista
 Introduction In this lab, you will install the Windows 7 or Vista operating system. Recommended Equipment A computer with a blank hard disk drive Windows 7 or Vista installation DVD or USB flash drive
Instrument Software Update Instructions
 Purpose Instrument Software Update Instructions Keysight X-Series Signal Analyzers, Non-Touch (N9000A, N9010A, N9020A, N9030A) With either WES7 or Windows 10 operating systems The purpose of this document
Imaging your Classmate (Veteran Image
 Imaging your Classmate (Veteran Image Download) This document describes the procedure for creating a bootable USB drive to restore the 2017 FRC image on a Classmate computer. Note that Veteran teams are
Sidewinder. Hardware Guide Models S1104, S2008, S3008. Revision E
 Sidewinder Hardware Guide Models S1104, S2008, S3008 Revision E Table of contents Preface...3 Find product documentation... 3 1 Introducing the appliances... 4 Models and features... 4 Supported software...
Cisco UCS Diagnostics User Guide for B-Series Servers, Release 1.0
 First Published: October 25, 2013 Americas Headquarters Cisco Systems, Inc. 170 West Tasman Drive San Jose, CA 95134-1706 USA http://www.cisco.com Tel: 408 526-4000 800 553-NETS (6387) Fax: 408 527-0883
Reinstalling the Operating System on the Dell PowerVault 745N
 Reinstalling the Operating System on the Dell PowerVault 745N This document details the following steps to reinstall the operating system on a PowerVault 745N system: 1. Install the Reinstallation Console
Initial Configuration Steps of FireSIGHT Systems
 Initial Configuration Steps of FireSIGHT Systems Document ID: 118595 Contributed by Nazmul Rajib and Jose Escobar, Cisco TAC Engineers. Oct 09, 2014 Contents Introduction Prerequisite Configuration Step
Updating the Firmware on Cisco UCS C-Series Servers
 Updating the Firmware on Cisco UCS C-Series Servers This chapter includes the following topics: Upgrading the Firmware on a Cisco UCS C-Series Server Using the HUU, on page 1 Upgrading the Firmware on
Cisco Integrated Management Controller (IMC) Supervisor is a management system that allows you to manage rack mount servers on a large scale.
 Supervisor is a management system that allows you to manage rack mount servers on a large scale.") Contents Introduction Prerequisites Requirements Qualified Serviers Minimum Firmware Versions Supported PCiE Cards Supported Hypervisor versions Supported Browser Versions Configure Deploying Cisco IMC
Contents Introduction Prerequisites Requirements Qualified Serviers Minimum Firmware Versions Supported PCiE Cards Supported Hypervisor versions Supported Browser Versions Configure Deploying Cisco IMC
Product Bulletin for Supermicro CDE250 BIOS Upgrade to Version 2.1a
 Product Bulletin for Supermicro CDE250 BIOS Upgrade to Version 2.1a Contents Problem Statement...1 Cisco Recommendation and Instruction...2 Requirements...2 Instruction on BIOS 2.1a Upgrade...2 Preparing
Quick Guide. Full Install on Hog 4 OS Consoles Jan 4, 2017
 Quick Guide High End Systems Full Install on Hog 4 OS Consoles Jan 4, 2017 Rev C PAGE 1/5 You may occasionally need to do a full install of the Hog 4OS on your console. A full install is not typically
Cisco Emergency Responder Installation
 Overview, page 1 Hardware and Software Prerequisites, page 1 System Preparations, page 2 Installation and Migration on the Cisco UCS Server, page 4 Installation on a New System, page 13 Emergency Responder
Installing the Server Operating System or Hypervisor
 Installing the Server Operating System or Hypervisor This chapter includes the following sections: Operating System or Hypervisor Installation Methods, page 1 KVM Console, page 1 PXE Installation Servers,
PanelMate epro PS and epro PS Classic Restore Factory Image Load
 PanelMate epro PS and epro PS Classic Restore Factory Image Load Introduction There are 4 versions of the restore factory image load kits (catalog numbers 76MLPSD, 76MLPSB, 76MLPSCD, and 76MLPSCB). These
Cisco UCS C-Series. Installation Guide
 Installation Guide UPDATED: 04 October 2018 Copyright Notices Copyright 2002-2018 KEMP Technologies, Inc. All rights reserved. KEMP Technologies and the KEMP Technologies logo are registered trademarks
ScreenScape Connect. Connecting to a Non-Broadcasted WiFi Network
 ScreenScape Connect Connecting to a Non-Broadcasted WiFi Network 03 Introduction 03 Deleting WiFi Entries 05 Connecting to Hidden WiFi Introduction If you require your Connect Device to be connected to
Vista 2.3 includes a new installer which makes applying the console image file (the ISO file) much easier for the end user.
 much easier for the end user.") JandsPtyLtd40KentRoadMascotNSW2020AustrPhon+6195820909Fa+619582099wwjandscomau Technical Bulletin Date: 6 February 2014 Author: Susan Twartz Distribution: General Public Reimaging Linux Consoles After
JandsPtyLtd40KentRoadMascotNSW2020AustrPhon+6195820909Fa+619582099wwjandscomau Technical Bulletin Date: 6 February 2014 Author: Susan Twartz Distribution: General Public Reimaging Linux Consoles After
PanelMate epro PS Family Restore Factory Image Load
 PanelMate epro PS Family Restore Factory Image Load Introduction The restore factory image load kits provides a simple way for users to reset the load of the internal CompactFlash, that holds the Operating
Upgrading the Server Software
 APPENDIXB This appendix describes how to upgrade or reinstall the Cisco PAM server software, desktop client software, and Gateway module firmware. Contents Upgrade Notes for Release 1.5.0, page B-2 Obtaining
Product Bulletin for Supermicro CDE250 BIOS Upgrade to Version 2.1a
 Product Bulletin for Supermicro CDE250 BIOS Upgrade to Version 2.1a Contents Problem Statement... 1 Cisco Recommendation and Instruction... 2 Requirements... 2 Instruction on BIOS 2.1a Upgrade... 2 Preparing
Installing the Operating System or Hypervisor
 If you purchased E-Series Server or NCE Option 1 (E-Series Server or NCE without a preinstalled operating system or hypervisor), you must install an operating system or hypervisor. This chapter includes
Lab Install Windows 8
 Introduction In this lab, you will install Windows 8.1 and 8.0. Recommended Equipment A computer with a blank hard disk drive Windows 8.1 and 8.0 installation DVD or USB flash drive Step 1: Starting the
Recovering Cisco MXE 3500
 CHAPTER 7 Recovering Cisco MXE 3500 Revised: January 26, 2010, Caution This recovery process resets your Cisco MXE 3500 to the same state and configuration in which it was delivered to you. All changes
DSA8300 Digital Serial Analyzer Microsoft Windows 7 Ultimate Operating System Restore Instructions
 xx ZZZ DSA8300 Digital Serial Analyzer Microsoft Windows 7 Ultimate Operating System Restore Instructions *P071289900* 071-2899-00 Copyright Tektronix. All rights reserved. Licensed software products are
Lionstracs Groove X-R
 Lionstracs Groove X-R Groove OS version 5.3 Installation & Upgrade Guide 31 October 2011 English Language documentation prepared by Corcyra Global in consultation with Lionstracs Table of Contents Warning
ACU-RITE. USB Recovery Drive. User s Manual. For use with: MILLPWR G2 ID xx
 ACU-RITE User s Manual USB Recovery Drive For use with: MILLPWR G2 ID 1113777-xx English (en) 10/2017 Table of Contents 1-1 Introduction Required hardware... 5 Software... 5 1-2 Operation Navigating the
Cisco Emergency Responder Installation
 Cisco Emergency Responder (Emergency Responder) is distributed on an installation DVD that contains everything that is required to install Emergency Responder, including the Cisco Unified Communications
Installation of Cisco Business Edition 6000H/M
 Installation Overview, page 1 Installation Task Flow of Cisco Business Edition 6000H/M, page 2 Installation Overview This chapter describes the tasks that you must perform to install software on your Business
Starting the KVM Console
 Starting the KVM Console This chapter includes the following sections: KVM Console, page 1 Starting the KVM Console from a Server, page 5 Starting the KVM Console from a Service Profiles, page 5 Starting
Pro Focus 2202 Software Upgrade Procedure
 Pro Focus 2202 Software Upgrade Procedure IMPORTANT: The installation procedure must be carried out only by B-K service personnel or their authorised representatives, who are aware of the hazards involved.
Bare Metal. Quick Start Guide. Compact PC. Server Mode (Single-Interface Deployment) Before You Begin
 Before You Begin") Bare Metal Server Mode (Single-Interface Deployment) 2015 Silver Peak Systems, Inc. Before You Begin Download either the Hyper-V, KVM, or Xen appliance ISO image available from the Support portal or Marketplace.
Bare Metal Server Mode (Single-Interface Deployment) 2015 Silver Peak Systems, Inc. Before You Begin Download either the Hyper-V, KVM, or Xen appliance ISO image available from the Support portal or Marketplace.
MT LoadMaster Cisco UCS C-Series. Multi-Tenant LoadMaster for Cisco UCS C-Series Rack Server. Installation Guide
 Multi-Tenant LoadMaster for Cisco UCS C-Series Rack Installation Guide VERSION: 7.0 UPDATED: MARCH 2016 Table of Contents 1 Introduction... 3 1.1 Pre-requisites... 3 2... 4 2.1 Configure the Boot Options
Cisco Host Upgrade Utility 3.0 User Guide
 First Published: 2016-12-14 Americas Headquarters Cisco Systems, Inc. 170 West Tasman Drive San Jose, CA 95134-1706 USA http://www.cisco.com Tel: 408 526-4000 800 553-NETS (6387) Fax: 408 527-0883 2016-2018
Upgrading Earlier Release Version Servers for Cisco UCS Manager Integration
 Upgrading Earlier Release Version s for Cisco UCS Manager Integration This chapter includes the following sections: Required Items for Upgrade, page 1 Upgrading the C-Series Firmware, page 2 Updating Cisco
Guideline for the installation of C-MOR Video Surveillance Virtual Machine on VMware ESX Server
 This guideline illustrates the installation of the C-MOR Video Surveillance Virtual Machine on VMware ESX Server. This manual applies to C-MOR version 4 with 64 bit operating system. First download the
Reimage Procedures. Firepower 2100 Series Software Reimage and Disaster Recovery
 Firepower 2100 Series Software Reimage and Disaster Recovery Procedures, page 1 Firepower 2100 Series Software Reimage and Disaster Recovery Procedures In some cases, you may want to reset your system
Physical Imaging Rapid Recovery - Bare Metal Restore
 Physical Imaging Rapid Recovery - Bare Metal Restore Applicable Products These instructions apply to the following products: - MSP Overview Bare Metal Recovery (BMR) allows you to restore a physical image
MBB100 / DSM800 Update Instructions
 MBB100 / DSM800 Update Instructions Contents Contents... 1 Automatic Updates... 1 Manual Update to the Latest Version of N2KView... 2 Manual Update of the Complete Operating System... 3 Automatic Updates
Cisco Host Upgrade Utility 2.0 User Guide
 First Published: 2016-09-17 Americas Headquarters Cisco Systems, Inc. 170 West Tasman Drive San Jose, CA 95134-1706 USA http://www.cisco.com Tel: 408 526-4000 800 553-NETS (6387) Fax: 408 527-0883 2016
Setup Instructions for Upgrading the Windows XP Panasonic CF-19 Toughbook to Windows 7
 Setup Instructions for Upgrading the Windows XP Panasonic CF-19 Toughbook to Windows 7 Installation Setup Please ensure that the Windows XP CF-19 Toughbook to be upgraded is plugged in but powered OFF
Read This First *P *
 Dear Tektronix Customer, Thank you for your order and congratulations on the delivery of your new Tektronix oscilloscope. If your instrument did not ship with an operating system restore DVD, use the following
ESX Server 3i Embedded Setup Guide ESX Server 3i version 3.5 Embedded and VirtualCenter 2.5
 ESX Server 3i Embedded Setup Guide ESX Server 3i version 3.5 Embedded and VirtualCenter 2.5 ESX Server 3i Embedded Setup Guide ESX Server 3i Embedded Setup Guide Revision: 20090612 Item: VI-ENG-Q407-446
Deploying Cisco UCS Central
 This chapter includes the following sections: Obtaining the Cisco UCS Central Software from Cisco, page 1 Using the Cisco UCS Central OVA File, page 2 Using the Cisco UCS Central ISO File, page 4 Logging
FireFox. CIS 231 Windows 2012 R2 Server Install Lab #1
 CIS 231 Windows 2012 R2 Server Install Lab #1 1) Use either Chrome or Firefox to access the VMware vsphere web Client. https://vweb.bristolcc.edu CHROME At the your connection is not private message, click
Cisco Stealthwatch Cloud. Stealthwatch Cloud Free Trial Guide
 Cisco Stealthwatch Cloud Stealthwatch Cloud Free Trial Guide TOC Stealthwatch Cloud Free Trial Overview 6 Functionality Overview 7 Deployment 7 Dynamic Entity Modeling 7 Alerts and Analysis 8 Quick Start
Installing macos High Sierra
 Install macos High Sierra on a blank hard drive. Written By: Arthur Shi ifixit CC BY-NC-SA www.ifixit.com Page 1 of 8 INTRODUCTION If you have recently upgraded or replaced the hard drive for your MacBook
GV Director Restoring USB Image / Frame and Panel Installation
 IMPORTANT NOTE: If you have already been provided this update package via USB by a Grass Valley service representative, please skip ahead and begin on page 4. Requirements: 16 GB USB FLASH OR LARGER Mouse
Imaging your Classmate (Veteran/Rookie Image
 Imaging your Classmate (Veteran/Rookie Image Download) This document describes the procedure for creating a bootable USB drive to restore the 2014 FRC image on a Classmate computer. Note that Veteran teams
Firepower Management Center High Availability
 The following topics describe how to configure Active/Standby high availability of Cisco Firepower Management Centers: About, on page 1 Establishing, on page 7 Viewing Status, on page 8 Configurations
Getting Started Guide
 Getting Started Guide Sophos Firewall Software Appliance Document Date: August 2017 August 2017 Page 1 of 13 Contents Change Log...3 Copyright Notice...4 Preface...5 Minimum Hardware Requirement...5 Recommended
Software Images. About Software Images. Dependent Factors. Send documentation comments to CHAPTER
 CHAPTER 10 This chapter describes how to install and upgrade software images, and introduces the file system. It includes the following sections: About, page 10-1 Essential Upgrade Prerequisites, page
Installation. Installation Overview. Installation and Configuration Taskflows CHAPTER
 CHAPTER 4 Overview, page 4-1 Navigate the Wizard, page 4-7 Install and Configure Cisco Unified Presence, page 4-7 Perform a Fresh Multi-Node, page 4-15 Overview Cisco Unified Presence supports the following
Guide to SATA Hard Disks Installation and RAID Configuration
 Guide to SATA Hard Disks Installation and RAID Configuration 1. Guide to SATA Hard Disks Installation...2 1.1 Serial ATA (SATA) Hard Disks Installation...2 2. Guide to RAID Configurations...3 2.1 Introduction
Oscilloscope System Recovery
 Instructions Oscilloscope System Recovery The oscilloscope application (firmware) runs on a Microsoft Windows platform. While the instrument is designed to operate reliably for many years, the loading
Installing the Cisco Virtual Network Management Center
 CHAPTER 4 Installing the Cisco Virtual Network Management Center This chapter provides procedures for installing the Cisco Virtual Network Management Center (VNMC). This chapter includes the following
Preparing the boot media/installer with the ISO file:
 Preparing the boot media/installer with the ISO file: Download and extract the ISO file with your favorite uncompressing/extracting software (for example: 7zip or WinZip programs) to an empty USB Flash
The following table lists the supported upgrade paths to Cisco Finesse Release 11.5(1).
.") Supported Paths, page 1 Aligned Partitions Support, page 1 Perform, page 2 Perform Rollback, page 4 Supported Paths The following table lists the supported upgrade paths to Cisco Finesse Release 11.5(1).
Supported Paths, page 1 Aligned Partitions Support, page 1 Perform, page 2 Perform Rollback, page 4 Supported Paths The following table lists the supported upgrade paths to Cisco Finesse Release 11.5(1).
TSM800 / TSM1330 Update Instructions
 TSM800 / TSM1330 Update Instructions Contents Contents... 1 Automatic Updates... 1 Manual Update to the Latest Version of N2KView... 2 Manual Update of the Complete Operating System... 3 Automatic Updates
IT Essentials v6.0 Windows 10 Software Labs
 IT Essentials v6.0 Windows 10 Software Labs 5.2.1.7 Install Windows 10... 1 5.2.1.10 Check for Updates in Windows 10... 10 5.2.4.7 Create a Partition in Windows 10... 16 6.1.1.5 Task Manager in Windows
Plexxi Control Installation, Upgrade and Administration Guide Release 3.2.0
 Plexxi Control Installation, Upgrade and Administration Guide Release 3.2.0 702-20002-10 Rev 3.0 June 27, 2017 100 Innovative Way - Suite 3322 Nashua, NH 03062 Tel. +1.888.630.PLEX (7539) www.plexxi.com
Host Upgrade Utility User Guide for Cisco UCS E-Series Servers and the Cisco UCS E-Series Network Compute Engine
 Host Upgrade Utility User Guide for Cisco UCS E-Series Servers and the Cisco UCS E-Series Network Compute First Published: August 09, 2013 Americas Headquarters Cisco Systems, Inc. 170 West Tasman Drive
CESecure Quick Start Guide
 CESecure Quick Start Guide Using CESecure Software CESecure software is pre-installed on CMS Products Flash or Hard Drives and does not require installation. The CESecure software moves with the encryption
INSIGHT Installation Instructions
 This is the New Icon that will appear on your computer screen after the INSIGHT v8.1 software is installed. IMPORTANT: These instructions pertain to version 8.1.29. INSIGHT v8.1.29 requires Windows 8,
1) Use either Chrome of Firefox to access the VMware vsphere web Client. https://vweb.bristolcc.edu. FireFox
 Use either Chrome of Firefox to access the VMware vsphere web Client. https://vweb.bristolcc.edu. FireFox") CIS 231 Windows 7 Install Lab #2 1) Use either Chrome of Firefox to access the VMware vsphere web Client. https://vweb.bristolcc.edu CHROME At the your connection is not private message, click Advanced
CIS 231 Windows 7 Install Lab #2 1) Use either Chrome of Firefox to access the VMware vsphere web Client. https://vweb.bristolcc.edu CHROME At the your connection is not private message, click Advanced
Tutorial How to upgrade firmware on Phison S8 controller MyDigitalSSD using a Windows PE environment
 Tutorial How to upgrade firmware on Phison S8 controller MyDigitalSSD using a Windows PE environment Version 8.1 This tutorial will walk you through how to create a bootable USB drive to enter into a WINPE
Managing the Cisco APIC-EM and Applications
 Managing Cisco APIC-EM Using the GUI, page 1 Cisco APIC-EM Application Separation, page 1 Information about Backing Up and Restoring the Cisco APIC-EM, page 4 Updating the Cisco APIC-EM Software, page
Performing Administrative Tasks
 This chapter describes how to perform administrative tasks using Cisco CMX. Users who are assigned administration privileges can perform administrative tasks. Cisco CMX User Accounts, page 1 Backing Up
Installation. Power on and initial setup. Before You Begin. Procedure
 Power on and initial setup, page 1 Customize ESXi host for remote access, page 4 Access and configure ESXi host, page 6 Deploy virtual machines, page 13 Install applications on virtual machines, page 14
Cisco VDS Service Broker Software Installation Guide for UCS Platforms
 Cisco VDS Service Broker 1.0.1 Software Installation Guide for UCS Platforms Revised: May 2013 This document provides detailed instructions for installing the Cisco Videoscape Distribution Suite Service
Restoring the Server to Bare Metal
 Restoring the Server to Bare Metal Figure 19 below shows a virtual machine named Bare Metal System. As you can see, when we try to boot the system the boot fails because there is no operating system installed
CIS 231 Windows 2012 R2 Server Install Lab #1
 CIS 231 Windows 2012 R2 Server Install Lab #1 1) To avoid certain problems later in the lab, use Chrome as your browser: open this url: https://vweb.bristolcc.edu 2) Here again, to avoid certain problems
Deployment of a new M-Lab site
 Deployment of a new M-Lab site Deployment of a new M-Lab site Scope of the document HW deployment - on-site CHECKLIST for on-site staff, BEFORE going to the site SW configuration - on-site and off-site
Using the TUI Upgrade Utility to Update an Existing Release 2.4 Server
 Using the TUI Upgrade Utility to Update an Existing Release 2.4 Server First Published: November 4, 2011 Revised: June 12, 2012 Do not use the information in this module to perform an upgrade from Cisco
Updating to Version 6.2.2
 Before you begin the update, you must thoroughly read and understand these release notes, especially Before You Update: Important Notes and Pre-Update Readiness Checks. If you are unsure whether you should
VMware vsphere 5.5: Install, Configure, Manage Lab Addendum. Lab 3: Configuring VMware ESXi
 VMware vsphere 5.5: Install, Configure, Manage Lab Addendum Lab 3: Configuring VMware ESXi Document Version: 2014-07-08 Copyright Network Development Group, Inc. www.netdevgroup.com NETLAB Academy Edition,
Back Up/Restore Hard Drives And Partitions With CloneZilla Live
 By Falko Timme Published: 2008-11-25 17:35 Version 1.0 Author: Falko Timme Last edited 11/17/2008 This tutorial shows how you can back up and restore hard drives and partitions
Plexxi HCN Control Software Installation, Upgrade and Administration Guide Release through 3.3.0
 Plexxi HCN Control Software Installation, Upgrade and Administration Guide Release 3.2.2 through 3.3.0 December 8, 2017 100 Innovative Way - Suite 3322 Nashua, NH 03062 Tel. +1.888.630.PLEX (7539) www.plexxi.com
How to update OS image from V1421 to V1501 by Exe file
 Author Sean Hsu Version 1.0.0 Date 2010/4/20 Page 1/13 How to update OS image from V1421 to V1501 by Exe file Applies to: Platform OS version WinPAC/ViewPAC utility version WP-8x3x N/A N/A WP-8x4x All
LENOVO THINKSTATION P520C, P520, P720, & P920 WINDOWS 7 INSTALLATION
 LENOVO THINKSTATION P520C, P520, P720, & P920 WINDOWS 7 INSTALLATION Contents OVERVIEW SECTION 1 BIOS & PRE-INSTALLATION STEPS SECTION 2 WINDOWS 7 DRIVER SLIPSTREAM SETUP SECTION 3 WINDOWS 7 INSTALLATION
Wavestore V6 Installation Instructions
 Wavestore V6 Installation Instructions Wavestore Global Limited Boundary House Cricket Field Road Uxbridge UB8 1QG United Kingdom For Technical Support P: +44 (0) 1895 527127 E: support@wavestore.com W:
ShadowProtect Bare Metal Restore
 ShadowProtect Bare Metal Restore Prerequisites Datto Technical Support is always prepared and on stand-by to assist with business critical situations such as Bare Metal Restores (BMRs). If the situation
Tutorial - How to upgrade firmware on Phison S9 controller MyDigitalSSD using a Windows PE environment
 Tutorial - How to upgrade firmware on Phison S9 controller MyDigitalSSD using a Windows PE environment Version 1.9 This tutorial will walk you through how to create a bootable USB drive to enter into a
Configuration Note. AudioCodes One Voice for Microsoft Skype for Business. CloudBond 365. Backup and Restore Functionality. Version 9.
 7 Configuration Note AudioCodes One Voice for Microsoft Skype for Business CloudBond 365 Backup and Restore Functionality Version 9.5 Update 4 Configuration Note Contents Table of Contents 1 Introduction...
Troubleshooting Cisco APIC-EM Multi-Host
 The following procedures may be used to troubleshoot a Cisco APIC-EM multi-host configuration: Changing the Settings in a Multi-Host Cluster, page 1 Removing a Single Host from a Multi-Host Cluster, page
MAGNUM-SDVN Security Administration Manual
 MAGNUM-SDVN Security Administration Manual Revision 19: November 21, 2017 Contents Overview... 3 Administrative Access... 4 Logging Into Terminal Locally... 4 Logging Out Of Local Terminal... 4 Logging
Using UCS-Server Configuration Utility
 CHAPTER 3 This chapter contains the following sections: UCS-SCU Interface, page 3-1 Get System Updates, page 3-3 Configure a Server, page 3-5 RAID Configuration, page 3-5 OS Installation, page 3-8 Save
LENOVO THINKSTATION P520C, P520, P720, & P920 WINDOWS 10 INSTALLATION
 LENOVO THINKSTATION P520C, P520, P720, & P920 WINDOWS 10 INSTALLATION Contents OVERVIEW SECTION 1 BIOS & PRE-INSTALLATION STEPS SECTION 2 WINDOWS 10 INSTALLATION SECTION 3 WINDOWS 10 UPGRADE USING MEDIA
Task Scheduling. Introduction to Task Scheduling. Configuring a Recurring Task
 The following topics explain how to schedule tasks: Introduction to, on page 1 Configuring a Recurring Task, on page 1 Scheduled Task Review, on page 17 Introduction to You can schedule many different
OS Installer. Installation Instructions
 OS Installer These instructions are only relative to Digital X Bus X.200 owners needing to completely clean out their internal hard drive and re-install the entire operating system and the latest Digital