Jagannath Institute of Management Sciences Lajpat Nagar
|
|
|
- Earl Summers
- 5 years ago
- Views:
Transcription
1 Jagannath Institute of Management Sciences Lajpat Nagar BCA Sem II WEB TECHNOLOGIES Poonam Verma
2 Contents: UNIT I Web Essentials: Clients, Servers and communication, HTTP request message-response message.web Clients, Web Servers-Case Study. Markup Languages, XHTML :An Introduction to XHTML, History- Versions- Basic XHTML, Syntax and Semantics, Introduction to Dynamic web designing and Scripting Languages, Client Side and Server Side Scripting UNIT II JavaScript: Introduction to JavaScript, Elements of JavaScript, Variables, DataTypes,Operators,Control Statements, Functions, Dialogs: performing I/O, Objects in JavaScript, Document Object Model, Form Controls and Event Handling. UNIT III ASP: Introduction to ASP, ASP first Script, Programming features of ASP- Operators, Variables, if statement, select statement, static and dynamic arrays, ASP procedures, Do Loop, for Loop, Subroutines and strings, ASP forms-forms with get and post method. UNIT IV ASP with ADO: Accessing a database from an asp page, ADO-active x data objects, ADO database connection, display records, add records, sort records, delete records, update records from an ASP page through ADO. UNIT V XML: Features of XML, XML Mark up : Element markup, Attribute Markup, Element declarations, element content models: Element Sequences, Element choices, Combined sequences and choices, Element Occurrence Indicators: Discussion of three occurrence indicators?(question Mark) *(Asterisk Sign) + ( plus Sign), Character Content, PCDATA, Document Type Declaration and Validation, Developing a DTD from XML Code.
3 Unit I Web Essentials Learning Objectives: After studying this unit, you should be able to : Describe Web technology Describe the Web Essentials of the Internet Define the communication with the help of HTTP Understand the markup Languages Define XHTML Describe the different features and versions of XHTML 1.1 Introduction: Internet is a network of networks that consists of millions of private, public, academic, business, and government networks, of local to global scope, that are linked by a broad array of electronic, wireless, and optical networking technologies. Web technologies related to the interface between web servers and their clients. This information includes markup languages and standards for document identification and display. It can reach many people all over the world on multiple platforms and operating systems to make the Internet more powerful and easier to use. 1.2 Web Essentials: Clients, servers and Communication. A client computer and a server computer are usually two separate devices, each customized for their designed purpose. For example, a Web client works best with a large screen display, while a Web server does not need any display at all and can be located anywhere in the world. However, in some cases a given device can function both as a client and a server for the same
4 application. Likewise, a device that is a server for one application can simultaneously act as a client to other servers, for different applications. Client-server is just one approach to managing network applications The primary alternative, peer-to-peer networking, models all devices as having equivalent capability rather than specialized client or server roles. Compared to client-server, peer to peer networks offer some advantages such as more flexibility in growing the system to handle large number of clients. Client-server networks generally offer advantages in keeping data secure. Clients: Client devices are typically PCs with network software applications installed that request and receive information over the network. Mobile devices as well as desktop computers can both function as clients. Servers: A server device typically stores files and databases including more complex applications like Web sites. Server devices often feature higher-powered central processors, more memory, and larger disk drives than clients. Process of Communication: Clients and servers exchange messages in a request-response messaging pattern: The client sends a request, and the server returns a response. This exchange of messages is an example of interprocess communication. To communicate, the computers must have a common language, and they must follow rules so that both the client and the server know what to expect. The language and rules of communication are defined in a communications protocol. All client-server protocols operate in the application layer. A server may receive requests from many different clients in a very short period of time. Because the computer can perform a limited number of tasks at any moment, it relies on a scheduling system to prioritize incoming requests from clients in order to accommodate them all in turn. Example : When a bank customer accesses online banking services with a web browser (the client), she initiates a request to the bank's web server. Since the customer's login credentials are stored in a database, the web server runs a program to access a database server. This database server may, in turn, fetch financial transaction records from another database server.

5 An application server interprets the returned data by following the bank's business logic, and provides the output to the web server. Finally, the web server sends the result to the web browser, which interprets the data. Each server listed above acts as a client when it submits data in a request to another server for processing. In each step of this sequence of client server message exchanges, a computer processes a request and returns data. This is the request-response messaging pattern. When all the requests are met, the sequence is complete and the web browser presents the data to the customer. The principle of communication between a client and a server is composed of successions of requests and responses. The principle of communication is as explain below: A Web client (or browser) sends requests to a Web server. Every retrievable piece of information on the Web is identified by a Uniform Resource Locator (URL), which includes the name of the object, where it is located, and the protocol used to get it. The Web server is responsible for document storage and retrieval. It sends the document requested (or an error message) back to the requesting client. The Browser interprets and presents the document. The browser is responsible for document presentation. 1.2 a)communication through HTTP The Full Form of HTTP is HyperText Transfer Protocol. The language that Web clients and servers use to communicate with each other is called the Hypertext Transfer Protocol (HTTP). All Web clients and servers must be able to speak HTTP in order to send and receive hypermedia documents.

6 HTTP is the set of rules for transferring files (text, graphic images, sound, video, and other multimedia files) on the World Wide Web. As soon as a Web user opens their Web browser, the user is indirectly making use of HTTP. HTTP is an application protocol that runs on top of the TCP/IP suite of protocols (the foundation protocols for the Internet). HTTP concepts include (as the Hypertext part of the name implies) the idea that files can contain references to other files whose selection will elicit additional transfer requests. Any Web server machine contains, in addition to the Web page files it can serve and an HTTP daemon, a program that is designed to wait for HTTP requests and handle them when they arrive. Web browser on our computer is an HTTP client, sending requests to server machines. When the browser user enters file requests by either "opening" a Web file or clicking on a hypertext link, the browser builds an HTTP request and sends it to the Internet Protocol address (IP address) indicated by the URL. The HTTP daemon in the destination server machine receives the request and sends back the requested file or files associated with the request. (A Web page often consists of more than one file.)
7 1.3 Mark up Languages History of MarkUp Languages: A (document) markup language is a modern system for annotating a document in a way that is syntactically distinguishable from the text. The idea and terminology evolved from the "marking up" of paper manuscripts, i.e., the revision instructions by editors, traditionally written with a blue pencil on authors' manuscripts. In digital media this "blue pencil instruction text" was replaced by tags, that is, instructions are expressed directly by tags or "instruction text encapsulated by tags". In 1989, physicist Sir Tim Berners-Lee wrote a memo proposing an Internet-based hypertext system, then specified HTML and wrote the browser and server software in the last part of The first publicly available description of HTML was a document called "HTML Tags", first mentioned on the Internet by Berners-Lee in late It describes 18 elements comprising the initial, relatively simple design of HTML. Except for the hyperlink tag, these were strongly influenced by SGMLguid, an in-housesgml-based documentation format at CERN. Eleven of these elements still exist in HTML 4. Berners-Lee considered HTML to be an application of SGML. It was formally defined as such by the Internet Engineering Task Force (IETF) with the mid-1993 publication of the first proposal for an HTML specification: "Hypertext Markup Language (HTML)" Internet-Draft by Berners-Lee and Dan Connolly, which included an SGML Document Type Definition to define the grammar. Many of the HTML text elements are found in the 1988 ISO technical report TR 9537 Techniques for using SGML, which in turn covers the features of early text formatting languages such as that used by the RUNOFF command developed in the early 1960s for the CTSS (Compatible Time-Sharing System) operating system. These formatting commands were derived from those used by typesetters to manually format documents. Steven DeRose argues that HTML's use of descriptive markup (and influence of SGML in particular) was a major factor in the success of the Web, because of the flexibility and extensibility that it enabled. HTML became the main markup language for creating web pages and other information that can be displayed in a web browser, and is quite likely the most used markup language in the world today.
8 1.4 XHTML Introduction to XHTML XHTML (Extensible HyperText Markup Language) is a family of XML markup languages that mirror or extend versions of the widely used Hypertext Markup Language (HTML), the language in which web pages are written. While HTML (prior to HTML5) was defined as an application of Standard Generalized Markup Language (SGML), a very flexible markup language framework, XHTML is an application of XML, a more restrictive subset of SGML. Because XHTML documents need to be well-formed, they can be parsed using standard XML parsers unlike HTML XHTML was developed to make HTML more extensible and increase interoperability with other data formats. HTML 4 was ostensibly an application of Standard Generalized Markup Language (SGML); however the specification for SGML was complex, and neither web browsers nor the HTML 4 Recommendation were fully conformant to it.. The XML standard, approved in 1998, provided a simpler data format closer in simplicity to HTML 4. By shifting to an XML format, it was hoped HTML would become compatible with common XML tools; servers and proxies would be able to transform content, as necessary, for constrained devices such as mobile phones. By using namespaces, XHTML documents could provide extensibility by including fragments from other XML-based languages such as Scalable Vector Graphics. Versions of XHTML: XHTML 1.0 December 1998 saw the publication of a W3C Working Draft entitledreformulating HTML in XML. This introduced Voyager, the codename for a new markup language based on HTML 4, but adhering to the stricter syntax rules of XML. By February 1999 the name of the specification had changed to XHTML 1.0: The Extensible HyperText Markup Language, and in January 2000 it was officially adopted as a W3C Recommendation. There are three formal DTDs for XHTML 1.0, corresponding to the three different versions of HTML 4.01: XHTML 1.0 Strict is the XML equivalent to strict HTML 4.01, and includes elements and attributes that have not been marked deprecated in the HTML 4.01 specification. As of May 25, 2011, XHTML 1.0 Strict is the document type used for the homepage of the website of the World Wide Web Consortium. XHTML 1.0 Transitional is the XML equivalent of HTML 4.01 Transitional, and includes the presentational elements (such ascenter, font and strike) excluded from the strict version.
9 XHTML 1.0 Frameset is the XML equivalent of HTML 4.01 Frameset, and allows for the definition of frameset documents a common Web feature in the late 1990s. XHTML Syntax: XHTML is a markup language that specifies the format of text that is displayed in a Web browser, such as Microsoft s Internet Explorer or Netscape s Com-municator. One key issue when using XHTML is the separation of the presentation of a document. (i.e., the document s appearance when rendered by a browser) from the structure of the document s information. XHTML markup contains text that represents the content of a document and elements that specify a document s structure. Some important elements of an XHTML document include the html element, the head element and the body element. The html element encloses the head section (represented by the head element) and the body section (represented by the body element). The head section contains information about the XHTML document, such as the title of the document. The head section also can contain special document-formatting instructions called style sheets and client-side programs called scripts for creating dynamic Web pages. The body section contains the page s content that the browser displays when the user visits the Web page. XHTML documents delimit an element with start and end tags. A start tag consists of the element name in angle brackets (e.g., <html> ). An end tag consists of the element name preceded by a / in angle brackets (e.g., </html> ) 1 <?xml version = "1.0"?> 2 <!DOCTYPE html PUBLIC "-//W3C//DTD XHTML 1.0 Strict//EN" 3` " 4 5 <!-- Fig. E.1: main.html --> 6 <!-- Our first Web page. --> 7 8 <html xmlns = " 9 <head> 10 <title>our first Web page</title> 11 </head> <body> 14 <p>welcome to XHTML!</p>
10 15 </body> 16 </html> Explanation: Lines 1 3 are required in XHTML documents to conform with proper XHTML syntax. Lines 5 6 are XHTML comments. XHTML document creators insert comments to improve markup readability and to describe the content of a document. Comments also help other people read and understand an XHTML document s markup and content. Comments do not cause the browser to perform any action when the user loads the XHTML document into the Web browser to view the document. In this example, lines 8 and 16 define the start and end of the html element. Note that the end tag on line 16 has the same name as the start tag, but is preceded by a / inside the angle brackets. Many start tags define attributes that provide additional information about an element. Browsers can use this additional information to determine how to process the element. Lines 9 11 define the Web page s head section with a head element. Line 10 specifies a title element. This is called a nested element, because it is enclosed in the head element s start and end tags. The head element also is a nested element, because it is enclosed in the html element s start and end tags. The title element describes the Web page. Line 13 opens the document s body element. The body section of an XHTML document specifies the document s content, which may include text and tags. Some tags, such as the paragraph tags (<p> and </p> ) in line 14, mark up text for display in a browser. All text placed between the <p> and </p> tags form one paragraph. When the browser renders a paragraph, a blank line usually precedes and follows paragraph text. This document ends with two closing tags (lines 15 16). These tags close the body and html elements, respectively. The ending </html> tag in an XHTML document informs the browser that the XHTML markup is complete.
11 1.5 Dynamic Web Designing A server-side dynamic web page is a web page whose construction is controlled by an application server processing server-side scripts. In server-side scripting parameters determine how the assembly of every new web page proceeds, including the setting up of more client-side processing. A client-side dynamic web page processes the web page using HTML scripting running in the browser as it loads. JavaScript and other scripting languages determine the way the HTML in the received page is parsed into the Document Object Model, or DOM, that represents the loaded web page. The same client-side techniques can then dynamically update or change the DOM in the same way. A dynamic web page is then reloaded by the user or by a computer program to change some variable content. The updating information could come from the server, or from changes made to that page's DOM. This may or may not truncate the browsing history or create a saved version to go back to, but a dynamic web page update using Ajax technologies will neither create a page to go back to, nor truncate the web browsing history forward of the displayed page. Using Ajax technologies the end user gets one dynamic page managed as a single page in the web browser while the actual web content rendered on that page can vary. The Ajax engine sits only on the browser requesting parts of its DOM, the DOM, for its client, from an application server.

12 1.6 Server-side scripting A program running on a web server (server-side scripting) is used to generate the web content on various web pages, manage user sessions, and control workflow. Server responses may be determined by such conditions as data in a posted HTML form, parameters in the URL, the type of browser being used, the passage of time, or a database or server state. Such web pages are often created with the help of server-side languages such as ASP,ColdFusion, JavaScript Perl, PHP, Ruby, WebDNA and other languages. These server-side languages often use the Common Gateway Interface (CGI) to produce dynamic web pages. Two notable exceptions are ASP.NET, and JSP, which reuse CGI concepts in their APIs but actually dispatch all web requests into a shared virtual machine. Dynamic web pages are often cached when there are few or no changes expected and the page is anticipated to receive considerable amount of web traffic that would create slow load times for the server if it had to generate the pages on the fly for each request. 1.7 Client-side scripting Client-side scripting is changing interface behaviors within a specific web page in response to mouse or keyboard actions, or at specified timing events. In this case, the dynamic behavior
13 occurs within the presentation. The Client-side content is generated on the user's local computer system. Such web pages use presentation technology called rich interfaced pages. Client-side scripting languages like JavaScript or ActionScript, used for Dynamic HTML (DHTML) and Flash technologies respectively, are frequently used to orchestrate media types (sound, animations, changing text, etc.) of the presentation. The scripting also allows use of remote scripting, a technique by which the DHTML page requests additional information from a server, using a hidden frame, XML HttpRequests, or a Web service The first "widespread used" version of JavaScript was in 1996 (with Netscape 3 and ECMAScript standard). Example The Client-side content is generated on the client's computer. The web browser retrieves a page from the server, then processes the code embedded in the page (typically written in JavaScript) and displays the retrieved page's content to the user. The innerhtml property (or write command) can illustrate the "Client-side dynamic page" generation: two distinct pages, A and B, can be regenerated (by an "event response dynamic") as document.innerhtml = A and document.innerhtml = B; or "on load dynamic" by document.write(a) and document.write(b). Unit II JAVASCRIPT Learning Objectives: After studying this unit, you should be able to : Describe Javascript Describe features of JavaScript Define the Variables and their data types used in JavaScript Define Control Statements Describe Functions Describe the JavaScript Objects Understand the concept of Document and Event Handling Write programs of Javascript with form controls 2.1 Introduction
14 JavaScript (JS) is a dynamic interpreted computer programming language. It is most commonly used as part of web browsers, whose implementations allow client-side scripts to interact with the user, control the browser, communicate asynchronously, and alter the document content that is displayed. It is also being used in server-side programming, game development and the creation of desktop and mobile applications. It supports many advanced concepts such as objectoriented-programing, recursion, lambda, and closures and is an approachable language for beginners. For Javascript all that is required is a simple text-editor and a browser. In windows, one can use notepad under the accessories and Linux and mac users have a similar editor. 2.2 Features of Javascript are : i. Javascript is case sensitive ii. Javascript is an event driven language which means the scripts written react to events that are set up. iii. Javascript is not a strongly typed language which means one need not be concern with the type of data a variable is storing, only what the variable is storing and in Javascript, variables can store anything, even functions. iv. Variables in Javascript have FUNCTION scope. That is, all variables are global unless they are explicitly defined inside a function and even then child-functions have access to their parent's variables. If a function defines a new variable WITHOUT using the var keyword, that variable will be global in scope. v. Javascript supports true and false as boolean values. vi. JavaScript is almost entirely object-based. Object property names are string keys. They support two equivalent syntaxes: dot notation (obj.x = 10) and bracket notation (obj['x'] = 10). Properties and their values can be added, changed, or deleted at run-time. Most properties of an object (and those on its prototype inheritance chain) can be enumerated using a for...in loop. JavaScript has a small number of built-in objects such as Function and Date. vii. JavaScript also supports regular expressions in a manner similar to Perl, which provide a concise and powerful syntax for text manipulation that is more sophisticated than the built-in string functions 2.3 Variables: Storing Data for your Program It s possible to write a program that defines the value of every single piece of data it uses, but that s like driving a ski lift one does not get to choose where they re going. If one wants the program to be able to take user input, and adapt to different pages and situations, one has to have some way of working with values that one does not know in advance.
15 If we want the program to be a bit more flexible, we need to abstract some of its components. And one of those methods are the use of variables. Variables allow us to give a piece of data a name, then reference that data by its name further along in our program. This way, we can reuse a piece of data without having to remember what its actual value was; all we have to do is remember a variable name. In JavaScript, we create a variable by using the keyword var and specifying the name we want to use: var chameleon; This is called declaring a variable. Having been declared, chameleon is ready to have some data assigned to it. This can be done with the help of the assignment operator (=), placing the variable name on the left and the data on the right: var chameleon; chameleon = "blue"; This whole process can be shortened by declaring and assigning the variable in one go: var chameleon = "blue"; variable names can comprise almost any combination of letters and numbers, though no spaces are allowed. Most punctuation and symbols have special meaning inside JavaScript, so the dollar sign ($) and the underscore (_) are the only non-alphanumeric characters allowed in variable names. Variable names are also case-sensitive, so the names chameleon, Chameleon, and CHAMELEON refer to unique variables that could exist simultaneously. these are all acceptable variable declarations: var chameleon = "blue"; var Chameleon = "red"; var CHAMELEON = "green"; var yellow_chameleon = "yellow"; var orangechameleon = "orange"; var chameleon$ = "greedy";
16 It s standard practice to create variable names in lowercase letters, unless you re concatenating more than one word. And as I mentioned, variable names can t have spaces in them, so if you want a variable name to include more than one word, you can separate each word with an underscore (multi_word_variable) or capitalize the first letter of each word except for the first (multiwordvariable) Logical and Comparison Operators to be used with variables Javascript supports equality checking (==) and identity checking (===). Equality checks for equality regardless of type. Therefore 25 and '25' will evaluate as true. Identity checking checks not only for equality but type equality as well so 25 and '25' will evaluate as false because, while both are 25, one is a string and the other a number. Note that a single equal sign is an assignment statement! x=5 will assign 5 to x, while x==5 will see if x is equal to 5, and x===5 will check to see if x is identical to 5. In addition to == and ===, you can check for not equal (!=) and not identical (!==). = Assignment x=5; // assigns 5 to x == Equality, is x==5? === Identity, is x 5 and a number as well?!= Not equal, is x unequal to 5?!== Not identical, is x unequal to the Number 5? OR, is (x==5) OR (y==5) && And, is (x==5) AND (y==5) < Less than. is x less than 5? <= Less than or equal. is x less than or equal to 5? > Greater than. is x greater than 5? >= Greater than or qual. is x greater than or equal to 5? 2.4 Variable Types: Different Types for Different Data JavaScript, however, is loosely typed the language doesn t care what the variables hold. A variable could start off holding a number, then change to holding a character, a word, or anything else one wants it to hold. In JavaScript, we can work with numbers, strings, Booleans, arrays and objects. (a) Numbers Numbers in JavaScript come in two ways: whole numbers and decimals. The technical term for a whole number is an integer or int. A decimal is called a floating point number, or float. These terms are used in most programming languages, including JavaScript. To create a variable with numerical data, you just assign a number to a variable name: var whole = 3;var decimal = ;
17 Floating point numbers can have a practically unlimited number of decimal places: var shortdecimal = 3.1; var longdecimal = ; (b) Strings A string is a series of characters of any length, from zero to infinity. Those characters could be letters, numbers, symbols, punctuation marks, or spaces.to specify a string, we surround a series of characters with quote marks. It s okay to include a single quote inside a double-quoted string, or a double quote inside a single-quoted string, but if we require to include a quote mark inside a string that s quoted with the same mark, you must precede the internal quote marks with a backslash (\). This is called escaping the quote marks: var singleescape = 'He said \'RUN\' ever so softly.'; var doubleescape = "She said \"hide\" in a loud voice."; Those backslashes disappear when the string is actually used. (c) Booleans Boolean values are fairly simple, really they can be either true or false. They re used mainly when we re making decisions. In order to assign a Boolean value to a variable, simply specify which state should be given to it. true and false are keywords in JavaScript, so no need to put any quote marks around them: var lying = true; var truthful = false; (d) Arrays Numbers, strings and Booleans are good ways to store individual pieces of data, but what happens when a group of data values are required to be work upon, like a list of names or a series of numbers? One could create a whole bunch of variables, which would be a tough job to manage.

18 Arrays solve this problem by providing, an ordered structure for storing a group of values. Array can be thought of as being like a rack in which each slot is able to hold a distinct value. In order to create an array, we use the special array markers, which are the opening and closing square brackets: var rack = []; The variable rack is now an array, but there s nothing stored in it. Each slot in an array is actually called an element, and in order to put some data into an element,it has to be correctly referenced which element is required to be put in. This reference is called an index, which is a number that represents an element s position in an array. The first element in an array has an index of 0. The second element has an index of 1, the third: 2, and so on. To reference a particular element, we use the variable name, followed by an opening square bracket, then the index and a closing square bracket, like this: var rack = []; rack[0] = "First"; rack[1] = "Second"; An array storing data sequentially, starting index at 0. It s possible to populate an array when it s declared. We simply insert values, separated with commas, between the square brackets: var rack = ["First", "Second", "Third", "Fourth"]; That statement says that we should create an array rack that has four elements with the values specified here. The first value will have an index of 0, the second value an index of 1, and so on. Arrays can contain any data type not just strings so you could have an array of numbers: var numberarray = [1, 2, 3, 5, 8, 13, 21, 34];
19 An array of strings: var stringarray = ["Veni", "Vidi", "Vici"]; A mixed array, containing multiple data types, would look like this: var mixedarray = [235, "Parramatta", "Road"]; Here s an array of arrays: var subarray1 = ["Paris", "Lyon", "Nice"]; var subarray2 = ["Amsterdam", "Eindhoven", "Utrecht"]; var subarray3 = ["Madrid", "Barcelona", "Seville"]; var superarray = [subarray1, subarray2, subarray3]; That last example is a multi-dimensional array. 2.5 Conditions and Loops: Controlling Program Flow The way we make those decisions is through the use of special structures called conditions and loops, which help to control which parts of your program will run under particular conditions, and how many times those parts will be run. Although a program might seem like a linear path one statement following another conditional statements act like intersections, allowing to change directions on the basis of a given condition. (a) if Statements The most common conditional statement is an if statement. An if statement checks a condition, and if that condition is met, allows the program to execute some code. If the condition isn t met, the code is skipped. The flow of a program through an if statement can be visualized as in Figure:
 and will be evaluated as a Boolean, with true meaning the code between the curly braces will be executed and false")
20 Syntax for if statements: if (condition) { conditional code; } Instead of a semicolon, an if statement ends with the conditional code between curly braces ({ }). The condition has to be contained within round brackets (also called parentheses) and will be evaluated as a Boolean, with true meaning the code between the curly braces will be executed and false indicating it will be skipped. (b) if-else Statements An if statement allows to execute some code when a condition is met, but doesn t offer any alternative code for cases when the condition isn t met. In an if-else statement, after the closing brace of the if, an else is included, which specifies code to be executed when the condition of the if statement fails:
; } else { alert(\"you are not allowed in.")
21 Syntax of if else statement: if (condition){ conditional code;}else{ alternative conditional code;} Example: var name = "Marcus"; if (name == "Maximus") { alert("good afternoon, General."); } else { alert("you are not allowed in."); } (c) else-if Statements: If you want to provide some alternative code for cases in which an if statement fails, but you want to further assess the data in order to decide what course of action to take, an
22 else-if statement is what you need. Instead of just typing else, type else if, followed by the extra condition you want to test: var name = "Marcus"; if (name == "Maximus") { alert("good afternoon, General."); } else if (name == "Marcus") { alert("good afternoon, Emperor."); } else { alert("you are not allowed in."); } You can chain together as many else-if statements as you want, and at the end, you can include a normal else statement for use when everything fails. (d) while Loops while is the simplest of the loops. All it needs is a condition, and some conditional code: while (condition){ conditional code;} When the program first encounters the while loop, it checks the condition. If the condition evaluates to true, the conditional code will be executed. When the program reaches the end of the conditional code, it goes back up to the condition, checks it, and if it evaluates to true, the conditional code will be executed and so on, A while loop only finishes when its condition evaluates to false. This means it s important to have something inside the conditional code that will affect the condition, eventually making it evaluate to false. Otherwise, your program will never escape the while loop, and will repeat the conditional code forever, causing the browser to become unresponsive. Loops are extremely handy when they re used in conjunction with arrays, because they allow you to step sequentially through the array and perform the same operation on each element.

23 To step through an array with a while loop an incrementing counter is required that starts at 0 and increases by one each time the loop executes. This incrementor will keep track of the index of the element that we re currently working with. When we reach the end of the array, we need to make it stop that s where we use the array s length property. In this example, we ll multiply each element of the numbers array by two: var numbers = [1, 2, 3, 4, 5]; var incrementer = 0; while (incrementer < numbers.length) { numbers[incrementer] *= 2; incrementer++; } The conditional code inside that while loop uses incrementer as the index for the array. Starting at 0, this variable will reference the first element, but because we increase it by one for each execution of the loop, it will step through all of the elements in turn. Once incrementer has the same value as numbers.length, the condition will fail and the program will exit the while loop, having doubled all the elements in the array. (e) do-while Loops
24 A do-while loop behaves almost identically to a while loop, with one key difference: the conditional code is placed before the condition, so the conditional code is always executed at least once, even if the condition is immediately false. The conditional code is placed inside the curly braces of the do; the whilestatement contains the condition right after that: do{ conditional code;} while (condition); eg: var numbers = [1, 2, 3, 4, 5]; var i = 0; while (i < numbers.length) { numbers[i] *= 2; i++; } (f) for Loops for Loops are like while loops, but they offer a couple of handy shortcuts for statements that we commonly use with loops.
![var numbers = [1, 2, 3, 4, 5]; for (var i = 0; i < numbers.](/docs-images/93/113498957/images/25-0.jpg "length; i++) { numbers[i] *= 2; } A for loop shortens two aspects of the while loop: the declaration of a counter variable, and the incrementing of that variable.")
25 var numbers = [1, 2, 3, 4, 5]; for (var i = 0; i < numbers.length; i++) { numbers[i] *= 2; } A for loop shortens two aspects of the while loop: the declaration of a counter variable, and the incrementing of that variable. The first statement is the declaration. It allows us to declare a counter variable in this case i and set its initial value. The second statement is the condition that controls the loop. Just like the condition in a while loop, this condition must evaluate to true in order for the conditional code to be executed. It s evaluated as soon as the program reaches the forloop (but after the counter has been declared), so if it evaluates to false immediately, the conditional code will never be executed. The third statement is an action that will be executed every time the program reaches the end of the conditional code. It is normally used to increment (or decrement) the counter, but you could theoretically put anything in there.
26 2.6 Functions Functions are like little packages of JavaScript code waiting to be called into action. We have used the alert function to pop up an alert box in the browser. alert is a function that s native to all browsers that means it comes built-in with the browser s JavaScript interpreter but it s possible to create your own functions, which you can call whenever you want. A function can essentially be seen as a wrapper for a block of code. All you need to do is name that block, and you ll be able to call it from other areas of your program, whenever you like. You can define your own functions using the function keyword. This tells the program that you re defining a new function, and that the code contained between the curly braces that follow should be executed whenever that function is called: function warning() { alert("this is your final warning"); } The name that follows the function keyword is the name that you want to give your function (function names have the same restrictions as variable names). This is the name you ll call whenever you want your program to run the code inside the function. The name must be followed by round brackets they re empty in this instance. In the example above, we created a new function called warning, so whenever we make a call to this function, the statements inside the function will be executed, causing an alert box to appear, displaying the text, This is your final warning. As in the function declaration above, round brackets must appear immediately after the function name in a function call: warning(); These brackets serve two purposes: they tell the program that you want to execute the function, and they contain the data also known as arguments. Arguments: Passing Data to a Function Functions can be designed to take as many arguments as you want, and those arguments don t have to be strings they can be any sort of data that you can create in JavaScript.
27 When you define your function, you can provide names for the arguments that are to be passed to it. These are included in the round brackets immediately after the function name, with a comma separating arguments in cases where there s more than one: function sandwich(bread, meat) { alert(bread + meat + bread); } Once an argument name has been defined in the function declaration, that argument becomes a variable that s available every time the function is run, allowing you to use the data passed to the function inside the function itself. As you can see in the sandwich function above, two arguments are defined: bread and meat. These two arguments are used in a call to alert and produce a little nonsensical message to the user. Return Statements: Outputting Data from a Function A function may return data to the statement that called it. The neat thing about that is that you can assign a function call as the value of a variable, and that variable s value will become whatever was returned by the function. To get a function to return a value, we use the return keyword, followed by the value we want it to return: function sandwich(bread, meat) { var assembled = bread + meat + bread; } return assembled; A return statement is always the final act of a function; nothing else is processed after a function has returned. Consider this code: function prematurereturner() { return "Too quick"; alert("was it good for you?"); } The alert function wouldn t be called, because the return statement would always cut off execution of the function. This ability to cut off execution of a function with a return statement
28 can be handy when used in conjunction with a conditional statement, where you only want the rest of the function to be executed if a certain condition is met. 2.7 Objects Objects are really just amorphous programming blobs. They re an amalgam of all the other data types, existing mainly to make life easier for programmers. Still, their vagueness of character doesn t mean they re not useful. Objects exist as a way of organizing variables and functions into logical groups. Objects do this by grouping together sets of properties and methods. Properties are variables that are only accessible via their object, and methods are functions that are only accessible via their object. By requiring all access to properties and methods to go through the objects that contain them, JavaScript objects make it much easier to manage your programs. when you create a new array, you re creating a new instance of the built-in Array object. The length of an array is actually a property of that object, and arrays also have methods like pushv and splice, An array is a native object, because it s built in to the JavaScript language, but it s easy to create your own objects using the Object constructor: var Robot = new Object(); Once you ve instantiated your new object, you re then free to add properties and methods to it, to modify the values of existing properties, and to call the object s methods. The properties and methods of an object are both accessed using the dot (.) syntax: Robot.metal = "Titanium"; Robot.killAllHumans = function() { alert("exterminate!"); }; Robot.killAllHumans(); (a) Date Object: The Date object is used to work with dates and times.
29 Create a Date Object The Date object is used to work with dates and times. Date objects are created with the Date() constructor. There are four ways of initiating a date: new Date() // current date and time new Date(milliseconds) //milliseconds since 1970/01/01 new Date(dateString) new Date(year, month, day, hours, minutes, seconds, milliseconds) Some examples of initiating a date: var today = new Date() var d1 = new Date("October 13, :13:00") var d2 = new Date(79,5,24) var d3 = new Date(79,5,24,11,33,0) (b) Math Object The Math object allows you to perform mathematical tasks. Math is not a constructor. All properties/methods of Math can be called by using Math as an object, without creating it. Syntax var x = Math.PI; // Returns PI var y = Math.sqrt(16); // Returns the square root of 16 Math Object Properties Property Description E Returns Euler's number (approx ) LN2 Returns the natural logarithm of 2 (approx ) LN10 Returns the natural logarithm of 10 (approx ) LOG2E Returns the base-2 logarithm of E (approx )
30 LOG10E Returns the base-10 logarithm of E (approx ) PI Returns PI (approx. 3.14) SQRT1_2 Returns the square root of 1/2 (approx ) SQRT2 Returns the square root of 2 (approx ) Math Object Methods Method abs(x) Description Returns the absolute value of x acos(x) Returns the arccosine of x, in radians asin(x) Returns the arcsine of x, in radians atan(x) Returns the arctangent of x as a numeric value between -PI/2 and PI/2 radians atan2(y,x) Returns the arctangent of the quotient of its arguments ceil(x) Returns x, rounded upwards to the nearest integer cos(x) Returns the cosine of x (x is in radians) exp(x) Returns the value of E x floor(x) Returns x, rounded downwards to the nearest integer
31 log(x) Returns the natural logarithm (base E) of x max(x,y,z,...,n) Returns the number with the highest value min(x,y,z,...,n) Returns the number with the lowest value pow(x,y) Returns the value of x to the power of y random() Returns a random number between 0 and 1 round(x) Rounds x to the nearest integer sin(x) Returns the sine of x (x is in radians) sqrt(x) Returns the square root of x tan(x) Returns the tangent of an angle (c) String Object The String object is used to manipulate a stored piece of text. String objects are created with new String(). Syntax var txt = new String("string"); or var txt = "string"; String Object Methods Method charat() Description Returns the character at the specified index charcodeat() Returns the Unicode of the character at the specified index
32 concat() Joins two or more strings, and returns a copy of the joined strings fromcharcode() Converts Unicode values to characters indexof() Returns the position of the first found occurrence of a specified value in a string lastindexof() Returns the position of the last found occurrence of a specified value in a string localecompare() Compares two strings in the current locale match() Searches for a match between a regular expression and a string, and returns the matches replace() Searches for a match between a substring (or regular expression) and a string, and replaces the matched substring with a new substring search() Searches for a match between a regular expression and a string, and returns the position of the match slice() Extracts a part of a string and returns a new string split() Splits a string into an array of substrings substr() Extracts the characters from a string, beginning at a specified start position, and through the specified number of character substring() Extracts the characters from a string, between two specified indices tolocalelowerc ase() Converts a string to lowercase letters, according to the host's locale tolocaleupperc Converts a string to uppercase letters, according to the host's
33 ase() locale tolowercase() Converts a string to lowercase letters tostring() Returns the value of a String object touppercase() Converts a string to uppercase letters trim() Removes whitespace from both ends of a string valueof() Returns the primitive value of a String object 2.8 Document Object Model: Every web page resides inside a browser window which can be considered as an object. A Document object represents the HTML document that is displayed in that window. The Document object has various properties that refer to other objects which allow access to and modification of document content. The way that document content is accessed and modified is called the Document Object Model, or DOM. The Objects are organized in a hierarchy. This hierarchical structure applies to the organization of objects in a Web document. Window object: Top of the hierarchy. It is the outmost element of the object hierarchy. Document object: Each HTML document that gets loaded into a window becomes a document object. The document contains the content of the page. Form object: Everything enclosed in the <form>...</form> tags sets the form object. Form control elements: The form object contains all the elements defined for that object such as text fields, buttons, radio buttons, and checkboxes.

34 Here is a simple hierarchy of few important objects: 2.9 Java Script Event Handling: Event Handlers The simplest way to run JavaScript code in response to an event is to use an event handler. Event handlers have been around for as long as browsers have supported JavaScript, and predate the DOM standard. An event handler is a JavaScript function that s plugged into a node in the DOM so that it s called automatically when a particular event occurs in relation to that element. Setting up a function as an event handler is easy. All you need is a reference to the DOM element for which you want to handle events. Then, you set the element s onevent property, where event is the type of event you want to handle: element.onevent = eventhandler; we can t assign an event handler to our element until the element has loaded.

35 The browser encounters the <script>tag in the HTML document s header and loads the JavaScript file. 1. Our code declares the Link object, then calls Core.start to request that the object s init method be called when the whole document has loaded. 2. The page finishes loading, and the Link object s init method is called. This method finds the link and sets up the clickhandler method as its click event handler. 3. The user clicks the link, which generates a click event. The browser calls clickhandler, the link s click event handler Some of the events on which the JavaScript Programming can be carried out are listed as below:

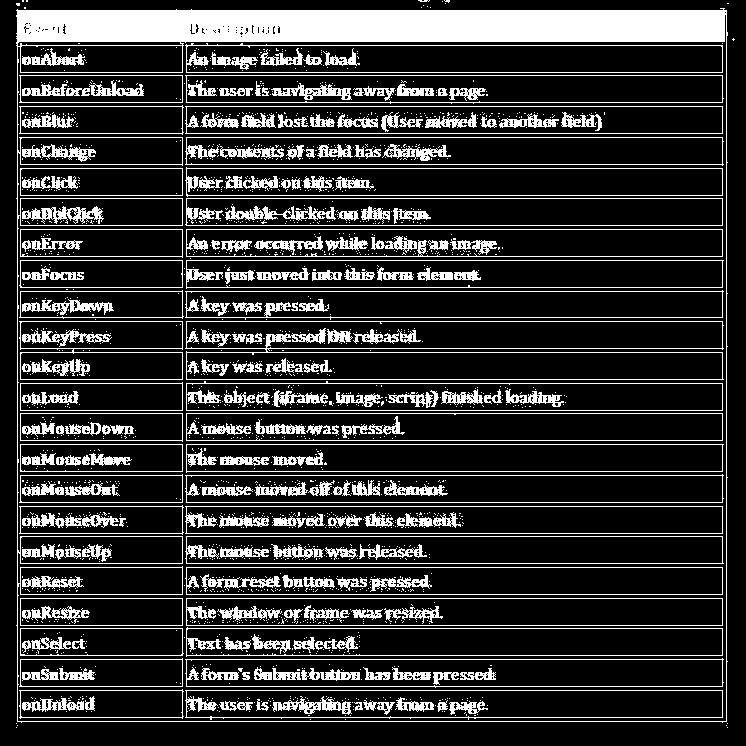
36
37 2.9 Forms in JavaScript: The HTML Form object serves a number of purposes. It acts a container for all of the GUI objects that make up a form. It also acts as the mechanism for grouping together the information provided by the user and sending it back to the server for processing. The <form> takes a number of attributes of which the following are the most commonly used: name - the name of the form, which will be used when referencing objects within the form using JavaScript code. method - the method by which data is sent to the server. This will either be "GET" or "POST" depending on the server-side configuration. action - the URL of the CGI script to which the data entered by the user will be sent. It is also possible to use mailto: to have the data sent to an address. onsubmit - an optional function to call, or inline script to execute before the form data is submitted to the server. This can be useful for validating user input. The following is an example of a Form object named registerform which submits the user data to a cgi script called register.cgi located in the /cgi-bin directory on the server which hosts the web site. The transfer is configured to use the GET method: <form name="registerform" method="get" action="/cgi-bin/register.cgi"> <-- Form Objects go here --> </form> Accessing Objects in a Form the Form object is really just a container which contains other objects (such as text fields and buttons). One way to access the elements in a Form is to use the Form object's elements property. This is an array containing all the objects in a Form (see JavaScript Arrays for details on arrays). We can, therefore, access any element in the array by using the index (note that the objects in the array are in the order in which they are specified in the Form). Suppose we have a text object which is the first object inside a Form called myform: <form action="" name="myform">
38 <input type="text" name="phonenumber" id="phonenumber" value="" /> </form> We can access this object as follows: document.myform.elements[0]; We can then extend this to get the current value entered into the text object: textvalue = document.myform.elements[0].value; A much easier approach is to access the object using the name that was assigned to it at creation. This is achieved using thegetelementbyid() method. Assuming in our first example the Text object was assigned a name of phonenumber we could assign the object to a variable as follows: phone = document.getelementbyid("phonenumber"); We can then subsequently use the phone variable to access the current text value entered into the text field object: document.write ( "The text is " + phone.value ); JavaScript and the Text Object The most common of these objects is the Text object. The Text object places a single line text field into the form into which the user can type information (such a name, address or telephone number). The syntax for creating a text object within a Form is as follows: <input type="text" name="objectname" id="object id" value="current value" size="30" event handling>
39 type - specifies that the type of object is a TEXT object. name - represents the name by which this object may be reference in JavaScript. id - the id used when accessing Form object elements using thegetelementbyid() method (described later in this chapter) value - primes the text object with an initial value (optional). size - specifies the maximum number of characters that can be entered into the Text field. event handling specifies what action to take when a particular event on the object is triggered. Events that can be triggered by the Text object are: onfocus - triggered when the text field gains focus (typically when the cursor is moved into the field to begin typing). onblur - triggered when the text field loses focus (typically when the user clicks somewhere outside the text area). onchange - triggered when the contents of the text area is changed by the user and focus is lost. onselect - triggered when the user highlights text in the text field. In addition to events, the Text object also has a number of methods that can be accessed to perform such tasks as selecting text and changing focus: focus() - sets focus and sets the cursor on the text field blur() - Removes focus from the field (the opposite of focus()) select() - Selects the text in the field so that when the user types all the existing text is replaced. Now that we have covered some of the basics of building a FORM we can bring some of these concepts together in an example using the text object. The following example creates a Form containing a text field. When the user clicks in the text field the onfocus event is triggered which, in turn, calls the select() method to highlight the text in the field. Note that since we are referencing the current object when calling the select() method we can use the this keyword to refer to the current object: <html> <head> <title>javascript Form Example</title>
40 <script language=javascript type="text/javascript"> function buttonpressed() { // document.write ( document.myform.elements[0].value ); var phone = document.getelementbyid("mytext"); document.write ( phone.value ); } </script> </head> <body> <form action="" name="myform"> <input type="text" name="mytext" id="mytext" value="some text" onfocus="this.select()"/> </form> </body> </html> JavaScript and The Button Object There are three types of Button object available. As with the Text object the Button objects use the <input> tag. The type=attribute is then used to define which type of button is to be created. The three different types are: type="button" - The basic button which performs no action by default unless an event handler is assigned to it. type="submit" - The submit button. When pressed this button causes the data in the Form to be sent to the server using the settings defined in the enclosing <Form> tag. If the onsubmit attribute on the enclosing <form> tag has been specified this will be executed before the form data is submitted (useful for form data validation). type="reset" - The reset button. When pressed causes the fields in the Form to be either cleared, or reset to the defaultvalue (if one has been specified). A submit button can be created as follows: <form name="registerform" method="get" action="/cgibin/register.cgi"> <input type="text" name="myname" value=""/>
41 <input type="text" name="myphone" value=""/> <input type="submit" name="buttonname" value="click here to submit information"> </form> When the submit button is pressed in the above example the data in the two Text fields will be submitted to the register.cgi script specified in the <form> tag. The generic "BUTTON" type can be defined as follows: <form name="registerform" method="get" action="/cgi-bin/register.cgi"> <input type="text" name="myname" value=""/> <input type="text" name="myphone" value=""/> <input type="button" name="buttonname" value="product codes" onclick="showcodes()"> </form> JavaScript Check Boxes The Check Box object creates a small square that changes between a checked and unchecked state when clicked. Check Boxes are ideal for providing the user with a "Yes" or "No" choice. The Check Box object uses the <input> tag as follows: <form action="" name="orderform"> <input type="checkbox" name="maillistbox" checked>add me to the mailing List. </form> The checked attribute states whether the box should be checked by default when it is first created. The current setting of a CheckBox can be obtained by accessing the checked property of the object. For example: if (document.orderform.maillistbox.checked) { addtomailinglist(); } You can also change the state of a Check Box by explicitly setting the checked property:
42 document.orderform.maillistbox.checked = false; The Check Box object has one event, onclick, which is triggered when the user clicks on the box, and one method, click(), which simulates a user click when called. JavaScript and Radio Buttons The Radio Button object takes its name from the buttons on an old radio. In the old days a radio would a have a number of buttons for making selections (such as frequency band). Depressing one button would cause the currently selected button to pop up, thereby ensuring that only one button was pressed at any one time. JavaScript Radio Buttons provide a similar functionality for situations where a "one of many" choice is to be presented to the user. The syntax for creating a group of Radio Buttons is as follows: <form action="" name="orderform"> <input type="radio" name="mycolor" value="red" checked> Red <input type="radio" name="mycolor" value="green"> Green <input type="radio" name="mycolor" value="blue"> Blue </form> JavaScript and Drop-down / Select Object The Select object provides a drop down list of choices from which the user can choose (often referred to as ComboBoxes in other GUI environments). When the drop down list is not visible the current selection is displayed in a text area. Due to the fact that the Select Object supports both single and multiple selection of items in the list it is ideal for both "one of many" and "many of many" selection choices. The Select Object uses the <select> tag together with <option> tags representing the choices to be displayed in the drop-down list: <select name="carbrands"> <option value="ford" SELECTED>Ford Motor Company <option value="gm">general Motors <option value="honda">honda Motor Company </select> Objective Questions:
43 Options - True - False CORRECT ANSWER : False
44 Unit III ASP: Active server Pages Learning Objectives: After studying this unit, you should be able to : Understand the Basic concepts of ASP Describe programming features of ASP Define the ASP Operators & variables Describe the Looping & Conditional statements Define Static and Dynamic Arrays Describe Procedures and forms controls 3.1 Introduction: ASP stands for Active Server Pages. Microsoft introduced Active Server Pages in December 1996, beginning with Version 3.0. Microsoft officially defines ASP as: Active Server Pages is an open, compile-free application environment in which you can combine HTML, scripts, and reusable ActiveX server components to create dynamic and powerful Web-based business solutions. Active Server pages enables server side scripting for IIS with native support for both VBScript and Jscript.. In other words, ASP is a Microsoft technology that enables you to create dynamic web sites with the help of server side script, such as VBScript and Jscript. ASP technology is supported on all Microsoft Web servers that are freely available. ASP stands for Active Server Pages ASP is a Microsoft Technology ASP is a program that runs inside IIS IIS stands for Internet Information Services IIS comes as a free component with Windows 2000 IIS is also a part of the Windows NT 4.0 Option Pack 3.2 Some of the advantages of the ASP are: Dynamically edit, change, or add any content of a Web page
45 Respond to user queries or data submitted from HTML forms Access any data or databases and return the results to a browser Customize a Web page to make it more useful for individual users The advantages of using ASP instead of CGI and Perl, are those of simplicity and speed Provide security - since ASP code cannot be viewed from the browser Clever ASP programming can minimize the network traffic Method to run ASP on computer: To allow a user to access an ASP, the ability to do so must be enabled on the IIS server. IIS or Personal Web Server, of Microsoft must be downloaded on the computer. When you are creating an Active Server Page, the server-side script can be identified in one of the following two ways: Use the server-side script block identifiers <% and %>. Use the <SCRIPT> tag with the RUNAT= SERVER attribute. An ASP file normally contains HTML tags, just like an HTML file. However, an ASP file can also contain server scripts, surrounded by the delimiters <% and %>. Server scripts are executed on the server, and can contain any expressions, statements, procedures, or operators valid for the scripting language you prefer to use. 3.3 The Response.Write Command The Response.Write command is used to write output to a browser. The following example sends the text "Hello World" to the browser: In VbScript: <!DOCTYPE html> <html> <body> <% response.write("hello World!") %> </body> </html> In JavaScript <%@ language="javascript"%> <!DOCTYPE html> <html> <body> <% Response.Write("Hello World!")
46 %> </body> </html> 3.4 Procedures The ASP source code can contain procedures and functions: VbScript: <!DOCTYPE html> <html> <head> <% sub vbproc(num1,num2) response.write(num1*num2) end sub %> </head> <body> <p>result: <%call vbproc(3,4)%></p> </body> </html> JavaScript: language="javascript" %> <!DOCTYPE html> <html> <head> <% function jsproc(num1,num2) { Response.Write(num1*num2) } %> </head> <body> <p>result: <%jsproc(3,4)%></p>
47 </body> </html> 3.5 ASP Forms and User Input The Request.QueryString and Request.Form commands are used to retrieve user input from forms. The Request object can be used to retrieve user information from forms. Example HTML form <form method="get" action="simpleform.asp"> First Name: <input type="text" name="fname"><br> Last Name: <input type="text" name="lname"><br><br> <input type="submit" value="submit"> </form> User input can be retrieved with the Request.QueryString or Request.Form command. Request.QueryString The Request.QueryString command is used to collect values in a form with method="get". Information sent from a form with the GET method is visible to everyone (it will be displayed in the browser's address bar) and has limits on the amount of information to send. If a user typed "Bill" and "Gates" in the HTML form above, the URL sent to the server would look like this: Assume that "simpleform.asp" contains the following ASP script: <body> Welcome <% response.write(request.querystring("fname")) response.write(" " & request.querystring("lname")) %> </body>
48 The browser will display the following in the body of the document: Welcome Bill Gates Request.Form The Request.Form command is used to collect values in a form with method="post". Information sent from a form with the POST method is invisible to others and has no limits on the amount of information to send. If a user typed "Bill" and "Gates" in the HTML form above, the URL sent to the server would look like this: Assume that "simpleform.asp" contains the following ASP script: <body> Welcome <% response.write(request.form("fname")) response.write(" " & request.form("lname")) %> </body> The browser will display the following in the body of the document: Welcome Bill Gates The VBScript arrays are 0 based, meaning that the array element indexing starts always from 0. The 0 index represents the first position in the array, the 1 index represents the second position in the array, and so forth. There are two types of VBScript arrays - static and dynamic. Static arrays remain with fixed size throughout their life span. To use static VBScript arrays you need to know upfront the maximum number of elements this array will contain. If you need more flexible VBScript arrays with variable index size, then you can use dynamic VBScript arrays. VBScript dynamic arrays index size can be increased/decreased during their life span. 3.6 Arrays in ASP: (a) Static Arrays Let's create an array called 'arrcars' that will hold the names of 5 cars:
49 LANGUAGE="VBSCRIPT" %> <% 'Use the Dim statement along with the array name 'to create a static VBScript array 'The number in parentheses defines the array s upper bound Dim arrcars(4) arrcars(0)="bmw" arrcars(1)="mercedes" arrcars(2)="audi" arrcars(3)="bentley" arrcars(4)="mini" 'create a loop moving through the array 'and print out the values For i=0 to 4 response.write arrcars(i) & "<br>" Next 'move on to the next value of i %> <% Dim arrcars arrcars = Array("BMW","Mercedes","Audi","Bentley","Mini") 'each element must be separated by a comma 'again we could loop through the array and print out the values For i=0 to 4 response.write arrcars(i) & "<br>" Next %> (b) Dynamic Arrays Dynamic arrays come in handy when you aren't sure how many items your array will hold. To create a dynamic array you should use the Dim statement along with the array s name, without specifying upper bound: <% Dim arrcars arrcars = Array() %> In order to use this array you need to use the ReDim statement to define the array s upper bound: <% Dim arrcars arrcars = Array()
50 Redim arrcars(27) %> When you use the ReDim statement you lose all elements of the array. Using the keyword PRESERVE in conjunction with the ReDim statement will keep the array we already have and increase the size: <% Dim arrcars arrcars = Array() Redim arrcars(27) Redim PRESERVE arrcars(52) %> 3.7 Functions & Procedures Functions and procedures provide a way to create re-usable modules of programming code and avoid rewriting the same block of code every time you do the particular task. If you don't have any functions/procedures in your ASP page, the ASP pages are executed from top to bottom, the ASP parsing engine simply processes your entire file from the beginning to the end. ASP/VBScript functions and procedures, however, are executed only when called, not inline with the rest of the code. A function or subprocedure can be reused as many times as required, thus saving you time and making for a less clustered looking page. You can write functions in ASP similar to the way you write them in Visual Basic. It is good programming practice to use functions to modularize your code and to better provide reuse. To declare a subroutine (a function that doesn t return a value, starts with the Sub keyword and ends with End Sub), you simply type: <%@ LANGUAGE="VBSCRIPT" %> <% Sub subroutinename( parameter_1,..., parameter_n ) statement_1 statement_2... statement_n end sub %> A function differs from a subroutine in the fact that it returns data, start with Function keyword and end with End Function. Functions are especially good for doing calculations and returning a value. To declare a function, the syntax is similar: <%@ LANGUAGE="VBSCRIPT" %> <% Function functionname( parameter_1,..., parameter_n ) statement_1
51 statement_2... statement_n end function %> LANGUAGE="VBSCRIPT" %> <% Sub GetInfo(name, phone, fee) Response.write("Name: "& name &"<br>") Response.write("Telephone: "& telephone &"<br>") Response.write("Fee: "& fee &"<br>") End Sub %> Now let's consider how to call the sub. There are two ways: <% 'the first method Call GetInfo("Mr. O'Donnel"," ",20) 'the second one GetInfo "Mr. O'Donnel"," ",20 %> In each example, the actual argument passed into the subprocedure is passed in the corresponding position. Note that if you use the Call statement, the arguments must be enclosed in parentheses. If you do not use call, the parentheses aren't used. Now let's look at the code for a function that takes an integer value and returns the square of that value. Also included is code to call the function. <% Function Square(num) Square = num * num end function 'Returns 25 Response.Write(Square(5)) 'Should print "45 is less than 8^2" if 40 < Square(7) then Response.Write("45 is less than 8^2") else Response.Write("8^2 is less than 40") end if %>
52 To return a value from a function, you need to name the output value the same as your function or you will not get a value returned. 3.8 Looping Statements: ASP performs several types of repetitive operations, called "looping". Loops are set of instructions used to repeat the same block of code till a specified condition returns false or true depending on how you need it. To control the loops you can use counter variable that increments or decrements with each repetition of the loop. The two major groups of loops are For..Next and Do..Loop. The For...Next statements are best used when you want to perform a loop a specific number of times. The Do...Loop statements are best used to perform a loop an undetermined number of times. In addition, you can use the Exit keyword within loop statements. The For... Next Loop The For Each... Next Loop The Do... Loop The Exit Keyword (a) The For... Next Loop For...Next loops are used when you want to execute a piece of code a set number of times. The syntax is as follows: For counter = initial_value to finite_value [Step increment] statements Next The For statement specifies the counter variable and its initial and finite values. The Next statement increases the counter variable by one. Optional the Step keyword allows to increase or decrease the counter variable by the value you specify. Have a look at the very simple example: <%@ language="vbscript" %> <% For i = 0 to 10 Step 2 'use i as a counter response.write("the number is " & i & "<br />") Next %> The preceding example prints out even numbers from 0 to 10, the <br> tag puts a line break in between each value.
53 Next example generates a multiplication table 2 through 9. Outer loop is responsible for generating a list of dividends, and inner loop will be responsible for generating lists of dividers for each individual number: <%@ language="vbscript" %> <% response.write("<h1>multiplication table</h1>") response.write("<table border=2 width=50%") For i = 1 to 9 'this is the outer loop response.write("<tr>") response.write("<td>" & i & "</td>") For j = 2 to 9 'inner loop response.write("<td>" & i * j & "</td>") Next 'repeat the code and move on to the next value of j response.write("</tr>") Next 'repeat the code and move on to the next value of i response.write("</table>") %> (b) The For Each... Next Loop The For Each...Next loop is similar to a For...Next loop. Instead of repeating the statements a specified number of times, the For Each...Next loop repeats the statements for each element of an array (or each item in a collection of objects). The following code snippet creates drop-down list where options are elements of an array: <% Dim booktypes(7) 'creates first array booktypes(0)="classic" booktypes(1)="information Books" booktypes(2)="fantasy" booktypes(3)="mystery" booktypes(4)="poetry" booktypes(5)="humor" booktypes(6)="biography" booktypes(7)="fiction" Dim arrcars(4) 'creates second array arrcars(0)="bmw" arrcars(1)="mercedes" arrcars(2)="audi" arrcars(3)="bentley" arrcars(4)="mini"
54 Sub createlist(some_array) 'takes an array and creates drop-down list dim i response.write("<select name=""mylist"">" & vbcrlf) 'vbcrlf stands for Carriage Return and Line Feed For Each item in some_array response.write("<option value=" & i & ">" & item & "</option>" & vbcrlf) i = i + 1 Next 'repeat the code and move on to the next value of i response.write("</select>") End Sub 'Now let's call the sub and print out our lists on the screen Call createlist(booktypes) 'takes booktypes array as an argument Call createlist(arrcars) 'takes arrcars array as an argument %> (c) The Do... Loop The Do...Loop is another commonly used loop after the For...Next loop. The Do...Loop statement repeats a block of statements an indefinite number of times. The statements are repeated either while a condition is True or until a condition becomes True. The syntax looks as follows: Do [While Until] condition statements Loop Here is another syntax: Do statements Loop [While Until] condition In this case the code inside this loop will be executed at least one time. Have a look at the examples: The example below defines a loop that starts with i=0. The loop will continue to run as long as i is less than, or equal to 10. i will increase by 1 each time the loop runs. <% Dim i 'use i as a counter i = 0 'assign a value to i Do While i<=10 'Output the values from 0 to 10 response.write(i & "<br \>") i = i + 1 'increment the value of i for next time loop executes Loop %>
55 Now let's consider a more useful example which creates drop-down lists of days, months and years. You can use this code for registration form, for example. <% 'creates an array Dim month_array(11) month_array(0) = "January" month_array(1) = "February" month_array(2) = "March" month_array(3) = "April" month_array(4) = "May" month_array(5) = "June" month_array(6) = "July" month_array(7) = "August" month_array(8) = "September" month_array(9) = "October" month_array(10) = "November" month_array(11) = "December" Dim i 'use i as a counter response.write("<select name=""day"">" & vbcrlf) i = 1 Do While i <= 31 response.write("<option value=" & i & ">" & i & "</option>" & vbcrlf) i = i + 1 Loop response.write("</select>") response.write("<select name=""month"">" & vbcrlf) i = 0 Do While i <= 11 response.write("<option value=" & i & ">" & month_array(i) & "</option>" & vbcrlf) i = i + 1 Loop response.write("</select>") response.write("<select name=""year"">") i = 1900 Do Until i = 2005 response.write("<option value=" & i & ">" & i & "</option>" & vbcrlf) i = i + 1 Loop response.write("</select>") %> (d) The Exit Keyword
56 The Exit keyword alters the flow of control by causing immediate exit from a repetition structure. You can use the Exit keyword in different situations, for example to avoid an endless loop. To exit the For...Next loop before the counter reaches its finite value you should use the Exit For statement. To exit the Do...Loop use the Exit Do statement. <% response.write("<p><strong>example of using the Exit For statement:</strong><p>") For i = 0 to 10 If i=3 Then Exit For response.write("the number is " & i & "<br />") Next response.write("<p><strong>example of using the Exit Do statement:</strong><p>") i = 5 Do Until i = 10 i = i - 1 response.write("the number is " & i & "<br />") If i < 10 Then Exit Do Loop %>
57 UNIT IV ASP with ADO Learning Objectives: After studying this unit, you should be able to : Describe ADO Describe how to access the database from an ASP page Define the ADO connection with the ASP Describe how to display, add, sort and delete records from an ASP pages through ADO 4.1 Introduction The great advantage of ASP is possibility to respond to user queries or data submitted from HTML forms. You can process information gathered by an HTML form and use ASP code to make decisions based off this information to create dynamic web pages. In this tutorial we will show how to create an HTML form and process the data. Before you can process the information, you need to create an HTML form that will send information to your ASP page. There are two methods for sending data to an ASP form: POST and GET. These two types of sending information are defined in your HTML form element's method attribute. Also, you must specify the location of the ASP page that will process the information. Below is a simple form that will send the data using the POST method. Information sent from a form with the POST method is invisible to others and has no limits on the amount of information to send. Copy and paste this code and save it as "form.html". <html> <head> <title>process the HTML form data with the POST method</title> </head> <body> <form method="post" action="process.asp" name="form1"> <table width="70%" border="0" cellspacing="0" cellpadding="0"> <tr> <td>name:</td> <td colspan="2"><input type="text" name="name"></td> </tr> <tr> <td> </td>
58 <td colspan="2"><input type="text" name=" "></td> </tr> <tr> <td>comments:</td> <td colspan="2"><textarea name="comment" cols="40" rows="5"></textarea></td> </tr> <tr> <td> </td> <td colspan="2"><input type="submit" name="submit" value="submit"></td> </tr> </table> </form> </body> </html> Next, we are going to create our ASP page "process.asp" that will process the data. In our example we decided to send data with the POST method so to retrieve the information we can use the ASP 'Request.From' command. Copy and paste this code and save it in the same directory as "form.html". Language="VBscript" %> <html> <head> <title>submitted data</title> </head> <body> <% 'declare the variables that will receive the values Dim name, , comment 'receive the values sent from the form and assign them to variables 'note that request.form("name") will receive the value entered 'into the textfield called name name=request.form("name") =request.form(" ") comment=request.form("comment") 'let's now print out the received values in the browser Response.Write("Name: " & name & "<br>") Response.Write(" " & & "<br>") Response.Write("Comments: " & comment & "<br>") %> </body> </html>
59 4.2 Creating an Instance of Connection Object The power of Active Server Pages comes through when we tie databases to our web sites. To connect to a database, ASP uses what is called ActiveX Data Objects, or ADO for short. ADO comes with ASP, and can be used easily from your ASP pages. First we must create an instance of the connection object and feed it the location of the database we wish to connect to and the driver that we intend to use. For these purposes we will use a connection string. You can choose an ODBC or an OLEDB connection string. We will use OLEDB for our example as it's faster and more stable. Next, we should open the connection to the database: <% 'declare the variable that will hold new connection object Dim Connection 'create an ADO connection object Set Connection=Server.CreateObject("ADODB.Connection") 'declare the variable that will hold the connection string Dim ConnectionString 'define connection string, specify database driver and location of the database ConnectionString="PROVIDER=Microsoft.Jet.OLEDB.4.0;" & _ "Data Source= c:\inetpub\wwwroot\db\examples.mdb" 'open the connection to the database Connection.Open ConnectionString %> Great, now we have an active connection to our database. Let's retrieve all the records from the 'Cars' table. For that we have to create an instance of the recordset object and feed it an SQL statement. <% 'declare the variable that will hold our new object Dim Recordset 'create an ADO recordset object Set Recordset=Server.CreateObject("ADODB.Recordset") 'declare the variable that will hold the SQL statement Dim SQL SQL="SELECT * FROM CARS" 'Open the recordset object executing the SQL statement and return records Recordset.Open SQL, Connection %> We have returned a recordset based on our SQL statement so let's now print out them in the browser.
60 <% 'first of all determine whether there are any records If Recordset.EOF Then Response.Write("No records returned.") Else 'if there are records then loop through the fields Do While NOT Recordset.Eof Response.write Recordset("Name") Response.write Recordset("Year") Response.write Recordset("Price") Response.write "<br>" Recordset.MoveNext Loop End If %> Finally, need to close the objects and free up resources on the server. <% Recordset.Close Set Recordset=Nothing Connection.Close Set Connection=Nothing %> 4.3 Connection Strings Connection strings are string variables which contain database connection information and then passed to ADO(ActiveX Data Objects) which will interpret them and act accordingly. Since there are going to be passed to ADO, they need to be in a comprehensible for ADO format. Connection string contains several arguments set to specific values and separated by semicolon. If you are connecting to a SQL database, you need the DRIVER, the SERVER, the DATABASE, the UID, the PWD, and other optional information. If you're connecting to an Access database, you need the DRIVER, and the DBQ, and some other optional information. MS Access Connection Strings SQL Server Connection Strings MySQL Connection Strings Oracle Connection Strings to create a System Data Source Name (DSN) for an Access database on your local machine. To do that you need to follow a couple of steps:

 Flip to the System")
61 Open the 'ODBC Data Source Administrator' ( Start -> Control Panel -> Administrative Tools -> Data Sources ) Flip to the System DSN tab Click Add...


62 In the box that will appear you should select the Microsoft Access driver and click Finish Type in a name that is easily remembered and relevant to your database in the 'Data Source Name' textbox Click Select and browse to your local database file Click OK all the way out You have now created a DSN which will come in handy when you try to connect and retrieve information from your database. 4.4 Connection Using DSN
63 DSN stands for 'Data Source Name'. It is an easy way to assign useful and easily rememberable names to data sources which may not be limited to databases alone. <% 'declare the variables Dim Connection Dim Recordset Dim SQL 'declare the SQL statement that will query the database SQL = "SELECT * FROM TABLE_NAME" 'create an instance of the ADO connection and recordset objects Set Connection = Server.CreateObject("ADODB.Connection") Set Recordset = Server.CreateObject("ADODB.Recordset") 'open the connection to the database Connection.Open "DSN=dsn_name;UID=user_name;PWD=password;Database=database_name" 'Open the recordset object executing the SQL statement and return records Recordset.Open SQL,Connection 'first of all determine whether there are any records If Recordset.EOF Then Response.Write("No records returned.") Else 'if there are records then loop through the fields Do While NOT Recordset.Eof Response.write Recordset("FIRST_FIELD_NAME") Response.write Recordset("SECOND_FIELD_NAME") Response.write Recordset("THIRD_FIELD_NAME") Response.write "<br>" Recordset.MoveNext Loop End If 'close the connection and recordset objects to free up resources Recordset.Close Set Recordset=nothing Connection.Close Set Connection=nothing %>
64 Connect without a DSN (using a connection string) Let s look at a sample script to get an idea how to connect to MS SQL Server database without DSN: <% 'declare the variables Dim Connection Dim ConnString Dim Recordset Dim SQL 'define the connection string, specify database driver ConnString="DRIVER={SQL Server};SERVER=yourServername;UID=yourUsername;" & _ "PWD=yourPassword;DATABASE=yourDatabasename" 'declare the SQL statement that will query the database SQL = "SELECT * FROM TABLE_NAME" 'create an instance of the ADO connection and recordset objects Set Connection = Server.CreateObject("ADODB.Connection") Set Recordset = Server.CreateObject("ADODB.Recordset") 'Open the connection to the database Connection.Open ConnString 'Open the recordset object executing the SQL statement and return records Recordset.Open SQL,Connection 'first of all determine whether there are any records If Recordset.EOF Then Response.Write("No records returned.") Else 'if there are records then loop through the fields Do While NOT Recordset.Eof Response.write Recordset("FIRST_FIELD_NAME") Response.write Recordset("SECOND_FIELD_NAME") Response.write Recordset("THIRD_FIELD_NAME") Response.write "<br>" Recordset.MoveNext Loop End If 'close the connection and recordset objects to free up resources Recordset.Close
65 Set Recordset=nothing Connection.Close Set Connection=nothing %> 4.5 Add a Record to a Table in a Database We want to add a new record to the Customers table in the Northwind database. We first create a form that contains the fields we want to collect data from: <html> <body> <form method="post" action="demo_add.asp"> <table> <tr> <td>customerid:</td> <td><input name="custid"></td> </tr><tr> <td>company Name:</td> <td><input name="compname"></td> </tr><tr> <td>contact Name:</td> <td><input name="contname"></td> </tr><tr> <td>address:</td> <td><input name="address"></td> </tr><tr> <td>city:</td> <td><input name="city"></td> </tr><tr> <td>postal Code:</td> <td><input name="postcode"></td> </tr><tr> <td>country:</td> <td><input name="country"></td> </tr> </table> <br><br> <input type="submit" value="add New"> <input type="reset" value="cancel"> </form> </body> </html>
66 When the user presses the submit button the form is sent to a file called "demo_add.asp". The "demo_add.asp" file contains the code that will add a new record to the Customers table: <html> <body> <% set conn=server.createobject("adodb.connection") conn.provider="microsoft.jet.oledb.4.0" conn.open "c:/webdata/northwind.mdb" sql="insert INTO customers (customerid,companyname," sql=sql & "contactname,address,city,postalcode,country)" sql=sql & " VALUES " sql=sql & "('" & Request.Form("custid") & "'," sql=sql & "'" & Request.Form("compname") & "'," sql=sql & "'" & Request.Form("contname") & "'," sql=sql & "'" & Request.Form("address") & "'," sql=sql & "'" & Request.Form("city") & "'," sql=sql & "'" & Request.Form("postcode") & "'," sql=sql & "'" & Request.Form("country") & "')" on error resume next conn.execute sql,recaffected if err<>0 then Response.Write("No update permissions!") else Response.Write("<h3>" & recaffected & " record added</h3>") end if conn.close %> </body> </html> 4.6 Update a Record in a Table We want to update a record in the Customers table in the Northwind database. We first create a table that lists all records in the Customers table: <html> <body> <% set conn=server.createobject("adodb.connection") conn.provider="microsoft.jet.oledb.4.0"
67 conn.open "c:/webdata/northwind.mdb" set rs=server.createobject("adodb.recordset") rs.open "SELECT * FROM customers",conn %> <h2>list Database</h2> <table border="1" width="100%"> <tr> <% for each x in rs.fields response.write("<th>" & ucase(x.name) & "</th>") next %> </tr> <% do until rs.eof %> <tr> <form method="post" action="demo_update.asp"> <% for each x in rs.fields if lcase(x.name)="customerid" then%> <td> <input type="submit" name="customerid" value="<%=x.value%>"> </td> <%else%> <td><%response.write(x.value)%></td> <%end if next %> </form> <%rs.movenext%> </tr> <% loop conn.close %> </table> </body> </html> If the user clicks on the button in the "customerid" column he or she will be taken to a new file called "demo_update.asp". The "demo_update.asp" file contains the source code on how to create input fields based on the fields from one record in the database table. It also contains a "Update record" button that will save your changes:
68 <html> <body> <h2>update Record</h2> <% set conn=server.createobject("adodb.connection") conn.provider="microsoft.jet.oledb.4.0" conn.open "c:/webdata/northwind.mdb" cid=request.form("customerid") if Request.form("companyname")="" then set rs=server.createobject("adodb.recordset") rs.open "SELECT * FROM customers WHERE customerid='" & cid & "'",conn %> <form method="post" action="demo_update.asp"> <table> <%for each x in rs.fields%> <tr> <td><%=x.name%></td> <td><input name="<%=x.name%>" value="<%=x.value%>"></td> <%next%> </tr> </table> <br><br> <input type="submit" value="update record"> </form> <% else sql="update customers SET " sql=sql & "companyname='" & Request.Form("companyname") & "'," sql=sql & "contactname='" & Request.Form("contactname") & "'," sql=sql & "address='" & Request.Form("address") & "'," sql=sql & "city='" & Request.Form("city") & "'," sql=sql & "postalcode='" & Request.Form("postalcode") & "'," sql=sql & "country='" & Request.Form("country") & "'" sql=sql & " WHERE customerid='" & cid & "'" on error resume next conn.execute sql if err<>0 then response.write("no update permissions!") else response.write("record " & cid & " was updated!") end if end if conn.close
69 %> </body> </html> 4.7 Delete a Record in a Table We want to delete a record in the Customers table in the Northwind database. We first create a table that lists all records in the Customers table: <html> <body> <% set conn=server.createobject("adodb.connection") conn.provider="microsoft.jet.oledb.4.0" conn.open "c:/webdata/northwind.mdb" set rs=server.createobject("adodb.recordset") rs.open "SELECT * FROM customers",conn %> <h2>list Database</h2> <table border="1" width="100%"> <tr> <% for each x in rs.fields response.write("<th>" & ucase(x.name) & "</th>") next %> </tr> <% do until rs.eof %> <tr> <form method="post" action="demo_delete.asp"> <% for each x in rs.fields if x.name="customerid" then%> <td> <input type="submit" name="customerid" value="<%=x.value%>"> </td> <%else%> <td><%response.write(x.value)%></td> <%end if next %> </form> <%rs.movenext%>
70 </tr> <% loop conn.close %> </table> </body> </html> If the user clicks on the button in the "customerid" column he or she will be taken to a new file called "demo_delete.asp". The "demo_delete.asp" file contains the source code on how to create input fields based on the fields from one record in the database table. It also contains a "Delete record" button that will delete the current record: <html> <body> <h2>delete Record</h2> <% set conn=server.createobject("adodb.connection") conn.provider="microsoft.jet.oledb.4.0" conn.open "c:/webdata/northwind.mdb" cid=request.form("customerid") if Request.form("companyname")="" then set rs=server.createobject("adodb.recordset") rs.open "SELECT * FROM customers WHERE customerid='" & cid & "'",conn %> <form method="post" action="demo_delete.asp"> <table> <%for each x in rs.fields%> <tr> <td><%=x.name%></td> <td><input name="<%=x.name%>" value="<%=x.value%>"></td> <%next%> </tr> </table> <br><br> <input type="submit" value="delete record"> </form> <% else sql="delete FROM customers" sql=sql & " WHERE customerid='" & cid & "'"
71 on error resume next conn.execute sql if err<>0 then response.write("no update permissions!") else response.write("record " & cid & " was deleted!") end if end if conn.close %> </body> </html>
72 Unit V XML Learning Objectives: After studying this unit, you should be able to : Describe XML Describe the Features of XML Define the XML Markup Elements Understand the markup Languages Define XML Element Occurrence Indicators Developing a DTD 5.1 Introduction If XML markup is a structural language for a document, and tags are the Important elements for the structure. They mark the boundaries of elements, allow insertion of comments and special instructions, and declare settings for the parsing environment. A parser, the front line of any program that processes XML, relies on tags to help it break down documents into discrete XML objects. Elements are the most common XML object type. They break up the document into smaller and smaller cells, nesting inside one another like boxes.

73 Parts of XML document
74 Features of XML: Main features of XML: XML files are text files, which can be managed by any text editor. XML is very simple, because it has less than 10 syntax rules. XML is extensible, because it only specifies the structural rules of tags. No specification on tags them self. Because of these features, XML offers following advantages XML provides a basic syntax that can be used to share information between different kinds of computers, different applications, and different organizations. XML data is stored in plain text format. This software- and hardware-independent way of storing data allows different incompatible systems to share data without needing to pass them through many layers of conversion. This also makes it easier to expand or upgrade to new operating systems, new applications, or new browsers, without losing any data. With XML, your data can be available to all kinds of "reading machines" (Handheld computers, voice machines, news feeds, etc), and make it more available for blind people, or people with other disabilities. XML provides a gateway for communication between applications, even applications on wildly different systems. As long as applications can share data (through HTTP, file sharing, or another mechanism), and have an XML parser, they can share structured information that is easily processed. Databases can trade tables, business applications can trade updates, and document systems can share information. It supports Unicode, allowing almost any information in any written human language to be communicated. It can represent common computer science data structures: records, lists and trees. Its self-documenting format describes structure and field names as well as specific values. The strict syntax and parsing requirements make the necessary parsing algorithms extremely simple, efficient, and consistent. Content-based XML markup enhances searchability, making it possible for agents and search engines to categorize data instead of wasting processing power on context-based full-text searches. XML is heavily used as a format for document storage and processing, both online and offline. It is based on international standards. It can be updated incrementally.
75 It allows validation using schema languages such as XSD and Schematron, which makes effective unit-testing, firewalls, acceptance testing, contractual specification and software construction easier. The hierarchical structure is suitable for most (but not all) types of documents. It is platform-independent, thus relatively immune to changes in technology. Forward and backward compatibility are relatively easy to maintain despite changes in DTD or Schema. Its predecessor, SGML, has been in use since 1986, so there is extensive experience and software available. There are following types of information in an XML file: 1. Processing Instruction: Used to pass an instruction to applications that processing this file. Processing instructions are written in the following syntax: <?target instruction?> where "target" is the name of a target group of applications expected to use this instruction, and "instruction" is the actual instruction to be passed to those applications. 2. Comments: Used only to comment the XML file. Comments will be ignored by application that processing this file. Comments are written in the following syntax: <!--comment--> where "comment" is the text of comment. 3. XML Elements: Used to present a unit of information, with a name, a optional body, and optional attributes. Elements are written in the following syntaxes: <tag/> <tag attributes/> <tag>content</tag> <tag attributes>content</tag> where "tag" is the name of the element, "content" is a string of text, or text mixed with XML elements, and "attributes" is one pair of name and value or a list of multiple pairs of name and value written in the following syntax: name="value" name_1="value 1" name_2="value 2"... name_n="value n"
76 4. Mixed Text: A string of text, or text mixed with XML elements, used as contents of elements. Examples of mixed text: This mixed text only contains characters. This mixed text <br/>contains characters and <b s="1">elements</b>. This mixed text contains entities, &, <</b>. 5. XML Entities: Special escape sequences to represent XML reserved characters. XML entities can be used in element content and attribute values. These are XML pre-defined entities and reserved characters they are representing: Entity Character & & ' ' > > < < "e; " 5. CDATA Section: A section of text in which any XML reserved characters should be treated as normal characters. CDATA sections are written in the following syntax: <![CDATA[ text line... ]]> Syntax rules of an XML file: Two XML elements can be nested by including one element as part of the content of the other element. There must be only one element, called root element, that is not nested inside any other elements. There must be one "xml" processing instruction before the root element. Values of element attributes must be enclosed within two double quotes. Element's tag and attribute's name must be made of alphanumeric characters and 4 additional characters: "-", "_", ":", and ".". "instructions" in a processing instruction must be written in the same syntax as the attributes of an element. That's it. As I said earlier, XML syntax is very simple.
77 A valid XML file: <?xml version="1.0"?> <dictionary> <!-- valid.xml Copyright (c) 2012, HerongYang.com, All Rights Reserved. --> <note>a valid & simple XML</note> <word> <name is_acronym="true" language="en">pop</name> <definition>post Office Protocol</definition> <definition>point Of Purchase</definition> </word> <word> <update date=" "/> <name is_acronym="yes">xml</name> <definition>extensible Markup Language</definition> <note>example: <![CDATA[<?xml version="1.0"?><p>hello world!</p>]]> </note> </word> <word> <update editor="herong Yang"/> <name>markup</name> <definition>the amount added to the cost price to calculate the selling price - <i>webster</i></definition> </word> </dictionary> Here is a simple XML sample file that represents a glossary with only two words defined: <?xml version="1.0"?> <!-- dictionary.xml Copyright (c) 2012, HerongYang.com, All Rights Reserved. --> <dictionary> <word acronym="true"> <name>xml</name>
78 <definition referenece="herong's Notes">eXtensible Markup Language.</definition> <update date=" "/> </word> <word symbol="true"> <name></name> <definition>mathematical symbol representing the "less than" logical operation, like: 1<2.</definition> <definition>reserved symbol in XML to representing the beginning of tags, like: <![CDATA[<p>Hello world!</p>]]> </definition> </word> </dictionary> Note that: A multiple-line comment is used to show the copyright information. "dictionary" is the root element. Attributes are used in elements: "word", "definition" and "update". "update" is an empty element with no content. "word" is a nested element, and repeated twice. Entity "'" is used in attribute "reference". Entity "<" is used in contents of elements "name" and "definition". CDATA section is used in the second "definition" of the second "word", in which "<p>" and "</p>" will not be considered as XML tags any more. Since XML file don't care about how the tags should be named and what information they should be carrying, we can re-organize the same information in many ways. For example: We could move the information from the "date" attribute of "update" element into the content, and rewrite the "update" like: <update> </update> We could also move content into an attribute, like: <name is_acronym="true" value="xml"/>
79 XML Element: An XML element is everything from (including) the element's start tag to (including) the element's end tag. An element can contain: other elements text attributes or a mix of all of the above... <bookstore> </bookstore> <book category="children"> <title>harry Potter</title> <author>j K. Rowling</author> <year>2005</year> <price>29.99</price> </book> <book category="web"> <title>learning XML</title> <author>erik T. Ray</author> <year>2003</year> <price>39.95</price> </book> In the example above, <bookstore> and <book> have element contents, because they contain other elements. <book> also has an attribute (category="children"). <title>, <author>, <year>, and <price> have text content because they contain text. Empty XML Elements An alternative syntax can be used for XML elements with no content: Instead of writing a book element (with no content) like this: <book></book> It can be written like this:
80 <book /> This sort of element syntax is called self-closing. XML Naming Rules XML elements must follow these naming rules: Names can contain letters, numbers, and other characters Names cannot start with a number or punctuation character Names cannot start with the letters xml (or XML, or Xml, etc) Names cannot contain spaces Any name can be used, no words are reserved. Best Naming Practices Make names descriptive: <first_name>, <last_name>. Make names short and simple, like this: <book_title> not like this: <the_title_of_the_book>. Avoid "-". If you name something "first-name," some software may think you want to subtract name from first. Avoid ".". If you name something "first.name," some software may think that "name" is a property of the object "first." Avoid ":". Colons are reserved to be used for something called namespaces (more later). Non-English letters like éòá are perfectly legal in XML, but watch out for problems if your software doesn't support them. Naming Styles There are no naming styles defined for XML elements. But here are some commonly used: Style Example Description Lower case <firstname> All letters lower case

81 Upper case <FIRSTNAME> All letters upper case Underscore <first_name> Underscore separates words Pascal case <FirstName> Uppercase first letter in each word Camel case <firstname> Uppercase first letter in each words exept the first If you choose a naming style, it is good to be consistent! XML documents often have a corresponding database. A good practice is to use the naming rules of your database for the elements in the XML documents. XML Elements are Extensible XML elements can be extended to carry more information. Look at the following XML example: <note> <to>tove</to> <from>jani</from> <body>don't forget me this weekend!</body> </note> Let's imagine that we created an application that extracted the <to>, <from>, and <body> elements from the XML document to produce this output: MESSAGE To: Tove From: Jani Don't forget me this weekend! Imagine that the author of the XML document added some extra information to it: <note> <date> </date>
82 <to>tove</to> <from>jani</from> <heading>reminder</heading> <body>don't forget me this weekend!</body> </note> XML Attributes: XML elements can have attributes, just like HTML. Attributes provide additional information about an element. XML Attributes In HTML, attributes provide additional information about elements: <img src="computer.gif"> <a href="demo.asp"> Attributes often provide information that is not a part of the data. In the example below, the file type is irrelevant to the data, but can be important to the software that wants to manipulate the element: <file type="gif">computer.gif</file> XML Attributes Must be Quoted Attribute values must always be quoted. Either single or double quotes can be used. For a person's sex, the person element can be written like this: <person sex="female"> or like this: <person sex='female'> If the attribute value itself contains double quotes you can use single quotes, like in this example: <gangster name='george "Shotgun" Ziegler'>
83 or you can use character entities: <gangster name="george "Shotgun" Ziegler"> XML Elements vs. Attributes Take a look at these examples: <person sex="female"> <firstname>anna</firstname> <lastname>smith</lastname> </person> <person> <sex>female</sex> <firstname>anna</firstname> <lastname>smith</lastname> </person> In the first example sex is an attribute. In the last, sex is an element. Both examples provide the same information. There are no rules about when to use attributes or when to use elements. Attributes are handy in HTML. In XML my advice is to avoid them. Use elements instead. My Favorite Way The following three XML documents contain exactly the same information: A date attribute is used in the first example: <note date="10/01/2008"> <to>tove</to> <from>jani</from> <heading>reminder</heading> <body>don't forget me this weekend!</body> </note> A date element is used in the second example:
84 <note> <date>10/01/2008</date> <to>tove</to> <from>jani</from> <heading>reminder</heading> <body>don't forget me this weekend!</body> </note> An expanded date element is used in the third: (THIS IS MY FAVORITE): <note> <date> <day>10</day> <month>01</month> <year>2008</year> </date> <to>tove</to> <from>jani</from> <heading>reminder</heading> <body>don't forget me this weekend!</body> </note> XML DTD or Document Type Definition DTD is expected to define formal grammar of XML based markup language(s). Basically DTD contains list of elements that can occur in markup, list of attributes of each element, possible attribute values or value types (may declare default attribute values too) and content model that specifies allowed nesting of elements. This information can be used in several ways. 1. One can use DTD to validate document, i.e., to check whether document follows formal rules defined in DTD, in this way one can detect possible errors (like misspelled element names, attribute names/values, wrongly nested elements etc.) that otherwise would be difficult to notice. 2. One can use DTD just to provide accurate description of markup language. 3. One can use DTD to define character entities, specify default attributes and bind elements to XML namespaces. Elements Type Declaration Elements used in markup language are declared as follows <!ELEMENT ElementName FormalContentModel>
85 where ElementName is name of element like h1, par, table, ul etc. and FormalContentModel is expression that specifies its content model. In XML DTD content model may specify what elements can be children of given elementand whether element may contain character data. There are several possible content models. They are described below. 1. EMPTY This is the simplest content model that says that element is empty and should not contain any character data or any nested elements. For example XHTML 'br' element that is used for forced line breaks <br/> is empty element. In DTD it is described as follows: <!ELEMENT br EMPTY> Usually empty elements are represented by empty tags like <br/> but <br></br> is also valid markup. 2. ANY Simple content model. It says that element may contain anything, including character data or any other elements (that are declared in DTD). 3. Mixed Mixed content model should be used when element may contain both character data and other elements. Content model looks like (#PCDATA ChildName1 ChildName2... ChildNameN)* where ChildNames are names of possible child elements. If no child elements are allowed this content model reduces to (#PCDATA) Example: Suppose that 'group' element may contain text, or 'subgroup' element and 'subgroup' element may contain only text, no tags inside, like <group> My Group <subgroup>first Subgroup</subgroup> <subgroup>second Subgroup</subgroup> </group> In DTD these elements can be described as: <!ELEMENT group (#PCDATA subgroup)*> <!ELEMENT subgroup (#PCDATA)>
86 'Mixed' content model does not define order of child elements, does not specify how many times child element may be repeated in markup, and can not be combined with other content models. For example the following models are illegal: (#PCDATA em strong strong)* <?warning repeated names are not allowed?> (#PCDATA em strong)+ <?warning '+' and '?' keys are not used in 'Mixed' content model?> (#PCDATA (em strong))* <?warning In 'Mixed' content model choices should not be nested?> 4. children Unlike 'Mixed' content model, this one applies to elements that may contain only child elements and should not contain any child text nodes. It may specify list of child elements, in addition it may impose restrictions on their possible order or specify how many times certain element may occur in content model. This is achieved by combining sequences and choices. Sequence is ordered list of child elements that looks like (FirstChild, SecondChild, ThirdChild) Choice is unordered list of child elements like (Child AnotherChild YetAnotherChild) Sequence and choice can be combined to describe more complex content models Signs '?', '+' and '*' can be used to specify how many times content model may be repeated ('?' means 1 or 0, '+' means > 0, '*' means any times) they may appear after sequence or choice and after any element name inside sequence or choice. Examples: <!ELEMENT fraction (numerator, denominator)> <?note Fraction has numerator followed by denominator?> <!ELEMENT list (ListItem)+> <?note List contains at least one list item?> <!ELEMENT table (TableCaption?, TableRow+)> <?note Table contains optional caption (it can be omitted) followed by at least one table row?> <!ELEMENT matrix (MatrixRow, MatrixRow+)> <?note matrix has at least two rows?> <!ELEMENT parent (FirstChild, (AnotherChild YetAnotherChild)+, LastChild)> <?note parent must contain FirstChild followed by one or more other children and ended with LastChild?> <!ELEMENT shortlist (item, item, item?, item?, item?, item?, item?, item?, item?)> <?note shortlist contains at least two and at most nine items?>
87 DECLARING ATTRIBUTES If element has some attributes they must be declared in DTD as follows <!ATTLIST ElementName AttributeName AttributeType DefaultDeclaration AttributeName AttributeType DefaultDeclaration AttributeName AttributeType DefaultDeclaration> AttributeName is full (qualified) name of attribute like href, xml:lang, title. If elements has more then one attribute list declarations then these lists are simply merged and if certain attribute is declared several times then first declaration overwrites all subsequent ones. AttributeType is either string type (CDATA) that means attribute value may be arbitrary, tokenized type like ID, IDREF, IDREFS, NMTOKEN, NMTOKENS or enumerated type (list of all possible attribute values). DefaultDeclaration may specify whether attribute is required and if attribute is not required then it may specify default attribute value. STRING TYPE String type (CDATA) imposes no restriction on attribute value, it may carry arbitrary character data that does not break well-formedness of document. TOKENIZED TYPES Most important tokenized types are the following: NMTOKEN. Attributes of this type must have values that consist from any letters (not necessary Latin), digits or characters '_', '-', '.', ':' Example: <!ATTLIST span xml:lang NMTOKEN #IMPLIED> NMTOKENS. The same as NMTOKEN or space separated list of NMTOKENs Example: <!ATTLIST span class NMTOKENS #IMPLIED> ID. It is the same as NMTOKEN but first character should be letter, '_' or ':' In addition ID type attribute values must be unique (two ID type attributes that appear in single document are not allowed to carry the same value). Example: <!ATTLIST span id ID #IMPLIED>
88 IDREF. Must contain reference to unique ID (value of any ID type attribute). Example: <!ATTLIST a nextfocus IDREF #IMPLIED> IDREFS. Must contain reference to unique ID or space separated list of such a references. Example: <!ATTLIST group related IDREFS #IMPLIED> ENUMERATED TYPE This type of attributes may have only limited number of predefined values. Example: <!ATTLIST pre xml:space (preserve) #IMPLIED> <!ATTLIST txt xml:space (default preserve) #IMPLIED> DEFAULT ATTRIBUTE DECLARATION There are several types of default declarations. Most important are: #IMPLIED Keyword #IMPLIED specifies that attribute can be omitted #REQUIRED Keyword #REQUIRED means that attribute value must be explicitly specified in markup Default The same as #IMPLIED but if attribute is omitted XML parser must attach attribute with default value to element and pass it to application. Example: <!ATTLIST txt xml:space (default preserve) "preserve"> <?note In this case <txt>text</txt> will be treated as <txt xml:space="preserve">text</txt>?> #FIXED The same as default but in this case default value is the only possible attribute value.
89 Example: <!ATTLIST root xmlns CDATA #FIXED " ATTRIBUTE VALUE NORMALIZATION values of all attributes are normalized by XML parser. Basically it means that all tabs, carriage returns and line feed characters are replaced with space, and if attribute is of tokenized type then multiple spaces in attribute value are replaced by single space, while leading and trailing spaces are stripped. CHARACTER ENTITIES Custom character entities can be defined as follows <!ENTITY EntityName EntityValue> Further they can be referred in XML document as &EntityName; They can be used to define convenient notations for frequently used constructions or difficult to access characters. If some character entity is declared several times then first declaration overwrites later ones. Example: <!ENTITY aacute "á"> <!ENTITY Aacute "Á"> PARAMETER ENTITIES Parameter entities can be used to introduce convenient notation for frequently used constructions. Parameter entity should be used within DTD (not in XML markup) they are declared as follows <!ENTITY % EntityName EntityValue> and further they can be referred in DTD as %EntityName; For example: <!ENTITY % Attributes "attr NMTOKENS #IMPLIED xml:id ID #IMPLIED"> <!ATTLIST lf %Attributes;> <!ATTLIST wr %Attributes;> is equivalent to <!ATTLIST lf attr NMTOKENS #IMPLIED xml:id ID #IMPLIED> <!ATTLIST wr attr NMTOKENS #IMPLIED xml:id ID #IMPLIED> If some parameter entity is declared several times then first declaration overwrites later ones. Parameter entities may be stored in external DTDs. In this case they can be declared as follows: <!ENTITY % EntityName SYSTEM "
90 OR <!ENTITY % EntityName PUBLIC "Formal Public Identifier" " CONDITIONAL SECTIONS Conditional sections are used to include or ignore certain sections from DTD. They look like <![INCLUDE[ <!ELEMENT title (#PCDATA)> <?note This section is processed?> ]]> <![IGNORE[ <!ELEMENT caption (#PCDATA)> <?note This section is ignored?> ]]> Usually they are combined with parameter entities as follows <!ENTITY % condition "IGNORE"> <![%condition;[ <!ELEMENT title (#PCDATA)> <? This section is ignored if value of parameter entity 'condition' is "IGNORE" and included if "INCLUDE". One can redefine value of parameter entities in any preceding DTD subset (incl. internal one)?> ]]> In this way one can reconfigure DTD by redefining certain parameter entities. PROCESSING INSTRUCTIONS Processing instructions look like <?Name content?>.they are used to pass certain information to applications. For example the following instruction, included in XHTML 1.1 DTD, passes title of DTD to W3C markup validator <?doc type="doctype" role="title" { XHTML 1.1 }?> INTERNAL AND EXTERNAL DTDS Document Type Definition can be either internal, external or combination of these two. Internal DTD is included in document's prolog before root element. It looks like <!DOCTYPE RootElementName [ INTERNAL DTD IS PLACED HERE]>
91 External DTD is stored in separate dtd file served as application/xml-dtd and can be linked to document, like <!DOCTYPE RootElementName SYSTEM " OR <!DOCTYPE RootElementName PUBLIC "Formal Public Identifier" " internal and external DTDs can be combined <!DOCTYPE RootElementName SYSTEM " [INTERNAL DTD IS PLACED HERE]> OR <!DOCTYPE RootElementName PUBLIC "Formal Public Identifier" " [INTERNAL DTD IS PLACED HERE]> Note that XML parsers are NOT required to read external DTDs therefore information that may influence rendering of XML document should be stored in internal DTD subset (basically this applies to definitions of character entities and default attribute values).
92 Summary for web technologies:
93 Most Web pages remote or local are a combination of those technologies Raw content, placed inside HTML tags, Interactivity produced with the help of CSS rules JavaScript and VB Script scripting languages Newer technologies like DHTML, XHTML, and XML are also a part of dynamic web development languages. A little knowledge now can prepare you for new technologies and help you keep up in the web development process Jagannath Institute of Management Sciences Web Technologies 2 JavaScript, XML
94 The Three Layers of the Web Once upon a time, there was A king! my little readers will say right away. No, children, you are wrong. Once upon a time there was a piece of wood The Adventures of Pinocchio You can do a lot without JavaScript. Using Hypertext Markup Language (HTML), 1 you can produce complex documents that intricately describe the content of a page and that content s meaning to the minutest detail. Using Cascading Style Sheets (CSS), you can present that content in myriad ways, with variations as subtle as a single color, as striking as replacing text with an image. No matter how you dress it up, though, HTML and CSS can only achieve the static beauty of the department store mannequin or at best, an animatronic monstrosity that wobbles precariously when something moves nearby. With JavaScript, you can bring that awkward puppet to life, lifting you as its creator from humble shop clerk to web design mastery!

95 But whether your new creation has the graceful stride of a runway model, or the shuffling gait of Dr. Frankenstein s monster, depends as much on the quality of its HTML and CSS origins as it does on the JavaScript code that brought it to life. Before we learn to work miracles, therefore, let s take a little time to review how to build web sites that look good both inside and out, and see how JavaScript fits into the picture. Keep em Separated Not so long ago, professional web designers would gleefully pile HTML, CSS, and JavaScript code into a single file, name it index.html, 2 and call it a web page. You can still do this today, but be prepared for your peers to call it something rather less polite. Somewhere along the way, web designers realized that the code they write when putting together a web page does three fundamental things: 2 Or default.htm, if they had been brainwashed by Microsoft.

96 11 It describes the content of the page. 12 It specifies the presentation of that content. 13 It controls the behavior of that content. They also realized that keeping these three types of code separate, as depicted in Figure 1.1, made their jobs easier, and helped them to make web pages that work better under adverse conditions, such as when users have JavaScript disabled in their browsers. Computer geeks have known about this for years, and have even given this principle a geeky name: the separation of concerns. Figure 1.1. Separation of concerns Now, realizing this is one thing, but actually doing it is another especially if you re not a computer geek. I am a computer geek, and I m tempted to do the wrong thing all the time. I ll be happily editing the HTML code that describes a web page s content, when suddenly I ll find myself thinking how nice that text would look if it were in a slightly different shade of gray, if it were nudged a little to the left, and if it had that hee-larious photocopy of my face I made at the last SitePoint office party in the background. Prone to distraction as I am, I want to make those changes right away.
97 Now which is easier: opening up a separate CSS file to modify the page s style sheet, or just typing those style properties into the HTML code I m already editing? Like behaving yourself at work functions, keeping the types of code you write separate from one another takes discipline. But once you understand the benefits, you too will be able to summon the willpower it takes to stay on the straight and narrow. Three Layers Keeping different kinds of code as separate as possible is a good idea in any kind of programming. It makes it easier to reuse portions of that code in future projects, it reduces the amount of duplicate code you end up writing, and it makes it easier to find and fix problems months and years later. When it comes to the Web, there s one more reason to keep your code separate: it lets you cater for the many different ways in which people access web pages. Depending on your audience, the majority of your visitors may use well-appointed desktop browsers with cutting-edge CSS and JavaScript support, but many might be subject to corporate IT policies that force them to use older browsers, or to browse with certain features (like JavaScript) disabled. Visually impaired users often browse using screen reader or screen magnifier software, and for these users your slick visual design can be more of a hindrance than a help. Some users won t even visit your site, preferring to read content feeds in RSS or similar formats if you offer them. When it comes time to build these feeds, you ll want to be able to send your HTML content to these users without any JavaScript or CSS junk. The key to accommodating the broadest possible range of visitors to your site is to think of the Web in terms of three layers, which conveniently correspond to the three kinds of code I mentioned earlier. These layers are illustrated in Figure 1.2.


98 Figure 1.2. The three layers of the Web When building a site, we work through these layers from the bottom up: 15 We start by producing the content in HTML format. This is the base layer, which any visitor using any kind of browser should be able to view. 16 With that done, we can focus on making the site look better, by adding a layer of presentation information using CSS. The site will now look good to users able to display CSS styles. 17 Lastly, we can use JavaScript to introduce an added layer of interactivity and dynamic behavior, which will make the site easier to use in browsers equipped with JavaScript. If we keep the HTML, CSS, and JavaScript code separate, we ll find it much easier to make sure that the content layer remains readable in browsing environments where the presentation and/or behavior layers are unable to operate. This start at the bottom approach to web design is known in the trade as progressive enhancement. Let s look at each of these layers in isolation to see how we can best maintain this separation of code.

99 HTML for Content Everything that s needed to read and understand the content of a web page belongs in the HTML code for that page nothing more, nothing less. It s that simple. Web designers get into trouble when they forget the K.I.S.S. principle, 3 and cram noncontent information into their HTML code, or alternatively move some of the page s content into the CSS or JavaScript code for the page. A common example of non-content information that s crammed into pages is presentational HTML HTML code that describes how the content should look when it s displayed in the browser. This can include old-fashioned HTML tags like <b>, <i>, <u>, <tt>, and <font>: <p>whatever you do, <a href="666.html"><font color="red">don't click this link</font></a>!</p> It can take the form of inline CSS applied with the style attribute: <p>whatever you do, <a href="666.html" style="color: red;">don't click this link</a>!</p> It can also include the secret shame of many well-intentioned web designers CSS styles applied with presentational class names: <p>whatever you do, <a href="666.html" class="red">don't click this link</a>!</p> Presentational Class Names? If that last example looks okay to you, you re not alone, but it s definitely bad mojo. If you later decide you want that link to be yellow, you re either stuck up- dating both the class name and the CSS styles that apply to it, or living with the embarrassment of a class named red that is actually styled yellow. That ll turn your face yellow er, red! 3 Keep It Simple, Stupid.
100 Rather than embedding presentation information in your HTML code, you should focus on the reason for the action for example, you want a link to be displayed in a different color. Is the link especially important? Consider surrounding it with a tag that describes the emphasis you want to give it: <p>whatever you do, <em><a href="evil.html">don't click this link</a></em>!</p> Is the link a warning? HTML doesn t have a tag to describe a warning, but you could choose a CSS class name that conveys this information: <p>whatever you do, <a href="evil.html" class="warning">don't click this link</a>!</p> You can take this approach too far, of course. Some designers mistake tags like <h1> as presentational, and attempt to remove this presentational code from their HTML: <p class="heading">a heading with an identity crisis</p> Really, the presentational information that you should keep out of your document is the font, size, and color in which a heading is to be displayed. The fact that a piece of text is a heading is part of the content, and as such should be reflected in the HTML code. So this code is perfectly fine: <h1>a heading at peace with itself</h1> In short, your HTML should do everything it can to convey the meaning, or semantics of the content in the page, while steering clear of describing how it should look. Web standards geeks call HTML code that does this semantic markup. Writing semantic markup allows your HTML files to stand on their own as meaningful documents. People who, for whatever reason, cannot read these documents by viewing them in a typical desktop web browser will be better able to make sense of them this way. Visually impaired users, for example, will be able to use assistive software like screen readers to listen to the page as it s read aloud, and the more clearly your HTML code describes the content s meaning, the more sense tools like these will be able to make of it.
101 Best of all, however, semantic markup lets you apply new styles (presentation) and interactive features (behavior) without having to make many (or, in some cases, any!) changes to your HTML code. CSS for Presentation Obviously, if the content of a page should be entirely contained within its HTML code, its style or presentation should be fully described in the CSS code that s applied to the page. With all the work you ve done to keep your HTML free of presentational code and rich with semantics, it would be a shame to mess up that file by filling it with snippets of CSS. As you probably know, CSS styles can be applied to your pages in three ways: inline styles <a href="evil.html" style="color: red;"> Inline styles are tempting for the reasons I explained earlier: you can apply styles to your content as you create it, without having to switch gears and edit a separate style sheet. But as we saw in the previous section, you ll want to avoid inline styles like the plague if you want to keep your HTML code mean- ingful to those who cannot see the styles. embedded styles <style type="text/css">.warning { color: red; } </style> <a href="evil.html" class="warning"> Embedded styles keep your markup clean, but tie your styles to a single document. In most cases, you ll want to share your styles across multiple pages on your site, so it s best to steer clear of this approach as well.
102 external styles <link rel="stylesheet" href="styles.css" /> <a href="evil.html" class="warning"> styles.css.warning { color: red; } External styles are really the way to go, because they let you share your styles between multiple documents, they reduce the amount of code browsers need to download, and they also let you modify the look of your site without having to get your hands dirty editing HTML. But you knew all that, right? This is a JavaScript book, after all, so let s talk about the JavaScript that goes into your pages. JavaScript for Behavior As with CSS, you can add JavaScript to your web pages in a number of ways: 17 You can embed JavaScript code directly in your HTML content: <a href="evil.html" onclick="javascript code here"> 18 You can include JavaScript code at the top of your HTML document in a <script> tag: <script type="text/javascript"><!--//--><![cdata[//><!-- JavaScript code here //--><!]]></script> <a href="evil.html" class="warning">

103 CDATA? If you re wondering what all that gobbledygook is following the <script> tag and preceding the </script> tag, that s what it takes to legitimately embed JavaScript in an XHTML document without confusing web browsers that don t understand XHTML (like Internet Explorer). If you write your page with HTML instead of XHTML, you can get away with this much simpler syntax: <script type="text/javascript"> JavaScript code here </script> vii. You can put your JavaScript code in a separate file, then link to that file from as many HTML documents as you like: <script type="text/javascript" src="script.js"></script> <a href="evil.html" class="warning"> JavaScript code here script.js (excerpt) Guess which method you should use. Writing JavaScript that enhances usability without cluttering up the HTML document(s) it is applied to, without locking out users that have JavaScript disabled in their browsers, and without interfering with other JavaScript code that might be applied to the same page, is called unobtrusive scripting. Unfortunately, while many professional web developers have clued in to the benefits of keeping their CSS code in separate files, there is still a lot of JavaScript code mixed into HTML out there. By showing you the right way to use JavaScript in this book, we hope to help change that.
104 The Right Way So, how much does all this stuff really matter? After all, people have been building web sites with HTML, CSS, and JavaScript mixed together for years, and for the majority of people browsing the Web, those sites have worked. Well, as you come to learn JavaScript, it s arguably more important to get it right than ever before. JavaScript is by far the most powerful of the three languages that you ll use to design web sites, and as such it gives you unprecedented freedom to completely mess things up. As an example, if you really, really like JavaScript, you could go so far as to put everything content, presentation, and behavior into your JavaScript code. I ve actually seen this done, and it s not pretty especially when a browser with Java-Script disabled comes along. Even more telling is the fact that JavaScript is the only one of these three languages that has the ability to hang the browser, making it unresponsive to the user. 4 Therefore, through the rest of this book, we ll do our darnedest to show you the right way to use JavaScript, not just because it keeps your code tidy, but because it helps to keep the Web working the way it s meant to by making content accessible to as many people as possible, no matter which web browser they choose to use. JavaScript Libraries As I mentioned, one of the benefits of keeping different kinds of code separate is that it makes it easier to take code that you ve written for one site and reuse it on another. Certain JavaScript maniacs (to be referred to from this point on as people ) have taken the time to assemble vast libraries of useful, unobtrusive JavaScript code that you can download and use on your own web sites for free. Throughout this book, we ll build each of the examples from scratch all of the JavaScript code you need can be found right here in these pages. Since there isn t always time to do this in the real world, however, and because libraries are quickly 4 We ll show you an example of this in Chapter 7.

105 becoming an important part of the JavaScript landscape, we ll also look at how the popular JavaScript libraries do things whenever the opportunity presents itself. Here are the libraries that we ll use in this book: Prototype script.aculo.us Yahoo! User Interface Library (YUI) Dojo jquery MooTools Not All Libraries are Created Equal Watch out for sites offering snippets of JavaScript code for you to copy and paste into your web pages to achieve a particular effect. There is a lot of free code out there, but not all of it is good. In general, the good libraries come in the form of JavaScript (.js) files that you can link into your pages unobtrusively, instead of pasting JavaScript directly into your HTML code. If you don t feel confident to judge whether a particular JavaScript library is good or bad, ask for some advice in the SitePoint Forums, 5 or just stick with the libraries mentioned in this book they re all very good. Let s Get Started! Enough preaching you picked up this book to learn JavaScript, right? (If you didn t, I m afraid you re in for a bit of a disappointment.) Clean HTML and CSS are nice and all, but it s time to take the plunge into the third layer of the Web: behavior. Turn the page, and get ready to start using some cool (and unobtrusive) JavaScript. 5
106 Chapter2 Programming with JavaScript Programming is all about speaking the language of computers. If you re a robot, this should be pretty easy for you, but if you re unlucky enough to be a human, it might take a bit of adjustment. If you want to learn how to program, there are really two things you have to get your head around. First, you have to think about reducing one big problem into small, digestible chunks that are just right for a computer to crunch. Second, you have to know how to translate those chunks into a language that the computer understands. I find that the second part the syntax gradually becomes second nature (much like when you learn a real second language), and experienced programmers have very little trouble switching between different languages (like JavaScript, PHP, Ruby, or Algol 60). Most of the thought in programming is focused on the first part thinking about how you can break down a problem so that the computer can solve it. By the time you ve finished this book, you ll understand most of the syntax that JavaScript has to offer, but you ll continue learning new ways to solve programming
107 problems for as long as you continue to program. We ll tell you how to solve quite a few problems in this book, but there are always different ways to achieve a given task, and there will always be new problems to solve, so don t think that your learning will stop on the last page of this book. Running a JavaScript Program Before you even start writing your first JavaScript program, you ll have to know how to run it. Every JavaScript program designed to run in a browser has to be attached to a document. Most of the time this will be an HTML or XHTML document, but exciting new uses for JavaScript emerge every day, and in the future you might find yourself using JavaScript on XML, SVG, or something else that we haven t even thought of yet. We re just going to worry about HTML in this book, because that s what 99% of people use JavaScript with. To include some JavaScript on an HTML page, we have to include a <script> tag inside the head of the document. A script doesn t necessarily have to be JavaScript, so we need to tell the browser what type of script we re including by adding a type attribute with a value of text/javascript: <!DOCTYPE HTML PUBLIC "-//W3C//DTD HTML 4.01//EN" " <html lang="en-us"> <head> <title>the Running Man</title> <meta http-equiv="content-type" content="text/html; charset=utf-8"> <script type="text/javascript"> </script> </head> </html> You can put as much JavaScript code as you want inside that <script> tag the browser will execute it as soon as it has been downloaded:

; //--><!")
108 <!DOCTYPE HTML PUBLIC "-//W3C//DTD HTML 4.01//EN" " <html lang="en-us"> <head> <title>the Running Man</title> <meta http-equiv="content-type" content="text/html; charset=utf-8"> <script type="text/javascript"> alert("arnie says hi!"); </script> </head> </html> XHTML and Embedded JavaScript don t Mix For this one example, we ve switched from an XHTML DOCTYPE to an HTML DOCTYPE. As mentioned in Chapter 1, embedding JavaScript in XHTML requires gobbledygook that few mortals can remember: <script type="text/javascript"><!--//--><![cdata[//><!-- alert("arnie says hi!"); //--><!]]></script> For many, this is reason enough to avoid embedded JavaScript. Even though it s nice and easy to just type some JavaScript straight into your HTML code, it s preferable to include your JavaScript in an external file. This approach provides several advantages: 2 It maintains the separation between content and behavior (HTML and JavaScript). 3 It makes it easier to maintain your web pages. 4 It allows you to easily reuse the same JavaScript programs on different pages of your site. To reference an external JavaScript file, you need to use the src attribute on the <script> tag:

109 <!DOCTYPE html PUBLIC "-//W3C//DTD XHTML 1.0 Strict//EN" " <html xmlns=" lang="en-us"> <head> <title>the Running Man</title> <meta http-equiv="content-type" content="text/html; charset=utf-8" /> <script type="text/javascript" src="example.js"></script> </head> </html> Any JavaScript that you might have included between your <script> and </script> tags can now be put into that external file and the browser will download the file and run the code. The file can be called whatever you want, but the common practice is to include a.js extension at the end of it. If you d like to try out the little program above, create a new HTML document (or open the closest one to hand) and insert the <script> tag inside the head. Once you ve done that, put this snippet into a file called example.js in the same directory or folder: alert("arnie says hi!"); Now, open the HTML file in your browser, and see what happens! As you read through the rest of this chapter, you can replace the contents of example.js with each of the simple programs that I ll show you, and try them for yourself! Absolute URLs Work Too As with the src attribute of an image, you can reference a file anywhere on your server, or anyone else s server: <script type="text/javascript" src="
110 It s possible to include as many external scripts on your page as you want: <script type="text/javascript" src="library.js"></script> <script type="text/javascript" src="more.js"></script> <script type="text/javascript" src="example.js"></script> This capability is what makes JavaScript libraries, where you include a standard library file on your page alongside other code that uses the contents of that library, possible. Every time you load a page with JavaScript on it, the browser will interpret all of the included JavaScript code and figure out what to do with it. If you ve loaded a page into your browser, and then you make some changes to that page s JavaScript (either on the page itself or in an external file), you ll need to refresh the page before those changes will be picked up by the browser. Statements: Bite-sized Chunks for your Browser So now you know how to tell the browser that it needs to run some JavaScript, but you don t know any JavaScript for it to run. We d better fix that! Earlier, we were talking about reducing a problem into steps that a computer can understand. Each small step you take in a program is called a statement, and it tells the browser to perform an action. By building up a series of these actions, we create a program. Statements are to programs as sentences are to books. In JavaScript each statement has to be separated by a new line or a semicolon. So, two statements could be written like this: Statement one Statement 2.0 Or they could be written like this: Statement one;statement 2.0;
111 It is generally considered best practice, however, to do both separate statements by a semicolon and a new line: Statement one; Statement 2.0; This way, each of your statements will be easy to read, and you ll have removed the potential for any ambiguity that might occur if two statements accidentally run together. There s a whole bunch of different tasks you can achieve inside each statement; the first one that we ll look at shortly is creating variables. Comments: Bite-sized Chunks Just for You If you follow the advice in this book and keep your JavaScript code simple and well structured, you should be able to get the gist of how it works just by looking at it. Every once in a while, however, you ll find yourself crafting a particularly tricky segment of code, or some esoteric browser compatibility issue will force you to insert a statement that might seem like nonsense if you had to come back and work on the program later. In situations like these, you may want to insert a comment. A comment is a note in your code that browsers will ignore completely. Unlike the rest of the code you write, comments are there to be read by you (or other programmers who might later need to work on your code). In general, they explain the surrounding code, making it easier to update the program in future. JavaScript supports two types of comments. The first is a single-line comment, which begins with two slashes (//) and runs to the end of the line: Statement one; // I'm especially proud of this one Statement 2.0; As soon as the browser sees two slashes, it closes its eyes and sings a little song to itself until it reaches the end of the line, after which it continues to read the program as usual.
112 If you need to write a more sizable comment, you can use a multi-line comment, starting with /* and ending with */: /* This is my first JavaScript program. Please forgive any mistakes you might find here. If you have any suggestions, write to n00b@example.com. */ Statement one; // I'm especially proud of this one Statement 2.0; You ll notice a distinct lack of comments in the code presented in this book. The main reason for this is that all of the code is explained in the surrounding text, so why not save a few trees? In real-world programs, you should always include a comment if you suspect that you might not understand a piece of code when you return to work on it later. Variables: Storing Data for your Program It s possible to write a program that defines the value of every single piece of data it uses, but that s like driving a ski lift you don t really get to choose where you re going. If you want your program to be able to take user input, and adapt to different pages and situations, you have to have some way of working with values that you don t know in advance. As with most programming concepts, it s very useful at this point to think of your computer as a BGC (Big, Giant Calculator). You know where you are with a calculator, so it makes programming a bit easier to understand. Now, we could write a program for a calculator that said: But every time we run that program, we re going to get exactly the same answer. There s no way that we can substitute the values in the equation for something else values from another calculation, data from a file, or even user input. If we want the program to be a bit more flexible, we need to abstract some of its components. Take a look at the equation above and ask yourself, What does it really do?
113 It adds two numbers. If we re getting those numbers when we run the program, we don t know what they ll be when we write the program, so we need some way of referring to them without using actual numbers. How about we give them names? Say x and y. Using those names, we could rewrite the program as: x + y Then, when we get our data values from some faraway place, we just need to make sure it s called x and y. Once we ve done that, we ve got variables. Variables allow us to give a piece of data a name, then reference that data by its name further along in our program. This way, we can reuse a piece of data without having to remember what its actual value was; all we have to do is remember a variable name. In JavaScript, we create a variable by using the keyword var and specifying the name we want to use: var chameleon; This is called declaring a variable. Having been declared, chameleon is ready to have some data assigned to it. We can do this using the assignment operator (=), placing the variable name on the left and the data on the right: var chameleon; chameleon = "blue"; This whole process can be shortened by declaring and assigning the variable in one go: var chameleon = "blue";
114 In practice, this is what most JavaScript programmers do declare a variable whenever that variable is first assigned some data. If you ve never referenced a particular variable name before, you can actually assign that variable without declaring it using var: chameleon = "blue"; The JavaScript interpreter will detect that this variable hasn t been declared before, and will automatically declare it when you try to assign a value to it. At first glance, this statement seems to do exactly the same thing as using the var keyword; however, the variable that it declares is actually quite different, as we ll see later in this chapter when we discuss functions and scoping. For now, take it from me it s always safest to use var. The var keyword has to be used only when you first declare a variable. If you want to change the value of the variable later, you do so without var: var chameleon = "blue"; chameleon = "red"; You can use the value of a variable just by calling its name. Any occurrence of the variable name will automatically be replaced with its value when the program is run: var chameleon = "blue"; alert(chameleon); The second statement in this program tells your browser to display an alert box with the supplied value, which in this case will be the value of the variable chameleon, as shown in Figure 2.1.
115 Figure 2.1. JavaScript replacing the variable name with its value Your variable names can comprise almost any combination of letters and numbers, though no spaces are allowed. Most punctuation and symbols have special meaning inside JavaScript, so the dollar sign ($) and the underscore (_) are the only non-al-phanumeric characters allowed in variable names. Variable names are also case-sensitive, so the names chameleon, Chameleon, and CHAMELEON refer to unique variables that could exist simultaneously. Given those rules, these are all acceptable variable declarations: var chameleon = "blue"; var Chameleon = "red"; var CHAMELEON = "green"; var yellow_chameleon = "yellow"; var orangechameleon = "orange"; var chameleon$ = "greedy"; It s standard practice to create variable names in lowercase letters, unless you re concatenating more than one word. And as I mentioned, variable names can t have spaces in them, so if you want a variable name to include more than one word, you can separate each word with an underscore (multi_word_variable) or capitalize the first letter of each word except for the first (multiwordvariable) an approach called camel casing, because the name has humps like a camel (if you squint your eyes and tilt your head slightly kind of). The approach you use to name variables really comes down to personal preference, and which name style you find more readable. I use camel casing because some long-forgotten lecturer beat it into me with a big plank.
116 Variable Types: Different Types for Different Data A lot of programming languages feature strictly typed variables. With these, you have to tell the program what type of data the variable is going to hold when it s declared, and you can t change a variable s type once it has been created. JavaScript, however, is loosely typed the language doesn t care what your variables hold. A variable could start off holding a number, then change to holding a character, a word, or anything else you want it to hold. Even though you don t have to declare the data type up front, it s still vital to know what types of data a variable can store, so that you can use and manipulate them properly inside your own programs. In JavaScript, you can work with numbers, strings, Booleans, arrays and objects. We ll take a look at the first four of these types now, but you ll have to wait till the end of the chapter to read about objects, because they re a bit trickier. Numbers Eventually, everything inside a computer is broken down into numbers (see the Big Giant Calculator theory we explored earlier). Numbers in JavaScript come in two flavors: whole numbers and decimals. The technical term for a whole number is an integer or int. A decimal is called a floating point number, or float. These terms are used in most programming languages, including JavaScript. To create a variable with numerical data, you just assign a number to a variable name: var whole = 3; var decimal = ; Floating point numbers can have a practically unlimited number of decimal places: var shortdecimal = 3.1; var longdecimal = ; And both floats and integers can have negative values if you place a minus sign (- ) in front of them:
117 var negativeint = -3; var negativefloat = ; Mathematical Operations Numbers can be combined with all of the mathematical operations you d expect: addition (+), subtraction (-), multiplication (*), and division (/). They re written in fairly natural notation: var addition = 4 + 6; var subtraction = 6 4; var multiplication = 5 * 9; var division = 100 / 10; var longequation = * / 10; The symbols that invoke these operations in JavaScript +, -, *, and / are called operators, and as we ll see through the rest of this chapter, JavaScript has a lot of them! In a compound equation like the one assigned to longequation, each of the operations is subject to standard mathematical precedence (that is, multiplication and division operations are calculated first, from left to right, after which the addition and subtraction operations are calculated from left to right). If you want to override the standard precedence of these operations, you can use brackets, just like you learned in school. Any operations that occur inside brackets will be calculated before any multiplication or division is done: var unbracketed = * 5; var bracketed = (4 + 6) * 5; Here, the value of unbracketed will be 34, because 6 * 5 is calculated first. The value of bracketed will be 50, because (4 + 6) is calculated first. You can freely combine integers and floats in your calculations, but the result will always be a float:
118 var whole = 3; var decimal = ; var decimal2 = decimal whole; var decimal3 = whole * decimal; decimal2 now equals and decimal3 equals If you divide two integers and the result is not a whole number, it will automatically become a float: var decimal = 5 / 4; The value of decimal will be Calculations can also involve any combination of numbers or numerical variables: var dozen = 12; var halfdozen = dozen / 2; var fulldozen = halfdozen + halfdozen; A handy feature of JavaScript is the fact that you can refer to the current value of a variable in describing a new value to be assigned to it. This capability lets you do things like increase a variable s value by one: var age = 26; age = age + 1; In the second of these statements, the age reference on the right uses the value of age before the calculation; the result of the calculation is then assigned to age, which ends up being 27. This means you can keep calculating new values for the same variable without having to create temporary variables to store the results of those calculations. The program above can actually be shortened using the handy += operator, which tells your program to add and assign in one fell swoop: var age = 26; age += 1;
, and there s an even shorter shortcut")
119 Now, age will again equal 27. It turns out that adding 1 to a variable is something that happens quite frequently in programming (you ll see why when we get to loops later in this chapter), and there s an even shorter shortcut for adding 1 to a variable: var age = 26; age++; By adding the special ++ operator to the end of age, we tell the program to increment the value of age by 1 and assign the result of this operation as the new value. After those calculations, age again equals 27. Before or After? As an alternative to placing the increment operator at the end of a variable name, you can also place it at the beginning: var age = 26; ++age; This achieves exactly the same end result, with one subtle difference in the processing: the value of age is incremented before the variable s value is read. This has no effect in the code above, because we re not using the variable s value there, but consider this code: var age = 26; var agecopy = age++; Here, agecopy will equal 26. Now consider this: var age = 26; var agecopy = ++age; In this code, agecopy will equal 27. Due to the possible confusion arising from this situation, the tasks of incrementing a variable and reading its value are not often completed in a single step. It s safer to increment and assign variables separately.
120 As well as these special incrementing operators, JavaScript also has the correspond- ing decrementing operators, -= and --: var age = 26; age -= 8; Now age will be 18, but let s imagine we just wanted to decrease it by one: var age = 26; age--; age will now be 25. You can also perform quick assignment multiplication and division using *= and /=, but these operators are far less common. Strings A string is a series of characters of any length, from zero to infinity (or as many as you can type in your lifetime; ready set go!). Those characters could be letters, numbers, symbols, punctuation marks, or spaces basically anything you can find on your keyboard. To specify a string, we surround a series of characters with quote marks. These can either be single or double straight quote marks, 1 just as long as the opening quote mark matches the closing quote mark: var single = 'Just single quotes'; var double = "Just double quotes"; var crazynumbers = "18 crazy numb3r5"; var crazypunctuation = '~cr@zy_punctu&t!on'; The quote marks don t appear in the value of the string, they just mark its boundaries. You can prove this to yourself by putting the following code into a test JavaScript file: 1 Some text editors will let you insert curly quotes around a string, like this. JavaScript will not recognize strings surrounded by curly quotes; it only recognizes straight quotes, "like this."
121 var single = 'Just single quotes'; alert(single); When you load the HTML page that this file s attached to, you ll see the alert shown in Figure 2.2. Figure 2.2. The string s value displaying without the quotes used to create the string It s okay to include a single quote inside a double-quoted string, or a double quote inside a single-quoted string, but if you want to include a quote mark inside a string that s quoted with the same mark, you must precede the internal quote marks with a backslash (\). This is called escaping the quote marks: var singleescape = 'He said \'RUN\' ever so softly.'; var doubleescape = "She said \"hide\" in a loud voice."; Don t worry those backslashes disappear when the string is actually used. Let s put this code into a test JavaScript file: var doubleescape = "She said \"hide\" in a loud voice."; alert(doubleescape); When you load the HTML page the file s attached to, you ll see the alert box shown in Figure 2.3.

122 Figure 2.3. The string s value displaying without the backslashes used to escape quote marks in the string It doesn t matter whether you use single or double quotes for your strings it s just a matter of personal preference. I tend to use double quotes, but if I m creating a string with a lot of double quotes in it (such as HTML code), I ll switch to using single quotes around that string, just so I don t have to escape all the double quotes it contains. String Operations We can t perform as many operations on strings as we can on numbers, but a couple of very useful operators are available to us. If you d like to add two strings together, or concatenate them, you use the same + operator that you use for numbers: var complete = "com" + "plete"; The value of complete will now be "complete". Again, you can use a combination of strings and string variables with the + operator: var name = "Slim Shady"; var sentence = "My name is " + name; The value of sentence will be "My name is Slim Shady". You can use the += operator with strings, but not the ++ operator it doesn t make sense to increment strings. So the previous set of statements could be rewritten as:
123 var name = "Slim Shady"; var sentence = "My name is "; sentence += name; There s one last trick to concatenating strings: you can concatenate numbers and strings, but the result will always end up being a string. If you try to add a number to a string, JavaScript will automatically convert the number into a string, then concatenate the two resulting strings: var sentence = "You are " sentence now contains "You are 1337". Use this trick when you want to output sentences for your h4x0r friends. Booleans Boolean values are fairly simple, really they can be either true or false. It s probably easiest to think of a Boolean value as a switch that can either be on or off. They re used mainly when we re making decisions, as we ll see in a few pages time. In order to assign a Boolean value to a variable, you simply specify which state you want it to be in. true and false are keywords in JavaScript, so you don t need to put any quote marks around them: var lying = true; var truthful = false; If you were to surround the keywords in quote marks, they d just be normal strings, not Boolean values. Arrays Numbers, strings and Booleans are good ways to store individual pieces of data, but what happens when you have a group of data values that you want to work with, like a list of names or a series of numbers? You could create a whole bunch of variables, but they still wouldn t be grouped together, and you d have a hard time keeping track of them all.

124 Arrays solve this problem by providing you with an ordered structure for storing a group of values. You can think of an array as being like a rack in which each slot is able to hold a distinct value. In order to create an array, we use the special array markers, which are the opening and closing square brackets: var rack = []; The variable rack is now an array, but there s nothing stored in it. Each slot in an array is actually called an element, and in order to put some data into an element you have to correctly reference which element you want to put it in. This reference is called an index, which is a number that represents an element s position in an array. The first element in an array has an index of 0, which can be a little confusing at first, but it s just a programming quirk you have to get used to. The second element has an index of 1, the third: 2, and so on. To reference a particular element, we use the variable name, followed by an opening square bracket, then the index and a closing square bracket, like this: var rack = []; rack[0] = "First"; rack[1] = "Second"; With that data in the array, you could imagine it looking like Figure 2.4. Figure 2.4. An array storing data sequentially, with an index for each element, starting at 0
; The resulting alert is shown in Figure 2.5.")

125 When we want to retrieve a particular element, we use the array-index notation just like a normal variable name. So, if we had an array like the one above, we could create an alert box displaying the value of the second element like this: alert(rack[1]); The resulting alert is shown in Figure 2.5. Figure 2.5. An alert box displaying a value retrieved from an array It s possible to populate an array when it s declared. We simply insert values, separated with commas, between the square brackets: var rack = ["First", "Second", "Third", "Fourth"]; That statement says that we should create an array rack that has four elements with the values specified here. The first value will have an index of 0, the second value an index of 1, and so on. The array that s created will look like Figure 2.6. Figure 2.6. The resulting array
126 Arrays can contain any data type not just strings so you could have an array of numbers: var numberarray = [1, 2, 3, 5, 8, 13, 21, 34]; You might have an array of strings: var stringarray = ["Veni", "Vidi", "Vici"]; A mixed array, containing multiple data types, would look like this: var mixedarray = [235, "Parramatta", "Road"]; Here s an array of arrays: var subarray1 = ["Paris", "Lyon", "Nice"]; var subarray2 = ["Amsterdam", "Eindhoven", "Utrecht"]; var subarray3 = ["Madrid", "Barcelona", "Seville"]; var superarray = [subarray1, subarray2, subarray3]; That last example is what we call a multi-dimensional array it s a two-dimensional array, to be precise and it s useful if you want to create a group of groups. In order to retrieve a value from one of the sub-arrays, you have to reference two indices, like so: var city = superarray[0][2]; If we translate that statement, starting from the right side, it says: [2] Get the third element [0] of the first array superarray in superarray... var city = and save that value in a new variable, city.
127 It s possible to have arrays of arrays of arrays, and arrays of arrays of arrays of arrays, but as you can probably tell from these descriptions, such arrangements quickly become unmanageable, so two-dimensional arrays are normally as far as you ever need to go. The last thing to understand about arrays is the fact that a very useful property is attached to them: length. Sometimes, you ll be dealing with an unknown array an array you ve obtained from somewhere else and you won t know how many elements it contains. In order to avoid referencing an element that doesn t exist, you can check the array s length to see how many items it actually contains. We perform this check by adding.length to the end of the array name: var shortarray = ["First", "Second", "Third"]; var total = shortarray.length; The value of total will now be 3 because there are three items in the array shortarray. It s important to note that you can t use array.length to get the index of the last item in the array. Because the first item s index is 0, the last item s index is actually array.length 1: var lastitem = shortarray[shortarray.length 1]; This situation might seem a bit annoying, until you realize that this makes it easy to add an element to the end of the array: shortarray[shortarray.length] = "Fourth"; Associative Arrays Normal arrays are great for holding big buckets of data, but they can sometimes make it difficult to find the exact piece of data you re looking for. Associative arrays provide a way around this problem they let you specify keyvalue pairs. In most respects an associative array is just like an ordinary array, except that instead of the indices being numbers, they re strings, which can be a lot easier to remember and reference:
128 var postcodes = []; postcodes["armadale"] = 3143; postcodes["north Melbourne"] = 3051; postcodes["camperdown"] = 2050; postcodes["annandale"] = 2038; Now that we ve created our associative array, it s not hard to get the postcode for Annandale. All we have to do is specify the right key, and the value will appear: alert(postcodes["annandale"]); The resulting alert is shown in Figure 2.7. Figure 2.7. Finding a postcode using an associative array Although the keys for an associative array have to be strings, the values can be of any data type, including other arrays or associative arrays. Conditions and Loops: Controlling Program Flow So far, we ve seen statements that allow you to set and retrieve variables inside your program. For a program to be really useful, however, it has to be able to make decisions based on the values of those variables. The way we make those decisions is through the use of special structures called conditions and loops, which help to control which parts of your program will run under particular conditions, and how many times those parts will be run.
129 Conditions: Making Decisions If you think of your program as being like a road map, and the browser as a car navigating those roads, you ll realize that the browser has to be able to take different paths depending on where the user wants to go. Although a program might seem like a linear path one statement following another conditional statements act like intersections, allowing you to change directions on the basis of a given condition. if Statements The most common conditional statement is an if statement. An if statement checks a condition, and if that condition is met, allows the program to execute some code. If the condition isn t met, the code is skipped. The flow of a program through an if statement can be visualized as in Figure 2.8. Figure 2.8. The logical flow of an if statement
130 Written as code, if statements take this form: if (condition) { conditional code; } Instead of a semicolon, an if statement ends with the conditional code between curly braces ({ }). 2 It s considered best practice to put each of these braces on its own line, to make it as easy as possible to spot where blocks of code begin and end. Indenting Code It s standard practice to indent the code that s inside curly braces. On each indented line, a standard number of spaces or tab characters should appear before the first character of the statement. This helps to improve the readability of your code and makes it easier to follow the flow of your programs. We use two spaces as the standard indentation in this book, but you can use four spaces, one tab whatever looks best to you. Just be consistent. Every time you nest curly braces (for instance, in another if statement inside a block of conditional code), you should increase the indentation for the nested lines by one standard indent. The condition has to be contained within round brackets (also called parentheses) and will be evaluated as a Boolean, with true meaning the code between the curly braces will be executed and false indicating it will be skipped. However, the condition doesn t have to be an explicit Boolean value it can be any expression that evaluates to a value that s able to be used as a Boolean. Expressions An expression is a combination of values, variable references, operators, and function calls that, when evaluated, produce another value. Wherever a JavaScript value (like a number or a string) is expected, you can use an expression instead. 2 If the conditional code consists of just one statement, you can choose to omit the curly braces. I find it clearer to always include the braces, which is what we ll do in this book.

131 Here s a simple expression: When evaluated, it produces a value (10). We can write a statement that uses this expression like so: var effect = 4 + 6; We now have in our program a variable called effect, with a value of 10. With conditional statements, the most useful types of expressions are those that use comparison operators to test a condition and return a Boolean value indicating its outcome. You might remember comparison operators such as greater than (>) and less than (<) from some of your old mathematics classes, but there are also equality (==) and inequality (!=) operators, and various combinations of these. Basically, each comparison operator compares what s on the left of the operator with what s on the right, then evaluates to true or false. You can then use that result in a conditional statement like this: var age = 27; if (age > 20) { alert("drink to get drunk"); } The greater than and less than operators are really only useful with numbers, because it feels a bit too Zen to ask is one string greater than another? However, the equality operator (==) is useful with both strings and numbers: var age = 27; if (age == 50){ alert("half century"); }
132 var name = "Maximus"; if (name == "Maximus") { alert("good afternoon, General."); } In the first condition, age is 27 and we re testing whether it is equal to 50; obviously, this condition will evaluate to false, so the conditional code will not be run. In the second condition, name is "Maximus" and we re testing whether it is equal to "Maximus". This condition will evaluate to true and the conditional code will be executed. == versus = Be careful to use two equals signs rather than one when you intend to check for equality. If you use only one, you ll be assigning the value on the right to the variable on the left, rather than comparing them, so you ll end up losing your original value rather than checking it! We can reverse the equality test by using the inequality operator (!=): var name = "Decimus"; if (name!= "Maximus") { alert("you are not allowed in."); } Now, because name is "Decimus" and we re testing whether it isn t equal to "Maximus" that condition will evaluate to true and the conditional code will be run. Table 2.1 lists the most commonly used comparison operators, and the results they ll return with different values:
133 Table 2.1. Commonly Used Comparison Operators Operator Example Result > A > B true if A is greater than B >= A >= B true if A is greater than or equal to B < A < B true if A is less than B <= A <= B true if A is less than or equal to B == A == B true if A equals B!= A!= B true if A does not equal B!!A true if A s Boolean value is false Multiple Conditions Instead of using just one test as a condition, you can create a whole chain of them using the logical operators AND (&&) and OR ( ). 3 Both of these operators may be used to combine conditional tests. The AND operator specifies that both tests must evaluate to true in order for the whole expression to evaluate to true. The OR operator specifies that only one of the tests has to evaluate to true in order for the whole expression to evaluate to true. Take a look at this conditional statement: var age = 27; if (age > 17 && age < 21) { alert("old enough to vote, too young to drink"); } Here, age is greater than 17 but it s not less than 21, so, since one of the tests evaluated to false, the entire condition evaluates to false. This is a good way to check if a number falls within a specific range. On the other hand, the OR operator is good for checking whether a variable matches one of a few values: 3 That s two vertical bars, not lowercase Ls or number 1s.
134 var sport = "Skydiving"; if (sport == "Bungee jumping" sport == "Cliff diving" sport == "Skydiving") { alert("you're extreme!"); } Although the first two tests in this expression evaluate to false, sport matches the last test in the OR expression, so the whole condition will evaluate to true. if-else Statements An if statement allows you to execute some code when a condition is met, but doesn t offer any alternative code for cases when the condition isn t met. That s the purpose of the else statement. In an if-else statement, you begin just as you would for an if statement, but immediately after the closing brace of the if, you include an else, which specifies code to be executed when the condition of the if statement fails: if (condition) { conditional code; } else { alternative conditional code; } The flow of this construct can be visualized as shown in Figure 2.9. To provide some alternative code, all you have to do is append an else statement to the end of the if: var name = "Marcus"; if (name == "Maximus") { alert("good afternoon, General."); }
135 Figure 2.9. The logical flow of an if-else statement else { alert("you are not allowed in."); } This approach saves you from creating a separate if statement with a negative formulation of the original condition. else-if Statements Technically speaking, else-if isn t a separate type of statement from if-else, but you should be aware of it, because it can be quite useful.
136 If you want to provide some alternative code for cases in which an if statement fails, but you want to further assess the data in order to decide what course of action to take, an else-if statement is what you need. Instead of just typing else, type else if, followed by the extra condition you want to test: var name = "Marcus"; if (name == "Maximus") { alert("good afternoon, General."); } else if (name == "Marcus") { alert("good afternoon, Emperor."); } else { alert("you are not allowed in."); } You can chain together as many else-if statements as you want, and at the end, you can include a normal else statement for use when everything fails (though it s not necessary). Loops: Minimizing Repetition Computers are meant to make life easier, right? Well, where are those darn robot servants, huh? Luckily, computers have a few capabilities that will save you thinking and typing time when you re programming. The most effective of these are loops, which auto- mate repetitive tasks like modifying each element in an array. There are a couple of different loop statements but they essentially do the same thing: repeat a set of actions for as long as a specified condition is true. while Loops while is the simplest of the loops. All it needs is a condition, and some conditional code:
137 while (condition) { conditional code; } When the program first encounters the while loop, it checks the condition. If the condition evaluates to true, the conditional code will be executed. When the program reaches the end of the conditional code, it goes back up to the condition, checks it, and if it evaluates to true, the conditional code will be executed and so on, as Figure 2.10 shows. A while loop only finishes when its condition evaluates to false. This means it s important to have something inside the conditional code that will affect the condition, eventually making it evaluate to false. Otherwise, your program will never escape the while loop, and will repeat the conditional code forever, causing the browser to become unresponsive. 4 Loops are extremely handy when they re used in conjunction with arrays, because they allow you to step sequentially through the array and perform the same operation on each element. To step through an array with a while loop, you need an incrementing counter that starts at 0 and increases by one each time the loop executes. This incrementer will keep track of the index of the element that we re currently working with. When we reach the end of the array, we need to make it stop that s where we use the array s length property. In this example, we ll multiply each element of the numbers array by two: var numbers = [1, 2, 3, 4, 5]; var incrementer = 0; while (incrementer < numbers.length) { } numbers[incrementer] *= 2; incrementer++; 4 In Firefox, the browser will eventually display a message to the user complaining that your script is taking a long time to execute. Oh, the shame!
138 Figure The logical flow of a while loop The conditional code inside that while loop uses incrementer as the index for the array. Starting at 0, this variable will reference the first element, but because we increase it by one for each execution of the loop, it will step through all of the elements in turn. Once incrementer has the same value as numbers.length, the con-dition will fail and the program will exit the while loop, having doubled all the elements in the array. i is for incrementer The variable name incrementer is frequently shortened to i, which is a commonly used name for a variable that increments inside a loop. This variable is often called a counter variable, because it counts how many times the loop has been executed.
139 do-while Loops A do-while loop behaves almost identically to a while loop, with one key difference: the conditional code is placed before the condition, so the conditional code is always executed at least once, even if the condition is immediately false. The conditional code is placed inside the curly braces of the do; the while statement contains the condition right after that: do { conditional code; } while (condition); The flow of the program can be described as in Figure do-while loops aren t used very much. In fact, I don t think I ve used one in ten years of programming. 5 Your friends and family will be impressed if you know about them, though. for Loops for loops are my favorite kind of loops they re so succinct! They re a lot like while loops, but they offer a couple of handy shortcuts for statements that we commonly use with loops. Consider this while loop: var numbers = [1, 2, 3, 4, 5]; var i = 0; while (i < numbers.length) { } numbers[i] *= 2; i++; With a for loop, you can reduce the code above to: 5 The co-author wishes it noted that he uses them all the time possibly just because he likes to show off.
![Figure 2.11. The logical flow of a do-while loop var numbers = [1, 2, 3, 4, 5]; for (var i = 0; i < numbers.](/docs-images/93/113498957/images/140-0.jpg "length; i++) { numbers[i] *= 2; } A for loop shortens two aspects of the while loop: the declaration of a counter variable, and the incrementing of that variable.")
140 Figure The logical flow of a do-while loop var numbers = [1, 2, 3, 4, 5]; for (var i = 0; i < numbers.length; i++) { numbers[i] *= 2; } A for loop shortens two aspects of the while loop: the declaration of a counter variable, and the incrementing of that variable. If you look inside the round brackets immediately after the for keyword, you ll see three different statements separated by semicolons. The first statement is the declaration. It allows us to declare a counter variable in this case i and set its initial value.
141 The second statement is the condition that controls the loop. Just like the condition in a while loop, this condition must evaluate to true in order for the conditional code to be executed. It s evaluated as soon as the program reaches the for loop (but after the counter has been declared), so if it evaluates to false immediately, the conditional code will never be executed. The third statement is an action that will be executed every time the program reaches the end of the conditional code. It is normally used to increment (or decrement) the counter, but you could theoretically put anything in there. A for loop can be thought to exhibit a flow similar to that shown in Figure Functions: Writing Code for Later So far, all the JavaScript code we ve seen (and you ve perhaps tried out) executes as soon as the page loads in your browser. It runs from top to bottom and then stops, never to run again (at least, until the page is reloaded). Quite often, we ll want to execute different parts of our program at different times, or re-run the same code quite a few times. In order to do this, you have to put your code into functions. Functions are like little packages of JavaScript code waiting to be called into action. You ve seen one function already in this chapter the alert function we used to pop up an alert box in the browser. alert is a function that s native to all browsers that means it comes built-in with the browser s JavaScript interpreter but it s possible to create your own functions, which you can call whenever you want. A function can essentially be seen as a wrapper for a block of code. All you need to do is name that block, and you ll be able to call it from other areas of your program, whenever you like. You can define your own functions using the function keyword. This tells the program that you re defining a new function, and that the code contained between the curly braces that follow should be executed whenever that function is called:
142 Figure The logical flow of a for loop function warning() { alert("this is your final warning"); }
143 The name that follows the function keyword is the name that you want to give your function (function names have the same restrictions as variable names). This is the name you ll call whenever you want your program to run the code inside the function. The name must be followed by round brackets they re empty in this instance, but as you ll see in the next section, this will not always be the case. In the example above, we created a new function called warning, so whenever we make a call to this function, the statements inside the function will be executed, causing an alert box to appear, displaying the text, This is your final warning. As in the function declaration above, round brackets must appear immediately after the function name in a function call: warning(); These brackets serve two purposes: they tell the program that you want to execute the function, and they contain the data also known as arguments that you want to pass to the function. 6 Not every function has to have arguments passed to it, but you always have to use the brackets in a function call. Arguments: Passing Data to a Function If you look at the ways we used the alert function on previous pages, you ll notice that we always inserted a string between the brackets of the function call: alert("insert and play"); The string "Insert alert function; the browser s alert box. and play" is actually an argument that we re passing to the alert is designed to take that argument and display it in the Functions can be designed to take as many arguments as you want, and those arguments don t have to be strings they can be any sort of data that you can create in JavaScript. 6 Some people like to call these parameters. Some people also like to eat sheep s brains.
144 When you define your function, you can provide names for the arguments that are to be passed to it. These are included in the round brackets immediately after the function name, with a comma separating arguments in cases where there s more than one: function sandwich(bread, meat) { alert(bread + meat + bread); } Once an argument name has been defined in the function declaration, that argument becomes a variable that s available every time the function is run, allowing you to use the data passed to the function inside the function itself. As you can see in the sandwich function above, two arguments are defined: bread and meat. These two arguments are used in a call to alert and produce a little nonsensical message to the user. Let s call the function sandwich with the arguments "Rye" and "Pastrami": sandwich("rye", "Pastrami"); When the code for sandwich is executed, those arguments become available as the variables bread and meat, respectively. So, as Figure 2.13 indicates, the user would end up with a pastrami on rye. Figure Using a function argument as a variable

; We could access those arguments via the arguments array inside the function, like this: function debate() { } var")
145 The arguments Array In addition to being available in their assigned argument names, the values that are passed to a function are also made available inside an automatically generated array variable named arguments. Even if you don t declare any argument names in your function declaration, you can actually pass one or more arguments when you call the function. These arguments will still be available in the arguments array. This can be useful for writing functions that will accept any number of arguments. Imagine we called a function with these arguments: debate("affirmative", "negative"); We could access those arguments via the arguments array inside the function, like this: function debate() { } var affirmative = arguments[0]; var negative = arguments[1]; Return Statements: Outputting Data from a Function Thus far, the outcome of most of our functions has been to display an alert box to the user with a message in it. But most of the time, you ll want your functions to be silent, simply passing data to other parts of your program. A function may return data to the statement that called it. The neat thing about that is that you can assign a function call as the value of a variable, and that variable s value will become whatever was returned by the function. To get a function to return a value, we use the return keyword, followed by the value we want it to return:
146 function sandwich(bread, meat) { var assembled = bread + meat + bread; } return assembled; Then, the function s all ready to be used in an expression: var lunch = sandwich("rye", "Pastrami"); The lunch variable now contains the string "RyePastramiRye". If you want to get really tricky, you ll be pleased to hear that the return value can even be an expression: function sandwich(bread, meat) { return bread + meat + bread; } The expression will be evaluated and the result will be returned, producing the same effect as the previous version of the code. A return statement is always the final act of a function; nothing else is processed after a function has returned. Consider this code: function prematurereturner() { return "Too quick"; } alert("was it good for you?"); The alert function wouldn t be called, because the return statement would always cut off execution of the function. This ability to cut off execution of a function with a return statement can be handy when used in conjunction with a conditional statement, where you only want the rest of the function to be executed if a certain condition is met.
147 Scope: Keeping your Variables Separate Right back at the start of this chapter I mentioned that you should avoid using variables without first declaring them using the var keyword. This will help you prevent variable clashes in your functions. Most of the variables we saw in this chapter weren t declared inside a function, and therefore reside in what s known as global scope. Variables declared in global scope may be accessed from any other JavaScript code running in the current web page. This mightn t sound too bad, and it often won t be a problem until you start using common variable names inside your functions. Take a look at this program: function countwiis() { stock = 5; sales = 3; } return stock - sales; stock = 0; wiis = countwiis(); What will be the value of stock after this code has run? You d probably expect it still to be 0, which is what we set it to be before calling countwiis. However, countwiis also uses a variable called stock. But because the function doesn t use var to declare this variable, JavaScript will go looking outside the function in the global scope to see whether or not that variable already exists. Indeed it does, so JavaScript will assign the value 5 to that global variable. What we really intended was for countwiis to use its own separate stock variable. To achieve this, we need to declare that variable with local scope. A variable with local scope exists only within the confines of the function in which it was created. It also takes precedence over variables with global scope if a local variable and a global variable both have the same name, a function will always use the local variable, leaving the global variable untouched.
148 How do you declare a local variable? Put var in front of it. Let s reformulate our code with all our variables correctly declared: function countwiis() { var stock = 5; var sales = 3; } return stock - sales; var stock = 0; var wiis = countwiis(); The stock variable declared outside the countwiis function will remain untouched by the stock variable declared inside countwiis our function can live in peace and harmony with the rest of the universe! The lesson here is that unless you intend a variable to be shared throughout your program, always declare it with var. 7 Objects Now that we ve looked at variables and functions, we can finally take a look at ob-jects. Objects are really just amorphous programming blobs. They re an amalgam of all the other data types, existing mainly to make life easier for programmers. Still, their vagueness of character doesn t mean they re not useful. Objects exist as a way of organizing variables and functions into logical groups. If your program deals with bunnies and robots, it ll make sense to have all the functions and variables that relate to robots in one area, and all the functions and variables 7 Strictly speaking, variables created outside of functions will always be in the global scope, whether they are declared with var or created simply by assigning a value to an undeclared variable name. Nevertheless, declaring all your variables with var is a good habit to get into, and is considered best practice.
149 that relate to bunnies in another area. Objects do this by grouping together sets of properties and methods. Properties are variables that are only accessible via their object, and methods are functions that are only accessible via their object. By requiring all access to properties and methods to go through the objects that contain them, JavaScript objects make it much easier to manage your programs. We ve actually played with objects already when you create a new array, you re creating a new instance of the built-in Array object. The length of an array is actually a property of that object, and arrays also have methods like push and splice, which we ll use later in this book. An array is a native object, because it s built in to the JavaScript language, but it s easy to create your own objects using the Object constructor: var Robot = new Object(); Naming Conventions Variable names start with a lowercase letter, while object names start with an uppercase letter. That s just the way it is. After decades of finely honed programming practice, this convention helps everyone distinguish between the two. Once you ve instantiated your new object, you re then free to add properties and methods to it, to modify the values of existing properties, and to call the object s methods. The properties and methods of an object are both accessed using the dot (.) syntax: Robot.metal = "Titanium"; Robot.killAllHumans = function() { alert("exterminate!"); }; Robot.killAllHumans(); The first line of this code adds to our empty Robot object a metal property, assigning it a value of "Titanium". Note that we don t need to use the var keyword when

150 we re declaring properties, since properties are always in object scope they must be accessed via the object that contains them. The statement that begins on the second line adds a killallhumans method to our Robot object. Note that this is a little different from the syntax that we used previ-ously to declare a standalone function; here, our method declaration takes the form of an assignment statement (note the assignment operator, =, and the semicolon at the end of the code block). Alternative Syntax for Standalone Functions As it turns out, you can also use this syntax to declare standalone functions if you want to. Never let it be said that JavaScript doesn t give you options! Before, we used this function declaration: function sandwich(bread, meat) { alert(bread + meat + bread); } JavaScript lets you write this in the form of a variable assignment, if you prefer: var sandwich = function(bread, meat) { alert(bread + meat + bread); }; As you might expect, there is a very subtle difference between the effects of these two code styles: a function declared with the former syntax can be used by any code in the file, even if it comes before the function declaration. A function de-clared with the latter syntax can only be used by code that executes after the as-signment statement that declares the function. If your code is well organized, however, this difference won t matter. Finally, the last line of our program calls the Robot object s killallhumans method. As with a lot of JavaScript, we can shortcut this whole sequence using the object literal syntax:
151 var Robot = { metal: "Titanium", killallhumans: function() { alert("exterminate!"); } }; Rather than first creating an empty object and then populating it with properties and methods using a series of assignment statements, object literal syntax lets you create the object and its contents with a single statement. In object literal syntax, we represent a new object with curly braces; inside those braces, we list the properties and methods of the object, separated by commas. For each property and method, we assign a value using a colon (:) instead of the assign- ment operator. Object literal syntax can be a little difficult to read once you ve been using the standard assignment syntax for a while, but it is slightly more succinct. We re going to use this object literal syntax throughout this book to create neatly selfcontained packages of functionality that you can easily transport from page to page. Unobtrusive Scripting in the Real World After reading Chapter 1, you no doubt have it fairly clear in your head that HTML is for content and JavaScript is for behavior, and never the twain shall meet. How-ever, it s not quite that simple in the real world. If you have a close look at the way JavaScript is downloaded alongside the HTML page that links to it, you should notice that sometimes in fact most of the time the JavaScript will download before all of the HTML has downloaded. This presents us with a slight problem. Browsers execute JavaScript files as soon as the JavaScript file is downloaded not the HTML file. So chances are that the JavaScript will be executed before all of the HTML has been downloaded. If your JavaScript executes and is trying to enhance
152 the HTML content with behavior before it s ready, you re probably going to start seeing JavaScript errors about HTML elements not being where they re supposed to be. One way around this problem is to wait until all of the HTML is ready before you run any JavaScript that modifies or uses the HTML. Luckily, JavaScript has a way of detecting when the web page is ready to do this. Unluckily, the code involved is rather complicated. To get you up to speed quickly, I ve created a special library object, Core. This object includes a method called start that monitors the status of the page, and lets your JavaScript objects know when it s safe to start playing around with the HTML. It does this by calling your object s init method. All you have to do is let the function know which objects require this notification, and make sure each of those objects has an init method that will start working with the web page when it s called. So, if you had a Robot object that wanted to find all the robots on your page, you d write the following code: var Robot = { init: function() { Your HTML modifying code; } }; Core.start(Robot); By registering Robot with Core.start on the final line, you can rest assured that Robot.init will be run only when it s safe to do so. Core.start uses some JavaScript voodoo that we ll learn about in later chapters, but if you want to know all the details now, flick to Appendix A. Summary If you ve never programmed before, stepping into JavaScript can be a little daunting, so don t think you have to understand it straight away. Take the time to read through
153 this chapter s explanations again, and maybe try out some of the examples I find I learn best by practical experience and experimentation. Once you ve got a firm understanding of the concepts behind programming and the basics of JavaScript, continue on to the next chapter, where we ll learn how to work with the contents of web pages and create some real-world programs.
154 Chapter3 Document Access Without a document, JavaScript would have no way to make its presence felt. It s HTML that creates the tangible interface through which JavaScript can reach its users. This relationship makes it vital that JavaScript be able to access, create, and manipulate every part of the document. To this end, the W3C created the Document Object Model a system through which scripts can influence the document. This system not only allows JavaScript to make changes to the structure of the document, but enables it to access a document s styles and change the way it looks. If you want to take control of your interfaces, you ll first have to master the DOM. The Document Object Model: Mapping your HTML When an HTML document is downloaded to your browser, that browser has to do the job of turning what is essentially one long string of characters into a web page. To do this, the browser decides which parts are paragraphs, which parts are headings,
155 which parts are text, and so on. In order to save poor JavaScript programmers from having to do the exact same work, the browser stores its interpretation of the HTML code as a structure of objects, called the Document Object Model, or DOM. Within this model, each element in the HTML document becomes an object, as do all the attributes and text. JavaScript can access each of these objects independently, using built-in functions that make it easy to find and change what we want on the fly. As a result of the way in which HTML is written as a hierarchy of nested elements marked with start and end tags the DOM creates a different object for each element, but links each element object to its enclosing (or parent) element. This creates an explicit parent-child relationship between elements, and lends the visualization of the DOM most readily to a tree structure. Take, for example, this HTML: <!DOCTYPE html PUBLIC "-//W3C//DTD XHTML 1.0 Strict//EN" " <html xmlns=" lang="en-us"> <head> <title>dominating JavaScript</title> <meta http-equiv="content-type" content="text/html; charset=utf-8" /> </head> <body> <h1> DOMinating JavaScript </h1> <p> If you need some help with your JavaScript, you might like to read articles from <a href=" rel="external">dan Webb</a>, <a href=" rel="external">ppk</a> and <a href=" rel="external">jeremy Keith</a>. </p> </body> </html>

156 These elements, as mapped out in the DOM, can most easily be thought of as shown in Figure 3.1. Figure 3.1. Each element on an HTML page linking to its parent in the DOM To create the DOM for a document, each element in the HTML is represented by what s known as a node. A node s position in the DOM tree is determined by its parent and child nodes. An element node is distinguished by its element name (head, body, h1, etc.), but this doesn t have to be unique. Unless you supply some identifying characterist- ic like an id attribute one paragraph node will appear much the same as another. Technically, there s a special node that s always contained in a document, no matter what that document s content is. It always sits right at the top of the tree and it s called the document node. With that in mind, Figure 3.2 would be a more accurate representation of the DOM.
 are one type of node, and they define most of the structure of the DOM, but the actual content of")
157 Figure 3.2. The DOM tree, including the document node Element nodes (that is, nodes that represent HTML elements) are one type of node, and they define most of the structure of the DOM, but the actual content of a document is contained in two other types of nodes: text nodes and attribute nodes. Text Nodes In HTML code, anything that s not contained between angled brackets will be interpreted as a text node in the DOM. Structurally, text nodes are treated almost exactly like element nodes: they sit in the same tree structure and can be reached just like element nodes; however, they cannot have children. If we reconsider the HTML example we saw earlier, and include the text nodes in our visualization of the DOM, it becomes a lot bigger, as Figure 3.3 illustrates.

158 Figure 3.3. The complete DOM tree, including text nodes Although those text nodes all look fairly similar, each node has its own value, which stores the actual text that the node represents. So the value of the text node inside the title element in this example would be DOMinating JavaScript. Whitespace May Produce Text Nodes As well as visible characters, text nodes contain invisible characters such as new lines and tabs. If you indent your code to make it more readable (as we do in this book), each of the lines and tabs that you use to separate any tags or text will be included in a text node. This means you may end up with text nodes in between adjacent elements, or with extra white space at the beginning or end of a text node. Browsers handle these whitespace nodes differently, and this variability in DOM parsing is the reason why you have to be very careful when relying upon the number or order of nodes in the DOM. Attribute Nodes With tags and text covered by element and text nodes, the only pieces of information that remain to be accounted for in the DOM are attributes. At first glance, attributes would appear to be part of an element and they are, in a way but they still occupy their own type of nodes, handily called attribute nodes.

159 Any of the three anchor elements in the example DOM we saw earlier could be visualized as shown in Figure 3.4 with the element s attribute nodes. Figure 3.4. The href and rel attributes represented as attribute nodes in the DOM Attribute nodes are always attached to an element node, but they don t fit into the structure of the DOM like element and text nodes do they re not counted as children of the element they re attached to. Because of this, we use different functions to work with attribute nodes we ll discuss those functions later in the chapter. As you can see from the diagrams presented here, the DOM quickly becomes com-plex even with a simple document so you ll need some powerful ways to identify and manipulate the parts you want. That s what we ll be looking at next. Accessing the Nodes you Want Now that we know how the DOM is structured, we ve got a good idea of the sorts of things we ll want to access. Each node be it an element, text, or attribute node contains information that we can use to identify it, but it s a delicate matter to sort through all of the nodes in a document to find those we want. In many ways, manipulating an element via the DOM is a lot like applying element styles via CSS. Both tasks take this general pattern: 1. Specify the element or group of elements that you want to affect. 2. Specify the effect you want to have on them.
160 Although the ways in which we manipulate elements vary greatly between the two technologies, the processes we use to find the elements we want to work on are strikingly similar. Finding an Element by ID The most direct path to an element is via its id attribute. id is an optional HTML attribute that can be added to any element on the page, but each ID you use has to be unique within that document: <p id="uniqueelement"> </p> If you set out to find an element by ID, you ll need to make one big assumption: that the element you want has an ID. Sometimes, this assumption will mean that you need to massage your HTML code ahead of time, to make sure that the required element has an ID; at other times, that ID will naturally appear in the HTML (as part of the document s semantic structure). But once an element does have an ID, it be-comes particularly easy for JavaScript to find. If you wanted to reference a particular element by ID in CSS, you d use an ID selector beginning with #: #uniqueelement { color: blue; } Roughly translated, that CSS says: Find the element with the ID uniqueelement. Make its color blue. CSS is quite a succinct language. JavaScript is not. So, to reference an element by ID in JavaScript, we use the getelementbyid method, which is available only from the document node. It takes a string as an argument, then finds the element that has that string as its ID. I like to think of getelementbyid as a sniper that can pick out
161 one element at a time highly targeted. For instance, imagine that our document included this HTML: <h1> Sniper (1993) </h1> <p> In this cinema masterpiece, <a id="berenger" href="/name/nm /">tom Berenger</a> plays a US soldier working in the Panamanian jungle. </p> We can obtain a reference to the HTML element with the ID berenger, irrespective of what type of element it is: var target = document.getelementbyid("berenger"); The variable target will now reference the DOM node for the anchor element around Tom Berenger s name. But let s suppose that the ID was moved onto another element: <h1 id="berenger"> Sniper (1993) </h1> <p> In this cinema masterpiece, <a href="/name/nm /">tom Berenger</a> plays a US soldier working in the Panamanian jungle. </p> Now, if we execute the same JavaScript code, our target would reference the h1 element. Once you have a reference to an element node, you can use lots of native methods and properties on it to gain information about the element, or modify its contents. You ll explore a lot of these methods and properties as you progress through this book. If you d like to try to get some information about the element we just found, you can access one or more of the element node s native properties. One such property
162 is nodename, which tells you the exact tag name of the node you re referencing. To display the tag name of the element captured by getelementbyid, you could run this code: var target = document.getelementbyid("berenger"); alert(target.nodename); An alert dialog will pop up displaying the tag name, as shown in Figure 3.5. Figure 3.5. Displaying an element s tag name using the nodename property If an element with the particular ID you re looking for doesn t exist, getelementbyid won t return a reference to a node instead, it will return the value null. null is a special value that usually indicates some type of error. Essentially, it indicates the absence of an object when one might normally be expected. If you re not sure that your document will contain an element with the particular ID you re looking for, it s safest to check that getelementbyid actually returns a node object, because performing most operations on a null value will cause your program to report an error and stop running. You can perform this check easily using a conditional statement that verifies that the reference returned from getelementbyid isn t null: var target = document.getelementbyid("berenger"); if (target!= null) { alert(target.nodename); }
163
164 Events When we started out in Chapter 2, every script that we looked at would be loaded by the browser and executed right away. Since then, we ve learned how to wait until the HTML document has finished loading before unleashing the awesome power of JavaScript. In every case, however, the script will work its magic (for in- stance, making the rows of your tables stripy), then fizzle out, leaving behind an enhanced but still very static page. You don t need to suffer with scripts that peak too quickly! With the simple techniques we ll explore in this chapter, you ll learn to take control, write scripts that last longer, and become a superstar well, in your favorite JavaScript chat room, anyway. Don t get me wrong scripts that enhance web pages the instant they re loaded (let s call them quickies ) have their place, but there are limits to how much they can improve the user experience of a site. JavaScript really gets interesting when you start to write scripts that are triggered by events that occur during the user s interaction with the page, like clicking a hyperlink, scrolling the browser s viewport, or typing a value into a form field.
165 An Eventful History Thanks to the wide adoption of the Document Object Model (DOM) standard, ac- cessing HTML elements in your JavaScript code works very similarly in every browser. If only the same could be said for every aspect of JavaScript! As it happens, running JavaScript code in response to an event stands out as one of the few remain- ing features that are implemented in wildly varying ways in current browsers. The news isn t all bad. There is a certain amount of common ground. For as long as they ve supported JavaScript, browsers have had a simple model for dealing with events using event handlers and all current browsers provide compatible support for these handlers, despite the fact that a complete standard was never written for them. 1 As we ll see, these techniques come with limitations that you ll want to avoid when you can, but they offer a good fallback option. DOM Level 0 The first version of the W3C DOM specification was called Document Object Model Level 1. Since event handlers (along with a number of other nonstandard JavaScript features) predate this specification, developers like to call them Document Object Model Level 0. Stepping into the 21st century, the World Wide Web Consortium (W3C) has developed the DOM Level 2 Events standard, 2 which provides a more powerful means of dealing with events, called event listeners. Almost all browsers now support this standard, the notable exception being Internet Explorer up to and including IE 7.0. Internet Explorer has its own way of doing things, and though its approach is almost as powerful, it s also sufficiently different to force us to write extra code to cater for this popular browser. It s interesting to note that Microsoft participated in the development of the DOM Level 2 Events specification within the W3C, but when it came time to release IE 5.5, Microsoft chose not to support the specification in that browser. In the two 1 The HTML 4 specification briefly discusses them under the heading Intrinsic Events [ 2

166 major releases of Internet Explorer since then (IE 6.0 and 7.0), there has been no sign of Microsoft adding support for this standard. Thankfully, we don t have to wait for Microsoft. The benefits of using event listeners, be they the W3C standard version or Internet Explorer s peculiar alternative, are so great that legions of dedicated geeks have investigated the incompatibilities and come up with reasonable solutions. With a little work, we can build these solutions into our Core library so that we can use event listeners freely, without encountering browser compatibility issues. Event Handlers The simplest way to run JavaScript code in response to an event is to use an event handler. Event handlers have been around for as long as browsers have supported JavaScript, and predate the DOM standard. An event handler is a JavaScript function that s plugged into a node in the DOM so that it s called automatically when a particular event occurs in relation to that element. Figure 4.1 illustrates this concept. Figure 4.1. Plugging in a single event handler function to respond to a particular event Let s start with an obvious example the user clicking on a link like this: linkhandler.html (excerpt) <p>the first captain of the USS Enterprise NCC-1701 was <a id="wikipedia" href=" ">Christopher Pike</a>.</p>
167 When a user clicks on a link like this one, the browser generates a click event. By default, the browser will respond to that click event by navigating to the URL specified by the link. But before this happens, we can plug in our own event handler to respond to the event. Let s say you want to display an alert to notify users that they re leaving your site. An event handler is just a JavaScript function, so we can write a function to present the alert. As usual, we don t want to interfere with other scripts, so we ll wrap this function in an object with a unique name: linkhandler.js (excerpt) var WikipediaLink = { clickhandler: function() { alert("don't believe everything you read on Wikipedia!"); } }; Setting up a function as an event handler is easy. All you need is a reference to the DOM element for which you want to handle events. Then, you set the element s onevent property, where event is the type of event you want to handle: element.onevent = eventhandler; To handle click events for the wikipedia link above with our clickhandler function (which is a method of our WikipediaLink object), we write this code: var link = document.getelementbyid("wikipedia"); link.onclick = WikipediaLink.clickHandler; linkhandler.js (excerpt) But there s a catch: we can t assign an event handler to our element until the element has loaded. Thankfully, we already know how to write code that s executed only after the entire document is loaded:
 { alert(\"don't believe everything you read on Wikipedia!\"); } }; Core.start(WikipediaLink); The code for this example is deceptively simple. As Figure 4.")
168 linkhandler.js var WikipediaLink = { init: function() { var link = document.getelementbyid("wikipedia"); link.onclick = WikipediaLink.clickHandler; }, clickhandler: function() { alert("don't believe everything you read on Wikipedia!"); } }; Core.start(WikipediaLink); The code for this example is deceptively simple. As Figure 4.2 reveals, our code is actually executed in three stages: Figure 4.2. The three stages of script execution 1. The browser encounters the <script> tag in the HTML document s header and loads the JavaScript file. Our code declares the WikipediaLink object, then


169 calls Core.start to request that the object s init method be called when the whole document has loaded. 2. The page finishes loading, and the WikipediaLink object s init method is called. This method finds the wikipedia link and sets up the clickhandler method as its click event handler. 3. The user clicks the link, which generates a click event. The browser calls clickhandler, the link s click event handler, which displays the alert shown in Figure 4.3. Figure 4.3. The event handler in action Once the user clicks the OK button to dismiss the alert, the browser follows the link as normal. Event Handlers as HTML Attributes If you go looking, you ll find that a lot of sites set up JavaScript event handlers using HTML attributes, like this: <a href=" " onclick="javascript code here"> </a> As I mentioned in Chapter 1, this is the JavaScript equivalent of assigning CSS properties to your elements using the HTML style attribute. It s messy, it violates the principle of keeping code for dynamic behavior separate from your document content, and it s so 1998.
170 Default Actions As we ve just seen, event handlers let you respond to user actions by running any JavaScript code you like. But often, the browser still gets the last word. Take the example we just saw: no matter how creative and amazing the code in our event handler, when it s done, the browser will take over and follow the link as normal. I don t know about you, but I call that being a slave to the Man, and I won t take it. Browsers take all sorts of actions like this: They follow links that users click. They submit forms when users click a Submit button, or hit Enter. They move keyboard focus around the page when the user hits Tab. These are called default actions things the browser normally does in response to events. In most cases you ll want the browser to do these things, but sometimes you ll want to prevent them from occurring. The easiest way to stop the browser from performing a default action in response to an event is to create for that event an event handler that returns false. For example, we can modify the link click event handler we created above to ask the user for confirmation before the link is followed: clickprompt.js (excerpt) clickhandler: function() { if (!confirm("are you sure you want to leave this site?")) { return false; } } The confirm function used in this code is built into the browser, just like alert. And it displays a message to the user just like alert does, except that it offers the user two buttons to click: OK and Cancel. If the user clicks OK, the function returns true. If the user clicks Cancel, the function returns false. We then use the! operator introduced in Table 2.1 to reverse that value so that the body of the if statement is executed when the user clicks Cancel.

 { return confirm( \"Are you sure you want to leave this site?")
171 As shown in Figure 4.4, this new code prompts the user with the message Are you sure you want to leave this site? and causes our clickhandler method to return false if the user clicks Cancel. This, in turn, prevents the browser from performing the default action for the click event, so the browser does not follow the link. Figure 4.4. The user choosing whether or not to take the default action Cutting Down on Code If you re feeling especially zen, you might have spotted the fact that confirm returns false when we want clickhandler to return false. Since these values match, you can simplify the code of clickhandler if you want to: clickhandler: function() { return confirm( "Are you sure you want to leave this site?"); } This version of the code simply returns whatever confirm returns, which turns out to be exactly what we want. The this Keyword So far, we ve created one event handler that handles one particular event occurring on one particular HTML element pretty pathetic, if you ask me. The real fun is in writing an event handler that can handle events for many HTML elements!
172 Now, while assigning an event handler to many different elements is relatively straightforward, making it do something sensible for each element can be tricky, and that s where the this keyword comes into play. A popular request from web development clients is for links to external sites to open in a new browser window or tab. However you feel about this in principle, the way a link opens is considered a part of the behavior of the page, and thus should be controlled by your JavaScript code (if at all). 3 To open a URL in a new window or tab, simply use JavaScript s built-in open function: 4 open(url); Writing a click event handler that opens a particular URL in a new window is therefore trivial: clickhandler: function() { } open(" return false; But how do we do this for every external link in the page? We definitely don t want to write a separate click handler for every external link. The solution is to write a single handler that can retrieve the URL of the link that has just been clicked, using the this keyword: 3 In past versions of the HTML standard, you could set the target attribute of a link to control how it would open. This attribute was deprecated in HTML 4 in favor of JavaScript alternatives. 4 You ll see this referred to as window.open in many other books and online tutorials, because tech-nically, all built-in functions are actually methods of the global window object. But you don t see them talking about window.alert, do you?
173 newwindow.js (excerpt) clickhandler: function() { } open(this.href); return false; this is a special JavaScript keyword that behaves like a variable, except that you can t assign it a value its value is the object upon which the currently-executing function was invoked as a method. In other words, if you call object.method(), then within the code of method, the this keyword will refer to object. When the code currently being executed is not within a function, or when the function was not called as a method of an object, then this points to the global object that contains all global variables and functions. Since the browser calls an event handler as a method of the element on which the event occurred, you can use this within an event handler to get a reference to that element. In the above code, we use this to get a reference to the link that the user has clicked, then use its href property to obtain the URL to which the link points. By using this to retrieve from the element itself the information we need in order to respond to an event, we have created an event handler that can be assigned to all of the external links on the page. We just need to identify them with a class in our HTML code, and use that in our script s init method: var ExternalLinks = { init: function() { var extlinks = Core.getElementsByClass("external"); newwindow.js for (var i = 0; i < extlinks.length; i++) { extlinks[i].onclick = ExternalLinks.clickHandler; } },
174 } }; clickhandler: function() { open(this.href); return false; Core.start(ExternalLinks); The Problem with Event Handlers Many JavaScript developers like event handlers because they re simple to use, and they work in all browsers. Unfortunately, they come with one big, honking limitation: you can only assign one event handler to a given event on a given HTML element. In simple terms, you can t easily make more than one thing happen when an event occurs. Consider this code: element.onclick = script1.clickhandler; element.onclick = script2.clickhandler; Only the clickhandler in script2 will be executed when a click occurs on element, because assigning the second event handler replaces the first. You might wonder if we really need to assign more than one event handler. After all, how often are you going to want more than one script to respond to the click event of a link? And as long as we were just talking about click events, you d be right to wonder. But there are all sorts of events that you can respond to, and for some of them it would be extremely useful to have multiple handlers. As we ll see in Chapter 6, for example, a form s submit event often requires multiple scripts to check that the various form fields have been filled out correctly. The commonly used workaround to this problem is to assign as the event handler a function that calls multiple event handling functions:
175 element.onclick = function() { } script1.clickhandler(); script2.clickhandler(); But all sorts of things are wrong with this approach: this will no longer point to the element within the clickhandler methods. If either clickhandler method returns false, it will not cancel the default action for the event. Instead of assigning event handlers neatly inside a script s init method, you have to perform these assignments in a separate script, since you have to reference both script1 and script2. There are solutions to all of these problems, of course, but they involve complicated and twisty code 5 that you really shouldn t have to deal with to accomplish something as basic as responding to events. In addition to the simple event handlers we ve just looked at, most browsers today have built-in support for a more advanced way of handling events: event listeners, which do not suffer from the one-handler-only restriction. Event Listeners The good news is that event listeners are just like event handlers, except that you can assign as many event listeners as you like to a particular event on a particular element, and there is a W3C specification that explains how they should work. 6 The bad news is that Internet Explorer has its own completely different, and somewhat buggy version of event listeners that you also need to support if you want your scripts to work in that browser. Oh, and sometimes Safari likes to do things slightly differently, too

176 Like an event handler, an event listener is just a JavaScript function that is plugged into a DOM node. Where you could only plug in one event handler at a time, however, you can plug multiple listeners in, as Figure 4.5 illustrates. Figure 4.5. Plugging in only one handler, but many listeners The code that sets up an event listener is quite different from that used to set up an event handler, but it s still fairly easy: element.addeventlistener("event", eventlistener, false); In browsers that support W3C-standard event listeners, the addeventlistener method is available on every object that supports events. This method takes three arguments: the name of the event to which you want to assign the listener (e.g. "click"), the listener function itself, and a Boolean value that you ll usually want to set to false (more on this last argument in the section called Event Propagation ). To set up an event listener in Internet Explorer, however, you need to use a method called attachevent. This method works a lot like addeventlistener, but it takes slightly different arguments: element.attachevent("onevent", eventlistener); Spot the differences? The first argument the name of the event you re interested in must be prefixed with on (for example, "onclick"), and there is no mysterious third argument.
177 Any script that uses event listeners will need to use addeventlistener for all browsers that support it, and attachevent for Internet Explorer browsers that don t. Ensuring that your script uses the right method is a simple matter of using an ifelse statement that checks if the addeventlistener or attachevent methods exist in the current browser: if (typeof element.addeventlistener!= "undefined") { element.addeventlistener("event", eventlistener, false); } else if (typeof element.attachevent!= "undefined") { element.attachevent("onevent", eventlistener); } This is another example of the object detection technique that we first saw at work in Chapter 3. Let s employ this technique to display an alert in response to the click event of a particular link, as we did using event handlers earlier in this chapter: var WikipediaLink = { init: function() { var link = document.getelementbyid("wikipedia"); linklistener.js (excerpt) if (typeof link.addeventlistener!= "undefined") { link.addeventlistener( "click", WikipediaLink.clickListener, false); } else if (typeof link.attachevent!= "undefined") { link.attachevent("onclick", WikipediaLink.clickListener); } }, clicklistener: function() {
178 } }; alert("don't believe everything you read on Wikipedia!"); Core.start(WikipediaLink); It s not as simple as setting up an event handler, of course, but this code isn t too complex, and it allows for another script to add its own click event listener to the link without dislodging the one we ve set up here. Although you ll usually just add event listeners to your DOM nodes and forget about them, you can unplug an event listener from a DOM node if you need to. In the W3C s standard event listener model, we use the removeeventlistener method to achieve this, whereas in Internet Explorer, we use detachevent. In either case, we pass the method the same arguments we passed when adding the listener: if (typeof element.removeeventlistener!= "undefined") { element.removeeventlistener("event", eventlistener, false); } else if (typeof element.detachevent!= "undefined") { element.detachevent("onevent", eventlistener); } Default Actions You ll remember that you can simply return false from an event handler in order to prevent the browser from carrying out the default action for an event, such as following a clicked hyperlink. Event listeners let you do this too, but in a slightly different way. In the W3C standard event listener model, the browser will always pass an event object to the event listener function. The event object s properties contain information about the event (for instance, the position of the cursor when the event occurred), while its methods let us control how the event is processed by the browser. In order to prevent the browser from performing the default action for an event, we simply call the event object s preventdefault method:
179 clicklistener: function(event) { if (!confirm("are you sure you want to leave this site?")) { event.preventdefault(); } } If multiple listeners are associated with an event, any one of those listeners calling preventdefault is enough to stop the default action from occurring. Internet Explorer s event model is, of course, similar but different. In Internet Explorer, the event object isn t passed to the event listener as an argument; it s available as a global variable named event. Also, the event object doesn t have a preventdefault method; instead, it has a property named returnvalue that we can set to false in order to prevent the default action from taking place: clicklistener: function() { if (!confirm("are you sure you want to leave this site?")) { event.returnvalue = false; } } Again, using the technique of object detection to figure out which event model the current browser supports, we can write an event listener that s able to cancel the default action in either event model: clicklistener: function(event) { if (typeof event == "undefined") { event = window.event; } clickpromptlistener.js (excerpt) if (!confirm("are you sure you want to leave this site?")) { if (typeof event.preventdefault!= "undefined")
180 } { event.preventdefault(); } else { event.returnvalue = false; } } At the start of this listener, we check if we ve actually been passed an event object as an argument according to the W3C event model. If we haven t, we set our event variable to window.event, which is Internet Explorer s global event object. We refer to it as window.event instead of just event because our function already has its own variable named event. Then, when it comes time to cancel the default action, we check to see whether or not the event object has a preventdefault method. If it does, we call it. If it doesn t, we set the object s returnvalue property to false instead. Either way, the default action is prevented.
181 XML XML stands for Extensible Markup Language. It is a text-based markup language derived from Standard Generalized Markup Language (SGML). XML tags identify the data and are used to store and organize the data, rather than specifying how to display it like HTML tags, which are used to display the data. XML is not going to replace HTML in the near future, but it introduces new possibilities by adopting many successful features of HTML. There are three important characteristics of XML that make it useful in a variety of systems and solutions: XML is extensible: XML allows you to create your own self-descriptive tags, or language, that suits your application. XML carries the data, does not present it: XML allows you to store the data irrespective of how it will be presented. XML is a public standard: XML was developed by an organization called the World Wide Web Consortium (W3C) and is available as an open standard. XML Usage A short list of XML usage says it all: XML can work behind the scene to simplify the creation of HTML documents for large web sites. XML can be used to exchange the information between organizations and systems. XML can be used for offloading and reloading of databases. XML can be used to store and arrange the data, which can customize your data handling needs. XML can easily be merged with style sheets to create almost any desired output. Virtually, any type of data can be expressed as an XML document. What is Markup? XML is a markup language that defines set of rules for encoding documents in a format that is both human-readable and machine-readable. So what exactly is a markup language? Markup is information added to a document that enhances its meaning in certain ways, in that it identifies the parts and how they relate to each other. More specifically, a markup language is a set of symbols that can be placed in the text of a document to demarcate and label the parts of that document. Following example shows how XML markup looks, when embedded in a piece of text: Hello, world! This snippet includes the markup symbols, or the tags such as... and... The tags and mark the start and the end of the XML code fragment. The tags
182 and surround the text Hello, world!. Is XML a Programming Language? A programming language consists of grammar rules and its own vocabulary which is used to create computer programs. These programs instructs computer to perform specific tasks. Syntax:. The following diagram depicts the syntax rules to write different types of markup and text in an XML document. XML Declaration The XML document can optionally have an XML declaration. It is written as below: <?xml version="1.0" encoding="utf-8"?> Where version is the XML version and encoding specifies the character encoding used in the document. Syntax Rules for XML declaration The XML declaration is case sensitive and must begin with "<?xml>" where "xml" is written in lower-case. If document contains XML declaration, then it strictly needs to be the first statement of the XML document. The XML declaration strictly needs be the first statement in the XML document. An HTTP protocol can override the value of encoding that you put in the XML declaration. Tags and Elements
183 An XML file is structured by several XML-elements, also called XMLnodes or XML-tags. XML-elements' names are enclosed by triangular brackets < > as shown below: <element> Syntax Rules for Tags and Elements Element Syntax: Each XML-element needs to be closed either with start or with end elements as shown below: <element>...</element> or in simple-cases, just this way: <element/> Nesting of elements: An XML-element can contain multiple XML-elements as its children, but the children elements must not overlap. i.e., an end tag of an element must have the same name as that of the most recent unmatched start tag. Following example shows incorrect nested tags: <?xml version="1.0"?> <contact-info> <company>tutorialspoint <contact-info> </company> Following example shows correct nested tags: <?xml version="1.0"?> <contact-info> <company>tutorialspoint</company> <contact-info> Root element: An XML document can have only one root element. For example, following is not a correct XML
184 document, because both the x and y elements occur at the top level without a root element: <x>...</x> <y>...</y> The following example shows a correctly formed XML document: <root> <x>...</x> <y>...</y> </root> Case sensitivity: The names of XML-elements are casesensitive. That means the name of the start and the end elements need to be exactly in the same case. For example <contact-info> is different from <Contact- Info>. Attributes An attribute specifies a single property for the element, using a name/value pair. An XML-element can have one or more attributes. For example: <a href=" Here href is the attribute name and is attribute value. Syntax Rules for XML Attributes Attribute names in XML (unlike HTML) are case sensitive. That is, HREF andhref are considered two different XML attributes.
185 Same attribute cannot have two values in a syntax. The following example shows incorrect syntax because the attribute b is specified twice: <a b="x" c="y" b="z">...</a> Attribute names are defined without quotation marks, whereas attribute values must always appear in quotation marks. Following example demonstrates incorrect xml syntax: <a b=x>...</a> In the above syntax, the attribute value is not defined in quotation marks. XML References References usually allow you to add or include additional text or markup in an XML document. References always begin with the symbol "&",which is a reserved character and end with the symbol ";". XML has two types of references: Entity References: An entity reference contains a name between the start and the end delimiters. For example & where amp is name. The namerefers to a predefined string of text and/or markup. Character References: These contain references, such as A, contains a hash mark ( # ) followed by a number. The number always refers to the Unicode code of a character. In this case, 65 refers to alphabet "A". XML Text The names of XML-elements and XML-attributes are casesensitive, which means the name of start and end elements need to be written in the same case.

186 To avoid character encoding problems, all XML files should be saved as Unicode UTF-8 or UTF-16 files. Whitespace characters like blanks, tabs and line-breaks between XML-elements and between the XML-attributes will be ignored. An XML document is a basic unit of XML information composed of elements and other markup in an orderly package. An XML document can contains wide variety of data. For example, database of numbers, numbers representing molecular structure or a mathematical equation. XML Document example A simple document is given in the following example: <?xml version="1.0"?> <contact-info> <name>tanmay Patil</name> <company>tutorialspoint</company> <phone>(011) </phone> </contact-info> The following image depicts the parts of XML document. Document Prolog Section The document prolog comes at the top of the document, before the root element. This section contains:

187 XML declaration Document type declaration You can learn more about XML declaration here : XML Declaration. Document Elements Section Document Elements are the building blocks of XML. These divide the document into a hierarchy of sections, each serving a specific purpose. You can separate a document into multiple sections so that they can be rendered differently, or used by a search engine. The elements can be containers, with a combination of text and other elements. Syntax Following syntax shows XML declaration: <?xml version="version_number" encoding="encoding_declaration" standalone="standalone_status"?> Each parameter consists of a parameter name, an equals sign (=), and parameter value inside a quote. Following table shows the above syntax in detail: Parameter Parameter_value Parameter_description Version 1.0 Specifies the version of the XML standard used.
CHAPTER 2 MARKUP LANGUAGES: XHTML 1.0
 WEB TECHNOLOGIES A COMPUTER SCIENCE PERSPECTIVE CHAPTER 2 MARKUP LANGUAGES: XHTML 1.0 Modified by Ahmed Sallam Based on original slides by Jeffrey C. Jackson reserved. 0-13-185603-0 HTML HELLO WORLD! Document
5/19/2015. Objectives. JavaScript, Sixth Edition. Introduction to the World Wide Web (cont d.) Introduction to the World Wide Web
 Introduction to the World Wide Web") Objectives JavaScript, Sixth Edition Chapter 1 Introduction to JavaScript When you complete this chapter, you will be able to: Explain the history of the World Wide Web Describe the difference between
Objectives JavaScript, Sixth Edition Chapter 1 Introduction to JavaScript When you complete this chapter, you will be able to: Explain the history of the World Wide Web Describe the difference between
Product Price Formula extension for Magento2. User Guide
 Product Price Formula extension for Magento2 User Guide version 1.0 Page 1 Contents 1. Introduction... 3 2. Installation... 3 2.1. System Requirements... 3 2.2. Installation...... 3 2.3. License... 3 3.
JavaScript CS 4640 Programming Languages for Web Applications
 JavaScript CS 4640 Programming Languages for Web Applications 1 How HTML, CSS, and JS Fit Together {css} javascript() Content layer The HTML gives the page structure and adds semantics Presentation
CSI 3140 WWW Structures, Techniques and Standards. Markup Languages: XHTML 1.0
 CSI 3140 WWW Structures, Techniques and Standards Markup Languages: XHTML 1.0 HTML Hello World! Document Type Declaration Document Instance Guy-Vincent Jourdan :: CSI 3140 :: based on Jeffrey C. Jackson
Developing a Basic Web Page
 Developing a Basic Web Page Creating a Web Page for Stephen Dubé s Chemistry Classes 1 Objectives Review the history of the Web, the Internet, and HTML Describe different HTML standards and specifications
Such JavaScript Very Wow
 Such JavaScript Very Wow Lecture 9 CGS 3066 Fall 2016 October 20, 2016 JavaScript Numbers JavaScript numbers can be written with, or without decimals. Extra large or extra small numbers can be written
CGS 3066: Spring 2015 JavaScript Reference
 CGS 3066: Spring 2015 JavaScript Reference Can also be used as a study guide. Only covers topics discussed in class. 1 Introduction JavaScript is a scripting language produced by Netscape for use within
Client-Side Web Technologies. JavaScript Part I
 Client-Side Web Technologies JavaScript Part I JavaScript First appeared in 1996 in Netscape Navigator Main purpose was to handle input validation that was currently being done server-side Now a powerful
JavaScript CS 4640 Programming Languages for Web Applications
 JavaScript CS 4640 Programming Languages for Web Applications 1 How HTML, CSS, and JS Fit Together {css} javascript() Content layer The HTML gives the page structure and adds semantics Presentation
JAVASCRIPT AND JQUERY: AN INTRODUCTION (WEB PROGRAMMING, X452.1)
") Technology & Information Management Instructor: Michael Kremer, Ph.D. Class 1 Professional Program: Data Administration and Management JAVASCRIPT AND JQUERY: AN INTRODUCTION (WEB PROGRAMMING, X452.1) WHO
Technology & Information Management Instructor: Michael Kremer, Ph.D. Class 1 Professional Program: Data Administration and Management JAVASCRIPT AND JQUERY: AN INTRODUCTION (WEB PROGRAMMING, X452.1) WHO
Chapter 2. Outline. Simple C++ Programs
 Chapter 2 Simple C++ Programs Outline Objectives 1. Building C++ Solutions with IDEs: Dev-cpp, Xcode 2. C++ Program Structure 3. Constant and Variables 4. C++ Operators 5. Standard Input and Output 6.
CSS The web browser uses its own resources, and eases the burden on the server. It has fewer features than server side scripting.
 What is JavaScript? HTML and CSS concentrate on a static rendering of a page; things do not change on the page over time, or because of events. To do these things, we use scripting languages, which allow
extensible Markup Language
 extensible Markup Language XML is rapidly becoming a widespread method of creating, controlling and managing data on the Web. XML Orientation XML is a method for putting structured data in a text file.
Full file at
 Java Programming: From Problem Analysis to Program Design, 3 rd Edition 2-1 Chapter 2 Basic Elements of Java At a Glance Instructor s Manual Table of Contents Overview Objectives s Quick Quizzes Class
CERTIFICATE IN WEB PROGRAMMING
 COURSE DURATION: 6 MONTHS CONTENTS : CERTIFICATE IN WEB PROGRAMMING 1. PROGRAMMING IN C and C++ Language 2. HTML/CSS and JavaScript 3. PHP and MySQL 4. Project on Development of Web Application 1. PROGRAMMING
Objectives. Introduction to HTML. Objectives. Objectives
 Objectives Introduction to HTML Developing a Basic Web Page Review the history of the Web, the Internet, and HTML. Describe different HTML standards and specifications. Learn about the basic syntax of
JAVASCRIPT BASICS. JavaScript Math Functions. The Math functions helps you to perform mathematical tasks
 JavaScript Math Functions Functions The Math functions helps you to perform mathematical tasks in a very way and lot of inbuilt mathematical functions which makes the programmers life easier. Typical example
(Refer Slide Time: 01:40)
") Internet Technology Prof. Indranil Sengupta Department of Computer Science and Engineering Indian Institute of Technology, Kharagpur Lecture No #25 Javascript Part I Today will be talking about a language
Internet Technology Prof. Indranil Sengupta Department of Computer Science and Engineering Indian Institute of Technology, Kharagpur Lecture No #25 Javascript Part I Today will be talking about a language
STATS 507 Data Analysis in Python. Lecture 2: Functions, Conditionals, Recursion and Iteration
 STATS 507 Data Analysis in Python Lecture 2: Functions, Conditionals, Recursion and Iteration Functions in Python We ve already seen examples of functions: e.g., type()and print() Function calls take the
JavaScript Functions, Objects and Array
 JavaScript Functions, Objects and Array Defining a Function A definition starts with the word function. A name follows that must start with a letter or underscore, followed by any number of letters, digits,
Background of HTML and the Internet
 Background of HTML and the Internet World Wide Web in Plain English http://www.youtube.com/watch?v=akvva2flkbk Structure of the World Wide Web A network is a structure linking computers together for the
INTRODUCTION TO WEB DEVELOPMENT AND HTML. Lecture 15: JavaScript loops, Objects, Events - Spring 2011
 INTRODUCTION TO WEB DEVELOPMENT AND HTML Lecture 15: JavaScript loops, Objects, Events - Spring 2011 Outline Selection Statements (if, if-else, switch) Loops (for, while, do..while) Built-in Objects: Strings
Dynamism and Detection
 1 Dynamism and Detection c h a p t e r ch01 Page 1 Wednesday, June 23, 1999 2:52 PM IN THIS CHAPTER Project I: Generating Platform-Specific Content Project II: Printing Copyright Information and Last-Modified
Tutorial 1 Getting Started with HTML5. HTML, CSS, and Dynamic HTML 5 TH EDITION
 Tutorial 1 Getting Started with HTML5 HTML, CSS, and Dynamic HTML 5 TH EDITION Objectives Explore the history of the Internet, the Web, and HTML Compare the different versions of HTML Study the syntax
Variables and Typing
 Variables and Typing Christopher M. Harden Contents 1 The basic workflow 2 2 Variables 3 2.1 Declaring a variable........................ 3 2.2 Assigning to a variable...................... 4 2.3 Other
1.1 A Brief Intro to the Internet
 1.1 A Brief Intro to the Internet - Origins - ARPAnet - late 1960s and early 1970s - Network reliability - For ARPA-funded research organizations - BITnet, CSnet - late 1970s & early 1980s - email and
What is PHP? [1] Figure 1 [1]
![What is PHP? [1] Figure 1 [1]](/thumbs/80/82156183.jpg "What is PHP? [1] Figure 1 [1]") PHP What is PHP? [1] PHP is an acronym for "PHP: Hypertext Preprocessor" PHP is a widely-used, open source scripting language PHP scripts are executed on the server PHP is free to download and use Figure
PHP What is PHP? [1] PHP is an acronym for "PHP: Hypertext Preprocessor" PHP is a widely-used, open source scripting language PHP scripts are executed on the server PHP is free to download and use Figure
A tutorial report for SENG Agent Based Software Engineering. Course Instructor: Dr. Behrouz H. Far. XML Tutorial.
 A tutorial report for SENG 609.22 Agent Based Software Engineering Course Instructor: Dr. Behrouz H. Far XML Tutorial Yanan Zhang Department of Electrical and Computer Engineering University of Calgary
E ECMAScript, 21 elements collection, HTML, 30 31, 31. Index 161
 A element, 108 accessing objects within HTML, using JavaScript, 27 28, 28 activatediv()/deactivatediv(), 114 115, 115 ActiveXObject, AJAX and, 132, 140 adding information to page dynamically, 30, 30,
Methods CSC 121 Fall 2016 Howard Rosenthal
 Methods CSC 121 Fall 2016 Howard Rosenthal Lesson Goals Understand what a method is in Java Understand Java s Math Class and how to use it Learn the syntax of method construction Learn both void methods
Hypertext Markup Language, or HTML, is a markup
 Introduction to HTML Hypertext Markup Language, or HTML, is a markup language that enables you to structure and display content such as text, images, and links in Web pages. HTML is a very fast and efficient
Introduction to Computer Programming in Python Dr. William C. Bulko. Data Types
 Introduction to Computer Programming in Python Dr William C Bulko Data Types 2017 What is a data type? A data type is the kind of value represented by a constant or stored by a variable So far, you have
710 Index Attributes, 127 action attribute, 263 assigning, bottom attribute, domain name attribute, 481 expiration date attribute, 480 8
 INDEX Symbols = (assignment operator), 56 \ (backslash), 33 \b (backspace), 33 \" (double quotation mark), 32 \e (escape), 33 \f (form feed), 33
Chapter 1 Introduction to HTML, XHTML, and CSS
 Chapter 1 Introduction to HTML, XHTML, and CSS MULTIPLE CHOICE 1. The world s largest network is. a. the Internet c. Newsnet b. the World Wide Web d. both A and B A PTS: 1 REF: HTML 2 2. ISPs utilize data
1. Please, please, please look at the style sheets job aid that I sent to you some time ago in conjunction with this document.
 1. Please, please, please look at the style sheets job aid that I sent to you some time ago in conjunction with this document. 2. W3Schools has a lovely html tutorial here (it s worth the time): http://www.w3schools.com/html/default.asp
1.1 A Brief Intro to the Internet
 1.1 A Brief Intro to the Internet - Origins - ARPAnet - late 1960s and early 1970s - Network reliability - For ARPA-funded research organizations - BITnet, CSnet - late 1970s & early 1980s - email and
JavaScript Specialist v2.0 Exam 1D0-735
 JavaScript Specialist v2.0 Exam 1D0-735 Domain 1: Essential JavaScript Principles and Practices 1.1: Identify characteristics of JavaScript and common programming practices. 1.1.1: List key JavaScript
CITS1231 Web Technologies. JavaScript Math, String, Array, Number, Debugging
 CITS1231 Web Technologies JavaScript Math, String, Array, Number, Debugging Last Lecture Introduction to JavaScript Variables Operators Conditional Statements Program Loops Popup Boxes Functions 3 This
PHP and MySQL for Dynamic Web Sites. Intro Ed Crowley
 PHP and MySQL for Dynamic Web Sites Intro Ed Crowley Class Preparation If you haven t already, download the sample scripts from: http://www.larryullman.com/books/phpand-mysql-for-dynamic-web-sitesvisual-quickpro-guide-4thedition/#downloads
CSC Web Technologies, Spring Web Data Exchange Formats
 CSC 342 - Web Technologies, Spring 2017 Web Data Exchange Formats Web Data Exchange Data exchange is the process of transforming structured data from one format to another to facilitate data sharing between
UR what? ! URI: Uniform Resource Identifier. " Uniquely identifies a data entity " Obeys a specific syntax " schemename:specificstuff
 CS314-29 Web Protocols URI, URN, URL Internationalisation Role of HTML and XML HTTP and HTTPS interacting via the Web UR what? URI: Uniform Resource Identifier Uniquely identifies a data entity Obeys a
.. Cal Poly CPE/CSC 366: Database Modeling, Design and Implementation Alexander Dekhtyar..
 .. Cal Poly CPE/CSC 366: Database Modeling, Design and Implementation Alexander Dekhtyar.. XML in a Nutshell XML, extended Markup Language is a collection of rules for universal markup of data. Brief History
Princess Nourah bint Abdulrahman University. Computer Sciences Department
 Princess Nourah bint Abdulrahman University 1 And use http://www.w3schools.com/ JavaScript Objectives Introduction to JavaScript Objects Data Variables Operators Types Functions Events 4 Why Study JavaScript?
Methods CSC 121 Spring 2017 Howard Rosenthal
 Methods CSC 121 Spring 2017 Howard Rosenthal Lesson Goals Understand what a method is in Java Understand Java s Math Class and how to use it Learn the syntax of method construction Learn both void methods
Intro to Programming. Unit 7. What is Programming? What is Programming? Intro to Programming
 Intro to Programming Unit 7 Intro to Programming 1 What is Programming? 1. Programming Languages 2. Markup vs. Programming 1. Introduction 2. Print Statement 3. Strings 4. Types and Values 5. Math Externals
From administrivia to what really matters
 From administrivia to what really matters Questions about the syllabus? Logistics Daily lectures, quizzes and labs Two exams and one long project My teaching philosophy...... is informed by my passion
PHP by Pearson Education, Inc. All Rights Reserved.
 PHP 1992-2012 by Pearson Education, Inc. All Client-side Languages User-agent (web browser) requests a web page JavaScript is executed on PC http request Can affect the Browser and the page itself http
Web Engineering (CC 552)
") Web Engineering (CC 552) Introduction Dr. Mohamed Magdy mohamedmagdy@gmail.com Room 405 (CCIT) Course Goals n A general understanding of the fundamentals of the Internet programming n Knowledge and experience
Web Engineering (CC 552) Introduction Dr. Mohamed Magdy mohamedmagdy@gmail.com Room 405 (CCIT) Course Goals n A general understanding of the fundamentals of the Internet programming n Knowledge and experience
C++ Programming Lecture 11 Functions Part I
 C++ Programming Lecture 11 Functions Part I By Ghada Al-Mashaqbeh The Hashemite University Computer Engineering Department Introduction Till now we have learned the basic concepts of C++. All the programs
Ordinary Differential Equation Solver Language (ODESL) Reference Manual
 Reference Manual") Ordinary Differential Equation Solver Language (ODESL) Reference Manual Rui Chen 11/03/2010 1. Introduction ODESL is a computer language specifically designed to solve ordinary differential equations (ODE
Ordinary Differential Equation Solver Language (ODESL) Reference Manual Rui Chen 11/03/2010 1. Introduction ODESL is a computer language specifically designed to solve ordinary differential equations (ODE
Maciej Sobieraj. Lecture 1
 Maciej Sobieraj Lecture 1 Outline 1. Introduction to computer programming 2. Advanced flow control and data aggregates Your first program First we need to define our expectations for the program. They
Chapter 17. Fundamental Concepts Expressed in JavaScript
 Chapter 17 Fundamental Concepts Expressed in JavaScript Learning Objectives Tell the difference between name, value, and variable List three basic data types and the rules for specifying them in a program
HTML is a mark-up language, in that it specifies the roles the different parts of the document are to play.
 Introduction to HTML (5) HTML is a mark-up language, in that it specifies the roles the different parts of the document are to play. For example you may specify which section of a document is a top level
The Number object. to set specific number types (like integer, short, In JavaScript all numbers are 64bit floating point
 Internet t Software Technologies JavaScript part three IMCNE A.A. 2008/09 Gabriele Cecchetti The Number object The JavaScript Number object does not allow you to set specific number types (like integer,
Tutorial 10: Programming with JavaScript
 Tutorial 10: Programming with JavaScript College of Computing & Information Technology King Abdulaziz University CPCS-665 Internet Technology Objectives Learn the history of JavaScript Create a script
IT 374 C# and Applications/ IT695 C# Data Structures
 IT 374 C# and Applications/ IT695 C# Data Structures Module 2.1: Introduction to C# App Programming Xianrong (Shawn) Zheng Spring 2017 1 Outline Introduction Creating a Simple App String Interpolation
Section 2: Introduction to Java. Historical note
 The only way to learn a new programming language is by writing programs in it. - B. Kernighan & D. Ritchie Section 2: Introduction to Java Objectives: Data Types Characters and Strings Operators and Precedence
4. Java Project Design, Input Methods
 4-1 4. Java Project Design, Input Methods Review and Preview You should now be fairly comfortable with creating, compiling and running simple Java projects. In this class, we continue learning new Java
Lecture 05 I/O statements Printf, Scanf Simple statements, Compound statements
 Programming, Data Structures and Algorithms Prof. Shankar Balachandran Department of Computer Science and Engineering Indian Institute of Technology, Madras Lecture 05 I/O statements Printf, Scanf Simple
COMS 469: Interactive Media II
 COMS 469: Interactive Media II Agenda Review Data Types & Variables Decisions, Loops, and Functions Review gunkelweb.com/coms469 Review Basic Terminology Computer Languages Interpreted vs. Compiled Client
Chapter 1 Summary. Chapter 2 Summary. end of a string, in which case the string can span multiple lines.
 Chapter 1 Summary Comments are indicated by a hash sign # (also known as the pound or number sign). Text to the right of the hash sign is ignored. (But, hash loses its special meaning if it is part of
3 The Building Blocks: Data Types, Literals, and Variables
 chapter 3 The Building Blocks: Data Types, Literals, and Variables 3.1 Data Types A program can do many things, including calculations, sorting names, preparing phone lists, displaying images, validating
a Why JavaScript? jonkv interactivity on the web CGI JavaScript Java Applets Netscape LiveScript JavaScript 1: Example
 Why JavaScript? 2 JavaScript JavaScript the language Web page manipulation with JavaScript and the DOM 1994 1995: Wanted interactivity on the web Server side interactivity: CGI Common Gateway Interface
JavaScript Basics. The Big Picture
 JavaScript Basics At this point, you should have reached a certain comfort level with typing and running JavaScript code assuming, of course, that someone has already written it for you This handout aims
Data Types and Basic Calculation
 Data Types and Basic Calculation Intrinsic Data Types Fortran supports five intrinsic data types: 1. INTEGER for exact whole numbers e.g., 1, 100, 534, -18, -654321, etc. 2. REAL for approximate, fractional
CS WEB TECHNOLOGY
 CS1019 - WEB TECHNOLOGY UNIT 1 INTRODUCTION 9 Internet Principles Basic Web Concepts Client/Server model retrieving data from Internet HTM and Scripting Languages Standard Generalized Mark up languages
Chapter 3 - Simple JavaScript - Programming Basics. Lesson 1 - JavaScript: What is it and what does it look like?
 Chapter 3 - Simple JavaScript - Programming Basics Lesson 1 - JavaScript: What is it and what does it look like? PP presentation JavaScript.ppt. Lab 3.1. Lesson 2 - JavaScript Comments, document.write(),
Programming the Web 06CS73 INTRODUCTION AND OVERVIEW. Dr. Kavi Mahesh, PESIT, Bangalore. Textbook: Programming the World Wide Web
 Programming the Web 06CS73 INTRODUCTION AND OVERVIEW Dr. Kavi Mahesh, PESIT, Bangalore Textbook: Programming the World Wide Web Introduction: Internet and World-Wide Web Internet History Internet Protocols
Weiss Chapter 1 terminology (parenthesized numbers are page numbers)
") Weiss Chapter 1 terminology (parenthesized numbers are page numbers) assignment operators In Java, used to alter the value of a variable. These operators include =, +=, -=, *=, and /=. (9) autoincrement
Weiss Chapter 1 terminology (parenthesized numbers are page numbers) assignment operators In Java, used to alter the value of a variable. These operators include =, +=, -=, *=, and /=. (9) autoincrement
HTML5 and CSS3 More JavaScript Page 1
 HTML5 and CSS3 More JavaScript Page 1 1 HTML5 and CSS3 MORE JAVASCRIPT 3 4 6 7 9 The Math Object The Math object lets the programmer perform built-in mathematical tasks Includes several mathematical methods
COMS 469: Interactive Media II
 COMS 469: Interactive Media II Agenda Review Ch. 5: JavaScript An Object-Based Language Ch. 6: Programming the Browser Review Data Types & Variables Data Types Numeric String Boolean Variables Declaring
Javascript. UNIVERSITY OF MASSACHUSETTS AMHERST CMPSCI 120 Fall 2010
 Lecture 14 Javascript Announcements Project #2 New website Exam#2 No. Class Date Subject and Handout(s) 17 11/4/10 Examination Review Practice Exam PDF 18 11/9/10 Search, Safety, Security Slides PDF UMass
Chapter 1 Introduction to Computers and the Internet
 CPET 499/ITC 250 Web Systems Dec. 6, 2012 Review of Courses Chapter 1 Introduction to Computers and the Internet The Internet in Industry & Research o E Commerce & Business o Mobile Computing and SmartPhone
This course is designed for web developers that want to learn HTML5, CSS3, JavaScript and jquery.
 HTML5/CSS3/JavaScript Programming Course Summary Description This class is designed for students that have experience with basic HTML concepts that wish to learn about HTML Version 5, Cascading Style Sheets
Web Programming Pre-01A Web Programming Technologies. Aryo Pinandito, ST, M.MT
 Web Programming Pre-01A Web Programming Technologies Aryo Pinandito, ST, M.MT Document Formats: The evolution of HTML HTML HyperText Markup Language Primary document type for the web Transmitted using
Code Editor. The Code Editor is made up of the following areas: Toolbar. Editable Area Output Panel Status Bar Outline. Toolbar
 Code Editor Wakanda s Code Editor is a powerful editor where you can write your JavaScript code for events and functions in datastore classes, attributes, Pages, widgets, and much more. Besides JavaScript,
Pace University. Fundamental Concepts of CS121 1
 Pace University Fundamental Concepts of CS121 1 Dr. Lixin Tao http://csis.pace.edu/~lixin Computer Science Department Pace University October 12, 2005 This document complements my tutorial Introduction
Methods CSC 121 Fall 2014 Howard Rosenthal
 Methods CSC 121 Fall 2014 Howard Rosenthal Lesson Goals Understand what a method is in Java Understand Java s Math Class Learn the syntax of method construction Learn both void methods and methods that
Programming for the Web with PHP
 Aptech Ltd Version 1.0 Page 1 of 11 Table of Contents Aptech Ltd Version 1.0 Page 2 of 11 Abstraction Anonymous Class Apache Arithmetic Operators Array Array Identifier arsort Function Assignment Operators
INFS 2150 Introduction to Web Development and e-commerce Technology. Programming with JavaScript
 INFS 2150 Introduction to Web Development and e-commerce Technology Programming with JavaScript 1 Objectives JavaScript client-side programming Example of a JavaScript program The element
Objectives. Introduction to JavaScript. Introduction to JavaScript INFS Peter Y. Wu, RMU 1
 Objectives INFS 2150 Introduction to Web Development and e-commerce Technology Programming with JavaScript JavaScript client-side programming Example of a JavaScript program The element
Working with JavaScript
 Working with JavaScript Creating a Programmable Web Page for North Pole Novelties 1 Objectives Introducing JavaScript Inserting JavaScript into a Web Page File Writing Output to the Web Page 2 Objectives
CSC Web Programming. Introduction to JavaScript
 CSC 242 - Web Programming Introduction to JavaScript JavaScript JavaScript is a client-side scripting language the code is executed by the web browser JavaScript is an embedded language it relies on its
Lecture 3: The Basics of JavaScript. Background. Needs for Programming Capability. Origin of JavaScript. Using Client-side JavaScript
 Lecture 3: The Basics of JavaScript Wendy Liu CSC309F Fall 2007 Background Origin and facts 1 2 Needs for Programming Capability XHTML and CSS allows the browser to passively display static content How
A network is a group of two or more computers that are connected to share resources and information.
 Chapter 1 Introduction to HTML, XHTML, and CSS HTML Hypertext Markup Language XHTML Extensible Hypertext Markup Language CSS Cascading Style Sheets The Internet is a worldwide collection of computers and
Structured documents
 Structured documents An overview of XML Structured documents Michael Houghton 15/11/2000 Unstructured documents Broadly speaking, text and multimedia document formats can be structured or unstructured.
History of the Internet. The Internet - A Huge Virtual Network. Global Information Infrastructure. Client Server Network Connectivity
 History of the Internet It is desired to have a single network Interconnect LANs using WAN Technology Access any computer on a LAN remotely via WAN technology Department of Defense sponsors research ARPA
1.1 A Brief Intro to the Internet
 1.1 A Brief Intro to the Internet - Origins - ARPAnet - late 1960s and early 1970s - Network reliability - For ARPA-funded research organizations - BITnet, CSnet - late 1970s & early 1980s - email and
CS2900 Introductory Programming with Python and C++ Kevin Squire LtCol Joel Young Fall 2007
 CS2900 Introductory Programming with Python and C++ Kevin Squire LtCol Joel Young Fall 2007 Course Web Site http://www.nps.navy.mil/cs/facultypages/squire/cs2900 All course related materials will be posted
JAVASCRIPT AND JQUERY: AN INTRODUCTION (WEB PROGRAMMING, X452.1)
") Technology & Information Management Instructor: Michael Kremer, Ph.D. Class 4 Professional Program: Data Administration and Management JAVASCRIPT AND JQUERY: AN INTRODUCTION (WEB PROGRAMMING, X452.1) AGENDA
Technology & Information Management Instructor: Michael Kremer, Ph.D. Class 4 Professional Program: Data Administration and Management JAVASCRIPT AND JQUERY: AN INTRODUCTION (WEB PROGRAMMING, X452.1) AGENDA
Tail Calls. CMSC 330: Organization of Programming Languages. Tail Recursion. Tail Recursion (cont d) Names and Binding. Tail Recursion (cont d)
 Names and Binding. Tail Recursion (cont d)") CMSC 330: Organization of Programming Languages Tail Calls A tail call is a function call that is the last thing a function does before it returns let add x y = x + y let f z = add z z (* tail call *)
CMSC 330: Organization of Programming Languages Tail Calls A tail call is a function call that is the last thing a function does before it returns let add x y = x + y let f z = add z z (* tail call *)
The first sample. What is JavaScript?
 Java Script Introduction JavaScript is the most popular scripting language on the internet, and works in all major browsers, such as Internet Explorer, Firefox, Chrome, Opera, and Safari. In this lecture
UNIT -II. Language-History and Versions Introduction JavaScript in Perspective-
 UNIT -II Style Sheets: CSS-Introduction to Cascading Style Sheets-Features- Core Syntax-Style Sheets and HTML Style Rle Cascading and Inheritance-Text Properties-Box Model Normal Flow Box Layout- Beyond
Engineering Problem Solving with C++, Etter/Ingber
 Engineering Problem Solving with C++, Etter/Ingber Chapter 2 Simple C++ Programs C++, Second Edition, J. Ingber 1 Simple C++ Programs Program Structure Constants and Variables C++ Operators Standard Input
Embracing HTML5 CSS </> JS javascript AJAX. A Piece of the Document Viewing Puzzle
 Embracing HTML5 AJAX CSS JS javascript A Piece of the Document Viewing Puzzle Embracing HTML5: A Piece of the Document Viewing Puzzle For businesses and organizations across the globe, being able to
UNIT - I. Introduction to C Programming. BY A. Vijay Bharath
 UNIT - I Introduction to C Programming Introduction to C C was originally developed in the year 1970s by Dennis Ritchie at Bell Laboratories, Inc. C is a general-purpose programming language. It has been
EEC-682/782 Computer Networks I
 EEC-682/782 Computer Networks I Lecture 20 Wenbing Zhao w.zhao1@csuohio.edu http://academic.csuohio.edu/zhao_w/teaching/eec682.htm (Lecture nodes are based on materials supplied by Dr. Louise Moser at
3. WWW and HTTP. Fig.3.1 Architecture of WWW
 3. WWW and HTTP The World Wide Web (WWW) is a repository of information linked together from points all over the world. The WWW has a unique combination of flexibility, portability, and user-friendly features
Overview. Introduction. Introduction XML XML. Lecture 16 Introduction to XML. Boriana Koleva Room: C54
 Overview Lecture 16 Introduction to XML Boriana Koleva Room: C54 Email: bnk@cs.nott.ac.uk Introduction The Syntax of XML XML Document Structure Document Type Definitions Introduction Introduction SGML