MadCap Software. What's New Guide. Lingo 10
|
|
|
- Coleen Small
- 5 years ago
- Views:
Transcription

1 MadCap Software What's New Guide Lingo 10
2 Copyright 2016 MadCap Software. All rights reserved. Information in this document is subject to change without notice. The software described in this document is furnished under a license agreement or nondisclosure agreement. The software may be used or copied only in accordance with the terms of those agreements. No part of this publication may be reproduced, stored in a retrieval system, or transmitted in any form or any means electronic or mechanical, including photocopying and recording for any purpose other than the purchaser's personal use without the written permission of MadCap Software. MadCap Software 7777 Fay Avenue La Jolla, California THIS PDF WAS CREATED USING MADCAP FLARE.
3 CONTENTS CHAPTER 1 Introduction 5 Summary of Major New Features 6 Summary of Additional New Features 7 CHAPTER 2 DITA Translation Enhancements 9 Content References 10 Dynamic Attribute Filtering 13 New Element Types Supported for Translation 20 CHAPTER 3 Dynamic Filtering 21 Filtering Out Conditions 22 Filtering by Target 28 Settings 32 CHAPTER 4 Flare Integration Enhancements 33 Font Mapping 34 Index and Glossary Sort Orders 37 Language Skins 40 CHAPTER 5 Flattening 43 Flattening Snippets 44 Flattening Variables 49 Settings 55
4 CHAPTER 6 Source Control 57 CHAPTER 7 Additional New Features bit Support 60 Command Line 61 Dictionaries (Global) and Spell Check Enhancements 62 File Type Support Enhancements 72 Help Live or Local 80 Image Replacement 83 Project Export Enhancements 96 Project Properties Dialog 97 Report Enhancements 102 Smart Quotes 109 TOC View Window Pane 110 Translation Editor Enhancements 115 APPENDIX PDFs 129 iv
5 CHAPTER 1 Introduction This version of Lingo contains several new features and enhancements. For more information about each feature discussed in this manual, open the online Help and refer to the "What's New in this Version" topic. Links are provided in each new feature description, taking you to topics that contain additional information and steps. This chapter discusses the following: Summary of Major New Features 6 Summary of Additional New Features 7
6 Summary of Major New Features Following are the major new features introduced in this version of Lingo. MAJOR NEW FEATURES Feature What's New? For More Information DITA Translation Enhancements Dynamic Filtering Flare Integration Enhancements Flattening Source Control Confrefs Dynamic attribute filtering New element types supported Conditions Targets Font mapping Index and glossary sort orders Language skins Flatten snippets Flatten variables Apache Subversion Git Microsoft Team Foundation Server Perforce See "DITA Translation Enhancements" on page 9. See "Dynamic Filtering" on page 21. See "Flare Integration Enhancements" on page 33. See "Flattening" on page 43. See "Source Control" on page 57. 6
7 Summary of Additional New Features Following are several additional new features and enhancements introduced this version of Lingo. Feature What's New? For More Information 64-Bit Support Command Line Dictionaries and Spell Check File Type Support Help Live or Local Image Replacement Lingo is now 64-bit Better access to RAM Export a Lingo project Export a Lingo project in a specific language Update/sync a Lingo project with the source file Global or project dictionaries Redesigned Spell Check window pane Import unrecognized file types as text files FrameMaker files sent for review Flare target files for PDF and EPUB Choice between live external or local Help system Batch and multi-language image replacement Skin image replacement See "64-bit Support" on page 60. See "Command Line" on page 61. See "Dictionaries (Global) and Spell Check Enhancements" on page 62. See "File Type Support Enhancements" on page 72. See "Help Live or Local" on page 80. See "Image Replacement" on page 83. CHAPTER 1 What's New Guide 7
8 Feature What's New? For More Information Project Export Project Properties Dialog Reports Smart Quotes TOC View Window Pane Translation Editor Update previously exported versions Basic information Project settings New QA reports Styling updates Replace quotes based on target language Filter files according to TOC from Flare project Improved conditional text support Cleaner index and concept tags See "Project Export Enhancements" on page 96. See "Project Properties Dialog" on page 97. See "Report Enhancements" on page 102. See "Smart Quotes" on page 109. See "TOC View Window Pane" on page 110. See "Translation Editor Enhancements" on page
9 CHAPTER 2 DITA Translation Enhancements Lingo now supports content references and parses them for translation. You can also flatten content references to text and translate them in the Translation Editor. Additionally, many new element types have been added, and you can now filter your project content based on several DITA attributes. This chapter discusses the following: Content References 10 Dynamic Attribute Filtering 13 New Element Types Supported for Translation 20
10 Content References Lingo now supports content references (conrefs) for translation. This is beneficial because it allows authors of DITA projects to translate reusable content elements in their project. In addition to supporting conrefs for translation, Lingo 10 allows you to replace conrefs with text in the Translation Editor. This is referred to as "flattening." If the conref is flattened, translators can edit the translation to make it more appropriate for the segment where it appears. Flattened conrefs appear as normal text in the Translation Editor, while unflattened conrefs appear as tags. Transltors can move these tags to their correct location in the target segment. Similarly, you may have multiple versions of content based on the document you are writing. This is often the case if you have content that needs to be translated differently for different audiences. You can flatten conrefs when creating a new project, or you can change an existing project's flattening settings using the Project Properties dialog. Settings are updated dynamically, so you do not need to update the project to apply the settings. 10
 already includes some of the segments in your project, but the segments in your TM do not use content references; instead, the text is written as")
11 E X A M P L E You use content references throughout your DITA project. You know that your existing translation memory (TM) already includes some of the segments in your project, but the segments in your TM do not use content references; instead, the text is written as part of the segment. Because of this, you decide to flatten the content references in your entire project. This way, when you send the project to your translator, she will get the most accurate matches from your existing TM. This will also let her account for context in the segment when translating the content references. CHAPTER 2 What's New Guide 11
12 Note: The DITA file associated with a conref must be part of your ditamap, otherwise Lingo will not be able to locate the file when importing the DITA project. Note: As a best practice, you should always translate conrefs in the associated DITA file, even if you have flattened them and translated them in the segment. Lingo will use the translation from these files for instances of the conref that are not included in the segment (e.g., conrefs that are removed from the Translation Editor). Note: You can flatten both inline and block conrefs. Flattening block conrefs may add additional tags to the segment in order to preserve the formatting found in the block of content. 12
13 Dynamic Attribute Filtering You can filter DITA files to include one or more conditional attributes. The resulting Lingo project will include all of the translatable files that are marked with the selected attributes (while excluding those that are not selected). Additionally, because Lingo supports block-level and inline attributes, content within a segment that is marked with an excluded attribute will also be excluded from a filtered Lingo project. If you use conditional attributes to filter your Lingo project, the filtered content and files will be used throughout your project when running reports, creating bundles, and performing other tasks. For example, if you pull a report, you will only see data from the filtered content. If you make a bundle, you will only be able to select from files that are included in the project. You can filter a project when creating a new project, or you can make changes to an existing project's filtering settings using the Project Properties dialog. Settings are updated dynamically, so you do not need to update the project to apply the settings. CHAPTER 2 What's New Guide 13

14 E X A M P L E Your DITA files include information for Mac, Windows, and Linux operating systems. In your DITA files, you used the platform attribute to mark the content applicable to each of these operating systems. Additionally, you used the audience attribute to mark content for expert and novice users. 14

15 When creating your Lingo project, you have the option to filter your content by either the platform or audience attributes. You could also filter the content using both attributes. You need to translate all of the content that is applicable to all of your users who use Windows. You select the windows platform attribute to include this attribute type (excluding Mac and Linux) and leave the audience attribute set to All (including both expert and novice users). CHAPTER 2 What's New Guide 15

16 16 Your project looks like this in Lingo:

17 You then use Lingo to create a bundle and send the Windows files to your translator. CHAPTER 2 What's New Guide 17


18 You also need to translate content for expert Linux users, but this content goes to a different translator. You open the Project Properties dialog and adjust the filter settings so the platform attribute is set to linux (excluding Mac and Windows) and the audience attribute is set to expert (excluding novice users). Your project dynamically updates, and now it looks like this in Lingo: Because your project now displays only the expert-level Linux files, you can create a bundle with these files and send them to the other translator. 18
19 Note: If you update the filter settings for an existing project, the translation status of changed segments is set to Untranslated. You also have the option to completely clear any existing translations for these segments. CHAPTER 2 What's New Guide 19
20 New Element Types Supported for Translation Lingo now parses several new DITA element types for translation. The following elements are now translatable: <alt> <author> <codeblock> <desc> <glossaryacronym> <glossarysurfaceform> <glossdef> <glossterm> <indexterm> <mainbooktitle> <ph conref> <publisher> <refsyn> <related-links conref> <stepresult> <xref> Note: For more detailed information about DITA, please refer to: 20
21 CHAPTER 3 Dynamic Filtering You can now filter a source Flare project by target or conditions. Filtering by target allows you to create a Lingo project that includes files in a specific Flare target, while filtering by condition removes files and content marked with specific conditions. Using filtering options narrows down large Flare projects or more easily breaks down large projects into smaller chunks based on conditions or targets. You can filter a project when creating a new project, or you can make changes to an existing project's filter settings using the Project Properties dialog. Settings are updated dynamically, so you do not need to update the project to apply the settings. This chapter discusses the following: Filtering Out Conditions 22 Filtering by Target 28 Settings 32
22 Filtering Out Conditions You can filter Flare projects to exclude one or more conditions. You can also select conditions based on the entire condition set, or you can pick the specific conditions in the set that you want to filter by. The resulting Lingo project will include all of the translatable files that are not marked with the selected conditions. Additionally, because Lingo now supports block-level, inline, glossary, snippet, and CSS conditions (see Improved Conditional Text Support), content within a file or segment that is marked with an excluded condition tag will also be excluded from a filtered Lingo project. If you use condition tags to filter your Lingo project, the filtered content and files will be used throughout your Lingo project when running reports, creating bundles, viewing glossary terms, and performing other tasks. For example, if you pull a report, you will only see data from the filtered content. If you make a bundle, you will only be able to select from files that are included in the project. 22

23 E X A M P L E You are an author with a very large Flare project, but you only need to send specific files to your translator. Rather than exporting your entire project to Lingo and then searching for the individual files that you need to export for translation, you instead mark the files and folders you do not need to translate with a "Do Not Translate" condition tag as you are create each item in Flare. CHAPTER 3 What's New Guide 23

24 In Lingo, you then filter the project to exclude the condition tag, creating a new Lingo project that only includes the files you need to send to your translator. 24

25 When you open the project in Lingo, it looks like this: Because you applied the "Do Not Translate" condition throughout your project, you see only a handful of topics and images. You also see a few project files, such as your glossary, variables file, and TOCs. CHAPTER 3 What's New Guide 25
, four were marked with a \"Do Not Translate\"")
26 E X A M P L E The content author filtered her Flare project to exclude a "Do Not Translate" condition tag. Of the nine lines in the original topic (including the heading), four were marked with a "Do Not Translate" condition tag. 26

27 When you view the topic in the Translation Editor, only five segments appear in Lingo. This is because four lines were excluded when the project was created. Additionally, you see blue condition tag indicators in some segments where individual words were conditioned out and excluded from a segment. Note: Conditions that "unbind" rather than "exclude" content will not be excluded when you filter out a condition in Lingo. If you notice that content has not been removed but you think that it should be, check to be sure that the condition is not marked as an "unbind" condition in Flare. CHAPTER 3 What's New Guide 27
28 Filtering by Target You can filter your Flare projects by target. The resulting project will include all of the translatable files that are part of the selected target, such as topics, images, skins, and variables. A good reason to use target filters is if you need to maintain different translations for different targets. Additionally, you could filter to a specific target and use variable flattening if you need use different definitions of a variable in different targets. E X A M P L E You are preparing Lingo projects for your translators. You have two translators: a senior translator who translates your PDF manuals and online Help; and an assistant translator who translates shorter documents, like brochures. When you import your Flare project to Lingo, you decide to filter by target. Rather than creating a big Lingo project and then trying to remember which files go in the brochures and which go in the online Help, it's faster for you to use the targets you already created in Flare to quickly filter the project. First, you need to send files to your assistant translator, who is working on a brochure about lists. To do this, you filter by the Brochure target. 28
29 CHAPTER 3 What's New Guide 29


30 Lingo automatically adds the correct files to the project, and you can easily bundle the files and send them to the assistant translator. 30

31 Additionally, since the variable definitions used in the project are determined by the target filter, your translator will see the correct variables when translating the project. Note: If you filter by target, target-specific variables can be translated in the target file from the File List. Default variable definitions are translated in the variable set file (they are not considered target-specific, even if selected for a target). All other variables (and variables in projects not filtered by target) can be translated in the variables file. As a best practice, you should translate variables in the variable set or target file, even if you have flattened them and translated them in the segment. Lingo will use the translation from these files for instances of the variable that are not included in the segment (e.g., variable tags that are removed from the Translation Editor). CHAPTER 3 What's New Guide 31
32 Settings You can filter conditions and targets when creating a new project, or you can update an existing project's filtering settings on the Flare Settings tab of the Project Properties dialog (File>Project Properties). The settings are the same in both locations. Filter by target Select this option, then select the target whose files you want to include in the Lingo project. Any files that are not part of that target will not be shown in the File List. If you want to replace variable definitions for a specific target, you can select variables from the Select variables to flatten grid. Filter out condition Select this option, then click Select conditions. In the dialog that opens, select the condition tag set(s) you want to exclude from the Lingo project from the grid on the left side of the dialog. Then select or deselect individual condition tags in each set from the grid on the right side of the dialog. Note: You can also filter DITA projects using conditional attributes. Note: If you update the filter settings for an existing project, the translation status of changed segments is set to Untranslated. You also have the option to completely clear any existing translations for these segments. 32
33 CHAPTER 4 Flare Integration Enhancements Enhancements have been made to improve the way Lingo projects integrate with MadCap Flare. These features include the ability to create font maps, sort index and glossary terms, and create language skins. This chapter discusses the following: Font Mapping 34 Index and Glossary Sort Orders 37 Language Skins 40
34 Font Mapping If you are translating a project into multiple languages, you may need to use different fonts for each language. Using fonts appropriate for the language's character set ensures that the characters display correctly when viewed in the output. You can use Lingo's font mapping feature to locate the fonts already used in the source Flare project and map them to fonts that are supported by each target language. To do this, open the Manage font Maps dialog (Resources>Manage Font Mapping) and create a font map, then edit it. In the dialog that opens, select the files you want to scan. Lingo will search these files and list the fonts currently being used. Then you can select the font you want to map to each original font. You can do this for each language in your project. When the translated project is exported, the Flare project will use the mapped fonts for each language. E X A M P L E You are translating a Flare project that was originally written in English. You need to translate it into French and Arabic. You know that each of these documents will use different fonts in the final output, so you use Lingo to create a font map. First you scan your project files for fonts. The files are currently using Arial, Calibri, and Cambria. This is fine for French, which does not need to display a special character set, and therefore does not need a special font. However, you need to use a different font for Arabic in order to support the language's character set. You switch the language to Arabic and map each of the fonts in your project to B Fantezy, which is an Arabic font. 34

35 CHAPTER 4 What's New Guide 35
 Page layouts (.flpgl) Snippets (.flsnp) Stylesheets and table stylesheets (.css) Topics (.htm) Note: Some fonts (like Arial) include characters used in other languages.")
36 When the author exports the Arabic project back to Flare, the output uses B Fantezy and all of the characters are supported. Note: Lingo scans the following file types for fonts: Master pages (.flmsp) Page layouts (.flpgl) Snippets (.flsnp) Stylesheets and table stylesheets (.css) Topics (.htm) Note: Some fonts (like Arial) include characters used in other languages. However, there is no guarantee that these fonts will work well in all programs or in all browsers. For best results, you should always map fonts to an appropriate character set 36
37 Index and Glossary Sort Orders There may be times that you want to create a custom sort order for your Flare index or glossary. You can do this by adding a "Sort As" term to the index or glossary term. Custom sort orders are especially important when translating a Flare project because terms in each translated language may have different spellings or pronunciations that are not automatically picked up by Flare. Because of this, you may need to specify how the index or glossary should sort a term, so the term is identified correctly when the Lingo project is exported back to Flare. After you translate the index or glossary file, open the Project Properties dialog and select the Sort Order tab. From here, you can see all of the index or glossary terms in your project, as well as the custom terms set for the source project, if applicable. If any of the translated terms need to be sorted using a different letter, you can add an entry in the Sort As column. When the author exports the translated project to Flare, the index or glossary will use the new terms to alphabetize the entries. CHAPTER 4 What's New Guide 37

38 E X A M P L E You are translating a project into Japanese, which uses three different character types. You are translating mostly in kanji, but you want to use katakana in your index and glossary because these characters are phonetic. Because of this, you use Lingo's sort as feature to add katakana "Sort As" terms for each index and glossary word in the Lingo project. 38

39 Later, when the project is exported back to Flare, the index and glossary are sorted using the katakana alphabet instead of the kanji alphabet. Note: If your project has been filtered by a target or condition tag, the glossary file only displays terms that have not been excluded. CHAPTER 4 What's New Guide 39
 containing several terms used in different Flare skins (e.g., \"Table of Contents,\" \"Glossary,\" \"Home\"). Translators can open the language skin file to translate these terms.")
40 Language Skins When you create your Lingo project, you have the option to add a language skin to your project. This generates a language skin file (LanguageSkin.fllng) containing several terms used in different Flare skins (e.g., "Table of Contents," "Glossary," "Home"). Translators can open the language skin file to translate these terms. This is especially useful if there are custom terms in the Flare skin and they need to be translated to match the custom interface. When you export the project back to Flare, the language skin can be seen by opening the Project Organizer, then selecting the Advanced folder. Additional changes can be made to the language skin in Flare, if necessary. When the output is generated, the translations in the language skin replace Flare's default translations for interface elements. Note: If your project's target language has an available spell check dictionary, some translations will be pre-populated when you create your language skin. The available translations vary depending on the language you are using. Languages with an available spell check dictionary are displayed in bold when you select a language during project creation. 40

41 Note: When translating language skin segments, the interface element value is added to the segment as a segment note for your reference. Note: You can only add language skins to a project if there are not language skins already in the source Flare project. If the source Flare project already includes one or more language skins, they will be added to the Lingo project and can be translated. CHAPTER 4 What's New Guide 41
42 42
43 CHAPTER 5 Flattening You can now replace Flare variables and snippets with text in the Translation Editor. This is referred to as "flattening." If the content is flattened, translators can edit the translation to make it more appropriate for the segment where it appears. Similarly, you may have multiple versions of content based on the document you are writing. This is often the case if you have content that needs to be translated differently for different audiences. You can flatten snippets and variables when creating a new project, or you can change an existing project's flattening settings using the Project Properties dialog. Settings are updated dynamically, so you do not need to update the project to apply the settings. This chapter discusses the following: Flattening Snippets 44 Flattening Variables 49 Settings 55

44 Flattening Snippets You can flatten sub-segment snippets (i.e., snippets that are part of a segment, as opposed to their own tag). This means that snippet content will be included as text in the segment in Lingo. Translating a snippet as part of the segment allows translators to account for context, rather than translating each snippet individually. This also makes sure that you have the most accurate translations in the translation memory. Flattened snippets appear as normal text in the Translation Editor, while unflattened snippets appear as tags. Translators can move these tags to their correct location in the target segment. E X A M P L E There are several short snippets in your Lingo project. Sometimes they appear as part of a segment. Other snippets appear as their own segments. 44

45 If you do not flatten the snippets... CHAPTER 5 What's New Guide 45


46 ...the content in Lingo looks as follows. Because the snippets are unflattened, you see tags where the snippets appear in the segments. You can drag each tag into the target segment. Snippets that are part of their own segment do not appear as tags in the Translation Editor. You can translate all of the snippets in the snippet files, which are found in the File List. 46
47 If you do flatten your snippets... CHAPTER 5 What's New Guide 47

48 ...the content in Lingo looks as follows. Content from each snippet appears in the Translation Editor as text. Note: You can flatten both inline and block snippets. Flattening block snippets may add additional tags to the segment in order to preserve the formatting found in the block of content. Note: As a best practice, you should always translate snippet content in the snippet files, even if you have flattened them and translated them in the segment. Lingo will use the translation from these files if it finds instances of the snippet that are not included in the segment (e.g., snippet tags that are removed from the Translation Editor). 48
49 Flattening Variables Replacing variables with their definitions is referred to as "flattening." You can flatten variables from a specific variable set, and you can select certain variables in a set. This gives the translator greater flexibility when translating, because some variables (like a company name) may never need to be translated, but others may always need to be translated. Flattened variables appear as normal text in the Translation Editor, while unflattened variables appear as tags. Translators can move these tags to their correct location in the target segment. Additionally, you can use variable flattening in conjunction with target filtering if you need use different definitions of a variable in different targets. CHAPTER 5 What's New Guide 49

50 E X A M P L E You are a Flare author writing a short manual for a company that has two internal teams: Red and Blue. One of the variables in your project is a target-specific "Team" variable with two definitions: "Red" and "Blue." You need your manual translated into Spanish. When creating your Lingo project, you filter the Flare project by target so you only see the appropriate topics and variables for each team. The first document you produce is the one for the Blue team. To do this, you filter by the "Blue" target when creating the Lingo project. You do not flatten the variables for this project. 50
.")
51 The variable definition for "Blue" that was specified in your Flare project is included in the Lingo project. When finished, you bundle the project and send it to your translator. Because you did not flatten the variables in the project, your translator will translate the variable in the target file (because it is target-specific). CHAPTER 5 What's New Guide 51

52 When translating segments, he simply moves the "Blue" tag in the source segment to the target segment. He does not need to translate the variable each time he encounters it in a topic. When you create the Lingo project for the Red team, you decide to flatten the "Red" variable. Unlike "Blue," which does not take on a different gender depending on the words it modifies, "Red" might be masculine or feminine. You know that you may need to change the variable slightly to use correct gender agreement. 52
 from the Select variables to flatten area at the top of the tab.")
53 To do this, you update the project's settings on the Flare Settings tab of the Project Properties dialog (File>Project Properties). You choose to filter by the Red target. You also select the "Team" variable (which has the "Red" definition in this target) from the Select variables to flatten area at the top of the tab. CHAPTER 5 What's New Guide 53

54 When finished, you bundle the project and send it to your translator. By flattening the variable, your translator can translate it directly in the segment and make changes based on the context of the sentence. The variable also appears in the target file, because Lingo will use this translation if the variable is used elsewhere in the project. Note: If you filter by target, target-specific variables can be translated in the target file from the File List. Default variable definitions are translated in the variable set file (they are not considered target-specific, even if selected for a target). All other variables (and variables in projects not filtered by target) can be translated in the variables file. As a best practice, you should translate variables in the variable set or target file, even if you have flattened them and translated them in the segment. Lingo will use the translation from these files for instances of the variable that are not included in the segment (e.g., variable tags that are removed from the Translation Editor). 54
55 Settings You can flatten snippets and variables when creating a new project, or you (or the translator) can update an existing project's flattening settings on the Flare Settings tab of the Project Properties dialog (File>Project Properties). The settings are the same in both locations. Flatten a Variable Select the variable set(s) you want to flatten from the grid on the left side of the dialog. Then select or deselect individual variables from the grid on the right side of the dialog. If you want to replace variable definitions for a specific target, you can optionally select a target from the Filter to target drop-down. Flatten a Snippet Select Convert sub-segment snippets to text at the bottom of the dialog. This will convert all inline snippets to text. Note: If you update the flattening settings for an existing project, the translation status of changed segments is set to Untranslated. You also have the option to completely clear any existing translations for these segments. Note: You can also flatten DITA content references. CHAPTER 5 What's New Guide 55
56 56
57 CHAPTER 6 Source Control Lingo provides integrated source control support for Subversion, Git, Team Foundation Server, and Perforce. Source control is a process that allows you to store your project files in a central location and determine which individuals have access to those files. By using a source control system to manage access to files, you can ensure that there are no file conflicts when many individuals are working on the same project (multi-user teams). You can also revert back to earlier versions of source control files if necessary. Source control is even useful for single users because it provides a means for maintaining a constant backup of all project files. For more information about Lingo's integrated source control support, please refer to the online Help. Important: If you are using source control, do not include your local termbase (.litdb3) and translation memory (.db) files in your project folder. These files do not function correctly when used with source control, and can cause conflicts. Instead, you should use a server termbase or translation memory. This will allow other users to have access to the terms in the database while avoiding possible conficts.
58 58
59 CHAPTER 7 Additional New Features In addition to the features already discussed, some additional new features are being introduced in this version. This chapter discusses the following: 64-bit Support 60 Command Line 61 Dictionaries (Global) and Spell Check Enhancements 62 File Type Support Enhancements 72 Help Live or Local 80 Image Replacement 83 Project Export Enhancements 96 Project Properties Dialog 97 Report Enhancements 102 Smart Quotes 109 TOC View Window Pane 110 Translation Editor Enhancements 115
60 64-bit Support Lingo is now a 64-bit application. This is beneficial because 64-bit applications provide better access to your computer's memory (RAM). This is especially useful if you have a large project or often work with multiple files at once, because Lingo will run faster and more efficiently. Note: If you have any mappings to the Lingo application (e.g., shortcuts), you will need to update them so they point to the Program Files folder. Previous versions of Lingo were native 32-bit applications and were installed in the Program Files (x86) folder. For example, the new location of the Lingo application is C:\Program Files\MadCap Software\MadCap Lingo 10\Lingo.app\Lingo.exe. Note: If you want to import Doc-To-Help projects to a 64-bit version of Lingo, you will need to download Microsoft Access Database Engine 2010 x64 edition. If you do not already have this add-in, Lingo will prompt you to install it from the Microsoft Download Center. 60
61 Command Line Lingo now supports the command line for managing your projects. Depending on the command(s) used, you can accomplish any of the following. Export a Lingo project Export a Lingo project in a specific language Update/sync a Lingo project with the source file The best way to use the command line feature is to create a batch file with the necessary commands in it. Then you can use a scheduling tool (such as the Task Scheduler utility in Windows) to run the batch file automatically whenever you want. Note: Arguments in the command line are case sensitive. CHAPTER 7 What's New Guide 61

62 Dictionaries (Global) and Spell Check Enhancements Some enhancements have been made to dictionaries and the spell checking feature they support. Dictionaries Global or Project In previous versions, Lingo supported only project-level custom dictionaries for spell checking purposes. By "project-level," we mean that the dictionaries you created were tied to specific projects. These types of dictionaries are still supported. But now you also have the option of creating global dictionaries. A global dictionary means that any Lingo project you open on your computer can use it for spell checking. This is a convenient way to ensure that all of your projects are using the same spellings for terms. By default, a new global dictionary is stored in your AppData folder, like all of your built-in dictionaries. However, you can use the Options dialog to choose another location for your global dictionary. For example, you might be working with a team of translators and want to make sure you are all using the same spellings for certain terms. By choosing a network directory, your entire team can use the same global dictionary. 62

63 You can even use a global dictionary as well a project dictionary. If this is the case, the Spell Check window pane combines and displays suggested spellings from both dictionaries, as well as from the built-in dictionary for that language. CHAPTER 7 What's New Guide 63
64 Spell Check Changes The Spell Check window pane has been redesigned, and several new options have been added to it. This includes the following: Look in more locations (e.g., content document, documents in the same folder, whole project). Add spellings to global or project dictionaries. Open the Options dialog to set global dictionary settings, as well as to tell Lingo to ignore certain types of words or circumstances during spell check. The process has also changed somewhat. Previously, you used the Spell Check window pane to move from file to file to see each questionable spelling. Starting with this version, the questionable spellings are listed in a grid at the bottom of the window pane after you start the spell check process. Click on a row to deal with a specific misspelling, then select the following row to move to the next one, and so on. This is desirable because you can perform all of your spell check work in one place, without having to open a bunch of different files. However, you always have the option to open a particular file where a questionable spelling occurs. 64


65 Also, if you press F7, the Spell Check window pane opens and automatically displays the first questionable spelling it finds in the current file. Following are the main sections in the redesigned Spell Check window pane. Many of the fields and options in these sections are new or changed. CHAPTER 7 What's New Guide 65
66 SPELL CHECK In the first drop-down,select the location where you want to perform the spell check (if you have a Lingo project open): current document Lingo checks the spelling in the active file only. documents in the same folder Lingo checks the spelling in all files located in the same folder as the current one. whole project Lingo checks the spelling in every file in the project. You can use the buttons to the right to initiate or stop the spell check process, as well as open the file where a questionable spelling occurs: Start/Cancel Display all occurrences of questionable spellings in a grid at the bottom of the window pane. Each time you select a row in the grid, the "Not In Dictionary" and "Suggestions" fields are populated with the results. If the process is in progress, the label changes to "Cancel," which you can click to stop the process. View In File Open the file where the current questionable spelling occurs, and highlight it. 66

67 CHAPTER 7 What's New Guide 67

68 NOT IN DICTIONARY This field displays each questionable spelling in its context with red, underlined font. 68
69 You can use the buttons and drop-down field to the right in order to take action on the questionable spelling. Ignore Lingo ignores the spelling of the word for the current session. Ignore All Lingo ignores the spelling of the word and adds the spelling of this word to the Ignored Words Editor (which can be opened from the Tools ribbon). This means that if other occurrences of the word are found in any other files in future sessions, they will not be flagged as questionable spellings. This is similar to adding words to a dictionary. The difference is that this feature simply ignores questionable spellings of certain words, whereas a dictionary also lists spellings as suggestions. Add To Dictionary Lingo adds the word to the dictionary so that it is not flagged as a questionable spelling in the future. The word will also be displayed as a suggestion for future questionable spellings that are very similar. The kind of dictionary (Global or Project) to which it is added is determined by the selection in the next field. Global/Project If you select Global, spellings of words are added to a dictionary that can be used by any projects pointing to it. If you select Project, spellings of words are added to a dictionary that can be used only by the current project. CHAPTER 7 What's New Guide 69

70 SUGGESTIONS This field displays alternative suggestions for each questionable spelling. 70
71 You can use the buttons to the right in order to replace the current spelling with a suggestion, or to set other options. Change Lingo changes only the current instance of the misspelled word with the alternative word selected in the Suggestions field. Change All Lingo changes all instances of the misspelled word with the alternative word selected in the Suggestions field. Options This opens the Spelling tab of the Options dialog. If using a global dictionary, you can use fields at the top of the dialog to choose a location for it. You can also use fields at the bottom to ignore any of the following when spell checking files: Ignore repeated words Ignore words with numbers Ignore uppercase words Ignore URLs Ignore mixed case words Ignore addresses Warning: When you use a spell check suggestion to change the spelling in a file, the edit is made on disk, not in the editor. Therefore, you cannot undo the action if you change your mind. Instead, you will need to open the affected file and change the text manually. CHAPTER 7 What's New Guide 71
72 File Type Support Enhancements Improvements have been made to Lingo's file type support. Flare target files are now supported, and Framemaker files previously supported only for translation are now also supported for review. Additionally, you can now import any unrecognized file type, including custom file types, by using a text file filter. Import Unrecognized File Types as Text Files Lingo now allows you to import any file type as a text file by using a text file filter and regular expressions. This is helpful if you work with files that use uncommon or custom file extensions. To import any file type, create a new Lingo project and add your file to Lingo. If you add a file type that Lingo does not recognize, you will see a warning image next to the file filter drop-down. To resolve this error, select an existing text file filter or create a new one using regular expressions. Adding a text file filter will treat the file as a text file and allow you to import and translate the file. If you do not select a filter, the file will be discarded when you create the project. You can also add unrecognized file types as part of a folder. If you do this, Lingo will notify you to apply a text filter to the appropriate files within the folder. If you do not apply a filter to the unrecognized files, they will be discarded from the folder upon project creation. Important: Creating file type filters is recommended for advanced Lingo users. This feature requires an understanding of advanced topics such as regular expressions, XML, and segmentation rules. Additionally, it is recommended that you are familiar with the file(s) you are importing prior to adding a filter. Some file type filters require you to select the specific content that you want to import (e.g., sheet labels, headers and footers, comments). 72

73 E X A M P L E You need to translate an ODF file. However, Lingo does not recognize this file type. When you add the file to your project, you see a yellow warning icon. CHAPTER 7 What's New Guide 73

74 74 To resolve this error, select the Filter drop-down and select Create New.


75 The File Filters dialog opens, and you can create a new text file filter using regular expressions. When you select the new text file filter from the drop-down, the error is resolved. CHAPTER 7 What's New Guide 75

76 The file is imported for translation. FrameMaker Files Sent for Review In previous versions of Lingo, FrameMaker files were supported for translation, but you could not send translated files for review. In Lingo 10, you can now send translated FrameMaker files for review using Lingo's internal review process. When working with FrameMaker files in Lingo, you can save these files as a review package (File>Review>Save Review Package). In the dialog that opens, select the files you want to send, then click Finish. The files will be saved as a Lingo review package (.lirev). 76

77 Flare Target Files You can now translate Flare target files (.fltar) for PDF and EPUB targets. This allows you to translate the target's metadata fields, such as the document title or description. This metadata is important when distributing content, because it helps publishers correctly categorize information, and it helps users find the document. You can translate the following metadata: PDF Keywords Subject Title CHAPTER 7 What's New Guide 77

78 EPUB Description Genre Subject Title 78

79 Note: When you translate metadata in a PDF or EPUB target file, the metadata type is added to the segment as a segment note. CHAPTER 7 What's New Guide 79

80 Help Live or Local Lingo's online and dynamic Help system has changed, pointing to files hosted externally. This allows for live updates to the Help. Also, there is a new local Help option that lets you view Help located on your computer instead. Live External Help System By default, Lingo's dynamic Help is now hosted online, rather than inside the application. This allows topics to be updated on an as-needed basis with the most current information. In previous versions of Lingo, the dynamic Help was only updated when there was a new product release. To open the dynamic Help for the active element in the interface, select Help>Dynamic Help. 80

81 You can also open the full online Help in your browser. To do this, you can click the Open Topic in Browser button at the top of the dynamic Help window pane. CHAPTER 7 What's New Guide 81

82 You can also select Help>Open Help. Local Help System Because the Help system is hosted online, you may not be able to access it if you are behind a firewall or if you have a slow connection. In that case, you can use a local version of the Help. Lingo will even switch to the local Help automatically if it detects that you cannot connect to the external Help system. If you want to use the local Help manually, open the Options dialog (File>Options), and on the General tab select Use Local Help. Select this option if you want to use the local Help manually. Note: The local Help system is only updated when the application is updated. If you want to be sure that you have the most current version of the Help, disable the local Help. 82
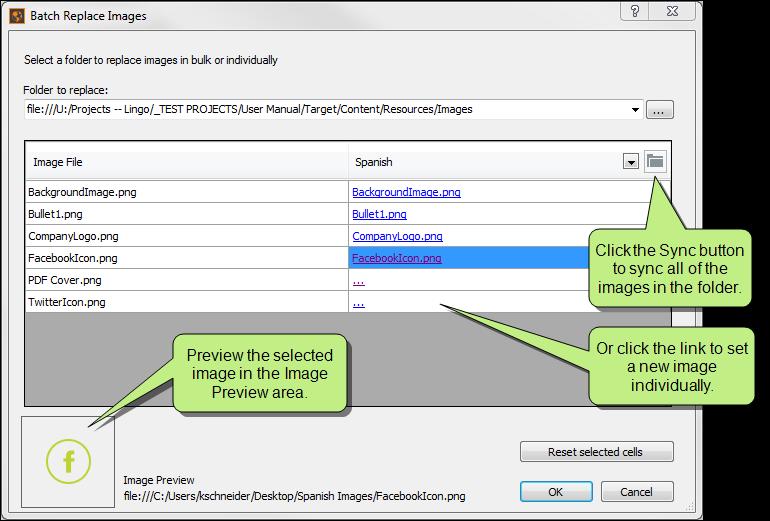
83 Image Replacement In previous versions of Lingo, if you wanted to replace images in your project, you would need to replace them individually, or you could replace them in you original Flare project and then update your Lingo project. New methods to replace images have been added to Lingo 10. You can now replace several images at once using a batch. This method also supports multilingual projects. You can also replace images in skins. Batch and Multi-Language Image Replacement You can replace an image in Lingo instead of deleting and adding the image manually. You can also create a batch that lets you replace many images at the same time, without needing to retranslate their callouts. If you are working in a multilingual project, you can replace the original images with different images for each language in your project. This is very useful if you need to localize images for different languages or countries. To open the Batch Replace Images dialog, select Home>Batch Replace Images, or select in the File List's local toolbar. The dialog that opens, you can select the folder containing the original images and sync them to a folder containing replacement images. If the images in the replacement folder have the same names as the images in the original folder, the replacement images will automatically be linked to the original images. You can also manually replace images by clicking the link in an image's cell. If you click on the original or replacement image in the grid, you can view a preview of the image at the bottom of the dialog. CHAPTER 7 What's New Guide 83
84 84

85 Batch image replacement supports multilingual projects. The currently selected active language is shown in the dialog by default. To replace images for a different language in your project, select a new language from the drop-down at the top of the language column. When you click OK, the original images will be replaced with the new images that you selected. Any translated callouts that were part of the original images will be transferred to the replacement images. CHAPTER 7 What's New Guide 85

86 E X A M P L E You are translating documentation for a company whose products are used in both English- and Spanish-speaking countries. You need to localize the images in the documentation so the text on the images is appropriate for the language used in the documentation. To do this, you can use the Batch Image Replace dialog to sync the images from the English source project with the localized Spanish images. 86

87 To do this, you create a folder with the localized Spanish images. After you click the the Batch Replace Images dialog, you select the Spanish Images folder. button in CHAPTER 7 What's New Guide 87

88 Any images that have identical file names to those in the original Images folder are automatically replaced with your localized Spanish images. Note: If there are not any images in your project, batch image replacement is disabled. Note: Callouts from the original image are transferred to the replacement image and can be translated in Lingo. However, if your replacement image also contains callouts, these callouts will be flattened during the replacement process, and will no longer be editable. As a best practice, choose replacement images that do not include callouts. 88
89 Note: When performing a batch replacement, you can replace images in subfolders. To sync correctly, the subfolders must have the same names in the original folder and the replacement folder. Folders with different names will not sync. Note: If you have localized images and you update your Lingo project, a confirmation dialog will ask you if you want to replace the localized images with the images from the source project. Note: If you are translating a MadCap Mimic movie, you can replace frame background images. However, image objects are not replaceable. Note: If you localize an image and then reopen the Batch Image Replacement dialog, the replacement link next to the original image will say "localized." This alerts you that you have already replaced that image with a new image. However, you can still click the link and replace the image with a new image. CHAPTER 7 What's New Guide 89

90 Skin Image Replacement In addition to replacing images in topics, you can also replace images used in skins. You can replace logos in Flare's HTML5 skins, and you can replace the About box in Mobile and WebHelp skins. To replace the skin image, open the skin in the Translation Editor, then click in the local toolbar. The Replace Skin Images dialog opens. You can see a preview of the current skin image in the dialog. Click Browse to select a new image. E X A M P L E You need to localize hundreds of images in a Flare project. You have already used the Batch Image Replace dialog to localize images in the topic files, but you also need to localize the skin files, so the online Help will show the correct version of your company logo. To do this, you set the current target language in the Project Properties dialog... 90

91 ...then you open the skin file for that language. In the local toolbar, select Replace Skin Images. CHAPTER 7 What's New Guide 91


92 92 In the dialog that opens, replace the current logo...


93 ...with the new logo. CHAPTER 7 What's New Guide 93


94 You do this for each target language. When the project is exported back to Flare and the file outputs are generated, the online Help shows the correct logo for each skin. 94

95 Note: You can replace skin images with.gif,.jpeg,.jpg, and.png image types. Note: If you need to localize images in your skins, you can select a different target language for the project from the Project Properties dialog (File>Project Properties). Then for that language, open the skin file(s). CHAPTER 7 What's New Guide 95

96 Project Export Enhancements Project export has been updated so Lingo will update previously exported versions of the project. In previous versions of Lingo, if you wanted to re-export an existing project, you would need to create a second copy of the project, or delete the previous export. When you update a project in Lingo 10, a confirmation dialog will alert you if the export destination already exists. When exporting the project to an existing location, only changed and new files will be exported. You can view saved export logs in the Project Properties dialog. If an export fails, these logs provide information about what caused the failure. You can save and view these logs. 96

97 Project Properties Dialog In previous versions, you could view and change basic project information using the Project Editor. You can now access these and other project-related settings using the Project Properties dialog. The Project Properties dialog organizes project settings and information into the following tabs: General View the project's name, folder, domain, client, and log files. You can also open the Lingo project folder. CHAPTER 7 What's New Guide 97
 to use when compiling statistics and applying the")
98 Project Language View and change the project's current target language and the source file's language. You can also add and remove languages from the project and select the language(s) to use when compiling statistics and applying the translation memory and machine translations. 98

99 Flare Settings Select the variable sets or individual variables you want to flatten, select project filtering options, and choose whether or not you want to convert inline snippets to text. This tab is only available in Flare projects. CHAPTER 7 What's New Guide 99


100 DITA Settings Select conditional attributes to filter a DITA project. This tab is only available in DITA projects. Sort Order Add "Sort As" entries for index and glossary terms. These terms will be used when you export the project back to Flare to create a custom index and glossary sort order. This tab is only available in Flare projects. 100

101 Source Control Select options related to source control, such as binding and unbinding a project. If the project is already bound, you can use the source control button to perform tasks on files in your project. CHAPTER 7 What's New Guide 101
102 Report Enhancements Improvements have been made to Lingo's reporting features. These include new quality assurance (QA) reports and report styling updates to improve readability. New Quality Assurance Reports Two new quality assurance reports have been added in Lingo 10: Localized image files This report shows the localization status of all of the images in your project. The report shows the languages for which you have chosen a new image ("localized" images), as well as those still using the original source file ("unlocalized" images). E X A M P L E Let's say you are translating a project into 10 different languages. As part of the translation process, you need to localize all of the images in the project. During the course of your project, several new topics are added to the source project, and you receive new images that you need to localize. Because there have been so many changes to the project, you periodically run the localized image files report to see the localization status of each image in the project. When you run the report, you can see each original image, what languages have been localized for each image, and what languages have not been localized for each image. This helps you keep track of which images you still need to update. 102

103 The following image shows how such a report might look. CHAPTER 7 What's New Guide 103
104 Translations that match machine translation This report compares the translated target segment with any available machine translations (MTs). This allows you to review your translations against the machine translations and make changes if necessary. You can change the threshold for the minimum MT match percentage, and you can set a minimum number of words in the segment (to prevent obvious matches, such as names or short phrases, from appearing in the results). Note: This report is unavailable if an MT provider is not connected to the project. E X A M P L E Let's say you regularly send your Lingo projects out for translation. You want to make sure that your translators are not relying too heavily on MT, because your company uses several company-specific terms that are located in your concordance and in your translation memories, but would not be found in a translation from an MT. When you get your translations back from the translators, you run a QA report to see which translations match the MT. You set the percent match at 90% and the minimum word match to 4 words. When you look at the report, you can see which translations are at least a 90% match to the MT. You may want to review these translations to make sure that your translators made the appropriate adjustments to the machine-generated translations. 104

105 CHAPTER 7 What's New Guide 105


106 Report Styling Updates Lingo's quality assurance (QA) and statistics reports have been restyled with spacing and formatting improvements so they are easier to read. QA REPORTS Lingo's QA report has been updated to use better spacing and alternating row colors to improve readability. The location of the target segment has been moved to the first column so it is the first thing you see. If you run multiple QA reports, lines help to separate each report. 106


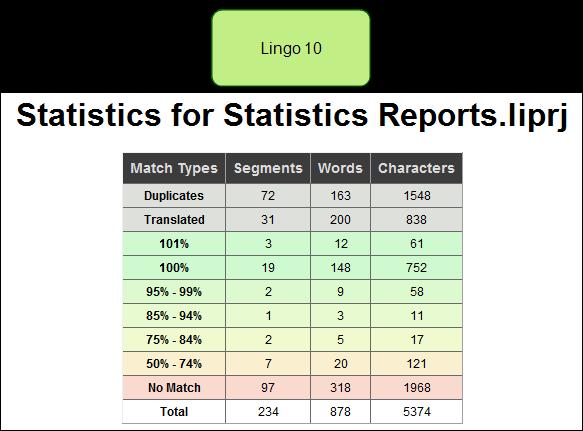
107 STATISTICS REPORTS Lingo's statistics report has been updated to use more defined tables with clearer spacing. Each table uses grid lines to provide visual distinction between each row, and colors help you quickly identify the match percentages in the table. Lines help to separate individual statistics reports for each topic in the project. CHAPTER 7 What's New Guide 107
108 108

109 Smart Quotes Improvements have been made to the way Lingo handles smart quotes when translating a segment. Previously, Lingo would automatically replace straight quotes with curly quotes, regardless of the language being translated. However, Lingo now replaces quotes based on your project's current target language. Note: Selecting the smart quote option does not automatically replace all of the straight quotes that you already have in your project. Likewise, existing smart quotes are not automatically replaced with language-specific smart quotes. If you need to update the quotes in your project, It is recommended that you use the Find and Replace in Files window pane to find all of the files in the project containing straight quotes (or existing smart quotes) and then enter smart quotes in their place. CHAPTER 7 What's New Guide 109
110 TOC View Window Pane You can now filter the topics in your Lingo project using the TOC View window pane. This view allows you to filter the topics in your project by any table of contents (TOC) in the source Flare project. This is especially useful if you are working with a very large Lingo project, because not only does it let you filter by topic files and by TOC, but it also lets you see the order of the topics and the way the topics fit together in the final output. When in TOC View, you can also view topics' conditional indicators, save linked files for review, and create or merge translation bundles. 110


111 E X A M P L E You are working with a large Lingo project. It includes many different file types: images, skins, page layouts, and topics. There are several TOCs in the source Flare project, and different reviewers are responsible for the content that belongs in each TOC. You need to send the appropriate review packages to each reviewer. You open the TOC View window pane and filter the files to show a specific table of contents. This lets you see only the topic files that belong in that TOC. CHAPTER 7 What's New Guide 111

112 Then you can create a review package and send the topics in that TOC to the reviewer. 112

113 Later, when the reviewer sends their review package back to you, you can merge the review package back into Lingo. If you want, you can do this from TOC View, as well. CHAPTER 7 What's New Guide 113

114 When you are ready to create a bundle for your another translator, select a different TOC from the TOC drop-down. The files in the list update, and you can prepare a new bundle. 114
115 Translation Editor Enhancements Improvements have been made to how the Translation Editor handles conditional text and concept and index tags. Condition tags are now supported on block level and inline text, and also on glossary and index terms. Additionally, concept and index tags, which have always been supported, have been cleaned up to improve usability in the Translation Editor. Improved Conditional Text Support Condition tag support has been enhanced in Lingo 10. In previous versions, conditional text was only supported on files. Lingo 10 also supports block level and inline conditional text, as well as condition tags on glossary terms, snippets, and CSS styles. When you are working with segments in the Translation Editor, you will see yellow condition tags on either side of the content that is conditioned. Translators can drag these tags to the appropriate location in the target segment to indicate where the conditional text indicator should appear in the exported project. Additionally, you can now filter content using condition tags. When creating a new Lingo project, you can filter out one or more conditions. CHAPTER 7 What's New Guide 115


116 E X A M P L E The segment below includes a condition tag. Lingo places yellow conditional text tags on either side of the text that were marked with a condition tag indicator in the source document. You can hover over the tags to see information about the condition that is applied to the text. When the translator translates the segments, he can drag the yellow tags into the target segments, so the translation will also include the condition tag. Later, when the translator exports the document back to Flare, the condition tag will appear in the finished project. 116

117 E X A M P L E You create your glossary in Flare with the intent of using the same glossary file for multiple outputs. To do this, you apply condition tags to each term that indicate which terms belong in which output. Some terms are used in multiple targets, others are used in single targets. CHAPTER 7 What's New Guide 117


118 Later, when you need to send a specific target to your translator, you can filter your Lingo project by the target you need to produce. 118

119 When you do this, the condition text rules set in the Flare target are applied to the Lingo project. Because you applied condition tags to your glossary as well as to your topics, when your translator opens the glossary file in your Lingo project, she will only see the terms that need to be translated for that output. CHAPTER 7 What's New Guide 119

120 She will also only see the terms for that ouput when she opens the Project Properties dialog and views the Sort Order information for the glossary. 120

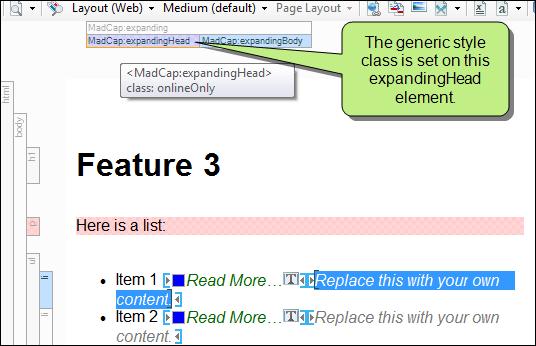
121 E X A M P L E You use expanding text throughout your Flare project. You do not want your expanding headers to appear in your printed outputs, so you create a style class in your stylesheet that has an OnlineOnly condition tag applied to it, and then set this style class on your expanding headers. CHAPTER 7 What's New Guide 121
122 122

123 Later, you need to send one of your printed outputs for translation. When you create a Lingo project, can exclude the OnlineOnly condition tag from the project. CHAPTER 7 What's New Guide 123

124 This way, the expanding headers in your online outputs are not included in the content you send to your translator. Note: Although you can filter out condition tags, Lingo does not explicitly include the condition tags that you have not excluded. For example, if you have condition tags A and B in your project, and you filter out A, you will see content marked with tag B in the project. However, if there is content marked with both tags in your project, it will also be excluded. This is because Lingo excludes anything marked with the A tag, even if the B tag was not also excluded. If you need to exclude some content and include other content, you can do this by filtering your project using a Flare target with your desired condition filters. Filtering by a Flare target respects both include and exclude condition tag filters. Note: Conditions that "unbind" rather than "exclude" content will not be excluded when you filter out a condition in Lingo. If you notice that content has not been removed but you think that it should be, check to be sure that the condition is not marked as an "unbind" condition in Flare. 124

125 Cleaner Index and Concept Tags In Lingo 10, if an index or concept tag appears at the beginning or end of a segment, it is no longer displayed in the Translation Editor. Removing these tags makes segments look cleaner in the Translation Editor, and prevents translators from needing to move tags that are not related to the segment. Additionally, these tags are no longer displayed in Live Preview mode. Tags are still displayed if they appear between two words. All tags in a project are translatable when you open their associated file (e.g., index map, concept map) from the File List window pane. This content is added back to the segment when the project is exported. E X A M P L E When an author writes topics, she includes all of her topic's concept and index tags at the beginning of the topic, by the topic title. That way, when people click an index or related topic link in the output, they are directed to the top of the topic in the online Help. CHAPTER 7 What's New Guide 125

126 When the author imports her Flare project into Lingo, these tags are automatically removed from the segment. This way the tags do not clutter the beginning of each segment and you can translate just the important content. However, you can still translate these tags when you open the index keyword and concept keyword files in the File List. 126
USER GUIDE MADCAP FLARE SharePoint
 USER GUIDE MADCAP FLARE 2018 SharePoint Copyright 2018 MadCap Software. All rights reserved. Information in this document is subject to change without notice. The software described in this document is
Source Control: Subversion
 USER GUIDE MADCAP LINGO 10.1 Source Control: Subversion Copyright 2018 MadCap Software. All rights reserved. Information in this document is subject to change without notice. The software described in
Source Control: Perforce
 USER GUIDE MADCAP LINGO 10.1 Source Control: Perforce Copyright 2018 MadCap Software. All rights reserved. Information in this document is subject to change without notice. The software described in this
MadCap Software. Key Features Guide. Lingo 10.1
 MadCap Software Key Features Guide Lingo 10.1 Copyright 2017 MadCap Software. All rights reserved. Information in this document is subject to change without notice. The software described in this document
USER GUIDE MADCAP LINGO Source Control: Git
 USER GUIDE MADCAP LINGO 10.1 Source Control: Git Copyright 2018 MadCap Software. All rights reserved. Information in this document is subject to change without notice. The software described in this document
Source Control Guide: Microsoft Team Foundation Server
 MadCap Software Source Control Guide: Microsoft Team Foundation Server Lingo 10.1 Copyright 2017 MadCap Software. All rights reserved. Information in this document is subject to change without notice.
USER GUIDE. MADCAP FLARE 2017 r3. Import
 USER GUIDE MADCAP FLARE 2017 r3 Import Copyright 2018 MadCap Software. All rights reserved. Information in this document is subject to change without notice. The software described in this document is
Analyzer and Reports Guide
 MadCap Software Analyzer and Reports Guide Flare 2017 r2 Copyright 2017 MadCap Software. All rights reserved. Information in this document is subject to change without notice. The software described in
USER GUIDE MADCAP CONTRIBUTOR 8. Getting Started
 USER GUIDE MADCAP CONTRIBUTOR 8 Getting Started Copyright 2018 MadCap Software. All rights reserved. Information in this document is subject to change without notice. The software described in this document
Source Control: Perforce
 USER GUIDE MADCAP FLARE 2018 Source Control: Perforce Copyright 2018 MadCap Software. All rights reserved. Information in this document is subject to change without notice. The software described in this
USER GUIDE. MADCAP FLARE 2017 r3. Source Control: Git
 USER GUIDE MADCAP FLARE 2017 r3 Source Control: Git Copyright 2018 MadCap Software. All rights reserved. Information in this document is subject to change without notice. The software described in this
Getting Started Guide
 MadCap Software Getting Started Guide Lingo 10.1 Copyright 2017 MadCap Software. All rights reserved. Information in this document is subject to change without notice. The software described in this document
Source Control: Subversion
 USER GUIDE MADCAP FLARE 2018 Source Control: Subversion Copyright 2018 MadCap Software. All rights reserved. Information in this document is subject to change without notice. The software described in
MadCap Software. Index Guide. Flare 2017 r2
 MadCap Software Index Guide Flare 2017 r2 Copyright 2017 MadCap Software. All rights reserved. Information in this document is subject to change without notice. The software described in this document
Folders and Files. Folder
 C H E A T S H E E T / / F L A R E 2 0 1 8 Folders and Files Folders You will always see Content and Project folders (which hold content and project files, respectively). In addition to those, you might
USER GUIDE MADCAP FLARE Topics
 USER GUIDE MADCAP FLARE 2018 Topics Copyright 2018 MadCap Software. All rights reserved. Information in this document is subject to change without notice. The software described in this document is furnished
USER GUIDE MADCAP FLARE Accessibility
 USER GUIDE MADCAP FLARE 2018 Accessibility Copyright 2018 MadCap Software. All rights reserved. Information in this document is subject to change without notice. The software described in this document
USER GUIDE MADCAP LINGO Termbases
 USER GUIDE MADCAP LINGO 10.2 Termbases Copyright 2018 MadCap Software. All rights reserved. Information in this document is subject to change without notice. The software described in this document is
USER GUIDE. MADCAP FLARE 2018 r2. What's New
 USER GUIDE MADCAP FLARE 2018 r2 What's New Copyright 2018 MadCap Software. All rights reserved. Information in this document is subject to change without notice. The software described in this document
USER GUIDE MADCAP DOC-TO-HELP 5. Getting Started
 USER GUIDE MADCAP DOC-TO-HELP 5 Getting Started Copyright 2018 MadCap Software. All rights reserved. Information in this document is subject to change without notice. The software described in this document
USER GUIDE MADCAP FLARE Language Support
 USER GUIDE MADCAP FLARE 2018 Language Support Copyright 2018 MadCap Software. All rights reserved. Information in this document is subject to change without notice. The software described in this document
Contribution Workflow
 USER GUIDE MADCAP CONTRIBUTOR 8 Contribution Workflow Copyright 2018 MadCap Software. All rights reserved. Information in this document is subject to change without notice. The software described in this
USER GUIDE. MADCAP FLARE 2017 r3. Accessibility
 USER GUIDE MADCAP FLARE 2017 r3 Accessibility Copyright 2018 MadCap Software. All rights reserved. Information in this document is subject to change without notice. The software described in this document
USER GUIDE MADCAP FLARE Project Creation
 USER GUIDE MADCAP FLARE 2018 Project Creation Copyright 2018 MadCap Software. All rights reserved. Information in this document is subject to change without notice. The software described in this document
MadCap Lingo. Translation Guide. Version 7.0 THIS USER GUIDE WAS CREATED USING MADCAP FLARE
 MadCap Lingo Translation Guide Version 7.0 THIS USER GUIDE WAS CREATED USING MADCAP FLARE Copyright 2013 MadCap Software. All rights reserved. Information in this document is subject to change without
USER GUIDE MADCAP MIMIC 8. Key Features
 USER GUIDE MADCAP MIMIC 8 Key Features Copyright 2018 MadCap Software. All rights reserved. Information in this document is subject to change without notice. The software described in this document is
MadCap Flare Training
 MadCap Flare Training Course Overview Welcome Audience Course Overview Preparing Your Computer for the Course Flare Overview What Is Flare? Getting Around in Flare User Interface Ribbon or Toolbars Projects
USER GUIDE. MADCAP FLARE 2017 r3. QR Codes
 USER GUIDE MADCAP FLARE 2017 r3 QR Codes Copyright 2018 MadCap Software. All rights reserved. Information in this document is subject to change without notice. The software described in this document is
USER GUIDE. MADCAP FLARE 2018 r2. Eclipse Help
 USER GUIDE MADCAP FLARE 2018 r2 Eclipse Help Copyright 2018 MadCap Software. All rights reserved. Information in this document is subject to change without notice. The software described in this document
MadCap Mimic. Movie Creation Guide. Version 7
 MadCap Mimic Movie Creation Guide Version 7 Copyright 2013 MadCap Software. All rights reserved. Information in this document is subject to change without notice. The software described in this document
Movie Generation Guide
 MadCap Mimic Movie Generation Guide Version 7 Copyright 2013 MadCap Software. All rights reserved. Information in this document is subject to change without notice. The software described in this document
USER GUIDE MADCAP FLARE Tables
 USER GUIDE MADCAP FLARE 2018 Tables Copyright 2018 MadCap Software. All rights reserved. Information in this document is subject to change without notice. The software described in this document is furnished
TUTORIAL MADCAP FLARE Tripane and PDF
 TUTORIAL MADCAP FLARE 2018 Tripane and PDF Copyright 2018 MadCap Software. All rights reserved. Information in this document is subject to change without notice. The software described in this document
MadCap Software. What's New Guide. Doc-To-Help 5
 MadCap Software What's New Guide Doc-To-Help 5 Copyright 2017 MadCap Software. All rights reserved. Information in this document is subject to change without notice. The software described in this document
Documents, Templates, and Content Guide
 MadCap Software Documents, Templates, and Content Guide Doc-To-Help 5 Copyright 2017 MadCap Software. All rights reserved. Information in this document is subject to change without notice. The software
MadCap Software. What's New Guide. Flare 11
 MadCap Software What's New Guide Flare 11 Copyright 2015 MadCap Software. All rights reserved. Information in this document is subject to change without notice. The software described in this document
TUTORIAL. MADCAP FLARE 2018 r2. Side Navigation
 TUTORIAL MADCAP FLARE 2018 r2 Side Navigation Copyright 2018 MadCap Software. All rights reserved. Information in this document is subject to change without notice. The software described in this document
USER GUIDE MADCAP CAPTURE 7. Key Features
 USER GUIDE MADCAP CAPTURE 7 Key Features Copyright 2018 MadCap Software. All rights reserved. Information in this document is subject to change without notice. The software described in this document is
TUTORIAL MADCAP DOC-TO-HELP 5. New User
 TUTORIAL MADCAP DOC-TO-HELP 5 New User Copyright 2018 MadCap Software. All rights reserved. Information in this document is subject to change without notice. The software described in this document is
New User Tutorial Guide
 MadCap Software New User Tutorial Guide Doc-To-Help 5 Copyright 2017 MadCap Software. All rights reserved. Information in this document is subject to change without notice. The software described in this
USER GUIDE MADCAP CAPTURE 7. Getting Started
 USER GUIDE MADCAP CAPTURE 7 Getting Started Copyright 2018 MadCap Software. All rights reserved. Information in this document is subject to change without notice. The software described in this document
WELCOME Introduction to MadCap Flare and An Overview of What's New in Version 12. Mike Hamilton V.P. of Product Evangelism
 WELCOME Introduction to MadCap Flare and An Overview of What's New in Version 12 Mike Hamilton V.P. of Product Evangelism PRESENTER Mike Hamilton V.P. Product Evangelism MadCap Software Mike has over 15
Touring the Workspace Guide
 MadCap Flare Touring the Workspace Guide Version 9.0 THIS USER GUIDE WAS CREATED USING MADCAP FLARE Copyright 2013 MadCap Software. All rights reserved. Information in this document is subject to change
USER GUIDE. MADCAP FLARE 2018 r2. Images
 USER GUIDE MADCAP FLARE 2018 r2 Images Copyright 2018 MadCap Software. All rights reserved. Information in this document is subject to change without notice. The software described in this document is
USER GUIDE. MADCAP [PRODUCT NAME] 2017 r3. Key Features
![USER GUIDE. MADCAP [PRODUCT NAME] 2017 r3. Key Features](/thumbs/76/73454739.jpg "USER GUIDE. MADCAP [PRODUCT NAME] 2017 r3. Key Features") USER GUIDE MADCAP [PRODUCT NAME] 2017 r3 Key Features Copyright 2018 MadCap Software. All rights reserved. Information in this document is subject to change without notice. The software described in this
USER GUIDE MADCAP [PRODUCT NAME] 2017 r3 Key Features Copyright 2018 MadCap Software. All rights reserved. Information in this document is subject to change without notice. The software described in this
TUTORIAL MADCAP FLARE Top Navigation
 TUTORIAL MADCAP FLARE 2018 Top Navigation Copyright 2018 MadCap Software. All rights reserved. Information in this document is subject to change without notice. The software described in this document
MadCap Central. Server Management & Purchasing Guide
 MadCap Central Server Management & Purchasing Guide Copyright 2017 MadCap Software. All rights reserved. Information in this document is subject to change without notice. The software described in this
TUTORIAL MADCAP FLARE Getting Started
 TUTORIAL MADCAP FLARE 2018 Getting Started Copyright 2018 MadCap Software. All rights reserved. Information in this document is subject to change without notice. The software described in this document
USER GUIDE MADCAP FLARE WebHelp
 USER GUIDE MADCAP FLARE 2018 WebHelp Copyright 2018 MadCap Software. All rights reserved. Information in this document is subject to change without notice. The software described in this document is furnished
MadCap Software. WebHelp Guide. Flare 2017 r2
 MadCap Software WebHelp Guide Flare 2017 r2 Copyright 2017 MadCap Software. All rights reserved. Information in this document is subject to change without notice. The software described in this document
USER GUIDE MADCAP FLARE Search
 USER GUIDE MADCAP FLARE 2018 Search Copyright 2018 MadCap Software. All rights reserved. Information in this document is subject to change without notice. The software described in this document is furnished
Computer Nashua Public Library Introduction to Microsoft Word 2010
 Microsoft Word is a word processing program you can use to write letters, resumes, reports, and more. Anything you can create with a typewriter, you can create with Word. You can make your documents more
Server Management & Purchasing Guide
 USER GUIDE MADCAP CENTRAL Server Management & Purchasing Guide Copyright 2018 MadCap Software. All rights reserved. Information in this document is subject to change without notice. The software described
Macromedia RoboHelp Course Outline
 Tel 0845 686 0266 http://www.multimediacentre.co.uk RoboHelp X5 Course Outline Description This 3-day instructor-led training course covers the strategies and development process of designing a Help system.
USER GUIDE. MADCAP FLARE 2017 r3. Getting Started
 USER GUIDE MADCAP FLARE 2017 r3 Getting Started Copyright 2018 MadCap Software. All rights reserved. Information in this document is subject to change without notice. The software described in this document
A Guide to Quark Author Web Edition 2015
 A Guide to Quark Author Web Edition 2015 CONTENTS Contents Getting Started...4 About Quark Author - Web Edition...4 Smart documents...4 Introduction to the Quark Author - Web Edition User Guide...4 Quark
Published by SDL International ( Copyright SDL International. All rights reserved. Documentation for SDLX2004.
 Guide to SDL Edit & Translating ITDs Published by SDL International (http://www.sdlintl.com). Copyright SDL International. All rights reserved. Documentation for SDLX2004. Microsoft and Windows are registered
Quark XML Author for FileNet 2.5 with BusDocs Guide
 Quark XML Author for FileNet 2.5 with BusDocs Guide CONTENTS Contents Getting started...6 About Quark XML Author...6 System setup and preferences...8 Logging in to the repository...8 Specifying the location
Context-sensitive Help
 USER GUIDE MADCAP DOC-TO-HELP 5 Context-sensitive Help Copyright 2018 MadCap Software. All rights reserved. Information in this document is subject to change without notice. The software described in this
Getting Started Guide
 MadCap Mimic Getting Started Guide Version 7 Copyright 2013 MadCap Software. All rights reserved. Information in this document is subject to change without notice. The software described in this document
USER GUIDE. MADCAP FLARE 2018 r2. Getting Started
 USER GUIDE MADCAP FLARE 2018 r2 Getting Started Copyright 2018 MadCap Software. All rights reserved. Information in this document is subject to change without notice. The software described in this document
Realize Reader Chrome App Version User Guide
 Realize Reader 18.0 Chrome App Version 3.2.0 User Guide 3/9/2018 Contents Contents ii What Is Realize Reader 1 Use Realize Reader Mobile Apps 1 Navigate the Bookshelf 2 View Information About a Book 2
Beginner Workshop Activity Guide 2012 User Conference
 Beginner Workshop Activity Guide 2012 User Conference TUESDAY, MARCH 6 2:00PM 5:00 PM Beginner Training Workshop Attendees will learn the end user functions of OU Campus TM. They will learn how to log
Creating Web Pages with SeaMonkey Composer
 1 of 26 6/13/2011 11:26 PM Creating Web Pages with SeaMonkey Composer SeaMonkey Composer lets you create your own web pages and publish them on the web. You don't have to know HTML to use Composer; it
Realize Reader Windows App. User Guide
 Realize Reader 18.1 Windows App User Guide 6/12/2018 Contents Contents ii What Is Realize Reader 1 Use Realize Reader Mobile Apps 1 Navigate the Bookshelf 2 View Information About a Book 2 Download a Book
Migrate Legacy Word Documentation into MadCap Flare. Matthew Ellison
 Migrate Legacy Word Documentation into MadCap Flare Matthew Ellison Matthew Ellison Certified MadCap trainer and consultant Technical Director of annual UA Europe conference What we ll cover in this session
Getting Acquainted with Office 2007 Table of Contents
 Table of Contents Using the New Interface... 1 The Office Button... 1 The Ribbon... 2 Galleries... 2 Microsoft Help with Changes... 2 Viewing Familiar Dialog Boxes... 2 Download Get Started Tabs from Microsoft...
Quark XML Author October 2017 Update for Platform with Business Documents
 Quark XML Author 05 - October 07 Update for Platform with Business Documents Contents Getting started... About Quark XML Author... Working with the Platform repository...3 Creating a new document from
Word Getting Started The Word Window u vw. Microsoft QUICK Source. Creating a New Blank Document. Creating a New Document from a Template
 Microsoft QUICK Source Word 2007 Getting Started The Word Window u vw x y z u Quick Access Toolbar contains shortcuts for the most commonly used tools. v Microsoft Office Button contains common file and
Introduction to Microsoft Word 2010
 Introduction to Microsoft Word 2010 Microsoft Word is a word processing program you can use to write letters, resumes, reports, and more. Anything you can create with a typewriter, you can create with
University of Sunderland. Microsoft Word 2007
 Microsoft Word 2007 10/10/2008 Word 2007 Ribbons you first start some of the programs in 2007 Microsoft Office system, you may be surprised by what you see. The menus and toolbars in some programs have
Adobe RoboHelp (2019 release)
") (2019 release) An all-new way to create for you. An amazing experience for your customers. Version comparison chart Available 11 2015 release 2017 release 2019 release Authoring Productivity Snippets within
(2019 release) An all-new way to create for you. An amazing experience for your customers. Version comparison chart Available 11 2015 release 2017 release 2019 release Authoring Productivity Snippets within
Easing into DITA Publishing with TopLeaf
 Easing into DITA Publishing with TopLeaf DITA allows authors to quickly start creating topic-based documents. It provides a great deal of out of the box functionality for managing and re-using content.
Microsoft Office Word. Part1
 Microsoft Office 2010 - Word Part1 1 Table of Contents What is Microsoft Word?... 4 Creating a document... 5 Toolbar... 6 Typing in MS Word Text Area... 7 Cut, Copy and Paste Text... 9 Paste Preview...
Introduction to Microsoft Word 2010
 Introduction to Microsoft Word 2010 Microsoft Word is a word processing program you can use to write letters, resumes, reports, and more. Anything you can create with a typewriter, you can create with
MadCap Flare 2018 vs Adobe RoboHelp 2019
 MadCap Flare 2018 vs Adobe RoboHelp 2019 A Detailed Functionality Comparison Our comprehensive guide helps you understand the key differences between MadCap Flare and Adobe RoboHelp 2019. View the full
CHAPTER 3: MICROSOFT OFFICE: WORD 2010
 CHAPTER 3: MICROSOFT OFFICE: WORD 2010 Quick Summary Microsoft Office 2010 includes programs, servers, and services for individuals and organizations. The insertion point is a blinking vertical line that
Moving from FrameMaker to Blaze: Best Practices
 Moving from Adobe FrameMaker to MadCap Blaze is easy, although to get the best results you need to do some planning before you start. This document discusses suggestions and issues to make the import result
Worldox GX4 Overview 2017
 World Software Corporation 266 Harristown Suite 201 Glen Rock, NJ 074522 Worldox GX4 Overview 2017 w w w. w o r l d o x. c o m What s New in Worldox GX4 Worldox GX4 has been totally redesigned with two
9+2 Often-Overlooked Features In Flare s Target Editor
 9+2 Often-Overlooked Features In Flare s Target Editor Who Am I? Neil Perlin - Hyper/Word Services. Internationally recognized content consultant. Help clients create effective, efficient, flexible content
Quark XML Author for FileNet 2.8 with BusDocs Guide
 Quark XML Author for FileNet.8 with BusDocs Guide Contents Getting started... About Quark XML Author... System setup and preferences... Logging on to the repository... Specifying the location of checked-out
WHITE PAPER. Comparison Guide: Choosing Between Help Authoring Tools and CCMSs
 WHITE PAPER Comparison Guide: Choosing Between Help Authoring Tools and CCMSs Introduction Introduction Every few years, the debate flares up over whether to use a HAT (help authoring tool) or a CMS (content
A Guide to Quark Author Web Edition October 2017 Update
 A Guide to Quark Author Web Edition 2015 - October 2017 Update Contents Getting Started...1 Smart Documents...1 Introduction to the Quark Author Web Edition User Guide...1 Quark Author Web Edition configuration...1
Quark XML Author September 2016 Update for Platform with Business Documents
 Quark XML Author 05 - September 06 Update for Platform with Business Documents Contents Getting started... About Quark XML Author... Working with the Platform repository... Creating a new document from
MadCap Lingo at HPE Big Data
 MadCap Lingo at HPE Big Data Dr. Uwe Schwenk L10N Coordinator August 10, 2017 Quality means doing it right when no one is looking. Henry Ford 2 AGENDA Environment Design structure and Goals Products in
Lexis for Microsoft Office User Guide
 Lexis for Microsoft Office User Guide Created 12-2017 Copyright 2017 LexisNexis. All rights reserved. Contents Lexis for Microsoft Office About Lexis for Microsoft Office... 1 About Lexis for Microsoft
USER GUIDE MADCAP DOC-TO-HELP 5. Making It Look Good
 USER GUIDE MADCAP DOC-TO-HELP 5 Making It Look Good Copyright 2018 MadCap Software. All rights reserved. Information in this document is subject to change without notice. The software described in this
SuperNova. Screen Reader. Version 14.0
 SuperNova Screen Reader Version 14.0 Dolphin Computer Access Publication Date: 09 April 2014 Copyright 1998-2014 Dolphin Computer Access Ltd. Technology House Blackpole Estate West Worcester WR3 8TJ United
FirmSite Control. Tutorial
 FirmSite Control Tutorial 1 Last Updated June 26, 2007 by Melinda France Contents A. Logging on to the Administrative Control Center... 3 Using the Editor Overview:... 3 Inserting an Image... 7 Inserting
WHAT IS THIS ABOUT? Design of your documentation universe
 WHAT IS THIS ABOUT? Design of your documentation universe WHAT IS THIS ABOUT? Design of your documentation universe Available options Pros and cons What we do in the world s oldest living Flare project
Copyright 2018 Maxprograms
 Copyright 2018 Maxprograms Table of Contents Introduction... 1 TMXEditor... 1 Features... 1 Getting Started... 2 Editing an existing file... 2 Create New TMX File... 3 Maintenance Tasks... 4 Sorting TM
De La Salle University Information Technology Center. Microsoft Windows SharePoint Services and SharePoint Portal Server 2003
 De La Salle University Information Technology Center Microsoft Windows SharePoint Services and SharePoint Portal Server 2003 WEB DESIGNER / ADMINISTRATOR User s Guide 2 Table Of Contents I. What is Microsoft
Realize Reader ios Mobile App Version User Guide
 Realize Reader 18.1 ios Mobile App Version 5.0.0 User Guide 6/6/2018 Contents Contents ii What Is Realize Reader 1 Use Realize Reader Mobile Apps 1 Navigate the Bookshelf 2 View Information About a Book
Solo 4.6 Release Notes
 June9, 2017 (Updated to include Solo 4.6.4 changes) Solo 4.6 Release Notes This release contains a number of new features, as well as enhancements to the user interface and overall performance. Together
MadCap Flare Version 9
 MadCap Flare Version 9 Importing an MSWord 2007 Document TECHCOMM PROCEDURE Sample Flare Project by Laura Protano Copyright 2014 Company Incorporated. All Rights Reserved. The copyright and trade secret
Function. Description
 Function Check In Get / Checkout Description Checking in a file uploads the file from the user s hard drive into the vault and creates a new file version with any changes to the file that have been saved.
Specification Manager
 Enterprise Architect User Guide Series Specification Manager Author: Sparx Systems Date: 30/06/2017 Version: 1.0 CREATED WITH Table of Contents The Specification Manager 3 Specification Manager - Overview
RoboHelp HTML Training
 RoboHelp HTML Training Developed by Diamondhead Documentation, Inc. 2011 Nationwide Advantage Mortgage Company Page 1 of 11 Table of Contents Directory Structure... 3 HTML Files (Topics) Folder... 3 URLs
MadCap Capture. Shortcuts Guide. Version 6.0 THIS USER GUIDE WAS CREATED USING MADCAP FLARE
 MadCap Capture Shortcuts Guide Version 60 THIS USER GUIDE WAS CREATED USING MADCAP FLARE Copyright 2013 MadCap Software All rights reserved Information in this document is subject to change without notice
Microsoft Word Part I Reference Manual
 Microsoft Word 2002 Part I Reference Manual Instructor: Angela Sanderson Computer Training Coordinator Updated by: Angela Sanderson January 11, 2003 Prepared by: Vi Johnson November 20, 2002 THE WORD SCREEN