CarbonArc PRO. User s Guide. Carbon Project, Inc. 25 Burlington Mall Road Suite 300 Burlington, MA 01803
|
|
|
- Brent Hodges
- 6 years ago
- Views:
Transcription


1 CarbonArc PRO User s Guide Carbon Project, Inc. 25 Burlington Mall Road Suite 300 Burlington, MA info@thecarbonproject.com
2 Copyright Message Information in this document, including URL and other Internet Web site references, is subject to change without notice. The Carbon Project may have patents, patent applications, trademarks, copyrights, or other intellectual property rights covering subject matter in this document. Except as expressly provided in any written license agreement from The Carbon Project, the furnishing of this document does not give you any license to these patents, trademarks, copyrights, or other intellectual property Carbon Project, Inc. All rights reserved. The names of actual companies and products mentioned herein may be the trademarks of their respective owners. The Carbon Project Trademarks The Carbon Project, CarbonTools, CarbonArc, CarbonCloud, Geosocial Networking, ((Echo))MyPlace, Community Oriented Architecture are trademarks or registered trademarks in the United States, European Community, or certain other jurisdictions. ESRI 3D Analyst, ACORN, ADF, AML, ArcAtlas, ArcCAD, ArcCatalog, ArcCOGO, ArcData, ArcDoc, ArcEdit, ArcEditor, ArcEurope, ArcExplorer, ArcExpress, ArcFM, ArcGIS, ArcGlobe, ArcGrid, ArcIMS, ARC/INFO, ArcInfo, ArcInfo Librarian, ArcInfo Professional GIS, ArcInfo The World's GIS, ArcLocation, ArcLogistics, ArcMap, ArcNetwork, ArcNews, ArcObjects, ArcOpen, ArcPad, ArcPlot, ArcPress, ArcQuest, ArcReader, ArcScan, ArcScene, ArcSchool, ArcSDE, ArcSdl, ArcStorm, ArcSurvey, ArcTIN, ArcToolbox, ArcTools, ArcUSA, ArcUser, ArcView, ArcVoyager, ArcWatch, ArcWeb, ArcWorld, ArcXML, Atlas GIS, AtlasWare, Avenue, Business Analyst Online, BusinessMAP, Community, CommunityInfo, Data Automation Kit, Database Integrator, DBI Kit, EDN, ESRI, ESRI Team GIS, ESRI The GIS Company, ESRI The GIS People, FormEdit, Geographic Design System, ESRI BIS, Geography Matters, Geography Network, GIS by ESRI, GIS Day, GIS for Everyone, GISData Server, InsiteMAP, JTX, MapBeans, MapCafé, MapData, MapObjects, Maplex, ModelBuilder, MOLE, NetEngine, PC ARC/INFO, PC ARCPLOT, PC ARCSHELL, PC DATA CONVERSION, PC STARTER KIT, PC TABLES, PC ARCEDIT, PC NETWORK, PC OVERLAY, PLTS, Rent-a-Tech, RouteMAP, SDE, Site Reporter, SML, Sourcebook America, Spatial Database Engine, StreetEditor, StreetMap, TABLES, Tapestry, the ARC/INFO logo, the ArcAtlas logo, the ArcCAD logo, the ArcCAD WorkBench logo, the ArcCOGO logo, the ArcData logo, the ArcData Online logo, the ArcEdit logo, the ArcEurope logo, the ArcExplorer logo, the ArcExpress logo, the ArcFM logo, the ArcFM Viewer logo, the ArcGIS logo, the ArcGrid logo, the ArcIMS logo, the ArcInfo logo, the ArcLogistics Route logo, the ArcNetwork logo, the ArcPad logo, the ArcPlot logo, the ArcPress for ArcView logo, the ArcPress logo, the ArcScan logo, the ArcScene logo, the ArcSDE CAD Client logo, the ArcSDE logo, the ArcStorm logo, the ArcTIN logo, the ArcTools logo, the ArcUSA logo, the ArcView 3D Analyst logo, the ArcView Business Analyst logo, the ArcView Data Publisher logo, the ArcView GIS logo, the ArcView Image Analysis logo, the ArcView Internet Map Server logo, the ArcView logo, the ArcView Network Analyst logo, the ArcView Spatial Analyst logo, the ArcView StreetMap 2000 logo, the ArcView StreetMap logo, the ArcView Tracking Analyst logo, the ArcWorld logo, the Atlas GIS logo, the Avenue logo, the BusinessMAP logo, the Community logo, the Data Automation Kit logo, the Digital Chart of the World logo, the ESRI Data logo, the ESRI globe logo, the ESRI Press logo, the Geography Network logo, the MapCafé logo, the MapObjects Internet Map Server logo, the MapObjects logo, the MOLE logo, the NetEngine logo, the PC ARC/INFO logo, the Production Line Tool Set logo, the RouteMAP IMS logo, the RouteMAP logo, the SDE logo, The World's Leading Desktop GIS, Water Writes, and Your Personal Geographic Information System are trademarks, registered trademarks, or service marks of ESRI in the United States, the European Community, or certain other jurisdictions. Open Geospatial Consortium Trademarks OpenGIS, OGC and Open Geospatial Consortium are registered trademark of the Open Geospatial Consortium, Inc
3 i. Release notes Version 1.7 Release Notes Update - Using CarbonTools PRO libraries New Supports GML 3.2 Update Secure SDI now support Single-Sign-On capability for federated authentication services Bug fix - GML will not parse when namespace name is not "gml" Bug fix - WMS uses CRS instead of SRS for WMS version 1.3.x Version 1.6 Release Notes Update - Using CarbonTools PRO libraries New - Added geometry filter to the filter builder. Allows the insertion of a spatial filter using geometries read from a GML file. New - Added spatial operator setting to the dynamically set bounding-box filter on WFS New Secure SDI tool allows setting a cookie based Single Sign-On (SSO) security Enhancement - Query tab page now has scroll bars for the query view Enhancement - Query tab page updates when changes are applied to the layer properties Bug fix - Tooltip on Insert form shows the wrong message Change Activation method has changed. Added new welcome window while in evaluation mode (see section 2.2.1) - 3 -
4 1. INTRODUCTION SYSTEM SETUP SYSTEM REQUIREMENTS INSTALLING CARBONARC Activating CarbonArc ENABLING THE CARBONARC TOOLBARS USING CARBONARC PRO OGC TOOLS OVERVIEW Add Layers Using Secured Services Secure SDI Searching Catalog Services for the Web (CS-W) Using Secured Services Using Search Templates Export WFS Features to Shapefile Export WFS Features to GML File Messages Log Refresh Layers Refreshing Secured Services SUPPORTED CARBONARC FORMATS Web Map Services (WMS) WMS Layer Properties Web Coverage Service (WCS) WCS Layer Properties Web Feature Services (WFS) Feature Layer Properties Geography Markup Language (GML) GML Layer Properties WFS TRANSACTIONS TOOLS Manage WFS-T Sources and Properties Editing the Properties Table Insert New Items Delete Feature Update Feature Committing Transactions Using Secured Services SAVING AND RESTORING SESSIONS TUTORIALS WALKTHROUGH 1 USING OGC LAYERS WALKTHROUGH 2 USING THE CATALOG WALKTHROUGH 3 USING FEATURE TRANSACTIONS
5 1. Introduction Geospatial interoperability is a modern concept addressing the need for collaboration between Geographic Information Systems (GIS). With the development of the Internet a new medium evolved for sharing maps and other geospatial content. GIS content could now be accessed and disseminated easily and quickly. However, a need for a common language between content providers and content users has emerged. To address this, an international industry consortium made out of companies, government agencies and academic institutes was formed, called The Open Geospatial Consortium (OGC). OGC has published numerous open specifications that provide deep guidelines on how to publish and service geospatial content. These specifications are getting worldwide recognition as the geospatial interoperability standard. The US government has acknowledged and accepted the need for Services Oriented Architecture (SOA) and the use of common and open specifications. A National System for Geospatial-Intelligence (NSG) standards baseline was issued as a response to the national need for data interoperability highlighted by the events of September 11, The US has endorsed a set of OGC specification known collectively as Spatial Data Infrastructure (SDI) 1.0. CarbonArc PRO is an extension to the ArcGIS desktop GIS from Environmental Systems Research Institute, Inc. (ESRI). By plugging into ArcGIS, CarbonArc allows the use of Web services and data formats implementing OGC specifications as an integral part of the GIS. CarbonArc allows the use of Geography Markup Language (GML) in ArcMap while maintaining the complex GML structure, properties and attributes with no loss of data. CarbonArc provides a way to interact with Web services such as Web Coverage Service (WCS), Web Map Service (WMS) and Web Feature Service (WFS) as native layers within the work environment of the ArcMap application. This enables the creation of map views that are a mixture of OGC sources, local files and any other data formats natively supported by the ArcGIS package. User friendly tools hide the complexities and intricacies of OGC specifications, providing a true geospatial interoperability client. Some of the more complex interoperability standards, such as Catalog Services for the Web (CS-W), Filter Encoding (FE) and Web Feature Service Transactional (WFS-T) are accessible via CarbonArc s graphical user interface and do not require prior knowledge in XML or OGC specifications. For example, the Export to Shapefile tool allows the transformation of complex GML data retrieved from a Web Feature Service into a Shapefile type layer. This tool automatically retrieves and parses the layer s GML schema and builds a tabular representation of the properties. The data is then added to the map as a native Shapefile based layer. This process is seamless and allows the user to work with WFS content as a well known and supported ArcGIS layer. This one step process represents the essence of CarbonArc, where no prior knowledge of GML or Shapefile is needed; the analyst simply uses the graphical tools provided to transform data from an OGC Web service to a well known and supported data form
6 CarbonArc is designed for maximum usability. Its multi-threaded operation and caching mechanism are designed to enhance user experience of the OGC Web services by minimizing idle time. Interacting with Web services does not stall the application even with the slowest responding services. The caching mechanism ensures a view of the projected data in the currently viewed region while new data is being updated in the background. Moreover, the full data set is seamlessly saved and loaded with the ArcMap project files (MXD). This allows the quick restoration of data from a local file even when internet connection is not available. These technologies are the result of many years of experience The Carbon Project has dealing both with the utmost complicated OGC specs on one hand, and the most accessible and usable geospatial interoperability clients on the other. With CarbonArc PRO you can also create new GML features, update or delete features and commit the changes to a Web Feature Service Transactional (WFS-T). For maximum usability the data edits are locally cached and may be transmitted to the server in a single transaction. Moreover, any local edits done on a layer are saved with the ArcMap project file. CarbonArc will store all work done on a WFS-T layer in the MXD file. Therefore, saving and loading the current view in ArcMap will also preserve any edits and changes not yet committed to the transactional Web service. The features data managed by CarbonArc provide a new way to view and access complex geospatial data. For example, using ArcMap s Identify tool will show a treeview representation of the complex properties structure and contained geometries of the selected feature. This view reflects the way CarbonArc disembarks from the traditional tabular features, where properties are described as table rows. CarbonArc s feature handling preserves the nested XML based form of properties. It also handles mixed geometries and multiple geometry types contained within the features. CarbonArc uses of native symbology of ArcGIS and applies it to GML based features via custom renderers. When a GML based layer is read CarbonArc will automatically detect the type of symbology that is adequate for the GML geometries and set its default symbol. As it is with other types of feature data in ArcGIS, the symbology can be easily set. A set of custom renderers allow customized styling of the complex data, including mixed geometry renderer that allows the view of features with multiple geometry types. CarbonArc PRO is developed using CarbonTools PRO ( a software development tool which provides the engine for the data caching and management as well as advanced capabilities for geospatial interoperability. For more information about the CarbonTools PRO toolkit please contact The Carbon Project at info@thecarbonproject.com
 CarbonArc PRO is forward compatible with any ArcGIS service pack released by ESRI. For further information about ArcGIS service packs please visit: http://support.esri.")
: \Program Files\ArcGIS\DotNet The directory should contain libraries for.net support.")
7 2. System Setup 2.1. System requirements Windows 2000/XP/Vista.NET Framework version 2.0 or higher ArcGIS 9.2 with.net support installed (see system requirements for ArcGIS 9.2) CarbonArc PRO is forward compatible with any ArcGIS service pack released by ESRI. For further information about ArcGIS service packs please visit: Tip: A quick way to make sure ArcGIS is installed with.net enabled is by making sure that the following directory exists (Figure 1): \Program Files\ArcGIS\DotNet The directory should contain libraries for.net support. If the directory is missing or empty, try to reinstall ArcGIS while making sure that.net support is enabled. Figure 1 Note: The Microsoft.NET Framework 2.0 can be installed and run sideby-side with other.net Framework versions. There is no need to uninstall existing versions before to installing a new one
 and follow the onscreen instructions.")
8 2.2. Installing CarbonArc Installation of CarbonArc is a straight forward process. If installing from the internet, simply run the MSI file (Microsoft Installer package) and follow the onscreen instructions. When installing from a CD, wait for the CD to automatically start the installation process. If the installation process does not start automatically once the CD is inserted access the CD folders and run the Setup.exe file. Follow the onscreen information to complete the process. A successful installation procedure will install the required files and automatically sign the plug-ins and extensions to the ArcGIS application. When done, you may start ArcMap and the CarbonArc toolbars and layers will be available (see section 2.3 on how to enable the CarbonArc PRO toolbars). Note: If ArcGIS is missing the required service pack or the.net support an error will occur and the installation will be aborted Activating CarbonArc When CarbonArc is first installed it will be automatically designated as a 30 day evaluation version. Enabling the CarbonArc toolbars will display a dialog requesting a license key (Figure 2). Make sure to obtain a valid license key to avoid expiration of the package. In case evaluation period expires all of the CarbonArc tools will be disabled. Figure 2-8 -
.")
9 2.3. Enabling the CarbonArc Toolbars Once CarbonArc PRO is successfully installed the tools and toolbars should be available in the ArcMap toolset. A quick way to enable the CarbonArc toolbars is to use the View Toolbars menu item and check the CarbonArc OGC Tools and CarbonArc WFS Transactions toolbars (Figure 3). Once checked, the CarbonArc toolbars will be available for use within ArcMap (Figure 5). The toolbars can be placed anywhere in the environment as well as docked where possible. Figure 3 Another way to enable the toolbars is to use the Tools Customize menu option in ArcMap. The CarbonArc toolbars will be available in the Toolbars page. Check the checkbox to enable the toolbar (Figure 4)


10 Figure 4 Once selected for display, the added toolbars should appear in ArcMap and may be positioned on the screen or docked like any other ArcMap toolbars. Figure
11 3. Using CarbonArc PRO 3.1. OGC Tools Overview Add Layers This tool is activated from the CarbonArc OGC Tools toolbar in ArcMap by pressing the Add Layers button ( ). Clicking this button will activate a dialog where services and GML files are managed and where content may be added to the ArcMap map view (Figure 7). This dialog is used for importing data from Geography Markup Language (GML) files or data from OGC Web services. The Add Layers dialog provides a list of Web services. This list includes Web Feature Services (WFS), Web Coverage Services (WCS) and Web Map Services (WMS). Through this dialog you may manage the history of used services, ask for server Capabilities (displayed as a tree-view of supported data layers), and set some initial parameters for accessing the data and import content into the ArcMap map view and legend. You may also assign the user name and password for services that require user authentication. Tip: CarbonArc maintains a history of known services in an XML file located in the user s configuration folder. This file is located at: \Documents and Settings\[user]\Application Data\The Carbon Project\CarbonArc\services.xml in Windows Vista the file is located at: \Users\[user]\AppData\Roaming\The Carbon Project\CarbonArc\services.xml Similarly a files.xml file maintains the history of GML files added. These files are read when the ArcMap application first starts, and automatically saved when changes are made. In order to add a new Web service to the list click on the Add Service button ( ) and fill in the required form information such as the Service URL, version, optional description and authentication parameters (Figure 6). Once the service was successfully added it will appear in the services list. You may edit the service information or delete it using a context-menu accessed by right-clicking on the corresponding item in the services list. Once a service is selected from the list its Capabilities are read and the data layers supported by the service will be displayed in a nested tree-view form. You may then select a layer from the Capabilities tree-view

12 Figure 6 The GML files manager preserves a history of added files. When selecting the Files tab you may add a file ( ) or remove a selected file for from the list ( ). Note that this tool does not check if listed files exist or not, therefore deleting a GML file in the Windows file explorer will not update the CarbonArc files list. When selecting a layer either from a Web service or a GML file a preview will be generated. The preview is generated within the bounding-box specified by the Web service s published Capabilities or GML. Web services will also offer additional textual information about the selected layer, as acquired from the service Capabilities. Closing this dialog window will not lose any information. When reopening the dialog the previous session, including the capabilities tree and preview will be restored. Add Web service to services list Select the service from the list Select layer from the Capabilities tree Preview the layer s content Add the layer to the map Service info saved in services list Server Capabilities read and parsed Limited data is read into the preview CarbonArc creates a custom dynamic layer added to the map view Quick Tour 1 - Steps for adding a layer from a Web service to the Map view

13 Figure 7 Tip: The Add Layer dialog provides a quick way to set some properties and styling parameters of the selected layer. You may change these settings using the layer properties after the layer is added to the map Using Secured Services Services that use password-based authentication schemes such as basic, digest, NTLM, and Kerberos are fully supported by CarbonArc PRO. When adding a service with specified username and password, this service is marked as secured. The user authentication parameters are sustained only during the ArcMap session, thus when selecting a secured service in future sessions (e.g. after restarting ArcMap) CarbonArc will ask for the user credentials. The username and password need only be specified once per session. The credentials for accessing a layer can also be set using the Security property page of any Web based layer. Note: User name & password type security described here is different from the Secure SDI service described in page
 security service that facilitates the cooperation of autonomous organizations by securely controlling users' access to")
14 Secure SDI The Secure SDI tool supports a Spatial Data Infrastructure (SDI) security service that facilitates the cooperation of autonomous organizations by securely controlling users' access to information resources. The SDI Security system provides a uniform way for users to identify and authenticate themselves, and for organizations to share their information assets and web services with these users in a controlled and collaborative way. Note: Setting this security measure should not affect communications with open-service that do not support Secure SDI. Note: The security cookie must be obtained for every ArcMap session The Secure SDI tool is activated from the CarbonArc OGC Tools toolbar in ArcMap by pressing the Secure SDI button ( ). Clicking this button will open a form requesting the authentication server address, a user name and password and a jurisdiction (Figure 8). Once all the parameters are set, click the Get Authentication button and the system will fetch all relevant credentials. Once successful, certificates will be used when communicating with services of the corresponding domain. You may aggregate as many certificates as needed. To clear all used certificates use the Clear All button ( ). Figure 8 Tip: This system is implemented using CubeWerx Identity Management Server (IMS). To learn more about SDI Security visit
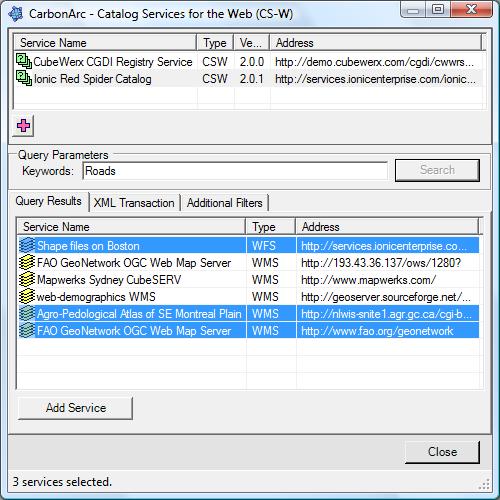
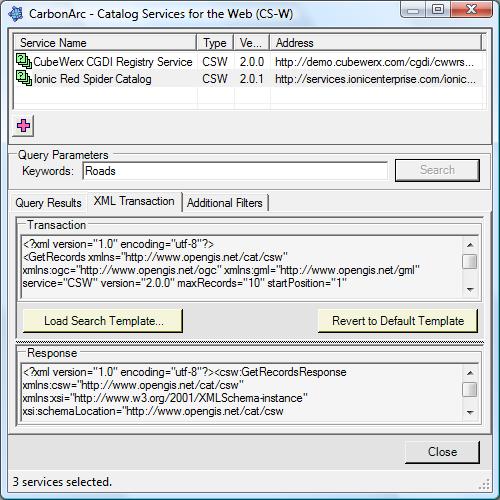
15 Searching Catalog Services for the Web (CS-W) By activating the Catalog Search tool ( ) a dialog opens where Catalog Services, implementing OGC Catalog Services for the Web (CS-W) specifications, may be searched. The search procedure will return a list of OGC services (WMS, WFS, and WCS) according to parameters that include keywords, results page information, and optional spatial filtering. The catalog search is designed to work with Ionic Software s (part of Leica Geosystems) Red Spider catalog service 1 as well as the CubeWerx Web Registry Service 2 using the CS-W EBRIM profile. Other Catalogs supporting EBRIM and implementing the CS-W specifications may be supported. This tool provides a list of catalogs. You may add or remove CS-W sources from the list. In order to add a new service click on the Add button ( ), right click on a service item to remove or edit its parameters. To search the catalog you must select a catalog from the services list (Figure 9). This will actually starts a background process which reads and parses the catalog s Capabilities document. In the Query Parameters section type the keyword or keywords to be used in the search. Once a service is selected and keywords are typed the Search button will be enabled. The Filters tab selection provides additional parameters used with the query (Figure 9). In this tab an region-based filter may be set. Using the bounding box filter will constrain the search to find only services that publish a footprint within the requested region. The initial coordinates in the bounding box filter are the current map view and may be manually altered. Clicking the Search button sends a GetRecords command to the catalog. Once the search is complete the result is parsed into a list of found services. Services that are already available in CarbonArc will appear in green text. Services that were found in the search results but are missing crucial information such as a Web address will appear in gray text. Gray or green marked services cannot be added to the CarbonArc services list. Selecting services and clicking the Add Services button will immediately update the Add Layer dialog with the new services. Tip: The XML Transaction tab contains the XML form of the query and the response (right image in Figure 9). These are valuable when debugging a service, or interacting with a vendor s support service
16 Tip: You can select multiple services from the results list (as seen in Figure 9) and bring all of them into the Add Layer list with a single click of the Add Services button. Add Catalog service to list Select a Catalog from services list Type key words to search box Set additional filters Click the Search button Select services from the results table Click the Add Service button Use the Add Layers tool Catalog info saved in services list Catalog capabilities read and parsed Search query is built using template Search query is updated on the fly Query sent and response parsed Validate selected services Services added to services list Quick Tour 2 Steps for using the Catalog tool
17 Using Secured Services CarbonArc supports password-based secured catalogs the same way other services are handled. See section for more details Using Search Templates In order to provide flexibility with various Catalogs and Catalog versions, CarbonArc PRO provides a way to alter the format of the GetRecords query sent to the service. The template is an XML file describing the query with a few place-holders (see XML Source 1). You can use the Load Search Template button (Figure 9) in the XML Transaction page to import your own template. Once set the template will be used for all catalog search operations. In order to revert to the default template provided with the CarbonArc package, use the Revert to Default Template button. Tip: The used CatalogSearchServicesTemplate.XML file is found at: \Documents and Settings\[user]\Application Data\The Carbon Project\CarbonArc\ CatalogSearchServicesTemplate.xml in Windows Vista the file is located at: \Users\[user]\AppData\Roaming\The Carbon Project\CarbonArc\ CatalogSearchServicesTemplate.xml Keywords used within the search template are: Keyword in Template version="" maxrecords="" startposition="" #SEARCHSTRING# #GMLENVELOPE# Description Attribute will be set with selected Catalog version Attribute value will be set with set Max Records value as set in the Catalog search Additional Filters page Attribute value will be set with the Start Position value as set in the Catalog search Additional Filters page Replaced with the search keywords typed by the user Replaced with the GML style envelope geometry created from the bounding box filter <!--?[--> Begin Line to be added only if bounding box filter is used <!--]?--> End line to be added only if bounding box filter is used
18 <?xml version="1.0" encoding="utf-8"?> <GetRecords xmlns=" xmlns:ogc=" xmlns:gml=" service="csw" version="" maxrecords="" startposition="" resulttype="results" outputschema="ebrim"> <Query typenames="extrinsicobject Service Association"> <ElementName>/Service</ElementName> <Constraint version="1.0.0"> <ogc:filter> <ogc:and> <ogc:propertyisequalto matchcase="false"> <ogc:literal>operateson</ogc:literal> </ogc:propertyisequalto> <ogc:propertyisequalto matchcase="false"> </ogc:propertyisequalto> <ogc:propertyisequalto matchcase="false"> </ogc:propertyisequalto> <ogc:or> <ogc:propertyislike> <ogc:literal>%#searchstring#%</ogc:literal> </ogc:propertyislike> <ogc:propertyislike> <ogc:literal>%#searchstring#%</ogc:literal> </ogc:propertyislike> <ogc:propertyislike> <ogc:literal>%#searchstring#%</ogc:literal> </ogc:propertyislike> <ogc:propertyislike> <ogc:literal>%#searchstring#%</ogc:literal> </ogc:propertyislike> <ogc:propertyislike> <ogc:literal>%#searchstring#%</ogc:literal> </ogc:propertyislike> <ogc:propertyislike> <ogc:literal>%#searchstring#%</ogc:literal> </ogc:propertyislike> <ogc:propertyislike> <ogc:literal>%#searchstring#%</ogc:literal> </ogc:propertyislike> </ogc:or> <!--?[--><ogc:intersects><!--]?--> <!--?[--><!--#GMLENVELOPE#--><!--]?--> <!--?[--></ogc:intersects><!--]?--> </ogc:and> </ogc:filter></constraint></query></getrecords> XML Source 1 CarbonArc PRO default CatalogSearchServicesTemplate.XML

19 Figure 9 <ogc:intersects> <ogc:propertyname>/extrinsicobject/slot[@name="footprint"]/ <gml:envelope srsname="epsg:4326" xmlns:gml=" <gml:lowercorner> </gml:lowercorner> <gml:uppercorner>180 90</gml:upperCorner> </gml:envelope> </ogc:intersects> Figure
20 Export WFS Features to Shapefile The ArcGIS platform is a powerful tool for processing and analyzing geospatial content. However, most of its tools require a flat, tabular, single geometry type data. The XML based Geography Markup Language is a nested, complex format which sometimes contains more than one geometry type or even multiple geometries per feature. To alleviate the difficulty of harnessing the full power of ArcGIS with Web Feature Service content CarbonArc PRO provides the Export Features to Shapefile tool ( ). This tool automatically detects all WFS based layers currently available in the map. By selecting the requested layer CarbonArc automatically loads the relevant GML schema from the service (using the WFS DescribeFeatureType operation), parses it and tries to automatically build a correlated table of fields. In many cases CarbonArc will manage an automatic tabular representation of the data, enabling the data conversion within a single click of a button. However, sometimes field types cannot be parsed from the schema; in such cases the user interface will indicate the issues that need to be resolved so a valid Shapefile can be created. For example, a mixed geometry type layer (i.e. a layer that may contain points, lines and/or polygons but is exclusive to none) has to be resolved to a single geometry in order to be exported (Figure 11). CarbonArc will translate element types as they appear in the GML schema to valid Shapefile field types, according to the following: Parsed from GML Shapefile field Type Description TEXT String Character string SHORT Small Integer Integer LONG Integer Long Integer FLOAT Single Single-precision floating-point number. DOUBLE Double Double-precision floating-point number. DATE Date Date POINT Point geometry type Geometry LINE Polyline geometry type Geometry POLYGON Polygon geometry type Geometry Uri addresses are parsed as TEXT by CarbonArc


21 The user interface distinguishes fields that require attention by coloring the table cells with a red or blue shade background. Generic fields whose types could not be resolved are highlighted in red, geometry fields that must be specified are in blue. In some cases a geometry field will appear in red if CarbonArc could not determine that the field is in fact a Geometry container type. All field types may be resolved manually, regardless of the problem using a pull-down selection. Make sure to match the correct type to the field or an error may be reported during the export process. Unknown field types, excluding fields representing geometries, may be assigned to the generic TEXT type. Figure 11 The Target File Name selection allows you to set the target directory and base name for the target Shapefile. CarbonArc will automatically add a timestamp value to the file name and produce all the necessary files. This will ensure the unique naming for the new files and avoid any coincidental overwrites of data. Note: A Shapefile is in essence a collection of files with the same name and different extensions. CarbonArc will produce files with the extensions SHP, SHX, DBF and PRJ. Tip: The default folder for this tool is found at: \Documents and Settings\[user]\Application Data\The Carbon Project\CarbonArc\Data in Windows Vista the directory will be located at: \Users\[user]\AppData\Roaming\The Carbon Project\CarbonArc\Data

22 Before exporting the data you may select which fields will be used by using the check boxes to the left of the field names. Keep in mind that at least one field must be selected and one and only one Geometry type field must be selected and resolved. If any of these conditions is not met CarbonArc will report the error in the tool s status bar (Figure 12) when trying to create the Shapefile based layer. Figure 12 Once the table is ready for export simply click the Add as Shapefile button to start the export process. CarbonArc will translate all features available in the layer with a matching geometry type (features that do not support the selected geometry type will be omitted). When the Shapefile conversion is complete a new layer is added to the map (Figure 13). Tip: All features, including the cached features in the layer will be used in the export procedure. To export only features in the current view make sure your layer uses the bounding box filter and use the Refresh tool (see page 28) to clear all cached feature and import features in the viewed region. Once done use the Export to Shapefile tool


23 Figure
24 Open the Export to Shapefile tool Select WFS layer to export Resolve field types and geometry fields Export to Shapefile CarbonArc lists all WFS based layers Reads and parses layer schema Validates that table qualifies for export Translate features to a Shapefile layer and add it to the map Quick Tour 3 Steps to export a WFS layer to a Shapefile layer in ArcMap

25 Tip: To export all features in a layer that has multiple geometry types try to create several Shapefiles, one for each type (point, line and polygon) and process the result using ArcMap s native functionality. If a layer has multiple geometries per feature, simply uncheck all the geometries save the one desired as the Shapefile geometry

26 Export WFS Features to GML File CarbonArc PRO provides a tool to export the features read from a Web Feature Service directly to a file using the Export to GML tool ( ). When using this tool you may select a WFS layer added by CarbonArc to the map. Once a layer is selected the WFS GetFeature query used by the tool is displayed for reference. The query is based on the layer s current settings including filtering and GML specification (see section on how to set the WFS layer properties). Once a layer is selected, you must specify a filename to where the response is written to. Once a layer is selected and the file name is specified, press the Read to File button to initiate the reading process. The feature reading and saving operation is done a- synchronously so more than one file can be processed (the progress bar will only indicate progress only on the last operation). Note: The Export to GML tool posts a new GetFeature query to the WFS, regardless of the data currently present or cached in the layer. Therefore, there may be a difference between the current map view of the selected layer and the GML file saved. Figure 14 Tip: If the Export to GML tool is open while adding new layers to the map the tool s list of feature layers will be updated automatically
 displays messages, errors and exceptions captured by CarbonArc. Using this tool you can filter messages related to certain layers in the map.")
27 Messages Log Dealing with Web services, especially open-geospatial services, sometimes requires some troubleshooting. The Messages Log tool ( ) displays messages, errors and exceptions captured by CarbonArc. Using this tool you can filter messages related to certain layers in the map. For example, the NASA JPL WMS returns a service exception when trying to get a map outside the allowed bounds. Instead of an image the service returns an XML explaining in readable text the nature of the error. This exception is logged by CarbonArc along with its internal exception that captured the event (Figure 15). Figure 15 Most services will return a human readable message in the XML. In the NASA WMS example the following XML was returned (logged as message number 1). The <ServiceException> tag contains the text explanation of the error: <?xml version='1.0' encoding="utf-8" standalone="no"?> <!DOCTYPE ServiceExceptionReport SYSTEM " "> <ServiceExceptionReport version="1.1.0"> <ServiceException> Bounding box has an invalid area </ServiceException> </ServiceExceptionReport> XML Source
28 Refresh Layers The Refresh tool ( ) generates a refresh operation on all layers added by CarbonArc that originated from a Web Map Service (WMS), Web Coverage Service (WCS) or a Web Feature Service (WFS). Any cached content will be cleared and new information will be retrieved from the corresponding services. This operation is useful if a network problem or a glitch in any of the services occurred. In addition, this is particularly important when interacting with services that generate dynamic data. For example Web services with transaction capability (e.g. WFS-T) or temporal data such as real-time weather. If changes were made on the data, the layer must be refreshed in order to view the latest content while cached information becomes invalid or outdated. Since the refresh operation clears any cached data, information that was removed on the server side will disappear from the map. For example, if a weather service provides real-time cloud coverage a refreshed version of the map will force a removal of the previous content and replace it with updated cloud features. Another example is a WFS- Transactional (WFS-T) where several users edit information on the layer. In this case one user may delete a feature, other users looking at the same layer will need to refresh the layer in order to clear the cache and update the features. If the cache is not cleared deleted or updated features will remain in CarbonArc session although the server version differs Refreshing Secured Services Layers of services that require authentication may require a new user name and password if the map is brought from a new session, e.g. reading an MXD file. CarbonArc PRO does not preserve the authentication parameters anywhere outside the existing session; therefore any layer that requires authentication will report a server error (see the Messages Log tool in section 3.1.6). To get new content from the service set the user name and password by using the layer s Security property page
29 3.2. Supported CarbonArc Formats Web Map Services (WMS) A Web service implementing OGC Web Map Service (WMS) 3 specifications produces maps of spatially referenced data dynamically from geographic information. A map is a mere image representation based on the server-side geographic content. WMS produced maps are generally rendered in an image format such as PNG, GIF or JPEG (Figure 16). This is in contrast to a Web Feature Service (WFS), which returns geospatial features, and a Web Coverage Service (WCS), which returns raster coverage. To import raster layers from a WMS use the Add Layer tool (see section 3.1). You may read the Capabilities of the service by selecting it from the list, select a layer from the Capabilities tree-view, view a preview of the map and finally add the layer to ArcMap (using the Add Layer button in the dialog). If the current ArcMap map view has no layers, the map s region will be set according to the added layer s bounding box. Therefore, if the added layer is the first in a new map view the new map will be set to the added layer s default region. Note: Some services, such as the NASA Jet Propulsion Laboratory WMS ( will throw an error when the requested image is in a region larger than the maximum bounding box. This will result in the last cached or no map showed, and the messages log updated (see section 3 on how to view the log). The reason for this to happen when zooming to the layer extent is that the viewed region is adjusted according to the display ratio, causing the displayed region to sometimes be larger than the requested bounding box. If this happens try to zoom into the map in order to seek a legit region that returns a valid map. A WMS layer imported by CarbonArc is dynamically updated. The image returned from the Web service will be refreshed whenever the viewed region is changed, for example when a zoom or pan operation occurs. CarbonArc will perform the GetMap (or Map for WMS version 1.0.0) query a-synchronously and the view will be refreshed once a new map becomes available. While CarbonArc is processing the request in the background, an adjusted view of the currently cached map is rendered. For example, in the case of zooming-in this feature will cause a pixilated view to appear until a fresh update is fetched from the Web service
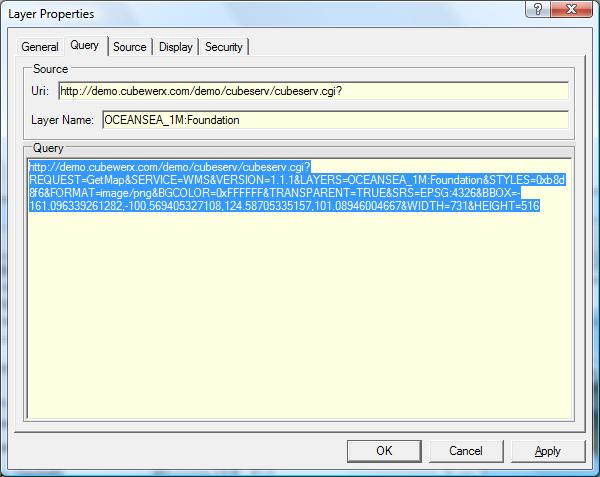
30 When using the ArcMap Identify tool the service will be queried for the information on the clicked location (using the GetFeatureInfo query). The result is displayed in a local browser view (Figure 17) in the Identify tool results view. The full query is available for reference at the top of the information panel WMS Layer Properties The Layer Properties dialog of a raster layer, added by CarbonArc by accessing a Web Map Service (WMS), will offer a few options to adjust the layer s style and behavior. To access the Layer Properties dialog right-click on the layer in the ArcMap legend and select Properties from the context-menu. The following tab pages will be available: Query Tab The Query tab (Figure 18) shows the layer s source server Web address, the full layer name and the complete WMS query that was sent to the server. Source Tab The Source tab (Figure 19) provides a way to select the default extent for the layer. The layer extent is used when ArcMap requests the layer s extent, for example when performing a zoom-to-layer operation. The default extent can be selected from a list of optional regions available for this layer as provided by the Capabilities document from the originating WMS. The region may also be set manually using the bounding-box textboxes. Tip: To set the active region according to the Lat-Long bounding-box, use the Lat Long Extent button. Note that EPSG:4326 is the code for WGS84, the commonly used Lat-Long revision. Display Tab The Display tab (Figure 20) provides a quick way to adjust the transparency of the layer. The transparency can be set to any value between 0 (completely transparent) and 100 (opaque). In the Display tab, certain styling parameters can be adjusted. The layer styles list contains available styling options, as provided by the WMS. The pull-down list contains all available styles for the current layer and enables the setting of a new rendering style. The selected style will be applied to the current view, as well as all further dynamic updates affecting the layer. The available image formats provides a way to import the map image in a requested format. The formats supported by the layer are described by the service Capabilities and
 which is supported by most Web Map Services.")
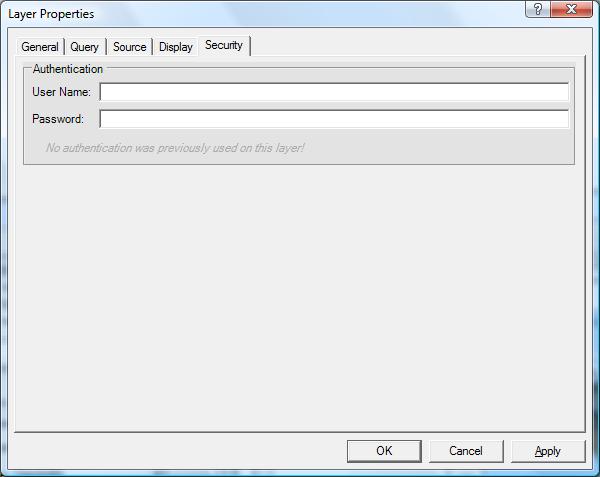
31 are listed in a pull-down selection list. When an image format is selected, all maps sent from the WMS will be imported in the requested image format. The default image format is Portable Network Format (PNG) which is supported by most Web Map Services. However, in the case where a service does not implicitly support PNG, CarbonArc will automatically try to select a different format suitable for the layer. Tip: The Portable Network Format (PNG) is the recommended image format for maps from WMS. This format has a reasonable compression ratio while maintaining good image quality and it supports pixel transparency (a selected color value defined as the transparent color). PNG is commonly supported by most Web Map Services. Security Tab The Security tab (Figure 21) allows the setting of user credentials for usage with authenticated services. This property page allows the manual change of the layer s credentials if need change or new authentication is required. For enhanced security the user name and password are present only at an ArcMap session. Therefore, if a layer is within a newly loaded map project (MXD) or ArcMap was restarted, the username and password will have to be set. This panel will indicate if user credentials were previously set for this layer. Figure

32 Figure 17 Figure


33 Figure 19 Figure 20 Figure
34 Web Coverage Service (WCS) OGC Web Coverage Service (WCS) 4 extends the Web Map Server (WMS) specification to allow access to geospatial Coverages that represent values or properties of geographic locations, rather than WMS generated raster maps. The Coverages are usually returned as a descriptive image format such as GeoTIFF or JPEG2000. To import raster coverage from a WCS to ArcMap, use the Add Layer tool (see section 3.1). You may read the Capabilities of the service select a coverage from the tree-view and add the selected coverage to ArcMap (using the Add Layer button). Note: Most coverage formats will not show a preview but will display correctly in ArcMap (if using an ArcGIS supported raster format such as GeoTIFF). If the current map view in ArcMap does not have any layers, the map s region will be set automatically according to the added coverage s bounding box. Note: As it is with WMS the WCS layer imported by CarbonArc is a dynamically updated data source. The coverage returned from the Web service will be refreshed whenever the view region is changed due to zoom, pan or other map view changing actions. CarbonArc will perform the GetCoverage query a-synchronously and the view will be refreshed once a new coverage becomes available. While the process is working in the background, a projected view of the current coverage is rendered. When using the ArcMap Identify tool the WCS will be queried for the information on the clicked location (using the DescribeCoverage query). The result is displayed in a local browser view in the Identify tool results view
35 WCS Layer Properties The Layer Properties dialog of a coverage based layer, added by CarbonArc by accessing a Web Coverage Service (WCS), will offer similar options to those provided by a WMS. These properties provide options for adjusting the layer s style and behavior (see section ). To access the Layer Properties dialog right-click on the layer in ArcMap s legend and select Properties from the context-menu. Query Tab The Query tab shows the layer s source server address, the full layer name and the complete WCS GetCoverage query that was sent to the server. Source Tab The Source tab provides a way to select the default extent for the layer. The layer extent is used when ArcMap requests the layer s extent, for example when performing a zoomto-layer operation. The default extent can be selected from a list of optional regions available for this layer as provided by the Capabilities of the originating WCS. The region may also be set manually. Display Tab The Display tab provides a quick way to adjust the transparency of the layer. The transparency can be set to any value from 0 (completely transparent) to 100 (opaque). In the Display tab the image format for the coverage may be set. The supported image formats for the coverage are provided by the service and listed in a pull-down list. When an image format is selected, all coverage updates sent from the WCS will be in the requested format. Security Tab The Security tab allows the setting of user credentials for usage with authenticated services. This property page allows the manual change of the layer s credentials if need change or new authentication is required. For enhanced security the user name and password are available only per ArcMap session. Therefore, if a layer is within a newly loaded map project (MXD) or ArcMap was restarted, the username and password will have to be set. This panel will indicate if user credentials were previously set
36 Web Feature Services (WFS) The OGC Web Feature Service (WFS) 5 is an interface allowing requests for geospatial features. Geospatial features are XML based and can convey much more information than a simple raster map. The XML-based GML (see section 3.2.4) is the standard format for transporting the geospatial features. CarbonArc allows access to any Web Feature Service version and supports GML 2.x, GML 3.x and GMLsf (simple features) formats. Once a feature type is selected from the Add Layer tool (see section 3) a preview will be generated of no more than 15 features. This preview is displayed using a generic CarbonArc styling (red circles for points, black lines and white polygons with black outline). A layer added from a feature service will initially use two filters when performing the GetFeature query, a region filter and a maximum features filter. Once a preview is ready, adding the layer to the Map will automatically set a bounding-box filter. The filter uses the geometry property found in the previewed features (OGC specifications require that the property name containing the geometry is specified when performing a spatial filter). If no preview was ready, you may set the bounding-box filter from the layer s properties after the layer was added to the map. In addition to a region filter CarbonArc will also use a MaxFeatures limit (set by default to 100). This limits the amount of features received from the service. It is highly recommended to have this filter enabled and set to a reasonable value in order to avoid an inadvertent server and transfer overload (e.g. zooming to a national view of a local roads layer will generate millions of features and geometries). Tip: If the layer was added when no preview is available you will need to set the bounding box filter manually using the layer properties. The Detect button will scout any available features to try and decide automatically the most suitable property name to perform the filter on. Like other Web based layers supported by CarbonArc the WFS layer is a dynamic layer. Any change in the current region of map, for example as a result of panning or zooming, will access the WFS and retrieve features according to the current filter parameters. Previously gathered features are preserved and cached. New features are merged with existing cached data as duplicates are identified and intelligently consolidated by CarbonArc. This functionality substantially reduces the wait time when moving to a region that was previously visited since CarbonArc a-synchronously gathers new features while presenting the cached data, preventing ArcMap from becoming idle
. These features are usually more complex than tabular formats such as Shapefiles.")
37 Note: Using the Refresh tool (see section 3.1.7) will clear any cached data and perform a new GetFeature query. The features obtained from a Web Feature Service are in the form of Geometry Markup Language (GML). These features are usually more complex than tabular formats such as Shapefiles. As with XML tags, GML data is nested, i.e. properties can contain sets of other properties. When using the ArcMap Identify tool to view the properties of a GML feature CarbonArc will display the information as a tree-view in the tool s window (Figure 22). GML is not limited to a single geometry type or even to a single geometry within a feature, although most commonly a single geometry type will be used within a layer (to learn more about GML see section 3.2.4). The bottom of the information pane provides the source service address of the viewed feature. If the feature was altered using WFS-T editing tool (see section 3.3) the operation state is indicated. Figure
, will offer a few options for adjusting the layer s behavior and")
38 Feature Layer Properties The Layer Properties of a features based layer, added by CarbonArc by accessing a Web Feature Service (WFS), will offer a few options for adjusting the layer s behavior and style. To access the Layer Properties dialog right-click on the layer in layers list and select Properties from the context-menu. The following tab pages will be available: Query Tab The Query tab shows the layer s source server address, the full layer name and the complete WFS GetFeature query that was sent to the server. Notice that the GetFeature query is in XML format and contains all constraints and filters specified for the layer. Filters Tab The Filters tab (Figure 23) provides a way to set and change constraints on the features the WFS should return. In other words, these values are used in the query CarbonArc forms when accessing the WFS. Figure
39 The Maximum Features Filter section provides a way to set the MaxFeatures Filter. This filter limits the number of features the WFS should return. Tip: Some services will return hundreds, thousands or more features for certain extents. For example, asking a feature layer for points representing cities may result in a very large GML if the map is overlooking the whole world. To avoid overloading the server and ensuring manageable content it is recommended to always enable the MaxFeatures filter. The Data Handling section provides a checkbox to enable or disable feature caching. When caching is enabled any change in the viewed extent of the map, for example as a result of a pan or zoom, will preserve previously gathered features while the newly received features are merged with the existing content. Duplicates are automatically identified and consolidated by CarbonArc. This functionality substantially reduces the wait time when moving to a region that was previously visited. When caching is disabled the layer overwrites previously gathered features whenever the view changes. The Geography Markup Language settings section provides parameters related to the GML version and enables the optional use of schema parsing. Note: CarbonArc uses by default the CarbonTools PRO 6 quick parser. This parser uses common traits of GML for parsing, while avoiding costly schema usage. However, some GML data requires the schema to work properly. Tip: Only GML schema (and later versions such as 3.2.1) is a valid XML schema. Previous versions were not fully W3C compliant and may be rejected by the XML parsers used by CarbonArc PRO. Check the Messages Log tool (see section 3.1.6) to track down any errors. The Bounding Box Filter section provides a quick way to add a spatial filter to the GetFeature query. The Use Bounding Box Filter check box enables or disables this filter. The WFS specification requires that the GML property, which encapsulates
40 the geometry filtered on, must be specified for spatial filters. Setting this property can be done manually in this section using the text-box or the Select button (visually browsing all existing features), or by clicking the Detect button which uses existing features to automatically find the required property name. If the service is WFS version or later (as specified in the Add Layers see section 3.1.1), you may alter the spatial operator used with this filter. The default spatial operator used with WFS queries is within. For more information about filters consult the Open Geospatial Consortiums Filter Encoding Implementation specification 7. The Filter Text section provides an extensive sandbox for creating customized filters. Using the text box or the Filter Builder tool (by clicking the Filter Builder button) CarbonArc provides extensive support to the OGC Filter Encoding specification. The Filter Builder tool (Figure 24) provides an intuitive way to create logical filters. Each rule is represented as a row in the table made out of a Property, Comparison operator and a Value. Each rule can also be negated (a logical NOT to a rule). Each rule must specify how it relates to the next rule using a logical AND/OR (unless it is the last rule in the set). The Filter Builder supports setting a geometry filter. Using this feature you may apply a spatial filter on the query using geometry and a spatial operator. By clicking on Add Geometry a dialog opens that allows adding geometry read from a GML file (Figure 25). This tool allows you to browse the GML file and select the feature from which the geometry is used while the geometry is previewed. Once selected a spatial operator is applied to the filter using the selected geometry. You may adjust the spatial operator using the list in the corresponding combobox. When adding new filter rules the Filter Builder will immediately update the text area with the corresponding XML that implements the OGC Filter Encoding specifications. This filter rule is appended to the WFS queries generated by CarbonArc when accessing the layer. If a bounding box filter is enabled, it is appended to this filter rule. The filter text will not show the bounding-box filter, to view the complete query use the query tab (remember to apply the changes in order the view them in the query page). CarbonArc also provides a method to apply a geometry filter to the query. Note: The Filter Builder tool uses the existing features to fill the Property names. Only existing features are used. If the layer is empty, the Properties pull-down list will be empty as well


41 Tip: The filter Builder tool is designed to help create simple logical filters. To create complex groups comparison you may edit the filter text manually. Figure 24 Figure
42 GML Symbology Tab The native renderers, filters and other operations in ArcGIS are mostly designed to handle features in tabular format (e.g. Shapefiles), however GML is an XML based format which is more robust. Each feature can contain nested information where each feature may have different properties and types from the other; furthermore features are not limited by the type and amount of geometries they represent. This makes GML data much more complex to handle since each feature in a layer may have different properties and geometries than the other. CarbonArc preserves the GML complex form, therefore the native renderers and other field based operations do not apply. CarbonArc offers new ways to render GML, including GML data with mixed-geometries (feature have different geometries types within the same layer). By accessing the Layer Properties and switching to the GML Symbology Tab a set of applicable renderers is available (Figure 26). CarbonArc makes full use of the ArcGIS native symbology within its custom renderers. The following table describes the various renderers available in CarbonArc: Renderer Name Simple Renderer Mixed Simple Renderer Unique Values Renderer Description A basic renderer that allows the use of ArcGIS symbology on a single geometry type. Same as the Simple Renderer, only there is no limitation for having a single geometry type throughout the layer. Each geometry type (points, lines or polygons) can have its own symbology setting. Renders a geometry using a unique symbol and color scheme. A feature property is selected to create a distinction between the drawn geometries (see Figure 28 and Figure 29 on page 46)

.")
43 Figure 26 GML Labels Simple labeling can be added to GML based layers. Checking the label enabling checkbox activates the labeling on the layer. To set the labeling, select the name of the property whose value will be displayed and the label symbol (Figure 27). Clicking on the Text Symbol button will open the ArcMap symbol dialog which enables the selection and configuration of the text labels. Figure
44 Display Tab The Display tab provides a quick way to adjust the transparency of the layer. The transparency can be set to any value between 0 (completely transparent) and 100 (opaque). Tip: Layer transparency can also be adjusted using the ArcMap Effects toolbar. Security Tab The Security tab allows the setting of user credentials for usage with authenticated services. This property page allows the manual change of the layer s credentials if need change or new authentication is required. For enhanced security the user name and password are available only per ArcMap session. Therefore, if a layer is within a newly loaded map project (MXD) or ArcMap was restarted the username and password will have to be set. This panel will indicate if user credentials were previously set for this layer
45 Geography Markup Language (GML) Geography Markup Language (GML) 8 is the default format of features returned by a WFS (see 3.2.3), however CarbonArc also supports reading GML as files to ArcMap. GML files are loaded as layers (see section on how to read GML files using the Add Layer tool). Unlike GML data from a Web Feature Service, GML files are read and cached once. The data remains static in memory and no transactions or refresh events will affect the features. The origin file name (excluding the path) is used as the layer name in the ArcMap legend GML Layer Properties The Layer Properties of a file based GML feature layer, added by CarbonArc, will offer options for adjusting the layer s style. To access the Layer Properties dialog right-click on the layer name in the map s legend and select Properties from the context-menu. The following tab pages will be available: Display Tab The Display tab provides a quick way to adjust the transparency of the layer. The transparency can be set to any value between 0 (completely transparent) and 100 (opaque). GML Symbology Tab The GML Symbology tab provides a way to control the rendering of the feature layer (Figure 28 and Figure 29). For more information about rendering and symbology see the GML Symbology section in WFS Feature Layer Properties (Section ). GML Labels Simple labeling can be added to GML based layers. Checking the label enabling checkbox activates the labeling on the layer. To set the labeling, select the name of the property whose value will be displayed and the label symbol (Figure 27). Clicking on the Text Symbol button will open the text symbol dialog which enables the selection and configuration of the text labels


46 Figure 28 Figure
47 3.3. WFS Transactions Tools Transactions are a powerful concept supported by the OGC Web Feature Service Transactional (WFS-T) specifications 9. These specifications describe ways to interact and affect the remote content directly from the end-user. The transactional capability of WFS means that an end-user can alter the global data view from a remote location using queries based on open specifications. CarbonArc utilizes this capability in a very usable and secure fashion. The CarbonArc feature editing tools, the transactions management tool and service interaction tool, enable ArcGIS users to edit GML features using ArcMap and effortlessly submit the feature edits to a remote Web service Manage WFS-T Sources and Properties Before using transactions CarbonArc needs to have prior knowledge on the WFS-T server, the transactional feature layers and all properties associated with the transacted features. The Manage Transaction Sources tool ( ) allows the management and editing of the required information. In addition, this tool can auto generate property types and rules using the appropriate GML schema. Preparing a known set of properties and rules is mandatory for working with the transactions tools. For example, in order to add a new feature CarbonArc must know what layers in the map have actual Insert capability, what are the properties the feature can have, what rules apply to these properties and what types of geometries are allowed for the feature. Without this knowledge at hand, discovering and applying this information for each operation will make feature editing slow and cumbersome, unfit for a productive user friendly environment. CarbonArc resolves this by asking the user to set once the information about the used transaction layers. The information is saved in a transactions cache file. Once a layer is registered to the transactions cache file any changes to its settings and rule will be updated in the managed file and will be available to all future CarbonArc sessions. Tip: CarbonArc maintains the transaction services information in an XML file located in the user s configuration folder. The file is located at: \Documents and Settings\[user]\Application Data\The Carbon Project\CarbonArc\ transactions_cache.xml in Windows Vista the file is located at: \Users\[user]\AppData\Roaming\The Carbon Project\CarbonArc\transactions_cache.xml This file is read when the ArcMap application first starts, and automatically saved when updates are made through the management tool

48 To add a new transaction feature layer select the corresponding WFS from the services list. This list is shared with the Add Layer services list and is filtered to show only feature services. When a service is selected CarbonArc reads its Capabilities and shows the parsed results as a tree-view. Note that usually WFS publish their capabilities as a flat list with no hierarchical form. In this case the tree-view will look as a list of feature layers with no root item. Selecting a feature layer from a service that does not support the Transaction operation (as parsed from the service s reported Capabilities) will not be allowed and a warning message will be displayed in the tool s status bar (Figure 30). Figure 30 Tip: CarbonArc uses only POST type transactions. Therefore the ability to support transactions by the server is actually determined by the existence of an HTTP POST address for the Transaction operation in the Capabilities. Selecting a layer from a service that does support transactions will check each of the supported operations for the specified layer (insert, delete and update). If no operation is supported the layer is not allowed for transactions. The supported operations by the selected feature layer will be marked in a checkbox (seen bellow the properties table). Once the layer is verified as transactional you may use the Read from Schema button to let CarbonArc automatically configure the layer s properties and rules (Figure 31). Note that if this layer was previously added to the CarbonArc transaction sources cache, using the schema parsing operation will overwrite any prior edits made to the layer
49 information and rules. The information parsed from the schema is not saved until all unresolved field types are resolved. For example, if a geometry field is ambiguous, this tool will ask for manual verification on the type of geometry to use. An unresolved property type will appear in red or blue background where blue signifies an unresolved geometry. Tip: You cannot change a property type read and parsed from the GML schema. However, it is possible (though not recommended) to change that value the next time editing the layer properties (i.e. when the table is populated from the transactions cache file and not the schema). Simply re-select the layer, select table cell of the property type and click the [F2] key. The following property types are available as a drop-down when editing property type: Type TEXT FLOAT DOUBLE SHORT LONG POINT LINE POLYGON GEOMETRY Description Character string Single-precision floating-point number. Double-precision floating-point number. Integer Long Integer Point type geometry Polyline type geometry Polygon type geometry Mixed geometry type (can be point, polyline or polygon) Note: CarbonArc uses the WFS DescribeFeatureType operation to fetch the schema for the layer. If the server does not support an HTTP GET address for DescribeFeatureType the Read from Schema operation will fail

50 Figure Editing the Properties Table The Manage Transaction Sources tool provides a lot of flexibility on editing the properties information and rules. You may edit some of the individual table cells, delete rows and insert new rows. In case an illegal cell value was used (e.g. text where a number is expected) the cell will be cleared and a message will indicate the problem in the status bar. This tool will also demand that at least one geometry property will be set before allowing the settings to be preserved. Table editing commands are: To edit an individual cell use the arrow keys or mouse to highlight the required cell and press the [F2] key (alternatively double-click inside the cell) To delete a row select the row header (left of the row) and click the [Delete] key. To insert a new row add a property name in the new row (last row in the table, marked with an asterisk). Once the row is added a new edit row will appear for any additional row additions


51 Some rules are maintained when editing cell values. The following table summarizes error messages that may be reported while validating edits: Action Trying to add a Length value to a property that is not of type TEXT Typing a non integer value in the Length cell Trying to add a minimum or maximum value to a property with type TEXT Typing a non-numeric value in the Min Value or Max Value cells Message Only 'text' type fields may have a length Max length must be an integer Min/max value is not allowed on 'text' type fields Min/max value must be a number <?xml version="1.0"?> <CarbonArc_WFST_Transactions_Cache xmlns:xsi= xmlns:xsd=" <Layers> <Layer ns=" version="1.0.0" gml="gml2" insert="true" update="true" delete="true"> <Url> <Name>wfs:BUSINESS</Name> <Fields> <Field name="name" type="text" length="20" /> <Field name="type" type="text" length="4" defaultval="a" /> <Field name="street_name" type="text" /> <Field name="building_nbr" type="text" /> <Field name="postcode" type="text" length="12" /> <Field name="city" type="text" /> <Field name="telephone" type="text" length="16" /> <Field name="total_employees" type="long" minval="1" maxval="10000" /> <Field name="geometry" type="geometry" /> </Fields> </Layer> </Layers> </CarbonArc_WFST_Transactions_Cache> XML Source 3 A sample transactions_cache.xml file containing one layer with property rules
52 Open the Manage Transaction Sources Select WFS-T from the services list Select feature layer from Capabilities Use the Read from Schema button CarbonArc lists only WFS based layers Reads and parses the Capabilities Validate layer as transactional. Get info from cache. Read and parse layer schema and fill table cells accordingly. Validates and saves layer in cache file. User edits cells Validates edit and saves in cache. Quick Tour 4 Adding new transactional layer to the CarbonArc transactions cache
53 Insert New Items Clicking the Insert New Feature tool ( ) activates the Insert dialog (see Figure 32 and Figure 33). The layers drop-down list at the top of the tool s dialog is automatically set according to the available feature layers in the ArcMap view correlated with the known transaction sources (see Manage Transaction Sources tool - section 3.3.1). Only feature layers declared by the WFS Capabilities as supporting the Insert operation are shown. When a layer is selected the properties available for the feature (according to the transaction layer information set using the Transaction Sources Manager) are listed. Default property values will automatically be set accordingly. To edit the values of the properties simply select the value cell in the table and press the [F2] key to edit the value (alternatively, double click in the table cell to start the value edit mode). Changed values will be validated for type and range (e.g. typing text for a numerical based value). A property that failed validation will be marked with a red background and a message box will specify the error; a valid value will be marked in green. When activating this tool the cursor will change to the insert feature cursor ( ) and you may digitize the selected geometry type directly on the map view. When the digitizing is complete an overlay geometry symbol will be displayed. The overlay symbol appears as long as the feature is being edited. Once the feature is inserted (using the Add button) the geometry will receive the layer s current ArcMap style and the feature will seamlessly merge into the layer (Figure 32). The geometry s coordinates may also be edited manually using the coordinates editor in the Geometry panel (Figure 34), changing the coordinates of the geometry manually will immediately update the overlay shape drawn on the screen. Note: Only a polygon s external ring can be digitized on the map. To add internal rings you must enter the coordinates manually to the table. Use the Add button to insert this transaction to the transactions cache. The new feature will be added to the layer and marked as an inserted feature. Note: The newly inserted feature will only exist on the local machine. To update the server, a transaction must be committed successfully to the Web Feature Service (see section 3.3.5)

54 Figure

55 Dialog title describes the current tool functionality. Select the feature layer to perform the insert on. The target WFS-T information (more info as a tooltip). Select Properties or Geometry view. The properties and values of the feature. The values can be set by selecting the value s table cell and pressing the [F2] key. The default values are set automatically, but can be changed by the user. When changing a value the cell background will turn green if valid, red if not. An icon which signifies that the transaction type is Insert and that the geometry type is point, polyline or polygon. Close the dialog. Add this feature to the transactions cache. Select geometry type. These buttons are available only for transactional layers marked as mixed geometries (using the GEOMETRY type). Figure 33 Note: The Insert Feature tool validates values set to properties according to the rules and types declared using the Transaction Sources Manager tool. If the validation fails a message box will alert the user and the cell will be marked with a red background

56 A panel that shows a textual presentation of the added geometry. Using this panel you may manually edit the coordinates of the shape. When inserting a polygonal shape you may add and remove interior polygon rings. Add polygon internal ring. Remove current polygon internal ring. Figure 34 Note: Editing the geometry shape on the map will automatically update the tabular coordinates view in the Geometry panel. Any manual edits to the shape using the table will instantly affect the overlay geometry preview shown on the map
57 Delete Feature Clicking the Delete Feature tool ( ) activates the Delete dialog (see Figure 35 and Figure 36). The drop-down list at the top of the dialog is automatically set according to the available feature layers in the ArcMap view correlated with the known transaction sources (see Manage Transaction Sources tool - section 3.3.1). Only feature layers declared by the WFS Capabilities as supporting the Delete operation are shown. Activating this tool will change the cursor to the delete feature cursor ( ). Select a feature for deletion by clicking it on the map. When selected, the feature s geometry will flash and the dialog values will populate with its corresponding properties and values. If more than one feature is found at the selected location, the dialog will allow browsing on all matching features. Selecting a feature using the dialog s browsing function will flash the selected geometry on the map. If a selected feature is already in the transactions cache the current status is displayed in the feature s information using one of the following icons: - The feature is new (Added). - The feature s properties and/or geometry were updated (Updated). - The feature is marked for deletion (Deleted). Once the Delete button is pressed the feature is marked for deletion. If this feature is a new feature (previously marked as Added ) it will be deleted immediately and permanently after a user confirmation. If the feature was updated (marked as Updated ) its state will change and it will be marked for deletion. In such case the previously set updates will not take effect in the transactions commit process. A feature marked for deletion may be unmarked using the dialogs Undo Delete button. This button is enabled when selecting a feature which is marked as deleted. Note: A feature marked for deletion will remain on the local map and on the server. To update the WFS-T feature layer the Delete transaction must be committed successfully to the server. Once the transaction completed successfully, the feature will be removed from view. CarbonArc provides a visual distinction to all features marked for deletion. The Delete Feature tool provides a set of buttons allowing various methods to highlight the deleted features. These features may be seen as black or white symbols or a special XOR pen that differentiates deleted features from other items on the map (Figure 35 shows a deleted feature using the blackened symbol)

58 Figure 35 Note: Symbol distinction for deleted features only works on polygons using solid color brush. Polygon symbols that use pattern brushes will not display the symbol distinction
. Number of available features in the clicked location. A view of the selected feature.")
59 Dialog title describes the current tool functionality. Select the layer to perform the transaction on. The feature s target WFS-T address. Current uncommitted transaction state of the selected feature (none, added, updated or deleted). Number of available features in the clicked location. A view of the selected feature. Browse through all features found for the selected location belonging to the currently selected layer. Select the deleted features symbol distinction (none, black, white or XOR pen). An icon which signifies that the transaction type is delete and that the geometry type is point, polyline or polygon. Close the dialog. Add this action to the transactions cache (delete the feature permanently if this is an uncommitted new feature). Undo deletion. Remove deletion marking from the selected feature (available only for features marked for deletion). Figure
60 Update Feature The Update Feature tool ( ) activates the Update dialog (Figure 37). The drop-down list at the top of the dialog is automatically set according to the available feature layers in the ArcMap view correlated with the known transaction sources (see Manage Transaction Sources tool - section 3.3.1). Only feature layers declared by the WFS Capabilities as supporting the Update operation are shown. Activating this tool will change the cursor to the update feature cursor ( ). Select a feature for update by simply clicking it on the map. If a feature or features in the selected location are found the selected geometry will flash and the dialog s properties and values will populate accordingly. Properties that were preset in the transactions cache and do not exist in the selected feature will be added and marked with a green background. If more than one feature is found for the selected location the dialog will allow browsing on all found features. Selecting a feature using the dialog s browsing function will flash the selected feature s geometry on the map. If a selected feature is already in the transactions cache the current status will be represented using one of the following icons: - The feature is new (Added). - The feature s properties and/or geometry were updated (Updated). - The feature is marked for deletion (Deleted). To edit the values of the properties simply select the value cell in the table and press the [F2] key to edit the value (alternatively, double click in the table cell to start the value edit mode). Changed values will be validated for type and range (e.g. typing text for a numerical based value). A property that failed validation will be marked with a red background and a message box will specify the error; a valid value will be marked in green. The Update dialog provides a selection of three modes on how the tool interacts with the map. The interaction mode is selected using one of three push-buttons marked as Select, Draw and Move. When in Select mode, clicking on the map will select a feature to update. When in Draw mode, a new geometry may be digitized in a process similar to the one described in the Insert New Feature tool (see section 3.3.2). The Move mode allows the repositioning of the geometry by grabbing and dragging it on the map. Once the Update button is pressed the feature is marked for update. If this feature is a new feature (marked as Added ) its property values will be updated, however the feature state will remain as Added. If the feature was marked for deletion, its state will switch to updated

61 Note: To provide maximum efficiency the update transaction created by CarbonArc will use only feature properties that were altered. Similarly the geometry GML will only be included if it was changed. Dialog title describes the current tool functionality. Select the layer to perform the transaction on. The target WFS-T address. Select Properties or Geometry panel view. Current uncommitted transaction state of the selected feature (none, added, updated or deleted). A view of the currently selected feature. The properties and values of the feature. The values can be set by clicking on the value s table cell and pressing [F2]. When changing a value the cell background will turn green if valid, red if not. Close the dialog. Assign the changed to the feature and mark it for update. Select map interaction mode (Select, Draw or Move). Browse through all features found at the selected location from the currently selected layer. Select geometry type. These buttons are available only for transactional layers marked as mixed geometries (using the GEOMETRY type). Icon that signifies that the transaction type is Update and the geometry type is a polygon. Figure
62 Committing Transactions The Commit Transactions tool ( ) provides a way to view all the edits and updates made on a features layer and perform the transaction operation on the corresponding Web Feature Service Transactional (WFS-T). The Commit dialog (Figure 38) is where transactions may be reviewed, removed or committed to the server. Transactions created by the Insert, Delete or Update Feature tools are stored on the local desktop as marked-for-transaction features until committed to the server (or removed). Once transactions are successfully committed they will be removed from the layer. After the successful commit the layer will be refreshed, thus updating the content on the map from the server. For example, if a new feature was added using the Insert tool it will reside as a marked as Added feature on the local machine. After a successful commit is performed this feature is removed from the local layer, however the layer is then refreshed and the data fetched from the server should contain the new feature. The new feature will be added to the layer as an unmarked feature, native to the layer. When opening the dialog you may choose the layer to process from a list of all available layers that may contain transactions. Selecting a layer will display all pending transactions in a list where each transaction shows the feature ID (if not an inserted feature) and the transaction type. A group of radio-buttons allows filtering of the transactions according to their type. Selecting All will show an unfiltered view of all the transactions. Pending feature transactions are listed according to the feature ID and the transaction type. However, new items do not have a feature identity since the server is responsible for allocating one to it. Therefore, new items will be listed with an id marked as <none>. When selecting a transaction from the list the corresponding geometry will flash momentarily in the main map view and the feature s properties will show in the tool s dialog. Transaction items may be deleted from the list by simply clicking the Delete Transactions button. After user confirmation, this action will permanently remove the checked features in the list from the layer without ever committing them to the server. Notice that this operation will lose all edits and changes made to these features. When checking and un-checking the check-boxes of transaction items, the tool will construct and show an updated XML query. This query is a WFS transaction produced from the selected transaction items. When ready to submit the transaction to the service press the Commit button. Once commit is activated the XML is sent to the WFS-T and processed. The dialog will report the progress and the outcome of this operation. If the transaction completed successfully the transacted features will be cleared from the list and the layer will refresh. Inserted and updated features will now be imported as native layer features, while deleted features will be removed from the map. In case of a failure the tool will report the result and preserve the transaction items

63 Tip: According to OGC specifications: if a transaction fails the service will roll back all operations described by the transaction. Therefore, none of the operations, even those who are legit, will succeed. Follow the messages in the service response to find which of the operations failed and why. When the failing elements are detected simply uncheck them before committing and correct the problem using the edit tools. It is very possible that transactions will fail due to server malfunction. In this case report the problem to the vendor s technical support. Select the layer to manage the transaction on. The target WFS-T address. Filter the available transactions according to their type. Only the selected types will show. List of available transactions. Preview of the selected feature in the list. Hide or show transaction and response panel. Quick check and uncheck on all items. XML representation of the transaction constructed using the checked items. XML response from the service. Close the dialog. Remove the checked transactions. All checked transactions will be permanently deleted without being committed to the server. Commit the checked transactions to the WFS-T server. Status bar reports the server response to the Commit operation. Response could be Success, Failed or Partial. Figure

64 <Transaction service="wfs" version="1.0.0" xmlns=" <Insert> <xyz:layer xmlns:xyz=" xmlns:gml=" <xyz:name>new Polygon</wfs:NAME> <xyz:type>a</wfs:type> <xyz:geometry> <gml:polygon> <gml:outerboundaryis> <gml:linearring> <gml:coordinates decimal="." cs="," ts=" "> , </gml:linearring> </gml:outerboundaryis> </gml:polygon> </xyz:geometry> </xyz:layer> </Insert> <Delete typename="xyz:layer"> <ogc:filter> <ogc:featureid fid="layer.120" /> </ogc:filter> </Delete> <Update typename="xyz:layer"> <Property> <Name>xyz:NAME</Name> <Value>Acme Corp.</Value> </Property> <ogc:filter> <ogc:featureid fid="layer.117" /> </ogc:filter> </Update> </Transaction> XML Source 4 Transaction containing feature insert, update and delete <?xml version="1.0" encoding="utf-8"?> <WFS_TransactionResponse xmlns:ogc=" xmlns:ogcwfs=" xmlns=" version="1.0.0" xmlns:xsi=" xsi:schemalocation=" <InsertResult> <ogc:featureid fid="layer.129" /> </InsertResult> <TransactionResult> <Status> <SUCCESS /> </Status> </TransactionResult> </WFS_TransactionResponse> XML Source 5 Response from WFS-T showing successful operation
65 Add, delete and update features Activate the Commit Transactions tool Select layer from the drop-down list Select features to commit Press the Commit button Features are marked for transaction All transactional layers are listed All transactions for the layer get listed Transaction query preview shown Transaction sent to server. Response is parsed & displayed If successful: Remove transacted items and refresh from server Quick Tour 5 Using the Commit Transactions tool Using Secured Services For enhanced security, transactions committed to a password protected WFS-T require authentication before completing the operation. The username and password may be the same as the ones used for the WFS features read operation or specify different user credentials. The Commit Transactions operation on a secured server will prompt the user for username and password before attempting to send the transaction
66 3.4. Saving and Restoring Sessions Layers generated by CarbonArc are saved as part of the ArcMap project (MXD file). When the map is saved in ArcMap the CarbonArc layers will store the current parameters needed to access the Web service as well as cached maps and features including any pending transactions on transactional WFS layers. Loading a map containing Web service layers does not require any immediate internet connection since the data is restored from the file. However, when internet connection is not available any attempt to update the content will fail. These failures will be reported to the Messages Log (see section 3.1.6). CarbonArc will use the existing cached data for display but no live refreshes will be available. When the connection is restored the layers will be able to refresh correctly and all other operations should return to normal. Keep in mind that project files containing CarbonArc layers will fail to open correctly on ArcGIS desktops where CarbonArc is not installed. However, different desktops that have CarbonArc installed may share and use ArcMap project files containing CarbonArc based layers. Tip: It is recommended to use the refresh tool after loading a map if there is any chance that changes were made in the data on the server side since it was last saved. Note: If the loaded map view contains layers with pending transactions, there is a chance that some of the transactions will no longer be valid as update were made elsewhere to the server
, Web Map Service (WMS) and Web Feature Service (WFS).")
67 4. Tutorials 4.1. Walkthrough 1 Using OGC Layers This quick tutorial will take you through the stages of adding OGC layers from Web Coverage Service (WCS), Web Map Service (WMS) and Web Feature Service (WFS). In addition this will demonstrate the basic use of the Identify tool and how to save and load the project with CarbonArc layers. Note: The services used in this guide are free and open at the time of the writing. They are provided by vendors and agencies not related to The Carbon Project. The Carbon Project cannot guarantee the availability, data content or reliability of these services. This walkthrough merely illustrates how to use CarbonArc with OGC compliant services. Step 1 Adding a base map from a WCS. Open ArcMap. Click the Add Layer tool and select the Digital Globe WCS service. The Capabilities will be read and displayed in the tree-view. Select New York and click OK. This process may take a few seconds to complete. Since the coverage is fetched according to the view size the higher the resolution and the bigger the ArcMap window, the longer it takes to fetch the image from the server


68 Step 2 Adding base map from a WMS. Open the Add Layer dialog and select the Microsoft/USGS Terra Service. Select the layer titled USGS Digital Ortho-Quadrangles and set its style to Red Grid Lines. Click Add Layer to bring this layer to ArcMap. Step 3 Zooming and panning the map Zoom and pan to the Manhattan area. Notice that while the layers are updated the cached image will be projected. Check and uncheck the top layer view to compare the two images
69 Step 4 Add new WFS to the services list In the Add Layer tool click the Add Service button and add the National Spatial Data Infrastructure (NSDI) WFS service. The NSDI WFS address is: and its version is


70 Step 5 Adding features from a WFS Select the NSDI Framework WFS, change the GML version to GML3 and click on the Hydro Element (Water Bodies - Hi Res) layer. Once the preview is generated add the feature layer to the map. Note that you may alter the polygon styling the same way done for any other features in ArcMap. CarbonArc uses the native ArcMap symbology in order to render the GML features. A quick way to alter the symbol is to click on the symbol legend in the layers list. Once the symbol is selected the layer style will be automatically updated. Step 6 Layer information Use the ArcMap Identify tool to observe the feature properties. Note that the GML feature is described using a tree-view structure. Unlike Shapefiles GML is based on complex XML format
 to open the MXD file. This will restore the previous session.")
71 Step 7 Saving the session Use the ArcMap Save command (Ctrl+S) to save the work to an MXD file. Step 8 Loading the session from file Start a new map using the ArcMap New command (Ctrl+N). This clears the map and legend. Alternatively you may close ArcMap and start it again. Use the ArcMap Open command (Ctrl+O) to open the MXD file. This will restore the previous session. Since all cached data is preserved in the file, this will work even when there is no internet connection. However, when connection is restored the dynamic nature of these layers will be restored and zooming and panning will access the servers to fetch relevant content

72 4.2. Walkthrough 2 Using the Catalog This tutorial will take you through the stages of adding a new Catalog service (CS-W), searching the catalog using keywords and adding the search results to the services list as a functional OGC service. Note: The services used in this guide are free and open at the time of the writing. They are provided by vendors and agencies not related to The Carbon Project. The Carbon Project cannot guarantee the availability, data content or reliability of these services. This walkthrough merely illustrates how to use CarbonArc with catalog services. Step 1 Adding a Catalog. Open ArcMap. Click the Search for Services using Catalog button to open the search dialog. Click the Add New Service button and fill in the Catalog s URL and other relevant information (note that the Description and Name are used locally and have no affect on the service operations). In this example a catalog from Ionic Software (part of Leica Geosystems) is added. The address used for this catalog is: and the catalog version is When finished, the new service will appear in the Catalogs list

73 Step 2 Searching the Catalog. In the Catalog search dialog, select the service to query. Note that the selection will start a service Capabilities reading and parsing in the background. A progress bar may appear to show the progress of reading and parsing the Capabilities document. The service may not be queried until this process is complete. Enter a keyword to search on and adjust the search filters (if necessary). For example we will search for services that contain the keyword Boston using the default filters and no bounding box limitation (as set in the tool by default). Typing a keyword will enable the Search button (assuming that a service is selected and the processed described in Step 1 completed successfully). Clicking on the Search button will start the Catalog searching process (using the OGC GetRecords operation). You may view the query and XML result in the XML Transaction tab
 or appear in")


74 Step 3 Adding the results to the services list. Select from the results the services you require, which are neither grayed out (missing URL) or appear in green text (already in your services list), and click the Add Service button. In this example there are two results. The second result, named Boston on Oracle, is already in the services list and appears in green font. The first result in the list is a feature service named Shape files on Boston. We will mark the Shape files on Boston service and click the Add Service. The service is now marked in green and appears in the Add Layer dialog as an accessible OGC service
75 4.3. Walkthrough 3 Using Feature Transactions This tutorial will take you through the stages of adding a transactional feature layer to the transactions cache, setting rules and property types, making edits to a mixed geometry transactional layer and committing the edits to the WFS-T. Note: The services used in this guide are free and open at the time of the writing. They are provided by vendors and agencies not related to The Carbon Project. The Carbon Project cannot guarantee the availability, data content or reliability of these services. This walkthrough merely illustrates how to use CarbonArc with services implementing OGC specifications. Step 1 Adding a feature layer to the transactions cache. In this walkthrough we use a WFS-T from Ionic Software (part of Leica Geosystems). This service s Web address is: and the service version is Open ArcMap. Click the Manage WFS-T Sources and Properties button to open the features transactions management tool. Select the WFS-T from the services list, this will cause CarbonArc to read and parse the Capabilities. Select the wfs:business layer. This layer supports the Insert, Delete and Update operations (see check-boxes indicating supported transactions). The Read from Schema button should be enabled since this is a WFS-T and the layer supports transactions. Click the Read from Schema button to generate a table

76 Step 2 Resolving property types. In this sample feature layer the GEOMETRY property is recognized by CarbonArc as an unresolved geometry and is marked in blue. The dialog s status bar indicates that an unresolved field type exists. This layer in fact supports mixed geometries; therefore we can mark the field as the nondescript GEOMETRY type. Once the property type is set the table cell will show in green and since there are no more unresolved types the status bar indicates that the layer was added to the transactions cache file

77 Step 3 Setting property rules. You may add rules such as text maximum length, default value, minimum value for numerical fields and maximum value for numerical fields. In this case we will set the long integer value of TOTAL_EMPLOYEES to a range of 1 to We will also set the default value for TYPE as A and limit this field to 1 character long. Step 4 Preparing a map. To illustrate feature editing we will use a base-map provided by the USGS via TerraService WMS (see Walkthrough 1 Using OGC Layers). The various edits will take place on Boston s Logan National Airport. Make sure to add the WFS-T BUSINESS layer to the map. Since this layer is of mixed geometry, use the GML symbology tab in the layer s properties to set the renderer to Mixed Geometries

78 Step 5 Inserting new features. Activate the Insert Feature tool. Since the BUSINESS layer is the only transactional layer in the map it will automatically be selected by the tool. The properties and rules set in previous steps will automatically apply. Since the layer is of mixed geometry type, the geometry selection buttons will be enabled. Select polygon and click on the map to start digitizing the geometry. Click on each point and double-click to complete the drawing. To re-digitize the geometry simply click on the map again. Add property values. Note that illegal values (according to the rules set in previous steps) will show an invalid cell with a red background. For example, since we set the TYPE property as a maximum length of 1, typing a two letter value shows an error. Correcting the error will show the cell background in green
.")
79 Step 6 Inserting more features and deleting new features. Using the Insert Feature tool add additional features. In case a new geometry must be removed use the Delete Feature tool to select it and click the Delete button to permanently remove it (CarbonArc will ask for confirmation). Step 7 Committing new features to server. Activate the Commit Transactions tool. Since BUSINESS is the only transactional layer, it will automatically be selected and all transactions will be listed. Since we only added features, all the transactions will be of type ADDED. Select all items and click the Commit Transactions button. Successful transaction will be reported in the status bar

80 Step 8 Updating features. Activate the Update Features tool. Since BUSINESS is the only transactional layer, it will automatically be selected. Click on the runway polygon to select it. The tool s dialog will show the properties and their values. In this sample we moved the runways geometry and renamed it to Runaway 2. Note: Notice that other properties are marked in green. These properties did not carry any value; therefore the server ignored them when added. The update tool recognized that these properties are missing (according to the transactions cache) and proposes to add them with the update process. Leaving these values as they are will not affect the feature. Click on the Move button and drag the feature s polygon. This will relocate the feature as part of the Update transaction
81 Step 9 Deleting features from the server. Activate the Delete Features tool. Since BUSINESS is the only transactional layer, it will automatically be selected. Click on features and mark them for deletion. Notice how the geometries symbols are blackened. Use the symbol distinction push buttons to toggle between the ways deleted features are rendered

82 Step 10 Committing feature updates and deletion to the server. Activate the Commit Transactions tool. Since BUSINESS is the only transactional layer, it will automatically be selected and all transactions will be listed. All edits and deletions will be listed. Select all items and click the Commit Transactions button. Successful transaction will be reported
What's New in ESRI Business Analyst Server 9.3.1
 What's New in ESRI Business Analyst Server 9.3.1 Last Revised September 24, 2009 Contents What's New in ESRI Business Analyst Server 9.3.1...3 Overview... 3 Data and Maps...4 2009/2014 Data... 4 New and
ArcGIS 4: Sharing Content on the Web STUDENT EDITION
 ArcGIS 4: Sharing Content on the Web STUDENT EDITION Copyright 2016 Esri All rights reserved. Course version 3.1.1. Version release date July 2016. Printed in the United States of America. The information
Editing Data with ArcGIS for Desktop. Student Edition
 Editing Data with ArcGIS for Desktop Student Edition Copyright 2014 Esri All rights reserved. Course version 3.0. Version release date December 2014. Printed in the United States of America. The information
Migrating to ArcGIS 10.2 for Server. Student Edition
 Migrating to ArcGIS 10.2 for Server Student Edition Copyright 2013 Esri All rights reserved. Course version 2.0. Version release date August 2013. Printed in the United States of America. The information
What's New at ArcPad 6
 What's New at ArcPad 6 An ESRI White Paper April 2002 ESRI 380 New York St., Redlands, CA 92373-8100, USA TEL 909-793-2853 FAX 909-793-5953 E-MAIL info@esri.com WEB www.esri.com Copyright 2002 ESRI All
Global Delineation with EDNA Data Arc Hydro Version 1.1 Final, July 2005
 Global Delineation with EDNA Data Arc Hydro Version 1.1 Final, July 2005 ESRI 380 New York St., Redlands, CA 92373-8100, USA TEL 909-793-2853 FAX 909-793-5953 E-MAIL info@esri.com WEB www.esri.com Global
Using ArcGIS for Water Utility Workflows STUDENT EDITION
 Using ArcGIS for Water Utility Workflows STUDENT EDITION Copyright 2017 Esri All rights reserved. Course version 2.0. Version release date February 2017. Printed in the United States of America. The information
Implementing Versioned Workflows in a Multiuser Geodatabase. Student Edition
 Implementing Versioned Workflows in a Multiuser Geodatabase Student Edition Copyright 2016 Esri All rights reserved. Course version 4.0. Version release date March 2016. Printed in the United States of
Building 3D Cities Using Esri CityEngine STUDENT EDITION
 Building 3D Cities Using Esri CityEngine STUDENT EDITION Copyright 2017 Esri All rights reserved. Course version 2.0. Version release date February 2017. Printed in the United States of America. The information
ArcGIS 9.x MXD Layers Scalability Testing
 Environmental Systems Research Institute, Inc., 380 New York St., Redlands, CA 92373-8100 USA TEL 909-793-2853 FAX 909-307-3014 Environmental Systems Research Institute, Inc. ArcGIS 9.x MXD Layers Scalability
ArcGIS Mobile - An Introduction. Eric Rodenberg
 ArcGIS Mobile - An Introduction Eric Rodenberg Environmental Systems Research Institute, Inc Copyright 1999 2009 ESRI All rights reserved. Printed in the United States of America. The information contained
Copyright information. U.S. Government Restricted/Limited Rights. ESRI Trademarks. Copyright ESRI All rights reserved
 Copyright 1999-2007 ESRI All rights reserved Copyright information The information contained in this document is the exclusive property of ESRI and its licensor(s). This work is protected under United
Deploying Interoperable Multivendor GIS Solutions Using ArcGIS With Oracle Spatial
 Deploying Interoperable Multivendor GIS Solutions Using ArcGIS With Oracle Spatial An ESRI Technical Paper September 2002 ESRI 380 New York St., Redlands, CA 92373-8100, USA TEL 909-793-2853 FAX 909-793-5953
Managing Workflow with Versions. An ESRI White Paper. October 2000
 An ESRI White Paper Managing Workflow with Versions October 2000 ESRI 380 New York St., Redlands, CA 92373-8100, USA TEL. 909-793-2853 FAX 909-793-5953 E-MAIL info@esri.com WEB www.esri.com Copyright 2000
Using Geographic Information System Technology With Linux
 Using Geographic Information System Technology With Linux An ESRI White Paper June 2002 ESRI 380 New York St., Redlands, CA 92373-8100, USA TEL 909-793-2853 FAX 909-793-5953 E-MAIL info@esri.com WEB www.esri.com
System Design Strategies
 An ESRI Technical Reference Document March 2006 Prepared by: Dave Peters Systems Integration ESRI 380 New York Street Redlands, California 92373-8100 Copyright 2006 ESRI All rights reserved. Printed in
System Design Strategies
 An ESRI Technical Reference Document August 2005 Prepared by: Dave Peters Systems Integration Environmental Systems Research Institute, Inc. 380 New York Street Redlands, California 92373-8100 Copyright
The 15-Minute Map Creating a Basic Map in ArcMap
 The 15-Minute Map Creating a Basic Map in ArcMap Transcript Copyright 2007 ESRI All rights reserved. The information contained in this document is the exclusive property of ESRI. This work is protected
ArcIMS 4 Architecture and Functionality
 ArcIMS 4 Architecture and Functionality An ESRI White Paper May 2003 ESRI 380 New York St., Redlands, CA 92373-8100, USA TEL 909-793-2853 FAX 909-793-5953 E-MAIL info@esri.com WEB www.esri.com Copyright
PROCEDURAL RUNTIME WHITEPAPER
 PROCEDURAL RUNTIME WHITEPAPER Abstract Esri CityEngine is based on the procedural runtime, which is the underlying engine that supports also two GP tools in ArcGIS 10.X and drives procedural symbology
ArcGIS MODELBUILDERTM
 SUPPLEMENT for ArcGIS 10.3 HIC INFORMATION SYSTEMS GEOGRAPHIC INFORMATION SYSTEMS GEOGRAPHIC INFORMATION SYSTEMS GEOGRAPHIC INFORMATION SYSTEMS GEOGRAPHIC INFORMA G E T T I N G T O K N O W ArcGIS MODELBUILDERTM
Release notes. Quick reference. MOLE tutorial
 About Defense Solutions and this guide Release notes Installation and setup (includes system requirements) Quick reference MOLE tutorial Developing with Defense Solutions Copyright 2006 2010 Esri All rights
System Design Strategies
 System Design Strategies An ESRI White Paper July 2002 Prepared by: Dave Peters Systems Integration Environmental Systems Research Institute, Inc. 380 New York Street Redlands, California 92373-8100 Copyright
Map Generalization in GIS: Practical Solutions with Workstation ArcInfo Software
 Map Generalization in GIS: Practical Solutions with Workstation ArcInfo Software An ESRI Technical Paper July 2000 ESRI 380 New York St., Redlands, CA 92373-8100, USA TEL 909-793-2853 FAX 909-793-5953
Using ESRI data in Autodesk ISD Products
 GI13-3 Using ESRI data in Autodesk ISD Products 1.5 hr. Class 02-Dec-03 3:30pm - 5:00pm Session Description: We will focus on using data in a variety of ESRI formats within the Autodesk GIS product line,
What's New in ArcView 3.1, 3.2, and 3.3
 An ESRI White Paper June 2002 ESRI 380 New York St., Redlands, CA 92373-8100, USA TEL 909-793-2853 FAX 909-793-5953 E-MAIL info@esri.com WEB www.esri.com Copyright 2002 ESRI All rights reserved. Printed
Raster Data in ArcSDE 8.2
 Raster Data in ArcSDE 8.2 An ESRI White Paper May 2002 ESRI 380 New York St., Redlands, CA 92373-8100, USA TEL 909-793-2853 FAX 909-793-5953 E-MAIL info@esri.com WEB www.esri.com Copyright 2002 ESRI All
June Fire Mapping. Building and Maintaining Street Networks in ArcGIS. Mike Price, Esri
 June 2012 Fire Mapping Building and Maintaining Street Networks in ArcGIS Mike Price, Esri Copyright 2012 Esri All rights reserved. Printed in the United States of America. The information contained in
Raster Data in ArcSDE 8.1.2
 Raster Data in ArcSDE 8.1.2 An ESRI White Paper February 2002 ESRI 380 New York St., Redlands, CA 92373-8100, USA TEL 909-793-2853 FAX 909-793-5953 E-MAIL info@esri.com WEB www.esri.com Copyright 2002
Using ArcScan for ArcGIS
 ArcGIS 9 Using ArcScan for ArcGIS Copyright 00 005 ESRI All rights reserved. Printed in the United States of America. The information contained in this document is the exclusive property of ESRI. This
ArcGIS Schematics: Automatic Schematic Generation for ArcGIS
 ArcGIS Schematics: Automatic Schematic Generation for ArcGIS An ESRI White Paper May 2005 ESRI 380 New York St., Redlands, CA 92373-8100, USA TEL 909-793-2853 FAX 909-793-5953 E-MAIL info@esri.com WEB
Answer the following general questions: 1. What happens when you right click on an icon on your desktop? When you left double click on an icon?
 Name: Date: June 27th, 2011 GIS Boot Camps For Educators Practical: Explore ArcGIS 10 Desktop Tools and functionality Day_1 Lecture 1 Sources: o ArcGIS Desktop help o ESRI website o Getting to Know ArcGIS
Setting up Local Parameters in Arc Hydro August 2006
 Setting up Local Parameters in Arc Hydro August 2006 ESRI 380 New York St., Redlands, CA 92373-8100, USA TEL 909-793-2853 FAX 909-793-5953 E-MAIL info@esri.com WEB www.esri.com Copyright 2006 ESRI All
What Is the ArcIMS Tracking Server?
 What Is the ArcIMS Tracking Server? An ESRI White Paper May 2003 ESRI 380 New York St., Redlands, CA 92373-8100, USA TEL 909-793-2853 FAX 909-793-5953 E-MAIL info@esri.com WEB www.esri.com Copyright 2003
ESRI Shapefile Technical Description
 An ESRI White Paper July 1998 Copyright 1997, 1998 Environmental Systems Research Institute, Inc. All rights reserved. Printed in the United States of America. The information contained in this document
Exporting ArcScene to 3D Web Scenes. Documents. An Esri White Paper November 2013
 Exporting ArcScene to 3D Web Scenes Documents An Esri White Paper November 2013 Copyright 2013 Esri All rights reserved. Printed in the United States of America. The information contained in this document
Visualization with ArcGlobe. Brady Hoak
 Visualization with ArcGlobe Brady Hoak Contents What is ArcGlobe? 3D Mapping and ArcGlobe Displaying data in ArcGlobe ArcGlobe tools Tips for constructing ArcGlobe documents New at ArcGIS 9.3 ArcGIS integration
Leveraging OGC Services in ArcGIS Server. Satish Sankaran, Esri Yingqi Tang, Esri
 Leveraging OGC Services in ArcGIS Server Satish Sankaran, Esri Yingqi Tang, Esri GIS Creating and Managing Geo Information Products - Proprietary - Open Specifications - Standards Dissemination of Geo
Introduction to GeoServer
 Tutorial ID: This tutorial has been developed by BVIEER as part of the IGET web portal intended to provide easy access to geospatial education. This tutorial is released under the Creative Commons license.
What's New in ArcGIS 9.2 Service Packs
 What's New in ArcGIS 9.2 Service Packs 18 July 2007 Updated for Service Pack 3 This document describes the main enhancements to 9.2 added by the service packs. It does not cover the bug fixes and quality
Introducing ArcScan for ArcGIS
 Introducing ArcScan for ArcGIS An ESRI White Paper August 2003 ESRI 380 New York St., Redlands, CA 92373-8100, USA TEL 909-793-2853 FAX 909-793-5953 E-MAIL info@esri.com WEB www.esri.com Copyright 2003
ArcGIS 9. Using ArcCatalog
 ArcGIS 9 Using ArcCatalog Copyright 1999, 2003 2005 ESRI All rights reserved. Printed in the United States of America. The information contained in this document is the exclusive property of ESRI. This
Pictometry for ArcGIS Desktop Local Release Notes
 Version 10.4 The Desktop - Local 10.4 extension is compatible with ArcGIS Desktop 10.4. Version 10.3.2 This extension includes a new installer, which allows you to select a location (other than Program
Using ArcGIS. Tracking Analyst. GIS by ESRI
 Using ArcGIS Tracking Analyst GIS by ESRI Copyright 2002 ESRI All Rights Reserved Printed in the United States of America The information contained in this document is the exclusive property of ESRI This
ArcGIS Extension User's Guide
 ArcGIS Extension 2010 - User's Guide Table of Contents OpenSpirit ArcGIS Extension 2010... 1 Installation ( ArcGIS 9.3 or 9.3.1)... 3 Prerequisites... 3 Installation Steps... 3 Installation ( ArcGIS 10)...
ArcGIS 9. Using ArcGIS Tracking Analyst
 ArcGIS 9 Using ArcGIS Tracking Analyst Copyright (c) 2004-2005 TASC, Inc. and its licensor(s). All Rights Reserved. Printed in the United States of America. The information contained in this document is
Leveraging OGC Services in ArcGIS Server. Satish Sankaran Yingqi Tang
 Leveraging OGC Services in ArcGIS Server Satish Sankaran ssankaran@esri.com Yingqi Tang ytang@esri.com Agenda Interoperability Enablers OGC and esri OGC Web Services ArcGIS and OGC Web Services - @ version
Server Usage & Third-Party Viewers
 Server Usage & Third-Party Viewers October 2016 HiPER LOOK Version 1.4.16.0 Copyright 2015 PIXIA Corp. All Rights Reserved. Table of Contents HiPER LOOK Server Introduction... 2 Google Earth... 2 Installation...2
ArcGIS 9. Using ArcCatalog
 ArcGIS 9 Using ArcCatalog Copyright 1999, 2003 2004 ESRI All rights reserved. Printed in the United States of America. The information contained in this document is the exclusive property of ESRI. This
Getting Started With LP360
 Getting Started With LP360 12/22/2015 1 Contents What is LP360?... 3 System Requirements... 3 Installing LP360... 4 How to Enable the LP360 Extension... 4 How to Display the LP360 Toolbar... 4 How to Import
ERDAS Image Web Server Datasheet
 ERDAS Image Web Server Datasheet age 1 of 10 ERDAS Image Web Server Image serving protocols Multi-protocol support Expose images with different protocols. ERDAS Compressed Wavelet Protocol (ECWP) image
What's New in ArcGIS 9.2 Service Packs
 What's New in ArcGIS 9.2 Service Packs 8 July 2008 Updated for Service Pack 6 This document describes the main enhancements to 9.2 added by the service packs. It does not cover the bug fixes and quality
Leveraging OGC Services in ArcGIS Server
 Esri International User Conference San Diego, CA Technical Workshops Jul.14 th 2011 Leveraging OGC Services in ArcGIS Server Satish Sankaran Yingqi Tang Agenda Interoperability
Leveraging OGC Standards on ArcGIS Server
 Leveraging OGC Standards on ArcGIS Server Satish Sankaran Interoperability and Standards Team James Michel III ESRI Intel Team ArcGIS Server Complete Interoperable Server-Based GIS Desktop Explorer Web
LAB 1: Introduction to ArcGIS 8
 LAB 1: Introduction to ArcGIS 8 Outline Introduction Purpose Lab Basics o About the Computers o About the software o Additional information Data ArcGIS Applications o Starting ArcGIS o o o Conclusion To
Exercise 1: Getting to know ArcGIS
 The Scenario You are working for the California Visitor s Commission. You have been asked to prepare a map of California for several dignitaries from out of the country. Your map will need to include enough
Accessing OGC Services To access OGC WMS and WFS open the service in the directory that you want to consume, and click on either WMS or WFS.
 Using Web Services Web Services Overview This user guide contains instructions on how to consume a range of services through a range of both web based and desktop GIS applications. Web services are a live
GML, WFS and SVG: A New Frontier of Internet GIS
 GML, WFS and SVG: A New Frontier of Internet GIS Zhong-Ren Peng Director Center for Advanced Spatial Information Research Associate Professor Department of Urban Planning University of Wisconsin-Milwaukee
Using ArcCatalog. GIS by ESRI
 Using ArcCatalog GIS by ESRI Copyright 1999, 2001 ESRI All rights reserved Printed in the United States of America The information contained in this document is the exclusive property of ESRI This work
MrSID Plug-in for 3D Analyst
 LizardTech MrSID Plug-in for 3D Analyst User Manual Copyrights Copyright 2009 2010 LizardTech. All rights reserved. Information in this document is subject to change without notice. The software described
ArcGIS 9. Using ArcReader
 ArcGIS 9 Using ArcReader Copyright 2003 2004 ESRI. All Rights Reserved. Printed in the United States of America. The information contained in this document is the exclusive property of ESRI. This work
ESRI Software Evolution
 ArcGIS Jan Šlahař About ESRI ESRI - Environmental Systems Research Institute Founded in 1969, Redlands, California In 2002 Esri had approximately a 36 percent share of the GIS software market worldwide
user manual GeoViewer DB Netze Fahrweg
 user manual GeoViewer DB Netze Fahrweg Register of Infrastructure Updated: Juli 2018 Release: 1.11.0 Page 1 von 32 Content 1 List of illustrations 3 2 Basics 4 2.1 Components 4 2.1.1 Interfaces 4 2.1.2
What s s Coming in ArcGIS 10 Desktop
 What s s Coming in ArcGIS 10 Desktop Damian Spangrud ArcGIS Product Manager, ESRI dspangrud@esri.com (or at least turn to silent) ArcGIS 10 A Simple & Pervasive System for Using Maps & Geographic Information
Animation in ArcMap Tutorial
 ArcGIS 9 Animation in ArcMap Tutorial Copyright 2005 2006 ESRI All Rights Reserved. Printed in the United States of America. The information contained in this document is the exclusive property of ESRI.
ArcGIS 9. ArcGIS Tracking Analyst Tutorial
 ArcGIS 9 ArcGIS Tracking Analyst Tutorial Copyright (c) 2004 2008 ESRI. All Rights Reserved. Printed in the United States of America. The information contained in this document is the exclusive property
Esri Support for Geospatial Standards
 APRIL 2017 ArcGIS Is Open and Interoperable Esri Support for Geospatial Standards Copyright 2017 Esri All rights reserved. Printed in the United States of America. The information contained in this document
for ArcSketch Version 1.1 ArcSketch is a sample extension to ArcGIS. It works with ArcGIS 9.1
 ArcSketch User Guide for ArcSketch Version 1.1 ArcSketch is a sample extension to ArcGIS. It works with ArcGIS 9.1 ArcSketch allows the user to quickly create, or sketch, features in ArcMap using easy-to-use
GEOSPATIAL ERDAS APOLLO. Your Geospatial Business System for Managing and Serving Information
 GEOSPATIAL ERDAS APOLLO Your Geospatial Business System for Managing and Serving Information ERDAS APOLLO Do you have large volumes of data, a geographicallydistributed user base and rapidly changing
MAPLOGIC CORPORATION. GIS Software Solutions. Getting Started. With MapLogic Layout Manager
 MAPLOGIC CORPORATION GIS Software Solutions Getting Started With MapLogic Layout Manager Getting Started with MapLogic Layout Manager 2011 MapLogic Corporation All Rights Reserved 330 West Canton Ave.,
Lab.4 & Assignment 2. Lab4. Conversion of Hardcopy Map to ArcGIS Map
 EATS4400 GIS Lab.4 & Assignment 2 Lab4 Conversion of Hardcopy Map to ArcGIS Map In this lab exercise you will have chance to go through the steps to convert hardcopy map into digital map for ArcGIS. Digitizing
Introduction. About LIDAR Server
 QUICK START GUIDE Introduction About LIDAR Server LIDAR Server brings the performance of QCoherent's flagship LP360 product to the internet. The same core LIDAR software technology now provides LIDAR data
ArcGIS 9 Installation Guide: ArcSDE 64 bit for Microsoft SQL Server
 ArcGIS 9 Installation Guide: ArcSDE 64 bit for Microsoft SQL Server Copyright 2009 ESRI All Rights Reserved. Printed in the United States of America. The information contained in this document is the exclusive
ArcScan for ArcGIS Tutorial
 ArcGIS 9 ArcScan for ArcGIS Tutorial Copyright 00 008 ESRI All rights reserved. Printed in the United States of America. The information contained in this document is the exclusive property of ESRI. This
Exercise 1: An Overview of ArcMap and ArcCatalog
 Exercise 1: An Overview of ArcMap and ArcCatalog Introduction: ArcGIS is an integrated collection of GIS software products for building a complete GIS. ArcGIS enables users to deploy GIS functionality
Developers Road Map to ArcGIS Desktop and ArcGIS Engine
 Developers Road Map to ArcGIS Desktop and ArcGIS Engine Core ArcObjects Desktop Team ESRI Developer Summit 2008 1 Agenda Dev Summit ArcGIS Developer Opportunities Desktop 9.3 SDK Engine 9.3 SDK Explorer
ArcSDE 8.1 Questions and Answers
 ArcSDE 8.1 Questions and Answers 1. What is ArcSDE 8.1? ESRI ArcSDE software is the GIS gateway that facilitates managing spatial data in a database management system (DBMS). ArcSDE allows you to manage
RELEASE NOTES. Trimble Positions Desktop add-in
 RELEASE NOTES Trimble Positions Desktop add-in These release notes provide important information about the Trimble Positions Desktop add-in version 10.2.0.1. Please read these release notes carefully.
ArcGIS 9. Maplex Tutorial
 ArcGIS 9 Maplex Tutorial Copyright 004 006 ESRI All rights reserved. Printed in the United States of America. The information contained in this document is the exclusive property of ESRI. This work is
This document does not represent a commitment to implement any portion of this specification in any company s products.
 Copyright Notice Copyright 2003 York University The companies and organizations listed above have granted the Open GIS Consortium, Inc. (OGC) a nonexclusive, royalty-free, paid up, worldwide license to
ArcGIS. for Desktop. Tips and Shortcuts 10.1
 ArcGIS 10.1 for Desktop Tips and Shortcuts Map Navigation Refresh and redraw the display. F5 Suspend the map s drawing. F9 Zoom in and out. Center map. Roll the mouse wheel backward and forward. Hold down
International Organization for Standardization Technical Committee 211 (ISO/TC211)
") Esri Support for Geospatial Standards: Open Geospatial Consortium (OGC) International Organization for Standardization Technical Committee 211 (ISO/TC211) An Esri White Paper April 2015 Copyright 2015
Esri Support for Geospatial Standards: Open Geospatial Consortium (OGC) International Organization for Standardization Technical Committee 211 (ISO/TC211) An Esri White Paper April 2015 Copyright 2015
ArcGIS and ArcGIS Pro 1.3 Enterprise Deployment. An Esri Technical Paper August 2016
 ArcGIS 10.4.1 and ArcGIS Pro 1.3 Enterprise Deployment An Esri Technical Paper August 2016 Copyright 2016 Esri All rights reserved. Printed in the United States of America. The information contained in
Introduction to ArcGIS Server 10.1
 Introduction to ArcGIS Server 10.1 E-Learning for the GIS Professional Any Time, Any Place! geospatialtraining.com Module Outline What is ArcGIS Server? GIS Resources and Services ArcGIS Server Components
An Esri White Paper July 2010 Use GIS Data ReViewer to Inspect ArcFM Feeder Manager Circuits
 An Esri White Paper July 2010 Use GIS Data ReViewer to Inspect ArcFM Feeder Manager Circuits Esri, 380 New York St., Redlands, CA 92373-8100 USA TEL 909-793-2853 FAX 909-793-5953 E-MAIL info@esri.com WEB
Mail & Deploy Reference Manual. Version 2.0.5
 Mail & Deploy Reference Manual Version 2.0.5 Introduction TABLE OF CONTENTS Introduction... 4 General Introduction... 5 Architecture... 6 Server... 6 Repository... 6 Client... 6 Contact Us... 7 Server...
Juniata County, Pennsylvania
 GIS Parcel Viewer Web Mapping Application Functional Documentation June 21, 2017 Juniata County, Pennsylvania Presented by www.worldviewsolutions.com (804) 767-1870 (phone) (804) 545-0792 (fax) 115 South
Tutorial International Standards. Web Map Server (WMS) & Web Feature Server (WFS) Overview
 & Web Feature Server (WFS) Overview") ISO/TC 211 17 th Plenary & Associated Meetings Berlin, Germany, DIN Institute / 2003-10-31 Advisory Group on Outreach Tutorial International Standards Web Map Server (WMS) & Web Feature Server (WFS) Overview
ISO/TC 211 17 th Plenary & Associated Meetings Berlin, Germany, DIN Institute / 2003-10-31 Advisory Group on Outreach Tutorial International Standards Web Map Server (WMS) & Web Feature Server (WFS) Overview
FDO Data Access Technology at a Glance
 Autodesk Geospatial FDO Data Access Technology at a Glance Work seamlessly with your geospatial data whatever the format 1 The Challenge The growing need for openness and interoperability between traditional
Introduction to GIS 2011
 Introduction to GIS 2011 Digital Elevation Models CREATING A TIN SURFACE FROM CONTOUR LINES 1. Start ArcCatalog from either Desktop or Start Menu. 2. In ArcCatalog, create a new folder dem under your c:\introgis_2011
Linear Referencing in ArcGIS. GIS by ESRI
 Linear Referencing in ArcGIS GIS by ESRI Copyright 00 ESRI All rights reserved. Printed in the United States of America. The information contained in this document is the exclusive property of ESRI. This
ArcGIS. ArcGIS Desktop. Tips and Shortcuts
 ArcGIS ArcGIS Desktop Tips and Shortcuts Map Navigation Refresh and redraw the display. F5 9.1, Suspend the map s drawing. F9 9.1, Zoom in and out. Center map. Roll the mouse wheel backward and forward.
How to Create a Tile Package
 United States Department of Agriculture Digital Mobile Sketch Mapping (DMSM) How to Create a Tile Package (TPK) Forest Service Introduction A tile package (.tpk) allows you to use a set of packaged tiles
ArcGIS and ArcGIS Pro Enterprise Deployment. An Esri Technical Paper July 2015
 ArcGIS 10.3.1 and ArcGIS Pro Enterprise Deployment An Esri Technical Paper July 2015 Copyright 2015 Esri All rights reserved. Printed in the United States of America. The information contained in this
Architecting ArcGIS Server Solutions for Performance and Scalability
 Architecting ArcGIS Server Solutions for Performance and Scalability Dave Wrazien Eric Miller ESRI Developer Summit 2008 1 Schedule 75 minute session 60 65 minute lecture 10 15 minutes Q & A following
TerrainOnDemand ArcGIS
 TM TerrainOnDemand ArcGIS Connect to Intermap Technologies NEXTMap data within: ArcGIS Desktop 9.3.1 and Above AGDQS0312 TerrainOnDemand ArcGIS 2 TerrainOnDemand ArcGIS Table of Contents 1. Introduction...1
How to Set Workspace Environments for Project Work
 How to Set Workspace Environments for Project Work An ESRI Short Tutorial January 2006 ESRI 380 New York St., Redlands, CA 92373-8100, USA TEL 909-793-2853 FAX 909-793-5953 E-MAIL info@esri.com WEB www.esri.com
David W. Allen. for ArcGIS 10.2
 David W. Allen for ArcGIS 10.2 This page intentionally left blank. This page intentionally left blank. Esri Press, 380 New York Street, Redlands, California 92373-8100 Copyright 2014 Esri All rights reserved.
ArcGIS 10.5, ArcGIS Pro 1.4, and ArcGIS Earth 1.4 Enterprise Deployment. An Esri Technical Paper March 2017
 ArcGIS 10.5, ArcGIS Pro 1.4, and ArcGIS Earth 1.4 Enterprise Deployment An Esri Technical Paper March 2017 Copyright 2017 Esri All rights reserved. Printed in the United States of America. The information
Create a personal geodatabase
 Create a personal geodatabase To create a personal geodatabase that corresponds to the same release as the ArcGIS for Desktop client you are using, follow these steps: 1. In ArcCatalog, right-click the