Processor Expert Software RAppID Suite Overview
|
|
|
- Lorena Brown
- 5 years ago
- Views:
Transcription
1 Processor Expert Software RAppID Suite Overview FTF-AUT-F0074 Sudhakar Srinivasa Senior Software Engineer A P R TM External Use

2 Session Introduction This one hour session covers: Overview of Processor Expert Software, RAppID Suite tool for Qorivva MPC57xx processors. Overview of User Interface Documentation features Code generation features Creating blinking LED example project using RAppID Suite tool A brief introduction to other RAppID (Rapid Application Initialization & Documentation tool) based initialization tools for other Qorivva families External Use 1
3 Session objectives After completing this session you will be able to: Use PinSetting component for configuration of pins Quickly use RAppIDSuite tool for configuration of peripherals of Qorivva MPC57xx processors. Generate extensive documentation after initialization using RAppIDSuite. External Use 2
4 Agenda Introduction RAppIDSuite Overview RAppID Suite User Interface PinSetting Component RAppID Suite generated code overview RAppID Suite generated document overview Creating example LED blink project Other RAppID tools Summary External Use 3
5 Processor Expert Software, RAppID Suite Processor Expert Software, RAppID Suite is an eclipse based Pin muxing and rapid initialization tool for MPC57xx family of Qorivva processors. This tool includes an automatic code generator which generates tested and optimized C and assembly code that is tuned to your application needs for the selected Freescale device. By using this tool, software developers can initialize the MCU in hours instead of weeks External Use 4
6 System Requirement 1.8 GHz Pentium compatible processor or better 1 GB RAM. 1 GB hard disk space, 400 MB on Windows system disk Microsoft Windows XP 32-bit and 64-bit (Professional Edition) or Microsoft Windows Vista 32-bit and 64-bit (Home Premium Edition and Business Edition) or Microsoft Windows 7 32-bit and 64-bit (Home Premium Edition and Professional Edition) External Use 5
7 RAppIDSuite Availability MPC577xK Pin Muxing and Init available now. MPC574xM Pin Muxing available now, Init available August MPC5748G Pin Muxing available now, Init available April 2014 MPC5777M - Pin Muxing available 2 nd quarter, Init available 3 rd quarter 2014 MPC5777C - Pin Muxing available 3 rd quarter, Init available 4th quarter 2014 MPC5746R - Pin Muxing available 3rd quarter, Init available 4th quarter 2014 External Use 6
8 Getting RAppIDSuite Download from Download includes RAppIDSuite base product and service pack Future bug fix and feature enhancements will be available as service pack releases. External Use 7
9 Agenda Introduction RAppIDSuite Overview RAppIDSuite User Interface PinSetting Component RAppIDSuite generated code overview RAppIDSuite generated document overview Creating example LED blink project Other RAppID tools Summary External Use 8
10 RAppIDSuite Overview RAppIDSuite is an eclipse based tool for Pin muxing and initialization tool for MPC57xx family of Qorivva processors. RAppIDSuite is integrated as a plug-in into the Eclipse IDE. The application is created from building blocks called embedded components consisting of CPU, peripherals and Pin setting components. Provides graphical representation of Clock for intuitive setting of system and peripheral clocks. RAppIDSuite peripheral initialization components generate effective initialization code for all on-chip devices and support all their features. External Use 9
11 RAppIDSuite Overview Generates efficient C and Assembly code based on target MCU for a multitude of compilers, including Diab (Wind River), Green Hills, HighTec GCC. Provides built-in documentation on each component of the processor. Provides hints on each configurable register field to assist in proper initialization value. A built-in knowledge base, which immediately flags resource conflicts and incorrect or incomplete settings. Installation comes with tutorials and example projects to help user quickly get started with RAppIDSuite application. External Use 10
12 RAppIDSuite Overview Export and Import components to/from other projects. Save a configured component as template and re-use in other projects Enable/Disable components added to the project. When disabled, code for the disabled component is not generated. Option to freeze code generation. External Use 11
13 Agenda Introduction RAppIDSuite Overview RAppIDSuite User Interface PinSetting Component RAppIDSuite generated code overview RAppIDSuite generated document overview Creating example LED blink project Other RAppID tools Summary External Use 12
14 RAppIDSuite User Interface The RAppIDSuite is integrated as a plug-in in the Eclipse IDE providing set of views. The user interface of RAppIDSuite consists of the following windows: Component Inspector - Allows you to configure components of the project. Component Library - Shows all supported components including processor components. Configuration Registers - Shows overview of the peripheral initialization settings for the current processor. Memory Map - Shows the processor address space and internal and external memory mapping. Components Shows embedded components that are added to the project. Initialization Sequence - Lets you customize the initialization sequence of components added to project. Processor - View of the processor derivative used in a given project. External Use 13
15 RAppIDSuite C/C++ Perspective Project Panel External Use 14
16 RAppIDSuite C/C++ Perspective Project Panel Component Inspector window External Use 15
17 RAppIDSuite C/C++ Perspective Project Panel Component Inspector window Component Window External Use 16
18 RAppIDSuite C/C++ Perspective Project Panel Component Inspector window Component Window Problem Window External Use 17
19 RAppIDSuite C/C++ Perspective Component Library window Project Panel Component Inspector window Component Window Problem Window External Use 18
20 RAppIDSuite Hardware Perspective Register Window External Use 19
21 RAppIDSuite Hardware Perspective Register Window Processor window External Use 20

22 Project Explorer window Lists all the project in the workspace. You can have multiple projects in a workspace. You can work on multiple projects by switching between the projects. Each project tree includes generated code, linker files, generated documents that can be accessed from this window. External Use 21

23 Components View To open this view, click menu Window > Show View > Other... and select Processor Expert > Components. Lists all the components added to the selected project. Selecting any component lets you configure the component in component inspector window. External Use 22

24 Components Library View To open this view, click menu Window > Show View > Other... and select Processor Expert > Components Library. Lists all the components available for the part selected in Project window. You add components to the project by selecting the component from this window. External Use 23
25 Component Inspector View To open this view, click menu Window > Show View > Other... and select Processor Expert > Component Inspector Allows to view and initialize register fields of the component selected from Component window. Provides two different ways to edit: Properties (tree) view and Graphical view Allows to view and configure clock setting External Use 24

26 Component Inspector View GUI view Allows to view and configure component selected from Component window. External Use 25
27 Component Inspector View Clock view Allows to view and initialize clock setting of the component selected from Component window. External Use 26
28 Component Inspector View Clock view Clock Control Description Clock Source IRC, XTAL etc Clock Selector Switch Prescaler External Use 27

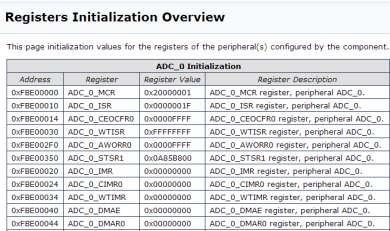
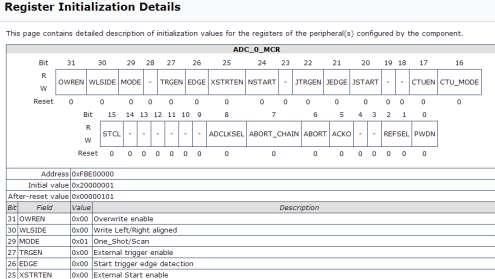
29 Configuration Registers View To open this view, click menu Window > Show View > Other... and select Processor Expert > Configuration Registers This view displays values of initialized, after reset and address of registers of the selected component. External Use 28

30 Configuration Registers View The last register value modified is highlighted. You may be able to modify the register value from this window. Registers value can be changed if: They are not read-only and when the project is without errors. Editing of configuration registers is supported by the selected component. External Use 29

31 Memory Map View To open this view, click menu Window > Show View > Other... and select Processor Expert >Memory Map This view shows the processor address space and memory mapping. Detailed information for an individual memory area is provided as a hint when you move the cursor over it. External Use 30
32 Memory Map View The black linecrossed area shows the memory allocated by a component or compiler. External Use 31

33 Initialization sequence View To open this view, click menu Window > Show View > Other... and select Processor Expert >Initialization Sequence This view lets you customize initialization sequence of components. By default, the sequence is not specified. You can change the sequence using up/down buttons External Use 32

34 Processor View To open this view, click menu Window > Show View > Other... and select Processor Expert >Processor This view displays selected target microcontroller with its peripherals and pins. The icon next to the peripheral indicates that the peripheral is added to the project. This window allows you to generate code and also to switch to a different package, if applicable. External Use 33

35 Processor View (Pin View) Displays pin coordinate. The background color of the pin reflects routing of the pin to the peripheral. Moving the cursor over the pin displays detailed information about the pin. External Use 34
36 Processor View Control buttons Buttons Description Zoom in Increases the detail level of the view. Zoom out Increases the detail level of the view. Rotate Rotates the pin view clockwise Resource view displays peripherals Bottom view of pins (BGA package) Top view of pins External Use 35
37 Agenda Introduction RAppIDSuite Overview RAppIDSuite User Interface PinSetting Component RAppIDSuite generated code overview RAppIDSuite generated document overview Creating example LED blink project Other RAppID tools Summary External Use 36
38 PinSetting Component PinSettings component is designed for: Configuration of pin routing / muxing Assignment of signal names to pins (customize pin names) Configuration of pin functional/electrical properties Allocate Functions to Pins Generate comprehensive report External Use 37

39 PinSettings Component Main Screen Button to generate HTML report for Pin Routing Configuration. Functional properties view allows configuration of pin electrical properties Expanded and Collapsed view are designed for pin routing configuration. Expanded view displays the pins using their coordinates, Collapsed view uses pin names. Both tabs displays the same configuration, the change on one tab is automatically applied to the second tab. External Use 38

40 PinSettings Component Expanded View The selected or configured pin name can be viewed in the last column i.e., Selected Pin Name column. After configuring the pin for selected function/signal, a User Signal name can be assigned. If modified, the user assigned signal name appears in the HTML report. If the signal name is modified, and user wants the original name to appear again in the field, then just delete the modified name and press the Tab key or Enter/Return key. This will set the original pin name in User Signal Name column. The text with checkbox represents the Pin Coordinates on Processor diagram/image. External Use 39

41 PinSettings Component Collapsed View Pin Selection column contains the list of Pins which can be configured for selected Function/Signal. If not configured, then <Automatic> is displayed, which means no user requirement for configuration. <Automatic>: The property does not specify any requirement for the configuration of the routing. If there is another requirement for the pin routing (from another component), it is accepted and the required pin is selected. If there is no other requirement, after reset pin is selected. If there is no default (after-reset) pin or default pin configuration is in conflict with other pin settings, no pin is selected. Direction column contains the list of Directions which can be configured for selected Function/Signal, if direction configuration is supported. For fixed direction signals, the direction text is displayed and grayed-out. For configurable direction, by default <Automatic> will be displayed, and will not be grayed-out. External Use 40

42 Functional Properties for Pins view This view allows configuration of pin electrical properties External Use 41

43 Allocate Functions to Pins Select the Peripheral Tab Select Pin as an Input or an output function Selected Pin s background is highlighted with tab s background color. See the Pad color change on Allocated Pad in diagram, it is same as the highlighted color in Selected tab. External Use 42

44 Fixed Pins Representation in Expanded View The pins which are dedicated and are not available for configuration to the user, are represented as grayed-out selected checkboxes in Expanded view. Also the Background color is set for such pins. External Use 43

45 Fixed Pins Representation in Collapsed View The pins or direction which are not available for configuration to the user, are represented as grayed-out text in Collapsed view. External Use 44


46 Error Representation in Expanded & Collapsed View In case of conflict/error, the report generation buttons will be grayed-out, with warning symbol. On Error configuration the conflict is represented on the Tab Name and the First column of the row where error is configured. Also the detailed error message is displayed in the Selected Pin Name column and the tooltip of the check-box On Error configuration the conflict is represented on the Tab Name and the Second column of the row where error is configured. Also the detailed error message is displayed in the Selected Pin Name column and the tooltip of the Pin Selection cell. External Use 45


47 Functional Property Configuration From Processor view A dialog will pop-up to configure the functional properties of a pin. This is a Dynamic Window. The options/properties available for configuration are those which are supported by the selected pin. On Right-click on a pin, an option will be given to a user to open the Pin Functional Properties dialog to configure the Functional Properties of a pin. This option will be visible if a pin supports the Functional Properties. External Use 46

48 HTML Report After finishing the configuration, select HTML Report button to generate HTML report. If the report is successfully generated, a message dialog will be displayed mentioning the file location, and successful report generation. The report cannot be generated if there is any error in the component External Use 47
49 PinSettings Component HTML Report The report contains the following parts: Header with project identification Processor package view List of all peripherals with brief description List of each pin with name, assigned peripheral and function and direction. List of each pin with all possible assignable peripheral and functions External Use 48

50 Sample HTML Report External Use 49


51 Sample HTML Report External Use 50
52 Agenda Introduction RAppIDSuite Overview RAppIDSuite User Interface PinSetting Component RAppIDSuite generated code overview RAppIDSuite generated document overview Creating example LED blink project Other RAppID tools Summary External Use 51
53 RAppIDSuite Code Overview Generates code from reset to main including interrupt vectors. Extensive code comments including settings of each component of project,initialized values, clear instructions stating where to add user code. Generates separate source files for each component. Two options for static code: Stand alone: static code copied from installation repository to project repository. Linked: static code remains in installation repository and linked to the project. Changes made to static code affects all projects. Option to set code generation log that contains detailed history of code changes every time code is generated. Option to freeze code generation to avoid accidental code generation. External Use 52
54 Agenda Introduction RAppIDSuite Overview RAppIDSuite User Interface PinSetting Component RAppIDSuite generated code overview RAppIDSuite generated document overview Creating example LED blink project Other RAppID tools Summary External Use 53
55 RAppIDSuite Documentation External Use 54
56 Agenda Introduction RAppIDSuite Overview RAppIDSuite User Interface PinSetting Component RAppIDSuite generated code overview RAppIDSuite generated document overview Creating example LED blink project Other RAppID tools Summary External Use 55
57 Creating led blink project Create a new Processor Expert project for MPC577xK part with WindRiver compiler option Configure build options Configure mode entry options Configure output pin Configure PIT interrupt Add code to toggle an output in interrupt service routine. Generate code Build code Run the code on target External Use 56
58 Build requirements Install GNU make utility Add make.exe to path Set WIND_DIAB_PATH environment variable to point to Diab compiler directory. Add Diab compiler directory to path. External Use 57

59 Create new Processor Expert Project Select from menu New- >Project->Processor Expert Project Enter project name Select Next External Use 58

60 Select Part Select required part Select Next External Use 59

61 Select Project Mode Select Use current perspective option Select Standalone mode Select Next External Use 60

62 Select compiler Select Green Hills Compiler and Finish External Use 61

63 Set project properties - generate ISR Change Generate ISRs option to Yes. This will generate user configured ISR code into event.c In this example, we are creating PIT ISR which will get generated in event.c External Use 62

64 Configure Output pin In this example, we will toggle output Y16 using PIT. To do this, Pin Y16 has to be configured as output. In PinSetting component, select SIUL2 peripheral. Configure pin Y16 (pad 98) as output. External Use 63

65 Configure build option We will build this example as RAM project. This selection is done in Cpu component. In the component window, Select Cpu component External Use 64

66 Set build option In Build options tab, set Default memory code to INTERNAL RAM External Use 65

67 Configure Interrupt options Select INTC component Select Interrupt Setting tab Select PIT interrupt Change PIT0 Channel0 interrupt priority to 1, processor to Processor0 and add the function name of the ISR External Use 66

68 Set Mode Entry Options Select MC_ME component Select Device Configuration tab Select Peripheral Configuration tab Select Normal button External Use 67

69 Add PIT component In the component library window, right click on PIT component and select Add to Project External Use 68
70 Configure PIT Timer Select Clock Diagram tab Enable PIT0 Timer0 Set Timer0 Load Value to to set the timer period to 1.25 sec External Use 69

71 Configure PIT Interrupt Select Device Configuration tab Select Device Settings tab Enable PIT Channel0 interrupt External Use 70

72 Configure PIT Intialization Select Initialization tab Enable PIT module External Use 71

73 Add SIUL2 component In the component library window, right click on SIUL2 component and select Add to Project External Use 72

74 Configure SIUL2 Option Select Properties tab Set Multiplexed Signals- >Signal 98 to Initialize External Use 73

75 Generate Code In the component window, select generate code icon. External Use 74

76 Add ISR code In Project Explorer window, double click on on Event.c to edit. External Use 75
 on every PIT interrupt External")
77 Add ISR code Add code to toggle pin Y16 (pg[2]) on every PIT interrupt External Use 76
78 Build project Open command window cd to project base directory Execute make External Use 77
79 Run the project on target Connect pin E4 on the motherboard to an LED Using a debugger, load the elf file to RAM Run the code LED should blink at a rate of 1.25sec External Use 78
80 Agenda Introduction RAppIDSuite Overview RAppIDSuite User Interface PinSetting Component RAppIDSuite generated code overview RAppIDSuite generated document overview Creating example LED blink project Other RAppID tools Summary External Use 79


 and Green Hills On-line")


81 RAppID Classic Rapid Application Initialization & Documentation Basic Product Highlights GUI-based tool for rapidly, intuitively developing Initialization code for MPC55xx, MPC56xx MCU families Configure Startup code from reset to main() Configure and generate key Infrastructure code such as Exception and Interrupt handlers and services routines. Automatic report generation of peripheral and register settings Generation of efficient C and Assembly code based on target MCU for a multitude of compilers, including Freescale s CodeWarrior, Diab (Wind River) and Green Hills On-line documentation and built-in tool tips for ease of use Performs consistency checks to eliminate mistakes and inconsistencies Built-in tutorials with sample projects Built-in support rappid@freescale.com with 24 Hr response *Pin Wizard Only Supports: MPC551x MPC553x MPC555x MPC556x MPC560xB MPC560xP MPC560xS MPC566xG/E* MPC567xF MPC564xB MPC564xA MPC564xL MPC567xK MPC567xR External Use 80

82 Processor Expert RAppID Suite : Q&A External Use 81
83 Agenda Introduction RAppIDSuite Overview RAppIDSuite User Interface PinSetting Component RAppIDSuite generated code overview RAppIDSuite generated document overview Creating example LED blink project Other RAppID tools Summary External Use 82
84 Summary Processor Expert Software, RAppID Suite can be used to quickly initialize MPC57xx family of Qorivva processors. RAppID Suite can create an extensive documentation on pin configuration and peripheral configuration Availability of other RAppID init family of tools for Qorivva MPC56xx family. External Use 83
85 Freescale Semiconductor, Inc. External Use
Rapid Software Development on 32-Bit Automotive MPC56xx Family of MCUs
 November, 2010 Rapid Software Development on 32-Bit Automotive MPC56xx Family of MCUs AMF-AUT-T0819 Patrick W. Menter Manager - Automotive Silicon Support Tools Reg. U.S. Pat. & Tm. Off. BeeKit, BeeStack,
Processor Expert Software Microcontroller Driver Suite. Device Initialization User Guide
 Processor Expert Software Microcontroller Driver Suite Device Initialization User Guide Revised: 1 November 2012 Freescale, the Freescale logo, CodeWarrior, ColdFire, Kinetis and Processor Expert are trademarks
3.1. User Guide. Processor Expert and Device Initialization PROCESSOR EXPERT FOR FREESCALE HCS12 & HCS12X FAMILY. Freescale Semiconductor, Inc.
 Document Version 3.1 PROCESSOR EXPERT FOR FREESCALE HCS12 & HCS12X FAMILY Freescale Semiconductor, Inc. Processor Expert and Device Initialization User Guide PROCESSOR EXPERT AND DEVICE INITIALIZATION
DEVKIT-MPC5748G SOFTWARE INTEGRATION GUIDE (SWIG) Ultra-Reliable MCUs for Industrial and Automotive Applications.
 Ultra-Reliable MCUs for Industrial and Automotive Applications.") DEVKIT-MPC5748G SOFTWARE INTEGRATION GUIDE (SWIG) Ultra-Reliable MCUs for Industrial and Automotive Applications www.nxp.com/devkit-mpc5748g S32 DESIGN STUDIO IDE FOR POWER ARCHITECTURE www.nxp.com/s32ds
DEVKIT-MPC5748G SOFTWARE INTEGRATION GUIDE (SWIG) Ultra-Reliable MCUs for Industrial and Automotive Applications www.nxp.com/devkit-mpc5748g S32 DESIGN STUDIO IDE FOR POWER ARCHITECTURE www.nxp.com/s32ds
MPC5748G-LCEVB SOFTWARE INTEGRATION GUIDE (SWIG) Ultra-Reliable MCUs for Industrial and Automotive Applications.
 Ultra-Reliable MCUs for Industrial and Automotive Applications.") MPC5748G-LCEVB SOFTWARE INTEGRATION GUIDE (SWIG) Ultra-Reliable MCUs for Industrial and Automotive Applications www.nxp.com/mpc5748g-lcevb S32 DESIGN STUDIO IDE FOR POWER ARCHITECTURE www.nxp.com/s32ds
MPC5748G-LCEVB SOFTWARE INTEGRATION GUIDE (SWIG) Ultra-Reliable MCUs for Industrial and Automotive Applications www.nxp.com/mpc5748g-lcevb S32 DESIGN STUDIO IDE FOR POWER ARCHITECTURE www.nxp.com/s32ds
Release Notes. S32 Design Studio for ARM v1.1
 Release Notes S32 Design Studio for ARM v1.1 TABLE OF CONTENTS 1 Release description... 2 1.1 Release content... 2 2 What s New... 2 2.1 New device support... 2 2.2 New features... 2 3 System Requirements...
3.1. User Guide. Processor Expert and Device Initialization. PROCESSOR EXPERT FOR FREESCALE ColdFire FAMILY. Freescale Semiconductor, Inc.
 Document Version 3.1 PROCESSOR EXPERT FOR FREESCALE ColdFire FAMILY Freescale Semiconductor, Inc. Processor Expert and Device Initialization User Guide PROCESSOR EXPERT AND DEVICE INITIALIZATION FOR FREESCALE
CodeWarrior Plug-in for Freescale HCS12(X) Device Initialization User Manual
 Device Initialization User Manual") CodeWarrior Plug-in for Freescale HCS12(X) Device Initialization User Manual Help version 2.9 Copyright 2010 Freescale Semiconductor, Inc. PROCESSOR EXPERT is trademark of Freescale Semiconductor, Inc.
CodeWarrior Plug-in for Freescale HCS12(X) Device Initialization User Manual Help version 2.9 Copyright 2010 Freescale Semiconductor, Inc. PROCESSOR EXPERT is trademark of Freescale Semiconductor, Inc.
S32R274RRUEVB AND S32R372RRSEVB SOFTWARE INTEGRATION GUIDE (SWIG)
") S32R274RRUEVB AND S32R372RRSEVB SOFTWARE INTEGRATION GUIDE (SWIG) Ultra-Reliable MCUs for Industrial and Automotive Applications www.nxp.com/s32ds S32 DESIGN STUDIO IDE FOR POWER ARCHITECTURE www.nxp.com/s32ds
S32R274RRUEVB AND S32R372RRSEVB SOFTWARE INTEGRATION GUIDE (SWIG) Ultra-Reliable MCUs for Industrial and Automotive Applications www.nxp.com/s32ds S32 DESIGN STUDIO IDE FOR POWER ARCHITECTURE www.nxp.com/s32ds
Getting Started with Pins Tool User's Guide
 Getting Started with Pins Tool User's Guide Document Number: PINSGS Rev. 0, 05/2016 2 NXP Semiconductors Contents Section number Title Page Chapter 1 Introduction 1.1 Features...5 1.2 Conventions... 6
Controller Continuum. for Microcontrollers V6.3. Quick Start
 Controller Continuum for Microcontrollers V6.3 Quick Start CodeWarrior Development Studio for Microcontrollers V6.x Quick Start SYSTEM REQUIREMENTS Hardware Operating System Disk Space PC with 1 GHz Intel
Getting Started with Qorivva Fast
 Freescale Semiconductor Document Number:AN4894 Application Note Rev 0, Mar 2014 Getting Started with Qorivva Fast Start Kit for TRK-MPC5604P by: Sudhakar Srinivasa 1 Introduction This application note
Release Notes. CodeWarrior Development Studio for Microcontrollers v10.6 Update 1.0.0
 Release Notes CodeWarrior Development Studio for Microcontrollers v10.6 Update 1.0.0 TABLE OF CONTENTS 1 What s New... 2 1.1 General... 2 1.2 ColdFire/ColdFire+... 2 1.3 Digital Signal Controller (DSC)...
Lab Determining Data Storage Capacity
 Lab 1.3.2 Determining Data Storage Capacity Objectives Determine the amount of RAM (in MB) installed in a PC. Determine the size of the hard disk drive (in GB) installed in a PC. Determine the used and
Installing Service Pack Updater Archive for CodeWarrior Tools (Windows and Linux) Quick Start
 Quick Start") Installing Service Pack Updater Archive for CodeWarrior Tools (Windows and Linux) Quick Start SYSTEM REQUIREMENTS Hardware Operating System Disk Space Windows OS: PC with 1 GHz Intel Pentium compatible
Installing Service Pack Updater Archive for CodeWarrior Tools (Windows and Linux) Quick Start SYSTEM REQUIREMENTS Hardware Operating System Disk Space Windows OS: PC with 1 GHz Intel Pentium compatible
S32 SDK for Power Architecture Release Notes Version EAR
 S32 SDK for Power Architecture Release Notes Version 0.8.0 EAR 2017 NXP Contents 1. DESCRIPTION...3 2. SOFTWARE CONTENTS...4 3. DOCUMENTATION...4 4. EXAMPLES...5 5. SUPPORTED HARDWARE AND COMPATIBLE SOFTWARE...6
MCUXpresso Config Tools User's Guide (Desktop)
") NXP Semiconductors Document Number: GSMCUXCTUG User's Guide Rev 2, 09/2017 MCUXpresso Config Tools User's Guide (Desktop) Contents Contents Chapter 1 Introduction...5 1.1 Versions...5 1.2 Tools localization...
NXP Semiconductors Document Number: GSMCUXCTUG User's Guide Rev 2, 09/2017 MCUXpresso Config Tools User's Guide (Desktop) Contents Contents Chapter 1 Introduction...5 1.1 Versions...5 1.2 Tools localization...
CodeWarrior Development Studio for etpu v10.x Quick Start SYSTEM REQUIREMENTS
 CodeWarrior Development Studio for etpu v10.x Quick Start SYSTEM REQUIREMENTS Hardware Operating System Software Disk Space Intel Pentium 4 processor, 2 GHz or faster, Intel Xeon, Intel Core, AMD Athlon
Note that FLIP is an Atmel program supplied by Crossware with Atmel s permission.
 INTRODUCTION This manual will guide you through the first steps of getting the SE-8051ICD running with the Crossware 8051 Development Suite and the Atmel Flexible In-System Programming system (FLIP). The
Copyright 2014 Xilinx
 IP Integrator and Embedded System Design Flow Zynq Vivado 2014.2 Version This material exempt per Department of Commerce license exception TSU Objectives After completing this module, you will be able
Quick Start Guide TWR-S08PT60. 5-Volt S08P Family of 8-bit MCUs for Industrial and Appliance Applications TOWER SYSTEM
 TWR-S08PT60 5-Volt S08P Family of 8-bit MCUs for Industrial and Appliance Applications TOWER SYSTEM Get to Know the TWR-S08PT60 Primary Connector Force BDM Infrared Port Reset Switch Motor Control Daughter
CodeWarrior Development Studio for Power Architecture Processors Version 10.x Quick Start
 CodeWarrior Development Studio for Power Architecture Processors Version 10.x Quick Start SYSTEM REQUIREMENTS Hardware Operating System Intel Pentium 4 processor, 2 GHz or faster, Intel Xeon, Intel Core,
Model-Based Design Toolbox MPC57xx Series
 Model-Based Design Toolbox MPC57xx Series Release Notes An Embedded Target for the MPC57xx Family of Processors Version 3.0.0 1-1 Summary 1 What is New in Version 3.0.0... 1-3 2 MPC57xx MCU Support...
CodeWarrior Development Studio for StarCore DSP SC3900FP Architectures Quick Start for the Windows Edition
 CodeWarrior Development Studio for StarCore DSP SC3900FP Architectures Quick Start for the Windows Edition SYSTEM REQUIREMENTS Hardware Operating System Disk Space Intel Pentium 4 processor, 2 GHz or faster,
Programming in the MAXQ environment
 AVAILABLE The in-circuit debugging and program-loading features of the MAXQ2000 microcontroller combine with IAR s Embedded Workbench development environment to provide C or assembly-level application
M16C/62P QSK QSK62P Plus Tutorial 1. Software Development Process using HEW4
 M16C/62P QSK QSK62P Plus Tutorial 1 Software Development Process using HEW4 Overview The following tutorial is a brief introduction on how to develop and debug programs using HEW4 (Highperformance Embedded
Getting Started with MCUXpresso SDK CMSIS Packs
 NXP Semiconductors Document Number: MCUXSDKPACKSGSUG User's Guide Rev. 1, 11/2017 Getting Started with MCUXpresso SDK CMSIS Packs 1 Introduction The MCUXpresso Software Development Kit (SDK) is a comprehensive
Introduction to Embedded System Design using Zynq
 Introduction to Embedded System Design using Zynq Zynq Vivado 2015.2 Version This material exempt per Department of Commerce license exception TSU Objectives After completing this module, you will be able
STM32 Ecosystem Workshop. T.O.M.A.S Team
 STM32 Ecosystem Workshop T.O.M.A.S Team After successful code generation by STM32CubeMX this is the right time to import it into SW4STM32 toolchain for further processing 2 Handling the project in SW4STM32
Installation and Quick Start of isystem s winidea Open in DAVE. Tutorial Version 1.0, May, 2014
 Installation and Quick Start of isystem s winidea Open in DAVE Tutorial Version.0, May, 0 About winidea Open isysytem provides a free version of its debugger IDE called winidea Open; it can use the Segger
for Freescale MPC55xx/MPC56xx Microcontrollers V2.10 Quick Start
 for Freescale MPC55xx/MPC56xx Microcontrollers V2.10 Quick Start CodeWarrior Development Studio for MPC55xx/MPC56xx Microcontrollers, version 2.xx Quick Start SYSTEM REQUIREMENTS Hardware Operating System
DAVE 3 Hands on / Quick Start Tutorial. Presentation Tutorial Start 1 v1.1: Creating a simple Project using PWM and Count Apps
 DAVE Hands on / Quick Start Tutorial Presentation Tutorial Start v.: Creating a simple Project using PWM and Count Apps Project Changing the brightness of an LED with the PWM App PWMSP00 Interrupt on timer
RL78 Project Configuration Tips
 RL78 Project Configuration Tips Renesas Electronics America Inc. Renesas Technology & Solution Portfolio 2 Microcontroller and Microprocessor Line-up 2010 2012 32-bit 8/16-bit 1200 DMIPS, Superscalar Automotive
MPC57xx e200zx Core Differences FTF-AUT-F0345
 MPC57xx e200zx Core Differences FTF-AUT-F0345 Shanaka Yapa Automotive MCU Apps Eng A P R. 2 0 1 4 TM External Use Agenda Abstract Automotive MCU Roadmap Automotive Power Architecture MCU Technologies MPC57xx
Purchase Agreement. P&E Microcomputer Systems, Inc. 98 Galen St. Watertown, MA
 Purchase Agreement P&E Microcomputer Systems, Inc. reserves the right to make changes without further notice to any products herein to improve reliability, function, or design. P&E Microcomputer Systems,
Eclipse Quick Reference Windows Hosted
 Eclipse Quick Reference Windows Hosted Menus and Keyboard Shortcuts (some menus/items can be hidden in any perspective) File Menu New Open Path Open File Close Close All Save Save As Save All Revert Move
Keil TM MDK-ARM Quick Start for. Holtek s HT32 Series Microcontrollers
 Keil TM MDK-ARM Quick Start for Holtek s Microcontrollers Revision: V1.10 Date: August 25, 2011 Table of Contents 1 Introduction... 5 About the Quick Start Guide... 5 About the Keil MDK-ARM... 6 2 System
DAVE TM & DAVE TM SDK
 Product Name DAVE TM & DAVE TM SDK Release Version V4.2.2 Type Of Release* Productive Name of the Supplier Infineon Technologies AG Mode of Release Infineon Server(http://dave.infineon.com/) Date of Release
CodeWarrior Development Studio for Power Architecture Processors FAQ Guide
 CodeWarrior Development Studio for Power Architecture Processors FAQ Guide Document Number: CWPAFAQUG Rev. 10.x, 06/2015 2 Freescale Semiconductor, Inc. Contents Section number Title Page Chapter 1 Introduction
Dr. Andreas Both / Zhang Enqin Automotive Runtime Software
 Nov 6, 2008 Getting Started with Freescale's AUTOSAR OS and Microcontroller Abstraction Layer (MCAL) Software Packages PA110 Dr. Andreas Both / Zhang Enqin Automotive Runtime Software owners. Freescale
Quick Start Guide TWR-S08DC-PT60. Tower System Daughter Card for the 5-Volt 8-bit MC9S08P Family TOWER SYSTEM
 Quick Start Guide TWR-S08DC-PT60 Tower System Daughter Card for the 5-Volt 8-bit MC9S08P Family TOWER SYSTEM Quick Start Guide Get to Know the TWR-S08DC-PT60 OSBDM USB Connector Potentiometer Reset Switch
An Introduction to the MPC57xx Nexus Aurora Interface
 An Introduction to the MPC57xx Nexus Aurora Interface FTF-AUT-F0344 Randy Dees A P R. 2 0 1 4 TM External Use Agenda MPC57xx Debug Overview Nexus Aurora Trace Overview Board and Connector Recommendations
SKP16C26 Tutorial 1 Software Development Process using HEW. Renesas Technology America Inc.
 SKP16C26 Tutorial 1 Software Development Process using HEW Renesas Technology America Inc. 1 Overview The following tutorial is a brief introduction on how to develop and debug programs using HEW (Highperformance
HandsOn Technology -- HT-MC-02 MODEL: HT-MC-02
 HandsOn Technology 8051 μcontroller Starter Kits FLASH μcontroller PROGRAMMER/DEVELOPMENT SYSTEM MODEL: HT-MC-02 8051 is one of the most popular 8-bit µcontroller architectures in use today, learn it the
INSTALLATION GUIDE. ID DESIGNER PC-Based Software Installation Guide. Version 4.0
 INSTALLATION GUIDE ID DESIGNER PC-Based Software Installation Guide Version 4.0 122 West State Street Traverse City, MI 49684 www.salamanderlive.com 877.430.5171 TABLE OF CONTENTS 1 ABOUT THIS GUIDE...
CodeWarrior Development Studio for Freescale HCS12(X) Microcontrollers
 Microcontrollers") 8-/16-bit Microcontrollers CodeWarrior Development Studio for Freescale HCS12(X) Microcontrollers Overview The comprehensive, highly visual CodeWarrior Development Studio for Freescale HCS12(X) Microcontrollers
8-/16-bit Microcontrollers CodeWarrior Development Studio for Freescale HCS12(X) Microcontrollers Overview The comprehensive, highly visual CodeWarrior Development Studio for Freescale HCS12(X) Microcontrollers
Red Suite 4 Getting Started. Applies to Red Suite 4.22 or greater
 Red Suite 4 Getting Started Applies to Red Suite 4.22 or greater March 26, 2012 Table of Contents 1 ABOUT THIS GUIDE... 3 1.1 WHO SHOULD USE IT... 3 2 RED SUITE 4... 4 2.1 NEW FEATURES IN RED SUITE 4...
CodeWarrior Development Studio for Advanced Packet Processing FAQ Guide
 CodeWarrior Development Studio for Advanced Packet Processing FAQ Guide Document Number: CWAPPFAQUG Rev. 10.2, 01/2016 2 Freescale Semiconductor, Inc. Contents Section number Title Page Chapter 1 Introduction
Spartan-6 LX9 MicroBoard Embedded Tutorial. Tutorial 1 Creating an AXI-based Embedded System
 Spartan-6 LX9 MicroBoard Embedded Tutorial Tutorial 1 Creating an AXI-based Embedded System Version 13.1.01 Revision History Version Description Date 13.1.01 Initial release for EDK 13.1 5/15/2011 Table
for StarCore DSP Architectures Quick Start for the Windows Edition
 for StarCore DSP Architectures Quick Start for the Windows Edition CodeWarrior Development Studio for StarCore DSP Architectures Quick Start for the Windows Edition SYSTEM REQUIREMENTS Hardware Operating
Getting Started with Qorivva Fast
 Freescale Semiconductor Document Number:AN4850 Application Note Rev 1, Mar 2014 Getting Started with Qorivva Fast Start Kit for TRK-MPC5606B by: Sudhakar Srinivasa 1 Introduction This application note
indart -HCS08 In-Circuit Debugger/Programmer for Freescale HCS08 Family FLASH Devices User s Manual Rev. 2.0
 indart -HCS08 In-Circuit Debugger/Programmer for Freescale HCS08 Family FLASH Devices User s Manual Rev. 2.0 Copyright 2006 SofTec Microsystems DC01028 We want your feedback! SofTec Microsystems is always
ATOLLIC TRUESTUDIO FOR STM32 QUICK START GUIDE
 ATOLLIC TRUESTUDIO FOR STM32 QUICK START GUIDE This document is intended for those who want a brief, bare bones getting started guide. This should suffice for that purpose, but a lot of detail has been
Z8 Encore! XP/Z8 Encore! Development Kits
 Z8 Encore! XP/Z8 Encore! Development Kits QS004311-0111 Introduction This describes how to set up Zilog s Z8 Encore! XP/Z8 Encore! Development Kits and start using them to build designs and applications
RX Smart Configurator
 APPLICATION NOTE RX Smart Configurator User s Guide: e² studio R20AN0451ES0120 Rev.1.20 Introduction This application note describes the basic usage of the RX Smart Configurator (hereafter called the Smart
for ColdFire Architectures V7.2 Quick Start
 for ColdFire Architectures V7.2 Quick Start CodeWarrior Development Studio for ColdFire Architectures V7.2 Quick Start SYSTEM REQUIREMENTS Hardware Operating System Disk Space 1 GHz Pentium compatible
IAR EWARM Quick Start for. Holtek s HT32 Series Microcontrollers
 IAR EWARM Quick Start for Holtek s Microcontrollers Revision: V1.10 Date: August 25, 2011 Table of Contents 1 Introduction... 5 About the Quick Start Guide... 5 About the IAR EWARM... 6 2 System Requirements...
P&E Microcomputer Systems, Inc. PKGPPCNEXUS
 P&E Microcomputer Systems, Inc. PKGPPCNEXUS Quick Start Guide for the PHYTEC phycore-mpc5554 Rapid Development Kit Visit us on the web: www.pemicro.com 2006 P&E Microcomputer Systems, Inc. All Rights Reserved
LAB #1: The CSM12C32 Module and PBMCUSLK Project Board
 CS/EE 5780/6780 Handout #1 Spring 2007 Myers LAB #1: The CSM12C32 Module and PBMCUSLK Project Board Lab writeup is due to your TA at the beginning of your next scheduled lab. Don t put this off to the
ATOLLIC TRUESTUDIO FOR ARM QUICK START GUIDE
 ATOLLIC TRUESTUDIO FOR ARM QUICK START GUIDE This document is intended for those who want a brief, bare bones getting started guide. This should suffice for that purpose, but a lot of detail has been left
Processor Expert. CodeWarrior Plug-in for Freescale. User Manual
 Processor Expert CodeWarrior Plug-in for Freescale User Manual version 2.82 2005 UNIS, spol. s r.o. ALL RIGHTS RESERVED All brands or trademarks are property of their respective holders. - 1 - CONTENTS
CodeWarrior Development Studio for Freescale 68HC12/HCS12/HCS12X/XGATE Microcontrollers Quick Start SYSTEM REQUIREMENTS Hardware Operating System 200
 CodeWarrior Development Studio for Freescale 68HC12/HCS12/HCS12X/XGATE Microcontrollers Quick Start SYSTEM REQUIREMENTS Hardware Operating System 200 MHz Pentium II processor or AMD-K6 class processor,
BASICS OF THE RENESAS SYNERGY PLATFORM
 BASICS OF THE RENESAS SYNERGY PLATFORM TM Richard Oed 2017.12 02 CHAPTER 5 WORKING WITH THE DEVELOPMENT ENVIRONMENTS FOR SYNERGY CONTENTS 5 WORKING WITH THE DEVELOPMENT ENVIRONMENTS FOR SYNERGY 03 5.1
SKP16C62P Tutorial 2 Creating A New Project Using TM. Renesas Technology America Inc.
 SKP16C62P Tutorial 2 Creating A New Project Using TM Renesas Technology America Inc. 1 Overview This tutorial describes the steps in creating new programs. To get the most out of the SKP including the
USB Mouse tutorial. Step-by-step project creation. CAK 2005 Petr Stružka UNIS, spol. s r.o.
 USB Mouse tutorial Step-by-step project creation CAK 2005 Petr Stružka UNIS, spol. s r.o. PStruzka@unis.cz Application Specification Application simulates mouse device connected through USB Mouse simulation
TriCore Free Entry Tool Chain. AURIX family and AUDO Future, AUDO MAX
 A Getting Started to TriCore Free Entry Tool Chain AURIX family and AUDO Future, AUDO MAX Integrated Development Environment for 32-bit TriCore derivatives Contents Before you start 1 of 36 PLS / HighTec
Contents. About This Guide... 2 Audience... 2 Revision History... 2 Conventions... 3 Definitions, Acronyms, and Abbreviations... 3
 Contents About This Guide................................. 2 Audience............................................. 2 Revision History....................................... 2 Conventions..........................................
EVB9S08DZ60. Demonstration Board for Freescale MC9S08DZ60. User s Manual
 EVB9S08DZ60 Demonstration Board for Freescale MC9S08DZ60 User s Manual EVB9S08DZ60 Evaluation Board for Freescale MC9S08DZ60 (64-Pin LQFP) User s Manual Revision 1.0 Copyright 2006 SofTec Microsystems
Freescale Semiconductor Inc. Vybrid DS-5 Getting Started Guide Rev 1.0
 Freescale Semiconductor Inc. Vybrid DS-5 Getting Started Guide Rev 1.0 1 Introduction... 3 2 Download DS-5 from www.arm.com/ds5... 3 3 Open DS-5 and configure the workspace... 3 4 Import the Projects into
As CCS starts up, a splash screen similar to one shown below will appear.
 APPENDIX A. CODE COMPOSER STUDIO (CCS) v5.1: A BRIEF TUTORIAL FOR THE OMAP-L138 A.1 Introduction Code Composer Studio (CCS) is Texas Instruments integrated development environment (IDE) for developing
WIND RIVER DIAB COMPILER
 AN INTEL COMPANY WIND RIVER DIAB COMPILER Boost application performance, reduce memory footprint, and produce high-quality, standards-compliant object code for embedded systems with Wind River Diab Compiler.
C Programming in Atmel Studio 7 Step by Step Tutorial
 C Programming in Atmel Studio 7 Step by Step Tutorial Sepehr Naimi NicerLand.com 1/1/017 Contents Introduction... Downloading and Installing Atmel Studio... 3 Opening Atmel Studio... 3 Creating the first
HI-TIDE Release Notes for Version 3.13
 HI-TIDE Release Notes for Version 3.13 Copyright (C) 2007 HI-TECH Software. All Rights Reserved. Printed in Australia. Produced on: September 24, 2007 HI-TECH Software Pty. Ltd. ACN 002 724 549 45 Colebard
Using the TASKING Pin Mapper for AURIX
 Using the TASKING Pin Mapper for AURIX MA160-870 (v1.0) February 12, 2016 Copyright 2016 Altium BV. All rights reserved. You are permitted to print this document provided that (1) the use of such is for
Codewarrior for ColdFire (Eclipse) 10.0 Setup
 10.0 Setup") Codewarrior for ColdFire (Eclipse) 10.0 Setup 1. Goal This document is designed to ensure that your Codewarrior for Coldfire v10.0 environment is correctly setup and to orient you to it basic functionality
Codewarrior for ColdFire (Eclipse) 10.0 Setup 1. Goal This document is designed to ensure that your Codewarrior for Coldfire v10.0 environment is correctly setup and to orient you to it basic functionality
MPC55xx Highlighted Features
 MPC55xx Highlighted Features Why Do I Need an etpu? Number one constraint of microcontrollers is their limited ability to perform high speed time related tasks. Limited by CPU interrupt overhead in servicing
CodeWarrior to S32 Design Studio (S32DS) Migration Guide Migrating legacy programs to the new S32DS IDE environment
 Migration Guide Migrating legacy programs to the new S32DS IDE environment") NXP Semiconductors Document Number: AN5282 Application Note Rev. 3, 09/2016 CodeWarrior to S32 Design Studio (S32DS) Migration Guide Migrating legacy programs to the new S32DS IDE environment by: David
NXP Semiconductors Document Number: AN5282 Application Note Rev. 3, 09/2016 CodeWarrior to S32 Design Studio (S32DS) Migration Guide Migrating legacy programs to the new S32DS IDE environment by: David
BASICS OF THE RENESAS SYNERGY TM
 BASICS OF THE RENESAS SYNERGY TM PLATFORM Richard Oed 2018.11 02 CHAPTER 9 INCLUDING A REAL-TIME OPERATING SYSTEM CONTENTS 9 INCLUDING A REAL-TIME OPERATING SYSTEM 03 9.1 Threads, Semaphores and Queues
UM2125 User manual. STM8 configuration tool. Introduction
 User manual STM8 configuration tool Introduction STM8CubeMX is a graphical tool for STM8 core microcontrollers. It is part of STMCube initiative (see Section 1: "STM8CubeMX overview") and is available
GP1 Programmable Accelerometer Quick Start Guide Version 1.2
 GP1 Programmable Accelerometer Quick Start Guide Version 1.2 1 Before You Begin 1.1 Packing List Please confirm that you received a complete GP1 Programmable Accelerometer kit, you should have received:
Hands-On Workshop: Developing with the Kinetis Software Development Kit
 Hands-On Workshop: Developing with the Kinetis Software Development Kit FTF-SDS-F0127 Michael Norman Technical Marketing Manager Chris Brown Applications Engineer A p r i l. 0 9. 2 0 1 4 TM External Use
Hands-On with STM32 MCU Francesco Conti
 Hands-On with STM32 MCU Francesco Conti f.conti@unibo.it Calendar (Microcontroller Section) 07.04.2017: Power consumption; Low power States; Buses, Memory, GPIOs 20.04.2017 21.04.2017 Serial Interfaces
Fleet Manager 2002 Professional Network Configuration Guide
 Handling a complex world. Fleet Manager 2002 Professional Network Configuration Guide Overview The VDO Fleet Manager Professional utilises an advanced three-tier client-server model and is designed to
F28069 ControlCard Lab1
 F28069 ControlCard Lab1 Toggle LED LD2 (GPIO31) and LD3 (GPIO34) 1. Project Dependencies The project expects the following support files: Support files of controlsuite installed in: C:\TI\controlSUITE\device_support\f28069\v135
CodeWarrior Development Studio for Microcontrollers V10.x Getting Started Guide
 CodeWarrior Development Studio for Microcontrollers V10.x Getting Started Guide Revised: January 12, 2011 Freescale, the Freescale logo, CodeWarrior, ColdFire, and Kinetis are trademarks of Freescale Semiconductor,
USB Debug Adapter. Power USB DEBUG ADAPTER. Silicon Laboratories. Stop. Run. Figure 1. Hardware Setup using a USB Debug Adapter
 C8051F2XX DEVELOPMENT KIT USER S GUIDE 1. Kit Contents The C8051F2xx Development Kits contain the following items: C8051F206 or C8051F226 Target Board C8051Fxxx Development Kit Quick-Start Guide Silicon
Getting Started with Kinetis SDK (KSDK) v.1.2
 v.1.2") Freescale Semiconductor Document Number: KSDK12GSUG User's Guide Rev. 0, 4/2015 Getting Started with Kinetis SDK (KSDK) v.1.2 1 Overview Kinetis SDK (KSDK) is a Software Development Kit that provides comprehensive
Freescale Semiconductor Document Number: KSDK12GSUG User's Guide Rev. 0, 4/2015 Getting Started with Kinetis SDK (KSDK) v.1.2 1 Overview Kinetis SDK (KSDK) is a Software Development Kit that provides comprehensive
Tutorial - Installing Freescale CodeWarrior
 Tutorial - Installing Freescale CodeWarrior Author: Joel - http://myfreescalewebpage.free.fr Last revision of this document: 1.4 of 2014-10-19. Table of contents Revisions... 2 Introduction... 3 1 Download
Microbee Technology FTM-3SE
 Microbee Technology FTM-3SE Freescale Tower System Compatible Field Programmable Gate Array Module TWR-K70 Demo Quick Start Guide The flexibility that programmable logic brings to hardware design has now
BASICS OF THE RENESAS SYNERGY PLATFORM
 BASICS OF THE RENESAS SYNERGY PLATFORM TM Richard Oed 2017.12 02 CHAPTER 9 INCLUDING A REAL-TIME OPERATING SYSTEM CONTENTS 9 INCLUDING A REAL-TIME OPERATING SYSTEM 03 9.1 Threads, Semaphores and Queues
Windows Network Server
 Windows Network Server The Client Explorer helps you manage all your client data files. Users on a network can share the same database so that the index is constantly up-to-date for all to see, and files
Kinetis SDK Freescale Freedom FRDM-KL03Z Platform User s Guide
 Freescale Semiconductor, Inc. KSDKKL03UG User s Guide Rev. 1.0.0, 09/2014 Kinetis SDK Freescale Freedom FRDM-KL03Z Platform User s Guide 1 Introduction This document describes the hardware and software
Embedded automotive applications are just a few clicks away. Philippe NOEL - STMicroelectronics
 Embedded automotive applications are just a few clicks away Philippe NOEL - STMicroelectronics Agenda 2 Presentation Time Speaker 13:30 SPC5Studio overview Philippe NOEL Basic application configuration
Embest IDE Pro for ARM 2005
 Embest IDE Pro for ARM 2005 1.1 About Embest IDE Pro for ARM2005 Embest IDE Pro for ARM2005 is a new release of Embest IDE for ARM based on 2004 version. It is an Integrated Development Environment for
ToolStick-EK TOOLSTICK USER S GUIDE. 1. Kit Contents. 2. ToolStick Overview. Green and Red LEDs. C8051F321 provides USB debug interface.
 TOOLSTICK USER S GUIDE 1. Kit Contents The ToolStick kit contains the following items: ToolStick Silicon Laboratories Evaluation Kit IDE and Product Information CD-ROM. CD content includes: Silicon Laboratories
AURIX family and AUDO Future, AUDO MAX
 A Getting Started to Free TriCore Entry Tool Chain AURIX family and AUDO Future, AUDO MAX Integrated Development Environment for 32-bit TriCore derivatives Contents Before you start 1 of 39 PLS / HighTec
IAR C-SPY Hardware Debugger Systems User Guide
 IAR C-SPY Hardware Debugger Systems User Guide for the Renesas SH Microcomputer Family CSSHHW-1 COPYRIGHT NOTICE Copyright 2010 IAR Systems AB. No part of this document may be reproduced without the prior
A brief intro to MQX Lite. Real work: hands-on labs. Overview, Main features and Code Size
 October 2013 A brief intro to MQX Lite Overview, Main features and Code Size Real work: hands-on labs Create a new MQX-Lite project, add ConsoleIO and BitIO components Create tasks, watch the flashing
Module Road Map. 7. Version Control with Subversion Introduction Terminology
 Module Road Map 1. Overview 2. Installing and Running 3. Building and Running Java Classes 4. Refactoring 5. Debugging 6. Testing with JUnit 7. Version Control with Subversion Introduction Terminology
CodeWarrior Development Studio for Power Architecture Processors V10.X FAQ Guide
 CodeWarrior Development Studio for Power Architecture Processors V10.X FAQ Guide Revised: February 27, 2013 Freescale, the Freescale logo, CodeWarrior, PowerQUICC, QorIQ, Qorivva, Starcore are trademarks