Source-Connect Pro 3.9 User Guide
|
|
|
- Simon Bradford
- 5 years ago
- Views:
Transcription


1 Source-Connect Pro 3.9 User Guide Source Elements Source-Connect Pro 3.9 User Guide 1
2 Table of Contents Table of Contents 1. Introducing Source- Connect 1.1 About Source- Connect 1.2 What s new in Source- Connect Pro 3.9? 2. Installation 2.1: System requirements 2.2: Network configuration 2.3: Downloading and Installing Source- Connect 3. Setup and Settings 3.1: Basics 3.2 Audio Input and Output 3.3: Getting Around 3.4: About Source- Connect 3.5: Source- Connect Pro: Setting session parameters - Overview 3.6.1: Setting session parameters - Bitrate 3.6.2: Setting session parameters - Resilience 3.6.3: Setting session parameters - Port 3.6.4: Setting session parameters - Buffer 3.6.5: Setting session parameters - Recommended defaults 3.6.6: Autologin 3.6.7: Alert 3.6.8: Show offline contacts 4. Your Profile and Contacts 4.1: Configuring your Profile 4.2: Managing your Contacts list online 5. Using Source- Connect 5.1: Logging in 5.2 Establishing a session 5.3 Network timeouts 5.4 Session status 5.5 Instant Messaging 5.6 Remote Transport Sync (RTS) 5.7 Closing a Source- Connect session 5.8 Logging out of Source- Connect 5.9 Privacy 6. Source- Connect Link 6.1 What s Source- Connect Link? 6.2 Quick- Start: Using Link 6.3 Example uses 6.4 Pro Tools HD and RTAS 6.5 Remote Transport Sync 6.6 Supported DAWS / Audio Hosts Source Elements Source-Connect Pro 3.9 User Guide 2
3 6.7 Troubleshooting Link 7. VPN Mode 7.1 About Source- Connect Pro and VPN mode 7.2 Activating VPN mode: 7.3 Using VPN mode 7.4 VPN mode and Hamachi 8. The Q Manager: Auto- Restore and Replace 8.1 Ultra- QuickStart Guide This section is provided for the most common case uses Lifecycle of a recording 8.3 Launch and configure the Q Manager for recording 8.4 Login Mode 8.5 FTP settings 8.6 Using Auto- Restore and Auto- Replace: Details 8.7. What is Auto- Restore and Auto- Replace? 8.8. Comprehensive Q Manager interface overview 8.9 Invalid Q Manager settings and warnings 8.10 Q Activity panel Troubleshooting Auto- Restore and Replace 8.12 Common Q Manager issues 9. Source- Stream: Firewall & Network traversal 9.1 What is Source- Stream? 10. Troubleshooting and known issues 10.1 Troubleshooting 10.2 Known Issues 10.3 Integrated debugging with Support 11. Contact Support Source Elements Source-Connect Pro 3.9 User Guide 3

, for remote synchronization of recording sessions.")

4 1. Introducing Source-Connect Source-Connect Pro 3.9 is a standalone application for Mac OSX that supports high-quality recording and monitoring of audio signals over the internet and allows for input and output directly into your DAW of choice. 1.1 About Source-Connect Source-Connect provides professional studio access to high quality, real-time audio streaming from within your editing environment, along with Remote Transport Sync (RTS), for remote synchronization of recording sessions. To reduce the channel bandwidth requirements while maintaining low delay and high quality communications, Source-Connect uses a state-of-the-art AAC codec developed by Fraunhofer IIS. Source-Connect Pro 3.9 no longer includes the Apt-X Extended algorithm from APT. In addition to streaming and RTS capabilities, Source-Connect also provides Contacts management and Instant Messaging features. You can add or remove contacts and edit your personal settings and profile by logging in to your account on the Source-Connect website. Source Elements Source-Connect Pro 3.9 User Guide 4


5 1.2 What s new in Source-Connect Pro 3.9? Source-Connect Pro 3.9 supports Source-Stream, a method for bypassing firewall restrictions. This means you can travel and use Source-Connect almost anywhere you can get broadband internet (some firewall restrictions may still apply, contact our Support team for details). Source-Connect Pro 3.9 is a fully standalone application and features Source-Connect Link, a set of AAX, RTAS, Audio Units and VST plugins that directly send audio to many supported hosts. Since version 3.7.0, Source-Connect Link supports 32-bit AAX sessions and 64-bit Audio Units. Source-Connect Pro now also allows you to connect using your audio settings at the higher sample rates of 88.2 khz, 96 khz, khz and 192 khz. This functionality works with both Source-Link and built-in audio. For documentation specific to using Source-Connect Link see Section 6. For a general overview of the Source-Connect versions and features see: Source-Connect 3.9 includes integrated debugging features, to help you work with our Support team. See the Troubleshooting section for more information. Source Elements Source-Connect Pro 3.9 User Guide 5
6 2. Installation 2.1: System requirements Supported Host Versions and Hardware Support for Mac OSX from OSX version 10.7 and up. Source-Connect Pro supports most core-audio and ASIO drivers as of the writing of this manual. Source-Connect requires an audio driver to launch. If your computer does not have one, you can install the free Source-Nexus driver from elements. com/ products/ source- nexus Clock issues with certain digital audio connections: The Mac Pro computers known as Nehalem and Westmere do not always support correctly locking to an external clock source. This can be problematic when connecting via an optical/digital method to external hardware such as the Digi192. Please contact Support for other options or see Appendix 1. Source-Connect supported sample-rates: Source-Connect currently supports 44.1 khz, 48 khz, 88 khz, 96 khz, khz and 192 khz. Source-Connect supported bit-rates: Source-Connect supports 16 bit, 24 bit and 32 bit sessions. Compatibility Source-Connect 3.9 is compatible to connect with all 3.0 versions and up, except for some Remote Transport Sync, Q Manager and codec limitations. Source-Stream requires that both sides of the connection are on Source-Connect 3.9 and have Source-Stream enabled. Contact Support if you have connection questions. Source Elements Source-Connect Pro 3.9 User Guide 6
7 2.2: Network configuration To establish an audio session between two studios, direct peer-to-peer communication is required between two hosts each running Source-Connect. Internet communication occurs over the UDP protocol, which is a low level and very fast Internet Protocol. It is therefore required that your firewall and/or router is configured properly to enable such communication. For most operations you will open UDP in your firewall and/or port forward these ports to your computer s IP address. Please review the online Network Guide for specific details on getting your Network configured for Source-Connect: elements. com/ support/ networkguide Bandwidth: Source-Connect requires an Internet connection with bandwidth of at least 300 kbps in both directions. You may need to configure your firewall and/or router if you are inside a network or have an active firewall. Corporate firewalls and routers may be able to provide QoS services to increase your application bandwidth. Please refer to our detailed network-specific information if you have difficulty connecting successfully. You can get an idea of your bandwidth via Internet Speed test sites, such as speakeasy. net/ speedtest. However, please note that a report from a site in California does not mean that you will be getting the same bandwidth when connecting to a peer in, say, Australia. Additional firewall information Source-Connect will make outgoing requests from any available TCP port to ports 80 (or 5222 on earlier versions) on our servers. All TCP ports should be allowed to make outgoing connections to and from the firewall. Most networks allow these connections by default. For additional information on configuring your network, please refer to: elements. com/ support/ networkguide You will find here an illustrated step-by-step guide on configuring your network, along with Advanced documentation for IT administrators. For detailed assistance please contact Support. Source Elements Source-Connect Pro 3.9 User Guide 7
8 2.3: Downloading and Installing Source-Connect All Source Elements software is obtained by download directly from your account on the website. To get access to the Downloads page you will need: 1. A physical ilok dongle 2. A valid evaluation or purchased license for Source-Connect For more information on the ilok: elements. com/ support/ ilok If you requested an evaluation license, or purchased a license you should have also created a new Source Elements account at the same time. Use this account to login to your account and download the software. If you did not receive an account please contact Support. Installing Source-Connect You should now have downloaded the correct software for your ilok license. Launch the installer and follow the instructions. Newer versions of Source-Connect will install over existing installations. Installing InterLok Extensions: You must have the InterLok Extensions installed to allow Source-Connect to recognise your ilok. InterLok extensions are installed with the Installer Application. The installer will not overwrite extensions which are more recent, and will only upgrade older versions. You may need to restart the computer if this is the first time you have installed the InterLok Extensions. Source Elements Source-Connect Pro 3.9 User Guide 8
9 Installing ReWire Some systems will have a previous installation of ReWire, and on Mac OSX the permissions may be such that Source-Connect cannot install the required components. If you encounter a failed installation issue, it is likely due to this. If you are not using ReWire you can safely remove any previous ReWire components from your system. Remove the following folder: /Library/Application Support/Propellerheads Software And Source-Connect will be able to complete the installation. Note that if you have existing ReWire components for other programs, for example Melodyne or Reason, you should backup, rather than delete, this folder and restore when required. Uninstalling on Mac OSX To uninstall Source-Connect, open the Installer image and run the Uninstaller package. This will not remove your settings and Q Manager folder. To manually remove all your stored Source-Connect and Q Manager data delete this folder: /Library/Application Support/Source Elements Uninstalling on Windows You can uninstall on Windows using the Remove Programs feature in the Windows system. Source Elements Source-Connect Pro 3.9 User Guide 9
10 3. Setup and Settings 3.1: Basics The following is a quick guide, which does not include working with Auto-Restore, Auto-Replace or Remote Transport Sync. See the section 5 and 8 in this guide for information on working with these technologies. Basic steps in using Source-Connect are as follows: 1. Launch the Source-Connect application. 2. Log in with your username and password. 3. Set up your audio I/O. See the documentation specific to your DAW from our support page or contact our support team for assistance. See Section 6 for documentation on using Source- Connect Link. 4. Setup your audio session parameters. Parameters that can be set are bitrate, resilience and buffer size. You may also need to specify a port. If in doubt, use the default settings. 5. Select an online contact in your Contacts list and press Connect in the Status (top) panel. This will connect both studios with a real-time streaming-audio session. Instant Messaging will be activated between the connected partners, and if the sample rate and channels are the same (e.g. 48khz mono), RTS (Remote Transport Sync) will also be enabled. During the session, you send compressed audio data to each other over the Internet. Be advised that if either user does not have sufficient bandwidth or has excess packet loss there is a possibility of an audible dropout. To minimize dropouts, see the support documentation online. You can also work with the Q Manager to ensure full-quality recording is achieved. 6. Disconnect. This will end your audio session with the remote studio. 7. Log out. Source Elements Source-Connect Pro 3.9 User Guide 10

11 3.2 Audio Input and Output To record in a host such as Pro Tools or Logic, you will need to route the signal to and from Source- Connect to your DAW. For best practice we suggest using the optical port on your hardware, or you can use Source-Connect Link. Source-Connect also supports Source-Nexus for low-latency multi-channel links. See the documentation for your DAW on the main Source-Connect Pro support page, or contact our support team for assistance. 3.3: Getting Around Source-Connect consists of multiple tabs. Simply click on the Tab title in the center section of Source- Connect to show that tab. You can collapse Source-Connect to its minimum size by clicking on the open tab header. 3.4: About Source-Connect The About Box provides information on which version of Source-Connect you have installed. To view the About box, go to the Apple menubar, click on Source-Connect and then About Source-Connect Pro : Opening the About Box: Source Elements Source-Connect Pro 3.9 User Guide 11

12 3.5: Source-Connect Pro: Setting session parameters - Overview To modify your settings, select the Settings tab. Audio I/O You will set your Audio I/O settings here, including whether to send and receive in Mono or Stereo, and the sample rate of 44.1 khz, 48 khz, 88.2 khz, 96 khz, khz and 192 khz. See Section 6 on using Source-Link. Network Settings Ultimately the actual capability of your network connection will determine the consistency of your sending and receiving reception. However you can optimize the quality of reception with the bitrate, buffer and resilience settings you choose to use. The following network parameters can be specified: Send Settings (Bitrate and Resilience) Receive Settings (Port, Buffer, Restore and Replace) See the following section for more information on these settings. You can also test and view the status of the specific UDP ports via the Port Test button. Source Elements Source-Connect Pro 3.9 User Guide 12

13 General Preferences You can choose to have Source-Connect as a floating window with the Always on Top option. This is useful when you are working in Pro Tools for example, and want to monitor the connection. This option helps to make Source-Connect feel like a plug-in. You also have several alert options: Alert repeat: single, repeat (until connection time-out), or none Alert level: 0db to -25db On request: ask, accept last or accept all The on request->accept last will automatically allow the last connection partner to reconnect. This can be helpful during debugging or sessions that may be having network difficulties. Accept all is useful if you are not going to be in front the computer to accept the connection request : Setting session parameters - Bitrate These settings affect the audio stream that you will be sending. Note that you cannot change these settings while you are connected to a remote user. To change your settings you must first disconnect, make your changes, and then reconnect. IMPORTANT: With sessions at 48khz, sending bitrates below 64kbps mono and 128kbps stereo will require sample-rate conversion as we cannot transfer the lower bitrates at the native sample-rate. If you are working with RTS or Restore or Replace and your session is at 48khz sample-rate you must work with at least 64kbps mono or 128kbps stereo minimum. Source Elements Source-Connect Pro 3.9 User Guide 13

14 Source-Connect Pro bitrates: Mono: AAC 32, 48, 56, 64, 56, 96, 112, 128, 160 kbps Stereo: AAC 64, 56, 112, 128, 192, 224, 256, 320 kbps The higher the bitrate, the higher the quality of the stream at sending side. However, higher bit rates require more resources as they increase the network load. For example, using a bitrate of 64 kbps (kilobits) will require approximately 20 KB (KiloBytes) of data per second on your actual network, which corresponds to about 200k in required network speed. In an ideal world, you should be able to achieve a rate equal to your purchased speed (divided by 8 (to get bytes), less 10% (TCP/IP and general Internet overhead). It is unlikely you will ever see that speed however, due to issues including network congestion or overloading on your local network, ISP level, or backbone, and extended hop counts. Generally, therefore, we recommend a minimum of 300 kbps up and down to achieve a reasonable stream at 64 kbps. For higher bitrate transfers you will need more resources - with business cable (1.5mb up/down) or a T1 you may find you are able to transfer multiple streams of 320kbps stereo! 3.6.2: Setting session parameters - Resilience In general a resilience setting of 1 should be used. Higher resilience settings than 1 are generally more effective over very high speed connections. A resilience setting of 0 is not recommended unless you are on the same LAN or you have a dedicated network with no other traffic interference. Source Elements Source-Connect Pro 3.9 User Guide 14
.")
15 3.6.3: Setting session parameters - Port Source-Connect requires a set of UDP ports to be available to establish a connection. This should be a number between For proper operation, 2 successive UDP ports should be opened in your firewall and/or mapped in your router (where the first port is the number you specify in the Port field in the Settings panel). For example, if you wish to use port 6000, ports 6000 and 6001 should be opened and mapped to your computer s internal IP address. Verify the port status with the Port Test button. It should return successful. Please see the online Network Guide for more information on the Port Test: elements. com/ support/ networkguide 3.6.4: Setting session parameters - Buffer The higher the buffer value, the higher the possibility of avoiding audible packet loss. On the other hand, a higher buffer value means a longer communication delay. If you are on a T1 or higher connection (both remote plug-ins) you may find that reducing the buffer size offers lower delay with the same quality experience. If you or your remote connection are on cable or DSL, a higher buffer is recommended. A value of at least 200ms is recommended, as values lower than this disable additional recovery algorithms designed to avoid packet loss. Additionally, the ideal setting for our recovery algorithms to work is to set the buffer to at least double the ping time between you and your connected user. If your latency increases too much you can set a higher buffer on the side of the connection that needs to receive the highest quality stream. Source Elements Source-Connect Pro 3.9 User Guide 15

16 3.6.5: Setting session parameters - Recommended defaults Setting the bitrate at 96kbps, resilience of 1 and a receiver buffer of 200ms is the ideal setting for most voice situations as it requires the least resources, consumes less bandwidth and provides excellent audio quality. Lower bitrates provide easier transmission in less-than-ideal network situations. We recommend understanding your network resources as much as possible, as this allows you to achieve optimal results : Autologin When Autologin is checked, you are automatically logged in with your existing settings intact upon initializing Source-Connect. Each time you open a session with Source-Connect enabled, and Autologin checked, you will be automatically logged in and be ready to connect : Alert Not staring at your monitor? Source-Connect will let you know with an brief aural alert when someone is requesting a connection. To have the alert repeat for 30 seconds, select Repeat. It will stop once any connection request made to you times out. If you prefer to switch this off, simply select the option None in your Settings panel : Show offline contacts If you find your Contacts list has become rather long, you can make it more manageable by unselecting the Show offline contacts checkbox. This will now only show any of your Contacts who are logged in and can make it much easier to find the Contact you are looking for when starting a session. See the next section for more about managing Contacts. Source Elements Source-Connect Pro 3.9 User Guide 16
17 4. Your Profile and Contacts 4.1: Configuring your Profile Your Contacts list and profile is managed on the Source-Connect website under your Account, which you can access by pressing the Go to online account in the Login panel, or logging in to your account directly online. You can choose what information to display (or not to display). Your basic profile information is available to your Contacts via the Source-Connect software and, depending on the level of privacy you choose, may be viewable to all other users of Source-Connect. See the Account and Profile pages for available options: elements. com/ account 4.2: Managing your Contacts list online To add a new Contact, simply search or browse for the contact you wish to add and click on the Add contact button: elements. com/ contacts IMPORTANT: Newly added Contacts may not be immediately visible in your list while you are logged in to the Source-Connect plug-in. If you have added a new Contact, or know that a Contact has added you, please log out, and log back in to refresh the list. The website will let you know if you need to do this once you add a new Contact. Source Elements Source-Connect Pro 3.9 User Guide 17


18 5. Using Source-Connect 5.1: Logging in To login, enter your username and password and press the Login button. If your login is successful, the Status panel will change its view: it will now show that you are able to establish an audio session. 5.2: Establishing a session Upon logging in, the Contacts panel will list the users you have chosen to display in your Contacts list. Detailed user information is shown in the section at the right of the panel, and can be viewed by double clicking on a username in the list. Before connecting to a user and establishing an audio session, it is always recommended that you check your settings. Source Elements Source-Connect Pro 3.9 User Guide 18


19 To initiate an audio session, select the user in the Contacts panel with whom the session is to be established. It is only possible to connect to users who have Online status: that is, the users who are online and not already engaged in a session. Upon selecting a user in the list, press the View profile button. You will see that their name, address and any personal details they may have provided appear in the left part of the Contacts panel. This can help you to confirm that you are actually connecting to the user you want. To connect: Select the user you wish to connect with in the Contacts list and press the Connect button in the Status panel to request a connection. If the remote user agrees to the dialog that appears immediately on their screen, the session is established. If both users port settings are correctly set and the audio settings are appropriate for your respective bandwidths, sending and receiving will begin. Audio activity is displayed in the signal meter. Otherwise (if the remote user disagrees or the request times out), the session is not established and a corresponding alert message is displayed. Source Elements Source-Connect Pro 3.9 User Guide 19
20 Failed connection: If you do not see a blinking sending or receiving light at the top of the plug-in it means that there is a problem with the network. Please review the Network Guide for information on how to resolve this: elements. com/ support/ networkguide 5.3: Network timeouts Request timeout: 30 seconds This is the time required to reply to the confirmation dialog when establishing audio session. If you make a request, and see that your user stays listed as busy, you know that they are online, but are away from their computer. You can cancel your request at any time by pressing disconnect. Streaming timeout If the audio session is established but no audio data is received your receiving blinker light will stop blinking to let you know that the network is not sending you any audio. If this happens during your session, try disconnecting and reconnecting with a lower bitrate and resilience setting. Source-Connect session timeout Source-Connect keeps your connection alive indefinitely, until you either log out, close your Pro Tools session or disconnect your network. In some cases you may receive a dialogue Connection reset by peer : this means you were unexpectedly disconnected usually because your network was no longer responding. Go ahead and reconnect. If the problem persists it is due to insufficient bandwidth resources. Automatic reconnection in case of Network failure Source-Connect will also recognize if the connection has been lost with the Source-Connect servers. If this is the case, it will not disconnect your session automatically, but continue to assume that your Contact partner is still available. Once the server connection is restored you will see an Instant Message stating this. This is a new feature designed to help in cases where network anomalies stop you from making a server connection, but you may still have peer-to-peer network service and you can continue with your audio session. Source Elements Source-Connect Pro 3.9 User Guide 20

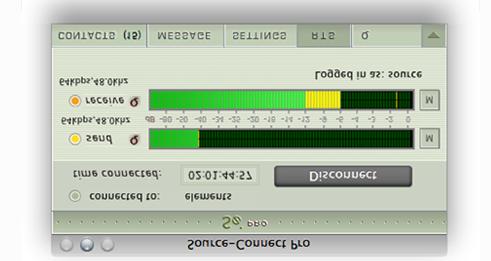
21 5.4: Session status When the session is successfully established, the current session properties are shown in the Status panel. You are informed of the bitrate quality and sample rate that is being sent and received, and whether you are sample-rate converting. Session properties: Sending light: If the connection is successful your sending light will blink. If you do not have a sending light blinking but you do have a receive light, it is likely to be an audio application/hardware problem. Try restarting and verify your host settings. Receive light: If the connection is successful your receiving light will blink. If you do not have a receiving light blinking it is likely to be a firewall or other network problem. You should verify that the port test is successful on both sides. See the online Network Guide for more information. Sample-rate: The sample-rate that Source-Connect is receiving The sample-rate listed below the sending and receiving status indicate the sample-rate that the codec within Source-Connect is working at and not necessarily the same sample-rate that the host application is set at. If they are different Source-Connect will indicate that it is sample-rate converting. NOTE: Sample-rate converting is not compatible with Auto-Restore and Auto- Replace or with Remote Transport Sync. Source Elements Source-Connect Pro 3.9 User Guide 21

22 Q icon on sending meter: The other side has Restore or Replace checked in their Settings panel and is capable of requesting Restore and Replace processes. When you are sending Q processes Source-Connect will cache the entire session to your hard-drive. You can delete this cache via the Q Manager. Q icon on receiving meter: You have Restore or Replace checked in your Settings panel and are capable of requesting Restore and Replace processes. Q Manager - IMPORTANT: If the Q icon has a red slash through it means that the Q Manager is not correctly configured however this will not affect your Source-Connect audio connection in any way. Please review Section 8 on Auto-Restore and Replace. 5.5: Instant Messaging During an audio session it is often useful to exchange instant messages with remote user, for example if you are not able to send or receive a signal for any reason, or you do not wish to interrupt the audio signal with a message to the other side. To send a message, type in the lower textbox at the bottom of Instant Messaging panel and enter your message. Press either enter or return key or click the Send button. Sent and received messages appear in the text display panel above. Messaging Focus: Note that after sending a message, the keyboard focus will be in the messaging panel. You will need to +Tab back to your audio host or click back with the mouse. Source Elements Source-Connect Pro 3.9 User Guide 22
23 5.6: Remote Transport Sync (RTS) RTS is an integrated method of synchronizing remotely connected Pro Tools (or other DAWs that support ReWire) transports. Purpose-built for ADR, over-dubbing and remote monitoring RTS makes distance collaboration easier and more efficient than it s ever been. Source-Connect onwards implements several new features and now includes support for Tempo maps. The following is a very brief overview. For specific instructions and screenshots, please see the comprehensive Remote Transport Sync FAQ: elements. com/ support/ source- connect- rts How to enable RTS: 1. Create a new mono Audio or Aux track. 2. From the Inserts->RTAS(AAX)-> Instruments menu, instantiate Se ReWire. (Note: you do not have to select an input or output in this track). 3. When you establish a session over Source-Connect the SEND and RECEIVE buttons will now be enabled in the RTS panel. Using RTS To use RTS, one user must be in SEND mode and the other in RECEIVE. The RECEIVE user has no transport controls - effectively they are now slaved to the SEND user who has 2 possible types of operation: ADR mode or Mix/review mode. Source-Connect Pro fully supports both ADR or Mix/ review modes. Source-Connect Standard can receive Mix/reviw mode but only send and receive ADR mode. Please review the Remote Transport Sync FAQ for details on ADR or Mix/review modes and running an RTS session. elements. com/ support/ source- connect- rts 5.7: Closing a Source-Connect session A Source-Connect session can be disconnected by pressing the Disconnect button in Status panel, by logging out, or quitting Source-Connect. Source Elements Source-Connect Pro 3.9 User Guide 23
24 5.8: Logging out of Source-Connect Logging out can be performed manually by pressing the Log out button in the Settings panel. Once you are logged out, you can log in again at any time and with any valid Source-Connect account. 5.9: Privacy Once you have established a connection and you are sending and receiving audio, you are sending data directly to and receiving from only your remote user. Instant Messages are not captured or stored on our servers. For a comprehensive outline of our Privacy policy, please read: elements. com/ info/ privacy Source Elements Source-Connect Pro 3.9 User Guide 24
25 6. Source-Connect Link 6.1 What s Source-Connect Link? Source-Connect Link provides a direct, internal connection via AAX, RTAS, Audio Units and VST plugins to and from the Source-Connect application directly to your supported DAW of choice, such as Pro Tools, Logic, Nuendo etc. Source-Connect Link is a quick, easy way to use Source-Connect, Remote Transport Sync, and the Q Manager with your DAW when you don t have the external equipment and/or an appropriate audio interface to use Source-Connect with its own audio device. This enables you to use the full features and stability of the Standalone application while taking advantage of the flexibility and recording/mixing features of your DAW without needing additional cables or audio interfaces. Source-Connect Link with Pro supports the following sample rates: 44.1 khz 48 khz 88.2 khz 96 khz khz 192 khz Using higher sample rates While the higher sample rates of 88.2 and 96khz are supported, Source-Connect will downsample these to 44.1 and 48khz respectively for transmission. For this reason, you cannot use RTS or the Q Manager with these sample rates. Source Elements Source-Connect Pro 3.9 User Guide 25


26 6.2 Quick-Start: Using Link A video introduction is available here: elements. com/ support/ videos A quick-start guide follows: 1. Instantiate Source-Connect Link into your DAW on an Aux track In Pro Tools, for example, this plugin is under the Other menu, or listed under Source Elements. Follow the user guide of your DAW to learn how to insert plug-ins, or see our available guides here: elements. com/ support/ link/ 2. Note the plugin ID that shows up in the plugin window Source Elements Source-Connect Pro 3.9 User Guide 26

27 3. Select this ID in the Source-Connect Settings->Audio I/O menu To determine where in your Audio I/O you choose to use the Link plug-in see the next section below (6.3). 6.3 Example uses There are four common use cases for using the Link plugin: 1. Record You want to record your connection partner from Source-Connect into your DAW. Place the link plug-in in your DAW so it is the last item in the path prior to your record track. Then select Link as your output in the Audio I/O Settings in Source-Connect. For talk back use any direct audio input of your choice for the into Source-Connect 2. Send a mix You want to send a live audio mix from your DAW to your Source-Connect partner. In your DAW create a duplicate channel that has your main mix for as its input, Route your talk back through your DAW and into this channel. Then place the link plug-in on this channel. Select Link as your input in the Audio I/O Settings in Source-Connect. Select a direct audio output of your choice so you can hear your connection partner. 3. Send a processed microphone signal You want to use plugins or processing built-in to your DAW before sending your microphone signal to Source-Connect. Place the link plug-in in your DAW so it is the last item in the path, after any plugins or processing you need to do. Then select Link as your input in the Audio I/O Settings in Source-Connect. To hear your connection partner, in Source-Connect use any direct audio output of your choice in Source-Connect Source Elements Source-Connect Pro 3.9 User Guide 27
28 4._Send and receive through your DAW In certain cases you may wish to use Link for both sending and receiving to your DAW. This may be the case where record and monitoring is being switched several times during the session, or in a large session where the engineer may want all their I/O integrated in one mixer. To set up link in this way there are two basic options. a- One link plugin for Input and Output. In this mode Select the same link ID in Source-Connect for input and output. In your DAW place Source-Connect in the same routing configuration as you would have with Source-Connect 3.0 RTAS/VST/AU (input to the track equals the Source-Connect Send signal and the output of the track is the Source-Connect Receive signal). b- One link plugin for Input and one link for Output. Some DAWS do not allow the routing flexibility for the convenience of an integrated send/receive plug-in. In the case where separate link plug-ins are required the user should combine the routing for methods 1 and 2. Please note: the downside to using the Link plugin for both send and receive is that its additional latency can cause an excessive delay of up to 150ms depending on your DAW settings. 6.4 Pro Tools HD and RTAS Older Pro Tools HD with simple RTAS and no AAX support do not support the use of the Source-Connect Link plug-in for reliable performance. Pro Tools HD users should use the proper external digital I/O setup with Source-Connect Pro. While the Source-Connect Link RTAS plug-in will work in Pro Tools HD, because of various issues with the RTAS engine in Pro Tools HD, certain intermittent performance situations can arise. Read more about this issue here: elements. com/ support/ hd- issues Source Elements Source-Connect Pro 3.9 User Guide 28
29 6.5 Remote Transport Sync Sync to Picture, ADR and for overdubbing You can use Link in any of the three scenarios above. Then initiate the SeRewire device in your DAW s rewire feature set. Please refer to your DAWs Rewire instructions as well as the specific RTS section of this manual for further information. 6.6 Supported DAWS / Audio Hosts This is not a comprehensive list, please contact us if you are not sure if your DAW is supported. Pro Tools Logic Nuendo Cubase Reaper Digital Performer GarageBand Ableton Live Adobe Audition (except recording) Many VST hosts on Windows Unsupported hosts These hosts have been found to not work with Source-Connect due to the way that they are configured to use plugins or due to incompatibilities. Twisted Wave Sound Forge Tracktion Adobe Audition (for recording) 6.7 Troubleshooting Link The main issue with Source-Connect Link may be additional latency. To mitigate latency between Source-Connect and your DAW try setting your plugin buffers and DAW host processing buffers to the lowest possible setting. For example in Pro Tools open your Playback Engine settings and lower the Host Processing buffer to 256 or lower. Source-Connect Link is a slim-line plugin and should not incur much CPU usage. Another issue may be that you are not receiving audio from Source-Connect to Link on Mac OSX. To resolve this make sure that Source-Connect and your DAW launch with the same sample-rate; you may also delete the Audio Midi preferences and restart your computer. Source Elements Source-Connect Pro 3.9 User Guide 29
30 7. VPN Mode 7.1 About Source-Connect Pro and VPN mode Source-Connect operates as a peer-to-peer type application over the UDP protocol, and this can cause connectivity problems when attempting to establish a two-way data connection in an unconfigured or very strict network. Factors such as firewalls and multi-layer subnets will generally make it difficult to walk into a venue and be confident of establishing a two-way Source-Connect session. Additionally, certain environments have strict security policies, so allowing firewall and network configurations are not possible. As a solution, Source-Connect Pro can operate in VPN mode. This solves three problems: connectivity confidence, security, and privacy. VPN mode and connectivity confidence VPN connections operate over the TCP protocol and can function even within strict networks and proxy servers because it is possible to tunnel over HTTP. If a suitable VPN solution is implemented, all the enduser requires is a software client that they need to run when they wish to connect. Access can be strictly managed with unique, time-critical passwords. Cisco, for example, has such a VPN solution available where the client software is freely distributable and operates transparently. Or, solutions utilising IPSEC may be suitable, which can be activated with built-in Mac OSX software for example. VPN Security / Privacy Where security and privacy are concerns, the best solution is one where you have complete control over the security methods. When Source-Connect Pro is in VPN mode it is configured to disallow connections to external IP addresses, so you can be confident that your network is secure. 7.2 Activating VPN mode: When launching Source-Connect, instead of logging in with your username and password, press the VPN mode button on the left of the login panel. Source-Connect will now open in VPN mode. When VPN mode is activated, your own private IP address is available under the this address menu. To connect to a user on your private network, simply enter their IP address and port in the connect to section. When your settings are correctly entered, simply connect as you would in Source-Connect. The remote user will be asked if they wish to connect. Upon accepting the request your session now begins. Source Elements Source-Connect Pro 3.9 User Guide 30
31 7.3 Using VPN mode 1. First, ensure that your VPN network is running then login into VPN Mode instead of logging in with your username. You should see that your VPN IP address is available via the drop down menu in the Contacts panel. Generally, you can check that your VPN is active and your connection partner is available by entering the IP address of the user you are connecting to and running the ping test. If you can t ping that computer, you may not be able to connect via Source-Connect VPN. Some networks may not support the Ping test so check with your IT administration where possible. 2. If you are on an active VPN you should be ready to make and accept a connection. If VPN mode cannot find a valid private IP address you will receive a dialog informing you of this. Please quit Source- Connect and check your Internet Connection if this occurs. 3. Once you are ready to connect, you will see your IP address listed in the My IP address and port menu. If you have more than one IP listed, select the IP address that corresponds to the network interface you intend to use. At least one side of the connection needs to communicate their IP address to the other connecting computer. You should also let them know what base port you are using (if it is not the default 6000). 4. To connect to another user, simply type in their IP address in the connect to section. Note that this can only be a private IP address. This is to ensure complete security on your part, so you are confident knowing VPN mode will never send traffic to an unauthorized network. 5. If you are on a complex network, for example you are on different subnets, you may need to administer your common router so it knows to connect you. For information on managing your network, contact your IT personnel or get in touch with us at support. 6. When you are ready to connect press the CONNECT button in the Status panel. If the network is properly configured, you will be immediately connected and your session will run like a normal Source- Connect session. For technical support, you are welcome contact us. Please note, however, that when working with private networks we are unable to offer assistance directly on Source- Connect without being given access credentials to your VPN. 7.4 VPN mode and Hamachi Source-Connect Pro supports the free LogMeIn Hamachi VPN application. This allows you to make a secure connection over most firewalled networks without requiring any previous setup. A full guide on using Hamachi is available here: elements. com/ support/ hamachi/ pro- and- hamachi Source Elements Source-Connect Pro 3.9 User Guide 31
32 8. The Q Manager: Auto-Restore and Replace This section provides a complete overview on using Source-Connect from version 3.2 and up with Restore and Replace. Q Manager version 2 provides easier and faster Restore and Replace operations, plus several additional back-up options. This section is divided into 12 parts: 8.1 Ultra-QuickStart Guide 8.2 Lifecycle of a recording 8.3 Launch and Configure the Q Manager for recording 8.4 Login mode 8.5 FTP settings 8.6 Using Auto-Restore and Auto-Replace: Details 8.7 What is Auto-Restore and Auto-Replace? 8.8 Comprehensive Q Manager interface overview 8.9 Invalid Q Manager settings and warnings 8.10 Q Activity panel 8.11 Troubleshooting 8.12 Common Q Manager issues This section starts with a step-by-step guide to using Auto-Restore and Auto-Replace. It is important that you understand what settings need to be verified. This is briefly covered in section 8.1: Ultra-QuickStart Guide, so please review section 8.3. Launch and Configure the Q Manager for recording if your recording needs are outside of the scope of the QuickStart guide. The online Q Manager Help guide is also available directly from on the Q Manager setup panel and will take you to the comprehensive Q Manager guide online. You can refer to this guide whenever needed for quick help. If you have any questions on working with the Q Manager and Auto-Restore and Auto- Replace please contact Support. Source Elements Source-Connect Pro 3.9 User Guide 32
33 8.1 Ultra-QuickStart Guide This section is provided for the most common case uses. 1. Launch Source-Connect Pro and connect using 44.1khz or 48khz, with bitrate of 64kbps mono or higher. 2. The Q manager will login automatically. Check that your FTP service is active. If you get an FTP error see the FTP error section of this manual or contact Support. 3. Set your audio files folder / session folder in the Q Manager Setup panel. This is the folder where you will record your actual files to. 4. Make sure you have Restore and Replace checked in the Source-Connect settings panel. 5. Connect with Source-Connect to your connection partner and check that you have a Q icon on the Receive status, next to the blinking Receive light. 6. Record a test file it should show up immediately in your Q Requests. If it says Restored, select and choose Replace Now from options menu. If it progresses and comes back saying Replaced, you re good to go! Source Elements Source-Connect Pro 3.9 User Guide 33

34 8.2. Lifecycle of a recording This section is a step-by-step guide to using Source-Connect Pro for Auto-Restore and Auto-Replace. It shows how the Q Manager works by describing the lifecycle of a file recorded in Pro Tools and the subsequent restore and final replace process. 1. Enable Restore and Replace in your Source-Connect Pro settings To request Restore data you must have the Q restore checkbox checked in the Source-Connect Pro Settings panel. To request Replace data you must have the Q Replace checkbox checked. You can use either or if you need, or disable both if you are just monitoring the connection. 2. Request a Source-Connect session When you request a Source-Connect session with Restore or Replace checked, your connection partner will be show a dialog indicating that you wish to receive Restore or Replace data. Source Elements Source-Connect Pro 3.9 User Guide 34


35 3. Ready to record If your partner accepts you have now established a Source-Connect session with Restore and Replace enabled. You should now see a Q icon to the left of the Receiving meter, indicating that you can receive Restore and Replace data. If your connection partner also has Source-Connect Pro and has the Restore/Replace boxes checked you will see a Q by your Sending meter also. 4. Recording an audio file In this example we are sending a sine-tone signal via the Signal Generator plug-in to be recorded, and for the purposes of demonstration we are causing a significant number of dropped packets. You can see on the waveform in the timeline when the recording is significantly degraded: IMPORTANT: As noted previously in this document it is necessary to ensure that your recorded signal is passed directly to your record track, with no volume changes or other plug-in processes in between Source-Connect and the record track. This ensures that the Q Manager will able to fully restore and replace your recordings. Source Elements Source-Connect Pro 3.9 User Guide 35


36 5. Restoring the audio file in the background Once you stop recording the Q Manager will start the restore process. You can continue recording multiple files as the restore process does not interrupt your session in any way. If you have the Send status notifications to Source-Connect IM option enabled in the Advanced settings of the Q Manager, you will see the result of the process in your Source-Connect Instant Message window as files are processed: 6. Taking a look at the restored file Since we have recorded a sine-tone signal, it is simple to see visually how the restore process works. Select the filename in the Pro Tools bin and choose Recalculate waveform overviews. We can now compare the files before and after the restore process visually: Before and after the restore process: We can now see (and hear on playback) that we have a completely restored audio file with perfect playback. Source Elements Source-Connect Pro 3.9 User Guide 36


37 7. Replacing the file with full resolution PCM data It is not necessary to restore your audio files if you only need the replace process. However, if your files are currently being restored you ll need to wait until this process completes before activating the replace process. To activate the replace process there are two options: manually per file or all available files at once. Replace now To process files individually, highlight that file in the Q Requests panel and select Replace now : Start Replace process To process all available files in the Q Requests menu, select the Start Replace process from the Q Menubar dropdown menu: You will see an Instant Message (if IM notifications are enabled) to let you know that the Replace process has completed and the status of the file in the Q Requests panel will be Replaced. Depending on the size of your files and the available bandwidth between you and your connection partner, this process will take some time, and longer than the restore process. Click on the arrow next to the filename to show the current progress. If the file is very large you will see a percentage of the progress. Source Elements Source-Connect Pro 3.9 User Guide 37


38 Once the process is complete you now have the full resolution PCM files in your edit window of your DAW. 8. Detecting whether your audio files are ready for Restore and Replace It is possible that because of your audio I/O routing, the Q signal is not being detected in your recorded Source-Connect audio - even though you have the Q icon displayed. Often this is because the I/O you are sending audio through is also used with other input sources. To verify whether this is the case, or if you have set the wrong Audio Files folder in the Q Manager you can try manually scanning a file. If the file status comes back 'Q not present' it means that it was either not recorded from Source-Connect, or the aux you used was not a clean aux. We recommend creating a brand new aux channel in the I/O settings of Pro Tools and testing your record again. To manually scan a file choose Scan file(s) from the Requests options menu, then select a file that has been recorded via the Source-Connect connection. Source Elements Source-Connect Pro 3.9 User Guide 38

39 8.3 Launch and configure the Q Manager for recording Launching Source-Connect and the Q Manager When you launch Source-Connect, the Q Manager will also launch. By default, the Q Manager will login with the Source-Connect username and password that is entered in Source-Connect. If you logout and login to Source-Connect with another account, the Q Manager will also be logged in to that new account. Setting your Session Record directory Generally, the only step you will need to take is to set your Session folder directory. This is the actual folder where you record your audio files, e.g. the Audio Files folder in Pro Tools and Logic. Source Elements Source-Connect Pro 3.9 User Guide 39


40 8.4 Login Mode The Q Manager is designed to automatically login to your Source-Connect account you are currently working with for ease of use. However under some situations you may need to modify your Login settings. Login Mode: Auto Under Auto Mode, the Q Manager will login to the Source-Connect currently used. If you logout of Source-Connect and login to another account, the Q Manager will also login to this new account. When using Auto mode, take care you are not using an account that may also be used in another computer, if you have multiple rooms. It is important that the same Q Manager account is logged in to the same computer that the original Source-Connect session was recorded on, due to the local data storage. Login Mode: Manual You can set a permanent account to be used by the Q Manager. When launched it will only login to this account and not switch when Source-Connect may use a different account. This is useful, for example, in a large studio where you don t have a fixed account per computer. You can use as many Q Manager accounts as you have multi-connect accounts (See your Profile on the Source-Connect website or ask Support). The Q Manager will try to login to your Source-Connect when you click the Save button. Login Mode: VPN Mode When using VPN Mode in Source-Connect, you must have the Q Manager in VPN Mode also, as it uses a different protocol to communicate with your remote Source-Connect connection partner. If you are in Auto Login Mode, the Q Manager will automatically switch to VPN Mode if you are in VPN Mode in Source-Connect. If you are set to Manual mode, you will need to manually switch to VPN Mode. Source Elements Source-Connect Pro 3.9 User Guide 40

41 8.5 FTP settings The Q Manager only transfers audio and Q data via the FTP protocol. This requires that you have an active FTP account to request Q data from your connection partner. The FTP account you use should not be a highly secure account: in order to transmit data to each other this account information will be communicated to the other side. While Source- Connect and the Q Manager do this silently, it may be possible for the other side to listen and detect your FTP login information. Because the Q Manager communicates your FTP login, only the side requesting data will transmit the FTP login information to be used. It is not important that the other side has a valid FTP account. The same is for Source-Connect Standard because Standard cannot request Restore or Replace data it does not have any FTP login information stored to use. So, if you are the side requesting Restore and Replace, your FTP account will be used for those data transfers. Setting your FTP account You can set your FTP account manually via the Q Manager login settings. Testing your FTP account The Q Manager will validate your FTP account by sending a test file on each login or on changing your login settings. The test file will need to be written and downloaded from your FTP site. This means your FTP account much have read and write permission. You can also set a specific FTP path if you need to do so. Source Elements Source-Connect Pro 3.9 User Guide 41


42 8.6 Using Auto-Restore and Auto-Replace: Details 1. To enable Auto-Restore and Auto-Replace recording on your end, make sure 'restore' and replace is checked in the Settings panel. If your remote contact wishes to record with Auto-Restore/Replace enabled, they should also enable these settings. It is not necessary to both sides to enable restore, only the side which will be recording. Also, you don t need to enable Restore if you just want Replace. 2. Connect to your remote contact over Source-Connect. If Auto-Restore and/or Replace is enabled, you will see a 'Q' icon on your receiving meter, meaning that you can record and receive Auto-Restore and Replace data. Note: sample-rate converting or stereo to mono converting is not supported. You will receive a message and your Q will have a red slash if sample rate and channel count are not the same on both sides. 3. Record the original signal received from Source-Connect. IMPORTANT: If you pass the Source-Connect signal through any filters, reverbs or any other kind of signal processing including changes in volume the file will NOT be restored or replaced. We recommend you use bussing to send the signal from Source-Connect or Source-Connect Link plugin to your record track unaltered. Source-Connect Pro fully supports mono and stereo recordings. 4. If any dropped packets occurred during your recording, the Q Manager will repair your recorded file in the background and send an Instant Message to the IM window of SourceConnect with the status of the file process. You can disable the Instant Message option in the Advanced settings of the Q Manager. Source Elements Source-Connect Pro 3.9 User Guide 42


43 Activating Auto-Replace If the 'replace' option was enabled in Source-Connect, you will be able to easily replace the encoded and decoded recorded audio with the original PCM audio from your remote contact. There are two ways you can replace recorded audio files: per file individually, or all available files at once. Manual Auto-Replace To activate the Auto-Replace process for a single recorded file, simply select the audio file you wish to replace in the Q Requests menu of the Activity panel and select 'Replace Now' from the drop-down menu. The time required to replace the file with the original PCM depends on the size of the file and the available bandwidth. We recommend that you wait until your session is complete before activating the Auto-Replace process, as the process will be much faster and will utilize all your bandwidth without disrupting your Source-Connect session. Auto-Replace all To Auto-Replace all available files at once, select the 'Start Replace process' from the menubar dropdown menu. All available recorded files will be processed, and if your remote contact has not paused transfers, deleted that particular Q Uploads session, or shut down the machine or the Source-Connect Q Manager, you can activate the Auto-Replace process at any time after your session, whether it is an hour later or a week. Source Elements Source-Connect Pro 3.9 User Guide 43
44 8.7. What is Auto-Restore and Auto-Replace? With traditional long-distance recording, whether with Source-Connect, ISDN or any network-based transmission, the send signal is subject to various issues which may cause dropped packets and therefore glitches in your recorded audio. Previously the only method to ensure a fully complete recording was to ensure your connection partner was also recording locally, so you could transfer this audio after your session and manually replace it in your edit. Source-Connect with Q is the only available automated method to ensure that your recordings are perfect every time, with our Auto-Restore functionality. Additionally, with Auto-Replace you can request the original PCM audio and replace the compressed AAC without requiring any additional effort. How does it work? First, an overview of how audio is transferred and recorded over packet-based transmission lines: 1. The audio signal is sent through Source-Connect, and is split into packets. 2. These packets are sent sequentially to your connected partner over the internet. 3. If a network error occurs, a packet may not arrive in time. 4. If this occurs you will hear a minor glitch in the received audio signal. Source Elements Source-Connect Pro 3.9 User Guide 44
45 Source-Connect has built-in error correction modes to try and resolve these dropped packet issues in real time, however under certain circumstances a packet may not be retrieved in time to recover the signal before it is recorded. Auto-Restore resolves this problem by working in the background in non-realtime and restoring your recorded audio files. 5. The audio file is scanned when recording completes. 6. If any missing packets are detected they are requested from your connected partner, who stored them during the connection. 7. Your file is restored and is now available for flawless playback. Auto-Replace Auto-Replace works in a similar way, except the packets which are requested from your connected partner are of the original PCM data which was sent into the Source-Connect plug-in, and instead of only requesting those packets which did not arrive in time, all packets are requested. A complete replacement of the decoded AAC audio is then made with the full resolution PCM audio. An important distinction between Replace and Restore, is that Replace operations will take longer to transfer due to PCM being uncompressed data. Generally we would recommend you activate the Replace process once your session is complete. Source Elements Source-Connect Pro 3.9 User Guide 45

46 8.8. Comprehensive Q Manager interface overview This section is a complete overview of all available options and their functions. Settings panel 1. Status and Login Choose which Login mode to use. If your login details are correct you will see that the Q Manager successfully logs in with Status: Online. The Q Manager will take 5-30 seconds to login, depending on the availability of your FTP service. Source Elements Source-Connect Pro 3.9 User Guide 46
47 2. Session folder Your Session folder is very important you must select the folder you are going to be recording into or the Q Manager will not be able to detect the files to be processed. Choose the Audio Files folder of your Pro Tools session. You can either click the Choose button and find your Audio Files folder in the dialog that pops up, or you can drag the folder from your Finder window. Once you have chosen your Session folder, any newly recorded files will be processed automatically by the Q Manager. If you have existing files that you would like processed, press Rescan All and see your Activity Requests panel for details. This option is useful for when you have existing files in your Audio Files folder which require processing. For example, you may not have restored or replaced your Source-Connect recorded files, or there may have been an error which required a reboot, for example. Rescan all files can also be used to reload a session which contains multiple files for which processing has been delayed for some reason, for example you are using FTP mode and you wish to Replace all files at the end of the day in a batch. 3. Delete all upload session data Each time that you establish a session where your connection partner has selected Restore and/or Replace, Source-Connect will immediately begin storing all session data in compressed and/or PCM form. This can quickly fill a hard drive: at the rate of 56MB per hour for Restore and 700MB per hour for Replace. The Q Manager helps you keep track of your hard drive availability by letting you know when you have less than 20% available. You can choose to delete this stored upload data at any time, and once you have deleted this data your connection partner will not be able to request any Restore or Replace processes. Please ensure that your connection partner has received everything they need before you delete this data. If you choose to delete your session data while connected, your current session will not be deleted. This can be useful if you find you are running out of drive space and cannot reestablish the session. Source Elements Source-Connect Pro 3.9 User Guide 47

48 4. Advanced Additional settings are available under Advanced: Q data folder The default location for the Q data folder where all your upload stored data is saved to is: /Library/Application Support/Source-elements/Q data/ You can choose to store this data in any location, however we strongly suggest that you set this once and leave it. If the Q Manager attempts to send Restore or Replace data to your connection partner, and this folder location has been changed, the process will fail. Send status notifications to Source-Connect IM For each available recorded file in your Audio Files folder, the status of the file can be sent as an IM message to your Source-Connect Instant Messaging panel. This can be useful for quickly monitoring the status of your recorded files. Note that this feature requires that you are logging into Source-Connect as the same username as entered in the Q Manager. For example, if you are logged in as username in the Q Manager, you cannot be logged in as username*b in Source-Connect or you will not receive the IM messages. If this is the case, the next time you login as username into Source-Connect your IM messages will be shown to you. Start with Source-Connect If this is checked, the Q Manager will always launch automatically with Source-Connect. If you are not intending to use the Q Manager in any way, for example you use Source-Connect primarily for bridging, you can disable this option. Source Elements Source-Connect Pro 3.9 User Guide 48
49 5. Q Manager version This shows your installed version of the Q Manager. Source Elements periodically releases updates, so if you are having any issues please contact Support with this information. 6. Shutdown Q Press this to shut down the Q Manager. You can also Quit via the icon on the Dock, or use the File menu. Once the Q Manager is shut down, any requests made to you from your connection partner will not be communicated and they will receive a process error. Source Elements Source-Connect Pro 3.9 User Guide 49

50 8.9 Invalid Q Manager settings and warnings If your Q Manager settings are invalid for some reason, you ll be given a dialog warning. Possible warnings are: Invalid username or password Invalid FTP settings Duplicate login, possibly on different machines Q Manager is unable to connect to the internet Invalid username or password This means that your username and password are incorrectly entered, or your username has not been validated to work with Source-Connect 3.0 and up. If you are sure that your username and password are correct, you can validate your details simply by visiting the Download page on the Source Elements website: elements. com/ downloads Then click on the Download page for your Source-Connect version. The username and password that you are logging into Support with will now be validated to work with the Q Manager Invalid FTP settings This means that you entered either none or incorrect FTP settings in your Network Profile. It is important that you have a valid FTP account, or the Q Manager will not login. Source Elements Source-Connect Pro 3.9 User Guide 50


51 Duplicate login on different machines If you see this error, it means that another computer is currently logged in with your username and password. If you choose to continue the other machine will be logged out. It will get this same message, so be aware that if someone else is seeing this you may have an issue of both of you not being able to login. It can also mean that your computer restarted unexpectedly, and the Q Manager did not manually log out, in which case ignore this message and continue with your login. Q Manager cannot connect to the Internet If the Q Manager cannot connect to the internet, perhaps due to a firewall settings or other network configuration issues, the status will be Offline. Check that your internet connection is working, and if you have a built-in firewall you will need to allow access to the Q Manager and Q Daemon. Source Elements Source-Connect Pro 3.9 User Guide 51

52 8.10 Q Activity panel This panel gives you a full overview of what files are being processed, what the result was, and allows you to fully manage your restore and replace processes. Introduction: What s going on? When you record a file in your Audio Files folder, the Q Manager will analyze the file to determine whether it is suitable for processing. If the recorded file was created with Source-Connect and the Q Manager is set to listen to the Audio Files folder that this file was recorded to, the Q Manager will list it immediately after the recording is completed and, if needed and the settings are at the default, a restore process will take place. Depending on the length of the file, the number of dropped packets, and the available bandwidth, the file can be fully restored within a few seconds. All files are subsequently listed in the Activity panel with the corresponding process status. Source Elements Source-Connect Pro 3.9 User Guide 52

53 Activity panel: Q Requests Q Requests Overview Each time you establish a Source-Connect session, the Q Manager will create a new Session in the Q Requests panel. All files recorded during this particular session will be listed under this session, allowing you to manage your files per connection. A new session is created each time you connect with Source- Connect. File status: Next to the filename will be the status of that file. When the Q Manager first detects a file, it is scanned to see if any restore operations are required. If not, the file status will be Restore not required. Otherwise, the file proceeds to be restored, or if you or the other side has transfers paused, the file will remain Waiting for requested until transfers are resumed. Additionally, if you manually scan a file (see next section) and the audio file was not recorded with Source-Connect the status will be 'Q not present'. File process status: There are two possible processes for files: Restore and/or Replace. Each process can be viewed by clicking on the arrow next to the filename. The status will change according to the stage of the process. When a process is complete the status is done. For each process, a progress bar will show to indicate the process is underway. Depending on the length of the recorded file and the transfer speed between you and the other side, the progress bar can be an indication of how much time the process will take. Note that there are many factors involved and the time required will vary depending on the size, bandwidth and requested process type. Restore processes are generally very fast. For Replace processes a full replacement of the decoded AAC audio is made with the full resolution PCM audio. Thus the transfer of an entire Replace session this may require some time. Source Elements Source-Connect Pro 3.9 User Guide 53
 This option allows you to scan a particular file or files which have not been processed.")
54 Q Requests: Options menu For each file and session, you have additional options available to you via the Options menu. Depending on what you have highlighted, various options will be available to you. File actions: Scan file( s ) This option allows you to scan a particular file or files which have not been processed. This can be useful if there has been a system error and certain file processes have not been completed, or if you have a very large number of files from a previous session and only need to process particular files. This option can also be useful when there are certain errors which result in a newly recorded file not showing up in the Requests menu, for example a Pro Tools CPU error may result in new files remaining undetected. Multiple files can be selected in the File dialog by holding down the Shift or Command keys. Reveal in finder Reveal the highlighted file in the Mac OSX finder Cancel This option is available to use when a file is currently being processed. This option is useful, for example, when you have a very large file which is being processed or a transfer is underway and you prefer to cancel the process. You can restart the process by selecting Restore or Replace now. Source Elements Source-Connect Pro 3.9 User Guide 54
55 Restore now To start the Restore process on an individual file, highlight the file to be processed and select Restore now. If the file has not been restored already, and the other side has not deleted or moved the corresponding data and is online, your file will be restored. Replace now To start the Replace process on an individual file, highlight the file to be processed and select Replace now. If the other side is compatible with the Replace process and has not deleted or moved the corresponding data and is online, your file will be replaced. Transfer actions: These options apply to your overall network transfers, not to individual files. Cancel Cancel all current Request transfers. Any current file transfers underway will be cancelled. You can restart transfers by using the appropriate Restore or Replace option. Session actions: Rename It is highly recommended that you rename the Session name for easier management. You can do this by highlighting the Session name and selecting Rename from the Q Requests Options menu. You can rename the session at any time. Remove from view Over time your Q Requests panel will become full of session data. Once your session is complete and your data transfers are successful, you can remove a session from view. This does not delete existing files or data, it only hides the session. To show a session again, select the Audio Files folder in the Setup panel with Rescan all files selected and Apply. Your session will show up again in the Requests panel. Undo Replace To ensure the integrity of your recorded audio files, the Q Manager allows you the option to undo the Replace process in the event of a corrupted process. NOTE: This option requires that Backup before replace is checked in the Advanced panel. Delete Backup This option deletes the Replace data backup for your highlighted session. Once your session is fully replaced or other processes are completed successfully as required, you can delete the backup to preserve disk space. Remove all from view This is the same as 'Remove from view', however it will remove all visible sessions in your Requests panel. This is a great way to quickly clear the panel. Import If an transfer has failed, or if you choose to have the remote connection partner manually transfer the Q session, use this menu to import that data file, or you can simply drag the data file onto the Activity panel. Source Elements Source-Connect Pro 3.9 User Guide 55

.")
56 Activity panel: Q Uploads Q Uploads Overview If your connected partner is recording and requesting Restore or Replace data, you ll be storing data on your side to enable the Restore and Replace processes. You will see the status of this data storage and any requested transfers in the Q Uploads panel. Each upload process will show a progress bar and the current status. The currently active session will be displayed in blue lettering, for easy viewing. When the upload is completed successfully the status will be Done. The current disk usage is displayed to help you know when you may need to allocate additional resources, or delete the session data from disk (see further in this section). Q Uploads: Options menu For session you have additional options available to you via the Options menu. Rename session For easier session management and later session recognition you can rename the session. Source Elements Source-Connect Pro 3.9 User Guide 56
57 Delete selected session Once your connected partner has successfully completed all required transfers you can delete the Uploads session to preserve disk space. Note that this option is not undoable. It will mean that your connected partner will no longer be able to request any further restore or replace operations. Delete all session data from disk If you know that your recording partner has successful completed all Restore and Replace processes, you can now delete all session data from disk. This will permanently remove all stored data to date. You will be asked to confirm this action. After deleting all data you will see that the disk usage at the bottom of the panel has gone down to a small number. This option is not available to you while currently connected via Source-Connect. The remaining Export options are explained in the following section. Source Elements Source-Connect Pro 3.9 User Guide 57

, the Sending side will see that a Session has been created in the Uploads panel of the Q Manager Activity. Once you disconnect the session is now available to be exported.")
58 Activity panel: Export session options This powerful feature of the Q Manager allows the export of the stored session data from the Sending side. What this means is that if Auto-Restore or Replace fails for any reason, you'll always have a perfect back up of the entire session from the moment you were connected. The session is provided in various formats depending on what method is preferred. Once there are drop-outs (if any!), the Sending side will see that a Session has been created in the Uploads panel of the Q Manager Activity. Once you disconnect the session is now available to be exported. These options are available for all Source-Connect Pro users assuming the Q Manager was correctly configured for both sides while during the connection, i.e. there was no red slash in the Q icon in the Source-Connect connection status. Export MP4 To export the session as an mp4, select the Session name in Q Uploads, and choose 'Export mp4' from the Uploads options menu. Source Elements Source-Connect Pro 3.9 User Guide 58


59 The export helper application will launch, and you will be asked to save the file. By default the filename is the date and time of the session connection. You can rename the file as required. This file can be played in any MP4 player, such as Quicktime or itunes, or it can be imported directly into most editors. You can choose the cancel the export process by hitting the Cancel button. Once the Export is complete you can now play back your complete session without network dropouts, and or FTP this to your connection partner. Export PCM This option is only available for Source-Connect Pro, if the Receiving side has the Replace option for Source-Connect Pro, and the Replace checkbox was enabled for that connection. The same method applies as for Export MP4 above. Source Elements Source-Connect Pro 3.9 User Guide 59


60 Export Restore and Replace Export Restore and Replace is highly useful in case of issues of your connection partner not receiving your data due to network errors or FTP failure. Essentially this is a manual process of transferring the Restore and Replace data, instead of automatically having it transferred by the Q Manager on request. When you are disconnected from your session, select Export Restore or Replace: Restore will export the AAC data and Replace will export the PCM data. The Replace export process will require additional disk space and transfer time. You will be prompted to save the data file: You can now manually transfer this data file to your remote connection partner, by or FTP for example. Source Elements Source-Connect Pro 3.9 User Guide 60

 or orange R icon (for Replace).")
61 Your connection partner will receive this data file and import it by using either the Import option on the Q Requests menu, or dropping the file onto the Requests panel. The Q Manager will import the data: When a Restore or Replace session has been exported and successfully imported, that session will have an green R icon (for Restored) or orange R icon (for Replace). Source Elements Source-Connect Pro 3.9 User Guide 61


62 This indicates that all files for the session have been successfully Restored or Replaced and no more operations are required for this session. Activity panel: Cancel all If a transfer is in process and you need to conserve bandwidth or no longer wish for the process to continue, the Cancel All button will pause all transfers currently in process. You can resume any transfers again at any time, however transfers will be reset so any data that has been uploaded or downloaded will begin again. Source Elements Source-Connect Pro 3.9 User Guide 62

63 Activity: Q Requests Information panel Information about each session, file and transfer process is available by highlighting a line in the Q Requests panel and viewing the info panel underneath the session list. The information available is: Name: Name of the file State: Current status of the file Restored: How many packets (or drops ) were detected and recovered by the restore process Replaced: How many replace pieces are to be transferred and processed Session ID: The session ID used for file management Error: For successful processes the error number is blank. If an error occurred the number will indicate the nature of the error. See Troubleshooting and Error reporting for more information on finding out what the possible errors are and how to resolve them. Duration: Created: Time: Restore: Replace: Duration of the file Date that the file was recorded Time that the file was recorded Whether the restore process is available to you Whether the replace process is available to you Activity: Q Uploads Information panel Similar information about each session transfer process is available by highlighting a line in the Q Uploads panel and viewing the info panel underneath the session list. Source Elements Source-Connect Pro 3.9 User Guide 63

64 Q Menubar options The Q Manager has several functions available to you via the Menubar and also provides a quick glance at what processes are active: Set session folder Use this option to quickly change your Audio Files folder between sessions. After you select the folder the Setup panel will show and you ll need to click on Apply to save the new folder setting. Q Requests This shows all files available for restore and replace and the total overall percentage processed. Start Replace process This option is only available to you via this menu: it will start the replace process for all available files in your Q Requests menu. Note this may take some time if you have a large number of files. Individual or all processes can be cancelled as needed via the Q Requests option menu. Show Activity / Settings panel Open the Activity or Settings panel. Source Elements Source-Connect Pro 3.9 User Guide 64

65 Q Manager Menu options The Q Manager menu offers a Clean up process. Over time your sessions, while being removed from view, may cause your Q Manager database to become very large. Cleaning up your database is recommended once in awhile, you will be warned if your disk usage is less than 20% on the Q Manager by a red bold text notification. Simply choose Clean up from your Q Manager menu and any sessions no longer in view in your Activity panel will be permanently removed. Source Elements Source-Connect Pro 3.9 User Guide 65


66 8.11. Troubleshooting Auto-Restore and Replace For each file and process there is a status. For successful files the status will be Restored or Replaced depending on the type of process last completed. If you see that the status for a file, or files, is Failed to restore or Failed to replace it means that either you or your connection partner has invalid settings or a component is not properly installed or configured. There are various reasons as to why a file may fail to replace or restore. To find out the exact reason for a failed process, select the file in the Q Requests panel: Now, look at the error code message to the very bottom: For example, this error tells us that the Q Manager was quit before the process could be completed. To resolve this, simply restart the process. Q Manager errors are rare, and generally mean that the other side is offline, or has moved or deleted the Q data. Contact support with any specific questions, we will be able to provide detailed information on a case-by-case basis. Source Elements Source-Connect Pro 3.9 User Guide 66
67 8.12 Common Q Manager issues A comprehensive guide is available online: elements. com/ support/ q The following are common reasons why Auto-Restore and Auto-Replace may fail. Verify the following: 1. Check that Q is enabled. You should have a Q icon to the left of your Source-Connect receiving meter if you are the recording end, and on the Sending meter if you are the sending end. Verify that the Restore and/or Replace checkboxes are checked in the Source-Connect Pro Settings panel before establishing a connection. 2. It is important that you do not have any audio plug-ins or volume level changes between the signal from Source-Connect and your record channel. You must have both the Source-Connect Link aux track and your record track set to 0dB or the Q Manager will not be able to process your files, and you cannot insert any other plug-ins between Source-Connect and your record track. 3. Pro Tools errors, for example CPU errors, may cause the Q Manager to not detect the file. If this is the case, reapply the Q Manager with Rescan all files selected or select Scan file(s) from the Q Requests menu in the Activity panel. 4. Verify your Q Manager settings: Your username and password should be correctly entered Ensure that you have selected the correct Audio Files folder for your current Pro Tools session Ensure that your FTP settings are correct and accessible to the Q Manager. 5. Q Manager should be launched: make sure you can view the Q Manager via the MenuBar icon. NOTE: Files which are recorded with Source-Connect when the Q Manager is not launched can be later processed by rescanning the Audio Files directory. 6. Files should be recorded while Source-Connect session was established. Files recorded when Source-Connect is not established will not appear for processing in the Q Manager. 7. Sample-rate converting is not supported. Verify your connection is not sample-rate converting. Source Elements Source-Connect Pro 3.9 User Guide 67
68 9. Source-Stream: Firewall & Network traversal This section explains what Source-Stream is, and how to use it for two purposes: achieving a connection when you are behind a strict firewall or complicated network, and making a long-distance connection over the Public Internet. To use Source-Stream, you will need a compatible version of Source-Connect Pro or Pro X, version 3.9 or higher. 9.1 What is Source-Stream? Source-Stream will relay traffic for you using the best possible network path available between servers. You and your connection partner may choose to be on the same server, if this is the nearest for you both, or you may choose different servers to manage your traffic as it crosses the globe. For example, if you are in Australia and your connection partner is in Paris, you may choose to use the Singapore service while your partner uses the UK service. If both of you are on mainland Europe, you would both use the UK service. Or similarly, if both of you are on the West Coast of the U.S, both of you use the West Coast service. The idea is to connect to the service closest to you and use it like a kind of direct portal to your destination. 9.2 Setting up Source-Stream Visit the Source-Connect settings panel on your Dashboard. The Source-Stream panel will only be available to you if you have a license for the support versions, and have a current Support contract. Source Elements Source-Connect Pro 3.9 User Guide 68
69 10. Troubleshooting and known issues 10.1 Troubleshooting The Support section of the website provides much more detail on troubleshooting. Most issues are network related, you should follow the Network Guide: elements. com/ support/ networkguide A quick overview of common issues follows: Low audio quality, many artifacts Try to reduce your bitrate and increase the buffer size. You may also be experiencing hardware issues: for example, check that your hardware matches your session sample-rate and try increasing your hardware playback buffer size. Audio is clicking on a regular basis: Because Source-Connect 3.9 is outside of Pro Tools and has a low processor footprint, you should not see any CPU-related recording issues. Most Pro Tools HD issues are related to clock source inconsistencies. Verify that your clock is set correctly, and that the Mac s I/O is set up to sync with the correct clock source. The clock source settings can be found under the Audio Midi Setup application in Applications->Utilities. Automatically disconnected, Connection reset by peer dialogue There may be severe network congestion occurring. This can happen if you are inside a LAN where many other users are downloading and uploading large files. Reduce your bitrate, increase the buffer size and reconnect. User has suddenly gone offline In the event of an unexpected disconnect, due to hardware, software or network failure, your remote user may not re-appear until the server has recognised that they have timed-out. This can take up to 60 seconds. To expedite the process of the server recognising that a user has inadvertently logged out, users can log out and log back in. See the following section on Known Issues for additional information. Source Elements Source-Connect Pro 3.9 User Guide 69
 also require additional resources we recommend running Source-Connect on newer machines.")
70 10.2 Known Issues Unsupported Pro Tools versions: The Q Manager with Auto-Restore and Replace is not available for any Pro Tools 6 version. CPU speed / RAM configurations: Because USB devices (for example, if you are using an Mbox for your audio I/O) also require additional resources we recommend running Source-Connect on newer machines. If your computer is configured with insufficient resources, you may experience difficulty while reading and writing to disk, and your DAW may tell you that you have insufficient resources. It is not recommended that you connect your audio devices via a USB hub unless the hub is selfpowered. Network bandwidth: The most common cause of difficulty is insufficient network resources. Assuming your network has sufficient bandwidth the issue may be due to internal congestion, for example an FTP server is running or other people are heavily using the network. A common fix for this is to install a dedicated DSL line, or apply QoS ( Quality of Service ) settings on the router. For further details and tools see the Support section online or contact Support Integrated debugging with Support Source-Connect 3.9 comes with a new integrated debugging method to send connection information to Support when requested. To send a debug session, click on the Help menu and choose Start debug session. Once the issue has been reproduced, click on Stop debug session. After a few seconds your Support person will be provided with the following information: Source Elements Source-Connect Pro 3.9 User Guide 70
Source-Connect Pro 3.8 User Guide
 Source-Connect Pro 3.8 User Guide 1 Table of Contents 1. Introducing Source-Connect 1.1 About Source-Connect 1.2 What s new in Source-Connect Pro 3.8? 2. Installation 2.1 System requirements 2.2 Network
Source-Connect Standard 3.8 User Guide
 Source-Connect Standard 3.8 User Guide Source Elements 2005-2014 Source-Connect 3.8 User Guide 1 1. Introducing Source-Connect Source-Connect Standard 3.8 is a standalone application for Mac OSX 10.7 10.10
32 Lives V2. 32-Bit to 64-Bit Plug-Ins Adapter. User Manual v Sound Radix Ltd. All Rights Reserved
 32 Lives V2 32-Bit to 64-Bit Plug-Ins Adapter User Manual v2.0 1 Overview 32 Lives is a 32-bit to 64-bit Audio Units and VST2 plug-ins adapter. It enables legacy 32-bit plug-ins to run transparently in
THE PLAY 5 SYSTEM RELEASE NOTES & INSTALLATION GUIDE
 THE PLAY 5 SYSTEM RELEASE NOTES & INSTALLATION GUIDE EASTWEST SOUNDS Welcome to the PLAY 5 System! Whether this is your first experience with the PLAY System, or you re upgrading from a previous version,
Workshare Desktop App. User Guide
 Workshare Desktop App User Guide February 2018 Workshare Desktop App User Guide Table of Contents Introducing the Workshare Desktop App...4 What is the Desktop App?... 5 Key features of the Workshare desktop
Pro Tools LE 7.1 on Macintosh for Pro Tools LE Systems on Mac OS X 10.4 ( Tiger ) Only
 Only") Read Me Pro Tools LE 7.1 on Macintosh for Pro Tools LE Systems on Mac OS X 10.4 ( Tiger ) Only Introduction This Read Me documents compatibility details, known issues, error codes, and corrections to the
Read Me Pro Tools LE 7.1 on Macintosh for Pro Tools LE Systems on Mac OS X 10.4 ( Tiger ) Only Introduction This Read Me documents compatibility details, known issues, error codes, and corrections to the
Pro Tools LE on Mac for Pro Tools LE Systems on Mac OS X 10.4 ( Tiger ) Only
 Only") Read Me Pro Tools LE 7.1.1 on Mac for Pro Tools LE Systems on Mac OS X 10.4 ( Tiger ) Only Introduction This Read Me documents compatibility details, known issues, error codes, and corrections to the guides
Read Me Pro Tools LE 7.1.1 on Mac for Pro Tools LE Systems on Mac OS X 10.4 ( Tiger ) Only Introduction This Read Me documents compatibility details, known issues, error codes, and corrections to the guides
Pro Tools LE 7.1.2r2 on Mac for Pro Tools LE Systems on Mac OS X 10.4 ( Tiger ) Only
 Only") Read Me Pro Tools LE 7.1.2r2 on Mac for Pro Tools LE Systems on Mac OS X 10.4 ( Tiger ) Only Introduction This Read Me documents compatibility details, known issues, error codes, and corrections to the
Read Me Pro Tools LE 7.1.2r2 on Mac for Pro Tools LE Systems on Mac OS X 10.4 ( Tiger ) Only Introduction This Read Me documents compatibility details, known issues, error codes, and corrections to the
The Administration Tab - Diagnostics
 The Administration Tab - Diagnostics The diagnostic tests (Ping and Traceroute) allow you to check the connections of your network components. Ping Test. The Ping test will check the status of a connection.
Avid Pro Tools LE 6.5 on Windows XP
 Read Me Avid Pro Tools LE 6.5 on Windows XP This Read Me documents compatibility details, known issues, and guide addenda for Avid Pro Tools LE 6.5 systems on Windows. Compatability Digidesign can only
Intel Unite Solution. Small Business User Guide
 Intel Unite Solution Small Business User Guide March 2017 Legal Disclaimers & Copyrights All information provided here is subject to change without notice. Contact your Intel representative to obtain the
Pro Tools LE 7.0 on Macintosh for Pro Tools LE Systems on Mac OS X 10.4 ( Tiger ) Only
 Only") Read Me Pro Tools LE 7.0 on Macintosh for Pro Tools LE Systems on Mac OS X 10.4 ( Tiger ) Only Introduction This Read Me documents compatibility details, known issues, error codes, and corrections to the
Read Me Pro Tools LE 7.0 on Macintosh for Pro Tools LE Systems on Mac OS X 10.4 ( Tiger ) Only Introduction This Read Me documents compatibility details, known issues, error codes, and corrections to the
DSS User Guide. End User Guide. - i -
 DSS User Guide End User Guide - i - DSS User Guide Table of Contents End User Guide... 1 Table of Contents... 2 Part 1: Getting Started... 1 How to Log in to the Web Portal... 1 How to Manage Account Settings...
Videon Product Manual
 Videon Product Manual Greylock and Sorona Encoders/Decoders Document Number 10004134-R06 Copyright 2018 Videon Central, Inc. All rights reserved. No part of this publication may be reproduced, distributed,
Pro Tools M-Powered 7.1 on Macintosh
 Read Me Pro Tools M-Powered 7.1 on Macintosh Introduction This Read Me documents compatibility details, known issues, error codes, and corrections to the guides for Pro Tools M-Powered 7.1 on Digidesign-qualified
Agent and Agent Browser. Updated Friday, January 26, Autotask Corporation
 Agent and Agent Browser Updated Friday, January 26, 2018 2018 Autotask Corporation Table of Contents Table of Contents 2 The AEM Agent and Agent Browser 3 AEM Agent 5 Privacy Mode 9 Agent Browser 11 Agent
CL series Live Recording with Nuendo Live. Using Steinberg Nuendo Live
 CL series Live Recording with Nuendo Live Using Steinberg Nuendo Live 2nd Edition: April 2013 Summary: This guide will show how quick and easy it is to achieve a high quality, live multi-track recording
AT&T Core Mobility Integrated Dispatch Console User Guide. Installation Guide. AT&T Integrated Dispatch Console 3.0
 Installation Guide AT&T Integrated Dispatch Console 3.0 October 2016 Table of Content 1. Introduction... 3 1.1. Purpose and Scope... 3 1.2. Terms and Definitions... 3 1.3. About this Manual... 5 1.4. What
The Ultimate DAW Plugin Manager
 1 The Ultimate DAW Plugin Manager Quick Start Guide for the OSX platform P a g e 1 32 2 Contents Section 1 - Introduction Section 2 - Quick Start Section 3 - Installation Section 4 - Registering UDPM Section
WAVES. MultiRack SETUP GUIDE V9.80
 WAVES MultiRack SETUP GUIDE V9.80 1 Table of Contents 1. Overview... 3 2. Basic Requirements... 3 3. Software... 4 4. Required Waves Licenses... 4 5. Installing MultiRack... 5 MultiRack Native/SoundGrid
Cisco Unified CME Telephony Service Provider 2.1 Setup Guide
 Cisco Unified CME Telephony Service Provider 2.1 Setup Guide Revised: January 12, 2007 Introduction Cisco Unified Communications Manager Express (Cisco Unified CME, formerly known as Cisco Unified CallManager
ipass Open Mobile 2.8.x for Android Quick Start Guide
 ipass Open Mobile 2.8.x for Android Quick Start Guide V E R S I O N 1. 1, S E P T E M B E R 2013 Corporate Headquarters ipass Inc. 3800 Bridge Parkway Redwood Shores, CA 94065 USA www.ipass.com +1 650-232-4100
Broadband Router DC-202. User's Guide
 Broadband Router DC-202 User's Guide Table of Contents CHAPTER 1 INTRODUCTION... 1 Broadband Router Features... 1 Package Contents... 3 Physical Details...3 CHAPTER 2 INSTALLATION... 5 Requirements...
Pro Tools M-Powered 7.0 on Macintosh
 Read Me Pro Tools M-Powered 7.0 on Macintosh Introduction This Read Me documents compatibility details, known issues, error codes, and corrections to the guides for Pro Tools M-Powered 7.0 on Digidesign-qualified
Apogee Quartet. QuickStart Guide
 Apogee Quartet QuickStart Guide V1, September, 2012 Contents Overview! 3 Introduction! 3 Package contents! 4 Quartet panel tour! 5 Display and touchpad tour! 7 Connecting to your Mac! 8 Adjusting Input
32 Lives 32 Bit to 64 Bit AU Adapter User Manual
 32 Lives 32 Bit to 64 Bit AU Adapter User Manual 1 Overview 32 Lives is a 32 bit to 64 bit Audio Units plug ins adapter, and is compatible with virtually all 64 bit Audio Units host applications. In July
Sonicwall NSA240 / TZ210 Configuration Guide (Firmware: SonicOS Enhanced o & up)
") Sonicwall Configuration Guide v1.0 Sonicwall NSA240 / TZ210 Configuration Guide (Firmware: SonicOS Enhanced 5.8.1.1-35o & up) 169 Saxony Road, Suite 212 Encinitas, CA 92024 Phone & Fax: (800) 477-1477
Sonicwall Configuration Guide v1.0 Sonicwall NSA240 / TZ210 Configuration Guide (Firmware: SonicOS Enhanced 5.8.1.1-35o & up) 169 Saxony Road, Suite 212 Encinitas, CA 92024 Phone & Fax: (800) 477-1477
Getting Started with your vtalk
 Welcome Congratulations on purchasing a vtalk! We re glad to have you as part of the vtalk family. This guide will run you through how to setup your vtalk and get your business running in no time at all.
LifeSize Gateway User Guide
 LifeSize Gateway User Guide March 2008 Copyright Notice 2008 LifeSize Communications Inc, and its licensors. All rights reserved. LifeSize Communications has made every effort to ensure that the information
Videon Product Manual. Shavano Encoder
 Videon Product Manual Shavano Encoder Copyright 2018 Videon Central, Inc. All rights reserved. No part of this publication may be reproduced, distributed, or transmitted in any form or by any means, including
Voic Plus User Guide
 Voicemail Plus User Guide Version: 2.0_CA Revised: 25 September 2007 Notices Copyright 2007 Vonage. All rights reserved. No part of this documentation may be reproduced in any form or by any means or used
NetTalk Internet Phone Service Trouble Shooting Guide & User Tips
 NetTalk Internet Phone Service Trouble Shooting Guide & User Tips Section 1: Trouble Shooting Guide... 2 1.1. What should I do if I cannot login or connect to NetTalk Internet Phone Service?... 2 1.2.
PMS 138 C Moto Black spine width spine width 100% 100%
 Series MOTOROLA and the Stylized M Logo are registered in the US Patent & Trademark Office. All other product or service names are the property of their respective owners. 2009 Motorola, Inc. Table of
INSTRUCTION MANUAL BreakingSecurity.net. Revision Remcos v2.3.0
 INSTRUCTION MANUAL Revision 14 -- Remcos v2.3.0 2019 BreakingSecurity.net 1 TABLE OF CONTENTS CHAPTER 1: INTRODUCTION TO REMCOS... 3 USAGE CASES... 3 COMPATIBILITY & DEVELOPMENT... 3 STRUCTURE... 4 CHAPTER
CHAPTER 7 ADVANCED ADMINISTRATION PC
 ii Table of Contents CHAPTER 1 INTRODUCTION... 1 Broadband ADSL Router Features... 1 Package Contents... 3 Physical Details... 4 CHAPTER 2 INSTALLATION... 6 Requirements... 6 Procedure... 6 CHAPTER 3 SETUP...
Troubleshooting Web Inbox
 , page 1 Introduction The Web Inbox application provides access to voice messages and receipts stored on the Cisco Unity Connection server. The Web Inbox enables users to play, compose, reply to or forward,
Troubleshooting Cisco IP Communicator
 CHAPTER 8 Troubleshooting Cisco IP Communicator This chapter provides information that can help you troubleshoot problems with Cisco IP Communicator. For additional troubleshooting information, refer to
ipass Open Mobile 2.10.x for Android Quick Start Guide
 ipass Open Mobile 2.10.x for Android Quick Start Guide V E R S I O N 1. 0, MAY 2 0 1 4 Corporate Headquarters ipass Inc. 3800 Bridge Parkway Redwood Shores, CA 94065 USA www.ipass.com +1 650-232-4100 +1
Access Gateway Client User's Guide
 Sysgem Access Gateway Access Gateway Client User's Guide Sysgem AG Sysgem is a trademark of Sysgem AG. Other brands and products are registered trademarks of their respective holders. 2013-2015 Sysgem
ACN DIGITAL PHONE SERVICE (DPS) USER GUIDE
 USER GUIDE") ACN DIGITAL PHONE SERVICE (DPS) USER GUIDE Using your phone adaptor and calling from home General Guidelines 1. What do I need before I can use the ACN Digital Phone Service (DPS)? Customers will need
ACN DIGITAL PHONE SERVICE (DPS) USER GUIDE Using your phone adaptor and calling from home General Guidelines 1. What do I need before I can use the ACN Digital Phone Service (DPS)? Customers will need
Yealink VCS Network Deployment Solution
 Yealink VCS Network Deployment Solution Oct. 2015 V10.6 Yealink Network Deployment Solution Table of Contents Table of Contents... iii Network Requirements... 1 Bandwidth Requirements... 1 Calculating
Hamachi User Guide April 2007 Copyright 2007 LogMeIn, Inc. All rights reserved. For support or other feedback, contact
 April 2007 Copyright 2007 LogMeIn, Inc. All rights reserved. For support or other feedback, contact support@logmein.com This guide is based on the Hamachi 1.0.2.1 version and is for machines running the
Editor/Plug-In Editor Manual
 Editor/Plug-In Editor Manual E Table of Contents Introduction... 1 Main features...1 Please note before use...1 M50 Editor and M50 Plug-In Editor operating requirements...1 Installation... Installation
Wireless-G Router User s Guide
 Wireless-G Router User s Guide 1 Table of Contents Chapter 1: Introduction Installing Your Router System Requirements Installation Instructions Chapter 2: Preparing Your Network Preparing Your Network
SASKTEL INTEGRATED BUSINESS COMMUNICATIONS (IBC)
") SASKTEL INTEGRATED BUSINESS COMMUNICATIONS (IBC) DESKTOP CLIENT USER GUIDE Version 4 January 2018 TABLE OF CONTENTS About the SaskTel IBC Desktop Client...3 Requirements...3 How to download and install
SASKTEL INTEGRATED BUSINESS COMMUNICATIONS (IBC) DESKTOP CLIENT USER GUIDE Version 4 January 2018 TABLE OF CONTENTS About the SaskTel IBC Desktop Client...3 Requirements...3 How to download and install
OPC UA Configuration Manager Help 2010 Kepware Technologies
 OPC UA Configuration Manager Help 2010 Kepware Technologies 1 OPC UA Configuration Manager Help Table of Contents 1 Getting Started... 2 Help Contents... 2 Overview... 2 Server Settings... 2 2 OPC UA Configuration...
DANTE CERTIFICATION PROGRAM LEVEL 2
 DANTE CERTIFICATION PROGRAM LEVEL 2 THE DANTE CERTIFICATION PROGRAM Level 2: Intermediate Dante Concepts Delivered in-person Larger systems (approx. 12 devices) Clocking options Understanding unicast &
ACCESS 4.0 Addendum. Product Manual
 ACCESS 4.0 Addendum Product Manual ACCESS 4.0 Firmware addendum The ACCESS manual describes operation of firmware 3.x. Firmware 4.x adds significant new features and changes the default behavior of the
Privileged Remote Access Failover Configuration
 Privileged Remote Access Failover Configuration 2003-2018 BeyondTrust, Inc. All Rights Reserved. BEYONDTRUST, its logo, and JUMP are trademarks of BeyondTrust, Inc. Other trademarks are the property of
ForeScout CounterACT Resiliency Solutions
 ForeScout CounterACT Resiliency Solutions User Guide CounterACT Version 7.0.0 About CounterACT Resiliency Solutions Table of Contents About CounterACT Resiliency Solutions... 5 Comparison of Resiliency
Broadband Router DC 202
 Broadband Router DC 202 Full Manual Table of Contents DC-202 xdsl/cable Broadband router REQUIREMENTS...4 INTRODUCTION...4 DC-202 Features...4 Internet Access Features...4 Advanced Internet Functions...5
Accessing CharityMaster data from another location
 Accessing CharityMaster data from another location When all of your computers are on the same Local Area Network (LAN), you can place the back end files (including your data and the Word templates) onto
LevelOne FBR User s Manual. 1W, 4L 10/100 Mbps ADSL Router. Ver
 LevelOne FBR-1416 1W, 4L 10/100 Mbps ADSL Router User s Manual Ver 1.00-0510 Table of Contents CHAPTER 1 INTRODUCTION... 1 FBR-1416 Features... 1 Package Contents... 3 Physical Details... 3 CHAPTER 2
Wimba Pronto. Version 2.0. User Guide
 Wimba Pronto Version 2.0 User Guide Wimba Pronto 2.0 User Guide Welcome to Wimba Pronto 1 What's New in Wimba Pronto 2.0 2 Getting Started 3 Wimba Pronto System Requirements 3 Creating a New Wimba Pronto
3. Suggested Use and Configurations Multiple Computers with a Single DiGiGrid M... 11
 D Table of Contents Introduction...4 1. GETTING STARTED...5 1.1 System Requirements...5 1.2 Registration...5 1.3 Software Installation...5 1.4 Licenses...6 2. Hardware...7 3. Suggested Use and Configurations...8
Waves. MultiRack SoundGrid V9. Outboard Processing Host for Your DiGiCo Console
 Waves MultiRack SoundGrid V9 Outboard Processing Host for Your DiGiCo Console Contents The Rack in Detail... 3 Adding Plugins to a Rack... 6 Rack View: Controlling Your Plug-ins... 7 WaveSystem Toolbar
and close the various Traktor Panels. Setup: click on the setup icon to open the setup dialog. Close: clicking this icon will close TRAKTOR DJ Studio.
 Welcome... TRAKTOR DJ Studio 2 Quick Reference...to TRAKTOR DJ Studio 2, the latest and most advanced version of the software that changed the way DJs think about computers. We ve introduced a number of
CONNECT TROUBLESHOOTING GUIDE. dspec and Resyn. Troubleshoot connections between dspec and Resyn.
 CONNECT TROUBLESHOOTING GUIDE dspec and Resyn Troubleshoot connections between dspec and Resyn. Page 2 Table of Contents dspec and Resyn Network Overview... 3 Direct... 3 Indirect... 3 Remote... 3 Network
Transport Gateway Installation / Registration / Configuration
 CHAPTER 4 Transport Gateway Installation / Registration / Configuration This chapter covers the following areas: Transport Gateway requirements. Security Considerations When Using a Transport Gateway.
Using the Cable Monitor Tool
 APPENDIX B This appendix describes the Cisco ubr905 and Cisco ubr925 cable access routers Cable Monitor tool. The Cable Monitor is part of the router s onboard software that provides a web-based diagnostic
Server Edition USER MANUAL. For Microsoft Windows
 Server Edition USER MANUAL For Microsoft Windows Copyright Notice & Proprietary Information Redstor Limited, 2016. All rights reserved. Trademarks - Microsoft, Windows, Microsoft Windows, Microsoft Windows
PSEG SSL VPN USER GUIDE
 PSEG SSL VPN USER GUIDE FOR NON-CORPORATE PCs (Windows 7, Vista, XP, and MAC OS X) TABLE OF CONTENTS QUICK CONNECT TO SSL VPN... 1 Connect to SSL VPN... 1 Disconnect from SSL VPN... 1 FIRST TIME USER SETUP...
AT&T Collaborate TM. Network Assessment Tool
 AT&T Collaborate TM Network Assessment Tool 2016 AT&T Intellectual Property. All rights reserved. AT&T, Globe logo, Mobilizing Your World and DIRECTV are registered trademarks and service marks of AT&T
Document authored by: Native Instruments GmbH Software version: (02/2013)
") Setup Guide Disclaimer The information in this document is subject to change without notice and does not represent a commitment on the part of Native Instruments GmbH. The software described by this document
Setup Guide Disclaimer The information in this document is subject to change without notice and does not represent a commitment on the part of Native Instruments GmbH. The software described by this document
Sonnox Oxford SuprEsser & SuprEsser DS
 Sonnox Oxford SuprEsser & SuprEsser DS Release Notes MAC AAX DSP (SuprEsser DS) v2.0.7 Sonnox Toolbar factory presets missing in v2.0.6 - Fixed Installer Filename: PTXSUPM5-160519.zip Release Date: 19/05/16
Transport and Security Specification
 Transport and Security Specification 15 November 2017 Version: 6.3 Contents Overview 3 Standard network requirements 3 Source and Destination Ports 3 Configuring the Connection Wizard 4 Private Bloomberg
OPC UA Configuration Manager PTC Inc. All Rights Reserved.
 2017 PTC Inc. All Rights Reserved. 2 Table of Contents 1 Table of Contents 2 4 Overview 4 5 Project Properties - OPC UA 5 Server Endpoints 7 Trusted Clients 9 Discovery Servers 10 Trusted Servers 11 Instance
Server Edition USER MANUAL. For Mac OS X
 Server Edition USER MANUAL For Mac OS X Copyright Notice & Proprietary Information Redstor Limited, 2016. All rights reserved. Trademarks - Mac, Leopard, Snow Leopard, Lion and Mountain Lion are registered
Soundtheory Gullfoss Change Log
 Soundtheory Gullfoss Change Log Known issues (2018-12-07) None v1.2.6 (2018-12-16) Fixed an issue with certain hosts that could cause Gullfoss to not process audio. v1.2.5 (2018-12-07) Fixed an issue with
IP Camera User Manual
 Statement IP Camera User Manual If the user manual cannot help you to solve the problem, please call our technology center about the solutions. We will update the content for the new functions without
End User Manual. December 2014 V1.0
 End User Manual December 2014 V1.0 Contents Getting Started... 4 How to Log into the Web Portal... 5 How to Manage Account Settings... 6 The Web Portal... 8 How to Upload Files in the Web Portal... 9 How
The Connector. Version 1.2 Microsoft Project to Atlassian JIRA Connectivity. User Manual
 The Connector Version 1.2 Microsoft Project to Atlassian JIRA Connectivity User Manual Ecliptic Technologies, Inc. Copyright 2008 www.the-connector.com Page 1 of 86 Copyright and Disclaimer All rights
Sabre Customer Virtual Private Network Launcher (SCVPNLauncher)
") Sabre Customer Virtual Private Network Launcher (SCVPNLauncher) User s Guide Sabre Travel Network This document provides detailed information for the install/uninstall, operation, configuration and troubleshooting
Sabre Customer Virtual Private Network Launcher (SCVPNLauncher) User s Guide Sabre Travel Network This document provides detailed information for the install/uninstall, operation, configuration and troubleshooting
Broadband Router. with 2 Phone Ports WIRED. Installation and Troubleshooting Guide RT31P2. A Division of Cisco Systems, Inc. Model No.
 A Division of Cisco Systems, Inc. Broadband Router with 2 Phone Ports WIRED Installation and Troubleshooting Guide Model No. RT31P2 Copyright and Trademarks Specifications are subject to change without
For the latest compatibility information, visit the Avid website (
 Read Me Audio Plug-Ins Version 10.1 This Read Me documents important information and known issues for using Avid and Avid-distributed audio plug-ins with Pro Tools HD 10.1 software running on Avid HDX
WAVES. MultiRack SETUP GUIDE V9.7
 WAVES MultiRack SETUP GUIDE V9.7 1 Table of Contents 1. Overview... 3 2. Basic Requirements... 3 3. Software... 4 4. Required Waves Licenses... 4 5. Installing MultiRack... 5 MultiRack Native/SoundGrid
AEQ FORUM VIRTUAL USER S MANUAL ED. 03/15 Firmware Version: PBA Base CPU v1.65 or higher Software Version: AEQ FORUM VIRTUAL v1.
 USER S MANUAL ED. 03/15 V. 1.2-03/10/2016 Firmware Version: Software Version: PBA Base CPU v1.65 or higher v1.30 or higher CONTENTS 1. INSTALLING AND RUNNING THE APPLICATION.... 3 1.1. Installation. System
PROMISE ARRAY MANAGEMENT ( PAM) USER MANUAL
 USER MANUAL") PROMISE ARRAY MANAGEMENT ( PAM) USER MANUAL Copyright 2002, Promise Technology, Inc. Copyright by Promise Technology, Inc. (Promise Technology). No part of this manual may be reproduced or transmitted
PROMISE ARRAY MANAGEMENT ( PAM) USER MANUAL Copyright 2002, Promise Technology, Inc. Copyright by Promise Technology, Inc. (Promise Technology). No part of this manual may be reproduced or transmitted
Defining IPsec Networks and Customers
 CHAPTER 4 Defining the IPsec Network Elements In this product, a VPN network is a unique group of targets; a target can be a member of only one network. Thus, a VPN network allows a provider to partition
Atmosphere / Trilogy Intel Mac Wrappers
 Atmosphere / Trilogy Intel Mac Wrappers Table Of Contents Introduction What Does It Do & How Does It Work? Instructions Tutorial Videos How To Authorize Wrapper Features Song Compatibility Editing Sounds
FM 4/100 USB Software for OSX
 FM 4/100 USB Software for OSX JLCooper makes no warranties, express or implied, regarding this software s fitness for a particular purpose, and in no event shall JLCooper Electronics be liable for incidental
2757 VoIP Phone Users Guide
 2757 VoIP Phone Users Guide Rev. 1.0 Table of Contents 1 Introduction... 5 1.1 Package Contents... 5 1.2 Features... 5 1.3 Basic Setup... 6 2 Network Setup... 8 2.1 Static IP Address... 8 2-2 PPPoE...11
Configuration Manager
 CHAPTER 7 This chapter describes how to perform routine Cisco VXC Manager configuration management tasks using the Administrator Console. It provides information on managing the configuration settings
Barracuda Link Balancer
 Barracuda Networks Technical Documentation Barracuda Link Balancer Administrator s Guide Version 2.3 RECLAIM YOUR NETWORK Copyright Notice Copyright 2004-2011, Barracuda Networks www.barracuda.com v2.3-111215-01-1215
VI. Corente Services Client
 VI. Corente Services Client Corente Release 9.1 Manual 9.1.1 Copyright 2014, Oracle and/or its affiliates. All rights reserved. Table of Contents Preface... 5 I. Introduction... 6 II. Corente Client Configuration...
ipass Open Mobile 3.1.x for Android Quick Start Guide
 ipass Open Mobile 3.1.x for Android Quick Start Guide V E R S I O N 1. 0, J A N U A R Y 2 0 1 5 Corporate Headquarters ipass Inc. 3800 Bridge Parkway Redwood Shores, CA 94065 USA www.ipass.com +1 650-232-4100
Prophet '08 PlugSE Editor
 Prophet '08 PlugSE Editor SoundTower PlugSE for Prophet 08 Synthesizer VST (PC/Mac) AudioUnits (Mac) SoundEditor, PlugSE, and ipad Products Reach Inside... SoundTower Inc. 2012 www.soundtower.com Special
Oracle Beehive. Before Using Oracle Beehive Client and Communicator. Using BlackBerry with Oracle Beehive Release 2 ( )
") Oracle Beehive Using BlackBerry with Oracle Beehive Release 2 (2.0.1.6) November 2011 Document updated November 4, 2011 This document describes how to access Oracle Beehive from your RIM BlackBerry device
Oracle Beehive Using BlackBerry with Oracle Beehive Release 2 (2.0.1.6) November 2011 Document updated November 4, 2011 This document describes how to access Oracle Beehive from your RIM BlackBerry device
Technical Notes for Ocularis 4.0
 The purpose of this document is to provide technical details for various new features in the Ocularis 4.0 release. Topics in this Document Ocularis Mix and Match Architecture... 1 Ocularis Critical Camera
Troubleshooting Tips for the PMC Application
 CHAPTER5 Troubleshooting Tips for the PMC Application This chapter provides information about basic troubleshooting tips and error messages that you may encounter when you use the PMC application. This
Viewing System Status, page 404. Backing Up and Restoring a Configuration, page 416. Managing Certificates for Authentication, page 418
 This chapter describes how to maintain the configuration and firmware, reboot or reset the security appliance, manage the security license and digital certificates, and configure other features to help
MagicInfo VideoWall Author
 MagicInfo VideoWall Author MagicInfo VideoWall Author User Guide MagicInfo VideoWall Author is a program designed to construct a VideoWall layout and create VideoWall content by adding various elements
Installation Guide. Cimatron Site Manager 2.0 Release Note
 Installation Guide Cimatron Site Manager 2.0 Release Note Installation Guide i Table of Contents Introduction... 1 Cimatron Site Manager Components... 2 Installation... 3 Hardware Requirements... 3 Software
3. Suggested Uses And Configurations Adding More I/Os to Your System Multiple Computers with a Single DiGiGrid Q...
 Table of Contents Introduction...4 1. Getting Started...5 1.1 System Requirements...5 1.2 Registration...5 1.3 Software Installation...5 1.4 Licenses...6 2. HARDWARE...7 2.1 Monitoring options...8 3. Suggested
Source Control: Perforce
 USER GUIDE MADCAP LINGO 10.1 Source Control: Perforce Copyright 2018 MadCap Software. All rights reserved. Information in this document is subject to change without notice. The software described in this
Digital Video Surveillance Center Management Software
 Digital Video Surveillance Center Management Software NVClient User Manual Revision: V3.2 Updated: 12-2011 Contents Chapter I General...- 3-1.1 INTRODUCTION... - 3-1.2 MAIN FUNCTIONS... - 3 - Chapter II
The Applications and Gaming Tab - Port Range Forward
 The Applications and Gaming Tab - Port Range Forward The Applications and Gaming Tab allows you to set up public services on your network, such as web servers, ftp servers, e-mail servers, or other specialized
BT CLOUD VOICE COMMUNICATOR USER GUIDE.
 BT CLOUD VOICE COMMUNICATOR iphone EDITION. USER GUIDE. WHAT S IN THIS GUIDE. 1. Introduction. 3 1.1 Overview 3 1.2 Audience 3 2. Requirements. 4 2.1 Hardware & Software Requirements 4 2.2 Licensing Requirements
Quick Start Guide. Web Conferencing & Secure Instant Messaging via Microsoft Office Communications Server Apptix Live Support:
 Quick Start Guide Web Conferencing & Secure Instant Messaging via Microsoft Office Communications Server 2007 Apptix Live Support: 866-428-0128 Quick Start Guide / Introduction Page 2 of 9 Quick Start
Home What's Included Installation Using the DV Dongle Technical Info FAQ. Using the DV Dongle
 Home What's Included Installation Using the DV Dongle Technical Info FAQ Using the DV Dongle Start the DVTool application by double clicking on the DVTool icon on your desktop. This brings up the main