napp-it ZFS Storage Server User s Guide Setup First steps published: 2017-July-19 (c) napp-it.org
|
|
|
- Patricia Fleming
- 6 years ago
- Views:
Transcription
1 napp-it ZFS Storage Server User s Guide Setup First steps published: 2017-July-19 (c) napp-it.org Licence: CC-BY-SA see
2 Content: 1. Introduction to the Solaris Family 2. ZFS Distributions 3. Hardware and ZFS configurations 4. Napp-it ToGo setup (preconfigured) 5. Napp-it manual setup and remove 6. Manuals, help and infos 7. Remote Management 8. Napp-it Web-UI 9. ZFS Pools 10. ZFS filesystems 11. Solarish SMB Server 12. User and Groups/ Active Directory 13. NFS server 14. iscsi/ FC server 15. Data scrubbing 16. Data snapshots/ versioning/ backup 17. Data replikation/ availability 18. Rollback and Clones 19. Operational settings 20. Appliance Security 21. Appliance Tuning 22. Appliance Maps 23. Disaster and general data security 24. napp-it Free vs Pro & Extensions 25. Appliance Z-RAID / ZPOOL-RAID with SSF (Storage/Service Failover) 26. HA/ RSF-1 Clustering (3rd party extension) 27. Addendum: About Storage Problems and Solutions 28. other manuals
3 1. The Solaris Family - OPENSOLARIS based operating systems Developed by Sun with its initial release in 2008, based on Unix System 5, Release 4 with revolutionary features like ZFS ( Comstar (enterprise ready iscsi and FC technology), Dtrace, Crossbow virtual networking, virtualization with Zones ( ZFS integrated kernel based CIFS/SMB and NFS server among other features like ZFS boot mirrors, disk unique WWN enumeration or fault management service with auto hotspare support. If you want to follow the way from Sun OpenSolaris to the free forks like the current Illumos based distributions, you should look at Bryan Cantrills (Joyent) slideshow at or Some essentials from the slideshow: In the mid-1990 it becomes a foregone conclusion that UNIX would die at the hands of Windows NT Hard to believe, but SUN seems the only computer vendor whose Windows NT strategy was to beat Windows NT Sun s dedication to this vision - the operating system as a nexus of innovation - attracted an entire new generation of engineers to the company Development started on more radical ideas, each of it would become revolutionary in its own right (ZFS, DTrace, Zones, Crossbow, Comstar, Fault Management, Service Managment, Least Privilege) These were technologies invented and initiated by engineers, not managers or marketers These projects reflected the people behind them..organizations don t innovate - people do As the rise of Linux forced the market price of OS aquisition to zero, that open sourcing the (Solaris) operating system was the right business decision (in Unfortunately, not all elements of the OS could be opensourced, some contracts prevented some small but important bits from beeing opensourced. To allow such proprietary drivers, Sun developed a file based copy left licence (CDDL)... this was not done to deliberatly GPL incompatible! Ailing Sun was bought by Oracle in Over 2010, it becomes clear that Oracle had obsolutely no interest in OpenSolaris... There was.. a move to close the system (OpenSolaris) Starting in the summer of 2010, Garett D Amore at Nexenta - with the help of Rich Lowe, Jason King and others - began the process of ether writing the closed bits from scratch or porting from BSD. Dubbed Illumos (from illuminare, Latin for illuminate) and made available on August 3, 2010 Illumos was not designed to be a fork, but rather an entirely open downstream repository of OpenSolaris Solaris 11 was released on November 9, and there was no source release The entire DTrace team, all primary ZFS inventors and primary engineers for zones and networking had left Oracle.. nearly all of these engineers went to companies betting on Illumos. In Illumos, we have seen critical innovations and bug fixes in ZFS, DTrace, Zones and other core technologies. These innovations ill never be in Oracle Solaris. Joyent team ported KVM from Linux. Illumos distributions SmartOS and OpenIndiana have KVM support by default. Solarish If we talk about common features of Oracle Solaris and the free Solaris fork Illumos (ex OmniOS, OpenIndiana, SmartOS) the term Solarish is common.
4 2. ZFS Distributions Unlike storage appliances that are based on their own distribution of BSD, Illumos or Linux, napp-it is a Nasifier for some general-use enterprise operating systems that you can keep up to date like Based on Solarish - Oracle Solaris (commercial OS) - OpenIndiana Hipster (with a desktop option), community project based on Illumos - OmniOS (free and stable Solaris fork), community project based on Illumos Wiki: Downloads: or a mirror like Community repo is and Changelog Based on Linux - Ubuntu - Debian Linux - support is limited to ZFS management, Autosnap, Autoscrub and AutoJob features and does not include the advanced features of the Solaris release. Between ZFS distributions you can move ZFS pools with the follwing restrictions - From/to Oracle Solaris: Pools must be V28, ZFSv5 - From BSD based systems: Possible with GEOM or with GPT partitions spanning the whole disk - Beside that: OpenZFS distributions must support same features. No problem with current releases. The reasons for a Solarish based ZFS System - 100% focus on ZFS that was developed for Solaris 10 years ago and is most stable and complete there - a complete storage OS from one hand, not the toolbox with a core OS and many options and vendors - stable support for mirrorred ZFS boot systems with boot environments (restore a former bootable OS state) - WWN enumeration of disks (disk unique identification) to keeps disk id identical over controller, server or OS - fault management with active hot-spares that replaces faulted disks automatically - SMB, NFS and iscsi integrated in the core OS and maintained by Oracle or Illumos (OmniOS) - virtual networking with virtual switches and virtual nics with vlan support - service management SMF with service auto restart - Solarish CIFS server with NFS4 ACL (more Windows NTFS alike than Posix ACL) and AD support, Windows SID as extended ZFS attribute (Permissions stay intact after a restore to another AD server), - ZFS snaps as Windows previous version, stable and just working out of the box since years OS setup manual for all OS options see


5 2.1. OpenIndiana Hipster as minimal server text edition, regular text edition or with a Mate GUI You can run napp-it on OpenIndiana Hipster (OpenSource) or Oracle Solaris Both support SMB 2.1 and come with a GUI. You manage storage via the napp-it Web-UI but the local GUI helps to transfer and organize data locally or to setup things like ip v6. If you want the GUI in production systems, prefer Solaris. Alternatively you can use the text-edition of OpenIndiana or Solaris or OmniOS, a minimalistic and very stable OpenSource distribution for storage and other production use cases (This is the preferred platform for napp-it) Details see OmniOS or OpenIndiana or Oracle Solaris server edition They come with a console only interface. To manage local data, you can use Midnight Commander via Putty. Storage management is done via the napp-it Webinterface. As they include only the absolute needed software, they are the most stable option.


6 2.3. Storage-Management via napp-it on OmniOS, OpenIndiana or Oracle Solaris ZFS Filesystems and disk details
7 3. Hardware OmniOS runs on common desktop and serverhardware, see You should mainly care about the network and the disk controller. Rules for a trouble free minimal system - use Sata/ AHCI with a 30GB Bootsdisk (60GB when using the napp-it ToGo image) - prefer Intel nics - use at least 4 GB ECC RAM (2 GB is the absolute minimum, more gives performance as readcache) - use at least 8GB if you enable na--it realtime monitoring or acceleration - enabling dedup may increase these minimums Rules for barebone quality storage or Napp-in-One - use server class hardware/ server chipsets and IPMI remote management - use ECC RAM and an Sata bootdidk/ DOM with 60GB or more (SuperMicro DOM or prefer an Intel S3510) - use a Celeron G4400 or a Xeon as they offers ECC support and vt-d (virtualized SAN) - use Intel Nics (10 GbE preferred, ex Intel X540) - use LSI HBA with raidless IT firmware, ex LSI 9207 that comes with IT firmware per default - prefer SAS disks with an expander - use SAS disks for HA solutions based on Multipath IO - prefer Sata disks with multiple HBAs (without expander) - prefer 24/7 enterprise disks Rules for high capacity storage - prefer raid Z2 vdevs with 6 or 10 disks or Z3 vdevs with 11 disks - prefer enterprise SAS disks or 24/7 high quality Sata/ NAS drives - with desktop disks, check reliability, ex with backplaze annual failure rates Rules for High-Performance storage - prefer Enterprise SSD with powerloss protection and build in overprovisioning like Intel S3500-S3710 or Samsung PM/SM 863 series - optionally use manual overprovisioning example with a host protected area (HPA) on new SSDs You can create a HPA with hdat2, Rules for fast but write secure storage like ESXi datastores - use sync write with a dedicated high perfomance Slog device Rules for a dedicated Slog device - ultra low latency - continous high write iops, even under load - powerloss protection - should be noticable faster than your pool like Intel S3700 with a disk pool or a ZeusRAM with an SSD pool - examples: ZeusRAM, a Dram based device (best of all) or Intel S3700/ 3710 more: >> Sample Configs
8 3.1 ZFS Configurations

9 4. napp-it ToGo setup (install from a preconfigured image, beta) There are two options, one for a barebone setup and one for a virtualized ESXi setup 4.1 ready to use barebone napp-it ToGo distribution for an Sata bootdisk This is the easiest and suggested setup method of installing, backup and recover a napp-it barebone appliance based on a preconfigured image for a ready to use ZFS storage server. It works best for OEM use with known hardware. It may not work with any hardware or disk. On success, please send a mail to community@napp-it.org with your mainboard, interface, disk type and remark. I will create then a list of known to work setups. Download and clone the 512n or 512e image. For best reliability use an Intel S GB with powerloss protection (512e). You may use a 64 GB SuperMicro Sata DOM or a 60GB+ Sata disk or SSD (mostly 512n). Use an Sata port for your bootdisk. As Clonezilla currently is not ZFS aware it clones the whole disk via dd. Step 1: Create a bootable USB stick (256MB is ok) with Clonezilla, a free cloning tool. You can use a 16/32GB USB FAT-32 stick (depend on size), USB/Sata disk or share for the systemimage. Download tuxboot.exe from This is a tool to create a bootable USB stick with Clonezilla live on it. Start tuxboot on a Windows machine, select Update and an amd64 clonezilla stable or testing edition and clone it to the USB stick Step 2: Download the zipped napp-it image from either the version for 512n disks or the version for 512e (4k physical sectorsize), unzip and copy the included folder to another USB stick or a network share ex NFS/SMB. You can download an image with a preconfigured OmniOS + napp-it 512n for free. The foldername is something like img18-disk-mainboard-512n. For napp-it Pro users, there are plans to add images with different mainboards, disk sizes and napp-it. Step 3: Boot your server from the CloneZilla USB stick to restore napp-it. Select your keyboard type, deviceimage-mode and a the source of the image ex a local USB Stick/ disk or a NAS. Default is restoring the image from a local USB stick/disk to your local Sata disk. The Sata bootdisk or DOM can be 512n or 512e (the disk is physically 4k sectorsize) with 64 GB or more (Imagesize 62 GB). It is important that you use an image that fits to your disk (512n or 512e physical sectorsize). With an USB device for the image, plug it in prior selecting source image. see btw: You can use CloneZilla to backup, clone or restore any bootdisk, even a Mac with OSX. Step 4: Boot napp-it from your Sata disk (Set the Sata disk as boot-disk in the mainboard bios). All network adapters are enabled automatically in DHCP mode. You can logon at console as root (no password) and enter ifconfig -a to list all network adapters with their ip adresses. Start your browser and connect napp-it via Next, set a root password, a napp-it password and optionally enable/disable SSH root access On a new setup, create now a new datapool, optionally some users and share filesystems: If this is a restore after a crash, import the old datapool and optionally restore users and settings from a backup on your datapool (manually or with the ACL extension in menu Users > restore) settings.
 and boot your server from the USB stick 1.")
 stick or disk, insert")

10 4.1.2 Screenshots of a base setup (asuming you have a Clonezilla USBStick) Copy the napp-it imagefolder to you USB stick (root directory) and boot your server from the USB stick 1. Start Clonezilla 2. select device-image mode 3. select local_dev (USB drive) 4. Clonezilla is now ready to read the napp-it image If the image is on an USB(3) stick or disk, insert the stick now, wait 5s, press enter and select the image. 5. select your USB stick as source and select Top directory on next screen Your napp-it image must be on another stick/ disk or partition than CloneZilla itself. 6. select Beginner mode
 where you want 10. Clonezilla is now restoring the image to your to restore the image. You can optionally check bootdisk.")


11 7. select restoredisk 8. Select the Imagefile that you want to restore If restoredisk is missing (savedisk only), go back to 4. as Clonezilla did not read the image properly. 9. Select your Sata disk (> 60 GB) where you want 10. Clonezilla is now restoring the image to your to restore the image. You can optionally check bootdisk. You can also create your own images as the image on next screen. Otherwise press Enter a source for a recovery. On problems with the image, and confirm that you want to proceed. do a manual setup and send a message with the problem and mainboard to bugreport@napp-it.org After the restore: Optionally enter a key and update napp-it to newest Free or Pro edition. Optionally update OmniOS On problems with the restored image: 1. If napp-it boots, but network not working: do a manual network setup, see Image is not compatible with your SSD, use the ones that were used to create the image 3. Image is incompatible with your hardware: do a manual setup and create your image for restore 4. Image cannot boot due a problem with the bootmanager grub (ex different controller). This can be solved: - boot your server with a regular OmniOS installer disk or USB stick (available from OmniTi), select keyboard - select 3=Shell after boot, what gives you a console, enter format ti list disks (cancel afterwards with ctrl-c) format format lists all disks, write down id of your bootdisk ex c1t0d0, then enter ctrl-c to to return to console - modify grub to use a different bootdisk/ controller, enter the following CLI command (add s0 to disk-id) ex installgrub /boot/grub/stage1 /boot/grub/stage2 /dev/rdsk/c1t0d0s0 reboot There is an option with installgrub -m that installs a new master boot record If this does not help, do a manual setup of OmniOS + napp-it.
12 Create a Master image for a certain platform: Important: If you want to create a new master image, use a new SSD or do a secure erase (smaller image) 1. Install OmniOS, OpenIndiana or Oracle Solaris Download the ISO or USB image and burn a bootable CD/DVD or clone the USB stick Boot the installer and run a default setup 2. enable compress set compress=lz4 rpool set atime=off rpool 3. set network dladm show-link ipadm create-if e1000g0 3.1 use DHCP (preferred method on initial setup) ipadm create-addr -T dhcp e1000g0/dhcp 3.2 add nameserver echo nameserver >> /etc/resolv.conf 3.3 use dns (copy over DNS template) cp /etc/nsswitch.dns /etc/nsswitch.conf If something happens (typo error), retry, opt. delete interface ex ipadm delete-if e1000g0 4 Setup the napp-it appliance wget -O - perl 5. reset root root (Unix and SMB), no password (press enter twice) passwd root 6. enable SSH root access via napp-it menu Services > SSH 7. Login via Putty (to copy/paste commands with a mouse right-click) 8. set TLS for encrypted mai ex Gmail (run the from Putty/ Console and confirn any questions with enter) perl -MCPAN -e shell notest install Net::SSLeay notest install IO::Socket::SSL notest install Net::SMTP::TLS exit; 9. disable services SSH root access and sendmail service in napp-it (menu Service) set netbios_enable=true (Windows network browsing in OmniOS and up, menu Service>SMB>prop.) 10. set basic tunings in napp-it System > Tuning, 11. delete all BE 12. run perl /var/web-gui/data/tools/other/prepare_image.pl 13 beadm create backup.setup (console, creates a backup bootenvinment with nics not configured) 14. Enter halt and power off, start clonezilla 15. clone the systemdisk with defaults (quite fast, medium compress). name like date-img18-board-disk or select advanced settings with z2p compress, compromise between compression time and size
13 4.2 ready to use ESXi distribution (napp-in-one, virtual NAS/SAN) This is the fastest and easiest configuration method on ESXi that comes as a downloadable ready to use ESXi storage server template that combines the minimalistic and in professional environments leading VM Server ESXi with a complete but tiny Enterprise class NAS/SAN Storage solution based on the Solaris fork OmniOS as a preconfigured ESXi VM template with napp-it and Vmware tools for ESXi up to 6.0. Both ESXi and the napp-it VM are installed or reinstalled after a complete crash within minutes as they do not include any important configurations. All services that require configuration like databases, webservers etc should be virtualized on stable ZFS storage with online backup and snap support. The VM requires a DHCP server. You must only import the VM (OVA Template). For disaster recovery, you can export your individual template from ESXi. The template is ready to use. Download from You can download the image with a preconfigured OmniOS + napp-it VM for free. For napp-it Pro users, there are images with newer OmniOS releases, TLS preinstalled and napp-it Pro available. If you want to create your own storage VM, upload the OmniOS ISO to your local datastore. Create a new VM with type Solaris 64bit and a 30 GB bootdisk and tell Esxi to boot from this ISO. Update napp-it to newest Free or Pro edition in menu About >> Update 5. napp-it manual barebone Installation (OmniOS) Use this method if you want to setup a different OS version or a different ditribution ex OpenIndiana or Oracle Solaris or if the default cloning method of a preconfigured image fails. Use a 32 GB or larger Sata SSD/disk or Sata DOM as system disk (optionally two for a boot-mirror) ex Download the usb-dd installer file from You can create a bootable USB stick (1 MB min) with the free imager (Windows) from Boot your OS installer from USB stick and install OmniOS with defaults to your bootdisk. Select use whole disk. If you want to mirror two bootdisks, you can do this later in napp-it. The OS installation is finished after a few minutes. Reboot the system after OS setup. OmniOS is installed without a configured network. Only the user root is available after setup with empty password (no password needed) For a working enterprise class storage appliance, you need to - install OmniOS, OpenIndiana or Oracle Solaris - configure network - run the online napp-it installer - reboot (or set current bootenvironment, BE as default) and set a root password (for console and SMB access) - manage the appliance with any webbrowser at address optionally: - install TLS if you want to send aencrypted lerts and statusmail ex to Gmail. Create a disaster recovery image Create a bootable USB stick 256MB+ with CloneZilla (see 4.1) and boot the stick. If you want a fast backup, select Expert mode and z1p compression (very fast, medium compression rate) and save the disaster recovery image to another disk or an NFS/SMB share. You can restore your image from a local disk (can be an USB stick) or an NFS or SMB share.
14 5.1 Manual setup of a napp-it storage appliance with DHCP Download the OmniOS or Solaris installer (ISO dvd or USB installer), boot the installer and install the OS. Select UTC timezone, with bloody versions keep all defaults incl keyboard After OS setup, your need to configure your network either with DHCP (5.1) or manually (5.2) Initial setup of the napp-it appliance with DHCP - boot OmniOS and login as root (no password) - list available network adapters with their linkname (ex e1000g0): dladm show-link - create an ip interface based on the linkname ipadm create-if e1000g0 - enable DHCP (requires a DHCP server) ipadm create-addr -T dhcp e1000g0/dhcp - add nameserver echo nameserver >> /etc/resolv.conf - use DNS name resolution (copy over DNS template) cp /etc/nsswitch.dns /etc/nsswitch.conf - install napp-it online (default/ free version) wget -O - perl - reboot (or set current bootenvironment as default) reboot - set a root password (this password is valid for Unix shell logins and SMB connects) passwd root optional: check current network settings ifconfig -a optional: If something happens (typo error), delete interface and retry ipadm delete-if e1000g0 optional for ESXi: pkg install open-vm-tools, pkg install vmxnet3s export template with dhcp, without pass-through devices or cd isos optional with newest OmniOS: svcadm disable sendmail and sendmail-client (
15 5.2 Setup napp-it storage appliance with manual ip settings After OS setup, your need to configure your network either with DHCP (5.1) or manually (5.2) Initial setup of the napp-it appliance with manual ip settings If you have a working DHCP server: use DHCP and set network manually later in napp-it - boot OmniOS and login as root (no password) - list available network adapters with their linkname (ex e1000g0): dladm show-link - create an ip interface based on the linkname ipadm create-if e1000g0 - set a manual ip address ipadm create-addr -T static -a /24 e1000g0/v4 - add default route (enter your router ip) route -p add default add nameserver echo nameserver >> /etc/resolv.conf - use DNS name resolution (copy over DNS template) cp /etc/nsswitch.dns /etc/nsswitch.conf - install napp-it 0.9 online wget -O - perl - reboot (or set current bootenvironment as default) reboot - set a root password (this password is valid for Unix shell logins and SMB connects) passwd root optional: check current network settings ifconfig -a optional: If something happens (typo error), delete interface and retry ipadm delete-if e1000g0 5.3 stop/ remove/ manual deinstall of napp-it Napp-it installer creates a bootenvironment with the state prior the installation so you can always go back. As napp-it is a pure copy and run installation, it copies everything to /var/web-gui If you delete this folder, the init file /etc/init.d/napp-it, the user nappit and an entry in /etc/sudoers and user_attr you have wiped it beside tools that are installed during setup like smartmontools, midnight commander, iperf or netcat. You do not need napp-it for regular storage operations. If you want to stop napp-it, use /etc/init.d/napp-it stop (start restart) If you install add-ons like the AMP stack, they are using pkgsrc from Joyent with files in /opt
16 6. ZFS manuals and infos You should now download and optionally printout some basic manuals. 6.1 napp-it manuals manuals for Oracle Solaris 11 Download and print out needed manuals from manuals for Oracle Solaris 11 Express and OmniOS Download and print out needed manuals. As Oracle offers only manuals for their current release, you must use an archive search for Solaris 11 Express manuals (OmniOS is more or less a fork of Solaris 11 Express) The archive.is page refers to the old Solaris Express 11 page. If you click on a description, you are forwarded to the current Solaris 11 page. If you click on Download you get the correct manual. Download manuals and print out at least the ZFS administration guides 6.4 other books and manuals, Less known Solaris features Maillists, forums and IRC Join the following maillists, threads and IRC discussions to keep you informed (Hardforum) (Solaris/napp-it subforum) (DE)

17 7. Remote management A Server can be managed remotely, use these tools 7.1 IPMI IPMI ist a must have for a server: IPMI is a remote management microcontroller on serverclass hardware like Supermicro mainboards that ends with a -F. You can connect the microcontroller remotely with a webbrowser even when the server is in a power-off state. Functions are mainly power on/off/reset, a remote console/keyboard and the ability to mount ISOs like a lokal CD/DVD drive. IPMI window (Java applet) with a virtual keyboard and a console preview that can be displayed full size. You can enable IPMI and its ip adress in your mainboard bios. It comes with a dedicated network port so you can connect with a dedicated and isolated management network. As an option, you can use your regular Lan port (insecure). IPMI requires a current Java (free download from For security reasons, you must allow the ip of your server ( ex ) for java applets. SuperMicro default IPMI user/pw (you should change that) user: pw: ADMIN ADMIN

18 7.2 Remote Console via Putty Putty is a must have tool. Daily storage management is done via the napp-it Web-Interface. Some tasks require console access. This can be done locally or remotely via Putty, a free Windows application. Download and run - no installation required. To use Putty, you must enable SSH on OmniOS. This is the case per default but per default only regular users can login, not root. So you must either create a regular user than can login. After this you can gain admin permissions wit a su command. Other option is to enable remote root access in the napp-it Web-GUI in menu Services >> SSH >> allow root. As this can be a security problem, you should disable remote root afterwards with menu Services >> SSH >> deny root Tips: You can copy/ paste CLI commands with a right mouse click into the Putty Window. The same is the case when you mark text within the Putty console. Midnight commander, a console filebrowser that runs on OmniOS with an optional usermenu is installed automatically by napp-it to do local file management (copy/move/delete/edit). This is the fastest way to copy/move files as it is done locally and not over your network. You can start midnight commander when you enter mc at console and quit with F10. If Midnight commander is showing wrong characters, you can either set a proper environment variable or call Midnight commander directly with a LANG envronment ex (German), start mc like: LANG=de_DE mc
 like a ftp client but encrypted - edit /find files on your server (you can use different editors for")
19 7.3 Remote Filemanagement/ Fileediting on Windows with WinSCP WinSCP is a must have tool. WinSCP is a free Windows application that allows - upload/download files (binary/text/auto) like a ftp client but encrypted - edit /find files on your server (you can use different editors for differen filetypes) - delete/copy/move files (not as fast as Midnight Commander as files must be transferred encrypted over LAN) - check/modify Unix permissions and ownership To use WinSCP you must enable SSH on OmniOS. This is the case per default but per default only allows that regular users can login, not root. An option is to enable remote root access in the napp-it Web-GUI in menu Services >> SSH >> allow root. As this can be a security problem, you should disable remote root afterwards with menu Services >> SSH >> deny root. Tips: When you connect as root, you have full permissions to edit all files on OmniOS including systemfiles. This makes Unix magagement a lot easier as you can manage remotely from Windows and do not need to use ancient editors like vi.
20 8. First steps with the napp-it Web-Gui Use your browser to manage napp-it: example If you are unsure about your ip, enter the following console command ifconfig -a If you start napp-it the first time, you are asked to setup napp-it passwords and . Setup options (Menu About >> Settings): User accounts: Admin and oprtator These are napp-it only accounts and are used only for web-management and appliance grouping default-user User operator has a reduced set of administration options Menu and Language You can select a menu-set that allows different menu descriptions and translatiions You can also restrict menu items: Default set is Solaris (sol) that offers only Storage options supported by Solaris or OmniOS You should use this menu set in production environments. As Solaris is an enterprise OS, you can use it for other services or applications as well example a Webserver or Databese Server. You can use these services without support Napp-it offers some menus that may help to manage them like the Apache webserver You will find according menus for this example under Services > Apache with the options to edit the config files, includes, modules or related like php condig files. To enable these unsupported menus, you must select another menuset, example en or de. You can force a special menu set if you rename /_my/zfsos/_lib/lang/my to /_my/zfsos/_lib/lang/my! You must place a menu description file about_menus.txt in this folder. Napp-it can send alert and status e, either unencrypted or TLS encrypted Enter the account details about your mailsetup. Be aware: napp-it must store your cleartext password push Push alerts is an option to send alerts to your desktop or smartphone.

21 Welcome to the napp-it Web-Gui Napp-it welcomes you with the above startscreen that shows basic infos about your OS/ napp-it release, the state of services and your current iostat. After an initial setup, napp-it comes with a 30 day evaluation of Pro features. This includes realtime monitoring of single appliances and appliance groups, WWN enclosure management, remote replication, advanced ACL management and an improved GUI performance due background acceleration agents. Napp-it Pro includes support options like access to developer or bugfix releases or -support for the complete edition. After the 30 day evaluation, you can continue to use napp-it free without a time or capacity restriction -even commercially- with all features that are needed to manage a ZFS storage appliance. Napp-it free is not crippleware or a product that is limited in essential features. It is sufficient for many cases. It is a stable state of napp-it that is updated from the dev release from time to time. If you want to support napp-it or use Pro features or require immediate access to bugfix releases commercially or as a homeoffer, check There are two menus 1. the regular menus like About, Services, System, Disk,.. You use them for Storage management. 2. The top level menu with Logout, Edit, Menu-set, Mon and Acc The menu-set allows to switch between menu sets (you can select in About> settings) of force a MY! menu. Edit allows to control execution of menus, view menu sources or display internal hash-data that are processed by a menu. Mon enables/ disables realtime graphs and Acc enables/ disables background agents in napp-it Pro.

22 9. Create a ZFS datapool From other systems like Windows, you know disks where you can create one or more partitions with a fixed size. You can combine single disks or partitions to a Raid that is treated like a single disk. It is possible to increase a partition up to disk or Raid-array size. But you cannot span a partition afterwards over multiple disks or raidarrays without destroying the old partition. If a disk is full, you must create a new one and copy over data. ZFS allows a more flexible handling of disc capacity with a concept that is called storage virtualization. Base of this is a storage pool. Unlike a disk or conventional raid array, the size of a ZFS pool can grow dynamically. You start with a new pool that is build from a Raid-Array example a ZFS Raid-1 or Raid-Z without Raid problems like the write hole problem of conventional Raid. If you need more capacity, you add more Raid-Arrays to build storage up to the Petabyte range as this is the real design goal of ZFS. Similar to oldstyle partitions, you create ZFS filesystems on your pool but unlike old partitions, you do not set a size of a filesystem as it can grow dynamically up to the poolsize. If you increase the pool, the additional capacity is immediately available to all filesystems. You can limit capacity with quotas and ensure with reservations. create a ZFS pool with menu Pools >> create Pool - name your pool (ex tank) - select version (only needed for compatibility mainly with Oracle Solaris and pool v28/5) - select disks that you want to use for your first raid-array/ vdev (ex two 3 TB disks in a mirror) - enable overflow protection (a 10% pool reservation that limits usable capacity to prevent a full/slow pool) You can reduce/ delete the reservation in menu ZFS Filesystems at any time click submit and your pool tank is created. Details about the pool: see menu Pools click on poolname to list all pool-properties or on a property to modify. Extend a ZFS datapool If you want to increase capacity, use menu Pools >> extend pool and add another Raid-array (ZFS call it vdev) ex a mirror or raid-z. ZFS will stripe data over all vdevs to increase not only capacity but performance.

23 10. Create a ZFS filesystem From other systems like Windows, you know partitions that you can format in FAT32 or NTFS. This is similar to OmniOS and ZFS with the difference, that you always format to ZFS and that the size of a filesystem can grow dynamically up to poolsize. You can limit the available capacity of a filesystem with quotas and ensure with reservations. This is called storage virtualization. Basically it is enough to create a single filesystem and use traditional folders below to organize your data. But as every filesystem can have different ZFS properties, can be replicated and has its own snapshots, it is common to use as many filesystems as you like, up to thousands (example one filesystem per user). create a ZFS pool with menu ZFS Filesystems >> create - select your pool (ex tank) - name your new filesystem (ex userdata) - select case sensitivity (Unix is case sensitive, Windows not - for a SMB server use the Windows-behaviour ) - set immediate SMB sharing on or off - other settings like atime, nbmand and recordsize click submit and you have created a filesystem, optionally with SMB sharing enabled. You can now connect from Windows as user root as you do not have created other users yet. Default permission is everyone=modify. Create more filesystems ex vm when needed (ESXi datastore)
 to modify.")
24 Menu ZFS filesystems Most settings about share and filesystem properties are ZFS filesystem properties that can can be set/controlled in this menu. You can click on an editable setting (they are blue coloured) to modify. Examples: enable/ disable a SMB share: click in the row of a filesystem example tank/userdata to the entry under the column SMB enable/ disable a NFS share click in the row of a filesystem example tank/vm to the entry under the column NFS enable/ disable a iscsi share (a ZFS volume as a blockdevice) click in the row of a filesystem example tank/vm to the entry under the column iscsi set a quota for a filesystem click in the row of a filesystem example tank/userdata to the entry under the column QUO or RFQU set a reservation for a filesystem click in the row of a filesystem example tank/userdata to the entry under the column RES or RFRES enable sync write for a filesystem click in the row of a filesystem example tank/userdata to the entry under the column SYNC Sync write setting affects data security. Off means fast cached writes but last 5s are lost on a powerloss. enable LZ4 compress for a filesystem click in the row of a filesystem example tank/userdata to the entry under the column COMPR enable dedup for a filesystem click in the row of a filesystem example tank/userdata to the entry under the column DEDUP Warning: dedup works poolwide. With low RAM this can dramatically reduce performance. set/reset ACL for files and folders click in the row of a filesystem example tank/userdata to the entry under the column Folder-ACL Reset ACL is free. Other features are part of an extension. You can set ACL via Windows in napp-it free. list all ZFS filesystem properties click on the filesystem name ex tank/userdata
 you have two options for an SMB server.")
25 11. Solarish SMB/ CIFS Server SMB/CIFS is a filesharing protocol from the Windows world. It is widely used on any platform. Even Apple switched to SMB in their newer OSX releases as the default sharing protocol. On OmniOS/ OpenIndiana/ Solaris (Solarish) you have two options for an SMB server. One is SAMBA that is available on any Linux/ Unix system. The other is the Solaris hcifs server that is available on Solaris based systems only and is the de facto standard SMB server there. If one compare SAMBA with Solarish CIFS you will find many features in SAMBA that are not available in Solarish CIFS. But Solarish CIFS has some advantages that are not in SAMBA, mainly because SAMBA must run on any X-System with any filesystem. Some of these features are killer features as they affect easyness, performance or Windows compatibility like: some Advantages of SAMBA over Solarish CIFS - same server on any X-system - can act as AD server - a lot of sharing options - nested shares/ shares independent from ZFS filesystems - permissions are based on Unix UID/GID/ Posix ACL, this is a plus if you work mainly in a Unix world some Advantages of Solarish CIFS over SAMBA (used by napp-it) - fully integrated in ZFS as a filesystem property, easy handling via zfs set command there is no configuration file, enable it and set permissions as file/share attribut. - multithreaded and fast - integration of ZFS snaps as Windows previous version - manageable via Windows management console (connected users, open files, share level permissions) - share and file/folder level permissions (Windows server alike) - permissions are based on NFS4 ACL. allow/ deny with inheritance settings. They work very similar to Windows NTFS - Windows SID as extended ZFS attribute. This allow a move/backup of data in a Windows AD environment between servers where permissions are preserved. enable SMB sharing in menu ZFS Filesystems, click on off in the row of a filesystem under SMB
26 11.1 SMB related settings (Solarish CIFS) SMB Service The SMB service is started automatically when you enable a share. Some modifications (like share level ACL) require a service restart. This is done automatically by napp-it. On problems with the SMB server or if you are in a AD Domain that was temporarely unavailable, it may be needed to restart the service manually in menu Services >> SMB If you import a pool with shares enabled and SMB service disabled, you may get a warning that the SMB service is not enabled. You can ignore as the service is started automatically or after a share off/on. Set netbios_enable=true (allow Windows network browsing) in menu Services > SMB > properties SMB Share On As SMB Sharing is a in Solarish and ZFS integrated property of filesystem, you can enable a share in menu ZFS Filesystems when you click on off in the row of a filesystem under SMB with the following options: - sharename: The share is visible to a client like Windows under this name if you add a $ to the name, the share is hidden, example userdata$ To connect such a hidden share, you must connect from Windows like \\datanode-01\userdata$ - guest allowed: You do not need to login with a name and password to access the share (ex from Windows) - ABE (access based enumeration): Only files and folders are visible where you have permissions SMB Share off To disable a share, click on the sharename in the row of the filesystem and set sharesmb = off SMB permissions In contrast to other Unix services, Solarish CIFS uses Windows alike NFS4 ACL with permission inheritance, not traditional Unix permissions like 755 or Posix ACLs ( ). This is the reason why you should not set Unix permissions like 755 on files/folders that are shared over SMB as this would delete ACL inheritance settings that are not know in traditional Unix. Always use ACL to set permissions on Solarish. As tradititional Unix permissions are a subset of the ACL possibilities, they are reduced automatically to fit the ACL permissions. As ZFS is a Unix filesystem, it must use Unix UID and GID as file security attributes. Solarish CIFS additionally store Windows Security ID s (SID) as extended ZFS attributs. They are used by the CIFS server only and allows file movements/ backups where Windows NTFS alike permissions were preserved - does not matter what UID a user has. This is an advantage especially in an AD environment. When you create a new ZFS filesystem with napp-it, the default permission is set to root = full access everyone@ = modify This allows that any user can connect a SMB share with read/write permissions as default. If you do not create new users, only root has (full) access to regular SMB shares at the moment unless you do not had enabled the guest option that allows a connect without login. If you replicate or move a pool to another Solarish server that is also a domain-member, all permissions stay intact as the Windows SID/ security ID is stored as an extended ZFS attribute. This is unique for a Unix filesystem.
 SMB server listing in Windows under network environment Set netbios_enable=true in menu Services > SMB > Properties (OmniOS 151018+).")
27 SMB guest access Create a user with name guest (pw does not matter), and enter smbadm enable-user guest at console or the napp-it cmd field and use guest to connect. (OmniOS and up) SMB server listing in Windows under network environment Set netbios_enable=true in menu Services > SMB > Properties (OmniOS ). This function requires an additional Windows Master Browser ex a Windows Server SMB server browsing in OSX via Bonjour (ZFS server displayed as Apple Xserve) Enable Bonjour (multicast/dns) in menu Services > Bonjour. This function requires a valid Pro/Dev release OSX finder view of SMB servers (the Xserve icons are OmniOS ZFS SMB storage servers with Bonjour enabled) SMB identity mapping In an Active Directory environment you can map AD-users ex the Domainadmin to root to allow full access for these users to all files - even when there was no explicit permission set for admins as root has always full access. ID mapping is available in menu Users (napp-it ACL extension) Attention: Do not map local Unix users to local Unix users. Map only AD users to Unix users. You can map local SMB groups to local Unix groups. But for a SMB only usage, you do not need any mappings. They are only needed to use the same users on SMB and other Unix applications. User backup and restore If you need to restore an OmniOS/ Solaris ZFS server and want to keep local permissions intact, you must recreate local users with the same user-id. If you have enabled the napp-it backup function in menu Jobs, you can restore napp-it and all user settings in menu Users > Restore settings (the ACL extension on a napp-it Pro or Dev edition is required) Howto: Reinstall OS, setup napp-it, insert a license key, update napp-it to a Pro edition and import datapool. Now you can use the menu User > restore to restore settings from your datapool

28 ACLs on files and folders Each file and folder on OmniOS has an owner (root or the creator), Unix permissions (traditional Unix permissions like 755) and NFS4 ACL permissions. If you enter for example at console /usr/bin/ls -V /var/web-gui/napp-it you may get as a result root@datanode-01:/root# /usr/bin/ls -V /var/web-gui/_my total 2 drwxr-xr-x 2 napp-it root 2 Mar 19 15:00 wwwroot owner@:rwxp--aarwccos: :allow group@:r-x---a-r-c--s: :allow everyone@:r-x---a-r-c--s: :allow drwxr-xr-x 3 napp-it root 3 Mar 19 15:00 zfsos user: :rwxp-daarwc--s:fd-----:allow owner@:rwxp--aarwccos: :allow group@:r-x---a-r-c--s: :allow everyone@:r-x---a-r-c--s: :allow Owner (napp-it), group (root), Unix permissions like drwxr-xr-x and ACLs like owner@:rwxp--aarwccos: :allow or auser ACL are shown. Windows SID informations are not shown here as they are used in the CIFS server only. ACLs can be assigned to OmniOS/AD users, OmniOS/SMB or AD groups or as a trivial ACL to owner@, group@ or everyone@ to be compatible to traditional Unix permissions. You can modify ACL permissions with the /usr/bin/chmod command, per Windows or per napp-it ACL extension. Modifying ACL via CLI command is really stupid. Especially with napp-it free, you can use Windows (beside Home editions) to modify permissions. To do this, you can login to the SMB share from Windows as user root. A right-mouse click >> Property on a file or folders opens the Windows property dialog where you can select Security. Set Permissions just like you would do on a real Windows server. Good to know: User root or the owner/creator have always full access, you cannot lock them out - even if permission is not set explicitely. This is normal on Unix and different to Windows (and a boon for any admin doing backups) If you set ACL on a folder, they are per default inherited to newly created files and folders unless you set inherit to this folder only The user that is logged in is the owner of new files and folders (with full permission). You can override this behaviour with the ZFS property acl inheritance = discard or restricted (default is passthrough). Windows processes first deny rules then allow. Solaris processes them in their order where the first matching rule is relevant. To set correct deny rules, use napp-it/ ACL extension
29 ACLs on shares ACL on shares was introduced by Windows to restrict access independently and additionally to permissions on files and folders, mainly to restrict access without the need to modify file attributes. On Solaris, a share control file is used that is created when you enable a share. ex if you enabler a SMB share share tank/userdata, you find the share control file as /tank/userdata/.zfs/shares/userdata You can set share level ACL via napp-it/ ACL extension, or remotely via Windows server management (You must connect a share/ server management as a user that is a member of the SMB admin group.) examples: File ACL: Share ACL: full access readonly real permission: readonly File ACL: Share ACL: readonly full real permission: readonly File ACL: Share ACL: full user: paul=full real permission: paul= full, no other user allowed The default share-level ACL is: full access (only file attributes are relevant) Modifications on share level ACL require that you disable/enable a share or restart the SMB service to take effect.
30 ZFS Properties aclinherit and aclmode From aclinherit aclmode Determine the behavior of ACL inheritance. Values include: discard For new objects, no ACL entries are inherited when a file or directory is created. The ACL on the file or directory is equal to the permission mode of the file or directory. noallow For new objects, only inheritable ACL entries that have an access type of deny are inherited. restricted For new objects, the write_owner and write_acl permissions are removed when an ACL entry is inherited. passthrough When property value is set to passthrough, files are created with a mode determined by the inheritable ACEs. If no inheritable ACEs exist that affect the mode, then the mode is set in accordance to the requested mode from the application. passthrough-x Has the same semantics as passthrough, except that when passthrough-x is enabled, files are created with the execute (x) permission, but only if execute permission is set in the file creation mode and in an inheritable ACE that affects the mode. The default mode for the aclinherit is passthrough (napp-it only). Modifies ACL behavior when a file is initially created or controls how an ACL is modified during a chmod operation. Values include the following: discard A file system with an aclmode property of discard deletes all ACL entries that do not represent the mode of the file. This is the default value. mask A file system with an aclmode property of mask reduces user or group permissions. The permissions are reduced, such that they are no greater than the group permission bits, unless it is a user entry that has the same UID as the owner of the file or directory. In this case, the ACL permissions are reduced so that they are no greater than owner permission bits. The mask value also preserves the ACL across mode changes, provided an explicit ACL set operation has not been performed. passthrough A file system with an aclmode property of passthrough indicates that no changes are made to the ACL other than generating the necessary ACL entries to represent the new mode of the file or directory. The default mode for the aclmode is pass-through (napp-it only). aclmode = restricted is added in Illumos/OmniOS to avoid permission modifications with a chmod command (ex via NFS)

31 12. User and Groups If you do not need to restrict access to a SMB share, you can enable guestaccess and you are ready. If you want to restrict access, you can create users with napp-it menu User When you create a user, you only need to enter a username and a password. This user is valid for SMB access and is a valid Unix user. You can assign a UID/GID for a new user when needed ex for NFS (optional). Attention: Windows groups and Unix groups behaves different. This is the reason why the Solaris CIFS server come with an own SMB group management that works independently from Unix groups. If you need groups to restrict SMB access, you must do this with SMB groups. Menu User allows to create SMB groups add add users to these groups. There is an idmapping option Winuser -> Unixuser and Wingroup -> Unixgroup in Solaris/ OmniOS. While a usermapping makes sense only in an AD-environment to map an AD user to a Unix user (never map a local Unixuser to a local Unixuser) you can map local SMB groups to local Unixgroups to achieve a similar permission behaviour within SMB and locally on Unix.
32 ACL settings for multi-user SMB access some basic examples for File and Folder ACL settings Goal: - everyone can access and read files from a share like data (data is a filesystem below a pool named tank) - everyone can modify files in data/common and below - user paul is the only one to access data/paul and below needed ACL settings: folder /tank/data: allow everyone@=readx (read and execute), no-inherit, this folder only folder /tank/data/common: allow everyone@=modify, inherit to folders and subfolders folder /tank/data/paul: allow paul=modify or full, inherit to folders and subfolders Goal: - everyone can access and read from a share like data (data is a filesystem below a pool named tank) read should be allowed only from folder /tank/data, not folders below - everyone can create new folders but not files on data - only the creator of a folder (=owner) has access to the new folder and below needed ACL settings (aclmode must not restrict ownership when creating folders): folder /tank/data: allow everyone@=readx (read and execute), no-inherit, this folder only allow everyone@=create_folder_set, inherit to folders and subfolders allow owner@=modify or full, inherit to folders and subfolders Goal: - everyone can access and read from a share like data (data is a filesystem below a pool named tank) - everyone can read files files on /tank/data/common and below - members of SMB group professors are allow to modify /tank/data/common and below - only members of SMB group professors are allowed to modify /tank/data/professors and below needed ACL settings (aclmode must not restrict ownership when creating folders): folder /tank/data: allow everyone@=readx (read and execute), no-inherit, this folder only folder /tank/data/common: allow everyone@=readx, inherit to folders and subfolders allow group:professors=modify, inherit to folders and subfolders folder /tank/data/professors: allow group:professors=modify, inherit to folders and subfolders Active Directory: If you want to assign ACL to AD users, this may require that the AD user was logged in once to a SMB share.
33 12.1 Active Directory With a few users especially if you use only one or two fileservers, a simple local user management is sufficient, simple and idiot proof. With more users, many servers you need to have the same credidentials on any machine. To achieve this you need a centralized user database like Ldap or Active Directory. The Solaris CIFS server is prepared to be a member computer in an AD environment. You can join a Domain with menu Services >> SMB >> Active Directory Enter: Domainname ex ex myuniversity.edu IP-Adress of your AD-Master server ex: Domainadmin username: admin Domaiadmin password: ***** When you click submit, OmniOS syncronizes time and sets DNS to your AD server and joins the domain. If OmniOS lost connectivity to your AD server, you can disable/enable the SMB service or rejoin the domain. Care about Your napp-it Server can be either a member of a workgroup (use local user) or a domain (can use either local or domain user). If you switch from domain to workgroup-mode, remove all mappings with idmap remove -a If you join a domain, you should create at least one idmapping (give domainadmin root permission): Other mappings are not needed, replace domainadmin with your admin username. idmap add winuser:domainadmin unixuser:root Possible Problems: If you get a UNSUCCESSFULL error If you want to join a domain newly, please verify that your domain does not already have a computer member with the name of your OmniOS server. In this case you get UNSUCCESSFULL other reasons for UNSUCCESSFULL: - wrong username/password Sometimes UNSUCCESSFULL happens for unknown or timeout reasons. - If you try again a second or third time it may work. If you get a INTERNAL ERROR - Check if SMB service is online (you must have enabled a SMB share) If you get a Failed to find any domain controller - check network, ip and DNS settings - try another lmauth level (4 is ok for Windows 2012) - check if there is already a server account in the domain, if so delete prior joining
34 If you get a Failed to find any domain controller on Oracle Solaris 11.3 This is due a new management of DNS service in Solaris where you must set parameters via svcs compare Step 1, configure client svccfg -s network/dns/client svc:/network/dns/client> setprop config/search = astring: ( domain.lan ) svc:/network/dns/client> setprop config/domain = astring: ( domain.lan ) setprop config/nameserver = net_address: ( ) svc:/network/dns/client> apply Usage: apply file Apply a profile. svc:/network/dns/client> quit refresh and restart svcadm refresh dns/client svcadm restart dns/client Step 2: configure DNS svccfg -s name-service/switch svc:/system/name-service/switch> setprop config/host = astring: files dns svc:/system/name-service/switch> setprop config/ipnodes = astring: files dns svc:/system/name-service/switch> apply Usage: apply file Apply a profile. svc:/system/name-service/switch> exit Name Service Dienst refresh and restart svcadm refresh name-service/switch svcadm restart name-service/switch root@server01:~# svcadm refresh name-service/switch root@server01:~# svcadm restart name-service/switch btw complicated was yesterday, this is overcomplicated!!!
35 13. NFS shares NFS is a filesharing protocol from the Unix world that is supported in NFS v3 and NFS v4. Mostly NFS3 is used in secure environments where you mainly need performance as NFS3 lacks Authenthification (to login with name/pw) and Authorisation (no restrictions based on file permissions) beside some good will settings based on client ip and client UID. You can enable/disable NFS in menu ZFS filesystems in the row of a filesystem under NFS as a filesystem property, similar to SMB sharing. Mostly you set on or off. Other option is to restrict access based on client ip or allow full acces independently from the client UID. Enable NFS set NFS = on or instead on on something like rw=@ /24,root=@ /24 tank/vm Disable NFS set NFS = off 14. iscsi shares iscsi is not a multiuser filesharing protocoll like SMB or NFS. It offers blockstorage to a single client that is treated there like a local disk and formatted from the client with a filesystem. You need a cluster filesystem if you want to allow access from two clients simultaniously. Originally, Sun implemented iscsi sharing as a filesystem property like NFS and SMB. As iscsi is mostly used in large and complex HA environments, this approach was replaced by COMSTAR, a enterprise framework to manage iscsi and FC environments. When should you use iscsi/ FC - when you need a non-zfs filesystem like ext4, HFS+, NTFS or VMFS ex ESXi environments or a Windows Server based on ZFS blockstorage - in HA environments with a setup similar to SAS multipath but with iscsi datanode multipath to allow large capacity, high performance or remote installations (not limited by cable length) - in HA environments with dataheads or clients (ex storageserver with services or a server) and datanodes that provide their storage via iscsi. This can be a simple datanode mirror or a raid-z over datanodes. Enable iscsi via menu Comstar 1. create a Logical Unit (LU). This can be a ZFS volume, a file or a RAW disk 2. create a target (this is the part that you connect from a client) 3. create a target group with targets as members 4. add a view from your logical units to a target group to make them visible as a LUN. Enable iscsi via menu ZFS Filesystems For smaller installations, Comstar is quite complex. Napp-it offers a way where you can enable iscsi on a per filesystem way with a on/off switch in menu ZFS filesystems in the row of a filesystem under iscsi. If you enable iscsi here, you create a logical unit, a target, a target group and a view in a 1:1 relation. If you need more than on/off or basic settings, you can manage the targets with menu Comstar as well.
36 15. Data Scrubbing With older filesystems like Ext4 or NTFS you have had the following problem. You edit a file and you have a crash or powerloss while you write/ update the file. As these filesystems do inline modifications (modifiy parts of the current data on disk) the following can happen: regarding your data 1. nothing written, old data is valid 2. new valid data, modifications are correct 3. modificated data is parly written, no chance to detect or repair the problem regarding the metadata 1. metadate correct updated 2. metadata corrupt=corrupt filesystem, an offline fschk is needed to repair the filesystem structure No chance to detect metadata problems beside a offline fschk that can last days and this does not even help to detect or repair data corruptions. The result is only valid metadata structures. ZFS, a new generation filesystem ZFS stands for a new generation of filesystem that do not try to reduce these problems but to avoid them completely with two basic principles: CopyOnWrite and End to End Checksums on data/os level. CopyOnWrite means, that you do not do inline updates of old data but write datablocks always new. In the above powerloss szenario, ZFS behaves like: regarding your data and metadata 1. modified data is written completely new, data pointers are updated, new data is valid and verified 2. modified data is not written completely, data pointers are not updated, old data keeps valid and verified 3. If anything goes wrong, this will be detected by checksums on next read and auto repaired (self healing) That does not mean, that you cannot have a dataloss. If you write/update a large file with a powerloss, this file is corrupt and damaged (no miracle with ZFS) but your filesystem is not damaged ans always valid. reasons for corrupted data on disk - Powerloss or a system crash - I/O errors due to a bad disk, controller, cabling, backplane or PSU - On-disk data corruption due to cosmic rays, magnetic or electromagnetic fields - Driver bugs resulting in data being transferred to or from the wrong location - A user or Virus modifying data by accident or intention All beside the last problem can be at least detected and mostly autorepaired by checksums and redundancy. For the last point ZFS offers snapshots. On a multiterabyte Array you will always find corrupted data over time. Scrub on every read, on demand or as a planned job On every read, data is checked and repaired from Raid redundancy when a checksum error is detected. (auto self healing filesystem). If you want to check the whole pool you can start a scrub manually or as a planned napp-it Job. With desktop disks I would do this once a month ex on a low io day like saturday. Unlike a traditional fschk that require an offline filesystem for quite a long time without a real repair option, a scrub is a online process that runs in the background with low priority and verifies/repair all data. I own many server and systems and see checksum repairs quite often: This feature is mandatory!
37 16. Data Snapshots, Versioning and Backup If you care about your data, you do backups. If you really care about your data, you do multiple backups like tapes that you rotate on a daily or weekly base for a data history. If your data was deleted or modified by accident or intention (virus, staff) you have a chance to regain original data from a former backup. While you always need a backup for a real disaster like fire or a thief, this concept has three weak points. The first is that the number of backups is mostly limited due to limited resources. The second is, that access to a backup means mostly a restore that is at least inconvenient. The third is, that you often cannot trust the backup, because it usually has no checksum verification and no repair option on problems. Mostly you or the admin discover this when you need the backup - too late.. Data versioning/ secure backup For the data versioning problem with regular user access to former states, you can save several versions of a file like report-2015.doc, report-2015v2.doc or report-2015-this is the latest.doc. Another option is a mechanism like Apple Timemachine, where you copy/sync dataversions to a another disk on a regular base like once a day. While this work it is annoying because of the delay when you must copy or restore huge data. Another option is Windows shadow copies on a Windows server ( ). This is a block level snapshot mechanism of the whole volume. The result is a versioning filesystem. If you do daily snaps, you can browse/ restore the data with Windows Previous Versions. The problem remains, that you should not do too many snaps. I also had a problem with Windows VSS snaps in the past that they were lost after a system crash with a fress OS install. Main problem: you cannot really trust NTFS filesysystems (not always consistent like a CopyOnWrite filesystem) and no checksums (no verified data, no autorepair). This may be different in future with ReFS but currently this is not a comparable option to ZFS. ZFS snapshots ZFS snapshots are far better than the former solutions. ZFS is a CopyOnWrite filesystem where all modified datablocks are written newly while the former datablocks can be overwritten after a succesfull write. A ZFS snapshot means that the former datablocks are blocked and cannot be re-used unless the snap is deleted. This requires only to keep some datapointers and can be done without delay and no initial space consumption. Even ten-thousands of snaps can be hold without any problem (Okay as the former state blocks capacity, sometimes the pool is full). As this is done on ZFS storage, checksum verification, scrubbing and autorepair is working - does not matter how old a snap is - ideal for long term storage and archives with regular scrubs. As this is managed by the ZFS pool itself, you are not in danger too loose them when you move a pool. You can also trust these snaps absolutely. An admin can destoy a snap but cannot modify data as a snap is readonly. The best is, this is transparent to a user. You can access ZFS snaps on Solaris via Windows Previous Versions with all ACL or AD permissions intact even from a Backup. With a snapshot rule like take a snap every 15 Minkeep 4, every hour-keep 24, every week-keep 4, every months- keep 24 you can go back two years on a filer. Snapshots > Mass delete allows to destroy snaps based on name or age. On a valid Pro or Dev edition, you can keep on snap per filesysten per day/week/month or mass destroy in the background (required for many snaps). ZFS backup While you can backup data from a ZFS storage to any system, ZFS offers remote and ultrafast incremential replication based on snaps where only modified datablocks are transferred with ZFS security and their own snapshot history. In my own setups, I use two main backup systems in my serverroom where I replicate data based on even or uneven days and a third backup system in another building for important data and a snapshot history that covers at least 90 days (daily snaps)
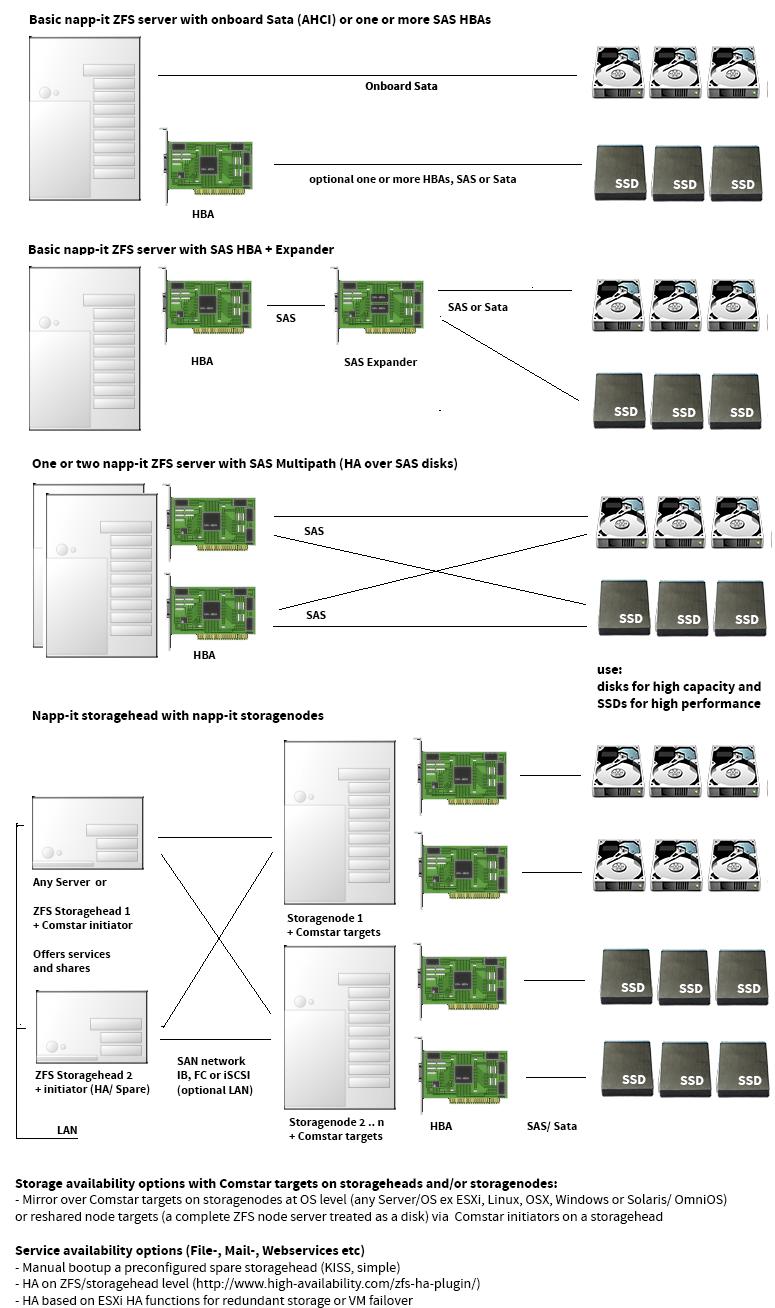
38 17. Async Data Replikation/ Avalability Unlike other backup or sync methods, ZFS replication can keep an active ZFS filesystem with open files in sync with another filesystem on the same or a remote ZFS server. You can run replications down to every minute to sync filesystems near realtime. A replication initially transfers the whole filesystem with ZFS properies based on a snapshot. After the first run, replication works as an incremental transfer based on snaps on source and target that must be in sync and represents the same data state. On an incremental run, the target filesystem is resetted to the same state as the last source filesystem snap. A new source snap represents the datablock differences between this snap and the current state. Only this snap is transferred as a datastream. This makes replication ultra fast. Napp-it replicates over a buffered netcat connection up to wireframe performance. As replication is based on snaps, each data state is like a hard shutdown, As a replication run resets a target filesystem to a former state to be in sync with the source filesystem, you should should not use it beside reads between replications. If you need to switch to a replicated filesystem a main filesystem. you must stop replication and set the filesystem to read/write. To switch back, you can replicate the filesystem back. Snapshots on replicated filesystems. As a replication target filesystem is resetted to a base snap on every replication run, you can keep older replication snaps based on date or name. On a source filesystem you can use regular snaps for versioning Sync Data Replikation If you need realtim sync with the exact same datastate at any time you can use a mirror between appliances. You need two or more storage nodes (independent ZFS storage servers) that offer a ZFS filesystem over a fast network connection as a FC or iscsi target. A storagehead can the built a ZFS pool over these iscsi targets as a mirror or raid-z over nodes Data Availability from Backup to active/active HA There are several steps to increase data availability. 1. Availability due Backup First step is backup from time to time to a physically separate place. Especially on a disaster you can restore a former datastate. Restore can last a very long time. 2. Availability due Replication to a backup/spare system This is near realtime local copy to a spare/backup system. On problems you can switch services to this datastate in a very short time. If you have enough free bays on your backup/spare system and your main pool is working, you can also move and import the pool to regain service availability. From a crash, time to regain services is between 15 minutes and an hour 3. High avaiability with a multipath SAS storage and two nodes. Mostly problems are not related to disks but HBAs, Mainboards or a system configuration. A typical HA config can share dualpath SAS disks to two identical appliances. A HA Software like RSF-1 can manage the two appliances and switch services between them in a few seconds. As an addition you can use two appliances and two storage nodes and connect them via iscsi. On a storage node or a storage head problem, you can automatically switch between under control of RSF-1. HA is usually quite complicated and should be done only under support. Napp-it does not support HA in the GUI, but you can use RSF-1 from
39 18. Data Rollback and Clones (on valid Pro/ Dev editions) If you need any sort of protection against unintenionally or intentionally deleted or modified data like a file delete, file overwrite or file ecncypt ex by a malware, you need versioning with snaps. Once you have snaps, you have several options to access data from snaps Access snaps on a per file base Snaps are readonly files in folder /filesystem/.zfs/snapshot. You can use a filebrowser or you can Windows and previous versions to access previous versions of files Rollback a whole filesystem to a snap. You can use the zfs rollback to discard all changes made to a file system since a specific snapshot was created. The file system reverts to its state at the time the snapshot was taken. Warning! If you roll back, all intermediate and all clones based on them are destroyed without an undo option. For most rollback cases, using Windows and Previous version is the suggested method for a roll back as you can restrict the rollback to files and folders. You can use napp-it menu ZFS-Filesystem >> Rollback to initiate a rollback 18.3 Create a Clone (writeable filesystem from a snap). This is called a clone that you can use like a regular filesystem. You can create clones from console or Napp-it menu Snapshots >> Clones (napp-it Pro only) A clone is a writable volume or file system whose initial contents are the same as the snapshot from which it was created. Creating a clone is nearly instantaneous and initially consumes no additional disk space. In addition, you can snapshot a clone. Clones can only be created from a snapshot. When a snapshot is cloned, an implicit dependency is created between the clone and snapshot. Even though the clone is created somewhere else in the dataset hierarchy, the original snapshot cannot be destroyed as long as the clone exists. The origin property exposes this dependency, and the zfs destroy command lists any such dependencies, if they exist. Clones do not inherit the properties of the dataset from which it was created. Because a clone initially shares all its disk space with the original snapshot, its used property value is initially zero. As changes are made to the clone, it uses more disk space. The used property of the original snapshot does not include the disk space consumed by the clone. The parent filesystem of the parent snap must be writable or you cannot mount the clone. Clones must be destroyed before the parent snapshot can be destroyed Promote a Clone (Replacing a ZFS File System With a ZFS Clone) You can use the zfs promote command to replace an active ZFS file system with a clone of that file system. This feature enables you to clone and replace file systems so that the original file system becomes the clone of the file system. In addition, this feature makes it possible to destroy the file system from which the clone was originally created. Without clone promotion, you cannot destroy an original file system of active clones.
40 19. Basic operational settings Your storage appliance is now up and running. Care about the following settings Napp-it settings (menu About >> Settings) all settings are stored in /var/web-gui/_log/napp-it.cfg - set passwords for admin and operator (encrypted one way hashvalues) - set (mailserver, mailuser, mailpw, store unencrypted) - set push data (alerts to your desktop or smartphone) System-Settings - Menu Sytem >> HW and Localization >> Localization ex America > New_York, set Language en_us.utf-8 and your keyboard, you need a reboot - create bootable snapshots (=BE, bootenvoronments) manually prior serious system modifications This is done automatically on OS or napp-it updates and allows a bootup on a former OS state. Auto-Job Settings - Enable napp-it auto-job to 5min (Jobs >> autos ervice) - set other job to sync time via ntpdate > AD server or any other ntpserver - Set -alert and status jobs in menu Jobs >> >> alert or status Per default napp-it sends unencrypted over port 25 If your smtp server requires TLS encrypted mail example Googl over port 587, you must - install TLS modules, see - switch napp-it to use TLS in menu Jobs >> TLS >> enable TLS - Set push-alert (Pushalot or Pushover) for your desktop or smartphone - more see (Windows8 and -Phone, free) and (ios, Android) - Set a backup job (Jobs >backup >> create backup job) tp backup basic OS and napp-it settings to a pool Restore all user, SMB groups, idmappings and other napp-it settings then via User > Restore (ACL extension) - Set autoscrub jobs (see 15.) for your pools in menu Jobs >> scrub >> create autoscrub job - ex set autoscrub of your system pool (rpool) to every first sat (of a month) - set autoscrub of your datapools (with desktop disks I would use once a monty as well) - Set autosnap jobs (see 16.) for your pools in menu Jobs >> snap >> create autosnap job As ZFS snaps are readonly and cannot be modified/destroyed from a share, they are virus/user save This is your first and most important method to avoid dataloss and undo unwanted modifications ex: - set autosnap: snap every hour, keep 24 - set autosnap: snap every day, keep 31 - set autosnap: snap every 1st of a month, keep 12 Your primary storage ist where you should care about a highest possible level of raid and data security. Data restoring can be done mostly from your primary storage as ZFS is a versioning filesystem with snaps. To be prepared for a real disaster (sabotage, fire, overvoltage or a thief), you need a disaster backup at least with some snapshots. If data is important, this should be done to two different systems where one must be on a different physical location like another building or offline within a save. You can do this via sync (rsync or robocopy) or via the faster ZFS incremental replication that can be done every few minutes. - set a replication job to another napp-it appliance (require replication extension and grouping)

41 20. Security Restrict access to management functions - Web management is done via port 81 for http or port 82 for https Realtime graphic/ websocket is displayed over port 3000 (https/wss port 36000) If you enable wss in About > Settings, you must install the SSL/TLS modules, see Jobs > TLS If you want to use your own certificate, place it at /var/web-gui/_log/mini_httpd.pem, otherwise the sample certificate at /var/web-gui/data/tools/httpd/mini_httpd.pem is used - Remote console via Putty and remote fileaccess via WinSCP is done on SSH port 22 - Replications are done over a random port > In an unsecure environment, you should restrict the above ports to a secure environment, either based on a network adapter (link) or based on your networks Restrict access to file services - Fileserveices like NFS3 do not offer authentication. Access can be only limited to a fakeable source ip. This can be a security problem example when you offer NFS for ESXi where your storage server is accessable over untrusted networks for management or other services. In an unsecure environment, you should restrict access to services like iscsi, NFS, SMB or WWW either based on a network adapter (link) or based on your local networks or single ip adresses. Firewall settings/ Security panel (available on a valid Pro or Dev edition) You can use the napp-it Pro security panel to restrict access based on a set of ip adresses or local networks or based on a network adapter. With napp-it free, set the according rules manually.

42 21. Appliance Tuning (available on a valid Pro or Dev complete edition on Nic, System/IP or service level (iscsi, NFS, SMB) Storage performance depend on your physical network, your server and storage hardware and your settings that can be optimized to a special hardware environment or a special use case. The defaults are intended for 1Gb/s Ethernet networks and a typical filer use. Above that a Solaris based system offer a lot of tuning options. When 1Gb/s networks (about 100MB/s) came up many years ago, this was sufficient as storage capacity was quite low and performance of an average internal disk and network performance was quite similar. Now storage is in the multiple Terabyte area with a view to Petabyte. A simple backup or move of data from one pool to another over network can last days or weeks. Local storage with the new NVMe SSDs can give a performance of 1000MB/s or more. This is why we need faster networks like 10Gb/s Ethernet (about 1000 MB/s) and for this we need some tuning settings to achieve full performance on your hardware or for a workload.. Napp-it Appliance Tuning Panel (napp-it Pro complete only)
43 21.1 Tuning aspects - TCP/IP tuning of Server side This includes send and receive buffers that can be modified on a running system and mtu settings (Jumboframes, mtu=9000) that require a reboot. - TCP/IP tuning on switches you must enable mto=9000 or Jumboframes or the switch blocks Jumboframes - TCP/IP on client side This depend on your hardware. For examle with Windows and the mainstream 10G adapter Intel X540, you should disable interrupt throtteling. - System and service tuning in /etc/system that require a reboot like NFS buffers, hotplug behaviour of AHCI Sata, timeout of disks on problems and many other aspects. - Nic (ex in ixgbe.conf) and vnic (vmxnet3s.conf) settings These are mainly mtu and buffer settings that should be increased for 10G - Disk settings in sd.conf Mainly settings for advanced sector disks, power management and other aspects of disks - SAS controller settings ex in mpt_sas.conf Settings like mpio and other controller dependent SAS aspects - napp-in-one tuning If you use napp-in one to connect ESXi over the internal vswitch with the ZFS storage VM, all transfers are in software so most netwok and Ethernet centric tunings aspects are not needed, You should use vmxnet3 as vnic as it is much faster than the e1000 vnic with the base vmxnet3 tuning. The other tuning aspects are mainly relevant for external access or if you use a 10G nic in pass-through mode for fastest external access. Remarks about napp-in-one tuning (ESXi related aspects) You mainly use NFS to offer ZFS storage for ESXi. If you modify OmniOS settings like the vmxnet3 settings, it can happen that you need to reboot OmniOS twice (check console on boot as vmxnet3 settings are displayed on bootup). Some settings result in an All Path Down=NFS not availabe error in ESXi. You can fix this with an ESXi reboot. Some NFS service modifications hinder ESXi to reconnect at all. You can fix this when you delete are VMs from inventory (NOT from disk), delete the NFS mount, readd the NFS mount and reimport the VMs to inventory (use ESXi filebrowser and a right mouse click on the.vmx file in the VM folder) Tuning for napp-it Free You can manually modify system settings via console, Putty or remotly edit files via WinSCP You can try the settings from the napp-it Pro tuning console Tuning for napp-it Pro You can use the tuning console that allows - enable a basic tuning with the options for an immediate reboot and a BE creation - use up to ten private editable tuning configurations that can be easily moved to other appliances Hints about other aspects like SSD, iscsi settings or Pool considerations see napp-it menu System > System tuning

44 21.2 Network aspects A modern NVMe PCI-e SSD can offer 1000MB/s sequentially and more. A regular disk offers sequentially up to 200 MB/s. If you build a Raid-Z over disks, your pool is capable of a similar performance than an NVMe or better. This and a typical capacity of a NAS in the Terabyte to Petabyte range where you need days or weeks to copy this over to another NAS or backup system requires a faster network than the mostly available 1G/s network with a transfer rate of up to about 100MB/s. So an adequate network performance that has a relation to your pool performance and that allows to transfer data in the Terabyte range is simply not possible if you only use 1G/s networks. 10G networks with a transfer capacity up to 1000MB/s is the solution. If you buy a new serverclass mainboard you can find boards with a minimal premium with 10G onboard, You should use these offers. There are also quite cheap 10G nics around. Outside the Windows and Linux world, you should stay with Intel cards and even with Windows they are usually the fastest and most stable option. Then connect your NAS with a 10G capable switch, either via SFP+ (optical up to 70km or copper up to 5m) or 1000G Base T, the traditional ethernet cable up to 100m. If there are 1G clients attached to that switch, this will give up to 10 clients full 1G each. If you have more 10G clients, you need a switch with enough 10G ports. This introduces two problems. One is that 10G switches with more than two ports are quite expensive. Then they are quite loud and only an option in a serverroom. In a Lab or Desktop environment this is not an option, Napp-it = 1/10G Switch = Cheap and silent high performance storage/networks for labs/ office/ desktops If you mainly need 10G access from your NAS to your backupsystem, some ESXi hosts or some videoediting clients, you can simply add some 10/40G nics to your NAS. This can range from Intel X520-D2 to X540-T2 over the Intel X710 where driver support for OmniOS is on the way. The X710 is a single or dual QSFP+ card that offers up to 2 x 40G/s or alternatively up to 8 SFP+. If you use cheap chopper QSFP+ to 4 x SFP+ cables (up to 5m), you can provide fast 10G access to a workgroup of 8 clients per nic. For longer distances you must use optical cables or an additional X520 or 640 adapter. If you enable the bridging functionality, napp-it acts like a regular 1/10/40G switch. Every computer can connect the NAS, each other and the internet that is connected for example on the 1G onboard nic of the NAS. You can enable the bridging/ switching functionality per CLI commands or with napp-it Pro monitor up from dev where you enable switching in menu System > Network Eth. If you use for example the Super- Micro X9SRL-F you can add up to 5 x NVMe PCI-e adapters, up to 10 Sata SSDs with a SM-M28SAB-OEM and two additional nics (10/40G). This storage is a ultrafast and ultrasilent Office NAS without an extra 10G switch.
. You can create up to 9 maps and assign disks to the map.")
 Map 1: your boot enclosure with 2 x 3,5 disks and 2 x NVMe in PCI-e Slot 1 Map 2: a 12 x 3,5 Bay enclosure (Max 90 Bay SuperMicro) Map 3: a 24 x")
45 22. Appliance Maps (16.4f and dev or newer with napp-it Pro complete) Appliance Maps works with Sata or LSI HBAs where it uses the sasircu tool (like Disks > DISK Location). It allows to display maps of your enclosures (up from napp-it 16.8). You can create up to 9 maps and assign disks to the map. You can then printout a screenshot of a map an place it on the server as a reference. If a disk fails, the map allows to identify the slot of the failed disk. Example: demo maps (without disk assignment) Map 1: your boot enclosure with 2 x 3,5 disks and 2 x NVMe in PCI-e Slot 1 Map 2: a 12 x 3,5 Bay enclosure (Max 90 Bay SuperMicro) Map 3: a 24 x 3,5 Enclosure. Example: bootdisk + 24 x 2,5 SSD enclosure with new editing option to add remarks to a slot

46 Example: Map Chenbro 50 x 3,5 Bay

47 Map list: this list is generated from map data, disk location and smart values The values of the list: Slotnumber Enclosure WWN or slot id Product Serialnr capacity1 Disk state Target nr Pool Vdev iostat messages capacity2 Smart temp Smart info Smart health Smart selftest Smart type Slotinfo Print out the disk map and the map list and place them on top of your storageserver as a disc and location documentation. It will we very valuable on any kind of problems.
48 23. Disaster and General Data Security ZFS is the best available free technology to protect your data. It adresses nearly all problems of conventional filesystems and raid technologies with many disks or large capacity. Unlike checksummed backup technologies like Snapraid it works in realtime and protects your data from the moment when you click save. It can detect every problem due data and metadata checksums in the chain disk-controller-driver > controller > cabling > disk. On access or with a online scrubbing that you should run on a regular base it can repair all bitrot/silent data errors or write/read errors on the fly. ZFS software raid protects against raid problems like bitrot on a Raid-1. A conventional system reads from one or the other part of a mirror but cannot detect if a datablock contains garbage and if it detects that both parts of a mirror are different, it cannot decide, with one is good and which on is bad due the missing data checksums. ZFS detects the faulted part and repairs on the fly. With Snapshots that are readonly (nobody can modify/ delete them on a share and not even root can modify them locally) you are protected against unwanted file modification or delete. Even malware like those who encrypt all your data continously in the background asking for money to decrypt cannot encrypt snapshot data, not even when running as admin. This is important as you quite often detect the problem too late when even data on backup is encrypted or modified. You need readonly longterm versioning with ZFS snaps to be safe. With ZFS you can use raid-levels with a unique protection agains disk failures. With Raid-Z2/3 you can use vdevs where 2 or 3 disks can fail per vdev without a dataloss. The statistical chance to loose data due disk failures is then near zero. ZFS Raid is software raid with CopyOnWrite that protects against raid write hole problems. On a powerloss during a write on a conventional Raid 1/5/6 it can happen that datamodification is done on one half of a mirror but not on the other or that data is modified but metadata not updated or in case of a raid 5/6 that a stripeset is written on some disks but not all. ZFS use Copy on Write what means that an atomic write (ex data modification + metadate update) is done completely or discared ex due a crash. So different states of mirrored disks or partly written raid stripes are not possible on ZFS by design. So for daily use, you are protected agains all sorts of problem? Yes - nearly. Three problems must be adressed outside ZFS, this is data corruption in RAM, a crash or power outage and a disaster like a sabotage by an employee, human errors, fire, theft or overvoltage due a flash Data Corruption due RAM problems This is not a ZFS problem but a problem of any sort of data processing. A bitflip in RAM modifies data. This can result in a crash, in a wrong calculation or in modified data during a write or with a checksummed filesystem during a read when processing the checksum. While these problems affects all computer systems, ZFS promises 100% data protection against any sort of problems. Undetected RAM problems/bitflips is quite the only problem that ZFS cannot detect nor repair. The chance of such problems may be acceptable with less RAM like a few hundred Megabyte. A modern workstation or storage server use Gigabytes of RAM. In such a cese a bitflip is not a theoretical chance but a real problem that happens too often. To adress this problem you must use RAM with checksums = ECC Ram, more So it is unsafe to use ZFS without ECC? In the end yes, its unsafe as ZFS cannot protect against all typical computer problems that can happen on daily use without RAM protection. You should simply not buy new systems without ECC, does not matter if its a storage server or a workstation when you process sensitive data. The premium is small and data is too valid. Another question is: Can I use ZFS on my old systems without ECC? The answer is more yes than no, especially with RAM in the lower Gigabyte area. If you use any other filesystem, you are affected by the same bitflip problem but there are many other problems where ZFS can help. Write errors due RAM problems are the same with every filesystem. ZFS increases the chance of bitflip problems a little due processing checksums on read to repair bitrot or silent errors what means a higher RAM usage. You can disable checksumming but bitrot on a Multi-TB disk array happens more often than a bitflip on 2-4 GB RAM. So again yes, more advantages than disadvantages without ECC when using ZFS instead a checksum less filesystem without CopyOnWrite but for sure a NoGo for valuable data.
49 23.2 Powerloss or Crash Problems Your OS, raid subsystem and your disks offer advanced features to ensure data security during regular operation but what happens on a sudden powerloss or system crash - Are you protected against such problem? The answer is, it depends. So what happens on a sudden powerloss? Problems can occur for the file that is currently written, for the raid or filesystem structure or the data validity on a single disk or SSD. File consistency The first inspection is, what happens if you save a Word document and power fails: This will always mean, that this document or the newest state is corrupt as it is only partly on disk. A solutution are local tmp files that allows Word to revert to a last state. Another protection is an UPS for your desktop, switch and storage server. Mainly you are only protected on the application level like Word. ZFS cannot offer help. Raid and filesystem consistency But what happens to the Raid or the filesystem on the storage system during this crash? The basic problem is that you cannot update data on all disks at the same time. If you write data ex to a Raid-1 the first disk is updated then the next. A power outage can result in a situation where one disk is updated but not the other or that data is updated but not metadata. The same happens with a Raid 5/6 where a raid-stripe is only partly written. Result can be a damaged raid and/or a damaged filesystem structure. This problem is called Write-Whole-Problem ( A conventional Raid or filesystem cannot protect against such problems as the raid has no control or knwoledge about data content or transaction groups or write atomicity to ensure that a data update MUST include a metadata update or must be done on all disks of a Raid. The solution against this problem is CopyOnWrite what means that you do not inline update data structures but write evetry datablock new. The old state is then available for overwriting unless you do not block with a snap. A write action on ZFS that affects filestructure or Raid consistency is done ompletely or discared completely on a crash. Result: The CopyOnWrite mechanism protects ZFS Software Raid and the ZFS filesystem against powerloss problems. This is crash insensitivity by design. Traditional filesystem problems require a offline chkdsk run (that can last days on large arrays) after a crash to hopely regain a consistent metadata structure. This is not needed with ZFS as these problems cannot occur. There is no chkdsk on ZFS. All what you need is online scrubbing to repair bitrot problems. Transaction Consistency ZFS metadata structures are always consistent. But what happens if your application writes transactions that depends on each other like a financial transactions. A move money means, remove it from one account and THEN add it to another. Or if you use ZFS as a storage for a virtualisation environment. Data is then a filesystem like ext4 or ntfs that is not CopyOnWrite. A valid write must consist of a data update followed by a metadata update. In both cases you need transaction safety under control of the database application or the virtualized OS that writes the data. The key is that you must ensure that after a commit from the storage unit, the data must to be on stable storage and not lost in the disk writeback or ZFS storage cache on a crash. One option would be, disable all write caching but this is a bad idea. Caching is where performance comes from when you connect a very fast unit (CPU/RAM) with a very slow unit (storage). ZFS offers unique read and write caching options that you do not want to disable as you will then fall back to pure disk performance what is a fraction of the overall storage performance with caching. You are in a dilemma now as you need caches for performance and you need a behaviour that every committed write is on stable disk what means uncached sync write. ZFS can do both: process a fast combined write where you cache all slow and small random writes for a few seconds and write them then as a single fast sequential write and ensure that every single action is on disk.
50 Sync Write (Log every commited write to a ZIL device) ZFS always collects small and slow randow writes in a rambased write cache for a few seconds and write them together as a single large sequential write. A commit to a writing application means, yes data is in cache. It does not mean data is on disk. This behaviour is essential to achieve performance. A powerloss can result in a few seconds of lost data. As the writing application has no control this can affect transactions where for exampe the first transaction is on disk after a write and the next dependent transaction is lost in cache on a powerloss. If you need a transaction safe behaviour where a commit must means, yes data is on disk, you can enforce sync for a filesystem or allow on request of a writing application (sync=always or default). In such a case you enable a sync write logging for every commited small random write directly to stable storage to a special device called ZIL followed by a regular fast sequential cached write of multiple transactions to the pool. Basically you have not achieved anything on first view. In contrast, you have fast combined cached writes and additionally uncached commited random writes of every single datablock as both write actions go to the same pool, This is why you sometimes discover that on a slow pool enabling sync reduces your pool performance to 10% of the value that you can achieve with sync=disabled. Dedicated Slog (ZIL on a separate device) This is why you can add an Slog to the pool. This is an additional DRAM or Flash based disk or NVMe. If you use an Slog device with powerlosss protection and a much lower latency, much higher iops values than your pool, you can ensure a safe uncached sync write behaviour without such a dramatically reduced performance. Remember: The ZIL is not a write cache device. This is already offered by ZFS in RAM. Its an additional logdevice that contains all committed data what means that it only need to be able to store about 10s of writes. Even with a single 10G connection, about 8GB is enough. This is why one of the fastest Slog devices, a ZeusRAM has only 8GB of battery buffered DRAM. The Slog device content is only read on a reboot after a crash to redo commited writes. A good newer Slog device is an Intel S/P DC You do not need to mirror the Slog unless you do not need to ensure performance on a Slog failure as ZFS will otherwise revert performance to the slow onpool ZIL. With current ZFS even a pool import with a missing Slog is possible. SSD Powerloss problems In the past, SSDs were mainly used as an L2Arc cache device or an Slog. As a single spindle disk offers only about 100 iops while enterprise SSDs can offer iops under constant steady load. Do not believe the iops of cheap desktop SSDs as they offer this only for a very short time and performancy degrades then to a few thousand iops while enterprise SSD can hold their performance on a steady constant write load. While SSDs improves IO performance dramatically over spindels, they come with a serious security problem. As writes can be only done in pages and you need an erase cycle prior rewriting data, the SSD firmware is constanly reorganising data in the background (garbage collection). A power outage can mean a data loss at any time with SSDs, does not matter if there is storage activity or not and not even CopyOnWrite can protect you against. Raid and checksums can help to repair problems on access. For a professional setup, you should avoid this problem by using SSDs with powerloss protection. All enterprise SSDs offer this as a feature. Some cheaper desktop SSDs offers also powerloss protection but it is sometimes not clear if this affects data written from the OS and the background data from garbage collection I prefer HGST, Intel or Samsungs in the datacenter editions ex a small Intel S3510 as bootdisk and Intel S3510 for readoptimized pools and the 3610 or 3700/3710 models with better write iops values.
51 23.3 Disaster Protection As long as your storage server is working or you can repair the system, you will need nothing but snaps to regain any state of data, current or a previous version based on readonly snaps that you can create nearly without limits, without a delay or a initial space consumption and that you can use for long term storage and accessability. Monthly scrubs will check and repair any sort of bitrot to ensure long term data security. What you must care about is a real disaster like fire, theft, sabotage, human errors, overvoltage or a massive computer problem that results in a pool loss. To address such problems, you need backups that are not affectes by any of the disaster reasons. Your backup system can also adress availability needs below realtime switchover of storage or services that requires a hot failover system and the ZFS-1 plugin from high-availability.com as you can access your data from a backupsystem at any time. With ZFS replication to can sync data between your active storage and a backup system down to a few minutes even when the system is under heavy load. Several Levels of disaster protection Level 1: home use Buy one or more disks depending to your security concerns like external USB disks or disks that you can insert into your storage server with free disk bays. You can also connect USB disks to your laptop or desktop. You can then access the backup there but without the snapshot security. Then use a sync tools, best is zfs send that allows readonly snapshots on the backup disk. Other options are rsync or robocopy to sync folders from your storage server to such a disk. Remove the disk (can be a mirror in case of ZFS) on a regular base and place it on a safe place and insert the next disk to continue backups. Change this disk or disks with the former or next and re-sync data on a daily, weekly or monthly base. Level 2: SoHo use Add another small ZFS storage server and place it on another physical location/ room. This can be a cheap HP Microserver that gives you 4 disk bays where you can insert disks for a backup pool. Replicate data from your primary storage on a hourly or daily base. Keep replication snaps there for previous versions. On problems you can access or continue working on the backup system. From time to time, replace the backup pool with a second one and keep the disks on a safe location outside. Level 3: Professional use Care additionally about two backups on different systems and different locations. As availability may be a concern, use a second similar/ same system in a HA config or with async replication that you can run down to some minutes delay. It would be perfect if it offers enough free disk bays to just move the disk from your primary storage on hardware problems to continue work after a pool import with the original data state. Use another backupsystem that allows to continue backup even when your first backup system is out of order or on service. Care about a snapbased longterm backup history with replication snaps on your backup system. This can be different from the snap retention polica on your primary system that you set with autosnap. As an additional suggestion, use different disks on your backups systems to avoid problems like I had with Seagate Constellations 3 TB. They work for more than a year without problems and nearly simultaniously they fail one by another. Another suggestion is stay on a former OS release on your backup system. Bugs on a newer OS will then not affect backups. Level 4. Critical data Backup and Async Replication are always needed to be protected against a disaster but they do not work in realtime. If someting happens, your backup state is not really up to date. The delay to your former data state can be minutes (replication) or a day (backup). An additional problem is the restore time of a backup or the time for a service failover to a backup system. If you need your data and services to be available on a second system with the same state without interuption, the current default commercial solution is a RSF-1 cluster with two server accessing the same SAS disks via Multipath IO and a pool/service failover in case of problems. Another solution is a napp-it ZFS Appliance Raid over the network. You need two ZFS server where each provide an iscsi target from a local datapool. An SCSI initiator (can be dedicated or provided by one of the server) allows to build a pool with a Raid-1 over them. If server1 fails, you can enable the initiator on server2, import the pool and your NFS and SMB services are up again with current data -even in an AD environment. Uf server1 comes back, the data is resilvered over the network. An automatic failover is planned.
52 24. Napp-it Pro 24.1 Differences napp-it Free vs napp-it Pro Napp-it is a web-based management interface to build a NAS/SAN on top of an enterprise class default Operating System installation like Oracle Solaris or the free Solaris forks like OmniOS or OpenIndiana. You can install napp-it also on Linux but the Linux release is restricted to ZFS, Snap- and Jobmanagement while the Solarish (Oracle Solaris and the free forks) edition offers enterprise grade features. napp-it Free Is a ZFS storage server appliance with the most needed functions. As an enduser you can download and install napp-it Free and use it at home or within your company or organisation without a capacity or time limit even commercially. The Free edition includes all functions to run a NAS/SAN with many enterprise features. There are no restrictions regarding OS features and it comes with all basic features to run and manage a ZFS Storage System in a SoHo, lab, office or school environment. Napp-it is not an OpenSource application but all sources are open (Perl) and you are allowed to edit or extend the functionality of napp-it. You are not allowed to distribute napp-it outside your home, office or organisation and you are not allowed to remove license restrictions. If you create your own add-ons or extensions you can distribute your menus and scripts but without napp-it itself example with an online installer. If you initially install napp-it Free it comes with a 30 day evalkey to evaluate the Pro features that are available in the free edition. Some features require an update to a newer Pro edition. Such updates are not possible with a Free edition. Napp-it Free is updated only from time to time or to fix severe bugs. After the eval period, functionality is automatically reduced to the free features. napp-it Pro extends the functionality of napp-it Free. It is the version for professional users. It offers: - Support with immediate access to bugfixes, newer Pro and developer editions with online update/downgrade of last 5 releases. With a napp-it complete extension you have support for setup problems. - Notable improved GUI performance, background agents for system parameters You can enable/ disable background acceleration in toplevel menu acc nearby logout - Edit menu with the option to display the actions of a menu, internal napp-it values and the menu actions. - Clone menu (create, promote, destroy, care about clones in menu snaps and filesystems) - Snap mass delete features: mass destroy as a background task (no timeout with many snaps) - Snap mass delete features: keep at least one snap per day/week/month If you want to install napp-it on behalf of someone or if you want to bundle napp-it with hardware either under the napp-it brand or as an OEM backend with your own logos and menus or basic messages, you need always a Pro license with the allowance of bundling. This allowance is included when you order a Pro license with a bundling remark when you request a quotation at For larger quantities or distribution ask for conditions. Napp-it Pro is the mandatory base of additional extensions like ACL/user management, monitoring or remote replication and requires a nonfree license key, either as a subscription or perpetual. napp-it Pro Complete For professional users there is napp-it Pro complete with all functions. For special single functions you can aquire the extensions separately. Appliance functions like Appliance Maps require the complete edition.
53 24.2 Complete extension (not working on Linux) If you want to unlock all Pro features from all extensions you can use the Napp-it Pro complete edition. Complete adds Appliance menus like Appliance Maps, Appliance Security and Appliance Tuning. Complete additionally adds support for setup problems but only for regular commercial licenses ACL and user management extension (Solarish only) includes - File and Folder ACL settings via Web-GUI - Care about order of ACL settings (not possible from Windows) - Allow deny rules (not possible from Windows) - Share based ACL settings (Permissions on a share itself, not on files or folders) - Trivial ACL (similar to unix permissions) like owner@, group@ and everyone@ - Control of ACL order (Solaris ACL are order sensitive; Windows cares first about deny then about allow rules) - Control of ACL inheritance for newly created files and folders - Local user and groups - Active Directory user and groups - human readable ACL set names like full_set, modify_set, read_set, create_fileset, create_folderset, owner_default, etc - Control of ACL-inherit and ACL-mode property - reset all ACL (recursively) to defaults like modify, roor only, owner only, etc You can modify permissions and permission related ZFS properties in menu ZFS filesystems under Folder-ACL. Below current permissions and settings you find the controls to modify settings. A resest ACL to everyone@ recursively is available even in the napp-it Free edition. - User-Quota, Group-Quota settings via Web-UI (napp-it menu ZFS filesystem -> used) - IDmappings via Web-UI (Menu user) - Restore all napp-it, user, smbgroup and idmapping settings from backup job data (Menu user - restore settings) Without the extension, you can control file permissions either from console via /usr/bin/chmod or via Windows when you connect a share as root. The main restriction from Windows is that Windows processes all deny rules prior allow rules while Solarish respects the order of rules. If you need deny rules, you should set them on Solarish. The other restriction is that you can remove admin permissions on Windows with the result that an admin has no access unless he or she modifies permissions. On Solarish, root has always access even without a dedicated ACL rule. This makes recursive modifications like reset ACL easier Monitor extension (Solarish only) includes Realtime monitoring can be enabled/disabled with toplevel menu mon nearby logout - Realtime monitoring of important system parameters via websocket (status lights) - Shortterm monitoring (last 60s) of cpu%, w%, b% and iops/s of reads, writes and waits - Longterm monitoring (next release) - Realtime Update of pages (2 Min after last access) - Monitoring of LSI SAS2 slots (ZFS WWN disk-id to physical slot mapping) - Editing features (menus, actions and translations) - Logs and hashed with internal infos and return values of napp-it commands on a page load - Health-Status for multiple napp-it appliances (with status lights) via netscan or on appliance groups - Vnic, Vlan and Link-Aggregation settings - Disk, SAS2 Bays and Smartvalues are discovered in the background and buffered > 1h to increase GUI performance - Bridge Management in Menu System > Network Eth ( dev up): Use OmniOS like a 1/10 G switch
54 24.5 Async highspeed/ network replication (Solarish and Linux) - Async Replication between appliances (near realtime) with remote appliance management and monitoring - Based on ZFS send/ receive and snapshots with snap retention policy (hours, days, months, years, numbers) - After an initial full transfer, only modified datablocks are transferred - High speed transport via (buffered on Solaris) netcat - (unencrypted transfer, intended for secure LANs) - Replication is always pull data. You only need a key on the target server, not on sources How to setup - You need a licence key on a target server only (you can request evaluation keys) - Register the key: copy/paste the whole key-line into menu extension-register, example: replicate h:server ::vcqmhqsmvsdcnetqsmvsttdvsk - Group your appliances with menu extension -appliance group. Klick on ++ add to add members to the group - Create a replication job with menu Jobs - replicate - create replication job - Start the job manually or timer based - After the initial transfer (can last some time), all following transfers are copying only modifies blocks - You can setup transfers down to every minute (near realtime) - If one of your server is on an unsecure network like Internet: buld a secure VPN tunnel between appliances - If you use a firewall with deep inspection: This may block netcat, set a firewall rule to allow port 81 and replication ports Use it for Highspeed inhouse replication for backup or near realtime failover/redundancy on secure networks External replication over VPN links with fixed ip s and a common DNS server (or manual host entries) How replication works - On initial run, it creates a source snap jobid...nr_1 and transfers the complete ZFS dataset over a netcat highspeed connection. When the transfer is completed successfully, a target snap jobid.._nr_1 is created. A replication can be recursive (ex whole pool with all filesystems). Use this for a pool transfer only. - The next replication run is incremental and based on this snap-pair. A new source snap jobid.._nr_2 with modified datablocks is created and transfered. When the transfer is completed successfully, a new target snap jobid.._nr_2 is created. And so on. Only modified datablocks are transfered to provide near realtime syncs when run every few minutes. If a replication fails for whatever reason, you have a higher source than target snapnumber. This does not matter. The source snap is recreated on next incremental run. Incremental replications can be recursive. But you should avoid that as zfs send does not care of newly created or modified filesystems. In such a case, an incremental recursive replication run fails with an error. Difference to other sync methods like rsync Both rsync and ZFS replication are methods to syncronise data on two servers or filesystems/folders. While rsync can sync any folders, ZFS replication can sync ZFS filesystems. The main difference is that rsync scans all source and target folders on a run and transfers modified files based on a comparison. Rsync must therefor travers the whole data structures what makes it really slow especially with many small files and rsync cannot sync open files. The pro is that you can run it any time without any special restrictions.
55 ZFS replication works completely different to rsync. First it is based on ZFS snapshots what allows to sync open files in their last state on disk. Next it creates a pure datastream from the content of a snap that is send to the target filesystem. Therefor performance is not reduced if you transfer many small files and only limited by network and the disk subsystem. You can sync two filesystems with replication even when they are in the Petabyte range down to some minutes delay (near realtime) what would not be possible with rsync. This is a huge improvement over sync methods like rsync but you must accept the serious restriction that ZFS replication does not compare source and target data. This is not a problem on an initial replication as the whole filesystem is transferred. On the following incremental replications, you must rollback the target filesystem to the exact state of the according source snap that represents the state at last replication run. A new source snap that contains modified datablocks related to the last common snap can then be transferred to update the target filesystem. The only control that replication has is that it can detect if the target base snap for a rollback is not exact identical to the according base snap on the source machine. In such a case replication is cancelled with an snap mismatch error. If something happens during the transfer like zfs send not started correctly, ZFS problems on source or target side, network problems or pool busy, you will get only a receive: failed to read from stream error without more details. In case of problems, check - Replication requires that all source machines and target machine are grouped Open menu Extensions > Appliance group and klick on ZFS on an appliance under group members. If you do not see a listing of the remote filesystems, try to re-add the appliance to the group, optionally delete the group member in /var/web-gui/_log/group on source and target (problem may result from a host renaming) or delete the whole group on all members with Extensions > Appliance group > delete members and rebuild the group. - Replication requires that the napp-it webserver is running on port 81 on source and target machine. The replication itself is done via a netcat datastream on a port > These ports must be open. Check if napp-it is working on both machines. If you have a firewall, check that port 81 and the replication port (see menu Jobs) are open. - Replication requires an identical ZFS snap-state on source and target Check if you have a snap-pair with same max jobid_nr_n numbers on source or target. If you do not have identical corresponding snaps, you must restart with an initial sync after a rename of the target file system as a backup. If the following initial replication is successfull you can delete the renamed filesystem. This means: be careful when you delete replication snaps. Especially the last two snap numbers on target and the same snapnumbers on source should not be destroyed without need. If for whatever reason a snap-pair with same number is not exact identical (can happen ex due follwing snaps with size=0 and results in a snap mismatch or stream error) and you have a former snap pair_nr you can destroy the last target snap. If you start a replication run then, the last snap-pair is used. If you delete a replication job, destroy its repli snaps manually. - Other problems Check if you have enough space on source and target (check also reservations and quota settings) If the receiver and sender is starting but no data is transferred, check for network or routing problems problems. Check if source or target filesystem is blocking, example with a list snapshots or list filesystem command. A reboot may help then. If a filesysestem or snap listing lasts longer than 45s this may resuld in a timeout problem. optionally: Set several replication to a different time to reduce load, optionally reduce max_arc cache to increase free RAM. With MTU 9000 and transfer problems/ stream error, try MTU 1500 Check free memory in menu System > Basic Statistic > Memory (free/freelist should be > 2GB) with many replications or reduce ARC usage example to 80% or 60% in menu System > Appliance tuning (Pro complete) Free meomry is shown on a source system in menu Jobs > Remote log (napp-it )
56 Replication settings - First you must create an appliance group, then you can create a replication job in menu Jobs > Replicate > create replication job with following options Source host: Source ZFS Enable recursiv Incremental option Replicate to ZFS Replication Type SMB/ABE share Force Job id Keep Can be localhost or any server of your appliance group This is the source filesystem that you want to replicate When enabled, other ZFS filesystems below source will be replicated as well You should use this only to replicate a pool once. Recursiv fails if you add or delete a filesystem The i option is the default, the I option includes intermediate snaps The replicated filesystem will be located below If you want to replicate a filesystem below the root pool folder, select ex video/data as source and backup as target to create backup/video netcat is the only and the fastest option On a replicated filesystem with shares, all shares are disabled by default. You must activate this if you want the replicated filesystem shared If you reinstall your backupsystem without old jobdata available, you can create a job with sam source and target and the old job-id (from snaplist) This allows to continue the replication without a new initial run This allows to set a retention policy for your backupsystem, example hours:24,days:32,months:12,years:2 This will keep one snap per hour for today, one snep per day for last 32 days, one snap per month for last 12 months, one snap per year for last two years This setting is needed as an incremential replication does a filesystem rollback to the last common base snap. If you create snaps manually or via the autosnap function, they are lost on next replication run An additional keep parameter is char ex day=12,1000 This will keep any snap with a number ending to 1000 Hold With hold you can hold snaps based on numbers or days (n or ns) If you set for example 10, this means hold all replication snaps for ten days If you set for example 10s, this means hold always last 10 replication snaps You can combine keep and hold. Both settings are respected. Read it like a AND relation or destroy a snap only if the keep setting and the hold setting will allow. Timetable Set month, day, hour or minute settings as a trigger Set a status like manual or active Active requires, that Jobs > Autoservice is enabled ex to a trigger every 15 min Protect snaps If you want to protect snaps, you can set them manually to hold see
57 Debugging Check loggings on target side in menu Jobs. Either click on replicate under Joblog for an overview of the last replication runs. A more detailled view is available when you click under Last to the date entry that shows loggings of the very last run. You can also check loggings on source side in menu Jobs > Remote The communication details are logged in menu Jobs > Monitor. Clear the monitor prior a replication run to display only new events. Sometimes it is helpful to start a replication as root from a console. You can start a job with the command: perl /var/web-gui/data/napp-it/zfsos/_lib/scripts/job-replicate.pl run_ Replace with the job-id, 123 are debug levels when called via console, 1=repli, 2=remote, 3=keep Sometimes a pool is blocking/ remains busy for whatever reason Try to export/ import the pool (zpool export -f poolname). If this fails, reboot Continue a replication if you reinstall an OS If you reinstall the OS you must either restore group and job settings. The easiest way is when you have used a napp-it backup job (Menu Jobs) that creates a backup of group and job settings on your first datapool under backup_napp-it. In such a case you can restore the files under /var/web-gui/_logs/jobs and /groups manually. With napp-it Pro and the ACL extension, you can easily restore all user, group and napp-it settings in menu User > Restore Settings If you do not have a backup of the job and group settings, first rebuild the group with menu Extension > Appliance Group > ++ add. Then list the snaps and check for the jobid of the former replication job. Then create a new replication job with the same source and target filesystem. Enter the former job-id in the field Force jobid. You can then continue the replication job without the need of a new initial transfer. If you must do a new initial transfer, rename the old target filesystem for backup reasons. The start an initial transfer. On success you can delete the old renamed filesystem. Naming of napp-it replication snaps: On the source system ex: mail/data@ _repli_zfs_backup1_nr_528 where mail/data is the source filesystem that is replicated is the jobid backup1 is the hostname where it replicates to 528 is the ongoing number of the snap (to identify identical snaps on source and target) On the target system ex: backup/repli_mail/data@ _repli_zfs_backup1_nr_528 backup/repli_mail/data is the target filesystem of the replication is the jobid backup1 is the hostname where it replicates to (this host) 528 is the ongoing number of the snap (to identify identical snaps on source and target)
58 25. Appliance Z-RAID with SSF (Storage and Service Failover) based on Comstar iscsi targets/ initiators (under development, not ready) Z-RAID vs RAID-Z ZFS and Raid-Z is a perfect solution when you want data protection against bitrot with end to end data checksums and a crash resistent CopyOnWrite filesystem with snaps and versioning. ZFS Raid-Z protects against disk failures. ZFS replication adds a ultrafast method for async backups even when files are open. ZFS and Z-RAID is the next step as it adds realtime sync between independent Storage Appliances where ZFS protects against a whole Appliance failure. It also adds Availabilty for NFS and SMB services as it allows a full Storage Server failure with a manual or automatic Pool and NFS/SMB service failover with a shared virtual ip. RAID-Z Traditionally you build a ZFS pool from RAID-Z or Raid-1 vdevs from disks. To be protected against a disaster like a fire or flash, you do backups and snaps for daily access of previous versions to access deleted or modified files. In case of a disaster, you can restore data and re-establish services based the last backup state. Main Problem: there is a delay between your last data state and the backup state. You can reduce the gap with ZFS Async Replication but the problem remains that backup is never up to date. An additional critical point are open files. As ZFS Replication is based on snaps, the last state of a replication is like a sudden poweroff what means that files (or VMs in a virtualisation environment) may be in a corrupted state on the backup. Another problem is time to re-establish services like NFS or SMB on a server crash. If you need to be back online in a short time, you use a second backup system that is able and prepared to takeover services based on the last backup state. As on Solarish systems, NFS and SMB are integrated in the OS/Kernel/ZFS with the Windows security identifier SID as an extended ZFS attribute (Solarish SMB), this is really troublefree. Even in a Windows AD environment, you only need to import a pool, takeover the ip of the former server, and your clients can access their data with all AD permission settings intact without any additional settings to care about. Z-RAID SSF But what about a solution that allows all data on the main server and the backup server to be really in sync? This would mean that you do not use async technologies like backup or replication but sync technologies like mirroring or Raid-Z between your storagervers where ZFS protecs against a whole server or pool failure. This is Z-RAID SSF where you build a ZFS Pool not from disks but from independent storageservers each with a local datapool and a manual or automatic Z-POOL and Service Failover in case of problems with the primary server. What is required to build a ZFS Z-RAID SSF over Appliances on a network? First you need blockdevices as a ZFS pool is build on blockdevices. A disk is a blockdevice but you can also use files (like on Lofi encrypted ZFS pools) and FC/iSCSI LUNs and the last option is the solution. You know Comstar and iscsi as a proven technology to create Targets that you may have already used for clients like ESXi, OSX or Windows where you use Comstar to offer LUNs over the network like a local disk. What about using these network LUNs not for other systems but for ZFS itself? You only need a software called Initiator that allows to connect to network LUNs and use them like local disks. If you have not known, this is included in Solarish Comstar as well. When you enable the Initiator with any Target Discovery, it will detect all LUNs from selected Targets and offer them like local disks. Comstar and iscsi is proven technology, so the question is, why we have not used this in the past? The answer is quite simple: Not fast enough on an average 1G network and you need some iscsi knowledge to set it up. The additional Layer Disks -> ZFS Pool -> Target -> network -> Initiator -> ZFS Pool can also slow down compared to a local Pool where the datapath is Disks -> ZFS Pool.

59 25.2 Setup Appliance Z-RAID SSF (ZPOOL-RAID with Storage and Service Failover) The basic option is using two Storage Appliances where each offer a local Pool as a LUN via iscsi. An Initiator on one of them creates a Z-RAID Pool over both LUNs and offers services like NFS or SMB. On problems, the Initiator on the second server imports the Z-RAID and switch NFS/SMB services over a common virtual HA ip. You can extend this with two dedicated Storageheads for the Initiator part that creates the Z-RAID Pool on LUNs from up to 6 Storagenodes for a network Raid-1/Z. Main advantage of the dedicated solution is that all LUNs on a Storagehead failover stay intact and that you have a better control of the LUN access as you can switch a Target Sub-ip to be only in the subnet of one Initiator. This avoids the very critical situation where boths Heads are trying to access the LUNs at the same time.

60 Z-RAID SSF Management: Menu Pools > Appliance Z-RAID SSF This menu shows the state of the network Z-RAID and allows to change the state of heads (Master/ Slave ) and nodes. You can do a manual failover between heads or a role switch from this menu. more, see Z-RAID SSF manual

61 26. HA Cluster RSF-1 The HA Cluster menu adds configuration menus for the RSF-1 Cluster Plugin from high-availability.com. It gives you the option to setup iscsi targets, manage sub-ips and AutoScrub or AutoSnap Jobs for a whole Cluster. Appliance Maps to visualize your disk location in a backplane can be imported on the passive node. Typically, you use two servernodes that access the same SAS disks in a common SAS Dual Expander JBOD via multipath IO. If one servernode fails or needs service, you can switch to the second node manually or automatically (active/ative) to offer services like iscsi, NFS or SMB without an interruption and with current data state. There is no performance impact due the Cluster. This is the current default professional HA solution. RSF-1 RSF-1 brings advanced HA (High Availability) features to ZFS providing a more resilient and robust storage offering tolerant to system failures. Active/Active and Active/Passive configurations are supported. As well as providing core ZFS HA and failover capability to ensure availability in the event of failure, RSF-1 also brings ringfencing mechanisms to protect multi-tenanted storage devices, orchestrates the seamless failover of COMSTAR and ALUA targets, and manages virtual network access (views) to the data. The RSF-1 Cluster Plugin can be obtained with support directly from high-availability.com or from distributors specialised to HA/ Clustering solutions. Napp-it only offers a menu to make handling easier. The RSF-1 Plugin or support for clustering is a 3rd party offer and not available from napp-it.org.
napp-it on OpenIndiana
 napp-it on OpenIndiana Setup and First steps published: 2017-Apr-24 (c) napp-it.org Licence: CC-BY-SA see http://creativecommons.org/licenses/by-sa/2.0/ Content: 1. Setup options for OpenIndiana (Hipster)
napp-in-one ESXi Virtual Server + virtualized ZFS Storage Server NAS/SAN User s Guide Setup and First steps published: 2017-Nov-24 (c) napp-it.
 napp-it.") napp-in-one ESXi Virtual Server + virtualized ZFS Storage Server NAS/SAN User s Guide Setup and First steps published: 2017-Nov-24 (c) napp-it.org Licence: CC-BY-SA see http://creativecommons.org/licenses/by-sa/2.0/
napp-in-one ESXi Virtual Server + virtualized ZFS Storage Server NAS/SAN User s Guide Setup and First steps published: 2017-Nov-24 (c) napp-it.org Licence: CC-BY-SA see http://creativecommons.org/licenses/by-sa/2.0/
Preparing the boot media/installer with the ISO file:
 Preparing the boot media/installer with the ISO file: Download and extract the ISO file with your favorite uncompressing/extracting software (for example: 7zip or WinZip programs) to an empty USB Flash
Virtual Appliance User s Guide
 Cast Iron Integration Appliance Virtual Appliance User s Guide Version 4.5 July 2009 Cast Iron Virtual Appliance User s Guide Version 4.5 July 2009 Copyright 2009 Cast Iron Systems. All rights reserved.
HP Supporting the HP ProLiant Storage Server Product Family.
 HP HP0-698 Supporting the HP ProLiant Storage Server Product Family https://killexams.com/pass4sure/exam-detail/hp0-698 QUESTION: 1 What does Volume Shadow Copy provide?. A. backup to disks B. LUN duplication
IOPStor: Storage Made Easy. Key Business Features. Key Business Solutions. IOPStor IOP5BI50T Network Attached Storage (NAS) Page 1 of 5
 Page 1 of 5") IOPStor: Storage Made Easy Application data, virtual images, client files, email, the types of data central to running a successful business can seem endless. With IOPStor you finally have an advanced
IOPStor: Storage Made Easy Application data, virtual images, client files, email, the types of data central to running a successful business can seem endless. With IOPStor you finally have an advanced
napp-it napp-it Z-RAID vcluster v.2 User s Guide Setup on OmniOS with napp-it Pro complete published: 2018, Dec 06 (c) napp-it.org
 napp-it.org") napp-it napp-it Z-RAID vcluster v.2 User s Guide Setup on OmniOS with napp-it Pro complete published: 2018, Dec 06 (c) napp-it.org Licence: CC-BY-SA see http://creativecommons.org/licenses/by-sa/2.0/ Content:
napp-it napp-it Z-RAID vcluster v.2 User s Guide Setup on OmniOS with napp-it Pro complete published: 2018, Dec 06 (c) napp-it.org Licence: CC-BY-SA see http://creativecommons.org/licenses/by-sa/2.0/ Content:
Getting Started with OpenSolaris An Introduction for Technical Evaluators
 Getting Started with OpenSolaris 2009.06 - An Introduction for Technical Evaluators 3 days starting 25 January at Guillemot Park, Camberley, Surrey To book please make direct contact with Sarah Clayton
LENS Server Maintenance Guide JZ 2017/07/28
 LENS Server Maintenance Guide JZ 2017/07/28 Duty Maintain LENS server with minimum downtime Patch critical vulnerabilities Assist LAB member for using the LENS services Evaluate for custom requirements
Build your own NAS with OpenMediaVault
 Build your own NAS with OpenMediaVault Installation Minimum Requirements i486 or amd64 platform 1 GiB RAM 2 GiB HDD/DOM/CF/USB Thumb Drive used as OpenMediaVault system drive. Flash Drives without static
Zadara Enterprise Storage in
 Zadara Enterprise Storage in Google Cloud Platform (GCP) Deployment Guide March 2017 Revision A 2011 2017 ZADARA Storage, Inc. All rights reserved. Zadara Storage / GCP - Deployment Guide Page 1 Contents
Back Up/Restore Hard Drives And Partitions With CloneZilla Live
 By Falko Timme Published: 2008-11-25 17:35 Version 1.0 Author: Falko Timme Last edited 11/17/2008 This tutorial shows how you can back up and restore hard drives and partitions
Symantec NetBackup PureDisk Compatibility Matrix Created August 26, 2010
 Symantec NetBackup PureDisk 6.6.1 Compatibility Matrix Created August 26, 2010 Copyright 2010 Symantec Corporation. All rights reserved. Symantec, the Symantec Logo, and Backup Exec are trademarks or registered
How to install the software of ZNS8022
 How to install the software of ZNS8022 1. Please connect ZNS8022 to your PC after finished assembly. 2. Insert Installation CD to your CD-ROM drive and initiate the auto-run program. The wizard will run
efolder Replibit Administration
 Last Published January 2017 Table of Contents Table of Contents... 1 Thank you for choosing efolder Replibit!... 8 Customer Support... 8 SECTION A: Introduction to Major Components & Terms... 9 The Agent...
HP LeftHand SAN Solutions
 HP LeftHand SAN Solutions Support Document Installation Manuals VSA 8.0 Quick Start - Demo Version Legal Notices Warranty The only warranties for HP products and services are set forth in the express warranty
Installing the Operating System or Hypervisor
 If you purchased E-Series Server or NCE Option 1 (E-Series Server or NCE without a preinstalled operating system or hypervisor), you must install an operating system or hypervisor. This chapter includes
Dell Storage Compellent Integration Tools for VMware
 Dell Storage Compellent Integration Tools for VMware Administrator s Guide Version 3.1 Notes, Cautions, and Warnings NOTE: A NOTE indicates important information that helps you make better use of your
2 Bay 3.5 HDD SATA NAS Media Server Setting...20 Bonjour...21 TorrentFlux Maintenance...25 Disk Utility...25 RAID Setting...
 Table of contents 1. Overview of the 2 Bay NAS...3 1.1 Introduction...3 1.2 System Requirement...3 1.3 Hardware Installation...3 1.4 Setup the client PC and 2 Bay NAS...3 1.4.1 Setup network configuration
napp-it ZFS Storage Server Some performance tests to decide about some storage setups on different use cases
 napp-it ZFS Storage Server Some performance tests to decide about some storage setups on different use cases - How important is RAM - Differences between HD, SSD, NVMe - What about Slog - AiO or barebone
CompTIA Linux+ Guide to Linux Certification Fourth Edition. Chapter 2 Linux Installation and Usage
 CompTIA Linux+ Guide to Linux Certification Fourth Edition Chapter 2 Linux Installation and Usage Objectives Prepare for and install Fedora Linux using good practices Outline the structure of the Linux
Benchmarks 29 May 2013 (c) napp-it.org
 napp-it.org") Benchmarks 29 May 2013 (c) napp-it.org Hardware: SM X9 SRL-F, Xeon E5-2620 @ 2.00GHz, 65 GB RAM, 6 x IBM 1015 IT (Chenbro 50bay) OS: napp-it appliance v. 0.9c1, OmniOS stable (May 2013) Disks: 5 Seagate
Benchmarks 29 May 2013 (c) napp-it.org Hardware: SM X9 SRL-F, Xeon E5-2620 @ 2.00GHz, 65 GB RAM, 6 x IBM 1015 IT (Chenbro 50bay) OS: napp-it appliance v. 0.9c1, OmniOS stable (May 2013) Disks: 5 Seagate
Parallels Server 4.0 for Mac Bare Metal Edition
 Parallels Server 4.0 for Mac Bare Metal Edition Installation Guide Copyright 1999-2010 Parallels Holdings, Ltd. Parallels Holdings, Ltd. c/o Parallels International GMbH. Parallels International GmbH Vordergasse
Acronis Disk Director 11 Home. Quick Start Guide
 Acronis Disk Director 11 Home Quick Start Guide Copyright Acronis, Inc., 2000-2010. All rights reserved. "Acronis", "Acronis Compute with Confidence", "Acronis Recovery Manager", "Acronis Secure Zone",
Install ISE on a VMware Virtual Machine
 Supported VMware Versions, page 1 Support for VMware vmotion, page 1 Support for Open Virtualization Format, page 2 Virtual Machine Requirements, page 3 Virtual Machine Resource and Performance Checks,
Dell Storage Compellent Integration Tools for VMware
 Dell Storage Compellent Integration Tools for VMware Version 4.0 Administrator s Guide Notes, Cautions, and Warnings NOTE: A NOTE indicates important information that helps you make better use of your
Install ISE on a VMware Virtual Machine
 Supported VMware Versions, page 1 Support for VMware vmotion, page 1 Support for Open Virtualization Format, page 2 Virtual Machine Requirements, page 3 Virtual Machine Resource and Performance Checks,
Install ISE on a VMware Virtual Machine
 Supported VMware Versions, page 1 Support for VMware vmotion, page 1 Support for Open Virtualization Format, page 2 Virtual Machine Requirements, page 2 Virtual Machine Resource and Performance Checks,
napp-it napp-it Z-RAID User s Guide Setup on OmniOS with napp-it Pro complete published: 2016, Sep 14 (c) napp-it.org
 napp-it.org") napp-it napp-it Z-RAID User s Guide Setup on OmniOS with napp-it Pro complete published: 2016, Sep 14 (c) napp-it.org Licence: CC-BY-SA see http://creativecommons.org/licenses/by-sa/2.0/ Content: 1. Appliance
napp-it napp-it Z-RAID User s Guide Setup on OmniOS with napp-it Pro complete published: 2016, Sep 14 (c) napp-it.org Licence: CC-BY-SA see http://creativecommons.org/licenses/by-sa/2.0/ Content: 1. Appliance
DSI Optimized Backup & Deduplication for VTL Installation & User Guide
 DSI Optimized Backup & Deduplication for VTL Installation & User Guide Restore Virtualized Appliance Version 4 Dynamic Solutions International, LLC 373 Inverness Parkway Suite 110 Englewood, CO 80112 Phone:
NexentaStor VVOL
 NexentaStor 5.1.1 VVOL Admin Guide Date: January, 2018 Software Version: NexentaStor 5.1.1 VVOL Part Number: 3000-VVOL-5.1.1-000065-A Table of Contents Preface... 3 Intended Audience 3 References 3 Document
Cluster Management Workflows for OnCommand System Manager
 ONTAP 9 Cluster Management Workflows for OnCommand System Manager August 2018 215-12669_C0 doccomments@netapp.com Table of Contents 3 Contents OnCommand System Manager workflows... 5 Setting up a cluster
Design principles for a napp-it ZFS Storageserver
 Design principles for a napp-it ZFS Storageserver published: 2018-Mar-15 (c) napp-it.org Licence: CC-BY-SA see http://creativecommons.org/licenses/by-sa/2.0/ Content: 1. Design Principles 1.1. What is
Cisco VDS Service Broker Software Installation Guide for UCS Platforms
 Cisco VDS Service Broker 1.0.1 Software Installation Guide for UCS Platforms Revised: May 2013 This document provides detailed instructions for installing the Cisco Videoscape Distribution Suite Service
Using iscsi with BackupAssist. User Guide
 User Guide Contents 1. Introduction... 2 Documentation... 2 Terminology... 2 Advantages of iscsi... 2 Supported environments... 2 2. Overview... 3 About iscsi... 3 iscsi best practices with BackupAssist...
Manually Mount Usb Flash Drive Ubuntu Server 12.04
 Manually Mount Usb Flash Drive Ubuntu Server 12.04 USB storage devices have the enormous advantage that for the most part they By default, disk drives do not auto-mount in Ubuntu Server Edition. Sometimes,
Install ISE on a VMware Virtual Machine
 ISE Features Not Supported in a Virtual Machine, page 1 Supported VMware Versions, page 1 Support for VMware vmotion, page 2 Support for Open Virtualization Format, page 2 Virtual Machine Requirements,
Now on Linux! ZFS: An Overview. Eric Sproul. Thursday, November 14, 13
 Now on Linux! ZFS: An Overview / Eric Sproul What is ZFS? Filesystem, volume manager, and RAID controller all in one More properly: a storage sub-system Production debut in Solaris 10 6/06 ("Update 2")
(Ubuntu 10.04), the installation command is slightly different.
, the installation command is slightly different.") Grub Manual Install Ubuntu 10.04 Without 1st option : get a disk including Boot-Repair, 2nd option : install Boot-Repair in Ubuntu or when you can't boot Windows after installing Ubuntu, or when GRUB is
Grub Manual Install Ubuntu 10.04 Without 1st option : get a disk including Boot-Repair, 2nd option : install Boot-Repair in Ubuntu or when you can't boot Windows after installing Ubuntu, or when GRUB is
This option lets you reset the password that you use to log in if you do not remember it. To change the password,
 User s Guide Overview IDrive offers the most cost-effective BMR functionality with onsite disk image backup for SMBs. You can store entire data of hard disks including the operating system (OS) and application
SPECIFICATION FOR NETWORK ATTACHED STORAGE (NAS) TO BE FILLED BY BIDDER. NAS Controller Should be rack mounted with a form factor of not more than 2U
 TO BE FILLED BY BIDDER. NAS Controller Should be rack mounted with a form factor of not more than 2U") SPECIFICATION FOR NETWORK ATTACHED STORAGE (NAS) TO BE FILLED BY BIDDER S.No. Features Qualifying Minimum Requirements No. of Storage 1 Units 2 Make Offered 3 Model Offered 4 Rack mount 5 Processor 6 Memory
SPECIFICATION FOR NETWORK ATTACHED STORAGE (NAS) TO BE FILLED BY BIDDER S.No. Features Qualifying Minimum Requirements No. of Storage 1 Units 2 Make Offered 3 Model Offered 4 Rack mount 5 Processor 6 Memory
Dell Storage Integration Tools for VMware
 Dell Storage Integration Tools for VMware Version 4.1 Administrator s Guide Notes, cautions, and warnings NOTE: A NOTE indicates important information that helps you make better use of your product. CAUTION:
ElasterStack 3.2 User Administration Guide - Advanced Zone
 ElasterStack 3.2 User Administration Guide - Advanced Zone With Advance Zone Configuration TCloud Computing Inc. 6/22/2012 Copyright 2012 by TCloud Computing, Inc. All rights reserved. This document is
Installing and Upgrading Cisco Network Registrar Virtual Appliance
 CHAPTER 3 Installing and Upgrading Cisco Network Registrar Virtual Appliance The Cisco Network Registrar virtual appliance includes all the functionality available in a version of Cisco Network Registrar
Veeam Backup & Replication for VMware vsphere
 Veeam Backup & Replication for VMware vsphere Version 9.5 Evaluator's Guide December, 2017 2017 Veeam Software. All rights reserved. All trademarks are the property of their respective owners. No part
Install ISE on a VMware Virtual Machine
 ISE Features Not Supported in a Virtual Machine, page 1 Supported VMware Versions, page 1 Support for VMware vmotion, page 2 Support for Open Virtualization Format, page 2 Virtual Machine Requirements,
1Y0-A26 Citrix XenServer 6.0 Practice Exam
 1Y0-A26 Citrix XenServer 6.0 Practice Exam Section 1: Implementing XenServer 1.1 Specific Task: Configure boot storage from SAN Objective: Given a scenario, determine how to configure options on the XenServer
Virtualization with VMware ESX and VirtualCenter SMB to Enterprise
 Virtualization with VMware ESX and VirtualCenter SMB to Enterprise This class is an intense, five-day introduction to virtualization using VMware s immensely popular Virtual Infrastructure suite including
XD10004: How to Install VMware ESX Server 3.5 on VMware Workstation 6.5 as a VM
 white paper XD10004: How to Install VMware ESX Server 3.5 on VMware Workstation 6.5 as a VM VI in a Box - the portable virtual infrastructure Title: How to Install VMware ESX Server 3.5 on VMware Workstation
version 5.4 Installation Guide
 version 5.4 Installation Guide Document Release Date: February 9, 2012 www.phdvirtual.com Legal Notices PHD Virtual Backup for Citrix XenServer Installation Guide Copyright 2010-2012 PHD Virtual Technologies
VMware vsphere Storage Appliance Installation and Configuration
 VMware vsphere Storage Appliance Installation and Configuration vsphere Storage Appliance 1.0 vsphere 5.0 This document supports the version of each product listed and supports all subsequent versions
Oracle 1Z Oracle Solaris 11 System Administration.
 Oracle Oracle Solaris 11 System Administration http://killexams.com/exam-detail/ QUESTION: 147 Review the boot environments displayed on your system: Which option describes the solaris-1 BE? A. It is active
Acronis Backup & Recovery 11.5
 Acronis Backup & Recovery 11.5 Installation Guide Applies to the following editions: Update 2 Advanced Server Server for Windows Virtual Edition Server for Linux Advanced Server SBS Edition Workstation
Mediatomb AddOn for napp- it ZFS Server Appliance
 Mediatomb AddOn for napp- it ZFS Server Appliance Published: 2013-02- 20 Christopher Schinzel I am not a native english speaker but will do my best. If you have any suggestions, technical or syntax errors
Installation of Cisco Business Edition 6000H/M
 Installation Overview, page 1 Installation Task Flow of Cisco Business Edition 6000H/M, page 2 Installation Overview This chapter describes the tasks that you must perform to install software on your Business
Getting Started with ESX Server 3i Installable Update 2 and later for ESX Server 3i version 3.5 Installable and VirtualCenter 2.5
 Getting Started with ESX Server 3i Installable Update 2 and later for ESX Server 3i version 3.5 Installable and VirtualCenter 2.5 Getting Started with ESX Server 3i Installable Revision: 20090313 Item:
HPE VMware ESXi and vsphere 5.x, 6.x and Updates Getting Started Guide
 HPE VMware ESXi and vsphere 5.x, 6.x and Updates Getting Started Guide Abstract This guide is intended to provide setup information for HPE VMware ESXi and vsphere. Part Number: 818330-003 Published: April
PD-SATA USB/LAN Network Attached Storage Enclosure for 3.5 SATA Hard Drives
 Network Attached Storage Enclosure for 3.5 SATA Hard Drives User Manual & Installation Guide March 16, 2008 - v1.0 Table of Contents 1 INTRODUCTION...1 1.1 ICON KEY...1 1.2 THE...1 1.3 PACKAGE CONTENTS...1
Lab #5 Guide: Installing Ubuntu as a Virtual Machine
 Lab #5 Guide: Installing Ubuntu as a Virtual Machine CTEC1863/2018F Operating Systems Mike Boldin Tools, Materials and Equipment Oracle VirtualBox software official site: https://www.virtualbox.org/wiki/downloads
Installing Ubuntu Server
 CHAPTER 1 Installing Ubuntu Server You probably chose Ubuntu as a server solution because of either your gratifying experience using it on the desktop or the raves you ve heard from others about its user-friendly
3 INSTALLING WINDOWS XP PROFESSIONAL
 INSTALLING WINDOWS XP PROFESSIONAL.1 Preparing for installation Objectives.1.1 Windows XP Professional Hardware Requirements.1.2 Hardware Compatibility List (HCL) check.1. Hard Disk Partition.1.4 Required
Parallels Server 5 Bare Metal
 Parallels Server 5 Bare Metal Installation Guide Copyright 1999-2011 Parallels Holdings, Ltd. and its affiliates. All rights reserved. Parallels Holdings, Ltd. c/o Parallels International GMbH. Parallels
AMD RAID Installation Guide
 AMD RAID Installation Guide 1. AMD BIOS RAID Installation Guide.. 2 1.1 Introduction to RAID.. 2 1.2 RAID Configurations Precautions 3 1.3 Installing Windows 8 / 8 64-bit / 7 / 7 64-bit With RAID Functions....5
CyberStore DSS. Multi Award Winning. Broadberry. CyberStore DSS. Open-E DSS v7 based Storage Appliances. Powering these organisations
 Multi Award Winning CyberStore DSS CyberStore DSS CyberStore DSS Storage Appliances: Open-E DSS v7 based Storage Appliances The CyberStore DSS range of iscsi SAN / NAS storage appliances include 1U-4U
A3800 & A3600. Service Release SR2.1 Release Notes. A-Class. VTrak A-Class firmware version Clients
 VTrak A-Class A3800 & A3600 Service Release SR2.1 Release Notes A-Class VTrak A-Class firmware version 1.11.0000.00 Clients VTrak Mac Client Package 1.3.1 42009 VTrak Windows Client Package 1.3.0-40692
Using UCS-Server Configuration Utility
 CHAPTER 3 This chapter contains the following sections: UCS-SCU Interface, page 3-1 Get System Updates, page 3-3 Configure a Server, page 3-5 RAID Configuration, page 3-5 OS Installation, page 3-8 Save
Exam Name: VMware Certified Professional on vsphere 5 (Private Beta)
") Vendor: VMware Exam Code: VCP-511 Exam Name: VMware Certified Professional on vsphere 5 (Private Beta) Version: DEMO QUESTION 1 The VMware vcenter Server Appliance has been deployed using default settings.
Vendor: VMware Exam Code: VCP-511 Exam Name: VMware Certified Professional on vsphere 5 (Private Beta) Version: DEMO QUESTION 1 The VMware vcenter Server Appliance has been deployed using default settings.
CA Agile Central Administrator Guide. CA Agile Central On-Premises
 CA Agile Central Administrator Guide CA Agile Central On-Premises 2018.1 Table of Contents Overview... 3 Server Requirements...3 Browser Requirements...3 Access Help and WSAPI...4 Time Zone...5 Architectural
User s Guide February 28, 2017
 User s Guide February 28, 2017 Copyright 2008-2017 Tiger Technology. All rights reserved. This publication, or parts thereof, may not be reproduced in any form, by any method, for any purpose. TIGER TECHNOLOGY
DX-2104 / 2112 series NAS Affordable, Simple, and Reliable Enterprise-class NAS
 DX-2104 / 2112 series NAS Affordable, Simple, and Reliable Enterprise-class NAS Dax DX2104/ 2112 NAS series aims to bring the enterprise-class features into SMB market at competitive price, helps organizations
LevelOne FNS-7000A. 4-bay Tower NAS w/2 Gigabit Ethernet. User`s Manual
 LevelOne FNS-7000A 4-bay Tower NAS w/2 Gigabit Ethernet User`s Manual CUSTOMER SERVICE For the contact details of customer service and technical support, please refer to the registration card. LIMITED
Virtualization with VMware ESX and VirtualCenter SMB to Enterprise
 Virtualization with VMware ESX and VirtualCenter SMB to Enterprise This class is an intense, four-day introduction to virtualization using VMware s immensely popular Virtual Infrastructure suite including
My Cloud EX2 Ultra Storage Device Release Notes for Firmware
 My Cloud EX2 Ultra Storage Device Release Notes for Firmware 2.30.165 These release notes provide information on My Cloud EX2 Ultra Storage Device Information on the firmware is provided as listed below:
The Future of ZFS in FreeBSD
 The Future of ZFS in FreeBSD Martin Matuška mm@freebsd.org VX Solutions s. r. o. bsdday.eu 05.11.2011 About this presentation This presentation will give a brief introduction into ZFS and answer to the
Macrorit Partition Expert 4.3.5
 Content Macrorit Partition Expert 4.3.5... 1 User Manual... 1 Welcome... 1 About Macrorit Partition Expert... 1 Main Features... 1 Advanced Features... 1 Tools... 2 Unique Technology... 2 System Requirements:...
How to Use This Lab Manual
 3 Contents How to Use This Lab Manual........................................ 5 Lab 1: Setting Up the Student System.................................. 7 Lab 2: Installing Fedora............................................
Product Release Notes
 Release Details SNAZ OS v4.00 Product Release Notes Release Name: SNAZ 4.00 Release Note Number: RNote103 Release Version: 4.00.31 Release Date: 14 th Feb 2006 Release Type: Full Release Supported Platforms:
Installing or booting DSS V6 from a USB flash drive or other writable media starting with the ZIP file
 QUICK START DSS V6 DSS V6 is a standalone bootable storage OS. The software for the Lite version and the regular version of DSS is the same. When you install DSS V6 you can alternatively choose to run
The power of centralized computing at your fingertips
 Pinnacle 3 Professional The power of centralized computing at your fingertips Philips Pinnacle 3 Professional specifications The power of centralized computing in a scalable offering for mid-size clinics
Acronis Backup Advanced Version 11.5 Update 6
 Acronis Backup Advanced Version 11.5 Update 6 APPLIES TO THE FOLLOWING PRODUCTS Advanced for Windows Server Advanced for Linux Server Advanced for PC Advanced for VMware / Hyper-V / RHEV / Citrix XenServer
EFOLDER SHADOWPROTECT CONTINUITY CLOUD GUIDE
 EFOLDER SHADOWPROTECT CONTINUITY CLOUD GUIDE Solution Overview Last Updated August 2, 2012 Prepare for the worst-case scenario with the efolder continuity cloud. Downtime of critical infrastructure can
Backup App V7. Quick Start Guide for Windows
 Backup App V7 Quick Start Guide for Windows Revision History Date Descriptions Type of modification 30 Jun 2016 First Draft New 25 Nov 2016 Added Restore Options to Ch 8 Restoring Data; Combined Technical
Configuration Note. AudioCodes One Voice for Microsoft Skype for Business. CloudBond 365. Backup and Restore Functionality. Version 9.
 7 Configuration Note AudioCodes One Voice for Microsoft Skype for Business CloudBond 365 Backup and Restore Functionality Version 9.5 Update 4 Configuration Note Contents Table of Contents 1 Introduction...
PARALLELS SERVER 4.0 FOR MAC BARE METAL EDITION README
 PARALLELS SERVER 4.0 FOR MAC BARE METAL EDITION README February 18, 2010 1999-2010 Parallels Holdings, Ltd. and its affiliates. All rights reserved. This document provides the first-priority information
Installing VMware vsphere 5.1 Components
 Installing VMware vsphere 5.1 Components Module 14 You Are Here Course Introduction Introduction to Virtualization Creating Virtual Machines VMware vcenter Server Configuring and Managing Virtual Networks
Using UCS-Server Configuration Utility
 CHAPTER 3 This chapter provides information on using the UCS-Server Configuration Utility and contains the following sections: UCS-SCU Interface, page 3-1 Server Inventory, page 3-3 Server Health, page
Documentation. OTRS Appliance Installation Guide. Build Date:
 Documentation OTRS Appliance Installation Guide Build Date: 12/10/2014 OTRS Appliance Installation Guide Copyright 2001-2014 OTRS AG This work is copyrighted by OTRS AG. You may copy it in whole or in
OS6 N2310 N4310 FWRN Build 870
 [Release Date] Apr 13, 2017 [Applicable Hardware] N2310 N4310 [Software Upgrade/Downgrade Note] 1. N2310 & N4310 come from 2 difference upgrade file. 2. We recommend backup the RAID data before firmware
NexentaStor Installation QuickStart Guide. Document History
 NexentaStor 5.1.1 Installation QuickStart Guide You can manage NexentaStor 5.x appliances with its Command Line Interface (CLI) and REST APIs, or with the NexentaFusion graphical user interface (GUI).
Manual Boot Camp Install Windows 8 From Usb Using
 Manual Boot Camp Install Windows 8 From Usb Using To avoid all this, I've chosen to bypass Bootcamp and install Windows in my Mac's native EFI mode. Does not work with Windows 7, only works with Windows
napp-it ZFS Storage principles for high performance SMB fileservices Dual Xeon, 8/40 GB RAM Intel X540, mtu 9000 (JumboFrames)
") napp-it ZFS Storage principles for high performance SMB fileservices Server: Dual Xeon, 8/40 GB RAM Intel X540, mtu 9000 (JumboFrames) Server OS: Oracle Solaris 11.3 SMB 2.1 OmniOS 151017 SMB 2.1 Client
napp-it ZFS Storage principles for high performance SMB fileservices Server: Dual Xeon, 8/40 GB RAM Intel X540, mtu 9000 (JumboFrames) Server OS: Oracle Solaris 11.3 SMB 2.1 OmniOS 151017 SMB 2.1 Client
Addonics T E C H N O L O G I E S. mini NAS. Model: NAS25HDU Key Features
 1.0 Key Features Addonics T E C H N O L O G I E S mini NAS Model: NAS25HDU2 Convert any 2.5 SATA drive into a Network Attached Storage device Connect a USB printer to share it over the network One Fast
Dell Fluid Data solutions. Powerful self-optimized enterprise storage. Dell Compellent Storage Center: Designed for business results
 Dell Fluid Data solutions Powerful self-optimized enterprise storage Dell Compellent Storage Center: Designed for business results The Dell difference: Efficiency designed to drive down your total cost
The following table lists the supported upgrade paths to Cisco Finesse Release 11.5(1).
.") Supported Paths, page 1 Aligned Partitions Support, page 1 Perform, page 2 Perform Rollback, page 4 Supported Paths The following table lists the supported upgrade paths to Cisco Finesse Release 11.5(1).
Supported Paths, page 1 Aligned Partitions Support, page 1 Perform, page 2 Perform Rollback, page 4 Supported Paths The following table lists the supported upgrade paths to Cisco Finesse Release 11.5(1).
Introduction to Virtualization. From NDG In partnership with VMware IT Academy
 Introduction to Virtualization From NDG In partnership with VMware IT Academy www.vmware.com/go/academy Why learn virtualization? Modern computing is more efficient due to virtualization Virtualization
USER GUIDE. CTERA Agent for Windows. June 2016 Version 5.5
 USER GUIDE CTERA Agent for Windows June 2016 Version 5.5 Copyright 2009-2016 CTERA Networks Ltd. All rights reserved. No part of this document may be reproduced in any form or by any means without written
HP VMware ESXi and vsphere 5.x and Updates Getting Started Guide
 HP VMware ESXi and vsphere 5.x and Updates Getting Started Guide Abstract This guide is intended to provide setup information for HP VMware ESXi and vsphere. HP Part Number: 616896-409 Published: September
XL-NAS-400SA. User s Guide
 XL-NAS-400SA User s Guide Table of Contents Chapter 1 Hardware devices 1.1 1.2 1.3 Accessories and XL-NAS-400SA at a glance LCD message and light indicators Hardware installation Chapter 2 Initial setup
Network Management Utility
 4343-7705-02 Network Management Utility Foreword Welcome Network Management Utility is utility software that provides central control over printers, copiers, and other devices on a network. With Network
Adding Groups to Groups
 108 Authenticating and Authorizing Accounts 4 Select the Project X group, and drag it from the Groups drawer to the Other Groups list. Notice that as you drag the group, the pointer changes from an arrow