Oracle is a registered trademark of Oracle Corporation and/or its affiliates. Other names may be trademarks of their respective owners.
|
|
|
- Osborne Tate
- 6 years ago
- Views:
Transcription

1 Primavera Portfolio Management 9.0 What s New
2 Copyright , Oracle and/or its affiliates. The Programs (which include both the software and documentation) contain proprietary information; they are provided under a license agreement containing restrictions on use and disclosure and are also protected by copyright, patent, and other intellectual and industrial property laws. Reverse engineering, disassembly, or decompilation of the Programs, except to the extent required to obtain interoperability with other independently created software or as specified by law, is prohibited. The information contained in this document is subject to change without notice. If you find any problems in the documentation, please report them to us in writing. This document is not warranted to be error-free. Except as may be expressly permitted in your license agreement for these Programs, no part of these Programs may be reproduced or transmitted in any form or by any means, electronic or mechanical, for any purpose. If the Programs are delivered to the United States Government or anyone licensing or using the Programs on behalf of the United States Government, the following notice is applicable: U.S. GOVERNMENT RIGHTS Programs, software, databases, and related documentation and technical data delivered to U.S. Government customers are "commercial computer software" or "commercial technical data" pursuant to the applicable Federal Acquisition Regulation and agency-specific supplemental regulations. As such, use, duplication, disclosure, modification, and adaptation of the Programs, including documentation and technical data, shall be subject to the licensing restrictions set forth in the applicable Oracle license agreement, and, to the extent applicable, the additional rights set forth in FAR , Commercial Computer Software--Restricted Rights (June 1987). Oracle USA, Inc., 500 Oracle Parkway, Redwood City, CA The Programs are not intended for use in any nuclear, aviation, mass transit, medical, or other inherently dangerous applications. It shall be the licensee's responsibility to take all appropriate fail-safe, backup, redundancy and other measures to ensure the safe use of such applications if the Programs are used for such purposes, and we disclaim liability for any damages caused by such use of the Programs. Oracle is a registered trademark of Oracle Corporation and/or its affiliates. Other names may be trademarks of their respective owners. The Programs may provide links to Web sites and access to content, products, and services from third parties. Oracle is not responsible for the availability of, or any content provided on, third-party Web sites. You bear all risks associated with the use of such content. If you choose to purchase any products or services from a third party, the relationship is directly between you and the third party. Oracle is not responsible for: (a) the quality of third-party products or services; or (b) fulfilling any of the terms of the agreement with the third party, including delivery of products or services and warranty obligations related to purchased products or services. Oracle is not responsible for any loss or damage of any sort that you may incur from dealing with any third party. Page 2 of 121

3 Page 3 of 121
4 Table of Contents Overview... 5 Detailed Description... 9 Features... 9 Workflows... 9 Wizard and Diagram Editor... 9 Workflows Tab in the Guide Pane Starting a Workflow Manually Workflow Instances List and Report Receive Copy of Workflow Task as Security Modules Special Functionality in Setup Screen View-only and Forms-only users in Workflows New Look P6 Colors and Style Branding Strip Log out from Main Screen Setup and Admin Links Help Menu Library Option Unicode Support Enhancements P6 Bridge Server Support for User Token Authentication Alert Enhancements Alerts can Trigger when a Category Value or Indicator has Changed Alert can Start Workflow & Activate Web Service Item Contacts can be Recipient for Alert Triggered by Sub-item Change Alert Expiration Date Form and Dashboard Enhancements Default Form and Dashboard per Domain Sub-item Cell Trend Sub-item Cell Annotation in Tooltip End-user Dependency Type Change Blocked Paper Size Selected in Export Settings Submit Changed to Save Search Enhancements Search Field for Selecting User Searching with? and * Wildcards Enhancements for the Administrator Additional QBP Periodic Update Task Timeout for Scheduled Task Ignore Groups in LDAP Sync Utility Custom Export General Maintenance Open API Syntax Packager Databases and DB Utilities Page 4 of 121
5 Overview Workflows A robust set of Primavera Portfolio Management (PPM) workflow features provides new opportunities for collaboration on common portfolio objectives. Via manual and system tasks, PPM Workflows both guides the end-user through intricate business processes and automatically triggers relevant system events. PPM workflows support both manual and automatic decision-making and parallel processes. Manual Tasks can be assigned to specific users or user groups or by role (categories of the user value type together with a scope item or portfolio). By leveraging the Item and Portfolio hierarchy and the role category, a single task in design time instantiates into multiple tasks for many users during run-time. Workflows can be started manually, by another workflow or triggered by an alert. Workflow tasks can be displayed on the special Workflows tab in the Guide pane on the left of the screen, or can be sent to your inbox. More details New Look PPM 9 now resembles the P6 look both in colors and in main tab style. It is possible to Log out directly from the module screen without need to access a menu option. All product documentation is now directly accessible from the new Help menu/library option. More details Unicode Support All Unicode characters are supported wherever the system displays text or receives textual input. More details P6 Bridge Server Support for User Token Authentication User token authentication is now supported when the Bridge accesses Primavera P6 (provided that the P6 server is set up to support this type of authentication). In addition, cookie authentication now supports SSL (HTTPS). More details Page 5 of 121
6 Alerts can Trigger when a Category Value or Indicator has Changed A new transition operator, changes, has been added to both the Category Value Condition Met and the Category Indicator Condition Met alerts. With this transition operator there is no need to define the value or indicator to which it changes. In addition, two other transition operators increases and decreases have been added to the Category Value Condition Met alert when the value type of the category is float, integer, date or value list. With these two transition operators too, there is no need to define the value to which the category increases or decreases. More details Alert can Start Workflow or Activate Web Service Two additional outcomes of an Alert are new supported; Starting a Workflow and Activating a Web Service. This means that any of the seven types of Alert events (including the Specific version of the Phase Modified, Deliverable Modified and Action Item Modified alerts) may now send an message, start a workflow or activate a Web Service. More details Item Contacts can be Recipient for Alert Triggered by Sub-item Change Category Value or Category Indicatory Condition Met alerts triggered by a change in a sub-item cell can use item contacts as their recipients. More details Alert Expiration Date Alerts can be assigned an expiration date. More details Default Form and Dashboard per Domain Each domain can be assigned a single default form and default dashboard. This default form or dashboard, if defined, will automatically display when switching to an item/portfolio whose domain differs from that of the previously displayed item/portfolio. More details Page 6 of 121
7 Sub-item Cell Trend The cell trend for dynamic list cells, both for sub-item categories and the sub-item name can now be displayed. More details Sub-item Cell Annotation in Tooltip Sub-item cell annotations now appear in the tooltip of the cell. More details End-user Dependency Type Change Blocked When a Dependencies List has been configured without the dependency Type column, then the Type field is also disabled in the Dependency Properties dialog box. This prevents the end-user from changing a Dependency type when the Dependency column is not displayed. More details Paper Size Selected in Export Settings Export Settings of a Form or Dashboard include end-user support for determining whether the Paper size should be Letter (Default) or A4. More details Submit Changed to Save The Submit button has been renamed Save and all prompts reflecting the Submit process now refer to a Save process instead of a Submit process. More details Search Field for Selecting User A Search field has been added to facilitate the selection of a user. More details Searching with? and * Wildcards New wildcard search functionality has been introduced into the Search fields of the various View (Map, Scorecard, Form and Dashboard), Item or Portfolio and Data as of Navigation tab trees in the PPM Page 7 of 121
8 Modules and Setup wizards, as well as in the Search field in the Setup screen. This means that when searching for an entity,? can be substituted for any single character, while * can be substituted for any number of any characters. More details Additional QBP Periodic Update It is now possible to schedule two periodic updates for any Query-based portfolio, be it a Portfolio of Items or a Portfolio of Portfolios. The original periodic update is referred to in the Task scheduler as the Standard Periodic Update (Portfolios) and the new one is referred to as the Frequent Periodic Update (Portfolios). More details Task Timeout for Scheduled Task In the Portfolio Management Task Scheduler, each scheduled task can be assigned a maximum duration. If the task does not complete within this duration, it will be interrupted by the system and will be defined as not having been completed successfully. More details Ignore Groups in LDAP Sync Utility Support has been added to the LDAP Synchronization utility to facilitate the synchronization of Users without synchronizing the user groups. It is no longer necessary to list all groups which should be ignored during the synchronization process. More details Custom Export It is now possible to create Custom Export Templates that include an uploaded PPM document in addition to the previously supported cell data of any item portfolio or sub-item. More details Page 8 of 121
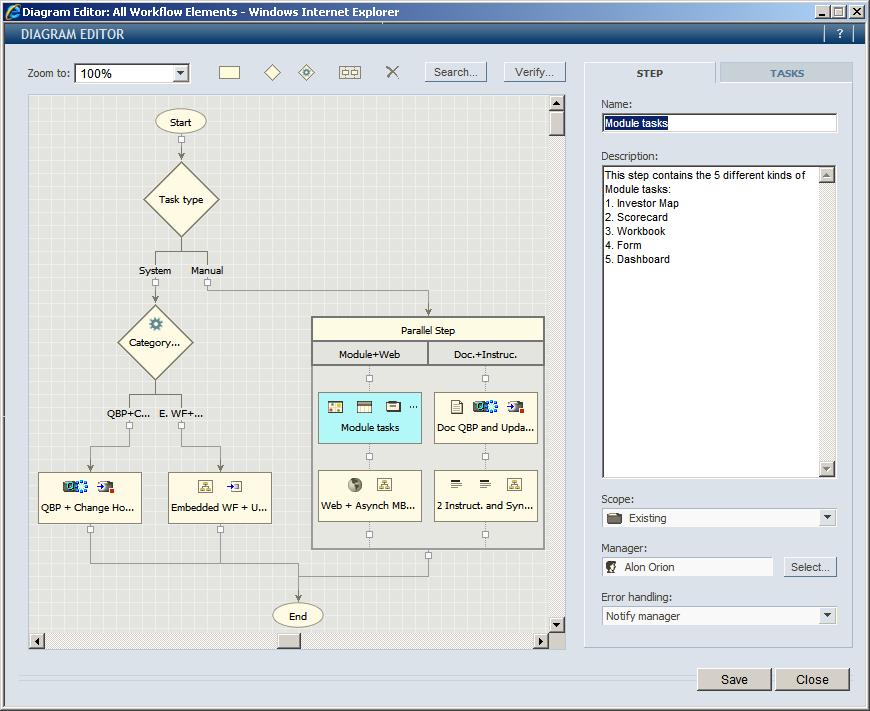
9 Detailed Description Features Workflows A robust set of Primavera Portfolio Management (PPM) workflow features provides new opportunities for collaboration on common portfolio objectives. Via manual and system tasks, PPM Workflows both guides the end-user through intricate business processes and automatically triggers relevant system events. PPM workflows support both manual and automatic decision-making and parallel processes. Manual Tasks can be assigned to specific users or user groups or by role (categories of the user value type together with a scope item or portfolio). By leveraging the Item and Portfolio hierarchy and the role category, a single task in design time instantiates into multiple tasks for many users during run-time. Workflows can be started manually, by another workflow or triggered by an alert. Workflow tasks can be displayed on the special Workflows tab in the Guide pane on the left of the screen, or can be sent to your inbox. Wizard and Diagram Editor A. Introduction The basic workflow contains, in addition to its Start and End steps, at least one step consisting of at least one task. The tasks may be manual tasks performed by a PPM user or automatic tasks performed by the system. Note: You define steps and associated tasks using the DIAGRAM EDITOR. Here is where you create a workflow diagram and access the STEP and TASK tabs mentioned in this and subsequent topics. For more information about the workflow DIAGRAM EDITOR, refer to Workflow Diagram Editor. 1. Overview of Steps These are the types of steps from which you can design a workflow: a. Tasks step b. Manual Decision step c. Category-based Decision step d. Parallel step Page 9 of 121
10 You assign each step a name and description, and you select for each step a scope and manager, if either is to be different from those you selected for the workflow. You also select the way the step is to be handled if it encounters an error. For more information about how to enter step properties, refer to Entering Properties in the Workflow STEP Tab. 2. Overview of Tasks There are manual tasks which are performed by PPM users and system tasks which are automatically implemented by the PPM system. You can assign each task a name and description, and you can define its scope. For each manual task, you must designate a performer and select the Sign off method the performer will use when completing the task. Also, each task, whether a manual task or system task, has its own unique properties which must be defined per task. You can define multiple tasks for a Tasks step but only one task for a Manual Decision or Category-based Decision step. A Parallel step consists of two to five tracks with one or more tasks steps positioned within each track. You can specify a name for each task along with other properties that can also vary depending on the type of step and task. When a workflow is run, steps in the workflow are run in chronological order, while all tasks within a step are instantiated simultaneously when the step runs. The following topics provide an explanation of each type of step, the type of tasks or task that you can define for each type of step, and the use of tracks for a Parallel step. a. Tasks Step and Associated Tasks Use a Tasks step to define a step with one or more tasks where the primary property of each separate task is defined by one of the following tasks types. ~ Module ~ Document ~ Web ~ Instructions ~ Embedded workflow ~ Query-based portfolio ~ Update category Page 10 of 121
11 ~ Change home portfolio The first four task types, Module, Document, Web and Instructions, are manual tasks performed by a PPM user. The last four task types, Embedded workflow, Query-based portfolio, Update category and Change home portfolio are system tasks implemented automatically by the system. In a Tasks step all tasks are instantiated at the same time, and all tasks must be completed before the Step is considered completed. For more information about defining properties for a Tasks step, refer to Inserting a Tasks Step and Defining its Properties. The following topics provide an explanation of each of the task types listed above, all associated with the Tasks step. ~ Module Task A Module task is used when the performer of the task must be directed to one of the following modules as part of his task: Investor Scorecard Workbook Forms Dashboards ~ Document Task A Document task is used when the performer of the task must be directed to an uploaded document. ~ Web Task A Web task is used when the performer of the task must be directed to a web site. ~ Instructions Task An instructions task is used when the performer of the task must be given instructions about a task not linked to any PPM or Web screen. ~ Embedded workflow Task Page 11 of 121
12 Embedded workflow is a system task. This task is used when you want one workflow to automatically start another workflow. The embedded workflow may be one of the following: Synchronous - the host workflow waits for the completion of the embedded workflow Asynchronous - the host workflow continues processing without waiting for the completion of the embedded workflow ~ Query-based Portfolios Task Query-based portfolio is a system task. This task automatically updates all query-based portfolios located within the scope of the task. ~ Update category Task Update category is a system task. This task automatically updates any category with a constant value. ~ Change Home Portfolio Task Change home portfolio is a system task. This task moves the object to another home portfolio. The moved object will have the security assigned to its new home portfolio. b. Manual Decision Step and Associated Task A Manual Decision step lets you define a decision question with two to five possible answers (options). The decision is made manually by the assigned performer. For information about how to define properties for a Manual Decision step, refer to Inserting a Manual Decision Step and Defining its Properties. c. Category-based Decision Step and Associated Task A Category-based Decision step lets you define a decision question with two to five possible answers (options). The decision is made automatically based on conditions set for category indicators or values. For information about how to define properties for a Category-based Decision step, refer to Inserting a Category-based Decision Step and Defining its Properties. Page 12 of 121
13 d. Parallel Step and Associated Tracks A parallel step lets you have more than one current Tasks step running at the same time. This is done by defining between two to five parallel tracks of Task steps, all of which must be completed for the workflow to continue beyond the parallel step. Be aware that when a parallel step runs, each step in a track runs chronologically based on its order in the track; steps in each track run independently from steps in other tracks; and the parallel step does not finish until all steps in the parallel step are completed. For more information about how to define properties for a Parallel step, refer to Inserting a Parallel Step and Defining its Properties. B. Defining Workflows This section describes how to define a new workflow. To create new workflows, complete the steps described in the following sub-sections: Step 1: Accessing the Workflow Wizard, describes how to access the Workflow Wizard. Step 2: Entering General Workflow Information describes how to enter general workflow information, such as its name. Step 3: Selecting Instance Defaults describes how to set the default values for workflow instances generated from this template. Step 4: Designing the Workflow in the Diagram Editor describes using the Diagram Editor to design the workflow s steps and tasks. Step 5: Setting and Viewing In Folders Information - same as in other PPM entities. Step 6: Defining Security Permissions - same as in other PPM entities. 1. Step 1: Accessing the Workflow wizard This section describes how to access the Workflow Wizard where you can design new workflows or edit existing ones. Page 13 of 121

14 a. From the Setup drop-down list, select Workflows. The navigation pane displays the list of workflows. b. Click New to open the WORKFLOW wizard in New mode. 2. Step 2: Entering General workflow Information This section describes how to enter general workflow information, including the Name, Description, Owner, and Status. Page 14 of 121

15 a. In the Name field, enter the workflow s name. b. In the Description field, enter important details to further identify this workflow from others. You can include hypertext in the description. c. In the Owner field, the name of the logged-in user will appear. To change this owner, select a user from the drop-down list. d. In the Status field, select Enabled or Disabled. Enable a workflow to make it available. The system or a user can start an enabled workflow. Disable a workflow to make it unavailable for use by users or the system. e. Click Next to proceed to the Instance Defaults step of the WORKFLOW wizard, where you define the initial properties for all future instances of this particular workflow. 3. Step 3: Selecting Instance Defaults This section describes how to set the default values for workflow instances generated from this template. Page 15 of 121

16 a. From the General step, click Next. The Instance Defaults step of the WORKFLOW wizard appears. b. From the Scope list, select the item or portfolio in the context of which instances of this workflow will be instantiated. c. Click the Select button to assign a specific user or role (category of value type user) as the default manager for any workflow instances generated from this template. For more information about how to use the Manager dialog box, refer to Selecting a Manager. Selecting a Manager In the context of Workflows, there are four instances where you need to select a manager: ~ Default workflow instance manager (Workflow wizard/instance defaults step) ~ Step manager for any of the steps in a workflow, defined on the Step tab for each of the following: Tasks step Category-based decision step Page 16 of 121
 This manager may be a specific user or role (category of value type user). In the first three cases this selection is made in the MANAGER dialog box.")
17 Manual decision step Parallel ~ Manager of a workflow instance started by an Alert (ALERT wizard/outcomes step/select WORKFLOW dialog box) ~ Manager of a workflow instance when manually starting a workflow (START WORKFLOW dialog box) This manager may be a specific user or role (category of value type user). In the first three cases this selection is made in the MANAGER dialog box. (The Manager field in the START WORKFLOW dialog box is a simple dropdown field described in Starting a Workflow Manually.) The following describes this dialog box: To use the MANAGER dialog box: ~ In the Type drop-down filter select Users, Roles or All. The listing is populated by Users, Roles or both accordingly, in alphabetical order. Note: When used to define the Manager of workflow to be started by an alert, the Type dropdown also includes Approved. This displays the joint contents of the Manager and Alternate Managers fields as defined on the Instance defaults step of the selected workflow. ~ Enter a character string in the Search field to display only names (first or last) associated with the selected Type that matches the search string. Blank out the Search field to redisplay all names associated with the current selection in the Type field. Page 17 of 121
18 ~ Depending on the context, the listing will include additional options at the top such as: [None] which can be selected temporarily. Before enabling a workflow, all manager fields must be defined. <Same as workflow> - which allows the Step manager to be inherited from the Workflow <As defined in the workflow> - which allows the alert which starts the workflow to use the pre-defined workflow instance manager. ~ Select a user, role or one of the additional listings and then click OK. ~ Click OK. d. From the Alternate Managers list select an optional group of additional managers who may also manage this workflow. e. All workflow system execution must be performed with the security permission of a specific user. If this to be determined only when the workflow is activated, leave the Defined when activated check box set to its checked default. ~ To set a default workflow system execution permissions user for each workflow instance, uncheck this box. The logged-in user will automatically be assigned as this permissions user. ~ To change this default permissions user to another user click on the Permissions button. This will pop-up the WORKFLOW SYSTEM EXECUTION PERMISSIONS dialog box. For information about completing this dialog box, refer to Assigning the Workflow System Execution Permissions User. ~ Assigning the Workflow System Execution Permissions User Proceed as follows to complete the WORKFLOW SYSTEM EXECUTION PERMISSIONS dialog box. Page 18 of 121

19 Select a user from the User's dropdown field and enter the user's password. For the workflow instance to run successfully the specified user must have sufficient security permissions on any entity or data accessed or update during system execution. Alternatively, if the selected user has been given security permissions for the 'Permit workflow to access or update all entities & data' security module, its checkbox will be enabled and checking it will grant automatic security clearance for each entity or data used in system execution, even if the user does not have specific permission on each entity or piece of data. Click OK. f. When you complete this step, click Next to proceed to the Diagram step of the WORKFLOW wizard, where you define the actual business process represented by the workflow. 4. Step 4: Designing the Workflow in the DIAGRAM EDITOR Use the workflow DIAGRAM EDITOR to design the workflow s steps and tasks. a. From the Instance Defaults step, click Next. The Diagram step of the WORKFLOW wizard appears. Page 19 of 121
20 b. Click Edit. The DIAGRAM EDITOR appears. Refer to WORKFLOW DIAGRAM EDITOR for detailed information about the toolbar icons and how to use the DIAGRAM EDITOR. 5. Step 5: Setting and Viewing In Folders Information - same as in other PPM entities 6. Step 6: Viewing In Folders Information - same as in other PPM entities C. Workflow DIAGRAM EDITOR The Diagram editor is where you design the workflow s steps and tasks. At minimum, a workflow must be defined as having a start, an end, and at least one step containing at least one task. 1. To access the DIAGRAM EDITOR: a. Use the SETUP screen to create a new workflow or to edit an existing workflow. Refer to Defining Workflows for information about using the Setup screen to create or edit a workflow. Page 20 of 121
 icon : Click to insert a new tasks step into the diagram.")
21 The DIAGRAM EDITOR appears: The Diagram editor presents the following: ~ A toolbar: The toolbar consists of the following: Zoom to: To increase or decrease the size of the diagram. To view the workflow without making any changes use the Zoom to drop-down and the horizontal and vertical scrollbars. New Step (Tasks) icon : Click to insert a new tasks step into the diagram. For more information, refer to Inserting a Tasks Step and Defining its Properties. New Decision step (Manual) icon : Click to insert a new manual decision step graphic into the diagram. For more information, refer to Inserting a Manual Decision Step and Defining its Properties. Page 21 of 121
22 New Decision step (Category-based) icon : Click to insert a new category-based decision step graphic into the diagram. For more information, refer to Inserting a Category-based Decision Step and Defining its Properties. New Parallel step icon : Click to insert a new parallel step graphic into the diagram. For more information, refer to Inserting a Parallel Step and Defining its Properties. Remove (Step or connecting lines) icon : Click to remove a selected step or connecting line from the diagram. Search button: Click to search for steps, tasks, options and tracks. For more information, refer to Searching in the Diagram Editor. Verify button: Click to review any problems that would prevent the workflow from running properly. For more information, refer to Verifying the Workflow. ~ Diagram display area: The area in which you create and edit a workflow diagram. ~ STEP tab: Click to enter or edit step properties for a selected step in the diagram. For more information, refer to Entering Properties in the Workflow Step Tab.. ~ TASK tab: This tab appears when a step is selected in the diagram. Click to enter or edit task properties for a selected step in the diagram. 2. Entering Properties in the Workflow STEP Tab Proceed as follows from within the Workflow Diagram editor to complete the STEP tab: Page 22 of 121

23 a. If necessary, select the step. Then click the STEP tab. b. In the Name field, type a name for the step. All step names must be unique within a specific workflow template. c. In the Description field, type a description of the step. This field is optional. d. In the Scope field, accept the default or click the drop-down list. The default, <Same as workflow>, means it will inherit its value from the workflow. e. If you click the drop-down list, the Select an Item or Portfolio pop-up window appears. Select an item from the pop-up window. The step scope field need not be defined if the Step manager is not a role and if its scope is not needed to define the task scope. f. In the Manager field, click Select to select a manager or accept the default. The default, < Same as workflow >, means it will inherit its value from the workflow. This field is required. g. If you click Select, the Manager dialog box appears. Select a name and click OK. For more information about using this dialog box, refer to Selecting a Manager. h. In the Error handling field, select how errors for this step are to be handled. There are three error modes: Page 23 of 121
24 ~ Ignore - any errors in the step or task will be ignored; and the workflow will continue as if nothing happened. The error will be recorded in the Audit log. ~ Stop workflow - any errors in the step or task will automatically stop the workflow. The error and the fact that the workflow was suddenly stopped will be recorded in the Audit log. ~ Notify manager - any errors in the step or task will assign a 'Reassigned due to error' task to the step and workflow manager requesting them to decide whether to ignore the error and continue, or stop the workflow. This option is the default mode for all steps except for the Category-based decision step where the 'Stop workflow' mode is enforced. This option is the default mode for the Tasks step and the Parallel step. The default mode (which is also enforced) for the Manual and Category-based decision steps is 'Stop workflow'. 3. Inserting a Tasks Step and Defining its Properties A Tasks step lets you define a step with one or more tasks. After you insert the new Tasks step, you use the associated STEP and TASKS tabs to define properties. You complete the STEP tab once for a step. However, you may define multiple tasks in the TASKS tab using the Task dialog box for each task. The fields on the Task dialog box can vary, depending on the value you enter in its Type field. Because of that, the procedure below for entering properties in the TASKS tab, presents numbered steps for completing the Task dialog box based on the value you enter its Type field. To insert the new step into the diagram: a. From the DIAGRAM EDITOR, click on the New step (Tasks) icon on the toolbar to insert the associated graphic into the diagram. Then drag and drop the graphic to the appropriate location. b. To connect a connector line to the step, click on the connector line to highlight it, and then click on the step to which the line is to connect. c. To enter properties in the STEP tab, refer to Entering Properties in the Workflow Step Tab. d. To enter properties in the TASKS tab: Page 24 of 121

25 ~ If it is not already selected, select the Tasks step. Then click the TASKS tab. When you create tasks for this step, they are listed to the left of the up and down arrows shown TASKS tab above. You can then use the arrows to position a task within the list. Since only the first four tasks in the list will appear in the corresponding step in the diagram, using the arrows to position tasks simply allows you to control those that get shown in the step in the diagram. Page 25 of 121
26 ~ Click New. The Task dialog box appears. In the Name field, type a name. In the Description field, type a description. In the Type field, select a type. Proceed as follows if you selected Module in the Type field: In the Module field, select an applicable module. If you selected Investor, then select a Map. To display data from a date other than the current date, select a version or enter a date in the Data as of field. Page 26 of 121


27 If you selected Scorecard, then select a Scorecard. To display data from a date other than the current one, select a version or enter a date in the Data as o field. If you selected Workbook, then select a Scorecard and a Tab. If you selected Forms, then select a Form and Tab. To display data from a date other than the current one, select a version or enter a date in the Data as of field. If the form supports the creation of a new Item or Portfolio, and this task requires the creation of same, select the relevant option in the Create new entity drop-down field. Page 27 of 121


28 If you selected Dashboards, then select a Dashboard and Tab. To display data from a date other than the current one, select a version or enter a date in the Data as of field. If the dashboard supports the creation of a new item or portfolio, and this task requires the creation of same, select the relevant option in the Create new entity drop-down field. In the Sign off field, define the type of sign off for this task. For more information about this field, refer to Defining Sign Off. Defining Sign Off The Sign off field defines the nature of the sign off process of each manual task. Generally speaking there are three options: None - If this option is selected, the sign off is completed immediately on clicking the 'Sign off' link in the Guide pane, without an intermediate OK/Cancel prompt. OK/Cancel - If this option is selected, an OK/Cancel prompt summarizing the task details will pop-up after the Performer clicks on the Sign off link in the Guide pane. The Performer must then click OK to finalize the sign off. This is the system default for all tasks. OK/Cancel + Password - If this option is selected, the aforementioned OK/Cancel prompt together with a password field will pop up. The Performer cannot click OK to sign off without first entering his password. Page 28 of 121
29 In the Scope section of this dialog box, complete the applicable fields. For more information about these fields, refer to Defining Task Scope. Defining Task Scope The Task Scope has three possible functions: Defining the essence of the task o o o o o o Module tasks - for their links Category-based decision task - for the data to be checked Update category task - for the data to updated Query-based portfolio - which portfolios should be refreshed Change home portfolio - Which Items or Portfolios should have their Home Portfolio changed Embedded workflow - For defining the Scope of tasks included in an Embedded Workflow whose scope is set to be inherited scope from the Embedded Workflow Determining the Performer of a Task or Manager of an Embedded Workflow - If the Performer of a Manual task or the Manager of the Embedded Workflow is defined as a role (Category of data type user) a scope is needed to resolve that role. Generating multiple tasks (iterative tasks) from one task definition - The Scope Item or Portfolio together with a Scope level value of 1 or more levels below, Both or All, generates multiple tasks (according to the number of Items or Portfolios for a single specific Performer, or for many Performers, if the Performer is defined as a Role or Group. The Task dialog box Scope section includes the following fields: Item or portfolio: For selecting the Scope item or Portfolio of this task. Scenario: For selecting a pre-defined Portfolio scenario. Relevant to the Module: Investor task only. Page 29 of 121
30 Scope level: For defining a task scope relative to the selected Scope item or portfolio. Scope level options depend on the Scope Item or Portfolio entity type: o o For Item - 'Selected Item' and is disabled For Portfolio of Items - 'Selected Portfolio' (default), '1 below' including all of the items in the selected portfolio but not the portfolio itself, 'Both' including both all of the items and the selected portfolio. o For Portfolio of Portfolios - 'Selected Portfolio' (default); '1 below', '2 below' and '3 below' including the entities 1, 2 or 3 levels below the selected portfolio but not the portfolio itself, 'Custom (4 or more below)' for defining, together with the 'Custom' field, entities 4 or more levels below the selected portfolio but not the portfolio itself, 'All' including entities at all levels below the selected Portfolio together with the Portfolio itself. Custom: For defining Scope levels more than 3 levels below the Selected Portfolio. Enabled only when Scope level = 'Custom (4 or more below)' Apply to: If the Scope Item or Portfolio is a Portfolio of Portfolios, and the Scope level 1 or more levels below, this field determines whether 'Items', 'Portfolios' or 'Both' should be included in the scope of the task. In the Performer field, accept the default or click the Select button next to the Performer field and select the performer of this task from the PERFORMER dialog box. Then click OK. For more information about using this dialog box, refer to Selecting a Performer. Selecting a Performer In the context of Workflows, there are two instances where you need to select a performer: Task Performer for any of the other Manual tasks o Manual decision task (TASK tab) Page 30 of 121
 This performer manager may be a specific user, role (category of value type user) or group.")
31 o o o o Module: Investor, Scorecard, Workbook, Forms, Dashboards (Task dialog box) Document (Task dialog box) Web (Task dialog box) Instructions (Task dialog box) Manager of the embedded workflow (Task dialog box for Embedded workflow) This performer manager may be a specific user, role (category of value type user) or group. The following describes this dialog box: To use the PERFORMER dialog box: In the Type drop-down filter select Users, Roles, Groups or All. The listing is populated by Users, Roles, Groups or all three of them accordingly, in alphabetical order. Note: When used to define the Manager of an embedded workflow (started by a host workflow) the Type drop-down also includes Approved. This displays the joint contents of the Manager and Alternate Managers fields as defined on the Instance defaults step of the selected embedded workflow. Enter a character string in the Search field to display only those names (first or last) associated with the selected Type that match the search string. Page 31 of 121

32 Empty the Search field to redisplay all names associated with the current selection in the Type field. Depending on the context the listing will include additional options at the top such as: o o [None] which can be selected temporarily, but before enabling a workflow, all Performer fields and the Manager of the embedded workflow field must be defined. <Step manager> - which allows the Performer or Manager of Embedded Workflow to be inherited from the Step Select a user, role, group or one of the additional listings and then click OK. Click OK. Proceed as follows if you selected Document in the Type field: Page 32 of 121
33 Click the Select button next to the Document field. The DOCUMENTS dialog box appears. Select an item or portfolio. A list of documents uploaded for this item or portfolio appears in the DOCUMENTS dialog box. Select a document from the list and click OK. In the Sign off field, define the type of sign off for this task. For more information about this field, refer to Defining Sign Off. In the Scope section of this dialog box, complete the applicable fields. For more information about these fields, refer to Defining Task Scope. In the Performer field, accept the default or click the Select button next to the Performer field and select the performer of this task from the PERFORMER dialog box. Then click OK. For more information about using this dialog box, refer to Selecting a Performer. Click OK. Proceed as follows if you selected Web in the Type field: Page 33 of 121
34 Enter a valid Web URL in the Link to field or click the Browse button next to the Link to field to select the applicable intranet file to which to link. In the Sign off field, define the type of sign off for this task. For more information about this field, refer to Defining Sign Off. In the Scope section of this dialog box, complete the applicable fields. For more information about these fields, refer to Defining Task Scope. In the Performer field, accept the default or click the Select button next to the Performer field and select the performer of this task from the PERFORMER dialog box. Then click OK. For more information about using this dialog box, refer to Selecting a Performer. Click OK. Proceed as follows if you selected Instructions in the Type field: Type any instructions into the Description field. Page 34 of 121

35 In the Sign off field, define the type of sign off for this task. For more information about this field, refer to Defining Sign Off. In the Scope section of this dialog box, complete the applicable fields. For more information about these fields, refer to Defining Task Scope. In the Performer field, accept the default or click the Select button next to the Performer field and select the performer of this task from the PERFORMER dialog box. Then click OK. For more information about using this dialog box, refer to Selecting a Performer. Click OK. Proceed as follows if you selected Embedded workflow in the Type field: In the Embedded workflow field, select a workflow. Both enabled and disabled workflows display in the Select a Workflow pop-up window. Select Host workflow or Embedded workflow to determine what defines the Workflow System Execution Permissions user. Page 35 of 121
36 Check Host workflow waits for completion of embedded workflow if you want the host workflow to wait for the embedded workflow to end before the host workflow continues. In the Scope section of this dialog box, complete the applicable fields. For more information about these fields, refer to Defining Task Scope. In the Manager of embedded workflow field, either accept the As defined in embedded workflow checkbox default or uncheck it and click the Select button to select a different manager for the embedded workflow. Then click OK. For more information about using this dialog box, refer to Selecting a Performer. Click OK. Proceed as follows if you selected Query-based portfolio in the Type field: Select Workflow System Execution Permissions user or Query Permissions user to determine the query-based portfolio permissions user. Page 36 of 121

37 In the Scope section of this dialog box, complete the applicable fields. For more information about these fields, refer to Defining Task Scope. Click OK. Proceed as follows if you selected Update category in the Type field: In the Category field, select the category to be updated. In the Data as of field, accept the Today default, select a version or enter the date at which the category will be updated. In the Value field, select an appropriate value. The type of field will reflect the value type of the category. If the value type was float, integer or text, the Value field will be an edit field. When closing the Task dialog box via OK, the contents will be validated for float, integer or text, respectively. Page 37 of 121

38 If the value type was either value list or user, the Value field will be a dropdown field containing all of the values in that value list or all of the users in the system, respectively. If the value type was date, the Value field will be a combo-box date field for either entering a date or selecting a version. In the Scope section of this dialog box, complete the applicable fields. For more information about these fields, refer to Defining Task Scope. Click OK. Proceed as follows if you selected Change home portfolio in the Type field: In the New home portfolio field, select another home portfolio. The type of entity (Portfolio of Items or Portfolio of Portfolios) selected for the New home portfolio, determines to some extent the possible options of the Scope fields. Page 38 of 121
39 In the Scope section of this dialog box, complete the applicable fields. For more information about these fields, refer to Defining Task Scope. Click OK. 4. Inserting a Manual Decision Step and Defining its Properties A Manual Decision step lets you define a decision question with two to five possible answers (options). The decision is made manually by the assigned performer. After you insert the new decision step, you use the associated STEP and TASK tabs to define properties. You complete the STEP and TASK tabs only once for a decision step. To insert the new step into the diagram: a. From the DIAGRAM EDITOR, click on the New Decision step (Manual) icon on the toolbar to insert the associated graphic into the diagram. Then drag and drop the graphic to its appropriate location. b. To connect a connector line to the step, click on the connector line to highlight it, and then click on the step to which the line is to connect. c. To enter properties in the STEP tab, refer to Entering Properties in the Workflow STEP Tab. d. To enter properties in the TASK tab: Page 39 of 121

40 ~ If it is not already selected, select the manual decision step. Then click the TASK tab. ~ In the Name field, type a name for this task. ~ In the Options list, double-click the name of an existing option if you want to edit it. Notice that any edit is reflected in the associated decision step in the diagram. ~ If you want to add another option, click the Add button next to the Options list. Doubleclick the default name in the Options list to edit it. ~ If you have more than two options and you want to remove one of them, select the option and click the Remove button. ~ In the Sign off question field, accept the default text or double-click the text and type your own text. ~ In the Sign off field, select the type of sign off for the task. For more information about this field, refer to Defining Sign Off. ~ In the Performer field, accept the default or click the Select button next to the Performer field and select the performer of this task from the PERFORMER dialog box. Then click OK. For more information about using this dialog box, refer to Selecting a Performer. Page 40 of 121

41 5. Inserting a Category-based Decision Step and Defining its Properties A Category-based Decision step lets you define a decision question with two to five possible answers (options). The decision is made automatically based on conditions set for category indicators or values. After you insert the new decision step, you use the associated STEP and TASK tabs to define properties. You complete the STEP and TASK tabs only once for a decision step. To insert the new step into the diagram: a. From the DIAGRAM EDITOR, click on the New Decision (Category-based) step icon on the toolbar to insert the associated graphic into the diagram. Then drag and drop the graphic to the appropriate location. b. To connect a connector line to the step, click on the connector line to highlight it, and then click on the step to which the line is to connect. c. To enter properties in the STEP tab, refer to Entering Properties in the Workflow STEP Tab. d. To enter properties in the TASK tab: ~ If it is not already selected, select the category-based decision step. Then click the TASK tab. Page 41 of 121
42 ~ In the Options list, double-click the name of an existing option if you want to edit it. Notice that any edit is reflected in the associated decision step in the diagram. ~ If you want to add another option, click the Add button next to the Options list. Doubleclick the default name in the Options list to edit it. ~ If you have more than two options and you want to remove one of them, select the option and click the Remove button. ~ In the Category field, click the down arrow and select the applicable category from the Select a Category pop-up window. ~ In the Data as of field, accept the default or click the down arrow and select a version from the Select a Version pop-up window or enter a date. ~ After you select a category, the data type fields, Value or Indicator together with the Conditions table will appear on the TASK tab. Depending on the Data type (Value/Indicator) and Value type (Float, Integer, Date, Text, Value list or User) of the category selected, a corresponding Conditions table will display as follows: Page 42 of 121


43 Value type = Float, Integer Value type = Date Value type = Text Value type = Value List Value type = User Data type = Indicator Page 43 of 121
44 ~ First select the data type which you wish to use; the category Value or Indicator. If the category has only one option, that option will automatically be selected and disabled. ~ Conditions table Condition values If the Value type is Float, Integer or Date, define the ranges of values of the category via the From and To cells for which each option will be selected. If the Value type is Date a No Value condition is displayed for which an option must be selected. Treat null as zero checkbox - If the Value type is Float or Integer, a Treat null as zero checkbox appears. o o If checked then there is no need to define a No Value condition for it is the same as the condition defined for zero. If not checked, a No Value condition is automatically displayed. An option must be selected for this condition If the Value type is Text enter strings in the String cells for which each option will be selected. Note: There is no need to define all possible values. A Catch-all Else exists for which an option must be defined. If the Value type is Value list or User or the Data type = Indicator, select Values, User names or Indicators via the Value, User and Indicator cells, respectively for which each option will be selected. Note: There is no need to define all possible values. A Catch-all Else exists for which an option must be defined. Add button -, Click the Add button to add a condition. Remove button - Select a condition and click the Remove button to remove a condition. Page 44 of 121

45 6. Inserting a Parallel Step and Defining its Properties A parallel step lets you have more than one current Tasks step running at the same time. This is done by defining between two to five parallel tracks of Task steps, all of which must be completed for the workflow to continue beyond the parallel step. After inserting a parallel step, you must verify that each Track of the parallel step includes at least one Tasks step. To insert the new parallel step into the diagram: a. From the Diagram Editor, click on the New Parallel step icon on the toolbar to insert the associated graphic into the diagram. Then drag and drop the graphic to the appropriate location. b. To connect a connector line to the step, click on the connector line to highlight it, and then click on the step to which the line is to connect. c. To enter properties in the STEP tab, refer to Entering Properties in the Workflow STEP Tab. d. To enter properties in the TRACKS tab (to add or remove tracks or to edit the names of tracks): ~ If it is not already selected, select the parallel step. Then click the TRACKS tab. Page 45 of 121

46 ~ If you want to edit the name of a track, double-click on the name you want to edit. Then edit the name. ~ If you want to add a track, click the Add button. Then double-click the name and edit it as appropriate. ~ If you want to remove a track, select the track to be removed and click the Remove button. ~ To add steps to a track: Select the line beneath the applicable track in the workflow diagram. Click the New Step (Tasks) icon in the toolbar to insert the new step. Define properties for the associated STEP and TASKS tabs. Refer to Inserting a Tasks Step and Defining its Properties for more information. Repeat the above steps as applicable to add steps for each track. 7. Searching in the Diagram Editor You can search from within the Diagram Editor for steps, tasks, options and tracks. Page 46 of 121

47 To search from the Diagram Editor: a. Click the Search button in the toolbar. The SEARCH dialog box appears. b. In the Search field, type the search string. Then click the search icon. Matches appear in the Search results field. Steps and Tasks appear with their respective icons, Track names appear with parallel step icon, while Option names appear with their respective Decision step icon, Manual or Category-based. c. Click the search result that you want to locate, and then click the Show button. The step that contains the search match is highlighted. 8. Verifying the Workflow You can verify whether the workflow contains problems that would prevent it from running properly. Problems with the workflow are shown in the Verify dialog box, as shown in the sample below: Page 47 of 121

48 The VERIFY dialog box lists the type of problem, the step or task where the problem resides, and a brief description of the problem. The verification process identifies two basic types of problems: Errors and Warnings. a. Errors Errors are problems such that if left unchanged will create a run-time error in the workflow instance. For example, a Task defined without a Performer. Until all errors are fixed, the verification will fail and the template will remain disabled. The Verify dialog box represents errors with a red X. b. Warnings Warnings are problems that can be fixed outside of the workflow editor. For example, if a Module Task (which requires a scope to define its link) ultimately inherits its scope from the Workflow and the workflow's scope = [None], there will only be a warning because this could be rectified by inserting a Workflow scope when starting the workflow manually. Warnings do not prevent the enabling of the workflow template. The VERIFY dialog box represents warnings with a black exclamation symbol (!). To verify the workflow from the Diagram Editor: a. Click Verify in the toolbar. The VERIFY dialog box appears. b. Click the row that you want to display more details. The details appear in the Details field. c. Click the Show button to highlight the area of the diagram where the problem resides and to open the applicable tab, such as the STEP or TASK tab, if applicable. (Drag the VERIFY dialog box away if it blocks your view of the Diagram Editor.) Page 48 of 121
49 d. Fix the error as indicated by the descriptive text in the dialog box. Note: Fixed errors continue to be shown in the VERIFY dialog box until you click Refresh. e. Repeat the above steps for each error. f. When you finish verification, click the Close button. Then click Save to save the changes. D. Editing a Workflow which is Currently Running If the workflow selected to be edited has a current instance running, a prompt will pop up informing the user that only certain parts of the workflow can be edited. Specifically this means that most Step and Task properties can be changed. What cannot be changed are the General and Instance Default fields and the diagram of the workflow, all of which are disabled. 1. Permitted changes in a workflow with a current instance running can be introduced in any step in the workflow, even the in current step. 2. Changes in the current steps or in steps occurring prior to the current step will not be implemented until the next instantiation of the workflow. 3. Changes in steps occurring after the current step will already be implemented during the current instantiation of the workflow. 4. If while editing a workflow there was no current instance running, but prior to saving the changes the workflow was started by another user, the configurator will be instructed by a prompt how to proceed. Workflows Tab in the Guide Pane The Guide pane, formerly called My Processes, now contains two tabs; Processes (formerly My Processes) and the new Workflows tab. The Workflows tab contains a list of all your current workflows and tasks. The instructions for each task will closely guide you through all of your tasks. A. Showing or Hiding the Guide pane 1. To show the Guide pane: From the View menu of any module, choose Show/Hide Guide pane, or click corner of the main window. in the top left Page 49 of 121


50 2. To hide the Guide pane: From the View menu of any module, choose Show/Hide Guide pane, or click corner of the Guide pane. on the top right B. Viewing Workflows, Steps, and Tasks from the Guide Pane You can use the Guide pane Workflows tab to display all currently running workflows whose current workflow steps contain workflow tasks in which you are either a performer or manager. 1. Displaying Workflows, Steps and Tasks When you open the Guide pane and click the Workflows tab, you can view the information in one or two primary ways: Performer view or Manager view. Page 50 of 121

51 a. Performer View Performer View displays only those workflows whose current step contains tasks in which you are a performer. To display Performer View, Click Options, Show Performer View. For a single workflow, the following screen shows a sample followed by descriptions of the information you see in Performer View: ~ The name of the workflow instance ~ Show Diagram link to display the diagram of the corresponding workflow template ~ The date and time the workflow instance started ~ The name of the user who started the workflow, if the workflow was started manually, or the host workflow instance name if the workflow was embedded in another workflow, or the name of the alert if started by an alert. ~ The name of the item/portfolio of the workflow scope Page 51 of 121
52 ~ The name of the manager of the workflow ~ The description of the workflow ~ The name of the step containing the task of which you are a performer ~ The name of the item/portfolio of the step scope ~ The name of the step manager ~ The description of the step ~ The total number of tasks that you must sign off in the current step. The total number of tasks changes dynamically as you sign off tasks. Note: You can hide most of the above details associated with workflows by selecting Options, Hide Details. Select Options, Show Details to redisplay the details. b. Displaying Tasks in Performer View When viewing workflow information in the Guide pane, you can display the tasks of the currently active step in which you are a performer by clicking on the name of the workflow. You can return to the workflow list by clicking on the Show Workflow List button. The tasks in which you are a performer display beneath the workflow and step details. Each task lists its name, scope, and description, as shown in the sample below: Page 52 of 121

53 A manual decision would appear with its name, decision question, and sign off link, similar to the following sample: If the current step is a parallel step, then when viewing its tasks, in Performer View, the tasks are clustered according to the current Step of each track of the parallel step. For example, the following sample information appears in the Guide pane when you are a performer for current tasks in tracks within a parallel step. Below, on the left details are shown. On the right details are hidden: Page 53 of 121


54 A check mark appears ahead of each completed task in the Guide pane, unless you choose to hide completed tasks, as discussed in the note below. Note: You can hide or show details when displaying tasks by selecting Options, Hide Details or Options, Show Details, as applicable. Note: You can hide or show completed (checked off) tasks when displaying tasks by selecting Options, Hide Checked off Tasks or Options, Show Checked off Tasks, as applicable. c. Manager View Manager View displays information only for those workflows whose current step contains tasks in which you are either a performer or manager. Page 54 of 121

.")
55 To start Manager View, Click Options, Show Manager View. For a single workflow, you see all the same information listed for the Show Performer View, but in addition to the total number of tasks that you must perform as a performer, another field displays that provides the total number of tasks remaining for the current step in which you are manager. Note: If you are both the designated performer and manager of a task, the task is counted only as a perform task and you receive this task only as a performer (sign off task). Note: If you are the manager of a task in more than one way (Step and Workflow manager, Step and Parallel Step Manager, Parallel Step and Workflow Manager, Step, Parallel Step and Workflow Manager), the task is counted as a Manager task (Manager Sign off task). Note: You can hide most of the details associated with workflows by selecting Options, Hide Details. Select Options, Show Details to redisplay the details. Page 55 of 121


56 d. Displaying Tasks in Manager View When viewing workflow information in the Guide pane, you can display the tasks of the currently active step in which you are a performer or manager by clicking on the name of the workflow. Task details for a manual decision would appear with its name, decision question, performer, and Manager sign off link, similar to the following sample: In Manager View, two sets of tasks can display: Tasks for which you are a performer, along with a Sign off link for each uncompleted task, and tasks for which you are the manager, Page 56 of 121
57 with a Manager sign off link appearing after each uncompleted task. The task details displayed in the Manager view are the same as in the performer view with the addition of the name of the designated performer of the task. Tasks for which you are a performer appear above a dashed line that separates them from tasks for which you are a manager. If the current step is a parallel step, then when viewing its tasks, whether in Manager View, the tasks are clustered according to the current Step of each track of the Parallel step. For example, the following information appears in the Guide pane when you are both the performer and manager for tasks in a parallel step. Below, on the left, details are shown. On the right details are hidden: Page 57 of 121

 tasks when displaying tasks by selecting Options, Hide Checked off Tasks or Options,")
58 Manager Tasks Manager Tasks A Sign off or Manager sign off link appears after each uncompleted task. A check mark appears ahead of each completed task, unless you choose to hide completed tasks, as discussed in the note below. Note: You can hide or show details when displaying tasks by selecting Options, Hide Details or Options, Show Details, as applicable. Note: You can hide or show completed (checked off) tasks when displaying tasks by selecting Options, Hide Checked off Tasks or Options, Show Checked off Tasks, as applicable. Page 58 of 121
 A sign off for a task is defined using the workflow DIAGRAM EDITOR.")
59 2. SIGN OFF dialog boxes All manual tasks that display in Performer or Manager view are associated with a Sign off or Manager sign off link, which appears underneath the task information. (System tasks will appear only in the Manager view with a Manager sign off, until the system has completed the task) A sign off for a task is defined using the workflow DIAGRAM EDITOR. Clicking on a Sign off link displays the SIGN OFF dialog box for that task. The performer must complete the SIGN OFF dialog box to complete the task. Note: Be aware that once the performer (or manager) clicks OK on a SIGN OFF dialog box, the task is marked as completed and the action is irreversible; there is no undo. The SIGN OFF dialog box can vary, depending on the sign off option defined when the task was defined in the workflow DIAGRAM EDITOR. a. Performer Sign Offs A sign off that requires a simple OK or Cancel is defined using the workflow DIAGRAM EDITOR (by selecting OK/Cancel in the Sign off field). Clicking a Sign off link for a sign off that was defined as OK/Cancel causes a SIGN OFF dialog box similar to the following sample to appear: A sign off that requires an OK or Cancel response as well as the performer s password is defined in the workflow DIAGRAM EDITOR (by selecting OK/Cancel + Password in the Sign off field). Clicking a SIGN OFF link for a sign off that was defined as OK/Cancel + Password causes a SIGN OFF dialog box similar to the following sample to appear: Page 59 of 121

60 If when using the Workflow Diagram Editor None was selected for the Sign off field, then the task becomes checked off as it is completed and no intermediate sign off dialog box appears. A sign off for a manual decision task that requires a simple OK or Cancel response subsequent to selecting an option is defined in the workflow DIAGRAM EDITOR by selecting OK/Cancel in the Sign off field. The options presented in the drop-down list are those defined using the TASK tab in the workflow DIAGRAM EDITOR. Clicking a manual decision Sign off link for a sign off that was defined as OK/Cancel causes a SIGN OFF dialog box similar to the following sample to appear: A sign off for a manual decision task that requires an OK or Cancel response as well as the performer s password subsequent to selecting an option is defined using the Workflow DIAGRAM EDITOR (by selecting OK/Cancel + Password in the Sign off field). The options presented in the drop-down list are those defined using the TASK tab in the workflow DIAGRAM EDITOR. Clicking a manual decision Sign off link for a sign off that was defined as OK/Cancel + Password causes a SIGN OFF dialog box similar to the following sample to appear: Page 60 of 121

 Tasks Error handing for a step is defined using the STEP tab in the Workflow diagram editor.")
61 b. Manager Sign Offs Clicking on a Manager sign off link always pops up a MANAGER SIGN OFF dialog box with OK/Cancel buttons and a Password field. Note: This is the case even if the corresponding performer Sign off link did not require a pop up SIGN OFF dialog box to verify the Sign off. Clicking the Manager sign off link for a manual decision task pops up a MANAGER SIGN OFF dialog box similar to the following: 3. Reassigned Due to Error (Error Handling) Tasks Error handing for a step is defined using the STEP tab in the Workflow diagram editor. If the Error handling option selected was Notify Manager, an error in the task will cause a new task to be reassigned to the Manager of the step. The reassigned task will be shown in the manager s guide pane. Page 61 of 121


62 The Manager can choose whether to ignore the error and sign off the task, or stop the workflow. C. Participating in Workflows This subsection provides a simple example of a workflow to convey a fundamental sense of what you see and do when you are a participant in a running workflow. For this example, know that the performers are Bob Basic, Mick Middleman (Bob s manager), and Tina Top (the project manager). 1. Before this workflow begins, Bob Basic receives an from Tina Top who requests that Bob submit candidate IT projects for the Cloud Computing Initiative by way of the Candidate Project Form. Bob subsequently submits the candidate, upon which an item added to portfolio alert triggers the Basic Approval workflow. 2. Bob opens the Guide pane and sees that Basic Approval is currently the only workflow instance relevant to him, as shown below: Page 62 of 121


63 3. Bob clicks on the workflow s name to display its tasks: 4. Bob clicks on the Describe Candidate task, which displays the relevant screen for this task. Page 63 of 121
64 5. Bob completes the applicable fields as shown below. 6. Upon completing the previous screen, Bob clicks Save and then, since he has now completed his task, clicks the Sign off link under his task in the Guide pane. The associated SIGN OFF dialog box appears: 7. Bob clicks OK to complete the Sign off process, and the workflow progresses. Page 64 of 121

65 Note: Be aware that once OK is clicked on a SIGN OFF, the action is irreversible; there is no undo. 8. Since Bob has no further tasks, his Guide pane appears as follows: 9. The workflow progresses and the current step includes a task for Mick along with a system task that was already performed, as shown in Mick s Guide pane below: Page 65 of 121
66 10. Mick clicks on the Review Candidate task in his Guide pane, which displays the screen relevant to performing his task: 11. Mick reviews the form and then clicks on Project Status and changes the status to Submitted for Manager Approval[. He then clicks Save. Having reviewed the form and changed the status, Mick then clicks the associated Sign off link, circled below: Page 66 of 121
67 12. Upon clicking the SIGN OFF link, the SIGN OFF dialog box appears: 13. Mick clicks OK to complete the Sign off, and the workflow progresses to the next step, in which Mick has a decision to make, as shown in his Guide pane: Page 67 of 121

68 14. Mick clicks on Sign off link to display the Sign off dialog box with the Which option do you prefer? field, as shown below: 15. Mick selects Approve, and then clicks OK to complete the Sign off. The workflow then progresses. Since Mick has no further tasks, his Guide pane appears as follows: Page 68 of 121

69 16. The workflow progresses and the current step includes a task for Tina along with a system task that was already performed, as shown in Tina s Guide pane below: 17. Tina clicks on the Review Candidate task in her Guide pane, which displays the screen relevant to performing her task. Tina reviews the form and then clicks on Project Status and changes the status to Project Manager Approved. She then clicks Save. Page 69 of 121
70 18. Having reviewed the form and changed the status, Tina then clicks the associated Sign off, link circled below: 19. Upon clicking the Sign off link, the SIGN OFF dialog box appears: 20. Tina clicks OK to complete the Sign off, and the workflow progresses to the next step, in which Tina has a decision to make, as shown in her Guide pane. However, before she makes the Page 70 of 121

71 decision, she wants to review the workflow, so she clicks the Show Diagram link, as circled below. 21. Clicking the Show Diagram link displays the workflow in the Diagram Editor, shown below. After reviewing the workflow, she closes the editor by clicking the Close button. Page 71 of 121

72 22. Tina has now considered what has been done and clicks Sign off to display the sign off and to select an option. She clicks the down arrow to display the options. 23. Tina selects Approve and then clicks OK to complete the Sign off. Page 72 of 121
73 24. This instance of Basic Approval workflow is now complete. Starting a Workflow Manually Workflows can be started automatically, either when triggered by an alert or if it is embedded within another workflow, or manually, by using the START WORKFLOW dialog box. Note: Access to the START WORKFLOW dialog box requires Read & View permission on the Start Workflow Instances security module. For information about defining an alert to start a workflow refer to Alert can Start Workflow & Activate Web Service. To manually start a workflow: Page 73 of 121

74 A. Click Collaborate, Start Workflow. The START WORKFLOW dialog box appears. B. In the Workflow field, click the down arrow. The Select a Workflow pop-up window appears. Note: The workflows are filtered by workflow security, so you see only those workflows for which you have workflow security. C. Select a workflow template. D. In the Scope field, accept the default or click the down arrow and select the applicable portfolio or item from the pop-up window. E. In the Manager field, accept the default or select an applicable value. For more information about selecting a manager, refer to Selecting a Manager. Note: The Manager field drop-down list contains the Manager and Alternate Managers defined in the WORKFLOW wizard Instance defaults step. If the manager there was defined as a role, the dropdown list contains one role and the names of all of the users in the group selected for the Alternate Managers. F. The Description field displays the description of the selected workflow. This field is read only. G. If you do not want to start the workflow from the beginning, click on the Start from step drop-down to select the step at which to start the workflow. Page 74 of 121

75 H. Click Permissions. The WORKFLOW SYSTEM EXECUTION PERMISSIONS dialog box appears. For information how to change the Workflow system Execution Permission user, refer to Assigning the Workflow System Execution Permissions User. I. Click OK to close the START WORKFLOW dialog box. Workflow Instances List and Report You can use the WORKFLOW INSTANCES dialog box to review, stop, archive, delete, and report on workflow instances. Page 75 of 121
76 If you have Read & View permission on the Manage Workflow Instances security module, this dialog box displays all workflow instances in the system, regardless of whether their status is Pending, Active, Completed, Stopped or Faulted, and regardless of whether or not they have been archived. If you are a manager of workflows, this dialog box displays all Workflow instances of which you are a manager, regardless of whether their status is Pending, Active, Completed, Stopped or Faulted, and regardless of whether or not they have been archived. In either of the above cases you can A. See the name of the Workflow template even if you do not have Read & View Permission on the workflow folder in which this template is located. B. Stop any workflow whose Status is Pending or Active C. Archive or Remove any workflow whose Status is Completed, Stopped or Faulted D. Get a Report of any Workflow Instance listed, whether archived or not E. View/Edit any listed workflow template provided that you have Read & View/Edit permissions for this template. To access the Workflow Instances dialog box, click Collaborate, Workflow Instances. The WORKFLOW INSTANCES dialog box appears. The WORKFLOW INSTANCES dialog box displays the following: A. Workflow instances list: A list of workflow instances including the status of each. Archived instances show if the Show archived instances check box is checked. These are the possible workflow instance statuses: 1. Active 2. Completed 3. Pending 4. Stopped 5. Faulted B. The Description pane on the right side of the dialog box displays information about the selected workflow instance. Page 76 of 121
77 1. If the selected instance is either Pending or Active, the information visible to the workflow manager in the Guide Pane when in Show Manager View, is displayed. 1. If the selected instance is Completed, Faulted or Stopped, then only the Workflow name, Start date and time, Started by, Scope and Manager information are displayed. C. The Show Details checkbox when checked displays full information about the workflow and current Steps and Tasks and when unchecked, shows only abbreviated information. This is identical to their Show Details/Hide Details option in their Guide Pane counterpart. This checkbox only affects the display of Pending and Active workflows. D. Workflow Instances control buttons 1. Stop button for stopping a workflow instance To stop a workflow instance: a. From the WORKFLOW INSTANCES dialog box, select the workflow instance you want to stop. b. Click Stop. This stops any Pending or Active workflow. 2. Archive button for archiving a workflow instance To archive a workflow instance: a. From the WORKFLOW INSTANCES dialog box, select the workflow instance you want to archive. b. Click Archive. This makes it possible to hide the selected workflow instance from the Workflow Instances list (together with clearing the Show archived instances checkbox) without removing them from the database. 3. Edit button for viewing or editing the workflow template of a workflow instance You cannot edit all the properties of a workflow if one or more instances of it are already running. For more information about editing a workflow which has instances which are currently running refer to Editing a Workflow which is Currently Running. To edit a workflow: a. From the WORKFLOW INSTANCES dialog box, select the workflow you want to edit. b. Click Edit. The WORKFLOW wizard appears populated with the workflow template from which this instance was generated. Page 77 of 121
78 4. Report button for getting a report of all of the events of a workflow instance To generate a report of a workflow instance: a. From the WORKFLOW INSTANCES dialog box, select the workflow instance for which you want to generate a report. b. Click Report. This will display a detailed sequence of all events recorded related to this workflow instance. A sample is shown below: 5. Remove button for completely removing any trace of the events of a workflow instance You can remove a workflow instance. Be aware that when you remove a workflow instance, it is completely removed from the system and there is no way for you to display an instance that has been removed or retrieve any other information about it. To remove a workflow instance: Page 78 of 121

79 a. From the WORKFLOW INSTANCES dialog box, select the workflow instance you want to remove. b. Click Remove. This removes the instance from the database together with the information in its Workflow instance report. Receive Copy of Workflow Task as If a user would like to receive notification concerning workflow tasks for which he is a Performer, he must check the Receive copy of workflow tasks as checkbox on the Contact step of the USER wizard. When checked, the Performer of any task (but not the Step Manager or Workflow Manager) in addition to having notification of the task appearing in the Workflows tab of the Guide pane, will receive an in his inbox, as follows: From: Primavera Portfolio Management.Server@noreply.com Subject: PPM Workflow Task - Workflow: OMB Submission 1 st quarter To: Nissan Zisken The following workflow task has been generated for you: Workflow: OMB Submission 1 st quarter Started: Mar 14, :31 Manager: Alon Orion Description: This workflow has ten steps. Step: Manager Approval of Budget Manager: Michael Lubling Description: Manager must approve the tasks in this step. Page 79 of 121
80 Task: Input Budget Staff Costs Scope: Budgeting staff Description: Enter costs of all of the members of the staff. Security Modules In order to manage user permissions for workflow-related operations, the following security modules have been added: A. Start Workflow Instances The user can start a workflow: manually (logged-in user), or via a host workflow (Workflow System Execution Permissions user) or alert (alert owner). B. Manage Workflow Instances The user can view, stop, archive, or delete a workflow instance. C. Permit Workflow to Access and Update all Entities & Data Can permit workflow instances to access all entities and data needed for system execution regardless of their security settings. Note: If the security of the Workflow System Execution Permissions user is based on this security module, and this same user is defined as the Query Permissions user for a Query-based portfolio task, this does not grant this user automatic Read & View for each portfolio and for the category conditions data. This user must have individual Read & view permission for each category s data and for each Item/Portfolio as is the case for the usual Query permissions user. Special Functionality in Setup Screen A. A workflow template cannot be enabled or disabled from the Setup screen. The Enable/Disable options are disabled. To disable or enable a workflow, you must use the Enable/Disable options on the General step of the WORKFLOW wizard. B. You cannot remove a category or version that is used by a workflow unless you first remove the category or version from that workflow. C. A workflow template cannot be removed from its home folder if 1. It has an instance which is currently running or pending Page 80 of 121
81 2. It is embedded in another workflow 3. It is defined as the outcome of an alert D. When a workflow template can be removed, any of its non-archived Stopped, Faulted or Completed workflow instances which are not currently archived, will automatically be archived. View-only and Forms-only users in Workflows Forms-only and View-only users will always be treated as if they are Denied permissions for the following three workflow security modules: A. Start Workflow Instance 1. These user types cannot manually start a workflow via the Start Workflow dialog box. 2. If either of these user types are the alert owners of alerts whose outcome = Start workflow, then the alert triggering will fail. The error message written to the log for an alert owner that actually has deny for Start Workflow will also cover this case. 3. If either of these user types is defined as the Workflow System Execution Permissions users for an Embedded workflow, then it is as if there is no Workflow System Execution Permissions user and the Embedded Workflow will not be able to start. Any error messages for this scenario will be the same as for users who have permission denied on the Start Workflow Instance security module. B. Manage Workflow Instances - The only workflow instances that these user types can see in the Workflow Instances dialog box are instances for which they are defined as the Manager. C. Permit Workflow to Access all Entities & Data - If either of these user types are defined as the Workflow System Execution Permissions user of a workflow instance (which is either manually started by some other user or triggered by an Alert of which this user is not the owner), then they require specific permission for each entity or data that workflow system execution must access or update. They are viewed as if they have been denied blanket permission to access and update all entities & data granted by this security module. Page 81 of 121
82 The following table describes Workflow-related functionality for Forms-only or View-only license types. Workflow Functionality Forms-only View-only 1. Selected as Workflow/Step Yes Yes Manager or Task Performer 2. Guide pane Workflow & Processes tabs, Show Workflow List button, Refresh & Options Yes Yes Workflow link Tasks list Yes Yes Show Diagram link Yes Yes Task Sign off/manager Sign Yes Yes Off/Stop Workflow link SIGN OFF/MANAGER SIGN OFF/STOP WORKFLOW dialog boxes Yes Yes Task links Yes Yes (But links to Investor, Scorecard, Workbook or Dashboard display error screen) Update Data in Module Task links Yes No (Cannot enter data) 3. Start Workflow Instance No (Has Deny permissions on this security module) No (Has Deny permissions on this security module) 4. Manage Workflow Instances No (Has Deny permissions on this security module, but can manage Workflows of which she is the manager) 5. Permit Workflow to Access all Entities & Data No (Has Deny permissions on this security module) 6. Create (Workflow) Alert No (Has Deny permissions on the Create Alert security module.) 7. Edit WORKFLOW wizard Yes (No access to setup but can Partially Edit Workflow via Show Diagram link, and fully edit via the Workflow Instances dialog box, Edit control.) No (Has Deny permissions on this security module, but can manage Workflows of which she is the manager) No (Has Deny permissions on this security module) Yes (Has Allow permissions on the Create Alert security module but the Workflow will not be able to start.) No (Has access to WF but only in view mode except for Permissions user) Page 82 of 121

83 New Look PPM 9 now resembles the P6 look both in colors and in main tab style. It is possible to Log out directly from the module screen without need to access a menu option. All product documentation is now directly accessible from the new Help menu/library option. P6 Colors and Style The overall look of PPM 9 now resembles the web based interface of P6. These changes include: A. Colors - The default color scheme was changed to a range of P6 blues. The previous color scheme can be selected during the installation process. B. Tab style - The module tabs with their respective icons were replaced by typical P6 tabs C. Upper left curved corner of the screen and the dialog boxes was replaced by a straight corner Branding Strip The branding strip was extended, and now also serves as the background for the module tabs. The customized strip should be at least 70 pixels high, and its design should include an area which will be overlapped by the module tabs (28 pixels high). Log out from Main Screen A log out link was added to the logged in user & Date line on the top right corner of the screen. Page 83 of 121

84 Setup and Admin Links These module links were moved up to the logged in user & Date line on top right corner of the screen. Help Menu Library Option This link leads to an online library containing all PPM product documentation. Unicode Support All Unicode characters are supported wherever the system displays text or receives textual input. Enhancements P6 Bridge Server Support for User Token Authentication User token authentication is now supported when the Bridge accesses Primavera P6 (provided that the P6 server is set up to support this type of authentication). In addition, cookie authentication now supports SSL (HTTPS). Page 84 of 121

85 Authentication controls for defining the method of accessing Primavera P6 have been added to the Bridge Server Settings dialog box. If the previously supported Cookies method of authentication is selected, it is now possible to use the HTTPS protocol when accessing data from P6. Username token authentication is also supported. Page 85 of 121

86 A. If HTTP is the data transfer protocol used, then the following additional Settings must be defined via the Authentication Settings dialog box: 1. Message Security is automatically set to Sign & Encrypt. 2. Server certification thumbprint Since Message Security is automatically set to Sign & Encrypt a Server certification thumbprint must be entered. 3. Time stamp A time stamp may be optionally set for each transfer of data. B. If HTTPS is the data transfer protocol used, it is then possible to do away with the message security, and there is no need for a server certification thumbprint or time stamp for the data transfer, as shown below: Nevertheless, it is still possible to choose Sign & Encrypt message and defined a server certificate thumbprint and time stamp. Page 86 of 121
87 Alert Enhancements Alerts can Trigger when a Category Value or Indicator has Changed A new transition operator, changes, has been added to both the Category Value Condition Met and the Category Indicator Condition Met alerts. With this transition operator there is no need to define the value or indicator to which it changes. In addition, two other transition operators increases and decreases have been added to the Category Value Condition Met alert when the value type of the category is float, integer, date or value list. With these two transition operators too, there is no need to define the value to which the category increases or decreases. Note: One should use these new operators only after carefully considering all options. If used incorrectly, they can trigger a massive amount of unnecessary alert events with their concomitant messages, workflows started or web services activated. Page 87 of 121
88 The following table describes the exact wording of the new Transition operators as they appear in the Event step of the ALERT wizard, and of the [Condition Operator] keywords as they appear in the Message step of the ALERT wizard per Category value type or Indicator. Note: If the category defined in a Category Value Condition Met alert changes from any value to Null or No Value, if the Transition operator was changes it will trigger the alert. If the transition operator was increases or decreases it will not trigger the alert. 1. CHANGE Transition operator [Condition Operator] keyword All category Value types and Indicator changes changed 2. INCREASE Integer/Float increases increased Date changes to later date changed to later date Value list changes to value with higher weight changed to value with higher weight Text/User NA NA 3. DECREASE Integer/Float decreases decreased Date changes to earlier date changed to earlier date Value List changes to value with lower weight changed to value with lower weight Text/User NA NA Alert can Start Workflow & Activate Web Service Two additional outcomes of an Alert are new supported; Starting a Workflow and Activating a Web Service. This means that any of the seven types of Alert events (including the Specific version of the Phase Modified, Deliverable Modified and Action Item Modified alerts) may now send an message, start a workflow or activate a Web Service. Page 88 of 121

89 A new Outcome step has been added to the Alert wizard supporting any one of three types of outcomes; Send message (which is the Default), Start workflow or Activate Web Service. If the Send Message radio button has been selected, the Alert wizard will function the same way it did in PPM 8.0. Note: Once an alert has been created, its outcome cannot be modified. A. Start Workflow 1. To start a workflow via the Alert a. Select the Start workflow radio button. This disables the Message and Recipients step. b. Click on the Select Workflow button. This pops-up the SELECT WORKFLOW dialog box. Page 89 of 121


90 ~ Click on the Workflow field. This pops-up the Select a Workflow tab tree It displays all workflows which the logged-in user is authorized to see whether they are disabled or not. Note: If a disabled workflow is selected, ii will cause a run-time error if not enabled prior to being started by the alert. Selecting a workflow populates the Description field with the description of the workflow, which cannot be altered Page 90 of 121

91 The name of the Workflow Instance that will be created when the alert triggers can be set in advance. By default, it is set to the Workflow name, but it can be edited. The Scope of the workflow s instance is by default, defined by the Item or Portfolio for which the alert has been triggered. The workflow s scope can be selected instead. Note: Mistaken scope definitions will cause Run-time errors. For example, if the alert scope is a Root folder or Sub-item, the workflow will not start. The Manager of the workflow is by default, <As defined in workflow>, but a different manager can be selected by clicking on the Select button. This pops up the MANAGER dialog box. Page 91 of 121
 the workflow will not start when the alert s event is triggered, The Workflow System Execution Permissions")
92 Note: Although any User or Role can be selected as the Manager of the workflow, if this User or Role does not appear on the Approved list of Managers (which consists of the Manager User or Role and the members of Alternate Manager s group as defined on the Instances step of the Workflow) the workflow will not start when the alert s event is triggered, The Workflow System Execution Permissions user is by default, the Owner of the alert. The Workflow s System Execution Permissions user can be selected instead. 2. Once the alert event is triggered, the Workflow will start only if the owner of the alert has Read & View permission on the Start Workflow security module. Page 92 of 121
93 B. Activate Web Service 1. To activate a Web Service via the alert a. Select the Activate Web Service at the following URL radio button. Note: the Message and Recipients step are ghosted b. Enter the URL of the Web Service in the field beneath the radio button. Note: The URL used must meet certain specifications. For details see Primavera Portfolio Management Enterprise API.chm. 2. Name space values a. Web service alerts are created with the /EventSink/ name space. This is not displayed in the wizard. Note: This is an advanced topic, of interest for Web Service developers only. Read more about PPM Web Service name spaces at Primavera Portfolio Management Enterprise API.chm b. Name space values are never changed. Web service (programmatic) alerts created in different PPM versions, will be saved with their original name space even when viewed, edited and saved by the wizard of a different version. This name space is also not displayed in the wizard. Page 93 of 121
94 C. New Functionality in the Setup screen 1. Setup Details displayed for Workflow and Web Service alerts a. Workflow alert ~ Name: <Alert name> ~ Scope: <Alert scope> ~ Workflow: <WF template name> ~ Instance Name: <WF instance name> ~ Expires: <Expiration date-time> b. Web Service ~ Name: <Alert name> ~ Scope: <Alert scope> ~ Web Service URL: <Web Service URL> ~ Expires: <Expiration date-time> Note: If no <Expiration date-time> has been defined for the , Workflow or Web Service alerts, then the Expires: label does not display. Page 94 of 121

95 2. Display of Web Service (Programmatic Alerts) a. Show Web service Alerts displays all Web Service alerts (formerly named Programmatic Alerts). b. These cannot be seen simultaneously with the & Workflow alerts Item Contacts can be Recipient for Alert Triggered by Sub-item Change Category Value or Category Indicator Condition Met alerts triggered by a change in a sub-item cell can use item contacts as their recipients. When Category Value and Category Indicator Condition Met alerts are defined for a certain scope item/portfolio, the alert will be triggered either when the condition is met for the scope item/portfolio or when met for any of the sub-items of the scope item/portfolio. Page 95 of 121
 item or its sub-items B.")
96 A. For example, an alert is set to be triggered when the category Expenses becomes greater than 1,000,000 for the Accounts Payable (ERP) item or its sub-items B. If the outcome of this alert is Send message Page 96 of 121


97 C. and one of the Selected Recipients is defined as the Item Contacts role, D. If the Accounts Payable (ERP) item has Contacts defined for it Page 97 of 121


98 E. then when the sub-item Account #1 of the Accounts Payable (ERP) item triggers the Alert F. the Contacts of the parent item will receive the alert message. Alert Expiration Date Alerts can be assigned an expiration date. A. Each new alert, regardless of its outcome ( message, Start Workflow or Activate Web Service) may be assigned an expiration date (but not a time). Page 98 of 121
99 1. The default expiration for any alert is Never. 2. If the Date radio button is selected, a valid date later <Today> in the correct date format must be inserted 3. Only dates can be entered but not times. Internally the expiration time is set to midnight 00:00 of the selected date. B. When viewing an alert created (via the Open API) with an expiration time, if the time is not 00:00 it will displayed in non-editable form next to the date: 1. If the time is 00:00 it is not displayed. 2. User can change the radio button and the date, but not the time. 3. Changing the radio button to Never erases the date and the time. 4. Changing the date resets the Date together with the currently displayed time Page 99 of 121

100 Form and Dashboard Enhancements Default Form and Dashboard per Domain Each domain can be assigned a single default form and default dashboard. This default form or dashboard, if defined, will automatically display when switching to an item/portfolio whose domain differs from that of the previously displayed item/portfolio. A. FORM & DASHBOARD wizard / General step Page 100 of 121

101 Although the descriptions below are formulated in terms of changes in the FORM wizard and Module, they apply equally to the DASHBOARD wizard and module. 1. A Default form for this domain checkbox has been added to the General step of the FORM wizard beneath the Domain field. 2. By checking this checkbox, the configurator will be able to set a form as the default form for a given domain. 3. When the All Domains option is selected, the checkbox should be unchecked and disabled. 4. When the checkbox is checked, but another form has already been set as the default form of the specified domain, the following prompt should display on Finish: a. On OK, the wizard window will be closed, and the current form will be defined as the default form of the specified domain, overriding the previous default form. b. The prompt will display and the overriding will occur regardless of the security rights the logged-in user has with regard to the overridden form. B. Forms & Dashboards Module 1. This default form, if defined, will automatically display when switching to an item/portfolio whose domain differs from that of the previously displayed item/portfolio. Specifically, the default form will be displayed when all the following conditions are met: a. The newly selected item/portfolio belongs to a specific domain (not No Domain) which differs from that of the form b. The current form is defined for a different domain (not All Domains ) c. The logged-in user has the security permission to view the default form. 2. If the domain of the newly selected item/portfolio item has no form set as its default, or if such a form had been set, but the logged-in user lacks security permissions to view, the forms selection field should be emptied (<Select a form>). Page 101 of 121


102 Sub-item Cell Trend The cell trend for dynamic list cells, both for sub-item categories and the sub-item name, can now be displayed. A. In the Dynamic List, right-click on any sub-item category cell. The drill-down menu which pops-up now includes a Trend option. B. Clicking on Trend pops up the CELL PROPERTIES dialog box for this sub-item category cell. Page 102 of 121


103 1. All tabs are disabled except for the TREND tab 2. The Add button is disabled 3. The Trend cells themselves cannot be updated from this dialog box. C. The cell trend of the sub-item name can also be displayed. Page 103 of 121
104 D. If the Dynamic list has a name column, the name of the selected sub-item appears in the header of the CELL PROPERTIES dialog box. Page 104 of 121
105 E. If the Dynamic list does not have a name column, the name of the sub-item type together with the serial # of the sub-item will appear in the header of the CELL PROPERTIES dialog box. Sub-item Cell Annotation in Tooltip Sub-item cell annotations now appear in the tooltip of the cell. Page 105 of 121


106 A. When hovering over the category value in a Dynamic List, a single tooltip with its value and annotation will appear. B. When hovering over the category value/reference value in a Scorecard, a single tooltip with the value, reference value and annotation will appear. C. When hovering over the category indicator in either a Scorecard or Dynamic List, a single tooltip with both the indicator and the annotation will appear. Page 106 of 121


107 End-user Dependency Type Change Blocked When a Dependencies List has been configured without the dependency Type column, then the Type field is also disabled in the Dependency Properties dialog box. This prevents the end-user from changing a Dependency type when the Dependency column is not displayed. Page 107 of 121
 or A4.")
108 Paper Size Selected in Export Settings Export Settings of a Form or Dashboard include end-user support for determining whether the Paper size should be Letter (Default) or A4. Page 108 of 121
109 Submit Changed to Save The Submit button has been renamed Save and all prompts reflecting the Submit process now refer to a Save process instead of a Submit process. Page 109 of 121

110 Search Enhancements Search Field for Selecting User A Search field has been added to facilitate the selection of a user. This search field has been added in the following places in the application: A. Form and Dashboard tabs 1. User Category fields 2. User Category cells in Tables 3. User Category cells for Sub-items in Dynamic Lists Page 110 of 121

111 B. Scorecard User Category cells Page 111 of 121
, Item or Portfolio and Data as of Navigation tab")
112 C. User Group wizard for selecting Users or Contacts Searching with? and * Wildcards New wildcard search functionality has been introduced into the Search fields of the various View (Map, Scorecard, Form and Dashboard), Item or Portfolio and Data as of Navigation tab trees in the PPM Modules and Setup wizards, as well as the Search field in the Setup screen. This means that when searching for an entity,? can be substituted for any single character, while * can be substituted for any number of any characters. Page 112 of 121


113 This wildcard search functionality is not supported when selecting users either in the modules or the setup wizards. Page 113 of 121
 and the new one is referred to as the Frequent Periodic Update (Portfolios).")
114 Enhancements for the Administrator Additional QBP Periodic Update It is now possible to schedule two periodic updates for any Query-based portfolio, be it a Portfolio of Items or a Portfolio of Portfolios. The original periodic update is referred to in the Task scheduler as the Standard Periodic Update (Portfolios) and the new one is referred to as the Frequent Periodic Update (Portfolios). Page 114 of 121
115 A. In the PORTFOLIO of Items wizard/items step and in the PORTFOLIO of Portfolios wizard/portfolios step, the Periodic Update: checkbox has become the Periodic update: dropdown supporting three options: None (default), Standard and Frequent. Standard is equivalent to having Periodic Update checked in PPM 8.0 B. Schedule Task The parameters of these two periodic updates are defined in the SCHEDULE TASK dialog box. The default frequency for the Standard Periodic Update is once a day, while the default frequency for the Frequent Periodic Update is once every half day. Page 115 of 121
 3.")

116 C. ADMIN/STATUS tab/scheduled Tasks The three Scheduled Tasks displayed on the STATUS tab are now: 1. Import Data 2. Standard Periodic Update (Portfolios) 3. Frequent Periodic Update (Portfolios) Tooltip support has been added to the Task column. D. Server Maintenance Details has been expanded to display all of the other scheduled tasks. Page 116 of 121

117 Task Timeout for Scheduled Task In the Portfolio Management Task Scheduler, each scheduled task can be assigned a maximum duration. If the task does not complete within this duration, it will be interrupted by the system and will be defined as not having been completed successfully. This task duration is defined by the Time out after: drop-down field which supports the following 9 options: A. 1 minute B. 5 minutes C. 15 minutes D. 30 minutes E. 1 hr F. 3 hrs G. 6 hrs H. 12 hrs I. unlimited Page 117 of 121

118 Ignore Groups in LDAP Sync Utility Support has been added to the LDAP Synchronization utility to facilitate the synchronization of Users without synchronizing the user groups. It is no longer necessary to list all groups which should be ignored during the synchronization process. The keyword ignore groups (including the quote marks) can be entered instead, in the TASK PARAMETERS Ignore ProSight Group field for scheduled synchronization, and in the Active Directory Synchronization Ignore PPM Groups field for ad hoc synchronization. This assures that the synchronization will include only users and not any of the groups. Custom Export It is now possible to create Custom Export Templates that include an uploaded PPM document in addition to the previously supported cell data of any item portfolio or sub-item. Page 118 of 121
Primavera Portfolio Management Reporting Views for SQL Server databases
 Portfolio Management Reporting Views for SQL Server Databases 16 R1 Copyright 1999-2016, Oracle and/or its affiliates. The Programs (which include both the software and documentation) contain proprietary
Oracle is a registered trademark of Oracle Corporation and/or its affiliates. Other names may be trademarks of their respective owners.
 Primavera Portfolio Management 9.1 Data Mapping and Data Flow for the Bridge for Primavera P6 Copyright 1999-2014, Oracle and/or its affiliates. The Programs (which include both the software and documentation)
Primavera Portfolio Management 9.1 Bridge for Microsoft Office Project Server 2007 Users Guide
 Primavera Portfolio Management 9.1 Bridge for Microsoft Office Project Server 2007 Users Guide Last printed: 7/28/2011 11:37:00 PM Last saved: 7/28/2011 11:37:00 PM ii Primavera Portfolio Management Bridge
Primavera Portfolio Management 9.1 Bridge for Primavera P6 Users Guide
 Primavera Portfolio Management 9.1 Bridge for Primavera P6 Users Guide Last printed: 7/28/2011 11:41:00 PM Last saved: 7/28/2011 11:41:00 PM ii Primavera Portfolio Management Bridge for Primavera P6 --
Oracle Information Rights Management Oracle IRM Windows Authentication Extension Guide 10gR3 August 2008
 10gR3 August 2008 ,, 10gR3 Copyright 2007, 2008, Oracle. All rights reserved. Primary Author: Martin Abrahams Contributing Author: Martin Wykes The Programs (which include both the software and documentation)
 What's New in P6 Professional Release 8.2 December 2011 Copyright Oracle Primavera What's New in P6 Professional Copyright 1999, 2011, Oracle and/or its affiliates. All rights reserved. Oracle and Java
USING ADMINISTRATOR FEATURES
 HYPERION FINANCIAL MANAGEMENT SYSTEM 9 RELEASE 9.3.1 USING ADMINISTRATOR FEATURES Oracle's Hyperion Financial Management System 9 Release 9.3 contains significant enhancements to administrator features
Adaptive Risk Manager Challenge Question Cleanup 10g ( ) December 2007
 December 2007") Adaptive Risk Manager Challenge Question Cleanup 10g (10.1.4.3.0) December 2007 Adaptive Risk Manager Challenge Question Cleanup, 10g (10.1.4.3.0) Copyright 2007, Oracle. All rights reserved. The Programs
Adaptive Risk Manager Challenge Question Cleanup 10g (10.1.4.3.0) December 2007 Adaptive Risk Manager Challenge Question Cleanup, 10g (10.1.4.3.0) Copyright 2007, Oracle. All rights reserved. The Programs
Oracle Application Access Controls Governor. Release Notes Release 8.0.1
 Oracle Application Access Controls Governor Release Notes Release 8.0.1 May 2008 Oracle Application Access Controls Governor Installation Guide Copyright 2007, 2008 Oracle Corporation and/or its affiliates.
Oracle Enterprise Single Sign-on Kiosk Manager
 Oracle Enterprise Single Sign-on Kiosk Manager User s Guide Release 10.1.4.0.3 E10338-01 June 2007 Oracle Enterprise Single Sign-on Kiosk Manager User s Guide, Release 10.1.4.0.3 E10338-01 Copyright 2006-2007,
Oracle is a registered trademark of Oracle Corporation and/or its affiliates. Other names may be trademarks of their respective owners.
 Primavera Portfolio Management 9.1 Configuring VMware Copyright 1999-2014, Oracle and/or its affiliates. The Programs (which include both the software and documentation) contain proprietary information;
PDF Quick Reference. Oracle Health Sciences InForm CRF Submit Release Part Number: E
 PDF Quick Reference Oracle Health Sciences InForm CRF Submit Release 3.1.2 Part Number: E40031-01 Contents Contents PDFs and Adobe Reader 1 PDF file structure... 1 Opening a PDF... 2 Printing a PDF...
Copyright
 P6 Team Member for iphone App User's Guide P6 EPPM Release 8.1 July 2011 Copyright Oracle Primavera P6 Team Member for iphone App User's Guide Copyright 2011, Oracle and/or its affiliates. All rights reserved.
Oracle Information Rights Management Sealed for Lotus Notes Extension 10gR3 PR3 May 2008
 10gR3 PR3 May 2008 ,, 10gR3 PR3 Copyright 2007, 2008, Oracle. All rights reserved. Contributing Authors: Martin Abrahams, Martin Wykes The Programs (which include both the software and documentation) contain
Getting Started with Attunity Replicate on Amazon EC2. Version 6.0
 Getting Started with Attunity Replicate on Amazon EC2 Version 6.0 November 21, 2017 Getting Started with Attunity Replicate on Amazon EC2 All rights reserved. Primary Author: Charlton Book The Programs
Oracle Enterprise Manager
 Oracle Enterprise Manager System Monitoring Plug-in Installation Guide for Microsoft Active Directory Release 10 (2.1.2.1.0) E14542-01 April 2009 Microsoft Active Directory, which is included with Microsoft
GRCC Reporting Framework BIP for GRCC Admin/Implementation Guide
 GRCC Reporting Framework BIP for GRCC Admin/Implementation Guide GRCC Reporting Framework BIP for GRCC Admin/Implementation Guide Copyright 2009 Oracle Corporation and/or its affiliates. All rights reserved.
Oracle is a registered trademark of Oracle Corporation and/or its affiliates. Other names may be trademarks of their respective owners.
 Primavera Portfolio Management 8.0 What s New Copyright 1999-2010, Oracle and/or its affiliates. The Programs (which include both the software and documentation) contain proprietary information; they are
equestionnaire User Guide
 Prodika Product Lifecycle Management equestionnaire User Guide Release 5.1 Part Number: TPPR-0045-5.1A Make sure you check for updates to this manual at the Oracle Documentation Web site Copyrights and
New Features in Primavera Professional 15.2
 New Features in Primavera Professional 15.2 COPYRIGHT & TRADEMARKS Copyright 2015, Oracle and/or its affiliates. All rights reserved. Oracle is a registered trademark of Oracle Corporation and/or its affiliates.
PEOPLESOFT FINANCIALS/SUPPLY CHAIN MANAGEMENT 9 MAINTENANCE PACK 13 DELTA
 PEOPLESOFT FINANCIALS/SUPPLY CHAIN MANAGEMENT 9 MAINTENANCE PACK 13 DELTA PeopleSoft Financials/Supply Chain Management 9 Maintenance Pack 13 Delta Contributors: Teams from PeopleSoft Product Documentation
Oracle Enterprise Single Sign-on Provisioning Gateway
 Oracle Enterprise Single Sign-on Provisioning Gateway Installation and Setup Guide Release 10.1.4.0.3 E10330-01 June 2007 Oracle Enterprise Single Sign-on Provisioning Gateway Installation and Setup Guide,
Oracle Enterprise Single Sign-on Kiosk Manager. User Guide Release E
 Oracle Enterprise Single Sign-on Kiosk Manager User Guide Release 10.1.4.1.0 E12623-01 April 2009 Oracle Enterprise Single Sign-on Kiosk Manager, User Guide, Release 10.1.4.1.0 E12623-01 Copyright 2006-2009,
Oracle Utilities Smart Grid Gateway Adapter for Echelon
 Oracle Utilities Smart Grid Gateway Adapter for Echelon User's Guide Release 2.0.0 Service Pack 9 E23539-04 May 2013 Oracle Utilities Smart Grid Gateway Adapter for Echelon User's Guide Release 2.0.0 Service
AutoVue Integration SDK. Security and Authentication Guide
 AutoVue Integration SDK Security and Authentication Guide February 28, 2011 Page 2 Copyright 1998, 2011, Oracle and/or its affiliates. All rights reserved. The Programs (which include both the software
System Monitoring Plug-in Installation Guide for Microsoft Internet Information Services Release 4 ( ) Versions Supported
 Versions Supported") Oracle Enterprise Manager System Monitoring Plug-in Installation Guide for Microsoft Internet Information Services Release 4 (2.1.2.1.0) B28047-03 April 2007 This document provides a brief description
Oracle Enterprise Manager System Monitoring Plug-in Installation Guide for Microsoft Internet Information Services Release 4 (2.1.2.1.0) B28047-03 April 2007 This document provides a brief description
Copyright 1998, 2009, Oracle and/or its affiliates. All rights reserved.
 Clearing Cache COPYRIGHT & TRADEMARKS Copyright 1998, 2009, Oracle and/or its affiliates. All rights reserved. Oracle is a registered trademark of Oracle Corporation and/or its affiliates. Other names
Oracle Insurance QuickView Service Ordering User Guide. Version 8.0
 Oracle Insurance QuickView Service Ordering User Guide Version 8.0 February 2009 Oracle Insurance QuickView Service Ordering User Guide Version 8.0 Part # E14966-01 Library # E14885-01 E14886-01 February
Oracle Alert Documentation Updates
 Oracle Alert Documentation Updates RELEASE 11.0.1 June 1998 Copyright 1998, Oracle Corporation. All rights reserved. The Programs (which include both the software and documentation) contain proprietary
New Features in Primavera P6 16.2
 New Features in Primavera P6 16.2 COPYRIGHT & TRADEMARKS Copyright 2016, Oracle and/or its affiliates. All rights reserved. Oracle is a registered trademark of Oracle Corporation and/or its affiliates.
Oracle VueLink for Documentum
 Oracle VueLink 19.3.2 for Documentum User s Manual An Integration between Documentum and AutoVue Client/Server Deployment Copyright 1998, 2012, Oracle and/or its affiliates. All rights reserved. The Programs
IVS Explorer User s Guide. Oracle Insurance Policy Administration - Life Release 8.1 E May 2009
 IVS Explorer User s Guide Oracle Insurance Policy Administration - Life Release 8.1 E14444-01 May 2009 Oracle Insurance Policy Administration - Life Release V8.1 Copyright 2009, Oracle. All rights reserved.
Oracle Hospitality Suite8 Export to Outlook User Manual Release 8.9. July 2015
 Oracle Hospitality Suite8 Export to Outlook User Manual Release 8.9 July 2015 Copyright 1987, 2015, Oracle and/or its affiliates. All rights reserved. This software and related documentation are provided
OIPA System Requirements. Oracle Insurance Policy Administration - Life Release 8.1 E May 2009
 OIPA System Requirements Oracle Insurance Policy Administration - Life Release 8.1 E14444-01 May 2009 Oracle Insurance Policy Administration Release V8.1 Copyright 2009, Oracle. All rights reserved. License
Oracle Enterprise Manager. Description. Platforms Supported. Versions Supported
 Oracle Enterprise Manager System Monitoring Plug-in Installation Guide for IBM DB2 Database Release 5 (3.0.1.0.0) E10488-01 August 2007 This document provides a brief description about the Oracle System
BRF Crystal_Reporting_9_1
 Version Date: February 2014 COPYRIGHT & TRADEMARKS Copyright 1998, 2011, Oracle and/or its affiliates. All rights reserved. Oracle is a registered trademark of Oracle Corporation and/or its affiliates.
Administrator Guide. Oracle Health Sciences Central Designer 2.0. Part Number: E
 Administrator Guide Oracle Health Sciences Central Designer 2.0 Part Number: E37912-01 Copyright 2013, Oracle and/or its affiliates. All rights reserved. The Programs (which include both the software and
Oracle Customer Care. Implementation Guide. Release 11i. August, 2000 Part No. A
 Oracle Customer Care Implementation Guide Release 11i August, 2000 Part No. A86218-01 Oracle Customer Care Implementation Guide, Release 11i Part No. A86218-01 Copyright 1996, 2000, Oracle Corporation.
Governance, Risk, and Compliance Controls Suite. Release Notes. Software Version
 Governance, Risk, and Compliance Controls Suite Release Notes Software Version 7.2.2.1 Governance, Risk, and Compliance Controls Suite Release Notes Part No. AG008-7221A Copyright 2007, 2008, Oracle Corporation
ORACLE USER PRODUCTIVITY KIT USAGE TRACKING ADMINISTRATION & REPORTING RELEASE SERVICE PACK 1 PART NO. E
 ORACLE USER PRODUCTIVITY KIT USAGE TRACKING ADMINISTRATION & REPORTING RELEASE 3.6.1 SERVICE PACK 1 PART NO. E17383-01 MARCH 2010 COPYRIGHT Copyright 1998, 2010, Oracle and/or its affiliates. All rights
Copyright
 Displaying P6 EPPM Metrics in Oracle Enterprise Manager Release 8.1 September 2011 Copyright Oracle Primavera Displaying P6 EPPM Metrics in Oracle Enterprise Manager Copyright 2011, Oracle and/or its affiliates.
Oracle Enterprise Manager
 Oracle Enterprise Manager Management Agent Release Notes for HP-UX Itanium 10g Release 2 (10.2.0.1) B28767-01 April 2006 These Release Notes identify differences between the delivered Oracle Enterprise
BAA Oracle EBS R12.1 isupplier Portal Created on 11/26/2012 3:18:00 PM
 Created on 11/26/2012 3:18:00 PM COPYRIGHT & TRADEMARKS Copyright 1998, 2009, Oracle and/or its affiliates. All rights reserved. Oracle is a registered trademark of Oracle Corporation and/or its affiliates.
Reporting User Guide. Prodika Product Lifecycle Management. Release 5.1
 Prodika Product Lifecycle Management Reporting User Guide Release 5.1 Part No. TPPR-0029-5.1A Make sure you check for updates to this manual at the Oracle Documentation Web site Oracle s Prodika PLM 5.1
Oracle Enterprise Manager. Description. Versions Supported. Prerequisites
 Oracle Enterprise Manager System Monitoring Plug-in Installation Guide for Microsoft SQL Server Release 1 (2.0.1.0.0) E10003-02 February 2008 This document provides a brief description about the Oracle
Oracle Utilities Meter Data Management Integration to SAP for Meter Data Unification and Synchronization
 Oracle Utilities Meter Data Management Integration to SAP for Meter Data Unification and Synchronization Meter Data Management User's Guide Addendum Release 11.1 E28260-02 March 2013 Oracle Utilities Meter
Customer Service Training Activities Created on 10/10/2011 3:33:00 PM. FSU Service Center. Quick Reference Guide v.
 Created on 10/10/2011 3:33:00 PM FSU Service Center Quick Reference Guide v.4 Revised 10/10/11 COPYRIGHT & TRADEMARKS Copyright 1998, 2009, Oracle and/or its affiliates. All rights reserved. Oracle is
October 14, Business Intelligence Connector Guide
 October 14, 2017 Copyright 2013, 2017, Oracle and/or its affiliates. All rights reserved. This software and related documentation are provided under a license agreement containing restrictions on use and
Oracle Utilities Mobile Workforce Management
 Oracle Utilities Mobile Workforce Management Mobile Application User s Guide Release 2.1.0 Service Pack 5 E26618-06 October 2013 , Release 2.1.0 Service Pack 5 E26618-06 Copyright 2000, 2012, 2013 Oracle
Oracle Enterprise Manager. Description. Versions Supported. Prerequisites
 Oracle Enterprise Manager System Monitoring Plug-in Installation Guide for IBM DB2 Database 10g Release 2 (10.2) B28040-01 January 2006 This document provides a brief description about the Oracle System
Document Reference Library User Guide
 Prodika Product Lifecycle Management Document Reference Library User Guide Release 5.1 Part Number: TPPR-0049-5.1A Make sure you check for updates to this manual at the Oracle Documentation Web site Oracle
Oracle Enterprise Manager. Description. Versions Supported. System Monitoring Plug-in Installation Guide for EMC CLARiiON System Release 5 (
 Oracle Enterprise Manager System Monitoring Plug-in Installation Guide for EMC System Release 5 (1.0.3.0.0) E10505-01 August 2007 This document provides a brief description about the Oracle System Monitoring
JD Edwards EnterpriseOne 8.12 Standalone Client Installation Guide. for the Oracle Application Server
 JD Edwards EnterpriseOne 8.12 Standalone Client Installation Guide for the Oracle Application Server April 2006 JD Edwards EnterpriseOne 8.12 Standalone Client Installation Guide Copyright 2006, Oracle.
2 Records Manager Updates
 Oracle Records Manager Corporate Edition Release Notes 10g Release 3 (10.1.3.3.2) October 2007 These release notes outline new and enhanced features for this release of Records Manager Corporate Edition.
Secure Configuration Guide
 Secure Configuration Guide Oracle Health Sciences InForm Publisher On Demand Release 2.0 Part Number: E53275-01 Copyright 2014, Oracle and/or its affiliates. All rights reserved. The Programs (which include
AutoVue Document Print Service. Overview
 AutoVue Document Print Service Overview Copyright 2008, 2010 Oracle and/or its affiliates. All rights reserved. The Programs (which include both the software and documentation) contain proprietary information;
Oracle Cloud Using the Google Calendar Adapter with Oracle Integration
 Oracle Cloud Using the Google Calendar Adapter with Oracle Integration E85501-05 January 2019 Oracle Cloud Using the Google Calendar Adapter with Oracle Integration, E85501-05 Copyright 2017, 2019, Oracle
Oracle Enterprise Single Sign-on Logon Manager How-To: Configuring ESSO-LM Event Logging with Microsoft SQL Server 2005 Release
 Oracle Enterprise Single Sign-on Logon Manager How-To: Configuring ESSO-LM Event Logging with Microsoft SQL Server 2005 Release 11.1.1.5.0 21012-01 March 2011 Oracle Enterprise Single Sign-on Logon Manager
Oracle Utilities Smart Grid Gateway Adapter Development Kit
 Oracle Utilities Smart Grid Gateway Adapter Development Kit User's Guide Release 2.1.0 Service Pack 2 E41628-02 April 2014 Oracle Utilities Smart Grid Gateway Adapter Development Kit User's Guide Release
Cover Page. Oracle Report Parser System Administration Guide 10g Release 3 ( ) March 2007
 March 2007") Cover Page Oracle Report Parser System Administration Guide 10g Release 3 (10.1.3.3.0) March 2007 Oracle Report Parser System Administration Guide, 10g Release 3 (10.1.3.3.0) Copyright 2007, Oracle. All
Cover Page Oracle Report Parser System Administration Guide 10g Release 3 (10.1.3.3.0) March 2007 Oracle Report Parser System Administration Guide, 10g Release 3 (10.1.3.3.0) Copyright 2007, Oracle. All
 P6 Analytics Sample Data Release 1.2 May 2011 Copyright Oracle Primavera P6 Analytics Sample Data Copyright 2008, 2011, Oracle and/or its affiliates. All rights reserved. The Programs (which include both
EnterpriseTrack Reporting Data Model Configuration Guide Version 17
 EnterpriseTrack EnterpriseTrack Reporting Data Model Configuration Guide Version 17 October 2018 Contents About This Guide... 5 Configuring EnterpriseTrack for Reporting... 7 Enabling the Reporting Data
Governance, Risk, and Compliance Controls Suite. Hardware and Sizing Recommendations. Software Version 7.2
 Governance, Risk, and Compliance Controls Suite Hardware and Sizing Recommendations Software Version 7.2 GRC Controls Suite Hardware and Sizing Recommendations Part No. AG014-720B Copyright 2007, 2008,
1 Siebel Attachments Solution Overview
 Oracle Fusion Middleware User's Guide for Oracle Enterprise Content Management Solutions for Oracle Siebel 11g Release 1 (11.1.1) E17067-01 May 2010 This document provides information on options available
CONTENT PLAYER 9.6_CA_BBP_EN_1.0
 CONTENT PLAYER 9.6_CA_BBP_EN_1.0 COPYRIGHT Copyright 1998, 2009, Oracle and/or its affiliates. All rights reserved. Oracle is a registered trademark of Oracle Corporation and/or its affiliates. Other names
1 Important Configuration Changes
 Oracle Database Application Express Release Notes Release 2.2 B28553-02 July 2006 These Release Notes contain important information not included in the Oracle Application Express documentation. For the
Siebel Application Deployment Manager Guide. Version 8.0, Rev. A April 2007
 Siebel Application Deployment Manager Guide Version 8.0, Rev. A April 2007 Copyright 2005, 2006, 2007 Oracle. All rights reserved. The Programs (which include both the software and documentation) contain
Spend less on file attachment storage space Reliably back up your data or file attachments Use your OpenAir data in your reporting tools
 Spend less on file attachment storage space Reliably back up your data or file attachments Use your OpenAir data in your reporting tools With OpenAir s Automatic Backup System (ABS) and Workspace downloads,
Defining Constants and Variables for Oracle Java CAPS Environments
 Defining Constants and Variables for Oracle Java CAPS Environments Part No: 821 2547 March 2011 Copyright 2008, 2011, Oracle and/or its affiliates. All rights reserved. License Restrictions Warranty/Consequential
Oracle is a registered trademark of Oracle Corporation and/or its affiliates. Other names may be trademarks of their respective owners.
 Primavera Portfolio Management Configuring Web Portlets for Microsoft Project Server 2007 Copyright 1999-2014, Oracle and/or its affiliates. The Programs (which include both the software and documentation)
Adaptive Strong Authenticator Configuration Guide 10g ( ) December 2007
 December 2007") Adaptive Strong Authenticator Configuration Guide 10g (10.1.4.3.0) December 2007 Adaptive Strong Authenticator Configuration Guide, 10g (10.1.4.3.0) Copyright 2007, Oracle. All rights reserved. The Programs
Adaptive Strong Authenticator Configuration Guide 10g (10.1.4.3.0) December 2007 Adaptive Strong Authenticator Configuration Guide, 10g (10.1.4.3.0) Copyright 2007, Oracle. All rights reserved. The Programs
Oracle Enterprise Single Sign-on Provisioning Gateway. Novell Identity Manager Integration and Installation Guide Release
 Oracle Enterprise Single Sign-on Provisioning Gateway Novell Identity Manager Integration and Installation Guide Release 11.1.1.2.0 E17537-02 November 2010 Oracle Enterprise Single Sign-on P rovisioning
Oracle Universal Records Management Oracle Universal Records Management Adapter for SharePoint Administration Guide 10g Release 3 (
 Cover Page Oracle Universal Records Management Oracle Universal Records Management Adapter for SharePoint Administration Guide 10g Release 3 (10.1.3.3.0) March 2007 Oracle Universal Records Management
Adaptive Risk Manager Offline PoC Guide 10g ( ) December 2007
 December 2007") Adaptive Risk Manager Offline PoC Guide 10g (10.1.4.3.0) December 2007 Adaptive Risk Manager Offline PoC Guide, 10g (10.1.4.3.0) Copyright 2007, Oracle. All rights reserved. The Programs (which include
Adaptive Risk Manager Offline PoC Guide 10g (10.1.4.3.0) December 2007 Adaptive Risk Manager Offline PoC Guide, 10g (10.1.4.3.0) Copyright 2007, Oracle. All rights reserved. The Programs (which include
Oracle Retail Category Management Release Notes Release April 2007
 Oracle Retail Category Management Release Notes Release 12.0.4.2 April 2007 Oracle Category Management Release Notes, Release 12.0.4.2 Copyright 2007, Oracle. All rights reserved. Primary Author: Gary
Oracle Cloud Using the Eventbrite Adapter with Oracle Integration
 Oracle Cloud Using the Eventbrite Adapter with Oracle Integration E85506-05 January 2019 Oracle Cloud Using the Eventbrite Adapter with Oracle Integration, E85506-05 Copyright 2017, 2019, Oracle and/or
Oracle Enterprise Single Sign-on Logon Manager. Installation and Setup Guide Release E
 Oracle Enterprise Single Sign-on Logon Manager Installation and Setup Guide Release 10.1.4.1.0 E12635-01 March 2009 Oracle Enterprise Single Sign-on, Installation and Setup Guide, Release 10.1.4.1.0 E12635-01
Oracle AutoVue VueLink 20.0 for ENOVIA
 Oracle AutoVue VueLink 20.0 for ENOVIA User s Manual An Integration between ENOVIA PLM and Oracle AutoVue Copyright 1998, 2010, Oracle and/or its affiliates. All rights reserved. The Programs (which include
Oracle Workflow Builder for Windows 2000 or Windows XP. Oracle XML Gateway Message Designer for Windows 2000
 Oracle Workflow Client Installation Guide Release 12 Part No. B31435-01 November 2006 Overview Purpose This document explains how to install or upgrade the Oracle Workflow and Oracle XML Gateway components
Oracle Standard Management Pack
 Oracle Standard Management Pack Readme Release 2.1.0.0.0 February 2000 Part No. A76911-01 Table Of Contents 1 Introduction 2 Compatibility 3 Documentation and Help 4 Oracle Performance Manager 5 Oracle
What's New. Features introduced in New Features in Primavera Gateway 17
 What's New New Features in Primavera Gateway 17 Features introduced in 17.7 An External Custom provider utility enables you to build, deploy, and maintain custom providers outside of Gateway. By leveraging
Administration Guide. Oracle Health Sciences LabPas Release 3.1. Part Number: E
 Administration Guide Oracle Health Sciences LabPas Release 3.1 Part Number: E48671-01 Copyright 2008-2013, Oracle and/or its affiliates. All rights reserved. The Programs (which include both the software
Product Collaboration User Guide
 Product Collaboration User Guide Agile 9.2.2.1 TP1137-9.2.2.1A Make sure you check for updates to this manual at the Oracle Technology Network Website Agile 9.2.2.1 COPYRIGHT AND TRADEMARKS Copyright 1995,
ORACLE DATA INTEGRATOR ADAPTER FOR HYPERION FINANCIAL MANAGEMENT GETTING STARTED
 RELEASE 9.3.1.1 ORACLE DATA INTEGRATOR ADAPTER FOR HYPERION FINANCIAL MANAGEMENT GETTING STARTED CONTENTS IN BRIEF Sample Files for Practice... 2 Financial Management Sample Application Prerequisites...
Overview of the Plug-In. Versions Supported
 Oracle Enterprise Manager System Monitoring Plug-In Installation Guide for Exadata Power Distribution Unit Release 11.1.0.2.0 E20087-03 March 2011 Overview of the Plug-In This plug-in will be used to monitor
About the P6 EPPM Importing and Exporting Guide
 P6 EPPM Importing and Exporting Guide October 2018 Contents About the P6 EPPM Importing and Exporting Guide Scope This guide contains information about import and export formats and the process of importing
User Scripting April 14, 2018
 April 14, 2018 Copyright 2013, 2018, Oracle and/or its affiliates. All rights reserved. This software and related documentation are provided under a license agreement containing restrictions on use and
Portal Administration Guide
 Portal Administration Guide InForm TM GTM 5.5 SP0 Part number: DC-INF55-015-000 Copyright 2002-2011, Oracle and/or its affiliates. All rights reserved. The Programs (which include both the software and
Oracle Utilities Mobile Workforce Management
 Oracle Utilities Mobile Workforce Management Mobile Application User s Guide Release 2.0.1 E17826-02 July 2010 Oracle Utilities Mobile Workforce Management Mobile Application User s Guide, Release 2.0.1
Oracle Enterprise Manager Ops Center. Introduction. What You Will Need. Creating vservers 12c Release 1 ( )
") Oracle Enterprise Manager Ops Center Creating vservers 12c Release 1 (12.1.4.0.0) E27357-02 June 2013 This guide provides an end-to-end example for how to use Oracle Enterprise Manager Ops Center. Introduction
Oracle Enterprise Manager Ops Center Creating vservers 12c Release 1 (12.1.4.0.0) E27357-02 June 2013 This guide provides an end-to-end example for how to use Oracle Enterprise Manager Ops Center. Introduction
Oracle Hospitality OPERA Exchange Interface Cloud Authentication. October 2017
 Oracle Hospitality OPERA Exchange Interface Cloud Authentication October 2017 Copyright 2016, 2017, Oracle and/or its affiliates. All rights reserved. This software and related documentation are provided
Report Management and Editor!
 Quickly Find the Right Reports and Build New Reports with the Report Management and Editor! HOW DOES THE REPORT MANAGER AND EDITOR WORK? The Report Manager is a search and preview interface which helps
Computer Aided Compliance Screening User Guide
 Prodika Product Lifecycle Management Computer Aided Compliance Screening User Guide Release 5.1 Part No. TPPR-0031-5.1A Make sure you check for updates to this manual at the Oracle Documentation Web site
Oracle Cloud. Using the Google Calendar Adapter Release 16.3 E
 Oracle Cloud Using the Google Calendar Adapter Release 16.3 E68599-05 September 2016 Oracle Cloud Using the Google Calendar Adapter, Release 16.3 E68599-05 Copyright 2015, 2016, Oracle and/or its affiliates.
Material Stock Requests 9.2 HCSD
 Material Stock Requests 9.2 Version Date: April 2016 COPYRIGHT & TRADEMARKS Copyright 1998, 2011, Oracle and/or its affiliates. All rights reserved. Oracle is a registered trademark of Oracle Corporation
Oracle. Applications Cloud Using Functional Setup Manager. Release 13 (update 18A)
") Oracle Applications Cloud Release 13 (update 18A) Release 13 (update 18A) Part Number E92071-02 Copyright 2011-2018, Oracle and/or its affiliates. All rights reserved. Authors: Sandesh Posa, Mary Kalway
Oracle Applications Cloud Release 13 (update 18A) Release 13 (update 18A) Part Number E92071-02 Copyright 2011-2018, Oracle and/or its affiliates. All rights reserved. Authors: Sandesh Posa, Mary Kalway
Advanced ARC Reporting
 COPYRIGHT & TRADEMARKS Copyright 1998, 2009, Oracle and/or its affiliates. All rights reserved. Oracle is a registered trademark of Oracle Corporation and/or its affiliates. Other names may be trademarks
Content Synchronization and Syndication User Guide
 Prodika Product Lifecycle Management Content Synchronization and Syndication User Guide Release 5.1 Part No. TPPR-0021-5.1A Make sure you check for updates to this manual at the Oracle Documentation Web
Synchronous SAP Connector
 Synchronous SAP Connector Enterprise Integration Platform 2.1.2 SAP-Link 4.1.2 Part No. E11176-01 Make sure you check for updates to this manual at the Oracle Technology Network Website Copyrights and
Oracle Utilities Smart Grid Gateway Adapter for Itron OpenWay
 Oracle Utilities Smart Grid Gateway Adapter for Itron OpenWay User's Guide Release 2.1.0 Service Pack 2 E41627-02 April 2014 Oracle Utilities Smart Grid Gateway Adapter for Itron OpenWay User's Guide Release