ETERNUS SF Express V14.1. User's Guide. Windows
|
|
|
- Tabitha Sparks
- 6 years ago
- Views:
Transcription


1 ETERNUS SF Express V14.1 User's Guide Windows B1FN ENZ0(00) January 2010
2 Preface Purpose This manual gives an overview of the ETERNUS SF Express (hereafter referred to as Express). This manual describes the Express product features. Reader This manual is intended for people who are considering installing Express or who want an overall understanding of the product. Readers will gain an understanding of the Express functions from this manual. Organization This manual consists of the following chapters: Chapter 1 Overview This chapter gives an overview of the Express. Chapter 2 Required Environment This chapter explains the environment required by a storage system including Express. Chapter 3 Flow from Introduction to Operation This chapter explains the workflow from installing to operating a storage system. Chapter 4 Express Managed Information This chapter explains the information managed by Express. Chapter 5 Introducing This chapter explains the steps to install a storage system using Express. Chapter 6 Operation This chapter explains how to operate a storage system using Express. Chapter 7 Maintenance This chapter explains the maintenance of Express Manager. Appendix A Advanced Copy Function This appendix explains Advanced Copy function. Appendix B Installing and uninstalling Express This appendix explains installing and uninstalling Express. Appendix C Commands This appendix explains commands. Appendix D Messages This appendix explains the messages output from Express. Appendix E Detail Error Messages of ETERNUS This appendix explains the details of error messages for ETERNUS. Appendix F Events This appendix explains the events output from Express. Notation The names, abbreviations, and symbols shown below are used in this manual. - i -
3 Product abbreviations The following table shows how product names are abbreviated in this manual: Abbreviation ETERNUS Disk storage system FibreCAT SX Disk storage system Windows Server 2008 Windows Windows XP Windows Vista Windows 7 ETERNUS DX60 ETERNUS DX80 ETERNUS DX90 FibreCAT SX60 FibreCAT SX80 FibreCAT SX80 iscsi FibreCAT SX88 FibreCAT SX100 Formal name Microsoft(R) Windows Server(R) 2008 Standard(32-bit)(64-bit) Microsoft(R) Windows Server(R) 2008 Enterprise(32-bit)(64-bit) Microsoft(R) Windows Server(R) 2008 Datacenter(32-bit)(64-bit) Microsoft(R) Windows Server(R) 2008 Standard without Hyper-V(TM) (32-bit)(64-bit) Microsoft(R) Windows Server(R) 2008 Enterprise without Hyper- V(TM)(32-bit)(64-bit) Microsoft(R) Windows Server(R) 2008 Datacenter without Hyper- V(TM)(32-bit)(64-bit) Microsoft(R) Windows Server(R) 2008 R2 Standard(64-bit) Microsoft(R) Windows Server(R) 2008 R2 Enterprise(64-bit) Microsoft(R) Windows Server(R) 2008 R2 Datacenter(64-bit) Microsoft(R) Windows Server(R) 2008 Standard(32-bit)(64-bit) Microsoft(R) Windows Server(R) 2008 Enterprise(32-bit)(64-bit) Microsoft(R) Windows Server(R) 2008 Datacenter(32-bit)(64-bit) Microsoft(R) Windows Server(R) 2008 Standard without Hyper-V(TM) (32-bit)(64-bit) Microsoft(R) Windows Server(R) 2008 Enterprise without Hyper- V(TM)(32-bit)(64-bit) Microsoft(R) Windows Server(R) 2008 Datacenter without Hyper- V(TM)(32-bit)(64-bit) Microsoft(R) Windows Server(R) 2008 R2 Standard(64-bit) Microsoft(R) Windows Server(R) 2008 R2 Enterprise(64-bit) Microsoft(R) Windows Server(R) 2008 R2 Datacenter(64-bit) Microsoft(R) Windows(R) XP Home Edition Microsoft(R) Windows(R) XP Professional Windows Vista(R) Home Basic Windows Vista(R) Home Premium Windows Vista(R) Business Windows Vista(R) Enterprise Windows Vista(R) Ultimate Windows(R) 7 Home Basic Windows(R) 7 Professional Windows(R) 7 Ultimate Command Prompt Command prompt is shown as ">" and the command format is described as follows. > Command name The command path is omitted. If the product is installed the standard directory, add C:\Program Files (x86)\eternus SF\Express \Manager\bin\ to the command if necessary. - ii -
4 The following path is used for the above command. C:\Program Files (x86)\eternus SF\Express\Manager\bin\Command name Symbols Notations in the following formats are used to indicate matters that must be noted and reference information: Note This is important information which must be read and carefully noted. Point This is information which is useful to know. See This describes related reference items and where they are located. Information This is reference information related to using the product. Example This is an example that is useful as a reference. Export Administration Regulation Declaration This document may contain specific technologies that are covered by International Exchange and International Trade Control Laws. In the event that such technology is contained, when exporting or providing the document to non-residents, authorization based on the relevant laws is required. Trademarks Microsoft, Windows, Windows Server, Windows XP, Windows Vista, Windows 7, and Internet Explorer are trademarks or registered trademarks of Microsoft Corporation in the United States and other countries. Systemwalker is a trademark or registered trademark of Fujitsu Limited. All other trademarks and product names are the property of their respective owners. These names in this manual are not necessarily followed by a trademark notation (TM or (R)). Shipment date and revision history January 2010 First Edition Use in High Risk Environments This Product is designed and developed as contemplated for general use, including without limitation, general office use, personal use, household use, and ordinary industrial use, but is not designed or developed for use in areas where grave dangers that could lead directly to death or bodily injury are encountered (hereinafter "High Risk Environment"), including without limitation, nuclear power core control, airplane control, air traffic control, mass transport operation control, life support, and weapon launching control, unless extremely high - iii -
5 levels of safety are deployed. The Customer shall not use the Product without meeting the safety requirements for the High Risk Environments. Contact your Fujitsu business department if this product is to be used for any purpose in a High Risk Environment. Note No part of this manual may be reproduced without permission. This manual is subject to change without advance notice. Copyright Copyright FUJITSU LIMITED iv -
6 Contents Chapter 1 Overview Overview of a storage system Overview of Express Overview of Express Configuration of Express...3 Chapter 2 Required Environment Hardware conditions Software conditions...9 Chapter 3 Flow from Introduction to Operation Chapter 4 Express Managed Information Contact addresses in trouble occurrences Advanced Copy function information Various information...15 Chapter 5 Introducing Installing Express Installing Express Manager program Installing Express Client program Registering users Configuring the Network Environment Discovering Storage Advanced Copy Configuration Wizard Remote Advanced Copy Configuration Wizard Various Settings Various information Setting up contact information Test Procedure of testing SNMP Trap reception Procedure of sending test...27 Chapter 6 Operation Starting the Storage System Management GUI Performance Monitoring Starting collection of Performance information Stopping collection of Performance information Showing the Performance information When having detected any trouble Identifying the trouble condition Trouble analysis Trouble response Executing Advanced Copy Setup PATH environment variables settings Access Path Settings Executing Clone type Advanced Copy Starting Copy Control Management GUI Registering ETERNUS Disk storage system Creating copy groups Adding copy pairs Executing Advanced Copy Clone(One Time)[OPC] type Clone(Recurring)[QuickOPC] type Clone(Split mirror)[ec] type v -
7 6.4.3 Executing Snapshot type Advanced Copy Starting Copy Control Management GUI Registering ETERNUS Disk storage system Creating copy groups Adding copy pairs Executing Advanced Copy Executing Remote Advanced Copy (HA system configuration) Starting Copy Control Management GUI Registering ETERNUS Disk storage systems Creating copy groups Adding copy pairs Executing Advanced Copy Executing Remote Advanced Copy (DR system configuration) Starting Copy Control Management GUI Registering ETERNUS Disk storage systems Creating copy groups Adding copy pairs Executing Advanced Copy Reload construct configuration Express manager server with multiple IP Addresses When sending a test mail When changing the contact addresses in trouble occurrences Changing Advanced Copy function Advanced Copy function Remote Advanced Copy function Changing Express various information...94 Chapter 7 Maintenance Backing up Express Manager environment Recovering Express Manager environment Changing Express Manager environment Changing port numbers Changing the IP address Changing the Storage System Configuration change Changing the storage system name Changing the IP address Changing the SNMP community name Changing the User Name or Password Appendix A Advanced Copy Function A.1 Introduction A.1.1 What is an Advanced Copy? A.1.2 What is a Remote Advanced Copy? A.1.3 Technical terms A.1.4 Advanced Copy license A.2 Configuration A.2.1 Configuration common in all copy methods A.2.2 Configuration for clone A.2.3 Configuration for snapshot A.2.4 Configuration for remote copy A.3 Clone (EC) A.3.1 How to work A.3.2 Restoration A.4 Clone (OPC) A.4.1 How to work A.4.2 Restoration A.5 Clone (QuickOPC) vi -
8 A.5.1 How to work A.5.2 Restoration A.6 Snapshot (SnapOPC+) A.6.1 How to work A.6.2 Restoration A.6.3 SDV operations A.6.4 SDP operations A.7 Remote Advanced Copy (REC) A.7.1 How to work A.7.2 Transfer buffer operations A.7.3 Restoration A.8 Combinations of Advanced Copy A.8.1 Multiple copy A.8.2 Cascade copy A.9 ECO mode A.10 Note on Backup and Restore by Express A.11 Trouble shooting Appendix B Installing and uninstalling Express B.1 Installation B.1.1 Installation of Express Manager B.1.2 Installation of Express Client B.2 Uninstallation B.2.1 UnInstallation of Express Manager B.2.2 UnInstallation of Express Client Appendix C Commands C.1 Commands for Advanced Copy function C.1.1 acarray add (ETERNUS Disk storage system registration command) C.1.2 acarray change (Command for changing ETERNUS names and access paths for ETERNUS Disk storage systems) C.1.3 acarray list (Command for displaying information about ETERNUS Disk storage systems) C.1.4 acarray detail (Command for displaying detailed information about ETERNUS Disk storage systems) C.1.5 acarray remove (Command for deleting registration information for ETERNUS Disk storage systems) C.1.6 acinq lv (Command for displaying information about logical volumes) C.1.7 acinq lunmap (Command for displaying LUN Mapping information) C.1.8 acinq ag (Command for displaying a list of affinity groups) C.1.9 acinq hag (Command for displaying a list of host affinity groups) C.1.10 acrecbuff set (Setting REC transfer buffers) C.1.11 acrecbuff stat (Displaying REC transfer buffer status) C.1.12 acgroup create (Copy group creation command) C.1.13 acgroup list (Copy group display command) C.1.14 acgroup detail (Command for displaying detailed information about copy groups) C.1.15 acgroup remove (Copy group deletion command) C.1.16 acpair add (Copy pair addition command) C.1.17 acpair remove (Copy pair deletion command) C.1.18 acopc start (Clone(OPC) type Advanced Copy or Clone(QuickOPC) type Advanced Copy start command) C.1.19 acopc query (Status display command for Clone(OPC) type Advanced Copy or Clone(QuickOPC) type Advanced Copy) C.1.20 acopc cancel (Clone(OPC) type Advanced Copy or Clone(QuickOPC) type Advanced Copy stop command) C.1.21 acsnap start (Snapshot type Advanced Copy start command) C.1.22 acsnap query (Status display command for snapshot type Advanced Copy) C.1.23 acsnap cancel (Snapshot type Advanced Copy stop command) C.1.24 acec start (Clone(EC) type or Remote Advanced Copy start command) C.1.25 acec query (Status display command for Clone(EC) type or Remote Advanced Copy) C.1.26 acec suspend (Clone(EC) type or Remote Advanced Copy temporary suspension command) C.1.27 acec resume (Clone(EC) type or Remote Advanced Copy restart command) C.1.28 acec reverse (Clone(EC) type or Remote Advanced Copy reverse command) C.1.29 acec change (Remote Advanced Copy mode change command) vii -
9 C.1.30 acec cancel (Clone(EC) type or Remote Advanced Copy stop command) C.1.31 acsdv init (Initialize snap data volume command) C.1.32 acsdv stat (Display snap data volume status command) C.1.33 acsdv poolstat (Display snap data pool status command) C.1.34 acutil devs (Logical volume information display command) C.1.35 acgetvolinfo (Displaying logical volume information) C.1.36 acutil refresh (Partition table refresh command) C.1.37 acmcapture (troubleshooting data collection command) C.2 XML format output for Advanced Copy function C.2.1 List of commands support the XML format output function C.2.2 XML format C.3 storageadm perfdata (Performance information operation command) C.4 express_managersnap (Troubleshooting information collection of Manager) Appendix D Messages D.1 Message Format D.2 Message output from Manager D.3 Message output from CLI D.3.1 Messages for "storageadm perfdata" command D.3.2 Messages for "express_managersnap" command D.4 Message output from Copy Control Module D.4.1 Message Explanations D.4.2 Detailed Messages D.5 Error Messages on Troubleshooting Data Collection Command Appendix E Detail Error Messages of ETERNUS Appendix F Events F.1 Event Format F.2 Events related to event notification F.3 Events related to Disk storage system configuration change F.4 Events related to changing the IP address F.5 Events related to performance monitoring F.6 Event related to device polling function Glossary Index viii -
10 Chapter 1 Overview This chapter gives an overview of the Express. 1.1 Overview of a storage system A storage system refers to the overall configuration of a system including servers that perform daily transactions, storage that holds data. Figure 1.1 Overview image of a storage system 1.2 Overview of Express This product is an additional software which can be operated with the GUI to use ETERNUS Disk storage system and FibreCAT SX Disk storage system easily Overview of Express Express is an easy to use software addition to ETERNUS Disk storage system, in order to facilitate management of ETERNUS based storage as well as leverage ETERNUS functionality like Snapshots, Cloning or Remote copies. Multiple storage management Multiple ETERNUS Disk storage systems can be managed and monitored with one console. In addition, FibreCAT SX Disk storage system can be monitored


11 Health and status overview The internal configurations of Disk storage systems, such as volumes and RAID groups are displayed in a list, so that they can easily be checked. Besides, the integrated management of multiple storage systems makes it easy to notice any error occurrence even if you do not pay attention to each individual storage system. Copy setting wizard Hardware settings that should be performed before using Advanced Copy functions provided by ETERNUS Disk storage system can easily be done using a wizard. Advanced Copy For Snapshots, Clones and Remote copies that are the Advanced Copy functions provided by ETERNUS Disk storage system, you can set copy parameters and copy executions on the GUI window with ease. Also, using the command line interface for Express enables a series of copy operations, so that the above functions are available for purposes of making scripts to work together with other programs and executing copy periodically using an OS scheduler
[OPC] Clone(Recurring)[Quick OPC] Clone(Split mirror)[ec] Snapshot[SnapOPC+] Remote Advanced Copy - Synchronous mode - Consistency mode - Stack mode Performance management The command")
12 Types of Advanced Copy are as follows. Clone(One Time)[OPC] Clone(Recurring)[Quick OPC] Clone(Split mirror)[ec] Snapshot[SnapOPC+] Remote Advanced Copy - Synchronous mode - Consistency mode - Stack mode Performance management The command line operations allow 1 hour ETERNUS hardware performance information to be output into a CSV file Configuration of Express The Express is comprised of the following components

13 Figure 1.2 Configuration of Express Storage System Management GUI The following is the overview of the Storage System Management GUI window. Use this as a reference when using the Storage System Management GUI

14 Figure 1.3 Storage System Management GUI window Copy Control Management GUI The following is the overview of the Copy Control Management GUI window. Use this as a reference when using the Copy Control Management GUI

15 Figure 1.4 Copy Control Management GUI window Note Express can execute the processing of a maximum of 8 Snapshot type copy pairs concurrently. If you execute the processing of 9 or more Snapshot type copy pairs concurrently or if you execute Clone type copy or Remote type copy, you need the licenses of their respective types
16 Chapter 2 Required Environment This chapter describes the environments required for a storage system including Express. When you use the Advanced Copy function (except Snapshot[SnapOPC+] within 8 sessions), you need to get equivalent Advanced Copy License key in advance. 2.1 Hardware conditions A storage system including Express requires the following hardware. Table 2.1 Storage hardware conditions Series name ETERNUS DX FibreCAT SX Model name DX60 DX80 DX90 SX60 SX80 SX80 iscsi SX88 SX100 Note For FibreCAT SX Disk storage system, only monitoring is supported. Table 2.2 Server hardware conditions Series name PRIMERGY Note PRIMERGY FT model is unsupported. Table 2.3 Capacities required for servers on which to install Express Type of Express Memory requirement (Unit : MB) Disk space requirement (Unit : MB) Remarks Express Manager (A) A: Repository Express Client Repository Additionally, when performance management is being performed, based on the type of target (the ETERNUS DX60/DX80/DX90), the number of logical units involved, and the number of DE (Disk Enclosure), the required capacity given below becomes necessary
17 (2) * (240 + ( * number of DEs * (number of secured LUs + number of secured RAIDGroups[*1])) * (86400 / 60) + (95 * number of DEs) + (50 * (number of secured LUs + number of secured RAIDGroups[*1]))) / * (Number of days to collect + 12) * ( * (86400 / performance monitoring interval (seconds) 60)) / 1024 [*1] The "number of secured RAIDGroups" is the number of RAIDGroups created from the secured Lus. Example When securing the performance information of 512LUs in an ETERNUS DX80, (2 * (240 + ( * * ( )) * (86400 / 60) + (95 * 2) + (50 * ( ))) / 1024) + (3 * 2 * ( * (86400 / 60)) / 1024) = MB is required. Additionally, when performance information is output using the performance information operation command, the following disk space is required, depending on the number of LUs of the ETERNUS DX60/DX80/DX90, number of DEs, number of ports that is used to collect performance information. Each element number of installed DEs, installed CM Ports, LUs, RAIDGroups is the number mounted in the device when the command is executed. Number of days to output 1/24 * ((( * number of installed DEs * number of installed CM Ports * (number of LUs + number of RAIDGroups)) * (86400 / performance monitoring interval (seconds) 60)) + ( * number of installed DEs * number of installed CM Ports * (number of LUs + number of RAIDGroups))) / 1024 See Refer to "C.3 storageadm perfdata (Performance information operation command)"

18 Figure 2.1 Schematic view showing hardware conditions Point Number of management for Disk storage systems Express is recommended to manage less than 10 Disk storage systems. Connecting servers and a Disk storage systems - FC-AL - Fabric - iscsi - SAS 2.2 Software conditions Software conditions required for Express and software unavailable with Express are as follows. Software conditions required for Express Table 2.4 Manager software conditions OS Microsoft(R) Windows Server(R) 2008 Standard(32-bit)(64-bit) Microsoft(R) Windows Server(R) 2008 Enterprise(32-bit)(64-bit) Microsoft(R) Windows Server(R) 2008 Datacenter(32-bit)(64-bit) Comment (64 bit) supports only 32 bit compatibility mode (WOW64)
19 OS Microsoft(R) Windows Server(R) 2008 Standard without Hyper-V(TM)(32-bit) (64-bit) Microsoft(R) Windows Server(R) 2008 Enterprise without Hyper-V(TM)(32- bit)(64-bit) Microsoft(R) Windows Server(R) 2008 Datacenter without Hyper-V(TM)(32- bit)(64-bit) Microsoft(R) Windows Server(R) 2008 R2 Standard(64-bit) Microsoft(R) Windows Server(R) 2008 R2 Enterprise(64-bit) Microsoft(R) Windows Server(R) 2008 R2 Datacenter(64-bit) Table 2.5 Client software conditions OS Microsoft(R) Windows(R) XP Home Edition Microsoft(R) Windows(R) XP Professional Windows Vista(R) Home Basic Windows Vista(R) Home Premium Windows Vista(R) Business Windows Vista(R) Enterprise Windows Vista(R) Ultimate Windows(R) 7 Home Basic Windows(R) 7 Professional Windows(R) 7 Ultimate Microsoft(R) Windows Server(R) 2008 Standard(32-bit)(64-bit) Microsoft(R) Windows Server(R) 2008 Enterprise(32-bit)(64-bit) Microsoft(R) Windows Server(R) 2008 Datacenter(32-bit)(64-bit) Microsoft(R) Windows Server(R) 2008 Standard without Hyper-V(TM)(32-bit) (64-bit) Microsoft(R) Windows Server(R) 2008 Enterprise without Hyper-V(TM)(32- bit)(64-bit) Microsoft(R) Windows Server(R) 2008 Datacenter without Hyper-V(TM)(32- bit)(64-bit) Microsoft(R) Windows Server(R) 2008 R2 Standard(64-bit) Microsoft(R) Windows Server(R) 2008 R2 Enterprise(64-bit) Microsoft(R) Windows Server(R) 2008 R2 Datacenter(64-bit) Comment Server Core installation option is unsupported. Guest OS in Hyper-V(TM) environment is unsupported. Comment (64 bit) supports only 32 bit compatibility mode (WOW64). Server Core installation option is unsupported. Exclusive software This software cannot coexist with the following software. ETERNUS SF Storage Cruiser Systemwalker Centric Manager (manager function only) Note When following software is installed, ETERNUS SF Express Advanced Copy function can not be used. In this case, you can only use Copy Control Module of ETERNUS SF AdvancedCopy Manager. - ETERNUS SF AdvancedCopy Manager (Copy Control Module) 14.0 or older When ETERNUS SF AdvancedCopy Manager (Copy Control Module) 14.1 has been installed, both ETERNUS SF Express Advanced Copy function and AdvancedCopy Manager CCM can be used

20 Chapter 3 Flow from Introduction to Operation This chapter describes the flow from introduction of a storage system to its operation. Figure 3.1 Flow from installing to operating a storage system Express defines the role of each administrator for installing and administering a storage system
21 Table 3.1 Roles of administrators Administrator System Administrator Hardware Administrator Tasks The system administrator is in charge of tasks from designing to operating the storage system. All the tasks required to operate the storage system are handled by this person. The hardware administrator is in charge of the storage system hardware. Hardware failures are handled by this person. Point Required privileges for administrators To use Express, it is necessary to register a system administrator on a server on which you will install Express. Refer to "5.2 Registering users" on the privileges granted to users to be registered
22 Chapter 4 Express Managed Information This chapter describes the information managed by Express to introduce and operate a storage system. The following is the information managed by Express. Table 4.1 List of information managed by Express Information managed by Express "4.1 Contact addresses in trouble occurrences" "4.2 Advanced Copy function information" Item Storage system introduction Storage system In use Name B B Phone number B B Mail address B B Automatic notification of trouble occurrence B B Disk storage system Name A B Disk storage system Model Name A C Disk storage system IP Address A B Advanced Copy Configurations A B Remote Advanced Copy Configurations B B "4.3 Various information" Number of days events kept B B A : Required items B : Additionable/changeable items C : Unchangeable items Number of days login/logout kept B B Interval in Minutes B B SMTP server B B SMTP Port B B Mail Sender B B 4.1 Contact addresses in trouble occurrences Express manages administrators and their contact addresses to reach if any trouble should occur in a storage system. Point Administrators and their contact addresses are to be optionally determined when Express is introduced or used. If you receive a notification of trouble occurrence or if you send the information collected according to the "How to collect trouble information" by , decide administrators and their contact addresses. Express manages the following contact addresses on a per administrator basis. For the role of each administrator, see the "Chapter 3 Flow from Introduction to Operation". Table 4.2 Contact information in trouble occurrences Name Item Name of an administrator. If you manage the storage system under a number of names, set up the name of a representative
23 Phone number Mail address Item Automatic notification of trouble occurrence Phone number of an administrator. Mail address via which to receive a notification of trouble occurrence. The trouble of the storage system is notified to Express Manager by SNMP Trap. If error or warning level trouble should occur while the storage system is operated, select whether or not to send a notification of trouble occurrence. You can select a system administrator. If a notification of trouble occurrence is received under a number of names, set up a mailing list for those addresses. Note When notifying a hardware administrator of trouble occurrence, the notification should be made from a system administrator. 4.2 Advanced Copy function information Express manages the following information on the storage (Disk storage system). Table 4.3 Advanced Copy function information Item Disk storage system Name Disk storage system name. Disk storage system Model Name Disk storage system model name. Disk storage system IP Address The IP address of the Disk storage system. Advanced Copy Configurations The Advanced Copy configurations information is shown as follows: Advanced Copy License registration status Copy table size Bitmap ratio Total amount for Snap Data Pool Number of Snap Data Volumes Remote Advanced Copy Configurations The Remote Advanced Copy configurations information is shown as follows: Remote Advanced Copy License registration status Connectivity Line speed Compression ratio REC buffer Note The other parameters described above are set by ETERNUS Web GUI. Disk storage system Name should be an alphanumeric character within 16 characters, when you use Advanced Copies
24 Information For Advanced Copy function, refer to "Appendix A Advanced Copy Function". 4.3 Various information Express manages the following information besides that described in the "4.1 Contact addresses in trouble occurrences" through the "Appendix A Advanced Copy Function". Table 4.4 Various information History Item Number of days events kept Number of days login/ logout kept Number of days event history is kept. Number of days login/logout history is kept. Screen refresh Interval in Minutes Screen refresh interval for the Storage System Management GUI. This can be specified in minute. To refresh screen manually, select the "Refresh" icon in the pane title bar in the Storage System Management GUI. "Screen refresh" is to acquire information from Express manager and to display the information in Storage System Management GUI. (Neither the configuration information nor the state are acquired from the device.) The acquisition of the configuration information and the state is executed by "6.5 Reload construct configuration". SMTP server SMTP server name used when receiving a notification of trouble occurrence. When not receiving a notification of trouble occurrence or when not sending the information collected according to the "How to collect trouble information" by , you do not have to set it up. SMTP Port Mail Sender The port number of the SMTP server to send event notification . The sender address for event notification . The address set here is used as an sender
25 Chapter 5 Introducing This chapter describes the procedure to introduce a Disk storage system using Express. 5.1 Installing Express This section explains the installation of Express Installing Express Manager program Install the Express manager program to use a management server. Refer to "B.1.1 Installation of Express Manager" for the installation method. Note If the Express manager server has multiple IP Addresses Refer to "6.6 Express manager server with multiple IP Addresses" for the setting procedure Installing Express Client program Install the Express client program to use a windows PC or server. Refer to "B.1.2 Installation of Express Client" for the installation method. 5.2 Registering users Register Express users before using a Disk storage system. Refer to the table below to create a system administrator's user account on the Express manager installed server. Table 5.1 Privileges required for the administrator's user account Administrator System administrator Privileges A user with the Administrator privileges registered on the OS of Express manager installed server. The user information registered in this step is used when starting the Storage System Management GUI. The login history can be checked using the [Login History] under [Misc] menu of the Storage System Management GUI. Note A user with privileges described in the "Table 5.1 Privileges required for the administrator's user account" can use Express. Create user accounts only for the users who will use Express to prevent unexpected users from using it. Information Refer to the "Chapter 3 Flow from Introduction to Operation" for the roles of the system administrator
26 5.3 Configuring the Network Environment This software uses SNMP communication to find devices. Therefore, a storage device whose SNMP agent is inactive cannot be detected. The storage device's SNMP agent must be started. Check the network environment, access authorization and communication mode settings between the Express Manager server and the Disk storage system. Make sure that one communication mode is not set to "Auto Negotiation" while the other is set to "Full (full duplex)" Refer to the manual of the Disk storage system and check the network environment settings. If the network environment configurations are insufficient, set them with ETERNUS Web GUI or FibreCAT SX WBI (web-browser interface). When a firewall is placed, set the following port numbers to be able to pass the firewall. Table 5.2 Settings for a firewall between the Express Manager server and the ETERNUS Disk storage system Port Number Protocol Communication Start Direction 23 tcp From Express Manager server to ETERNUS Disk storage system. 161 udp From Express Manager server to ETERNUS Disk storage system. 162 udp From ETERNUS Disk storage system to Express Manager server tcp From Express Manager server to ETERNUS Disk storage system. Note The telnet protocol port and the ETERNUS maintenance protocol port should be open in the firewall setting on the ETERNUS Disk storage system. Table 5.3 Settings for a firewall between the Express Manager server and the FibreCAT SX Disk storage system Port Number Protocol Communication Start Direction 161 udp From Express Manager server to FibreCAT SX Disk storage systems. 162 udp From FibreCAT SX Disk storage systems to Express Manager server. Table 5.4 Settings for a firewall between the Express Manager server and the Express Client PC or server Default Port Number Protocol Communication Start Direction 9853 tcp From Express Client PC or server to Express Manager server tcp From Express Client PC or server to Express Manager server. Note When firewall of OS is made effective. The Express doesn't use Microsoft SNMP Trap Service to receive the SNMP Trap. Therefore, SNMP Trap cannot be received by making "SNMP Trap Service (UDP in)" effective in "Inbound Rules" of "Windows Firewall with Advanced Security". Please add Inbound Rule of the following content by using "New Inbound Rule Wizard". Item Rule type Protocol port UDP Set value
27 Item Set value Port Local 162 Action Allow the connection 5.4 Discovering Storage A system administrator will follow the steps below to discovery a storage device using the Storage System Management GUI. 1. Execute the following preparations to discover the storage system for the Express. - For ETERNUS Disk storage system Please set by ETERNUS Web GUI following item, refer to the ETERNUS Web GUI manuals for more information. - Confirm IP address of the server that operates Express manager is included in allowed IP list of MNT port on "Setup Network Environment Screen". - Make the SNMP function of MNT port effective at "Setup SNMP Agent (Basic Interface) Screen". - Please confirm storage system name displayed in "Name" column on "Modify Storage System Name Screen". Specify it in the alphanumeric character within 16 characters when you use Advanced Copy. - For FibreCAT SX Disk storage system Please set by FibreCAT SX WBI according to the following procedures, refer to FibreCAT SX Series Administrator's Guide for more information. - Make the SNMP function effective at "Services Security" page. 2. Login to the server using a user with Administrator privilege. 3. Start the Storage System Management GUI. Refer to "6.1 Starting the Storage System Management GUI" to start the Storage System Management GUI
![4. Select [Add Disk Array] and specify an IP address, Administrator ID](/docs-images/76/73074786/images/28-1.jpg "and password for Disk storage system. 5. Click the [Next] button.")
28 4. Select [Add Disk Array] and specify an IP address, Administrator ID and password for Disk storage system. 5. Click the [Next] button

29 6. Specify an IP address and a Name of SNMP community. Note When the ETERNUS Disk storage system that IP address is set to 2 CMs respectively is added by "Add Disk Array", it is necessary to specify "Master IP" in the wizard. 7. Specify Administrator ID and password for the ETERNUS Disk storage system if you use it. 8. Display current configuration information. After check these parameter are correct, next step is Advanced Copy Configuration Wizard. If this Disk storage system is not target, retry to add other Disk storage system or cancel this work. 9. Set up an Advanced Copy function. - For Advanced Copy function Follow the procedures described in "5.5 Advanced Copy Configuration Wizard". - For Remote Advanced Copy function Follow the procedures described in "5.6 Remote Advanced Copy Configuration Wizard". Note Execute the discovery of each controller module for FibreCAT SX Disk storage system with 2 controller modules. To delete the storage device which has registered in Express Client, select the device on the screen, and click [Delete Disk Array]. If the device uses Advanced Copy function, you must not delete storage device which has registered in Express Client
30 5.5 Advanced Copy Configuration Wizard A system administrator will follow the steps below to set up an Advanced Copy function using the Advanced Copy Configuration Wizard. Please click [Advanced Copy Configuration] in [Configuration Management] of Storage System Management GUI. Advanced Copy Configuration Wizard starts. 1. Input Advanced Copy License Displays Advanced Copy license status. If the Advanced Copy license is not registered, input the license key. Point To utilize Advanced Copy functions or Remote Advanced Copy functions, the corresponding Advanced Copy licenses are required. However, up to 8 SnapOPC+ sessions can be run by Express without license. 2. Advanced Copy Parameters Tunes the parameters that relates to Advanced Copy. 3. SDPV setting A list of the current Snap Data Pool and Snap Data Pool Volume is displayed, and then creates Snap Data Pool Volume. To remove SDPV, please use ETERNUS Web GUI. Item SDPV Name The number of characters in the SDPV Name must be 16 or less including numeric values generated by "Count". The "Count" parameter generates consecutive number values that are included at the end of the SDPV
31 Item Size (GB) Count Name. The SDPV name must be unique and not contain spaces. An integer number must be input for the size of SDPV. The total number of volumes must be 128 or less including SDPV to be added and existing volumes in the RAID Group. An integer number must be input for the size of SDPV. Note It is recommended to provide at least one SDPV for every CM of ETERNUS Disk storage system. In addition, if there is any encrypted open volume, it is required to provide an encrypted SDPV separately from a normal SDPV. 5.6 Remote Advanced Copy Configuration Wizard A system administrator will follow the steps below to set up a Remote Advanced Copy using the Remote Advanced Copy Configuration Wizard. Please click [Remote Copy Configuration] in [Configuration Management] of Storage System Management GUI. Remote Advanced Copy Configuration Wizard starts. Note In Remote Advanced Copy Configuration, values for not shown parameters are what ETERNUS Disk storage system currently has. If necessary, please confirm or modify them by ETERNUS Web GUI. When you change FC-CA to FC-RA, already set parameters are changed to default values. Connection is changed to FC-AL. Transfer rate is changed to Auto Negotiation. When you modify REC route, the modification creates new REC route. If necessary, please use ETERNUS Web GUI to remove previous used REC route. If you need to remove REC buffer, please use ETERNUS Web GUI. If you detect the two devices for which the REC route and Remote Copy license have already been set up, you can finish settings by reloading the device information after having registered both devices

32 1. Display a list of pairs that are already configured for Remote Advanced Copy 2. Select the primary storage List all the registered Disk storage systems and let the system administrator to choose the primary storage. 3. Select a secondary storage The system administrator user may select another Disk storage system for the secondary storage except the one chosen as the primary storage. 4. Remote Advanced Copy route settings Displays a list of Disk storage system ports available for Remote Advanced Copy. Set the secondary path. 5. Connection instruction Instruction is given for connecting between remote adapter ports and wait for completion. 6. Configure REC buffer Enter buffer setting parameter for REC Consistency mode. If the Consistency mode is not used, this parameter is not needed to set. REC buffer is set for both ETERNUS Disk storage systems of REC pair. 5.7 Various Settings This section describes how to specify various information on Express
33 5.7.1 Various information Click [Preferences] in [Misc] menu to specify various information. Click the [General] tab to specify the following information. Number of days events kept: Specify the number of days to retain event log. A range of specifiable values (effective range) is from 0 to 365. If a value above 365 is input, use its upper 2 figures as an input value. Number of days login/logout history kept: Specify the number of days to retain login/logout history. A range of specifiable values (effective range) is from 0 to 365. If a value above 365 is input, use its upper 2 figures as an input value. Interval in Minutes Specify the screen refresh time interval in minutes. If 0 (zero) is specified, the screen is not refreshed automatically. A range of specifiable values (effective range) is from 0 to If a value above 1440 is input, use its upper 3 figures as an input value
![Click the [System] tab to specify the following information.](/docs-images/76/73074786/images/34-0.jpg "SMTP Server: Mail Sender: Specify a mail address to be set in the mail")

34 Click the [System] tab to specify the following information. SMTP Server: Mail Sender: Specify a mail address to be set in the mail sender header. SMTP Port: Specify a SMTP port number Setting up contact information Click [Contacts] in [Misc] menu to set up contact information

35 Set up information for system administrator and hardware administrator
36 5.8 Test This section describes procedure of testing SNMP Trap reception and sending Procedure of testing SNMP Trap reception The test of the SNMP Trap reception is executed according to the following procedures. Confirm SNMP Trap from storage system is displayed in Storage System Management GUI. For ETERNUS Disk storage system SNMP Trap sending destination is automatically set. Click the [Send] button in the "Perform SNMP Trap Test" screen of ETERNUS Web GUI. Refer to the ETERNUS Web GUI manuals for more information. For FibreCAT SX Disk storage system SNMP Trap sending destination is not automatically set. Please set by FibreCAT SX WBI according to the following procedures, refer to FibreCAT SX Series Administrator's Guide for more information. 1. Make SNMP Trap notification enable at "notification summary" page. 2. Set IP address of the server that operates Express Manager and make SNMP Trap enable at "SNMP configuration" page. 3. Click the [Send Test Trap] button at "SNMP configuration" page Procedure of sending test Follow this procedure if the even notification has been set. Ensure that the test is received using the address that has been set. Refer to "6.7 When sending a test mail" to test if the test can be received using the address that has been set
37 Chapter 6 Operation This chapter describes the procedure to operate the Disk storage system using Express. 6.1 Starting the Storage System Management GUI This section describes the procedure to start the Storage System Management GUI. Note Since the ETERNUS Web GUI and the ETERNUS CLI has a higher authority over modification functions than the Storage System Management GUI, if you use them at the same time, the Storage System Management GUI may end abnormally. For example, while a configuration is being changed with the ETERNUS Web GUI, you cannot execute "6.5 Reload construct configuration" with the Storage System Management GUI. Therefore, when you use the Storage System Management GUI, do not use the ETERNUS Web GUI and the ETERNUS CLI. 1. Make sure whether the Computer Browser service is started. (Only when the computer is joined to a Windows domain) If the computer is joined to the Windows domain, it is required that the Computer Browser service has been started in order to use the Storage System Management GUI. For this reason, make sure that the [Status] of the Computer Browser service is [Started] by clicking on [Control Panel] > [Administrative Tools] > [Services]. Point The Computer Browser service on Windows Server 2008 is stopped by default. 2. Start the Storage System Management GUI. 3. Login. - In the case of a user account with administrator authority whose OS is Windows Server 2008 and whose user name is not Administrator: [Start] > [All Programs] > [ETERNUS SF Express] > [Express], and right-click the [Express] to display [Run as Administrator]. - In cases other than above: [Start] > [Programs] > [ETERNUS SF Express] > [Express]. Enter your user ID and password to log into the Storage System Management GUI. In each environment, the following user IDs can be specified. - Local server: Local user - Domain member server: Local user and Domain user - Domain controller server (PDC/BDC): Domain user Note When the domain user is specified, it is specified with "Domain-name\user-name" format
38 6.2 Performance Monitoring This software supports performance management functionality for Disk storage systems. This functionality enables users to get details about the operation and load statuses of devices. However, this software does not support performance management functionality in relation to the ETERNUS Disk storage system SDV or FibreCAT SX Disk storage system. When a user gives an instruction for performance management of a target device from a Storage System Management GUI window, the performance management unit issues SNMP get periodically through a LAN to devices to obtain performance information, and it saves the information as performance data on the Express manager server. This software can output performance information up to 1 hour before by the storageadm perfdata (Performance information operation command) and manages the device. To conduct performance monitoring, sufficient disk space is required on the administrative server for performance data storage. Make sure that sufficient disk space is ensured referring to "2.1 Hardware conditions". Note Do not execute performance monitoring for a single device from more than one administrative server(*) at the same time. * The Express manager servers, the ETERNUS SF Storage Cruiser administrative servers, or the Systemwalker Resource Coordinator administrative servers. The performance management functionality always starts up when the Express manager server starts up. For devices in which performance management settings have been configured, performance information collection starts in the background. Accordingly, performance information is collected regardless of whether Storage System Management GUI window display. To stop performance information collection, execute performance management stop processing Starting collection of Performance information When you click [Start Performance] in Storage System Management GUI window, an instruction to obtain performance information is issued to the performance management unit, and the performance management unit obtains performance information of the device through the LAN and saves it as performance data. Since the performance management unit is started as a daemon of the Express manager server, the unit continues obtaining performance information while the Express manager server is active, even if no Storage System Management GUI window is displayed. The logical configuration of the storage device is recognized, and the obtaining of performance information starts. At the start of obtaining performance information of the selected storage system, an amount of time (tens of seconds to several minutes) is spent to obtain the logical configuration before any performance information is actually obtained. When performance monitoring starts, "Monitoring" is displayed in "Perf.Data" row as a state of the performance monitoring. The table below lists value of "Perf.Data" row and their corresponding statuses and actions to be taken. The color may differ from that of the current status. Click [Reload Configuration] button on the Storage System Management GUI window to check the latest status. Value of "Perf.Data" row Status Appropriate action Monitoring Performance is being monitored. (Normal) Performance is being monitored. Recovering Error Stop Performance monitoring is being recovered (e.g. device time-out). Performance monitoring is being error (e.g. device time-out, writing to the performance information file failed.) Performance monitoring has stopped. (Normal) The Express manager server cannot communicate with a device. Check the network status and device status. Log off, when ETERNUS Web GUI is in a login state. The Express manager server cannot communicate with a device. Check the network status and device status. Log off, when ETERNUS Web GUI is in a login state. Check the write permission to the file and the capacity of the file system. Then, click [Stop Performance] in Storage System Management GUI window. Performance monitoring has stopped
39 6.2.2 Stopping collection of Performance information Click [Stop Performance] to stop collection of Performance information
40 6.2.3 Showing the Performance information The performance information can be output to the CSV format file by using the storageadm perfdata (Performance information operation command). The following information can be managed. Performance information (Unit) LUN Logical Volume RAID Group Disk drive CM Read/Write count (IOPS) Read/Write data transfer rate (MB/S) Read/Write response time (msec) Read/Pre-fetch/Write cache hit rate (%) Disk busy rate (%) Load (CPU usage) rate (%) Copy remaining amount (GB)
41 Performance information (Unit) CM Port Device Read/Write count (IOPS) Read/Write data transfer rate (MB/S) Number of active disks (Disk) Power consumption (W) Temperature (C) Note Performance information about the ETERNUS Disk storage system SDV is not supported, and performance information values for RAID Group cannot be guaranteed. 6.3 When having detected any trouble The following is a description of the procedure to be taken if any trouble should occur during Disk storage system operations. Any trouble occurrence is detected in the following way. An of error or warning level trouble occurrence is sent from Express. Trouble occurrence is notified by a user. The following is a flow from trouble detection to its response

42 Figure 6.1 Flow from trouble detection to its response Identifying the trouble condition If any trouble should occur, start the Storage System Management GUI. Since the Storage System Management GUI displays the status of each device with icons or messages, it is easy to identify the trouble condition
43 In addition, via the Storage System Management GUI you can identify the status of the storage system. Figure 6.2 Storage System Management GUI in trouble occurrences If any trouble is occurring, check the following points. Icon "Error( )" or "Warning( )" icon is displayed at the trouble-occurring area. If these icons are displayed, it is highly possible that business operations are affected. Therefore, identify the contents of the trouble to take responses. Message A message of trouble occurrence is displayed at "Event" along with an icon. Point In the following cases, the state icon of the storage system displayed in the [Monitoring] menu is renewed. When there is an event notification more than the warning level from the storage system. When you execute "6.5 Reload construct configuration" with Storage System Management GUI Trouble analysis There are other methods to analyze the effects of the trouble besides "6.3.1 Identifying the trouble condition". Use those methods as required. In addition, for hardware troubles, contact the hardware administrator when needed

44 Trouble information collection This is used when collecting detailed information about the trouble, which can be collected via the Storage System Management GUI. For trouble information collection, refer to "How to collect trouble information". Display of configuration information details You can check every server operation and disk configuration information managed in storage in a list. Selecting the Storage System Management GUI will display configuration information details. How to collect trouble information 1. Select [Collect Troubleshooting Info] from the [Troubleshooting] menu in the Storage System Management GUI. 2. Select the required item to click the [OK] button. Figure 6.3 Collect Troubleshooting Information See Checking / changing the address set up for the system administrator When you check and/or change the contact address set up for the system administrator, refer to the "6.8 When changing the contact addresses in trouble occurrences" Trouble response After identifying the trouble condition as shown in the "6.3.1 Identifying the trouble condition" or by "6.3.2 Trouble analysis", contact a system administrator or a hardware administrator, referring to the message and trouble information. After resolving the trouble, reload the configuration as shown in "6.5 Reload construct configuration" to acquire information again up to date. [Refresh] button on the Storage System Management GUI only acquires information on the Express manager server, and doesn't update information on the manager. Latest information is displayed by select [Refresh] button about [Events] information in [Disk Array Information] tab. Reload the configuration as shown in the above-mentioned when you want to display latest information about other information

45 Note Contact to the hardware administrator If a message output in a trouble occurrence says "Contact the hardware administrator", the system administrator contact to the hardware administrator. 6.4 Executing Advanced Copy This section explains the procedures for executing Advanced Copies. When you use Advanced Copy function, to assure data consistency, please confirm that there isn't any access to business volume. However, for more assure consistency, stop the server connected to the business volume is recommended. When you can't stop the business server, unmount the business volume by the server's OS command and reflect the data from the file cash and stop the access to file cash. The command of unmount, refer to each OS's manual. See Refer to "Appendix A Advanced Copy Function" for details of Advanced Copy Setup This section explains how to set up Advanced Copy function for execution. The setup procedure is shown below PATH environment variables settings When using Express Advanced Copy commands, it is recommended to add a bin directory of Express Advanced Copy Control Module to path environmental variables. For example, the procedure for Windows Server 2008 R2 is shown below. 1. [Start] > Right-click on [Computer] and select [Properties]. 2. Left clink on [Advanced system settings]
46 3. Select the [Advanced] tab of system properties, and click the [Environment Variables] button. 4. Add the values below to the PATH variables. <Express Manager program directory>\advancedcopy Manager Copy Control Module\bin Information The default directory name of Express Manager program is "C:\Program Files (x86)\eternus SF". Point - Use a semi-colon to separate multiple directories. - When the Advanced Copy function executes it only with Copy Control Management GUI, this setting is unnecessary Access Path Settings With Express Manager, there must be a logical path between the Express Manager server and the ETERNUS Disk storage system. This logical path is referred to as an "access path". To create an access path, the ETERNUS Disk storage system must have a logical volume for control purposes. Allocate one logical volume within the ETERNUS Disk storage system to the Express Manager server for access path use. The settings procedure for the access path is explained below. 1. Allocate to the server the ETERNUS logical volume to be set up as the access path. The allocated logical volume is recognized as a disk. 2. Initialize the disk in MBR (DOS) or GPT disk format. 3. Create a partition, and allocate a drive letter. Note Deletion procedure for "Active Partition Flag" is as follows. C:\Windows\system32>diskpart DISKPART> select disk 2 DISKPART> list part DISKPART> select part 0 DISKPART> inactive Executing Clone type Advanced Copy The Clone type Advanced Copy includes the following three types. Clone(One Time)[OPC] Execute OPC (One Point Copy) of the ETERNUS Disk storage system. All the volume contents at the point of time that Advanced Copy was executed are copied onto its copy destination volume. When the OPC command is invoked, ETERNUS creates a point in time snapshot of the source volume and then immediately returns a notification to the operator that the backup is complete, before any physical copying has even occurred. This allows for access to
[OPC] is highly effective for the following applications: - Generation backups where near continuous uptime is critical such as internet business applications - Clone(One Time)[OPC] is")
47 be returned to the transaction or source volume with little or no interruption while the copy is performed as a background process at the hardware level in the ETERNUS. Clone(One Time)[OPC] is highly effective for the following applications: - Generation backups where near continuous uptime is critical such as internet business applications - Clone(One Time)[OPC] is the primary method for restoration from a backup volume irrespective of the backup copy method thus minimizing resultant downtime - Where minimizing server I/O load is critical to overall business application performance. The following diagram represents the process used in a Clone(One Time)[OPC]. Figure 6.4 Clone(One Time)[OPC] Clone(Recurring)[Quick OPC] Execute QuickOPC of the ETERNUS Disk storage system. When the QuickOPC command is invoked, it will determine if an initial copy exists, then will copy only updated blocks of data that have been tracked since the initial copy was created to the backup volume for that specific QuickOPC session. If QuickOPC detects that an initial copy does not exist, it will create the initial copy using OPC. The differential copy method used in QuickOPC significantly reduces the time required for physical data copying in order to create a Point in Time snapshot whilst minimizing the I/O load on the storage system host server. Clone(Recurring)[Quick OPC] is highly effective where: - Backup to disk where uptime is critical - Creation of frequent restore points or generation backups The following diagram represents the differential copy process used in a Clone(Recurring)[QuickOPC] Copy after an initial copy has been created
![Figure 6.5 Clone(Recurring)[Quick OPC] Clone(Split mirror)[ec] Execute EC (Equivalent Copy) of the ETERNUS Disk storage system.](/docs-images/76/73074786/images/48-0.jpg "The Equivalent Copy feature invokes a process of synchronization between source and destination volumes to create a synchronized copy of the source volume.")
48 Figure 6.5 Clone(Recurring)[Quick OPC] Clone(Split mirror)[ec] Execute EC (Equivalent Copy) of the ETERNUS Disk storage system. The Equivalent Copy feature invokes a process of synchronization between source and destination volumes to create a synchronized copy of the source volume. The purpose of the synchronization is to reach and maintain a state of equivalence with the source volume in order to create a temporary copy or archival backup. The source volume remains available and accessible as there is no need to stop or suspend access to the source volume while the copy is built using the synchronization process. When a state of equivalence with the source volume has been attained, the destination volume continues to be maintained as an image of the source volume. At any subsequent point while the source volume and the destination copy are in this state of equivalence, the destination copy can be split from the source, thus creating a backup with history or a replica copy as at that point in time. Clone(Split mirror)[ec] is highly effective for: - Making backups much more quickly than with conventional backup processes, because backup data can be collected in parallel with ordinary transactions. - Reducing processing time and costs by means of distributed processing using copy data
[ec] Take the following procedure to execute Clone")

49 Figure 6.6 Clone(Split mirror)[ec] Take the following procedure to execute Clone type Advanced Copy Starting Copy Control Management GUI Start the Copy Control Management GUI from Express Clinet. Click [Copy Control Management] in [Tools] to launch Copy Control Management GUI
50 Registering ETERNUS Disk storage system Register an ETERNUS Disk storage system with Express Manager as the devices to be used for copies
51 1. Click [Add disk Array] in [Disk Arrays] to register an ETERNUS Disk storage system. The [Add Disk Array] menu is shown. 2. Specify the following information. - Storage Location - Array Name - IP Address - User Name - Password - Access Path
52 Creating copy groups A copy group is a group of copy pairs, consisting of a copy source logical volume and a copy destination logical volume. When creating copy groups, specify which type of Advanced Copy and which ETERNUS Disk storage system to use
![1. Click [Create] in [Copy Groups] to create a copy group. The [Create] menu is shown. 2.](/docs-images/76/73074786/images/53-0.jpg "Specify the following information.")
53 1. Click [Create] in [Copy Groups] to create a copy group. The [Create] menu is shown. 2. Specify the following information. - Group Name - Copy Type - Disk Array (for Local copy)
54 Point Group Name must be up to 64 alphanumeric characters, hyphens (-), underscores (_), hashes (#) or periods (.). The first character must be an alphanumeric character Adding copy pairs Add copy pairs to the copy group that have been created. Copy pairs are strings that define copy source and destination logical volumes. 1. Click [Add pairs] in the Copy Group to add copy pairs. The [Add Copy Pair] menu is shown. 2. Select the following information. - Copy Source Volume - Copy Destination Volume
55 Executing Advanced Copy Clone(One Time)[OPC] type Execute Clone(One Time)[OPC] type Advanced Copy. Click [Start Forward Clone(One Time)[OPC]] in the Copy Group to start Clone (One Time) [OPC]. However, if you want to reverse the copied data, click [Start Reverse Clone(One Time)[OPC]]
56 Clone(Recurring)[QuickOPC] type Execute Clone(Recurring)[QuickOPC] type Advanced Copy. The Clone(Recurring)[QuickOPC] type operating procedure is as follows
![1. Execute copy (1st time). 1. Click [Start Forward Clone(Recurring)[QuickOPC]] in the Copy Group to start Clone (Recurring) [QuickOPC].](/docs-images/76/73074786/images/57-1.jpg "However, if you want to reverse the copied data, click [Start Reverse Clone(Recurring)[QuickOPC]]. 2. The [Start Forward Clone(Recurring)[QuickOPC]] menu is shown.")
57 1. Execute copy (1st time). 1. Click [Start Forward Clone(Recurring)[QuickOPC]] in the Copy Group to start Clone (Recurring) [QuickOPC]. However, if you want to reverse the copied data, click [Start Reverse Clone(Recurring)[QuickOPC]]. 2. The [Start Forward Clone(Recurring)[QuickOPC]] menu is shown. Point This time does not check the [Start session with difference]
58 2. Execute copy (2nd time or later). 1. Click [Start Forward Clone(Recurring)[QuickOPC]] in the Copy Group to start Clone(Recurring) [QuickOPC]. 2. The [Start Forward Clone(Recurring)[QuickOPC]] menu is shown. Point A system administrator should check the [Start session with difference]
59 Clone(Split mirror)[ec] type Execute Clone (Split mirror) [EC] type Advanced Copy. The Clone (Split mirror) [EC] type operating procedure is as follows. 1. Start copy Click [Start Forward Clone(Split mirror) [EC]] in the Copy Group to start Clone (Split mirror) [EC]. However, if you want to reverse the copied data, click [Start Reverse Clone(Split mirror)[ec]]

60 2. Wait for equivalent state Wait until [Copy Phase] is changed to "Paired" from "Copying"
61 3. Suspend copy Click [Suspend Clone(Split mirror)[ec]] in the Copy Group to suspend the clone copy
62 4. Resume copy Click [Resume Clone(Split mirror)[ec]] in the Copy Group to resume the clone copy. Then repeat the procedures 2 to

63 6.4.3 Executing Snapshot type Advanced Copy Execute SnapOPC+ of the ETERNUS Disk storage system. SnapOPC+ uses the Copy-On-Write method to create a copy of the source volume in the state before any updates were made. SnapOPC+ can save the copy source volume data in the state before any updates are made snap generation. Due to the mechanism and features of SnapOPC+, it is designed to be efficiently used as a backup to recover from software failures (such as operator mistakes and software ends abnormal). If a copy source volume becomes inaccessible due to a hardware fault, then the relevant copy session error - as a result, the data on the copy destination volume cannot be read correctly. In order to be prepared for such fatal hardware faults. We recommends that, in conjunction with SnapOPC+, OPC/QuickOPC/EC/REC should be used to make a complete copy of data. SnapOPC+ is typically used for: Temporary source for a cascade copy to alternate media such as tape. Backup to disk for file servers and other data with a low modification rates

64 Figure 6.7 Snapshot type Advanced Copy Take the following procedure to execute Snapshot type Advanced Copy
65 Starting Copy Control Management GUI Start the Copy Control Management GUI from Express Client. Click [Copy Control Management] in [Tools] to launch Copy Control Management GUI Registering ETERNUS Disk storage system Register an ETERNUS Disk storage system with Express Manager as the devices to be used for copies
66 1. Click [Add disk Array] in [Disk Arrays] to register an ETERNUS Disk storage system. The [Add Disk Array] menu is shown. 2. Specify the following information. - Storage Location - Array Name - IP Address - User Name - Password - Access Path
67 Creating copy groups A copy group is a group of copy pairs, consisting of a copy source logical volume and a copy destination logical volume. When creating copy groups, specify which type of Advanced Copy and which ETERNUS Disk storage system to use
68 1. Click [Create] in [Copy Groups] to create a copy group. The [Create] menu is shown. 2. Specify the following information. - Group Name - Copy Type - Disk Array (for Local copy)

69 Point Group Name must be up to 64 alphanumeric characters, hyphens (-), underscores (_), hashes (#) or periods (.). The first character must be an alphanumeric character Adding copy pairs Add copy pairs to the copy groups that have been created. Copy pairs are strings that define copy source and destination logical volumes. 1. Click [Add pairs] in the Copy Group to add copy pairs. The [Add Copy Pair] menu is shown. 2. Select the following information. - Copy Source Volume - Copy Destination Volume
 Click [Start Forward Snapshot[SnapOPC+]] in the Copy")
70 Executing Advanced Copy 1. Execute copy (1st time) Click [Start Forward Snapshot[SnapOPC+]] in the Copy Group to start Snapshot[SnapOPC+]
71 - 62 -
72 2. Execute copy (2nd time or later) Click [Start Forward Snapshot[SnapOPC+]] again, when you want to create the next generation
73 The copy for second generation is started, and the first generation is changed [Status] to "Copy On Write(Inactive)" from "Copy On Write(Active)"
 This section describes Remote Advanced Copy in the High Availability system configuration.")
74 Note You cannot select a first-generation copy pair group to start Snapshot copy Executing Remote Advanced Copy (HA system configuration) This section describes Remote Advanced Copy in the High Availability system configuration. Execute remote copy between two ETERNUS DX90s at the same site. Even if any failure should occur in one ETERNUS DX90, the other ETERNUS DX90 can continue business operation

75 Figure 6.8 HA system configuration diagram Take the following procedures to execute Remote Advanced Copy
76 Starting Copy Control Management GUI Start the Copy Control Management GUI from Express Clinet. Click [Copy Control Management] in [Tools] to launch Copy Control Management GUI
77 Registering ETERNUS Disk storage systems Register ETERNUS Disk storage systems with Express Manager as the devices to be used for copies
78 1. Register an ETERNUS Disk storage system 1. Click [Add disk Array] in [Disk Arrays] to register an ETERNUS Disk storage system. The [Add Disk Array] menu is shown. 2. Specify the following information. - Storage Location - Array Name - IP Address - User Name - Password - Access Path
79 2. Register another ETERNUS Disk storage system 1. Click [Add Disk Array] in [Disk Arrays] to register an ETERNUS Disk storage system. The [Add Disk Array] menu is shown. 2. Specify the following information. - Storage Location

80 - Array Name - IP Address - User Name - Password - Access Path Creating copy groups A copy group is a group of copy pairs, consisting of a copy source logical volume and a copy destination logical volume. When creating copy groups, specify which type of Advanced Copy and which ETERNUS Disk storage system to use
81 1. Click [Create] in the Copy Group to create a Copy Group. The [Create] menu is shown. 2. Specify the following information. - Group Name - Copy Type - Local Disk Array(for Remote Copy) - Remote Disk Array(for Remote Copy)
82 Point Group Name must be up to 64 alphanumeric characters, hyphens (-), underscores (_), hashes (#) or periods (.). The first character must be an alphanumeric character Adding copy pairs Add copy pairs to the copy groups that have been created. Copy pairs are strings that define copy source and destination logical volumes
83 1. Click [Add Pairs] in the Copy Group to add Copy Pairs. The [Add Copy Pair] menu is shown. 2. Specify the following information. - Copy Source Array - Copy Source Volume - Copy Destination Array - Copy Destination Volume
 type operating procedure is as follows. 1.")
![Start copy Click [Start Forward Remote Copy[REC]] in the copy group to start](/docs-images/76/73074786/images/84-1.jpg "Remote Advanced Copy.")
84 Executing Advanced Copy Execute Clone (Remote) type Advanced Copy. The Clone (Remote) type operating procedure is as follows. 1. Start copy Click [Start Forward Remote Copy[REC]] in the copy group to start Remote Advanced Copy. However, if you want to reverse the copied data, click [Start Reverse Remote Copy[REC]]
85 Specify the Remote Advanced Copy operating modes. - Transfer mode - Recovery mode - Split mode
86 2. Wait for equivalent state Wait until [Progress] is changed to "100%"
87 3. Suspend copy Click [Suspend Remote Copy[REC]] in the Copy Group to suspend the copy. 4. Resume copy Click [Resume Remote Copy[REC]] in the Copy Group to resume the copy. Then repeat the procedures 2 to
88 6.4.5 Executing Remote Advanced Copy (DR system configuration) This section describes Extended Remote Advanced Copy in a disaster recovery solution system configuration. Against disasters, execute remote copy between ETERNUS DX90 at active site and ETERNUS DX90 at standby site. If a disaster should occur, switch to the one at standby site and you can continue the system operation

89 Figure 6.9 Disaster recovery solution system configuration diagram Take the following procedures to execute Remote Advanced Copy
90 Starting Copy Control Management GUI Start the Copy Control Management GUI from Express Clinet. Click [Copy Control Management] in [Tools] to launch Copy Control Management GUI Registering ETERNUS Disk storage systems Register ETERNUS Disk storage systems with Express Manager as the devices to be used for copies
91 1. Register an ETERNUS Disk storage system in the local site 1. Click [Add Disk Array] in [Disk Arrays] to register an ETERNUS Disk storage system. The [Add Disk Array] menu is shown. 2. Specify the following information. - Storage Location - Array Name - IP Address - User Name - Password - Access Path

92 2. Register an ETERNUS Disk storage system in the remote site 1. Click [Add Disk Array] in [Disk Arrays] to register an ETERNUS Disk storage system. The [Add Disk Array] menu is shown. 2. Specify the following information. - Storage Location

93 - Array Name - Box ID You can get the Box ID in remote site by ETERNUS Web GUI. Point Array Name must be up to 16 alphanumeric characters Creating copy groups A copy group is a group of copy pairs, consisting of a copy source logical volume and a copy destination logical volume. When creating copy groups, specify which type of Advanced Copy and which ETERNUS Disk storage system to use
![1. Click [Create] in the Copy Group to create a Copy Group. The [Create] menu is shown. 2.](/docs-images/76/73074786/images/94-0.jpg "Specify the following information.")
94 1. Click [Create] in the Copy Group to create a Copy Group. The [Create] menu is shown. 2. Specify the following information. - Group Name - Copy Type - Local Disk Array(for Remote Copy) - Remote Disk Array(for Remote Copy)

95 Point Group Name must be up to 64 alphanumeric characters, hyphens (-), underscores (_), hashes (#) or periods (.). The first character must be an alphanumeric character Adding copy pairs Add copy pairs to the copy groups that have been created. Copy pairs are strings that define copy source and destination logical volumes
![1. Click [Add Pairs] in the Copy Group to add](/docs-images/76/73074786/images/96-0.jpg "Copy Pairs. The [Add Copy Pair] menu is shown.")
96 1. Click [Add Pairs] in the Copy Group to add Copy Pairs. The [Add Copy Pair] menu is shown
 type Advanced Copy. The Clone (Remote) type operating procedure is as follows. - 88 -")
97 2. Select the volume of the ETERNUS Disk storage system in the local site, and specify the volume of the ETERNUS Disk storage system in the remote site Executing Advanced Copy Execute Clone (Remote) type Advanced Copy. The Clone (Remote) type operating procedure is as follows
98 1. Start copy Click [Start Forward Remote Copy[REC]] in the copy group to start Remote Advanced Copy. However, if you want to reverse the copied data, click [Start Reverse Remote Copy[REC]]. Specify the Remote Advanced Copy operating modes. - Transfer mode - Recovery mode - Split mode

99 2. Wait for equivalent state Wait until [Progress] is changed to "100%"
100 3. Suspend copy Click [Suspend Remote Copy[REC]] in the Copy Group to suspend the copy. 4. Resume copy Click [Resume Remote Copy[REC]] in the Copy Group to resume the copy. Then repeat the procedures 2 to
101 6.5 Reload construct configuration This section explains when reloading the configuration created by ETERNUS Web GUI. Note Only a system administrator may change the configuration. Select the [Reload Configuration] button. Reloads the configuration created by ETERNUS Web GUI and applies it. [Refresh] button on the Storage System Management GUI only acquires information on the Express manager server, and doesn't update information on the manager. Latest information is displayed by select [Refresh] button about [Events] information in [Disk Array Information] tab. Reload the configuration as shown in the above-mentioned when you want to display latest information about other information. 6.6 Express manager server with multiple IP Addresses If the Express manager server has multiple IP Addresses, specify one IP Address to communicate with Express clients. Perform the following procedures to specify the IP address
102 1. Open the file shown below : [Install directory]\express\manager\etc\express_manager.ini 2. Specify the IP address as a parameter of "express.rmi.manager.ipaddress" option. Example express.rmi.manager.ipaddress= Restart "esfexpressmgr" and "esfexpressccm" services. 6.7 When sending a test mail Make sure whether or not a test mail can be received at the address set up or under the SMTP server name. Take the following procedure to send a test mail. 1. Select [Contacts] to check the destination address. 2. Make sure that the test mail can be received at the address set up. 6.8 When changing the contact addresses in trouble occurrences Change the contact addresses of administrators and addresses at which to receive a notification of trouble occurrence from [Contacts] in the Storage System Management GUI. In addition, after having changed the addresses at which to receive a notification of trouble occurrence, refer to the "6.7 When sending a test mail" to check whether the test mail can be received at the addresses set up. 6.9 Changing Advanced Copy function This section explains the procedure for how to change an Advanced Copy function and a Remote Advanced Copy function Advanced Copy function Follow the procedure below to reload configuration. 1. Select the [Advanced Copy Configuration] button and the Advanced Copy Configuration Wizard will be displayed. 2. Set again the Advanced Copy function along the wizard. See Refer to "5.5 Advanced Copy Configuration Wizard" on the details of an Advanced Copy function Remote Advanced Copy function Follow the procedure below to reload configuration. 1. Select the [Remote Advanced Copy Configuration] button and the Remote Advanced Copy Configuration Wizard will be displayed
103 2. Set again the Remote Advanced Copy function along the wizard. See Refer to "5.6 Remote Advanced Copy Configuration Wizard" on the details of a Remote Advanced Copy function Changing Express various information This section explains the procedure for how to change Express various information. Select the [Preferences] in the [Misc] menu. Reloads the Express various information changed by Storage System Management GUI. Point When changing the SMTP server name After having changed the SMTP server name, refer to the "6.7 When sending a test mail" to make sure whether the test mail can be received using the SMTP server name set up. See For details of various information, refer to "4.3 Various information"
104 Chapter 7 Maintenance This chapter describes the maintenance of Express Manager. 7.1 Backing up Express Manager environment It is required to save Express Manager environment against failures in a server on which Express Manager is running. Take the following procedure to save its environment. All operations are performed on the relevant server on which Express Manager is running. Information About description in the procedure $BAK_DIR means the backup destination directory. $INS_DIR means a directory in which Express Manager is installed. 1. Stop the services. Open Service Control Manager to stop the following three services. - ETERNUS SF Express Manager - ETERNUS SF Express Manager for CCM GUI Service - ETERNUS SF Storage Cruiser Manager 2. Back up various settings information. Using Explorer, create the following backup directory: - $BAK_DIR\Express\Manager\etc - $BAK_DIR\Express\Manager\etc\db Using Explorer, copy the subdirectories and files in the following directories to the backup location. Source directory $INS_DIR\Express\Manager\etc\db Destination directory $BAK_DIR\Express\Manager\etc\db Using Explorer, copy the following file to the backup location. Source file $INS_DIR\Express\Manager\etc\express_manager.ini Destination directory $BAK_DIR\Express\Manager\etc 3. Back up device management information. Using Explorer, create the following backup directory: - $BAK_DIR\Storage Cruise\Manager\var\opt\FJSVssmgr\current\opencimom Using Explorer, copy the subdirectories and files in the following directories to the backup location. Source directory $INS_DIR\Storage Cruise\Manager\var\opt\FJSVssmgr \current\opencimom\logr Destination directory $BAK_DIR\Storage Cruise\Manager\var\opt\FJSVssmgr \current\opencimom 4. Back up essential files. If there are no subdirectories or files, backup is unnecessary. Using Explorer, create the following backup directories:
105 - $BAK_DIR\Storage Cruise\Manager\etc\opt\FJSVtrccb\2.0 - $BAK_DIR\Storage Cruise\Manager\var\opt\FJSVtrccb\2.0\ac - $BAK_DIR\Storage Cruise\Manager\var\opt\FJSVtrccb\2.0\db - $BAK_DIR\Storage Cruise\Manager\var\opt\FJSVtrccb\2.0\sr - $BAK_DIR\Storage Cruise\Manager\var\opt\FJSVssmgr\current - $BAK_DIR\Storage Cruise\Manager\var\opt\FJSVssmgr\current\vsccompose Using Explorer, copy the subdirectories and files in the following directories to the backup location. Source directory $INS_DIR\Storage Cruise\Manager\etc\opt\FJSVtrccb\2.0 $INS_DIR\Storage Cruise\Manager\var\opt\FJSVtrccb\2.0\ac $INS_DIR\Storage Cruise\Manager\var\opt\FJSVtrccb\2.0\db $INS_DIR\Storage Cruise\Manager\var\opt\FJSVtrccb\2.0\sr $INS_DIR\Storage Cruise\Manager\var\opt\FJSVssmgr \current\vsccompose Destination directory $BAK_DIR\Storage Cruise\Manager\etc\opt\FJSVtrccb\2.0 $BAK_DIR\Storage Cruise\Manager\var\opt\FJSVtrccb \2.0\ac $BAK_DIR\Storage Cruise\Manager\var\opt\FJSVtrccb \2.0\db $BAK_DIR\Storage Cruise\Manager\var\opt\FJSVtrccb \2.0\sr $BAK_DIR\Storage Cruise\Manager\var\opt\FJSVssmgr \current\vsccompose Using Explorer, copy the following file to the backup location. Source file $INS_DIR\Storage Cruise\Manager\var\opt\FJSVssmgr \current\systemevent.csv Destination directory $BAK_DIR\Storage Cruise\Manager\var\opt\FJSVssmgr \current 5. Back up files that are related to the performance management function. If you are not using the performance management function, this step is unnecessary. Using Explorer, create the following backup directories: - $BAK_DIR\Storage Cruise\Manager\var\opt\FJSVssmgr\current\perf Using Explorer, copy the subdirectories and files in the following directories to the backup location. Source directory $INS_DIR\Storage Cruise \Manager\var\opt\FJSVssmgr \current\perf Destination directory $BAK_DIR\Storage Cruise\Manager\var\opt\FJSVssmgr \current\perf 6. If Advanced Copy function is used, save files about definition of copy group and copy pair. Using Explorer, create the following backup directory: - $BAK_DIR\AdvancedCopy Manager Copy Control Module\etc\db - $BAK_DIR\AdvancedCopy Manager Copy Control Module\etc\db\cg - $BAK_DIR\AdvancedCopy Manager Copy Control Module\var\micc\database Using Explorer, copy the file to the backup location. Source file $INS_DIR\AdvancedCopy Manager Copy Control Module \etc\db\eternus.xml $INS_DIR\AdvancedCopy Manager Copy Control Module \var\micc\database\devicereglist.xml Destination directory $BAK_DIR\AdvancedCopy Manager Copy Control Module \etc\db $BAK_DIR\AdvancedCopy Manager Copy Control Module \Manager\var\micc\database
106 Using Explorer, copy all files in the source directory to the backup location. Source directory $INS_DIR\AdvancedCopy Manager Copy Control Module \etc\db\cg Destination directory $BAK_DIR\AdvancedCopy Manager Copy Control Module \Manager\etc\db\cg 7. Restart the services Open Service Control Manager to start the following three services. - ETERNUS SF Express Manager - ETERNUS SF Express Manager for CCM GUI Service - ETERNUS SF Storage Cruiser Manager 7.2 Recovering Express Manager environment If any failure occurs in a server on which Express Manager is running, take the following procedure to restore Express Manager. All operations are performed on the relevant server on which Express Manager is running. Information About description in the procedure $BAK_DIR means the backup destination directory. $INS_DIR means a directory in which ETERNUS Express Manager is installed. 1. Install Express Manager. Refer to the section "5.1.1 Installing Express Manager program" to reinstall Express Manager. 2. Stop the services. Open Service Control Manager to stop the following three services. - ETERNUS SF Express Manager - ETERNUS SF Express Manager for CCM GUI Service - ETERNUS SF Storage Cruiser Manager 3. Restore various settings information. Using Explorer, create the following directory, if these directories do not exist. - $INS_DIR\Express\Manager\etc - $INS_DIR\Express\Manager\etc\db By using Explorer, copy the subdirectories and files in the following directories to the backup location. Source directory $BAK_DIR\Express\Manager\etc\db Destination directory $INS_DIR\Express\Manager\etc\db By using Explorer, copy the following file from the backup location. Source file $BAK_DIR\Express\Manager\etc\express_manager.ini Destination directory $INS_DIR\Express\Manager\etc
107 4. Restore the device management information. By using Explorer, delete the subdirectories and files in the restore destination directories shown below. Do not delete the restore destination directories themselves. If these directories do not exist, create them. - $INS_DIR\Storage Cruise\Manager\var\opt\FJSVssmgr\current\opencimom\logr By using Explorer, copy the subdirectories and files from the backup location. Source directory $BAK_DIR\Storage Cruise\Manager\var\opt\FJSVssmgr \current\opencimom\logr Destination directory $INS_DIR\Storage Cruise\Manager\var\opt\FJSVssmgr \current\opencimom\logr 5. Restore essential files. By using Explorer, delete the subdirectories and files in the restore destination directories shown below. Do not delete the restore destination directories themselves. If these directories do not exist, create them. - $INS_DIR\Storage Cruise\Manager\etc\opt\FJSVtrccb\2.0 - $INS_DIR\Storage Cruise \Manager\var\opt\FJSVtrccb\2.0\ac - $INS_DIR\Storage Cruise\Manager\var\opt\FJSVtrccb\2.0\db - $INS_DIR\Storage Cruise\Manager\var\opt\FJSVtrccb\2.0\sr - $INS_DIR\Storage Cruise\Manager\var\opt\FJSVssmgr\current\vsccompose By using Explorer, delete the following file. - $INS_DIR\Storage Cruise\Manager\var\opt\FJSVssmgr\current\systemevent.csv If there are no subdirectories or files, restore is unnecessary. By using Explorer, copy the subdirectories and files from the backup location. Source directory $BAK_DIR\Storage Cruise\Manager\etc\opt\FJSVtrccb\2.0 $BAK_DIR\Storage Cruise\Manager\var\opt\FJSVtrccb\2.0\ac $BAK_DIR\Storage Cruise\Manager\var\opt\FJSVtrccb\2.0\db $BAK_DIR\Storage Cruise\Manager\var\opt\FJSVtrccb\2.0\sr $BAK_DIR\Storage Cruise\Manager\var\opt\FJSVssmgr \current\vsccompose Destination directory $INS_DIR\Storage Cruise\Manager\etc\opt\FJSVtrccb\2.0 $INS_DIR\Storage Cruise\Manager\var\opt\FJSVtrccb \2.0\ac $INS_DIR\Storage Cruise\Manager\var\opt\FJSVtrccb \2.0\db $INS_DIR\Storage Cruise\Manager\var\opt\FJSVtrccb \2.0\sr $INS_DIR\Storage Cruise\Manager\var\opt\FJSVssmgr \current\vsccompose By using Explorer, copy the following file from the backup location. Source file $BAK_DIR\Storage Cruise\Manager\var\opt\FJSVssmgr \current\systemevent.csv Destination directory $INS_DIR\Storage Cruise\Manager\var\opt\FJSVssmgr \current 6. Restore files that are related to the performance management function. If you are not using the performance management function, this step is unnecessary. By using Explorer, delete the subdirectories and files in the restore destination directories shown below. Do not delete the restore destination directories themselves. If these directories do not exist, create them. - $INS_DIR\Storage Cruise\Manager\var\opt\FJSVssmgr\current\perf By using Explorer, copy the subdirectories and files in the following directories from the backup location
108 Source directory $BAK_DIR\Storage Cruise\Manager\var\opt\FJSVssmgr \current\perf Destination directory $INS_DIR\Storage Cruise\Manager\var\opt\FJSVssmgr \current\perf 7. If Advanced Copy function is used, restore files about definition of copy group and copy pair. By using Explorer, delete the subdirectories and files in the restore destination directories shown below. Do not delete the restore destination directories themselves. If these directories do not exist, create them. - $INS_DIR\AdvancedCopy Manager Copy Control Module\etc\db - $INS_DIR\AdvancedCopy Manager Copy Control Module\etc\db\cg - $INS_DIR\AdvancedCopy Manager Copy Control Module\micc\databaseetc\db Using Explorer, copy the file from the backup location. Source file $BAK_DIR\AdvancedCopy Manager Copy Control Module \etc\db\eternus.xml $BAK_DIR\AdvancedCopy Manager Copy Control Module \var\micc\database\devicereglist.xml Destination directory $INS_DIR\AdvancedCopy Manager Copy Control Module \etc\db $INS_DIR\AdvancedCopy Manager Copy Control Module \var\micc\database Using Explorer, copy all files from the backup location. Source directory $BAK_DIR\AdvancedCopy Manager Copy Control Module\etc \db\cg Destination directory $INS_DIR\AdvancedCopy Manager Copy Control Module \etc\db\cg 8. Restart the Manager. Open Service Control Manager to start the following three services. - ETERNUS SF Express Manager - ETERNUS SF Express Manager for CCM GUI Service - ETERNUS SF Storage Cruiser Manager 7.3 Changing Express Manager environment Changing port numbers Express uses the following four port numbers. service name port number protocol Note esfexpressmgr 9853 tcp Express manager service for Express client esfexpressccm 9854 tcp Express manager service for Copy Control Management GUI sscruisera 4917 tcp Express manager service(internal use) nfport tcp Express manager service(internal use) Those port numbers are defined in the services file of the system. Take the following procedure to change the port numbers used by Express. 1. Open the file "%SystemRoot%\system32\drivers\etc\services" with a notepad
109 2. Pick out the entry of a service name to be changed to change its entry port number. # <service name> <port number>/<protocol> [aliases...] [#<comment>] # esfexpressmgr 9853/tcp esfexpressccm 9854/tcp nfport 23456/tcp sscruisera 4917/tcp 3. Save the file "%SystemRoot%\system32\drivers\etc\services" to close. 4. Reboot the server that is running Express Manager Changing the IP address The following is the procedure to change the IP address for the server that is running Express Manager. 1. Change the IP address for the server that is running Express Manager. 2. Stop the services. Open Service Control Manager to stop the following 3 services. - ETERNUS SF Express Manager - ETERNUS SF Express Manager for CCM GUI Service - ETERNUS SF Storage Cruiser Manager 3. If the management server has two network interfaces or more, change the IP address which used by communication between the management server and an Express client referring to "6.6 Express manager server with multiple IP Addresses". 4. If the notification destination of SNMP Trap set for a storage system is specified by an IP address, change the IP address. 5. Reboot the server. 6. Start Express Manager to connect to the changed server IP address. Point When the server which is running Express Manager has its IP address changed, the device which specifies the IP address as a destination of SNMP Trap needs to change to that IP address. For ETERNUS Disk storage system Change the destination of SNMP Trap setting by ETERNUS Web GUI. The destination of SNMP Trap is displayed in "Setup SNMP Agent (Trap) Screen". Delete the pre-change IP address and specify the post-change IP address and community name. Click the [Add New Destination] button, and the new destination is added. For FibreCAT SX Disk storage system Change the destination of SNMP Trap setting by FibreCAT SX WBI. The destination of SNMP Trap is displayed in "SNMP configuration" page. Delete the pre-change IP address and specify the post-change IP address
110 7.4 Changing the Storage System Configuration change If the configuration of the storage system has been changed such as logical volume deletion and addition or host affinity deletion, addition and change, take the procedure shown in the section "6.5 Reload construct configuration" Changing the storage system name When changing a storage system name, take the following procedure. 1. Start the Storage System Management GUI. 2. If Advanced Copy function is used on the storage system whose name is to be changed, start the Copy Control Management GUI. Delete the storage system via the Copy Control Management GUI. Note You must not perform any operation such as deletion of a copy group or a copy pair with respect to copy groups and copy pairs. 3. Delete a storage system whose name is to be changed via the Storage System Management GUI. 4. Add the storage system whose name was changed via the Storage System Management GUI. For more information, refer to the section "5.4 Discovering Storage". 5. If you perform copy operation on the storage system, add the system name via the Copy Control Management GUI. For more information, refer to the section "6.4 Executing Advanced Copy". Point Refresh behavior is required for re-registered systems or copy groups Changing the IP address The following is the procedure to change the IP address for storage system. 1. Start the Storage System Management GUI. 2. If Advanced Copy function is used on the storage system whose IP address is to be changed, start the Copy Control Management GUI. Delete the storage system via the Copy Control Management GUI. Note You must not perform any operation such as deletion of a copy group or a copy pair with respect to copy groups and copy pairs. 3. Delete the storage system whose name is to be changed via the Storage System Management GUI. 4. Add the storage system whose IP address was changed via the Storage System Management GUI. For more information, refer to the section "5.4 Discovering Storage". 5. If you perform copy operation on the storage system, add its name via the Copy Control Management GUI. For more information, refer to the section "6.4 Executing Advanced Copy"
111 Point Refresh behavior is required for re-registered systems or copy groups Changing the SNMP community name When changing SNMP community name of the storage system, follow the procedure below to reload configuration. 1. Select the [Delete Disk Array] to delete the configuration. 2. Select the [Add Disk Array] to discover the storage system as shown in "5.4 Discovering Storage" Changing the User Name or Password The following is the procedure to change the User Name or Password to access a storage system. If Advanced Copy functions are not used, this procedure is not needed. 1. Start the Storage System Management GUI. 2. Start the Copy Control Management GUI. Delete the storage system via the Copy Control Management GUI. Note You must not perform any operation such as deletion of a copy group or a copy pair with respect to copy groups and copy pairs. 3. Add the storage system with the new User Name and Password via the Copy Control Management GUI. For more information, refer to the "6.4 Executing Advanced Copy"
112 Appendix A Advanced Copy Function This appendix explains the Advanced Copy function. A.1 Introduction A.1.1 What is an Advanced Copy? The Advanced Copy functions allow the Disk storage system to carry out high-speed copying operations itself, with no need to draw on server CPU resources. With Advanced Copy functions, at any point in time a business data volume can be copied to a separate copy volume, quickly and within the Disk storage system. Once the copy is complete, the copy volume can be separated from the business volume ensuring no further updates to the business volume are applied to the copy volume. This allows the copy volume data to be backed up to a tape device, as a point in time copy of the business data, while normal operations continue. Advanced Copy methods Advanced Copy functions provide three clone functions (EC, OPC, QuickOPC) and one snapshot function (SnapOPC+). Clone is a full (real) copy of the original data. Snapshot is a virtual copy of the original data. EC (Equivalent Copy) A function that always creates a synchronized copy of a business data volume on a copy volume (Mirroring method). The business volume and copy volume are synchronized but can be separated at any required time (mirror suspend). The copy volume can then be backed up to a tape device while business operations continue on the business volume. Suspend/Resume functions can be used to re-establish the mirror by copying only updated data since the mirror was suspended. OPC (One Point Copy) A function that creates a copy of the business data volume at any point in time (Background Copy). Data on the business volume is copied logically to a copy volume, quickly, as and when required. The copy volume can be used for backup operation, to a tape device, without waiting for physical copy completion, while business operations can continue on the business volume. QuickOPC A function that creates a copy of all the business data volume and subsequently only copies updated data (Background Copy). This suits large database operation where backup times must be reduced. SnapOPC+ A function that creates a copy of the data prior to it being updated (Copy-on-Write). As requires less copy volume capacity compared with clone, SnapOPC+ is ideal for copy operations for systems with relatively few updates such as file servers

113 These copy methods all copy the data as it exists at a specific point in time, but there are different features, advantages and disadvantages to each method as detailed below: Copy type Clone Snapshot Function name EC OPC QuickOPC SnapOPC+ Copy method Timing of actual copy load Effect on access to the copy source while copy is running Effect on access to the copy source after copy has "finished" Lifetime of copy session Size of copy destination area Copy action during restore Best used for... Mirror breaking method Before "mirror breaking" Background copy method After the copy command is issued Background copy method After the copy command is issued N/A Minor Minor Yes N/A Until the Equivalent state is stopped Same as the copy source (Clone) Copy back all the data by OPC EC Reverse (Suspend Reverse Resume) only copies updated areas Backup to disk Creation of testing data Slight during background copy Until background copy is completed Same as the copy source (Clone) If OPC is active, copy back only the already copied data Backup to disk Creation of testing data Restoring from backup disk Slight during background copy Until session is stopped and copy is completed Same as the copy source (Clone) Copy back only the already copied data Backup to disk Creation of testing data Recovery from physical disk failure when data Copy-on-write method Yes - Until session is stopped Sufficient for changed areas (Snapshot) Restore operation is not available (use OS tools to copy whole files instead) Temporary backup area for backup to tape Backup to disk for file server and other low modification rate data

114 Copy type Clone Snapshot Function name EC OPC QuickOPC SnapOPC+ modification rate is low (generational management is available) Note These are generic observations based on the mechanisms involved. Actual effect on servers will depend on the specifics of the usage environment. A.1.2 What is a Remote Advanced Copy? Remote Advanced Copy provides a server-less remote mirroring function which ensures fast recovery when the primary site Disk storage system becomes unusable because of a disaster, such as fire, earthquake or malicious damage. Remote Advanced Copy methods Remote Advanced Copy By using Fibre Channel interfaces, Remote Advanced Copy can provide lower cost remote site support up to a maximum distance of 10km between a primary storage device and a secondary device. Figure A.1 Remote Advanced Copy connection Extended Remote Advanced Copy Extended Remote Advanced Copy uses a combination of a Fibre Channel switch and WAN converter to support very long distances over WAN. Replicated data can be located at a remote site hundreds of kilometers away from the primary site. This provides high security for the protection of critical data from both man-made and natural disasters

115 Figure A.2 Extended Remote Advanced Copy connection (via FC-RA) A.1.3 Technical terms Sessions For Advanced Copy, each copying action is called a "session". Different copy source areas, copy destination areas and copy types can be specified for each session. A.1.4 Advanced Copy license To utilize Advanced Copy functions or Remote Advanced Copy functions, the corresponding Advanced Copy licenses are required. However, up to 8 SnapOPC+ sessions can be run by Express without license. A.2 Configuration A.2.1 Configuration common in all copy methods License registration Register Advanced Copy license keys with Advanced Copy Wizard or Remote Advanced Copy Wizard of Express. Specifically, in REC case, license keys for 2 Disk storage systems need to be registered. Parameter setting To use (Remote) Advanced Copy, resolution and table size need to be set. These parameters can be set by ETERNUS Web GUI/ETERNUS CLI or Express. Resolution is the value that determines the amount of data each bit in the copy bitmap represents. The allowed resolution settings of "1 (standard)", "2", "4", "8", and "16" respectively give 8KB, 16KB, 32KB, 64KB, and 128KB regions of data per bitmap bit. The same value is used in the ETERNUS Disk storage system. The smallest possible resolution value should be set, to reduce the internal process overhead. Table size is the dedicated memory area required for Advanced Copy management. The table size and resolution settings are determined by the copy capacity and the number of sessions (volumes) that will be run simultaneously
116 A.2.2 Configuration for clone Creating copy destination volumes When creating copy destination volumes for clone, note the following: The type of a copy destination volume must be OPEN. SDV (Snap Data Volume) or SDPV (Snap Data Pool Volume) can not be used as a copy destination volume for clone. The size of a copy destination volume must be the same as that of copy source volume (the original volume). To create OPEN volume, use ETERNUS Web GUI/ETERNUS CLI because Express does not offer the feature to create OPEN volumes. A.2.3 Configuration for snapshot Creating copy destination volumes When creating copy destination volumes for snapshot, note the following: The type of a copy destination volume must be SDV. OPEN or SDPV can not be used as a copy destination for snapshot. The size of a copy destination volume must be the same as that of copy source volume (the original volume). When creating an SDV, set the appropriate capacity. Creating Snap Data Pool (SDP) Snap Data Pool (SDP) is used for SnapOPC+. By registering standby storage areas in the SDP, it is possible to supply extra storage areas (SDPE: Snap Data Pool Elements) from the SDP whenever the amount of updates exceeds the capacity of the copy destination SDV, allowing the copy session to continue without failing. If storage area capacity runs short in an SDV, extra storage area (SDPE) is automatically supplied from the SDP. Once the copy session is completed, all extra storage area (SDPE) supplied to the SDV is returned to the SDP. (The SDPE is also returned to the SDP if the copy session fails.)

117 Figure A.3 SDP concept When creating copy destination volumes for snapshot, note the following: One SDP can be created per ETERNUS Disk storage system. SDP becomes available upon creating a dedicated SDPV. After creation, the SDPV is automatically allocated to the SDP. If the SDV is encrypted, make sure the SDPV is also encrypted. If the ETERNUS Disk storage system contains both encrypted and non-encrypted SDVs, then both encrypted and non-encrypted SDPVs will be needed. Estimate the update amounts expected for each copy source volume, then decide the SDV and SDP capacities. If estimation is difficult, try setting up the SDV and SDP with a total capacity of 50% of that of the copy source (note that this is just a rule-of-thumb value and that different operating configurations will require different SDP capacities). Figure A.4 Construction of SDP
118 A.2.4 Configuration for remote copy Creating copy destination volumes When creating copy destination volumes for remote copy, note the following: The type of a copy destination volume must be OPEN. SDV or SDPV can not be used as a copy destination volume for remote copy. The size of a copy destination volume must be the same as that of copy source volume (the original volume). To create OPEN volume, use ETERNUS Web GUI/ETERNUS CLI because Express does not offer the feature to create OPEN volumes. Setting of FC-RA ports FC-RA (Fibre Channel Remote Adapter) ports are required for REC. Change any FC-CA port to an FC-RA port. Setting of FC-RA paths Create a data transmission path by combination of FC-RA ports. This setting is required for all storage systems that perform REC. Setting of REC buffers When using the Consistency mode, REC buffers are used. Up to four REC buffers can be set in the ETERNUS DX90. Set the REC buffer size for both data transmission and reception units. You can use a single buffer for unidirectional data transfer only. Therefore, if you use the bidirectional data transfer, you must also set the buffer for reverse directional data transfer

119 A.3 Clone (EC) A.3.1 How to work Figure A.5 State transition diagram
120 Table A.1 Relationship between session operation and Express function Session operation Express function Start acec start Suspend acec suspend Resume acec resume Reverse acec reverse Stop acec cancel Start When the EC session is started, the whole area of data specified by the source parameters is copied. If data copying has been completed for a given area and a write operation is applied to that area, the write data is also transferred to the destination area. After all data in the specified area has been copied over, the data in source and destination areas will be kept in almost the same state by the EC function. This is called the Equivalent state. In the Equivalent state, if source data is changed, the same data is transferred to the destination area to maintain the Equivalent state. Until the EC session reaches to the Equivalent state, copy destination volume are neither readable nor writable. If EC session is in the Equivalent state, copy destination volume are not writable but readable. Suspend When the EC session is suspended, both the copy source volume and the copy destination volume are accessible as independent volumes (copy destination volume becomes readable and writable). The Suspend operation can only be executed when the EC session is in the Equivalent state. Unlike the Stop operation, changes to the source and destination volumes continue to be recorded while the Suspend state applies. Resume When the EC session is resumed, data is copied over from the source to the destination so as to catch up on all the changes that were made after the Suspend operation was performed and recover the Equivalent state. As the amount of data that thus needs to be transferred is much less than would be required if the whole source area were to be recopied, the time required to recover the Equivalent state is also greatly reduced. If the source is changed under the Suspend state (when copying is temporarily interrupted by the Suspend operation), the changes are sent to the destination after the Resume operation is performed (when the copy is restarted). However, any changes made at the destination while under the Suspend state will be rolled-back (overwritten from the source data). Consequently, any and all changes made to the destination during the Suspend state are discarded and lost following the Resume operation. Concurrent Suspend Multiple EC sessions can be suspended using the Concurrent Suspend operation. This allows consistent copies of multi-volume dataobjects, such as databases, to be easily acquired
121 Reverse When the EC session is reversed, the copy direction is reversed. The Reverse operation can only be executed when the EC session data is in the Suspend state. Stop When the EC session is stopped, it terminates. If the EC session in one of the following statuses is stopped, the copy destination volume should not be used because the mirroring is incomplete. Initial copy state Error suspend state If the EC session in one of the following statuses is stopped, the copy destination volume can be used because the mirroring has been complete. Equivalent state Suspend state A.3.2 Restoration Restoration can be performed by the Reverse function of EC or by OPC. Restoration by reversing EC The Reverse operation of EC allows high-speed restoration of the pre-update data saved in the secondary destination back to the updated areas of the primary volume. (The Suspended copy session is reversed and then resumed.)

122 Restoration by OPC To perform restoration by OPC, start the OPC session in the reverse direction after stopping the EC session. The method using OPC has no advantage over the method using the EC reverse function in that a full copy is required. However, it has the benefit that the original volume can be used immediately after the logical copy has completed
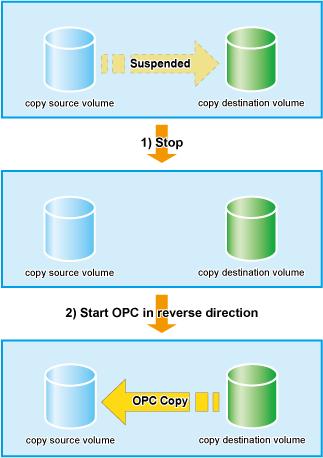
123

124 A.4 Clone (OPC) A.4.1 How to work Figure A.6 State transition diagram Table A.2 Relationship between OPC operation and Express function Session operation Express function Start acopc start Stop acopc cancel Start When the OPC session is started, the logical copy completes immediately and returns a "copied" response before any actual (physical) copying occurs. The actual physical copy process starts after the logical copy has finished. This is an internal ETERNUS Disk storage system background process that is not visible to the server. After the logical copy has completed, the copy destination area becomes accessible. When the physical copy has completed, the session automatically terminates. Stop When the OPC session is stopped, it terminates. The copy destination volume can not be used because the physical copy is incomplete. A.4.2 Restoration Restoration can be done by executing OPC in the reverse direction. Especially, restoration with a background physical copy is possible

125 A.5 Clone (QuickOPC) A.5.1 How to work Figure A.7 State transition diagram Table A.3 Relationship between QuickOPC operation and Express function Session operation Express function Start acopc start
 copying occurs.")
126 Session operation Restart Stop acopc start -diff acopc cancel Express function Start When the QuickOPC session is started, the logical copy completes immediately and returns a "copied" response before any actual (physical) copying occurs. The actual physical copy process and tracking process start after the logical copy has finished (the tracking process keeps track of data which is modified for copy source and copy destination volumes after the logical copy). These two processes are internal ETERNUS Disk storage system background processes that are not visible to the server. After the logical copy has completed, the copy destination area becomes accessible. Even if the physical copy has finished, the session remains because the tracking process is still active. Restart When the QuickOPC session is restarted, then instead of the initial full copy, only the data areas recorded by the tracking process are copied over from the source to the destination. While less data needs to be copied, this copy is similar to the initial copy in that a logical copy step precedes the actual physical copy, and the copy destination becomes read/write accessible as soon as the logical copy has completed. The tracking process also starts recording subsequent updates again at this stage. If the source is changed after the previous logical copy, the changes are sent to the destination after the Restart operation is performed (when the copy is restarted). However, any changes made at the destination after the previous logical copy will be rolled-back (overwritten from the source data). Consequently, any and all changes made to the destination after the previous logical copy are discarded and lost following the Restart operation. Stop When the QuickOPC session is stopped, it terminates. If the QuickOPC session which is in the Physical copy and Tracking state is stopped, the copy destination volume can not be used because the physical copy is incomplete. If the QuickOPC session in the Tracking state is stopped, the copy destination volume can be used because the physical copy has completed. A.5.2 Restoration Restoration can be done by executing OPC in the reverse direction

127 Especially, restoration with a background physical copy is possible. Although a restoration is executed with OPC, only the data that has been updated since the previous QuickOPC is copied. Therefore, in copy using QuickOPC, not only a physical backup but also restoration is completed in a short period of time. By performing OPC for restoration, any changes made at the primary volume after the previous logical copy will be rolled-back (overwritten from the secondary volume data). Consequently, any and all changes made to the primary volume after the previous logical copy are discarded and lost following OPC for restoration
 SnapOPC+ Figure A.")
128 A.6 Snapshot (SnapOPC+) A.6.1 How to work Figure A.8 State transition for (normal) SnapOPC+ Figure A.9 State transition diagram for dummy SnapOPC

129 Table A.4 Relationship between session operation and Express function Session operation Express function Start normal SnapOPC+ acsnap start Start dummy SnapOPC+ acsnap start -estimate Stop acsnap cancel Start When the SnapOPC+ session is started, the copy-on-write process starts. When a write I/O is requested from the server, the copy-on-write process copies the old data to the copy destination before writing the new data to the copy source. This process is an internal ETERNUS Disk storage system background process that are not visible to the server. After the SnapOPC+ session has been started, the copy destination area becomes accessible. Unlike Clone (OPC, QuickOPC, EC), as the physical copy destination only needs to be large enough to contain updated areas, size requirements are usually small. While the referencing of unmodified areas of the SnapOPC+ "copy" directly from the original data on the copy source volume reduces the copy load, this dependence on the copy source volume means that SnapOPC+ is not suited to persistent or long-term data backup/ recovery use. Up to 8 SnapOPC+ sessions per one copy source can be set. Since multiple SnapOPC+ sessions for one copy source are managed in generations, multiple copy operation can be performed with less disk capacity. Stop When the SnapOPC+ session is stopped, the copy-on-write process terminates and all the data saved in SDV are lost. If there are older SnapOPC+ sessions than the SnapOPC+ session to stop, it cannot be stopped. Such a SnapOPC+ session can be stopped by using the force option. However, the Stop operation with the force option stops not only the specified SnapOPC+ session but also all the older SnapOPC+ sessions
130 A.6.2 Restoration Restoration requires the SnapOPC+ copy destination be mounted by the OS and the target data restored using normal file copying. Note Restoration by the reverse OPC cannot be performed for ETERNUS DX60/DX80/DX90. A.6.3 SDV operations Table A.5 Relationship between SDV operation and Express function SDV operation Express function Monitoring SDV capacity acsdv stat Initialize SDV acsdv init Monitoring SDV capacity If an SDP is not used, the SDV should be monitored on a periodic basis to ensure that adequate remaining capacity leeway is maintained. Initialize SDV Even if no copy sessions are running, some operational problems can cause large volumes of writes to occur, reducing the SDV or SDP capacity available to the copy session when it is set. In these cases, the "Initialize SDV" operation should be performed. Note that when a Snap Data Volume is initialized, any existing data on it will become inaccessible, so this data should be backed up beforehand, using OS commands. A.6.4 SDP operations Table A.6 Relationship between SDP operation and Express function SDP operation Express function Monitoring SDP capacity acsdv poolstat Monitoring SDP capacity If an SDP is used, the SDP should be monitored on a periodic basis to ensure that adequate remaining capacity leeway is maintained. If the allocatable SDP capacity runs short, this is indicated by /snmp Trap notification. A.7 Remote Advanced Copy (REC) Remote Equivalent Copy (REC) is used for both Remote Advanced Copy and Extended Remote Advanced Copy. Whereas EC is an internal cabinet copy function, REC is the equivalent copy function for use between cabinets
131 A.7.1 How to work Figure A.10 Session state and state transition Table A.7 Relationship between session operation and Express function Session operation Express function Start acec start Suspend acec suspend
132 Session operation Resume Reverse Mode change Stop acec resume acec reverse acec change acec cancel Express function Start When the REC session is started, the whole area of data specified by the source parameters is copied. If data copying has been completed for a given area and a write operation is applied to that area, the write data is also transferred to the destination area. After all data in the specified area has been copied over, the data in source and destination areas will be kept in almost the same state by the REC function. This is called the Equivalent state. In the Equivalent state, if source data is changed, the same data is transferred to the destination area to maintain the Equivalent state. Until the REC session reaches to the Equivalent state, copy destination volume are neither readable nor writable. If REC session is in the Equivalent state, copy destination volume are not writable but readable. Unlike EC, the following operation modes need to be specified at the start of REC sessions. Transmission mode This mode is concerned with data transmission of REC. Transmission Mode Synchronous mode Consistency mode (Asynchronous) Stack mode (Asynchronous) The REC Synchronous mode guarantees that the copy process is fully complete on both sides of the REC before any update process response is returned to the server. Since the update and copy processes are performed at the same time, the copy process order will naturally be the same as the update process order. However, the concomitant REC transfer processes will always cause the update responses to be slower than a native update alone. Especially, when the Remote Advanced Copy is used in a long-distance WAN connection, the transmission via the WAN is delayed and the data transmission process is also delayed, which can greatly affect the performance. The sequential transfer of data to destination ETERNUS Disk storage systems is guaranteed in all REC sessions where the Consistency mode has been set. A checkpoint is set at a certain interval (every few seconds) and pending data is copied over during this interval. Synchronous data can be maintained at a certain level. To guarantee the order property, a special REC buffer must be assigned in the cache memory. Before starting the copy session, an REC buffer must be setup in each ETERNUS Disk storage system (both source and destination) to contain pending changes. You cannot simultaneously use a given REC buffer for both transmission and reception. However, the REC buffers can be switched from transmission to reception and back. As the response to the updating process by the server is executed asynchronously with the copy process, delays are minimized. If many data updates are requested, the write-completed response to the server is delayed and the copy process is executed at the higher priority. However, if too many requested changes are pending, the copy processes can cause the server response to become excessively slow, so the copy session is temporarily Halted. After a certain period of time, a prescribed error recovery process is started. In the Consistency mode, the Stop and Suspend sequence is different depending on whether or not Concurrent Suspend is used. In the Stack mode, source-side data updates are responded to immediately. The copy process is executed asynchronously so that it does not affect the response to the server. The copy source area for each copy session is regularly patrolled for updates. However, when multiple writes have occurred in the same location, only the current data at the time of the next patrol check needs to be sent to the copy destination, helping to minimize the amount of transfer data
133 Transmission Mode Through mode (Asynchronous) Therefore, this mode allows data copying with no effect on server performance even if the data transfer line bandwidth is limited. The following sequence of Stop and Suspend commands must be executed to guarantee that the potentially large amounts of data that may remain in the buffer are copied to the destination. Use of this mode is not recommended. The Through mode is still provided for compatibility with legacy systems. However, you should understand how data is copied in the Through mode since it may be useful if the Consistency mode and the Stack mode are stopped for certain reasons. As the response to source-side data updates is executed asynchronously with the copy process, delays are minimized. When data is updated, the copy process is queued. However, the queue has limited length and if the number of queued processes exceeds the limit, the response to the server is delayed and the copy process is executed at the higher priority. Since the queue length is relatively short, the Equivalent state suspend process will always complete within a specified time. Since the data update and transfer processes are executed using the same block size, transmission performance is not high. When writing sequential data in particular, execution of the update and transfer processes is mutually exclusively, so deteriorating performance is a common result. When deciding whether to use this mode, consideration should be given to the fact that processing takes longer to complete than for Stack mode. Split mode This mode is concerned with how REC sessions behave when the line paths are disconnected by a disaster or line error. Split Mode Automatic Split Manual Split If the communication has failed due to certain reasons during REC execution, the REC session is disconnected automatically so that data can be updated at the source location. If the communication has failed due to certain reasons during REC execution, the operator is asked whether or not to disconnect the REC session or not in the Manual Split mode. Though the Manual Split mode does reduce availability somewhat, it also helps keep the copy source data and copy destination data better synchronized, resulting in much lower data losses in the event of a disaster. If data copying has failed due to the disconnection of all paths or other reasons, the server becomes unable to update the data in this mode. Therefore, applications that require the data be updated by the server cannot continue if all REC paths become disconnected, or the backup center or backup ETERNUS Disk storage system fails. Recovery mode This mode is concerned with how REC sessions are recovered after the line that was disconnected by the transmission error has recovered. Recovery Mode Automatic Recovery Manual Recovery REC sessions are automatically resumed as soon as the line that was disconnected by the transmission error has recovered. REC sessions must be manually resumed after the line that was disconnected by the transmission error has recovered. Suspend When the REC session is suspended, both the copy source volume and the copy destination volume are accessible as independent volumes (copy destination volume becomes readable and writable). The Suspend operation can only be executed when the REC session is in the Equivalent state. Unlike the Stop operation, changes to the source and destination volumes continue to be recorded while the Suspend state applies. The procedure to suspend the REC session varies depending on REC Transmission mode

134 Synchronous mode In this case, the procedure is the same as that of EC. Figure A.11 Suspend and resume work flow for REC session in Synchronous mode Stack mode or Consistency mode In order to suspend the REC session in these modes, the Transmission mode must be changed to through mode. However, the Transmission mode is not required to be changed if the REC session in Consistency mode is suspended by Concurrent Suspend

135 Figure A.12 Suspend and resume work flow for REC session in Stack or Consistency mode Concurrent Suspend As EC, multiple REC sessions can be suspended using the Concurrent Suspend operation. This allows consistent copies of multi-volume data-objects, such as databases, to be easily acquired


136 The Concurrent Suspend operation can be performed if the Transmission mode is Synchronous mode or Consistency mode. Figure A.13 Concurrent Suspend and resume work flow for REC session in Synchronous or Consistency mode Resume When the REC session is resumed, data is copied over from the source to the destination so as to catch up on all the changes that were made after the Suspend operation was performed and recover the Equivalent state. As the amount of data that thus needs to be transferred is much less than would be required if the whole source area were to be recopied, the time required to recover the Equivalent state is also greatly reduced. If the source is changed under the Suspend state (when copying is temporarily interrupted by the Suspend operation), the changes are sent to the destination after the Resume operation is performed (when the copy is restarted). However, any changes made at the destination while under the Suspend state will be rolled-back (overwritten from the source data). Consequently, any and all changes made to the destination during the Suspend state are discarded and lost following the Resume operation. The operation modes of REC are not changed by the Resume operation. Reverse When the REC session is reversed, the copy direction is reversed. The Reverse operation can only be executed when the REC session data is in the Suspend state. Mode change When the REC session is in the Suspend state, the operation modes can be changed by the "Mode Change" operation
137 Stop When the REC session is stopped, it terminates. If the REC session in one of the following statuses is stopped, the copy destination volume should not be used because the mirroring is incomplete. Initial copy state Error suspend state Halt state which occurred when the REC session was in the Initial copy state If the REC session in one of the following statuses is stopped, the copy destination volume can be used because the mirroring has been complete. Equivalent state Suspend state Halt state which occurred when the REC session was in the Equivalent state A.7.2 Transfer buffer operations Table A.8 Relationship between session operation and Express function Session operation Express function Change buffer role acrecbuff set Monitoring buffer usage acrecbuff stat Change buffer role The Set operation can change the use of REC transfer buffer from SEND to RECV and vice versa. Monitoring buffer usage The transfer buffer usage can be checked using the "Monitoring buffer" operation. Monitor buffer usage regularly while REC sessions in Consistency mode are running. A "Rate" of 100% means the transfer buffer is in high-load state. A.7.3 Restoration Restoration can be performed by the Reverse function of REC. The procedure for restoration is the same as EC. A.8 Combinations of Advanced Copy A.8.1 Multiple copy Multiple copy is a method that copies the same copy source area to multiple copy destinations. Multiple copy destinations may be specified to obtain more than one copy of the original data at a time. This allows copies of the same data for different purposes, such as backup and testing


138 Figure A.14 Multiple copy Note Following copy type combination selection rules when using multiple copy. For multiple copy with EC only, REC only, or both EC and REC, the start and end points of all copy sessions must be the same. For remote copy, REC (Consistency mode) cannot be used for multiple copy destination volumes in the same copy destination device. A.8.2 Cascade copy Cascade copy is a method that adds copy sessions end-to-end, with an existing copy destination volume becoming the copy source for a new copy session, or vice versa. Figure A.15 Cascade copy A.9 ECO mode The ETERNUS Disk storage system offers the eco-mode (power-saving) function based on the MAID (Massive Array of Idle Disks) technology. The spindle rotation of the disk drive can be turned on and off by using this function. Express offers the eco support tools to control whether spindle rotation of the disk drive is on or off

139 Used in combination with the copy operations of Express, the eco support tools allow the spindle rotation the disk drive to be turned off when it is not used for a long period, thus reducing the power consumption of the ETERNUS Disk storage system. A.10 Note on Backup and Restore by Express Express performs backup and restoration regardless of the state of the server to be backed up. Therefore, make sure that both copy source and destination volumes are inaccessible in order to ensure consistency of backup data. For absolute assurance of data consistency, we highly recommend to stop the target server before executing backups and restorations. If the server can not be suspended, dismount a target volume using the OS function to prevent data within a file cache from being reflected and inhibit access to the target volume. A.11 Trouble shooting The following figure shows the flow of troubleshooting tasks if a hardware or similar fault occurs. Figure A.16 Troubleshooting flow Error on a hardware error When a hardware error occurs in a source or destination volume, perform the repair work on the error according to the following procedures. 1. Use copy management software (e.g. Express) to stop the session in which the error occurred. If the session cannot be stopped by using copy management software, use ETERNUS Web GUI to stop it. 2. Iron out the hardware error. 3. If required, for copy management software, redefine copy source and destination volumes. 4. Re-start the session in which the error occurred. Error on a remote copy data transmission If the Recovery mode of the REC session is Manual Recover mode, the session need to be recovered manually after the transmission error has recovered. The procedure to do this is as follows. 1. Suspend the REC session with force option to change the halt status to the Suspend state. 2. Resume the REC sessions

140 Appendix B Installing and uninstalling Express This appendix explains the installing and uninstalling of the Express. B.1 Installation This section explains the installation of the Express. B.1.1 Installation of Express Manager This chapter explains the installation of the Manager program of Express. A flowchart outlining the installation process for the Manager program is shown below: Install Manager program, using the following procedure: 1. Login to the system. Login as the user who has the Administrator's authority on the system where Express will be installed
![2. Insert the Express CD-ROM into the drive and an initial window will be displayed. Click [Install ETERNUS SF Express Manager].](/docs-images/76/73074786/images/141-1.jpg "Point When any version of ETERNUS SF AdvancedCopy Manager Copy Control Module 14.0 or earlier is already being installed, the following screen will appear.")
141 2. Insert the Express CD-ROM into the drive and an initial window will be displayed. Click [Install ETERNUS SF Express Manager]. Point When any version of ETERNUS SF AdvancedCopy Manager Copy Control Module 14.0 or earlier is already being installed, the following screen will appear. When [Yes] button is clicked, installation is continued. In this case, the Advanced Copy functions of Express are not available. When [No] button is clicked, installation is stopped. When using the Advanced Copy functions of Express, uninstall ETERNUS SF AdvancedCopy Manager Copy Control Module and then reinstall Express
![3. At the following window, check the displayed contents, and then click the [Next] button. 4. Accept the license usage terms and conditions displayed on the [License Agreement] window.](/docs-images/76/73074786/images/142-1.jpg "Check the displayed contents, and then click the [Yes] button. 5. Specify the installation directory.")
142 3. At the following window, check the displayed contents, and then click the [Next] button. 4. Accept the license usage terms and conditions displayed on the [License Agreement] window. Check the displayed contents, and then click the [Yes] button. 5. Specify the installation directory. If this product is to be installed in directories other than those displayed (default directories), click the [Change] button to select the desired directories. After all the proper directories have been selected, click the [Next] button
![6. Specify the port number to be allocated for the service in the [The registration of the port number] window.](/docs-images/76/73074786/images/143-0.jpg "Normally, default port numbers are set in [The registration of the port number] window.")

143 6. Specify the port number to be allocated for the service in the [The registration of the port number] window. Normally, default port numbers are set in [The registration of the port number] window. If the other service uses one of the same port numbers, change the relevant port number of either service to be unique. Table B.1 List of port numbers Service Name Port number Note esfexpressmgr 9853 Express manager service for Express client. esfexpressccm 9854 Express manager service for Copy Control Management GUI

144 Service Name Port number Note sscruisera 4917 Internal use. It does not need to open this port on the firewall. nfport Internal use. It does not need to open this port on the firewall. Information Please confirm the current service file that the port number described above is vacant. The services file is located in %SystemRoot%\system32\drivers\etc directory. The %SystemRoot% is the directory where the Windows operating system is installed. OS Windows Server 2008 C:\Windows\system32\drivers\etc\services Full path name of services file (default) 7. Confirm the settings on the [Start Copying Files] window. If the information specified is correct, click the [Next] button, or to correct or modify any settings click the [Back] button. 8. Start the copying. The file transfer in progress can be viewed on the [Setup Status] window
145 9. Update of the system configuration. Wait for the update completion of the system configuration. 10. Finish the Installer. Click the [Finish] button to end the install process, and reboot the computer

146 B.1.2 Installation of Express Client This chapter explains the installation of the Client program of Express. A flowchart outlining the installation process for the Client program is shown below: Install Client program, using the following procedure: 1. Login to the system. Logon as the user who has the Administrator's authority on the system where Express will be installed
147 2. Insert the Express CD-ROM into the drive and an initial window will be displayed. Click [Install ETERNUS SF Express Client]. 3. At the following window, check the displayed contents, and then click the [Next] button. 4. Accept the license usage terms and conditions displayed on the [License Agreement] window. Check the displayed contents, and then click the [Yes] button
![5. Accept the license of Eclipse usage terms and conditions displayed on the [Eclipse License Agreement] window.](/docs-images/76/73074786/images/148-0.jpg "Check the displayed contents, and then click the [Yes] button. 6. Specify the installation directory.")

148 5. Accept the license of Eclipse usage terms and conditions displayed on the [Eclipse License Agreement] window. Check the displayed contents, and then click the [Yes] button. 6. Specify the installation directory. If this product is to be installed in directories other than those displayed (default directories), click the [Change] button to select the desired directories. After all the proper directories have been selected, click the [Next] button
![7. Confirm the settings on the [Start Copying Files] window.](/docs-images/76/73074786/images/149-0.jpg "If the information specified is correct, click the [Next] button, or to")
![correct or modify any settings click the [Back] button. 8.](/docs-images/76/73074786/images/149-1.jpg "Start the copying.")
149 7. Confirm the settings on the [Start Copying Files] window. If the information specified is correct, click the [Next] button, or to correct or modify any settings click the [Back] button. 8. Start the copying. The file transfer in progress can be viewed on the [Setup Status] window
![9. Create the shortcut. When [Yes] button is clicked, installer is create the shortcut on the desk top. When [No] button is clicked, installer is not create the shortcut. 10.](/docs-images/76/73074786/images/150-1.jpg "Finish the Installer. When the installation is completed, the following confirmation window will be displayed. Click the [Finish] button to end the install process. - 141 -")
150 9. Create the shortcut. When [Yes] button is clicked, installer is create the shortcut on the desk top. When [No] button is clicked, installer is not create the shortcut. 10. Finish the Installer. When the installation is completed, the following confirmation window will be displayed. Click the [Finish] button to end the install process

151 B.2 Uninstallation This section explains the uninstallation of the Express. B.2.1 UnInstallation of Express Manager This chapter explains the uninstallation of the Manager program of Express. Note After uninstalling, all contents of the "<Express Manager program directory>\express\manager" folder in the install directory are removed. (The default directory name of Express Manager program is "C:\Program Files (x86)\eternus SF".) Do not put your own files under the folder. If necessary, backup Express Manager environment as shown in "7.1 Backing up Express Manager environment" before uninstall. 1. Login to the system. Login as the user who has the Administrator's authority on the system where Express will be uninstalled. 2. Open the window that can add or remove programs, and delete the "ETERNUS SF Express Manager" program. The name of window that can add or remove programs and the method to open its window are as follows. OS Name of window Method to open window Windows Server 2008 Programs and Features When "Start menu" is used: [Start] > [Control Panel] > [Programs and Features] When "Classic Start menu" is used: [Start] > [Settings] > [Control Panel] > [Programs and Features]
152 3. The following confirmation window will be displayed, click the [Yes] button. 4. Delete of the system configuration. Wait for the delete completion of the system configuration. 5. Start the uninstall. The file transfer in progress can be viewed on the [Setup Status] window
153 6. When the uninstallation is completed, the following confirmation window will be displayed. Click the [Finish] button, and reboot the computer. 7. Even if uninstall is carried out, the package directory may not be removed. If the directory remains, remove as required. Note If the licenses for ETERNUS SF products have been registered, these licenses will remain on the management server even after having uninstalled Express Manager. If you do not use ETERNUS SF products (do not use their licenses) on the same server in the future, please uninstall "ETERNUS SF License Manager" from "Programs and Features". B.2.2 UnInstallation of Express Client This chapter explains the uninstallation of the Client program of Express. 1. Login to the system. Login as the user who has the Administrator's authority on the system where Express will be uninstalled. 2. Open the window that can add or remove programs, and delete the "ETERNUS SF Express Client" program. The name of window that can add or remove programs and the method to open its window are as follows. OS Name of window Method to open window Windows 7 Uninstall a program [Start] > [Control Panel] > [Uninstall a program] Windows Vista Programs and Features [Start] > [Control Panel] > [Programs and Features] Windows XP Add or Remove Programs When "Start menu" is used: [Start] > [Control Panel] > [Add or Remove Programs] When "Classic Start menu" is used: [Start] > [Settings] > [Control Panel] > [Add or Remove Programs]
![OS Name of window Method to open window Windows Server 2008 Programs and Features When "Start menu" is used: [Start] > [Control Panel] > [Programs and Features] 3.](/docs-images/76/73074786/images/154-0.jpg "The following confirmation window will be displayed, click the [Yes] button. When \"Classic Start menu\" is used: [Start] > [Settings] > [Control Panel] > [Programs and Features] 4. Start the uninstall.")
154 OS Name of window Method to open window Windows Server 2008 Programs and Features When "Start menu" is used: [Start] > [Control Panel] > [Programs and Features] 3. The following confirmation window will be displayed, click the [Yes] button. When "Classic Start menu" is used: [Start] > [Settings] > [Control Panel] > [Programs and Features] 4. Start the uninstall. The file transfer in progress can be viewed on the [Setup Status] window
155 5. When the uninstallation is completed, the following confirmation window will be displayed. Click the [Finish] button. 6. Even if uninstall is carried out, the package directory may not be removed. If the directory remains, remove as required
156 Appendix C Commands This appendix explains the various commands that are used with Express. C.1 Commands for Advanced Copy function This section explains the commands for Advanced Copy function. Point If using commands, refer to " PATH environment variables settings". The Advanced Copy commands can be classified as follows. Environment definition commands Table C.1 List of commands for controlling ETERNUS Disk storage systems Function Command Explanation C.1.1 acarray add (ETERNUS Disk storage system registration command) C.1.2 acarray change (Command for changing ETERNUS names and access paths for ETERNUS Disk storage systems) C.1.3 acarray list (Command for displaying information about ETERNUS Disk storage systems) C.1.4 acarray detail (Command for displaying detailed information about ETERNUS Disk storage systems) C.1.5 acarray remove (Command for deleting registration information for ETERNUS Disk storage systems) acarray add acarray change acarray list acarray detail acarray remove Registers ETERNUS Disk storage systems. Changes the access paths and ETERNUS names for ETERNUS Disk storage systems. Displays information about ETERNUS Disk storage systems. Displays detailed information about ETERNUS Disk storage systems. Removes registration information about ETERNUS Disk storage systems. Table C.2 List of commands for displaying information relating to ETERNUS Disk storage systems Function Command Explanation C.1.6 acinq lv (Command for displaying information about logical volumes) C.1.7 acinq lunmap (Command for displaying LUN Mapping information) C.1.8 acinq ag (Command for displaying a list of affinity groups) C.1.9 acinq hag (Command for displaying a list of host affinity groups) acinq lv acinq lunmap acinq ag acinq hag Table C.3 List of commands for control REC transfer buffer Displays information about logical volumes. Displays LUN mapping information. Displays affinity groups for ETERNUS Disk storage systems. Displays host affinity groups for ETERNUS Disk storage systems. Function Command Explanation C.1.10 acrecbuff set (Setting REC transfer buffers) acrecbuff set Setting REC transfer buffers. C.1.11 acrecbuff stat (Displaying REC transfer buffer status) acrecbuff stat Displaying REC transfer buffer status
157 Table C.4 List of commands for setting up copy groups Function Command Explanation C.1.12 acgroup create (Copy group creation command) acgroup create Creates a copy group. C.1.13 acgroup list (Copy group display command) acgroup list Displays the copy groups that have been set up. C.1.14 acgroup detail (Command for displaying detailed information about copy groups) acgroup detail Displays the copy pairs that have been set up in copy groups. C.1.15 acgroup remove (Copy group deletion command) acgroup remove Removes copy groups. C.1.16 acpair add (Copy pair addition command) acpair add Adds copy pairs to copy groups. C.1.17 acpair remove (Copy pair deletion command) acpair remove Removes copy pairs from copy groups. Operation commands Table C.5 List of commands for Advanced Copy Function Command Explanation C.1.18 acopc start (Clone(OPC) type Advanced Copy or Clone(QuickOPC) type Advanced Copy start command) C.1.19 acopc query (Status display command for Clone(OPC) type Advanced Copy or Clone(QuickOPC) type Advanced Copy) C.1.20 acopc cancel (Clone(OPC) type Advanced Copy or Clone(QuickOPC) type Advanced Copy stop command) C.1.21 acsnap start (Snapshot type Advanced Copy start command) C.1.22 acsnap query (Status display command for snapshot type Advanced Copy) C.1.23 acsnap cancel (Snapshot type Advanced Copy stop command) C.1.24 acec start (Clone(EC) type or Remote Advanced Copy start command) C.1.25 acec query (Status display command for Clone(EC) type or Remote Advanced Copy) C.1.26 acec suspend (Clone(EC) type or Remote Advanced Copy temporary suspension command) C.1.27 acec resume (Clone(EC) type or Remote Advanced Copy restart command) C.1.28 acec reverse (Clone(EC) type or Remote Advanced Copy reverse command) C.1.29 acec change (Remote Advanced Copy mode change command) C.1.30 acec cancel (Clone(EC) type or Remote Advanced Copy stop command) acopc start acopc query acopc cancel acsnap start acsnap query acsnap cancel acec start acec query acec suspend acec resume acec reverse acec change acec cancel Starts Clone(OPC) type Advanced Copy or Clone(QuickOPC) type Advanced Copy. Displays the status of Clone(OPC) type Advanced Copy or Clone(QuickOPC) type Advanced Copy. Stops Clone(OPC) type Advanced Copy or Clone(QuickOPC) type Advanced Copy. Starts snapshot type Advanced Copy. Displays the status of snapshot type Advanced Copy. Stops snapshot type Advanced Copy. Start of Clone(EC) type Advanced Copy or Remote Advanced Copy. Displays the status of Clone(EC) type Advanced Copy or Remote Advanced Copy. Temporarily suspends Clone(EC) type Advanced Copy or Remote Advanced Copy. Restarts temporarily interrupted Clone(EC) type Advanced Copy or Remote Advanced Copy. Reverses the direction of Clone(EC) type Advanced Copy or Remote Advanced Copy. Changes the mode of Remote Advanced Copy. Stops Clone(EC) type Advanced Copy or Remote Advanced Copy
158 Utility commands Table C.6 List of commands for Snap data volume and Snap data pool Function Command Explanation C.1.31 acsdv init (Initialize snap data volume command) acsdv init Initializes snap data volumes. C.1.32 acsdv stat (Display snap data volume status command) C.1.33 acsdv poolstat (Display snap data pool status command) Table C.7 List of utility commands acsdv stat acsdv poolstat Displays the status of a snap data volume. Displays the status of a snap data pool. Function Command Explanation C.1.34 acutil devs (Logical volume information display command) C.1.35 acgetvolinfo (Displaying logical volume information) acutil devs acgetvolinfo Displays information about logical volumes on Windows servers. Displays logical volume information. C.1.36 acutil refresh (Partition table refresh command) acutil refresh Refreshes the partition table for the disk. Troubleshooting data collection commands Table C.8 List of troubleshooting data collection commands Function Command Explanation C.1.37 acmcapture (troubleshooting data collection command) acmcapture Collects data for use in investigating faults. C.1.1 acarray add (ETERNUS Disk storage system registration command) NAME acarray add - Registration of ETERNUS Disk storage systems. SYNOPSIS For ETERNUS Disk storage system in the local site acarray add -a DISKARRAY-NAME -ip DISKARRAY-IP -user USER -password PASSWORD -path ACCESSPATH [- xml] For ETERNUS Disk storage system in a remote site acarray add -a DISKARRAY-NAME -boxid BOX-ID -remote [-xml] DESCRIPTION This command registers ETERNUS Disk storage systems. Please make sure to specify the "add" subcommand. An error will occur when an attempt is made to register an ETERNUS Disk storage system with the same IP address as an ETERNUS Disk storage system that has already been registered. OPTIONS -a DISKARRAY-NAME This option specifies the ETERNUS names that are used by Express. Specify it in the alphanumeric character within 16 characters
159 -ip DISKARRAY-IP This option specifies the IP address of the ETERNUS Disk storage system. An error will occur when an attempt is made to register an ETERNUS Disk storage system with the same IP address as an ETERNUS Disk storage system that has already been registered. -user USER This option specifies a user name with Administrator privileges for ETERNUS Web GUI. Specify the user name using a string that is between 4 and 16 characters long. Refer to the ETERNUS Web GUI manuals for more information about ETERNUS Web GUI. -password PASSWORD This option specifies the password for the user with Administrator privileges for ETERNUS Web GUI. Refer to the ETERNUS Web GUI manuals for more information about ETERNUS Web GUI. -path ACCESSPATH This option specifies the access path in the logical volume within the ETERNUS Disk storage system that was specified with the "-a" option. Specify the drive letter. Example: X: -box-id BOX-ID This option specifies the BOX-ID of the ETERNUS Disk storage system. An error will occur when an attempt is made to register an ETERNUS Disk storage system with the same BOX-ID as an ETERNUS Disk storage system that has already been registered. Refer to the ETERNUS Web GUI manuals for more information. -remote -xml This option specifies when registering the ETERNUS Disk storage system which is in a remote site. This option specifies when displaying the result of the command execution by the XML format. EXIT STATUS =0: Completed successfully >0: Terminated abnormally EXAMPLES C:\>acarray add -a DX80 -ip user root -password root -path X: Successful completion. C.1.2 acarray change (Command for changing ETERNUS names and access paths for ETERNUS Disk storage systems) NAME acarray change - Change of ETERNUS names and access paths. SYNOPSIS For ETERNUS Disk storage system in the local site acarray change -a DISKARRAY-NAME {-path ACCESSPATH -new NEW-DISKARRAY-NAME} [-xml]
160 For ETERNUS Disk storage system in a remote site acarray change -a DISKARRAY-NAME -new NEW-DISKARRAY-NAME -remote [-xml] DESCRIPTION This command changes the ETERNUS names and access paths for ETERNUS Disk storage systems. Please make sure to specify the "change" subcommand. OPTIONS -a DISKARRAY-NAME This option specifies the existing ETERNUS name for which the ETERNUS name or access path is to be changed. -path ACCESSPATH This option specifies the new access path to be set in the ETERNUS Disk storage system. Specify the drive letter. Example: Y: -new NEW-DISKARRAY-NAME This option specifies the new ETERNUS name to be set for the ETERNUS Disk storage system. -remote -xml This option specifies when changing the ETERNUS Disk storage system which is in a remote site. This option specifies when displaying the result of the command execution by the XML format. EXIT STATUS =0: Completed successfully >0: Terminated abnormally EXAMPLES C:\>acarray change -a DX80 -p path Y: Successful completion. C.1.3 acarray list (Command for displaying information about ETERNUS Disk storage systems) NAME acarray list - Display of information on the ETERNUS Disk storage system. SYNOPSIS acarray list [-remote] [-xml] DESCRIPTION This command displays a list of the ETERNUS Disk storage systems that have been registered, together with information about each ETERNUS Disk storage system. Please make sure to specify the "list" subcommand
161 OPTIONS -remote -xml This option specifies when referring the ETERNUS Disk storage system which is in a remote site. This option specifies when displaying by the XML format. EXIT STATUS =0: Completed successfully >0: Terminated abnormally EXAMPLES Displaying ETERNUS Disk storage systems which are in a local site: C:\>acarray list Name BOX-ID IP Address DX80 00ETERNUSDXL##ET08E21A####LN ## DX80B 00ETERNUSDXL##ET08F22A####JP ## The following table shows the meanings of the information displayed. Title Name BOX-ID IP Address Explanation Displays the ETERNUS name. Displays the BOX ID for the ETERNUS Disk storage system. Displays the IP address for the ETERNUS Disk storage system. Displaying ETERNUS Disk storage systems which are in a remote site: C:\>acarray list -remote Name BOX-ID DX80 00ETERNUSDXL##ET08E21A####LN ## DX80B 00ETERNUSDXL##ET08F22A####JP ## The following table shows the meanings of the information displayed. Name BOX-ID Title Displays the ETERNUS name. Explanation Displays the BOX ID for the ETERNUS Disk storage system. C.1.4 acarray detail (Command for displaying detailed information about ETERNUS Disk storage systems) NAME acarray detail - Display of detailed information on the ETERNUS Disk storage system. SYNOPSIS acarray detail -a DISKARRAY-NAME [-xml]
162 DESCRIPTION This command displays a list of the ETERNUS Disk storage systems that have been registered, together with detailed information about each ETERNUS Disk storage system. Please make sure to specify the "detail" subcommand. OPTIONS -a DISKARRAY-NAME -xml This option specifies the ETERNUS name. This option specifies when displaying by the XML format. EXIT STATUS =0: Completed successfully >0: Terminated abnormally EXAMPLES Displaying an ETERNUS Disk storage system which is in a local site: C:\>acarray detail -a DX80 Disk Array Name : DX80 BOX-ID : 00ETERNUSDXL##ET08E21A####LN ## IP Address : Admin User : root Access Path : X: The following table shows the meanings of the information displayed. Title Disk Array Name BOX-ID IP Address Admin User Access Path Explanation Displays the ETERNUS name. Displays the BOX ID for the ETERNUS Disk storage system. Displays the IP address for the ETERNUS Disk storage system. (NOTE) Displays the name of the user with Administrator privileges for ETERNUS Web GUI. (NOTE) Displays the access path set up for the ETERNUS Disk storage system. (NOTE) NOTE: If the specified ETERNUS Disk storage system exists on a remote site, a hyphen (-) is displayed. C.1.5 acarray remove (Command for deleting registration information for ETERNUS Disk storage systems) NAME acarray remove - Deletion of registered information of the ETERNUS Disk storage system. SYNOPSIS acarray remove -a DISKARRAY-NAME [-xml] DESCRIPTION This command deletes registration information for ETERNUS Disk storage systems. Please make sure to specify the "remove" subcommand
163 OPTIONS -a DISKARRAY-NAME -xml This option specifies the ETERNUS name. This option specifies when displaying the result of the command execution by the XML format. EXIT STATUS =0: Completed successfully >0: Terminated abnormally EXAMPLES C:\>acarray remove -a DX80 Successful completion. C.1.6 acinq lv (Command for displaying information about logical volumes) NAME acinq lv - Display of information on logical volumes. SYNOPSIS acinq lv -a DISKARRAY-NAME [-free] [-xml] DESCRIPTION This command displays a list of the logical volumes for ETERNUS Disk storage systems, together with information about each logical volume. Please make sure to specify the "lv" subcommand. This information can be displayed for the following types of logical volumes: Open SDV Thin Provisioning Volume OPTIONS -a DISKARRAY-NAME This option specifies the ETERNUS name. -free Displays list of logical volumes that meet the following requirements. - Not registered with an affinity group. - Not used by LUN Mapping settings if the affinity function is disabled. -xml This option specifies when displaying by the XML format. EXIT STATUS =0: Completed successfully
164 >0: Terminated abnormally EXAMPLES [When you specify the option -free] C:\>acinq lv -a DX80 -free LV No LV Name LV Size LV Type RG No Encrypt x0023 vol M Open 5 - [When you do not specify the option -free] C:\>acinq lv -a DX80 LV No LV Name LV Size LV Type RG No Encrypt x0010 vol M Open 4-0x0011 vol M Open 4-0x0012 vol M Open 4-0x0013 vol M Open 2-0x0014 vol M Open 2-0x0023 vol M Open 5 - The following table shows the meanings of the information displayed. LV No LV Name LV Size LV Type RG No Encrypt Title Explanation Displays the logical volume number in hexadecimal. Displays the alias for the logical volume (0 to 16 characters). (Only be displayed when used with an ETERNUS Disk storage system that supports logical volume alias name.) Displays the size of the logical volume in Megabytes. Displays the logical volume type. Open: This refers to an "Open Volume", which means a normal volume that can be used with open systems. SDV: This refers to a "Snap Data Volume", which means a volume that can be used as the copy destination for SnapOPC/SnapOPC+. The volume of this type cannot be used as the copy destination for OPC/QuickOPC/EC/REC. TPV: This refers to a "Thin Provisioning Volume", which means a virtual volume that can be used with open systems. Displays the RAID group number. The hyphen (-) is displayed, when "TPV" is displayed in "LV Type" field. Displays the encryption status of the logical volume. -: Indicates an unencrypted volume. Yes: Indicates an encrypted volume. NOTES This command is not available for ETERNUS Disk storage systems registered as a remote device
165 C.1.7 acinq lunmap (Command for displaying LUN Mapping information) NAME acinq lunmap - Display of LUN Mapping information. SYNOPSIS acinq lunmap -a DISKARRAY-NAME -agno AFFINITY-GROUP-NO [-xml] DESCRIPTION This command displays LUN Mapping information for affinity groups. Please make sure to specify the "lunmap" subcommand. This command cannot be used with the connected affinity group. OPTIONS -a DISKARRAY-NAME This option specifies the ETERNUS name. -agno AFFINITY-GROUP-NO -xml This option specifies an affinity group number. This option specifies when displaying by the XML format. EXIT STATUS =0: Completed successfully >0: Terminated abnormally EXAMPLES C:\>acinq lunmap -a DX80 -agno 0x004 LUN LV No LV Name x0000 0x0003 vol03 0x0001 0x0004 vol04 0x0002 0x0005 vol05 The following table shows the meanings of the information displayed. Title LUN LV No LV Name Explanation Displays the logical unit number in hexadecimal. Displays the logical volume number in hexadecimal. Displays the alias for the logical volume (0 to 16 characters). (Displayed only when used with an ETERNUS that supports logical volume alias name.) NOTES This command is not available for ETERNUS Disk storage systems registered as a remote device. C.1.8 acinq ag (Command for displaying a list of affinity groups)
166 NAME acinq ag - Display of list of affinity groups. SYNOPSIS acinq ag -a DISKARRAY-NAME [-xml] DESCRIPTION This command displays a list of affinity groups for ETERNUS Disk storage systems. Please make sure to specify the "ag" subcommand. "Affinity groups" are management information on ETERNUS Disk storage systems that indicate the relationship between logical unit numbers (LUN), which can be recognized by the host, and logical volume numbers, which are managed within ETERNUS Disk storage systems. OPTIONS -a DISKARRAY-NAME -xml This option specifies the ETERNUS name. This option specifies when displaying by the XML format. EXIT STATUS =0: Completed successfully >0: Terminated abnormally EXAMPLES C:\>acinq ag -a DX80 AG No AG Name x000 win_78 0x001 x86_76 The following table shows the meanings of the information displayed. AG No AG Name Title Explanation Displays the affinity group number in hexadecimal. Displays the affinity group name. NOTES This command is not available for ETERNUS Disk storage systems registered as a remote device. C.1.9 acinq hag (Command for displaying a list of host affinity groups) NAME acinq hag - Display of list of host affinity groups. SYNOPSIS acinq hag -a DISKARRAY-NAME [-xml]
167 DESCRIPTION This command displays host affinity groups for ETERNUS Disk storage systems. Please make sure to specify the "hag" subcommand. "Host affinity groups" are management information on ETERNUS Disk storage systems that indicate the relationship between the world wide name (WWN) for the host and its affinity groups. Disks that connect to the host can be specified as host affinity groups. OPTIONS -a DISKARRAY-NAME -xml This option specifies the ETERNUS name. This option specifies when displaying by the XML format. EXIT STATUS =0: Completed successfully >0: Terminated abnormally EXAMPLES C:\>acinq hag -a DX80 Host Name Port Type Address AG No AG Name win_78_1 FC A5A 0x002 win_78 win_78_2 FC AC340DA34F 0x003 win_78 x86_76 FC AA2C45GG 0x004 x86_76 The following table shows the meanings of the information displayed. Title Host Name Port Type Address AG No AG Name Explanation Displays the host name or alias name. The host name is displayed for the FC-CA or the Serial Attached SCSI. The alias name is displayed for the iscsi. Displays the data transfer method. FC: fibre channel connection iscsi: iscsi connection SAS: Serial Attached SCSI connection Displays the WWN for the connection destination. The WWN is displayed for the FC-CA. The iscsi address is displayed for the iscsi. The SAS address is displayed for the Serial Attached SCSI. Displays the affinity group number in hexadecimal. Displays the affinity group name. NOTES This command is not available for ETERNUS Disk storage systems registered as a remote device
168 C.1.10 acrecbuff set (Setting REC transfer buffers) NAME acrecbuff set - Sets up REC transfer buffers. SYNOPSIS acrecbuff set -a DISKARRAY-NAME -id BUFFER-ID -use {SEND RECV} [-xml] DESCRIPTION The settings for transfer buffers used in an ETERNUS Disk storage system are changed. To execute this command, it is required that the REC transfer buffers have been already set. OPTIONS -a DISKARRAY-NAME This option specifies the ETERNUS name. -id BUFFER-ID This option specifies a transfer buffer ID. -use {SEND RECV} This option specifies the application of the transfer buffer. - SEND : For sending - RECV : For receiving -xml This option specifies when displaying the result of the command execution by the XML format. EXIT STATUS =0: Completed successfully >0: Terminated abnormally EXAMPLES C:\>acrecbuff set -a DX90 -id 1 -use SEND Successful completion NOTES Set up buffers while no session exists in asynchronous Consistency mode, which is in ACTIVE or ERROR SUSPEND status. It takes tens of seconds to change buffer settings. Since transfer buffers are not available while their settings are changed, do not execute REC operations. This command is not available for ETERNUS Disk storage systems registered as a remote device. C.1.11 acrecbuff stat (Displaying REC transfer buffer status) NAME acrcsbuff stat - Displays REC transfer buffer information
169 SYNOPSIS acrecbuff stat -a DISKARRAY-NAME [-xml] DESCRIPTION The information for transfer buffers used in an ETERNUS Disk storage system is displayed. OPTIONS -a DISKARRAY-NAME -xml This option specifies the ETERNUS name. This option specifies when displaying by the XML format. EXIT STATUS =0: Completed successfully >0: Terminated abnormally EXAMPLES C:\>acrecbuff stat -a DX90 ID Use Rate RemoteBoxID SEND 12% 00ETERNUSDXL##ET09E24AG###NP ## 2 RECV 0% 00ETERNUSDXL##ET09E24AG###NP ## The following table shows the meanings of the information displayed. ID Use Title Displays a transfer buffer ID. Displays the transfer buffer attribute (application). SEND: for sending RECV: for receiving Rate Displays the transfer buffer usage as a percentage. When the REC transfer buffer is not available, "----" is displayed. For sending: Displays the transfer buffer usage as a percentage. Even if REC in asynchronous Consistency mode is not executed, the usage does not become 0 %. For receiving: "0 %" is displayed at all times. RemoteBoxID Displays the BOX ID for the ETERNUS Disk storage system. NOTES This command is not available for ETERNUS Disk storage systems registered as a remote device. C.1.12 acgroup create (Copy group creation command) NAME acgroup create - Creation of copy groups
170 SYNOPSIS acgroup create -g COPY-GROUP -type { OPC QuickOPC SnapOPCP EC REC } -a DISKARRAY-NAME [-remote REMOTE-DISKARRAY-NAME] [-xml] DESCRIPTION This command creates a copy group. Please make sure to specify the "create" subcommand. OPTIONS -g COPY-GROUP This option specifies the copy group name. The copy group name is an alias for the copy group that can be used with Express. Specify copy group names using up to 64 alphanumeric characters, hyphens (-), underscores (_), hashes (#) or periods (.). The first character must be an alphanumeric character. An error will occur when an attempt is made to create a copy group with the same name as a copy group that has already been registered. -type { OPC QuickOPC SnapOPCP EC REC } This option specifies the type of copy used within the copy group. Specify one of the following copy types: - OPC - QuickOPC - SnapOPCP - EC - REC -a DISKARRAY-NAME This option specifies the ETERNUS name. For REC, the access path of the ETERNUS Disk storage system specified here is used. -remote REMOTE-DISKARRAY-NAME -xml For REC, the ETERNUS name besides the specified ETERNUS Disk storage system is specified by the -a option. The access path of the ETERNUS Disk storage system specified by the -a option is used, instead of the access path of the ETERNUS Disk storage system specified here. This option specifies when displaying the result of the command execution by the XML format. EXIT STATUS =0: Completed successfully >0: Terminated abnormally EXAMPLES C:\>acgroup create -g group01 -type OPC -a DX80 Successful completion. C.1.13 acgroup list (Copy group display command)
171 NAME acgroup list - Display of copy groups. SYNOPSIS acgroup list [-xml] DESCRIPTION This command displays a list of copy groups. Please make sure to specify the "list" subcommand. OPTIONS -xml This option specifies when displaying the result of the command execution by the XML format. EXIT STATUS =0: Completed successfully >0: Terminated abnormally EXAMPLES C:\>acgroup list CG Name Group01 Group02 The following table shows the meaning of the information displayed. Title CG Name Displays the copy group name. Explanation C.1.14 acgroup detail (Command for displaying detailed information about copy groups) NAME acgroup detail - Detailed display of copy groups. SYNOPSIS acgroup detail -g COPY-GROUP [-xml] DESCRIPTION This command displays the copy pairs that have been set up in copy groups. Please make sure to specify the "detail" subcommand. OPTIONS -g COPY-GROUP This option specifies the copy group name. -xml This option specifies when displaying by the XML format
172 EXIT STATUS =0: Completed successfully >0: Terminated abnormally EXAMPLES For OPC, QuickOPC, SnapOPCP and EC C:\>acgroup detail -g group01 Copy Group Name : group01 Copy Group Type : OPC Disk Array Name : DX80 (00ETERNUSDXL##ET08E21A####LN ##) Pair DX80/0x1:DX80/0x6 DX80/0x2:DX80/0x7 DX80/0x3:DX80/0x8 The displayed content is shown next. Title Copy Group Name Copy Group Type Disk Array Name Pair Displays the copy group name. Displays the copy type set in the copy group. Explanation Displays the Box ID and ETERNUS name that was specified with the "-a" option of the acgroup create (Copy group creation command). Displays the copy pair that was set up. For REC C:\>acgroup detail -g group01 Copy Group Name : group01 Copy Group Type : REC Disk Array Name : DX90P (00ETERNUSDXL##ET09E24AG###NP ##) Remote Disk Array Name : DX90S (00ETERNUSDXL##ET09E24AG###NP ##) Pair DX90P/0x1:DX90S/0x1 DX90P/0x2:DX90S/0x2 DX90P/0x3:DX90S/0x3 The following table shows the meanings of the information displayed. Title Copy Group Name Copy Group Type Disk Array Name Remote Disk Array Name Pair Displays the copy group name. Explanation Displays the copy type set in the copy group. Displays the Box ID and ETERNUS name that was specified with the "-a" option of the acgroup create (Copy group creation command). Displays the Box ID and ETERNUS name that was specified with the "-remote" option of the acgroup create (Copy group creation command). Displays the copy pairs that have been set up
173 C.1.15 acgroup remove (Copy group deletion command) NAME acgroup remove - Deletion of copy groups. SYNOPSIS acgroup remove -g COPY-GROUP [-xml] DESCRIPTION This command removes copy groups. Please make sure to specify the "remove" subcommand. OPTIONS -g COPY-GROUP -xml This option specifies the copy group name. This option specifies when displaying the result of the command execution by the XML format. EXIT STATUS =0: Completed successfully >0: Terminated abnormally EXAMPLES C:\>acgroup remove -g group01 Successful completion. NOTES Even if a copy group contains a pair, it is deleted. Regardless of the Advanced Copy status of the pair, the copy group is deleted. Therefore, check the Advanced Copy status and then delete the copy group. If you delete it accidentally, stop the Advanced Copy of the pair registered in the group on ETERNUS Web GUI or create the same copy group once again to add it and then stop the Advanced Copy. C.1.16 acpair add (Copy pair addition command) NAME acpair add - Addition of copy pairs. SYNOPSIS acpair add -g COPY-GROUP -p PAIR [-xml] DESCRIPTION This command adds copy pairs to copy groups. Please make sure to specify the "add" subcommand. OPTIONS -g COPY-GROUP This option specifies the copy group name
174 -p PAIR This option specifies the copy pair to be added. The following example shows the format for specifying copy pairs. - (1) ETERNUS name for the copy source - (2) Logical volume number for the copy source - (3) ETERNUS name for the copy destination - (4) Logical volume number for the copy destination Point If it starts with "0x", it is a hexadecimal number. -xml This option specifies when displaying the result of the command execution by the XML format. EXIT STATUS =0: Completed successfully >0: Terminated abnormally EXAMPLES C:\>acpair add -g group01 -p DX80/0x1:DX80/0x6 Successful completion. NOTES Make sure that the logical volumes specified for the copy source and the copy destination are of the same size. If the copy type is OPC, QuickOPC or EC - Specify the ETERNUS name that was specified with the -a option for acgroup create (Copy group creation command). - When specifying a pair of ETERNUS Disk storage systems, specify the same ETERNUS Disk storage systems as those specified with the -a option when creating the copy group. If the copy type is SnapOPCP - For a pair of ETERNUS Disk storage systems to be specified, specify the same ETERNUS Disk storage systems as those specified with the -a option when creating the copy group. - If the number of copy destination volumes for the copy source volume of a specified pair exceeds the maximum number of sessions of Snapshot type Advanced Copy copies, this command ends abnormally. - If the copy destination for the specified pair is not SDV, this command ends abnormally. If the copy type is REC - Specify the ETERNUS name that was specified with either the -a or the -remote option for acgroup create (Copy group creation command). - Specify different ETERNUS names for the copy source and the copy destination

175 - The copy source ETERNUS name and the copy destination ETERNUS name for the copy pair being added must be the same as the copy source ETERNUS name and copy destination ETERNUS name for any copy pairs that have already been added to the copy group. - When specifying a pair of ETERNUS Disk storage systems, specify the same ETERNUS Disk storage systems as those specified with the -a or -remote option when creating the copy group. - For the paired ETERNUS names, specify different names for copy source and copy destination. e.g.: - OK: DX90P/0x50:DX90S/0x51 - NG: DX90P/0x50:DX90P/0x51 - The copy source and destination ETERNUS names for a specified pair should be the same as those for already added pair. If any pair in the same string exists in the group, it cannot be newly added. Specify the same-size logical volumes for a pair you want to specify. If you specify any logical volumes of different sizes and perform copy operation, it leads to the following results. 1. In the case of a copy-source logical volume size being larger than a copy-destination logical volume, when copy operation is executed, it will end abnormally. 2. In the case of a copy-source logical volume size being smaller than a copy-destination logical volume size, the copy will be the size of the copy-source logical volume. C.1.17 acpair remove (Copy pair deletion command) NAME acpair remove - Deletion of copy pairs. SYNOPSIS acpair remove -g COPY-GROUP -p PAIR [-xml]
ETERNUS SF Express V14.2. User's Guide. Windows
 ETERNUS SF Express V14.2 User's Guide Windows B1FN-5955-03ENZ0(00) June 2011 Preface Purpose This manual gives an overview of ETERNUS SF Express (hereafter referred to as Express). This manual describes
ETERNUS SF Express V15.0. Operation Guide. Windows/Linux
 ETERNUS SF Express V15.0 Operation Guide Windows/Linux B1FW-5962-01ENZ0(02) March 2012 Preface Purpose This manual gives an overview of ETERNUS SF Express. ETERNUS SF Express is part of the following Storage
ETERNUS SF AdvancedCopy Manager SRA Version 2.4. User's Guide. Windows(64)
") ETERNUS SF AdvancedCopy Manager SRA Version 2.4 User's Guide Windows(64) B1WS-0994-04ENZ0(03) June 2017 Preface Purpose This manual explains how to install and customize ETERNUS SF AdvancedCopy Manager
ETERNUS SF AdvancedCopy Manager SRA Version 2.4 User's Guide Windows(64) B1WS-0994-04ENZ0(03) June 2017 Preface Purpose This manual explains how to install and customize ETERNUS SF AdvancedCopy Manager
Operation Guide for Copy Control Module
 ETERNUS SF Express V15.3/ AdvancedCopy Manager V15.3 Operation Guide for Copy Control Module Windows/Solaris/Linux B1FW-5959-05ENZ0(01) April 2014 Preface Purpose This manual describes the how to use the
ETERNUS SF Express V15.1/ Storage Cruiser V15.1/ AdvancedCopy Manager V15.1. Migration Guide
 ETERNUS SF Express V15.1/ Storage Cruiser V15.1/ AdvancedCopy Manager V15.1 Migration Guide B1FW-5958-03ENZ0(00) August 2012 Preface Purpose This manual describes how to upgrade to this version from the
Operation Guide for Copy Control Module
 FUJITSU Storage ETERNUS SF AdvancedCopy Manager V16.2 Operation Guide for Copy Control Module Windows/Solaris/Linux B1FW-6015-03ENZ0(02) July 2015 Preface Purpose This manual describes the how to deliver
ETERNUS SF AdvancedCopy Manager V15.0. Quick Reference
 ETERNUS SF AdvancedCopy Manager V15.0 Quick Reference B1FW-5967-02ENZ0(00) April 2012 Preface Purpose This manual describes the pre-installation requirements, installation procedure, configuration procedure,
ETERNUS SF AdvancedCopy Manager Glossary
 ETERNUS SF AdvancedCopy Manager 14.1 Glossary J2X1-7455-02ENZ0(00) January 2010 Preface Purpose This manual describes the terminology used in the ETERNUS SF AdvancedCopy Manager manuals. Intended Readers
ETERNUS SF Express V15.3/ Storage Cruiser V15.3/ AdvancedCopy Manager V15.3. Migration Guide
 ETERNUS SF Express V15.3/ Storage Cruiser V15.3/ AdvancedCopy Manager V15.3 Migration Guide B1FW-5958-06ENZ0(00) June 2013 Preface Purpose This manual describes how to upgrade to this version from the
ETERNUS SF AdvancedCopy Manager Overview
 ETERNUS SF AdvancedCopy Manager 14.2 Overview J2X1-7443-04ENZ0(00) June 2011 Preface Purpose This manual provides an overview of the ETERNUS SF AdvancedCopy Manager. This manual describes the ETERNUS SF
ETERNUS SF Express V15.0/ Storage Cruiser V15.0/ AdvancedCopy Manager V15.0. Migration Guide
 ETERNUS SF Express V15.0/ Storage Cruiser V15.0/ AdvancedCopy Manager V15.0 Migration Guide B1FW-5958-02ENZ0(01) May 2012 Preface Purpose This manual describes how to upgrade to this version from the previous
FUJITSU Storage ETERNUS SF Express V16.3 / Storage Cruiser V16.3 / AdvancedCopy Manager V16.3. Migration Guide
 FUJITSU Storage ETERNUS SF Express V16.3 / Storage Cruiser V16.3 / AdvancedCopy Manager V16.3 Migration Guide B1FW-6000-04ENZ0(00) October 2015 Preface Purpose This manual describes how to upgrade to this
FUJITSU Storage ETERNUS SF Express V16.5 / Storage Cruiser V16.5 / AdvancedCopy Manager V16.5. Migration Guide
 FUJITSU Storage ETERNUS SF Express V16.5 / Storage Cruiser V16.5 / AdvancedCopy Manager V16.5 Migration Guide B1FW-6000-06ENZ0(01) June 2017 Preface Purpose This manual describes how to upgrade to this
FUJITSU Storage ETERNUS SF Storage Cruiser V16.3 / AdvancedCopy Manager V16.3. Cluster Environment Setup Guide
 FUJITSU Storage ETERNUS SF Storage Cruiser V16.3 / AdvancedCopy Manager V16.3 Cluster Environment Setup Guide B1FW-6006-04ENZ0(00) October 2015 Preface Purpose This manual provides information on installation
FUJITSU Storage ETERNUS SF AdvancedCopy Manager V16.0. Overview
 FUJITSU Storage ETERNUS SF AdvancedCopy Manager V16.0 Overview B1FW-6009-01ENZ0(01) May 2014 Preface Purpose This manual provides an overview for understanding the FUJITSU Storage ETERNUS SF AdvancedCopy
FUJITSU Storage ETERNUS SF AdvancedCopy Manager V16.1. Overview
 FUJITSU Storage ETERNUS SF AdvancedCopy Manager V16.1 Overview B1FW-6009-02ENZ0(00) June 2014 Preface Purpose This manual provides an overview for understanding the FUJITSU Storage ETERNUS SF AdvancedCopy
User's Guide for Infrastructure Administrators (Resource Management)
") ServerView Resource Orchestrator Cloud Edition V3.0.0 User's Guide for Infrastructure Administrators (Resource Management) Windows/Linux J2X1-7612-01ENZ0(05) April 2012 Preface Purpose This manual provides
ServerView Resource Orchestrator Cloud Edition V3.0.0 User's Guide for Infrastructure Administrators (Resource Management) Windows/Linux J2X1-7612-01ENZ0(05) April 2012 Preface Purpose This manual provides
FUJITSU Storage ETERNUS SF Express V16.2 / Storage Cruiser V16.2 / AdvancedCopy Manager V16.2. Installation and Setup Guide
 FUJITSU Storage ETERNUS SF Express V16.2 / Storage Cruiser V16.2 / AdvancedCopy Manager V16.2 Installation and Setup Guide B1FW-5999-03ENZ0(02) July 2015 Preface Purpose This manual provides information
ETERNUS SF Storage Cruiser V15.0. Quick Reference
 ETERNUS SF Storage Cruiser V15.0 Quick Reference B1FW-5963-02ENZ0(00) April 2012 Preface Purpose This manual describes the pre-installation requirements, installation procedure, configuration procedure,
FUJITSU Storage ETERNUS SF AdvancedCopy Manager V16.5. Overview
 FUJITSU Storage ETERNUS SF AdvancedCopy Manager V16.5 Overview B1FW-6009-06ENZ0(00) May 2017 Preface Purpose This manual provides an overview for understanding FUJITSU Storage ETERNUS SF AdvancedCopy Manager
FUJITSU Storage ETERNUS SF Express V16.1 / Storage Cruiser V16.1 / AdvancedCopy Manager V16.1. Installation and Setup Guide
 FUJITSU Storage ETERNUS SF Express V16.1 / Storage Cruiser V16.1 / AdvancedCopy Manager V16.1 Installation and Setup Guide B1FW-5999-02ENZ0(00) June 2014 Preface Purpose This manual provides information
ETERNUS SF Express V15.2/ Storage Cruiser V15.2/ AdvancedCopy Manager V15.2. Web Console Guide. Windows
 ETERNUS SF Express V15.2/ Storage Cruiser V15.2/ AdvancedCopy Manager V15.2 Web Console Guide Windows B1FW-5955-04ENZ0(01) February 2013 Preface Purpose This Manual describes the ETERNUS SF Web Console
FUJITSU Storage ETERNUS SF Storage Cruiser V16.2 / AdvancedCopy Manager V16.2. Operation Guide for VMware vsphere Virtual Volumes
 FUJITSU Storage ETERNUS SF Storage Cruiser V16.2 / AdvancedCopy Manager V16.2 Operation Guide for VMware vsphere Virtual Volumes B1FW-6020-01ENZ0(02) July 2015 Preface Purpose This manual explains the
Structure and Overview of Manuals
 FUJITSU Software Systemwalker Operation Manager Structure and Overview of Manuals UNIX/Windows(R) J2X1-6900-08ENZ0(00) May 2015 Introduction Purpose of This Document Please ensure that you read this document
ETERNUS SF AdvancedCopy Manager Operator's Guide for Tape Server Option
 ETERNUS SF AdvancedCopy Manager 14.0 Operator's Guide for Tape Server Option J2X1-7453-01ENZ0(00) July 2009 Preface Purpose This manual describes the functionality of ETERNUS SF AdvancedCopy Manager for
ETERNUS SF AdvancedCopy Manager GUI User's Guide
 ETERNUS SF AdvancedCopy Manager 14.1 GUI User's Guide J2X1-7450-02ENZ0(00) January 2010 Preface Purpose of the User's Guide The AdvancedCopy Manager GUI User's Guide provides detailed information relating
FUJITSU Storage ETERNUS SF Storage Cruiser V16.5 / AdvancedCopy Manager V16.5. Cluster Environment Setup Guide
 FUJITSU Storage ETERNUS SF Storage Cruiser V16.5 / AdvancedCopy Manager V16.5 Cluster Environment Setup Guide B1FW-6006-06ENZ0(00) May 2017 Preface Purpose This manual provides information on installation
User's Guide (Systemwalker User Management and Single Sign-On Edition)
") Systemwalker Service Quality Coordinator User's Guide (Systemwalker User Management and Single Sign-On Edition) Windows/Solaris/Linux J2X1-7665-02ENZ0(00) January 2013 Preface Purpose of this manual This
Systemwalker Service Quality Coordinator User's Guide (Systemwalker User Management and Single Sign-On Edition) Windows/Solaris/Linux J2X1-7665-02ENZ0(00) January 2013 Preface Purpose of this manual This
User's Guide - Master Schedule Management
 FUJITSU Software Systemwalker Operation Manager User's Guide - Master Schedule Management UNIX/Windows(R) J2X1-3170-14ENZ0(00) May 2015 Preface Purpose of This Document This document describes the Master
ETERNUS SF AdvancedCopy Manager Operator's Guide for Cluster Environment
 ETERNUS SF AdvancedCopy Manager 14.2 Operator's Guide for Cluster Environment J2X1-7452-04ENZ0(00) June 2011 Preface Purpose This manual explains the installation and customization of ETERNUS SF AdvancedCopy
FUJITSU Software PRIMECLUSTER GLS for Windows. GLS Setup Guide for Cluster Systems 4.4
 FUJITSU Software PRIMECLUSTER GLS for Windows GLS Setup Guide for Cluster Systems 4.4 B1FN-5996-01ENZ0(00) January 2017 Preface Purpose of this Manual This manual is intended to explain installation procedures
Systemwalker Software Configuration Manager. Technical Guide. Windows/Linux
 Systemwalker Software Configuration Manager Technical Guide Windows/Linux B1X1-0126-04ENZ0(00) January 2013 Preface Purpose of this Document This document explains the functions of Systemwalker Software
ETERNUS SF AdvancedCopy Manager V13.3 Message Guide
 B1WW-8881-05ENZ0 (00) ETERNUS SF AdvancedCopy Manager V13.3 Message Guide ii Preface About This Manual This manual explains the messages output by ETERNUS SF AdvancedCopy Manager. Intended Reader This
ETERNUS SF AdvancedCopy Manager V13.2 Operator's Guide (Linux)
") J2UZ-8170-03ENZ0(A) ETERNUS SF AdvancedCopy Manager V13.2 Operator's Guide (Linux) ii Preface ++ Purpose This manual describes the operations available on ETERNUS SF AdvancedCopy Manager. ++ Intended Readers
J2UZ-8170-03ENZ0(A) ETERNUS SF AdvancedCopy Manager V13.2 Operator's Guide (Linux) ii Preface ++ Purpose This manual describes the operations available on ETERNUS SF AdvancedCopy Manager. ++ Intended Readers
FUJITSU Storage ETERNUS SF Storage Cruiser V16.6 / AdvancedCopy Manager V16.6. Operation Guide for VMware vsphere Virtual Volumes
 FUJITSU Storage ETERNUS SF Storage Cruiser V16.6 / AdvancedCopy Manager V16.6 Operation Guide for VMware vsphere Virtual Volumes B1FW-6020-05ENZ0(00) December 2017 Preface Purpose This manual explains
Setup Guide. FUJITSU Software. Serverview Infrastructure Manager Plug-in for. Microsoft System Center. Virtual Machine Manager 1.2
 FUJITSU Software Serverview Infrastructure Manager Plug-in for Microsoft System Center Virtual Machine Manager 1.2 Setup Guide For Windows Server 2016 CA92344-2184-01 Dec, 2017 Preface Purpose This Setup
ETERNUS SF Storage Cruiser Message Guide. Windows/Solaris/Linux
 ETERNUS SF Storage Cruiser 14.2 Message Guide Windows/Solaris/Linux J2S2-1548-03ENZ0(00) June 2010 Preface Purpose This manual explains the output messages related to storage management of ETERNUS SF Storage
PRIMECLUSTER GLS for Windows. User's Guide 4.3
 PRIMECLUSTER GLS for Windows User's Guide 4.3 B1FN-5851-02ENZ0(02) March 2012 Preface Purpose of this Manual This manual is intended to explain how to install, operate, and administer PRIMECLUSTER GLS
FUJITSU Storage ETERNUS SF Express V16.5 / Storage Cruiser V16.5 / AdvancedCopy Manager V16.5. Installation and Setup Guide
 FUJITSU Storage ETERNUS SF Express V16.5 / Storage Cruiser V16.5 / AdvancedCopy Manager V16.5 Installation and Setup Guide B1FW-5999-06ENZ0(00) May 2017 Preface Purpose This manual provides information
ETERNUS SF Storage Cruiser Message Guide. Windows/Solaris/Linux
 ETERNUS SF Storage Cruiser 14.0 Message Guide Windows/Solaris/Linux J2S2-1548-01ENZ0(00) July 2009 Preface Purpose This manual explains the output messages related to storage management of ETERNUS SF Storage
PRIMECLUSTER GLS for Windows. User's Guide 4.3
 PRIMECLUSTER GLS for Windows User's Guide 4.3 B1FN-5851-03ENZ0(01) August 2012 Preface Purpose of this Manual This manual is intended to explain how to install, operate, and administer PRIMECLUSTER GLS
NEC ESMPRO AlertManager User's Guide
 NEC ESMPRO AlertManager User's Guide Chapter 1 General Description Chapter 2 Installation Chapter 3 Setting Chapter 4 Appendix AM_E-UG-W-001-01-004 NEC Corporation 2014 Contents Contents... 2 Notations
FUJITSU Storage ETERNUS SF Storage Cruiser V16.1. Operation Guide
 FUJITSU Storage ETERNUS SF Storage Cruiser V16.1 Operation Guide B1FW-6007-02ENZ0(01) July 2014 Preface Purpose This manual describes the FUJITSU Storage ETERNUS SF Storage Cruiser used by the following
ETERNUS SF AdvancedCopy Manager V13.1 Operator's Guide for Tape Backup Option
 J2S2-0560-02ENZ0(A) ETERNUS SF AdvancedCopy Manager V13.1 Operator's Guide for Tape Backup Option Preface ++ Purpose This manual describes the functionality of ETERNUS SF AdvancedCopy Manager for Tape
ServerView Resource Orchestrator V User's Guide. Windows/Linux
 ServerView Resource Orchestrator V2.3.0 User's Guide Windows/Linux J2X1-7530-01ENZ0(02) July 2011 Preface Purpose This manual provides an outline of ServerView Resource Orchestrator (hereinafter Resource
FUJITSU Storage ETERNUS SF Express V16.3 / Storage Cruiser V16.3 / AdvancedCopy Manager V16.3. Web Console Guide. Windows
 FUJITSU Storage ETERNUS SF Express V16.3 / Storage Cruiser V16.3 / AdvancedCopy Manager V16.3 Web Console Guide Windows B1FW-6001-04ENZ0(04) June 2016 Preface Purpose This manual describes the ETERNUS
ServerView Resource Coordinator VE. Installation Guide. Windows/Linux
 ServerView Resource Coordinator VE Installation Guide Windows/Linux J2X1-7458-03ENZ0(00) February 2010 Preface Purpose This manual explains how to install ServerView Resource Coordinator VE (hereinafter
Troubleshooting Guide
 Systemwalker Runbook Automation Troubleshooting Guide Windows/Linux B1X1-0122-03ENZ0(00) July 2012 Preface Purpose of This Document This document describes how to deal with problems that occur with the
ServerView Resource Orchestrator V User's Guide. Windows/Linux
 ServerView Resource Orchestrator V2.2.1 User's Guide Windows/Linux J2X1-7526-01ENZ0(01) November 2010 Preface Purpose This manual provides an outline of ServerView Resource Orchestrator (hereinafter Resource
FUJITSU Storage ETERNUS SF Express V16.4 / Storage Cruiser V16.4 / AdvancedCopy Manager V16.4. Web Console Guide. Windows
 FUJITSU Storage ETERNUS SF Express V16.4 / Storage Cruiser V16.4 / AdvancedCopy Manager V16.4 Web Console Guide Windows B1FW-6001-05ENZ0(00) October 2016 Preface Purpose This manual describes the ETERNUS
FUJITSU Software. Serverview Infrastructure Manager Plug-in for. Microsoft System Center. Operations Manager 1.2. Setup Guide. For Windows Server 2016
 FUJITSU Software Serverview Infrastructure Manager Plug-in for Microsoft System Center Operations Manager 1.2 Setup Guide For Windows Server 2016 CA92344-2182-01 Dec, 2017 1 Preface Purpose This Setup
FUJITSU Software. Infrastructure Manager Plug-in for Microsoft. System Center. Operations Manager 1.2. Setup Guide. For Windows Server 2016 / 2019
 FUJITSU Software Infrastructure Manager Plug-in for Microsoft System Center Operations Manager 1.2 Setup Guide For Windows Server 2016 / 2019 CA92344-2546-02 October, 2018 1 Contents Preface... 3 Purpose...
FUJITSU Software Interstage Studio V11.1. Installation Guide
 FUJITSU Software Interstage Studio V11.1 Installation Guide B1WD-3159-02ENZ0(00) November 2013 Preface Purpose This manual, the Interstage Studio Installation Guide, explains how to setup Interstage Studio.
ETERNUS SF AdvancedCopy Manager GUI User's Guide
 ETERNUS SF AdvancedCopy Manager 14.0 GUI User's Guide J2X1-7450-01ENZ0(00) July 2009 Preface Purpose of the User's Guide The AdvancedCopy Manager GUI User's Guide provides detailed information relating
FUJITSU Storage ETERNUS DX60 S2 Disk storage system. Read Me First
 FUJITSU Storage ETERNUS DX60 S2 Disk storage system Read Me First Fujitsu would like to thank you for purchasing our ETERNUS DX60 S2 Disk storage system (hereinafter referred to as "ETERNUS DX Disk storage
Systemwalker Software Configuration Manager. Operation Guide. Windows/Linux
 Systemwalker Software Configuration Manager Operation Guide Windows/Linux B1X1-0128-04ENZ0(00) January 2013 Preface Purpose of this Document This document explains how to use the different features and
Microsoft Windows NT Microsoft Windows Softek AdvancedCopy Manager Operator's Guide V10.0L30
 Microsoft Windows NT Microsoft Windows 2000 Softek AdvancedCopy Manager Operator's Guide V10.0L30 Preface ++ Purpose This manual describes the operations on Softek AdvancedCopy Manager. ++ Intended Readers
FUJITSU Software. ServerView Infrastructure Manager Plug-in for. VMware vcenter Server 1.1. Setup Guide. For vcenter Server 6.0
 FUJITSU Software ServerView Infrastructure Manager Plug-in for VMware vcenter Server 1.1 Setup Guide For vcenter Server 6.0 CA92344-2178-01 Dec, 2017 1 Preface Purpose This Setup Guide describes the installation
A698HKBH9-E-I RFID Data Management Pro for Fixed Readers Installation Guide. June 2017 Version 2.40
 A698HKBH9-E-I-0240 RFID Data Management Pro for Fixed Readers Installation Guide June 2017 Version 2.40 -i- Preface This document explains the procedure of the installation and the Confirmation of RFID
FUJITSU Software Systemwalker Software Configuration Manager. Operator's Guide. Windows/Linux
 FUJITSU Software Systemwalker Software Configuration Manager Operator's Guide Windows/Linux B1X1-0129-04ENZ0(00) March 2014 Preface Purpose of this Document This document explains patch management procedures
ETERNUS SF AdvancedCopy Manager V13.2 Operator's Guide (HP-UX)
") J2SZ-0180-03ENZ0(A) ETERNUS SF AdvancedCopy Manager V13.2 Operator's Guide (HP-UX) ii Preface ++ Purpose This manual explains how to operate the Web-GUI with ETERNUS SF AdvancedCopy Manager. ++ Reader
J2SZ-0180-03ENZ0(A) ETERNUS SF AdvancedCopy Manager V13.2 Operator's Guide (HP-UX) ii Preface ++ Purpose This manual explains how to operate the Web-GUI with ETERNUS SF AdvancedCopy Manager. ++ Reader
Operation Guide for Optimization Option
 ETERNUS SF Storage Cruiser V15.0 Operation Guide for Optimization Option Windows/Solaris/Linux B1FW-5965-02ENZ0(00) April 2012 Preface Purpose This manual describes Optimization Option, the optional product
ETERNUS SF AdvancedCopy Manager V13.1 GUI User s Guide
 B1WW-8871-02ENZ0(00) ETERNUS SF AdvancedCopy Manager V13.1 GUI User s Guide Preface ++ Purpose This manual explains how to operate the Web-GUI with ETERNUS SF AdvancedCopy Manager. ++ Reader This manual
ETERNUS Web GUI User's Guide (Operation)
") ETERNUS Web GUI User's Guide (Operation) FUJITSU Storage ETERNUS DX100 S3/DX200 S3, ETERNUS DX500 S3/DX600 S3 Disk storage systems, ETERNUS DX200F All Flash Array This page is intentionally left blank.
ETERNUS Web GUI User's Guide (Operation) FUJITSU Storage ETERNUS DX100 S3/DX200 S3, ETERNUS DX500 S3/DX600 S3 Disk storage systems, ETERNUS DX200F All Flash Array This page is intentionally left blank.
Troubleshooting Guide
 Systemwalker Runbook Automation Troubleshooting Guide Windows/Linux B1X1-0122-04ENZ0(00) September 2012 Preface Purpose of This Document This document describes how to deal with problems that occur with
ETERNUS SF AdvancedCopy Manager V13.2 GUI User s Guide
 B1WW-8871-03ENZ0(00) ETERNUS SF AdvancedCopy Manager V13.2 GUI User s Guide ii Preface ++ Purpose This manual explains how to operate the Web-GUI with ETERNUS SF AdvancedCopy Manager. ++ Reader This manual
ServerView Resource Orchestrator Cloud Edition V Setup Guide. Windows/Linux
 ServerView Resource Orchestrator Cloud Edition V3.1.0 Setup Guide Windows/Linux J2X1-7610-02ENZ0(00) July 2012 Preface Resource Orchestrator Documentation Road Map The documentation road map for Resource
Copyright PFU LIMITED
 -------------------------------------------------------- Fujitsu ScandAll PRO V1.8.1 Update8 README -------------------------------------------------------- Copyright PFU LIMITED 2007-2013 This file contains
ETERNUS VSS Hardware Provider Installation Information
 ETERNUS VSS Hardware Provider Installation Information May 2017 Contents Abbreviations... 3 About ETERNUS VSS Hardware Provider... 3 Operating System Versions... 4 s... 5 ETERNUS DX60, ETERNUS DX80, ETERNUS
ServerView Resource Orchestrator Virtual Edition V User's Guide. Windows/Linux
 ServerView Resource Orchestrator Virtual Edition V3.0.0 User's Guide Windows/Linux J2X1-7606-01ENZ0(05) April 2012 Preface Purpose This manual provides an outline of ServerView Resource Orchestrator (hereinafter
Interstage Business Process Manager Analytics V12.1. Migration Guide. Windows/Linux
 Interstage Business Process Manager Analytics V12.1 Migration Guide Windows/Linux B1X1-0160-02ENZ0(00) January 2013 Preface This chapter provides a general introduction to this user guide, describing its
FUJITSU Storage ETERNUS AF series and ETERNUS DX S4/S3 series
 Utilizing VMware vsphere Virtual Volumes (VVOL) with the FUJITSU Storage ETERNUS AF series and ETERNUS DX S4/S3 series Reference Architecture for Virtual Platforms (15VM/iSCSI) The ETERNUS AF series and
FUJITSU Software ServerView Infrastructure Manager V2.1. Operating Procedures
 FUJITSU Software ServerView Infrastructure Manager V2.1 Operating Procedures CA92344-1718-02 August 2017 Preface Purpose This manual describes overviews of the initial settings and the operating procedures
B1FN ENZ0(02) PRIMEQUEST. System Disk Mirror for Windows User's Guide V1.0
 PRIMEQUEST. System Disk Mirror for Windows User's Guide V1.0") B1FN-5771-01ENZ0(02) PRIMEQUEST System Disk Mirror for Windows User's Guide V1.0 Preface Purpose of This Manual This manual describes the functions and usage of PRIMEQUEST System Disk Mirror for Windows
B1FN-5771-01ENZ0(02) PRIMEQUEST System Disk Mirror for Windows User's Guide V1.0 Preface Purpose of This Manual This manual describes the functions and usage of PRIMEQUEST System Disk Mirror for Windows
FUJITSU Software Systemwalker Desktop Patrol. Reference Manual. Windows
 FUJITSU Software Systemwalker Desktop Patrol Reference Manual Windows B1WD-3290-08ENZ0(00) March 2018 Preface Purpose of this guide This guide explains commands, CSV input/output file formats, and output
ServerView Resource Coordinator VE. Installation Guide. Windows
 ServerView Resource Coordinator VE Installation Guide Windows B1WD-2748-01ENZ0(01) August 2009 Preface Purpose This manual explains how to install ServerView Resource Coordinator VE (hereinafter Resource
Operation Guide: for Clients
 FUJITSU Software Systemwalker Desktop Patrol Operation Guide: for Clients Windows B1WD-3289-07ENZ0(00) March 2018 Preface Purpose of this guide This guide explains the necessary installation settings and
Systemwalker Software Configuration Manager. Reference Guide. Windows/Linux
 Systemwalker Software Configuration Manager Reference Guide Windows/Linux B1X1-0130-04ENZ0(00) January 2013 Preface Purpose of this Document This document explains the commands and files provided by Systemwalker
Interstage Big Data Complex Event Processing Server V1.0.0
 Interstage Big Data Complex Event Processing Server V1.0.0 User's Guide Linux(64) J2UL-1665-01ENZ0(00) October 2012 PRIMERGY Preface Purpose This manual provides an overview of the features of Interstage
Guide for Secure File Transfers Using the Storage Function
 FUJITSU Storage ETERNUS DX series and ETERNUS AF series ETERNUS SF AdvancedCopy Manager Guide for Secure File Transfers Using the Storage Function Using the ETERNUS DX series or the ETERNUS AF series in
Data Protection Guide
 SnapCenter Software 4.0 Data Protection Guide For Microsoft Exchange Server March 2018 215-12936_C0 doccomments@netapp.com Table of Contents 3 Contents Deciding whether to read the SnapCenter Data Protection
FUJITSU Software Systemwalker Operation Manager. Upgrade Guide. UNIX/Windows(R)
") FUJITSU Software Systemwalker Operation Manager Upgrade Guide UNIX/Windows(R) J2X1-3150-16ENZ0(00) May 2015 Preface Purpose of This Document This document describes the migration method, and notes when
FUJITSU Software Systemwalker Operation Manager Upgrade Guide UNIX/Windows(R) J2X1-3150-16ENZ0(00) May 2015 Preface Purpose of This Document This document describes the migration method, and notes when
Data Protection Guide
 SnapCenter Software 4.0 Data Protection Guide For Custom Plug-ins March 2018 215-12932_C0 doccomments@netapp.com Table of Contents 3 Contents Deciding on whether to read the SnapCenter Data Protection
FUJITSU Storage ETERNUS SF Express V16.1 / Storage Cruiser V16.1 / AdvancedCopy Manager V16.1. Web Console Guide. Windows
 FUJITSU Storage ETERNUS SF Express V16.1 / Storage Cruiser V16.1 / AdvancedCopy Manager V16.1 Web Console Guide Windows B1FW-6001-02ENZ0(01) July 2014 Preface Purpose This manual describes the ETERNUS
Printer Driver. Installation Guide. November 2014 Version Copyright FUJITSU LIMITED
 Printer Driver Installation Guide November 2014 Version 1.00 -i- Preface This document explains the procedure of the installation and the Confirmation of ZXP-7 Driver (Hereafter, it is written, "This
PaperStream NX Manager 1.0 User's Guide
 P2WW-3940-01ENZ2 PaperStream NX Manager 1.0 User's Guide Contents Introduction 6 Manuals... 6 Trademarks... 8 Manufacturer... 8 Use in High-Safety Applications... 8 Abbreviations Used in This Manual...
ServerView Resource Coordinator VE. Command Reference. Windows
 ServerView Resource Coordinator VE Command Reference Windows B1WD-2751-01ENZ0(01) August 2009 Preface Purpose This manual explains the commands available in ServerView Resource Coordinator VE (hereinafter
PaperStream NX Manager 1.1 User's Guide
 P2WW-3940-02ENZ2 PaperStream NX Manager 1.1 User's Guide Contents Introduction 6 Manuals... 6 Trademarks... 8 Manufacturer... 8 Use in High-Safety Applications... 8 Abbreviations Used in This Manual...
NEC ESMPRO AlertManager User's Guide (Windows)
") NEC ESMPRO AlertManager User's Guide (Windows) Chapter 1 General Description Chapter 2 Installation Chapter 3 Setting Chapter 4 Appendix 10.111.01-129.01 NEC Corporation 2016 Contents Contents... 2 Conventions
NEC ESMPRO AlertManager User's Guide (Windows) Chapter 1 General Description Chapter 2 Installation Chapter 3 Setting Chapter 4 Appendix 10.111.01-129.01 NEC Corporation 2016 Contents Contents... 2 Conventions
Systemwalker Service Quality Coordinator. Technical Guide. Windows/Solaris/Linux
 Systemwalker Service Quality Coordinator Technical Guide Windows/Solaris/Linux J2X1-6800-02ENZ0(00) November 2010 Preface Purpose of this manual This manual explains the functions and usage of Systemwalker
Systemwalker Service Quality Coordinator. Technical Guide. Windows/Solaris/Linux
 Systemwalker Service Quality Coordinator Technical Guide Windows/Solaris/Linux J2X1-6800-03ENZ0(00) May 2011 Preface Purpose of this manual This manual explains the functions and usage of Systemwalker
User's Guide for Tenant Users
 ServerView Resource Orchestrator Cloud Edition V3.0.0 User's Guide for Tenant Users Windows/Linux J2X1-7615-01ENZ0(05) April 2012 Preface Purpose This document explains how to operate the ROR Console provided
System Monitor - Performance Monitoring Services 5.8 User's Guide
 System Monitor - Performance Monitoring Services 5.8 User's Guide - First Edition - Copyright (C) NEC Corporation 2004-2017. Disclaimer of Warranty All the information, text, graphics, links or other items
FUJITSU Software. ServerView Infrastructure Manager Plug-in for. VMware vcenter Server Appliance 1.1. Setup Guide. For vcenter Server Appliance 6.
 FUJITSU Software ServerView Infrastructure Manager Plug-in for VMware vcenter Server Appliance 1.1 Setup Guide For vcenter Server Appliance 6.0 CA92344-1949-01 Aug, 2017 1 Preface Purpose This Setup Guide
FUJITSU Software Systemwalker Software Configuration Manager. Release Notes. Windows/Linux
 FUJITSU Software Systemwalker Software Configuration Manager Release Notes B1X1-0125-05ENZ0(00) August 2014 Preface Purpose of this Document This document presents an overview of the functions that have
FUJITSU Storage ETERNUS SF AdvancedCopy Manager V16.3. Operation Guide AIX
 FUJITSU Storage ETERNUS SF AdvancedCopy Manager V16.3 Operation Guide AIX B1FW-6014-04ENZ0(00) October 2015 Preface Purpose This manual describes the functionality of FUJITSU Storage ETERNUS SF AdvancedCopy
Systemwalker User's Guide - Systemwalker User Management and Single Sign-On. UNIX/Windows(R)
") Systemwalker User's Guide - Systemwalker User Management and Single Sign-On UNIX/Windows(R) J2X1-7470-05ENZ0(00) April 2012 Preface Purpose of This Document This document explains how to install the Systemwalker
Systemwalker User's Guide - Systemwalker User Management and Single Sign-On UNIX/Windows(R) J2X1-7470-05ENZ0(00) April 2012 Preface Purpose of This Document This document explains how to install the Systemwalker
17 In big Data Centers it may be practical to collect event and error messages to a central syslog server.
 Slide 0 Welcome to this Web-Based-Training session providing you an introduction to the Initial Setup of the ETERNUS DX80 S2, DX90 S2, DX410 S2 and DX440 S2. 1 In this first chapter we will look at the
Solaris OE. Softek AdvancedCopy Manager User's Guide 10.2
 Solaris OE Softek AdvancedCopy Manager User's Guide 10.2 Preface ++ Purpose This manual explains how to operate Web-GUI with Softek AdvancedCopy Manager. ++ Reader This manual is intended for system managers
Copyright PFU LIMITED
 -------------------------------------------------------- PaperStream Capture 1.0.12 README File -------------------------------------------------------- Copyright PFU LIMITED 2013-2015 This file contains