Version 1.6. MiY Product Line GateApp Development Guide
|
|
|
- Roxanne Turner
- 6 years ago
- Views:
Transcription
1 Version 1.6 MiY Product Line GateApp Development Guide
2 2012 Cogent, Inc. All rights reserved. This document contains commercial information and trade secrets of Cogent, Inc. which are confidential and proprietary in nature and are subject to protection under law. Access to the information contained herein, howsoever acquired and of whatsoever nature, will not entitle the accessor thereof to acquire any right thereto. The data subject to this restriction are contained in all sheets of this document. Disclosure of any such information or trade secrets shall not be made without the prior written permission of Cogent, Inc. No part of this publication may be reproduced, stored in a retrieval system, or transmitted, in any form or by any means, electronic, mechanical, photocopying, recording, or otherwise, without the prior written permission of Cogent, Inc. The information in this document is subject to change without notice. The software mentioned in this document is furnished under license and may only be used or copied in accordance with the terms of such license. Contact software manufacturers directly for terms of software licenses for any software mentioned in this document not originating from Cogent, Inc. All brand or product names are the trademarks or registered trademarks of their respective holders. Cogent Document # MiY-AE-SP Document Revision History Version Date Author Comment /19/2011 JL,CP,CC Initial version /15/2011 CP Minor revisions. Updated Relay/Line Trigger, SDK Installer section and added reference to LocalCardTest sample application /28/2011 CP Added Indicate and UnregisteredFromDevice GateDevice events, show/hide mouse section and a list of Sandbox namespaces /02/2012 CP Added new 1.5 features, including GateApp Images, Animations, Signatures and ScriptTask sections /24/2012 CP Updated Integration Points /22/2012 CP Added GateDevice.MessageWindow object. Removed reference to PEM files because they are now embedded in the SecurAPI. Removed reference to MyCustomGateApp sample project because it is a duplicate of the MiY GateApp VS 2008 template project /03/2012 CP Updated screen shots. Added how to request DEV license from Security Manager.
3
4 Contents 1 Introduction 1 2 MiY Sandbox SDK Installer 4 3 USB Ports 5 4 GateApps Sample Application and Project Templates Creating a GateApp Project Template GateApp Creation Manual GateApp Creation Packaging a GateApp Deploying a GateApp Deploying to a Managed Device Deploying to a Standalone Device Debugging a GateApp Using the Mouse Stopping the Nurse Stopping the Factory GateApp Device Files GateApp Signatures MiY Device Emulator Device Emulator Layout GPIO Functionality Using the MiY Device Emulator Sandbox GateDevice MessageWindow PropertyHelper UserHelper EthernetAdapter EventLog KeyHandler WiegandIn WiegandOut Panel In TcpMessageClient TlsMessageClient Contents iii
5 Biometric Relay Line Trigger Tamper Indicate UnregisteredFromDevice Events DeviceEventReceiver LocalDeviceEvent Data Changed Events Keypad LEDs Flash Storage Smartcards Sounds Images Animations SSL MiY Integration Points Server Integration IServerModule Extension IServerService Extension ScriptTask Database Table Glossary of Terms 57 Contents iv
6 1 Introduction The Make-it-Yours (MiY) product line is a rapid application development framework that allows integrators to easily customize their access workflow, deploy their customizations, and allow for innovation beyond the basic physical access reader. The solution is considered a framework rather than an SDK, because of its built-in comprehensive access modules that can be mixed and re-ordered to accomplish various workflows. This allows an integrator to develop applications that: Maintain full control over their intellectual property Mold 3M Cogent biometric and smartcard technology into their solutions Meet the unique needs of their customers 3M Cogent s MiY Product line is built to take advantage of Microsoft s.net C# architecture for ease of development. Enabling developers to establish secure socket connections to a separate system, request web-services from enterprise solutions, or even integrate with virtually any USB device via the USB host port on the back of the MiY device. The following diagram shows the overall architecture of the MiY sandbox framework. 1 -Introduction 1
7 The MiY framework is composed of the following components: 1. MiY Security Service A.NET based server that provides several services and integration points for the framework: Windows Communication Foundation (WCF) SOAP web service: is designed to manage all access related and system related data. These web services are designed to allow for easy integration with other systems or customized management GUI interfaces. WCF technology allows the server to run on small and large scale systems. The server handles all network communication and synchronization of data with the devices. SecurProtocol Sandbox Communications service: allows the service to communicate directly with the MiY Devices over Ethernet or RS485 networks. SecurProtocol is used to abstract the detailed differences between the two communication protocols and allow simplified management through the Sandbox framework. Microsoft Extensibility Framework (MEF): also provides additional integration points using MEF as a fast and easy way to enhance the MiY Security Service with additional modules. The service is also designed to handle automatic creation and upgrade of new or existing MiY system databases automatically. The MiY Security Service currently supports Microsoft SQL Server Sandbox A.NET (Full and Compact) based, extendible framework providing all core functionality, including message protocols, smart cards, biometrics, etc., used by the server and devices. 3. MiY Security Manager The standard user interface client application for managing all aspects of the MiY platform, including user management, device management, government credential, etc. The security manager is.net based and communicates directly with the same MiY Security Service web service calls that are also available for other integrators to use if they would like to customize their own Security Manager. 4. MiY Device (MiY ID/MiY Card/MiY Search) A Windows CE 6 based device with a builtin background Nurse monitoring application and replaceable GateApp. The Nurse maintains the core functionality within the framework such as managing device registration, user templates, settings, package upload, etc The GateApp manages the workflow and user interface. The Nurse and standard GateApps are both based on the Sandbox and underlying.net Compact Framework. 5. MiY Package Studio A.NET based, developer friendly application used to build packages for custom GateApps. After a package is built, they can then be deployed to devices to replace or enhance the standard functionality. GateApp packages can be deployed to MiY devices in two (2) ways: a. Using the MiY Security Manager to upload the package through the MiY Framework. The MiY Security Service then manages the deployment to one or more specific devices based on assigned relationship between packages and zones. 1 -Introduction 2
8 b. Or directly to a device via the MiY Device Admin Utility through the OTG USB port on the bottom of the device. 6. MiY Device Admin Utility.NET based utility application that is used to import and export various data directly from the MiY device in a standalone setup: including users, operators, prints, logs, settings, packages (Firmware, Nurse, and GateApp), wiegand formats, certificates, CRLs, etc. If the devices are managed directly by the MiY Security Service, there will be little to no need for the MiY Device Admin Utility because it is completely handled by the MiY Security Service. The admin utility communicates with the device via the OTG USB port on the bottom of the device. An admin must first login to the device and enable the USB port from the device menu. Some example uses of this utility include: a. Uploading a custom or updated GateApp package to the device. b. Uploading a new OS firmware or Nurse Package to the device. c. Exporting logs from a standalone device on a periodic basis. d. Exporting users and their prints that were enrolled on a standalone device. e. Adding operators to a standalone device. f. Uploading a custom wiegand format to the device for output to a panel. g. Uploading trusted certificate authorities to a MiY Gov device running the government credential application. All of the above components are built on a common sandbox.net based framework and work together to provide a robust and easily extendable PACS system. The system is securely controlled, while also allowing customization of device applications and data management. Applications written with our sandbox SDK can be easily packaged, uploaded to the server and deployed to all or specific devices within the infrastructure with ease. 1 -Introduction 3


9 2 MiY Sandbox SDK Installer The MiY Sandbox SDK installer is an MSI designed to help developers create custom GateApps in the MiY framework. Installing this SDK provides all necessary binaries, help files, sample applications and Visual Studio GateApp project templates used to create applications for MiY devices. The SDK also includes the MiY device emulator that can be used for limited development when a real MiY device is not available. The MiY Sandbox SDK installer is an MSI installer and assumes that it is being installed on a development machine where any prerequisites for development have already been installed, such as the latest Windows Installer and Microsoft Visual Studio To install the SDK, simply run MiYSandboxSdk.msi and follow the instructions. You may elect to perform a Custom install and only install desired components, but a Typical or Complete install is recommended to get all SDK components for optimal development. If the device emulator is needed, run the Biogate_DeviceEmulator Windows CE6 Emulator installer from Start\Programs\3M Cogent Inc\MiY SDK Installer\Install Emulator. Run these installers and follow the instruction on the screen until completion. Once these are installed, you re ready to get started. 2 -MiY Sandbox SDK Installer 4


10 3 USB Ports The MiY device has two (2) USB ports that are configurable. The device has a USB host port and OTG USB client port. The USB host port is only accessible from the back panel of the device. The USB host port is used to integrate additional USB components to the device, such as a camera, by adding a driver for the component to the firmware and updating GateApps to use the new component. The OTG USB client port is located on the bottom of the device and is disabled by default. An administrator must login to the device menu to enable the OTG port for Normal or Development use. Normal OTG mode allows for communication between the device and the Device Admin Utility running on a PC or laptop that has the MiY Device Driver installed. The Development mode is designed for use by developers that need the device to communicate with their PC or laptop via Microsoft ActiveSync or Windows Mobile Device Center. 3 -USB Ports 5

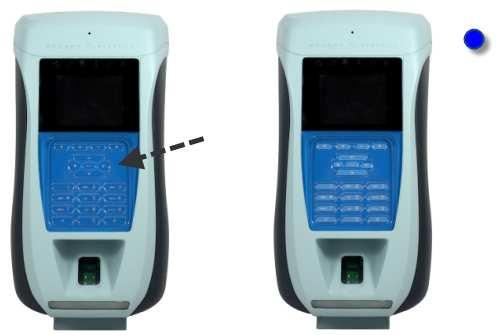
11 To enable the OTG USB port, perform the following: 1. Press the * plus # key to begin admin login. The Admin Login screen is displayed. 2. Enter your User Name and select OK. Note: if your operator account has fingerprints enrolled on the device, you can present one of your enrolled fingers to gain access. The Admin Password screen is displayed. 3. Enter your password and select OK. If access is granted, the Admin Menu screen is displayed. 3 -USB Ports 6


12 4. Select the Device Info menu option. The Device Info screen is displayed. 5. Select the General menu option. The General Info screen is displayed and you can see that the OtgMode is disabled by default. 6. Navigate to and select the OtgMode from the list of settings. The OtgMode setting is displayed. 7. Choose the desired mode and select OK. The General Info screen is displayed and you can confirm the mode change selected. 3 -USB Ports 7


13 8. Select Save to commit the changes. A success screen is displayed and then the Device Info menu. 9. Exit menu system. 3 -USB Ports 8
14 4 GateApps A GateApp is a.net Compact Framework based application that provides the primary user interface and authentication workflow for the MiY devices. Each MiY device is shipped with a standard GateApp providing the end-user experience (menus, prompts, LEDs, sounds, etc.) and access control functionality (inputs, outputs, communication, enrollment, matching, etc.) of the MiY product line. The MiY Sandbox Framework is meant to do all of the heavy lifting for core device functionality. The sandbox is also extendible if additional custom functionality is required. Creating a GateApp can be as simple as changing a sound or LED colors or as complex as integrating a new USB peripheral with accompanying driver support for the OS. This could also include custom access control workflows, integration with other external systems directly from a device, etc. GateApps can be developed against the following Windows CE targets: The real MiY ID, MiY Card or MiY Search device (Recommended) Or The MiY Device Emulator. Building and deploying GateApps is accomplished in three (3) easy stages: 1. Create a custom GateApp with Microsoft Visual Studio 2008 while including necessary MiY Sandbox SDK dlls. 2. Package all necessary GateApp files (executables, dlls, etc.) using the MiY Package Studio. 3. Deploy the GateApp package to a device with the MiY Security Manager or MiY Device Admin Utility. After completing these stages above, you have replaced the standard functionality of the MiY device with your own. This document will go on to further to explain each stage of this process in greater detail. 4.1 Sample Application and Project Templates Before creating a GateApp there are a few possible starting points to help kick-start the development process. The MiY Sandbox SDK includes sample application projects with source code and also a convenient Visual Studio project template for creating GateApps. The MiY Sandbox SDK includes and installs a MiY GateApp project template for Microsoft Visual Studio This project template provides a fully functional sample GateApp without any coding necessary and automatically references all required MiY files in the SDK bin directory. Simply create a new project using this template, build and deploy the application to a MiY device or emulator. 9
15 The MiY Sandbox SDK includes the following Device (.NET Compact Framework) sample applications with source code: GateAppSample This sample application shows how to use many of the core sandbox components available when developing a GateApp. These core sandbox components include, fingerprint enrollment and matching, event logging, property creation, user creation, etc. The MiY Sandbox SDK includes the following Desktop (Full.NET Framework) sample applications with source code: LocalCardTest This application demonstrates: o How to enroll user fingerprints with local USB fingerprint scanners o How to read and write 3M Cogent formatted contactless cards using local USB smart card RFID readers, such as the SCM SCL010. These cards contain user information and fingerprints and can be used for access control with MiY Readers. 4.2 Creating a GateApp GateApps are developed using Microsoft Visual Studio 2008 and the MiY Sandbox SDK. Developers can debug and test the GateApps against a real MiY ID, MiY Card or MiY Search device or the MiY Device Emulator. Note: the emulator is a good starting point for development but does have limitations because it is not running on the actual hardware and operating system. A real MiY device is a more accurate representation of GateApp performance. The following are required to develop applications for MiY devices: MiY Sandbox SDK MiY device or emulator Microsoft Visual Studio 2008 with SP1 Microsoft.NET Compact Framework 3.5 Microsoft SQL Compact 3.5 SP1 Device Runtime Project Template GateApp Creation Use the following steps to create a GateApp with the provided visual studio project template: 1. Open Microsoft Visual Studio Select File/New/Project to create a new MiY GateApp project and specify a Name, such as MyCustomGateApp. 10

 that demonstrates some")

16 3. Select OK to create the project. 4. The GateApp project is created with references and links to required MiY files in the SDK bin directory. This application has a single form (Main) that demonstrates some fundamental GateApp development concepts and serves as a starting point to your custom development. 5. Build and deploy the GateApp to a MiY device or emulator and modify the application as needed. 11

17 4.2.2 Manual GateApp Creation Use the following steps to create a GateApp manually without the project template: 1. Open Microsoft Visual Studio Select File/New/Project to create a new Smart Device Project and specify a Name, such as MyCustomGateApp. 3. Select OK and the Add New Smart Device Project screen is displayed. Select the Target Platform (Windows CE), the.net Compact Framework version (3.5) and the Device Application template. 4. Select OK and the MyCustomGateApp solution is now created. 5. Add.NET Reference to Microsoft.WIndowsce.Forms. 12
 DLLs: a. SecurAPI.Biometric.dll b. SecurAPI.dll c. SecurAPI.Net.SSL.dll d. SecurAPI.Packaging.dll e. SecurAPI.PACSDevice.dll f. SecurAPI.SmartCard.dll Note: SecurAPI.")
18 6. Add References to the required Sandbox DLLs from the MiY Sandbox SDK. The DLLs are located at MiY Sandbox SDK/Bin. Right-click on References and select Add Reference/Browse to specify the DLLs. Select a total of six (6) DLLs: a. SecurAPI.Biometric.dll b. SecurAPI.dll c. SecurAPI.Net.SSL.dll d. SecurAPI.Packaging.dll e. SecurAPI.PACSDevice.dll f. SecurAPI.SmartCard.dll Note: SecurAPI.PACSDevice.UI.dll is optional if use of 3M Cogent style GateApp graphics layout is desired. This includes a header/data/footer panel layout style and includes all default 3M Cogent panels (menus, progress, info, etc.) 7. Select OK after the required Sandbox references are selected and they are now included in the solution. 13

 files: a. DeviceFlashInfo.dll b. ftrscanapi.dll c. libeay32.dll d.")
19 8. Add links to necessary Sandbox support files from the MiY Sandbox SDK. The support files are located at MiY Sandbox SDK/Device/bin. Right-click on MyCustomGateApp and select Add/Existing Item. 9. Browse to specify the following files. Select a total of eight (8) files: a. DeviceFlashInfo.dll b. ftrscanapi.dll c. libeay32.dll d. pacs_native_apis.dll e. PACSBio.dll f. scsyce.dll g. ssleay32.dll h. tfm_simple.dll 14


20 10. Select the down arrow next to the Add button and select Add as Link. 11. For all links added to the project, set the link Properties as follows: a. Set the Build Action to Content and b. Set the Copy to Output Directory to Copy if newer or Copy Always. 12. Start writing code. 13. Declare an instance of the SecurAPI.PACSDevice.GateDevice object in your application. Note: the GateDevice object MUST be included and started in your application to be supported by the Sandbox framework and MiY platform. GateDevice handles server/device communication, application monitoring and provides convenient access to all standard Sandbox functionality. 15
21 14. Call GateDevice.Start during application initialization. 15. Call GateDevice.Stop during application shutdown. 16. Insert code to resize your application to the current screen size (320 W x 240 H) (optional) and set your application to TopMost, as seen in the sample code below. If your application is not set to TopMost, then it will not display. The below code sample shows an example of how to incorporate the GateDevice object into your application. When initializing the GateDevice, you can specify null for the contact reader, contactless reader and fingerprint scanner parameters if they are not needed by your application. using System; using System.Linq; using System.Collections.Generic; using System.ComponentModel; using System.Data; using System.Drawing; using System.Text; using System.Windows.Forms; using SecurAPI.PACSDevice; using SecurAPI.PACSDevice.Hardware; namespace MyCustomGateApp { public partial class Form1 : Form { // Static instance of GateDevice. Only one instance of the GateDevice // is supported. Attempts to run multiple instances // will result in errors. private static SecurAPI.PACSDevice.GateDevice gatedevice = null; public Form1() { InitializeComponent(); // Get the current size of the screen int width = System.Windows.Forms.Screen.PrimaryScreen.Bounds.Width; int height = System.Windows.Forms.Screen.PrimaryScreen.Bounds.Height; // Resize the form to fill the whole screen and always be on top this.location = new Point(0, 0); this.size = new Size(width, height); this.topmost = true; // Initialize GateDevice with contact reader, contactless reader //and fingerprint scanner support enabled. 16
22 gatedevice = new GateDevice( HardwareFactory.GetContactReader(), HardwareFactory.GetContactlessReader(), true, HardwareFactory.GetFingerprintScanner()); try { // Set a bogus message window until GateDevice is fully started AppSettings.Instance.Device.MessageWindow = new PACSMessageWindow(DeviceConst.WindowNameGateApp + "_disabled"); // Start the GateDevice object. This is required to initialize //all MiY Sandbox framework support. gatedevice.start(); // Optional add a custom message handler //AppSettings.Instance.Device.MessagePortal.MessageHandlers.A dd(new CustomMessageHandler()); } } // Required. Allows your app to receive custom messages from the server if using custom message handlers like above. // Set the correct window name to enable the message window for receiving windows messages from the Nurse now that we are ready AppSettings.Instance.Device.MessageWindow.Text = DeviceConst.WindowNameGateApp; catch (Exception ex) { } MessageBox.Show("GateDevice start error: " + ex.message); } } private void Form1_Closing(object sender, CancelEventArgs e) { // Cleanup if (gatedevice!= null) { gatedevice.stop(); } } 17. Build the solution and verify that it succeeded. Verify that all MiY SDK references and support files (Step 5 and 8 above) are deployed to the output directory /bin/debug or /bin/release. Release build is recommended for production. 17

 for managing and building one or more GateApp package files (.")
23 a. You can now package the resulting application files and deploy them to a MiY device. b. For debugging, specify the Target Device to deploy to. Select Windows CE Device if a MiY device is connected to your machine via OTG USB. If you are using the MiY Device Emulator, then select Biogate_DeviceEmulator Emulator to deploy to the emulator. 4.3 Packaging a GateApp After you have created a GateApp, you can now package the GateApp using the MiY Package Studio. The MiY Package Studio has the same look and feel as Microsoft Visual Studio and is used to create package project solutions (.cpgproj) for managing and building one or more GateApp package files (.cpg). Use the MiY Package Studio application to package your GateApp files as follows: 1. Install and run the MiY Package Studio. 2. From the top-left corner, select New Project to create a new package project. 18

24 19


25 3. From the Solution Explorer, double-click the <No Name> default package. The project starts out with a single package, but you can add more packages to a project if desired. Name your package, for example, MyCustomProduct. 4. Select the MyCustomProduct Files tab. Select Add File from the top toolbar to add your package files. 20

26 5. Select all of your GateApp files and select Open. The files are now added to your package. 21
 for your GateApp and select OK. 7. Click Build All or select to build your specific package. 8.")
. Note: the package file(s) (.")
27 6. Select the MyCustomProduct Properties tab. Select the button to specify an App Path for the package. Select the executable file (.exe) for your GateApp and select OK. 7. Click Build All or select to build your specific package. 8. If you have not already saved the package project, you are prompted to specify a name and location to save the package project. Specify a location and name for your package project file (.cpgproj). Note: the package file(s) (.cpg) in your project are saved to the same location when successfully built. 22


28 9. Build output displays in the Output window and you will see errors if there were problems building the package. 10. If the build was successful, browse your file system to the location where you saved the package project and you will find MyCustomProduct.cpg. This is your GateApp package that you can now deploy to any MiY device. 23

29 4.4 Deploying a GateApp After you have packaged your GateApp as a.cpg file, you are now ready to deploy it to a MiY device. GateApp packages can be deployed to devices in two ways: 1. Using the MiY Security Manager to upload the package to the server and deploy the package to one or more specific devices, 2. Or directly to a device via the MiY Device Admin Utility and OTG USB port on the bottom of the device Deploying to a Managed Device Managed devices are devices that have been registered to a server. All data on registered devices is managed by the server, which includes assigning and deploying GateApp packages to devices. To deploy a GateApp using the MiY Security Manager, perform the following steps: 1. Install and run MiY Security Manager. Refer to the MiY Security Manager User Guide for detailed information. 2. Select Package Management from the toolbar in the bottom right corner. 3. Select Import Package. 4. Browse to your package file (.cpg), such as MyCustomProduct.cpg, and select OK to upload it to the server. 24


30 5. Your package is now on the server, which you can see by selecting All Packages from the Zones tree-view on the left of the Package Management screen. 6. You can now assign the package to a zone from the Package Management screen or from the Zones & Devices screen. 7. From the Package Management screen, select the desired zone from All Zones in the Zones tree-view. The zone package assignment screen appears. 25


31 8. Select Change next to the GateApp component at the bottom of the package list. Select your GateApp package, such as MyCustomProduct, and select OK. 9. The GateApp package is now assigned to the specified zone and will be deployed to any MiY device in that zone. 10. Select Zones & Devices to view devices in the specified zone to verify that the new GateApp has been synchronized. The GateApp indicator is green when the GateApp is successfully synchronized to a device. 26

32 4.4.2 Deploying to a Standalone Device MiY devices are shipped in Standalone mode (no MiY Security Server or MiY Security Manager required) and remain in standalone mode until registered to a server. Once registered to a server, the device is considered to be in managed mode because the server is in control of the device. To return the device back to standalone mode, the device must be unregistered from the server either from the device menu (Reset Sitekey) or from the MiY Security Manger (Remove device). All device data (users, operators, prints, logs, packages, etc.) can be imported and exported to and from the device via the MiY Device Admin Utility. The MiY Device Admin Utility is used to deploy packages (Firmware, Nurse and GateApp) to the device while in standalone mode. Note: the MiY Device Admin Utility can always export data from a device, but can only send data to a device when the device is in standalone mode. To deploy a GateApp using the MiY Device Admin Utility, perform the following steps: 1. Install and run the MiY Device Admin Utility application on your PC or laptop. 2. Set the OTG USB port on the MiY device to Normal mode. Refer to the USB Ports section for details. 3. Connect the OTG USB port on the bottom of the device to your PC or laptop with a USB cable. a. The MiY Device Admin Utility installer should have installed the MiY Device Driver. However, if your PC or laptop does not recognize the device, then try manually installing the MiY Device Driver via the Device Manager, Add New Device wizard or other preferred method. b. The device will appear in the PC Device Manager as a MiY Device with an exclamation if the driver is not installed. From here, you can point to the MiY Device Driver files to install the driver for the unknown device. 27


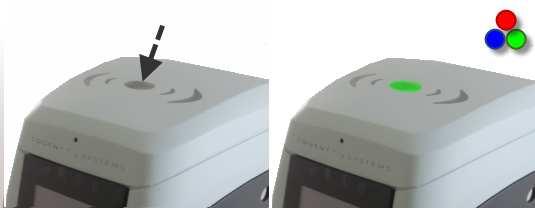
33 4. From the Device Admin Utility, select Indicate to verify you are connecting to the correct device. The device LEDs should flash and you should hear a sound. 5. Select Connect to connect to the device. Note: if the connect button is disabled, then communication between the device and the PC or laptop is not functioning correctly. This could be for several reasons: the device is not physically connected to the PC or laptop via USB cable, the device OTG USB mode is not set to Normal, the MiY Device Driver is not installed on the PC or laptop or the USB port on the device or PC/laptop is not functioning correctly. 6. After successfully connecting, select Open from the top-left menu button to browse for your GateApp package. 28


34 7. Browse for your GateApp package and select Open. 8. The package file is loaded and basic package information is displayed if the package file is valid. Select send to upload the GateApp package to the device. You will see Sending Package File in the output window and the Send/Send All buttons are disabled until the operation is complete. 29
35 9. If successfully sent to the device, you will see a success message and your package will soon be extracted and installed appropriately. Depending on the size of the package, the extraction and installation processing time will vary. If installing a GateApp package, you will see the currently running GateApp on the device, if any, exit and the Nurse application will be displayed. This means that your package is being installed and should be complete in a few minutes. Note: Firmware packages contain the entire Windows CE OS and take a considerably longer amount of time to synchronize than the Nurse and GateApp packages. Firmware and Nurse Packages will automatically reboot the device before returning to normal operation. GateApp packages will automatically start the GateApp if no application errors exist. See the MiYGateAppDevelopmentGuide for details. 10. If your GateApp does not start, then it most likely has an application error preventing it from starting. You should display messages and/or log events using the provided GateDevice object described in the Sandbox section of this document. Event logs can be exported using the Export Data button on the toolbar. 4.5 Debugging a GateApp Debugging a GateApp on the MiY device may be performed with standard Windows CE debugging mechanisms, such as: Debugging from Visual Studio over the OTG USB port (recommended). Debugging from Visual Studio over Ethernet. Manual debugging via replacing GateApp files on the device storage card Using the Mouse By default, the windows mouse cursor is hidden by the Nurse and all 3M Cogent gate applications. For development purposes, you can place an empty text file on the storage card root ( \Storage Card\ShowMouse.txt ) to enable the mouse cursor. You can then connect a mouse to the USB host port on the back of the device to navigate. This is very convenient for development, but the file must be removed for a production device. You can use the following two (2) methods to enable/disable the mouse in your applications. We strongly recommend disabling the mouse in your gate applications, as shown in the MiY GateApp visual studio 2008 template sample. To disable the mouse: SecurAPI.PACSDevice.Utility.GateAppUtility.ShowMouse(false); To enable the mouse: SecurAPI.PACSDevice.Utility.GateAppUtility.ShowMouse(true); Stopping the Nurse The Nurse monitoring application is installed and running on all production MiY devices, which provides all fundamental device/server communication, security and monitoring. While your GateApp needs to be tested with the Nurse is running, you may want to temporarily stop the 30
36 Nurse during GateApp development. Note: you will lose all standard communication with the server if you stop the Nurse. You can stop the Nurse in two (2) ways: By killing the process (Nurse.exe) with the Windows CE Remote Process Viewer included with Microsoft Visual Studio 2008 Remote Tools. By connecting a mouse to the USB host port on the back of the device and doubleclicking the Nurse title bar at the top of the screen that displays the current date/time. You may need to move the mouse around a little before the mouse cursor becomes active on the screen Stopping the Factory GateApp You can stop the factory installed GateApp with the same procedure as above for the Nurse. If the Nurse is running, it will attempt restart the installed GateApp on the GateAppHealthCheckInterval (default is 30 seconds). You can prevent the Nurse from restarting the GateApp by setting the GateAppHealthCheckInterval to 0 from the device menu Device Info/General, the MiY Security Manager (if the device is registered to a server) system/zone/device properties or the MiY Device Admin Utility property file upload to device Device Files All MiY device files are maintained in the \Storage Card folder. Your GateApp is also free to access the Storage Card via the standard windows file system as needed. There are three (3) system databases on the Storage Card root called: PACSDeviceData.sdf PACSUserData.sdf PACSDeviceLog.sdf The Device and UserData databases are encrypted for security, but the DeviceLog is unprotected for easy access to logs. These databases are all controlled by the Nurse and should not be tampered with except to possibly view logs. The MiY folder structure is as follows: \Storage Card Root storage card folder where MiY databases are stored. \PACS \Nurse Nurse monitoring application and related files. \GateApp Currently installed GateApp and related files. \Installed MiY system files used for installation of packages. \Pending MiY system files used for installation of packages. Note: the \GateApp directory is where custom GateApps are installed via package upload. One (1) GateApp package may be installed, which could contain multiple programs if desired. 31
37 4.6 GateApp Signatures Beginning with version 1.5 of the MiY framework, all GateApp packages must be signed by 3M Cogent before they can be deployed to production devices. For development purposes, the device OtgMode can be set to Development to allow for unsigned packages to be installed on the device. The MiY SDK also comes with a DevMode license file, which can be uploaded to the server from the MiY Security Manager System Settings/Licensing tab. This allows unsigned packages to be uploaded to devices from the Security Manager for testing. To request a DevMode license, go to the System Settings/Licensing tab in the Security Manager. Select DevMode from the drop down list and click Create License Request to save a license request file. Send this license request file to 3M Cogent SDK support and they will send back a signed license file. Click Load License to import the signed DevMode license from 3M Cogent. Once development and testing are finished, send a request to 3M Cogent to have your GateApp validated and signed for production use. This feature helps ensure the security and integrity of your MiY system. 32
38 5 MiY Device Emulator The MiY Device Emulator is designed to give developers a development and debugging platform without having to purchase a physical device for each individual developer. While you can use the emulator for development, we recommend that you run your gate application on a real device first. Note: the MiY Sandbox SDK installer automatically installs the emulator shell application described below. However, you must manually install the MiY Windows CE6 Emulator (Biogate_DeviceEmulator), which you can launch from Start\Programs\3M Cogent Inc\MiY Sandbox SDK\Install Emulator. 5.1 Device Emulator Layout The MiY Device Emulator main window is mainly divided into the following components: 1 GPIO Panel 2 Device Interface 3 Message Log 4 Emulator Controls 33
39 5.2 GPIO Functionality This section will define the correlation between the buttons and color boxes on the emulator with the actual device. 5V Input (bit 0) This corresponds to the Panel_In_0 port on the back of the device. When you press the Open button, then the color box will change from Red to Green and the button text will change from Open to Closed. The controls will just toggle. 5V Input (bit 1) This corresponds to the Panel_In_1 port on the back of the device. When you press the Open button, then the color box will change from Red to Green and the button text will change from Open to Closed. The controls will just toggle. 5V Output This corresponds to the Line_Trigger port on the back of the device. The color box will change to Green when you command the line trigger to turn on via the SecurAPI calls. It is turned off by default; hence the color box is Red. 12V Output This corresponds to the Relay port on the back of the device. The color box will change to Green when you command the relay to turn on via the SecurAPI calls. It is turned off by default; hence the color box is Red. Wiegand Output This corresponds to the wiegand output from the back of the device. The bits outputted through our SecurAPIs will appear as binary bits. We have given you the option to copy the outputted bits to your clipboard as well as clearing the textbox. Wiegand Input This corresponds to the wiegand input from the back of the device. You input the bits that you want to send to the device and then click Send. Dip Switch (bit 0) This corresponds to pin 1 of the 2-pin dipswitch on the back of the device. When you press the Off button, then the text will change from Off to On and the color box will change from Red to Green and vice versa. By default, this is set to off. Dip Switch (bit 1) This corresponds to pin 2 of the 2-pin dipswitch on the back of the device. When you press the Off button, then the text will change from Off to On and the color box will change from Red to Green and vice versa. By default, this is set to off. Hall Sensor This corresponds to the Hall Effect sensor that is attached to the back of the device. Clicking on the button will toggle between the text being Closed and Green to Open and Red respectively. 5.3 Using the MiY Device Emulator The MiY Device Emulator must be started before you try to debug a gate application. The following steps will show you how to start and configure the emulator: 34
40 1. Navigate to Start Menu -> All Programs -> 3M Cogent Inc -> MiY Sandbox SDK -> Emulator Shell. The emulator should appear. 2. Click on the dropdown box and select Biogate_DeviceEmulator 3. Press the Connect button and a Windows CE emulator window should appear on your screen. 35

41 4. You should also have information in the device emulator window showing your computer s IP address 5. Inside of the Windows CE window, click on File and then click on Configure. The Emulator Properties window should appear 6. The Shared Folder must be configured to act like the storage card that s on the physical device. Click on the button to select a folder on your computer. After you select a folder, click on OK. You should now see the Shared Folder information populated 36


42 7. Click on the button to configure the network settings. Press the next to Enable NE2000 PCMCIA network adaptor and bind to: and select your local Ethernet adapter. Note: you may need to install Virtual PC 2007 to enable the virtual adapter. Click the OK button when you re done. 8. Now that device emulator is configured, you can deploy your gate applications to the device emulator from Microsoft Visual Studio Simply select and deploy to the Biogate_DeviceEmulator Emulator target device, as seen below. 37
43 6 Sandbox The Sandbox is a collection of APIs in the SecurAPI namespace that provide all core MiY functionality and is designed to simplify integration and expansion. The Sandbox serves as the foundation of the MiY platform and is used by the MiY server, devices and related applications. It supports the.net Full and Compact Framework and is fully extendable. The Sandbox provides a rich set of developer tools in the following namespaces: SecurAPI.Biometrics SecurAPI.Collections SecurAPI.Cryptography SecurAPI.Data SecurAPI.IO SecurAPI.Messaging SecurAPI.Net SecurAPI.Net.SSL SecurAPI.Packaging SecurAPI.PACSDevice SecurAPI.PACSDevice.UI SecurAPI.Resources SecurAPI.SmartCard SecurAPI.Utility SecurAPI.Wiegand 38

44 6.1 GateDevice SecurAPI.PACSDevice.GateDevice is a fundamental object for GateApp development and is required by all GateApps to be supported by the MiY platform. GateDevice handles all server/device communication, application monitoring and provides convenient access to all standard Sandbox device functionality. There are many APIs in the sandbox framework that can be leveraged by developers, but GateDevice is a convenient way to access device basics. These basic operations include access to users, properties, logs, device events, wiegand, Ethernet adapters, etc. 39
45 6.1.1 MessageWindow The GateDevice.MessageWindow object is a SecurAPI.PACSDevice.Utility.PACSMessageWindow that must be set or the GateDevice fails to start with an ArgumentNullException. The PACSMessageWindow should be created on the primary window in your application, as demonstrated in the MiY GateApp VS2008 template. The MessageWindow allows the Nurse to communicate with the GateApp in various ways using windows messaging, such as sending over any custom messages to your GateApp. You should initialize the object on a primary window, such as the MainForm, and set a bogus window name, as shown below. This is optional to specify a bogus window name, but prevents your application from receiving any messages until fully started and any custom message handlers are added. AppSettings.Instance.Device.MessageWindow = new PACSMessageWindow(DeviceConst.WindowNameGateApp + "_disabled"); After the GateDevice object is started and any custom message handlers are added, set the window text to the correct GateApp window name to start receiving messages. // Set the correct window name to enable the message window for receiving windows messages from the Nurse now that we are ready AppSettings.Instance.Device.MessageWindow.Text = DeviceConst.WindowNameGateApp; PropertyHelper Properties are name/value pairs that provide a generic mechanism for managing settings and having them automatically synchronized between the server and device. Properties are Unicode strings and are stored as nvarchar(4000). The GateDevice.PropertyHelper object provides various methods for getting and setting device properties. The get property methods provide convenient methods to get properties stored as basic data types, such as bool, integer and enumerations. PropertyRecord property = AppSettings.Instance.Device.PropertyHelper.GetProperty("GENGate.Mode"); UserHelper The GateDevice.UserHelper object provides various methods for managing users and operators on the device EthernetAdapter The GateDevice.EthernetAdapter object provides access to the device Ethernet adapter EventLog The GateDevice.EventLog object provides methods for logging reserved and custom events on the device. If connected to a server, then device uploads the logs to the server on the 40

46 LogUploadInterval property. The EventLogger.EventLogActivityCodes enumeration defines all reserved event codes. The EventLogger also has various methods for querying the event logs on the device. The advantage of using event logs is that all event logs are automatically centralized by the Sandbox MiY Framework. This makes it easy to centralize data in a distributed system. Note: Creating extremely verbose event logs will over run the system if not used with care. They are great for capturing event based information. AppSettings.Instance.Device.EventLog.LogEventActivity( EventLogger.EventLogActivityCodes.WARN, null, AppSettings.Instance.Device.MACAddress, "Hello world!"); KeyHandler The GateDevice.KeyHandler object is an instance of the SecurAPI.PACSDevice.Hardware.PACSKeypad object, which provides events when keys are pressed on the device. To get a key press, simply handle the GateDevice.KeyHandler.KeyPressed event. protected override void KeyHandler_KeyPressed(object sender, KeyPressedEventArgs e) { if (e.keyvalue == PACSKeypad.PACSKeys.Num5) { //Do something } } WiegandIn The GateDevice.WiegandIn object provides full control over the wiegand-in line on the device for the wiegand-in template assigned to the device. The wiegand-in template is assigned via the WiegandFormatIn property. The WiegandIn object allows you to Start and Stop wiegand-in signal polling and handle the WiegandReceived event to receive the data received WiegandOut The GateDevice.WiegandOut object provides full control over the wiegand-out line on the device for the wiegand-out template assigned to the device. The wiegand-out template is assigned via the WiegandFormatOut property. The following code shows how to send the PanelID, FacilityCode 41
47 and AgencyCode elements out over a wiegand format that includes any of these elements. private string wiegandoutpanelid = String.Empty; private void SendWiegand(string panelid) { this.wiegandoutpanelid = panelid; if (AppSettings.Instance.Device.WiegandOut!= null && AppSettings.Instance.Device.WiegandOut.Template!= null) { AppSettings.Instance.Device.WiegandOut.Transmit((Action<IWiegandSection, WiegandEncoder>)this.GetWiegandFieldCallback); } /// <summary> /// Get wiegand field callback to populate wiegand out values. /// </summary> /// <param name="section">the wiegand section</param> /// <param name="encoder">the wiegand encoder</param> private void GetWiegandFieldCallback(IWiegandSection section, WiegandEncoder encoder) { if (section.valuesource == WiegandValueSource.PanelID) { ulong fielddata = 0; if (!String.IsNullOrEmpty(this.wiegandOutPanelID)) { fielddata = Convert.ToUInt64(this.wiegandOutPanelID); } encoder.encode(fielddata, section.startindex, section.length, section.bitorder); } else if (section.valuesource == WiegandValueSource.FacilityCode) { ulong fielddata = Convert.ToUInt64(AppSettings.Instance.Device.FacilityCode); encoder.encode(fielddata, section.startindex, section.length, section.bitorder); } else if (section.valuesource == WiegandValueSource.AgencyCode) { ulong fielddata = Convert.ToUInt64(AppSettings.Instance.Device.AgencyCode); encoder.encode(fielddata, section.startindex, section.length, section.bitorder); } } Panel In The GateDevice object exposes a PanelInReceived event that is fired when a panel in signal is received on the device panel in lines. The GateDevice.PanelInMonitoringEnabled flag is used to enable or disable panel in monitoring. The GateDevice.PanelInMonitorInterval value is used to set how often the panel in status is checked when panel in monitoring is enabled. private void Device_PanelInReceived(object sender, PanelInEventArgs e) { if (e.linestatus!= PanelInStatus.NoLinesRaised) { //Turn the Lock Icon LED Green 42
48 } } else { } Program.MainForm.LockIconLed.TurnOn(LedColor.Green); //Turn the Lock Icon LED Red Program.MainForm.LockIconLed.TurnOn(LedColor.Red); TcpMessageClient The GateDevice.TcpMessageClient object provides easy access to send messages via TCP to the server. If custom messages are sent to the server, a corresponding message handler assembly to handle the custom message must be added to the server. Please refer to the MiY Server Integration section for details for adding custom handlers TlsMessageClient The GateDevice.TlsMessageClient object provides easy access to send TLS encrypted messages to the server. If custom messages are sent to the server, a corresponding message handler assembly to handle the custom message must be added to the server. Please refer to the MiY Server Integration section for details for adding custom handlers. As long as the device is registered to a server all TLS communication setup and teardown will be automatically performed Biometric The GateDevice object has several properties that provide access to the fingerprint scanner and important fingerprint operations, such as enrollment, 1 to 1 matching and 1 to N matching. These properties include: PrintScanner an IFingerprintScanner object that provides access to the fingerprint scanner on the device. This interface is designed to allow for easy integratation of different USB fingerprint scanners. PrintEnroller an IBiometricEnroll object that provides the ability to enroll user fingerprints. PrintSearcher an IBiometricSearch object that provides the ability to perform 1 to N user fingerprint searches. Note: to perform searches you must first call GateDevice.LoadUserFingerMatchingDatabase, which loads device user prints into memory. Program memory usage will increase and device performance may degrade as the number of user prints increases. Use GateDevice.UnloadUserFingerMatchingDatabase to release the prints from memory if fingerprint searching is not required. PrintVerifier an IBiometricVerify object that provides the ability to perform 1 to 1 user fingerprint matches. 43
49 GateDevice.SearchFinger is a convenient method for performing user fingerprint searches Relay The GateDevice object exposes a SetRelay method to turn on/off 12V power for a simple relay switch Line Trigger The GateDevice object exposes a SetLineTrigger method to turn on/off a line trigger signal Tamper The GateDevice object exposes a TamperStatusChanged event that is fired when the tamper status of the device changes. The tamper status changes when the tamper switch and/or hall effect sensor inside the device housing change state from not triggered to triggered or vice versa. If you choose to not handle this event, then the device performs default actions when tamper is detected Indicate The GateDevice object exposes an Indicate event that is fired when a request to indicate the device is received. The default behavior of the device when indicated is to cycle the icons LEDs, flash the backlight LED and play a sound. If you want to change or remove the default behavior, then you can handle the Indicate event as desired in your application UnregisteredFromDevice The GateDevice object exposes an UnregisteredFromDevice event that is fired when a device is unregistered locally from the device menu (Reset Site Key). Handle this event if you need to perform any custom actions, such as removing any confidential custom data when a device is unregistered. To handle this event when initiated by the server, use the GateDevice.DeviceEventReceiver.DeviceEventReceived event and the DeviceUnRegistered event code. 44
50 6.2 Events The SecurAPI.PACSDevice.GateDevice object provides various events that can be handled by your application to perform special actions when important events occur on the device. These events may be initiated by the server or directly from the device DeviceEventReceiver The GateDevice.DeviceEventReceiver exposes a DeviceEventReceived event that is fired when important device events occur that are performed by the server on the device. These events are defined in SecurAPI.PACSDevice.Event.DeviceEvents and include: DeviceRegistered Occurs when the device is registered to a server. DeviceUnRegistered Occurs when the device is un-registered from a server. EthernetChanged Occurs when the device network configuration is changed by the server (Ethernet or RS485). PropertyUpdated Occurs when a property is updated by the server. UserRemoved Occurs when a user is removed by the server. UserUpdated Occurs when a user is added/updated by the server. OperatorAdded Occurs when an operator is added by the server. OperatorRemoved Occurs when an operator is removed by the server. CardTypeAdded Occurs when a smart card type is added by the server. CardTypeRemoved Occurs when a smart card type is removed by the server. CardLayoutAdded Occurs when a smart card layout is added by the server. CardLayoutRemoved Occurs when a smart card layout is removed by the server. RevokedCardAdded Occurs when a revoked smart card is added by the server. RevokedCardRemoved Occurs when a revoked smart card is removed by the server. BurnedCardAdded Occurs when a burned card is added by the server. BurnedCardRemoved Occurs when a burned card is removed by the server. WiegandTemplateAdded Occurs when a wiegand template is added by the server. WiegandTemplateRemoved Occurs when a wiegand template is removed by the server. GateAppExitRequest IMPORTANT. Occurs when the GateApp needs to exit, such as when a KillGateApp request is initiated by the server or the GateApp is being replaced by a new GateApp package. This event should always be handled by a custom GateApp so that it can exit gracefully when necessary. If not handled, the GateApp will be forcefully 45
51 killed which can have undesirable side effects on the device. ServerOnline Occurs when communication is received from the server LocalDeviceEvent The GateDevice exposes a LocalDeviceEvent event that is fired when important device events occur that are initiated locally on the device. These events are defined in SecurAPI.PACSDevice.Event.DeviceEvents and currently include: DeviceUnRegistered Occurs when the device is un-registered from a server (Reset Site Key device menu option). EthernetChanged Occurs when the device network configuration is changed (Ethernet or RS485). PropertyUpdated Occurs when a property is updated. UserAdded Occurs when a user is added. UserRemoved Occurs when a user is removed. UserUpdated Occurs when a user is updated. UserPrintTemplatesUpdated Occurs when user print templates are updated. OperatorAdded Occurs when an operator is added. OperatorRemoved Occurs when an operator is removed Data Changed Events The GateDevice object exposes several events that get fired when important data changes on the device. These events can be subscribed to if there is a need to perform actions when these events occur. The supported events include: OperatorPrintsChanged fired when operator prints change on the device. They may have been added, updated or removed. UserPrintsChanged fired when user prints change on the device. They may have been added, updated or removed. PropertiesChanged fired when properties change on the device. They may have been added, updated or removed. Note: this does not include changes to PropertyRecord.DeviceOnly properties. CertificatesChanged fired when certificates change on the device. They may have been added, updated or removed. CRLsChanged fired when CRLs (Certificate Revocation Lists) change on the device. They may have been added, updated or removed. 46

52 6.3 Keypad The SecurAPI.PACSDevice.Hardware.PACSKeypad object provides an IKeyHandler implementation for the MiY device keypad. The GateDevice.Keyhandler provides convenient access to this object for detecting key presses. The keypad is designed to only handle a single key press at a time. Before a second key press is announced to the handler the first finger must have left the detection field. Additionally keypad events are buffered, such that the keys can be pressed and queued by the device. Each event is then passed to the handlers when available. Note: The keypad is designed to compensate automatically for changes in humidity, temperature, and air density due to elevation. Due to this design the keypad is not meant for press and hold actions. When fingers are left in the field, the keypad may slowly calibrate and be come less sensitive. Once the finger is removed from the field, it will slowly calibrate back to normal. Though in normal cases this will not be an issue, as an example, it is not recommended to hold the button for longer than 20 minutes, as it will take a few minutes to return to normal after the button is released. 6.4 LEDs The SecurAPI.PACSDevice.Hardware.LED namespace provides methods for controlling the device LEDs. The PACSLed object represents a single device LED and can be used to turn on/off, blink and set the color of a particular LED. There are a total of twelve (12) supported LEDs, which are defined in the LedNumber enumeration. There are convenient PACSLed classes that extend PACSLed to define each of these LEDs, which you can use to control a particular LED. Some LEDs are capable of RGB (red, green, blue) where as some are only capable of a limited number of colors. These include: BacklightLed 47


53 GuidanceContactlessCardLed StatusLed GuidanceContactCardLed UV-Led GuidanceKeypadLed 48
54 IconContactCardLed IconContactlessCardLed IconKeypadLed IconFingerLed IconFaceLed 49

55 IconLockLed Simply instantiate one of these classes and you have basic control over that particular LED. The PACSLed object defines the attributes of a particular LED. To perform the actual LED actions, it requires an IPACSLedManager object. SecurAPI.PACSDevice.Hardware.LED.PACSLedManager is the default implementation, which you can easily access from GateDevice.LedManager object when creating PACSLed objects. The PACSLedManager provides various methods for controlling groups of LEDs and some specific actions performed by the MiY device, such as pulsating the LEDs on top of the device and indicating the device. 6.5 Flash Storage The sandbox framework provides the ability to store limited amounts of data in persistent onboard device flash storage, which is maintained across: Device reboot Power cycling OS Updates Factory Resets Using the SecurAPI.PACSDevice.Hardware.PACSFlash object, simply call FlashRead and FlashWrite to read and write starting at offset 0 up to offset 524,288. This section of the flash is completely reserved for any data the needs to be preserved between OS updates. Note: Flash memory (NAND) does have a write limitation (50,000 within the same 1K block); writing multiple times into flash may cause the flash memory to corrupt. Remember to write critical data within flash in multiple blocks several kilobytes away from each other. Additionally it is not recommended to store information that is rapidly changing. It is recommended for critical identifiers that are meant to be read, proprietary license keys, or identifiers for important IP cameras they are linked to. For data that may change rapidly, it is recommended to store this information on the Storage Card. 50
.")
56 6.6 Smartcards The sandbox framework provides a comprehensive set of contact and contactless smart card and reader functionality in the SecurAPI.SmartCard namespace of the SecurAPI and SecurAPI.SmartCard assemblies. The smart card support includes: Low level PCSC reader implementations for exchanging APDUs with ISO 7816 smart cards (SecurAPI.SmartCard.Reader.PCSC). High level abstraction layer for reading Java based contact smart cards with applets and containers. Low level support for reading/writing Mifare, DESFire and HID iclass (SecurAPI.SmartCard.ContactlessCard). High level Mifare, DESFire and HID iclass support for reading/writing 3M Cogent formatted user cards. Card detection helper class for detecting card insertion and removal (SecurAPI.SmartCard.Reader.CardDetector). BER-TLV, TV, CBEFF and FASCN parsers. Smart card capabilities of each MiY device may differ depending on the type and model of the MiY-device. HID readers, at the time of this writing, are only available on the MiY-ID readers and must be ordered with and HID reader from your local distributor. 6.7 Sounds The SecurAPI.PACSDevice.GateSounds object provides the ability to play supported device sounds. All supported device sounds are customizable by simply replacing the appropriate wav file in the Sounds folder of your GateApp package. When creating your GateApp package with the MiY Package Studio, create a Sounds folder and add your versions of the following sounds. The supported sounds are: AccessGranted.wav AccessDevied.wav KeyPress.wav UserActionDetected.wav CardReadBegin.wav CardReadEnd.wav FingerCaptureEnd.wav Indicate.wav The GateApp can be easily customized by replacing the wave files directly. It s recommended to use short audio files since the sound functions are blocking functions and will wait until the whole sound is played before moving on in the code. It s also recommended to keep the sound files mono-channel to reflect the single speaker design. Smaller audio files also take up less memory and will improve the performance of the GateApp. The GateSounds object will also play any custom wav file via the following methods: 51
Avalanche Remote Control User Guide. Version 4.1
 Avalanche Remote Control User Guide Version 4.1 ii Copyright 2012 by Wavelink Corporation. All rights reserved. Wavelink Corporation 10808 South River Front Parkway, Suite 200 South Jordan, Utah 84095
INSTALLATION GUIDE Spring 2017
 INSTALLATION GUIDE Spring 2017 Copyright and Disclaimer This document, as well as the software described in it, is furnished under license of the Instant Technologies Software Evaluation Agreement and
Ocean Wizards and Developers Tools in Visual Studio
 Ocean Wizards and Developers Tools in Visual Studio For Geoscientists and Software Developers Published by Schlumberger Information Solutions, 5599 San Felipe, Houston Texas 77056 Copyright Notice Copyright
Controlsoft Identity and Access Management Software Controlsoft Identity Access Management Software
 Controlsoft Identity Access Management Software IA Server Software Installation Guide v8.0.229 2018 Controlsoft Ltd 9010-0050 Issue 6 Page 1 of 39 29/10/2018 Contents 1. Introduction... 3 1.1. PC Specifications...
SC-T35/SC-T45/SC-T46/SC-T47 ViewSonic Device Manager User Guide
 SC-T35/SC-T45/SC-T46/SC-T47 ViewSonic Device Manager User Guide Copyright and Trademark Statements 2014 ViewSonic Computer Corp. All rights reserved. This document contains proprietary information that
Integrated for Océ Setup Guide
 Integrated for Océ Setup Guide Version 1.2 2016 OCE-20160914 Equitrac Integrated for Océ Setup Guide Document History Revision Date September 14, 2016 Revision List New supported devices/card reader web
Quick KVM 1.1. User s Guide. ClearCube Technology, Inc.
 Quick KVM 1.1 User s Guide ClearCube Technology, Inc. Copyright 2005, ClearCube Technology, Inc. All rights reserved. Under copyright laws, this publication may not be reproduced or transmitted in any
OASYS OASYS WORKSTATION INSTALLATION GUIDE
 OASYS OASYS WORKSTATION INSTALLATION GUIDE VERSION 8.0 DECEMBER 21, 2017 Copyright 2017 DTCC. All rights reserved. This work (including, without limitation, all text, images, logos, compilation and design)
Evaluation Guide Host Access Management and Security Server 12.4
 Evaluation Guide Host Access Management and Security Server 12.4 Copyrights and Notices Copyright 2017 Attachmate Corporation, a Micro Focus company. All rights reserved. No part of the documentation materials
Equitrac Integrated for Konica Minolta
 Equitrac Integrated for Konica Minolta 1.2 Setup Guide 2014 Equitrac Integrated for Konica Minolta Setup Guide Document Revision History Revision Date Revision List August 9, 2013 Updated for Equitrac
Cisco CTL Client setup
 Cisco CTL Client setup This chapter provides information about Cisco CTL client setup. About Cisco CTL Client setup, page 2 Remove etoken Run Time Environment 3.00 for CTL Client 5.0 plug-in, page 2 Cisco
Equitrac Integrated for Konica Minolta. Setup Guide Equitrac Corporation
 Equitrac Integrated for Konica Minolta 1.2 Setup Guide 2012 Equitrac Corporation Equitrac Integrated for Konica Minolta Setup Guide Document Revision History Revision Date Revision List November 1, 2012
ControlPoint. Advanced Installation Guide. September 07,
 ControlPoint Advanced Installation Guide September 07, 2017 www.metalogix.com info@metalogix.com 202.609.9100 Copyright International GmbH., 2008-2017 All rights reserved. No part or section of the contents
Metalogix ControlPoint 7.6. Advanced Iinstallation Guide
 Metalogix ControlPoint 7.6 Advanced Iinstallation Guide 2018 Quest Software Inc. ALL RIGHTS RESERVED. This guide contains proprietary information protected by copyright. The software described in this
SAS Simulation Studio 14.1: User s Guide. Introduction to SAS Simulation Studio
 SAS Simulation Studio 14.1: User s Guide Introduction to SAS Simulation Studio This document is an individual chapter from SAS Simulation Studio 14.1: User s Guide. The correct bibliographic citation for
The Open Core Interface SDK has to be installed on your development computer. The SDK can be downloaded at:
 This document describes how to create a simple Windows Forms Application using some Open Core Interface functions in C# with Microsoft Visual Studio Express 2013. 1 Preconditions The Open Core Interface
GeniusPlus Help On Line
 GeniusPlus Help On Line Starting the application File Menu Device Menu Edit Menu View Menu Tools Menu Window Menu Help Menu Parameters Explorer Version 1.12 and later - September 30, 2013 1 Guide to Rapid
Chime for Lync High Availability Setup
 Chime for Lync High Availability Setup Spring 2017 Copyright and Disclaimer This document, as well as the software described in it, is furnished under license of the Instant Technologies Software Evaluation
Finger Authentication Server
 Futronic Technology Company Ltd. Finger Authentication Server User's Guide Version 5.7 Copyright 2003-2010 Futronic Technology Company Ltd. Copyright 2003-2010 Futronic Technology Company Ltd. All rights
NBC-IG Installation Guide. Version 7.2
 Installation Guide Version 7.2 2017 Nuance Business Connect 7.2 Installation Guide Document Revision History Revision Date August 8, 2017 Revision List Updated supported SQL Server versions June 14, 2017
Attix5 Pro Storage Platform Console
 Attix5 Pro Storage Platform Console V7.0.1 User Manual for Microsoft Windows Your guide to managing the Attix5 Pro backup environment using the Storage Platform Console. 0 Copyright notice and proprietary
Installation Guide Worksoft Analyze
 Installation Guide Worksoft Analyze Worksoft, Inc. 15851 Dallas Parkway, Suite 855 Addison, TX 75001 www.worksoft.com 866-836-1773 Worksoft Analyze Installation Guide Version 1.0.0 Copyright 2018 by Worksoft,
Zodiac iclass II OPERATOR GUIDE
 Zodiac iclass II OPERATOR GUIDE July 2013 Page 2 of 24 Table of Contents INTRODUCTION... 4 PC REQUIREMENTS... 5 INSTALLING THE USB FINGERPRINT SCANNER (HAMSTER)... 5 INSTALLING THE USB SMARTCARD PROGRAMMER
BUSINESS DEVELOPMENT SUITE MOBILE INSTALLATION GUIDE. Version 14R2
 BUSINESS DEVELOPMENT SUITE MOBILE INSTALLATION GUIDE Version 14R2 COPYRIGHT INFORMATION 2015 Thomson Reuters Elite. All rights reserved. Proprietary and confidential information of Thomson Reuters Elite.
Version 1.4. Cogent VDM and Device Guide
 Version 1.4 Cogent VDM and Device Guide 2010 Cogent, Inc. All rights reserved. This document contains commercial information and trade secrets of Cogent, Inc. which are confidential and proprietary in
HP Intelligent Management Center v7.1 Branch Intelligent Management System Administrator Guide
 HP Intelligent Management Center v7.1 Branch Intelligent Management System Administrator Guide Abstract This document describes how to administer the HP IMC Branch Intelligent Management System. HP Part
BMC FootPrints 12 Integration with Remote Support
 BMC FootPrints 12 Integration with Remote Support 2003-2019 BeyondTrust Corporation. All Rights Reserved. BEYONDTRUST, its logo, and JUMP are trademarks of BeyondTrust Corporation. Other trademarks are
Hands-On Lab. Windows Azure Virtual Machine Roles. Lab version: Last updated: 12/14/2010. Page 1
 Hands-On Lab Windows Azure Virtual Machine Roles Lab version: 2.0.0 Last updated: 12/14/2010 Page 1 CONTENTS OVERVIEW... 3 EXERCISE 1: CREATING AND DEPLOYING A VIRTUAL MACHINE ROLE IN WINDOWS AZURE...
SAS Contextual Analysis 14.3: Administrator s Guide
 SAS Contextual Analysis 14.3: Administrator s Guide SAS Documentation August 25, 2017 The correct bibliographic citation for this manual is as follows: SAS Institute Inc. 2017. SAS Contextual Analysis
Equitrac Integrated for Océ
 Equitrac Integrated for Océ 1.2 Setup Guide 2014 Equitrac Integrated for Océ Setup Guide Document History Revision Date Revision List November 2, 2012 Updated for Equitrac Office/Express version 4.2.5
Microsoft Office Groove Server Groove Manager. Domain Administrator s Guide
 Microsoft Office Groove Server 2007 Groove Manager Domain Administrator s Guide Copyright Information in this document, including URL and other Internet Web site references, is subject to change without
USER MANUAL. Disclaimer
 USER MANUAL Disclaimer The instructions in this document have been carefully checked for accuracy and are presumed to be reliable. Smart I Electronics Systems Pvt. Ltd. and its writers assume no responsibility
VMware AirWatch Product Provisioning and Staging for Windows Rugged Guide Using Product Provisioning for managing Windows Rugged devices.
 VMware AirWatch Product Provisioning and Staging for Windows Rugged Guide Using Product Provisioning for managing Windows Rugged devices. AirWatch v9.2 Have documentation feedback? Submit a Documentation
Installation Guide Worksoft Certify
 Installation Guide Worksoft Certify Worksoft, Inc. 15851 Dallas Parkway, Suite 855 Addison, TX 75001 www.worksoft.com 866-836-1773 Worksoft Certify Installation Guide Version 9.0.3 Copyright 2017 by Worksoft,
Cisco CTL Client Setup
 This chapter provides information about Cisco CTL client setup. About, page 2 Addition of Second SAST Role in the CTL File for Recovery, page 2 Cluster Encryption Configuration Through CLI, page 3 Remove
ROCK-POND REPORTING 2.1
 ROCK-POND REPORTING 2.1 Installation and Setup Guide Revised on 09/25/2014 TABLE OF CONTENTS ROCK-POND REPORTING 2.1... 1 SUPPORT FROM ROCK-POND SOLUTIONS... 2 ROCK-POND REPORTING OVERVIEW... 2 INFRASTRUCTURE
Xton Access Manager GETTING STARTED GUIDE
 Xton Access Manager GETTING STARTED GUIDE XTON TECHNOLOGIES, LLC PHILADELPHIA Copyright 2017. Xton Technologies LLC. Contents Introduction... 2 Technical Support... 2 What is Xton Access Manager?... 3
CA GovernanceMinder. CA IdentityMinder Integration Guide
 CA GovernanceMinder CA IdentityMinder Integration Guide 12.6.00 This Documentation, which includes embedded help systems and electronically distributed materials, (hereinafter referred to as the Documentation
Oracle is a registered trademark of Oracle Corporation and/or its affiliates. Other names may be trademarks of their respective owners.
 Primavera Portfolio Management 9.0 What s New Copyright 1999-2011, Oracle and/or its affiliates. The Programs (which include both the software and documentation) contain proprietary information; they are
VMware Horizon Session Recording Fling:
 VMware Horizon Session Recording Fling: The VMware Horizon Session Recording fling allows administrators to record VMware Blast Extreme sessions to a central server for playback. These recordings can be
ImageNow Interact for Microsoft SharePoint Installation, Setup, and User Guide
 ImageNow Interact for Microsoft SharePoint Installation, Setup, and User Guide Version: 6.6.x Written by: Product Documentation, R&D Date: ImageNow and CaptureNow are registered trademarks of Perceptive
Travelport Smartpoint v Developer.NET Framework Quick Installation Guide
 Smartpoint v7.4.90 Developer.NET Framework 4.6.2 Quick Installation Guide Version 1.0 14 October 2017 THE INFORMATION CONTAINED IN THIS DOCUMENT IS CONFIDENTIAL AND PROPRIETARY TO TRAVELPORT Copyright
Fitness Manager V4 Install Guide
 Fitness Manager V4 Install Guide Table of Contents 1 Welcome to V4...3 License Agreement...4 Copyright...4 2. Minimum System Requirements...5 3. Navigating the Install...6 4. Installing V4 on the Server...7
Developing for Mobile Devices Lab (Part 1 of 2)
") Developing for Mobile Devices Lab (Part 1 of 2) Overview Through these two lab sessions you will learn how to create mobile applications for Windows Mobile phones and PDAs. As developing for Windows Mobile
Developing for Mobile Devices Lab (Part 1 of 2) Overview Through these two lab sessions you will learn how to create mobile applications for Windows Mobile phones and PDAs. As developing for Windows Mobile
Evaluation Guide Host Access Management and Security Server 12.4 SP1 ( )
") Evaluation Guide Host Access Management and Security Server 12.4 SP1 (12.4.10) Legal Notice For information about legal notices, trademarks, disclaimers, warranties, export and other use restrictions,
Evaluation Guide Host Access Management and Security Server 12.4 SP1 (12.4.10) Legal Notice For information about legal notices, trademarks, disclaimers, warranties, export and other use restrictions,
Dell Lifecycle Controller Integration Version 3.0 For Microsoft System Center Configuration Manager User's Guide
 Dell Lifecycle Controller Integration Version 3.0 For Microsoft System Center Configuration Manager User's Guide Notes, Cautions, and Warnings NOTE: A NOTE indicates important information that helps you
Solution Composer. User's Guide
 Solution Composer User's Guide January 2014 www.lexmark.com Contents 2 Contents Overview...4 Understanding the basics...4 System recommendations...5 Building custom solutions...6 Getting started...6 Step
WINDOWS HOST GUIDE. Remote Support & Management PC Mac Tablet Smartphone Embedded device. WiseMo Host module on your PC or Server
 WINDOWS HOST GUIDE Remote Support & Management PC Mac Tablet Smartphone Embedded device WiseMo Guest module for example on your Windows PC WiseMo Host module on your PC or Server WiseMo develops software
SyncStudio by HandApps Software. A Complete Mobile Database Synchronization Solution. Quick-Start Manual. Release 3.x, June 2017
 SyncStudio by HandApps Software A Complete Mobile Database Synchronization Solution Quick-Start Manual Release 3.x, June 2017 Copyright 2017 by HandApps Software All rights reserved Page 1 of 36 Edition
GT-400 User Guide for Attendance Enterprise 2.1
 GT-400 User Guide for Attendance Enterprise 2.1 (Latest update: http://www.infotronics.com/ae2.1/gt400_userguide.pdf) InfoTronics, Inc. 2014 All Rights Reserved InfoTronics is a registered trademark of
Comodo Endpoint Security Manager Professional Edition Software Version 3.3
 Comodo Endpoint Security Manager Professional Edition Software Version 3.3 Quick Start Guide Guide Version 3.2.022615 Comodo Security Solutions 1255 Broad Street Clifton, NJ 07013 Comodo Endpoint Security
IBSDK Quick Start Tutorial for C# 2010
 IB-SDK-00003 Ver. 3.0.0 2012-04-04 IBSDK Quick Start Tutorial for C# 2010 Copyright @2012, lntegrated Biometrics LLC. All Rights Reserved 1 QuickStart Project C# 2010 Example Follow these steps to setup
Aimetis Thin Client 2.7. User Guide
 Aimetis Thin Client 2.7 User Guide Disclaimers and Legal Information Copyright 2016 Aimetis Inc. All rights reserved. This material is for informational purposes only. AIMETIS MAKES NO WARRANTIES, EXPRESS,
VMware AirWatch - Workspace ONE, Single Sign-on and VMware Identity Manager
 VMware AirWatch - Workspace ONE, Single Sign-on and VMware Identity Table of Contents Lab Overview - HOL-1857-03-UEM - Workspace ONE UEM with App & Access Management... 2 Lab Guidance... 3 Module 1 - Workspace
Installation Instructions for SAS Activity-Based Management 6.2
 Installation Instructions for SAS Activity-Based Management 6.2 Copyright Notice The correct bibliographic citation for this manual is as follows: SAS Institute Inc., Installation Instructions for SAS
Dell Lifecycle Controller Integration Version 2.2 For Microsoft System Center Configuration Manager User's Guide
 Dell Lifecycle Controller Integration Version 2.2 For Microsoft System Center Configuration Manager User's Guide Notes, Cautions, and Warnings NOTE: A NOTE indicates important information that helps you
IntelliTrack DMS (Data Management System) v8.1 Quick Start Guide Preliminary Copy (July 2011) Copyright 2011 IntelliTrack, Inc.
 v8.1 Quick Start Guide Preliminary Copy (July 2011) Copyright 2011 IntelliTrack, Inc.") Quick Start Guide Reasonable measures have been taken to ensure that the information included in this guide is complete and accurate. However, IntelliTrack reserves the right to change any specifications
Quick Start Guide Reasonable measures have been taken to ensure that the information included in this guide is complete and accurate. However, IntelliTrack reserves the right to change any specifications
FICAM Configuration Guide
 UTC Fire & Security Americas Corporation, Inc. 1212 Pittsford-Victor Road Pittsford, New York 14534 USA Tel 866.788.5095 Fax 585.248.9185 www.lenel.com Overview FICAM Configuration Guide The instructions
Aimetis A10D Thin Client 2.1
 Aimetis A10D Thin Client 2.1 Disclaimers and Legal Information Copyright 2016 Aimetis Inc. All rights reserved. This material is for informational purposes only. AIMETIS MAKES NO WARRANTIES, EXPRESS,
VMware AirWatch Integration with RSA PKI Guide
 VMware AirWatch Integration with RSA PKI Guide For VMware AirWatch Have documentation feedback? Submit a Documentation Feedback support ticket using the Support Wizard on support.air-watch.com. This product
x10data Application Platform v7.1 Installation Guide
 Copyright Copyright 2010 Automated Data Capture (ADC) Technologies, Incorporated. All rights reserved. Complying with all applicable copyright laws is the responsibility of the user. Without limiting the
One Identity Active Roles 7.2. Azure AD and Office 365 Management Administrator Guide
 One Identity Active Roles 7.2 Azure AD and Office 365 Management Administrator Copyright 2017 One Identity LLC. ALL RIGHTS RESERVED. This guide contains proprietary information protected by copyright.
What is MobiKEY? Definitions
 MAP User Guide Table of Contents What is MobiKEY?... 4 Definitions... 4 MAP: Setting up IT Administration for Success... 5 Benefits of MAP... 5 MAP Reports Module... 5 Setting up your MAP Account... 6
Pulse SCADA/HMI. Pulse Smart Login 1.1
 Pulse SCADA/HMI Pulse Smart Login 1.1 September 2014 Copyright The information in this document is subject to change without prior notice and does not represent a commitment on the part of AFCON Control
Getting Started with Tally.Developer 9
 Getting Started with Tally.Developer 9 The information contained in this document is current as of the date of publication and subject to change. Because Tally must respond to changing market conditions,
ControlPoint. Installation Guide for SharePoint August 23,
 ControlPoint Installation Guide for SharePoint 2007 August 23, 2017 www.metalogix.com info@metalogix.com 202.609.9100 Copyright International GmbH., 2008-2017 All rights reserved. No part or section of
UC for Enterprise (UCE) NEC Centralized Authentication Service (NEC CAS)
 NEC Centralized Authentication Service (NEC CAS)") UC for Enterprise (UCE) NEC Centralized Authentication Service (NEC CAS) Installation Guide NEC NEC Corporation October 2010 NDA-30362, Revision 15 Liability Disclaimer NEC Corporation reserves the right
UC for Enterprise (UCE) NEC Centralized Authentication Service (NEC CAS) Installation Guide NEC NEC Corporation October 2010 NDA-30362, Revision 15 Liability Disclaimer NEC Corporation reserves the right
Server Installation ZENworks Mobile Management 2.6.x January 2013
 www.novell.com/documentation Server Installation ZENworks Mobile Management 2.6.x January 2013 Legal Notices Novell, Inc., makes no representations or warranties with respect to the contents or use of
VMware Workspace ONE Quick Configuration Guide. VMware AirWatch 9.1
 VMware Workspace ONE Quick Configuration Guide VMware AirWatch 9.1 A P R I L 2 0 1 7 V 2 Revision Table The following table lists revisions to this guide since the April 2017 release Date April 2017 June
User Documentation. Administrator Manual.
 User Documentation Administrator Manual Proposal Software 1140 US Highway 287, Suite 400-102 Broomfield, CO 80020 USA Tel: 203.604.6597 www.proposalsoftware.com Table of Contents Open the WebPro Viewer...
docalpha 5.0 Server Configuration Utility User Guide
 docalpha 5.0 Server Configuration Utility User Guide Contents 1. docalpha Architecture Overview 3 1.1. docalpha Server Overview 3 2. Working with docalpha Server Configuration Utility 4 2.1. Starting docalpha
SecuRemote for Windows 32-bit/64-bit
 SecuRemote for Windows 32-bit/64-bit E75.20 User Guide 13 September 2011 2011 Check Point Software Technologies Ltd. All rights reserved. This product and related documentation are protected by copyright
MorphoManager User Manual. Table of Contents
 User Manual Table of Contents Introduction... 4 Support... 4 Overview... 5 What is a client?... 5 What is a server?... 5 What is a fingerprint enrollment device?... 5 What is a MorphoAccess?... 6 What
ZENworks Reporting System Reference. January 2017
 ZENworks Reporting System Reference January 2017 Legal Notices For information about legal notices, trademarks, disclaimers, warranties, export and other use restrictions, U.S. Government rights, patent
TSS-7/TSS-10 7" and 10.1" Room Scheduling Touch Screens
 TSS-7/TSS-10 7" and 10.1" Room Scheduling Touch Screens Supplemental Guide Crestron Electronics, Inc. Crestron product development software is licensed to Crestron dealers and Crestron Service Providers
User Guide. 3CX Audio Scheduler. Version
 User Guide 3CX Audio Scheduler Version 15.5.21 "Copyright VoIPTools, LLC 2011-2018" Information in this document is subject to change without notice. No part of this document may be reproduced or transmitted
MegaTrack. Quick Start Guide
 MegaTrack Quick Start Guide MegaTrack Quick Start Guide This document will help you quickly install and test the MegaTrack software. For additional information regarding the operation and configuration
Version Installation Guide. 1 Bocada Installation Guide
 Version 19.4 Installation Guide 1 Bocada Installation Guide Copyright 2019 Bocada LLC. All Rights Reserved. Bocada and BackupReport are registered trademarks of Bocada LLC. Vision, Prism, vpconnect, and
DigitalPersona Pro Enterprise
 DigitalPersona Pro Enterprise Quick Start Guide Version 5 DATA PROTECTION REMOTE ACCESS SECURE COMMUNICATION STRONG AUTHENTICATION ACCESS RECOVERY SINGLE SIGN-ON DigitalPersona Pro Enterprise DigitalPersona
KYOCERA Net Viewer User Guide
 KYOCERA Net Viewer User Guide Legal Notes Unauthorized reproduction of all or part of this guide is prohibited. The information in this guide is subject to change without notice. We cannot be held liable
Wwise Installation and Migration Guide
 Wwise 2015.1.9 Installation and Migration Guide Wwise 2015.1.9 Wwise 2015.1.9: Installation and Migration Guide Wwise 2015.1.9 Revision 1910 Copyright 2016 Audiokinetic Inc. All rights reserved. Patents
Creating Domain Templates Using the Domain Template Builder 11g Release 1 (10.3.6)
") [1]Oracle Fusion Middleware Creating Domain Templates Using the Domain Template Builder 11g Release 1 (10.3.6) E14139-06 April 2015 This document describes how to use the Domain Template Builder to create
[1]Oracle Fusion Middleware Creating Domain Templates Using the Domain Template Builder 11g Release 1 (10.3.6) E14139-06 April 2015 This document describes how to use the Domain Template Builder to create
Getting Started Tutorial - Eclipse Edition. Sybase Unwired Platform 1.2
 Getting Started Tutorial - Eclipse Edition Sybase Unwired Platform 1.2 DOCUMENT ID: DC01017-01-0120-01 LAST REVISED: March, 2009 Copyright 2009 by Sybase, Inc. All rights reserved. This publication pertains
HR-Lite Database & Web Service Setup Guide
 HR-Lite Database & Web Service Setup Guide Version: 1.00 HR21 Limited All rights reserved. No part of this document may be reproduced or transmitted in any form or by any means, electronic or mechanical,
Release Notes: NetAXS Firmware Release January 14, NetAXS-4 Firmware R Release Notes. NetAXS-4. Revision 06
 NetAXS-4 Firmware R03.04.18 Release Notes NetAXS-4 Revision 06 Table of Contents Notices and Trademarks... 3 Terms, Acronyms, Abbreviations, and Symbols... 3 I. RELEASE CONTENTS... 3 Product Name and Model...
Multifactor Authentication Installation and Configuration Guide
 Multifactor Authentication Installation and Configuration Guide Software Version 5.0.0.0 General Information: info@cionsystems.com Online Support: support@cionsystems.com 2017 CionSystems Inc. ALL RIGHTS
The fastest way to get a signature. DocuSign Desktop Client. v3.0. User Guide
 The fastest way to get a signature. DocuSign Desktop Client v3.0 User Guide Stick-eTabs, DocuSign Professional, the DocuSign logo, The fastest way to get a signature., and DocuSign are trademarks or registered
VMware AirWatch Cloud Connector Guide ACC Installation and Integration
 VMware AirWatch Cloud Connector Guide ACC Installation and Integration Workspace ONE UEM v1810 Have documentation feedback? Submit a Documentation Feedback support ticket using the Support Wizard on support.air-watch.com.
LiNC-NXG for Windows 8 Professional, Windows 7 Professional, Vista Business Edition and XP Professional
 LiNC-NXG for Windows 8 Professional, Windows 7 Professional, Vista Business Edition and XP Professional Installation Guide for LiNC-NXG 33-10067-001 REV: C PCSC 3541 Challenger Street Torrance, CA 90503
Wavelink Avalanche Site Edition Java Console User Guide. Version 5.3
 Wavelink Avalanche Site Edition Java Console User Guide Version 5.3 Revised 04/05/2012 ii Copyright 2012 by Wavelink Corporation. All rights reserved. Wavelink Corporation 10808 South River Front Parkway,
Getting Started with Tally.Developer 9 Series A Release 3.0
 Getting Started with Tally.Developer 9 Series A Release 3.0 The information contained in this document is current as of the date of publication and subject to change. Because Tally must respond to changing
ControlPoint. Quick Start Guide. November 09,
 ControlPoint Quick Start Guide November 09, 2017 www.metalogix.com info@metalogix.com 202.609.9100 Copyright International GmbH., 2008-2017 All rights reserved. No part or section of the contents of this
User Guide. Version R94. English
 AuthAnvil User Guide Version R94 English March 8, 2017 Copyright Agreement The purchase and use of all Software and Services is subject to the Agreement as defined in Kaseya s Click-Accept EULATOS as updated
Conventions in this tutorial
 This document provides an exercise using Digi JumpStart for Windows Embedded CE 6.0. This document shows how to develop, run, and debug a simple application on your target hardware platform. This tutorial
Rev T 237
 9424200996 Rev T 237 BESTCOMSPlus is a Windows -based, PC application that provides a user-friendly, graphical user interface (GUI) for use with Basler Electric communicating products. The name BESTCOMSPlus
Integration Guide. SafeNet Authentication Client. Using SAC CBA for VMware Horizon 6 Client
 SafeNet Authentication Client Integration Guide Technical Manual Template Release 1.0, PN: 000-000000-000, Rev. A, March 2013, Copyright 2013 SafeNet, Inc. All rights reserved. 1 Document Information Document
RedBeam Inventory Tracking User Manual
 RedBeam Inventory Tracking User Manual Contact us at www.redbeam.com. Page 1 Table of Contents Table of Contents... 2 Overview... 4 RedBeam Inventory Tracking... 4 PC Prerequisites... 4 Mobile Computer
Nimsoft Service Desk. Single Sign-On Configuration Guide. [assign the version number for your book]
![Nimsoft Service Desk. Single Sign-On Configuration Guide. [assign the version number for your book]](/thumbs/80/81218109.jpg "Nimsoft Service Desk. Single Sign-On Configuration Guide. [assign the version number for your book]") Nimsoft Service Desk Single Sign-On Configuration Guide [assign the version number for your book] Legal Notices Copyright 2012, CA. All rights reserved. Warranty The material contained in this document
Nimsoft Service Desk Single Sign-On Configuration Guide [assign the version number for your book] Legal Notices Copyright 2012, CA. All rights reserved. Warranty The material contained in this document
Oracle Hospitality Cruise Shipboard Property Management System
 Oracle Hospitality Cruise Shipboard Property Management System Fargo HDP5000 Printer Installation Guide Release 7.30.872 E83930-01 April 2017 Copyright 1995, 2017 Oracle and/or its affiliates. All rights
HPE Security Fortify WebInspect Enterprise Software Version: Windows operating systems. Installation and Implementation Guide
 HPE Security Fortify WebInspect Enterprise Software Version: 17.10 Windows operating systems Installation and Implementation Guide Document Release Date: May 2017 Software Release Date: April 2017 Legal