1-Touch idataagent TABLE OF CONTENTS OVERVIEW 1-TOUCH FOR AIX 1-TOUCH FOR HP-UX 1-TOUCH FOR LINUX
|
|
|
- Blaise Barnett
- 5 years ago
- Views:
Transcription
1 Page 1 of Touch idataagent TABLE OF CONTENTS OVERVIEW Introduction Key Features Fully unattended operating system reinstall Point in Time Restore Terminology 1-TOUCH FOR AIX System Requirements Install the 1-Touch Server Software Install the Unix File System idataagent Basic Configuration Enable 1-Touch Backup Perform a Backup Advanced Configuration Performing Backup for AIX WPAR Client NIM Master Server Configuration Basic Recovery Advanced Recovery Restoring Data Backed Up Before a Specific Date Changing the Priority of the Restore Job Starting the Restore Job in Suspended State Restoring From a Copy Precedence Restoring From a Specific Data Path Troubleshooting 1-TOUCH FOR HP-UX System Requirements Install the 1-Touch Server Software Install the Unix File System idataagent Basic Configuration Enable 1-Touch Backup Perform a Backup Basic Recovery Advanced Recovery Restoring Data Backed Up Before a Specific Date Changing the Priority of the Restore Job Starting the Restore Job in Suspended State Restoring From a Copy Precedence Restoring From a Specific Data Path 1-TOUCH FOR LINUX System Requirements Install the Unix File System idataagent Basic Configuration Enable 1-Touch Backup Perform a Backup Create a Client Information Checklist Advanced Configuration Create a Client Information Checklist Schedule a Backup Prepare for Recovery Similar System Restore Non-Interactive Restore
2 Page 2 of 186 Interactive Restore Dissimilar System Restore Non-Interactive Restore Interactive Restore Map Disks Using The GUI Based Mapper Additional Options Change the Client Configuration During Non-Interactive Restore Recover the Client to a Different Firewall Configuration Change the Client Configuration During Interactive Restore Use a NFS Location for Non-interactive Restore Create a New Partition Create a New Mountpoint Add a New Physical Volume Add a New Logical Volume Add a New Swapfile Troubleshooting Frequently Asked Questions 1-TOUCH FOR SOLARIS System Requirements Install the 1-Touch Server Software Install the Unix File System idataagent Basic Configuration Enable 1-Touch Backup Perform a Backup Basic Recovery Advanced Recovery Global File System Recovery Restoring Data Backed Up Before a Specific Date Changing the Priority of the Restore Job Starting the Restore Job in Suspended State Restoring From a Copy Precedence Restoring From a Specific Data Path Troubleshooting 1-TOUCH FOR WINDOWS System Requirements Install the 1-Touch Server Software Install the Windows File System idataagent Basic Configuration Enable 1-Touch Backup Perform a Backup of 1-Touch Client Create a Checklist Configuration for Offline Restore Configure a Remote Software Cache For 1-Touch Server Download and Install Software Updates on 1-Touch Server Apply Updates in 1-Touch Server Cache to 1-Touch Live CD Boot image Configuration for Online Restore Manage Windows Drivers Manage Windows Distribution Shares, Service Packs and Hot Fixes Create an Answer File Additional Options Creating an Answer File for iscsi Disk Restore Create a Live CD Similar Disk Restore Offline Non Interactive Restore Offline Interactive Restore Online Restore Dissimilar Disk Restore Offline Non Interactive Restore Offline Interactive Restore Online Restore
3 Page 3 of 186 Cross Hardware Similar Disk Restore Offline Non Interactive Restore Offline Interactive Restore Online Restore Cross Hardware Dissimilar Disk Restore Offline Non Interactive Restore Offline Interactive Restore Online Restore Additional Options Accessing the Response File From an UNC Path During an Offline Non-Interactive Restore Changing the Client Configuration During an Offline Non-Interactive Restore Using an USB Drive Instead of a Live CD Cluster Recovery Configuring WINS and DNS during Interactive Offline Restore Restore the Teaming Network Adapters Troubleshooting Frequently Asked Questions
4 Page 4 of 186 Overview TABLE OF CONTENTS Introduction Key Features Fully unattended operating system reinstall Point in Time Restore Faster Disaster Recovery via Offline Restores Cross Hardware Restore Terminology WHERE TO GO NEXT 1-Touch for AIX 1-Touch for HP-UX 1-Touch for Linux 1-Touch for Solaris 1-Touch for Windows INTRODUCTION 1-Touch recovery helps to recover a crashed system in the least amount of time. By automatically rebuilding the operating system, you can recover systems with defective components such as inaccessible volumes or crashed disks. You don't need to reinstall the individual software packages or operating systems manually. This feature is available on the Windows platform as well as on various Unix platforms. You need to setup a 1-Touch server to enable this feature. Depending on client environment, you can use the CommCell Console or the 1-Touch wizard to run the recovery process. The 1-Touch server secures the required information from the 1-Touch client's backup and then uses this information to recreate the client's environment. Linux clients do not require 1-Touch server. The required information for 1-Touch recovery is available on the CommServe and Linux Live CD. KEY FEATURES The 1-Touch Recovery involves the following key features: FULLY UNATTENDED OPERATING SYSTEM REINSTALL You can initiate the recovery process of a single or multiple clients from a central location, such as the CommServe. This will be useful when you want to reinstall the operating system on all the clients connected to a CommServe. POINT IN TIME RESTORE You can restore the system state of a client, backed up on a specific date and time. FASTER DISASTER RECOVERY VIA OFFLINE RESTORES On Windows platform, 1-Touch recovery can be performed in online and offline modes. Online recovery involves many steps to be carried out manually and is a very slow process for a Disaster Recovery. This process uses Windows distribution to install the operating system and then initiate a recovery which makes it slower. Also, a lot of space is needed on the 1-Touch server to maintain the distributions and the Simpana software to be installed after the operating system installation is complete. Offline recovery does away with operating system installation and the restore is performed while running on Boot CD itself making this a quick process for a Disaster Recovery. CROSS HARDWARE RESTORE You can perform the 1-Touch Recovery to a target Windows system with completely different hardware configurations. The target system can have different network interface adapters, mass storage devices, video adapters, motherboards, and CPUs TERMINOLOGY The 1-Touch documentation uses the following terminology: 1-TOUCH CLIENT 1-TOUCH SERVER LIVE CD DISSIMILAR DISK RESTORE ASYMMETRIC DISK RESTORE A computer that is connected to 1-Touch server A server that is used for 1-Touch recovery of 1-Touch clients. A CD used to boot the client for 1-Touch recovery. This term is used in the 1-Touch recovery of Windows clients. When the disk configuration of the restored system is different than that of the backed up system, you need to perform a Dissimilar Disk Restore. This term is used in 1-Touch recovery of Unix clients. When the disk configuration of the restored system is different than that of the backed up system, you need to perform the Asymmetric Disk Restore.
5 Page 5 of 186 ISO IMAGE OFFLINE RESTORE ONLINE RESTORE ANSWER FILE This is a file that contains all the information required to initiate the 1-Touch recovery. Use this file to create the Live CD. This term is used in the 1-Touch recovery of Windows clients. A recovery procedure in which the operating system is restored and not re-installed. An access to 1-Touch server is not required to perform the Offline Restore. This term is used in the 1-Touch recovery of Windows clients. A recovery procedure in which the operating system is re-installed. You need access to 1-Touch server to perform the Offline Restore. The client answer file contains information such as the computer name, operating system, IP address, and disk partition/format information. This information is used during the 1-Touch Recovery for silent deployment of operating system and restoration of the client. For more terms, refer to Glossary.
6 Page 6 of 186 System Requirements - 1-Touch AIX HP-UX Linux Solaris Windows OPERATING SYSTEM The following are the requirements for 1-Touch on an AIX: SERVER AIX bit with technology level 2 or higher (LPAR with shared fibre channel card NPIV supported) AIX bit and 64-bit with technology level 7 (or higher) and runtime library xlc.rte or higher CLIENT AIX bit with technology level 2 or higher (LPAR with shared fibre channel card NPIV supported) AIX bit and 64-bit with technology level 7 (or higher) and runtime library xlc.rte or higher HARD DRIVE The 1-Touch Server requires 2 GB of disk space per client for the 1-Touch client configuration files. MEMORY 1 GB RAM minimum required; 2 GB RAM recommended. PROCESSOR Power PC (Includes IBM System p) AIX LPAR SUPPORT Data protection on Logical Partitioning (LPAR) is supported. SUPPORTED FILE SYSTEM AND VOLUME MANAGER TYPES AIX logical Volume Manager for Root and Non- root Volumes (LVM) VERITAS Volume Manager 5.0 or higher for Non root Volumes (VXVM) Journal File System (JFS) (AIX) Enhanced Journal File System (JFS2) (AIX) For AIX 5.3, RAW logical volume is supported for ML 10 and above NOTES SERVER The 1-Touch Server must be a dedicated AIX machine running the NIM master server environment. CLIENT NIM client must be installed and/or configured on clients (EZ-NIM client). Clients should have a configured network card that can be used to boot from a NIM master. For clients with link aggregation or EtherChannel, ensure that standard network adapter is configured for communication with NIM server. The 1-Touch server can be in the same subnet as the client computer, or it can be in a different subnet. However, if they are in different subnets, ensure that there is no network firewall between the server and the client. For each different subnet there should be NIM network resource defined. This is important not only when NIM master and client are in different subnets, but also in case 1-Touch recovery is performed to a client that is in a different subnet than the NIM master and the original client. If the network resource is not defined for the destination client subnet and selected during recovery, 1-Touch recovery will not be successful. For more information on defining NIM network resources, refer to IBM NIM documentation. Only active volume group will be backed up during 1-Touch backup. This feature is not supported when bootable partitions are on the disk arrays (snapable disk). DISCLAIMER Minor revisions and/or service packs that are released by application and operating system vendors are supported by our software but may not be individually listed in our System Requirements. We will provide information on any known caveat for the revisions and/or service packs. In some cases, these revisions and/or service packs affect the working of our software.
7 Page 7 of 186 Changes to the behavior of our software resulting from an application or operating system revision/service pack may be beyond our control. The older releases of our software may not support the platforms supported in the current release. However, we will make every effort to correct the behavior in the current or future releases when necessary. Please contact your Software Provider for any problem with a specific application or operating system. Additional considerations regarding minimum requirements and End of Life policies from application and operating system vendors are also applicable
8 Page 8 of 186 Deployment - 1-Touch for AIX Deployment Configuration Recovery FAQ Troubleshooting 1-Touch Recovery allows you to recover the entire computer system without installing the Operating system or any other software. INSTALLATION To perform 1-Touch Recovery you must first install the following: 1-TOUCH SERVER Install 1-Touch Server software on the computer that satisfies the minimum system requirements. Install the 1-Touch Server Software 1-TOUCH CLIENT Install Unix File System idataagent on the computer that satisfies the minimum system requirements. The computer is referred to as the Client computer in this install procedure. BEFORE YOU BEGIN Download Software Packages Download the latest software package to perform the install. System Requirements for 1-Touch Server and Client Verify that the computer in which you wish to install the 1- Touch Server Software satisfies the System Requirements. Overview Provides comprehensive information about 1-Touch feature The software can be installed using one of the following methods: Method 1: Interactive Install Unix File System idataagent - to install directly on client computer. Method 2: Install Software from CommCell Console - to install remotely on a client computer. 1-TOUCH SERVER INSTALL THE 1-TOUCH SERVER SOFTWARE 1. Place the Software Installation Disc on a AIX computer that satisfies the minimum System Requirements. 2. Run the following command from the Software Installation Disc:./cvpkgadd 3. The product banner and other information is displayed. Press Enter. 4. Read the license agreement. Type y and press Enter. 5. Press Enter. Please select a setup task you want to perform from the list below: Advance options provide extra setup features such as creating custom package, recording/replaying user selections and installing External Data Connector software. 1) Install data protection agents on this computer 2) Advance options 3) Exit this menu Your choice: [1] 6. Press Enter. Certain Simpana packages can be associated with a virtual IP, or in other words, installed on a "virtual machine" belonging to some cluster. At any given time the virtual machine's services and IP address are active on only one of the cluster's servers. The virtual machine can "failover" from one server to another, which includes stopping services and deactivating IP address on the first server and activating the IP address/services on the other server. You now have a choice of performing a regular Simpana install on the physical host or installing Simpana on a virtual machine for operation within a cluster. Most users should select "Install on a physical machine" here. 1) Install on a physical machine 2) Install on a virtual machine 3) Exit Your choice: [1] 7. If you have only one network interface, press Enter to accept the default network interface name and continue. We found one network interface available on your machine. We will associate it with the physical machine being
9 Page 9 of 186 If you have multiple network interfaces, enter the interface name that you wish to use as default, and then press Enter. The interface names and IP addresses depend on the computer in which the software is installed and may be different from the example shown. installed, and it will also be used by the CommServe to connect to the physical machine. Note that you will be able to additionally customize Datapipe Interface Pairs used for the backup data traffic later in the Simpana Java GUI. Please check the interface name below, and make connections if necessary: Physical Machine Host Name: [angel.company.com] 8. Press Enter. Please specify the client name for this machine. It does not have to be the network host name: you can enter any word here without spaces. The only requirement is that it must be unique on the CommServe. Physical Machine Client name: [angel] 9. Type the appropriate number to select 1-Touch Server. A confirmation screen will mark your choice with an "X". Type d for Done, and press Enter. Install Simpana on physical machine angel Please select the Simpana module(s) that you would like to install. [ ] 1) MediaAgent [1301] [CVGxMA] [ ] 2) UNIX File System idataagent [1101] [CVGxIDA] [a=all n=none r=reverse q=quit d=done >=next <=previous? =help] Enter number(s)/one of "a,n,r,q,d,>,<,?" here:2 10. Press Enter. Do you want to use the agents for restore only without consuming licenses? [no] 11. Type the appropriate number to install the latest software scripts and press Enter. Select Download from the software provider website to download the latest software scripts. Make sure you have internet access. Select Use the one in the installation media to install the software scripts from the package or share from which the installation is currently being performed. Select Use the copy I already have by entering its unix path, to specify the path if you have the software script in an alternate location. Installation Scripts Pack provides extra functions and latest support and fix performed during setup time. Please specify how you want to get this pack. If you choose to download it from the website now, please make sure you have internet connectivity at this time. This process may take some time depending on the internet connectivity. 1) Download from the software provider website. 2) Use the one in the installation media 3) Use the copy I already have by entering its unix path Your choice: [1] Press Enter. Keep Your Install Up to Date - Latest Service Pack Latest Service Pack provides extra functions and latest support and fix for the packages you are going to install. You can download the latest service pack from software provider website. If you decide to download it from the website now, please make sure you have internet connectivity at this time. This process may take some time depending on the internet connectivity. Do you want to download the latest service pack now? [no] 13. Press Enter to accept the default path. If you want to specify a different path, type the path and then press Enter. If you want to install the software binaries to an NFS shared drive, specify the directory on which you have mounted the NFS file system and then press Enter. In order to make sure that the client computer has read/write access to NFS shared drive, review the steps described in Installing Software Binaries to an NFS Shared Drive. Do not use the following characters when specifying the path:!@#$%^&*():/?\ Please specify where you want us to install Simpana binaries. It must be a local directory and there should be at least 176MB of free space available. All files will be installed in a "simpana" subdirectory, so if you enter "/opt", the files will actually be placed into "/opt/simpana". Installation Directory: [/opt] 14. Press Enter to accept the default location. Enter a path to modify the default location and press Enter. All the modules installed on the computer will store the log files in this directory. Please specify where you want to keep Simpana log files. It must be a local directory and there should be at least 100MB of free space available. All log files will be created in a "simpana/log_files" subdirectory, so if you enter "/var/log", the logs will actually be placed into "/var/log/simpana/log_files". Log Directory: [/var/log] 15. Press Enter. Most of Software processes run with root privileges, but some are launched by databases and inherit database access rights. To make sure that registry and log files can be written to by both kinds of processes we can either make such files world-writeable or we can grant write access only to processes belonging to a particular group, e.g. a "simpana" or a "dba" group.
10 Page 10 of 186 We highly recommend now that you create a new user group and enter its name in the next setup screen. If you choose not to assign a dedicated group to Software processes, you will need to specify the access permissions later. If you're planning to backup Oracle DB you should use "dba" group. Would you like to assign a specific group to Software? [yes] 16. Type the Group name and press Enter. Press Enter again. Please enter the name of the group which will be assigned to all Software files and on behalf of which all Software processes will run. In most of the cases it's a good idea to create a dedicated "simpana" group. However, if you're planning to use Oracle idataagent or SAP Agent, you should enter Oracle's "dba" group here. Group name: sky1 REMINDER If you are planning to install Simpana Informix, DB2, PostgreSQL, Sybase or Lotus Notes idataagent, please make sure to include Informix, DB2, etc. users into group "sky1". Press <ENTER> to continue Type a network TCP port number for the Communications Service (CVD) and press Enter. Type a network TCP port number for the Client Event Manager Service (EvMgrC) and press Enter. Every instance of Simpana should use a unique set of network ports to avoid interfering with other instances running on the same machine. The port numbers selected must be from the reserved port number range and have not been registered by another application on this machine. Please enter the port numbers. Port Number for CVD : [8400] Port Number for EvMgrC: [8402] 18. If you do not wish to configure the firewall services, press Enter. Is there a firewall between this client and the CommServe? [no] If this computer is separated from the CommServe by firewall(s), type Yes and then press Enter. For firewall options and configuration instructions, see Firewall Configuration and continue with the installation. 19. Type the fully qualified CommServe host name and press Enter. Ensure that the CommServe is accessible before typing the name; otherwise the installation will fail. Please specify hostname of the CommServe below. Make sure the hostname is fully qualified, resolvable by the name services configured on this machine. CommServe Host Name: mycommserve.company.com 20. Press Enter. Commcell Level Global Filters are set through Simpana GUI's Control Panel in order to filter out certain directories or files from backup Commcell-widely. If you turn on the Global filters, they will be effective to the default subclient. There are three options you can choose to set the filters. 1) Use Cell level policy 2) Always use Global filters 3) Do not use Global filters Please select how to set the Global Filters for the default subclient? [1] 21. Type the appropriate number to select the Client Group and press Enter. This screen will be displayed only if Client Groups are configured for the CommCell Client Group(s) is currently configured on CommServe mycommserve.company.com. Please choose the group(s) that you want to add this client angel.company.com to. The selected group(s) will be marked (X) and can be deselected if you enter the same number again. After you are finished with the selection, select "Done with the Selection". [ ] 1) Unix [ ] 2) DR [a=all n=none r=reverse q=quit d=done >=next <=previous? =help]s Enter number(s)/one of "a,n,r,q,d,>,<,?" here: A confirmation screen will mark your choice with an "X". Type d for Done, and press Enter. Client Group(s) is currently configured on CommServe cs.company.com. Please choose the group(s) that you want to add this client client.company.com to. The selected group(s) will be marked (X) and can be deselected if you enter the same number again. After you are finished with the selection, select "Done with the Selection". [ ] 1) Unix
11 Page 11 of 186 [X ] 2) DR [a=all n=none r=reverse q=quit d=done >=next <=previous? =help]s Enter number(s)/one of "a,n,r,q,d,>,<,?" here: d 23. Enter the number associated with the storage policy you want use and press Enter. Please select one storage policy for this IDA from the list below: 1) SP_StandAloneLibrary2_2 2) SP_Library3_3 3) SP_MagLibrary4_4 Storage Policy: [1] 24. Type 3 and press Enter. Certain Simpana packages can be associated with a virtual IP, or in other words, installed on a "virtual machine" belonging to some cluster. At any given time the virtual machine's services and IP address are active on only one of the cluster's servers. The virtual machine can "failover" from one server to another, which includes stopping services and deactivating IP address on the first server and activating the IP address/services on the other server. Currently you have Simpana installed on physical node angel.company.com. Now you have a choice of either adding another package to the existing installation or configure Simpana on a virtual machine for use in a cluster. 1) Add another package to angel.company.com 2) Install Simpana on a virtual machine 3) Exit Your choice: [3] 1-TOUCH CLIENT METHOD 1: INTERACTIVE INSTALL UNIX FILE SYSTEM IDATAAGENT Before installing Unix File System idataagent, ensure that the client computer is in same subnet as the 1-Touch Server. If both 1-Touch Server and client computer are in different subnet, ensure that there is no firewall between the server and the client computer. 1. Place the Software Installation Disc on a AIX client computer that satisfies the minimum System Requirements. 2. Run the following program from the Software Installation Disc:./cvpkgadd 3. The product banner and other information is displayed. Press Enter. 4. Read the license agreement. Type y and press Enter. 5. Press Enter. Please select a setup task you want to perform from the list below: Advance options provide extra setup features such as creating custom package, recording/replaying user selections and installing External Data Connector software. 1) Install data protection agents on this computer 2) Advance options 3) Exit this menu Your choice: [1] 6. Press Enter. Certain Simpana packages can be associated with a virtual IP, or in other words, installed on a "virtual machine" belonging to some cluster. At any given time the virtual machine's services and IP address are active on only one of the cluster's servers. The virtual machine can "failover" from one server to another, which includes stopping services and deactivating IP address on the first server and activating the IP address/services on the other server. You now have a choice of performing a regular Simpana install on the physical host or installing Simpana on a virtual machine for operation within a cluster. Most users should select "Install on a physical machine" here.
12 Page 12 of If you have only one network interface, press Enter to accept the default network interface name and continue. If you have multiple network interfaces, enter the interface name that you wish to use as default, and then press Enter. The interface names and IP addresses depend on the computer in which the software is installed and may be different from the example shown. 1) Install on a physical machine 2) Install on a virtual machine 3) Exit Your choice: [1] We found one network interface available on your machine. We will associate it with the physical machine being installed, and it will also be used by the CommServe to connect to the physical machine. Note that you will be able to additionally customize Datapipe Interface Pairs used for the backup data traffic later in the Simpana Java GUI. Please check the interface name below, and make connections if necessary: Physical Machine Host Name: [angel.company.com] 8. Press Enter. Please specify the client name for this machine. It does not have to be the network host name: you can enter any word here without spaces. The only requirement is that it must be unique on the CommServe. Physical Machine Client name: [angel] 9. Type the appropriate number to install Unix File System idataagent. A confirmation screen will mark your choice with an "X". Type d for Done, and press Enter. Install Simpana on physical machine angel Please select the Simpana module(s) that you would like to install. [ ] 1) MediaAgent [1301] [CVGxMA] [ ] 2) UNIX File System idataagent [1101] [CVGxIDA] [a=all n=none r=reverse q=quit d=done >=next <=previous? =help] Enter number(s)/one of "a,n,r,q,d,>,<,?" here:2 10. Press Enter. Do you want to use the agents for restore only without consuming licenses? [no] 11. Type the appropriate number to install the latest software scripts and press Enter. Select Download from the software provider website to download the latest software scripts. Make sure you have internet access. Select Use the one in the installation media to install the software scripts from the package or share from which the installation is currently being performed. Select Use the copy I already have by entering its unix path, to specify the path if you have the software script in an alternate location. Installation Scripts Pack provides extra functions and latest support and fix performed during setup time. Please specify how you want to get this pack. If you choose to download it from the website now, please make sure you have internet connectivity at this time. This process may take some time depending on the internet connectivity. 1) Download from the software provider website. 2) Use the one in the installation media 3) Use the copy I already have by entering its unix path Your choice: [1] Press Enter. Keep Your Install Up to Date - Latest Service Pack Latest Service Pack provides extra functions and latest support and fix for the packages you are going to install. You can download the latest service pack from software provider website. If you decide to download it from the website now, please make sure you have internet connectivity at this time. This process may take some time depending on the internet connectivity. Do you want to download the latest service pack now? [no] 13. Press Enter to accept the default path. If you want to specify a different path, type the path and then press Enter. If you want to install the software binaries to an NFS shared drive, specify the directory on which you have mounted the NFS file system and then press Enter. In order to make sure that the client computer has read/write access to NFS shared drive, review the steps described in Installing Software Binaries to an NFS Shared Drive. Do not use the following characters when specifying the path:!@#$%^&*():/?\ Please specify where you want us to install Simpana binaries. It must be a local directory and there should be at least 176MB of free space available. All files will be installed in a "simpana" subdirectory, so if you enter "/opt", the files will actually be placed into "/opt/simpana". Installation Directory: [/opt] 14. Press Enter to accept the default location. Enter a path to modify the default location and press Enter. All the modules installed on the computer will store the log files in this directory. Please specify where you want to keep Simpana log files. It must be a local directory and there should be at least 100MB of free space available. All log files will be created in a "simpana/log_files" subdirectory, so if you enter "/var/log", the logs will actually be placed into "/var/log/simpana/log_files".
13 Page 13 of 186 Log Directory: [/var/log] 15. Press Enter. Most of Software processes run with root privileges, but some are launched by databases and inherit database access rights. To make sure that registry and log files can be written to by both kinds of processes we can either make such files world-writeable or we can grant write access only to processes belonging to a particular group, e.g. a "simpana" or a "dba" group. We highly recommend now that you create a new user group and enter its name in the next setup screen. If you choose not to assign a dedicated group to Software processes, you will need to specify the access permissions later. If you're planning to backup Oracle DB you should use "dba" group. Would you like to assign a specific group to Software? [yes] 16. Type the Group name and press Enter. Press Enter again. Please enter the name of the group which will be assigned to all Software files and on behalf of which all Software processes will run. In most of the cases it's a good idea to create a dedicated "simpana" group. However, if you're planning to use Oracle idataagent or SAP Agent, you should enter Oracle's "dba" group here. Group name: sky1 REMINDER If you are planning to install Simpana Informix, DB2, PostgreSQL, Sybase or Lotus Notes idataagent, please make sure to include Informix, DB2, etc. users into group "sky1". Press <ENTER> to continue Type a network TCP port number for the Communications Service (CVD) and press Enter. Type a network TCP port number for the Client Event Manager Service (EvMgrC) and press Enter. Every instance of Simpana should use a unique set of network ports to avoid interfering with other instances running on the same machine. The port numbers selected must be from the reserved port number range and have not been registered by another application on this machine. Please enter the port numbers. Port Number for CVD : [8400] Port Number for EvMgrC: [8402] 18. If you do not wish to configure the firewall services, press Enter. Is there a firewall between this client and the CommServe? [no] If this computer is separated from the CommServe by firewall(s), type Yes and then press Enter. For firewall options and configuration instructions, see Firewall Configuration and continue with the installation. 19. Type the fully qualified CommServe host name and press Enter. Ensure that the CommServe is accessible before typing the name; otherwise the installation will fail. Please specify hostname of the CommServe below. Make sure the hostname is fully qualified, resolvable by the name services configured on this machine. CommServe Host Name: mycommserve.company.com 20. Press Enter. Commcell Level Global Filters are set through Simpana GUI's Control Panel in order to filter out certain directories or files from backup Commcell-widely. If you turn on the Global filters, they will be effective to the default subclient. There are three options you can choose to set the filters. 1) Use Cell level policy 2) Always use Global filters 3) Do not use Global filters Please select how to set the Global Filters for the default subclient? [1] 21. Type the appropriate number to select the Client Group and press Enter. This screen will be displayed only if Client Groups are configured for the CommCell Client Group(s) is currently configured on CommServe mycommserve.company.com. Please choose the group(s) that you want to add this client angel.company.com to. The selected group(s) will be marked (X) and can be deselected if you enter the same number again. After you are finished with the selection, select "Done with the Selection". [ ] 1) Unix [ ] 2) DR [a=all n=none r=reverse q=quit d=done >=next <=previous? =help]s Enter number(s)/one of "a,n,r,q,d,>,<,?" here: 2
14 Page 14 of A confirmation screen will mark your choice with an "X". Type d for Done, and press Enter. Client Group(s) is currently configured on CommServe cs.company.com. Please choose the group(s) that you want to add this client client.company.com to. The selected group(s) will be marked (X) and can be deselected if you enter the same number again. After you are finished with the selection, select "Done with the Selection". [ ] 1) Unix [X ] 2) DR [a=all n=none r=reverse q=quit d=done >=next <=previous? =help]s Enter number(s)/one of "a,n,r,q,d,>,<,?" here: d 23. Enter the number associated with the storage policy you want use and press Enter. Please select one storage policy for this IDA from the list below: 1) SP_StandAloneLibrary2_2 2) SP_Library3_3 3) SP_MagLibrary4_4 Storage Policy: [1] 24. Type 3 to the Exit option and press Enter. The installation is now complete. Certain Simpana packages can be associated with a virtual IP, or in other words, installed on a "virtual machine" belonging to some cluster. At any given time the virtual machine's services and IP address are active on only one of the cluster's servers. The virtual machine can "failover" from one server to another, which includes stopping services and deactivating IP address on the first server and activating the IP address/services on the other server. Currently you have Simpana installed on physical node angel.company.com. Now you have a choice of either adding another package to the existing installation or configure Simpana on a virtual machine for use in a cluster. 1) Add another package to angel.company.com 2) Install Simpana on a virtual machine 3) Exit Your choice: [3] METHOD 2: INSTALL SOFTWARE FROM COMMCELL CONSOLE 1. From the CommCell Browser, select Tools Add/Remove Software Install Software. 2. Click Next. 3. Select Unix and Linux.
15 Page 15 of 186 Click Next. 4. Select Manually Select Computers. Click Next. 5. Enter the fully qualified domain name of the AIX client computer in which you wish to install. For example: apple.domain.company.com The Unix File System idataagent software will be installed on this client computer. Click Next. 6. Click Next. 7. Specify UserName and Password of client computer. Click Next.
16 Page 16 of Select Unix File System idataagent. Click Next. 9. Select Client Group from Available and click Add. Do not add more than one Client Group. Select a Storage Policy from the drop-down list. Click Next. 10. Click Next. 11. Select Immediate. Click Next.
17 Page 17 of Click Finish. 13. You can track the progress of the job from the Job Controller or Event Viewer window. 14. Once the job is complete, right-click the CommServe computer, click View and then click Admin Job History. 15. Select Install/Upgrade/Remove Software. Click OK.
18 Page 18 of You can view the following details about the job by right-clicking the job: Items that succeeded during the job Items that failed during the job Details of the job Events of the job Log files of the job
19 Page 19 of 186 Configuration - 1-Touch for AIX Deployment Configuration Recovery FAQ Troubleshooting TABLE OF CONTENTS Basic Configuration Enable 1-Touch Backup Perform a Backup Advanced Configuration Performing Backup for AIX WPAR Client NIM Master Server Configuration BASIC CONFIGURATION ENABLE 1-TOUCH After you install the File System idataagent, follow the steps given below to enable the 1-Touch for the default subclient : 1. From the CommCell Console, navigate to <Client> File System idataagent defaultbackupset. Right-click the default subclient and click Properties. 2. Click 1-Touch Recovery tab. Select 1-Touch Recovery. Select the 1-Touch Server from the list. Enter the path to the 1-Touch server Directory. Click OK. PERFORM A BACKUP After you enable 1-Touch, perform backups of the default subclient periodically to capture any changes in the client system configuration. Before recovering a client, ensure that you have run at least one full backup of the default subclient. 1. From the CommCell Console, navigate to <Client> File System idataagent defaultbackupset. Right-click the subclient, and click Backup. 2. Select Full. Select Immediate. Click OK.
20 Page 20 of You can track the progress of the backup job from the Job Controller window. When the backup job has completed, the Job Controller displays the status as Completed. ADVANCED CONFIGURATION PERFORMING BACKUP FOR AIX WPAR CLIENT For AIX 6.1 clients that have a System Workload Partitioning (WPAR) environment installed on the root volume, the WPAR environment creates a file system. This file system has a mount option that is set to false by default. Before performing a full backup, set this option to true to enable 1-Touch for AIX backups. NIM MASTER SERVER CONFIGURATION Ensure that the 1-Touch Recovery Server is a dedicated AIX machine and it is running the NIM master server environment. If you are using the the AIX 6.1 NIM server as a 1-Touch server, then for an AIX 5.3 client, ensure that server has the following resources: Spot resource with the appropriate ML version LPP resource with the appropriate ML version Verify that the NIM master server and the CommServe names are resolved correctly using /etc/hosts or bind.
21 Page 21 of 186 Recovery- 1-Touch for AIX Deployment Configuration Recovery FAQ Troubleshooting TABLE OF CONTENTS Basic Recovery Advanced Recovery Restoring Data Backed Up Before a Specific Date Changing the Priority of the Restore Job Starting the Restore Job in Suspended State Restoring From a Copy Precedence Restoring From a Specific Data Path BASIC RECOVERY 1. Login to CommCell Console using CommCell credentials. Do not use domain credentials to login to CommCell. The single sign on is not supported for 1-Touch feature. 2. From the CommCell Console, navigate to <Client> File System idataagent defaultbackupset. Right-click the Default Backup Set and click All Tasks 1-Touch Recovery. 3. Select the backup job for recovering the operating system. Click Next. 4. Click Next. 5. Review the recovery options. Click Finish.
22 Page 22 of 186 ADVANCED RECOVERY When AIX operating system is not running or if additional manual steps are required on the client, you have to manually perform the network boot for the client. 1. From the CommCell Console, navigate to <Client> File System idataagent defaultbackupset. Right-click the Default Backup Set and click All Tasks 1-Touch Recovery. 2. Select the backup job for recovering the operating system. Click Next. 3. Do not select Automatic Client Reboot. Click Next. 4. Review the recovery options. Click Finish.
23 Page 23 of Wait for the 1-Touch recovery job to complete restoring mksysb to the NIM master. 6. If the client is running operating system you can perform any necessary steps required on client computer. If the client doesn t have the operating system, connect it to the network and switch power ON. Navigate to the SMS menu Configure network interface if required to use the NIM master server. Boot the client computer using network interface. If Restore Data option is selected, a new restore job will be automatically started. After the client computer reboot and the restore job are complete, verify if the client is up and services are running. Check connectivity from the CommCell Console. Clean up the NIM master server. RESTORING DATA BACKED UP BEFORE A SPECIFIC DATE You can perform a point-in-time restore of the system state. You can recover data from a backup that occurred before the specified date and time. 1. From the CommCell Console, navigate to <Client> File System idataagent defaultbackupset. 2. Right-click the defaultbackupset and click All Tasks 1-Touch Recovery. 3. In the Submit 1-Touch Recovery Request dialog box, click Select Recovery Options. 4. Click Restore data from the backup that occurred before this date. 5. Enter date and time. 6. Select a Time Zone. 7. Click Next. 8. Click Finish. CHANGING THE PRIORITY OF THE RESTORE JOB You can increase the priority of a restore job. If you want to perform the 1-Touch recovery on a high priority, follow the steps given below: 1. From the CommCell Console, navigate to <Client> File System idataagent defaultbackupset. 2. Right-click the defaultbackupset and click All Tasks 1-Touch Recovery. 3. In the Submit 1-Touch Recovery Request dialog box, click Select Recovery Options. 4. Click Advanced. 5. Click Change Priority. 6. Enter the priority number between 0 to 999. Lower the number, higher the priority. 7. Click Ok. 8. Click Next. 9. Click Finish.
24 Page 24 of 186 STARTING THE RESTORE JOB IN SUSPENDED STATE If there are multiple jobs running simultaneously on the CommServe, you can hold the restore job on suspended state. Once the CommServe is freed up, you can resume the restore job from the Job Controller window. 1. From the CommCell Console, navigate to <Client> File System idataagent defaultbackupset. 2. Right-click the defaultbackupset and click All Tasks 1-Touch Recovery. 3. In the Submit 1-Touch Recovery Request dialog box, click Select Recovery Options. 4. Click Advanced. 5. Click Startup in suspended state 6. Click Ok. 7. Click Next. 8. Click Finish. RESTORING DATA FROM A COPY PRECEDENCE By default, 1-Touch recovery will restore the data from the primary copy. But if you want to restore data from a particular storage policy copy, you can specify the copy precedence. 1. From the CommCell Console, navigate to <Client> File System idataagent defaultbackupset. 2. Right-click the defaultbackupset and click All Tasks 1-Touch Recovery. 3. In the Submit 1-Touch Recovery Request dialog box, click Select Recovery Options. 4. Click Advanced. 5. Click Copy Precedence. 6. Click Restore from copy precedence. 7. Enter the copy precedence number. 8. Click Ok. 9. Click Next. 10. Click Finish. RESTORING DATA FROM A SPECIFIC DATA PATH If you want to restore the data from a specific location on a MediaAgent, you can specify the data path as follows:
25 Page 25 of From the CommCell Console, navigate to <Client> File System idataagent defaultbackupset. 2. Right-click the defaultbackupset and click All Tasks 1-Touch Recovery. 3. In the Submit 1-Touch Recovery Request dialog box, click Select Recovery Options. 4. Click Advanced. 5. Click Data Path. 6. Select the following to specify the data path: Use MediaAgent Use Library Use Drive Pool Use Drive Use Proxy 7. Click Ok. 8. Click Next. 9. Click Finish.
26 Page 26 of 186 System Requirements - 1-Touch AIX HP-UX Linux Solaris Windows OPERATING SYSTEM The following are the requirements for 1-Touch on HP-UX: SERVER HP-UX 11i v3 (11.31) HP-UX 11i v2 (11.23) HP-UX 11i v1 (11.11) with a minimum of OS patch level of December 2008 patch bundle or higher (contact Hewlett Packard to obtain the patch) CLIENT HP-UX 11i v3 (11.31) HP-UX 11i v2 (11.23) HP-UX 11i v1 (11.11) with a minimum of OS patch level of December 2008 patch bundle or higher (contact Hewlett Packard to obtain the patch) HARD DRIVE The 1-Touch Server requires 2 GB of disk space per client for the 1-Touch client configuration files. The 1-Touch Client requires 2 GB of disk space per client. MEMORY 1 GB RAM minimum required; 2 GB RAM recommended. PROCESSOR Itanium PA-RISC SUPPORTED FILE SYSTEM AND VOLUME MANAGER TYPES HPUX Logical Volume Manager for Root and Non-Root volumes (LVM) VERITAS Volume Manager 5.0 or higher for Root and Non Root volumes (VxVM) HFS File system (HFS) VERITAS File System (VxFS) NOTES The latest Ignite-UX software must be installed on both the 1-Touch server and the client. Ensure that the same version of this software is installed on both the server and client. Ensure that the same version of NFS PV3 is installed on the 1-Touch server and the client. The 1-Touch Server and the client must have the same processor. SERVER The 1-Touch Server must be a dedicated HP-UX machine running the Ignite server environment. CLIENT Ensure that the remsh process is running on the client to enable a network boot from the 1-Touch server. If this process is not running, you must manually reboot the client and perform the network recovery. This feature is not supported when bootable partitions are on the disk arrays (snapable disk). DISCLAIMER Minor revisions and/or service packs that are released by application and operating system vendors are supported by our software but may not be individually listed in our System Requirements. We will provide information on any known caveat for the revisions and/or service packs. In some cases, these revisions and/or service packs affect the working of our software. Changes to the behavior of our software resulting from an application or operating system revision/service pack may be beyond our control. The older releases of our software may not support the platforms supported in the current release. However, we will make every effort to correct the behavior in the current or future releases when necessary. Please contact your Software Provider for any problem with a specific application or operating system. Additional considerations regarding minimum requirements and End of Life policies from application and operating system vendors are also applicable
27 Page 27 of 186 Deployment - 1-Touch for HP-UX Deployment Configuration Recovery FAQ 1-Touch Recovery allows you to recover the entire computer system without installing the Operating system or any other software. INSTALLATION To perform the 1-Touch Recovery, you must install the following: 1-TOUCH SERVER Interactive Install - 1-Touch Server Software 1-TOUCH CLIENT Install Unix File System idataagent on the computer that satisfies the minimum system requirements. The computer is referred to as the Client computer in this install procedure. The software can be installed using one of the following methods: Method 1: Interactive Install Unix File System idataagent - to install directly on client computer. Method 2: Install Software from CommCell Console - to install remotely on a client computer. 1-TOUCH SERVER BEFORE YOU BEGIN Download Software Packages Download the latest software package to perform the install. System Requirements for 1-Touch Server and Client Verify that the computer in which you wish to install the 1- Touch Server Software satisfies the System Requirements. Overview Provides comprehensive information about 1-Touch feature INSTALL THE 1-TOUCH SERVER SOFTWARE 1. Place the Software Installation Disc on a HP-UX computer that satisfies the minimum System Requirements. 2. Run the following command from the Software Installation Disc:./cvpkgadd 3. The product banner and other information is displayed. Press Enter. 4. Read the license agreement. Type y and press Enter. 5. Press Enter. Please select a setup task you want to perform from the list below: Advance options provide extra setup features such as creating custom package, recording/replaying user selections and installing External Data Connector software. 1) Install data protection agents on this computer 2) Advance options 3) Exit this menu Your choice: [1] 6. Press Enter. Certain Simpana packages can be associated with a virtual IP, or in other words, installed on a "virtual machine" belonging to some cluster. At any given time the virtual machine's services and IP address are active on only one of the cluster's servers. The virtual machine can "failover" from one server to another, which includes stopping services and deactivating IP address on the first server and activating the IP address/services on the other server. You now have a choice of performing a regular Simpana install on the physical host or installing Simpana on a virtual machine for operation within a cluster. Most users should select "Install on a physical machine" here. 1) Install on a physical machine 2) Install on a virtual machine 3) Exit Your choice: [1] 7. If you have only one network interface, press Enter to accept the default network interface name and continue. If you have multiple network interfaces, enter the interface name that you wish to use as default, and then press Enter. We found one network interface available on your machine. We will associate it with the physical machine being installed, and it will also be used by the CommServe to connect to the physical machine. Note that you will be able to additionally customize Datapipe Interface Pairs used for the backup data traffic later in the Simpana Java
28 Page 28 of 186 The interface names and IP addresses depend on the computer in which the software is installed and may be different from the example shown. GUI. Please check the interface name below, and make connections if necessary: Physical Machine Host Name: [angel.company.com] 8. Press Enter. Please specify the client name for this machine. It does not have to be the network host name: you can enter any word here without spaces. The only requirement is that it must be unique on the CommServe. Physical Machine Client name: [angel] 9. Type the appropriate number to select 1-Touch Server. A confirmation screen will mark your choice with an "X". Type d for Done, and press Enter. Install Simpana on physical machine angel Please select the Simpana module(s) that you would like to install. [ ] 1) MediaAgent [1301] [CVGxMA] [ ] 2) UNIX File System idataagent [1101] [CVGxIDA] [a=all n=none r=reverse q=quit d=done >=next <=previous? =help] Enter number(s)/one of "a,n,r,q,d,>,<,?" here:2 10. Press Enter. Do you want to use the agents for restore only without consuming licenses? [no] 11. Type the appropriate number to install the latest software scripts and press Enter. Select Download from the software provider website to download the latest software scripts. Make sure you have internet access. Select Use the one in the installation media to install the software scripts from the package or share from which the installation is currently being performed. Select Use the copy I already have by entering its unix path, to specify the path if you have the software script in an alternate location. Installation Scripts Pack provides extra functions and latest support and fix performed during setup time. Please specify how you want to get this pack. If you choose to download it from the website now, please make sure you have internet connectivity at this time. This process may take some time depending on the internet connectivity. 1) Download from the software provider website. 2) Use the one in the installation media 3) Use the copy I already have by entering its unix path Your choice: [1] Press Enter. Keep Your Install Up to Date - Latest Service Pack Latest Service Pack provides extra functions and latest support and fix for the packages you are going to install. You can download the latest service pack from software provider website. If you decide to download it from the website now, please make sure you have internet connectivity at this time. This process may take some time depending on the internet connectivity. Do you want to download the latest service pack now? [no] 13. Press Enter to accept the default path. If you want to specify a different path, type the path and then press Enter. If you want to install the software binaries to an NFS shared drive, specify the directory on which you have mounted the NFS file system and then press Enter. In order to make sure that the client computer has read/write access to NFS shared drive, review the steps described in Installing Software Binaries to an NFS Shared Drive. Do not use the following characters when specifying the path:!@#$%^&*():/?\ Please specify where you want us to install Simpana binaries. It must be a local directory and there should be at least 176MB of free space available. All files will be installed in a "simpana" subdirectory, so if you enter "/opt", the files will actually be placed into "/opt/simpana". Installation Directory: [/opt] 14. Press Enter to accept the default location. Enter a path to modify the default location and press Enter. All the modules installed on the computer will store the log files in this directory. Please specify where you want to keep Simpana log files. It must be a local directory and there should be at least 100MB of free space available. All log files will be created in a "simpana/log_files" subdirectory, so if you enter "/var/log", the logs will actually be placed into "/var/log/simpana/log_files". Log Directory: [/var/log] 15. Press Enter. Most of Software processes run with root privileges, but some are launched by databases and inherit database access rights. To make sure that registry and log files can be written to by both kinds of processes we can either make such files world-writeable or we can grant write access only to processes belonging to a particular group, e.g. a "simpana" or a "dba" group. We highly recommend now that you create a new user group and enter its name in the next setup screen. If you choose not to assign a dedicated group to Software processes, you will need to specify the access permissions later.
29 Page 29 of 186 If you're planning to backup Oracle DB you should use "dba" group. Would you like to assign a specific group to Software? [yes] 16. If you indicated Yes in the previous step, you will be prompted for the group name that must be used to launch processes. Enter the group name and then press Enter. Please enter the name of the group which will be assigned to all Software files and on behalf of which all Software processes will run. In most of the cases it's a good idea to create a dedicated "simpana" group. However, if you're planning to use Oracle idataagent or SAP Agent, you should enter Oracle's "dba" group here. Group name: sky1 REMINDER If you are planning to install Simpana Informix, DB2, PostgreSQL, Sybase or Lotus Notes idataagent, please make sure to include Informix, DB2, etc. users into group "sky1". Press <ENTER> to continue Type a network TCP port number for the Communications Service (CVD) and press Enter. Type a network TCP port number for the Client Event Manager Service (EvMgrC) and press Enter. Every instance of Simpana should use a unique set of network ports to avoid interfering with other instances running on the same machine. The port numbers selected must be from the reserved port number range and have not been registered by another application on this machine. Please enter the port numbers. Port Number for CVD : [8400] Port Number for EvMgrC: [8402] 18. If you do not wish to configure the firewall services, press Enter. Is there a firewall between this client and the CommServe? [no] If this computer is separated from the CommServe by firewall(s), type Yes and then press Enter. For firewall options and configuration instructions, see Firewall Configuration and continue with the installation. 19. Type the fully qualified CommServe host name and press Enter. Ensure that the CommServe is accessible before typing the name; otherwise the installation will fail. Please specify hostname of the CommServe below. Make sure the hostname is fully qualified, resolvable by the name services configured on this machine. CommServe Host Name: mycommserve.company.com 20. Press Enter. Commcell Level Global Filters are set through Simpana GUI's Control Panel in order to filter out certain directories or files from backup Commcell-widely. If you turn on the Global filters, they will be effective to the default subclient. There are three options you can choose to set the filters. 1) Use Cell level policy 2) Always use Global filters 3) Do not use Global filters Please select how to set the Global Filters for the default subclient? [1] 21. Type the appropriate number to select the Client Group and press Enter. This screen will be displayed only if Client Groups are configured for the CommCell Client Group(s) is currently configured on CommServe mycommserve.company.com. Please choose the group(s) that you want to add this client angel.company.com to. The selected group(s) will be marked (X) and can be deselected if you enter the same number again. After you are finished with the selection, select "Done with the Selection". [ ] 1) Unix [ ] 2) DR [a=all n=none r=reverse q=quit d=done >=next <=previous? =help]s Enter number(s)/one of "a,n,r,q,d,>,<,?" here: Enter the number associated with the storage policy you want use and press Enter. Please select one storage policy for this IDA from the list below: 1) SP_StandAloneLibrary2_2 2) SP_Library3_3 3) SP_MagLibrary4_4 Storage Policy: [1] 23. Type 3 to the Exit option and press Enter. The installation is now complete. Certain Simpana packages can be associated with a virtual IP, or in other words, installed on a "virtual machine" belonging to some cluster. At any given time the virtual
30 Page 30 of 186 machine's services and IP address are active on only one of the cluster's servers. The virtual machine can "failover" from one server to another, which includes stopping services and deactivating IP address on the first server and activating the IP address/services on the other server. Currently you have Simpana installed on physical node angel.company.com. Now you have a choice of either adding another package to the existing installation or configure Simpana on a virtual machine for use in a cluster. 1) Add another package to angel.company.com 2) Install Simpana on a virtual machine 3) Exit Your choice: [3] 1-TOUCH CLIENT METHOD 1: INTERACTIVE INSTALL UNIX FILE SYSTEM IDATAAGENT 1. Place the Software Installation Disc on a HP-UX client computer that satisfies the minimum System Requirements. 2. Run the following command from the Software Installation Disc:./cvpkgadd 3. The product banner and other information is displayed. Press Enter. 4. Read the license agreement. Type y and press Enter. 5. Press Enter. Please select a setup task you want to perform from the list below: Advance options provide extra setup features such as creating custom package, recording/replaying user selections and installing External Data Connector software. 1) Install data protection agents on this computer 2) Advance options 3) Exit this menu Your choice: [1] 6. Press Enter. Certain Simpana packages can be associated with a virtual IP, or in other words, installed on a "virtual machine" belonging to some cluster. At any given time the virtual machine's services and IP address are active on only one of the cluster's servers. The virtual machine can "failover" from one server to another, which includes stopping services and deactivating IP address on the first server and activating the IP address/services on the other server. You now have a choice of performing a regular Simpana install on the physical host or installing Simpana on a virtual machine for operation within a cluster. Most users should select "Install on a physical machine" here. 1) Install on a physical machine 2) Install on a virtual machine 3) Exit Your choice: [1] 7. If you have only one network interface, press Enter to accept the default network interface name and continue. If you have multiple network interfaces, enter the interface name that you wish to use as default, and then press Enter. The interface names and IP addresses depend on the computer in which the software is installed and may be different from the example shown. We found one network interface available on your machine. We will associate it with the physical machine being installed, and it will also be used by the CommServe to connect to the physical machine. Note that you will be able to additionally customize Datapipe Interface Pairs used for the backup data traffic later in the Simpana Java GUI. Please check the interface name below, and make connections if necessary: Physical Machine Host Name: [angel.company.com] 8. Press Enter. Please specify the client name for this machine. It does not have to be the network host name: you can enter any word here without spaces. The only requirement is that it must be unique on the CommServe.
31 Page 31 of 186 Physical Machine Client name: [angel] 9. Type the appropriate number to install Unix File System idataagent. A confirmation screen will mark your choice with an "X". Type d for Done, and press Enter. Install Simpana on physical machine angel Please select the Simpana module(s) that you would like to install. [ ] 1) MediaAgent [1301] [CVGxMA] [ ] 2) UNIX File System idataagent [1101] [CVGxIDA] [a=all n=none r=reverse q=quit d=done >=next <=previous? =help] Enter number(s)/one of "a,n,r,q,d,>,<,?" here:2 10. Press Enter. Do you want to use the agents for restore only without consuming licenses? [no] 11. Type the appropriate number to install the latest software scripts and press Enter. Select Download from the software provider website to download the latest software scripts. Make sure you have internet access. Select Use the one in the installation media to install the software scripts from the package or share from which the installation is currently being performed. Select Use the copy I already have by entering its unix path, to specify the path if you have the software script in an alternate location. Installation Scripts Pack provides extra functions and latest support and fix performed during setup time. Please specify how you want to get this pack. If you choose to download it from the website now, please make sure you have internet connectivity at this time. This process may take some time depending on the internet connectivity. 1) Download from the software provider website. 2) Use the one in the installation media 3) Use the copy I already have by entering its unix path Your choice: [1] Press Enter. Keep Your Install Up to Date - Latest Service Pack Latest Service Pack provides extra functions and latest support and fix for the packages you are going to install. You can download the latest service pack from software provider website. If you decide to download it from the website now, please make sure you have internet connectivity at this time. This process may take some time depending on the internet connectivity. Do you want to download the latest service pack now? [no] 13. Press Enter to accept the default path. If you want to specify a different path, type the path and then press Enter. If you want to install the software binaries to an NFS shared drive, specify the directory on which you have mounted the NFS file system and then press Enter. In order to make sure that the client computer has read/write access to NFS shared drive, review the steps described in Installing Software Binaries to an NFS Shared Drive. Do not use the following characters when specifying the path:!@#$%^&*():/?\ Please specify where you want us to install Simpana binaries. It must be a local directory and there should be at least 176MB of free space available. All files will be installed in a "simpana" subdirectory, so if you enter "/opt", the files will actually be placed into "/opt/simpana". Installation Directory: [/opt] 14. Press Enter to accept the default location. Enter a path to modify the default location and press Enter. All the modules installed on the computer will store the log files in this directory. Please specify where you want to keep Simpana log files. It must be a local directory and there should be at least 100MB of free space available. All log files will be created in a "simpana/log_files" subdirectory, so if you enter "/var/log", the logs will actually be placed into "/var/log/simpana/log_files". Log Directory: [/var/log] 15. Press Enter. Most of Software processes run with root privileges, but some are launched by databases and inherit database access rights. To make sure that registry and log files can be written to by both kinds of processes we can either make such files world-writeable or we can grant write access only to processes belonging to a particular group, e.g. a "simpana" or a "dba" group. We highly recommend now that you create a new user group and enter its name in the next setup screen. If you choose not to assign a dedicated group to Software processes, you will need to specify the access permissions later. If you're planning to backup Oracle DB you should use "dba" group. Would you like to assign a specific group to Software? [yes] 16. Type the Group name and press Enter. Press Enter again. Please enter the name of the group which will be assigned to all Software files and on behalf of which all Software processes will run. In most of the cases it's a good idea to create a dedicated "simpana" group. However, if you're planning to
32 Page 32 of 186 use Oracle idataagent or SAP Agent, you should enter Oracle's "dba" group here. Group name: sky1 REMINDER If you are planning to install Simpana Informix, DB2, PostgreSQL, Sybase or Lotus Notes idataagent, please make sure to include Informix, DB2, etc. users into group "sky1". Press <ENTER> to continue Type a network TCP port number for the Communications Service (CVD) and press Enter. Type a network TCP port number for the Client Event Manager Service (EvMgrC) and press Enter. 18. If you do not wish to configure the firewall services, press Enter. Every instance of Simpana should use a unique set of network ports to avoid interfering with other instances running on the same machine. The port numbers selected must be from the reserved port number range and have not been registered by another application on this machine. Please enter the port numbers. Port Number for CVD : [8400] Port Number for EvMgrC: [8402] Is there a firewall between this client and the CommServe? [no] If this computer is separated from the CommServe by firewall(s), type Yes and then press Enter. For firewall options and configuration instructions, see Firewall Configuration and continue with the installation. 19. Type the fully qualified CommServe host name and press Enter. Ensure that the CommServe is accessible before typing the name; otherwise the installation will fail. Please specify hostname of the CommServe below. Make sure the hostname is fully qualified, resolvable by the name services configured on this machine. CommServe Host Name: mycommserve.company.com 20. Press Enter. Commcell Level Global Filters are set through Simpana GUI's Control Panel in order to filter out certain directories or files from backup Commcell-widely. If you turn on the Global filters, they will be effective to the default subclient. There are three options you can choose to set the filters. 1) Use Cell level policy 2) Always use Global filters 3) Do not use Global filters Please select how to set the Global Filters for the default subclient? [1] 21. Type the appropriate number to select the Client Group and press Enter. This screen will be displayed only if Client Groups are configured for the CommCell Client Group(s) is currently configured on CommServe mycommserve.company.com. Please choose the group(s) that you want to add this client angel.company.com to. The selected group(s) will be marked (X) and can be deselected if you enter the same number again. After you are finished with the selection, select "Done with the Selection". [ ] 1) Unix [ ] 2) DR [a=all n=none r=reverse q=quit d=done >=next <=previous? =help]s Enter number(s)/one of "a,n,r,q,d,>,<,?" here: Enter the number associated with the storage policy you want use and press Enter. Please select one storage policy for this IDA from the list below: 1) SP_StandAloneLibrary2_2 2) SP_Library3_3 3) SP_MagLibrary4_4 Storage Policy: [1] 23. Type 3 to the Exit option and press Enter. The installation is now complete. Certain Simpana packages can be associated with a virtual IP, or in other words, installed on a "virtual machine" belonging to some cluster. At any given time the virtual machine's services and IP address are active on only one of the cluster's servers. The virtual machine can "failover" from one server to another, which includes stopping services and deactivating IP address on the first server and activating the IP address/services on the other server. Currently you have Simpana installed on physical node angel.company.com. Now you have a choice of either adding another package to the existing installation or configure Simpana on a virtual machine for use in a cluster.
33 Page 33 of 186 1) Add another package to angel.company.com 2) Install Simpana on a virtual machine 3) Exit Your choice: [3] METHOD 2: INSTALL SOFTWARE FROM COMMCELL CONSOLE 1. From the CommCell Browser, select Tools Add/Remove Software Install Software. 2. Click Next. 3. Select Unix and Linux. Click Next. 4. Select Manually Select Computers. Click Next.
34 Page 34 of Enter the fully qualified domain name of the HP-UX client computer in which you wish to install. For example: apple.domain.company.com The Unix File System idataagent software will be installed on this client computer. Click Next. 6. Click Next. 7. Specify UserName and Password of client computer. Click Next. 8. Select Unix File System idataagent. Click Next.
35 Page 35 of Select Client Group from Available and click Add. Do not add more than one Client Group. Select a Storage Policy from the drop-down list. Click Next. 10. Click Next. 11. Select Immediate. Click Next. 12. Click Finish.
36 Page 36 of You can track the progress of the job from the Job Controller or Event Viewer window. 14. Once the job is complete, right-click the CommServe computer, click View and then click Admin Job History. 15. Select Install/Upgrade/Remove Software. Click OK. 16. You can view the following details about the job by right-clicking the job: Items that succeeded during the job
37 Page 37 of 186 Items that failed during the job Details of the job Events of the job Log files of the job
38 Page 38 of 186 Configuration - 1-Touch for HP-UX Deployment Configuration Recovery FAQ TABLE OF CONTENTS Basic Configuration Enable 1-Touch Perform a Backup BASIC SETUP ENABLE 1-TOUCH After you install the File System idataagent, follow the steps given below to enable the 1-Touch for the default subclient : 1. From the CommCell Console, navigate to <Client> File System idataagent defaultbackupset. Right-click the default subclient and click Properties. 2. Click 1-Touch Recovery tab. Select 1-Touch Recovery. Select the 1-Touch Server from the list. Enter the path to the 1-Touch server directory. Enter the location of the ignite server in the 1-Touch Server directory. Typically, the location of the the ignite server is as follows: /var/opt/ignite/clients/ Click Ok. If you replaced the 1-Touch client s network card after the 1-Touch backup, be sure to update the 1-Touch server with the new MAC address before you start the 1-Touch recovery. PERFORM A BACKUP After you enable 1-Touch, perform backups of the default subclient periodically to capture any changes in the client system configuration. Before recovering a client, ensure that you have run at least one full backup of the default subclient. 1. From the CommCell Console, navigate to <Client> File System idataagent defaultbackupset. Right-click the subclient, and click Backup. 2. Select Full. Select Immediate. Click OK.
39 Page 39 of You can track the progress of the backup job from the Job Controller window. When the backup job has completed, the Job Controller displays the status as Completed.
40 Page 40 of 186 Recovery - 1-Touch for HP-UX Deployment Configuration Recovery FAQ TABLE OF CONTENTS Basic Recovery - Restoring to Client with HP-UX Operating System Running Advanced Recovery Rebuilding a Client Restoring Data Backed Up Before a Specific date Changing the Priority of the Restore Job Starting the Restore Job in Suspended State Restoring From a Copy Precedence Restoring From a specific Data Path BASIC RECOVERY - RESTORING TO A CLIENT WITH HP-UX OPERATING SYSTEM RUNNING Follow the steps given below when the HP-UX Operating System is running on the client and you can automatically boot the client: 1. Login to CommCell Console using CommCell credentials. Do not use domain credentials to login to CommCell. The single sign on is not supported for 1-Touch feature. 2. From the CommCell Console, navigate to <Client> File System idataagent defaultbackupset. Right-click the Default Backup Set and click All Tasks 1-Touch Recovery. 3. Select the backup job for recovering the operating system. Click Next. 4. Click Next.
41 Page 41 of Review the recovery options. Click Finish. ADVANCED RECOVERY REBUILDING A CLIENT When HP-UX operating system is not running, you need to rebuild the client. You have to manually perform the network boot for the client. For network reboot, The 1-Touch server and the 1-Touch client need not be in the same subnet. If the client is in a different subnet, data can still be recovered over the network by using an Ignite Server with the help of a boot helper (provided by Hewlett-Packard). 1. From the CommCell Console, navigate to <Client> File System idataagent defaultbackupset. Right-click the Default Backup Set and click All Tasks 1-Touch Recovery. 2. Select the backup job for recovering the operating system. Click Next. 3. Do not select Automatic Client Reboot. Click Next. 4. Review the recovery options. Click Finish.
42 Page 42 of Connect the client to network and switch on the power. Perform the LAN boot. RESTORING DATA BACKED UP BEFORE A SPECIFIC DATE You can perform a point-in-time restore of the system state. You can recover data from a backup that occurred before the specified date and time. 1. From the CommCell Console, navigate to <Client> File System idataagent defaultbackupset. 2. Right-click the defaultbackupset and click All Tasks 1-Touch Recovery. 3. In the Submit 1-Touch Recovery Request dialog box, click Select Recovery Options. 4. Click Restore data from the backup that occurred before this date. 5. Enter date and time. 6. Select a Time Zone. 7. Click Next. 8. Click Finish. CHANGING THE PRIORITY OF THE RESTORE JOB You can increase the priority of a restore job. If you want to perform the 1-Touch recovery on a high priority, follow the steps given below: 1. From the CommCell Console, navigate to <Client> File System idataagent defaultbackupset. 2. Right-click the defaultbackupset and click All Tasks 1-Touch Recovery. 3. In the Submit 1-Touch Recovery Request dialog box, click Select Recovery Options. 4. Click Advanced. 5. Click Change Priority. 6. Enter the priority number between 0 to 999. Lower the number, higher the priority. 7. Click Ok. 8. Click Next. 9. Click Finish. STARTING THE RESTORE JOB IN SUSPENDED STATE If there are multiple jobs running simultaneously on the CommServe, you can hold the restore job on suspended state. Once the CommServe is freed up, you can resume the restore job from the Job Controller window. 1. From the CommCell Console, navigate to <Client> File System idataagent defaultbackupset.
43 Page 43 of Right-click the defaultbackupset and click All Tasks 1-Touch Recovery. 3. In the Submit 1-Touch Recovery Request dialog box, click Select Recovery Options. 4. Click Advanced. 5. Click Startup in suspended state 6. Click Ok. 7. Click Next. 8. Click Finish. RESTORING DATA FROM A COPY PRECEDENCE By default, 1-Touch recovery will restore the data from the primary copy. But if you want to restore data from a particular storage policy copy, you can specify the copy precedence. 1. From the CommCell Console, navigate to <Client> File System idataagent defaultbackupset. 2. Right-click the defaultbackupset and click All Tasks 1-Touch Recovery. 3. In the Submit 1-Touch Recovery Request dialog box, click Select Recovery Options. 4. Click Advanced. 5. Click Copy Precedence. 6. Click Restore from copy precedence. 7. Enter the copy precedence number. 8. Click Ok. 9. Click Next. 10. Click Finish. RESTORING DATA FROM A SPECIFIC DATA PATH If you want to restore the data from a specific location on a MediaAgent, you can specify the data path as follows: 1. From the CommCell Console, navigate to <Client> File System idataagent defaultbackupset. 2. Right-click the defaultbackupset and click All Tasks 1-Touch Recovery. 3. In the Submit 1-Touch Recovery Request dialog box, click Select Recovery Options. 4. Click Advanced. 5. Click Data Path. 6. Select the following to specify the data path: Use MediaAgent Use Library Use Drive Pool Use Drive Use Proxy 7. Click Ok. 8. Click Next. 9. Click Finish.
44 Page 44 of 186 System Requirements - 1-Touch AIX HP-UX Linux Solaris Windows OPERATING SYSTEM The following are the requirements for 1-Touch on Linux: CLIENT ORACLE LINUX Oracle Enterprise Linux 5.x(Carthage) with glibc 2.5.x RED HAT ENTERPRISE LINUX Red Hat Enterprise Linux 6.0 with glibc 2.12.x* *client must have a minimum of Service Pack 11 (SP11) installed Red Hat Enterprise Linux 5.x with glibc 2.5.x Red Hat Enterprise Linux 4.7 with glibc 2.3.x SUSE LINUX SuSE Linux 11.x with glibc 2.9.x SuSE Linux 10.x with glibc 2.4.x HARD DRIVE The 1-Touch Client requires 500 MB of disk space for 1-Touch client configuration files. MEMORY 2 GB RAM minimum required; 3 GB RAM recommended. PROCESSOR Intel Pentium, x64 or compatible processors PERIPHERALS A CD-ROM drive or ability to boot from an ISO image file is required to boot the client for recovery. SUPPORTED FILE SYSTEM AND VOLUME MANAGER TYPES Supported File system and volume manager types Linux Logical Volume Manager (LVM) Version 2 Second Extended File System (ext2) Third Extended File System (ext3) Fourth Extended File System (ext4) Reiser File System (reiserfs) XFS Supported Options Block size, blocks per group, revision Block size, blocks per group, revision Block size, blocks per group, revision Block size, hash function, journaling device, uuid Block size, number of allocation groups, stripe unit, inode size, maximum percentage of file system space that can be allocated to inodes, log device, lazy-count, log version, size of blocks in the real-time section Snapshot volumes will not be recovered as part of the 1-touch recovery. Hence, it is recommended that you mount and backup the snapshot data. NOTES COMMSERVE To enable 1-Touch recovery, the Force per-client certificate authentication on CommServe option has to be turned off on the CommServe at least for the duration of the recovery. This option can be accessed from the CommServe Control Panel by clicking on Certificate Administration. CLIENT
45 Page 45 of 186 iscsi disks are supported for Virtualize Me; all the backed up iscsi disks will be re-created as regular SCSI disks on the virtual machine if they are selected during restores. iscsi disks are not supported for 1-Touch. These disks need to be manually unselected during interactive restores if any iscsi disks are backed up. SAN disks are supported for 1-Touch and Virtualize Me. For Virtualize Me, as FC HBA (Fibre Channel Host Bus Adapter) virtualization is not supported, multipath SAN disks will be re-created as regular SCSI disks. 1-Touch supports native Linux multipathing. Vendor specific multipath implementations are not supported. Itanium (IA64) processor is not supported. DISCLAIMER Minor revisions and/or service packs that are released by application and operating system vendors are supported by our software but may not be individually listed in our System Requirements. We will provide information on any known caveat for the revisions and/or service packs. In some cases, these revisions and/or service packs affect the working of our software. Changes to the behavior of our software resulting from an application or operating system revision/service pack may be beyond our control. The older releases of our software may not support the platforms supported in the current release. However, we will make every effort to correct the behavior in the current or future releases when necessary. Please contact your Software Provider for any problem with a specific application or operating system. Additional considerations regarding minimum requirements and End of Life policies from application and operating system vendors are also applicable
46 Page 46 of 186 Deployment - 1-Touch for Linux Deployment Configuration Recovery Troubleshooting FAQs 1-Touch Recovery allows you to recover the entire computer system without installing the operating system or any other software. INSTALLATION 1-TOUCH CLIENT Install the Unix File System idataagent on the computers that satisfies the minimum system requirements. The computer is referred to as the Client computer in this install procedure. The software can be installed using one of the following methods. Ensure you have the following before performing the install: Software version Service Pack 12. BEFORE YOU BEGIN Download Software Packages Download the latest software package to perform the install. System Requirements for 1-Touch Client Verify that the computer in which you wish to enable 1- Touch feature satisfies the System Requirements. Overview Provides comprehensive information about 1-Touch feature METHOD 1: INTERACTIVE INSTALL Use this procedure to install directly on client computer. METHOD 2: INSTALL SOFTWARE FROM COMMCELL CONSOLE Use this procedure to install remotely on a client computer. METHOD 1: INTERACTIVE INSTALL 1. Place the Software Installation Disc on a Linux client computer that satisfies the minimum System Requirements. 2. Run the following command from the Software Installation Disc:./cvpkgadd 3. The product banner and other information is displayed. Press Enter. 4. Read the license agreement. Type y and press Enter. 5. Press Enter. Please select a setup task you want to perform from the list below: Advance options provide extra setup features such as creating custom package, recording/replaying user selections and installing External Data Connector software. 1) Install data protection agents on this computer 2) Advance options 3) Exit this menu Your choice: [1] 6. Press Enter. Certain Simpana packages can be associated with a virtual IP, or in other words, installed on a "virtual machine" belonging to some cluster. At any given time the virtual machine's services and IP address are active on only one of the cluster's servers. The virtual machine can "failover" from one server to another, which includes stopping services and deactivating IP address on the first server and activating the IP address/services on the other server. You now have a choice of performing a regular Simpana install on the physical host or installing Simpana on a virtual machine for operation within a cluster. Most users should select "Install on a physical machine" here. 1) Install on a physical machine 2) Install on a virtual machine 3) Exit Your choice: [1] 7. If you have only one network interface, press Enter to accept the default network interface name and continue. If you have multiple network interfaces, enter the interface name that you wish to use as default, and then press Enter. The interface names and IP addresses depend on the computer in which the software is installed and may be different from the example shown. We found one network interface available on your machine. We will associate it with the physical machine being installed, and it will also be used by the CommServe to connect to the physical machine. Note that you will be able to additionally customize Datapipe Interface Pairs used for the backup data traffic later in the Simpana Java GUI. Please check the interface name below, and make
47 Page 47 of 186 connections if necessary: Physical Machine Host Name: [angel.company.com] 8. Press Enter. Please specify the client name for this machine. It does not have to be the network host name: you can enter any word here without spaces. The only requirement is that it must be unique on the CommServe. Physical Machine Client name: [angel] 9. Type the appropriate number to select Unix File System idataagent. A confirmation screen will mark your choice with an "X". Type d for Done, and press Enter. To select multiple component, enter the number by adding a space. Your screen may look different from the example shown. Install Simpana on physical machine angel Please select the Simpana module(s) that you would like to install. [ ] 1) MediaAgent [1301] [CVGxMA] [ ] 2) UNIX File System idataagent [1101] [CVGxIDA] [a=all n=none r=reverse q=quit d=done >=next <=previous? =help] Enter number(s)/one of "a,n,r,q,d,>,<,?" here:2 10. Press Enter. Do you want to use the agents for restore only without consuming licenses? [no] 11. Type the appropriate number to install the latest software scripts and press Enter. Select Download from the software provider website to download the latest software scripts. Make sure you have internet access. Select Use the one in the installation media to install the software scripts from the package or share from which the installation is currently being performed. Select Use the copy I already have by entering its unix path, to specify the path if you have the software script in an alternate location. Installation Scripts Pack provides extra functions and latest support and fix performed during setup time. Please specify how you want to get this pack. If you choose to download it from the website now, please make sure you have internet connectivity at this time. This process may take some time depending on the internet connectivity. 1) Download from the software provider website. 2) Use the one in the installation media 3) Use the copy I already have by entering its unix path Your choice: [1] Press Enter. Keep Your Install Up to Date - Latest Service Pack Latest Service Pack provides extra functions and latest support and fix for the packages you are going to install. You can download the latest service pack from software provider website. If you decide to download it from the website now, please make sure you have internet connectivity at this time. This process may take some time depending on the internet connectivity. Do you want to download the latest service pack now? [no] 13. Press Enter to accept the default path. If you want to specify a different path, type the path and then press Enter. If you want to install the software binaries to an NFS shared drive, specify the directory on which you have mounted the NFS file system and then press Enter. In order to make sure that the client computer has read/write access to NFS shared drive, review the steps described in Installing Software Binaries to an NFS Shared Drive. Do not use the following characters when specifying the path:!@#$%^&*():/?\ Please specify where you want us to install Simpana binaries. It must be a local directory and there should be at least 176MB of free space available. All files will be installed in a "simpana" subdirectory, so if you enter "/opt", the files will actually be placed into "/opt/simpana". Installation Directory: [/opt] 14. Press Enter to accept the default location. Enter a path to modify the default location and press Enter. All the modules installed on the computer will store the log files in this directory. Please specify where you want to keep Simpana log files. It must be a local directory and there should be at least 100MB of free space available. All log files will be created in a "simpana/log_files" subdirectory, so if you enter "/var/log", the logs will actually be placed into "/var/log/simpana/log_files". Log Directory: [/var/log] 15. Type the appropriate number to select the Client Group and press Enter. This screen will be displayed only if Client Groups are configured for the CommCell Client Group(s) is currently configured on CommServe mycommserve.company.com. Please choose the group(s) that you want to add this client angel.company.com to. The selected group(s) will be marked (X) and can be deselected if you enter the same number again. After you are finished with the selection, select "Done with the Selection". [ ] 1) Unix [ ] 2) DR [a=all n=none r=reverse q=quit d=done >=next <=previous? =help]s Enter number(s)/one of "a,n,r,q,d,>,<,?" here: 2
48 Page 48 of Enter the number associated with the storage policy you want use and press Enter. Please select one storage policy for this IDA from the list below: 1) SP_StandAloneLibrary2_2 2) SP_Library3_3 3) SP_MagLibrary4_4 Storage Policy: [1] 17. Type 3 and press Enter. The installation is now complete. Certain Simpana packages can be associated with a virtual IP, or in other words, installed on a "virtual machine" belonging to some cluster. At any given time the virtual machine's services and IP address are active on only one of the cluster's servers. The virtual machine can "failover" from one server to another, which includes stopping services and deactivating IP address on the first server and activating the IP address/services on the other server. Currently you have Simpana installed on physical node angel.company.com. Now you have a choice of either adding another package to the existing installation or configure Simpana on a virtual machine for use in a cluster. 1) Add another package to angel.company.com 2) Install Simpana on a virtual machine 3) Exit Your choice: [3] METHOD 1: INSTALL SOFTWARE FROM COMMCELL CONSOLE 1. From the CommCell Browser, select Tools Add/Remove Software Install Software. 2. Click Next. 3. Select Unix and Linux. Click Next.
49 Page 49 of Select Manually Select Computers. Click Next. 5. Enter the fully qualified domain name of the linux client computer in which you wish to install. For example: apple.domain.company.com The Unix File System idataagent will be installed on this client computer. Click Next. 6. Click Next. 7. Specify UserName and Password of client computer. Click Next.
50 Page 50 of Select Unix File System idataagent. Click Next. 9. Select Client Group from Available and click Add. Do not add more than one Client Group. Select a Storage Policy from the drop-down list. Click Next. 10. Click Next. 11. Select Immediate. Click Next.
51 Page 51 of Click Finish. 13. You can track the progress of the job from the Job Controller or Event Viewer window. 14. Once the job is complete, right-click the CommServe computer, click View and then click Admin Job History. 15. Select Install/Upgrade/Remove Software. Click OK.
52 Page 52 of You can view the following details about the job by right-clicking the job: Items that succeeded during the job Items that failed during the job Details of the job Events of the job Log files of the job

53 Page 53 of 186 Configuration - 1-Touch for Linux Deployment Configuration Recovery Troubleshooting FAQs TABLE OF CONTENTS Basic Configuration Enable 1-Touch Perform a Backup Advanced Configuration Create a Client Information Checklist Schedule a Backup BASIC CONFIGURATION ENABLE 1-TOUCH After you install the File System idataagent, follow the steps given below to enable the 1-Touch for the default subclient : 1. From the CommCell Console, navigate to <Client> File System idataagent defaultbackupset. Right-click the default subclient and click Properties. 2. Click 1-Touch Recovery tab. Select 1-Touch Recovery. Click OK. PERFORM A BACKUP After you enable 1-Touch, perform backups of the default subclient periodically to capture any changes in the client system configuration. Before recovering a client, ensure that you have run at least one full backup of the default subclient. 1. From the CommCell Console, navigate to <Client> File System idataagent defaultbackupset. Right-click the subclient, and click Backup. 2. Select Full. Select Immediate. Click OK.
54 Page 54 of You can track the progress of the backup job from the Job Controller window. When the backup job has completed, the Job Controller displays the status as Completed. ADVANCED CONFIGURATION CREATE A CLIENT INFORMATION CHECKLIST If you want to perform the interactive restore, you must create a client information checklist before starting the restore. You can also use client configuration stored on a CommSeve to create a client information checklist. Create a checklist that contains the following client information: REQUIRED INFORMATION HOW TO FIND IT CLIENT INFORMATION Client Name Host Name IP Address Net Mask Gateway Address 1. From the CommCell Console, navigate to <Client>. 2. Right click the <Client> and click Properties. 3. Select General tab. 4. Note down the Client Name and Host Name. Note down IP address, Net Mask and Gateway address of the interface of the client that is used to communicate with the CommServe. For Example: 1. Login to Client computer using the root login and password. 2. Type ifconfig. DNS Server address 3. Note down inet addr and Mask for eth0 1. Login to Client computer using the root login and password. 2. Type cat /etc/resolv.conf. 3. Note down the IP address for nameserver. COMMSERVE AND MEDIAAGENT INFORMATION CommServe Client Name 1. From the CommCell Console, navigate to <Client>. 2. Right click the <Client> and click Properties. 3. Select General tab. CommServe Host Name 4. Note down the Client Name. 1. From the CommCell Console, navigate to <Client>. 2. Right click the <Client> and click Properties. 3. Select General tab. CommServe IP Address 4. Note down the CommServe HostName. 1. Login to CommServe using the administrator login and password.
55 Page 55 of Invoke the Command Prompt. CommCell Credentials Firewall Port Number 3. Type ipconfig. 1. Start CommCell Console on the Client Computer. 2. Note down the username and password to login the CommServe. You will need this information only when the firewall is set between the CommServe and the client. 1. From the CommCell Console, navigate to <Client>. 2. Right click the <Client> and click Properties. 3. Select Firewall Configuration tab. 4. Select Summary tab. MediaAgent Name 5. Note down the firewall port number. 1. From the CommCell Console, navigate to <Client> File System idataagent defaultbackupset. 2. Note down the storage policy associated with the default subclient. 3. From the CommCell Console, navigate to the <Storage Policy> 4. Right-click the Primary copy and select Properties. MediaAgent IP Address 5. Note down the MediaAgent name. 1. Login to MediaAgent using the administrator login and password. 2. Invoke the Command Prompt. 3. Type ipconfig. CREATE CLIENT INFORMATION CHECKLIST USING THE CLIENT CONFIGURATION A new Client Configuration is stored on a CommServe when you make any changes in the client system configuration and perform a backup. Use the client configuration stored on a CommServe to create a client information checklist From the CommCell Console, navigate to <Client> 2. Right-click the <Client> and click All Tasks 1-Touch Recovery Point. 2. Select the most recent client configuration. Click Edit Config. 3. Note down the following information in the client information checklist: CommServe Host Name CommServe Client Name
56 Page 56 of Click the DNS tab and note down the following information in the client information checklist: DNS Suffix Primary, Secondary and Tertiary Name Server IP address 6. Click the Network Config tab and note down the following information in the client information checklist: Client IP Address Client Gateway Client Netmask 7. Click Edit and note down the Client Hostname. 8. Click Cancel to close the dialog box. SCHEDULE A BACKUP


57 Page 57 of From the CommCell Console, navigate to <Client> File System idataagent defaultbackupset. Right-click the subclient, and click Backup. 2. Click Schedule to schedule the backup for a specific time. Click Configure to set the schedule for the backup job. 3. Select the appropriate scheduling options. For example: Click Weekly. Check the days you want the run the backup job. Change the Start Time to 9:00 PM Click OK to close the Schedule Details dialog Click OK to close the Backup Options dialog The backup job will execute as per the schedule.
58 Page 58 of 186 Recovery - 1-Touch for Linux Deployment Configuration Recovery Troubleshooting FAQs TABLE OF CONTENTS Prepare for Recovery Similar System Restore Non-Interactive Restore Interactive Restore Dissimilar System Restore Non-Interactive Restore Interactive Restore Map Disks Using The GUI Based Mapper Additional Options Change the Client Configuration During Non-Interactive Restore Recover the Client to a Different Firewall Configuration Change the Client Configuration During Interactive Restore Use Temporary Client during Recovery Use a NFS Location for Non-interactive Restore Create a New Partition Create a New Mountpoint Add a New Physical Volume Add a New Logical Volume Add a New Swapfile PREPARE FOR RECOVERY The DVD4.iso will be available in the Linux Live CD directory of the Simpana Installer package. You can also download the DVD4.iso. 1. Log on to the Maintenance Advantage web site. 2. Click the Downloads & Packages tab to download the DVD4.iso. 3. Use this ISO image to boot the client using one of the following methods: Burn a Live CD and boot the client. Copy the ISO image to a NFS server and setup a PXE Server to perform a network boot. Copy the ISO image on a ESX server and setup the ESX server to boot a virtual machine. SIMILAR SYSTEM RESTORE If you are restoring to a computer which has the same hard disk configuration as that of the backed up computer, perform a Similar System Restore using one of the following methods: NON INTERACTIVE RESTORE A recovery point is a point-in-time configuration of the client containing the network configuration, mountpoint details and information about the client itself. A new client configuration (recovery point) is generated on subsequent backups if the client's hardware has changed, or changes have been made to the network, storage or mountpoint configuration. Use the client configuration stored on the CommServe to create a recovery response file needed to perform a non-interactive recovery. 1. Connect a USB drive to a Linux computer and use the following command to format the USB drive: mkfs.vfat -I /dev/<drive_name> For example: mkfs.vfat -I /dev/sdb Do not partition the disk. Use the drive as a full disk. 2. From the CommCell Console, navigate to <Client> Right-click the <Client> and click All Tasks 1-Touch Recovery Point
59 Page 59 of Select the most recent client configuration to create a recovery response file. Click Export Config. 4. Enter the credentials used to login to CommCell Console. Click OK. 5. Save the recovery response file as onetouchresponse.xml. 6. Connect the formatted USB drive to the computer where recovery response file is stored. 7. Copy the recovery response file to the formatted drive. 8. Connect the USB drive to the client. 9. Boot the client using the ISO image. 10. Type Default and press Enter to start the default recovery.
60 Page 60 of Select OK and press Enter to start the system state and file system restore. The system state and the file system data backed up during the most recent backup will be restored. 13. Press Enter. 14. Remove the 1-Touch Linux Live CD and reboot the system. INTERACTIVE RESTORE Perform the interactive restore when you don't want to use the recovery response file. 1. Keep the Client Information Checklist ready. 2. Boot the client using the ISO image. 3. Type Default and press Enter to start the default recovery. 4. Enter the short name or the fully qualified client hostname specified in the client information checklist. Select the Use temp client during recovery option if you want to create a new client temporarily during the restore process. This option is not required for regular 1-Touch recovery. For more information, refer to Use Temporary Client during Recovery. If a temporary client is being used during recovery, the New Client Host Name must be unique on the CommServe. Otherwise, any other existing client with the same host name will be renamed and the associated backed up data will be lost permanently. Select Next and press Enter. 5. Enter the IP address, network and name server details of the network specified in the client information checklist. Select Next and press Enter.
61 Page 61 of Enter the details of the CommServe and MediaAgent specified in the client information checklist. Select Next and press Enter. 7. Select Next and press Enter. By default the system state and the file system data, backed up during the most recent backup will be restored. You can select a backup job to restore the system state data and a backup job to restore the file system data. 8. Select Next and press Enter. By default the system mountpoints will be selected for restore. You can select the mountpoints that you want to recover. 9. Select Next and press Enter. 10. Select Yes and press Enter. 11. Press Enter. 12. Remove the 1-Touch Linux Live CD and reboot the system. DISSIMILAR SYSTEM RESTORE
62 Page 62 of 186 If you are restoring to a computer which has the different hard disk configuration than that of the backed up computer, perform a Dissimilar System Restore using one of the following methods: NON-INTERACTIVE RESTORE A recovery point is a point-in-time configuration of the client containing the network configuration, mountpoint details and information about the client itself. A new client configuration (recovery point) is generated on subsequent backups if the client's hardware has changed, or changes have been made to the network, storage or mountpoint configuration. Use the client configuration stored on the CommServe to create a recovery response file needed to perform a non-interactive recovery. 1. Connect a USB drive to a Linux computer and use the following command to format the USB drive: mkfs.vfat -I /dev/<drive_name> For example: mkfs.vfat -I /dev/sdb Do not partition the disk. Use the drive as a full disk. 2. From the CommCell Console, navigate to <Client> Right-click the <Client> and click All Tasks 1-Touch Recovery Point 3. Select the most recent client configuration to create a recovery response file. Click Export Config. 4. Enter the credentials used to login to CommCell Console. Click OK. 5. Save the recovery response file as onetouchresponse.xml.

63 Page 63 of Connect the formatted USB drive to the computer where recovery response file is stored. 7. Copy the recovery response file to the formatted drive. 8. Connect the USB drive to the client. 9. Boot the client using the ISO image. 10. Type Default and press Enter to start the default recovery. 11. Select OK and press Enter to start the system state and file system restore. The system state and the file system data backed up during the most recent backup will be restored. 13. Select Next and press Enter. You can also use GUI Based Mapper to map disk. 14. Review the Backed up Disks. Review the Current Disks. Select a disk from the Backed up Disks that you want to map with a Current Disk. Select a disk from the Current Disk. Select Add Map. Map all the required disks. Select Next and press Enter. 15. Select Next and press Enter.

64 Page 64 of Select Yes and press Enter. 17. Press Enter. 18. Remove the 1-Touch Linux Live CD and reboot the system. INTERACTIVE RESTORE Perform the interactive restore when you don't want to use the recovery response file. 1. Keep the Client Information Checklist ready. 2. Boot the client using the ISO image. 3. Type Default and press Enter to start the default recovery. 4. Enter the short name or the fully qualified client hostname specified in the client information checklist. Select the Use temp client during recovery option if you want to create a new client temporarily during the restore process. This option is not required for regular 1-Touch recovery. For more information, refer to Use Temporary Client during Recovery. If a temporary client is being used during recovery, the New Client Host Name must be unique on the CommServe. Otherwise, any other existing client with the same host name will be renamed and the associated backed up data will be lost permanently. Select Next and press Enter. 5. Enter the IP address, network and name server details of the network specified in the client information checklist. Select Next and press Enter. 6. Enter the details of the CommServe and MediaAgent specified in the client information checklist. Select Next and press Enter. 7. Select Next and press Enter.


65 Page 65 of 186 By default the system state and the file system data, backed up during the most recent backup will be restored. You can select a backup job to restore the system state data and a backup job to restore the file system data. 8. Select Next and press Enter. By default the system mountpoints will be selected for restore. You can select the mountpoints that you want to recover. 9. Select Next and press Enter. You can also use GUI Based Mapper to map disks. 10. Review the Backed up Disks. Review the Current Disks. Select a disk from the Backed up Disks that you want to map with a Current Disk. Select a disk from the Current Disk. Select Add Map. Map all the required disks. Select Next and press Enter. 11. Select Next and press Enter. 12. Select Yes and press Enter. 13. Press Enter. 14. Remove the 1-Touch Linux Live CD and reboot the system. MAP DISKS USING THE GUI BASED MAPPER During the Interactive Dissimilar System Restore you can select GUI Based Mapper tool to map disks.
66 Page 66 of Select GUI Based Mapper. Enter the IP address of a remote system where you can display the Asymmetric Disk Mapper (ADM) interface. The remote system must have xserver running on it Login to the remote system where you are displaying ADM Interface. Right click a disk from the target system. Select Copy Partitions option. 4. Select a disk that you want to map. Click OK. 5. Review the target disk configuration. Click Restore. Close the 1-Touch ADM GUI dialog box. 6. On the client computer and press Enter. 7. Remove the 1-Touch Linux Live CD and reboot the system.
67 Page 67 of 186 ADDITIONAL OPTIONS CHANGE THE CLIENT CONFIGURATION DURING NON-INTERACTIVE RESTORE During a non-interactive restore, follow the steps given below to change the client configuration: From the CommCell Console, navigate to <Client> 2. Right-click the <Client> and click All Tasks 1-Touch Recovery Point. 2. Select a client configuration. Click Edit Config. 3. Enter the CommServe IP address. Enter the hostname and IP address of the MediaAgent that is used to backup the client. Click Configure Password. 4. Enter the credentials used to login to CommCell Console. Click OK. Click DNS tab. 5.

68 Page 68 of 186 Enter name server details and the domain name of the network where client will be recovered. Click Network Config tab. 6. Select an interface to change the network configuration of the client. Click Edit. 7. Enter the IP address and network details of the network where client will be recovered. Click OK. 8. Click OK to save the updated client configuration. RECOVER THE CLIENT TO A DIFFERENT FIREWALL CONFIGURATION If you want to change the firewall configuration of the client before recovering it, follow the steps given below: 1. From the CommCell Console, navigate to <Client> Right-click the <Client> and click All Tasks 1-Touch Recovery Point 2. Select the most recent client configuration to create a recovery response file. Click Export Config.

69 Page 69 of Enter the credentials used to login to CommCell Console. Click OK. 4. Save the recovery response file as onetouchresponse.xml. 5. Open the file onetouchresponse.xml using a text editor. Enter the port number in onetouchresponse.xml. For example: The Firewall Setting in the onetouchresponse.xml will be as follows: tunnel_ports=8600 Save onetouchresponse.xml. Use the updated recovery response file to perform the non-interactive restore. CHANGE THE CLIENT CONFIGURATION DURING INTERACTIVE RESTORE During interactive restore, follow the steps given below to change the client configuration: 1. Boot the client using the ISO image. 2. Type Default and press Enter to start the default recovery.
70 Page 70 of Enter the short name or the fully qualified client hostname. You cannot change the client name during the restore. Select the Use temp client during recovery option if you want to create a new client temporarily during the restore process.. For more information, refer to Use Temporary Client during Recovery. If a temporary client is being used during recovery, the New Client Host Name must be unique on the CommServe. Otherwise, any other existing client with the same host name will be renamed and the associated backed up data will be lost permanently. Select Next and press Enter. 4. Enter the IP address, network and name server details of the network where client will be recovered. Select Next and press Enter. 5. Enter the details of the CommServe and MediaAgent that are used to backup the client. Select Next and press Enter. 6. Continue the Similar or Dissimilar System Restore USE TEMPORARY CLIENT DURING RECOVERY You can change the client name and the host name temporarily during the restore process. This will be useful if the source computer and the computer being recovered are different and you do not want to turn off the source client until the restore completes successfully. You can also use this option when the source machine and the machine being recovered are same, to prevent corruption of the source client if the recovery process fails for any reason. 1. Boot the computer where you want to recover the client using the ISO image. 2. Type Default and press Enter to start the default recovery. 3. Enter the short name of the client in the Client Name field. 4. Enter the fully qualified hostname of the client in the Client HostName field. 5. Select the Use temp client during recovery option. 6. Enter the client name, which you want to use temporarily during the restore procedure in the New Client Name field. 7. Enter fully qualified hostname of the client, which you want to use temporarily during the restore procedure in the New Client HostName field. If a temporary client is being used during recovery, the New Client Host Name must be unique on the CommServe. Otherwise, any other existing client with the same host name will be renamed and the associated backed up data will be lost permanently. 8. Complete the Similar or Dissimilar System Restore procedure. During the restore, the Linux File System idataagent will be installed in the restore only mode with the new client name and host name. The CommServe and MediaAgent should be able to connect to the computer being recovered with the new host name. After the restore completes successfully, the temporary client will be deleted. The original client name and hostname and network settings, which were backed up will be restored. You must turn off the source client before rebooting the restored client. USE A NFS LOCATION FOR NON-INTERACTIVE RESTORE Instead of using the USB drive, use a NFS location to access the recovery response file during the similar or dissimilar system restore. Follow the steps give


71 Page 71 of 186 below to perform the non-interactive restore when the recovery response file is stored in a NFS location: 1. Boot the client using the ISO image. 1. Type Default and press Enter to start the default recovery. 2. Select Select Location to specify the NFS location of the response file. 3. Select Use NFS Path. Enter the NFS Server Name or IP address. Enter the response file path on the NFS server. 4. Enter the IP Address of the client. Enter Net Mask of the client. Enter the Gateway of the client. Enter the DNS Suffix for the client. Select Next and press Enter. The system state and the file system data backed up during the most recent backup is restored. 5. Follow the steps described in the Similar System Restore or Dissimilar System Restore depending upon the hard disk configuration of the client. CREATE NEW PARTITIONS Use the ADM Interface to create new partitions 1. Right-click a disk on the target system. Select Create Partitions.


72 Page 72 of Select the Partition Type. Select the Filesystem. Enter the Partition Size. Click Bootable to create a boot partition. Click OK. Continue the disk mapping process. CREATE NEW MOUNT POINTS Use the ADM Interface to create new mountpoints 1. Right-click in the empty space in the right pane. Select Create Mountpoint. 2. Select the Partition. Enter the mount path. Click Add to fstab to include the mountpoint in the fstab file. Click OK. Continue the disk mapping process.

73 Page 73 of 186 ADD A NEW PHYSICAL VOLUME Use the ADM Interface to add a new volume. 1. Right click in the empty space in the right pane. Select Create Volumegroup. 2. Right-click an existing volume group. Select the Add physical volume. 3. Select the partition to associate with the volume. Click OK. Continue the disk mapping process.

74 Page 74 of 186 ADD A NEW LOGICAL VOLUME Make sure that you have created at least one physical volume before adding a logical volume. 1. Right-click an existing volume group. Select the Add logical volume. 2. Enter the name and size of the new logical volume. Click OK. Continue the disk mapping process. ADD A NEW SWAPFILE 1. Right-click in the empty space in the right pane. Select the Create Swapfile. 2. Enter the path and size of the swapfile. Click OK. Continue the disk mapping process.
75 Page 75 of 186 Troubleshooting - 1-Touch for Linux Deployment Configuration Recovery Troubleshooting FAQs The following section provides information on some of the troubleshooting scenarios related to 1-Touch Recovery: PROBLEM/ERROR The silent install fails during the recovery process. SOLUTION Open another virtual terminal and check the silent install log file. The log file is available at the following location: /tmp/.gxsetup/silent_install.***** Here ***** is the cvpkgadd process ID. Unable to retrieve the job details <corresponding job ID:XX> Error 17: Cannot mount selected Partition. Identify and correct the problem. Restart the recovery process using the /init command. This error message appears during the 1-Touch Recover if the file system restore job on the CommServe is killed or failed. Use the /init command to restart the file system restore job. The system fails to boot because the boot disk is changed before restore. Perform the following steps to boot the client: 1. If the boot disk has changed, make sure it is selected as a bootable disk in the BIOS settings. 2. Edit the grub menu during boot. Change the root (hd#) entry to use the proper root disk. 3. Continue to boot. 1-Touch recovery failed because of mismatch between the configurations of backed up and restored systems. 4. Once the system is up, user can run the grub-install to make the fix permanent. This error occurs when the vendor information for a drive is not available. Typically the vendor information is not available for a flash drive or pen drive. To resolve this issue, make sure that no flash drives or pen drives are connected to the client computer before starting the 1-Touch recovery.
76 Page 76 of 186 Frequently Asked Questions - 1-Touch Linux Deployment Configuration Recovery Troubleshooting FAQs DO I NEED TO SETUP 1-TOUCH SERVER TO PERFORM 1-TOUCH RECOVERY? No. You don't need 1-Touch Server to perform the 1-Touch Recovery. You need to install File System idataagent on the client computer and then enable 1- Touch feature. For more information, refer to Enable 1-Touch. You must perform atleast one full backup before performing the 1-Touch recovery of the client computer. It is recommended to perform the backup of default subclient periodically. This will capture any changes in the client configuration. For more information, refer to Perform A Backup. DO I NEED A NEW BOOTCD FOR EACH CLIENT I PLAN TO RECOVER? No. Use the 1-Touch Linux Live CD provided as DVD4 or You can also download the 1-Touch ISO image with the latest updates and use it for each of your clients. For more information, see Prepare for Recovery. ARE ANY OPERATING SYSTEM UTILITIES SPECIFICALLY REQUIRED DURING 1-TOUCH RECOVERY? No. In general, all the below listed operating system utilities are distributed along with standard operating system distributions. OPERATING SYSTEM UTILITIES arch e2image last mv swapon awk echo ldd netstat sync basename egrep ln openvt tail bash eject locale passwd tar cat env ls pidof tee chgrp expr lsmod ping test chmod false lspci ping6 time chown fdisk lvcreate ps top chroot fgrep lvdisplay pvcreate touch chvt file lvm pvdisplay tr cksum find lvmdiskscan pvs true clear fsck lvscan pvscan tset cp fsck.ext2 mkdir pvs tty cpio fsck.ext3 mke2fs pvscan umount cut fuser mkfifo pwd uname date gawk mkfs reboot uptime dd getopt mkfs.ext2 rm usleep ddate grep mkfs.ext3 rmdir vgcfgbackup depmod gunzip mkinitrd rmmod vgcfgrestore df gzip mkswap route vgchange diff head modinfo sdiff vgcreate dir host modprobe sed vgdisplay dirname hostname mknod sleep vi dmesg ifconfig mktemp stty whereis du insmod more su which e2fsck kill mount swapoff zcat HOW TO SETUP A PXE SERVER FOR NETWORK BOOT? 1. Ensure that the machine where you are setting up Network boot or PXE boot is running nfs server, tftp server and dhcp server in the same subnet as the client. Preferably, use a Linux host to setup the pxe boot. 2. Copy or mount the Linux 1-Touch Live CD ISO to the Linux host and set up nfs server to export this mount point. 3. Copy the kernel and initrd to the host tftp server directory. The default location is /tftpboot. 4. Configure dhcp server options such that the restoring client will obtain a dynamic IP address and the PXE boot configuration files will be passed to the client. For example: Create a dhcp configuration file(/etc/dhcpd.conf) as follows: authoritative;
77 Page 77 of 186 ddns-update-style none; allow bootp; allow booting; subnet netmask { option routers ; option subnet-mask ; option domain-name-servers ; option domain-name-servers ; option ip-forwarding off; default-lease-time 21600; max-lease-time 43200; host garuda5 { hardware ethernet 00:0c:29:c8:bf:11; fixed-address ; next-server ; filename "linux-install/pxelinux.0"; } } The hostname of the client that needs to be assigned the IP address is garuda5 MAC address of the client that needs to be assigned IP is 00:0c:29:c8:bf:11 IP that will be assigned to the client being booted through dhcp is IP address of the tftp server is The location on the tftp server where pxelinux.0 boot loader is located: linux-install/pxelinux.0 A prefix of /tftpboot will automatically be added to the filename provided in the /etc/dhcpd.conf file. So the actual location on the tftp server where pxelinux.0 is located is "/tftpboot/linux-install/pxelinux.0". 5. Create a configuration file to setup a TFTP server at the following location: /tftpboot/linux-install/pxelinux.cfg. The file should have a name like c-29-c8-bf-11 (MAC address of the client that is being booted through TFTP) or AC1041A5 (IP address that is being assigned to client in the hex notation.) The configuration file contents can be as below: default onetouch label onetouch kernel onetouch/vmlinuz append initrd=onetouch/initrd.img crashkernel=32m@0 ramdisk_blocksize=1024 ramdisk_size=1024m root=/dev/ram rw method=nfs: :/mnt/netboot ip=dhcp The kernel and initrd locations are relative to the location mentioned in dhcpd.conf file. For example: When you create the dhcpd.conf file as mentioned above, the kernel and initrd will be located /tftpboot/linux-install/onetouch. 6. Edit the /etc/xinetd.d/tftp configuration file as follows to enable the tftp services. disable=no 7. Restart the xinetd service. This can also be done by running chkconfig tftp on. The kernel and initrd will be extracted from the 1Touch boot cd. The network boot will access the contents of boot cd through NFS. For example: If you have created the above configuration /tftpboot/linux-install/pxelinux.cfg/ c-29-c8-bf-11, the NFS location that will be used for network boot is :/mnt/netboot. 8. Use the following commands for creating the network boot setup. Copy the bootcd.iso to the TFTP server. mkdir -p /mnt/cdrom


78 Page 78 of 186 mount -t iso9660 bootcd.iso /mnt/cdrom -o loop cp -f /mnt/cdrom/isolinux/initrd.img /tftpboot/linux-install/onetouch cp -f /mnt/cdrom/isolinux/vmlinuz default /tftpboot/linux-install/onetouch/vmlinuz The above commands will create the kernel and initrd required for Network boot. 9. Create the NFS mount point from where the CD contents can be accessed. cp -rf /mnt/cdrom/* /mnt/netboot Here /mnt/netboot is a NFS mount point which can be accessed by the restored system through NFS. 10. After creating the above setup, reboot the client being restored and choose to boot through network in BIOS. HOW TO SETUP AN ESX SERVER TO BOOT A VIRTUAL MACHINE? 1. Log on to ESX Server. Download the ISO Image on ESX Server. Start the ESX Server Client. 2. Click CD/DVD Drive 1 Connect to ISO Image on Local Disk. 3. Click Edit virtual machine settings. 4. Click Options. Click Boot Options. Click The next time virtual machine boots, force entry into BIOS setup screen. 5. Power Off the virtual machine. Power On the virtual machine. Select CD-ROM Drive from the Boot menu. 1-TOUCH LINUX DVD4 IS UNABLE TO FIND/LOAD A HARDWARE DRIVER? During 1-Touch Recovery, a driver missing error shows up when the 1-Touch DVD4 cannot locate and load some specific hardware driver/s. In such cases, 1. Determine the phase when driver load failed. 1-Touch Recovery and VirtualizeME processes are carried out in two phases.
79 Page 79 of 186 When the machine being recovered is booted using DVD4, the client boots up using a customized kernel (re) distributed by CommVault. Once booted, any driver missing error message showing up before YaST GUI is launched falls under the first phase. After the system state restore, kexec operation is invoked to boot up the backed up machine s kernel. Any driver missing error message that you see after the reboot falls under the second phase. 2. Compile the driver for the specific kernel version. It is recommended to report any driver missing error messages via Technical Support. If it is critical to proceed without delay, the specific drivers may be compiled for the following kernel version: default The kernel module is compiled for x86 (32-bit). Missing storage driver error messages during the first phase may be ignored as only the networking and keyboard/display drivers are required in this phase. 3. Copy and load the drivers. Copy the required drivers to a USB removable disk, partitioned such that the first partition is a vfat/ext2/ext3 file system. Insert the USB disk and look up for the device name using the dmesg command. Check if the device exists in /dev For example, to check for the device named sdb: # ls -l /dev/sdb* - lists device names like sdb, sdb1 etc., If the device is not listed, use the following steps: # mknod /dev/sdb b the minor number should be as per the device naming convention followed in Linux # mknod /dev/sdb1 b 8 17 # mkdir /mnt # mount /dev/sdb1 /mnt Copy and load the driver: # cp /mnt/<driver>.ko /lib/modules/`uname -r`/<path> # modprobe -f <driver> Ensure that you use the modprobe -f option to load the custom built drivers. HOW CAN I RESTART THE RECOVERY YAST UI AFTER LOADING CUSTOM DRIVERS OR IF THE RECOVERY PROCESS FALLS BACK TO A SHELL? 1. For VirtualizeME, the UI should not be restarted manually. Kill the VirtualizeME job to make sure the VM is deleted and resubmit the job after making appropriate changes. 2. For interactive 1-Touch recovery, if the UI fails to load due to some missing drivers or if it falls back to shell, report to the Technical Support with appropriate logs. If you are able to resolve the error manually by loading custom drivers or by making any necessary corrections, use the following steps to restart the YaST UI: Make sure the YaST UI is stopped: # killall y2base Go to the first virtual terminal by hitting Alt+F1. Navigate to the root directory, and type the command # cd / If the error occurred in the first phase. # /usr/lib/yast2/bin/y2base /1touch.ycp ncurses If the error occurred in the second phase. # chroot /chroot /launchyast.sh A SYSTEM MOUNT POINT RESIDING ON A VOLUME GROUP IS NOT RECOVERED. WHAT DO I DO?
80 Page 80 of To avoid this problem, select the option to recover only the system mount points. For more information, see Interactive Restore. 2. If you cannot fix the problem, create a new volume group using the ADM Interface. 3. Add a physical volume to the volume group using the ADM Interface. See Add New Physical Volumes. 4. Create logical volume on the volume group. See Add New Logic Volumes. 5. Create the system mount point that you want to recover. A SYSTEM MOUNT POINT RESIDING ON A MPATH DEVICE IS NOT RECOVERED. WHAT DO I DO? 1. To avoid this problem, select the option to recover only the system mount points. For more information, see Interactive Restore. 2. After the client is recovered, a list of all the available external disk and devices is displayed. 3. Create the the system mount point that you want to recover on the external drive. Otherwise, you can create the lost system mount point on a logical volume or a partition in the recovered disk. CAN I PERFORM 1-TOUCH RECOVERY REMOTELY? Yes.. Follow the steps given below to perform the remore recovery: 1. Connect the client using a serial cable.. 2. Open hyperterminal or putty in full screen mode. 3. Set baud rate to n8 4. Select serial at the boot prompt. 5. Follow the steps for the Symmetric or Asymmetric Disk Restore. The entire recovery process can be performed over the serial console. MY RECOVERY FAILED, WHAT DO I DO? Depending on the error message that was prompted, you may try to fix the problem as follows: 1. Select ALT + F(n) to open another terminal if needed 2. Run /init to restart the recovery process. It will restart from the point of failure 3. If you cannot fix the problem, gather the following data and escalate. Entire contents of /tmp (For Example: tar zcvf tmp.tgz /tmp) Entire contents of /system_state Entire contents of /python_dir 4. Configure NFS share or any other means to transfer the data. I ENTERED IP OF THE MACHINE WHERE I WANT TO EXPORT THE ADM GUI, BUT IT DOESN T WORK 1. Check if you can ping to the machine using another terminal. Select ALT + F(n) to open another terminal if needed 2. Check if the machine has an X server running with no authentication. For example: Xming 3. IF this has not solved the problem, keep all the required data ready and escalate the issue. 4. Configure NFS share or any other method to transfer the data. MY DISKS ARE PARTITIONED AND FORMATTED - BUT NOW THE RECOVERY PROCESS HAS STOPPED WITH AN ERROR. WHAT DO I DO? 1. Check for any error such as bad disks, bad FC port, etc. 2. If this does not solve the problem, keep all the required data ready and escalate the issue. 3. Configure NFS share or any other method to transfer the data. 4. Set up the same recovery over serial console and set up a webex. MY FS DATA HAS RECOVERED BUT NOW THE RECOVERY PROCESS HAS STOPPED WITH AN ERROR CONCERNING THE BOOTLOADER. WHAT DO I DO? 1. Check for errors in cvrestore.log and /tmp/grub.log 2. If this does not solve the problem, keep all the required data ready and escalate the issue.
81 Page 81 of Configure NFS share or any other method to transfer the data. 4. Use the bootcd hidden menu option rescue to boot up and tweak the bootloader if required. 5. Set up the same recovery over serial console and set up a webex. CAN I CHANGE THE CLIENT NAME AND CLIENT HOST NAME DURING 1-TOUCH RECOVERY? You can change the client host name during the 1-Touch recovery. For more information, see Change the Client Configuration during Interactive Restore or Change the Client Configuration during Non-Interactive Restore. You can not change the client name during the 1-Touch recovery. CAN I CHANGE THE IP ADDRESS, NET MASK AND DEFAULT GATEWAY OF THE CLIENT DURING 1-TOUCH RECOVERY? Yes. For more information, see Change the Client Configuration during Interactive Restore or Change the Client Configuration during Non-Interactive Restore. CAN I CHANGE THE DNS SEARCH SUFFIX AND NAME SERVER IP ADDRESS OF THE CLIENT DURING 1-TOUCH RECOVERY? Yes. For more information, see Change the Client Configuration during Interactive Restore or Change the Client Configuration during Non-Interactive Restore. DOES 1-TOUCH SUPPORT MACHINES CONFIGURED WITH SOFTWARE RAID? No. Software RAID is currently not supported.
82 Page 82 of 186 System Requirements - 1-Touch AIX HP-UX Linux Solaris Windows OPERATING SYSTEM The following are the requirements for 1-Touch on Solaris: SERVER Solaris 9 64-bit Solaris 9 4/04 64-bit Solaris 9 4/04 32-bit Solaris 9 32-bit Solaris 8 [Extended Support] Solaris 10.x 64-bit CLIENT Solaris 9 64-bit Solaris 9 4/04 64-bit Solaris 9 4/04 32-bit Solaris 9 32-bit Solaris 8 [Extended Support] Solaris 10.x 64-bit The x64 processor is supported for Solaris 10.x 64-bit operating system. All other operating systems support Sun Sparc5 or higher recommended processors. HARD DRIVE The 1-Touch Server and client requires 500 MB of disk space. MEMORY 1 GB RAM minimum required; 2 GB RAM recommended. PROCESSOR Sparc5 or higher recommended x64 SUPPORTED FILE SYSTEMS AND VOLUME MANAGER TYPES VERITAS Volume Manager (VxVM) 5.0 or higher (unencapsulated root volume only) Solaris Volume Manager (svm) UNIX File System (UFS) VERITAS File System (VxFS) Zettabyte File System (ZFS) NOTES SERVER The 1-Touch Server must be a dedicated Solaris machine running the Jump Start server environment. For 1-Touch Server, use any Solaris system that is configured as a JumpStart server and has the required networking services, which include RARP, bootp, and tftp. Configure the 1-Touch server using the Solaris Advanced Installation Guide (see, It is recommended that you set the primary mirror as the boot device for restores to succeed. The Solaris JumpStart server version (including updates) should be greater than or equal to the version of the Solaris client whose data is targeted for recovery. A Solaris JumpStart server can recover data from a Solaris client whose version is equal to or less than the server version. For example, a Solaris 10 JumpStart server can recover data from Solaris 10 client, Solaris 9 client, etc. Similarly, a Solaris 9 JumpStart server cannot recover data from Solaris 10 client, but it can recover data from Solaris 9 client, Solaris 8 client, etc. If Solaris 10 Update 6 or above jumpstart server is used as 1-touch server, please make sure that it has /boot/solaris/bin/root_archive. It is required for unpacking and repacking Solaris miniroot in jumpstart server. Ensure that the permissions setting for an NFS share on the JumpStart server is "ro" (read-only) Solaris 9 and Solaris 10 boot image versions are supported.
83 Page 83 of 186 CLIENT This feature is not supported when bootable partitions are on the disk arrays (snapable disk). iscsi root is supported for 1-Touch. Solaris local zones are not supported for 1-Touch backups. Link aggregation is not supported for 1-Touch backups. I/O Multipathing(MPxIO) is not supported for root file system recovery. DISCLAIMER Minor revisions and/or service packs that are released by application and operating system vendors are supported by our software but may not be individually listed in our System Requirements. We will provide information on any known caveat for the revisions and/or service packs. In some cases, these revisions and/or service packs affect the working of our software. Changes to the behavior of our software resulting from an application or operating system revision/service pack may be beyond our control. The older releases of our software may not support the platforms supported in the current release. However, we will make every effort to correct the behavior in the current or future releases when necessary. Please contact your Software Provider for any problem with a specific application or operating system. Additional considerations regarding minimum requirements and End of Life policies from application and operating system vendors are also applicable
84 Page 84 of 186 Deployment - 1-Touch for Solaris Deployment Configuration Recovery Troubleshooting 1-Touch Recovery allows you to recover the entire computer system without installing the Operating system or any other software. INSTALLATION To perform 1-Touch Recovery you must first install the following: 1-TOUCH SERVER Install 1-Touch Server software on the computer that satisfies the minimum system requirements. Install the 1-Touch Server Software 1-TOUCH CLIENT Install Unix File System idataagent on the computer that satisfies the minimum system requirements. The computer is referred to as the Client computer in this install procedure. BEFORE YOU BEGIN Download Software Packages Download the latest software package to perform the install. System Requirements for 1-Touch Server and Client Verify that the computer in which you wish to install the 1- Touch Server Software satisfies the System Requirements. Overview Provides comprehensive information about 1-Touch feature The software can be installed using one of the following methods: Method 1: Interactive Install Unix File System idataagent - to install directly on client computer. Method 2: Install Software from CommCell Console - to install remotely on a client computer. 1-TOUCH SERVER INSTALL THE 1-TOUCH SERVER SOFTWARE 1. Place the Software Installation Disc on a Solaris computer that satisfies the minimum System Requirements. 2. Run the following command from the Software Installation Disc:./cvpkgadd 3. The product banner and other information is displayed. Press Enter. 4. Read the license agreement. Type y and press Enter. 5. Press Enter. Please select a setup task you want to perform from the list below: Advance options provide extra setup features such as creating custom package, recording/replaying user selections and installing External Data Connector software. 1) Install data protection agents on this computer 2) Advance options 3) Exit this menu Your choice: [1] 6. Press Enter. Certain Simpana packages can be associated with a virtual IP, or in other words, installed on a "virtual machine" belonging to some cluster. At any given time the virtual machine's services and IP address are active on only one of the cluster's servers. The virtual machine can "failover" from one server to another, which includes stopping services and deactivating IP address on the first server and activating the IP address/services on the other server. You now have a choice of performing a regular Simpana install on the physical host or installing Simpana on a virtual machine for operation within a cluster. Most users should select "Install on a physical machine" here. 1) Install on a physical machine 2) Install on a virtual machine 3) Exit Your choice: [1] 7. If you have only one network interface, press Enter to accept the default network interface name and continue. We found one network interface available on your machine. We will associate it with the physical machine being
85 Page 85 of 186 If you have multiple network interfaces, enter the interface name that you wish to use as default, and then press Enter. The interface names and IP addresses depend on the computer in which the software is installed and may be different from the example shown. installed, and it will also be used by the CommServe to connect to the physical machine. Note that you will be able to additionally customize Datapipe Interface Pairs used for the backup data traffic later in the Simpana Java GUI. Please check the interface name below, and make connections if necessary: Physical Machine Host Name: [angel.company.com] 8. Press Enter. Please specify the client name for this machine. It does not have to be the network host name: you can enter any word here without spaces. The only requirement is that it must be unique on the CommServe. Physical Machine Client name: [angel] 9. Type the appropriate number to select 1-Touch Server. A confirmation screen will mark your choice with an "X". Type d for Done, and press Enter. Install Simpana on physical machine angel Please select the Simpana module(s) that you would like to install. [ ] 1) MediaAgent [1301] [CVGxMA] [ ] 2) UNIX File System idataagent [1101] [CVGxIDA] [a=all n=none r=reverse q=quit d=done >=next <=previous? =help] Enter number(s)/one of "a,n,r,q,d,>,<,?" here:2 10. Press Enter. Do you want to use the agents for restore only without consuming licenses? [no] 11. Type the appropriate number to install the latest software scripts and press Enter. Select Download from the software provider website to download the latest software scripts. Make sure you have internet access. Select Use the one in the installation media to install the software scripts from the package or share from which the installation is currently being performed. Select Use the copy I already have by entering its unix path, to specify the path if you have the software script in an alternate location. Installation Scripts Pack provides extra functions and latest support and fix performed during setup time. Please specify how you want to get this pack. If you choose to download it from the website now, please make sure you have internet connectivity at this time. This process may take some time depending on the internet connectivity. 1) Download from the software provider website. 2) Use the one in the installation media 3) Use the copy I already have by entering its unix path Your choice: [1] Press Enter. Keep Your Install Up to Date - Latest Service Pack Latest Service Pack provides extra functions and latest support and fix for the packages you are going to install. You can download the latest service pack from software provider website. If you decide to download it from the website now, please make sure you have internet connectivity at this time. This process may take some time depending on the internet connectivity. Do you want to download the latest service pack now? [no] 13. Press Enter to accept the default path. If you want to specify a different path, type the path and then press Enter. If you want to install the software binaries to an NFS shared drive, specify the directory on which you have mounted the NFS file system and then press Enter. In order to make sure that the client computer has read/write access to NFS shared drive, review the steps described in Installing Software Binaries to an NFS Shared Drive. Do not use the following characters when specifying the path:!@#$%^&*():/?\ Please specify where you want us to install Simpana binaries. It must be a local directory and there should be at least 176MB of free space available. All files will be installed in a "simpana" subdirectory, so if you enter "/opt", the files will actually be placed into "/opt/simpana". Installation Directory: [/opt] 14. Press Enter to accept the default location. Enter a path to modify the default location and press Enter. All the modules installed on the computer will store the log files in this directory. Please specify where you want to keep Simpana log files. It must be a local directory and there should be at least 100MB of free space available. All log files will be created in a "simpana/log_files" subdirectory, so if you enter "/var/log", the logs will actually be placed into "/var/log/simpana/log_files". Log Directory: [/var/log] 15. Press Enter. Most of Software processes run with root privileges, but some are launched by databases and inherit database access rights. To make sure that registry and log files can be written to by both kinds of processes we can either make such files world-writeable or we can grant write access only to processes belonging to a particular group, e.g. a "simpana" or a "dba" group.
86 Page 86 of 186 We highly recommend now that you create a new user group and enter its name in the next setup screen. If you choose not to assign a dedicated group to Software processes, you will need to specify the access permissions later. If you're planning to backup Oracle DB you should use "dba" group. Would you like to assign a specific group to Software? [yes] 16. Type the Group name and press Enter. Press Enter again. Please enter the name of the group which will be assigned to all Software files and on behalf of which all Software processes will run. In most of the cases it's a good idea to create a dedicated "simpana" group. However, if you're planning to use Oracle idataagent or SAP Agent, you should enter Oracle's "dba" group here. Group name: sky1 REMINDER If you are planning to install Simpana Informix, DB2, PostgreSQL, Sybase or Lotus Notes idataagent, please make sure to include Informix, DB2, etc. users into group "sky1". Press <ENTER> to continue Type a network TCP port number for the Communications Service (CVD) and press Enter. Type a network TCP port number for the Client Event Manager Service (EvMgrC) and press Enter. Every instance of Simpana should use a unique set of network ports to avoid interfering with other instances running on the same machine. The port numbers selected must be from the reserved port number range and have not been registered by another application on this machine. Please enter the port numbers. Port Number for CVD : [8400] Port Number for EvMgrC: [8402] 18. If you do not wish to configure the firewall services, press Enter. Is there a firewall between this client and the CommServe? [no] If this computer is separated from the CommServe by firewall(s), type Yes and then press Enter. For firewall options and configuration instructions, see Firewall Configuration and continue with the installation. 19. Type the fully qualified CommServe host name and press Enter. Ensure that the CommServe is accessible before typing the name; otherwise the installation will fail. Please specify hostname of the CommServe below. Make sure the hostname is fully qualified, resolvable by the name services configured on this machine. CommServe Host Name: mycommserve.company.com 20. Press Enter. Commcell Level Global Filters are set through Simpana GUI's Control Panel in order to filter out certain directories or files from backup Commcell-widely. If you turn on the Global filters, they will be effective to the default subclient. There are three options you can choose to set the filters. 1) Use Cell level policy 2) Always use Global filters 3) Do not use Global filters Please select how to set the Global Filters for the default subclient? [1] 21. Type the appropriate number to select the Client Group and press Enter. This screen will be displayed only if Client Groups are configured for the CommCell Client Group(s) is currently configured on CommServe mycommserve.company.com. Please choose the group(s) that you want to add this client angel.company.com to. The selected group(s) will be marked (X) and can be deselected if you enter the same number again. After you are finished with the selection, select "Done with the Selection". [ ] 1) Unix [ ] 2) DR [a=all n=none r=reverse q=quit d=done >=next <=previous? =help]s Enter number(s)/one of "a,n,r,q,d,>,<,?" here: Enter the number associated with the storage policy you want use and press Enter. Please select one storage policy for this IDA from the list below: 1) SP_StandAloneLibrary2_2 2) SP_Library3_3 3) SP_MagLibrary4_4
87 Page 87 of 186 Storage Policy: [1] 23. If you want 1-Touch support for Solaris 8, type Yes, press Enter and go to step 27. If you do not want this support, accept the No default, press Enter and go to the next step. 24. If you want 1-Touch support for Solaris 9, type Yes, press Enter and go to step 27. Simpana JumpStart Do you want 1-Touch support for Solaris 8? [no] Do you want 1-Touch support for Solaris 9? [no] If you do not want this support, accept the No default, press Enter and go to the next step. 25. If you want 1-Touch support for Solaris 10 (Sparc) Update 5 and below, type Yes, press Enter and go to step 27. Do you want 1-Touch support for Solaris 10 Update 5 and below? [no] If you do not want this support, accept the No default, press Enter and go to the next step. 26. For Solaris bit or Solaris 10 (Sparc) Update 6 and above, type Yes and press Enter for 1-Touch support. 27. If you entered Yes in the above step, this screen will be displayed. Type the path to the JumpStart boot directory and press Enter. If Jumpstart files are not yet installed, quit this install and install JumpStart first. If another question requesting 1-Touch support is displayed, go to the previous step; if not, go to the next step. 28. Type 3 to the Exit option and press Enter. The installation is now complete. Do you want 1-Touch support for Solaris 10 Update 6 and above? [no] Please specify the absolute path to the Jumpstart 'Boot' directory. If JumpStart files are not yet installed on this system, please quit the installation of this package and install the JumpStart package before proceeding. JumpStart Dir: /export/home/sol10u6/solairs_10/tools/boot/release = 6 Certain Simpana packages can be associated with a virtual IP, or in other words, installed on a "virtual machine" belonging to some cluster. At any given time the virtual machine's services and IP address are active on only one of the cluster's servers. The virtual machine can "failover" from one server to another, which includes stopping services and deactivating IP address on the first server and activating the IP address/services on the other server. Currently you have Simpana installed on physical node angel.company.com. Now you have a choice of either adding another package to the existing installation or configure Simpana on a virtual machine for use in a cluster. 1) Add another package to angel.company.com 2) Install Simpana on a virtual machine 3) Exit Your choice: [3] 1-TOUCH CLIENT METHOD 1: INTERACTIVE INSTALL UNIX FILE SYSTEM IDATAAGENT 1. Locate the Software Installation Disc and then enter cvpkgadd. 2. The product banner and other information is displayed. Press Enter. 3. Read the license agreement. Type y and press Enter. 4. Press Enter. Please select a setup task you want to perform from the list below: Advance options provide extra setup features such as creating custom package, recording/replaying user selections and installing External Data Connector software. 1) Install data protection agents on this computer 2) Advance options 3) Exit this menu Your choice: [1] 5. Press Enter. Certain Simpana packages can be associated with a virtual IP, or in other words, installed on a "virtual machine" belonging to some cluster. At any given time the virtual machine's services and IP address are active on only one of the cluster's servers. The virtual machine can "failover" from one server to another, which includes stopping services and deactivating IP address on the first server and activating the IP address/services on the other server. You now have a choice of performing a regular Simpana
88 Page 88 of If you have only one network interface, press Enter to accept the default network interface name and continue. If you have multiple network interfaces, enter the interface name that you wish to use as default, and then press Enter. The interface names and IP addresses depend on the computer in which the software is installed and may be different from the example shown. install on the physical host or installing Simpana on a virtual machine for operation within a cluster. Most users should select "Install on a physical machine" here. 1) Install on a physical machine 2) Install on a virtual machine 3) Exit Your choice: [1] We found one network interface available on your machine. We will associate it with the physical machine being installed, and it will also be used by the CommServe to connect to the physical machine. Note that you will be able to additionally customize Datapipe Interface Pairs used for the backup data traffic later in the Simpana Java GUI. Please check the interface name below, and make connections if necessary: Physical Machine Host Name: [angel.company.com] 7. Press Enter. Please specify the client name for this machine. It does not have to be the network host name: you can enter any word here without spaces. The only requirement is that it must be unique on the CommServe. Physical Machine Client name: [angel] 8. Type the number associated with the Unix File System idataagent and press Enter. A confirmation screen will mark your choice with an "X". Type d for Done, and press Enter. Install Simpana on physical machine angel Please select the Simpana module(s) that you would like to install. [ ] 1) MediaAgent [1301] [CVGxMA] [ ] 2) UNIX File System idataagent [1101] [CVGxIDA] [a=all n=none r=reverse q=quit d=done >=next <=previous? =help] Enter number(s)/one of "a,n,r,q,d,>,<,?" here:2 9. Press Enter. Do you want to use the agents for restore only without consuming licenses? [no] 10. Type the appropriate number to install the latest software scripts and press Enter. Select Download from the software provider website to download the latest software scripts. Make sure you have internet access. Select Use the one in the installation media to install the software scripts from the package or share from which the installation is currently being performed. Select Use the copy I already have by entering its unix path, to specify the path if you have the software script in an alternate location. Installation Scripts Pack provides extra functions and latest support and fix performed during setup time. Please specify how you want to get this pack. If you choose to download it from the website now, please make sure you have internet connectivity at this time. This process may take some time depending on the internet connectivity. 1) Download from the software provider website. 2) Use the one in the installation media 3) Use the copy I already have by entering its unix path Your choice: [1] Press Enter. Keep Your Install Up to Date - Latest Service Pack Latest Service Pack provides extra functions and latest support and fix for the packages you are going to install. You can download the latest service pack from software provider website. If you decide to download it from the website now, please make sure you have internet connectivity at this time. This process may take some time depending on the internet connectivity. Do you want to download the latest service pack now? [no] 12. Press Enter to accept the default path. If you want to specify a different path, type the path and then press Enter. If you want to install the software binaries to an NFS shared drive, specify the directory on which you have mounted the NFS file system and then press Enter. In order to make sure that the client computer has read/write access to NFS shared drive, review the steps described in Installing Software Binaries to an NFS Shared Drive. Do not use the following characters when specifying the path:!@#$%^&*():/?\ Please specify where you want us to install Simpana binaries. It must be a local directory and there should be at least 176MB of free space available. All files will be installed in a "simpana" subdirectory, so if you enter "/opt", the files will actually be placed into "/opt/simpana". Installation Directory: [/opt] 13. Press Enter. Please specify where you want to keep Simpana log files. It must be a local directory and there should be at least
89 Page 89 of MB of free space available. All log files will be created in a "simpana/log_files" subdirectory, so if you enter "/var/log", the logs will actually be placed into "/var/log/simpana/log_files". Log Directory: [/var/log] 14. Press Enter. Most of Software processes run with root privileges, but some are launched by databases and inherit database access rights. To make sure that registry and log files can be written to by both kinds of processes we can either make such files world-writeable or we can grant write access only to processes belonging to a particular group, e.g. a "simpana" or a "dba" group. We highly recommend now that you create a new user group and enter its name in the next setup screen. If you choose not to assign a dedicated group to Software processes, you will need to specify the access permissions later. If you're planning to backup Oracle DB you should use "dba" group. Would you like to assign a specific group to Software? [yes] 15. Type the Group name and press Enter. Press Enter again. Please enter the name of the group which will be assigned to all Software files and on behalf of which all Software processes will run. In most of the cases it's a good idea to create a dedicated "simpana" group. However, if you're planning to use Oracle idataagent or SAP Agent, you should enter Oracle's "dba" group here. Group name: sky1 REMINDER If you are planning to install Simpana Informix, DB2, PostgreSQL, Sybase or Lotus Notes idataagent, please make sure to include Informix, DB2, etc. users into group "sky1". Press <ENTER> to continue Press Enter to accept the default number of streams and continue, or Enter the appropriate number of streams, and then press Enter. The number of streams specified ensures that concurrent backup/restore streams would have sufficient system resources. For more information on the subject, see Configuring Kernel Parameters for Solaris. 17. Type a network TCP port number for the Communications Service (CVD) and press Enter. Type a network TCP port number for the Client Event Manager Service (EvMgrC) and press Enter. Please enter the total number of streams that you plan to run at the same time. We need to make sure that you have enough semaphores and shared memory segments configured in /etc/system. Number of streams: [10] Every instance of Simpana should use a unique set of network ports to avoid interfering with other instances running on the same machine. The port numbers selected must be from the reserved port number range and have not been registered by another application on this machine. Please enter the port numbers. Port Number for CVD : [8400] Port Number for EvMgrC: [8402] 18. If you do not wish to configure the firewall services, press Enter. Is there a firewall between this client and the CommServe? [no] If this computer is separated from the CommServe by firewall(s), type Yes and then press Enter. For firewall options and configuration instructions, see Firewall Configuration and continue with the installation. 19. Type the fully qualified CommServe host name and press Enter. Ensure that the CommServe is accessible before typing the name; otherwise the installation will fail. Please specify hostname of the CommServe below. Make sure the hostname is fully qualified, resolvable by the name services configured on this machine. CommServe Host Name: mycommserve.company.com 20. Press Enter. Commcell Level Global Filters are set through Simpana GUI's Control Panel in order to filter out certain directories or files from backup Commcell-widely. If you turn on the Global filters, they will be effective to the default subclient. There are three options you can choose to set the filters. 1) Use Cell level policy 2) Always use Global filters 3) Do not use Global filters Please select how to set the Global Filters for the default subclient? [1] 21. Type the appropriate number to select the Client Group and press Enter. Client Group(s) is currently configured on CommServe mycommserve.company.com. Please choose the group(s) that
90 Page 90 of 186 This screen will be displayed only if Client Groups are configured for the CommCell 22. A confirmation screen will mark your choice with an "X". Type d for Done, and press Enter. you want to add this client angel.company.com to. The selected group(s) will be marked (X) and can be deselected if you enter the same number again. After you are finished with the selection, select "Done with the Selection". [ ] 1) Unix [ ] 2) DR [a=all n=none r=reverse q=quit d=done >=next <=previous? =help]s Enter number(s)/one of "a,n,r,q,d,>,<,?" here: 2 Client Group(s) is currently configured on CommServe cs.company.com. Please choose the group(s) that you want to add this client client.company.com to. The selected group(s) will be marked (X) and can be deselected if you enter the same number again. After you are finished with the selection, select "Done with the Selection". [ ] 1) Unix [X ] 2) DR [a=all n=none r=reverse q=quit d=done >=next <=previous? =help]s Enter number(s)/one of "a,n,r,q,d,>,<,?" here: d 23. Enter the number associated with the storage policy you want use and press Enter. Please select one storage policy for this IDA from the list below: 1) SP_StandAloneLibrary2_2 2) SP_Library3_3 3) SP_MagLibrary4_4 Storage Policy: [1] 24. Type 3 to the Exit option and press Enter. The installation is now complete. Certain Simpana packages can be associated with a virtual IP, or in other words, installed on a "virtual machine" belonging to some cluster. At any given time the virtual machine's services and IP address are active on only one of the cluster's servers. The virtual machine can "failover" from one server to another, which includes stopping services and deactivating IP address on the first server and activating the IP address/services on the other server. Currently you have Simpana installed on physical node angel.company.com. Now you have a choice of either adding another package to the existing installation or configure Simpana on a virtual machine for use in a cluster. 1) Add another package to angel.company.com 2) Install Simpana on a virtual machine 3) Exit Your choice: [3] METHOD 1: INSTALL SOFTWARE FROM COMMCELL CONSOLE 1. From the CommCell Browser, select Tools Add/Remove Software Install Software. 2. Click Next.

91 Page 91 of Select Unix and Linux. Click Next. 4. Select Manually Select Computers. Click Next. 5. Enter the fully qualified domain name of the Linux client computer in which you wish to install. For example: apple.domain.company.com The Unix File System idataagent will be installed on this client computer. Click Next. 6. Click Next.

92 Page 92 of Specify UserName and Password of client computer. Click Next. 8. Select Unix File System idataagent. Click Next. 9. Select Client Group from Available and click Add. Do not add more than one Client Group. Select a Storage Policy from the drop-down list. Click Next. 10. Click Next.
93 Page 93 of Select Immediate. Click Next. 12. Click Finish. 13. You can track the progress of the job from the Job Controller or Event Viewer window. 14. Once the job is complete, right-click the CommServe computer, click View and then
94 Page 94 of 186 click Admin Job History. 15. Select Install/Upgrade/Remove Software. Click OK. 16. You can view the following details about the job by right-clicking the job: Items that succeeded during the job Items that failed during the job Details of the job Events of the job Log files of the job

95 Page 95 of 186 Configuration - 1-Touch for Solaris Deployment Configuration Recovery Troubleshooting TABLE OF CONTENTS Basic Configuration Enable 1-Touch Perform a Backup BASIC CONFIGURATION ENABLE 1-TOUCH After you install the File System idataagent, follow the steps given below to enable the 1-Touch for the default subclient : 1. From the CommCell Console, navigate to <Client> File System idataagent defaultbackupset. Right-click the default subclient and click Properties. 2. Click 1-Touch Recovery tab. Select 1-Touch Recovery. Select the 1-Touch Server from the list. Enter the path to the 1-Touch server Directory. Click OK. If the 1-Touch client host ID (MAC address) has changed since the most recent 1-Touch backup, be sure to update the client's Ethernet address within the /etc/ethers file on the 1-Touch server. Otherwise, you will not be able to boot the 1-Touch client. PERFORM A BACKUP After you enable 1-Touch, perform backups of the default subclient periodically to capture any changes in the client system configuration. Before recovering a client, ensure that you have run at least one full backup of the default subclient. 1. From the CommCell Console, navigate to <Client> File System idataagent defaultbackupset. Right-click the subclient, and click Backup. 2. Select Full. Select Immediate. Click OK.
96 Page 96 of You can track the progress of the backup job from the Job Controller window. When the backup job has completed, the Job Controller displays the status as Completed.


97 Page 97 of 186 Recovery - 1-Touch for Solaris Deployment Configuration Recovery Troubleshooting TABLE OF CONTENTS Basic Recovery Advanced Recovery Global File System Recovery Restoring Data Backed Up Before a Specific Date Changing the Priority of the Restore Job Starting the Restore Job in Suspended State Restoring From a Copy Precedence Restoring From a specific Data Path BASIC RECOVERY 1. Login to CommCell Console using CommCell credentials. Do not use domain credentials to login to CommCell. The single sign on is not supported for 1-Touch feature. 2. From the CommCell Console, navigate to <Client> File System idataagent defaultbackupset. Right-click the Default Backup Set and click All Tasks 1-Touch Recovery. 3. Select the backup job for recovering the operating system. Click Next. 4. Click Next. 5. Review the recovery options.
98 Page 98 of 186 Click Finish. 5. Connect the client to network and switch on the power. At the boot prompt of the affected client, enter one of the following commands: Give the following command to start the basic recovery of essential OS file systems. For example: /, /opt, /usr, /var. boot net w recover u=<user_id> p=<passwd> Give the following command to start recovery of OS and replaced disks: boot net w recover newfs-changed-drives u=<user_id> p=<passwd> Give the following command to recover all partitioned disks and created file systems, regardless of their state: boot net w recover newfs-all u=<user_id> p=<passwd> Here <user_id> is Commcell console user id and <passwd> is Commcell console password. w is optional to Solaris install method to skip starting X window session. This step starts the 1-Touch. All logging output for the recovery is redirected to the console and a file under the /tmp directory. Press Enter to start the automatic restore. After the restore complete, the system will reboot. ADVANCED RECOVERY OPTIONS GLOBAL FILE SYSTEM RECOVERY The global file system makes all files across a cluster equally accessible and visible to all nodes. The Global File System will not be recovered during the 1- Touch recovery of a single node from the cluster. During the full system recovery, if the Global File System is not available, start the Global File System recovery. 1. Ensure that the file system type is same as the previous global file system. 2. Start the Global File System restore from the node that served as the Global File System controller at the time of the last 1-Touch backup. 3. The 1-Touch restore directory contains the Global File System disk recovery commands. For example: Use the following command to recover the Global File System volume group using VERITAS Volume Manager <jump start directory>/<client>/galaxy/idataagent/systemrecovery/disks/vxvm.vxmake.oracle_dg or Use the following command to recover the Global File System volume group using Solaris Volume Manager <jump start directory>/<client>/galaxy/idataagent/systemrecovery/disks/lvm.mk.commands RESTORING DATA BACKED UP BEFORE A SPECIFIC DATE You can perform a point-in-time restore of the system state. You can recover data from a backup that occurred before the specified date and time. 1. From the CommCell Console, navigate to <Client> File System idataagent defaultbackupset. 2. Right-click the defaultbackupset and click All Tasks 1-Touch Recovery. 3. In the Submit 1-Touch Recovery Request dialog box, click Select Recovery Options.


99 Page 99 of Click Restore data from the backup that occurred before this date. 5. Enter date and time. 6. Select a Time Zone. 7. Click Next. 8. Click Finish. CHANGING THE PRIORITY OF THE RESTORE JOB You can increase the priority of a restore job. If you want to perform the 1-Touch recovery on a high priority, follow the steps given below: 1. From the CommCell Console, navigate to <Client> File System idataagent defaultbackupset. 2. Right-click the defaultbackupset and click All Tasks 1-Touch Recovery. 3. In the Submit 1-Touch Recovery Request dialog box, click Select Recovery Options. 4. Click Advanced. 5. Click Change Priority. 6. Enter the priority number between 0 to 999. Lower the number, higher the priority. 7. Click Ok. 8. Click Next. 9. Click Finish. STARTING THE RESTORE JOB IN SUSPENDED STATE If there are multiple jobs running simultaneously on the CommServe, you can hold the restore job on suspended state. Once the CommServe is freed up, you can resume the restore job from the Job Controller window. 1. From the CommCell Console, navigate to <Client> File System idataagent defaultbackupset. 2. Right-click the defaultbackupset and click All Tasks 1-Touch Recovery. 3. In the Submit 1-Touch Recovery Request dialog box, click Select Recovery Options. 4. Click Advanced. 5. Click Startup in suspended state 6. Click Ok. 7. Click Next. 8. Click Finish. RESTORING DATA FROM A COPY PRECEDENCE By default, 1-Touch recovery will restore the data from the primary copy. But if you want to restore data from a particular storage policy copy, you can specify the copy precedence. 1. From the CommCell Console, navigate to <Client> File System idataagent defaultbackupset. 2. Right-click the defaultbackupset and click All Tasks 1-Touch Recovery.


100 Page 100 of In the Submit 1-Touch Recovery Request dialog box, click Select Recovery Options. 4. Click Advanced. 5. Click Copy Precedence. 6. Click Restore from copy precedence. 7. Enter the copy precedence number. 8. Click Ok. 9. Click Next. 10. Click Finish. RESTORING DATA FROM A SPECIFIC DATA PATH If you want to restore the data from a specific location on a MediaAgent, you can specify the data path as follows: 1. From the CommCell Console, navigate to <Client> File System idataagent defaultbackupset. 2. Right-click the defaultbackupset and click All Tasks 1-Touch Recovery. 3. In the Submit 1-Touch Recovery Request dialog box, click Select Recovery Options. 4. Click Advanced. 5. Click Data Path. 6. Select the following to specify the data path: Use MediaAgent Use Library Use Drive Pool Use Drive Use Proxy 7. Click Ok. 8. Click Next. 9. Click Finish.
101 Page 101 of 186 Troubleshooting - 1-Touch for Solaris Deployment Configuration Recovery Troubleshooting The following section provides information on some of the troubleshooting scenarios related to 1-Touch Recovery: PROBLEM/ERROR The client is unable to boot. SOLUTION To debug boot problems, use the snoop and truss commands. The 1-Touch client updates the sr.log log files on both the client and the 1-Touch server. If a 1-Touch client backup completed successfully and is somehow failing to boot, be sure to check the sr.log on the 1-Touch server for any warning. If you are using a different 1-Touch server than that was used previously, remove the client s name from the database of the previous 1-Touch server. Otherwise, the client will not be able to boot off the network because both servers will respond to the client s RARP request. To do this, from the Tools directory, run the./rm_install_client <clientname> command. For DHCP clients, run the following commands:./rm_install_client <platform name>./rm_install_client <ethernet address>./rm_install_client -f <boot file name> Sometimes, the RARP, bootparams and tftp daemons fail to re-read network information pertaining to the 1-Touch client. In such cases, you may have to restart the daemons. Error: execution of 'format -d c0t3d0 -f /tmp/fmtinput -s' failed Exiting to shell... # # format -d c0t3d0 -f /tmp/fmtinput -s Warning: error writing VTOC. DIOCTL_RWCMD: I/O error Warning: error reading backup label. Warning: no backup labels Label failed. You may get this error during phase 2 of 1-Touch recovery. The error message appears in the recoverlog file. This log file is located in the /tmp directory of the system. You get this error because Operating System does not recognize one of the disk drives. To resolve this issue, add information about the correct disk type of the unrecognized disks in the format.dat file. The format.dat file can be located where jumpstart server is installed. For example, it can be located at: <jumpstart_root>/solaris*/tools/boot/etc/format.dat
102 Page 102 of 186 System Requirements - 1-Touch AIX HP-UX Linux Solaris Windows The following are the requirements for 1-Touch on Windows: 1-TOUCH SERVER WINDOWS 7 Microsoft Windows 7 32-bit and x64 Editions WINDOWS SERVER 2003 Microsoft Windows Server bit and x64 Editions with a minimum of Service Pack 1 WINDOWS SERVER 2008 R2 Microsoft Windows Server 2008 R2 x64 Editions* *Core Editions not supported WINDOWS SERVER 2008 Microsoft Windows Server bit and x64 Editions* *Core Editions not supported WINDOWS VISTA Microsoft Windows Vista 32-bit and x64 Editions WINDOWS XP Microsoft Windows XP Professional 32-bit and x64 Editions CLIENT WINDOWS 7 Microsoft Windows 7 32-bit and x64 Editions WINDOWS SERVER 2003 Microsoft Windows Server bit and x64 Editions with a minimum of Service Pack 1 WINDOWS SERVER 2008 R2 Microsoft Windows Server 2008 R2 x64 Editions WINDOWS SERVER 2008 Microsoft Windows Server bit and x64 Editions WINDOWS VISTA Microsoft Windows Vista 32-bit and x64 Editions WINDOWS XP Microsoft Windows XP Professional 32-bit and x64 Editions HARD DRIVE 7 GB minimum of hard disk space for installing the software. 500 MB of free disk space is required for job result directory. 500 MB of free disk space is required for log directory. The RAM size of the client must be two times the size of the Live CD. The size of the Live CD can vary depending on the processor type and drivers added to the image. The default size is approximately 1 GB. You can verify the size. The 1-Touch ISO image is located at: SystemRecovery\Images\Windows 32-bit\BOOT_IMAGE\ISO\sources SystemRecovery\Images\Windows x64\boot_image\iso\sources MEMORY 32 MB RAM minimum required beyond the requirements of the operating system and running applications PROCESSOR All Windows-compatible processors supported
103 Page 103 of 186 PERIPHERALS A CD-ROM drive or ability to boot from an ISO image file is required to boot the client for recovery. No server is required for 9.0 NOTES CLIENT Ensure that the TCP/IP Services are configured on the computer before performing the backup. 1-Touch recovery is supported for systems which boot from SAN or the recovery of SAN attached disks. 1-Touch recovery is not supported if the system partition of the client computer is located on the FAT 32 volume. You must use a wired internet connection to recover a laptop. Use Disaster Recovery to recover a CommServe. You cannot recover a CommServe using the1-touch recovery. In a dual boot system, the operating system that is used while performing the backup will be recovered during 1-Touch recovery. You cannot recover both the operating systems. Ensure that windows is not installed on the drive other than C:\. The unattended installation of windows on a drive other than C:\ is not supported. You cannot perform the Online or Offline Restore when windows is installed on a drive other than C:\ 1-Touch does not support recovery of disks managed by Veritas Volume Manager due to inconsistent results with VDS. 1-Touch does not support recovery of disks that has BitLocker Encryption. To recover a Windows XP Client, you must perform the Online Restore. 1-Touch recovery of Windows XP clients is not supported if multilingual user interface (MUI) is other than English language. If MUI is English, you can perform the Online restore. The Offline and Non-interactive restores are not supported for Windows XP clients. Ensure that the client does not have multiple active partitions. You cannot perform Offline recovery if the client has multiple active partitions. DISCLAIMER Minor revisions and/or service packs that are released by application and operating system vendors are supported by our software but may not be individually listed in our System Requirements. We will provide information on any known caveat for the revisions and/or service packs. In some cases, these revisions and/or service packs affect the working of our software. Changes to the behavior of our software resulting from an application or operating system revision/service pack may be beyond our control. The older releases of our software may not support the platforms supported in the current release. However, we will make every effort to correct the behavior in the current or future releases when necessary. Please contact your Software Provider for any problem with a specific application or operating system. Additional considerations regarding minimum requirements and End of Life policies from application and operating system vendors are also applicable
104 Page 104 of 186 Deployment - 1-Touch for Windows Deployment Configuration Recovery Troubleshooting FAQ TABLE OF CONTENTS 1-Touch Recovery allows you to recover the entire computer system without installing the Operating system or any other software. Perform the following to enable 1-Touch Recovery: Install 1-Touch Server Software Setup a Remote Software Cache Configure a Remote Software Cache For 1-Touch Server Download and Install Software Updates on 1-Touch Server Apply Updates in 1-Touch Server Cache to 1-Touch Live CD Boot image Install Windows File System idataagent on the Client Computer BEFORE YOU BEGIN Download Software Packages Download the latest software package to perform the install. Software Installation Discs The software package is also available on the software installation discs. System Requirements for 1-Touch Server and Client Verify that the computer in which you wish to install the 1- Touch Software satisfies the System Requirements. Overview Provides comprehensive information about 1-Touch feature INSTALL THE 1-TOUCH SERVER SOFTWARE Install 1-Touch Server software on the computer that satisfies the minimum system requirements. This computer is referred as the 1-Touch Server. 1. Run Setup.exe from the Software Installation Disc on the computer that satisfies the minimum system requirements. 2. Select the required language. Click Next. 3. Select the option to install software on this computer. NOTES The options that appear on this screen depend on the computer in which the software is being installed. 4. Select I accept the terms in the license agreement. Click Next.
105 Page 105 of Expand Client Modules Backup & Recovery File System and select 1-Touch Server. Click Next. 6. If this computer and the CommServe is separated by a firewall, select the Configure firewall services option and then click Next. For firewall options and configuration instructions, see Firewall Configuration and continue with the installation. If firewall configuration is not required, click Next. 7. Enter the fully qualified domain name of the CommServe Host Name. Click Next. Do not use space and the following characters when specifying a new name for the CommServe Host Name: \ `~!@#$%^&*()+=<>/?,[]{}:;'" 8. Click Next.
106 Page 106 of Select Add programs to the Windows Firewall Exclusion List, to add CommCell programs and services to the Windows Firewall Exclusion List. Click Next. This option enables CommCell operations across Windows firewall by adding CommCell programs and services to Windows firewall exclusion list. It is recommended to select this option even if Windows firewall is disabled. This will allow the CommCell programs and services to function if the Windows firewall is enabled at a later time. 10. Verify the default location for software installation. Click Browse to change the default location. Click Next. Do not install the software to a mapped network drive. Do not use the following characters when specifying the destination path: / : *? " < > # It is recommended that you use alphanumeric characters only. 11. Click Next. 12. Click Next.

107 Page 107 of Click Next. 14. Select a Storage Policy. Click Next. If you do not have Storage Policy created, this message will be displayed. Click OK. You can create the Storage Policy later in step Enter the path for 1-Touch Server distribution folder. Click Next. NOTES This folder will contain the following: Client Files share - It will contain client files and folders selected for recovery. Image share - It will contain the files, required to deploy the File System idataagent. It will also contain a Boot_image folder with 1touchBoot.iso for burning a bootable CD-ROM WINDIST folder- It will contain shares housing the Microsoft Windows Distribution folders 16. Click Next.

108 Page 108 of Click Next. 18. Select Do not launch 1-Touch Options now. I will prepare the 1-Touch Server at a later time. Click Next. 19. Click Finish. If you already have a storage policy selected in step 14, click the Next button available on the bottom of the page to proceed to the Configuration section. If you do not have Storage Policy created, continue with the following step. 20. Create a Storage Policy: 1. From the CommCell Browser, navigate to Policies. 2. Right-click the Storage Policies and then click New Storage Policy. 3. Follow the prompts displayed in the Storage Policy Wizard. The required options

109 Page 109 of 186 are mentioned below: Select the Storage Policy type as Data Protection and Archiving and click Next. Enter the name in the Storage Policy Name box and click Next. From the Library list, click the name of a disk library to which the primary copy should be associated and then click Next. Ensure that you select a library attached to a MediaAgent operating in the current release. From the MediaAgent list, click the name of a MediaAgent that will be used to create the primary copy and then click Next. For the device streams and the retention criteria information, click Next to accept default values. Select Yes to enable deduplication for the primary copy. From the MediaAgent list, click the name of the MediaAgent that will be used to store the Deduplication store. Type the name of the folder in which the deduplication database must be located in the Deduplication Store Location or click the Browse button to select the folder and then click Next. Review the details and click Finish to create the Storage Policy. SETUP A REMOTE SOFTWARE CACHE The 1-Touch server will be used to create the 1-Touch Live CD required for 1-Touch recovery. The 1-Touch Live CD boots the client computer and and installs CommVault on the client computer during 1-Touch recovery. You must download and install all the latest updates for CommVault and WinPE on the 1-Touch server. CONFIGURE A REMOTE CACHE FOR 1-TOUCH SERVER When the 1-Touch Server software is not installed on a CommServe, you must configure a remote cache for the 1-Touch server. A remote cache will store all the updates for 1-Touch Server software, Windows File System idataagent and WinPE. You can skip this configuration if 1-Touch server is installed on the CommServe. 1. From the CommCell Console, right click the CommServe computer and click All Tasks Add/Remove Software Add/Remove Software Configuration. 2. Select Remote Software Cache tab Click Add. 3. Select the client Computer. Click Enable Remote Software Cache. Enter the path to Cache Directory. Click OK.


110 Page 110 of 186 DOWNLOAD AND INSTALL UPDATES ON 1-TOUCH SERVER Before creating the 1-Touch Live CD, download all the software updates for 1-Touch Server software, Windows File System idataagent and WinPE. 1. From the CommCell Browser, right-click on the CommServe computer node, and click All Tasks -> Add/Remove Software -> Download Software. 2. Click OK. 3. Click Job Initiation tab. By default Immediate option is selected. Click OK.


111 Page 111 of You can track the progress of the job from the Job Controller window. The software updates are stored automatically in the CommServe Cache and 1-Touch Server cache. 5. From the CommCell Browser, right-click on the 1-Touch Server computer node, and click All Tasks -> Add/Remove Software -> Install Updates 6. Click Job Initiation tab. By default Immediate option is selected. Click OK. APPLY UPDATES IN 1-TOUCH SERVER CACHE TO 1-TOUCH LIVE CD BOOT IMAGE Follow the steps given below to mount the 1-Touch Live CD and apply the software updates to the ISO: 1. From the CommCell Console, navigate to <Client Computers> < 1-Touch Server>. Right-click and click All Tasks Add/Remove Software Copy Software. 2. Select Copy and Update One Touch Cache. Click OK. All the software updates are copied to 1-Touch server cache and then integrated with 1-Touch ISO for each type of processor.


112 Page 112 of 186 INSTALL WINDOWS FILE SYSTEM IDATAAGENT ON THE CLIENT COMPUTER Install Windows File System idataagent on the computers that satisfies the minimum system requirements. The computer is referred as the 1-Touch Client. The software can be installed using one of the following methods: Method 1: Interactive Install - to install directly on client computer. Method 2: Install Software from CommCell Console - to install remotely on a client computer. INTERACTIVE INSTALL 1. Run Setup.exe from the Software Installation Disc on the computer that satisfies the minimum system requirements. 2. Select the required language. Click Next. 3. Select the option to install software on this computer. NOTES The options that appear on this screen depend on the computer in which the software is being installed. 4. Select I accept the terms in the license agreement. Click Next.


113 Page 113 of Expand Client Modules Backup & Recovery File System and select Windows File System idataagent. Click Next. 6. Click YES to install Microsoft.NET Framework package. This prompt is displayed only when Microsoft.NET Framework is not installed. Once the Microsoft.NET Framework is installed, the software automatically installs the Microsoft Visual J# 2.0 and Visual C++ redistributable packages. 7. If this computer and the CommServe is separated by a firewall, select the Configure firewall services option and then click Next. For firewall options and configuration instructions, see Firewall Configuration and continue with the installation. If firewall configuration is not required, click Next. You cannot perform 1-Touch restore and VirtualizeMe operations if you configure firewall between CommServe and the client computer. 8. Enter the fully qualified domain name of the CommServe Host Name. Click Next. Do not use space and the following characters when specifying a new name for the CommServe Host Name: \ `~!@#$%^&*()+=<>/?,[]{}:;'" 9. Click Next.


114 Page 114 of Select Add programs to the Windows Firewall Exclusion List, to add CommCell programs and services to the Windows Firewall Exclusion List. Click Next. This option enables CommCell operations across Windows firewall by adding CommCell programs and services to Windows firewall exclusion list. It is recommended to select this option even if Windows firewall is disabled. This will allow the CommCell programs and services to function if the Windows firewall is enabled at a later time. 11. Verify the default location for software installation. Click Browse to change the default location. Click Next. Do not install the software to a mapped network drive. Do not use the following characters when specifying the destination path: / : *? " < > # It is recommended that you use alphanumeric characters only. 12. Select a Client Group from the list. Click Next. This screen will be displayed if Client Groups are configured in the CommCell Console. 13. Click Next.
115 Page 115 of Click Next. 15. Select a Storage Policy. Click Next. If you do not have Storage Policy created, this message will be displayed. Click OK. You can create the Storage Policy later in step Click Next. 17. Click Next.
116 Page 116 of Click Finish. If you already have a storage policy selected in step 15, click the Next button available on the bottom of the page to proceed to the Configuration section. If you do not have Storage Policy created, continue with the following step. 19. Create a Storage Policy: 1. From the CommCell Browser, navigate to Policies. 2. Right-click the Storage Policies and then click New Storage Policy. 3. Follow the prompts displayed in the Storage Policy Wizard. The required options are mentioned below: Select the Storage Policy type as Data Protection and Archiving and click Next. Enter the name in the Storage Policy Name box and click Next. From the Library list, click the name of a disk library to which the primary copy should be associated and then click Next. Ensure that you select a library attached to a MediaAgent operating in the current release. From the MediaAgent list, click the name of a MediaAgent that will be used to create the primary copy and then click Next. For the device streams and the retention criteria information, click Next to accept default values. Select Yes to enable deduplication for the primary copy. From the MediaAgent list, click the name of the MediaAgent that will be used to store the Deduplication store. Type the name of the folder in which the deduplication database must be located in the Deduplication Store Location or click the Browse button to select the folder and then click Next. Review the details and click Finish to create the Storage Policy. METHOD 2: INSTALL SOFTWARE FROM COMMCELL CONSOLE 1. From the CommCell Browser, select Tools Add/Remove Software Install Software.

117 Page 117 of Click Next. 3. Select Windows. Click Next. 4. Select Manually Select Computers. Click Next. 5. Enter the fully qualified domain name of the computer in which you wish to install. For example: apple.domain.company.com Click Next.


118 Page 118 of Click Next. 7. Specify UserName and Password. Click Next. 8. Select Windows File System idataagent. Click Next. 9. Click Next.


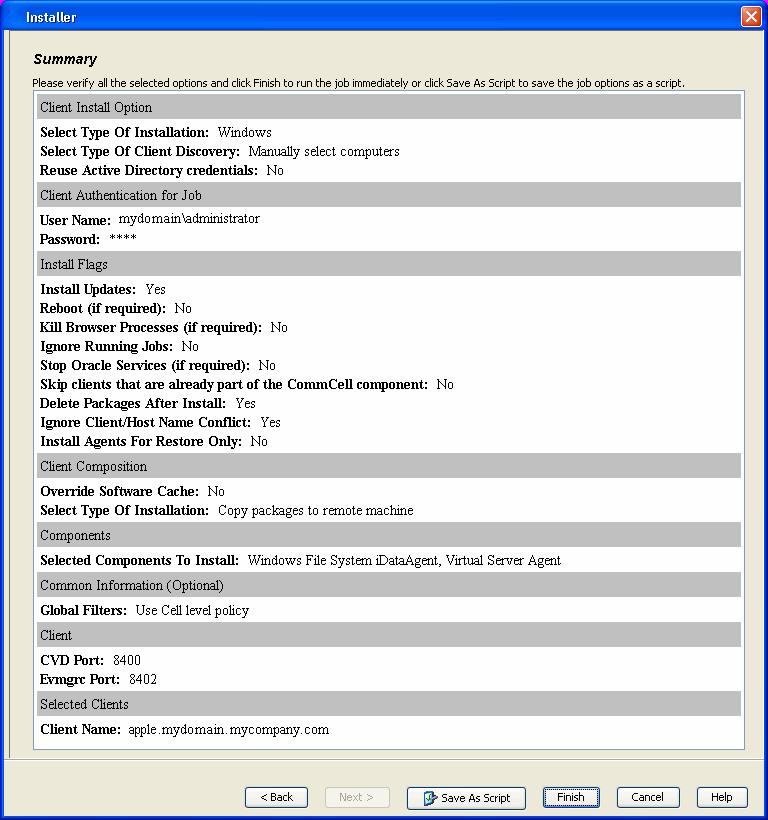
119 Page 119 of Click Next. 11. Select Immediate. Click Next. 12. Click Finish.


120 Page 120 of You can track the progress of the job from the Job Controller or Event Viewer window. 14. Once the job is complete, right-click the CommServe computer, click View and then click Admin Job History. 15. Select Install/Upgrade/Remove Software. Click OK. 16. You can view the following details about the job by right-clicking the job: Items that succeeded during the job Items that failed during the job Details of the job Events of the job Log files of the job


121 Page 121 of 186 Configuration - 1-Touch for Windows Deployment Configuration Recovery Troubleshooting FAQ TABLE OF CONTENTS Basic Configuration Enable 1-Touch Backup Perform a Backup of 1-Touch Client Create a Checklist Configuration for Online Restore Manage Windows Drivers Manage Windows Distribution Shares, Service Packs and Hot Fixes Create an Answer File Additional Options Creating an Answer File for iscsi Disk Restore BASIC CONFIGURATION ENABLE 1-TOUCH BACKUP The windows system state backup includes all the information required for 1-Touch recovery. Follow the steps given below to ensure that the system state data is included in a subclient: 1. From the CommCell Console, navigate to <Client> File System idataagent defaultbackupset. Right-click the default subclient, and click Properties. 2. Click the General tab. Ensure that Use VSS for System State check box is selected. 3. Click the Content tab. Ensure that the Backup System State check box is selected.


122 Page 122 of 186 You can use any subclient to backup the system state data. However, if you want to perform the non interactive restore, use the default subclient to back up the system state data. PERFORM A BACKUP OF 1-TOUCH CLIENT Before recovering a client, ensure that you have run at least one full backup for the subclient that contains the system state data. If you are performing backup of a Windows 7 client, ensure that the Administrator account is enabled. You cannot perform the Offline restore if administrator account is not enabled while performing the backup. Follow the steps given below to perform a full backup: 1. From the CommCell Console, navigate to <Client> File System idataagent defaultbackupset. Right-click the subclient, and click Backup. 2. Select Full. Select Immediate. Click OK. 3. You can track the progress of the backup job from the Job Controller window. When the backup job has completed, the Job Controller displays the status as Completed. CREATE A CHECKLIST If you want to perform an Online Restore or an Interactive Restore, ensure that you have all the required client information before starting the a restore. Create a checklist that contains the following client information: REQUIRED INFORMATION CommCell Credentials HOW TO FIND IT

123 Page 123 of Invoke the CommCell Console on the client computer Windows Credentials Network Adapters and Drivers 2. Note down the username and password to login to CommServe from CommCell Console. 1. Login to 1-Touch server. 2. Note down username and password. 1. Click Start Programs Accessories System Information. 2. In the System Information dialog box, click Components Network Adapter. Mass Storage Drivers 3. Note down the Network Adapter and Drivers information. 1. Click Start Programs Accessories System Information. 2. In the System Information dialog box, click Software Environment System Drivers. CommServe Host Name 3. Note down the driver information. 1. From the CommCell Console, navigate to <Client>. 2. Right click the <Client> and click Properties. 3. Select General tab. CommServe IP Address 4. Note down the CommServe HostName. 1. Login to CommServe using the administrator login and password. 2. Invoke the Command Prompt. Windows License Key 3. Type ipconfig Refer to the License document. Note down the string of 25 letters on the license document. CONFIGURATION FOR ONLINE RESTORE If you are not planning to perform an online restore, skip the following steps and go to Recovery section. Follow the steps given below before starting an Online restore: MANAGE WINDOWS DISTRIBUTION SHARES, SERVICE PACKS, AND HOT FIXES Check if all the required Windows Distribution Shares are available on the 1-Touch Server. Also, ensure that all the service packs and hot fixes are integrated with the distribution share. If required, you can add the Windows Distribution Shares. You will need the installation CD and the License Key for the appropriate version of the Windows operating system. 1. Login to 1-Touch Server. 2. Click Start Programs CommVault Simpana 1-Touch. 3. Click Windows Distribution Manager. 4. Click Add.


124 Page 124 of Select the Product Version. Enter the Folder name to create a new windows distribution share. Enter the Number of source folders, CDs, DVDs to import from. Enter Source Location. Enter the User name and Password. Enter the License Key. Click Add. This distribution share will be available for selection in the 1-Touch Client Preparation Wizard. 6. Review the Hotfixes and service packs change log. Select the unrequired Hotfixes and service packs from the list and click Remove. Click Update to apply Windows Updates to a Windows Distribution Share. 7. Browse to the appropriate Hotfixes or service packs from the list Click the Windows Distributions to which you want to apply these Hotfixes or service packs. Click Apply. Click Done. Removing a Hotfix or service pack from the list of available Hotfixes does not remove the Hotfix from the Windows Distribution to which it has been applied. Once a service pack or Hotfix is applied/slipstreamed to a Windows Distribution, it cannot be removed. The option to integrate, or slipstream, Security Updates and Service Packs into Windows distribution shares supports Update.exe or any later version. When integrating Updates in your distribution shares, be sure to integrate the Service Pack first.

125 Page 125 of 186 MANAGE WINDOWS DRIVERS Check if all the required mass storage and network adapter drivers are available on 1-Touch Server. Add the required drivers. 1. Login to 1-Touch Server. 2. Click Start Programs CommVault Simpana 1-Touch 3. Click Windows Driver Manager. 4. Select the Driver Type. Select the OS Family. Review the list of available drivers for the selected operating system. Click Add to add any additional drivers. Select the Driver Type from the list. Browse to the Location where drivers are stored. Select Driver from the list of available drivers. Select a Processor Type from the list. Select the OS Family. Click OK. These drivers will be available for selection in the 1-Touch Client Preparation Wizard. If third-party mass storage drivers are needed, use standard vendor-supplied Windows drivers. You can use the RIS version or the native version of the Mass Storage Driver for 1-Touch Recovery. The drivers must be compatible to Windows version on the client that is being recovered. CREATE AN ANSWER FILE When you have all drivers and windows distribution shares ready on the 1-Touch server, create an answer file. You can also create an answer file after you boot


126 Page 126 of 186 the client. 1. Login to 1-Touch Server. 2. Click Start Programs CommVault Simpana 1-Touch. 3. Select 1-Touch Client Preparation Wizard. Click Next. 4. Click Next. 5. Enter CommCell User Name. Enter CommCell Password. Select the client for which you want to create the answer file. Click Next. 6. Click Next.


127 Page 127 of Enter the Windows User name and Password for 1-Touch Server. Do not use the following characters in the password: {,, }, ~. If the password contains any of these characters, create a new user and enter the new User Name and Password. 8. Click Next. 9. Select Windows Distribution Share Name from the list of available shares. Click Next.


128 Page 128 of Select the primary mass storage driver from the list. Select all the mass storage drivers necessary for installing the operating system. If you are performing Cross Hardware Restore, select the mass storage drivers for the computer where you are recovering. Click Next. 11. Select PnP Drivers for the Client. The PnP Drivers will be used while installing the operating system. Click Next. 12. Click Next. Select Dissimilar Disk Mapping if the computer where you are performing the restore has different disk configuration from the client that was backed up. If the client computer has iscsi disk, select the Configure and restore iscsi disks check box.

129 Page 129 of If you want to exclude any folder or driver from the full system restore, enter the path of the folder or driver and click Add. Click Next. 14. Select the Network Adapter to Bind. Click Next. 15. Click Next.


130 Page 130 of Review the summary of the client answer file. Click Done to save the answer file. 17. Enter the name of a Client Profile Click Save to save the client preparation as a client profile. Click Done to save the client preparation as a client answer file. It is saved on the 1-Touch server in the SystemRecovery\Client Files folder. ADDITIONAL OPTIONS CREATING AN ANSWER FILE FOR ISCSI DISKS RESTORE If the client computer is using iscsi disks, follow the steps given below while creating an answer file: 1. Ensure that you have selected the Configure and restore iscsi disks check box while creating the answer file for the client.


131 Page 131 of If you are restoring Windows 2003 computer, provide the following details: Location of the iscsi Initiator Installation File. User name and password for the location where iscsi Initiator Installation File is stored. You must perform an Online Restore if you are restoring a client that has iscsi disks. Foe more information, refer Online Restore.
132 Page 132 of 186 Recovery - 1-Touch for Windows Deployment Configuration Recovery Troubleshooting FAQ TABLE OF CONTENTS Prerequisites Create a Live CD Similar Disk Restore Offline Non Interactive Restore Offline Interactive Restore Online Restore Dissimilar Disk Restore Offline Non Interactive Restore Offline Interactive Restore Online Restore Cross Hardware Similar Disk Restore Offline Non Interactive Restore Offline Interactive Restore Online Restore Cross Hardware Dissimilar Disk Restore Offline Non Interactive Restore Offline Interactive Restore Online Restore Additional Options Accessing the Response File From an UNC Path During an Offline Non-Interactive Restore Changing the Client Configuration During an Offline Non-Interactive Restore Using an USB Drive Instead of a Live CD Cluster Recovery Configuring WINS and DNS during Interactive Offline Restore Restore the Teaming Network Adapters PREREQUISITES Users must have CommCell administrative privileges to perform 1-Touch recovery. Disable authentication for Agent installation using the following steps: 1. Log on to the CommServe. 2. Right-click the <CommServe> and click the Security tab. 3. Disable Require Authentication for Agent Installation check box. 4. Click OK. CREATE A LIVE CD A Live CD will be required to boot the client. You can create a Live CD image using 1-Touch Wizard on 1-Touch server. Before creating a Live CD image, consider the following prerequisites: All the software updates for 1-Touch Server software, Windows File System idataagent and WinPE are downloaded to remote cache on 1-Touch server and applied to 1-Touch Live CD. For more information refer to Download and Install Updates on 1-Touch Server. Follow the steps given below to create a Live CD: 1. Login to 1-Touch Server. 2. Click Start Programs CommVault Simpana 1-Touch. 3. Click 1-Touch Boot CD Wizard.

133 Page 133 of Click Next. 5. Select the processor type from the list. The processor type must match with the processor of the computer where you are restoring the client. 6. By default Mass Storage Drivers for Windows 7 WINPE are automatically added to the boot CD. The mass storage drivers are required by the Boot CD to connect to primary mass storage device. Click Next and go to step 8. If you want to add any additional drivers to the boot CD, click Add and continue to next step.


134 Page 134 of Skip this step if you do not want to add any Mass Storage Drivers to the list. Select Mass Storage from the Driver Type list. Browse to the Location where.oem files are stored and select the required file. Select a Processor Type from the list. In the OS Family list, select Windows 7. Click Add. The list of Mass Storage Drivers displays the newly added driver. Select the drivers from the list which you want to add to the boot CD. You can select multiple drivers. Click Next. 8. By default NIC Drivers for Windows 7 WINPE are automatically added to the boot CD. The NIC drivers are required by the ISO to connect with the network. Click Next and go to step 10. If you want to add any additional drivers to the list, click Add and continue to next step. 9. Skip this step if you do not want to add any NIC Drivers. Select Network Adapter from the Driver Type list. Browse to the Location where.inf files are stored and select the required file. Select Driver from the list of available drivers. Select a Processor Type from the list. In the OS Family list, select Windows 7. Click Add. The list of NIC Drivers displays the newly added driver. Select the drivers from the list which you want to add to the boot CD. You can select multiple drivers. Click Next. 10. Enter the location to save the ISO image. Click Done.

135 Page 135 of Create a Live CD using the ISO. 1-Touch clients may have different types of operating systems and processors. You must create a Live CD for each type of processor. Ensure that you have all the latest software updates included in the Live CD. Learn more... Back to Top SIMILAR DISK RESTORE When you are restoring to a computer which has the same hardware and disk configuration as that of the backed up computer, use one of the following methods to perform the restore: OFFLINE NON-INTERACTIVE RESTORE Use this method when you do not want to provide the client information during the restore. When you backup the client, the client information is stored as a client configuration. This is a offline recovery method to restore the operating system. It does not require connection with 1-Touch Server. 1. Create a 1-Touch Live CD. 2. From the CommCell Console, navigate to <Client> Right-click the <Client> and click All Tasks 1-Touch Recovery Point 3. Select the most recent client configuration to create a response file. A new client configuration is generated when you make any changes in the client network configuration and then perform a full backup. Click Export Config.
136 Page 136 of Enter the credentials used to login to CommCell Console. Click OK. 5. Save the response file as onetouchresponse.xml. By default, the response file is saved in the My documents folder on the computer that is running the CommCell Console. 6. Copy the response file to a USB drive or a removable disk or a network location. 7. Connect the USB drive or the removable disk to the client that you want recover. If you want to use a network location to access the response file during the restore, follow the steps given in Accessing the Response File From an UNC Path During a Non-Interactive Restore. 8. Use the 1-Touch Live CD to boot the client. 9. Select the language from the list Click OK. 10. Click OK to start the full system restore.
137 Page 137 of Click OK. Remove the Live CD and restart the computer. OFFLINE INTERACTIVE RESTORE Use this method when you want to specify the client configuration information during the restore. This is a offline recovery method to restore the operating system. It does not require connection with 1-Touch Server. 1. Create 1-Touch Live CD Use the 1-Touch Live CD to boot the client. 2. Select the language from the list Click OK. 3. Click Next. 4. Click Yes if all disk devices are detected.
138 Page 138 of Enter CommServe Host Name. Enter CommServe IP address. Select the Network Connection from the Connection drop-down combo box. Click Get Clients. Select client Host Name from the list. Click Next. 6. Review network information for CommServe and restored client. Click Next. 7. Enter CommCell User Name. Enter CommCell Password. Enter the credentials that are used to login to CommCell from the client. Click Next.

139 Page 139 of Click Next. 9. Click Next. If you want to exclude any folder or driver from the full system restore, enter the path of the folder or driver and click Add. 10. Click Next.

140 Page 140 of Click Next. 12. Click OK. The TCP/IP Properties of the client captured during the backup are displayed. If the target computer has different IP, change the TCP/IP Properties or click Use DHCP to use DHCP instead of static IP address. The full system restore starts. 13. Click OK. Click Finish. Remove the Live CD and restart the computer. After you click Finish, the computer may reboot one or more times. ONLINE RESTORE Perform the Online Restore to reinstall the operating system on the client. The Windows Distribution Shares and Drivers available on 1-Touch Server are used to reinstall the operating system.
141 Page 141 of Login to 1-Touch Server and create Answer File for the 1-Touch Client. For more information, go to Creating an Answer File. 2. Create 1-Touch Live CD. Use 1-Touch Live CD to boot the client. 3. Select the language from the list Click OK. 4. Click Next. 5. Click Yes if all disk devices are detected. 6. Select Online Restore. Enter the Client Name. If the client answer file is not created on 1-Touch Server, select Create Client Answer files for 1-Touch Recovery and follow the steps described in Creating an Answer File. Click Next.
142 Page 142 of Enter IP Address of the 1-Touch Server where the client answer file is available. Enter the User name and Password for the 1-Touch Server. Click Next. 8. Click Next. 8. Reboot the computer after the windows installation completes. During the Windows installation process of a 1-Touch Recovery, the Windows Administrator password is set as 1Touch. Upon completion of the 1-Touch Recovery, the Administrator's original password will be restored from the backup. After the windows installation completes, the computer may reboot one or more times.
143 Page 143 of 186 Back to Top DISSIMILAR DISK RESTORE Perform a Dissimilar Disk Restore, when the computer where you are restoring, satisfies the following criteria: The hardware configuration of the computer is same as backed up computer The disk configuration of the computer is different than the backed up computer Use one of the following methods to perform the restore. OFFLINE NON INTERACTIVE RESTORE Use this method when you do not want to provide the client information during the restore. When you backup the client, the client information is stored as a client configuration. This is a offline recovery method to restore the operating system. It does not require connection with 1-Touch Server. 1. Create a 1-Touch Live CD. 2. From the CommCell Console, navigate to <Client> Right-click the <Client> and click All Tasks 1-Touch Recovery Point 3. Select the most recent client configuration to create a response file. A new client configuration is generated when you make any changes in the client network configuration and then perform a full backup. Click Export Config. 4. Enter the credentials used to login to CommCell Console.
144 Page 144 of 186 Click OK. 5. Save the response file as onetouchresponse.xml. By default, the response file is saved in the My documents folder on the computer that is running the CommCell Console. 6. Copy the response file to a USB drive or a removable disk or a network location. 7. Connect the USB drive or the removable disk to the client that you want recover. If you want to use a network location to access the response file during the restore, follow the steps given in Accessing the Response File From an UNC Path During a Non-Interactive Restore. 8. Use the 1-Touch Live CD to boot the client. 9. Select the language from the list Click OK. 10. Click OK to start the full system restore. 11. Review the Source Disk Layout and Destination Disk Layout. Right-click a disk from Destination Disk Layout and select the disk type that you want to assign to the destination disk. Click OK to start the disk initialization process. 12. Click Yes.
145 Page 145 of Repeat the steps 11 and 12 to clean all the required disks from the Destination Disk Layout. Click Done after all disks are initialized. 14. Right-click the disk from the Source Disk Layout that you want to map with a destination disk. Select Map. 15. Select a destination disk from the the Available Disk List to map with the selected source disk. Select the Partition Type. Select the File system. Click Perform quick format if you want to format the selected disk. Click Enable file and folder compression to enable the file system compression for the selected disk. Enter the Volume Size. Select a Drive Letter to assign it to the selected volume. Click OK. 16. Review the Destination Disk Layout. Click OK to start full system restore. 17. Click OK. Remove the Live CD and restart the computer.
146 Page 146 of 186 OFFLINE INTERACTIVE RESTORE Use this method when you want to specify the client configuration information during the restore. This is a offline recovery method to restore the operating system. It does not require connection with 1-Touch Server. 1. Create 1-Touch Live CD Use the 1-Touch Live CD to boot the client. 2. Select the language from the list Click OK. 3. Click Next. 4. Click Yes if all disk devices are detected. 5. Enter CommServe Host Name. Enter CommServe IP address. Select the Network Connection from the Connection drop-down combo box.
147 Page 147 of 186 Click Get Clients. Select client Host Name from the list. Click Next. 6. Review network information for CommServe and restored client. Click Next. 7. Enter CommCell User Name. Enter CommCell Password. Enter the credentials that are used to login to CommCell from the client. Click Next. 8. Ensure that Dissimilar Disk Mapping is selected. Click Next.

148 Page 148 of Click Next. If you want to exclude any folder or driver from the full system restore, enter the path of the folder or driver and click Add. 10. Review the Source Disk Layout and Destination Disk Layout. Right-click a disk from Destination Disk Layout and select the disk type that you want to assign to the destination disk. Click OK to start the disk initialization process. 11. Click Yes. 12. Repeat the steps 9 and 10 to clean all the required disks from the Destination Disk Layout. Click Done after all disks are initialized.
149 Page 149 of Right-click the disk from the Source Disk Layout that you want to map with a destination disk. Select Map. 14. Select a destination disk from the the Available Disk List to map with the selected source disk. Select the Partition Type. Select the File system. Click Perform quick format if you want to format the selected disk. Click Enable file and folder compression to enable the file system compression for the selected disk. Enter the Volume Size. Select a Drive Letter to assign it to the selected volume. Click OK. 15. Review the Destination Disk Layout. Click OK to start full system restore. 16. Click OK. The TCP/IP Properties of the client captured during the backup are displayed. If the target computer has different IP, change the TCP/IP Properties or click Use DHCP to use DHCP instead of static IP address. The full system restore starts.
150 Page 150 of Click OK. Remove the Live CD and restart the computer. ONLINE RESTORE Perform the Online Restore to reinstall the operating system on the client. The Windows Distribution Shares and Drivers available on 1-Touch Server are used to reinstall the operating system. Ensure that you have selected Dissimilar Disk Mapping Restore Option while creating the answer file. 1. Login to 1-Touch Server and create Answer File for the 1-Touch Client. For more information, go to Creating an Answer File. 2. Create 1-Touch Live CD. Use 1-Touch Live CD to boot the client. 3. Select the language from the list Click OK. 4. Click Next. 5. Click Yes if all disk devices are detected.
151 Page 151 of Select Online Restore. Enter the Client Name. If the client answer file is not created on 1-Touch Server, select Create Client Answer files for 1-Touch Recovery and follow the steps described in Creating an Answer File. Click Next. 7. Enter IP Address of the 1-Touch Server where the client answer file is available. Enter the User name and Password for the 1-Touch Server. Click Next. 8. Click Next.
152 Page 152 of Review the Source Disk Layout and Destination Disk Layout. Right-click a disk from Destination Disk Layout and select the disk type that you want to assign to the destination disk. Click OK to start the disk initialization process. 10. Click Yes. 11. Repeat steps 9 and 10 to clean all the required disks from the Destination Disk Layout. Click Done to start the disk cleaning. 12. Right-click the disk from the Source Disk Layout that you want to map with a destination disk. Select Map. 13. Select a destination disk from the the Available Disk List to map with the
153 Page 153 of 186 selected source disk. Select the Partition Type. Select the File system. Click Perform quick format if you want to format the selected disk. Click Enable file and folder compression to enable the file system compression for the selected disk. Enter the Volume Size. Select a Drive Letter to assign it to the selected volume. Click OK. 14. Review the Destination Disk Layout. Click OK to start recovery of the destination disk. 15. Reboot the computer after the windows installation completes. After the windows installation completes, the computer may reboot one or more times. During the Windows installation process of a 1-Touch Recovery, the Windows Administrator password is set as 1Touch. Upon completion of the 1-Touch Recovery, the Administrator's original password will be restored from the backup. Back to Top CROSS HARDWARE SIMILAR DISK RESTORE When a target system has different hardware than the backed up system, perform the Cross Hardware restore. If the backed up system is still running the Simpana services, stop the services before performing the cross hardware restore. Use one of the following methods to perform the restore. OFFLINE NON INTERACTIVE RESTORE Use this method when you do not want to provide the client information during the restore. When you backup the client, the client information is stored as a client configuration. This is a offline recovery method to restore the operating system. It does not require connection with 1-Touch Server. PREREQUISITES Copy all the required Mass Storage Drivers and NIC Drivers to a network location. For example: If the target system requires Adaptec Ultra160 mass storage driver, then copy the driver.inf for Adaptec Ultra160 to a network location. 1. Create a 1-Touch Live CD. 2. From the CommCell Console, navigate to <Client>
154 Page 154 of 186 Right-click the <Client> and click All Tasks 1-Touch Recovery Point 3. Select the most recent client configuration to create a response file. A new client configuration is generated when you make any changes in the client network configuration and then perform a full backup. Click Export Config. 4. Enter the credentials used to login to CommCell Console. Click OK. 5. Save the response file as onetouchresponse.xml. By default, the response file is saved in the My documents folder on the computer that is running the CommCell Console. 6. Copy the response file to a USB drive or a removable disk or a network location. 7. Connect the USB drive or the removable disk to the client that you want recover. If you want to use a network location to access the response file during the restore, follow the steps given in Accessing the Response File From an UNC Path During a Non-Interactive Restore. 8. Use the 1-Touch Live CD to boot the client.
155 Page 155 of Select the language from the list Click OK. 10. Click OK to start the full system restore. 11. Enter a UNC path to the.inf file for the mass storage drivers. The third party Mass Storage drivers are required to locate the boot disk when restarting the computer. You must provide the path to.inf file for the mass storage drivers. You can provide the path to.inf file for the NIC drivers now or you can provide it after the system restarts. It is recommended that you install the latest hardware drivers after the restore completes. 12. Enter the password to access the network location where drivers are stored. 13. Select file(s) required to install the drivers. Click Open. 14. Click OK. 15. Enter the valid license key for the restored Windows Operating System. Refer to the check list in the Configuration section. Click OK.
156 Page 156 of Click OK. Remove the Live CD and restart the computer. OFFLINE INTERACTIVE RESTORE Use this method when you want to specify the client configuration information during the restore. This is a offline recovery method to restore the operating system. It does not require connection with 1-Touch Server. PREREQUISITES Copy all the required Mass Storage Drivers and NIC Drivers to a network location. For example: If the target system requires Adaptec Ultra160 mass storage driver, then copy the driver.inf for Adaptec Ultra160 to a network location. 1. Create 1-Touch Live CD Use the 1-Touch Live CD to boot the client. 2. Select the language from the list Click OK. 3. Click Next. 4. Click Yes if all disk devices are detected.
157 Page 157 of Enter CommServe Host Name. Enter CommServe IP address. Select the Network Connection from the Connection drop-down combo box. Click Get Clients. Select client Host Name from the list. Click Next. 6. Review network information for CommServe and restored client. Click Next. 7. Enter CommCell User Name. Enter CommCell Password. Enter the credentials that are used to login to CommCell from the client. Click Next.
158 Page 158 of Ensure that the Go to Windows Mini-Setup is selected. This option is selected by default when the restored computer has different mouse, keyboard, disk configuration, network interface card, or processor than that of the backed up computer. The mini-setup wizard runs after the restore. This wizard configures network settings and installs the required drivers. You need to provide the credentials for the domain in which you want to add the restored computer. Click Advanced Options. 9. Enter the Username and Password for the domain in which you want to add the restored computer. Ensure that the Reboot After Restore is completed is selected. Click OK. 10. Click Next. Select the Increase logging level option if you want to increase the logging level of windows and Simpana logs. The increased logging level gives you more information for troubleshooting. After the restore, you may want to review the system state for troubleshooting. Do not select the Reboot After Restore is completed option if you want to review the system state.
159 Page 159 of Click OK. The TCP/IP Properties of the client captured during the backup are displayed. If the target computer has different IP, change the TCP/IP Properties or click Use DHCP to use DHCP instead of static IP address. The full system restore starts. 12. Enter a UNC path to the.inf file for the mass storage drivers. The third party Mass Storage drivers are required to locate the boot disk when restarting the computer. You must provide the path to.inf file for the mass storage drivers. You can provide the path to.inf file for the NIC drivers now or you can provide it after the system restarts. It is recommended that you install the latest hardware drivers after the restore completes. 13. Enter the valid license key for the restored Windows Operating System. Refer to the check list in the Configuration section. Click OK. 14. Click OK. Windows Mini-Setup Wizard configures the network settings and installs required drivers. This process may take few minutes. The computer may reboot one or more times.
160 Page 160 of 186 ONLINE RESTORE Perform the Online Restore to reinstall the operating system on the client. The Windows Distribution Shares and Drivers available on 1-Touch Server are used to reinstall the operating system. PREREQUISITES Make sure that the required mass storage and NIC drivers are included in the answer file. 1. Login to 1-Touch Server and create Answer File for the 1-Touch Client. For more information, go to Creating an Answer File. 2. Create 1-Touch Live CD. Use 1-Touch Live CD to boot the client. 3. Select the language from the list Click OK. 4. Click Next. 5. Click Yes if all disk devices are detected.
161 Page 161 of Select Online Restore. Enter the Client Name. If the client answer file is not created on 1-Touch Server, select Create Client Answer files for 1-Touch Recovery and follow the steps described in Creating an Answer File. Click Next. 7. Enter IP Address of the 1-Touch Server where the client answer file is available. Enter the User name and Password for the 1-Touch Server. Click Next. 8. Click Next.
162 Page 162 of Check the TCP/IP and Display Adapter configurations. Use the Client Checklist to check the configuration. If they are incorrect, perform the following steps: Re-install the appropriate Network Interface Card drivers. Uninstall the Network Adapters and Display Adapters using the Hardware Uninstall Wizard or Windows Device Manager. Restart the computer. Reconfigure the TCP/IP and Display Adapter settings. 9. Reboot the computer after the windows installation completes. During the Windows installation process of a 1-Touch Recovery, the Windows Administrator password is set as 1Touch. Upon completion of the 1-Touch Recovery, the Administrator's original password will be restored from the backup. After the windows installation completes, the computer may reboot one or more times. Back to Top CROSS HARDWARE DISSIMILAR DISK RESTORE When a target system has different hardware and the different disk configuration than the backed up system, perform the Cross Hardware Dissimilar Disk restore. If the backed up system is still running the Simpana services, stop the services before performing the cross hardware restore. Use one of the following methods to perform the restore. OFFLINE NON INTERACTIVE RESTORE Use this method when you do not want to provide the client information during the restore. When you backup the client, the client information is stored as a client configuration. This is a offline recovery method to restore the operating system. It does not require connection with 1-Touch Server.

163 Page 163 of 186 PREREQUISITE Copy all the required Mass Storage Drivers and NIC Drivers to a network location. For example: If the target system requires Adaptec Ultra160 mass storage driver, then copy the driver.inf for Adaptec Ultra160 to a network location. 1. Create a 1-Touch Live CD. 2. From the CommCell Console, navigate to <Client> Right-click the <Client> and click All Tasks 1-Touch Recovery Point 3. Select the most recent client configuration to create a response file. A new client configuration is generated when you make any changes in the client network configuration and then perform a full backup. Click Export Config. 4. Enter the credentials used to login to CommCell Console. Click OK. 5. Save the response file as onetouchresponse.xml. By default, the response file is saved in the My documents folder on the computer that is running the CommCell Console. 6. Copy the response file to a USB drive or a removable disk or a network location.
164 Page 164 of Connect the USB drive or the removable disk to the client that you want recover. If you want to use a network location to access the response file during the restore, follow the steps given in Accessing the Response File From an UNC Path During a Non-Interactive Restore. 8. Use the 1-Touch Live CD to boot the client. 9. Select the language from the list Click OK. 10. Click OK to start the full system restore. 10. Review the Source Disk Layout and Destination Disk Layout. Right-click a disk from Destination Disk Layout and select the disk type that you want to assign to the destination disk. 11. Click Yes. 12. Repeat steps 10 and 11 to clean all the required disks from the Destination Disk Layout. Click Done after all disks are initialized. 13. Right-click the disk from the Source Disk Layout that you want to map with a destination disk. Select Map.

165 Page 165 of Select a destination disk from the the Available Disk List to map with the selected source disk. Select the Partition Type. Select the File system. Click Perform quick format if you want to format the selected disk. Click Enable file and folder compression to enable the file system compression for the selected disk. Enter the Volume Size. Select a Drive Letter to assign it to the selected volume. Click OK. 15. Review the Destination Disk Layout. Click OK to start recovery of the destination disk. 16. Enter a UNC path to the.inf file for the mass storage drivers. The third party Mass Storage drivers are required to locate the boot disk when restarting the computer. You must provide the path to.inf file for the mass storage drivers. You can provide the path to.inf file for the NIC drivers now or you can provide it after the system restarts. It is recommended that you install the latest hardware drivers after the restore completes. 17. Enter the password to access the network location where drivers are stored. 18. Select file(s) to install the drivers.


166 Page 166 of 186 Click Open. 19. Click OK. 20. Enter the valid license key for the restored Windows Operating System. Refer to the check list in the Configuration section. Click OK. 21. Click OK. Remove the Live CD and restart the computer. OFFLINE INTERACTIVE RESTORE Use this method when you want to specify the client configuration information during the restore. This is a offline recovery method to restore the operating system. It does not require connection with 1-Touch Server. PREREQUISITE Copy all the required Mass Storage Drivers and NIC Drivers to a network location. For example: If the target system requires Adaptec Ultra160 mass storage driver, then copy the driver.inf for Adaptec Ultra160 to a network location. 1. Create 1-Touch Live CD Use the 1-Touch Live CD to boot the client. 2. Select the language from the list Click OK.
167 Page 167 of Click Next. 4. Click Yes if all disk devices are detected. 5. Enter CommServe Host Name. Enter CommServe IP address. Select the Network Connection from the Connection drop-down combo box. Click Get Clients. Select client Host Name from the list. Click Next. 6. Review network information for CommServe and restored client.

168 Page 168 of 186 Click Next. 7. Enter CommCell User Name. Enter CommCell Password. Enter the credentials that are used to login to CommCell from the client. Click Next. 8. Ensure that the Go to Windows Mini-Setup check box is selected. This option is selected by default when the restored computer has different mouse, keyboard, disk configuration, network interface card, or processor than that of the backed up computer. The mini-setup wizard runs after the Offline Restore. This wizard configures network settings and installs the required drivers. You need to provide the credentials for the domain in which you want to add the restored computer. Ensure that the Dissimilar Disk Mapping is seleced. Click Advanced Options. 9. Enter the Username and Password for the domain in which you want to add the restored computer. Ensure that the Reboot After Restore is completed is selected. Click OK. Select the Increase logging level option if you want to increase the logging level of windows and Simpana logs. The increased logging level gives you more information for troubleshooting.

169 Page 169 of 186 After the restore, you may want to review the system state for troubleshooting. Do not select the Reboot After Restore is completed option if you want to review the system state. 10. Click Next. If you want to exclude any folder or driver from the full system restore, enter the path of the folder or driver and click Add. 11. Review the Source Disk Layout and Destination Disk Layout. Right-click a disk from Destination Disk Layout to initialize the disk and select the disk type that you want to assign to the destination disk. 12. Click Yes. 13. Repeat steps 11 and 12 to clean all the required disks from the Destination Disk Layout. Click Done after all disks are initialized. 14. Right-click the disk from the Source Disk Layout that you want to map with a destination disk. Select Map.
170 Page 170 of Select a destination disk from the the Available Disk List to map with the selected source disk. Select the Partition Type. Select the File system. Click Perform quick format if you want to format the selected disk. Click Enable file and folder compression to enable the file system compression for the selected disk. Enter the Volume Size. Select a Drive Letter to assign it to the selected volume. Click OK. 16. Review the Destination Disk Layout. Click OK to start recovery of the destination disk. 17. Click OK. The TCP/IP Properties of the client captured during the backup are displayed. If the target computer has different IP, change the TCP/IP Properties or click Use DHCP to use DHCP instead of static IP address. The full system restore starts. 18. Enter a UNC path to the.inf file for the mass storage drivers. The third party Mass Storage drivers are required to locate the boot disk when restarting the computer. You must provide the path to.inf file for the mass storage drivers. You can provide the path to.inf file for the NIC drivers now or you can provide it after the system restarts.

171 Page 171 of 186 It is recommended that you install the latest hardware drivers after the restore completes. 19. Enter the valid license key for the restored Windows Operating System. Refer to the check list in the Configuration section. Click OK. 20. Click OK. Remove the Live CD and restart the computer. ONLINE RESTORE Perform the Online Restore to reinstall the operating system on the client. The Windows Distribution Shares and Drivers available on 1-Touch Server are used to reinstall the operating system. PREREQUISITE Make sure that the Dissimilar Disk Restore Option is selected and all the required mass storage and NIC drivers are selected while creating the answer file. 1. Login to 1-Touch Server and create Answer File for the 1-Touch Client. For more information, go to Creating an Answer File. 2. Create 1-Touch Live CD. Use 1-Touch Live CD to boot the client. 3. Select the language from the list Click OK. 4. Click Next.


172 Page 172 of Click Yes if all disk devices are detected. 6. Select Online Restore. Enter the Client Name. If the client answer file is not created on 1-Touch Server, select Create Client Answer files for 1-Touch Recovery and follow the steps described in Creating an Answer File. Click Next. 7. Enter IP Address of the 1-Touch Server where the client answer file is available. Enter the User name and Password for the 1-Touch Server. Click Next.

173 Page 173 of Click Next. 9. Check the TCP/IP and Display Adapter configurations. Use the Client Checklist to check the configuration. If they are incorrect, perform the following steps: Re-install the appropriate Network Interface Card drivers. Uninstall the Network Adapters and Display Adapters using the Hardware Uninstall Wizard or Windows Device Manager. Restart the computer. Reconfigure the TCP/IP and Display Adapter settings. 10. Review the Source Disk Layout and Destination Disk Layout. Right-click a disk from Destination Disk Layout and select the disk type that you want to assign to the destination disk.

174 Page 174 of Click Yes. 12. Repeat steps 10 and 11 to clean all the required disks from the Destination Disk Layout. Click Done to start the disk cleaning. 12. Right-click the disk from the Source Disk Layout that you want to map with a destination disk. Select Map. 13. Select a destination disk from the the Available Disk List to map with the selected source disk. Select the Partition Type. Select the File system. Click Perform quick format if you want to format the selected disk. Click Enable file and folder compression to enable the file system compression for the selected disk. Enter the Volume Size. Select a Drive Letter to assign it to the selected volume. Click OK. 14. Review the Destination Disk Layout. Click OK to start recovery of the destination disk.


175 Page 175 of Reboot the computer after the windows installation completes. During the Windows installation process of a 1-Touch Recovery, the Windows Administrator password is set as 1Touch. Upon completion of the 1-Touch Recovery, the Administrator's original password will be restored from the backup. After the windows installation completes, the computer may reboot one or more times. ADDITIONAL OPTIONS ACCESSING THE RESPONSE FILE FROM AN UNC PATH DURING AN OFFLINE NON-INTERACTIVE RESTORE You can access the recovery response file from a network location during the non-interactive restore. Follow the steps give below to perform the noninteractive restore when the recovery response file is stored in a network location: 1. Boot the client using the 1-Touch Live CD. 2. Select the language from the list Click OK. 3. Click OK. A temporary DHCP IP will be assigned automatically to the client that you are recovering. 4. If the temporary DHCP IP is not assigned automatically, you have to provide the Static IP, Subnet Mask Default Gateway, Primary DNS and WINS. 5. Enter the UNC path of the location where the response file is located and click OK. The permanent IP address of the client will be the IP address that is stored in the

176 Page 176 of 186 response file. 10. Click OK to start the full system restore. CHANGINGTHE CLIENT CONFIGURATION DURING AN OFFLINE NON-INTERACTIVE RESTORE During a non-interactive restore, follow the steps given below to change the client configuration: 1. From the CommCell Console, navigate to <Client> Right-click the <Client> and click All Tasks 1-Touch Recovery Point 2. Select a client configuration. Click Edit Config. 3. Enter the CommServe IP address. Enter the hostname and IP address of the MediaAgent that is used to backup the client. Click Change and enter the CommCell Console credentials. Click Change and enter the Domain Login Credentials. Click OK.


177 Page 177 of Click DNS tab. Enter domain name server suffix for the network where client will be recovered. 5. Click Network Config tab. Select an interface to change the network configuration of the client. Click Edit. 6. Enter the IP address and network details of the network where client will be recovered. Click OK. 7. Click OK to save the updated client configuration. USING AN USB DRIVE INSTEAD OF LIVE CD You can use an USB drive to boot the client. Follow the steps given below to create an USB drive for booting the client: 1. Connect the USB drive with the computer where you have stored the 1-Touch ISO image. 2. Open the Command Prompt and enter the following commands: DISKPART lis disk 3. Identify the disk number of the USB drive that you want to use to boot the client and enter the following commands: sel <disk number> clean create partition primary select partition 1
178 Page 178 of 186 active format fs=ntfs quick assign exit 4. Copy the bootsect.exe from Boot folder of Win7 distribution to one of the following location: For Windows X64 clients: SystemRecovery\Images\Windows x64\boot_image\iso\boot For Windows 32-bit clients: SystemRecovery\Images\Windows 32\BOOT_IMAGE\ISO\boot 5. Using the command prompt, navigate to the above location and enter following command: BOOTSECT.EXE/NT60 <assigned drive letter for USB drive>: 6. Copy the content in ISO folder (SystemRecovery\Images\Windows 32-bit\BOOT_IMAGE\ISO) to USB Drive. 7. Connect the USB drive to the client that you want to boot. 8. Change the BIOS Settings on the client to boot from the USB drive. CLUSTER RECOVERY If all nodes the cluster are down, offline recovery is not supported for the first or primary node recovery. Perform the Online Restore to recover the first node in a cluster. Once the cluster starts, remaining nodes can be recovered using offline or online recovery process. Perform the 1-Touch recovery of the Windows Server 2003 and 2008 cluster as follows: 1. Perform the Online Restore of the active node. The active node is the the node that has the quorum disk. The cluster services become available when the quorum disk is restored. 2. Perform the Interactive or Non-Interactive Restore to recover the passive nodes in the cluster. If the restored node shows unavailable in the cluster, evict and add the restored node. Do not perform the authoritative restore when you are performing Offline Restore. After you complete the Online or Offline Restore, do not start the authoritative restore before performing a full backup. For Windows Server 2003, start the command prompt, go to the <install directory>\base folder and enter the following command: authorutil.exe -cluster RESTORE PROGRAM FILES FOR THE VIRTUAL SERVER The cluster uses the following resources: CommVault Communications Service CommVault Client Event Manager The program files required to start and run these resources must be restored to the virtual server's disk. You will need to restore the data to each virtual server using the Full System Restore of the Microsoft Windows File System idataagent restore. For more information, go to Restore Program Files for Virtual Server. CONFIGURING WINS AND DNS DURING INTERACTIVE RESTORE When the client computer and CommServe are in the same domain, DNS will be used for name resolution between client computer and CommServe. WINS will be used for name resolution in the following scenarios: CommServe and Client computer are in different networks. CommServe is registered in a workgroup During the Interactive Restore, you can configure the WINS as follows: 1. In the 1-Touch Client Recovery wizard, select Offline Restore. 2. Enter CommSeve Host Name and IP Address. 3. Select the Network Connection from the Connection drop-down combo box. 4. Select Use the following IP address. 5. Enter IP address, Subnet mask, Default gateway. 6. Enter the DNS in which CommServe is registered. 7. Enter the Primary WINS. 8. Click Get Clients to connect with CommServe and get the list of clients.

179 Page 179 of 186 RESTORE THE TEAMING NETWORK ADAPTERS To restore the teaming network adapter: 1. Uninstall the teaming software. 2. Restart the computer. 3. Install the teaming software to restore the teaming net. Back to Top
180 Page 180 of 186 Troubleshooting - 1-Touch for Windows Deployment Configuration Recovery Troubleshooting FAQ The following section provides information on some of the troubleshooting scenarios related to 1-Touch Recovery: SYMPTOM/ERROR SOLUTION A full system restore of a Microsoft Windows 2008 Server Provide the activated product key again in order to log in to the recovered client. requires the administrator to provide the product license key. This message will appear on the Windows login screen after a full system recovery from a backup that contained an activated product key: An unauthorized change was made to Windows. You must retype your Windows Server Product Key to activate the license. When you attempt to integrate a service pack into a Windows Distribution folder for a processor type, X64, IA64, etc. that does not match the version of the 1-Touch Server, the following message will appear: update.exe is valid, but is for a machine type other than the current machine 1. Copy the Windows folder, CD-ROM or DVD to a directory. For example, from the Windows CD-ROM, copy *.* C:\winXP. 2. Download, copy and extract the Windows Service Pack executable to the same directory. For example: copy xpsp2.exe c:\winxpsp2 c:\winxpsp2 \xpsp2.exe /u /x:c:\winxpsp2. This will extract the i386 folder into C:\winXPSP2 3. Update/integrate the Windows Directory with the Service Pack. For example: cd winxpsp2\updates c:\winxpsp2 \UPDATES\update.exe /s:c:\winxp For Windows 2000, the system state restore fails. Failure during Windows Server 2003 Cluster Recovery The slipstreamed service pack distribution can now be imported to the 1-Touch Server using the Windows Distribution. If Hotfix KB is in the backup, it must be applied to the target. Slipstream this fix into the Windows 2000 Distribution folder. Refer to KB or Microsoft Security Bulletin MS04-012, "Cumulative Update for Microsoft RPC/DCOM (828741)" at When the cluster disks are repartitioned, a failure message may appear because the disk GUIDs for the quorum have been changed. 1. View the System Event Log. Windows Installation Fails for Systems using HP OEM NIC 2. If you see Event ID 1034 in the System Event Log, refer to the KB and KB in the Microsoft Knowledge Base articles on For Systems using the HP OEM NIC, when boot the client using the 1-Touch Live CD, a pop-up will indicate that the network interface cards found in the computer are different from those found at backup time. This error message appears, if the backup has captured the team virtual MAC address that was set by teaming. It is a software-generated MAC address and not an actual address. 1. Verify or provide the correct MAC address to the NICs found in the computer. This will update the Windows unattend.txt file. Copy the updated %1-Touch Server% \ClientFiles\%ClientName%\unattend.txt file to the %1-Touch Server%\ClientFiles\% ClientName%\$OEM$\OnetouchTmp folder. During the mini setup stage the following error message appears: Windows could not complete the installation. To install Windows on this computer, restart the installation. 2. Perform the Online Restore. 1. Open Command Prompt 2. Navigate to %systemdrive%\windows\panther. 3. Open diagerr.xml file. 4. Ensure that the diagerr.xml file displays the following error message: 5. EnableLocalUserAccount: Unable to enable local account [Administrator]; status = 0x8c5 6. Perform the administrator backup of the client. The mini-setup fails during the offline restore because only the administrator can run the mini-setup. During the installation of Windows 2003, the following error appears: Error loading operating system. 7. Perform the offline restore. Update the BIOS of the target computer OR 1. Start the Windows Distribution Manager on the 1-Touch Server. 2. Apply the following Microsoft Hotfix:
181 Page 181 of 186 WindowsServer2003-KB x86-ENU.exe Windows Management Instrumentation (WMI) Service are not The WMI services cannot be restored using the Interactive or Non-interactive restore method if recovered after an Interactive or Non-interactive restore. the VSS is not enabled before performing the system state backup. For more information about enabling VSS for system state backup, refer to Configuring System State Backups. To restore WMI services, browse the default subclient and select WMI from the System State. For more information about Browse and Restore method, refer to Getting Started - Windows File System Restore. Interactive Restore fails if you manually reboot the client after the Simpana install. After the Simpana install, the client IP address is added to the CommServe database and when you initiate the Interactive Restore with the same IP address and hostname, the restore fails. Follow the steps given below before starting the interactive restore: 1. From the CommCell Browser, navigate to Client Computers. 2. Identify and right-click the client and select All Tasks Release License. 3. Right-click the client and select All Tasks Delete. When you performing an online restore for a client that has Simpana 8.0 version, you may get the following error: Qlogin: Error 9x10³: Invalid Login/Password. Logon Failed. 4. Start the Interactive Restore. When you are recovering the 8.0 client, you must provide the CommCell Console username and password in the answer file. The single signon feature is not available for 8.0 clients and the user account credentials of the domain cannot be used during the Online Restore. Follow the steps given below to avoid this error: 1. Before starting the recovery of an 8.0 client, create a CommCell user account with an administrative privileges. 2. From the 1-Touch Server, create an answer file for the client and enter the CommCell username and password. During the Offline Restore the CommCell Console displays the following message: Please check the Windows Server service. Windows share permissions will not be backed up or restored. [[2114] The Server service is not started. Distributed Component Object Model (DCOM) component appears disabled after the 1-Touch restore of the client computer. Microsoft Distributed Transaction Coordinator (DTC) Service does not start after 1-Touch Recovery. 3. Perform the Online Restore using the modified answer file. This message appears because Windows in not running on the target computer. The Share permissions will be restored automatically during the Offline Restore. You can ignore this error message. Run the following command from the command prompt on the client computer after 1-Touch restore is complete: %windir%\system32\msdtc.exe resetlog Follow the steps given below to restart the Microsoft Distributed Transaction Coordinator (DTC) Service: 1. Navigate to the following folder: %SystemRoot%\System32\Dtclog If the Dtclog folder does not exist, create the folder. 2. Check if a Msdtc.log file exists and ename it to Msdtc.old. 3. Create a new Msdtc.log file using Notepad and save it at the following location: %SystemRoot%\System32\Dtclog 1-Touch Client does not reboot automatically after the full system restore. Full System Restore goes to pending state during 1-Touch Recovery of Windows XP SP2. 4. Open the command prompt and enter the following command: msdtc -resetlog If the client computer has 2 disks, the disk drive numbers may not correspond as expected during the full system restore. As a result, the system disk will be restored as a second disk and client computer fails to reboot. For more information about issues in disk enumeration, refer to Change the order of the disks from the BIOS Settings after the restore completes. If the 1-Touch client has Windows XP Service Pack 2 (SP2) installed on it, Windows Firewall is turned on by default. A full idataagent Restore job will go to a pending state if the client firewall is turned on. When the job state goes to pending perform the following: 1. On the command line, type CTRL+C and press Enter. 2. Turn off the firewall on the client. 3. Resume the job from the CommCell Console. The restore operation will recover the firewall settings from the backup data. You can view the firewall settings on the client computer: 1. Click Start and then click Control Panel. 2. In the Control Panel, click Windows Security Center and then click Windows Firewall. Windows File System idataagent install fails during the Online The Online Restore process installs the Windows File System idataagent software in silent mode, Restore and a silent mode install of this idataagent supports only the defined default port numbers. If the Windows File System idataagent software was installed on the client using port numbers other than the default port numbers (8400, 8402), the silent install of this idataagent may fail.
182 Page 182 of 186 While creating Live CD, you may get following error: Could not contact server, AttachPreInstall failed. If this occurs, install the Windows File System idataagent software and run fullida.bat on the client to continue with the recovery. The fullida.bat is located in C:\onetouchtemp\ folder on the client computer. This error appears because the network card without an IP has got more priority in the 1-Touch server. Follow the steps given below to change the priority of the NIC card: 1. Click Start Run. 2. Type ncpa.cpl and then click OK. You can see the available connections in the LAN and High-Speed Internet section of the Network Connections window. 3. On the Advanced menu, click Advanced Settings, and then click the Adapters and Bindings tab. 4. In the Connections area, select the connection that you want to move higher in the list. 1-Touch Restore Fails with the following Error: Windows returned no error string for error f 5. Use the arrow buttons to move the connection. You will get this error when a new partition cannot be created on the unused space on a disk. Ensure that the specified partition size is smaller than the current partition size. You can manually decrease the size during disk creation by selecting the Dissimilar Disk Mapping option. For more information refer to following links: Dissimilar Disk Mapping - Dissimilar Disk Restore VDS Errors -
183 Page 183 of 186 Frequently Asked Questions - 1-Touch Windows Deployment Configuration Recovery Troubleshooting FAQ CAN I CONVERT A CLIENT COMPUTER INTO A VIRTUAL MACHINE? Yes. When a CommServe is connected to an ESX server, you can convert convert a physical machine (computer) into a virtual machine using the 1-Touch backup data. You can also modify the hardware and network configuration of the client while converting it into a virtual machine. For more information, refer to Virtualize Me - Getting Started. CAN I CONVERT A VIRTUAL MACHINE INTO A PHYSICAL MACHINE? Yes. Follow the steps given below to convert a virtual machine into a physical machine: 1. Ensure that you have enabled 1-Touch backup on the virtual machine and you have performed atleast one full backup. 2. Create a response file for the virtual machine and perform the Non-Interactive Restore using the response file. For more information about creating response file for a Windows machine, refer to Non-Interactive Restore. For more information about creating response file for a Linux machine, refer to Non-Interactive Restore. During Non interactive restore, copy the response file on a USB drive and connect the USB drive to a physical machine. HOW TO ADD 1-TOUCH ISO IMAGE TO A PXE SERVER 1. Create the 1-Touch ISO image using the 1-Touch Boot CD Wizard. 2. Configure the PXE Server and add the 1-TOUCH ISO image to it. 3. Use a remote monitoring console to start the client and select a PXE boot. 4. Change the CMOS boot sequence to boot from the hard disk. 5. Perform the Offline or Online Restore. 6. Once the restore completes, set the CMOS back to PXE or the preferred boot method. HOW TO ADD THE BROADCOM NETXTREME II DRIVER TO AN ANSWER FILE 1. Gather the following Broadcom Netxtreme II NIC drivers: bxnd52x.sys (for the Windows install) bxvbdx.sys (for the Windows install) b06nd51x.sys (for the 1-Touch boot CD and RIS Driver) 2. Add any Mass Storage Drivers needed for the Windows installation to the answer file. For example: percsas.sys or mraid32.sys. 3. Add the following NIC Drivers to the answer file: BXBVD.INF BXND.INF 4. Create a batch file with the following contents for the NetxTremeII driver: c:\onetouchtmp\netset c:\onetouchtmp\unattend.txt When you run this batch file, NetxTremeII driver will be able to set static IP addresses during installation 5. Create a master batch file that contains the following batch file names and paths: Master.bat: Call "C:\OneTouchTmp\netxtremeII2.bat" Call "C:\OneTouchTmp\mapshare.bat" Call "C:\OneTouchTmp\afterBoot.bat" 6. Add the name and path of the master batch file in the unattend.txt file located at Clientfiles\%clientname%. The contents of the unattend.txt file will look as follows: [GuiRunOnce] Command0="C:\OneTouchTmp\MASTER.bat" 7. Copy the following files to Clientfiles\%clientname%\$OEM$\$1\OneTouchTmp:

184 Page 184 of 186 netxtremeii2.bat netset.exe (provided by Microsoft) unattend.txt (from Clientfiles\%clientname%) 8. Add NetXtreme II RIS driver (B06ND.INF) to the 1-Touch ISO image. When you are importing the RIS driver to the Boot CD Image, remove any Broadcom non-ris drivers from the image. Otherwise, the non-ris driver will be found at the boot and it will not connect. HOW CAN I MANUALLY ADD SOFTWARE UPDATES TO 1-TOUCH SERVER CACHE? 1. Login to 1-Touch Server. 2. Navigate to <software_install_directory>/base/ 3. Double-click CopyToCache.exe. 4. Enter or Browse to the location where updates are available. 5. Select Copy to Cache to copy the updates to CommServe Updates Cache 6. Select Copy to 1-Touch to copy the updates to 1-Touch Server Updates Cache. 7. Click Copy to start the copying process. AFTER PERFORMING 1-TOUCH BACKUP, I UPGRADED THE SIMPANA VERSION. CAN I USE THE BACKUP PERFORMED BEFORE THE UPGRADE FOR 1-TOUCH RECOVERY? If the Simpana version or update level on the client computer is different from that for the Simpana software on the backup date, then consider the following before performing the 1-Touch recovery: Online Restore You must exclude the Simpana folder while performing the Online Restore. This will prevent any older versions of the binaries from being restored. Interactive Restore You must perform the backup on the client computer after the upgrade and then perform the Interactive Restore. CAN I USE CLIENT PREPARATION WIZARD TO ADD SERVICE PACKS TO WINDOWS VISTA AND WINDOWS 2008? No. You cannot add service packs to Windows Vista and Windows 2008 using Client Preparation Wizard. For unsupported deployment scenarios, Microsoft KB recommends to obtain the Windows Service Pack media directly from Microsoft. Refer to CAN I INSTALL WINDOWS ON ANY DRIVE OF THE CLIENT COMPUTER? 1-Touch recovery may fail if the client computer has following configurations: Windows XP or Windows 2003 is installed on a drive other than the C drive. Drive letters up to and including Windows drive are not in order. For example: C:, E:\Windows; D: C:, F:, G:\Windows Drive letters up to and including the Windows (boot) drive are in order, but one letter is assigned to the installation disk drive. For example: C:, D:(Installation Disk); E:\Windows\ Drive letters up to and including the Windows (boot) drive are in order, but Windows is installed on a disk other than the first disk that is controlled by a second disk controller. For example: d1 controller1 C:, D:, E:, d2 controller2 F:\Windows A maximum of 19 partitions per computer can be used. Also, drive letters W:, X:, Y:, and Z: must not be assigned within the computer. CAN I PERFORM 1-TOUCH RECOVERY OF A WINDOWS XP CLIENT WHICH HAS DYNAMIC DISKS?
TABLE OF CONTENTS OVERVIEW SYSTEM REQUIREMENTS GETTING STARTED - DEPLOYMENT GETTING STARTED - DEPLOYMENT ON A CLUSTER
 Page 1 of 30 Quick Start - HP-UX File System idataagent TABLE OF CONTENTS OVERVIEW Introduction Key Features Add-On Components Terminology SYSTEM REQUIREMENTS GETTING STARTED - DEPLOYMENT Where to Install
TABLE OF CONTENTS OVERVIEW SYSTEM REQUIREMENTS GETTING STARTED - DEPLOYMENT GETTING STARTED - DEPLOYMENT ON A CLUSTER GETTING STARTED CONFIGURATION
 Page 1 of 24 Quick Start - FreeBSD File System idataagent TABLE OF CONTENTS OVERVIEW Introduction Key Features Add-On Components Terminology SYSTEM REQUIREMENTS GETTING STARTED - DEPLOYMENT Where to Install
TABLE OF CONTENTS OVERVIEW SYSTEM REQUIREMENTS GETTING STARTED - DEPLOYMENT GETTING STARTED - DEPLOYMENT ON A CLUSTER GETTING STARTED CONFIGURATION
 Page 1 of 18 Quick Start - Tru64 File System idataagent TABLE OF CONTENTS OVERVIEW Introduction Key Features Add-On Components Terminology SYSTEM REQUIREMENTS GETTING STARTED - DEPLOYMENT Where to Install
TABLE OF CONTENTS OVERVIEW SYSTEM REQUIREMENTS GETTING STARTED - DEPLOYING IN A GLOBAL ZONE OR SOLARIS SERVER
 Page 1 of 40 Quick Start - Solaris File System idataagent TABLE OF CONTENTS OVERVIEW Introduction Key Features Add-On Components Terminology SYSTEM REQUIREMENTS GETTING STARTED - DEPLOYING IN A GLOBAL
Quick Start - Unix File Archiver Agent
 Page 1 of 21 Quick Start - Unix File Archiver Agent TABLE OF CONTENTS OVERVIEW Introduction Key Features Recall Throttling Point in Time Restore Stub Pruning Terminology SYSTEM REQUIREMENTS DEPLOYMENT
TABLE OF CONTENTS OVERVIEW NEW FEATURES SYSTEM REQUIREMENTS SUPPORTED FEATURES DEPLOYMENT ON WINDOWS DEPLOYMENT ON UNIX DEPLOYMENT ON UNIX CLUSTER
 Page 1 of 42 Quick Start Guide - Sybase idataagent TABLE OF CONTENTS OVERVIEW NEW FEATURES SYSTEM REQUIREMENTS SUPPORTED FEATURES DEPLOYMENT ON WINDOWS DEPLOYMENT ON UNIX DEPLOYMENT ON UNIX CLUSTER CONFIGURATION
TABLE OF CONTENTS. Features - DB2 idataagent OVERVIEW SYSTEM REQUIREMENTS - DB2 IDATAAGENT INSTALLATION. Install the DB2 idataagent - Windows
 Page 1 of 96 Features - DB2 idataagent TABLE OF CONTENTS OVERVIEW SYSTEM REQUIREMENTS - DB2 IDATAAGENT INSTALLATION Install the DB2 idataagent - Windows Install the DB2 idataagent - Unix Install the DB2
TABLE OF CONTENTS OVERVIEW SYSTEM REQUIREMENTS GETTING STARTED - DEPLOYMENT GETTING STARTED - DEPLOYMENT ON A CLUSTER
 Page 1 of 32 Quick Start - Linux File System idataagent TABLE OF CONTENTS OVERVIEW Introduction Key Features Add-On Components Terminology SYSTEM REQUIREMENTS GETTING STARTED - DEPLOYMENT Where to Install
TABLE OF CONTENTS GETTING STARTED ADVANCED OVERVIEW SYSTEM REQUIREMENTS SUPPORTED FEATURES GETTING STARTED - DEPLOYMENT
 Page 1 of 191 Administration Guide - FreeBSD File System idataagent TABLE OF CONTENTS OVERVIEW Introduction Key Features Simplified Data Management Point-In-Time Recovery SnapProtect Backup Backup and
ADMINISTRATION GUIDE EXTERNAL DATA CONNECTOR (NETBACKUP)
") ADMINISTRATION GUIDE EXTERNAL DATA CONNECTOR (NETBACKUP) Published On: 11/19/2013 V10 Service Pack 4A Page 1 of 50 External Data Connector (NetBackup) TABLE OF CONTENTS OVERVIEW SYSTEM REQUIREMENTS INSTALLATION
ADMINISTRATION GUIDE EXTERNAL DATA CONNECTOR (NETBACKUP) Published On: 11/19/2013 V10 Service Pack 4A Page 1 of 50 External Data Connector (NetBackup) TABLE OF CONTENTS OVERVIEW SYSTEM REQUIREMENTS INSTALLATION
TABLE OF CONTENTS. Features - Image Level idataagent OVERVIEW SYSTEM REQUIREMENTS - IMAGE LEVEL IDATAAGENT INSTALLATION
 Page 1 of 103 Features - Image Level idataagent TABLE OF CONTENTS OVERVIEW SYSTEM REQUIREMENTS - IMAGE LEVEL IDATAAGENT INSTALLATION Install the Image Level idataagent - Windows Install the Image Level
TABLE OF CONTENTS. Features - ProxyHost idataagent OVERVIEW SYSTEM REQUIREMENTS - PROXYHOST IDATAAGENT INSTALLATION
 Page 1 of 71 Features - ProxyHost idataagent TABLE OF CONTENTS OVERVIEW SYSTEM REQUIREMENTS - PROXYHOST IDATAAGENT INSTALLATION Install the ProxyHost idataagent - Windows Install the ProxyHost idataagent
Quick Start - OnePass Agent for Unix File System
 Page 1 of 28 Quick Start - OnePass Agent for Unix File System TABLE OF CONTENTS OVERVIEW Introduction Key Features Terminology SYSTEM REQUIREMENTS DEPLOYMENT - ONEPASS AGENT FOR UNIX FILE SYSTEM Installation
Features - Quick Recovery Agent
 Page 1 of 102 Features - Quick Recovery Agent TABLE OF CONTENTS OVERVIEW SYSTEM REQUIREMENTS - QUICK RECOVERY AGENT INSTALLATION Install the Quick Recovery Agent - Windows Install the Quick Recovery Agent
Quick Start Guide - OSSV Plug-In
 Page 1 of 36 Quick Start Guide - OSSV Plug-In TABLE OF CONTENTS OVERVIEW NEW FEATURES SYSTEM REQUIREMENTS GETTING STARTED - SETUP THE NETAPP OSSV AGENT GETTING STARTED - OSSV PLUG-IN DEPLOYMENT ON WINDOWS
TABLE OF CONTENTS. Features - MySQL idataagent OVERVIEW SYSTEM REQUIREMENTS - MYSQL IDATAAGENT INSTALLATION. Install the MySQL idataagent -Unix
 Page 1 of 56 Features - MySQL idataagent TABLE OF CONTENTS OVERVIEW SYSTEM REQUIREMENTS - MYSQL IDATAAGENT INSTALLATION Install the MySQL idataagent -Unix BACKUP - MYSQL RESTORE DATA - MYSQL CONFIGURATION
TABLE OF CONTENTS GETTING STARTED ADVANCED OVERVIEW NEW FEATURES SYSTEM REQUIREMENTS SUPPORTED FEATURES DEPLOYMENT ON WINDOWS DEPLOYMENT ON UNIX
 Page 1 of 108 TABLE OF CONTENTS OVERVIEW Introduction Key Features Terminology NEW FEATURES SYSTEM REQUIREMENTS SUPPORTED FEATURES GETTING STARTED DEPLOYMENT ON WINDOWS Interactive Install Install Software
Table of Contents. Page 1 of 130
 Page 1 of 130 Features - DB2 idataagent Table of Contents Overview System Requirements - DB2 idataagent Installation Install the DB2 idataagent - Windows Install the DB2 idataagent - Unix Install the DB2
Administration Guide - Documentum idataagent (Oracle)
") Page 1 of 236 Administration Guide - Documentum idataagent (Oracle) TABLE OF CONTENTS OVERVIEW Introduction Key Features Supported Environments Full Range of Backup and Recovery Options Scheduling Efficient
Page 1 of 236 Administration Guide - Documentum idataagent (Oracle) TABLE OF CONTENTS OVERVIEW Introduction Key Features Supported Environments Full Range of Backup and Recovery Options Scheduling Efficient
Administration GUIDE. IntelliSnap EMC VMAX/Symmetrix. Published On: 11/19/2013 V10 Service Pack 4A Page 1 of 80
 Administration GUIDE IntelliSnap EMC VMAX/Symmetrix Published On: 11/19/2013 V10 Service Pack 4A Page 1 of 80 IntelliSnap User Guide - EMC VMAX/Symmetrix Table of Contents Pre-Deployment UNIX Windows Getting
ADMINISTRATION GUIDE IntelliSnap Nimble Storage
 ADMINISTRATION GUIDE IntelliSnap Nimble Storage Published On: 11/19/2013 V10 Service Pack 4A Page 1 of 67 IntelliSnap User Guide - Nimble Storage TABLE OF CONTENTS PRE-DEPLOYMENT UNIX WINDOWS GETTING STARTED
Features - 1-Touch. Table of Contents. Page 1 of 74. System Requirements - 1-Touch for Unix System Requirements - 1-Touch for Windows
 Page 1 of 74 Features - 1-Touch Table of Contents Overview System Requirements System Requirements - 1-Touch for Unix System Requirements - 1-Touch for Windows Installation Install the 1-Touch Server Software
Quick Start - Virtual Server idataagent (Microsoft/Hyper-V)
") Page 1 of 19 Quick Start - Virtual Server idataagent (Microsoft/Hyper-V) TABLE OF CONTENTS OVERVIEW Introduction Key Features Complete Virtual Machine Protection Granular Recovery of Virtual Machine Data
Page 1 of 19 Quick Start - Virtual Server idataagent (Microsoft/Hyper-V) TABLE OF CONTENTS OVERVIEW Introduction Key Features Complete Virtual Machine Protection Granular Recovery of Virtual Machine Data
TABLE OF CONTENTS OVERVIEW NEW FEATURES SYSTEM REQUIREMENTS SUPPORTED FEATURES DEPLOYMENT ON WINDOWS DEPLOYMENT ON WINDOWS CLUSTER DEPLOYMENT ON UNIX
 Page 1 of 55 Quick Start Guide - Oracle idataagent TABLE OF CONTENTS OVERVIEW NEW FEATURES SYSTEM REQUIREMENTS SUPPORTED FEATURES DEPLOYMENT ON WINDOWS DEPLOYMENT ON WINDOWS CLUSTER DEPLOYMENT ON UNIX
Quick Start - OnePass Agent for Windows File System
 Page 1 of 23 Quick Start - OnePass Agent for Windows File System TABLE OF CONTENTS OVERVIEW Introduction Key Features Terminology SYSTEM REQUIREMENTS DEPLOYMENT Installation Method 1: Interactive Install
Administration GUIDE. OSSV Plug-In. Published On: 11/19/2013 V10 Service Pack 4A Page 1 of 100
 Administration GUIDE OSSV Plug-In Published On: 11/19/2013 V10 Service Pack 4A Page 1 of 100 User Guide - OSSV Plug-In Table of Contents Overview New Features System Requirements Getting Started Setup
Quick Start - BlueArc File Archiver
 Page 1 of 20 Quick Start - BlueArc File Archiver TABLE OF CONTENTS OVERVIEW Introduction Key Features Terminology SYSTEM REQUIREMENTS DEPLOYMENT Installation Method 1: Interactive Install Method 2: Install
User Guide - Exchange Database idataagent
 Page 1 of 208 User Guide - Exchange Database idataagent TABLE OF CONTENTS OVERVIEW Introduction Key Features Add-On Components Customized Features for Your Exchange Version Terminology SYSTEM REQUIREMENTS
Table of Contents. Page 1 of 73. Install the MySQL idataagent -Unix. Instances - MySQL Subclients - MySQL. Backup Job History Restore Job History
 Page 1 of 73 Features - MySQL idataagent Table of Contents Overview System Requirements - MySQL idataagent Installation Install the MySQL idataagent -Unix Backup - MySQL Restore Data - MySQL Configuration
Quick Start - NetApp File Archiver
 Page 1 of 19 Quick Start - NetApp File Archiver TABLE OF CONTENTS OVERVIEW Introduction Key Features Terminology SYSTEM REQUIREMENTS DEPLOYMENT Installation Method 1: Interactive Install Method 2: Install
TABLE OF CONTENTS. Quick Start - Windows File System idataagent. Page 1 of 44 OVERVIEW SYSTEM REQUIREMENTS DEPLOYMENT
 Page 1 of 44 Quick Start - Windows File System idataagent TABLE OF CONTENTS OVERVIEW Introduction Key Features Simplified Data Management Point-In-Time Recovery System State SnapProtect Backup Office Communications
Administration GUIDE. Sybase idataagent. Published On: 11/19/2013 V10 Service Pack 4A Page 1 of 176
 Administration GUIDE Sybase idataagent Published On: 11/19/2013 V10 Service Pack 4A Page 1 of 176 User Guide - Sybase idataagent Table of Contents Overview Introduction Key Features Terminology System
Quick Start Guide - Exchange Database idataagent
 Page 1 of 90 Quick Start Guide - Exchange Database idataagent TABLE OF CONTENTS OVERVIEW Introduction Key Features Add-On Components Customized Features for Your Exchange Version Terminology SYSTEM REQUIREMENTS
User Guide - Exchange Mailbox Archiver Agent
 Page 1 of 245 User Guide - Exchange Mailbox Archiver Agent TABLE OF CONTENTS OVERVIEW Introduction Key Features Add-On Components Terminology SYSTEM REQUIREMENTS - EXCHANGE MAILBOX ARCHIVER AGENT DEPLOYMENT
Administration GUIDE. Virtual Server idataagent (VMware) Published On: 11/19/2013 V10 Service Pack 4A Page 1 of 225
 Published On: 11/19/2013 V10 Service Pack 4A Page 1 of 225") Administration GUIDE Virtual Server idataagent (VMware) Published On: 11/19/2013 V10 Service Pack 4A Page 1 of 225 User Guide - Virtual Server idataagent (VMware) Table of Contents System Requirements
Administration GUIDE Virtual Server idataagent (VMware) Published On: 11/19/2013 V10 Service Pack 4A Page 1 of 225 User Guide - Virtual Server idataagent (VMware) Table of Contents System Requirements
TABLE OF CONTENTS GETTING STARTED ADVANCED OVERVIEW NEW FEATURES SYSTEM REQUIREMENTS SUPPORTED FEATURES DEPLOYMENT ON WINDOWS
 Page 1 of 51 User Guide - Oracle idataagent TABLE OF CONTENTS OVERVIEW Introduction Key Features Add-On Components Terminology NEW FEATURES SYSTEM REQUIREMENTS SUPPORTED FEATURES GETTING STARTED DEPLOYMENT
Features - ContinuousDataReplicator
 Page 1 of 130 Features - ContinuousDataReplicator TABLE OF CONTENTS OVERVIEW SYSTEM REQUIREMENTS - CONTINUOUSDATAREPLICATOR INSTALLATION Install ContinuousDataReplicator Install ContinuousDataReplicator
Features - Microsoft Data Protection Manager
 Page 1 of 36 Features - Microsoft Data Protection Manager TABLE OF CONTENTS OVERVIEW NEW FEATURES SYSTEM REQUIREMENTS SUPPORTED FEATURES GETTING STARTED - DATA PROTECTION MANAGER DEPLOYMENT GETTING STARTED
Features - SRM Windows File System Agent
 Page 1 of 53 Features - SRM Windows File System Agent Table of Contents Overview System Requirements - SRM Windows File System Agent Installation Install the SRM Windows File System Agent Install the SRM
Administration GUIDE. OnePass Agent for Exchange Mailbox. Published On: 11/19/2013 V10 Service Pack 4A Page 1 of 177
 Administration GUIDE OnePass Agent for Exchange Mailbox Published On: 11/19/2013 V10 Service Pack 4A Page 1 of 177 User Guide - One Pass Agent for Exchange Mailbox Table of Contents Overview Introduction
QUICK START GUIDE Active Directory idataagent
 QUICK START GUIDE Active Directory idataagent Published On: 11/19/2013 V10 Service Pack 4A Page 1 of 39 Quick Start Guide - Active Directory idataagent TABLE OF CONTENTS OVERVIEW SYSTEM REQUIREMENTS SUPPORTED
Administration Guide - Documentum idataagent (DB2)
") Page 1 of 65 Administration Guide - Documentum idataagent (DB2) TABLE OF CONTENTS OVERVIEW Introduction Key Features Supported Environments Full Range of Backup and Recovery Options Scheduling Efficient
Page 1 of 65 Administration Guide - Documentum idataagent (DB2) TABLE OF CONTENTS OVERVIEW Introduction Key Features Supported Environments Full Range of Backup and Recovery Options Scheduling Efficient
TABLE OF CONTENTS. Features - Lotus Notes Document idataagent. Page 1 of 75 OVERVIEW SYSTEM REQUIREMENTS - LOTUS NOTES DOCUMENT IDATAAGENT
 Page 1 of 75 Features - Lotus Notes Document idataagent TABLE OF CONTENTS OVERVIEW SYSTEM REQUIREMENTS - LOTUS NOTES DOCUMENT IDATAAGENT INSTALLATION Install the Lotus Notes idataagents - Windows BACKUP
Administration GUIDE. OnePass Agent for NetApp. Published On: 11/19/2013 V10 Service Pack 4A Page 1 of 132
 Administration GUIDE OnePass Agent for NetApp Published On: 11/19/2013 V10 Service Pack 4A Page 1 of 132 User Guide - OnePass Agent for NetApp Table of Contents System Requirements Administrator Getting
Administration Guide - BlueArc File Archiver
 Page 1 of 103 Administration Guide - BlueArc File Archiver TABLE OF CONTENTS OVERVIEW Introduction Key Features Terminology SYSTEM REQUIREMENTS DEPLOYMENT Installation Method 1: Interactive Install Method
Administration GUIDE. IntelliSnap Virtual Server idataagent for VMware. Published On: 11/19/2013 V10 Service Pack 4A Page 1 of 277
 Administration GUIDE IntelliSnap Virtual Server idataagent for VMware Published On: 11/19/2013 V10 Service Pack 4A Page 1 of 277 IntelliSnap User Guide - Virtual Server idataagent for VMware Table of Contents
Upgrades TABLE OF CONTENTS SOFTWARE INSTALLATION DISCS SUPPORT INFORMATION - UPGRADE UPGRADE CONSIDERATIONS BACKWARD COMPATIBILITY COMMNET SERVER
 Page 1 of 132 Upgrades TABLE OF CONTENTS SOFTWARE INSTALLATION DISCS SUPPORT INFORMATION - UPGRADE UPGRADE CONSIDERATIONS BACKWARD COMPATIBILITY COMMNET SERVER Interactive Upgrade - CommNet Server Database
Quick Start Guide TABLE OF CONTENTS COMMCELL ARCHITECTURE OVERVIEW COMMCELL SOFTWARE DEPLOYMENT INSTALL THE COMMSERVE SOFTWARE
 Page 1 of 35 Quick Start Guide TABLE OF CONTENTS This Quick Start Guide is designed to help you install and use a CommCell configuration to which you can later add other components. COMMCELL ARCHITECTURE
Administration Guide - Celerra File Archiver
 Page 1 of 104 Administration Guide - Celerra File Archiver TABLE OF CONTENTS OVERVIEW Introduction Key Features Terminology SYSTEM REQUIREMENTS DEPLOYMENT Installation Method 1: Interactive Install Method
Administration Guide - NetApp File Archiver
 Page 1 of 100 Administration Guide - NetApp File Archiver TABLE OF CONTENTS OVERVIEW Introduction Key Features Terminology SYSTEM REQUIREMENTS DEPLOYMENT Installation Method 1: Interactive Install Method
Virtual Server Agent for VMware VMware VADP Virtualization Architecture
 Virtual Server Agent for VMware VMware VADP Virtualization Architecture Published On: 11/19/2013 V10 Service Pack 4A Page 1 of 18 VMware VADP Virtualization Architecture - Virtual Server Agent for VMware
Dell Compellent Storage Center with CommVault Simpana 9.0. Best Practices
 Dell Compellent Storage Center with CommVault Simpana 9.0 Best Practices Document revision Date Revision Comments 1/30/2012 A Initial Draft THIS BEST PRACTICES GUIDE IS FOR INFORMATIONAL PURPOSES ONLY,
HP StorageWorks Performance Advisor. Installation Guide. Version 1.7A
 HP StorageWorks Performance Advisor Installation Guide Version 1.7A notice Copyright 2002-2004 Hewlett-Packard Development Company, L.P. Edition 0402 Part Number B9369-96068 Hewlett-Packard Company makes
Features - ContinuousDataReplicator
 Page 1 of 193 Features - ContinuousDataReplicator Table of Contents Overview System Requirements - ContinuousDataReplicator Installation Install ContinuousDataReplicator Install ContinuousDataReplicator
Features - Exchange Public Folder Archiver Agent
 Page 1 of 77 Features - Exchange Public Folder Archiver Agent Table of Contents Overview System Requirements - Exchange Public Folder Archiver Agent Installation Install the Exchange Mailbox/Public Folder
Teamcenter Installation on Linux Clients Guide. Publication Number PLM00010 J
 Teamcenter 10.1 Installation on Linux Clients Guide Publication Number PLM00010 J Proprietary and restricted rights notice This software and related documentation are proprietary to Siemens Product Lifecycle
Features - Content Indexing and Search
 Page 1 of 131 Features - Content Indexing and Search TABLE OF CONTENTS OVERVIEW SYSTEM REQUIREMENTS Content Indexing Engine Web Search Server Web Search Client INSTALLATION Install the Content Indexing
Backup Solution. User Guide. Issue 01 Date
 Issue 01 Date 2017-08-30 Contents Contents 1 Introduction... 1 1.1 What Is the Backup Solution?... 1 1.2 Why Choose the Backup Solution?... 2 1.3 Concepts and Principles...3 1.3.1 Basic OBS Concepts...3
DASH COPY GUIDE. Published On: 11/19/2013 V10 Service Pack 4A Page 1 of 31
 DASH COPY GUIDE Published On: 11/19/2013 V10 Service Pack 4A Page 1 of 31 DASH Copy Guide TABLE OF CONTENTS OVERVIEW GETTING STARTED ADVANCED BEST PRACTICES FAQ TROUBLESHOOTING DASH COPY PERFORMANCE TUNING
Table of Contents. Page 1 of 82. Install the Exchange idataagents Install the Exchange idataagents - Clustered Environment -Virtual Server
 Page 1 of 82 Features - Exchange Public/Web Folder idataagent Table of Contents Overview System Requirements - Microsoft Exchange Public/Web Folder idataagent Installation Install the Exchange idataagents
Teamcenter Installation on Windows Clients Guide. Publication Number PLM00012 J
 Teamcenter 10.1 Installation on Windows Clients Guide Publication Number PLM00012 J Proprietary and restricted rights notice This software and related documentation are proprietary to Siemens Product Lifecycle
Commvault Simpana 11 Best Practices for Cloud Backup Accelerator
 Table of contents iscsi setup to connect to Cloud Backup Accelerator. Installing Media Agent. Detecting and configure Tape Library. Loading Media. Commvault Simpana 11 Best Practices for Cloud Backup Accelerator
Cluster Server Generic Application Agent Configuration Guide - AIX, Linux, Solaris
 Cluster Server 7.3.1 Generic Application Agent Configuration Guide - AIX, Linux, Solaris Last updated: 2017-11-04 Legal Notice Copyright 2017 Veritas Technologies LLC. All rights reserved. Veritas and
Arcserve Backup for Windows. Release Summary r16
 Arcserve Backup for Windows Release Summary r16 Legal Notice This Documentation, which includes embedded help systems and electronically distributed materials, (hereinafter referred to as the Documentation
Using iscsi with BackupAssist. User Guide
 User Guide Contents 1. Introduction... 2 Documentation... 2 Terminology... 2 Advantages of iscsi... 2 Supported environments... 2 2. Overview... 3 About iscsi... 3 iscsi best practices with BackupAssist...
VI-CENTER EXTENDED ENTERPRISE EDITION GETTING STARTED GUIDE. Version: 4.5
 VI-CENTER EXTENDED ENTERPRISE EDITION GETTING STARTED GUIDE This manual provides a quick introduction to Virtual Iron software, and explains how to use Virtual Iron VI-Center to configure and manage virtual
Chapter 7. GridStor Technology. Adding Data Paths. Data Paths for Global Deduplication. Data Path Properties
 Chapter 7 GridStor Technology GridStor technology provides the ability to configure multiple data paths to storage within a storage policy copy. Having multiple data paths enables the administrator to
Chapter 4 Data Movement Process
 Chapter 4 Data Movement Process 46 - Data Movement Process Understanding how CommVault software moves data within the production and protected environment is essential to understanding how to configure
Features - SRM Exchange Agent
 Page 1 of 55 Features - SRM Exchange Agent TABLE OF CONTENTS OVERVIEW SYSTEM REQUIREMENTS - SRM EXCHANGE AGENT INSTALLATION Install the SRM Exchange Agent CONFIGURATION SRM Data Collection SRM EXCHANGE
Virtual Server Agent v9 with VMware. June 2011
 Virtual Server Agent v9 with VMware June 2011 Contents Summary... 3 Backup Transport Methods... 3 Deployment Scenarios... 3 VSA Installation Requirements... 4 VSA Patch Requirements... 4 VDDK Installation...
Installing AX Server with PostgreSQL (multi-server)
") Installing AX Server with PostgreSQL (multi-server) Version: 13 Published: Wednesday, November 29, 2017 ACL Services Ltd. 2017 Table of contents Table of contents Table of contents 3 Introduction 7 Intended
Installing AX Server with PostgreSQL (multi-server) Version: 13 Published: Wednesday, November 29, 2017 ACL Services Ltd. 2017 Table of contents Table of contents Table of contents 3 Introduction 7 Intended
HP-UX System Administration
 HP-UX System Administration This intensive course is designed for experienced UNIX administrators who like to understand the differences between HP-UX and standard UNIX. It is essential that students have
Configuration Note. AudioCodes One Voice for Microsoft Skype for Business. CloudBond 365. Backup and Restore Functionality. Version 9.
 7 Configuration Note AudioCodes One Voice for Microsoft Skype for Business CloudBond 365 Backup and Restore Functionality Version 9.5 Update 4 Configuration Note Contents Table of Contents 1 Introduction...
Chapter 2 CommVault Data Management Concepts
 Chapter 2 CommVault Data Management Concepts 10 - CommVault Data Management Concepts The Simpana product suite offers a wide range of features and options to provide great flexibility in configuring and
Virtualization with VMware ESX and VirtualCenter SMB to Enterprise
 Virtualization with VMware ESX and VirtualCenter SMB to Enterprise This class is an intense, five-day introduction to virtualization using VMware s immensely popular Virtual Infrastructure suite including
USER GUIDE. CTERA Agent for Windows. June 2016 Version 5.5
 USER GUIDE CTERA Agent for Windows June 2016 Version 5.5 Copyright 2009-2016 CTERA Networks Ltd. All rights reserved. No part of this document may be reproduced in any form or by any means without written
Chapter 10 Protecting Virtual Environments
 Chapter 10 Protecting Virtual Environments 164 - Protecting Virtual Environments As more datacenters move to virtualize their environments and the number of virtual machines and the physical hosts they
Installing the Cisco Unified MeetingPlace Web Server Software
 Installing the Cisco Unified MeetingPlace Web Server Software Release 8.5 Revised: 2/19/13 : Install the Application Server (which includes the Software Media Server) : Install the Hardware Media Server
Installing and Configuring VMware Identity Manager Connector (Windows) OCT 2018 VMware Identity Manager VMware Identity Manager 3.
 OCT 2018 VMware Identity Manager VMware Identity Manager 3.") Installing and Configuring VMware Identity Manager Connector 2018.8.1.0 (Windows) OCT 2018 VMware Identity Manager VMware Identity Manager 3.3 You can find the most up-to-date technical documentation on
Installing and Configuring VMware Identity Manager Connector 2018.8.1.0 (Windows) OCT 2018 VMware Identity Manager VMware Identity Manager 3.3 You can find the most up-to-date technical documentation on
Symantec NetBackup PureDisk Compatibility Matrix Created August 26, 2010
 Symantec NetBackup PureDisk 6.6.1 Compatibility Matrix Created August 26, 2010 Copyright 2010 Symantec Corporation. All rights reserved. Symantec, the Symantec Logo, and Backup Exec are trademarks or registered
Veritas NetBackup Getting Started Guide. Release 8.0
 Veritas NetBackup Getting Started Guide Release 8.0 Veritas NetBackup Getting Started Guide Documentation version: 8.0 Legal Notice Copyright 2015 Veritas Technologies LLC. All rights reserved. Veritas,
Document Number ECX-Exchange2010-Migration-QSG, Version 1, May 2015 Copyright 2015 NEC Corporation.
 EXPRESSCLUSTER X for Windows Quick Start Guide for Microsoft Exchange Server 2010 Migration from a single-node configuration to a two-node mirror disk cluster Version 1 NEC EXPRESSCLUSTER X 3.x for Windows
Vendor: IBM. Exam Code: C Exam Name: Enterprise Technical Support for AIX and Linux -v2. Version: Demo
 Vendor: IBM Exam Code: C4040-108 Exam Name: Enterprise Technical Support for AIX and Linux -v2 Version: Demo QUESTION 1 Which power reduction technology requires a software component in order to be activated?
Ekran System High Availability Deployment Guide
 Ekran System High Availability Deployment Guide Table of Contents About... 3 System Requirements... 4 Program Structure... 5 Deployment Process... 6 About... 6 Prerequisites... 6 General Prerequisites...
IBM Tivoli Storage Manager for AIX Version Installation Guide IBM
 IBM Tivoli Storage Manager for AIX Version 7.1.3 Installation Guide IBM IBM Tivoli Storage Manager for AIX Version 7.1.3 Installation Guide IBM Note: Before you use this information and the product it
LifeKeeper for Linux v5.0. Sybase ASE Recovery Kit Administration Guide
 LifeKeeper for Linux v5.0 Sybase ASE Recovery Kit Administration Guide October 2010 SteelEye and LifeKeeper are registered trademarks. Adobe Acrobat is a registered trademark of Adobe Systems Incorporation.
Getting Started with ESXi Embedded
 ESXi 4.0 Embedded vcenter Server 4.0 This document supports the version of each product listed and supports all subsequent versions until the document is replaced by a new edition. To check for more recent
Acronis Backup & Recovery 11.5
 Acronis Backup & Recovery 11.5 Installation Guide Applies to the following editions: Update 2 Advanced Server Server for Windows Virtual Edition Server for Linux Advanced Server SBS Edition Workstation
User Guide. Version 2.1
 Kaseya Backup and Disaster Recovery User Guide Version 2.1 August 11, 2008 About Kaseya Kaseya is a global provider of IT automation software for IT Solution Providers and Public and Private Sector IT
HP Data Protector Media Operations 6.11
 HP Data Protector Media Operations 6.11 Getting started This guide describes installing, starting and configuring Media Operations. Copyright 2009 Hewlett-Packard Development Company, L.P. Part number:
VMware vfabric Data Director Installation Guide
 VMware vfabric Data Director Installation Guide vfabric Data Director 1.0.1 This document supports the version of each product listed and supports all subsequent versions until the document is replaced
Symantec NetBackup Enterprise Server and Server 7.x OS Software Compatibility List
 Symantec NetBackup Enterprise Server and Server 7.x OS Software Compatibility List Created on July 25, 2011 Copyright 2011 Symantec Corporation. All rights reserved. Symantec, the Symantec Logo, and Backup
Parallels Virtuozzo Containers 4.6 for Windows
 Parallels Parallels Virtuozzo Containers 4.6 for Windows Deploying Microsoft Clusters Copyright 1999-2010 Parallels Holdings, Ltd. and its affiliates. All rights reserved. Parallels Holdings, Ltd. c/o
Migrating vrealize Automation 6.2 to 7.2
 Migrating vrealize Automation 6.2 to 7.2 vrealize Automation 7.2 This document supports the version of each product listed and supports all subsequent versions until the document is replaced by a new edition.
Symantec NetBackup Getting Started Guide. Release 7.7.1
 Symantec NetBackup Getting Started Guide Release 7.7.1 21353428 Symantec NetBackup Getting Started Guide Documentation version: 7.7.1 PN: 21353428 Legal Notice Copyright 2015 Symantec Corporation. All
Virtualization with VMware ESX and VirtualCenter SMB to Enterprise
 Virtualization with VMware ESX and VirtualCenter SMB to Enterprise This class is an intense, four-day introduction to virtualization using VMware s immensely popular Virtual Infrastructure suite including
IBM Tivoli Storage Manager for HP-UX Version Installation Guide IBM
 IBM Tivoli Storage Manager for HP-UX Version 7.1.4 Installation Guide IBM IBM Tivoli Storage Manager for HP-UX Version 7.1.4 Installation Guide IBM Note: Before you use this information and the product
Configuring Deduplication for High Performance
 Configuring Deduplication for High Performance A Dell Technical White Paper Dell PowerVault DL2000 Powered By CommVault Introduction The Dell PowerVault DL2000 Powered by CommVault Simpana 8 Advanced Deduplication
VMware vfabric Data Director 2.5 EVALUATION GUIDE
 VMware vfabric Data Director 2.5 EVALUATION GUIDE Introduction... 2 Pre- requisites for completing the basic and advanced scenarios... 3 Basic Scenarios... 4 Install Data Director using Express Install...
Installation Guide V1.1
 Installation Guide V1.1 The information contained in this manual is the licensed property of Fujitsu Software Technology Corporation. Use of the information contained herein is restricted to the terms