Aeroxcraft VTR-GP Tilt/Roll Gimbal User Manual
|
|
|
- Randell Osborne
- 5 years ago
- Views:
Transcription


1 Aeroxcraft VTR-GP Tilt/Roll Gimbal User Manual
2 Contents. Notes 2. Introduction 3. Installing GoPro camera 4. Connecting to a DJI Naza or Wookong 5. Installing HoverflyGimbal 6. Adjusting centre points (Tools Required) 7. Adjusting centre points of axes 8. Adjusting centre points of axes 9. Adjusting Belt Tension (Roll) 0. Adjusting Belt Tension (Tilt). Fitting Accessories 2
3 ) Notes REMOVE PROPELLERS AND DISCONNECT MOTORS BEFORE PROCEDING. This document is a work in progress. Information contained within this document may be incorrect and we cannot be held responsible for any damage/injuries caused by following the information contained within this document. If you are unsure what you are doing get advice from someone who does. Do not turn axes by hand. Servos are rated for 333Hz Power servos using a 6V BEC. Do not connect directly to a flight controller such as DJI Wookong or Naza. Multirotor helicopters are dangerous. Operate them away from people and property. Be responsible. If in doubt do not fly. Always remove propellers from motors before carrying out work on your multirotor helicopter. Failure to do so can cause serious injury. It is the owner s responsibility to ensure this model is assembled and fitted out correctly and safely. Ensure that your model is capable of safely and reliably lifting the payload you are asking it to. This model is dangerous if used in an incorrect manner. Ensure you seek assistance from an experienced flyer if you are unsure. Do not fly near people, property or highways. Do not fly over people, property or highways. There may be laws and regulations governing the use of this model in your area, seek advice from your authorities if you are unsure. Planning your build and installation is key to building a safe and reliable multi rotor. Make sure all wiring is of the correct gauge, properly connected, neat and protected from wear/tear and radio/electrical interference. Make sure all the components you use are suitable for the size and weight of your multi rotor. Do not over tighten screws. Check this product for damaged hardware, loose joints, missing parts or sharp edges before and after assembly and frequently during use. Do not use unless all components are correctly fitted and adjusted. Do not use if any parts are missing, damaged or broken. Assembly is required. Take care when unpacking and assembling; contains small parts and sharp edges. If you require any replacement parts they are all available from Aeroxcraft. Contact us for details. 3
4 2) Introduction To follow... 4


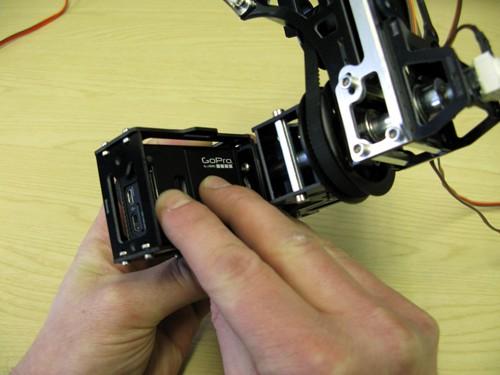

5 3) Installing GoPro camera 5

6 4) Connecting to a DJI Naza or Wookong REMOVE PROPELLERS AND DISCONNECT MOTORS BEFORE PROCEDING. It is not recommended to connect the gimbal directly to a Naza or Wookong controller. The current drawn by the servos can easily exceed the power that the controller can provide, which in turn can cause the controller to malfunction or become damaged. If this occurs in-flight then it is likely to cause a crash. Crashes can also cause damage to your multirotor and also to people and property. Crashes are bad! In addition to the above issues, the Naza and Wookong controllers output 5 volts from F & F2. Most digital servos work best on 6 Volts, giving more speed and torque with the higher voltage. The servos need to connect to the controller and BEC as in the schematic diagram below. 6


7 To achieve this you need to make wiring harness from some servo extension leads. Below is an example of this. On this harness the roll input has not got a black lead, this is because the 0v is provided already by the black lead on the Tilt input. With this harness both the tilt and roll inputs need to be connected for it to work correctly. Do not drive the servos at a higher frequency then they are rated for. The MKS servos supplied are rated at 333Hz. 7

8 You can finely adjust the centre positions of the gimbal in the DJI assistant software. Set the gimbal gains in the DJI assistant software so that the gimbal stays level when the multirotor tilts and rolls. Sighting the gimbal against a known level like a doorway or using a digital/spirit level will help when setting the gimbal gains. Typical settings are: 8

9 5) Installing HoverflyGimbal The gimbal control provided by the DJI Naza is often too slow to react to the movements of a multirotor in flight. If you want to get pro results then you need something better. The HoverflyGimbal controller provides much faster and smoother control of your gimbal. The VTR-GP has a mounting plate on the rear specifically for mounting a HoverflyGimbal board. Before you mount your HoverflyGimbal to your gimbal you need to calibrate the sensors. Details on this are in the HoverflyGimbal manual which is available from hoverflytech.com. Time spent getting this right will save you time later on when you try to fine tune the settings. For the purposes of the VTR-GP we have found that HoverflyGimbal firmware version.03 is the best one to use. Mount the HoverflyGimbal as pictured above using the screws and nuts supplied with your VTR-GP gimbal. The power connector should be pointing upwards. Power the HoverflyGimbal with a good quality BEC such as the Castle Creation 0amp BEC set to 6 Volts. Many cheaper BECs are of questionable quality, the output voltage can be 'noisy' and they can also give off excessive radio interference. 9


10 Set the Mounting Configuration as Back Top in the HoverflyGimbal configurator. When setting the centre points of the servos in the HoverflyGimbal configurator, make sure the gimbal is as level as possible, as indicated in the area below. If you don't have your RX connected to the HoverflyGimbal to adjust the tilt then make sure the Tilt servo 'Transmitter/Receiver Control' is set to 'None'. If you do have your RX connected to the HoverflGimbal, make sure that only the 0v and Signal wires are used. Make sure there is no power (middle red wire) going from the RX to the HoverflyGimbal, failure to ensure this will cause problems and at worst cause damage to your RX or HoverflyGimbal.

11 Below are the servo settings we are using on our HoverflyGimbal for the VTRGP. Note that yours settings may be slightly different. We have found that a digital level is very useful for accurately setting the Centre Points and Scaling factors. You will need to fine tune the settings (the Acc Rate Gain in particular) to get the best results for your rig, flying style and filming style.

 Something to centre the servo, for eg a servo tester or a TX/RX.")

12 6) Adjusting centre points (Tools Required) Before you begin, you will need the following items: Hex 2mm allenkey key/screwdriver (eg. Wera 02305) Long thin flat bladed screwdriver (eg. Wera 7996) Something to centre the servo, for eg a servo tester or a TX/RX. A servo tester set to 520us which is the centre signal for most servos. A typical TX/RX combo. Hex 2mm allenkey key/screwdriver (Wera 02305) Long thin flat bladed screwdriver (Wera 7996)


13 7) Adjusting centre point of Roll Axis Place your flat thin screwdriver down the hollow roll shaft. You should be able to locate the end of the screwdriver into the end of the potentiometer shaft. It will not turn as it is clamped to the roll shaft by the steel collar. Slacken 2.5mm hex grub screw on the steel collar. It needs to be slack enough so you can turn the potentiometer with the screwdriver and also tight enough so that the potentiometer still turns with the roll shaft.

14 IMPORTANT! Remove the 2mm hex tool from the grub screw before proceeding. Failure to do so may damage the gimbal. IMPORTANT! When you connect the servos to the gimbal it may move quickly and unexpectedly. Make sure your fingers and any cables are out of the way and cannot be damaged by the gimbal. Make sure that you can disconnect the power quickly if need be. If the grub screw is too loose when you connect the servo it may continuously spin round. Connect your servo tester and set the position to 520us. Alternatively connect to a RX, making sure the channel you connect to is at the centre position on the TX (don't forget trims & Sub-trims need to be central). You should now be able to adjust the centre point of the gimbal by turning the end of the potentiometer with the screwdriver. Once you are happy with the position you have set, re-tighten the grub screw in the steel collar. By adjusting the centre point, the roll arm can be configured to be on the other side of the camera. This moves the lens of the GoPro camera nearer to the centre of the roll axis. Some people prefer this but for the Hero3 it means you cannot access the hdmi port whilst the camera is in the gimbal. Similarly you could adjust the camera to be in portrait (rather than landscape). This would make the gimbal a Roll/Pan gimbal. We have not tried this out ourselves, do so at your own risk. It might be of use to someone?


15 8) Adjusting centre point of Tilt Axis Place your flat thin screwdriver down the hollow Tilt shaft. You should be able to locate the end of the screwdriver into the end of the potentiometer shaft. It will not turn as it is clamped to the tilt shaft by the steel collar. Slacken 2.5mm hex grub screw on the steel collar. It needs to be slack enough so you can turn the potentiometer with the screwdriver and also tight enough so that the potentiometer still turns with the tilt shaft.

16 IMPORTANT! Remove the 2mm hex tool from the grub screw before proceeding. Failure to do so may damage the gimbal. IMPORTANT! When you connect the servos to the gimbal it may move quickly and unexpectedly. Make sure your fingers and any cables are out of the way and cannot be damaged by the gimbal. Make sure that you can disconnect the power quickly if need be. If the grub screw is too loose when you connect the servo it may continuously spin round. Connect your servo tester and set the position to 520us. Alternatively connect to a RX, making sure the channel you connect to is at the centre position on the TX (don't forget trims & Sub-trims need to be central). You should now be able to adjust the centre point of the gimbal by turning the end of the potentiometer with the screwdriver. Once you are happy with the position you have set, re-tighten the grub screw in the steel collar. By adjusting the centre point, the camera housing can be configured so the camera is removed from the front rather than the back. You can also set the camera to be point vertically down.


17 9) Adjusting Belt Tension (Roll) Slacken the 2x 2.5mm hex screws here......and here on the other side. Pull the servo like below to achieve the desired tension. Then move the hex spacer against the servo plate and re-tighten tighten the 2 screws. A helper can make this much easier. Do not over-tighten the belt. It needs to be tight enough to stop any slop in the movement of the roll arm, but no tighter. If it is too tight it can damage the servo or the gimbal.


18 0) Adjusting Belt Tension (Tilt) Slacken the 2x 2.5mm hex screws here......and here on the other side. Pull the servo like below to achieve the desired tension. Then move the hex spacer against the servo plate and re-tighten tighten the 2 screws. A helper can make this much easier. Do not over-tighten the belt. It needs to be tight enough to stop any slop in the movement of the roll arm, but no tighter. If it is too tight it can damage the servo or the gimbal.
19 ) Fitting Accessories To follow... Horizontal mounting brackets Changing the rail brackets DJI S800 Mountings Fitting Tilt shaft for PhotoHigher Skyline
Further Information can be found at
 Below is a step by step guide to assembling the Hurricane-Rig. Remember that this is a precision optical instrument. Excessive force can bend critical parts. If treated well it should give many years of
RedEdge/3DR Solo INTEGRATION GUIDE
 by RedEdge/3DR Solo INTEGRATION GUIDE P/N: 900-00008 Rev 01 May 2017 Table of Contents Thank you for your purchase! 1 What s inside? 1 What s required 2 Let s get started! 2 Attaching the power board 2
TG VR Gimbal User Manual V Accsoon. All Rights Reserved.
 TG20 360 VR Gimbal User Manual V1.0 20161209 www.accsoon.com E-mail: salse@accsoon.com 0 Disclaimers and Warnings Congratulations on purchasing you new VR Gimbal. Please read this manual and disclaimer
Manual DJI Phantom 2 Vision Dronexpert Gimbal
 Manual DJI Phantom 2 Vision Dronexpert Gimbal V2 1. Remove battery from the phantom. 2. Place the Phantom upside down. 3. Pull the jackplug out of the camera 4. Lift the frame carefully from rubber holders.
Cannes Edition Product List
 Cannes Edition Product List Congratulations on your purchase of a DSLRProsCannes Edition Aerial Kit. Inside your Special Edition tough case you will find the following items with numbers that correspond
STEP 1: MODULE MOUNTING / WIRING:
 VER1.0 PINOUT DIAGRAM: PORT 1 - INPUT 1 (S.BUS, PWM, PPM INPUT) PORT 2 - INPUT 2 (PWM MODE INPUT OR AUX OUTPUT DEFINED IN SOFTWARE) PORT 3 - OUTPUT 1 (S.BUS OUTPUT) PORT 4 - OUTPUT 2 (SERVO OUTPUT) PORT
RedEdge-M TM / DJI Matrice 100 INTEGRATION GUIDE
 by RedEdge-M TM / DJI Matrice 100 INTEGRATION GUIDE P/N: 900-00009 Rev 01 - Nov 2017 Table of Contents Thank you for your purchase! 1 What s inside? 1 What s Required? 2 Let s get started! 2 Attaching
Mini FPV Tricopter / Vtail / Quadcopter
 Mini FPV Tricopter / Vtail / Quadcopter Frame Assembly Manual / Tips and Tricks Armattan Minis Website: http://www.armattanminis.ca/ Main Armattan Website (doesn t have minis): http://www.armattanquads.com/
DOWNLOADING THE APP FOR APPLE PHONES: DOWNLOADING THE APP FOR ANDROID PHONES: For Android Phones go to Google Play or the Android Store.
 DOWNLOADING THE APP FOR APPLE PHONES: DOWNLOADING THE APP FOR ANDROID PHONES: For Android Phones go to Google Play or the Android Store. For Apple Phones go to the app store and click GET. Make sure your
Make a Quadcopter using KK Flight Controller
 Make a Quadcopter using KK 2.1.5 Flight Controller 1 Typical Applications A quadcopter, also called a quadrotor helicopter or quadrotor, is a multirotor helicopter that is lifted and propelled by four
ZYX User Manual V Revision
 ZYX User Manual V.00 206.07.26 Revision Contents Warning and Disclaimer... 3 I. Product Introduction... 4 II. Product List... 5. Package Contents... 5 III. Mounting & Configuration... 6. Gimbal Controller
HALO 2000 GIMBAL SILENT MOTOR DRIVE TECHNOLOGY DIRECT DRIVE BRUSHLESS MOTORS HIGH PERFORMANCE IMU, GPS AND COMPASS
 HALO 2000 GIMBAL HALO 2000 GIMBAL The Halo 2000 is a three axes stabilised camera Gimbal, constructed from carbon fibre composite and built with leading-edge technology for film industry use. The carbon
Senrigan-GP-45 Brushless Gimbal Instruction Manual v1.2
 Senrigan-GP-45 Brushless Gimbal Instruction Manual v1.2 Page 1 of 16 Contents 1. Introduction...3 2. Check List...4 3. Equipment Required For Assembly...5 4. Assembly Steps Mechanism Parts...6 5. Assembly
Articulating TV/Monitor Clamp/Grommet Desk Mount Model: DE640S (Hydro Series)
") Articulating TV/Monitor Clamp/Grommet Desk Mount Model: DE640S (Hydro Series) Instruction Manual Images may be different from actual product Disclaimer It is Dyconn s intention to have all the correct
Articulating TV/Monitor Clamp/Grommet Desk Mount Model: DE640S (Hydro Series) Instruction Manual Images may be different from actual product Disclaimer It is Dyconn s intention to have all the correct
Quick Start Guide. Basic set-up for your Axis360 system
 Quick Start Guide Basic set-up for your Axis360 system Table of Contents 1 Setting up Slide slider assembly attach belt to cart attach ballhead to cart connect motor to controller attach slider to tripod(s)
RedEdge-M TM / DJI Inspire 1 Quick Mount INTEGRATION GUIDE
 RedEdge-M TM / DJI Inspire 1 Quick Mount INTEGRATION GUIDE P/N: 900-00013 Rev 01 - Apr 2018 Table of Contents Thank you for your purchase! 1 What s inside? 1 What s Required? 2 Let s get started! 2 Assembling
V40 Videoboom MAIN OPERATING INSTRUCTIONS INDEX 5. SPECIFICATIONS V40 1. INTRODUCTION 2. LIST OF FUNCTIONS AND PARTS
 MAIN OPERATING INSTRUCTIONS V40 Videoboom INDEX 1. INTRODUCTION 2. LIST OF FUNCTIONS AND PARTS 3. INSTRUCTIONS V40 3.1 ASSEMBLY & SETTING UP 3.2 WEIGHT SYSTEM 3.3 MOUNTING THE VIDEO CAMERA 4. USING THE
imac Intel 27" EMC 2639 Hard Drive
 imac Intel 27" EMC 2639 Hard Drive Replacement Replace the Hard Drive in your imac Intel 27" EMC 2639. Written By: Walter Galan ifixit CC BY-NC-SA www.ifixit.com Page 1 of 26 INTRODUCTION Replacing the
FPV racer Frame class:
 By FPV racer Frame class: Prop. size: Motor size: Power: Flight Cam: Material: 250 Up to 6" M3 or M2 attached motors of choice Up to 4S 1500 mah housed inside frame as optimum, depending on brand Tie-strap
Instruction Manual. Gold Pan Tilt Head with 12V Joystick Control Box (PT-GOLD)
") Instruction Manual Gold Pan Tilt Head with 12V Joystick Control Box (PT-GOLD) All rights reserved No part of this document may be reproduced, stored in a retrieval system, or transmitted by any form or
Instruction Manual Gold Pan Tilt Head with 12V Joystick Control Box (PT-GOLD) All rights reserved No part of this document may be reproduced, stored in a retrieval system, or transmitted by any form or
CHAPTER 3B: ELECTRONIC POWER STEERING
 Electronic Power Steering CHAPTER 3B: ELECTRONIC POWER STEERING NOTE: The basic steering system, such as the tie rod ends, drag links axles, etc., is covered in Chapter 3A: Steering. In 2012, Cub Cadet
ARRIS Zhao Yun Pro User Manual. Content
 ARRIS Zhao Yun Pro User Manual Thank you for buying ARRIS Zhao Yun Pro 3-Axis brushless Gimbal. Each gimbal has been adjusted and tested before we send it out. For this gimbal, Most customers can plug
N1 Video Encoder. User Manual V
 N1 Video Encoder User Manual V1.0 2015.8 Disclaimer Thank you for purchasing the N1 Video Encoder. Users must comply with local radio transmission laws and regulations when using this product. By using
INSTALLATION INSTRUCTIONS
 Accessory Application Publication No. INSTALLATION INSTRUCTIONS (DCT TYPE) P/N 08E84-MKC-A00 GL1800D/DA Honda Dealer: Please give a copy of these instructions to your customer. MII 16426 Issue Date January
ZENMUSE H3-3D Gimbal. User Manual V DJI Innovations. All Rights Reserved.
 ZENMUSE H3-3D Gimbal User Manual V1.02 2014.06.09 www.dji.com 2014 DJI Innovations. All Rights Reserved. Warning & Disclaimer H3-3D gimbal is calibrated before delivery, no adjustment or modification to
Contents. QuickStart Guide. p/n LIT
 Contents QuickStart Guide p/n LIT-804000 Camera mounting plate loose Co-Pilot 3.5 monitor and AA battery pack All four screws must be loose to free the camera mounting plate. tight Make sure to tighten
IBM. Rack Installation Instructions
 IBM Rack Installation Instructions Review the documentation that comes with your rack cabinet for safety and cabling information. When installing your server in a rack cabinet, consider the following:
E3 CNC Router Troubleshooting Guide
 Simple Cost Effective Designs. E3 CNC Router Troubleshooting Guide The purpose of this document is to give those new to CNC routing is a quick reference for the common issues of getting the E3 CNC router
Mini Probe. user manual. DM Models
 Mini Probe user manual DM Models 1.0: Index Section Title Page 1.0 Index...............................2 2.0 Safety Summary......................3 3.0 Introduction..........................4 4.0 Components
X/Y Issues on ASP-645-1
 X/Y Issues on ASP-645-1 Issues seen with X or Y problems: A) Table will not move in X or Y when you are using the Frame Arrow buttons on the control panel. B) On power up the control panel gives Error
Removal and Installation8
 8 Screw Types 8-4 Top Cover Assembly 8-5 Left Hand Cover 8-6 Right Hand Cover 8-10 Front Panel Assembly 8-14 Left Rear Cover 8-15 Right Rear Cover 8-16 Extension Cover (60" Model only) 8-17 Media Lever
Operating Instructions
 Operating Instructions Model Numbers: LS LS M LS G LS A LS LS 00 LS M-WC LS A LS X LS M-WC LS B LS X LS M LS Dimensions A / B / C / D / E 0 / F / Electrical Information Voltage AMPS Frequency 0 HZ Single
GH-50. Gimbal Head. You re on steady ground
 GH-50 Gimbal Head You re on steady ground 1 INTRODUCTION Thank You for choosing Oben! The Oben GH-50 is a gimbal-type tripod head designed to balance a lens along its vertical and horizontal axes. Ideal
Canon EOS Rebel T2i Top Cover Replacement
 Canon EOS Rebel T2i Top Cover Replacement Replacing the top piece of a Canon T2i (550D). In my case, I had a broken hot-shoe, but as most controls on this camera are built into the same part, this repair
CAMERA ASSEMBLY. Removal/Replacement of the Camera Box Assembly APR-CA. Install Camera Assembly. Remove Camera Assembly
 CAMERA ASSEMBLY Removal/Replacement of the Camera Box Assembly APR-CA REQUIRED TOOLS: 9/64 hex key Small flat-tip screwdriver Remove Camera Assembly camera 1. Locate the camera assembly underneath the
Field Service Procedure Replacement Azimuth Motor Kit, 3011
 1. Brief Summary: Troubleshooting document for diagnosing a fault with and replacing the azimuth motor on the 3011 antenna. 2. Checklist: Verify Initialization MDE Status LED Pedestal Error Verify Encoder
MicaSense RedEdge-MX TM Multispectral Camera. Integration Guide
 MicaSense RedEdge-MX TM Multispectral Camera Integration Guide Revision: 01 October 2018 MicaSense, Inc. Seattle, WA 2018 MicaSense, Inc. Page 1 of 19 TABLE OF CONTENTS Introduction and Scope 3 Camera
3-Axis Stabilized Handheld Gimbal for Camera. Instructions. Guilin Feiyu Technology Incorporated Company
 3-Axis Stabilized Handheld Gimbal for Camera Instructions Guilin Feiyu Technology Incorporated Company User Manual E N V. 0 Catalogue. G6 Plus Overview 2. Quick Start Guide 3 3. Balance the Gimbal 4 Balance
HTC RE Companion Handheld camera
 HTC RE Companion Handheld camera disassemby HTC RE Companion camera disassembly starting point. This will get the camera open with minimal damage, and give you some options to repair. Written By: Mike
E3 CNC Router Troubleshooting Guide
 Simple Cost Effective Designs. E3 CNC Router Troubleshooting Guide The purpose of this document is to give those new to CNC routing is a quick reference for the common issues of getting the E3 CNC router
Removal and Installation 8
 Removal and Installation 8 8 Introduction 8-2 Service Calibration Guide to Removal and Installation 8-4 Window 8-8 Covers and Trims 8-12 Rear Tray 8-31 Rear Cover 8-32 Media Lever 8-33 Media Lever Position
OV1001 Part No OV1001 HEIGHT ADJUSTABLE TABLE USER GUIDE
 OV1001 Part No. 23620 OV1001 HEIGHT ADJUSTABLE TABLE USER GUIDE PRODUCT OVERVIEW User Guide: OV1001 OV1001 HEIGHT ADJUSTABLE TABLE A healthier work environment starts with the option to sit or stand throughout
Maintenance. Every Flying Session:
 Maintenance Maintenance The Draganflyer series aircraft feature a direct drive system requiring minimal maintenance as compared to a tradition style helicopter with servo linkages, gears, drive shafts,
NOTICE OF INTENDED INSTALLATION AND USE
 * JBL Audio equipped vehicles will require additional part # DP-TYJBL1 audio interface. NOTICE OF INTENDED INSTALLATION AND USE THE ROSEN MULTI-MEDIA NAVIGATION SYSTEMS CONTAIN AN INTERNAL VIDEO PLAYER,
iosd (On Screen Display)
") iosd (On Screen Display) User Manual V2.2 For iosd Firmware Version V3.3 & iosd Assistant V4.1* July, 216 * iosd Firmware V3.3 compatible with iosd Assistant V4.1. www.dji.com 216 DJI All Rights Reserved.
iosd (On Screen Display) User Manual V2.2 For iosd Firmware Version V3.3 & iosd Assistant V4.1* July, 216 * iosd Firmware V3.3 compatible with iosd Assistant V4.1. www.dji.com 216 DJI All Rights Reserved.
Rack Installation Instructions
 Rack Installation Instructions Review the documentation that comes with your rack cabinet for safety and cabling information. When installing your server in a rack cabinet, consider the following: v Two
2 x Dynamic Arms on 135 Post with C-Clamp
 Installation Guide AWMS-2-D13-C 2 x Dynamic Arms on 135 Post with C-Clamp COMPONENT CHECKLIST RANGE A AWM-LC Post Clamp B AWM-AD Dynamic Arm (x2) C AWM-P13 135 Post D AWM-FC C-Clamp CONTENTS C-Clamp Page
Remote Control Motorized TV Ceiling Mount
 INSTALLATION MANUAL Remote Control Motorized Ceiling Mount CAUTION: DO NOT EXCEED RATED LISTED WEIGHT. SERIOUS INJURY OR PROPERTY DAMAGE MAY OCCUR! DEHA-400E 15 200x200 300x300 400x200 400x400 55" MAX
INSTALLATION MANUAL. ST-BTWD650IR2812 B or W Weatherproof Day/Night Infrared Color Camera
 INSTALLATION MANUAL ST-BTWD650IR2812 B or W Weatherproof Day/Night Infrared Color Camera PACKAGE CONTENTS This package contains: One ST-BTWD650IR2812 camera with Black or White housing One extension tube
C-pan arm USERS INSTRUCTIONS
 C-pan arm USERS INSTRUCTIONS Designed 1 of 12 and made in Denmark Thanks for purchasing a 9.Solutions product. With great passion, we design our products to be as versatile as possible. We hope that our
INSPIRE 1 Quick Start Guide V1.0
 INSPIRE Quick Start Guide V.0 The Inspire is a professional aerial filmmaking and photography platform that is ready to fly right out of the box. Featuring an onboard camera equipped with a 0mm lens and
Caution Notes. Features. Specifications. A3-L User Manual V1.0
 Caution Notes Thank you for choosing our products. If any difficulties are encountered while setting up or operating it, please consult this manual first. For further help, please don t hesitate to contact
INSTALLATION INSTRUCTIONS
 Accessory Application Publication No. INSTALLATION INSTRUCTIONS & ATTACHMENT (MT) P/N 08E70-MKC-A20 GL1800 Honda Dealer: Please give a copy of these instructions to your customer. MII Issue Date January
LumaRail Free Stand Bed Assist Rail with IntelliBrite LED Night Light
 LumaRail Free Stand Bed Assist Rail with IntelliBrite LED Night Light Assembly and Operation Instructions Thank you for investing in this premium Platinum Health product. Please carefully follow the assembly
QuickStart Guide. Contents
 Contents QuickStart Guide The Tiffen Company, 90 Oser Avenue, Hauppauge, New York 11788 631-273-2500 800-645-2522 www.tiffen.com Tiffen Steadicam Operations, Glendale, CA 818-843-4600 1-800-593-3331 www.steadicam.com
Installing 6 Indexer: PRS Standard Tools
 888-680-4466 ShopBotTools.com Installing 6 Indexer: PRS Standard Tools Copyright 2016 ShopBot Tools, Inc. page 1 Copyright 2016 ShopBot Tools, Inc. page 2 Table of Contents Overview...5 Installing the
Spreading Wings S900 User Manual
 Spreading Wings S900 User Manual 2016.01 V1.4 Disclaimer Thank you for purchasing the S900. Please visit the Spreading Wings S900 page on www.dji.com regularly to keep up to date with product information,
3-Axis Stabilized Handheld Gimbal
 3-Axis Stabilized Handheld Gimbal Guilin Feiyu Technology Incorporated Company User Manual EN V1.3 1. Product Overview * The showing sports camera is not included in the package Accessories Thumb Screw
Zenmuse Z15-BMPCC User Manual
 Zenmuse Z15-BMPCC User Manual 2014.12 V1.2 Warning & Disclaimer Do not modify or adjust the Z15-BMPCC. The Z15-BMPCC has been calibrated specifically for the designated Camera and Lens before it leaves
3-Axis Wearable Gimbal for Action Camera. Instructions. Guilin Feiyu Technology Incorporated Company
 -Axis Wearable Gimbal for Action Camera Instructions Guilin Feiyu Technology Incorporated Company User Manual E N V. Catalogue. WGX Overview. Quick Start Guide. Function operation 4 Working Mode 4 Function
FRU Installation Notes Virtuo Monitor Glass Replacement
 January 2016 900975-001 Rev 00 FRU Installation Notes Virtuo Monitor Glass Replacement Purpose How to replace the touch screen glass on a Virtuo This document is for these components or categories Expected
3 Indexer Installation For PRSalpha Tools
 888-680-4466 ShopBotTools.com 3 Indexer Installation For PRSalpha Tools Copyright 2016 ShopBot Tools, Inc. page 1 Copyright 2016 ShopBot Tools, Inc. page 2 Table of Contents General Safety and Precautions...5
HQ Pro-Stitcher Hardware Upgrade Installation Instructions 01/15/13
 Getting Started Monitor Styles HQ Pro-Stitcher Hardware Upgrade Installation Instructions 01/15/13 1. Identify the monitor style on your HQ Pro-Stitcher by comparing to the photos at the right. 2. Find
Installation and Assembly: 2 x 2 Video Wall Ceiling Mount for 40" - 55" flat Panel Displays
 Installation and Assembly: 2 x 2 Video Wall Ceiling Mount for 40" - 55" flat Panel Displays Model: DS-VWT955-2X2 EXTENSION COLUMN (SOLD SEPARATELY) COMPATIBILITY Display width must be a minimum of 36"
Zenmuse Z15-A7. User Manual
 Zenmuse Z15-A7 User Manual V1.0 2015.4 Warning & Disclaimer The Z15-A7 gimbal has been calibrated specifically for the designated camera and lens before it leaves the factory. Please mount only the designated
Installation Guide Philips MP20/30/40/50/60/70 IntelliVue M-Series Arm Rail Mount Kit
 Installation Guide Philips MP20/30/40/50/60/70 IntelliVue M-Series Arm Rail Mount Kit The purpose of this guide is to: 1. Describe attachment of Table Top Mount to Mounting Adapter on Arm (page 2). 2.
Jr. Pan Tilt Head (PT-JR) Instruction Manual
 Instruction Manual") 1 Jr. Pan Tilt Head (PT-JR) Instruction Manual 2 At Proaim, our goal is to ensure 100% Customer Satisfaction in all that we do. We back our sales with a 1 year warranty from the date of purchase and work
1 Jr. Pan Tilt Head (PT-JR) Instruction Manual 2 At Proaim, our goal is to ensure 100% Customer Satisfaction in all that we do. We back our sales with a 1 year warranty from the date of purchase and work
Powerbook G4 Titanium DVI 667/800/867/1GHZ Repair Guide
 Powerbook G4 Titanium DVI 667/800/867/1GHZ Repair Guide Copyright 2003 Powerbookmedic.com. All rights reserved. Any portion of this manual may not be copied, reproduced, or distributed without the express
Vacuum Maintenance Manual (EXCERPT Tim Benedict)
") 1. Position a ladder, scaffold, or work stand, on the right side of Vacuum Skid where the blower motors are installed. 2. Locate the six (6) vacuum hoses connecting the blower motors to the HEPA housings
1. Position a ladder, scaffold, or work stand, on the right side of Vacuum Skid where the blower motors are installed. 2. Locate the six (6) vacuum hoses connecting the blower motors to the HEPA housings
Field Service Procedure Level Cage Motor Kit, XX06, XX06R, XX06RZ, XX06RZA, XX97, XX97A, XX97B, XX00, XX00B & XX07
 1. Brief Summary: Troubleshooting document for diagnosing a fault with and replacing the level cage motor on the XX06 & XX97, XX97A, XX97B, XX00, XX00B & XX07 series antennas. 2. Checklist: Verify Initialization
Treadmill Integrated LCD Screen Option. Cardio Theater Integrated Bracket Assembly Instructions
 Treadmill Integrated LCD Screen Option Cardio Theater Integrated Bracket Assembly Instructions Table of Contents 1 2 3 4 5 6 Before You Begin... 4 Obtaining Service... 4 Unpacking the Equipment... 4 Important
Mac Mini Mid 2011 SSD Dual Drive Installation
 Mac Mini Mid 2011 SSD Dual Drive Installation Install a second hard drive in your mid 2011 Mac Mini. Written By: Dozuki System 2017 guides.crucial.com Page 1 of 19 INTRODUCTION Use this guide to install
Quick Installation Guide
 Full Motion Dual Monitor Arm, Pole Mount Quick Installation Guide Please Review the entire Quick Installation Guide prior to installation. If you have any questions regarding the compatibility of this
Phantom 2 Reference Guide
 Phantom 2 Reference Guide Contents Section 1: Operation and Preparing for Flight. 2 Transmitter introduction 2 Controlling the Drone 2 Turning on the Transmitter 3 Range Extender 3 Basic Drone Parts 4
RAM Rail Mount Kit RAM 201U 5 Arm RAM 2461U Monitor Mount RAM 235U Base, Double U-Bolt
 Note: Indented items indicate parts included in an assembly listed above Part Name/Description Part Number Quantity DirectCommand Kit 4100800 1 Cable Installation Kit 2000901-1 1 Dielectric Grease 2002872
Rider AMP TM. Parts Manual. Model In. S.D. Deck /09 Printed in USA
 AMP TM Parts Manual Rider Model 900 -In. S.D. Deck 0800 /09 Printed in USA THE MANUAL Before you operate your unit, carefully and completely read manuals supplied with the unit. The contents will provide
Contents AGFA MSC
 Contents Contents Color Printer...1.1 General...1.1 Tools...1.1 Lens Carrier...1.2 Changing the Zoom...1.2 Focusing...1.2 Adjustment of the Zoom position...1.3 Adjustment of the fixed focus lens position...1.4
imac Intel 27" Retina 5K Display CPU Replacement
 imac Intel 27" Retina 5K Display CPU Replacement Replace or upgrade the CPU in your imac Intel 27" Retina 5K Display. Written By: Sam Lionheart ifixit CC BY-NC-SA www.ifixit.com Page 1 of 36 INTRODUCTION
Zenmuse Z15-BMPCC. User Manual. V1.0 May 09, 2014
 Zenmuse Z15-BMPCC User Manual V1.0 May 09, 2014 Warning & Disclaimer Do not modify or adjust the Z15-BMPCC. The Z15-BMPCC has been calibrated specifically for the designated Camera and Lens before it leaves
Tile Plow Installation Gold Digger
 NOTE: Indented items indicate parts included in an assembly listed above Part Name/Description Part Number Quantity Tile Plow Kit Soil Max System 4100470 1 Hex head cap screw - M10 x 75mm 2002007-10075
Print Head Replacement and Adjustment Guide for the CD Printer Revision C
 Print Head Replacement and Adjustment Guide for the CD Printer 110488-001 Revision C Rimage is the trademark of the Rimage Corporation. Perfect Image is a registered trademark of the Rimage Corporation.
GYRO-ASSIST SETUP MANUAL
 GYRO-ASSIST SETUP MANUAL Tyler Middle Mount II Gyro-Assist for Film or Video cameras. PLEASE RETURN THIS MANUAL WITH EQUIPMENT $50.00 CHARGE FOR MANUAL IF NOT RETURNED. CAN BE DOWNLOADED FROM www.strattoncamera.com
NOTICE OF INTENDED INSTALLATION AND USE
 NOTICE OF INTENDED INSTALLATION AND USE THE ROSEN MULTI-MEDIA NAVIGATION SYSTEMS CONTAIN AN INTERNAL VIDEO PLAYER, WHICH IS NOT INTENDED FOR VIEWING BY THE DRIVER. THE VIDEO PLAYER IS DISABLED WHEN THE
RC Tractor Guy Controller V2.1 Assembly Guide
 RC Tractor Guy Controller V. Assembly Guide Features 0 Push button inputs Dual axis thumb sticks with built-in push button Rotary encoders with built-in push button MCU Socket to suit Meduino Mega 560
Setup Information Panosaurus May 3, 2011
 Setup Information Panosaurus 2.0 www.gregwired.com May 3, 2011 Please take the time to read all of the setup information to ensure success and ease of use of this tripod head. Much of the setup is a one
Quick Installation Guide
 Full Motion Single Monitor Arm, Pole Mount Quick Installation Guide Please Review the entire Quick Installation Guide prior to installation. If you have any questions regarding the compatibility of this
Navigator II INstallatIoN MaNUal For static and PaN/tIlt configurations
 Navigator II Installation MANUAL For Static and Pan/Tilt Configurations Document Number: 432-0001-00-12, rev 100 FLIR Systems, Inc., 2008. All rights reserved worldwide. No parts of this manual, in whole
Attaching DX Encoders to your Majestic Carriage
 Attaching DX Encoders to your Majestic Carriage Encoders are the white wheels that you need to have on your carriage in order for the stitch regulation to work. Encoders detect the movement of the machine
Phase One. ixu-rs 1000 / ixu 1000 / ixu 150 UAV Camera Systems. For DJI M600 & M600 PRO. Installation Guide
 Phase One ixu-rs 1000 / ixu 1000 / ixu 150 UAV Camera Systems Installation Guide For DJI M600 & M600 PRO 1 Phase One ixu-rs 1000 / ixu 1000 / ixu 150 UAV Camera Systems Installation Guide For DJI M600
E92. Hardware User s Manual. 3MP Indoor Mini Dome with Basic WDR, Fixed lens. (PoE) Ver. 2013/02/04
 Ver. 2013/02/04") E92 3MP Indoor Mini Dome with Basic WDR, Fixed lens Hardware User s Manual (PoE) Ver. 2013/02/04 Table of Contents 0. Precautions 3 1. Introduction 4 Package Contents... 4 Features and Benefits... 5 Safety
E92 3MP Indoor Mini Dome with Basic WDR, Fixed lens Hardware User s Manual (PoE) Ver. 2013/02/04 Table of Contents 0. Precautions 3 1. Introduction 4 Package Contents... 4 Features and Benefits... 5 Safety
User s Guide. for RackMac Pro 4U Rack Enclosure for New Mac Pro
 User s Guide for RackMac Pro 4U Rack Enclosure for New Mac Pro Contents 1 Introduction 1 2 RackMac Pro Description 2 External Features Computer Mounting Module 5/64-Inch Hex Wrench Mac Pro Bottom Cover
Warning Before Installation. Package Contents EN - 1. Refer to your user's manual for the operating temperature.
 510000221G Warning Before Installation English Power off the Network Camera as soon as smoke or unusual odors are detected. Do not place the Network Camera on unsteady surfaces. Do not insert sharp or
Dynamic Perception Stage Zero Dolly Owners Manual
 matthias a. uhlig Dynamic Perception Stage Zero Dolly Owners Manual camera obscura verlag matthias a. uhlig Matthias A. Uhlig Dynamic Perception Stage Zero Dolly Owners Manual Waschow: Camera Obscura Verlag,
TABLE OF CONTENTS SECTION 1 TABLETOP CONFIGURATION SECTION 2 TABLETOP CONFIGURATION ACCESSORIES SECTION 3 SLIDE CONFIGURATION
 S6 USER S MANUAL TABLE OF CONTENTS SECTION 1 TABLETOP CONFIGURATION SECTION 2 TABLETOP CONFIGURATION ACCESSORIES SECTION 3 SLIDE CONFIGURATION SECTION 4 SLIDE CONFIGURATION ACCESSORIES SECTION 5 RACK MOUNT
Paramount Electronics Replacement Instructions
 Paramount Electronics Replacement Instructions Revision 1.7, October 2017 2017 Software Bisque, Inc. All rights reserved. Contents Replacing Paramount Electronics... 3 Step 1: Save Existing Control System
3-Axis Stabilized Handheld Gimbal for Smartphone. Instructions. Guilin Feiyu Technology Incorporated Company. User Manual EN V1.0
 -Axis Stabilized Handheld Gimbal for Smartphone Instructions Guilin Feiyu Technology Incorporated Company User Manual EN V.0 Catalogue. SPG Overview. Quick Start Guide. Charging 5 4. Function operation
Upgrading the programmer supply unit of the BeeProg+/BeeProg2 programmer
 Upgrading the 50-0033 programmer supply unit of the BeeProg+/BeeProg2 programmer How-Do-It Manual December 2012 BeeProgX_50-0033_PSU1_upgrade_manual, version 1.31 page 1 Introduction This how-do-it manual
Quick Installation Guide
 Full Motion Dual Monitor Arm, Pole Mount Quick Installation Guide Please Review the entire Quick Installation Guide prior to installation. If you have any questions regarding the compatibility of this
X-Hubsan App. The Battery. Aircraft Component Breakdown
 E N X-Hubsan App Download the X-Hubsan application for free by scanning the code on the right or by finding it on the App Store (ios) and Google Play (Android). X-Hubsan The Battery Wall Adapter Balance
Instructions to Install Retrofit Kit 6/7000 Machine
 Instructions to Install Retrofit Kit 6/7000 Machine **TURN POWER OFF OF MACHINE BEFORE INSTALLATION** READ ALL INSTRUCTIONS BEFORE STARTING INSTALLATION Retrofit kit contents: PART NAME QUANTITY PART NUMBER