Cannes Edition Product List
|
|
|
- Rafe Nichols
- 6 years ago
- Views:
Transcription
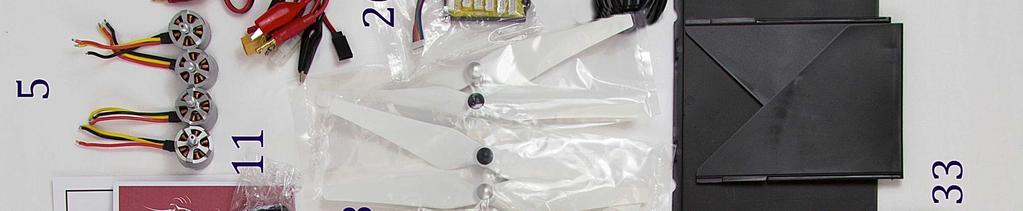
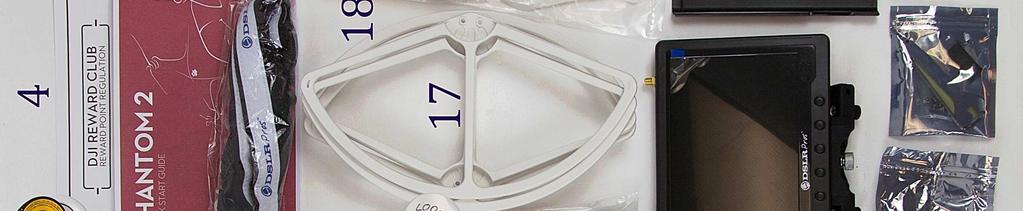
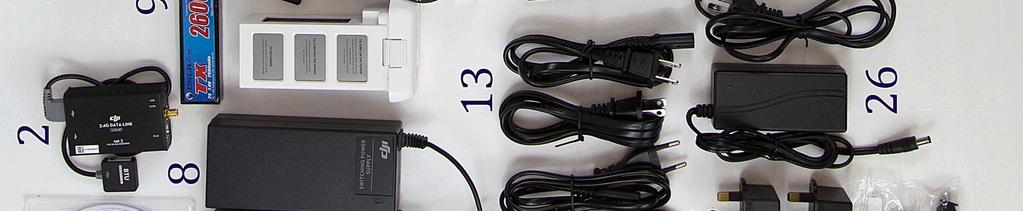
1 Cannes Edition Product List Congratulations on your purchase of a DSLRProsCannes Edition Aerial Kit. Inside your Special Edition tough case you will find the following items with numbers that correspond to the kit image on the following page. 1. DJI Instruction Manual and Software Installer Disk 2. DJI 2.4 GHz BTU Datalink Radio For Waypoint Navigation 3. DJI Phantom 2 With 3-Axis Gimbal And Anti-Gravity Motors Pre-Installed 4. DJI Phantom 2 Quick Start Guide 5. Original DJI Motors 6. Antenna For Datalink 7. USB Cables for Datalink 8. Set Of 2 DJI Smart Flight Battery Chargers 9. 2 LiPo Batteries For Futaba Transmitter (1 Shown) 10.Set Of 5 DJI Smart Flight Batteries (2 Shown) 11. DSLRPros Lanyard For Futaba Transmitter 12.Set Of 2 Micro-USB Cables 13. A/C Power Cables For DJI Smart Flight Battery Chargers 14. Antenna Set For FPV Field Monitor 15. Futaba Transmitter 16. Cables For FPV Field Monitor 17. Propeller Guards 18. Set Of 4 Self-Tightening Propeller Blades (Carbon Fiber Blades Not Pictured) 19.Charging Harness For LiPo Battery With Car Adaptor 20. Balance Board for LiPo Battery Charger 21. DSLRPros TXS-8 Pro LiPo Charger 22. A/C Power Cable For LiPo Multi-Charger 23. String For Propeller Guards 24. Anti-Drop Pins For Gimbal 25. International Plug Set 26. Field Monitor Charger 27. A/C Power Cable For Field Monitor Charger GHz Patch Antenna For FPV Field Monitor 29. DSLRPros 7" FPV Field Monitor 30.Sun Shade For FPV Field Monitor 31. Set of Spare Gimbal Vibration Absorbers 32. Philip's Head Screwdriver 33. Set Of Spare Screws and Propeller Wrench


2
. DJI Phantom 2 Wiki: http://wiki.dji.com/en/index.")
3 PLEASE READ ALL TOPICS BEFORE POWERING ON FOR FIRST TIME New pilots should NOT fly the Phantom with the Gimbal attached until they have had at least 10 hours of flight practice. Refer to the Zenmuse H3-3D operator's manual for installation and removal instructions (found on DJI Phantom 2 Wiki: DJI Phantom 2 Videos: For DSLRPros videos please visit our YouTube Channel Link: 1. Turning On Your Transmitter and Phantom 2 2. Advanced Calibration 3. Compass Calibration 4. LED Break Down 5. GoPro Shooting Preferences 6. Flight Modes 7. OEM Phantom Controller/Transmitter (If Applicable) 8. Futaba Controller/Transmitter (If Applicable) 9. Propeller Installation 10. Gimbal Installation & Removal 11. Updating Your Software 12. Battery Safety WARNING: DO NOT fly with zip ties attached to Phantom. Zip ties are installed for shipping purposes only. DO NOT use WiFi with the GoPro on the Phantom. This will cause the pilot to lose control over the craft and result in a flyaway. DO NOT power on the Phantom without a GoPro attached to the gimbal. This will damage the gimbal and render it unusable. Be sure to add the anti-drop caps to the gimbal before flying with the gimbal attached. It is the owner's responsibility to be certain that the propeller blades are attached properly and securely fastened before every flight. It is recommended that novice pilots learn to fly with the white plastic propellers
4 1. Turning On Your Transmitter and Phantom 2 Always turn on your transmitter before turning on your craft. To turn on our transmitter press the power switch to the "on" position. Make sure your throttle is all the way down and the toggle switches are in the uppermost position before turning on your transmitter. To turn on your Phantom 2 insert the DJI Smart Flight Battery into the craft, press the circular power button once, then press again and hold until the Power Light on the battery turns red. 2. Advanced Calibration Make sure the settings have been properly adjusted so that the Phantom can run with the best performance possible. Plug the Phantom into your PC or Mac using the USB cable provided. Power on the transmitter with the throttle all the way down. Power on the Phantom. Open the DJI Phantom Application. Go to the Tools tab. Click Advance. Make sure there is no metal anywhere around the compass. Do not touch the table that the craft is on and make sure it is very still. Click advanced cali. When a box pops up that says power down MC ignore it, click OK, and do not touch anything. When the advanced calibration has completed successfully, a green check mark will appear to the right of the status bar. 3. Compass Calibration It is important to calibrate your compass outdoors every time you fly your craft. This allows the Phantom to track its own position from multiple satellites and ensures optimal performance. Set the Phantom on a flat surface. With the throttle down and all switches in the uppermost position power up the transmitter and then power up the Phantom. Wait until the Phantom has full GPS lock. You will know the Phantom has full GPS lock when the LEDs under the Phantom's arms are green and blinking. Flip the flight mode switch from GPS to Atti five times in a steady motion until the lights on the underside of the craft turn a solid, unblinking yellow. Pick up the Phantom (do not hold by compass). Hold the Phantom straight out and turn your body in a complete circle until the lights turn from yellow to solid green. Stop turning. Rotate the Phantom vertically so that the USB port is facing straight down and repeat your 360- degree rotation until the lights blink green again. Place the Phantom back on the ground and look to see that there are only green blinking lights. If not, repeat the process.
5 4. LED Break Down This list will help users understand what all the different LED light combinations on the Phantom mean. Initialization: Slow, steady flashing yellow lights. Satellite Lock: 2 green blinks. Transmitter Off: Rapid steady flashing yellow lights. IOC Enabled: Users will see green flashing lights but intermittently have a yellow flash indicating that it is working. Be sure to fly more than 30 feet away from the craft's home location. DO NOT fly with any red lights at all. 4. Starting Up the FPV (If Applicable) Follow these steps to properly turn on the FPV connection. Not following these steps may result in damage to the system. Make sure the GoPro is connected and powered on. Make sure the antennas are screwed in to both the TX and Monitor/Rx of the FPV system before powering on. Make sure the BAND and CHANNELS on both the FPV TX and Monitor/Rx are the same. Our FPV system is multichannel and multi-band capable. When the digital counter turns on the FPV TX is on and transmitting. Turn on the FPV Monitor/Rx by pressing and holding the power button for 3 seconds. A red light next to the power button will turn on when the Monitor is on. 5. GoPro Shooting Preferences The GoPro has an array of different shooting modes and settings. This can be overwhelming for users who are not accustomed to using a GoPro, so here is a quick reference guide on our recommendations for different shooting conditions. More information can be found in the GoPRo manual. Overall best shooting: 2.7k, 30 FPS, Low light shooting: 1080P 30 FPS, Wide, No Pro tune Slow motion: 1080p at 60 fps (any setting at a higher fps than 60) Put all GoPro footage through CineForm (free editing/conversion software offered by GoPro) before putting it into any other editing program. 6. Flight Modes The Phantom 2 comes with multiple flight modes that allow users to control the Phantom in many different ways. Attitude Mode: Maintains altitude but the craft will keep moving in one direction when influenced by wind or momentum. GPS Attitude Mode: Maintains altitude and position. Even if acted upon by an outside force it will return to its last location (where the user let go of the sticks). IOC Mode: No matter the position of the Phantom, the directional controls will always remain the same.
6 7. OEM Phantom Controller/Transmitter (If Applicable) The Phantom OEM Controller/Transmitter is the default transmitter for the Phantom 2. Refer to the DJI tutorials and User Manual for flight controls and information. The DSLRPros Lanyard attaches to the OEM Phantom Transmitter by the silver loop above the power switch. 8. Futaba Controller/Transmitter (If Applicable) The Futaba controller is the ideal controller for DSLRPros aerial kits. This is an upgraded controller that provides more options when piloting the Phantom. The LiPo charger is meant to charge the LiPo battery only. NEVER charge a LiPo battery with any charger that is not a LiPo battery charger. Incorrect charging can cause damage the battery that may result in severe damage to persons and surroundings. Left Stick: Located on the left hand side of the transmitter, pressing up and down on the throttle controls vertical movements. Pressing left and right on the throttle stick causes the aerial to rotate clockwise or counter-clockwise. Right Stick: Located on the right hand side of the transmitter, the right stick controls forward and backward movement and left and right horizontal movement. To turn on the motors for your craft, move both the left and right control stick all the way down and towards the center of the transmitter. Release the sticks when the motors begin to spin. SA Toggle Switch: This is the Intelligent Orientation Control (IOC) mode, which is NOT enabled by default. This switch is located on the left side of the transmitter just above the throttle control. SE Toggle Switch: This controls the flight mode. This switch is located on the top, left hand side of the transmitter. See the "Advanced NAZA Assistant Manual" for further details. SH Toggle Switch: This is the timer reset. This timer is set to warn the user when to start landing the Phantom. This switch is located on the top, right hand side of the transmitter. RD Knob: This sets the gimbal stopping point for the tilt. The trim slider on the rear, right side of the Futaba controls the tilt. The RD knob is located on the front of the transmitter, above the power switch. SD Toggle Switch: The Dual Rate option on the Futaba allows users to limit the overall speed at which the Phantom can operate through the "Fluid Slow Pan" mode. 9. Propeller Installation It is the owner's responsibility to be certain that the propeller blades are attached properly and securely fastened before every flight. All propeller blades are directional and can only be attached to one set of motors. Installing a propeller blade on the wrong motor can result in damage to the craft. If you are unsure about how to install your propeller blades, contact DSLRPros before attempting to fly your craft. It is recommended that novice pilots learn to fly with the white plastic propellers. The carbon fiber propellers are for experienced pilots. They are of a different construction and can be much more dangerous for inexperienced pilots. Proper direction for rotation is necessary when attaching propeller blades. When the front of the craft is facing the user, the motors are numbered 1 to 4 (counter clockwise), starting with the left hand motor. Prop nuts on motors 1 & 3 tighten by spinning clockwise while prop nuts on motors 2 & 4 tighten in a counter clockwise direction.


7 DSLRPros Carbon Fiber Props are NOT self-tightening. To attach the propellers, remove the warning discs from the motors and spin the propeller blades onto the corresponding motor in the direction indicated by the above image. Correct propeller installation is necessary for proper flight. Additional information can be found in the DJI User Manual. Propeller guards are to be used for indoor situations only. Please follow the instructions below to install prop guards. To install your propeller guards, carefully place your craft upside down on a stable, flat surface. Under each motor, you will see 4 2mm Hex screws. Remove the two outermost screws from the base of each motor. Do not discard the removed screws. Use the propeller guard screws (note that these screws are longer than those that you just removed from the P2) to secure the propeller guards to the base of the motors. For added security, thread the white string included with your purchase through the eyes of the propeller guards. 10. Gimbal Installation & Removal It is highly recommended that new pilots remove the lower half of the gimbal before flight practice so that in the event of a crash while learning to fly the Phantom the Zenmuse H3-3D will not be damaged. Please refer to the Zenmuse H3-3D operator manual for detailed installation and removal procedures. The images and directions below are only supplemental to the manuals found on the DJI website. Only the lower half of the gimbal is attached and secured in place via the rubber tension grommets, which have a lip that fits into the bracket rings. While these provide enough tension to retain the gimbal during flight they can come loose if the craft is involved in a significant crash. The grey/black ribbon cable will be the only connection to the craft for power and video. This cable can be disconnected and reconnected at will after the lower half is removed from the brackets. To disconnect your gimbal, pinch the rubber tension grommets and pull out of the top plate. Disconnect the ribbon cable from the gimbal by firmly pulling it out of the back of the gimbal. It is recommended that you disconnect the gimbal cable before performing any firmware updates. Failure to do so can result in damage to your gimbal.

8 To reconnect your gimbal, pinch the rubber tension grommets back into place and reattach the ribbon cable. Be sure to attach the anti-drop pins before flying with your gimbal installed. 11. Updating Your Software It is recommended that you periodically check for software updates using the DJI assistant software application. When upgrading the firmware on either the transmitter or the craft, be sure to disconnect the gimbal from the craft. Upgrading your software with the gimbal's ribbon cable still attached can permanently damage the gimbal. Plug the Phantom into your PC or Mac using the USB cable provided. Power on the transmitter with the throttle all the way down. Power on the Phantom. Open the DJI Phantom software. Go to the Upgrade tab. If upgrades are available, check with DSLRPros to ensure that the upgrade is necessary before installing. After the upgrade is complete, power down your craft and transmitter before reattaching the gimbal. 12. Battery Safety It is vital to the safety of your aerial craft, yourself, and others that you practice proper battery safety when using, charging, and storing all batteries used with your Phantom. Improper use, charging, and/or storage of batteries can result in damage to the battery or personal property. Please adhere to all battery safety guidelines in the included manuals. The estimated flight time for a Phantom 2 with H3-3D gimbal under ideal conditions is 11 minutes.


9 Only charge your batteries using the included charging units. Failure to do so may result in fire. Never charge batteries unattended. If you notice that a battery is swelling or ballooning, immediately discontinue the charge, remove the battery from the charger, and observe the battery outside and away from any combustible materials for at least 15 minutes. In the event of a crash, remove the battery from the craft and observe it in a safe location looking for swelling or damage for at least 15 minutes before using the battery again. When storing your batteries for more than two weeks, you must reduce their charge to storage mode. Refer to your manual for proper battery storage procedures. If your kit includes a Futaba transmitter with a Lithium Polymer Battery, please adhere to the guidelines outlined in the charger manual and only use the included Futaba charging station when charging a Futaba battery. It is always recommended to charge and store your LiPo batteries in a LiPo Safe Flame Resistant bag. Failure to do so can result in fire. It is recommended that you use the Balance(BAL) setting when charging LiPo batteries. DSLRPros 2600mAH LiPo battery is 2 Cell(2S) and charges at NO more than 2Amps.
 SA Toggle Switch (OFF, COURSE LOCK, HOME LOCK): This is your Intelligent Orientation Control or IOC.")

 RD Knob: This knob sets the gimbal's stopping point for the camera tilt. The tilt is controlled by the trim lever on the rear right side of the Futaba.")
 SH Toggle Switch: This is your timer reset. The Futaba comes with dual timers set to give you an audible alarm at 4 minutes and again at 8 minutes.")
10 (3) (8) (1) SE Toggle Switch (GPS, ATTI, ATTI): This is your flight mode control. The lowest ATTI position can be set to trigger "FAILSAFE" as an advanced feature. See you DJI Phantom "Advanced NAZA Assistant Manual" for further details. (2) SA Toggle Switch (OFF, COURSE LOCK, HOME LOCK): This is your Intelligent Orientation Control or IOC. This mode is not enabled by default. (3) SB and SC Toggle Switches (OFF, SMALL RADIUS, LARGE RADIUS): These switches control the advanced Point of Interest flight profiles. This function allows the operator to bank left or right using only the right joystick. Using the SB Toggle will allow the pilot to fly an inside pivot around a central object. Using the SC Toggle will enable you to fly an outside pivot. These functions are reserved for advanced users and NOT enabled at default. (4) RD Knob: This knob sets the gimbal's stopping point for the camera tilt. The tilt is controlled by the trim lever on the rear right side of the Futaba. (5) SD Toggle Switch (OFF, 30%, 50%): This enables the "Fluid Slow Pan" mode. (6) Throttle and Pan Control Stick. (7) Forward, Backward, Left and Right Control Stick. (8) SH Toggle Switch: This is your timer reset. The Futaba comes with dual timers set to give you an audible alarm at 4 minutes and again at 8 minutes. Once you switch out a new battery, use the SH switch to zero out the timer. NOTE: The automatic timer should only be used as a reference point and should not be relied upon for accurate battery life. Under ideal conditions, a Phantom 2 with H3-3D axis installed will have 11 minutes of flight time.
11 Phantom 2 Flight Procedures It is recommended that you follow this procedure when flying your craft. o Be certain that the WiFi function on your GoPro is off. If you see a flashing blue light on your GoPro, this means the WiFi function is on and must be turned off before starting your craft. o Check that batteries for transmitter and craft are fully charged and properly installed. o Check that a camera is connected to gimbal. o Check that antennas are connected to FPV monitor. o Check that propellers are securely fastened to motors. o Place all switches on transmitter in their uppermost position with the throttle all the way down. o Power on your transmitter. o Power on your craft and wait for LED lights to stop flashing red, indicating that your craft has achieved its GPS signal. o Perform a compass calibration. o With the craft on an even surface at least ten feet away from you, start the motors by moving the control sticks down and towards the center of the transmitter. o Press up on the throttle to take off.
INSPIRE 1 Quick Start Guide V1.0
 INSPIRE Quick Start Guide V.0 The Inspire is a professional aerial filmmaking and photography platform that is ready to fly right out of the box. Featuring an onboard camera equipped with a 0mm lens and
Phantom 2 Reference Guide
 Phantom 2 Reference Guide Contents Section 1: Operation and Preparing for Flight. 2 Transmitter introduction 2 Controlling the Drone 2 Turning on the Transmitter 3 Range Extender 3 Basic Drone Parts 4
INSPIRE 1 Release Notes
 2017.07.10 1. All-in-One firmware version updated to v01.11.01.50. 2. Remote Controller firmware version updated to v1.7.80. 3. DJI GO app ios version updated to v3.1.13. 4. DJI GO app Android version
PHANTOM 3. Quick Start Guide ADVANCED V1.2
 PHANTOM 3 ADVANCED Quick Start Guide V.2 Phantom 3 Advanced It s time to meet your Phantom. The Phantom 3 Advanced s camera records video at up to 080p/60fps and captures 2 megapixel photos. Review the
INSPIRE 1 Release Notes
 2016.12.15 1. All-in-One firmware version updated to v1.10.1.40. 2. DJI GO app ios version updated to v3.1.1. 3. DJI GO app Android version updated to v3.1.1. What s New: 1. Optimized Flight Restriction
Hubsan H501S User Documentation
 Hubsan H501S User Documentation The purpose of this document is to record for easy reference the user knowledge base of the Hubsan H501S quadcopter. This is a work in progress and is intended to be edited
TG VR Gimbal User Manual V Accsoon. All Rights Reserved.
 TG20 360 VR Gimbal User Manual V1.0 20161209 www.accsoon.com E-mail: salse@accsoon.com 0 Disclaimers and Warnings Congratulations on purchasing you new VR Gimbal. Please read this manual and disclaimer
iosd (On Screen Display)
") iosd (On Screen Display) User Manual V2.2 For iosd Firmware Version V3.3 & iosd Assistant V4.1* July, 216 * iosd Firmware V3.3 compatible with iosd Assistant V4.1. www.dji.com 216 DJI All Rights Reserved.
iosd (On Screen Display) User Manual V2.2 For iosd Firmware Version V3.3 & iosd Assistant V4.1* July, 216 * iosd Firmware V3.3 compatible with iosd Assistant V4.1. www.dji.com 216 DJI All Rights Reserved.
DJI Inspire 1 V 2. 0 User Manual
 DJI Inspire 1 V 2. 0 User Manual Compliance Information KCC Warning Message 해당무선설비는운용중전파혼신가능성이있으므로인명안전과관련된서비스는할수없습니다. 해당무선설비는운용중전파혼신가능성이있음 In the Box Check that all of the following items have been included
OSMO MOBILE. User Manual V
 OSMO MOBILE User Manual V1.2 2017.03 Searching for Keywords Search for keywords such as battery and install to find a topic. If you are using Adobe Acrobat Reader to read this document, press Ctrl+F on
ZENMUSE H3-3D Gimbal. User Manual V DJI Innovations. All Rights Reserved.
 ZENMUSE H3-3D Gimbal User Manual V1.02 2014.06.09 www.dji.com 2014 DJI Innovations. All Rights Reserved. Warning & Disclaimer H3-3D gimbal is calibrated before delivery, no adjustment or modification to
Zenmuse Z15-A7. User Manual
 Zenmuse Z15-A7 User Manual V1.0 2015.4 Warning & Disclaimer The Z15-A7 gimbal has been calibrated specifically for the designated camera and lens before it leaves the factory. Please mount only the designated
Zenmuse Z15-GH4 (HD) User Manual
 User Manual") Zenmuse Z15-GH4 (HD) User Manual 2015.4 V1.4 Warning & Disclaimer Do not modify or adjust the Z15-GH4. The Z15-GH4 gimbal has been calibrated specifically for the designated camera and lens before it leaves
Zenmuse Z15-GH4 (HD) User Manual 2015.4 V1.4 Warning & Disclaimer Do not modify or adjust the Z15-GH4. The Z15-GH4 gimbal has been calibrated specifically for the designated camera and lens before it leaves
Senrigan-GP-45 Brushless Gimbal Instruction Manual v1.2
 Senrigan-GP-45 Brushless Gimbal Instruction Manual v1.2 Page 1 of 16 Contents 1. Introduction...3 2. Check List...4 3. Equipment Required For Assembly...5 4. Assembly Steps Mechanism Parts...6 5. Assembly
Quick Start Guide.
 Quick Start Guide www.c-me.de Specifications: Size: 130 x65x24mm folded Weight: 150g WiFi: 2.4 GHz Image Sensor: 1/2.3 CMOS Video: 1080P 30 fps* Photo: 8MP* Format: JPG/MP4 (MPEG-4 AVC/H.264) Battery:
X-CAM A10-3H 3 Axis Gimbal for GOPRO. User Manual ( V2.00 )
") X-CAM A10-3H 3 Axis Gimbal for GOPRO User Manual ( V2.00 ) The X-CAM A10-3H 3 Axis Gimbal has been setup and calibrated for use with GOPRO cameras, it is ready to use straight from the box. Specifications:
X-CAM A10-3H 3 Axis Gimbal for GOPRO User Manual ( V2.00 ) The X-CAM A10-3H 3 Axis Gimbal has been setup and calibrated for use with GOPRO cameras, it is ready to use straight from the box. Specifications:
Hornet S. Remote Controller. Operation Manual. RD12
 Hornet S Remote Controller RD12 Operation Manual www.jyu.com PART DESCRIPTIONS Hornet S Communication Indicator red: disconnected green: connected remote battery capacity indicator red: low capacity green:
X-Hubsan App. The Battery. Aircraft Component Breakdown
 E N X-Hubsan App Download the X-Hubsan application for free by scanning the code on the right or by finding it on the App Store (ios) and Google Play (Android). X-Hubsan The Battery Wall Adapter Balance
Height Changes Your Aesthetic View
 USER MANUAL VERSION1.0 Height Changes Your Aesthetic View INTRODUCTION Support & Service Thank you for purchasing Wingsland Minivet, you hereby agree with and accept the terms of this disclaimer and is
Aeroxcraft VTR-GP Tilt/Roll Gimbal User Manual
 Aeroxcraft VTR-GP Tilt/Roll Gimbal User Manual Contents. Notes 2. Introduction 3. Installing GoPro camera 4. Connecting to a DJI Naza or Wookong 5. Installing HoverflyGimbal 6. Adjusting centre points
The Modern Archetype of Drones. Symmetrical facet design radiates a brilliance in the sky
 The Modern Archetype of Drones Symmetrical facet design radiates a brilliance in the sky INSTANT FLYING The Xiro Xplorer is ready to fly right out of the box. Attach the propellers, install the battery
7.58 lbs (3440 g, including two batteries, without gimbal and camera)
") Appendix Specifications Aircraft Weight Max Takeoff Weight GPS Hovering Accuracy Max Angular Velocity Max Tilt Angle Max Ascent Speed Max Descent Speed Max Takeoff Sea Level Max Wind Speed Resistance T650
Appendix Specifications Aircraft Weight Max Takeoff Weight GPS Hovering Accuracy Max Angular Velocity Max Tilt Angle Max Ascent Speed Max Descent Speed Max Takeoff Sea Level Max Wind Speed Resistance T650
Epic Made Easy The Redesigned 350 QX3
 Available November 2014 350 QX3 AP Combo BLH8160 (APC) Epic Made Easy The Redesigned 350 QX3 Capturing spectacular aerial video and stills is even easier with the new Blade 350 QX3. Its simplified controls,
Inspire 2 Release Notes
 Date: 2018.04.18 Remote Controller Firmware: DJI GO 4 app: V01.02.0100 V01.01.0010 ios V 4.2.12 or above, Android V 4.2.12 or above Added support for adjusting the maximum velocity of aircraft s real-time
Dragonfly Pro USER MANUAL
 New vision of the world Shenzhen Simtoo Intelligent Technology Co., Ltd. West Industry Building A5, Park Road, Bao An District, Shenzhen, China 518000 TEL: +86 755 2373 2452 Web: www.simtoo.com Email:
3-Axis Stabilized Handheld Gimbal
 3-Axis Stabilized Handheld Gimbal Guilin Feiyu Technology Incorporated Company User Manual EN V1.3 1. Product Overview * The showing sports camera is not included in the package Accessories Thumb Screw
Phase One. ixu-rs 1000 / ixu 1000 / ixu 150 UAV Camera Systems. For DJI M600 & M600 PRO. Installation Guide
 Phase One ixu-rs 1000 / ixu 1000 / ixu 150 UAV Camera Systems Installation Guide For DJI M600 & M600 PRO 1 Phase One ixu-rs 1000 / ixu 1000 / ixu 150 UAV Camera Systems Installation Guide For DJI M600
Zenmuse Z15-BMPCC User Manual
 Zenmuse Z15-BMPCC User Manual 2014.12 V1.2 Warning & Disclaimer Do not modify or adjust the Z15-BMPCC. The Z15-BMPCC has been calibrated specifically for the designated Camera and Lens before it leaves
RONIN THUMB CONTROLLER
 RONIN THUMB CONTROLLER User Manual V1.0 2015.6 Disclaimers and Warnings Congratulations on purchasing your new DJI product. Carefully read the manual and all disclaimers before using this product. By using
Zenmuse Z15-BMPCC. User Manual. V1.0 May 09, 2014
 Zenmuse Z15-BMPCC User Manual V1.0 May 09, 2014 Warning & Disclaimer Do not modify or adjust the Z15-BMPCC. The Z15-BMPCC has been calibrated specifically for the designated Camera and Lens before it leaves
ARRIS Zhao Yun Pro User Manual. Content
 ARRIS Zhao Yun Pro User Manual Thank you for buying ARRIS Zhao Yun Pro 3-Axis brushless Gimbal. Each gimbal has been adjusted and tested before we send it out. For this gimbal, Most customers can plug
DIRECTOR DUCATTI AMBITION Equipment list
 All equipment owned and operated. CINEMA CAMERAS RED EPIC Epic M / Side SSD and Lens Mount (Canon TI Mount) Red Remote Redmag 1.8 SSD 128GB (Memory Cards) Matte Box W/ Cage and Side Flags (Carbon Fiber)
AVT Model Tripod.
 AVT Model Tripod www.ravelliphoto.com Product Overview: The Ravelli AVT professional tripod is a high performance, fluid drag tripod that provides smooth continuous drag control and operates on both pan
MAVIC PRO. Quick Start Guide V1.4
 MAVIC PRO Quick Start Guide V1.4 Aircraft The DJITM MAVICTM Pro is DJI's smallest flying camera, featuring a fully stabilized camera, Intelligent Flight Modes and Obstacle Avoidance inside a revolutionary
ARRIS X-Speed 250B Assembling Manual
 ARRIS X-Speed 250B Assembling Manual Thank you for purchasing the ARRIS X-Speed 250B FPV Racing drone. Be sure to read through the entire manual before starting your build. If you bought the ARRIS X-Speed
OSMO MOBILE 2. User Manual. v
 OSMO MOBILE 2 User Manual v1.0 2018.02 Searching for Keywords Search for keywords such as battery and install to find a topic. If you are using Adobe Acrobat Reader to read this document, press Ctrl+F
Mi Smartphone Gimbal Manual Please read the manual carefully before using the product.
 Mi Smartphone Gimbal Manual Please read the manual carefully before using the product. 1. Product Introduction Product accessories list USB charging cable x1 Mi Smartphone Gimbal Manual Please read the
NANOMIND 110 USER MANUAL
 NANOMIND 110 USER MANUAL Highlights - MindRacer in nano size frame, running MindPX & PX4 flight stack - heavy lifter, maximum take-off weight up to 80 g - 5~7 minutes flight time - full modularized, stackable,
ZYX User Manual V Revision
 ZYX User Manual V.00 206.07.26 Revision Contents Warning and Disclaimer... 3 I. Product Introduction... 4 II. Product List... 5. Package Contents... 5 III. Mounting & Configuration... 6. Gimbal Controller
3-Axis Wearable Gimbal for Action Camera. Instructions. Guilin Feiyu Technology Incorporated Company
 -Axis Wearable Gimbal for Action Camera Instructions Guilin Feiyu Technology Incorporated Company User Manual E N V. Catalogue. WGX Overview. Quick Start Guide. Function operation 4 Working Mode 4 Function
TRD Beholder MS1 Camera Stabilizer
 TRD Beholder MS1 Camera Stabilizer Table of Content Product Description Kit Includes Battery Setup and Charging Camera Setup and Balancing How to Use Other Features 1 2 2 4 5 6 Supported Cameras 6 Attention
Inspire 2 Release Notes
 Date: 2018.11.16 DJI GO 4 app: v01.02.0300 v01.01.0050 ios v4.3.0 or above, Android v4.3.0 or above Fixed a rare issue where compass interference altered the orientation of the aircraft. Fixed a rare issue
DJI GS PRO. User Manual V
 DJI GS PRO User Manual V1.4 2017.03 Video Tutorials Virtual Fence Mission 3D Map Area Mission Waypoint Flight Mission 2 2017 DJI All Rights Reserved. Contents Video Tutorials 2 Disclaimer 4 Warning 4 Introduction
WooKong Multi Rotor Product Release Notes
 Date : February 21, 2014 WooKong M firmware version : 5.26 WooKong M software version : 2.04 WM Assistant version : 1.4.25 WooKong M Quick Start Guide : 1.12 Software WooKongM Assistant Software V2.04
Mini FPV Tricopter / Vtail / Quadcopter
 Mini FPV Tricopter / Vtail / Quadcopter Frame Assembly Manual / Tips and Tricks Armattan Minis Website: http://www.armattanminis.ca/ Main Armattan Website (doesn t have minis): http://www.armattanquads.com/
User Manual for ARRIS FPV250 with SPRacing F3 Flight Controller With Cleanflight
 User Manual for ARRIS FPV250 with SPRacing F3 Flight Controller With Cleanflight 1.12.00 1. How to Connect the F3 Flight Controller to the Computer. 1.1. Do not connect the F3 flight controller to the
3-Axis Stabilized Handheld Gimbal for Smartphone. Instructions. Guilin Feiyu Technology Incorporated Company. User Manual EN V1.0
 -Axis Stabilized Handheld Gimbal for Smartphone Instructions Guilin Feiyu Technology Incorporated Company User Manual EN V.0 Catalogue. SPG Overview. Quick Start Guide. Charging 5 4. Function operation
3-Axis Stabilized Handheld Gimbal for Camera. Instructions. Guilin Feiyu Technology Incorporated Company
 3-Axis Stabilized Handheld Gimbal for Camera Instructions Guilin Feiyu Technology Incorporated Company User Manual E N V. 0 Catalogue. G6 Plus Overview 2. Quick Start Guide 3 3. Balance the Gimbal 4 Balance
3-Axis Stabilized Handheld Gimbal. Guilin Feiyu Technology Incorporated Company
 3-Axis Stabilized Handheld Gimbal Guilin Feiyu Technology Incorporated Company User Manual EN V1.1 1. Product Overview * The showing sports camera is not included in the package Thumb Screw Tilt Axis Cross
Inspire 2 Release Notes
 Date: 2017.11.13 Remote Controller Firmware: DJI GO 4 app: V01.01.0200 V01.01.0002 ios V 4.1.14 or above, Android V 4.1.14 or above Added support for the Zenmuse X7 gimbal and camera. CineCore 2.1 now
Inspire 2 Release Notes
 Date: 2017.12.13 Remote Controller Firmware: DJI GO 4 app: V01.01.0300 V01.01.0002 ios V 4.1.18 or above, Android V 4.1.18 or above Optimized Zenmuse X7 lens connection stability to fix an issue where
Dell Edge Gateway. Service Manual Series
 Dell Edge Gateway 5000 Series Service Manual Computer Model: Dell Edge Gateway 5000/5100 Regulatory Model: N01G/N02G Regulatory Type: N01G001/N02G001 Notes, cautions, and warnings NOTE: A NOTE indicates
The mobile device holder can be tilted at different positions and angles. DO NOT force an overlarge mobile device into the mobile device holder.
 Remote Controller Profile The Phantom 3 Standard remote controller features a 2.4 GHz WiFi Video Downlink, 5.8 GHz aircraft transmission system, and a built-in battery. It is capable of transmitting signals
Attach the propeller, install the battery and you enter the fascinating world of photography and aerial video.
 XPLORER V - XIRO - HD XPLORER V Platform 3-axis stabilized HD Camera 1080 Manufacturer:XIRODRONE Reference:AXR-16001 Loyalty points offered:291 Price:699.00 XPLORER V - XIRO - HD EVERYTHING YOU NEED IN
Jaguar F-TYPE CAM Dual Camera interface for select 14+ Jaguar vehicles NTV-KIT589
 3950 NW 120 th Ave, Coral Springs, FL 33065 TEL 561-955-9770 FAX 561-955-9760 Jaguar F-TYPE CAM Dual Camera interface for select 14+ Jaguar vehicles NTV-KIT589 BHM Overview Jaguar F-TYPE CAM interfaces
INSPIRE 1 PRO User Manual
 INSPIRE 1 PRO User Manual 2017.12 V1.4 Searching for Keywords Search for keywords such as battery and install to find a topic. If you are using Adobe Acrobat Reader to read this document, press Ctrl+F
3-Axis Stabilized Handheld Gimbal. Guilin Feiyu Technology Incorporated Company
 3-Axis Stabilized Handheld Gimbal Guilin Feiyu Technology Incorporated Company User Manual EN V1.0 1. Product Overview * The showing sports camera is not included in the package Thumb Screw Tilt Axis Cross
User Manual V K Camera with an Integrated 3-axis Gimbal
 User Manual V 1.1 4K Camera with an Integrated 3-axis Gimbal Table of Contents Introduction 3 At a Glance 3 Charging the Battery 4 Status Battery LED Indicator Description 4 Check the Battery Level 5 Insert
Mavic Pro Release Notes
 Date : 2017.08.22 v01.03.1000 v4.1.7 v4.1.5 Fixed an occasional issue where DNG files couldn t be opened. Fixed an occasional issue where the camera would restart automatically during recording. Fixed
Mavic Pro Release Notes
 Date : 2017.09.19 v01.04.0000 v4.1.10 v4.1.10 Added QuickShot feature (requires DJI GO 4 app v4.1.10 or higher). Added Dynamic Home Point for ActiveTrack mode (requires DJI GO 4 app v4.1.10 or higher).
Zenmuse Z15-GH3 User Manual V1.00
 Zenmuse Z15-GH3 User Manual V1.00 2013.09.13 Revision www.dji.com 2013 DJI Innovations. All Rights Reserved. 1 Warning & Disclaimer No adjusting or amending is allowed to Z15. Z15 is specialized for Camera
Quick Start Guide V
 Quick Start Guide V1.5 2016.8 1. Get to Know Your DOBBY DOBBY is ZEROTECH s compact, portable, multi-axis aircraft that has been tailor-made for selfie-lovers. It comes with a high definition camera that
Tips for Users: Go Pro Hero3
 Tips for Users: Go Pro Hero3 The GoPro is complicated to use and it takes time to figure it out. Borrow it before you need it to learn how to use it. We do not adjust the settings. The settings may be
Removal and Installation8
 8 Screw Types 8-4 Top Cover Assembly 8-5 Left Hand Cover 8-6 Right Hand Cover 8-10 Front Panel Assembly 8-14 Left Rear Cover 8-15 Right Rear Cover 8-16 Extension Cover (60" Model only) 8-17 Media Lever
User Manual V
 INSPIRE User Manual RAW V1.0 2016.03 Searching for Keywords Search for keywords such as battery and install to find a topic. If you are using Adobe Acrobat Reader to read this document, press Ctrl+F on
Contents Download INAV Connect to INAV Reset Default Configuration Binding the Receiver to the Radio...
 Contents Download INAV... 1 Connect to INAV... 1 Reset Default Configuration... 3 1. Binding the Receiver to the Radio... 9 2. Verify the RX (receiver) Channel Mapping...10 3. Verify AUX Channel Mapping...12
DOWNLOADING THE APP FOR APPLE PHONES: DOWNLOADING THE APP FOR ANDROID PHONES: For Android Phones go to Google Play or the Android Store.
 DOWNLOADING THE APP FOR APPLE PHONES: DOWNLOADING THE APP FOR ANDROID PHONES: For Android Phones go to Google Play or the Android Store. For Apple Phones go to the app store and click GET. Make sure your
STEP 1: MODULE MOUNTING / WIRING:
 VER1.0 PINOUT DIAGRAM: PORT 1 - INPUT 1 (S.BUS, PWM, PPM INPUT) PORT 2 - INPUT 2 (PWM MODE INPUT OR AUX OUTPUT DEFINED IN SOFTWARE) PORT 3 - OUTPUT 1 (S.BUS OUTPUT) PORT 4 - OUTPUT 2 (SERVO OUTPUT) PORT
Introduction CLASS 1 LED PRODUCT
 Introduction Thank you for purchasing a set of FlightLights, a high performance LED system for model aircraft designed and manufactured by BrainCube Aeromodels Ltd. This manual will describe how to safely
Navigation interface for Jeep GC 5 RA2 NTV-KIT581
 3950 NW 120 th Ave, Coral Springs, FL 33065 TEL 561-955-9770 FAX 561-955-9760 NNG-Jeep GC Navigation interface for Jeep GC 5 RA2 NTV-KIT581 NNG-JEEP GC Kit Content 5 1 6 4 7 2 3 1. 2. 3. 4. 5. 6. 7. 8.
SPARK. Quick Start Guide V1.6
 SPARK Quick Start Guide V1.6 SPARK The DJI SPARK is DJI's smallest flying camera featuring a stabilized camera, Intelligent Flight Modes, and Obstacle Avoidance inside a light, portable body. Equipped
Quick Start Guide V1.0
 Quick Start Guide V1.0 Overview The OSMO TM + is a professional handheld gimbal camera that combines mobility and stability in one device. Its camera features an optical zoom lens providing 3.5x optical
Trimble UAS Portfolio Update. August 25 th 2015
 Trimble UAS Portfolio Update August 25 th 2015 Trimble UAS Portfolio Updates Trimble UX5 Setting the Standard in Mapping Trimble UX5 HP High Precision Surveying and Mapping Solution Trimble ZX5 Flexible
ipad Navigation Map and FPV live video can be displayed with P-in-P (above) or Side-by-Side (below) layout. Custom Telemetry can be shown in either
 or Side-by-Side (below) layout. Custom Telemetry can be shown in either") Camera Overview FPV Camera brings a complete new FPV flying experience for DJI Phantom 3 Pro/Adv and Inspire 1 with innovative Navigation Map to let experienced pilots flying safer and more enjoyable.
Camera Overview FPV Camera brings a complete new FPV flying experience for DJI Phantom 3 Pro/Adv and Inspire 1 with innovative Navigation Map to let experienced pilots flying safer and more enjoyable.
DJI GS PRO. User Manual V
 DJI GS PRO User Manual V1.8 2017.08 Video Tutorials Virtual Fence Mission 3D Map Area Mission 3D Map POI Mission Waypoint Flight Mission 2 2017 DJI All Rights Reserved. Contents Video Tutorials 2 Disclaimer
DAT AL I N K 3. Quick Start Guide V1.0
 DAT AL I N K 3 Quick Start Guide V1.0 Disclaimer Congratulations on purchasing your new DJI product. The information in this document affects your safety and your legal rights and responsibilities. Read
OSMO. Quick Start Guide V1.4
 OSMO Quick Start Guide V1.4 Overview The OSMO TM is a professional handheld gimbal that combines mobility and stability in one device. Its camera shoots sharp 12MP still photos and stable video at up to
V5420 Host Card Upgrade Kit for R3082D Quick Start Guide
 Quick Start Guide Upgrade kit contents The table below shows the contents of the V5420 Host Card Upgrade Kit (components are not shown to scale). Part Function Pieces V5420 Host Card 1 Host card bracket
Caution Notes. Features. Specifications. A3-L User Manual V1.0
 Caution Notes Thank you for choosing our products. If any difficulties are encountered while setting up or operating it, please consult this manual first. For further help, please don t hesitate to contact
3-Axis Stabilized Handheld Gimbal for Camera. Instructions. Guilin Feiyu Technology Incorporated Company
 3-Axis Stabilized Handheld Gimbal for Camera Instructions Guilin Feiyu Technology Incorporated Company User Manual E N V2.0 Catalogue 1.Product Overview 1 2.Installation 2.1Battery Charging 2.2Battery
Jaguar F-TYPE CAM 16. Dual Camera interface for select 16+ Jaguar vehicles NTV-KIT746 BHM 05/31/16 NTV-DOC259
 3950 NW 120 th Ave, Coral Springs, FL 33065 TEL 561-955-9770 FAX 561-955-9760 Jaguar F-TYPE CAM 16 Dual Camera interface for select 16+ Jaguar vehicles NTV-KIT746 BHM Overview Jaguar F-TYPE CAM 16 interfaces
Canon Powershot SD550 Zoom Lens Assembly Replacement
 Canon Powershot SD550 Zoom Lens Assembly Replacement This repair guide will show you how to take apart the PowerShot SD550 and replace the zoom lens. Written By: Matthew Theiss ifixit CC BY-NC-SA www.ifixit.com
OSMO POCKET. User Manual v1.0
 OSMO POCKET User Manual v1.0 2018.12 Searching for Keywords Search for keywords such as battery and install to find a topic. If you are using Adobe Acrobat Reader to read this document, press Ctrl+F on
DJI Ace One product release notes
 Date : 26 July 2012 Ace One firmware version : 4.02 Ace Assistant software version : 2.4 Low Voltage Warning Semi Auto Takeoff & Landing (Optional) Ground Station chargeable functions: View (optional)
THIS IS THE CURRENT FF USER GUIDE AS OF PLEASE DO NOT USE ANY PREVIOUSLY DATED VERSIONS
 THIS IS THE CURRENT FF USER GUIDE AS OF 02-26-2012 PLEASE DO NOT USE ANY PREVIOUSLY DATED VERSIONS INTRODUCTION: I compiled this guide from information posted on RCGroups.COM and from GoodLuckBuy.COM where
RONIN 2 Diagram. 1. Grip 2. Gimbal Connector 3. HD-SDI Output 4. Power Button V Accessory Power Port
 RONIN 2 Diagram 1. Grip 2. Gimbal Connector 3. HD-SDI Output 4. Power Button 5. 14.4V Accessory Power Port 6. Pan Motor 7. Camera Upper Mounting Plate 8. GPS 9. HD-SDI Input 10. Focus Mounting Plate 11.
BEST Control System. Dave Wilkerson. September 12, 2015
 BEST Control System BEST Robotics, Inc. Dave Wilkerson September 12, 2015 Copyright 2012 BEST Robotics, Inc. All rights reserved. 1 Servos Joystick Return Kit AAA Battery Charger Analog WiFi key USB/Tether
Datalink 3 User Manual
 Datalink 3 User Manual 2017.07 V1.0 Searching for Keywords Search for keywords such as battery and install to find a topic. If you are using Adobe Acrobat Reader to read this document, press Ctrl+F on
THIS IS THE CURRENT FF USER GUIDE AS OF PLEASE DO NOT USE ANY PREVIOUSLY DATED VERSIONS
 THIS IS THE CURRENT FF USER GUIDE AS OF 05-04-2012 PLEASE DO NOT USE ANY PREVIOUSLY DATED VERSIONS INTRODUCTION: I compiled this guide from information posted on RCGroups.COM and from GoodLuckBuy.COM where
NNG-Ford V1 NTV-KIT558. Navigation interface for FORD vehicles equipped with 8.4 MyTouch NTV-DOC218
 3950 NW 120th Ave, Coral Springs, FL 33065 TEL 561-955-9770 FAX 561-955-9760 NNG-Ford V1 Navigation interface for FORD vehicles equipped with 8.4 MyTouch NTV-KIT558 NTV-DOC218 SoftTouch Navigation System
Product Overview. Features
 APCF1 Model Tripod Product Overview The Ravelli APCF1 is a Professional Quality Carbon Fiber Tripod providing a solid base for high-end photographic equipment. This model is a mix of carbon fiber and magnesium
OSMO. Quick Start Guide V1.0
 OSMO Quick Start Guide V1.0 Overview The Osmo is a professional handheld gimbal that combines mobility and stability in one device. Its camera shoots sharp 12MP still photos and stable video at up to 4K.
Spreading Wings S900 User Manual
 Spreading Wings S900 User Manual 2016.01 V1.4 Disclaimer Thank you for purchasing the S900. Please visit the Spreading Wings S900 page on www.dji.com regularly to keep up to date with product information,
CYCLOPS TORNADO OSD V1.0 manual
 CYCLOPS TORNADO OSD V1.0 manual Thanks for buying and using CYCLOPS OSD series products, please read this manual carefully before use. Installation of connections Important: select Jumper instructions:
ibook G4 14" 933 MHz-1.33 GHz Hard Drive
 ibook G4 14" 933 MHz-1.33 GHz Hard Drive Replacement Written By: irobot ifixit CC BY-NC-SA www.ifixit.com Page 1 of 25 INTRODUCTION You can install hard drives up to 9.5mm thick. TOOLS: Coin (1) Phillips
FPV racer Frame class:
 By FPV racer Frame class: Prop. size: Motor size: Power: Flight Cam: Material: 250 Up to 6" M3 or M2 attached motors of choice Up to 4S 1500 mah housed inside frame as optimum, depending on brand Tie-strap
RedEdge-M TM / DJI Inspire 1 Quick Mount INTEGRATION GUIDE
 RedEdge-M TM / DJI Inspire 1 Quick Mount INTEGRATION GUIDE P/N: 900-00013 Rev 01 - Apr 2018 Table of Contents Thank you for your purchase! 1 What s inside? 1 What s Required? 2 Let s get started! 2 Assembling
Q2 XBee Handheld Controller Assembly Guide
 Q2 XBee Handheld Controller Assembly Guide Copyright Quantum Robotics Inc. Q2 Controller V1.0 1 Parts List: The kit comes with 14 individual bags. 1. Case Top and Bottom 2. Case Screw Package containing:
3-Axis Gimbal for Mirrorless and DSLR Cameras. Guilin Feiyu Technology Incorporated Company
 3-Axis Gimbal for Mirrorless and DSLR Cameras Guilin Feiyu Technology Incorporated Company User Manual EN V 2.1 1. Product Overview [5] [4] [3] [12] [7] [6] [9] [8] [2] [13] [14] [1] [15] [16] [17] [10]
DualShock 4 Analog Stick Covers Replacement
 DualShock 4 Analog Stick Covers Replacement Replace analog stick covers on the Dualshock 4 controller. Written By: Maaz Hussaini ifixit CC BY-NC-SA www.ifixit.com Page 1 of 9 INTRODUCTION Use this guide