Using mental ray for Exterior Renderings
|
|
|
- Suzan Cobb
- 5 years ago
- Views:
Transcription
1 12/1/2005-8:00 am - 11:30 am Room:N. Hemispheres (Salon A4) (Dolphin) Walt Disney World Swan and Dolphin Resort Orlando, Florida Using mental ray for Exterior Renderings Mark Couture - Intellicon Solutions, Inc. DV41-3 Has mental ray software been making you "mental" in Autodesk VIZ 2005? If you've attempted to learn mental ray and have been frustrated, then you'll benefit from this class. We'll help you progress quickly along the learning curve and discuss how to use mental ray for producing top notch exterior renderings. We'll take you through a repeatable process for getting great results with the software. We'll also use Photoshop software and add plenty of scene elements like landscape, people, cars, and more to make your renderings look just like the pros'. You'll learn how to:- Set up the environment and rendering settings- Configure your exterior lighting and discuss the options- Create killer materials like glass and grass. By the time we're done you'll see architectural glass in any color, and a grass material so real that you could mow it!we'll also share techniques and websites that will help you take your renderings to the next level by adding great finishing details. About the Speaker: Mark is the professional services manager for Intellicon Solutions, Inc. in Jacksonville, Florida. He has 14 years of experience as an Architect, Autodesk applications engineer, and reseller AE. Mark's expertise in ADT, ABS, and VIZ has allowed him to consult, train, and implement for firms nationwide. He is a Certified Autodesk Instructor at the AUGI CAD Camps, at Florida College in Jacksonville, and developed computer-based training courseware for Building Systems. Mark helped organize and implement two AUGI CAD Camps in Jacksonville and Tampa, and the Gunslinger's CAD Manager tech group in Jacksonville. Mark practices architecture/rendering/animation and enjoys being a site moderator for the rendering community at mark.couture@intellicon.com
2


3 INTRODUCTION What is the sense of rendering if you can t repeat the process and positive results on a consistent basis? That is the frustration for many users who use the default scanline rendering engine and radiosity as a lighting solution. Mental Ray can bridge that gap and provide you with the quality and consistency between renderings. This in turn saves you a lot of time that was wasted waiting for a radiosity solution or tweaking the results to look realistic. In this session we will explore many features of Mental Ray and focus the application for exterior renderings. We ll take a look at how Mental Ray changes the Viz interface and explain the new terminology and rendering settings. Even more important, I ll focus on visually demonstrating the terms and how their settings affect your renders. We will also focus on a process and workflow you can use on practically any project. This workflow includes the process of working in Mental Ray, as well as taking your renderings into Photoshop to create a finished product. Lastly, this handout is designed to take you through the process from beginning to end and can act as your Mental Ray roadmap when you get back to the office on Monday! SELECTING MENTAL RAY AS THE DEFAULT RENDERING ENGINE First thing we need to do is select Mental Ray as the render engine. In the Render Scene dialog box (F10), select the Common tab, browse down to the Assign Render fly out. In the Production slot, choose the browse button on the far right, then select Mental Ray Renderer from the Choose Render window. Selecting Save as Default will make this change permanent for all new Viz scenes. 2


4 CHANGES TO THE INTERFACE Materials: Yellow: Mental Ray materials Blue: Viz standard materials Lighting: Mental Ray Omni Mental Ray Spot Standard and photometric lighting will still work and render correctly. New shading options have been added including a Mental Ray Shadow Map Rendering Dialog Box This dialog box has undergone an extensive change. We will be covering these in detail as we progress through the session. Our specific area of interests for exterior renders will be the Indirect Illumination tab and the Renderer tab. For comparison, below is the default scanline rendering dialog box. 3


5 Render Presets This is a commonly ignored feature of the render dialog box. Often, users come to this dialog box for every scene and set parameters within each tab to their favorite settings. Instead of manually doing this each time, users can save all the settings across all tabs to a name that can be recalled later. This is called a Render Preset. At the bottom of the render dialog box you will see existing render presets that come with Viz. Here you will also see the option to save and load render presets. By default, the render presets are saved in the Viz 2005 or 2006 folder as shown: Object Properties Dialog Box If you select an object and right-click, you can choose to view and modify an object s properties. In Viz 2005 and 2006, you will have a Mental Ray tab with options to control Caustics and Global Illumination. We ll cover these two features at a later time, but for now we want to recognize these new features. Also, as a side note, the Mental Ray tab is always present in the Object Properties dialog box regardless of whether you have changed the rendering engine to use Mental Ray. 4

6 Preferences Dialog Box The last interface change we ll discuss is the Preferences Dialog box. Found under the customize pull down menu, this is where you choose overall general Mental Ray settings. Specifically, this is where you can turn on/off the Mental Ray messages that may appear on your screen during renders. PROJECT WORKFLOW The object of this session is to demonstrate workflow that can be used back at the office on any given project with Mental Ray. The following workflow is a practical approach to any project, large or small: 1. Scene Setup 2. File Linking 3. Basic Gray Material Assignment 4. Camera Setup 5. Lighting Setup 6. Setting up the Render Dialog Box 7. Detailed Material Assignments 8. Lighting and Material Adjustments 9. Enhance the Scene with Additional Models 10. Final Rendering 11. Post Production in PhotoShop 5


7 STEP #1: Scene Setup When you first open Viz a default scene will be loaded. Next, we need to change the default scene settings for a Mental Ray render. The items to change are: Units Setup, found in the Customize pull down menu. Change your default units to US Standards, Feet with Fractional Inches. The default units should be inches. Default rendering engine to Mental Ray, as previously discussed on page 2. Environment Dialog Box, found under the Render pull down menu. Here we want to change the exposure control to none. TIP: Vizstart.max If you find that you are constantly changing and customizing the default scene from Viz or Max, then you can change the default opening scene. Like other Autodesk products, you can save a scene or drawing to be used as a template. Here in Viz, the template file is called Vizstart.max. It can be as empty or populated as you desire. Things you may consider placing in your Vizstart.max files are: Default Units setup Default rendering engine Standard materials used on most projects (asphalt, grass, etc..) Typical Lighting setup 6


8 The Vizstart.max is found in the folder specified by the VIZStart entry in the configure paths dialog box. As shown below, you can access the configure paths dialog box by selecting the Customize pull down menu. STEP #2: File Linking Many users will desire to use an AutoCAD drawing within their model. The File Link Manager in Viz or Max provides capabilities to reference a file, as AutoCAD does with XREF s. There are a few options and settings to change before we link a drawing. First, Launch the File Link Manager, found in the File pull down menu. On the Attach Tab, browse to the file you want to link in Viz. On this tab, you can select a Preset, which holds all the attachment settings we ll discuss shortly. Also, you ll see an option to specify the layers from the drawing that you want to import. Next we want to select the Presets tab. 7


9 The presets tab gives you the ability to control some aspects of how the drawing is linked. You can save these to a preset to be called up again at a later time. We ll select NEW, and create a new preset. Give it a name descriptive of what the settings are. In our example, we ll all this preset High Detail. Next, select Modify to change the settings for High Detail. On the first tab, Basic, you ll want to change the smooth angle to 0.0, the curve steps to 0, and the surface deviation for 3D solids to 0 0 as well. This will ensure that you have an extremely accurate model and all the curves draw in AutoCAD will come out very smooth here in Viz. Increasing these numbers will give you a smoother model, however, you sacrifice speed and get a larger Viz model. If these numbers are increased then your model is not smooth when linked. This may be fine if you are a greater distance away from the rendered object. However, if you are doing close renders to your model, then you ll want the settings we just specified. Next, we ll select the Advanced tab. In this tab, we ll specify how we want to group the geometry coming in from our drawing. We ll chose to derive our AutoCAD primities by ENTITY. This way, our geometry will remain individual objects, rather than grouping them together by layer or color, etc. Note, for users linking ADT drawings, linking by Entity is crucial. Lastly, you have the choice to use ADT materials when linking a drawing. If you leave both material options unchecked, then ADT materials will be used by default. For the sake of our session, I will choose to NOT use ADT materials, and use our scene materials from Viz. 8


10 Now we can save our presets, and go back to the attach tab and choose our preset we just created, then choose Attach File. STEP #3: Assign a basic Gray Material Often folks try to go gangbusters with materials far too early in the process and putting the cart before the horse. First, we need to assign a default gray material to your entire scene. This will act as a good base to setup your camera and lighting. STEP #4: Camera Setup Mental Ray uses standard Viz cameras. You can select from a Target or Free Camera. Target cameras give you the most accuracy for adjusting your view. In this session we ll use a target camera. When placing a camera, be certain to place it in the Z height to what your viewing audience would see. For example, a typical person standing in the parking lot would be 5-6. STEP #5: Here comes the Sun! Mental Ray introduces two new lights to the Viz lineup. MR Area Omni, and MR Area Spot. Both Standard and Photometric lights are compatible with Mental Ray and render correctly. The Skylight and IES Sky features are supported in Mental Ray when using Global Illumination. We ll discuss Global Illumination later in the session. Note: The IES Sun is not supported by Mental Ray in Viz 2005 and 2006 unless you use Raytrace or Shadow Map shadows. 9


11 In our session we are going to place light source and a Skylight. A skylight is an object we ll place above the model that will mimic the earth s atmosphere. In the real world, daylight does not just come from direct sunlight; it also comes from light that is scattered through the atmosphere. MR Area Spot For our light source, we have a couple of options that will work with Mental Ray, however your best choice will be the MR Area Spot. The following dialog boxes show the settings behind our MR Area Spot. The multiplier can be adjusted, as we will mostly do during the session. The light color should be a light golden beige. Also, be certain that Ray Trace Shadows are selected as well. Advanced Raytrace or Area Shadows are not supported. The darkness, or density of your shadows is controlled in the Shadow Parameters rollout. We can adjust this as needed to give the best effect and contrasting light in your renders. Skylight Next we ll place the skylight with the settings shown on the right. We ll come back and adjust the multiplier as needed to make sure the scene is not over developed and too bright. 10

12 First Test Render We ve got a lot more settings to cover in the render dialog box, but we can start to see some progress by doing a test render at this point. This is a great time to look at the angle of the sun, and the resulting shadows. The darkness of the shadows, the darkness of the indirectly lit areas are of no concern at this point. Test rendering at this point, with all the features of the rendering dialog box turned off, will be fast and easy. STEP #6: Setting up the Render Scene Dialog Box Indirect Illumination First, we need to discuss some basic principles of Mental Ray, and the terms that go with them. Indirect Illumination controls how the light will reflect and populate your scene. You can control specific features of Indirect Illumination in the Render Scene dialog box. Because of Indirect Illumination, areas of your model that don t get direct sunlight will still be visible and lit. 11

13 Caustics This feature simulates reflected and refracted light from transparent objects such as glass or water. Below is an illustration that shows the effects of Caustics in a rendering. Caption courtesy of Autodesk Photons and Samples The caption discusses the term photons. Simply stated, Photons are beams of light that reflect and refract throughout the scene. As you can see in the 2 nd caption, light beams are hitting the wall and bottom of the pool. Samples refer to the number of Photons you desire in your scene. The more samples, the better the outcome as shown in the last caption. 12


14 Using Caustics in your renderings can be very time consuming and increase render times. Because of this, you can control which objects in your scene will generate or receive caustics. Select and object in your scene, RT-click and select Properties. On the Mental Ray tab, as shown above, you can select the option to generate or receive caustics. Note: Caustics are an effective tool, but are rarely beneficial in an exterior rendering. Because of this, we can globally turn off caustics for the entire scene in the Render Scene dialog box. Samples are the total number of photons that will be used in the scene, and Radius is the size of the photons. Kernels control the sharpness of the photons. Higher than 1 = more blurry, less than 1 = more sharp. Global Illumination Global Illumination (GI) is to Mental Ray, what Radiosity is to the standard Viz scanline render engine. GI simulates light bouncing off objects in the scene creating diffuse or ambient light. This light will eventually fill in every aspect of the model. GI is an effective tool to enhance the realism of a scene. However, GI does not affect caustics (light bouncing off reflective/refractive objects like glass or water). The photons number controls the number of photons, and the radius controls the size. Caption courtesy of Autodesk 13


15 Note: As with Caustics, GI is an effective tool, but are rarely beneficial in an exterior rendering. Because of this, we will keep GI turned off. Caption courtesy of Autodesk Photon Maps The photon is traced through the scene, being reflected or transmitted by objects, until it strikes a diffuse surface. When it strikes a surface, the photon is stored in the photon map. Samples and Radius are the same as above for caustics and GI. Max Trace Depth is the total number of bounces a photon will process before it stops. Save and Load options: When you render, Mental Ray calculates a photon map for the scene, and saves it to a.pmap file. Instead of rebuilding a photon map each time you render, you can save a photon map solution and re-use it again to save time on future renderings for this scene. Note: Again, as with Caustics and GI, Photon Maps are typically not used for exterior renders. 14


16 Final Gather Finally.. something in the Render Scene dialog box we can use for exterior renders! Final gather refines the over lighting solution, like Radiosity would do. When lighting and rendering an interior scene, Final Gather can smooth out the results of the photon maps. Note, Final Gather does increase your render times and is typically only used for final renders. For test renders, you would normally turn this feature off, or reduce the number of samples. Caption courtesy of Autodesk Samples Sets how many rays are used to compute indirect illumination in a final gather. Increasing this value makes global illumination less noisy, but also increases rendering time. Default=
17 Max Radius When on, sets the maximum radius within which final gathering is used. The default value of 1.0 encompasses the entire scene. Reducing this value can improve quality at a cost of rendering time. Default=1.0. Min Radius When on, sets the minimum radius, within which final gathering must be used. Increasing this value can improve render quality but increase rendering time. Unavailable unless Max Radius is turned on. Default=0.1 (Ten percent of the Max Radius). Fast Lookup (Slower GI) If turned on before you render the scene, the mental ray renderer computes information to speed up the regathering process. The fast lookup computation can take a long time, but it can greatly reduce the total rendering time. Default=off. Like photon maps and shadow maps, the fast lookup computation can be saved in a file and then reused in subsequent renderings. Preview (No Precalculations) When on, final gathering skips the precalculation phase. This results in a rendering with artifacts, but begins rendering more quickly, so it can useful when you want to do a series of trial renderings. Default=off. Rebuild (Do Not Re-Use Cache) When on, the mental ray renderer computes the fast lookup data. If an FGM file is specified, it stores the fast lookup data in the file. When off, the renderer reads the data from the file and skips the computation step. Default=on. Note: You can turn on Rebuild without specifying a file. In this case, the renderer stores the fast lookup data in memory only. Use Falloff (Limits Ray Distance) When on, uses the Start and Stop values to limit the length of light rays used for regathering. This can help improve regathering time, especially for scenes that are not fully enclosed by geometry. Default=off. 16

18 Use File When on, the results are saved in a final gather map (FGM) file. An FGM file (.fgm) is a final gather map file. It is used by the mental ray renderer to save the results of a final gathering pass. Generating and saving an FGM file can speed up subsequent renderings. STEP #6 Continued: Setting up the Renderer tab & Sample Quality Caption courtesy of Autodesk 17


19 TIP: Render Presets The idea behind this class is to produce repeatable results. Best way to repeat results is to save your settings from a render that was successful. If you find a great mix of render settings from the Render Scene dialog box, then you can save those settings to a Render Preset. After choosing to save a Preset, the Preset Categories dialog box will appear. Select the tabs you want to save the settings for and then choose Save. Also take a look at the library of presets that already exist. This may be a valuable way to learn how to setup your scenes for high render quality, vs. test render quality. Test Render Now that the render dialog box settings are set, lets take a look at how they render. Also, you can adjust your ambient color settings in the Environment dialog box for a softer overall appearance. 18


20 STEP #7: Detailed Material Assignments Scene Background Now that we are working toward a finished render, we ll want to establish an image to be used as our background. Even though you may plan on doing this in Photoshop, you can still establish a background here in Viz similar to the final background image you will be using in Photoshop. The reason for this is to use Viz in helping us with the reflections of the sky and clouds on your materials, like glass or water. To create a scene background, launch the material editor from the Rendering pulldown menu, and choose the get material icon. In the Map Browser window, select to browse from new. Select Bitmap as the map type. Back in the material editor, change the coordinates from texture to environment, and keep it on screen from the dropdown on the right. Next, we ll go into the environment dialog box and select this new map as our background. In the background slot, check to use a map, then choose the large icon that says none. This will allow you to browse for a map. Choose to browse from the material editor, then select the new map we just created. To see the background map in your viewport, we must configure the viewport to show the map. Go to the Views pulldown menu, then select Viewport Background. In the next dialog box, check the top box for use environment background, then look below and select the box for display background. You should now see the scene background. You can adjust the background spacing, size, and location in the material editor. 19

21 Mental Ray Materials vs. Viz Materials Mental Ray can use any Viz material or one of the new Mental Ray material types. Architectural materials save a lot of time with all the pre-programmed settings for standard architectural materials. Assigning materials in Mental Ray is identical to Viz. However, there are some exciting new features of Mental Ray materials that we ll want to cover. First, lets discuss some terminology. Mental Ray Connection This is a rollout menu in the material editor. Basically, it is the special features of a material that are now available because you are using Mental Ray. Note, the Mental Ray Connection rollout will not appear if you don t have the Mental Ray Extension turned on in the Preferences dialog box. Browse to the Customize pulldown, then Preferences. Choose the Mental Ray tab and you ll see the first check box for Mental Ray Extensions. Shaders In mental ray, a shader is a function that calculates light effects. There can be shaders for lights, cameras (lens shaders), materials, shadows, and so on. For a list of shaders available for each slot of the mental ray connection rollout, refer to the help menu. Search for the mental ray Connection Rollout for a complete list. 20


22 Displacement A displacement map displaces the geometry of surfaces. Unlike bump mapping, displacement mapping actually changes the geometry of the surface or patch tessellation. Displacement maps apply the gray scale of the map to generate the displacement. Lighter colors in the 2D image push outward more than darker colors, resulting in a 3D displacement of the geometry. Grass Displacement so real you ll have to mow it! Thanks to Jeff Patton, a Mental Ray guru, he has given us access to his website to download this incredible displacement material. Browse to the following address and click on the MR Grass section on the left. 21

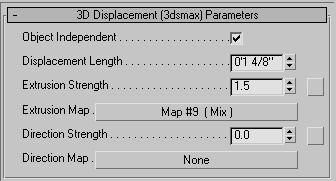


23 Grass The Details 22
.")
24 Glass, so real you will smudge it! Thanks to Jeff Patton, once again, we have some great Mental Ray glass materials to choose from. Here is a render preview using different glass options. The Lume collection of shaders provide a number of photo-real effects when used with the mental ray renderer. In the Material/Map Browser, the name of these shaders is followed by (lume). For glass, we often use the following lume shaders: Glass Lume Metal Lume The scene above can be downloaded at: 23
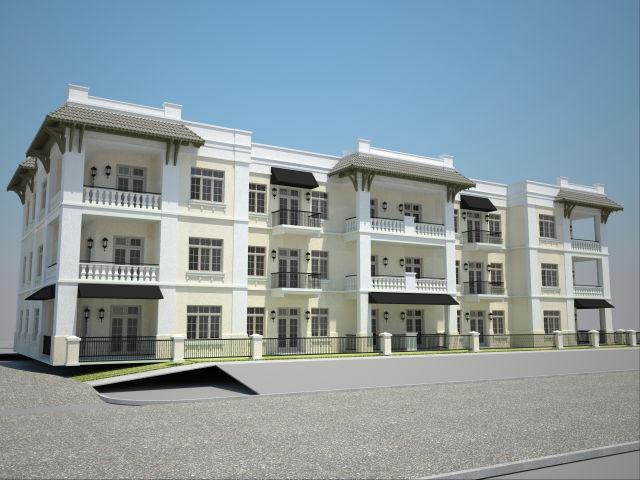
25 STEP #8: Lighting and Material Adjustments Now that we have our lighting and materials assigned, you should do another test render to see how the materials are being affected by the light source. Then we can adjust our light strength, material settings for an optimal outcome. STEP #9: Embellish Your Scene With Additional Models This is a step that a lot of folks try to do far too early in the scene setup. Often I ll have somebody looking for help with lighting or materials. When they post their scene, it is filled with trees, cars, people, etc. The models we use to embellish the scene are best when kept for the last and final stages in Viz. This is to make the earlier refinements of lighting and materials far more simple. Consider, when you render with all those extra scene elements, you add a lot of time to the overall process. Using the Viz Asset Browser is a great tool for drag and drop support of all your favorite Viz blocks. Great websites for FREE Viz blocks:


26 STEP #10: Final Rendering Now that you have all the details buttoned up, the next step is to render your scenes to a high resolution image. If you plan on printing at 300dpi for the deliverable, then you can multiply the size of the final print, in inches, by 300 for each direction. This will give you the size of the image you need to render. For example, an 8x10 would have a render size of 2400x3000 dpi if printed at 300 dpi. STEP #11: Post Production Many folks ask; Just how much do you do in Viz before you use another program like photoshop?. My answer is as follows: Viz: Building, site/terrain, paving and sidewalks, background image (for glass reflections only), possibly some additional elements to embellish the scene. Photoshop: Landscape, grass, background image, people, cars, etc. 25

27 26

28 RESOURCES ONLINE FORUMS FOR ADT, VIZ AND MAX MEET ME THERE! 27
Autodesk Viz Render Illuminated Speaker; Charles Busa
 December 2-5, 2003 MGM Grand Hotel Las Vegas Autodesk Viz Render Illuminated Speaker; Charles Busa BD3-3 Autodesk Viz Render Illuminated This course is an introduction to the new Autodesk VIZ Render. Learn
THEA RENDER ADAPTIVE BSD ENGINE
 THEA RENDER ADAPTIVE BSD ENGINE ADAPTIVE (BSD) ENGINE Adaptive (BSD) is the name of the biased engine inside Thea Render. This engine is a biased one (this is why we use the abbreviation "BSD") as it uses
Chapter 11. Caustics and Global Illumination
 11 and Global Illumination Chapter 11 Direct illumination occurs when a light source directly illuminates an object or objects in a scene. Indirect illumination occurs if light illuminates objects by reflection
AV Using Autodesk 3ds Max Design, Autodesk Revit, and iray to Render Compelling Photographic Scenes
 AV4672 - Using Autodesk 3ds Max Design, Autodesk Revit, and iray to Render Compelling Photographic Scenes Steven Schain Autodesk Certified Instructor AV4672 This virtual class introduces designers to the
Interior space in daylight Elsevier Inc. All rights reserved.
 Interior space in daylight Bonus Chapter 1 Day Lighting an Interior Space 1.1 Introduction In this chapter, you will learn about lighting an interior scene while you work on the lighting for the living
Caustics - Mental Ray
 Caustics - Mental Ray In this tutorial we are going to go over some advanced lighting techniques for creating realistic caustic effects. Caustics are the focused patterns of light which form after light
Caustics - Mental Ray
 Caustics - Mental Ray (Working with real caustic generation) In this tutorial we are going to go over some advanced lighting techniques for creating realistic caustic effects. Caustics are the bent reflections
Ambient Occlusion Pass
 Ambient Occlusion Pass (Soft Shadows in the Nooks and Crannies to Replicate Photorealistic Lighting) In this tutorial we are going to go over some advanced lighting techniques for an Ambient Occlusion
There are many kinds of surface shaders, from those that affect basic surface color, to ones that apply bitmap textures and displacement.
 mental ray Overview Mental ray is a powerful renderer which is based on a scene description language. You can use it as a standalone renderer, or even better, integrated with 3D applications. In 3D applications,
AECOsim Building Designer Quick Start Guide
 AECOsim Building Designer Quick Start Guide Chapter A17 Rendering 2012 Bentley Systems, Incorporated www.bentley.com/aecosim Table of Contents Rendering...3 The Camera... 3 Materials... 5 Material Palettes...
Rendering Engines - Specific tools may depend on "Rendering Engine"
 Week 5 3DS Max, Cameras, Lighting and Materials Rendering - Process of turning geometry into pixels Rendering Engines - Specific tools may depend on "Rendering Engine" 1. Internal (3DS MAX) ART (Autodesk
Unbelievable Visualization Techniques: Letting Your Imagination Soar!
 11/29/2005-5:00 pm - 6:30 pm Room:N. Hemispheres (Salon A4) (Dolphin) Walt Disney World Swan and Dolphin Resort Orlando, Florida Unbelievable Visualization Techniques: Letting Your Imagination Soar! Chris
Advanced Rendering CHAPTER. Render Window. Learning Objectives. Image Pane
 CHAPTER Advanced Rendering Learning Objectives After completing this chapter, you will be able to: Make advanced rendering settings. Set the resolution for a rendering. Save a rendering to an image file.
Shadow Casting in World Builder. A step to step tutorial on how to reach decent results on the creation of shadows
 Shadow Casting in World Builder A step to step tutorial on how to reach decent results on the creation of shadows Tutorial on shadow casting in World Builder 3.* Introduction Creating decent shadows in
03. 3ds Max Design & Mental Ray
 Design + Computing 03. 3ds Max Design & Mental Ray 9/23/2015 CAD & Graphics II HOM2027 Fall 2014 Every Wednesday 2:00 pm 5:50 pm Jin Kook Lee, PhD. 02-2220-2645 designit@hanyang.ac.kr Assistant Professor,
Mastering Autodesk 3ds Max 2013
 Mastering Autodesk 3ds Max 2013 Harper, J ISBN-13: 9781118129715 Table of Contents Introduction? xxi Chapter 1? Getting to Know Autodesk? 3ds Max? 2013??? 1 Introducing the New 3ds Max 2013 Features????
Lighting for Photorealistic Renderings
 11/28/2005-8:00 am - 9:30 am Room:N. Hemispheres (Salon A4) (Dolphin) Walt Disney World Swan and Dolphin Resort Orlando, Florida Alexander Bicalho - Autodesk DV11-2 If you ever created a 3D model, applied
Chapter 4- Blender Render Engines
 Chapter 4- Render Engines What is a Render Engine? As you make your 3D models in, your goal will probably be to generate (render) an image or a movie as a final result. The software that determines how
Complete Display Control in Autodesk Architectural Desktop
 11/30/2005-10:00 am - 11:30 am Room:N. Hemispheres (Salon D) (Dolphin) Walt Disney World Swan and Dolphin Resort Orlando, Florida Complete Display Control in Autodesk Architectural Desktop Matt Dillon
AR-media TUTORIALS IMPROVING REALISM AMBIENT OCCLUSION. (June, 2011)
") AR-media TUTORIALS IMPROVING REALISM AMBIENT OCCLUSION (June, 2011) Copyright Copyright 2008/2011 Inglobe Technologies S.r.l. All rights reserved. No part of this publication may be reproduced, transmitted,
AR-media TUTORIALS IMPROVING REALISM AMBIENT OCCLUSION (June, 2011) Copyright Copyright 2008/2011 Inglobe Technologies S.r.l. All rights reserved. No part of this publication may be reproduced, transmitted,
3ds Max certification prep
 3ds Max certification prep Study online at quizlet.com/_25oorz 1. 24 Frames per second 2. 25 Frames per second, Europe 3. 30 Frames per second, Americas and Japan 4. Absolute mode, off set mode 5. How
Animation Basics. Learning Objectives
 Animation Basics Learning Objectives After completing this chapter, you will be able to: Work with the time slider Understand animation playback controls Understand animation and time controls Morph compound
ICDAS 3ds Max Design & 3ds Max
 ICDAS 3ds Max Design & 3ds Max 2016.0 2016.0 C:\ICDAS\MANUAL\3ds Max Design\ICDAS 3ds Max Design & 3ds Max 2016.0, 2 ICDAS 2015-06-01 2014-06-01 2013-06-01 Dear user Welcome to 3ds Max Design and 3ds Max.
Submerge Camera Shader
 Submerge Camera Shader In this tutorial we are going to take a look at a simple scene with a swimming pool and a teapot and we will use the Mental Ray Camera shader called "Submerge" to change the look
Mental Ray for BK5100
 for BK5100 Practical guide: Global Illumination Interior and MIA Materials Tweety 1 Technisch Ontwerp en Informatica Lecture overview Final Gather Exterior Lighting and rendering an exterior scene using
It s A Material World After All Alexander L.. Wood CAD Training Solutions, LLC
 November 30 December 3, 2004 Las Vegas, Nevada It s A Material World After All Alexander L.. Wood CAD Training Solutions, LLC GD21-3 Learn the basics of taking your 3D model into a rendered presentation.
Rendering with mental ray and 3ds Max
 Rendering with mental ray and 3ds Max Rendering with mental ray and 3ds Max Second Edition Joep van der Steen Ted Boardman AMSTERDAM BOSTON HEIDELBERG LONDON NEW YORK OXFORD PARIS SAN DIEGO SAN FRANCISCO
Lighting & 3D Graphics. Images from 3D Creative Magazine
 Lighting & 3D Graphics Images from 3D Creative Magazine Contents Introduction Definitions 3D Lighting Basics 3D Light Sources Lighting Controls & Effects Brightness & Colour Shadows Hotspot And Falloff
Getting Along: Coordinating Architectural and Structural Design with Autodesk Revit Structure
 11/30/2005-8:00 am - 9:30 am Room:N. Hemispheres (Salon A2) (Dolphin) Walt Disney World Swan and Dolphin Resort Orlando, Florida Getting Along: Coordinating Architectural and Structural Design with Autodesk
Advanced Maya Texturing and Lighting
 Advanced Maya Texturing and Lighting Lanier, Lee ISBN-13: 9780470292730 Table of Contents Introduction. Chapter 1 Understanding Lighting, Color, and Composition. Understanding the Art of Lighting. Using
Hemlock Folly v2 Notes
 Hemlock Folly v2 Notes DAZ Studio Iray Instance Optimization - IMPORTANT When rendering the full scene preset, it is important that you set Instance Optimization to Memory, otherwise Daz Studio will go
MITOCW MIT6_172_F10_lec18_300k-mp4
 MITOCW MIT6_172_F10_lec18_300k-mp4 The following content is provided under a Creative Commons license. Your support will help MIT OpenCourseWare continue to offer high quality educational resources for
Advanced Maya e Texturing. and Lighting. Second Edition WILEY PUBLISHING, INC.
 Advanced Maya e Texturing and Lighting Second Edition Lee Lanier WILEY PUBLISHING, INC. Contents Introduction xvi Chapter 1 Understanding Lighting, Color, and Composition 1 Understanding the Art of Lighting
Advanced Distant Light for DAZ Studio
 Contents Advanced Distant Light for DAZ Studio Introduction Important Concepts Quick Start Quick Tips Parameter Settings Light Group Shadow Group Lighting Control Group Known Issues Introduction The Advanced
Rendering Techniques in 3D AutoCAD, Part 1. David Cohn Independent Consultant
 Rendering Techniques in 3D AutoCAD, Part 1 David Cohn Independent Consultant 1 Evaluation Forms Please remember to fill out your evaluation form This is session GD111 3 And, please silence your cell phone.
Autodesk Revit Building and 3ds Max : A One-Two Punch
 11/28/2005-8:00 am - 9:30 am Room:N. Hemispheres (Salon A2) (Dolphin) Walt Disney World Swan and Dolphin Resort Orlando, Florida Autodesk Revit Building and 3ds Max : A One-Two Punch Roger Cusson - L'Atelier
IBL/GI & GLASS. Getting Realistic Results By Yon Resch. The Three Types of GI lighting and Glass
 IBL/GI & GLASS Getting Realistic Results By Yon Resch Glass and other transparent materials are some of the hardest materials to render realistically. This has mainly to do with the number of additional
Autodesk Combustion 4 Integration with 3ds Max and Autodesk VIZ
 12/1/2005-8:00 am - 11:30 am Room:Peacock 2 (Swan) Walt Disney World Swan and Dolphin Resort Orlando, Florida Autodesk Combustion 4 Integration with 3ds Max and Autodesk VIZ Gary Davis - visualz, LLC DV41-2
Architectural Visualization Workflow in Autodesk Building Design Suite 2013
 Architectural Visualization Workflow in Autodesk Building Design Suite 2013 Marvi Basha TU Graz Class Summary - What is Arch-Viz? - Revit vs. 3Ds Max - Workflow - Post Production Class Summary - What is
Lesson 03: We will add water and will set the placing conditions for the material. WorldBuilder 3.5. for. About Digital Element Tutorials:
 Lesson 03: We will add water and will set the placing conditions for the material for WorldBuilder 3.5 About Digital Element Tutorials: This tutorial is available both in.pdf format and in Qarbon format,
Autodesk Fusion 360: Render. Overview
 Overview Rendering is the process of generating an image by combining geometry, camera, texture, lighting and shading (also called materials) information using a computer program. Before an image can be
TUTORIAL 7: Global Illumination & Ambient Occlusion
 TUTORIAL 7: Global Illumination & Ambient Occlusion The goal of this short tutorial is to introduce a few select aspects of mental ray so that you may consider incorporating them in your projects if appropriate.
V-RAY MATERIAL SETTINGS
 V-RAY MATERIAL SETTINGS author: Wouter Wynen brought to you by: 2006 VisMasters. All rights reserved. VisMasters and the VisMasters logo are trademarks of ArchVision, Inc. All other trademarks belong to
Photo Studio Optimizer
 CATIA V5 Training Foils Photo Studio Optimizer Version 5 Release 19 September 008 EDU_CAT_EN_PSO_FF_V5R19 Photo Studio Optimizer Objectives of the course Upon completion of this course you will be able
Achieving Contentment with the AutoCAD Architecture Content Browser Douglas Bowers, AIA
 Achieving Contentment with the AutoCAD Architecture Content Browser Douglas Bowers, AIA AB110-3 If you have created AutoCAD Architecture (formerly ADT) object styles and want to know how to easily share
Raycast Rendering Maya 2013
 2000 2012 Michael O'Rourke Raycast Rendering Maya 2013 (See also the Intro to Lights and Rendering tutorial for an introduction to the basics of rendering an image) Concept There are several algorithms
Corona Sky Corona Sun Corona Light Create Camera About
 Plugin menu Corona Sky creates Sky object with attached Corona Sky tag Corona Sun creates Corona Sun object Corona Light creates Corona Light object Create Camera creates Camera with attached Corona Camera
Lighting Techniques 1
 STEP 1: open your Class-05 Max fi le _ main menu / Customize / Units Setup _ set Display Unit Scale as shown in Image 1 _ set Lighting Units to: American STEP 2: select Daylight.01 _ command panel / modify
Visualization Insider A Little Background Information
 Visualization Insider A Little Background Information Visualization Insider 2 Creating Backgrounds for 3D Scenes Backgrounds are a critical part of just about every type of 3D scene. Although they are
Texture Mapping. Images from 3D Creative Magazine
 Texture Mapping Images from 3D Creative Magazine Contents Introduction Definitions Light And Colour Surface Attributes Surface Attributes: Colour Surface Attributes: Shininess Surface Attributes: Specularity
: CASE STUDY: USING MAYA AND MENTAL RAY FOR PHOTOREALISTIC INTERIOR LIGHTING
 2006-1795: CASE STUDY: USING MAYA AND MENTAL RAY FOR PHOTOREALISTIC INTERIOR LIGHTING Marty Fitzgerald, East Tennessee State University American Society for Engineering Education, 2006 Page 11.312.1 Case
Glass Gambit: Chess set and shader presets for DAZ Studio
 Glass Gambit: Chess set and shader presets for DAZ Studio This product includes a beautiful glass chess set, 70 faceted glass shader presets and a 360 degree prop with 5 material files. Some people find
General mental ray questions
 HDRI For Artists Siggraph 2008 mental ray HDRI FAQ By Håkan Zap Andersson, mental images version 4.1: April 25, 2008 General mental ray questions What is/are the primary reasons I should use mental ray
Autodesk 3ds Max Design 2013 Fundamentals
 Autodesk 3ds Max Design 2013 Fundamentals Supplemental Files SDC P U B L I C AT I O N S Schroff Development Corporation Better Textbooks. Lower Prices. www.sdcpublications.com Tutorial files on enclosed
Autodesk Architectural Desktop Real-World Workflow Methodology
 11/30/2005-5:00 pm - 6:30 pm Room:N. Hemispheres (Salon E1) (Dolphin) Walt Disney World Swan and Dolphin Resort Orlando, Florida Autodesk Architectural Desktop Real-World Workflow Methodology Edward Goldberg,
Carrara Tutorial: Undersea Effects with Light Cones and Gels in Carrara. Carl E. Schou. January 31, 2004
 Carrara Tutorial: Undersea Effects with Light Cones and Gels in Carrara Carl E. Schou January 31, 2004 MorningStar Ascension There are many different ways to get underwater effects in computer graphics.
Global Illumination. COMP 575/770 Spring 2013
 Global Illumination COMP 575/770 Spring 2013 Final Exam and Projects COMP 575 Final Exam Friday, May 3 4:00 pm COMP 770 (and 575 extra credit) Projects Final report due by end of day, May 1 Presentations:
Creative Efficiency Research: MODO 801 vs. Maya From CAD file to finished rendering: How MODO stacks up in a real-world workflow situation
 Creative Efficiency Research: vs. From CAD file to finished rendering: How MODO stacks up in a real-world workflow situation About this Benchmark Project This benchmark project was conducted to measure
Introduction. Chapter Computer Graphics
 Chapter 1 Introduction 1.1. Computer Graphics Computer graphics has grown at an astounding rate over the last three decades. In the 1970s, frame-buffers capable of displaying digital images were rare and
A Basic Guide to Modeling Landscapes in Google SketchUp
 DYNASCAPE SOFTWARE INC. A Basic Guide to Modeling Landscapes in Google SketchUp A DS Sketch 3D User Guide Volume 2 This guide will take you through the steps of creating a 3D model of a landscape in Google
Mia Round Corners Node
 Mia Round Corners Node NAKHLE Georges - july 2007 This tutorial describes how to use the mental ray MIA Round Corners node. 1) Create a polygonal cube, and make sure that mental ray plug-in is loaded.
Materials in Kerkythea ~ a beginners guide
 Materials in Kerkythea ~ a beginners guide I started using Kerkythea as a way of rendering SketchUP models. I quickly found that I needed to be able to create and work with materials. I read Patrick Nieborg
ART 268 3D Computer Graphics Texture Mapping and Rendering. Texture Mapping
 ART 268 3D Computer Graphics Texture Mapping and Rendering Texture Mapping Is the way in which a material is wrapped around an object. The default method is UVW mapping (see below). When you drag a material
Shadows. COMP 575/770 Spring 2013
 Shadows COMP 575/770 Spring 2013 Shadows in Ray Tracing Shadows are important for realism Basic idea: figure out whether a point on an object is illuminated by a light source Easy for ray tracers Just
CGDD 4113 Final Review. Chapter 7: Maya Shading and Texturing
 CGDD 4113 Final Review Chapter 7: Maya Shading and Texturing Maya topics covered in this chapter include the following: Shader Types Shader Attributes Texturing the Axe Life, Love, Textures and Surfaces
Fundamentals. Autodesk SDC. Better Textbooks. Lower Prices. Schroff Development Corporation. Supplemental Files
 Autodesk 3ds Max Design 2012 Fundamentals Supplemental Files SDC PUBLICATIONS Schroff Development Corporation Better Textbooks. Lower Prices. www.sdcpublications.com Tutorial files on enclosed CD Table
Ok, so to get started we will take a look at the settings in the Render setup. If we were to take a render right now this is what we would see...
 Caustics - V-Ray In this tutorial we are going to go over some advanced lighting techniques for creating realistic caustic effects using the V-Ray renderer. Caustics function in V-Ray much like they function
Chapter 23- UV Texture Mapping
 Chapter 23- UV Texture Mapping Since games need to be able to process operations as fast as possible, traditional rendering techniques (specular, ray tracing reflections and refractions) cannot typically
Point based global illumination is now a standard tool for film quality renderers. Since it started out as a real time technique it is only natural
 1 Point based global illumination is now a standard tool for film quality renderers. Since it started out as a real time technique it is only natural to consider using it in video games too. 2 I hope that
FreeForm 3D Displacer User Manual. freeform created by mettle.com
 FreeForm 3D Displacer User Manual freeform created by mettle.com Contents 3 Installation 4 Controls 6 Controls - cont d 8 Support 9 Application FreeForm 3D Displacer The FreeForm 3D Displacer plugin for
4) Finish the spline here. To complete the spline, double click the last point or select the spline tool again.
 Finish the spline here. To complete the spline, double click the last point or select the spline tool again.") 1) Select the line tool 3) Move the cursor along the X direction (be careful to stay on the X axis alignment so that the line is perpendicular) and click for the second point of the line. Type 0.5 for
1) Select the line tool 3) Move the cursor along the X direction (be careful to stay on the X axis alignment so that the line is perpendicular) and click for the second point of the line. Type 0.5 for
Chapter 9- Ray-Tracing
 Ray-tracing is used to produce mirrored and reflective surfaces. It is also being used to create transparency and refraction (bending of images through transparent surfaceslike a magnifying glass or a
Turn your movie file into the homework folder on the server called Lights, Camera, Action.
 CS32 W11 Homework 3: Due MONDAY, APRIL 18 Now let s put the ball in a world of your making and have some fun. Create a simple AND WE MEAN SIMPLE environment for one of your ball bounces. You will assign
Basic Rendering Techniques Part B
 Basic Rendering Techniques Part B Using Materials in 3d Max The simplest method for changing g the default gray color of a 3d object is to apply hue to the object using the diffuse color feature. The physical
ahhdri IBL Daylight Pack for ahenvironmentlight Version 2.0
 Page 1 of 9 ahhdri IBL Daylight Pack for ahenvironmentlight Version 2.0 Table of Contents ahhdri IBL Daylight Pack...2 Introduction...2 Where to find the DayLight Presets after Installation...3 Loading
Rock Tutorial: Creating A Rock Like Seen In Gears Of War With A Focus On Normal
 http://www.icantbelieveitsnothighpoly.com/tutorials_new.html To view finished product 360 degrees around Instructions // Download: Video (Rotation of Final Mesh)/// (Right click and save) This is an advanced
REU Modeling Course Day 1 pt2 AutoDesk Maya - More Modeling
 REU Modeling Course Day 1 pt2 AutoDesk Maya - More Modeling Maggie Iglesias Pena iglesias@iastate.edu Workshop Workflow Let s Review last session Creating & Applying Materials Rendering Today s mini goal
V-RAY 3.6 FOR RHINO KEY FEATURES. January 2018
 V-RAY 3.6 FOR RHINO KEY FEATURES January 2018 NEW FEATURES MORE POWERFUL GPU RENDERING Faster, more powerful GPU rendering adds support for on-demand mip-mapping, aerial perspective, displacement, subsurface
MR Shaders Dielectric Materials Rendering Glass and Simple Caustics
 Dielectric Material This shader is a physically based material shader that can be used to simulate dielectric media such as glass, water, and other liquids. The shader uses Fresnel's formulas for dielectric
What s New In Autodesk VIZ Eddie Perlberg
 December 2-5, 2003 MGM Grand Hotel Las Vegas Eddie Perlberg VI12-1 Autodesk Architectural Desktop 2004 also includes VIZ Render, its very own visualization tool. VIZ Render uses some of the same technology
Property of: Entrada Interactive. PBR Workflow. Working within a PBR-based environment
 Property of: Entrada Interactive PBR Workflow Working within a PBR-based environment Ryan Manning 8/24/2014 MISCREATED PBR WORKFLOW CryDocs on Physically Based Shading/Rendering: http://docs.cryengine.com/display/sdkdoc4/physically+based+rendering
Chief Architect X10 New Feature List
 PRODUCTIVITY Saved Plan Views. Create and save multiple plan views (similar to saved cameras). Each view retains Layer Set, Annotation Set and Active Defaults. Open multiple Plan Views in Windows or Tabs,
Artlantis training for new users
 Artlantis training for new users page 2 This training program reviews the main features of Artlantis. You will learn about the various presentation types such as still images, ivisit 3D panoramas, VR objects
Oso Toon Shader. Step 1: Flat Color
 Oso Toon Shader By default the Oso Toon Shader has most of the same elements of standard Iray Uber Shader, that it is based on. However, there are some additional functions that allow OTS to do some dramatic
FLAMINGO CHEAT SHEET FOR ES 305 CLASS 5 Pages of Fresh Flamingo Goodness
 FLAMINGO CHEAT SHEET FOR ES 305 CLASS 5 Pages of Fresh Flamingo Goodness *Keep this PDF with you at all times it will help you to maneuver the vast and confusing ocean that is the Flamingo Materials Editor!
Rendering and Radiosity. Introduction to Design Media Lecture 4 John Lee
 Rendering and Radiosity Introduction to Design Media Lecture 4 John Lee Overview Rendering is the process that creates an image from a model How is it done? How has it been developed? What are the issues
The V-Ray installer will automatically remove any previous installations. This will allow you to seamlessly upgrade from previous versions.
 Overview This guide is to serve as a reference for installing V-Ray for 3ds Max and 3ds Max Design. Please refer to the Glossary page for specific terms used in this document. If you experience any problems,
Introduction to 3D Concepts
 PART I Introduction to 3D Concepts Chapter 1 Scene... 3 Chapter 2 Rendering: OpenGL (OGL) and Adobe Ray Tracer (ART)...19 1 CHAPTER 1 Scene s0010 1.1. The 3D Scene p0010 A typical 3D scene has several
Making Your Label Styles Work For You in C3D
 Making Your Label Styles Work For You in C3D Mark Hultgren Smith Engineering CV110-5 Once you have completed this course, you'll understand and be able to apply the methods for developing a complete set
FAQ - Podium v1.4 by Jim Allen
 FAQ - Podium v1.4 by Jim Allen Podium is the only plug-in to run natively within SketchUp, and the only one to have a true 'one click' photorealistic output. Although it is about as simple as you can expect
Design Visualization with Autodesk Alias, Part 2
 Design Visualization with Autodesk Alias, Part 2 Wonjin John Autodesk Who am I? Wonjin John is an automotive and industrial designer. Born in Seoul, Korea, he moved to United States after finishing engineering
critical theory Computer Science
 Art/Science Shading, Materials, Collaboration Textures Example title Artists In the recommend real world, two the main following: factors determine the appearance of a surface: basic understanding what
Introduction to InfraWorks 360 for Civil
 Eric Chappell Autodesk Aimed at Civil industry professional, this class will cover basic importing of data sources to make an existing model, followed by creation of roads, buildings, and city furniture
Using Masks for Illustration Effects
 These instructions were written for Photoshop CS4 but things should work the same or similarly in most recent versions Photoshop. 1. To download the files you ll use in this exercise please visit: http:///goodies.html
Autodesk VIZ Awesome Results for All Autodesk Applications
 11/30/2005-5:00 pm - 6:30 pm Room:N. Hemispheres (Salon A4) (Dolphin) Walt Disney World Swan and Dolphin Resort Orlando, Florida Autodesk VIZ 2006 - Awesome Results for All Autodesk Applications Eddie
Consider a partially transparent object that is illuminated with two lights, one visible from each side of the object. Start with a ray from the eye
 Ray Tracing What was the rendering equation? Motivate & list the terms. Relate the rendering equation to forward ray tracing. Why is forward ray tracing not good for image formation? What is the difference
04. 3d Graphics UI & 3ds Max + MR
 Design + Computing 04. 3d Graphics UI & 3ds Max + MR 9/26/2014 CAD & Graphics II HOM2027 Fall 2014 Every Friday 2:00 pm 6:00 pm Jin Kook Lee, PhD. 02-2220-2645 designit@hanyang.ac.kr Assistant Professor,
AWE Surface 1.0 Documentation
 AWE Surface 1.0 Documentation AWE Surface is a new, robust, highly optimized, physically plausible shader for DAZ Studio and 3Delight employing physically based rendering (PBR) metalness / roughness workflow.
Data passed from a source application is recognized by the destination application, yielding identical results. Data (Converted) compatibility
 compatibility") Interoperability Chart Version 2015 LEGEND Perfect compatibility Data passed from a source application is recognized by the destination application, yielding identical results. Data (Converted) compatibility
Interoperability Chart Version 2015 LEGEND Perfect compatibility Data passed from a source application is recognized by the destination application, yielding identical results. Data (Converted) compatibility
GODRAYS Expanded: Celestial Bodies. By Sickleyield and Marshian. Users Manual
 GODRAYS Expanded: Celestial Bodies By Sickleyield and Marshian Users Manual Table of Contents Introduction...3 1. Finding the Product...4 2: Using The Material Presets...8 3: Process & Fine Tuning...9