CanVis: Photorealistic Visualization
|
|
|
- Madison Underwood
- 5 years ago
- Views:
Transcription


1 CanVis: Photorealistic Visualization This publication provides instructions for using CanVis photorealistic visualization software developed by the National Oceanic and Atmospheric Agency and the National Agroforestry Center. This free software allows users to visualize changes made to yards, gardens, and other landscapes by using photographic simulation. Users can test the way a landscape design looks before picking up a shovel! CanVis is similar to Photoshop, but it s easier to pick up. Exercises in this article will help beginners become familiar with the software. CONTENT Tips for Creating Photorealistic Visualization Projects..1 General Definitions... 2 Examples... 2 Download CanVis Software... 4 Download Object Libraries and Objects... 4 Area Selection and Manipulation... 5 Object Color and Blending... 6 Object Editing and Manipulation... 6 CanVis Toolbars... 9 Additional Examples Tips for Creating Photorealistic Visualization Projects Use visualization to tell a story. This means making the visualization as realistic as necessary for the purpose of the project. Angle, scale, and lighting should be relevant to the project objective. The amount of detail depends on the project objective; for example, a conceptual mock-up may not need a lot of detail to get the point across. When displaying or comparing before and after products, clearly label the pre-simulated picture and the simulated result. Consider the presentation of the results. Will you print the final product, turn it into a PowerPoint presentation, create a report, or make a poster? The visual quality of the simulation makes a difference based on the final product. Beginners should use a picture taken on the same level or plane as the desired landscape for the base photo. It is easier to create a wanted background and replicate it than it is to cover up an unwanted background. Remember to use the correct perspective and shading. Beginners may want to avoid a large amount of sky in their base image because it can be tough to replicate the cloud and sky shading realistically. Do not use BMP or TIFF images as a rule of thumb. Cluster cover-ups like shrubs and grasses to make lines less visible. Start a database of photos that you can edit to create objects to add to your object library. CanVis s included library is limited.
 Object (texture)")
")
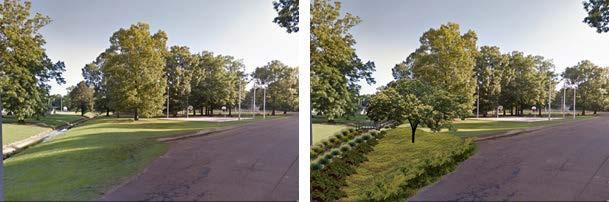
2 General Definitions Base Image Bounding Box Object (tree) Object (texture) Examples Example 1. Tree in need of pruning before (left) and after simulation (right). 2
 and simulation with tree islands added")
3 Example 2. Parking lot before (top) and simulation with tree islands added (arrows) to conform to local landscape ordinance (bottom). 3

. You can also download objects from the CanVis website.")
4 Example 3. Commercial route beautification before (left) and simulation (right). Download CanVis Software from the NOAA Website Download Object Libraries, Objects, and Base Images Objects can be downloaded from the CanVis website, or you can upload your own objects. Your CanVis software automatically comes with some objects. Objects with transparent backgrounds are saved as LOB or tga files. Instructions on making your own Object LOB/tga files are provided later in this publication (see page 8). You can also download objects from the CanVis website. For example, from the CanVis website, scroll to Commercial-Urban Object Libraries (under Coastal Object Libraries ), and click on the link. You probably don t need to fill your hard drive with all the provided libraries (Full Package), so download libraries relevant to your work (for example, coastal vegetation, people, parks and urban areas, symbols, transportation, walls, and buffers). Your computer may, by default, download a zipped folder to the Downloads folder. You will have to double-click to unzip it. Next, in the CanVis software you downloaded to your computer, go to Library on the main menu, then New Library; select Object Library for objects, or Texture Library for textures; give a name to your new library (for example, Example Library ); and click OK twice. After that, click on the main menu Library, select your new library from the list, click Items, click Add Items, navigate to the appropriate folder, and select Items To Add. To see these files, you may have to change the file type to LOB or tga. Click Open. The objects will appear in the preview window. Next, still in the new library window, click on Library, Save Library, and click yes. Close the window. You can retrieve base images from Google Maps or Google Earth. Copy a satellite image or street view to your computer s clipboard. Open it in the Paint application (or some other photo editing application) to edit. Then open it in CanVis as a base image (explained below). You can also use digital camera photos or scanned images. Scanned images should be 100 DPI for 8 x 10 photos and up to 166 DPI for 3 x 5 photos. A digital photo should be taken at 800 x 600 screen resolution. It s preferable to take large DPI photos because you may need the pixelated detail, and you can always lower the resolution (file size) on the computer. You cannot increase DPI. Take photos on an overcast day or have the sun to your back to avoid harsh shadows. If the area is large, shoot in segments and make your design in pieces. Take the photo from a spot perpendicular to the area to be designed (shoot from the front, not at an angle). Clean the area before taking photo remove unwanted and unnecessary elements. 4
5 Exercise 1. Starting a Project and Loading a Base Image Download Commercial-Urban Object Library from the CanVis website. Next, obtain a map or street view from Google Maps. Prepare this image for CanVis in Paint or another photo editing application. Open this image in CanVis as a base image. Save project from the File menu. Once you have done this, close the project from File on the main menu. Next, open a blank canvas. Area Selection and Manipulation Outline Area: Use this tool to create or fill an area (texture) or object. To place a texture in your image, use the Drawing Tools in the Texture toolbar. Click the Outline Area icon to open the Define Area toolbox. In the toolbox, there are three rows of icons. The top row is the Add Mode (default) and Subtract Mode. Add Mode creates one big area out of a series of smaller areas. The Subtract Mode allows you to cut a shape from that added area. It only works when you create the bounding box first, then use the Subtract Mode to subtract the area, then add the texture profile to the modified area. You might use this tool if creating a planting space in a wall, for example. The second row contains the Drawing tools (Freehand Draw, Square Draw, Ellipse Draw). Let s give these tools a try. Click the Add Mode and the Square Draw tool (in the middle). Try drawing several large squares. Then fill one of those areas with a texture by clicking on the Perspective Library in the same Define Area toolbox (or Perspective icon on the toolbar if you have closed the Define Area toolbox). Make sure the correct angle and distance are used to make the texture realistic (see Change Perspective below). Click OK. Next, try creating outlines from the Freehand Draw tool. In Freehand, you have to come back to the first point to close the polygon. Before adding a perspective and without clicking the cursor outside your new area, try using the Add, Delete, and Move icons on the third row to add a point, delete a point, and move a point from the outline. Notice how the cursor changes when you select these tools. The cursor must be placed exactly on the point to move or subtract it (you may have to zoom in to select the point). In Freehand Draw, you can hold down the shift key to confine the line to 45 degree angles. Also in Freehand, by pressing the backspace button before you close the polygon, you can undo the points in succession so you don t have to start over completely if you make a mistake. Edit tools only work with points and will not move lines. Use these edit tools to reshape your area. You can always click Cancel to start over or click OK when you re satisfied. Your outline is now ready to add a texture using the Perspective Library. Note that once you add a texture, you can t make shape changes. 5 You can replicate part of your background image using the Outline Area tool. Click on the Outline Area icon. Use the draw tools to define an area. Click OK. With the area still selected, select Area from the main menu, then Convert to Object. Now you can replicate (below) or copy and paste the background area that you made into an object. Using Textures: You can quickly change a texture profile. Select the texture you want to change. Click on the Texture Library button on the Texture tool bar. Select the texture library you want. Select the profile you want to see in the design. Holding down the left mouse button, drag the profile onto the image (notice cursor changes) and drop it. The texture will now change to the perspective and scale of the previous profile. Change Perspective: The Perspective tool makes textures look like they are visually correct. For example, to make a roofing profile follow the line of the roof or make a groundcover look like it s going into the distance, you should use the Perspective tool. Select a texture for which you want to change perspective. Next, click on Area in the main menu, then change the texture s perspective by selecting the appropriate setting (Roof is the most versatile) and moving the corners of your texture to get the right perspective. Roof allows movement of all the corners independently. Siding locks the side corners together to create the illusion of the texture lying straight on its side. Paving locks the top and bottom corners together to add the perspective of lying down flat. Use the slider bar to match the scale of your background image. Click OK. Paint Texture: This is on the Advanced toolbar or under Tools in the main toolbar. Pick the size and shape of brush. You can paint using a texture (from a library), pick a color from the existing background pixels (Pick Color), or select a color from the color palette (Choose Color). If you select a texture from the library, remember to adjust the scale. To paint with that texture, place your cursor over the area to be painted, left click, and drag. You have to use this tool in an area where the angle is not important because you can t use Perspective for painted textures. Click undo if needed.
6 Object Color and Blending Adjust Colors: Click Adjust Colors under the Tools in the main menu or the Adjust Colors icon. Select an object to modify and adjust the red, blue, or green colors of the object. Note preview in toolbox window. You can click reset and start over if needed. Color Levels: Use Color Levels to improve the image quality of an object or background. Click Tools, then Color Levels. Adjust intensity and contrast using the slider bars. Colorize: Use Colorize to change the color of the background, object, or texture. If it is an element (Object or Texture), select it, and from the main menu, go to Tools, then select Colorize. In the toolbox, you can select a color and add it to the selected element. You can change the color swatch by dragging the slider bars. If the feature you want to color is part of the background image, you must define (outline) the feature first. Using the Outline Area tool, define (outline) the feature, and click OK. Now open the Colorize tool to add the color you want. Alternatively, you can select Pick Color in the Colorize toolbox, then left click the dropper cursor on the color you want. Note the swatch change. Object Editing and Manipulation Layers: Every object or image has its own layer determined by the order in which you added them to the project. The layer tools allow you to shuffle the layers. From the main menu, go to View, then check the View Layer toolbar to open. The toolbar s options include, from left to right, the Zoom tools, Object to Front, Object to Back, One Layer Up, and One Layer Down. Select the object that is on the lowest layer and move it to the front using the Object to Front button. Then, move it to the back with the One Layer Down button. Next, bring it forward layer-bylayer using the One Layer Up button. Replicate: To make copies of objects in your project, select the object or texture, then select Replicate on the Object toolbar on the main menu. Place the arrow cursor on the spot where you want the object copied, and left click. To deselect, use the right click button on the mouse, and the cursor returns to normal. Rotate: Select the object, go to Rotate on the Object toolbar, click the corner anchor on your object, and move the mouse to rotate the object on its axis. Right click to deselect Rotate tool. Flip: Select the object. In the Object menu, select Flip to flip horizontally or vertically. This is useful when positioning objects where facing direction is important. Erase: Select the object, then click Erase on the Object toolbar. From the Erase toolbox, select the brush size and shape. Place the cursor over what you want to erase, then click and drag. Click Unerase to paint an erased portion back in. If you want to undo your last move, click Undo. Note that erase does not function on the base image. Smudge: Smudge helps to blend objects or an object and background. Select an object. Go to Tools on the main menu, select Smudge. Select the size of brush. Place the cursor over the object to soften the edges and blur the detail. To change the transparency, right click on the object and change the transparency in the bitmap box to create the illusion. Smudge can be used to blur the background, but this is seldom an objective. Grouping: You may have several defined areas with the same texture and different perspectives. You may want to change the texture at the same time while keeping the perspective (think changing a walkway). Click on one Exercise 2. Adding and Manipulating Textures 1. Add a pavement texture from the texture library using the Add mode. 2. Next, create a pathway using the drawing tools. Ensure the right perspective and scale. 3. Experiment with changing points of the texture. 4. Practice the drag-and-drop method of changing texture profiles. 5. Use the Paint tool to paint with a base image color. 6. Click OK and save. 6
7 area, hold down the shift key, and click the other areas individually. In the main menu, under Area, select Create Texture. In Texture Library, select the profile by clicking once. Hold down the mouse button and drag the profile to the texture in your project you want to change. Release the mouse to change the texture profile. The same process applies to changing a set of objects (for example, plant material). The same idea applies to grouping objects. You can group several objects, then go to the Object menu on the main menu and select Merge Objects to create one object from the multiple objects. This merged object can then be replicated across the base image. Warp: Warp is like Perspective, but for objects instead of textures. Use the Warp tool, found in the Object toolbar, to make objects that are photographed from the front go on an angle. For example, make a fence run down the side of the yard or make a gate look like it is open. For an object to lie down or be placed on a vertical surface, you need to use the Vertical setting. This links the two side corners of the bounding box together. Now take the bottom corner of the bounding box and click and drag it up and out (toward the outside of the picture). Now it appears to be lying flat. The top corner may have to be lowered a little, as well. The Free setting in the Warp toolbox is used for irregular objects. Use it on any object that doesn t stand vertically or horizontally. Lighting Tools: Go to the Lighting toolbar in the View toolbar, or select the Day/Night icon. To add a ray of light (for example, from a streetlight), you ll need to click on the dusk, dark, or night icons in the Lighting toolbar to create darkness if your base photo was taken in full daylight. Next, click on the Lighting tools (the lightbulb icon). You can use the Spread method or Paintwith-Light method to illustrate light. The software defaults to the Paint-with-Light method. However, Spread is more useful for creating light from streetlamps. Next, select the size and shape of brush you want. Now, set intensity and light width using the slider bars. The intensity bar is how dim the light is, and the light width is the amount of pixels the light will expand. Make sure the intensity and width are adjusted so that they are visible. You can erase the light by clicking on Erase Mode and drawing over the light line. By using the Spread tool, you don t need to select the brush. Adjust the intensity and light width. Point where you want the most intensity to be, then drag your cursor to define the shape you want. Turn off the Lighting tool bar by clicking on the Day/Night icon. Shadows: Select the object from which to create a shadow. Left click once on the Shadow icon from the Object toolbar. Deselect the object and move it so you can see the shadow. You have to select the shadow, then right click to change its transparency. Because the shadow is an object, you can rotate, flip, resize, and warp the shadow. Magic Wand Tool (Creating LOB/tga files): The Magic Wand tool is used to create your own library objects. Start with a photo using the acceptable image quality described previously. After you have selected an image, you should first remove as much of the background as possible using a photo editing program on your computer. First, open a new document and colorize the background (Tools from the main menu, then select Exercise 3. Bringing It All Together 1. Using the Paint-with-Light method, try setting the width to 8 and the intensity to 100. Create a line of light. The width extends 8 pixels out from the middle of your line. Now try a lesser intensity. 2. Using the Spread tool, try adding in a lamp post object, then create the look of a beam of light shining from the post toward the ground. 3. Add a person object. Create a shadow that matches the background in terms of orientation, perspective, and intensity. 4. Add three or four unique shrub objects. Use the layers tool to change their position. Try flipping, erasing, and rotating the objects. 5. Next, use the grouping tool and drag-and-drop feature to change the shrubs to a different material. Use the smudge tool to blend the objects together to create a realistic effect. 6. Try replicating an object that is in the background image. 7. Now that you re an expert, start adding objects to make your project look better. Consider design elements, add groundcovers and shrubs, change object colors and shading, and blur to soften edges and blend. 8. Always remember to save your work. 7

, and left click.")
8 Colorize). Pick a color that doesn t appear in the image you want to put in your library. Import your selected image (File, Import, Open) into the new document background. Now create a transparent mask. Select the imported image. Click on the Magic Wand icon on the Advanced tool bar or go to Tools on the ribbon, then select Magic Wand. In the toolbox, set the background color to something unique, like bright red. Set the exclude tolerance to 10% to start. This is a repeated process you will work your way down. Place the Magic Wand cursor over the area of background where you want to create the mask (in other words, excluding those pixels), and left click. Some of the unwanted area has been selected, but it may not be enough. If it s not enough, you can increase the exclude tolerance. If it s too much, click undo and decrease the exclude tolerance. Continue this process until most of the unwanted image is selected. Use the erase tool to clean up the remaining pixels. Click OK when you are satisfied. Now all the areas of the mask are transparent. Once the image is fully edited, export it as a LOB/tga and save to your computer. You will have to add it to a library to use it (explained previously). Exercise 4. Creating an Object with Transparent Background A solid object with straight, 90-degree lines is best for beginners who wish to create new objects. Find an object, such as the bench below, and take a photo. Create a new transparent object using the photo. Remember to first remove unnecessary parts of the image. Import the object into a relevant library. Add the object from the library to your project. Save. 8

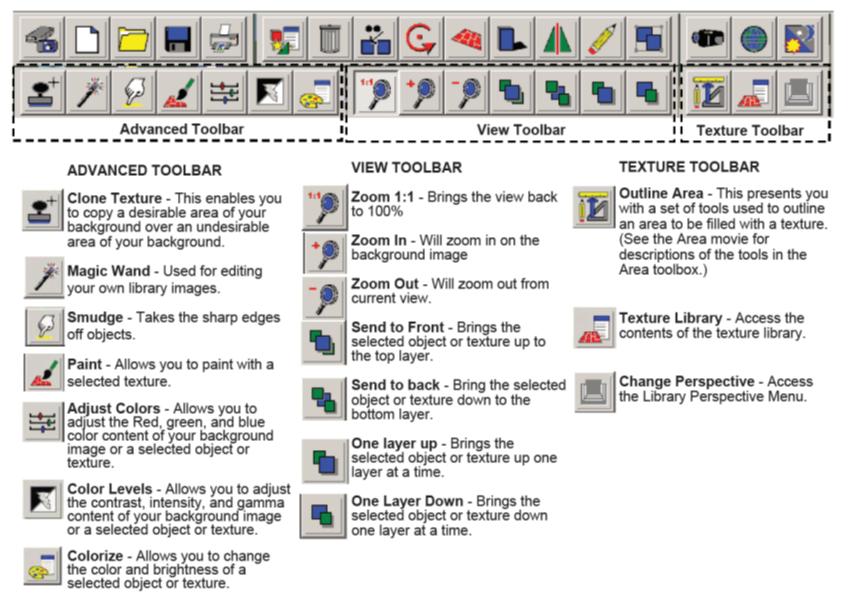
9 CanVis Toolbars 9
 and simulation")

10 Additional Examples Street tree planting project map: before (left) and simulation (right). Stormwater best management practices: before (left) and simulation (right). 10
 and simulation (right).")

11 Culverting a blue-line stream: before (left) and simulation (right). Proposed development of green space into apartments: before (left) and simulation (right). Park vegetation improvements: before (left) and simulation (right). 11


12 Landscape design plan: before (top) and plan using CanVis (bottom). Publication 3198 (POD-03-18) By Jason Gordon, PhD, Associate Extension Professor, Forestry. Copyright 2018 by Mississippi State University. All rights reserved. This publication may be copied and distributed without alteration for nonprofit educational purposes provided that credit is given to the Mississippi State University Extension Service. Produced by Agricultural Communications. Mississippi State University is an equal opportunity institution. Discrimination in university employment, programs, or activities based on race, color, ethnicity, sex, pregnancy, religion, national origin, disability, age, sexual orientation, genetic information, status as a U.S. veteran, or any other status protected by applicable law is prohibited. Questions about equal opportunity programs or compliance should be directed to the Office of Compliance and Integrity, 56 Morgan Avenue, P.O. 6044, Mississippi State, MS 39762, (662) Extension Service of Mississippi State University, cooperating with U.S. Department of Agriculture. Published in furtherance of Acts of Congress, May 8 and June 30, GARY B. JACKSON, Director
Pen Tool, Fill Layers, Color Range, Levels Adjustments, Magic Wand tool, and shadowing techniques
 Creating a superhero using the pen tool Topics covered: Pen Tool, Fill Layers, Color Range, Levels Adjustments, Magic Wand tool, and shadowing techniques Getting Started 1. Reset your work environment
FACULTY AND STAFF COMPUTER FOOTHILL-DE ANZA. Office Graphics
 FACULTY AND STAFF COMPUTER TRAINING @ FOOTHILL-DE ANZA Office 2001 Graphics Microsoft Clip Art Introduction Office 2001 wants to be the application that does everything, including Windows! When it comes
Paint Tutorial (Project #14a)
") Paint Tutorial (Project #14a) In order to learn all there is to know about this drawing program, go through the Microsoft Tutorial (below). (Do not save this to your folder.) Practice using the different
Paint Tutorial (Project #14a) In order to learn all there is to know about this drawing program, go through the Microsoft Tutorial (below). (Do not save this to your folder.) Practice using the different
Education and Training CUFMEM14A. Exercise 2. Create, Manipulate and Incorporate 2D Graphics
 Education and Training CUFMEM14A Exercise 2 Create, Manipulate and Incorporate 2D Graphics Menu Exercise 2 Exercise 2a: Scarecrow Exercise - Painting and Drawing Tools... 3 Exercise 2b: Scarecrow Exercise
Adobe Photoshop CS2 Reference Guide For Windows
 This program is located: Adobe Photoshop CS2 Reference Guide For Windows Start > All Programs > Photo Editing and Scanning >Adobe Photoshop CS2 General Keyboarding Tips: TAB Show/Hide Toolbox and Palettes
2 Working with Selections
 2 Working with Selections Learning how to select areas of an image is of primary importance you must first select what you want to affect. Once you ve made a selection, only the area within the selection
A QUICK TOUR OF ADOBE ILLUSTRATOR CC (2018 RELEASE)
") A QUICK TOUR OF ADOBE ILLUSTRATOR CC (2018 RELEASE) Lesson overview In this interactive demonstration of Adobe Illustrator CC (2018 release), you ll get an overview of the main features of the application.
A QUICK TOUR OF ADOBE ILLUSTRATOR CC (2018 RELEASE) Lesson overview In this interactive demonstration of Adobe Illustrator CC (2018 release), you ll get an overview of the main features of the application.
RICE DMC SHORT COURSE. Creating a Digital Illustration in Photoshop (Advanced)
") RICE DMC SHORT COURSE Creating a Digital Illustration in Photoshop (Advanced) 1.Filter>Render>Clouds 2.Filter>Distort>Shear Image> Adjustments>Hue and Saturation Add Layer Style 3D>New 3D Layer from File
RICE DMC SHORT COURSE Creating a Digital Illustration in Photoshop (Advanced) 1.Filter>Render>Clouds 2.Filter>Distort>Shear Image> Adjustments>Hue and Saturation Add Layer Style 3D>New 3D Layer from File
Paint/Draw Tools. Foreground color. Free-form select. Select. Eraser/Color Eraser. Fill Color. Color Picker. Magnify. Pencil. Brush.
 Paint/Draw Tools There are two types of draw programs. Bitmap (Paint) Uses pixels mapped to a grid More suitable for photo-realistic images Not easily scalable loses sharpness if resized File sizes are
Basic Tools. Chapter 1. Getting started
 Chapter 1 Basic Tools Getting started Jasc Paint Shop Pro is a powerful art package which you can use to paint, write text, retouch photos and make images ready for the web. After only a few lessons you
2. If a window pops up that asks if you want to customize your color settings, click No.
 Practice Activity: Adobe Photoshop 7.0 ATTENTION! Before doing this practice activity you must have all of the following materials saved to your USB: runningshoe.gif basketballshoe.gif soccershoe.gif baseballshoe.gif
Photogrammetry Guide to Creating Digital 3D Models
 Photogrammetry Guide to Creating Digital 3D Models By Emily Hauf (SUNY Geneseo) and the Paleontological Research Institution Guide Version 1.0 Part I - Photography Create studio setup with black cloth
User Guide Belltech Systems, LLC
 User Guide Belltech Systems, LLC http://www.belltechsystems.com May, 2006 1. Introducing Belltech CaptureXT 2. Installation and Uninstallation Installation Running the Application Uninstallation 3. User
A Guide to Processing Photos into 3D Models Using Agisoft PhotoScan
 A Guide to Processing Photos into 3D Models Using Agisoft PhotoScan Samantha T. Porter University of Minnesota, Twin Cities Fall 2015 Index 1) Automatically masking a black background / Importing Images.
9 Using Appearance Attributes, Styles, and Effects
 9 Using Appearance Attributes, Styles, and Effects You can alter the look of an object without changing its structure using appearance attributes fills, strokes, effects, transparency, blending modes,
Adobe Illustrator CC 2018 Tutorial
 Adobe Illustrator CC 2018 Tutorial GETTING STARTED Adobe Illustrator CC is an illustration program that can be used for print, multimedia and online graphics. Whether you plan to design or illustrate multimedia
In this lesson, you ll learn how to:
 LESSON 5: ADVANCED DRAWING TECHNIQUES OBJECTIVES In this lesson, you ll learn how to: apply gradient fills modify graphics by smoothing, straightening, and optimizing understand the difference between
Press the Plus + key to zoom in. Press the Minus - key to zoom out. Scroll the mouse wheel away from you to zoom in; towards you to zoom out.
 Navigate Around the Map Interactive maps provide many choices for displaying information, searching for more details, and moving around the map. Most navigation uses the mouse, but at times you may also
HAPPY HOLIDAYS PHOTO BORDER
 HAPPY HOLIDAYS PHOTO BORDER In this Photoshop tutorial, we ll learn how to create a simple and fun Happy Holidays winter photo border! Photoshop ships with some great snowflake shapes that we can use in
use selection tools, layers & masks in PhotoPlus X4 Faking it! Combine three source photos and add text to create a composite image or montage.
 How to use selection tools, layers & masks in PhotoPlus X4 Faking it! Combine three source photos and add text to create a composite image or montage. The example montage uses photographs of a famous building
Introduction Panning the View...9 Zooming the View...9 Zooming into the Selection...10 Zooming into a Rectangle...10 Adding Objects...
 Copyright Hengestone Holdings, Inc. All Rights Reserved. Copyright Idea Spectrum, Inc. All Rights Reserved. Idea Spectrum, and the Idea Spectrum logo are all trademarks of Idea Spectrum, Inc. Windows is
Adobe Photoshop Sh S.K. Sublania and Sh. Naresh Chand
 Adobe Photoshop Sh S.K. Sublania and Sh. Naresh Chand Photoshop is the software for image processing. With this you can manipulate your pictures, either scanned or otherwise inserted to a great extant.
Learning to use the drawing tools
 Create a blank slide This module was developed for Office 2000 and 2001, but although there are cosmetic changes in the appearance of some of the tools, the basic functionality is the same in Powerpoint
Drawing shapes and lines
 Fine F Fi i Handmade H d d Ch Chocolates l Hours Mon Sat 10am 6pm In this demonstration of Adobe Illustrator CS6, you will be introduced to new and exciting application features, like gradients on a stroke
On the Web sun.com/aboutsun/comm_invest STAROFFICE 8 DRAW
 STAROFFICE 8 DRAW Graphics They say a picture is worth a thousand words. Pictures are often used along with our words for good reason. They help communicate our thoughts. They give extra information that
This document should only be used with the Apple Macintosh version of Splosh.
 Splosh 1 Introduction Splosh is an easy to use art package that runs under both Microsoft Windows and the Macintosh Mac OS Classic or Mac OS X operating systems. It should however be noted that the Apple
CS Multimedia and Communications REMEMBER TO BRING YOUR MEMORY STICK TO EVERY LAB! Lab 02: Introduction to Photoshop Part 1
 CS 1033 Multimedia and Communications REMEMBER TO BRING YOUR MEMORY STICK TO EVERY LAB! Lab 02: Introduction to Photoshop Part 1 Upon completion of this lab, you should be able to: Open, create new, save
Creative Sewing Machines Workbook based on BERNINA Embroidery Software V8
 V8 Lesson 49 Using an Object for a Carving Stamp Edited for V8.1 update. We will start by using Corel to find and save an image. On your desktop there should be 4 Corel icons. I have grouped mine together
12 APPLYING EFFECTS. Lesson overview
 12 APPLYING EFFECTS Lesson overview In this lesson, you ll learn how to do the following: Use various effects, such as Pathfinder, Scribble, and Drop Shadow. Use Warp effects to distort type. Create three-dimensional
Designer Reference 1
 Designer Reference 1 Table of Contents USE OF THE DESIGNER...4 KEYBOARD SHORTCUTS...5 Shortcuts...5 Keyboard Hints...5 MENUS...7 File Menu...7 Edit Menu...8 Favorites Menu...9 Document Menu...10 Item Menu...12
Severe Weather Safety PSA
 Contents Add Text 2 Format Text 3 Add Stickers 4 Resize Stickers 8 Change the Color of the Canvas 9 Name the Project 12 Add a Page 12 Practice Adding and Formatting Text 13 Use the Paint Brush Tool 14
Adding Objects Creating Shapes Adding. Text Printing and Exporting Getting Started Creating a. Creating Shapes Adding Text Printing and Exporting
 Getting Started Creating a Workspace Pages, Masters and Guides Adding Objects Creating Shapes Adding Text Printing and Exporting Getting Started Creating a Workspace Pages, Masters and Guides Adding Objects
Virtual MODELA USER'S MANUAL
 Virtual MODELA USER'S MANUAL Virtual MODELA is a program that simulates the movement of the tool on the screen. Contents Contents Part 1 Introduction 1-1 System Requirements... 4 1-2 Overview of Virtual
ADOBE TRAINING CS6 PHOTOSHOP BASICS: EDITING PHOTOS & WORKING WITH TEXT - 1
 ADOBE TRAINING CS6 PHOTOSHOP BASICS: EDITING PHOTOS & WORKING WITH TEXT Photoshop is the leading professional software for editing and adjusting photos, images and other graphic projects. It is a very
Advanced Special Effects
 Adobe Illustrator Advanced Special Effects AI exercise preview exercise overview The object is to create a poster with a unified color scheme by compositing artwork drawn in Illustrator with various effects
Corel Draw 11. What is Vector Graphics?
 Corel Draw 11 Corel Draw is a vector based drawing that program that makes it easy to create professional artwork from logos to intricate technical illustrations. Corel Draw 11's enhanced text handling
Using Google SketchUp
 Using Google SketchUp Mike Bailey mjb@cs.oregonstate.edu http://cs.oregonstate.edu/~mjb/sketchup What is Google SketchUp? Google SketchUp is a program which lets you sketch in 3D. It is excellent for creating
3. Let s say that we are unsure about what kind of
 Class Objectives Creating/mixing gradients Loading and using custom brushes Applying/modifying layer styles (drop shadow, glow, pattern overlay, stroke, etc.) Using transformations rotate, perspective,
Using Selection Tools and Layers
 Using Selection Tools and Layers A version of the melon head. Yours does not need to look just like this. Start by opening the Lesson 02 Start file provided. Select File>Save As and rename file adding
Tip: Shift/Control/Alt- will reset entire Photoshop program in case someone has changed settings.
 Adobe Photoshop CS2 Class 1 Tip: Shift/Control/Alt- will reset entire Photoshop program in case someone has changed settings. Create New File: 1. Click on File/New 2. Choose setting below Resolution: Higher
3 WOrkinG WiTH SElECTiOnS lesson overview
 3 Working with Selections Lesson overview In this lesson, you ll learn how to do the following: Make specific areas of an image active using selection tools. Reposition a selection marquee. Move and duplicate
Basic Tutorials Series: Navigating the Software. RenoWorks Support Team Document #HWPRO0002
 Basic Tutorials Series: Navigating the Software RenoWorks Support Team Document #HWPRO0002 Navigating the software 2 1 Opening the Software Opening the Software There are two ways to open the program and
Reconstruct Basics Patrick Parker Aug. 2017
 Reconstruct Basics Patrick Parker Aug. 2017 Trace Palette From the trace palette, you can select the color, name, and shape of the trace you want to make. Here s the Trace Palette: If the Trace Palette
Inserting Information into PowerPoint
 LESSON 6 6.1 Inserting Information into PowerPoint After completing this lesson, you will be able to: Change the layout of a slide. Insert a clip art image. Scale an image. Insert and format a table. Insert
Window Designer. Opening Screen: When you start Window Designer, you will see the Opening Screen. Here you will be choosing from 4 options:
 Window Designer Opening Screen: When you start Window Designer, you will see the Opening Screen. Here you will be choosing from 4 options: New Design: Use this option when no pre-built templates are available
The Polygonal Lasso Tool In Photoshop
 The Polygonal Lasso Tool In Photoshop Written by Steve Patterson. Photoshop s Polygonal Lasso Tool, another of its basic selections tools, is a bit like a cross between the Rectangular Marquee Tool and
SketchUp + Google Earth LEARNING GUIDE by Jordan Martin. Source (images): Architecture
: Architecture") SketchUp + Google Earth LEARNING GUIDE by Jordan Martin Source (images): www.sketchup.com Part 1: Getting Started with SketchUp GETTING STARTED: Throughout this manual users will learn different tools
SketchUp + Google Earth LEARNING GUIDE by Jordan Martin Source (images): www.sketchup.com Part 1: Getting Started with SketchUp GETTING STARTED: Throughout this manual users will learn different tools
Graphic Design & Digital Photography. Photoshop Basics: Working With Selection.
 1 Graphic Design & Digital Photography Photoshop Basics: Working With Selection. What You ll Learn: Make specific areas of an image active using selection tools, reposition a selection marquee, move and
LESSON 2 MODELING BASICS
 LESSON 2 MODELING BASICS In this lesson we ll start to model a multi-story office building from scratch. We ll construct the base grid, create the two towers and place slabs between the stories. Also we
The Fundamentals. Document Basics
 3 The Fundamentals Opening a Program... 3 Similarities in All Programs... 3 It's On Now What?...4 Making things easier to see.. 4 Adjusting Text Size.....4 My Computer. 4 Control Panel... 5 Accessibility
Contents. Introducing Clicker Paint 5. Getting Started 7. Using The Tools 10. Using Sticky Points 15. Free resources at LearningGrids.
 ClickerPaintManualUS.indd 2-3 13/02/2007 13:20:28 Clicker Paint User Guide Contents Introducing Clicker Paint 5 Free resources at LearningGrids.com, 6 Installing Clicker Paint, 6 Getting Started 7 How
SNOWFLAKES PHOTO BORDER - PHOTOSHOP CS6 / CC
 Photo Effects: Snowflakes Photo Border (Photoshop CS6 / CC) SNOWFLAKES PHOTO BORDER - PHOTOSHOP CS6 / CC In this Photoshop tutorial, we ll learn how to create a simple and fun snowflakes photo border,
ILLUSTRATOR. Introduction to Adobe Illustrator. You will;
 ILLUSTRATOR You will; 1. Learn Basic Navigation. 2. Learn about Paths. 3. Learn about the Line Tools. 4. Learn about the Shape Tools. 5. Learn about Strokes and Fills. 6. Learn about Transformations. 7.
Adobe Photoshop Elements 2.0 Lessons for Educators
 Adobe Photoshop Elements 2.0 Lessons for Educators April Fool s Day Project Adobe Education April Fool s Day Project This project takes advantage of many of the tools in the Adobe Photoshop Elements toolbox
Quick Guide for Photoshop CC Basics April 2016 Training:
 Photoshop CC Basics Creating a New File 1. Click File > New 2. Keep Default Photoshop Size selected in the Preset drop-down list. 3. Click OK. Showing Rulers 1. On the Menu bar, click View. 2. Click Rulers.
2 SELECTING AND ALIGNING
 2 SELECTING AND ALIGNING Lesson overview In this lesson, you ll learn how to do the following: Differentiate between the various selection tools and employ different selection techniques. Recognize Smart
In this exercise you will be creating the graphics for the index page of a Website for children about reptiles.
 LESSON 2: CREATING AND MANIPULATING IMAGES OBJECTIVES By the end of this lesson, you will be able to: create and import graphics use the text tool attach text to a path create shapes create curved and
Using Google SketchUp
 Using Google SketchUp Mike Bailey mjb@cs.oregonstate.edu http://cs.oregonstate.edu/~mjb/sketchup What is Google SketchUp? Google SketchUp is a program which lets you sketch in 3D. It is excellent for creating
How to...create a Video VBOX Gauge in Inkscape. So you want to create your own gauge? How about a transparent background for those text elements?
 BASIC GAUGE CREATION The Video VBox setup software is capable of using many different image formats for gauge backgrounds, static images, or logos, including Bitmaps, JPEGs, or PNG s. When the software
12 APPLYING EFFECTS. Lesson overview
 12 APPLYING EFFECTS Lesson overview In this lesson, you ll learn how to do the following: Use various effects like Pathfinder, Distort & Transform, Offset Path, and Drop Shadow effects. Use Warp effects
Drawing tool gallery 2 06/06/07 09:21:26. Illustrator provides the following drawing tools: The Add Anchor Point tool (+) adds anchor points to paths.
 adds anchor points to paths.") pport/adobe/adobehelpdata/cache/illustrator/12.0/en_us/htmłpage/ws714a382cdf7d304e7e07d0100196cbc5f-6266.html Drawing tool gallery Drawing tool gallery Illustrator provides the following drawing tools:
pport/adobe/adobehelpdata/cache/illustrator/12.0/en_us/htmłpage/ws714a382cdf7d304e7e07d0100196cbc5f-6266.html Drawing tool gallery Drawing tool gallery Illustrator provides the following drawing tools:
HOW TO. In this section, you will find. miscellaneous handouts that explain. HOW TO do various things.
 In this section, you will find miscellaneous handouts that explain do various things. 140 SAVING Introduction Every time you do something, you should save it on the DESKTOP. Click Save and then click on
GGR 375 QGIS Tutorial
 GGR 375 QGIS Tutorial With text taken from: Sherman, Gary E. Shuffling Quantum GIS into the Open Source GIS Stack. Free and Open Source Software for Geospatial (FOSS4G) Conference. 2007. Available online
Part 1: Basics. Page Sorter:
 Part 1: Basics Page Sorter: The Page Sorter displays all the pages in an open file as thumbnails and automatically updates as you add content. The page sorter can do the following. Display Pages Create
InDesign Tools Overview
 InDesign Tools Overview REFERENCE If your palettes aren t visible you can activate them by selecting: Window > Tools Transform Color Tool Box A Use the selection tool to select, move, and resize objects.
Creative Effects with Illustrator
 ADOBE ILLUSTRATOR PREVIEW Creative Effects with Illustrator AI OVERVIEW The object is to create a poster with a unified color scheme by compositing artwork drawn in Illustrator with various effects and
FrontPage 98 Quick Guide. Copyright 2000 Peter Pappas. edteck press All rights reserved.
 Master web design skills with Microsoft FrontPage 98. This step-by-step guide uses over 40 full color close-up screen shots to clearly explain the fast and easy way to design a web site. Use edteck s QuickGuide
Fig. A. Fig. B. Fig. 1. Fig. 2. Fig. 3 Fig. 4
 Create A Spinning Logo Tutorial. Bob Taylor 2009 To do this you will need two programs from Xara: Xara Xtreme (or Xtreme Pro) and Xara 3D They are available from: http://www.xara.com. Xtreme is available
SketchUp. SketchUp. Google SketchUp. Using SketchUp. The Tool Set
 Google Google is a 3D Modelling program which specialises in making computer generated representations of real-world objects, especially architectural, mechanical and building components, such as windows,
Chapter 1. Getting to Know Illustrator
 Chapter 1 Getting to Know Illustrator Exploring the Illustrator Workspace The arrangement of windows and panels that you see on your monitor is called the workspace. The Illustrator workspace features
Illustrator 1 Object Creation and Modification Tools
 Illustrator 1 Object Creation and Modification Tools Pen Tool Creates a precision shape using points and curve handles. Shape Tools Creates geometric solids. Selection Tool Selects objects and groups.
Step 1: Create A New Photoshop Document
 Snowflakes Photo Border In this Photoshop tutorial, we ll learn how to create a simple snowflakes photo border, which can be a fun finishing touch for photos of family and friends during the holidays,
Adobe InDesign CS6 Tutorial
 Adobe InDesign CS6 Tutorial Adobe InDesign CS6 is a page-layout software that takes print publishing and page design beyond current boundaries. InDesign is a desktop publishing program that incorporates
L E S S O N 2 Background
 Flight, Naperville Central High School, Naperville, Ill. No hard hat needed in the InDesign work area Once you learn the concepts of good page design, and you learn how to use InDesign, you are limited
Introduction to Microsoft Office PowerPoint 2010
 Introduction to Microsoft Office PowerPoint 2010 TABLE OF CONTENTS Open PowerPoint 2010... 1 About the Editing Screen... 1 Create a Title Slide... 6 Save Your Presentation... 6 Create a New Slide... 7
EDITING AND COMBINING SHAPES AND PATHS
 4 EDITING AND COMBINING SHAPES AND PATHS Lesson overview In this lesson, you ll learn how to do the following: Cut with the Scissors tool. Join paths. Work with the Knife tool. Outline strokes. Work with
Instructions for automatically masking a black background in Agisoft PhotoScan
 A Simple Photogrammetry Rig for the Reliable Creation of 3D Artifact Models in the Field: Lithic Examples from the Early Upper Paleolithic Sequence of Les Cottés (France) Instructions for automatically
creating files and saving for web
 creating files and saving for web the template files assume a default image size of 300 x 300 pixels images intended for the web should be produced in rgb mode name your images in a logical format, so
SketchUp Tool Basics
 SketchUp Tool Basics Open SketchUp Click the Start Button Click All Programs Open SketchUp Scroll Down to the SketchUp 2013 folder Click on the folder to open. Click on SketchUp. Set Up SketchUp (look
Numbers Basics Website:
 Website: http://etc.usf.edu/te/ Numbers is Apple's new spreadsheet application. It is installed as part of the iwork suite, which also includes the word processing program Pages and the presentation program
CREATING A POWERPOINT PRESENTATION BASIC INSTRUCTIONS
 CREATING A POWERPOINT PRESENTATION BASIC INSTRUCTIONS By Carolyn H. Brown This document is created with PowerPoint 2013/15 which includes a number of differences from earlier versions of PowerPoint. GETTING
Photoshop Basics A quick introduction to the basic tools in Photoshop
 Photoshop Basics A quick introduction to the basic tools in Photoshop Photoshop logo courtesy Adobe Systems Inc. By Dr. Anthony R. Curtis Mass Communication Department University of North Carolina at Pembroke
ILLUSTRATOR TUTORIAL-1 workshop handout
 Why is Illustrator a powerful tool? ILLUSTRATOR TUTORIAL-1 workshop handout Computer graphics fall into two main categories, bitmap graphics and vector graphics. Adobe Illustrator is a vector based software
ADOBE PHOTOSHOP Using Masks for Illustration Effects
 ADOBE PHOTOSHOP Using Masks for Illustration Effects PS PREVIEW OVERVIEW In this exercise, you ll see a more illustrative use of Photoshop. You ll combine existing photos with digital art created from
How to draw and create shapes
 Adobe Flash Professional Guide How to draw and create shapes You can add artwork to your Adobe Flash Professional documents in two ways: You can import images or draw original artwork in Flash by using
Customizing FlipCharts Promethean Module 2 (ActivInspire)
") Customizing FlipCharts Promethean Module 2 (ActivInspire) Section 1: Browsers The browsers (located on the left side of the flipchart) are menus for various functions. To view the browsers, click Main
Customizing FlipCharts Promethean Module 2 (ActivInspire) Section 1: Browsers The browsers (located on the left side of the flipchart) are menus for various functions. To view the browsers, click Main
Creating Digital Illustrations for Your Research Workshop III Basic Illustration Demo
 Creating Digital Illustrations for Your Research Workshop III Basic Illustration Demo Final Figure Size exclusion chromatography (SEC) is used primarily for the analysis of large molecules such as proteins
PowerPoint 2016 Building a Presentation
 PowerPoint 2016 Building a Presentation What is PowerPoint? PowerPoint is presentation software that helps users quickly and efficiently create dynamic, professional-looking presentations through the use
HYPERSTUDIO TOOLS. THE GRAPHIC TOOL Use this tool to select graphics to edit. SPRAY PAINT CAN Scatter lots of tiny dots with this tool.
 THE BROWSE TOOL Us it to go through the stack and click on buttons THE BUTTON TOOL Use this tool to select buttons to edit.. RECTANGLE TOOL This tool lets you capture a rectangular area to copy, cut, move,
Photoshop Creative Cloud (CC)
") Photoshop Creative Cloud (CC) Photoshop is an image editing and design software. Photoshop can be used to add special effects to an image, correct color and image flaws, and even remove parts of an image
Photoshop Creative Cloud (CC) Photoshop is an image editing and design software. Photoshop can be used to add special effects to an image, correct color and image flaws, and even remove parts of an image
Adobe photoshop Using Masks for Illustration Effects
 Adobe photoshop Using Masks for Illustration Effects PS Preview Overview In this exercise you ll see a more illustrative use of Photoshop. You ll combine existing photos with digital art created from scratch
Photoshop Tutorial: Removing the Background from an Image
 Photoshop Tutorial: Removing the Background from an Image I. Downloading & Opening the file. II. Magic Wand (tomato) Click on the link on the class blog to download the file. Open Photoshop. Go to File
USING THE PHOTOSHOP TOOLBOX
 IN THIS CHAPTER USING THE PHOTOSHOP TOOLBOX Using the Options Bar 44 Using the Selection Tools 45 Using the Crop and Slice Tools 46 Using the Retouching Tools 46 Using the Painting Tools 49 Using the Drawing
Photoshop Tutorial: Removing the Background from an Image
 Photoshop Tutorial: Removing the Background from an Image I. Downloading & Opening the file. II. Magic Wand (tomato) Type the following into your browser window to download the source file: da7913.kocfiles.net/veggies.psd
3 WORKING WITH SELECTIONS
 3 WORKING WITH SELECTIONS Lesson overview In this lesson, you ll learn how to do the following: Make specific areas of an image active using selection tools. Reposition a selection marquee. Move and duplicate
ORGANIZING YOUR ARTWORK WITH LAYERS
 9 ORGANIZING YOUR ARTWORK WITH LAYERS Lesson overview In this lesson, you ll learn how to do the following: Work with the Layers panel. Create, rearrange, and lock layers and sublayers. Move objects between
Custom Shapes As Text Frames In Photoshop
 Custom Shapes As Text Frames In Photoshop I used a background for this activity. Save it and open in Photoshop: Select Photoshop's Custom Shape Tool from the Tools panel. In the custom shapes options panel
Adobe Illustrator CC Advanced
 Copy/Paste Objects 1. Select with Selection-Tool 1. Hold Alt-Key Drag with Selection-Tool while still holding the Alt-Key (Additionally holding Shift will move straight or in 45/90/180 Degrees) Align Objects
ADOBE PHOTOSHOP: CLEANUP & POPULATION
 Aggregation Pattern Follow these steps to prepare two different options of aggregation patterns: 1. Begin by opening Photoshop. From the menu bar, click on the "File" menu -> "Open". Then locate your scanned
Session 7 MS Word. Graphics. Inserting Clipart, and Graphics Modify graphics Position graphics
 Session 7 MS Word Graphics Inserting Clipart, and Graphics Modify graphics Position graphics Table of Contents Session 7 Working with Graphics... 1 The Toolbar... 1 Drawing Toolbar... 1 Picture Toolbar...