11. Menu 12. UP/DOWN 13. OK/Call key 14. Answering machine functions 15. Speaker/Headset 16. Microphone 17. Recall 18. Redial 19.
|
|
|
- Gladys Barton
- 5 years ago
- Views:
Transcription
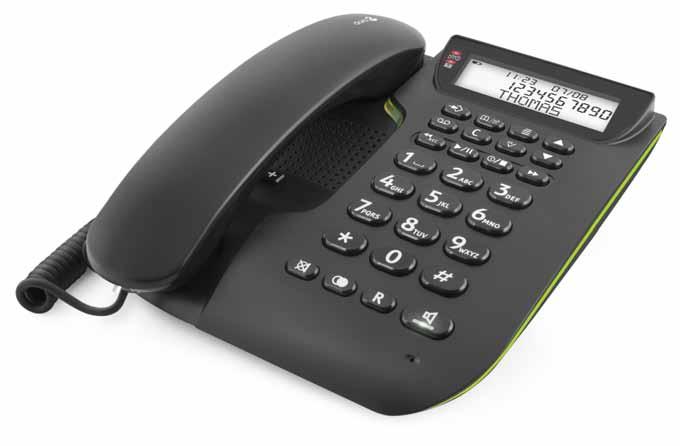
1 Aton C40
2 1. Extra amplification (boost) 2. Handset/Speaker volume control 3. Service access keys 4. MEMO 5. Hanging peg for handset 6. Store 7. Message waiting indicator 8. New call and answering machine on/off indicator 9. Phonebook/Caller ID 10. Clear 11. Menu 12. UP/DOWN 13. OK/Call key 14. Answering machine functions 15. Speaker/Headset 16. Microphone 17. Recall 18. Redial 19. Mute
3 Contents Care and Maintenance...1 Installation...1 Connection...1 Setup...1 Wall mounting...2 Operation...2 The display...2 Make a call...3 Mute...3 Timer...3 Volume control...3 Service access...4 Phonebook...4 Character table...4 Storing contacts...4 Phonebook dialling...5 Edit contacts...5 Deleting contacts...5 Deleting all contacts...5 Call list...5 Retrieving and dialling...6 Messages...6 Deleting numbers...6 Transfer numbers to the phonebook...6 Answering machine...7 Settings...7 OGM (outgoing message)...8 ICM (incoming message)...8 Call monitoring...9 MEMO (personal message)...9 Two-way recording...9 Remote control Out of memory Other PBX Message Waiting Indicator Ring signal Connecting a Headset Hearing Aid Compatible Troubleshooting Annex Swisscom Contact Center Environmental impact... 13
4 Care and Maintenance Only use batteries, mains adapter and accessories that have been approved for use with this particular model. Connecting other accessories may be dangerous and may invalidate the phone's type approval and guarantee. The mains adapter is the disconnect device between the product and mains power. The mains socket outlet must be close to the equipment and easily accessible. Your unit is a technically advanced product and should be treated with the greatest care. Negligence may void the warranty. Protect the unit from moisture. Rain/snowfall, moisture and all types of liquid can contain substances that corrode the electronic circuits. If the unit gets wet, you should remove the battery and allow the unit to dry completely before you replace it. Do not use or keep the unit in dusty, dirty environments. The unit s moving parts and electronic components can be damaged. Do not keep the unit in warm places. High temperatures can reduce the lifespan for electronic equipment, damage batteries and distort or melt certain plastics. Do not keep the unit in cold places. When the unit warms up to normal temperature, condensation can form on the inside which can damage the electronic circuits. Do not try to open the unit in any other way than that which is indicated here. Do not drop the unit. Do not knock or shake it either. If it is treated roughly the circuits and precision mechanics can be broken. Do not use strong chemicals to clean the unit. The advice above applies to the unit, battery and other accessories. If the unit is not working as it should, please contact the place of purchase for service. Don t forget the receipt or a copy of the invoice. Installation Connection 1. Connect the curly cord to the handset and to the socket marked q on the unit. 2. Connect the mains adapter to an electrical wall socket and then to the socket marked DC 9V on the unit. 3. Connect the telephone line cord to a network wall socket and then to the socket marked K on the unit. 4. Lift the handset and listen for the dial tone. 5. Position the cables in the grooves underneath the unit. Setup 1. Press w. 2. CONTRAST is displayed. Press 0 to change, press V to continue without changes. 3. Select desired contrast setting (2=normal) using v/v. Press TIME/DATE is displayed. Press 0 to change, press V to continue. 5. To set hour (00-23) use v/v. Press Select desired minute using v/v. Press Select desired month using v/v. Press Select desired date using v/v. Press 0. 1
5 9. Select desired weekday using v/v. Press DEUTSCH 1 is displayed. Press 0 to change, press V to continue. 11. Select desired language using v/v. Press VOICE is displayed. Press 0 to change, press V to continue. 13. Select ON or OFF using v/v. Press RECALL is displayed. Press 0 to change, press V to continue. 15. Select the desired setting using v/v. 100 for CH 1, 270 or 600. Press ANSWER DELAY is displayed. Press to change, press V to continue. 17. Select 2, 4 or TS using v/v. Press ANSWER MODE is displayed. Press 0 to change, press V to continue. 19. Select ANSWER/RECORD or ANSWER ONLY using v/v. Press PIN CODE is displayed. Press 0 to change, press V to continue. 21. Use the numeric keypad to enter the code (default=0000). Press 0. Enter the new code (4 digits). Press 0. If the code is not accepted/correct you will hear a short beep, repeat step 19 and PRIVACY MODE is displayed. Press 0 to change, press V to continue. 23. Select ON or OFF using v/v. Press 0. To change settings for time, language or contrast etc. later on, repeat steps as above. Wall mounting The phone can be wall mounted. WARNING Make sure that no cables, water pipes or gas pipes are located inside the wall before drilling into it. 1. Drill two holes in the wall, vertically 102 mm mm apart. 2. Insert the screws, allowing them to project ~5 mm out from the wall. 3. Unplug and remove the handset. 4. Position the phone so that the screws on the wall fit into the slots in the bracket, then slide the phone downwards until it is hanging on the screws. 5. Activate the hanging peg (located by the hook switch) by rotating it 180 degrees. 6. Replace the handset, on the hanging peg, in the hook switch. Operation The display In standby mode the date and time is indicated on the display, the total number of calls that have been stored in the Call list memory, and the number of new calls. Note! There are separate logs for answering machine and Caller ID and separate red LED s. In order to stop the flashing LED the corresponding log must be reviewed. Tip: You can always press to return to standby. 1. Delivery setting 2
6 Make a call Normal call 1. Lift the handset. 2. Enter the phone number. Pre dial Pre dial allows you to enter and change a phone number before it is dialled. 1. Enter the phone number. Delete with c. 2. Lift the handset to dial. Re-dial Re dial allows you to call the last dialled phone numbers. Lift the handset and press r to dial the most recently dialled phone number. Repeatedly press r to scroll through the dialled numbers. Lift the handset to dial the phone number. Handsfree/speakerphone It is only possible for one person at a time to talk in handsfree mode. Avoid loud background noises, e.g. music, as this interferes with the handsfree function. 1. Press to activate the handsfree function. 2. Enter the phone number. 3. Press to end the call. Tip: You can switch between handset and handsfree mode during a call, press or lift the handset. Mute Press and hold z to disconnect the handset's microphone, release z to resume the conversation. Timer During a call the display shows a call timer, indicating the duration of the call. The timer is a simple way to help you keep track of how long the call lasts. Volume control Adjust handset volume during a call with. Adjust speaker volume (hands free) during a call with v/v. Extra amplification (boost) Press the button to activate amplification. The amplification is deactivated at the end of each call to avoid harming people with normal hearing. WARNING The handset/headset volume can be turned up very loud. The amplification should only be used by people with impaired hearing ability. 3
7 Service access Key 1 and 2 can be programmed with a service number. 1. Press and hold 1 or 2. ENTER NUMBER is displayed. Use the keypad and c to edit the access number. Press p. 2. ENTER NAME is displayed. Use the keypad to edit the access name. Press p to confirm the changes. To dial, press and hold 1 or 2 and press 0 or lift the handset. Phonebook The phonebook will store 99 sets of names and phone numbers. Contacts in the phonebook are arranged alphabetically. Each name can be up to 14 characters in length, and phone numbers can be up to 22 digits in length. If you subscribe to a Caller ID service, the name/number of the caller will be shown when you receive an incoming call (for those numbers stored in the phonebook or the memories). Character table Each number key has been allocated certain characters. Key 1 Letters/symbols [Space character] + & - / X 1 2 A B C Å Ä Æ æ å ä ß 2 D E F ë 3 3 G H I ï 4 4 J K L M N O Ñ ñ Ö ö 6 P Q R S T U V Ü ü 8 W X Y Z 9 9 ( ) * < > *,. :? = 0 0 $ _ %! ; # # Storing contacts 1. Press b / to select phonebook mode. Ensure b is displayed. 2. Press p. NEW CONTACT? is displayed. 3. Press p again. 4. Enter phone number. Press p. 5. Enter name. Press the corresponding number key one or more times for the first letter (see the table above). 4
8 6. Press p. 7. Press p if you want to add more contacts, or press to return to standby. Note! Press r to insert a pause in the phone number. If you wish to change a number, store the new number in the same location as the old one. Phonebook dialling 1. Press b/ to select phonebook mode. Ensure b is displayed. 2. Select required memory location using v/v. To quick-search in the phonebook press the corresponding number key one or more times for the first letter (see Character table, p.4). 3. Lift the handset to dial displayed number. If you do nothing the phone will return to standby mode. Edit contacts 1. Press b / to select phonebook mode. Ensure b is displayed. 2. Select required memory location using v/v. 3. Press and hold p until EDIT CONTACT? is displayed. Press p. 4. Change displayed phone number with c and v/v. Press p. 5. Changes to displayed name can be made using c and v/v. 6. Press p to confirm the changes. Deleting contacts 1. Press b / to select phonebook mode. Ensure b is displayed. 2. Select required memory location using v/v. 3. Press c. DELETE? is displayed. 4. Press and hold c until displayed phone number disappears. Deleting all contacts 1. Press b / to select phonebook mode. Ensure b is displayed. 2. Select required memory location using v/v. 3. Press and hold c until DELETE ALL? is displayed. 4. Press and hold c until EMPTY is displayed. Call list Caller ID (caller identification) allows you to see who is calling before you answer a call and to see who has called in your absence. If the number is stored in the phonebook, the caller s name is displayed. Received calls are stored chronologically, the sequential number is displayed. When the Caller list memory is full, the oldest number will be deleted automatically as the new call is logged. New calls are indicated with the New call indicator /1 flashing. 5
9 Note! In order for numbers to be displayed, the Caller ID (CLIP) service should be provided by your network operator and a current subscription in place. Contact your operator for more information. In the Swisscom network, the number of the caller; CLIP (Calling Line Identification Presentation) is automatically transferred. There are separate logs for the answering machine and the Caller ID and separate red LED s. In order to stop the flashing LED the corresponding log must be reviewed. Retrieving and dialling 1. Press b/ to select CALL LIST mode. Ensure is displayed. 2. Press v or V to review the numbers stored in the Caller list memory. 3. Lift the handset to dial the displayed number. Note! During a conversation, you can switch from the handset to hands free mode at any time by pressing. Press again to terminate the call. Messages Various text messages and symbols can be displayed: OUT OF AREA No information received, e.g. an international call PRIVATE The call comes from a withheld number or a PBX Q Number not previously seen T A call is received while using the Call Waiting function 5 Message Waiting indication. Deleting numbers 1. Press b/ to select CALL LIST mode. Ensure is displayed. 2. Select the number you wish to erase using v/v. 3. Press c. DELETE? is displayed, alternatively press and hold c until DELETE ALL? is displayed. 4. Press and hold c until EMPTY is displayed. Press to return to standby. 5. If you do nothing the phone will return to standby mode. Note! This deletes the Call list memory, not the Phonebook memory. Transfer numbers to the phonebook 1. Press b/ to select CALL LIST mode. Ensure is displayed 2. Select the number you wish to copy using v/v. 3. Press p. 4. COPY TO PBOOK? is displayed. Press p. 5. Change displayed phone number with c and v/v. Press p. 6. Enter name using c and v/v. 7. Press p to confirm the changes. 6
10 Settings Answering machine Switching the answering machine on and off The answering machine can be switched ON or OFF using the In ON position, incoming calls will be answered by the answering machine and the red indicator /1 will be on. -key. In OFF position, no calls will be answered and the red indicator /1 will be off. Note! Although the answering machine is turned off it will answer a call after 10 rings, to enable the remote control commands. Number of Rings (Answer delay) The number of rings before the answering machine answers can be selected between 2, 4 or TS. With TS (Toll Saver/Time saver) selected, calls will be answered after four rings until a new incoming message has been recorded, any subsequent calls will be answered after two rings. Once these incoming messages have been erased or read this cycle will be repeated. This is useful when remotely accessing your unit. If there is no answer after three rings, no incoming messages have been recorded and you can terminate the call before you are charged. Pin code The PIN CODE (default=0000) is needed in order to gain access to the remote control functions of the answering machine. The same code is used for PRIVACY MODE. You can alter the code, see Setup, p.1. Note! Using a PIN code prevents other people from accessing your machine without permission. For security reasons, it is recommended that you change the PIN code from the default setting of Voice With VOICE set to ON you will be announced the time for when the incoming message was recorded. With VOICE set to OFF the time and date will not be announced but you can still see when the incoming message was recorded in the display. Answer only ANSWER ONLY is your announcement message to a caller in which contact information can be supplied but no incoming message will be recorded. When ANSWER ONLY is selected A2 is displayed. Note! You can record your own greeting message, or use the pre-recorded message. See Record outgoing message, p.8 for instructions on how to record an outgoing message. "Hello, we are unable to take your call right now. Please do not leave a message as this is not recorded. Thanks for calling." Privacy mode Use privacy mode if you want to prevent unauthorized people from accessing your incoming messages. With PRIVACY MODE set to ON you will be asked to enter the PIN CODE before listening to your incoming messages. 7
11 Note! PRIVACY MODE and remote access uses the same PIN code. OGM (outgoing message) The outgoing message is your message to an incoming caller and may be up to 60 seconds in length. You may want the message to tell the caller that they may start speaking once the beep is heard after your outgoing message. "Hello, we are unable to take your call right now, please leave a message after the beep. Thanks for calling." Record outgoing message 1. Press and hold. You will hear a short beep, the LED will flash and RECORD OGM is displayed, do not release until you are done recording. 2. Record your outgoing message. Speak clearly towards the machine from a distance of cm. 3. Release to stop recording. 4. The outgoing message will be repeated after a few seconds. Repeat this procedure if you want to change the message, any old outgoing message will automatically be erased when a new one is recorded. Check outgoing message Press. The current outgoing message will now be played. Restore the pre-recorded message 1. Press and hold. You will hear a short beep, the LED will flash and RECORD OGM is displayed, release. 2. The pre-recorded outgoing message is played after a few seconds. Note! You can record 2 different outgoing messages, one for (normal) ANSWER/RECORD and one for ANSWER ONLY. See Answer only, p.7 on how to select ANSWER MODE. ICM (incoming message) The red indicator /1 flashes to indicate that new messages have been received. Playback will always begin with any new messages, for example if there are three old messages and two new ones, only the two new ones will be played back, then the answering machine will return to standby mode. Press the play key once again to listen to all messages, starting with the oldest messages. 1. Press to start playback. With PRIVACY MODE activated you need to enter the PIN CODE (default=0000) and then press 0. The answer machine will then play the incoming message(s). 2. After each message a short beep will be heard. 3. When playback is finished you will hear a short beep, and the machine will return to standby mode. All incoming messages are saved (unless you have erased any during playback), new messages will then be recorded after the old ones. 8
12 Following functions are available during playback Key Function Repeat the current message, or press Skip to next message twice to step back through the message Stop playback c v/v Erase messages Increase or decrease the speaker volume Pause during playback (max. 7 seconds). Press again to resume playback Delete incoming message If you want to delete a single incoming message press c while the message is playing. To erase all messages after playback, press and hold c until unit beeps. Note! New messages cannot be deleted until they have been played. With PRIVACY MODE activated you need to enter the PIN CODE (default=0000) and then press 0. Call monitoring Incoming messages can be heard through the loudspeaker as they are received. If there is no sound, adjust the volume using v/v. Note! With PRIVACY MODE activated Call Monitoring will be disabled. MEMO (personal message) A personal message MEMO is a message recorded directly onto the answering machine (120 seconds maximum) without dialling. This means that the answering machine may be used as an electronic notebook, where messages, reminders or other notes to family members or colleagues can be recorded. 1. Press and hold the a-key. You will hear a beep. 2. Start speaking clearly towards the machine to record your message. This function only works when the handset is on the base (on-hook). 3. Release a to stop recording. 4. Memos are played back in the same way as regular incoming messages. Note! With PRIVACY MODE activated you need to enter the PIN CODE (default=0000) and then press 0. The answering machine will then play the recorded MEMO(s). Two-way recording You can record phone conversations as they occur. There is approximately 27 minutes available recording time in memory, with the answering machine handling two-way recordings as a regular incoming call. 1. A call is connected. 2. Press a. 2WAY RECORDING is displayed and a, indicating that two-way recording is in progress. 9
13 3. Press to terminate recording. Remote control The answering machine can be remotely accessed using an ordinary tone dialling phone. 1. Call the answering machine (the number that your answering machine is connected to, usually your home number). 2. Enter the PIN code (default code is 0000) when the outgoing message is played. 3. Select remote access command(s): Remote control commands Command 1# 2# During playback: 3# 4# 5# 6# After playback: 7# Function Play new messages Play all messages Erase single message during playback Skip to previous message Stop playback Skip to next message Switching the answering machine on and off 8# Record a new outgoing message, to stop recording press 5# 9# Record a MEMO, to stop recording press 5# 0# Room monitoring (active for 2 minutes and 30 seconds, press 0# to continue) Note! If the machine doesn t respond correctly to the remote control commands, try pressing the phone keys for a longer or shorter time. If you do not enter any remote control command, the answering machine will disconnect after a few seconds. If you listen to any incoming messages for more than 2 minutes and 40 seconds, you will hear two beeps. Press any key to continue. Remote activation The answering machine can be activated using the remote control functions. 1. Call up the answering machine. After approximately 10 rings, the machine will answer and emit a long tone. 2. Enter the PIN CODE during your outgoing message. If the code is accepted, you will hear two short beeps. 3. Press 7#. One beep confirms that the answering machine is now on. Replace the handset. Room monitoring This remote access feature enables you to call your home and turn ON the answering machine s microphone function, allowing you to monitor sounds in the room where the answering machine is situated. 10
14 Out of memory The total capacity of the answering machine s memory is approximately 27 minutes. The memory space is shared between the outgoing message, personal memos, and regular incoming messages. When the memory is full MEMORY FULL is displayed, the answering machine will answer after 10 rings to allow remote playback and deletion of messages, no new messages will be accepted until the existing messages have been played and erased. Other PBX Message Waiting Indicator Some PBX systems use a function called Message Waiting. The phone will indicate when a call was received by the Message Waiting light (5) next to the display. The switch is located under the battery cover. The MW function operates differently depending on the PBX in question. Please contact the system controller for more information. The following alternatives are available: ringer indicator ( ), high DC voltage (HV), + and. When the phone is used in systems without a PBX, ringer indicator ( ) should be selected. Ring signal The ringer volume, melody and tone can be set using the switches located under the battery cover. Ring melody Ringer tone Connecting a Headset You can connect a headset to the socket =. When a headset is connected the speaker key is used to connect/disconnect a call (equivalent to lifting and putting down the handset). The volume in the headset can be adjusted during a call using v/v. A neck loop/extra handset can be connected to this socket instead of a headset. DORO original headsets are tested and adapted for this model. Other types and makes of headsets may be used, though the function and sound quality cannot be guaranteed. In the worst case, these could damage the headset and phone. This type of damage is not covered by the phone s guarantee. Selecting headset or hands free mode Select headset-/handsfree mode by setting the switch = / on the back of the phone. Note! On delivery, the phone is set to handsfree mode. The handsfree function will not work when the headset function is activated and vice versa. Hearing Aid Compatible This phone is hearing aid compatible. Select the T-mode on your hearing aid to enable this feature. 11
15 Troubleshooting Check that the telephone cord is undamaged and properly plugged in. Disconnect any additional equipment, extension cords and other phones. If the problem is resolved, the fault is with some other equipment. Test the equipment on a known working line (e.g. at a neighbour s house). If the equipment works there the fault is probably with your telephone line. Please inform your network operator. The answering machine does not respond to remote access Check that you are using a tone dial telephone. Try holding the keys down longer, approximately 1 second per digit. The answering machine is not answering Memory may be full. Delete old messages. Check that the adapter/phone cord is connected correctly. Check that the answering machine function is turned on. If the telephone still does not work, please contact the place of purchase for service. Don t forget the receipt or a copy of the invoice. Annex Support If you have any general questions about products and services, please do not hesitate to contact Swisscom Customer Service on freephone number or visit Warranty Repairs are carried out in accordance with the "Warranty conditions of Swisscom (Switzerland) Ltd". In the event of defects occurring, the Customer may contact the sales outlet or the appropriate Swisscom customer service. Any costs associated with bringing back and collecting the device shall be borne by the Customer, even in the case of a warranty claim. If, at the request of the Customer, defects and faults are remedied at his place of residence (not possible for all devices), Swisscom shall charge the Customer for the travel to the work site, the use of vehicles and the duration of the work. If the equipment is leased, you can benefit from the free on-site service. Restrictions The warranty does not cover operating items and consumables such as batteries or data carriers (e.g. operating instructions on CD or paper). Nor does it apply to defects which can be attributed to the penetration of moisture or other outside influences (damage as a result of being dropped, crushed or struck, incl. damage during transportation). Approval/Conformity This device is intent to be operated on the analogue Swiss network. Country specific conditions have to be taken into account. If you have any questions about the differences between the public phone networks, please contact your specialist dealer or network provider. Swisscom hereby declares that this device meets the essential requirements and other relevant regulations laid down in Directive 1999/5/EC. The Declaration of Conformity can be found on the following web site: Maintenance Clean the housing surfaces with a soft, fluff free cloth. Do not use any cleaning agents or solvents. 12
16 Swisscom Contact Center On this freephone number, we would be happy to advise you on all aspects of telecommunications: fixed network, mobile, broadband DSL, Bluewin TV, billing questions and much more. Environmental impact At the end of its working life this device must not under any circumstances be disposed of as normal waste. It must be taken to a point of sale or central collection point for electronic and electrical devices in accordance with the Swiss Ordinance on the Return, Taking Back and Disposal of Electrical and Electronic Appliances (ORDEA). The individual materials are recyclable as indicated. By reutilizing, recycling or re-using them in any other form, you are making a major contribution towards environmental protection. 13
17 14
18 Version Doro AB. All rights reserved. REV STR
Doro Magna English
 Doro Magna 4000 English 9 1 English 1. Handset volume control 2. Speaker 3. Service access keys 4. Hanging peg for handset 5. Clear 6. OK 7. Speed dial keys 8. Caller ID (access received numbers) 9. New
Aton C29. User Guide
 Aton C29 User Guide Cover_Aton C29_en.indd 1 22.4.2009 9:12:34 Uhr Aton_C29_EN.book Page 3 Monday, June 22, 2009 4:04 PM Aton_C29_EN.book Page 1 Monday, June 22, 2009 4:04 PM Table of Contents 1 Important
CL210A TELEPHONE & ANSWERING MACHINE
 CL210A TELEPHONE & ANSWERING MACHINE CONTENTS CONTENTS CONTENTS 1 INTRODUCTION 3 Unpacking the Telephone 4 DESCRIPTION 5 General Description 5 INSTALLATION 7 Setting Up 7 Wall Mounting 7 SETTINGS 8 Ringer
PhoneEasy record 327cr
 PhoneEasy record 327cr 1 19 18 17 16 15 14 2 13 3 4 12 5 1 Ring signal indicator 2 Socket for handset cord 3 Handset volume control 4 Flash button/programming 5 Redial 6 Volume control, answer machine
PhoneEasy 110. English
 PhoneEasy 110 English 1 2 3 4 5 6 O a 1 3 ABC 2 DEF 4 GHI 5 MN O 7 8 W XY Z PQRS 7 L r JKL TUV 6 9 * 0 # English 1. Phonebook 2. Boost (sound amplification) 3. Intercom 4. Recall key 5. Call key/speaker
PhoneEasy 110. English
 PhoneEasy 110 English 1 2 3 4 5 6 7 a O 1 2A B C 3 4 7 5 8 * 0 r L 6 9 # D E F G H I J K L M N O P Q R S T U V W X Y Z L 14 13 12 11 10 9 8 English 1. Phonebook 2. Boost (sound amplification) 3. Intercom
Aton C6. Bedienungsanleitung. User Manual Mode d emploi Istruzioni per l uso
 Aton C6 Bedienungsanleitung User Manual Mode d emploi Istruzioni per l uso CONTENT Getting started.....................................................................3 Safety Precautions................................................................3
Now available to purchase from
 CONTENTS CONTENTS 1 INTRODUCTION 3 Unpacking the Telephone 4 DESCRIPTION 5 General Description 5 INSTALLATION 7 Setting Up 7 Wall Mounting 8 SETTINGS 9 Ringer Settings 9 Flash (Recall) Setting 9 Receiving
CONTENTS. INTRODUCTION 3 Unpacking the Telephone 4. DESCRIPTION 5 General Description 5. INSTALLATION 10 Setting Up 10 Wall Mounting 11
 CONTENTS CONTENTS 1 INTRODUCTION 3 Unpacking the Telephone 4 DESCRIPTION 5 General Description 5 INSTALLATION 10 Setting Up 10 Wall Mounting 11 SETTINGS 12 Ringer Settings 12 Flash (Recall) Setting 12
Doro Magna English
 Doro Magna 2000 1. Ringer LED 2. Earpiece 3. Extra amplification (boost) 4. Up/Call log 5. Left menu key/ok 6. Call key 7. */Keypad lock 8. Speakerphone on/off 9. Microphone 10. Phonebook 11. Recall key
INTRODUCTION. Thank you for purchasing a Qualitel product which adopts excellent workmanship and exceptional reliability.
 1 INTRODUCTION Thank you for purchasing a Qualitel product which adopts excellent workmanship and exceptional reliability. Your telephone is designed to give you flexibility in use and high quality performance.
List of network services. Miscellaneous settings. List of incoming calls and messages
 Guarantee Dear Customer, Thank you for purchasing this Philips product which has been designed and manufactured to the highest quality standards. If, unfortunately, something should go wrong with this
LAZER Model 905K USER GUIDE
 Specification This product is designed for use in Great Britain and complies with the European Low Voltage and EMC Directives. For a copy of the Declaration of Conformity for this product, please write
Charge handset(s) for 24 hours before use.
 for 24 hours before use.") Kala 300 Kala 300 Duo Kala 300 Trio Kala 300 Quattro Kala 300 Vox Kala 300 Vox Duo Kala 300 Vox Trio Kala 300 Vox Quattro! Charge handset(s) for 24 hours before use. This equipment is not designed for
Kala 300 Kala 300 Duo Kala 300 Trio Kala 300 Quattro Kala 300 Vox Kala 300 Vox Duo Kala 300 Vox Trio Kala 300 Vox Quattro! Charge handset(s) for 24 hours before use. This equipment is not designed for
LAZER Model 906K USER GUIDE
 Specification This product is designed for use in Great Britain and complies with the European Low Voltage and EMC Directives. For a copy of the Declaration of Conformity for this product, please write
User Guide. Telstra 7400 & 7400a. Digital DECT Cordless Telephone /Integrated Answering Machine
 Telstra 7400 & 7400a Digital DECT Cordless Telephone /Integrated Answering Machine User Guide If you have any problems with your phone, refer to the Help section of this User Guide or call TecHelp on 1300
900 MHz Digital Two-Line Cordless Speakerphone with Answering System 9452 with Caller ID/Call Waiting
 USER S MANUAL Part 2 900 MHz Digital Two-Line Cordless Speakerphone with Answering System 9452 with Caller ID/Call Waiting Please also read Part 1 Important Product Information AT&T and the globe symbol
User instructions. PHONE-Dex
 User instructions PHONE-Dex Package contents* User manual Batteries and cover Handset Mains adapter Phone cable Base unit Phone plug * May not look exactly as illustrated. 1 2 3 4 5 6 11 10 9 8 7 English
BT Big Button 100 Edition User Guide BT Big Button 100
 User Guide BT Big Button 100 Welcome to your BT Big Button 100 phone Large buttons for easy dialling. Handsfree make and receive calls using the loudspeaker. One-touch 1571 button dials your network answering
Standby. ** Onis only. * Onis Memo only SETUP
 Standby R PHONE BOOK Add Entry Remove Entry RINGERS Handset Base Station 7 SETUP Automatic Dialling Pause Dial Mode Network Type Recall Type Add Handset Remove Handset Register Handset Change Base Station
CONTENTS 1. INTRODUCTION 3 Unpacking the Telephone 4. DESCRIPTION 5 General Description 5 Key Description 7 LCD Description 8
 CONTENTS CONTENTS 1 INTRODUCTION 3 Unpacking the Telephone 4 DESCRIPTION 5 General Description 5 Key Description 7 LCD Description 8 INSTALLATION 9 Setting Up 9 Wall Mounting 10 Table Mounting 11 SETTINGS
Thank you for purchasing our product which adopts excellent workmanship and exceptional reliability.
 INTRODUCTION Thank you for purchasing our product which adopts excellent workmanship and exceptional reliability. Your telephone is designed to give you flexibility in use and high quality performance.
User Guide BT RESPONSE 123e
 User Guide BT RESPONSE 123e DIGITAL TELEPHONE ANSWERING MACHINE This product is intended for connection to analogue public switched telephone networks and private switchboards in the United Kingdom. Key
2.4 GHz Cordless Telephone Answering System 2325/2365 with Caller ID/Call Waiting
 USER S MANUAL Part 2 2.4 GHz Cordless Telephone Answering System 2325/2365 with Caller ID/Call Waiting Please also read Part 1 Important Product Information 2002 Advanced American Telephones. All Rights
Fig. 1. Figs. 2, 3, 4, & 5. Berkshire MR42. Hotel CLI telephone USER GUIDE. Contents. 1. The Display Panel (see illustration Fig.
 Berkshire MR42 Hotel CLI telephone USER GUIDE Contents 1. The Display Panel (see illustration Fig.1) 2. Received Calls List 3. Receiving calls 4. Making calls 5. Compliance Notes 6. Safety Statement 7.
Converse 2-line Telephone. User Guide
 Converse 2-line Telephone User Guide Please open this page for a further at a glance guide to your Converse 2-Line. Please open this page for an at a glance guide to your Converse 2-Line. At a glance Handset
TABLE OF CONTENTS INSTALLATION OF THE RAVENNA PHONE... 2 INSTALLATION OF THE BATTERIES... 2 TONE/PULSE SWITCH... 2 THE TELE-SERVICES KEY...
 TABLE OF CONTENTS INSTALLATION OF THE RAVENNA PHONE... 2 INSTALLATION OF THE BATTERIES... 2 TONE/PULSE SWITCH... 2 THE TELE-SERVICES KEY... 2 PROGRAMMING OF THE RAVENNA... 3 SPEAKERPHONE-BUTTON... 3 SPEAKER
Standby. ** Oniso only. * Oniso Memo only SETUP
 Standby R PHONE BOOK Add Entry Remove Entry RINGERS Handset Base Station 7 SETUP Automatic Dialling Pause Dial Mode Network Type Recall Type Add Handset Remove Handset Register Handset Change Base Station
2.4 GHz 2-Line Corded/Cordless Answering System 2462 with Caller ID/Call Waiting
 2462_00_1 ATT CIB 1/28 1/28/02 9:52 AM Page ii 1 USER S MANUAL Part 2 2.4 GHz 2-Line Corded/Cordless Answering System 2462 with Caller ID/Call Waiting DRAFT 1/28/02 Please also read Part 1 Important Product
User Guide. Telstra M450. Digital Answering Machine
 Telstra M450 Digital Answering Machine User Guide If you have any problems with your answering machine, firstly refer to the Troubleshooting section of this User Guide or call our TecHelp line on 1300
Aton H61 User Guide. en
 Aton H61 User Guide en 10.2008 Cover_Aton_H61_en.indd 1 18.8.2008 13:34:52 Uhr In t r o d u c t i o n Dear customer: Thank you for purchasing this Swisscom product; we appreciate your trust in us. This
User Guide. Quartet Cordless Telephone & Digital Answering Machine
 Quartet 2015 Cordless Telephone & Digital Answering Machine User Guide This equipment is not designed for making emergency telephone calls when the power fails. Alternative arrangements should be made
Model: DS6151. User s manual. w w w.v t e c h p h o n e s. c o m
 Model: DS65 User s manual w w w.v t e c h p h o n e s. c o m Congratulations on purchasing your new VTech product. Before using this telephone, please read Important safety instructions on page 8 of this
2.4 GHz Corded Cordless Telephone with Caller ID/Call Waiting 1480
 91-5824-70-00_ATT1480_R0 9/15/03 2:47 PM Page ii USER S MANUAL Part 2 2.4 GHz Corded Cordless Telephone with Caller ID/Call Waiting 1480 Please also read Part 1 Important Product Information 2002 Advanced
XL220 Feature Phone User Guide
 XL220 Feature Phone User Guide 1 Index Page Contents 3 Feature List of the Orchid XL220 4 Installing the XL220 5 Curly Cord and Line Cord 5 Telephone Stand 5 Wall Mounting 6 Key Pad Layout 7 Programming
User Guide. Telstra 2400/2400a. Digital DECT Cordless Telephone/ Digital DECT Cordless Telephone with Digital Answering Machine
 Telstra 2400/2400a Digital DECT Cordless Telephone/ Digital DECT Cordless Telephone with Digital Answering Machine User Guide If you have any problems with your phone, refer to the Help section of this
GSM Fixed Wireless Terminal
 GSM Fixed Wireless Terminal User Guide Model AT-1000G Installation and functions This device is intended to be used with a traditional analogue phone or behind PBX system. With the AT-1000G you no longer
900 MHz Cordless Answering System with Caller ID/Call Waiting 9357 DRAFT 7/6/01
 9357_book/wc_1ATT 7/6/01 4:10 PM Page ii USER S MANUAL Part 2 900 MHz Cordless Answering System with Caller ID/Call Waiting 9357 DRAFT 7/6/01 Please also read Part 1 Important Product Information AT&T
User Guide. Monitor 420. Digital Answering Machine
 Monitor 420 Digital Answering Machine User Guide If you have any problems with your answering machine, firstly refer to the Troubleshooting section of this User Guide or call our TecHelp line on 1300 369
User Guide BT PARAGON 450
 User Guide BT PARAGON 450 2 Section Note heading Note text Welcome to your BT Paragon 450 corded telephone and answering machine n Answering machine with up to 36 minutes digital recording time. n Play
Relate 700. Caller Display Telephone. User guide
 Relate 700 Caller Display Telephone User guide Please open this page for an At a glance guide to your Relate 700 Caller Display. At a glance Handset clip Rotate for wall mounting to secure handset firmly
Cordless Phone. Answering System Caller ID. User s Guide
 User s Guide 43-327 Answering System Caller ID Cordless Phone Thank you for purchasing your new cordless phone from RadioShack. Please read this user s guide before installing, setting up, and using your
PDX-5300 DECT series Owner s Manual CID, Handsfree with Digital Answering Machine
 PDX-5300 DECT series Owner s Manual CID, Handsfree with Digital Answering Machine 1 of 1 Safety Information Getting Started Unpacking Your Telephone LCD Display on the Handset Basic Steps to Install Battery
User Guide BT DIVERSE BT Diverse 6350 Issue 3 Edition
 User Guide BT DIVERSE 6350 BT Diverse 6350 Issue 3 Edition 1 7.11.05 7187 Welcome to your BT Diverse 6350 digital corded / cordless twin telephone answering machine Directory lets you store up to 100 names
User Guide for the Wireless Clip-on Headset (HS-21W) Issue 1
 Issue 1") User Guide for the Wireless Clip-on Headset (HS-21W) 9236329 Issue 1 DECLARATION OF CONFORMITY We, NOKIA CORPORATION declare under our sole responsibility that the product HS-21W is in conformity with
User Guide for the Wireless Clip-on Headset (HS-21W) 9236329 Issue 1 DECLARATION OF CONFORMITY We, NOKIA CORPORATION declare under our sole responsibility that the product HS-21W is in conformity with
900 MHz Cordless Telephone/Answering System with Caller ID/Call Waiting 9371 DRAFT 8/14/01
 9371_book_1ATT 8/14/01 10:00 AM Page ii USER S MANUAL Part 2 900 MHz Cordless Telephone/Answering System with Caller ID/Call Waiting 9371 DRAFT 8/14/01 Please also read Part 1 Important Product Information
BT Freestyle 350 Issue 2 Edition BT Freestyle 350. User Guide
 BT Freestyle 350 User Guide Section Welcome to your BT Freestyle 350 Digital Cordless Telephone Directory lets you store up to 100 names and numbers for easy dialling. The BT button provides quick access
Newfonic Phone User Guide
 Newfonic Phone 4019 User Guide Welcome Congratulations on the purchase of your Newfonic Phone. The Newfonic is durable and designed to give you years of quality service. Please read this manual carefully
The Onis Vox handset. Earpiece. Down Key Press this key to move through the menu or to decrease earpiece volume during calls.
 Language Automatic Dialling Pause Dial Mode Network Type Recall Type Add Handset Remove Handset Register Handset Change Base Station Name 6 SETUP 5 BASE SEL Standby R PHONEBOOK BABY SIT Add Entry ANSW
BT Duet 210. User Guide
 BT Duet 210 User Guide Welcome. to your BT Duet 210 Corded Telephone 10 number quickdial memory - for ease of dialling your most important telephone numbers Mute mutes your voice so you can talk to someone
UK s best selling phone brand. User Guide. BT Freelance XT 3500 Cordless Phone with Answering Machine
 UK s best selling phone brand User Guide BT Freelance XT 3500 Cordless Phone with Answering Machine 2 This User Guide provides you with all the information you need to get the most from your phone You
Nokia Bluetooth Speakers MD-5W. Issue1
 Nokia Bluetooth Speakers MD-5W 2 3 4 5 6 7 8 8 9 10 11 12 14 13 Issue1 DECLARATION OF CONFORMITY Hereby, NOKIA CORPORATION declares that this MD-5W product is in compliance with the essential requirements
UK s best selling phone brand. User Guide
 UK s best selling phone brand User Guide BT3530 Digital Cordless Phone With Answering Machine 2 This User Guide provides you with all the information you need to get the most from your phone. You must
BT Call Blocking. Pull out and keep
 BT HALO USER GUIDE You need a Caller Display service from your network provider to use Call Blocking and other Caller Display enabled features. Charges may apply. Pull out and keep BT Call Blocking To
ILLUSTRATION. Base station. Mains power supply / line LED. Earpiece. Display. SOS key. Memory key. On/Off line key. Redial key
 ILLUSTRATION Base station Mains power supply / line LED Earpiece Display Memory key On/Off line key Dialling keypad SOS key Redial key Internal call / music on hold key Recall and Programming key Earpiece
Nokia Bluetooth Headset BH-202. Issue 1
 Nokia Bluetooth Headset BH-202 22 3 1 4 5 7 6 8 9 Issue 1 DECLARATION OF CONFORMITY Hereby, NOKIA CORPORATION declares that this HS-38W product is in compliance with the essential requirements and other
Motorola IT.6. Digital Cordless Telephone Mobile Connectivity with Bluetooth Wireless Technology. For IT.6.1, IT.6.2, IT.6.3 and IT.6.
 Digital Cordless Telephone Mobile Connectivity with Bluetooth Wireless Technology Motorola IT.6 For IT.6.1, IT.6.2, IT.6.3 and IT.6.4 Warning: Charge the handset for 24 hours before use. Welcome... to
UK s best selling phone brand. User Guide. BT Duet 210. Corded Phone
 UK s best selling phone brand User Guide BT Duet 210 Corded Phone Welcome. to your BT Duet 210 Corded Telephone 10 number quickdial memory - for ease of dialling your most important telephone numbers Mute
Your handset. Antenna. Earpiece. Display. Up Key Press this key to move through the menu or to increase earpiece volume during calls.
 Your handset Antenna Earpiece Display This display tells you what is happening on your telephone. Down Key Press this key to move through the menu or to decrease earpiece volume during calls. Phone Book
BT Decor 2600 Premium Nuisance Call Blocker
 Designed to block nuisance calls Quick User Guide BT Decor 2600 Premium Nuisance Call Blocker Corded Phone with Answering Machine You need a Caller Display service from your network provider to use Call
Response 123 Plus. Digital Telephone and Answering Machine. User Guide
 Response 123 Plus Digital Telephone and Answering Machine User Guide This product is intended for connection to analogue public switched telephone networks and private switchboards in the United Kingdom.
User Guide BT DECOR BT Decor 1200 Issue 1 Edition
 User Guide BT DECOR 1200 BT Decor 1200 Issue 1 Edition 3 22.11.05 6899 Welcome to your BT Decor 1200 Corded Telephone 50 Name and number Directory for storing all your contacts. Handsfree operation for
Block Nuisance Calls. Quick Set-up and User Guide. BT2700 Nuisance Call Blocker Digital Cordless Phone with Answer Machine
 Block Nuisance Calls Quick Set-up and User Guide BT2700 Nuisance Call Blocker Digital Cordless Phone with Answer Machine 2 Important please read first Only use the line cord, power supply and rechargeable
Charge the handset(s) for 24 hours before use!
 for 24 hours before use!") EN User manual Charge the handset(s) for 24 hours before use! EN Welcome mode Before using your CD 135, you need to configure it according to the country of use. Install the batteries. After a few minutes
EN User manual Charge the handset(s) for 24 hours before use! EN Welcome mode Before using your CD 135, you need to configure it according to the country of use. Install the batteries. After a few minutes
PHONE EASY. User guide. Big Button Telephone. Computer & Telephone Services Ltd NZ
 PHONE EASY Big Button Telephone Computer & Telephone Services Ltd NZ 0800 366363 support@cts.co.nz User guide LOCATION OF CONTROLS 1 2 1 2 3 4 5 6 7 8 9 0 8 9 M1 M2 M3 STORE/MUTE MEMORY RECALL REDIAL +
Response 5 answering machine
 Response 5 answering machine User guide At a glance MEMO/FF Press to record a memo message for someone. Also fast forwards the tape during message playback. Cover Recording MC30 cassette 15 minutes per
Quick start guide. CL4939 Big button big display telephone/answering system with caller ID/ call waiting
 Quick start guide CL4939 Big button big display telephone/answering system with caller ID/ call waiting Introduction This quick start guide provides you basic installation and use instructions. A limited
User Guide BT DECOR 1300
 User Guide BT DECOR 1300 Welcome to your BT Decor 1300 Corded Telephone 100 Name and number Directory for storing all your contacts. 4 Standard ringtones and 6 polyphonic ringtones. Handsfree operation
UK s best selling phone brand. User Guide. BT Xenon 1500 Digital Cordless Phone With Answering Machine
 UK s best selling phone brand User Guide BT Xenon 1500 Digital Cordless Phone With Answering Machine 2 This User Guide provides you with all the information you need to get the most from your phone. You
UK s best selling phone brand. User Guide. BT Concero 1400 Digital Cordless Phone With Answering Machine
 UK s best selling phone brand User Guide BT Concero 1400 Digital Cordless Phone With Answering Machine 2 This User Guide provides you with all the information you need to get the most from your phone.
User Guide. BT Edge Think before you print!
 BT Edge 1500 User Guide This new interactive user guide lets you navigate easily through the pages and allows you to be directed straight to any websites that are referenced. Simply hover the cursor over
V Telephone User Guide
 Key button function description: 0-9: Numeric key/two touch memory MEMORY: pick up two-touch memory locations. number. M1 M8: one touch memory. REDIAL/PAUSE: redial/pause 3.6 seconds. : search up incoming
AT&T and the globe symbol are registered trademarks of AT&T Corp. licensed to Advanced American Telephones.
 1 USER S MANUAL Part 2 Tapeless Digital Answering System Telephone with Time/Day 1817 Fold open this manual for information about this telephone s installation and operation. Please also read Part 1 Important
USER GUIDE. idect C5i System. Digital Cordless Telephone with 50 Name and Number Phonebook and Answering Machine
 USER GUIDE idect C5i System Digital Cordless Telephone with 50 Name and Number Phonebook and Answering Machine THIS EQUIPMENT IS NOT DESIGNED FOR MAKING EMERGENCY TELEPHONE CALLS WHEN THE POWER FAILS.
User guide BT Hub Phone 1010
 Hub Phone 1010 [3]DkBlue 13/4/06 5:44 pm Page 1 Bringing it all together User guide BT Hub Phone 1010 Hub Phone 1010 [3]DkBlue 13/4/06 5:44 pm Page 2 Welcome to your BT Hub Phone 1010 Digital Cordless
CONTENTS. INTRODUCTION 4 Unpacking the Telephone 5. DESCRIPTION and General Description 6 Key Description 8 LCD Description 10 Menu Navigation 12
 CONTENTS CONTENTS 1 INTRODUCTION 4 Unpacking the Telephone 5 DESCRIPTION and General Description 6 Key Description 8 LCD Description 10 Menu Navigation 12 INSTALLATION and Setting Up 13 Wall Mounting 14
REVISED 5/1/01. AT&T and the globe symbol are registered trademarks of AT&T Corp. licensed to Advanced American Telephones.
 REVISED 5/1/01 1 USER S MANUAL Part 2 1818 Digital Answering System Speakerphone Fold open this manual for information about this product s installation and operation. Please also read Part 1 Important
BT Diverse 6250 Issue 2 Edition User Guide BT DIVERSE 6250
 User Guide BT DIVERSE 6250 Welcome to your BT Diverse 6250 digital cordless telephone answering machine Directory lets you store up to 100 names and numbers for easy dialling. Copy the whole directory
INTRODUCTION SAFETY INSTRUCTION FEATURES
 INTRODUCTION Thank you for your purchasing our newest Caller ID phone with phonebook function. This manual is designed to familiarize you with this phone. To get the maximum use from your new phone, we
Models: DS6221/DS6221-2/ DS6221-3/DS6221-4/ DS6221-5/DS6222-4/ DS User s manual. w w w.v t e c h p h o n e s. c o m
 Models: DS6221/DS6221-2/ DS6221-3/DS6221-4/ DS6221-5/DS6222-4/ DS6222-5 User s manual w w w.v t e c h p h o n e s. c o m Congratulations on purchasing your new VTech product. Before using this telephone,
User Guide BT DECOR 310
 *YOU MUST SUBSCRIBE TO A COMPATIBLE CALLER DISPLAY, CALL WAITING AND VOICE MESSAGING SERVICE BEFORE THESE FEATURES WILL WORK. A QUARTERLY FEE IS PAYABLE. BT Decor 310 ~ Issue 2 ~ 1st Edition ~ 27th August
BT Freelance XC1500. User Guide
 BT Freelance XC1500 User Guide Welcome to your BT Freelance XC1500 Digital Cordless Telephone Answering Machine Up to 12 minutes digital recording time. Access your messages remotely from any other Touchtone
User Guide. BT Hudson 1500 Plus. Think before you print!
 BT Hudson 1500 Plus User Guide This new interactive user guide lets you navigate easily through the pages and allows you to be directed straight to any websites or email addresses that are referenced.
GETTING TO KNOW YOUR TELSTRA CALL GUARDIAN 302 CORDED PHONE
 GETTING TO KNOW YOUR TELSTRA CALL GUARDIAN 302 CORDED PHONE 2 Check box contents Mains power adaptor TCG302 corded telephone with handset Telephone line cord Important Only use the mains power adaptors
Nokia Bluetooth Headset BH /1
 Nokia Bluetooth Headset BH-301 2 7 1 3 4 5 6 8 9251888/1 9 1 10 DECLARATION OF CONFORMITY Hereby, NOKIA CORPORATION declares that this HS-51W product is in compliance with the essential requirements and
OWNER S INSTRUCTION MANUAL
 OWNER S INSTRUCTION MANUAL CALLER ID TYPE II MULTI-FEATURE TELEPHONE MODEL 2730 1 IMPORTANT SAFETY INSTRUCTIONS Always follow basic safety precautions when using your telephone equipment to reduce the
Allegro_CID TAD.book Page 1 Tuesday, January 15, :30 PM. Motorola D210 series Digital Cordless Phone
 Allegro_CID TADbook Page 1 Tuesday, January 15, 2008 4:30 PM Motorola D210 series Digital Cordless Phone Allegro_CID TADbook Page 0 Tuesday, January 15, 2008 4:30 PM Welcome Introducing your Digital Cordless
Nokia Bluetooth Headset BH /1
 Nokia Bluetooth Headset BH-201 1 3 7 9 2 5 4 6 8 12 13 10 11 9200041/1 DECLARATION OF CONFORMITY Hereby, NOKIA CORPORATION declares that this HS-52W product is in compliance with the essential requirements
5.8 GHz Cordless Telephone Answering System 5840 with Caller ID/Call Waiting
 5840_CIB_2ATT 2002.11.7 5:47 PM Page II USER S MANUAL Part 2 5.8 GHz Cordless Telephone Answering System 5840 with Caller ID/Call Waiting 5840 Please also read Part 1 Important Product Information 2002
9516CW Installation and User Guide
 9516CW Installation and User Guide 9516CW Important Tips Wait for at least two rings to allow the phone to identify a caller and display the caller s name and/or number. You will have to subscribe to a
Corded Big Button Telephone with Speakerphone
 Instruction Manual Corded Big Button Telephone with Speakerphone L05CBIG10 Contents Safety First... 4 Unpacking... 6 Getting Started... 7 Locating the Base Unit...7 Wall Mounting (optional)... 8 Control
Digital Cordless Telephone (DECT) with Caller ID & Speakerphone Function DENVER DDP-300
 with Caller ID & Speakerphone Function DENVER DDP-300") Digital Cordless Telephone (DECT) with Caller ID & Speakerphone Function DENVER DDP-300 USER S MANUAL Please read before use and save Before use Please refer to installation for details Important- emergency
Digital Cordless Telephone (DECT) with Caller ID & Speakerphone Function DENVER DDP-300 USER S MANUAL Please read before use and save Before use Please refer to installation for details Important- emergency
BT RESPONSE 75+ SET UP & USER GUIDE GET 5 OFF * your next purchase over 50 with voucher code: ligo5reward
 BT RESPONSE 75+ SET UP & USER GUIDE Find more user manuals and product information at www.ligo.co.uk/manuals/ www.ligo.co.uk GET 5 OFF * your next purchase over 50 with voucher code: ligo5reward * Not
BUTLER 4850/TWIN/ TRIPLE/QUATTRO USER GUIDE
 BUTLER 4850/TWIN/ TRIPLE/QUATTRO USER GUIDE 2.1 Important To use Caller ID (display caller), this service has to be activated on your phone line. Normally you need a separate subscription from your telephone
Exclusive Caller Display
 Exclusive Caller Display CONTENTS DORO X5 DORO X5 User guide TABLE OF CONTENTS Installation... 2 Functions... 2 Assembly instructions/battery... 3 Table mount... 4 Wall mount... 4 Set Up... 5 Display...
USER GUIDE CORDED TELEPHONE. Voxtel C115
 USER GUIDE UK CORDED TELEPHONE Voxtel C115 V1 1 P1 18 19 20 1 17 16 15 14 13 2 3 4 5 6 7 8 9 10 11 12 P2 P4 P3 2 1 BECAUSE WE CARE Thank you for purchasing this product. This product has been designed
121000TP227S USER'S MANUAL
 121000TP227S USER'S MANUAL TABLE OF CONTENTS FEATURE LIST SAFETY INSTRUCTIONS INTRODUCTION LOCATION OF CONTROLS FUNCTION BUTTONS MENU SETTINGS CALLER ID INFORMATION DISPLAY MESSAGES CALLER ID SYSTEM OPERATION
User guide Conference phone Konftel 200
 User guide Conference phone Konftel 200 Deutsch I I Français I Italiano Conference phones for every situation This package includes the following items: 1 pc User Guide 1 pc Conference Phone 1 pc Mains
BT CONVERSE 2200 User Guide
 BT CONVERSE 2200 User Guide Welcome to your BT Converse 2200 Corded Telephone Eleven one-touch buttons for easy dialling of your most important numbers. Headset facility lets you make and receive calls
USER GUIDE CORDLESS TELEPHONE. Voxtel D235
 1 USER GUIDE CORDLESS TELEPHONE Voxtel D235 V1 2 P1 P2 8 7 6 1 2 3 5 4 P3 14 15 16 9 P4 19 17 18 12 13 10 11 P5 P6 P7 3 1 BECAUSE WE CARE Thank you for purchasing this product. This product has been designed