Phone & Features Guide
|
|
|
- Jasmine Evans
- 6 years ago
- Views:
Transcription

1 Phone & Features Guide Eleventh Edition
2 Contents Introduction To The Guide Star2Star Supported Phones Polycom Phones a). Answering a Call b). Making a Call c). Microphone Mute d). Holding a Call e). Transferring a Call f). Ending a Call g). Creating a 3 Party Conference Call h). Volume Controls i). Missed Call Display j). Do Not Disturb k). Changing Ringtones l). Voic Access m). Speed Dials n). Call Park o). Expansion Modules p). Phone Options (Call Waiting Settings) q). Issues with non Star2Star IVR Systems when using a Polycom phone r). Parking a call on a Polycom VVX phone when a new call arrives s). Completing a call transfer on a Polycom VVX phone when a new call arrives Polycom IP 4000 and IP 6000 Conference Phones a). Answering a Call b). Making a Call c). Microphone Mute d). Holding a Call e). Transferring a Call f). Ending a Call g). Creating a 3 Party Conference h). Volume controls i). Do Not Disturb j). Missed call display k). Voic Access l). LED Indicators m). Call Park n). Phone Options Polycom IP 5000 Conference Phone a). Answering a Call b). Making a Call c). Microphone Mute d). Holding a Call e). Transferring a Call Edition Eleven Page 2 of 272
3 f). Ending a Call g). Creating a 3 Party Conference h). Volume controls i). Do Not Disturb j). Missed call display k). Voic Access l). LED Indicators m). Call Park n). Phone Options Polycom Productivity Suite Software Grandstream Phones a). Answering a Call b). Making a Call c). Microphone Mute d). Holding a Call e). Transferring a Call f). Ending a Call g). Creating a 3 Party Conference Call h). Volume Controls i). Do Not Disturb j). Missed Call Display k). Changing Ringtones l). Voic Access m). Phone Options n). Speed Dials o). Call Park Polycom VVX 300/310 Phones a.) Phone Views b.) Placing Calls: c.) Answering calls: d.) Transferring calls: e.) Forwarding calls: f.) Star2Star Call Park and Retrieve g.) Placing conference calls: h.) Favorites i.) Viewing recent calls j.) Listening to Voice Mail k.) Muting the Microphone l.) Do Not Disturb m.) Adjusting Volume n.) Updating Ringtones o.) Speed Dial Polycom VVX 400/410 Phones a.) Phone Views b.) Entering Data c.) Calls Edition Eleven Page 3 of 272
4 d.) Star2Star Call Park and Retrieve e.) Conference Calls f.) Favorites g.) Viewing Recent Calls h.) Contact Directory i.) Listening to Voice Mail j.) Muting the Microphone k.) Do Not Disturb l.) Adjusting Volume m.) Ringtones n.) Speed Dial Polycom VVX500 Business Media Phone a). Phone Views b). Answering calls c). Placing calls d). Ending calls e). Headsets f). Responding to Incoming calls g). Holding calls h). Transferring Calls i). Conference Calls j). Forwarding Calls k). Do Not Disturb l). Voic m). Recent Calls n). Contact Directory o). Recording Calls p). Playing Recorded Calls q). Call Park and Retrieve r). Speed Dial Polycom VVX a.) Phone Views b.) Answering Calls c.) Managing Multiple Calls d.) Placing Calls e.) Responding to Incoming Calls f.) Holding Calls g.) Transferring Calls h.) Conference Calls i.) Forwarding Calls j.) Do Not Disturb k.) Listening to Voic l.) Viewing Recent Calls m.) Working with Your Contact Directory n.) Ringtones o.) Speaker/Ringer Volume/Microphone Mute Edition Eleven Page 4 of 272
5 p.) Recording Calls q.) Customizing Phone Display r.) Call Park and Retrieve s.) Speed Dial t.) Using the Bluetooth Headset S2S 3000 Softphone a). Answering a Call b). Making a Call c). Microphone Mute d). Holding a Call e). Transferring a Call f). Ending a Call g). Creating a 3 Party Conference Call h). Volume Controls i). Do Not Disturb j). Missed Call Display k). Changing Ringtones l). Voic Access m). Speed Dials n). Call Park S2S 3000 Softphone Guide S2S 3000 Softphone Download / Transfer license to another PC S2S 3000 Softphone - Audio Device Setup Panasonic KX-TGP500 Phones a). Supplied accessories b). Setting up the base unit c). Setting up the handset d). Handset features e). Answering a Call f). Making a Call g). Microphone Mute h). Call Waiting i). Transferring a Call j). Conference Calls k). Call Share l). Phonebook m). Call Forwarding n). Changing the ring count o). Do not disturb p). Block anonymous calls q). Changing the handset name r). Setting Date and Time s). Updating the base unit software t). Registering a handset to the base unit u). Using Caller ID v). Voic Edition Eleven Page 5 of 272
6 w). Intercom x). Belt Clip y). Wall mounting charger z). Base unit mounting snom Phones a). Answering a Call b). Making a Call c). Microphone Mute d). Holding a Call e). Transferring a Call f). Ending a Call g). Creating a 3 Party Conference Call h). Volume Controls i). Do Not Disturb j). Missed Call Display k). Changing Ringtones l). Voic Access m). Speed Dials n). Call Park ( Key System Mode ) o). Expansion Modules p). Phone Options q). PA1 Paging Device snom m3 IP DECT Wireless Phone a). Answering a Call b). Making a Call c). Microphone Mute d). Holding a Call e). Transferring a Call f). Ending a Call g). Creating a 3 Party Conference h). Volume controls i). Missed call display j). Voic Access k). How to Lock / Unlock the keypad l). Call Park snom m9 IP Wireless Phone a.) Making a call b.) Answering a call c.) Ending a call d.) Redial e.) Microphone Mute f.) Holding a call g.) 3 Party Conference Call h.) Transfering a call i.) Find-Me / Follow-Me j.) Lock / Unlock the Keypad Edition Eleven Page 6 of 272
7 k.) Missed Calls l.) Voice Mail m.) Phone Directory n.) Volume Adjustment o.) Changing Ring Tones p.) Star2Star Call Park and Retrieve Cisco Phones (SPA525G2) a). Answering a Call b). Making a Call c). Microphone Mute d). Holding a Call e). Transferring a Call f). Ending a Call g). Creating a 3 Party Conference Call h). Volume Controls i). Missed Call Display j). Do Not Disturb k). Changing Ringtones l). Voic Access m). Directory n). Call Park o). Speed Dials p). Attendant Console (Expansion Modules) q). Advanced Features (Bluetooth) q). Advanced Features (Bluetooth Mobile Phone) (contd) q). Advanced Features (Bluetooth - Headset) (contd) q). Advanced Features (Charging Your Mobile Phone) n). Advanced Features (Playing MP3 Files on Your Phone) Cisco Phones (SPA50xG Series and SPA303G) a). Answering a Call b). Making a Call c). Microphone Mute d). Holding a Call e). Transferring a Call f). Ending a Call g). Creating a 3 Party Conference Call h). Volume Controls i). Missed Call Display j). Do Not Disturb k). Changing Ringtones l). Voic Access m). Directory n). Call Park o). Speed Dials p). Attendant Console (Expansion Modules) Cisco Phones Configuring the SPA500S & DS Attendant Console(s) Edition Eleven Page 7 of 272
8 20. Cisco Phones (7940/7960) Series a). Answering a Call b). Making a Call c). Microphone Mute d). Holding a Call e). Transferring a Call f). Ending a Call g). Creating a 3 Party Conference Call h). Volume Controls i). Missed Call Display j). Do Not Disturb k). Changing Ringtones l). Voic Access m). Directory n). Call Park Yealink SIP-T20P Telephone a). Making a Call b). Answering a Call c). Placing a call on Hold d). Do Not Disturb e). Forwarding Calls f). Transfer Calls g). Conference Calls h). Parking Calls i). Voic j). Contact Directory Yealink SIP-T22P Telephone a). Making a Call b). Answering a Call c). Placing a call on Hold d). Do Not Disturb e). Forwarding Calls f). Transfer Calls g). Conference Calls h). Parking Calls i). Voic j). Contact Directory Yealink SIP-T26P Telephone a). Making a Call b). Answering a Call c). Placing a call on Hold d). Do Not Disturb e). Forwarding Calls f). Transfer Calls g). Conference Calls h). Parking Calls Edition Eleven Page 8 of 272
9 i). Voic j). Contact Directory Yealink SIP-T28P Telephone a). Making a Call b). Answering a Call c). Placing a call on Hold d). Do Not Disturb e). Forwarding Calls f). Transfer Calls g). Conference Calls h). Speed Dial i). Voic j). Contact Directory k). Call Park Yealink SIP-T32G Telephone a). Making a Call b). Answering a Call c). Do Not Disturb d). Muting a call e). Putting a call on Hold f). Call Waiting g). Speed Dial Keys h). Directory i). Voic j). Transfer a call k). Forwarding a call l). Conference Calls m). Speed Dial Yealink SIP-T38G Telephone a). Making a Call b). Answering a Call c). Do Not Disturb d). Muting a call e). Putting a call on Hold f). Speed Dial Keys g). Directory h). Voic i). Transfer a call j). Forwarding a call k). Conference Calls l). Speed Dial Yealink EXP39 Expansion Module a). Connect to the phone b). Connect to the next module c). Connect cords d). Configuration Edition Eleven Page 9 of 272
10 Yealink Speed Dial Transfer Method Configuration Mitel IP Phones a) IP Phone b) IP Phone c) IP Phone d). Phone Features e). Answering Calls f). Placing Calls g). Redialing h). Ending a Call i). Muting a Call j). Placing a Call on Hold k). Call Transfer l). Conference Calls m). Phone Directory n). Speed Dials Analog Phones a). Answering a Call b). Making a Call c). Microphone Mute d). Holding a Call e). Transferring a Call f). Ending a Call g). Creating a 3 Party Conference Call h). Volume Controls i). Missed Call Display j). Do Not Disturb k). Changing Ringtones l). Voic Access m). Speed Dials n). Call Park ***Star2Star System Features*** Call Pickup Intercom Paging Direct Dial to Voic Setting up your Voic Voic Guide Voic to Mobile Service Providers to SMS Gateways (Cell Phone Text Message Alerts) Find-Me / Follow-Me CallerID Blocking Location based caller ID block: Inter-Location Dialing StarDialer for Outlook CAC (Call Accounting Codes) Edition Eleven Page 10 of 272
11 42. PAC (Personal Authorization Codes) Park Methods and Park Announce Destination Edition Eleven Page 11 of 272
12 Introduction To The Guide This guide is designed to help you get the most out of your Star2Star experience. It provides a detailed explanation for using your phone and the features on your Star2Star system. Please identify your phone type from the guide in section 1. Star2Star Supported Phones. There are subtle differences in operation for each phone model and manufacturer. Star2Star currently supports phones from six different manufacturers, Polycom, Yealink, Grandstream, snom, Mitel and Cisco. We also support a Softphone (S2S 3000) available for PCs and Apple Mac. Analog phones can be supported via an adapter. All are referenced throughout this guide. Many of the phones listed use soft keys. A soft key is a button, located alongside a display device which changes during the operation of the phone. Phone features are grouped together by manufacturer type. There is also a section that covers Star2Star System Features i.e. those features that are not specific to a phone type. To easily navigate this document on-line, use the links provided in the Contents pages or click your phone (image) in section 1. Star2Star Supported Phones. Click on the phone model (highlighted link below image) to show a video presentation of the phone e.g. IP 650 Edition Eleven Page 12 of 272


 * IP 650 14 Key Backlit Expansion Module (Max 3) * IP")
13 1. Star2Star Supported Phones Use the following guide to identify your phone type. Your Star2Star system supports the following devices. This document will reference Polycom, Grandstream, Softphone, snom or Cisco. The Polycom phone model number can be found on the underside of the phone. The snom model number is to the top right side of the phone. The Cisco phone model number is located at top right side of the phone. Polycom Phone See (Note) IP 430 IP 501 IP 601 * IP 32x/33x IP 450 IP 550 IP 560 (GigE) IP 650 * IP 670 * (Color/GigE) VVX 300/310 VVX 400/410 VVX 500 * IP Key Expansion Module (Max 3) * IP Key Backlit Expansion Module (Max 3) * IP Key Color Backlit Expansion Module (Max 3) IP 4000 Conference Phone IP 6000 Conference Phone VVX 600 VVX EXP Module (Paper) (Max 3) VVX Color LCD EXP Module (Max 3) IP 5000 Conference Phone (Note) IP 32x / 33x includes IP 320, IP 321, IP 330, IP 331 and IP 335 Edition Eleven Page 13 of 272
 Cisco Phone Cisco SPA303 Cisco SPA501G *** Cisco SPA504G *** Cisco SPA508G *** Cisco SPA509G *** Cisco SPA525G2 *** Cisco SPA500S *** 32 Key Attendant Console")
14 1. Star2Star Supported Phones (contd) Grandstream Phone Softphone GXP2000 S2S 3000 (User provided PC Handset/Headset) snom Phone ** 42 Key Expansion Module (Max 3) snom 300 snom 320 ** snom 360 ** snom 370 ** snom m3 IP DECT (wireless) Cisco Phone Cisco SPA303 Cisco SPA501G *** Cisco SPA504G *** Cisco SPA508G *** Cisco SPA509G *** Cisco SPA525G2 *** Cisco SPA500S *** 32 Key Attendant Console (Max 2) Cisco SPA500DS *** 30 Key Attendant Console (Max 2) Cisco IP Phone 7960 (SIP firmware 8.9) (Note) Phones not supplied by Star2Star Cisco IP Phone 7940 (SIP firmware 8.9) (Note) Phones not supplied by Star2Star Edition Eleven Page 14 of 272


15 Analog Phone Panasonic Phone (Note) Phones not supplied by Star2Star Panasonic KX-TGP500 Yealink Phone Yealink T20P Yealink T22P Yealink T26P Yealink T28P Yealink T32G Yealink T38G Expansion Module EXP39 Mitel 5320 Mitel 5330 Mitel 5340 Edition Eleven Page 15 of 272
16 a). Answering a Call Using the Handset: 1. Pick up the handset. 2. Polycom Phones Using Hands-Free Speakerphone Mode: 1. Press, or with the handset on hook press the line key with the active indicator, or the soft key. Using the (optional) Headset: 1. Press to answer the call through an optionally connected headset. In all cases the active call will appear on the display showing call duration and destination. Handling multiple calls: 1. With a call in progress any subsequent calls are displayed by a change in the phones display screen. The user will also hear a short tone to indicate another call is present. Select the down arrow button then select the soft key as shown on the phones display. 2. Your original caller is automatically placed on hold. (Note) the Polycom phone can handle multiple calls per line appearance. 3. Alternatively you may press the hold key. The line key will flash and the phone will ring. Press the line key to answer the new call. 4. Once the phone reaches its multiple call limit the next caller will either hear Voic or follow the phones Find-Me / Follow-Me settings if configured. b). Making a Call Using the handset: 1. Pick up the handset and dial the desired number. If the number is less than 10 digits please press Send or Dial to complete the call. Using Hands Free Speaker Phone Mode: 1. With the handset on-hook, press any assigned line key,, or to obtain dial tone. Dial the desired number. 2. If the number is less than 10 digits please press Send or Dial to complete the call. Using the (optional) Headset: 1. With the headset connected, press any assigned line key,, or to obtain dial tone. Dial the desired number. 2. If the number is less than 10 digits please press Send or Dial to complete the call. 3. (Note) You also have the option to dial directly from the dial pad without first getting dial tone. Simply enter the number then lift the handset or use a headset, press the soft key, or press the or keys. In all cases, the active call will appear on the display showing call duration and destination. Edition Eleven Page 16 of 272
17 2. Polycom Phones-Making a Call (contd) Redial Last Number: 1. To redial the last number dialed press the redial key. On models IP 32x/33x press the key to display the Placed Call List. Use the press again to dial the number. Up/Down arrow keys to search for the desired number. Then Call Lists: 1. To access a list of calls you have placed, received or missed press 2. Select Features followed by Call Lists. Information on respective calls will be displayed. Alternatively you may select the following arrow keys for fast access: Press for Speed Dials Press for Received Calls Press for Placed Calls Press for Missed Calls Outgoing CallerID: 1. Your phone can be configured to display the Outgoing CallerID of your main number (default setting) or any other number that is configured on your system. 2. The CallerID can also be set to Blocked. 3. System Administration access is required to change these settings. 4. A typical setup could be to display the main company CallerID on the first line appearance and another ID or Blocked for subsequent line appearances. 5. To use this feature, once configured, select the relevant line button to make your call (Note) The number of available line appearances is phone type dependant. 6. Your Outgoing CallerID will reflect what s set in the Star2Star Web Portal. c). Microphone Mute 1. During a call press the red indicator LED on the phone lights and a flashing microphone on the display indicates that the other party cannot hear you. 2. Press again to resume audio. Edition Eleven Page 17 of 272
18 2. Polycom Phones (contd) d). Holding a Call 1. During a call press or the soft key. The call will be placed on hold, the line key will flash red, Hold will be indicated on the display. The caller on hold will hear Music or Message on hold if enabled. 2. Press Hold again, the soft key, or the flashing line key to retrieve the call. If multiple calls are on hold on a single line key, use the and keys to select the desired call, then press the soft key to return to this call. If calls are on hold on more than one line key, the call details can be viewed by pressing and holding the desired line key. If a line key is pressed briefly, the first call on hold on that line key will be retrieved. e). Transferring a Call Blind Transfer (Transfer the call to another party without any announcement): 1. During a call, press the soft key. The caller on hold will hear Music or Message on hold if enabled on your system. 2. Press the soft key. Dial the number you want to transfer the call to then press the Send soft key to complete the transfer. Alternatively you may use the arrow keys to access speed dial numbers, missed, placed, and received call lists. Select a number from one of these lists then press the soft key to complete the transfer. Transfer may be cancelled during establishment by pressing the soft key. The original call is resumed. Transfer (Announced): 1. During a call, press the soft key. The caller on hold will hear Music or Message on hold if enabled on your system. Dial the number you want to transfer the call to then press the Send soft key to complete the transfer. Alternatively you may use the arrow keys to access speed dial numbers, missed, placed, and received call lists. Select a number from one of these lists then press the soft key. 2. When the called party answers, announce the call and press the soft key again or hang-up to transfer the call. f). Ending a Call 1. Press the soft key OR replace the handset, or press if in Hands-free Mode, or in Headset Mode. Edition Eleven Page 18 of 272
19 2. Polycom Phones (contd) g). Creating a 3 Party Conference Call 1. You can create a conference with two other parties using the phones local conferencing feature. 2. Place a call to the first party. 3. Press the Conf soft key to create a new call (the active call is placed on hold). 4. Dial the phone number of the second party or use the display control keys to access your contact directory, missed, received or placed call list. From one of these lists press the 5. When the second party answers, press the Conf soft key again to join all parties in the Conference or press the call. soft key. soft key to put the first call on hold and keep the second call as the active (Note) A conference can be created at any time between an active call either incoming or outgoing and a call which is on hold (on the same line or another line) by pressing the More soft key followed by the soft key. h). Volume Controls 1. Press the volume keys to adjust handset, headset and hands-free speaker volume during a call. 2. Pressing these keys in an idle state will adjust the ringer volume. 3. Your settings will be retained unless the phone is powered off. i). Missed Call Display 1. To view missed calls and clear the missed call display on your phone press the down arrow key. (Polycom IP 32x/33x users see note below) Press for Missed Calls 2. Press this key at any time to view missed calls. 3. Use the Up/Down arrow keys to navigate through the list of calls. 4. You may dial missed calls by pressing the Dial soft key in your phone display. 5. Pressing the Edit soft key in your phone display provides the ability to edit the missed number before dialing. 6. Pressing the More soft key in your phone display will provide further options i.e. Clear, Save, Info, More. 7. Pressing Clear will remove the missed call entry. 8. Pressing Save will temporarily save the missed call as a speed dial which may be retrieved (dialed) by pressing the Up arrow key. (Note) this will be lost if the phone is powered off. 9. Pressing Info will provide details of the missed call i.e. Date/Time. 10. (Note) When using a Polycom IP 32x/33x press the Callers soft key to view Received calls. Missed calls are stored as a Received Call. You may also access this list by pressing, Features and then selecting Call Lists. Use the Up/Down arrow keys to navigate through the list of calls. Edition Eleven Page 19 of 272
20 2. Polycom Phones (contd) j). Do Not Disturb 1. For Polycom IP 430/450/32x/33x press and select Features, and then select Do not disturb. Your phone will be prevented from ringing on incoming calls. Callers will be directed to your voic or Find-Me / Follow-Me if invoked. When the feature is enabled a Do not disturb icon will appear in the phone display. 2. To remove the Do not disturb feature press and select Features, and then select Do not disturb. 3. For Polycom IP 501/601/550/560/650/670 phones press the key to enable/disable the Do not disturb feature. 4. To remove the Do not disturb feature press again. k). Changing Ringtones 1. Press the key to enter the Main Menu. 2. Use the down arrow to select 3. Settings and press the Select soft key as indicated in the phone display. 3. Alternatively just press 3 to shortcut. 4. Select option 1. Basic. 5. Use the down arrow to select 3. Ring Type and press the Select soft key as indicated in the phone display. 6. Alternatively just press 3 to shortcut. 7. The Line Select menu is displayed. Depending on the type of phone in use a number of lines will be displayed. 8. All general calls to your phone will appear on Line1, unless your system administrator or Dealer has configured the system to use an alternative line number. 9. To change the ring tone for Line1 press the Select soft key as indicated in the phone display. 10. The Ring Type menu will be displayed. 11. Use the up/down arrows to browse through the available ring tones for your phone. 12. You will note a checkmark against the current ring tone in use. 13. Use the phone soft keys as indicated in the phone display to Play Exit Select 14. Pressing Play will play the ring tone. 15. Pressing Select will select that ring tone for use as indicated by the checkmark. 16. To access the Ring Tone menu rapidly by shortcuts press the key, followed by (Note): Be sure when changing ring tones, to thoroughly test and ensure the ring tone meets your business requirements. Edition Eleven Page 20 of 272
21 2. Polycom Phones (contd) l). Voic Access 1. The red message waiting light indicator will flash to indicate that a new message is waiting. When you lift the handset Stuttering Dial Tone is played. The phone will also periodically send a discreet audible tone indicating that a new message is waiting. 2. To listen to voice messages press the key, dial 1000 or on an IP 320/330 phone press the Msgs soft key as indicated on the phone display if messages are present. 3. Press the Connect soft key indicated in the phones display to connect your phones mailbox. 4. The system will prompt for your password. (Note) as a new user accessing your mailbox for the first time, your password will be the same as your extension number. You will be guided through a short setup process including a password change. Set a password that is different to the extension number. See section Setting up your Voic . m). Speed Dials Description This option allows the user to add / manage individual speed dial numbers for their phone. Items that appear in the Destinations list can be selected. This option also provides the ability to add custom numbers and labels for easy identification i.e. those not in Applications as Dial External Numbers. The number of available speed dials will change if a user has an expansion key module associated with the phone. The number of modules can be set in Basic Settings under the P H O N E S Y S T E M C O N F I G U R A T I O N Menu. Select the Extensions link. The following phones sold by Star2Star Communications can be fitted with an Expansion Module/Attendant Console, sometimes also referred to as a Sidecar : Polycom IP 601, IP 650, IP 670, VVX 300, VVX 400, VVX 500, VVX 600 Snom 320, 360, 370 Grandstream GXP2000 Cisco SPA502G, SPA504G, SPA508G, SPA509G and the SPA525G2 Edition Eleven Page 21 of 272
22 Setup 2. Polycom Phones Speed Dials (contd) 1. Select the Speed Dials option under I N D I V I D U A L P H O N E S E T T I N G S to change the settings associated with the Speed Dial feature. (Note) not available on the snom 300 or m3. 2. Remember to Save Changes to PBX and reboot the phone. To reboot the phone unplug the Internet cable momentarily. The phone will restart. (Note) if the phone has a separate power cable connected, momentarily unplug that cable to reboot the phone. Edition Eleven Page 22 of 272
 press the Dir soft key on a Polycom 32x / 33x. Select the speed dial # using the drop down bar.")

23 2. Polycom Phones Speed Dials (contd) 3. The following examples show configuration of the Speed Dial feature for a Polycom phone. You may add multiple speed dial entries on a Polycom phone. Select the up arrow on a Polycom phone for fast access to speed dial numbers. (Note) press the Dir soft key on a Polycom 32x / 33x. Select the speed dial # using the drop down bar. Make your selection from the available options. As you complete an entry another available entry will appear on screen. 4. The following example shows configuration of the Speed Dial feature for a Polycom IP 601 or IP 650 with 1 Expansion module added. You can also add additional Speed Dials to the phone. A Polycom expansion module has 14 physical keys available. Up to 3 modules can be fitted to the IP 601/650/670 phones. All 42 keys can be programmed via the Speed Dials option if all 3 modules are fitted. You may add additional Speed Dials as required. These will appear on the phone and can be accessed via the Up arrow key (Note) press the Dir soft key on a Polycom 32x / 33x. Edition Eleven Page 23 of 272

 this feature is available for the following phones; Polycom, Grandstream and snom (not 300 or m3).")
24 2. Polycom Phones Speed Dials (contd) 5. To add a Custom Number and label for easy identification, select the Add Custom Number toward the bottom of the selection list. Add the number and associated label. (Note) this feature is available for the following phones; Polycom, Grandstream and snom (not 300 or m3). Select the Add Custom Number option. Enter the Custom number and Label. Edition Eleven Page 24 of 272
25 2. Polycom Phones (contd) n). Call Park 1. To park a call and retrieve from a different phone perform an attended (Announced) transfer to a. See section Transferring a Call 2. The system will play back a retrieval code ( ). a. The system provides up to 99 park positions 3. When the caller is Parked they will hear Message / Music on hold if enabled on your system. 4. To retrieve the call, dial the retrieval code to reconnect to the call. 5. If the call remains parked for longer than the system timeout (see On-Hold Options in the Portal Advanced Settings) the call will ring back on the originating extension. Edition Eleven Page 25 of 272
26 2. Polycom Phones (contd) o). Expansion Modules The following Star2Star Polycom phones can be fitted with an Expansion Module also sometimes known as a sidecar. Compatible Phones Expansion Module Unit Description Features Polycom IP 601 Polycom IP 650 Polycom IP 670 Polycom VVX 300 Polycom VVX 400 Polycom VVX 500 Polycom VVX 600 The unit is self-powered and has 14 programmable buttons, LED s and display. Up to 3 units can be fitted to a single phone. The unit is self-powered and has 40 illuminated bi-color LED programmable line keys. Up to 3 units can be fitted to a single phone. The unit is self-powered and has 28 illuminated bi-color keys. Up to 3 units can be fitted to a single phone. Use the Star2Star web portal Speed Dial option to configure your expansion module. Commonly used numbers can be added either from the system Application-Dial External Numbers or custom numbers and labels. You can also add extensions and monitor the presence of a local extension. Generally you would monitor an extension on its Line 1 appearance. This is where all calls arrive by default. (Note) When monitoring extensions the lamp will only light when the extension is actually connected to a call or ringing with a new call. Edition Eleven Page 26 of 272

27 2. Polycom Phones (contd) p). Phone Options (Call Waiting Settings) Polycom users can set additional phone options using the Star2Star web portal. 1. Select Phone Options under I N D I V I D U A L P H O N E S E T T I N G S to configure the following options: a. Call Waiting Settings. See screen shot and configuration settings below. b. Disable Message Waiting Tone. The periodic alert tone that plays to indicate that new voic messages are waiting. c. Disable Message Waiting Stutter Tone. The interrupted dial tone that is heard when new voic messages are waiting. d. Set the phone to auto answer. e. Holding Reminder Tone. The tone that is heard when you have calls held on your phone. (Note) Acoustic Echo Cancellation should only be used under instruction from the Star2Star Technical Support organization. Click here to change Phone Options This update provides three options for firmware 3.2.2; Beep, Ring, and Visual. "Beep" provides the user with the familiar tone via the handset, headset or speaker "Ring" causes the ringer to sound as is does for the first incoming call. "Visual" disables audio prompts, but the LCD still shows the second call coming in the same way as "Beep" and "Ring". Finally, phones running and above can select "Off". This will completely disable call waiting. There is no indication a second call is coming in. Customers who currently have call waiting "Disabled" will be automatically set to "Visual". Edition Eleven Page 27 of 272
28 q). Issues with non Star2Star IVR Systems when using a Polycom phone Some IVR (Interactive Voice Response) systems will not always respond to DTMF (Dual Tone Multi Frequency) digits dialed on a Polycom phone. To overcome this problem we have provided a DTMF level adjustment available for users of Polycom phones. Access the Star2Star portal. Navigate to the "Individual Phone Settings" for the required phone (see example below). Click the Phone Options link in the "Individual Phone Settings" menu (see example below). The DTMF Tone Level? is set by default at -15 db. Change this setting to -10 db (higher tone level setting). After making changes on this page, please remember to Save Changes to PBX and reboot the phone. r). Parking a call on a Polycom VVX phone when a new call arrives Follow these steps to park an existing call and answer another call: 1. With a call active on your phone 2. New call arrives (incoming call pop appears on your phone) 3. Press the keypad * or # button to remove the call pop screen (you may also press the down arrow on a VVX 300/310/400/410 phone) 4. Press More soft key and then press the Park soft key 5. Answer the new incoming call Edition Eleven Page 28 of 272
 3.")
29 s). Completing a call transfer on a Polycom VVX phone when a new call arrives Follow these steps to complete a Transfer of an existing call and answer another call: 1. With a call active on your phone 2. New call arrives either prior to or partway through a Transfer (incoming call pop appears on your phone) 3. Press the keypad * or # button to remove the call pop screen (you may also press the down arrow on a VVX 300/310/400/410 phone) 4. Press the Transfer soft key to either complete a partially completed Attended Transfer (i.e. you are talking to the extension) or initiate a Transfer 5. Answer the new incoming call Edition Eleven Page 29 of 272

30 Edition Eleven Page 30 of 272

: 1. During a call, press soft keys More then Trnsfer (the active call is placed on hold).")
31 3. Polycom IP 4000 and IP 6000 Conference Phones a). Answering a Call 1. Press or the Answer soft key. b). Making a Call 1. Press and dial the number or dial the number first, and then press. c). Microphone Mute 1. During a call press. 2. If you are using external microphones, you can also press on the microphones. You can hear all other parties while Mute is enabled. 3. To turn off Mute, press again. d). Holding a Call 1. During a call, press the Hold soft key. 2. Press the Resume soft key to resume the call. e). Transferring a Call Blind Transfer (Transfer the call to another party without any announcement): 1. During a call, press soft keys More then Trnsfer (the active call is placed on hold). The caller on hold will hear Music or Message on hold if enabled on your system. 2. Press the Blind soft key. 3. Place a call to the party you wish to transfer the call to, press the Send soft key to complete the call. Edition Eleven Page 31 of 272
32 3. Polycom IP 4000 and IP 6000 Conference Phones-Transferring a Call (contd) Transfer (Announced): 1. During a call, press soft keys More then Trnsfer (the active call is placed on hold). The caller on hold will hear Music or Message on hold if enabled on your system. 2. Place a call to the party you wish to transfer the call to, press the Send soft key. 3. After speaking with the second party, press soft keys More then Trnsfer to complete the transfer. (Note) Transfer can be cancelled by pressing the Cancel soft key. The original call is resumed. f). Ending a Call 1. Press or the EndCall soft key. g). Creating a 3 Party Conference 1. With a call in progress, press soft keys More then Confrnc to create a new call (the active call is placed on hold). 2. Place a call to the second party. 3. When the second party answers, press soft keys More then Confrnc again to join all parties in the conference. (Note) When a conference call has been established, pressing the Split soft key will split the conference into two calls on hold. Placing the call on hold on the conference originator s phone will place the other parties in the conference on hold. (Note) A conference can be created at any time between an active call either incoming or outgoing and a call which is on hold (on the same line or another line) by pressing the More soft key twice followed by the soft key. Ending the call on the conference originator s phone will allow the other parties to continue the conference. h). Volume controls 1. Press the volume keys to adjust the speaker volume during a call. 2. Pressing these keys in idle state adjust the ringer volume. i). Do Not Disturb 1. Press, Features, and then press to toggle Do Not Disturb on and off. A flashing icon and text on the display confirm that the feature is enabled. Edition Eleven Page 32 of 272
33 3. Polycom IP 4000 and IP 6000 Conference Phones (contd) j). Missed call display 1. To quickly view missed calls and clear the missed call display on your phone press the down arrow key. 2. Press this key at any time to view missed calls. 3. Use the Up/Down arrow keys to navigate through the list of calls. 4. You may dial missed calls by pressing the Dial soft key in your phone display. 5. Pressing the Edit soft key in your phone display provides the ability to edit the missed number before dialing. 6. Pressing the Info soft key to view detailed call information. 7. Pressing Clear will remove the missed call entry. 8. Pressing Save will temporarily save the missed call as a speed dial which may be retrieved (dialed) by pressing the Up arrow key. (Note) this will be lost if the phone is powered off. 9. Press to return to the idle display. 10. You may also access Missed, Received, or Placed calls by pressing followed by Features then Call Lists. k). Voic Access 1. The LED indicators on the front of the phone will flash red and stutter dial tone will sound to indicate that message(s) are in the phones mailbox. 2. To access Voic dial The system will prompt for your password. (Note) as a new user accessing your mailbox for the first time, your password will be the same as your extension number. You will be guided through a short setup process including a password change. Set a password that is different to the extension number. See section Setting up your Voic . See also Voic Guide. l). LED Indicators 1. The LEDs located on the top of the phone indicate the current status. a. Green Your call is in progress. b. Flashing green - There is an incoming call. c. Blinking green Your call is held by the other party. d. Red Your call is muted. e. Flashing red You have voice mail. f. Blinking red You have placed the call on hold. Edition Eleven Page 33 of 272
34 3. Polycom IP 4000 and IP 6000 Conference Phones (contd) m). Call Park 1. To park a call and retrieve from a different phone perform an attended (Announced) transfer to a. See section Transferring a Call 2. The system will play back a retrieval code ( ). a. The system provides up to 99 park positions 3. When the caller is Parked they will hear Message / Music on hold if enabled on your system. 4. To retrieve the call, dial the retrieval code to reconnect to the call. 5. If the call remains parked for longer than the system timeout (see On-Hold Options in the Portal Advanced Settings) the call will ring back on the originating extension. n). Phone Options See Section 2. Polycom Phones - q). Phone Options Edition Eleven Page 34 of 272
35 4. Polycom IP 5000 Conference Phone a). Answering a Call 1. Press or the Answer soft key. b). Making a Call 1. Press and dial the number or dial the number first, and then press. c). Microphone Mute 1. During a call press. 2. The console LEDs will glow red. 3. You can hear all other parties while Mute is enabled. The other parties cannot hear you. 4. To turn off Mute, press again. d). Holding a Call 1. During a call, press the Hold soft key. 2. The console LEDs will blink red. 3. Press the Resume soft key to resume the call. e). Transferring a Call Blind Transfer (Transfer the call to another party without any announcement): 1. During a call, press the Trnsfer soft key. 2. The active call is placed on hold. (The caller on hold will hear Music or Message on hold if enabled on your system.) 3. Press the Blind soft key. 4. Place a call to the party you wish to transfer the call to, press the Send soft key to complete the call. Edition Eleven Page 35 of 272
36 4. Polycom IP 5000 Conference Phone - (contd) Transfer (Announced): 1. During a call, press the Trnsfer soft key. 2. The active call is placed on hold. (The caller on hold will hear Music or Message on hold if enabled on your system). 3. Place a call to the party you wish to transfer the call to, press the Send soft key. 4. After speaking with the second party, press the Trnsfer soft key to complete the transfer. (Note) Transfer can be cancelled by pressing the Cancel soft key. The original call is resumed. f). Ending a Call 1. Press or the EndCall soft key. g). Creating a 3 Party Conference To create a three-way local conference call: 1. Call the first party. 2. After the first party answers, press the Confrnc soft key. The active call is placed on hold. 3. Enter the number of the second party, and then press the Send soft key. 4. When the second party answers, press the Confrnc soft key. All parties are now joined in the conference. You can do the following: To put the conference on hold, press the Hold soft key. To resume the conference, press the Resume soft key. To end the conference, press the End Call soft key. (The other parties will remain connected.) To end the conference and split the conference into two separate calls on hold, press the Split soft key. (Note) A conference can be created at any time between an active call either incoming or outgoing and a call which is on hold by pressing the More soft key followed by the Join soft key. h). Volume controls 1. Press the volume keys to adjust the speaker volume during a call. 2. Pressing these keys in an idle state adjust the ringer volume. i). Do Not Disturb 1. Press, Features, and then press the Select soft key to toggle Do Not Disturb on and off. A flashing icon and text on the display confirm that the feature is enabled. Edition Eleven Page 36 of 272
37 4. Polycom IP 5000 Conference Phone - (contd) j). Missed call display 1. To quickly view missed calls and clear the missed call display on your phone press the down arrow key. 2. Press this key at any time to view missed calls. 3. Use the Up/Down arrow keys to navigate through the list of calls. 4. You may dial missed calls by pressing the Dial soft key in your phone display. 5. Pressing the Edit soft key in your phone display provides the ability to edit the missed number before dialing. 6. Press the More soft key followed by the Info soft key to view detailed call information. 7. Press the More soft key followed by the Clear soft key will remove the missed call entry. 8. Pressing the More soft key followed by the Save soft key will temporarily save the missed call as a speed dial which may be retrieved (dialed) by pressing the Up arrow key. (Note) this will be lost if the phone is powered off. Use the Star2Star web portal Individual Phone Setting Speed Dials option to permanently store numbers for your phone. 9. Press to return to the idle display. 10. You may also access Missed, Received, or Placed calls by pressing followed by Features then Call Lists. k). Voic Access 1. A message envelope will appear in the top left portion of the phone display and stutter dial tone will sound to indicate that message(s) are in the phones mailbox. 2. Periodically a message waiting indicator tone will sound. 3. To access Voic dial The system will prompt for your password. (Note) as a new user accessing your mailbox for the first time, your password will be the same as your extension number. You will be guided through a short setup process including a password change. Set a password that is different to the extension number. See section Setting up your Voic . See also Voic Guide. l). LED Indicators 2. The LEDs located on the top of the phone indicate the current status. a. Green Your call is in progress. b. Flashing green - There is an incoming call. c. Blinking red You have placed the call on hold. d. Red Your call is muted. Edition Eleven Page 37 of 272
38 4. Polycom IP 5000 Conference Phone - (contd) m). Call Park 1. To park a call and retrieve from a different phone perform an attended (Announced) transfer to b. See section Transferring a Call 2. The system will play back a retrieval code ( ). b. The system provides up to 99 park positions 3. When the caller is Parked they will hear Message / Music on hold if enabled on your system. 4. To retrieve the call, dial the retrieval code to reconnect to the call. 5. If the call remains parked for longer than the system timeout (see On-Hold Options in the Portal Advanced Settings) the call will ring back on the originating extension. n). Phone Options See Section 2. Polycom Phones - q). Phone Options 5. Polycom Productivity Suite Software This software provides users with enhanced features on the Polycom Phone models listed below. For more details: 1. Access the Star2Star portal and select the CONFIGURATION option at the top of the page. 2. (Note) If you do not have a login please contact your System Administrator or Reseller. 3. Select the User Guides option under I N D I V I D U A L P H O N E S E T T I N G S 4. Click the Polycom Productivity Suite User Guide link to view / download. Recording Calls on the SoundPoint IP 650, 670 Playing Back Recorded Calls on the SoundPoint IP 650, 670 Managing Conference Calls on the SoundPoint IP 450, 550, 560, 650, 670 Edition Eleven Page 38 of 272
39 6. Grandstream Phones a). Answering a Call Using the Handset: 1. Pick up the handset. Using Hands-Free Speakerphone Mode: 1. Press the SPEAKER key or LINE key. Using the (optional) Headset: 1. Press the SPEAKER key or LINE key to answer a call. Handling multiple calls: 1. Select a flashing red LINE key to answer an incoming call. 2. Subsequent calls (Flashing red LINE keys) can be answered by pressing the associated LINE key. 3. Your original caller is automatically placed on hold. (Note) the Grandstream phone can handle a total of 11 calls. 4. When all 4 LINE keys are in use subsequent incoming calls will appear on the 7 Speed dial keys. 5. Once all 11 are in progress caller #12 will either hear Voic or follow the phones Find-Me / Follow- Me settings if configured. b). Making a Call Using the handset: 1. Pick up the handset, LINE1 will light; dial the desired number and press SEND to complete the call. 2. Alternatively you may press any one of the four LINE keys to dial. Using Hands Free Speaker Phone Mode: 1. With the handset on-hook, press the SPEAKER key to obtain dial tone. Dial the desired number and then press SEND. 2. Alternatively you may press any one of the four LINE keys to dial. Using the (optional) Headset: 1. Press the SPEAKER key or LINE key, dial the desired number and press SEND to complete the call. Redial Last Number: 1. To redial the last number you dialed, pick up the handset, press the SPEAKER key or LINE key and then press Send. Edition Eleven Page 39 of 272

40 6. Grandstream Phones - (contd) Call Lists: 1. Press the OK button to display the Main Menu (See picture below). 2. Select Call History and then Received Calls/Missed Calls/Dialed Calls and select phone number. 3. Press OK to select and press OK again to dial. Press the OK / Menu button to display the Main Menu Outgoing CallerID: 1. Your phone can be configured to display the Outgoing CallerID of your main number (default setting) or any other number that is configured on your system. 2. The CallerID can also be set to Blocked. 3. System Administration access is required to change these settings. 4. A typical setup could be to display the main company CallerID on the first line appearance and another ID or Blocked for subsequent line appearances. 5. To use this feature, once configured, select the relevant line button (1 4) to make your call. 6. Your Outgoing CallerID will reflect what s set in the Star2Star Web Portal. c). Microphone Mute 1. During a call press the MUTE/DEL key. The word MUTE will appear in the phone display indicating that the other party cannot hear you. 2. Press the MUTE/DEL key again to resume audio. d). Holding a Call 1. During a call press the HOLD button. The call will be placed on hold, the LINE key will flash green, HOLD will be indicated on the display. The caller on hold will hear Music or Message on hold if enabled. 2. Press the flashing LINE key to resume. Edition Eleven Page 40 of 272
41 6. Grandstream Phones (contd) e). Transferring a Call Blind Transfer (Transfer the call to another party without any announcement): 1. During a call, press the TRNF key. The caller on hold will hear Music or Message on hold if enabled on your system. 2. The display will change displaying TRANSFER for the respective LINE#. The display will also show DIAL NUMBER (BLIND) OR SELECT LINE (ATTENDED). 3. Dial the number required and press SEND. Transfer (Announced): 1. During a call, press a different LINE key. The caller on hold will hear Music or Message on hold if enabled on your system and the LINE key will flash green. 2. Dial the number required and press SEND. 3. When the called party answers, announce the call and press the TRNF key (The display will change displaying TRANSFER for the respective LINE#. The display will also show DIAL NUMBER (BLIND) OR SELECT LINE (ATTENDED). 4. Press the flashing LINE key to complete the transfer. f). Ending a Call 1. Replace the handset or press SPEAKER if in handsfree mode or using a headset. g). Creating a 3 Party Conference Call 1. This is currently NOT a supported feature on this phone. h). Volume Controls Use the left / right arrow keys to change the volume setting Use the up / down arrow keys to browse 1. To set the ringer volume. 2. Press the OK / Menu button 3. Use the down arrow key to select Preference. 4. Press the OK / Menu button to select. 5. Use the down arrow key to select Ring Volume. 6. Press the OK / Menu button to select. 7. Use the left / right arrow keys to change the volume setting. 8. Press the OK / Menu button to select. 9. Press the left arrow key twice to return. 10. To adjust handset, headset and hands-free speaker volume during a call, press the up / down arrow keys during a call. Edition Eleven Page 41 of 272
42 6. Grandstream Phones (contd) i). Do Not Disturb Use the up / down arrow keys to navigate through options 1. Press the OK / Menu button. 2. Use the down arrow key to select Preference. 3. Press the OK / Menu button to select. 4. Use the down arrow key to select Do NOT Disturb. 5. Press the OK / Menu button to select. 6. Use the up / down arrow keys to Enable or Disable DND. 7. Press the OK / Menu button to select. 8. Press the left arrow key twice to return. 9. The icon will flash in the phone display when the feature is enabled. 10. Callers will be directed to your voic or Find-Me / Follow-Me if invoked. 11. Alternatively you may press the MUTE/DEL button to set the Do NOT Disturb feature. Press the MUTE/DEL button if you do not want to take a call. This will send the caller directly to voic or Find-Me / Follow-Me if invoked. j). Missed Call Display 1. To view missed calls and clear the missed call display on your phone press the Up arrow key. Press the OK / Menu button to display missed call details Press the Up arrow key to display missed calls 2. Press the OK button to display details about the missed call. 3. Use the Up/Down keys to navigate through the list of calls. 4. Use the OK button for a number to display further details. 5. Date and Time is displayed. 6. Select the Dial option to call the number. 7. Select the Remove option to delete from the missed call list. 8. (Note) the missed call feature can be disabled on this phone. Users that have been configured with Portal access can log in to the Star2Star Portal, select CONFIGURATION and change the settings associated with the Phone Options feature. If you do not have a login please contact your System Administrator or Reseller. 9. Select the Phone Options link to hide missed calls, turn on/off the backlight or print Speed Dial labels for your phone. Edition Eleven Page 42 of 272
43 6. Grandstream Phones (contd) Click the Phone Options link to show the missed calls display and backlight options. Use this option to hide the missed call display Use this option, available on a Grandstream phone, to enable the backlight k). Changing Ringtones Use the up / down arrow keys to browse 1. Press the OK / Menu button 2. Use the down arrow key to select Preference. 3. Press the OK / Menu button to select. 4. Use the down arrow key to select Ring Tone. 5. Press the OK / Menu button to select. 6. Use the up / down arrow keys to browse through the available ring tones. 7. Press the OK / Menu button to select. 8. Press the left arrow key twice to return. Edition Eleven Page 43 of 272

44 6. Grandstream Phones (contd) l). Voic Access 1. The red message waiting light indicator will flash to indicate that a new message is waiting. 2. To listen to voice messages press the MSG key or dial 1000 then press the SEND key. 3. The system will prompt for your password. a. (Note) as a new user accessing your mailbox for the first time, your password will be the same as your extension number. You will be guided through a short setup process including a password change. Set a password that is different to the extension number. See section Setting up your Voic . m). Phone Options Use your Star2Star Portal login, select CONFIGURATION to change the settings associated with the Phone Options feature. If you do not have a login please contact your System Administrator or Reseller. 1. Click Phone Options under I N D I V I D U A L P H O N E S E T T I N G S. This will allow you to Hide/Show missed calls and Enable/Disable the backlight on a Grandstream GXP2000 Phone only. 2. Remember to Save Changes to PBX when you have finished and reboot the phone. Use this option to hide the missed call display Use this option, available on a Grandstream phone, to enable the backlight Edition Eleven Page 44 of 272
45 6. Grandstream Phones (contd) n). Speed Dials Description This option allows the user to add / manage individual speed dial numbers for their phone. Items that appear in the Destinations list can be selected. This option also provides the ability to add custom numbers and labels for easy identification i.e. those not in Applications as Dial External Numbers. The number of available speed dials will change if a user has an expansion key module associated with the phone. The number of modules can be set in Basic Settings under the P H O N E S Y S T E M C O N F I G U R A T I O N Menu. Select the Extensions link. The following phones sold by Star2Star Communications can be fitted with an Expansion Module, sometimes also referred to as a Sidecar : Polycom IP 601, IP 650 Snom 320, 360, 370 Grandstream GXP2000 Cisco SPA502G, SPA504G, SPA508G, SPA509G and the SPA525G2 Setup 1. Select the Speed Dials option under I N D I V I D U A L P H O N E S E T T I N G S to change the settings associated with the Speed Dial feature. 2. Remember to Save Changes to PBX and reboot the phone. To reboot the phone unplug the internet cable momentarily. The phone will restart. (Note) if the phone has a separate power cable connected, momentarily unplug that cable to reboot the phone. Edition Eleven Page 45 of 272

 the phone has 7 physical programmable keys already see example above. Grandstream GXP2000 expansion module has 56 physical keys available. Up to 2 modules can be fitted to the phone.")
46 6. Grandstream Phones Speed Dials (contd) 3. The following example shows configuration of the Speed Dial feature for a Grandstream GXP2000. Grandstream GXP2000 phone, has 7 physical speed dial buttons available to configure. Use this option, available on a Grandstream GXP2000 phone, to print speed dial labels. 4. The following example shows configuration of the Speed Dial feature for a Grandstream GXP2000 with 1 Expansion module added. (Note) the phone has 7 physical programmable keys already see example above. Grandstream GXP2000 expansion module has 56 physical keys available. Up to 2 modules can be fitted to the phone. This gives a total of 119 keys (includes 7 keys on the phone) that can be programmed via the Speed Dials option if both modules are fitted. Edition Eleven Page 46 of 272
47 6. Grandstream Phones Speed Dials (contd) 5. To add a Custom Number and label for easy identification, select the Add Custom Number toward the bottom of the selection list. Add the number and associated label. (Note) this feature is available for the following phones; Polycom, Grandstream and snom (not 300 or m3). Select the Add Custom Number option. Enter the Custom number and Label. Edition Eleven Page 47 of 272
48 6. Grandstream Phones (contd) o). Call Park 1. To park a call and retrieve from a different phone perform an attended (Announced) transfer to a. See section Transferring a Call 2. The system will play back a retrieval code ( ). a. The system provides up to 99 park positions 3. When the caller is Parked they will hear Message / Music on hold if enabled on your system. 4. To retrieve the call, dial the retrieval code to reconnect to the call. 5. If the call remains parked for longer than the system timeout (see On-Hold Options in the Portal Advanced Settings) the call will ring back on the originating extension. Edition Eleven Page 48 of 272
 Phone Views Your phone has four main Views: Home, Calls, Active Call, and")


49 7. Polycom VVX 300/310 Phones a.) Phone Views Your phone has four main Views: Home, Calls, Active Call, and Lines View (the default). Change Views: For Home View, press From Home View, press to display either Lines, Calls or Active Call View. Home View Home View displays icons you can select to access phone functions. Use the right, left, up and down arrow keys to display more icons. Lines View Lines View displays phone Lines, Favorites and soft keys. If your phone is idle, you can press the Line key to access the Dialer. Calls View Calls View displays a list of all your calls. Edition Eleven Page 49 of 272

50 Call color indicates call status: Medium gray: Active call. Dark gray: Incoming call. White: Held call. Use the up and down arrow keys to select a call (highlight it). The soft keys control the highlighted call. Entering Data Use the dial pad keys to enter information. To backspace, press. To type with the dial pad keys, press a key repeatedly to view the character options and stop to select. To type other characters, press Encoding or Mode. When using the dial pad keys, use the 1, *, 0 and # keys. Calls Only one call can be active at one time. You may use the handset, speakerphone or headset for calls. During a call, you can change modes by picking up the handset or by pressing or. If you navigate away from your call(s), press to see Active Call or Calls view again. When in Calls view, switch to Lines view by pressing More > Lines. Switch back to Calls view by pressing More > Calls. b.) Placing Calls: Pick up the handset, or press or. Enter the phone number and press Send. Or, enter the phone number first, then press Dial, pick up the handset or press or. From Lines View: Press the phone Line key, enter the phone number and press Send. From Home View: Select New Call using the left and right arrow keys. Enter the phone number and press Send. Note: You may place calls quickly by selecting a recent call or Favorite, or tap a contact s phone number in the Contact Directory. c.) Answering calls: Press or tap Answer, pick up the handset or press. Edition Eleven Page 50 of 272
51 To answer a new call while on an active call, tap Answer. The current call will be held. Ending calls: To end an active call, replace the handset, press or. Or, press End Call. To end a held call, navigate to Calls View and highlight the held call. Press Resume and press End Call. Holding calls: From Calls view, press Hold or. Remember to highlight the call first. To resume a held call, press Resume or again. d.) Transferring calls: From Calls View, press Transfer or, and call the other party. When you hear the ring back tone or after you talk with the other party, press Transfer or. Press Blind to complete a transfer without waiting for the ringback tone. e.) Forwarding calls: To enable call forwarding, press Forward from Home or Lines view. Select the forwarding type to enable, type a forwarding number, and press Enable. To disable call forwarding, press Forward from Home or Lines view. Select the forwarding type to disable, and press Disable. To enable per-call forwarding: As your phone rings, press Forward, enter the forwarding number, and press Forward. f.) Star2Star Call Park and Retrieve During an incoming call, press the More soft key. Press the Park soft key. The caller will be parked in the first available Park position. The caller will hear music or message on hold if configured on your system. Press illuminated Park key to retrieve the call. g.) Placing conference calls: Call the first party. After the call connects, press More and select Confrnc. Dial and connect with the second party, and press Confrnc again. From Lines or Calls View, you may: Press Hold to hold the conference. Edition Eleven Page 51 of 272
52 Press End Call to remove yourself from the call but keep the other participants connected. Press Manage to manage each participant (if available). Press Split to end the conference and hold all participants. Note: If you have an active and held call, press Join to set up a conference. h.) Favorites Favorites are contacts you call most often. Favorites display in your Favorites list. A smaller number of Favorites displays in Lines view. Viewing your Favorites list: Press and select Directories > Favorites. Making a contact a Favorite: Navigate to your Contact Directory and select the contact. Press Info, press More, and select Add to Favorites. Press Yes to confirm. Dialing a Favorite: Press the Favorite from Home or Lines view or from your Favorites list. i.) Viewing recent calls From Lines view, do one of the following: Press, select Directories and select Recent Calls to view your Recent Calls list. Press the right arrow key to view the recent Placed Calls. Press the left arrow key to view the recent Received Calls. Press the down arrow key to view the recent Missed Calls. Press the up arrow key to view Favorites. Saving recent callers to your directory: From your Recent Calls list, press Sort to sort and order calls. Press Type to display only certain calls or select a call record to call the person. Contact Directory To select a contact from the Contact Directory, press. Viewing your directory: Select Directories from Home view. Press Contact Directory on the Directory screen. To add or edit a contact in your local phone directory: Access the Star2Star Web Portal and navigate to the Individual Phone Settings section for your phone. Click the Speed Dials link to add contacts and other options to your phone. Adding a contact directly into phone: Navigate to your Contact Directory and press Add. Type the contact s information and press Save. To make a contact a Favorite, enter a Favorite Index number. Edition Eleven Page 52 of 272
53 (Note) If you change the contact directly in the phone, be aware when rebooting the phone, that contact info will be lost. Updating contact information: Navigate to your Contact Directory and select the contact. Press Info, press Edit, update the contact s information and press Save. Deleting a contact: Navigate to your Contact Directory and select the contact. Press Info, press Delete and press Yes to confirm. Searching for a contact: Navigate to your Contact Directory and press Search. Enter search criteria and press Search. Dialing a contact from your Directory: Navigate to your Contact Directory and select the contact. From the contact s information screen, select the contact s phone number. Note: A star indicates a Favorite. j.) Listening to Voice Mail Select Messages from Home View or press prompts. and select Message Center. Press Connect and follow the k.) Muting the Microphone During a call, press so other parties cannot hear you. To disable Mute, press again. This applies to calls using the handset, headset and speakerphone. l.) Do Not Disturb To disable ringing, press DND from Home or Lines View. When Do Not Disturb is enabled, the DND icon displays in the status bar and beside the appropriate Line key. Press to disable DND. m.) Adjusting Volume To change call volume, press during a call. To change the ringer volume, press when the phone is idle or ringing. n.) Updating Ringtones To change the incoming call ringtone, select Settings from Home View and press Basic > Ring Type. Select the desired ringtone. To set a ringtone for a contact, navigate to your Contact Directory and select the contact. Press Edit, update the contact s ring type and press Save. o.) Speed Dial Use the Star2Star Web Portal to configure speed dial buttons in individual phone settings. When configured on your phone, press the designated speed dial key to dial out the preset number. Edition Eleven Page 53 of 272


54 8. Polycom VVX 400/410 Phones a.) Phone Views Your phone has three main Views: Home, Calls, Active Call, and Lines View (the default). Change Views: For Home View, press Press to alternate between Home and Lines view. Home View Home View displays icons you can select to access phone functions. Use the right, left, up and down arrow keys to display more icons. Lines View Lines View displays phone Lines, Favorites and soft keys. If your phone is idle, you can press the Line key to access the Dialer. Calls View If your phone has one or more calls, you can access Calls View. Edition Eleven Page 54 of 272
 Entering Data Use the dialpad keys to enter information. To backspace, press.")
 Calls Only one call can be active at one time. You may use the handset, speakerphone or headset for calls.")
55 Call color indicates call status: Dark Green: Active call. Bright Blue: Incoming call. Dark Blue: Held call. Use the up and down arrow keys to select a call (highlight it). The soft keys control the highlighted call. b.) Entering Data Use the dialpad keys to enter information. To backspace, press. To type with the dialpad keys, press a key repeatedly to view the character options and stop to select. To type other characters, press Encoding or Mode. When using the dialpad keys, use the 1, *, 0 and # keys. c.) Calls Only one call can be active at one time. You may use the handset, speakerphone or headset for calls. During a call, you can change modes by picking up the handset or by pressing or. If you navigate away from your call(s), press to see Active Call or Calls view again. When in Calls view, switch to Lines view by pressing More > Lines. Switch back to Calls view by pressing More > Calls. Placing Calls: Pick up the handset, or press or. Enter the phone number and press Send. Or, enter the phone number first, then press Dial, pick up the handset or press or. Edition Eleven Page 55 of 272
56 From Lines View: Press the phone Line key, enter the phone number and press Send. From Home View: Select New Call using the left and right arrow keys. Enter the phone number and press Send. Note: You may place calls quickly by selecting a recent call or Favorite, or tap a contact s phone number in the Contact Directory. Answering calls: To answer with the speakerphone, press or tap Answer. To answer with the handset, pick up the handset. To answer with the headset, press. To answer a new call while on an active call, press Answer. The current call will be held. Ending calls: To end an active call, replace the handset, press or. Or, press End Call. To end a held call, navigate to Calls View and highlight the held call. Press Resume and press End Call. Holding calls: From Calls view, press Hold or. Remember to highlight the call first. To resume a held call, press Resume or again. Transferring calls: From Calls View, press Transfer or you talk with the other party, press Transfer or the ringback tone., and call the other party. When you hear the ring back tone or after. Press Blind to complete a transfer without waiting for Forwarding calls: To enable call forwarding, press Forward from Home or Lines view. Select the forwarding type to enable, type a forwarding number, and press Enable. To disable call forwarding, press Forward from Home or Lines view. Select the forwarding type to disable, and press Disable. To enable per-call forwarding: As your phone rings, press Forward, enter the forwarding number, and press Forward. d.) Star2Star Call Park and Retrieve During an incoming call, press the More soft key. Press the Park soft key. The caller will be parked in the first available Park position, which will illuminate. The caller will hear music or message on hold if configured on your system. Press illuminated Park key to retrieve the call. Edition Eleven Page 56 of 272
57 e.) Conference Calls Call the first party. After the call connects, press More and select Confrnc. Dial and connect with the second party, and press Confrnc again. From Lines or Calls View, you may: Press Hold to hold the conference. Press End Call to remove yourself from the call but keep the other participants connected. Press Manage to manage each participant (if available). Press Split to end the conference and hold all participants. Note: If you have an active and held call, press Join to set up a conference. f.) Favorites Favorites are contacts you call most often. Favorites display in your Favorites list. A smaller number of Favorites displays in Lines view. Viewing your Favorites list: Press and select Directories > Favorites. Making a contact a Favorite: Navigate to your Contact Directory and select the contact. Press Info, press More, and select Add to Favorites. Press Yes to confirm. Dialing a Favorite: Press the Favorite from Home or Lines view or from your Favorites list. g.) Viewing Recent Calls From Lines view, do one of the following: Press, select Directories and select Recent Calls to view your Recent Calls list. Press the right arrow key to view the recent Placed Calls. Press the left arrow key to view the recent Received Calls. Press the down arrow key to view the recent Missed Calls. Press the up arrow key to view Favorites. Saving recent callers to your directory: From your Recent Calls list, press Sort to sort and order calls. Press Type to display only certain calls or select a call record to call the person. Edition Eleven Page 57 of 272
58 h.) Contact Directory To select a contact from the Contact Directory, press. Viewing your directory: Select Directories from Home view. Press Contact Directory on the Directory screen. To add or edit a contact in your local phone directory: Access the Star2Star Web Portal and navigate to the Individual Phone Settings section for your phone. Click the Speed Dials link to add contacts and other options to your phone. Adding a contact directly into phone: Navigate to your Contact Directory and press Add. Type the contact s information and press Save. To make a contact a Favorite, enter a Favorite Index number. (Note) If you change the contact directly in the phone, be aware when rebooting the phone, that contact info will be lost. Updating contact information: Navigate to your Contact Directory and select the contact. Press Info, press Edit, update the contact s information and press Save. Deleting a contact: Navigate to your Contact Directory and select the contact. Press Info, press Delete and press Yes to confirm. Searching for a contact: Navigate to your Contact Directory and press Search. Enter search criteria and press Search. Dialing a contact from your Directory: Navigate to your Contact Directory and select the contact. From the contact s information screen, select the contact s phone number. Note: A star indicates a Favorite. i.) Listening to Voice Mail An envelope adjacent to a Line key indicates that you have voic . Select Messages from Home view or press and select Message Center. Press Connect and follow the prompts. j.) Muting the Microphone During a call, press so other parties cannot hear you. To disable Mute, press again. This applies to calls using the handset, headset and speakerphone. k.) Do Not Disturb To disable ringing, press DND from Home or Lines View. When Do Not Disturb is enabled, the DND icon displays in the status bar and beside the appropriate Line key. Press to disable DND. Edition Eleven Page 58 of 272
59 l.) Adjusting Volume To change call volume, press during a call. To change the ringer volume, press when the phone is idle or ringing. m.) Ringtones To change the incoming call ringtone, select Settings from Home View and press Basic > Ring Type. Select the desired ringtone. To set a ringtone for a contact, navigate to your Contact Directory and select the contact. Press Edit, update the contact s ring type and press Save. n.) Speed Dial Use the Star2Star Web Portal to configure speed dial buttons in individual phone settings. When configured on your phone, press the designated speed dial key to dial out the preset number. Edition Eleven Page 59 of 272


60 9. Polycom VVX500 Business Media Phone a). Phone Views The Polycom VVX 500 has four main views: Home, Calls, Active Call, and Lines view (the default). To change views: For Home view, press From Home view, press To switch between Lines view and either Calls or Active Call view, swipe the screen to the right or left. Home view: You may display Home view, as shown, by pressing. At the top, the status bar displays your phone s extension number and the time and date. If your phone has information you should know about, icons and/or messages will scroll, together with the date, under the time display. Edition Eleven Page 60 of 272

61 Home view shows three main icons: New Call: Tap New Call to display the Dialer. From the Dialer, you may enter a number or URL and place a call. From the Dialer, you may quickly access the Directory, Recent Calls and Favorites. Messages: Tap Messages to access your voic messages. Directories: Tap Directories to view all the contacts in your local Contact Directory. From your directory, you may add and search for contacts as well as quickly access the Dialer, Recent Calls and Favorites. If you press and hold the page indicator additional icons, press and hold. Home view expands to display additional icons as shown. To hide the Additional icons include: Settings: Tap Settings to access features and settings to customize your phone. Calendar: If the Calendar feature is available on your phone, you may tap Calendar to view and join meetings. Note: You may also swipe the screen to see additional Home view icons. From Home view, tap the phone line to display your phone lines and favorites as shown. From this screen, tap a phone line to open the Dialer or tap a favorite to dial the favorite. To go back to the Home view icons, tap Close. Lines view: Lines view as shown is your phone s default display. Lines view displays all your phone lines, favorites and soft keys. Edition Eleven Page 61 of 272


62 If your phone is idle, you may: Tap a phone line to access the Dialer. Swipe to switch between Lines view and the Idle Browser (if available). If your phone has calls, the phone line indicates the number of calls you have and if they re active or held, as shown. If the phone line has an active call, a green bar displays. If the phone line has one or more held calls, a flashing red bar displays. Active Call view: If you have only one active call in progress, you may access Active Call view as shown. This view displays the name and number of the person you re talking with and the duration of the call. From Active Call view, you can manage the call: (hold, end or transfer) or set up a conference call with the person you re talking with and another party. Calls view: You may access Calls view if your phone has multiple calls in progress or you have one held call. Scroll to see all your calls. If your phone has multiple lines, calls display under the associated line. Edition Eleven Page 62 of 272
, tap to see Active Call or Calls view again. b).")
63 Call color indicates status: Dark green - Active call. Dark blue - Incoming and held calls. Bright green - Active call is highlighted. Bright blue - Incoming or held call is highlighted. Tap a call to highlight it. The soft keys apply to the highlighted call. Note: If you navigate away from your call(s), tap to see Active Call or Calls view again. b). Answering calls All incoming calls display in an Incoming Call window, as shown. To answer the call, pick up the handset, press or tap Answer to use the speakerphone or press. If you are already in handset, speakerphone or headset mode, tap Answer. If you don t answer the call within 10 seconds, the Incoming Call window disappears, and either Home or Calls view displays (depending if your phone last displayed Home or Lines view), as shown. Edition Eleven Page 63 of 272
64 To answer the call, pick up the handset, press or press. Or from Calls view, tap Answer to use the speakerphone. If you want to use the handset or headset, pick up the handset or press. Answering another call: If you don t answer the call within 10 seconds, the Incoming Call window disappears and either Home or Calls view displays as shown. To answer the call from Home view, tap and tap Answer., tap the incoming call to highlight it if you are in an active call To answer the call from Calls view, tap the call to highlight it if you re in an active call and tap Answer. Answering calls automatically: Your phone can automatically direct incoming calls to your speakerphone after a certain number of rings. Your system administrator sets how many times your phone rings before the call is auto-answered. You may choose to mute the phone s microphone when your phone automatically answers calls, so the caller won t immediately hear you. To unmute the call, press. If you enable Auto Answer and a call arrives while you re already in a call, the incoming call will be automatically answered if you end or hold the current call. 1. Tap Settings from Home view, and tap Basic > Preferences > Auto Answer. 2. From the Auto Answer screen, do the following: To enable your phone to automatically answer SIP calls, tap Auto Answer SIP Calls, and tap Yes. The default setting is No. To mute the microphone for all auto-answered calls so the incoming caller can t hear you, tap Microphone Mute, and tap Yes. The default setting is Yes. 3. Tap Save. Edition Eleven Page 64 of 272

65 c). Placing calls You may call using the handset, speakerphone or headset. You can dial the number first and then choose the method or choose the method first and then dial the number. You can place a call in the following ways: Manually, from the Dialer Automatically, by tapping a favorite in Home or Lines view Automatically, by tapping a favorite in your Favorites list, tapping a call in the Recent Calls list, or selecting a contact in your directory. Calling from the Dialer: The Dialer displays a list of previously placed calls. Tap one of the entries to automatically enter it or start entering a number. As you enter numbers, the Dialer displays a list of similar numbers as shown. Tap a match to automatically enter it. To display the Dialer, do one of the following: From Home view, tap New Call. From Lines or Calls view, tap New Call. This method only works if you don t have an active call. If your phone is idle, start entering a phone number. Pick up the handset, or press or. In Lines view, tap a phone line that doesn t have any calls. When you access the Dialer, an active call is held. To call from the Dialer: Pick up the handset, press or press. From the Dialer, enter the number and tap. From the Dialer, enter the number. Then pick up the handset, press or tap or press. If you re already in handset, speakerphone or headset mode, open the Dialer, enter the number and tap. Edition Eleven Page 65 of 272
66 Placing Calls from Favorites, Lists and Directories: In addition to the Dialer, you can place calls from the Recent Calls list, Favorites list, or your Directory. Or, you can quickly call a favorite from Home or Lines view. To call from the Recent Calls list: 1. Access your Recent Calls list by doing one of the following: From Home view, tap New Call. From the Dialer, tap Recent. If you only have held calls, you may also tap New Call from Lines and Calls view. From Lines, Calls, or Active Call view, tap. 2. From the Recent Calls list, tap the person you want to call. Calling from your Favorites list: 1. From Home view, tap New Call. 2. From the Dialer, tap Favorites. 3. From your Favorites list, tap the favorite you want to call. Calling from your Directory: 1. Access your directory by doing the following: From Home view, tap Directories. If a Corporate Directory is available on your phone, you will need to tap Directories from Home view and tap Contact Directory. From Home view, tap New Call and tap Directory. 2. From your Directory, tap the contact you want to call. 3. From the contact s information screen, tap the contact s phone number. Redialing Numbers: To dial the last number you called, open the Dialer. The first number in the list is the last call you placed. 1. From Home view, tap New Call. 2. From the Dialer, tap the first number in the list. Or instead of selecting the last call you placed, scroll through the list and select another previously placed call. 3. Place the call. d). Ending calls To quickly end an active call replace the handset or press or. From Active Call, Lines or Calls view, tap End Call. If you are in Calls view, be sure to highlight the call first. Edition Eleven Page 66 of 272
67 Ending held calls: You can t end a held call. From Calls view, tap the call to highlight it, tap Resume, and then tap End Call. You can end only active calls, not held calls, from Lines view. e). Headsets You can connect an analog and/or USB headset to your phone. If an analog headset is connected, green. If a USB headset is connected, glows blue. If both an analog and USB headset are connected, the USB headset will be used. If two USB headsets are connected, the headset you connected first will be used. glows If you use a headset, you may set up your phone so that all calls use your headset. If you use a headset that supports electronic hookswitch (EHS), you can press the hookswitch button to place, answer and end calls. In addition, you may be able to mute calls and control volume from your headset. Enabling Headset Memory Mode: You can set up your phone so that all incoming and outgoing calls use your headset. At any time, you can switch to handset or speakerphone mode. 1. Tap Settings from Home view, and tap Basic > Preferences > Headset > Headset Memory. 2. From the Headset Memory Mode screen, tap Enabled. 3. Press. 4. To activate Headset Memory Mode, press twice. Now, whenever you answer a call, the call will connect to your headset automatically. If you switch to the speakerphone or the handset, you deactivate Headset Memory Mode. Calls will no longer automatically go to your headset unless you choose this mode. To have calls go to your headset again, activate Headset Memory Mode by pressing twice. f). Responding to Incoming calls While your phone rings, you may do the following: Temporarily ignore the call before answering it. Reject the call so you can t answer it. Forward the call to another party. Ignoring Incoming Calls: Remove the Incoming Call window and display either Home or Calls view. Even though the call is ignored, Home, Lines and Calls view will still display the incoming call notification. Stop your phone from ringing. When you ignore or silence a call, you can still answer the call. Edition Eleven Page 67 of 272

68 From the Incoming Call window, tap Ignore (for private lines) or Silence (for shared lines). The Incoming Call window disappears, your phone stops ringing, and either Home or Calls view displays. Rejecting Incoming Calls: Reject a call to stop your phone from ringing and end the call so you can t answer it. Calls you reject display in your Recent Calls list. Rejecting calls is not available for shared lines. From the Incoming Call window, tap Reject. You may also reject an incoming call from Lines and Calls view. The call ends. g). Holding calls You may place any active call on hold. A held call displays in Home, Lines and Calls view as shown: From Active Call, Lines or Calls view, tap Hold. If you are in Calls view and the active call is not highlighted, be sure to tap it to select it. Resuming a held call: From Lines view, tap Resume. If there is more than one held call on the line, the last call you held will be resumed. If you have multiple lines and you tap Resume, the last call you held, on either line, will be resumed. Or From Calls view, tap the call to highlight it and tap Resume. h). Transferring Calls When you transfer a call to another party, you have the option to talk to the party before the transfer completes. If your phone supports a blind transfer, you can automatically transfer a call without talking to the other party. The call is automatically transferred after you dial the number of the party you are transferring the call to. 1. From Active Call, Lines, or Calls view, tap Transfer. The active call is held. 2. From the Dialer, place a call to the party you want to transfer the call to. 3. When you hear the ring-back sound, tap Transfer to complete the transfer. Or, if you want to talk with the person before the transfer completes, you can connect with the person, and then tap Transfer. To cancel the transfer before the call connects, tap Cancel. Blind Transfer: 1. From Active Call, Lines or Calls view, tap Transfer. The active call is held. 2. From the Dialer, tap Blind and place a call to the party you want to transfer the call to. If you don t see Edition Eleven Page 68 of 272


69 Blind, tap More (at the top of the screen) and tap Blind. If you are using a handset, complete the transfer by replacing the handset. The call automatically transfers to the specified party. i). Conference Calls 1. Call the first party. 2. From Active Call, Lines, or Calls view, tap Confrnc. The active call is held. 3. Using the Dialer, call the second party. 4. When the second party answers, tap Confrnc to join all parties in the conference as shown. Note: If your phone has an active call and one held call, either on the same or a different line, tap Join from either Lines or Calls view to automatically create a conference call. The conference call takes place on the line from which you handled the last active call. Holding and Resuming Conference Calls: From Active Call, Lines, or Calls view, tap Hold. If you are in Calls view, be sure to highlight the conference first. The other participants are held. The following example shows the held conference in Calls view. From Lines or Calls view, tap Resume. Ending Conference Calls: From Active Call, Lines, or Calls view, tap End Call. The conference call ends. By default, the other parties remain connected. Splitting Conference Calls: From Active Call, Lines, or Calls view, tap Split. The conference call ends. By default, the other parties remain connected. Edition Eleven Page 69 of 272

70 Managing Conference Call Participants: 1. Set up an active conference call. 2. From Active Call, Lines, or Calls view, tap Manage. If you are in Calls view, be sure to tap the conference call to highlight it. 3. Tap the participant you want to manage. 4. Do one of the following: Tap Far Mute to mute the selected participant. The muted participant can hear everyone, but no one can hear the muted participant. Tap Hold to hold the selected participant. The held party can t hear anyone, and no one can hear the held party. Tap Remove to remove the selected participant from the conference, end the conference call, and create an active call between you and the other participant. Tap Information to view additional information about the selected participant. Tap Back to exit the conference management function. j). Forwarding Calls 1. Tap Settings from Home view and tap Features > Forward. Or, from Lines view, tap Forward. 2. If your phone is set up with multiple lines, tap the line to apply forwarding to. 3. From the Forwarding Type Select screen, tap the forwarding type you want: Always: To forward all incoming calls. No Answer: To forward all unanswered incoming calls. Busy: To forward calls that arrive when you re already in a call. 4. Enter the forwarding number, and tap Enable. If you selected the No Answer option, you can enter the number of rings before your phone forwards the call. A value of 2 is recommended. If you chose the Always forwarding option, the forwarding number scrolls in the status bar. If a phone line is idle, Lines view displays the forwarding icon on the phone line, as shown. Edition Eleven Page 70 of 272

71 Disabling Call Forwarding: 1. Tap Settings from Home view, and tap Features > Forward. Or, from Lines view, tap Forward. 2. If your phone is set up with multiple lines, tap the line to disable forwarding for. 3. From the Forwarding Type Select screen, tap the forwarding type to disable, and tap Disable. Diverting Calls: 1. From Home view, tap Directories. If a Corporate Directory is available on your phone, tap Directories > Contact Directory. 2. From your directory, tap the contact whose calls you want to send to another party. 3. From the contact s information screen, tap. 4. From the Edit Contact screen, do the following: Tap Divert Contact, and enter the number of the party to whom you want to divert the call. Tap Auto Divert, and tap Enabled. Tap Save. k). Do Not Disturb When you enable Do Not Disturb (DND), you prevent your phone from ringing and send all incoming calls directly to voic . All calls you receive while DND is enabled will be logged to your Recent Calls list. 1. Tap Settings from Home view, and tap Features > Do Not Disturb. 2. Tap Enable or Disable. When you enable Do Not Disturb, My Status: Do Not Disturb and scroll in the status bar. In addition, displays on the phone line in Lines view, as shown Edition Eleven Page 71 of 272

.")
. Contact Directory From Home view, tap Directories.")
72 l). Voic A message counter in Home view, as shown, indicates the number of new messages you have. Listening to Voic Messages: 1. On the status bar, tap, and tap Message Center. Or, from Home view, tap Messages and tap Message Center. 2. If multiple lines are configured on your phone, the Line Select screen displays. Tap the line that has the message. 3. From the Messages screen, tap Connect and follow the prompts. m). Recent Calls Your phone maintains lists of missed, received, and placed calls. Each list can hold up to 100 entries. The Recent Calls list displays calls as either: Missed Calls only, Placed Calls only, Received Calls only or All Calls (missed, placed and received). You may choose the type of list to display and sort and order calls as desired. By default, the list displays all calls as shown. From Home view, tap New Call and tap Recent. You may also be able to access Recent Calls by tapping Directories from Home view, and tapping Recent Calls. n). Contact Directory From Home view, tap Directories. If a Corporate Directory is on your phone, tap Contact Directory on the Edition Eleven Page 72 of 272

73 Directory screen or tap New Call from Home view, and tap Directory. From your Contact Directory, scroll to view contacts or enter search criteria to find one. Searching for a contact: 1. From your Contact Directory, tap Search. 2. From the Search screen, enter search criteria and tap Search. If you re using the onscreen keyboard, tap before you tap Search. A list of search results is displayed. Tap Return to display your Contact Directory again. Dialing a contact: 1. From your Contact Directory, tap the contact you want to call. 2. From the contact s information screen, tap the contact s phone number. To add or edit a contact in your local phone directory: Access the Star2Star Web Portal and navigate to the Individual Phone Settings section for your phone. Click the Speed Dials link to add contacts and other options to your phone. Adding a contact directly into phone: 1. From your Contact Directory, tap. 2. From the Add Contact screen, enter contact information: For First Name, enter the contact s first three initials. Tap Ring Type and select the ringtone you want to use for the contact. 3. Tap Save. (Note) If you change the contact directly in the phone, be aware when rebooting the phone, that contact info will be lost. o). Recording Calls If the call recording feature is available and you connect a USB flash drive to the USB port on your phone, you can record active calls on your phone. Recordings are stored as.wav files on the USB flash drive. You can record up to four hours in one file. When you attach a USB flash drive to your phone, a USB icon, scrolls in the status bar together with a Edition Eleven Page 73 of 272
74 message that tells you how much recording time is available on the USB flash drive. You can t record when: There are no connected calls on your phone. You place a new call to transfer a call or set up a conference. The phone prompts you to answer an incoming call. If you hold a call, recording pauses. Recording continues if the called party places you on hold. Recording stops if all active calls end, no matter who ends the calls. If you press while recording, only the called parties are recorded. You control recording by tapping Start, Pause, Resume and Stop. All active calls that occur on your phone between the time you tap Start and Stop are recorded, alternating in the same.wav file. If you record, or attempt to record, a call, the following messages may appear on your screen: If there is insufficient free space on the USB flash drive when you tap Start, recording doesn t start and the message USB device is full/recording cancelled displays. If the USB flash drive becomes full during recording, recording stops and the message USB device is full/recording stopped displays. If you remove the USB flash drive during recording, recording stops and the message USB device removed unsafely/recording cancelled displays. If you attach an unsupported USB flash drive, the message Unsupported USB device attached displays along with information about the unsupported product. Recording a call: 1. From Lines, Calls, or Active Call view, tap Record. 2. To start recording, tap Start. The Recording icon scrolls in the status bar while the phone records, as shown. The message Recording in progress also scrolls in the status bar. While you record, you may stop or pause the recording. If you want to hold, end, transfer, or set up a conference call while you record, tap Back. 3. To stop recording, do one of the following: Edition Eleven Page 74 of 272
75 Tap Stop. Then tap Back if you want to manage the call, hold, end, transfer it or set up a conference. When you stop recording, the Stopped Recording icon displays in the status bar. To end the call, tap Back and tap End Call or hang up. Recording a conference call: You can record a conference call in the same way as other calls with the following exceptions: All conference call participants are recorded. If one of the conference participants presses not recorded., that participant is If you hold a conference call, recording pauses. You can place or answer other calls, which will be recorded in the same file. When you resume the conference call, recording resumes. Pause and Resume a recording: Tap Pause. To resume the recording, tap Resume. Recording continues within the same.wav file. p). Playing Recorded Calls If you connect a USB flash drive to your phone, you can play calls that you recorded on your phone. You can browse the recorded files, stored as.wav files, on the USB flash drive. You can also open, rename and delete the recorded files. If there are no supported.wav files on the USB flash drive, the message Unsupported.wav file format appears on the screen. Playing recorded calls occurs in real time. To adjust the volume of the recording while you play it, press one of the Volume keys,. Playing stops if you tap Exit, or press, or. If the handset is off-hook when you tap Play, you ll hear audio through the handset. If the handset is on-hook when you tap Play, you ll hear audio through the speaker. If you lift the handset while you listen through the speaker, you ll hear the audio through the handset. You can t open a.wav file if you have an active call or during recording. If you try, the message Action aborted displays. If all calls are held, you may start playing a recording. However, if you resume a call, playback will stop. You can play recorded files on other devices, such as a Windows or Apple based computer using an application capable of playing.wav files. If an error occurs while a recording plays, playing stops. If you re playing a file and an incoming call arrives, playing pauses and the phone rings. If you don t answer your phone, playback remains paused and you have to tap Resume to continue playing the recording. If you decide to reject the incoming call, tap Resume and playing will resume. Browsing recorded files: 1. Tap Settings from Home view, and tap Features > Removable Storage Media > Browse Recordings. A list of recordings displays, as shown. Edition Eleven Page 75 of 272

76 2. From the Browse Recordings screen, tap the recording you want to rename, delete or play. You can rename, delete or play the selected.wav file by tapping Rename, Delete, or Open (to play it). Playing recorded files: 1. Tap Settings from Home view, and tap Features > Removable Storage Media > Browse Recordings. 2. From the Browse Recordings screen, tap the file you want to play and tap Open. 3. Tap Play. Playing displays on the screen. The position indicator (in hours, minutes and seconds) above the progress bar changes as the file plays in real time as shown. While the recording plays, you can pause by tapping Pause. To resume playing, tap Resume. To stop playing and return to the Browse Recordings screen, tap Exit. q). Call Park and Retrieve During an incoming call, tap Park on the touch screen. The caller is now parked in the first available Park position. The caller will hear music or message on hold if configured on your system. Tap illuminated Park button to retrieve the call. r). Speed Dial Use the Star2Star Web Portal to configure speed dial buttons in individual phone settings. When configured on your phone, press the designated speed dial key to dial out the preset number. Edition Eleven Page 76 of 272


77 10. Polycom VVX 600 a.) Phone Views Your phone has four main views: Home, Calls, Active Call, and Lines view (the default). To change views: For Home view, press. From Home view, press to display either Lines, Calls, or Active Call view. To switch between Lines view and either Calls or Active Call view, swipe the screen to the right or left. Home View You can display Home view (shown next) by pressing. Home view displays your phone line, and icons you can tap to access phone features, settings, and information. At the bottom of Home view is a Page Indicator that you can press and hold to control how many icons Home view displays. To show all Home view icons (shown next), press and hold the Page Indicator shown above. Press and hold the Page Indicator again to view fewer icons. Edition Eleven Page 77 of 272


78 Home view displays the following icons: New Call Tap New Call to display the Dialer so you can place a call. Messages Tap Messages to access your voic . Directories Tap Directories to access your Contact Directory and Recent Calls list. You may also be able to access a Corporate Directory and Buddy Status List if they re set up on your phone. Forward Tap Forward to set up forwarding options for incoming calls. DND Tap DND to toggle DND (Do Not Disturb) on or off. When DND is enabled, your phone won t ring and incoming calls will go to voice mail. Settings Tap Settings to access phone features and settings to customize your phone. Additional icons may include: From Home view, tap the phone line to display additional phone lines that may be set up for your phone, and favorites (shown next). From this screen, tap a phone line to open the Dialer, or tap a favorite to dial the favorite. To display the Home view icons again, tap Close. Lines View Lines view (shown next) is your phone s default display. To display Lines view, press from Home view. Lines view displays your phone line(s), your favorites, and soft keys in the soft key area. If your phone is idle, you can: Tap a phone line to access the Dialer. Edition Eleven Page 78 of 272
, press and hold the phone line, or swipe the screen.")

79 Swipe to switch between Lines view and the Idle Browser (if available). If your phone has calls, the phone line indicates the number of calls you have, and if they re active or held. If the phone line has one or more held calls, a flashing red bar displays, as shown in the following VVX 600 example. To display your call(s), press and hold the phone line, or swipe the screen. Active Call View If you have only one call in progress and it s active (has audio) you can access Active Call view (shown next). If you re in Home view, you can display Active Call view by pressing, or tapping in the status bar. To switch between Lines and Active Call view, swipe the screen right or left. Active Call view displays the name and number of the person you re talking with and the duration of the call. From Active Call view, you can manage the call: hold, end or transfer it, or set up a conference call with a person you re talking with and another party. Calls View You can access Calls view (shown next) if your phone has multiple calls in progress, or you have one held call. If you re in Home view, you can display Calls view by pressing, or tapping in the status bar. To switch between Lines and Calls view, swipe the screen right or left. Scroll to see all your calls. If your phone has multiple lines, calls display under the associated line. Call color indicates status: Edition Eleven Page 79 of 272


80 Dark green Active call. Dark blue Incoming and held calls. Bright green Active call is highlighted. Bright blue Incoming or held call is highlighted. b.) Answering Calls All incoming calls display in an Incoming Call window, as shown. To answer the call, do one of the following: Pick up the handset Press speakerphone or tap Answer Press headset button If you are already in handset, speakerphone or headset mode, tap Answer and the phone will automatically use the mode you are in. If you don t answer the call within 10 seconds, the Incoming Call window disappears, and either Home or Calls view displays, as shown next. The view that displays depends if your phone last displayed Home or Lines view. Incoming call from Home view Incoming call from Calls view Edition Eleven Page 80 of 272


 Managing Multiple Calls You can easily manage multiple calls from Lines and Calls view.")
81 To answer the call, pick up the handset, press, or press. Or, from Calls view, tap Answer to use the speakerphone. Answering Another Call If you have a call and an incoming call arrives on the same or a different line, a call waiting tone beeps, and the Incoming Call window displays, as shown next. To answer the call, tap Answer. The call you were in is held. If you don t answer the call within 10 seconds, the Incoming Call window disappears, and either Home or Calls view displays, as shown next. Incoming call from Home view Incoming call from Calls view To answer the call from Home view, tap to display Calls view. To answer the call from Calls view, tap the incoming call if it s not already highlighted, and tap Answer. c.) Managing Multiple Calls You can easily manage multiple calls from Lines and Calls view. To switch between the two views, swipe the screen. Edition Eleven Page 81 of 272
, and line 2095 has one held call.")


82 Lines view shows you each line on your phone, and how many calls each line has, as shown next. A green bar indicates a line with an active call. A flashing red bar indicates a line with one or more held calls. In the example, line 2092 has two calls (one active, one held), and line 2095 has one held call. The soft keys apply to the phone line that has the blue border. To display the calls for a particular line, press and hold the phone line. If you tap a phone line that doesn t have an active call, the most recent call on that line will become active. The current call will be held. Swipe the screen to display Calls view. Calls view displays all the calls for each phone line, as shown next. All the calls for a phone line display under the associated phone line. Scroll up or down to see all your lines and calls. To manage a call, tap a call to highlight it. Then, tap one of the soft keys to hold, resume, end or transfer the highlighted call or set up a conference with the highlighted call. d.) Placing Calls You may place a call using the handset, speakerphone or headset. You can dial the number first and then choose the method by picking up the handset, pressing, or pressing or choose the method first, and then dial the number. You can place calls in these ways: Manually, from the Dialer Automatically, by tapping a favorite in Home or Lines view Automatically, from your Favorites list, Recent Calls list, or Contact Directory. Calling from the Dialer The Dialer displays a list of previously placed calls. Tap one of the entries to automatically enter it. Or start entering a number. As you enter numbers, the Dialer displays a list of similar numbers, as shown next. Tap a match to automatically enter it. Edition Eleven Page 82 of 272
83 To display the Dialer, do one of the following: From Home view, tap New Call From Lines or Calls view, tap the New Call soft key. (The New Call soft key won t display if you have an active call). If your phone is idle, start entering a phone number. Pick up the handset or press or. This method only works if you don t have an active call. In Lines view, tap a phone line that doesn t have any calls. When you access the Dialer, an active call is held. To call from the Dialer: Enter the number, and then pick up the handset, press or tap, or press. or If you re already in handset, speakerphone, or headset mode, enter the number, and tap. Placing Calls from Favorites, Lists, and Directories In addition to the Dialer, you can place calls from the Recent Calls list, Favorites list, or your Directory. Or, you can quickly call a favorite from Home or Lines view. To call from the Recent Calls list: 1. Access your Recent Calls list by doing one of the following: From Home view, tap Directories, and tap Recent Calls. From the Dialer, tap Recent. From Lines, Calls, or Active Call view, tap. 2. From the Recent Calls list, tap the person you want to call. The call is automatically placed. To call from your Favorites list: 1 From Home view, tap New Call. 2 From the Dialer, tap Favorites. 3 From your Favorites list, tap the favorite you want to call. The call is automatically placed. Note: You can quickly dial a favorite from Home or Lines view: From Home view: Tap the phone line, and tap the favorite you want to call. From Lines view: Tap the favorite you want to call. Edition Eleven Page 83 of 272

84 To call from your Directory: 1. Access your directory by doing the following: From Home view, tap Directories, and tap Contact Directory. or From Home view, tap New Call, and tap Directory. 2. From your Directory, tap the contact you want to call. 3. From the contact s information screen, tap the contact s phone number. The call is automatically placed. Redialing Numbers To dial the last number you called, open the Dialer. The first number in the list is the last call you placed. To redial a number: 1 From the Dialer (shown next), tap the first number in the list. 2. Place the call. Ending Calls To quickly end an active call, replace the handset or press or. Or, from Active Call, Lines or Calls view, tap End Call. If you re in Calls view, be sure to highlight the call first. Note: A call must be active to end it. To end a held call: From Calls view, tap the held call to highlight it, tap Resume, and then tap End Call. e.) Responding to Incoming Calls While your phone rings, you can do the following: Temporarily ignore the call before answering it. Reject the call so it goes directly to voic . Forward the call to another person. Edition Eleven Page 84 of 272

85 Ignoring Incoming Calls Ignore or silence a call to stop your phone from ringing. Even though the call is ignored, your phone will still display the incoming call notification so you can still answer the call. To ignore or silence a call: From the Incoming Call window, tap Ignore (for private lines) or Silence (for shared lines). The Incoming Call window disappears, your phone stops ringing, and either Home or Calls view displays. Rejecting Incoming Calls Reject a call to stop your phone from ringing and send the call directly to voic . Calls you reject display in your Recent Calls list. Rejecting calls is not available for shared lines. To reject an incoming call: From the Incoming Call window, tap Reject. You can also reject an incoming call from Lines and Calls view. The call goes directly to voic . Forwarding Incoming Calls to Another Person While your phone rings, you can forward the call to another person. To forward an incoming call to another person: 1. While your phone rings, tap Forward. 2. From the Call Forwarding screen, enter the forwarding number, and tap Forward. f.) Holding Calls You can place any active call on hold. A held call displays in Home, Lines, and Calls view as follows: To hold a call: From Active Call, Lines, or Calls view, tap Hold. If you re in Calls view, be sure to highlight the call first. To resume a held call: Do one of the following: Edition Eleven Page 85 of 272
86 From Lines view, tap Resume. If there s more than one held call on the line, the last call that you held will be resumed. If you have multiple lines and you tap Resume, the last call that you held on either line will be resumed. or From Calls view, tap the call to highlight it, and tap Resume. g.) Transferring Calls When you transfer a call to another person, you have the option to talk to the person before the transfer completes. If your phone supports a blind transfer, you can automatically transfer a call without talking to the other person. The call is automatically transferred after you dial the number you re transferring the call to. To transfer a call: 1. From Active Call, Lines, or Calls view, tap Transfer. The active call is held. 2. From the Dialer, place a call to the person you want to transfer the call to. 3. When you hear the ring-back sound, tap Transfer to complete the transfer. Or, if you want to talk with the person before the transfer completes, connect and talk with the person, and then tap Transfer. To cancel the transfer before the call connects, tap Cancel. To perform a blind transfer: 1 From Active Call, Lines, or Calls view, tap Transfer. The active call is held. 2 From the Dialer, tap Blind, and place a call to the person you want to transfer the call to. If you don t see Blind, tap More (at the top of the screen), and tap Blind. The call automatically transfers to the person you specified. h.) Conference Calls There are two ways to set up a conference: the conventional way by calling two people and using the Confrnc soft key or joining two existing calls using the Join soft key. To set up a conference call: 1. Call the first person. 2. From Active Call, Lines, or Calls view, tap Confrnc. The active call is held. 3. Using the Dialer, call the second person. 4 When the second person answers, tap Confrnc to join everyone in a conference. The Active: Conference screen displays, as shown next. Edition Eleven Page 86 of 272

87 To place a conference call on hold: From Active Call, Lines, or Calls view, tap Hold. If you re in Calls view, be sure to highlight the conference first. The other two people in the conference are held. The following example shows a held conference in Calls view. To resume a held conference call: From Lines or Calls view, tap Resume. Ending Conference Calls To end a conference, and your connection to the other people, tap End Call. By default, when you tap End Call, the other two people remain connected. However, your system administrator may have set up your phone so that all connections end. To end a conference call: From Active Call, Lines, or Calls view, tap End Call. The conference call ends. By default, the other two people remain connected. Splitting Conference Calls into Two Held Calls When you split a conference, you end the conference and place the other two people on hold. You can split an active or held conference call. To split a conference call: From Active Call, Lines, or Calls view, tap Split. The conference call ends. By default, the other two people are held. Managing Conference Call Participants If you re able to manage the people in a conference call, you can: Mute a participant. Hold a participant. Remove a participant from the conference. Edition Eleven Page 87 of 272
 2.")
88 i.) Forwarding Calls To forward all calls to another person: 1. From Home view, tap Forward. (You can also tap Settings from Home view, and tap Features > Forward, or if your phone is idle, tap Forward from Lines view.) 2. If your phone is set up with multiple lines, tap the line to apply forwarding to. 3. From the Forwarding Type Select screen, tap the forwarding type you want: Always To forward all incoming calls. No Answer To forward all unanswered incoming calls. Busy To forward calls that arrive when you re already in a call. 4. Enter the forwarding number, and tap Enable. If you selected the No Answer option, you can enter the number of rings before your phone forwards the call. A value of 2 is recommended. The forwarding number you chose scrolls in the status bar, as shown next. If a phone line is idle, Lines view displays the forwarding icon, next to the phone line, as shown next. To disable call forwarding: 1. From Home view, tap Forward. 2. If your phone is set up with multiple lines, tap the line to disable forwarding for. 3. From the Forwarding Type Select screen, tap the forwarding type to disable, and tap Disable. j.) Do Not Disturb Enabling Do Not Disturb (DND) stops your phone from ringing and sends all incoming calls directly to voic . All calls you receive while DND is enabled are logged to your Recent Calls list. When you enable Do Not Disturb, the following happens: The Do Not Disturb icon,, displays in the status bar, as shown next. For VVX 600 phones, the icon displays at the far right of the status bar, next to other icons that you can tap. Edition Eleven Page 88 of 272


89 If your phone is idle, the Do Not Disturb icon,, displays next to your phone line in Lines view, as shown next. If you have new messages or forwarding enabled, the messages or forwarding icon will display instead. The DND icon in Home view,, changes to, as shown next. Note: Enabling Do Not Disturb on shared lines disables ringing only. You will still see a visual notification of the call and have the option to answer the call. To toggle Do Not Disturb on and off: From Home view, tap DND. Or, if your phone is idle, tap DND from Lines view. To enable or disable Do Not Disturb for a particular line: 1. From Home view, tap DND. 2. From the Line Select screen, tap the line to enable or disable Do Not Disturb on. 3. From the Do Not Disturb screen, tap Enable or Disable. k.) Listening to Voic Your phone may indicate new voic messages by the following: A message counter in Home view, as shown next. The counter indicates the number of new messages you have. Edition Eleven Page 89 of 272

 Viewing Recent Calls Your phone maintains a Recent Calls list, a list of missed, received, and placed calls.")
90 A message counter in the status bar (shown next).the counter displays on the Message icon,. If you have new messages, the Message icon also displays next to the phone line in Lines view, as shown next. A flashing Message Waiting Indicator, located at the top-right of your phone. An audible alert (if your phone is on-hook). To listen to voic messages: 1. On the status bar, tap, and tap Message Center. Or, from Home view, tap Messages, and tap Message Center. 2. If multiple lines are configured on your phone, the Line Select screen displays. Tap the line that has the message. 3. From the Messages screen, tap Connect and follow the prompts. l.) Viewing Recent Calls Your phone maintains a Recent Calls list, a list of missed, received, and placed calls. Each list can hold up to 100 entries. From the Recent Calls list (shown next), you can: Sort, order, and filter calls. By default, the list displays all call types (missed, placed, and received), with the most recent call displaying first, as shown next. Remove certain calls from the list. Tap a call record to view call details and manage the call. Tap a call record to automatically call the person. Icons display next to a call to indicate the call type: Placed calls display. Edition Eleven Page 90 of 272
91 Received calls display. Missed calls display. To view your Recent Calls list: From Home view, tap New Call, and tap Recent. You can also access recent calls by tapping Directories from Home view, and tapping Recent Calls. m.) Working with Your Contact Directory From your local Contact Directory, you can: View contact information. Search for contacts. Dial contacts. If you can update your Contact Directory, you can also do the following: Add contacts. Update contact information. Delete contacts. To add or edit a contact in your local phone directory: Access the Star2Star Web Portal and navigate to the Individual Phone Settings section for your phone. Click the Speed Dials link to add contacts and other options to your phone. To view your Contact Directory: Tap Directories from Home view, and tap Contact Directory. or Tap New Call from Home view, and tap Directory. From your Contact Directory, scroll to view contacts or enter search criteria to find one. (Note) If you change the contact directly in the phone, be aware when rebooting the phone, that contact info will be lost. To view contact information: From your Contact Directory, tap the contact. The contact s information screen, including the contact s name and phone number, displays (as shown next). Additional information such as a job title, label, or address may also display. Edition Eleven Page 91 of 272


92 To search for a contact: 1. From your Contact Directory, tap Search. 2. From the Search screen, enter search criteria and tap Search. If you re using the onscreen keyboard, tap before you tap Search. A list of search results is displayed. Tap Return to display your Contact Directory again. To dial a contact: 1. From your Contact Directory, tap the contact you want to call. 2. From the contact s information screen (shown next), tap the contact s phone number. n.) Ringtones To select an incoming call ringtone for your phone or a line: 1. Tap Settings from Home view, and tap Basic > Ring Type. 2. If multiple lines are configured on your phone, tap the line you want to apply a new ringtone to. 3. From the Ring Type screen, tap the ringtone you want. To hear the ringtone before you change it, tap Play. The default ringtone is Low Trill. To select a ringtone for a contact: 1. From your Contact Directory, tap the contact whose ringtone you want to change. 2. From the contact s information screen, tap. 3. From the Edit Contact screen, tap Ring Type, tap the ringtone you want, and then tap. 4. From the Edit Contact screen, tap Save. Edition Eleven Page 92 of 272
93 o.) Speaker/Ringer Volume/Microphone Mute To change the volume of what you hear during a call, press one of the Volume keys, To change the volume of the incoming call ringtone, press one of the Volume keys, idle or ringing., while you re in a call., while your phone is Mute the microphone so other parties can t hear you. Microphone Mute applies to all modes (handset, headset, and speakerphone). You can still hear all other parties when you mute the microphone. To mute the microphone: During a call (including a conference call), press. The Mute key glows red. The other parties can t hear you. To disable Mute, press again. p.) Recording Calls If the call recording feature is available, and you connect a USB flash drive to the USB port on your phone, you can record active calls on your phone. Recordings are stored as.wav files on the USB flash drive. You can record up to four hours in one file. When you attach a USB flash drive to your phone, a USB icon,, displays in the status bar, together with a message that tells you how much recording time is available on the USB flash drive. If you have a VVX 600, you can tap You can t record when: to view your recordings and USB properties. There are no connected calls on your phone. You place a new call to transfer a call or set up a conference. The phone prompts you to answer an incoming call. If you hold a call, recording pauses. Recording continues if the called party places you on hold. Recording stops if all active calls end, no matter who ends the calls. If you press while recording, only the called parties are recorded. Tones and indications, such as the dialing of digits or ringing from another party s phone, that occur before a call connects are not recorded. Local tones and indications, such as DTMF tones when dialing, are not recorded. However, tones from another party s phone may be recorded. You control recording by tapping Start, Pause, Resume, and Stop. All active calls that occur on your phone between the time you tap Start and Stop are recorded, alternating in the same.wav file. To record a call: 1. From Lines, Calls, or Active Call view, tap Record. Edition Eleven Page 93 of 272
94 2. To start recording, tap Start. The message Recording in progress scrolls in the status bar. The Recording icon also displays in the status bar, as shown next. 3. To stop recording, do one of the following: Tap Stop. or Tap Back, and tap End Call. Or, depending what mode you re using, press or, or replace the handset. When you stop recording, the USB icon,, displays in the status bar, as shown next. To record a conference: You can record a conference call in the same way as other calls with the following exceptions: All conference call participants are recorded. If one of the conference participants presses not recorded., that participant is If you hold a conference call, recording pauses. You can place or answer other calls, which will be recorded in the same file. When you resume the conference call, recording resumes. To pause and resume a recording: Tap Pause. To resume the recording, tap Resume. Recording continues within the same.wav file. When you pause a recording, Recording Paused scrolls in the status bar. The Recording Paused icon,, also displays in the status bar. To browse recorded files: Tap Settings from Home view, and tap Features > Removable Storage Media > Browse Recordings. A list of recordings displays, as shown next. If there are no supported.wav files on the USB flash drive, the message Unsupported.wav file format appears on the screen. Edition Eleven Page 94 of 272

95 To rename or delete a recording: 1. Tap from Lines or Calls view, and tap Browse Recordings. 2. From the Browse Recordings screen, tap the recording you want to rename or delete. 3. To rename the file, tap Rename, update the filename, and tap OK. Or, to delete the file, tap Delete. To play a recorded call: 1. Tap from Lines or Calls view, and tap Browse Recordings. 2. From the Browse Recordings screen, tap the file you want to play, and tap Open. 3. Tap Play. Playing displays on the screen. The position indicator in hours, minutes, and seconds that displays above the progress bar changes as the file plays in real time, as shown next. While the recording plays, you can pause by tapping Pause. To resume playing, tap Resume. To stop playing and return to the Browse Recordings screen, tap Exit. To adjust the volume of a recording while you play it, press one of the Volume keys,. Playback stops if you tap Exit, or press, or. If the handset is off-hook when you tap Play, you ll hear audio through the handset. If the handset is on-hook when you tap Play, you ll hear audio through the speaker. If you lift the handset while you listen through the speaker, you ll hear the audio through the handset. If you re playing a file and an incoming call arrives, playing pauses and the phone rings. If you don t answer your phone, playback remains paused, and you have to tap Resume to continue playing back the recording. If you decide to reject the incoming call, tap Resume, and playback will resume. You can t open a.wav file if you have an active call or if you re recording. If you try to, the message Action aborted displays. If all calls are held, you can start playing a recording. However, if you resume a call, playback will stop. q.) Customizing Phone Display Changing the Time and Date Display: Edition Eleven Page 95 of 272
96 1. Tap Settings from Home view, and tap Basic > Preferences > Time & Date. 2. From the Time & Date screen, do one of the following: To change the date format, tap Clock Date. To change the time format, tap Clock Time. To change the order of the time and date display, tap Clock Order. 3. From the Clock Date, Clock Time, or Clock Order screen, tap the format you want. To enable or disable the time and date display: 1. Tap Settings from Home view, and tap Basic > Preferences > Time & Date. 2. From the Time & Date screen, tap Enable or Disable to turn on or off the time and date display. Changing the backlight: Your phone s backlight has two components: Backlight Intensity The brightness of the screen during phone activity and inactivity. Backlight intensity has three settings: Backlight On The brightness of the screen when there is phone activity. Backlight Idle The brightness of the screen when there is no phone activity. Maximum Intensity The brightness scale that applies to both Backlight On and Backlight Idle intensities. Backlight Timeout The number of seconds the phone is inactive before the backlight dims to its Backlight Idle intensity. The backlight timeout period begins after your last key press or the last phone event, such as an incoming call. You can change the Backlight On intensity and the Backlight Idle intensity separately. You can choose a high, medium, or low intensity, or turn off the backlight entirely. When you change the Maximum Intensity, you modify the entire backlight intensity scale. For example, if you decrease the Maximum Intensity, the low, medium, and high levels for both Backlight On and Backlight Idle intensities decrease. To change the backlight intensity: 1. Tap Settings from Home view, and tap Basic > Backlight Intensity. 2. From the Backlight Intensity screen, tap Backlight On Intensity. 3. From the Backlight On Intensity screen, tap the intensity you want, and tap Back. The default is High. 4. From the Backlight Intensity screen, tap Backlight Idle Intensity. 5. From the Backlight Idle Intensity screen, tap the intensity you want, and tap Back. The default is Low. 6. From the Backlight Intensity screen, tap Maximum Intensity. 7. From the Maximum Intensity screen, tap Up or Down (or drag your finger along the slider) to increase or Edition Eleven Page 96 of 272
97 decrease the maximum intensity the screen can display. To change the Backlight Timeout: 1. Tap Settings from Home view, and tap Basic > Backlight Timeout. 2. From the Backlight Timeout screen, tap the number of seconds the phone will be idle before the backlight dims. The default is 40 seconds. r.) Call Park and Retrieve During an incoming call, tap Park on the touch screen. The caller is now parked in the first available Park position. The caller will hear music or message on hold if configured on your system. Tap illuminated Park button to retrieve the call. s.) Speed Dial Use the Star2Star Web Portal to configure speed dial buttons in individual phone settings. When configured on your phone, press the designated speed dial key to dial out the preset number. t.) Using the Bluetooth Headset Many Bluetooth headsets can be configured to work with this phone in "Handsfree" mode. The VVX 600 phone supports the use of Bluetooth 2.1+EDR headsets and Handsfree Profile (HFP) 1.0. When Bluetooth v2.1+ EDR is enabled on the VVX 600 phone, an icon displays in the status bar. Bluetooth is disabled by default. Users can manage add, remove, connect, and disconnect their own Bluetooth headsets. When a Bluetooth headset is paired and connected with the VVX 600 phone, the icon changes displaying a headset in the status bar. Users can connect up to four headsets to their phones. The VVX 600 phone supports the Hands - Free Profile (HFP) Audio Gateway role. This will provide basic call control, volume control, and audio routing capability to and from the headset and your Bluetooth enabled VVX 600 phone. Edition Eleven Page 97 of 272
98 When the phone rings, the headset rings as well. The headset button can be used to answer a call without touching the Polycom VVX 600 phone. The headset button can be used to go back on hook without the need to touch the VVX 600. (Note) some headsets support voice commands. (See below). To setup a Bluetooth headset on the Polycom VVX Press the Home button on the upper right side of the phone 2. Tap the Settings icon on screen 3. Tap 1 Basic 4. Swipe up the screen to display option 12 Bluetooth Settings Tap 12 Bluetooth Settings Tap 1 Bluetooth Radio (Off) 7. Tap 2 On (wait while the BT radio turns on) 8. Tap the Back button (top left of screen) 9. Tap 2 Manage BT Headsets 10. Place your Bluetooth headset in pairing mode (refer to the manufactures guidelines) 11. Tap Scan (bottom left on phone display) 12. Tap Connect (next to Scan button) once your headset has been found to complete the pairing process 13. Add, Remove, Connect and Disconnect tap the Bluetooth icon displaying in the status bar The Plantronics Voyager Legend Bluetooth headset has been extensively tested on the Polycom VVX 600 at Star2Star and is used by our Receptionist, who is able to answer calls using voice commands i.e. "Answer", without the need to touch the phone. Calls are then transferred to users via StarScope 2 drag and drop functionality. This headsets supports the following: Smart Call Routing Intuitively directs calls to your phone or headset, pauses music for incoming calls, and allows you to automatically answer by simply placing the headset on your ear. Precision Audio Multi-microphones optimize your voice and minimize noise caused by wind, movement, and background sounds. Caller Announce & Voice Commands Announces incoming caller's name and lets you say "answer" to accept the call or "ignore" to decline. Just say "answer" to take a call. Tap the voice button to check battery level, connection status, or dial Vocalyst to hear s, newsfeeds, and more. The Voyager Legend supports A2DP, which lets you stream podcasts, audiobooks, music, prompts from GPS navigation apps, and other audio through the headset. It also supports multi-point, so you can pair two devices simultaneously and alternate between them. Edition Eleven Page 98 of 272
99 11. S2S 3000 Softphone a). Answering a Call 1. Click on the softphone or click answer on the call alert box. 2. Alternatively click the line number on the softphone. 3. Or press Enter (On the keyboard) if softphone is the active application. 4. You can ignore the call and send the caller directly to Voic or activate Find-Me / Follow-Me if configured by pressing. (Note) If the call is from a queue, pressing IGNORE will step the call on to the next Member in the queue. Handling multiple calls: 1. Select an illuminated (yellow) line key to answer an incoming call. 2. When answered the line key will show green. 3. A subsequent call (yellow line key) can be answered by pressing the associated line key. 4. Your original caller is automatically placed on hold (line key turns red) and will hear MOH Message/Music on Hold if configured on your system. (Note) the softphone can handle a total of 2 calls, 1 for each line key. 5. When both lines are busy caller #3 will either get Voic or follow the phones Find-Me / Follow-Me settings if configured. The softphone display will show missed call no lines available. 6. The missed call information is available by clicking on the icon in the softphone display. b). Making a Call Using a user supplied headset/handset: 1. Dial the number required by using the softphone keypad or your PC/Mac keyboard then click on the softphone. 2. As you start to enter the number the line key will turn green. 3. Alternatively you may select any line key to dial. When you hear dial tone dial the number then click on the softphone to complete the call. 4. As you start to enter a number, a suggestion for completing the entry may appear e.g. you enter 9 and the display shows this is showing a previously dialed number. Press Tab on your keyboard to accept the suggestion and <- Enter to dial or just continue typing a new number. 5. You may also Drag-and-Drop an entry from your Contacts list or paste a number directly into the softphone display to dial by using Ctrl + v see section Softphone Guide. 6. Alternatively select a Contact in your Contacts list and click right mouse to dial. a. (Note) You may import Contacts from another source i.e. Outlook or a supported file format. 7. If your Contacts list contains many entries use the field to filter the list. Edition Eleven Page 99 of 272

100 11. S2S 3000 Softphone Making a Call (contd) Using Hands Free Speaker Phone Mode (Uses PC/Mac Microphone and Speaker if available): 1. Click on the softphone. 2. When you hear dial tone dial the number then click on the softphone to complete the call. Redial Last Number: 1. To redial the last number you dialed click on the softphone. 2. Alternatively you may click twice. Call Lists: 1. To access a list of calls you have placed, received or missed click here to open the Calls & Contact Drawer. Click here to display the Calls & Contact Drawer Call Record: 1. Click at any time during a call. Click again to stop recording. Recordings are saved as.wav files. 2. To view/change the Recorded Calls Location, click at the top of the phone and then select Options. Display the pane. At the bottom of the pane note the Recorded Call Location. Enter the folder where you want the recording files to be saved. You may also open the folder to view/listen to recordings. 3. The S2S 3000 Softphone can be configured to automatically record all calls. Contact your system administrator or reseller for details. c). Microphone Mute 1. During a call click on the softphone dial pad to prevent the other party from hearing you. The icon and will appear on the call display. Edition Eleven Page 100 of 272
101 11. S2S 3000 Softphone (contd) d). Holding a Call 1. During a call click. The active call will be placed on hold; the Line key will change from green to red and will appear on the call display. The caller on hold will hear Music or Message on hold if enabled. 2. Click the Line key to resume. e). Transferring a Call Blind Transfer (Transfer the call to another party without any announcement): 1. During a call click on the dial pad. The line and XFER LED turn blue and appears on the call display. 2. Dial the number required then click either or press Enter on your keyboard to transfer the call. 3. will appear on the call display. Transfer (Announced): 1. During a call select an available line. The original call will automatically be put on hold and will hear Music or Message on hold if enabled on your system. 2. Dial the number required then click. 3. When the called party answers, announce the call. 4. When you are ready to transfer the call, click on the dial pad, will appear on the call display. 5. The line of the original call is now red and the line of the third party is blue. 6. Select the original line (red) to complete the transfer. 7. will appear on the call display. f). Ending a Call 1. Click on the call display, click in the call alert window if configured or right-click the icon in the System Tray and choose End Call. Edition Eleven Page 101 of 272
102 11. S2S 3000 Softphone (contd) g). Creating a 3 Party Conference Call You can create a conference with two other parties using the phones local conferencing feature. There are three ways to set up a conference call. 1. Manual Setup: AA (Auto Answer) off and AC (Auto Conference) off. 2. AA Off and AC On. 3. Conference Server Mode: AA on and AC on. Manual Setup AA off AC on: 1. With one active call on one of the lines, place the call on hold by either: a. Selecting another line and dialing a third party, or b. Clicking on an incoming call. 2. To conference in both lines, click. All lines will be part of the conference. 3. To suspend the conference, click again to place all other parties on hold. The other participants cannot speak to one another. 4. You can talk privately to one line by clicking the appropriate line. 5. To restart the conference, click again. Viewing information on calls: 1. Hover over any line that is in use to see the status of the call e.g. on hold or in conference and the name or number of the caller. Removing a Party during an Active Conference: 1. Suspend the conference by clicking. 2. Select the line of the participant who will be leaving the conference. 3. Click to remove the party from the conference call. 4. Click the remaining line key or take the line off hold to re establish the call with the remaining party. 5. A party can also leave the conference by simply hanging up. Removing all parties: 1. If the conference call is in progress (not on hold), you can hang up on all parties and end the conference by clicking. Edition Eleven Page 102 of 272
103 11. S2S 3000 Softphone Creating a 3 Party Conference Call (contd) AA Off and AC On: You can answer calls manually and the softphone adds each to the conference automatically. 1. Click on. 2. Manually answer the first call. There is no need to put the call on hold. 3. When the next call arrives, on another line, answer the call. As soon as you answer the call, a conference will be set up among the three parties. Conference Server Mode AA On and AC On: Softphone will auto answer and auto conference both lines together. 1. Click on and on. 2. When the first call arrives, the softphone will automatically answer. You can speak to this caller. 3. When the second call arrives it will be answered and added to the conference automatically. (Note) We recommend that you use the Star2Star conference room feature for conference calls involving more than 3 parties. h). Volume Controls 1. Use the microphone slider to adjust the volume of your voice for your listeners. 2. Use the speaker adjustment to adjust volume of the sound you are hearing. 3. Adjust your PC/Mac sound controls for handsfree and ringing volume. i). Do Not Disturb 1. Click on the dial pad. 2. will appear in the softphone display. 3. All incoming calls will be sent to voic or your Find-Me / Follow-Me settings if configured. 4. An incoming call will show as and the missed call icon will appear however no sound or connection is made. 5. Click on the missed call icon to view caller details. 6. You can still make outgoing calls with the DND feature activated. Edition Eleven Page 103 of 272
. Changing Ringtones 1. Click at the top of the softphone.")
104 11. S2S 3000 Softphone (contd) j). Missed Call Display 1. If you have a missed call(s) the icon will be visible in the softphone display. Click on the icon to view the missed call detail. The icon is cleared from the display. Right-mouse on the missed number in the Missed Call list to either Call or Add to Contacts. k). Changing Ringtones 1. Click at the top of the softphone. Select Options. 2. Display the pane. You can import.wav files as different Ring Tones. 3. You may also set the softphone to automatically come to the front of other applications when you receive a call. 4. You may also set the softphone to display the Call Alert Box when a call arrives. 5. You can set this Alert Box to remain visible during a call. Edition Eleven Page 104 of 272

. Speed Dials 1. You may import Contacts to dial from another source i.e. Outlook or a supported file format.")
105 11. S2S 3000 Softphone (contd) l). Voic Access 1. The icon will appear on the softphone display when voic is present. You can listen to new messages by clicking on this icon. This icon is only present when you have new messages. 2. To access your mail box at other times dial The system will prompt for your password. (Note) as a new user accessing your mailbox for the first time, your password will be the same as your extension number. You will be guided through a short setup process including a password change. Set a password that is different to the extension number. See section Setting up your Voic . m). Speed Dials 1. You may import Contacts to dial from another source i.e. Outlook or a supported file format. 2. Alternatively you may either Add Contacts manually or click in the softphone display during an active call to add that caller to your Contacts. 3. Click right mouse on a Contact to dial. 4. If your Contacts list contains many entries use the field to filter the list. Right click on a Contact to Call / Edit / Delete Click here to display Contact options Click here to display the Calls & Contacts tab Edition Eleven Page 105 of 272
106 11. S2S 3000 Softphone (contd) n). Call Park 1. To park a call and retrieve from a different phone perform an attended (Announced) transfer to a. See section Transferring a Call 2. The system will play back a retrieval code ( ). a. The system provides up to 99 park positions 3. When the caller is Parked they will hear Message / Music on hold if enabled on your system. 4. To retrieve the call, dial the retrieval code to reconnect to the call. 5. If the call remains parked for longer than the system timeout (see On-Hold Options in the Portal Advanced Settings) the call will ring back on the originating extension. Edition Eleven Page 106 of 272


107 12. S2S 3000 Softphone Guide 1. Menu Minimize Hide Calls & Contact Drawer Transfer, Hold, Record, Auto Answer, Auto Conference, Do Not Disturb, Conference Open/Close Calls & Contact Drawer Dial Microphone Control Hang up 2. Speaker Control You have new Voic . Click this icon to access your voic messages Click this icon to add this caller to your Contacts list. Click here to send your incoming call directly to voic or activate Find-Me / Follow-Me if configured and activated for your extension. You have missed an incoming call. To clear the icon, click on the icon. Indicates you are talking Indicates mute is on (Note) If the call is from a queue, pressing IGNORE will step the call on to the next Member in the queue. Edition Eleven Page 107 of 272
108 12. S2S 3000 Softphone Guide (contd) 3. Hot Keys Function Keyboard Shortcut Select Line 1 F1 or Ctrl + 1 Select Line 2 F2 or Ctrl + 2 Clear Backspace Dial Enter Turn Auto-Answer on/off Ctrl + a Open Calls & Contacts drawer Ctrl + b Turn Do Not Disturb (DND) on/off Ctrl + d Turn Auto-Conference on/off Ctrl + f Hang up Esc Call Ignore Ctrl + i Mute Ctrl + m Hold Ctrl + o Exit Ctrl + q Redial Ctrl + r Transfer Ctrl + t Paste (Paste a number into the display to dial) Ctrl + v S2S 3000 Softphone Download / Transfer license to another PC The S2S 3000 softphone is licensed for use on one computer only. If you wish to transfer this license to another computer and download the softphone application to that PC, uninstall the application on the original PC first and then complete the following steps: 1. Login to the Star2Star portal, select the CONFIGURATION option. 2. If you do not have a login please contact your system administrator or reseller for help. 3. Select your softphone extension from the dropdown if you have more than one phone. 4. As an S2S 3000 softphone user you will see E X T E N S I O N S U M M A R Y information applicable to your phone adjacent to the I N D I V I D U A L P H O N E S E T T I N G S selection links. 5. Click on the Transfer my S2S 3000 to another computer link. ** Edition Eleven Page 108 of 272


109 S2S 3000 Softphone Download / Transfer license to another PC (contd) 6. You may now login to the Portal on the computer you wish to transfer the S2S 3000 Softphone license to. 7. Select the CONFIGURATION option 8. Click on the Download: S2S 3000 for Windows link below S2S 3000 Softphone Information This will install the Softphone application onto your computer. 9. When you start the S2S 3000 Softphone application for the first time you will be prompted for the Username and Password. Enter this information exactly as it is displayed in the Star2Star Portal under S2S 3000 Softphone Information. S2S 3000 Softphone - Audio Device Setup The S2S 3000 Softphone will automatically detect devices attached to your computer and chooses which ones to use for audio. If you wish to override the selection made automatically by the Softphone you change them on the Devices panel. See below. 1. To view/edit settings click 2. Select Options to display the Options pane. 3. Select the Devices option. Edition Eleven Page 109 of 272

110 S2S 3000 Softphone Audio Device Setup (contd) 4. Headset and Speakerphone options are displayed. 5. You can select from the available options on the drop down. In this example the Headset Speaker and Microphone device is set to use a Bluetooth wireless headset. The Speakerphone is set to use the computers microphone or plug-in and internal speaker. Incoming calls will alert through the computers speaker. 6. If you encounter problems with your selected audio device using the S2S 3000 softphone use the follow steps to diagnose the problem: a. With the softphone visible on screen select the record option. b. Speak into your selected microphone device. c. The microphone level lights should glow red and your voice will be recorded. d. If it does not go to Programs/Accessories/Entertainment/Sound Recorder to display the Microsoft basic sound recording application. Click on the red record button to start recording. e. Speak into your selected microphone device. Stop the recording and play back. f. If no sound is heard your selected device is not recognized by your computer. g. Try using an alternative device e.g. the computers microphone and speaker. Edition Eleven Page 110 of 272


.")
111 a). Supplied accessories 13. Panasonic KX-TGP500 Phones Each Panasonic KX-TGP500 phone unit contains the following accessories: b). Setting up the base unit Note: When connecting the base unit of the KX-TGP500, use only the supplied Panasonic AC adaptor PQLV219 or PQLV219 (03). Edition Eleven Page 111 of 272
.")
 in the handset. Do NOT use Alkaline/Manganese/NiCd batteries.")
112 The base unit status indicator The handset locator button displays the status of the unit and network. [ALL] allows you to page all handsets. c). Setting up the handset Note: When connecting the handset charger, use only the supplied Panasonic AC adaptor PQLV291 or PQLV219 (03). Battery installation Note: Use ONLY Ni-MH batteries size AAA (R03) in the handset. Do NOT use Alkaline/Manganese/NiCd batteries. Be sure to confirm correct polarities when installing batteries into the handset. Edition Eleven Page 112 of 272

113 Battery charging Charge batteries for about 6 hours when first installing the unit. The handset screen will display Charging. When batteries are fully charged, the charge indicator will go off. Battery level indicator The handset screen will display icons indicating battery levels. You may expect Panasonic Ni-MH batteries to last up to 5 hours for continuous use talking time and up to 10 days when not in use (standby) before needing complete recharging. Note: It is normal for batteries not to reach full capacity at the initial charge. Maximum battery performance is reached after a few complete cycles of use (charge/discharge). Actual battery performance depends on a combination of how often the handset is in use and how often it is not in use (standby). Even after the handset is fully charged, the handset can be left on the charger without any ill effect on the batteries. The battery level may not be displayed correctly after you replace the batteries. In this case, place the handset on the charger and let it charge for at least 6 hours. Edition Eleven Page 113 of 272

![Joystick: By pushing the joystick [ ], [ ], [<], or [>] repeatedly, you may scroll through (up, down, left, or right) various lists or items or adjust the receiver/ speaker volume (up or down) while](/docs-images/71/65634810/images/114-1.jpg "talking. Temporarily switching the handset display mode You may select to display either a single item or multiple items on one screen at a time for the phonebook list, caller list and redial list.")
114 d). Handset features Soft Keys: The handset features 2 soft keys and a joystick. By pressing a soft key, or by pressing the center of the joystick, you may select the feature shown directly above it on the display. Joystick: By pushing the joystick [ ], [ ], [<], or [>] repeatedly, you may scroll through (up, down, left, or right) various lists or items or adjust the receiver/ speaker volume (up or down) while talking. Temporarily switching the handset display mode You may select to display either a single item or multiple items on one screen at a time for the phonebook list, caller list and redial list. You may temporarily switch the handset display mode by pressing the right soft key when viewing the lists with: [MULTI]: Multiple items are shown on one screen at a time. [SINGLE]: An item is shown on one screen at a time. You may confirm the detailed information. e). Answering a Call Using the handset When a call is being received, the ringer indicator on the handset flashes rapidly. The last 4 digits of the line number on which the call is being received are displayed. 1. Lift the handset and press [CALL], {C}, or when the unit rings. You may also answer the call by pressing any dial key from [0] to [9] [*] or [#]. (Any key answer feature) 2. When you finish talking, press [OFF] or place the handset on the charger. Note: If the auto talk feature is turned off, you may select which line answers when more than one call is being received: [CALL] [ ]/[ ]: Select the desired line. à Press [CALL], or If is displayed during the call, other units may join the conversation. Contact your administrator for further Edition Eleven Page 114 of 272
115 information. f). Making a Call Using the handset 1. Lift the handset and dial the phone number. To correct a digit, press [CLEAR]. 2. Press [CALL] or The unit selects the default line configured by your administrator. You may also select the line manually as follows: [LINE] à [ ]/[ ]: Select the desired line. à [CALL] 3. When you are finished talking, press [OFF] or place the handset on the charger. Note: If is displayed during the call, other units may join the conversation. Contact your administrator for further information. A maximum of 3 lines can be used at a time. To use the optional headset, plug the headset into the headset jack before performing step 1. Using the speakerphone 1. Dial the phone number and press The unit selects the default line configured by your administrator. You may also select the line manually as follows: [LINE] à [ ]/[ ]: Select the desired line. à. Speak alternately with the other party. 2. When you finish talking, press [OFF]. Note: For best performance, use the speakerphone in a quiet environment. To switch back to the receiver, press Redial last number: The last 10 phone numbers dialed are stored in the redial list (each 32 digits max.). 1. [REDIAL] 2. [ ]/[ ]: Select the desired phone number. 3. / If is pressed and the other party s line is engaged, the unit automatically redials multiple times. While the handset is waiting to redial, the ringer indicator flashes. To cancel, press [OFF]. Editing, erasing, storing a number in redial list 1. [REDIAL] 2. [ ]/[ ]: Select the desired phone number. à [MENU] 3. Proceed with the desired operation. Editing a number before calling: [ ]/[ ]: Edit and Call à [SELECT] à Use the joystick to move the cursor. à Edit the number. à Press [CALL] or Erasing a number: [ ]/[ ]: Erase à [SELECT] à [ ]/[ ]: Yes à [SELECT] à [OFF] Storing a number to the phonebook: [ ]/[ ]: Save phonebook à [SELECT] à To store the name, continue from step 3. Note: When editing: To erase a number, place the cursor on the number, press [CLEAR]. To insert a number, place the cursor to the right of where you want to insert the number, press the appropriate dial key. Edition Eleven Page 115 of 272
116 g). Microphone Mute While mute is turned on, you may hear the other party, but the other party cannot hear you. 1. Press [MUTE] during an outside call. 2. To return to the conversation, press [MUTE] again. Note: [MUTE] is a soft key visible on the display during a call. h). Call Waiting This feature allows you to receive calls while you are already talking on the phone. If you receive a call while on the phone, the 2nd caller s information is displayed on the handset that is in use after you hear the interrupt tone. This feature depends on your phone system. Contact your administrator for further information. 1. Press [SWITCH] to answer the 2nd call. 2. To switch between, calls press [SWITCH]. i). Transferring a Call Outside calls may be transferred to an outside party 1. During an outside call, press [MENU]. 2. [ ]/[ ]: Transfer à [SELECT] 3. Dial the phone number. To correct the number, press [CANCEL] to clear the number and enter again. 4. Wait for the paged party to answer. If the paged party does not answer, press [CANCEL] 2 times to return to the outside call. 5. [TRANS] Note: In step 3, you may dial the phone number from the phonebook: à [ ]/[ ]: Select the desired entry. à [CALL] Calls may be transferred without speaking to the outside party 1. During an outside call, press [MENU]. 2. [ ]/[ ]: Blind transfer à [SELECT] 3. Dial the phone number. To correct the number, press [CANCEL] to clear the number and enter again. 4. [TRANS] The outside call rings at the other unit. Note: In step 3, you may dial the phone number from the phonebook: à [CALL] à [ ]/[ ]: Select the desired entry. j). Conference Calls Multiple people can establish a conference call. 1. During an outside call, press [MENU]. 2. [ ]/[ ]: Conference à [SELECT] 3. Dial the phone number. To correct the number, press [CANCEL] to clear the number and re-enter. 4. Wait for the paged party to answer. If the paged party does not answer, press [CANCEL] 2 times to return to the outside call. Edition Eleven Page 116 of 272
117 5. [CONF] To add a new party to the conference, repeats steps 1-4. Note: In step 3, you may dial the phone number from the phonebook: à [CALL] à [ ]/[ ]: Select the desired entry. k). Call Share Joining a call You may join an existing outside call. Availability depends on your phone system. Contact your administrator for further information. Note: The line must be set to allow other units to join through the Web user interface Privacy Mode. is displayed on the unit currently in use when it is allowed to join the call. Contact your administrator for further information. 1. Press [LINE] when the other unit is on an outside call. 2. [ ]/[ ]: Select the desired line to join. à [SELECT] l). Phonebook The phonebook allows you to make calls without having to dial manually. You may add up to 100 names and phone numbers to the phonebook. Adding entries 1. [MENU] (center of joystick) 2. [ ]/[ ]: Phonebook à [SELECT] 3. [ADD] 4. Enter the party s name (16 characters maximum). à [OK] 5. Enter the party s phone number (32 digits max.). à [OK]. If you do not need to assign the ringer ID, go to step 8. Note: While entering characters, you may switch between uppercase and lowercase by pressing [*]. 6. [ ]/[ ]: Set Ringer ID à [SELECT] 7. [ ]/[ ]: Select the desired setting. à [OK] 8. [SAVE] To add other entries, repeat from step [OFF] Note: In step 3, you may also press [MENU]. à [ ]/[ ]: New entry à [SELECT]. If you select No Ringer ID (default), the unit uses the ringer tone previously selected when a call is received from that caller. Finding and calling a phonebook entry To scroll through all entries: 1. [MENU] (center of joystick) 2. [ ]/[ ]: Phonebook à [SELECT] 3. [ ]/[ ]: Select the desired entry. 4. You may also select the line manually as follows: Edition Eleven Page 117 of 272
118 [LINE] à [ ]/[ ]: Select the desired line. à Press [CALL] or Searching by first character (alphabetically) 1. [MENU] (center of joystick) 2. [ ]/[ ]: Phonebook à [SELECT] 3. Press the dial key ([0] [9], or [#]) corresponding to the character you are searching for. Press the same dial key repeatedly to display the first entry corresponding to each character located on that dial key. If there is no entry corresponding to the character you selected, the next entry is displayed. 4. [ ]/[ ]: Scroll through the phonebook if necessary. 5. You may also select the line manually as follows: [LINE] à [ ]/[ ]: Select the desired line. à Press [CALL] or Editing entries 1. Find the desired entry à [MENU] 2. [ ]/[ ]: Edit à [SELECT] 3. Proceed with the desired operation. To change the name or phone number: [ ]/[ ]: Select the name or phone number. à [SELECT] à Edit the information. à [OK] To change the ringer ID: [ ]/[ ]: Select the current ringer ID. à [SELECT] à [ ]/[ ]: Select the desired setting. à [OK]. To turn the ringer ID off, select No Ringer ID. 4. [SAVE] à [OFF] Erasing entries Erasing a single entry: 1. Find the desired entry. à [MENU] 2. [ ]/[ ]: Erase à [SELECT] 3. [ ]/[ ]: Yes à [SELECT] à [OFF] Erasing all entries: 1. [MENU] (center of joystick) 2. [ ]/[ ]: Phonebook à [SELECT] à [MENU] 3. [ ]/[ ]: Erase all items à [SELECT] 4. [ ]/[ ]: Yes à [SELECT] 5. [ ]/[ ]: Yes à [SELECT] à [OFF] Edition Eleven Page 118 of 272
![Character table for entering names While entering characters, you may switch between uppercase and lowercase by pressing [*] Chain dial This feature allows you to dial phone numbers in the phonebook](/docs-images/71/65634810/images/119-0.jpg "while you are on a call. This feature can be used to dial a number you have stored in the phonebook, without having to dial manually. 1. During an outside call, press [MENU] 2.")
![[ ]/[ ]: Phonebook à [SELECT] 3. [ ]/[ ]: Select the desired entry. 4. Press [CALL] to dial the number.](/docs-images/71/65634810/images/119-1.jpg "Speed Dial Assigning an entry in the phonebook to a speed dial key: Dial keys [1] to [9] can each be used as a speed dial key, allowing you to dial a number from the phonebook by simply pressing a")
119 Character table for entering names While entering characters, you may switch between uppercase and lowercase by pressing [*] Chain dial This feature allows you to dial phone numbers in the phonebook while you are on a call. This feature can be used to dial a number you have stored in the phonebook, without having to dial manually. 1. During an outside call, press [MENU] 2. [ ]/[ ]: Phonebook à [SELECT] 3. [ ]/[ ]: Select the desired entry. 4. Press [CALL] to dial the number. Speed Dial Assigning an entry in the phonebook to a speed dial key: Dial keys [1] to [9] can each be used as a speed dial key, allowing you to dial a number from the phonebook by simply pressing a dial key. 1. Find the desired entry. à [MENU] 2. [ ]/[ ]: Speed dial à [SELECT] 3. [ ]/[ ]: Select the desired dial key number. à [SELECT] If Overwrite? is displayed, the dial key you selected has a phone number already assigned to it. To overwrite with the currently selected phone number, go to step 4. To select another dial key, press [BACK], then repeat this step. 4. [ ]/[ ]: Yes à [SELECT] à [OFF] Note: Where a dial key is already being used for speed dialing, Q is displayed next to the dial key number. Making a call using a speed dial key 1. Press and hold the desired speed dial key ([1] [9]). You may view other speed dial assignments by pushing the joystick down or up. 2. You may also select the line manually as follows: [LINE]à [ ]/[ ]: Select the desired line. à Press Edition Eleven Page 119 of 272
120 [CALL] or Canceling a speed dial assignment 1. Press and hold the desired speed dial key ([1] [9]). à [ERASE] 2. [ ]/[ ]: Yes à [SELECT] à [OFF] m). Call Forwarding Incoming calls can be forwarded to another party. You can choose one of 3 modes: 1. Unconditional : All incoming calls are forwarded. 2. Busy : Incoming calls while the line is in use are forwarded. 3. No answer : Incoming calls after a certain number of rings are forwarded. The default setting of the number of ring count is 3. Note: We recommend setting the mode with your network administrator. If this feature is set on your unit, it may be overridden by your phone system settings. This feature is not available on shared lines. The call is logged in the caller list with after the call is forwarded. Turning call forwarding on/off 1. [MENU] (center of joystick) 2. [ ]/[ ]: IP service à [SELECT] 3. [ ]/[ ]: Call features à [SELECT] 4 [ ]/[ ]: Call forward à [SELECT] 5. Proceed with the desired operation. When 1 line is registered: Go to step 6. When 2 or more lines are registered: [ ]/[ ]: Select the desired line. à [SELECT] 6. [ ]/[ ]: Select the desired option. à [SELECT] 7. [ ]/[ ]: On/Off à [SELECT] 8. [ ]/[ ]: Select On or Off. à [SAVE] If you select Off, press [OFF] to exit. If the phone number forwarded to has been already set, press [OFF] to exit. To change the phone number, perform from step 7. Press [OFF] to exit. 9. Enter the phone number you want to forward calls to (24 digits max.). à [SAVE] If you have selected No answer, enter the number of rings before the unit forwards calls (0, 2-20 rings). à [SAVE] 10. [OFF] n). Changing the ring count You may change the number of rings before the call is forwarded if No answer is selected. 1. [MENU] (center of joystick) Edition Eleven Page 120 of 272
121 2. [ ]/[ ]: IP service à [SELECT] 3. [ ]/[ ]: Call features à [SELECT] 4. [ ]/[ ]: Call forward à [SELECT] 5. Proceed with the desired operation. When 1 line is registered: Go to step 6. When 2 or more lines are registered: [ ]/[ ]: Select the desired line. à [SELECT] 6. [ ]/[ ]: No answer à [SELECT] 7. [ ]/[ ]: Ring count à [SELECT] 8. Enter the number of rings before the unit forwards calls (0, 2-20 rings). à [SAVE] à [OFF] o). Do not disturb This feature allows the unit to reject calls on selected lines. The default setting is Off. Note: We recommend setting up the Do Not Disturb feature with your administrator. If this feature is set on your unit, it may be overridden by your phone system settings. This feature is not available on shared lines. The call is logged in the caller list with after the call is rejected. 1. [MENU] (center of joystick) 2. [ ]/[ ]: IP service à [SELECT] 3. [ ]/[ ]: Call features à [SELECT] 4. [ ]/[ ]: Do not disturb à [SELECT] 5. Proceed with the desired operation. When 1 line is registered: Go to step 6. When 2 or more lines are registered: [ ]/[ ]: Select the desired line. à [SELECT] 6. [ ]/[ ]: Select On or Off à [SAVE] à [OFF] p). Block anonymous calls This feature allows the unit to reject calls when the unit receives a call without a phone number. The default setting is Off. Note: We recommend setting this feature with your administrator. This feature is not available on shared lines. The call is logged in the caller list with [MENU] (center of joystick) [ ]/[ ]: IP service à [SELECT] [ ]/[ ]: Call features à [SELECT] [ ]/[ ]: Block anonymous à [SELECT] Proceed with the desired operation. When 1 line is registered: Go to step 6. after the call is rejected. When 2 or more lines are registered: [ ]/[ ]: Select the desired line. à [SELECT] Edition Eleven Page 121 of 272
122 6 [ ]/[ ]: Select On or Off. à [SAVE] à [OFF] Call block This feature allows the unit to reject calls from specified phone numbers that you do not want to answer. When a call is received, the unit does not ring while the caller is being identified. If the phone number matches an entry in the call block list, the unit rejects the call. Note: When the unit receives a call from a number that is stored in the call block list, the call is logged in the caller list with the icon after the call is rejected. Storing unwanted callers You can store up to 30 phone numbers in the call block list by using the caller list or by entering the numbers directly Note: You are advised to store the 10 digits (including an area code) for PSTN calls because if 7 digits are stored, all numbers that have the last 7 digits will be blocked. From the caller list: 1. [CID] (left soft key) 2. [ ]/[ ]: Select the entry to be blocked. à [MENU] 3. [ ]/[ ]: Save call block à [SELECT] 4. [ ]/[ ]: Yes à [SELECT] à [OFF] By entering phone numbers: 1. [MENU] (center of joystick) à [#][2][1][7] à [ADD] 2. Enter the phone number (24 digits max.). à [SAVE] To erase a digit, press [CLEAR] 3. [OFF] Viewing/Editing/Erasing call block numbers 1. [MENU] (center of joystick) à [#][2][1][7] 2. [ ]/[ ]: Select the desired entry. To exit, press [OFF]. 3. Proceed with the desired operation. Editing a number: [MENU] à [ ]/[ ]: Edit à [SELECT] à Edit the phone number. à [SAVE] à [OFF] Erasing a number: [MENU] à [ ]/[ ]: Erase à [SELECT] à [ ]/[ ]: Yes à [SELECT] à [OFF] Note: When editing, press the desired dial key to add, [CLEAR] to erase. q). Changing the handset name Each handset may be given a customized name ( Bob, Warehouse, etc.). This is useful when you make intercom calls between handsets. You may also select whether or not the handset name is displayed in standby mode. The default setting is Off. If you select On without entering any handset name, Handset 1 to Handset 6 is displayed. 1. [MENU] (center of joystick) à [#][1][0][4] 2. Enter the desired name (10 characters max). If not required, go to step [OK] Edition Eleven Page 122 of 272
123 4. [ ]/[ ]: On à [SAVE] à [OFF] r). Setting Date and Time Set if the unit does not show the date and time. You can set the date and time through the Web user interface and also program it to adjust automatically using the Simple Network Time Protocol (SNTP). Also daylight saving time setting is available through the Web user interface. Contact your administrator for further information. 1. [MENU] (center of joystick) à [#][1][0][1] 2. Enter the current month, date, and year. Example: March 15, 2010 [0][3][1][5] [1][0] 3. Enter the current hour and minute (12-hour clock format). Example: 9:30 [0][9][3][0] 4. [AM/PM]: Select AM or PM. 5. [SAVE] à [OFF] Note: When English is selected as the display language, 12-hour clock format is used. When Spanish is selected, 24-hour clock format is used. To correct a digit, push the joystick left, right, up, or down to move the cursor to the digit, then make the correction. s). Updating the base unit software Your phone system reseller may offer new features and improve its software version from time to time. If you set the base unit software update setting to manual mode through the Web user interface, you need to download the update when Update version. Press OK. is displayed. Contact your administrator for further information. Note: Make sure the STATUS indicator on the base unit is lit in green and no line is in use. 1. Press while Update version. Press OK. is displayed. The current and new base unit software versions are displayed. If you want to download the update later, press [CANCEL]. When you are ready to download, see Confirming the base unit software version. 2. [OK] Note: The STATUS indicator on the base unit flashes while downloading. When the download is complete, the STATUS indicator stops flashing and changes to steady green. Confirming the base unit software version 1. [MENU] (center of joystick) à [#][1][5][6] The current base unit software version is displayed. To exit, press [OFF]. 2. If Update version? is displayed, press [OK] to download. To exit without downloading, press [CANCEL]. t). Registering a handset to the base unit Additional handsets Up to 3 handsets can be registered to the base unit. Registering a handset to the base unit The supplied handset and base unit are pre- registered. If for some reason the handset is not registered to the base unit (for example, I is displayed even when the handset is near the base unit), re-register the handset. Edition Eleven Page 123 of 272
124 1. Handset: [MENU] (center of joystick) à [#][1][3][0] 2. Base unit: Press and hold [ALL] for about 4 seconds until the STATUS indicator flashes in red. If all registered handsets start ringing, press the same button to stop. Then repeat from step 1. The next step must be completed within 90 seconds. 3. Handset: Press, then wait until a long beep sounds. When the handset has been registered successfully, will change to. Note: When you purchase an additional handset, refer to the additional handset s installation manual for registration. Deregistering a handset A handset may cancel its own registration (or the registration of another handset) that is stored to the base unit. This allows the handset to end its wireless connection with the system. 1. [MENU] (center of joystick) à [#][1][3][1] 2. [3][3][5] à [OK] 3. [ ]/[ ]: Select the desired unit. à [SELECT] 4. [ ]/[ ]: Yes à [SELECT] When you cancel a different handset than the one you are now using, press [OFF] to exit. u). Using Caller ID Availability of this service depends on your phone system. Contact your administrator for further information. Caller ID features When an outside call is received, the caller s information is displayed. Information for the last 100 callers is logged in the caller list from the most recent call to the oldest. If the call is received as an anonymous call, Anonymous call is displayed. Missed calls If a call is not answered, the unit treats it as a missed call and Missed call is displayed. You may then view the caller list to see who called while you were away. Phonebook name display When caller information is received and it matches a phone number stored in the phonebook, the stored name in the phonebook is displayed and logged in the caller list. Ringer ID This feature may help you identify who is calling by using different ringers for different callers stored in the phonebook. You may assign a different ringer to each phonebook entry. When a call is received from a caller stored in the phonebook, the assigned ringer rings after the caller information is displayed. Caller list 1. [CID] (left soft key) 2. Push the joystick down to search from the most recent call or push the joystick up to search from the oldest call. You may see detailed information about the caller by pressing [SINGLE]. 3. To call back, press.to exit, press [OFF]. Edition Eleven Page 124 of 272
125 Editing a caller s phone number before calling back 1. [CID] (left soft key) 2. [ ]/[ ]: Select the desired entry. You can see the detailed information about the caller by pressing [SINGLE]. 3. [MENU] 4. [ ]/[ ]: Edit and Call à [SELECT] 5. Edit the number. Press dial key ([0] [9]) to add, [CLEAR] to delete. 6. Press [CALL] or Erasing selected caller information 1. [CID] (left soft key) 2. [ ]/[ ]: Select the desired entry. à [MENU] 3. [ ]/[ ]: Erase à [SELECT] 4. [ ]/[ ]: Yes à [SELECT] à [OFF] Erasing all caller information 1. [CID] (left soft key) à [ERASE] 2. [ ]/[ ]: Yes à [SELECT] v). Voic The unit lets you know that you have new voice mail messages in the following ways: New Voice Mail is displayed if message indication service is available. The message indicator on the handset flashes slowly if the message alert feature is turned on. Message alert You may select whether or not the message indicator on the handset flashes slowly when new voice mail messages are recorded. The default setting is Off. 1. [MENU] (center of joystick) à [#][3][4][0] 2. [ ]/[ ]: Select the desired setting. à [SAVE] à [OFF] Note: While the message alert is on, battery-operating time is shortened. Listening to voic messages 1. [MENU] (center of joystick) 2. [ ]/[ ]: New Voice Mail [SELECT] 3. [ ]/[ ]: Select the desired line. à [SELECT] is displayed next to the line if there are new messages. If an arrow (>) is displayed after the number, the whole phone number is not shown. Push the joystick right to see the remaining numbers. To return to the previous display, push the joystick left. 4. When finished, press [OFF]. w). Intercom Intercom calls may be made between handsets. Edition Eleven Page 125 of 272
126 If you receive an outside call while talking on the intercom, you will hear interrupt tones. To answer the call, press [OFF], then press. When paging the handset, the paged handset beeps for 1 minute. Making an intercom call 1. [MENU] (center of joystick) à [ ]/[ ]: Intercom à [SELECT] 2. [ ]/[ ]: Select the desired unit. à [CALL]. To stop paging, press [OFF]. 3. When you finish talking, press [OFF]. Answering an intercom call 1. Press to answer the page. 2. When you finish talking, press [OFF]. Auto intercom Off (Default): Turns this feature off. On (Ringer On) : When an intercom call is received, the handset rings 2 times then the speakerphone is automatically turned on. On (Ringer Off) : When an intercom call is received, the handset does not ring and the speakerphone is automatically turned on. This allows you to easily monitor a baby s room, for example, from different areas of the house. 1. [MENU] (center of joystick) à [#][2][7][3] 2. [ ]/[ ]: Select the desired setting. 3. [SAVE] à [OFF] Note: Auto intercom cannot be used when your handset is receiving a transferred outside call or all handsets are being paged by the base unit. Answering an intercom call using auto intercom 1. When you are paged by another handset, speak into the microphone. To switch to the receiver, press. 2. To end the intercom, press [OFF]. Monitoring audio in a room You may listen to the sound in a room where another handset is located. Note: Before using this feature, set auto intercom on the destination handset to On (Ringer Off) to allow access by other handsets. 1. Call the destination handset. You may listen to the audio. 2. To mute your sound output, press [MUTE] if necessary. 3. Press [OFF] to stop monitoring. Transferring calls Outside calls can be transferred between 2 handsets. 1. During an outside call, press [MENU]. 2. [ ]/[ ]: Intercom à [SELECT] 3. [ ]/[ ]: Select the desired handset. à [CALL] 4. Wait for the paged party to answer. If the paged party does not answer, press t to return to the outside Edition Eleven Page 126 of 272
![call. 5. [OFF] x). Belt Clip The TGP500 handset may be equipped with a belt clip.](/docs-images/71/65634810/images/127-0.jpg "Attach as shown. y).")


127 call. 5. [OFF] x). Belt Clip The TGP500 handset may be equipped with a belt clip. Attach as shown. y). Wall mounting charger The TGP500 charger unit is designed to be moveable and placed on any flat surface or mounted to a wall as shown. 1. Drive the screws (not supplied) into the wall. 2. Mount the charger, then slide it down and to the right until it is secure. Note: Make sure the wall is strong enough to support the weight of the unit. Edition Eleven Page 127 of 272


128 z). Base unit mounting The TGP500 base unit is designed to be moveable and placed on a flat surface or may be mounted to a wall as shown. 1. Remove the base unit stand by pushing and sliding down.. 2. Mount the base unit by inserting the screws (not supplied) into the round openings on the unit, then slide the unit down to secure it. Panasonic TGP500 phone (continued) Note: Make sure the wall is strong enough to support the weight of the unit. Attaching the base unit stand Attach the base unit stand by fitting the tab into the slot on the base unit. Slide the stand until it clicks. Edition Eleven Page 128 of 272
129 14. snom Phones a). Answering a Call (Note) on the snom 300 / 320 / 360 / 370 an incoming call is indicated by an audible ringer and a blinking (yellow) line indicator. Additionally the snom 370 has a flashing red Call Indication LED at the top of the phone display. This indicator will remain steady when a call is in progress. If you are already on a call incoming call indication will be an audible beep and a change in the phones display. Using the Handset: 1. Pick up the handset. Using Hands-Free Speakerphone Mode: 2. Press, or with the handset on hook press the line key with the active indicator (yellow blinking), or the Confirm key. Using the (optional) Headset: 3. Press to switch the phone to headset mode. When using the snom 360 or 370 the icon will appear in the phone display. You may either press the key, blinking line indicator or the Confirm key to answer your call. In all cases the active call will appear on the display showing call duration and caller ID. 4. (Note) When using a snom 300, to switch the phone to headset mode press 4 times to enter Setup / Use headset Device -> <On>. The symbol will appear in the phone display. Repeat the process to turn off or press the Speaker button to toggle between headset and speaker mode. Handling multiple calls: 5. With a call in progress any subsequent calls are displayed by a change in the phones display screen. The user will also hear a short tone to indicate another call is present. Select the Confirm key or on a snom 360 / 370 press the Ok soft key to accept the call. 6. Your original caller is automatically placed on hold indicated by a slow flashing (yellow) line indicator. Additionally the snom 370 displays a slow flashing red Call Indication LED at the top of the phone display. 7. Press to navigate through the calls. Press the Confirm key to select. 8. Once the phone reaches its multiple call limit the next caller will either hear Voic or follow the phones Find-Me / Follow-Me settings if configured. Edition Eleven Page 129 of 272
130 14. snom Phones (contd) b). Making a Call Using the handset: 1. Pick up the handset, the yellow line indicator will light, dial the desired number. Press the Confirm key to complete the call. Additionally the snom 370 has a steady red Call Indication LED at the top of the phone display. Using Hands Free Speaker Phone Mode: 2. With the handset on-hook, press or the line key (solid yellow LED when pressed). Dial the desired number. 3. Press the Confirm key to complete the call. 4. Alternatively you may dial the number first then press to complete the call. Using the (optional) Headset: 1. Press to switch the phone to headset mode. When using the snom 360 or 370 the icon will appear in the phone display. 2. (Note) When using a snom 300, to switch the phone to headset mode press 4 times to enter Setup / Use headset Device -> <On>. The symbol will appear in the phone display. Repeat the process to turn off or press the Speaker button to toggle between headset and speaker mode. 3. Dial the desired number and press the Confirm key to complete the call or press the line key (solid yellow LED when pressed). Redial: 1. To redial last number press twice. 2. To redial previously dialed numbers press. A list of recently dialed numbers will be displayed with the most recent at the top of the list. Use the navigation keys to move through the list. Press the Confirm key over a displayed or highlighted entry to complete the call. Outgoing CallerID: 1. Your phone can be configured to display the Outgoing CallerID of your main number (default setting) or any other number that is configured on your system. 2. The CallerID can also be set to Blocked. 3. System Administration access is required to change these settings. 4. A typical setup could be to display the main company CallerID on the first line appearance and another ID or Blocked for subsequent line appearances. 5. To use this feature, once configured, press the down arrow on the navigation keys to select the second line appearance to make your call (Note) not available on the snom Your Outgoing CallerID will reflect what s set in the Star2Star Web Portal. Edition Eleven Page 130 of 272
131 7. Press up arrow on the navigation keys to re select the first line appearance. Input Mode: 1. Your phone can be set to enter Alphanumeric Characters instead of numbers (indicated by the phone display). This can cause confusion when trying to dial out. 2. To return to the normal Numeric Mode to make outgoing calls on the snom 300 press down arrow on the navigation keys. On the snom 320 / 360 / 370 press the first soft key. c). Microphone Mute 1. During a call press or the Mute soft key (snom 320 / 360 / 370) so that the other party cannot hear you. Additionally the snom 370 display changes showing a symbol. 2. Press again or the Unmute soft key to resume audio. d). Holding a Call 1. (snom 320 / 360 / 370) During a call press. The call will be placed on hold, the yellow line key indicator will flash slowly, and Hold will be indicated on the phone display. The caller on hold will hear Music or Message on hold if enabled on your system. Additionally the snom 370 displays a slow flashing red Call Indication LED at the top of the phone display. 2. (snom 300) During a call press the Line key L1. The call will be placed on hold, the yellow line key indicator will flash slowly, and Hold will be indicated on the phone display. The caller on hold will hear Music or Message on hold if enabled on your system. 3. (snom 320 / 360 / 370) To resume the call press again, the flashing line key or press the Confirm key. 4. (snom 300) To resume the call press the flashing line key L1 or press the Confirm key. 5. (snom 320 / 360 / 370) Your phone will handle multiple calls on hold. Press to display all calls on hold. Use the navigation keys to move through the list. Press the Confirm key or over a displayed or highlighted entry to retrieve the call from hold. 6. (snom 300) Your phone will handle multiple calls on hold. Press the line key to display all calls on hold. Use the navigation keys to move through the list. Press the Confirm key or line key over a displayed or highlighted entry to retrieve the call from hold. Edition Eleven Page 131 of 272
132 14. snom Phones (contd) e). Transferring a Call Blind Transfer (Transfer the call to another party without any announcement): 1. During a call, press. The caller on hold will hear Music or Message on hold if enabled on your system. 2. Dial the number you want to transfer the call to then press the Confirm key to complete the transfer. Transfer (Announced): 1. When using (snom 320 / 360 / 370) place your caller on hold by pressing or press the line key L1 if using the (snom 300). Your caller will hear Music or Message on hold if enabled on your system. 2. Dial the number you want to transfer the call to then press the Confirm key. 3. When the called party answers, announce the call, press and then press again or to complete the transfer. 4. Press to cancel the transfer i.e. the called party does not wish to accept the call. f). Ending a Call 1. Replace the handset, or if in hands free speaker phone mode press the Cancel key, or press. If you are using the phone in mode press the Cancel key to end your call. g). Creating a 3 Party Conference Call 1. You can create a conference with two other parties using the phones local conferencing feature. 2. Place a call to the first party. 3. Place the active call on hold (snom 320 / 360 / 370) press, (snom 300) press the line key. The caller will hear Music or Message on hold if enabled on your system. 4. Dial the phone number of the second party or use to access your Speed Dial entries. Use the navigation keys to move through the list. Press the entry to complete the call. Confirm key over a displayed or highlighted 5. When the second party answers, (snom 320 / 360 / 370) press to join all parties in the Conference. (snom 300) press to join all parties in the Conference. Edition Eleven Page 132 of 272
133 14. snom Phones (contd) h). Volume Controls 1. Press the keys to adjust handset, headset and hands-free speaker phone volume during a call. 2. Pressing these keys in an idle state will adjust the ringer volume. i). Do Not Disturb 1. Press the key on the phone or the DND soft key. 2. The following icons/prompts will appear in the display of each respective phone model to indicate that the Do Not Disturb feature is active. a. Snom 300 DND b. snom 320 c. snom 360 d. snom Incoming calls will not ring the phone with this feature activated. Callers will be directed to your voic or Find-Me / Follow-Me if invoked. 4. You will still be able to make outgoing calls with the DND feature activated. 5. Pressing again deactivates the feature. j). Missed Call Display 1. To view missed calls and clear the missed call display when using snom 320 / 360 / 370 press. On a snom 300 press. 2. On the snom 360 or 370 use the or navigation keys to select Missed Calls. Press. On a snom 300 press. 3. When using the snom 320 select soft key. 4. Use the soft keys to navigate through the list. Alternatively if you are using a snom 360 or 370 you may use the navigation keys. 5. Press to return to the previous screen. 6. (Note) you may also view Received and Dialed calls. 7. If you are using the snom 320 press the Details soft key and to display more information about the call (Date/Time etc). For the snom 360 or 370 press the Next soft key and to display more information about the call (Date/Time etc). When using a snom 300 press. Edition Eleven Page 133 of 272
134 14. snom Phones Missed Call Display (contd) 8. To dial a number using the Missed, Received or Dialed call list, press the Confirm key over a displayed or highlighted entry to complete the call. 9. Press the Clear soft key to remove entries. k). Changing Ringtones 1. snom 320 / 360 / 370 press the key. a. snom 360 / 370 i. Use the navigation keys to select option 2 Ring Tone. ii. Press or the Ok soft key to select. iii. Use the or navigation keys to select the line appearance. iv. Generally all calls to your phone will appear on the first Line appearance, unless your system administrator or reseller has configured the system to use the second line appearance. v. When Line1 is displayed or highlighted press or the Ok soft key to select. vi. A list of available Ring Tones will appear. vii. Use the or navigation keys to select the required Ring Tone. viii. A displayed or highlighted Ring Tone is played back. ix. Press to return to the previous screen after making your selection. b. snom 300 / 320 i. Press 3 times to reach Configuration. ii. Select Reg. iii. Use the or navigation keys to select the line appearance. iv. Generally all calls to your phone will appear on the first Line appearance, unless your system administrator or reseller has configured the system to use the second line appearance. v. A displayed or Ring Tone is played back vi. Use the or navigation keys to select the required Ring Tone. Edition Eleven Page 134 of 272
135 14. snom Phones (contd) l). Voic Access 1. The message waiting light will flash (snom 370 red), (snom 300 / 320 / 360 yellow) to indicate that a new message is waiting. When you lift the handset Stuttering Dial Tone is played. 2. To listen to voice messages on a snom 320 / 360 / 370 press the key or dial When using a snom 300 dial Alternatively on a snom 320 / 360 / 370 you may press the VMail soft key as indicated on the phone display. On the snom 300, when VMail is indicated in the phone display, press the Confirm key to connect to the voice mail system. 3. The system will prompt for your password. (Note) as a new user accessing your mailbox for the first time, your password will be the same as your extension number. You will be guided through a short setup process including a password change. Set a password that is different to the extension number. See section Setting up your Voic . Edition Eleven Page 135 of 272
136 14. snom Phones (contd) m). Speed Dials Description This option allows the user to add / manage individual speed dial numbers for their phone. Items that appear in the Destinations list can be selected. This option also provides the ability to add custom numbers and labels for easy identification i.e. those not in Applications as Dial External Numbers. The number of available speed dials will change if a user has an expansion key module associated with the phone. The number of modules can be set in Basic Settings under the P H O N E S Y S T E M C O N F I G U R A T I O N Menu. Select the Extensions link. The following phones sold by Star2Star Communications can be fitted with an Expansion Module, sometimes also referred to as a Sidecar : Polycom IP 601, IP 650, IP670 Snom 320, 360, 370 Grandstream GXP2000 Cisco SPA502G, SPA504G, SPA508G, SPA509G and the SPA525G2 Setup 1. Select the Speed Dials option under I N D I V I D U A L P H O N E S E T T I N G S to change the settings associated with the Speed Dial feature. (Note) not available on the snom 300 or m3. 2. Remember to Save Changes to PBX and reboot the phone. To reboot the phone unplug the internet cable momentarily. The phone will restart. (Note) if the phone has a separate power cable connected, momentarily unplug that cable to reboot the phone. Edition Eleven Page 136 of 272
137 14. snom Phones - Speed Dials (contd) 3. To add a Custom Number and label for easy identification, select the Add Custom Number toward the bottom of the selection list. Add the number and associated label. (Note) this feature is available for the following phones; Polycom, Grandstream and snom (not 300 or m3). Select the Add Custom Number option. Enter the Custom number and Label. Edition Eleven Page 137 of 272
 select the Directory/Dir soft key.")
138 14. snom Phones - Speed Dials (contd) 1. To access the individual Speed Dial directory entries added via the Star2Star web portal press the button or (snom 320 / 360 / 370) select the Directory/Dir soft key. (note) The snom 300 will only provide access to the Company Directory. 2. Your Speed Dial entries will be displayed. 3. Use the or navigation keys to browse the entries. 4. Press over a highlighted or displayed entry to dial. 5. The following example shows the Speed Dial Options for a snom (320 / 360 / 370) phone with 1 Expansion module added. You can also add Speed Dials to utilize the remaining available buttons on the phone. (Note) not available on the snom 300 or m3. There are 12 keys/leds on your snom phone. The first 2 are reserved for lines. There are 10 keys available for Speed Dial programming. (note) only 6 keys will be available if your system is set to Key System Mode (see example) as 4 keys/led positions 3 6 are reserved for Park Positions. A snom expansion module has 42 physical keys/leds available. Up to 3 modules can be fitted to a snom 320 / 360 / 370. Using the available buttons on the phone this could give a total of 136 keys or 132 if your system is set to Key System Mode. All available keys can be programmed via the Speed Dials option in the Star2Star Web Portal. You may append the Company Directory to your speed dial list, including any other locations. Edition Eleven Page 138 of 272

139 14. snom Phones (contd) n). Call Park ( Key System Mode ) 1. When using the snom 320 / 360 / 370 phones your system can be programmed to operate in Key System Mode which emulates a squared key system when parking calls in that the system provides shared park positions. This feature is not available on the snom 300 phone. When a call is active on your phone press the key to park the call. The system sets a default value of 4 calls that can be parked on your phone in this manner and will be visible to other snom 320 / 360 / 370 phone users. However this value can be changed in the Location Information for your system by a system administrator or your reseller. Each call occupies a different park/line position that will be visible (solid yellow LED) to other phone users on your system. You can retrieve the parked call from the respective park/line position from any snom 320 / 360 / 370 phone on your system: Line Keys Shared Park Positions. Four positions are created by default. However more can be created by your System Administrator or Dealer. 2. Alternatively you can park a call on a local phone (non remote) and retrieve from a different local phone perform an attended (Announced) transfer to Use this process for the snom 300. a. See section Transferring a Call 3. The system will play back a retrieval code ( ). The retrieval code 7001 relates to a snom 320 / 360 / 370 shared park position #1. The retrieval code 7002 relates to a snom 320 / 360 / 370 shared park position #2. etc. a. The system provides up to 99 park positions 4. When the caller is Parked they will hear Message / Music on hold if enabled on your system. 5. To retrieve the call, dial the retrieval code to reconnect to the call. 6. If the call remains parked for longer than the system timeout (see On-Hold Options in the Portal Advanced Settings) the call will ring back on the originating extension. Edition Eleven Page 139 of 272
. Phone Options The unit is self powered and has 42 programmable buttons with LED s.")
140 14. snom Phones (contd) o). Expansion Modules The following Star2Star snom phones can be fitted with an Expansion Module also sometimes known as a sidecar. Compatible Phones Expansion Module Unit Description Features snom 320 snom 360 snom 370 p). Phone Options The unit is self powered and has 42 programmable buttons with LED s. Up to 3 units can be fitted to a single phone. Use the Star2Star web portal Speed Dial option to configure your expansion module. Commonly used numbers can be added either from the system Application-Dial External Numbers or custom numbers and labels. You can also add extensions and monitor the presence of a local extension. Generally you would monitor an extension on its Line 1 appearance. This is where all calls arrive by default. (Note) When monitoring extensions the lamp will only light when the extension is actually connected to a call or ringing with a new call. snom users can set additional phone options using the Star2Star web portal. 1. Select Phone Options under I N D I V I D U A L P H O N E S E T T I N G S to configure the following options: a. Change Speaker Phone Settings. b. Configure Holding Reminder Tone. c. Configure the Handset Mic Volume. d. Change the Auto Dial Timeout. (Note) the phone will start to dial by default after 3 seconds. e. Change the Call Waiting behavior (Audible tone On/Off or Visual only). Click here to change Phone Options Edition Eleven Page 140 of 272

141 14. snom Phones (contd) q). PA1 Paging Device Description The snom PA1 provides a very simple way to deliver cost effective paging for your business. It is setup like any other phone in the Star2Star Web Portal with an extension number with no user associated. The unit is pre built with wall mounting brackets. A drill template and screws are also provided. The snom PA1 contains the following outputs: Sound Amplifier - Embedded Class D 4W power amplifier. This amplifier can support a small unpowered speaker at 8Ω. Sound Output Push-on speaker terminals labeled Speaker, LINE out 3.5mm jack labeled Line Out. We would suggest the push-on 8Ω speaker connection for small installations and the 3.5mm Line Out jack for larger setups. Typically using a stereo male 3.5mm jack to dual RCA (phono) cable you can connect the output of the snom PA1 through a separately provided amplifier and associated speakers. Operation Call the extension number assigned to the snom PA1. The call will be automatically answered and audio will be present at the speaker or amplifier and associated speakers. Edition Eleven Page 141 of 272


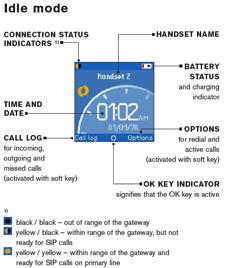
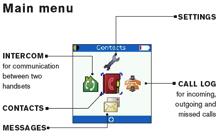
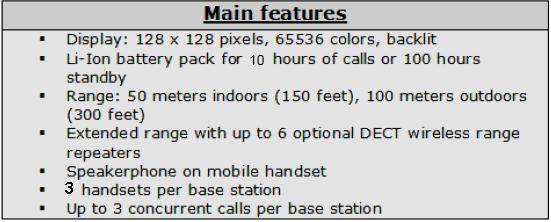
142 15. snom m3 IP DECT Wireless Phone Edition Eleven Page 142 of 272
143 15. snom m3 IP DECT Wireless Phone (contd) a). Answering a Call 1. Pickup the handset and press the Green Phone key. 2. You can also set the handset to auto answer when lifted from the charger or answer when any key is pressed. Access the menu by pressing the OK Key. Navigate to Settings using the navigational keys. Press the OK Key to select. Use the navigational keys to select Telephony settings. Press the OK Key to select. Use the navigational keys to select Answer mode. Both options are displayed (Auto answer / Any key answer). Handling multiple calls: 1. With a call already in progress on your phone, you can answer a subsequent call if required. 2. When the call arrives you will hear a single call waiting tone and call waiting will appear in the handset display. 3. To answer the new call, press the Green Phone key. 4. Your original call will be placed on hold and will hear Music/Message on hold if configured on your system. 5. Press the Options key to either swap the calls, initiate a 3 party conference or transfer. 6. Alternatively you may press the Reject key to divert the new incoming call to your voic . b). Making a Call 1. Enter the number you wish to dial and press the Green Phone key. 2. To make another call with one already in progress, press the hold key. 3. Your original caller will hear music / message on hold if configured on your system. 4. Enter the new number and press the Green Phone key to complete the call. 5. Press the Options key to either swap the calls, initiate a 3 party conference or transfer. Redial Last Number: 1. Press the Options soft key, select Redial and then press the OK key. The most recently dialed number is displayed. 2. Press the Green phone key to call the number. 3. Alternatively select the Call log soft key to access a list of all calls made. The Call log lists Missed, Incoming, Outgoing calls. c). Microphone Mute 1. During a call press the Mute soft key. 2. Press the Mute off soft key to unmute. d). Holding a Call 1. During a call press the Hold soft key. The caller on hold will hear Music or Message on hold if enabled on your system. 2. To retrieve the call on hold press the Options soft key. 3. Select Retrieve call. 4. Press the OK key. Edition Eleven Page 143 of 272
144 15. snom m3 IP DECT Wireless Phone (contd) e). Transferring a Call Blind Transfer (Transfer the call to another party without any announcement): 1. During a call press the Hold soft key. 2. Select the Options soft key. 3. Select Transfer and press the OK key. 4. Enter the number you wish to transfer to and press the OK key. 5. The call is transferred with no announcement. Transfer (Announced): 1. During a call press the Hold soft key. 2. Enter the number you wish to transfer to and press the Green phone key to connect. 3. Announce the call when connected to the other party. 4. To transfer select the Options soft key. 5. Select Transfer and press the OK key. 6. The call is transferred. f). Ending a Call 1. Press the Red phone key. g). Creating a 3 Party Conference 1. With a call in progress, press the Hold soft key. 2. Enter the number you wish to conference with. 3. When the other party answers select the Options soft key. 4. Select Conference to connect all 3 parties together. h). Volume controls 1. To adjust the handset or speaker volume during a call. Press the VOLUME UP / DOWN keys on the side of the handset. 2. To adjust the ringer volume and or melody, access the menu by pressing the OK Key. 3. Navigate to Settings using the navigational keys. Press the OK Key to select. 4. Use the navigational keys to select Audio settings. Press the OK Key to select. 5. Select Ringer volume. 6. Use the VOLUME UP / VOLUME DOWN keys on the side of the handset or the navigational up / down keys to change volume settings. i). Missed call display 1. To quickly clear the missed call display and access the missed call log on your phone press the OK key. 2. You may select the Call log soft key at any time to display (Missed / Incoming / Outgoing) calls. 3. Use the up / down navigational keys to move through the list of calls. 4. Use the left / right navigational keys to select call type i.e. Missed / Incoming / Outgoing / All calls. Edition Eleven Page 144 of 272
145 15. snom m3 IP DECT Wireless Phone (contd) 5. Press the OK key over a highlighted entry to view call details. 6. Press the Green phone key to connect. j). Voic Access 1. The handset display will indicate!new Voic and the icon when new messages arrive. 2. To access the Voic system with the!new Voic display on the handset screen, press the OK key. 3. Press OK again and then press the Play Soft key to connect to the Voic system. 4. Alternatively you can dial 1000 to access the Voic system at any time. 5. The system will prompt for your password. (Note) as a new user accessing your mailbox for the first time, your password will be the same as your extension number. You will be guided through a short setup process including a password change. Set a password that is different to the extension number. See section Setting up your Voic . See also Voic Guide. k). How to Lock / Unlock the keypad 1. If you are carrying the handset around, you can lock the keypad so that you do not use it accidentally. 2. In idle mode press the * key, and then press the Lock soft key. 3. To unlock, press the * key, and then press the Unlock soft key. l). Call Park 1. To park a call on a local phone (non remote) and retrieve from a different local phone perform an attended (Announced) transfer to a. See section Transferring a Call 2. The system will play back a retrieval code ( ). a. The system provides up to 99 park positions 3. When the caller is Parked they will hear Message / Music on hold if enabled on your system. 4. To retrieve the call, dial the retrieval code to reconnect to the call. 5. If the call remains parked for longer than the system timeout (see On-Hold Options in the Portal Advanced Settings) the call will ring back on the originating extension. Edition Eleven Page 145 of 272


146 16. snom m9 IP Wireless Phone Edition Eleven Page 146 of 272
147 a.) Making a call Enter the number you wish to dial and press the Green Phone key. To make another call with one already in progress, press Options and select Hold Call. Your original caller will hear music / message on hold if configured on your system. Enter the new number and press the Green Phone key to complete the call. Press the Options key to either swap the calls, initiate a 3 party conference or transfer. b.) Answering a call Pickup the handset and press the Green Phone key. You can also set the handset to auto answer when lifted from the charger. Access the menu by pressing the center navigation key followed by -> Auto Answer. Press OK to activate/deactivate (checkmark = on). Handling multiple calls: With a call already in progress on your phone, you can answer a subsequent call if required. When the call arrives the handset will display a Call Waiting Indication. CWI will appear toward the bottom of the screen. To accept the waiting call, press Options. To accept the waiting call, press Options. Click Accept to answer the call. Your original call will be placed on hold and will hear Music/Message on hold if configured on your system. To reject the new call and continue with the active call click Reject. Press the Options key to either swap the calls, initiate a 3 party conference or transfer. c.) Ending a call Press the Red phone key. d.) Redial Press the Green Phone key. The Dialed calls list is displayed. Use the navigation wheel Press the Green phone key to select the number you require. to call the number or press OK. Press the Green phone key twice to last number redial. Alternatively select the CHist soft key to access a list of all calls. The Call log lists Missed, Received, and Dialed calls. e.) Microphone Mute During a call press the Mute soft key. To unmute the call press Resume. f.) Holding a call During a call press Options. Select Hold Call. The caller on hold will hear Music or Message on hold if enabled on your system. Edition Eleven Page 147 of 272
148 To retrieve the call on hold, press the Resume soft key. g.) 3 Party Conference Call With a call in progress, press the Options soft key. Select New Call Enter the number you wish to conference with and press OK. Select Conference All 3 parties are connected together. Ending the call on the conference originator s phone will end the conference. Use the Star2Star Conference room feature for larger conferences. h.) Transfering a call Blind Transfer (Transfer the call to another party without any announcement): During a call press the Options soft key. Select Transfer Call. Enter the number you wish to transfer to and press the OK key. The call is transferred with no announcement. Transfer (Announced): During a call press the Options soft key. Select New Call. Enter the number you wish to transfer to and press OK to connect. Announce the call when connected to the other party. To transfer select the Options soft key. Select Bridge Calls to complete the transfer. i.) Find-Me / Follow-Me Use the Star2Star Find-Me / Follow-Me feature in the Star2Star Web portal to forward calls from your extension. Follow Me (Immediate) -- Calls to your extension will be sent automatically to the number you define. Find Me (Sequential) -- Calls to your extension will ring your extension and any other numbers that you define, in order. Find Me (All) -- Calls to your extension will ring your extension and any other numbers that you define, all at once. j.) Lock / Unlock the Keypad If you are carrying the handset around, you can lock the keypad so that you do not use it accidentally. In idle mode press and hold the # key. A lock symbol appears in the display. To unlock, press and hold the # key. Edition Eleven Page 148 of 272
149 k.) Missed Calls To view missed calls on your phone press CHist followed by OK. Use the navigation wheel to select the number required. Press the Green Phone key to call. Press Options to either Detail (provide call details), Delete or Save to directory. (Note) Pressing CHist (Call History) provides access to all (Missed / Received / Dialed) calls. l.) Voice Mail The icon will appear in the handset display when a new message(s) is present. The VM soft key will also be present. To access the Voic system, with a new message(s) present, press the VM key. Enter your password as requested and follow the system prompts. Alternatively you can dial 1000 to access the Voic system at any time. The system will prompt for your password. (Note) when accessing the voice mail system for the first time your password is your extension#. Change this to a 4-digit number you can recall easily. m.) Phone Directory Use the navigation wheel and press i to display the Phone Directory. The company directory is automatically downloaded to this phone. Scroll through the available contacts then press the Green Phone key to call. Select Details to display contact details, press Options to Edit / Delete Entry. Edit an existing entry via the handset: Select Edit Entry to change an entry. Use the navigation wheel to select the field you wish to edit. Select OK. Make your changes. Select Cf to delete characters. Press OK to save the changes. Adding a new entry via the handset: Select OK at <New Item>. Using the key pad enter the contact name. Use * to change the keypad from upper to lower case or numeric entry (See HANDSET LAYOUT). Select numeric and then press # to display Symbols including a space. Press OK and select either Home / Office or Mobile. Press OK. Enter the contact telephone number. Press OK. Contact details are displayed as entered. Navigate to any field and select OK to edit. Press Save to save the entry. n.) Volume Adjustment To adjust the handset or speaker volume in an idle state or during a call, press the VOLUME UP / DOWN keys on Edition Eleven Page 149 of 272
150 the side of the handset. o.) Changing Ring Tones Press the center navigation button followed by (Preferences) Navigate to Audio Settings g Ringer Settings Press OK to select. Select a setting, e.g. External Calls. Press OK to select. Set the volume (1-6) using the navigation keys, then scroll to the next line and select a melody. Press OK to save the settings. p.) Star2Star Call Park and Retrieve Perform an announced transfer to the park code Listen to the system retrieval code announcement e.g Transfer the call. The caller is now parked. The caller will hear music or message on hold if configured on your system. Dial the system retrieval code e.g on any local extension to retrieve the call. Edition Eleven Page 150 of 272
151 17. Cisco Phones (SPA525G2) a). Answering a Call Using the Handset: 1. Pick up the handset. Using the Speakerphone: 2. Press, Answer soft key or (red flashing line button). Using the optional Headset: 3. Press to answer the call using a headset. b). Making a Call Using the Handset: 1. Pick up the handset and dial the desired number. 2. Press the Dial soft key to complete the call. Using the hands-free Speakerphone: 1. With the handset on-hook, either press (speaker button), or (a line button). Dial the desired number. 2. Press the Dial soft key to complete the call. Using the optional Headset: 1. With the headset connected, press (headset button), or (a line button). Dial the desired number. 2. Press the Dial soft key to complete the call. Handling multiple calls: 1. With a call in progress the next call to the phone will be indicated by a change in the phones display screen indicating that a call is waiting and showing caller information for the call. The user will also hear a short call waiting tone to indicate another call is present. The line button and indicator at the top of the phone will flash red. Select the Answer soft key or flashing line button to answer the call. 2. Your original caller is automatically placed on hold and the display information for the call will appear on screen. 3. Press the blinking line button to toggle between calls. 4. If you receive additional calls the caller will be connected to your voic or follow the path of Find-Me / Follow-Me if configured for your phone. (Note) During a call, you can alternate between handset, headset, or hands-free modes by pressing the or buttons. Edition Eleven Page 151 of 272
152 17. Cisco Phones SPA525G2 (contd) Redial: 1. Press the Redial soft key and use the navigation arrows to select the desired number from the Place Call list. 2. Lift the handset or press the Dial soft key. 3. Select the EditDial soft key to edit the number selected before dialing e.g. to add an area code. Call History: 1. To access a list of All Calls, Missed Calls, Received Calls, or Placed Calls press. 2. Use the Navigation button (down arrow) to scroll to Option 2 Call History. Press the Select soft key. 3. Use the Navigation button (down/up arrow) to scroll to the required option. 4. Use the Navigation button (down/up arrow) again to scroll to the required entry. 5. Press the Dial soft key to call the number displayed. 6. Select the EditDial soft key to edit the number selected before dialing e.g. to add an area code. 7. You may also select the Option soft key for the following options: a. Delete Entry (Deletes a specific call history entry) b. Delete List (Deletes all entries for a specific call history list) c. Add to Address Book (Add the call detail to your personal address book) Outgoing CallerID: 1. Your phone can be configured to display the Outgoing CallerID of your main number (default setting) or any other number that is configured on your system. 2. The CallerID can also be set to Blocked. 3. System Administration access is required to change these settings. 4. A typical setup could be to display the main company CallerID on the first line appearance and another ID or Blocked for subsequent line appearances. 5. To use this feature, once configured, select the relevant line button 1 5 to make your call. 6. Your Outgoing CallerID will reflect what s set in the Star2Star Web Portal. c). Microphone Mute 1. To mute the phone microphone, speaker, or headset microphone press. The button will glow red. 2. The other party cannot hear you. 3. Press (microphone mute button) again to unmute and resume audio. d). Holding a Call 1. During a call either press the Hold soft key or hold button to place the call on hold. 2. The line button flashes red. 3. The caller on hold will hear Music or Message on hold if enabled on your system. 4. Press the Resume soft key or flashing red line button to re establish the call. Edition Eleven Page 152 of 272
153 17. Cisco Phones SPA525G2 (contd) e). Transferring a Call Blind Transfer (Transfer without announcement): 1. During a call, press (right arrow) then press the BlindXfer soft key. 2. The caller on hold will hear Music or Message on hold if enabled on your system. 3. Dial the number you want to transfer the call to then press the Dial soft key to complete the transfer. 4. Alternatively during a call press the Transfer soft key, dial the number you require then press the Dial soft key followed by the Transfer soft key to complete the transfer. Transfer (Announced): 1. During a call, press the Transfer soft key. 2. The caller on hold will hear Music or Message on hold if enabled on your system. 3. Dial the number you want to transfer the call to and then press the Dial soft key. 4. When the called party answers announce the call. 5. Press the Transfer soft key to complete the transfer. f). Ending a Call 1. Press the End Call soft key or replace the handset. 2. Press (line button) if you are using the Speakerphone, headset or handset. 3. Alternatively you may also press (headset button) if you are using a headset. g). Creating a 3 Party Conference Call To create a three-way local conference call: 1. You can create a conference with two other parties using the phones local conferencing feature. 2. During an active call, press (right arrow) then press the Conf soft key to create a new call. 3. The active call is placed on hold and the caller will hear Music or Message on hold if enabled on your system. 4. Dial the phone number of the second party 5. When the second party answers, press the Conf soft key again to join all parties in the Conference. When you hang up, the other two parties are disconnected. To keep the other parties in a call, but disconnect you from the call, press the Join soft key. Use the Star2Star Conference room feature for larger conferences. h). Volume Controls 1. Press the volume button to adjust handset, headset and speakerphone volume during a call. 2. Pressing this button with the phone in an idle state will adjust the ringer volume. 3. Press the Save soft key to keep the setting. Edition Eleven Page 153 of 272
154 17. Cisco Phones SPA525G2 (contd) i). Missed Call Display Returning a Missed Call: 1. If the LCD screen shows a missed call, press the Call Rtn soft key to return the call. (Note) if the phone display shows multiple missed calls pressing the Call Rtn soft key will return the last missed call. 2. Press the Miss soft key to display a list of Missed Calls. 3. Use the Navigation button (down/up arrow) to scroll to the required entry. 4. Press the Dial soft key to call the number displayed. 5. Select the EditDial soft key to edit the number selected before dialing e.g. to add an area code. 6. You may also select the Option soft key for the following options: a. Delete Entry (Deletes a specific call history entry) b. Delete List (Deletes all entries for a specific call history list) c. Add to Address Book (Add the call detail to your personal address book) 7. If the LCD screen does not show a missed call, you can return a call from the Missed Call list. 8. To access a list of Missed Calls press to access Call History. 9. Use the Navigation button (down arrow) to scroll to Option 2 Call History. Press the Select soft key. 10. Use the Navigation button (down/up arrow) to scroll to Option 2 Missed Calls. Press the Select soft key. 11. Use the Navigation button (down/up arrow) again to scroll to the required entry. 12. Use the Dial soft key call the number displayed. 13. Select the EditDial soft key to edit the number selected before dialing e.g. to add an area code. 14. (Note) step 6 above also applies. j). Do Not Disturb 1. Press DND soft key. 2. A Do Not Disturb message will appear in the phone display. 3. Press the Clr DND soft key to turn off the feature. (Note) callers will be directed to Voice Mail or the Star2Star Find-Me / Follow- Me feature if invoked. k). Changing Ringtones 1. Press (setup button) to enter the Settings Menu. 2. Scroll to User Preferences and press Select. 3. Scroll to 2 Audio Preferences and press the Select soft key. 4. Scroll to the extension you wish to change. Typically all calls will arrive on Ext Press the right arrow navigation button to view and subsequently scroll the available ring tone options. 6. Press the Play soft key to listen. 7. When you have selected the tone you require press the Select soft key. 8. Press the Back soft key twice followed by the Exit soft key to return to the idle phone display. (Note) you may upload 2 custom mp3 ring tones. Edition Eleven Page 154 of 272
155 17. Cisco Phones SPA525G2 (contd) l). Voic Access 1. The indicator at the top of the phone will glow red when new message are waiting. A message envelop icon will appear against your extension number in the phone display. 2. To listen to voice messages press the button or dial The system will prompt for your password. (Note) as a new user accessing your mailbox for the first time, your password will be the same as your extension number. You will be guided through a short setup process including a password change. Set a password that is different to the extension number. See section Setting up your Voic . m). Directory The Company Extension Directory is automatically downloaded to the phone. 1. To access the Directory press (setup button). 2. Use the navigation arrows to select option 1 Directories. Press the Select soft key. 3. The phone will display 2 options: - Personal Address Book You can add up to 300 entries into the phone directly. Each entry contains a number of fields i.e. Name / Work No / Mobile No / Home No / Ring Tone. (Note) you can also import contacts directly from a Bluetooth enabled mobile phone. View the Star2Star Phone and Features Guide for details on this feature. - Directory The corporate extension directory is automatically downloaded to the phone. The phone will display 32 entries at a time. Press the Next soft key to display additional entries as required. 4. Using the navigation arrows select the directory you require and press the Select soft key. 5. Use the navigation arrows to select the entry you require. 6. Press the Option soft key (Personal Address Book only) to use the Search feature to locate a specific entry. 7. Press the Dial soft key to dial the entry you require. n). Call Park 1. To park a call on a local phone (non remote) and retrieve from a different local phone, with a call in progress press the Park soft key. 2. The phone will automatically park the call. 3. The caller will hear music or message on hold if configured on your system. 4. If the phone has been fitted with the SPA500S Attendant Console and the system has been configured in Key System Mode users will see shared park appearances on that console. A park retrieval code of 7001 relates to the first shared park appearance button, 7002 relates to the second etc. 5. Dial the retrieval code e.g to retrieve the call. 6. Alternatively if the phone has been fitted with an Attendant Console press the relevant shared park appearance button to retrieve the parked call. 7. If the call remains parked for longer than the system timeout (see On-Hold Options in the Portal Advanced Settings Admin users only) the call will ring back on the originating extension. Edition Eleven Page 155 of 272
156 17. Cisco Phones SPA525G2 (contd) o). Speed Dials You can create speed dials assigned to a number, that, when pressed on the keypad, dials the number assigned to it. You can have up to 8 speed dials (2 9). Location 1 is reserved. 1. Press (setup button) 2. Scroll to Speed Dials and press the Select soft key. 3. For a new speed dial, scroll to select an unused speed dial location (2 through 9). 4. To edit an existing speed dial, select it. 5. Press the Edit soft key. 6. Enter the name and phone number for the speed dial. 7. To select a contact from the Address Book, press Option and then Select to Select From Address Book. Scroll to choose the contact and press Select. 8. Press Save. To call one of your configured speed dial numbers, choose one of the following options: Open a phone line and press the number for the speed dial (2 9), then wait a few seconds or press the Dial soft key. Press (setup button) select Speed Dial, choose the number, and press the Dial soft key. (Note) if your phone has been fitted with an attendant console(s) use the Star2Star Web Portal Individual Phone Settings / Speed Dials section to configure this device. Typically you would add local extensions to view their presence and allow one touch transfer of calls from your phone to that extension. p). Attendant Console (Expansion Modules) The following Star2Star Cisco SPA Phones can be fitted with the Cisco SPA500S and SPA500DS Attendant Console(s) also sometimes know as an Expansion Module. See Section 11. Cisco Phones (SPA5xxG Series Attendant Console) for more details on configuring using the Star2Star Web Portal. Compatible Phones Attendant Console Unit Description Features Cisco SPA502G Cisco SPA504G Cisco SPA508G Cisco SPA509G Cisco SPA525G2 The SPA500S unit is self powered and has 32 programmable multicolored LED buttons. Up to 2 units can be fitted to a single phone. The SPA500DS unit is self powered and has 30 programmable LED buttons. Up to 2 units can be fitted to a single phone. Use the Star2Star web portal Speed Dial option to configure your attendant console(s). Commonly used numbers can be added either from the system Application-Dial External Numbers or custom numbers and labels. You can also add extensions and monitor the presence of a local extension. Generally you would monitor an extension on its Line 1 appearance. This is where all calls arrive by default. The Cisco SPA500S module supports One Touch Transfer and call pickup. (Note) When monitoring extensions the lamp will only light when the extension is actually connected to a call or ringing with a new call. (Note) When fitted to the SPA525G2 shared park appearance positions will be displayed. Edition Eleven Page 156 of 272
 The Cisco SPA525G2 supports Bluetooth to allow use of the phone with a wireless Bluetooth-enabled headset and/or a Bluetooth-enabled mobile phone.")
157 17. Cisco Phones SPA525G2 (contd) q). Advanced Features (Bluetooth) The Cisco SPA525G2 supports Bluetooth to allow use of the phone with a wireless Bluetooth-enabled headset and/or a Bluetooth-enabled mobile phone. You can do the following: Pair a wireless Bluetooth-enabled headset and Cisco SPA525G2. Pair your Bluetooth-enabled mobile phone and Cisco SPA525G2. Your mobile phone is assigned a line button on your phone. You can make and receive mobile calls using the Cisco SPA525G2. Switch audio for in-progress calls between your mobile phone and the Cisco SPA525G2. Import your mobile phone address book to your Cisco SPA525G2 personal address book (up to 300 contacts). Use your Cisco SPA525G2 as a handsfree device for your mobile phone. (Note) Not all mobile phones support this function. If you have both a headset and a Bluetooth-enabled phone paired with your Cisco SPA525G2, the phone can only connect to one device at a time. If multiple Bluetooth devices are in range of your phone, the order of devices in the Bluetooth Profiles list is used, and the device with a higher priority is activated first. Click the arrow keys to move devices up and down in priority. You can choose yes or no under Connect Automatically to determine if the phone connects automatically if it detects the Bluetooth device. You can also remove devices in this window. Enabling Bluetooth on Your Phone: 1. Press (setup button) to enter the Settings menu. 2. Scroll to User Preferences and press Select. 3. Scroll to Bluetooth Configuration and press Select. 4. With Bluetooth selected, press the Right Arrow key until a blue check mark appears. 5. Press Save. Edition Eleven Page 157 of 272
 (contd) Pairing Your Cisco SPA 525G2 with a Bluetooth-Enabled Mobile Phone: To pair your Cisco SPA525G2 with your Bluetooth-enabled mobile phone, you can")
158 17. Cisco Phones SPA525G2 (contd) q). Advanced Features (Bluetooth Mobile Phone) (contd) Pairing Your Cisco SPA 525G2 with a Bluetooth-Enabled Mobile Phone: To pair your Cisco SPA525G2 with your Bluetooth-enabled mobile phone, you can either initiate pairing from the Cisco SPA525G2, or from your mobile phone. Initiating Pairing from the Cisco SPA 525G2: 1. Enabled Bluetooth as described previously. 2. Press (setup button) to enter the Settings menu. 3. Scroll to User Preferences and press Select. 4. Scroll to Bluetooth Configuration and press Select. 5. Scroll to Bluetooth Mode and press the Right Arrow key to choose one of the following: a. Handsfree Your Cisco SPA525G2 will operate as a handsfree device with a Bluetooth-enabled mobile phone. The bottom line appearance button will reconfigure displaying a mobile phone icon. b. Both Your Cisco SPA525G2 will operate with your Bluetooth-enabled mobile phone or operate with a Bluetooth headset. 6. Your phone will reconfigure itself Refreshing Voice Component will be displayed temporarily as this process completes. (Note) Your Cisco SPA 525G2 will connect to only one device at a time (either the Bluetooth headset or the Bluetooth-enabled mobile phone.) If multiple Bluetooth devices are in range of the Cisco SPA525G2, the order of devices in the Bluetooth Configuration > Bluetooth Profiles list is used, and the device with a higher priority is activated first. 7. Scroll to Bluetooth Profiles and press the Right Arrow key to enter the profile screen. 8. Make sure your mobile phone is in Listen mode. This mode is selected so that other devices can find it. Refer to your Bluetooth enabled Mobile Phone instructions for details on this process. 9. Press Scan to scan for your mobile phone. (Note) Depending on the network environment (for example, the number of Bluetooth devices and noise level), your Bluetooth headset may not appear on the found devices list. Ensure the headset is powered on and has Bluetooth activated, and retry the scan. 10. In the Select a Bluetooth Device to Pair list, select the mobile phone to which you want to pair and press Connect. 11. The Cisco SPA525G2 will display Connecting Bluetooth Device. 12. A prompt for a passcode will appear in your mobile phone display to complete the Pairing process. That passcode is usually 4 zeroes e.g If the pairing process is successful the last line appearance button on your Cisco SPA525G2 phone will be green and a mobile phone icon with a flashing lightning bolt icon is displayed next to the mobile phone name, number, or other identifier (such as the phone model) for your phone (see image below). Edition Eleven Page 158 of 272
.")
159 q). Advanced Features (Bluetooth Mobile Phone) (contd) 14. When your mobile phone is no longer paired (Bluetooth deactivated or mobile phone out of range) your Cisco SPA525G2 display will change. The line appearance button will be orange (see image below). (Note) When your Bluetooth enabled Mobile Phone is successfully paired with the Cisco SPA525G2 the name, number, or other identifier shown in the display depends on what is configured on your mobile phone. If you have not configured a name on your phone, the phone may display your phone number or some other identifier (such as the phone model). The display name can vary depending on your phone model and configuration. 15. To verify the mobile phone configuration. 16. Press (setup button) to enter the Settings menu. 17. Scroll to User Preferences and press Select. 18. Scroll to Bluetooth Configuration and press Select. 19. Scroll to Bluetooth Profiles and press the Right Arrow key to enter the profile screen. 20. Your mobile phone should appear in the list of Bluetooth devices. Importing Your Mobile Phone Address Book into the Cisco SPA525G2: 1. Press (setup button) to enter the Settings menu and select Directories or press the Directory soft key. 2. Select Personal Address Book. Edition Eleven Page 159 of 272
 Depending on your mobile phone, you may need to authorize the Bluetooth connection, even if the phone is already paired with the Cisco")
. 6.")
160 17. Cisco Phones SPA525G2 (contd) 3. Press the Import soft key. (Note) Depending on your mobile phone, you may need to authorize the Bluetooth connection, even if the phone is already paired with the Cisco SPA525G2. q). Advanced Features (Bluetooth Mobile Phone) (contd) 4. The phone displays a status message about the import. 5. The download time will vary based upon the number of entries in your mobile phone (300 maximum). 6. If the import process is successful, your imported contacts are shown in the Directory. Edition Eleven Page 160 of 272
161 Making a Mobile Phone Call Using Your Cisco SPA525G2: When you make a mobile phone call using your Cisco SPA525G2, your Cisco SPA 525G2 acts as a handsfree device for your phone. The call is made through your mobile phone, but the audio is present on the Cisco SPA525G2 and the call control is done using the Cisco SPA525G2, unless you switch back to your mobile phone. 1. Press the line button associated with your mobile phone (the line button is marked with a mobile phone icon with a flashing lightning bolt). 2. Enter a number to dial and press the Dial softkey. 3. Alternatively press the Directory softkey and select Personal Address book. Choose a number and press the Dial softkey. 4. The outgoing call appears on both your Cisco SPA 525G2 and your mobile phone display. The Cisco SPA 525G2 displays an off-hook icon next to the mobile phone display name. Edition Eleven Page 161 of 272

162 17. Cisco Phones SPA525G2 (contd) q). Advanced Features (Bluetooth Mobile Phone) (contd) 5. After the call is connected, the icon next to the mobile phone display shows that the call is established. The audio goes through the Cisco SPA525G2, although the mobile phone display also shows a connected call. 6. To switch audio from your Cisco SPA525G2 phone press the soft key below the mobile phone icon. Press the soft key again to switch audio back to the Cisco SPA525G2 (see image below). (Note) Not all mobile phones support this function. 7. When a mobile phone call is incoming, outgoing, or connected on your Cisco SPA525G2, the display shows information about your mobile phone. (Note) Not all mobile phones support this function. The call display bubble shows the following information: Battery indicator Shows the battery life left on your mobile phone. Signal strength Shows the signal strength for your mobile phone. Network (optional) May show the phone network for your mobile phone. Receiving Mobile Phone Calls Using Your Cisco SPA525G2: If your mobile phone is paired with the Cisco SPA525G2, an incoming call to your mobile phone is also displayed on the Cisco SPA525G2. 1. To answer a call press the Answer softkey, red flashing line button associated with your mobile phone, pick up the handset or press (speaker button). 2. Press Ignore to ignore the call. The caller will be directed to your mobile voic . Edition Eleven Page 162 of 272
 (contd) Connecting Bluetooth Headsets: To configure the phone to work with your Bluetooth headset, first enable Bluetooth on the Cisco SPA525G2 phone as")
163 17. Cisco Phones SPA525G2 (contd) q). Advanced Features (Bluetooth - Headset) (contd) Connecting Bluetooth Headsets: To configure the phone to work with your Bluetooth headset, first enable Bluetooth on the Cisco SPA525G2 phone as described earlier: Initiating Pairing With Your Bluetooth Headset: 1. Press (setup button) to enter the Settings menu. 2. Scroll to User Preferences and press Select. 3. Scroll to Bluetooth Configuration and press Select. 4. Scroll to Bluetooth Mode and press the Right Arrow key to choose one of the following: a. Handsfree Your Cisco SPA525G2 will operate as a handsfree device with a Bluetooth-enabled mobile phone. The bottom line appearance button will reconfigure displaying a mobile phone icon. b. Both Your Cisco SPA525G2 will operate with your Bluetooth-enabled mobile phone or operate with a Bluetooth headset. 5. Your phone will reconfigure itself Refreshing Voice Component will be displayed temporarily as this process completes. (Note) Your Cisco SPA 525G2 will connect to only one device at a time (either the Bluetooth headset or the Bluetooth-enabled mobile phone.) If multiple Bluetooth devices are in range of the Cisco SPA525G2, the order of devices in the Bluetooth Configuration > Bluetooth Profiles list is used, and the device with a higher priority is activated first. 6. Scroll to Bluetooth Profiles and press the Right Arrow key to enter the profile screen. 7. Make sure your headset is in Listen mode. This mode is required so that other devices can find it. Refer to your Bluetooth headset instructions for details on this process. 8. Press Scan to scan for your headset. (Note) Depending on the network environment (for example, the number of Bluetooth devices and noise level), your Bluetooth headset may not appear on the found devices list. Ensure the headset is powered on and has Bluetooth activated, and retry the scan. 9. In the Select a Bluetooth Device to Pair list, select the headset you want to pair and press Connect. 10. The Cisco SPA525G2 will display Connecting Bluetooth Device. 11. The Bluetooth Profile screen will appear. 12. Navigate to the Pin field and enter the appropriate Pin usually 4 zeroes e.g to complete the Pairing process. Edition Eleven Page 163 of 272
 Charging Your Mobile Phone Using Your Cisco SPA525G2: You can use the USB port on the Cisco SPA525G2 model to charge your Bluetooth-enabled mobile phone")
164 17. Cisco Phones SPA525G2 (contd) q). Advanced Features (Charging Your Mobile Phone) Charging Your Mobile Phone Using Your Cisco SPA525G2: You can use the USB port on the Cisco SPA525G2 model to charge your Bluetooth-enabled mobile phone if your phone has a mini-usb port. e.g. BlackBerry, iphone. n). Advanced Features (Playing MP3 Files on Your Phone) Your phone contains an audio player that can play.mp3 files (playlist limited to 48 songs). To play music on your phone, you must load the audio files onto a USB memory device (not sold with the phone). The phone reads the files from the device, so the device must remain inserted while playing the files. (Note) Only MP3 music with no Digital Media Rights protection can be played on the Cisco SPA525G2 IP Phone. Creating the Playlist: 1. Connect a USB storage device to your PC. 2. Create a directory named mp3 on the USB device and copy the audio files into that directory. 3. Remove the USB device from your PC and insert it into the USB slot on the Cisco SPA525G2. 4. Press (setup button) to enter the Settings menu. 5. Scroll to MP3 Player and press Select. 6. Press Add List to create a playlist from the songs on the USB device. 7. Choose songs by choosing one of the following methods: Choose individual songs by scrolling to the song you want and pressing the Right Arrow key or the Select button. Choose all songs on the USB device by pressing SelectAll. You can clear all selected songs by pressing ClearAll. 8. After choosing songs, the songs will be marked with a check in the box next to the song. Press Add to add the selected songs to the playlist. Edition Eleven Page 164 of 272

165 17. Cisco Phones SPA525G2 (contd) q). Advanced Features (Playing MP3 Files on Your Phone) (contd) Playing Songs: 1. In the Playlist, scroll to the song you want to begin playing and press Play. 2. You have the following controls: Stop Stop the song. Pressing play will restart song play. Previous Move to the previous song in the playlist. Next Move to the next song in the playlist. Back Move back one screen to the playlist. Controlling the Audio: 1. Use the Volume button on the phone to turn the music up or down. To switch the audio destination between the speaker, headset, and handset, press the Up Arrow or Down Arrow key. The icon on the left above the song length display shows the audio destination of speaker, handset, or headset (see the following graphic). Edition Eleven Page 165 of 272
166 18. Cisco Phones (SPA50xG Series and SPA303G) a). Answering a Call Using the Handset: 1. Pick up the handset. Using the Speakerphone: 1. Press, answer soft key or (red flashing line button-not SPA502G). Using the optional Headset: 1. Press to answer the call using a headset. b). Making a Call Using the Handset: 1. Pick up the handset and dial the desired number. 2. Press the dial soft key to complete the call. Using the hands-free Speakerphone: 1. With the handset on-hook, either press (speaker button), or (a line button-not SPA502G). Dial the desired number. 2. Press the dial soft key to complete the call. Using the optional Headset: 1. With the headset connected, press (headset button), or (a line button-not SPA502G). Dial the desired number. 2. Press the dial soft key to complete the call. Handling multiple calls: 1. With a call in progress the next call to the phone will be indicated by a change in the phones display screen indicating that a call is waiting and showing caller information for the call. The user will also hear a short call waiting tone to indicate another call is present. The line button and indicator at the top of the phone will flash red-(not SPA502G). Select the answer soft key or flashing line button (not SPA502G) to answer the call. 2. Your original caller is automatically placed on hold and the display information for the call will appear on screen. 3. Press the blinking line button (not SPA502G). to toggle between calls. 4. If you receive additional calls the caller will be connected to your voic or follow the path of Find-Me / Follow-Me if configured for your phone. (Note) During a call, you can alternate between handset, headset, or hands-free modes by pressing the or buttons. Edition Eleven Page 166 of 272
167 18. Cisco Phones SPA50xG Series and SPA 303G (contd) Redial: 1. Press the redial soft key and use the navigation arrows to select the desired number from the Place Call list. 2. Lift the handset or press the dial soft key. 3. Select the edit soft key to edit the number selected before dialing e.g. to add an area code. Call History: 1. To access a list of Redial, Answered Calls and Missed Calls press. 2. Use the Navigation button (down arrow) to scroll to Option 2 Call History. Press the Select soft key. 3. Use the Navigation button (down/up arrow) to scroll to the required option. 4. Use the Navigation button (down/up arrow) again to scroll to the required entry. 5. Press the dial soft key to call the number displayed. 6. Select the edit soft key to edit the number selected before dialing e.g. to add an area code. 7. Select the delete soft key to delete a call history entry. 8. Select the cancel soft key to go back a screen. Outgoing CallerID: 1. Your phone can be configured to display the Outgoing CallerID of your main number (default setting) or any other number that is configured on your system. 2. The CallerID can also be set to Blocked. 3. System Administration access is required to change these settings. 4. A typical setup could be to display the main company CallerID on the first line appearance and another ID or Blocked for subsequent line appearances. 5. To use this feature, once configured, select the relevant line button 1 5 to make your call. 6. Your Outgoing CallerID will reflect what s set in the Star2Star Web Portal. c). Microphone Mute 1. To mute the phone microphone, speaker, or headset microphone press. The button will glow red. 2. The other party cannot hear you. 3. Press (microphone mute button) again to unmute and resume audio. d). Holding a Call 1. During a call either press the Hold soft key or hold button to place the call on hold. 2. The line button flashes red. 3. The caller on hold will hear Music or Message on hold if enabled on your system. 4. Press the Resume soft key or flashing red line button to re establish the call. Edition Eleven Page 167 of 272
168 18. Cisco Phones SPA50xG Series and SPA 303G (contd) e). Transferring a Call Blind Transfer (Transfer without announcement): 1. During a call, press (right arrow) then press the BlindXfer soft key. 2. The caller on hold will hear Music or Message on hold if enabled on your system. 3. Dial the number you want to transfer the call to then press the Dial soft key to complete the transfer. 4. Alternatively during a call press the Transfer soft key, dial the number you require then press the Dial soft key followed by the Transfer soft key to complete the transfer. Transfer (Announced): 1. During a call, press the Transfer soft key. 2. The caller on hold will hear Music or Message on hold if enabled on your system. 3. Dial the number you want to transfer the call to and then press the Dial soft key. 4. When the called party answers announce the call. 5. Press the Transfer soft key to complete the transfer. f). Ending a Call 1. Press the End Call soft key or replace the handset. 2. Press (line button) if you are using the Speakerphone, headset or handset. 3. Alternatively you may also press (headset button) if you are using a headset. g). Creating a 3 Party Conference Call To create a three-way local conference call: 1. You can create a conference with two other parties using the phones local conferencing feature. 2. During an active call, press (right arrow) then press the Conf soft key to create a new call. 3. The active call is placed on hold and the caller will hear Music or Message on hold if enabled on your system. 4. Dial the phone number of the second party 5. When the second party answers, press the Conf soft key again to join all parties in the Conference. When you hang up, the other two parties are disconnected. To keep the other parties in a call, but disconnect you from the call, press the Join soft key. Use the Star2Star Conference room feature for larger conferences. h). Volume Controls 1. Press the volume button to adjust handset, headset and speakerphone volume during a call. 2. Pressing this button with the phone in an idle state will adjust the ringer volume. 3. Press the Save soft key to keep the setting. Edition Eleven Page 168 of 272
169 18. Cisco Phones SPA50xG Series and SPA 303G (contd) i). Missed Call Display Returning a Missed Call: 1. If the LCD screen shows a missed call, press the Call Rtn soft key to return the call. (Note) if the phone display shows multiple missed calls pressing the Call Rtn soft key will return the last missed call. 2. Press the Miss soft key to display a list of Missed Calls. 3. Use the Navigation button (down/up arrow) to scroll to the required entry. 4. Press the Dial soft key to call the number displayed. 5. Select the EditDial soft key to edit the number selected before dialing e.g. to add an area code. 6. You may also select the Option soft key for the following options: a. Delete Entry (Deletes a specific call history entry) b. Delete List (Deletes all entries for a specific call history list) c. Add to Address Book (Add the call detail to your personal address book) 7. If the LCD screen does not show a missed call, you can return a call from the Missed Call list. 8. To access a list of Missed Calls press to access Call History. 9. Use the Navigation button (down arrow) to scroll to Option 2 Call History. Press the Select soft key. 10. Use the Navigation button (down/up arrow) to scroll to Option 2 Missed Calls. Press the Select soft key. 11. Use the Navigation button (down/up arrow) again to scroll to the required entry. 12. Use the Dial soft key call the number displayed. 13. Select the EditDial soft key to edit the number selected before dialing e.g. to add an area code. 14. (Note) step 6 above also applies. j). Do Not Disturb 1. Press DND soft key. 2. A Do Not Disturb message will appear in the phone display. 3. Press the Clr DND soft key to turn off the feature. (Note) callers will be directed to Voice Mail or the Star2Star Find-Me / Follow- Me feature if invoked. k). Changing Ringtones 1. Press (setup button) to enter the Settings Menu. 2. Scroll to User Preferences and press Select. 3. Scroll to 2 Audio Preferences and press the Select soft key. 4. Scroll to the extension you wish to change. Typically all calls will arrive on Ext Press the right arrow navigation button to view and subsequently scroll the available ring tone options. 6. Press the Play soft key to listen. 7. When you have selected the tone you require press the Select soft key. 8. Press the Back soft key twice followed by the Exit soft key to return to the idle phone display. (Note) you may upload 2 custom mp3 ring tones. Edition Eleven Page 169 of 272
170 18. Cisco Phones SPA50xG Series and SPA 303G (contd) l). Voic Access 1. The indicator at the top of the phone will glow red when new message are waiting. A message envelop icon will appear against your extension number in the phone display. 2. To listen to voice messages press the button or dial The system will prompt for your password. (Note) as a new user accessing your mailbox for the first time, your password will be the same as your extension number. You will be guided through a short setup process including a password change. Set a password that is different to the extension number. See section Setting up your Voic . m). Directory The Company Extension Directory is automatically downloaded to the phone. 1. To access the Directory press (setup button). 2. Use the navigation arrows to select option 1 Directories. Press the Select soft key. 3. The phone will display 2 options: - Personal Address Book You can add up to 300 entries into the phone directly. Each entry contains a number of fields i.e. Name / Work No / Mobile No / Home No / Ring Tone. (Note) you can also import contacts directly from a Bluetooth enabled mobile phone. View the Star2Star Phone and Features Guide for details on this feature. - Directory The corporate extension directory is automatically downloaded to the phone. The phone will display 32 entries at a time. Press the Next soft key to display additional entries as required. 4. Using the navigation arrows select the directory you require and press the Select soft key. 5. Use the navigation arrows to select the entry you require. 6. Press the Option soft key (Personal Address Book only) to use the Search feature to locate a specific entry. 7. Press the Dial soft key to dial the entry you require. n). Call Park 1. To park a call on a local phone (non remote) and retrieve from a different local phone, with a call in progress press the park soft key. 2. The phone will announce the system retrieval code e.g and automatically park the call. 3. The caller will hear music or message on hold if configured on your system. 4. Cisco SPA508G and SPA509G phone users will see the parked call in 1 of four shared park appearances displayed on the phone if the system is configured in Key System Mode. A park retrieval code of 7001 relates to the first shared park appearance button, 7002 relates to the second etc. Non 508G / 509G users will see shared park appearances if the phone is fitted with the SPA500S Attendant Console. (Note) not available on the 303 model. 5. To retrieve a parked call on the 508G / 509G or another model with an Attendant Console fitted, press the relevant shared park appearance button. 6. Alternatively dial the retrieval code e.g to retrieve the call. 7. If the call remains parked for longer than the system timeout (see On-Hold Options in the Portal Advanced Settings Admin users only) the call will ring back on the originating extension. Edition Eleven Page 170 of 272
171 18. Cisco Phones SPA50xG Series and SPA 303G (contd) o). Speed Dials You can create speed dials assigned to a number, that, when pressed on the keypad, dials the number assigned to it. You can have up to 8 of these (2 9) speed dials. Location 1 is reserved for voice mail). 1. Press (setup button) 2. Scroll to Speed Dial and press the select soft key. 3. For a new speed dial, scroll to select an unused speed dial location (2 through 9). 4. To edit an existing speed dial or add a new one select it by using the navigation buttons then press the edit soft key. 6. Enter the phone number for the speed dial and select the ok soft key. To call one of your configured speed dial numbers, choose one of the following options: Open a phone line and press the number for the speed dial (2 9), then wait a few seconds or press the dial soft key. Press (setup button) select Speed Dial, choose the number, and press the dial soft key. (Note) if your phone has been fitted with an attendant console(s) use the Star2Star Web Portal Individual Phone Settings / Speed Dials section to configure this device. Typically you would add local extensions to view their presence and allow one touch transfer of calls from your phone to that extension. p). Attendant Console (Expansion Modules) The following Star2Star Cisco SPA Phones can be fitted with the Cisco SPA500S Attendant Console(s) also sometimes know as an Expansion Module. See Section 11. Cisco Phones (SPA5xxG Attendant Console) for more details on configuring using the Star2Star Web Portal. (Note) not available for the SPA303. Compatible Phones Attendant Console Unit Description Features Cisco SPA502G Cisco SPA504G Cisco SPA508G Cisco SPA509G Cisco SPA525G2 The unit is self powered and has 32 programmable multicolored LED buttons. Up to 2 units can be fitted to a single phone. Use the Star2Star web portal Speed Dial option to configure your attendant console(s). Commonly used numbers can be added either from the system Application-Dial External Numbers or custom numbers and labels. You can also add extensions and monitor the presence of a local extension. Generally you would monitor an extension on its Line 1 appearance. This is where all calls arrive by default. The Cisco SPA500S module supports One Touch Transfer and call pickup. (Note) When monitoring extensions the lamp will only light when the extension is actually connected to a call or ringing with a new call. (Note) When fitted to the Cisco SPA502G/504G shared park appearance positions will be displayed. Edition Eleven Page 171 of 272
172 19. Cisco Phones Configuring the SPA500S & DS Attendant Console(s) Description This feature allows the user to add / manage individual speed dial numbers for their phone using the Cisco SPA500S and SPA500DS Attendant Console(s). Up to 2 modules can be fitted without additional power to a compatible phone i.e. Cisco SPA502G, Cisco SPA504G, Cisco SPA508G, Cisco SPA509G and the Cisco SPA525G2. Items that appear in the Destinations list can be selected. You can also select local extensions to manage their presence and use additional features i.e. One Touch Transfer / Call Pickup. This option also provides the ability to add custom numbers and labels for easy identification i.e. those not in Applications as Dial External Numbers. The number of available speed dials will change if a user has more than one expansion key module associated with the phone. (Note) When fitted to the Cisco SPA502G/504G/525G2 shared park appearance positions will be displayed when the system is configured in Key System Mode. The system will automatically reserve the first 4 positions by default. The number of modules can be set in Basic Settings under the P H O N E S Y S T E M C O N F I G U R A T I O N Menu. Select the Extensions link (Administrator Only). Setup 1. Select the Speed Dials option under I N D I V I D U A L P H O N E S E T T I N G S to configure the attendant console. 2. Remember to Save Changes to PBX and reboot the phone. To reboot the phone unplug the Internet cable momentarily. The phone will restart. (Note) if the phone has a separate power cable connected, momentarily unplug that cable to reboot the phone. Edition Eleven Page 172 of 272

 the additional Speed Dials 1 4 that are reserved for Park Positions on the phone itself. Speed Dials 5 8 are also on the phone and available for use.")
 Positions 1 4 are reserved for Park Positions on a Cisco SPA502G, SPA504G and SPA525G2 phone if your system is in Key System Mode which allows users to park calls in shared park positions.")
173 19. Cisco Phones (SPA5xxG Series Attendant Console(s)) (contd) 3. The following examples show configuration of the Speed Dial feature using the Cisco SPA500S Attendant Console with either the Cisco SPA502G, SPA504G, SPA508G, SPA509G and SPA525G2 phones. Cisco SPA502G, SPA504G and SPA525G2 Attendant Console with the system in Key System Mode Cisco SPA509G with an Attendant Console. The system is operating in Key System Mode. (Note) the additional Speed Dials 1 4 that are reserved for Park Positions on the phone itself. Speed Dials 5 8 are also on the phone and available for use. The Cisco SPA500S Attendant Console has 32 programmable multicolored LED buttons available. All 64 buttons can be programmed via the Speed Dials option if both modules are fitted. (Note) Positions 1 4 are reserved for Park Positions on a Cisco SPA502G, SPA504G and SPA525G2 phone if your system is in Key System Mode which allows users to park calls in shared park positions. Both the Cisco SPA508G and SPA509G have 4 Park Positions available on the phone. Therefore the first 4 Positions on an Expansion Module are available for use via the Star2Star Web Portal. Select the speed dial # using the drop down bar. Make your selection from the available options. You may also enter a Custom Number with label. This option is located at the bottom of the drop down list. Cisco SPA509G with Attendant Console fitted. Multicolored LED buttons show green when a monitored extension is idle. Solid red when busy. Flashing red when ringing. The following examples show configuration of the Speed Dial feature using the Cisco SPA500DS Attendant Console with either the Cisco SPA502G, SPA504G, SPA508G, SPA509G and SPA525G2 phones. Edition Eleven Page 173 of 272

174 Select the speed dial # using the drop down bar. Make your selection from the available options. You may also enter a Custom Number with label. This option is located at the bottom of the drop down list. The Cisco SPA500DS 15-Button Attendant Console provides up to 30 programmable call pickup or speed dial buttons. Up to two attendant consoles can be attached for a total of 30 buttons (60 programmable speed dial keys). (Note) Positions 1 4 are reserved for Park Positions on a Cisco SPA502G, SPA504G and SPA525G2 phone if your system is in Key System Mode which allows users to park calls in shared park positions. Both the Cisco SPA508G and SPA509G have 4 Park Positions available on the phone. Therefore the first 4 Positions on an Expansion Module are available for use via the Star2Star Web Portal. The Cisco SPA500DS features 15 programmable buttons, Page Left/Page Right keys, Call Transfer, Speed Dial, Busy Lamp Field, One-Touch Transfer, Call Pickup. Edition Eleven Page 174 of 272
175 20. Cisco Phones (7940/7960) Series a). Answering a Call Using the Handset: 5. Pick up the handset. Using Hands-Free Speakerphone Mode: 6. Press, Answer soft key or (the line button for the incoming call). Using the (optional) Headset: 7. Press if unlit to answer the call using a headset. 8. Or if is already lit, press the Answer soft key or (the line button for the incoming call). Handling multiple calls: 9. With a call in progress the next call to the phone will be indicated by a change in the phones display screen indicating that a call is waiting and showing caller information for the call. The user will also hear a short call waiting tone to indicate another call is present. Select the Answer soft key to answer the call. 10. Your original caller is automatically placed on hold and the display information for the call will flash on screen. 11. If you receive additional calls the caller will be connected to your voic or follow the path of Find-Me / Follow-Me if configured for your phone. b). Making a Call Using the handset: 1. Pick up the handset and dial the desired number. If the number is less than 10 digits please press the Dial soft key to complete the call. Using Hands Free Speaker Phone Mode: 2. With the handset on-hook, either press the New Call soft key,, or (a line button). Dial the desired number. 3. If the number is less than 10 digits please press the Dial soft key to complete the call. Using the (optional) Headset: 4. With the headset connected, press, the New Call soft key, or (a line button). Dial the desired number. 5. If the number is less than 10 digits please press the Dial soft key to complete the call. Edition Eleven Page 175 of 272
176 20. Cisco Phones (contd) Redial Last Number: 1. To redial the last number dialed press the Redial soft key. Call Lists: 9. To access a list of Missed Calls, Received Calls, or Placed Calls press. 10. Use the Navigation button to scroll to the required list. Press the Select soft key. 11. Use the Navigation button again to scroll to the required entry. 12. Press the Dial soft key to call the number displayed. Outgoing CallerID: 7. Your phone can be configured to display the Outgoing CallerID of your main number (default setting) or any other number that is configured on your system. 8. The CallerID can also be set to Blocked. 9. System Administration access is required to change these settings. 10. A typical setup could be to display the main company CallerID on the first line appearance and another ID or Blocked for subsequent line appearances. 11. To use this feature, once configured, select the relevant line button to make your call (Note) The number of available line appearances is phone type dependant. 12. Your Outgoing CallerID will reflect what s set in the Star2Star Web Portal. c). Microphone Mute 1. During a call press. The indicator will glow red. 2. The other party cannot hear you. 3. Press again to resume audio. 4. This feature will work when using handset, headset or speakerphone. d). Holding a Call 1. During a call press the Hold soft key to place the call on hold. 2. The call information will flash on screen and Hold will be indicated on the display. 3. The caller on hold will hear Music or Message on hold if enabled on your system. 4. Press the Resume soft key to re establish the call. 5. If two calls are placed on hold, use the Navigation button to select the desired call, and then press the Resume soft key to return to this call. Edition Eleven Page 176 of 272
177 20. Cisco Phones (contd) e). Transferring a Call Blind Transfer (Transfer the call to another party without any announcement): 1. During a call, press the more soft key. The caller on hold will hear Music or Message on hold if enabled on your system. 2. Press the BlndXfr soft key. Dial the number you want to transfer the call to then press the Dial soft key to complete the transfer. Alternatively you may press to access a list of Missed Calls, Received Calls, or Placed Calls. 3. Use the Navigation button to scroll to the required list. Press the Select soft key. 4. Use the Navigation button again to scroll to the required entry. 5. Press the Dial soft key to call the number displayed and complete the transfer. Transfer (Announced): 6. During a call, press the more soft key. The caller on hold will hear Music or Message on hold if enabled on your system. 7. Press the Trnsfer soft key. Enter the number you require. 8. Press the Dial soft key to complete the call. 9. Alternatively you may press to access a list of Missed Calls, Received Calls, or Placed Calls. 10. Use the Navigation button to scroll to the required list. Press the Select soft key. 11. Use the Navigation button again to scroll to the required entry. 12. Press the Dial soft key to call the number displayed. 13. When the called party answers announce the call. 14. Press the Trnsfer soft key to complete the transfer. f). Ending a Call 1. Press the EndCall soft key or replace the handset. 2. Press if you are using the Speakerphone. 3. Press if you are using a headset. Press the EndCall soft key if you wish to keep headset mode activated (keep the button lit after hanging up). Edition Eleven Page 177 of 272
178 20. Cisco Phones (contd) g). Creating a 3 Party Conference Call 1. You can create a conference with two other parties using the phones local conferencing feature. 2. With an incoming call on your phone or a call you have made, press the Confrn soft key to create a new call. 3. The active call is placed on hold and the caller will hear Music or Message on hold if enabled on your system. 4. Dial the phone number of the second party or press to access your call lists. From one of these lists press the Dial soft key. 5. When the second party answers, press the Join soft key again to join all parties in the Conference. h). Volume Controls 1. Press the volume keys to adjust handset, headset and speakerphone volume during a call. 2. Pressing these keys in an idle state will adjust the ringer volume. 3. Your settings will be retained unless the phone is powered off. i). Missed Call Display 1. To view missed calls and clear the missed call display on your phone press to access the directory. Press the Select soft key for option 1 Missed Calls. 2. Use the Navigation Button to view all missed calls. 3. Press the Dial soft key to return the call. 4. The most recent will be at position 1 in the list. j). Do Not Disturb 1. Press to enter the Settings Menu. 2. Use the Navigation Button to select option 6 Call Preferences. Press the Select soft key. 3. Select option 1 Do Not Disturb. 4. Press the Yes soft key followed by the Save soft key to turn on the DND feature for your phone. 5. Press the Back soft key to return to normal phone display. 6. Do Not Disturb is displayed on your phone. 7. Callers will hear your voic or follow the path of Find-Me / Follow-Me if configured on your system. Edition Eleven Page 178 of 272
179 20. Cisco Phones (contd) k). Changing Ringtones 1. Press to enter the Settings Menu. 2. Use the Navigation Button to select option 2 Ring Type. Press the Select soft key. 3. Use the Navigation Button to scroll through available ring types. 4. Press Play to hear the selected ring type. 5. When you find a ring sound that you want, press Select, then press OK. l). Voic Access 1. When you receive a message on your phone the red light on your handset will glow to indicate that a new message(s) is waiting. A flashing envelop icon will appear on your phone display. 2. When you lift the handset Stuttering Dial Tone is played. 3. To listen to voice messages press the button or dial The system will prompt for your password. (Note) as a new user accessing your mailbox for the first time, your password will be the same as your extension number. You will be guided through a short setup process including a password change. Set a password that is different to the extension number. See section Setting up your Voic . m). Directory 1. The company extension directory is automatically downloaded to the phone. The system will also retain details of Missed, Received and Placed Calls. 2. To access the Directory press 3. Use the Use the Navigation Button to select the option you require e.g. 5. External Directory. 4. Use the Navigation Button to select an entry or your keypad to enter the first character of a name. 5. Press the Dial soft key to dial the entry you require. n). Call Park 1. To park a call and retrieve from a different phone perform an attended (Announced) transfer to a. See section Transferring a Call 2. The system will play back a retrieval code ( ). a. The system provides up to 99 park positions 3. When the caller is Parked they will hear Message / Music on hold if enabled on your system. 4. To retrieve the call, dial the retrieval code to reconnect to the call. 5. If the call remains parked for longer than the system timeout (see On-Hold Options in the Portal Advanced Settings) the call will ring back on the originating extension. Edition Eleven Page 179 of 272
180 21. Yealink SIP-T20P Telephone a). Making a Call Using the handset:. Pick up the handset.. Enter the desired number using the keypad.. Press or. By default, the # key is set as a send key. You may also set the * key as a send key or set neither of them as send keys. Using the speakerphone: 1. With the handset on-hook, press or the line key to obtain a dial tone. 2. Enter the desired number, then press or. Or 1. With the handset on-hook, enter the desired number using the keypad. 2. Press, or. Placing a call using the headset: 1. With the optional headset connected, press to activate the headset mode. 2. Press the line key to obtain a dial tone. 3. Enter the desired number using the keypad. 4. Press,. Edition Eleven Page 180 of 272
181 With the optional headset connected: 1. Press to activate the headset mode. 2. Enter the desired number using the keypad. 3. Press or. Placing Multiple Calls: 1. To place a new call during an active call, press the line key. The active call is placed on hold. 2. Enter the desired number using the key pad. 3. Press, or. You may press or to switch between the calls, then press again to resume the desired call. Redialing a call: Press to enter the Dialed Calls list. Press or to select the desired call, then press or. Press twice when the phone is idle to call the last dialed number. b). Answering a Call To answer a call using the handset: Pick up the handset. To answer a call using the hands-free speakerphone mode: 1. Press. 2. With the handset on-hook and headset mode deactivated, press. 3. With the handset on-hook and headset mode deactivated, press the line key (the line key LED flashes green). To answer a call using the headset: Do one of the following: Edition Eleven Page 181 of 272
182 1. Press. 2. With the headset mode activated, press. 3. With the headset mode activated, press the line key (the line key LED flashes green). Answering When in Another Call: If you have an active call and an incoming call arrives on the phone, do one of the following: Press. The incoming call is answered and the original call is placed on hold. Or 1. Press to access the new call. 2. Press. The incoming call is answered and the original call is placed on hold. Note: You may ignore incoming calls by pressing the Reject soft key or the Silence soft key. Ending a call: Do one of the following: If you are using the handset, hang up the handset or press. If you are using a headset, press. If you are using the speakerphone, press or. Note: To end a call placed on hold, you may press the HOLD key to resume the call before ending it. Muting a call: Press during an active call. The phone LCD screen indicates the call is on mute. Press again to un-mute the call. c). Placing a call on Hold Press green. during a call. The phone LCD screen will show the call on hold and the line key LED will flash Edition Eleven Page 182 of 272
183 Note: The phone will beep softly every 30 seconds as a reminder there is a call on hold. Resuming a call on hold: Press again. Multiple calls on hold: If multiple calls are placed on hold, press or to switch between the calls, then press to retrieve the desired call. If more than two calls are on hold, an indication appears on the LCD screen, for example 1/3, indicating that this is the first call out of three calls. If multiple calls are on hold on more than one line key, you can view the details of the calls by pressing the corresponding line key and then press to retrieve the call. d). Do Not Disturb You can enable or disable the Do Not Disturb (DND) mode on the phone. If DND mode is enabled, the phone will reject all incoming calls automatically and the callers will hear a busy signal or a message, depending on how your system administrator set up the configuration server. To activate the DND mode on the SIP-T20P IP phone: 1. Press. 2. Select Features > DND. 3. Select Enable from the DND field. 4. (Optional). Enter the On or Off code respectively in the DND ON Code or DND OFF Code Field. 5. Press to accept the change. The DND icon on the LCD screen indicates that Do Not Disturb is enabled. Incoming calls will be rejected automatically and n New Missed Call ( n indicates the number of the missed call) will prompt on the LCD screen. Note: The Do Not Disturb feature is local to the phone and may be overridden by the server settings. For more information, contact your system administrator. Edition Eleven Page 183 of 272
184 e). Forwarding Calls 1. Press. 2. Select Features > Forward. 3. Press or to select the desired forwarding type, then press. The options are: Always: Incoming calls are immediately forwarded. Busy: Incoming calls are immediately forwarded if the phone is busy. No Answer: Incoming calls are forwarded if not answered after a period of time. If you select Always: 1. Press or to select Enable from the Always field. 2. Enter the destination number you want to forward all incoming calls to in the Forward to field. 3. (Optional.) Enter the always forward on code or always off code respectively in the On Code or Off Code field. If you select Busy: 1. Press or to select Enable from the Busy Field. 2. Enter the destination number you want to forward all incoming calls to when the phone is busy in the Forward to field. 3. (Optional.) Enter the busy forward on code or busy off code respectively in the On Code or Off Code field. If you select No Answer: Edition Eleven Page 184 of 272
185 1. Press or to select Enable from the No Answer field. 2. Enter the destination number you want to forward all unanswered incoming calls to in the Forward to field. 3. Press or to select the ring time to wait before forwarding in the After Duration field (The default ring time is 60 seconds). 4. (Optional.) Enter the no answer forward on code or off code respectively in the On Code or Off Code field. 5. Press to accept the change. The icon on the LCD screen indicates call forward is enabled. You may also configure the forward feature via the web user interface at the path Phone > Features. Disabling Call Forward: Do one of the following: Press Press when the phone is idle., select Features > Forward. Press or to select the forwarding type, then press. Press or to select Disable to disable the call forward. Forwarding an incoming call to another party: 1. When the phone rings, press. 2. Enter the number you want to forward the incoming call to. 3. Press or. The LCD screen prompts a call forwarded message. f). Transfer Calls Calls may be transferred in three different ways: Edition Eleven Page 185 of 272
186 Blind Transfer: Transfer a call directly to another party without consulting. Semi-Attended Transfer: Transfer a call when receiving ringback. Attended Transfer: Transfer a call with prior consulting. Blind Transfer: 1. Press during a call. 2. Enter the number you want to transfer the call to. 3. Press again to complete the transfer. The call will be connected to the number to which you are transferring. Semi-Attended Transfer: 1. Press during a call. 2. Enter the number you want to transfer the call to. 3. Press or to dial out. 4. Press to complete the transfer when receiving the ringback. To perform an attended transfer: 1. Press during a call.. 2. Enter the number you want to transfer the call to. 3. Press or to dial out. 4. After the party answers the call, press to complete the transfer. If you are using a handset, the transfer can be completed by hanging up the handset. You may cancel the transfer before the call connects by pressing. g). Conference Calls Local Conference Call: 1. Place a call to the first party. 2. Press to create a new call. The active call is placed on hold. Edition Eleven Page 186 of 272
187 3. Enter the number of the second party and press or. 4. When the second party answers the call, you can speak with him or her before adding to the conference. 5. Press again to join all parties in the conference. Joining two calls in a conference: Place two calls using two different accounts on the phone (for example, place the first call using account 1, then place the second call using account 2). Press or to select the call for conference and make sure the call is active (for example, select the call on account 1). Press to join the two calls in the conference on account 1. You can press to place the conference on hold. You may press the CONF key to split the conference call into two individual calls. To drop the conference call, press. Network Conference Call: To use this feature, contact your system administrator for the network conference-uri in advance, and configure the phone via web user interface: Click on Account > Advanced. Select the desired conference type from the pull-down list of Conference Type. Enter the conference URI (e.g. conference@example.com) in the Conference URI field. Click Confirm to accept the change. Setting up a network conference call: 1. Place a call to the first party. 2. Press to create a new call. The active call is placed on hold. 3. Enter the number of the second party and press or. 4. When the second party answers the call, press to add the second party to the conference. 5. Press to create a new call. The conference is placed on hold. 6. Enter the number of the new party then press or. 7. When the new party answers the call, press to add the new party to the conference. 8. Repeat steps 5 to 7 until you have added all intended parties. Edition Eleven Page 187 of 272
188 h). Parking Calls Star2Star Call Park and Retrieve: 1. Perform an Attended transfer to the park code Listen to the system retrieval code announcement e.g Press Transfer. 4. The caller is now parked. 5. The caller will hear music or message on hold if configured on your system. 6. Dial the system retrieval code e.g on any local extension to retrieve the call. Parking a call: 1. User on phone A places a call to phone B. 2. User on phone A wants to take the call in a conference room for privacy, then presses the call park key on phone A. 3. (Optional) The SIP server sends the first available call park extension, which will appear on the LCD screen of phone A. 4. The user on phone A walks to an available conference room where the phone is designated as phone C. The user dials the call park retrieve code (or the call park extension (e.g. 150)) to retrieve the parked call. The system establishes a call between phone C and B. Note: The call park feature code and call park extension are predefined on the system server. Contact your system administrator for more information. If the parked call is not retrieved within a period of time assigned by the system, the phone performing call park feature will receive a call back. i). Voic Listening to voice messages: 1. When the phone user interface prompts receiving new voice mails, press or to dial out the voice mail access code. 2. Follow the voice prompt to listen to your voice messages. When all new voice mails are retrieved, the MESSAGE key LED will turn off. Edition Eleven Page 188 of 272
189 Alternatively you can dial 1000 to access the Voic system at any time. The system will prompt for your password. Note: when accessing the voice mail system for the first time your password is your extension #. Change this to a 4-digit number you can easily recall. Viewing voice mail via phone user interface: 1. Press. 2. Select Messages > View Voice Mail. The LCD screen displays the amount of voice mails that includes old or new voice mails. 3. Select an account and press to listen to the voice mails. j). Contact Directory Adding a contact: 1. Press when the phone is idle, then select Local Directory > Contact List. 2. Press or to select Enter, then press. 3. Enter a unique contact name in the Name field and enter the phone number in the proper field. 4. Press to accept the change. Editing a contact: 1. Press when the phone is idle, then select Local Directory > Contact List. 2. Press or to select Enter, then press. 3. Press or to select the desired contact, then press or to select Edit, then press. 4. Update the contact information. Press to accept the change. Deleting a contact: 1. Press when the phone is idle, then select Local Directory > Contact List. 2. Press or to select Enter, then press. 3. Press or to select the desired contact, then press or to select Del, then press. 4. Press when Delete Selected Item? prompts on the LCD screen. Edition Eleven Page 189 of 272

190 22. Yealink SIP-T22P Telephone a). Making a Call Using the handset:. Pick up the handset.. Enter the desired number using the keypad.. Press,, or the Send soft key. By default, the # key is set as a send key. You may also set the * key as a send key or set neither of them as send keys. Using the speakerphone: 1. With the handset on-hook, press or the line key to obtain a dial tone. 2. Enter the desired number using the keypad. 3. Press,, or the Send soft key. Or 1. Enter the desired number using the keypad. 2. Press,,, or the Send soft key. Placing a call using the headset: 1. With the optional headset connected, press to activate the headset mode. 2. Press the line key to obtain a dial tone. 3. Enter the desired number using the keypad. Edition Eleven Page 190 of 272
191 4. Press,, or the Send soft key. With the optional headset connected: 1. Press to activate the headset mode. 2. Enter the desired number using the keypad. 3. Press,, or the Send soft key. Placing Multiple Calls: 1. To place a new call during an active call, press the line key. The active call is placed on hold. 2. Enter the desired number using the key pad. 3. Press,, or the Send soft key. Or 1. Press the Hold soft key to place the original call on hold. 2. Press the NewCall soft key. 3. Enter the desired number using the key pad. 4. Press,, or the Send soft key. You may press or to switch between the calls, then press the Resume soft key to retrieve the desired call. Redialing a call: Press twice. A call to your last placed call is attempted. To redial a previously placed call from your phone: 1. Press when the phone is idle. 2. Press or to select the desired entry from the dialed call list, then press or the Send soft key. b). Answering a Call To answer a call using the handset: Pick up the handset. Edition Eleven Page 191 of 272
192 To answer a call using the hands-free speakerphone mode: 1. Press. 2. With the handset on-hook and headset mode deactivated, press the Answer soft key. 3. With the handset on-hook and headset mode deactivated, press the line key (the line key LED flashes green). To answer a call using the headset: 1. Press. 2. With the headset mode activated, press the Answer soft key. 3. With the headset mode activated, press the line key (the line key LED flashes green). Answering When in Another Call: If you have an active call and an incoming call arrives on the phone, do one of the following: Press the Answer soft key. The incoming call is answered and the original call is placed on hold. Or 1. Press to access the new call. 2. Press or the Answer soft key. The incoming call is answered and the original call is placed on hold. Note: You may ignore incoming calls by pressing the Reject soft key or the Silence soft key. Ending a call: If you are using the handset, press the Cancel soft key or hang up the handset. If you are using a headset, press the Cancel soft key. If you are using the speakerphone, press or the Cancel soft key. Note: To end a call placed on hold, you can press the Cancel soft key to end the call directly or press the Resume soft key to resume the call before ending it. Muting a call: Press during an active call. Press again to un-mute the call. Edition Eleven Page 192 of 272
193 c). Placing a call on Hold Press the Hold soft key during a call. The phone LCD screen will show the call on hold and the line key LED will flash green. Note: The phone will beep softly every 30 seconds as a reminder there is a call on hold. Resuming a call on hold: Press the Resume soft key. Multiple calls on hold: If multiple calls are placed on hold, press or to switch between the calls, then press the Resume soft key to retrieve the desired call. If more than two calls are on hold, an indication appears on the LCD screen, for example 2/3, indicating that this is the second call out of three calls. If multiple calls are on hold on more than one line key, you can view the details of the calls by pressing the corresponding line key and then press the Resume soft key to retrieve the call. d). Do Not Disturb You can enable or disable the Do Not Disturb (DND) mode on the phone. If DND mode is enabled, the phone will reject all incoming calls automatically and the callers will hear a busy signal or a message, depending on how your system administrator set up the configuration server. To activate the DND mode on the SIP-T22P IP phone: Press the DND soft key when the phone is idle. The is activated. icon on the LCD screen indicates that Do Not Disturb Incoming calls will be rejected automatically and n New Missed Call ( n indicates the number of the missed call) will prompt on the LCD screen. Note: The Do Not Disturb feature is local to the phone and may be overridden by the server settings. For more information, contact your system administrator. e). Forwarding Calls Press Menu > Features > Call Forward. Press or to select the desired forwarding type, then press the Enter soft key. The options are: Always Forward: Incoming calls are immediately forwarded. Busy Forward: Incoming calls are immediately forwarded if the phone is busy. No Answer Forward: Incoming calls are forwarded if not answered after a period of time. Edition Eleven Page 193 of 272
194 If you select Always Forward: 1. Press or, or the Switch soft key to select Enable from the Always field. 2. Enter the destination number you want to forward all incoming calls to in the Forward to field. 3. (Optional.) Enter the always forward on code or always off code respectively in the On Code or Off Code field. If you select Busy Forward: 1. Press or, or the Switch soft key to select Enable from the Busy Field. 2. Enter the destination number you want to forward all incoming calls to when the phone is busy in the Forward to field. 3. (Optional.) Enter the busy forward on code or busy off code respectively in the On Code or Off Code field. If you select No Answer Forward: 1. Press or, or the Switch soft key to select Enable from the No Answer field. 2. Enter the destination number you want to forward all unanswered incoming calls to in the Forward to field. 3. Press or, or the Switch soft key to select the ring time to wait before forwarding in the After Ring Time field (The default ring time is 60 seconds). 4. (Optional.) Enter the no answer forward on code or off code respectively in the On Code or Off Code field. Press the Save soft key to accept the change or the Back soft key to cancel. The indicates call forward is enabled. icon on the LCD screen Edition Eleven Page 194 of 272
195 You may also configure the forward feature via the web user interface at the path Phone > Features. Disabling Call Forward: Press when the phone is idle. Press Menu > Features > Call Forward. Press or to select the desired forwarding type, then press the Enter soft key. Press or, or the Switch soft key to select Disable to disable the call forward. Forwarding an incoming call to another party: 1. When the phone rings, press the Fwd soft key. 2. Enter the number you want to forward the incoming call to. 3. Press,, or the Send soft key. The incoming call is forwarded. The LCD screen prompts a call forward message. f). Transfer Calls Calls may be transferred in three different ways: Blind Transfer: Transfer a call directly to another party without consulting. Semi-Attended Transfer: Transfer a call when receiving ringback. Attended Transfer: Transfer a call with prior consulting. Blind Transfer: 1. Press or the Tran soft key during a call. 2. Enter the number you want to transfer the call to. Edition Eleven Page 195 of 272
196 3. Press or the Tran soft key to complete the transfer. The call will be connected to the number to which you are transferring. Semi-Attended Transfer: Press or the Tran soft key during a call. Enter the number you want to transfer the call to. Press or to dial out. Press or the Tran soft key to complete the transfer when receiving the ringback. To perform an attended transfer: Press or the Tran soft key during a call.. Enter the number you want to transfer the call to. Press or to dial out. After the party answers the call, press or the Tran soft key to complete the transfer. If you are using a handset, the transfer can be completed by hanging up the handset. You may cancel the transfer before the call connects by pressing the Cancel soft key. g). Conference Calls Local Conference Call: 1. Place a call to the first party. 2. Press the Conf soft key to create a new call. The active call is placed on hold. 3. Enter the number of the second party and press,, or the Send soft key. 4. When the second party answers the call, you can speak with him or her before adding to the conference. 5. Press the Conf soft key again to join all parties in the conference. Joining two calls in a conference: Place two calls using two different accounts on the phone (for example, place the first call using account 1, then place the second call using account 2). Press or to select the call for conference and make sure the call is active (for example, select the call on account 1). Press the Conf soft key to join the two calls in the conference on account 1. You can press the Hold soft key to place the conference on hold. You may press the Split soft key to split Edition Eleven Page 196 of 272
197 the conference call into two individual calls. To drop the conference call, press the Cancel soft key. Network Conference Call: To use this feature, contact your system administrator to have your phone configured. Click on Account > Advanced. Select the desired conference type from the pull-down list of Conference Type. Enter the conference URI (e.g. in the Conference URI field. Click Confirm to accept the change. Setting up a network conference call: 1. Place a call to the first party. 2. Press the Conf soft key to create a new call. The active call is placed on hold. 3. Enter the number of the second party and press,, or the Send soft key. 4. When the second party answers the call, press the Conf soft key to add the second party to the conference. 5. Press the Conf soft key to create a new call. The conference is placed on hold. 6. Enter the number of the new party then press,, or the Send soft key. 7. When the new party answers the call, press the Conf soft key to add the new party to the conference. 8. Repeat steps 5 to 7 until you have added all intended parties. h). Parking Calls Star2Star Call Park and Retrieve: 1. Perform an Attended transfer to the park code Listen to the system retrieval code announcement e.g Press Transfer. 4. The caller is now parked. 5. The caller will hear music or message on hold if configured on your system. 6. Dial the system retrieval code e.g on any local extension to retrieve the call. Parking a call: 1. User on phone A places a call to phone B. Edition Eleven Page 197 of 272
198 2. User on phone A wants to take the call in a conference room for privacy, then presses the call park key on phone A. 3. (Optional) The SIP server sends the first available call park extension, which will appear on the LCD screen of phone A. 4. The user on phone A walks to an available conference room where the phone is designated as phone C. The user dials the call park retrieve code (or the call park extension (e.g. 150)) to retrieve the parked call. The system establishes a call between phone C and B. Note: The call park feature code and call park extension are predefined on the system server. Contact your system administrator for more information. If the parked call is not retrieved within a period of time assigned by the system, the phone performing call park feature will receive a call back. i). Voic Listening to voice messages: 1. Press or the Connect soft key. 2. Follow the voice prompts to listen to your voice messages. Alternatively you can dial 1000 to access the Voic system at any time. The system will prompt for your password. Note: when accessing the voice mail system for the first time your password is your extension #. Change this to a 4-digit number you can easily recall. j). Contact Directory Adding a contact: 1. Press the Dir soft key when the phone is idle, then select Local Directory > Contacts. 2. Press the Add soft key to add a contact. 3. Enter a unique contact name in the Name field and enter the phone number in the proper field. 4. Press the Save soft key to accept the change. Editing a contact: 1. Press the Dir soft key when the phone is idle, then select Local Directory > Contacts. 2. Press or to select the desired contact. Press the Option soft key and then select Detail from the prompt list. 3. Update the contact information. 4. Press the Save soft key to accept the change. Deleting a contact: Edition Eleven Page 198 of 272
199 1. Press the Dir soft key when the phone is idle, and then select Local Directory > Contacts. 2. Press or to select the desired contact. Press the Option soft key, then select Delete from the prompt list. 3. Press the OK soft key when Delete Selected Item? prompts on the LCD screen. Note: The Star2Star company directory is pre-loaded on your phone and can be accessed by pressing the Directory soft key, then selecting Local Directory > Remote Phonebook > Company Directory. Edition Eleven Page 199 of 272
200 23. Yealink SIP-T26P Telephone a). Making a Call You can place a call in three ways: Using the handset Using the speakerphone Using the headset You may also dial the number first, then choose the way you want to speak to the other party. You may search the call history, the local contact directory or the remote phonebook and dial from the search results. During a call, you can alternate between Speakerphone, Headset or Handset modes by pressing the speakerphone key, the HEADSET key or picking up the handset. The call duration of active call is visible on the LCD screen. Using the handset: 1. Pick up the handset. 2. Enter the desired number using the keypad. 3. Press,, or the Send soft key. By default, the # key is set as a send key. You may also set the * key as a send key or set neither of them as send keys. Using the speakerphone: 1. With the handset on-hook, press or the line key to obtain a dial tone. Edition Eleven Page 200 of 272
201 2. Enter the desired number using the keypad. 3. Press,, or the Send soft key. Or 1. Enter the desired number using the keypad. 2. Press,,, or the Send soft key. Placing a call using the headset: 1. With the optional headset connected, press to activate the headset mode. 2. Press the line key to obtain a dial tone. 3. Enter the desired number using the keypad. 4. Press,, or the Send soft key. With the optional headset connected: 1. Press to activate the headset mode. 2. Enter the desired number using the keypad. 3. Press,, or the Send soft key. Placing Multiple Calls: 1. To place a new call during an active call, press the line key. The active call is placed on hold. 2. Enter the desired number using the key pad. 3. Press,, or the Send soft key. Or 1. Press the Hold soft key to place the original call on hold. 2. Press the NewCall soft key. 3. Enter the desired number using the key pad. 4. Press,, or the Send soft key. You may press or to switch between the calls, then press the Resume soft key to retrieve the desired call. Redialing a call: Press twice. A call to your last placed call is attempted. Edition Eleven Page 201 of 272
202 To redial a previously placed call from your phone: 1. Press when the phone is idle. 2. Press or to select the desired entry from the dialed call list, then press or the Send soft key. b). Answering a Call The active call will appear on the LCD screen showing call duration and destination. To answer a call using the handset: Pick up the handset. To answer a call using the hands-free speakerphone mode: 1. Press. 2. With the handset on-hook and headset mode deactivated, press the Answer soft key. 3. With the handset on-hook and headset mode deactivated, press the line key (the line key LED flashes green). To answer a call using the headset: 1. Press. 2. With the headset mode activated, press the Answer soft key. 3. With the headset mode activated, press the line key (the line key LED flashes green). Answering When in Another Call: If you have an active call and an incoming call arrives on the phone, do one of the following: Press the Answer soft key. The incoming call is answered and the original call is placed on hold. Or 1. Press to access the new call. 2. Press or the Answer soft key. The incoming call is answered and the original call is placed on hold. Note: You may ignore incoming calls by pressing the Reject soft key or the Silence soft key. Edition Eleven Page 202 of 272
203 Ending a call: If you are using the handset, press the Cancel soft key or hang up the handset. If you are using a headset, press the Cancel soft key. If you are using the speakerphone, press or the Cancel soft key. Note: To end a call placed on hold, you can press the Cancel soft key to end the call directly or press the Resume soft key to resume the call before ending it. Muting a call: Press during an active call. The phone LCD screen indicates that the call is on mute. Press again to un-mute the call. c). Placing a call on Hold You may place an active call on hold at any time. At most, one active call may be in progress on your phone. Other calls can be received and made while placing the original call on hold. When placing a call on hold, your IP PBX can play a melody or message to the other party while waiting. Press or the Hold soft key during a call. The phone LCD screen will show the call on hold and the line key LED will flash green. Note: The phone will beep softly every 30 seconds as a reminder there is a call on hold. Resuming a call on hold: Press or the Resume soft key. Multiple calls on hold: Edition Eleven Page 203 of 272
204 If multiple calls are placed on hold, press or to switch between the calls, then press the Resume soft key to retrieve the desired call. If more than two calls are on hold, an indication appears on the LCD screen, for example 2/3, indicating that this is the second call out of three calls. If multiple calls are on hold on more than one line key, you can view the details of the calls by pressing the corresponding line key and then press the Resume soft key to retrieve the call. d). Do Not Disturb You can enable or disable the Do Not Disturb (DND) mode on the phone. If DND mode is enabled, the phone will reject all incoming calls automatically and the callers will hear a busy signal or a message, depending on how your system administrator set up the configuration server. To activate the DND mode on the SIP-T26P IP phone: Press the DND soft key when the phone is idle. The is activated. icon on the LCD screen indicates that Do Not Disturb Incoming calls will be rejected automatically and n New Missed Call ( n indicates the number of the missed call) will prompt on the LCD screen. Note: The Do Not Disturb feature is local to the phone and may be overridden by the server settings. For more information, contact your system administrator. e). Forwarding Calls Press Menu > Features > Call Forward. Press or to select the desired forwarding type, then press the Enter soft key. The options are: Always Forward: Incoming calls are immediately forwarded. Busy Forward: Incoming calls are immediately forwarded if the phone is busy. No Answer Forward: Incoming calls are forwarded if not answered after a period of time. If you select Always Forward: 1. Press or, or the Switch soft key to select Enable from the Always field. 2. Enter the destination number you want to forward all incoming calls to in the Forward to field. Edition Eleven Page 204 of 272
205 3. (Optional.) Enter the always forward on code or always off code respectively in the On Code or Off Code field. If you select Busy Forward: 1. Press or, or the Switch soft key to select Enable from the Busy Field. 2. Enter the destination number you want to forward all incoming calls to when the phone is busy in the Forward to field. 3. (Optional) Enter the busy forward on code or busy off code respectively in the On Code or Off Code field. If you select No Answer Forward: 1. Press or, or the Switch soft key to select Enable from the No Answer field. 2. Enter the destination number you want to forward all unanswered incoming calls to in the Forward to field. 3. Press or, or the Switch soft key to select the ring time to wait before forwarding in the After Ring Time field (The default ring time is 60 seconds). 4. (Optional) Enter the no answer forward on code or off code respectively in the On Code or Off Code field. Press the Save soft key to accept the change or the Back soft key to cancel. The indicates call forward is enabled. icon on the LCD screen You may also configure the forward feature via the web user interface at the path Phone > Features. Disabling Call Forward: Press when the phone is idle. Press Menu > Features > Call Forward. Press or to select the desired forwarding type, then press the Enter soft key. Press or, or the Switch soft key to select Disable to disable the call forward. Edition Eleven Page 205 of 272
206 Forwarding an incoming call to another party: 1. When the phone rings, press the Fwd soft key. 2. Enter the number you want to forward the incoming call to. 3. Press,, or the Send soft key. The incoming call is forwarded. The LCD screen prompts a call forward message. f). Transfer Calls Calls may be transferred in three different ways: Blind Transfer: Transfer a call directly to another party without consulting. Semi-Attended Transfer: Transfer a call when receiving ringback. Attended Transfer: Transfer a call with prior consulting. Blind Transfer: 1. Press or the Tran soft key during a call. 2. Enter the number you want to transfer the call to. 3. Press or the Tran soft key to complete the transfer. The call will be connected to the number to which you are transferring. Semi-Attended Transfer: Press or the Tran soft key during a call. Enter the number you want to transfer the call to. Press or to dial out. Press or the Tran soft key to complete the transfer when receiving the ringback. Edition Eleven Page 206 of 272
207 To perform an attended transfer: Press or the Tran soft key during a call.. Enter the number you want to transfer the call to. Press or to dial out. After the party answers the call, press or the Tran soft key to complete the transfer. If you are using a handset, the transfer can be completed by hanging up the handset. You may cancel the transfer before the call connects by pressing the Cancel soft key. g). Conference Calls Local Conference Call: 1. Place a call to the first party. 2. Press or the Conf soft key to create a new call. The active call is placed on hold. 3. Enter the number of the second party and press,, or the Send soft key. 4. When the second party answers the call, you can speak with him or her before adding to the conference. 5. Press or the Conf soft key again to join all parties in the conference. Joining two calls in a conference: Place two calls using two different accounts on the phone (for example, place the first call using account 1, then place the second call using account 2). Press or to select the call for conference and make sure the call is active (for example, select the call on account 1). Press or the Conf soft key to join the two calls in the conference on account 1. You can press or the Hold soft key to place the conference on hold. You may press the Split soft key to split the conference call into two individual calls. To drop the conference call, press the Cancel soft key. Network Conference Call: To use this feature, contact your system administrator to configure your phone. Click on Account > Advanced. Select the desired conference type from the pull-down list of Conference Type. Enter the conference URI (e.g. conference@example.com) in the Conference URI field. Click Confirm to accept the change. Edition Eleven Page 207 of 272
208 Setting up a network conference call: 1. Place a call to the first party. 2. Press or the Conf soft key to create a new call. The active call is placed on hold. 3. Enter the number of the second party and press,, or the Send soft key. 4. When the second party answers the call, press or the Conf soft key to add the second party to the conference. 5. Press the Conf soft key to create a new call. The conference is placed on hold. 6. Enter the number of the new party then press,, or the Send soft key. 7. When the new party answers the call, press or the Conf soft key to add the new party to the conference. 8. Repeat steps 5 to 7 until you have added all intended parties. h). Parking Calls Star2Star Call Park and Retrieve: 1. Perform an Attended transfer to the park code Listen to the system retrieval code announcement e.g Press Transfer. 4. The caller is now parked. 5. The caller will hear music or message on hold if configured on your system. 6. Dial the system retrieval code e.g on any local extension to retrieve the call. Parking a call: 1. User on phone A places a call to phone B. 2. User on phone A wants to take the call in a conference room for privacy, then presses the call park key on phone A. 3. (Optional) The SIP server sends the first available call park extension, which will appear on the LCD screen of phone A. 4. The user on phone A walks to an available conference room where the phone is designated as phone C. The user dials the call park retrieve code (or the call park extension (e.g. 150)) to retrieve the parked call. The system establishes a call between phone C and B. Note: The call park feature code and call park extension are predefined on the system server. Contact your Edition Eleven Page 208 of 272
209 system administrator for more information. If the parked call is not retrieved within a period of time assigned by the system, the phone performing call park feature will receive a call back. i). Voic Listening to voice messages: 1. Press or the Connect soft key. 2. Follow the voice prompts to listen to your voice messages. Alternatively you can dial 1000 to access the Voic system at any time. The system will prompt for your password. Note: when accessing the voice mail system for the first time your password is your extension #. Change this to a 4-digit number you can easily recall. j). Contact Directory Adding a contact: 1. Press the Dir soft key when the phone is idle, then select Local Directory > Contacts. 2. Press the Add soft key to add a contact. 3. Enter a unique contact name in the Name field and enter the phone number in the proper field. 4. Press the Save soft key to accept the change. Editing a contact: 1. Press the Dir soft key when the phone is idle, then select Local Directory > Contacts. 2. Press or to select the desired contact. Press the Option soft key and then select Detail from the prompt list. 3. Update the contact information. 4. Press the Save soft key to accept the change. Deleting a contact: 1. Press the Dir soft key when the phone is idle, and then select Local Directory > Contacts. 2. Press or to select the desired contact. Press the Option soft key, then select Delete from the prompt list. 3. Press the OK soft key when Delete Selected Item? prompts on the LCD screen. Note: The Star2Star company directory is pre-loaded on your phone and can be accessed by pressing the Directory soft key, then selecting Local Directory > Remote Phonebook > Company Directory. Edition Eleven Page 209 of 272
210 24. Yealink SIP-T28P Telephone a). Making a Call You can place a call in three ways: Using the handset Using the speakerphone Using the headset You may also dial the number first, then choose the way you want to speak to the other party. You may search the call history, the local contact directory or the remote phonebook and dial from the search results. During a call, you can alternate between Speakerphone, Headset or Handset modes by pressing the speakerphone key, the HEADSET key or picking up the handset. The call duration of active call is visible on the LCD screen. Using the handset: 1. Pick up the handset. 2. Enter the desired number using the keypad. 3. Press,, or the Send soft key. By default, the # key is set as a send key. You may also set the * key as a send key or set neither of them as send keys. Using the speakerphone: 1. With the handset on-hook, press or the line key to obtain a dial tone. 2. Enter the desired number using the keypad. Edition Eleven Page 210 of 272
211 3. Press,, or the Send soft key. Or 1. Enter the desired number using the keypad. 2. Press,,, or the Send soft key. Placing a call using the headset: 1. With the optional headset connected, press to activate the headset mode. 2. Press the line key to obtain a dial tone. 3. Enter the desired number using the keypad. 4. Press,, or the Send soft key. With the optional headset connected: 1. Press to activate the headset mode. 2. Enter the desired number using the keypad. 3. Press,, or the Send soft key. Placing Multiple Calls: 1. To place a new call during an active call, press the line key. The active call is placed on hold. 2. Enter the desired number using the key pad. 3. Press,, or the Send soft key. Or 1. Press the Hold soft key to place the original call on hold. 2. Press the NewCall soft key. 3. Enter the desired number using the key pad. 4. Press,, or the Send soft key. You may press or to switch between the calls, then press the Resume soft key to retrieve the desired call. Redialing a call: Press twice. A call to your last placed call is attempted. To redial a previously placed call from your phone: Edition Eleven Page 211 of 272
212 1. Press when the phone is idle. 2. Press or to select the desired entry from the dialed call list, then press or the Send soft key. b). Answering a Call The active call will appear on the LCD screen showing call duration and destination. To answer a call using the handset: Pick up the handset. To answer a call using the hands-free speakerphone mode: 1. Press. 2. With the handset on-hook and headset mode deactivated, press the Answer soft key. 3. With the handset on-hook and headset mode deactivated, press the line key (the line key LED flashes green). To answer a call using the headset: 1. Press. 2. With the headset mode activated, press the Answer soft key. 3. With the headset mode activated, press the line key (the line key LED flashes green). Answering When in Another Call: If you have an active call and an incoming call arrives on the phone, do one of the following: Press the Answer soft key. The incoming call is answered and the original call is placed on hold. Or 1. Press to access the new call. 2. Press or the Answer soft key. The incoming call is answered and the original call is placed on hold. Note: You may ignore incoming calls by pressing the Reject soft key or the Silence soft key. Edition Eleven Page 212 of 272

213 Ending a call: If you are using the handset, press the Cancel soft key or hang up the handset. If you are using a headset, press the Cancel soft key. If you are using the speakerphone, press or the Cancel soft key. Note: To end a call placed on hold, you can press the Cancel soft key to end the call directly or press the Resume soft key to resume the call before ending it. Muting a call: Press during an active call. The phone LCD screen indicates that the call is on mute. Press again to un-mute the call. c). Placing a call on Hold You may place an active call on hold at any time. At most, one active call may be in progress on your phone. Other calls can be received and made while placing the original call on hold. When placing a call on hold, your IP PBX can play a melody or message to the other party while waiting. Press or the Hold soft key during a call. The phone LCD screen will show the call on hold and the line key LED will flash green. Note: The phone will beep softly every 30 seconds as a reminder there is a call on hold. Resuming a call on hold: Press or the Resume soft key. Edition Eleven Page 213 of 272
214 Multiple calls on hold: If multiple calls are placed on hold, press or to switch between the calls, then press the Resume soft key to retrieve the desired call. If more than two calls are on hold, an indication appears on the LCD screen, for example 2/4, indicating that this is the second call out of four calls. If multiple calls are on hold on more than one line key, you can view the details of the calls by pressing the corresponding line key and then press the Resume soft key to retrieve the call. d). Do Not Disturb You can enable or disable the Do Not Disturb (DND) mode on the phone. If DND mode is enabled, the phone will reject all incoming calls automatically and the callers will hear a busy signal or a message, depending on how your system administrator set up the configuration server. To activate the DND mode on the SIP-T28P IP phone: Press the DND soft key when the phone is idle. The is activated. icon on the LCD screen indicates that Do Not Disturb Incoming calls will be rejected automatically and n New Missed Call ( n indicates the number of the missed call) will prompt on the LCD screen. Note: The Do Not Disturb feature is local to the phone and may be overridden by the server settings. For more information, contact your system administrator. e). Forwarding Calls Press Menu > Features > Call Forward. Press or to select the desired forwarding type, then press the Enter soft key. The options are: Always Forward: Incoming calls are immediately forwarded. Busy Forward: Incoming calls are immediately forwarded if the phone is busy. No Answer Forward: Incoming calls are forwarded if not answered after a period of time. If you select Always Forward: 1. Press or, or the Switch soft key to select Enable from the Always field. Edition Eleven Page 214 of 272
 Enter the always forward on code or always off code respectively in the On Code or Off Code field. If you select Busy Forward: 1.")


215 2. Enter the destination number you want to forward all incoming calls to in the Forward to field. 3. (Optional.) Enter the always forward on code or always off code respectively in the On Code or Off Code field. If you select Busy Forward: 1. Press or, or the Switch soft key to select Enable from the Busy Field. 2. Enter the destination number you want to forward all incoming calls to when the phone is busy in the Forward to field. 3. (Optional) Enter the busy forward on code or busy off code respectively in the On Code or Off Code field. If you select No Answer Forward: 1. Press or, or the Switch soft key to select Enable from the No Answer field. 2. Enter the destination number you want to forward all unanswered incoming calls to in the Forward to field. 3. Press or, or the Switch soft key to select the ring time to wait before forwarding in the After Ring Time field (The default ring time is 60 seconds). 4. (Optional) Enter the no answer forward on code or off code respectively in the On Code or Off Code field. Edition Eleven Page 215 of 272
216 Press the Save soft key to accept the change or the Back soft key to cancel. The icon on the LCD screen indicates call forward is enabled. You may also configure the forward feature via the web user interface at the path Phone > Features. Disabling Call Forward: Press when the phone is idle. Press Menu > Features > Call Forward. Press or to select the desired forwarding type, then press the Enter soft key. Press or, or the Switch soft key to select Disable to disable the call forward. Forwarding an incoming call to another party: 1. When the phone rings, press the Fwd soft key. 2. Enter the number you want to forward the incoming call to. 3. Press,, or the Send soft key. The incoming call is forwarded. The LCD screen prompts a call forward message. f). Transfer Calls Calls may be transferred in three different ways: Blind Transfer: Transfer a call directly to another party without consulting. Semi-Attended Transfer: Transfer a call when receiving ringback. Attended Transfer: Transfer a call with prior consulting. Blind Transfer: 1. Press or the Transfer soft key during a call. 2. Enter the number you want to transfer the call to. Edition Eleven Page 216 of 272
217 3. Press or the Tran soft key to complete the transfer. The call will be connected to the number to which you are transferring. Semi-Attended Transfer: Press or the Transfer soft key during a call. Enter the number you want to transfer the call to. Press or to dial out. Press or the Transfer soft key to complete the transfer when receiving the ringback. To perform an attended transfer: Press or the Transfer soft key during a call. Enter the number you want to transfer the call to. Press or to dial out. After the party answers the call, press or the Transfer soft key to complete the transfer. If you are using a handset, the transfer can be completed by hanging up the handset. You may cancel the transfer before the call connects by pressing the Cancel soft key. g). Conference Calls Local Conference Call: 1. Place a call to the first party. 2. Press or the Conf soft key to create a new call. The active call is placed on hold. 3. Enter the number of the second party and press,, or the Send soft key. Edition Eleven Page 217 of 272
218 4. When the second party answers the call, you can speak with him or her before adding to the conference. 5. Press or the Conf soft key again to join all parties in the conference. Joining two calls in a conference: Place two calls using two different accounts on the phone (for example, place the first call using account 1, then place the second call using account 2). Press or to select the call for conference and make sure the call is active (for example, select the call on account 1). Press or the Conf soft key to join the two calls in the conference on account 1. You can press or the Hold soft key to place the conference on hold. You may press the Split soft key to split the conference call into two individual calls. To drop the conference call, press the Cancel soft key. Network Conference Call: To use this feature, contact your system administrator to configure your phone. Click on Account > Advanced. Select the desired conference type from the pull-down list of Conference Type. Enter the conference URI (e.g. conference@example.com) in the Conference URI field. Click Confirm to accept the change. Setting up a network conference call: 1. Place a call to the first party. 2. Press or the Conf soft key to create a new call. The active call is placed on hold. 3. Enter the number of the second party and press,, or the Send soft key. 4. When the second party answers the call, press or the Conf soft key to add the second party to the conference. 5. Press the Conf soft key to create a new call. The conference is placed on hold. Edition Eleven Page 218 of 272
. Speed Dial Use the Star2Star Web Portal https://portal.star2star.com/ to configure speed dial buttons in individual phone settings.")
219 6. Enter the number of the new party then press,, or the Send soft key. 7. When the new party answers the call, press or the Conf soft key to add the new party to the conference. 8. Repeat steps 5 to 7 until you have added all intended parties. h). Speed Dial Use the Star2Star Web Portal to configure speed dial buttons in individual phone settings. Using the speed dial key: Press the designated speed dial key to dial out the preset number. i). Voic Listening to voice messages: 1. Press or the Connect soft key to dial out the access voice mail code. 2. Follow the voice prompts to listen to your voice messages. Alternatively you can dial 1000 to access the Voic system at any time. The system will prompt for your password. Note: when accessing the voice mail system for the first time your password is your extension #. Change this to a 4-digit number you can easily recall. Viewing voice mail messages: 1. Press Menu > Messages > Voice Mail > View Voice Mail. The phone LCD screen displays the amount of the voice mails that includes new or old voice mails. 2. Select an account then press the Connect soft key to listen to the voice mails. Edition Eleven Page 219 of 272
220 j). Contact Directory Adding a contact: 1. Press the Directory soft key when the phone is idle, then select Local Directory > Contacts. 2. Press the Add soft key to add a contact. 3. Enter a unique contact name in the Name field and enter the phone number in the proper field. 4. Press the Save soft key to accept the change. Editing a contact: 1. Press the Directory soft key when the phone is idle, then select Local Directory > Contacts. 2. Press or to select the desired contact. Press the Option soft key and then select Detail from the prompt list. 3. Update the contact information. 4. Press the Save soft key to accept the change. Deleting a contact: 1. Press the Directory soft key when the phone is idle, and then select Local Directory > Contacts. 2. Press or to select the desired contact. Press the Option soft key, then select Delete from the prompt list. 3. Press the OK soft key when Delete Selected Item? prompts on the LCD screen. Note: The Star2Star company directory is pre-loaded on your phone and can be accessed by pressing the Directory soft key, then selecting Local Directory > Remote Phonebook > Company Directory. k). Call Park Star2Star Call Park and Retrieve: 1. Perform an Attended transfer to the park code Listen to the system retrieval code announcement e.g Press Transfer. 4. The caller is now parked. 5. The caller will hear music or message on hold if configured on your system. 6. Dial the system retrieval code e.g on any local extension to retrieve the call. Edition Eleven Page 220 of 272
221 25. Yealink SIP-T32G Telephone a). Making a Call You may make a phone call via the following devices: 1. Pick up the handset, icon will be shown in the idle screen. 2. Press the Speaker button, icon will be shown in the idle screen. 3. Press the Headset button if the headset is connected to the Headset port in advance. In the dial-up interface, the icon will be shown in the idle screen. Dial Number Directly: Dial the number. Press Send soft key. Dial from Pool: In dial-up interface, press Pool soft key. Use the Navigation keys to highlight your choice. Choose the corresponding option. Select a record, then press the Send/Dial button. Redial: Press Redial button to enter the Dialed Calls interface and choose a record to dial out. During the call, you may alternate between Headset, Handset and Speakerphone by pressing the corresponding buttons or picking up the handset. If you have registered more than one account, you can choose a certain account to make your call: 1. Press the Left/Right navigation key to choose a default account when your phone is in idle status. 2. In the dial-up interface, press the Line soft key to choose an account. Then press the Select soft key to confirm. 3. Press the three line keys on the keypad to activate the chosen account. b). Answering a Call To answer an incoming call, lift the handset. To answer using the speakerphone, press the Speaker button. To answer using the headset, press the Headset button. Edition Eleven Page 221 of 272
. Do Not Disturb Press DND soft key to activate Do Not Disturb Mode.")

222 If you are on an active call, the LCD screen will display Incoming Call: #. Press the Answer soft key to answer the call or Reject soft key to refuse the call. Denying an incoming call: Press Reject soft key or X button to deny the incoming call directly. c). Do Not Disturb Press DND soft key to activate Do Not Disturb Mode. Further incoming calls will be rejected and the display will show the icon. Press DND soft key again to deactivate DND mode. d). Muting a call This function allows you to mute the microphone of the active audio device during a call. You cannot be heard by the other party. You can still hear all other parties while mute is enabled. When you press the X button, the conversation will be muted. To mute/resume a conversation: Press X button to mute the call during a conversation. The icon to unmute the call return to normal conversation. will be shown in the LCD. Press it again e). Putting a call on Hold This call function allows you to place an active call on hold. In this case your IP PBX might play a melody or message to the other party while waiting. Other calls can be received and made while having a call on hold. To hold/retrieve a call: 1. Press the Hold soft key to put your active call on hold. Edition Eleven Page 222 of 272
223 2. During the call, there will be an audio tone every 30 seconds indicating a current call on hold. 3. If there is only one call on hold, press the Resume soft key or Hold soft key to retrieve the call. 4. If there is more than one call on hold, press the SWAP soft key to switch the conversation. 5. If you want to hold all calls, you may press the line key, which you set as Hold, then press the Up/Down navigation key to highlight the call. Press the corresponding line key (set as Hold) to retrieve the call. You may also press the line key to establish a new call and then all calls will be held. f). Call Waiting To enable/disable Call Waiting via Phone interface: 1. Press Menu > Features > Call Waiting. 2. Use the navigation key or Switch soft key to enable/disable the call waiting option. 3. Use the navigation key or Switch soft key to enable/disable the Play Tone option. This option is used to define whether to play ring tones when there is an incoming call during an active call. 4. Press Save soft key to save the change, or Back soft key to return to the previous menu. g). Speed Dial Keys The phone has 3 line keys, which are able to set up to 30 functions per key. Contact your administrator to configure speed dial keys on your phone. Edition Eleven Page 223 of 272


224 h). Directory Adding a contact to a local directory: 1. Press Directory > Local Directory 2. Choose a group and press the Enter soft key. 3. Press Add soft key, enter Name, Office, Mobile and Other phone number. Use the abc soft key to choose an input method like Numeric, Upper/Lower Case Alphanumeric. 4. If you want to assign a contact to a specific account, you can use navigation key to select desired account. 5. Choose and set a special ring tone for the contact. 6. Use the navigation key to select the group you want to assign. 7. Choose photo, then press Enter soft key to enter into the edit page. Use the navigation key to select a photo for this contact. Press OK soft key to confirm and return to the previous screen. 8. Press Save soft key to add the record to contacts. 9. Press Save soft key to add the record to contacts or Back soft key to cancel. Editing a contact via Phone interface: 1. Press Directory > Local Directory 2. Choose a group, and press the Enter soft key. 3. Use the navigation key to highlight the contact you want to edit. Press Option > Detail and enter into the edit page. 4. Make the change. Press Save soft key to save the change or press Back soft key to return to the directory. Edition Eleven Page 224 of 272
225 Deleting a contact from the local directory: 1.Press Directory > Local Directory 2. Choose a group, and press the Enter soft key. 3. Use the navigation key to highlight the contact you want to delete. Press Option soft key, and scroll to Delete> Press OK soft key. 4. A warning window will pop up asking whether to confirm deleting the contact. 5. Press OK soft key to confirm the operation or press the Cancel soft key to return to the directory. Searching a contact in local directory: 1. Press Directory > Local Directory > Search to enter into the search page or choose a group and press the Enter soft key. Press the number keypad to enter into the search page directly. 2. The search interface will display where you may enter the contact you are searching for. Press the OK soft key. 3. The phone will display the contact. Note: The Star2Star company directory is pre-loaded on your phone and can be accessed by pressing the Directory soft key, then selecting Local Directory > Remote Phonebook > Company Directory. i). Voic Press Menu > Messages > Voice Mail > View Voice Mail. Edition Eleven Page 225 of 272
.")
226 Alternatively you may dial 1000 to access the Voic system at any time. The system will prompt for your password. Note: when accessing the voice mail system for the first time your password is your extension #. Change this to a 4-digit number you can easily recall. j). Transfer a call You may customize your phone so that incoming calls are transferred directly to the third party (another extension, mobile phone number, etc.) There are three ways to transfer the call: Blind Transfer, Attended Transfer and Semi-Attended Transfer. Blind Transfer via phone interface: 1. Press the TRAN Button or Tran soft key to put the caller on hold. Dial the new telephone number and press the Tran soft key to call out. Your call will turn to hold status and the LCD will display as Transferred. 2. After the call is answered, press the Cancel soft key to complete the transfer. 3. You will be disconnected from the call and the other parties will be able to talk. Attended Transfer via phone interface: 1. Press the TRAN Button or Tran soft key to put the caller on hold. Dial the new phone number and press the OK or SEND button to call out. 2. After the call is answered you will be able to talk to the new party without the caller on hold being able to hear the conversation. Press the TRAN button to complete the transfer. You will be disconnected from the call and the caller on hold will be able to talk to the transferred party. Semi-Attended Transfer via phone interface: 1. Press the TRAN button or Tran soft key to put the caller on hold. Dial a new number and press the OK or SEND button to call out. 2. While the new number is ringing, hang up or press the Transfer soft key. Your call will turn to hold status and the LCD will display as Transferred. 3. You will be disconnected from the call when the new caller answers the call. The on hold caller and new caller will be able to talk. Edition Eleven Page 226 of 272
227 k). Forwarding a call Calls may be forwarded to another phone number, cell phone or voic . Call forwarding can be configured in the following ways: Always: Incoming calls are immediately forwarded. Busy: Incoming calls are immediately forwarded when the phone is busy. No Answer: Incoming calls are forwarded when the phone is not answered after a specific period. To configure Forward option via the phone interface: 1. Press Menu soft key > Features > Call Forward to enter the configure page. 2. Select one of three options: Always Forward, Busy Forward and No Answer Forward and enter the phone number you want to forward. 3. If you select No Answer Forward, you must also select After Ring Times option. 4. Press Save soft key to save the changes. l). Conference Calls Establishing a local conference: 1. Press the Conf soft key during an active call. 2. The first call is placed on hold. You will hear a dial tone. Dial the number to conference in, then press the Send soft key. 3. When the call is answered, you may have a private conversation at first and then press the CONF button. The conference call will include you and the other two parties. Edition Eleven Page 227 of 272
. Speed Dial Use the Star2Star Web Portal https://portal.star2star.")
228 4. During the conference, press the Split soft key to split the conference into two hold lines and press the Resume soft key to resume the chosen call respectively. 5. When you press the Hold key, the conference will be on hold. 6. Hang up to disconnect all parties. m). Speed Dial Use the Star2Star Web Portal to configure speed dial buttons in individual phone settings. Using the speed dial key: Press the designated speed dial key to dial out the preset number. Edition Eleven Page 228 of 272
229 26. Yealink SIP-T38G Telephone a). Making a Call You may make a phone call via the following devices: 1. Pick up the handset, icon will be shown in the idle screen. 2. Press the Speaker button, icon will be shown in the idle screen. 3. Press the Headset button if the headset is connected to the Headset port in advance. In the dial-up interface, the icon will be shown in the idle screen. Dial Number Directly: Dial the number. Press Send soft key. Redial: Press Redial button to enter the Dialed Calls interface and choose a record to dial out. During the call, you may alternate between Headset, Handset and Speakerphone by pressing the corresponding buttons or picking up the handset. b). Answering a Call To answer an incoming call, lift the handset. To answer using the speakerphone, press the Speaker button. To answer using the headset, press the Headset button. If you are on an active call, the LCD screen will display Incoming Call: #. Press the Answer soft key to answer the call or Reject soft key to refuse the call. Edition Eleven Page 229 of 272
230 Denying an incoming call: Press Reject soft key to deny the incoming call directly which will go to voic or Find Me Follow Me if configured on your system. c). Do Not Disturb Press DND soft key to activate Do Not Disturb Mode. Further incoming calls will be rejected and go to voic or Find Me Follow Me if configured on your system and the display will show the icon. Press DND soft key again to deactivate DND mode. d). Muting a call This function allows you to mute the microphone of the active audio device during a call. You cannot be heard by the other party. You can still hear all other parties while mute is enabled. When you press the X button, the conversation will be muted. To mute/resume a conversation: Press X button to mute the call during a conversation. The icon to unmute the call return to normal conversation. will be shown in the LCD. Press it again e). Putting a call on Hold This call function allows you to place an active call on hold. In this case your IP PBX might play a melody or message to the other party while waiting. Other calls can be received and made while having a call on hold. To hold/retrieve a call: 1. Press the Hold soft key to put your active call on hold. 2. During the call, there will be an audio tone every 30 seconds indicating a current call on hold. 3. If there is only one call on hold, press the Resume soft key or Hold soft key to retrieve the call. 4. If there is more than one call on hold, press the Up/Down navigation key to highlight the call, then press the Resume soft key or HOLD button to retrieve the call. Edition Eleven Page 230 of 272
231 f). Speed Dial Keys The SIP-T38G phone has 10 Memory keys which can be configured up to 33 functions per key and it 6 line keys which can be configured up to 32 functions per key. Contact your administrator to configure speed dial keys. g). Directory Adding a contact to a local directory: 1. Press Directory > Local Directory 2. Choose a group and press the Enter soft key. 3. Press Add soft key, enter Name, Office, Mobile and Other phone number. Use the abc soft key to choose an input method like Numeric, Upper/Lower Case Alphanumeric. 4. If you want to assign a contact to a specific account, you can use navigation key to select desired account. 5. Choose and set a special ring tone for the contact. 6. Use the navigation key to select the group you want to assign. 7. Choose photo, then press Enter soft key to enter into the edit page. Use the navigation key to select a photo for this contact. Press OK soft key to confirm and return to the previous screen. 8. Press Save soft key to add the record to contacts. 9. Press Save soft key to add the record to contacts or Back soft key to cancel. Editing a contact via Phone interface: Edition Eleven Page 231 of 272

232 1. Press Directory > Local Directory 2. Choose a group, and press the Enter soft key. 3. Use the navigation key to highlight the contact you want to edit. Press Option > Detail and enter into the edit page. 4. Make the change. Press Save soft key to save the change or press Back soft key to return to the directory. Deleting a contact from the local directory: 1.Press Directory > Local Directory 2. Choose a group, and press the Enter soft key. 3. Use the navigation key to highlight the contact you want to delete. Press Option soft key, and scroll to Delete> Press OK soft key. 4. A warning window will pop up asking whether to confirm deleting the contact. 5. Press OK soft key to confirm the operation or press the Cancel soft key to return to the directory. Searching a contact in local directory: 1. Press Directory > Local Directory > Search to enter into the search page or choose a group and press the Enter soft key. Press the number keypad to enter into the search page directly. 2. The search interface will display where you may enter the contact you are searching for. Press the OK soft key. 3. The phone will display the contact. Edition Eleven Page 232 of 272

233 Note: The Star2Star company directory is pre-loaded on your phone and can be accessed by pressing the Directory soft key, then selecting Local Directory > Remote Phonebook > Company Directory. h). Voic 1. Press Menu > Messages > Voice Mail > View Voice Mail. 2. You can view the list of new or old voice mail. 3. Choose the account, then press the Connect soft key to listen to new and old messages. Note: Before listening to voic , make sure the connecting code has been set on the phone. Alternatively you may dial 1000 to access the Voic system at any time. The system will prompt for your password. Note: when accessing the voice mail system for the first time your password is your extension #. Change this to a 4-digit number you can easily recall. i). Transfer a call You may customize your phone so that incoming calls are transferred directly to the third party (another extension, mobile phone number, etc.) There are three ways to transfer the call: Blind Transfer, Attended Transfer and Semi-Attended Transfer. Blind Transfer via phone interface: 1. Press the TRAN Button or Tran soft key to put the caller on hold. Dial the new telephone number and press the Tran soft key to call out. Your call will turn to hold status and the LCD will display as Transferred. 2. After the call is answered, press the Cancel soft key to complete the transfer. 3. You will be disconnected from the call and the other parties will be able to talk. Edition Eleven Page 233 of 272
234 Attended Transfer via phone interface: 1. Press the TRAN Button or Tran soft key to put the caller on hold. Dial the new phone number and press the OK or SEND button to call out. 2. After the call is answered you will be able to talk to the new party without the caller on hold being able to hear the conversation. Press the TRAN button to complete the transfer. You will be disconnected from the call and the caller on hold will be able to talk to the transferred party. Semi-Attended Transfer via phone interface: 1. Press the TRAN button or Tran soft key to put the caller on hold. Dial a new number and press the OK or SEND button to call out. 2. While the new number is ringing, hang up or press the Transfer soft key. Your call will turn to hold status and the LCD will display as Transferred. 3. You will be disconnected from the call when the new caller answers the call. The on hold caller and new caller will be able to talk. j). Forwarding a call Calls may be forwarded to another phone number, cell phone or voic . Call forwarding can be configured in the following ways: Always: Incoming calls are immediately forwarded. Busy: Incoming calls are immediately forwarded when the phone is busy. No Answer: Incoming calls are forwarded when the phone is not answered after a specific period. To configure Forward option via the phone interface: 1. Press Menu soft key > Features > Call Forward to enter the configure page. 2. Select one of three options: Always Forward, Busy Forward and No Answer Forward and enter the phone number you want to forward. 3. If you select No Answer Forward, you must also select After Ring Times option. 4. If using this function by server, please enter the On Code and Off Code option. When you choose to enable the call forward function via your IP phone, it will send a message to the server which will turn on the function immediately. When there is call to the extension, the server will forward it to the set number automatically based on the forward type. The IP phone will no longer display the record in call history. Edition Eleven Page 234 of 272

235 4. Press Save soft key to save the changes. k). Conference Calls Establishing a local conference: 1. Press the Conf soft key during an active call. 2. The first call is placed on hold. You will hear a dial tone. Dial the number to conference in, then press the Send soft key. 3. When the call is answered, you may have a private conversation at first and then press the CONF button. The conference call will include you and the other two parties. 4. During the conference, press the Split soft key to split the conference into two hold lines and press the Resume soft key to resume the chosen call respectively. 5. When you press the Hold key, the conference will be on hold. 6. Hang up to disconnect all parties. l). Speed Dial Use the Star2Star Web Portal to configure speed dial buttons in individual phone settings. Using the speed dial key: Press the designated speed dial key to dial out the preset number. Edition Eleven Page 235 of 272


.")
236 27. Yealink EXP39 Expansion Module Expansion Module EXP39 is designed for connection to the Yealink T26P/T28P/T38G VoIP phones. Note: Before installation, be sure to unplug the remote Internet connection and/or power supply as well as the phone stand from the Yealink IP phone. Place the telephone and the expansion module upside down on a soft surface so that you can read nameplates from the front. The expansion module must be placed to the left of the telephone. a). Connect to the phone Use the connecting sheet and screw to connect the EXP39 to the IP phone. Edition Eleven Page 236 of 272

.")
.")
237 b). Connect to the next module Follow the same step to connect the next expansion module Note: The phone can support up to six expansion modules. If you use more than two expansion modules, you will need to connect an additional power adapter to any one of the expansion modules. c). Connect cords Plug the connecting cord into the Ext jack of the IP phone (the next port to the Ext in jack of the first module). To connect more than one module, plug another cord into the Ext out jack and the other port to the Ext in jack of the second module. Edition Eleven Page 237 of 272
. Configuration The expansion module EXP39 has 38 programmable keys that can be configured via the Star2Star web portal.")
238 Up to six modules can be connected. Connect the Ext in port of the previous module and the Ext out port of the next module with a connecting cord. Attach the stand and power adapter. Connect handset and headset to use. d). Configuration The expansion module EXP39 has 38 programmable keys that can be configured via the Star2Star web portal. 19 keys appear on the first screen with a Page Switch key at the top of the screen that switches the display to a second display of 19 keys. Press the Page Switch to return to the original screen. Page Switch You can use the Star2Star web portal to configure key functions, i.e. monitor the presence of local extensions, speed dials, numbers you call on a regular basis. Edition Eleven Page 238 of 272


239 1. Log in to the Star2Star web portal. Click the Configuration tab at the top of the screen. 2. Click Extensions. Edition Eleven Page 239 of 272

 The following example shows the phone with 1 expansion module.")
240 3. Edit the extension and set the number of expansion modules. Click Save Changes to PBX. 4. Click Individual Phone Settings. 5. Click the Speed Dials option. 6. Use the drop-down lists to point the speed dials to the desired extensions, destinations or custom dial patterns. (Note) The following example shows the phone with 1 expansion module. Edition Eleven Page 240 of 272

241 7. Click Save Changes to PBX. 8. Once the Save Changes has completed, reboot the phone. Yealink Speed Dial Transfer Method Configuration This applies to the Yealink family of phones. The first and most significant is a portal selectable option under individual phone settings that will allow T-2X users to change the behavior of transfers using the dss key. This is to address the user error that has in some cases resulted in a "merged" call on park/speed-dial. The new option is entitled "Speed Dial Transfer Method" and has the choices, "New Call", "Attended", and "Blind". The default is Attended and will not change. By selecting "New Call", the user will be presented with a new menu on the phone LCD screen that will allow them to continue with the transfer to another active call, or to begin a new call. This is not yet available in the T-3X. The second issue will address a problem with access to the company directory via the "Dir" softkey on the T-2X. Currently the company directory is accessible via the "remote directory" only by accessing the features menu. This fix will unify the behavior with the T-3X. To apply the changes a "Save Changes" and reboot is required. Edition Eleven Page 241 of 272
 and self-labeling keys. The 5320 IP Phone offers seven programmable multi-function keys for one-touch feature access.")
242 28. Mitel IP Phones The Mitel 5320 IP Phone is full-feature, dual port, dual mode enterprise-class telephone that provides voice communication over an IP network. It features a large graphics display (160 x 320) and self-labeling keys. The 5320 IP Phone offers seven programmable multi-function keys for one-touch feature access. It provides ten fixed feature keys for convenient access to features such as Conferencing, Redial, and many customizable user settings as well as navigational keys to access various screens and application layers. The Mitel 5330 IP Phone is a full-feature, dual port, dual mode enterprise-class telephone that provides voice communication over an IP network. It features a large graphics display (160 x 320) and self-labeling keys. The 5330 IP Phone offers 24 programmable multi-function keys for one touch feature access. It provides ten fixed feature keys for convenient access to features such as Conferencing, Redial, and many customizable user settings as well as navigational keys to access various screens and application layers. Edition Eleven Page 242 of 272
 and self-labeling keys. The 5340 IP Phone offers 48 programmable multi-function keys for one-touch feature access.")
. 5320 IP Phone 1. Handset 2. Programmable buttons 3. Display 4. Ring/Message Indicator 5. Feature buttons 6. Dialpad buttons 7. Navigation buttons 8.")
243 The Mitel 5340 IP Phone is a full-feature, dual port, dual mode enterprise-class telephone that provides voice communication over an IP network. It features a large graphics display (160 x 320) and self-labeling keys. The 5340 IP Phone offers 48 programmable multi-function keys for one-touch feature access. It provides ten fixed feature keys for convenient access to features such as Conferencing, Redial, and many customizable user settings as well as navigational keys to access various screens and application layers. a) IP Phone 1. Handset 2. Programmable buttons 3. Display 4. Ring/Message Indicator 5. Feature buttons 6. Dialpad buttons 7. Navigation buttons 8. External Speaker Edition Eleven Page 243 of 272
. 5340 IP Phone 1.")

244 b) IP Phone 1. Handset 2. Programmable buttons 3. Display 4. Ring/Message Indicator 5. Feature buttons 6. Dialpad buttons 7. Navigation buttons 8. External Speaker c) IP Phone 1. Handset 2. Display 3. Menu Buttons 4. Ring/Message Indicator 5. Feature buttons 6. Dialpad buttons 7. Programmable buttons 8. Navigation buttons 9. External Speaker Edition Eleven Page 244 of 272

245 d). Phone Features The following list shows the features and functions available on Mitel phones: Handset - The handset provided with Mitel phones are hearing aid compatible (HAC). If you are using a headset or if you are in Hands free Mode, you do not need to use the handset. Display - The display provides a 160 x 320 (pixels) high-resolution viewing area for selecting and using features and identifying callers. When idle, the display shows user information, the system time and date, and feature button assignments. Ring/Message Indicator - The Ring/Message Indicator flashes or stays lit to indicate call, message, and feature activity. Ring/Message Indicator signals are described in the following table: Feature Buttons Feature buttons provide quick access to commonly used features. See the following table for descriptions: Edition Eleven Page 245 of 272


246 Speaker The speaker provides audio for hands free calls and background music. Programmable buttons - The IP Phones have self-labeling, programmable buttons. The 5320 IP Phone has 11 programmable buttons. The 5330 IP Phone has 33 programmable buttons. The 5340 IP Phone has 42 programmable buttons. Each phone has the following buttons that can be programmed in the Star2Star Web Portal: Navigation Page buttons The Mitel IP Phones have three Navigation Page icons located in the bottom right hand corner of the display to navigate between the IP phone s three display pages. When a page icon Edition Eleven Page 246 of 272
247 in the bottom right-hand corner of the Display blinks, it means that there is real-time activity on the page where the number or feature is located. If you navigate to the second or third pages, you must use the Navigation Page buttons to return to the first page. You are not automatically returned to the first page after using features or when the IP phone is idle. You can also press the (Home) button on the 5340 IP Phone (only) to return to the first page. Headset - When using a headset, press to connect to or disconnect from calls. The Headset icon appears when the headset is in use. You cannot use the handset or speakerphone when the IP phone is in Headset Mode. Disconnecting the headset automatically enables the handset. Volume Levels - You can change the following volume levels: Ringer (alerting tone) Handset Headset Background music External speaker To change a volume level - While using the feature, press to increase the volume, or press to decrease the volume. The volume level is automatically saved. Display - To adjust the Contrast or Brightness levels: 1. Press (Applications). 2. Press Settings, and then press Brightness and Contrast. 3. Press (Contrast or Brightness) + or to find the level you want to use. 4. Press # or Save to save the setting, and then press Close to exit the Applications menu. Viewing Call History - To view your call history: 1. From the idle display, press (Applications), and then press Call History. 2. Press: Missed to view your missed calls (if any). All to view a list of all call records. Answered to view your incoming calls. Made to view your outgoing calls. 3. Use the navigation buttons at the bottom of the display to move to the previous, first, or next page of call records. The total number of calls in the current list is shown in the bottom left corner of the display. 4. Press Close to return to the previous list. Call Records Deleting You can delete individual call records or all calls of a certain type. To delete an individual call record: 1. From the idle display, press (Applications), and then press Call History. 2. Press the button to the left of the call to display the call details Edition Eleven Page 247 of 272
248 3. Press Delete Log Entry. To delete all calls by type: 1. From the idle display, press (Applications), and then press Call History. 2. Press: Missed to view your missed calls (if any). All to view all calls. Answered to view your incoming calls. Made to view your outgoing calls. 3. Press Delete List to delete all calls from the currently displayed list. 4. You are prompted to confirm the delete. Press Delete. Contact List Customizing You can use the People application on the 5340 IP Phone to add, delete, and edit contact names and numbers. You can also dial anyone on your contact list from the People application. The People window displays up to eight contacts per page, ordered alphabetically by last name. (Note) The People application is not supported on the 5320 and 5330 IP Phones. Adding Names to Your Contact List You can add a name to your contact list by entering it directly using the People application or by copying a number using the To People from the Call History application. To add a name to your contact list using the People application on your 5340 IP Phone: 1. From the idle display, press (Applications), and then press People. 2. Press New. 3. Enter the number. If an outgoing prefix is required to access an external line you may need to add the digit(s). 4. Press Save. 5. Press the appropriate letters to spell the name of your contact. 6. Press Save. 7. Press Close. Editing Your Contact List To edit contact information using the People application on your 5340 IP Phone: 1. From the idle display, press (Applications), and then press People. 2. Press the name you wish to edit. (If you wish to delete the name from your contact list, press Delete.) 3. Press Edit Name. 4. Using the on-screen keyboard, update the appropriate information. 5. Press Save. 6. Press Edit Number. 7. Using the on-screen keyboard, update the appropriate information. 8. Press Save. 9. Press Close. Dialing from Your Contact List To dial a contact from your People application list on your 5340 IP Phone: 1. From the idle display, press (Applications), and then press People. 2. Use the navigation buttons to page through the contact list and select the desired name. 3. Dial the contact name using one of the following methods: Edition Eleven Page 248 of 272
249 Select a contact name and press Dial. Press the button to the right of the contact s dial icon in the main list. (The contact name does not need to be selected.) 4. Continue the call using the speakerphone, or lift the handset for privacy. e). Answering Calls Lift the handset, or press to answer a call while using a headset, or to answer a call in Handsfree Mode. If you are currently on a call, press the flashing IC or Call Key button to answer a waiting call. To answer a waiting call: Press the flashing IC or Call Key button. This action hangs up on the connected call and connects you to the waiting call. You can also place the first call on hold before you answer the waiting call. f). Placing Calls Lift the handset and dial the desired number or press a Speed Call key. Using the hands-free Speakerphone: With the handset on-hook, press Using the optional Headset: (speaker button). Dial the desired number. Insert the headset jack into the Headset port located on the back of the IP phone. The headset icon appears when the headset is in use. You cannot use the handset or speakerphone when the IP phone is in Headset Mode. Disconnecting the headset automatically enables the handset. (Note) Because Headset Mode disables the handset and speakerphone, you must turn off Headset Mode before you can use the handset or speakerphone. Dial the desired number. g). Redialing With or without the handset lifted, press number. (Redial). The system automatically selects a line and dials the You may also press (Speakerphone) and then (Redial) to redial the last number you manually dialed. h). Ending a Call Press or replace the handset. Edition Eleven Page 249 of 272
250 i). Muting a Call You can use Mute to temporarily turn off your microphone, preventing the other party on the call from hearing you. To mute or unmute the microphone: While on a call, press (Mute). MICROPHONE MUTE ON appears. When the microphone is muted, the Mute button lamp is lit. Press (Mute) again to un-mute the microphone. j). Placing a Call on Hold During a call, press (hold) to place the call on hold. The line key flashes. The caller on hold will hear Music or Message on hold if enabled on your system. Replace the handset if necessary. To retrieve the call on hold, lift the handset or press the flashing line key to re-establish the call. k). Call Transfer To Transfer an active call: During a call, press.the caller on hold will hear Music or Message on hold if enabled on your system. Dial the number you want to transfer the call to, then either hand up or announce the transfer. To cancel the Transfer, press (Cancel). l). Conference Calls To create a three-way local conference call: You can create a conference with two other parties using the phone s local conferencing feature. While on the first call, press (Conference) to place the call on hold. The caller will hear Music or Message on hold if enabled on your system. CALL NEXT PARTY TO CNF appears on the phone screen. Place a call to the next conference party. When the party answers, announce the conference, then press to place the call on hold. If necessary, repeat this step to add the remaining conference party. When all parties have answered, press again to join all parties in the conference. To leave a conference, hang up or press. Edition Eleven Page 250 of 272
251 Transferring a conference: During the conference, press and then dial the extension number. Announce the conference (if desired) and then hang up. CONFERENCE TFR from <name> appears on the called party s display. The party must then press the flashing Conference button to connect to the conference. Dropping out of a conference: Press the Conference button or (Hold), and then hang up. ENTER EXTENSION NUMBER appears. This removes you from the conference but leaves the other parties connected. To return to the conference: Press the flashing Call Key button. CONFERENCE WAS HOLDING appears, and you are reconnected to the conference. Ending a conference: You can end a conference and place all conference parties on Individual Hold, allowing you to toggle between the held parties and speak to one party at a time. To end a conference and place all parties on Individual Hold: Press the Conference button, and then press (Hold). CONFERENCE PARTIES ON HOLD appears. To toggle between the held callers: Press parties. (Hold) twice for internal parties or the applicable Call Key button for external m). Phone Directory The Company Extension Directory is automatically downloaded to the phone. To access the Directory press the Phone Book soft key or press Select Phone Book and press OK. Scroll through entries using or keys. Personal Address Book: Press scroll to PHONEBOOK and press OK soft key. Press the AddNew soft key to add personal address entries. Press Yes to add new Address and Press Submit. Do the same for entering Name. Press the keys to scroll through the entries in the address book. Press Dial soft key to call the desired entry. You may edit, cancel or delete an entry by pressing the Change soft key. Directory: The corporate extension directory is automatically downloaded to the phone. 1. Press the Phone Book soft key. The Company Directory is displayed. Edition Eleven Page 251 of 272
252 2. Press the keys to scroll through the entries. 3. Use the navigation arrows to select the entry you require. 4. Press the Dial soft key to dial the entry you require. n). Speed Dials You can create speed dials assigned to a number, that, when pressed on the keypad, dials the number assigned to it. Press scroll to PROGRAM MEMORY KEYS. Press OK. Select an available soft key to assign a phone number. Press Yes to MODIFY TO SPEED DIALKEY. Enter the phone number or extension to be assigned to that button. Press Save., Cancel or <---- to edit entry. To edit an existing speed dial or add a new one, press. Scroll to PROGRAM MEMORY KEYS. Press OK. Select the previously assigned Speed Dial key. Press Edit to change the assigned number or extension. Or, press Delete to remove the assigned number from the Speed Dial key. Press Save when edit or removal is completed. To call one of your configured speed dial numbers: Lift the handset or press and press the assigned speed dial key. Edition Eleven Page 252 of 272
253 29. Analog Phones (Note) Operation may vary depending upon phone type / manufacturer. a). Answering a Call Using the Handset: 1. Follow the manufacturer s instructions. Using Hands-Free Speakerphone Mode: 2. Follow the manufacturer s instructions if this feature is available. Using the (optional) Headset: 3. Follow the manufacturers instructions if this feature is available, b). Making a Call Using the handset: 1. Follow the manufacturer s instructions. Using Hands Free Speaker Phone Mode: 2. Follow the manufacturer s instructions if this feature is available. Using the (optional) Headset: 4. Follow the manufacturer s instructions if this feature is available. Redial Last Number: 5. Follow the manufacturer s instructions. Call Lists: 6. Follow the manufacturer s instructions if this feature is available. c). Microphone Mute 1. Follow the manufacturer s instructions. d). Holding a Call 1. Pressing Flash momentarily (if available) on many analog phones will place your caller on hold. The caller on hold will hear Music or Message on hold if enabled on your system. Edition Eleven Page 253 of 272
254 29. Analog Phones (contd) e). Transferring a Call Blind Transfer (Transfer the call to another party without any announcement): 1. During a call, press Flash (if available) to receive dial tone. 2. Your caller will be placed on hold and will hear Music or Message on hold if enabled on your system. 3. Dial the number you require. 4. Wait until you hear ringing tone then hang up to blind transfer the call. Transfer (Announced): 1. During a call, press Flash (if available) to receive dial tone. 2. Your caller will be placed on hold and will hear Music or Message on hold if enabled on your system. 3. Dial the number you require. 4. When the called party answers announce the call. 5. Hang up to transfer the call. f). Ending a Call 1. Follow the manufacturer s instructions. g). Creating a 3 Party Conference Call 1. To create a conference with two other parties using the local conferencing feature (if available). 2. With an incoming call on your phone or a call you have made, press Flash (if available) to receive dial tone. 3. The active call is placed on hold and the caller will hear Music or Message on hold if enabled on your system. 4. Dial the phone number of the second party. 5. When the second party answers, press Flash (if available) again to join all parties in the Conference. h). Volume Controls 1. Follow the manufacturer s instructions. i). Missed Call Display 1. Follow the manufacturer s instructions. j). Do Not Disturb Feature not supported. Edition Eleven Page 254 of 272
255 29. Analog Phones (contd) k). Changing Ringtones 1. Follow the manufacturer s instructions. l). Voic Access 1. Follow the manufacturer s instructions. 2. When you receive new voic stutter dial town will be heard. Some phone types may also support visual indication that voic is present. 3. To listen to voice messages dial The system will prompt for your password. (Note) as a new user accessing your mailbox for the first time, your password will be the same as your extension number. You will be guided through a short setup process including a password change. Set a password that is different to the extension number. See section Setting up your Voic . m). Speed Dials Feature not supported via Star2Star web portal. See manufacturer s instruction for local phone directory storage if available. n). Call Park 1. To park a call and retrieve from a different phone perform an attended (Announced) transfer to a. See section Transferring a Call 2. The system will play back a retrieval code ( ). a. The system provides up to 99 park positions 3. When the caller is Parked they will hear Message / Music on hold if enabled on your system. 4. To retrieve the call, dial the retrieval code to reconnect to the call. 5. If the call remains parked for longer than the system timeout (see On-Hold Options in the Portal Advanced Settings) the call will ring back on the originating extension. Edition Eleven Page 255 of 272
256 ***Star2Star System Features*** 30. Call Pickup 1. To pick up a call ringing a specific phone that is not ringing as part of a Ring Group, dial *8xxx (xxx being the extension of the ringing phone). 2. For example your neighbor s phone extension 112 is ringing. You would dial *8112 to pickup that call. 3. To pick up a call on any ringing phone dial * Intercom 1. To intercom (directly connect through the phones speaker) to another extension dial 7xxx (xxx being the extension you wish to connect to). 2. For example to directly connect to your neighbor s phone extension 112, you would need to dial The extension you dial will ring once and then automatically answer. 4. Your voice will be heard through the phone speaker. 5. You may also intercom to a remote extension using the same 7xxx format. 6. You can intercom across multiple Star2Star system locations. See section Inter-Location Dialing. Use the following format to dial <location prefix>7<extension> (eg: ) where 21 is the location prefix for another location associated with your system and 7105 to intercom with extension 105. (Note) Feature not available on S2S 3000 Softphone, snom m3 IP DECT wireless phone, Cisco 7940 / 7960 phones or analog phones. 32. Paging 1. Your Star2Star system has the ability to page small groups of extension users approximately 5 7. (Note) with requirements for larger paging groups Star2Star recommends the use of the snom PA1 device (see Section 9. snom Phones PA1 Paging Device) or overhead paging that can be accessed via an analog extension on your system. Contact your reseller or Star2Star for details. 2. This feature creates the same result described in Section Intercom. However it applies to a number of extensions placed in a Paging Group. 3. Dial the 3 digit Paging Group Internal Direct Dial Number [xxx] to use the feature. Contact your system Administrator or reseller for details of the Paging Group setup on your system. 4. Extensions in the Paging Group will ring once and then automatically answer. 5. Your voice will be heard through the phone external speaker. 6. Remember to end the call when paging is complete. 7. A paging group Internal Direct Dial number can be entered as a valid speed dial entry. See section Speed Dials. (Note) Feature not available on StarLite ipbx, S2S 3000 Softphone, snom m3 IP DECT wireless phone, snom m9 IP DECT wireless phone, Cisco 7940 / 7960 phones or analog phones and Panasonic TGP500 Cordless phone. Edition Eleven Page 256 of 272
257 ***Star2Star System Features*** (contd) 33. Direct Dial to Voic 1. To leave a voic for another user without ringing their phone or transferring a call directly to a person s voic , dial 6xxx (xxx being the extension to send the voic to). You can Direct Dial to Voic across multiple Star2Star system locations. See section Inter-Location Dialing. Use the following format to dial <location prefix>6<extension> (eg: ) where 21 is the location prefix for another location associated with your system and 6105 to leave a voic directly without ringing the phone. 34. Setting up your Voic 1. Follow the instructions in Voic Access for your specific phone type to access the Voic system on your phone for the first time. 2. Enter your extension number when prompted by the system for your password. When accessing your voic for the first time your password will be the same as your extension number. 3. The system will prompt you with Welcome to Star2Star Voic . First I will guide you through a short setup process. 4. The system will then prompt you to change your password Enter your password followed by the # key. 5. Enter a new 4 digit password that you can easily remember. Do not use your extension number as this will restart the initial setup process again. 6. The system will prompt you to re enter the new password again to validate. 7. (Note) Users that have been configured with Portal access can log in to the Star2Star Portal, select CONFIGURATION and change their Voic password in the I N D I V I D U A L P H O N E S E T T I N G S section. Select the Voic link to display all options for Voic . Select the Change your voic PIN option to change your password. If you want to reset the voic box for a new user so that it will prompt them to enter a PIN and create a new greeting, set the PIN to be the same as the extension. 8. If you do not have a login please contact your System Administrator or reseller. 9. The system will prompt you to record your name After the tone say your name then press the # key. 10. When you press the # key after speaking your name, the system will provide you with 3 options: Press 1 to accept the recording Press 2 to listen to the recording Press 3 to rerecord your name 11. Select option 0 to record an unavailable message, record your name, record a temporary greeting or change your password. 12. (Note) Your extension can be configured without the Voic feature. Please contact your System Administrator or reseller if that option is required. (Note) the system automatically deletes messages that are more than 90 days old. If you wish to keep messages indefinitely save them in the Archived folder (4). Messages in the Archived folder are not automatically purged. Edition Eleven Page 257 of 272

258 35. Voic Guide Edition Eleven Page 258 of 272

259 Edition Eleven Page 259 of 272

260 Edition Eleven Page 260 of 272


261 Star2Star Communications Edition Eleven Page 261 of 272

262 36. Voic to Phone users can enable the feature which will send their Voic to and/or Pager/Cell Phone Address. The is sent with a WAV file attachment for listening to the message. The Pager/Cell Phone will receive a text notification with no attached WAV file. 1. Access the Star2Star portal and select the CONFIGURATION option at the top of the page. 2. (Note) If you do not have a login please contact your System Administrator or reseller. 3. Select the Voic option under I N D I V I D U A L P H O N E S E T T I N G S to send voic to /pager/cell phone. The following options may also be configured in the same setup screen:- System speaks the caller ID prior to speaking the message. System speaks the Date/Time prior to speaking the message. Determine how long the users phone should ring before the call is sent to voic . Determine how many days voic will remain before automatic deletion. Change the user s voic pin. Click here to change the voic PIN / Password Edition Eleven Page 262 of 272
263 36. Voic to (contd) 4. To configure I N D I V I D U A L P H O N E S E T T I N G S to enable the voic to feature, set the option to yes and enter a valid address as per the example below. You may also set the option to send a message to a Pager/cell Phone Address by entering a valid number in the correct format. Set the option to yes and enter a valid address. You may also set the system to send an alert message to a Page/Cell Phone Address. Individual Phone Settings Extension Summary screen. This screen shows what features are set for each user at a glance. In this example David Jones [100] now has Find-Me / Follow-Me set and Voic to / Pager/Cell Phone as per the examples above. Edition Eleven Page 263 of 272
264 36. Voic to (contd) 1. Additional notification that a voic has been received can be achieved by setting the /Pager/Cell Phone option. (Note) sending notification to a cell phone using text messaging (SMS), differs for each mobile provider. A common list of providers is provided below. However Star2Star cannot guarantee the functionality with a third party device. Contact your mobile provider to ensure that your device supports this feature and to verify the correct format. Please be aware that this is not a free service unless it is included in your mobile plan. Mobile Service Providers to SMS Gateways (Cell Phone Text Message Alerts) AT&T Use the format number@txt.att.net T-Mobile USA Use the format number@tmomail.net Verizon Wireless Use the format number@vtext.com Sprint PCS Use the format number@messaging.sprintpcs.com Sprint PCS - Short Mail Use the format number@sprintpcs.com Alltel Use the format number@message.alltel.com Bellsouth Use the format number@bellsouth.cl US Cellular Use the format number@ .uscc.net Virgin Mobile USA Use the format number@vmobl.com Metro PCS Use the format number@mymetropcs.com Metro PCS Use the format number@mymetropcs.sms.us (Note) ensure you enter the correct format for your cell phone. Entering the number alone will not work. Edition Eleven Page 264 of 272

 Calls can follow a sequence of ringing up to 4 alternative numbers in turn with varying timeout values. Find Me (All) Calls can ring up to 4 alternative numbers simultaneously. 1.")
265 37. Find-Me / Follow-Me Users are provided with powerful functionality to re direct calls via an intuitive web screen. Callers will follow the Find-Me / Follow-Me configuration, if set, to locate their party. There are 3 configuration styles available for this functionality: Find Me (Immediate) Calls are immediately diverted / forwarded to an alternative number. Find Me (Sequential) Calls can follow a sequence of ringing up to 4 alternative numbers in turn with varying timeout values. Find Me (All) Calls can ring up to 4 alternative numbers simultaneously. 1. Access the Star2Star portal and select the CONFIGURATION option at the top of the page. 2. (Note) If you do not have a login please contact your System Administrator or reseller. 3. Select the Find-Me / Follow-Me option under I N D I V I D U A L P H O N E S E T T I N G S Select users here. Individual Phone Settings Extension Summary screen. This screen shows what features are set for each user at a glance. In this example Doug Miles [160] does not have the Find-Me / Follow-Me feature set. 1. Set the Find-Me / Follow-Me feature by checking the option Check this box to enable the Find-Me / Follow-Me feature. 2. In the example below the Find-Me / Follow-Me feature is now set for immediate. Calls to Doug Miles [160] will forward immediately to the alternative number set for a period of 20 seconds. Callers, if unanswered in that timeframe, will receive Doug Miles [160] Voic . Find-Me / Follow-Me feature is enabled. Style is set to immediate. Forwarded calls will ring the (941) number for 17 seconds after which time they will reach Doug Miles [160] Voic . Edition Eleven Page 265 of 272

266 3. Select the life raft icon to view help on the Find-Me / Follow-Me feature. Selecting the life preserver icon above will display help. A full description of the Find-Me / Follow-Me feature is displayed including comments on diverting calls to cell phones or lines answered by an answer machine. 4. Setting the Find-Me / Follow-Me feature to Sequential. See the example below. The call will ring Doug Miles [160] extension for 20 seconds before following the Find-Me / Follow- Me configuration. The call will then ring extension 101 for 17 seconds before moving off to ring extension 103 for a further 20 seconds. Finally the call will route externally to again for 20 seconds. If the call remains unanswered by a person, answering machine or cell phone voic , then the call will reach the voic of Doug Miles [160]. Select a long, short or no message to be played to callers or stay with the location s default setting on a per-user basis. 5. View the Individual Phone Settings Extension Summary screen below to see what features are set for your extension. Edition Eleven Page 266 of 272

267 Individual Phone Settings Extension Summary screen. This screen shows what features are set for each user at a glance. In this example Doug Miles [160] now has Find-Me / Follow-Me set as per the examples above. 38. CallerID Blocking This option allows a user to prevent unwanted calls from reaching their extension. Incoming callers, when blocked, will hear fast busy for approximately 5 seconds prior to disconnection. Blocked numbers can be allowed again by simply deleting the entry. (Note) this feature is not available when the extension is called via a Ring Group or Menu. Use your Star2Star Portal login, select CONFIGURATION to change the settings associated with the CallerID Blocking feature. If you do not have a login please contact your System Administrator or reseller. 1. Select the CallerID Blocking option under I N D I V I D U A L P H O N E S E T T I N G S 2. Remember to Save Changes to PBX when done. Remember to Save Changes to PBX when done Enter the number to be blocked here then select add. Please enter the full number including the area code. Location based caller ID block: With this feature enabled, callers from blocked numbers will hear a fast busy tone for a few seconds, then the call cuts off. System Administrators can enter blocked number data using comma or line delimited format. You can also use the output from a database / CRM system and paste into the Location CallerID Blocking screen using the required format. 1. Select the CallerID Blocking option under I N D I V I D U A L P H O N E S E T T I N G S 2. Remember to Save Changes to PBX when done. Edition Eleven Page 267 of 272
268 Enter the number(s) to be blocked here then select Add Blocks. Please enter the full number including the area code by comma separated or one per line. Select box next to Block these numbers at all locations in this customer? to activate blocking of entered phone numbers. Save Changes to PBX when complete. Edition Eleven Page 268 of 272
269 39. Inter-Location Dialing 1. If your company has multiple Star2Star systems/locations you may dial other extension users in those locations by prefixing their extension number by a 2 digit code. This is a free internet telephone call. (Note) You may also use the Intercom and Direct Dial to Voic features over your system wide locations. 2. To view other locations in your organization use your Star2Star Portal login, select CONFIGURATION to use the Print Company Directory feature. If you do not have a login please contact your System Administrator or reseller. 3. Select the Print Company Directory option under I N D I V I D U A L P H O N E S E T T I N G S 4. The company directory will show all extension users on your system and any other locations within your business. 5. To dial another user in a different location within your business dial xxyyy where xx is the location code of the other system and yyy is the 3 digit extension number. For example to dial extension 100 in another location with a location code of 21 you would dial The Intercom and Direct Dial to Voic features (see sections Intercom and Direct Dial to Voic ) can operate over different locations for eg. To Intercom a user on extension 100 in location 25 you would dial To send a voic directly to the same user on extension 100 you would dial The same process applies when calling remote extensions on a different location. Edition Eleven Page 269 of 272


270 40. StarDialer for Outlook StarDialer for Outlook integrates your Star2Star Phone System with Microsoft Outlook on any PC running Windows XP. Functionality is provided for local extension users to dial telephone numbers using contacts that already exist in their MS Outlook contact directory. If you would like to have this useful feature loaded on your PC please contact your system administrator or reseller for help. 1. To load the StarDialer application on your PC, click the StarDialer option under I N D I V I D U A L P H O N E S E T T I N G S in the Star2Star Web Portal to download the software. 2. You will be prompted to enter your Star2Star extension number. 3. Once StarDialer has been installed your computer must be restarted. 4. To make a call using the StarDialer application open your contacts tab in MS Outlook. 5. Move your mouse over the name of the contact you wish to dial and press the right mouse key. 6. A menu will be displayed. Move your mouse over the name of the contact you wish to dial and press the right mouse key. A menu will be displayed. 7. Select the Call Contact option. 8. The New Call window will appear. Select the number you wish to dial. 9. The first time you make a call, you must select the Asterisk Line in the applications Dialing Options. This needs to be done once only. 10. Click Dialing Options to select the Asterisk Line (do this once only). Edition Eleven Page 270 of 272

271 40. StarDialer for Outlook (contd) 11. Select Asterisk from the drop down in the Connect using line options. 12. Click OK to close the Dialing Options dialog box. 13. Click Start Call to dial. 14. Your extension will ring. 15. Answer the call and you will connect to the number you selected to call. 41. CAC (Call Accounting Codes) A CAC, if configured on your system, provides the ability to account for calls based upon number dialed and call duration. This information is reflected in the Call Detail Records (Reports). Typical application would be when a customer charges back to a client. The codes are enabled and added in the Phone System Configuration / Extensions section of the portal. If enabled the system prompts for the Call Accounting Code. However calls can be made without using a CAC simply by pressing # when prompted. 42. PAC (Personal Authorization Codes) A PAC, if configured on your phone, provides the ability to ensure that all phone users enter a code to dial any non local (> than 7 digits) number. A call cannot be completed without a valid code. This information will be reflected in the Call Detail Records (Reports). This feature is enabled via the Phone System Configuration / Location Information section of the Portal by your system administrator or reseller. PAC codes are entered in the same Location Information page. Edition Eleven Page 271 of 272
CALNET 3: AT&T Voice DNA : Quick reference guide
 CALNET 3: AT&T Voice DNA: Quick reference guide Polycom SoundPoint IP 321 / 331 CALNET 3: AT&T Voice DNA : Quick reference guide Polycom SoundPoint IP 321 / 331 Version 1.2 Page 2 AT&T Voice DNA : Quick
Voic Guide. Access internally Access your mailbox by pressing the Messages/Msgs/MSG key or by dialing Enter your password.
 Voicemail Guide Access internally Access your mailbox by pressing the Messages/Msgs/MSG key or by dialing 1000. Enter your password. Access externally (if configured on your system) i.e. An option on your
User Guide: Polycom SoundPoint IP335 Phone
 User Guide: Polycom SoundPoint IP335 Phone User Guide Contents: User Guide Contents:... 2 IP335 Button Diagram... 3 Telephone Feature Overview... 4 IP335 Features... 4 Reading the Display... 4 How to Use
Polycom Soundpoint 650 IP Phone User Guide
 20 19 18 17 16 1 2 15 14 13 12 This guide will help you to understand and operate your new IP Phone. Please print this guide and keep it handy! 3 11 For additional information go to: http://www.bullseyetelecom.com/learning-center
User Guide. Infinite Voice (Polycom VVX 300/400)
") User Guide Infinite Voice (Polycom VVX 300/400) August 2016 Table of Contents 1. Phone Keys and Views... 2 1.1 Phone Keys and Views... 2 1.1.1 Home View... 2 1.1.2 Lines View... 3 1.1.3 Calls View... 3
User Guide Infinite Voice (Polycom VVX 300/400) August 2016 Table of Contents 1. Phone Keys and Views... 2 1.1 Phone Keys and Views... 2 1.1.1 Home View... 2 1.1.2 Lines View... 3 1.1.3 Calls View... 3
Reference Guide. IP Phone/Calling Features Voic Dialing. Your Phone Calling Features. Phone Views. To dial phone number or extension.
 TelNet OfficeEdge Complete Polycom VVX300 / 310 IP Phone. Reference Guide. IP Phone/Calling Features Voicemail Dialing Your Phone Calling Features To dial phone number or extension Lift your handset and
Reference Guide. IP Phone/Calling Features Voic . Dialing. Your Phone Calling Features. Phone Views. To dial phone number or extension.
 TelNet OfficeEdge Complete Polycom VVX400 Series IP Phone. Reference Guide. IP Phone/Calling Features Voicemail Dialing Your Phone Calling Features To dial phone number or extension Lift your handset and
Polycom VVX410. Full user guide
 Polycom VVX410 Full user guide Contents Contents... 2 Introduction... 4 How to set up the Polycom VVX410... 5 Phone Keys and Hardware... 6 Using your phone... 7 Home view... 7 Lines View... 7 Calls View...
User Guide: Panasonic KX-UT113
 User Guide: Panasonic KX-UT113 User Guide Contents: User Guide Contents:... 2 KX-UT113 Button Diagram... 3 Telephone Feature Overview... 4 KX-UT113 Features... 4 Reading the Display... 4 How to Use your
Polycom SoundPoint IP Phones
 Polycom SoundPoint IP Phones Polycom phones offer a high quality communications experience, combining an intuitive, easy to navigate interface with great audio quality. The purpose of this guide is to
ACC-1143 PUG. Polycom 4 and 6-Line Desk Phone Quick Reference Guide
 ACC-1143 PUG Polycom 4 and 6-Line Desk Phone Quick Reference Guide Table of Contents INTRODUCTION TO YOUR POLYCOM 4 OR 6-LINE DESK PHONE... 2 WELCOME... 2 DESK PHONE... 2 HOW TO USE YOUR VERTICAL 4-LINE
SIP Communicator Spitfire S300 User Guide
 SIP Communicator Spitfire S300 User Guide 1 TABLE OF CONTENTS Handset Description Page 3 Keypad Lock Page 6 Directory Page 6 Adding an Entry. Page 6 Edit or Delete an Entry Page 7 Black List Page 7 Dialing
CALNET 3: AT&T Voice DNA Polycom SoundPoint IP 321 / 331
 CALNET 3: AT&T Voice DNA Polycom SoundPoint IP 321 / 331 Version 1.2 2018 AT&T Intellectual Property. All rights reserved. AT&T, Globe logo, Mobilizing Your World and DIRECTV are registered trademarks
Reference Guide. IP Phone/Calling Features Voice Mail Personal Assistant Toolbar. Dialing. Your Phone Calling Features.
 TelNet OfficeEdge Complete Polycom SoundPoint 550 IP Phone. Reference Guide IP Phone/Calling Features Voice Mail Personal Assistant Toolbar Dialing To dial phone number or extension Lift your handset and
Polycom VVX500 Series IP Phone Reference Guide Dialing Your Phone Calling Features To dial phone number or extension Phone Views Speakerphone
 TelNet OfficeEdge Complete Polycom VVX500 Series IP Phone. Reference Guide IP Phone/Calling Features Voicemail. Dialing Your Phone Calling Features To dial phone number or extension Lift handset and dial
Avaya IP Office Phone Manual
 Avaya IP Office Phone Manual Contents 1 PHONES... 3 1.1 Overview of the 5402... 3 1.2 Overview of the 5410... 5 1.3 Overview of the 5420... 7 1.4 Overview of the 1403 / 1603... 9 1.5 Overview of the 1408
Setting up Polycom VVX phones on the Cloud PBX
 Setting up Polycom VVX phones on the Cloud PBX This document outlines the set-up and use of Polycom VVX termninals on the Cloud PBX Contents List of Polycom phones that are auto provisioned and tightly
BUSINESS. QUICK START GUIDE Polycom VVX 410. Business Media Phone INTEGRATED COMMUNICATIONS SOLUTION
 BUSINESS INTEGRATED COMMUNICATIONS SOLUTION QUICK START GUIDE Polycom VVX 410 Business Media Phone With Business+ you now have access to the latest phone service. Get ready to experience the power of Business+.
Telephone User Instructions
 Telephone User Instructions Telephone User Guide 1 Contents Contents 1. Key Panel... 3 1. Making and Receiving calls... 5 1.1 Incoming calls... 5 1.2 Outgoing calls... 5 1.3 Re-dial... 5 1.4 Callers List...
VIRTUAL PBX USER GUIDE. All you need to know
 VIRTUAL PBX USER GUIDE All you need to know Customer Service At MyNetFone, we pride ourselves on delivering friendly and prompt customer service & technical support. So if you run into any questions or
Quickstart Guide Polycom VVX 400/410
 Quickstart Guide Polycom VVX 400/410 Polycom VVX 300/310 Features Message Indicator Line Keys Line Keys Soft Keys Speaker Transfer Messages Hold Dialpad Home/Lines key Navigation keys/ Select key Headset
Polycom SoundPoint IP 450
 Polycom SoundPoint IP 450 User Guide For training/documentation, please visit us @ http://customertraining.verizonbusiness.com or call 1 800 662 1049 2009 Verizon. All Rights Reserved. The Verizon and
Polycom 450 IP Phone User Training. Advancing Technology with Personal Commitment
 Polycom 450 IP Phone User Training Advancing Technology with Personal Commitment Overview of IP 450 Phone Programming and Using the IP Phone Placing a Call Answering a Call Ending a Call Redialing a Number
Polycom VVX 400 Quick Start Guide
 Polycom VVX 400 Quick Start Guide To Answer a call, do any of the following; Lift Handset off cradle Push Speakerphone Key to use speakerphone Push Headset key to use headset (if equipped). If headset
Yealink SIP-T46G, T42G, and T41P Enterprise IP Phones Quick User Guide
 Yealink SIP-T46G, T42G, and T41P Enterprise IP Phones Quick User Guide Quick User Guide for 8x8 Virtual Office This guide provides information you need to begin using your phone quickly. Phone Views There
Yealink Gigabit IP Phone SIP-T46G
 Yealink Gigabit IP Phone SIP-T46G Quick Reference Guide Applied to firmware version 72.1 or later. CONTENTS Basic Call Features Page 2-5 02 Placing a Call Answering a Call Ending a Call 03 Redial Call
CALNET 3: AT&T Voice DNA Polycom SoundPoint IP 650 / 670
 CALNET 3: AT&T Voice DNA Polycom SoundPoint IP 650 / 670 Version 1.4 2018 AT&T Intellectual Property. All rights reserved. AT&T, Globe logo, Mobilizing Your World and DIRECTV are registered trademarks
TPGBizPhone. Standard T42G IP Phone User Guide
 TPGBizPhone Standard T42G IP Phone User Guide Contents Overview... 5 Hardware Component Instructions... 5 Icon Instructions... 6 LED Instructions... 7 Customising Your Phone... 8 General Settings... 8
AVAYA 9601 SIP DESKPHONE INSTRUCTIONS
 AVAYA 9601 SIP DESKPHONE INSTRUCTIONS The following table provides button/feature descriptions for the 9601 deskphone. Name Description 1 Message Waiting Indicator An illuminated red light in the upper
Polycom VVX500 and VVX600
 Polycom VVX500 and VVX600 Full user guide Contents Contents... 2 Introduction... 4 How to set up the Polycom VVX500 and VVX600... 5 Phone Keys and Hardware... 6 Using your phone... 7 Home view... 7 Lines
First Communications Cloud IP PBX User Guide (Polycom)
") First Communications Cloud IP PBX User Guide (Polycom) 2017 Property of First Communications Contents Introduction... 3 General Phone Operations... 4 Polycom VVX 300 Series... 4 Polycom VVX 300 Series
First Communications Cloud IP PBX User Guide (Polycom) 2017 Property of First Communications Contents Introduction... 3 General Phone Operations... 4 Polycom VVX 300 Series... 4 Polycom VVX 300 Series
Telstra IP Telephony - Telstra IP Video Phone Feature Guide
 1. The Touch screen Your phone has a touch-sensitive screen. To access features or obtain information, tap the menu items, arrow keys, soft keys (the keys along the bottom of the touch screen) and field
TELEPHONE BUTTONS & ICONS TOUCHSCREEN OVERVIEW
 This Telephone Guide describes the various features available to you. Telephone Buttons and Icons describe the physical buttons and keys on the phone, the Touchscreen Overview outlines basic functions
Telstra VVX410 Phone Guide
 Select Save Config to Save the Config Your phone will automatically reboot Note 1: Restarting the phone may take a few minutes Note 2: If your phone has been preconfigured the QSetup soft key will not
Polycom SoundPoint IP 320/330
 Polycom SoundPoint IP 320/330 User Guide For training/documentation, please visit us @ http://customertraining.verizonbusiness.com or call 1 800 662 1049 2009 Verizon. All Rights Reserved. The Verizon
ImpactConnect Hosted PBX Phone Guide - Polycom Soundpoint IP 335
 Phone Guide - Contacts Customer suppt: @ 855-997-6353 customersuppt@impacttelecom.com myaccount.impacttelecom.com www.impacttelecom.com VERSION 1.3 FEBRUARY 2015 NAVIGATION Scrolling Step in/out of menus,
Getting Started 3. Using this Guide 3 Connecting Your Phone 4
 Table of Contents Getting Started 3 Using this Guide 3 Connecting Your Phone 4 Adjusting the Footstand / Handset Rest 5 Signing In to Your Phone 5 Choosing the Proper Headset 5 An Overview of Your Phone
LG Ericsson IP Phone IP 8802A
 LG Ericsson IP Phone IP 8802A 1 1 Message LED 2 3 8 4 9 5 6 7 10 11 12 13 Programmable Keys 14 2 Keys 1 Description of keys Navigation Controls: Left: Use to go to the previous menu in the settings menu.
Press the More key at anytime to scroll across if the feature you need is not visible.
 Display Features The display on your phone is very interactive. As you use the phone the information will change and different features and functions will appear on the display. The 6 buttons above the
FORWARDING ALL CALLS TO ANOTHER PERSON
 UNDERSTANDING POLYCOM VVX 40 TABLE OF CONTENTS: COVER : UNDERSTANDING POLYCOM VVX 40... FORWARDING CALLS... LISTENING TO VOICEMAILS... MANAGING CONFERENCE CALLS... 4 TRANSFERRING CALLS... 6 UNDERSTANDING
ENDING A CALL Press the EndCall soft key. Or depending on the call mode, press the speaker button or hang up the handset.
 PLACING A CALL Using the Handset: Pick up the handset. Enter the phone number, wait a few seconds and the call will process. Or enter the phone number first, then pick up the handset. Using the hands-free
Cisco 504G, 514G, 508G, and 303G Initial Setup
 Cisco 504G, 514G, 508G, and 303G Initial Setup 1 Handset 2 Message Waiting Indicator 3 LCD Screen 4 Line keys 5 Softkey buttons 6 Navigation button 7 Messages button 8 Hold button 9 Setup button 10 Mute
Vertical 2-Line Desk Phone Quick Reference Guide
 Contact your Sales Representative for more information. Table of Contents Introduction to your Xcelerator Desk Phone... 3 How to use your Xcelerator Desk Phone... 3 Answering and making calls... 3 Handling
Polycom VVX Series. Table of Contents. Business Media Phone User Guide
 Table of Contents Getting Started...2 Phone Keys, Hardware and Features...3 Phone Views...5 Phone Icons and Status Indicators...8 Navigation, Fields, and Data Entry...9 Cleaning the Touchscreen (VVX501)...13
Panasonic DT543/546 Training
 Panasonic DT543/546 Training Page 1 of 9 Page 2 of 9 ANSWERING/PLACING A CALL Answer a call: When your phone is ringing: Lift handset or press SP-PHONE for hands free Place an outside call: Lift handset
Polycom VVX 300 Series
 wowforbusiness.com Polycom VVX 300 Series Phone User Guide Basic Phone Functions Table of Contents Placing a Call...2 Ending a Call...3 Local Directory...3 Hold and Resume..4 Answering an Incoming Call....4
USER MANUAL Grandstream GXP1400/1405
 USER MANUAL Grandstream GXP1400/1405 astervox sdn bhd (1066828-D) 7 Jalan Derumun, Damansara Heights 50490 Kuala Lumpur, Malaysia Tel: +603 2035 5888 sales@astervox.com www.astervox.com June 2014 astervox
Centrex Phone Instructions
 Centrex Phone Instructions Making a Call To Make a Call: Using the Handset - Lift the handset and dial Using the Speakerphone- Press the Speaker button and dial. To Dial: An internal extension - Dial the
Icon Instructions LED Instructions Touch Screen Display Navigating Menus and Fields Entering Data and Editing Fields
 ... 4... 5... 5 Icon Instructions... 6 LED Instructions... 7 Touch Screen Display... 8 Navigating Menus and Fields... 10 Entering Data and Editing Fields... 11... 12 General Settings... 12 Backlight...
UCx Feature Guide for Nortel IP phones - with Feature Key mode disabled
 UCx Feature Guide for Nortel IP phones - with Feature Key mode disabled Date: 22 November 2016 System: UCx Release: 5.0 Phone models: Nortel IP Phones i20xx Series, 11xx Series and 12xx Series Page 2 of
Polycom VVX 410 Customer User Guide
 USER GUIDE Software 4.1.4 March 2013 1725-49090-001 Rev A Polycom VVX 410 Customer User Guide 0 P a g e Phone Keys and Hardware The following figure shows the important phone features, which are described
UCx Feature Guide for Infinity phones
 UCx Feature Guide for Infinity phones Date: 23 August 2018 Version: 1.4 System: UCx Release: 6.0 Phone models: E-MetroTel will provide support for the following Infinity IP phones, as long as the phones
Hosted Phone Quick Start Guide. Get the most out of our Hosted Phone service with these handy instructions for the Polycom VVX phone.
 Hosted Phone Quick Start Guide Get the most out of our Hosted Phone service with these handy instructions for the Polycom VVX 300-310 phone. 1 Contents Equipment......................................................................
Panasonic User Guide (Panasonic KX-DT 333/343 Series Phones)
") Panasonic User Guide (Panasonic KX-DT 333/343 Series Phones) DISPLAY FEATURES: (4 soft keys) 573-874-0101 PROG Used to program keys RING Volume of the Ring Tone INFO Date/Time/Day of Week MENU Personal/System/
Panasonic User Guide (Panasonic KX-DT 333/343 Series Phones) DISPLAY FEATURES: (4 soft keys) 573-874-0101 PROG Used to program keys RING Volume of the Ring Tone INFO Date/Time/Day of Week MENU Personal/System/
Cisco SPA50x User Manual
 Cisco SPA50x User Manual Table of Contents: Phone operation 2 Claricom System Star Codes 65 Claricom User Voicemail 66 USER GUIDE Cisco Small Business Cisco SPA50X and SPA51X SIP IP Phones Models SPA501G,
TPG BizPhone. Premium T48G IP Phone User Guide
 TPG BizPhone Premium T48G IP Phone User Guide Contents Overview... 5 Hardware Component Instructions... 5 Icon Instructions... 6 LED Instructions... 7 Touch Screen Display... 8 Navigating Menu and Fields...
Yealink SIP-T48G and T49G Enterprise IP Phones Quick User Guide
 Yealink SIP-T48G and T49G Enterprise IP Phones Quick User Guide Quick User Guide for 8x8 Virtual Office This guide provides information you need to begin using your phone quickly. Phone Views There are
Cisco Model SPA 303 Quick Start Guide
 Cisco Model SPA 303 Quick Start Guide Welcome Thank you for choosing the Cisco Small Business IP phone. This guide describes how to install your phone and how to perform some basic tasks. 1 Installing
POLYCOM PHONE USER GUIDE
 POLYCOM PHONE USER GUIDE PLACING AND ANSWERING AUDIO CALLS VVX 300, 400, 500 and 600 can manage a maximum of 24 active, incoming, and held audio calls at a time. However, you can have only one active call
Phone Information. IP2061 Quick Reference Guide. ICON Voice Networks REV 1.0. ICON Voice Networks
 Phone Information Extension Number: Passcode / Voice Mail Access Code: IP Address: MAC Address: Serial Number: REV 1.0 IP2061 Quick Reference Guide ICON Voice Networks 8001 Jetstar Drive Irving, TX 75063
Yealink BASIC PHONE GUIDE T48G POWERED BY XCHANGE TELECOM
 POWERED BY XCHANGE TELECOM UNDERSTANDING THE KEYS ON YOUR The Hard keys may display a fixed function, may be programmed to display extensions or other frequently used functions like Speed Dial. The Soft
PLEASE READ. This user manual is from the manufacturer Jive Communications may not support some features discussed in this document.
 PLEASE READ This user manual is from the manufacturer Jive Communications may not support some features discussed in this document. Please see our online documentation or contact us for a complete list
Polycom VVX User Guide
 Polycom VVX 500-600 User Guide Polycom VVX 500-600 Features USB port for external video camera Message waiting indicator Home/Lines key Speaker Dialpad Security slot (on side) Colour touchscreen display
Quickstart Guide. Polycom VVX 500/600
 Quickstart Guide Polycom VVX 500/600 Polycom VVX 500/600 Features USB port for external video camera Message waiting indicator Home/Lines key Speaker Dialpad Security slot (on side) Colour touchscreen
Polycom IP 5000 User Guide
 Polycom IP 5000 User Guide 1 Contents 1.0 Basic Phone Features... 3 Placing Calls... 3 Answering Calls... 3 Ending Calls... 3 Redialling Numbers... 3 Muting the Microphone... 3 Holding and Resuming Calls...
AVAVA 9608 SIP DESKPHONE INSTRUCTIONS
 AVAVA 9608 SIP DESKPHONE INSTRUCTIONS MESSAGE WAITING INDICATOR YOUR PHONE DISPLAY NAVIGATION ARROWS and the OK BUTTON 9608 PHONE INSTRUCTIONS If there are messages in your Avaya Voice Mailbox, the light
Operating Your Phone. This section describes how to operate your Cisco IP Phone and includes information on soft keys and phone features.
 This section describes how to operate your Cisco IP Phone and includes information on soft keys and phone features. Note Because there are differences in phone and site configurations, not all features
Cisco IP Phones. Quick Start Guide SPA303. Tel Woodley Ave., Van Nuys, CA USA
 Cisco IP Phones SPA303 Quick Start Guide 2 SPA303 3 Welcome Thank you for choosing the Cisco Small Business IP phone. This guide describes how to install your phone and how to perform some basic tasks.
Polycom VVX300 / VVX310 / VVX400 / VVX410. User Guide
 Polycom VVX300 / VVX310 / VVX400 / VVX410 User Guide Table of content Phones overview Basic telephony features Advanced telephony features Voicemail & Call history Phone preferences Contact management
Red Road Telecom. Grandstream GXP 2000 Series. v Red Road Telecom, LLC
 Red Road Telecom Telephone User s Guide Grandstream GXP 2000 Series v2.0 2008 Red Road Telecom, LLC Contents Line Keys... 3 Programmable Keys... 3 Display... 3 Answering a Call... 4 Not Answering A Call...
Polycom VVX201. Owner s Manual. Version 2
 Polycom VVX201 Owner s Manual Version 2 TABLE OF CONTENTS Before You Begin... 6 Who Should Read this Guide?...6 Typographic Conventions...6 Get Started... 7 View Your Phone Keys and Hardware...7 VVX 201
Yealink 46G. A Complete Overview for Conversation Users
 Yealink 46G A Complete Overview for Conversation Users Contents Hardware... 3 Soft Keys... 4 Answering a Call... 6 Making a Call... 7 Actions Performed While in a Call... 7 Muting a Call... 7 Placing a
Quick Start Guide. Intermedia Hosted PBX Yealink W52 Wireless DECT Phone
 Quick Start Guide Intermedia Hosted PBX Yealink W52 Wireless DECT Phone 2 Welcome to your Hosted PBX Service. What s in the box? Yealink W52 Wireless DECT Phone W52 Base Parts A. 1 Base Station B. 1 Power
Polycom VVX500. Flip Connect. User Guide. Flip Solutions Ltd t/a Flip Connect Unit 5/6, 29 Mill Lane, Welwyn Hertfordshire, AL6 9EU
 Flip Connect Polycom VVX500 User Guide _- Unit 5/6, 29 Mill Lane, Welwyn Hertfordshire, AL6 9EU 020 3056 5060 0870 421 5411 support@flipconnect.co.uk www.flipconnect.co.uk Contents How to set up the Polycom
Guide to using your CISCO IP 6961 phone at Imperial College London
 Cisco IP Phone 6961 Cisco IP 6961 Phone Screen 1. Header Displays date, time and extension number 2. Extension details and other phone information - During a call, displays detai ls for the active line.
Quick Reference Guide.
 TelNet OfficeEdge Complete Cisco SPA500 series phone. Quick Reference Guide. IP Phone/Calling Features VoiceMail Personal Assistant Toolbar Dialing Your Phone Calling Features To dial phone number or extension
Cisco IP Phone 7906G and 7911G Basic User Guide
 CISCO IP PHONE 790G AND 7911G Hold Places the active call on hold, resumes a call on hold, and switches between an active call and an incoming call or an active call and a call on hold. 7 Keypad Works
[Cisco IP Telephony Training]
![[Cisco IP Telephony Training]](/thumbs/85/91386702.jpg "[Cisco IP Telephony Training]") [Cisco IP Telephony Training] [Knowing Your VoIP Phone] Message Waiting Light LCD Screen Line or speed dial buttons Footstand adjustment Soft keys Dialing pad Navigation button Volume Function toggles
[Cisco IP Telephony Training] [Knowing Your VoIP Phone] Message Waiting Light LCD Screen Line or speed dial buttons Footstand adjustment Soft keys Dialing pad Navigation button Volume Function toggles
Vox Centrex Yealink T29 UserGuide
 Vox Centrex Yealink T29 UserGuide Monique Verto Supreme November 2015 TABLE OF CONTENTS Handset Description Page 2 Keypad Lock Page 5 Directory Page 5 Adding an Entry. Page 5 Edit or Delete an Entry..
Polycom VVX 500/600 Features
 Polycom VVX 500/600 Features USB port for external video camera Message waiting indicator Home/Lines key Speaker Dialpad Security slot (on side) Colour touchscreen display Headset key Speakerphone key
Model No. KX-TGP500 B08. Model No. KX-TGP550
 User Guide SIP Cordless Phone Model No. KX-TGP500 B08 Model No. KX-TGP550 T08 Model shown is KX-TGP500. Model shown is KX-TGP550. Thank you for purchasing a Panasonic product. You can configure some of
RVC HP/3Com - Model 3502 Phone Quick Reference. RVC HP/3Com - Model 3502 Phone Quick Reference Guide
 RVC HP/3Com - Model 3502 Phone Quick Reference Guide RVC_3502_Phone_Quick_Reference_v9.5.docx Page 1 of 8 6/21/2011 Put a Call on Hold While you are on a call, press Hold button (red button in lower right).
AVAYA 9608/9611G SIP DESKPHONE INSTRUCTIONS
 AVAYA 9608/9611G SIP DESKPHONE INSTRUCTIONS MESSAGE WAITING INDICATOR PHONE DISPLAY NAVIGATION ARROWS and the OK BUTTON PHONE BUTTON MESSAGE BUTTON CONTACTS HISTORY HOME HEADSET SPEAKER VOLUME BUTTON MUTE
Mitel Deskphones. 1. Getting started Phone overview. Table of Contents Prerequisites. Mitel 6873 Quick guide. Table 2.
 Mitel Deskphones Mitel 6873 Quick guide Copyright 2015-2016 Mitel Communications AB 2. Press Done. 1.2. Phone overview Table of Contents 1. Getting started... 1 2. Basic call handling... 2 3. Advanced
Avaya 9408 User Guide
 Avaya 9408 User Guide UW-IT Quick Reference Guide Contents 9408 Telephone Buttons and Features... 3 Description of Icons on the Display... 4 Making and Receiving Phone Calls... 5 Answering a Call... 5
Cisco Small Business Model SPA 504g
 Cisco Small Business Model SPA 504g User Guide Version 1 Table of Contents Getting Started... 1 About This Document... 1 Organization... 1 Overview of the Cisco Small Business IP Phones... 3 Understanding
IP Office 9504 Telephone Quick Guide
 9504 Telephone Quick Guide Your 9504 Telephone The supports the 9504 telephones. The phone supports 12 programmable call appearance/feature buttons. The labels for these are displayed in the main display
Cisco 8841 & 8851 IP Phone Quick Reference V 1.2
 Cisco 8841 & 8851 IP Phone Quick Reference V 1.2 1. Handset Light Strip 2. Line / Session Buttons 3. Phone Screen 4. Soft Key Buttons* 5. Navigation and Select Button 6. Release Button 7. Hold / Resume
Telephone Features User Guide. BCM 4.0 Business Communications Manager
 Telephone Features User Guide BCM 4.0 Business Communications Manager Document Status: Standard Document Version: 03 Part Code: N0060608 Date: June 2006 Telephone button icons Use this guide as a quick
What you will learn today..
 What you will learn today.. Getting Started Dial Plan Phone and Calling Features Unified Communications 2 Getting Started Phone Navigation Note: SoundPoint IP 335 pictured. Appearance might vary slightly
Polycom Soundpoint IP 330/331/335 Phone. Quick Reference Guide. Downloaded from manuals search engine
 Polycom Soundpoint IP 330/33/335 Phone Quick Reference Guide www.i-evolve.com/voip Table of Contents Phone Overview... Soft Key Features... How to Place a Call... Placing a Call from a Call List... Ending
CISCO 7960/7942 IP PHONE
 CISCO 7960/7942 IP PHONE Cisco IP Phone 7960/7942 Operation To place and answer calls with the handset, simply lift the handset. To place and answer calls using the speakerphone, press SPEAKER. You can
Polycom IP 430 User Guide
 Polycom IP 430 User Guide Table of Contents Table of Contents...2 Introduction...3 The Polycom IP430 IP Phone... 3 Web Portal...3 Telephony Toolbar...4 Document Format...4 Feature Functionality...4 Feature
Polycom IP 7000 User Guide
 Polycom IP7000 User Guide Polycom IP 7000 User Guide Table of Contents Table of Contents...2 Introduction...3 The Polycom IP4000 IP Phone... 3 Web Portal...4 Telephony Toolbar...4 Document Format...5 Feature
Polycom VVX 300 Training
 Polycom VVX 300 Training Home View You can always return to the Homescreen by pressing the Home button on your phone. You can use the arrows to scroll and select your desired icon. VVX 300 Front View VVX
LCD Screen. Soft Keys. Handset (Optional cordless handset shown) Speaker. TRANSFER A CALL While connected to a live call
 Speaker. TRANSFER A CALL While connected to a live call") 1 2 1 LCD Screen Fixed Function Keys 2 Programmable Keys Contacts Goodbye 7 3 3 Soft Keys Call History Redial 8 4 5 4 5 6 Navigation Keys/Select Button Dial Pad Fixed Function Keys Voicemail Settings Volume
1 2 1 LCD Screen Fixed Function Keys 2 Programmable Keys Contacts Goodbye 7 3 3 Soft Keys Call History Redial 8 4 5 4 5 6 Navigation Keys/Select Button Dial Pad Fixed Function Keys Voicemail Settings Volume
AT&T Unified Communications Services
 AT&T Unified Communications Services UC Voice User s Guide For End Users V1.2 October, 2015 Disclaimer The contents of the document may be revised by AT&T at any time without notice. Please consult the
AVAYA 9608 IP Phone QUICK REFERENCE GUIDE
 AVAYA 9608 IP Phone QUICK REFERENCE GUIDE The phone supports 24 programmable call appearance/feature buttons. The labels for these are displayed in the main display and can be controlled by the adjacent
IP Office 9621 Telephone Quick Reference Guide
 9621 Telephone Quick Reference Guide Your 9621 Telephone The supports the 9621 telephone. The phone supports 24 programmable call appearance/feature buttons. The labels for these are displayed in the main
Yealink Gigabit IP Phone SIP-T48G
 Yealink Gigabit IP Phone SIP-T48G Quick Reference Guide Applied to firmware version 72.1 or later. CONTENTS Using your Phone Page 2 02 Navigating the Touch Screen Basic Call Features Page 3-6 03 Placing