VS Port FXS SIP. VoIP Telephone Adaptor. User Manual. V2.1h
|
|
|
- Cleopatra Amber Flynn
- 6 years ago
- Views:
Transcription
1 VS200 2-Port FXS SIP VoIP Telephone Adaptor User Manual V2.1h
2 Quick Guide Step 1: Broadband (ADSL/Cable Modem) Connections for VS200 A. Connect VS200 LAN port to ADSL NAT Router as the following connection. B. Connect VS200 PC port to Notebook PC LAN port using a Category 5 LAN cable. C. Connect VS200 RJ11 PHONE1 port to a one Telephone Set. D. Connect VS200 RJ11 PHONE2 port to a another Telephone Set. E. Connect DC Power Adaptor. After power on, the POWER LED will be Green ON. In 5 seconds, the PHONE LED will start flashing 5 times and be ready for configurations. F. Pick up the Phone1 or Phone2, the PHONE LED will be lit, and you should hear a dial tone. G. When the PHONE LED is Green flashing, it indicats a successful SIP registration for Phone 1. H. When the PHONE LED is Red flashing, it indicats a successful SIP registration for Phone 2. I. Press #121# and #120# from the phone to listen to IVR and to check the DHCP status and the IP address (e.g ) for VS200. After the IP announcement, please hang up. Figure A. ADSL Connections with NAT Router for VS200 ADSL Modem INTERNE NAT Router VS200 IP: WAN PC IP: LAN PHONE Router IP: PHONE2 Step 2: Settings for VS200 from PC Web Browser A. VS200 is defaulted at embedded NAT mode. B. Press #120# from the phone to listen and check IP address (default is ) for VS200. C. Enter the IP address from PC Web browser for configuration settings. Example: Enter from IE Web browser to display login page. D. Enter the user name and password into the blank field. The default settings are Username: root Password: test. Click the Login button to enter for configurations. 2
3 E. You need to set up the following web configurations: Phone Settings, Network, SIP Settings, NAT Settings for registration to a SIP server. Remember to submit, save and reboot for new configurations. F. The PHONE1 LED will be Green and PHONE2 LED will be Red flashing showing a successful registration in the SIP server. For further detail configurations, please refer to the user manual. Step 3: Making Point-To-Point SIP Calls A. While the PHONE LED is flashing continuously showing a successful registration in the SIP server. B. Pick up the phone, and you should hear a dial tone. C. Press # to call the party with the number registered in the SIP server. Note # is used to send out the call immediately. In a moment, you should hear the ring back tone, and wait for the called party to answer. For more applications, please refer to the user manual. Note: Difficulties in configuring VS200? Please refer to the last chapter for trouble shootings. 3
4 TABLE OF CONTENTS 1 INTRODUCTIONS 6 2 FEATURES 6 3 STANDARD COMPLIANCES 7 4 PACKING CONTENTS 7 5 LED INDICATORS 7 6 INSTALLATIONS & SIP CONFIGURATIONS 8 7 DEFAULT RESET BY TELEPHONE 8 8 CONFIGURATIONS BY WEB BROWSER 9 LOGIN THE GATEWAY 9 SYSTEM INFORMATION 10 PHONE BOOK SETTINGS 11 Phone Book 11 PHONE SETTINGS 12 Call Forward 12 SNTP 13 Volume 14 DND 15 Caller ID 16 Dial Plan 17 Flash Time 19 Call Waiting 20 T.38 (FAX) 21 Hot Line 22 Alarm 23 NETWORK 24 Network Status 24 WAN 25 LAN 26 DDNS 27 VLAN 28 DMZ 30 Virtual Server 31 PPTP 32 SIP SETTINGS 33 4
5 Service Domain 33 Port Settings 35 Codec Settings 36 Codec ID Settings: 38 DTMF Settings: 39 Rport Settings: 39 Other Settings 40 NAT TRANS 41 STUN 41 OTHERS 42 Auto Config 42 FXS Port 44 MAC Clone 45 Tone 45 Advanced 46 Status Log 47 USER PASSWORD 48 SAVE CHANGES 48 UPDATE 49 New Firmware 49 Auto Update: 52 Default Settings: 56 REBOOT 57 9 CONFIGURATIONS BY TELEPHONE & IVR VOIP APPLICATIONS EXAMPLES 60 EXAMPLE 1: SIP-TO-SIP CALLING/ANSWERING 61 EXAMPLE 2: SIP TO DIRECT IP CALLING 61 EXAMPLE 3: DIRECT IP TO DIRECT IP CALLING/ANSWERING 62 EXAMPLE 4: DIRECT IP TO DIRECT IP CALLING WITHIN NAT ROUTER 62 EXAMPLE 5: 3-WAY CONFERENCE CALL, CALL TRANSFER, CALL WAITING, HOLD 63 EXAMPLE 6: SIP-TO-SIP CALLING FOR TROUBLE SHOOTING FOR WEB CONFIGURATIONS DO NOT HEAR DIAL TONE? CAN NOT ACCESS WEB PAGE? ONLY ONE IP AVAILABLE FROM ADSL/CABLE SERVICE PROVIDER? 69 5
6 1 Introductions The VS200 is a 2-port FXS Telephone Adaptor (TA) with SIP Protocols for Voice over IP (VoIP) applications. Connecting to the Internet and two analog telephone sets, the VS200 can supports two concurrent VoIP calls over the Internet. VS200 provides Ethernet WAN and LAN ports for ADSL and Notebook PC connections. It also provides two RJ11 connectors for analog telephones (FXS). The two FXS ports can support T.38 features for FAX over Internet. With an embedded NAT/DHCP server, VS200 can be easily configured to fit for different network diagrams by PC Web browser and telephone set, and it is very suitable for ITSP (Internet Telephony Service Providers) and SOHO users to make VoIP calls. Note that VS200 requires an IP address, a subnet mask, and its gateway Router IP address for its own use to connect to Internet. These three are available from your Internet service provider. VS200 may enable PPPoE or DHCP features to automatically get an assigned dynamic IP from the ITSP. Please refer to Chapter 8 Configurations by Web browser for detailed information. 2 Features The VS200 VoIP TA is equipped with two RJ11 connectors for POTS, and two RJ45 connectors for ADSL Modem/Router and PC connections. The VS200 is featuring as the following Three LED Indicators for VS200: POWER, PHONE, LAN RJ45 x 2 for WAN and LAN ports + RJ11 x 2 for FXS port Configurations by Web Browser and Telephone Embedded NAT/DHCP Server PPPoE/DHCP Client for Dynamic IP plus NAT, DNS, and DDNS Clients Support PPTP VPN Features and Support STUN server for NAT Traversal Support registrations for up to 3 SIP Servers Hot Line Mode Dial Plan Settings T.38 FAX over IP Interactive Voice Recording (IVR) for telephone IP status Phone Book, Call Forward/Waiting, Call Transfer/Hold, and 3-Way Conference Calls Auto Configurations by TFTP, HTTP, or FTP server Remote Firmware Upgraded with HTTP or TFTP server by Web PC Direct IP/URL Dial without SIP Proxy or Dial number via SIP server Telephone features: Volume Adjustment, Phone book, and Flash Out-Band DTMF (RFC 2833) / In-Band DTMF / Send DTMF SIP Info 6
7 3 Standard Compliances The VS200 VoIP TA supports for the following standards VoIP Protocol: IETF RFC3261 and RFC 2543 for SIP SIP Authentication: IETF RFC2069 and RFC 2617 for MD5 Speech Codec: ITU-T G.711, G.723, G.729A/B, VAD and CNG Echo Cancellation: ITU-T G.165/168 4 Packing Contents Inside the package you should find: ⑴. One VS200 2-Port SIP TA ⑵. One AC to 12VDC/1A Power Adaptor ⑶. One User Manual CD Please check if the packing is damaged or any component is missing. If so, please contact your distributor. 5 LED Indicators On the front panel of VS200, there are three LED indicators as the following POWER: On indicates the power is normal PHONE: Green On indicates Off-Hook on Phone 1 or Phone 2. Green Flashing indicates a successful SIP registration for Phone 1. Red Flashing indicates a successful SIP registration for Phone 2. Yellow Flashing indicates successful SIP registrations for both Phone 1 & 2. LAN: On indicates the Ethernet Ports are in Connection. Flashing indicates the data activity of Ethernet ports. 7
8 6 Installations & SIP Configurations 1. Connect VS200 RJ45 WAN port to ADSL Modem/Router using a Category 5 LAN cable. 2. Connect VS200 RJ45 LAN port to Notebook PC using a Category 5 LAN cable. 3. Connect VS200 RJ11 PHONE1 port (next to LAN port) to a Plain Old Telephone Set (POTS). 4. Connect VS200 RJ11 PHONE2 port to another Plain Old Telephone Set (POTS). 5. Connect the power adaptor to power on VS200, and the POWER LED will be lit constantly. 6. The PHONE LED indicators will be OFF for about 5 seconds and start flashing for 5 times, and remain OFF for VoIP configurations. The LAN LED will be constantly ON when any one of RJ45 ports is connected. If the PHONE LED keeps flashing, it indicates that VS200 has successfully registered in the SIP server. 7. Pick up the phone1 or phone2, the PHONE LED will be lit and you should hear a dial tone. If you hear a busy tone, please check if the WAN port is connected properly. 8. Press #120# to listen and check the LAN port assigned IP address for the VS200. The default IP address is This IP address will be used for the Web configurations from Notebook PC. Please refer to Section 8 for Web configurations. 9. Please refer Chapter 10 for VoIP applications examples of SIP registrations, and register Phone 1 & 2 into your SIP server. 10. The PHONE LED will be Green flashing for Phone 1 successful registration, and Red flashing for Phone 2 successful registration, respectively. (Yellow flashing for both Phone 1 & 2 successful registrations.) 11. After successful registration into the SIP server, the PHONE LED will be Green flashing. Pick up the Phone 1, and you should hear a dial tone. Press # to call the party with the number registered in the SIP server. Note that # will dial out the number immediately. Dialing without # will not dial out until the auto dial timer (default=5 seconds) elapsed. In a moment, you should hear a ring back tone, and wait for answer. 7 Default Reset by Telephone VS200 provides an easy way to reset to factory defaults by using Telephone. Pick up the phone and press #198#. The VS200 will reset back to factory defaults, and enter into POWER ON cycle. The PHONE LED indicators will be OFF for about 5 seconds and start flashing for 5 times. The POWER LED then will be lit constantly, and the PHONE LED will be OFF. If the PHONE LED keeps flashing, it indicates that VS200 has successfully registered in the SIP server. 8

9 8 Configurations by Web Browser Login the gateway You may enter the IP address from PC Web browser to configure VS200. For example, enter from IE web browser to display login page as follows Please enter the default IP address from PC Web browser. The following Web page shall be displayed on PC. If you have difficulties accessing the Web page from the PC Web browser, the subnet IP of PC might be different from xxx. In this case, please refer to Chapter 11 for trouble shooting Please enter the username and password into the blank field. The default settings are: Username: root Password: test 8.3. Click the Login button will enter the management information page for system setup. Note that whenever you change the setting in each Web page, please remember to click the Submit button in the page, and click the Save button to save into the non-volatile memory and click the Reboot button to activate the new settings. 9

10 System Information 8.4. You will see the system information such as firmware version, Codec, etc in this page You may click the button list at the left hand side to configure the VS200. Model Name Show device Model Name. Firmware Version Device Risc version, eg: Tue Jan 16 11:28: Codec Version Device DSP version, eg: Wed Dec 20 17:28: Call Status Protocol Show device VoIP protocol. PhoneNo Show the Phone 1 and Phone 2 Realm #1 Show the first registry information status Realm #2 Show the second registry information status Realm #2 Show the third registry information status WAN Status MAC address WAN port of MAC address IP address/netmask IP address/netmask Gateway Default router IP address DNS DNS IP address LAN Status IP address/netmask Current LAN port IP address/netmask 10

11 Phone Book Settings Phone Book 8.6. You may add/delete Name (in numeric only) up to maximum 140 entries in Phone book list To add a phone name, you need to enter the position, the name, and the phone URL. When you finished a new phone list, just click the Add Phone button To delete a phone name, please select the phone name then click Delete Selected button To delete all phone names, please click Delete All button After dialing a phone number, the TA will first match with the Name in the phone book. If matched, the TA will send out the corresponding URL. be sent out Example 1: Name: 101, URL: If not, the dialed phone number will Press 101# on telephone, and the phone at will start ringing Example 2: Name: 102, URL: james@sipserver.com Press 102# on telephone, and the TA will call the URL james@sipserver.com Example 3: No Name: 103 in phone book. Press 103# on telephone, and the TA will call the registered number

12 Phone Settings The pages are as follows; Call Forward, SNTP, Volume, DND, Caller ID, Dial Plan, Flash Time (or hook switch), Call Waiting, T.38 FAX over IP, Hot Line and Alarm settings. Call Forward You can select the forward mode and enter the forward URL. Choose phone number: Select Phone 1 or Phone 2 for you want to change the functions. All Forward: Busy Forward: No Answer Forward: All incoming call will forward to the URL you choose. The incoming call will forward to the URL when the callee is busy. The incoming call will forward to the URL when no answer You need to set the Time Out ring which will initiate No-Answer forwarding to the number you choose. When you finished the setting, please click the Submit button. 12


13 SNTP You can setup the primary and second SNTP Server IP Address, to get the date/time information. You may also set the Time Zone, and how long need to synchronize again. When you finished the setting, please click the Submit button. 13

14 Volume You can setup the Handset Volume and Handset Gain in this page. Handset Volume is to set the volume hearing from the handset. Handset Gain is to set the volume send out to the other side s handset. 14

15 DND You can setup the DND (Do Not Disturb) setting to keep the phone silence. You can choose either DND Always or a DND period DND Always: All incoming call will be blocked until this feature is disabled DND Period: Set a time period and the phone will be blocked during the time period. If the time in From is greater than that in To time, the DND time will be from Day 1 to Day After you finished the setting, please click the Submit button. 15

16 Caller ID You may show caller ID in your PSTN Phone or IP Phone by selecting Yes in Single Caller ID, and the desired Caller ID option for either FSK or DTMF. When you finished the setting, please click the Submit button. 16
17 Dial Plan Dial plan and auto dial timer settings can be set in this page. The dial plan allows you to map the dialing into an easy-to-remember phone number system. The auto dial timer specifies the elapse time between the dialing digits. When Drop prefix is ON and the dialing prefix is matched, the prefix will be dropped and replaced by the rule digits and followed by the rest of dialing digits. When Drop prefix is OFF and the dialing prefix is matched, the rule digits will be added before the dialing digits in accord with the settings Symbol Representations: Symbol Representations x or X 0,1,2,3,4,5,6,7,8,9 + or Example 1: Drop Prefix: No, Replace rule 1: 002, a) Pressing 8613xxx will result in dialing out xxx. b) Pressing 8862xxx will result in dialing out xxx. Example 2: Drop Prefix: Yes, Replace rule 2: 006, a) Pressing 002xxx will result in dialing out 006+xxx. b) Pressing 003xxxx will result in dialing out 006+xxxx. Example 3: Drop Prefix: No, Replace rule 3: 009, 12 a) Pressing 12xxx will result in dialing out xxx. Example 4: Drop Prefix: No, Replace rule 4: 007, 5xxx+35xx+21xx a) Pressing 5xxx will result in dialing out 007+5xxx. b) Pressing 534 will result in dialing out 534 (not matched for the rest 3 digits). c) Pressing 35xx will result in dialing out xx. d) Pressing 356 will result in dialing out 356 (not matched for the rest 2 digits). e) Pressing will result in dialing out (not matched for the rest 2 digits). Example 5: Dial Now: *xx+#xx+11x+xxxxxxxx a) Pressing *00, *01, *02.. *99 will result in dialing out the same *xx immediately. b) Pressing #00, #01, #02.. #99 will result in dialing out the same #xx immediately. c) Pressing 110, 111, will result in dialing out the same 11x immediately. d) Pressing (8 digits) will result in dialing out immediately. This implies that the phone numbers with 9 or more digits are prohibited. 17
, you may enter a specific IP address (e.g. SIP gateway IP address) in this field for all dialing numbers sending to this IP address.")
18 8.26. Auto Dial Timer: The inter-digit timer. Default is 5 seconds None SIP Server Mode : When SIP Settings > Service Domain were left blank (that means no SIP registration available), you may enter a specific IP address (e.g. SIP gateway IP address) in this field for all dialing numbers sending to this IP address. This can be used when only SIP gateway is available. Note when at least one SIP server is successfully registered in SIP settings, this will be automatically disabled When you finish the setting, please click the Submit button Click the Save button. The changes you have made will be saved and the VS200 will reboot automatically. 18

19 Flash Time You can set the flash time duration for the telephone flash key or hook switch in this page. The telephone flash key is used to switch to the other phone line or HOLD, and is quite useful for the 3-way conference call and the call waiting function. When you finished the setting, please click the Submit button. Notes: Flash Signal Detect (MAX): Maximum Flash Hook duration (unit:10ms) Flash Signal Detect (MIN): Minimum Flash Hook duration (unit:10ms) 19

20 Call Waiting You can enable the call waiting function in this page. It allows answering another coming call by pressing flash key while holding the current call. You may switch back to previous call by pressing flash key again. button. When you finished the setting, please click the Submit Call Transfer function The call transfer function allows users to answer an incoming call and to hold the current call by pressing flash key, and then transfer the current call to the desired party by dialing the desired party number ended with # key. The call transfer function is exclusive with call waiting function. You may enable call transfer function by disabling the call waiting function (#139#), or disable call transfer function by enabling the call waiting function (#138#). 20
21 T.38 (FAX) T.38 function can be used for FAX transmission over IP. Note that T.38 function must be enabled for both side of FAX over IP. You may enable or disable the T.38 function. T.38 Pass through codec for ulaw or alaw, and make sure your SIP server/gateway also supports this T.38 function. When you finished the setting, please click the Submit button. 21
22 Hot Line The Hot Line mode allows to making a direct call at the Phone Number or IP stored in this page without dialing. Hot-Line Mode is very convenient for IP calling to Public Switching Telephone Network (PSTN) number through FXO Gateway When the Hot Line mode is enabled, you just pick up the phone and the VS200 will call the party directly to the preset IP (or URL) address. The default for Hot Line mode is disabled You need to Enable and click the Submit button and reboot to activate the function. Pick up the phone. In 1-2 seconds (default wait time), the VS200 will automatically call the preset IP or phone number. 22
23 Alarm You can configure the Alarm setting in this page. 23

24 Network VS200 is equipped with an embedded NAT router between LAN and PC ports to meet the IP Network requirements. If you have an external NAT router, then you may select Bridge mode in WAN setting. The WAN setting is for the LAN port, and LAN setting for PC port. Thus the two LAN and PC Ethernet ports will be bridged and transparent. Otherwise, you may select NAT mode to enable embedded NAT and go on DDNS settings. The default is at NAT mode. Network Status You can check and show the current Network settings in this page. - Interface 0 is for WAN port Status and Interface 1 is for LAN port Status. 24

25 WAN The WAN setting is used to configure the VS200 WAN port connecting to the ADSL Modem/Router The default setting is NAT mode for VS200, and this enables the embedded NAT router between the WAN port and LAN port. the embedded NAT router. You may select Bridge Mode if you need NOT use When setting to Bridge Mode, only the WAN settings will get effective and the LAN settings in the next section will be ignored There are three selections for WAN IP Type: Fixed IP, DHCP Client, and PPPoE modes. This WAN setting is for the VS200 WAN port when set in NAT mode. at DHCP Client Mode. The WAN default is For Fix IP Mode, please make sure the IP address. Net Mask, Gateway, and DNS settings are suitable in your current network environment For PPPoE Mode, you have to enter correct username and password to get the IP address from your Internet Service Provider When you finished the settings, please click the Submit button 25

26 LAN The default IP address is for VS200, with Net Mask , and DHCP Server enabled. The IP addresses for DHCP are from 150 to Connect your PC to the LAN port, set your PC as DHCP Client mode, and the PC will get an IP address from the VS200 automatically When you finished the settings, please click the Submit button. 26

27 DDNS You need to have a DDNS account before configuring the DDNS setting. Usually, most of the VoIP applications are working with a SIP Proxy Server. Nonetheless, you may have a DDNS account with a public IP address, and others can call you via the DDNS account. When you finished the setting, please click the Submit button. 27

28 Example : VLAN The VLAN setting is for VoIP packets related to WAN port VLAN Packets: If you enable VLAN Packets and set the VID, User Priority, and CFI, then all the incoming packets will be checked with the IP Address and the VID VID: Please set your VID in accordance with your service provider User Priority: Defines user priority with eight (2^3) priority levels. IEEE 802.1P defines the operation for these 3 user priority bits. Usually, this will be defined by your service provider. 28

29 8.53. CFI: Canonical Format Indicator is always set to zero for Ethernet switches. CFI is used for compatibility between Ethernet type network and Token Ring type network. If a frame received at an Ethernet port has a CFI set to 1, then that frame should not be forwarded as it is to an untagged port When you enable the first VLAN Packets and set the VID, User Priority, and CFI, then all the incoming packets with the TA s IP address and the same VID will be accept by the TA. If the incoming packets with TA s IP address but different VID then the packets will be discard by the TA. The Other incoming packets with different IP address will go through the WAN port to the LAN port. Notes : When WAN port set to NAT Mode with VLAN enabled, please make sure the PC or network device on LAN port must support the same VLAN function to pass through WAN port. When WAN port set to Bridge Mode with VLAN enabled, the VLAN will only functionon on ATA. The packets from LAN port, will pass through WAN without VLAN function. 29

30 DMZ The DMZ can be enabled/disabled and configured in this page. 30

31 Virtual Server The Virtual Server IP and Port numbers can be configured in this page. 31
 Server can be set ON/OFF in this page. This PPTP can be used to pentrate the firewall when used with Virtual Private Network (VPN) applications.")
32 L2TP The Point-to-Point Tunnel Protocol (PPTP) Server can be set ON/OFF in this page. This PPTP can be used to pentrate the firewall when used with Virtual Private Network (VPN) applications. PPTP The Point-to-Point Tunnel Protocol (PPTP) Server can be set ON/OFF in this page. This PPTP can be used to pentrate the firewall when used with Virtual Private Network (VPN) applications. 32
33 33
34 SIP Settings You can setup the Service Domain, Port Settngs, Codec Settings, RTP Setting, RPort Setting and Other Settings for SIP Proxy Server registrations in this page. Service Domain You may register up to three SIP Servers for three Realms in the VS200. You can receive the incoming calls from all the three SIP Servers. For outgoing calls, you may select the registration SIP server first, and then call the associated registration phone number To select SIP Server 1 (default), please pickup the phone, press 1*, then hangup To select SIP Server 2 (or 3), please pickup the phone, press 2* (or 3*), then hangup Click Active ON to enable the Service Domain, then enter the following items: Display Name: enter the name you want to display User Name: enter the User Name given by your ITSP Register Name: enter the Register Name given by your ITSP Register Password: enter the Register Password given by your ITSP Domain Server: enter the Domain Server given by your ITSP Proxy Server: enter the Proxy Server given by your ITSP Outbound Proxy: enter the Outbound Proxy of ITSP. You may skip If not provided Register Period: enter the Register Period in minute given by your ITSP When it shows Registered in the Register Status, it indicates a successful registration to the ITSP, and the PHONE LED will start flashing. The VS200 is then ready for VoIP call If you have more than one SIP account, please follow the steps to register to other ITSPs After you finished the setting, please click the Submit button. 34
35 Click selection phone number of settings. Click selection? 35

36 Port Settings You can setup the SIP and RTP port number in this page. Each ITSP provider might have different SIP/RTP port setting, please refer to the ITSP to setup the port number correctly. When you finished the setting, please click the Submit button. The defaults for Phone 1 SIP port and RTP port are 5060 and 20000, Phone 2 SIP port and RTP port are 5062 and respectively. 36

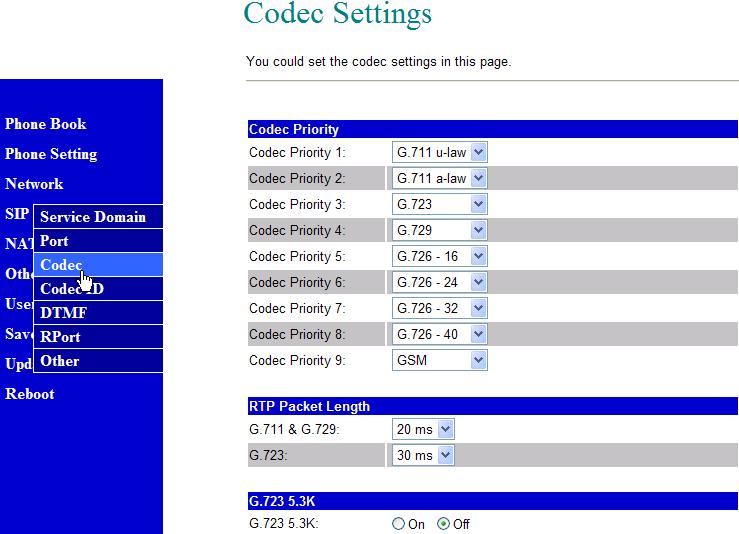
37 Codec Settings You can setup the Codec priority, RTP packet length, and VAD function in this page. You need to follow the ITSP recommendations to setup these items. 37
38 38

39 Codec ID Settings: You can setup the Codec ID in this page. You need to follow the ITSP suggestion to setup these items. 39

40 DTMF Settings: You can setup the options for DTMF function in this page. The options include RFC2833 (Outband DTMF), Inband DTMF, and Send DTMF SIP info. The default is set at Inband DTMF. If you are making two-stage callings for extension to PSTN, you might need to select Outband DTMF option. Rport Settings: You can enable/disable the RPort in this page. To change this setting, please follow your ISP information. When you finished the setting, please click the Submit button. 40
.")
41 Other Settings You can setup the Hold by RFC and QoS in this page. To change these settings please follows your ITSP information. When you finished the setting, please click the Submit button. The QoS is used to set the voice packet priority. higher priority for the voice packets in Internet. cooperate with the other Internet devices. SIP Expire Time: 60 (15~86400 sec, 0=defined by Server). Higher value other than zero will get However, the QoS function still needs to Keep Alives Period: 60 (Default: 60, Range: 15 ~ 250sec) that is send keepalives messages in the RTP stream to keep NAT open. Jitter Buffer: 1 (Default: 1, Range: 0~250 packets) SIP Server Type: General, Asterisk, BroadWorks, Nortel, Xener, Vodtel. SIP VID: 0 (2~4094, 0: disabled). This VLAN ID is for SIP only through WAN. RTP VID: 0 (2~4094, 0: disabled). This VLAN ID is for RTP voice packets. 41

42 NAT Trans STUN The STUN function must be enabled to work properly behind NAT when registered in SIP server. You may enter the STUN server IP address and the STUN port number as shown in the following example. 42
43 Others You can setup Auto Config, MAC Clone, Tone and Some Advanced Settings in this page. Auto Config Auto Configuration function can be used to download the original configurations stored in the TFTP, HTTP or FTP server. This is useful for the new user to automatically download a predefined configuration setting. Remember to click the Submit button and Save in the Save Change section. The VS200 will then reboot and automatically download the original configurations from the TFTP or FTP server. Note that the TFTP download works only for public IP address. 43
44 TFTP Mode FTP Mode 44


45 HTTP Mode FXS Port You could select the FXS impedence of the analog telephone by different country. 45
46 MAC Clone The MAC Clone function is to clone the MAC when only one MAC is available from ITSP. This is to share with the PC using the same MAC. When you finished settings, please click the Submit button. Tone The Tone setting can be adjusted to generate Dial tone, Ring back tone, Ring tone, Congestion tone, Call waitting tone and Busy tone for different countries. When you finished with the settings, please click the Submit button. 46
: There are 3 options. Type 1(xx")
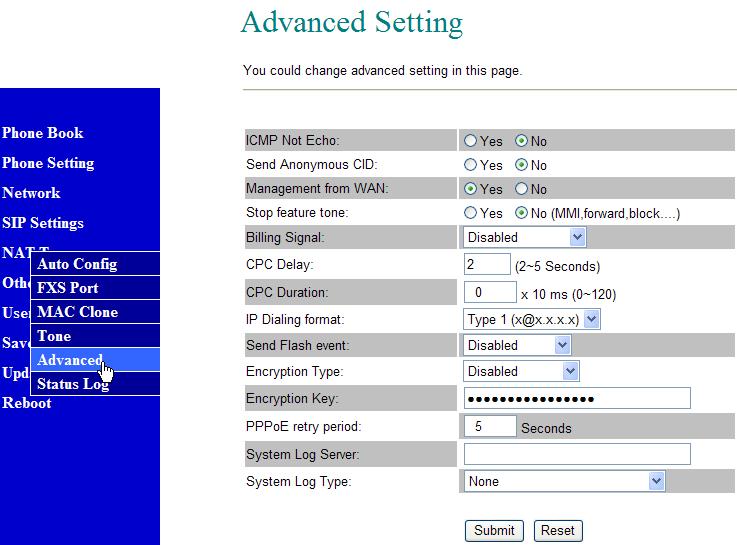
47 Advanced The advanced settings might be useful for some network requirements. The ICMP function is to echo when someone ping this device. This can prevent from haker attacking the device by not echoing. When you finished the setting, please click the Submit button. IP Dialing format (P2P dialing): There are 3 options. Type 1(xx@x.x.x), by default when you dialed , VS200 will auto prefix userip@ in your dialed IP address and send out to remote end. Type 2 (x.x.x.), when you dialed , it will send out to remote end without appending anything. Disable: disable IP dialing function. Encryption Type: Must be disabled for standard SIP protocol. Please consult your ITSP for encryption type when registered in ITSP. Encryption Key: Special key for encryption need 47
48 48

49 Status Log You can check system status log. 49

50 User Password You may change the login name and password in this page. Save Changes You can save the changes you have made, and click the Save button. After clicking the Save button, the VS200 will automatically save the new settings. 50


51 Update New Firmware VS200 provides two methods, HTTP or TFTP, to update new firmware as the following steps: HTTP is mostly used for firmware update by using local PC. TFTP is used with TFTP server for firmwares in TFTP server. Select the firmware code type, Risc or DSP code. (mostly for Risc code) Click the Browse button to choose the updated file location for HTTP download, or Select TFTP and enter the IP address of TFTP server for firmware download, then click the Update button. 51


52 TFTP Mode 52

53 NOTE: Do NOT power OFF the VS200 after clicking the Select button, or you may damage the VS200. The remote TFTP download works only for public IP address After clicking the Update button, the firmware list will be displayed from server to indicate the available firmware for download Select the new file you want to download to the VS200 then click the Select button. In 3 to 4 minutes, the PHONE LED indicators will start flashing 5 times to indicate successful firmware update. Then, you need to login again new IP address which is available from IVR by pressing #120# from phone. 53
54 Auto Update: Auto update function can be used to auto-update the firmware stored in the TFTP, HTTP or FTP server per the schedule as the following settings Select the update method and enter the server IP address, Click the Submit button to get auto-update effective. Notes: Check new Firmware: Power on and Scheduling: Check new firmware when power on and in accord with schedule. Must be updated manually. Scheduling Only (default): Check in accord with schedule. Scheduling (Date): Default at 14 days. Scheduling (Time): Default at AM 00:00 05:59 randomly. 54
55 TFTP Mode 55

56 FTP Mode 56

57 HTTP Mode 57
58 Backup Settings You can restore the VS200 to factory default in this page. By clicking the Restore button, the VS200 will restore to default and automatically restart again. Default Settings You can restore the VS200 to factory default in this page. By clicking the Restore button, the VS200 will restore to default and automatically restart again. 58

59 Reboot You may click the Reboot button to restart, then VS200 will automatically reboot with the stored configurations. 59
60 9 Configurations by Telephone & IVR You can use telephone to configure and check the status of VS200. for WAN port of VS200, and the LAN setting is for LAN port of VS200. Note the WAN setting is Group IVR Action Phone Command Remarks Status Check TA LAN IP Address #120# Status Check IP Type #121# IVR will report the current TA local IP address. Hang up while hearing end tone. IVR will report if WAN DHCP in enabled or disabled. Hang up while hearing end tone. Status Check Phone Number #122# IVR will report registered phone number. Status Check Network Mask #123# IVR will report WAN network mask. Status Check Gateway IP Address #124# IVR will report WAN Gateway IP address. Status Check Primary DNS Server IP Address #125# IVR will report WAN Primary DNS Server IP address. Status Check TA WAN IP Address #126# IVR will report the TA WAN IP address. Status Check Firmware Version #128# IVR will announce the firmware version. Status Set WAN interfaces Speed #129+[0-4]# 0: Auto, 1: 100M Full, 2: 100M Half, 3: 10M Full, 4: 10M Half Setting Set WAN DHCP client #111# This set WAN to DHCP Client mode. Setting Set WAN Static IP Address #112xxx*xxx*xxx*xxx# Setting Set WAN Network Mask #113xxx*xxx*xxx*xxx# Setting Set Router IP Address #114xxx*xxx*xxx*xxx# Ex: #112061*066*159*009# Note xxx must be 3 decimal digits. This setting will disable DHCP Client. Ex: #113255*255*255*000# Note xxx must be 3 decimal digits and Must set WAN Static IP first (#112). Ex: #114061*066*159*254# Note xxx must be 3 decimal digits and Must set WAN Static IP first (#112). Setting Set Primary DNS Server #115xxx*xxx*xxx*xxx# Ex: #115159*168*001*001# Note xxx must be 3 decimal digits and Must set WAN Static IP first (#112). 1:G.711 u-law, 2: G.711 a-law, Setting Set Codec #130+[1-8]# 3: G.723.1, 4: G.729a, 5: G K, 6: G K, 7: G K, 8: G K. Setting Set Handset Gain #131+[00~15]# Ex: #13107# and default is 06 Setting Set Handset Volume #132+[00~12]# Ex: #13209# and Default is 10 Setting Setting Set TFTP Server IP Address Set FTP Server IP Address #135xxx*xxx*xxx*xxx# Ex: #135061*066*159*254# #136xxx*xxx*xxx*xxx# Ex: #136159*168*001*001# Setting Auto Configure Mode #137+[0~2]# 0: Disable, 1: TFTP mode 2: FTP mode 60
61 Group IVR Action Phone Command Remarks Setting Enable Call Waiting #138# This will disable Call Transfer. Setting Disable Call Waiting #139# This will enable Call Transfer. Setting Unlock Keypad #190# You must unlock keypad first in order to change settings by keypad. Setting Lock Keypad #191# Keypad can NOT be used for setting. Setting Reboot #195# Setting Factory Reset #198# After you hear Option Successful, hang-up and TA will reboot automatically. TA will reset back to factory defaults. WARNING: ALL User-Changeable NONDEFAULT SETTINGS WILL BE LOST! Setting Blind Call Transfer #510#xxxxxx# Ex: #510#54321# transfer to Setting Attendant Call Transfer #511#xxxxxx# Ex: #511#54321# transfer to Setting 3-Way Conference Call #512#xxxxxx# Ex: #512#54321# conference with Setting 1* Select the First SIP server. Setting 2* Select the Second SIP server. Setting 3* Select the Third SIP server. 61

62 10 VoIP Applications Examples You can use PC Web browser to configure VS200. For example, enter from PC web browser. A. ADSL Connections without NAT Router for VS200 ADSL Modem INTERNET WAN LAN PHONE2 PHONE1 B. ADSL Connections with NAT Router for VS200 ADSL Modem INTERNET VS200 IP: NAT Router WAN Router IP: PHONE2 LAN PHONE1 62
63 Example 1: SIP-to-SIP Calling/Answering Applications: The applications can be for ADSL connections as in either Diagrams A or B. Both parties are registered to SIP server with private IP under NAT router. The SIP-to-SIP calling works when both calling and answering parties are registered to SIP server with given registered phone numbers. For Diagram A without NAT router, you may select NAT mode to enable the embedded NAT router. For Diagram B with external NAT router, you may select Bridge mode to disable the embedded NAT. Configurations: 1. Select either NAT or Bridge in accord with your network in WAN settings page, 2. Select DHCP Client to automatically get an IP address from NAT router. 3. Remember to click the Submit button, 4. Select Active ON in the SIP settings / Service Domain page, 5. Enter the items of Register Name, Password, Proxy Server, and Outbound Proxy, 6. Select ON in the STUN setting, if Outbound Proxy is NOT available. 7. Upon successful SIP registration, the PHONE LED will start Green flashing. Callings: 8. Pick up the phone, and you should hear a dial tone for VoIP mode. 9. Press 1688# or 1688 to call the party with the registered SIP phone number Note that # key will dial out the number immediately. Dialing without # will not dial out until the auto dial timer (default=5 seconds) elapsed. Example 2: SIP to Direct IP Calling Applications: The application is for the calling party with ADSL connection as in either Diagrams A or B. The calling party is registered to SIP server with either fixed real IP or private IP under NAT router. The answering party is with fixed real IP. Configurations: 1. Same as in Example Select ON in the SIP settings/stun setting page without Outbound Proxy. 3. Make sure the PHONE LED is flashing continuously with a successful SIP registration. Callings: 4. Pick up the phone for VoIP mode. 5. Press 211*21*191*4# or 211*21*191*4 to call the party with the real IP address of In a moment, you should hear a ring back tone, and wait for the VoIP called party to answer. 63
64 Example 3: Direct IP to Direct IP Calling/Answering Applications: The applications are for ADSL connection without NAT router as in Diagram A. Both parties are with fixed real IP. The Direct IP calling works when both calling and answering parties are with known fixed IP. SIP server registrations are not required in this application. Configurations: 1. Select Fixed IP, and bridge ON in the Network / WAN settings page, 2. Enter the items of IP, Subnet Mask, Gateway IP, 3. Click the Submit button. 4. Make sure the SIP server is OFF (default is OFF) and PHONE LED is NOT flashing. Callings: 5. Pick up the phone for VoIP mode. 6. Press 211*21*191*4# or 211*21*191*4 to call the party with the real IP address of Note that # key will dial out the number immediately. Dialing without # will not dial out until the auto dial timer (default=5 seconds) elapsed. In a moment, you should hear a ring back tone, and wait for the VoIP called party to answer. Example 4: Direct IP to Direct IP Calling within NAT Router Applications: For the calling party in ADSL connection with NAT router as in Diagram B, this Direct IP calling can work when the answering parties are with fixed private IP addresses within the same VPN network, or with fixed real IP addresses. Configurations: 1. Select Fixed IP, and bridge ON in the Network / WAN settings page, 2. Enter the items of IP, Subnet Mask, Gateway IP, 3. Click the Submit button. 4. Make sure the SIP server is OFF (default is OFF) and PHONE LED is NOT flashing. Callings: 5. Pick up the phone for VoIP mode. 6. Press 192*168*1*51# or 192*168*1*51 to call the party with the private IP address of Press 211*21*191*4 to call the party with the real IP address of In a moment, you should hear a ring back tone, and wait for the called party to answer. 64
65 Example 5: 3-Way Conference Call, Call Transfer, Call Waiting, Hold 3-Way Conference Call, Call Transfer Applications: These are for call transfer and conferencing among Parties A, B, and C. Three parties are registered to SIP server with either fixed real IP or private IP. There are two kinds of call transfer; Blind Transfer and Attendant Transfer. Blind Transfer: Party A calls Party B. While in conversation, Party B may press Flash key to hold the call and then press #510# [Party C number] # to transfer to Party C. Attendant Transfer: Party A calls Party B. While in conversation, Party B may press Flash key to hold the call and then press #511# [Party C number] # to call and talk to Party C. Hang up from Party B, then Party A will transfer and connect to Party C. 3-Way Conference Call: Party A calls Party B. While in conversation, Party B may press Flash key to hold the call and then press #512# [Party C number] # to call and talk to Party C. Press Flash key from Party B, then Party C will join for the conferenc call. Call Waiting Application: When a new call is coming while you are talking, you will hear an interrupt tone and you can push the Flash key to switch to answer the new call. You may push the Flash key to switch between the two calls. Call Hold Application: You may press the Hold (Flash) key to hold the current call for a while, then press Hold key again to resume talking. 65

66 Example 6: SIP-to-SIP Calling for Applications: This shows how to use inphonex as an example for free ITSP provider. The applications are for both parties registered to inphonex SIP server. 1. Visit and click Test our service with free internet calling! ICON to sign up for a new registered account number. Follow the instructions for registration. 2. After finished, you will receive a mail sent by the inphonex mail system, and you will get one inphonex phone number and password in the mail. For example, the register name/phone number is with password xxxx. 3. Login to the Web configuration page. Configurations: 4. WAN (for VS200 WAN port) and LAN (for VS200 LAN port) Settings 66

67 5. SIP Settings You have to enter the Display Name, User Name, Registered Name, Registered Password, Domain Server (sip.inphonex.com), Proxy Server (sip.inphonex.com), Outbound Proxy (keep to blank). After finished the setting, click the Submit button and the Save Change button. The system will reboot automatically. After the system boots up, the SIP setting page will show Registered, and the PHONE LED will start flashing. 67

68 INPHONEX SIP Server Register Name: Password: xxxx Domain Server: sip.inphonex.com Proxy Server: sip.inphonex.com 68
. 7. Press 7123455 to call the party with the registered INPHONEX phone number 7123455.")
69 Callings: 6. Pick up the phone for VoIP mode. (Your INPHONEX phone number ). 7. Press to call the party with the registered INPHONEX phone number In a moment, you should hear the ring back tone, and wait for the called party to answer. 69
70 11 Trouble Shooting for Web Configurations DO NOT HEAR DIAL TONE? When you pick up the phone and hear a busy tone, it indicates the VS200 WAN port is NOT connected or failed registration at SIP Server. Make sure the ADSL Ethernet cable is connected to the LAN port of VS200 and Power Reset again CAN NOT ACCESS WEB PAGE? IE Web Browser is a useful tool to configure VS200. When you have difficulties in accessing the default IP address of VS200 as in the following figure, the most possibility is that the PC might have different subnet IP settings from xxx. In this case, you must change VS200 IP address to the same subnet as PC and NAT router. NAT Router INTERNET WAN PHONE2 LAN PHONE1 Example: To change VS200 IP address to the same subnet as PC and NAT router 1. Pick up the phone and press #111# from the phone to enable DHCP Client mode. VS200 will reboot, and LED will start flasing to get an IP address from NAT DHCP server. 2. Pick up the phone and press #126# to obtain the VS200 IP address from telephone IVR, for example, Enter from IE web browser to login VS200 web page for configurations. 70
71 11.3. ONLY ONE IP AVAILABLE FROM ADSL/CABLE SERVICE PROVIDER? Sometimes only one IP address is available from Internet Service Provider (ISP) without NAT router as the following figure. Usually, a DHCP or PPPoE server at the central side of ISP is used to assign one IP address to each user. In this case, you may need to enable the embedded NAT router of VS200 to provide more than one IP addresses for PC and VS200. ADSL Modem INTERNET WAN LAN PHONE2 PHONE1 Example: To change PC IP address to the same subnet as for VS In Window XP - At Control Panel, open "Network Connections". - right click on "Local Area Connection", and then click on Properties. - The "Local Area Connection Properties" window will pop up. - Double click on "Internet Protocol (TCP/IP)". - The "Internet Protocol (TCP/IP) Properties" window will pop up. - Click on "Use the following IP Address". - Enter IP: (50 can be any number other than 1, which is used by VS200). - Enter Subnet mask: Enter Default gateway: Click on OK button. 2. You will lose internet connection at this time. 3. At IE browser, type 4. Follow the username and password for web login. 5. At LAN setting, turn on DHCP server. 6. At WAN setting, choose "DHCP client" to work with your ADSL/Cable modem. 7. Save change, wait for VS200 to reboot. 8. Change your PC's "Internet Protocol (TCP/IP) Properties" back to "obtain an IP address automatically". 9. You may press #120# and #126# to listen to the IVR for LAN and WAN IP addresses. 10. Go back to to configure VS200 for SIP settings. 71
ANSEL FXS / 1 PSTN. VoIP Telephone Adaptor. User Manual V1.10
 ANSEL 5518 1 FXS / 1 PSTN VoIP Telephone Adaptor User Manual V1.10 Quick Guide Step 1: Broadband (ADSL/Cable Modem) Connections for ANSEL 5518 A. Connect ANSEL 5518 WAN port to ADSL NAT Router as the following
EIP 7012 Essence VoIP Phone Administration Guide Version 1.0B
 Essence Technology EIP 7012 Essence VoIP Phone Administration Guide Version 1.0B Table of Contents 1 Introduction... 1 1.1 Hardware Overview... 1 1.2 Software Overview... 1 2 Keypad interface for IP Phone
VoIP ATA series (ATA171plus, ATA172plus, ATA-171, ATA-172, ATA-171M, ATA-171P)
") ATA Web User Guide VoIP ATA series (ATA171plus, ATA172plus, ATA-171, ATA-172, ATA-171M, ATA-171P) User Guide Released Date : January-2015 Firmware Version : V.303 1. Introduction... 4 2. Hardware Overview...
ATA Web User Guide VoIP ATA series (ATA171plus, ATA172plus, ATA-171, ATA-172, ATA-171M, ATA-171P) User Guide Released Date : January-2015 Firmware Version : V.303 1. Introduction... 4 2. Hardware Overview...
VOI-7010 / VOI-7011 SIP IP
 LevelOne VOI-7010 / VOI-7011 SIP IP Telephone User Manual Ver. 1.0-0707 ii Safety FCC WARNING This equipment may generate or use radio frequency energy. Changes or modifications to this equipment may cause
TT11 VoIP Router 1FXS/1FXO TA User Guide
 TT11 VoIP Router 1FXS/1FXO TA User Guide Page 1 Table of Contents: 1.0 Introduction... 3 2.0 Package Contents... 3 3.0 Summary of LED & Connector Descriptions... 4 3.1 The Front LEDs... 4 3.2 The Rear
EZLOOP VOIP FXS2 ADAPTER USER GUIDE
 EZLOOP VOIP FXS2 ADAPTER USER GUIDE V.1.4 2006/4/24 0 1 Introduction... 2 1.1 Hardware Overview...2 1.2 Software Overview...2 2 Keypad Interface for The EZLOOP VOIP FXS2 ADAPTER... 3 3 Setup the EZLOOP
DS LBT 8249 DOMUS VOIPHONE TELEPHONE. Ref. 4501/5 VOL+ REG VMS MENU VOL- ENTER P.BOOK CALL LOG DOWN DEL/MUTE CONF. 2 ABC 3 DEF LINE-1
 HOLD 2 ABC VMS VMS CONF. MENU Mod. 4501 DS 4501-002 LBT 8249 DOMUS VOIPHONE TELEPHONE Ref. 4501/5 VOL+ REG P.BOOK VOL- ENTER 1 CALL LOG UP DEL/MUTE DOWN M1 4 GHI M3 M2 7 PQRS 8 TUV 5 JKL 6 MNO 3 DEF LINE-2
User Guide. V110, V210P, V211, V220 VoIP ATA
 User Guide V110, V210P, V211, V220 VoIP ATA Welcome to the Wonderful World of VoIP Congratulations on your purchase of a NetComm VoIP ATA. Whether this is your first VoIP device or you are upgrading from
FTA-102L. Free Roaming Gateway. User Manual
 FTA102L Free Roaming Gateway User Manual FTA102L PORTech Communications Inc. Content 1. Introduction... 1 2. System Topology... 2 3. Function Description... 2 4. Parts list... 3 5. Dimension: 14*9*3 cm...
RP-FSO522 2-Line FXO, 2-Line FXS SIP IP Gateway. Feature
 RP-FSO522 2-Line FXO, 2-Line FXS SIP IP Gateway RP-FSO522 is an 2-Line FXO plus 2-Line FXS gateway with SIP protocol IP device which allows to connect 2 Lines of analog PSTN telephone line and connect
CHAPTER 3 CONFIGURING THE SIP-PHONE THROUGH WEB PAGES STEP 1. BROWSE THE IP ADDRESS PREDEFINED VIA KEYPAD... 36
 WellPhone-305 SIP CHAPTER 1 OVERVIEW OF THE SIP-PHONE... 3 1. HARDWARE OVERVIEW... 4 1.Front View and Keypad function... 4 2.Back View...11 3.Specification of connector...11 2. SOFTWARE FEATURES AND SPECIFICATION...
Welltech WellGate User Manual
 Welltech WellGate 2626 An Easy to Use PBX Gateway User Manual Copyright 2009 Welltech Computer Co., Ltd. All right reserved Table of Contents Introduction...2 WellGate 2626 - An Easy to Use PBX Gateway...2
KTA1010 INSTALL GUIDE
 KTA1010 INSTALL GUIDE Table of Contents 1 Check for Required Items... 2 2 Installation... 2 2.1 Installation View... 2 2.2 Connection Chart to determine cable types... 3 3 Ready to use... 3 3.1 Network
ATA-171/172/ 171P/171M/ 171+/172+ User s Guide
 ATA-171/172/ 171P/171M/ 171+/172+ V2.1 2011/02/25 Table of Contents 1 Introduction...4 Chapter 1.1 Hardware Overview...4 Chapter 2.1 Software Overview...4 Keypad Interface for The ATA...5 Chapter 3.1 Instruction
4 Port IP-PBX + SIP Gateway System
 4 Port IP-PBX + SIP Gateway System The IPG-40XG is an embedded Voice over IP (VoIP) PBX Server with Session Initiation Protocol (SIP) to provide IP extension phone connections for global virtual office
EP502/EP504 IP PBX 1.1 Overview
 1.1 Overview The EP502/EP504 is an embedded Voice over IP (VoIP) Server with Session Initiation Protocol (SIP) to provide IP extension phone connection for global virtual office of small-to-medium business
2757 VoIP Phone Users Guide
 2757 VoIP Phone Users Guide Rev. 1.0 Table of Contents 1 Introduction... 5 1.1 Package Contents... 5 1.2 Features... 5 1.3 Basic Setup... 6 2 Network Setup... 8 2.1 Static IP Address... 8 2-2 PPPoE...11
VOI-9300 SIP IP PBX. User Manual
 VOI-9300 SIP IP PBX User Manual September 2008 GENERAL PUBLIC LICENSE This product incorporates open source code into the software and therefore falls under the guidelines governed by the General Public
SVG300S+ 2 FXS SIP/IAX ATA USER MANUAL
 SVG300S+ 2 FXS SIP/IAX ATA USER MANUAL STEPHEN TECHNOLOGIES CO.,LIMITED ALL RIGHTS RESERVED Contents Preface... 3 About this Manual... 3 Audience... 3 Related Documentation... 3 Document Conventions...
2FXS Analog Telephone Adapter
 2FXS Analog Telephone Adapter Product features Feature-rich telephone service over home or office Internet/ Intranet connection Auto-provisioning features for flexible, ease-of use IP PBX system integration
VOI-9300 SIP IP PBX. User Manual
 VOI-9300 SIP IP PBX User Manual Table of Content 1. INTRODUCTION...4 1.1. OVERVIEW...4 2. FEATURES...5 3. STANDARD COMPLIANCE...5 4. PACKING CONTENT...6 5. LED INDICATORS & INTERFACE CONNECTORS...6 6.
VIP-156/VIP156PE/VIP-157/VIP-157S
 VoIP Analog Telephone Adapter VIP-156/VIP156PE/VIP-157/VIP-157S User s manual Version 3.31 1 Copyright Copyright (C) 2010 PLANET Technology Corp. All rights reserved. The products and programs described
IS-381 / IS-382 IP Audio gateway. User Manual
 IS-381 / IS-382 IP Audio gateway User Manual IS-381 IS-382 PORTech Communications Inc. Content 1. Introduction... 1 2. Functions... 1 3. Parts list... 2 4.Main body size... 2 5.Panel description... 3 6.Link
Grandstream Networks, Inc. HT802 Analog Telephone Adaptor User Guide
 Grandstream Networks, Inc. HT802 Analog Telephone Adaptor User Guide COPYRIGHT 2016 Grandstream Networks, Inc. http://www.grandstream.com All rights reserved. Information in this document is subject to
VG422R. User s Manual. Rev , 5
 VG422R User s Manual Rev 1.0 2003, 5 CONGRATULATIONS ON YOUR PURCHASE OF VG422R... 1 THIS PACKAGE CONTAINS... 1 CONFIRM THAT YOU MEET INSTALLATION REQUIREMENTS... 1 1. INSTALLATION GUIDE... 2 1.1. HARDWARE
TG400/TG800 Series. VOIP Voice Gateway. Version: 2.0.1
 TG400/TG800 Series VOIP Voice Gateway USER MANUAL Version: 2.0.1 Default Login Details WAN IP Address: DHCP LAN IP Address: http://222.222.222.1 User Name: admin Password: admin Preface... 5 0.1 About
Version: epbxum_
 epbx-100a-128 User s Manual Version: epbxum_128.300 CH1. Overview 5 1.1 Specifications 5 1.2 Hardware Overview 7 1.2.1 Front Panel and LED Indication...7 1.2.2 Back Panel...8 CH2. Start to configure epbx-100a-128
802.3af PoE SIP Analog Telephone Adapter
 802.3af PoE SIP Analog Telephone Adapter Product features Feature-rich telephone service over home or office Internet/ Intranet connection 802.3af/at PoE and auto-provisioning features for flexible, ease-of
GoIP Series SIM Card for GSM Voice Gateway User Manual
 GoIP Series SIM Card for GSM Voice Gateway User Manual V3.0 Shenzhen HYBERTONE Technology Co., Ltd Http://www.hybertone.com Marketing@ hybertone.com Support@ hybertone.com Content Content...1 1 Overview...3
User Manual. Model: 4GoIP. Version 1.0
 User Manual Four Channel s GSM VoIP Gateway Model: 4GoIP Version 1.0 Contents 1 Product Introduction... 3 1.1 General Information...3 1.2 Protocol...3 1.3 Hardware Specification...4 1.4 Software Specification...4
Contents. 2 V85 Desktop VoIP Phone User Guide YML772 Rev1
 Contents Chaper 1: Introduction... 4 About VoIP... 4 Chapter 2: Getting to know your V85... 6 Before you begin...... 6 Package Contents... 7 Rear of the V85... 8 Chapter 3: Getting your V85 Up and Running...
Dynamix DW IAD VoIP Gateway (H.323) User Manual
 User Manual") Dynamix DW IAD - 162 VoIP Gateway (H.323) User Manual PREFACE----------------------------------------------------------------------------------------------------V PART I: DYNAMIX IAD-162 GATEWAY OVERVIEW
Dynamix DW IAD - 162 VoIP Gateway (H.323) User Manual PREFACE----------------------------------------------------------------------------------------------------V PART I: DYNAMIX IAD-162 GATEWAY OVERVIEW
VoIP Analog Telephone Adapter VIP-158 User s manual Version 1.00
 VoIP Analog Telephone Adapter VIP-158 User s manual Version 1.00-1 - Copyright Copyright (C) 2007 PLANET Technology Corp. All rights reserved. The products and programs described in this User s Manual
D-Link DVG-1402S. Manual. 2Voice + 4SW VoIP Router. Version B.1. Building Networks for People
 D-Link DVG-1402S 2Voice + 4SW VoIP Router Manual Building Networks for People Version B.1 Contents Package Contents... 3 Introduction... 4 Rear Panel Connections... 5 Front Panel LEDs... 6 Features...
8-Port SIP VoIP Gateway (8 FXS)
") 8-Port SIP VoIP Gateway (8 FXS) Highlights Supports SIP 2.0 (RFC 326) Supports IPv6 and IPv4 simultaneously Up to 24 SIP service domains and Caller ID Supports auto HTTP provision and fax feature Flexible
8-Port SIP VoIP Gateway (8 FXS) Highlights Supports SIP 2.0 (RFC 326) Supports IPv6 and IPv4 simultaneously Up to 24 SIP service domains and Caller ID Supports auto HTTP provision and fax feature Flexible
Grandstream Networks, Inc. HT801/HT802 Analog Telephone Adaptors User Guide
 Grandstream Networks, Inc. HT801/HT802 Analog Telephone Adaptors User Guide COPYRIGHT 2017 Grandstream Networks, Inc. http://www.grandstream.com All rights reserved. Information in this document is subject
Analog Telephone Adapter Setup for Q-SYS Softphone
 Analog Telephone Adapter Setup for Q-SYS Softphone This document applies to this Cisco device: SPA232D Introduction This document covers the use of the SPA232D in the role of analog telephone adapter (ATA)
SDP-R25 User Manual 05/06/2015
 SDP-R25 User Manual 05/06/2015 1 Content Production Overview... 4 1. Production... 4 2. Features...4 Configuration...7 1. Web Login... 7 1.1. Obtaining the IP address... 7 1.2. Login the Web...7 2. Status...8
for VoIP Gateway Series
 Smart Web Manager for VoIP Gateway Series www.addpac.com AddPac Technology 2010, Sales and Marketing Contents Web Connection Main Page Layout System Configuration Language, WAN Setup, LAN Setup, NAT, NTP,
see the Cisco SPA100 Series Administration Guide for details. The configuration profile is uploaded to the Cisco SPA122 at the time of provisioning.
 * Note: Many specifications are programmable within a defined range or list of options. Please see the Cisco SPA100 Series Administration Guide for details. The configuration profile is uploaded to the
AR168F SIP Phone User Guide
 AR168F SIP Phone User Guide - 1 - INDEX 1. PRODUCT OVERVIEW...4 2. FEATURES AND SPECIFICATION...4 2.1. Hardware Features...4 2.2. Software Features...5 2.3. Standard and Protocol...6 2.4. Electric Requirements...7
AP-SAV100 Analog Voice Intercom
 AP-SAV100 Analog Voice Intercom IP Gateway High Performance IP Extension Solution for Legacy Analog Door Phone www.addpac.com AddPac Technology Sales and Marketing Contents Product Overview Hardware Specification
Table of Contents. CRA-200 Analog Telephone Adapter 2 x Ethernet Port + 2 x VoIP Line. Quick Installation Guide. CRA-200 Quick Installation Guide
 CRA-200 Analog Telephone Adapter 2 x Ethernet Port + 2 x VoIP Line Quick Installation Guide Table of Contents VoIP ATA Package Contents... 2 Checklist... 2 IMPORTANT SAFETY INSTRUCTIONS... 3 Connecting
PLEASE READ. This user manual is from the manufacturer Jive Communications may not support some features discussed in this document.
 PLEASE READ This user manual is from the manufacturer Jive Communications may not support some features discussed in this document. Please see our online documentation or contact us for a complete list
CHAPTER 7 ADVANCED ADMINISTRATION PC
 ii Table of Contents CHAPTER 1 INTRODUCTION... 1 Broadband ADSL Router Features... 1 Package Contents... 3 Physical Details... 4 CHAPTER 2 INSTALLATION... 6 Requirements... 6 Procedure... 6 CHAPTER 3 SETUP...
Phone Adapter with Router
 Voice User Guide Model No. SPA2102 Copyright and Trademarks Specifications are subject to change without notice. Linksys is a registered trademark or trademark of Cisco Systems, Inc. and/or its affiliates
RX3041. User's Manual
 RX3041 User's Manual Table of Contents 1 Introduction... 2 1.1 Features and Benefits... 3 1.2 Package Contents... 3 1.3 Finding Your Way Around... 4 1.4 System Requirements... 6 1.5 Installation Instruction...
Version: SIPPBXUM.100
 SIPPBX 6200A User s Manual Version: SIPPBXUM.100 CH1. Overview... - 5-1.1 Specifications... - 5-1.2 Hardware Overview... - 8-1.2.1 The Front Panel... - 8-1.2.2 The Back Panel... - 8 - CH2. Start to configure
The VWRT510&WRT500 High Speed Router User s Guide
 The VWRT510&WRT500 High Speed Router User s Guide The page 1 of 53 Table of Contents 1 Preface... 4 2 LED Indicators and Connectors... 5 2.1 LED Indicators... 6 2.2 Hardware Installation... 7 3 Voice Prompt...
AC1200M/MS. User Manual
 AC1200M/MS User Manual Table of Contents User Manual... 1 1 Preface... 1 2 LED Indicators and Connectors... 1 2.1 LED Indicators... 1 2.2 Hardware Installation... 2 3 Voice Prompt (AC1200MS)... 2 4 User
AP800 TM PSTN Backup 4-Port FXS VoIP Gateway High Performance VoIP Gateway Solution
 AP800 TM PSTN Backup 4-Port FXS VoIP Gateway High Performance VoIP Gateway Solution Product Overview www.addpac.com AddPac Technology 2007, Sales and Marketing Contents Product Overview Hardware Specification
Grandstream Networks, Inc. HT814 Analog Telephone Adaptors User Guide
 Grandstream Networks, Inc. HT814 Analog Telephone Adaptors User Guide COPYRIGHT 2016 Grandstream Networks, Inc. http://www.grandstream.com All rights reserved. Information in this document is subject to
ALL7960 User Manual V1.00
 ALL7960 User Manual V1.00 1 Table Content Introduction...5 Safety Declaration...5 1. Getting Started...5 1.1 Package contents...5 1.2 Phone Specification...6 1.3 Phone Description...7 1.4 Key Pad define
Grandstream Networks, Inc. HT818 Analog Telephone Adaptor User Guide
 Grandstream Networks, Inc. HT818 Analog Telephone Adaptor User Guide COPYRIGHT 2018 Grandstream Networks, Inc. http://www.grandstream.com All rights reserved. Information in this document is subject to
AG-110 SIP Gateway User Manual
 AG-110 SIP Gateway User Manual 1.AG-110 SIP Gateway Features...3 1.1 Product Appearance... 3 1.2 Backside Illustration... 4 1.3 Software... 4 1.4 Protocol and standard... 4 1.5 Interface features... 5
UTT FXO/ 8FXO / 16FXO Analog VoIP Gateway Datasheet
 UTT 1000 4FXO/ 8FXO / 16FXO Analog VoIP Gateway Datasheet Page 1 of 11 Model UTT-1000-4FXO UTT-1000-8FXO UTT-1000-16FXO Overview FXO analog gateway offering seamless connectivity between VoIP and PSTN
Sipdex M200s IPPBX. Embedded. Support Any IP Phone. Softphone and SIP Client App
 Sipdex M200s IPPBX Based on embedded asterisk system, SIPDEX M200s IPPBX is a high quality, stable PBX without any moving parts and a very small footprint required minimum technology knowledge to deploy.
Wireless-G Router User s Guide
 Wireless-G Router User s Guide 1 Table of Contents Chapter 1: Introduction Installing Your Router System Requirements Installation Instructions Chapter 2: Preparing Your Network Preparing Your Network
IP 500 Internet Phone
 IP 500 Internet Phone [VoIP] User Manual 1 Index 1. Introduction... 3 1.1 Hardware Overview...3 1.2 Software Overview...3 1.3 Operating requirements:...4 1.4 Electric requirements:...4 1.5 Size:...4 1.6
Contents. 2 SmartVoice Gateway(s) User Guide YML832 Rev1
 User Guide YML832 Rev1") Contents 1. Introduction...4 Product Overview...4 Items that you will need and things you will need to know...5 NetComm SmartVoice Gateway Features...6 SmartVoice Gateway Hardware Description...9 Front
Contents 1. Introduction...4 Product Overview...4 Items that you will need and things you will need to know...5 NetComm SmartVoice Gateway Features...6 SmartVoice Gateway Hardware Description...9 Front
All Rights Reserved. February 2005 Version 1.1
 All Rights Reserved The use, disclosure, modification, transfer or transmittal of this work for any purpose, in any form, or by any means, without the written permission from Net2Phone is strictly forbidden.
LKR Port Broadband Router. User's Manual. Revision C
 LKR-604 4-Port Broadband Router User's Manual Revision C 1 Contents 1 Introduction... 4 1.1 Features... 4 1.2 Package Contents... 4 1.3 Finding Your Way Around... 5 1.3.1 Front Panel... 5 1.3.2 Rear Panel
Broadband Router. User s Manual
 Broadband Router User s Manual 1 Introduction... 4 Features... 4 Minimum Requirements... 4 Package Content... 4 Note... 4 Get to know the Broadband Router... 5 Back Panel... 5 Front Panel... 6 Setup Diagram...7
Contents. 2 V400 Series VoIP Gateway User Guide YML832 Rev1
 Contents 1. Introduction...4 Product Overview...4 Items that you will need and things you will need to know...5 NetComm V400 Series VoIP Gateway Features...6 Package Contents...9 Hardware Description...10
Sipura SPA 3000 How To. (c) Bicom Systems
 Bicom Systems") Sipura SPA 3000 How To Sipura SPA 3000 How To All rights reserved. No parts of this work may be reproduced in any form or by any means - graphic, electronic, or mechanical, including photocopying, recording,
Sipura SPA 3000 How To Sipura SPA 3000 How To All rights reserved. No parts of this work may be reproduced in any form or by any means - graphic, electronic, or mechanical, including photocopying, recording,
Table of Contents. Save Changes Restart System Troubleshooting Warranty Contacting Technical Support Registration...
 Table of Contents Product Overview...3 Introduction...3 Features...4 Hardware Overview...5 Front Panel - LEDs...5 Rear Panel - Connections...6 Installation...7 Requirements...7 Connection...8 Configuration...9
Please follow the steps that are listed here to get started with your Berkshire 10K ippbx telephone system.
 Please follow the steps that are listed here to get started with your Berkshire 10K ippbx telephone system. Step 1 Power-up and log into your PC. Unplug any existing ethernet cable from your PC. Step 2
User Manual FXS Series Gateway
 User Manual FXS Series Gateway Shenzhen HyberTone Technology Co.,Ltd. Http://www.hybertone.com Marketing@hybertone.com Support@hybertone.com Date: 2010-01-06 1 Contents 1. Product Introduction... 4 1.1
Grandstream Networks, Inc. HT812/HT814 Analog Telephone Adaptors User Guide
 Grandstream Networks, Inc. HT812/HT814 Analog Telephone Adaptors User Guide COPYRIGHT 2017 Grandstream Networks, Inc. http://www.grandstream.com All rights reserved. Information in this document is subject
VoIP Analog Telephone Adapter ATA-150/ATA-150S User s manual Version 1.00
 VoIP Analog Telephone Adapter ATA-150/ATA-150S User s manual Version 1.00-1 - Copyright Copyright (C) 2008 PLANET Technology Corp. All rights reserved. The products and programs described in this User
Wireless VoIP Phone Model: BT-WFP1000
 Table of Contents Wireless VoIP Phone Model: BT-WFP1000 User s Manual Chapter 1 Overview the WiFi Phone... 6 1.1 Front Panel and Keypad... 6 1.2 Removing and Installing the Battery... 8 1.4 Powering the
HD Voice Conference IP Phone with PSTN (3-Line) VIP-8030NT
 VIP-8030NT") HD Voice Conference IP Phone with PSTN (3-Line) Copyright Copyright (C) 2014 PLANET Technology Corp. All rights reserved. The products and programs described in this User s Manual are licensed products
HD Voice Conference IP Phone with PSTN (3-Line) Copyright Copyright (C) 2014 PLANET Technology Corp. All rights reserved. The products and programs described in this User s Manual are licensed products
FXO-08 (SIP) User Manual
 User Manual") FXO-08 8-ports FXO VoIP Gateway (SIP) User Manual Revision Information Version Date Description EN-V2.0a April-8-2008 2 nd English Version Table of Contents 1. Introduction...3 1.1 FXO-08 --8-ports FXO
FXO-08 8-ports FXO VoIP Gateway (SIP) User Manual Revision Information Version Date Description EN-V2.0a April-8-2008 2 nd English Version Table of Contents 1. Introduction...3 1.1 FXO-08 --8-ports FXO
Dynamix DW FXS-08 (SIP) User Manual. 8-ports FXS VoIP Gateway. Revision Information Version Date Description EN-V2.0a Apr nd English Version
 User Manual. 8-ports FXS VoIP Gateway. Revision Information Version Date Description EN-V2.0a Apr nd English Version") Dynamix DW FXS-08 8-ports FXS VoIP Gateway (SIP) User Manual Revision Information Version Date Description EN-V2.0a Apr-2-2008 2 nd English Version Table of Contents 1. Introduction...3 1.1 FXS-08 --8-ports
Dynamix DW FXS-08 8-ports FXS VoIP Gateway (SIP) User Manual Revision Information Version Date Description EN-V2.0a Apr-2-2008 2 nd English Version Table of Contents 1. Introduction...3 1.1 FXS-08 --8-ports
IAD User s Manual PL-300A 1FXS ATA. User s Manual. <Version: V2.0 > Copyrights All Rights Reserved. Page 1 of 25
 PL-300A 1FXS ATA User s Manual Copyrights 2004-2009 All Rights Reserved Page 1 of 25 Contents 1 Overview...3 2 Packing...3 3 Safety Instructions...3 4 Introduction to IAD...3 5 Performance
PA168V SIP FXS Gateway. Http Setup Guide
 PA168V SIP FXS Gateway Http Setup Guide Configuration with the standard WEB browser... 2 Network Setting:... 3 Audio settings:... 5 Dial Plan Settings:... 7 SIP Protocol Settings:... 10 Other settings:...
SIP-Phone 302 Administration Guide SIP-Phone 302 Ver:
 Chapter 1 Overview of the SIP-Phone 302... 4 1. Hardware Overview... 5 2. Software Features and Specification... 8 Chapter 2 Configuring the SIP-Phone 302 through LCD Phone menu... 10 1. Initialize SIP-Phone
STEPS IN CONFIGURATION START UP...4
 FXSO GATEWAY User Manual (1FXS/1FXO or 2FXS/2FXO ports) STEPS IN CONFIGURATION...3 1. START UP...4 1.1 INTRODUCTION...4 1.2 FEATURES AND SPECIFICATION...5 1.3 ACCESSORIES AND EQUIPMENT...6 1.4 APPEARANCE...6
 IPX Voice Communication Features and Services Auto Attendant Direct Inward Dialing (DID) Auto CO Line Hunting Multi Operator Hunting PBX/ATA Dial Plan Speed Call Short Number Life Line Custom Define Call
Dynamix DW IAD VoIP Gateway (SIP) User Manual
 User Manual") Dynamix DW IAD - 162 VoIP Gateway (SIP) User Manual Preface... V Part I: Dynamix IAD -162 Gateway Overview...1 1.1 Overview...2 1.2 Software Specifications...3 1.3 Hardware Specifications...4 Part II:
Dynamix DW IAD - 162 VoIP Gateway (SIP) User Manual Preface... V Part I: Dynamix IAD -162 Gateway Overview...1 1.1 Overview...2 1.2 Software Specifications...3 1.3 Hardware Specifications...4 Part II:
LevelOne Broadband Routers
 LevelOne Broadband Routers FBR-1100TX FBR-1400TX FBR-1401TX FBR-1700TX User's Guide TABLE OF CONTENTS CHAPTER 1 INTRODUCTION... 1 Features of your LevelOne Broadband Router... 1 Package Contents... 4
Arion Router and Firewall User s Manual. Rev 1.0 Mar 2004
 Arion 3001-4 Router and Firewall User s Manual Rev 1.0 Mar 2004 Table of Contents 1. INTRODUCTION... 1 1.1. PRODUCT OVERVIEW... 1 2. HARDWARE DESCRIPTION... 2 2.1. FRONT PANEL... 2 Arion 3001-4 Front Panel...
SETU VGFX Quick Start
 SETU VGFX Quick Start SETU VGFX VoIP-GSM-FXS-FXO Gateway Quick Start Introduction Thank you for choosing Matrix SETU VGFX! Please read the instruction in this quick start to install this feature reached
GIGABIT COLOR IP PHONE
 GIGABIT COLOR IP PHONE USER GUIDE UC842 Version:1.0.3.59 Nanjing Hanlong Technology Co., Ltd 86-25-84608050 support@hanlongtek.com Notices Information Notices Information Copyright Copyright 2005-2013
LevelOne FBR User s Manual. 1W, 4L 10/100 Mbps ADSL Router. Ver
 LevelOne FBR-1416 1W, 4L 10/100 Mbps ADSL Router User s Manual Ver 1.00-0510 Table of Contents CHAPTER 1 INTRODUCTION... 1 FBR-1416 Features... 1 Package Contents... 3 Physical Details... 3 CHAPTER 2
Voice Communication for Free High Performance Embedded VoIP Gateway
 Voice Communication for Free High Performance Embedded VoIP Gateway 07I12CM.ENC Copyright Notice Copyright (c) 2007 DSG Technology Inc. All rights reserved. This guide, the software and the hardware described
KTA3100 INSTALL GUIDE
 KTA3100 INSTALL GUIDE Table of Contents 1 Check for Required Items...2 2 Installation Steps...2 2.1 Installation View... 2 2.2 Connection Chart to determine cable types... 3 3 Ready to Use...3 3.1 Obtain
SIP / H.323 PoE IP Phone. VIP-100PT / VIP-150PT User s Manual
 SIP / H.323 PoE IP Phone VIP-100PT / VIP-150PT User s Manual Table of Contents Chapter 1 Overview of the PoE IP Phone...1 VIP-100PT / VIP-150PT Features...1 1.1 Hardware Overview...2 1.1.1 Front View and
Matrix SETU ATA. VoIP Adaptors with FXO, FXS, GSM Ports and Multiple SIP Accounts
 Warm Welcome Matrix SETU ATA VoIP Adaptors with FXO, FXS, GSM Ports and Multiple SIP Accounts SETU ATA Presentation Outline Introduction Variants Target Customers Applications Key Features Technical Specifications
DSL/CABLE ROUTER with PRINT SERVER
 USER S MANUAL DSL/CABLE ROUTER with PRINT SERVER MODEL No:SP888BP http://www.micronet.info 1 Content Table CHAPTER 0:INTRODUCTION... 4 FEATURES... 4 MINIMUM REQUIREMENTS... 4 PACKAGE CONTENT... 4 GET TO
User Manual. Unicorn Analog Telephone Adaptor. Hanlong Technology Co., Ltd. Table of Content.
 User Manual Unicorn 3112 Analog Telephone Adaptor Hanlong Technology Co., Ltd http://www.hanlongtek.com Table of Content 1. WELCOME... 3 2. WHAT IS IN THE PACKAGE... 3 3. PRODUCT OVERVIEW... 3 3.1. Key
SoLink-Lite IP-PBX. Administrator Guide. (Version 1.0)
") SoLink-Lite IP-PBX Administrator Guide (Version 1.0) TABLE OF CONTENT 1.0 Introduction... 1 2.0 Setting Up the IP-PBX... 2 3.0 Logging On... 3 4.0 Configuring Network... 4 5.0 Configuring Hardware... 5
SoLink-Lite IP-PBX Administrator Guide (Version 1.0) TABLE OF CONTENT 1.0 Introduction... 1 2.0 Setting Up the IP-PBX... 2 3.0 Logging On... 3 4.0 Configuring Network... 4 5.0 Configuring Hardware... 5
ATCOM IPPBX IP01 Product Guide Version: VoIPon Tel: +44 (0) Fax: +44 (0)
 Fax: +44 (0)") Figure: ATCOM IPPBX IP01 ATCOM IPPBX IP01 Product Guide Version: 1.0 2010-05-10 Content CONTACT ATCOM... 3 CHAPTER 1 THE INTRODUCTION OF IP01... 4 CHAPTER 2 ACCESS TO THE IP01... 6 2.1 WEB PAGE ACCESS
Figure: ATCOM IPPBX IP01 ATCOM IPPBX IP01 Product Guide Version: 1.0 2010-05-10 Content CONTACT ATCOM... 3 CHAPTER 1 THE INTRODUCTION OF IP01... 4 CHAPTER 2 ACCESS TO THE IP01... 6 2.1 WEB PAGE ACCESS
SIP IP Phone. User Manual / Version 1.0 IPP-120
 SIP IP Phone User Manual / Version 1.0 IPP-120 Chapter 1 Overview of the SIP IP Phone (IPP-120)... 3 1. Hardware Overview... 4 1.Front View and Keypad function... 4 2.Back View... 6 3.Specification...
Release Note for TA400/800
 Version 41.19.0.X Yeastar Information Technology Co. Ltd. ===Firmware Version: V41.19.0.16== Applicable Model: TA400/800 Release Date: November 24, 2015 New Features 1. Added TR-069 feature. 2. Added Distinctive
Preface... V. Part I: IAD Gateway Overview Overview Software Specifications Hardware Specifications Part II: Start-UP...
 I Preface... V Part I: IAD Gateway Overview... 1 1.1 Overview... 2 1.2 Software Specifications... 3 1.3 Hardware Specifications... 5 Part II: Start-UP... 10 2.1 Software Installation Guide... 2.1.1 Default
STEPHEN TECHNOLOGIES CO.,LIMITED. User Manual. Model: SVG800S VoIP ATA
 User Manual Model: SVG800S VoIP ATA Contents Contents1 Product Introduction...1 1 Product Introduction...3 1.1 General Information...3 1.2 Protocol...3 1.3 Hardware Specification...4 1.4 Software Specification...4
AP500 4-Port FXS VoIP Gateway
 AP500 4-Port FXS VoIP Gateway High Performance VoIP Gateway Solution Product Overview www.addpac.com AddPac Technology Sales and Marketing Contents Product Overview Hardware Specification APOS Technology
Entry Level PoE IP Phone
 Entry Level IP Phone Key Features Highlights Supports SIP 2.0 (RFC3261) IEEE 802.3af Power over Ethernet compliant (VIP- 1000PT only) Supports HD voice (G.722) Voice Activity Detection Auto Provisioning:
AddPac Technology. 2012, Sales and Marketing.
 SOHO GSM Gateway Solution AddPac Technology 2012, Sales and Marketing www.addpac.com Contents SOHO GSM Gateway Service Diagram SOHO GSM Gateway Series AP-GS501(1ch) AP-GS701(1ch) AP-GS702(2ch) AP-GS802(2ch)