NNG-Ford V1 NTV-KIT558. Navigation interface for FORD vehicles equipped with 8.4 MyTouch NTV-DOC218
|
|
|
- Sydney Hunt
- 5 years ago
- Views:
Transcription


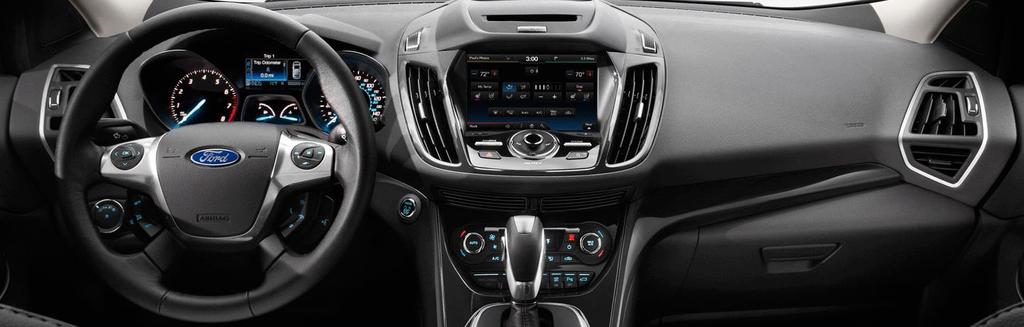


1 3950 NW 120th Ave, Coral Springs, FL TEL FAX NNG-Ford V1 Navigation interface for FORD vehicles equipped with 8.4 MyTouch NTV-KIT558 NTV-DOC218


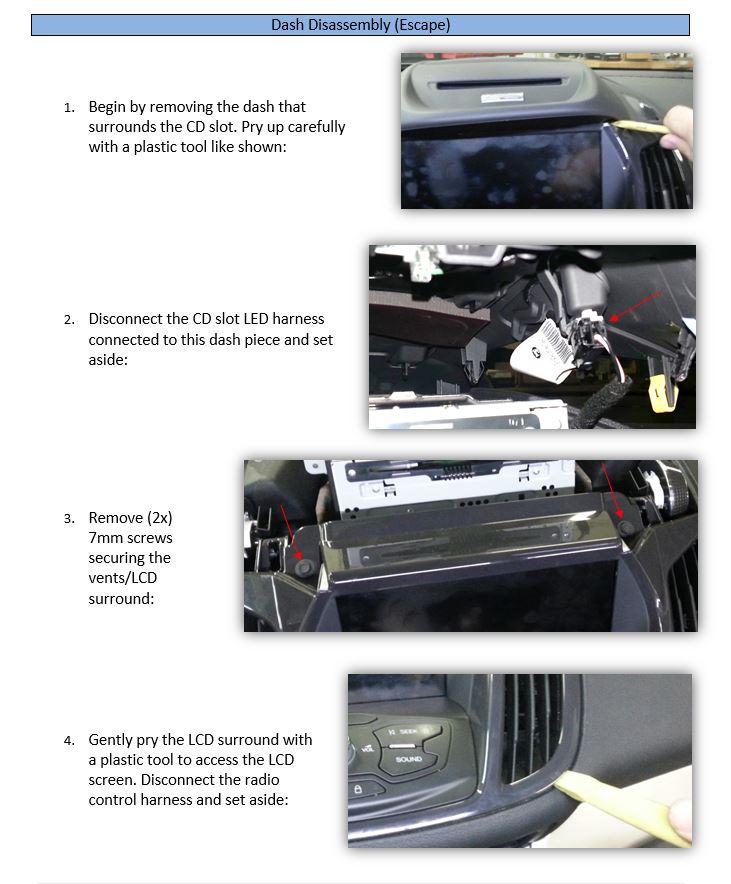
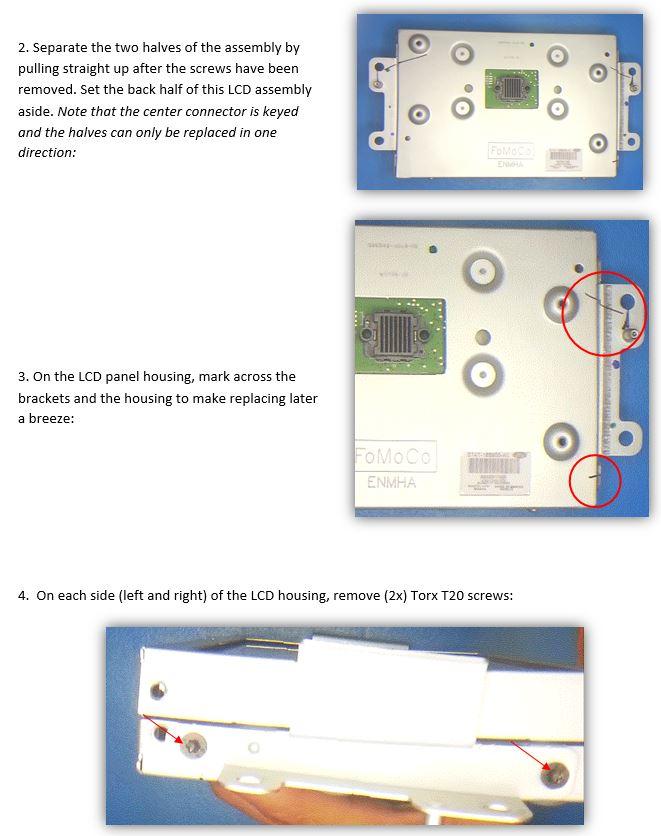
2 SoftTouch Navigation System Ford Edge Installation Instructions NTV-KIT558: FORD V1 NTV-KIT585: FORD V2 NTV-DOC218 Compatibility INSTALLATION PERFORMED ON FORD EDGE FOR REFERENCE ONLY! Parts Identification Page 1 Vehicle Preparation Page 2 Programming Switch Settings Page 2 Installation Page 3 1. NNG-FORD V1 GPS/Interface 2. NNG-FORD V1 Internal Modification PCB 3. NNG-FORD V1 Plug & Play T-Harness 4. LCD/TP Cables 5. Audio Switch Module 6. Audio I/O Y-Cable 7. Rear-LCD Cable 8. GPS Antenna 9. OEM/NAV Toggle Switch
3 STOP Install At Your Own Risk NTV-DOC218 YOU MUST READ THESE WARNINGS AND NOTICE BEFORE PRODUCT HANDLING AND INSTALLATION! PRODUCT AND VEHICLE APPLICATION WARRANTY DISCLAIMER WARNING! The Navigation Electronic Components are sensitive to Electro-Static Discharge (ESD). DO NOT HANDLE THE NAVIGATION ELECTRONIC COMPONENTS WITHOUT PROPER ESD GROUNDING DURING INSTALLATION. FAILURE TO USE PROPER ESD PROTECTION WHEN HANDLING THE NAVIGATION COMPONENTS WILL VOID THE PRODUCT WARRANTY. WARNING! Installation of this Navigation Electronics product in the vehicle radio head unit must be performed by a professional technician that is experienced with proper work methods, ESD handling requirements, and knowledgeable of specific procedures for radio disassembly, Navigation Electronics installation, and reassembly of the vehicle Radio Head Unit as well as proper handling requirements of all components involved. FAILURE TO FOLLOW PROPER DISASSEMBLY, INSTALLATION, AND REASSEMBLY PROCEDURES AND PROPER COMPONENT HANDLING REQUIREMENTS MAY RESULT IN IRREVERSIBLE DAMAGE TO THE VEHICLE RADIO HEAD UNIT AND/OR THE NAVIGATION ELECTRONICS AND WILL VOID THE PRODUCT WARRANTY! WARRANTY DISCLAIMER NOTICE! Radio removal, disassembly, installation of Navigation Electronics, and Radio re-assembly/re-installation is the responsibility of the installer. It is recommended that you contract a professional installer that is experienced with proper work methods involving electronics and knowledgeable of specific procedures for radio disassembly, Navigation Electronics installation, and re-assembly/re-installation of the Radio Head Unit in the vehicle.

 apply the emergency brake and (B) read this entire manual before beginning.")

4 WARNING To avoid dangerous distractions that may lead to an accident, the driver should never operate the system while the vehicle is in motion. Before installing this product, the seller should inform the end-user of proper use and compliance with the proper instructions and all state and federal laws. Vehicle Preparation Before beginning your installation, familiarize yourself with the installation instructions and the SoftTouch Navigation system components. To ensure your safety, (A) apply the emergency brake and (B) read this entire manual before beginning. CAUTION: It is advisable to disconnect the negative battery cable for 3 minutes before beginning installation, to avoid unintended air bag deployment. Note and record any anti-theft radio codes prior to disconnecting. NTV-DOC218 Default Programming Switch (Dip Switch) Settings Default Programming Switch Settings 1 Off 2 Off 3 On 4 Off 5 On 6 On 7 Off 8 On Factory or Aftermarket Camera Settings To use an aftermarket camera Place switch #1 in OFF position. To use the vehicle s factory camera Place switch #1 in ON position.
5
6
7
8
9
10
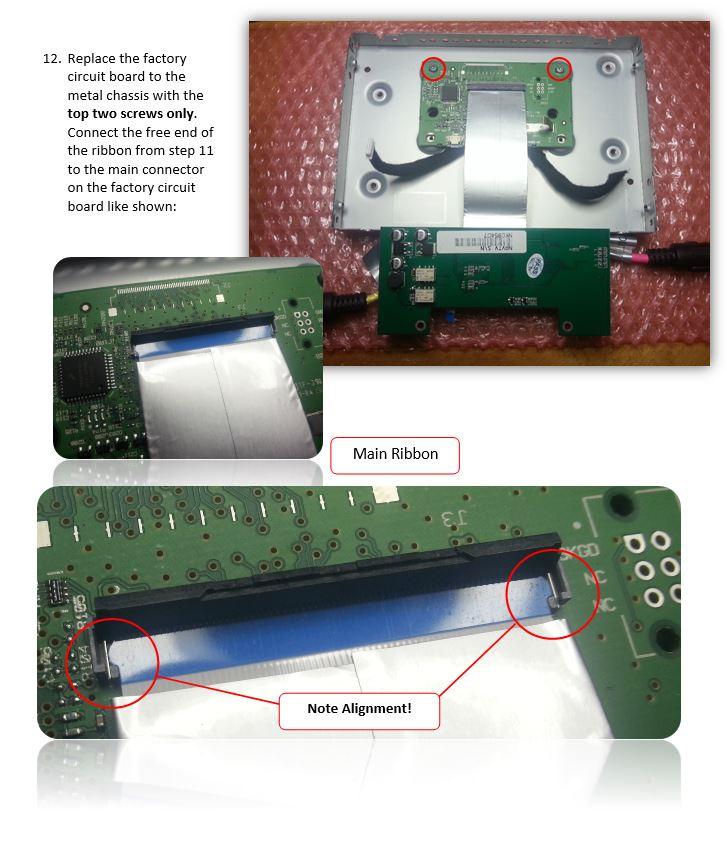
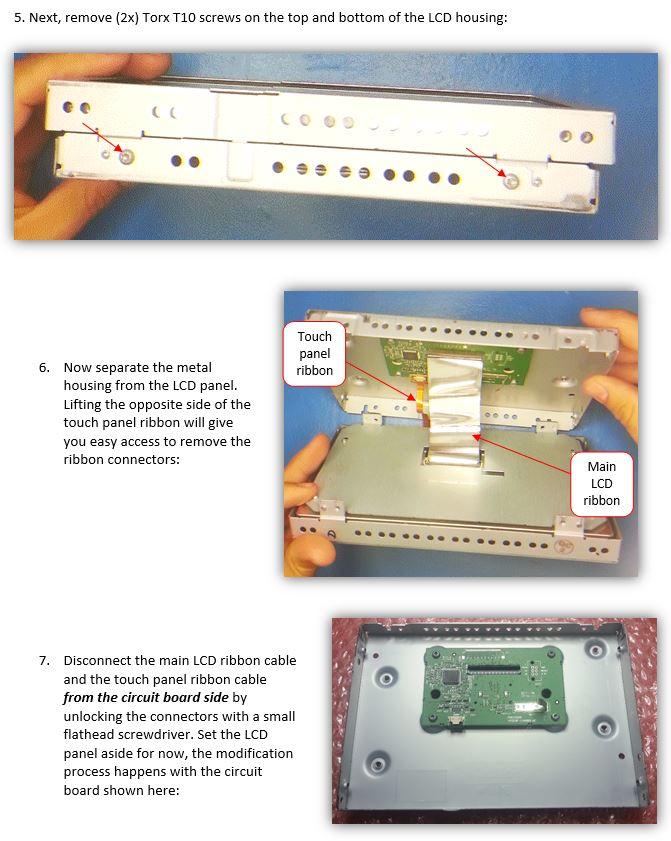
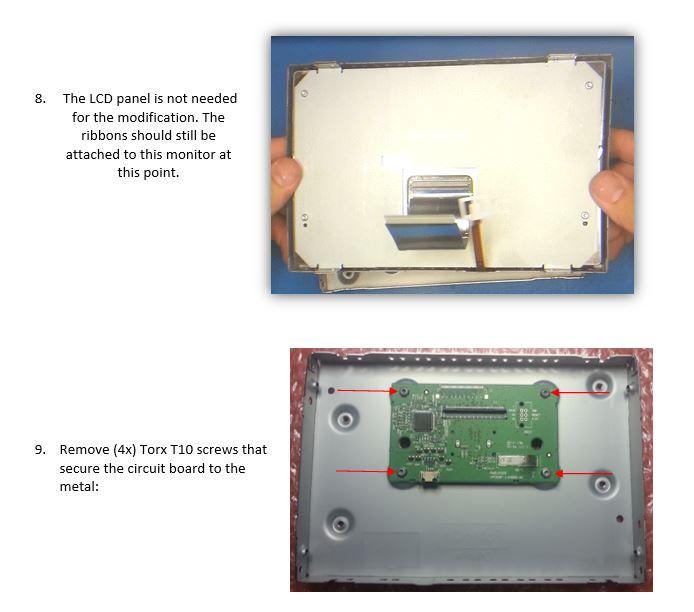
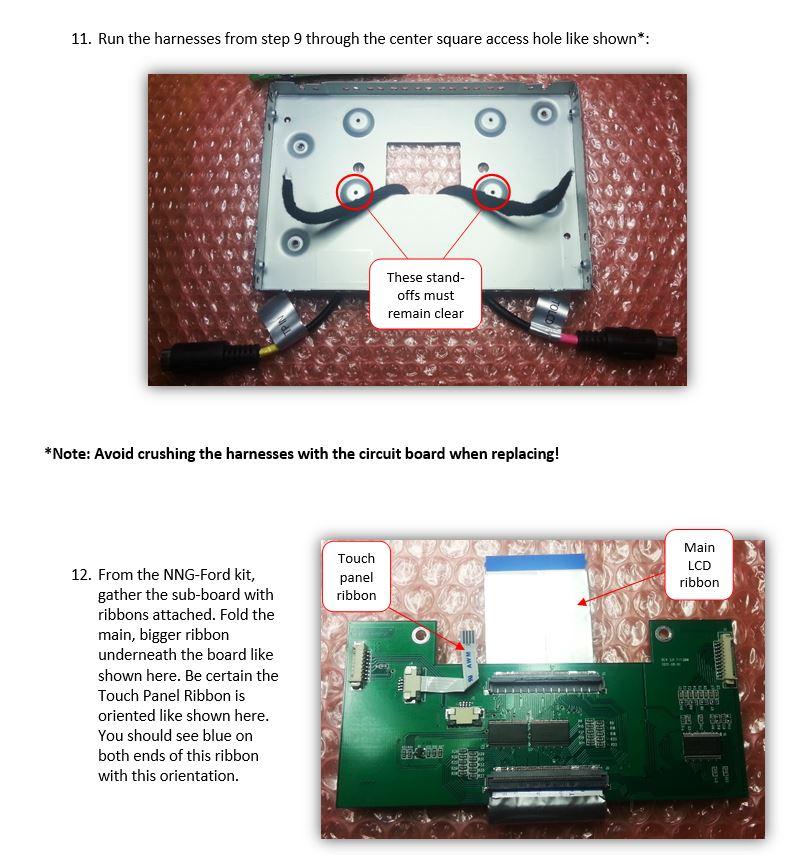
11 Page 10
12 Page 11
13 Page 12


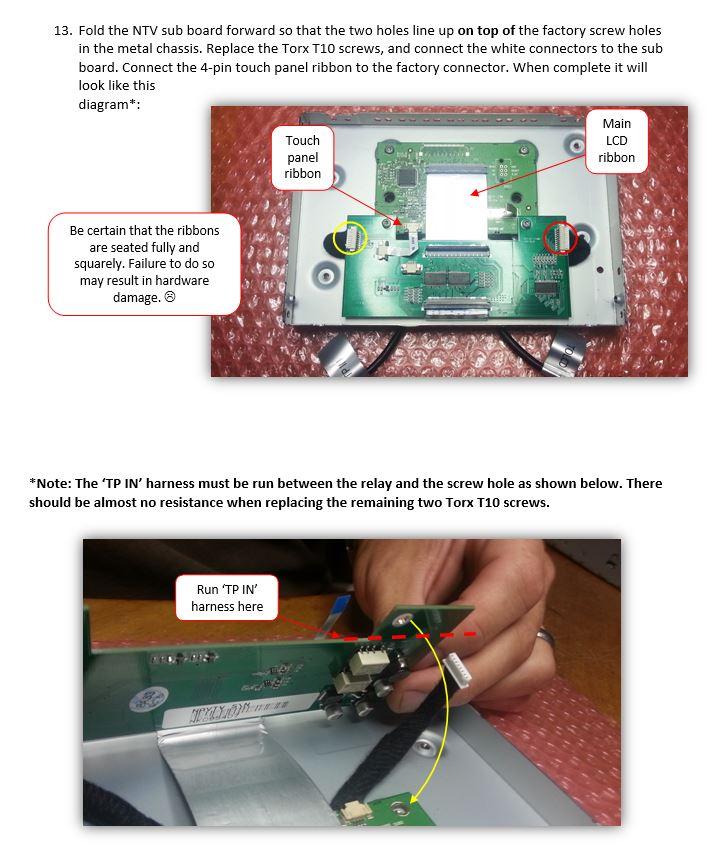
14 Mount the GPS antenna to the top-rear of the vehicle allowing it to attach using its magnetic base. Route the GPS antenna extensions harness to the front of the vehicle above the headliner, down the passenger-side A-pillar, and behind the glovebox. Connect the TP-IN and LCD-IN harness to the PINK and YELLOW ports on the navigation control module. Page 13


15 Connect the power harness from the vehicle interface harness to the navigation control module. Connect the speaker interface harness to the navigation control module. Find the threaded end of the GPS antenna and connect it to the navigation control module. Connect the vehicle interface harness to the factory wiring harness on the car. (Note: the large factory harness includes a locking retainer clip.) Page 14


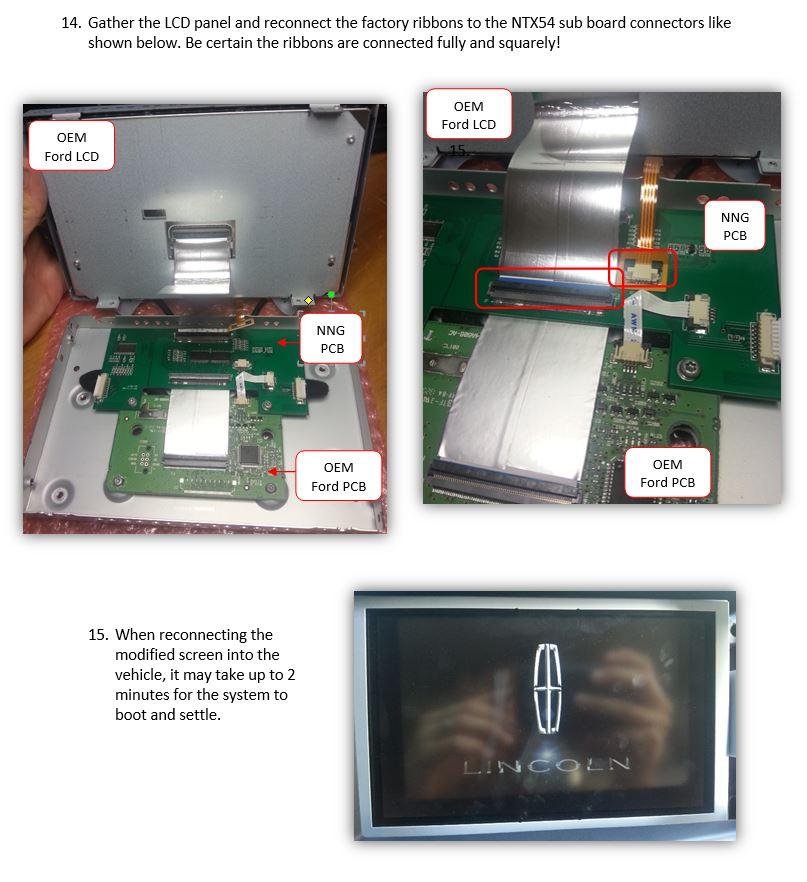
16 Apply double sided tape (or equivalent) to the bottom side of the navigation control module. Attach the navigation control module to the dashboard in the open cavity below the factory CD player. Attach the vehicle interface harness to the backside of the touch screen unit. Connect the TP-IN and LCD-IN harnesses previously routed through the backside of the touch screen unit s casing to the TP-IN and LCD-IN harnesses from the navigation interface module. Page 14


17 Replace the touch screen unit and factory CD player. Make sure no wires are pinched in the process. If indoors, start the vehicle and move it outside so that the GPS antenna has a clear view of the sky. Press the mute/call decline button to switch from the factory interface to the igo Navigation interface. Reassembly 1. Reinstall all trim pieces taking special care to ensure harnesses and wiring connections are properly secured. 2. Make sure no harnesses are bent or pinched by trim pieces. 3. Reconnect all disconnected bulbs and check for function. Installation Tips Confirm proper cable extension connector orientation and always verify proper ends are routed in correct direction. It is a good idea to dry-fit all pieces in this kit before permanently attaching them to ensure proper orientation and operation before beginning installation for familiarization with components. Always treat any metal exposed during installation with a rust preventative compound to prevent system failure due to rust and/or corrosion. Always seal any holes drilled with the provided sealing putty to prevent water infiltration through unprotected areas. Confirm integrity of mechanical and electrical connections before moving to next installation sequence. Installation Notes Page 15

18 NNG-FORD V1 Wiring Diagram Page 16
 Steps: 1. Connect both FD-AUDSPK-02 and AUD-6PIN-01 to GPS Audio Box 2.")
19 Ford Audio Integration Components for audio integration: 1. GPS Audio Box 2. Wiring (FD-AUDSPK-02) 3. Wiring (AUD-6PIN-01) 4. Main Harness (same harness used in main install) 5. Rear-LCD (connected to GPS box from main install) Steps: 1. Connect both FD-AUDSPK-02 and AUD-6PIN-01 to GPS Audio Box 2. Connect white, 2-PIN power plug to power from main Interface harness 2-PIN power 3. Insert green wire with pin to Main Harness (See figure 1) insert pin here green wire from FD_AUDSPK-02 Figure 1 Figure 1a 4. Connect 2-pin speaker plug to Rear-LCD speaker plug 5. Locate the dash center speaker. Note: If this car is not equipped with a center dash speaker, locate the Front-LEFT driver speaker leads, heading into driver's front door. Wire colors are typically White and White/Brown. Test wires before using! 6. AUD-6PIN-01 has 6 wires, split to 2 black connectors. The WHITE wires are NOT used. a. Cut the pair of signal leads from the OEM center channel speaker in HALF. b. The FEMALE 4-PIN black plug is sound OUTPUT to Speaker (connect + and -). Gray/Black: - and Gray: +. c. The MALE 4-PIN black plug is sound INPUT from Car (connect + and -). Gray/Black: - and Gray: +. 8-PIN black audio I/O pinout from Audio Box: ** Normally, radio audio will by-pass audio box. When GPS talks, audio box will mute factory audio output and provide GPS audio to the dash speaker. ** Page 17


 Press!")
20 WEAK /NO GPS SIGNAL? Tips to Improve GPS Antenna Signal if vehicle equipped Metallized Windshield* GPS MONITOR Tools Exit IGO MAP by press SHUT DOWN BUTTON Console> SETUP GPS MONITOR Locate the Antenna with minimum 5 bars in dark blue or Gray bar (Always suggest mounting the GPS antenna on the roof) Press! icon to reset GPS signal and change the Antenna position
. However, stay away from the windshield.")
 card from the module and remove it 2.")

21 PROPER GPS ANTENNA POSITION if vehicle equipped *Metallized Windshield SUV/Coupe Sedan TRUCK (Shown as Tundra) Alternatively, installer might choose to mount Antenna inside the headliner or inside vehicle using GPS monitor tools (see instruction). However, stay away from the windshield. * Windshields with metal particles can interfere with radio waves, dash-mount satellite radio receivers, and GPS receivers may be affected external transmitters and receivers may be required. If you see an 'OUT OF MEMORY' error when switching to NAV mode: 1. Access the map micro SD (or standard size SD) card from the module and remove it 2. Use an SD card adapter for the PC to load the content 3. Access the map software from the PC from adapter 4. Look for the main folder NAVI from the SD card 5. Inside the NAVI folder, you should find a folder SAVE 6. Delete the SAVE folder from the SD card 7. Check to ensure the SAVE folder is successfully deleted 8. Insert the cleaned SD card back to the module 9. Turn on the system and check all functions. You should see it start with initial setup steps. Touch Screen Calibration: 1. Turn off Ignition. Access NAV interface and remove SD card. 2. Turn on Ignition, WAIT for white screen with crosshair. 3. Calibrate the touch screen for NAV by pressing the center of each cross hair as they appear. You may have to hold each crosshair for a solid second. 4. Once you get to 'OK' and press, shut system down and re-insert SD card NAV interface. 5. Power on and test.
NNG Toyota 3/3s Navigation System for select Toyota NTV-KIT553/598
 3950 NW 120 th Ave, Coral Springs, FL 33065 TEL: 561-955-9770 FAX: NNG Toyota 3/3s Navigation System for select Toyota NTV-KIT553/598 NNG-Toyota 3/3s Kit Content 1 4 9 5 6 2 3 8 1. 2. 3. 4. 5. 6. 7. 8.
Navigation interface for Jeep GC 5 RA2 NTV-KIT581
 3950 NW 120 th Ave, Coral Springs, FL 33065 TEL 561-955-9770 FAX 561-955-9760 NNG-Jeep GC Navigation interface for Jeep GC 5 RA2 NTV-KIT581 NNG-JEEP GC Kit Content 5 1 6 4 7 2 3 1. 2. 3. 4. 5. 6. 7. 8.
RECOMMENDED TOOLS PERSONAL & VEHICLE PROTECTION MASKING TAPE
 GUIDE PART NUMBER: 250-7616 GM SOFT TOUCH NAVIGATION SYSTEM GENERAL APPLICABILITY 2013- RAV4 KIT CONTENTS ITEM QTY DESCRIPTION 1 1 NAVIGATION INTERFACE MODULE 2 1 VEHICLE INTERFACE T-HARNESS 3 1 LCD/GPS
NNG-Toyota 6. Navigation interface for Toyota Sienna NTV-KIT625 BHM 11/02/15 NTV-DOC237
 3950 NW 120 th Ave, Coral Springs, FL 33065 TEL 561-955-9770 FAX 561-955-9760 NNG-Toyota 6 Navigation interface for 15-16 Toyota Sienna NTV-KIT625 BHM 11/02/15 NTV-DOC237 Toyota 6 navigation system application
Parts Identification Page 1 Vehicle Preparation Page 3 Programming Switch Settings Page 3 Installation Page 4. Form #5420,
 SoftTouch Navigation System 250-7613 2012-2013 Toyota Camry Installation Instructions General Applicability: Toyota 2012-2013 Prius/Prius V, 2013 Venza, 2013 Avalon, 2013 Highlander, 2013 Tacoma For video
NNG-GM2 Navigation interface for GM vehicles equipped with LVDS MYLink/CUE NTV-KIT552
 3950 NW 120 th Ave, Coral Springs, FL 33065 TEL 561-955-9770 FAX 561-955-9760 NNG-GM2 Navigation interface for GM vehicles equipped with LVDS MYLink/CUE NTV-KIT552 1. GM2 LVDS Interface/GPS combo 2. Plug
FDS3NAV2. For Ford Vehicles Equipped With SYNC3. Installation Instructions. Calibration and Setup Guide. Page 1 of 14
 FDS3NAV2 For Ford Vehicles Equipped With SYNC3 Installation Instructions Calibration and Setup Guide Page 1 of 14 Please read this manual thoroughly before installation. This manual illustrates a typical
CHRY UNI-CAM v2. Chrysler/Dodge/Jeep uconnect (RA4/RA3/RA2) Dual Camera/Control in Motion Interface NTV-KIT759
 Dual Camera/Control in Motion Interface NTV-KIT759") 3950 NW 120 th Ave, Coral Springs, FL 33065 TEL 561-955-9770 FAX 561-955-9760 CHRY UNI-CAM v2 Chrysler/Dodge/Jeep uconnect (RA4/RA3/RA2) Dual Camera/Control in Motion Interface NTV-KIT759 Compatible with
3950 NW 120 th Ave, Coral Springs, FL 33065 TEL 561-955-9770 FAX 561-955-9760 CHRY UNI-CAM v2 Chrysler/Dodge/Jeep uconnect (RA4/RA3/RA2) Dual Camera/Control in Motion Interface NTV-KIT759 Compatible with
Jaguar F-TYPE CAM Dual Camera interface for select 14+ Jaguar vehicles NTV-KIT589
 3950 NW 120 th Ave, Coral Springs, FL 33065 TEL 561-955-9770 FAX 561-955-9760 Jaguar F-TYPE CAM Dual Camera interface for select 14+ Jaguar vehicles NTV-KIT589 BHM Overview Jaguar F-TYPE CAM interfaces
Volvo VIM NTV-KIT298
 3950 NW 120 th Ave, Coral Springs, FL 33065 TEL 561-955-9770 FAX 561-955-9760 www.nav-tv.com info@nav-tv.com Volvo VIM NTV-KIT298 Overview The Volvo VIM kit enables video in motion (VIM) and navigation
Vehicle Applications. Features. Radio Compatibility. Note. Parts Included. Wiring Diagram
 Vehicle Applications BMW 1 SERIES 2011 - Up 1 Series (5 Door) 2012 - Up 1 Series (3 Door) Features 3 SERIES 2012 - Up 3 Series Sedan 2012 - Up 3 Series Wagon 4 SERIES 2013 - Up 4 Series Coupe 2013 4 Series
3950 NW 120 th Ave, Coral Springs, FL TEL FAX MFT F-CAM. Force Front Camera Module NTV-KIT831 BHM 07/31/18 NTV-DOC298
 3950 NW 120 th Ave, Coral Springs, FL 33065 TEL 561-955-9770 FAX 561-955-9760 MFT F-CAM Force Front Camera Module NTV-KIT831 BHM 07/31/18 Overview The MFT F-CAM module uses OEM buttons (or wire triggers)
Jaguar F-TYPE CAM 16. Dual Camera interface for select 16+ Jaguar vehicles NTV-KIT746 BHM 05/31/16 NTV-DOC259
 3950 NW 120 th Ave, Coral Springs, FL 33065 TEL 561-955-9770 FAX 561-955-9760 Jaguar F-TYPE CAM 16 Dual Camera interface for select 16+ Jaguar vehicles NTV-KIT746 BHM Overview Jaguar F-TYPE CAM 16 interfaces
DODGE Challenger Charger Journey. 6-Pin Video Input Cable 6-Pin Audio In/Out Cable GPS Magnetic Antenna
 CHRYSLER 2011-2014 300c DODGE 2011-2014 Challenger 2011-2014 Charger 2011-2014 Journey FIAT 2011-2014 Freemont Plug and Play connectors make installation simple and easy. Utilizes the latest mapping version
GM-K PRG. Dual Camera interface for 15 Chevy Sonic/Spark/Trax NTV-KIT626 BHM 10/15/15 NTV-DOC235
 3950 NW 120 th Ave, Coral Springs, FL 33065 TEL 561-955-9770 FAX 561-955-9760 GM-K PRG Dual Camera interface for 15 Chevy Sonic/Spark/Trax NTV-KIT626 BHM Overview The GM-K PRG interfaces a reverse and
SIR-PCM3 955/997 SIRIUS Satellite Radio interface for Porsche PCM 3 radios NTV-KIT266/285
 3950 NW 120 th Ave, Coral Springs, FL 33065 TEL 561-955-9770 FAX 561-955-9760 SIR-PCM3 955/997 SIRIUS Satellite Radio interface for Porsche PCM 3 radios NTV-KIT266/285 BHM Overview The SIR-PCM3 adds Sirius
AUDI-09 EXT MMi NTV-KIT187
 3950 NW 120 th Ave, Coral Springs, FL 33065 TEL 561-955-9770 FAX 561-955-9760 www.nav-tv.com info@nav-tv.com AUDI-09 EXT MMi NTV-KIT187 Overview The AUDI-09 EXT MMi Kit allows the user to add up to 3 video
W204-H NTV-KIT794. Overview
 3950 NW 120 th Ave, Coral Springs, FL 33065 TEL 561-955-9770 FAX 561-955-9760 www.nav-tv.com info@nav-tv.com W204-H NTV-KIT794 Overview The W204-H RVC Kit interfaces two camera inputs and optional HDMI
W204-N RVC NTV-KIT704
 3950 NW 120 th Ave, Coral Springs, FL 33065 TEL 561-955-9770 FAX 561-955-9760 www.nav-tv.com info@nav-tv.com W204-N RVC NTV-KIT704 Overview The W204-N RVC Kit interfaces a backup camera input (with active
BMW12-DYNAMIC KIT NTV-KIT462
 3950 NW 120 th Ave, Coral Springs, FL 33065 TEL 561-955-9770 FAX 561-955-9760 www.nav-tv.com info@nav-tv.com BMW12-DYNAMIC KIT NTV-KIT462 Overview The BMW12 kit allows the user to add up to 3 video inputs
BMW09N-DYNAMIC Kit NTV-KIT725 Screen Connector
 3950 NW 120 th Ave, Coral Springs, FL 33065 TEL 561-955-9770 FAX 561-955-9760 www.nav-tv.com info@nav-tv.com BMW09N-DYNAMIC Kit NTV-KIT725 Screen Connector Overview The BMW09-N kit interfaces 2 video inputs
AUDI DYNAMIC-EXT NTV-KIT701
 3950 NW 120 th Ave, Coral Springs, FL 33065 TEL 561-955-9770 FAX 561-955-9760 www.nav-tv.com info@nav-tv.com AUDI DYNAMIC-EXT NTV-KIT701 Overview The AUDI-DYN EXT Kit interfaces a backup camera (with dynamic
IOB-RVC NTV-KIT798. Overview
 3950 NW 120 th Ave, Coral Springs, FL 33065 TEL 561-955-9770 FAX 561-955-9760 www.nav-tv.com info@nav-tv.com IOB-RVC NTV-KIT798 Overview The IOB-RVC interfaces a single backup camera input to the factory
W DYNAMIC Kit NTV-KIT461
 3950 NW 120 th Ave, Coral Springs, FL 33065 TEL 561-955-9770 FAX 561-955-9760 www.nav-tv.com info@nav-tv.com W204-12 DYNAMIC Kit NTV-KIT461 Overview The W204-12 DYNAMIC kit allows the user to add up to
BMW-EVO KIT NTV-KIT804
 3950 NW 120 th Ave, Coral Springs, FL 33065 TEL 561-955-9770 FAX 561-955-9760 www.nav-tv.com info@nav-tv.com BMW-EVO KIT NTV-KIT804 Screen Connector Overview The BMW-EVO kit interfaces 2 video inputs (including
BMW12N-DYNAMIC KIT NTV-KIT717
 3950 NW 120 th Ave, Coral Springs, FL 33065 TEL 561-955-9770 FAX 561-955-9760 www.nav-tv.com info@nav-tv.com BMW12N-DYNAMIC KIT NTV-KIT717 Screen Connector Overview The BMW12-N kit interfaces 2 video inputs
AUDI DYNAMIC-A3 NTV-KIT702
 3950 NW 120 th Ave, Coral Springs, FL 33065 TEL 561-955-9770 FAX 561-955-9760 www.nav-tv.com info@nav-tv.com AUDI DYNAMIC-A3 NTV-KIT702 Overview The AUDI DYNAMIC-A3 Kit interfaces a backup camera input
CHRY MULTI-CAM. Dodge/Jeep uconnect (RA4) Interface with 6 video inputs NTV-KIT764 BHM 09/25/17 NTV-DOC266
 Interface with 6 video inputs NTV-KIT764 BHM 09/25/17 NTV-DOC266") 3950 NW 120 th Ave, Coral Springs, FL 33065 TEL 561-955-9770 FAX 561-955-9760 CHRY MULTI-CAM Dodge/Jeep uconnect (RA4) Interface with 6 video inputs NTV-KIT764 BHM Overview The UCTv2 series Interface integrates
3950 NW 120 th Ave, Coral Springs, FL 33065 TEL 561-955-9770 FAX 561-955-9760 CHRY MULTI-CAM Dodge/Jeep uconnect (RA4) Interface with 6 video inputs NTV-KIT764 BHM Overview The UCTv2 series Interface integrates
C.O.D-F50. Ford OEM 360 Surround-View Camera Controller NTV-KIT899 BHM 02/01/19 NTV-DOC334
 3950 NW 120 th Ave, Coral Springs, FL 33065 TEL 561-955-9770 FAX 561-955-9760 C.O.D-F50 Ford OEM 360 Surround-View Camera Controller NTV-KIT899 Overview The COD-F50 (Camera-On-Demand) kit allows Ford SuperDuty
AUDI DYNAMIC-EXT NTV-KIT701
 3950 NW 120 th Ave, Coral Springs, FL 33065 TEL 561-955-9770 FAX 561-955-9760 www.nav-tv.com info@nav-tv.com AUDI DYNAMIC-EXT NTV-KIT701 Overview The AUDI-DYN EXT Kit interfaces a backup camera (with dynamic
NTG3-SL NTV-KIT142. Overview Mercedes-SL. Backup camera / AV input / RSE / Video In Motion interface. Kit Contents. NTG3 Module NTV-ASY171
 NTG3 5.04.14 NAV-TV 3950 NW 120 Ave, Coral Srings, FL NTV-KIT142 Overview 2009-2011 Mercedes-SL Backup camera / AV input / RSE / Video In Motion interface Kit Contents SMB to RCA NTV-CAB007 Plug & Play
GMNAV1 Advent Integrated Navigation
 GMNAV1 Advent Integrated Navigation This interface is designed to integrate Navigation into select Buick and Chevrolet Systems. INSTALLATION MANUAL What s in the Box The following items are supplied with
PCM4-CAM NTV-KIT750. Overview
 3950 NW 120 th Ave, Coral Springs, FL 33065 TEL 561-955-9770 FAX 561-955-9760 www.nav-tv.com info@nav-tv.com PCM4-CAM NTV-KIT750 Overview The PCM4-CAM Kit interfaces a backup camera input (with active
MY-CUE-Kit NTV-KIT457
 3950 NW 120 th Ave, Coral Springs, FL 33065 TEL 561-955-9770 FAX 561-955-9760 www.nav-tv.com info@nav-tv.com MY-CUE-Kit NTV-KIT457 Overview The MY-CUE Kit allows the user to add up to 3 audio/video inputs
NOTICE OF INTENDED INSTALLATION AND USE
 NOTICE OF INTENDED INSTALLATION AND USE THE ROSEN MULTI-MEDIA NAVIGATION SYSTEMS CONTAIN AN INTERNAL VIDEO PLAYER, WHICH IS NOT INTENDED FOR VIEWING BY THE DRIVER. THE VIDEO PLAYER IS DISABLED WHEN THE
NOTICE OF INTENDED INSTALLATION AND USE
 * JBL Audio equipped vehicles will require additional part # DP-TYJBL1 audio interface. NOTICE OF INTENDED INSTALLATION AND USE THE ROSEN MULTI-MEDIA NAVIGATION SYSTEMS CONTAIN AN INTERNAL VIDEO PLAYER,
Barracuda Video in Motion for select GM vehicles NTV-KIT211
 3950 NW 120 th Ave, Coral Springs, FL 33065 TEL 561-955-9770 FAX 561-955-9760 Barracuda Video in Motion for select 07-11 GM vehicles NTV-KIT211 BHM Overview The NAV-TV Barracuda adds Video in Motion, Navigation
W204-5 NTV-KIT198. Overview
 3950 NW 120 th Ave, Coral Springs, FL 33065 TEL 561-955-9770 FAX 561-955-9760 www.nav-tv.com info@nav-tv.com W204-5 NTV-KIT198 Overview The W204-5 Kit allows the user to add up to 3 video inputs and a
NTG3 / NTG3E /NTG3SLK NTV-KIT102/106/189. Overview up Mercedes GL/ML/R/E/CLS/SLK. Backup camera / AV input / RSE / Video In Motion interface
 NTG3 5.04.14 NAV-TV 3950 NW 120 Ave, Coral Srings, FL NTG3 / NTG3E /NTG3SLK NTV-KIT102/106/189 Overview 2009-up Mercedes GL/ML/R/E/CLS/SLK Backup camera / AV input / RSE / Video In Motion interface Kit
NOTICE OF INTENDED INSTALLATION AND USE
 * JBL Audio equipped vehicles will require additional part # DP-TYJBL1 audio interface. NOTICE OF INTENDED INSTALLATION AND USE THE ROSEN MULTI-MEDIA NAVIGATION SYSTEMS CONTAIN AN INTERNAL VIDEO PLAYER,
REAR-VIEW CAMERA & AV INPUT INTEGRATION INTERFACE FOR DODGE & JEEP VEHICLES 2014-UP
 DODGE 2014-2015 Durango 2014-2015 RAM* JEEP 2014-2015 Grand Cherokee APPLICATION NOTES: FOR UCONNECT 5 AND 8.4 DISPLAYS *NOTE: Not compatible with diesel powered trucks. PARTS INCLUDED (2) CH-75V CAN Interface
Installation Instructions ROSTRA. Select GM Vehicles with 7 Screens
 Rostra 12-Volt Accessories Reverse Camera Input Interface for General Motors Vehicles 250-8454 Installation Instructions Select GM Vehicles with 7 Screens This manual shows a typical installation. Your
W205-RVC NTV-KIT580. Overview
 3950 NW 120 th Ave, Coral Springs, FL 33065 TEL 561-955-9770 FAX 561-955-9760 www.nav-tv.com info@nav-tv.com W205-RVC NTV-KIT580 Overview The W205-RVC Kit allows the user to add a backup camera input (with
BMW-EVO ID6 NTV-KIT837
 3950 NW 120 th Ave, Coral Springs, FL 33065 TEL 561-955-9770 FAX 561-955-9760 www.nav-tv.com info@nav-tv.com BMW-EVO ID6 NTV-KIT837 Screen Connector Overview The BMW-EVO ID6 kit interfaces 2 video inputs
ADDITIONAL CAM POWER REVERSE CAM POWER BLUETOOTH MUTE AUDIO + IN AUDIO - IN 12V ACC OUTPUT 12V CONSTANT GROUND
 UNPLUG ORIGINAL RADIO CONNECTORS THEN PLUG IN HERE PLUG AND PLAY NO OTHER CONNECTIONS ARE NECESSARY USE HANDSFREE KIT MICROPHONE IPOD/IPHONE/ITOUCH/IPAD CONNECTION USB INPUT ADD YOUR BLUETOOTH HANDSFREE
SMM501/501-H (Surveillance Mode Module) Ford Police Interceptors (Sedan and SUV)
 Ford Police Interceptors (Sedan and SUV)") An ISO 9001:2008 Registered Company SMM501/501-H (Surveillance Mode Module) 2013-2014 Ford Police Interceptors (Sedan and SUV) Introduction The SMM501/501-H is intended for 2013 and 2014 Ford Police Interceptors
An ISO 9001:2008 Registered Company SMM501/501-H (Surveillance Mode Module) 2013-2014 Ford Police Interceptors (Sedan and SUV) Introduction The SMM501/501-H is intended for 2013 and 2014 Ford Police Interceptors
UCTv2-W. 18 Wrangler uconnect 4.0 (CarPlay/Android Auto) Dual Camera Interface NTV-KIT851 BHM 01/19/18 NTV-DOC308
 Dual Camera Interface NTV-KIT851 BHM 01/19/18 NTV-DOC308") 3950 NW 120 th Ave, Coral Springs, FL 33065 TEL 561-955-9770 FAX 561-955-9760 UCTv2-W 18 Wrangler uconnect 4.0 (CarPlay/Android Auto) Dual Camera Interface NTV-KIT851 BHM Overview The UCTv2-W interface
3950 NW 120 th Ave, Coral Springs, FL 33065 TEL 561-955-9770 FAX 561-955-9760 UCTv2-W 18 Wrangler uconnect 4.0 (CarPlay/Android Auto) Dual Camera Interface NTV-KIT851 BHM Overview The UCTv2-W interface
GEN 6 LOCKPICK INSTALLATION OPTIONS COPYRIGHT 2010 COASTAL ELECTRONIC TECHNOLOGIES, INC.
 AFTERMARKET FRONT/BABY CAMERA VIDEO CONNECT HERE FRONT/BABY CAM POWER TO LOCKPICK RED W/BLACK STRIPE WIRE TO LOCKPICK BLACK GROUND WIRE UNPLUG ORIGINAL RADIO CONNECTORS THEN PLUG IN HERE PLUG AND PLAY
A3/GOLF 7-CAM NTV-KIT500
 3950 NW 120 th Ave, Coral Springs, FL 33065 TEL 561-955-9770 FAX 561-955-9760 www.nav-tv.com info@nav-tv.com A3/GOLF 7-CAM NTV-KIT500 Overview The A3/GOLF7-CAM Kit allows the user to add 1 video input
Coastal Electronic Technologies, Inc. GM LOCKPICK GMX-320 Installation and Operation Instructions
 Coastal Electronic Technologies, Inc. GM LOCKPICK GMX-320 Installation and Operation Instructions Thank you for your purchase of the Coastal Electronic Technologies, Inc. GM LOCKPICK GMX- 320. The GMX-320
PRECAUTIONS: Please read before you start the installation
 Installation manual for DVI HA HDD with HA HDD harness In the box: DVI HA HDD video interface HA HDD plug and play wiring harness Installation manual IMPORTANT: Please read all precautions first. This
Please read thoroughly before starting installation and check that kit contents are complete.
 Chrysler/Dodge/Jeep Remote Add-On CD player for RA1, RA2, RA3, or RA4 radios (Kit # 5000-8750) 2013-current RAM truck and Viper; 2015-current Charger, Challenger, and 300; 2017 Pacifica Please read thoroughly
W205-N RVC NTV-KIT703
 3950 NW 120 th Ave, Coral Springs, FL 33065 TEL 561-955-9770 FAX 561-955-9760 www.nav-tv.com info@nav-tv.com W205-N RVC NTV-KIT703 Overview The W205-N RVC Kit interfaces a backup camera input (with active
3950 NW 120 th Ave, Coral Springs, FL TEL FAX Ford A²B to 12-channel Analog & Digital sound processor NTV-KIT873
 3950 NW 120 th Ave, Coral Springs, FL 33065 TEL 561-955-9770 FAX 561-955-9760 Ford A²B to 12-channel Analog & Digital sound processor NTV-KIT873 WARNING: Do not connect any RCA cables to the ZEN-A2B interface
INSTALLATION INSTRUCTIONS FOR PART HYKIA-01 HYKIA-01. *Read Important Warning on page 1 before attempting any installation*
 6 2.5 ISO 1.5 M4 M5 M3 WIRE CUTTER INSTALLATION INSTRUCTIONS FOR PART HYKIA-01 HYKIA-01 *Read Important Warning on page 1 before attempting any installation* Hyundai and Kia 2010-up SPDIF amplifier interface
IOB-RVC NTV-KIT798. Overview
 3950 NW 120 th Ave, Coral Springs, FL 33065 TEL 561-955-9770 FAX 561-955-9760 www.nav-tv.com info@nav-tv.com IOB-RVC NTV-KIT798 Overview The IOB-RVC interfaces a single backup camera input to the factory
GM IO4/IO5/IO6 M.O.S.T. 50 to RCA, SPDIF & TosLink sound processor NTV-KIT838
 3950 NW 120 th Ave, Coral Springs, FL 33065 TEL 561-955-9770 FAX 561-955-9760 GM IO4/IO5/IO6 M.O.S.T. 50 to RCA, SPDIF & TosLink sound processor NTV-KIT838 BHM rb3 WARNING: Do not connect any RCA cables
Ford A²B to 12-channel Analog & Digital sound processor NTV-KIT873
 3950 NW 120 th Ave, Coral Springs, FL 33065 TEL 561-955-9770 FAX 561-955-9760 Ford A²B to 12-channel Analog & Digital sound processor NTV-KIT873 WARNING: Do not connect any RCA cables to the ZEN-A2B interface
ARC-CDJPLAYER INSTALLATION MANUAL Full plug and play kit, universal fit for use in Chrysler vehicles with RA1, RA2, RA3, or RA4 radios.
 Required for Install: ARC-CDJPLAYER INSTALLATION MANUAL Full plug and play kit, universal fit for use in Chrysler vehicles with RA1, RA2, RA3, or RA4 radios. 1. Chrysler/Dodge/Jeep vehicle with Uconnect
GM2 FIM LOCKPICK INSTALLATION OPTIONS COPYRIGHT 2012 COASTAL ELECTRONIC TECHNOLOGIES, INC.
 UNPLUG ORIGINAL RADIO CONNECTORS THEN PLUG IN HERE PLUG AND PLAY NO OTHER CONNECTIONS ARE NECESSARY FOR OVERRIDE FEATURES CONNECT USB CABLE HERE FOR FUTURE UPDATES OPTIONAL POWER OUTPUTS FOR CAMERA(S)
GM IO5/IO6 M.O.S.T. 50 to RCA, SPDIF & TosLink sound processor NTV-KIT838
 3950 NW 120 th Ave, Coral Springs, FL 33065 TEL 561-955-9770 FAX 561-955-9760 GM IO5/IO6 M.O.S.T. 50 to RCA, SPDIF & TosLink sound processor NTV-KIT838 BHM WARNING: Do not connect any RCA cables to the
GM NBS Truck CCD Backup Camera Kit Installation Guide
 CS GM1 GM NBS Truck 2007 2012 CCD Backup Camera Kit Installation Guide Thank you for your purchase! These instructions are intended for the do it yourselfer who decides to install the camera without professional
INSTALLATION INSTRUCTIONS
 2015 F-150 8 MyTouch factory display 360º Vision System (Kit # AVMS-3618) DUE TO THE COMPLEXITY OF THIS KIT PROFESSIONAL INSTALLATION IS REQUIRED CALIBRATION KIT IS REQUIRED FOR FINAL PROGRAMMING -Must
DSP12A-A2B Ford A²B to 12-channel Analog & Digital sound processor NTV-KIT889
 3950 NW 120 th Ave, Coral Springs, FL 33065 TEL 561-955-9770 FAX 561-955-9760 DSP12A-A2B Ford A²B to 12-channel Analog & Digital sound processor NTV-KIT889 WARNING: Due to the complexity and sensitivity
INSTALLATION INSTRUCTIONS
 Dual Camera Interface for Chrysler, Dodge, Jeep (Kit # 9002-2783 v2) Please read thoroughly before starting installation and check that kit contents are complete. Items Included in the Kit: Factory T-harness
DSP12A-A2B Ford A²B to 12-channel Analog & Digital sound processor NTV-KIT889
 3950 NW 120 th Ave, Coral Springs, FL 33065 TEL 561-955-9770 FAX 561-955-9760 DSP12A-A2B Ford A²B to 12-channel Analog & Digital sound processor NTV-KIT889 WARNING: Due to the complexity and sensitivity
GM IO5/IO6 M.O.S.T. 50 to RCA, SPDIF & TosLink sound processor NTV-KIT838
 3950 NW 120 th Ave, Coral Springs, FL 33065 TEL 561-955-9770 FAX 561-955-9760 GM IO5/IO6 M.O.S.T. 50 to RCA, SPDIF & TosLink sound processor NTV-KIT838 BHM WARNING: Do not connect any RCA cables to the
MULTIMEDIA & REAR-VIEW CAMERA INTEGRATION FOR SELECT LAND ROVER VEHICLES 2012-UP
 LAND ROVER 2012-2015 LR2 2012-2015 LR4 2015-2015 New Discovery Sport 2012-2015 Range Rover Evoque 2012-2015 Range Rover Sport APPLICATION NOTES: THIS TERFACE REQUIRES THE VEHICLES TO HAVE A FACTORY AUX
REC-AV XG NTV-KIT276
 3950 NW 120 th Ave, Coral Springs, FL 33065 TEL 561-955-9770 FAX 561-955-9760 www.nav-tv.com info@nav-tv.com REC-AV XG NTV-KIT276 Overview The REC-AV XG adds video input (including rear camera) for select
UCIT LIVE HD 4 Camera DVR. Installation Manual. 1/18 Version 1.0
 UCIT LIVE HD 4 Camera DVR Installation Manual 1/18 Version 1.0 This is a step by step guide that will walk you through installing the UCIT LIVE HD 4 Channel Camera System. Basic wiring experience and knowledge
Introduction & Features. Important Notes. Installation Steps
 Navigation Unlock & Reverse Camera Input Interface for Chrysler/Dodge/Jeep/Ram Vehicles Rev. 051915 ***Only applicable to revision 1.1.2 firmware on BCI-CH21*** Class 2 J1850 VPW Arbitration J1850 Class
TE-FORD-SV-1. TABLE OF CONTENTS Camera Installation App Configuration...6 Camera Specifications... 7
 TE-FORD-SV-1 INSTALLATION INSTRUCTIONS Ford F-150 Side View Camera Kit 2015-2017 Visit ibeamusa.com for more detailed information about the product and up-to-date vehicle specific applications TABLE OF
Mercedes Benz NTG5+ MOST150 to 12-channel Analog & Digital sound processor NTV-KIT871
 3950 NW 120 th Ave, Coral Springs, FL 33065 TEL 561-955-9770 FAX 561-955-9760 Mercedes Benz NTG5+ MOST150 to 12-channel Analog & Digital sound processor NTV-KIT871 WARNING: Do not connect any RCA cables
UCIT LIVE HD 4 Camera DVR. Installation Manual. 10/17 Version 2.0
 UCIT LIVE HD 4 Camera DVR Installation Manual 10/17 Version 2.0 This is a step by step guide that will walk you through installing the UCIT LIVE HD 4 Channel Camera System. Basic wiring experience and
AUDI / Porsche / Bentley M.O.S.T. 150 to 12-channel Analog & Digital sound processor NTV-KIT860
 3950 NW 120 th Ave, Coral Springs, FL 33065 TEL 561-955-9770 FAX 561-955-9760 AUDI / Porsche / Bentley M.O.S.T. 150 to 12-channel Analog & Digital sound processor NTV-KIT860 WARNING: Do not connect any
Ford Vehicles equipped with 8 MyFord Touch SYNC2 System Navigation Upgrade
 2013-2016 Ford Vehicles equipped with 8 MyFord Touch SYNC2 System Navigation Upgrade S1C042A-Y01E Installation and User Manual Disclaimer Please read this manual thoroughly prior to installation. This
Installation Instructions
 Installation Instructions Phones, Navigation These Installation Instructions supersede those dated February 2004. Page 1 of 9 March 2004 Accessory Development Changes to this revision are identified by
Gazer VI700A-NTG45 and VI700W-NTG45 INSTALLATION MANUAL
 Gazer VI700A-NTG45 and VI700W-NTG45 INSTALLATION MANUAL Contents List of compatible cars with preinstalled stock Mercedes Command Online NTG 4.5 and Mercedes Audio 20 NTG 4.5 multimedia interfaces... 3
SYNC FIM LOCKPICK INSTALLATION OPTIONS COPYRIGHT 2014 COASTAL ELECTRONIC TECHNOLOGIES, INC.
 UNPLUG ORIGINAL RADIO CONNECTORS THEN PLUG IN HERE GPS ANTENNA OPTION INCLUDED CONNECT USB CABLE HERE FOR FUTURE UPDATES FACTORY CONNECTORS INCLUDED 2 VIDEO CABLE TYPES INCLUDED **SEE APPLICATION GUIDE**
If technical support is required, please contact Advent Technical Support at
 Document 128-9011 Created 11/21/11 Kit Contents: Item # Qty. Component Description 1 2 Monitor Assembly 2 2 Remote Control 3 1 Cables # 3 4 1 Metal Wire Puller 5 1 Power Cord # 9 6 1 Owners Manual 7 2
Model: CAM430MV Wired Multi-View Camera with License Plate / Rear Surface Mount Installation Manual Features
 Model: CAM430MV Wired Multi-View Camera with License Plate / Rear Surface Mount Installation Manual Features Fully Adjustable, Multiple Viewing Angle Smart Camera. High Resolution, 1/2 CMOS Color Camera
EH50 ATTENTION: SECURITY COVERS ARE NO LONGER INCLUDED IN THE HEADREST KITS AS OF
 Toyota 4Runner 2011 - Dual Player Headrest Video Part Number: 00016-00360; Sand Beige 00016-00370; Black Accessory Code: EH50 ATTENTION: SECURITY COVERS ARE NO LONGER INCLUDED IN THE HEADREST KITS AS OF
Mobile Digital Video System
 Mobile Digital Video System Install/User Guide r4 Please read this user manual completely before operating this DVR system and keep it in a safe place for future reference. CD-ROM The CD below contains
v.logic Intelligent Solution Interface V4-CCC
 v.logic Intelligent Solution Interface For the E-series BMW and Mini with navigation system or radio and 6.5 or 8.8 monitor with 10pin BMW LVDS connector Product features Plug and play media-controller
GM IO4/IO5/IO6 MOST50 to RCA, SPDIF & TosLink sound processor NTV-KIT838
 3950 NW 120 th Ave, Coral Springs, FL 33065 TEL 561-955-9770 FAX 561-955-9760 GM IO4/IO5/IO6 MOST50 to RCA, SPDIF & TosLink sound processor NTV-KIT838 IMPORTANT NOTE: Many GM vehicles have poor chassis
GM IO4/IO5/IO6 MOST50 to RCA, SPDIF & TosLink sound processor NTV-KIT838
 3950 NW 120 th Ave, Coral Springs, FL 33065 TEL 561-955-9770 FAX 561-955-9760 GM IO4/IO5/IO6 MOST50 to RCA, SPDIF & TosLink sound processor NTV-KIT838 WARNING: Do not connect any RCA cables to the M650
TM LOCKPICK C8 INSTALLATION OPTIONS COPYRIGHT 2011 COASTAL ELECTRONIC TECHNOLOGIES, INC. UNPLUG ORIGINAL RADIO CONNECTORS THEN PLUG IN HERE
 TM LOCKPICK C8 INSTALLATION OPTIONS COPYRIGHT 2011 COASTAL ELECTRONIC TECHNOLOGIES, INC. FACTORY CONNECTORS INCLUDED UNPLUG ORIGINAL RADIO CONNECTORS THEN PLUG IN HERE PLUG AND PLAY NO OTHER CONNECTIONS
BMW / Mini. X SERIES Up X1 Sports Vehicle X5 Sports Activity Vehicle X6 Sports Activity Coupe
 BMW / Mini 1 SERIES 2007-2011 1 Series 3-door hatchback 2007-2013 1 Series 2-door Coupe (1M) 2004-2012 1 Series (5-door) 2008 - Up 1 Series Convertible 3 SERIES 2005-2011 3 Series Sedan 2005-2011 3 Series
Model: ACA400 & ACA500 Reverse Camera Installation Manual
 Model: ACA400 & ACA500 Reverse Camera Installation Manual ACA400 ACA500 FEATURES: High Resolution: 1/4 CMOS Color Camera Compact Zinc Alloy Die Cast Body Waterproof Housing 150 Degree Wide View Angle Minimum
9-3 M03-06, radio/navigation... page M07-, radio... page M07-, navigation... page M06-, radio/navigation...
 SCdefault 900 Installation instructions SITdefault MONTERINGSANVISNING INSTALLATION INSTRUCTIONS MONTAGEANLEITUNG INSTRUCTIONS DE MONTAGE 9-3 M03-06, radio/navigation....................... page 3 9-3
INSTALL GUIDE 4 MYFORD APPLICATIONS ARC-MFCAM357 ARC-MFMULTICAM ARC-MFSAT357
 INSTALL GUIDE 4 MYFORD APPLICATIONS MYFORD 4 DISPLAYS Use this manual for adding backup camera, auxiliary camera, and/or satellite radio to Ford vehicles with a 4 MyFord display with 12-pin connector.
TOYOTA SIENNA Dual Headrest Video
 TOYOTA SIENNA 2011- Dual Headrest Video Part Number: 00016-08130; Bisque 00016-08135; Gray 00016-08140; Dark Charcoal Code: EH5 Conflicts: Color Applicability/ Trim Level: Kit Contents: Item # Qty. Component
TOYOTA YARIS HATCHBACK Preparation
 Preparation Part Number: PT546-52120 (Base Grade) Kit Contents 1 1 Receiver Assembly, Radio Unit 2 1 Owner s Manual 3 1 Hardware Bag NOTE: Part number of this accessory may not be the same as the part
UCIT LIVE HD 4 Camera DVR. Installation Manual. 10/17 Version 2.0
 UCIT LIVE HD 4 Camera DVR Installation Manual 10/17 Version 2.0 Always Check https://www.safetytrack.net/camera-installation-and-user-manuals/ for the most up to date version of this installation guide.
Chevrolet/GMC 8 MyLink Navigation Interface i05
 2013-2015 Chevrolet/GMC 8 MyLink Navigation Interface i05 S1C016A-Y03E And 2016-2018 Chevrolet/GMC 8 MyLink Navigation Interface i06 S1C016A-Y10E / S1C016A-Y13E Installation and User Manual Disclaimer
PRE-INSTALL QUESTIONS
 PRE-INSTALL QUESTIONS Is it really Plug and Play? Yes. The Navos comes with all the necessary plugs and harnesses to connect directly to your car; no extra adapters or dash trim kits required. Is the Navos
INSTALLATION INSTRUCTIONS
 INSTALLATION INSTRUCTIONS Accessory Application Publications No. CASSETTE/MP3 (EX) 2006 PILOT All 30488 Issue Date SEP 2005 Player Attachment Kit (sold separately) : P/N 08B06-S9V-100A Cassette Player
MOST-AUX Fiber-optic AUX input for select MOST vehicles NTV-KIT001/002/007/008/143/151/152
 3950 NW 120 th Ave, Coral Springs, FL 33065 TEL 561-955-9770 FAX 561-955-9760 MOST-AUX Fiber-optic AUX input for select MOST vehicles NTV-KIT001/002/007/008/143/151/152 I N T E R F A C E BHM Overview The
Chapter 1 Getting Started
 Chapter 1 Getting Started Installation Instructions 1.1 Subject The NEO AUX adapter an integration between an MP3 player and a factory installed car stereo. Equipped with the specific vehicle harness and
Courtesy of:discountcarstereo.com C5CD-HF. Quick Start Bluetooth Installation Guide for select Corvette with 12-Disc CD Changer
 Courtesy of:discountcarstereo.com C5CD-HF Quick Start Bluetooth Installation Guide for select 1997-04 Corvette with 12-Disc CD Changer Created January 16, 2013 Revised March 12, 2019 Introduction: If your