TABLE OF CONTENTS. 03 Getting Started. 05 Installation. 23 Options. 06 Tutorials. 25 Software Update. 26 Support. 13 Main Window
|
|
|
- Maryann Nichols
- 5 years ago
- Views:
Transcription
1
2 2 TABLE OF CONTENTS 13 Main Window 03 Getting Started Introduction 13 Introducing Capture Express 03 Toolbar 13 Supported Product Families 03 Preview Area 14 System Requirements 03 Album 15 Control/Statistics Bar Installation Capture Settings Panel 19 Introduction 05 Installing Options Uninstalling 05 Introduction 23 General Tutorials Hotkey 24 Introduction 06 Tutorial 1: Basic Concepts Software Update Tutorial 2: Setting Capture Properties 08 Introduction 25 Tutorial 3: Capturing Video 08 Update Procedure 25 Tutorial 4: Run Multiple Instances of Capture Express Support 13 Main Window Getting Latest Materials 26
3 3 Getting Started Introducing Capture Express Capture Express is a lightweight live video production software designed specifically for Magewell capture devices. It supports 4K Ultra-HD and SD video encoding, and provides a series of functions such as snapshot, recording, video cropping and color adjustment to help you easily create snapshots and video clips. Supported Product Families The product families supported by Capture Express may change. Please refer to this web page for the latest information. Pro Capture USB Capture USB Capture Plus Eco Capture Gen 1 System Requirements Operating System Windows 7, 8, 8.1, 10 (x86) Windows 7, 8, 8.1, 10, Server 2008 R2, Server 2012, Server 2016 (x64) Processor Minimum: i3 3.30GHz Recommended: i7 2.66GHz+
4 4 Memory Minimum: 2GB RAM Recommended: 8GB+ RAM Graphics Card Minimum: OpenGL 2.0 Recommended: OpenGL 3.0+ NOTE: Nvidia or Intel Graphics Cards required for 4K video encoding
 and follow the instructions provided. Figure 1.")
5 5 Installation Introduction This chapter guides you through installing Capture Express. Installing To install Capture Express, follow these steps: 1. Download the installer from this web page. 2. Run the installer program (Magewell_CaptureExpress_v _installer.exe, see figure 1) and follow the instructions provided. Figure 1. Magewell Capture Express Setup Wizard Uninstalling To uninstall Capture Express, follow these steps: 1. In the Windows Start menu, click Settings > Apps to enter the Apps & features page. (See figure 2) 2. Select Magewell Capture Express and then click Uninstall to run the uninstaller. 3. The installer asks if you want to remove Capture Express and all its components. Select Yes to uninstall them. Figure 2. Uninstall Capture Express in the Windows "Apps & features" page
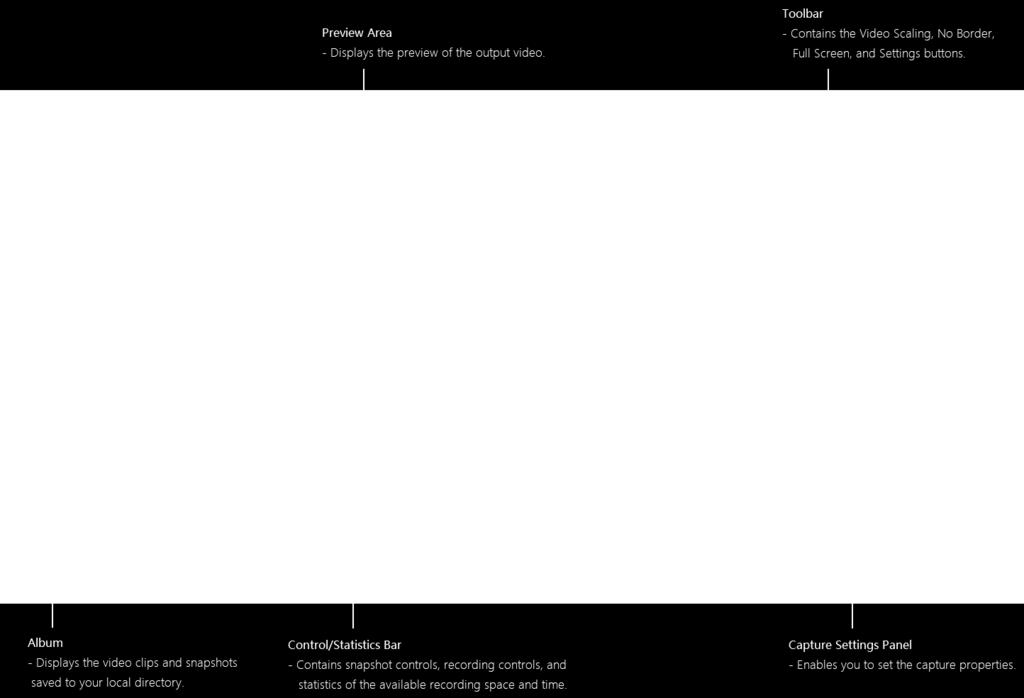
6 6 Tutorials Introduction The best way to get started using Capture Express is quickly working through all its main features. We provide you with a series of three tutorials to help you understand how to use this software to capture and record video. Since each tutorial builds on the skills and knowledge you've learned from the previous tutorials, it is recommended that you take the tutorials in order. As you gain hands-on experience through inputting, capturing and outputting the video, you'll gain a deeper knowledge of Capture Express's organizational structure and working methods, thereby enhancing the proficiency in using it. Tutorial 1: Basic Concepts Tutorial Preparation Before using Capture Express, you should connect the hardware according to the diagram below and turn on the video source and the computer. Layout The layout of the main window of Capture Express is shown in the following figure.

7 7
 Figure 3.")


8 8 Tutorial 2: Setting Capture Properties To set capture properties, click the arrow at the right of the main window to expand the Capture Settings Panel. The Capture Settings Panel has four tabs: DEVICE, VOLUME, OUTPUT FORMAT, and COLOR. (See figure 3) Figure 3. Capture Settings Panel DEVICE tab: Select the video capture device and audio capture device. VOLUME tab: Adjust the volume and monitor the audio level. OUTPUT FORMAT tab: Set the format of the output video, including resolution, frame rate, video bitrate, audio bitrate, aspect ratio, and video cropping range. COLOR tab: Set the color properties of the video, including brightness, contrast, hue, and saturation. For details on how to use the Capture Settings Panel, see Capture Settings Panel. Tutorial 3: Capturing Video This tutorial demonstrates how to quickly capture snapshots and video clips using the capture device "USB Capture HDMI Plus". Step 1. Select storage disk path 1. In the Toolbar, click Settings and then select Options. 2. When the Options dialog box displays, enter the General tab, and then select the Disk path where the output video will be stored. (See figure 4) Figure 4. Select storage disk path in the Options dialog box
 as the Audio device; 2.")
, Figure 5. Set Capture Properties in the Capture Settings Panel 1. click the Image Format button and select JPG; 2.")
9 9 Step 2. Set Capture Properties In the Capture Settings Panel (see figure 5), 1. expand the DEVICE tab, and then select USB Capture HDMI+ as the Video device and HDMI (USB Capture HDMI+) as the Audio device; 2. expand the VOLUME tab, light up the Headphone Mute and Master Mute buttons, and then adjust the volumes to appropriate levels; 3. expand the OUTPUT FORMAT tab, and then enable MATCH SOURCE. Step 3. Capture video snapshots In the Control/Statistics Bar (see figure 6), Figure 5. Set Capture Properties in the Capture Settings Panel 1. click the Image Format button and select JPG; 2. click the Snapshot Mode button and select Single-Frame Mode; 3. click the Snapshot button to capture the current video frame. Step 4. Record video clips Figure 6. Snapshot controls in the Control/Statistics Bar In the Control/Statistics Bar (see figure 7), 1. click the Output Format button and select Match Source; 2. click the Video Quality button and select Better; 3. click the Record button to start video recording; Figure 7. Recording controls in the Control/Statistics Bar 4. click the Record button again to stop the video recording.
10 10 Step 5. View the snapshots and video clips 1. Click the double-arrow button on the icon at the left bottom of the main window to open the Album. (See figure 8) 2. View the snapshots and video clips you've saved in the Album. Figure 8. Album Tutorial 4: Run Multiple Instances of Capture Express This tutorial demonstrates how to run multiple instances of Capture Express simultaneously to perform independent video processing tasks. Task Opening two Capture Express windows to let them work in parallel and using "Capture device A" and "Capture device B" to capture video respectively. Procedure Step 1. Create the first window to use "Capture device A" 1. Double-click the startup icon of Capture Express to open the first window. 2. In the Capture Settings Panel of the first window, expand the DEVICE tab, and then select "Capture device A" as the Video device. 3. Use "Capture device A" to capture video. (See Tutorial 3: Capturing Video)
11 11 Step 2. Create the second window to use "Capture device B" 1. Double-click the startup icon of Capture Express to open the second window. Then the name of the first window automatically displays the index "#1", and the name of the second window automatically displays "#2". 2. In the Capture Settings Panel of the second window, expand the DEVICE tab, and then select "Capture device B" as the Video device. 3. Use "Capture device B" to capture video. (See Tutorial 3: Capturing Video)

12 13 Main Window Introduction This chapter gives an orientation on the user interface of the main window, providing a quick tour of what tools are available, where to find them, and how these tools work together to help you capture snapshots or video clips. Toolbar The Toolbar is located at the top of the main window and contains four buttons: Video Scaling, No Border, Full Screen, and Settings. Video Scaling Click to select a scaling ratio to apply to the preview video. You can select Auto-Adaption to automatically fill the overall image to the available dimensions of the Preview Area. No Border Click to display the preview video in no border mode. When the no border mode is in use, you can click this button again or press Esc to exit. Full Screen Click to display the preview video in full screen mode. When the full screen mode is in use, you can click this button again or press Esc to exit. Settings Click to open the Settings menu, which contains the following options: Options: Open the Options dialog to set file storage formats, software startup mode, and hotkeys.
 About: Open the About dialog box to view version and copyright information about Capture Express.")
13 14 (See Options) Official Website: Open the official website of Magewell. Software Update: Open the Software Update dialog box to update Capture Express. (See Software Update) About: Open the About dialog box to view version and copyright information about Capture Express. Preview Area In the central part of the main window, the Preview Area displays the preview video before the video signal is encoded and compressed. All changes related to the capture settings will immediately appear on the preview video. After the video recording begins, the following information will be displayed at the top of the Preview Area: The recording duration, shown in the top left corner. The video and audio signal formats, shown in the top right corner, include three lines of information as follows: Line 1: Displays the resolution and refresh rate of the input video. Line 2: Displays the sampling rate and bit depth of the input audio, and whether the audio is LPCM-encoded or not. Line 3: Displays the frame rate and bitrate of video encoding. You can determine whether to display these input signal formats through the hotkey. (See Hotkey) Shortcut Menu in the Preview Area

14 15 Right-clicking anywhere in the Preview Area opens a shortcut menu with the following options: Video Scaling: Click the Video Scaling triangle to open the video scaling menu, and then select a scaling ratio to apply to the preview video. You can select Auto-Adaption to automatically fill the overall image to the available dimensions of the Preview Area. No Border: Click to display the preview video in no border mode. When the no border mode is in use, you can click this menu option again or press Esc to exit. Full Screen: Click to display the preview video in full screen mode. When the full screen mode is in use, you can click this menu option again or press Esc to exit. Start Recording: Click to start the video recording. Once the recording begins, the text of this menu option will change to Stop Recording. You can click Stop Recording to stop recording. Snapshot: Click to capture the current video frame. Video Crop: Click to open the cropping toolbar to crop the video. (See Crop) Options: Click to open the Options dialog box. (See Options) Album Hidden by default, the Album can be opened by clicking the double-arrow button on the icon at the left bottom of the main window, and appears beneath the Preview Area when it's open. The Album shows you every clip you have saved, giving you a way to play clips, delete unwanted clips and view the basic file details. To manage the clips (or snapshots) in the Album: To open a clip: Click the icon of a clip, or right-click the icon and then select Open in the context menu. To open the storage folder: Right-click the icon of a clip and then select Open Folder Location in
15 16 the context menu. To delete a clip: Hover the pointer over the icon of a clip, then click the delete button that appears at the upper right corner of the icon; or right-click the icon and then select Delete in the context menu. To delete all clips: Right-click the icon of a clip and then select Empty the Folder in the context menu. To view file details: Hover the pointer over the icon of a clip, then file details, including Name, Size, Duration (for video clips only), and Date created, appears in a tooltip a moment later. Or right-click the icon and then select Properties in the context menu to open the Properties dialog box of the chosen clip. Control/Statistics Bar The Control/Statistics Bar lies at the bottom of the main window. It consists of the snapshot controls, recording controls, and statistics of the available recording space and time. Snapshot Controls Image Format Click to select the storage format of the snapshot, including JPG, PNG, and BMP. Snapshot Mode Click to select the capture mode of the snapshot, including the Single-Frame Mode and Burst Mode. In the Burst Mode, five video frames are continuously captured. Snapshot Click to select this button to take frame snapshots.

16 17 Recording Controls Video Quality Click to select the video quality, including Normal, Better, Best, and Custom. If you want to change the Custom video quality, open the OUTPUT FORMAT tab of the Capture Settings Panel and then modify the Video bit rate and Audio bit rate. Output Format Click to select the output format of the video, including 4 recommended formats (720p30, 720p60, 1080p30, 1080p60), Match Source and Custom. When Match Source is selected, the resolution and frame rate of the output video are consistent with those of the input video. When Custom is selected, you can go to Capture Settings Panel > OUTPUT FORMAT tab to customize your output format. Note that changes you make in the OUTPUT FORMAT tab of the Capture Settings Panel also affect the properties of the Video Quality and Output Format controls. If the output format in the Capture Settings Panel matches any of the above recommended formats, the corresponding recommended format will be assigned to these controls. If you turn on the MATCH SOURCE function in the Capture Settings Panel, Match Source will be assigned to the Output Format control. If you use a custom output format in the Capture Settings Panel, Custom will be assigned to these controls. Recording Click to start or stop the video recording.
17 18 Statistics Disk free Displays the remaining space of your storage disk. You can specify the storage disk in the Options dialog box. (See Disk path) Time left Displays the time available to record video before the storage disk is filled up. To increase the Time left, you can lower the Video Quality and Output Format in the Recording Controls, or clean up the storage disk to expand the free disk space.

18 19 Capture Settings Panel The Capture Settings Panel is used to set capture properties related to device, volume, signal output format, and color. You can click the arrow at the right of the main window to show or hide the panel. DEVICE Tab The DEVICE tab is used to select video and audio capture devices. Video device Click to select the video input device. Audio device Click to select the audio input device. When the USB Capture (Plus) device is chosen as the video input device, the audio source for different audio devices are as follows: HDMI, SDI: Embedded audio from the HDMI/SDI video source. Computer: System audio from the computer. Mic, Line In: Audio from the microphone or line input device. VOLUME Tab The VOLUME tab is used to adjust the volume and monitor the audio level. Level Control Adjusts the audio level of the audio output.

19 20 Level Display Displays the levels (left and right) of the audio outputs. The number below each level bar stands for the channel index. Headphone Mute Toggles the monitor audio output in the headphones without affecting the recording audio output. Master Mute Mutes the recording audio output. OUTPUT FORMAT Tab The OUTPUT FORMAT tab is used to set the output signal format, including resolution, frame rate, video bitrate, audio bitrate, aspect ratio, and video cropping range. MATCH SOURCE Toggles the MATCH SOURCE function on or off. When MATCH SOURCE is turned on, the output resolution and frame rate are automatically set according to the input signal format. When turned off, you can manually set the output resolution and frame rate. Resolution Select the resolution of the video output. Frame rate Select the frame rate of the video output. When using a high output frame rate, you can turn on Optimize video preview in the Options dialog to display images with faster rendering speed. (See Optimize video preview)

20 21 Video bitrate Select the video bitrate of the video output. Audio bitrate Select the audio bitrate of the audio output. Aspect ratio Click the arrows next to the input boxes to adjust the aspect ratio of the video output. You can click to reset the output aspect ratio to the default value. Crop Crop the output video to a rectangular range that is determined by four values: X, Y, W, and H. X: The distance from the left edge of the original video to the top left point of the cropping range. Y: The distance from the top edge of the original video to the top left point of the cropping range. W: The width of the cropping range. H: The height of the cropping range. Crop video Click to open the cropping toolbar in the Preview Area. The cropping toolbar contains a rectangular marquee tool, a cropping ratio menu, four cropping range input boxes (X, Y, W, H), a reset button, a confirm button, and a cancel button. To use the cropping toolbar to crop video, follow these steps: 1. Select a cropping ratio. When the cropping ratio is a fixed value, the width and height of the crop
21 22 range will be locked at this ratio; when the cropping ratio is set as Free crop, the width and height of the cropping range can be set without any ratio limits. 2. Drag the rectangle marquee to adjust the cropping range; or input the values of X, Y, W, and H to set the cropping range. 3. Click to confirm the cropping. COLOR Tab The COLOR tab is used to set the color properties of the video output, including brightness, contrast, hue, and saturation. Brightness Adjust the brightness of the video output. Contrast Adjust the contrast of the video output. Hue Adjust the tint of the video output. Saturation Adjust the saturation of the video output. You can click to reset the brightness, contrast, hue, and saturation to their default values.


22 23 Options Introduction The Options window is used to set the file storage options, software startup options, and hotkeys. This chapter introduces how to use the Options window. To open the Options window, select Options from the Settings menu. General Storage Disk path Select the disk path to store the video clips and snapshots. Free disk space Displays the free space of the storage disk. Recording file unit Select the recording file unit that limits the maximum size of a recording file. Once the size of a recording file reaches this Recording file unit, the video will be automatically split and saved, after which a new recording process of the same source video will start from the split point. Software Startup Options Auto-start on boot When Auto-start on boot is selected, Capture Express will start automatically after you log into the operating system.

23 24 Open in full screen mode on startup When Open in full screen mode on startup is selected, Capture Express will start in full screen mode. Optimize video preview Enables you to either display images with faster interactivity or at full render quality. When Optimize video preview is selected, Capture Express will render the video at a lower rendering rate to increase the processing speed when the frame rate of the output video is high. Unselecting this option forces a full quality render to the preview area. Hotkey Hotkeys for common functions are listed in the Hotkey tab. Methods of resetting the hotkeys are as follows: To reassign a hotkey: Click the hotkey to enter the edit mode, then press and hold the new key combination on the keyboard. To remove a hotkey: Click the hotkey to enter the edit mode, then click box. To reset all hotkeys: Click Reset at the bottom of the Hotkey tab. at the right of the input


24 25 Software Update Introduction This chapter guides you through updating Capture Express. Update Procedure In the Settings menu, if a red badge appears next to the Software Update option, a new version of Capture Express is available. To update Capture Express, follow these steps: 1. In the Settings menu, click Software Update to check for updates. 2. In the Software Update window, if a new version is found, the release notes for the new version will be displayed. Click Update to start downloading the new version. 3. In the Uninstall dialog box, click Yes to uninstall the old version. 4. The update program automatically installs the new version.
25 26 Support Getting Latest Materials The latest materials, including brief introduction, user manual and installation package, can be found at the Magewell website's introduction page of Capture Express. Getting Technical Support You can get technical support in the following two ways: The Knowledge Base on Magewell official website is a helpful resource where you can visit for more information and troubleshooting. If existed answers can't help you address the issue, please click No. Report a Problem at the bottom of the page to send a support request to us. Contact Magewell support team (support@magewell.net) for help.
Matrox MuraControl for Windows
 Matrox MuraControl for Windows User Guide (for software version 6.00) 20179-301-0600 2017.09.25 Contents About this user guide... 6 Using this guide... 6 More information... 6 Overview... 7 Supported Matrox
Matrox MuraControl for Windows
 Matrox MuraControl for Windows User Guide (for software version 7.00) 20179-301-0700 2018.06.12 Contents About this user guide... 6 Using this guide... 6 More information... 6 Overview... 7 Supported Matrox
Gecata by Movavi 5. Recording desktop. Recording with webcam Capture videos of the games you play. Record video of your full desktop.
 Gecata by Movavi 5 Don't know where to start? Read these tutorials: Recording gameplay Recording desktop Recording with webcam Capture videos of the games you play. Record video of your full desktop. Add
JVA04 HDMI to USB Type-C Game Capture Station Manual Contents
 JVA04 HDMI to USB Type-C Game Capture Station Manual Contents 1. INTRODUCTION... 2 1.1 FEATURES... 2 1.2 PACKAGE CONTENTS... 3 1.3 SPECIFICATIONS... 3 1.4 SYSTEM REQUIREMENTS... 4 Computer... 4 Phone...
GOM Cam User Guide. Please visit our website (cam.gomlab.com) regularly to check out our. latest update.
 regularly to check out our. latest update.") GOM Cam User Guide Please visit our website (cam.gomlab.com) regularly to check out our latest update. From screen recording to webcam video and gameplay recording GOM Cam allows you to record anything
GOM Cam User Guide Please visit our website (cam.gomlab.com) regularly to check out our latest update. From screen recording to webcam video and gameplay recording GOM Cam allows you to record anything
Manual Version: V1.01. Video Management Server Client Software User Manual
 Manual Version: V1.01 Video Management Server Client Software User Manual Thank you for purchasing our product. If there are any questions, or requests, please do not hesitate to contact the dealer. Notice
XI104XUSB. HD+ Quad A/V USB3.0 Capture Box User s Guide. Rev /9/10
 XI104XUSB HD+ Quad A/V USB3.0 Capture Box User s Guide Rev 1.0 2012/9/10 Content 1. Preface... 4 2 Minimum Hardware Configuration... 4 3. Recommended Hardware Configuration... 4 4. Software Requirement...
CAPTURE. USER GUIDE v1
 CAPTURE USER GUIDE v1 INTRODUCTION About The Logitech Capture app makes creating content with your webcam as easy as lights, camera, Capture. Start recording high-quality videos the second you plug in
*Note that LL Studio can also work in Stand-alone mode with an SD card.
 PC System requirements: Operating System : Microsoft Windows XP / Windows Vista / Windows 7 / Windows 8 C.P.U : Intel Pentium IV at 2.0 GHz (or higher) Video Card : 128 MB VRAM Memory : 1 GB RAM Hard Disk
OPERATION MANUAL. MV-410HS Layout Editor. Version higher. Command
 OPERATION MANUAL MV-410HS Layout Editor Version 3.0 - higher Command Command Table of Contents 1. Setup... 1 1-1. Overview... 1 1-2. System Requirements... 1 1-3. Operation Flow... 1 1-4. Installing MV-410HS
USER GUIDE. For litecam HD Version 4.8. November 5 th, 2013.
 1 USER GUIDE For litecam HD Version 4.8 November 5 th, 2013. 2 Contents TABLE OF CONTENTS SYSTEM REQUIREMENTS 4 GUIDE TIP 5 LITECAM HD INSTALLATION GUIDE 9 litecam HD installation Procedure... 9 - Installation...
Camera Control for Windows
 Camera Control for Windows 1910012275 REV1.1.0 Contents Chapter 1 Introduction... 1 1.1 Overview... 1 1.2 System Requirement... 1 Chapter 2 Software Installation... 2 Chapter 3 Quick Start... 5 3.1 Create
ACDSee Video Studio User Guide. Contents
 Contents Welcome to ACDSee Video Studio 2 Creating, Saving, and Sharing Projects 3 Adding and Removing Media 4 Organizing, Adjusting, and Displaying Media 7 Timeline Tracks 7 Copying and Pasting Properties
Getting Started. Microsoft QUICK Source 7
 Microsoft QUICK Windows Source 7 Getting Started The Windows 7 Desktop u v w x u Icon links to a program, file, or folder that is stored on the desktop. v Shortcut Icon links to a program, file, or folder
USB 2.0 Video/Audio Grabber User s Guide
 USB 2.0 Video/Audio Grabber User s Guide Contents: Chapter 1: Introduction... 1 1.1 Package Contents... 1 1.2 System Requirements... 1 Chapter 2: Getting Started... 2 2.1 Connect USB A/V Adapter... 2 2.2
Customisation and production of Badges. Getting started with I-Color System Basic Light
 Customisation and production of Badges Getting started with I-Color System Basic Light Table of contents 1 Creating a Badge Model 1.1 Configuration of Badge Format 1.2 Designing your Badge Model 1.2.1
XI100XE-PRO HD Capture Adapter User s Guide
 XI100XE-PRO HD Capture Adapter User s Guide Rev 1.0 2012/11/28 http://www.magewell.com Content 1 Preface... 1 2 Minimum Hardware Configuration... 1 3 Recommended Hardware Configuration... 1 4 System Requirements...
XI100XE HD Capture Adapter User s Guide
 XI100XE HD Capture Adapter User s Guide Rev 1.0 2011/11/03 http://www.magewell.com Content 1 Preface... 1 2 Minimum Hardware Configuration... 1 3 Recommended Hardware Configuration... 1 4 System Requirements...
Motic Images Plus 3.0 ML Software. Windows OS User Manual
 Motic Images Plus 3.0 ML Software Windows OS User Manual Motic Images Plus 3.0 ML Software Windows OS User Manual CONTENTS (Linked) Introduction 05 Menus and tools 05 File 06 New 06 Open 07 Save 07 Save
FaceCam 321 Table of Contents
 FaceCam 321 Table of Contents FaceCam 321 Features.2 Set up the device 2 I.P.M(Image Protection Mechanism) setting.3 Using Instant Messenger Application.3 Arcsoft Webcam Companion 4.4 How to use WCC4..4-7
W-E
 Signage Suite V2.20 User Guide 605220-02-01-W-E-051613-02 Trademarks Windows XP, Windows Vista, Windows 7, and Microsoft are registered trademarks of Microsoft Corporation. All other trademarks are the
User Manual Portable Laptop Console Crash Cart Adapter
 User Manual Portable Laptop Console Crash Cart Adapter GUC211V PART NO. M1458 www.iogear.com 2017 IOGEAR. All Rights Reserved. Part No. M1458. IOGEAR, the IOGEAR logo is trademarks of IOGEAR. Microsoft
ScreenHunter 7.0 Pro Help File
 ScreenHunter 7.0 Pro Help File 2017 Wisdom Software Inc. All rights reserved. Designated trademarks and brands are the property of their respective owners. Notice of Non-Liability Wisdom Software Inc.
User s Guide. XI200DE-HDMI Dual HD HDMI capture Card. Rev /04/08
 XI200DE-HDMI Dual HD HDMI capture Card User s Guide 2013/04/08 Rev 1.0 Copyright 2009-2010 All Rights Reserved. Nanjing Universal Networks Co. i Content 1 Preface... 3 2 Minimum Hardware Configuration...
STORM Video Management Software User s Manual
 STORM Video Management Software User s Manual Version 2.0.1 Table of Contents 1. OVERVIEW AND ENVIRONMENT... 1 1.1 Overview... 1 1.2 STORM Interface... 1 2. LOGIN... 5 2.1 Initialize Device... 5 2.2 Login
Table of Contents. Chapter 1 Overview In This Manual ATVision Pro Features Product Information... 1
 Remote Management Software (ATVision Pro) Table of Contents Chapter 1 Overview... 1 1.1 In This Manual... 1 1.2 ATVision Pro Features... 1 1.3 Product Information... 1 Chapter 2 Installation... 3 Chapter
EOS MOVIE Utility Ver. 1.5
 ENGLISH Software for Playing, Merging and Movies EOS MOVIE Utility Ver. 1.5 Content of this Instruction Manual 1D C 1D X Mk II 1D X 5DS/5DS R 5D Mk III 6D 7D Mk II 70D EMU is used for EOS MOVIE Utility.
XI104AE VGA+ 4 SD Signals+ Audio Capture Adapter. User s Guide. Rev /6/1
 XI104AE VGA+ 4 SD Signals+ Audio Capture Adapter User s Guide Rev 1.0 2012/6/1 http://www.magewell.com Content 1 Preface... 1 2 Minimum Hardware Configuration... 1 3 Recommended Hardware Configuration...
XI100XE-PRO HD Capture Adapter
 XI100XE-PRO HD Capture Adapter User s Guide Rev 1.0 2012/11/28 Content 1. Preface... 4 2. Minimum Hardware Configuration... 4 3. Recommended Hardware Configuration... 4 4. System Requirements... 4 5. Hardware
Figure 4-9. Click Finish button, system pops up a dialogue box. Click the OK button, the startup wizard is complete. See Figure 4-10.
 For detailed information, please refer to chapter 4.11.4.1.1. Figure 4-9 Finish button, system pops up a dialogue box. the OK button, the startup wizard is complete. See Figure 4-10. Figure 4-10 4.4 Preview
Quick Start Guide (V1.03) UD.6L0201B1064A01
 UD.6L0201B1064A01") ivms-4200 PCNVR Quick Start Guide (V1.03) UD.6L0201B1064A01 Thank you for purchasing our product. If there is any question or request, please do not hesitate to contact the dealer. This manual applies
ivms-4200 PCNVR Quick Start Guide (V1.03) UD.6L0201B1064A01 Thank you for purchasing our product. If there is any question or request, please do not hesitate to contact the dealer. This manual applies
Unit III: Working with Windows and Applications. Chapters 5, 7, & 8
 Unit III: Working with Windows and Applications Chapters 5, 7, & 8 Learning Objectives In this unit, you will: Launch programs and navigate the Windows task bar. Perform common windows functions. Customize
Sending image(s) to report Click Send Snapshot on any screen in Dolphin3D and choose the Send to Report option
 to report Click Send Snapshot on any screen in Dolphin3D and choose the Send to Report option") Dolphin 3D Reports Sending image(s) to report Click Send Snapshot on any screen in Dolphin3D and choose the Send to Report option Creating a report step by step 1. Generate the desired images in Dolphin3D
Dolphin 3D Reports Sending image(s) to report Click Send Snapshot on any screen in Dolphin3D and choose the Send to Report option Creating a report step by step 1. Generate the desired images in Dolphin3D
100XUSB-PRO. All in One HD USB3.0 Capture Box User s Guide. Rev /3/20. Copyright All Rights Reserved.
 http://www..com Electronic Modular Solutions Limited Kendal House, 20 Blaby Road, S. Wigston, Leics., LE18 4SB, England Tel: +44 (0) 116 2775730 Fax: +44 (0) 116 2774973 Email: sales@ems-imaging.com Web:
Table of Contents. Chapter 1 Overview In This Manual RASplus Features Product Information Chapter 2 Installation...
 Remote Administration System Plus (RASplus) Table of Contents Chapter 1 Overview... 1 1.1 In This Manual... 1 1.2 RASplus Features... 1 1.3 Product Information... 1 Chapter 2 Installation... 3 Chapter
The Fundamentals. Document Basics
 3 The Fundamentals Opening a Program... 3 Similarities in All Programs... 3 It's On Now What?...4 Making things easier to see.. 4 Adjusting Text Size.....4 My Computer. 4 Control Panel... 5 Accessibility
AVerMedia. AverDiGi EH5116 PRO. Quick Installation Guide
 AVerMedia AverDiGi EH5116 PRO Quick Installation Guide i SPECIFICATIONS ARE SUBJECT TO CHANGE WITHOUT PRIOR NOTICE THE INFORMATION CONTAINED HEREIN IS TO BE CONSIDERED FOR REFERENCE ONLY WARNING TO REDUCE
CyberLink. Screen Recorder 4. User's Guide
 CyberLink Screen Recorder 4 User's Guide Copyright and Disclaimer All rights reserved. To the extent allowed by law, Screen Recorder IS PROVIDED AS IS, WITHOUT WARRANTY OF ANY KIND, EITHER EXPRESS OR IMPLIED,
hdalbum User Designer Guide Collect Create Share Designer V 1.2
 hdalbum User Designer Guide 2017 Collect Create Share Designer V 1.2 Table of Contents Contents Welcome to the hdalbum Designer... 2 Features... 2 System Requirements... 3 Supported File Types... 3 Installing
Using Online Help. About the built-in help features Using Help Using the How To window Using other assistance features
 Using Online Help About the built-in help features Using Help Using the How To window Using other assistance features About the built-in help features Adobe Reader 6.0 offers many built-in features to
CyberLink. U Webinar. User's Guide
 CyberLink U Webinar User's Guide Copyright and Disclaimer All rights reserved. To the extent allowed by law, U Webinar IS PROVIDED AS IS, WITHOUT WARRANTY OF ANY KIND, EITHER EXPRESS OR IMPLIED, INCLUDING
Using GIGABYTE Tablet PC for the First Time
 Congratulations on your purchase of the GIGABYTE Tablet PC! This manual will help you to get started with setting up your Tablet PC. The final product configuration depends on the model at the point of
Camtasia Studio 5.0 PART I. The Basics
 Camtasia Studio 5.0 Techsmith s Camtasia Studio software is a video screenshot creation utility that makes it easy to create video tutorials of an on screen action. This handout is designed to get you
Video Client. Version 1.6. en Software manual
 Video Client Version 1.6 en Software manual Video Client Table of Contents en 3 Table of contents 1 Introduction 5 1.1 System requirements 5 1.2 Software installation 5 1.3 Conventions used in the application
Master Pages. Basics 1
 Basics 1 Some elements of your design will appear on every page of your publication. For a professional look, these elements should be placed consistently from page to page. By using master pages, you
Excel. More Skills 11 Insert and Edit Comments. To complete this workbook, you will need the following file: You will save your workbook as: CHAPTER 2
 CHAPTER 2 Excel More Skills 11 Insert and Edit Comments A comment is a note that is attached to a cell, separate from other cell content. Comments can describe how a complex formula works or provide feedback
XI006AUSB 6-channel video USB3.0 Capture Box. User s Guide. Rev /03/20
 XI006AUSB 6-channel video USB3.0 Capture Box User s Guide Rev 1.0 2013/03/20 http://www.magewell.com Content 1 Preface... 1 2 Minimum Hardware Configuration... 1 3 Recommended Hardware Configuration...
Intelligent Security & Fire Ltd
 Copyright 2007-2009 Cortex Global Table of contents: Introduction... 3 1. Login... 3 1.1 Advanced login options... 4 2. Preview... 5 2.1 Main menu... 6 2.2 Camera list... 6 2.3 Main display... 6 2.4 Maps...
Video Management Software User Manual
 Video Management Software User Manual Manual Version: V1.02 i Thank you for choosing our product. If there are any questions, or requests, please do not hesitate to contact the dealer. Disclaimer CAUTION!
ezimagex2 User s Guide Version 1.0
 ezimagex2 User s Guide Version 1.0 Copyright and Trademark Information The products described in this document are copyrighted works of AVEN, Inc. 2015 AVEN, Inc. 4595 Platt Rd Ann Arbor, MI 48108 All
User Guide. BrightAuthor Release 2.0. BrightSign HD110, HD210, HD210w, HD410, HD810, HD1010, and HD1010w. COMPATIBLE WITH
 User Guide BrightAuthor Release 2.0 COMPATIBLE WITH BrightSign HD110, HD210, HD210w, HD410, HD810, HD1010, and HD1010w www.brightsign.biz Copyright Copyright 2010 by BrightSign, LLC. All rights reserved.
Compatibility with graphing calculators 32 Deleting files 34 Backing up device files 35 Working with device screens 36 Capturing device screens 36
 Contents Introduction to the TI Connect Window 1 TI Connect Window 1 Opening the TI Connect Window 2 Closing the TI Connect Window 4 Connecting and disconnecting TI handheld devices 4 Using Task Shortcuts
XnView Image Viewer. a ZOOMERS guide
 XnView Image Viewer a ZOOMERS guide Introduction...2 Browser Mode... 5 Image View Mode...14 Printing... 22 Image Editing...26 Configuration... 34 Note that this guide is for XnView version 1.8. The current
MagicInfo VideoWall Author
 MagicInfo VideoWall Author MagicInfo VideoWall Author User Guide MagicInfo VideoWall Author is a program designed to construct a VideoWall layout and create VideoWall content by adding various elements
GAMING MONITOR. OSD Sidekick
 GAMING MONITOR OSD Sidekick Copyright OSD Sidekick Installation Guide 2018 GIGA-BYTE TECHNOLOGY CO., LTD. All rights reserved. The trademarks mentioned in this manual are legally registered to their respective
User`s Manual. CMS Pro. Professional Central Monitoring Software. Full-featured Enterprise Class Surveillance Solution
 Professional Central Monitoring Software CMS Pro Full-featured Enterprise Class Surveillance Solution User`s Manual This document contains preliminary information and is subject to change without notice.
Contents. Version 1.5 and later. Introduction Panel Descriptions Sending Still Images to the VR-4HD... 12
 VR-4HD RCS is software designed to control the VR-4HD remotely using a computer. By connecting the VR-4HD and a computer via USB, along with operating the unit from the computer, you can also save and
Using GIGABYTE Notebook for the First Time
 P5 V4.0 Congratulations on your purchase of the GIGABYTE Notebook. This manual will help you to get started with setting up your notebook. The final product configuration depends on the model at the point
1 ZoomBrowser EX Software User Guide 5.0
 1 ZoomBrowser EX Software User Guide 5.0 Table of Contents (1/2) Chapter 1 Chapter 2 Chapter 3 What is ZoomBrowser EX? What Can ZoomBrowser EX Do?... 4 Guide to the ZoomBrowser EX Windows... 5 Task Buttons
Premiere Pro Desktop Layout (NeaseTV 2015 Layout)
") Premiere Pro 2015 1. Contextually Sensitive Windows - Must be on the correct window in order to do some tasks 2. Contextually Sensitive Menus 3. 1 zillion ways to do something. No 2 people will do everything
Premiere Pro 2015 1. Contextually Sensitive Windows - Must be on the correct window in order to do some tasks 2. Contextually Sensitive Menus 3. 1 zillion ways to do something. No 2 people will do everything
Microsoft PowerPoint 2007 Tutorial
 Microsoft PowerPoint 2007 Tutorial Prepared By:- Mohammad Murtaza Khan I. T. Expert Sindh Judicial Academy Contents Getting Started... 5 Presentations... 5 Microsoft Office Button... 5 Ribbon... 6 Quick
Using GIGABYTE Notebook for the First Time
 Congratulations on your purchase of the GIGABYTE Notebook P7! This Manual will help you to get started with setting up your notebook. For more detailed information, please visit our website at http://www.gigabyte.com.
XI100DE-HDMI-4K HDMI 4K
 XI100DE-HDMI-4K HDMI 4K capture Card User s Guide 2013/04/08 Rev 1.0 Copyright 2009-2010 All Rights Reserved. Nanjing Universal Networks Co. i Content 1 Preface... 3 2 Minimum Hardware Configuration...
Adobe Photoshop CS2 Reference Guide For Windows
 This program is located: Adobe Photoshop CS2 Reference Guide For Windows Start > All Programs > Photo Editing and Scanning >Adobe Photoshop CS2 General Keyboarding Tips: TAB Show/Hide Toolbox and Palettes
Using AORUS Notebook for the First Time
 Congratulations on your purchase of the AOS Notebook! This Manual will help you to get started with setting up your notebook. For more detailed information, please visit our website at http://www.aorus.com.
EASI MP-X Series. User Manual EASI MPR. Workstation. MPR Workstation user manual, , rev003
 EASI MP-X Series User Manual EASI MPR Workstation MPR Workstation user manual, 59300234, rev003 Contents MPR Workstation Introduction...1 General...1 Software version...1 Structure of the Network...1 Workstation
User Manual Any company, product or service names found in this document may be the trademarks or registered trademarks of their respective companies.
 User Manual Any company, product or service names found in this document may be the trademarks or registered trademarks of their respective companies. Action! Gameplay and screen recorder Thank you for
USB DVR Starter Guide
 USB DVR Starter Guide You must install the software bundled on the Install CD before connecting the USB DVR to the computer. 1 Install the software Connect the USB DVR to 2 the computer. This guide explains
NSCC SUMMER LEARNING SESSIONS MICROSOFT OFFICE SESSION
 NSCC SUMMER LEARNING SESSIONS MICROSOFT OFFICE SESSION Module 1 Using Windows Welcome! Microsoft Windows is an important part of everyday student life. Whether you are logging onto an NSCC computer or
SecuGuard. Basic 5.0. User s manual. Dec Version: 5.0.x
 SecuGuard Basic 5.0 User s manual Dec. 2009 Version: 5.0.x SecuGuard Basic System Requirement...5 Installation...6 Before Installing the Software... 6 Starting the Installation... 6 Quick Start...9 Install
org How to Import and Edit with Premiere Pro school Uploading Files Determine what kind of camera you used to film for your project.
 j tech org school Uploading Files How to Import and Edit with Premiere Pro Determine what kind of camera you used to film for your project. This document has been written to accommodate the JVC and CanonHD
User Manual of VSPlayer Software. VSPlayer Software. User Manual UD06784B
 VSPlayer Software User Manual UD06784B i User Manual COPYRIGHT 2017 Hangzhou Hikvision Digital Technology Co., Ltd. ALL RIGHTS RESERVED. Any and all information, including, among others, wordings, pictures,
Movavi Screen Recorder 5 for Mac
 Movavi Screen Recorder 5 for Mac Don't know where to start? Read these tutorials: Recording screen Recording online video Recording video from players Capture any fragment of your screen or the full desktop.
Introduction to web page creation
 Introduction to web page creation Step 1: Planning website and page layouts... 2 Step 2: Demonstrating Mediator... 2 Step 3: Linking the pages... 6 Step 4: Exporting your files... 6 MatchWare Page 1 Step
Using GIGABYTE Notebook for the First Time
 V. 0 Congratulations on your purchase of the GIGABYTE Notebook. This manual will help you to get started with setting up your notebook. The final product configuration depends on the model at the point
Veho VPA-001-QUDO USER MANUAL. Exploring your Qudo
 Veho VPA-001-QUDO USER MANUAL Exploring your Qudo 1 2 3 4 5 1 6 7 8 9 10 11 12 13 No Description 1 Holding the frame in Landscape: Move left button 2 On/Off Switch 3 SD Card Slot 4 USB Port 5 Charging
Overview of Adobe Fireworks
 Adobe Fireworks Overview of Adobe Fireworks In this guide, you ll learn how to do the following: Work with the Adobe Fireworks workspace: tools, Document windows, menus, and panels. Customize the workspace.
MadCap Mimic. Movie Creation Guide. Version 7
 MadCap Mimic Movie Creation Guide Version 7 Copyright 2013 MadCap Software. All rights reserved. Information in this document is subject to change without notice. The software described in this document
OFFICIAL USER MANUAL 1
 OFFICIAL USER MANUAL 1 Contents: Getting Started with Musician Video Maker 3 Launching And Activating Musician Video Maker 3 Beta Tester Users 5 Start Mode And Demo Mode 6 Importing Your Video Footage
A Reference guide to Using the Collaborate tool in your LMS (Mac Users)
") A Reference guide to Using the Collaborate tool in your LMS (Mac Users) Your LMS includes a synchronous (real-time) tool for online communication within your subject or community. The Collaborate tool
A Reference guide to Using the Collaborate tool in your LMS (Mac Users) Your LMS includes a synchronous (real-time) tool for online communication within your subject or community. The Collaborate tool
Inserting Information into PowerPoint
 LESSON 6 6.1 Inserting Information into PowerPoint After completing this lesson, you will be able to: Change the layout of a slide. Insert a clip art image. Scale an image. Insert and format a table. Insert
Video Modeling & Video Self-Modeling: Research to Practice
 Video Modeling & Video Self-Modeling: Research to Practice It s Showtime with ShowBiz Presented by the Virginia Department of Education s Autism Priority Project Developed by Teresa Lyons, T-TAC/VT How
NVMS1000. User Manual
 NVMS1000 User Manual Contents 1 Software Introduction... 1 1.1 Summary... 1 1.2 Operation Environment... 1 1.3 Install and Uninstall... 2 1.3.1 Install the Software... 2 1.3.2 Uninstall the Software...
Tutorials by All Creative Designs. Picasa 5 (3.9) Photo Editing Tutorial. How to download, install and use the Picasa Photo Editor
 Photo Editing Tutorial. How to download, install and use the Picasa Photo Editor") Tutorials by All Creative Designs www.allcreativedesigns.com.au Picasa 5 (3.9) Photo Editing Tutorial How to download, install and use the Picasa Photo Editor How to web optimize your photos for use on
Tutorials by All Creative Designs www.allcreativedesigns.com.au Picasa 5 (3.9) Photo Editing Tutorial How to download, install and use the Picasa Photo Editor How to web optimize your photos for use on
Using GIGABYTE Notebook for the First Time
 Congratulations on your purchase of the GIGABYTE Notebook. This manual will help you to get started with setting up your notebook. The final product configuration depends on the model at the point of your
13. Albums & Multi-Image Printing
 13. Albums & Multi-Image Printing The Album function is a flexible layout and printing tool that can be used in a number of ways: Two kinds of albums: At left we used automatic mode to print a collection
XnView 1.9. a ZOOMERS guide. Introduction...2 Browser Mode... 5 Image View Mode...15 Printing Image Editing...28 Configuration...
 XnView 1.9 a ZOOMERS guide Introduction...2 Browser Mode... 5 Image View Mode...15 Printing... 22 Image Editing...28 Configuration... 36 Written by Chorlton Workshop for hsbp Introduction This is a guide
Using AORUS Notebook for the First Time
 Congratulations on your purchase of the AORUS Notebook! This Manual will help you to get started with setting up your notebook. For more detailed information, please visit our website at http://www.aorus.com.
Contents. Introduction Panel Descriptions Saving Setting Values to the Computer As a File... 9
 V-1SDI RCS is software designed to control the V-1SDI using a computer. By connecting the V-1SDI and a computer via USB, along with operating the unit remotely from the computer, you can also save and
NVMS User Manual
 NVMS-1000 User Manual Contents 1 Software Introduction...1 1.1 Summary... 1 1.2 Operation Environment... 1 1.3 Install and Uninstall... 2 1.3.1 Install the Software... 2 1.3.2 Uninstall the Software...
imovie 08 Basics USF College of Education Laptop Initiative EDU 252, Website:
 imovie 08 Basics USF College of Education Laptop Initiative EDU 252, Email: laptoplounge@coedu.usf.edu Website: http://fcit.usf.edu/laptop/ imovie 08 is a completely redesigned version of the video editing
MICROSOFT WORD 2010 BASICS
 MICROSOFT WORD 2010 BASICS Word 2010 is a word processing program that allows you to create various types of documents such as letters, papers, flyers, and faxes. The Ribbon contains all of the commands
PowerPoint Slide Basics. Introduction
 PowerPoint 2016 Slide Basics Introduction Every PowerPoint presentation is composed of a series of slides. To begin creating a slide show, you'll need to know the basics of working with slides. You'll
Page Content. Inserting Text To add text to your document, you can type the text directly or use Cut or Copy and Paste or Paste Special.
 This section describes how to add content to your pages including text, Microsoft Office documents, images, Flash, and other media content. Inserting Text To add text to your document, you can type the
Bridgit Conferencing Software User s Guide. Version 3.0
 Bridgit Conferencing Software User s Guide Version 3.0 ii Table Of Contents Introducing Bridgit Conferencing Software... 1 System Requirements... 1 Getting Bridgit Conferencing Software... 2 The Bridgit
PowerPoint Introduction. Video: Slide Basics. Understanding slides and slide layouts. Slide Basics
 PowerPoint 2013 Slide Basics Introduction PowerPoint presentations are made up of a series of slides. Slides contain the information you will present to your audience. This might include text, pictures,
Table of contents. I Preface. II First steps 1. 3D stage 2. Your first stage
 Table of contents I Preface 1 II First steps 3 1. 3D stage 2. Your first stage III User mode 2 3 7 1. Rendering options 2. Resolution 3. Cameras 4. DMX levels 5. Universes patch 6. Movie recorder 6 7 7
Microsoft Excel 2010 Part 2: Intermediate Excel
 CALIFORNIA STATE UNIVERSITY, LOS ANGELES INFORMATION TECHNOLOGY SERVICES Microsoft Excel 2010 Part 2: Intermediate Excel Spring 2014, Version 1.0 Table of Contents Introduction...3 Working with Rows and
queue (for V1 Driver) (for Windows XP) Visual Presenter Image Software User Manual
 (for Windows XP) Visual Presenter Image Software User Manual") queue (V4.X) (for V1 Driver) (for Windows XP) Visual Presenter Image Software User Manual Date: 2009/08/11 i Contents 1. Introduction... 1 2. System requirement...1 3. Automatic installation of queue...
queue (V4.X) (for V1 Driver) (for Windows XP) Visual Presenter Image Software User Manual Date: 2009/08/11 i Contents 1. Introduction... 1 2. System requirement...1 3. Automatic installation of queue...
Table of Contents. Chapter 1 Overview In This Manual RASplus Features Product Information Chapter 2 Installation...
 Remote Administration System Plus (RASplus) Table of Contents Chapter 1 Overview... 1 1.1 In This Manual... 1 1.2 RASplus Features... 1 1.3 Product Information... 1 Chapter 2 Installation... 3 Chapter