User Manual. BioTime Web
|
|
|
- Elvin Miles
- 5 years ago
- Views:
Transcription

1 BioTime Web Version: 1.0 Date: December 2016
2 BioTime Web Index 1. Quick Start Overview Finger Placement How to use touch screen Recommended Operation Steps Setting up the system Departments settings Add department Delete department Employee management Add Employee Edit Employee Delete employee Authority Management Select Theme Network settings Wi-Fi settings Ethernet settings Switch on Web Server Open Webserver BioTimeWeb Login Menu options Dashboard Departments Employee Attendance Reports Information Languages Logout Graphic Operations FAQS


3 1. Quick Start 1.1. Overview 1. Backup Battery 2. SD Card 3. TCP/IP 4. USB Interface 5. DC 12V: Connect the factory default adapter. 6. Reset Button: Reboot device. 7. Power Button: Press and hold this button to 8. Backspace Key: Click this button to return to Shut down device. 9. Home Key: Click this button to return to desktop. 11. Fingerprint Sensor and Punch Card Area 12. Camera the previous interface. 10. Information Bar: Click this bar to view the detail about Date, USB, Core Service and Ethernet Connection. 2
.")
4 BioTime Web 1.2. Finger Placement Recommended fingers: The index finger, middle finger or the ring finger; the thumb and pinkie finger are not recommended (since they often present more difficulties to be recognized). The finger is flat to the surface and centred in fingered guide How to use touch screen Use finger pulps slid or click the touch screen. The fingertip and fingernail may affect the using of touch screen. 3
5 1.4. Recommended Operation Steps 1. Department Settings Click [Apps] > [Department] to enter the Department Setting interface. You can add, modify or delete department as required. 2. Add Employee Click [Apps] > [Employee] to enter the Employee Setting interface. Add, edit or delete the basic employee information: enrol Pin, Name, Fingerprint, Card and Password; assign Department and Authority as required. 3. Select Theme Click [Apps] > [SETTINGS] > [Display] to enter the Display Setting interface. Select as required. 4. Configure Wi-Fi or Ethernet Click [Apps] > [SETTINGS] > [Networks] to enter the communications interface. Select as required and configure it. 5. Switch on Webserver Application Click [Apps] > [Webserver] > Enable Webserver Function On 5. Open Webserver Application Open your predefined internet browser and write device IP in the address bar 4

6 BioTime Web 2. Setting up the system 2.1. Departments settings Browse the department information of device. The device has 7 departments in default, and the max capacity of department is 100. You can add, modify or delete department as required. Click [Apps] > [Department] to enter the Department Setting interface. Notice: Departments can be created directly in the terminal or using the webserver application. The following explanation is for creating departments using the terminal Add department 5


7 Delete department Notice: The delete department operation is irreversible. All child employees and departments will be added to nearest parent. 6


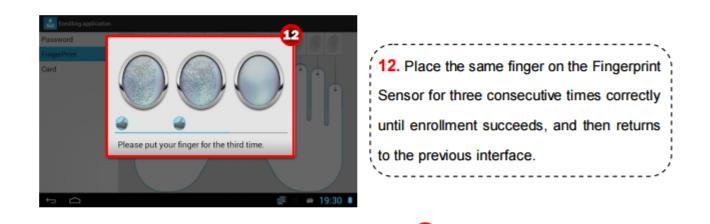
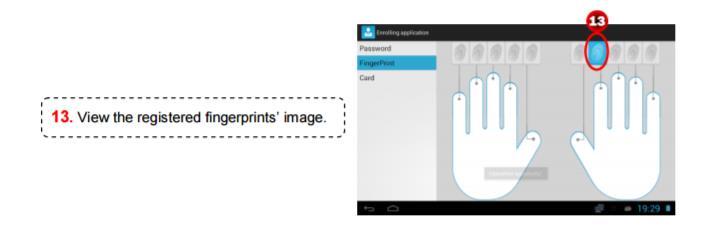
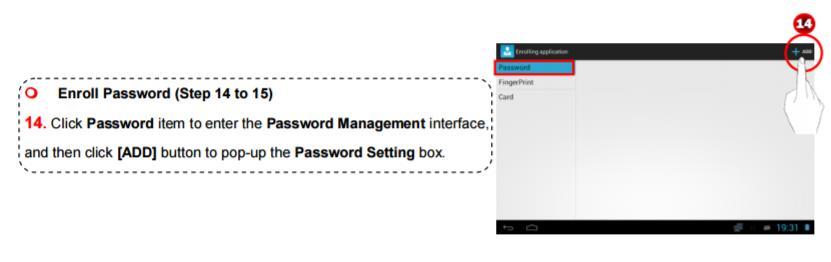
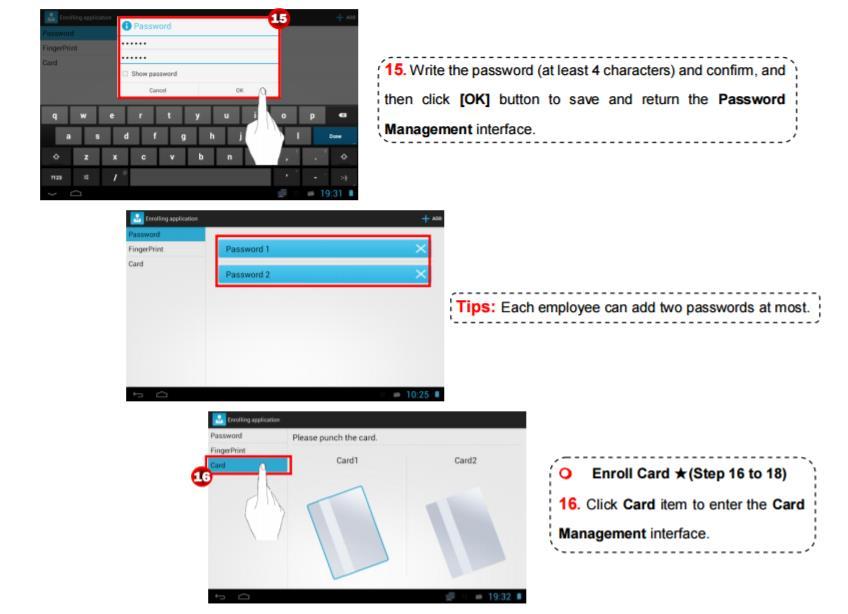
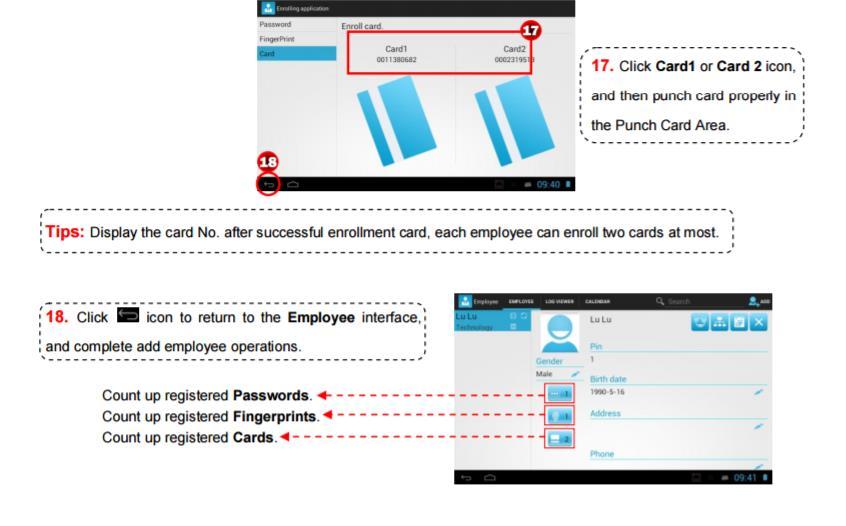
8 BioTime Web 2.2. Employee management Add, edit or delete the basic employee information: enrol Pin, Name, Fingerprint, Card and Password; assign Department and Authority as required. In company s attendance management, for employee s change, the information on the device also needs modification. Therefore, operations including Add, Delete, Check, Modify, etc. can be done on the device. For the first use, after click [Apps] > [Employee], the following box will pop-up, suggest you to add employee. Tips: There are no employees in the company; do you want to create a new one? Add Employee 7
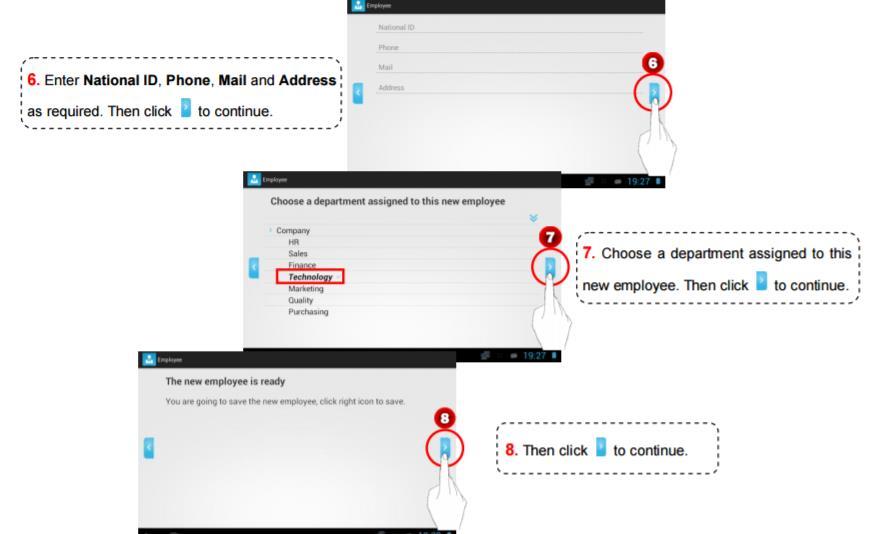
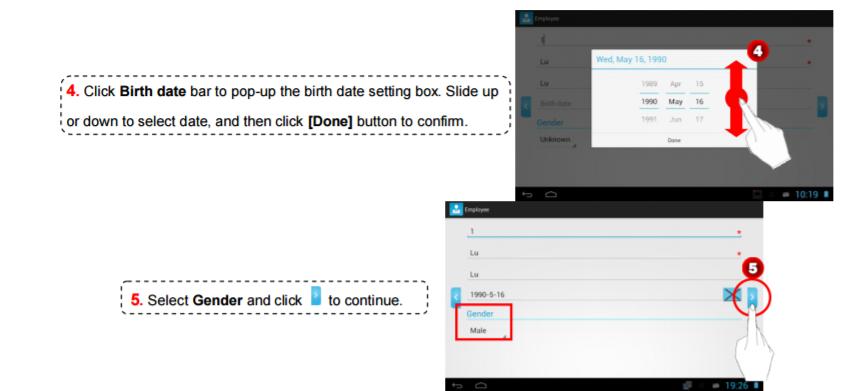
9 8

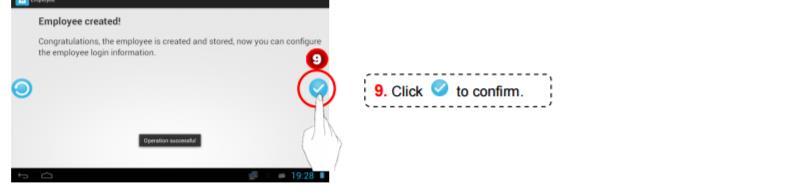
10 9 BioTime Web
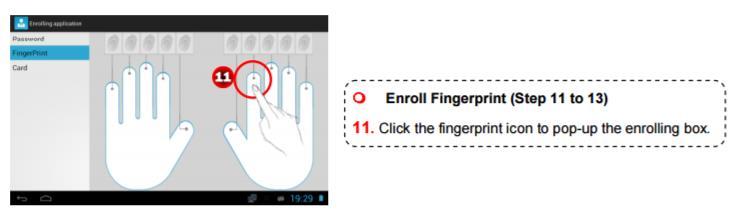
11 10


12 BioTime Web Edit Employee 11


13 Delete employee 12
![BioTime Web 2.2.4. Authority Management 2.2.4.1. Role Viewer Click [Apps] > [Authority] > [ROLES] to enter the Role Settings interface.](/docs-images/82/84770160/images/14-1.jpg "The device has four roles in default, namely Super Admin, Enroller, Attendance Admin and System Admin.")

14 BioTime Web Authority Management Role Viewer Click [Apps] > [Authority] > [ROLES] to enter the Role Settings interface. The device has four roles in default, namely Super Admin, Enroller, Attendance Admin and System Admin. Each role has three types of privileges, namely setup options, enroller and supervisor. You can check as required Employee Authority Setting Assign authority for employees. Click [Apps] > [Authority] to enter the Authority Setting interface. (Note: According to the current user privilege to display employee information. 13


15 2.3. Select Theme The terminal allows 5 different themes, you can check as required. 14

![[Apps] > [SETTINGS] >](/docs-images/82/84770160/images/16-2.jpg "[Networks] to enter")

16 BioTime Web 2.4. Network settings Click [Apps] > [SETTINGS] > [Networks] to enter the Networks Setting interface Wi-Fi settings 15
: The DNS 1 address is 0.")

17 Ethernet settings Static IP setting IP Address: The IP address is by default and can be changed as required. Subnet Mask: The subnet mask is by default and can be changed as required. Gateway: The gateway is by default and can be changed as required. DNS 1 (Optional): The DNS 1 address is by default and can be changed as required. DNS 2 (Optional): The DNS 2 address is by default and can be changed as required DHCP The device automatically obtains an IP address. 16


18 BioTime Web 2.5. Switch on Web Server To enable webserver application, we should switch on first the function. Please Click [Apps] > [Webserver] to enter the Webserver Setting interface. Please input as well the port number for connection, default port is: 8080 Notice: Please be sure the function is enable before running webserver in your browser. If you switch off webserver will not open. If you cannot enter in the Webserver please check first always this option Open Webserver Please open your predefined browser and write device IP and port number to open Webserver APP. 17

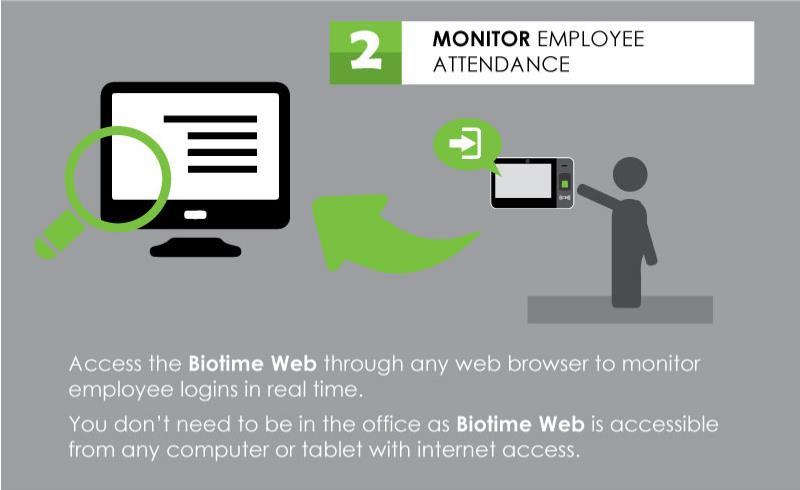
19 3. BioTimeWeb 3.1. Login Any enrolled user in the terminal with password can be logged in the application, please make sure you just enrol password to the right people with permissions to manage the application. To login please input your User ID as Username and your password and click on LOG IN Menu options After logging successfully, you will find the following menu options: Dashboard Departments Employee Attendance Reports Information Languages Log Out 18


20 BioTime Web Dashboard This Menu is a real-time monitoring which shows the daily log records, always last record appears the first one. The record information is the following: PIN, Name, Last Name, Attendance Event (Icon), Date and Time. On the right side, you can find a green icon to export the list to excel file Departments 19


21 It shows all departments created in the terminal, as we explained in topic 2.1, departments can be created in the terminal and then appears directly in the Webserver application or we can add them also in the application by clicking in the icon ADD NEW Please input department name and click accept to save it. Notice: You can edit existing ones if double click in the department you want to edit Employee All employees already created in the terminal will be displayed on employee menu. It shows the following information: PIN, Name, Last name, National ID department and Login types. 20

22 BioTime Web Login types shows in green colour the user information in the device, it means how user can be identified in the terminal. Please Take Care users with password in the terminal can be logged in Webserver application with full administration privileges. If you click on any employee, user information will be display as following On the right side, you can see three Icons: This Icon is to create a new employee. And the following screen will be displayed: Fields with * icon are required to save a new employee. 21

23 Notice: Please Remember the following: Fingerprints, cards and passwords should be created in the terminal. This icon is to delete an employee. Please Take Care All employee data will be deleted in the terminal. This icon is to export the list to an excel file. After export to excel if you open the file you will see the information as following: For the employee list, you have several filter options that can be used to filter the list information by User ID, Name, Last name and Department. 22

24 BioTime Web Attendance Attendance screen will show all employees attendance records between selected dates. All attendance record includes its own specific attendance icon. - Icon list: Check IN Break IN Overtime IN Check OUT Break OUT Overtime OUT Coffee Illness Smoke Holidays Lunch Business trip Personal issues Ext. work You can filter the list with the following options: User ID, Name, Last name, Date, Department and attendance event. After any filter modification please click on the following icon to refresh the screen. If you click on any employee day records the application will sidplay the following screen where you can view details and delete log record if needed. 23


25 If you select delete record the system will ask you for confirmation. The application allows to create a manual log record by clicking on this icon. show the following screen: It will You can select employee, date and time, the attendance event and the state, it means if it is an OUT or IN. After select all parameters please click on the green icon to save it or red one to cancel the operation. 24


26 BioTime Web Notice: After click on accept the screen will be refreshed showing the new log record. Also, you can change the list view if you short by PIN, Name, Last Name and Date This icon is to export the list to an excel file. After export to excel if you open the file you will see the information as following: Reports The report screen will display the total hours worked by an employee. You can set same filters as attendance screen but on this screen, you also can short by Daily, Weekly and Monthly. Always on the right side you will find a green icon to export to excel. 25

27 If you see a red tagged line with the status REVIEW, it means there is an error in the report which probably will be there is missing log record to make the calculation. You can click on view detail icon to see details and create manual record if needed to get total hours. When you click on view details it will display the following screen: Information The information screen will display very useful information like: Webserver Version Device Serial number Terminal firmware version Notice: If you have any problem, this information can be required by technical support. 26

28 BioTime Web Also, we can see in the information the maximum device capacity. This solution is limited to 40 users and 400 fingerprint templates Languages All these languages are already available. If you want to change language, please select your choice and automatically the software will change it Logout Please to logout from the application click on the following icon 27

29 4. Graphic Operations 28


30 29 BioTime Web
31 5. FAQS 1º I cannot access to webserver application. Please Ensure you have enable webserver application on device menu. Click on apps/webserver and check it. 2º How can I have remote access from internet? Please check your router model and search documentation about how to open and forward communication ports. (Normally you can use google to find it). 3º What is the user name and password to logging in the application? Create a user in the terminal with password, then use the User ID and Password to logging. Please be careful all users with password in the terminal can be logged and manage the application. 4º Application refresh is very slow. Please review the current device capacity in information menu. 30
F3102 / F3107 / F3110 / F3115 / F3210 / F3215 PN: 86085K K
 F3102 / F3107 / F3110 / F3115 / F3210 / F3215 0 86085K3000020 PN: 86085K3000020 Zavio F3102/F3107/F3110/F3115/F3210/F3215 Quick Installation Guide Please follow the installation steps below to set up
Zavio P5111/ P5116/ P5210 Quick Installation Guide
 86085M2000010 Zavio P5111/ P5116/ P5210 Quick Installation Guide Installation Steps Please follow the installation steps below to set up your P5111 / P5116/ P5210 Day/Night Pan/Tilt IP Camera. Check the
D G
 D7210 0 86085G6000010 Zavio D7210 Quick Installation Guide Please follow the installation steps below to set up your D7210 Dome IP Camera. Check the package contents against the list below. See P.1 Physical
PT100 and PT100W. PT100F and PT100FW. Ethernet Clock with Proximity Badge Reader
 PT100 and PT100W Ethernet Clock with Proximity Badge Reader Menu/Enter Key Function Keys Proximity Badge Reader Main Display Screen Note: PT100W includes WiFi Capability. PT100F and PT100FW Ethernet Clock
Zavio F3100 / F3105 Quick Installation Guide
 Zavio F3100 / F3105 Quick Installation Guide Please follow the installation steps below to set up F3100 / F3105 IP Camera. Check the package contents against the list below. See P.1 Physical overview.
HD-SDI Professional DVR Quick Guide
 HD-SDI Professional DVR Quick Guide 1. System Login 1.1 User Login Default Admin Password: 00000 1.2 Time Setting and HDD Format Navigate to {Menu} {Setup} {Time} and set the time/date to the appropriate
Facial & Fingerprint Recognition Product
 Facial & Fingerprint Recognition Product Series User Manual Version: 1.1.7 Date: January 2010 About This Manual This document introduces the user interface and menu operations of the Facial & Fingerprint
Dell EMC OpenManage Mobile. Version User s Guide (Android)
") Dell EMC OpenManage Mobile Version 2.0.20 User s Guide (Android) Notes, cautions, and warnings NOTE: A NOTE indicates important information that helps you make better use of your product. CAUTION: A CAUTION
Dell EMC OpenManage Mobile Version 2.0.20 User s Guide (Android) Notes, cautions, and warnings NOTE: A NOTE indicates important information that helps you make better use of your product. CAUTION: A CAUTION
F3102 / F3107 / F3110 / F3115 / F3210 / F3215 PN: 86085K K
 F3102 / F3107 / F3110 / F3115 / F3210 / F3215 86085K3000020 PN: 86085K3000030 Zavio F3102/F3107/F3110/F3115/F3210/F3215 Quick Installation Guide Please follow the installation steps below to set up F3102
How to manually set up EW-7228APn to extender wireless range
 How to manually set up EW-7228APn to extender wireless range 1. Find out the IP address of your computer. Have your computer get on Internet as normally, without EW-7228APn turning on. If you use a Windows
Sricam R. SricamPC Manual. Configure and Watch live videos using SricamPC. Customer Service
 Sricam SricamPC Manual Configure and Watch live videos using SricamPC Sricam Sricam Customer Service Telephone: +86-755-29360806 E-Mail: Support@sricam.com Skype ID: tech.sricam Website: www.sricam.com
Click on Close button to close Network Connection Details. You are back to the Local Area Connection Status window.
 How to configure EW-7228APn/EW-7416APn as a Repeater to extend wireless range This article can apply on EW-7228APn and EW-7416APn. We used screen shots of EW-7416APn in this instruction. We recommend you
Zavio M511E / M511W Quick Installation Guide
 Zavio M511E / M511W Quick Installation Guide Please follow the installation steps below to set up your M511E / M511W IP Camera. Check the package contents against the list below. See P.1 Physical overview.
Finger Vein Access Control device Quick Start Guide Version: 1.0 Date: June USB slot. USB slot
 Overview Fingerprint & Finger Vein Device Front Left Side: Finger Vein Device Touch screen Card reader Fingerprint reader Finger vein reader Finger vein sensor: During registration, after finger touches
Quick Setup Guide. for Standalone Omada Access Points. EAP110 / EAP115 / EAP225 / EAP245 / EAP320 / EAP330 / EAP115-Wall
 Quick Setup Guide for Standalone Omada Access Points EAP110 / EAP115 / EAP225 / EAP245 / EAP320 / EAP330 / EAP115-Wall EAP110-Outdoor / EAP225-Outdoor / EAP225-Wall 1910012420 REV1.0.1 May 2018 Omada EAP
Make sure that you have following items supplied with your DVR. If any of these items are missing or damaged, notify your vendor immediately.
 1. Getting Started... 3 1.1. Checking Supplied Items... 3 1.2. User Login... 3 1.3. Time Setting and HDD Format... 4 1.4. Setup... 4 2. System Operation... 5 2.1. Using Tool(Control) Bar... 5 2.2. Display
BT MobileXpress App V2 for Android Quick Guide
 BT MobileXpress App V2 for Android Quick Guide 2 P a g e Overview This quick guide provides an overview on how to use the BT MobileXpress App to connect to the BT MobileXpress Wi-Fi service. While the
Make sure that you have following items supplied with your DVR. If any of these items are missing or damaged, notify your vendor immediately.
 1. Getting Started... 2 1.1. Checking Supplied Items... 2 1.2. User Login... 2 1.3. Free Login... 2 1.4. Time Setting and HDD Format... 3 1.5. Setup... 3 2. System Operation... 4 2.1. Using Tool(Control)
ID
 CATLOG 1. Use notice... 1 1.1 the recommended procedure in the first using... 1 1.2 Button description... 2 2. User Management... 3 2.1 User Registration... 3 2.1.1 Fingerprint registration... 4 2.1.2
ID
 User Manual 1. Usage Guidelines.... 1 1.1 The recommended procedure... 1 1.2 Button description.... 2 1.3 The initial interface and main menu... 2 1.4 Authentication methods... 3 2. Department set....
7 inches Color TFT Serials User Manual
 Version: 1.0 Date: July 2011 About This Manual This document introduces the user interface and menu operations of the 7 inches color TFT serials products. About this manual All features are subject to
SL620/DS-Tmini Snaplab+ Internet Configuration Setting procedure
 SL620/DS-Tmini Snaplab+ Internet Configuration Setting procedure DNP PIE Nov 2015 V1.1 CONTENTS Introduction... 3 Router Update and Settings for SL-620:... 3 What is new?... 3 1. Updating the existing
INVISION TM IRIS TIME CLOCK USER GUIDE. InVision Iris Time Clock
 INVISION TM IRIS TIME CLOCK USER GUIDE InVision Iris Time Clock Copyright 2018 Paychex, Inc. All rights reserved. Paychex is a registered trademark and Paychex InVision is a trademark of Paychex, Inc.
Face & Fingerprint Recognition Product
 Realand Bio Co., LTD. Face & Fingerprint Recognition Product Hardware User Manual PRO6. Date: June 2016 Product Specification PC Software Version Cloud Based Version LCD Display 2.8 inch TFT Color Screen
Time Recorder Manual
 Time Recorder Manual 1. Install Authentication software... 1 1.1 Install Fingerprint Authentication Software... 1 1.2 Install Finger Vein Authentication Software... 3 1.3 Install Hybrid Authentication
A-1300 Biometric Access Control System USER'S MANUAL
 A-1300 Biometric Access Control System USER'S MANUAL Table of Contents 1. General Information... 1 1.0 Notification... 2 1.1 System Overview... 2 1.2 Main Features... 2 1.3 Equipment... 3 2. Basic Concepts...
Wireless N Megapixel Network Camera F3101/3106
 Wireless N Megapixel Network Camera F3101/3106 86085L1000020 Package Contents Camera F3101/3106 Network Camera Quick Installation Guide To provide brief product information and quick installation and wireless
1 Hardware Installation
 1 Hardware Installation 1.1 Choosing the Best Location for Wireless Operation Many environmental factors may affect the effective wireless function of the DSL Router. If this is the first time that you
Oct Wi-Fi Concierge Web Portal User Guide - English
 Oct 2017 Wi-Fi Concierge Web Portal User Guide - English Table of Contents 1 Overview of Wi-Fi Concierge Web Portal... 3 2 Access Wi-Fi Concierge Web Portal... 3 3 Language Settings... 4 4 Register a New
Portals 14 What is a portal? 14 Hardware 15 RS232 to RS USB to RS TCP/IP to RS Add a Serial Portal 16 Add a Network portal 16
 PROS LITE User Manual Version 2.0.0 www.visual-plus.com Table of Contents Getting Started 5 Starting PROS Lite 5 Create a Portal 5 Adding a control panel 6 Adding a user 7 Upload users to a controller
Self-Service Attendance Terminal User Manual
 Version: 4.0 Date: Sep. 2013 Scope: SSR self-service attendance terminal with a firmware version later than V3.0, 2.8 inch network attendance machine About This Manual This document describes the GUIs
Installation & Setup Guide
 Installation & Setup Guide Contents Terminal Installation 3 Standby Status 3 Entry to Menus 4 Enrolment 5 Enrolment of Administrators 5 USB Data Download 5 Clearing Clocking Data 6 Setting the Terminal
Self-Service Attendance Terminal User Manual
 Self-Service Attendance Terminal User Manual Version: 4.1 Date: May. 2014 Scope: SSR self-service attendance terminal with a firmware version later than V3.0, 2.8 inch network attendance machine About
isolved Go v9.0 Employee User Guide
 Table of Contents ISOLVED GO INTRODUCTION... 2 DOWNLOADING ISOLVED GO FROM GOOGLE PLAY/APPLE STORE... 2 LOGGING INTO THE ISOLVED GO APPLICATION... 3 ISOLVED GO OVERVIEW... 4 ISOLVED HCM... 5 VIEW PAYSTUB...
7NOX User Manual for Site Device. Book after-hours air conditioning in commercial buildings with ease.
 7NOX User Manual for Site Device Book after-hours air conditioning in commercial buildings with ease. Document Control Revision History This document is version controlled via the use of revision numbers.
SADP Software User Manual
 SADP Software User Manual UD08334B User Manual COPYRIGHT 2017 Hangzhou Hikvision Digital Technology Co., Ltd. ALL RIGHTS RESERVED. Any and all information, including, among others, wordings, pictures,
Default admin password: 00000
 1. System Login 1.1. User Login Default admin password: 00000 1.2. Time Setting and HDD Format Go to [{Menu} {Setup} {Time}] and input the proper time/date setting based on your time zone. Daylight Savings
1. Language setting. Frequently Ask Questions.
 Frequently Ask Questions. 1. Language setting Step 1: Power on NB and you would see the following screen. Please click the language and select one you need as primary language. Step 2: Key in root user
Please note, instructions in this guide are based on a PC running Windows 7. Please adapt the actions to suit your operating system.
 Please note, instructions in this guide are based on a PC running Windows 7. Please adapt the actions to suit your operating system. Please follow these steps to ensure that any changes made by your previous
ETH002-2 Relays at 16A Technical Documentation
 ETH002-2 Relays at 16A Technical Documentation Overview The ETH002 provides two volt free contact relay outputs with a current rating of up to 16Am. The module is powered from a 12vdc supply which can
Orbi WiFi System User Manual
 User Manual February 2018 202-11675-09 350 E. Plumeria Drive San Jose, CA 95134 USA Support Thank you for purchasing this NETGEAR product. You can visit www.netgear.com/support to register your product,
Dell EMC OpenManage Mobile. Version 3.0 User s Guide (Android)
") Dell EMC OpenManage Mobile Version 3.0 User s Guide (Android) Notes, cautions, and warnings NOTE: A NOTE indicates important information that helps you make better use of your product. CAUTION: A CAUTION
Dell EMC OpenManage Mobile Version 3.0 User s Guide (Android) Notes, cautions, and warnings NOTE: A NOTE indicates important information that helps you make better use of your product. CAUTION: A CAUTION
Time Attendance User s Manual
 Time Attendance User s Manual V1.0.0 1 Table of Contents Table of Contents... 2 1 Product Overview... 1 1.1 Introduction... 1 2 Installation Guide... 1 2.1 Checklist... 1 2.2 Panel and Interface... 1 2.3
Procedure to Upgrade Verizon FiOS Router and Configure Xbox 360 to connect with Microsoft USB WiFi Adapter
 FiOS TV & Internet Verizon DSL FAQ s Wireless Verizon Bundles Verizon Support Procedure to Upgrade Verizon FiOS Router and Configure Xbox 360 to connect with Microsoft USB WiFi Adapter Overview The current
How to assign an IP address and access your device
 User Manual Table of Contents Get started................................................ 3 Browser support................................................ 3 About default IP addresses........................................
Shaw Business Hitron Modem (CGNM-2250) Configuration User Guide
 Configuration User Guide") Shaw Business Hitron Modem (CGNM-2250) Configuration User Guide Contents 1. How to Login to your Hitron Modem... 3 2. SmartWiFi and Local Area Network (LAN) set up...4 a. LAN Setting -Private Gateway IP
Shaw Business Hitron Modem (CGNM-2250) Configuration User Guide Contents 1. How to Login to your Hitron Modem... 3 2. SmartWiFi and Local Area Network (LAN) set up...4 a. LAN Setting -Private Gateway IP
Website:
 Website: www.mantratec.com Application We Provide. PayTime (Desktop based Attendance & Payroll) PayTime ESS (Employee Self Service) PayTime SMS (SMS on Event) Web based Time Attendance Web based Payroll
X200 BIOELECTRONIX. Operating Instructions. X200 Main Interface. Clear or Backspace. Menu Key. On Duty IN & Shift UP
 Main Interface Punch Indicator Clear or Backspace Menu Key On Duty IN & Shift UP Off Duty OUT & Shift Down Escape or Select to punch in by Job number Fingerprint Sensor OK or Enter 1 Employee Fingerprint
Compumatic CompuTime101
 1. Getting Started Entering upgrade codes Defining global rules Adding clocks Adding departments Adding Shifts Adding employees Compumatic CompuTime101 Quick Reference Guide v3.2 2. Downloading Punches
3 inches Facial & Fingerprint Recognition
 3 inches Facial & Fingerprint Recognition Series Product User Manual Version: 3.0 Date: Nov. 2011 About This Manual This document introduces the user interface and menu operations of 3 inches Facial &
VISTA Transfer Station Setup
 Setup Setup The allows your agency to upload video evidence to its WatchGuard Video Evidence Library software from multiple VISTA cameras simultaneously. Each VISTA Transfer Station has eight slots for
BioSense II. (T/A System) WEB Configuration Manual
 WEB Configuration Manual") BioSense II (T/A System) WEB Configuration Manual 1.00.00, Jan/28/2014 (HW1.2) BioSense II (TA SYSTEM) Series: Web Ver1.1 Build Date: Jan/28/2014 Contents WEB Configuration...1 WEB Logon...1 Preparation...1
BioSense II (T/A System) WEB Configuration Manual 1.00.00, Jan/28/2014 (HW1.2) BioSense II (TA SYSTEM) Series: Web Ver1.1 Build Date: Jan/28/2014 Contents WEB Configuration...1 WEB Logon...1 Preparation...1
Pro71600N3 NVR User Manual
 Pro71600N3 NVR User Manual User Information Admin User Name: Admin Password: IP Address: System Name: Table Of Contents 1. Menu Operation...4 1.1 Main Menu...4 2. Start & Shutdown System...5 2.1 Start
User Guide. ZKTime Lite. Time & Attendance and Access Control software. Version 1.0
 User Guide ZKTime Lite Time & Attendance and Access Control software Version 1.0 ZKTime Lite ZKTime Lite User guide Important Notice Thanks for choosing this product. Without the written permission of
Contents. Table of Contents
 Table of Contents Contents 1. Web Interface Configuration... 2 1.1 Login Information... 3 1.2 Saving Configuration Changes... 4 1.3 Status Page... 5 1.4 Log... 6 1.4.1 Log Settings... 6 1.4.2 Syslog...
How to upgrade the firmware
 How to upgrade the firmware This document will detail how to update the firmware on DAP-1150. Ensuring the firmware remains up to date can assist with functionality / improved performances as well as adding
Quick User Guide for DVR Camera System
 Quick User Guide for DVR Camera System Before Setup Remote Access Make sure you have done: Hook cameras to the DVR using cables included in the package; power on your DVR and cameras; Connect your DVR
Lab - Connect to a Router for the First Time
 Introduction In this lab, you will configure basic settings on a wireless router. Recommended Equipment A computer with Windows installed An Ethernet NIC installed Wireless router Ethernet patch cable
BF-630X/BF-830X WEB SCREEN. Access Control/Time Attendance. User s Manual
 BF-630X/BF-830X Access Control/Time Attendance WEB SCREEN User s Manual Table of Contents CHAPTER 1 INSTALLATION... 2 Requirement...2 Procedure...2 CHAPTER 2 WEB SETUP DESCRIPTION... 3 Login Web...3 Preparation...3
Pro7804N1 NVR User Manual
 Pro7804N1 NVR User Manual Pro7804N1 User Manual BW R6.indd 1 User Information Admin User Name: Admin Password: IP Address: System Name: Table Of Contents 1. Menu Operation...4 1.1 Main Menu...4 2. Start
INSTRUCTION GUIDE FOR XENIO 500
 1x INSTRUCTION GUIDE FOR XENIO 500 Contents INTRODUCTION 4 WHAT S IN THE BOX 5 XENIO TIME CLOCK INSTALLATION 6-8 CONFIGURE WIFI SETTINGS (OPTIONAL) 9-10 CONNECT VIA ETHERNET/NETWORK CABLE 11 HOST PC SETTINGS
ivms-4200 Access Control Client User Manual UD00895N
 ivms-4200 Access Control Client User Manual UD00895N User Manual About this Manual This Manual is applicable to ivms-4200 Access Control Client. The Manual includes instructions for using and managing
How to assign an IP address and access your device
 User Manual Table of Contents Get started................................................ 3 Browser support................................................ 3 About default IP addresses........................................
ECO TA500 User Manual
 About this manual ECO TA500 User Manual Version: 1.0 Date: FEBRUARY 2017 About This Manual This document describes the GUIs and menu operations of the ECO TA500. About this manual Not all the devices have
AirLive RS Security Bandwidth Management. Quick Setup Guide
 AirLive RS-2000 Security Bandwidth Management Quick Setup Guide Important Information The AP mode s default IP address is The default Subnet Mask is The default login name is The default password is!!!!
How to setup WL-WN575A2/WL-WN575A3 Repeater Mode through Ethernet Cable
 How to setup WL-WN575A2/WL-WN575A3 Repeater Mode through Ethernet Cable The following setup procedure is for INITIAL SETUP. If your product has been configured before, we suggest you to RESET the product
Xpy4002-KX, Xpy4004-KX and Xpy8004-KX. setup with DDNS and mobile application
 Xpy4002-KX, Xpy4004-KX and Xpy8004-KX setup with DDNS and mobile application Xpy4002-KX, Xpy4004-KX and Xpy8004-KX setup with DDNS and mobile application Preliminary steps: 1. 2. 3. Nexxt Solutions DVR
SNMP Web Management. User s Manual
 SNMP Web Management User s Manual Suitable Product: SNMP Web Card SNMP Web Box Management Software for Uninterruptible Power Supply Systems Table of Contents 1. Overview... 1 1.1 Introduction... 1 1.2
TOTALPASS SMALL BUSINESS PREMIUM SOFTWARE UPDATE CHANGE LOG
 TOTALPASS SMALL BUSINESS PREMIUM SOFTWARE UPDATE CHANGE LOG TotalPass Small Business Premium Time Clock Updates Occasionally, Icon Time Systems releases new updates for your employee time clock. These
Zavio F520E Quick Installation Guide
 Zavio F520E Quick Installation Guide Please follow the installation steps below to set up your F520E IP Camera. Check the package contents against the list below. See P.1 Physical overview. See P.1 Install
User Manual. Applicable Models : X990.
 User Manual Applicable Models : X990 www.biomaxsecurity.com 3 inches Facial & Fingerprint Recognition Series Product User Manual Version: 3.3 About This Manual This document introduces the user interface
Heatmiser Netmonitor v3
 Heatmiser Netmonitor v3 Technical Set-Up (Firmware Version 3.5 or above) Function Page Number Connecting to your Netmonitor 2 Changing the Netmonitor IP address 4 Accessing the Netmonitor over the Internet
IdeaTab A1000L-F. User Guide V1.0. Please read the Important safety and handling information in the supplied manuals before use.
 IdeaTab A1000L - UserGuide IdeaTab A1000L-F User Guide V1.0 Please read the Important safety and handling information in the supplied manuals before use. file:///c /Users/xieqy1/Desktop/EN UG/index.html[2013/8/14
Video Decoder Setup Guide
 Package Content Video Decoder Setup Guide Inspect the packaging carton. Make sure the Video Decoder is properly delivered. Remove all items from the box and make sure the box contains the following items.
AXIS Camera Station S20 Appliance Series AXIS Camera Station S2008 Appliance AXIS Camera Station S2016 Appliance AXIS Camera Station S2024 Appliance
 AXIS Camera Station S2008 Appliance AXIS Camera Station S2016 Appliance AXIS Camera Station S2024 Appliance User Manual Table of Contents About the AXIS Camera Station S20 Appliance Series.............
1 WiPG-1600 User s Manual. WiPG User's Manual. version: 2.01
 1 WiPG-1600 User s Manual WiPG-1000 User's Manual version: 2.01 2 WiPG-1600 User s Manual Table of Contents 1 Overview... 3 2 Package Contents... 4 3 USB Token Contents... 4 4 Physical Details... 5 5 What
HOW TO SETUP TP-LINK DECO
 HOW TO SETUP TP-LINK DECO Ver 1.0 1 Before we start the TP-LINK DECO, we need to install TP-LINK DECO apps on our mobile. Goto PLAY STORE search for TP-LINK DECO Select TP-LINK DECO and install the apps
Peplink SD Switch User Manual. Published on October 25th, 2018
 Peplink SD Switch User Manual Published on October 25th, 2018 1 Table of Contents Switch Layout 4 Specifications 5 Hardware Overview 6 Quick Start Functions 7 Reset Switch 7 Connect Ethernet 7 Connect
Quick Start Guide. ProBio & ProFAC + ZKBioSecurity 3.0
 Quick Start Guide ProBio & ProFAC + ZKBioSecurity 3.0 CONTENT 1 Safety Precautions...2 On Using Face Recognition Device...3 Device Overview...5 Product Dimensions & Installation...6 Power Connection...7
1 Introduction to the software
 1 Introduction to the software mk:@msitstore:d:\winpower%20net\helpeng.chm::/introduction%20to%20softw... 1/2 1 Introduction to the software The monitoring software is matched with our company controller.
WF-2402 Quick Installation Guide
 WF-2402 Quick Installation Guide Netis 150Mbps Wireless-N Broadband Router 1. Check Your Package Contents The following items should be found in your package: 150Mbps Wireless-N Broadband Router Power
Dlink DSL 502T Configuring in Layer2 PPPoE for Windows XP and 2000
 Dlink DSL 502T Configuring in Layer2 PPPoE for Windows XP and 2000 Contents 1. Network Configuration 2. Restore Router To Factory Defaults 3. Re-configure In Layer2 PPPoE 4. Optional Please note: Some
Dear Customer, Thank you for purchasing our product, the Fingerprint Time and. Attendance Terminal! To fully enjoy the benefits of this product,
 Dear Customer, Thank you for purchasing our product, the Fingerprint Time and Attendance Terminal! To fully enjoy the benefits of this product, please read and understand the important information and
Quick Installation Guide DSL-2650U. 3G/ADSL/Ethernet Router with Wi-Fi and Built-in Switch
 DSL-2650U 3G/ADSL/Ethernet Router with Wi-Fi and Built-in Switch BEFORE YOU BEGIN Delivery Package Router DSL-2650U Power adapter DC 12V/1A RJ-11 telephone cable Ethernet cable (CAT 5E) Splitter (brochure).
3 inches Facial & Fingerprint Recognition
 3 inches Facial & Fingerprint Recognition Series Product User Manual Version: 3.3 Date: May. 2012 About This Manual This document introduces the user interface and menu operations of 3 inches Facial &
User Guide. 450Mbps/300Mbps Wireless N Access Point TL-WA901ND/TL-WA801ND REV
 User Guide 450Mbps/300Mbps Wireless N Access Point TL-WA901ND/TL-WA801ND REV4.0.0 1910011930 Contents About This Guide...1 Chapter 1. Get to Know About Your Access Point.................... 2 1. 1. Product
300 Series Cube Wireless HD Surveillance Camera with Microphone. Installation Manual. Important! Ensure your NVR has the latest firmware!
 300 Series Cube Wireless HD Surveillance Camera with Microphone Installation Manual Important! Ensure your NVR has the latest firmware! Read this page before you go to the job site! 2 For maximum control
1. Press "Speed Test" to find out your actual uplink and downlink speed.
 ASRock G10 Gaming Router 6.4 QoS Settings QoS Add Gaming Boost web page. Gaming Boost: Enable or disable the Gaming Boost. Bandwidth The router supports Gaming Boost natively, which identifies and intelligently
Table of Contents Overview of Fingerprint Technology...3 Introduction...3 System Requirements...4 Installation Guide...5
 Table of Contents Overview of Fingerprint Technology...3 Introduction...3 System Requirements...4 Installation Guide...5 Connecting the AccuTime Scanner...5 Installing the software...5 Initial startup
Hardware Quick Setup Guide
 Hardware Quick Setup Guide Contents: Page 1.. How to set time and date on the terminal..2 2.. How to enroll a finger and a backup finger.......2 3.. For the user who has difficulties passing finger scanning:...3
How to upgrade firmware in DSL-xxx series router
 How to upgrade firmware in DSL-xxx series router WARNING: DO NOT upgrade the firmware through a wireless connection. You may damage the router. Note that you will have to reconfigure the router after upgrading.
K Series Economic Models User Manual
 About this manual K Series Economic Models User Manual Version: 1.0 Date: July 2014 About This Manual This document describes the GUIs and menu operations of the K series economic models. I About this
Admin Mobile App (APP_102)
") Admin Mobile App (APP_102) Feature: eschoolplus Admin Mobile App Target Audience: Building Administrators Overview of eschoolplus Admin Mobile App Developed for ios and Android, the eschoolplus Admin Mobile
Admin Mobile App (APP_102) Feature: eschoolplus Admin Mobile App Target Audience: Building Administrators Overview of eschoolplus Admin Mobile App Developed for ios and Android, the eschoolplus Admin Mobile
1. Install the DANALE app. 2. Create an account
 USER S MANUAL EN 1. Install the DANALE app For Android users On your Google Play Store, search for Danale and then install the app on your phone. For ios users Please open your App Store, search for Danale
CS TIMECLOCK QUICK START MANUAL
 CS TIMECLOCK 3150 QUICK START MANUAL Document Date: March 2009 Document Status: Version 1.2 Program Status: Implemented in CS TimeClocks version 1.15 and later. 2009 by CapeSoft Software (pty) Ltd TABLE
Deploy a Customer Site
 Local Administration, on page 1 Run Port Check Tool, on page 4, on page 4 Add Cisco Wireless IP Phone 8821 to the Wireless LAN, on page 6 Provision the Phone, on page 7 Local Administration You can connect
FREUND SIP SW - V SIP-server setup
 FREUND SIP SW - V1.7.13 SIP-server setup Content 1. Product Setup 4 2. Log in and Home 5 3. Menu 9 3.1 Tools 9 3.1.1 Dashboard 9 3.1.2 Extensions 10 3.1.3 Trunks 14 3.1.4 Groups 18 3.1.5 Ring groups 20
Software Manual. For Fingerprint Attendance System
 Software Manual For Fingerprint Attendance System Content: 1 PRECAUTION... 4 2 GETTING STARTED...4 2.1. HOW TO COMMUNICATE THE SYSTEM WITH THE READER TERMINAL... 4 3 HOW TO USE FINGERPRINT T & A MANAGEMENT
Set Up and Use Your Kiosk... 1
 Kiosk User Guide Kiosk User Guide Contents Set Up and Use Your Kiosk... 1 Download the Application... 1 Enable Auto-Updates... 1 Technical Support... 2 Access the User Guide... 2 Report a Technical Problem...
IndustrySafe Guide to Importing and Editing Inspection Checklist
 IndustrySafe Guide to Importing and Editing Inspection Checklist This guide describes the process for uploading and editing inspection checklists using the IndustrySafe Safety Management Software. 1 Log