S-Drive Lightning User Guide v2.1
|
|
|
- Joseph Blankenship
- 5 years ago
- Views:
Transcription

1 S-Drive Lightning User Guide v2.1 Important Note This user guide contains detailed information about S-Drive for Salesforce Lightning usage. Refer to the S-Drive User Guide for more information about S-Drive usage in Salesforce Classic. Refer to the S-Drive Installation Guide and S-Drive Advanced Configuration Guide for more information about installation/configuration of S-Drive product and the S-Drive Quick Reference Guide for quick reference.
2 Contents A. S-Drive Folders Screen... 3 B. mydrive Folders... 6 C. View Types Preview Details Window D. Creating Folders E. Uploading Files F. Deleting Files Single File Deletion Multiple File Deletion G. Deleting Folders H. ing Files I. Post Files to Chatter J. Downloading Files One File Download Zip & Download (Multiple File and Folder Download) K. Opening Files L. Moving Files M. Copying Files N. Editing File/Folder Description O. Copying URL to Clipboard P. Sharing Files & Folders Q. Uploading New Version of a File R. Previous Versions of File S. Searching Items T. ios (ipad, iphone, ipod) Support U. S-Drive Attachments Account Files Contact Files Opportunity Files Case Files
3 5. Other Standard/Custom Object Files V. S-Drive Advanced Search Searching Files Configuring S-Drive Advanced Search Component W. SDriveTools API a. getattachmenturl() b. getattachmenturls() c. id15to18() d. getaccesskey() e. getbucketname() f. gets3endpoint() g. deletefiles() h. initializeupload() i. completeupload() j. cancelupload() k. getamazonheaders() l. initializemultipartupload() m. copypartmultipartupload() n. completemultipartupload() o. deletemultiparts() p. abortmultipartupload() q. inheritsharings() r. Uploading Files to S-Drive (Amazon S3) s. getpreviewurl() t. getpreviewurls() u. getthumbnailurl() v. getthumbnailurls() X. S-Drive Support
 is the \"Folders\" panel. It displays your account's folder structure.")
4 A. S-Drive Folders Screen S-Drive Folders screen is mainly divided into three panels. Let's first learn more about S-Drive Folders screen: 1. S-Drive Folders Figure 1 Left panel (Figure 1-1) is the "Folders" panel. It displays your account's folder structure. Your home folder is named as "Home" and your folders are listed in a hierarchical way. You can click on a folder name to display its contents in the right pane. If a top-folder has sub-folders under it, it will show its contents on the panel when clicked. 2. Toolbar Top panel (Figure 1-2) is the "Toolbar" panel. It displays breadcrumb navigation for folders, search box, action buttons and view type buttons. 3
5 Figure 2 (a) "Breadcrumb Folder Navigation" keeps the current folder information. For example, if you are under "Home/Animals/Cats" folder, the location information will be displayed in this area (Figure 2-a). You can click any level to drill down to that subfolder. (b) Home button is functioning same as Home link on breadcrumb navigation. It directs to root folder of S-Drive Folders. (c) Select All -Dropdown button is used to Select All or Deselect All items in the list. (d) Sort -Dropdown button is used to sort File List below. If a field selected (i.e. Create Date) files sorted by selected field as ascending order. If same field selected again it is sorted by descending order. (e) "Download File(s)" button is used to download selected file(s). If just one file selected it directly download file. If more than one file or folder selected, it creates a zip file and download it. (f) "Upload File(s)" button is used to upload file(s). See "Uploading Files" section for more information (Figure 2-f). This item is not displayed for the "Search Results View". (g) " Files" button is used to files. See " ing Files" section for more information (Figure 2-g). (h) "Create New Folder" button is used to create folders. See "Creating Folders" section for more information (Figure 2-h). This item is not displayed for the "Search Results View". (i) "Delete Selected File(s)" button is used to delete file(s) or folder(s). See "Deleting Files" and "Deleting Folders" sections for more information (Figure 2-i). (j) "Cut" button is used to move file(s) between folders. See "Moving Files" section for more information (Figure 2-j). (k) "Copy" button is used to copy file(s) between folders. See "Copying Files" sections for more information (Figure 2-k). 4
6 (l) "Paste" button is used to paste the copied or cut file(s) to a folder. This button is not visible until files are selected for cut/copy. See "Moving Files" and "Copying Files" sections for more information (Figure 2-l). This item is not displayed for the "Search Results View". (m) Custom Actions button is used to perform custom actions. See Custom Actions section in S-Drive Advanced Configuration Guide for more information. (n) It changes current view to List view. For more information, you can look at View Types section. (o) It changes current view to Thumbnail view. For more information, you can look at View Types section. (p) It changes current view to Grid view. For more information, you can look at View Types section. (q) By Settings dropdown menu button, you can set current View Type of S-Drive Folders page as default and set current Sort Field as default. Also, you can select whether to Hide Breadcrumbs and/or Hide Folders Tree View. a. Save View Type as Default : If this item is selected, it saves current view type to settings. When S-Drive page is opened, File List is shown in selected view type by default. b. Save Sort Field as Default : If this item selected, it saves current sort field to settings. When S-Drive page is opened, File List is ordered by selected field. c. Hide Breadcrumbs : If this item is selected, breadcrumbs (Figure 3-a) will not be shown in the panel. d. Hide Folders Tree View : If this item is selected, left panel shown in Figure 1-1 will not be shown. (r) "Search Box" is used to search items (files, folders) in S-Drive Folders. Refer to the "Searching Items" section for more information (Figure 2-q). (s) mydrive toggle button is used to navigate to mydrive folders. See mydrive section for more information. 5

7 B. mydrive Folders After the installation of S-Drive and clicking on S-Drive tab on the tabs menu, or S-Drive app in App Menu in Lightning Experience, you will navigate to your S-Drive page. The regular S-Drive page will be opened, and on the right-hand side of the toolbar menu, under the search bar, you will see a toggle button called mydrive. When you click on this button you will switch into a new page called mydrive. Figure 3 mydrive provides a new place to upload your files and create new folders that are only visible to you and no one else in your organization. mydrive is not available for Communities or Attachments. In mydrive, you can upload files, create folders, download or delete files and folders, and perform cut/copy/paste options, search for files in mydrive just as you do in S-Drive. The main difference of mydrive is that this place is private only to you. Therefore, you will not find any sharing related actions, such as Share, and Chatter in mydrive. Figure 4 To go back to S-Drive files, you can use the toggle button. Note: If your admin changed the settings of MyS3Object in Salesforce s Sharing Settings, your files and folders in mydrive might be visible to others. To make your mydrive private to you, contact your admin to change the sharing settings to private. 6
8 C. View Types A. List View List view is default S-Drive view for all users. There is no any thumbnail or preview image for this view type. The files are listed in a regular order in this view type (Figure 5). Figure 5 (1) First column contains "Select All" and "Select Single Item" check box options. This column is used to select items for multiple processing (download, , delete, cut, copy). You can select items by clicking checkboxes. (2) "Actions" column is used to display action buttons. Based on the sharing settings, you can see "Item Actions Menu" by down arrow button inside the Actions column. There are two quick buttons for constantly used actions: Download & Delete. Once you click the arrow button, you'll see a dropdown menu under the button. Let's review the details about these item actions. 7
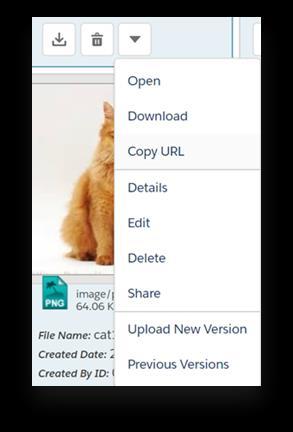
9 Figure 6 (a) Open: It opens files that browsers support to view. If browser cannot open, it will be downloaded. (b) Download: You can download the selected file by selecting this action menu item. If you start download action for a folder, it creates a zip file then download it. See "Downloading Files" section for more information. (c) Copy URL: This option is displayed only for files. You can copy the file download URL to the clipboard. See "Copying URL to Clipboard" section for more information. (d) Details: For a file or folder when you click Details action, A modal window opened with file thumbnail and all information about file or folder. For more information, see Details Window. (e) Edit: This option is displayed for both files and folders. You can edit file/folder description by clicking this action menu item. See "Editing File/Folder Description" section for more information. (f) Delete: This option is displayed for both files and folders. You can delete selected file/folder by clicking this action menu item. See "Deleting Files" and "Deleting Folders" sections for more information. 8
10 (g) Share: This option is displayed for both files and folders. You can share file/folder by clicking this action menu item. See "Sharing Files & Folders" section for more information. (h) Post to Chatter: This option is displayed only for files. You can post your thoughts related to this file by clicking on this action menu item. See Posting to Chatter section for more information. (i) Upload New Version: If versioning is enabled version actions are shown on menu. By this action, you can upload versions of a file. (j) Previous Versions: By this action, Versioning List page is opened, and all versions are listed. For more information please see Uploading New Version of a File and Previous Versions of File sections. (k) Custom Actions: You will see the custom actions that is built by your admin or developer in this section. Clicking on one of these actions will perform the custom action. See Custom Actions section in S-Drive Advanced Configuration Guide for more information or contact your admin if you have questions on the custom actions that is built for your organization. (3) "File Type Icon" column is used to distinguish file types. Folders, text files, image files etc. have different icons. You can sort by file types by clicking the column header (Figure 5). (4) "File Name" column is used to display file names (including file extensions) and folder names. You can sort by file name alphabetically ascending or descending by clicking the column header (Figure 5). (5) "Created Date" column is used to display the file upload date. File creation date is displayed in the month/day/year hour: minute form. You can sort files by creation dates ascending or descending by clicking the column header (Figure 5). (6) "Created By ID" column is used to display the file creator information based on the logged in user while uploading the file. You can sort files by created by field alphabetically ascending or descending by clicking the column header (Figure 5). (7) "Description" column is used to display the custom description of the file/folder. This description is saved while uploading the file or creating the folder by the user. It can also be edited easily at any time. (Figure 5). 9
11 (8) "File Size" column is used to display file size information. Folders have 0 bytes file size. You can sort filenames by file size ascending or descending by clicking the column header (Figure 5). B. Thumbnail View On thumbnail view, addition to List View there is thumbnail image of the document. Thumbnail view is active only for users who enabled Preview & Thumbnail feature. Figure 7 C. Grid View On Grid view, each item is listed on grid-card style with same height (Figure 9). To select grid view, Preview & Thumbnail feature should be enabled. In the Grid view, action buttons, menu & selection checkbox are different (Figure 10): 10
 Detail Window: When hovering thumbnail image there is a glass icon on the center. If you click on image Detail Window is opened. To see more information please check Detail Window section.")
. 5) Action Menu Button: You can access all actions about file or folder to click this down arrow button (Figure 8-5).")
12 Figure 8 1) Selection Checkbox: When mouse hovers over thumbnail image, a checkbox is shown on the top-left side. You can select or deselect item by using this checkbox. (Figure 8-1). 2) Detail Window: When hovering thumbnail image there is a glass icon on the center. If you click on image Detail Window is opened. To see more information please check Detail Window section. (Figure 8-2). 3) Download Button: You can download file or folder by using this button. (Figure 8-3). 4) Delete Button: It deletes file or folder. To see more information, you can see Delete section. (Figure 8-4). 5) Action Menu Button: You can access all actions about file or folder to click this down arrow button (Figure 8-5). To get detail information on actions menu please check List View \ Actions section. 11

13 Figure 9 Figure 10 12

14 1. Preview Details Window On Thumbnail, Grid and Card views when clicking thumbnail image of file, or on Action Menu clicking Details item, Detail View shows up. In the Detail page there are different tabs to navigate, to view different kind of information about the file. These three tabs are Detail, Chatter and Audit. The Detail view consist of three main parts: Preview image of file if it exists, File properties & custom fields and Action buttons. To get detailed information on actions menu please check List View \ Actions section. Figure 11 13
15 The Chatter view consist of two parts: the publisher and the feed. To get detailed information on Chatter please check Chatter section. Figure 12 The Audit view consist of information about the URL of the file, the created and expiration date, and hit and download counts. Figure 13 14
16 D. Creating Folders You can create folders by clicking "Create New Folder" button in the toolbar (Figure 2-h). You can create any number of sub-folders in a folder. Go to the folder that you want to create a sub-folder. Click "Create New Folder" button. After clicking the "Create New Folder" button, a new pop-up screen will be opened (Figure 14): Figure 14 (1) "Folder Name": Type in the new folder name into this field. You have 255 characters' limitation for the folder name. You can rename a folder after creation. Filling in this field is mandatory (Figure 14-1). (2) "Description": Type in the folder description into this field. You can use folder description to describe the folder. This field is an optional field that means you don't have to supply a description. You have characters' limitation for this field. However, you should keep it short for readability (Figure 14-2). (3) "Inherit Sharing from Parent Folder": If you're creating a folder in a subfolder and you have sharing enabled, you can inherit sharing from parent folder. Inheriting sharing from parent folder means all manual shares that are defined on parent folder will be applied to newly created folder (Figure 14-3). You won't be able to see this option if you're creating a folder at the "Home" level or if you do not have permissions for sharing. (4) "Close Button": If you decide not to create a folder, you can click on Close button. Operation will be canceled, and you'll return to the S-Drive Folders screen (Figure 14-4). 15
. Notes 1.")

17 (5) "Create Button": After filling in the required fields, you can click on Create button to create the new folder. S-Drive will create the new folder and refresh the folder structure for you (Figure 14-5). Notes 1. If you try to create a folder without a name, with forbidden characters, or with a name that exists in the current folder you'll get one of the warning messages below: - Required fields are missing [File Name]. - You are attempting to create a folder that has the same name with an existing folder! You may not have access to the existing folder because of sharing rules.'. Click OK and then specify a new name to the folder. 2. "Create Folder" button becomes invisible if you do not have permissions to create a folder. 3. "Create Folder" button becomes invisible for the "Search Results View" once a search operation is performed. So, you cannot create a folder in the search results screen. You need to click "Home" button and go to the folder where you want to create the subfolder. E. Uploading Files You can upload files by clicking "Upload File(s)" button in the toolbar (Figure 2-e). You can upload any number of files into a folder at a time. Go to the folder that you want to upload files. Click "Upload File(s)" button. After clicking the "Upload File(s)" button, a new pop-up screen will be opened as shown in Figure

18 Figure 15 (1) "+ Add" File(s) Button: You can add files to the upload list by using this button. After clicking the (+) sign, "Select file(s)" screen will be opened. You can browse your computer and select files to upload. To select multiple files at a time from a folder, click on each file while you are holding Ctrl key. After selecting files to upload, click Open button. Selected files will be added to the Upload Files screen. Note that selected files are not uploaded yet, you are just creating an upload list. You can use Add file(s) and Remove file(s) buttons multiple times to organize the upload list. (2) "- Remove file(s) Button: After adding some files to the "upload files list", you may decide to remove some files from the list. You can do this by selecting the file(s) from list and then clicking "Remove file(s)" button. To select multiple files, hold the "Ctrl" key, while selecting files to be deleted. (3) "Upload Progress Bar": This progress bar displays the upload information after clicking the "Upload file(s) Button". For Html Upload Widget, percentage of the progress (i.e. 49%) and the uploaded files count of total files count (i.e. 1/2) is displayed in the upload progress bar. If upload is completed successfully, it displays "Upload(s) completed successfully" message inside the progress bar. You can cancel the upload at any time by clicking the "Cancel Upload" button. (Note: Cancel Upload button is just visible while upload is in progress. 17
 Button\" will change to \"Cancel Upload Button\" while upload is in progress. You can cancel the upload any time by clicking this button.")
19 Figure 16 (4) "Upload File(s) Button: After selecting the files to be uploaded and editing their description, you can click this button, to start uploading files. "Upload file(s) Button" will change to "Cancel Upload Button" while upload is in progress. You can cancel the upload any time by clicking this button. If you cancel the upload, the current file which is being uploaded will be canceled. For example, if you select five files to upload and after uploading two files you decide to cancel the upload process, first two files will be uploaded but the process will be canceled after third file. There is also another possibility for the files that it may fail. Failing the upload for a file won't impact other file uploads, but it will be noted that it "FAILED" in the status column of the upload list after the upload completed. If you click to the "Upload file(s)" button after a failure or cancellation, "COMPLETED" files in the upload list will be skipped for this iteration and only unprocessed, failed or canceled items will be uploaded. (5) "File Column": This column displays the names of the files to be uploaded. (Figure 15-5) (6) "Size Column": This column displays the sizes of the files to be uploaded. (Figure 15-6) Notes 1. Html Upload Widget also supports custom object fields to edit these fields values before uploading. 1. "Status Column": This column displays the status of the files which are being uploaded. For HTML Upload, there are five possible scenarios: Queued, Uploading, Multipart Processing, Done and Failed. Figure 17 18

20 - Queued: Current file in the list is queued for upload. User can remove this file clicking this delete button. - Uploading: current file in the list is being uploaded to the S-Drive. - Multipart Processing: current file in the list is processing for multipart operations like copy part, complete multi part. This may take long time. - Done: current file in the list is successfully uploaded to the S-Drive. - Failed: current file is failed to upload. This may happen because of a system problem or user canceled the upload operation or also if you select "No" for the "Overwrite file?" question. For Html Upload, you can hover on the status of the individual item to display the details of a FAILED or CANCELED status. 2. "Close Button": This button is used to close Upload Screen. It is not enabled while upload is in progress. If you want to close the upload screen while an upload is in progress, first you need to cancel the upload. Notes 1. If you try to upload a file with a name that exists in that folder, you'll get a warning message saying, "Do you want to overwrite the file?" There are four possible answers: Yes, No, Yes to All and No to All (Figure 18). You may get this message multiple times for multi-file uploads for each file that has the same name of a file or folder in the uploaded folder. Figure 18 - If you select "Yes", file will be replaced with the uploaded file. After a successful completion its status will become COMPLETED. - If you select "No", new file won't be uploaded. Old file will stay in S-Drive. Upload status for this file will be set to FAILED. 19
 file, you'll get an error saying \"You can't upload a zero-length file! (File Name)\" (Figure 19). Click OK and select another file to upload. Figure 19 3.")

21 - If you select "Cancel", upload process will be canceled, and file upload status will be set with CANCELED. If this is a multi-file upload, files after canceled file won't be processed. 2. If you try to upload a 0-byteslength (blank) file, you'll get an error saying "You can't upload a zero-length file! (File Name)" (Figure 19). Click OK and select another file to upload. Figure After processing the upload list, you'll be informed by saying "Upload(s) completed successfully" if list is processed without any errors (Figure 20). After clicking OK button, upload screen will be closed, and the current folder will be refreshed. Figure "Upload File(s)" button becomes invisible if you do not have permissions to upload file(s). 5. "Upload File(s)" button becomes invisible for the "Search Results View" once a search operation is performed. So, you cannot upload file(s) to the search results screen. You need to click "Home" button and go to the folder where you want to upload file(s). F. Deleting Files There are two possible ways to delete files: "Single File Deletion" or "Multiple File Deletion". Note that "Deleting Folders" will be handled in a different topic. 20
. Using this method, you can delete files one by one. The files you chose to delete will immediately go to the Recycle Bin.")
22 1. Single File Deletion Figure 21 To delete a file, click the "Item Actions" button in the "Actions" column of the selected file and select "Delete" item menu action from the dropdown menu (Figure 21). Using this method, you can delete files one by one. The files you chose to delete will immediately go to the Recycle Bin. In Recycle Bin you can choose to delete the files permanently or restore them. You can access recycled files/folders by clicking on the Recycle Bin button which is at the bottom of the Folder s Tree. Figure 22 21
.")
23 When you navigate to Recycle Bin, you will see the list of files and folders you have deleted. You can recover or delete the files/folders in Recycle Bin. You can choose multiple items to delete or recover at once. For these purposes you can use the Toolbar menu buttons or the Actions menu (Figure 23). Figure 23 When you recover files/folders they will be sent back to where they were located before deletion. If you decide to delete the files, you can click on the Delete File item action or the Delete button on the Toolbar. After clicking the "Delete File" item action menu you'll be asked if you are sure (Figure 24). Figure 24 If you select "Yes", file will be deleted immediately, and you'll return to the S-Drive Folders screen. If you select "Cancel", file won't be deleted, and you'll return to the S-Drive Folders screen. 22 Notes 1. If versioning is enabled and selected file has versions, all versions of selected file will also be deleted.

24 2. Multiple File Deletion Figure 25 To delete multiple files at a time, select files and then click the "Delete File(s)" button in the toolbar of the S-Drive application (Figure 25). The files you have chosen to delete will immediately go to the Recycle Bin. In Recycle Bin you can choose to delete the files permanently or restore them. You can access recycled files/folders by clicking on the Recycle Bin button which is at the bottom of the Folder s Tree. 23
25 Figure 26 When you navigate to Recycle Bin, you will see the list of files and folders you have deleted. You can recover or delete the files/folders in Recycle Bin. You can choose multiple items to delete or recover at once. For these purposes you can use the Toolbar menu buttons or the Actions menu (Figure 27). Figure 27 When you recover files/folders they will be sent back to where they were located before deletion. Using this method, you can delete multiple files at a time. After clicking the "Delete File(s)" button you'll be asked if you are sure. Select "Yes" to delete selected files, "Cancel" to cancel delete operation. 24
26 Notes 1. If versioning is enabled and selected file has versions, all versions of selected file will also be deleted. G. Deleting Folders You can delete folders using the same approach mentioned in the "Deleting Files" section. However, there are some limitations for the folders. When you try to delete a folder, the delete request should not exceed the maximum CPU time on the Salesforce servers. If you cannot delete the folder because of this issue, you need to select a smaller set of folders, to be able to continue with delete process. Notes 1. If you try to delete another user s file or folder, you may get an error message: "You don't have enough permission to delete this file!" (Figure 28) that means there are sharing restrictions over files set by your System Administrator or the file owner. You need to obey the restrictions set by your System Administrator (or file owner). You need to contact with your System Administrator or file owner to correct any sharing related problem. Figure 28 Notes on File Recovery Please consider these situations when you delete / recover files and folders. 1. If you want to delete a file or folder permanently, first you must delete them from the S-Drive folders, and then delete them from the Recycle Bin. 2. If you delete a sub-folder and then delete the folder it was placed, both folders will be displayed in the Recycle Bin. When you try to recover the sub-folder, it will be sent to the main file, and still be in recycle bin. In order to recover any sub-folders or files, you should recover the main folder they are in. 25

27 3. If you send some files to Recycle Bin in Lightning Experience, the files won t be deleted in Classic. H. ing Files ing files is very easy using S-Drive. You can any number of files at a time. S-Drive does not attach files to s; it adds links to the files at the bottom of the message. You can set the expiration time for these links also. So, you and your recipients don't have to wait for sending/downloading large attachments. They'll just click the link in the and they'll download attachments directly from source in a secure and fast way. You can use templates in your organization. Let's see how this can be done (Figure 29). First select the files to from the folder you want by clicking checkboxes next to each file, then click " " button in the toolbar. screen will be opened. Figure 29 Files screen contains many features (Figure 30). Let's review the details of the fields in this screen: 26
28 Figure 30 (1) " Format": Used to select the format. If you want to remove any HTML formatting and send a text , click "Switch to Text-Only". Click "Switch to HTML" to use HTML formatting or to track the . This option will not be displayed if you selected an HTML template from the "Select Template" menu (Figure 30-1). (2) "To...": The main recipient of the (Figure 30-2). This field has to be filled with a Salesforce contact. You cannot type in the address; you need to search for contacts by clicking the "Lookup" button (Figure 30-14) and then getting a user from the list. You can also type in some characters of the contact name and then click the lookup button. After clicking the "Lookup" button "Search Contacts" screen will be opened (Figure 31). If you decide to change or remove the "To..." recipient of the you can clear this field. "Lookup" button is not available for Customer Portal users. This field is used just for sending to Salesforce contacts. Other recipients can be added to "Additional To...", "CC..." and "BCC..." fields. Also note that the message is added to the Activity History of the Salesforce.com contact. You can access activity history of a contact from his contact page under Salesforce.com Contacts tab. See S-Drive Advanced Configuration Guide for enabling Activity History for standard and custom objects. 27
 \"Search Criteria\": Type in the search criteria in this field.")
29 Figure 31 Important Note: For Contact, Account, Case and Opportunity S-Drive Attachments, "To" field is auto-filled with related contact information, if available. You can configure this option for custom objects using "S-Drive Advanced Configuration Guide Creating Custom Object Files" section. (a) "Search Criteria": Type in the search criteria in this field. S-Drive searches over name, last name and fields for the typed keyword after clicking the "Go" button or pressing the Enter key. You can leave it blank and press "Go" button to search across all of your contacts (Figure 31-a). (b) "Go Button": After typing in the search criteria, click this button to start the search and retrieve the search results (Figure 31-b). (c) "Name Column": Results will be listed in this section after the search. Results' name will be displayed in this column (Figure 31-c). (d) " Column": Results' s will be displayed in this column (Figure 31-d). (3) "Additional To...": You can add additional mail recipients here. For multiple recipients you need to comma-separate them. Also, you can click the "Lookup" button (Figure 30-14) to select recipients from Salesforce contacts (Figure 30-3). "Lookup" button is not available for Customer Portal users. (4) "CC...": Carbon copy the . If you want to carbon-copy the to some recipients, you can add them comma-separated here. Also, you can click the "Lookup" button (Figure 30-14) to select recipients from Salesforce contacts (Figure 30-4). "Lookup" button is not available for Customer Portal users. 28
 to select recipients from Salesforce contacts (Figure 30-5). \"Lookup\" button is not available for Customer Portal users.")
30 (5) "BCC...": Blind carbon copy the . If you want to blind-carbon-copy the to some recipients, you can add them comma-separated here. Also, you can click the "Lookup" button (Figure 30-14) to select recipients from Salesforce contacts (Figure 30-5). "Lookup" button is not available for Customer Portal users. (6) "Attachment Expiration": This field is used to set the expiration time for the attached files (Figure 30-6). Default is "Never Expires" (but organization-wide default value can be customizable over "S-Drive Configuration", consult to your system administrator to change the default value). Means that link in the will be active until the account is closed or the file is deleted. If you uncheck "Never Expires", other options will appear (Figure 32). If you check the "Never Expires", other options will disappear again. For example, if you select 30 minutes for the attachment expiration, recipients of the will not be able to download the attached files after 30 minutes of sending the . Figure 32 (a) "Number Field": Type in the number for the selected time type (i.e. 30 minutes, 4 hours, 5 months) (Figure 32-a). For this field, only positive integer values are allowed. If you type another character, you'll get " attachment expiration must use just numbers (e.g. 50)!" error message. (b) "Time Type": You can select minute(s), hour(s), day(s), month(s) or year(s) for this field (Figure 32-b). (7) "Attachment Details": This section gives information about attached files (Figure 30-7). If you click "Details" button next to the "X attachment(s)" text, you ll see the file names and file sizes of the attached files. You can remove attached files using red - button next to the attached file name. You can hide attachment details by clicking "Details" button again (Figure 33). Figure 33 29
31 (8) "Subject": Type the subject of the mail to this field. This field is required. If you select a template this section is auto filled with the subject of the template (Figure 30-8). (9) "Body": Type the message to this field. If you select a template this section is auto filled with the body of the template (Figure 30-9). (10) "Use Signature": If you want to use your signature that you created over Salesforce account, check this option. If you do not want to append signature to the , uncheck this option (Figure 30-10). "Use Signature" option is not available for Customer Portal users. To display or change your signature, login to your Salesforce account. Go to "Setup -> Personal Setup -> -> My Settings" and you'll see a section named " Signature". (11) "Send Button": To send your message, click Send button (Figure 30-11). If everything is fine, you'll get " has been sent successfully" message. If it fails, you'll get " Failed" message along with the reason of the failure (Figure 34). Figure 34 (12) "Select Template": You can click "Select Template" button to choose a predefined template. Choose a folder and select a template from the folder. If necessary, you can modify the content of the template in your ; however, you cannot modify Custom templates (Figure 35). Once you select the template screens "Subject" and "Body" sections will be filled with the contents of the predefined template. Template selection screen is not available for Customer Portal users. 30


32 Figure 35 (13) "Close": You can close screen by clicking this button. It will close the screen and return you back to the S-Drive screen (Figure 30-13). Notes 1. You cannot folders. If you try to a folder as an attachment, you'll get "You can t a folder. Please check your selection list and try again!" message (Figure 36). Figure 36 Important Note: Attach from S-Drive Folders button is not supported at the moment for S-Drive for Salesforce Lightning Experience. It will be supported with the upcoming patch releases. See S-Drive User Guide for more information about attaching files in Classic version of Salesforce. 31
33 I. Post Files to Chatter You can make comments on different files you have on your S-Drive files. For this purpose, you can use the Post to Chatter functionality. Click on Item Actions Menu of a file and click on Post to Chatter (Figure 37). Figure 37 Choosing this option will open a pop-up dialogue where you can share your thoughts on these files with Salesforce s Chatter. Figure 38 32

34 In this pop-up page, you can either post your thoughts, or create a poll and mention users who have access to this file. See the URL of the file in this pop-up box, by clicking on the Show URL button on the bottom left side. Figure 39 You can reach the Chatter posts about the file from the Detail page of the file, by clicking on the Chatter tab (Figure 40-1). In this page you can also share posts (Figure 40-2). Figure In Detail page you can click on the Chatter tab to see the chatter related information the posts and comments about the file. 2. In this place you can also post your thoughts about the file. 3. Here you can reach the chatter feed. Posts which are made about the specific file will be displayed in this section. 33
35 Figure 41 You can also like the posts, make comments about them and vote on polls. The results of these polls can also be displayed in this section. Note: In order to enable chatter, you should enable it using the S-Drive Configurations and also your Feed Tracking in Salesforce should be enabled on the object type s you want to make posts about. If you do not enable Feed Tracking, you won t be able to use Chatter on S-Drive. Figure 42 J. Downloading Files There are two ways of downloading files in S-Drive: "One File Download" and " Zip & Download (Multiple File & Folder Download)". 34

 If you choose multiple file and click download button on S-Drive Toolbar, or if you try to download folder by action menu, our")
36 1. One File Download Figure 43 You can download individual files by clicking "Download" item menu action and download shortcut button from the "Item Actions" button (Figure 43). If "Download" item menu action is selected for file item, download will be controlled by the browser you use (Internet Explorer, Firefox, Chrome, Safari, Opera etc.) If you select Download action for a folder it directs to Zip & Download. 2. Zip & Download (Multiple File and Folder Download) If you choose multiple file and click download button on S-Drive Toolbar, or if you try to download folder by action menu, our service prepares folders and files into a zip file, and start to download zip file automatically (Figure 44). Figure 44 35
37 After Zip file prepared, download starts. Zip file is handled by browser, for some browsers download may start immediately, some browsers may ask to download file or not (Figure 45). Zip file can be found under browser s defined download folder. Zip file is named as [YEAR][MONTH][DAY][HOUR][MINUTE][SECOND]_[OBJECT NAME].zip. Figure 45 K. Opening Files If you want to open the files automatically, you should click "Open" link (Figure 46). Figure 46 Notes 1. You should make some configurations for browsers (Internet Explorer, Firefox, Chrome, Safari, Opera etc.) to enable some types of files for opening. You can reference below links: Internet Explorer: Chrome:

 button at the top menu (Figure 47).")
.")
38 Firefox: L. Moving Files You can move files between directories in S-Drive. To do this, first you need to select files to move. Then click the "Cut"( ) button at the top menu. Go to the folder where you want to paste the files, select "Paste" ( ) button at the top menu (Figure 47). Figure 47 If sharing is enabled, it will ask if you want to bring the current sharings with the cut item(s). You can select "Yes" or "No" based on your decision (Figure 48). Figure 48 It will start the paste operation and a progress bar will be displayed in the middle of the screen (Figure 49). You can cancel the paste operation anytime by clicking "Cancel" button. After completion of the paste operation this pop-up screen will disappear. 37


39 Figure 49 If there is already a file with that name inside the target directory, S-Drive will warn you with "Do you want to overwrite?" message (Figure 50). Figure 50 If you select "Yes", it will overwrite the file and if there are other files in move list, it will process them. If you select "No", it will skip that file and process other files in the move list. If you select "Cancel" it will cancel the move process and won t process the files left. Notes 1. "Cut" and "Paste" buttons become invisible if you do not have permissions to cut/paste items in the current folder. 2. File will be "Cut" and "Paste" with all its versions, if you have versions under this file. 38
 button at the top menu.")
.")

40 M. Copying Files You can copy files between directories in S-Drive. To do this, first you need to select files to copy. Then select "Copy" ( ) button at the top menu. Go to the folder where you want to paste the files and select "Paste"( ) button at the top menu (Figure 51). Figure 51 If sharing is enabled, it will ask if you want to bring the current sharings with the cut item(s). You can select "Yes" or "No" based on your decision (Figure 52). Figure 52 If there is already a file with that name inside the target directory, S-Drive will warn you with the "Do you want continue with paste operation?" message (Figure 53). Figure 53 If you select "Yes", it will paste the file and if there are other files in copy list, it will process them. If you select "No", it will skip that file and process other files in the copy list. 39
41 Notes 1. "Copy" and "Paste" buttons become invisible if you do not have permissions to copy/paste items in the current folder. 2. If you have versions of your file, only latest version of the will be copied. N. Editing File/Folder Description To edit description of a file/folder, select a file/folder. Then go to the "Actions" tab of the selected file/folder. Click to the "Item Actions" button and select "Edit" item menu action from the dropdown list (Figure 54). Figure 54 The Detail page of that file/folder will be opened. You can change the name and description here and click Save button to save changes. If you click on Back button, the changes will not be saved, and you will be directed to S-Drive Folders screen. Figure 55 Notes 40
.")
42 1. If you try to edit description of a file/folder that you do not have edit permissions, you'll get "You don't have enough permission to update this file!" error message (Figure 56). Figure 56 41
. Figure 57 After clicking this button, Copy URL pop-up will be displayed (Figure 58). Select the URL by clicking \"Copy\" button in this pop-up.")
43 O. Copying URL to Clipboard To copy URL of a file to clipboard, click "Item Actions" button next to the file and click "Copy URL" action menu item to copy the URL of the selected file to the clipboard (Figure 57). Figure 57 After clicking this button, Copy URL pop-up will be displayed (Figure 58). Select the URL by clicking "Copy" button in this pop-up. You can close this pop-up by clicking "Close" button. After clicking Copy button, the button changes to COPIED! and the Copy URL for the picture becomes available for usage. Figure 58 You can paste it to any document or you can use it to access file from browser. For example, if you paste it to the Internet Explorer address bar after copying it, you will get a direct download link for the file (Figure 59). Figure Notes 1. This feature is not enabled for folders. Because folders don t have URLs in S-Drive. "Copy URL" item menu action is invisible for the folders.
.")
44 2. If you want to use shorter URLs, please see S-URL section in S-Drive Advanced Configuration Guide. P. Sharing Files & Folders S-Drive Folders supports object level sharing. You can share files and folders by clicking "Item Actions" button under "Actions" column and selecting "Share" action menu item from dropdown for individual files and folders (Figure 60). Figure 60 Once you select "Share" action menu item, current shares on the file will be listed in a pop-up (Figure 61). You can review the shares on the object, add new shares, and edit/delete manual shares, using this screen. Figure 61 43
. If name is underlined, you can click to open the details in a new window.")
45 "Action" column is used to edit or delete the manual shares (Figure 61-1 and Figure 61-2). "Type" column displays the type (user, group, role etc.) of the sharing (Figure 61-3). "Name" column displays the name of the user/group/role etc. that item is shared (Figure 61-4). If name is underlined, you can click to open the details in a new window. "Access Level" column displays if the share is "read only", "read/write" (Figure 61-5). "Reason" column displays the reason of the sharing (Figure 61-6). Only manual shares are editable, other types of shares (owner, custom object sharing rule etc.) are for view purposes. You can add new shares by clicking "New Share" button (Figure 61-7) and close this screen by clicking "Close" button (Figure 61-8). Once you click "New Share" button "Add New Share" page will be opened (Figure 62). You can select the "Type" from the dropdown (Figure 62-1). Once you select the type, available fields will be listed in "Available" section (Figure 62-2). You can select multiple items and click the arrows to move the items between "Available" and "Share With" sections (Figure 62-3). You can select "Read Only" or "Read/Write" from the "Access Level" section (Figure 62-4). Selected shares can be saved using "Save" button, you can go back by clicking "Cancel" button and you can close the Share pop-up by clicking "Close" button (Figure 62-5). Figure 62 If you want to edit a sharing you can click "Edit" in the share lists screen (Figure 61-1). You can change selected object's access level and save (Figure 63). 44 Figure 63
 with \"Read Only\" access level gives allowed shared user/group/ profile etc. read-only access.")
46 You can delete a manual sharing by clicking "Delete" in the share lists screen (Figure 61-2). If you select "Yes", share will be deleted (Figure 64). Figure 64 Notes 1. Sharing items (files or folder) with "Read Only" access level gives allowed shared user/group/ profile etc. read-only access. That means user can see file details, download file, copy file; but cannot edit, delete, move, rename file. If user has "Read Only" access on a folder he won't be able to see "New Folder", "Upload File(s)", "Cut" buttons. 2. Sharing items (files or folder) with "Read/Write" access level gives allowed shared user/group/ profile etc. read-write access. That means user can see file details, download file, copy, edit, delete, move, and rename file. But cannot delete the file. Only file/folder owner can delete the file. 3. If no sharing is given to the user on a folder, user won't be able to see the folder and its contents. 4. Sharing folders affects sub files and folders. So, if you share a folder, that sharing will be applied to sub files and folders. 5. If sharing is enabled and if you're in a subfolder (not Home folder), you'll see "Inherit Sharing from Parent Folder" checkbox when creating a folder or uploading files. Default is checked. You can uncheck this checkbox if you do not want to inherit shares from parent to the newly created folder or file (Figure 65) at the time of creation. 45

47 Figure If there are profile level permission definitions, profile level permissions override the sharing settings. So, if "S3Objects"is set as read only for a profile, there is no meaning to give read/write access on a folder. 7. Based on the shares that your file/folder have, some or all of the "Item Actions" item action menus may be invisible or clicking the item in the dropdown will warn you with a "not enough permission" error message. 8. If you want to restrict standard users to create files and folders at the top level of S-Drive Folders, you can check "Only Allow Users with Modify All Permissions to Create Items at the Top Level" checkbox from "S-Drive Configuration" tab. 9. "Share" item action menu in "Item Actions" dropdown is not visible to customer portal users. Q. Uploading New Version of a File [This feature requires enabling versioning on the organization. Refer to the S-Drive Installation Guide to enable Versioning for your organization.] You can upload new version of a file by clicking "Item Actions" button under "Actions" column and selecting "Upload New Version" action menu item from dropdown for individual files (Figure 66). Only HTML Upload Manager supports version upload. 46

48 Figure 66 Upload page will be opened, and you will be able to upload new version. You can only upload one file at a time for version upload. R. Previous Versions of File [This feature requires enabling versioning on the organization. Refer to the S-Drive Installation Guide to enable Versioning for your organization.] You can see previous versions of file by clicking "Item Actions" button under "Actions" column and selecting "Previous Versions" action menu item from dropdown for individual files. (Figure 67). Figure 67 You can set a version as the latest version by clicking "Item Actions" button under "Actions" column and selecting "Set Current" action menu item from dropdown for individual files in Versions screen. When you click Set Current, selected old version will be set as the latest version of the file. (Figure 68) 47

49 Figure 68 You will be able to apply Download, Open, Copy URL, Edit, Rename, Delete actions for individual version files also. These actions are same as the other item actions explained above. S. Searching Items You can search for files and folders inside S-Drive Folders. To start a search, type the search criteria to the right corner of S-Drive Folders screen, into the search box and click Enter (Error! Reference s ource not found.). You can use wildcards, * (multiple characters),? (single character) in search keywords. For example: exam*, boo? etc. When you perform a search in S-Drive folders, the search will also be made for mydrive folders. The results for both will be displayed in the same section with a Search results: XX file(s). S-Drive: X mydrive: X header. 'New Folder', 'Upload File(s)', 'Paste' buttons are invisible in the search results screen. You can go back to previous screen using ( ) button on top right, or you can go to home folder by clicking Home link on the breadcrumb panel or Home button ( ) on toolbar. To navigate to the search results for mydrive folders, you can click on mydrive button ( ). When clicked it will redirect you to mydrive folders. 48


50 Figure 69 New Folder, Upload File(s), Paste buttons are invisible in the search results screen. Notes 1. Salesforce.com does not index uploaded files immediately, so newly uploaded files will be eligible for search in a few minutes after the upload. 2. Search is performed on searchable fields like "File Name" and "Description". 3. If you try to search with blank criteria or with one character, you'll get an error message saying: "Search key must be longer than 1 character." (Figure 70). Figure 70 49
.")

51 T. ios (ipad, iphone, ipod) Support ios (ipad, iphone and ipod devices) support is improved for S-Drive Folders and S-Drive Attachments (Figure 71). Figure 71 You can browse and search folders/files, create folders, download files, files, cut-copy-paste files, edit fields (e.g. Description), delete files/folders, copy URLs of files, sort files/folder ascending or descending using your ios device (preferably ipad) (Figure 72). Figure 72 50

52 But currently you cannot upload files, download files using Download Manager for bulk download with your ios device. Because ios devices do not support Flash and Java technologies that our upload widgets use. We're planning to add upload feature in next releases. Screens for ios devices are like the "S-Drive Folders" and "S-Drive Attachments" screens except the "Upload File(s)" and "Download" buttons at the top of the files section are not available in ios versions. You can refer to the "S-Drive Attachments" section of this document for more information about the usage. Below is a screenshot of the Case Files section from an ipad device (Figure 73). Figure 73 51
53 U. S-Drive Attachments S-Drive Attachments is the object attachments for S-Drive. You can create folders and upload files to objects without file size limitations using S-Drive Attachments. You can also attach files to the objects from S-Drive Folders. Account, Case, Contact, and Opportunity S-Drive Attachments are bundled in the S-Drive installation. You just need to make some configuration to start using S-Drive Attachments. Please refer to the "S-Drive Installation Guide" for configuration of the S-Drive Attachments. You can also use S-Drive Attachments for your other standard/custom objects using the instructions in "S-Drive Advanced Configuration Guide". 1. Account Files After installing S-Drive, if you made the configuration correctly you'll be able to create account files in "Accounts" tab for each account easily. Go to your "Accounts" tab, select an account from the list (or create a new account). If you can see the "Account Files" page block in the current account's page, you can keep on reading (Figure 74). Otherwise please consult to the "S-Drive Installation Guide" to activate "Account Files" section. Figure 74 (1) Home button is used to direct to root folder of S-Drive Attachments from any sub-folder or search. (2) Select All -Dropdown button is used to Select All or Deselect All items in the list. 52
54 (3) Sort -Dropdown button is used to sort the File List. If a field selected (i.e. Create Date) files sorted by selected field as ascending order. If same field selected again it is sorted by descending order. (4) "Download File(s)" button is used to download selected file(s). If just one file selected it directly download file. If more than one file or folder are selected, it creates a zip file and download it. (5) "Upload File(s)" button is used to upload file(s) to this account. See "Uploading Files" section for more information (Figure 74-5). This item is not displayed for the "Search Results View". (6) " Files" button is used to files. See " ing Files" section for more information (Figure 74-6). (7) "Create New Folder" button is used to create folders. See "Creating Folders" section for more information (Figure 74-7). When you click on this button Create New Folder screen pops up (Figure 75). This item is not displayed for the "Search Results View". Figure 75 (8) "Delete Selected File(s)" button is used to delete file(s) or folder(s). See "Deleting Files" and "Deleting Folders" sections for more information (Figure 74-8). (9) "Cut" button is used to move file(s) between folders. See "Moving Files" section for more information (Figure 74-9). (10) "Copy" button is used to copy file(s) between folders. See "Copying Files" sections for more information (Figure 74-10). (11) "Paste" button is used to paste the copied or cut file(s) to a folder. This button is not visible until files are selected for cut/copy. See "Moving Files" and "Copying Files" sections for more information (Figure 74-11). This item is not displayed for the "Search Results View". 53
55 (12) Attach From S-Drive button is used to attach files from S-Drive Folders to this account. After clicking this button "S-Drive Folders" screen will be initialized. There will be two buttons above the toolbar section to attach files to this contact. You need to select file(s) to attach, and then click "Attach File(s)" button to start attaching. Attaching is a copy operation, so a new copy of the file will be created once attach is completed. Figure 76 After completion of the attach process, you ll be asked: "Do you want to quit from Attach from S-Drive Folders?" If you select "Yes", message will be closed, and you ll be redirected to the account page. "Cancel" button will return you to Attach From S-Drive screen. Figure 77 (13) Custom Actions button is used to perform different custom actions. See Custom Actions section in S-Drive Advanced Configuration Guide for more information. (14) It changes current view to List view. For more information, you can look at View Types section. (15) It changes current view to Thumbnail view. For more information, you can look at View Types section. (16) It changes current view to Grid view. For more information, you can look at View Types section. 54
56 (17) By Settings dropdown menu button, you can set current View Type of S-Drive Folders page as default and set current Sort Field as default. Also, you can select whether to Hide Breadcrumbs and/or Hide Folders Tree View. a. Save View Type as Default : If this item is selected, it saves current view type to settings. When S-Drive page is opened, File List is shown in selected view type by default. b. Save Sort Field as Default : If this item selected, it saves current sort field to settings. When S-Drive page is opened, File List is ordered by selected field. c. Hide Breadcrumbs : If this item is selected, breadcrumbs (Figure 74) will not be shown in the panel. d. Hide Folders Tree View : If this item is selected, left panel shown in Figure 74 will not be shown. (18) "Search Box" is used to search items (files, folders) in S-Drive Folders. Refer to the "Searching Items" section for more information (Figure 74). (19) "Breadcrumb Folder Navigation" keeps the current folder information. For example, if you are under "Home/Company Invoices" folder, the location information will be displayed in this area (Figure 74). You can click any level to drill down to that subfolder. (20) Folder Tree View displays your account's folder structure. Your home folder is named as "Home" and your folders are listed in a hierarchical way. You can click on a folder name to display its contents in the right pane. If a top-folder has sub-folders under it, it will show its contents on the panel when clicked. (21) Recycle Bin button is used for navigating to the Recycle Bin of your Account Files. You can find more information about the Recycle Bin in Deleting Files section. (22) Total Items / Pagination displays total items in selected folder and pagination if numbers of items are greater than the configured pagination number (Figure 74). If item (file/folder) count in a folder is greater than 10 (can be changed from the left side), items are displayed with pagination and total items are displayed next to the page numbers. Total items include only current folder items, not subfolder items. For example, if there are 108 items in the folder, first 100 items will be displayed in first page and last 8 items will be displayed in the 2 nd page. 55
57 (23) "Actions Column" contains a quick download and a quick delete button. It also contains "Item Actions" button (Figure 74). Once you click "Item Actions" button, dropdown is opened with list of item menu actions. Open is used to open the selected account file. After clicking this link, a new browser tab will be opened, and you will be able to view the file in this new tab. "Download" is used to download selected account file. After clicking this link, the download process will begin automatically, and you will be able to find the file under your computer s Downloads folder. "Copy URL is used to copy the URL of the selected account file. After clicking this link, a popup will appear along with the URL of the selected file (Figure 78). This item menu action is only for files and not available for folders. Figure 78 Details is used to open the details page of the selected account file or folder. In details page, it is possible to see the detailed information about that file or folder. Also, if the preview and thumbnails option is enabled, the thumbnail of a file can also be viewed from this page. 56
58 Figure 79 "Edit" is used to edit fields of a selected file/folder. After clicking this link; the edit page will be opened (Figure 80) and you'll be able to edit current account file's/folder's editable fields. Edit the fields, then click "Save". After clicking "Save", the fields you have edited will be saved. You can click on "Back" button to go back to previous page. Figure 80 "Delete " is used to delete selected account file/folder. After clicking this link, you'll get a warning message. Select "Yes" to delete the file/folder, "Cancel" to cancel. If you click "Yes", delete process will start. Notes 57
59 1. If versioning is enabled and selected file has versions, all versions of selected file will also be deleted. Post to Chatter is used to post comments/thoughts about a file to Salesforce Chatter. After clicking, a pop-up screen will appear, and you will be able to create a post or a poll, mention users, and share your thoughts about a file. "Upload New Version": [This feature requires enabling versioning on the organization. Refer to the S-Drive Installation Guide to enable Versioning for your organization.] You can upload new version of file by clicking "Item Actions" button under "Actions" column and selecting "Upload New Version" action menu item from dropdown for individual files (Figure 81). Only HTML Upload Manager supports version upload. Figure 81 "Previous Versions": [This feature requires enabling versioning on the organization. Refer to the S-Drive Installation Guide to enable Versioning for your organization.] You can see previous versions of file by clicking "Item Actions" button under "Actions" column and selecting "Previous Versions" action menu item from dropdown for individual files. (Figure 82). Figure 82 "Set Current:" You can set a version as the latest version by clicking "Item Actions" button under "Actions" column and selecting "Set Current" action menu item from dropdown for 58
60 individual files in Versions screen. When you click Set Current, selected old version will be set as the latest version of the file (Figure 83). Figure 83 You will be able to apply Download, Open, Copy URL, Edit, Rename, Delete actions for individual version files also. These actions are same as the other item actions explained above. (24) Content Type Column displays a type icon based on the content type of the account file/folder (Figure 74). (25) "File Name Column" shows the file name information for the account files (Figure 74). You can sort files/folder ascending or descending by clicking the field header. (26) "Customizable Field Columns" are used to display customizable fields (Figure 74). Your Salesforce.com account's system administrator can change this customizable list using "S-Drive Configuration" page. If nothing is configured you'll see, "Created Date", "Created By", "Description" and "File Size" columns by default. You can sort files/folder ascending or descending by clicking the field header if sorting is allowed for that field type. Notes 1. You cannot delete an account which has account files attached. You'll get an error message if you try to delete this kind of account (Figure 84). You need to delete account files first, and then you can delete the account. Figure 84 59
. If you can see the \"Contacts Files\" page block in the current contact s page, you can keep on reading.")
61 2. Contact Files After installing S-Drive, if you made the configuration correctly you'll be able to create contact files in "Contacts" tab for each contact easily. Go to your " Contacts " tab, select a contact from the list (or create a new contact). If you can see the "Contacts Files" page block in the current contact s page, you can keep on reading. Otherwise please consult to the "S-Drive Installation Guide" to activate "Contacts Files" section. Figure 85 (1) Home button is used to direct to root folder of S-Drive Attachments from any sub-folder or search. (2) Select All -Dropdown button is used to Select All or Deselect All items in the list. (3) Sort -Dropdown button is used to sort the File List. If a field selected (i.e. Create Date) files sorted by selected field as ascending order. If same field selected again it is sorted by descending order. (4) "Download File(s)" button is used to download selected file(s). If just one file selected it directly download file. If more than one file or folder are selected, it creates a zip file and 60
62 download it. (5) "Upload File(s)" button is used to upload file(s) to this contact. See "Uploading Files" section for more information (Figure 74-5). This item is not displayed for the "Search Results View". (6) " Files" button is used to files. See " ing Files" section for more information (Figure 74-6). (7) "Create New Folder" button is used to create folders. See "Creating Folders" section for more information (Figure 74-7). When you click on this button Create New Folder screen pops up (Figure 75). This item is not displayed for the "Search Results View". Figure 86 (8) "Delete Selected File(s)" button is used to delete file(s) or folder(s). See "Deleting Files" and "Deleting Folders" sections for more information (Figure 74-8). (9) "Cut" button is used to move file(s) between folders. See "Moving Files" section for more information (Figure 74-9). (10) "Copy" button is used to copy file(s) between folders. See "Copying Files" sections for more information (Figure 74-10). (11) "Paste" button is used to paste the copied or cut file(s) to a folder. This button is not visible until files are selected for cut/copy. See "Moving Files" and "Copying Files" sections for more information (Figure 74-11). This item is not displayed for the "Search Results View". (12) Attach From S-Drive button is used to attach files from S-Drive Folders to this contact. After clicking this button "S-Drive Folders" screen will be initialized. There will be two buttons above the toolbar section to attach files to this contact. You need to select file(s) to attach, and then click "Attach File(s)" button to start attaching. Attaching is a copy operation, so a new copy of the file will be created once attach is completed. 61
63 Figure 87 After completion of the attach process, you ll be asked: "Do you want to quit from Attach from S-Drive Folders?" If you select "Yes", message will be closed, and you ll be redirected to the contact page. "Cancel" button will return you to Attach From S-Drive screen. Figure 88 (13) Custom Actions button is used to perform different custom actions. See Custom Actions section in S-Drive Advanced Configuration Guide for more information. (14) It changes current view to List view. For more information, you can look at View Types section. (15) It changes current view to Thumbnail view. For more information, you can look at View Types section. (16) It changes current view to Grid view. For more information, you can look at View Types section. (17) By Settings dropdown menu button, you can set current View Type of S-Drive Folders page as default and set current Sort Field as default. Also, you can select whether to Hide Breadcrumbs and/or Hide Folders Tree View. 62
64 a. Save View Type as Default : If this item is selected, it saves current view type to settings. When S-Drive page is opened, File List is shown in selected view type by default. b. Save Sort Field as Default : If this item selected, it saves current sort field to settings. When S-Drive page is opened, File List is ordered by selected field. c. Hide Breadcrumbs : If this item is selected, breadcrumbs (Figure 74) will not be shown in the panel. d. Hide Folders Tree View : If this item is selected, left panel shown in Figure 74 will not be shown. (18) "Search Box" is used to search items (files, folders) in S-Drive Folders. Refer to the "Searching Items" section for more information (Figure 74). (19) "Breadcrumb Folder Navigation" keeps the current folder information. For example, if you are under "Home/Company Invoices" folder, the location information will be displayed in this area (Figure 74). You can click any level to drill down to that subfolder. (20) Folder Tree View displays your contact s folder structure. Your home folder is named as "Home" and your folders are listed in a hierarchical way. You can click on a folder name to display its contents in the right pane. If a top-folder has sub-folders under it, it will show its contents on the panel when clicked. (21) Recycle Bin button is used for navigating to the Recycle Bin of your Contact Files. You can find more information about the Recycle Bin in Deleting Files section. (22) Total Items / Pagination displays total items in selected folder and pagination if numbers of items are greater than the configured pagination number (Figure 74). If item (file/folder) count in a folder is greater than 10 (can be changed from the left side), items are displayed with pagination and total items are displayed next to the page numbers. Total items include only current folder items, not subfolder items. For example, if there are 108 items in the folder, first 100 items will be displayed in first page and last 8 items will be displayed in the 2 nd page. (23) "Actions Column" contains a quick download and a quick delete button. It also contains "Item Actions" button (Figure 74). Once you click "Item Actions" button, dropdown is opened with list of item menu actions. 63
65 Open is used to open the selected contact file. After clicking this link, a new browser tab will be opened, and you will be able to view the file in this new tab. "Download" is used to download selected contact file. After clicking this link, the download process will begin automatically, and you will be able to find the file under your computer s Downloads folder. "Copy URL is used to copy the URL of the selected contact file. After clicking this link, a popup will appear along with the URL of the selected file (Figure 78). This item menu action is only for files and not available for folders. Figure 89 Details is used to open the details page of the selected contact file or folder. In details page, it is possible to see the detailed information about that file or folder. Also, if the preview and thumbnails option is enabled, the thumbnail of a file can also be viewed from this page. Figure 90 "Edit" is used to edit fields of a selected file/folder. After clicking this link; the edit page will be opened (Figure 80) and you'll be able to edit current contact file's/folder's editable fields. Edit 64
66 the fields, then click "Save". After clicking "Save", the fields you have edited will be saved. You can click on "Back" button to go back to previous page. Figure 91 "Delete " is used to delete selected contact file/folder. After clicking this link, you'll get a warning message. Select "Yes" to delete the file/folder, "Cancel" to cancel. If you click "Yes", delete process will start. Notes 1. If versioning is enabled and selected file has versions, all versions of selected file will also be deleted. Post to Chatter is used to post comments/thoughts about a file to Salesforce Chatter. After clicking, a pop-up screen will appear, and you will be able to create a post or a poll, mention users, and share your thoughts about a file. "Upload New Version": [This feature requires enabling versioning on the organization. Refer to the S-Drive Installation Guide to enable Versioning for your organization.] You can upload new version of file by clicking "Item Actions" button under "Actions" column and selecting "Upload New Version" action menu item from dropdown for individual files (Figure 81). Only HTML Upload Manager supports version upload. 65
67 Figure 92 "Previous Versions": [This feature requires enabling versioning on the organization. Refer to the S-Drive Installation Guide to enable Versioning for your organization.] You can see previous versions of file by clicking "Item Actions" button under "Actions" column and selecting "Previous Versions" action menu item from dropdown for individual files. (Figure 82). Figure 93 "Set Current:" You can set a version as the latest version by clicking "Item Actions" button under "Actions" column and selecting "Set Current" action menu item from dropdown for individual files in Versions screen. When you click Set Current, selected old version will be set as the latest version of the file (Figure 83). Figure 94 66
68 You will be able to apply Download, Open, Copy URL, Edit, Rename, Delete actions for individual version files also. These actions are same as the other item actions explained above. (24) Content Type Column displays a type icon based on the content type of the contact file/folder (Figure 74). (25) "File Name Column" shows the file name information for the contact files (Figure 74). You can sort files/folder ascending or descending by clicking the field header. (26) "Customizable Field Columns" are used to display customizable fields (Figure 74). Your Salesforce.com account's system administrator can change this customizable list using "S-Drive Configuration" page. If nothing is configured you'll see, "Created Date", "Created By", "Description" and "File Size" columns by default. You can sort files/folder ascending or descending by clicking the field header if sorting is allowed for that field type. Notes 1. You cannot delete a contact which has contact files attached. You'll get an error message if you try to delete this kind of contact (Figure 84). You need to delete contact files first, and then you can delete the contact. Figure You can just upload contact files to contacts that you own. This is a limitation of Salesforce.com. If you try to upload a file to another user s contact, you won t be able to upload the contact file and will be warned: "insufficient access rights on cross-reference id". 67
.")
69 3. Opportunity Files After installing S-Drive, if you made the configuration correctly you'll be able to create opportunity files in "Opportunity" tab for each opportunity easily. Go to your " Opportunity " tab, select an opportunity from the list (or create a new opportunity). If you can see the " Opportunity Files" page block in the current opportunity s page, you can keep on reading. Otherwise please consult to the "S-Drive Installation Guide" to activate " Opportunity Files" section. Figure 96 (1) Home button is used to direct to root folder of S-Drive Attachments from any sub-folder or search. (2) Select All -Dropdown button is used to Select All or Deselect All items in the list. (3) Sort -Dropdown button is used to sort the File List. If a field selected (i.e. Create Date) files sorted by selected field as ascending order. If same field selected again it is sorted by descending order. (4) "Download File(s)" button is used to download selected file(s). If just one file selected it directly download file. If more than one file or folder are selected, it creates a zip file and download it. (5) "Upload File(s)" button is used to upload file(s) to this opportunity. See "Uploading Files" section for more information. This item is not displayed for the "Search Results View". 68
70 (6) " Files" button is used to files. See " ing Files" section for more information. (7) "Create New Folder" button is used to create folders. See "Creating Folders" section for more information. When you click on this button Create New Folder screen pops up. This item is not displayed for the "Search Results View". Figure 97 (8) "Delete Selected File(s)" button is used to delete file(s) or folder(s). See "Deleting Files" and "Deleting Folders" sections for more information. (9) "Cut" button is used to move file(s) between folders. See "Moving Files" section for more information. (10) "Copy" button is used to copy file(s) between folders. See "Copying Files" sections for more information. (11) "Paste" button is used to paste the copied or cut file(s) to a folder. This button is not visible until files are selected for cut/copy. See "Moving Files" and "Copying Files" sections for more information. This item is not displayed for the "Search Results View". (12) Attach From S-Drive button is used to attach files from S-Drive Folders to this opportunity. After clicking this button "S-Drive Folders" screen will be initialized. There will be two buttons above the toolbar section to attach files to this contact. You need to select file(s) to attach, and then click "Attach File(s)" button to start attaching. Attaching is a copy operation, so a new copy of the file will be created once attach is completed. 69
71 Figure 98 After completion of the attach process, you ll be asked: "Do you want to quit from Attach from S-Drive Folders?" If you select "Yes", message will be closed, and you ll be redirected to the opportunity page. "Cancel" button will return you to Attach From S-Drive screen. Figure 99 (13) Custom Actions button is used to perform different custom actions. See Custom Actions section in S-Drive Advanced Configuration Guide for more information. (14) It changes current view to List view. For more information, you can look at View Types section. (15) It changes current view to Thumbnail view. For more information, you can look at View Types section. (16) It changes current view to Grid view. For more information, you can look at View Types section. (17) By Settings dropdown menu button, you can set current View Type of S-Drive Folders page as default and set current Sort Field as default. Also, you can select whether to Hide Breadcrumbs and/or Hide Folders Tree View. 70
72 a. Save View Type as Default : If this item is selected, it saves current view type to settings. When S-Drive page is opened, File List is shown in selected view type by default. b. Save Sort Field as Default : If this item selected, it saves current sort field to settings. When S-Drive page is opened, File List is ordered by selected field. c. Hide Breadcrumbs : If this item is selected, breadcrumbs will not be shown in the panel. d. Hide Folders Tree View : If this item is selected, left panel will not be shown. (18) "Search Box" is used to search items (files, folders) in S-Drive Folders. Refer to the "Searching Items" section for more information. (19) "Breadcrumb Folder Navigation" keeps the current folder information. For example, if you are under "Home/Company Invoices" folder, the location information will be displayed in this area. You can click any level to drill down to that subfolder. (20) Folder Tree View displays your opportunity s folder structure. Your home folder is named as "Home" and your folders are listed in a hierarchical way. You can click on a folder name to display its contents in the right pane. If a top-folder has sub-folders under it, it will show its contents on the panel when clicked. (21) Recycle Bin button is used for navigating to the Recycle Bin of your Opportunity Files. You can find more information about the Recycle Bin in Deleting Files section. (22) Total Items / Pagination displays total items in selected folder and pagination if numbers of items are greater than the configured pagination number. If item (file/folder) count in a folder is greater than 10 (can be changed from the left side), items are displayed with pagination and total items are displayed next to the page numbers. Total items include only current folder items, not subfolder items. For example, if there are 108 items in the folder, first 100 items will be displayed in first page and last 8 items will be displayed in the 2 nd page. (23) "Actions Column" contains a quick download and a quick delete button. It also contains "Item Actions" button. Once you click "Item Actions" button, dropdown is opened with list of item menu actions. Open is used to open the selected opportunity file. After clicking this link, a new browser tab will be opened, and you will be able to view the file in this new tab. 71
73 "Download" is used to download selected opportunity file. After clicking this link, the download process will begin automatically, and you will be able to find the file under your computer s Downloads folder. "Copy URL is used to copy the URL of the selected opportunity file. After clicking this link, a popup will appear along with the URL of the selected file. This item menu action is only for files and not available for folders. Figure 100 Details is used to open the details page of the selected opportunity file or folder. In details page, it is possible to see the detailed information about that file or folder. Also, if the preview and thumbnails option is enabled, the thumbnail of a file can also be viewed from this page. Figure 101 "Edit" is used to edit fields of a selected file/folder. After clicking this link; the edit page will be opened and you'll be able to edit current opportunity file's/folder's editable fields. Edit the fields, then click "Save". After clicking "Save", the fields you have edited will be saved. You can click on "Back" button to go back to previous page. 72
74 Figure 102 "Delete " is used to delete selected opportunity file/folder. After clicking this link, you'll get a warning message. Select "Yes" to delete the file/folder, "Cancel" to cancel. If you click "Yes", delete process will start. Notes 1. If versioning is enabled and selected file has versions, all versions of selected file will also be deleted. Post to Chatter is used to post comments/thoughts about a file to Salesforce Chatter. After clicking, a pop-up screen will appear, and you will be able to create a post or a poll, mention users, and share your thoughts about a file. "Upload New Version": [This feature requires enabling versioning on the organization. Refer to the S-Drive Installation Guide to enable Versioning for your organization.] You can upload new version of file by clicking "Item Actions" button under "Actions" column and selecting "Upload New Version" action menu item from dropdown for individual filesfigure 81. Only HTML Upload Manager supports version upload. 73
75 Figure 103 "Previous Versions": [This feature requires enabling versioning on the organization. Refer to the S-Drive Installation Guide to enable Versioning for your organization.] You can see previous versions of file by clicking "Item Actions" button under "Actions" column and selecting "Previous Versions" action menu item from dropdown for individual files. Figure 104 "Set Current:" You can set a version as the latest version by clicking "Item Actions" button under "Actions" column and selecting "Set Current" action menu item from dropdown for individual files in Versions screen. When you click Set Current, selected old version will be set as the latest version of the file. Figure
76 You will be able to apply Download, Open, Copy URL, Edit, Rename, Delete actions for individual version files also. These actions are same as the other item actions explained above. (24) Content Type Column displays a type icon based on the content type of the opportunity file/folder. (25) "File Name Column" shows the file name information for the opportunity files. You can sort files/folder ascending or descending by clicking the field header. (26) "Customizable Field Columns" are used to display customizable fields. Your Salesforce.com opportunity s system administrator can change this customizable list using "S-Drive Configuration" page. If nothing is configured you'll see, "Created Date", "Created By", "Description" and "File Size" columns by default. You can sort files/folder ascending or descending by clicking the field header if sorting is allowed for that field type. Notes 1. You cannot delete an opportunity which has opportunity files attached. You'll get an error message if you try to delete this kind of opportunity. You need to delete opportunity files first, and then you can delete the opportunity. Figure Case Files After installing S-Drive, if you made the configuration correctly you'll be able to create case files in "Case " tab for each case easily. Go to your "Case " tab, select a case from the list (or create a new case). If you can see the "Case Files" page block in the current case s page, you can keep on reading. Otherwise please consult to the "S-Drive Installation Guide" to activate "Case Files" section. 75
77 Figure 107 (1) Home button is used to direct to root folder of S-Drive Attachments from any sub-folder or search. (2) Select All -Dropdown button is used to Select All or Deselect All items in the list. (3) Sort -Dropdown button is used to sort the File List. If a field selected (i.e. Create Date) files sorted by selected field as ascending order. If same field selected again it is sorted by descending order. (4) "Download File(s)" button is used to download selected file(s). If just one file selected it directly download file. If more than one file or folder are selected, it creates a zip file and download it. (5) "Upload File(s)" button is used to upload file(s) to this case. See "Uploading Files" section for more information. This item is not displayed for the "Search Results View". (6) " Files" button is used to files. See " ing Files" section for more information. (7) "Create New Folder" button is used to create folders. See "Creating Folders" section for more information. When you click on this button Create New Folder screen pops up. This item is not displayed for the "Search Results View". 76
78 Figure 108 (8) "Delete Selected File(s)" button is used to delete file(s) or folder(s). See "Deleting Files" and "Deleting Folders" sections for more information. (9) "Cut" button is used to move file(s) between folders. See "Moving Files" section for more information. (10) "Copy" button is used to copy file(s) between folders. See "Copying Files" sections for more information. (11) "Paste" button is used to paste the copied or cut file(s) to a folder. This button is not visible until files are selected for cut/copy. See "Moving Files" and "Copying Files" sections for more information. This item is not displayed for the "Search Results View". (12) Attach From S-Drive button is used to attach files from S-Drive Folders to this case. After clicking this button "S-Drive Folders" screen will be initialized. There will be two buttons above the toolbar section to attach files to this contact. You need to select file(s) to attach, and then click "Attach File(s)" button to start attaching. Attaching is a copy operation, so a new copy of the file will be created once attach is completed. Figure
79 After completion of the attach process, you ll be asked: "Do you want to quit from Attach from S-Drive Folders?" If you select "Yes", message will be closed, and you ll be redirected to the case page. "Cancel" button will return you to Attach From S-Drive screen. Figure 110 (13) Custom Actions button is used to perform different custom actions. See Custom Actions section in S-Drive Advanced Configuration Guide for more information. (14) It changes current view to List view. For more information, you can look at View Types section. (15) It changes current view to Thumbnail view. For more information, you can look at View Types section. (16) It changes current view to Grid view. For more information, you can look at View Types section. (17) By Settings dropdown menu button, you can set current View Type of S-Drive Folders page as default and set current Sort Field as default. Also, you can select whether to Hide Breadcrumbs and/or Hide Folders Tree View. a. Save View Type as Default : If this item is selected, it saves current view type to settings. When S-Drive page is opened, File List is shown in selected view type by default. b. Save Sort Field as Default : If this item selected, it saves current sort field to settings. When S-Drive page is opened, File List is ordered by selected field. c. Hide Breadcrumbs : If this item is selected, breadcrumbs will not be shown in the panel. d. Hide Folders Tree View : If this item is selected, left panel will not be shown. 78
80 (18) "Search Box" is used to search items (files, folders) in S-Drive Folders. Refer to the "Searching Items" section for more information. (19) "Breadcrumb Folder Navigation" keeps the current folder information. For example, if you are under "Home/Company Invoices" folder, the location information will be displayed in this area (Figure 74). You can click any level to drill down to that subfolder. (20) Folder Tree View displays your case s folder structure. Your home folder is named as "Home" and your folders are listed in a hierarchical way. You can click on a folder name to display its contents in the right pane. If a top-folder has sub-folders under it, it will show its contents on the panel when clicked. (21) Recycle Bin button is used for navigating to the Recycle Bin of your Case Files. You can find more information about the Recycle Bin in Deleting Files section. (22) Total Items / Pagination displays total items in selected folder and pagination if numbers of items are greater than the configured pagination number. If item (file/folder) count in a folder is greater than 10 (can be changed from the left side), items are displayed with pagination and total items are displayed next to the page numbers. Total items include only current folder items, not subfolder items. For example, if there are 108 items in the folder, first 100 items will be displayed in first page and last 8 items will be displayed in the 2 nd page. (23) "Actions Column" contains a quick download and a quick delete button. It also contains "Item Actions" button. Once you click "Item Actions" button, dropdown is opened with list of item menu actions. Open is used to open the selected case file. After clicking this link, a new browser tab will be opened, and you will be able to view the file in this new tab. "Download" is used to download selected case file. After clicking this link, the download process will begin automatically, and you will be able to find the file under your computer s Downloads folder. "Copy URL is used to copy the URL of the selected case file. After clicking this link, a popup will appear along with the URL of the selected file (Figure 78). This item menu action is only for files and not available for folders. 79
81 Figure 111 Details is used to open the details page of the selected case file or folder. In details page, it is possible to see the detailed information about that file or folder. Also, if the preview and thumbnails option is enabled, the thumbnail of a file can also be viewed from this page. Figure 112 "Edit" is used to edit fields of a selected file/folder. After clicking this link; the edit page will be opened (Figure 80) and you'll be able to edit current case file's/folder's editable fields. Edit the fields, then click "Save". After clicking "Save", the fields you have edited will be saved. You can click on "Back" button to go back to previous page. 80
82 Figure 113 "Delete " is used to delete selected case file/folder. After clicking this link, you'll get a warning message. Select "Yes" to delete the file/folder, "Cancel" to cancel. If you click "Yes", delete process will start. Notes 1. If versioning is enabled and selected file has versions, all versions of selected file will also be deleted. Post to Chatter is used to post comments/thoughts about a file to Salesforce Chatter. After clicking, a pop-up screen will appear, and you will be able to create a post or a poll, mention users, and share your thoughts about a file. "Upload New Version": [This feature requires enabling versioning on the organization. Refer to the S-Drive Installation Guide to enable Versioning for your organization.] You can upload new version of file by clicking "Item Actions" button under "Actions" column and selecting "Upload New Version" action menu item from dropdown for individual files. Only HTML Upload Manager supports version upload. 81
83 Figure 114 "Previous Versions": [This feature requires enabling versioning on the organization. Refer to the S-Drive Installation Guide to enable Versioning for your organization.] You can see previous versions of file by clicking "Item Actions" button under "Actions" column and selecting "Previous Versions" action menu item from dropdown for individual files. Figure 115 "Set Current:" You can set a version as the latest version by clicking "Item Actions" button under "Actions" column and selecting "Set Current" action menu item from dropdown for individual files in Versions screen. When you click Set Current, selected old version will be set as the latest version of the file. Figure
84 You will be able to apply Download, Open, Copy URL, Edit, Rename, Delete actions for individual version files also. These actions are same as the other item actions explained above. (24) Content Type Column displays a type icon based on the content type of the case file/folder. (25) "File Name Column" shows the file name information for the case files. You can sort files/folder ascending or descending by clicking the field header. (26) "Customizable Field Columns" are used to display customizable fields. Your Salesforce.com case s system administrator can change this customizable list using "S-Drive Configuration" page. If nothing is configured you'll see, "Created Date", "Created By", "Description" and "File Size" columns by default. You can sort files/folder ascending or descending by clicking the field header if sorting is allowed for that field type. Notes 1. You cannot delete a case which has case files attached. You'll get an error message if you try to delete this kind of case. You need to delete case files first, and then you can delete the case. Figure You can use "Case Files" feature from "Customer Portal" or Community also. After making required configuration for customer portal or community (See S-Drive Advanced Configuration Guide for more information), your customers can add case files to cases using "Customer Portal Interface" (Figure 118). Figure
.")
85 5. Other Standard/Custom Object Files You can use "files" for standard/custom objects other than Accounts, Contacts, Opportunities, and Cases easily. Go to your object s tab, select an object from the list (or create a new object). If you can see the "<Your Object Name> Files" page block in the current object's page, you can keep on reading (Figure 119). Otherwise please consult to the "S-Drive Advanced Configuration Guide" to activate "<Your Object Name> Files" section. Figure 119 (1) Home button is used to direct to root folder of S-Drive Attachments from any sub-folder or search. (2) Select All -Dropdown button is used to Select All or Deselect All items in the list. (3) Sort -Dropdown button is used to sort the File List. If a field selected (i.e. Create Date) files sorted by selected field as ascending order. If same field selected again it is sorted by descending order. (4) "Download File(s)" button is used to download selected file(s). If just one file selected it directly download file. If more than one file or folder are selected, it creates a zip file and download it. (5) "Upload File(s)" button is used to upload file(s) to this custom object. See "Uploading Files" section for more information. This item is not displayed for the "Search Results View". (6) " Files" button is used to files. See " ing Files" section for more information. 84
86 (7) "Create New Folder" button is used to create folders. See "Creating Folders" section for more information. When you click on this button Create New Folder screen pops up. This item is not displayed for the "Search Results View". Figure 120 (8) "Delete Selected File(s)" button is used to delete file(s) or folder(s). See "Deleting Files" and "Deleting Folders" sections for more information. (9) "Cut" button is used to move file(s) between folders. See "Moving Files" section for more information. (10) "Copy" button is used to copy file(s) between folders. See "Copying Files" sections for more information. (11) "Paste" button is used to paste the copied or cut file(s) to a folder. This button is not visible until files are selected for cut/copy. See "Moving Files" and "Copying Files" sections for more information. This item is not displayed for the "Search Results View". (12) Attach From S-Drive button is used to attach files from S-Drive Folders to this custom object. After clicking this button "S-Drive Folders" screen will be initialized. There will be two buttons above the toolbar section to attach files to this contact. You need to select file(s) to attach, and then click "Attach File(s)" button to start attaching. Attaching is a copy operation, so a new copy of the file will be created once attach is completed. 85
87 Figure 121 After completion of the attach process, you ll be asked: "Do you want to quit from Attach from S-Drive Folders?" If you select "Yes", message will be closed, and you ll be redirected to the custom object page. "Cancel" button will return you to Attach From S-Drive screen. Figure 122 (13) Custom Actions button is used to perform different custom actions. See Custom Actions section in S-Drive Advanced Configuration Guide for more information. (14) It changes current view to List view. For more information, you can look at View Types section. (15) It changes current view to Thumbnail view. For more information, you can look at View Types section. (16) It changes current view to Grid view. For more information, you can look at View Types section. (17) By Settings dropdown menu button, you can set current View Type of S-Drive Folders page as default and set current Sort Field as default. Also, you can select whether to Hide Breadcrumbs and/or Hide Folders Tree View. 86
88 a. Save View Type as Default : If this item is selected, it saves current view type to settings. When S-Drive page is opened, File List is shown in selected view type by default. b. Save Sort Field as Default : If this item selected, it saves current sort field to settings. When S-Drive page is opened, File List is ordered by selected field. c. Hide Breadcrumbs : If this item is selected, breadcrumbs will not be shown in the panel. d. Hide Folders Tree View : If this item is selected, left panel will not be shown. (18) "Search Box" is used to search items (files, folders) in S-Drive Folders. Refer to the "Searching Items" section for more information. (19) "Breadcrumb Folder Navigation" keeps the current folder information. For example, if you are under "Home/Company Invoices" folder, the location information will be displayed in this area (Figure 74). You can click any level to drill down to that subfolder. (20) Folder Tree View displays your custom object s folder structure. Your home folder is named as "Home" and your folders are listed in a hierarchical way. You can click on a folder name to display its contents in the right pane. If a top-folder has sub-folders under it, it will show its contents on the panel when clicked. (21) Recycle Bin button is used for navigating to the Recycle Bin of your Custom Object Files. You can find more information about the Recycle Bin in Deleting Files section. (22) Total Items / Pagination displays total items in selected folder and pagination if numbers of items are greater than the configured pagination number. If item (file/folder) count in a folder is greater than 10 (can be changed from the left side), items are displayed with pagination and total items are displayed next to the page numbers. Total items include only current folder items, not subfolder items. For example, if there are 108 items in the folder, first 100 items will be displayed in first page and last 8 items will be displayed in the 2 nd page. (23) "Actions Column" contains a quick download and a quick delete button. It also contains "Item Actions" button. Once you click "Item Actions" button, dropdown is opened with list of item menu actions. Open is used to open the selected custom object file. After clicking this link, a new browser tab will be opened, and you will be able to view the file in this new tab. 87
89 "Download" is used to download selected custom object file. After clicking this link, the download process will begin automatically, and you will be able to find the file under your computer s Downloads folder. "Copy URL is used to copy the URL of the selected custom object file. After clicking this link, a popup will appear along with the URL of the selected file (Figure 78). This item menu action is only for files and not available for folders. Figure 123 Details is used to open the details page of the selected custom object file or folder. In details page, it is possible to see the detailed information about that file or folder. Also, if the preview and thumbnails option is enabled, the thumbnail of a file can also be viewed from this page. Figure 124 "Edit" is used to edit fields of a selected file/folder. After clicking this link; the edit page will be opened (Figure 80) and you'll be able to edit current custom object file's/folder's editable fields. Edit the fields, then click "Save". After clicking "Save", the fields you have edited will be saved. You can click on "Back" button to go back to previous page. 88
90 Figure 125 "Delete " is used to delete selected custom object file/folder. After clicking this link, you'll get a warning message. Select "Yes" to delete the file/folder, "Cancel" to cancel. If you click "Yes", delete process will start. Notes 1. If versioning is enabled and selected file has versions, all versions of selected file will also be deleted. Post to Chatter is used to post comments/thoughts about a file to Salesforce Chatter. After clicking, a pop-up screen will appear, and you will be able to create a post or a poll, mention users, and share your thoughts about a file. "Upload New Version": [This feature requires enabling versioning on the organization. Refer to the S-Drive Installation Guide to enable Versioning for your organization.] You can upload new version of file by clicking "Item Actions" button under "Actions" column and selecting "Upload New Version" action menu item from dropdown for individual files. Only HTML Upload Manager supports version upload. 89
91 Figure 126 "Previous Versions": [This feature requires enabling versioning on the organization. Refer to the S-Drive Installation Guide to enable Versioning for your organization.] You can see previous versions of file by clicking "Item Actions" button under "Actions" column and selecting "Previous Versions" action menu item from dropdown for individual files. Figure 127 "Set Current:" You can set a version as the latest version by clicking "Item Actions" button under "Actions" column and selecting "Set Current" action menu item from dropdown for individual files in Versions screen. When you click Set Current, selected old version will be set as the latest version of the file. Figure
 Content Type Column displays a type icon based on the content type of the custom object file/folder. (25) \"File Name Column\" shows the file name information for the custom object files.")
92 You will be able to apply Download, Open, Copy URL, Edit, Rename, Delete actions for individual version files also. These actions are same as the other item actions explained above. (24) Content Type Column displays a type icon based on the content type of the custom object file/folder. (25) "File Name Column" shows the file name information for the custom object files. You can sort files/folder ascending or descending by clicking the field header. (26) "Customizable Field Columns" are used to display customizable fields. Your Salesforce.com custom object s system administrator can change this customizable list using "S-Drive Configuration" page. If nothing is configured you'll see, "Created Date", "Created By", "Description" and "File Size" columns by default. You can sort files/folder ascending or descending by clicking the field header if sorting is allowed for that field type. 1. "Customizable Field Columns" are used to display customizable fields (Figure ). Your Salesforce.com account's system administrator can change this customizable list using "S-Drive Configuration" page. If nothing is configured you'll see, "Created Date", "Created By", "Description" and "File Size" columns by default. You can sort files/folder ascending or descending by clicking the field header if sorting is allowed for that field type. Notes 1. If your system administrator set a before delete trigger for your object you cannot delete an object which has object files attached. You'll get an error message if you try to delete this kind of object (Figure 129). You need to delete object files first, and then you can delete the object. Figure You can use "<Your Object Name> Files" feature from "Customer Portal" also. After making required configuration for customer portal (See S-Drive Advanced Configuration Guide and S- Drive Customer Portal Guide for more information), your customers can add object files to your objects using "Customer Portal Interface". 91

93 V. S-Drive Advanced Search S-Drive Advanced Search is a new feature of S-Drive that helps to perform improved search functionality in object files. AdvancedSearchPage and AdvancedSearchComponent created for that. You can use AdvancedSearchComponent with your own VF pages. You can access to this feature using S- Drive Advanced Search tab. 1. Searching Files S-Drive Advanced Search needs following criteria to perform a search; - Object: This represents the S-Drive Object to select. Search will be performed on selected object. E.g. Account, Case. - Object File: This represents the S-Drive Object File to select. Search will be performed on selected object file. E.g. Account File, Case File. - Parent Object Field (Optional): This represents a field of selected parent S-Drive object. If you select a parent object field, you can see that in Results table. E.g. Case Number, Origin. - Search Keyword: This represents the keyword to perform a search. Search will be performed in all fields of selected object file for entered keyword. You can click on the Search button to perform a search. After a successful search, the results will be displayed on screen (Figure 130). Figure

.")
94 Item Actions 1- Downloading Files You can download a file by clicking "Download" item menu action under the "Item Actions" button (Figure 131). 2- Opening Files Figure 131 You can open a file by clicking "Open" item menu action under the "Item Actions" button (Figure 132). Figure
. After clicking Copy URL, you can select full URL and copy it (Figure 134).")
. After clicking Edit, you can edit Description of file and save it.")
95 3- Copy URL You can Copy URL of a file by clicking "Copy URL" item menu action under the "Item Actions button (Figure 133). After clicking Copy URL, you can select full URL and copy it (Figure 134). Figure 133 Figure Editing Files You can edit a file by clicking "Edit" item menu action under the "Item Actions" button (Figure 135). After clicking Edit, you can edit Description of file and save it. (Figure 136). 94


96 Figure 135 Figure 136 Notes 1. If versioning is enabled and if you are displaying previous versions, you can also edit version description for version files. 5- Deleting Files You can delete a file by clicking "Delete" item menu action under the "Item Actions" button (Figure 137). 95


97 Figure 137 Notes deleted. 1. If versioning is enabled and if you delete latest version, all previous versions will also be 6- Previous Versions You can display previous versions of files by clicking "Previous Versions" item menu action under the "Item Actions" button (Figure 138). After clicking on it, version history of the file will be listed (Figure 139). Figure
98 Figure 139 You can also Download, Open, Copy URL, Edit and Delete version files. Notes 1. You can edit Description and Version Description in Previous Versions screen. Also, if you delete Current Version on this screen, most recent file will be set as current. Selected and Delete Selected You can select one or multiple files by using checkboxes in results table and you can these files by clicking Selected button (Figure 140). You can select one or multiple files by using checkboxes in results table and you can Delete these files by clicking Delete Selected button (Figure 140). Figure
99 Navigation You can display the Folder Path of a file by clicking on the Click to View Folder Path link and then you can click on the Folder Path to navigate to this folder in a new tab. You can also click on the Parent Object Field (E.g CaseNumber) to navigate to this parent record in a new tab (Figure 141). Previous Versions screen doesn t support Folder Path column. Figure
100 2. Configuring S-Drive Advanced Search Component S-Drive Advanced Search feature has been designed as dynamic and reusable. So, you can configure AdvancedSearchComponent. Below, you can see the attributes of AdvancedSearchComponent; <apex:attribute name="searchcriteria" description="criteria of the search." access="global" type="string" required="required" assignto="{!searchcriteriaat}"/> <apex:attribute name="customobjectname" description="api Name of the custom object that the files will belong to. This object can also be one of the standard objects such as Solutions or Products. For example: 'MyObject c' or 'Solution'" access="global" type="string" required="required" assignto="{!customobjectnameat}"/> <apex:attribute name="customfield" description="this represents a field of parent S-Drive object. If you pass a parent object field, you can see this field in Results table. E.g. Case Number, Origin." access="global" type="string" required="required" assignto="{!customfieldat}"/> <apex:attribute name="customobjectfilename" description="api Name of the custom object that will represent the file. This custom file object is required to include fields indicated in the installation guide of S-Drive. For example: 'MyFile c'" access="global" type="string" required="required" assignto="{!customobjectfilenameat}"/> <apex:attribute name="filenamespaceprefix" description="namespace prefix for the file object. This attribute is required if the object has a namespace. For example: 'cg '" access="global" type="string" required="optional" assignto="{!filenamespaceprefixat}" default=""/> <apex:attribute name="objectnamespaceprefix" description="namespace prefix for the parent object for the attachments. This attribute is required if the object has a namespace. For example: 'cg '" access="global" type="string" required="optional" assignto="{!objectnamespaceprefixat}" default=""/> <apex:attribute name="relationshipname" description="master-detail relation used for selected standard/custom object. For example: 'Parent r'" access="global" type="string" required="required" assignto="{!relationshipnameat}" default=""/> <apex:attribute name="orderby" description="name of the field that should be used to order the list of files. This attribute is optional and leaving this empty will not order the results in any specific order. For example: 'File_Name c'" access="global" type="string" required="optional" assignto="{!orderbyat}" default=""/> <apex:attribute name="pagesize" description="page size for pagination. Attachment items will be paginated based on this value. This attribute is optional and default value is 100." access="global" type="integer" required="optional" assignto="{!pagesizeat}" default="100"/> </apex:component> 99
101 AdvancedSearchPage is used to pass customobjectname(object), customobjectfilename(object File), customfield(parent Object Field) and searchcriteria (Search Keyword) attributes into AdvancedSearchComponent using a user interface. You can embed AdvancedSearchComponent into a different VF Page, you can pass your info into component attributes. Sample use of AdvancedSearchComponent in a VisualForce page; <apex:page> <apex:form> <cg:advancedsearchcomponent /> </apex:form> </apex:page> searchcriteria="genre" customfield="origin" customobjectname="case" customobjectfilename="casefile c" filenamespaceprefix="cg " objectnamespaceprefix="cg " relationshipname="case r" orderby="file_name c" 100
102 Sample Output (Figure 142); Figure 142 W. SDriveTools API You can use SDriveTools API calls for programmatically interacting with S-Drive Attachments. a. getattachmenturl() This method is used to get the URL of an S-Drive Attachment. String getattachmenturl(string parentid, String fileobjectid, Long timevalue) Parameters: parentid: Id of the parent object. You can use 15-character id or 18-character id. fileobjectid: Id of the attachment (file) object. This can be retrieved using an SOQL query. An example can be found in following sections. timevalue: Expiration time of the link in seconds. Return Value: The method will return the URL of the S-Drive attachment. 101
103 Our example is about retrieving an image file from S-Drive Account Attachments and displaying it inside Account Page Layout. You can customize SOQL call and other options similar to the example. 1. First override Accounts View button with Account Files Page to upload a JPG image file to S- Drive Account Attachments. (Figure 143) Figure Upload a jpg image file into one of your accounts using Upload File(s) button. (Figure 144) Figure Create an apex class named ExamplePageController. In below code 1*60 is equivalent to one minute. You can set expiring time like this. Also you can configure your SOQL query based on your needs. (Figure 145) Figure 145 public with sharing class ExamplePageController { private Account acct; private String fileurl = ''; public ExamplePageController(ApexPages.StandardController controller) { this.acct = (Account)controller.getRecord(); List<cg AccountFile c> accountfiles = [Select id from cg AccountFile c where cg AccountFile c.cg WIP c = false and cg AccountFile c.cg Content_Type c = 'image/jpg' and cg AccountFile c.cg Account c = :acct.id]; if(accountfiles.size() > 0) { fileurl = cg.sdrivetools.getattachmenturl(acct.id, accountfiles[0].id, (1 * 60)); } 102
 Figure 146 <apex:page standardcontroller=\"account\" extensions=\"examplepagecontroller\"> <apex:image url=\"{!fileurl}\" /> </apex:page> 5.")
104 } else { fileurl = ' } } public String getfileurl() { return fileurl; } 4. Create an ExamplePage apex page with below content. (Figure 146) Figure 146 <apex:page standardcontroller="account" extensions="examplepagecontroller"> <apex:image url="{!fileurl}" /> </apex:page> 5. Customize your account page layout and include ExamplePage inside the layout. (Figure 147) Figure Now if you reload your account (which contains an image file) you'll see a screen like below. You can customize the apex class and page based on your needs. (Figure 148) 103
 This method is used to get multiple URLs for multiple objects of an S-Drive Attachment at a time.")
105 Figure 148 Notes 1. If you would like to get an old version of a file, you should add id of an old version file into fileoobjectids list. b. getattachmenturls() This method is used to get multiple URLs for multiple objects of an S-Drive Attachment at a time. List<String> getattachmenturls(list<id> parentids, List<ID> fileobjectids, Long timevalue) List<String> getattachmenturls(list<id> parentids, List<ID> fileobjectids, Long timevalue, Map<String,String> requestparameters) List<String> getattachmenturls(list<id> parentids, List<ID> fileobjectids, Long timevalue, List<Map<String,String>> requestparameterslist) Parameters: parentids: List of Salesforce ids of the parent objects. You can use 15-character id or 18- character id. fileobjectids: List of Salesforce ids of the attachment (files) objects. timevalue: Expiration time of the links in seconds. requestparameters: Map of request parameters and theirs values to set the parameters in the response (e.g. ('response-content-disposition, inline; filename=myfile.png')). For more information, visit the Amazon documentation: requestparameterslist: List of request parameters map for each files. Return Value: The method will return the list of URLs of the S-Drive attachment. 104
S-Drive User Guide v1.27
 S-Drive User Guide v1.27 Important Note This user guide contains detailed information about S-Drive usage. Refer to the S-Drive Installation Guide and S-Drive Advanced Configuration Guide for more information
Content Publisher User Guide
 Content Publisher User Guide Overview 1 Overview of the Content Management System 1 Table of Contents What's New in the Content Management System? 2 Anatomy of a Portal Page 3 Toggling Edit Controls 5
S-Drive Configuration for Salesforce.com Communities v1.25
 S-Drive Configuration for Salesforce.com Communities v1.25 Important Note This guide contains information about Salesforce Communities for S-Drive. Refer to the S-Drive Installation Guide, S-Drive Advanced
DOCUMENTUM D2. User Guide
 DOCUMENTUM D2 User Guide Contents 1. Groups... 6 2. Introduction to D2... 7 Access D2... 7 Recommended browsers... 7 Login... 7 First-time login... 7 Installing the Content Transfer Extension... 8 Logout...
Parish . User Manual
 Parish Email User Manual Table of Contents LOGGING IN TO PARISH EMAIL... 3 GETTING STARTED... 3 GENERAL OVERVIEW OF THE USER INTERFACE... 3 TERMINATE THE SESSION... 4 EMAIL... 4 MESSAGES LIST... 4 Open
Learn how to login to Sitefinity and what possible errors you can get if you do not have proper permissions.
 USER GUIDE This guide is intended for users of all levels of expertise. The guide describes in detail Sitefinity user interface - from logging to completing a project. Use it to learn how to create pages
2013 edition (version 1.1)
") 2013 edition (version 1.1) Contents 1 Introduction... 3 2 Signing in to your Office 365 account... 3 2.1 Acceptable Use Policy and Terms of Use... 4 3 Setting your profile and options... 4 3.1 Settings:
2013 edition (version 1.1) Contents 1 Introduction... 3 2 Signing in to your Office 365 account... 3 2.1 Acceptable Use Policy and Terms of Use... 4 3 Setting your profile and options... 4 3.1 Settings:
Web Ad Image Portal. User Manual
 Web Ad Image Portal User Manual Rev 06232008 Web Ad Image Portal User Manual Rev 06232008 Login and Home Page Access the portal via http://images.autobase.net Login with your dealer.autobase.net account
Outlook Web App. Getting Started. QUICK Source. Microsoft. in Exchange Server 2010
 QUICK Source Microsoft Outlook Web App in Exchange Server 2010 Getting Started The Outlook Web App Window u v w x y u v w x y Browser Toolbars allow the user to navigate in the browser. Outlook Web Access
Microsoft Windows SharePoint Services
 Microsoft Windows SharePoint Services SITE ADMIN USER TRAINING 1 Introduction What is Microsoft Windows SharePoint Services? Windows SharePoint Services (referred to generically as SharePoint) is a tool
Microsoft OneDrive. How to login to OneDrive:
 Microsoft OneDrive The beauty of OneDrive is that is accessible from anywhere you have an Internet connection. You can access it from a Mac or Windows computer. You can even access it on your SmartPhone
S-Drive Installation Guide v1.28
 S-Drive Installation Guide v1.28 Important Note This installation guide contains basic information about S-Drive installation. Refer to the S-Drive Advanced Configuration Guide for advanced installation/configuration
ES CONTENT MANAGEMENT - EVER TEAM
 ES CONTENT MANAGEMENT - EVER TEAM USER GUIDE Document Title Author ES Content Management - User Guide EVER TEAM Date 20/09/2010 Validated by EVER TEAM Date 20/09/2010 Version 9.4.0.0 Status Final TABLE
MindView Online - Quick Start Guide
 MindView Online - Quick Start Guide Overview MindView Online is an online concept mapping program that allows users to organize their thoughts visually to create, share, and export mind maps to Microsoft
Salesforce Classic Guide for iphone
 Salesforce Classic Guide for iphone Version 35.0, Winter 16 @salesforcedocs Last updated: October 27, 2015 Copyright 2000 2015 salesforce.com, inc. All rights reserved. Salesforce is a registered trademark
Salesforce Classic Mobile Guide for iphone
 Salesforce Classic Mobile Guide for iphone Version 41.0, Winter 18 @salesforcedocs Last updated: November 30, 2017 Copyright 2000 2017 salesforce.com, inc. All rights reserved. Salesforce is a registered
AN INTRODUCTION TO OUTLOOK WEB ACCESS (OWA)
") INFORMATION TECHNOLOGY SERVICES AN INTRODUCTION TO OUTLOOK WEB ACCESS (OWA) The Prince William County School Division does not discriminate in employment or in its educational programs and activities against
INFORMATION TECHNOLOGY SERVICES AN INTRODUCTION TO OUTLOOK WEB ACCESS (OWA) The Prince William County School Division does not discriminate in employment or in its educational programs and activities against
SharePoint: Fundamentals
 SharePoint: Fundamentals This class will introduce you to SharePoint and cover components available to end users in a typical SharePoint site. To access SharePoint, you will need to log into Office 365.
Site Owners: Cascade Basics. May 2017
 Site Owners: Cascade Basics May 2017 Page 2 Logging In & Your Site Logging In Open a browser and enter the following URL (or click this link): http://mordac.itcs.northwestern.edu/ OR http://www.northwestern.edu/cms/
Welcome to Cumulus Sites the easy to-use website portal of Cumulus that offers fast
 Welcome to Cumulus Sites the easy to-use website portal of Cumulus that offers fast file access and secure file distribution to anyone on the Web. Anyone can be allowed to self-serve access to a public
Installation & Configuration Guide Enterprise/Unlimited Edition
 Installation & Configuration Guide Enterprise/Unlimited Edition Version 2.3 Updated January 2014 Table of Contents Getting Started... 3 Introduction... 3 Requirements... 3 Support... 4 Recommended Browsers...
DSS User Guide. End User Guide. - i -
 DSS User Guide End User Guide - i - DSS User Guide Table of Contents End User Guide... 1 Table of Contents... 2 Part 1: Getting Started... 1 How to Log in to the Web Portal... 1 How to Manage Account Settings...
Hostopia WebMail Help
 Hostopia WebMail Help Table of Contents GETTING STARTED WITH WEBMAIL...5 Version History...6 Introduction to WebMail...6 Cookies and WebMail...6 Logging in to your account...6 Connection time limit...7
User Guide. v7.5. September 4, For the most recent version of this document, visit kcura's Documentation Site.
 User Guide v7.5 September 4, 2013 For the most recent version of this document, visit kcura's Documentation Site. Table of Contents 1 User guide overview 4 2 Relativity objects 4 3 Workspace 6 3.1 Workspaces
S-Drive Installation Guide v1.18
 S-Drive Installation Guide v1.18 Important Note This installation guide contains basic information about S-Drive installation. Refer to the S-Drive Advanced Configuration Guide for advanced installation/configuration
Administrative Training Mura CMS Version 5.6
 Administrative Training Mura CMS Version 5.6 Published: March 9, 2012 Table of Contents Mura CMS Overview! 6 Dashboard!... 6 Site Manager!... 6 Drafts!... 6 Components!... 6 Categories!... 6 Content Collections:
SharePoint: Fundamentals
 SharePoint: Fundamentals This class will introduce you to SharePoint and cover components available to end users in a typical SharePoint site. To access SharePoint, you will need to log into Office 365.
. Help Documentation. This document was auto-created from web content and is subject to change at any time. Copyright (c) 2018 SmarterTools Inc.
 2018 SmarterTools Inc.") Help Documentation This document was auto-created from web content and is subject to change at any time. Copyright (c) 2018 SmarterTools Inc. Email Email Overview SmarterMail users can send and receive
Help Documentation This document was auto-created from web content and is subject to change at any time. Copyright (c) 2018 SmarterTools Inc. Email Email Overview SmarterMail users can send and receive
Getting Started The Outlook Web Access Window
 QUICK Source Microsoft Outlook Web Access in Exchange Server 2003 Getting Started The Outlook Web Access Window ❶ ❷ ❸ ❹ ❺ ❻ ❼ ❽ Using the Reading Pane The Reading Pane allows you to view your e-mail messages
User Guide Ahmad Bilal [Type the company name] 1/1/2009
![User Guide Ahmad Bilal [Type the company name] 1/1/2009](/thumbs/92/109182878.jpg "User Guide Ahmad Bilal [Type the company name] 1/1/2009") User Guide Ahmad Bilal [Type the company name] 1/1/2009 Contents 1 LOGGING IN... 1 1.1 REMEMBER ME... 1 1.2 FORGOT PASSWORD... 2 2 HOME PAGE... 3 2.1 CABINETS... 4 2.2 SEARCH HISTORY... 5 2.2.1 Recent
User Guide Ahmad Bilal [Type the company name] 1/1/2009 Contents 1 LOGGING IN... 1 1.1 REMEMBER ME... 1 1.2 FORGOT PASSWORD... 2 2 HOME PAGE... 3 2.1 CABINETS... 4 2.2 SEARCH HISTORY... 5 2.2.1 Recent
COMMUNITIES USER MANUAL. Satori Team
 COMMUNITIES USER MANUAL Satori Team Table of Contents Communities... 2 1. Introduction... 4 2. Roles and privileges.... 5 3. Process flow.... 6 4. Description... 8 a) Community page.... 9 b) Creating community
Managing Your Website with Convert Community. My MU Health and My MU Health Nursing
 Managing Your Website with Convert Community My MU Health and My MU Health Nursing Managing Your Website with Convert Community LOGGING IN... 4 LOG IN TO CONVERT COMMUNITY... 4 LOG OFF CORRECTLY... 4 GETTING
A. Outlook Web App -
 A. Outlook Web App - Email 1. Outlook Web App (OWA) Vs. Outlook Outlook refers to an application that is physically installed on a computer. Whereas a Web Application is something that is not installed
S-Drive Installation Guide v1.25
 S-Drive Installation Guide v1.25 Important Note This installation guide contains basic information about S-Drive installation. Refer to the S-Drive Advanced Configuration Guide for advanced installation/configuration
BrainStorm Quick Start Card for Microsoft OneDrive for Business
 BrainStorm Quick Start Card for Microsoft OneDrive for Business mso.harvard.edu Changing the Way the World Works Clear the path for your productivity goals! Using Microsoft OneDrive for Business, you have
Secure Guard Central Management System
 Speco Technologies, Inc. Secure Guard Central Management System Usage Information Contents 1 Overview... 7 2 Installation... 7 2.1 System Requirements... 7 2.2 System Installation... 7 2.3 Command Line
Anchor User Guide. Presented by: Last Revised: August 07, 2017
 Anchor User Guide Presented by: Last Revised: August 07, 2017 TABLE OF CONTENTS GETTING STARTED... 1 How to Log In to the Web Portal... 1 How to Manage Account Settings... 2 How to Configure Two-Step Authentication...
Introduction to 9.0. Introduction to 9.0. Getting Started Guide. Powering collaborative online communities.
 Introduction to 9.0 Introduction to 9.0 Getting Started Guide Powering collaborative online communities. TABLE OF CONTENTS About FirstClass...3 Connecting to your FirstClass server...3 FirstClass window
Microsoft Outlook Basics
 Microsoft Outlook 2010 Basics 2 Microsoft Outlook 2010 Microsoft Outlook 2010 3 Table of Contents Getting Started with Microsoft Outlook 2010... 7 Starting Microsoft Outlook... 7 Outlook 2010 Interface...
Creating Dashboard. Version: 7.3
 Creating Dashboard Version: 7.3 Copyright 2015 Intellicus Technologies This document and its content is copyrighted material of Intellicus Technologies. The content may not be copied or derived from, through
Colligo Engage Outlook App 7.1. Connected Mode - User Guide
 7.1 Connected Mode - User Guide Contents Colligo Engage Outlook App 1 Benefits 1 Key Features 1 Platforms Supported 1 Installing and Activating Colligo Engage Outlook App 2 Checking for Updates 3 Updating
. Help Documentation. This document was auto-created from web content and is subject to change at any time. Copyright (c) 2019 SmarterTools Inc.
 2019 SmarterTools Inc.") Help Documentation This document was auto-created from web content and is subject to change at any time. Copyright (c) 2019 SmarterTools Inc. Email Email Overview SmarterMail users can send and receive
Help Documentation This document was auto-created from web content and is subject to change at any time. Copyright (c) 2019 SmarterTools Inc. Email Email Overview SmarterMail users can send and receive
EDRMS Version 6.3 User Guide
 EDRMS Version 6.3 User Guide Version 1.2 Copyright Netcall Telecom 2015; Proprietary Page 1 of 109 Contents ACCURACY... 6 RESTRICTED RIGHTS... 6 INTENDED AUDIENCE... 6 USER GUIDE STRUCTURE... 7 1 INTRODUCTION...
Nextiva Drive The Setup Process Mobility & Storage Option
 Nextiva Drive The Setup Process The Setup Process Adding Users 1. Login to your account and click on the Account icon at the top of the page (this is only visible to the administrator). 2. Click Create
Ektron Advanced. Learning Objectives. Getting Started
 Ektron Advanced 1 Learning Objectives This workshop introduces you beyond the basics of Ektron, the USF web content management system that is being used to modify department web pages. This workshop focuses
User Guide. Web Intelligence Rich Client. Business Objects 4.1
 User Guide Web Intelligence Rich Client Business Objects 4.1 2 P a g e Web Intelligence 4.1 User Guide Web Intelligence 4.1 User Guide Contents Getting Started in Web Intelligence 4.1... 5 Log into EDDIE...
Salesforce CRM Content Implementation Guide
 Salesforce CRM Content Implementation Guide Salesforce, Winter 18 @salesforcedocs Last updated: October 13, 2017 Copyright 2000 2017 salesforce.com, inc. All rights reserved. Salesforce is a registered
Office 365: . Accessing and Logging In. Mail
 Office 365: Email This class will introduce you to Office 365 and cover the email components found in Outlook on the Web. For more information about the Microsoft Outlook desktop client, register for a
Get Started. Estimating Explorer
 Get Started Estimating Explorer NOTICE This document and the Sage Timberline Office software may be used only in accordance with the accompanying Sage Timberline Office End User License Agreement. You
End User Manual. December 2014 V1.0
 End User Manual December 2014 V1.0 Contents Getting Started... 4 How to Log into the Web Portal... 5 How to Manage Account Settings... 6 The Web Portal... 8 How to Upload Files in the Web Portal... 9 How
BeetleEye Application User Documentation
 BeetleEye Application User Documentation BeetleEye User Documentation 1 Table of Contents Welcome to the BeetleEye Application... 6 Overview... 6 Navigation... 6 Access BeetleEye... 6 Update account information...
The Etomite Manual for website editors.
 The Etomite Manual for website editors. (Version: 1.1) Etomite is a web tool that allows your website to be user-editable. This means that you can add, edit, and delete pages and whole website sections
BE Share. Microsoft Office SharePoint Server 2010 Basic Training Guide
 BE Share Microsoft Office SharePoint Server 2010 Basic Training Guide Site Contributor Table of Contents Table of Contents Connecting From Home... 2 Introduction to BE Share Sites... 3 Navigating SharePoint
HTML REPORT VIEWER. Intellicus Enterprise Reporting and BI Platform. Intellicus Technologies
 HTML REPORT VIEWER Intellicus Enterprise Reporting and BI Platform Intellicus Technologies info@intellicus.com www.intellicus.com HTML Viewer i Copyright 2012 Intellicus Technologies This document and
Secure Transfer Site (STS) User Manual
 User Manual") Secure Transfer Site (STS) User Manual (Revised 3/1/12) Table of Contents Basic System Display Information... 3 Command Buttons with Text... 3 Data Entry Boxes Required / Enabled... 3 Connecting to the
Secure Transfer Site (STS) User Manual (Revised 3/1/12) Table of Contents Basic System Display Information... 3 Command Buttons with Text... 3 Data Entry Boxes Required / Enabled... 3 Connecting to the
SharePoint 2010 Tutorial
 SharePoint 2010 Tutorial TABLE OF CONTENTS Introduction... 1 Basic Navigation... 2 Navigation Buttons & Bars... 3 Ribbon... 4 Library Ribbon... 6 Recycle Bin... 7 Permission Levels & Groups... 8 Create
Amazon WorkMail. User Guide Version 1.0
 Amazon WorkMail User Guide Amazon WorkMail: User Guide Copyright 2017 Amazon Web Services, Inc. and/or its affiliates. All rights reserved. Amazon's trademarks and trade dress may not be used in connection
Adobe Document Cloud esign Services. for Salesforce Version 17 Installation and Customization Guide
 Adobe Document Cloud esign Services for Salesforce Version 17 Installation and Customization Guide 2015 Adobe Systems Incorporated. All rights reserved. Last Updated: August 28, 2015 Table of Contents
JSN ImageShow Configuration Manual Introduction
 JSN ImageShow Configuration Manual Introduction JSN ImageShow is the gallery extension built for Joomla! Content Management System for developers, photographers, and publishers. You can choose to show
WebStudio User Guide. OpenL Tablets BRMS Release 5.18
 WebStudio User Guide OpenL Tablets BRMS Release 5.18 Document number: TP_OpenL_WS_UG_3.2_LSh Revised: 07-12-2017 OpenL Tablets Documentation is licensed under a Creative Commons Attribution 3.0 United
Contents Office 365 Groups in Outlook 2016 on the web... 3 What are groups?... 3 Tips for getting the most out of Office 365 Groups...
 Contents Office 365 Groups in Outlook 2016 on the web... 3 What are groups?... 3 Tips for getting the most out of Office 365 Groups... 3 Create a Group in Web Outlook... 4 Group limits... 6 Group privacy...
Pennsbury G-Mail Composing and Sending Messages Compose
 Pennsbury G-Mail Composing and Sending Messages From the main screen, click on the Compose button to begin drafting a new message: The new message window will appear. Enter the subject of the email on
Salesforce.com Summer '10 Release Notes
 Salesforce.com: Summer '10 Salesforce.com Summer '10 Release Notes Last updated: July 20, 2010 Copyright 2000-2010 salesforce.com, inc. All rights reserved. Salesforce.com is a registered trademark of
OUTLOOK WEB APP (OWA): MAIL
: MAIL") Office 365 Navigation Pane: Navigating in Office 365 Click the App Launcher and then choose the application (i.e. Outlook, Calendar, People, etc.). To modify your personal account settings, click the Logon
Office 365 Navigation Pane: Navigating in Office 365 Click the App Launcher and then choose the application (i.e. Outlook, Calendar, People, etc.). To modify your personal account settings, click the Logon
Locker v Contents. User Guide March 11, Viewing others public locker files Accessing Group Lockers Creating group locker areas Index
 Locker v8.3.0 User Guide March 11, 2008 Contents What Locker does Accessing the Locker tool Creating a folder Uploading a file Restricted file formats Creating a file Editing a file or folder Downloading
Getting Started with Office 365
 Getting Started with Office 365 First Steps Welcome to Office 365! Create a Desktop Shortcut to the Office 365 Website 1. Right-click your desktop and choose New Shortcut 2. In the table below, copy the
An Overview of Webmail
 An Overview of Webmail Table of Contents What browsers can I use to view my mail? ------------------------------------------------------- 3 Email size and storage limits -----------------------------------------------------------------------
Perceptive Data Transfer
 Perceptive Data Transfer User Guide Version: 6.5.x Written by: Product Knowledge, R&D Date: September 2016 2015 Lexmark International Technology, S.A. All rights reserved. Lexmark is a trademark of Lexmark
Zimbra User Guide Rev
 Zimbra User Guide Rev. 2.12.2013 Using Zimbra Email To access Zimbra email, go to: https://email.outlookmail.com and enter your current network username and password. Supported browsers include: Windows
ShareSync Get Started Guide for Windows
 WHAT IS SHARESYNC? ShareSync Get Started Guide for Windows ShareSync is an enterprise-class cloud file backup and sharing service. ShareSync allows you to back up your files in real-time to protect against
Remote Support Web Rep Console
 Remote Support Web Rep Console 2017 Bomgar Corporation. All rights reserved worldwide. BOMGAR and the BOMGAR logo are trademarks of Bomgar Corporation; other trademarks shown are the property of their
Remote Support 19.1 Web Rep Console
 Remote Support 19.1 Web Rep Console 2003-2019 BeyondTrust Corporation. All Rights Reserved. BEYONDTRUST, its logo, and JUMP are trademarks of BeyondTrust Corporation. Other trademarks are the property
Office365 Outlook. The username is your complete employee number followed
 Office365 Outlook Sign In 1. Navigate to the shortcut for Office 365 on your desktop or enter the following url: http://portal.dekalbschoolsga.org. 2. Enter the username and password for your 365 account.
Create and Manage Partner Portals
 Create and Manage Partner Portals Salesforce, Summer 18 @salesforcedocs Last updated: June 20, 2018 Copyright 2000 2018 salesforce.com, inc. All rights reserved. Salesforce is a registered trademark of
ELM Server Exchange Edition ArchiveWeb version 5.5
 ELM Server Exchange Edition ArchiveWeb version 5.5 Copyright 2016 Lexmark. All rights reserved. Lexmark is a trademark of Lexmark International, Inc., registered in the U.S. and/or other countries. All
Paragon Essentials: Getting Started with Paragon 4 This manual sets the foundation for all future work in Paragon 4. It covers the basic activities
 Paragon Essentials: Getting Started with Paragon 4 This manual sets the foundation for all future work in Paragon 4. It covers the basic activities necessary to navigate the MLS. Table of Contents 1. Accessing
Confluence User Training Guide
 Confluence User Training Guide Below is a short overview of wikis and Confluence and a basic user training guide for completing common tasks in Confluence. This document outlines the basic features that
Help for Users & Domain Administrators
 Help for Users & Domain Administrators Help Documentation This document was auto-created from web content and is subject to change at any time. Copyright (c) 2018 SmarterTools Inc. Help for Users & Domain
Guidelines for uploading and downloading documents through Logicaldoc
 1: Logging in into Logicaldoc 1.1 Use this URL for login: http://172.16.2.9:8080/logicaldoc/ 2.1 Enter login id and password and click on Sign In Following window will appear after logging in: 2: Creating
USING THE CONSOLE TAB
 USING THE CONSOLE TAB Summary The console is a tab that combines related records into one screen with different frames so that users have all the information they need when interacting with Salesforce.
Sync to a Secondary Salesforce Organization
 Sync to a Secondary Salesforce Organization Salesforce, Summer 17 @salesforcedocs Last updated: August 9, 2017 Copyright 2000 2017 salesforce.com, inc. All rights reserved. Salesforce is a registered trademark
As a first-time user, when you log in you won t have any files in your directory yet.
 Welcome to Xythos WFS. This program allows you to share files with others over the Internet. When you store a file within your WFS account, you can make it selectively available to be viewed, edited, deleted,
Welcome to the CP Portal
 Welcome to the CP Portal Access your school documents from home Launch Internet Explorer and navigate to: https://files.cpcsc.k12.in.us/htcomnet/ Click on Continue to this website (not recommended) Key
SCHULICH MEDICINE & DENTISTRY Website Updates August 30, Administrative Web Editor Guide v6
 SCHULICH MEDICINE & DENTISTRY Website Updates August 30, 2012 Administrative Web Editor Guide v6 Table of Contents Chapter 1 Web Anatomy... 1 1.1 What You Need To Know First... 1 1.2 Anatomy of a Home
GOOGLE APPS. If you have difficulty using this program, please contact IT Personnel by phone at
 : GOOGLE APPS Application: Usage: Program Link: Contact: is an electronic collaboration tool. As needed by any staff member http://www.google.com or http://drive.google.com If you have difficulty using
USER GUIDE. EBMS SECURE MailGate
 USER GUIDE EBMS SECURE EMAIL MailGate USER REGISTRATION When a secure email is sent to a new user, Secure Mailbox generates a notification and sends it to their email account. The notification contains
MS Dynamics 2015 Case Management Fundamentals
 MS Dynamics 2015 Case Management Fundamentals Version 1.0 Page 1 of 86 Contents 1 Navigation and Tiles... 4 1.1 Using Case Management... 4 1.2 Setting your Home Screen... 5 Records Per Page... 6 Hints
Worldnow Producer. Stories
 Worldnow Producer Stories Table of Contents Overview... 4 Getting Started... 4 Adding Stories... 5 Story Sections... 5 Toolbar... 5 Copy Live URL... 6 Headline... 6 Abridged Title... 6 Abridged Clickable
Sync User Guide. Powered by Axient Anchor
 Sync Powered by Axient Anchor TABLE OF CONTENTS End... Error! Bookmark not defined. Last Revised: Wednesday, October 10, 2018... Error! Bookmark not defined. Table of Contents... 2 Getting Started... 7
Roxen Content Provider
 Roxen Content Provider Generation 3 Templates Purpose This workbook is designed to provide a training and reference tool for placing University of Alaska information on the World Wide Web (WWW) using the
User Guide. BlackBerry Workspaces for Windows. Version 5.5
 User Guide BlackBerry Workspaces for Windows Version 5.5 Published: 2017-03-30 SWD-20170330110027321 Contents Introducing BlackBerry Workspaces for Windows... 6 Getting Started... 7 Setting up and installing
Salesforce App Help. Salesforce, Winter
 Salesforce App Help Salesforce, Winter 18 @salesforcedocs Last updated: November 22, 2017 Copyright 2000 2017 salesforce.com, inc. All rights reserved. Salesforce is a registered trademark of salesforce.com,
Box. Files and Folders. Upload files or folders. Create a folder.
 O F F I C E O F I NFORM AT I O N T E CH NO L O G Y S E RVIC E S Files and Folders Upload files or folders 1. From the Upload button, select either Upload Files or Upload Folders. 2. Navigate to the files
File Cabinet Manager
 Tool Box File Cabinet Manager Java File Cabinet Manager Password Protection Website Statistics Image Tool Image Tool - Resize Image Tool - Crop Image Tool - Transparent Form Processor Manager Form Processor
Page Topic 02 Log In to KidKare 02 Using the Navigation Menu 02 Change the Language
 Page Topic 02 Log In to KidKare 02 Using the Navigation Menu 02 Change the Language help.kidkare.com 03 Enroll a Child 03 Withdraw a Child 03 View Pending and Withdrawn Children 04 View Kids by Enrollment
Contents. Common Site Operations. Home actions. Using SharePoint
 This is a companion document to About Share-Point. That document describes the features of a SharePoint website in as much detail as possible with an emphasis on the relationships between features. This
Set Up and Manage Salesforce Communities
 Set Up and Manage Salesforce Communities Salesforce, Spring 16 @salesforcedocs Last updated: April 28, 2016 Copyright 2000 2016 salesforce.com, inc. All rights reserved. Salesforce is a registered trademark
Outlook 2010 Cheat Sheet. USC Marshall School of Business Academic Information Services. Table of Contents
 USC Marshall School of Business Academic Information Services Outlook 2010 Cheat Sheet Aside from a few new features such as Quick Steps and Conversation View, the biggest change in Outlook 2010 from previous
Administrator Guide. November 2010
 Administrator Guide November 2010 AppShore Inc. Administrator Guide Table of Contents Overview...2 Logging into AppShore...2 How to upgrade a subscription...3 How to close your AppShore account...4 Roles...5
Web Sites Web Site Content
 Web Sites Web Site Content Last Updated: November 14, 2007 INTRODUCTION...3 Web Site Content...4 Tabs and Pages...4 Adding a Tab or Page...4 Editing a Tab or Page...8 Deleting a Tab or Page...9 Renaming