aaxa P4 Pico Projector TECHNOLOGIES User Guide
|
|
|
- Dylan Brown
- 6 years ago
- Views:
Transcription

1 aaxa TECHNOLOGIES P4 Pico Projector User Guide
2 Caution! WARNING: Please use this product as instructed. Misuse may cause injury or death. DO NOT use while driving DO NOT expose to water or wet surfaces. Electric shock may occur DO NOT expose the LED to your eyes or the eyes of others DO NOT block or restrict airflow from ventilation holes as this may cause the projector to overheat Caution for Battery Use Do not pierce or puncture the battery with sharp objects Do not heat the product or expose it to high temperature. Do not wet it or place it in any liquid Caution for Earphone (Earplug) Use Prolonged use at high volume may impair your hearing. High volume during walking or driving may cause distractions and result in injury or death Keep the projector, battery, or charger away from any heat sources
3 The AAXA P4 runs the Windows CE operating system. All Standard Functions can be found on the Home Screen and can be manipulated with the keypad on the projector. Because we dislike locked devices, rather than locking the Windows CE Desktop we have decided to leave this function unlocked. This allows users to enjoy the full capabilities of the Windows CE operating system. However if you choose to access the desktop, please make sure you know what you are doing. It is very easy to damage or corrupt the projector or the operating system through the Windows Desktop. AAXA does not support 3rd party applications and any adjustments to the desktop. You are on your own here please access the Windows Desktop at your own risk. Windows CE Desktop Notice: Accessing the desktop allows the user to manipulate the file system including installation of applications and manipulation of the OS control panel. Improper use can result in corruption and/or damage to the Operating System. AAXA Technologies does NOT provide technical support for Operating System issues. ACCESS AT YOUR OWN RISK! Use of desktop requires a mouse and keyboard. Please visit our webpage for more information
4 Table of Contents Chapter 1: P4 at a glance Main Unit Front/Back Remote & Keypad Accessories Chapter 2: Getting Started Powering On / FF Focus Adjustment / Throw Distance External Inputs /Input Sources Connecting to a Computer Connecting to Composite Video Connecting to Speaker or Headphones Connecting to Mouse/Keyboard Computer Data Transfer Saving to USB/SD card Connecting a Micro SD Card Connecting to a USB drive Chapter 3: Menu Screens Main menu Video Player Menu Photo Viewer Menu Music Player Menu Windows CE Desktop Setup Menu Chapter 4: Technical Details Troubleshooting Specifications 1


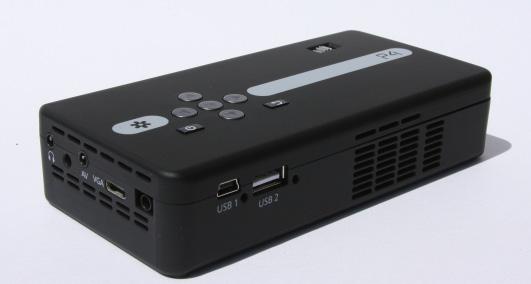
5 P4 at a Glance Main Unit Front/Back/Side Directional Pad Charge Indicator USB Port Mini USB Port Back Button Power Button Confirm Selection Reset Hole Micro SD Card Port Focus Adjustment Projection Lens Power Input VGA Input A/V Input Headphone Chapter 1 2


6 Remote & Keypad Power On/Off Main Menu Navigation Select Source Media Player Menu Navigation Power Direction Pad Exit/Back Both the keypad and remote can be used to navigate through the menus. The Main Menu Navigation on the remote functions exactly the same as the directional pad on the P4 unit. NOTICE: Pressing power on the remote will only put the projector in STANDBY mode. Please press the power button on the projector if you want to turn it off. 3


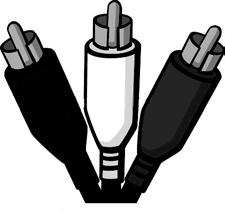
7 Accessories Tripod Remote Optional Keyboard/Mouse Power Adapter Mini USB to VGA Cable A/V Cable USB Adapter *Under various circumstances, the actual accessories may be different from those shown in the pictures above. 4
8 Getting Started Chapter 2 Powering ON the projector 1. Connect the power cord to the P4. 2. Connect the wall plug into the wall power source. 3. Press POWER button and hold for 2-3 seconds to switch on or switch off the power The LED turns red while charging. The LED turns green when charging is finished. 4 hours of charge time is required to reach a full charge. Powering OFF the projector 1. Press and hold the power button for 3 seconds. 2. The optical engine should power off and the fan should stop spinning. Note. Pressing the power button on the remote puts the projector in standby mode. It will NOT turn off the projector. Note: The P4 Projector battery does not charge when it is in operation. 5
 12 18 24 30 36 74 84 96 Diagonal Inch ( ) 6.3 9.5 12.6 15.8 18.9 38.9 44.2 50.5 DIAGONAL SCREEN SIZE 16:9 Aspect Ratio Throw Ratio 1.")
9 Focus Adjusment / Throw Distance Focus Adjustment 1. Spin the focus wheel left of right until the image becomes clear. 2. The recommended focus distance for this projector is 12 to infinity. Throw Distance Chart Distance inch ( ) Diagonal Inch ( ) DIAGONAL SCREEN SIZE 16:9 Aspect Ratio Throw Ratio 1.9 *minimum throw distance: 10 inches 6


10 External Inputs/Outputs Micro SD Card Headphone/speaker Keyboard Composite Cable USB Stick Laptop Desktop Mouse 7


11 Connecting to a Computer Step 1: Connect the large end of the to your computer s Step 2: VGA Cord VGA Adapter Connect the small end of the to your P4 s Step 3: In the Main Menu VGA Cord VGA Adapter Then Select Source Change resolution 8


12 Connecting to a Computer Cont. Step 4: Enabling VGA output on your Computer To enable VGA output on your computer most computers require turning on the video output feature. Each computer is different. Please consult your owner s manual for instructions to enable VGA output. Below are standard instructions for a Windows XP computer not all systems are the same. Step 5: Step 6: Press function & F5 to instruct the computer to enable multiple displays. You can also press Windows+P to toggle through display settings. *NOTE: different operating systems may differ 1. Right click on computer desktop and select Properties 2. Display Properties window will pop up 3. Click on the Settings Tab 4. If a secondary monitor is grayed out, click on it and check Extend my Windows Desktop onto this monitor 5. If the image is blurry or the text is not legible, adjust the screen resolution. We recommend 800x600 or 1024x768. 9


13 Connecting to Composite Video Step 1: Connect one end of the to your P4 s Composite Cord A/V Adapter Step 2: Connect opposite end of to your devices Composite Cord Composite Cord 10

14 Connecting to Composite Video Cont. Step 3: In the Main Menu Then Select Source Step 4: Turn on your multimedia device. Choose Composite Video Connectivity with multimedia devices The P4 can connect to many media devices including: ipod, iphone, ipad, VHS players, DVD players, smart phones, cameras, video game consoles and other peripherals with ease. *Apps on smart phones require video out capabilities to be displayed with the P4. 11


 Use Prolonged use")
15 Connecting Speakers/Headphones Step 1: Connect your speaker to your P4 s or headphones 3.5 mm cord Speaker Adapter Step 2: Ensure the power and volume on your speaker or headphones is turned on Step 3: Place headphones/earphones in/over ears Caution for Earphone (Earplug) Use Prolonged use at high volume may impair your hearing. 12


16 Connecting Keyboard/Mouse Step 1: Remove the USB Adapter from the back of your Keyboard /mouse combo Step 2: Connect your keyboard/mouse combo s to your P4 s USB Adapter USB Input Step 3: Move the ON/Off Switch on the side of the combo. Step 4: Press the red button to sync the wireless usb adapter to the keyboard. Mouse Touchpad Left Click Right Click 13

17 Connecting Keyboard/Mouse Optional Keyboard and Mouse can be purchased directly from AAXA Technologies at A USB mouse can be used to select most options on the P4. To move the cursor, place 1 finger on the pad located on the right and move your finger in the direction you wish to move the mouse. Hover over your selection and click the left mouse button. A keyboard can be used in the desktop feature. Please refer to the Desktop section of the manual for a more detailed explanation. Wireless Signal 14


18 Computer Data Transfer Only Step 1: Connect small end of the to your P4 s USB Adapter Micro USB Input Step 2: Connect opposite end of USB Adapter to your computer s USB Port Connecting your P4 to your computer for data transfer allows you to add files to store onto the onboard memory. This will allow you to play files with your P4 as a standalone device. 15

19 Computer Data Transfer Only Step 3: Turn On the P4 and open the OR Open to view files that autoplays. NAND hardrive Step 4: Place files in appropriate folders Video files go here Image files go here Music files go here Note. If your computer fails to detect the projector, check to make sure the cable is securely inserted on both sides. If you re still unable to view the folder, please consult with your operating system s owner manual. 16

20 How to Save Files to your Sd or USB In order to correctly display your media files SD or USB, the files must be placed in the correct folder. Step 1: Create folders movie, music, and picture in all lowercase. To do this, right click on your mouse on an empty space in your SD or USB s main folder. Step 2: Place files in appropriate folders Video files go here Music files go here Image files go here 17

21 Micro SD Card How to insert your Micro SD Card Slide in your SD card into the SD card slot on the front of the P4. (as shown in picture) Gently slide the SD card until it *clicks* into place. How to access your Micro SD Card Once your SD card has been inserted, you can navigate through the main menu to select what you want to view under each sub menu.(videos, Photo, Music) After selecting SD card mode you should now be able to access the data on the SD device through the onboard media player. *Review the Specification section of this manual to read about the supported file formats. 18

22 USB OTG(On-the-Go) How to insert your USB Drive Slide your USB Drive into USB slot. (as shown in picture) Gently slide the drive until it cannot go in any further. How to access your USB Drive Once your USB Drive has been inserted, you can navigate through the main menu to select what you want to view under each sub menu.(videos, Photo, Music) After selecting USB Drive Mode you should now be able to access the data on the USB drive through the onboard media player. *Review the Specification section of this manual to read about the supported file formats. 19
23 Menu Screens Main Menu Chapter 3 The P4 features a built in PMP (Portable Media Player) function. This function allows the projector to play videos, pictures, music files, and text. To access the main menu simply turn on the projector. Scroll Left/Right by pressing the rewind/fast foward buttons To select a submenu, highlight the desired submenu and press the Play/Pause button located in the middle of the keypad or remote. To go back to the previous page while in a submenu, press the back on the far right just underneath the directional keypad. 20


24 Video Player Menu Rewind / Back Pause Play/Stop Fast-Foward / Next Open File Volume Down Volume Up Opening a file: Choose Open File option Select device file is stored on Select file from list 21
25 Video Player Menu Playing Videos To play/pause a video, press the play button in the middle of the keypad or remote control To rewind, press and hold the left arrow button To fast-forward, press and hold the right arrow button To jump forward to the next vide, press the right arrow button To jump back to a prior video, press the left arrow button To adjust the volume, press the vol+ (on the remote) to increase and vol- (on the remote) to decrease the volume Note: If the video is large, please allow the projector a moment to process the file. If after a few minutes the projector does not play a video, it means the file is not compatible. *Review Specification section of this manual for supported video formats. 22


26 Photo Menu Close Menu Previous Next Run Slideshow -1 sec to slideshow +1 sec to slideshow Open File Opening a file: Choose Open File option Select device file is stored on Select file from list 23
27 Photo Menu Viewing Pictures The P4 Pico Projector allows you to view pictures individually or in a slideshow. To view individual photos, select the file you want to view in the file menu for the particular storage device on which the image file is stored. You can press the left and right arrow buttons on the touch pad or remote to flip through the pictures you have in the present folder. Viewing Pictures in a Slideshow To view your pictures in a slideshow, select a file and press Play when the picture appears. *Review Specification section of this manual for supported picture formats. 24

28 Music Player Menu Previous Play Stop Next Open File Repeat Shuffle Playlist Volume up Volume down Opening a file: Choose Open File option Select device file is stored on Select file from list 25
29 Music Player Menu Listening to music To play/pause a song, press the play button in the middle of the keypad or remote control To rewind, press and hold the left arrow button To fast-forward, press and hold the right arrow button To jump forward to the next vide, press the right arrow button To jump back to a prior video, press the left arrow button To adjust the volume, press the vol+ ( on the remote) to increase and vol- ( on the remote) to decrease the volume *Review Specification section of this manual for supported video formats. 26


30 The Windows CE Desktop allows users to load, install, and manipulate any third party applications that are supported by Windows CE including word processing, spreadsheets, games, and other applications. A Keyboard and Mouse is REQUIRED to use the Windows CE Desktop NOTE: To Exit Desktop mode, double click the button located on the desktop! Technical Support for the Desktop is not available. Please direct any questions to aaxatech. forumotion.com and we will do our best to assist you. 27


 Date and Time Adjust Date and Time")


31 Setup Menu The Settings Menu can be accessed by selecting Settings on the main menu There are 4 menus in the settings menu Sound & Display Volume Settings Allows the raising or lowering of volume Picture Adjustment Brightness, backlight and color temperature options IMAGE FLIP Flips image upside down (for rear projection) Date and Time Adjust Date and Time Language & Keyboard The projector allows you to choose from different languages To choose the language of your choice, highlight the language you want and press play. Disk Usage Displays total memory used on the P4 s onboard memory as well as an SD card if inserted 28
32 Technical Details Chapter 4 Troubleshooting IMAGE IS BLURRED Possible Causes The Projector is not in focus Solution Adjust the focus with the focus adjustment dial until the image comes into focus The Projector is offset from plane / angle of operation Move the projector so that it is both 180 degrees and on an evern plane with the screen. No Sync, No Signal 1. Be sure to setup the computer to enable a video signal output. On some laptops this is done by pressing and holding Function F5 key. If using the P4 as an external monitor on Windows based systems, this can be done by selecting extend my desktop to this monitor. The native resolution of the p4 projector is 858x480 and accepts up to 1024x768. Depending on the video driver different resolutions may need to be selected for proper output. 29
33 Technical Details Troubleshooting THE PROJECTOR DOES NOT TURN ON Possible Causes There is no power The power button was not held long enough NO PICTURE / FILE NOT SUPPORTED Possible Causes The video source is not properly connected or selected Solution Check to ensure the power outlet or battery source is good. check the power adapter to ensure a proper connection with the wall outlet as well as the proejctor. Confirm that the unit is charged and has enough power To power on the projector, the power button needs to be depressed for a full 3 seconds. try holding the power button until the optical engine turns on Solution Check the video source signal to ensure that it is properly connected. Select the current input source by choosing the input desired from the main menu Incorrect file extension / Video is encoded with incorrect codec Please refer to Specifications page to see which file types and codex are supported. Verify that the file was encoded properly. 30
34 Specifications Brightness Native Resolution Maximum Resolution Contrast Ratio Projectoin Lens: Image Size: Lamp: Video in: Audio Output: SD Card USB: Dimensions Weight Supported File Formats 80 Lumens WVGA(858x480) WXGA(1280x800) 2000:1 Manual Focus 10~80 inches 20,000 hour RGB Triple LEDs Composite A/V VGA(mini-VGA) 1.0 W stereo speakers 3.5 mm audio jack SD-HC Card Slot (32GB maximum) USB OTG (On-the-Go) (Memory Sticks) USB Data Transfer 172x71x31mm 0.5 lbs AVI, MPG. MP3, FLV, RMVB, RM, JPG 31
35
36 Please direct all customer service inquiries to: AAXA Technologies, Inc. 103A East Alton Santa Ana, CA (714)
aaxa P4X Pico Projector TECHNOLOGIES User Guide
 aaxa TECHNOLOGIES P4X Pico Projector User Guide Caution! WARNING: Please use this product as instructed. Misuse may cause injury or death. DO NOT use while driving DO NOT expose to water or wet surfaces.
aaxa TECHNOLOGIES User Guide
 aaxa TECHNOLOGIES User Guide Caution! WARNING: Please use this product as instructed. Misuse may cause injury or death. DO NOT use while driving DO NOT expose to water or wet surfaces. Electric shock may
aaxa P3 Pico Projector TECHNOLOGIES User Guide
 aaxa TECHNOLOGIES P3 Pico Projector User Guide Caution! WARNING: Please use this product as instructed. Misuse may cause injury or death. *Do not operate the Projector in direct sunlight or near heat sources
TECHNOLOGIES. P2jr Pico Projector. User Guide
 aaxa TECHNOLOGIES P2jr Pico Projector User Guide Caution! WARNING: Please use this product as instructed. Misuse may cause injury or death. DO NOT use while driving DO NOT expose to water or wet surfaces.
aaxa P3OO Pico Projector TECHNOLOGIES User Guide
 aaxa TECHNOLOGIES P3OO Pico Projector User Guide Caution! WARNING: Please use this product as instructed. Misuse may cause injury or death. DO NOT use while driving DO NOT expose to water or wet surfaces.
aaxa Pico Projector TECHNOLOGIES User Guide
 aaxa TECHNOLOGIES Pico Projector User Guide Caution! WARNING: Please use this product as instructed. Misuse may cause injury or death. DO NOT use while driving. DO NOT expose to water or wet surfaces.
aaxa TECHNOLOGIES PICO PROJECTOR User Guide
 aaxa TECHNOLOGIES PICO PROJECTOR User Guide Caution! WARNING: Please use this product as instructed. Misuse may cause injury or death. DO NOT use while driving DO NOT expose to water or wet surfaces. Electric
aaxa TECHNOLOGIES User Guide
 aaxa TECHNOLOGIES User Guide Caution! WARNING: Please use this product as instructed. Misuse may cause injury or death. DO NOT use while driving DO NOT expose to water or wet surfaces. Electric shock may
aaxa TECHNOLOGIES User Guide
 aaxa TECHNOLOGIES User Guide Caution! WARNING: Please use this product as instructed. Misuse may cause injury or death. DO NOT use while driving DO NOT expose to water or wet surfaces. Electric shock may
aaxa TECHNOLOGIES User Guide
 aaxa TECHNOLOGIES User Guide Caution! WARNING: Please use this product as instructed. Misuse may cause injury or death. DO NOT use while driving DO NOT expose to water or wet surfaces. Electric shock may
aaxa TECHNOLOGIES User Guide
 aaxa TECHNOLOGIES User Guide Caution! WARNING: Please use this product as instructed. Misuse may cause injury or death. DO NOT use while driving DO NOT expose to water or wet surfaces. Electric shock may
aaxa TECHNOLOGIES User Guide
 aaxa TECHNOLOGIES User Guide Caution! WARNING: Please use this product as instructed. Misuse may cause injury or death. DO NOT use while driving DO NOT expose to water or wet surfaces. Electric shock may
aaxa TECHNOLOGIES User Guide
 aaxa TECHNOLOGIES User Guide Vertical Operation The HD Pico can be used for vertical operation (Ceiling projection). To use the HD Pico for Ceiling projection set the HD Pico in "Eco mode". Only an TF
*Do not operate the projector near water such as by the sink or bathtub as this may cause electric shock.
 Table of Contents Table of Contents 1 Warnings 2 Overview 3 Remote Control Functions 4 Packing List 5 General Operation 6 Startup and control Shutdown Positioning / Throw Distance / Focus 7 Connecting
TECHNOLOGIES. User Guide
 aaxa TECHNOLOGIES User Guide Quick Start Guide Step 4: Settings Button Step 1: Power Adapter Port Step 2: Power Button Step 3: Adjust Focus Step 1: Connect the power adapter Step 2: Press the Power button
WARNINGS. *Do not operate the Projector in direct sunlight or near heat sources such as heaters, fires, and stoves as this may cause a fire hazard.
 WARNINGS *Do not operate the Projector in direct sunlight or near heat sources such as heaters, fires, and stoves as this may cause a fire hazard. *Do not operate the projector close to sources of steam
aaxa TECHNOLOGIES User Guide
 aaxa TECHNOLOGIES User Guide Caution! WARNING: Please use this product as instructed. Misuse may cause injury or death. DO NOT use while driving. DO NOT expose to water or wet surfaces. Electric shock
aaxa TECHNOLOGIES User Guide
 aaxa TECHNOLOGIES User Guide Caution! WARNING: Please use this product as instructed. Misuse may cause injury or death. DO NOT use while driving. DO NOT expose to water or wet surfaces. Electric shock
User s Manual BeamPod User Manual
 User s Manual BeamPod General Safety Information 1. Keep the device and packaging materials out of reach of infants and children. 2. Keep the power adapter and other contacts from water, Dry your hands
aaxa TECHNOLOGIES User Guide
 aaxa TECHNOLOGIES User Guide Caution! WARNING: Please use this product as instructed. Misuse may cause injury or death. DO NOT use while driving. DO NOT expose to water or wet surfaces. Electric shock
aaxa TECHNOLOGIES User Guide
 aaxa TECHNOLOGIES User Guide Caution! WARNING: Please use this product as instructed. Misuse may cause injury or death. DO NOT use while driving. DO NOT expose to water or wet surfaces. Electric shock
aaxa TECHNOLOGIES User Guide
 aaxa TECHNOLOGIES User Guide Caution! WARNING: Please use this product as instructed. Misuse may cause injury or death. DO NOT use while driving. DO NOT expose to water or wet surfaces. Electric shock
/ QUICK START GUIDE. Mobile Projector
 / QUICK START GUIDE Mobile Projector 1 STEP 1 - POWER UP Power Button Press and hold the power buttons for 5 seconds to turn on the device. (It may take a few seconds for the Cube to start projecting an
quick start Multi_3M-MP220-QSG-4-75x7.indb 1 11/29/2011 5:38:44 PM
 quick start quick start... 4 démarrage rapide... 14 kurzanleitung... 24 inicio rápido... 34 guida rapida... 44 snelstartgids... 54 快速入门指南... 64 快速入門指引... 74 クイックスタートガイド... 84 빠른시작가이드... 94 3 English Français
Adapt ADPP-305 Projector User Manual
 Adapt ADPP-305 Projector User Manual I IMPORTANT: Please read before use Before using the product, please read the manual carefully. This product has 4GB memory, and can receive an additional TF/Micro
XEMIO-950 MP5 PLAYER / 4GB MEMORY / TOUCH SCREEN. For information and support,
 XEMIO-950 MP5 PLAYER / 4GB MEMORY / TOUCH SCREEN For information and support, www.lenco.eu To the customer: Thank you for purchasing this MP5 player. When opening the box for the first time, please check
CONTENT COMPONENTS OF PROJECTOR... 2 SPECIFICATION... 3 INSTRUCTION MANUAL... 3 CHARGING THE PROJECTOR... 3 SET UP... 4
 MP50M User Manual CONTENT COMPONENTS OF PROJECTOR... 2 SPECIFICATION... 3 INSTRUCTION MANUAL... 3 CHARGING THE PROJECTOR... 3 SET UP... 4 POWERING UP AND VIEWING MEDIA... 4 ADJUSTING VOLUME... 5 ADJUSTING
NID- 7006A. Memory Powered by Android TM OS 4.1
 THE NEW GENERATION IN TECHNOLOGY NID- 7006A Core TM 7 Tablet PC with 8GB Built- In Memory Powered by Android TM OS 4.1 Basic Introduction... 1 Quick Start... 1 Battery management and charging... 1 Boot
AAXA Technologies P700 HD LED Pico Projector - Troubleshooting & Firmware Update Guide
 Troubleshooting: Image is blurred/picture not bright enough The Projector is not in focus Adjust the focus with the focus adjustment dial until the image comes into focus. Move the projector so that it
Innovative K5 Palm Size LED Projector.
 Innovative K5 Palm Size LED Projector www.innovative.com.sg 1 CONTENT COMPONENTS OF PROJECTOR... 2 SPECIFICATIONS... 3 CHARGING THE PROJECTOR... 3 SET UP... 4 POWERING UP AND VIEWING MEDIA... 4 ADJUSTING
III INDEX. Product List 1. Overview 1. Projector Specification 2. Basic Functions: 2. MP4 key functions description: 3.
 Version A I IMPORTANT This product is a micro projector with MP4 player function that can connect to mobile/iphone, MP4/iPod, PSP, PDA, DVD, PC/Notebook and other digital products which have video and
10.1 HD Memory View Instruction Manual
 10.1 HD Memory View Instruction Manual Cautions Precautions and maintenance For indoor use only To avoid risk of fire or electric shock, do not expose the unit to moisture or condensation. To avoid overheating,
ipod Tutorial Includes lessons on transferring music to ipod, playing music, and storing files on ipod
 ipod Tutorial Includes lessons on transferring music to ipod, playing music, and storing files on ipod apple Apple Computer, Inc. 2004 Apple Computer, Inc. All rights reserved. Apple, the Apple logo, Apple
xtab 7Q Tablet PC User s manual
 xtab 7Q Tablet PC User s manual TABLE OF CONTENTS INTRODUCTION... 3 I - GETTING STARTED... 3 Important Safety Precautions... 3 Cleaning the Panel... 3 Cleaning the Tablet... 3 Features... 4 Buttons Overview...
1. Notes. 2. Accessories. 3. Main Functions
 Contents 1. Notes... 2 2. Accessories... 2 3. Main Functions... 2 4. Appearance And Buttons... 3 5. MID Hardware Parameters... 4 6. MID Use And Preparation... 4 7. Keys Functions... 4 8. Start-up And Shutdown...
*For additional detailed product information and support, visit
 User Manual Introduction This product uses TI0.3 inch DMD chip, incorporating RGB LED display technology. LED light source, using LED RGB tri-chromatic LED chips, gives a life of up to 20000 hours. In
Ultra High Brightness Professional Monitor User Manual
 Manual Version UHBA1.0 Safety Instructions Please keep the display away from any heat sources. Place the display in a stable and well-ventilated place. Please handle with care as product contains glass.
Quick Start Guide MCDD (1.0) G
 G") Quick Start Guide MCDD0012301 (1.0) G Getting to Know Your Phone Camera Mirror Earpiece Speaker Headset Jack Volume Up/Down Left Soft Key Picture & Video Voice Command/ Memo Key Speakerphone Key* Charging
Quick Start Guide MCDD0012301 (1.0) G Getting to Know Your Phone Camera Mirror Earpiece Speaker Headset Jack Volume Up/Down Left Soft Key Picture & Video Voice Command/ Memo Key Speakerphone Key* Charging
English. If the time arises to throw away your product, please recycle all the components possible.
 Welcome: Thank you kindly for purchasing this fine product. Much investment in time and effort has gone into its development, and it is our hope that it will give you many years of trouble-free service.
Aspire E1-771G / E1-771 / E1-731G / E1-731
 Aspire E-77G / E-77 / E-7G / E-7 Quick Guide Product registration When using your product for the first time, it is recommended that you immediately register it. This will give you access to some useful
Xemio-154 User Manual
 Xemio-154 User Manual User manual Sport MP3 Player with Micro SD Card of 4GB IMPORTANT: Read all instructions carefully before using this product. Retain this owner s manual for future reference. Cautions
ipod nano User Guide
 ipod nano User Guide 2 Contents Chapter 1 4 ipod nano Basics 4 ipod nano at a Glance 5 Using ipod nano Controls 9 Using ipod nano Menus 12 About the ipod nano Internal Speaker 13 Connecting and Disconnecting
Remote control Song Book User s manual. 2 AA batteries AV cable HDMI cable. Angel to receive signals from the remote control:
 SAFETY MANUAL For safety, please read this manual carefully. ATTENTION: To reduce electric danger, do not open the device cover, and the user may not tamper with its inside. Consult a professional about
Aspire E1-572 / E1-570 / E1-532 / E1-530
 Aspire E1-57 / E1-570 / E1-53 / E1-530 Quick Guide Product registration When using your product for the first time, it is recommended that you immediately register it. This will give you access to some
Hi-Res 8 Wi-Fi Digital Picture Frame with MP3 player Table of Contents
 Hi-Res 8 Wi-Fi Digital Picture Frame with MP3 player Table of Contents Before Using the Digital Picture Frame...3 Introduction...3 Features and Specs...3 Package contents...4 Digital Picture Frame Layout...5
VRSLT: Long Duration Voice Recorder
 VRSLT: Long Duration Voice Recorder VRSLT THANK YOU FOR PURCHASING THE VRSLT: LONG DURATION VOICE Please read this manual before operating the VRSLT: Long Duration Voice Recorder and keep it handy. The
Multi-Function Digital Viewer
 Multi-Function Digital Viewer User Manual About this Manual Preface This manual describes how to get the most out of the Multi-Function Digital Viewer. You should read through this manual before using
V-TOUCH PRO MANUAL. 905L Series
 V-TOUCH PRO MANUAL 905L Series TABLE OF CONTENTS Table Of Contents Buttons Basic Features Caution Turning On/Off the Player Charging the Player Inserting the MicroSD Card Removing the McroSD Card Connecting
SMPK4230 User Manual
 SMPK4230 User Manual Sylvania is a registered trademark of OSRAM Sylvania Inc. Used under License What s in the box? Operating Unit User Manual Quick Start Guide USB Cable Earphone Battery Charger 2 Content
Tutorial. Includes lessons on transferring music to ipod, playing music, and storing files on ipod
 Tutorial Includes lessons on transferring music to ipod, playing music, and storing files on ipod The information in this document is subject to change without notice. Hewlett-Packard Company makes no
USER MANUAL KAHVG28XXXA
 USER MANUAL KAHVG28XXXA Quick Reference Dear Customers Thank you for choosing our portable game device. To ensure you can use our product efficiently please read this user manual carefully. Safety Safety
ipod classic User Guide
 ipod classic User Guide Contents 4 Chapter 1: ipod classic Basics 5 ipod classic at a glance 5 Using ipod classic controls 7 Disabling ipod classic controls 8 Using ipod classic menus 8 Adding or removing
Visual Land V TOUCH PRO
 Visual Land V TOUCH PRO Information in this manual are subject to change without notice. FEATURES 2.8 inch wide touch screen, 320X240 dot matrix full color high speed TFT screen Support MP3, WMA, RA, WAV
Aspire E1 Series (14")
") Aspire E1 Series (1") Quick Guide Enjoy the benefits of having an Acer ID With an Acer ID, you can: Remotely access your PC from your other devices with our free Acer Remote Files app Get the latest offers
Aspire E1 Series (1") Quick Guide Enjoy the benefits of having an Acer ID With an Acer ID, you can: Remotely access your PC from your other devices with our free Acer Remote Files app Get the latest offers
Aspire Notebook Series
 Aspire Notebook Series Quick Guide Product registration When using your product for the first time, it is recommended that you immediately register it. This will give you access to some useful benefits,
EVOBOOK 2. User s Manual.
 EVOBOOK 2 User s Manual www.evolio.ro 0 User s Manual Content Page Introduction.... 2 Parts and Controls.... 3 Getting Started...... 6 Turning On/Off EvoBook2. 6 Charging EvoBook2... 6 Inserting SD card....
PRESTIGIO LIBRETTO. e-book Reader PER307.
 PRESTIGIO LIBRETTO e-book Reader PER307 www.prestigio.com Table of Contents Disclaimer 3 Introduction 3 Package Content 3 Getting Started 4 Charging the Reader 5 Power On/Off, Reset Device, Insert MicroSD
HELLOMOTO. contents MOTO U9
 HELLOMOTO MOTO U9 Feel It, See It, Hear It! Your MOTO U9 phone is made to be held, and made to be seen! Transfer your favorite quickly and easily with Microsoft Windows Media Player 11. Control playback
EziNav G3 User Manual
 EziNav G3 User Manual 4.3 Touchscreen GPS with Bluetooth About this User Manual Congratulations on your purchase of your Kogan EziNav G3 GPS. This user manual provides information regarding the various
xtab-100 Tablet PC User s manual
 xtab-100 Tablet PC User s manual TABLE OF CONTENTS INTRODUCTION... 4 I - GETTING STARTED... 4 Important Safety Precautions... 4 Cleaning the Panel... 5 Cleaning the Personal Touch Tablet... 5 Features...
TALK 5H USER S MANUAL
 TALK 5H USER S MANUAL 2 INTRODUCTION... 5 GETTING STARTED... 5 Important Safety Precautions... 5 Cleaning the Panel... 6 Cleaning the Phone... 6 Features... 6 Buttons overview... 7 What s int he Box...
TV1 Digital Player User s Manual
 TV1 Digital Player User s Manual Note: Screen shots taken in this manual may appear different on the player itself. Table of Content: Computer System requirements... 1 Notes... 2 Product Introduction...
TM101W635L User s Guide
 TM101W635L User s Guide Customer Service NuVision Customer Service www.nuvision.com/assistance Phone: (800) 890-1288 Hours: 8:30am to 5:30pm PST M-F Email: cs@nuvision.com Register your tablet today at
Precautions If you do not use your Trio for over 24 hours, please switch it to OFF.
 Congratulations on purchasing your Trio Personal Media Player! To get the most out of your purchase, please take the time to carefully read through this manual. Foreword If any problems occur during while
DVR 514 Digital Video Recorder
 DVR 514 Digital Video Recorder User Manual 2010 Sakar International, Inc. All rights reserved. Windows and the Windows logo are registered trademarks of Microsoft Corporation. All other trademarks are
MP3 HARD DISK. User Manual V1.0
 User Manual V1.0 Contents Before Using the Product 1 Introduction 1 System Requirements 1 Charging the Battery 2 Transferring Music Files 3 Music File Transferring Example 4 Basic Functions 5 Components
KH-955 MP4 PLAYER / TOUCH SCREEN
 KH-955 MP4 PLAYER / TOUCH SCREEN User manual English For information and support, www.lenco.eu Table of Content Box content... 2 Warnings... 3 Basic controls and interfaces of the player... 4 Internal
USER MANUAL Digital Screen
 USER MANUAL Digital Screen RBDIG7 Cautions Precautions and Maintenance For indoor use only To avoid risk of fire or electric shock, do not expose the unit to moisture or condensation. To avoid overheating,
Contents. Introduction. Getting Started. Navigating your Device. Customizing the Panels. Pure Android Audio. E-Books. Browsing the Internet
 Contents Introduction Getting Started Your Device at a Glance Charging Assembling the Power Adapter Turning On/Off, Unlocking Setting to Sleep and Waking Up Connecting to a Computer Navigating your Device
with and -The quickest way to bring together audio/video media with interactive lesson planning.
 with and -The quickest way to bring together audio/video media with interactive lesson planning. This guide is meant for new AVRover owners to quickly get up to speed on the controls and functions within
PENDOPAD 10.1 QUICKSTART T GUIDE USER MANUAL PNDPP42DG10BLK. > Please read carefully before use
 PENDOPAD 10.1 PNDPP42DG10BLK QUICKSTART T GUIDE & USER MANUAL > Please read carefully before use This manual contains important safety precautions and information of correct use. Please be sure to read
Game Mode...29 Settings Mode...30 Using the AVI Converter Software...36 Troubleshooting...40
 Contents Important Notice...3 Safety Instructions...4 Product feature...5 Front view...7 Minimum System Requirements...8 Connect USB...8 Get Started...9 Power ON / Power OFF...9 Set Key Lock...9 Music
Android DLP Projector
 Panorama-10 Universal Compact Multimedia Android DLP Projector Introduction 1 With Panorama-10, find a simple solution to all your business, home and education projections. Simply give quick presentations
MOTO MOTOSTA MOTOST RT ART
 MOTOSLVR L72 MOTOSTART essentials Note: Before using your phone for the first time, be sure to review the important safety information in the user's guide. Periodically review this information so you
Mini Projector User s Guide with Integrated Multimedia Player
 Mini Projector User s Guide with Integrated Multimedia Player Please read this manual before Model P50M Table of Contents 1. Table of Contents---------------------------------1 2. Warnings-----------------------------------------2
Blaze EZ Quick Start Guide (Model: T70EZ) HIMS
 HIMS") Blaze EZ Quick Start Guide (Model: T70EZ) HIMS SELVAS Healthcare, Inc. 174, Gajeong-ro, Yuseong-gu, Daejeon, Korea 305-350 Phone: +82-42-864-4460 Fax: +82-42-864-4462 Email: hims@himsintl.com Website:
Blaze EZ Quick Start Guide (Model: T70EZ) HIMS SELVAS Healthcare, Inc. 174, Gajeong-ro, Yuseong-gu, Daejeon, Korea 305-350 Phone: +82-42-864-4460 Fax: +82-42-864-4462 Email: hims@himsintl.com Website:
Notebook Tour. User Guide
 Notebook Tour User Guide Copyright 2006 Hewlett-Packard Development Company, L.P. Microsoft and Windows are U.S. registered trademarks of Microsoft Corporation. Bluetooth is a trademark owned by its proprietor
USER MANUAL. Please read this user manual carefully before using your unit.
 USER MANUAL MULTIMEDIA LED PROJECTOR Please read this user manual carefully before using your unit. CONTENTS Contents...1 Caution... 2 What's in the box...3 Product Introduction...4 Remote Control Introduction...5
700TSU INSTALLATION MANUAL
 M 700TSU INSTALLATION MANUAL 2 Table of Contents Features...03 Specifications...04 Quick-Start...05 Remote Control...07 Hardware Installation...10 Software Installation...14 Touch Screen Driver Installation
Aspire V Quick Guide
 Aspire V3-772 Quick Guide Product registration When using your product for the first time, it is recommended that you immediately register it. This will give you access to some useful benefits, such as:
2014 Cadillac Escalade Rear Seat Entertainment M
 2014 Cadillac Escalade Rear Seat Entertainment M Infotainment System...... 3 Rear Seat Infotainment.... 3 Rear Seat Entertainment (RSE) System....................... 3 Index..................... i-1 Rear
1. Introduction. 1.1 Cosmo Specifications
 1. Introduction 1.1 Cosmo Specifications Details CPU Memory Storage Operating System Connectivity Sensor Camera Display Video Formats Description Quad Core 1.3 GHz ARM Cortex A7 Processor 512MB RAM 8 GB
Quick Start Turning on the Tablet PC for the First Time
 User s Manual DL46 Getting Started Congratulations on your purchase of a Tablet PC. The Tablet PC is a fully functional PC with built-in LAN, and wireless connectivity. With your Tablet PC you will be
For Model No. MP709 User Manual
 For Model No. MP709 EN User Manual This manual contains important safety precautions and information of correct use. Please be sure to read this manual carefully before use so as to avoid any accidents.
Lenovo Miix User Guide. Read the safety notices and important tips in the included manuals before using your computer.
 Lenovo Miix 2 11 User Guide Read the safety notices and important tips in the included manuals before using your computer. Notes Before using the product, be sure to read Lenovo Safety and General Information
 Glossary Warranty and support information Introduc tion ------------------------------------------------------------------------------ Safety instructions ----------------------------------------------------------------------
BLUETOOTH "SOUNDBAR" WITH SUBWOOFER
 BLUETOOTH "SOUNDBAR" WITH SUBWOOFER Quick Installation Guide DA-10294 Thank you for purchasing DIGITUS DA-10294. Specially designed to play music through Bluetooth from your mobile phone or computer (through
PENDOPAD 9.7 QUICKSTART GUIDE & USER MANUAL PNDPP42DG9BLK. > Please read carefully before use
 PENDOPAD 9.7 PNDPP42DG9BLK QUICKSTART GUIDE & USER MANUAL > Please read carefully before use This manual contains important safety precautions and information of correct use. Please be sure to read this
DVP-731 USER MANUAL DVD/MPEG4/CD/MP3/PLAYER
 DVP-731 USER MANUAL DVD/MPEG4/CD/MP3/PLAYER Please read this User Manual carefully to ensure proper use of this product and keep this manual for future reference. For information and support, www.lenco.eu
Get Started. Insert SIM card The phone is a Dual SIM mobile phone allowing you to use the facility of two networks.
 Thank You for Purchasing this Smart mobile device. This device will provide you with high quality mobile communication and entertainment based on SMART and high standards. Content in this manual may differ
Important About Camera
 1 Thank you for purchasing the GoXtreme Full Dome 360. This 360 camera allows you to capture, view and share amazing full panoramic 360º videos and photos. When viewed using the companion app or desktop
GETTING TO KNOW YOUR MACBOOK PRO. Equipment. 1. Ports LEFT SIDE RIGHT SIDE
 GETTING TO KNOW YOUR MACBOOK PRO Equipment 1. Ports LEFT SIDE RIGHT SIDE USB 3, Headphone/speaker Jack 2. Thunderbolt Dongle (laptop to VGA for projector) 3. Power Cord & Power Button - connect AC Power
Statement I. Thank you for purchasing the B05 Digital Audio Player produced by AGPTek. Before using the player, please read the manual carefully.
 Statement I. Thank you for purchasing the B05 Digital Audio Player produced by AGPTek. Before using the player, please read the manual carefully. If you have any question or any idea about this product,
xtab-700qci Tablet PC User s manual
 xtab-700qci Tablet PC User s manual TABLE OF CONTENTS INTRODUCTION... 3 I - GETTING STARTED... 3 Important Safety Precautions... 3 Cleaning the Panel... 3 Cleaning the Personal Touch Tablet... 3 Features...
Use_cases_English.qxd :51 Pagina 1. Use cases
 Use_cases_English.qxd 20-10-2005 16:51 Pagina 1 Media Center MCP9350i Use cases Use_cases_English.qxd 20-10-2005 16:51 Pagina 2 Online help: www.p4c.philips.com For interactive help, downloads and frequently
Digital MP3 & Video Player
 Models 215/415/418/818 Digital MP3 & Video Player Table of Contents: Product Overview... 2 Features & Notes... 2 Charging...2 Button Overview.. 3 Button Descriptions....3 Mini SD Card...3 Loading music,
Keys and parts (front)
") 2008 Nokia. All rights reserved. Nokia, Nokia Connecting People, Nseries, N96, Navi, and Nokia Care are trademarks or registered trademarks of Nokia Corporation. Other product and company names mentioned
2008 Nokia. All rights reserved. Nokia, Nokia Connecting People, Nseries, N96, Navi, and Nokia Care are trademarks or registered trademarks of Nokia Corporation. Other product and company names mentioned
RAVE MANUAL. 607 Series
 RAVE MANUAL 607 Series TABLE OF CONTENTS Table Of Contents Basic Features Caution Adding Files and Connecting Buttons Powering On/Off the Player Charging the Player Main Menu Music Video Pictures FM Radio
Sigma Simplicity Light & Café
 Sigma Simplicity Light & Café Digital Display Frame Issue 2 0 Contents Westomatic 12 Digital Display Frame User Guide ( Sigma Simplicity and Light ) Westomatic 12 Digital Display Frame User Guide... 2
ipod photo User s Guide
 ipod photo User s Guide Contents 3 Quick Start 5 What You Need to Get Started 8 Setting Up ipod photo to Play Music 13 Using ipod photo 13 Using ipod photo Controls 20 Connecting and Disconnecting ipod