Welcome Contents Diagram
|
|
|
- Edmund Morrison
- 5 years ago
- Views:
Transcription

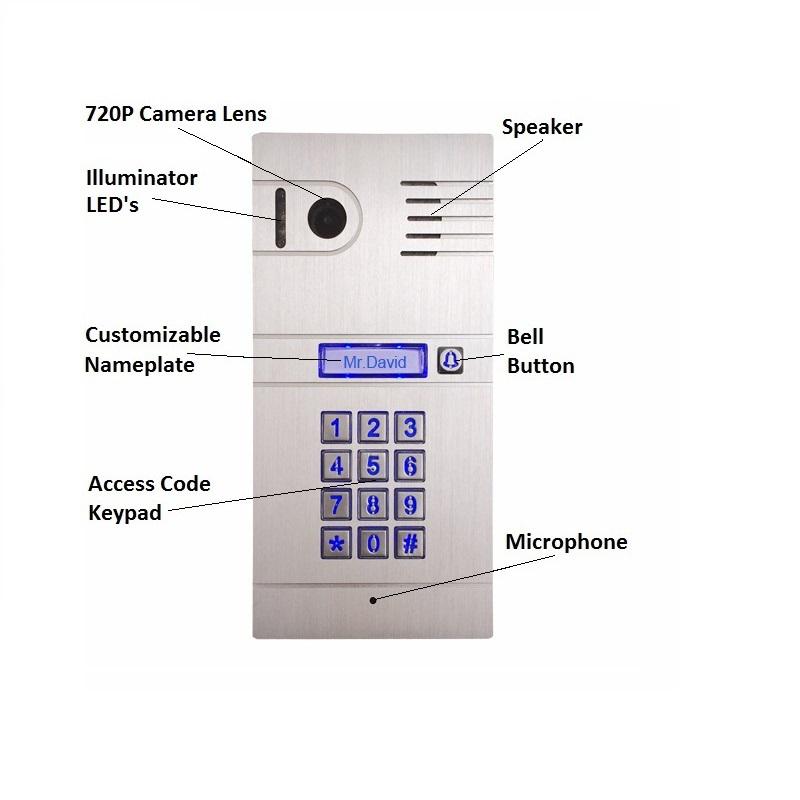
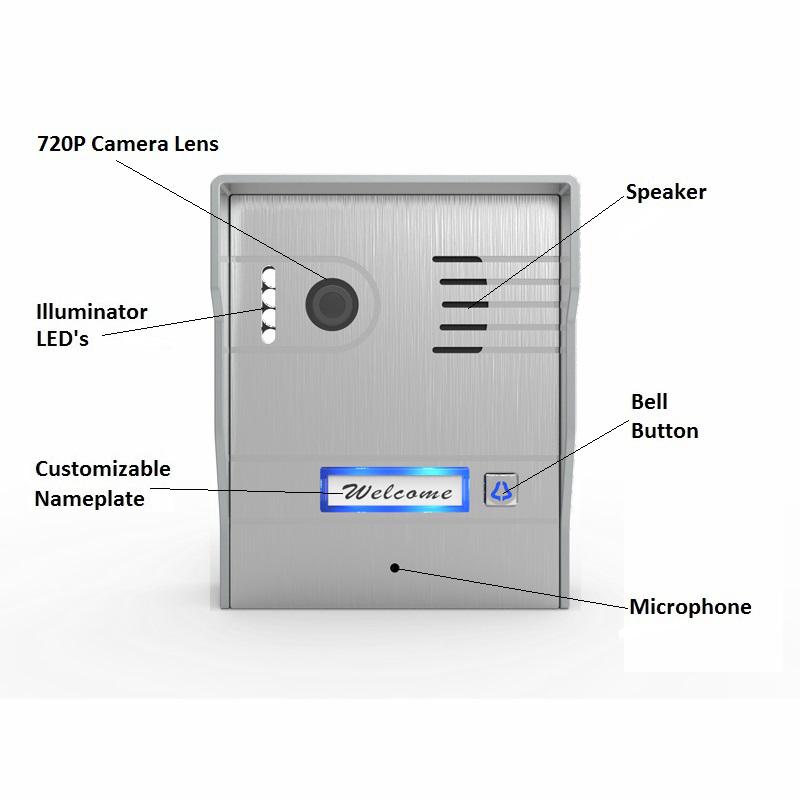
1 Welcome Congratulations on your purchase of our GBF PL960 Series of IP Doorbells. Our factory engineers were the first to enable viewing of multiple security cameras through your handheld smart device, and now have used that expertise to bring you a full-featured IP Video Doorbell system that enables you to monitor and interact with visitors at your door, from anywhere your mobile device has a Wi-Fi or data connection. Please read these instructions carefully and follow all of the required steps during setup to ensure your enjoyment of a fully functional IP Doorbell system in minutes. The PL960 Series of IP Doorbells can be connected to your LAN (Local Area Network) either through a Wireless (Wi-Fi) connection or a Wired (Ethernet Cable) connection. As with any video and audio streaming device, wired connections are preferred over Wi-Fi, but the convenience of not requiring wires from your IP Doorbell location to your router may be the determining factor in your installation. Contents (1) GBF PL960M/PM IP Doorbell (1) Metal Back Box (1) External Wi-Fi Antenna with 3 cable (1) 12VDC Power Supply (1) RJ-45 Wired Ethernet Adapter Dongle (1) Relay/Push-to-Exit Wiring harness (1) Bell Connector Wire Set (4) Screws with Anchors (2) Hex-Head Screws (1) Allen Key (1) Installation and Instruction Manual Diagram
2 1. Installation *Note: It may be more convenient to perform the initial configuration of the IP Doorbell with it temporarily connected to power nearby your home internet router and a computer. This way testing and operation can be verified before the unit is mounted permanently. - Location: Choose a location for your new IP Doorbell, taking in to consideration sightlines, shadows, and excessive background lighting for the camera. You must also consider proximity to AC power and the ability to run wiring for additional optional accessories. Optimal mounting height would be approximately 60 (150cm) up from the surface that the caller is standing on. Consider drilling a 1¼ diameter or larger hole into the wall behind the IP Doorbell to allow for the concealment of the Wi-Fi antenna or RJ-45 Dongle within the wall. - Back Box Mounting: Feed the power supply wiring, wiring harness(s), and the Wi- Fi Antenna cable or the RJ-45 dongle through the hole from the back side of the back box. Use the four screws (and anchors, if required) supplied to mount the back box to the wall in the desired location. - Connect wiring harness and other connections to the back of the IP Doorbell. Gently feed excess wiring through the hole in the back box into the wall cavity, and place the IP Doorbell into the back box (top first). - Secure the IP Doorbell into the back box at the bottom leading edge using the two supplied Hex-Head screws and Allen key. 2. Configuration Begin by performing a factory reset of the settings in your IP Doorbell. To default the settings to factory, follow these steps; - Apply power to the IP doorbell. - Within 5 seconds, press and hold the Bell button until your hear a distinctive 1 second long buzzer sound (after approximately 1 minute, it is preceded by a flash of the illuminator LED s). Release the Bell button after the buzzer sound stops. - The IP Doorbell will reset once again (about one minute) and is ready to start configuration shortly after the illuminator LED s flash. *Note: Performing a factory reset erases settings stored during the configuration process. Do not perform a factory reset after you have configured the IP Doorbell unless absolutely necessary. *To Proceed with a Wireless (Wi-Fi) installation, go to step 3a. *To Proceed with a Wired (RJ45) installation, complete step 3a, then connect the RJ45 cable. *To Proceed with a Wired (RJ45) installation without any requirement for a Wi-Fi connection credentials, start at step 3b (advanced).
3 3a. Initial Wireless (Wi-Fi) and Wired (RJ45) Configuration *Note: The Wi-Fi radio in the IP Doorbell uses 2.4GHz only, and good Wi-Fi signal operation at the IP Doorbell location is a must for satisfactory operation. Network speeds through your LAN and over WAN (internet, Wide Area Network) must meet at least 300 Kbps upload speed (most ISP s limit the upload speed much more than the download). *Initial Wi-Fi Configuration should only be performed ONCE using the ControlCam App on any mobile device. Additional mobile devices will use Add a Network Device to add the IP Doorbell to their ControlCam App. Using an ios Device: - While in close proximity to your IP Doorbell, connect your ios device to the Wi- Fi network of the IP Doorbell (Device). The SSID will be similar to LIDaw********, or the GID of the IP Doorbell prefaced by LID. - Open the ControlCam App. - Tap Add a New Device. - Tap on Start configuring. - Select the Wi-Fi network on which you want to connect the IP Doorbell. - Enter the Wi-Fi password for your selected network. - Tap Setting to save. - IP Doorbell will restart to join the Wi-Fi network (about 1 minute) and your screen will switch to the device settings page. *Note: There is no indication of an incorrectly entered Wi-Fi password. An incorrect password will cause the IP Doorbell to fail to connect to your Wi-Fi network, after which it will reset once more and the LIDaw******** SSID will reappear in your WiFi network scans on your mobile devices. If this happens, delete the IP Doorbell from the ControlCam App and start at the beginning of section 3.a again. - Enter a name in Device Name that you want to use to define this specific IP Doorbell (e.g. Front Door). This name will show in the ControlCam notifications to your mobile device. *You may use spaces or other special characters in the name, but only on ios devices. - Enter the User Name (default is admin ). - Enter the Password (default is 1234 ). - Tap Done. - Re-enter the device settings and turn on the Outdoor call-in. - *After correct configuration it may take a few moments for the IP Doorbell to make the initial connection through the cloud service. - *Unlock Password can be changed in the App as well as through the Web Browser Interface.
4 Using an Android Device: - Ensure your Android device is connected to same Wi-Fi network on which you want to connect the IP Doorbell. While in close proximity to your IP Doorbell, Tap Add a Device - Tap Add a New Device. The App will search for an unconfigured IP Doorbell within Wi-Fi range. - Tap on the GID of the device to be configured, and after a brief pause the message Connect device success that can be configured should display. - Tap Start configuring. - Network Name should match the Wi-Fi network on which you want to connect. - Enter the Wi-Fi password for your selected network. - Tap OK. - IP Doorbell will restart to join the Wi-Fi network (about 1 minute) and your screen will switch to the device settings page. *Note: There is no indication of an incorrectly entered Wi-Fi password. An incorrect password will cause the IP Doorbell to fail to connect to your Wi-Fi network, after which it will reset once more and the LIDaw******** SSID will reappear in your WiFi network scans on your mobile devices. If this happens, delete the IP Doorbell from the ControlCam App and start at the beginning of section 3.a again. - Enter a name in Device Name that you want to use to define this specific IP Doorbell (e.g. FrontDoor). This name will show in the ControlCam notifications to your mobile device. *Do not use any spaces or other special characters in the name on an Android device. - Enter the User Name (default is admin ). - Enter the Password (default is 1234 ). - Tap OK. - *After correct configuration it may take a few moments for the IP Doorbell to make the initial connection through the cloud service. - *Unlock Password can be changed in the App as well as through the Web Browser Interface. 3b. Initial Wired (RJ45, no Wi-Fi) Configuration *Initial Wired Configuration should only be performed ONCE using either IE (Internet Explorer) or Chrome Browsers. *Note: Firefox will not work*. The purpose of this configuration is to disable the broadcast of your IP Doorbell s GID through the IP Doorbell s Wi-Fi radio. Successful completion of the steps outlined in 3a of this manual will also disable the GID broadcast, but using method 3b negates the need to know your Wi-Fi credentials. This can be accomplished through the web browser interface of the IP Doorbell. These steps do require some network knowledge. Therefore, do not alter any settings unless you are sure of their purpose. To access this, perform the following steps; - Determine the IP address that your IP Doorbell has been assigned by your router. This can usually be found as one of the latest entries in the DHCP client list of
5 your router (consult the instructions for your individual router), or by using a network scanning tool (e.g. Fing) - Enter the IP address of the IP Doorbell into the address bar of your browser, preceded by (e.g. ). - Hit enter and a login request should appear. There may also be requests to install additional files, but if you are only intending to change the Network Configuration then you can ignore these additional requests. - Enter the User Name (default is admin ). - Enter the Password (default is 1234 ). - Click Login. - Click Config tab. - Expand Network Settings. - Click Wireless. - Change AP Mode to WLAN Mode. - Click OK to save the setting and restart the IP Doorbell. - After the IP Doorbell finishes it s reset (just after the illuminator LED s flash, about 1 minute), log back in to the Web Browser interface again. - Click Config tab. - Expand Network Settings. - Click LAN. - Ensure that the Gateway IP address matches the IP address of your router. 4. Adding Mobile Devices After successful completion of steps 3a or 3b above, Mobile devices will use Add a Network Device to add the IP Doorbell to their ControlCam App. ios Devices: - Download and/or open the ControlCam App. - Tap on Enter Now *Note: Do not tap Add a New Device. - Tap Add a Device. - Tap Add a Network Device *Note: Do not tap Add a New Device. - You now have 3 options for adding the IP Doorbell. o 1. Local Search If your mobile device is on the same network as your IP Doorbell, you can tap LAN Search and a list of GID s of IP Doorbells installed on your network will display. Choose the GID of the IP Doorbell you want to add. GID s in yellow have already been added to this instance of the ControlCam App.
6 o o 2. QR Code Scan Using the camera in your mobile device, scanning the QR code affixed to the back of the IP Doorbell will automatically populate the GID in the device settings. 3. Manual This option allows you to manually input the GID of the IP Doorbell in to the device settings, useful if your mobile device is not on the same network as the IP Doorbell. - Enter the name in Device Name that you want to identify the IP Doorbell (e.g. Front Door). This name will be specific to the App of each mobile device. *You may use spaces or other special characters in the name, but only on ios devices. - Enter the User Name (default is admin ). - Enter the Password (default is 1234 ). - Tap Done. - Re-enter the device settings and turn on the Outdoor call-in. - *After correct configuration it may take a few moments for the IP Doorbell to make the initial connection through the cloud service. - *Unlock Password can be changed in the App as well as through the Web. Browser Interface. This will change the password for all users of the IP Doorbell. It also changes the password required in the device settings. You may need to update the password in the device settings of the ControlCam App in each mobile device. Android Devices: - Download and/or open the ControlCam App. - Tap on Enter Now *Note: Do not tap Add a New Device. - Tap Add a Device. - Tap Add a Network Device *Note: Do not tap Add a New Device. - You now have 3 options for adding the IP Doorbell. o o o 1. LAN Search If your mobile device is on the same network as your IP Doorbell, you can tap LAN Search and a list of GID s of IP Doorbells installed on your network will display. Choose the GID of the IP Doorbell you want to add. GID s in yellow have already been added to this instance of the ControlCam App. 2. QR Code Scan Using the camera in your mobile device, scanning the QR code affixed to the back of the IP Doorbell will automatically populate the GID in the device settings. 3. Manually Input This option allows you to manually input the GID of the IP Doorbell in to the device settings.
7 - Enter the name in Device Name that you want to identify the IP Doorbell (e.g. FrontDoor). This name will be specific to the App of each mobile device. *You may not use spaces or other special characters in the name on Android devices. - Enter the User Name (default is admin ). - Enter the Password (default is 1234 ). - Tap Done. - Re-enter the device settings and ensure the Outdoor call-in is turned on. - *After correct configuration it may take a few moments for the IP Doorbell to make the initial connection through the cloud service. - *Unlock Password can be changed in the App as well as through the Web Browser Interface. This will change the password for all users of the IP Doorbell. It also changes the password required in the device settings. You may need to update the password in the device settings of the ControlCam App in each mobile device. 5. Keypad Programming (PL960PM Model) The PL960PM keypad can be custom programmed with up to 40 different access codes, and will trigger the same relay that is triggered through the ControlCam App. The length of the access codes and programming password can be programmed to be 2 to 6 digits in length (globally). However, the master password and unlock delay times set in the keypad are independent of the IP Doorbell. A factory reset of the IP Doorbell will not affect the programming contained in the keypad, and vice versa. The keypad requires a separate factory reset to clear the programming. - Modify the Programming Password o Disconnect power to the IP Doorbell. o While pressing the * button, restore the power to the IP Doorbell. Two short chirps will be heard. o Continue holding the button until the IP Doorbell starts chirping continuously. Release the button. o Enter the new password (length determined by other programming). A longer beep is heard, indicating the new password has been successfully stored. o Press * to exit the programming mode. - Enter Programming Mode o Press the * button, a chirp is heard. o Enter the programming password (default is 1234). A longer beep is heard, indicating the IP Doorbell is now in programming mode. o The IP Doorbell will automatically exit programming mode if there is no input at the keypad for over 30 seconds, or press * to exit programming. - Set Unlock Duration Time o Enter programming mode. o Press 00, a longer beep is heard. o Enter 2 digits (01 99) representing the new unlock duration time, in seconds. A longer beep is heard confirming the change.
8 o Press * to exit the programming mode. - Add User Access Codes o Enter programming mode. o Enter 2 digits (10 40) representing the slot in which the user code will reside, a longer beep is heard. o Enter the new user code (length determined by other programming); another longer beep will indicate the new code was stored successfully. o Press * to exit the programming mode. o *Note: Slots are not affected by the programmed unlock duration time. These access codes will only trip the relay for about 1 second. - Delete User Access Codes o Enter programming mode. o Enter 2 digits (01 40) representing the slot containing the access code you want to delete. A longer beep is heard. o Press the # button, another longer beep is heard confirming deletion. o Press * to exit the programming mode. - Delete User Access Codes Directly o Enter programming mode. o Press #, two short chirps are heard. o Enter the access code you want deleted, a longer beep is heard confirming deletion of the access code. o Press * to exit the programming mode. - Setting the Length of the Access codes and Programming Password o Enter the programming mode. o Press 99, a longer beep is heard. o Enter a single digit (2 6) representing the desired length of the access codes and programming password, a longer beep is heard confirming the change. o Press * to exit the programming mode.
9 - Delete All Settings (Maintains Programming Password) o Enter programming mode. o Press #, two short chirps can be heard. o Press # again, a longer beep can be heard. o Press # again 7 more times. After 3 seconds another longer beep will be heard confirming deletion of all User codes and resetting the unlock duration time back to 1 second. Programming password and length will remain unchanged. o Press * to exit the programming mode. - Factory Reset (Custom Keypad Settings Only) o Disconnect power to the IP Doorbell. o While pressing the # button, restore the power to the IP Doorbell. Two short chirps will be heard. o Continue holding the button until the IP Doorbell starts chirping continuously. Release the button. A longer beep is heard, indicating the keypad programming has been restored to factory default settings. 6. Advanced Features There are a number of advanced features that can be configured in your IP Doorbell. Access to these features requires accessing the IP Doorbell Web Server through Internet Explorer (IE) using ActiveX controls. Many features will not be visible or configurable with other web browsers. Video Tutorials and instructions for these features can be downloaded from our website at 7. Using the ControlCam App Receiving a Call from the Outdoor Station - When a visitor pushes the Bell button of the IP Doorbell, your mobile device will receive a pop-up alert with an audible ringtone. - Press Accept to immediately open the ControlCam App and begin a video conversation with the caller, or Cancel if desired. - Press and hold the mic icon in the App to talk to your visitor. Release to listen. *Network transmission delay may require you to hold the mic icon pressed for a slightly longer time to ensure your voice does not get cut short. - To hear audio from the IP Doorbell, the headphones icon must be highlighted in orange (tap to change). - The smaller mic icon must be highlighted in orange (tap to change) to enable the push-to-talk function of the larger mic icon.
10 Activating the Unlock Relay - Input the Unlock Password on your mobile device while it is connected to the IP Doorbell. The Unlock duration time is set separately in the App of each connected mobile device. - On Android Devices, the Auto Unlock feature can be enabled to allow for the simple pressing of the key icon to activate the relay (no code required). Monitoring the IP Doorbell - From the Devices page of the ControlCam App, tap on the image of the IP Doorbell you would like to connect with. - To hear audio from the IP Doorbell, the headphones icon must be highlighted in orange (tap to change). - The smaller mic icon must be highlighted in orange (tap to change) to enable the push-to-talk function of the larger mic icon. Capturing a Still Image - Tap the camera icon to store a still image from the IP Doorbell. This will be stored as a snapshot with a timestamp directly to your mobile device. - Playback can be achieved by tapping the. icon in the upper right corner of the Devices page in the ControlCam App, and then tapping Video capture file to show the list of stored snapshots and videos. Recording a Video Image - Tap the video icon to start recording a video from the IP Doorbell. Press the video icon again to stop recording. This will be stored as a video with a timestamp directly to your mobile device. - Playback can be achieved by tapping the. icon in the upper right corner of the Devices page in the ControlCam App, and then tapping Video capture file to show the list of stored snapshots and videos. Modifying App Settings - From the Devices page in your ControlCam App, tap on the icon beside the image of the IP Doorbell you wish to adjust. To be able to edit Device Name, GID, User Name, or Password settings, you must turn off the Outdoor Call-in, and then tap Edit. Then you can change these settings: o Device Name: Enter a name that you want to use to define this specific IP Doorbell. This name will show in the ControlCam notifications to your mobile device. *Android devices will not accept spaces or other special characters in the name. ios devices do allow special characters o GID: You can manually enter or update the GID number of your IP Doorbell. o o User Name: This will stay as admin Password: The password entered here must match the password programmed in the IP Doorbell through either the Web Server or the latest unlock password set in the ControlCam App. - From the Devices page in your ControlCam App, tap on the icon beside the image of the IP Doorbell you wish to adjust. These settings can be changed
11 in the ControlCam App without entering the Edit mode; Unlock password, Unlock delay, Auto unlock, and Outdoor call-in o Unlock password setting: Tap Unlock password setting, enter the old 4-digit password, and then enter the new 4-digit password. The password must be 4 numbers and can not begin with 00. *Note: Changing the password here changes the unlock password for all ControlCam Apps accessing the IP Doorbell, as well as the Web Server interface. o Unlock Delay: To change the time duration of the Unlock relay, tap Unlock Delay and move the slide adjustment to the desired time (0 99 seconds).*note: on ios devices the unlock delay time adjustment is accessed by tapping the. icon in the upper right corner of the main Devices page. o Auto Unlock: This feature allows the user to trigger the Unlock relay by simply tapping the key icon while connected to the IP Doorbell through the ControlCam App (no unlock code required). *Note: This feature is currently not available on the ios version of the ControlCam App. o Outdoor Call-in: To be able to receive a notification and ringtone of an incoming call from the IP Doorbell the Outdoor call-in must be enabled or turned on. With this feature turned off, the IP Doorbell can still be monitored by the ControlCam App but no notifications will be sent to that specific mobile device. *Note: Outdoor call-in must be turned off to be able to Edit IP Doorbell settings in the ControlCam App. Deleting an IP Doorbell from your Mobile Device - From the Devices page in your ControlCam App, tap on the icon beside the image of the IP Doorbell you wish to delete. Turn off the Outdoor Call-in, and then tap Edit. Tap the red Delete bar. Tap OK to confirm.
12
13
14
15
WELCOME. For customer support or any inquiries, please visit our web site at or contact us at
 WELCOME Congratulations on purchasing the GBF Smart Four Wire Intercom System. Our factory engineers were the first to enable multiple security cameras being monitored through a smart mobile device and
SVT-WIFI Video Intercom System C
 SVT-WIFI Video Intercom System C User Manual Please read this user manual prior to installing the system, and keep it well for future use. CONTENTS 1. Parts and Functions... 1 2. Terminal Descriptions...
HSPA+ WiFi Router with Voice
 NETCOMM LIBERTY SERIES HSPA+ WiFi Router with Voice 3G22WV Quick Start Guide This router has been designed to be placed on a desktop. All of the cables exit from the rear for better organization. The LED
IpAlarm Module Set Up
 Page 1 IpAlarm Module Set Up Note: This device is shipped configured for Ethernet connectivity. To use in this mode, connect the BLUE Jack (marked WAN) to your router and wait for the LEDs to stabilize.
IpAlarm Module Set Up VirtuAlarm model
 Page 1 IpAlarm Module Set Up VirtuAlarm model Note: This device is shipped configured for Ethernet connectivity. To use in this mode, connect the BLUE Jack (marked WAN) to your router and wait at least
Quick Install Guide. Model: PLC-223W, PLC-233W
 Quick Install Guide Model: PLC-223W, PLC-233W This installation guide provides basic instructions for installing the PLC-213W/ PLC-223W/PLC-233W indoor wireless IP camera on your network. By following
Introduction. Package Checklist. Minimum System Requirements. Registering Your Product. More Help
 Introduction Keep a watch on your family, pet, home or office 24/7, even when you re not there. Creative Live! Cam IP SmartHD gives you a live update on your phone, wherever you are. Get activity alerts,
Do not place or mount Ocli 1 in an area where it will be exposed to water. Ocli 1 is designed for indoor use.
 1 Manual: Ocli 1 with Observeye Viewer App for Android Setting Up Ocli 1 Live Viewing with Ocli 1 Recording Video and Taking Snapshots Using Advanced Features Setting Up Ocli 1 Place or Mount the Camera
WiFi Video Doorbell. User Manual
 WiFi Video Doorbell User Manual Introduction Content With Hisilicon Hi3518E processor and H.264 compression technology, this Wifi video intercom provides smooth realtime video transmission while keeps
EC-11 Ethernet Converter
 EC-11 Ethernet Converter PSTN Contact ID to TCP Converter Installation and Operations Manual Version 8.H3.MID 1 Table of Contents About EC-11 Ethernet Converter... 3 Circuit Board Layout and Wiring Diagram...
Installation guide for IP Camera G2
 Installation guide for IP Camera G2 Part I: Mobile Network connection For better experience the convenience that brought by this product, please download mobile phone software before using this product.
User Manual. Wireless IP Camera
 User Manual Wireless IP Camera Introduction Hi. Thank you for purchasing the AUKEY VT-CM1 Wireless Security IP Camera. Please read this user manual carefully and keep it in a safe place for future reference.
Wireless Video/Audio Intercoms
 Wireless Video/Audio Intercoms User Set-Up Guide and Instructions BEC Integrated Solutions Williamsville, New York 716-689-0871 1 Table of Contents: B-WSP1.Page 3 B-WSP2 Page 8 B-WC2..Page 13 B-WI2 Page
Zavio P5111/ P5116/ P5210 Quick Installation Guide
 86085M2000010 Zavio P5111/ P5116/ P5210 Quick Installation Guide Installation Steps Please follow the installation steps below to set up your P5111 / P5116/ P5210 Day/Night Pan/Tilt IP Camera. Check the
North America Sales & Service
 IP Camera User s Manual The IP camera is a specification embedded in the VETPEL PRO PLUS.ICU (UX-U900) model. The IP camera model provided may be changed without prior notice to improve performance. If
IP Camera User Manual
 the world through my eyes R IP Camera User Manual EN App Store Google Play Version:TWS20180723 1Product description 1.1Product Feature 1.2Package Contents 1.3IP Camera Overview 1.4Operating System Requirement
Article DE-WCV-WIFIDB010. WIFI doorbell USER MANUAL
 Article DE-WCV-WIFIDB010 WIFI doorbell USER MANUAL (V1.0) Product Parameter Video Ffrequency 720p lens, angle: 125 degrees Infrared night vision 850 Terminal System IOS6.0+ Android 4.4+ Voice Frequency
Megapixel Wireless IP camera with Night Mode & Audio Support V
 Megapixel Wireless IP camera with Night Mode & Audio Support V1.2 2018-06-21 As our products undergo continuous development the specifications are subject to change without prior notice COPYRIGHT Copyright
Quick Install Guide. For Covert IP Camera Series. Model: PLC-128PW, PLC-129PW
 Quick Install Guide For Covert IP Camera Series Model: PLC-128PW, PLC-129PW This installation guide provides basic instructions for installing the PLC-128PW and PLC-129PW covert IP camera on your network.
WiFi Wireless Video Door Phone. User Manual
 WiFi Wireless Video Door Phone User Manual Introduction With Hisilicon Hi3518E hardware platform, this WIFI/IP video intercom doorbell uses H.264 image compression. Its picture transmission data is small
Wireless IP Bird Box Camera
 Wireless IP Bird Box Camera Model: 4901-18 Operation and Installation Manual 1 WELCOME... 3 PRODUCT OVERVIEW... 4 HARDWARE INSTALLATION... 4 Attach the External Power Adapter... 4 SMARTPHONE OR TABLET
APWIFIDS WI-FI DOOR STATION
 APWIFIDS WI-FI DOOR STATION www.espuk.com J2474 ESP Instruction Manual APWIFIDS.indd 1 15/03/2017 11:20:14 System Overview Sunshield Optional accessories: IR LED Camera lens EVBPSBB Lock power supply Speaker
Quick Installation Guide
 Quick Installation Guide DL-200 Cellular Data logger V1.2_201610 TABLE OF CONTENTS CHAPTER 1 INTRODUCTION... 4 1.1 CONTENTS LIST... 5 1.2 HARDWARE INSTALLATION... 6 1.2.1 WARNING... 6 1.2.2 SYSTEM REQUIREMENTS...
Version B Wi-Fi IP CAMERA
 HD Version B-1.0.0 Wi-Fi IP CAMERA Quick Start Guide Table of Contents Get Started... 1 Hardware Installation... 1 Live Video... 2 Live Video via Wi-Fi... 6 Camera Settings... 8 Change Password... 8 Alarm
HooToo IP Camera User Manual(part two)
") HooToo Inc. HooToo IP Camera User Manual(part two) For Model: HT-IP210P Published by SunvalleyTek Group 2014/9/14 Content 1. IPCamClient (windows software)...3 Set up...3 CAM... 13 Local Setting... 13
HooToo Inc. HooToo IP Camera User Manual(part two) For Model: HT-IP210P Published by SunvalleyTek Group 2014/9/14 Content 1. IPCamClient (windows software)...3 Set up...3 CAM... 13 Local Setting... 13
Panoramic Talking Camera
 Panoramic Talking Camera IPC2201 home8alarm.com 1-844-800-6482 support@home8alarm.com 1 Table of Contents Chapter 1. Introduction... 1 1.1 System Requirement... 1 Chapter 2. Hardware Overview... 2 Chapter
User Manual For AT-100BW/200BW
 User Manual For AT-100BW/200BW www.alptopsecurity.com support@alptopsecurity.com This manual is written based on the current version of the software and hardware. If there are any inaccuracies or imperfect
HD WiFi Indoor / Outdoor Camera Kit. Quick Start Guide
 HD WiFi Indoor / Outdoor Camera Kit Quick Start Guide 1 Mobile Setup This quick start guide will help you configure your WiFi camera kit for initial use. Note: Please download and install App and connect
HD Pan Tilt IP Camera
 IP Camera User Guide Version 1.0.0.1 HD Pan Tilt IP Camera NIP-09L2J NIP-16L2J NIP-22L2J NIP-21L2J Page 1 Content 1. Hardware installation... 4 1.1 Hardware connection... 4 1.2 Network connection...5 1.3
Quick Installation Guide
 Quick Installation Guide ViconNet 8.0 Software ROUGHNECK V-CELL-HD-B Corner-Mount Network Camera XXYYY-XX-XX XX247-32-00 Vicon Industries Inc. does not warrant that the functions contained in this equipment
WAP3205 v2. User s Guide. Quick Start Guide. Wireless N300 Access Point. Default Login Details. Version 1.00 Edition 2, 12/2012
 WAP3205 v2 Wireless N300 Access Point Version 1.00 Edition 2, 12/2012 Quick Start Guide User s Guide Default Login Details LAN IP Address http://192.168.1.2 Password 1234 www.zyxel.com Copyright 2012 ZyXEL
Magnetic base Indicator light Microphone Camera lens Micro SD card slot Infrared light Front Side Pivot connector Built-in speakers
 Niro USER MANUAL Contents Introduction 4 Product Features 5 Niro LED Indicators 6 What s Included 7 Wi-Fi Requirements 8 Mobile Device Requirements 8 Garage Door Opener Requirements 8 Download the Momentum
Introduction. Built-in speaker. Infrared lights. Camera lens. Reset button. Indicator light. Micro- USB port for power supply.
 Axel USER MANUAL Contents Introduction 4 LED Indicators 5 What s Included 6 Wi-Fi Requirements 7 Mobile Device Requirements 7 Download the Momentum App 8 Pairing 9 Pairing additional Momentum Devices 11
THE SMART WAY TO ANSWER YOUR DOOR USER MANUAL
 THE SMART WAY TO ANSWER YOUR DOOR USER MANUAL IMPORTANT PLEASE READ THIS MANUAL CAREFULLY BEFORE OPERATING THE SYSTEM AND RETAIN FOR FUTURE REFERENCE. All devices, with the exception of the External Siren
Let s get started. Need more help getting started?
 Need more help getting started? www.zencam.com/support Let s get started. We hope you love your new Zencam Camera. If you have any questions, we're here for you. M1. M2. E1. E2 Series support@zencam.com
Contents. 1. Verify the package contents
 Bullet VERSION 1.3 This installation guide provides basic instructions for installing the PLC-325PW/ PLC-335PW on your network and then configure Android, ios App and PC software to view the camera. For
QUICK START GUIDE. Wireless Pan&Tilt IP Camera FSC880. Smart Reliable Secure. Faleemi Technologies Ltd.
 Wireless Pan&Tilt IP Camera QUICK START GUIDE FSC880 Smart Reliable Secure Faleemi Technologies Ltd www.faleemi.com support@faleemi.com support@faleemi.com www.facebook.com/faleemi Apple, Apple Store,
Outdoor User Manual. ios Application Android Application PC Setup
 Outdoor User Manual ios Application Android Application PC Setup Please read all instructions carefully before use to get the most out of your Outdoor Wireless Surveillance Camera. The design and features
HD WiFi Outdoor Camera. Quick Start Guide. Connect with Beam VER-Z3
 HD WiFi Outdoor Camera Quick Start Guide Connect with Beam VER-Z3 1 Mobile Setup This quick start guide will help you configure your WiFi camera kit for initial use. Before performing any permanent installation,
IP Cam EdiLife Quick Installation Guide
 IP Cam EdiLife Quick Installation Guide 08-2018 / v1.0 CONTENTS l. Product Information... 3 I-1 System Requirements... 3 II Camera Setup... 4 II-1 Hardware Setup... 4 II-2 EdiLife App... 6 II-2-1 Android
HSIP2 User Manual. ios Application Android Application PC Setup
 HSIP2 User Manual ios Application Android Application PC Setup Please read all instructions carefully before use to get the most out of your HSIP2 Wireless Surveillance Camera. The design and features
HSIP2 User Manual. ios Application Android Application PC Setup
 HSIP2 User Manual ios Application Android Application PC Setup Please read all instructions carefully before use to get the most out of your HSIP2 Wireless Surveillance Camera. The design and features
User Manual of P2P IP Cameras
 Updated on 20 August, 2013 User Manual of P2P IP Cameras This user manual applies to all the P2P IP Cameras as follows IPA Series: Home Pan-tilt IP Cameras IPB Series: Outdoor Waterproof IP Cameras IPC
F3102 / F3107 / F3110 / F3115 / F3210 / F3215 PN: 86085K K
 F3102 / F3107 / F3110 / F3115 / F3210 / F3215 0 86085K3000020 PN: 86085K3000020 Zavio F3102/F3107/F3110/F3115/F3210/F3215 Quick Installation Guide Please follow the installation steps below to set up
What s in the Box Get Started Hardware Installation For Mobile Device Set Up Camera... 6
 Quick Start Guide Table of Contents What s in the Box... 1 Get Started... 1 Hardware Installation... 2 For Mobile Device... 2 Set Up Camera... 6 Set Up Wi-Fi Without Network Cable... 8 View in Windows
Greet Pro. Quick Start Guide
 Greet Pro Quick Start Guide 1 Getting to know your Greet Pro The Greet Pro allows you to answer your door from any location. The Greet Pro is powered by your home's existing mechanical doorbell chime.
Quick Start Guide. Wireless IP Camera. Technical Support QG4_A
 Technical Support Wireless IP Camera Quick Start Guide For Windows Client & Mac Client, please download the PC software: https://reolink.com/software-and-manual/ For advanced setup, please download the
LeFun IP Camera Quick Install Guide
 LeFun IP Camera Quick Install Guide Website: www.lefunsmart.com E-mail: support@lefunsmart.com Catalog 1. Introduction... 2 1.1. Thank you for Choosing LeFun IP Camera... 2 1.2. Introducing LeFun IP Camera...2
HD Pan Tilt IP Camera
 IP Camera User Guide Version 1.0.0.1 HD Pan Tilt IP Camera Page 1 Content 1. Hardware installation... 4 1.1 Hardware connection... 4 1.2 Network connection...5 1.3 WPS setting...5 2. ipad, iphone App introduction...5
InTemp CX5000 Gateway Manual
 InTemp CX5000 Manual The InTemp CX5000 is a device that uses Bluetooth Low Energy (BLE) to regularly download up to 50 CX series loggers and upload the data to the InTempConnect website automatically via
WI-FI GARAGE DOOR CONTROLLER WITH CAMERA USER MANUAL
 WI-FI GARAGE DOOR CONTROLLER WITH CAMERA USER MANUAL Contents Introduction 4 Product Features 5 Garage Door Controller LED Indicators 6 What s Included 7 Wi-Fi Requirements 8 Mobile Device Requirements
1080p HD Outdoor WiFi IP Camera
 1080p HD Outdoor WiFi IP Camera Quick Start Guide Connect with Beam VER-Z3 1 Mobile Setup This quick start guide will help you configure your WiFi camera for initial use. Please plug in and complete this
WiFi Camera (V380) Installation Manual. iphone IOS Android. PC Client available on
 Installation Manual. iphone IOS Android. PC Client available on") WiFi Camera (V380) Installation Manual iphone IOS Android PC Client available on www.av380.cn/index-en.html iphone IOS Smart Phone Installation WiFi smart link installation (with WiFi Network) 1. Open
WiFi Camera (V380) Installation Manual iphone IOS Android PC Client available on www.av380.cn/index-en.html iphone IOS Smart Phone Installation WiFi smart link installation (with WiFi Network) 1. Open
Ctdigi.com. Instruction manual. Production by S & W Technology Labs
 Ctdigi.com Instruction manual Production by S & W Technology Labs I. Install app II. Guard camera Guard camera Introduction Accessory Sensor Scenario Guard 360 Introduction - Catalog - Install app Scenario
ZAVIO Indoor Box Camera. Quick Installation Guide
 ZAVIO Indoor Box Camera Quick Installation Guide 1 Quick Installation Guide Please follow the installation steps below to set up your IP camera. Check the package contents with the list below. See P.2
OnView Mobile Monitoring
 User Manual OnView Mobile Monitoring Table of Contents 1. Introduction...2 1.1 Application Description...2 1.2 Phone Compatibility...2 1.3 Where to Download the App...2 2. Application Function...2 2.1
Network Projector Operation Guide
 Network Projector Operation Guide Table of contents Preparation...4 Connecting the projector with your computer...4 Wired connection... 4 Wireless connection (for selected models)... 5 QPresenter...8 Minimum
SECURITY SYSTEM WIRELESS NVR. Quick Guide
 SECURITY SYSTEM WIRELESS NVR Quick Guide Declaration Thank you for choosing this product for your security system. Logan promises to offer our customers a viable and high quality solution. Logan will not
Mi Home Security Camera Connection Guide. (ios)
") Mi Home Security Camera Connection Guide (ios) 1. Navigate to the APP Store with your iphone and search for Mi Home, or scan the QR code below to download and install Mi Home APP. 2. Plug in the Mi Home
Mi Home Security Camera Connection Guide (ios) 1. Navigate to the APP Store with your iphone and search for Mi Home, or scan the QR code below to download and install Mi Home APP. 2. Plug in the Mi Home
INNOV.NET PTY LTD. User guide
 User guide Version1 2016 0 Contents Compatibility... 1 What s in the package?... 1 Setup the RM Pro... 1 Meaning of the LED indicators... 2 Setup e-control on your smartphone... 2 Can I program a remote
BlackVue C App Manual
 BlackVue C App Manual BlackVue C App Manual Contents Connecting to BLACKVUE CLOUD... 3 (A) Create an account... 3 (B) Register your dashcam with your account... 3 (C) Connect your BlackVue dashcam to a
OUTDOOR SECURITY CAMERA WITH LED FLOODLIGHT
 OUTDOOR SECURITY CAMERA WITH LED FLOODLIGHT Wifi Security Camera With LED Floodlight Features 20W with 1600 Lumens Indoor and Outdoor Wifi IP Camera with LED flood light Passive IR and Motion sensor Support
Cloud IP Camera Note:
 Version:V2.0 Cloud IP Camera User s Manual Note: Due to the continuous updating of the product and software, there may be a discrepancy between the operating guide and the APP interface.all the instructions
Table Of Content 1. What s in the box 3 2. About the unit 4 3. Getting started 5 4. Networking options 6 5. Turning on the MTC-5000 Unit 7 6.
 MTC-5000 User Guide Table Of Content 1. What s in the box 3 2. About the unit 4 3. Getting started 5 4. Networking options 6 5. Turning on the MTC-5000 Unit 7 6. The Status Bar Menu 8 7. Connecting participants
Wireless Security Setup Guide
 Wireless Security Setup Guide NF10WV FAQs Wireless Security Overview To guard your home network against attack and prevent unauthorised access, it is very important that you follow this guide to secure
Quick Installation Guide
 V50.02 Model: FI8918W Quick Installation Guide Indoor Pan/Tilt Wireless IP Camera Black White For Windows OS ------- Page 1 For MAC OS ------- Page 14 Quick Installation Guide For Windows OS Package Contents
Wireless Security Setup Guide
 Wireless Security Setup Guide NF17ACV FAQs Wireless Security Overview To guard your home network against attack and prevent unauthorised access, it is very important that you follow this guide to secure
smartentry Wireless Video Doorphone User Manual
 smartentry Wireless Video Doorphone User Manual Designed & Engineered Version 1.2 in the United Kingdom Contents Precautions... 3 1. Product Overview... 4 1.1. Product Features... 4 1.2. Contents... 4
Installation Instructions
 Installation Instructions For WiFi-Predator 1 P a g e Index Section Pages Android Configuration 3-6 iphone Configuration 7-10 Range and range testing 11-12 Installation 13 Power Supply 13 Wiring 14 Relay
Everything in your eyes. ismartviewpro. (For iphone) User Manual VER 5.0
 User Manual VER 5.0") IP Cloud Network Camera Everything in your eyes ismartviewpro (For iphone) User Manual 2018-01 VER 5.0 1. ismartviewpro Summary ismartviewpro (iphoneversion) is developed application software based on
IP Cloud Network Camera Everything in your eyes ismartviewpro (For iphone) User Manual 2018-01 VER 5.0 1. ismartviewpro Summary ismartviewpro (iphoneversion) is developed application software based on
HD WiFi Indoor / Outdoor Camera Guide
 HD WiFi Indoor / Outdoor Camera Guide Connectwith Beam VER-Z2C 1 Mobile Setup Before you perform any permanent installation, make sure you complete the mobile setup to configure your camera or camera kit.
Introduction. See page #6 for device requirements.
 W-FI CAMERA USER MANUAL Contents Introduction 4 Camera LED Indicators 5 Wi-Fi Requirements 6 Mobile Device Requirements 6 Download the Momentum App 7 Create an Account 8 Setup 10 Pairing 10 Connecting
Ref. 1717/31 (White) Ref. 1717/33 (Black)
 Ref. 1717/33 (Black)") Mod. 1717 DS1717-020 LBT20144 IP 7 TOUCHSCREEN MONITOR Ref. 1717/31 (White) Ref. 1717/33 (Black) COMPLETE USER MANUAL The information contained in this manual has been carefully collected and checked;
Mod. 1717 DS1717-020 LBT20144 IP 7 TOUCHSCREEN MONITOR Ref. 1717/31 (White) Ref. 1717/33 (Black) COMPLETE USER MANUAL The information contained in this manual has been carefully collected and checked;
KB Door Bell Camera Setup Guide
 Knowledge Base Text: Jimmy Wang KB Door Bell Camera Setup Guide Key Features: Replacing to the existing doorbell button, no extra wire needed * 2.1MP 1080P Full HD @30fps with audio 180 panoramic view
Roughneck V920D Series Camera Domes XX Quick Guide
 Quick Guide XX258-20-06 Roughneck V920D Series Camera Domes Vicon Industries Inc. Tel: 631-952-2288 Fax: 631-951-2288 Toll Free: 800-645-9116 24-Hour Technical Support: 800-34-VICON (800-348-4266) UK:
Enrich and Secure Your Life. User Manual. (G6 Plus Camera) Hunan Gaozhi Science And Technology Co., Ltd.
 Hunan Gaozhi Science And Technology Co., Ltd.") Enrich and Secure Your Life User Manual (G6 Plus Camera) Hunan Gaozhi Science And Technology Co., Ltd. Content 1. Structure....3 2. Main Parameter... 4 3. Networking Diagram... 5 3.1.1. WIFI Connection...
Enrich and Secure Your Life User Manual (G6 Plus Camera) Hunan Gaozhi Science And Technology Co., Ltd. Content 1. Structure....3 2. Main Parameter... 4 3. Networking Diagram... 5 3.1.1. WIFI Connection...
User Manual of 5.8G Outdoor CPE
 User Manual of 5.8G Outdoor CPE Version V1.2 Thank you for purchasing Enterprise High Gain Outdoor CPE. This manual will instruct you how to configure and manage this CPE, enable you to use it in a perfect
QUICK SETUP GUIDE WNVR201 SERIES. Specifically Designed for Tablets. Specifically Designed for Smart Phones.
 QUICK SETUP GUIDE WNVR201 SERIES www.nightowlsp.com Specifically Designed for Smart Phones Specifically Designed for Tablets RESET LAN1 LAN2 LAN3 LAN4 WAN What s in the Box Package Contents Disclaimer:
CHANGE THE DEFAULT PASSWORD
 User Manual CHANGE THE DEFAULT PASSWORD FCC Certification Requirements Caution: Any changes or modifications in construction of this device which are not expressly approved by the party responsible for
Optec WiFi Board
 Optec WiFi 802.11 Board Installation Instructions for the Optec 802.11b/g Wireless Board. The Optec Wireless Networking Board (WiFi) is an optional accessory for the FocusLynx and Gemini control hubs.
NBG-418N. Wireless N Home Router. Default Login Details. IMPORTANT! READ CAREFULLY BEFORE USE. KEEP THIS GUIDE FOR FUTURE REFERENCE.
 NBG-418N Wireless N Home Router IMPORTANT! Default Login Details LAN IP http://192.168.1.1 Address User Name admin Password 1234 READ CAREFULLY BEFORE USE. KEEP THIS GUIDE FOR FUTURE REFERENCE. IMPORTANT!
Quick Installation for Luowice Wireless IP Camera.
 Quick Installation for Luowice Wireless IP Camera www.youtube.com/watch?v=0jrqpolxqra&feature=youtu.be 1 Camera Panel...01 2 Assemble the Camera...02 3 Configure the Camera with Your Phone...03 3.1 LAN
PLC-128 series 720P VERSION 1.1
 PLC-128 series 720P VERSION 1.1 Verify the package contents This installation guide provides basic instructions for installing the PLC-128 series on your network. Follow these instructions, you can quickly
3MP WI-FI SECURITY CAMERA QUICK START GUIDE ENGLISH
 3MP WI-FI SECURITY CAMERA QUICK START GUIDE ENGLISH WELCOME! Congratulations on your latest purchase and welcome to the Q-See family. This guide will help get your camera up and running. WHAT S INCLUDED
Cloud IP Camera Note:
 Version:V2.0 Cloud IP Camera User s Manual Note: To protect your privacy, please change the initial password after login. Please keep your user name and password safely. Contents 1. Introduction... 2 1.1
EAP110-Outdoor. Installation Guide. 300Mbps Wireless N Outdoor Access Point
 EAP110-Outdoor Installation Guide 300Mbps Wireless N Outdoor Access Point Contents Overview 1 Typical Network Topology 4 Lightning and ESD Protection 5 Hardware Installation Mount EAP Connect Cables Power
Zavio F3100 / F3105 Quick Installation Guide
 Zavio F3100 / F3105 Quick Installation Guide Please follow the installation steps below to set up F3100 / F3105 IP Camera. Check the package contents against the list below. See P.1 Physical overview.
CUSAM WIFI Video Doorbell User Manual
 CUSAM WIFI Video Doorbell User Manual CSW01 CSW02 Index 1. Product brief introduction and setup guide (pg. 3 ~ 5) 1.1. Download WIFI Video Doorbell App 1.2. Product appearance 1.3. Installation diagram
IP Camera Quick Start Guide ==================== H Series V3.1
 IP Camera Quick Start Guide ==================== H Series V3.1 1. Package Contents IP Camera 5V Power Adaptor Bracket and Screws Wi-Fi Antenna Network Cable Quick Start Guide 2. Get Started Step-1 Download
Quick User Guide for DVR Camera System
 Quick User Guide for DVR Camera System Before Setup Remote Access Make sure you have done: Hook cameras to the DVR using cables included in the package; power on your DVR and cameras; Connect your DVR
INNOV.NET PTY LTD. User guide
 User guide 0 Contents Compatibility... 1 What s in the package?... 1 Add device... 2 Legend... 2 Meaning of the LED indicators... 2 Setup the RM Mini 3... 3 Setup e-control on your smartphone... 3 How
6 Controlling the Technomad Encoder
 T 6 Controlling the Technomad Encoder 6.1 User control interface The Techomad Encoder has a local web server built in. You can control the Technomad Encdoder from anywhere on your network using a standard
Smart Device Simple World
 Smart Device Simple World Thank you for choosing HUAWEI Mobile WiFi Supported functions and actual appearance depend on the specific models you purchased. The illustrations are provided for your reference
How to setup EW-7428HCn as a range extender for an existing Wi-Fi network
 How to setup EW-7428HCn as a range extender for an existing Wi-Fi network Thank you for purchasing Edimax EW-7428HCn High Power Ceiling Mount Wireless PoE Range Extender / Access Point. This guide will
Quick Installation Guide of Acer WLAN 11b Broadband Router
 Preparation 1 At lease one PC with IEEE802.11b WLAN client installed. 2 One straight-through Category 5 Ethernet cable, used to link WAN interface to xdsl or CM for Internet connection. 3 Acer WLAN 11b
Please note, instructions in this guide are based on a PC running Windows 7. Please adapt the actions to suit your operating system.
 Please note, instructions in this guide are based on a PC running Windows 7. Please adapt the actions to suit your operating system. Please follow these steps to ensure that any changes made by your previous
Contents. 2 WiFi user guide
 WiFi user guide Contents Welcome.... 3 What this guide provides... 3 Get to know your Nokia WiFi components... 4 Nokia WiFi Gateway 3........................................................... 4 Nokia
Quick Start Guide. Getting Started. Controls and Connections. Before you begin, please make sure that you have the following available:
 Quick Start Guide Getting Started Before you begin, please make sure that you have the following available: A computer network with 2.4GHz WiFi or Ethernet One of the following devices: An Apple iphone,
Avadesign Technology DP-104. IP Video Door Phone. and APP - 1 -
 DP-104 IP Video Door Phone and APP - 1 - WELCOME Congratulations on purchasing the VBell DP-104 SIP IP Video Door Phone. This door phone is suitable for all your business, and home, door entry communication
Smart Wireless WIFI Camera Instructions
 Smart Wireless WIFI Camera Instructions Dear users, Thanks for using this product. Please read the users' manual carefully and keep it for future reference. Thank you. 1 Content 1, How to download the