USER GUIDE MADCAP FLARE Tables
|
|
|
- Lee White
- 5 years ago
- Views:
Transcription

1 USER GUIDE MADCAP FLARE 2018 Tables
2 Copyright 2018 MadCap Software. All rights reserved. Information in this document is subject to change without notice. The software described in this document is furnished under a license agreement or nondisclosure agreement. The software may be used or copied only in accordance with the terms of those agreements. No part of this publication may be reproduced, stored in a retrieval system, or transmitted in any form or any means electronic or mechanical, including photocopying and recording for any purpose other than the purchaser's personal use without the written permission of MadCap Software. MadCap Software 7777 Fay Avenue La Jolla, California THIS PDF WAS CREATED USING MADCAP FLARE.
3 CONTENTS CHAPTER 1 Introduction 5 Table Elements 6 Tasks Associated With Tables 7 CHAPTER 2 Inserting Tables 8 CHAPTER 3 Table Stylesheets 18 Where Table Stylesheets are Stored 19 Example 20 Table Style Editor 22 Table Styles and RTL Languages 23 Steps for Using Table Stylesheets 24 Regular Stylesheets, Table Stylesheets, or Local Properties? 25 CHAPTER 4 Editing Tables 28 Ways to Edit Tables 30 Editing Table Styles in Regular Stylesheets 34 CONTENTS iii
4 Editing Table Stylesheets 37 Applying Table Stylesheets to Tables 52 Selecting Styles for Table Cell Contents 55 Selecting Tables 61 Creating Rounded Borders on Paragraphs and Tables 67 Converting Tables to Text 85 Converting Text to Tables 89 Cutting Table Columns and Rows 92 Deleting Tables 93 Inserting Table Columns and Rows 94 Merging Table Cells 96 Merging Tables 97 Moving Table Columns and Rows 102 Pasting Cells Within a Table 103 Resetting Local Cell Formatting 105 Resizing Tables 106 Setting Page, Column, and Frame Breaks on Tables 110 Sorting Tables 128 Splitting Table Cells 136 Editing Table Cell Properties 138 Editing Table Properties 142 Hiding the Bottom Border on Tables when Crossing Page Breaks 151 Using Styles to Repeat Table Captions in Print Output 158 CHAPTER 5 Creating a List of Tables 161 APPENDIX PDFs 163 CONTENTS iv
5 CHAPTER 1 Introduction Supported In: A table in Flare is much like it is in any word processing program, such as Microsoft Word, or in a printed textbook. It is a group of intersecting columns and rows that you can add to a topic for various purposes, such as comparing different elements. This chapter discusses the following: Table Elements 6 Tasks Associated With Tables 7 CHAPTER 1 5
6 Table Elements Following are explanations of some of the basic elements involved with tables. Element/Feature Caption Column Row Cell Header Row Footer Row Gridlines Description A caption is a small title or description that you can add either above or below the table. Using a caption above a table helps with accessibility. A column is a series of vertical cells in a table. For example, this table contains two columns one starting with the heading text "Element/Feature" and the other starting with the heading text "Description." A row is a series of horizontal cells in a table. For example, this table contains numerous rows. The second row in this table consists of the cell with the text "Caption" and the cell to the right with the description for that term. The third row consists of the cell with the text "Column" and the cell to the right with the description for that term. A cell is a single rectangular or square area within a table, where you can add text and other content. Each cell has its own set of gridlines that separate it from the other cells in the table. For example, the paragraph you are reading is contained in one cell. A header row is the first series of horizontal cells in a table. A header row is used to provide explanatory phrases for each of the columns in the table. For example, this table contains a header row; the first cell of the header row in this table contains the text "Element/Feature," and the second cell of the header row in this table contains the text "Description." Including a header row is optional. Using a header row helps with accessibility. A footer row is the final series of horizontal cells in a table. A footer row is used to provide footnotes pertaining to the table and its content. This table does not contain a footer row. Including a footer row is optional. Gridlines are the gray lines that indicate the edges of cells in a table. They appear in the XML Editor so that you can distinguish where rows, columns, and cells are located. Gridlines do not appear in the final output unless you add borders to the table. By default, when you add a table to a topic, the gridlines are shown in the XML Editor lets you easily hide or show the gridlines as necessary. CHAPTER 1 6
7 Element/Feature Table Style Template Description A table style template is simply a table style that has already been designed. When you create a new table style, you can use a table style template so that it already has a design to get you started. Tasks Associated With Tables Following are the main tasks for using tables in Flare: Insert Tables See "Inserting Tables" on page 8. Edit Tables See "Ways to Edit Tables" on page 30. Create a List of Tables See "Creating a List of Tables" on page 161. CHAPTER 1 7
8 CHAPTER 2 Inserting Tables You can create a table using the Insert Table dialog, which lets you specify various properties and settings for the table while you create it. Another option is to use the Insert Table grid, which lets you create a simple table by quickly selecting squares displayed from the Insert Table button; this method is faster but does not let you specify properties and settings for the table at the point of creation. HOW TO CREATE A TABLE USING THE INSERT TABLE DIALOG 1. Open the content file (e.g., topic, snippet). 2. In the XML Editor place your cursor where you want to add the table. 3. Select the Table ribbon. In the Table section click the face of the Insert Table button (not the down arrow). The Insert Table dialog opens. 4. Select the General tab and modify the options as necessary. TABLE SIZE Number of columns Enter the number of columns for the table. Number of rows Enter the number of rows for the table. Number of header rows Enter the number of header rows for the table. A header row can be used to hold titles for the different columns in the table. Number of footer rows Enter the number of footer rows for the table. A footer row can be used to hold footnote information about the table. CHAPTER 2 8
9 TABLE CAPTION Text Enter a caption (or title) for the table. This caption can be placed above the table or below it. Side Click in this field and select to place the caption either above or below the table. NOTE: Due to an issue with Internet Explorer, selecting Below table may place the caption above the table in outputs based on Internet Explorer. NOTE: Different browsers display different results if you have all of the following set on a table: a caption, rounded borders, and a color in the background of the first row. That's because some browsers consider the caption part of the table and others do not. One possible workaround is to set the border-top-leftradius and border-top-right-radius on the top-left and top-right cells. Repeat If you want captions to repeat on tables that span multiple pages in print-based output, select Repeat from this field. CHAPTER 2 9
10 NOTE: You can also edit this option in the regular stylesheet using the mc-caption-repeat property. In addition, you can edit table cell properties in the regular stylesheet. Continuation In this field, you can enter continuation text to the end of captions that repeat (other than the caption appearing on the first page where a table occurs). Typically this text would be something like "(continued)." NOTE: You can also edit this option in the regular stylesheet using the mc-caption-continuation property. In addition, you can edit table cell properties in the regular stylesheet. CHAPTER 2 10
11 SUMMARY You can enter a summary for a table. This adds the "summary" attribute to the <table> tag and is used to help make your output more accessible to individuals with disabilities. AUTOFIT BEHAVIOR AutoFit to contents Automatically sets the column widths to the same width as the table content. AutoFit to window Automatically sets the table width to the same width as the output window. Fixed column width Sets the column widths to the width that you specify. Select the down arrow next to this field and set the width in the popup. ALIGN Aligns the entire table either to the left, right, or center of the topic. TABLE STYLE You can select to use either a special table stylesheet or the table style from a regular stylesheet. Whichever one you choose will control the look of the table that you insert. When you add a table stylesheet to your project, it is stored in the Resources\TableStyles subfolder in the Content Explorer. CHAPTER 2 11
12 Table Style Select this option if you want to use a table stylesheet to control the look of the table. You can then select an existing table stylesheet from the drop-down list. CHAPTER 2 12
13 If you do not yet have a table stylesheet that you want to use, click the face of this button to open the Select Table Style Template dialog. This lets you create new table stylesheet. If you click the down arrow next to the button, you can select Print Style. This opens the Select Table Style dialog, which you can use to specify another table style to be used specifically for printed output. However, it is recommended that you use a medium instead of the "Print Style" option. CHAPTER 2 13
14 Style Class Select this option if you want to use a regular stylesheet to control the look of the table. You can then select the main table style from the drop-down, or you can select any class that you have added under that style. You can create classes for the table style in the Stylesheet Editor; those classes will then become available in this drop-down field. TO ADD A TABLE STYLE TO THE INSERT TABLE DIALOG a. In the Insert Table dialog, the face of the Create New Table Style button, not the down arrow. The Select Table Style Template dialog opens. b. In the Template Folders area, select a folder. c. In the Templates area, select one of the templates from the folder. You can see a preview of how the table will look in the Preview area below. d. (Optional) You can type a new name in the New Style Name field. e. Click OK. The style is added to the Insert Table dialog. CHAPTER 2 14
15 TEXT TO TABLE These options are enabled if you have selected text before opening the dialog to insert the table. This lets you create the table and quickly place all of the selected text into table cells. None Select this option if you want to create a table but not include any of the selected text. In other words, that text is removed and replaced with the new table. Paragraphs Select this option if you have selected multiple paragraphs and want to convert them into a table. Each paragraph will be placed in a separate table cell. Commas Select this option if you have selected text separated by commas and want to convert it into a table. Each segment of text between a comma will be placed in a separate table cell. Tabs Select this option if you have selected text separated by tabs and want to convert it into a table. Each segment of text between a tab separator will be placed in a separate table cell. Other Select this option if you have selected text separated by a specific text string (e.g., semicolons) and want to convert it into a table. After selecting this option, enter that text string in the field to the right. Each segment of text between the text string that you specify will be placed in a separate table cell. 5. Select the Borders tab and modify the options as necessary. Outer Borders Click in any of the individual fields (Left, Right, Top, Bottom) to specify the settings for the table border. If you click the down arrow to the right of all the fields, the settings will be applied to all of the border fields. When you click the down arrow or in one of the individual fields, a small popup displays. Use the lower-left area of the popup to enter a number for the thickness of the border. Use the lower-middle area to select a unit of measurement (e.g., point, pixel, centimeter) for the number you entered. Use the upper-right area to select a color for the border. And use the lower-right area to select a line type (e.g., solid, double, dashed) for the border. When you are finished, click OK in the small popup. CHAPTER 2 15
16 Border Radius These fields let you create rounded corners on the table. Click in any of the individual fields (Top-Left, Top-Right, Bottom-Right, Bottom-Left) to specify the settings for a particular corner of the table. If you click the down arrow to the right of all the fields, the settings will be applied to all of the fields. When you click that down arrow or in one of the individual fields, a small popup displays. This popup has two halves. You can complete only the left side of the popup if you like. This will create a curve that is equal horizontally and vertically. If you want a border to have more of a curve either horizontally or vertically, you can complete the fields in the right half of the popup as well, so that you have two values (e.g., 10px 15px) instead of one. For more information on using two sets of border radius properties, see css3.info/preview/rounded-border/. Use the lower-left area of the popup to enter a number for the amount of curve. The greater the number, the more curve that is applied.use the area to the right of the number field to select a unit of measurement (e.g., point, pixel, centimeter). If you want to provide a second value for the rounded border, complete the same fields on the right half of the popup. When you are finished, click OK in the small popup. Cell Border Collapse Select whether you want to collapse the cell borders in the table. If you collapse the cell borders, the row and cell borders of a table are joined in a single border. If you do not collapse the cell borders, the row and cell borders of a table are detached. If you use the border radius properties to create rounded borders, this must be set to "Do not collapse cell borders." Cell Border Spacing Use this area to increase or decrease the amount of spacing for a cell border (in pixels). 6. Click OK. The table is added. Now you can click in any cells of the table and add content (e.g., text, images, hyperlinks) as necessary. 7. Click to save your work. CHAPTER 2 16
17 HOW TO CREATE A TABLE USING THE INSERT TABLE GRID 1. Open the content file (e.g., topic, snippet). 2. In the XML Editor place your cursor where you want to add the table. 3. Select the Table ribbon. In the Table section click the down arrow (not the face) of the Insert Table button. The Insert Table dialog opens. 4. Hover over the grid. When you do this, the squares change color to indicate how many rows and columns will be included in the table. As soon as you click, the new table is inserted. The table initially looks very plain because it has no properties or stylesheet associated with it. Therefore, you will likely want to open the Table Properties dialog at some point to specify settings and/or apply a table stylesheet to it. See "Ways to Edit Tables" on page 30 and "Editing Table Properties" on page Click to save your work. TIP: When you insert a table, it is set up by default to use standard table tags in the individual cells (e.g., <th> for table headers, <td> for regular table text). However, if you press Enter at the end of a line, a <p> tag is added within the standard tag. Therefore, in order to keep all of the content in your table cells looking consistent, you may want to create a special style class of the p style to be used for table content (e.g., p.tabletext) and apply that style to all of your cells when you first create a table. You can manually apply specific styles to tables by selecting the table cells, clicking Table > Cell Content Style, and choosing the style to be used for those cells. However, rather than repeating all these steps each time you create a table, the easiest way to accomplish this is to set a default cell content style. You can do this in a couple of ways: globally or using a table stylesheet. See "Selecting Styles for Table Cell Contents" on page 55 and "Editing Table Stylesheets" on page 37. CHAPTER 2 17
18 CHAPTER 3 Table Stylesheets A table stylesheet lets you create a look that can be applied to several tables throughout your project. If you need to change the look of general topic content, you can use a regular stylesheet instead. In fact, a regular stylesheet is another way to control the look of tables. This chapter discusses the following: Where Table Stylesheets are Stored 19 Example 20 Table Style Editor 22 Table Styles and RTL Languages 23 Steps for Using Table Stylesheets 24 Regular Stylesheets, Table Stylesheets, or Local Properties? 25 CHAPTER 3 18

19 Where Table Stylesheets are Stored You can create as many table stylesheets as you need. The traditional location to store a table stylesheet in the Content Explorer is in the Resources\TableStyles folder. However, you can store it anywhere in the Content Explorer that you like. CHAPTER 3 19
 and a patterned one (with customized borders and colored shading in certain rows")
20 Example Here is an example showing how you might use table stylesheets. EXAMPLE You might use two different types of tables in your project a basic one (with simple borders and no shading) and a patterned one (with customized borders and colored shading in certain rows and columns). So you create one table stylesheet (let's say it's called "Basic.css") and format it the way you want, and then you create a second table stylesheet (let's say it's called "RowPatternStyleSheet.css") and format it. Then, as you insert tables into your topics, you can associate the new table with one of these two table stylesheets. CHAPTER 3 20

21 CHAPTER 3 21

22 Table Style Editor When you open a table stylesheet, it is displayed in the Table Style Editor, which contains multiple tabs and fields for specifying settings such as patterns, borders, backgrounds, alignment, and margins. CHAPTER 3 22
23 Table Styles and RTL Languages If you are using a right-to-left (RTL) language, table styles in your project need to write additional CSS rules behind the scenes in order to work correctly with RTL tables. Because this can potentially double the size of the table style file, this behavior does not happen by default if you create and save a new table style. However, the behavior kicks in automatically in the following two scenarios. If you open a topic in the XML Editor and an RTL table references an old table stylesheet, Flare updates and saves the table stylesheet in your Content folder. If you generate output and an RTL table references an old table stylesheet, the table style in the output will be updated. CHAPTER 3 23
24 Steps for Using Table Stylesheets Following are the primary steps when working with table stylesheets: 1. Create a New Table Stylesheet You can add a stylesheet to be used specifically for tables. For more information see the Flare online Help. 2. Edit After you create a new table stylesheet, you can edit it. See "Editing Table Stylesheets" on page Apply a Table Stylesheet to a Table After you edit a table stylesheet, you can apply the stylesheet to a table. See "Applying Table Stylesheets to Tables" on page 52. NOTE: For the differences between regular stylesheets, table stylesheets, and local properties and when you should use one over the other see "Regular Stylesheets, Table Stylesheets, or Local Properties?" on the next page NOTE: If you are importing Adobe FrameMaker documents and have tables that you have formatted in a certain way, you can create matching table styles as a result of the import. This can be specified on the Options page of the Import FrameMaker Wizard. In the Flare project, the new table styles will be named after the format named applied to the table in FrameMaker (e.g., "Format_A.css," "Format_B.css," and so on). You can rename these table stylesheets in Flare after the import. Even if you do not use this mapping feature, the table formatting still comes across when you import the files. The only difference is that table stylesheets make it easier to maintain the formatting of your tables within Flare. CHAPTER 3 24
25 Regular Stylesheets, Table Stylesheets, or Local Properties? You can control the look of tables in the following ways: Regular Stylesheet This lets you store styles for general content in your project, including tables, to control how that content looks. See "Editing Table Styles in Regular Stylesheets" on page 34.For more information about regular stylesheets, see the online Help. Table Stylesheet This lets you control the look for tables only, creating customizable patterns. See "Table Stylesheets" on page 18 and "Editing Table Stylesheets" on page 37. Table Properties Dialog This lets you control the look for a specific table only, by setting options locally. See "Editing Table Properties" on page 142. Other Local Formatting Tools For virtually any kind of content that you add to a content file (e.g., topic, snippet), there are a variety of local formatting tools to control the look. For example, you can highlight text in a table and use the Home ribbon to change the color. For more information see the Flare online Help. Which Should I Use? Using a stylesheet is always preferred over local formatting (i.e., controlling the look of content only at the place where it has been inserted). The good thing about stylesheets is that they let you separate the presentation from the content. That way, you can manage the look from one place, which can save you a lot of time and effort. For example, you can change the padding in 84 tables by changing a setting in a single stylesheet, as opposed to opening each of those 84 tables and changing the padding in each one. Of course, there may be times when you need to make a change in the properties for a single table only, but for the most part, you should try to use stylesheets. So why are there two kinds of stylesheets for tables? Why do you need to use a table stylesheet when you've already got a regular stylesheet? You actually do not need to. You can produce a look for tables entirely by using a regular stylesheet. But if you want to create tables that have different patterns (e.g., every other row might have a green background), it can be very difficult to do this in a regular stylesheet. So Flare lets you use these special table stylesheets to accomplish this task much more easily. You might even use both types of stylesheets to control different aspects of your tables. CHAPTER 3 25


26 CHAPTER 3 26
27 What About Conflicts and Precedence? Because you can often control the look of a table in multiple ways (1) local formatting tools, (2) local table properties, (3) a table stylesheet, or (4) a regular stylesheet it's possible that you might encounter conflicting settings from time to time. When this happens, the settings closest to the content typically has precedence. So any explicit setting in the Table Properties dialog (or other local formatting) has precedence over both stylesheet options, and the table stylesheet setting has precedence over the regular stylesheet setting. EXAMPLE Let's say you open a regular stylesheet and specify that the outer borders of the table should be green. Then you open the table stylesheet and specify that the outer borders should be red. And then you open the Table Properties dialog and specify that the outer borders should be blue. You've told Flare to do three different things to the same table. So in this case, the table would display blue borders, because the local properties rule over the other settings. But if you remove that setting from the Table Properties dialog and use the default setting, the table would then display red borders, because the table stylesheet has precedence over the regular stylesheet. And finally, if you remove the settings from both the Table Properties dialog and table stylesheet, using the default setting in both, the table would take its command from the regular stylesheet and display green borders. CHAPTER 3 27
28 CHAPTER 4 Editing Tables In addition to simply clicking in cells and typing text, there are several ways that you can edit tables after inserting them. This chapter discusses the following: Ways to Edit Tables 30 Editing Table Styles in Regular Stylesheets 34 Editing Table Stylesheets 37 Applying Table Stylesheets to Tables 52 Selecting Styles for Table Cell Contents 55 Selecting Tables 61 Creating Rounded Borders on Paragraphs and Tables 67 Converting Tables to Text 85 Converting Text to Tables 89 Cutting Table Columns and Rows 92 Deleting Tables 93 Inserting Table Columns and Rows 94 Merging Table Cells 96 Merging Tables 97 Moving Table Columns and Rows 102 Pasting Cells Within a Table 103 Resetting Local Cell Formatting 105 CHAPTER 4 28
29 Resizing Tables 106 Setting Page, Column, and Frame Breaks on Tables 110 Sorting Tables 128 Splitting Table Cells 136 Editing Table Cell Properties 138 Editing Table Properties 142 Hiding the Bottom Border on Tables when Crossing Page Breaks 151 Using Styles to Repeat Table Captions in Print Output 158 CHAPTER 4 29
30 Ways to Edit Tables Following are the ways to edit tables using styles. n Regular Stylesheets You can modify the look and feel of multiple tables at once by editing standard HTML table styles (e.g., table, th, td, tr) in your regular stylesheet. For example, you might use these styles in order to control the look of the text that appears in your table headings (th style) or within the cells (td style). See "Editing Table Styles in Regular Stylesheets" on page 34. n Table Stylesheets You can modify the look and feel of multiple tables at once by editing the properties in a custom table stylesheet. These table stylesheets let you easily and quickly create patterns and different looks for tables. See "Editing Table Stylesheets" on page 37. NOTE: For the differences between regular stylesheets, table stylesheets, and local properties and when you should use one over the other see "Regular Stylesheets, Table Stylesheets, or Local Properties?" on page 25 WARNING: When controlling the look of tables, you might want to choose just one method for styling them. You should use either (A) table stylesheets and perhaps classes of the p style (e.g., p.tabletext) for table content, or (B) standard table styles from a regular stylesheet. If you use standard table tags at the parent level (e.g., tr, td), you may run into trouble if you also use proxies in your project. The reason for this is that when proxies are generated, they also use standard parent-level table styles. So any style changes you make to the standard table styles may be seen not only in tables, but also in generated content created via proxies (e.g., TOCs, indexes). In this case, it would be wiser to use classes of the standard table styles (e.g., tr.myclass, td.myclass), instead of table styles at the parent level. However, if you decide to use classes of standard table styles (e.g., tr.myclass, td.myclass), you may be faced with a different dilemma. This issue occurs when you also use table stylesheets. That's because the table stylesheet settings will overwrite settings on the classes. CHAPTER 4 30
31 Cell Content Style When you insert a table, it is set up by default to use standard table tags in the individual cells (e.g., <th> for table headers, <td> for regular table text). However, if you press Enter at the end of a line, a <p> tag is added within the standard tag. Therefore, in order to keep all of the content in your table cells looking consistent, you may want to create a special style class of the p style to be used for table content (e.g., p.tabletext) and apply that style to all of your cells when you first create a table. You can manually apply specific styles to tables by selecting the table cells, clicking Table > Cell Content Style, and choosing the style to be used for those cells. However, rather than repeating all these steps each time you create a table, the easiest way to accomplish this is to set a default cell content style. You can do this in a couple of ways: globally or using a table stylesheet. See "Selecting Styles for Table Cell Contents" on page 55 and "Editing Table Stylesheets" on page 37. Breaks Page, Column, Frame You can set page, column, and frame breaks on tables using a couple of different options. In regular stylesheets, you can set breaks on the standard HTML table tags. The most common approach for page breaks is to set them on table rows through the tr style. Another option is that you can set breaks on rows (and on entire tables) through a table stylesheet. And because you can create patterns in table stylesheets, each pattern item might have different settings for breaks. See "Setting Page, Column, and Frame Breaks on Tables" on page 110. Converting to Text If you have a table containing text, you can remove the table but keep the text. When doing this, you can choose how the converted text should be represented: paragraphs, separated with commas, separated with text. See "Converting Tables to Text" on page 85. You can also convert text to a table (see "Converting Text to Tables" on page 89). Cutting Columns and Rows You can cut entire columns and rows in a table. When you do this, a paste icon displays after the table. This icon allows you to specify how you would like to handle the content when you cut the columns or rows. You can also set the default behavior for similar actions in the future. See "Cutting Table Columns and Rows" on page 92. Deleting Tables You can delete a table from a content file (e.g., topic, snippet). See "Deleting Tables" on page 93. Inserting Rows and Columns You can easily insert additional rows and columns into an existing table. You can insert one row or column at a time, or you can insert multiple rows or columns. See "Inserting Table Columns and Rows" on page 94. Merging Table Cells You can turn multiple cells in a table into one big cell. This is called "merging" cells. You can merge any number of rows and columns in a table, as long as they are adjacent to one another. See "Merging Table Cells" on page 96. CHAPTER 4 31
32 Merging Tables If you have two tables in a content file (e.g., topic, snippet) that are positioned one after the other, you can merge those tables so that they become one. You can do this by using the paste icon page 97. that may appear to the right of the tables. See "Merging Tables" on Moving Table Columns and Rows You can move columns and rows around in a table that you have inserted by dragging and dropping the structure bars. You can also move table rows by using keyboard shortcuts. See "Moving Table Columns and Rows" on page 102. Pasting Cells Within a Table You can copy cells from one table to another. If you copy cells from a table, then place your cursor within a single table cell and paste the contents, a paste icon displays to the right. This icon allows you to specify how you would like to handle the pasted cells. You can also set the default behavior for similar actions in the future. See "Pasting Cells Within a Table" on page 103. Resetting Local Cell Formatting If you have applied local formatting to a table (e.g., applying background shading to cells directly, not through the use of styles), you can easily remove it. This is possible even if the topic was previously saved and closed. See "Resetting Local Cell Formatting" on page 105. Resizing Tables You can change the height and width of tables by applying an absolute or relative unit of measurement. You can also change the size of tables and individual rows and columns by clicking and dragging the edges of the table bars. See "Resizing Tables" on page 106. Rounded Borders For most output formats, you can use CSS3 border-radius style properties to create rounded borders on tables. See "Creating Rounded Borders on Paragraphs and Tables" on page 67. Selecting Tables If you've inserted a table, you can select the different parts of it cells, rows, columns, entire table. See "Selecting Tables" on page 61. Sorting Tables You can sort a table by selecting an option from the Table ribbon at the top of the interface or from table context menus. Tables can be sorted using a simple or more advanced method. See "Sorting Tables" on page 128. Splitting Table Cells You can turn one cell in a table into many smaller cells by splitting the cell. When you split a cell, you are essentially inserting a smaller table into that cell. See "Splitting Table Cells" on page 136. Table Cell Properties After a table is inserted into a content file (e.g., topic, snippet), you can easily change the properties for cells within that table. This includes changing the borders, CHAPTER 4 32
33 text alignment, hyphenation, background, and more. See "Editing Table Cell Properties" on page 138. Table Properties After a table is inserted into a content file (e.g., topic, snippet), you can easily change the properties of that table. This includes changing the number of columns and cells, the style associated with the table, alignment, borders, and more. See "Editing Table Properties" on page 142. CHAPTER 4 33
34 Editing Table Styles in Regular Stylesheets Supported In: You can modify the look and feel of multiple tables at once by editing standard HTML table styles (e.g., table, th, td, tr) in your regular stylesheet. For example, you might use these styles in order to control the look of the text that appears in your table headings (th style) or within the cells (td style). HOW TO EDIT TABLE STYLES IN A REGULAR STYLESHEET 1. From the Content Explorer, open the stylesheet that you want to modify. 2. In the local toolbar, make sure the first button displays. If the button displays instead, then click it. NOTE: For steps using the Simplified view, see the online Help. 3. In the upper-left corner of the editor, click in the drop-down field and select 4. From the area below, select the appropriate table style.. caption This tag lets you modify the table caption, which is a short title or description of the table's purpose. When inserting or editing a table, you can add a caption above or below the table. col This tag lets you group together attribute specifications for table columns. The <col> elements are empty and serve only as a support for attributes. They may appear inside or outside an explicit column group (i.e., <colgroup> element). CHAPTER 4 34
35 colgroup This tag lets you group columns together structurally. The number of columns in the column group may be specified by using the element's <span> tag or by the <col> element, which represents one or more columns in the group. table This tag lets you modify entire tables. It contains all other elements that specify caption, rows, content, and formatting. tbody This tag lets you modify the main rows in a table (i.e., not the header or footer rows). Each <tbody> tag must have at least one <tr> tag within it, which is used to represent a single row. td This tag lets you modify the data (or content) in the primary cells of a table. When you press Enter after the first paragraph in a table cell, a paragraph <p> tag is added inside each <td> tag in that cell. tfoot This tag lets you modify a footer row in a table. When a table requires multiple pages in print layouts and outputs, the footer row is placed at the bottom of the last page. Each <tfoot> tag must have at least one <tr> tag within it, which is used to represent a single row. th This tag lets you modify the header content in a table. Why not just use the <td> tag for header content as well? First, by having different tags, you can more easily dictate one look for the header text (e.g., bold font) and a different look for the main content in the table (e.g., normal font). Second, using separate tags greatly assists users with visual disabilities, making it possible for multi-modal wireless browsers with limited display capabilities (e.g., Web-enabled pagers and phones) to handle tables. When you press Enter after the first paragraph in a table cell, a paragraph <p> tag is added inside each <th> tag in that cell. thead This tag lets you modify a header row in a table. When a table requires multiple pages in output, the header row is repeated by default at the top of each page. Each <thead> tag must have at least one <tr> tag within it, which is used to represent a single row. tr This tag lets you modify single rows that are contained within <tbody>, <tfoot>, and <thead> tags. For more about each of these tags, please refer to 5. From the Show drop-down list on the upper-right side of the editor, select right side of the editor.. The most relevant properties for that style are shown on the CHAPTER 4 35
36 6. (Optional) You can use the toggle button in the local toolbar to show properties below in a group view or an alphabetical view. 7. If you are using the group view, you can expand a property group. The property name is shown on the left. The right side is used for selecting and entering values for the property. Most of the relevant properties are the same as those used for regular paragraph formatting. For details about using the features on these tabs, see the online Help. For the td and th styles, you also might want to adjust the vertical alignment of text (e.g., top, middle, bottom). You can do this by expanding the Cell property group and setting the verticalalign property. 8. Click to save your work. CHAPTER 4 36
37 Editing Table Stylesheets You can modify the look and feel of multiple tables at once by editing the properties in a custom table stylesheet. These table stylesheets let you easily and quickly create patterns and different looks for tables. HOW TO EDIT A TABLE STYLESHEET 1. Open the table stylesheet that you want to edit. This is usually found in the Resources/TableStyles subfolder in the Content Explorer, but you can store table stylesheets in other folders in the Content Explorer if you like. 2. In the Table Style Editor, set the options for the table style on the tabs available. GENERAL TAB This tab lets you set border, padding, margin, page layout breaks, and background properties for the entire table style. Table Margins Click in any of the individual fields (Left, Right, Top, Bottom) to specify the settings for the table margins (the amount of space around the table). In the left side of the field, enter a number for the amount of padding. In the right side of the field, select a unit of measurement (e.g., point, pixel, centimeter) for the number you entered. If you click the down arrow to the right of all the fields, the settings will be applied to all of the table margin fields. When you click that down arrow, a small popup displays. Use the lower-left area of the popup to enter a number for the amount of margin. Use the lowerright area to select a unit of measurement. CHAPTER 4 37

38 Background Use this area to specify the settings that you want for the table background. In the Color field, click the down arrow and select a color from the popup. For advanced color options, select MoreColors and use the fields in the Color Picker dialog. Next to the Image field, click. Select an image file to insert and click OK. If you want the background image to repeat, select one of the options from the Repeat field. You can also set the image position horizontally and vertically by using the X and Y fields. Cell Padding Click in any of the individual fields (Left, Right, Top, Bottom) to specify the settings for the cell padding (the amount of space between the edge of the table cell and the content in the cell). In the left side of the field, enter a number for the amount of padding. In the right side of the field, select a unit of measurement (e.g., point, pixel, centimeter) for the number you entered. If you click the down arrow to the right of all the fields, the settings will be applied to all of the cell padding fields. When you click that down arrow, a small popup displays. Use the lower-left area of the popup to enter a CHAPTER 4 38
39 number for the amount of padding. Use the lower-right area to select a unit of measurement. Outer Borders Click in any of the individual fields (Left, Right, Top, Bottom) to specify the settings for the table border in the stylesheet. If you click the down arrow to the right of all the fields, the settings will be applied to all of the border fields. When you click that down arrow or in one of the individual fields, a small popup displays. Use the lower-left area of the popup to enter a number for the thickness of the border. Use the lower-middle area to select a unit of measurement (e.g., point, pixel, centimeter) for the number you entered. Use the upper-right area to select a color for the border. And use the lower-right area to select a line type (e.g., solid, double, dashed) for the border. When you are finished, click OK in the small popup. Border Radius These fields let you create rounded corners on the table (see "Creating Rounded Borders on Paragraphs and Tables" on page 67). Click in any of the individual fields (Top-Left, Top-Right, Bottom-Right, Bottom-Left) to specify the settings for a particular corner of the table. If you click the down arrow to the right of all the fields, the settings will be applied to all of the fields. When you click that down arrow or in one of the individual fields, a small popup displays. This popup has two halves. You can complete only the left side of the popup if you like. This will create a curve that is equal horizontally and vertically. If you want a border to have more of a curve either horizontally or vertically, you can complete the fields in the right half of the popup as well, so that you have two values (e.g., 10px 15px) instead of one. For more information on using two sets of border radius properties, see css3.info/preview/rounded-border/. Use the lower-left area of the popup to enter a number for the amount of curve. The greater the number, the more curve that is applied. Use the area to the right of the number field to select a unit of measurement (e.g., point, pixel, centimeter). If you want to provide a second value for the rounded border, complete the same fields on the right half of the popup. When you are finished, click OK in the small popup. Cell Border Collapse Select whether you want to collapse the cell borders in the stylesheet. If you collapse the cell borders, the row and cell borders of a table are joined in a single border. If you do not collapse the cell borders, the row and cell borders of a table are detached. If you use the border radius properties to create rounded borders, this must be set to "Do not collapse cell borders." Cell Border Spacing Use this area to increase or decrease the amount of spacing for a cell border. CHAPTER 4 39
40 Hide bottom ruling when table crosses a page break Set this field to True if you want to hide the bottom border when the table continues on another page. See "Hiding the Bottom Border on Tables when Crossing Page Breaks" on page 151. Overflow This determines what happens if content overflows the table. Visible The overflow is not clipped. It renders outside the table. This is default. Hidden The overflow is clipped, and the rest of the content will be invisible. If you are using border-radius properties on the table, you must select this option for the rounded corners to be seen properly. Scroll The overflow is clipped, but a scroll-bar is added to see the rest of the content. Auto If overflow is clipped, a scroll-bar should be added to see the rest of the content. Inherit The value of the overflow property is inherited from the parent element. Print Options Click this button to open the Breaks dialog and set page, column, and breaks for tables. CHAPTER 4 40

41 ROWS, COLUMNS, HEADER, AND FOOTER TABS These tabs let you set properties for the various elements of the table. For any of these elements, you can add multiple repeatable patterns with different colors and text properties. Following are descriptions for the fields that appear on each tab. ROW/COLUMN/HEADER/FOOTER STYLES Displays the patterns for the row, column, header, or footer in the stylesheet. Each line represents a different pattern and how many times it is repeated in a table before the next pattern occurs. Name Displays the name of each pattern. Depending on which tab you are working on, the default names of the patterns may be Body1, Body2, Body3, etc. Column1, Column2, Column3, etc. Header1, Header2, Header3, etc. Footer1, Footer2, Footer3, etc. You can click in the cell, press F2, and enter a custom name for each pattern if you like. CHAPTER 4 41


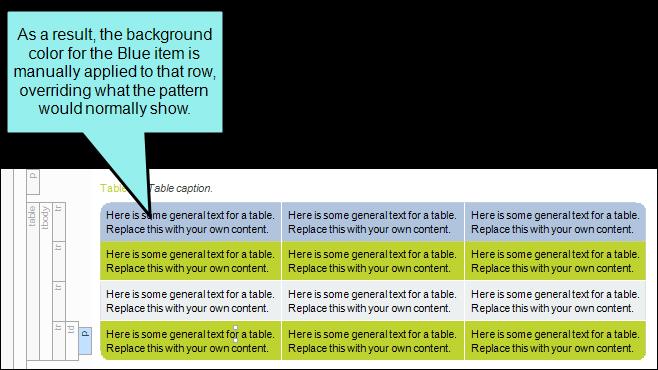
42 Type Select a type for the item. Most of the time you will probably want to use the Pattern type. This means that the settings for that item will be added automatically to any table using that table stylesheet. But if an item has a Custom type, its settings will not be added to a table automatically; instead, you would need to apply that item manually to the particular areas of the table where you want to use it. The Custom type might be used if you want a particular style for most of your tables, but there might be some tables where the style needs to be changed somewhat. In those cases, you can manually override the style for those specific tables. EXAMPLE You can switch the type for an item using the drop down menu. Let's say you have a table stylesheet with three pattern items on the Rows tab (Gray, Green, Blue), with alternating background colors. CHAPTER 4 42

43 However, only the first two items are using the Pattern type. The third item is using the Custom type. Therefore, when you insert a table and use this stylesheet, the rows alternate between gray and green only. CHAPTER 4 43

44 This particular pattern was created on the Rows tab, which means that it displays only in your body rows, not in any header or footer rows. By rightclicking on the tbody structure bar or any of the tr structure bars within it, you can select Row Style from the context menu. From there, you can select any of the available items in the pattern to override what you already have in the table. CHAPTER 4 44


45 CHAPTER 4 45


46 The only difference between the first two items (Gray and Green) and the third item (Blue) is that Blue can be applied only from this context menu manually. Gray and Breen are applied automatically, but can be applied manually from the context menu too. Repeat Click the up or down numbers to increase or decrease the number of times the pattern occurs in a table before the next pattern is displayed. Adds a new pattern. The new pattern is initially set to repeat just once, but you can change that in the "Repeat" cell. Removes the selected pattern from the list. Moves the selected pattern up in the list. Moves the selected pattern down in the list. CHAPTER 4 46
47 HEIGHT Select a pattern from the section above. Then click this field to open a small popup, which lets you set properties for the height of the row or width of the column. In the lower-left field enter a number. In the lower-right field, select a unit of measurement (e.g., points, pixels, centimeters) for the number you entered. Then click OK to accept the settings, or click Cancel to close the window without accepting them. FONT Select a pattern from the section above. Then click this field to open a small popup, which lets you set font properties. Weight Select an option to change the weight of the font (e.g., bold). The numbers from 100 to 900 represent different levels of darkness. The number 400 is the same as a "normal" weight, and the number 700 is the same as the standard "bold" option. "Bolder" means the next weight that is assigned to a font that is darker than the inherited one. "Lighter" means the next weight that is assigned to a font that is lighter than the inherited one. Style Select an option to change the style of the font (e.g., italic). According to the World Wide Web Consortium (w3.org): The font style specifies whether the text is to be rendered using a normal, italic, or oblique face. Italic is a more cursive companion face to the normal face, but not so cursive as to make it a script face. Oblique is a slanted form of the normal face, and is more commonly used as a companion face to sans-serif. This definition avoids having to label slightly slanted normal faces as oblique, or normal Greek faces as italic. Color Click this field and select a color for the text. For advanced color options, select More colors and use the fields in the Color Picker dialog. Size In the top field, select Length. Then in the lower-left field enter a number for the size of the text, and in the lower-right select a unit of measurement (e.g., points, pixels, centimeters) for the number. Family Click in this field and select a font family (e.g., Arial) for the text. CHAPTER 4 47
48 RULER Select a pattern from the section above. Then click this field to open a small popup, which lets you set properties for a rule (i.e., horizontal line) between the rows or columns in the pattern. In the lower-left field enter a number for the size of the rule. In the lower-middle field, select a unit of measurement (e.g., points, pixels, centimeters) for the number you entered.in the upper-right field, select a color for the rule. In the lower-right field, select a type of line (e.g., solid, double, dashed) for the rule. Then click OK to accept the settings, or click Cancel to close the window without accepting them. SEPARATOR Select a pattern from the section above. Then click this field to open a small popup, which lets you set properties for a separator (i.e., a horizontal line) between the final row or column in the pattern and the first row or column in the next pattern. In the lower-left field enter a number for the size of the separator. In the lower-middle field, select a unit of measurement (e.g., points, pixels, centimeters) for the number you entered. In the upper-right field, select a color for the separator. In the lower-right field, select a type of line (e.g., solid, double, dashed) for the separator. Then click OK to accept the settings, or click Cancel to close the window without accepting them. ALIGNMENT Select an option for aligning text in the row or column horizontally. Left The text aligns at the left edge of each cell. Center The text aligns in the center of each cell. Right The text aligns at the right edge of each cell. Justify The text aligns both at the left and right edges of each cell. CHAPTER 4 48
49 VERTICAL ALIGNMENT Select an option for aligning text in the row or column vertically. Top The text aligns at the top of each cell. Middle The text aligns in the middle of each cell. Bottom The text aligns at the bottom of each cell. PRINT OPTIONS (ROWS ONLY) Click the Print Options button to open the Breaks dialog and set page and column breaks for table row elements. BACKGROUND Use this area to specify the settings that you want for the background. In the Color field, click the down arrow and select a color from the popup. For advanced color options, select More Colors and use the fields in the Color Picker dialog. Next to the Image field, click. Select an image file to insert and click OK. If you want the background image to repeat, select one of the options from the Repeat field. You can also set the image position horizontally and vertically by using the X and Y fields. CELL PADDING Click in any of the individual fields (Left, Right, Top, Bottom) to specify the settings for the cell padding (the amount of space between the edge of the table cell and the content in the cell). In the left side of the field, enter a number for the amount of padding. In the right side of the field, select a unit of measurement (e.g., point, pixel, centimeter) for the number you entered. If you click the down arrow to the right of all the fields, the settings will be applied to all of the cell padding fields. When you click that down arrow, a small popup displays. Use the lower-left area of the popup to enter a number for the amount of padding. Use the lowerright area to select a unit of measurement. CHAPTER 4 49
50 CELL CONTENT STYLE When you insert a table, it is set up by default to use standard table tags in the individual cells (e.g., <th> for table headers, <td> for regular table text). However, if you press Enter at the end of a line, a <p> tag is added within the standard tag. Therefore, in order to keep all of the content in your table cells looking consistent, you may want to create a special style class of the p style to be used for table content (e.g., p.tabletext) and apply that style to all of your cells when you first create a table. You can manually apply specific styles to tables by selecting the table cells, clicking Table > Cell Content Style, and choosing the style to be used for those cells. However, rather than repeating all these steps each time you create a table, the easiest way to accomplish this is to set a default cell content style. You can do this in a couple of ways: globally or using a table stylesheet. The fields in this section let you set default styles in the table stylesheet for whatever tab you're on (Rows, Columns, Header, Footer). In the Tag field, select the parent style (usually p). Then in the Class field, select any class that is available for that parent style (e.g., TableRowText). You can have different defaults for each table stylesheet in your project. When you insert a new table using a particular table stylesheet, the various parts of the table (e.g., header, row, footer) will automatically start out with the appropriate styles so that you don't have to set any of them manually. This feature automatically applies the selected style class only in new tables (and in new cells within existing tables) that are associated with the table stylesheet. It does not affect existing tables. If you also have a style set in the Table ribbon using the global method, your settings in a table stylesheet override that style. For more information about selecting table cell content styles and using the global default method, see "Selecting Styles for Table Cell Contents" on page 55. CHAPTER 4 50
51 PATTERN EXAMPLE Let's say you want the rows in the table to alternate between having no background color and a green background color. In addition, you want a header row to have a blue background. To do this, you would complete the following steps: a. Select the Row tab. b. In the Row Styles section, click. There should now be two patterns (Body1 and Body2). c. To make the patterns more identifiable, click in the Name cell (where "Body1" is shown) and press F2. Then replace the existing text and type NoColor. d. Click in the Name cell (where "Body2" is shown) and press F2. Then replace the existing text and type Green. e. The Type cell should already be set to "Pattern" for each, and the Repeat cell should already be set to "1" for each. Keep those fields set as they are. f. Select the Green pattern row. g. In the Background/Color field, select a green color. h. Select the Header tab. i. Click in the Name cell and press F2. Then replace the existing text and type Blue. j. In the Background/Color field, select a blue color. The Preview section at the bottom of the editor lets you see how the table elements look as you make changes. 3. Click to save your work. NOTE: Alternatively, you can edit table styles in a regular stylesheet separately (see "Editing Table Styles in Regular Stylesheets" on page 34). For the differences between regular stylesheets, table stylesheets, and local properties and when you should use one over the other see "Regular Stylesheets, Table Stylesheets, or Local Properties?" on page 25 CHAPTER 4 51

52 Applying Table Stylesheets to Tables After you edit a table stylesheet, you can apply the stylesheet to a table. You can do this to one table at a time, or to multiple tables at the same time. HOW TO APPLY A TABLE STYLESHEET ONE TABLE AT A TIME The following steps show how to apply a table stylesheet to one table at a time. Use the next set of steps if instead you want to quickly apply a table stylesheet to many tables in different files. 1. Open the topic where a table has been inserted. 2. If the tag block bars are not shown to the left of the content, click at the bottom of the editor. 3. Right-click the table tag bar. 4. Do one of the following: In the context menu select Table Style and then select the stylesheet in the submenu. OR a. In the context menu, select Table Properties. The Table Properties dialog opens. b. Click Table Style, and from the drop-down select the stylesheet. CHAPTER 4 52

53 NOTE: If you have not yet created a table stylesheet yet, you can do so by clicking to the right of the field. Click the face of the button, not the down arrow. c. Click OK. 5. Click to save your work. HOW TO APPLY A TABLE STYLESHEET MULTIPLE TABLES AND FILES The following steps show how to quickly apply a table stylesheet to many tables in different files. Use the previous set of steps if instead you want to apply a table stylesheet to one table at a time. 1. Open the table stylesheet that you want to apply. 2. In the local toolbar of the Table Style Editor, click Apply Style. The Apply Table Style dialog opens, displaying all folders and topic files in your project. CHAPTER 4 53

54 3. Click in the check box next to each folder and/or file containing tables that should use the stylesheet. If you click next to a folder, the stylesheet will be applied to all files and subfolders under it. You can also select either of the following options in the dialog. Overwrite existing table styles Select this if you want to overwrite existing table styles in those topics. If you choose this option, you can also select Remove print table styles. As of Flare V7, print table styles are no longer the preferred method for single-sourcing tables in online and print output; mediums are now the recommended solution. Therefore, if you used print table styles in the past and want to remove them now, you can use this option. When this option is enabled, print table styles will be removed from any tables updated by this dialog. Remove local formatting Select this if you have local formatting in tables and want to remove it when the table style is applied. 4. Click OK. CHAPTER 4 54
55 Selecting Styles for Table Cell Contents When you insert a table, it is set up by default to use standard table tags in the individual cells (e.g., <th> for table headers, <td> for regular table text). However, if you press Enter at the end of a line, a <p> tag is added within the standard tag. Therefore, in order to keep all of the content in your table cells looking consistent, you may want to create a special style class of the p style to be used for table content (e.g., p.tabletext) and apply that style to all of your cells when you first create a table. You can manually apply specific styles to tables by selecting the table cells, clicking Table > Cell Content Style, and choosing the style to be used for those cells. HOW TO MANUALLY SELECT STYLES FOR TABLE CELL CONTENTS 1. Open the content file (e.g., topic, snippet). 2. Select the table cells for which you want to use a certain style. 3. Select Table > Cell Content Style. The Table Cell Content Style dialog opens, displaying the available paragraph styles in your stylesheet. 4. From the list, select the style that you want to use for the selected cells. If you select (none), any paragraph style applied will be removed from those cells. 5. Click OK. 6. Click to save your work. CHAPTER 4 55


56 EXAMPLE If you keep the default table styles, you will see something like this: CHAPTER 4 56

57 If you select all of the regular body rows in a table, open the Table Cell Content Style dialog, and select a p style class, those cells will have that p style within a td style, like this: However, rather than repeating all these steps each time you create a table, the easiest way to accomplish this is to set a default cell content style. You can do this in a couple of ways: globally or using a table stylesheet. CHAPTER 4 57

58 Global Style Method When you select Table > Cell Content Style, you can select the style you want and click the Set as default check box. Then when you insert a new table, the cells will already have the default style that you set, so you don't need to select that style each time you create a table. This is a very quick and easy solution. However, keep in mind that it is a global setting for all types of rows and all columns in every new table that you insert in that project. For example, if you choose p.tabletext as the default in this dialog, that style will automatically be initially set for all table header, body, and footer cells when you create a table. So if you want different styles for the different parts of the table, you will need to manually replace the default style in those table cells afterward. If you use this method, none of the existing tables that you've already created and formatted in your project are affected by the default setting. The default style is applied automatically only to new tables and new table cells that are created in the project. CHAPTER 4 58
.")
59 Table Stylesheet Method You can also set multiple defaults in your table stylesheets in the Cell Content Style section of the Table Style Editor. In the Tag field, select the parent style (p). Then in the Class field, either select a style class from the drop-down or type it directly in the field (e.g., TableRowText). Default table cell styles can be set for any of the following: headers, rows, columns, and footers. In addition, you can have different defaults for each table stylesheet in your project. CHAPTER 4 59
 that are associated with the table stylesheet.")
60 Then when you insert a new table using a particular table stylesheet, the various parts of the table (e.g., header, row, footer) will automatically start out with the appropriate styles so that you don't have to set any of them manually. This feature automatically applies the selected style class only in new tables (and in new cells within existing tables) that are associated with the table stylesheet. It does not affect existing tables. If you also have a style set in the Table ribbon using the global method, your settings in a table stylesheet override that style. CHAPTER 4 60
61 Selecting Tables If you've inserted a table, you can select the different parts of it cells, rows, columns, entire table. HOW TO SELECT INDIVIDUAL CELLS IN A TABLE 1. Open the content file (e.g., topic, snippet). 2. Click inside a table cell. 3. Do one of the following, depending on the part of the user interface you are using: Ribbon Select the Table ribbon. In the Table section, click the down arrow next to Select All Cells and choose Select Cell. Right-Click Right-click and from the context menu, choose Select > Cell. Drag Click and drag to highlight the cells you want to select, then release the mouse button. HOW TO SELECT ALL CELLS IN A TABLE 1. Open the content file (e.g., topic, snippet). 2. Click inside the table. 3. Do one of the following, depending on the part of the user interface you are using: Ribbon Select the Table ribbon. In the Table section, click Select All Cells. Right-Click Right-click and from the context menu, choose Select > All Cells. Drag Click and drag to highlight all the cells in the table, then release the mouse button. Structure Bars If the tag block bars are not shown to the left of the content, click at the bottom of the editor. Right-click on the table structure bar. In the context menu, choose Select > All Cells. CHAPTER 4 61
62 HOW TO SELECT TABLE ROWS 1. Open the content file (e.g., topic, snippet). 2. Click inside a table row. 3. Do one of the following, depending on the part of the user interface you are using: Ribbon Select the Table ribbon. In the Table section, click the down arrow next to Select All Cells and choose Select Row. Right-Click Right-click and from the context menu, choose Select > Row. Drag Click and drag to highlight all cells in the row, then release the mouse button. Structure Bars If the tag block bars are not shown to the left of the content, click at the bottom of the editor. Right-click on the tr structure bar. In the context menu, choose Select. HOW TO SELECT TABLE COLUMNS 1. Open the content file (e.g., topic, snippet). 2. Click inside a table column. 3. Do one of the following, depending on the part of the user interface you are using: Ribbon Select the Table ribbon. In the Table section, click the down arrow next to Select All Cells and choose Select Column. Right-Click Right-click and from the context menu, choose Select > Column. Drag Click and drag to highlight all cells in the column, then release the mouse button. Structure Bars If the tag block bars are not shown to the left of the content, click at the bottom of the editor. Right-click on the col structure bar. In the context menu, choose Select. CHAPTER 4 62
63 HOW TO SELECT AN ENTIRE TABLE 1. Open the content file (e.g., topic, snippet). 2. Click inside the table. 3. Do one of the following, depending on the part of the user interface you are using: Ribbon Select the Table ribbon. In the Table section, click the down arrow next to Select All Cells and choose Select Table. Right-Click Right-click and from the context menu, choose Select > Table. Structure Bars If the tag block bars are not shown to the left of the content, click at the bottom of the editor. Right-click on the table structure bar. In the context menu, choose Select > Table. CHAPTER 4 63

64 "SELECT ALL CELLS" VERSUS "SELECT TABLE" The "Select All Cells" and "Select Table" options seem to be similar, and they are. But they are not the same. The difference lies in which tags in the markup get selected. The "Select Table" option lets you select the outermost <table> tag and everything in it. The "Select All Cells" option selects only the appropriate tags within the <table> tag. EXAMPLE In the following example, we right-clicked on the table structure bar. CHAPTER 4 64

65 Choosing All Cells selects the individual cells of the table only. CHAPTER 4 65

66 Choosing Table selects the <table> tag and everything in it. CHAPTER 4 66

67 Creating Rounded Borders on Paragraphs and Tables Supported In: For most output formats, you can use CSS3 border-radius style properties to create rounded borders on block elements, such as paragraphs and blockquotes. You can also use set rounded borders on tables. CHAPTER 4 67

68 CHAPTER 4 68

69 Rounded Borders and Block Elements The properties for block elements are available in the Stylesheet Editor and in other areas of the user interface, such as the Paragraph Properties dialog. CHAPTER 4 69

70 CHAPTER 4 70

71 Rounded Borders and Tables For tables, you can set rounded borders in either a regular stylesheet or in a special table stylesheet. You can also set them locally in the Table Properties dialog. REGULAR STYLESHEET By setting rounded borders on the table style in a regular stylesheet, all of your tables will have the rounded borders. CHAPTER 4 71

72 CHAPTER 4 72

73 TABLE STYLESHEET If you set rounded borders in a special table stylesheet, using the Table Style Editor, only the tables using that stylesheet will have rounded borders. CHAPTER 4 73

 or \"Do not collapse cell borders\" (in a table stylesheet or the Table")
74 ADDITIONAL REQUIRED SETTINGS FOR ROUNDED BORDERS ON TABLES When setting rounded borders on tables, it is essential that you also set two other style properties. First, you must set the border-collapse property to "separate" (in a regular stylesheet) or "Do not collapse cell borders" (in a table stylesheet or the Table Properties dialog). CHAPTER 4 74

75 Second, you must set the overflow property to "hidden." This property prevents a background color in the table from obstructing the rounded corners, thus making the table look as if it still has square corners. CHAPTER 4 75

76 CHAPTER 4 76
77 However, Internet Explorer does not respect the overflow setting in tables. So the only way to ensure your tables appear to have rounded borders in Internet Explorer is to not have a background color in the cells at the four corners of the table. EXAMPLE Let's say you have set up a table stylesheet to use rounded corners. If you view the output on a Chrome browser, it looks like this: As you can see, the rounded borders are shown. CHAPTER 4 77

78 But then you view the same table in Internet Explorer. It looks like this: Notice that the rounded corners are obstructed by the background color. To solve this issue, you remove the background colors from the table. After you do that, the table looks like this in Internet Explorer, as well as in other browsers: CHAPTER 4 78
79 If you do not want to lose your background color, you might consider creating your tables without an outer border. That way, the rounded borders will still be shown in most browsers and in PDF output, and in Internet Explorer the tables will simply appear with square corners. EXAMPLE Let's say you have a table with a colored background, but without outer borders. With rounded corners it looks like this in most newer browsers: CHAPTER 4 79

80 And in Internet Explorer it looks like this:. HOW TO USE A STYLE TO SET ROUNDED BORDERS ON BLOCK ELEMENTS 1. From the Content Explorer, open the stylesheet that you want to modify. 2. In the local toolbar, make sure the first button displays. If the button displays instead, then click it. NOTE: For steps using the Simplified view, see the online Help. 3. In the upper-left corner of the Stylesheet Editor, click in the drop-down field and select. 4. Select the appropriate paragraph style. For example, you can select the parent p tag, or you can select a class that you may have created for that tag (e.g., p.tip, p.note). 5. From the Show drop-down list on the upper-right side of the editor, select. 6. (Optional) You can use the toggle button in the local toolbar to show properties below in a group view CHAPTER 4 or an alphabetical view. 80
81 7. If you are using the grouped view, expand the Border group. The property name is shown on the left. The right side is used for selecting and entering values for the property. 8. Locate the border-radius property that you want to change. Each corner (bottom-left, bottomright, top-left, top-right) can be set separately (e.g., border-bottom-left-radius, border-topright-radius). Even better, you can set the main border-radius property, which lets you specify the amount of curve for all four corners in one place. You can type values directly in the field (e.g., 5px; or 4px 7px). Alternatively, you can click in the field to the right of one of the properties, in which case a small popup displays. In the popup, you can enter the amount of curve you want in the H field (for Horizontal) and the V field (for Vertical). If you are setting values for the main border-radius property, you will see a small icon in the upper-left corner of the popup. If you click this icon, the popup changes, showing individual H and V fields for the four corners (Top Left, Top Right, Bottom Left, Bottom Right). For more information on using multiple sets of border radius properties, see Click OK when you're done. 9. If you are using the grouped view, expand the Table group. 10. For the border-collapse property, select separate from the drop-down. 11. If you are using the grouped view, expand the Positioning group. 12. For the overflow property, select hidden from the drop-down. 13. Click to save your work. CHAPTER 4 81
82 HOW TO USE A TABLE STYLESHEET TO SET ROUNDED BORDERS ON TABLES 1. Open the table stylesheet that you want to edit. This can be found in the Resources/TableStyles subfolder in the Content Explorer, but you can store table stylesheets in other folders in the Content Explorer if you like. 2. In the Table Style Editor, select the General tab. 3. In the Cell Border Collapse area, select Do not collapse cell borders. 4. Set the options in the Border Radius section. a. Click in any of the individual fields (Top-Left, Top-Right, Bottom-Right, Bottom-Left) to specify the settings for a particular corner of the table. If you click the down arrow to the right of all the fields, the settings will be applied to all of the fields. When you click that down arrow or in one of the individual fields, a small popup displays. This popup has two halves. You can complete only the left side of the popup if you like. This will create a curve that is equal horizontally and vertically. If you want a border to have more of a curve either horizontally or vertically, you can complete the fields in the right half of the popup as well, so that you have two values (e.g., 10px 15px) instead of one. For more information on using two sets of border radius properties, see css3.info/preview/rounded-border/. b. Use the lower-left area of the popup to enter a number for the amount of curve. The greater the number, the more curve that is applied. c. Use the area to the right of the number field to select a unit of measurement (e.g., point, pixel, centimeter). d. If you want to provide a second value for the rounded border, complete the same fields on the right half of the popup. e. Click OK. 5. Scroll down to the bottom of the tab, and in the Advanced area, click in the Overflow dropdown and select Hidden. 6. Click to save your work. CHAPTER 4 82
83 HOW TO USE A REGULAR STYLESHEET TO SET ROUNDED BORDERS ON TABLES 1. From the Content Explorer, open the stylesheet that you want to modify. 2. In the local toolbar, make sure the first button displays. If the button displays instead, then click it. NOTE: For steps using the Simplified view, see the online Help. 3. In the upper-left corner of the editor, click in the drop-down field and select 4. In the grid below, select table.. 5. From the Show drop-down list on the upper-right side of the editor, select. 6. (Optional) You can use the toggle button in the local toolbar to show properties below in a group view or an alphabetical view. 7. If you are using the grouped view, expand the Border group. The property name is shown on the left. The right side is used for selecting and entering values for the property. 8. Locate the border-radius property that you want to change. Each corner (bottom-left, bottomright, top-left, top-right) can be set separately (e.g., border-bottom-left-radius, border-topright-radius). Even better, you can set the main border-radius property, which lets you specify the amount of curve for all four corners in one place. You can type values directly in the field (e.g., 5px; or 4px 7px). Alternatively, you can click in the field to the right of one of the properties, in which case a small popup displays. In the popup, you can enter the amount of curve you want in the H field (for Horizontal) and the V field (for Vertical). If you are setting values for the main border-radius property, you will see a small icon in the upper-left corner of the popup. If you click this icon, the popup changes, showing individual H and V fields for the four corners (Top Left, Top Right, Bottom Left, Bottom Right). For more information on using multiple sets of border radius properties, see Click OK when you're done. 9. Click to save your work. CHAPTER 4 83
84 NOTE: Some older browsers may not support rounded borders, so even if you create the rounded borders for your content, they may display as rounded in some browsers but square in others. NOTE: Different browsers display different results if you have all of the following set on a table: a caption, rounded borders, and a color in the background of the first row. That's because some browsers consider the caption part of the table and others do not. One possible workaround is to set the border-top-left-radius and border-top-right-radius on the topleft and top-right cells. CHAPTER 4 84
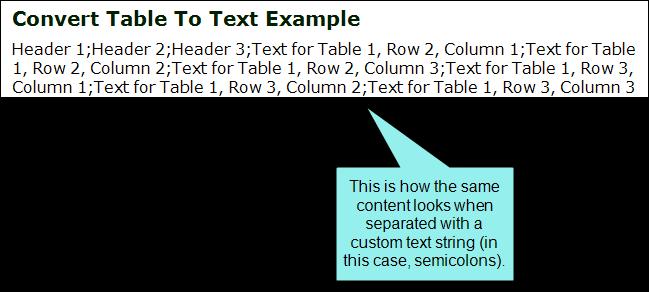
85 Converting Tables to Text If you have a table containing text, you can remove the table but keep the text. When doing this, you can choose how the converted text should be represented: paragraphs, separated with commas, separated with text. HOW TO CONVERT A TABLE TO TEXT 1. Open the content file (e.g., topic, snippet). 2. Place your cursor somewhere in the table. 3. Select the Table ribbon. In the Data section select Convert to Text. The table is converted to text using the default method convert to paragraphs, with commas, or with text string. 4. (Optional) If you want the conversion to use a different method, click the Paste icon that appears after the text and select the method. Convert to Paragraphs Select this option to convert the content in each table cell into separate paragraphs. Separate with Commas Select this option to convert the content in each table cell into text separated by commas. Separate with Text Select this option to convert the content in each table cell into text separated by a text string that you specify (e.g., a semicolon). Set Default Select this option to open the Default Behavior dialog. Then choose the type of behavior you want to use automatically when performing this action in the future, and click OK. CHAPTER 4 85

86 CHAPTER 4 86

87 CHAPTER 4 87


88 5. Click to save your work. CHAPTER 4 88
89 Converting Text to Tables If you have a series of paragraphs or some text separated by commas or other strings, you can quickly place all of it into a table. HOW TO CONVERT TEXT TO A TABLE 1. Open the content file (e.g., topic, snippet). 2. Drag and select the text to be converted, so that it is highlighted. 3. Select the Table ribbon. In the Table section click the face of the Insert Table button (not the down arrow). The Insert Table dialog opens. 4. In the Text to Table section, select one of the options. None Select this option if you want to create a table but not include any of the selected text. In other words, that text is removed and replaced with the new table. Paragraphs Select this option if you have selected multiple paragraphs and want to convert them into a table. Each paragraph will be placed in a separate table cell. Commas Select this option if you have selected text separated by commas and want to convert it into a table. Each segment of text between a comma will be placed in a separate table cell. Tabs Select this option if you have selected text separated by tabs and want to convert it into a table. Each segment of text between a tab separator will be placed in a separate table cell. Other Select this option if you have selected text separated by a specific text string (e.g., semicolons) and want to convert it into a table. After selecting this option, enter that text string in the field to the right. Each segment of text between the text string that you specify will be placed in a separate table cell. CHAPTER 4 89

90 You can also complete any of the other fields in the dialog as necessary. For more information about the other settings, see "Inserting Tables" on page 8. CHAPTER 4 90


91 5. Click OK. The text is converted to a table. 6. Click to save your work. CHAPTER 4 91
92 Cutting Table Columns and Rows You can cut entire columns and rows in a table. When you do this, a paste icon displays after the table. This icon allows you to specify how you would like to handle the content when you cut the columns or rows. You can also set the default behavior for similar actions in the future. HOW TO CUT TABLE COLUMNS AND ROWS 1. Open the content file (e.g., topic, snippet). 2. Select the column or row that you want to cut so that the cells are highlighted. 3. Press CTRL+X on your keyboard. 4. (Optional) You can click on the Paste icon and select any of the following options from the menu, depending on whether you cut columns and/or rows. Cut Columns Select this option to entirely cut the selected columns, removing both the columns and content from the table. Cut Rows Select this option to entirely cut the selected rows, removing both the rows and content from the table. Cut Cell Contents Select this option to cut only the content from the selected columns or rows, leaving the empty columns in the table. Set Default Select this option to open the Default Behavior dialog. Then choose the type of behavior you want to use automatically when performing this action in the future, and click OK. 5. Click to save your work. CHAPTER 4 92
93 Deleting Tables You can delete a table from a content file (e.g., topic, snippet). HOW TO DELETE A TABLE FROM A TOPIC 1. Open the content file (e.g., topic, snippet). 2. If the tag block bars are not shown to the left of the content, click at the bottom of the editor. 3. Right-click the block bar labeled "table" to the left of the table that you want to delete or the table itself. 4. From the context menu, click Delete. The table is deleted. 5. Click to save your work. CHAPTER 4 93
94 Inserting Table Columns and Rows You can easily insert additional rows and columns into an existing table. You can insert one row or column at a time, or you can insert multiple rows or columns. HOW TO INSERT A COLUMN INTO A TABLE 1. Open the content file (e.g., topic, snippet). 2. Do one of the following: Place your cursor in the table where you want to insert the column. Doing this will insert only one column. In a table, click and drag to select the number of columns you want to add (e.g., if you want to insert three columns, select three in the table). You do not need to select entire columns, just portions of them. 3. Do one of the following, depending on the part of the user interface you are using: Ribbon Select the Table ribbon. Then select Columns to the Left or Columns to the Right, depending on where you want to insert the column(s). Right-Click Right-click the table and select Insert > Columns to the Left or Insert > Columns to the Right, depending on where you want to insert the column(s). 4. Click to save your work. CHAPTER 4 94
95 HOW TO INSERT A ROW INTO A TABLE 1. Open the content file (e.g., topic, snippet). 2. Do one of the following: Place your cursor inside the table where you want to insert the row. Doing this will insert only one row when you are finished. In a table, click and drag to select the number of rows you want to add (e.g., if you want to insert three rows, select three in the table). You do not need to select entire rows, just portions of them. 3. Do one of the following, depending on the part of the user interface you are using: Ribbon Select the Table ribbon. Then select Rows Above or Rows Below, depending on where you want to insert the row(s). Right-Click Right-click the table and select Insert > Rows Above or Insert > Rows Below, depending on where you want to insert the row(s). 4. Click to save your work. CHAPTER 4 95
96 Merging Table Cells You can turn multiple cells in a table into one big cell. This is called "merging" cells. You can merge any number of rows and columns in a table, as long as they are adjacent to one another. You might want to merge cells, for example, to create a wide cell that serves as a heading for a group of columns under it. HOW TO MERGE CELLS IN A TABLE 1. Open the content file (e.g., topic, snippet). 2. Click inside a cell that will be on the outside edge of the new, bigger cell. 3. Hold down the mouse button and drag it to select surrounding cells. The cells that you select are shaded. 4. Release the mouse button. 5. Do one of the following, depending on the part of the user interface you are using: RibbonSelect the Table ribbon. In the Cells section select Merge Cells. Right-Click Right-click the table and from the context menu, select Merge Cells. 6. Click to save your work. CHAPTER 4 96
97 Merging Tables If you have two tables in a content file (e.g., topic, snippet) that are positioned one after the other, you can merge those tables so that they become one. You can do this by using the paste icon that may appear to the right of the tables. HOW TO MERGE TABLES 1. Open the content file (e.g., topic, snippet). 2. Perform an action to display the paste icon. Usually this means removing content between two tables so that they become adjacent, or copying and pasting one table before or after another. 3. Click the paste icon to the right of the tables. 4. Select the option that best suits your needs, depending on the type of action that you performed. Merge Table Up Select this option to merge the tables, with the table on top having precedence. Therefore, the merged table will use the table stylesheet from that table. Merge Table Down Select this option to merge the tables, with the table on the bottom having precedence. Therefore, the merged table will use the table stylesheet from that table. Don't Merge Tables Select this option to allow the tables to appear one after the other, without being merged into one table. Paste Table Select this option to paste the table as a whole. Therefore, you will actually have two separate tables next to each other. Paste (Above) Select this option to merge the rows and columns from the copied table into the existing one, above the rows from the other table. The table that was there first will have precedence. Therefore, the merged table will use the table stylesheet from that table. Paste (Below) Select this option to merge the rows and columns from the copied table into the existing one, below the rows from the other table. The table that was there first will have precedence. Therefore, the merged table will use the table stylesheet from that table. CHAPTER 4 97

 and those tables are placed one after the other, as a result of removing content between the")
98 Set Default Select this option to open the Default Behavior dialog. Then choose the type of behavior you want to use automatically when performing this action in the future, and click OK. EXAMPLE Let's say you have two tables in a content file (e.g., topic, snippet) and those tables are placed one after the other, as a result of removing content between the tables. When this occurs, you see a paste icon to the right of the tables. CHAPTER 4 98

99 CHAPTER 4 99


100 If you click on the icon, you can select from various options to specify how the tables should be merged, or not merged. CHAPTER 4 100

101 Suppose we tell Flare to "Merge Table Down." In this case the look of the table would change because the second table is given priority. 5. Click to save your work. NOTE: You cannot merge tables if the column count is different in them. CHAPTER 4 101
102 Moving Table Columns and Rows You can move columns and rows around in a table that you have inserted by dragging and dropping the structure bars. You can also move table rows by using keyboard shortcuts. HOW TO MOVE COLUMNS AND ROWS BY DRAGGING AND DROPPING 1. Open the content file (e.g., topic, snippet). 2. If the tag block bars are not shown to the left of the content, click at the bottom of the editor. 3. Click the appropriate tag bar to the left of the topic or column bar (in the span area) above the topic, and drag the row or column to the place where you want to move it. A blue arrow helps guide you, showing you where the row or column will be inserted when you release the mouse button. 4. Release the mouse button to drop the row or column to its new location in the table. The row or column is moved to its new location. 5. Click to save your work. HOW TO MOVE ROWS WITH KEYBOARD SHORTCUTS 1. Open the content file (e.g., topic, snippet). 2. In a table, click and drag to select the number of rows you want to move (e.g., if you want to move three rows, select three in the table). You do not need to select entire rows, just portions of them. 3. Hold down ALT+SHIFT on your keyboard and press the Up or Down arrow key. 4. Click to save your work. NOTE: You can move table columns and rows only within the same table. If you want to move a column or row from one table to another, you need to use the copy and paste options, and then delete the column or row from the original table. To copy a column or row, right-click on the bar and select Copy. To paste the column or row in the other table, rightclick on a bar next to the column or row where you want to paste it and select Paste (Above), (Below), (Left), or (Right). There is no cut option. CHAPTER 4 102
103 Pasting Cells Within a Table You can copy cells from one table to another. If you copy cells from a table, then place your cursor within a single table cell and paste the contents, a paste icon displays to the right. This icon allows you to specify how you would like to handle the pasted cells. You can also set the default behavior for similar actions in the future. HOW TO PASTE CELLS WITHIN A TABLE 1. Open the content file (e.g., topic, snippet). 2. Select the cells so that they are highlighted. 3. Press CTRL+C on your keyboard. 4. Open the content file (e.g., topic, snippet) containing the table that you want to paste into. 5. Do one of the following: You can select the same number of cells if you simply want to transfer the cell text into them. Click in a single table cell. 6. Press CTRL+V on your keyboard. 7. (Optional) You can click on the Paste icon and select any of the following options from the menu. Paste Cells Select this option to paste the copied cells, replacing the cells nearest to where you have placed your cursor. Paste Table Select this option to paste the copied cells as a separate table. It will be placed within the cell where you have placed your cursor. Paste (Above) Select this option to paste the copied cells above the cell where you have placed your cursor. Paste (Below) Select this option to paste the copied cells below the cell where you have placed your cursor. Paste (Left) Select this option to paste the copied cells to the left of the cell where you have placed your cursor. Paste (Right) Select this option to paste the copied cells to the right of the cell where you have placed your cursor. CHAPTER 4 103
104 Set Default Select this option to open the Default Behavior dialog. Then choose the type of behavior you want to use automatically when performing this action in the future, and click OK. 8. Click to save your work. CHAPTER 4 104
105 Resetting Local Cell Formatting If you have applied local formatting to a table (e.g., applying background shading to cells directly, not through the use of styles), you can easily remove it. This is possible even if the topic was previously saved and closed. HOW TO RESET LOCAL CELL FORMATTING 1. Open the content file (e.g., topic, snippet). 2. Do one of the following, depending on the part of the user interface you are using: n Ribbon Select the Table ribbon. In the Cells section select Reset Local Cell Formatting. n Right-Click Right-click inside the table and from the context menu select Reset Local Cell Formatting. EXAMPLE Let's say you have a table with three columns and you have locally added a different background color for each column. If you want to remove the background colors for all of the columns, you simply need to place your cursor somewhere in the table, right-click, and select Reset Local Cell Formatting. However, let's say instead that you want to remove the background color for only the middle column. In that case, you can select that column so that it is highlighted, right-click, and then select Reset Local Cell Formatting. 3. Click to save your work. NOTE: This option resets formatting placed on the entire cell (e.g., a background color added to cells would be removed). However, local formatting on content (e.g., bold text) is not affected. If you would like to remove local formatting for cells as well as cell content, you can use the Remove Inline Formatting button CHAPTER 4 instead. 105
106 Resizing Tables You can change the height and width of tables by applying an absolute or relative unit of measurement. You can also change the size of tables and individual rows and columns by clicking and dragging the edges of the table bars. HOW TO RESIZE TABLES BY APPLYING A UNIT OF MEASUREMENT 1. Open the content file (e.g., topic, snippet). 2. If the tag block bars are not shown to the left of the content, click at the bottom of the editor. 3. Right-click the table tag bar to the left of the table. 4. In the context menu select Table Size. 5. Enter a value in the Reset Width and/or Reset Height field. 6. Click in the drop-down field and select a unit of measurement (e.g., Point, Centimeter, Ems, Percentage). 7. Click. 8. Click to save your work. CHAPTER 4 106


107 HOW TO RESIZE TABLES, ROWS, AND COLUMNS BY CLICKING AND DRAGGING 1. Open the content file (e.g., topic, snippet). 2. Make sure that the tag bars and span bars are shown to the left of the table and above the table, respectively. If they are not shown, click (to show the tag bars), and click (to show the span bars) at the bottom of the editor. 3. Do any of the following: To Resize the Width of the Entire Table Click inside the table. Then click the far right edge of the bar for the entire table (the top bar) and drag it right or left. CHAPTER 4 107


108 To Resize an Individual Table Row Click the upper or lower edge of the row bar and drag it up or down. CHAPTER 4 108
109 To Resize an Individual Table Column Click inside the table. Then click the left or right edge of the column bar and drag it right or left. 4. Click to save your work. NOTE: You can also use "auto-fit" behaviors in the Properties dialog to automatically resize a table. See "Editing Table Properties" on page 142. NOTE: If you set a table to a specific height, that height may not be represented accurately if you are viewing the topic in Print Layout mode. CHAPTER 4 109
110 Setting Page, Column, and Frame Breaks on Tables Supported In: You can set page, column, and frame breaks on tables using a couple of different options. For additional information about frame breaks and why you might use them, see the online Help. In regular stylesheets, you can set breaks on the standard HTML table tags. The most common approach for page breaks is to set them on table rows through the tr style. Another option is that you can set breaks on rows (and on entire tables) through a table stylesheet. And because you can create patterns in table stylesheets, each pattern item might have different settings for breaks. You might use standard HTML table tags in a regular stylesheet if you want all tables to follow the same behavior when it comes to breaks. On the other hand, you might use table style settings if you have complex tables and patterns requiring some table elements to break in a certain way and other elements to behave differently. CHAPTER 4 110

111 HOW TO SET BREAKS FOR TABLES IN A REGULAR STYLESHEET 1. From the Content Explorer, open the stylesheet that you want to modify. 2. From the Medium drop-down in the Stylesheet Editor, make sure the proper medium is selected before you begin. In the Advanced view, you can open multiple mediums at once; you just need to look at the title at the top of the medium pane and make sure you are working in the correct one. If you are not using stylesheet mediums for your different outputs or if you want all mediums to have the same settings, just leave the medium set to default and continue. Mediums can be used if you want to use one group of settings for online output types and another group of settings for print-based output types. For example, you might use the default medium for your online outputs and the print medium for your print outputs. Please note that Flare remembers the last medium that you used when working in the stylesheet, so it may or may not be the one that you want to use the next time around. 3. In the local toolbar, make sure the first button displays. If the button displays instead, then click it. 4. In the upper-left corner of the editor, click in the drop-down field and select. CHAPTER 4 111
112 5. From the list below, select the appropriate style. Usually you want to put a break on table (which sets the break on the entire table) or tr (which sets the break on rows, allowing you to easily end a page with one row due to the amount of content, and begin the next page with the following row). 6. From the Show drop-down list on the upper-right side of the editor, select. 7. (Optional) You can use the toggle button in the local toolbar to show properties below in a group view or an alphabetical view. 8. If you are using the grouped view, expand the PrintSupport group. The property name is shown on the left. The right side is used for selecting and entering values for the property. 9. Select the appropriate property and value for it. Perhaps the most common setting is to click in the column to the right of page-break-inside, and select avoid from the drop-down. If you do this for the tr style, Flare will automatically create a break between rows so that row content does not continue from one page to another. COLUMN-BREAK-BEFORE Select an option to the right of this property to set a column break before the element. always A break will always occur before the element. auto A break will neither be forced nor prevented before the element. avoid A break will not occur before the element. inherit The break setting of the parent tag is used. COLUMN-BREAK-AFTER Select an option to the right of this property to set a column break after the element. always A break will always occur after the element. auto A break will neither be forced nor prevented after the element. avoid A break will not occur after the element. inherit The break setting of the parent tag is used. CHAPTER 4 112
113 COLUMN-BREAK-INSIDE Select an option to the right of this property for setting a column break inside the "rendering box" of the element. auto A break will neither be forced nor prevented inside the rendering box of the element. avoid A break will not occur inside the rendering box of the element. inherit The break setting of the parent tag is used. FRAME-BREAK-BEFORE Select an option to the right of this property to set a frame break before the element. always A break will always occur before the element. auto A break will neither be forced nor prevented before the element. avoid A break will not occur before the element. inherit The break setting of the parent tag is used. FRAME-BREAK-AFTER Select an option to the right of this property to set a frame break after the element. always A break will always occur after the element. auto A break will neither be forced nor prevented after the element. avoid A break will not occur after the element. inherit The break setting of the parent tag is used. FRAME-BREAK-INSIDE Select an option to the right of this property to set a frame break inside the "rendering box" of the element. automatic A break will neither be forced nor prevented inside the rendering box of the element. avoid A break will not occur inside the rendering box of the element. inherit The break setting of the parent tag is used. CHAPTER 4 113
114 PAGE-BREAK-BEFORE Select an option to the right of this property to set a page break before the element. always A break will always occur before the element. auto A break will neither be forced nor prevented before the element. avoid A break will not occur before the element. inherit The break setting of the parent tag is used. left One or two breaks will occur before the element so that the next page is formatted as a left page. right One or two page breaks will occur before the element so that the next page is formatted as a right page. PAGE-BREAK-AFTER Select an option to the right of this property to set a page break after the element. always A break will always occur after the element. auto A break will neither be forced nor prevented after the element. avoid A break will not occur after the element. inherit The break setting of the parent tag is used. left One or two breaks will occur after the element so that the next page is formatted as a left page. right One or two breaks will occur after the element so that the next page is formatted as a right page. PAGE-BREAK-INSIDE Select an option to the right of this property to set a page break inside the "rendering box" of the element. auto A break will neither be forced nor prevented inside the rendering box of the element. avoid A break will not occur inside the rendering box of the element. inherit The break setting of the parent tag is used. 10. Click to save your work. CHAPTER 4 114
115 HOW TO SET BREAKS IN A TABLE STYLESHEET 1. From the Content Explorer, open the stylesheet that you want to modify. 2. In the Table Style Editor, select the appropriate tab, depending on the table element that you want to create the break for. General tab This tab lets you set breaks for the entire table. Rows tab This tab lets you set breaks for regular rows in the table. 3. If the tab has multiple pattern items, select the one that you want to set the break for (e.g., in the Row Styles section). 4. Toward the bottom of the tab click the Print Options button. (You may need to use the scroll bar to view this button.) The Breaks dialog opens. 5. Use the Page Break, Column Break, and Frame Break sections in the dialog to specify the settings for a page, column, or frame break, respectively. BEFORE You can select one of the options for setting a page or column break before the element. Automatic A break will neither be forced nor prevented before the element. Always A break will always occur before the element. Avoid A break will not occur before the element. Force to 'left page' One or two breaks will occur before the element so that the next page is formatted as a left page. Force to 'right page' One or two page breaks will occur before the element so that the next page is formatted as a right page. AFTER You can select one of the options for setting a page or column break after the element. Automatic A break will neither be forced nor prevented after the element. Always A break will always occur after the element. Avoid A break will not occur after the element. Force to 'left page' One or two breaks will occur after the element so that the next page is formatted as a left page. CHAPTER 4 115
116 Force to 'right page' One or two breaks will occur after the element so that the next page is formatted as a right page. INSIDE You can select one of the options for setting a break inside the "rendering box" of the element. Automatic A break will neither be forced nor prevented inside the rendering box of the element. Avoid A break will not occur inside the rendering box of the element. 6. (Optional) If you have selected the General tab, you can also set widow and orphan properties for the table. By default, table widows and orphans are set at 1, which means that it is possible for there to be a single row from a table left at the top or bottom of a page or column (if you use multi-column page layouts). But you can change the setting in order to ensure that multiple rows are always shown at the top or bottom of a page or column. a. In the Widows section, click the down arrow in the upper-right corner and select Number. Then enter a number in the field. This determines the number of leftover rows allowed at the top of a page or column. b. In the Orphans section, click the down arrow in the upper-right corner and select Number. Then enter a number in the field. This determines the number of leftover rows allowed at the bottom of a page or column. 7. Click OK. 8. Click to save your work. EXAMPLE PAGE BREAK IN REGU LAR STYLESHEET Let's say you have a long table. In the output, the first part of the table might be shown on page 14, and the second part of it is shown on page 15. Suppose the final table row on page 14 has so much content that it wraps around to page 15, in essence splitting that row. If you would rather not split rows such as this, but rather keep them entirely on one page or another, you can set a page break on the tr style in a regular stylesheet. In this situation, you would set the "page-break-inside" property to "avoid." Therefore, all tables in your output would simply break automatically at the end of pages when necessary. CHAPTER 4 116

117 EXAMPLE PAGE BREAK IN SPEC IAL TABLE STYLESHEET Let's say you have many tables where you have not only main headings with a gray background at the top of each table, but subheadings with a blue background every so many rows. And whenever a new subheading is needed, you want a page break to occur before it so that the subheading row begins a new page. After designing your main header row in the Header tab of the Table Style Editor, you open the Rows tab. In the Rows tab you create two pattern items one for the main table rows and another for rows used as subheadings. CHAPTER 4 117

118 You leave the "RegularRows" item set as a "Pattern" type, which means that this style will be applied to rows in the table automatically. On the other hand, you change the type of the "SubHeadings" item to "Custom." This means that the style will not automatically be applied to rows to be used as subheadings; instead, you must apply the style to those rows manually. Why? Because you can't predict when you're going to need a subheading in a table. So you simply apply that look whenever it's needed. CHAPTER 4 118

119 As mentioned, subheading rows should have a blue background, so that's what you set in the Background area. CHAPTER 4 119

120 With the "SubHeadings" item still selected, you can click the Print Options button at the bottom of the tab. CHAPTER 4 120

121 In the Breaks dialog you select Always in the Before field in the Page Break section. CHAPTER 4 121

122 After you are finished designing your table stylesheet, you insert a table into a topic and apply the table stylesheet to it. But because the "SubHeading" pattern item was set to "Custom," none of the rows initially have the blue background or the page break setting. CHAPTER 4 122
123 In PDF output the table might look like this: CHAPTER 4 123

124 In order for a row to be treated as a subheading row with a page break, you need to right-click on the tr tag bar and select the custom "SubHeadings" style. CHAPTER 4 124
: CHAPTER 4")
125 In the XML Editor, the table might now look like this (in this example, the topic is being viewed with the Default medium, which is why we don't see the page break in action): CHAPTER 4 125

126 And in the PDF output, it would look like this: CHAPTER 4 126
127 NOTE: Because you can often control the look of a table in multiple ways (1) local formatting tools, (2) local table properties, (3) a table stylesheet, or (4) a regular stylesheet it's possible that you might encounter conflicting settings from time to time. When this happens, the settings closest to the content typically has precedence. So any explicit setting in the Table Properties dialog (or other local formatting) has precedence over both stylesheet options, and the table stylesheet setting has precedence over the regular stylesheet setting. Let's say you open a regular stylesheet and specify that the outer borders of the table should be green. Then you open the table stylesheet and specify that the outer borders should be red. And then you open the Table Properties dialog and specify that the outer borders should be blue. You've told Flare to do three different things to the same table. So in this case, the table would display blue borders, because the local properties rule over the other settings. But if you remove that setting from the Table Properties dialog and use the default setting, the table would then display red borders, because the table stylesheet has precedence over the regular stylesheet. And finally, if you remove the settings from both the Table Properties dialog and table stylesheet, using the default setting in both, the table would take its command from the regular stylesheet and display green borders. NOTE: If you are using a multi-column page layout and set an "Inside" break to "Avoid," you must specify this in both the "Page Break" and "Column Break" fields. NOTE: Frame breaks are supported only in PDF, XPS, and XHTML outputs. NOTE: It is also possible to use styles to set breaks on lists. CHAPTER 4 127
.")
128 Sorting Tables You can sort a table by selecting an option from the Table ribbon at the top of the interface or from table context menus. Tables can be sorted using a simple or more advanced method. Simple Sort You can sort rows in ascending or descending order, numerically and alphabetically (numbers are first, then letters). Advanced Sort You can sort tables using advanced options, choosing which columns to sort first. In addition, you can sort tables in this manner immediately, when the target is generated, or both. HOW TO SORT TABLES SIMPLE 1. Open the content file (e.g., topic, snippet). 2. Do one of the following: If you want to sort all rows in the table, place your cursor inside the table. The rows will be reordered based on the column where your cursor is placed. CHAPTER 4 128

129 If you want to sort only certain rows in the table, select those rows so that they are highlighted. The rows will be reordered based on the content of the first column in your selection. CHAPTER 4 129

130 3. Do one of the following, depending on the part of the user interface you are using: RibbonSelect the Table ribbon. In the Data section, select the Ascending down arrow and then choose Ascending or Descending. Right-Click Do one of the following: Right-click inside the table and from the context menu, select Sort Rows > Ascending or Sort Rows > Descending. Right-click one of the appropriate tag bars to the left of the table, depending on the rows you want to sort (e.g., table, thead, tfoot), and from the context menu, select Sort Rows > Ascending or Sort Rows > Descending. 4. Click to save your work. CHAPTER 4 130
131 HOW TO SORT TABLES ADVANCED 1. Open the content file (e.g., topic, snippet). 2. Place your cursor inside the table. 3. Do one of the following, depending on the part of the user interface you are using: Ribbon Select the Table ribbon. In the Data section, select the Ascending down arrow and then choose Advanced Sorting Options. Right-Click Do one of the following: Right-click inside the table and from the context menu, select Sort Rows > Advanced Sorting Options. OR Right-click one of the appropriate tag bars to the left of the table, depending on the rows you want to sort (e.g., table, thead, tfoot), and from the context menu, select Sort Rows > Advanced Sorting Options. The Advanced Sorting Options dialog opens. 4. Click. A row is added to the grid on the right. 5. In the Column cell, click the down arrow and choose the column to sort by. Then in the Direction cell choose ascending or descending. 6. (Optional) If you want to add another row, telling Flare which column to sort by next, click again. In the Column cell, click the down arrow and choose the column to sort by next. Then in the Direction cell choose ascending or descending. Repeat this for each additional row you want to add to the grid. 7. (Optional) Use the buttons on the right side of the dialog if you want to remove or rearrange the order of any of the rows in the grid. 8. (Optional) If you want Flare to automatically update the table sorting when you generate output, select Apply at compile time. This can be useful in case you make changes to the table in the XML Editor and want Flare to automatically make the changes so you don't have to. 9. (Optional) If you want Flare to apply the sorting rules to the table right away in the XML Editor, click Apply now. 10. Click OK. 11. Click to save your work. CHAPTER 4 131

132 EXAMPLE Let's say you have a table listing winners of the New York Marathon for a 10-year period, like this: CHAPTER 4 132
 in ascending order.")
133 Suppose you want to re-organize the information in this table. Maybe you want to sort first of all by the country of each runner (the third column) in ascending order. With the third column organized, you then want the rows to be organized once more according to the best times (the fourth column) in ascending order. So you right-click the table structure bar and choose Sort Rows, then Advanced Sorting Options. CHAPTER 4 133

134 In the Advanced Sorting Options dialog, your settings would look like this: CHAPTER 4 134

135 As a result, the table would be reorganized to look like this: CHAPTER 4 135
136 Splitting Table Cells You can turn one cell in a table into many smaller cells by splitting the cell. When you split a cell, you are essentially inserting a smaller table into that cell. HOW TO SPLIT CELLS IN A TABLE 1. Open the content file (e.g., topic, snippet). 2. Click inside the table cell that you want to split into smaller cells, or select multiple cells if you want. 3. Do one of the following, depending on the part of the user interface you are using: Ribbon Select the Table ribbon. In the Cells section select Split Cells. Right-Click Right-click the table and select Split Cells. 4. Complete the options in the Split Cells dialog as necessary. NUMBER OF COLUMNS Enter the number of columns to split the cell into. NUMBER OF ROWS Enter the number of rows to split the cell into. NUMBER OF HEADER ROWS Enter the number of header rows to include in the split cell. A header row can be used to hold titles for the different columns. NUMBER OF FOOTER ROWS Enter the number of footer rows to include in the split cell. A footer row can be used to hold footnote information. CHAPTER 4 136
137 TABLE STYLE Lists the table stylesheets (if any) that have been added. Select a stylesheet to associate it with the split cell area, thus changing the appearance of the columns and rows. If you do not select a table stylesheet, a simple table style is added without borders or other appearance settings. If you want to associate a pre-designed style with the table to affect its look and feel, you must first add the table style to the Split Cells dialog (using the Add button described below). After the style is added to the dialog, simply select it from the Table Style area. ADD Opens the Select Table Style Template dialog, which you can use to add a new table stylesheet. After clicking this button, complete the following steps. a. In the Template Folders area, select a folder. b. In the Templates area, select one of the templates from the folder. You can see a preview of how the table will look in the Preview area below. c. (Optional) You can type a new name for the style in the New Style Name field. d. Click OK. The style is added to the Split Cells dialog. Now you can select it to associate the style with the table. MERGE CELLS BEFORE SPLIT Select this option if you have selected multiple cells in the table and want to merge them into one cell before splitting it. 5. Click OK. The cell is split into new cells according to your selections in the Split Cell dialog. Now you can click in any cells of the table and add content (e.g., text, images, hyperlinks) as necessary. 6. Click to save your work. CHAPTER 4 137
138 Editing Table Cell Properties After a table is inserted into a content file (e.g., topic, snippet), you can easily change the properties for cells within that table. This includes changing the borders, text alignment, hyphenation, background, and more. HOW TO EDIT TABLE CELL PROPERTIES 1. Open the content file (e.g., topic, snippet). 2. Select one or more cells within the table. 3. Do one of the following, depending on the part of the user interface you are using: Ribbon Select the Home ribbon. At the bottom of the Paragraph section click. Keyboard Shortcut Press CTRL+ALT+B. The Cell Properties dialog opens. 4. Using the tabs in the dialog you can change any of the following. BORDERS a. Select the Borders tab. b. Set the options in the Borders section. i. Click in any of the individual fields (Left, Right, Top, Bottom) to specify the settings for the border. If you click the down arrow to the right of all the fields, the settings will be applied to all of the border fields. When you click that down arrow or in one of the individual fields, a small popup displays. ii. iii. iv. Use the lower-left area of the popup to enter a number for the border thickness. Use the lower-middle area to select a unit of measurement (e.g., point, pixel, centimeter) for the number you entered. Use the upper-right area to select a color for the border. v. Use the lower-right area to select a line type (e.g., solid, double, dashed) for the border. vi. Click OK. CHAPTER 4 138
139 PADDING a. Select the Borders tab. b. Set the options in the Padding section. Click in any of the individual fields (Left, Right, Top, Bottom) to specify the settings for the padding. This adds extra space between an image's border and the image itself. This adds extra space between a text box's border and the text within it. In the left side of the field, enter a number for the amount of padding. In the right side of the field, select a unit of measurement (e.g., point, pixel, centimeter) for the number you entered. If you click the down arrow to the right of all the fields, the settings will be applied to all of the padding fields. When you click that down arrow, a small popup displays. TEXT ALIGNMENT a. Select the Text tab. b. To set the horizontal alignment, in the Text Alignment section, select one of the options. Left Aligns the text on the left side of the cell. Center Aligns the text on the center of the cell. Right Aligns the text on the right side of the cell. Justify Aligns the text so that it is flush with both the left and right side. c. To set the vertical alignment, in the Alignment section, select one of the options. Top The text aligns at the top of each cell. Middle The text aligns in the middle of each cell. Bottom The text aligns at the bottom of each cell. TEXT INDENTATION a. Select the Text tab. b. Use the First line indent section. Specify the amount that you want to indent the first line of a paragraph. Select Length in the top drop-down list and enter a number value. You can then choose from several different units of measurement (points, pixels, centimeters, etc.). CHAPTER 4 139
140 TEXT LINE HEIGHT a. Select the Text tab. b. In the Line height section, click the down arrow in the upper-right corner and select Length. c. Enter a number in the field and use the down arrow in the lower-right corner to select a unit of measurement. This is the amount of space that will be added between lines. HYPHENATION a. Select the Hyphenation tab. b. Use the tab to specify the hyphenation settings. Enable Hyphenation Select whether you always or never want words to be hyphenated at the end of lines. Length of shortest word Enter the minimum number of characters that a word must have in order to be hyphenated. The minimum number of characters remaining Enter the minimum number of characters that must remain on the initial line when a word is hyphenated. For example, if you enter 4 in this field, a word that normally could be hyphenated after two characters would not be broken at that point. Instead, it would not be broken until at least four letters make an appearance on the first line. The minimum number of characters carried over Enter the minimum number of characters that must be carried over to the second line when a word is hyphenated. For example, if you enter 3 in this field, a hyphenated word must have at least three characters on the second line after it has been broken. The maximum number of adjacent lines Enter the maximum number of lines next to each other that are allowed to end with a hyphenated word. For example, if you do not mind seeing three consecutive lines ending in a hyphenated word, but you want to avoid seeing a fourth adjacent line with a hyphenated word, you can enter 3 in this field. CHAPTER 4 140
141 BACKGROUND a. Select the Background tab. b. Use the tab to specify the settings that you want for the background. SET A COLOR FOR THE BACKGROUND In the Color field, click the down arrow and select a color from the popup. For advanced color options, select More Colors and use the fields in the Color Picker dialog. ADD AN IMAGE TO THE BACKGROUND i. Next to the Image field, click the Browse button. The Insert Image dialog opens. ii. Select an image file to insert. You can do this in one of the following ways. Select an image already in the project by finding and selecting it in the built-in tree. Click to find and select an image file outside of the project. NOTE: If you want to select an image file that you recently inserted somewhere in your project, click the down arrow in the field next to the button and select the file from the list. iii. iv. Click OK. If you want the background image to repeat, select one of the options from the Repeat field. You can also set the image position horizontally and vertically by using the X and Y fields. 5. Click OK. 6. Click to save your work. CHAPTER 4 141
142 Editing Table Properties After a table is inserted into a content file (e.g., topic, snippet), you can easily change the properties of that table. This includes changing the number of columns and cells, the style associated with the table, alignment, borders, and more. HOW TO EDIT TABLE PROPERTIES 1. Open the content file (e.g., topic, snippet). 2. Click inside the table. 3. Do one of the following, depending on the part of the user interface you are using: Ribbon Select the Table ribbon. In the Table section select Table Properties. Right-Click Right-click the table and from the context menu, select Table Properties. 4. Select the General tab and modify the options as necessary. TABLE SIZE Number of columns Enter the number of columns for the table. Number of rows Enter the number of rows for the table. Number of header rows Enter the number of header rows for the table. A header row can be used to hold titles for the different columns in the table. Number of footer rows Enter the number of footer rows for the table. A footer row can be used to hold footnote information about the table. CHAPTER 4 142
143 TABLE CAPTION Text Enter a caption (or title) for the table. This caption can be placed above the table or below it. Side Click in this field and select to place the caption either above or below the table. Repeat If you want captions to repeat on tables that span multiple pages in print-based output, select Repeat from this field. CHAPTER 4 143
144 Continuation In this field, you can enter continuation text to the end of captions that repeat (other than the caption appearing on the first page where a table occurs). Typically this text would be something like "(continued)." SUMMARY You can enter a summary for a table. This adds the "summary" attribute to the <table> tag and is used to help make your output more accessible to individuals with disabilities. CHAPTER 4 144

145 AUTOFIT BEHAVIOR AutoFit to contents Automatically sets the column widths to the same width as the table content. AutoFit to window Automatically sets the table width to the same width as the output window. Fixed column width Sets the column widths to the width that you specify. Select the down arrow next to this field and set the width in the popup. ALIGN Aligns the entire table either to the left, right, or center of the topic. TABLE STYLE You can select to use either a special table stylesheet or the table style from a regular stylesheet. Whichever one you choose will control the look of the table that you insert. When you add a table stylesheet to your project, it is stored in the Resources\TableStyles subfolder in the Content Explorer. CHAPTER 4 145

146 Table Style Select this option if you want to use a table stylesheet to control the look of the table. You can then select an existing table stylesheet from the drop-down list. CHAPTER 4 146

147 If you do not yet have a table stylesheet that you want to use, click the face of this button to open the Select Table Style Template dialog. This lets you create new table stylesheet. If you click the down arrow next to the button, you can select Print Style. This opens the Select Table Style dialog, which you can use to specify another table style to be used specifically for printed output. However, it is recommended that you use a medium instead of the "Print Style" option. CHAPTER 4 147
148 Style Class Select this option if you want to use a regular stylesheet to control the look of the table. You can then select the main table style from the drop-down, or you can select any class that you have added under that style. You can create classes for the table style in the Stylesheet Editor; those classes will then become available in this drop-down field. TEXT TO TABLE These options are enabled if you have selected text before opening the dialog to insert the table. This lets you create the table and quickly place all of the selected text into table cells. None Select this option if you want to create a table but not include any of the selected text. In other words, that text is removed and replaced with the new table. Paragraphs Select this option if you have selected multiple paragraphs and want to convert them into a table. Each paragraph will be placed in a separate table cell. Commas Select this option if you have selected text separated by commas and want to convert it into a table. Each segment of text between a comma will be placed in a separate table cell. CHAPTER 4 148
149 Tabs Select this option if you have selected text separated by tabs and want to convert it into a table. Each segment of text between a tab separator will be placed in a separate table cell. Other Select this option if you have selected text separated by a specific text string (e.g., semicolons) and want to convert it into a table. After selecting this option, enter that text string in the field to the right. Each segment of text between the text string that you specify will be placed in a separate table cell. 5. Select the Borders tab and modify the options as necessary. Outer Borders Click in any of the individual fields (Left, Right, Top, Bottom) to specify the settings for the table border. If you click the down arrow to the right of all the fields, the settings will be applied to all of the border fields. When you click the down arrow or in one of the individual fields, a small popup displays. Use the lower-left area of the popup to enter a number for the thickness of the border. Use the lower-middle area to select a unit of measurement (e.g., point, pixel, centimeter) for the number you entered. Use the upper-right area to select a color for the border. And use the lower-right area to select a line type (e.g., solid, double, dashed) for the border. When you are finished, click OK in the small popup. Border Radius These fields let you create rounded corners on the table (see "Creating Rounded Borders on Paragraphs and Tables" on page 67). Click in any of the individual fields (Top-Left, Top-Right, Bottom-Right, Bottom-Left) to specify the settings for a particular corner of the table. If you click the down arrow to the right of all the fields, the settings will be applied to all of the fields. When you click that down arrow or in one of the individual fields, a small popup displays. This popup has two halves. You can complete only the left side of the popup if you like. This will create a curve that is equal horizontally and vertically. If you want a border to have more of a curve either horizontally or vertically, you can complete the fields in the right half of the popup as well, so that you have two values (e.g., 10px 15px) instead of one. For more information on using two sets of border radius properties, see css3.info/preview/rounded-border/. Use the lower-left area of the popup to enter a number for the amount of curve. The greater the number, the more curve that is applied.use the area to the right of the number field to select a unit of measurement (e.g., point, pixel, centimeter). If you want to provide a second value for the rounded border, complete the same fields on the right half of the popup. When you are finished, click OK in the small popup. Cell Border Collapse Select whether you want to collapse the cell borders in the table. If you collapse the cell borders, the row and cell borders of a table are joined in a single border. If you do not collapse the cell borders, the row and cell borders of a table are CHAPTER 4 149
150 detached. If you use the border radius properties to create rounded borders, this must be set to "Do not collapse cell borders." Cell Border Spacing Use this area to increase or decrease the amount of spacing for a cell border (in pixels). Hide bottom ruling when table crosses a page break Set this field to True if you want to hide the bottom border when the table continues on another page. See "Hiding the Bottom Border on Tables when Crossing Page Breaks" on the next page. Overflow This determines what happens if content overflows the table. 6. Click OK. Visible The overflow is not clipped. It renders outside the table. This is default. Hidden The overflow is clipped, and the rest of the content will be invisible. If you are using border-radius properties on the table, you must select this option for the rounded corners to be seen properly. Scroll The overflow is clipped, but a scroll-bar is added to see the rest of the content. Auto If overflow is clipped, a scroll-bar should be added to see the rest of the content. Inherit The value of the overflow property is inherited from the parent element. 7. Click to save your work. CHAPTER 4 150

151 Hiding the Bottom Border on Tables when Crossing Page Breaks Supported In: By default, if you have a table that crosses multiple pages in print-based output, the bottom border is shown before the table continues on the next page. CHAPTER 4 151
152 However, you also have the option to hide the bottom border when the table continues on another page. CHAPTER 4 152
153 HOW TO HIDE TABLE BOTTOM BORDERS IN A REGULAR STYLESHEET 1. From the Content Explorer, open the stylesheet that you want to modify. 2. From the Medium drop-down in the Stylesheet Editor, make sure the proper medium is selected before you begin. In the Advanced view, you can open multiple mediums at once; you just need to look at the title at the top of the medium pane and make sure you are working in the correct one. If you are not using stylesheet mediums for your different outputs or if you want all mediums to have the same settings, just leave the medium set to default and continue. Please note that Flare remembers the last medium that you used when working in the stylesheet, so it may or may not be the one that you want to use the next time around. 3. In the local toolbar, make sure the first button displays. If the button displays instead, then click it. 4. In the upper-left corner of the editor, click in the drop-down field and select 5. On the left side of the editor, select the table style.. 6. From the Show drop-down list on the upper-right side of the editor, select right side of the editor.. The most relevant properties for that style are shown on the 7. (Optional) You can use the toggle button in the local toolbar to show properties below in a group view or an alphabetical view. 8. If you are using the group view, expand the Table group. The property name is shown on the left. The right side is used for selecting and entering values for the property. CHAPTER 4 153

154 9. Click in the column to the right of mc-hide-bottom-ruling and select true from the drop-down. 10. Click to save your work. CHAPTER 4 154

155 HOW TO HIDE TABLE BOTTOM BORDERS IN A TABLE STYLESHEET 1. From the Content Explorer, open the stylesheet that you want to modify. 2. In the Table Style Editor, select the General tab. 3. Toward the bottom of the tab, click the field labeled Hide bottom ruling when table crosses a page break, and select True. 4. Click to save your work. CHAPTER 4 155

156 HOW TO HIDE TABLE BOTTOM BORDERS LOCALLY IN THE PROPERTIES DIALOG 1. Open the content file (e.g., topic, snippet). 2. Click inside the table. 3. Do one of the following, depending on the part of the user interface you are using: Ribbon Select the Table ribbon. In the Table section select Table Properties. Right-Click Right-click the table and from the context menu, select Table Properties. 4. Select the Borders tab. 5. Click the field labeled Hide bottom ruling when table crosses a page break, and select True. 6. Click OK. 7. Click to save your work. CHAPTER 4 156
157 NOTE: Because you can often control the look of a table in multiple ways (1) local formatting tools, (2) local table properties, (3) a table stylesheet, or (4) a regular stylesheet it's possible that you might encounter conflicting settings from time to time. When this happens, the settings closest to the content typically has precedence. So any explicit setting in the Table Properties dialog (or other local formatting) has precedence over both stylesheet options, and the table stylesheet setting has precedence over the regular stylesheet setting. Let's say you open a regular stylesheet and specify that the outer borders of the table should be green. Then you open the table stylesheet and specify that the outer borders should be red. And then you open the Table Properties dialog and specify that the outer borders should be blue. You've told Flare to do three different things to the same table. So in this case, the table would display blue borders, because the local properties rule over the other settings. But if you remove that setting from the Table Properties dialog and use the default setting, the table would then display red borders, because the table stylesheet has precedence over the regular stylesheet. And finally, if you remove the settings from both the Table Properties dialog and table stylesheet, using the default setting in both, the table would take its command from the regular stylesheet and display green borders. CHAPTER 4 157
158 Using Styles to Repeat Table Captions in Print Output Supported In: You can use styles to repeat captions on tables that span multiple pages in print-based output. Furthermore, you can add continuation text to the end of those captions (other than the caption appearing on the first page where a table occurs). Typically this text would be something like "(continued)." EXAMPLE CHAPTER 4 158
159 HOW TO USE STYLES TO REPEAT TABLE CAPTIONS IN PRINT OUTPUT 1. From the Content Explorer, open the stylesheet that you want to modify. 2. In the local toolbar, make sure the first button displays. If the button displays instead, then click it. 3. In the upper-left corner of the editor, click in the drop-down field and select. 4. On the left side of the editor, select table. 5. From the Show drop-down list on the upper-right side of the editor, select. The most relevant properties for that style are shown on the right side of the editor. 6. (Optional) You can use the toggle button in the local toolbar to show properties below in a group view or an alphabetical view. 7. If you are using the group view, expand the Table group. CHAPTER 4 159


160 8. You can change the following. mc-caption-repeat If you want captions to repeat on tables that span multiple pages in print-based output, click in the column to the right and select true from the drop-down. mc-caption-continuation You can click in the field to the right and enter continuation text for the end of captions that repeat (other than the caption appearing on the first page where a table occurs). Typically this text would be something like "(continued)." 9. Click to save your work. NOTE: In addition to using styles, you can enable these repeat/continuation features for a specific table by using the Insert Table dialog or the Table Properties dialog. CHAPTER 4 160
USER GUIDE. MADCAP FLARE 2017 r3. QR Codes
 USER GUIDE MADCAP FLARE 2017 r3 QR Codes Copyright 2018 MadCap Software. All rights reserved. Information in this document is subject to change without notice. The software described in this document is
TUTORIAL MADCAP FLARE Tripane and PDF
 TUTORIAL MADCAP FLARE 2018 Tripane and PDF Copyright 2018 MadCap Software. All rights reserved. Information in this document is subject to change without notice. The software described in this document
MadCap Software. Index Guide. Flare 2017 r2
 MadCap Software Index Guide Flare 2017 r2 Copyright 2017 MadCap Software. All rights reserved. Information in this document is subject to change without notice. The software described in this document
USER GUIDE. MADCAP FLARE 2018 r2. Images
 USER GUIDE MADCAP FLARE 2018 r2 Images Copyright 2018 MadCap Software. All rights reserved. Information in this document is subject to change without notice. The software described in this document is
USER GUIDE MADCAP CONTRIBUTOR 8. Getting Started
 USER GUIDE MADCAP CONTRIBUTOR 8 Getting Started Copyright 2018 MadCap Software. All rights reserved. Information in this document is subject to change without notice. The software described in this document
USER GUIDE MADCAP FLARE Topics
 USER GUIDE MADCAP FLARE 2018 Topics Copyright 2018 MadCap Software. All rights reserved. Information in this document is subject to change without notice. The software described in this document is furnished
Structure Bars. Tag Bar
 C H E A T S H E E T / / F L A R E 2 0 1 8 Structure Bars The XML Editor provides structure bars above and to the left of the content area in order to provide a visual display of the topic tags and structure.
Analyzer and Reports Guide
 MadCap Software Analyzer and Reports Guide Flare 2017 r2 Copyright 2017 MadCap Software. All rights reserved. Information in this document is subject to change without notice. The software described in
USER GUIDE. MADCAP FLARE 2017 r3. Import
 USER GUIDE MADCAP FLARE 2017 r3 Import Copyright 2018 MadCap Software. All rights reserved. Information in this document is subject to change without notice. The software described in this document is
ICT IGCSE Practical Revision Presentation Web Authoring
 21.1 Web Development Layers 21.2 Create a Web Page Chapter 21: 21.3 Use Stylesheets 21.4 Test and Publish a Website Web Development Layers Presentation Layer Content layer: Behaviour layer Chapter 21:
USER GUIDE MADCAP FLARE Accessibility
 USER GUIDE MADCAP FLARE 2018 Accessibility Copyright 2018 MadCap Software. All rights reserved. Information in this document is subject to change without notice. The software described in this document
Touring the Workspace Guide
 MadCap Flare Touring the Workspace Guide Version 9.0 THIS USER GUIDE WAS CREATED USING MADCAP FLARE Copyright 2013 MadCap Software. All rights reserved. Information in this document is subject to change
MadCap Software. Movies Guide. Flare 2017 r2
 MadCap Software Movies Guide Flare 2017 r2 Copyright 2017 MadCap Software. All rights reserved. Information in this document is subject to change without notice. The software described in this document
TUTORIAL MADCAP FLARE Top Navigation
 TUTORIAL MADCAP FLARE 2018 Top Navigation Copyright 2018 MadCap Software. All rights reserved. Information in this document is subject to change without notice. The software described in this document
USER GUIDE. MADCAP FLARE 2017 r3. Accessibility
 USER GUIDE MADCAP FLARE 2017 r3 Accessibility Copyright 2018 MadCap Software. All rights reserved. Information in this document is subject to change without notice. The software described in this document
USER GUIDE MADCAP CAPTURE 7. Getting Started
 USER GUIDE MADCAP CAPTURE 7 Getting Started Copyright 2018 MadCap Software. All rights reserved. Information in this document is subject to change without notice. The software described in this document
Advanced Table Styles
 Advanced Table Styles Scott DeLoach scott@clickstart.net ClickStart www.clickstart.net In this session, I will describe advanced techniques for formatting tables. Creating a table Select Insert > Table.
Contribution Workflow
 USER GUIDE MADCAP CONTRIBUTOR 8 Contribution Workflow Copyright 2018 MadCap Software. All rights reserved. Information in this document is subject to change without notice. The software described in this
USER GUIDE MADCAP FLARE SharePoint
 USER GUIDE MADCAP FLARE 2018 SharePoint Copyright 2018 MadCap Software. All rights reserved. Information in this document is subject to change without notice. The software described in this document is
TUTORIAL. MADCAP FLARE 2018 r2. Side Navigation
 TUTORIAL MADCAP FLARE 2018 r2 Side Navigation Copyright 2018 MadCap Software. All rights reserved. Information in this document is subject to change without notice. The software described in this document
ICT IGCSE Practical Revision Presentation Web Authoring
 21.1 Web Development Layers 21.2 Create a Web Page Chapter 21: 21.3 Use Stylesheets 21.4 Test and Publish a Website Web Development Layers Presentation Layer Content layer: Behaviour layer Chapter 21:
MS Word Professional Document Alignment
 MS Word Professional Document Alignment Table of Contents CHARACTER VS. PARAGRAPH FORMATTING...5 Character formatting...5 Paragraph Formatting...5 USING SHOW/HIDE TO REVEAL NON-PRINTING CHARACTERS...5
Working with Tables in Word 2010
 Working with Tables in Word 2010 Table of Contents INSERT OR CREATE A TABLE... 2 USE TABLE TEMPLATES (QUICK TABLES)... 2 USE THE TABLE MENU... 2 USE THE INSERT TABLE COMMAND... 2 KNOW YOUR AUTOFIT OPTIONS...
Rich Text Editor Quick Reference
 Rich Text Editor Quick Reference Introduction Using the rich text editor is similar to using a word processing application such as Microsoft Word. After data is typed into the editing area it can be formatted
Formatting a Report with Word 2010
 Formatting a Report with Word 2010 The basics Although you can use Word to do a great many formatting tasks, here we will concentrate on the basic requirements for good presentation of a report. These
Excel Select a template category in the Office.com Templates section. 5. Click the Download button.
 Microsoft QUICK Excel 2010 Source Getting Started The Excel Window u v w z Creating a New Blank Workbook 2. Select New in the left pane. 3. Select the Blank workbook template in the Available Templates
Week 5 Creating a Calendar. About Tables. Making a Calendar From a Table Template. Week 5 Word 2010
 Week 5 Creating a Calendar About Tables Tables are a good way to organize information. They can consist of only a few cells, or many cells that cover several pages. You can arrange boxes or cells vertically
TUTORIAL MADCAP DOC-TO-HELP 5. New User
 TUTORIAL MADCAP DOC-TO-HELP 5 New User Copyright 2018 MadCap Software. All rights reserved. Information in this document is subject to change without notice. The software described in this document is
SPARK. User Manual Ver ITLAQ Technologies
 SPARK Forms Builder for Office 365 User Manual Ver. 3.5.50.102 0 ITLAQ Technologies www.itlaq.com Table of Contents 1 The Form Designer Workspace... 3 1.1 Form Toolbox... 3 1.1.1 Hiding/ Unhiding/ Minimizing
MadCap Software. What's New Guide. Doc-To-Help 5
 MadCap Software What's New Guide Doc-To-Help 5 Copyright 2017 MadCap Software. All rights reserved. Information in this document is subject to change without notice. The software described in this document
Table Basics. The structure of an table
 TABLE -FRAMESET Table Basics A table is a grid of rows and columns that intersect to form cells. Two different types of cells exist: Table cell that contains data, is created with the A cell that
New User Tutorial Guide
 MadCap Software New User Tutorial Guide Doc-To-Help 5 Copyright 2017 MadCap Software. All rights reserved. Information in this document is subject to change without notice. The software described in this
Dreamweaver Tutorials Working with Tables
 Dreamweaver Tutorials This tutorial will explain how to use tables to organize your Web page content. By default, text and other content in a Web page flow continuously from top to bottom in one large
MadCap Mimic. Movie Creation Guide. Version 7
 MadCap Mimic Movie Creation Guide Version 7 Copyright 2013 MadCap Software. All rights reserved. Information in this document is subject to change without notice. The software described in this document
USER GUIDE MADCAP FLARE Project Creation
 USER GUIDE MADCAP FLARE 2018 Project Creation Copyright 2018 MadCap Software. All rights reserved. Information in this document is subject to change without notice. The software described in this document
Exploring Microsoft Office Word 2007
 Exploring Microsoft Office Word 2007 Chapter 3: Enhancing a Document Robert Grauer, Keith Mulbery, Michelle Hulett Objectives Insert a table Format a table Sort and apply formulas to table data Convert
TUTORIAL MADCAP FLARE Getting Started
 TUTORIAL MADCAP FLARE 2018 Getting Started Copyright 2018 MadCap Software. All rights reserved. Information in this document is subject to change without notice. The software described in this document
Microsoft How to Series
 Microsoft How to Series Getting Started with EXCEL 2007 A B C D E F Tabs Introduction to the Excel 2007 Interface The Excel 2007 Interface is comprised of several elements, with four main parts: Office
Microsoft Office Training Skills 2010
 Microsoft Office Training Skills 2010 Lesson 5 Working with pages, Tables, Shapes and Securing Documents Adding Page color Add color to the background of one or several pages in the document. 1. Click
Microsoft Word 2007 on Windows
 1 Microsoft Word 2007 on Windows Word is a very popular text formatting and editing program. It is the standard for writing papers and other documents. This tutorial and quick start guide will help you
Microsoft Excel 2010 Tutorial
 1 Microsoft Excel 2010 Tutorial Excel is a spreadsheet program in the Microsoft Office system. You can use Excel to create and format workbooks (a collection of spreadsheets) in order to analyze data and
INFS 2150 Introduction to Web Development
 INFS 2150 Introduction to Web Development 6. Tables and Columns Objectives Explore the structure of a web table Create table heading and data cells Apply CSS styles to a table Create cells that span multiple
INFS 2150 Introduction to Web Development
 INFS 2150 Introduction to Web Development 6. Tables and Columns Objectives Explore the structure of a web table Create table heading and data cells Apply CSS styles to a table Create cells that span multiple
Center for Faculty Development and Support Making Documents Accessible
 Center for Faculty Development and Support Making Documents Accessible in Word 2007 Tutorial CONTENTS Create a New Document and Set Up a Document Map... 3 Apply Styles... 4 Modify Styles... 5 Use Table
PRESENCE. RadEditor Guide. SchoolMessenger 100 Enterprise Way, Suite A-300 Scotts Valley, CA
 PRESENCE RadEditor Guide SchoolMessenger 100 Enterprise Way, Suite A-300 Scotts Valley, CA 95066 800-920-3897 www.schoolmessenger.com Contents Contents... 2 Introduction... 3 What is RadEditor?... 3 RadEditor
Quick Access Toolbar. You click on it to see these options: New, Open, Save, Save As, Print, Prepare, Send, Publish and Close.
 Opening Microsoft Word 2007 in the practical room UNIT-III 1 KNREDDY 1. Nyelvi beállítások az Office 2007-hez (Language settings for Office 2007 (not 2003)) English. 2. Double click on the Word 2007 icon
USER GUIDE MADCAP FLARE Language Support
 USER GUIDE MADCAP FLARE 2018 Language Support Copyright 2018 MadCap Software. All rights reserved. Information in this document is subject to change without notice. The software described in this document
Using Microsoft Excel
 Using Microsoft Excel Formatting a spreadsheet means changing the way it looks to make it neater and more attractive. Formatting changes can include modifying number styles, text size and colours. Many
Page Layout Using Tables
 This section describes various options for page layout using tables. Page Layout Using Tables Introduction HTML was originally designed to layout basic office documents such as memos and business reports,
INFS 2150 Introduction to Web Development
 INFS 2150 Introduction to Web Development 3. Page Layout Design Objectives Create a reset style sheet Explore page layout designs Center a block element Create a floating element Clear a floating layout
INFS 2150 Introduction to Web Development
 Objectives INFS 2150 Introduction to Web Development 3. Page Layout Design Create a reset style sheet Explore page layout designs Center a block element Create a floating element Clear a floating layout
Creating Accessible Microsoft Word 2003 Documents Table of Contents
 Table of Contents Creating Accessible Microsoft Word Documents...1 Introduction...2 Templates...2 Default Settings...2 Set the Language...2 Change Default Settings...2 To change the default Font:...2 To
Lesson 15 Working with Tables
 Working with Tables Computer Literacy BASICS: A Comprehensive Guide to IC 3, 4 th Edition 1 Objectives Create a table and insert text. Insert and delete rows and columns. Adjust column width and row height.
Tabs, Tables & Columns
 Tabs, Tables & Columns What we will cover Creating tables Formatting tables Sorting information in tables Using columns Using tabs Tables You can insert a table several: Insert Table button This will open
INFS 2150 / 7150 Intro to Web Development / HTML Programming
 XP Objectives INFS 2150 / 7150 Intro to Web Development / HTML Programming Designing a Web Page with Tables Create a text table Create a table using the , , and tags Create table headers
Graduate Health Sciences Word Topics
 Graduate Health Sciences Word Topics This workshop is based on topics provided by Graduated Health Sciences. Have you ever moved text from one part of a Word document to another, and the formatting changed
Nauticom NetEditor: A How-to Guide
 Nauticom NetEditor: A How-to Guide Table of Contents 1. Getting Started 2. The Editor Full Screen Preview Search Check Spelling Clipboard: Cut, Copy, and Paste Undo / Redo Foreground Color Background Color
Creating Forms. Starting the Page. another way of applying a template to a page.
 Creating Forms Chapter 9 Forms allow information to be obtained from users of a web site. The ability for someone to purchase items over the internet or receive information from internet users has become
Spreadsheets Microsoft Office Button Ribbon
 Getting started with Excel 2007 you will notice that there are many similar features to previous versions. You will also notice that there are many new features that you ll be able to utilize. There are
Lesson 15 Working with Tables
 Working with Tables Computer Literacy BASICS: A Comprehensive Guide to IC 3, 5 th Edition 1 Objectives Create a table and insert text. Insert and delete rows and columns. Adjust column width and row height.
Documents, Templates, and Content Guide
 MadCap Software Documents, Templates, and Content Guide Doc-To-Help 5 Copyright 2017 MadCap Software. All rights reserved. Information in this document is subject to change without notice. The software
MadCap Software. What's New Guide. Flare 11
 MadCap Software What's New Guide Flare 11 Copyright 2015 MadCap Software. All rights reserved. Information in this document is subject to change without notice. The software described in this document
Word Select New in the left pane. 3. Select Blank document in the Available Templates pane. 4. Click the Create button.
 Microsoft QUICK Word 2010 Source Getting Started The Word Window u v w x z Opening a Document 2. Select Open in the left pane. 3. In the Open dialog box, locate and select the file you want to open. 4.
WORD XP/2002 USER GUIDE. Task- Formatting a Document in Word 2002
 University of Arizona Information Commons Training Page 1 of 21 WORD XP/2002 USER GUIDE Task- Formatting a Document in Word 2002 OBJECTIVES: At the end of this course students will have a basic understanding
USER GUIDE MADCAP DOC-TO-HELP 5. Getting Started
 USER GUIDE MADCAP DOC-TO-HELP 5 Getting Started Copyright 2018 MadCap Software. All rights reserved. Information in this document is subject to change without notice. The software described in this document
Microsoft Office Word 2016 for Mac
 Microsoft Office Word 2016 for Mac Formatting Your Document University Information Technology Services Learning Technologies, Training & Audiovisual Outreach Copyright 2016 KSU Division of University Information
OpenForms360 Validation User Guide Notable Solutions Inc.
 OpenForms360 Validation User Guide 2011 Notable Solutions Inc. 1 T A B L E O F C O N T EN T S Introduction...5 What is OpenForms360 Validation?... 5 Using OpenForms360 Validation... 5 Features at a glance...
MS Office Word Tabs & Tables Manual. Catraining.co.uk Tel:
 MS Office 2010 Word Tabs & Tables Manual Catraining.co.uk Tel: 020 7920 9500 Table of Contents TABS... 1 BASIC TABS WITH ALIGNMENT... 1 DEFAULT TAB STOP... 1 SET MANUAL TAB STOPS WITH RULER... 2 SET MANUAL
Source Control: Subversion
 USER GUIDE MADCAP FLARE 2018 Source Control: Subversion Copyright 2018 MadCap Software. All rights reserved. Information in this document is subject to change without notice. The software described in
Computer Nashua Public Library Introduction to Microsoft Word 2010
 Microsoft Word is a word processing program you can use to write letters, resumes, reports, and more. Anything you can create with a typewriter, you can create with Word. You can make your documents more
Dreamweaver Basics. Planning your website Organize site structure Plan site design & navigation Gather your assets
 Dreamweaver Basics Planning your website Organize site structure Plan site design & navigation Gather your assets Creating your website Dreamweaver workspace Define a site Create a web page Linking Manually
MAKING TABLES WITH WORD BASIC INSTRUCTIONS. Setting the Page Orientation. Inserting the Basic Table. Daily Schedule
 MAKING TABLES WITH WORD BASIC INSTRUCTIONS Setting the Page Orientation Once in word, decide if you want your paper to print vertically (the normal way, called portrait) or horizontally (called landscape)
Using Microsoft Office 2003 Intermediate Word Handout INFORMATION TECHNOLOGY SERVICES California State University, Los Angeles Version 1.
 Using Microsoft Office 2003 Intermediate Word Handout INFORMATION TECHNOLOGY SERVICES California State University, Los Angeles Version 1.2 Summer 2010 Table of Contents Intermediate Microsoft Word 2003...
Correcting Grammar as You Type
 PROCEDURES LESSON 11: CHECKING SPELLING AND GRAMMAR Selecting Spelling and Grammar Options 2 Click Options 3 In the Word Options dialog box, click Proofing 4 Check options as necessary under the When correcting
Correcting Grammar as You Type. 1. Right-click the text marked with the blue, wavy underline. 2. Click the desired option on the shortcut menu.
 PROCEDURES LESSON 11: CHECKING SPELLING AND GRAMMAR Selecting Spelling and Grammar Options 2 Click Options 3 In the Word Options dialog box, click Proofing 4 Check options as necessary under the When correcting
P6 Professional Reporting Guide Version 18
 P6 Professional Reporting Guide Version 18 August 2018 Contents About the P6 Professional Reporting Guide... 7 Producing Reports and Graphics... 9 Report Basics... 9 Reporting features... 9 Report Wizard...
OU EDUCATE TRAINING MANUAL
 OU EDUCATE TRAINING MANUAL OmniUpdate Web Content Management System El Camino College Staff Development 310-660-3868 Course Topics: Section 1: OU Educate Overview and Login Section 2: The OmniUpdate Interface
San Pedro Junior College. WORD PROCESSING (Microsoft Word 2016) Week 4-7
 Week 4-7") WORD PROCESSING (Microsoft Word 2016) Week 4-7 Creating a New Document In Word, there are several ways to create new document, open existing documents, and save documents: Click the File menu tab and then
WORD PROCESSING (Microsoft Word 2016) Week 4-7 Creating a New Document In Word, there are several ways to create new document, open existing documents, and save documents: Click the File menu tab and then
Microsoft Word 2003 for Windows, Part 2
 Microsoft Word 2003 for Windows, Part 2 In this workshop, the following Word 2003 features will be covered: Creating and using Tables Formatting text using Styles Using MailMerge Arranging text in Columns
Excel 2007 New Features Table of Contents
 Table of Contents Excel 2007 New Interface... 1 Quick Access Toolbar... 1 Minimizing the Ribbon... 1 The Office Button... 2 Format as Table Filters and Sorting... 2 Table Tools... 4 Filtering Data... 4
4D Write. User Reference Mac OS and Windows Versions. 4D Write D SA/4D, Inc. All Rights reserved.
 4D Write User Reference Mac OS and Windows Versions 4D Write 1999-2002 4D SA/4D, Inc. All Rights reserved. 4D Write User Reference Version 6.8 for Mac OS and Windows Copyright 1999 2002 4D SA/4D, Inc.
New York City College of Technology. Microsoft Word Contact Information:
 New York City College of Technology Microsoft Word 2016 Contact Information: 718-254-8565 ITEC@citytech.cuny.edu Opening Word 2016 Begin by clicking on the bottom left corner icon on the desktop. From
PowerPoint Instructions
 PowerPoint Instructions Exercise 1: Type and Format Text and Fix a List 1. Open the PowerPoint Practice file. To add a company name to slide 1, click the slide 1 thumbnail if it's not selected. On the
Stamina Software Pty Ltd. TRAINING MANUAL Viságe Reporter
 Stamina Software Pty Ltd TRAINING MANUAL Viságe Reporter Version: 2 21 st January 2009 Contents Introduction...1 Assumed Knowledge...1 Pre Planning...1 Report Designer Location...2 Report Designer Screen
How to lay out a web page with CSS
 Activity 2.6 guide How to lay out a web page with CSS You can use table design features in Adobe Dreamweaver CS4 to create a simple page layout. However, a more powerful technique is to use Cascading Style
USER GUIDE MADCAP DOC-TO-HELP 5. Making It Look Good
 USER GUIDE MADCAP DOC-TO-HELP 5 Making It Look Good Copyright 2018 MadCap Software. All rights reserved. Information in this document is subject to change without notice. The software described in this
Formatting documents in Microsoft Word Using a Windows Operating System
 Formatting documents in Microsoft Word Using a Windows Operating System 2017-07-20 Research & Scholarship, McLaughlin Library University of Guelph 50 Stone Road East Guelph, Ontario N1G 2W1 2 Contents
AgWare ClickFORMS 7.0 Introductory Tutorial
 AgWare ClickFORMS 7.0 Introductory Tutorial MAIN WINDOW If you have used Office 2007, our new layout will look familiar. Here is a screenshot of the new and improved AgWare ClickFORMS window: The Forms
Excel Tutorial 1
 IT٢.we Excel 2003 - Tutorial 1 Spreadsheet Basics Screen Layout Title bar Menu bar Standard Toolbar Other Tools Task Pane Adding and Renaming Worksheets Modifying Worksheets Moving Through Cells Adding
Status Bar: Right click on the Status Bar to add or remove features.
 Excel 2013 Quick Start Guide The Excel Window File Tab: Click to access actions like Print, Save As, etc. Also to set Excel options. Ribbon: Logically organizes actions onto Tabs, Groups, and Buttons to
2. In the Start and End Dates section, use the Calendar icon to change the Displayed Start Date to 1/1/2015 and the Displayed End Date to 5/31/2015.
 Tutorials Lesson 1 - Format a Schedule In this lesson you will learn how to: Change the schedule s date range. Change the date headings. Change the schedule dimensions. Change the legend and add a new
Introduction to Microsoft Office 2007
 Introduction to Microsoft Office 2007 What s New follows: TABS Tabs denote general activity area. There are 7 basic tabs that run across the top. They include: Home, Insert, Page Layout, Review, and View
Introduction to Microsoft Word 2010
 Introduction to Microsoft Word 2010 Microsoft Word is a word processing program you can use to write letters, resumes, reports, and more. Anything you can create with a typewriter, you can create with
Additional catalogs display. Customize text size and colors.
 Collapsible Skin The collapsible skin option displays the catalogs and categories in a collapsible format enabling enhanced navigation on Qnet. Categories can be expanded to view all of the sub categories
Study Guide. PCIC 3 B2 GS3- Key Applications-Excel. Copyright 2010 Teknimedia Corporation
 Study Guide PCIC 3 B2 GS3- Key Applications-Excel Copyright 2010 Teknimedia Corporation Teknimedia grants permission to any licensed owner of PCIC 3 B GS3 Key Applications-Excel to duplicate the contents
What can Word 2013 do?
 Mary Ann Wallner What can Word 2013 do? Provide the right tool for: Every aspect of document creation Desktop publishing Web publishing 2 Windows 7: Click Start Choose Microsoft Office > Microsoft Word
CounselLink Reporting. Designer
 CounselLink Reporting Designer Contents Overview... 1 Introduction to the Document Editor... 2 Create a new document:... 2 Document Templates... 3 Datasets... 3 Document Structure... 3 Layout Area... 4
Getting Started with Eric Meyer's CSS Sculptor 1.0
 Getting Started with Eric Meyer's CSS Sculptor 1.0 Eric Meyer s CSS Sculptor is a flexible, powerful tool for generating highly customized Web standards based CSS layouts. With CSS Sculptor, you can quickly
Introduction to Microsoft Word 2010
 Introduction to Microsoft Word 2010 Microsoft Word is a word processing program you can use to write letters, resumes, reports, and more. Anything you can create with a typewriter, you can create with
Introduction to Microsoft Publisher
 Introduction to Microsoft Publisher Day One Agenda: Introduction Templates Layout Inserting and Formatting Text Inserting and Formatting Pictures Practice, Questions Day Two Agenda: Review Day One Tables