A how-to guide and helpful informations about configuration and options in theme.
|
|
|
- Egbert Alvin Black
- 5 years ago
- Views:
Transcription

1 A how-to guide and helpful informations about configuration and options in theme. If you have any questions or problems with this theme please use Envato Marketplace contact form on our profile. Muffin group
2 Table of contents: 1. General info & Installation Few words on start Package from themeforest How to install & update it? Page creation Getting started Muffin Builder Page Templates Slider options Muffin Slider Revolution Slider Getting demo slider Slider management Theme options panel Getting started General Sidebars Blog Portfolio Layout General Header Social Icons Custom CSS Colors General Menus Header Content Footer Headings Shortcodes Fonts Font Family Font Size Translate General Blog & Portfolio Error Import & Export Shortcodes Adding shortcodes in content using wp-editor List of available shortcodes & how to use them Blog Portfolio
3 8. Menu creation Images SEO Support & contact with us XML file with demo content Advanced theme customization Google Chrome Firebug for Firefox

4 1. General info & Installation 1.1 Few words on start "Brandon" is the new era of builing websites. Totally new Muffin Builder, lot`s of shortcodes, Muffin Slider, Full Width Portfolio, Swipe Technology, Revolution Slider or detailed Muffin Options panel. Be sure that with our new theme you can easily customize whatever you want on page. Please also note that all those options are amazingly easy to use. 1.2 Package from themeforest At first, after purchasing this theme please download the package from Themeforest. All you need to do that, is move your mouse over your login name in right top corner (of course after you`re logged in Themeforest) and then click Download. Here you will find all the items that you have purchased. It looks exactly just as the diagram below: In the next step click the Download > Main File(s) button next to Brandon theme and save package on your computer. In the package you can find things like documentation, license, psd files, zipped file with theme files and folder with theme files called Brandon. Please unpack the whole package after downloading it from Themeforest. 4
5 1.3 How to install & update it? At first please make sure that you have unpacked the whole package shown in the last point. This is very important! You can complete installation in two different ways: 1. WordPress Theme Manager - please go to Appearance > Themes > Install Themes > Upload, select zipped theme folder called "Brandon.zip" and press Install Now button. The wordpress will do the rest for you. 2. FTP upload - upload non-zipped theme folder called Brandon to /wpcontent/themes/ folder in your WordPress installation folder on your server. In the second part of this guide we have described how to update Brandon. Please make sure that you didn`t make any changes in the files. If you have made changes and you don`t want to lose them, the best way is to use one of freeware tools for comparing files, ex. Beyond Compare (we are not the authors of this tool so please don`t ask us how to use it. Answears to how to use it can be found on their website). After comparing these files you can upload on server only the files that hasn`t been changed. If you haven`t changed any theme files, all you need to do is update your version of theme by downloading the latest package from themeforest, unpacking files and uploading new files on the server while replacing the old files. Simply overwrite them. All your data in the database are safe because after updating theme files doesn`t change anything in the database. Please however always make a backup of your files & database. 5
6 2. Page creation Creating your own page has been never so easy. To make the first step please go to Pages > Add new. On first sight everything looks just like in default wordpress. But when you have a look under Visual/HTML area you will see some Page options. 2.1 Getting started 6
7 In first Visual/HTML area you can build your page using all available options in editor. Beyond the default options we included green button called "Insert shortcode". With this option you can build any page you want based on shortcodes. All available shortcodes for this theme has been described in section Shortcodes (section 5). Please note that you can build page based not only on shortcodes. You can also use Muffin Builder (section 2.2). Below the Muffin Builder you can find some Muffin Options. Hide the content - this options will hide the content from Wordpress editor. You can turn this button on or off. If you`re using Muffin Builder for building content please turn this button off. If you won`t turn it off, the content from Wordpress editor will show above the Muffin Builder items. Layout - you can choose personal layout for each page. There is 3 options to choose: full width without sidebar, left sidebar or right sidebar. Sidebar - here you can select proper sidebar for this page (of course if in the previous option you have selected right or left sidebar). You can create your own sidebars in Appearance > Brandon > Getting started > Sidebars. Slider - you can select Muffin offer slider or one of the Revolution Slider's for page. Please also note that for each page can be different slider. Of course, before select slider you need to create it with amazing Revolution Slider (section 3). SEO Title - title for page (if you leave this field empty, page will get default settings from Theme options panel > Getting started > General) SEO Description - description for page (if you leave this field empty, page will get default settings from Theme options panel > Getting started > General) SEO Keywords - keywords for page (if you leave this field empty, page will get default settings from Theme options panel > Getting started > General) After set up all this options on right side you can also choose right Page Template (section 2.3) for this site. 2.2 Muffin Builder What about Muffin Builder? With his help web development is child's play. Page can be splitted on totally different sections where you can choose things like colors, backgrounds, layouts, sidebars, classes and much more. For each section you can add an items that you need. Now with the new Muffin Builder you can also do things like clone sections or items so building websites is much faster and easier. You will love it! 7
8 To add item inside section please click Add item button. After that you will see the right Item already added below. You can do few things with this added Item. Expand Item to 1/4, 1/3, 1/2, 2/3, 3/4, 1/1 by using "+" button in the Item. The same way you can shorten this Item using "-" button. Please note that not all Items working with all sizes. You can delete Item/Section if you don`t need it by in right Item corner. You can edit each Item/Section by click on "pencil" in right bottom corner in the Item. You can clone each Item/Section by click on "clone" in right bottom corner in the Item. You can also move any Item/Section by drag & drop. Please remember that Muffin Builder is working only with Default template. You can choose one of below items: a) Accordion & FAQ This Item is adding Vertical tabs on page. You can add as many tabs as you need, just type Title and Content for each tab. You can also use Drag&Drop option to set the order for items. Available sizes: '1/4', '1/3', '1/2', '2/3', '3/4', '1/1' Attributes: this item similar to Tabs Item doesn`t have attributes like other Items. Instead of you can add new tabs by clicking "Add tab" and delete them by clicking. 8
9 Preview: b) Blockquote This Item is creating Blockquote box with photo and some content. Available sizes: '1/4', '1/3', '1/2', '2/3', '3/4', '1/1' Attributes: Content (text your own content for blockquote Item. Here you can use html tags) 9
10 Photo (set photo for author) Author (author of this blockquote) Company (autohor's company) Link (link to author's page) Open in new window (choose if you want to open link in the new window or not) Preview: c) Call to action This item can create nice Call to action item. Available sizes: '1/4', '1/3', '1/2', '2/3', '3/4', '1/1' Attributes: Image (upload background image for item) Text (type own text for this item) Button title (title for button) Button link (link for button) 10

11 Class (useful option when you want to open link in fancybox) Preview: d) Code This Item can be used for present code. Also it convert all html tags into html special chars. Available sizes: '1/4', '1/3', '1/2', '2/3', '3/4', '1/1' Attributes: Content (add your own code here) Preview: 11
12 e) Column This Item is creating your own column. Think about what you want to be here and just do it. Available sizes: '1/4', '1/3', '1/2', '2/3', '3/4', '1/1' Attributes: Title (visible only via admin panel - item label) Column content (this is the only attribute for this Item, feel free to use html tags and shortcodes in this section) 12
13 f) Contact box This Item is creating contact box. You can set up in this box few ways to contact with you. Available sizes: '1/4', '1/3', '1/2', '2/3', '3/4', '1/1' Attributes: Title (contact box title) Google Maps Lat (Latitude value for Google Map) Google Maps Lng (Longitude value for Google Map) Zoom (zoom value for Google Map) Address (set up your address, html tags are also allowed for this field) Telephone (telephone number) ( address) WWW (website url) 13
14 Left Button title (title for left button) Left Button link (link for left button) Right Button title (title for right button) Right Button link (link for right button) Preview: g) Content Adding this item will show Content from Wordpress Editor above Page Options. You can use it only once time per page. Please also remember to turn off "Show The Content" option. Available sizes: '1/4', '1/3', '1/2', '2/3', '3/4', '1/1' h) Divider This item is creating space between elements. It is also aligning for a single line, boxes located underneath. 14
15 Available sizes: '1/1' Attributes: Divider height (enter the amount of the divider height) Show line (choose if you want to show horizontal line as a divider) i) Fancy heading This item is creating great Heading. You can set up background, icon and much more. Available sizes: '1/1' Attributes: Title (title for heading) Content (content which you would like to have inside heading) Icon (icon for heading) Preview: 15
16 j) FAQ With this item you can create own FAQ page. You can also use Drag&Drop option to set the order for items. Available sizes: '1/4', '1/3', '1/2', '2/3', '3/4', '1/1' Attributes: Add tab (just add your own tabs for FAQ item) Open First (turn it on if you want to have first accordion item opened) 16
17 Preview: k) Feature box 17
 Image (upload image for feature box item) Image Animation (choose animation for image) Content (text for")
18 With this item you can create awesome Feature box item. Available sizes: '1/4', '1/3', '1/2' Attributes: Title (title for icon feature box item) Image (upload image for feature box item) Image Animation (choose animation for image) Content (text for feature box item) Button text (text for feature box button) Link (type link for feature box item) Open in new window (choose if you would like to open item in new window or not) Show border (choose if you want to show border for feature box item) Preview: 18
19 l) Image This item is very useful option for embedding images into page. Available sizes: '1/4', '1/3', '1/2', '2/3', '3/4', '1/1' Attributes: Image (here you can choose your own image) Alternate text (alt text for image) Caption (short text under image) Zoomed image (here you can choose your image to be opened after click) Link (if you don`t want to open image after click, you can type your own link for this image) 19
 Content")
20 m) Info Box This item is very useful if you want to get box with some info. Available sizes: '1/4', '1/3', '1/2', '2/3', '3/4', '1/1' Attributes: Title (title for Info Box item) Content (content for Info Box item) Preview: 20
 Category (category for Latest posts item)")
21 n) Latest posts This item is very useful if you want to get box with some info. Available sizes: '1/4', '1/3', '1/2' Attributes: Posts Title (title for Lates posts item) Category (category for Latest posts item) Link (link to page) Link title (title for link) Preview: 21
 Google Maps Lng (type right Lng value for your position) Height (height")
22 o) Map This Item will create the Google map. Map item is based on Google Maps API. Available sizes: '1/4', '1/3', '1/2', '2/3', '3/4', '1/1' Attributes: Google Maps Lat (type right Lat value for your position) Google Maps Lng (type right Lng value for your position) Height (height of the map) Zoom (zoom of the map) The map will appear only if Google Maps Lat and Google Maps Lng are filled correctly. Preview: 22

23 o) Offer This Item create amazing Offer section where you can put icons, text, images, videos and anything else what you can imagine. This Item have no attributes because all things for this section can be set up in WP Dashboard > Offer section. Available sizes: '1/1' Preview: 23
24 p) Our team This Item will create the single Our team profile. Show your team using this item. Available sizes: '1/4', '1/3' Attributes: Photo (choose photo for one of your our team's profile) Title (title for one of your our team's profile) Subtitle (subtitle for one of your our team's profile) Phone (phone number for one of your our team's profile) ( for one of your our team's profile) Facebook (facebook link with for one of your our team's profile) Twitter (twitter link with for one of your our team's profile) LinkedIn (LinkedIn link with for one of your our team's profile) You can create as many profiles for your people as you need. 24

25 Preview: r) Pricing item This Item will create amazing Pricing item. Available sizes: '1/4', '1/3', '1/2', '2/3', '3/4', '1/1' 25
26 Attributes: Title (pricing item title) Price (enter your price) Currency (enter your currency) Period (enter period for pricing table) Content (enter item content) Link title (enter link title, this link title will appear only if this field is filled) Link (enter link, this link will appear only if this field is filled) Featured (choose if you want to make this item featured or not) Preview: s) Progress bars This Item will create Progress bar. You can add as many you want. 26
 Preview: t) Quick Fact This Item will create nice box with some info.")
27 Available sizes: '1/4', '1/3', '1/2', '2/3', '3/4', '1/1' Add your own tabs by clicking "Add tab" button. You can add as many tabs as you need. Attributes: Title Content (type here as many bars you like, the shortcode for progress bar is [bar title="photoshop" value="80"]) Preview: t) Quick Fact This Item will create nice box with some info. You can add as many you want. Available sizes: '1/4', '1/3', '1/2', '2/3', '3/4', '1/1' Attributes: Number (type number for Quick Fact item) Title (title for Quick Fact item) Content (content for Quick Fact item) Show border (choose if you want to show right, dashed border) 27
28 Preview: u) Quick Form Create short form on homepage with any fields you want for quick contact way. Available sizes: '1/1' Attributes: Title (title for Quick Form item) Contact Form Shortcode (get shortcode for form from Contact Form 7 plugin section) Preview: 28
29 v) Tabs This Item will create Tabs. You can add as many tabs as you want. Available sizes: '1/4', '1/3', '1/2', '2/3', '3/4', '1/1' Add your own tabs by clicking "Add tab" button. You can add as many tabs as you need. Attributes: Title (tabs title) Content (tabs content) Preview: 29
 Order by (choose how to order testimonials - Title, Menu order or Date) Order")
30 w) Testimonials This Item will create Testomonials slider. Testimonials for this section, you can add in Testimonials > Add new section. Available sizes: '1/4', '1/3', '1/2' Attributes: Category (choose form which category you want to show testimonials) Order by (choose how to order testimonials - Title, Menu order or Date) Order (choose if you want to order Ascending or Descending) Preview: 30
31 x) Timeline This Item will create Timline section and you can use it for anything you need. Inside it works just like Tabs or Accordion. Just Add tab and add any content you want inside. Available sizes: '1/1' Attributes: Title (title for timeline item) Content (text for timeline content section) 31
32 Preview: y) Vimeo This item is very useful option for embedding Vimeo videos into page. Available sizes: '1/4', '1/3', '1/2', '2/3', '3/4', '1/1' 32
33 Attributes: Vimeo video ID - vimeo video`s ID. This value is placed at the end of every vimeo video after last "/", for example: Width - player`s width, 700 is highly recommended for left or right sidebar template while 950 for a default one. Height - video player`s height z) Youtube This item is very useful option for embedding Youtube videos into page. Available sizes: '1/4', '1/3', '1/2', '2/3', '3/4', '1/1' Attributes: YouTube video ID - youtube video`s ID. This value is placed at the end of every video after "v=" parameter, for example: width - player`s width, 700 is highly recommended for left or right sidebar template while 950 for a default one. height - video player`s height 33
34 NEW SPECIAL ITEM!!! SECTION This is totally new item which gives you lot`s of possibilities with creating pages. Now you can split each page, post or portfolio item for sections. Section is a part of page and can have own settings. Please take a look on image below to see what you can do: Attributes: Background Image (you can upload image/pattern for background section) Background Image position (choose position for background image) Background Color (you can choose color for background) Layout (you can choose if you want section with sidebar or not - each section can have own sidebar what is really amazing and people loves it) Sidebar (choose sidebar for section) Padding Top (you can add top padding for section if you want) Padding Bottom (you can add bottom padding for section if you want) Custom CSS classes (you can type own class for section - this is really great option for all those who want to get special style for section). For example you can add here my-own-super-section class and then you can go to Theme options > Layout > Custom CSS and write there own styles for this class:.my-own-super-section { margin: 30px; padding: 20px; font-size: 15px; etc... } 34
35 This is just example of what you can do so please do not use above css :) If you want to use multiple classes then please separate them with SPACE. We have one built-in class for this section which is named dark and you can use it if you want to get dark background. 2.3 Page Templates Template has several specially designed Page Templates, which can be used on Pages, adding them special features. Archives This template can automatically create list, that contain Available Pages, Latest Posts, Archives by Subjects and Archives by Months. Portfolio This template let you to add Portfolio for website. You can see these entries in section Portfolio > Portfolio. Sitemap This template let you to create simple sitemap. 35
36 3. Slider options 3.1 Muffin Slider Muffin Slider is simple slider made by our team and is dedicated for all those who want to make easy slides within very short time. Slider is built on swipe technology so it works on all mobile devices and is fully responsive. To create slides for muffin slider please go to Muffin Slider > Add new section in main menu on the left side in WP Dashboard. Each slide have some Slide Options what you can see on image below: Title - main title for slide (you can use HTML tags here) Text - text placed under main title (you can use HTML also) Button text - if you want to have button for slide you can type button text here Button link - link for button (please start link always with Dark background - if you uploaded dark background/featured image please turn this button on so you can have white text. Featured image - this option is not visible in Slide options section because it is default WordPress option and this option is next to Slide options section. This option is for slide image. Just click on Set featured image button and choose your own image for slide. Just really easy :) If you want to set up this slider for specific page, then you can do it in Page options section when you edit/create page. Inside this section you have "Slider" option and all you need to do is select - Muffin Slider - option. This is everything. 36

37 All data (images, texts, etc...) for this slider comes with xml file and can be downloaded from We have one additional option for this slider and you can find it in Theme options > Getting started > Sliders section. There is option for Muffin Slider timeout. 3.2 Revolution Slider Getting demo slider In package downloaded from Themeforest you can find slider-demo folder that has included uploads folder and slider1.txt file. In first step please upload content from uploads folder to your wp-content/uploads folder. In next step you need to go to Revolution Slider, click button "Create new slider" and fill below fields: Slider Title: Slider 1 Slider Alias: slide1 In next step please click "Create Slider" button. On the list of available sliders, click on slider that you already created and in the bottom section you will see "Show Export / Import" link. After that you will get field to select file. You need to choose slider1.txt file in this step and click "Import Slider" button. 37
38 3.2.2 Slider management After pressing the "Create New Slider" button you will reach a form where you are asked to enter a Slider Title (used for the Slider overview in this backend) and a Slider Alias (a slug that is used to implement the Slider in your WP later, so keep it simple with no spaces and special chars). You are also prompted to enter the Sliders Basic Settings, a Slider Title (for you to remember the Slider by) and a Slider Alias (please do not use special characters or spaces here, this defines the shortcode for you to use in your content). The options in the boxes on the right side (General Settings, Position, Appearance, Navigation, Thumbnails) have helping Tooltips on mouseover so they are not explained here. The Slider Type can be fixed (not responsive, fix dimensions), responsive (changes depending on the size of its max. sizes given later in relation to the screen size) or fullwidth (always 100% in width of the screen size, but height keeping the aspect ratio). The Sizes section is needed to fit the slider in all screen sizes needed. The height of the slider will always be calculated to keep the aspect ratio from the max width and height given in the Slider Size line. The next step is creating/editing slides. You get there by just clicking on "Edit Slides" in the Slider Form window. Just press "New Slide" and the native WP Media Upload dialog window will appear. Choose or Upload the slide's background image, choose "Full Size" and then "Insert Into Post" (all like you are used to it in your WP editor). You can always click on the pic to change it. Use the arrow handles on the right side to change the slides position in the slider (top to bottom = first to last slide to be shown) or delete it with the "Delete" button. The "Edit Slide" leads you to the next chapter "Slide". In the "Edit Slide" view you see the heart of our plugin. The drag&drop Caption editor. But first please note that you have another chance here to change the background image with the "Change Image" button. To create a Layer (Caption, Image or Video) press the button "Add Layer" or "Add Layer: Image". In case of a text layer a basic layer will be created you can use the "Text" field in the Layer Params to change the caption on it. The "Style" selectbox shows some basic styles (CSS classes) you can use to style the caption (you can always add own CSS classes to this field or edit the existing ones via the "Edit CSS File"). In case of an Image Layer you will see the native WP Media Uploader again. In case of a Video Layer you will prompted to a custom Video selection wizard. 38
39 You now can move the Layers around via drag&drop or type in the x and y coordinate in the corresponding fields. The "Layers Sorting" drag&drop list determines the Layers' z-index. This list specifies the stack order of an element. An element with greater stack order is always in front of an element with a lower stack order. Please also note that slider is a plugin and whole documentation for this item you can find in documentation/revolution-slider-documentation folder in package downloaded from themeforest. Remember: please set up chmod on 777 on below folders to show slider thumbnails and for possibility to edit CSS styles for slider in admin panel. wp-content/plugins/revslider/cache wp-content/plugins/revslider/rs-plugin/css NOTE! In default Revolution Slider version included into theme you will get all our styles for plugin. After update plugin to newer version, please do not forget to copy slider styles from /revolution-slider-demo/captions.css (this folder is included into TF package) to /wp-content/plugins/revslider/rs-plugin/css/captions.css 39

40 4. Theme options panel Theme options panel has been especially created to make your work faster and easier. Using it is very easy and in just a few minutes you can change a lot of things on your page. 4.1 Getting started General In this section you can set up some general options for your site. You can find here things like Google Analytics, Responsive version, etc. Please check below options available in this section: Responsive - choose if you want to use responsive version or not. Use built-in SEO fields - if you are using external SEO plugin you can easily turn off built-in SEO option. Meta Description - this is meta description for homepage but it`s also default description for each page added in Pages section. Meta Keywords - this is meta keywords for homepage but it`s also default keywords for each page added in Pages section. Google Analytics - paste your Google Analytics code to track your site. 40

41 4.1.2 Sidebars This is default option for pages and posts. Here you can set whether your post or page should have full width or maybe include a sidebar (left or right). For example when you choose Left sidebar each of your pages or post that you will create will have left sidebar. Of course, this is only default option and while creating page or post you can set up your own layout. You can also manage your Sidebars here. You can add new and delete existing one. Please always remember to click "Save Changes" button. Without that you will lose all your changes. 41

42 4.1.3 Blog Here you can find some options for blog page. This is of course a default option for new pages. You have got the following options for blog: Posts per page - you can select how many posts should be on page. Layout - choose layout for blog that you like the most. Show Categories - this option will show categories on posts list and single post when it is on. Show Comments - this option will show comments number on posts list and single post when it is on. Show Date - this option will show date on posts list and single post when it is on. Show Tags - this option will show tags on posts list and single post when it is on. 42

43 Read more - text for "Read more" link All pages in pagination- here you can choose if you want to show all of the pages insted of a short list of the pages near the current page. All of this options except Posts per page can be changed for each post. Please always remember to click "Save Changes" button. Without that you will lose all your changes Portfolio This option will certainly be very helpful in creating your portfolio page. Here you can set the following options: Posts per page - this is the number of portfolio posts per page. Layout - you can choose what layout will be the best for your portfolio (one, two, three or four colums) 43
44 Portfolio page - here you can select the right page for portfolio from list of all created pages. You need to choose a page for that because the theme applies info such a layout, sidebar and link to page in breadcrumbs. Single item slug - this is a link to single item. After changing that option please go to "Settings > Permalinks" and click "Save changes" button. Order by - you can select what should be used to sort your portfolio. Order - you can choose how your portfolio should be ordered (ascending or descending). jquery filtering - you can choose if you want to filter portfolio items using jquery plugin to make your portfolio look much better. Please always remember to click "Save Changes" button. Without that you will lose all your changes. 44

45 4.2 Layout In this section you can set up some layout options such as social icons or logo General This section is created for header. Here you can set up some options like: Use 960px grid - turn it on if you want 960px grid Layout - choose boxed or full width layout. Background Image - set up own background image Background Image position - choose position for your background image Custom Favicon - upload your own favicon 45

46 Footer Copyright Text - if you want to get your own copyright text then please type it here. Please always remember to click "Save Changes" button. Without that you will lose all your changes Header Here you can set up some options for logos, header and much more. Below we will describe all of them. Sticky Header - turn on/off sticky header Custom Logo - choose your custom logo image Retina Logo - choose your retina logo image (should be 2x larger than Custom Logo) Header Contact Text - text in header next to phone and Header Phone number - type phone number for Header Header - type for Header Vertical Slider - Timeout - time in miliseconds between slide transitions 46

47 Please always remember to click "Save Changes" button. Without that you will lose all your changes Social Icons Here you can set up some options for social icons. Below we will describe all of them. Facebook - link to your facebook profile Google + - link to your Google + profile Twitter - link to your twitter profile 47

48 Vimeo - link to your vimeo profile YouTube - link to your youtube profile Flickr - link to your flickr profile LinkedIn - link to your LinkedIn profile Pinterest - link to your Pinterest profile Dribbble - link to your Dribbble profile If you leave empty field for social icons like facebook, twitter etc. the icons will be not shown on the page. Please always remember to click "Save Changes" button. Without that you will lose all your changes Custom CSS Here you can find only one field called "Custom CSS". You can paste here your own css code for your page. Of a this field you don`t need to make any changes in css files. Please always remember to click "Save Changes" button. Without that you will lose all your changes. 48

49 4.3 Colors This is probably the most powerful options section in theme options panel. Here you can set up any color for each part of your page. Just check how many options you can set up in our color section General Only two options are available in this section. Theme skin - here you can choose one of the predefined styles or you can set your own colors. Please remeber that color options can be used only with the Custom Skin. Body background - choose color for your background Please always remember to click "Save Changes" button. Without that you will lose all your changes. 49
50 4.3.2 Menus Menu background - backround color for menu section Menu Link color - color for links in menu Menu Hover Link background - hover background color for links in menu Menu Hover Link color - hover color for links in menu Submenu background - backround color for submenu Submenu Link color - link color for submenu Submenu Hover Link color - link color for submenu on hover Widget Muffin Menu Link color - link color for muffin menu widget Widget Muffin Menu Hover Link color - link color for muffin menu widget on hover Please always remember to click "Save Changes" button. Without that you will lose all your changes. 50
51 4.3.3 Header Addons text color - text color for addons Social Icon background - background color for social icons Social Icon color - color for social icons Social Icon Hover color - color for social icons on hover Subheader background - background color for subheader section Page Title color - title color for page Breadcrumbs color - font color for breadcrumbs Vertical Slider Pager - color for vertical slider pager Vertical Slider Active Pager - color for vertical slider active pager Please always remember to click "Save Changes" button. Without that you will lose all your changes. 51

52 4.3.4 Content Text color - text color for content Link color - text color for links Link Hover color - hover color for links Note color - color for note Bold Note color - color for bold note Highlight background - background color for highlight text 52

53 Highlight text color - font color for highlight text Button background - background color for button Button text color - text color for buttons Submit Button background - backround color for submit button Submit Button color - color for submit button Photo border - border color for images Please always remember to click "Save Changes" button. Without that you will lose all your changes Footer Border Top - color for shaded line above the footer Text color - text color for footer Link color - link color for footer 53

54 Link Hover color - link color for footer on hover Heading color - heading color for footer Widget Title color - title color for widgets in footer Icon color - color for icons in footer Note color - color for note in footer Photo border - bor color for images in footer Please always remember to click "Save Changes" button. Without that you will lose all your changes Headings Heading H1 color - text color for h1 (Subpages header title font color) Heading H2 color - text color for h2 Heading H3 color - text color for h3 Heading H4 color - text color for h4 Heading H5 color - text color for h5 Heading H6 color - text color for h6 54
55 Please always remember to click "Save Changes" button. Without that you will lose all your changes. 55
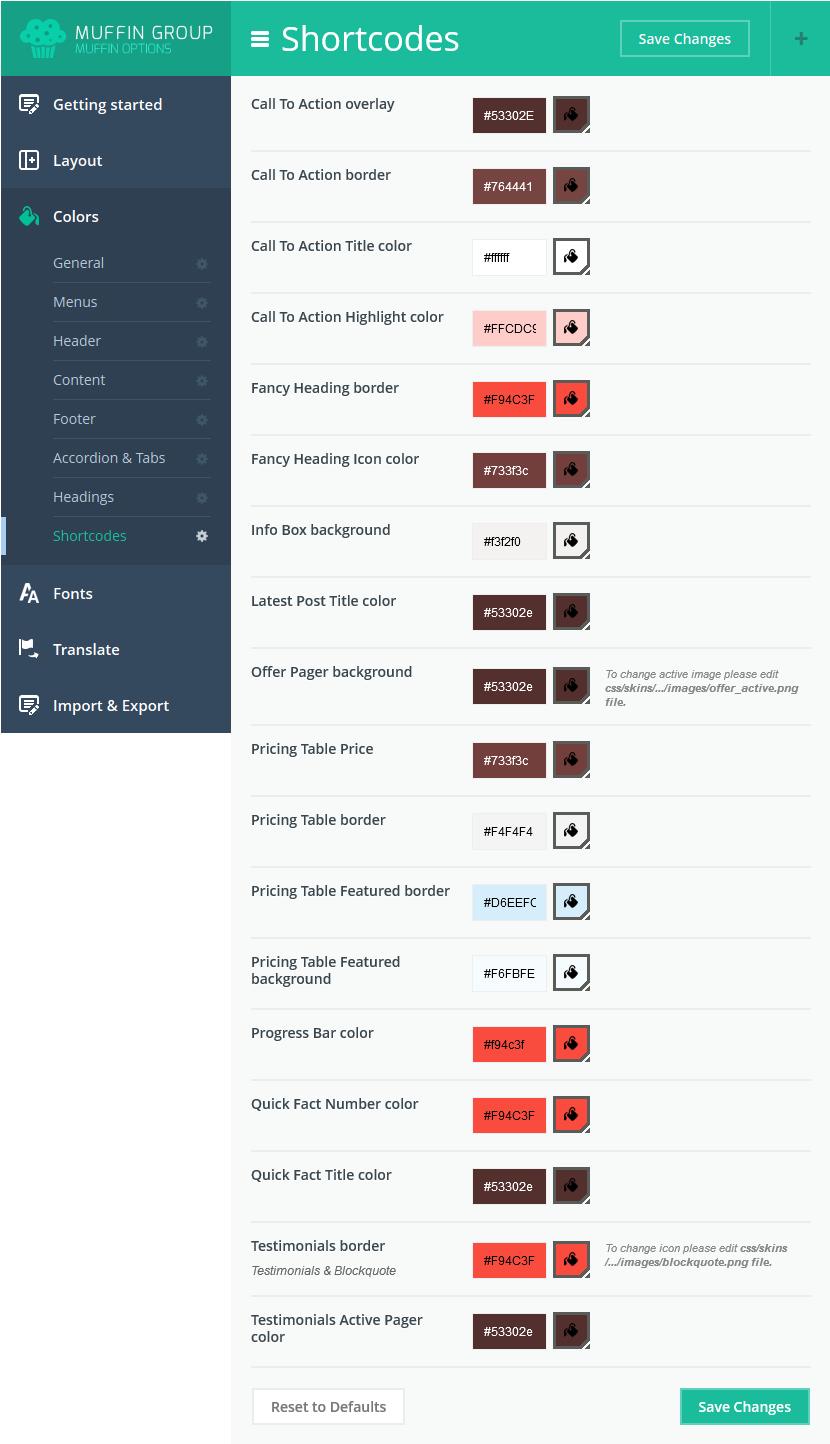
56 4.3.8 Shortcodes 56
57 Call to action overlay - overlay color for call to action item Call to action border - border color for call to action item Call to action title color - title color for call to action item Call to action highlight color - highlight color for call to action item Fancy heading border - border color for fancy heading item Fancy heading Icon color - icon color for fancy heading item Info Box background - background color for info box item Latest Post Title color - title color for latest post item Offer Pager background - background color for pager in offer item Pricing Table Price - price color for pricing item Pricing Table border - border color for pricing item Pricing Table Featured border - border color for featured pricing item Pricing Table Featured background - background color for featured pricing item Progress Bar color - color for progress bar item Quick Fact Number color - number color for quick fact item Quick Fact Title color - title color for quick fact item Testimonials border - border color for testimonials item Testimonials Active Pager color - color for active pager for testimonials item Please always remember to click "Save Changes" button. Without that you will lose all your changes. 57

58 4.4 Fonts In this section you can set up fonts for your website. We divided this section on four blocks what you can see below Font Family Content Font - this font will be used for all theme texts except headings and menu Main Menu Font - this font will be used for header menu Headings Font - this font will be used for all headings Google Font Subset - you can specify which subsets should be downloaded. Multiple subsets should be separated with coma (,) You can choose your own font from a palette of over 600 fonts. 58

59 4.4.2 Font Size Content - this font size will be used for all theme texts Main menu - this font will be used for top menu only Heading H1 - this font will be used for h1 headings Heading H2 - this font will be used for h2 headings Heading H3 - this font will be used for h3 headings Heading H4 - this font will be used for h4 headings Heading H5 - this font will be used for h5 headings Heading H6 - this font will be used for h6 headings You can select the font size of the range

60 4.5 Translate Translating the most important sections on the page has never been so easy General It depends how you want translate your theme. If you don`t want to translate using.mo and.po files you can do it easily in this section. Enable Translate - you can turn it off if you want to use.mo/.po files for more complex translation. Search Placeholder - here you can set up placeholder text for Header and Widget Search Home - here you can set up breadcrumbs text 60

61 4.5.2 Blog & Portfolio 61

62 This is area where you can set up some texts for your portfolio and blog page. Comment - text to display when is only one comment Comments - text to display when is more than one comment Comments off - text to display when comments are disabled Previous post - text on single blog page Next post - text on single blog page Select category - text available on portfolio page All - text available on portfolio page Project details - text available on single portfolio page Category - text available on blog & single portfolio page Client - text available on single portfolio page Date - text available on single portfolio page Task - text available on single portfolio page Website - text available on single portfolio page Visit online - text available on single portfolio page Error 404 Now your Error 404 page is 100% configurable. You can set up here below options: Title - this is title for error 404 page Subtitle - this is subtitle for error 404 page Text - text message for error 404 page Button - this is text for button on error 404 page 62

63 For each fields you can set up your own text. 4.6 Import & Export This section is especially for all those who want to move settings from theme options panel between themes or when you move your website from test server to live. You have few different ways to import or export settings what you can see on image below: You can also Reset settings from this section to default if you want so your theme will look like on our demo version. 5. Shortcodes As you know, shortcodes are really useful in creating pages, and they accelerate your work. That`s the main reason why have created them. Below you`ll learn how to use them in the "Brandon" theme. There is a lot of them and they are easy to use. 5.1 Adding shortcodes in content using wp-editor You can use shortcodes directly in WP editor. Just click on green circle button with plus inside. After that you`ll see whole list of shortcodes. After select right shortcode and click "Insert", the shortcode will be inserted into editor. 63
 title (title for button) target (optional target for link, ex.")
64 5.2 List of available shortcodes & how to use them 1) Buttons - as name indicates, these are the buttons to use on pages. Attributes for buttons are: link (link to other page) title (title for button) target (optional target for link, ex. "_blank") size (optional size of button - "normal" is default, you can also choose "small" or "large") color (color for text - as in background color you can use name of color, ex. "white" or hex ex."#ffffff") class this option is useful when you want to use prettyphoto Below you can see the example of buttons shortcode: [button link=" target="_blank" title="muffin group" size="large" color="orange" class="iframe"] Preview: For more info and demo please go to buttons shortcode demo 2) Divider - This item is creating space between elements. It is also aligning for a single line, boxes located underneath. Divider shortcode has got 2 attributes: height - enter the amount of the divider height (in px) line - type 1 if you want to show line, 0 if you don`t want Example of this shortcode below: [divider height="30" line="1"] For more info and demo please go to divider shortcode demo 64
65 3) Ico - this is a very useful option for embedding icons into page. This option has got just one atrribute: type (type of icon) Below you can see some examples of this shortcode: [ico type="fa-phone"] [ico type="fa-flickr"] For more info and demo please go to ico shortcode demo 4) Image - this is a very useful option for embedding images into page. This option has got a long list of available atrributes: src (url to image) align (optional alignment for image) - available values: none (default), left, right,center caption (optional) - text available under the image link (optional) - link for larger image or other page link_type (optional) - type of link can be choosen from 2 values available: target (optional, works only with "details" link_type) - link target, available value: "_blank" (open in new window) alt (optional) - alternative text for image Below you can see some examples of this shortcode: [image src="" link="" align="left" caption="align left with caption and lightbox"] [image src="" link="" link_type="details" target="_blank" align="right" caption="align right with caption <br /> and link to details <br /> open in new window"] [image src="" align="center"] For more info and demo please go to image shortcode demo 5) Lists - great tool when you want to present something within the list. We prepared 11 types of lists. Below you can check all of them: Unordered bullet list 65
66 <ul class="list"> <li>list item 1</li> <li>list item 2</li> </ul> Ordered list <ol class="list"> <li>list item 1</li> <li>list item 2</li> </ol> Roman ordered list <ol class="list list_roman"> <li>list item 1</li> <li>list item 2</li> </ol> Alpha ordered list <ol class="list list_alpha"> <li>list item 1</li> <li>list item 2</li> </ol> Unordered tick list <ul class="list list_tick"> <li>list item 1</li> <li>list item 2</li> </ul> Unordered info list 66
67 <ul class="list list_info"> <li>list item 1</li> <li>list item 2</li> </ul> Unordered warning list <ul class="list list_warning"> <li>list item 1</li> <li>list item 2</li> </ul> Unordered plus list <ul class="list list_plus"> <li>list item 1</li> <li>list item 2</li> </ul> Unordered minus list <ul class="list list_minus"> <li>list item 1</li> <li>list item 2</li> </ul> Unordered arrow list <ul class="list list_arrow"> <li>list item 1</li> <li>list item 2</li> </ul> Unordered help list 67
68 <ul class="list list_help"> <li>list item 1</li> <li>list item 2</li> </ul> As you can see, all of these lists have only a different kind of class. So if you want to change type of the list, you can easily do so by just changing the name of class.. For more info and demo please go to lists shortcode demo 6) Vimeo - this shortcode is for embadding vimeo videos on your page. Vimeo video shortcode has got 3 attributes: video - vimeo video`s ID. This value is placed at the end of every vimeo video after last "/", for example: width - player`s width, 700 is highly recommended for left or right sidebar template while 950 for a default one. height - video player`s height Example of this shortcode below: [vimeo video=" " width="700" height="400"] For more info and demo please go to video shortcode demo 7) Youtube - this shortcode is for embadding youtube videos on your page. Youtube video shortcode have got 3 attributes: video - youtube video`s ID. This value is placed at the end of every video after "v=" parameter, for example: width - player`s width, 700 is highly recommended for left or right sidebar template while 950 for a default one. height - video player`s height Example of this shortcode below: [youtube video="ye7vzlltp-4" width="700" height="420"] For more info and demo please go to video shortcode demo 68
69 6. Blog To create a blog please create a new page Pages > Add New and set up the title eg. Blog. In field Template leave default option on Default Template. In bottom section you will find Page options such as Layout and Sidebar. As you probably have guessed, you can choose whether your blog should be on full width or whether you want it with the sidebar (left or right). If you want blog with the sidebar you should also select the right sidebar for your page. You can also add video for each post. In section Post option, uder the Visual/HTML default editor you have some options to set. In this section you can set up Vimeo or Youtube video. At the end please click Publish button on the right. In the next step please go to Settings > Reading > Front page displays > A static page > Posts page, select page that you have already created and click Save changes. We have created some features specifically for bloggers. You will find them in Theme options panel > Getting started > Blog. These options are set on default for each new post. Full description of options for blog can be found in section Theme Options (section 4.1.3) Adding new posts works similar to standard WordPress Posts > Add New. Posts will be displayed on the already created page. Images for posts we can add using featured image. For more info about post creation please go to You can also check the movie about how to create a post 7. Portfolio To create a portfolio please start by creating a new page Pages > Add New and setting up the title eg. Portfolio. In field Template set the option Portfolio template. In the bottom section you also have Page options such as Layout and Sidebar. As you have probably guessed, you can select whether your portfolio should be in full width or whether it should be with a sidebar (left or right). If you decide on the portfolio with a sidebar you should also select the right sidebar for your page. In Portfolio section you can also add videos from Vimeo or Youtube for each portfolio item. Please don`t forget set up featured image for portfolio item when you are adding video. We have created some options for Portfolio page. You can find them in Theme options panel > Getting started > Portfolio. More info about these options can be found in Theme options panel (section 4.1.4). Porfolio items are working just like typical post. To add a new portfolio please go to Portfolio > Add new. As you can see you choose similiar options as for a blog. Additionally, in the bottom section of the page you have Page options. Here you can choose whether you want a full width portfolio or the one with a sidebar (left or right). 69
70 When you choose the option with a sidebar please don`t forget to select the right sidebar for this page. You can also type Excerpt and select Featured image. After that please just click Publish button. 8. Menu creation Menu creation works as in default Wordpress. To add your own menus go to Appearance > Menus, type Name for your menu and click Create Menu. In next step, in section Theme Locations for position Main menu you need to choose a menu that you ve just created. Now you can add Pages, Posts and Custom Links from blocks located on the left. At the end you need to save it by clicking on Save Menu. For more info about the menu creation please go to With this theme we also created Mega Menu option so you can create nice menus with items in columns with titles or without. If you want to create mega menu as we did for "Shortcodes" section on our demo, then it should be done as on below image: 70

71 For mega menu columns you must add menu item with # "URL" attribute and - as "Navigation label" value. Under this empty columns you can add right menu items. But if you want columns with "Titles" at the top, then instead of - you must type own value. 9. Images For this theme we used some images & icons available on the web. List of used images you can find below: Portfolio & Gallery Contact 71
72 / Blog Team & Testimonials Call to action / SEO In the era of what is happening in the search engines (especially Google) we implemented SEO option in our theme. We hope this will be very helpful for all of you. To set up general options for SEO please go to Theme options panel > Getting started > General. You can set up here things like Meta Description or Meta Keywords for homepage (this is also default option for each new page). If you are using external SEO plugin you can easily turn it off. Of course you can also set up options like Title, Meta Description and Meta Keywords for each page in this theme. You can do it in Pages > Add page > Page options. In section Page Options you can find fields like SEO Title, SEO Description and SEO Keywords. If you fill these fields, the page will adopt this values. If you leave this fields empty, the page will adopt default values that are in Theme options panel > Getting started > General. 11. Support & contact with us You can contact us in few ways. It depends on what you exactly need. If you have got a questions about theme, please place your question on forum Please note that we won`t answear support question in comments or s - we prefer to provide you with support on forum because your question can be helpful to other customers. 72
 you can contact us by using contact form on our profile`s page on")
73 Via comments you can send only presale questions or comment that is not related to support. If you have a really big problem and really need to give us access to your account (that is personal and can only be used by support) you can contact us by using contact form on our profile`s page on Themeforest - in right bottom section of page. There is no other way contact with us. So please don`t contact us by sending message on youtube, facebook or twitter - because it`s really difficult for us to control, your question could be lost in these communication channels. 12. XML file with demo content To download the XML file with demo content please at first go to page: In next step please select a product for which you need xml file (in this case please choose Brandon). Please also paste your themeforest username and purchase code. Afterwards simply click "Download" and your file should start downloading. When you get this file onto your computer, you can import it into your wordpress (please import this file only after installing Brandon theme). This video ( will show you how to import this file properly. 73

74 13. Advanced theme customization Sometimes there is a moment when you want to change something on your site that is not available in theme options panel. Something like: font size, color, margin or any other customization. You don`t have to ask us about all these things and wait for our response ever again. You can succeed in doing it on your own Google Chrome To do it you can use two best tools available for free in your web browser. If you`re using Google Chrome you can inspect element that you need to change by "Inspect element". To do it just hover mouse on element and click "Inspect element". After that you`ll see something like on screen below: As you can see on the image, on the left side there is a list of styles used for each class/id. If you want to change something, you can edit it on the screen and see how the elements look like. If everything is good and you want to make the same changes on your site please copy right styles from box of right side, for example: 74

75 #weekly-features.inner-border { } height: 80px; padding: 20px; and paste this code into: Theme options > Styles > Custom CSS code. If you want to paste this code instead of Custom CSS code you can do it in custom.css file. The result will be identical. It`s up to you to decide on which way to use Firebug for Firefox Apart from Google Chrome, we also suggest to use Firebug for Firefox. In contrast to Google Chrome, Firebug must be installed at first before you can use it. To do so please click Firefox in the left top corner > Add-ons and then search for Firebug and install it. When you get it into your browser you can use it the same way as with Google Chrome but instead of clicking "Inspect element" please click "Inspect element with Firebug". On the screen below you can see that it will look very similar to Inspect element in Google Chrome. 75
Kinetika. Help Guide
 Kinetika Help Guide 1 Hope you enjoy Kinetika theme! 3 Table of Contents Important Links 6 Theme Options - Setting Up Logo 26 Cover Photos 44 Applying Revolution Slider Slides 71 Important Notes 7 Logo
DOCUMENTATION OLAM WORDPRESS THEME
 DOCUMENTATION OLAM WORDPRESS THEME INDEX Theme installation 2 Setting up website 3 Sidebars & widgets 5 Working with EDD 8 Working with Unyson 8 Content Elements 9 Media elements 9 Olam elements 10 Creating
ifeature Pro Documentation for ifeature v1.1.2 (last updated 5/04/2011)
") 1 ifeature Pro Documentation for ifeature v1.1.2 (last updated 5/04/2011) TABLE OF CONTENTS: if Topic Page(s) Installing ifeature Pro 2 Updating ifeature Pro 3 Using the Menu 4 ifeature Pro Layout Templates
1 ifeature Pro Documentation for ifeature v1.1.2 (last updated 5/04/2011) TABLE OF CONTENTS: if Topic Page(s) Installing ifeature Pro 2 Updating ifeature Pro 3 Using the Menu 4 ifeature Pro Layout Templates
USER GUIDE AND THEME SETUP
 Thank you for purchasing my theme. If you have any questions that are beyond the scope of this help file, please feel free ask any questions on the online Support Forum, located at: http://themewich.com/forum.
Rocket Theme. User Guide
 Rocket Theme User Guide This user guide explains all main features and tricks of multifunctional Rocket WordPress Theme. This information will make your work with the theme even easier and more effective.
Content Elements. Contents. Row
 Content Elements Created by Raitis S, last modified on Feb 09, 2016 This is a list of 40+ available content elements that can be placed on the working canvas or inside of the columns. Think of them as
A Quick Introduction to the Genesis Framework for WordPress. How to Install the Genesis Framework (and a Child Theme)
") Table of Contents A Quick Introduction to the Genesis Framework for WordPress Introduction to the Genesis Framework... 5 1.1 What's a Framework?... 5 1.2 What's a Child Theme?... 5 1.3 Theme Files... 5
Table of Contents A Quick Introduction to the Genesis Framework for WordPress Introduction to the Genesis Framework... 5 1.1 What's a Framework?... 5 1.2 What's a Child Theme?... 5 1.3 Theme Files... 5
SALIENT USER GUIDE. 1 Page 1
 SALIENT USER GUIDE This guide provides instructions for installation, help on getting started and extensive documentation of features. It is recommended you read it thoroughly to fully leverage the theme's
Jobmonster Document. by NooTheme
 Jobmonster Document by NooTheme Jobmonster Document GENERAL... 6 Jobmonster Instruction... 6 WordPress Information... 6 Download Theme Package... 6 Requirement For Jobmonster... 7 INSTALLATION... 7 Install
Surface Documentation
 Surface Documentation A fully responsive magazine and blogging WordPress theme credit... Surface is a fully responsive magazine and blogging WordPress theme, built in a timeless and dynamic style. Surface
User Guide. Version 1.0
 User Guide Version 1.0 1 Introduction 5 Package Contents 5 System Requirements 5 How to Install 6 Uploading Theme Files 6 Activating your Theme 6 How to Create & Set your Home & Blog Page 6 Create your
1. Beginning (Important)
") Appointway Wordpress" Documentation by InkThemes Get Your Site Ready in Just 1 Click Thank you for purchasing our theme. If you have any questions that are beyond the scope of this help file, please feel
Appointway Wordpress" Documentation by InkThemes Get Your Site Ready in Just 1 Click Thank you for purchasing our theme. If you have any questions that are beyond the scope of this help file, please feel
Installation and Activation of Foody pro theme
 Installation and Activation of Foody pro theme Installation 1. Install Word Press from http://codex.wordpress.org/installing_wordpress. 2. Upload via Word press Admin: - Go to your WordPress admin panel,
A Guide to Using WordPress + RAVEN5. v 1.4 Updated May 25, 2018
 + v 1.4 Updated May 25, 2018 Table of Contents 1. Introduction...................................................................................3 2. Logging In.....................................................................................4
To upgrade to ifeature Pro visit:
 1 ifeature Free Documentation for ifeature v1.0.7 (last updated 4/26/2011) TABLE OF CONTENTS: Topic Page(s) Installing ifeature 2 Templates and Widgets 3 imenu 4 ifeature Settings 5 General Settings 6
LizardThemes.com Free & Premium WordPress Themes. LizardThemes. User Guide. First Edition
 LizardThemes.com Free & Premium WordPress Themes LizardThemes User Guide First Edition Online version: http://lizardthemes.com/documentation/ 2013 Contents Chapter 1 How to start... 3 Chapter 2 Theme Settings...
Sigurd WordPress Theme
 This is a complete guide to help you manage the installation and setup of the Theme that you just bought. Thank you for purchasing our theme. We hope that you ll find it easy to use and customize. Please
DOCUMENTATION. Table of content : GETTING STARTED. First Step. Theme Installation. Theme License. Importing Demo Data.
 DOCUMENTATION Table of content : GETTING STARTED First Step Theme Installation Theme License Importing Demo Data Setting Up Menu GENERAL SETTINGS Stretched or boxed layout Header Variations Logo Settings
DOCUMENTATION OLAM WORDPRESS THEME
 DOCUMENTATION OLAM WORDPRESS THEME INDEX Theme installation 2 Setting up website 3 Sidebars & widgets 5 Working with EDD 8 Working with Unyson 8 Content Elements 9 Media elements 9 Olam elements 10 Creating
Masterstudy - Education Center WordPress Theme
 A short guide and general information to help you get to know your new theme. Above all, I would like to thank you for purchasing this theme, your contribution is very much appreciated. This document covers
Social Portfolio Theme Installation Guide
 Welcome and thank you for your purchase! We have created a detailed guide on installing and setting up the Social Portfolio Theme. Please go through it and let us know if you get stuck at step. The initial
UW Oshkosh WordPress Training Manual. June 2015 Integrated Marketing Communications *Updated January 2016
 UW Oshkosh WordPress Training Manual June 2015 Integrated Marketing Communications *Updated January 2016 Table of Contents What is WordPress...3 WordPress Resources...3 Website Best Practices...4 How to
DELIZIOSO RESTAURANT WORDPRESS THEME
 DELIZIOSO RESTAURANT WORDPRESS THEME Created: 06/08/2013 Last Update: 25/10/2013 By: Alexandr Sochirca Author Profile: http://themeforest.net/user/crik0va Contact Email: alexandr.sochirca@gmail.com v.
WPI Project Center WordPress Manual For Editors
 WPI Project Center WordPress Manual For Editors April 17, 2015 Table of Contents Who should use this manual... 3 Signing into WordPress... 3 The WordPress Dashboard and Left-Hand Navigation Menu... 4 Adding
Tabs within Divi Theme Options include: Table of Contents. Divi Theme Options... 1 General Tab... 2 Navigation Tab... 6
 Divi Theme Options To get to Divi Theme Options select Divi from the side bar navigation from within your WordPress dashboard. Tabs within Divi Theme Options include: General, Navigation, Layout, Ads,
Creating and Managing Your Personal Mines Website on WordPress
 Creating and Managing Your Personal Mines Website on WordPress Table of Contents Creating your site... 2 Managing your site... 2 About WordPress... 2 Logging in... 2 Pages... 2 Editing an Existing Page...
Ace Corporate Documentation
 Ace Corporate Documentation Introduction Welcome To Ace Corporate! We would like to thank you for donwloading Ace Corporate, Business WordPress theme. It is the lite version of Ace Corporate Pro. Before
DOCUMENTATION. Lotos WordPress Theme
 DOCUMENTATION Lotos WordPress Theme Lotos Simple & Elegant Blog Theme Lotos is a versatile and powerful multipurpose WordPress blog theme perfect for any personal blog. Lotos makes customizing your blog
Oceanica Theme Documentation
 Oceanica Theme Documentation Updated on December 29, 2017 Installation Import sample data Import sample data from xml file. Import sample data from.sql file. Set up the front page Edit front page Site
BindTuning Installations Instructions, Setup Guide. Invent Setup Guide
 BindTuning Installations Instructions, Setup Guide Invent Setup Guide This documentation was developed by, and is property of Bind Lda, Portugal. As with any software product that constantly evolves, our
Azon Master Class. By Ryan Stevenson Guidebook #5 WordPress Usage
 Azon Master Class By Ryan Stevenson https://ryanstevensonplugins.com/ Guidebook #5 WordPress Usage Table of Contents 1. Widget Setup & Usage 2. WordPress Menu System 3. Categories, Posts & Tags 4. WordPress
~Arwa Theme~ HTML5 & CSS3 Theme. By ActiveAxon
 ~Arwa Theme~ HTML5 & CSS3 Theme By ActiveAxon Thank you for purchasing our theme. If you have any questions that are beyond the scope of this help file, please feel free to email us via our user page contact
Amory WordPress Theme
 This is a complete guide to help you manage the installation and setup of the Theme that you just bought. Thank you for purchasing our theme. We hope that you ll find it easy to use and customize. Please
Narya WordPress Theme
 This is a complete guide to help you manage the installation and setup of the Theme that you just bought. Thank you for purchasing our theme. We hope that you ll find it easy to use and customize. Please
The Fox Documentation
 The Fox Documentation Hi there! Thank you once again for purchasing The Fox Theme. While installing the item or using it, if you need any help, please open a support question at withemes.ticksy.com. Install
introduction what you'll learn
 introduction Jetpack is a plugin made by the same people that made Wordpress. By installing Jetpack you add a variety of useful modules to your Wordpress website. To use Jetpack on your website you need
How To Set Up The Genius Store Builder Theme Step--By--Step Guide For Building Your First Profitable Affiliate Store
 How To Set Up The Genius Store Builder Theme Step--By--Step Guide For Building Your First Profitable Affiliate Store Thank you for purchasing the InstaGenus plugin. You have received our bonus Genius Store
JSN PageBuilder 2 User Manual
 JSN PageBuilder 2 User Manual Introduction About JSN PageBuilder 2 JSN PageBuilder 2 is the latest innovation of Joomla PageBuilder with great improvements in terms of design, features, and user experience.
Ninja Menus extension for Magento 2
 Ninja Menus extension for Magento 2 User Guide Version 1.0 0 Table of Contents Ninja Menus I) Introduction... 2 II) Menu Grid... 3 III, Add new menu... 7 1. General setting... 8 2. Advanced settings...
gaalliance.org and bap.gaalliance.org Users Guide
 IDENTITY PRINT PUBLISHING WEB Visible Logic, Inc. 142 High Street Suite 615 Portland, ME 04101 207.761.4230 visiblelogic.com gaalliance.org and bap.gaalliance.org Users Guide CONTENTS Introduction 2 Site
Crypterio Theme Documentation
 Crypterio Theme Documentation Also available Online manual and Video tutorials. 2001 2018 Stylemix LLC Table of Contents Getting Started... 1 Introduction... 1 System Requirements... 2 Installing the Theme...
A set-up guide and general information to help you get the most out of your new theme.
 Hoarder. A set-up guide and general information to help you get the most out of your new theme. This document covers the installation, set up, and use of this theme and provides answers and solutions to
Raiden. A Personal Blogging WordPress Theme with focus on readability and style. Thanks for purchasing a theme from Codestag, you re awesome!
 Raiden A Personal Blogging WordPress Theme with focus on readability and style. Thanks for purchasing a theme from Codestag, you re awesome! In this document we will cover the installation and use of this
Contents. Page Builder Pro Manual
 PRISM Contents 1. Website/Pages/Stripes/Items/Elements... 2 2. Click & Edit, Mix & Match (Drag & Drop)... 3 3. Adding a Stripe... 4 4. Managing Stripes... 5 5. Adding a Page... 7 6. Managing Pages and
P a g e 0. CIDRZ Website Manual.
 P a g e 0 2015 CIDRZ Website Manual http://cidrz.org/ Manual Contents 1. Overview... 2 Getting Started... 2 The Frontend... 2 The Backend... 2 2.0 Managing the website... 4 Adding & editing pages... 4
DESIGNED, SEALED & DELIVERED
 DESIGNED, SEALED & DELIVERED HELLO AND WELCOME You have just been handed your brand new website and it looks wonderful. Now what do you do with it will make it truly yours. We have created this series
User Guide and Theme Setup
 Thank you for purchasing my theme. If you have any questions that are beyond the scope of this help file, please feel free ask any questions on the online Support Forum, located at: http://themewich.com/forum.
WORDPRESS TRAINING MANUAL LAST UPDATED ON FEBRUARY 26TH, 2016
 WORDPRESS TRAINING MANUAL LAST UPDATED ON FEBRUARY 26TH, 2016 LOG INTO WORDPRESS Visit the Login page http://intermountaineyecare.net/wp-admin/ Enter your Username and Password NOTE: Additional usernames
WordPress Manual For Massachusetts Academy of Math and Science
 WordPress Manual For Massachusetts Academy of Math and Science September 19, 2017 Table of Contents Who should use this manual... 4 Signing into WordPress... 4 The WordPress Dashboard and Left-Hand Navigation
LearnWP 2-day Intensive WordPress Workshop. Dawn Comber, Digital Dialogues Ruth Maude, Dandelion Web Design
 LearnWP 2-day Intensive WordPress Workshop Dawn Comber, Digital Dialogues Ruth Maude, Dandelion Web Design How do I login? Point your browser to your website URL adding wpadmin to the end of the address
GeekLove. An Elegant WordPress Wedding Theme. Thanks for purchasing a theme from Codestag, you re awesome!
 GeekLove An Elegant WordPress Wedding Theme Thanks for purchasing a theme from Codestag, you re awesome! In this document we will cover the installation and use of this theme. If you have any questions
WEBSITE INSTRUCTIONS. Table of Contents
 WEBSITE INSTRUCTIONS Table of Contents 1. How to edit your website 2. Kigo Plugin 2.1. Initial Setup 2.2. Data sync 2.3. General 2.4. Property & Search Settings 2.5. Slideshow 2.6. Take me live 2.7. Advanced
LUXWINE theme documentation
 LUXWINE theme documentation Introduction Thank you for purchasing my theme. If you have any questions that are beyond the scope of this help file, please feel free to email via my user page contact form
USER GUIDE: EDITOR. Drag & drop system: Content Manager Style Editor Add Elements Undo/Redo Save...
 USER GUIDE: EDITOR Drag & drop system:... 2 1. Content Manager... 3 2. Style Editor... 5 3. Add Elements... 6 4. Undo/Redo... 13 5. Save... 13 When we access Zeendo s website editor, we can see a series
Classroom Blogging. Training wiki:
 Classroom Blogging Training wiki: http://technologyintegrationshthornt.pbworks.com/create-a-blog 1. Create a Google Account Navigate to http://www.google.com and sign up for a Google account. o Use your
JSN PageBuilder 3 Configuration Manual Introduction
 JSN PageBuilder 3 Configuration Manual Introduction About JSN PageBuilder 3 JSN PageBuilder 3 is the latest innovation of Joomla! PageBuilder with great improvements in the interface, features, and user
VEGA Version /27/2017
 Version 2.2.1 01/27/2017 Vega Pro Check out the pro version at https://www.lyrathemes.com/vega-pro INSTALLING WORDPRESS INSTALLING THE THEME Using the Administration Panel Using cpanel Manually Using FTP
Emmet Next Theme Documentation
 Emmet Next Theme Documentation Updated on May 24, 2018 Quick Start Guide Installation Import sample data Insert API keys Front Page Setup Front Page Customization WordPress Customizer Settings Site identity
Contents. Xweb User Manual
 USER MANUAL Contents 1. Website/Pages/Sections/Items/Elements...2 2. Click & Edit, Mix & Match (Drag & Drop)...3 3. Adding a Section...4 4. Managing Sections...5 5. Adding a Page...8 6. Managing Pages
Who should use this manual. Signing into WordPress
 WordPress Manual Table of Contents Who should use this manual... 3 Signing into WordPress... 3 The WordPress Dashboard and Left-Hand Navigation Menu... 4 Pages vs. Posts... 5 Adding & Editing Your Web
N/A. JSN PageBuilder 2 Configuration Manual Introduction. System Requirements. Product Usage. Joomla Requirements. Server Requirement
 JSN PageBuilder 2 Configuration Manual Introduction About JSN PageBuilder 3 JSN PageBuilder 3 is the latest innovation from Joomla! PageBuilder, with great improvements to the interface, features, and
WEBSITE INSTRUCTIONS
 Table of Contents WEBSITE INSTRUCTIONS 1. How to edit your website 2. Kigo Plugin 2.1. Initial Setup 2.2. Data sync 2.3. General 2.4. Property & Search Settings 2.5. Slideshow 2.6. Take me live 2.7. Advanced
While editing a page, a menu bar will appear at the top with the following options:
 Page Editor ===> Page Editor How Can I Use the Page Editor? The Page Editor will be your primary way of editing your website. Page Editor Basics While editing a page, you will see that hovering your mouse
Starting Your SD41 Wordpress Blog blogs.sd41.bc.ca
 Starting Your SD41 Wordpress Blog blogs.sd41.bc.ca The web address to your blog starts with blogs.sd41.bc.ca/lastnamefirstinitial (eg. John Smith s blog is blogs.sd41.bc.ca/smithj) All work is done in
Index. alt, 38, 57 class, 86, 88, 101, 107 href, 24, 51, 57 id, 86 88, 98 overview, 37. src, 37, 57. backend, WordPress, 146, 148
 Index Numbers & Symbols (angle brackets), in HTML, 47 : (colon), in CSS, 96 {} (curly brackets), in CSS, 75, 96. (dot), in CSS, 89, 102 # (hash mark), in CSS, 87 88, 99 % (percent) font size, in CSS,
1 Woocommerce Products Designer
 1 Woocommerce Products Designer Contents Overview...2 A. Installation...3 1. Requirements...3 2. Installation process...3 B. Configuration...4 1. Basic configuration...4 2. General settings...4 3. Uploads...5
SmartTheme Manual 1 Last update: 2017/07/29 OptimizePress
 SmartTheme Manual 1 Last update: 2017/07/29 OptimizePress Copyright 2017 OptimizePress Table of Contents 1. SmartTheme... 1 2. Initial Setup... 2 2.1. Installing The Theme... 3 2.2. Installing & Activating
Sacred Heart Nativity
 August 2016 Sacred Heart Nativity http://www.shnativity.org Credentials Wordpress Admin Login URL: http://www.shnativity.org/wp-login.php login = sarriola@shnativity.org pw = sent via system email Login
IEEE Wordpress Theme Documentation
 IEEE Wordpress Theme Documentation Version 1.0.2 2014-05- 16 Table of Contents TABLE OF CONTENTS 2 INITIAL SETUP 3 FRONT PAGE 3 POSTS PAGE 4 CONTACT 5 SITE MAP 6 MENU 7 HOME PAGE 8 PAGE TEMPLATES 10 LEFT
Logging Into Your Site
 This training document is meant as a step-by-step guide to creating and delivering a UW-Madison site in the current UW-Madison theme. In this training class, you will learn how to log in to access your
Important installation note Back to Top. Homepage Overview Back to Top
 Inspire: Important installation note Back to Top After installing and activating the theme, you need to navigate to Settings > Permalinks and click on the Save Changes button, even if you haven t made
EPiServer Content Editor s Guide
 EPiServer Content Editor s Guide Contents Getting Started with EPiServer... 19 Logging In... 19 Navigating from the Global Menu... 19 Generic Functions, Toolbar and Panes... 20 Generic Functions... 20
Nilmini Theme Documentation
 Nilmini Theme Documentation 1. Theme-Installation After downloading the Nilmini theme.zip folder on your WordPress blog just log into your WordPress admin panel and go to design / themes. Next to the tab
Bizway Wordpress Theme Documentation by InkThemes
 Bizway Wordpress Theme Documentation by InkThemes Get Your Site Ready in Just 1 Click Like other themes of InkThemes, BizWay WordPress Business theme is also extremely easy to install and setup and you
How to use WordPress to create a website STEP-BY-STEP INSTRUCTIONS
 How to use WordPress to create a website STEP-BY-STEP INSTRUCTIONS STEP 1:Preparing your WordPress site Go to the Dashboard for your new site Select Appearance > Themes. Make sure you have Activated the
PROFILE DESIGN TUTORIAL KIT
 PROFILE DESIGN TUTORIAL KIT NEW PROFILE With the help of feedback from our users and designers worldwide, we ve given our profiles a new look and feel. The new profile is designed to enhance yet simplify
FME Extensions. Media Gallery & Product Videos Extension for Magento 2. User Guide - Version
 FME Extensions Media Gallery & Product Videos Extension for Magento 2 User Guide - Version 1.0 http://www.fmeextensions.com support@fmeextensions.com Intended Audience The content of this document is designed
WordPress A Reference Guide for TU Students Version:
 WordPress A Reference Guide for TU Students Version: 2017.11.17 Adapted from OTS Training s Reference Guide for Faculty/Staff by OTS Student Computing Services scs@towson.edu 410-704-5151 www.towson.edu/scs
Website Publishing Tool Manual
 Customer Support Website Publishing Tool Manual This is a designed as a definitive guide to all the features and tools available within Website Publishing Tool. Contents Introduction... 4 Adding Content...
Documentation:Tromas WordPress Theme
 Documentation:Tromas WordPress Theme Install Tromas WordPress Theme within a few minutes. Tromas is a Multipurpose Business WordPress Theme It s fully responsive with bootstrap framework, easy to customization,
Bugis Theme Documentation
 Bugis Theme Documentation 1. Theme-Installation After downloading the Bugis theme.zip folder on your WordPress blog just log into your WordPress admin panel and go to design / themes. Next to the tab Manage
CreateASite Beginner s Guide
 Contents Getting Started... 3 Access the CreateASite Control Panel... 3 Select a Category/Subcategory... 4 Select a Template... 6 Change the Site Template... 10 Change Colours... 12 Change Fonts... 13
Website Training Guide for Staff
 Website Training Guide for Staff Welcome to the General Website Training Guide. This tutorial will cover a brief introduction to the Research Website for St. Michael s Hospital, the Wordpress backend,
Crypterio Theme Documentation
 Crypterio Theme Documentation Also available Online manual and Video tutorials. 2001 2018 Stylemix LLC Table of Contents Getting Started... 1 Introduction... 1 System Requirements... 2 Installing the Theme...
1. Beginning (Important)
") Regal Wordpress" Documentation by InkThemes.com Get Your Site Ready in Just 1 Click Thank you for purchasing our theme. If you have any questions that are beyond the scope of this help file, please feel
Regal Wordpress" Documentation by InkThemes.com Get Your Site Ready in Just 1 Click Thank you for purchasing our theme. If you have any questions that are beyond the scope of this help file, please feel
T T USER GUIDE. 1. Website/Pages/Stripes/Items/Elements Click & Edit, Mix & Match (Drag & Drop) Adding a Stripe Managing Stripes...
 Adding a Stripe Managing Stripes...") T T T Contents USER GUIDE 1. Website/Pages/Stripes/Items/Elements... 2. Click & Edit, Mix & Match (Drag & Drop)... 3. Adding a Stripe... 4. Managing Stripes... 5. Adding a Page... 6. Managing Pages and
T T T Contents USER GUIDE 1. Website/Pages/Stripes/Items/Elements... 2. Click & Edit, Mix & Match (Drag & Drop)... 3. Adding a Stripe... 4. Managing Stripes... 5. Adding a Page... 6. Managing Pages and
WordPress Manual First Year Experience
 WordPress Manual First Year Experience May 18, 2015 Table of Contents Who should use this manual... 3 Signing into WordPress... 3 The WordPress Dashboard and Left-Hand Navigation Menu... 4 The Home Page
Crux. Getting Started. Theme Features. Setting up your store. Setting up the Page templates. Using background images. Working with Sidebars
 Crux Table of Contents Getting Started Installing WordPress Installing the theme Installing the Required Plugins Theme Features Custom Menus Theme Options Serving Retina Images Child Theme Support Setting
NETZONE CMS User Guide Copyright Tomahawk
 NETZONE CMS User Guide Copyright 2015. Tomahawk 1 Phone: + 64 9 522 2333 Email: getintouch@tomahawk.co.nz Tomahawk 2015 www.tomahawk.co.nz 2 NETZONE CMS USER GUIDE WHAT YOU LL FIND INSIDE LOGGING IN 4
JSN Reta 2 Customization Manual Before We Start
 JSN Reta 2 Customization Manual Before We Start The first thing we would like to say is this guide is not intended to cover everything you might want to customize the template. Here we disclose only the
HB Education. Theme Installation
 HB Education HB Education Theme is a simple, clean, beautifully designed responsive WordPress Education WordPress Theme. It is minimal but mostly used features will help you setup your website easily and
WordPress How to Create a Simple Image Slider with the New RoyalSlider
 WordPress How to Create a Simple Image Slider with the New RoyalSlider Last update: 2/20/2013 WARNING: DO NOT USE INTERNET EXPLORER you can use Firefox, Chrome, or Safari but the editing screens do not
Wordpress Training Manual
 The Dashboard... 2 If this is your first time logging in:... 2 How do I change my password or email address?... 3 Search Engine Optimization (SEO)... 4 SEO for Pages... 4 SEO for Images... 5 Managing Pages...
RocSite DIY (Design It Yourself) Website Designer Reference Manual
 Website Designer Reference Manual") RocSite DIY (Design It Yourself) Website Designer Reference Manual Revised 01.08.2017 RocSite Website Builder Manual Contents 1. Website/Pages/Stripes/Items/Elements...2 2. Click & Edit, Mix & Match (Drag
RocSite DIY (Design It Yourself) Website Designer Reference Manual Revised 01.08.2017 RocSite Website Builder Manual Contents 1. Website/Pages/Stripes/Items/Elements...2 2. Click & Edit, Mix & Match (Drag
Wowway Version 2.0. This is a complete guide to help you understand version 2.0 of Wowway
 Wowway Version 2.0 This is a complete guide to help you understand version 2.0 of Wowway Wowway version 2.0 was launched from the desire to reboot a great theme which was once the best grid portfolio theme
Administrative Training Mura CMS Version 5.6
 Administrative Training Mura CMS Version 5.6 Published: March 9, 2012 Table of Contents Mura CMS Overview! 6 Dashboard!... 6 Site Manager!... 6 Drafts!... 6 Components!... 6 Categories!... 6 Content Collections:
ICDPPC.ORG - WEBSITE MANUAL
 ICDPPC.ORG - WEBSITE MANUAL Table of Contents LOGIN TO WEBSITE... 4 GENERAL WEBSITE INSTRUCTIONS... 5 POST & PAGE CONTENT... 6 ADD DOCUMENTS ON PAGES... 7 ADD DOCUMENTS - TRANSLATION VERSIONS... 11 ADD
Goldfish 2. The Official Guide
 Goldfish 2 The Official Guide A Big Thank You to Tobias Schilpp 2019 Fishbeam Software Text, Graphics: Yves Pellot Proofread, Photos: Tobias Schilpp Publish Code: #190126 www.fishbeam.com Index 1. Tutorial:
Documentation:Travel Company Pro WordPress Theme
 Documentation:Travel Company Pro WordPress Theme Install Travel Company Pro WordPress Theme within a few minutes. Travel Company Pro is a Travel and tour WordPress Theme It s fully responsive with bootstrap
Portwalk Place WORDPRESS MANUAL O ROURKE HOSPITALITY MARKETING OROURKEHOSPITALITY.COM
 Portwalk Place WORDPRESS MANUAL TABLE OF CONTENTS Login... 3 Editing Existing Pages... 4 Adding New Pages... 7 Editing/Adding Text... 9 Creating a Link... 10 Linking to a PDF... 11 Making a Link a Button...