Spirit Sampler Installation and Operation Manual
|
|
|
- Griselda Farmer
- 6 years ago
- Views:
Transcription


1 Inst Spirit Sampler Installation and Operation Manual For Products: Spirit Sampler Document: SpiritSampler
2 AMERICAS & WORLD HEADQUARTERS Phone: Fax: Sales: Orders: Support: EUROPE, MIDDLE EAST & AFRICA Phone: Fax: Germany : UK : France : ASIA Phone: Fax: asiasales@oceanoptics.com Japan & Korea: Ocean Optics, Inc. 830 Douglas Ave. Dunedin, FL USA Manufacturing & Logistics 4301 Metric Dr. Winter Park, FL USA Sales & Support Geograaf EW Duiven The Netherlands Manufacturing & Logistics Maybachstrasse Ostfildern Germany Ocean Optics Asia 666 Gubei Road Kirin Tower Suite 601B Changning District Shanghai PRC, Copyright 2014 Ocean Optics, Inc. All rights reserved. No part of this publication may be reproduced, stored in a retrieval system, or transmitted, by any means, electronic, mechanical, photocopying, recording, or otherwise, without written permission from Ocean Optics, Inc. Trademarks All products and services herein are the trademarks, service marks, registered trademarks or registered service marks of their respective owners. Limit of Liability Every effort has been made to make this manual as complete and as accurate as possible, but no warranty or fitness is implied. The information provided is on an as is basis. Ocean Optics, Inc. shall have neither liability nor responsibility to any person or entity with respect to any loss or damages arising from the information contained in this manual.
3 SPIRITSAMPLER C
4
5 Table of Contents About This Manual... iii Document Purpose and Intended Audience... iii What s New in this Document... iii Document Summary... iii Product-Related Documentation... iii Upgrades... iii Chapter 1: Introduction... 1 Spirit Sampler Overview... 1 System Description... 2 Spirit Sampler Software... 4 Chapter 2: System Set-up... 5 Overview... 5 System Power-on... 5 Tablet Start-up... 7 Tablet Removal from the Case... 7 Connecting the Outflow Tubes... 7 Chapter 3: Operation... 9 Overview... 9 Starting Authenticator Software Collecting Reference Samples Main Menu Authenticate Preparing the Sample Authenticating Previously Saved Samples Identify the Sample Analyze the Sample Admin Functions Device Configuration Utilities Shutdown SPIRITSAMPLER i
6 Table of Contents Appendix A: Maintenance Overview Flow Cells Battery Light Source Tablet Appendix B: Specifications Index ii SPIRITSAMPLER
7 About This Manual Document Purpose and Intended Audience This document provides the users of the Spirit Sampler with instructions for setting up and measuring spirits with their instrument. What s New in this Document This version of the Spirit Sampler Installation and Operation Manual updates maintenance information. Document Summary Chapter Chapter 1: Introduction Chapter 2: System Set-up Chapter 3: Operation Appendix A: Maintenance Appendix B: Specifications Description Contains descriptive information about the Spirit Sampler. Provides instructions for setting up the Spirit Sampler. Provides instructions for using the Brand Manager and Authenticator software. Contains maintenance information for the flow cells, battery and light source. Lists product specifications. Product-Related Documentation You can access documentation for Ocean Optics products by visiting our website at Select Support Technical Documents, then choose the appropriate document from the available drop-down lists. Upgrades Occasionally, you may find that you need Ocean Optics to make a change or an upgrade to your system. To facilitate these changes, you must first contact Customer Support and obtain a Return Merchandise Authorization (RMA) number. Please contact Ocean Optics for specific instructions when returning a product. SPIRITSAMPLER iii
8 About This Manual Warranty Our 1-Year Warranty covers Ocean Optics OEM equipment from manufacturing defects: This comprehensive warranty ensures you of the highest level of craftsmanship and reliability. The warranty covers parts and labor needed to repair manufacturing defects that occur during the warranty period. We also will cover the costs of shipping warranty-related repairs from our customers to Ocean Optics and from us to our customers. iv SPIRITSAMPLER
9 Chapter 1 Introduction Spirit Sampler Overview The Spirit Sampler is an instrument for identifying the authenticity of spirits by comparing the spectrum of the sample to be verified against a standard spectrum for the chosen brand. The measurement taken is an absorbance spectrum - light absorbed by the sample is compared against a standard reference liquid, typically distilled water. The resulting spectrum is compared against the expected spectrum using a widely used statistical technique known as the sum of squares of Z-scores. The result is a score that allows a simple classification: pass, fail or almost matches. The Authenticator software is an easy to use interface that guides the user through the steps necessary to perform these measurements and automatically performs the necessary calculations, returning a quick and simple result. The system is installed in a protective hard shell traveling case, allowing you to take the power of a quality control lab with you into any environment. Other convenience features include: Fast sample analysis (in less than 15 seconds) Simple data presentation in an easy-to-understand format Easy loading of samples with separate channels for clear, light and dark spirits Simple, on-screen prompts to guide you through a measurement SPIRITSAMPLER
10 1: Introduction Spirit Sampler System Description The Spirit Sampler Pelican Case stores the following Spirit Sampler components: USB2000+ Spectrometer and UV-VIS lamp built into the case for taking measurements. A removable touchscreen tablet computer, which can be coupled to the mounted keyboard for data entry, and other Windows applications, or detached for truly portable offline data analysis. Three pairs of fluid ports labeled for injection and removal of clear (vodka), light (whisky), or dark (rum) spirit samples 2 SPIRITSAMPLER

11 1: Introduction Three outflow tubes Four syringes LED indicators for battery charge status. Two standard USB ports for data transfer and peripherals A standard power connector for overnight recharging A multi-pocket accessory bag. The case also includes a cavity for accessory storage. Spirit Sampler Components SPIRITSAMPLER


12 1: Introduction Spirit Sampler Components Close-up Spirit Sampler Software The Spirit Sampler software provides for setting up a customized database and authenticating spirit samples. It consists of these two main functions: Authenticator -- Used to collect brand sample absorbance data to initially collect absorbance data for the Brand Manager to develop spirit profiles. The Authenticator Admin preferences function allows you to customize your Spirit Sampler system for use in the field to authenticate spirits. See Chapter 3: Operation for more information on how to use the Authenticator software. Brand Manager -- Used to develop absorbance profiles for brands specific to your needs and then export this database for use by the Authenticator in field testing. See Chapter 3: Operation for more information on using the Brand Manager software. 4 SPIRITSAMPLER
13 Chapter 2 System Set-up Overview The set-up of the Spirit Sampler is quick and easy. Just apply power to the system, turn on the tablet, and set up your sampling ports. System Power-on The Spirit Sampler can draw power from either the system battery or through the supplied power cord from the mains. Two status LEDs are provided next to the main power switch. Their meanings are as follows: System LEDs Condition Green, Off Green, Blinking Green, Steady Red, Off Red, Blinking Red, Steady Meaning The power cord is NOT plugged in to the system. The main battery is the power source. The power cord is plugged in to the system and mains is the source of power. The main battery is actively charging. The main battery is fully charged. The power cord can be disconnected. The system is turned OFF. Power switch is OFF and/or the tablet is turned OFF. If power switch is on and the red LED is OFF, then either the tablet is not turned on, or there is an error condition. The system has no power. Either the power switch has not been set to ON, or the battery is dead and needs to be recharged by plugging the power cord into a power source. N/A The system is turned ON. Power switch is ON and the tablet may be turned ON. SPIRITSAMPLER
14 2: System Start-up There is also a small LED on the tablet itself, just to the right of the power button (along the top-left edge when opened, viewable from above). This LED has the following states: Tablet LED Condition Dark Orange White Meaning Mains power is not connected. The tablet may boot if it has sufficient internal battery charge, or it may fail to boot if its internal battery is fully discharged. Mains power is connected, and the tablet is actively charging. The tablet may or may not have sufficient charge to boot. If it does not boot and the light is orange, please wait 10 minutes for it to accrue enough charge to boot. Mains power is connected, but the tablet is not charging because it is fully charged. There should be no reason for the tablet to fail to boot while a white light is showing. Procedure To turn on the Spirit Sampler system, 1. Turn on the main power switch (back left). 2. Boot the tablet by pressing the thin black button along the top-left edge (when opened as a laptop) of the tablet display. The tablet should then boot directly to the Spirit Sampler Authenticator software application. Caution If the main power switch is turned off while the Authenticator software is running, undefined behavior can result. Turn the power switch back on, and then reboot the tablet. Note If the main power switch is turned off (or the main battery is completely discharged), the tablet itself can continue to operate through its own internal battery. However, the tablet will not be able to authenticate new samples (the spectrometer, lamp and shutters will be unpowered). Also, the two external USB ports exposed on the main system tray (back center) will also be unpowered, preventing the tablet from accessing thumb drives, printers, etc. 6 SPIRITSAMPLER

15 2: System Start-up Tablet Start-up Procedure To reboot the Spirit Sampler tablet, 1. Be sure that the system is powered on (see System Power-on). 2. On the tablet, swipe from right side of screen. a. Tap Settings. b. Tap Power. c. Tap Restart. Tablet Removal from the Case The tablet can be removed from the case by raising the front lid (exposing the keyboard of the tablet), then pressing the silver button in the back center of the keyboard. If you decide to remove the tablet for offline operation, the micro-usb power cable will need to be disconnected for removal, and then reconnected when the tablet is restored. Connecting the Outflow Tubes The system includes three clear plastic outflow tubes, which may be in the accessory bin (back right) or accessory bag (lid cavity). These tubes attach to the clear, light and dark channel ports. Slide these three outflow tubes over the three labeled outflow ports, such that their free ends hang over the edge of the case (outside the system). Place a beaker or cup beneath these tubes (all three tubes may point into a single beaker) since they release excess water and spirits from the system during use. Spirit Sampler Outflow Ports The Spirit Sampler system, includes a cup holder, it is recommended to unfold it and place it in front of the outflow tubes and place inside of it a cup to dispose the spirits. SPIRITSAMPLER

16 2: System Start-up Spirit Sampler Cup Holder 8 SPIRITSAMPLER
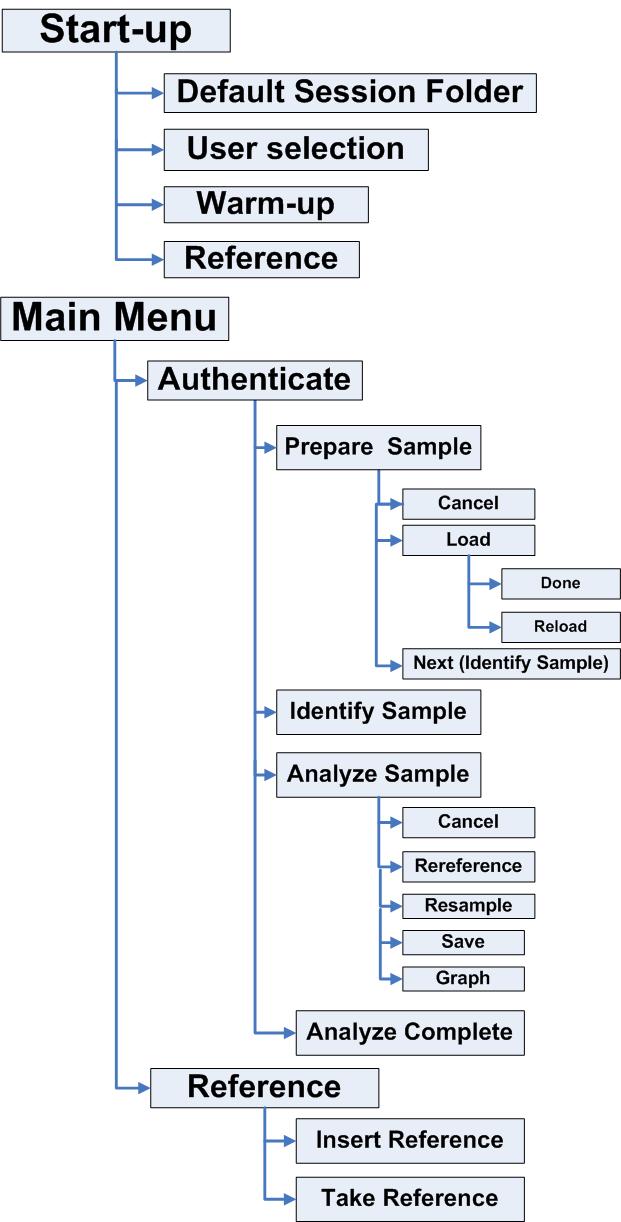
17 Chapter 3 Operation Overview The standard Spirit Sampler Authenticator software menu is organized as follows: SPIRITSAMPLER
18 10 SPIRITSAMPLER
19 SPIRITSAMPLER
.")
20 Starting Authenticator Software Procedure 1. Double-click the executable. The Spirit Sampler Authenticator Software opens with a dialog window asking for the default session folder. 2. Click Yes to use the default session folder, located at C:\Users\Spirit Sampler\Documents\Ocean Optics\Spirit Sampler\sessions\(Spirit Sampler serial number-automatic default Session number). or-- Click No to use a different location for the session folder. The Browse For Folder dialog window appears for you to browse for the desire location or create a new folder. Then click OK. 12 SPIRITSAMPLER
. Field mode -- provides only the ability to authenticate spirits.")
21 3. Choose to for the software to behave in Admin mode or Field mode: Admin mode provides full functionality to the configuration options (such as add, edit and modify libraries and parameters of the software itself). Field mode -- provides only the ability to authenticate spirits. SPIRITSAMPLER

22 4. To work in Field mode, click the Switch User button. In the Admin Login window, type the password and click Login. After you have entered the admin password, you can switch between the Admin and Field modes just by clicking the Switch User button in the upper right corner. 5. Allow the system to warm up. There is a minimum recommended warm-up period of around 10 minutes that must be allowed for the light source to stabilize. The Authenticator software enforces this warm-up period by disabling any further action in the software until the period has expired. Wait until the status progress bar finishes and click Next. 14 SPIRITSAMPLER

23 Notes If the tablet appears to be working, but the lamp disconnects itself during the warm-up procedure (causing an audible beep) this may indicate a low main system battery. Please plug the system into mains power and let it charge for an hour, and the problem should not recur. The Skip button is only for factory debugging purposes; it is never recommended to use this function. If you do wish to bypass this warm-up period with Administrator privileges, click the Skip button. A new dialog window appears for you to enter the admin password and click Login. SPIRITSAMPLER
24 Collecting Reference Samples The Spirit Sampler Authenticator software walks you through taking reference measurements to be used by the Brand Manager for creating a profile database. If the unit is being operated for a prolonged period it may be necessary to perform a reference measurement again to recalibrate the instrument. The software automatically keeps track of how long it has been since the instrument was referenced and prompts you when a new reference is necessary. Procedure 1. Inject 30 ml of distilled water from a syringe into the ports on the top row to clear the system to take a reference measurement. Be sure that the tubes connected to the overflow ports on the bottom row are resting in a container to collect the excess water. Then click Next. 16 SPIRITSAMPLER

25 Allow some time for the system to auto-calibrate. The Taking Reference window appears. Note The Skip button is only for factory debugging purposes; it is never recommended to use this function. If you do wish to bypass this warm-up period with Administrator privileges, click the Skip button. A new dialog window appears for you to enter the admin password and click Login. SPIRITSAMPLER

26 6. The Taking Reference screen offers the option to perform the following tasks: Admin: Displays the Admin Menu. Retry: Retakes the reference auto-calibration. Next: Displays the Main Menu. Main Menu The Main Menu allows you to perform the following functions: Authenticate: Takes the user to the Authentication procedure. See Authenticate. Reference: Takes the user to the Reference procedure. See Collecting Reference Samples. Admin: Takes the user to the Admin menu. Shutdown: Closes the software. 18 SPIRITSAMPLER

27 Authenticate The Spirit Sampler Authenticator software enables you to analyze spirit samples to confirm product quality and identity, and to detect counterfeit samples. Preparing the Sample Procedure 1. Inject the spirit to be measured into the appropriate port as follows: Clear Vodka Light Whisky Dark Rum SPIRITSAMPLER
28 2. On the Brand drop down menu, select the brand you wish to verify. 3. You now have the option to perform one of the following tasks: 20 SPIRITSAMPLER

29 Cancel: Return to the Main Menu Load: Authenticate previously saved samples Next: Display the Identify Sample screen Authenticating Previously Saved Samples The Load button on the Prepare Sample window allows an operator with Administrative privileges to re-authenticate one or many previously-saved samples to be able to test a recently updated Brand database. Procedure 1. Select the desired Brand in the drop-down menu and click the Load button. 2. On the new window, select the proper.csv brand file(s). These files are usually saved in the default location: C:\Users\Spirit Sampler\Documents\Ocean Optics\Spirit Sampler\sessions\spirit-sampler-xxxxx. 3. Click the Open button. SPIRITSAMPLER


30 The software re-authenticates the sample(s) in rapid succession. It graphs all of the samples, overlapping them on the chart for you to see exactly how they compare in absorbance. The graph legend shows exactly which samples Matched, Almost Matched and Failed. 22 SPIRITSAMPLER

31 4. To zoom in on the graph, click the Shift key + Mouse Right button + Point with the mouse to the area of interest. You can easily identify by color the authentication result. Red = Failed Yellow = Almost Matched Green = Matched To zoom back out on the graph in X and Y dimensions, click the small buttons at the bottom-left of the chart, beneath and beside the scroll-bar arrows. 5. Select the legend to highlight its corresponding brand file to display an information table. SPIRITSAMPLER
32 24 SPIRITSAMPLER

33 6. The Back button displays the Analyze Sample screen with the last authenticated saved brand file. 7. You now have the option to perform one of the following tasks: Done: Returns to the Main Menu. SPIRITSAMPLER
 that are usually saved on the default location: C:\Users\Spirit Sampler\Documents\Ocean Optics\Spirit Sampler\sessions\spirit-sampler-xxxxx. Then click the Open.")
34 Reload: Allows you to authenticate more previously saved samples. Go on to Step After clicking the Reload button, on the new window, select the proper.csv brand file(s) that are usually saved on the default location: C:\Users\Spirit Sampler\Documents\Ocean Optics\Spirit Sampler\sessions\spirit-sampler-xxxxx. Then click the Open. The software re-authenticates the sample(s) in rapid succession and stays in the Analyze Sample screen, displaying the last saved brand file authentication result. 26 SPIRITSAMPLER
35 9. To see the Sample Detail screen, click the Graph button. Otherwise click Done to go to the Main Menu. 10. Click Next to go to Identify Sample screen. Identify the Sample On the Identify Sample screen, you can enter optional comments about the sample. Procedure 1. Enter Notes, Ref Num Id, Ref Text Id and Location entries, as desired. 2. Click Next. SPIRITSAMPLER

36 Analyze the Sample 1. On the Analyze Sample screen, the Spirit Sampler system takes a measurement of the sample and displays the result: Failed to Match, Almost Matched or Matched. 28 SPIRITSAMPLER

37 2. To see the actual absorbance Graph, click the Graph button. SPIRITSAMPLER

38 3. Click Back to return to the Analyze Sample screen. 4. In the Analyze Sample screen, you have the option to perform the following tasks: Cancel: Returns to the Main Menu. Rereference: Takes you to the Reference procedure. Go to Step SPIRITSAMPLER
39 Resample: Measures the spirit again, with the same notes. Go to Step 6. 3: Operation Save: Saves the spectrum. Go to Step 7. If the user wishes to Rereference. A window message will open, asking Do you want to retake a water reference on channel X only. 5. Rereference: If the unit is being operated for a prolonged period it may be necessary to perform a reference measurement again to recalibrate the instrument: Click Yes to continue, but be sure to reload 30ml of distilled water in the port, and then click OK. Click No to cancel the Rereference procedure. SPIRITSAMPLER

40 6. Resample: Measures the spirit again, with the same notes and parameters. 7. Save: To save the spectrum, click the Save button. The file will be saved to the default location: C:\Users\Spirit Sampler\Documents\Ocean Optics\Spirit Sampler\sessions\spirit-sampler-xxxxx. When the saving procedure is done, the Analysis Complete screen displays. 32 SPIRITSAMPLER
41 8. The Analyze Complete screen offers the following tasks: Next sample: Displays the Identify Sample screen. Another Brand: Displays the Prepare Sample screen. Home: Displays the Main Menu screen. Admin Functions The Admin menu functions allow you to configure the device and perform various utilities. It is mainly used for Factory Testing and Factory Configuration. It is highly recommended that you do not, under any circumstances, change or modify any settings on this section unless recommended by the manufacturer. Caution Changing the factory settings on the Admin menu could result in bad testing and authentication. The following functions are available on the Admin menu for Device Configuration: Preferences: Change device settings and defaults. Brand Database: Select brand database for authentication. Factory Config: Change factory configuration settings. SPIRITSAMPLER
42 The following functions are available for the utilities:: Brand Manager: Create or Modify Brand Databases. Scope Mode: View spectra directly for alignment. Session Report: Generate a session report. Device Configuration Preferences Changes device settings and defaults. In the Preferences screen there are 7 different tabs: Labels: Edit labels within the software. Device: Modify acquisition parameters in the spectrometer. Timing: Modify timing acquisition parameters of the software. Integration: Modify integration time parameters of the spectrometer. Quality: Modify ratio test parameters for quality control of the spectrum. SSZ: Modify thresholds and validation for the spirit authentication. Monitoring: Modify temperature and battery preferences. Caution Changing these parameters is not recommended. Labels There are options to change the name and amount of the reference liquid that you are prompted to insert when taking the reference measurement, the name and amount of the port flush liquid, and the labels applied to each of the three channels available for measurement. 34 SPIRITSAMPLER
43 Device These settings change some of the basic parameters used by the spectrometer: Scans to average The number of spectra averaged during the measurement. Boxcar Half-Width Each spectrum is smoothed by applying a boxcar filter. This sets the number of pixels on each side of the central pixel to use for the averaging. Electric Dark Correction This correction subtracts the electric dark contribution to each spectrum automatically. The check box turns this feature on if checked, or off if unchecked. Nonlinearity Correction Corrects the nonlinear response of the detector in the spectrometer automatically. The check box turns this feature on if checked, off if unchecked. Debug Mode Turns on some additional software features to make it easier to track down any faults in the software. System ID The name used to identify the unit. By default it is the serial number of the spectrometer. Password The Administrator password. SPIRITSAMPLER

44 Timing Warm Up Time The amount of time in minutes that must be allowed for the light source to reach a stable temperature. Select Channel Delay A delay introduced before acquisition to allow the shutters time to operate. Settle Acquisitions Reserved for future use. Lamp Timeout The light source will power down after this period of inactivity. Allow Skipping Warm-Up Allows you to skip the system warm-up period. 36 SPIRITSAMPLER
45 Integration The system automatically attempts to set an optimal integration time during the reference measurement step. Target Counts The system attempts to set an integration time for each channel that achieves this target intensity. Error Margin The upper and lower bounds of the target intensity that are acceptable, specified as a fraction of the target intensity. Min Integ The minimum allowable integration time. Max Integ The maximum allowable integration time. Default The default integration time, used to initialize the attempt to set the integration time. Quality Wavelength UV Reserved for future use. Wavelength VIS Reserved for future use. Min ratio Reserved for future use. Max ratio Reserved for future use. Reference QC Enabled Enables or disables checking the reference liquid against a standard reference spectrum. SPIRITSAMPLER
46 SSZ Pass Maximum score for the sample to qualify as a pass. Fail The minimum score for the sample to qualify as a fail. Number of Samples per Authentication Each authentication generates this many spectra and saves each on in a file. Intra-Sample Delay Reserved for future use. 38 SPIRITSAMPLER

47 Monitoring Enable Monitoring Turn monitoring on or off. Battery Monitoring Turn battery monitoring on or off. Period The period between checks on the temperatures and battery levels. Number of Samples Reserved for future use. Low Battery Level The maximum battery level that is reported as low battery. Critical Battery Level The maximum battery level that is reported as critical battery. Fan Always On Sets the fan to always be on. Number of Temp Samples Reserved for future use. High Temp Level The minimum temperature that is reported as high. Critical Temp Level The minimum temperature that is reported as critical. 3: Operation Caution Changing these parameters is not recommended. Brand Database This menu option allows you to select a brand database. A dialog box is displayed to select the location in the file system of the brand database to be used. Once selected this brand database becomes the default for any subsequent operations. SPIRITSAMPLER
48 On the new Window select the proper database you wish to use for Authentication. Usually is on this folder: C:\Users\Spirit Sampler\Documents\Ocean Optics\Spirit Sampler\databases\XXXXX. Inside that folder there is a file named: database.cfg. Highlight the file and click Open. Factory Config The Factory Configuration menu option allows the user to: Restore the unit to the original factory settings Set the theme of the user interface. Set the time period for prompting the user to retake a reference measurement. Set the super user password. Set the minimum and maximum wavelength for the device. Caution The system will ask for a password. This menu should only be accessed by Ocean Optics. 40 SPIRITSAMPLER

49 Caution This functionality is for use by Ocean Optics only. SPIRITSAMPLER

50 Utilities Brand Manager The Spirit Sampler Brand Manager allows you to manage database libraries of spirit brands and manage these brands according to your application needs. The Authenticator software uses these libraries to authenticate sample spirits. Database Management The Brand Database menu option allows you to select, create, edit or delete a brand database. Additionally, it is possible to import a legacy database from an earlier implementation of the Authenticator and to export a database for deployment on field instruments. Select Database Navigate to the location of a brand database and to select it as the current database to be used. Click Select Database to browse to the location where libraries are stored of an existing database and then open the selected brand library. Usually they are on this folder: C:\Users\Spirit Sampler\Documents\Ocean Optics\Spirit Sampler\databases\XXXXX. 42 SPIRITSAMPLER


51 Create Database Use this function to create a new Brand Database customized to your measurement needs and save it to a specified location (typically C:\Users\Spirit Sampler\Documents\Ocean Optics\Spirit Sampler\databases\XXXXX). You are asked to supply a name for the database and an optional description. SPIRITSAMPLER


52 Edit Database Change the name and description of an existing database. Import Database Use this function to import a legacy Brand database from an older version. Navigate to the location of a legacy brand database created using a previous version of the Authenticator. 44 SPIRITSAMPLER

53 Export Database Export the currently selected database to a location in the file system for deployment to other (field) Spirit Sampler units. Delete Database Permanently delete the currently selected Brand database. This is irreversible. Confirmation is required by entering a password. SPIRITSAMPLER
54 Brand Management Brand Management allows you to select, edit or delete a brand signature within the currently selected brand database (define brand signature spectrum you have created/ defined in the brand library). There is also the option to import a brand signature created elsewhere. Select Brand Select one of the existing Brand Signatures in the current brand database for tasks such as editing. 46 SPIRITSAMPLER
55 Procedure 3: Operation 1. To add a new sample by acquiring a spectrum immediately, press New. You are prompted to inject the sample into the channel selected in the Color field. 2. Click the Yes button. The acquisition of the spectrum begins and a progress bar is displayed this step may take a few minutes. When the acquisition is complete you are prompted to save the source sample. 3. Click Yes. The name of the saved file appears in the Source Samples list, and the spectrum will appear in the preview graph. 4. Add more samples by repeating this process or by clicking the Add button to include source data files that have already been created. Each file that is added will appear in the Source Samples list and be previewed in the graph. You can select one or more spectra by selecting the source sample file. The associated spectrum in the graph will be highlighted. You can also select one or more spectra in the graph by typing Ctrl + left-clicking the mouse. The associated source sample will be highlighted in the list. 5. Select the wavelengths that will be used in the SSZ model for authentication against this new brand. A list of wavelengths is displayed in the Wavelengths field and highlighted by vertical lines in blue on the preview graph. The list of wavelengths can be changed by using the Add and Del buttons underneath the list of wavelengths. The highlighted wavelengths previewed in the graph are updated as you add and remove wavelengths. Check the Auto-Compute box to perform the calculation of the standard deviation for each wavelength. 6. Choose the maximum score for categorizing a sample as a pass with the Thresholds Pass spin-box. Choose the minimum score for categorizing a sample as a fail with the Thresholds Fail spin-box. 7. Click the Save button to create the new brand. From the Brand Manager you can click the Select Brand button to confirm that the brand is now in the database. SPIRITSAMPLER

56 Edit Brand -- Use this function to edit the selected brand signature. Procedure 1. You can edit the wavelengths that will be used in the SSZ model for authentication against this new brand. A list of wavelengths is displayed in the Wavelengths field and highlighted by vertical lines in blue on the preview graph. The list of wavelengths can be changed by using the Add and Del buttons underneath the list of wavelengths. The highlighted wavelengths previewed in the graph are updated as you add and remove wavelengths. Check the Auto-Compute box to perform the calculation of the standard deviation for each wavelength. 2. Choose the maximum score for categorizing a sample as a pass with the Thresholds Pass spinbox. Choose the minimum score for categorizing a sample as a fail with the Thresholds Fail spin-box 3. Click the Save button to create the new brand. From the Brand Manager you can click the Select Brand button to confirm that the brand is now in the database. 48 SPIRITSAMPLER

57 Import Brand -- Use this function to import an existing brand from another Brand Database. Delete Brand -- Use this function to delete a Brand Signature from the current Brand Database. This is irreversible. Confirmation is required by entering a password. SPIRITSAMPLER

58 Scope Mode Scope mode allows you to see the detail of spectra taken. This is intended for expert users to allow them to fine tune the parameters of the system. Scope mode takes a spectrum immediately on pressing the Start button. There are options to temporarily override the settings for the number of scans to average, delay and integration time for the spectrometer. Channel Select the channel(s) to show in scope mode. Shutter Select the shutter(s) to close in scope mode. Override Integ Time Temporarily override the instrument integration time with the values specified on this screen. Averaging Temporarily override the instrument scans to average with the value specified on this screen. Reference QC Show the reference QC spectrum. Take Optical Dark Acquire and show the dark spectrum. Lamp Test Perform a lamp test and save the results. 50 SPIRITSAMPLER

59 SPIRITSAMPLER

60 Session Report Session Report allows a set of measurements taken during a session to be summarized. You are prompted to select one or more result files saved during a session and to produce a summary report for the selected files. Files are added and removed for the Chosen list using the Add and Remove (or Remove All) buttons and a summary report is produced by pressing the Generate Report button. 52 SPIRITSAMPLER

61 Shutdown Clicking the Shutdown button prompts you to flush the ports with a configurable volume and type of flushing liquid before shutting down the software. SPIRITSAMPLER
62 Appendix A Maintenance Overview The Spirit Sampler system consists of the Sprit Sampler itself, as well as containing a battery for power that requires charging, a light source, and a tablet. Flow Cells Solids precipitation from sample spirits can potentially lead to particulate build up in one of the Spirit Sampler flow cells, which sometimes can cause air bubbles to become trapped inside the cell. This air bubble will cause both reference and sample measurement data to become inaccurate, resulting in spurious results. Such particulates can be removed by flushing the cell with either a solution of Ethanol/water or, if possible, concentrated Ethanol. Ensure the cell is fully purged and leave it for 3-4 hours before reinspecting. In the case of stubborn, difficult to remove particulates, it may be necessary to leave the cell flushed for 24 hours to fully dissolve any residual solid materials. Battery The system includes a built-in battery to support up to eight hours of disconnected operation. However, the battery will eventually discharge and require recharging. If you flip the power switch on, and the green LED does not come on, the main battery is dead and must be charged. To charge the main battery (including the secondary battery within the tablet computer), connect the included power cable to the power socket in the back-left of the main tray next to the power switch. SPIRITSAMPLER
63 Light Source A: Maintenance The Sprit Sampler light source is a deuterium-tungsten halogen type with lamp life of ~1500 hours. The lamp automatically turns off after 60 minutes if it is not used, and then the Spirit Sampler system must be restarted. Tablet Refer to the manufacturer Asus for support. SPIRITSAMPLER
64 Appendix B Specifications Specification Dimensions Weight Power Requirements Battery Life Spectrometer Wavelength Range Resolution Accuracy Light Source Type Wavelength range Time to stable output Lamp life Power consumption Operating temperature Value 47 x 38 x 18 cm (18.5 x 14.1 x 6.9 inches) 9.4 kg (20.8 lbs.) V; Hz; auto-ranging Over one working day on a single charge; <30 minutes charging time nm 1.0 nm +/- 2.0 nm Deuterium-Tungsten-Halogen nm (deuterium); nm (tungsten) 10 minutes (deuterium); 1 minute (tungsten halogen) ~1500 hours 7W 0 C C SPIRITSAMPLER
65 A: Maintenance SPIRITSAMPLER
66 Index A Admin menu, 32 analyze sample, 27 Autenticator software, 4 authenticate, 18 previously saved samples, 20 Authenticator software starting, 11 B Brand Management, 45 Brand Manager, 41 Brand Manager software, 4 C connecting outflow tubes, 7 D device configuration, 33 document audience, iii purpose, iii summary, iii I identify sample, 26 main menu, 17 maintenance, 53 M operation, 9 overview, 1 O P power-on, 5 product-related documentation, iii R reference sample collection, 15 S Scope Mode, 49 Session Report, 51 set-up, 5 shutdown, 52 software, 4 Authenticator, 4 Brand Manager, 4 software map, 9 specifications, 55 Spirit Sampler software, 4 starting Authenticator software, 11 start-up tablet, 7 system description, 2 T tablet start-up, 7 SPIRITSAMPLER
67 U W A: Maintenance upgrades, iii utilities, 41 warranty, iv what's new, iii SPIRITSAMPLER
Absolute Irradiance Installation and Operation Manual
 Absolute Irradiance Installation and Operation Manual For Products: JAZ-IRRAD Document: JAZ-A-IRRAD-02-201505 AMERICAS & WORLD HEADQUARTERS Phone: +1 727-733-2447 Fax: +1 727-733-3962 Sales: Orders: Support:
Multimode Laser-532 Installation and Operation Manual
 Multimode Laser-532 Installation and Operation Manual For Products: Model LASER-532-IP-LAB Document: 000-31000-010-02-201503 WARNING Protective Eye Wear Should Be Worn When Using This Instrument - Intense
LDC-1C LED Controller Installation and Operation Manual
 LDC-1C LED Controller Installation and Operation Manual Document: 27-MNL-LDC-1 Version: 1.0 AMERICAS & WORLD HEADQUARTERS Phone: +1 727-733-2447 Fax: +1 727-733-3962 Sales: Orders: Support: info@oceanoptics.com
Installation and Operation Manual Document Number
 Mini Deuterium Halogen Light Source DT-Mini-2-GS A Product Installation and Operation Manual Document Number 000-10000-110-02-0505 Offices: Ocean Optics, Inc. 830 Douglas Ave., Dunedin, FL, USA 34698 Phone
ecovis Krypton Light Source Installation and Operation Manual Document Number
 ecovis Krypton Light Source Installation and Operation Manual Document Number 000-10000-180-02-201401 Offices: Ocean Optics, Inc. World Headquarters 830 Douglas Ave., Dunedin, FL, USA 34698 Phone 727.733.2447
Blue LED Pulsed Light Source LS-475. Installation and Operation Manual Document Number
 Blue LED Pulsed Light Source LS-475 Installation and Operation Manual Document Number 000-10000-100-02-1209 Offices: Ocean Optics, Inc. 830 Douglas Ave., Dunedin, FL, USA 34698 Phone 727.733.2447 Fax 727.733.3962
ADC2000-PCI A/D Converter Operating Instructions
 ADC2000-PCI A/D Converter Operating Instructions Rev. 2.02 05062005 Offices: Ocean Optics, Inc. 830 Douglas Ave., Dunedin, FL, USA 34698 Phone 727.733.2447 Fax 727.733.3962 8:30 a.m.-6 p.m. EST Ocean Optics
Installation and Operation Manual Document Number
 Mini Deuterium Halogen Light Source DT-Mini-2-GS Installation and Operation Manual Document Number 000-10000-110-02-1209 Offices: Ocean Optics, Inc. World Headquarters 830 Douglas Ave., Dunedin, FL, USA
STS Spectrometer Getting Started
 STS Spectrometer Getting Started STS is a family of compact, low-cost spectrometers ideal for embedding into OEM devices. STS provides remarkable performance for a spectrometer of its size (just 40 mm
CVI SPECTRAL PRODUCTS. 111 Highland Drive Putnam CT, (860) SM32Pro
 SM32Pro") CVI SPECTRAL PRODUCTS 111 Highland Drive Putnam CT, 06260 (860) 928-5834 SM32Pro 2.8.28 Table of Contents Warranty and Liability 1 Quick Start Installation Guide 2 System Requirements 3 Requirements for
CVI SPECTRAL PRODUCTS 111 Highland Drive Putnam CT, 06260 (860) 928-5834 SM32Pro 2.8.28 Table of Contents Warranty and Liability 1 Quick Start Installation Guide 2 System Requirements 3 Requirements for
AbraScan Test Strip Reader Digital Reading of Test Strips for the Determination of Cyanotoxins in Contaminated Water Samples
 AbraScan Test Strip Reader Digital Reading of Test Strips for the Determination of Cyanotoxins in Contaminated Water Samples Product No. 475025 1. General Description The AbraScan RDS-1500 Test Strip Reader
User Guide for NR-W devices Version 1.1
 User Guide for NR-W devices Version 1.1 User Guide Page 1 Disclaimer of Warranties IMPORTANT: Sensors, software, documentation, and other products offered by Spectral Engines Oy, hereinafter referred to
CH142 Spring Spectrophotometers with Vernier Data Acquisition Software
 Spectrophotometers with Vernier Data Acquisition Software The absorbance of a sample is given as A = log I o I, where I o is the intensity without sample present and I is the intensity with the sample
OOIBase32 Spectrometer Operating Software Operating Instructions
 Rev 2.21 12092003 OOIBase32 Spectrometer Operating Software Operating Instructions Offices: Ocean Optics, Inc. 380 Main Street, Dunedin, Fla., USA Phone 727.733.2447 Fax 727.733.3962 8:30 a.m.-6 p.m. EST
Equitrac Integrated for Konica Minolta. Setup Guide Equitrac Corporation
 Equitrac Integrated for Konica Minolta 1.2 Setup Guide 2012 Equitrac Corporation Equitrac Integrated for Konica Minolta Setup Guide Document Revision History Revision Date Revision List November 1, 2012
THE i-stat 1 DOWNLOADER/RECHARGER (MODEL NUMBER DRC-300)
") i-stat TECHNICAL BULLETIN THE i-stat 1 DOWNLOADER/RECHARGER (MODEL NUMBER DRC-300) OVERVIEW This Technical Bulletin describes the instructions for using the new i-stat 1 Downloader/Recharger (DRC), which
i-stat TECHNICAL BULLETIN THE i-stat 1 DOWNLOADER/RECHARGER (MODEL NUMBER DRC-300) OVERVIEW This Technical Bulletin describes the instructions for using the new i-stat 1 Downloader/Recharger (DRC), which
A803 INSTRUCTION MANUAL
 A803 INSTRUCTION MANUAL A803 Manual Rev C, 2/2014 Page 1 10 Technology Drive Peabody, MA 01960 Ph: 978-818-6180 Fax: 978-818-6181 Web: www.intl-lighttech.com 2011 International Light Technologies For most
Solar Analysis System Quick Start Instructions
 RaySphere and RaySphere 1700 Description Solar Analysis System Quick Start Instructions RaySphere is a calibrated high-performance measurement device. It is designed for testing the spectral distribution
Table of Contents. Chapter 1. Safety Precautions Notice Chapter 2. Components and accessories Chapter 3. Camera components...
 P. 770.270.1394 F. 770.270.2389 865 Marathon Parkway Lawrenceville GA 30046 P. 770.270.1394 F. 770.270.2389 865 Marathon Parkway Lawrenceville GA 30046 Table of Contents Chapter 1. Safety Precautions Notice...
HP Deskjet F2100 All-in-One series. Basics Guide
 HP Deskjet F2100 All-in-One series Basics Guide Hewlett-Packard Company notices The information contained in this document is subject to change without notice. All rights reserved. Reproduction, adaptation,
Spectrometer Visible Light Spectrometer V4.4
 Visible Light Spectrometer V4.4 Table of Contents Package Contents...3 Trademarks...4 Manual Driver and Application installation...5 Manual Application Installation...6 First Start of the Application...8
Quick Start Guide: Welcome to OceanView
 Quick Start Guide: Welcome to OceanView Contents: Ctrl + Click a Topic Below for More Information Introduction to OceanView... 3 Welcome Screen... 3 Data Window... 3 Schematic View... 3 Persistence...
UV / VIS SPECTROPHOTOMETER
 www.mapada.com.cn A Professional Manufacturer Shanghai Mapada Instruments Co., Ltd. Add: Building D-10, 261# Sanbang Rd., Songjiang Export Processing Zone,Shanghai, 201611 Tel: +86-21-5488 1172 +86-21-5488-0273
Torus Concave Grating Spectrometers Installation and Operation Manual
 Amy to Torus Concave Grating Spectrometers Installation and Operation Manual For Products: Torus Document: 097-11101-000-02-201603 AMERICAS & WORLD HEADQUARTERS Phone: +1 727-733-2447 Fax: +1 727-733-3962
AEROTRAK PORTABLE AIRBORNE PARTICLE COUNTER MODEL 9310/9350/9510/9550/9500 QUICK START GUIDE
 AEROTRAK PORTABLE AIRBORNE PARTICLE COUNTER MODEL 9310/9350/9510/9550/9500 QUICK START GUIDE Thank you for purchasing a TSI AeroTrak Portable Airborne Particle Counter (particle counter). This guide will
New software features of the 7010 Particle Size. Analyzer Danielle Chamberlin May May 5, Page 1
 New software features of the 7010 Particle Size May 5, 2009 Analyzer 2.0.0 Danielle Chamberlin May 5 2009 Page 1 Introduction to the new 7010 software Instrument operation New look and feel easy to operate
IN5132/IN5142/IN5134/IN5134a IN5144/IN5144a/IN5135/IN5145 User's Manual (detailed) Instant Stack Guide
 Instant Stack Guide") Projector IN5132/IN5142/IN5134/IN5134a IN5144/IN5144a/IN5135/IN5145 User's Manual (detailed) Instant Stack Guide Thank you for purchasing this product. Features This projector can be used in conjunction
Projector IN5132/IN5142/IN5134/IN5134a IN5144/IN5144a/IN5135/IN5145 User's Manual (detailed) Instant Stack Guide Thank you for purchasing this product. Features This projector can be used in conjunction
Equitrac Embedded for Kyocera Mita. Setup Guide Equitrac Corporation Equitrac Corporation
 Equitrac Embedded for Kyocera Mita 1.3 Setup Guide 2012 Equitrac Corporation 2012 Equitrac Corporation Equitrac Embedded for Kyocera Mita Setup Guide Document Revision History Revision Date Revision List
Initial Activities. Getting Started on Your Equipment
 IA1 2019 Field Staff 1. Surface Pro Tablets (AC Only) Assessment Coordinators will be using Surface Pro tablets for their work at home and in the schools. Throughout your time on NAEP, you might encounter
Equitrac Embedded for Sharp OSA. Setup Guide Equitrac Corporation
 Equitrac Embedded for Sharp OSA 1.4 Setup Guide 2012 Equitrac Corporation Equitrac Embedded for Sharp OSA Setup Guide Revision Date Revision List November 1, 2012 Updated for Equitrac Office/Express 4.2.5
6165 MONEY COUNTING SCALE
 MANUAL English Nederlands Deutsch Français Español Italiano Português Polski Česky Slovenčina Magyar България 6165 MONEY COUNTING SCALE TABLE OF CONTENTS 01. INTRODUCTION page 3 1.1 Product 1.2 Display
Standard Operating Procedure for the Horiba FluroMax-4
 Standard Operating Procedure for the Horiba FluroMax-4 Adapted from Horiba Operations Manual Created by Michael Delcau, Modified by Brian Lamp The Fluoromax is capable of making a variety of measurements.
Equitrac Integrated for Konica Minolta
 Equitrac Integrated for Konica Minolta 1.2 Setup Guide 2014 Equitrac Integrated for Konica Minolta Setup Guide Document Revision History Revision Date Revision List August 9, 2013 Updated for Equitrac
Affordable Lab Technology
 T6 T6 UV/ VIS Spectrophotometer LOW STRAY LIGHT EXCELLENT STABILITY EASILY UPDATED MANY APPLICATIONS LOW COST HIGH QUALITY SMALL FOOTPRINT USER FRIENDLY SOFTWARE 1. 2 Low stray light Stray light below
Thermo Scientific Spectronic 200 Visible Spectrophotometer. The perfect tool. for routine measurements
 Thermo Scientific Spectronic 200 Visible Spectrophotometer The perfect tool for routine measurements The Standard for Routine Measurements Thermo Scientific SPECTRONIC spectrophotometers have served as
VitalView Activity & Data Viewer User Manual. Version 1.3. For Technical Assistance please contact STARR Life Sciences at
 VitalView Activity & Data Viewer User Manual Version 1.3 For Technical Assistance please contact STARR Life Sciences at 866-978-2779 STARR Life Sciences Corp., 2015 Table of Contents 1.0 Vital View Activity
High Accuracy Gloss Meter Operation Manual. This manual is only suitable for our single angle and multi-angles gloss meters.
 Content Introduction... 1 Cautions... 1 1. External structure description... 2 2. Switch on/off... 3 2.1 Startup... 3 2.2 Shutdown... 4 3. Basic operation... 4 3.1 Menu Operation... 4 3.2 Enter the main
QNC Best Practices. System Affected. Description. QNC Configuration Procedure. Technical Bulletin CS-18-04
 This technical bulletin explains the best approach to using the QNC tool when deploying handsets and provides tips and tricks on QNC behaviors to help smooth your deployment process. System Affected QNC
LCD MONITOR TOUCH PANEL DRIVER 2 OPERATION MANUAL. for Mac. Version 2.2
 LCD MONITOR TOUCH PANEL DRIVER 2 OPERATION MANUAL for Mac Version 2.2 Contents Introduction...3 Setting up the Computer...4 Install...4 How to configure settings...5 Touch Panel Settings...7 Touch Operation
FROG-4000TM Quick Start Guide
 FROG-4000TM Quick Start Guide 1 Precautions DO NOT invert the instrument with the sparge bottle attached. DO NOT transport or store the instrument with liquid in the sparge bottle. DO NOT handle or carry
HP Notebook PCs - Keyboard and TouchPad or ClickPad Guided Troubleshooter
 HP Notebook PCs - Keyboard and TouchPad or ClickPad Guided Troubleshooter This document applies to HP notebook computers. The keyboard, TouchPad, or ClickPad on your laptop is not working as expected:
UV-VIS Spectrophotometer
 T60 UV-VIS Spectrophotometer LOW STRAY LIGHT EXCELLENT STABILITY EASILY UPDATED MANY APPLICATIONS LOW COST HIGH QUALITY SMALL FOOTPRINT USER FRIENDLY SOFTWARE T60 UV-VIS Spectrophotometer 1/2 PG INSTRUMENTS
Embedded for Sharp OSA Setup Guide
 Embedded for Sharp OSA Setup Guide Version 1.4 2016 SHP-20160315 Equitrac Embedded for Sharp OSA Setup Guide Revision Date Revision List March 15, 2016 Updated for Equitrac Office/Express 5.6 September,
Nicolet is50 FTIR User s Booklet
 Nicolet is50 FTIR User s Booklet I. Getting started 1) Start your session by launching the LSA Chemistry Recharge software. This software keeps track of the amount of time that you are using the instrument.
KMnet Viewer. User Guide
 KMnet Viewer User Guide Legal Notes Unauthorized reproduction of all or part of this guide is prohibited. The information in this guide is subject to change for improvement without notice. We cannot be
POWER. allows users to interface a third party control system with the devices on a VN Matrix network.
 The Extron VNM Enterprise Controller 00 is a dedicated control device for managing large VN-Matrix systems. The controller allows users to view, manage, and dynamically control multiple VN-Matrix systems
Embedded for Xerox EPA-EIP Setup Guide
 Embedded for Xerox EPA-EIP Setup Guide 2016 XRX-EPA-EIP-20160315 Equitrac Embedded for Xerox EPA-EIP Setup Guide Document History Date Description of Revision Changes March 15, 2016 Updated for Equitrac
MDCStoreTools Data Management Utility
 MDCStoreTools Data Management Utility Version 1.1 User Guide 0112-0195 F July 2012 This document is provided to customers who have purchased Molecular Devices, LLC ( Molecular Devices ) equipment, software,
PICO LOGGING APPLICATION...
 1 Table of contents TABLE OF CONTENTS... 2 ABOUT THIS MANUAL... 3 IMPORTANT NOTES... 3 PICO LOGGING APPLICATION... 5 ABOUT THE PICO LOGGING PC APPLICATION... 5 WHERE TO GET A HOLD OF THE PICO LOGGING APPLICATION...
XnView 1.9. a ZOOMERS guide. Introduction...2 Browser Mode... 5 Image View Mode...15 Printing Image Editing...28 Configuration...
 XnView 1.9 a ZOOMERS guide Introduction...2 Browser Mode... 5 Image View Mode...15 Printing... 22 Image Editing...28 Configuration... 36 Written by Chorlton Workshop for hsbp Introduction This is a guide
Appendix 1: DataStudio with ScienceWorkshop Sensors Tech Tips
 Appendix 1: DataStudio with ScienceWorkshop Sensors Tech Tips Section 1: Starting an experiment 1.1 Opening a file 1. Open the File menu and select Open Activity. 2. In the Open dialog box, navigate to
UV-VIS Spectrophotometer
 UV-VIS Spectrophotometer LOW STRAY LIGHT EXCELLENT STABILITY EASILY UPDATED MANY APPLICATIONS LOW COST HIGH QUALITY SMALL FOOTPRINT USER FRIENDLY SOFTWARE UV-VIS Spectrophotometer 1/2 PG INSTRUMENTS LIMITED
Perkin-Elmer Lambda 3B Spectrophotometer
 Written by Mark Csele Written by Jeff Brown Operation Turn on the Lambda 3B and the Computer Remove all samples from the sample chamber. Turn on the lamp for the range being investigated using the switches
R&S ESW Test Receiver Release Notes Firmware Version V1.40 SP1
 R&S ESW Test Receiver Release Notes Firmware Version V1.40 SP1 These Release Notes are for following models of the R&S ESW EMI Test Receiver: R&S ESW8, order no. 1328.4100.08 R&S ESW26, order no. 1328.4100.26
Integrated for Océ Setup Guide
 Integrated for Océ Setup Guide Version 1.2 2016 OCE-20160914 Equitrac Integrated for Océ Setup Guide Document History Revision Date September 14, 2016 Revision List New supported devices/card reader web
Sensor Control User Guide Version 2.6
 Sensor Control User Guide Version 2.6 Software for spectral sensors and devices User Guide Page 1 Disclaimer of Warranties IMPORTANT: Sensors, software, documentation, and other products offered by Spectral
Equitrac Integrated for Océ
 Equitrac Integrated for Océ 1.2 Setup Guide 2014 Equitrac Integrated for Océ Setup Guide Document History Revision Date Revision List November 2, 2012 Updated for Equitrac Office/Express version 4.2.5
InVue BT128 Refractometer
 ADVANCED MATERIALS HANDLING USER GUIDE InVue BT128 Refractometer Process monitoring for laboratory fluid applications in a benchtop package TABLE OF CONTENTS Cautions and Warnings... 4 Safe Disposal...
Release Notes Life Technologies Attune NxT Software v2.3
 Release Notes Life Technologies Attune NxT Software v2.3 In the following pages you will find instructions describing: New software features Known software/system issues with troubleshooting guidance Software
LABQUEST 2 DATA LOGGER
 Page 29 LABQUEST 2 DATA LOGGER OBJECTIVES: 1. To introduce the fundamentals of the use of the LabQuest 2 data logger. 2. To illustrate the use of Logger Pro graphing software to graph and analyze data
Red Tide USB650 Fiber Optic Spectrometer. Installation and Operation Manual Document Number RT
 1. Red Tide USB650 Fiber Optic Spectrometer Installation and Operation Manual Document Number 170-00000-RT-02-1106 Offices: Ocean Optics, Inc. World Headquarters 830 Douglas Ave., Dunedin, FL, USA 34698
Table of Contents.
 Table of Contents http://www.bioaxxis.com 1. Items Included with the BioAxxis ThumbLock PCMU:...2 2. IMPORTANT NOTE:...2 3. Supported Operating Systems:...2 Section 1 Installing the BioAxxis ThumbLock
Datalogging IAQ Meter Instruction Manual
 Datalogging IAQ Meter 800050 Instruction Manual Datalogging IAQ Meter 800050 Copyright 2014 by Sper Scientific ALL RIGHTS RESERVED Printed in the USA The contents of this manual may not be reproduced or
XERA Kitchen Display Server User Manual. PUBLISHED BY Aldelo, LP 6800 Koll Center Parkway, Suite 310 Pleasanton, CA 94566
 XERA Kitchen Display Server User Manual 3 PUBLISHED BY Aldelo, LP 6800 Koll Center Parkway, Suite 310 Pleasanton, CA 94566 Copyright 1997-2014 by Aldelo, LP. All rights reserved. No Part of the contents
V-600 Operation. JASCO V-600 for Windows Software Manual
 V-600 Operation JASCO V-600 for Windows Software Manual P/N:0302-7420A September 2006 Preface This instruction manual serves as a guide for using this instrument. It is intended to instruct first-time
Innovative Electronics for a Changing World INDEX
 Innovative Electronics for a Changing World INDEX 1. SYSTEM DESCRIPTION 2. BOARD CONNECTIONS terminals and indicators 3. CONNECTION DIAGRAM 4. START UP GUIDE and passwords 5. HOME PAGE 6. STATUS PAGE 7.
Multi-Function Smart Indicator User Manual
 Multi-Function Smart Indicator User Manual EC30006 Content 1 Notice... 2 2 Specification... 2 3 Main parameter... 3 4 How to fix... 3 5 Port... 4 6 On/Off... 4 7 Charging... 4 8 Display... 5 9 Screen keypad...
Installation and Configuration Guide
 Installation and Configuration Guide h-series 800-782-3762 www.edgewave.com 2001 2011 EdgeWave Inc. (formerly St. Bernard Software). All rights reserved. The EdgeWave logo, iprism and iguard are trademarks
ProtoTRAK RX Homestead Place Rancho Dominguez, CA USA T F Service Department:
 ProtoTRAK RX Offline Programming Manual Document: P/N 26909 Version: 070118 Offline part number: PTRXOL For current CNC models: ProtoTRAK RMX 2615 Homestead Place Rancho Dominguez, CA 90220-5610 USA T
USER MANUAL. > analyze. reduce. recover
 USER MANUAL > analyze > reduce > recover Table of Contents COPY AUDIT... 1 OVERVIEW... 1 IMPORTANT NOTES FOR PRINT AUDIT 4 CUSTOMERS... 1 COMMUNICATOR TECHNICAL NOTES... 2 COPY AUDIT SOFTWARE... 2 INSTALLING
XnView Image Viewer. a ZOOMERS guide
 XnView Image Viewer a ZOOMERS guide Introduction...2 Browser Mode... 5 Image View Mode...14 Printing... 22 Image Editing...26 Configuration... 34 Note that this guide is for XnView version 1.8. The current
OCEAN OPTICS Chem 2000 Spectrophotometer
 OCEAN OPTICS Chem 2000 Spectrophotometer prepared for: Department of Chemistry and Biochemistry New Mexico State University Las Cruces, NM 88003 last updated May 2003 R.. Cowley TABLE OF CONTENTS I. Introduction...2
The Autopol VI Automatic Polarimeter
 TECHNICAL BULLETIN 926 For The Most Demanding High Accuracy Applications The Autopol VI Automatic Polarimeter The brand of polarimeter used in more U.S. labs than any other.* *Emmes Survey AUTOPOL The
AEROTRAK HANDHELD AIRBORNE PARTICLE COUNTER MODEL 9306 QUICK START GUIDE
 AEROTRAK HANDHELD AIRBORNE PARTICLE COUNTER MODEL 9306 QUICK START GUIDE Thank you for purchasing a TSI AeroTrak Model 9306 Handheld Airborne Particle Counter. This guide will help you quickly begin using
TopPoint Administrator User's Guide
 TopPoint Administrator User's Guide LT2153/ 2000 Gilson, Inc. All rights reserved December 2000 Table of Contents 1 Introduction 2 Installation 3 Operation System Requirements... 1-2 Minimum... 1-2 Recommended...
Quick Start Guide Axxin T8-ISO. Instrument. In association with: E: W: D Version 1.5
 Quick Start Guide Axxin T8-ISO Instrument In association with: E: support@axxin.com W: D006093 Version 1.5 Office DOCUMENT CONTROL DETAILS TITLE DOC No. CUSTOMER CONTACT QSG, Quick Start Guide, Axxin T8-ISO
This guide will help you with many of the basics of operation for your Epson 485wi BrightLink Projector with interactive functionality.
 This guide will help you with many of the basics of operation for your Epson 485wi BrightLink Projector with interactive functionality. If you need further assistance with questions, you can refer to the
ED40. Development Kit. Quick Start Guide
 ED40 Development Kit Quick Start Guide Disclaimer Honeywell International Inc. ( HII ) reserves the right to make changes in specifications and other information contained in this document without prior
Command Center Software Specification for the M11x platform Version 1.0
 Command Center Software Specification for the M11x platform Version 1.0 CONTACT: EMAIL: Carlos Mimoso carlos_mimoso@dell.com DATE: 10/14/2010 Unlimited distribution subject to the copyright. Disclaimers
INSTRUCTION MANUAL. AquiStar GDL. Dissolved Oxygen Datalogger
 INSTRUCTION MANUAL AquiStar GDL Dissolved Oxygen Datalogger Table of Contents 1 Introduction... 3 What is a GDL?... 3 Initial Inspection and Handling... 3 Do s and Don ts... 3 Getting Started... 4 GDL
User's Guide. Voice Messaging and Fax Software. FaxTalk Communicator SETM
 User's Guide Voice Messaging and Fax Software FaxTalk Communicator SETM FaxTalk Communicator SE for Windows Version 4.7 Telephone Consumer Protection Act of 1991 "It shall be unlawful for any person within
Aqueous GPC Instructions - Detailed
 Aqueous GPC Instructions - Detailed Waste Bottle Columns PL Datastream Injection Port GPC Computer UV Detector GPC Pump Eluent Bottle The Aqueous GPC Set Up RI Detector Important The points below must
Integrated for Konica Minolta Setup Guide
 Integrated for Konica Minolta Setup Guide Version 1.2 2016 KON-20160314 Equitrac Integrated for Konica Minolta Setup Guide Document Revision History Revision Date Revision List February 29, 2015 Updated
USER S MANUAL Madell Technology Corp Walnut Ave. Suite V Buena Park, CA USA Phone:
 DNM-9602A Microplate Reader USER S MANUAL Madell Technology Corp. 7372 Walnut Ave. Suite V Buena Park, CA 90620 USA Phone: 1-877-670-9023 http://www.madelltech.com 1 CONTENTS 1.Introduction 1.1 Characteristics
INDEX. Network Power Monitor NPM-R10-SNMP. Innovative Electronics for a Changing World. NPM-R10-SNMP Remote Network Power Monitor
 Innovative Electronics for a Changing World NPM-R10-SNMP Remote Network Power Monitor Optional relay board and GSM module INDEX 1. SYSTEM DESCRIPTION 2. SYSTEM BATTERY CONNECTIONS 3. SERIES CONNECTED BATTERIES
NETWORK PRINT MONITOR User Guide
 NETWORK PRINT MONITOR User Guide Legal Notes Unauthorized reproduction of all or part of this guide is prohibited. The information in this guide is subject to change for improvement without notice. We
The leg stand is located at the back of the product, on the top right. This adjustable-length leg stand will allow your ARCHOS to stand by itself on a
 About ARCHOS 9 PCtablet How do I activate the webcam? General It is activated by default and it automatically turns on when using an application that uses the webcam such as Skype. How can I install my
Operation. Symmetra MW II. Parallel System with Internal Bypass Static Switch. Normal Normal. UPS Summary. X405 UPS Summary.
 X008B X010 X007 X021 X022 X012 X008A X014A X011 X405 X013 X017 X014B UPS Summary UPS Summary ~ ~ ~ ~ Normal Normal Normal Normal Operation Symmetra MW II Parallel System with Internal Bypass Static Switch
Codian IP VCR IP VCR 2200 Series
 Codian IP VCR IP VCR 2200 Series Getting Started Codian IP VCR IP VCR 2200 Series Getting Started Copyright Codian 2006. All rights reserved. This Getting Started Guide may not be copied, photocopied,
Jasco FP-6500 Spectrofluorimeter Updated November 14, 2017
 Jasco FP-6500 Spectrofluorimeter Updated November 14, 2017 Instrument instructions can be found at: http://academic.bowdoin.edu/chemistry/resources/instructions.shtml If you have any problems with the
8 Button RS232/IR. Control Panel. MuxLab Inc A / SE A
 8 Button RS232/IR Control Panel 500816 MuxLab Inc. 2016 94-000833-A / SE-000833-A SAFETY PRECAUTIONS To insure the best use from the product, please read all instructions carefully before using the device.
Quick Setup & Getting Started
 Quick Setup & Getting Started HP Compaq Business PC Copyright 2007 Hewlett-Packard Development Company, L.P. The information contained herein is subject to change without notice. Microsoft, Windows, and
DataHub: FAQs/Troubleshooting
 On the Ward s DataHub... = Select key = On/Off and ESC key = Scroll key 1. How do I pair my DataHub with a Windows computer? 2. How do I pair my DataHub with an Apple Macintosh (Mac) computer? 3. How do
ibidi PumpControl Instruction Manual Version 1.5.0
 ibidi PumpControl Instruction Manual Version 1.5.0 II ibidi GmbH 2011, version 1.5.0, revision 2, 2011-10-26, Andreas Rainer Table of contents 1 General Information... 1 1.1 System Requirements... 1 1.2
Proficy* Workflow. Powered by Proficy SOA GETTING STARTED
 Proficy* Workflow Powered by Proficy SOA GETTING STARTED Version 1.5 SP4 February 2012 All rights reserved. No part of this publication may be reproduced in any form or by any electronic or mechanical
Equipment Overview: Safety:
 PerkinElmer Series 200 HPLC: Operating Procedure 12/2/11 R.C Equipment Overview: This document outlines the basic procedure for using the Sedex light scattering detector and the PE series 200 HPLC system
Software User s Manual
 1 About the manual 2 Navigating the manual 2 3 Opening the control panel 3 Control panel overview 4 Control panel settings 5 Calibrating the interactive pen display 6 Adjusting frequency and tracking (VGA
Precise & Affordable
 Water Analysis Instruments Thermo Scientific Orion AquaMate and AQUAfast Product Brochure Reliable water analysis Precise & Affordable A complete line of Spectrophotometers, Colorimeters and Turbidity
DPSS Laser. Quick Start Guide. What is in the box What does it do? How to build a setup Installation of required drivers...
 DPSS Laser Quick Start Guide What is in the box... 3 What does it do?... 5 How to build a setup... 6 Installation of required drivers... 12 Safety instructions... 15 How to operate the laser... 16 Installation
Dolphin ebase. Communication Cradle for the Dolphin 9700 Mobile Computer. User s Guide
 Dolphin ebase Communication Cradle for the Dolphin 9700 Mobile Computer User s Guide Introduction The Ethernet Base (ebase) enables a single Dolphin 9700 computer to communicate with a host device over