Tenable Appliance 4.6 User Guide. Last Updated: January 12, 2018
|
|
|
- Michael Waters
- 5 years ago
- Views:
Transcription


1 Tenable Appliance 4.6 User Guide Last Updated: January 12, 2018
2 Table of Contents Tenable Appliance 4.6 User Guide 1 Welcome to Tenable Appliance 6 System Requirements and Installation 8 Tenable VM Appliance Installation 9 VM Image Prerequisites 10 Security Considerations 12 Obtaining the Tenable VMware Virtual Machine Image 13 Obtaining the Hyper-V Virtual Machine Image 15 VM Upgrade Compatibility 17 Appliance Migration - 3.x to 4.x 19 Tenable Hardware Appliance Installation 22 Prerequisites 23 Unpacking the Box 24 Rack Mount Instructions 25 Hardware Specifications 26 Hardware Features 27 Network Connections and Initialization 28 Configuration and Operations 30 Set Admin Password 33 Configuration/Operations Tab 35 Appliance Tab 37 Appliance Interface 39 Engine are registered trademarks of Tenable Network Security, Inc. All other products or services are trademarks of their respective owners.
3 Console Menu 40 Appliance Tab 41 Administration Tab 43 Updates 44 lesystem 46 Restart/Shut Down 47 Configure Clock Settings 48 Configure SNMP Agent Strings 50 System Log Forwarding 51 Web Interface 52 Appliance Management Interface Users 54 Recovery Code Link 55 Configure Response Headers 57 Configure Website SSL Certificate 58 Generate Certificate Signing Request 59 Logout Redirection URL 60 Restrict Console Operations 61 Reinstall Appliance (Hardware Appliance Only) 62 Backup Appliance 63 Standalone Application Import 67 Restore from File 68 Networking Tab 69 Configure Networking 71 Configure Hostname 72 Engine are registered trademarks of Tenable Network Security, Inc. All other products or services are trademarks of their respective owners.
4 Interfaces 73 VLANs (Configure/Export) 75 Add VLAN 76 Parent Interface 78 Bulk Import/Configuration 80 Applications Tab 82 Enabling Applications 84 The SecurityCenter Application 85 Enable SecurityCenter 87 Current Disk Capacity 89 Manage SecurityCenter 90 Plugin Management 91 Web Server Listening Configuration 93 Web Server Security 94 Web Server Authentication 95 Certificate Authority Management 96 SSH User Access 97 The Nessus Application 98 Enable the Nessus Application 100 Manage Nessus 101 Additional Nessus Actions 102 Edit Nessus Users 103 Certificate Management 104 bweb Server Authentication 105 Engine are registered trademarks of Tenable Network Security, Inc. All other products or services are trademarks of their respective owners.
5 Nessus Rules (nesusd.rules) 106 The LCE Application 107 LCE Server Virtual Machine Quick Start 108 LCE Clients 110 The PVS Application 112 Manage PVS 114 PVS Monitoring Configuration 115 Certificate Management 116 Web Server Authentication 117 Using Nessus, SecurityCenter, and NNM 118 Logs Tab 119 Support Tab 121 Additional Resources 124 Virtual Image Migration 125 Hardware Migration 129 Expand Virtual Disk - VMware 139 Expand Virtual Disk - Hyper-V 140 Related Third-Party and Open-Source Licenses 142 Troubleshooting 143 Notice and Permissions 146 Engine are registered trademarks of Tenable Network Security, Inc. All other products or services are trademarks of their respective owners.
6 Welcome to Tenable Appliance This document describes the installation and operation of the Tenable Appliance. The Tenable Appliance is a browser-managed application that hosts various Tenable enterprise applications including Nessus, SecurityCenter (SC), and the Nessus Network Manager (NNM). A link is provided for the Log Correlation Engine (LCE) application, which will be available in a future release. The Tenable Appliance is available as either a Virtual Machine download or as a physical Hardware Appliance. The functionality is nearly identical for both, but there are some differences in the installation. Applications are available for installation on an as-needed basis on the Appliance and may be enabled or disabled conveniently under one platform. Please any comments and suggestions to support@tenable.com. Abbreviations The following abbreviations are used throughout this documentation: LCE - Log Correlation Engine NNM - Nessus Network Monitor SC - SecurityCenter VM - Virtual Machine SSL - Secure Sockets Layer Tenable Appliance Platform The Tenable Appliance VM is available for Microsoft s HyperV platform, VMware Server, VMware Player, VMware ESX, VMware Workstation, and VMware Fusion ( and may be downloaded from the Tenable Support Portal located at The Tenable Appliance is also available as Series 100, 200, or 300 hardware models, which can be obtained by contacting sales@tenable.com. Skill Requirements It is recommended that the Tenable Appliance be configured by personnel familiar with the Nessus vulnerability scanner, Tenable Enterprise Solutions (SC, LCE, and NNM), and the organization s security - 6 -
7 policies and procedures. If training is required for Nessus or Tenable Enterprise Solutions, please visit: Tip: Some general knowledge of the Virtual Machine (VM) platform being used and network configuration is required. Note: Hardware Appliance will not be sold after 3/31/2017. However, service will continue to be provided through the duration of your contract
8 System Requirements and Installation The Tenable Appliance can be installed using a virtual machine or hardware. Before installing, make sure that all of the prerequisites have been met. Click on the corresponding links below for the Tenable Hardware Appliance or Tenable Virtual Appliance installation requirements and procedures. Hardware Appliance Virtual Appliance - 8 -
9 Tenable VM Appliance Installation This section describes the installation steps for the Tenable VM Appliance. VM Image Prerequisites Security Considerations Obtaining the Tenable VMware Virtual Machine Image Obtaining the Tenable Hyper-V Virtual Machine Image VM Upgrade Compatibility Appliance Migration - 3.x to 4.x - 9 -
10 VM Image Prerequisites Before beginning installation, please be sure to have a host system with the following resources available: A system with the ability to run a VM image and at least 8 GB of assigned memory. Tip: The needed assigned memory for a VM image will vary depending on the Tenable applications enabled. Please refer to the installation documentation for the individual applications for memory recommendations and adjust the VM memory setting as appropriate. At least 200 GB of free disk space to accommodate the base VM image for the standard appliance or 50GB for the light appliance. If you choose to increase the VM disk size, ensure the extra space is available on the VM host system. Tip: The default disk size can not be decreased. Additionally, the needed assigned disk space for a VM image will vary depending on the Tenable applications enabled. Refer to the installation documentation for individual applications for disk space recommendations and adjust the VM disk space available to Hard Disk 2 of the Appliance VM image as appropriate. More information on expanding the disk space is available here. A system with the ability to run a VM image with at least 4 CPUs assigned. Tip: VM ESX hotplug support has been added, allowing users to allocate additional resources like CPUs and memory to the Appliance VM without having to reboot. At least one IP address for the Appliance. By default, the VM Appliance will obtain an IP address from a DHCP server, if one is available. Otherwise, a fixed address, netmask, and optional gateway may be assigned during the installation process. If there is a DHCP server available, but a static IP address is to be assigned, this may be set during the configuration process. Using multiple addresses allows for multi-homing the Appliance on different network segments to cut down on the network load. Tip: As with any security management device, a static IP address (assigned manually or via DHCP) is recommended for use on the Appliance network interfaces. Along with the IP address, the following values must be configured for the Tenable VM Appliance to be network accessible: The network subnet mask for the Appliance. The IP address of the Default Gateway for the Appliance (if applicable)
11 The IP addresses of the DNS servers for the Appliance (if applicable). A hostname for the Appliance. Note: It is necessary to have a hostname available to assign to the Appliance during installation to ensure the SSL certificate is generated properly. The Appliance ships with the default hostname of tnsappliance. Whenever the hostname is changed, a new server certificate will be generated and the device will require a reboot
12 Security Considerations When deploying the Tenable Appliance in an internal, external, or untrusted environment, it is strongly recommended that additional security precautions be taken to protect the device from attack and illicit use. Consider implementing the following recommendations: Use a signed SSL Certificate from a trusted and reliable Certificate Authority. Configure user rules that restrict scanning to IP addresses they are permitted to scan. Adopt a default deny policy for user roles and scanning activity. When configuring the device via the web interface, avoid using a web proxy or other device that may assist a third party in obtaining sensitive information
13 Obtaining the Tenable VMware Virtual Machine Image The Tenable Appliance VM is available for VMware Server, VMware Player, VMware ESX, VMware Workstation, and VMware Fusion ( and can be downloaded from the Tenable Support Portal. Nessus, SecurityCenter, and NNM applications are currently available on the Appliance. There are two versions of Appliance - Light and Standard. See the table below for version options/standards. Note: SecurityCenter is only available on the Standard version. Light Standard Data Collection Nessus and NNM Nessus and NNM Data Analysis None Security Center Automatic Updates Required Configurable Offline Updates Available (4.4.0) Available Download Size 700 MB 1.6 GB CPU 2 CPU 2 CPU Ram 8 GB 8 GB Drive 50 GB 200 GB The Tenable VMware image for VMware Server, VMware Fusion, VMware Workstation, VMware ESX server, and VMware Player is provided as an.ova file with the OS and applications in a 64-bit version. Note: An internet connection is required when using the Light version for updates and upgrades. The Light Appliance requires a connection over port 443 to Launch the VMware program and import the.ova file that was downloaded. Adjust the default VM settings as needed for the local environment. The boot process will be displayed in the VM console window when started. Note that it may take several minutes for the Application services to start. Once the boot process is complete, a console screen will be displayed as follows:
14 Please refer to the Configuration and Operations section for instructions on configuring the Appliance. Note: The following VMware products work with the Virtual Appliance: ESX 5.0 or later, Fusion 4.0 or later, Workstation 8.0 or later, and most current versions of Player
15 Obtaining the Hyper-V Virtual Machine Image The Tenable Appliance VM is available for Microsoft s Hyper-V server ( microsoft.com/hyper-v-server/) and can be downloaded from the Tenable Support Portal. Nessus, SecurityCenter, and NNM applications are currently available on the Appliance with LCE to be released in the future. The Tenable Hyper-V image for Microsoft s Hyper-V server is provided as a.zip file in a 64-bit version with a filename in the format similar to the following: TenableAppliance-HyperV bit.zip Note: It may take several minutes to download the files depending on your Internet connection speed. Note: The interface used for the Appliance should be configured with a static MAC address, not a dynamic one. Once it has been downloaded, extract the file using an unzip utility. The zip file contains two files: OS.vhd and Data.vhd. These are the virtual hard disks to be used when creating a new hypervisor instance. This instance must be a hardware version 1 instance. During the creation, select the OS.vhd as the initial hard drive. Once created, and prior to the initial launch, edit the settings and add the Data.vhd as an additional hard disk. It may be desirable to expand the size of the Data.vhd at this time. If snapshots are associated with the disk, it may not be expanded. Note: The OS disk is fixed and the Data disk is dynamic. The Appliance disk usage should be monitored and, possibly, expanded it if the data disk gets low. Start the virtual machine. The boot process will be displayed in the VM console window. Note that it may take several minutes for the application services to start. Once the boot process is complete, a console screen will be displayed:
16 Please refer to the Configuration and Operations section for instructions on configuring the Appliance
17 VM Upgrade Compatibility The matrix below displays the Tenable Appliance versions and the corresponding product versions supported. Appliance Security Center Nessus NNM LCE Client Version Version Version Version Version N/A N/A N/A N/A N/A N/A N/A N/A N/A N/A
18 Appliance Security Center Nessus NNM LCE Client Version Version Version Version Version Caution: SecurityCenter will be removed from the Light version when upgrading from 4.2 to 4.3. Customers should use a VM import to move SecurityCenter to a Standard version to keep it enabled. Contact customer support for updating versions older than or importing an older Appliance (to preserve old data)
19 Appliance Migration - 3.x to 4.x This document provides instructions on how to upgrade from Tenable Appliance to the latest version. Note: Click the link to view the Supported Upgrade Paths. The migration steps will require: Upgrade to Tenable Appliance version Disk migration to 4.2 and upgrade to the most recent version (3.X > upgrade to > migrate to 4.2 > upgrade to latest). Migration Steps 1. Upgrade to Tenable Appliance using the TenableAppliance update.tar via the Administration > Updates page. Note: All upgrade files are located here. (You may have to log into the portal before being directed to the upgrade files page.)

20 2. Install and configure another virtual image running Tenable Appliance v Attach the drives from Appliance to Appliance 4.2 and complete the import process. Note: The steps for attaching the drives and completing the import process can be found here. Click here for steps on attaching drives in VMware. Click here for steps on attaching drives in Hyper-V. 4. Upgrade 4.2 to the latest 4.X version. 5. Click the Check for Updates button to install any patches
21 When importing data in step 3, you may receive an import error due to version mismatch on SecurityCenter. Please note that Version can update OTA to include a version of SecurityCenter that is more recent than the version that ships on version 4.2. To remedy this, update SecurityCenter via the Appliance GUI, or manually update the Appliance to version 4.3 or 4.4, then run the import again. Note: See the Updates section in the Appliance user guide for instructions on updating the OTA Prior to performing the migration, it is recommended to make a backup of the current virtual image. This provides a recovery option if there is an issue during the migration process. Depending on the amount of data currently on the virtual image, the migration process may take several hours to complete while the data is being copied between the old and new disks. This process only migrates data for the Tenable applications that were previously installed. System configuration settings from the previous Appliance are not migrated. The password you set on the new virtual image won t be replaced with data from the attached disks. You can restore a System Configuration backup (by uploading or using one on the attached disks) if you want to restore those settings. Note: See the Restore from File section in the Appliance user guide for instructions on restoring a System Configuration backup. Due to differences in products, platforms, and versions, the steps described here are written for general use. The specific wording of options varies depending on the software being used. A migration option is available on the wizard if the drives are attached for import before launching the Appliance image. Please any comments and suggestions to support@tenable.com
22 Tenable Hardware Appliance Installation This section describes the installation process for the Tenable Appliance hardware. Prerequisites Unpacking the Box Rack Mount Instructions Hardware Specifications Hardware Features Network Connections and Initialization Obtaining and Installing Updates for Tenable Appliance
23 Prerequisites The Tenable Hardware Appliance must be installed by personnel able to configure IP addresses and perform basic networking tests using tools such as ping and traceroute to verify connectivity. Before beginning installation, please be sure to have the following hardware and information available: At least one static IP address for the Appliance (not required where DHCP will be used) The network subnet mask for the Appliance The IP address of the Default Gateway for the Appliance The IP address of the DNS servers for the Appliance A hostname for the Appliance A VGA monitor and USB keyboard It is recommended that the Appliance be assigned a dedicated IP address so it can be more easily identified and whitelisted by devices such as firewalls and other security tools. Note: It is necessary to have a hostname available to assign to the Appliance during installation to ensure the SSL certificate is generated properly. The Appliance ships with the default hostname of tnsappliance. If this is changed, a new server certificate will be generated automatically, requiring a reboot
24 Unpacking the Box While unpacking the box that the Appliance is shipped in please be sure to identify the following contents: Tenable Appliance Power Cable Rack Mount Kit Paper Documents: o o Quick Start Guide Rack Mount Instructions (inside the rack mount kit) Note: Either a straight-through or crossover cable can be used for Appliance configuration because the Appliance uses Auto-MDIX for link type determination
25 Rack Mount Instructions Follow the rack mount instructions provided in the Rack Mount Kit box to mount the Appliance in your cabinets after you have completed installation and verified that the Appliance is functioning properly
26 Hardware Specifications Specifications Series 100 Series 200 Series 300 Processor(s) 1 (Quad-Core) Xeon 1 (Eight-Core) Xeon E5-1 (Ten-Core) E5-2470V2 E GHz/ v2.5GHz/8 2.4 Ghz, 8 GT/s, 25MB GT/s/10MB GT/s/20MB Cache Memory 8 GB 16 GB 16 GB RAM DDR DDR DDR Disk(s) 1x1TB 7200 RPM 2x1TB 7200 RPM 128MB 2x1TB 7200 RPM 128MB 128MB Cache SATA Cache SATA 6.0Gb/s - Cache SATA 6.0Gb/s - 6.0Gb/s - No RAID RAID1 (1TB Usable) RAID1 (1TB Usable) Network Inter- 4 Ports Quad Port 4 Ports Quad Port Intel 4 - Intel Gb Ethernet faces Intel Gb Ethernet Gb Ethernet Ports 2 - Intel 10GbE Ethernet Ports Power Supply Dual 450-watt, Dual 450-watt, redund- Dual 450-watt, redund- redundant PFC ant PFC ant PFC Chassis 1U Rack Chassis 21" depth; 28 lbs 1U Rack Chassis 21" depth; 29 lbs 1U Rack Chassis 21" depth; 29 lbs Intended Nessus, Secur- Nessus, SecurityCenter, Nessus, SecurityCenter, itycenter, and NNM and NNM and NNM (Single Application)
27 Hardware Features This section describes the features of the Series 300 Tenable Hardware Appliance. Note: The Series 300 Tenable Appliance comes with a dual hard drive RAID 1 configuration. In the event of a hard drive failure, the Appliance will emit a constant beeping sound. This does not necessarily indicate total system failure since the configuration is mirrored, but it is recommended that Tenable Support be contacted immediately to resolve the issue
28 Network Connections and Initialization The Hardware Appliance comes with a pre-assigned IP address of Web configuration takes place using this IP address or one assigned via the Appliance console. Initialize and access the Appliance console as follows: Plug a network-enabled cable into the NIC5 port of the Appliance. Connect a monitor and USB keyboard to the Video and USB port connectors of the Appliance. Connect the provided power cables to the AC power receptacle and to a suitable AC power source and turn on the Appliance. Once the system has booted and initialization is complete, a text-based console screen is displayed with a number of options including: Appliance Information, Configure IP Address, Ping IP Address, Revert to Factory Defaults, Shutdown Appliance, and Restart Appliance. Note: The Hardware Appliance will not accept a DHCP address until it has been configured to do so via the web configuration interface
29 Note: The additional option (available only on the Tenable Hardware Appliance) to Revert to Factory Defaults. This option wipes out all previous data. Choose Configure IP Address to enter the static IPv4 or IPv6 address that will be used for web configuration along with the gateway and DNS addresses (if applicable). No further steps are required from the console although it can be used to display Appliance information, reconfigure the static IPv4 and IPv6 address on the first Ethernet device NIC1, ping an IPv4 or IPv6 address or hostname, revert the Appliance to factory defaults, shut down, and restart the Appliance

30 Configuration and Operations Note: Many of the configuration changes that are made via the Appliance web interface will not take effect until the corresponding service is restarted. For example, changing the XMLRPC port used by PVS from 8835 to another port will modify the configuration file; however, the Restart PVS button on the same page must first be clicked before the changes take effect (even though the page does not explicitly say a restart is required). This applies to most application-specific configuration items and is good practice when making configuration changes on the Tenable Appliance. The Tenable Appliance configuration procedure is similar for both the VM and Hardware Appliance. The console screen enables you to display information about the Appliance, configure a static IPv4 or IPv6 address, ping an IP address or hostname, revert to factory defaults (Hardware Appliance only), and shutdown/restart the Appliance. All other functions are performed through the web browser interface. When the Tenable VM Appliance is first booted, the system will attempt to obtain an IP address via DHCP. When the Tenable Hardware Appliance is first booted, a static IP address of is configured by default. If you want to change this IP address via the web interface, follow the directions in the Interfaces section. If an IPv4 or IPv6 address is configured from the console using the Configure IP Address option, the appropriate IP Address, Netmask or Prefix, and Gateway addresses must be known to properly configure the settings. A DNS server is required only if further configuration of the networking will not be performed via the web interface. Once entered, you will be asked to confirm your entries. Selecting the default of N will abort the changes, while y will accept the changes. This applies the settings to the NIC 1 (NIC 5 for Series 300) interface and will set the listening port for the Appliance interface to the default of Only an IPv4 or IPv6 address may be configured at the console for connecting to the Appliance. More detailed configurations must be made from the web interface
, use Ctrl+L (hold down Ctrl while pressing the L key) to refresh.")
31 To confirm that the correct IP address was set, use the arrow keys to highlight Appliance Information and press the Enter key. This will display information similar to the following: Tip: If the console display becomes unreadable for any reason (e.g., diagnostic or log messages), use Ctrl+L (hold down Ctrl while pressing the L key) to refresh. Using a web browser, enter the URL displayed under Appliance Information. For example, the URL in the example above for IPv4 is and IPv6 is [fe80::20c:29ff:fe29:9147]:8000/. Note that when using a link-local IPv6 address the NIC identifier must be used at the end of the IPv6 address. By default, the Appliance uses a self-signed SSL certificate that may display a warning in your web browser indicating the site s security certificate was not issued by a trusted Certificate Authority (CA). During the initial installation, such errors may safely be ignored. You will be able to upload a

32 custom certificate during configuration later. See the Administration Tab section for details on how to perform this action. Once the administrative web interface is loaded, a license screen will be displayed as shown below: Note: Please be sure to read all the information in the License Agreement before proceeding with the installation. A text or PDF version of the license can be downloaded and saved, if desired. Click on the Accept License Agreement button to proceed with the installation, or the Shutdown button to shut down the Appliance without accepting the license

33 Set Admin Password Once you have accepted the license, the next screen prompts you to create a password for the admin user. This password can be changed at a later time and additional users can be added as required: After the admin password is set, you will be prompted to log in: Tip: The authentication dialog box will look different depending on the web browser and theme used. The Tenable Appliance interface limits the number of failed login attempts. After several unsuccessful attempts, the IP address will be blocked from further login attempts for a period of ten minutes

34 The QRCode image of Recovery Secret page is displayed when you first log in. While not mandatory, scanning the image or entering the text of the recovery secret to your HOTP program will provide a method to reset your password if lost or forgotten utilizing a onetime password. Once your HOTP software is set up to provide a password, enter the code and click the Check button to confirm the correct code is generated. For more information about the HOTP functionality, please review the Appliance Management Interface Users section later in this document
35 Configuration/Operations Tab Each page of the Tenable Appliance displays the following navigation tabs: Appliance Administration Backup Networking Applications Logs Support Appliance configuration options are set through the Networking, Backup, and Administration pages. Application configuration options are available through the Applications page. The Appliance, Logs, and Support options are used to obtain more information about the Appliance and its underlying applications. The Log Out option appears on each page and will close the current session and return the user to the login page
36 - 36 -
37 Appliance Tab The Appliance tab, shown above, enables you to view application version and license information, network interface status, and other information about the Appliance at a glance. There are three sections under this tab: Application License Information, Appliance Information, and Version Information. Application License Information The information provided in this section displays a summary of the license information for the installed Tenable software. This provides a quick reference list to the current license status. This section is not displayed if there are no applications installed. Appliance Information
38 This section contains a variety of information pertinent to your particular Appliance configuration including current date/time as seen by the Appliance, system uptime, hostname, disk utilization, Ethernet interface links, installation date, admin user password creation date, and the date the license was accepted. The Interface text contains clickable links that navigates to the Networking tab configuration. Note: The Installed date information is the date the Appliance software was installed (or reinstalled), not the date of the local Appliance deployment. Version Information This section contains the Support ID (may read No Asset Tag on the VM Appliance) and the current versions of the base Appliance and all installed applications. This information is important when contacting Tenable Support
39 Appliance Interface The Appliance interface is comprised of a top navigation bar containing several options with expanded drop down lists and a main information/work section. Click on the top navigation bar options (Appliance, Administration, Backup, Networking, Applications, Logs, and Support) in the image below to go to the corresponding Appliance sections
40 Console Menu The Tenable Appliance console menu displays when the system is initialized. Click on the corresponding menu items to access the listed options

41 Appliance Tab The Appliance tab, shown above, enables you to view application version and license information, network interface status, and other information about the Appliance at a glance. There are three sections under this tab: Application License Information, Appliance Information, and Version Information. Application License Information The information provided in this section displays a summary of the license information for the installed Tenable software. This provides a quick reference list to the current license status. This section is not displayed if there are no applications installed. Appliance Information
42 This section contains a variety of information pertinent to your particular Appliance configuration including current date/time as seen by the Appliance, system uptime, hostname, disk utilization, Ethernet interface links, installation date, admin user password creation date, and the date the license was accepted. The Interface text contains clickable links that navigates to the Networking tab configuration. Note: The Installed date information is the date the Appliance software was installed (or reinstalled), not the date of the local Appliance deployment. Version Information This section contains the Support ID (may read No Asset Tag on the VM Appliance) and the current versions of the base Appliance and all installed applications. This information is important when contacting Tenable Support

43 Administration Tab The Administration tab provides several options to customize the Appliance for your environment and is divided into four sections System, Updates, Web Interface, and VM Import
44 Updates Update Appliance Updates can be downloaded from the Tenable Support Portal located under Updates on the Tenable Appliance download page. The update(s) should be stored locally before performing the installation. Update packages can be applied to either the hardware or VM version of the Appliance, unless otherwise noted. To apply the update, click "Choose File", then browse to the location that the update file was saved. A green banner will display if the update is successful. A red banner will display if the update is unsuccessful stating the problem that caused the error. After applying the update, the license will be shown again

45 The update can be confirmed by viewing the version information in the Appliance tab. Note: The best practice is to store locally. Storing locally prevents issues with browser upload. Update Availability Detection The Appliance has the ability to check for updates. When an update has been detected, a banner will appear at the top of the interface until it is installed. Click the Configure Automatic Update Detection button to set up automatic checks. The system is set to Apply Updates Automatically by default. Selecting the Check for Updates Automatically option alerts the user to updates in the interface, but does not apply them without user intervention. This feature cannot be disabled. In addition, an HTTP proxy may be configured. This proxy setting only applies to the Update Availability Detection option
46 lesystem The System option on the Administration tab provides options for restart/shutdown, clock configuration settings, SNMP agent configuration settings, and system log forwarding
47 Restart/Shut Down This section allows the shutdown or restart of the Appliance from the web interface rather than the console. In addition, Restart Appliance Services may be chosen to restart only the Appliance web server, NTP service, and Tenable applications being hosted on the Appliance
48 Configure Clock Settings The Appliance clock settings, including time zone and custom NTP server, are customized from the Configure Clock Settings section. Time Zone The drop-down menu next to the Time Zone: box allows you to select from all available time zones. By default, the Appliance will be set to the America/New_York time zone. NTP Local Reference Clock When set to On, the NTP service will utilize the local clock as a time reference when external time sources are unavailable. Due to the nature of VM environments, when the Appliance is run as a VM, it is recommended to turn this option off. When running and enabled on the hardware version of the Appliance, this option can be useful to maintain accurate time. Ignore NTP Requests Enabling this option prevents the NTP service from responding to time requests made from other devices on the network. It is recommended to enable this option in most hardware environments, and particularly when run as a VM guest. Custom NTP Servers The Tenable Appliance is configured with a built-in NTP client that, by default, synchronizes with public NTP servers from NTP.org. In most environments this will be modified to use an NTP server on the local network to ensure time is accurate with the Appliance s peers. To modify the NTP servers, enter the IP address or FQDN in the field provided. Standard ntp.conf server configuration lines may be used for server entries. Once the appropriate settings for the environment have been selected, click on Submit Clock Settings for the changes to take effect and initiate the first synchronization with the updated settings. Configure SNMP (v2c)agent Strings When monitoring the Appliance via SNMP, there are three settings to be configured: SNMP Community, System Contact, and System Location. Once set to the desired configuration, select the Submit SNMP Settings button to apply the new settings. If the SNMP agent is enabled, the service will
49 restart and enable them. Selecting the Enable SNMP Agent or Disable SNMP Agent will perform the appropriate action for the agent
50 Configure SNMP Agent Strings When monitoring the Appliance via SNMP, three settings must be configured SNMP Community, System Contact, and System Location. After the information is entered, click Submit SNMP Settings to apply the new settings. If the SNMP agent is enabled, the service will restart and enable them. Selecting Enable SNMP Agent or Disable SNMP Agent will perform the appropriate action for the agent
51 System Log Forwarding This option allows users to add configuration lines to the syslog configuration. Only forwarding entries are allowed. An example syslog configuration line would be: The setting, above, sends syslog messages with a priority of debug (or higher) to a system with the IPv4 address of (change this IP address to that of your syslog server). After entering the desired value, click Configure System Log. Certificates can be uploaded. Encrypted syslog is supported. Note: In the example, the Appliance selects only a subset of all possible generated syslog messages. (In this case, it specifically leaves out all the info level messages the Appliance normally generates.)
52 Web Interface The Web Interface option under the Administration tab provides options for user management, response header configuration, SSL certificate configuration, generation of certificate signing request (CSR), logout redirection URL settings, and restrict console operations
53 - 53 -
54 Appliance Management Interface Users New and existing Appliance users are managed through the Appliance Management Interface Users. First, select the user to modify by selecting the drop-down box next to Set Password for. If the user is a new user, ensure New User is selected. Next, fill out the relevant details for the username and password fields. Finally, choose the button pertinent to the operation being performed. Available buttons include Add User, Set Password, and Delete User. After successful completion, a green box is displayed at the top of the screen describing the status and details of the operation. When the Restrict Console Operations option is enabled, an additional drop-down item, Console Only User, is displayed. When set to Yes the new user can only control protected console options. The user cannot log into the web management interface of the Appliance. When set to No the indicated user can control the protected console options and log into the web management interface of the Appliance

55 Recovery Code Link The Recovery Code link displays a page that enables use of the HMAC-Based One Time Password (HOTP) authentication to change the Appliance login password when it has been forgotten and the user is unable to log in. The first step requires the user to download an HOTP supported application on a device. Once installed, select the recovery code link in the Tenable Appliance interface to display the information required to set up the Appliance s HOTP information on the device. Only the recovery page for the logged-in user will display. There are two different methods for entering the information. The first method on the page is the QRCode Image of Recovery Secret. Scan the QRCode image with the HOTP application. The HOTP application will display information about the new credentials
56 The second method is to manually enter the information supplied in the Text Entry of Recovery Secret section. Depending on the application used, you will need to enter one or more pieces of the supplied information. Select Counter or Key based if/when asked during the manual account setup. A new recovery secret can be created for the user if the HOTP device should become compromised. As the compromised user, select your own username from the drop-down and enter your password in both the password and confirm password fields. Then, click Setup Recovery Secret to generate a new recovery code. A green banner will display indicating the change succeeded or a red banner will display indicating failure with a note indicating the incorrect information. To confirm the HOTP application is configured correctly, generate a code from your software and enter it in the Enter a code from your software field and click Check. Entering the correct value will display the correct token and a message to validate success. Entering an incorrect value will produce an error message and the page will have to be reloaded. Entering an invalid code will cause the field to turn red; you will have the option to enter the code again. If the password is lost and must be changed, navigate to address or hostname>:8000/password. On this page, enter your username, the new password to associate with your account, and three of the codes in sequential order as provided by your HOTP application. Note: Whenever the password is changed, a new recovery code is generated. The HOTP program must be updated as the previous HOTP code becomes invalid when a new password is set. All Appliance Management Interface Users have equal and complete access to the Appliance
57 Configure Response Headers This section contains options for enabling and disabling advanced security headers. The Content Security Policy (CSP) is a computer security standard used to prevent cross-site scripting (XSS), clickjacking, and other code injection attacks resulting from the execution of malicious content in a trusted web page context. The X-Frame-Options HTTP response header can be used to indicate whether or not a browser should be allowed to render a page as a frame, iframe, or object. Sites can use this to avoid clickjacking attacks, by ensuring that their content is not embedded in other sites
58 Configure Website SSL Certificate The Appliance is shipped with a self-signed SSL certificate. To replace this with a certificate from a trusted Certificate Authority, click Choose File, browse for the certificate, and click Install Server Certificates. The Server Certificate and Server Key files must be chosen before clicking the Install Server Certificates button. In some environments, an Intermediate and/or Custom Root CA Certificate must also be provided at the same time. Note: The private key must NOT be password protected. After installing the certificate(s), reload the management interface to verify the changes were accepted. The Remove Server Certificates option will let you remove the current certificate and create a new self-signed SSL certificate
59 Generate Certificate Signing Request The Appliance provides the ability to generate a Certificate Signing Request (CSR). The options for generating the request are displayed in the screen capture below: All fields are optional and the information entered is dependent upon the Certificate Authority (CA) being used for certificate generation. After entering the required information and clicking Generate CSR, a window displays providing an option to locally save the CSR in a.tar.gz format. This archive contains three files (*.csr, *.key and CertificateSubject). The.csr file is submitted to your CA and the.key file must be kept private and uploaded to the Appliance along with the certificate received from the CA. The CertificateSubject file contains information about the data input and is for informational purposes only. Please refer to the specific instructions provided by your CA for more information about CSR generation. There is no requirement to use this feature to generate a CSR. It is provided as a convenience to our Appliance users only
60 Logout Redirection URL The Appliance will redirect you to the login page for the Appliance management interface after logging out. You can modify this setting to a selected web page. If the page is not located on the Appliance, a full URL is required (e.g.,
61 Restrict Console Operations Anyone with console access to the Appliance can perform any action available on the console menu. To prevent universal access, set this option to Yes. This update will require users to enter a username and password to perform actions that reassign the IP address, reinstall the Appliance (hardware only option), shutdown, or restart the Appliance. There is also an additional option to make a user a Console Only User
. From this section, choose the dropdown selection based on the desired reinstall level. Only available reversion points will be enabled, in bold black lettering, for selection.")
62 Reinstall Appliance (Hardware Appliance Only) Hardware Appliance users have the option to reinstall the software system to various update levels or even factory defaults (also available from the Appliance console). From this section, choose the dropdown selection based on the desired reinstall level. Only available reversion points will be enabled, in bold black lettering, for selection. Grayed lettering indicates that the previous reversion point is unavailable. Note: Choosing Factory Defaults will revert everything back to the Appliance default as it was shipped. Backups, applied updates, etc. are all removed. Choosing Base Version just installs the OS as it was when it was first shipped (versions of software and update level, etc.), but backups and updates remain available
63 Backup Appliance Regular backups of the Tenable Appliance data help to ensure redundancy and data recovery in the event of system failure
64 - 64 -
65 To back up the entire Appliance configuration, including Tenable application specific data, choose Whole Appliance from the drop-down. Other options include System Configuration and application specific backups. In addition, it is strongly recommended that you select Download Backup to save the.tar archive to a secondary storage device for data recovery. The drop-down next to Download Backup contains a list of all backups that are available on the Appliance and their size. Choose Restore Backup to restore a backup file from the locally available backup files. If the backup file is large, it may be split into smaller chunks to be uploaded in parts. The backup file may be split with any standard tool to perform such a process. When initially choosing the backup file to upload, select the first part of the split backup files. After that upload is complete, the confirmation window will prompt for the next part of the backup file to be uploaded or to begin restoring the backup if all of the file parts are uploaded. Choose Delete Backup to remove previously saved backups. Note: The backup process occurs in the background after a confirmation window opens with a warning that running services will be stopped before the backup begins. Do not attempt to start the service again before the backup status shows it has completed. After several minutes, refresh the browser window to see the newly generated backup. Automated Backups Users can set up Automated Backups by selecting the Enabled option in the Automated Backups section
66 1. Click the edit icon ( ) to set the time (month, day of the week, hour and minute) for the automatic backups. 2. Next, click the Store Automated Backups drop down list option to select the location to store the backups. 3. Click the Save Schedule button to confirm your selections. A green bar will display at the top of the screen indicating the system as successfully saved your Automated schedule options. Note: The automatic backup feature deletes the backup from the Appliance local disk after the transfer succeeds. Remote Backup Location The Automated Backups section provides an option to store backups at a remote location. To use this feature, the Remote Backup Location must be configured. The table below provides descriptions for the items that need to be entered. After the information has been entered, click Save Remote Config. Option Remote Backup Location Destination Path SSH Known Host File Port Authentication Description This is the location where the backup is sent. (supports SCP) This is the location on the machine (file path location). This is the SSH public/host key of the server the Appliance will connect to. This is the port that is connecting to the Appliance. This information is required to access the system. Enter the Username and either a Passphrase or SSH Private Key. (The SSH Private Key is preferred.) Note: Backups must be scheduled when no jobs are running and the system is in an idle state
67 Standalone Application Import Starting with the Tenable Appliance 3.1.0, backups of currently installed standalone versions of SecurityCenter 4.8.x and Nessus 5.x (Linux, Mac OS X, and FreeBSD versions) and higher may be imported into the Appliance via a downloadable script. Select the link next to the application you want to backup from step 1. Following the steps provided, create a backup of the application. Copy the backup file to a system where your browser may select it to upload to the Appliance. Proceed to the Restore from File section for details on uploading the backup file

68 Restore from File If you have previously saved the Appliance configuration to a file, you can restore the configuration by selecting the file from the Choose File button and selecting the Whole Appliance or individual application to be restored from the drop-down list. If the application is not contained in the backup file selected, no restore operation will be completed. Supported versions of the backups that may be restored are listed on the screen. To restore a backup to an Appliance that has enabled applications contained in the backup: 1. From the Backup tab, scroll to the Restore from File section, and select Only Nessus from the drop down menu. 2. Navigate to the Nessus Only backup file, and click Upload Backup File. 3. Click the Backup Existing or Restore Backup button. 4. Click the Discard Existing and Backup button. Note: When restoring a backup file from a previous version of Tenable software, it will be upgraded to the currently installed version on the Appliance
69 Networking Tab The Tenable Appliance has several networking options that can be configured for your environment. To configure these options, click on the Networking tab
70 - 70 -
71 Configure Networking The following networking options are available: Hostname the hostname given to the Tenable VM/Appliance Webserver Listening Port Change the port that the Appliance management web server listens on for incoming connections Domain Name Server(s) the IP address(es) of the server(s) that handle DNS queries, one per line Default Gateway (optional) the IPv4 and/or IPv6 address of the gateway system to send all packets that are not in the local network Search Domain (optional) the domain name that is attached to unqualified DNS queries. Multiple domains can be entered for the search. For multiple domain searches, separate each value with a space. Interfaces Configure and view settings for each of the available network interfaces If changes are required, enter the appropriate information in the fields provided and click on the appropriate button to apply the changes

72 Configure Hostname To change the hostname from the default (tnsappliance), enter the new hostname (less than 64 characters) in the box next to New hostname and click on the Set Hostname button. Immediately after clicking Set Hostname, a note appears indicating that the Appliance needs to be restarted for the change to take full effect. The user is presented with a screen similar to the screen capture below. Note: Changing the hostname will cause the Appliance to issue a new self-generated SSL certificate. This reboot ensures that operating system specific changes related to the hostname change fully take effect. Perform this reboot either through the web Administration page or via the console Restart Appliance option
73 Interfaces Network interfaces can be configured from the Networking page. By default, the Tenable VM Appliance obtains an IPv4 address and netmask for Interface 0 from a DHCP server. This can be changed to include IPv6 or static address. The Tenable Hardware Appliance ships with a static IPv4 address. This can be changed to a DHCP address by selecting Version 4 from the Use DHCP drop-down menu. Note: If the IP address is changed on the listening web interface, you will need to adjust the IP address in the URL of your browser to connect to the Appliance again. In the configuration area for each interface, the first line displays the MAC address of the NIC. Below the MAC Address box is a section called Interface In Use By, which indicates the Appliance services are utilizing the interface. The Negotiated Speed displays the maximum speed at which the NIC is connected to the network
74 The Status drop-down determines if the interface is disabled, configured only for IPv4, or configured for both IPv4 and IPv6. The Use DHCP drop-down offers options to prevent the interface from using DHCP. Only use DHCP to configure IPv4, IPv6, or both IPv4 and IPv6. The Accept Nameservers from DHCP drop-down offers the options - No, IPv4, IPv6, and both IPv4 and IPv6. The locally configured Domain Name Servers are not used when the No option is not selected. The IPv6 protocol offers an auto configuration option. This is not the same as IPv6 DHCP. The Accept IPv6 Autoconfiguration option offers the ability to enable or disable this feature on the interface. For interfaces other than the one being used to access the management interface, the Web Interface Accessible option can be configured as desired by adjusting the Yes/No toggle. The toggle option is disabled on the interface that is used to manage the Appliance. Current IP Addresses lists the current IPv4 and IPv6 addresses configured for the interface. Configured IP Addresses is a text entry field to configure static IPv4 and/or IPv6 addresses. Addresses may be entered as the IP Address/Prefix, IP Address/CIDR, or IP Address/Netmask. If static routes are required to facilitate networking needs, enter one or more static routes in the Static Routes box. When entered, the static route is applied to the interface on which it is entered. Note: Input as: <HOST/NETWORK> (via <GATEWAY>) (dev eth#) (metric #) For example: via For example: 2001:db8::/32 via 2001:db8::1 When using multiple network interfaces, there is not a provided method to configure IP forwarding or bridging between interfaces. The Appliance and its applications will use the best interface for network communications based on the system's routing table configuration. When finished configuring additional interfaces, click Configure Interfaces to save and restart networking services with the new configuration. Click Configure Interfaces to restart networking with the current configuration
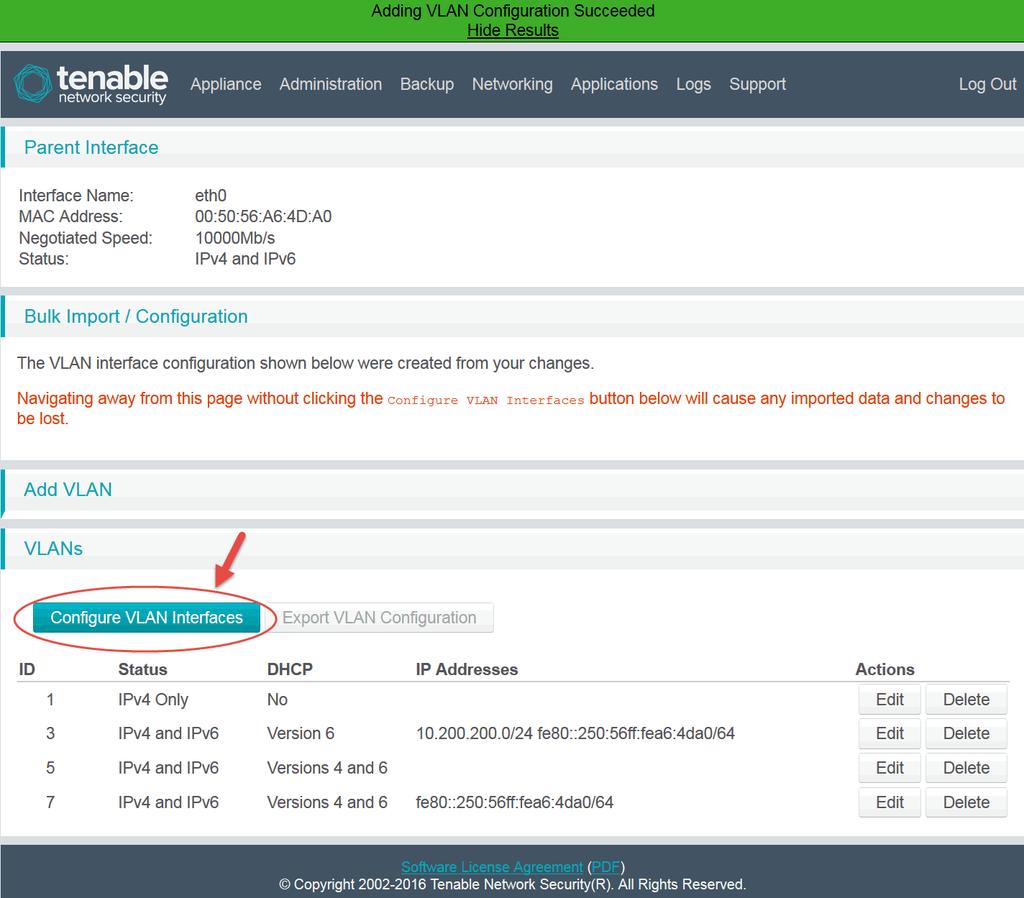
75 VLANs (Configure/Export) The Configure VLAN Interfaces option is only active when a VLAN has been configured and saved. A list of existing VLANs will display beneath this selection and will include options to edit and delete. VLANs can be exported using the Export VLAN option. Clicking the VLAN Export Configuration button exports the VLAN data to a text file, where it can be edited with updates/changes, saved and/or reuploaded
76 Add VLAN Users also have the option of adding a VLAN by selecting from a list of options. (The user does not have to complete this section if they have already configured the VLAN via the Bulk Import/Configuration section). VLAN ID This is the VLAN tag ID. The number can range from 1 to Status Specifies the type of IP address that will be used. Users will have the option to select IPv4 or IPv4 and IPv6. Use DHCP This option should be set if the users have not specified an IP Address/Netmask pair. If No is selected, the user must have an IP Address/Netmask pair on file. Users have the option of using Version 4, Version 6, or Version 4 and Version 6. Use Nameservers from DHCP This option will activate dependent on the Version selected in Use DHCP. This needs to be selected for DHCP responses. This entry is typically the same as the Use DHCP selection. Accept IPv6 Auto Configuration This feature is offered when using the IPv6 configuration option. Selecting Yes will allow the automatic configuration of connected devices over the IP network. Current IP Addresses Lists the current IPv4 and IPv6 addresses configured for the interface. Configured IP Addresses A text entry field to configure static IPv4 and/or IPv6 addresses. Static Routes Use this option if static routes are preferred. Enter the data in the following format. Note: Input as: <HOST/NETWORK> (via <GATEWAY>) (dev eth#) (metric #) For example: via For example: 2001:db8::/32 via 2001:db8::1 After the information has been entered, click Add VLAN. A confirmation, highlighted in green, will appear at the top of the screen with a note in the Bulk Import/Configuration section detailing the next step. You must click the Configure VLAN Interfaces options at the bottom of the page for the data to be imported. If you do not click Configure VLAN Interfaces, the added configuration will be lost
77 - 77 -
78 Parent Interface The Parent Interface provides information for the Network s existing interface. The Interface Name, MAC Address, Negotiated Speed and Status are displayed in this section
79 - 79 -
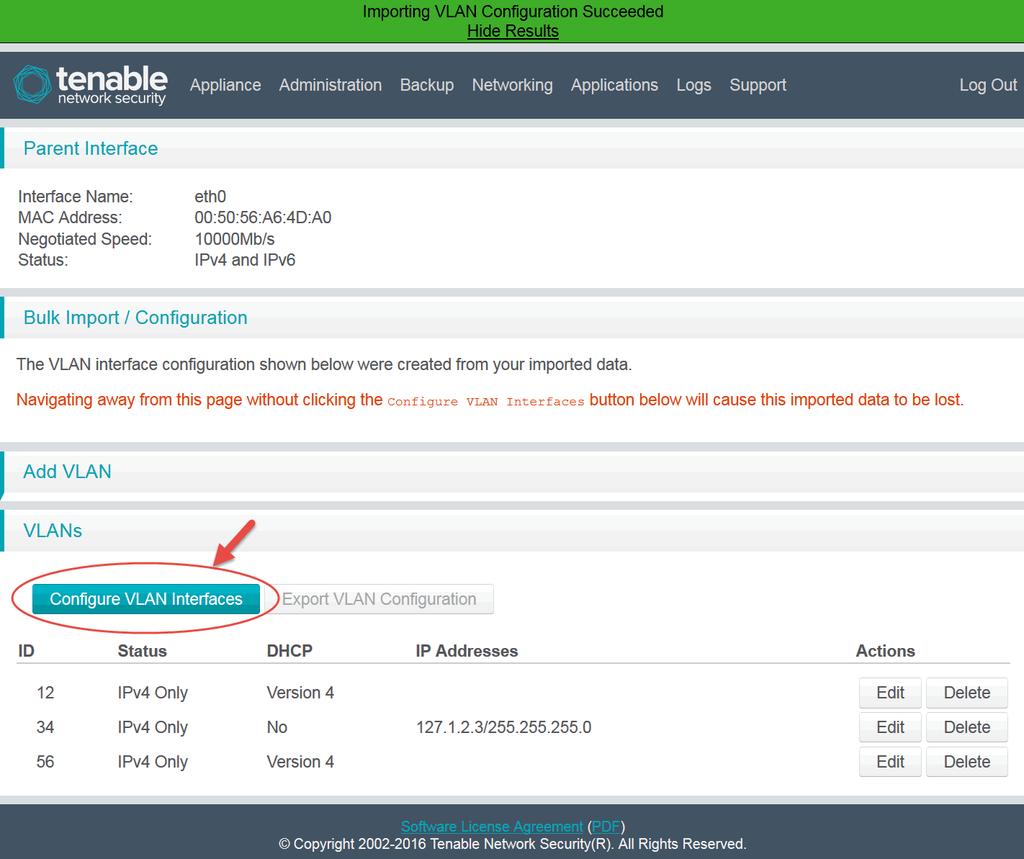
80 Bulk Import/Configuration The Bulk Import/Configuration section allows for quick editing of multiple VLAN interfaces and allows for quick duplication of VLAN configuration from one Appliance to another. Existing VLANs can be changed using this feature. The configuration information should be entered in the following format. [eth0.10] IPADDR=X.X.X.X NETMASK=Y.Y.Y.Y [eth0.11] [eth3.50] IPADDR=X.X.X.X NETMASK=Y.Y.Y.Y There is also an option to upload the configuration information click Browse, locate the specified file, and click Open. After the configuration information has been entered or uploaded, click Bulk Import. A confirmation, highlighted in green, will appear at the top of the screen with a note in the Bulk Import/Configuration section detailing the next step. You must click the Configure VLAN Interfaces options at the bottom of the page for the data to be imported. If you do not click Configure VLAN Interfaces, the added configuration will be lost
81 - 81 -

82 Applications Tab The Tenable applications that are available for installation on the Appliance are accessed and configured through the Applications tab. The available applications require an appropriate license to be activated once enabled. Each available application page initially contains an enable it button, license agreement for the application, a link to the Tenable website s product page, and a description of the product. Standard Version Light Version
83 - 83 -
84 Enabling Applications To use any of the available applications they must first be enabled. This is accomplished by navigating to the desired application s page under the Applicationspage and clicking the enable it button on the page. Enabling an application indicates an acceptance of the corresponding license agreement. For peak performance, Tenable strongly recommends that only one Tenable application (other than LCE client(s)) be installed on each Appliance VM. There is no additional cost associated with downloading and installing multiple VMs, provided they are properly licensed. While multiple applications can be run on a single Appliance, performance may be impacted for some applications while others are utilizing extra resources for their operations
85 The SecurityCenter Application Tenable s SecurityCenter provides continuous, asset-based security and compliance monitoring. It unifies the process of asset discovery, vulnerability detection, data leakage detection, event management, and configuration auditing for small and large enterprises. Configuration options for the SecurityCenter application after Enabling SecurityCenter. The configuration sections and associated options for this page are detailed in the corresponding sections
86 - 86 -
87 Enable SecurityCenter Before SecurityCenter can be used it must be enabled. On the Tenable Appliance Setup page, select SecurityCenter. Once selected, the System Information and Application Recommendations will display at the top of the screen. Selecting the SecurityCenter application will also enable the Accept License Agreement button below. Read/scroll through the Licensing information and click the Accept License Agreement button. You will also have to login to proceed
88 - 88 -
89 Current Disk Capacity When the Tenable Appliance VM is initially deployed, it provides a total of approximately 200 GB of usable disk space by default. This is in part to provide a smaller initial download size. However, when using SecurityCenter in most environments you will want to increase the virtual disk size as the data collected will quickly fill the available space. Please refer to the SecurityCenter documentation or contact Tenable Support for guidelines to adequate disk space allocation. Once the available disk capacity is over 60 GB the disk capacity notification area will not be displayed

90 Manage SecurityCenter A link is provided to directly access the installed SecurityCenter instance. Information about the SecurityCenter license is displayed and when it is green there are no issues to note. The running states of the SecurityCenter process and its accompanying daemons are displayed along with the current version of SecurityCenter as reported by the system and by SecurityCenter s database (DB). Below the version information are three buttons used to stop, start, and restart the SecurityCenter processes

91 Plugin Management The Plugin Management section enables users to manually update their Nessus plugin set. This is particularly useful in offline situations where SecurityCenter will not have direct access to Tenable s plugin servers. It is important to disable the SecurityCenter nightly plugin update process when using the manual method. A hyperlink is provided on the screen labeled manual plugin update page. If you need to perform a manual plugin update, click this link and follow the step-by-step directions. Once completed, click Submit the Information to save the information received for later. After the plugins have been manually updated, the page changes to include a link where plugin updates can be manually retrieved, or where the plugin feed can be reset in the event a reset is required (e.g., new activation code). The screen capture below contains a sampling of the updated page

92 Upload these plugins as type Active through the SecurityCenter Upload Plugin web page

93 Web Server Listening Configuration SecurityCenter s web server may be configured to listen on ports other than the HTTPS default of 443 if desired. When entering a port, it is assumed to be an HTTPS enabled port. Multiple ports may be selected by separating them with commas. When Listen on All IP Addresses is set to No, each IP address may be individually configured to listen or not for SecurityCenter requests. Each interface may be configured to listen on designated port(s)

94 Web Server Security The status of the SecurityCenter SSL certificates is displayed in this section. Using this interface, custom web server SSL certificates may be installed for SecurityCenter s use. Clicking the Remove Server Certificates button will generate a generic self-signed and untrusted SSL certificate for use by SecurityCenter, overwriting the current certificate in use
95 Web Server Authentication The Web Server Authentication section controls the configuration of the SSL Client Certificate authentication permissions. The three options are Required, Allowed, or Forbidden. Required configures the SecurityCenter web server to only accept connections from web browsers that present a valid SSL client certificate. Other connection attempts will be rejected by the web server with the exact message displayed dependent on the web browser in use. Allowed configures the SecurityCenter web server to accept a SSL client certificate if it is available, or proceed if a certificate is not present or used for the session. Due to their security configurations, some browsers may encounter connection issues when this setting is used. Forbidden configures the SecurityCenter web server to ignore any SSL client certificates but allow the web browser connection. This is the default setting
96 Certificate Authority Management This section enables the administrator to install custom SSL CA certificates to SecurityCenter for custom HTTPS SSL certificates, Nessus/NNM server certificate verification, and SecurityCenter client SSL certificates. Clicking the Browse button opens a dialog box to select a custom CA certificate to upload to the Appliance for SecurityCenter to use. Once selected, clicking the Install CA Certificate will install the custom certificate and will list it in the Certificate Authorities field. Note: All certificate files uploaded must contain only a single CA certificate. Multiple certificates in a single file will result in an error message. Selecting a CA certificate from those available in the list will allow downloading of the certificate to confirm it is the one expected or to delete a certificate that is no longer valid for use with the SecurityCenter installation

97 SSH User Access This option provides TNS users the ability to enable SSH access to the Appliance. After the SSH configuration is complete, a confirmation banner will display at the top of the page
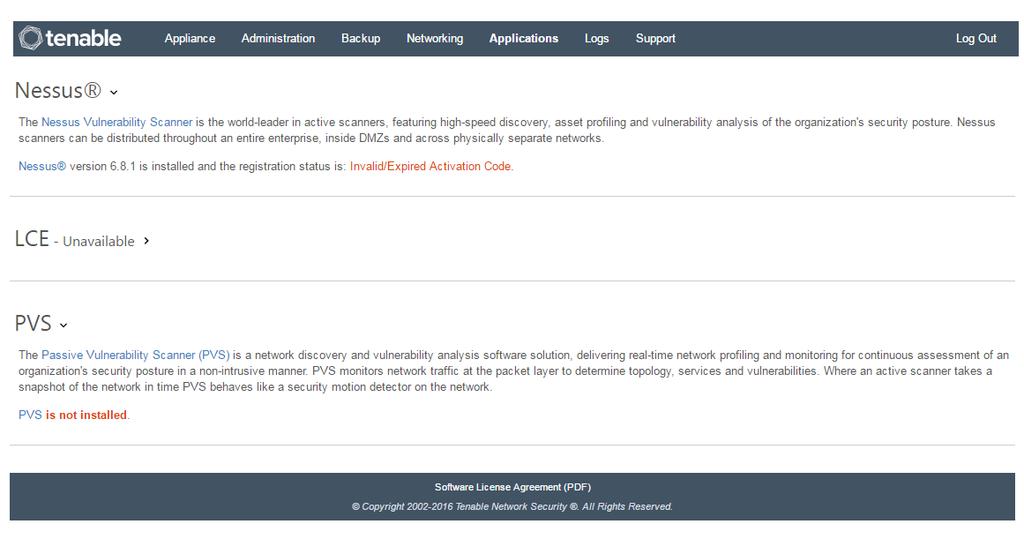
98 The Nessus Application Tenable s Nessus vulnerability scanner is the world-leader in active scanners, featuring high-speed discovery, asset profiling and vulnerability analysis of the organization s security posture. Nessus scanners can be distributed throughout an entire enterprise, inside DMZs, and across physically separate networks. The Nessus application must be activated and configured to make the system manageable via a web browser or SecurityCenter. Until a valid Activation Code is entered or the Nessus scanner has been configured to be managed by SecurityCenter, the message Invalid/Expired Activation Code will be displayed in red on the Appliance page. Configuration options for Nessus are available under the Applications tab by clicking on Nessus. An example screen capture is shown below
99 - 99 -
100 Enable the Nessus Application To enable the Nessus application, click on the enable it button on the line with the caption: Nessus is not enabled. Would you like to enable it? After clicking on this button, the back-end processes are enabled and a message is displayed to show the success or failure of the operation
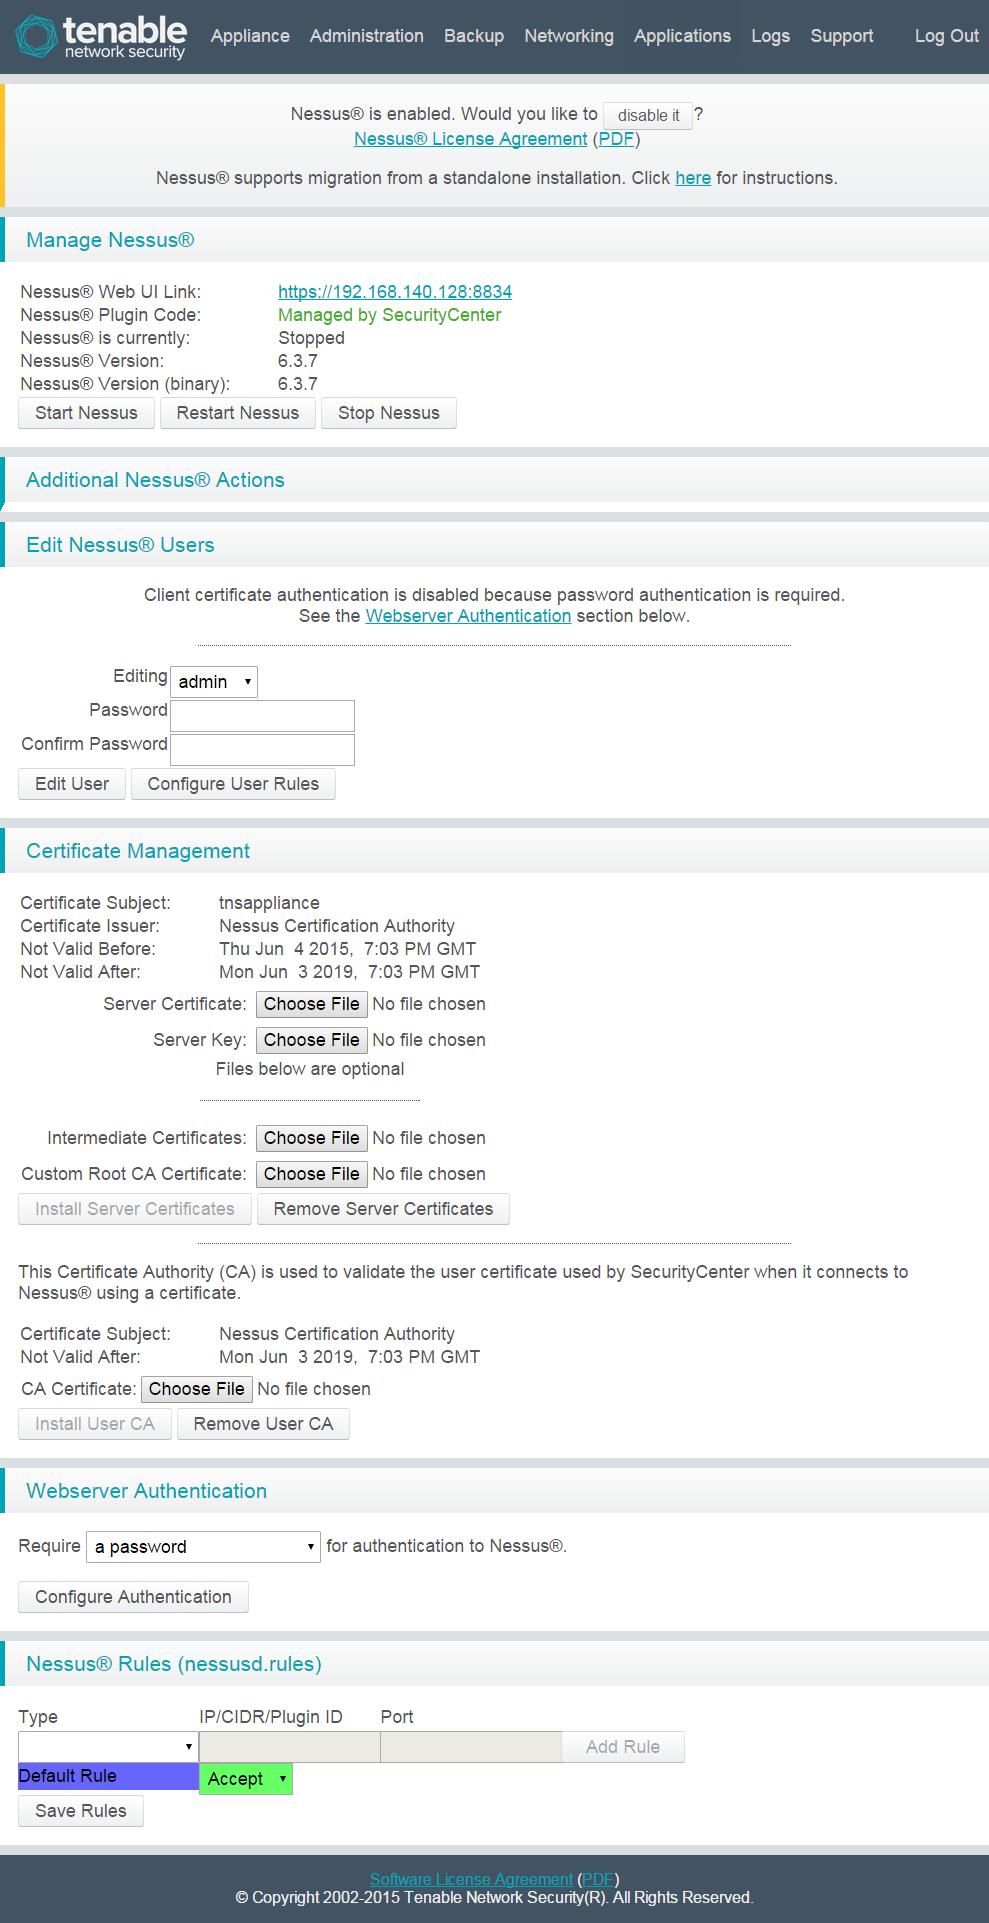
101 Manage Nessus The Manage Nessus section of this page displays information about the current state of Nessus including the Web UI Link, plugin code status, running state, and Nessus version. In addition, three buttons are available to perform the following Nessus actions: Start Nessus Restart Nessus Stop Nessus Note: Refer to the Nessus Installation and Configuration Guide available on the Tenable Support Portal for specifics on initial configuration of the Nessus application, including instructions on how to obtain and apply the appropriate Nessus license
102 Additional Nessus Actions This section offers an option to manually trigger a rebuild of the Nessus plugin database or to remove the existing plugins. The need to perform a rebuild or remove all the plugins is rare, and therefore this section is presented as collapsed by default
103 Edit Nessus Users Nessus users are created and managed primarily via the Nessus web user interface. However users may be edited using the Tenable Appliance interface to change their password or the Nessus rules for the user
104 Certificate Management From this section, custom Nessus certificates can be installed or removed. These certificates are used for accessing the Nessus Web interface with a proper CA certificate and for Nessus to SecurityCenter communications. The top section contains a browse dialog for the Server Certificate and Server Key File and optionally the Intermediate and Custom Root CA Certificates that are utilized for Nessus web user interface browser (and SecurityCenter ) access, while the bottom section (CA Certificate) is used for client (SecurityCenter or web browser) to Nessus server certificate-based communications
105 bweb Server Authentication The Web Server Authentication section controls the configuration of the SSL Client Certificate authentication permissions. The two options are a password or an SSL Client Certificate. This setting will control the option available for users to log into the Nessus server via SSL client certificate or password authentication. The an SSL Client Certificate option configures the Nessus web server to only accept connections from web browsers that present a valid SSL client certificate. Other connection attempts will be rejected by the web server with the exact message displayed dependent on the web browser in use. The a password option configures the Nessus web server to ignore any SSL client certificates but allow the web browser connection. This is the default setting and works with most web browsers without issue
106 Nessus Rules (nesusd.rules) This section allows you to define the nessusd.rules, that function the same as the user rules, to forbid/allow nessusd to connect to some/all ports for the specified IP address or Plugin ID. These rules affect Nessus globally regardless of the defined Nessus user rules
107 The LCE Application This application is not currently available for installation on the Appliance and must be installed on an accessible system if it is to be used by SecurityCenter. Tenable s Log Correlation Engine is a software module that aggregates, normalizes, correlates, and analyzes event log data from the myriad of devices within the infrastructure. Since the Log Correlation Engine is closely integrated with SecurityCenter, log analysis and vulnerability management can be centralized for a complete view of the security posture. Note: The LCE server is also available as a VM image from that can be quickly configured to get LCE up and running with minimal effort. Please refer to the LCE Server VM Quick Start Guide for more information
108 LCE Server Virtual Machine Quick Start This quick start guide explains how to initially configure the Log Correlation Engine (LCE) server virtual machine (VM). There are two versions of the LCE VM available: one for Microsoft s Hyper-V and the other for VMware platforms. When launched on either host type, the VM is configured and performs in the same manner. When the configuration is completed, the VM is in a nearly identical state as if the user created a CentOS 6.6 virtual machine with LCE server installed on it. Before proceeding, ensure that the LCE license key and code obtained from Tenable are available to configure the LCE server. Launch VM and Set Password Upon the initial launch of the VM, the only access to the VM is through the console interface. The initial login must be performed by the user root with the password of AppVM (without the quotes in both cases). After the initial login, the root user is forced to change the password. This must be a password that complies with the default CentOS password complexity rules. Enter the current password of AppVM followed by the new password. If the new password is acceptable, a prompt will appear to retype the password for confirmation. If it does not meet the complexity rules, you will be notified it is an unacceptable password and asked to type in a new password. Set Hostname and Network Interface After the password is successfully changed, enter a hostname for the VM. This must match the hostname provided to Tenable to acquire the LCE license key. When the hostname is entered, the network interface is configured via DHCP, SSH host keys are created, the SSH server is started, and the available IP addresses are displayed. Make a note of the IP address for use in configuring the LCE server. Configure LCE At this point the available IP address(es) are displayed along with a message reading: Connect to the LCE Web Interface to finish LCE configuration. Navigate to the DNS name or the IP address of the LCE server over port 8836 ( name or IP address>:8836>) in your preferred web browser to begin the LCE installation process. For details on the LCE installation and configuration process, please refer to the LCE Quick Start Guide or the LCE Administration and User guide, both available from The LCE Virtual Machine configuration is now complete. At this stage, it is operating as if CentOS 6.6 and LCE were installed by any other method. The only customizations made by Tenable are the initial configuration startup script, enabling access to the LCE ports through the firewall, and the file
109 /etc/init/tty.override file to enable the number lock key on boot. This file may be removed if desired. Maintaining security updates via the yum update command or other method is solely the responsibility of the organization deploying and maintaining the LCE virtual machine. Third Party License Declarations The LCE Server Virtual Machine is built on a CentOS 6.6 Linux distribution and the use is bound by the CentOS Project end user license agreement (EULA). CentOS-6 EULA CentOS-6 comes with no guarantees or warranties of any sorts, either written or implied. The Distribution is released as GPL. Individual packages in the distribution come with their own licenses. About Tenable Network Security Tenable Network Security provides continuous network monitoring to identify vulnerabilities, reduce risk, and ensure compliance. Our family of products includes SecurityCenter Continuous View, which provides the most comprehensive and integrated view of network health, and Nessus, the global standard in detecting and assessing network data. Tenable is relied upon by more than 24,000 organizations, including the entire U.S. Department of Defense and many of the world s largest companies and governments. We offer customers peace of mind thanks to the largest install base, the best expertise, and the ability to identify their biggest threats and enable them to respond quickly. For more information, please visit tenable.com

110 LCE Clients Three LCE clients have been added in the Tenable Appliance: the LCE client, Tenable Network Monitor, and Tenable Netflow Monitor. Enabling the clients is completed by entering the IP address or Hostname of the LCE server and the correct port to send the data to. The LCE default listening port of is entered initially and may be changed as needed. Once enabled, the only configuration option for the local client is to change the IP address or Hostname and port of the LCE listening server

111 As shown in the LCE Client example above, once a client is enabled other options are displayed. These options are the same except for the names for each of the available LCE clients. A Disable LCE Client button is available to disable the client from sending further data until the client is re-enabled. The client status is displayed along with the version of the client installed. The client may be started, restarted, or stopped using the appropriate button
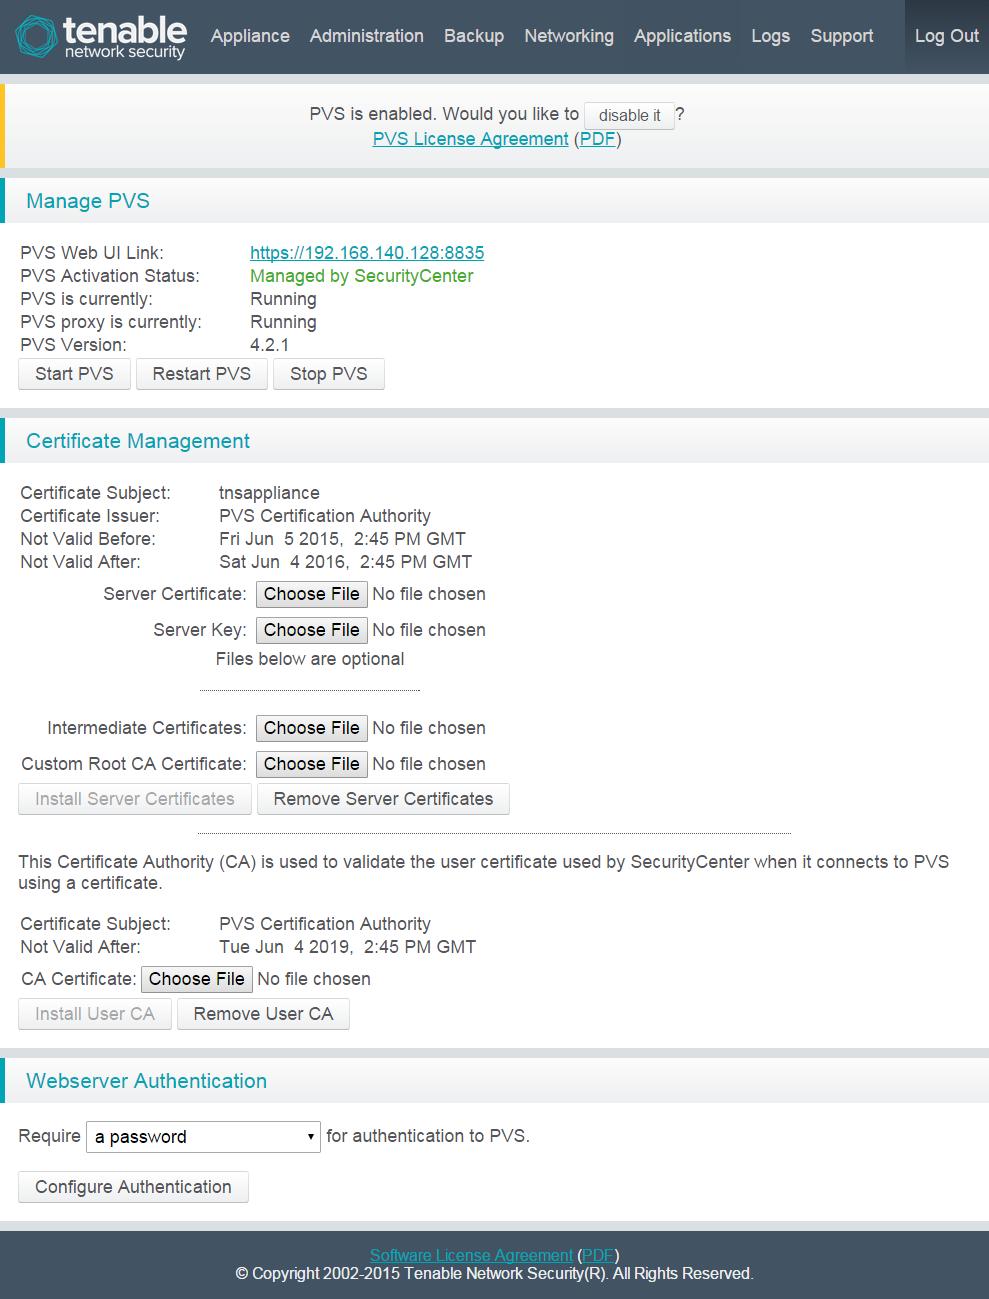
112 The PVS Application Tenable s Passive Vulnerability Scanner is a network discovery and vulnerability analysis software solution, delivering real-time network profiling and monitoring for continuous assessment of an organization s security posture in a non-intrusive manner. The Passive Vulnerability Scanner (PVS) monitors network traffic at the packet layer to determine topology, services, and vulnerabilities. Where an active scanner takes a snapshot of the network in time, the PVS behaves like a security motion detector on the network. The PVS application must be activated and configured to make the system manageable via a web browser or used by SecurityCenter. Note: Until a valid Activation Code is entered, the message Invalid/Expired Activation Code will be displayed in red on the Appliance page. The screen below displays options available to enable and configure the PVS application with SecurityCenter
113
114 Manage PVS The Manage PVS section of this page displays information about the current state of the PVS including the license state, running state, and version. There is a link to the PVS Web UI that may be selected to perform setup, configuration, and view scan results of the PVS application. In addition, three buttons are available to perform the following actions: Start PVS Restart PVS Stop PVS Note: Refer to the Nessus Installation and Configuration Guide available on the Tenable Support Portal for specifics on initial configuration of the Nessus application, including instructions on how to obtain and apply the appropriate Nessus license

115 PVS Monitoring Configuration If the PVS application is not configured to monitor any interface the option to set the monitoring configuration is displayed on the page. The option lists the available interfaces along with their status, which is a link to its configuration page and a drop-down with the options of Unmonitored or Monitored. When at least one interface is selected to be monitored and the Configure Monitored Network Interfaces button is clicked, PVS will be configured to monitor the selected interface(s) and the section will no longer be displayed. Further adjustments to the monitored interfaces may be made within the PVS application. Tip: This option is only displayed if PVS is configured and there is not an interface set up to monitor traffic
116 Certificate Management In this section, custom certificates for PVS can be installed or removed. These certificates are used to access the PVS Web interface with a proper CA certificate. The top section contains a browse dialog for the Server Certificate and Server Key File and optionally the Intermediate and Custom Root CA Certificates that are used for PVS web user interface browser access, while the bottom section (CA Certificate) is used for client to PVS server certificate-based communications
117 Web Server Authentication The Web Server Authentication section controls the configuration of the SSL Client Certificate authentication permissions. The two options are a password or an SSL Client Certificate. This setting will control the option available for users to log into the PVS server via password authentication or SSL client certificate. The an SSL Client Certificate option configures the PVS web server to only accept connections from web browsers that present a valid SSL client certificate. Other connection attempts will be rejected by the web server with the exact message displayed dependent on the web browser in use. The a password option configures the PVS web server to ignore any SSL client certificates but allows the web browser connection. This is the default setting and works with most web browsers without issue
118 Using Nessus, SecurityCenter, and NNM Extensive documentation for the applications installed on the Tenable Appliance is available at

119 Logs Tab Clicking on the Logs tab will display a selection of available logs based on the installed software as shown in the following screen capture. Available logs are displayed as grouped together under a heading for the Tenable Appliance itself or the application they belong to. To display a log, highlight the desired log in the View Logs section and select the number of Lines to view from the drop-down menu then click on the View Log File Snippet button. Selecting a log file from the available list and clicking the Download Log File button will download the complete log file, regardless of the number of lines selected. Note: The Tenable Appliance Logs text at the top of the list is not an option, but a heading and cannot be selected. NNM reports are able to be viewed and downloaded from this page as well
120 You also have the option to download a monthly log archive by selecting the month you want to download from the drop-down menu and clicking on the Download Log Archive button. Note:The log display may be cached by your browser. Click on your browser s refresh button to ensure you are viewing the current log
121 Support Tab If you have an issue that you are working with Tenable Support on, you may be asked to generate a support report to aid in troubleshooting the problem. If this is requested, click on the Support tab and then the Generate Support Report button and optionally select Sanitize the generated support report to remove IP addresses from the logs in the Tenable applications which support the feature, as shown in the following screen capture: Once the report is generated, it will be accessible on the Available Support Reports drop-down. Select the report to download, click Download Report, and then send the full report (the entire.tar.gz file) to support@tenable.com. When the support archive is no longer needed it may
122 safely be deleted. Select the report to delete from the drop-down and click the Delete Report button. While multiple support archives may be created each day, a daily task runs to delete all but the 10 most recent support reports each day. Network Tests Network tests can be done using traceroute or ping options. These tests are available from the Supporttab of the web interface and Network Tests entry on the console menu. From the Support menu in the UI. or command line on the console

123 Generate Packet Capture The Generate Packet Capture option gives the user the ability to create a packet capture of one or all of the available interfaces from a drop-down selection. The capture time is for a period ranging from 1 to 15 minutes, incremented by minutes, and utilizes the tcpdump utility. Providing a filter string for tcpdump gives the ability to filter the results of the report provided by tcpdump. This utility is useful for troubleshooting network connectivity issues. The Available Packet Captures section provides a drop-down list of the completed packet capture (pcap) files. Selecting a capture file from the list and selecting the download button will download the pcap file uncompressed or compressed as a gzipped file if the Compress Capture feature was used. Selecting a capture file and selecting the View Capture Snippet option will display the selected number of lines of the capture file without downloading the entire file. Clicking the Delete Capture button will permanently delete the selected capture file. Note: Information about tcpdump and its filter options is available at
124 Additional Resources The topics in this section offer guidance in areas related to Tenable Appliance. Virtual Image Migration Hardware Migration Expand Virtual Disk - VMware Expand Virtual Disk -Hyper-V Related Third-Party and Open-Source Licenses Acknowledgements
125 Virtual Image Migration The virtual Appliance supports direct import of application data from older Tenable Appliance virtual disks. The process for importation involves adding the previous Appliance's disk files to the new Appliance as a third and fourth drive. Prior to performing the migration it is recommended to make a backup of the current virtual image. This provides a recovery option if there is an issue during the migration process. Depending on the amount of data currently on the virtual image, the migration process may take several hours to complete while the data is being copied between the old and new disks. This process only migrates data for the Tenable applications that were previously installed. System configuration settings from the previous Appliance are not migrated. The password you set on the new VM won t be replaced with data from the attached disks. You can restore a System Configuration backup (by uploading or using one on the attached disks) if you wish to restore those settings. Due to differences in products, platforms, and versions, the steps described here are written for general use. The specific wording of options varies depending on the software being used. A migration option is available on the wizard if the drives are attached for import before launching the Appliance image. Steps in Wizard Use the following steps to perform virtual image migration before the Appliance has been installed. 1. The screen shot below reflects what displays in the wizard during the initial setup if the old Appliance's disks are attached before accessing the UI. This provides the ability to import an applic


126 ation prior to setting the password and accepting the license agreement. If the import is not done at this time, it can be done later in the Appliance UI by going to Administration tab (see Steps in Appliance UI below). A yellow circle if displays if disks are recognized
127 2. The system will then display the VM Import page. 3. Click on the Import Application Data button to complete the process. Steps in Appliance UI Use the following steps to perform the virtual image migration after Appliance has been installed. 1. Shut down your newly deployed Tenable Appliance VM. 2. Edit the settings for the newly deployedtenable Appliance VM within your VM software. Under the Hardware section, begin the process to add another hard disk. Choose to use an existing virtual disk and select the *-disk1/os.vhd then *-disk2/data.vhd files in that order from your existing Appliance. If asked, choose to keep the existing format of your.vmdk files. Note: When selecting the second.vmdk file, note that you must again browse to the directory containing your previous disk files. The VMware software does not open for browsing in the previously used directory. 3. Once the disk addition is complete, start your Tenable Appliance image
128 Some versions may display a message warning against using a duplicate UUID. Select the Yes button and continue to start. Use your web browser to navigate to your Tenable Appliance web interface. 4. At the top of the Admin page a Tenable Application Data Import section will be displayed. 5. When the Import Application Data button is clicked, it will perform the import of data in the background. 6. Once the page reloads, the Import Application Data button will be replaced with text indicating that the import process is in progress. The System Log contains progress messages and includes a final Application Data Migration Finished message. 7. Once the migration is complete, shut down the Tenable Appliance. Edit your virtual image and go to the Hardware section to remove the Appliance.vmdk disks added in step After removing the hard disks, boot the updated version of Tenable Appliance. You may log into your applications and find your previous data is now available. Note: To prevent disks from attaching in inverse order, disks will import a prior VM
129 Hardware Migration The following information provides steps for the Tenable Appliance hardware migration. The system must meet the following criteria before migration begins. The current Hardware Appliance must be upgraded from to using the supported upgrade path. A full system backup and download of the backup should occur before running the script Hardware-Migration tar.gz You must manually record hostname and networking configurations. (These are not retained after migration has completed.) Note: If you don't know your SecurityCenter hostname or any specific routing or network settings there could be application issues. Certificate information isn't maintained for the Appliance. The following states what happens as part of the migration script (Hardware-Migration tar.gz). Note: You must reboot after backup. 1. Download the Hardware-Migration tar.gz script and the Tenable Appliance update.tar files from under the Tenable Appliance Images section of the downloads page

130 2. Take a full system backup. a. Navigate to the Backup tab. b. Verify that the Take Backup of field is set to Whole Appliance. c. Click the Take Backup button


131 d. On the new page that appears, click on Take Backup, again. e. When the backup completes, scroll down to the Available Backups section under the Backup tab. Click the Download Backup button and store it to a safe location

132 3. Upload the Migration Script. a. Click on the Administration tab. In the Update Appliance section, select Choose File and browse to locate the Hardware-Migration tar.gz file previously downloaded from the Tenable Support site in step one. b. Click the Apply Update button


133 c. After the support script uploads, click the Perform Action button. Note: This may take a significant amount of time. d. After the migration completes, a confirmation message displays at the top of the screen


134 e. Navigate back to the Administration tab. Click the Restart Appliance button then click OK to confirm the restart. 4. Factory reinstall. a. When the Appliance restarts, the boot cycle will reinstall the Appliance image. This is normal


135 Note: The running post-installtion scripts portion of the install may take a significant amount of time. The Appliance may restart several times during this cycle. b. If the Appliance previously had a statically assigned IP address, log on to the local console for the Appliance and select Configure IP Address on the main menu to reset the IP address, default gateway, and DNS server IP addresses. (Log on is done after the Appliance restarts the Tenable Network Security console screen.) Note: The IP addrss should be entered in CIDR, (i.e /24) or decimal (i.e / ) format


136 c. If the previously recorded hostname is different from the default, open a web browser and navigate to the Networking tab. Change the default hostname to the correct hostname and click the Set Hostname button. d. After setting the new hostname, a message will display stating the Appliance must be restarted. e. Click on the Administration tab and click the Restart Appliance button, then click OK to confirm


137 f. Once the Appliance restarts, click on the Backup tab. Scroll to the bottom of the page and confirm that Restore is set to Whole Appliance. Next, click Browse to locate the backup file created in step two above. The application data will be available after migration and can be restored to the new version of the software
138 Note: It is strongly recommended to backup again post migration script

139 Expand Virtual Disk - VMware The Tenable Appliance supports expanding the virtual hard disk to increase the storage capacity of the Appliance. Follow the steps described in this appendix to expand your virtual disk. Note: The instructions provided here are to be used as guidelines. Two VMware products are described here: VMware Player and the vsphere Client. Due to differing VMware platforms, products, and versions, the specifics may be slightly different for your environment. Please reference the appropriate VMware manual for your environment. Locate Disk to be Expanded Power off your VM and navigate to the properties of your VM host. There you will find two hard disks. The first one, labeled Hard Disk (SCSI), is 20 GB in size. The second drive, labeled Hard Disk 2 (SCSI), is 30/180 GB in size by default and is the disk to choose for expansion. Note: Once you increase the size of the virtual drive, you cannot reduce it later. Additionally, do not expand it to a larger size than your physical hard disk can store

140 Expand Virtual Disk - Hyper-V The Tenable Appliance supports expanding the virtual hard disk to increase the storage capacity of the Appliance. Note: The instructions provided here are to be used as guidelines. The specifics may be slightly different for your environment. Please refer to the appropriate Hyper-V manual for your environment. Locate Disk to be Expanded Power off your VM and navigate to the settings of your VM host. Two hard drives will be configured. The first disk is named OS.vhd and should not be altered unless instructed to by Tenable Support. The second drive, named Data.vhd, is the disk to choose for expansion. Note: Once you increase the size of the virtual drive, it cannot be reduced later. Additionally, do not expand it to a size larger than your physical storage can accommodate. Click on the Edit button for the properties of the disk. Select Expand from the Choose Action option, and select Next to display the screen to select the new size. Enter the new size value and click Finish to close the window and expand the drive to the new size

141 Ignore Repartition Notice Once the process completes you may be presented with a dialog box indicating that you must repartition and expand the file system on the guest operating system. Note: Disregard this notice as the Tenable Appliance will apply the required changes on its next boot. Boot Appliance Once the process is complete you can boot your Tenable Appliance VM and make use of the additional space on the newly expanded disk
142 Related Third-Party and Open-Source Licenses phantomjs QT Webkit and Mongoose Breakpad OpenSSL Linenoise QCommandLine gitorious.org/qcommandline/qcommandline/blobs/master/copying CoffeeScript GIFLIB Wkhtmlpdf
143 Troubleshooting Q. I forgot the IP address of the Appliance. How do I retrieve it? A. If you forget the IP address of the Appliance, access the Appliance console and move the arrow keys to highlight Appliance Information and press Enter. Q. Nessus will not start. A. This could mean a corrupt plugin database. Select Applications/Nessus and select the button labeled Rebuild Plugin Database under Additional Nessus Actions. Wait approximately 5-60 minutes for the processing to complete. Refresh the page and see if Nessus starts. If not, ensure you have saved the current configuration and then perform a reinstallation and restore the saved configuration. If you are still experiencing issues, please contact Tenable Support for assistance. Q. I lost my password to the admin account. How do I reset it? A. To set up password recovery, follow the steps in the Appliance Management Interface Users section of this document. If the password recovery steps have not been performed, another admin account may reset the password for the affected user

144 If the first two options are not available to be used, the following steps must be performed, and all data will be lost. VM Appliance For the VM Appliance, deploy a new VM using the most recent version available from the support portal and proceed to complete the initial system configuration. You can then use backups previously downloaded to restore older data or follow the directions for importing your existing application data using disks from the previous Appliance VM. See Virtual Image Migration for more details on importing data from VM disks. Hardware Appliance For the Hardware Appliance, use the Appliance console Remove Password option to restore the Appliance to the default configuration. This will zero out the current admin password and allow you to create a new password the next time you log in to the Appliance UI. Note: Reverting to factory defaults or going back to an original VM image will cause you to lose any data that has not been captured and restored from a previous backup. See the section titled Backup Appliance for more information. Q. I have modified one of the application configuration items but the change doesn t seem to have taken effect
Tenable Appliance 4.8.x User Guide. Last Updated: December 12, 2018
 Tenable Appliance 4.8.x User Guide Last Updated: December 12, 2018 Table of Contents Welcome to Tenable Appliance 6 System Requirements and Installation 8 Tenable VM Appliance Installation 9 VM Image Prerequisites
Tenable Appliance 4.1 User Guide. Last Updated: 07 February, 2017
 Tenable Appliance 4.1 User Guide Last Updated: 07 February, 2017 Contents Introduction 6 Tenable VM Appliance Installation 8 VM Image Prerequisites 9 Security Considerations 10 Obtaining the Tenable VMware
Tenable Appliance User Guide. Last Updated: 16 September, 2016
 Tenable Appliance 4.3.0 User Guide Last Updated: 16 September, 2016 Contents Introduction 6 Tenable VM Appliance Installation 8 VM Image Prerequisites 9 Security Considerations 10 Obtaining the Tenable
Tenable Appliance 4.1 User Guide. Last Updated: 01 June, 2016
 Tenable Appliance 4.1 User Guide Last Updated: 01 June, 2016 Contents Introduction 6 Tenable VM Appliance Installation 8 VM Image Prerequisites 9 Security Considerations 10 Obtaining the Tenable VMware
Tenable Appliance 300 User Guide. Last Updated: 02 May, 2016
 Tenable Appliance 300 User Guide Last Updated: 02 May, 2016 Contents Introduction 4 Tenable Hardware Appliance Installation 5 Prerequisites 6 Unpacking the Box 7 Rack Mount Instructions 8 Hardware Specifications
CA Agile Central Administrator Guide. CA Agile Central On-Premises
 CA Agile Central Administrator Guide CA Agile Central On-Premises 2018.1 Table of Contents Overview... 3 Server Requirements...3 Browser Requirements...3 Access Help and WSAPI...4 Time Zone...5 Architectural
Installing and Configuring vcloud Connector
 Installing and Configuring vcloud Connector vcloud Connector 2.6.0 This document supports the version of each product listed and supports all subsequent versions until the document is replaced by a new
VMware Identity Manager Connector Installation and Configuration (Legacy Mode)
") VMware Identity Manager Connector Installation and Configuration (Legacy Mode) VMware Identity Manager This document supports the version of each product listed and supports all subsequent versions until
VMware Identity Manager Connector Installation and Configuration (Legacy Mode) VMware Identity Manager This document supports the version of each product listed and supports all subsequent versions until
Installing or Upgrading ANM Virtual Appliance
 CHAPTER 2 This chapter describes how to deploy Cisco ANM Virtual Appliance 4.3 (new installation) and how to upgrade from ANM software version 4.1 or 4.2 to software version 4.3. This chapter includes
ForeScout CounterACT. Single CounterACT Appliance. Quick Installation Guide. Version 8.0
 ForeScout CounterACT Single CounterACT Appliance Version 8.0 Table of Contents Welcome to CounterACT Version 8.0... 4 CounterACT Package Contents... 4 Overview... 5 1. Create a Deployment Plan... 6 Decide
WLM1200-RMTS User s Guide
 WLM1200-RMTS User s Guide Copyright 2011, Juniper Networks, Inc. 1 WLM1200-RMTS User Guide Contents WLM1200-RMTS Publication Suite........................................ 2 WLM1200-RMTS Hardware Description....................................
CA Agile Central Installation Guide On-Premises release
 CA Agile Central Installation Guide On-Premises release 2016.2 Agile Central to Go 2017.1 rallysupport@rallydev.com www.rallydev.com 2017 CA Technologies (c) 2017 CA Technologies Version 2016.2 (c) Table
Installing and Configuring VMware Identity Manager Connector (Windows) OCT 2018 VMware Identity Manager VMware Identity Manager 3.
 OCT 2018 VMware Identity Manager VMware Identity Manager 3.") Installing and Configuring VMware Identity Manager Connector 2018.8.1.0 (Windows) OCT 2018 VMware Identity Manager VMware Identity Manager 3.3 You can find the most up-to-date technical documentation on
Installing and Configuring VMware Identity Manager Connector 2018.8.1.0 (Windows) OCT 2018 VMware Identity Manager VMware Identity Manager 3.3 You can find the most up-to-date technical documentation on
Installing and Configuring vcloud Connector
 Installing and Configuring vcloud Connector vcloud Connector 2.5.0 This document supports the version of each product listed and supports all subsequent versions until the document is replaced by a new
dctrack Quick Setup Guide (Recommended) Obtain a dctrack Support Website Username and Password
 Obtain a dctrack Support Website Username and Password") dctrack 5.0.0 Quick Setup Guide This guide walks you through installing dctrack for the first time. In other words, this is a clean install - it is not an integration of dctrack and Power IQ, and it is
dctrack 5.0.0 Quick Setup Guide This guide walks you through installing dctrack for the first time. In other words, this is a clean install - it is not an integration of dctrack and Power IQ, and it is
Configuring High Availability (HA)
") 4 CHAPTER This chapter covers the following topics: Adding High Availability Cisco NAC Appliance To Your Network, page 4-1 Installing a Clean Access Manager High Availability Pair, page 4-3 Installing
4 CHAPTER This chapter covers the following topics: Adding High Availability Cisco NAC Appliance To Your Network, page 4-1 Installing a Clean Access Manager High Availability Pair, page 4-3 Installing
Vidyo Server for WebRTC. Administrator Guide
 Vidyo Server for WebRTC Administrator Guide Product Version 3.2 Document Version A April, 2016 TABLE OF CONTENTS Overview... 1 Understanding the Configuration Procedure... 1 1. Using Vidyo Server for WebRTC
Installation and Configuration Guide
 Installation and Configuration Guide h-series 800-782-3762 www.edgewave.com 2001 2011 EdgeWave Inc. (formerly St. Bernard Software). All rights reserved. The EdgeWave logo, iprism and iguard are trademarks
Viewing System Status, page 404. Backing Up and Restoring a Configuration, page 416. Managing Certificates for Authentication, page 418
 This chapter describes how to maintain the configuration and firmware, reboot or reset the security appliance, manage the security license and digital certificates, and configure other features to help
ForeScout Extended Module for Tenable Vulnerability Management
 ForeScout Extended Module for Tenable Vulnerability Management Version 2.7.1 Table of Contents About Tenable Vulnerability Management Module... 4 Compatible Tenable Vulnerability Products... 4 About Support
dctrack Quick Setup Guide Virtual Machine Requirements Requirements Requirements Preparing to Install dctrack
 dctrack Quick Setup Guide This Quick Setup Guide explains how to install and configure dctrack. For additional information on any aspect of dctrack, see the accompanying dctrack Help in other its online
The Balabit s Privileged Session Management 5 F5 Azure Reference Guide
 The Balabit s Privileged Session Management 5 F5 Azure Reference Guide March 12, 2018 Abstract Administrator Guide for Balabit s Privileged Session Management (PSM) Copyright 1996-2018 Balabit, a One Identity
HP LeftHand SAN Solutions
 HP LeftHand SAN Solutions Support Document Installation Manuals VSA 8.0 Quick Start - Demo Version Legal Notices Warranty The only warranties for HP products and services are set forth in the express warranty
Configure the Cisco DNA Center Appliance
 Review Cisco DNA Center Configuration Wizard Parameters, page 1 Configure Cisco DNA Center Using the Wizard, page 5 Review Cisco DNA Center Configuration Wizard Parameters When Cisco DNA Center configuration
Installation and Configuration Guide
 CYBERSECURITY, EVOLVED EdgeWave iprism Web Security Installation and Configuration Guide V8.0 15333 Avenue of Science, Suite 100 San Diego, CA 92128 Give us a call 1-855-881-2004 Send us an email: info@edgewave.com
Installing Cisco MSE in a VMware Virtual Machine
 Installing Cisco MSE in a VMware Virtual Machine This chapter describes how to install and deploy a Cisco Mobility Services Engine (MSE) virtual appliance. Cisco MSE is a prebuilt software solution that
Microsoft Hyper-V. Installation Guide
 Installation Guide UPDATED: 04 October 2018 Copyright Notices Copyright 2002-2018 KEMP Technologies, Inc. All rights reserved. KEMP Technologies and the KEMP Technologies logo are registered trademarks
OpenManage Integration for VMware vcenter Quick Install Guide for vsphere Client, Version 2.3.1
 OpenManage Integration for VMware vcenter Quick Install Guide for vsphere Client, Version 2.3.1 Notes, Cautions, and Warnings NOTE: A NOTE indicates important information that helps you make better use
Administering vrealize Log Insight. September 20, 2018 vrealize Log Insight 4.7
 Administering vrealize Log Insight September 20, 2018 4.7 You can find the most up-to-date technical documentation on the VMware website at: https://docs.vmware.com/ If you have comments about this documentation,
Dell Storage Compellent Integration Tools for VMware
 Dell Storage Compellent Integration Tools for VMware Version 4.0 Administrator s Guide Notes, Cautions, and Warnings NOTE: A NOTE indicates important information that helps you make better use of your
IPMI Configuration Guide
 IPMI Configuration Guide 1. Introduction of IPMI Server Manager... 2 2. IPMI Server Manager GUI Overview... 3 1 1. Introduction of IPMI Server Manager IPMI Server Manager allows remote access of computers
OpenManage Integration for VMware vcenter Quick Installation Guide for vsphere Web Client Version 3.2
 OpenManage Integration for VMware vcenter Quick Installation Guide for vsphere Web Client Version 3.2 Notes, cautions, and warnings NOTE: A NOTE indicates important information that helps you make better
Configuring the SMA 500v Virtual Appliance
 Using the SMA 500v Virtual Appliance Configuring the SMA 500v Virtual Appliance Registering Your Appliance Using the 30-day Trial Version Upgrading Your Appliance Configuring the SMA 500v Virtual Appliance
Installing Cisco CMX in a VMware Virtual Machine
 Installing Cisco CMX in a VMware Virtual Machine This chapter describes how to install and deploy a Cisco Mobility Services Engine (CMX) virtual appliance. Cisco CMX is a prebuilt software solution that
Upgrading from TrafficShield 3.2.X to Application Security Module 9.2.3
 Upgrading from TrafficShield 3.2.X to Application Security Module 9.2.3 Introduction Preparing the 3.2.X system for the upgrade Installing the BIG-IP version 9.2.3 software Licensing the software using
SC-T35/SC-T45/SC-T46/SC-T47 ViewSonic Device Manager User Guide
 SC-T35/SC-T45/SC-T46/SC-T47 ViewSonic Device Manager User Guide Copyright and Trademark Statements 2014 ViewSonic Computer Corp. All rights reserved. This document contains proprietary information that
HiveManager Virtual Appliance QuickStart
 This QuickStart describes the installation of a HiveManager Virtual Appliance. Introduction to HiveManager Virtual Appliance Before you can install the HiveManager Virtual Appliance, you must first install
Configure the Cisco DNA Center Appliance
 Review Cisco DNA Center Configuration Wizard Parameters, page 1 Configure Cisco DNA Center Using the Wizard, page 5 Review Cisco DNA Center Configuration Wizard Parameters When Cisco DNA Center configuration
Cisco Emergency Responder Installation
 Overview, page 1 Hardware and Software Prerequisites, page 1 System Preparations, page 2 Installation and Migration on the Cisco UCS Server, page 4 Installation on a New System, page 13 Emergency Responder
Product Version 1.1 Document Version 1.0-A
 VidyoDashboard Installation Guide Product Version 1.1 Document Version 1.0-A Table of Contents 1. Overview... 3 About This Guide... 3 Prerequisites... 3... 5 Installing the OVA for VMware ESXi... 5 Configuring
Testing and Restoring the Nasuni Filer in a Disaster Recovery Scenario
 Testing and Restoring the Nasuni Filer in a Disaster Recovery Scenario Version 7.8 April 2017 Last modified: July 17, 2017 2017 Nasuni Corporation All Rights Reserved Document Information Testing Disaster
OpenManage Integration for VMware vcenter Version 4.2. Web Client User's Guide
 OpenManage Integration for VMware vcenter Version 4.2 Web Client User's Guide Notes, cautions, and warnings NOTE: A NOTE indicates important information that helps you make better use of your product.
SmartPath EMS VMA Virtual Appliance Quick Start Guide
 LWN600VMA SmartPath Enterprise Wireless System Virtual Appliance SmartPath EMS VMA Virtual Appliance Quick Start Guide Provides the speed, range, security, adapability, and manageability to replace wired
GSS Administration and Troubleshooting
 CHAPTER 9 GSS Administration and Troubleshooting This chapter covers the procedures necessary to properly manage and maintain your GSSM and GSS devices, including login security, software upgrades, GSSM
UDP Director Virtual Edition Installation and Configuration Guide (for Stealthwatch System v6.9.0)
") UDP Director Virtual Edition Installation and Configuration Guide (for Stealthwatch System v6.9.0) Installation and Configuration Guide: UDP Director VE v6.9.0 2016 Cisco Systems, Inc. All rights reserved.
UDP Director Virtual Edition Installation and Configuration Guide (for Stealthwatch System v6.9.0) Installation and Configuration Guide: UDP Director VE v6.9.0 2016 Cisco Systems, Inc. All rights reserved.
IBM Single Sign On for Bluemix Version December Identity Bridge Configuration topics
 IBM Single Sign On for Bluemix Version 2.0 28 December 2014 Identity Bridge Configuration topics IBM Single Sign On for Bluemix Version 2.0 28 December 2014 Identity Bridge Configuration topics ii IBM
Platform Administration
 CHAPTER 6 Cisco provides these tools to manage the Cisco MobilityManager server platform: Cisco IPT web pages that provide complete platform administration functions. Command Line Interface (CLI) that
PVS 5.1 User Guide. Last Updated: October 10, 2016
 PVS 5.1 User Guide Last Updated: October 10, 2016 Table of Contents PVS 5.1 User Guide 1 Welcome to PVS 1 Getting Started with PVS 2 PVS Workflow 3 Hardware Requirements 4 Software Requirements 6 Licensing
Tenable.sc-Tenable.io Upgrade Assistant Guide, Version 2.0. Last Revised: January 16, 2019
 Tenable.sc-Tenable.io Upgrade Assistant Guide, Version 2.0 Last Revised: January 16, 2019 Table of Contents Welcome to the Tenable.sc-Tenable.io Upgrade Assistant 3 Get Started 4 Environment Requirements
vcenter CapacityIQ Installation Guide
 vcenter CapacityIQ 1.0 This document supports the version of each product listed and supports all subsequent versions until the document is replaced by a new edition. To check for more recent editions
Appliance Guide. Version 1.0
 Appliance Guide Version 1.0 Contents Contents 1 Revision history 2 Getting Started 3 Getting to Know the R7-3000/5000/5000x 5 Getting to Know the R7-1000 6 Setting Up the Appliance 7 Logging in to the
CloudLink SecureVM. Administration Guide. Version 4.0 P/N REV 01
 CloudLink SecureVM Version 4.0 Administration Guide P/N 302-002-056 REV 01 Copyright 2015 EMC Corporation. All rights reserved. Published June 2015 EMC believes the information in this publication is accurate
Chapter 10 Configure AnyConnect Remote Access SSL VPN Using ASDM
 Chapter 10 Configure AnyConnect Remote Access SSL VPN Using ASDM Topology Note: ISR G1 devices use FastEthernet interfaces instead of GigabitEthernet interfaces. 2015 Cisco and/or its affiliates. All rights
Dell Storage Integration Tools for VMware
 Dell Storage Integration Tools for VMware Version 4.1 Administrator s Guide Notes, cautions, and warnings NOTE: A NOTE indicates important information that helps you make better use of your product. CAUTION:
OpenManage Integration for VMware vcenter Quick Install Guide for vsphere Client Version 3.0
 OpenManage Integration for VMware vcenter Quick Install Guide for vsphere Client Version 3.0 Notes, Cautions, and Warnings NOTE: A NOTE indicates important information that helps you make better use of
Acano solution. Virtualized Deployment R1.1 Installation Guide. Acano. May D
 Acano solution Virtualized Deployment R1.1 Installation Guide Acano May 2014 76-1025-03-D Contents Contents 1 Introduction... 3 1.1 Before You Start... 3 1.1.1 About the Acano virtualized solution... 3
System Setup. Accessing the Administration Interface CHAPTER
 CHAPTER 3 The system can be configured through the web interface to provide the networking configuration for the appliance and other system settings that are important such as time and SSL certificate.
CounterACT 7.0 Single CounterACT Appliance
 CounterACT 7.0 Single CounterACT Appliance Quick Installation Guide Table of Contents Welcome to CounterACT Version 7.0....3 Included in your CounterACT Package....3 Overview...4 1. Create a Deployment
SonicWall Secure Mobile Access SMA 500v Virtual Appliance 8.6. Getting Started Guide
 SonicWall Secure Mobile Access SMA 500v Virtual Appliance 8.6 Getting Started Guide Copyright 2017 SonicWall Inc. All rights reserved. SonicWall is a trademark or registered trademark of SonicWall Inc.
KYOCERA Net Admin User Guide
 KYOCERA Net Admin User Guide Legal Notes Unauthorized reproduction of all or part of this guide is prohibited. The information in this guide is subject to change without notice. We cannot be held liable
Overview. ACE Appliance Device Manager Overview CHAPTER
 1 CHAPTER This section contains the following: ACE Appliance Device Manager, page 1-1 Logging Into ACE Appliance Device Manager, page 1-3 Changing Your Account Password, page 1-4 ACE Appliance Device Manager
Lenovo ThinkAgile XClarity Integrator for Nutanix Installation and User's Guide
 Lenovo ThinkAgile XClarity Integrator for Nutanix Installation and User's Guide Version 1.0 Note Before using this information and the product it supports, read the information in Appendix A Notices on
Forescout. Quick Installation Guide. Single Appliance. Version 8.1
 Forescout Version 8.1 Contact Information Forescout Technologies, Inc. 190 West Tasman Drive San Jose, CA 95134 USA https://www.forescout.com/support/ Toll-Free (US): 1.866.377.8771 Tel (Intl): 1.408.213.3191
Cisco Expressway Cluster Creation and Maintenance
 Cisco Expressway Cluster Creation and Maintenance Deployment Guide Cisco Expressway X8.6 July 2015 Contents Introduction 4 Prerequisites 5 Upgrading an X8.n cluster to X8.6 6 Prerequisites 6 Upgrade Expressway
vcenter Server Appliance Configuration Update 1 Modified on 04 OCT 2017 VMware vsphere 6.5 VMware ESXi 6.5 vcenter Server 6.5
 Update 1 Modified on 04 OCT 2017 VMware vsphere 6.5 VMware ESXi 6.5 vcenter Server 6.5 You can find the most up-to-date technical documentation on the VMware Web site at: https://docs.vmware.com/ The VMware
Virtual Appliance User s Guide
 Cast Iron Integration Appliance Virtual Appliance User s Guide Version 4.5 July 2009 Cast Iron Virtual Appliance User s Guide Version 4.5 July 2009 Copyright 2009 Cast Iron Systems. All rights reserved.
Cisco Unified Serviceability
 Cisco Unified Serviceability Introduction, page 1 Installation, page 5 Introduction This document uses the following abbreviations to identify administration differences for these Cisco products: Unified
VMware Identity Manager Cloud Deployment. Modified on 01 OCT 2017 VMware Identity Manager
 VMware Identity Manager Cloud Deployment Modified on 01 OCT 2017 VMware Identity Manager You can find the most up-to-date technical documentation on the VMware Web site at: https://docs.vmware.com/ The
RealPresence Access Director System Administrator s Guide
 [Type the document title] Polycom RealPresence Access Director System Administrator s Guide 2.1.0 March 2013 3725-78703-001A Polycom Document Title 1 Trademark Information POLYCOM and the names and marks
SRA Virtual Appliance Getting Started Guide
 SRA Virtual Appliance Getting Started Guide 1 Notes, Cautions, and Warnings NOTE: A NOTE indicates important information that helps you make better use of your system. CAUTION: A CAUTION indicates potential
PVS 4.4 User Guide. Revision April, 2016
 PVS 4.4 User Guide Revision 2 18 April, 2016 PVS 4.4 User Guide 1 About PVS 1 Getting Started with PVS 2 Hardware Requirements 3 Software Requirements 5 Licensing Requirements 6 Install, Upgrade, Configure,
BIG-IP System: Migrating Devices and Configurations Between Different Platforms. Version
 BIG-IP System: Migrating Devices and Configurations Between Different Platforms Version 13.0.0 Table of Contents Table of Contents Migration of Configurations Between Different Platforms...5 About Migrating
UDP Director Virtual Edition
 UDP Director Virtual Edition (also known as FlowReplicator VE) Installation and Configuration Guide (for StealthWatch System v6.7.0) Installation and Configuration Guide: UDP Director VE v6.7.0 2015 Lancope,
Deploy the ExtraHop Discover 3100, 6100, 8100, or 9100 Appliances
 Deploy the ExtraHop Discover 3100, 6100, 8100, or 9100 s Published: 2017-12-29 This guide explains how to install the rack-mounted EDA 3100, EDA 6100, EDA 8100, and EDA 9100 ExtraHop Discover appliances.
Amigopod Release Notes. Updating to Amigopod Document Overview. Overview of the Update Process. Verify the System s Memory Limit
 Amigopod 3.5.4 Release Notes This document contains release information for version 3.5.4 of the Aruba Amigopod visitor management appliance. Document Overview This document is organized into the following
Installing and Configuring vcenter Support Assistant
 Installing and Configuring vcenter Support Assistant vcenter Support Assistant 6.0 This document supports the version of each product listed and supports all subsequent versions until the document is replaced
Configuring Cisco TelePresence Manager
 CHAPTER 3 Revised: November 27, 2006, First Published: November 27, 2006 Contents Introduction, page 3-1 System Configuration Tasks, page 3-2 Security Settings, page 3-3 Database, page 3-4 Room Phone UI,
VMware AirWatch Content Gateway for Linux. VMware Workspace ONE UEM 1811 Unified Access Gateway
 VMware AirWatch Content Gateway for Linux VMware Workspace ONE UEM 1811 Unified Access Gateway You can find the most up-to-date technical documentation on the VMware website at: https://docs.vmware.com/
Nessus Network Monitor 5.4 User Guide. Last Updated: February 20, 2018
 Nessus Network Monitor 5.4 User Guide Last Updated: February 20, 2018 Table of Contents Nessus Network Monitor 5.4 User Guide 1 Welcome to Nessus Network Monitor 8 NNM Workflow 9 System Requirements 10
VidyoGateway. Administrator Guide. Product Version Document Version A February, 2017
 VidyoGateway Administrator Guide Product Version 3.5.1 Document Version A February, 2017 2017 Vidyo, Inc. all rights reserved. Vidyo s technology is covered by one or more issued or pending United States
ACE Live on RSP: Installation Instructions
 ACE Live on RSP ACE Live on RSP: Installation Instructions These installation instructions apply to OPNET ACE Live on RSP Release 7.1.3. You can find the latest version of this document at the OPNET Support
KACE Systems Deployment Appliance 5.0. Administrator Guide
 KACE Systems Deployment Appliance 5.0 Administrator Guide Table of Contents About the KACE Systems Deployment Appliance...10 Getting started... 11 Tasks for getting started using the KACE SDA... 11 About
Cisco Emergency Responder Installation
 Cisco Emergency Responder (Emergency Responder) is distributed on an installation DVD that contains everything that is required to install Emergency Responder, including the Cisco Unified Communications
Configuring the Cisco TelePresence System
 3 CHAPTER Revised: August 2011, Contents This chapter contains the following sections: First Time Setup Wizard for the CTS 500 32, page 3-1 First Time Setup for All Other CTS Models, page 3-2 IP Settings,
System Configuration. The following topics explain how to configure system configuration settings on Firepower Management Centers and managed devices:
 The following topics explain how to configure system configuration settings on Firepower Management Centers and managed devices: Introduction to, page 2 Appliance Information, page 5 Custom HTTPS Certificates,
Deploy the ExtraHop Discover Appliance 1100
 Deploy the ExtraHop Discover Appliance 1100 Published: 2018-07-17 The following procedures explain how to deploy an ExtraHop Discover appliance 1100. System requirements Your environment must meet the
VMware Identity Manager Cloud Deployment. DEC 2017 VMware AirWatch 9.2 VMware Identity Manager
 VMware Identity Manager Cloud Deployment DEC 2017 VMware AirWatch 9.2 VMware Identity Manager You can find the most up-to-date technical documentation on the VMware website at: https://docs.vmware.com/
Installing and Configuring vcenter Multi-Hypervisor Manager
 Installing and Configuring vcenter Multi-Hypervisor Manager vcenter Server 5.1 vcenter Multi-Hypervisor Manager 1.1.2 This document supports the version of each product listed and supports all subsequent
Sophos Virtual Appliance. setup guide
 Sophos Virtual Email Appliance setup guide Contents Installing a virtual appliance...1 Prerequisites...3 Enabling Port Access...4 Downloading Virtual Appliance Files... 7 Determining Disk Space and Memory
SonicWall SMA 8200v. Getting Started Guide
 SonicWall SMA 8200v Getting Started Guide Copyright 2017 SonicWall Inc. All rights reserved. SonicWall is a trademark or registered trademark of SonicWall Inc. and/or its affiliates in the U.S.A. and/or
Cisco VDS Service Broker Software Installation Guide for UCS Platforms
 Cisco VDS Service Broker 1.0.1 Software Installation Guide for UCS Platforms Revised: May 2013 This document provides detailed instructions for installing the Cisco Videoscape Distribution Suite Service
Plexxi HCN Plexxi Connect Installation, Upgrade and Administration Guide Release 3.0.0
 Plexxi HCN Plexxi Connect Installation, Upgrade and Administration Guide Release 3.0.0 May 3, 2018 100 Innovative Way - Suite 3322 Nashua, NH 03062 Tel. +1.888.630.PLEX (7539) www.plexxi.com Legal Notices
WatchGuard Dimension v2.1.1 Update 3 Release Notes
 WatchGuard Dimension v2.1.1 Update 3 Release Notes Build Number 567758 Release Date 8 August 2018 Release Notes Revision Date 8 August 2018 On 8 August 2018, WatchGuard released the Dimension v2.1.1 Update
 Trend Micro Incorporated reserves the right to make changes to this document and to the product described herein without notice. Before installing and using the product, please review the readme files,
Power IQ HyperV Quick Setup Guide
 Power IQ HyperV Quick Setup Guide Thank you for your purchase of Sunbird's Power IQ. This Quick Setup Guide explains how to install and configure the Power IQ with Hyper-V. For additional information on
Unified CVP Migration
 If there is a change in platform of a later release of Unified CVP, migration from the existing release to the later release is required. For example, moving from Unified CVP 10.5(1) to Unified CVP 11.5(1)
Using VMware View Client for Mac
 May 2012 View Client for Mac This document supports the version of each product listed and supports all subsequent versions until the document is replaced by a new edition. To check for more recent editions
CounterACT 7.0. Quick Installation Guide for a Single Virtual CounterACT Appliance
 CounterACT 7.0 Quick Installation Guide for a Single Virtual CounterACT Appliance Table of Contents Welcome to CounterACT Version 7.0... 3 Overview... 4 1. Create a Deployment Plan... 5 Decide Where to
VMware Horizon FLEX Client User Guide
 Horizon FLEX 1.10 This document supports the version of each product listed and supports all subsequent versions until the document is replaced by a new edition. To check for more recent editions of this
OpenManage Integration for VMware vcenter Quick Install Guide for vsphere Client, Version 2.3
 OpenManage Integration for VMware vcenter Quick Install Guide for vsphere Client, Version 2.3 Notes, Cautions, and Warnings NOTE: A NOTE indicates important information that helps you make better use of